

Page 1

Roborock S7
Robotic Vacuum Cleaner User Manual
Read this user manual carefully before using this product and
store it properly for future reference.
Page 2

Contents
005 Safety Information
009 Roborock Robotic Vacuum Cleaner Troubleshooting
010 Product Overview
016 Installation
021 Connect to the App
023 Instructions
027 Routine Maintenance
037 Basic Parameters
038 Errors
040 Common Issues
042 EU Declaration of Conformity
046 WEEE Information
047 Warranty Information
004
Page 3

Safety Information
Restrictions
ŎThis product is designed for indoor oor cleaning only, do not use it outdoors
(such as on an open-ended terrace), on any surface other than the ground (such
as a sofa), or in any commercial or industrial environment.
ŎDo not use this product on elevated surfaces without barriers such as the oor
of a loft, an open-ended terrace, or on top of furniture.
ŎDo not use the product when the ambient temperature is higher than
40°C (104°F), lower than 4°C (39°F).
ŎBefore using the product, move wires o the ground or place them to the side to
prevent them being pulled on by the cleaner.
ŎTo prevent blocking the product and to avoid damage to valuables, remove light-
weight items (such as plastic bags) and fragile objects (such as vases) from the
oor before cleaning.
ŎChildren should be supervised to ensure that they do not play with the appliance.
ŎThis product is not intended for use by persons (including children) with reduced
physical, sensory or mental capabilities, or lack of experience and knowledge,
unless they have been given supervision or instruction concerning use of the
product by a person responsible for their safety (CB).
005
Page 4

Safety Information
ŎThis product can be used by children aged from 8 years and above and persons
with reduced physical, sensory or mental capabilities or lack of experience and
knowledge if they have been given supervision or instruction concerning use of
the product in a safe way and understand the hazards involved. Children shall
not play with the product. Cleaning and user maintenance shall not be made by
children without supervision (EU).
ŎKeep the main brush cleaning tools out of reach of children.
ŎDo not place any object (including children and pets) on the product, whether it
is in operation or not.
ŎKeep hair, loose clothing, ngers, and all parts of the body away from openings
and moving parts.
ŎDo not use the product on burning objects (such as cigarette butts).
ŎDo not use the product on high pile carpets (product eectiveness may also be
reduced on dark carpets).
ŎDo not use the product to clean hard or sharp objects (such as decoration
wastes, glass and nails).
ŎDo not carry the product using the vertical bumper, upper cover or bumper.
ŎThe product must be switched o and the plug must be removed from socket
outlet before cleaning or maintaining the product.
006
Page 5

Safety Information
ŎDo not use wet cloth or liquids for cleaning the product.
ŎUse the product according to the manual. Any loss or damage caused from im-
proper use will be borne by the user.
ŎThis product contains batteries that are only replaceable by skilled persons.
Battery and Charging
WARNING
ŎDo not charge non-rechargeable batteries.
ŎFor the purposes of recharging the battery, only use the detachable supply unit
roborock CDZ11RR or CDZ12RR provided with this product.
ŎDo not dismantle, repair or modify the battery or charging dock.
ŎKeep the charging dock away from heat (such as radiators).
ŎDo not wipe the charging contacts with wet cloth or wet hands.
ŎIf the power cord is damaged, stop using it immediately. It must be replaced by
the manufacturer, its service agent, or similarly qualied persons to avoid a hazard.
ŎMake sure the product is powered o before shipment.
ŎUse of the original packaging is advised.
007
Page 6

Safety Information
ŎIf placing the robot into storage, charge it fully and turn it o before placing it in
a cool dry place. Recharge it at least every three months to prevent the battery
over discharging.
ŎTo satisfy RF exposure requirements, a separation distance of 20 cm or more
should be maintained between this device and persons during device operation.
To ensure compliance, operations at closer than this distance is not recommended.
ŎThe antenna used for this transmitter must not be co-located in conjunction with
any other antenna or transmitter.
008
Page 7

Roborock Robotic Vacuum Cleaner Troubleshooting
Name Troubleshooting
Problem listed in the User Manual
Robot
Charging dock
Power cable
The product cannot be powered on
The main brush, side brush, fan, or main wheels do not work
The robot does not receive power
The charging dock cannot be supplied with power
009
Page 8
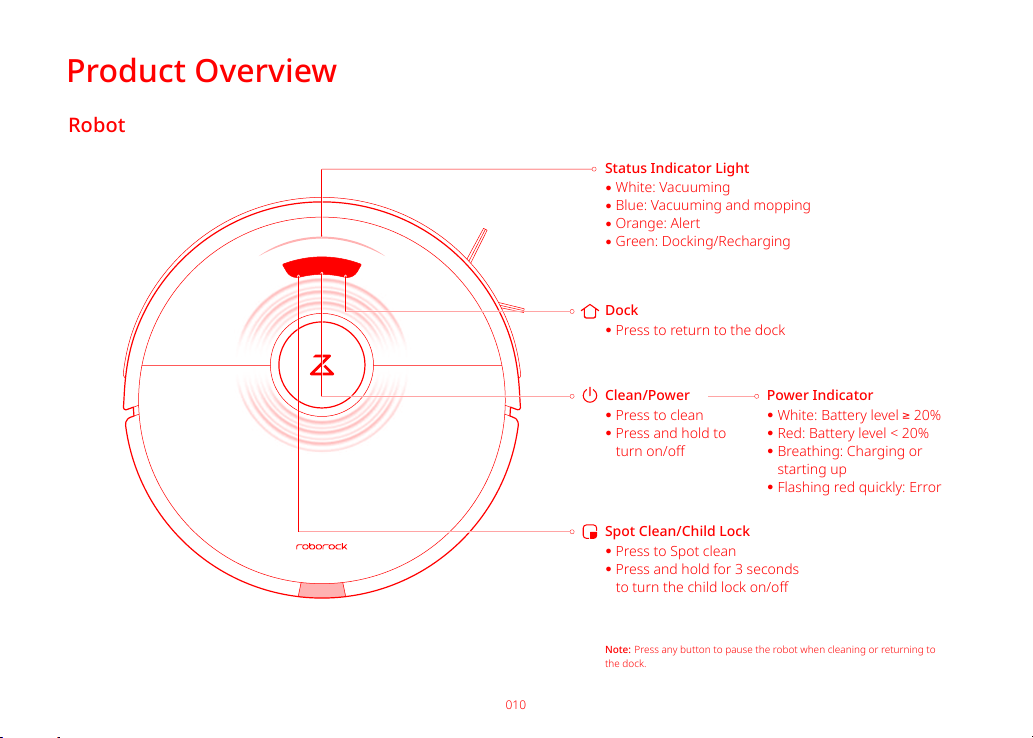
010
Robot
Clean/Power
ŎPress to clean
ŎPress and hold to
turn on/o
Power Indicator
Dock
ŎPress to return to the dock
Note: Press any button to pause the robot when cleaning or returning to
the dock.
Spot Clean/Child Lock
ŎPress to Spot clean
ŎPress and hold for 3 seconds
to turn the child lock on/o
ŎWhite: Vacuuming
ŎBlue: Vacuuming and mopping
ŎOrange: Alert
ŎGreen: Docking/Recharging
Status Indicator Light
Product Overview
ŎWhite: Battery level ≥ 20%
ŎRed: Battery level < 20%
ŎBreathing: Charging or
starting up
ŎFlashing red quickly: Error
Page 9
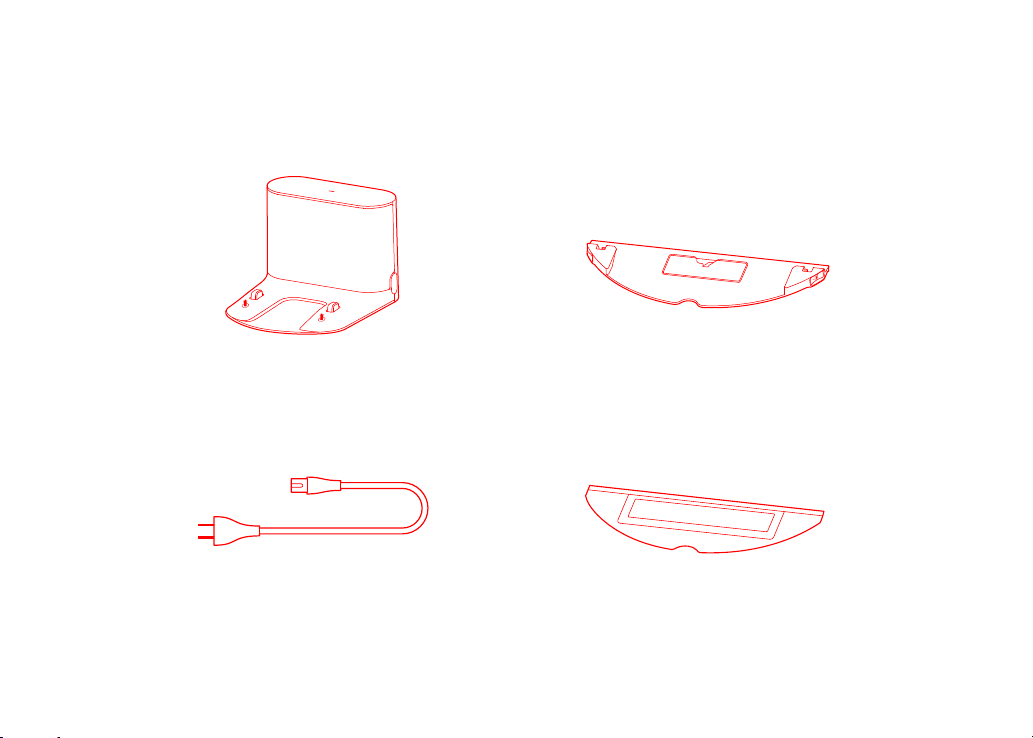
Product Overview
Parts List
Charging Dock VibraRise Mop Cloth Mount
VibraRise Mop ClothPower Cable
011
Page 10
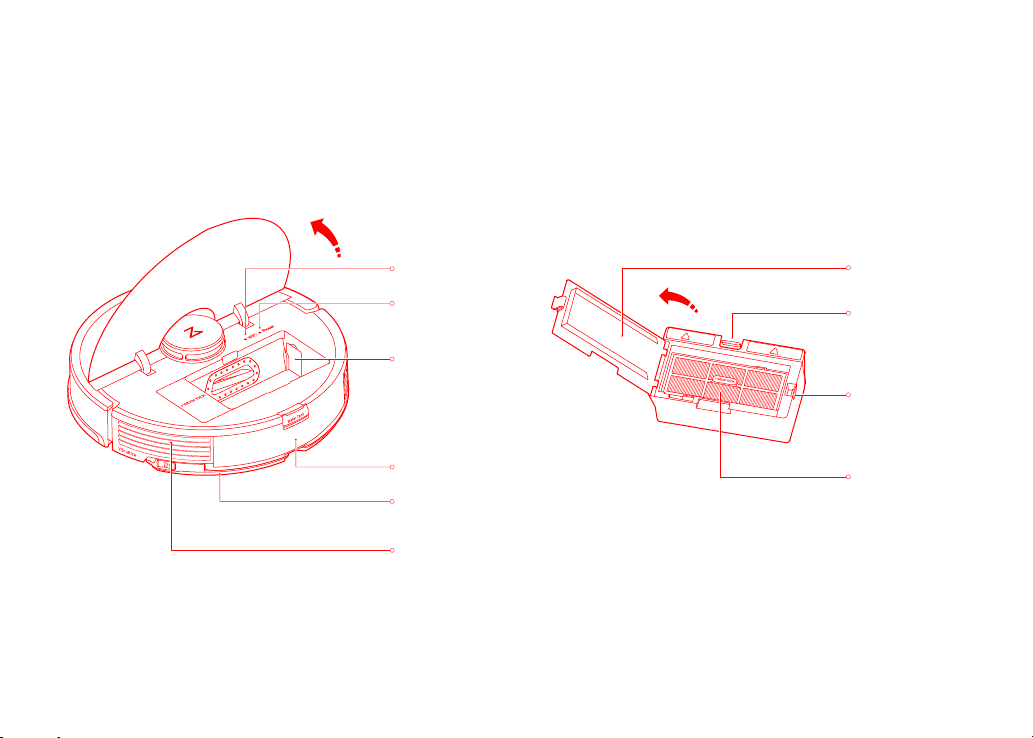
Product Overview
Robot
WiFi Indicator
System Reset
"JSJOMFU
Note: Remove this piece if using
the Roborock Auto-Empty Dock.
Available for purchase separately.
Visit www.roborock.com for
details.
Water Tank
VibraRise Mop
Cloth Mount
Air Vent
012
Dustbin
Filter Cover
Dustbin Latch
Filter Cover Latch
Washable Filter
Page 11
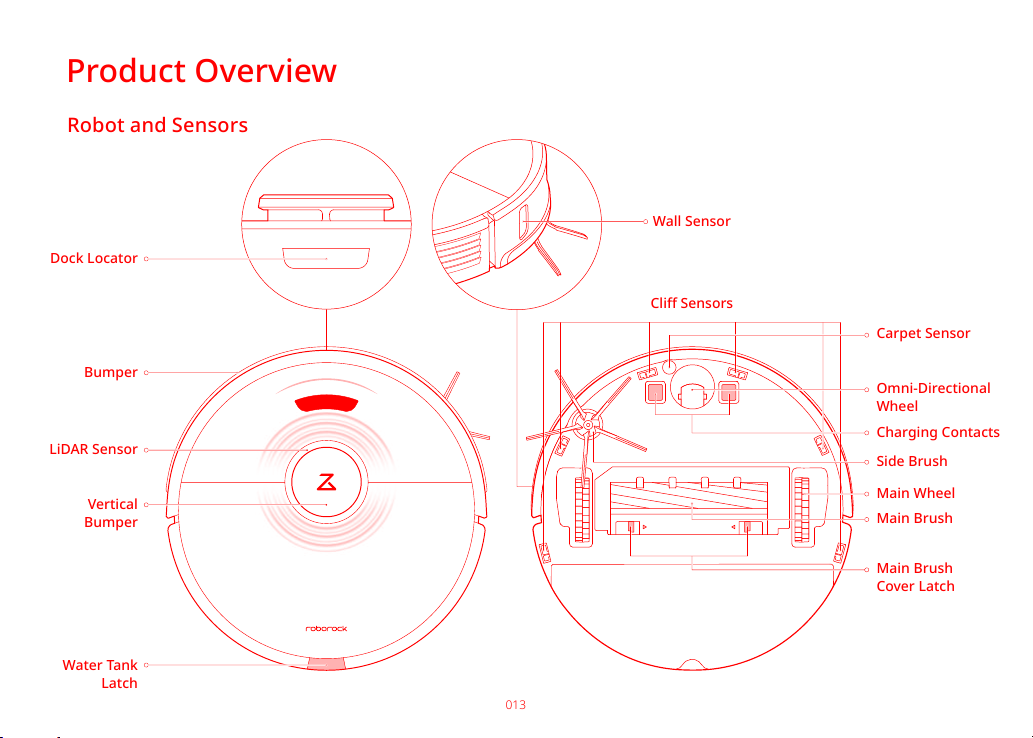
013
Robot and Sensors
Dock Locator
Bumper
LiDAR Sensor
Vertical
Bumper
Water Tank
Latch
Cli Sensors
Omni-Directional
Wheel
Wall Sensor
Charging Contacts
Carpet Sensor
Side Brush
Main Wheel
Main Brush
Main Brush
Cover Latch
Product Overview
Page 12
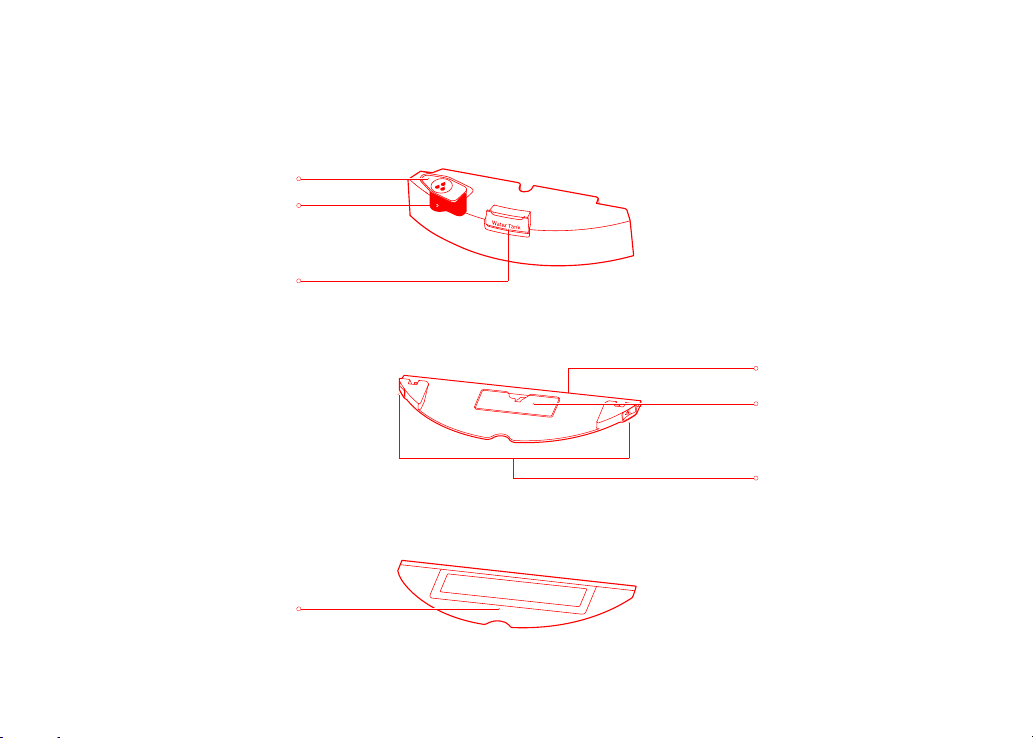
Product Overview
VibraRise Module
Water Tank Stopper
Water Filter
Water Tank Latch
Attachment Area
Electric Water Tank
Mop Cloth Attachment Slot
Vibration Module
Mop Cloth Mount Latch
VibraRise Mop Cloth Mount
VibraRise Mop Cloth
014
Page 13
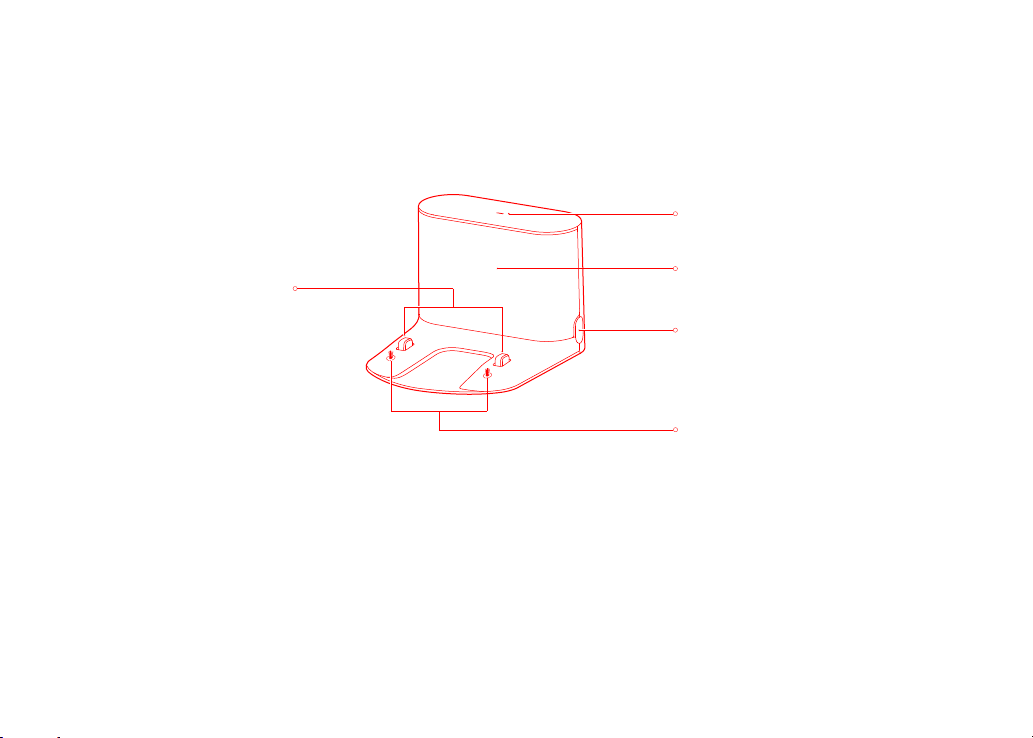
Product Overview
Charging Dock
Charging Dock Power Indicator
Charging Contacts
Dock Location Beacon
Power Socket
Electrode Brushes
015
Page 14
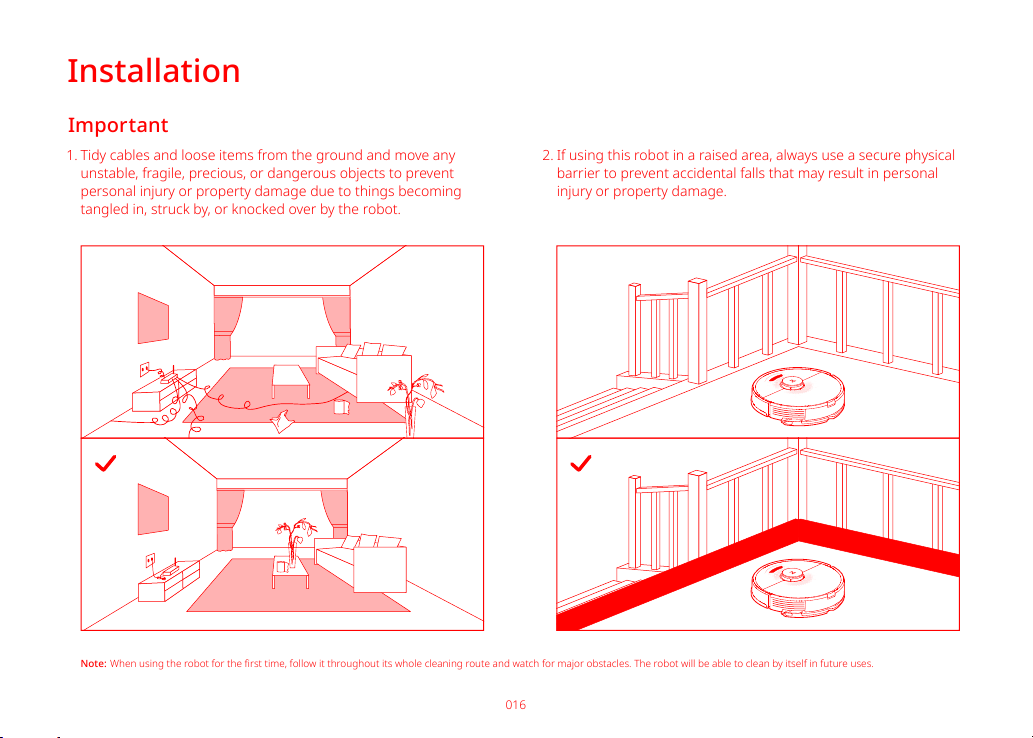
016
Important
Tidy cables and loose items from the ground and move any
unstable, fragile, precious, or dangerous objects to prevent
personal injury or property damage due to things becoming
tangled in, struck by, or knocked over by the robot.
1. If using this robot in a raised area, always use a secure physical
barrier to prevent accidental falls that may result in personal
injury or property damage.
2.
Note: When using the robot for the rst time, follow it throughout its whole cleaning route and watch for major obstacles. The robot will be able to clean by itself in future uses.
Installation
Page 15
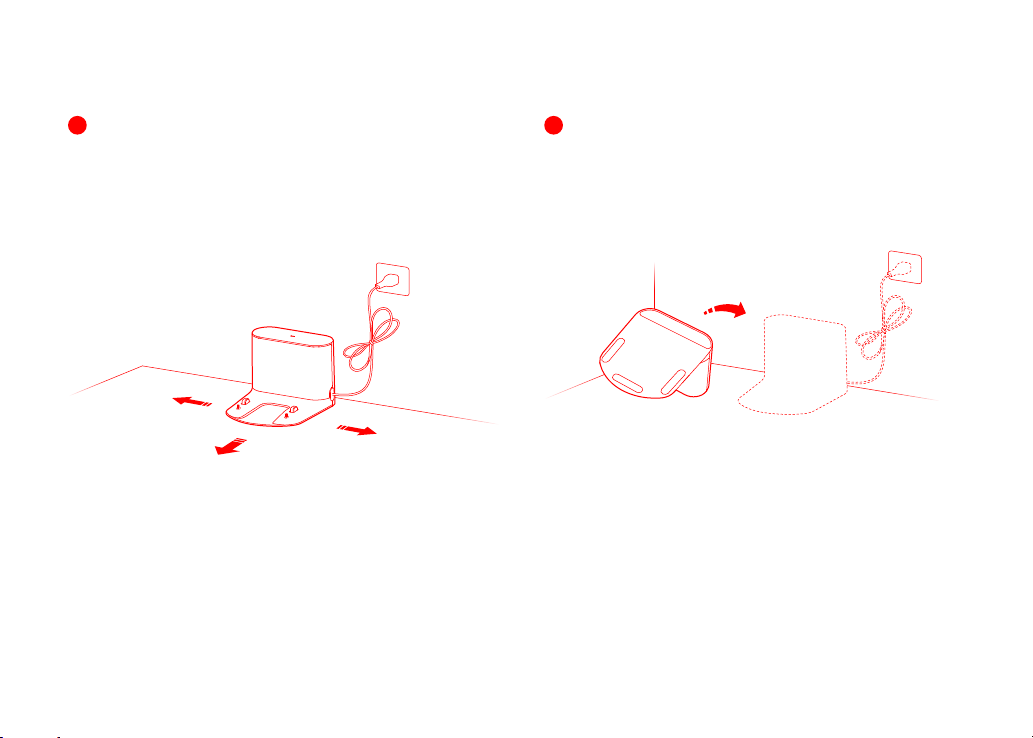
Installation
1
Position the charging dock
Keep the Charging Dock on a level surface, at against a wall.
Connect the power cable to the Charging Dock and tidy cables
from the oor. To ensure a better user experience of the
mobile app, place the Charging Dock in an area with good WiFi
coverage.
More than 0.5m (1.6ft)
More than 1.5m (4.9ft)
Note:
ŎAllow at least 0.5m (1.6ft) of clearance on each side, and more than 1.5m (4.9ft) in
front of the Charging Dock.
ŎIf the power cable hangs vertical to the ground, it may be caught by the robot, caus-
ing the Charging Dock to be disconnected.
ŎThe Charging Dock indicator is on when the Charging Dock is electried, and o when
the robot is charging.
ŎDo not place the Charging Dock in places that are directly exposed to sunlight, and do
not block the Location Beacon. Otherwise the robot may not be able to automatically
return to the Charging Dock.
ŎUse double-sided tape to stick the Charging Dock down.
More than 0.5m (1.6ft)
2
Secure the charging dock with the
adhesive tape
Wipe the oor of the area where the charging dock will be
placed with a dry cloth, then secure the dock in place using
double-sided tape at the bottom of the dock.
Note:
ŎUse of the double-sided tape to secure the charging dock is optional.
ŎWhen necessary, remove the double-sided adhesive tape slowly to reduce residue glue.
017
Page 16
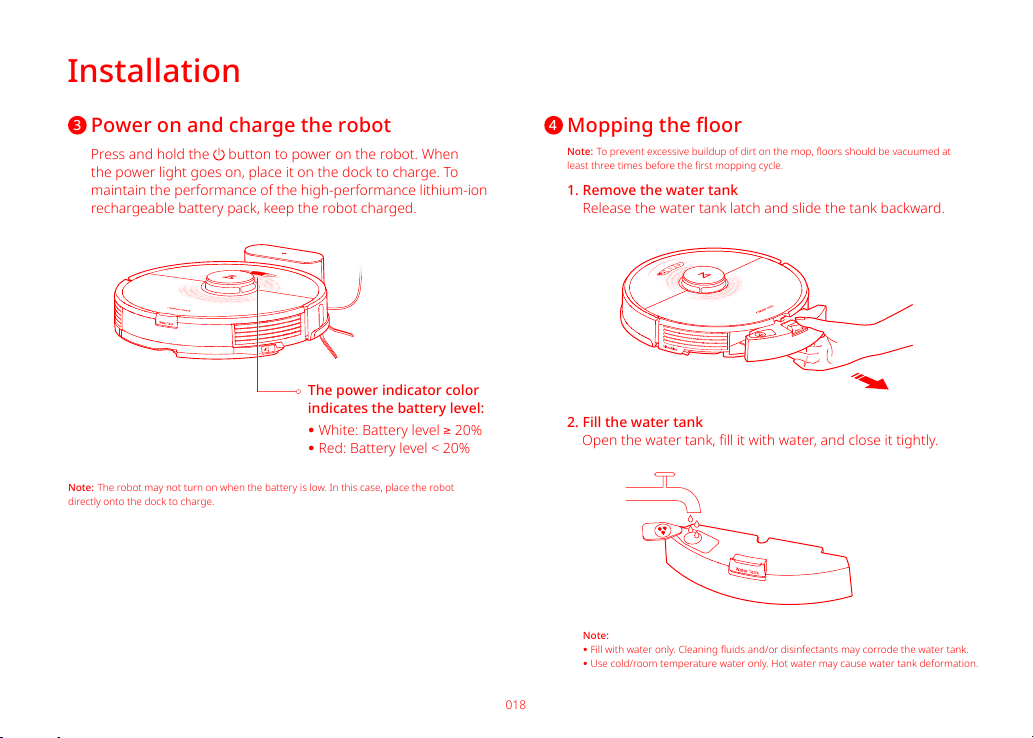
018
Mopping the oor
Note: To prevent excessive buildup of dirt on the mop, oors should be vacuumed at
least three times before the rst mopping cycle.
1. Remove the water tank
2. Fill the water tank
Release the water tank latch and slide the tank backward.
Open the water tank, ll it with water, and close it tightly.
Note:
ŎFill with water only. Cleaning uids and/or disinfectants may corrode the water tank.
ŎUse cold/room temperature water only. Hot water may cause water tank deformation.
4
Power on and charge the robot
Press and hold the
button to power on the robot. When
the power light goes on, place it on the dock to charge. To
maintain the performance of the high-performance lithium-ion
rechargeable battery pack, keep the robot charged.
Note: The robot may not turn on when the battery is low. In this case, place the robot
directly onto the dock to charge.
3
The power indicator color
indicates the battery level:
ŎWhite: Battery level ≥ 20%
ŎRed: Battery level < 20%
Installation
Page 17
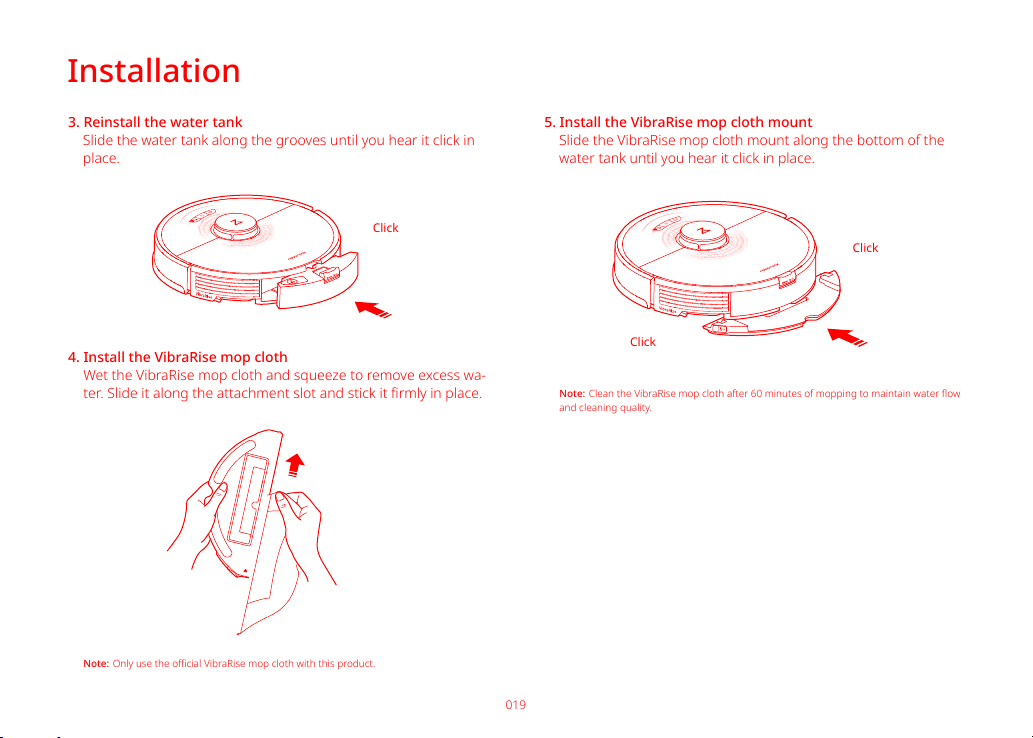
019
3. Reinstall the water tank
Slide the water tank along the grooves until you hear it click in
place.
4. Install the VibraRise mop cloth
Wet the VibraRise mop cloth and squeeze to remove excess wa-
ter. Slide it along the attachment slot and stick it rmly in place.
Installation
Note: Only use the ocial VibraRise mop cloth with this product.
5. Install the VibraRise mop cloth mount
Slide the VibraRise mop cloth mount along the bottom of the
water tank until you hear it click in place.
Note: Clean the VibraRise mop cloth after 60 minutes of mopping to maintain water ow
and cleaning quality.
Click
Click
Click
Page 18
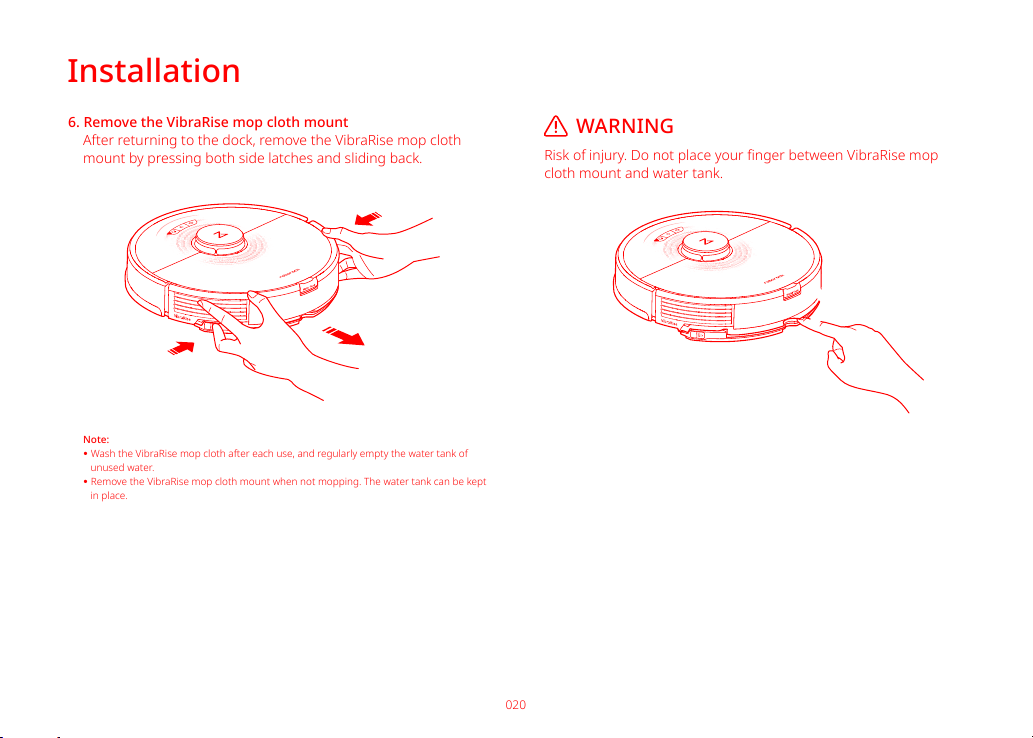
020
6. Remove the VibraRise mop cloth mount
After returning to the dock, remove the VibraRise mop cloth
mount by pressing both side latches and sliding back.
Note:
ŎWash the VibraRise mop cloth after each use, and regularly empty the water tank of
unused water.
ŎRemove the VibraRise mop cloth mount when not mopping. The water tank can be kept
in place.
Installation
Risk of injury. Do not place your nger between VibraRise mop
cloth mount and water tank.
WARNING
Page 19
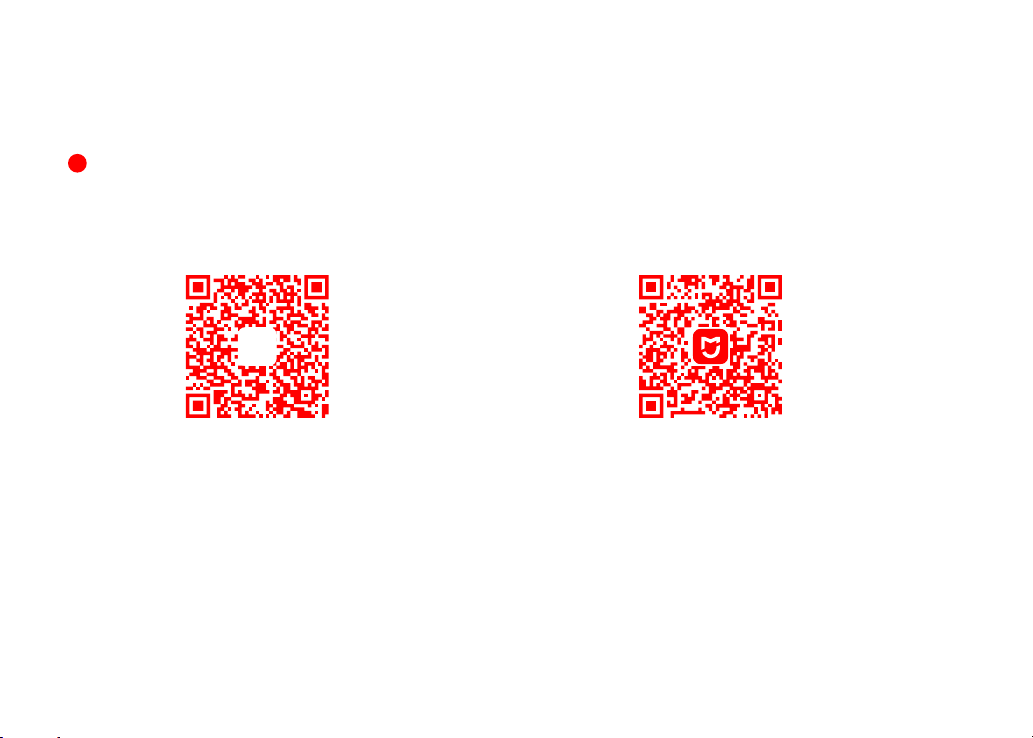
Connect to the App
This robot supports both Roborock and Xiaomi Home apps. Choose the one that best meets your needs.
1
Download the app
1. Search for “Roborock” in the App Store or Google Play or
scan the QR code to download and install the app.
2. Search for “Xiaomi Home” in the App Store or Google Play or
scan the QR code to download and install the app.
021
Page 20
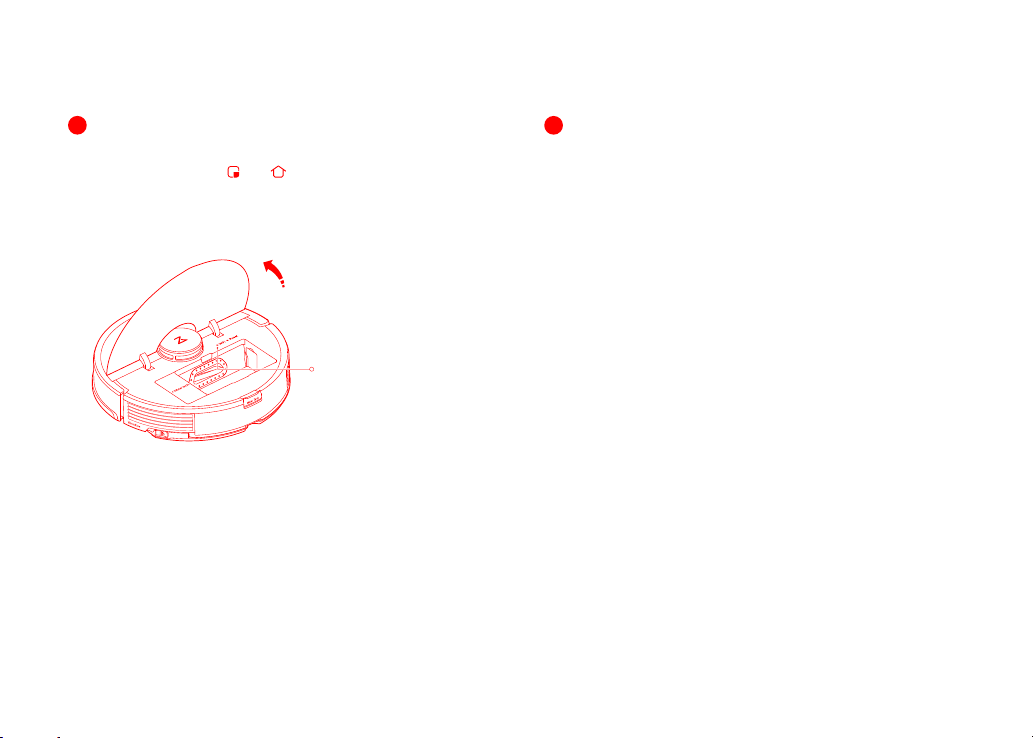
Connect to the App
2
Reset WiFi
1. Open the upper cover and nd the WiFi indicator.
2. Press and hold the and buttons until you hear the
“Resetting WiFi” voice alert. The reset is complete when the
WiFi indicator ashes slowly. The robot will then wait for a
connection.
WiFi indicator light
ŎO: WiFi disabled
ŎFlashing slowly: Waiting for
connection
ŎFlashing quickly: Connecting
ŎSteady: WiFi connected
Note: If you cannot connect to the robot due to your router conguration, a forgotten
password, or any other reason, reset the WiFi and add your robot as a new device.
022
3
Add device
On the app homepage, tap “+” in the top right corner and
follow the prompts to add a device.
Note:
ŎThe actual process may vary due to ongoing app updates. Follow the instructions
provided in the app.
ŎOnly 2.4GHz WiFi is supported.
ŎIf the robot waits more than 1 hour for a connection, WiFi will be automatically disa-
bled. If you need to reconnect, reset the WiFi before proceeding.
Page 21
Instructions
On/O
Press and hold the
dicator will turn on, and the robot will enter standby mode. Press
and hold the button to turn o the robot and end the current
cleaning cycle.
Note: The robot cannot be turned o when it is charging.
button to turn on the robot. The power in-
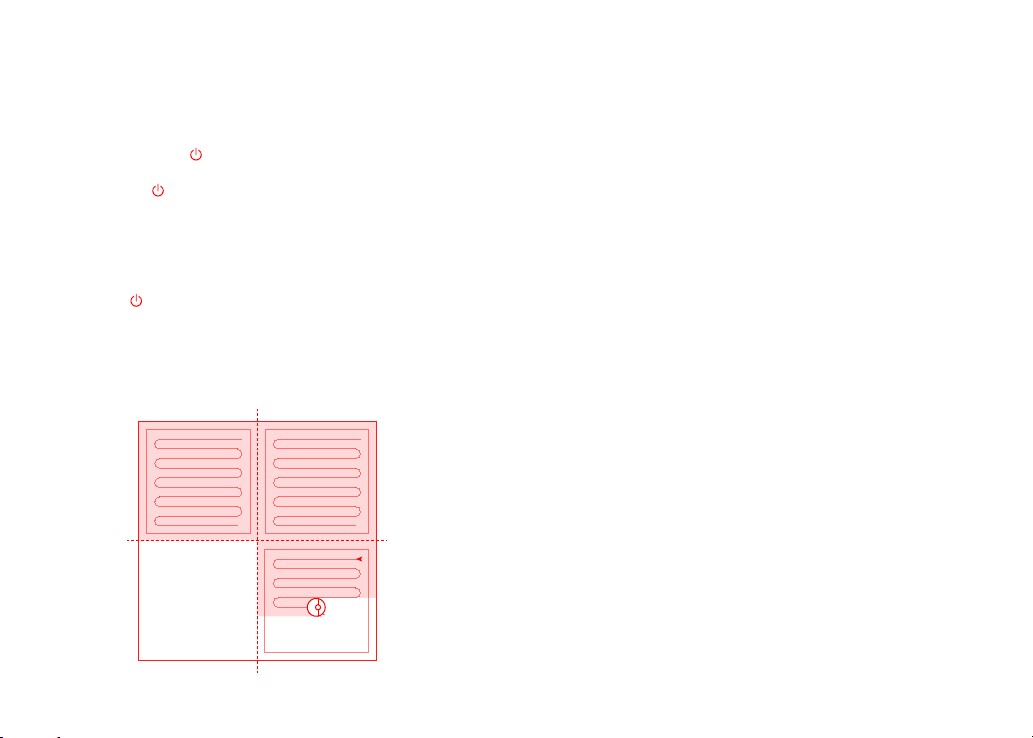
Start Cleaning
Press the
based on its scan of the room. It then splits each room into
squares, cleaning the edges of the square rst before covering the
inside in a zigzag pattern. Afterward, it moves to the next square
until every zone in every room has been eciently covered.
button to start cleaning. The robot will plan its route
Zone 1 – Cleaned
Zone 4 – Next Zone
Zone 2 – Cleaned
Zone 3 – In Progress
Note:
ŎCleaning cannot start if the battery level is too low. Allow the robot to charge before start-
ing cleanup.
ŎBefore cleaning, tidy cables (including the charging dock power cable) and fragile items
from the oor. Loose wires and objects may get caught in the robot, resulting in disconnection or damage to wires and property.
ŎIf cleaning is completed within 10 minutes, the area will be cleaned twice.
ŎIf the battery runs low during the clean, the robot will automatically return to the charging
dock to top up and continue where it left o.
ŎIf the VibraRise mop cloth mount is attached, the robot will lift the mount to clean carpeted
areas. You can choose to avoid carpeted areas in the app.
Mode Setting
Use the app to adjust suction power and vibration strength.
023
Page 22
Instructions
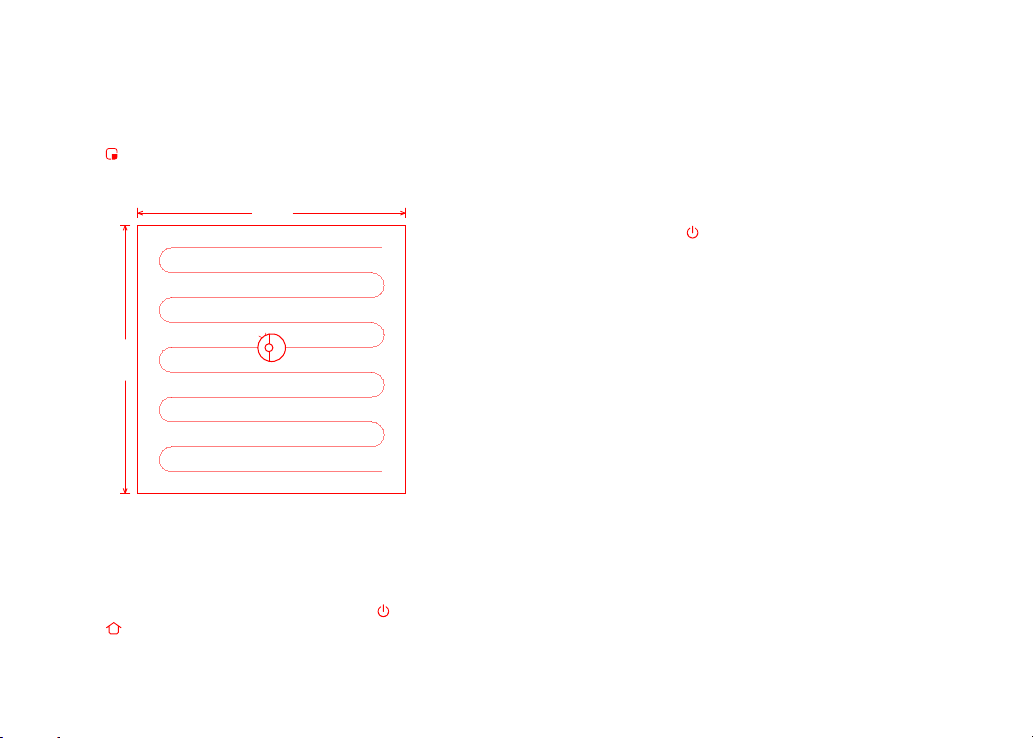
Spot Clean
to start Spot cleaning.
Press
Area: 1.5m (4.9ft) square centered on the robot.
1.5m
1.5m
Note: After spot cleaning, the robot will return to the starting point and enter Standby mode.
Pause
During a clean, press any button to pause, press
press to send the robot back to the dock.
Note: Placing a paused robot on the charging dock will end the current cleanup.
to continue, or
Relling the Water Tank or Cleaning the
VibraRise Mop Cloth
To add water or clean the VibraRise mop cloth, press any button
to stop the robot and remove the mopping module. After adding
water or cleaning the VibraRise mop cloth, reinstall the mopping
module and press the
button to continue.
Sleep
If the robot is inactive for over 10 minutes, it will enter the Sleep
mode, with its power indicator ashing once every few seconds.
Press any button to wake it up.
Note:
ŎThe robot will not enter Sleep mode when charging.
ŎThe robot will automatically shut down if left in Sleep mode for more than 12 hours.
Do Not Disturb (DND) mode
DND mode is enabled by default from 22:00 to 08:00. It can be
disabled or customized in the app. In DND mode, cleaning is
stopped, voice prompts are silenced, and the power indicator
dims.
Child Lock
With the child lock on, all buttons are locked when the robot is
stationary.
024
Page 23
Instructions
Charging
The robot will return to the charging dock automatically after nishing. If it is paused, press the
ing dock. The power indicator will breathe as the robot charges.
Note: If the robot cannot nd the charging dock, it will return to the most recent starting
location. Place the robot on the charging dock manually to recharge.
button to send it to the charg-
Error
If an error occurs, the power indicator ashes red quickly, and a
voice alert sounds. See “Errors” for solutions.
Note:
ŎThe robot will automatically enter Sleep mode if left in an error state for over 10 minutes.
ŎPlacing the robot on the charging dock in an error state will stop the current cleanup.
System Reset
If the robot does not respond to button presses or cannot be
turned o, reset the system. The robot will then restart.
Note: After a system reset, cleaning schedules, WiFi, and other settings will be restored to
factory settings.
Restore Factory Settings
If the robot is not functioning after a system reset, turn it on. Press
and hold the button and at the same time press Reset button
until you hear the “Restoring the initial version” voice prompt. The
robot will then be restored to factory settings.
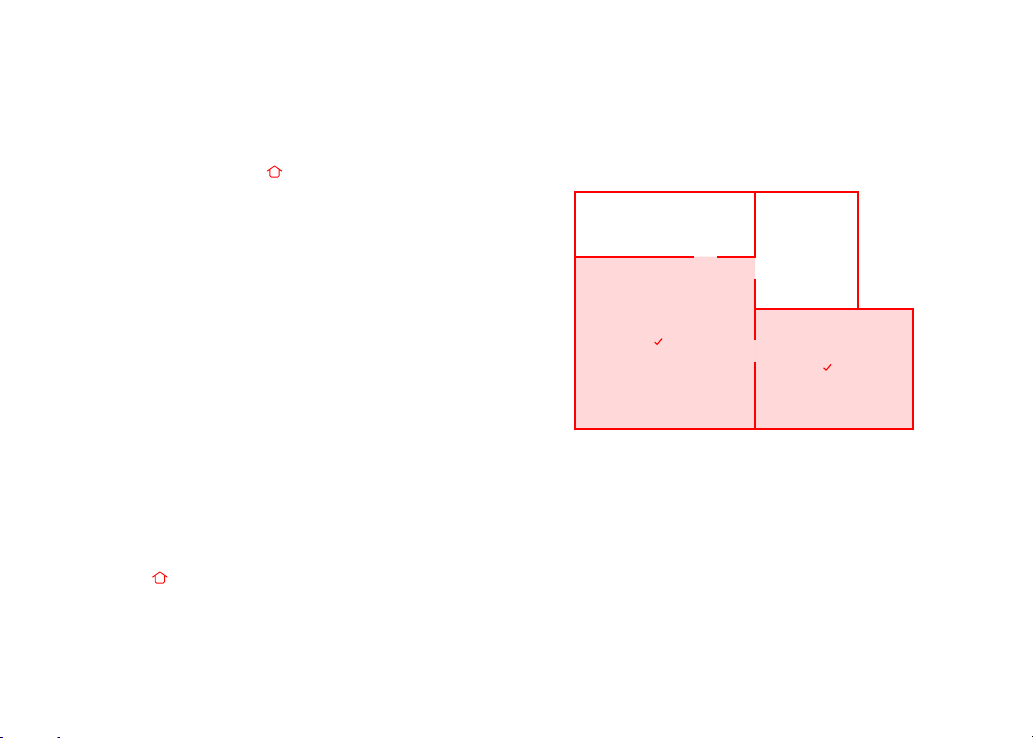
Selective Room Cleaning
The robot will clean the areas selected in the app.
C
D
A
B
Note:
ŎMap Saving mode must be switched on, and a full clean completed before this function can
be used.
ŎThe robot may enter unselected areas during cleaning. Clear obstacles from the ground
around the selected rooms as the robot may enter these areas.
Zone Cleaning
The robot will clean the Zone(s) drawn in-app.
Note: While cleaning the designated zone, the robot may move outside zone borders. Make
sure that there are no cables or obstacles placed close to the cleanup zone.
025
Page 24
Instructions
Scheduled Cleaning
Set cleaning schedules, and at the dened times, the robot will
clean and return to the dock.
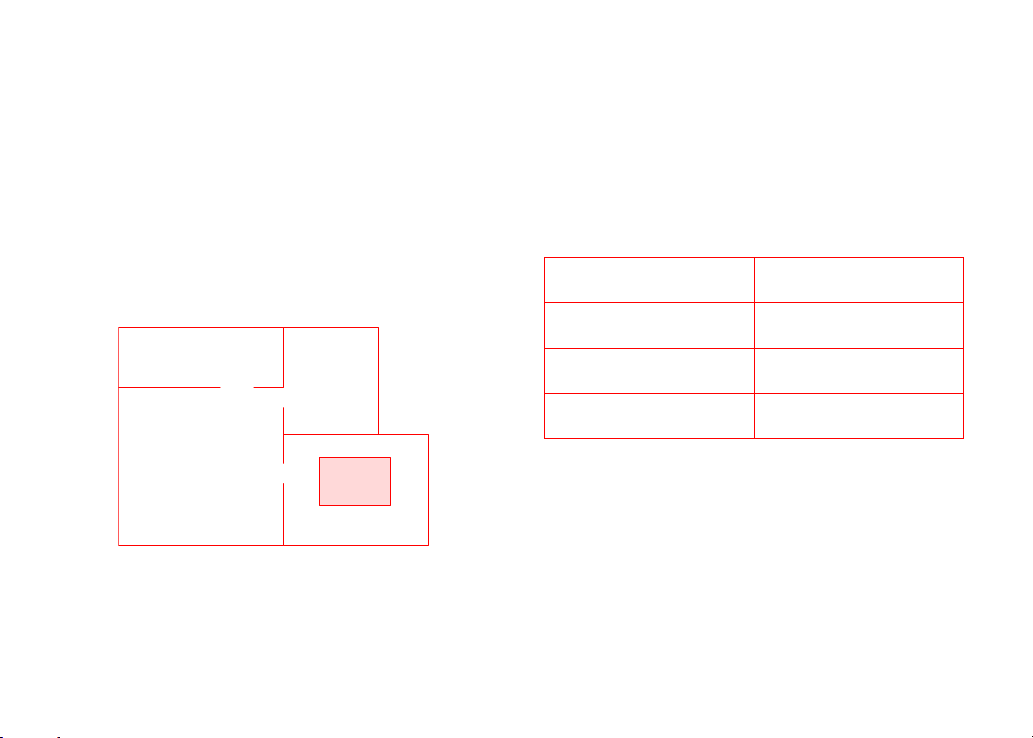
No-Go Zones, No-Mop Zones, and
Invisible Wall
Use No-Go Zones, and Invisible Wall created in-app to prevent
access to certain areas and rooms. By default, No-Mop Zones will
activate when the VibraRise mop cloth mount is in place.
Invisible Wall
No-Go Zones No-Mop Zones
Note:
ŎOnly in-app No-Go Zones and Invisible Wall are supported.
ŎMap Saving mode must be switched on, and a full clean completed before this function can
be used.
ŎNo-Go Zones, No-Mop Zones, and Invisible Wall should only be used to customize the
cleaning area. They should not be used to isolate hazards.
ŎMoving the robot by hand or making signicant changes to the environment may cause
the loss of No-Go Zones, No-Mop Zones, and Invisible Wall.
Firmware Updates
Use the app to update the robot rmware. Update when the robot
is on the charging dock and has at least 20% battery power. The
power indicator will ash white quickly during the update.
More App Functions
View Robot Status
Real-Time Map View Cleaning History
Map Management
Customized Cleaning Adjust Volume
Note: Actual app functions and details may dier slightly due to ongoing development and
upgrades.
026
Carpet Boost
Maintenance Schedule
Page 25

Routine Maintenance
To maintain optimum performance, maintain the robot according to the following guidelines:
Part
Omni-Directional
Wheel
Main Brush
Side Brush Monthly 3-6 months
Washable Filter 2 weeks 6-12 months
Charging Contacts (Robot) Wipe clean with a soft dry cloth.Monthly /
Charging Contacts
(Charging Dock)
Dock Locator Wipe clean with a soft dry cloth.Monthly /
Cli Sensors Wipe clean with a soft dry cloth.Monthly /
Carpet Sensor Wipe clean with a soft dry cloth.Monthly /
Main Wheels Wipe clean with a soft dry cloth.Monthly /
Note: Replacement frequency will vary depending on the actual situation. Should abnormal wear and tear occur, replace the relevant part.
Maintenance
Frequency
As required /
2 weeks 6-12 months
Replacement
Frequency
027
Maintenance Method
Use a screwdriver or similar tool to pry out the axles.
Rinse, allow to dry and press the wheel back in place.
Rotate the fasteners of the main brush caps in the
unlocking direction and take them down. After removing
the debris wrapped around the brush, reinstall the main
brush caps in the locking direction.
Use a screwdriver to unscrew the side brush. Remove any
entangled dirt and screw it back in place.
Remove and rinse, gently tapping to remove any dirt.
Air-dry for at least 24h before reuse.
Remove and clean the mop cloth after each use.VibraRise Mop Cloth After each use 3-6 months
Wipe clean with a soft dry cloth.Monthly /
Page 26
Routine Maintenance
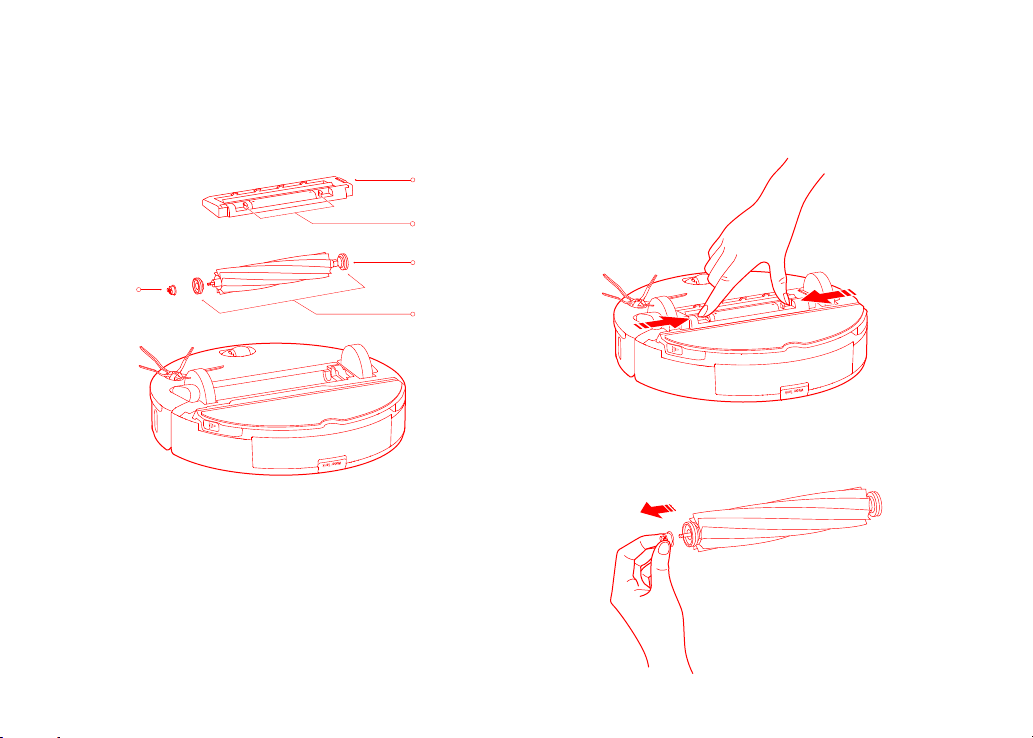
Main Brush
Main brush
bearing
1. Turn the robot over, then unlatch and remove the main
brush cover.
Main brush
cover
Latch
Main brush
Main brush cap
2. Take out the main brush, then remove and clean the bearings.
028
Page 27
Routine Maintenance
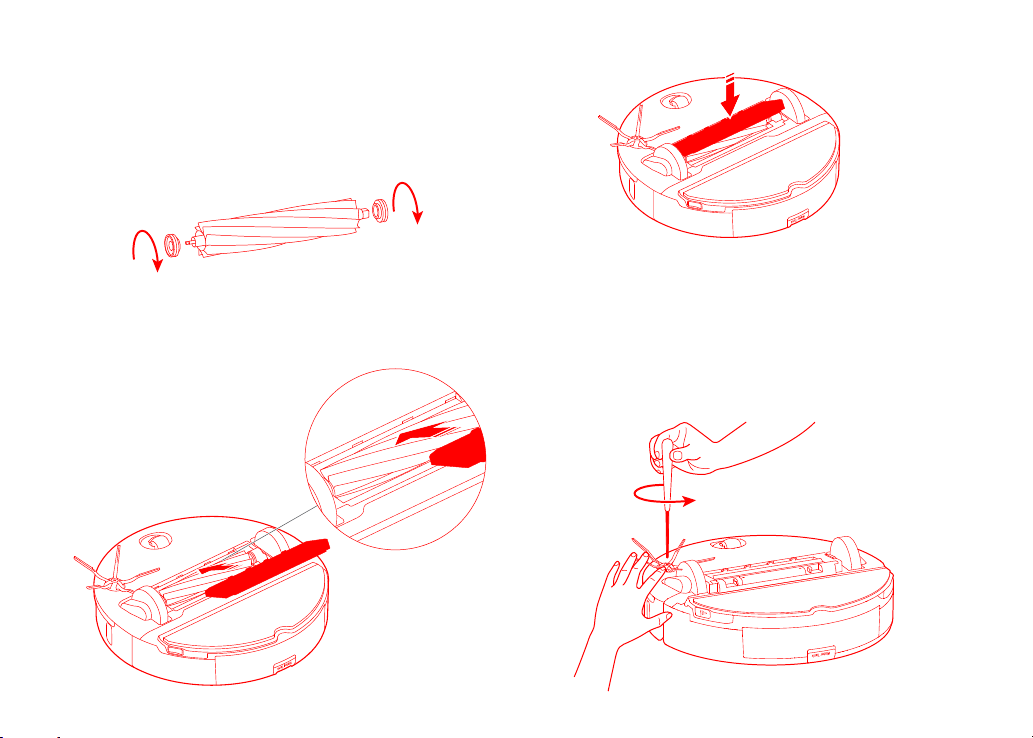
3. Remove the main brush cap, rotating in the unlock direction.
After cleaning, reattach it turning in the lock direction.
4. After removing the tangled hair or dirt at both ends of the main
brush, reinstall it, press on the main brush cover to lock it in
place.
Note:
ŎUse a wet cloth to wipe the main brush. Dry thoroughly before use while avoiding direct
exposure to the sun.
ŎDo not use corrosive detergent or disinfectant to clean the main brush.
Side Brush
1. Unscrew the side brush and remove any entangled dirt.
2. Reinstall and tighten in place.
029
Page 28
Routine Maintenance
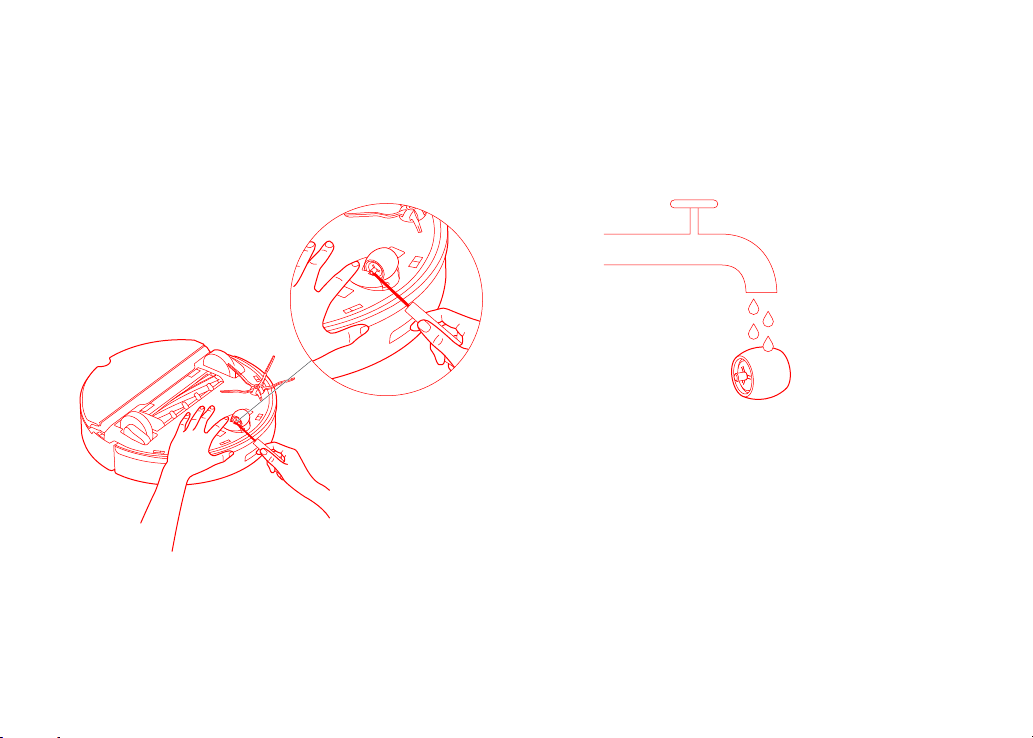
Omni-Directional Wheel
1. Use a small screwdriver or similar tool to pry out the axles and
remove the wheel.
Note: The omni-directional wheel bracket cannot be removed.
2. Rinse the wheel and axle to remove any hair or dirt.
3. Dry and reattach the wheel, pressing it rmly in place.
030
Page 29
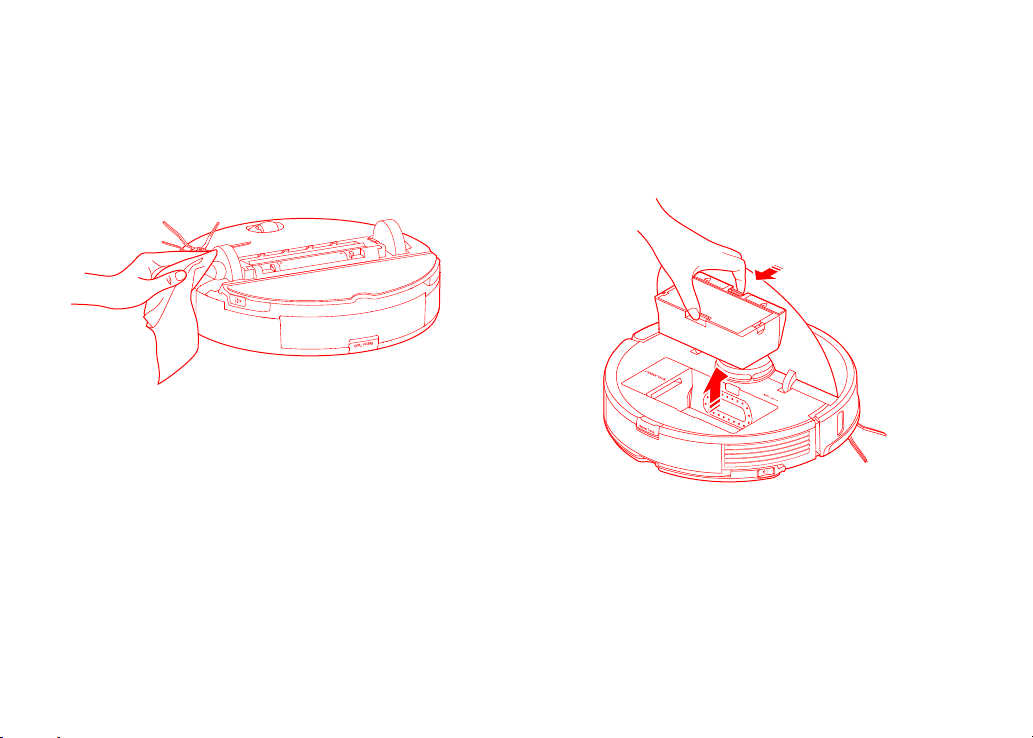
Routine Maintenance
Main Wheels
Use a soft dry cloth to wipe and clean the main wheels.
Dustbin
1. Open the top cover of the robot and remove the dustbin.
031
Page 30
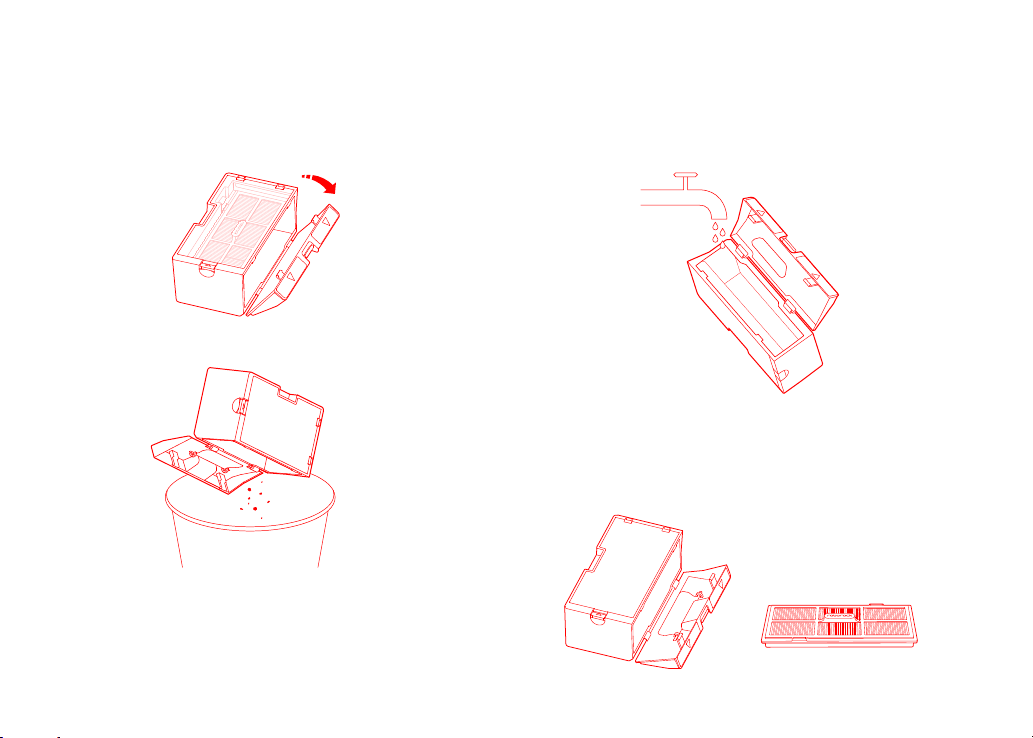
Routine Maintenance
2. Open the lid and empty the dustbin. 3. Fill it with clean water and close the lid. Gently shake the dust-
bin, then pour out the dirty water.
Note: To prevent blockage, only use fresh water without cleaning liquid.
4. Air-dry the dustbin and washable lter.
032
Page 31
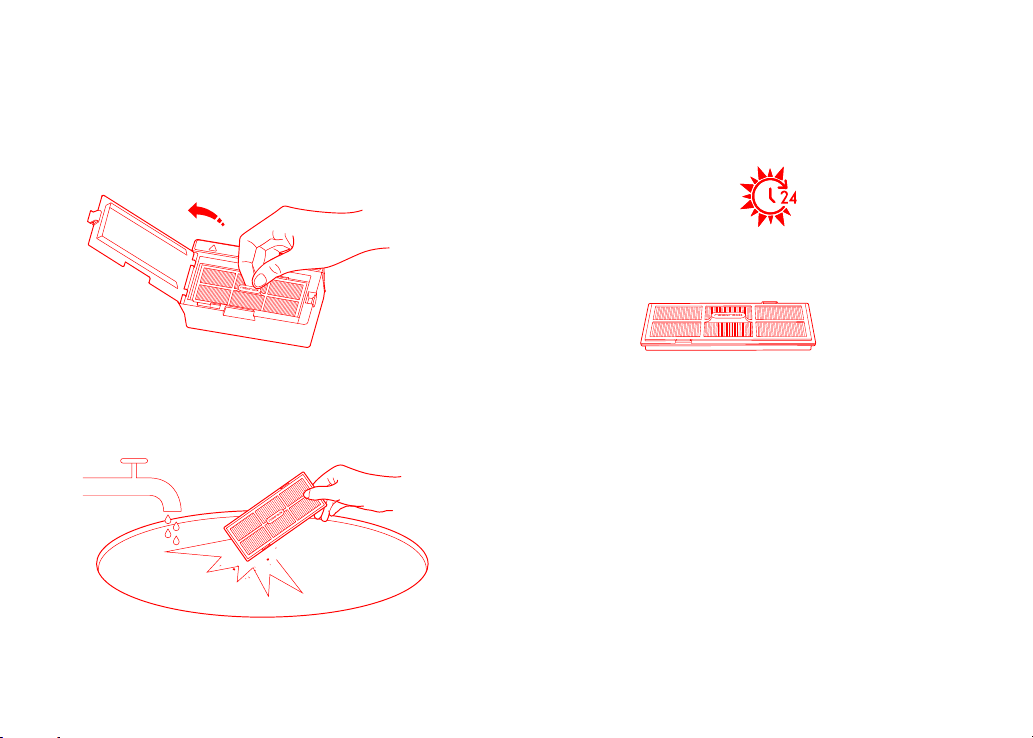
Routine Maintenance
Washable Filter
1. Open the lter cover and remove the lter.
2. Rinse repeatedly and tap the lter frame to remove as much
dirt as possible.
Note: To avoid damage, do not touch the lter with hands, brushes, or sharp objects.
3. Leave the lter to dry thoroughly before reinstalling it.
Note: Use an alternate lter if necessary.
033
Page 32
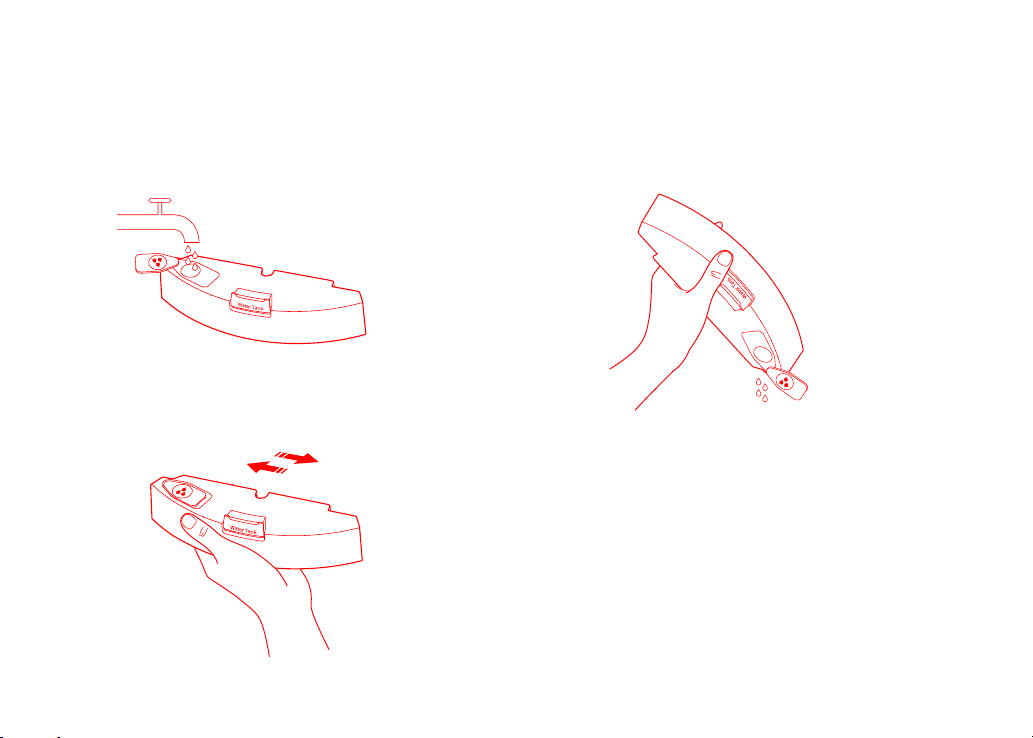
Routine Maintenance
Water Tank
1. Open the water tank and ll it with clean water.
2. Close up the water tank and shake it gently.
3. Pour out dirty water.
034
Page 33
Routine Maintenance
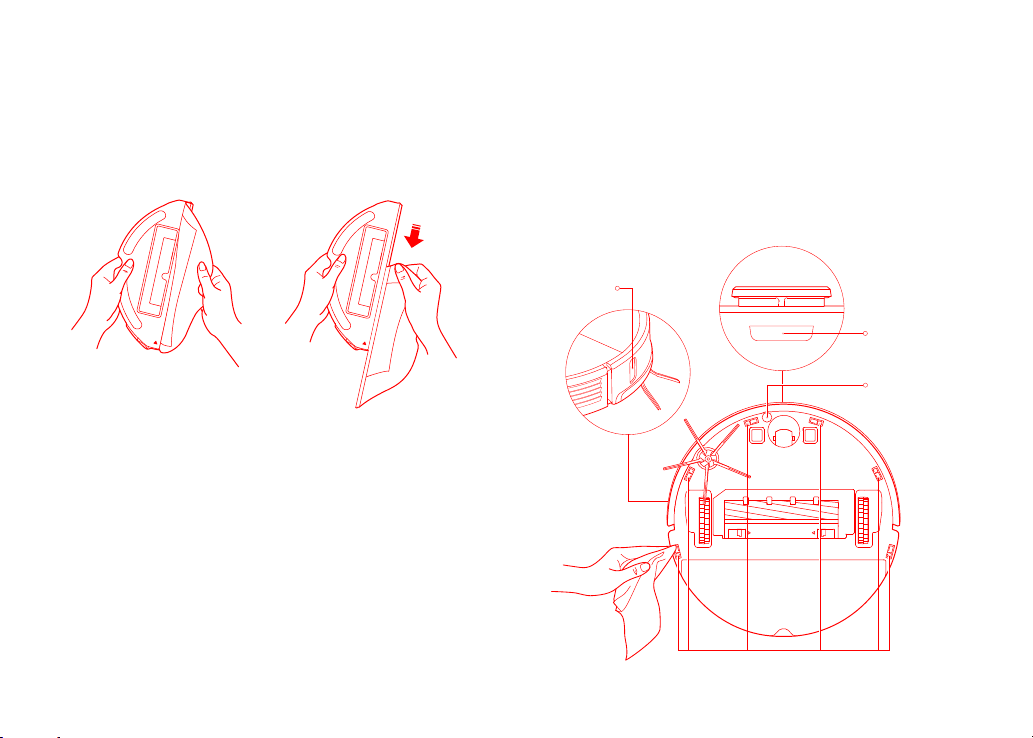
VibraRise Mop Cloth
1. Remove the VibraRise mop cloth from the VibraRise mop cloth
mount.
2. Clean the VibraRise mop cloth and air-dry it.
Note: A dirty VibraRise mop cloth will aect mopping performance. Always start with a
clean cloth.
Robot Sensors
Use a soft dry cloth to wipe and clean all sensors, including:
1. The dock locator.
2. The wall sensor.
3. The carpet sensor.
4. The six cli sensors.
Wall Sensor
Dock Locator
Carpet Sensor
Cli Sensors
035
Page 34
Routine Maintenance
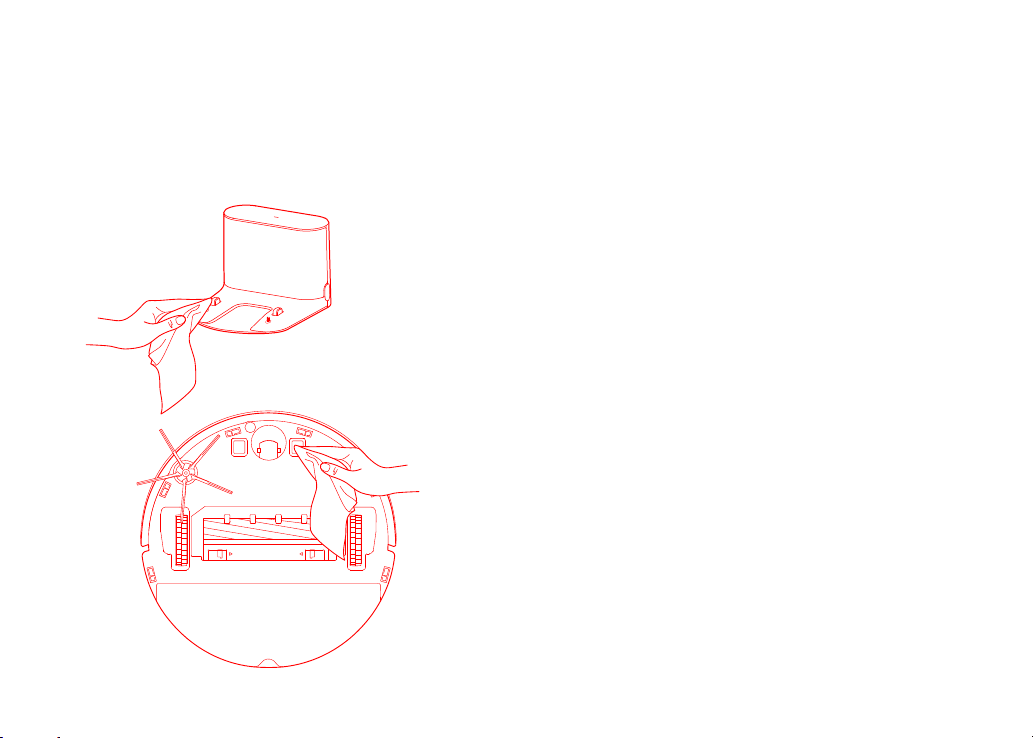
Charging Contact Areas
Use a soft dry cloth to wipe the charging contacts on the charging
dock and the robot.
Battery
The robot is equipped with a high-performance lithium-ion rechargeable battery pack. To maintain battery performance, keep
the robot charged.
Note: If the robot will not be used for an extended period, turn it o and charge it at least
every three months to avoid battery damage caused by over-discharging.
036
Page 35

Basic Parameters
Robot Charging Dock
Model
Dimensions
Battery
Weight
Wireless Connection
Rated Input
Charging Time
Note: The serial number is on a sticker on the underside of the robot.
roborock S7
353×350×96.5mm
14.4V/5200mAh lithium battery
Approx. 4.7kg
WiFi Smart Connect
20VDC 1.2A
< 6 hours
037
Model
Dimensions
Rated Power
Rated Input
Rated Output
Rated Frequency
Charging Battery
CDZ11RR or CDZ12RR
151×130×98mm
28W
100-240VAC
20VDC 1.2A
50-60Hz
14.4V/5200mAh lithium battery
Page 36

Errors
If an error occurs while the robot is cleaning, the power indicator will ash red quickly, and a voice alert will sound.
Refer to the following table for troubleshooting.
1. After resolving any of the following errors, relocate your robot and restart cleaning.
2. After any sensor errors, clean the sensor and retry.
3. If the battery is at an abnormal temperature, wait for it to return to normal before use.
Error 1: LiDAR turret or laser blocked. Check for obstruction and retry.
Error 2: Bumper stuck. Clean it and lightly tap to release it.
Error 3: Wheels suspended. Move robot and restart.
Error 4: Cli sensor error. Clean cli sensors, move robot away from drops and restart.
Error 5: Main brush jammed. Clean main brush and bearings.
Error 6: Side brush jammed. Remove and clean side brush.
Error 7: Wheels jammed. Move the robot and restart.
Error 8: Robot trapped. Clear obstacles surrounding robot.
Error 9: No dustbin. Install dustbin and lter.
Error 12: Low battery. Recharge and retry.
Error 13: Charging error. Clean charging contacts and retry.
Error 14: Battery error.
Error 15: Wall sensor dirty. Clean wall sensor.
038
Page 37

Errors
Error 16: Robot tilted. Move to level ground and restart.
Error 17: Side brush error. Reset robot.
Error 18: Fan error. Reset robot.
Error 21: Vertical bumper pressed. Move robot and retry.
Error 22: Dock locator error. Clean and retry .
Error 23: Could not return to dock. Clean dock location beacon and retry.
Error 27: VibraRise system jammed. Check for obstructions.
Error 28: Robot on carpet. Move robot to oor and retry.
Filter blocked or wet. Clean, dry, and retry.
No-go zone or Invisible Wall detected. Move robot from this area.
Cannot cross carpet. Move robot across carpet and restart.
Internal error. Reset the robot.
Note: A system reset may resolve some problems.
If the problem persists after using the recommendations in the table above, please email our after-sales service team:
US/Non-Europe Support: [email protected]
Europe Support: [email protected]
039
Page 38

Common Issues
Problem Solution
Unable to power on
Unable to charge
Slow charging
Unable to dock
Abnormal behavior ŎRestart the robot.
Noise during cleaning
Unable to connect to WiFi
ŎThe battery level is low. Put the robot on the charging dock and charge it before use.
ŎThe battery temperature is too low or too high. Only use the robot within the range of
4-40°C (39-104°F).
ŎCheck the power indicator light turns on and both ends of the power cabel are properly
connected.
ŎIf contact is poor, clean the contact areas on the charging dock and the robot.
ŎWhen used at high or low temperatures, the robot will automatically reduce its charging
speed to extend battery life.
ŎThe charging contacts may be dirty. Wipe them with a dry cloth.
ŎThere are too many obstacles near the charging dock. Move it to an open area.
ŎThe robot is too far from the charging dock. Place it closer and retry.
ŎThe main brush, side brush, main wheels, or omni-directional wheel may be jammed.
Turn o the robot and clean them.
ŎVibraRise system abnormal. Check for jammed objects.
ŎWiFi is disabled. Reset the WiFi and try again.
ŎThe WiFi signal is poor. Move the robot to an area with good WiFi reception.
ŎAbnormal WiFi connection. Reset the WiFi, download the latest mobile app, and retry.
ŎThe current Roborock robot is not supported. You can nd supported models in the app.
ŎUnable to connect to WiFi abruptly. There may be an error with your router settings.
Contact Roborock customer service for additional support.
040
Page 39

Common Issues
Problem Solution
Poor cleaning ability or dust falling out
Scheduled cleaning is not working
Is power always being drawn when the
robot is on the charging dock?
Does the robot need to be charged for
at least 16 hours the rst three times it is
used?
No or little water during mopping
Cleaning does not resume after
recharging
The robot cannot return to the charging
dock after Spot cleaning or when it has
been moved manually
The robot has begun to miss certain spots ŎThe wall sensor or cli sensors may be dirty. Wipe them with a soft dry cloth.
It takes a long time to ll the water tank ŎThe lter may be blocked and need cleaning.
ŎThe dustbin is full and needs emptying.
ŎThe lter is blocked and needs cleaning.
ŎThe main brush is jammed and needs cleaning.
ŎKeep the robot charged. Scheduled cleaning can only begin when the battery level is
above 20%.
ŎThe robot will draw power while it is docked to maintain battery performance, but
power consumption is minimal.
ŎNo. The robot can be used any time after it has been fully charged.
ŎCheck whether there is water in the water tank and use the mobile app to set the
scrub intensity or check the manual for full instructions on how to correctly install the
mop cloth and mop cloth mount.
ŎMake sure that the robot is not in DND mode. DND mode will prevent cleanup. When
cleaning a space requiring a top-up charge, if the robot was placed manually on the
charging dock before it returned to the dock automatically, it will not be able to continue cleanup.
ŎAfter spot cleaning or a signicant position change, the robot will re-generate the
map. If the charging dock is too far away, it may not be able to return to recharge
and must be placed on the charging dock manually.
041
Page 40

EU Declaration of Conformity
Hereby we:
Name of manufacturer
Address
Beijing Roborock Technology Co., Ltd.
Floor 6, Suite 6016, 6017, 6018, Building C, Kangjian Baosheng Plaza,
No.8 Heiquan Road, Haidian District, Beijing, P.R.CHINA
declare that this DoC is issued under our sole responsibility and that the products:
Product description
Type(model) designation(s)
Robotic Vacuum Cleaner and Accessories
roborock S7
042
Page 41

EU Declaration of Conformity
are in conformity and veried through testing with the provision of the following EU directives:
Article 3.1 a): Safety and Health
1. EN 60335-1:2012 + A11:2014 + AC:2014 + A13:2017+A1:2019 + A14:2019 + A2:2019
2. EN 60335-2-2:2010 + A11:2012 + A1:2013
3. EN 62311:2008
4. EN 62233:2008
Article 3.1 b): EMC
Radio Equipment Directive
2014/53/EU
RoHS Directive 2011/65/EU EN IEC 63000:2018
1. EN 301 489-1 V2.2.3:2019
2. EN 301 489-17 V3.1.1:2017
3. EN 55014-1:2017
4. EN 55014-2:2015
5. EN IEC 61000-3-2:2019
6. EN 61000-3-3:2013 + A1:2019
Article 3.2: Radio Spectrum
EN 300 328 V2.2.2:2019
Product description
Type(model) designation(s)
Charging Dock and Accessories
Charging Dock , model: CDZ11RR or CDZ12RR
043
Page 42
EU Declaration of Conformity
are in conformity and veried through testing with the provision of the following EU directives:
Low Voltage Directive 2014/35/EU
EMC Directive 2014/30/EU
RoHS Directive 2011/65/EU
1. EN 60335-1:2012 + A11:2014 + AC:2014 + A13:2017 +A1:2019 + A14:2019 + A2:2019
2. EN 60335-2-29:2004 + A2:2010 + A11:2018
3. EN 62233:2008
1. EN 55014-1:2017
2. EN 55014-2:2015
3. EN IEC 61000-3-2:2019
4. EN 61000-3-3:2013 + A1:2019
EN IEC 63000:2018
Person responsible for making this declaration:
Printed name: Rui.Shen
Position/Title: Quality Director
Signature:
Date of issue: 22/01/2021
Place of issue: Floor 6, Suite 6016, 6017, 6018, Building C, Kangjian Baosheng Plaza, No. 8 Heiquan Road, Haidian District, Beijing, P.R. CHINA
044
Page 43
WiFi Specification
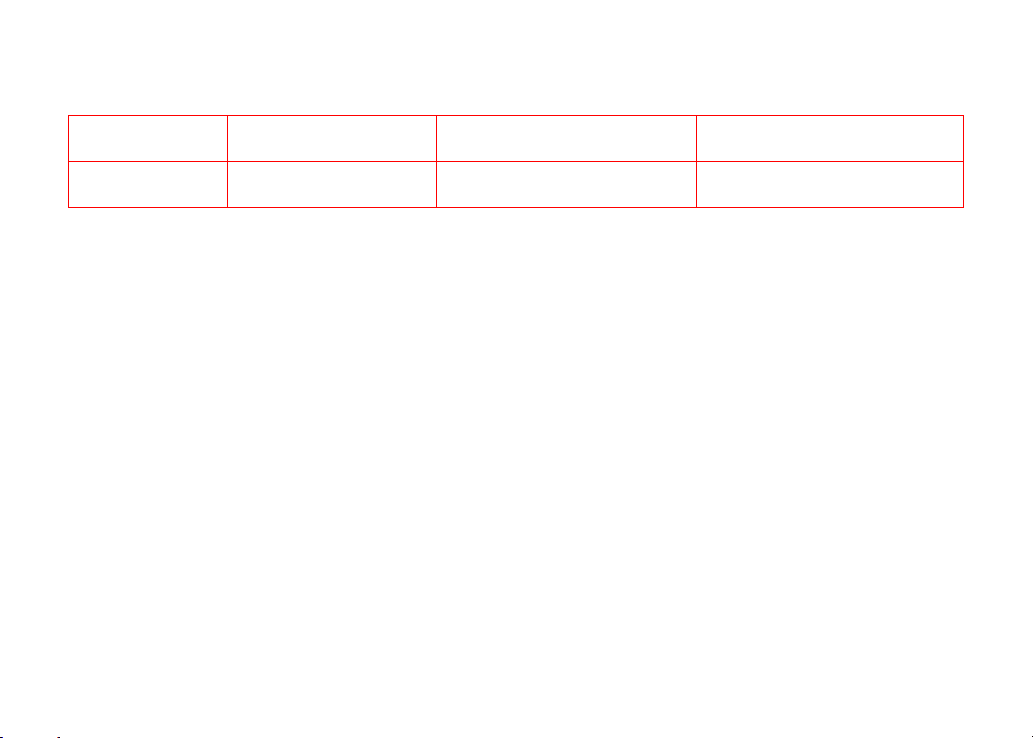
Service Protocol Frequency Range Max. Output Power
WiFi 802.11b/g/n 2400-2483.5 MHz
≤
20dBm
Laser Safety
The laser distance sensor of this product meets the standards for Class 1 Laser Products in IEC 60825-1:2014 and will not generate hazardous laser radiation.
045
Page 44

WEEE Information
Correct Disposal of this product . This marking indicates that this product should not be disposed with other household wastes throughout
the EU. To prevent possible harm to the environment or human health from uncontrolled waste disposal, recycle it responsibly to promote
the sustainable reuse of material resources. To return your used device, please use the return and collection systems or contact the retailer
where the product was purchased. They can take this product for environmental safe recycling.
Korrekte Entsorgung dieses Produkts. Innerhalb der EU weist dieses Symbol darauf hin, dass dieses Produkt nicht über den Hausmüll entsorgt werden darf. Altgeräte enthalten wertvolle recyclingfähige Materialien, die einer Wiederverwertung zugeführt werden sollten und um
der Umwelt bzw. der menschlichen Gesundheit nicht durch unkontrollierte Müllbeseitigung zu schaden. Bitte entsorgen Sie Altgeräte deshalb
über geeignete Sammelsysteme oder senden Sie das Gerät zur Entsorgung an die Stelle, bei der Sie es gekauft haben. Diese wird dann das
Gerät der stoichen Verwertung zuführen.
046
Page 45

Warranty Information
The warranty period depends on the laws of the country in which the product is sold, and the warranty is the responsibility of the seller.
The warranty only covers defects in material or workmanship.
The repairs under warranty may only be carried out by an authorized service centre. When making a claim under the warranty, the original bill
of purchase (with purchase date) must be submitted.
The warranty will not apply in cases of:
ŎNormal wear and tear.
ŎIncorrect use, e.g. overloading of the appliance, use of non-approved accessories, use of force.
ŎDamage caused by external inuences.
ŎDamage caused by non-observance of the user manual, e.g. connection to an unsuitable mains supply or non-compliance with the installa-
tion instructions.
ŎPartially or completely dismantled appliances.
047
Page 46

 Loading...