

Page 1

Roborock S4 Max Robot Vacuum
Cleaner User Manual
Read this user manual carefully before using this product and store it properly
for future reference.
Page 2

Safety Information
Restrictions
• This product is designed for indoor oor cleaning only, do not use it outdoors
(such as on an open-ended terrace), on any surface other than the ground
(such as a sofa), or in any commercial or industrial environment.
• Do not use this product on elevated surfaces without barriers such as the
oor of a loft, an open-ended terrace, or on top of furniture.
• Do not use the product when the ambient temperature is higher than 104°F
(40°C), lower than 39°F (4°C), or if there are liquids or tacky substances on the
oor.
• Before using the product, move wires o the ground or place them to the side
to prevent them being pulled on by the cleaner.
• To prevent blocking the product and to avoid damage to valuables, remove
lightweight items (such as plastic bags) and fragile objects (such as vases)
from the oor before cleaning.
• Children should be supervised to ensure that they do not play with the
appliance.
• This product is not intended for use by persons (including children) with
reduced physical, sensory or mental capabilities, or lack of experience and
knowledge, unless they have been given supervision or instruction concerning
2
Page 3

Safety Information
use of the product by a person responsible for their safety (CB).
• This product can be used by children aged from 8 years and above and
persons with reduced physical, sensory or mental capabilities or lack of
experience and knowledge if they have been given supervision or instruction
concerning use of the product in a safe way and understand the hazards
involved. Children shall not play with the product. Cleaning and user
maintenance shall not be made by children without supervision (EU).
• Keep the main brush cleaning tools out of reach of children.
• Do not place any object (including children and pets) on the product, whether
it is in operation or not.
• Keep hair, loose clothing, ngers, and all parts of the body away from
openings and moving parts.
• Do not use the product on burning objects (such as cigarette butts).
• Do not use the product on high pile carpets (product eectiveness may also
be reduced on dark carpets).
• Do not use the product to clean hard or sharp objects (such as decoration
wastes, glass and nails).
• Do not carry the product using the laser scanner cap, main unit cover, or
collision buer.
3
Page 4

Safety Information
• The product must be switched o and the plug must be removed from socket
outlet before cleaning or maintaining the product.
• Do not use wet cloth or liquids for cleaning the product.
• Do not use the mopping module on carpets.
• Use the product according to the manual. Any loss or damage caused from
improper use will be borne by the user.
• This product contains batteries that are only replaceable by skilled persons.
Battery and Charging
WARNING
• Do not charge non-rechargeable batteries.
• For the purposes of recharging the battery, only use the detachable supply
unit roborock CDZ11RR or CDZ12RR provided with this product.
• Do not dismantle, repair or modify the battery or charging dock.
• Keep the charging dock away from heat (such as heating vents).
• Do not wipe or clean the charging contact with wet cloth or wet hands.
• If the power cord is damaged, stop using it immediately. It must be replaced
by the manufacturer, its service agent, or similarly qualied persons to avoid a
hazard.
4
Page 5

Safety Information
• Make sure the product is powered o before shipment.
• Use of the original packaging is advised.
• If to be left unused for a long period of time, fully charge the product and
switch it o before storing it in a cool, dry place.
• Charge it at least every three months to avoid over discharging the battery.
• To satisfy RF exposure requirements, a separation distance of 20 cm or
more should be maintained between this device and persons during device
operation. To ensure compliance, operations at closer than this distance is not
recommended.
• The antenna used for this transmitter must not be co-located in conjunction
with any other antenna or transmitter.
5
Page 6

Roborock robot vacuum cleaner troubleshooting
Name Troubleshooting
Problem listed in the User Manual
Robot
Charging dock
Power cable
The product cannot be powered on
The main brush, side brush, fan, or main wheels do not work
The robot does not receive power
The charging dock cannot be supplied with power
6
Page 7
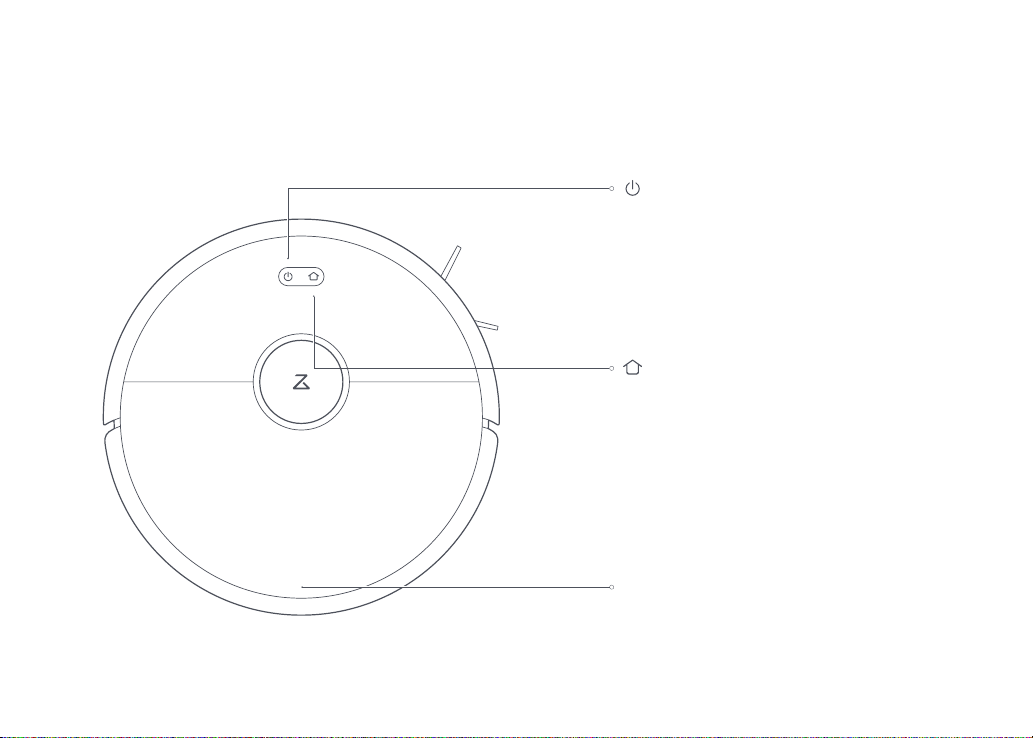
Product Introduction
Robot
On/O
• Press to start cleaning
• Press and hold to power on or o
Power indicator
• White: Bat ter y level ≥ 20%
• Red: Battery level < 20%
• Flashing slowly: Charging or s tar ting up
• Flashing red: Error
Dock/Spot Clean
• Press to return to the dock
• Press and hold to spot clean
Note:
Press an y button to pau se cleaning, r eturning
to dock , or spot cleani ng.
Cover latch
7
Page 8
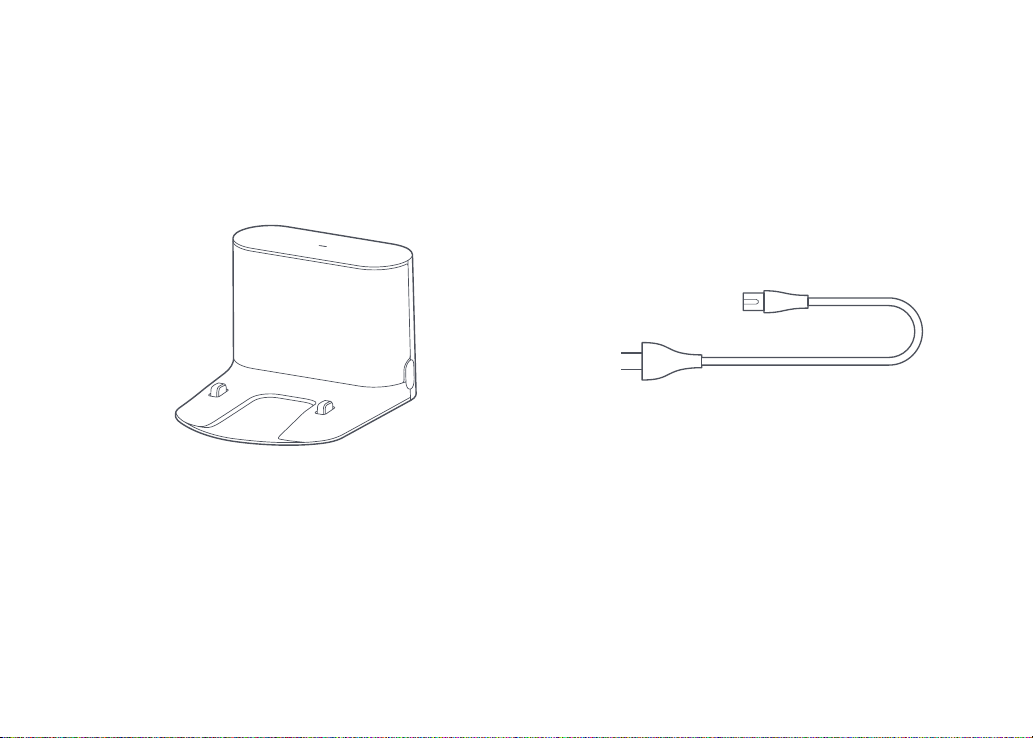
Product Introduction
Parts list
Charging dock Power cable
8
Page 9
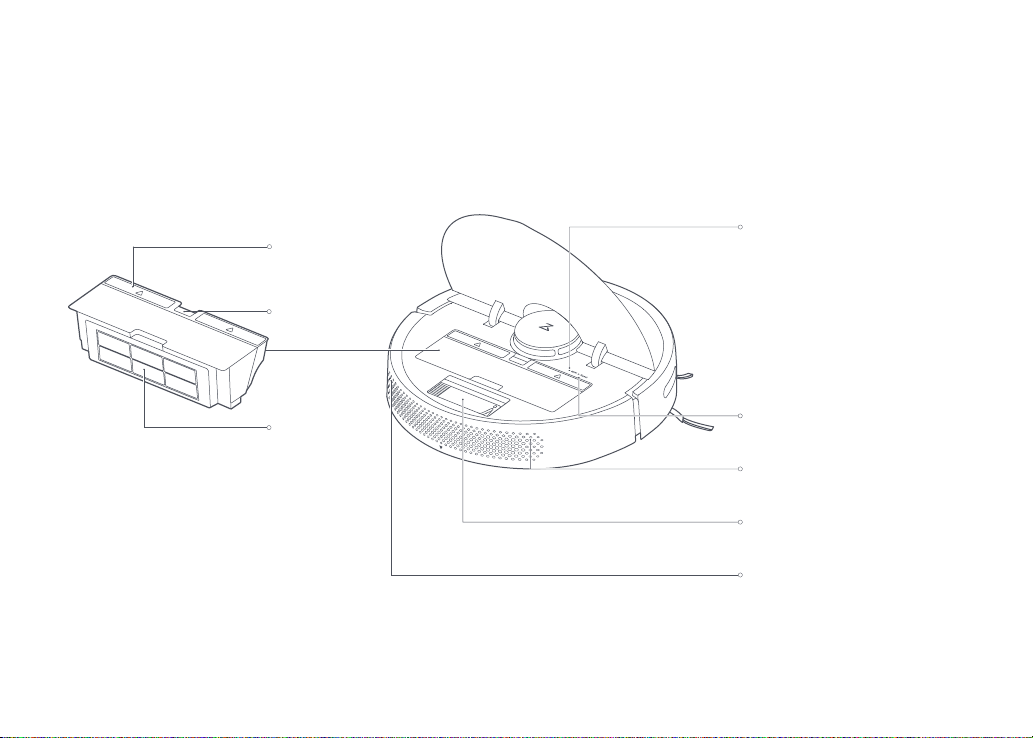
Product Introduction
Dustbin Robot
Cover latch
Dustbin latch
WiFi indicator light
• O: W iFi disabled
• Slow ashing: Waiting for
connection
• Fast ashing: Connecting
• Steady: WiFi connected
Air lter
System reset
Air vent
Main brush cleaning tool
Speaker
9
Page 10
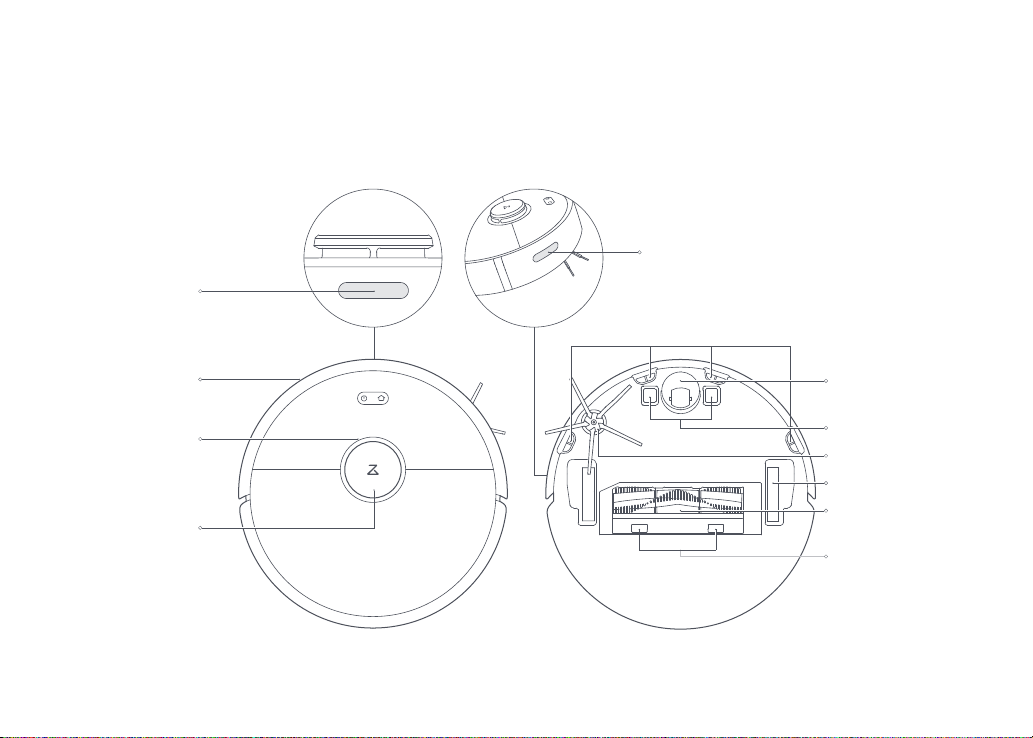
Product Introduction
Robot and sensors
Recharge sensor
Wall sensor
Cli sensor
Bumper
Laser distance
sensor
Vertical Bumper
Omnidirectional
wheel
Charging contact
Side brush
Main wheels
Main brush
Main brush
cover latch
10
Page 11
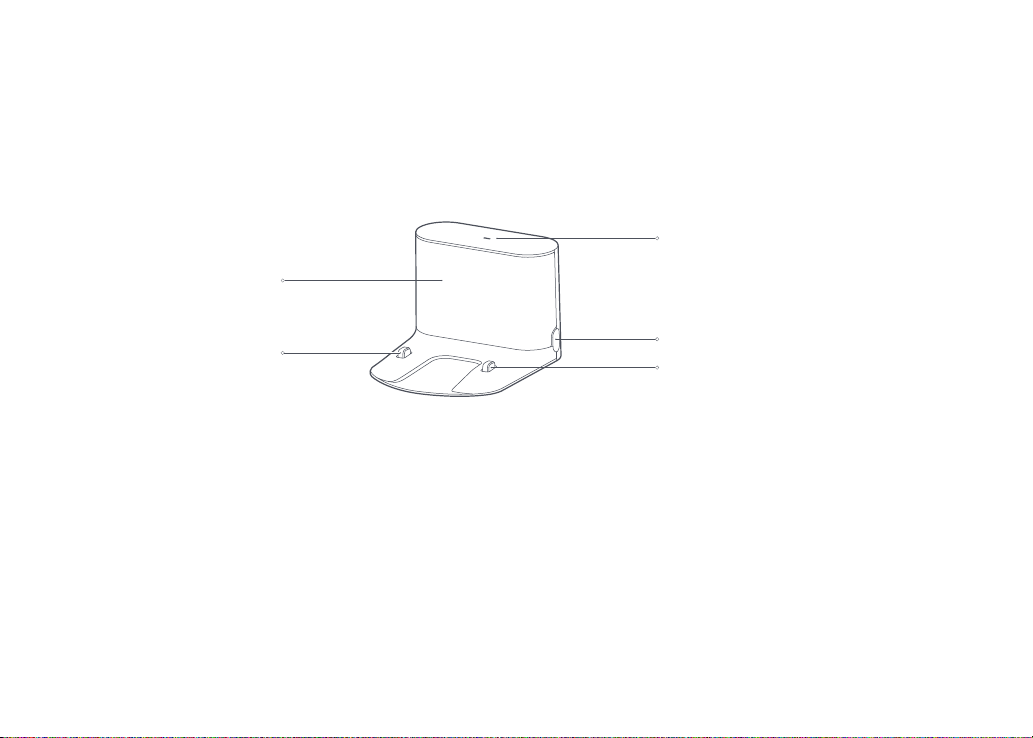
Product Introduction
Charging dock
Locator beacon
Charging dock power indicator
Charging contact
Power socket
Charging contact
11
Page 12
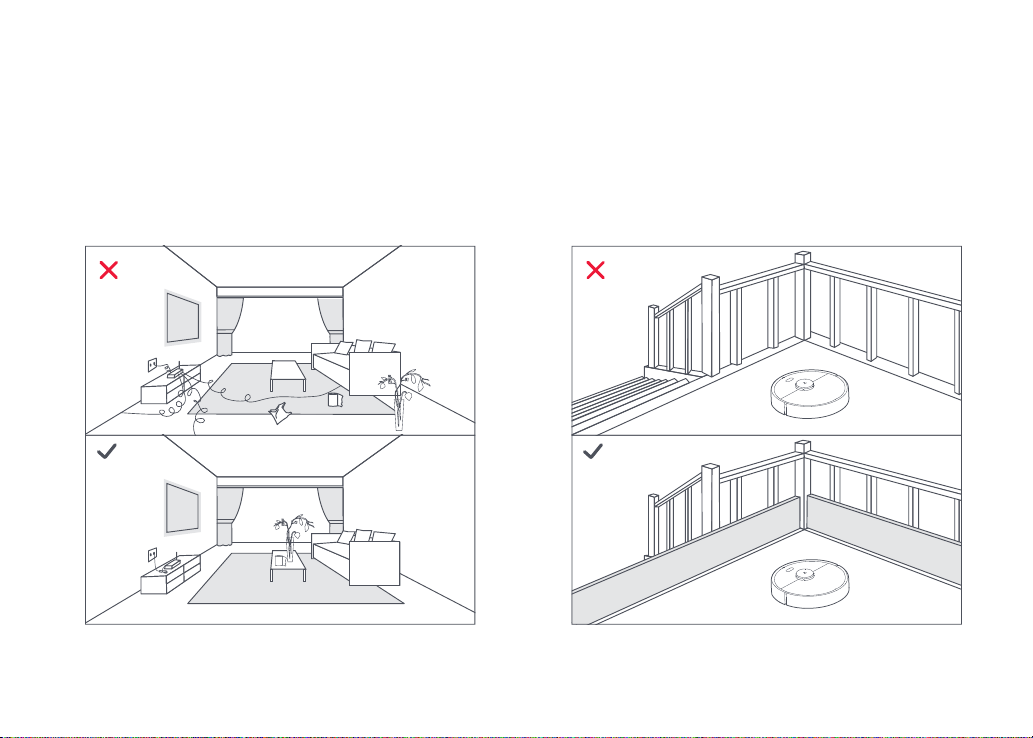
Installation
Important Information
Tidy c ables and loose items from the ground and move any
1. If using this robot in a raised area, always use a secure physical
unst able, fragile, precious, or dangerous items to prevent
personal injury or propert y damage due to items becoming
tangled in, s truck by, or knocked over by the robot.
Note:
When us ing the robot for t he rst time, fo llow it throug hout its whol e cleaning rout e and watch for maj or obstacle s. The robot wil l be able to clean by i tself in futu re uses.
2.
barrier to pre vent accidental falls that may result in personal
injur y or property damage.
12
Page 13
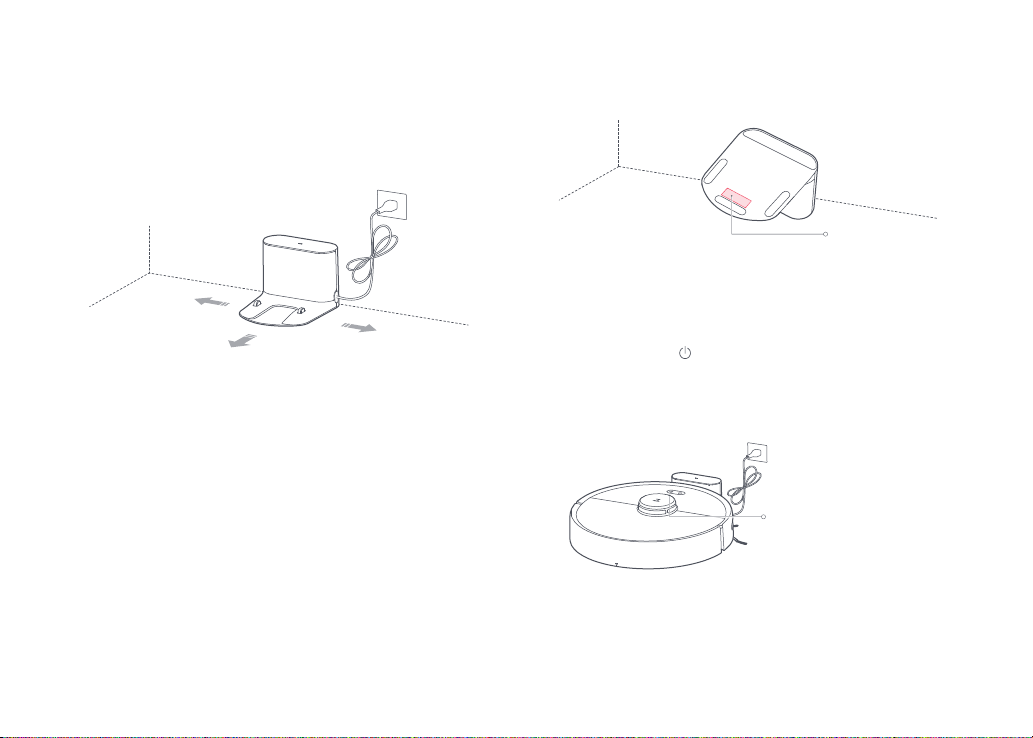
Installation
Using the robot
1. Place the charging dock against the wall on a at surface and
plug it in to the mains power.
More than 0.5m
(1.6f t)
More than 1.5m
(4.9f t)
Note:
• The cha rging dock shou ld have more tha n 0.5m (1.6ft) of cl earance on eac h side,
and more t han 1.5m (4.9f t) in the front .
• If the pow er cable is ver tical to the g round, it may be c aught by the rob ot, causing
the char ging dock to be di sconnecte d.
• The cha rging dock indi cator is on whe n the charging do ck is electr ied, and o
when th e robot is chargi ng.
2. Secure the charging dock with the adhesive tape. Wipe the oor
of the area where the charging dock will be placed with a dr y
cloth, then stick the enclosed double-side d tape to the oor.
Place the dock onto the double-side d tape to secure it in place.
More than 0.5m
(1.6f t)
Double-sided
Note:
• Use of th e double-si ded tape to sec ure the chargin g dock is option al.
• When ne cessary, re move the doubl e-sided ta pe slowly to red uce residue gl ue.
tape
3. Power on and charge.
Press and hold the
button to turn on the robot . When the
power indicator lights up, place t he robot onto the charging
dock to begin charging. The robot us es a high-performance
lithium-ion rechargeable ba ttery. To maintain peak bat ter y
performance, al ways ke ep the robot charged.
The color of the power
indicator indicates the
battery level
• White: Ba ttery level ≥ 20%
• Red: Batter y level < 20%
Note:
The rob ot will not turn o n when the bat tery is low. Pl ace the robot dir ectly onto t he
chargi ng dock to begin c harging.
13
Page 14
Installation
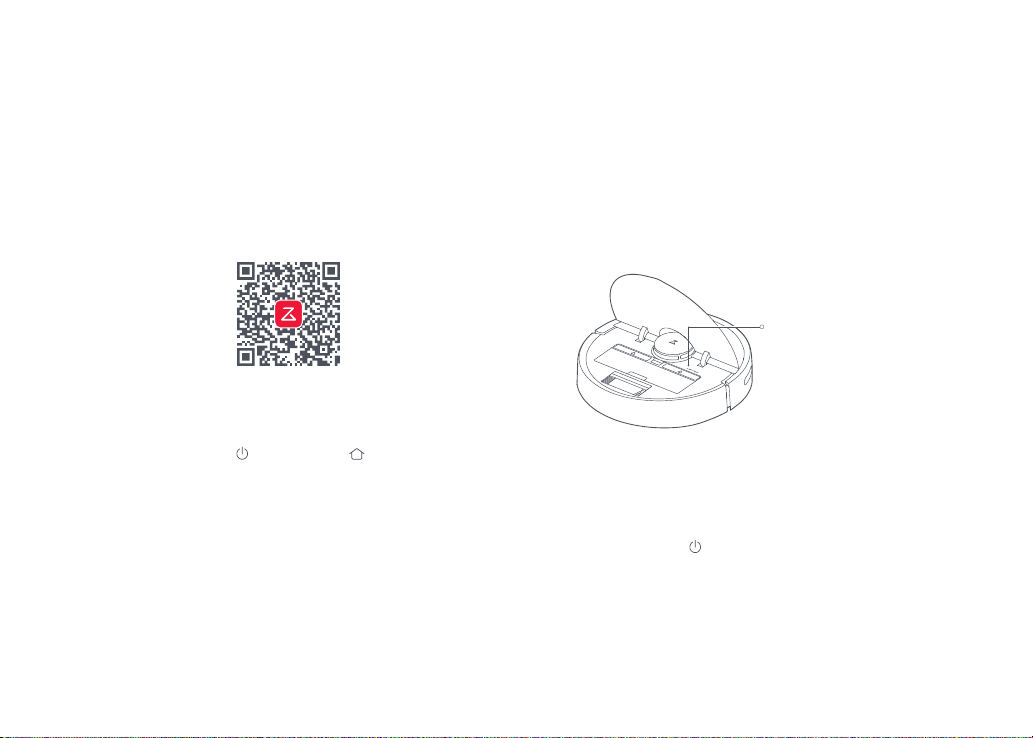
Connect to the app
4. Conne ct to the app. (recommended)
①
Download the Roboro ck app
Search "Roborock " in the A pp Store or Google Play, or scan
the QR code below, then download and install the app.
②
Reset WiFi
a. Open the top cover of the robot to reveal the W iFi indicator
light.
b. Press and hold the
you hear the "Reset ting WiFi" voice alert. When the WiFi
indicator light is ashing slowl y, the robot has entered
network conguration mode.
Note:
If you can not connect y our phone to the r obot, reset t he WiFi, and ad d your
robot as a n ew device.
button and the button until
③
Add device
Open the app and tap "+" in the top right corner, then follow
the ins tructions in-app. Once your robot has been added, it
will be found in a lis t on the homepage.
Note:
• Due to ong oing app devel opment, the a ctual proce ss may dier sl ightly from
the abo ve descripti on. Always f ollow the inst ructions g iven in the app.
• Only 2. 4GHz WiFi is s upported .
WiFi indicator light
• O: W iFi disabled
• Slow ashing: Waiting for
connection
• Fast ashing: Connecting
• Steady: WiFi connected
Using the robot
5. Start cleaning .
When the bat ter y is fully charged, the power indicator will
remain lit. Press the
button or use the app to start a cleanup.
14
Page 15
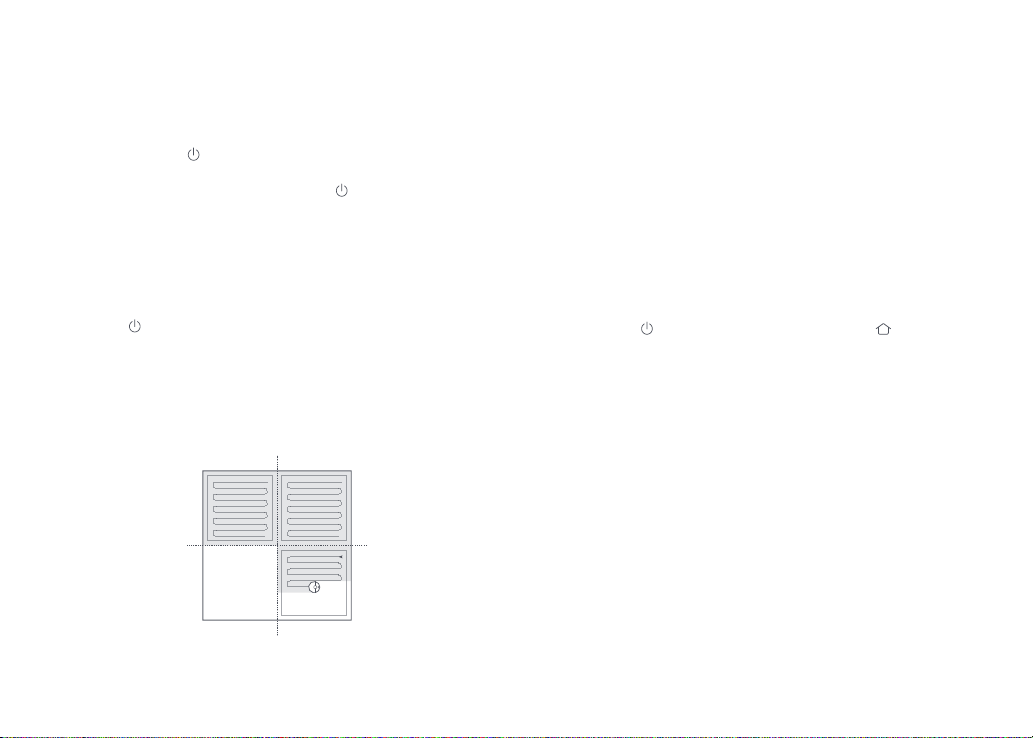
Instructions for use
On/off
Press and hold the
indicator will turn on and the robot will enter St andby mode. If the
robot is in Sleep mode, press and hold the
and end the current cleanup.
Note:
The rob ot cannot be tur ned o when it is c harging.
button to turn on the robot . The power
button to turn it o
Start cleanup
Press t he
will plan its cleaning route based on its scan of the area. It
cleans along the edges of a zone rst and then moves in a
Z-shaped cleaning rou te to cover the internal area eciently and
thoroughly.
button to star t cleaning. Once st arted, the robot
Zone 1 has
been cleaned.
Zone 4 is
pending.
Zone 2 has
been cleaned.
Zone 3 is b eing
cleaned.
Note:
• Cleani ng cannot st art if the bat tery leve l is too low. Allow t he robot to char ge before
restarting cleanup.
• Tidy aw ay any cables o n the ground (in cluding the po wer cable of the c harging
dock) b efore cleanin g to avoid losin g power or damagi ng either the r obot or the
connected device.
• If a clean up nishes wit hin 10 minutes, c leaning repea ts by default .
• If the ba ttery run s low before cle anup is complet e, the robot wi ll carry out a t op-up
charge b efore resumi ng cleanup fro m where it lef t o.
Pause
When the robot is cleaning, press any but ton to pause it.
Then press the
retur n it to the charging dock and stop the cleaning cycle.
Note:
Placin g a paused robot o n the charging d ock manually w ill end the curr ent cleanup.
button to continue cleaning or the button to
Sleep
If the robot is paused for over 10 -minutes, it will go to sleep, and
its power indicator will ash slowly. Press any button to wake it
back up.
Note:
• The rob ot will not go to sl eep when it is on t he charging doc k.
• The rob ot will automa tically shu t down if left i n sleep mode fo r more than 12 hours .
15
Page 16
Instructions for use
Charging
Auto: Af ter cleaning, the robot will automa tically return to the
charging dock to recharge.
Manual: In Pause mode, press the
back to the charging dock.
The power indicator will ash slowly as the robot charges.
Note:
If the cle aning cycle w as starte d away from the ch arging dock an d the robot could n ot
retur n to the dock af ter cleaning, i t will instea d return to its s tarting p oint. Place t he
robot di rectly on th e dock to rechar ge it.
button to send the robot
Error
If an error occurs while the robot is cleaning, the power indicator
will ash red quickl y, and you w ill hear a voice alert. See
"Troubleshooting" for res olution options.
Note:
• The rob ot will go to slee p automatic ally if left i n an Error stat e for over 10-mi nutes.
• Placin g the robot on the c harging dock i n an error stat e will stop the c urrent clean up.
Reset WiFi
If your phone cannot connect to the robot bec ause you have
changed your router conguration, forgot ten your pass word,
or any other reason, open the top cover to see the WiF i indic ator
light, then pre ss and hold the Spot Cleaning button and the
Recharge but ton unt il you hear the "Res etting WiFi" voice aler t.
When the WiFi indicator light ashes slowly, the robot has entere d
network conguration mode.
Note:
If the rob ot is left con necting to th e network fo r over an hour, its W iFi will be disa bled.
Reset W iFi before at tempting re connectio n.
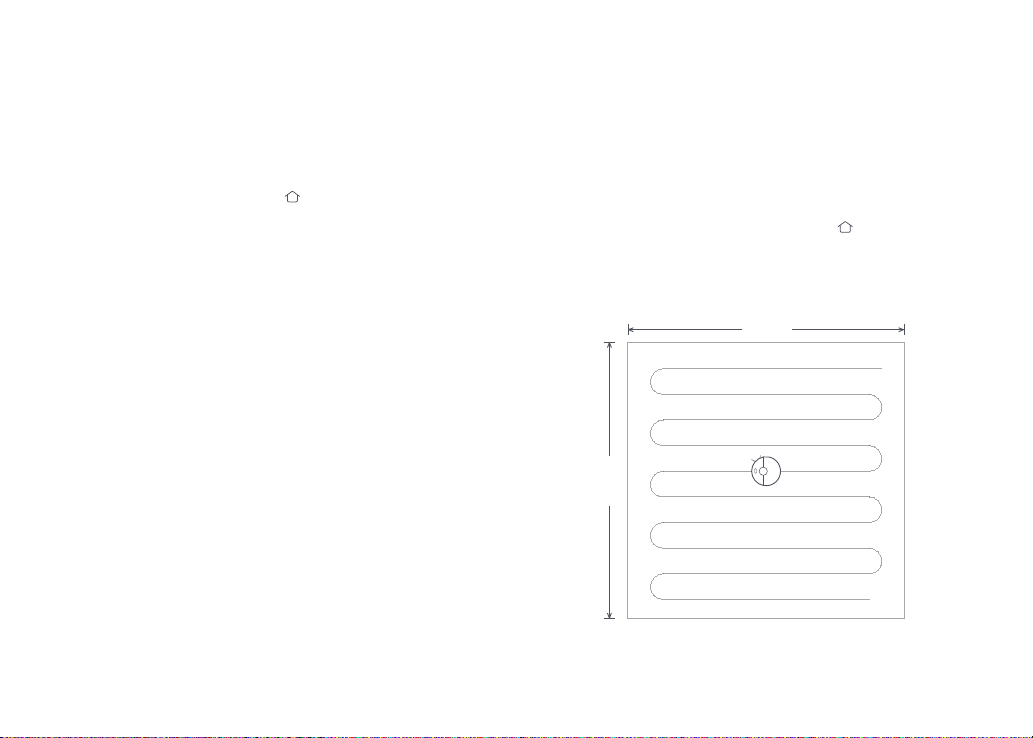
Spot Cleaning
In Standby or Pause mode, press and hold the
spot cleaning. This mode is used to clean a 1.5m x 1.5m square
area centered on the robot. A fter cleanup, the robot will return to
the center of the square.
1.5m
1.5m
Note:
Star ting spot clea ning in pause mo de will stop th e current clea ning cycle.
button to star t
16
Page 17
Instructions for use
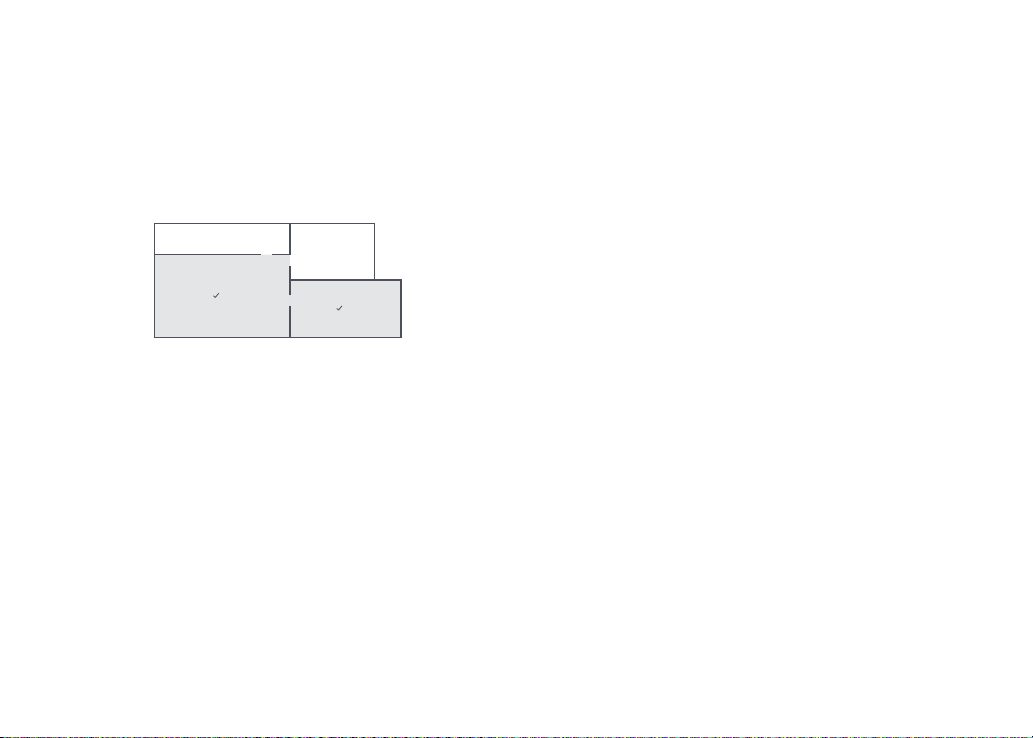
Selective Room Cleaning
Select spe cic rooms for cleaning in the app. In this mode, the
robot will onl y clean the selected rooms.
C
A
Note:
• A full map m ust be create d and Map Savin g mode switch ed on before th is function
can be us ed.
• Afte r cleaning st arts, the r obot may move be yond the dene d areas. Make sur e
there ar e no obstacl es preventin g the robot's a ccess to the ta rget rooms.
D
B
Scheduled Cleaning
Use the app to set st art times for scheduled cleanups.
The robot will re turn to the charging dock after each cleanup.
Zone Cleaning
Use the app to draw a specic zone for the robot to clean.
Note:
While cl eaning the des ignated zone, t he robot may mov e outside zone b orders.
Make sure t hat there are no c ables or obst acles placed c lose to the clea nup zone.
Pin n Go
Use the app to set a destination for the robot to go to.
Cleaning mode
Use the app to choose from Quiet, Balanced, Strong, or MAX
modes . The Balanced mode is the default.
Do Not Disturb (DND) mode
In DND mode, no cleanups will s tar t, no voice alert s will play, and
the power indicator will dim. DND Mode is set from 22:0 0 to 08:00
by default and can be disabled or modied in the app.
17
Page 18
Instructions for use
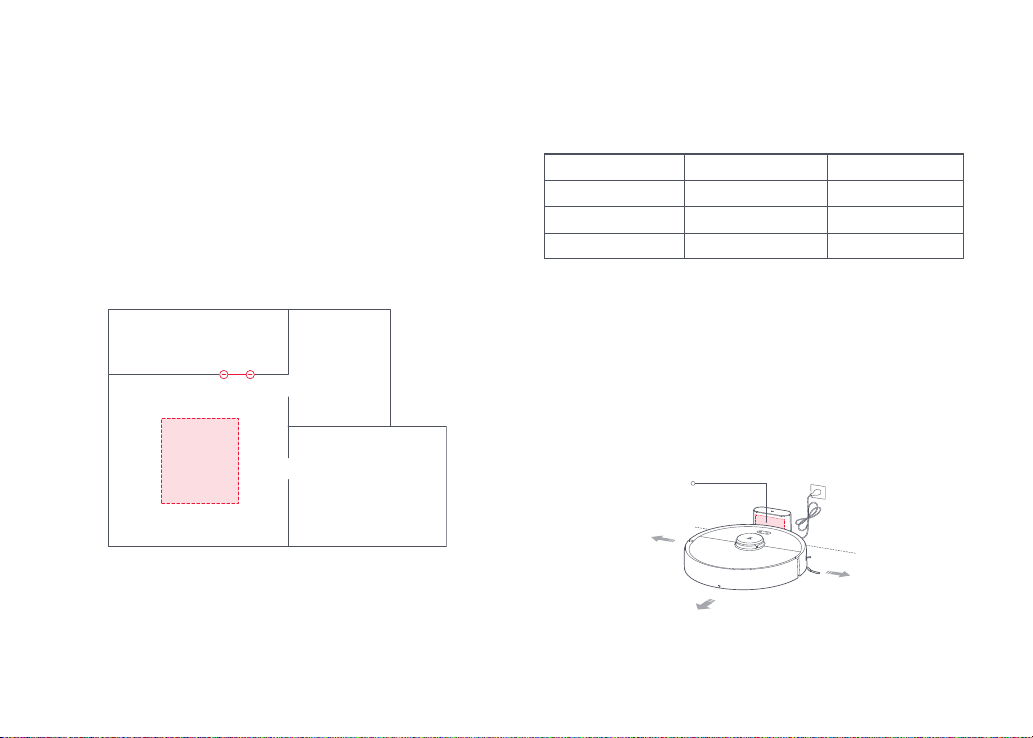
Virtual No-go Zone and Invisible Wall
The app can be us ed to draw Vir tual No- go Zone and Invisible Wall
to keep the robot from entering the areas you dene.
Note:
• "Map Sa ving Mode" mus t be turned on i n the app to use vir tual No- go Zone.
• Virt ual No-go Zo ne and Invisib le Wall should on ly be used to cus tomize the cle aning
area. T hey should not b e used to isolat e hazards.
• Movin g the robot manua lly or making s ignifcant ch anges to the hom e environmen t
may cau se the loss of vi rtual No- go Zone and Invi sible Wall.
Invisible Wall
No-go Zone
More app functions
Real- time map updat es
Change c leaning mode
View cl eaning histo ry
Change robot voice
Note:
Funct ions and deta ils of the app may v ary slightl y due to continu ous app develo pment
and upgr ades.
Carpe t Boost
Part replacement
schedule
Remote c ontrol
View ro bot status
Robot location
Do Not Di sturb (DND)
Firmware update
Charging Dock
The charging dock should be plugged in and placed against a wall
on level ground, with more than 0. 5m (1.6ft) of clearance on each
side, and more than 1.5m (4.9ft) in front. For the best experience
when using the mobile app, place the charging dock in an area
with strong WiFi coverage.
Locator beacon
More than
0.5m (1.6ft)
More than
1.5m (4.9 ft)
Note:
Do not plac e the char ging dock i n direc t sunligh t or block th e locato r beaco n;
other wise, the robo t may not be able t o return to t he chargi ng dock.
18
More than
0.5m (1.6ft)
mode
Page 19
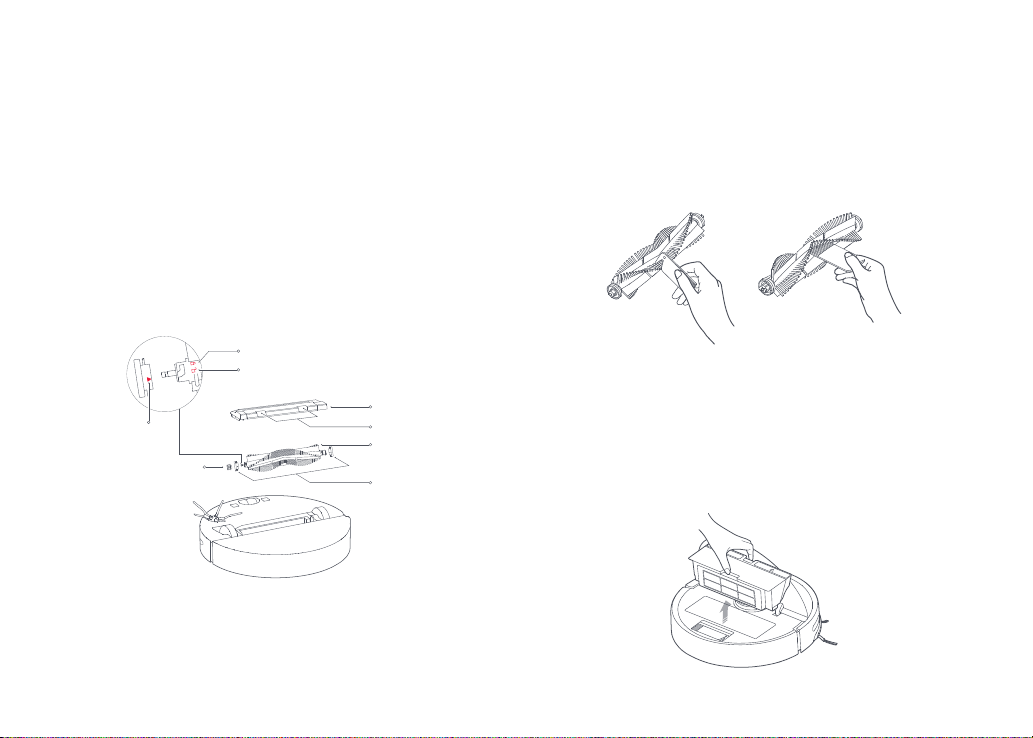
Routine maintenance
Main brush
*Clean weekly
1. Turn the robot over then unlatch and remove the main brush
co ver.
2. Take out the main brush, remove and clean i ts bearings.
3. Remove the main brush cap, rotating in the unlock direction.
4. Use the supplied main brush cleaning tool to remove any
entangled hair.
5. Re-ins tall the c ap and bearings f ollowing t he lock direction.
6. Re-insert the main brush and secure the brush cover.
Lock direction
Unlock direction
Main brush cover
Alignment mark
Main brush bearing
Note:
Main br ush repla cement eve ry 6-12 mont hs is recom mended.
Latch
Main brush
Main brush cap
Using the main brush cleaning tool
Use the main brush cleaning tool to remove any hair entangled
around the main brush.
Note:
If ther e is a large amount of hair, or hair i s tightly entangle d, remove i t careful ly to
avoid d amage to th e main bru sh.
Dustbin and lter
*Weekly cleaning is recommended
1. Open the top cover of the robot, squeeze the dustbin latch, and
remove the dustbin.
19
Page 20
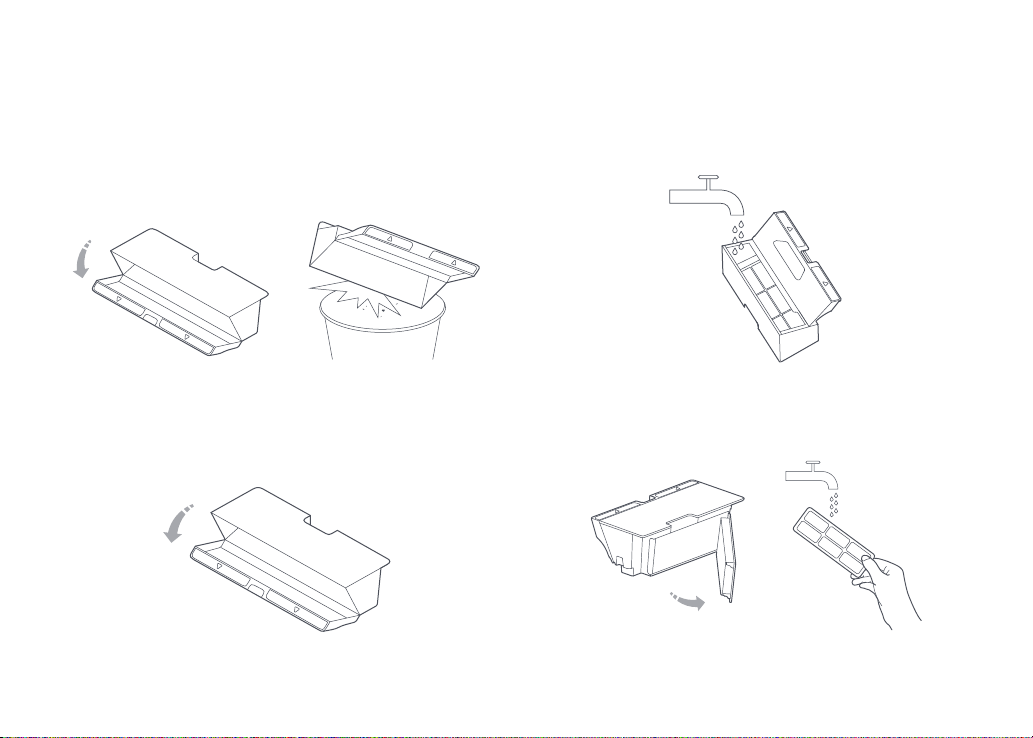
Routine maintenance
Dustbin and lter
*Weekly cleaning is recommended
2. Open the dust bin lid as indicated by the ar row and pour out the
contents.
Clean the washable lter
*Clean every two weeks
1. Open t he dust bin lid as indicated by the arrow and pour out the
contents.
2. Fill the dust bin with clean water and close the cover. Gently
shake the dus t bin, then pour out the dir ty water.
Note:
To preven t blockag e, only use fresh wat er withou t cleaning liquid.
3. Remove the lter and clean it wi th water.
Note:
To avoid d amage, do n ot touch th e surface of the lt er with ha nds, brus hes, or sha rp
objects.
20
Page 21
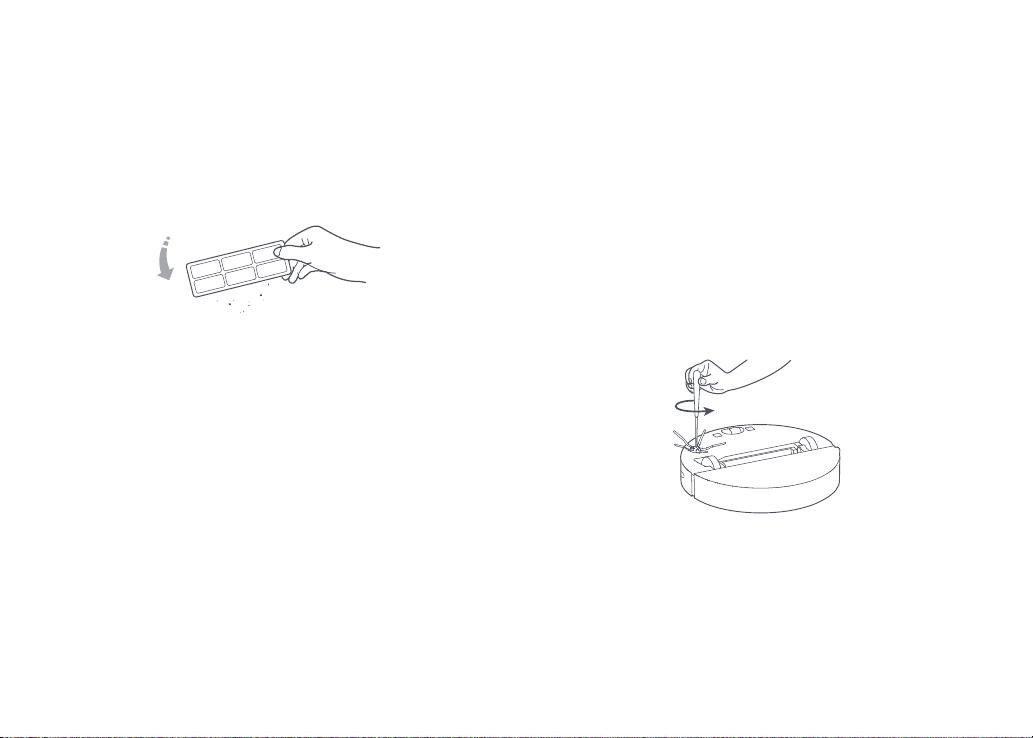
Routine maintenance
Clean the washable lter
*Clean every two weeks
4. Rinse repeate dly and tap the lter frame to remove as much dirt
as possible.
5. Leave the lter to dr y before reinst alling it.
Note:
Allow the lter t o dry tho roughly be fore use. 24-hour s of dry ing is reco mmended.
Alter nating be tween t wo lters is recomme nded.
Battery
The robot is equipped w ith a high-per formance lithium-ion
rechargeable batter y pack. To maintain bat tery per formance,
keep the robot charged.
Note:
If the r obot is to b e left un used for a n extende d period, turn it o before st orage and
charge it at leas t once ever y three m onths to av oid batt ery damag e resultin g from
over-discharging.
Charging dock
*Monthly cleaning recommended
Use a soft dry cloth to clean the charging contacts of the charging
dock.
Side brush
*Monthly cleaning recommended
1. Turn the robot over and remove the scre w holding the side brush.
2. Remove and clean the side brush.
3. Reinstall the side brush and tighten the s crew.
Note:
Side br ush repla cement eve ry 3-6 months is r ecommende d to maint ain cleanin g
quality.
21
Page 22
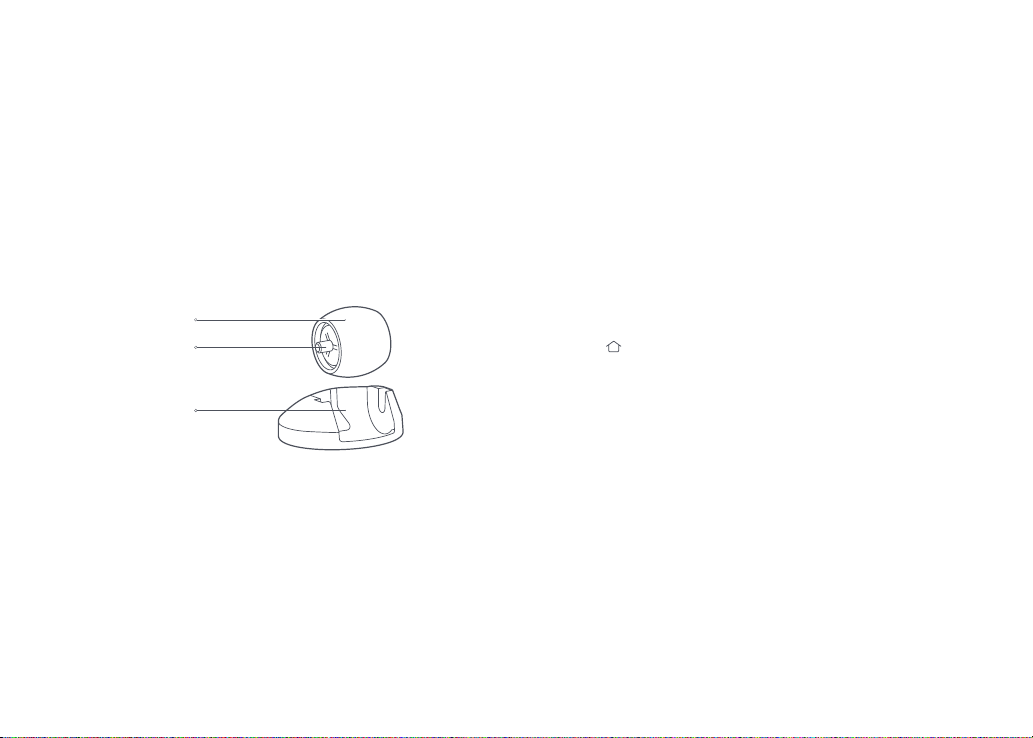
Routine maintenance
Omnidirectional wheel
*Clean as required
1. Turn the robot over.
2. Use a small screwdriver to pry out the axle and remove the
wheel.
3. Rinse the axle and the wheel with water to remove any hair and
dirt.
4. Dr y and reinstall the wheel, then press it back in place.
Wheel
Axle
Bracket
Note:
The om nidirecti onal wheel bracket ca nnot be remo ved.
System Reset
If the robot doe s not respond w hen you press a button or the
robot c annot be shut down, press the Reset but ton. T he robot will
then restart.
Note:
Afte r a system res et, cleanin g schedules , WiFi and othe r settings w ill be restore d to
factory settings.
Restore factory settings
If the robot is not functioning af ter a system reset, tur n it on, then
press the
until you hear the "St art restoring initial version" voice alert. The
robot w ill then be res tored to fac tor y set tings.
22
button, and then press and hold the Reset but ton
Page 23
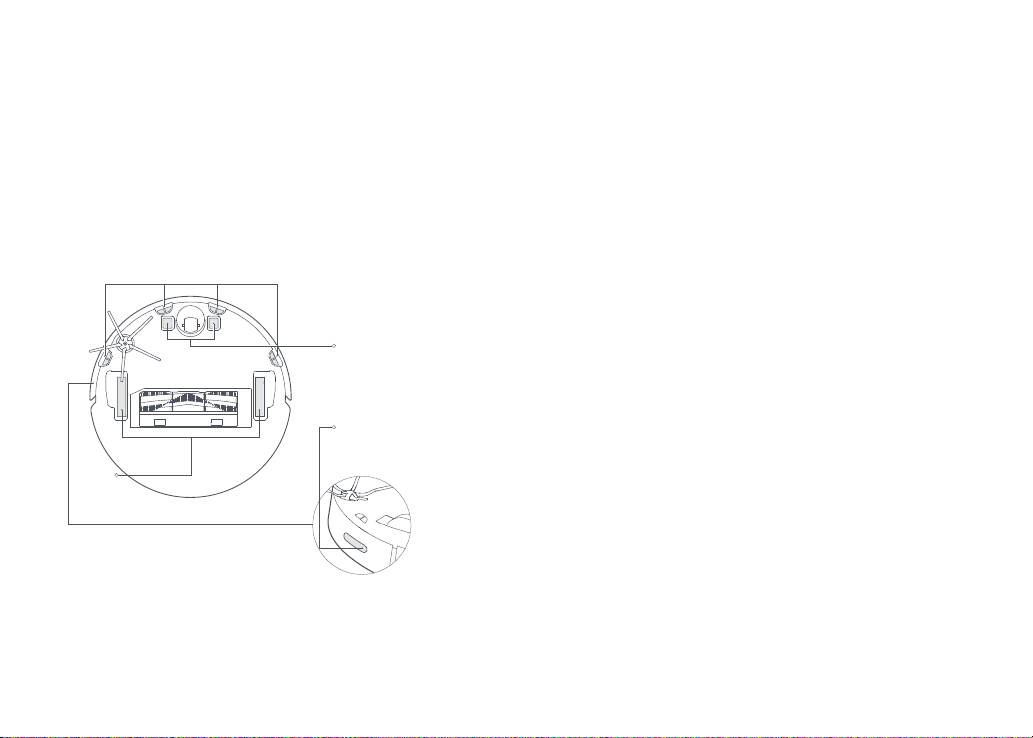
Routine maintenance
Robot sensors
*Clean monthly
Use a soft dry cloth to wipe and clean all sensors, including:
1. Four cli sensor s at the bot tom of the robot.
2. The wall s ensor on the right of the robot.
3. The charging contac t on the bot tom of the robot.
4. Robot vac uum main whe el.
Cli sensor
Charging contact
Wall sensor
main
wheel
Firmware update
Update the robot using the app. Place the robot on the charging
dock and ensure that the battery level is higher than 20% before
updating. The power indica tor will ash white quickly during a
rmware update.
23
Page 24
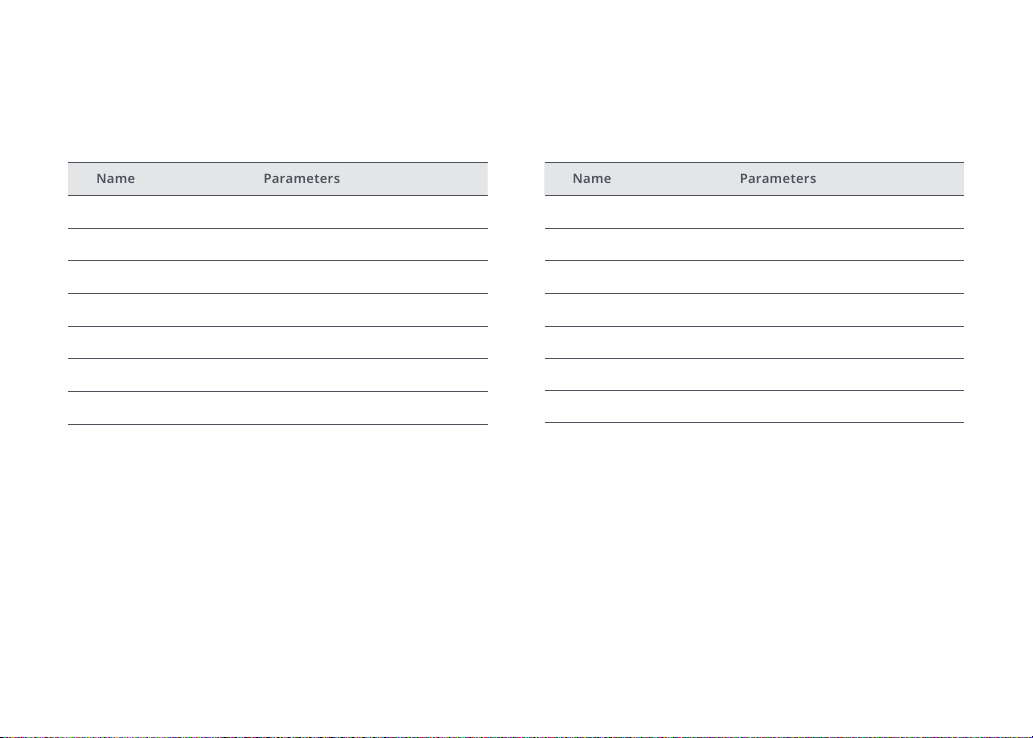
Basic parameters
Robot
Name NameParameters Parameters
Model Modelroborock S4 Max CDZ11RR or CDZ12RR
Dimensions Dimensions350 x 350 x 96. 5mm 151 x 130 x 98mm
Battery Rated power14.4V/5200mAh lithium battery 28W
Weight Rated inputApprox. 3.3 kg 100-24 0VAC
Wireless connection Rated output
Rated input 20VDC 1.2A
Charging time <6h
Note:
The seri al number is on a st icker on the und ersid e of the robot .
WiFi Smart Connect 20VDC 1.2A
Charging dock
Rated frequency
Charging Bat ter y
24
50-60Hz
14.4V/5200mAh lithium battery
Page 25
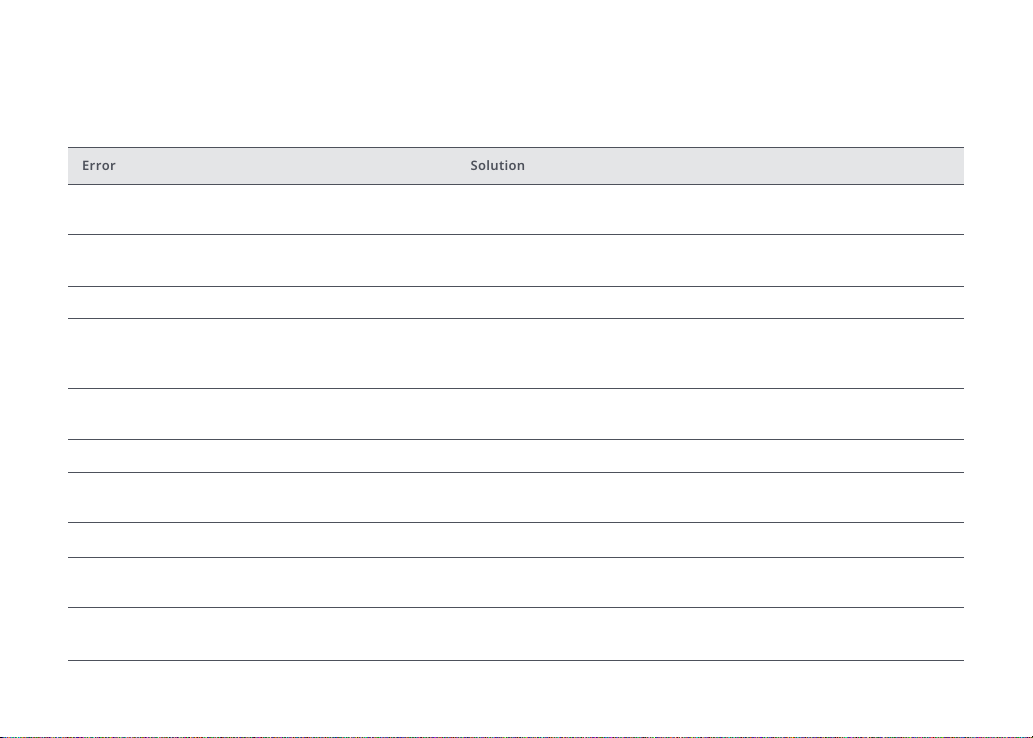
Troubleshooting
If an err or occurs dur ing th e clean up, the p ower indicator will ash red quickly, and a voice aler t will p lay. Ref er to the table below for res olut ion options .
Error Solution
Error 1: Rot ate the laser head to check that it turns
fre ely.
Error 2: Clean and lightly tap the bumper.
Error 3: Move the robot to a new location and restart . A wheel is suspended. Move the robot to a new location and rest art i t.
Error 4: Wipe the cli sensors, move the robot away
from raised edges, and res tar t.
Error 5: Remove t he main brush and clean the
brush and bearing.
Error 6: Remove and clean the side brush. The side brush may be tangled up. Remove and clean it.
Error 7: Look for anything s tuck in the main wheels
then move the robot to a new location and res tar t.
Error 8: Clear away any obstacles around the robot. The robot may be stuck. Clear any obsta cles around it.
Error 9: Inst all the dustbin and lter.
Error 10: M ake sure that the lter i s dry or clean t he lter.
The LDS unit is jammed. Remove any items blocking it then move the
robot to a new location and restart.
The bumper is s tuck . Tap the bumper repeatedly to dislodge any jammed
items . If nothing falls out , move the robot to a new location and rest art.
The robot is suspended. Move it to a new loca tion and restar t. If the problem
persists, clean the cli sensors. This error may also be caused by a dir ty cli
sensor. Try wiping all sensors clean.
The main brush may be tangled up. Remove and clean it .
The main wheels may be jammed . Remove and clean them.
Reins tall the dus tbin and lter and check that they are correctly ins talled. If
the problem persists, try replacing the lter.
The lter is not completely dry. Dry the lter for at least 24 hours . The lter may
also be blocked and require cleaning. If the problem persist s, replace the lter.
25
Page 26
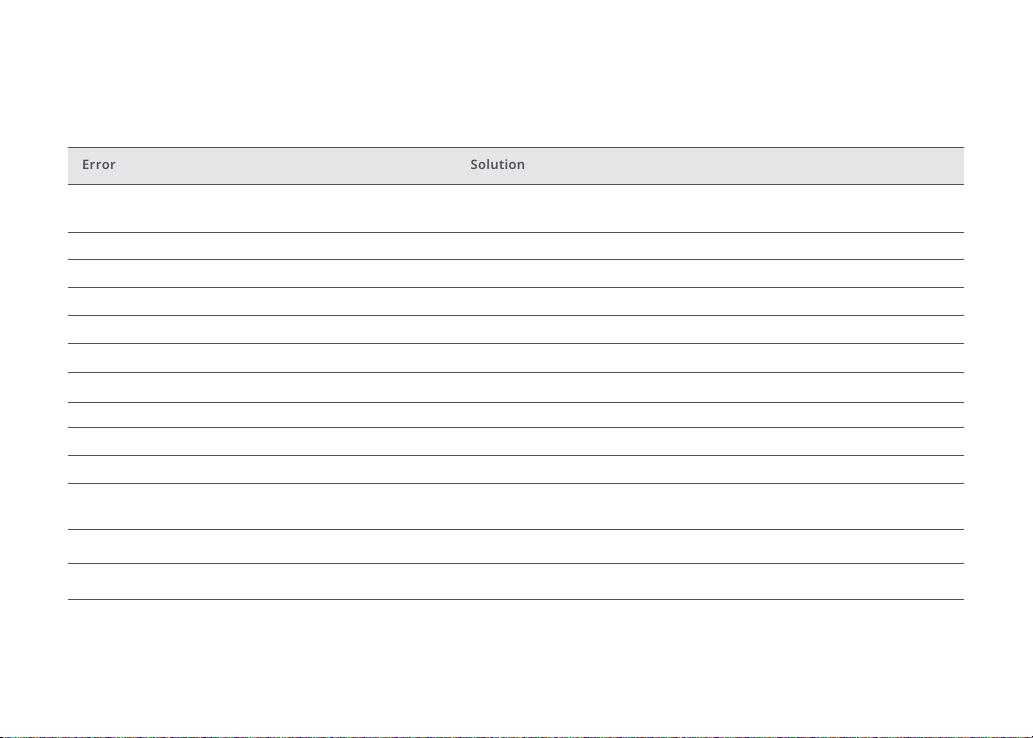
Troubleshooting
If an err or occurs dur ing th e clean up, the p ower indicator will ash red quickly, and a voice aler t will p lay. Ref er to the table below for res olut ion options .
Error Solution
Error 11: High- intensit y magnetic eld detected. The robot is too close to magne tic tape and c annot start. Move it to a new
Error 12: Battery level is too low. Recharge before use. Low bat tery. Recharge before use.
Error 13: Charging error. Clean the charging cont act area. Use a dr y cloth to cle an the chargin g contact s on the robot a nd on the charg ing dock.
Error 14: Battery error. The battery tempera ture is eithe r too high or too lo w. Wait until it re turns to normal.
Error 16: Robot is tilted. Place it on at ground and restar t. The robot is tilted. Move it to at ground and rest art.
Error 17: Side brush module error. Reset the sys tem. The side brush module is exp eriencing a fault. Reset the system.
Error 18: Vacuum fan error. Reset the sys tem. The vacuum fan is experiencing a fault. Reset the sy stem.
Error 21: Ver tical bumper pressed. Release it and retr y. The vertical bumper has been pressed. Relocate the robot and re try.
Error 24: Vir tual no-go zone or wall detected.Move the
robot to a new location and restart.
Error 26: Wipe the wall sensor.
Internal error. Reset t he sy stem. *
Note: A s ystem rese t may not resolv e all problems .
*
If the problem persists after using the recommendations in the table above, pleas e email our af ter-sales service team:
US/Non-Europe Support: [email protected] Europe Support: [email protected]
location and restart.
The recharge sensor is blocked by dust. W ipe the dust o.Error 2 2: Wipe the recharge sensor.
The charging dock is jammed. Clear it and retry.Error 2 3: Clean the charging dock locator beacon.
Move the robot away from the virtual no-go zone or barrier and res tar t.
The wall sensor is dir ty. Wipe it clean.
Malfunction due to an internal error. Reset the s ystem.
26
Page 27
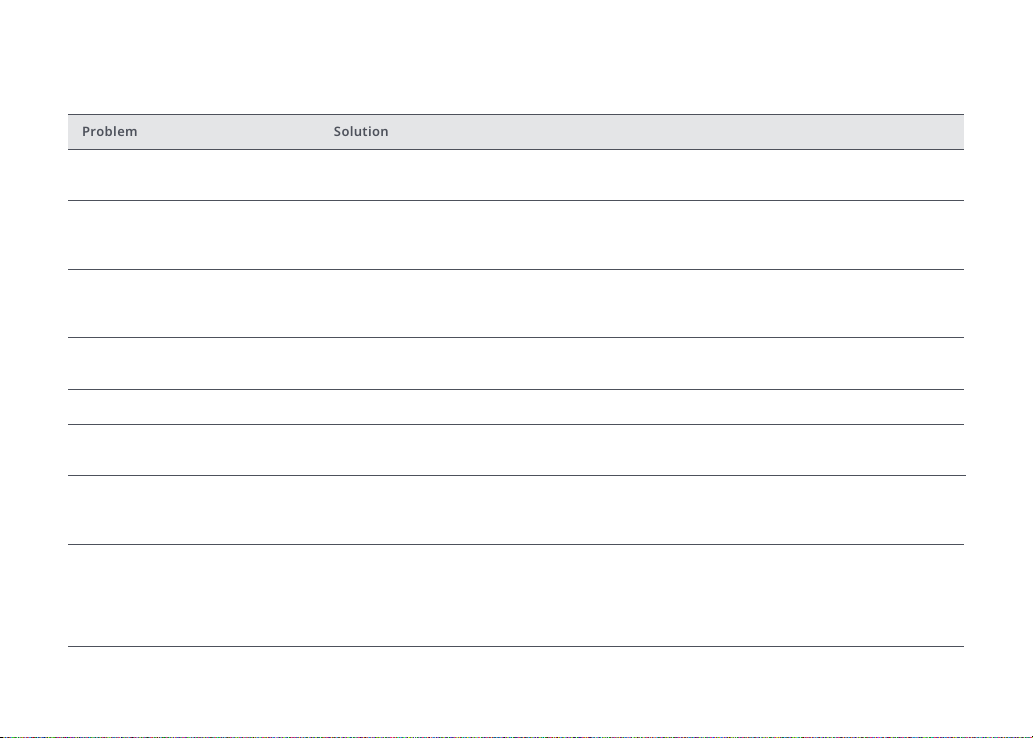
FAQs
Problem Solution
Unable to powe r on
Unable to charge
Slow charging
Unable to return to do ck
Abnormal behavior Rest art the rob ot.
Noise d uring cleaning
Poor cleaning per formance and/or
leaki ng dus t
Unable to connect to WiFi
The battery le vel is lo w. Put th e robot on the ch argin g dock and charge it be fore use.
The battery tempera ture is too low o r too hig h. Onl y use th e robot with in the ra nge of 4 -40°C ( 39-104°F).
If the charging dock is not receivi ng power, check that bot h ends of the power cable are proper ly connected.
If cont act is poor, clean the co ntact areas of the c harging dock and the r obot.
Power is restored when the power indicator light tur ns on.
When used at high or low tempe ratures, the robo t will automa tica lly re duce its charging speed to exte nd
battery life.
Charging contac ts may be dir ty. Clean the m with a dry cloth.
There are too many obs tacles near the charging dock . Move it to an ope n area.
The robot is to o far from the ch argin g dock . Place it clos er and retr y.
The mai n brus h, side b rush , or main w heel s may jam med. Turn o the ro bot and clean t hem.
If the omnidirectional w heel i s jamme d, use a s crewdriver to rem ove it for clea ning.
The Dustbi n is full and nee ds emptying.
The Filter is blocke d and ne eds cleaning.
The mai n brus h is dir ty. Cl ean it and retry.
WiFi i s disabled. R eset t he WiFi and try again.
WiFi signal is poor. Make sure tha t the robot is in an area with good WiF i signal recep tion .
Abnormal WiFi connec tion. Reset the WiFi, download the la test mobil e app and r etr y.
The current d evice is not suppor ted. You can nd supported model s insid e the app.
Unable to connect to WiFi. There may be an e rror w ith yo ur router settin gs. Contac t Roborock cu stom er
ser vice for help w ith troubl eshooting .
27
Page 28
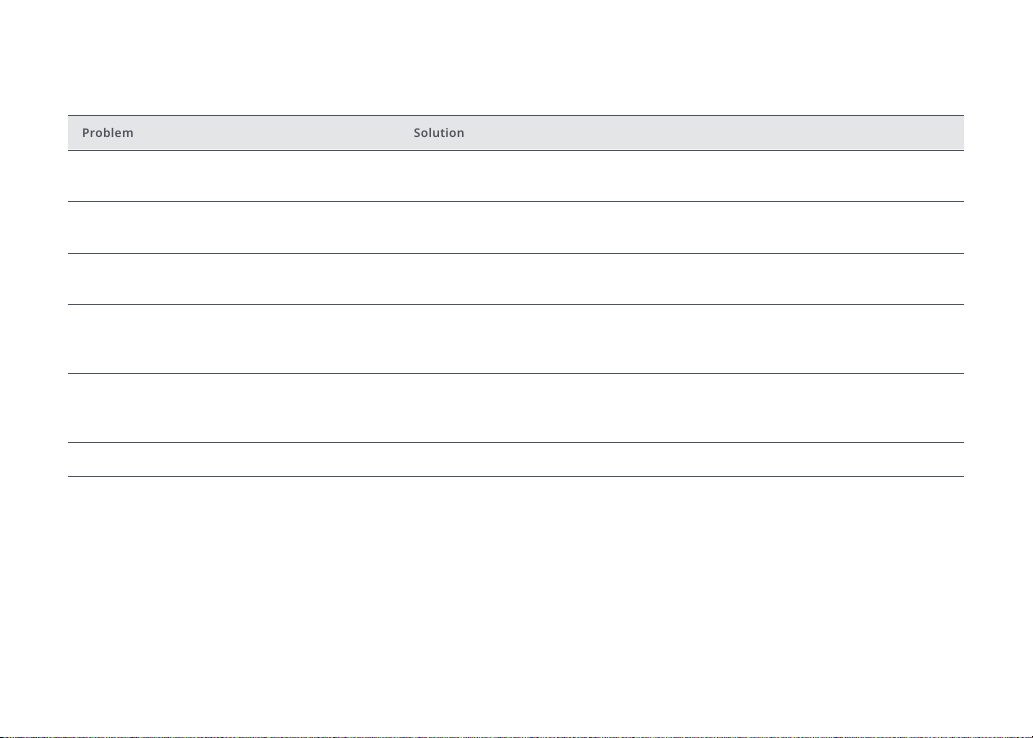
FAQs
Problem Solution
Scheduled c leani ng is not working
Is power always being drawn when the
robot i s on the charging dock ?
Does the robo t need to be char ged for at
least 16 hours t he rs t three times i t is use d?
Cleaning doe s not re sume af ter recharging
The robot cannot return to the cha rging d ock
after spot c leani ng or wh en it has been moved
manually.
The robot has b egun to m iss certain spots The wall sens or or cli sensors may be dir ty. Clean them with a soft dry c loth.
The battery le vel is to o low. Sc heduled cle aning c an onl y begi n when t he bat tery level is
above 2 0%.
The robot wil l draw power wh ile it is docked to maintain battery p erf ormance, but power
consumptio n is ex tremely low.
No. The r obot c an be used any time af ter it h as been fully charg ed once.
Make sure that the robo t is not in D ND mode. DND mo de will preve nt cleanup. When cle aning a
space requir ing a top-up charge, if the robot w as placed manually o n the Charging Dock before i t
is recharged automatic ally, it will no t be able to continue cl eanup.
After spot c leaning or a signic ant po siti on chan ge, the robot w ill regenerate th e map. If the
charging doc k is too far away, it may not be able to r etur n for recharging and must be p laced
on the ch arger manual ly.
28
Page 29
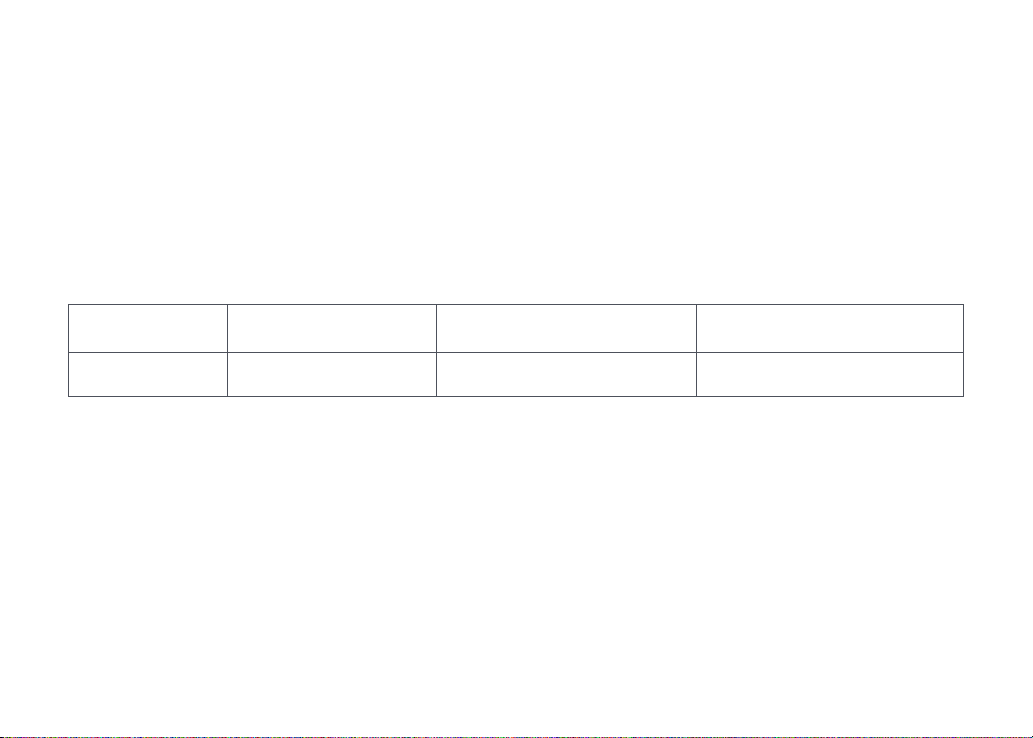
EU Declaration of Conformity
We Beijing Roborock Technology Co., Ltd., hereby, declares that this equipment is in compliance
with the applicable Directives and European Norms, and amendments. The full text of the EU
declaration of conformity is available at the following internet address:
https://global.roborock.com/pages/compliance
WiFi Sepcication
Service Protocol Frequency Range Max. Output Power
WiFi 802.11b/g/n 2400-2483.5 MHz
20dBm
≤
Laser Safety
The laser distance sensor of this product meets the standards for Class 1 Laser Products in IEC
60825-1:2014 and will not generate hazardous laser radiation.
29
Page 30

WEEE Information
Correct Disposal of this product . This marking indicates that this product should not be disposed
with other household wastes throughout the EU. To prevent possible harm to the environment or
human health from uncontrolled waste disposal, recycle it responsibly to promote the sustainable
reuse of material resources. To return your used device, please use the return and collection
systems or contact the retailer where the product was purchased. They can take this product for
environmental safe recycling.
Korrekte Entsorgung dieses Produkts Innerhalb der EU weist dieses Symbol darauf hin, dass
dieses Produkt nicht über den Hausmüll entsorgt werden darf. Altgeräte enthalten wertvolle
recyclingfähige Materialien, die einer Wiederverwertung zugeführt werden sollten und um
der Umwelt bzw. der menschlichen Gesundheit nicht durch unkontrollierte Müllbeseitigung zu
schaden. Bitte entsorgen Sie Altgeräte deshalb über geeignete Sammelsysteme oder senden Sie
das Gerät zur Entsorgung an die Stelle, bei der Sie es gekauft haben. Diese wird dann das Gerät der
stoichen Verwertung zuführen.
30
Page 31

Warranty Information
The warranty period depends on the laws of the country in which the product is sold, and the
warranty is the responsibility of the seller.
The warranty only covers defects in material or workmanship.
The repairs under warranty may only be carried out by an authorized service centre. When making
a claim under the warranty, the original bill of purchase (with purchase date) must be submitted.
The warranty will not apply in cases of:
Normal wear and tear
Incorrect use, e.g. overloading of the appliance, use of non-approved accessories Use of force,
damage caused by external inuences Damage caused by non-observance of the user manual,
e.g. connection to an unsuitable mains supply or non-compliance with the installation instructions
Partially or completely dismantled appliances.
31
 Loading...