

Orbit User Manual
Orbit
User Manual
V1.0
Model ORBTX2

2
Contents
Package Contents 4
Video Tutorial 4
Drone 5
Drone Introduction 6
Flight mode 6
Flight Status indicator 6
Propellers 6
Battery 7
Tracker 10
Tracker overview 11
Introduction 11
On/Off Switch 11
Indictor 11
Charging 12
Using the Tracker 13
Skye+ App 14
Download the Skye+ App 15
App Main Screen 15
Play 16
Buttons/Icons 17

3
Connecting Skye+ App with the Drone via Wi-Fi 21
Gallery 21
Social Community 24
Me 24
Firmware Upgrade 24
Powering off the Drone 24
Flight 25
Flight Restrictions & No-fly zones 26
Fight Environment Requirements 26
Preflight Preparations 26
Powering On/Off 27
Connecting to Mobile Devices 27
Digital Compass Calibration 27
One-click Takeoff/Landing 29
Flight by Skye+ app 30
Auto-follow Mode 31
Photography/Video Recording 32
One-click Return 32
Auto Hovering 32
Smart Low Battery Landing 33
Failsafe Hovering 33
Flight by Remote Controller(Optional) 33

4
FAQ 34
Appendix 41
FCC Compliance 42
IC Compliance 43
Safety Warnings 43
WEEE Directive 44
5
In the Box
1. Orbit Drone x1
2. Tracker(including strap) x1
3. Propeller Pair x4
4. Intelligent Flight Battery x1
5. Battery Charger x1
6. Power Cabel Set (incluiding a micro USB cable) x2
7. 《Orbit User Manual》
8. 《Skye Orbit Disclaimer and Operation Guidance》
9. 《Orbit Quick Start Guide》
10. 《Orbit Intelligent flight Battery Safety Guidelines》
Before you fly, please read 《Orbit User Manual》 、《 Skye Orbit Disclaimer
and Operation Guidance》 、《 Orbit Quick Start Guide》 and《Orbit
Intelligent flight Battery Safety Guidelines 》 for detailed product
information and operation guidelines.
Video Tutorials
Please watch the tutorial videos by scanning the QR code below, which
demonstrates how to use Orbit safely:

6
Drone
This chapter introduces the main
functionalities and features of the
drone together with propeller
installation and intelligent battery
operation guidelines.
7
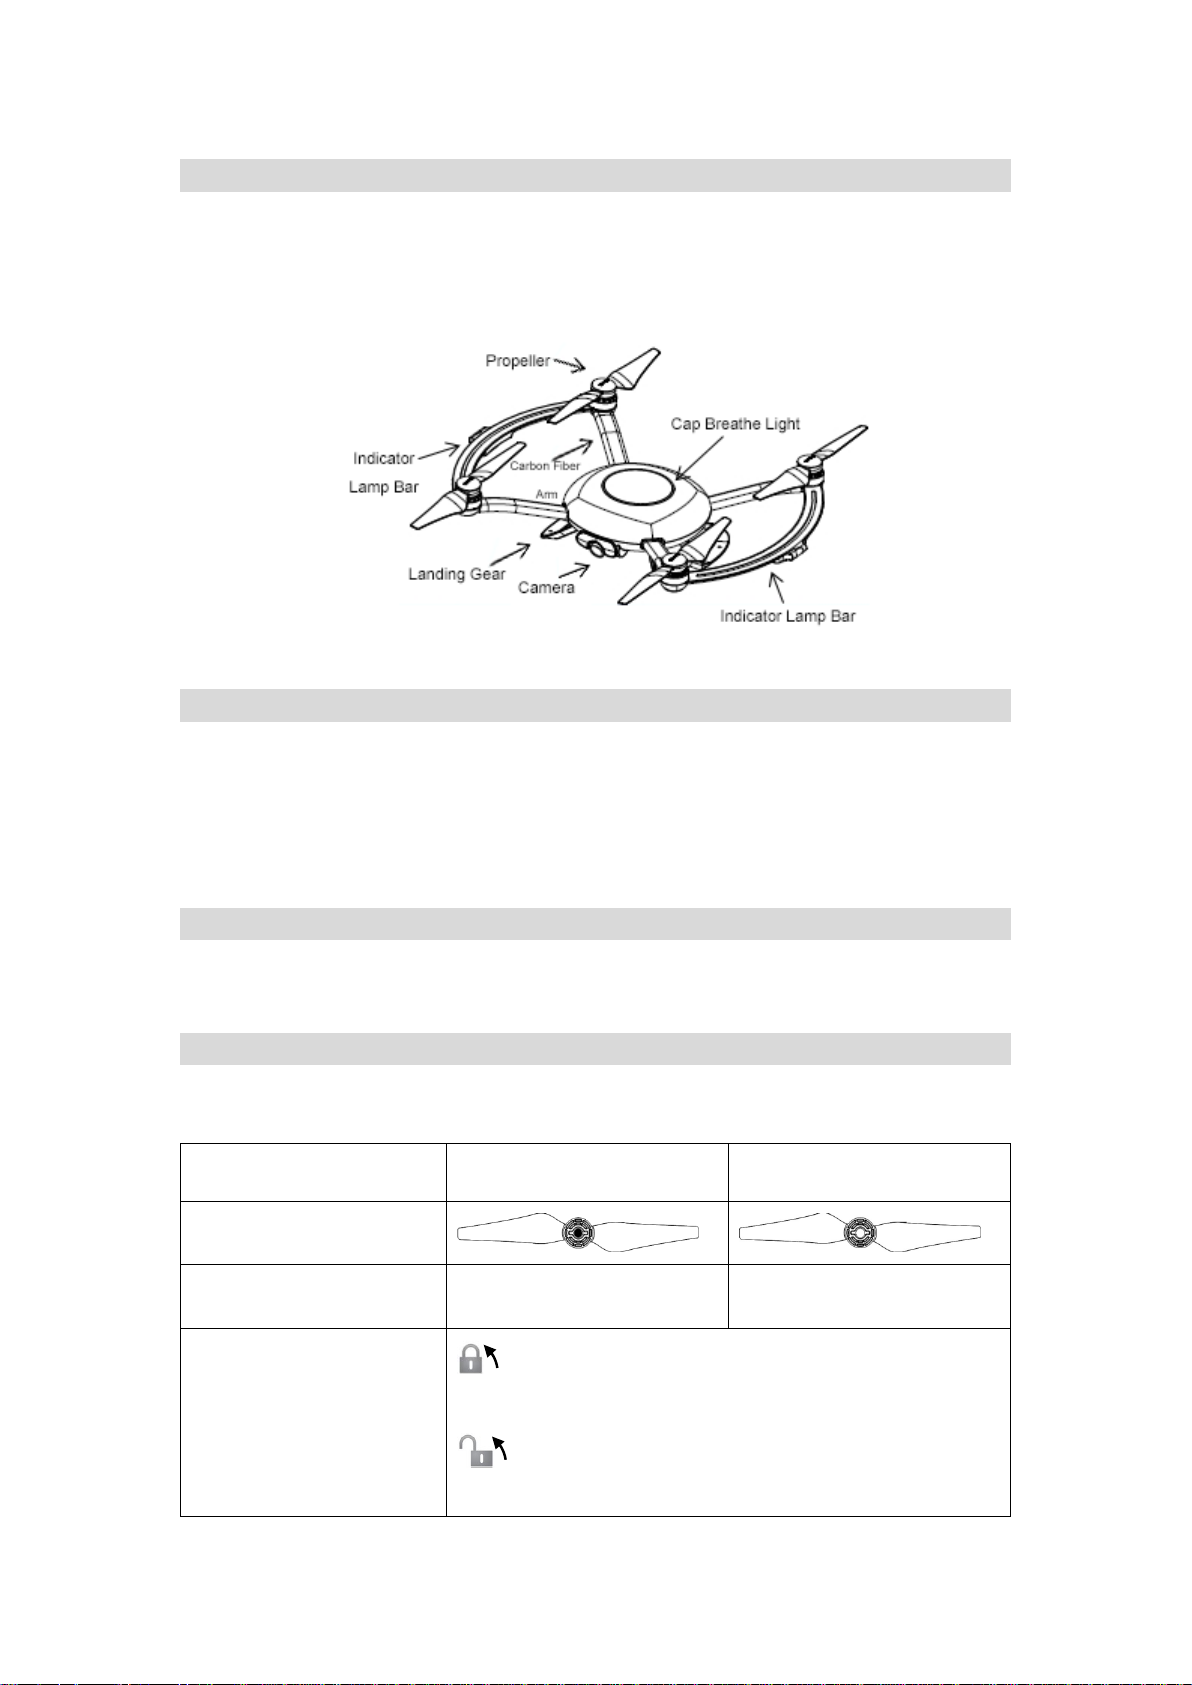
Device Overview
Orbit drone is composed of the following major parts: flight controller, communication
system, tracking system, location system and intelligent battery. Each of the abovementioned part will be introduced in detail.
Fight Mode
Orbit equips the newest generation flight controller, which support the following
mode :
APP mode:Control the drone with Skye+ app
RC mode:Control the drone with remote controller.
Drone Status Indicators
To indicate the on/off status, Orbit drone is equipped with one breathe light on the
top of the body, and another two light bands located at both sides.
Propellers
Orbit drone propellers measure 9.5inches,black-capped,and the screw threads inside
the caps are painted black and white to indicate different rotation directions.
propeller
Black screw threads
White screw threads
diagram
Installation location
To be installed on the
motor with dotted axis
To be installed on the
motor with undotted axis
Legends
lock:locking direction for attaching the propellers
to motor
Unlock : unlocking direction for detaching the
propellers from motor。
8
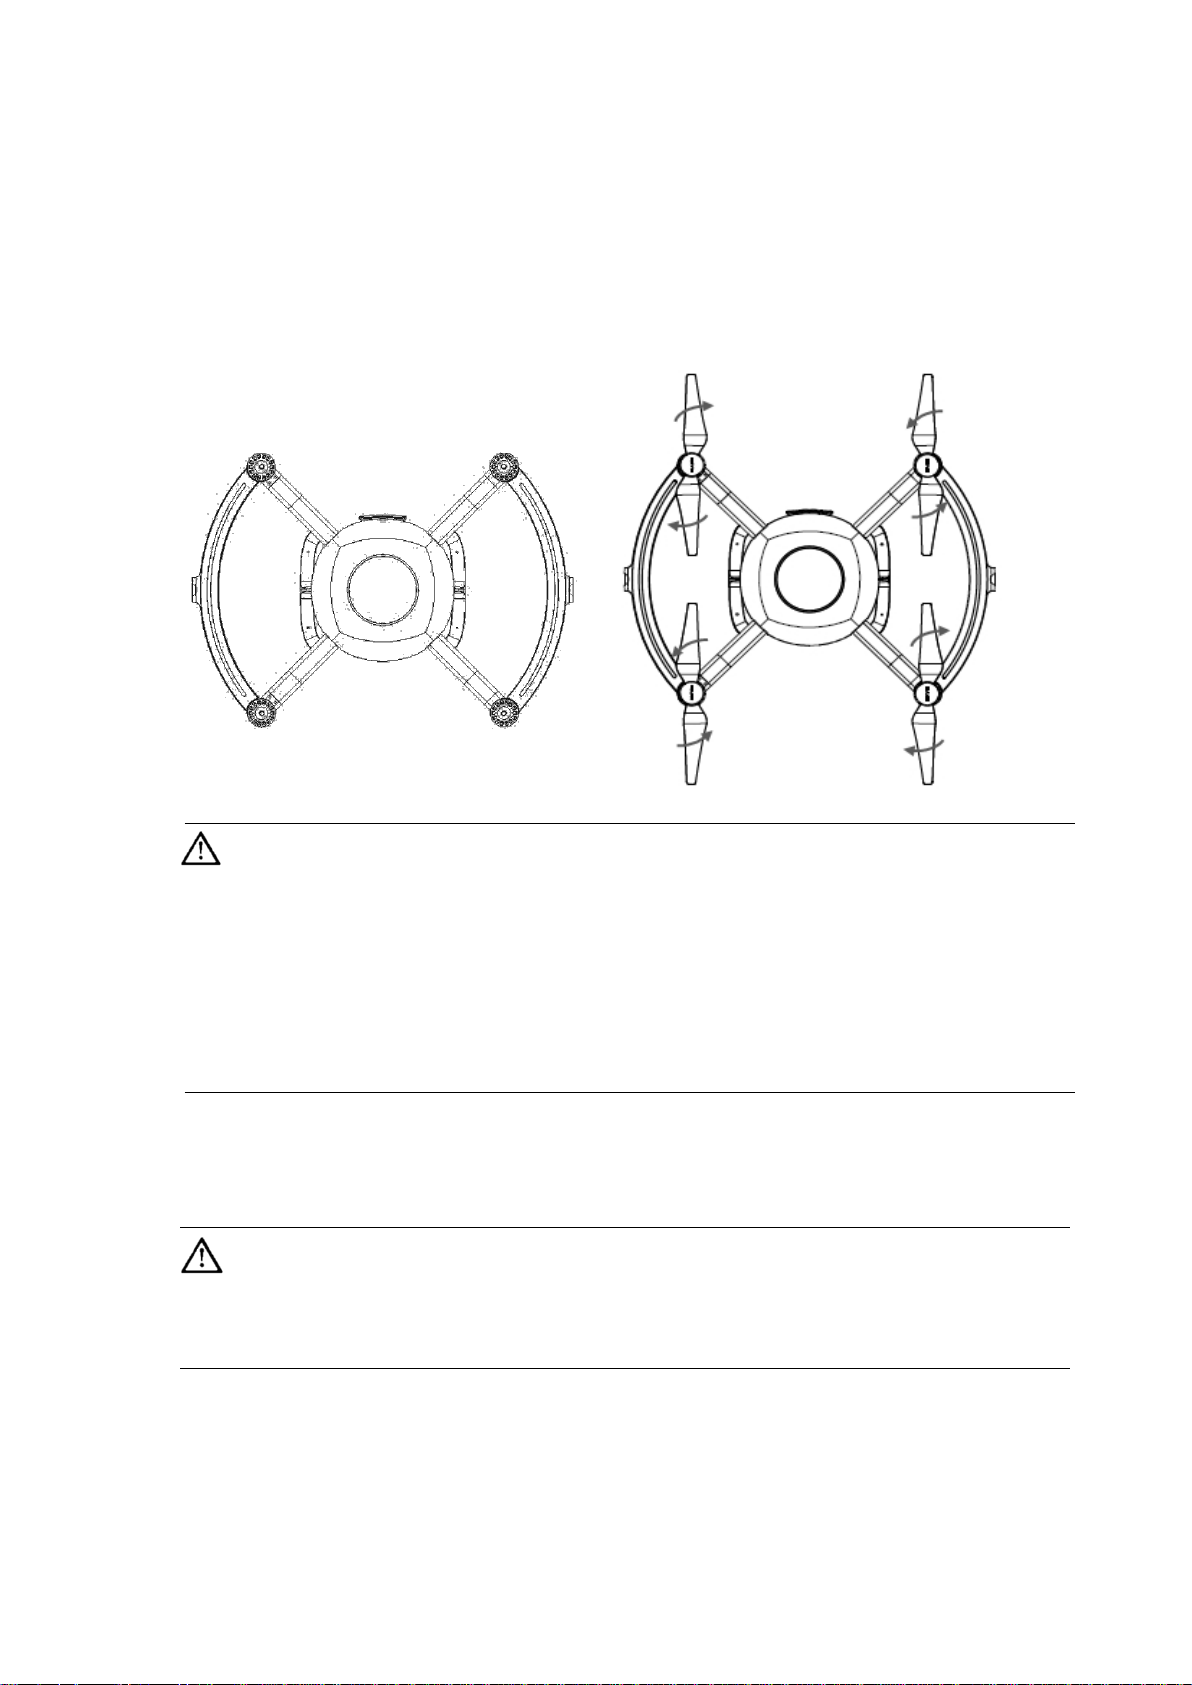
Attaching the Propellers:
Mount the propellers with black propeller screw threads to the motors with black dots.
Mount the propellers with white propeller screw threads to the motors without black
dots. Press the propeller down onto the mounting plate and rotate in the lock direction
until it is secured in its position, use one hand to fasten the propeller and another to
hold the motor.
Please ensure the propellers are attached to the matching motors.
Please manually ensure the propellers are firmly fastened to prevent
potential safety hazard
Handle the propellers with caution to prevent cutting hazard from the thin propeller
blades.
Use only the propellers provided by Skye. Do not mix up propellers from other origins
than Skye.
Propellers can be consumable, please order additional ones as needed
Detaching the Propellers
Hold the motor in place with one hand, then spin the propeller in the indicated
unlock direction.
Check that the propellers and motors are installed correctly and firmly before
every flight.
Ensure that all propellers are in good condition before each flight. DO NOT use aged,
chipped, or broken propellers.
To avoid injury, STAND CLEAR of and DO NOT touch propellers or motors when they
are spinning.
9
Battery
Introduction
Intelligent flight battery, dedicated for Orbit drone, has a capacity of 5100mAh, a
voltage of 11.4V and balance management functionality. Intelligent flight battery
contains newly designed high performance cells, and an advanced battery
management system to supply abundant electric power. Intelligent flight batter must
only be charged by a Skye official charger.
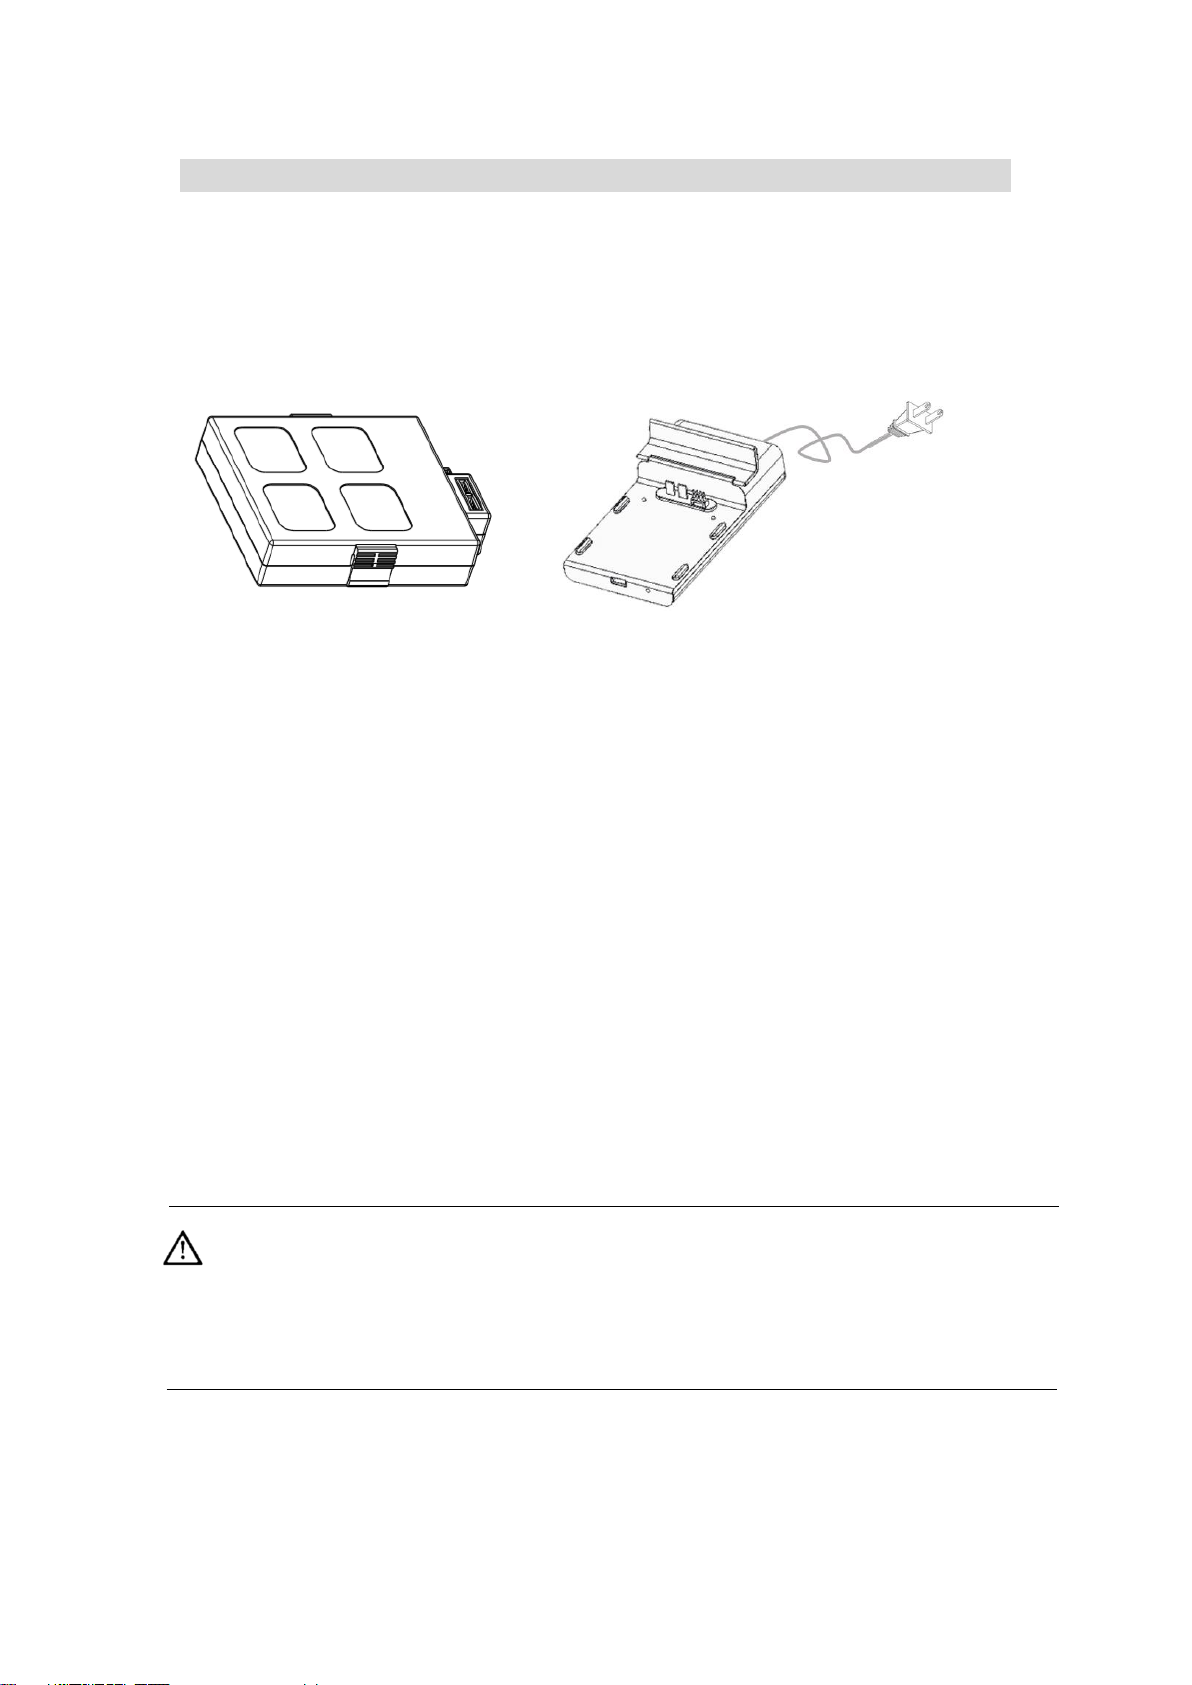
Intelligent Flight Battery Charger
Intelligent Flight Battery Functions
1. Balanced Charging: Automatically balances the voltage of each battery cell when
charging.
2. Overcharge Protection: Charging automatically stops when the battery is fully
charged.
3. Charging Temperature Protection:NO charging immediately after usage, wait until
the battery cools down.
4. Over Current Protection: The battery stops charging when high amperage (more
than 4.5 A) is detected
5. Over Discharge Protection: To prevent over-discharge damage, discharging
automatically stops when the battery voltage reaches 9 V.
6. Short Circuit Protection: Automatically cuts the power supply when a short circuit
is detected.
7. High voltage charging protection : Battery life can be shortened by frequent
charging. Charging does not proceed if a battery has already 90% or more charged.
8. Communication: Information pertaining to the battery’s voltage, capacity, current,
etc. is transmitted to the ‘setup’ section of the Skye+ App.
Before the first flight, ensure the battery is fully charged. Before operating the
battery, please read and abide to the instruction, liability waiver and sticker on
battery surface. Skye does not assume any responsibility for any consequences
caused by not following this document.
10
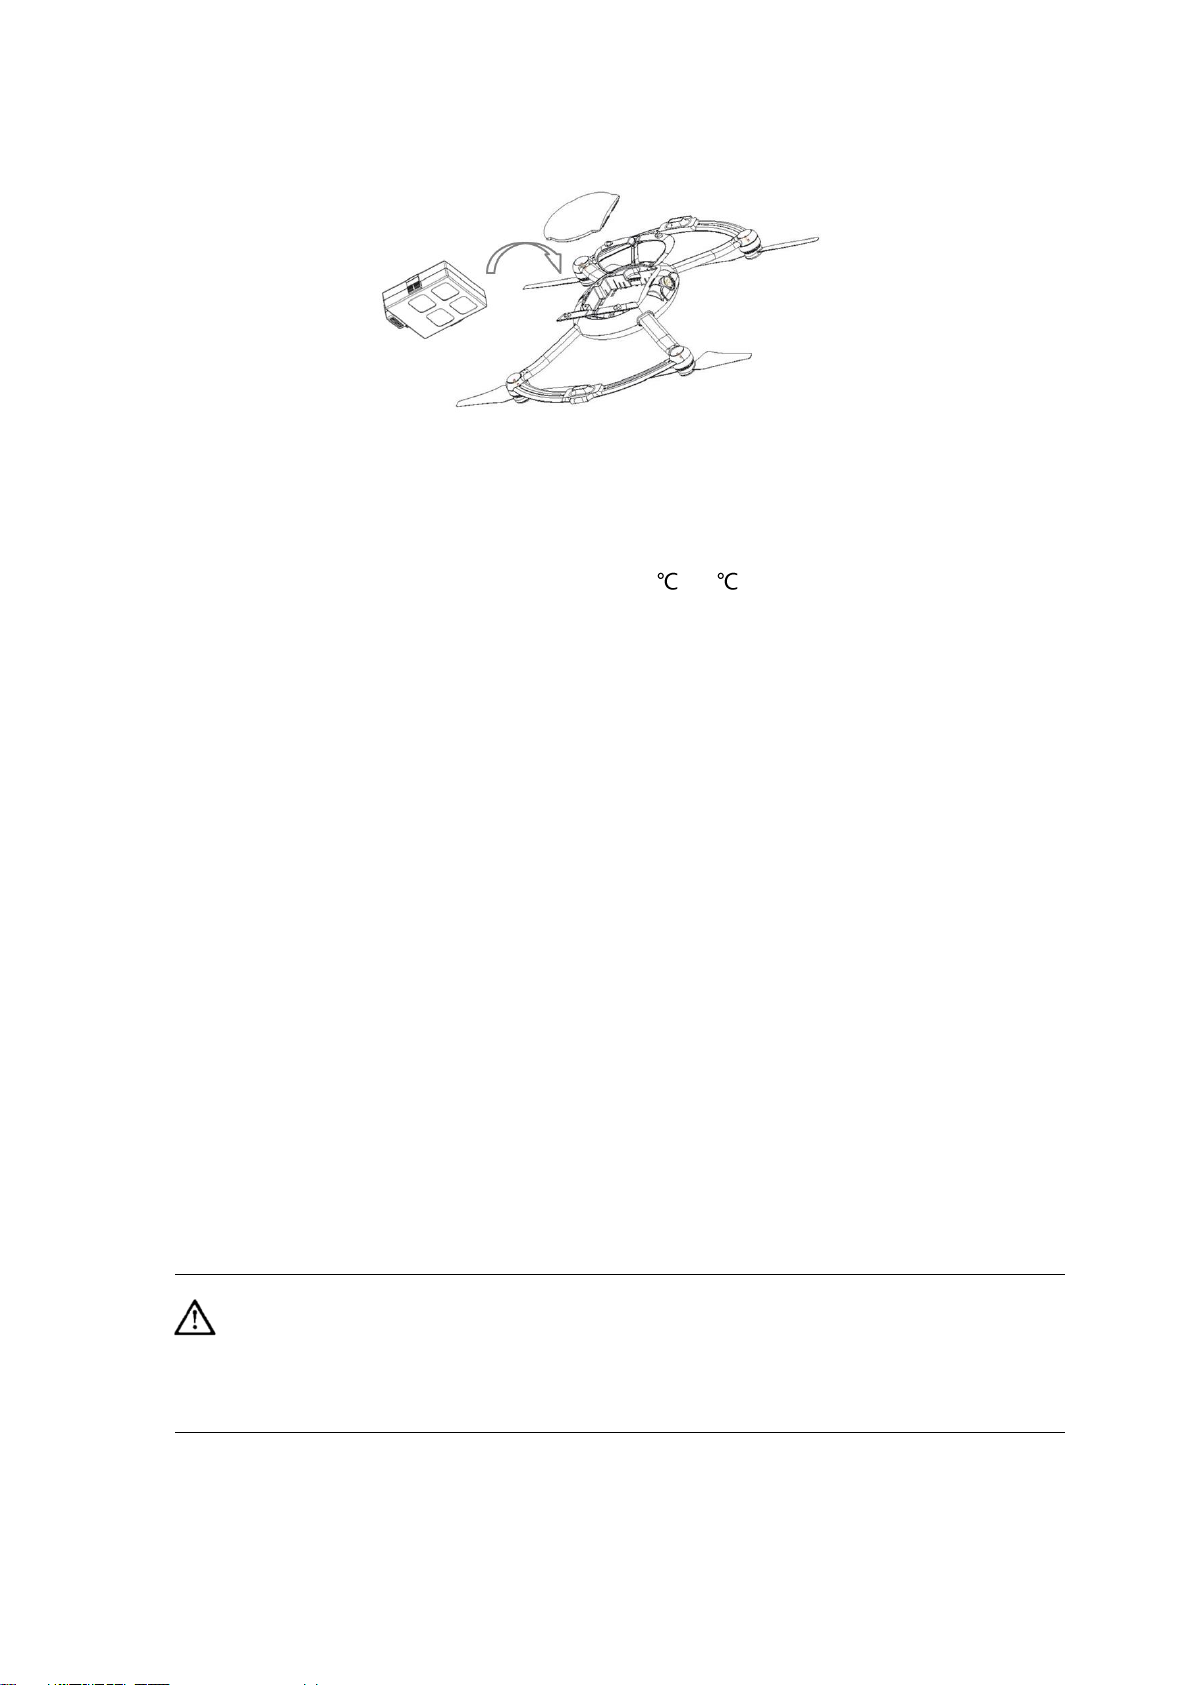
Install/Remove Battery
Open the back cover of the drone and push the battery into the matching slot (two
clicks on each side to securely lock the battery in place)
To remove,pull the battery while holding the two side clips.
1. When operated under low temperature(-10 ~-5 ), battery capacity reduces
significantly and the flight time is severely reduced as a result. Temperature can be
increased by rotating the propeller at a lower speed, and fly can proceed once the
temperature is higher. Please fully charge the battery before fly.
2. It is not recommended that the battery be used in extremely low temperature (< -
10°C) environments.
3. It is recommended to stop flying if APP prompts “low voltage warning”
4. In low temperature environment, it is recommended to preheat the battery to 5 to
20 degrees.
5. Before flying under low temperature environment, preheat the battery for 1-2min
Charging
1. Connect the charger to an AC outlet(100~240V,50/60Hz;If needed, please use
a power plug adaptor )。
2. Charger indicator:White light indicates undergoing charging; blue light indicates
fully charged status; red light indicates charging anomaly.
3. To prevent damage from frequent charging,capacity >90% won’t allow additional
charging and charger light turns blue
4. After each flight, wait until battery cools down to charge
5. It takes 1.5 hours to fully charge a battery
Please use the official charger, and charge one device at a time.
Please use the official charger to charge the intelligent flight battery, and Skye
does not take any responsibility for non-official chargers.
Switch off the drone before removing the battery.

11
Discharging
Slow discharging: install the battery and switch on the drone, then stationary
discharging is triggered and continues to discharge the battery lower than 30%
capacity. Remaining capacity can be read from APP. It is not recommended to turn on
the motor to discharge.
Fast discharging : fly outdoor until “low voltage warning” lands the drone.

12
Tracker
This chapter introduces functions,
features and use of tracker
13
Tracker Overview
Skye tracker is a hand-held device which serves as data transmitter. Short range data
transmission is implemented for certain compatible receivers chosen by users.
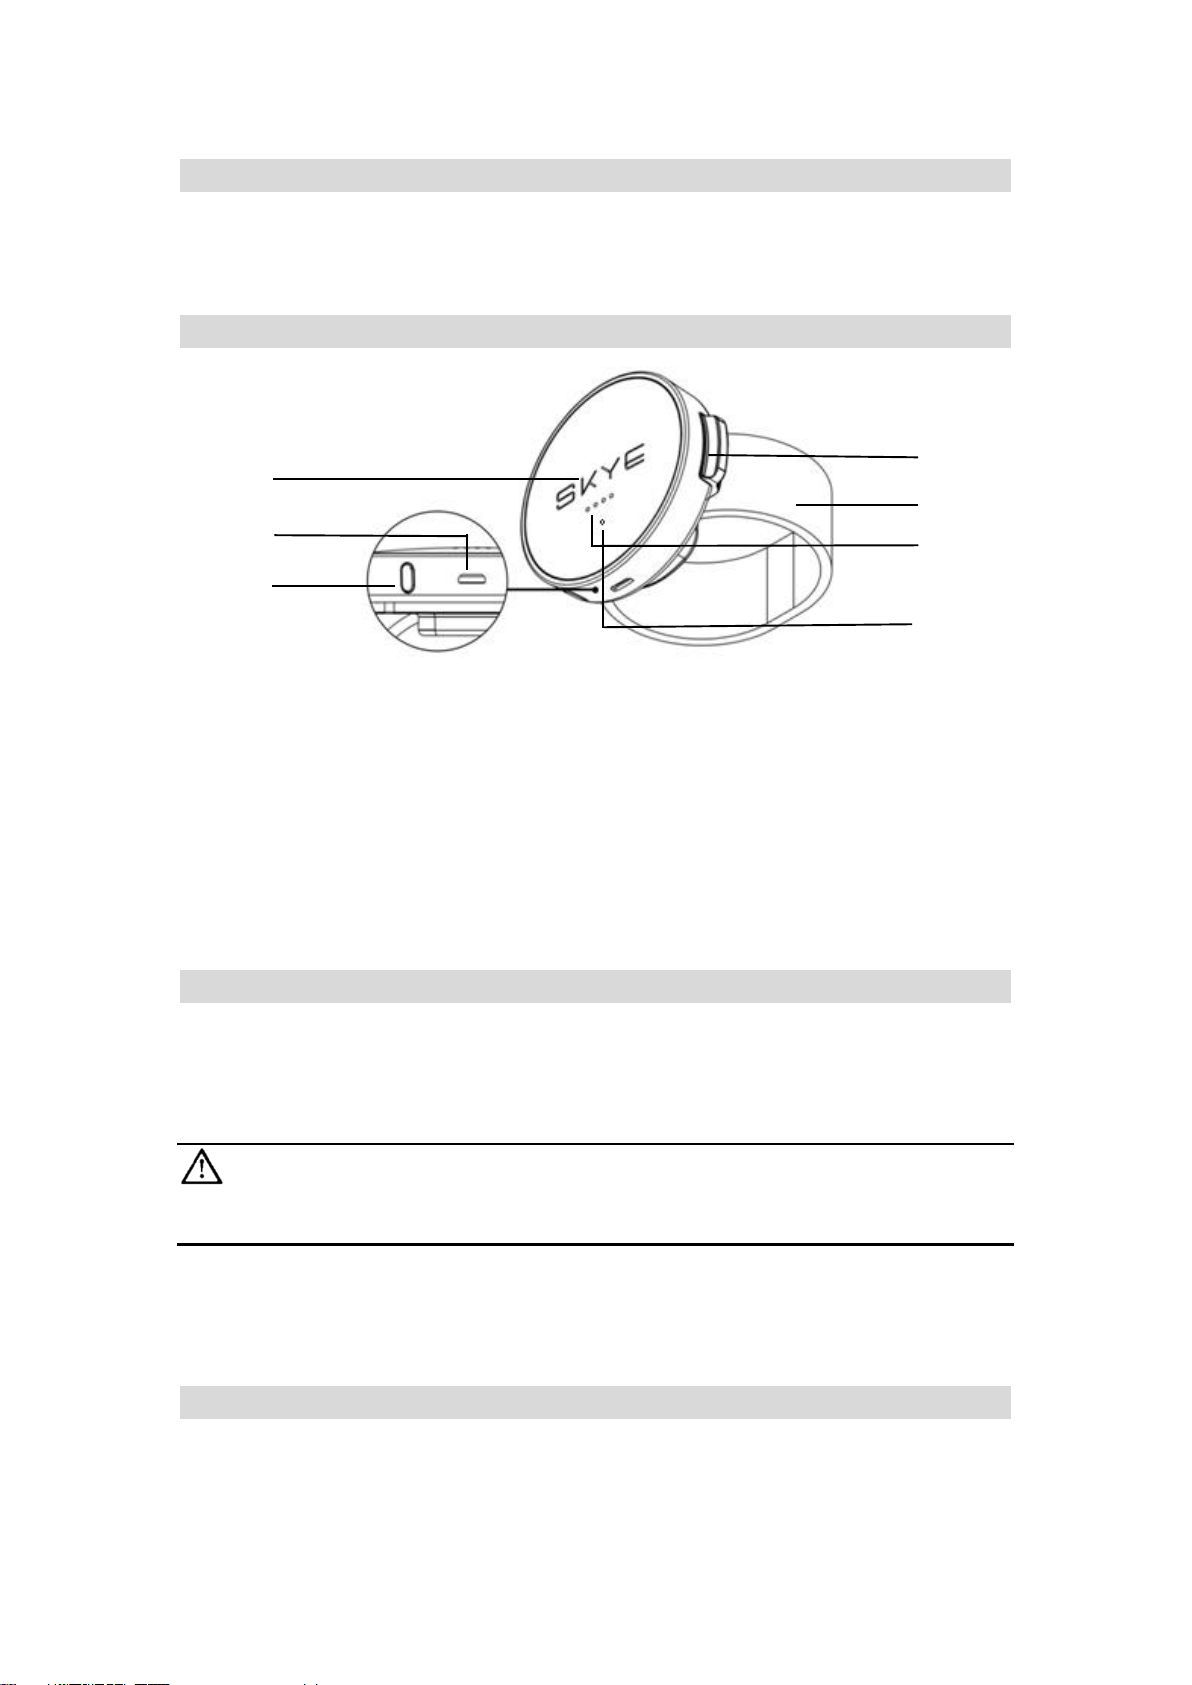
Tracker Introduction
[1] Skye logo
[2] Charging port
[3] Power button
[4] Tracker base
[5] Wrist Band
[6] Indicator
[7] Charging Indicator
ON/Off
Switching on
To switch on, press and hold power button for 4sec. The device switches on
successfully when LED light turns on with one beeping sound and one vibration.
If the tracker does not switch on,check the battery level or press and hold
power button for 15s.
Switching off
To switch on, press and hold power button. Switching off successful when LED lights
turn off one by one with beeping sound and vibration.
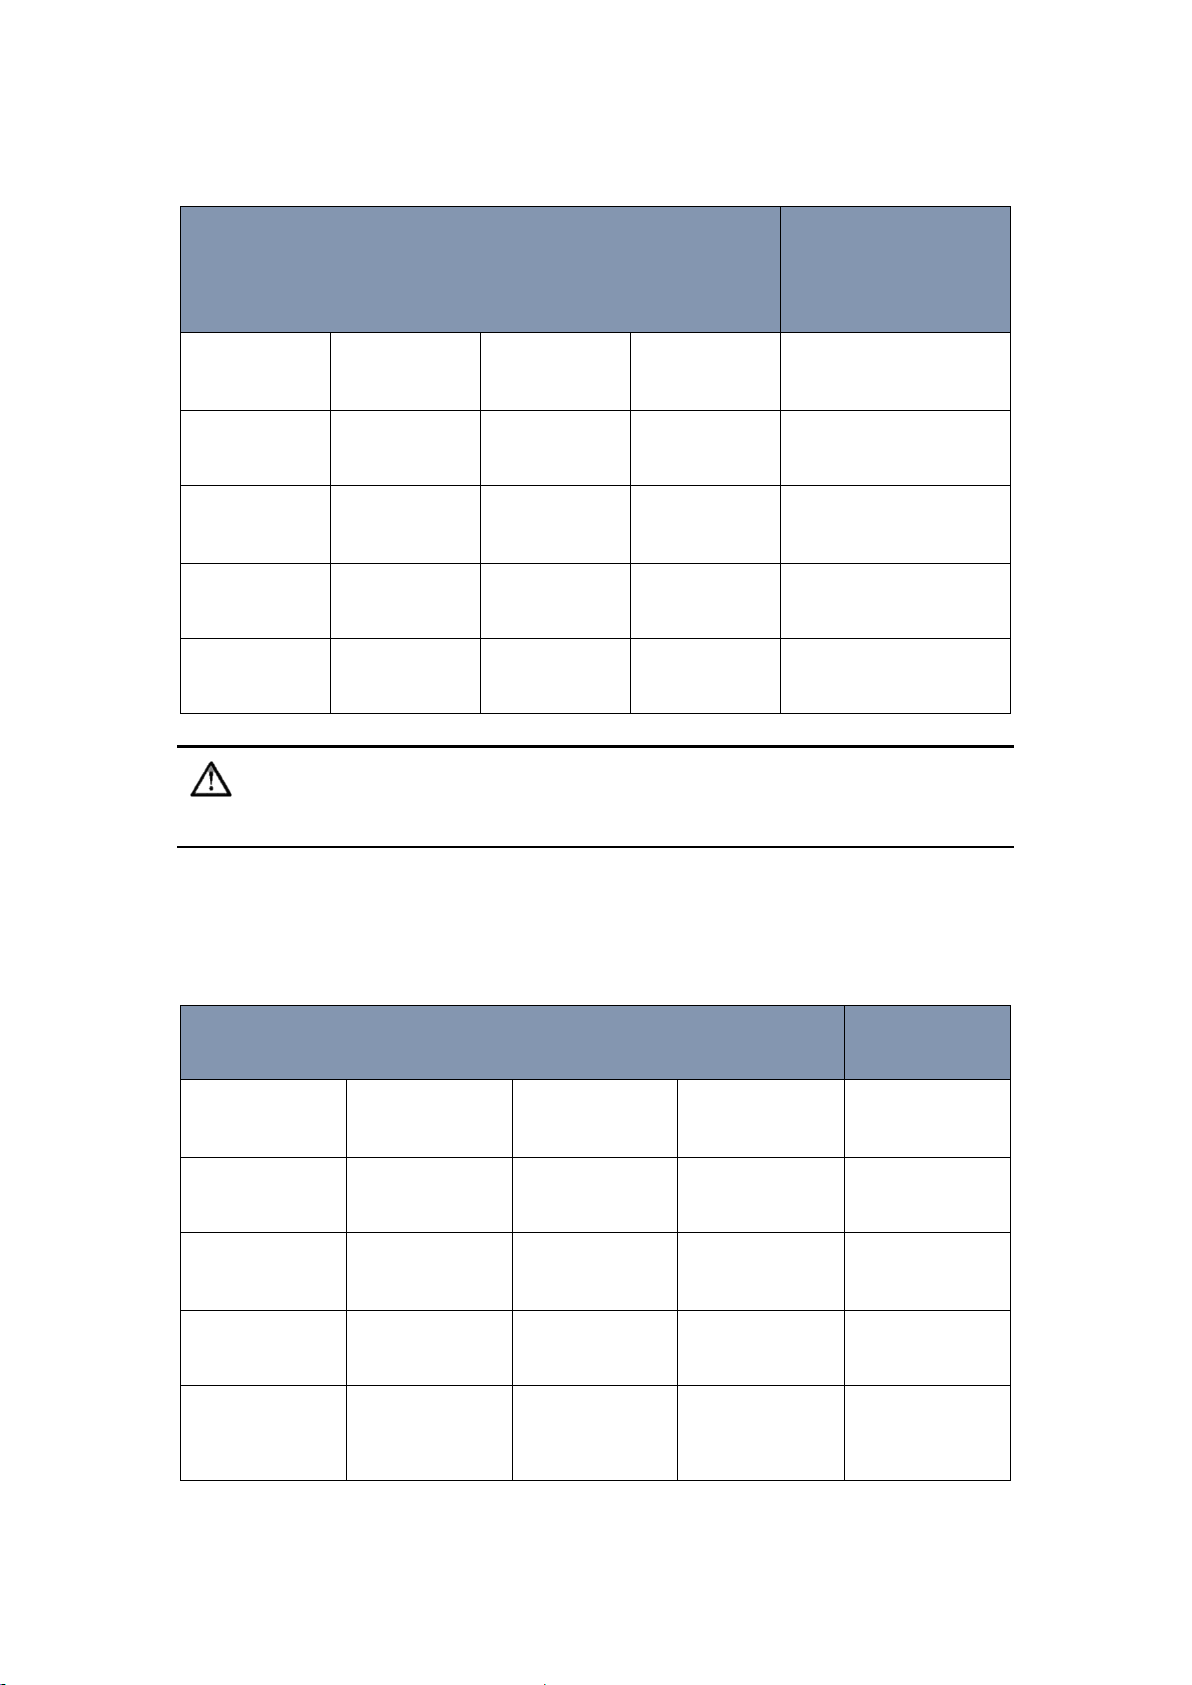
Indicator
Indicator has 4 LED lights in a row, to show GPS reception and tracker battery level.
The details are summarized as follows:
GPS indicator
[1]
[2]
[3]
[4]
[5]
[6]
[7]
14
When switched on,4 LED lights shows the number of effective GPS satellites. It is
recommended to operate when the number of effective satellites is greater than 4。
Light(●indicates ON ◎Indicates Off)
Effective # of GPS
satellites
● ● ●
●
≥16
● ● ●
◎
12~15
●
●
◎ ◎ 8~11
●
◎ ◎ ◎
4~7
◎ ◎ ◎
◎
<4
Intermittent beeping accompanied by vibration indicates loss of connection
between tracker and receriver.
Capacity Indictor
Under tracking mode, gently press the power bottom,then 4 lights indicate the
remaining battery capacity. After 3 seconds, the lights return to be GPS indicator。
When battery level is low, left-most light blinks.
Light(●indicates ON ◎Indicates Off)
Battery Level
● ● ●
●
75%~100%
● ● ●
◎
50%~75%
●
●
◎
◎
25%~50%
●
◎ ◎ ◎
5%~25%
◎
blinks
◎ ◎ ◎
Low battery

15
Charging
Tracker is powered by a rechargeable battery with duration 2h. To charge tracker,
connect charging port with Skye charger. Red indicator shows charging in progress;
blue indicator shows charging completed. A full charge takes 1.5h, and please
unplug the charger once charged.
How to use tracker
Wear
User needs to wear the tracking for tracking
1. Wear the tracking,revealing Skye logo, and make sure no obstruction between
receiver and tracker.
2. Check GPS indictor for sufficient reception.
3. Check battery indicator for sufficient charge level.

16
Skye+ App
This section introduces the four
tabs of the Skye+ app

17
Download the Skye+ App
To operate the drone, users must first download the Skye+ iOS app. Scan the following
QR code or enter https://itunes.apple.com/us/app/skye+/id1116011347 in your
browser to download the app in Apple Store:
Users can also search for our company “Skye Intelligence” in Apple Store to find the
Skye+ app.
Skye+ app requires iOS 8.0 or above (The android version will be coming soon to
Google Play and other major android stores, please check our company website for
latest news).
App Main Screen
Skye+ is an app specifically designed to work with the Skye drones. Users can use
Skye+ to conduct flight control, Gimbal adjustment and photo/video shooting, flight
parameter settings, and to turn the drone on/off; users can also use the app to browse
and edit the photos/videos from the drone, and share them instantly to social
networks at any time.

18
[1] Drone connection light
[2] Drone connection state
[3] Enter flight control screen
[4] Power off the drone
[5] Drone control tab
[6] Media gallery tab
[7] Social tab
[8] Me tab
PLAY
In the “Play” screen, users can perform One-Click Take-off, routine flight controls, OneClick Landing, Auto-Follow Recording and Camera Settings for the drone; users can
also view live-streamed images from the drone’s first-person perspective.

19
[1] Back to main screen [13] Drone battery indicator
[2] Settings [14] One-Click Take-Off/Landing
[3] Map [15] Flight speed indicator
[4] Tracker signal indicator [16] Flight altitude indicator
[5] Wi-Fi connection indicator [17] Tracker distance indicator
[6] Drone signal indicator [18] Drone battery progress bar
[7] Photo/Video switch [19] Flight direction buttons
[8] Camera settings [20] One-Click Return
[9] Photo Shutter/Video Record [21] Auto-Follow mode
[10] Flight direction buttons [22] Gimbal pitch angle adjustment
[11] Mobile device battery indicator [23] Gimbal pitch angle indicator
[12] Tracker battery indicator
Buttons/Icons
Click [2] to select related flight settings.
Settings
App Screenshot
Operating Instructions
Tracking Range
Slide the progress bar up
and down to set tracking
range (5m ~50m).

20
Joystick Setting
Choose between Mode 1,
Mode 2, or Mode 3 for the
virtual joysticks, or
customize based on
personal preferences.
Joystick Sensitivity
Choose between a fixed or
a moving virtual joystick.
Also, select the sensitivity
level of the joystick from
Low, Medium, to High.
Wi-Fi Setting
Click on “SSID” to change
the drone’s Wi-Fi name.
Click on “Password” to
change the network’s
password (8~16
characters). Click on “Save”
to complete setting.
Battery
Est. Time Remaining:
remaining flight time
based on battery level.
Total Capacity: total
battery capacity.
Remaining Capacity:
remaining battery.
Battery Life: number of
times that the battery can
be discharged/recharged
before it must be replaced
Temperature: Current
battery temperature
Time Charged: number of
times that the battery has
been charged

21
Digital-Compass
Calibration
Click on “Start” to start
Digital-Compass
Calibration.
Remote Control
Settings
Click on “Remote control
pairing” to start pairing.
Click [3] to display Map. “ ” indicates the drone’s current location, “ ” shows the
current position of your mobile device.
Click [7] to switch between Photo/Video modes.
:Slide to left to enter photo mode.
:Slide to right to enter video mode.

22
Click [8] to display camera settings.
Settings
App Screenshot
Functions
Resolution
Tap on
“Resolution” to
choose between
“Sports” and “HD”
setting.
Quality
Set the output
quality to “High”,
“Middle” or “Low”.
ISO
点击“ISO” 可选择
“AUTO” 、 “200” 、
“400” 、 “800” 、
“1600”不同感光度
Set the “ISO”
value to “AUTO”,
“200”, “400”, “800”
or “1600”.
White Balance
Set white balance
to “AUTO”,
“Cloudy”,
“Daylight”, or
“Incandescent”
Optical
Frequency
Set the “Optical
Frequency” to
“50Hz” or “60Hz”.

23
Reset all
Tap on “Reset all”
to reset all
camera values.
Click [9] to take photos or record videos.
: Click on this button to take photo.
:Click on this button to start/end video recording.
Click [10] and [19] to control the orientation/direction/altitude of the drone. (The
Joystick is set to Mode 2 by default)
Button
App Symbol
Control
[10]
Tap on to tilt forward, and
fly forward.
Tap on to tilt backward,
and fly backward.
Tap on to tilt leftward, and fly
to the left.
Tap on to tilt rightward, and fly
to the right.
[19]
Tap on to lift the drone
Tap on to have it descend
Tap on to turn drone
counter-clockwise.

24
Tap on to turn drone
clockwise.
Click on [14] to begin One-Click Take-off/Landing.
: Click on this button to begin One-Click Take-off.
: Click on this button to begin One-Click Landing.
Slide [21] up and down to adjust Gimbal pitch angle ranging from -30°~-70°
Connecting Skye+ App with the Drone via Wi-Fi
After powering on the drone, go the the “Settings -> Wi-Fi” on your mobile device, wait
until the network with the Drone’s SSID shows up, and select it, enter the password,
and click on OK to connect. The connection is successful if the Wi-Fi connection
indicator in the “Play” screen display “Connected”.
Gallery
Tap on to enter the media gallery to browse photos/videos in the SD card,
where users can also download, edit, delete, and share the items easily.

25
Features
App Screenshot
Explanation
Photo/Video
Browsing
When connected with the
drone, tap on the
upper left corner of the
“Gallery” tab to browse
through the saved photos and
videos.
Video Editing
Select a video in the SD card.
While it’s playing, users can
slide the progress bar below to
set a starting and an ending
point to cut a clip of max. 10
sec. The cut clip is saved in the
“Video” folder of the app.

26
Photo/Video
Download and
Deletion
When browsing
Photo/Video list in the SD
card, tap on to multi-
select items, and tap on
to download; or tap
on to delete.
Video Editing
When opening a video in the
Gallery, users can edit and
compile multiple clips
together.
Tap on to add a video
Tap on to turn original
sound track on/off
Tap on to open smart
editing mode
Tap on to add more
music templates
Tap on to select a music
template

27
Photo Editing
and Saving
When opening a photo in the
Gallery, users can edit the
photo by applying different
filter to it.
Video sharing
after saving
After clicking the “Save”
button, the video will be saved
into the app’s folder on your
mobile device, users can also
share the video to a social
network of their choice.
Social Community
Tap on the “Community” tab to enter the Skye+ sharing network. Check out current
trending photos and videos in the “Popular” section; find out your friends’ latest
updates in “Follow” section, like them, comment and repost; discover and participate
in discussions, activities with other Skye users in “Find” section.
Me
Go to your personal profile setting page in the “Me” tab. Users can register new Skye
accounts and login. Once logged in, users can purchase new Skye products, manage
personal settings, update firmware, access Help, and contact customer support, and
etc.

28
Firmware Upgrade
Go to “Me->Firmware Updates -> Download updates” to download the latest firmware,
and click “Install” to update after download is complete. Users can “Clear old packages”
to remove past packages.
Powering Off the Drone
Once connected to the drone, users can tap on in the main screen of the Skye+
app to power it off.

29
Flight
Once drone is successfully assembled,
please read this manual carefully. Please
test-fly the drone in open area
following the instructions here within
or under the guidance of a professional.
Please familiarize yourself with necessary
flying techniques by practicing adequately
before flying regularly or operating in
Auto-Follow mode. Please choose a safe
flight environment, and fly within required
distance and altitude.

30
Please read “Skye Disclaimer and Safety Instructions” prior to operation
Flight Restrictions & No-Fly Zones
Flight Restrictions
Skye+ app direct control range < 50m
Max. remote control range: 200m
Tracker operation range: 5m~20m
No-Fly Zones
No-Fly zones include airports and other flight-restricted areas.
Flight Environment Requirements
1. Please do NOT operate within No-Fly zones, e.g., airport, restricted military areas
and etc.
2. Please do NOT operate under severe weather conditions, e.g., heavy wind
(10m/s and up), rain, snow, fog, and etc.
3. Please do NOT operate in heavily populated areas. This may lead to flight
accidents and cause third-party damages.
4. Please choose to fly in open, unobstructed areas. Please do NOT fly between tall
buildings.
5. Please do NOT operate near power lines or cell phone towers. Places as such
can cause interferences to flight control signals.
6. Please do NOT operate over reinforced concrete ground, or near iron
towers/mines. Such environments can cause interferences to digital compass,
and thus lead to unstable flight behaviors.
7. When flying over water or glass surface, please be sure to select corresponding
scenario in the flight settings screen in the Skye+ app.

31
Preflight Preparations
1. Make sure the smart battery, remote control, tracker and your mobile device
are adequately charged.
2. Make sure propellers are installed correctly. Please refer to the propeller
installation section of this manual.
3. Make sure the Skye+ app on your mobile device is running correctly.
4. Make sure electric motors are functioning properly after the drone is powered
on.
5. Make sure Gimbal is functioning properly after the drone is powered on.
6. Make sure GPS signal reaches at least 6 stars after the drone is powered on.
Powering On/Off
Power On
1. Open the back cover and insert battery. The battery is secured once it clicks
on both sides in the drone, then put the lid back on.
2. Place the drone upright on even ground, and long-press your palm on the
upper lid for 5 seconds. The drone is successfully powered on once the blue
indicator light comes up.
Please don’t move the drone during powering-on process
Power Off
There are 2 ways to power off the drone, i.e., via the Skye+ app and by long-
pressing on the upper lid.
1. Via the Skye+ app: After landing, tap on the “<” button on the upper-left corner of
the flight control screen to go back to the main screen, and then tap on the “ ”
button. The drone is turned off after the blue indicator light blinks 3 times in 10
secs.

32
2. Manually: After landing, long-press your palm on the upper lid for 10 secs. The
drone is turned off after the blue indicator light blinks 3 times.
Connecting the drone with your mobile device
1. Turn on the device, make sure the blue indicator light is on.
2. Wait for 40 secs for the blue indicator light to turn from a solid state to a
“breathing” state.
3. On your mobile device, go to “Setting -> Wi-Fi”, choose the “Skye-xxxxxx” network,
and enter the password “12345678” to connect. Connection is successful once
the blue indicator light on the upper lid turns from the “breathing” state to the
solid state. (The default password of the device Wi-Fi is 12345678, we
recommend changing this password in the Skye+ app during your initial flight,
please refer to the App section of this manual.)
Digital Compass Calibration
When you operate the drone for the first time and whenever you fly at a new
location, you need to calibrate the digital compass to ensure safe a flight. The
digital compass is susceptible to interferences from other electronic devices, and
can have unstable behaviors and accidents. This can be prevented by having
frequent calibrations.
Cautions
1. Please avoid iron mines, parking lot, high-voltage cables, reinforced concrete
ground, and other areas that might have strong magnetic fields during
calibration.
2. Please avoid carrying iron object like keys on you during calibration.
3. Please do not calibrate indoors.

33
Steps
1. Power on the device properly.
2. Go you the Skye+ app, and enter the flight control screen by tapping on the “Play”
button. A calibration reminder dialog will show up, tap on “Yes” to start(If you are
flying at the same location where calibration has been done before, the system will
record campus data, reminder dialog is then skipped).
3. Hold the device upright, and rotate the drone horizontally 3 times until the
indicator light in the Skye+ app turns from yellow to Green. Tap on “Next” to
continue.
_______________________________________________________________________________
未校准 正在校准 校准完成
4. Hold the drone sideways with camera facing down, and rotate the drone 3
times until the indicator light turns from yellow to Green. Tap on “Complete”.
黄 绿 灰

34
When to re-calibrate?
1. The flight location is far from the previous location where it’s last calibrated.
2. Mechanical structure of the drone has been modified.
3. The drone exhibits severe drifting behaviors, and cannot fly in straight line.
One-Click Take-Off/Landing
Take-off
1. Place the calibrated device upright on even and open ground, and make sure
the rear end of the drone faces the user.
2. Make sure the mobile device is connected to the drone via Wi-Fi.
3. Open the Skye+ app, tap on “Play” button to enter the flight control screen,
make sure the Wi-Fi connection indicator shows “Connected”, and the GPS
signal level should read 6 or higher and live-streamed images are correct.
4. Tap on “Take Off”, make sure flight conditions are safe, and slide to the right to
confirm.
5. The drone will automatically takeoff and hover at about 3m altitude above
ground.
Landing
1. Fly the drone to an open area with even ground and safe enough for landing.
2. Tap on “Landing”, make sure the conditions are safe, and slide to the right to
confirm.
3. The device will automatically land, and the propellers will stop.
4. Users can take back control during the process of landing should there be an
emergency. Once user stops maneuvering the virtual joysticks, the drone will

35
automatically execute landing again.
_______________________________________________________________________________
1. Uneven grounds can lead to unstable takeoff, and possible flight accidents.
2. Takeoff and Landing should be carried out in open area, the users should
keep adequate safe distance from the drone.
_______________________________________________________________________________
Flight by the Skye+ app
By using the Skye+ app, you can conduct basic short-range flights. In the Settings
panel of the flight control screen, you can set the Joysticks to Mode 1, Mode 2,
Mode 3 or customized mode based on personal preferences. Please refer to the
App section of this manual for details. This section is illustrated by using Mode 2.
1. Power on the drone.
2. Open Skye+, select the Joystick mode and the sensitivity level in the Settings
screen, save, come back to the flight control screen, and click to take-off.
3. Once the drone enters a stable hovering state, users can start to operate it
with joysticks as follows:
Button
Flight Attitude
Joystick Control
Throttle controls the speed of
the rotors, provide lift and
descent:
Tap on to lift the device
Tap on to have it descend
Rudder (Yaw) changes the
direction the drone faces:
Tap on to turn device
counter-clockwise.
Tap on to turn drone
clockwise.

36
Pitch controls whether to fly
forward or backward:
Tap on to tilt forward,
and fly forward.
Tap on to tilt backward,
and fly backward.
Roll (Aileron) controls
whether to fly leftward or
rightward:
Tap on to tilt leftward,
and fly to the left.
Tap on to tilt rightward,
and fly to the right.
。
Auto-Follow Mode
1. Put the tracker on (Please refer to the Tracker section of this manual), and long-
press the power button for 4 secs to turn it on.
2. Open Skye+ app, check the tracker batter level and distance “D” in the “Play” screen
to make sure the it is functioning properly.
3. Take-off the drone in open area after the indicator lights on the tracker show at
least one star.
4. Keep the drone at least 5m away from the auto-follow target.
5. Adjust the drone to point to the target, adjust the Gimbal pitch angle by using the
slider in the flight control screen, so that the target is in the center of the
screen.
6. Tap on the button on the upper left corner of the flight control screen, and

37
draw a closed-shape that encompasses the target as illustrated below. Selection
fails if the resulting rectangle is red, whereas selection succeeds if it’s Green.
The tighter the resulting rectangle encompasses the target, the better. You can
repeat the selection process multiple times, and tap on “YES” to confirm, and
then the drone goes into auto-follow mode.
7. 中途追踪失败请向右滑动“Solution Screen”退出追踪模式,如需继续追踪请从步骤 5 开
始重新选择目标进行追踪。
8. 追踪结束向右滑动“Solution Screen”退出追踪模式。
7. Should the drone lose the target during the process, slide “Unlock” to the right
to exit auto-follow mode, and restart from step 5 to select target again.
8. Once the user finishes, slide “Unlock” to the right to exit auto-follow mode.
1.There can only be one device within the 100m radius range while being
operated in auto-follow mode.
2. Target should be in unobstructed view of the drone during the entire
flight.
Photography/Video Recording
Photo and video shooting feature includes:
1. When within the connection range, users can view live-streamed images from the
drone on the Skye+ app during the course of the flight.
2. The high-resolution photos and videos are automatically stored into the drone.
3. By using the Skye+ app, users can transfer the photos and videos to their mobile
devices, edit them, and share them to different social networks.
This section focuses on explaining how the drone takes photos and videos via the
Skye+ app.

38
_______________________________________________________________________________
Photo mode Video mode
Shutter/Start recording End Recording
______________________________________________________________________________
Photography/Video Recording during regular flight mode
When the drone is being operated by the app in regular flight mode, users can select
photo mode and press the shutter button to take photos at any time. Users can switch
to video mode, and press the shutter button to start recording, and press it again to
end recording.
Video Recording during Auto-Follow mode
Users need to first press the shutter button to start recording before going into auto-
follow mode. Once the users exit from the auto-follow mode, press the shutter button
again to end recording.
Photography/Video Recording when operated by remote control
When operated by a remote control, the drone must be within the 50m radius for the
Skye+ app to be able to take photos and videos.
One-Click Return
The drone can automatically return to its take-off location by using the One-Click
Return button in the Skye+ app or on the remote control.
Users can trigger one-click return when the drone is in the air above open ground, the
drone will suspend its current operations and raise 20m further in altitude, and then
return back to the take-off location of this flight via a direct route, and land by itself.
This process is completely automatic; the drone will keep hovering if the user cancels
the return order. Note that the drone does not avoid obstacles by itself during the
course of the return flight. The users can take back control by exiting from the return
mode.
Automatic Hovering
When connection is lost to the app or the remote control, the drone will automatically
hover above its location, and lands by itself once the smart battery level is below
certain level. If drone regains connection, the users can still use the app or the remote
control to take back control.
Smart Low-Battery Landing
When drone battery is low, the user should land the drone in time to avoid dangerous

39
situations due to battery outage. When the drone battery is below 15%, the drone will
land by itself.
Users can read the drone battery level in the Skye+ app; when below 30%, the drone
battery indicator in the app will turn red; when below 20%, the indicator will turn red,
and the app will sound the alarm; when below 15%, the app will automatically land
the drone.
Battery
Indicator
App Warnings
Flight Behavior
>30%
None
Enough battery, users can
enjoy full features.
≤30%
indicator turns red
Battery low, users should
beware of flight distance and
altitude, and prepare for
landing.
≤20%
indicator turns red, and
sounds alarm.
Battery extremely low, users
should beware of flight
distance and altitude, and
prepare for automatic
landing as drone starts to
hover.
≤15%
indicator turn red, and
sound alarm
Drone starts automatic
landing
☀Users can still adjust the drone by using the app or the remote control to a suitable
location for landing.
Failsafe Hovering
When control signal is lost during flight, the drone will hover above its current location.
Users can continue to control the drone once it regains connection with the app or the
remote control.
Flight by Remote Control (Optional)
Starting the Motors
A Combination Stick Command (CSC) is used to start the motors. Push both sticks to
the bottom inner corners to start the motors. Once the motors have started spinning,
release both sticks simultaneously.

40
Stopping the Motors
After landing, push the throttle down , and then push both sticks to the outer corners
. Motors will stop immediately. Release both sticks once motors stop.
_______________________________________________________________________________
Basic Flight Steps
1. Place drone upright on an even ground, with the rear end facing the user.
2. Power on the drone, and turn on the remote control.
3. Calibrate digital compass in the Skye+ app.
4. Perform remote control frequency pairing (Please refer to “Remote Control”
section).
5. Start the motors.
6. Hold the throttle up slowly to steadily lift up the drone.
7. Control the drone by remote control (Please refer to the “Remote Control”
section).
8. To land, hold the throttle down slowly to allow the drone to descend to even
ground steadily.
9. After landing, stop the motors.
10. Power off the drone and the remote control.
①
②

41
FAQ

42
Q: How close can Skye Orbit fly from me?
A: For the sake of safety, the closest following distance is 5m.
Q: Cans Skye Orbit track other object?
A: Yes, just pass her/him/it the tracker.
Q: Are Skye Orbit and the tracker waterproof?
A: The Orbit is not waterproof but it works in light rain. The tracker is
rainproof but doesn't work underwater.
Q: How about the device compatibility of Skye+ app?
A: The Skye+ app is currently compatible with mobile devices running IOS 8.0 or higher.
The android version will be coming soon to Google Play and other major android stores, please
check our company website for latest news.
To operate the drone, users must first download the Skye+ app. Scan the following QR code or
enter https://itunes.apple.com/us/app/skye+/id1116011347 in your browser to download the app
in Apple Store:
Users can also search for our company “Skye Intelligence” in Apple Store to find the Skye+
app.
Q: How to share edited videos on social media like Facebook?
A: Please sign up for a personal account on the “me” page of Skye+ app. Login
to your account and start editing your videos. When you finish editing and save
a video, you will be notified whether to share it or not.
Q: What to do if a firmware update failed?
A: Please download the latest firmware version. After download finishes, connect
Skye+ app with your drone and complete the firmware upgrade with one-click
installation.
Q: How to contact you?
A: If you have any question, please email us at support@skye-intelligence.com.
We are always here to help you.

43
Appendix

44
FCC Compliance
This device complies with part 15 of the FCC Rules. Operation is subject to the
following two conditions:
(1) This device may not cause harmful interference, and
(2) This device must accept any interference received, including interference that
may cause undesired operation.
Changes or modifications not expressly approved by the party responsible for compliance
could void the user's authority to operate the equipment.
Compliance Information
FCC Warning Message
Any changes or modifications not expressly approved by the party responsible for
compliance could void the user’s authority to operate the equipment.
This device complies with part 15 of the FCC Rules. Operation is subject to the
following two conditions:
(1) This device may not cause harmful interference, and
(2) this device must accept any interference received, including interference that
may cause undesired operation.
FCC Radiation Exposure Statement:
This equipment complies with FCC radiation exposure limits set forth for an
uncontrolled environment. This equipment should be installed and operated with
minimum distance 20cm between the radiator& your body. This transmitter must
not be co-located or operating in conjunction with any other antenna or
transmitter.
Note: This equipment has been tested and found to comply with the limits for a
Class B digital device, pursuant to part 15 of the FCC Rules. These limits are
designed to provide reasonable protection against harmful interference in a
residential installation. This equipment generates uses and can radiate radio
frequency energy and, if not installed and used in accordance with the instructions,
may cause harmful interference to radio communications. However, there is no
guarantee that interference will not occur in a particular installation. If this
equipment does cause harmful interference to radio or television reception, which
can be determined by turning the equipment off and on, the user is encouraged
to try to correct the interference by one or more of the following measures:
—Reorient or relocate the receiving antenna.
—Increase the separation between the equipment and receiver.
—Connect the equipment into an outlet on a circuit different from that to which
the receiver is connected.
—Consult the dealer or an experienced radio/TV technician for help.

45
IC Compliance
IC RSS warning
This device complies with Industry Canada licence-exempt RSS standard (s).
Operation is subject to the following two conditions: (1) this device may not cause
interference, and (2) this device must accept any interference, including
interference that may cause undesired operation of the device.
Le présent areil est conforme aux CNR d'Industrie Canada licables aux areils radio
exempts de licence.
L'exploitation est autorisée aux deux conditions suivantes:
(1) l'areil ne doit pas produire de brouillage, et
(2) l'utilisateur de l'areil doit accepter tout brouillage radioélectrique subi, même
si le brouillage est susceptible d'en compromettre le fonctionnement.
IC Radiation Exposure Statement:
This equipment complies with IC RF radiation exposure limits set forth for an
uncontrolled environment. This transmitter must not be co-located or operating
in conjunction with any other antenna or transmitter. This equipment should be
installed and operated with minimum distance 20cm between the radiator& your
body.
Any Changes or modifications not expressly approved by the party responsible for
compliance could void the user’s authority to operate the equipment.
The maximum antenna gain permitted for devices in the band 5725-5825 MHz
shall comply with the e.i.r.p. limits specified for point-to-point and non point-topoint operation as appropriate.
Users should also be advised that high-power radars are allocated as primary
users (i.e. priority users) of the bands 5250-5350 MHz and 5650-5850 MHz and
that these radars could cause interference and/or damage to LE-LAN devices.
le gain maximal d’antenne permis (pour les dispositifs utilisant la bande 5 725-5
825 MHz)
doit se conformer à la limite de p.i.r.e. spécifiée pour l’exploitation point à point
et non point à point, selon le cas.
De plus, les utilisateurs devraient aussi être avisés que les utilisateurs de radars
de haute puissancesont désignés utilisateurs principaux (c.-à-d., qu’ils ont la
priorité) pour les bandes 5 250-5 350 MHz et 5 650-5 850 MHz et que ces radars
pourraient causer du brouillage et/ou des dommages aux dispositifs LAN-EL.

46
Safety Warnings
WEEE Directive
Correct Disposal of this product. This marking indicates that this product
should not be disposed with other household wastes throughtout the EU.
To prevent possible harm to the environment or human health from
uncontrolled waste disposal, recycle it responsibly to promote the sustainable
reuse of material resources. To return your used device, please use the return and
collection systems or contact the retailer where the product was purchased. They
can take this product for environmental safe recycling.
 Loading...