


Remote Contr
V 1.0
oller

Remote Controller Pr
he Orbit r
emote controller is a wireless communication device that integrates the Orbit remote
T
control system. The remote control system operates at 2.4 GHz.
Oper
ating Mode: Control can be set to Mode 1 or Mode 2, or to a custom mode by the Skye+ app.!
Mode 1: The right stick serves as the throttle.
Mode 2: The left stick serves as the throttle.
ofile
Mobile De
vice Holder
Remote Controller
Using the Remote Controller
Turning the Remote Contr
emote controller has a capacity of 520 mAh rechargeable battery. The battery level is
The Orbit r
indicated via the Battery Level LEDs on the front panel. Follow the steps below to turn on your
remote controller:
1. Press and hold the Power Button for 2 seconds to turn on the remote controller, the remote
controller will beep when it is turned on.
2. The battery level is displayed via LED indicators on the front panel of the remote controller.
Please charge the remote controller using the included charger when the controller in low battery
level.
3. Repeat Step 1 to turn o
oller On and Off
ff the remote controller. !
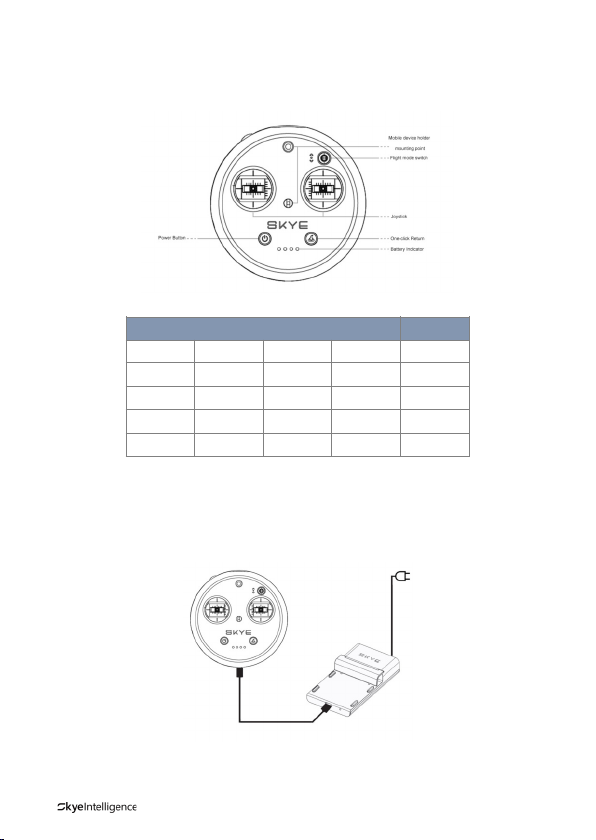
B
attery Level:
The battery level is displayed via LED indicators on the front panel of the remote controller:
Battery Level Indicators●ON ◎OFF
● ● ● ●
● ● ● ◎ 50%~75%
● ●
● ◎ ◎ ◎ 0%~25%
◎ ◎ ◎ ◎ =
Char
ging The Remote Controller
ge the remote controller using the included charger refer to the figure below:
Char
◎ ◎
Battery Level
75%~100%
25%~50%
0%

A
djust the tilt of the gimbal:
Users can use this dial to control the tilt of the gimbal:
Dial Gimbal Remarks
!
!
!
!
Flight Mode Switch
Toggle the switch to select the desir
GPS Mode:The drone utilizes the GPS System to automatically stabilize itself, it works best when
the GPS signal is strong.
Attitude Mode:The drone will only use its barometer for positioning to control the attitude, the
Auto-return function still working when the GPS signal is available.
ed flight mode:
Push the dial clockwise,
the camera rotates
upward. The more the dial
is pushed away from the
center position, the faster
the camera rotate.
Pull the dial anticlockwise,the camera
rotates downward. The
more the dial is pulled
away from the center
position, the faster the
camera rotate.
Position
Position 1 GPS Mode
Position 2
Attitude Mode
Flight Mode

Contr
olling Orbit
This section e
The Remote Control is set to Mode 2 by default.
Stick Neutr
Moving The Control Stick: The control stick is pushed away from the center position.
xplains how to control the orientation of the Orbit through the remote controller.
al/Mid-Point: Control sticks are in the center position.!
Remote
Contr
(Mode 2)
oller
Flight Attitude Remarks
Moving the left stick up and down changes the
drone’s elevation.!
Push the stick up to ascend and down to descend.
When both sticks are centered, the Orbit will hover
in place.
The more the stick is pushed away from the center
position, the faster the Orbit will change elevation.
Always push the stick gently to prevent sudden and
unexpected elevation changes.
Moving the left stick to the left or right
controls the rudder and rotation of the drone.!
Push the sick left to rotate the drone counterclockwise, push the stick right to rotate the
drone clockwise. If the stick is centered, the
Orbit will maintain its current orientation.
The more the stick is pushed away from the
center position, the faster the Orbit will rotate.
Moving the right stick up and down changes
the drone’s forward and backward pitch.!
Push the stick up to fly forward and down to
fly backward. Orbit will hover in place if the
stick is centered.
Moving the right stick control left and right
changes the drone’s left and right pitch.!
Push left to fly left and right to fly right. The
Orbit will hover in place if the stick is centered.

One-click Return
Press and hold the One-click Return button to start the One-click Return procedure. The Remote
Controller will beep and the LED indicator will blink to indicate that the drone is entering the
mode. The dr
click Return
again to cancel the
one will then return to the last recorded Home Point. Press this button
O
ne-click Return
pr
ocedure and regain control of the drone.
One-
Remote Contr
When the Remote Controller is turned on, it will detect the paring status with the Orbit, if the
controller is not paired with the drone, the Skye+ app will pop up a paring window as below:
Remote Pairing Procedures
Enter Settings scree and click Remote Controller Setting.
oller Paring
Step 1. Click “Remote Contr
oller Pairing”
Step 2. Click OK to start remote control

Step 3. Pairing in pr
ocess
Remote Contr
Calibr
Step 1. Click“Remote Controller Calibration”to enter the calibration screen.
ol Calibration
ation is required after pairing successful.
Step 1. Click“Remote Contr
oller Calibration”to enter the calibration screen.
Step 2. Click “Start Calibration”

S
tep 3. A warning is displayed to notice users to follo
Follow the instruction to start the combination stick command process until it shows
“Calibration succeed”
1. Users MUST pair the Remote Controller via Skye+ app before first use.
2. Make sure only one Remote Controller is on while paring.
w the instructions.

his content is subject to change. If you have any question about this document, please contact SKYE b
T
© SKYE. All Rights Reserved
Printed in China
a message to support@skye-intelligence.com
y sending

Any Changes or modifications not expressly roved by the party responsible for compliance could void the user’s
authority to operate the equipment.
This device complies with part 15 of the FCC Rules. Operation is subject to the following two conditions:
(1) This device may not cause harmful interference, and (2) this device must accept any interference received,
including interference that may cause undesired operation.
FCC Radiation Exposure Statement:
Note: This equipment has been tested and found to comply with the limits for a Class B digital device, pursuant to part
15 of the FCC Rules. These limits are designed to provide reasonable protection against harmful interference in a
residential installation. This equipment generates uses and can radiate radio frequency energy and, if not installed and
used in accordance with the instructions, may cause harmful interference to radio communications. However, there is
no guarantee that interference will not occur in a particular installation. If this equipment does cause harmful
interference to radio or television reception, which can be determined by turning the equipment off and on, the user is
encouraged to try to correct the interference by one or more of the following measures:
—Reorient or relocate the receiving antenna.
—Increase the separation between the equipment and receiver.
—Connect the equipment into an outlet on a circuit different from that to which the receiver is connected.
—Consult the dealer or an experienced radio/TV technician for help.
IC RSS warning
This device complies with Industry Canada licence-exempt RSS standard (s). Operation is subject to the following
two conditions: (1) this device may not cause interference, and (2) this device must accept any interference,including
interference that may cause undesired operation of the device.
Le présent areil est conforme aux CNR d'Industrie Canada licables aux areils radio exempts de licence.
L'exploitation est autorisée aux deux conditions suivantes:
(1) l'areil ne doit pas produire de brouillage, et
(2) l'utilisateur de l'appareil doit accepter tout brouillage radioélectrique subi, même si le brouillage est susceptible
d'en compromettre le fonctionnement.
SAR tests are c
transmitting at its highest certified power level. Before a new product is a available for sale to the public,
it must be tested and certified to the FCC (IC) that it does not exceed the exposure limit established by
the FCC (IC). For body-orn operation, this product has been tested and meets the FCC (IC) RF
exposure guidelines when used with an accessory designated for this product or when used with an
accessory that contains no metal.
Non-compliance with the above restrictions may result in violation of RF exposure guidelines.
onducted using standard operating positions accepted by the FCC (IC) with the product
 Loading...