

Page 1
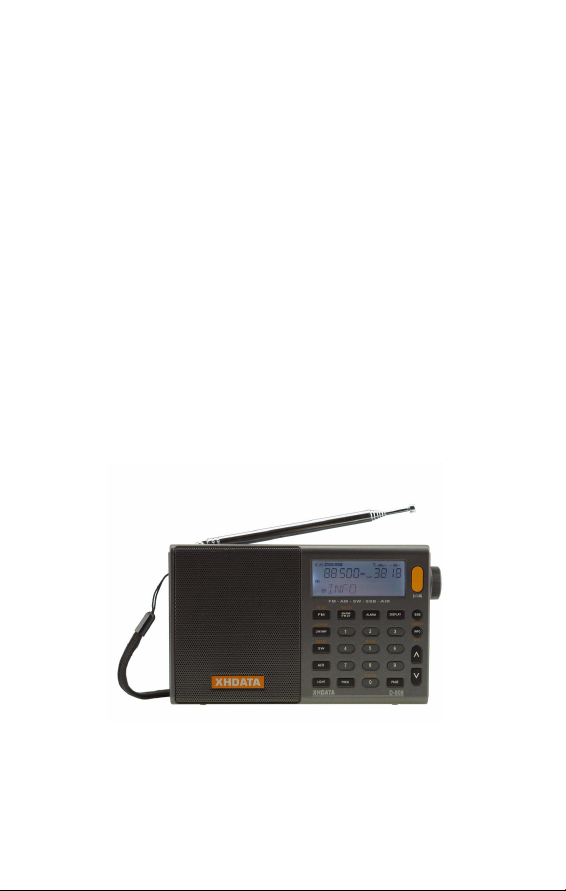
XHDATA
D-808
FM Stereo/LW/MW/SW-SSB AIR RDS
Synthesized Receiver
Page 2

QUICK START GUIDE
WARNING
· Do not expose this appliance to rain or moisture
· Do not submerge or expose to water
· Protect from high humidity and rain
· Only operate within specified temperature range(0°C to 40 °C)
· Unplug immediately if liquid has been spilled or debris have fallen into the unit
· Clean only with a dry cloth. Do not use detergents or chemical solvents as this
might damage the appearance
· Do not attempt to open the unit
· When the battery is fully charged, charging will stop automatically. If the screen
doesn’t display, please take the battery out and install again, or charge the radio
until the screen starts the indication.
1. Install 1 x 18650 battery in the battery compartment, paying attention to the
polarity of battery’ + and – ends
2. Turn on the radio by pressing the ‘POWER’ button
3. Adjust the volume by rotating the ‘VOLUME’ knob
4. Select band by pressing the band button
5. Use the ‘TUNING’ knob to locate a desired station or by directly entering a
frequency:
a) First, select the band you desire
b) Quick press the ‘FREQ’ button
c) Enter the frequency on the keyboard
Page 3
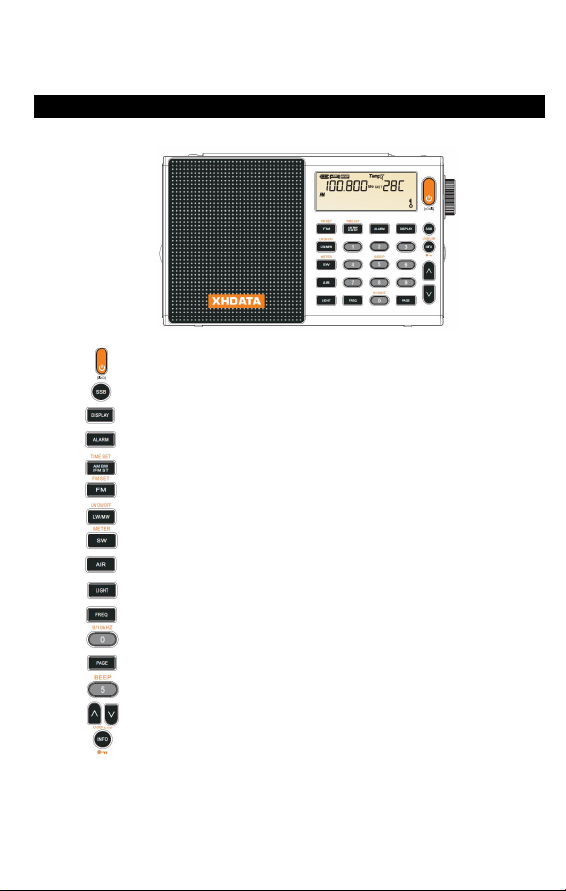
RADIO – FRONT VIEW
Powe r and Slee p Bu tton
SSB /Ba ttery Char ge Bu tton
Disp lay Butto n (Cl ock , Ala rm, sign al Stren gth
Alar m But ton (Ra dio & Buz zer)
AM Ban dwi dth S elec tion , FM S tere o/Mo no , Time Set
FM Ba nd, ATS , FM Fre q Ra nge Se lecti on
LW/ MW Ban d Se lec tion , AT S
SW BAN D, Me ter Band Se lect ion ,A TS
Air Ban d, ATS
Bac k Ligh t But ton
'FRE Q' En try Butt on
9/10 kHz Step Se lecti on But ton
Page Sele ctio n B utton
Beep On /Of f Butto n
Up/D own Se lect ion Butto n
RDS Info rmat ion, US B/L SB Sele ctio n, Lock Bu tton
0-9 Key: P age and Mem ory B utto n
Leve l, Te mp .)
Page 4
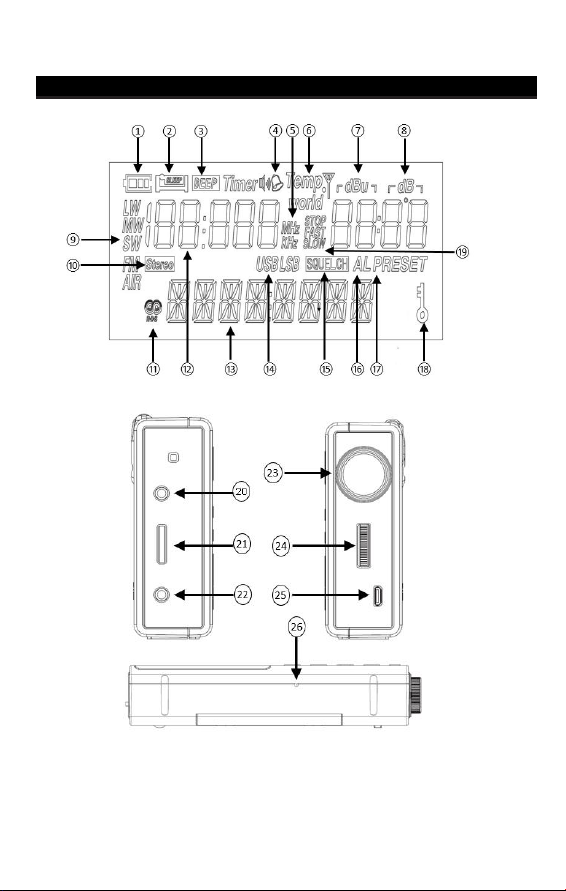
RADIO – CONTROL LOCATIONS
Page 5

1. Battery Icon / Charge Indicator
2.Sleep Timer is Activated
3. Beep is Activated
4. Alarm Set for Radio Station or Buzzer
5. kHz Indicates kilohertz while in MW,SW and LW bands ,MHZ indicates Megahertz
while in FM and Air band
6. Indicates Temperature
7. Reception Signal St rength
8. Signal-to-noise Ratio Indica tor
9. Band Indicators (AM, FM, SW, LW, AIR)
10. Stereo FM Reception
11. RDS Icon
12. Frequency/Time
13. RDS Information Display
14. USB/LSB Indicator fo r S SB
15. Air Sq uelch
16. Alarm is Activated
17. Station Memories 0-9
18. Radio is locked
19. Tuning Speed with Knob
20. External Antenna Jack (3.5mm)
21. Volume Control Knob
22. Earphone Jack (3.5mm)
23. Tuning Knob
24. Fine Tuning Knob
25. Power, Micro-USB jack
26. Reset Hole for resetting radio (located on bottom of radio)
Page 6
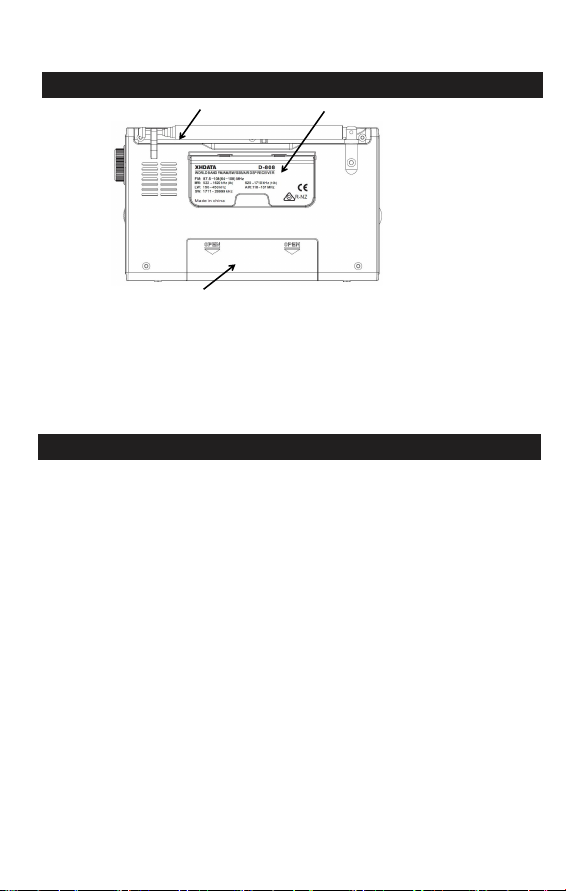
RADIO VIEW - BACK VIEW
27
○
29
○
27. Whip Antenna used for FM, SW,AIR bands
28. Back stand-up
29. Battery Compartment, insert 1 x 18650 Lithium Battery &INED
28
○
FUNCTIONS & OPERATIONS EXPLAINED
Power/Sleep Button
·To turn the radio 'ON: just press the orange power button.
·To use the Sleep timer - short press the orange b utton few times. The
Sleep Timer will automatically shut off the radio after the se t amount of
time expires. The display will cycle through minutes 120, 9 0, 60, 45, 30,15.
When the display to the “ON”, the radio is on for a long time.
Tuning Knob
·Rotate the Tuning Knob to tune into a different frequency while the radio
is on.
·Press the knob ' IN' shortly towards the b ody of the radio (on ce quickly) to
change among 'STOP' , 'FAST' and 'SLOW' tuning increments when
rotating the knob.
·Press the knob for about 5 seconds, squelch mode will start. Squelch
Mode only works on t he Air band. Press and hold the t uning knob "IN"
towards the b ody of the radio (for 2 seconds) to activate. "OFF" will
appear on the display screen. Rotate the kn ob to adjust the level of
squelch desired. The optimal level is u sually the lowest highest number
that does not h ave background noise. W ith squelch turned 'OFF: you may
be able to receive some very weak signal that d oes not register when the
squelch is enabled. Press the tuning knob 'IN' towards the body o f the
radio one time to save the current squelch setting.
Page 7

Up and Down Tuning Buttons
·Press once quickly to tune to the next frequency increment.
·Press and hold for 2 seconds to automatically tune to the next strong
station.
·Hold continuously to cycle through the whole band. Press once q uickly
again to stop at current frequency.
Lock Button
·With the radio off, press and hold for 2 seconds to controls lock, except
the volume control wheel. A lock ico n will display on the screen when the
radio is locked.
·To disable lock, press and hold the lock button again for 2 seconds.
·With the radio on, press quickly the lock button to display RDS
information (i.e. PS, DATE, RT, PTY),press again to display next
information.
·In SSB mode, press quickly this button to cycle USB and LSB
Display Button
·Press quickly the button to cycle d isplay alarm/ time/temperature/signal
strength level.
AM Bandwidth / FM Stereo Button
·Bandwidth Filters (for AM, SW, LW and Air band only): O n AM, SW, LW
and AIR bands there are 6 bandwidth settings that can be used to filter
out unwanted n oise or adjacent overlapping stations. Quickly p ress the
button to view the current bandwidth selection (500Hz, 1K , 1.2K, 2.2K, 3K,
4K) in cycle. Release the button to choose the displayed selection.
NOTE:
A narrow bandwidth of 1K or 1.2K may work best when receiving a weak
or noisy signal. For a strong local s ignal, 4kHz is usually best, especially
for music. If the station is chan ged then the radio will return to the default
bandwidth setting at 1kHz for SSB mode only. The default bandwidth is
3kHz in other modes.
Stereo or Mono Reception
·In th e FM band, press quickly the button t o cy cle b etween ‘MONO’ and
‘AUTO’. Typically, FM mono will have better reception than FM stereo.
NOTE:
If a station does not broadcast in stereo, or radio cannot lock onto the
stereo signal, the radio will only re ceive FM mono and the stereo symbol
will not be displayed.
Time Set
·If the radio is off, press quickly the button t hen UP or DOWN butt on to
cycle between ‘AUTO’ and ‘MANUAL’ to update time (‘AUTO' indicates
time automatically update s for RDS station). In Manual mode, the user
can use UP or DOWN button to adjust the time.
·Press a nd hold for 2 sec onds to set u p time with 0-9 key, 'TIME' is
flashing for time setting until finished.
Setting the Alarm
·With the radio powered off, p ress and hold ALARM button for 2 seconds.
Use 0-9 keys to directly enter the alarm time you desire.
·Press quickly ALARM button then ‘ALARM’ icon will flash. Press UP or
DOWN button to select alarm method: alarm by radio or buzzer and a larm
off.
·By default, the alarm will wake you with a beep. A speaker icon displays
on the screen indicating that the alarm will wake to the previous last radio
Page 8

station played. It is best to check the station frequency and adjust the
volume level to yo ur wake up pref erence before going to sleep t o ensure
that it is to your liking. When the alarm sounds, press the power button to
turn the alarm off, or press any other button to sleep for 10 more minutes.
FM Band I FM Set Button
·With the radio off, press and hold FM button to select FM frequency band
as 87 - 108MHz; 64-108MHz according to different countries.
·With the rad io on, press quickly to tune in FM band; press and hold for 2
seconds to activate ATS (Auto Tuning System) function.
LW / MW Button
·When the radio is powered off, press and hold for 2 seconds to turn on o r
off LW.
With the radio on, quickly p ress to switch between LW and MW band;
press and hold for 2 seconds to activate A TS and scan the entire LW or
MW band.
SW / Meter Button
·With the radio on, quickly press to start SW band and select meter band
and change between frequencies according to popular meter bands.
·Press and hold SW band for 2 seconds to activate ATS feature.
·With shortwave you can listen t o radio sig nals from around the world.
Signals are usually received best at night and early morning when the
earth's ionosphere does not cause interference with the bouncing signals.
This radio has several bandwidth filters to reduce interference.
Select which one sounds best by pressing the 'BANDWIDTH' button after
a station is tuned in.
AIR Button
·With the radio on, quickly press this button to activate AIR band, press
and hold for 2 seconds to start ATS to scan the entire Air bands. Once the
station is available, it will stop scanning to play this station.
LIGHT Button
·Quickly press this button to turn on the backlight of th e LCD display, the
backlight will be on all the time. Quick press again to turn off the light.
Activate 9/10kHzTuning Button
·When in 9k mode, the frequency range is 522-1620kHz, intelligent step is
1kHz / 9kHz (for Asia, Africa and Europe)
When in 10k mode, the frequency range is 520-1710kHz, intelligent step
is 1kHz / 10kHz (for North America)
Frequency Button
·When you are in your selected band, this button le ts you directly enter
the frequency number of y our desired station using the number b uttons.
For example, to play 1520kHz in the AM band, quickly press the FREQ
button and then enter 1,5, 2, 0 using the number buttons.
NOTE: When manually ente ring SW frequenc ies 1711 t o 29999, yo u
should press the FREQ button first. A fter entry, if entry is inco rrect, the
LCD will display ‘Error’…
Memory Preset Button D-9
·Save your favorite stations to memory buttons. To save a station, p ress
and hold any memory button for 2 seconds while the sta tion is playing.
The radio is a "smart" rad io and will remember current se ttings when a
station is preset into memory. Th e current se ttings that will be saved with
Page 9

your station are:
1. Stereo or Mono selection on FM
2. Bandwidth selection on AM, Shortwave, LW, or Air bands
Beep Button
·When radio powered off, press and hold 'BEEP' button ('5' key) for 3
seconds to switch between been on and off. If B eep is on, 'BEEP' icon will
be displayed.
Charge Button
·Use this radio to recharge your Lithium type batteries. Supply power to
the radio from micro-USB cable (th e charger is not included). The battery
icon on the display will begin to cycle indicating that the batteries are
charging. Charging will continue for 10 hours or until the batteries are full.
If you turn the radio on d uring the charge cycle, the battery icon may
indicate ch arging although it is not. Please be sure to keep the radio
turned off while charging.
Tuning Knob
·Rotate knob to tune in the next frequen cy increment. P ress the knob 'IN'
towards the body of the radio (on ce quickly) to change between 'FAST'
and 'SLOW' tu ning step when rotating the knob. 'FAST' tuning will use
larger incremental steps between frequencies, 'SLOW' tuning can improve
AM st ations that are sligh tly off frequency on poor signals. Try tuning
1kHz higher or lowe r than the actual station fre quency to see if reception
improves.
Fine Tuning
·In SSB mode, rotate the fine tuning knob to adjust the level of fine tuning.
·In other band mode, rotate the fine tuning knob to make slight adjustment
to receive some very weak signals with slow tuning increments, especially
for MW band.
Volume Control
·Rotate the small wheel up for higher volume and down for lower volume.
Earphone Jack
·For private listening, use h eadphones or earbuds. This jack can also b e
used as an audio output to another device.
External Antenna Jack
·You can connect an external antenna with this jack to improve the
reception on SW, and AIR band.
Back Stand
·Flip this p anel out t o prop u p your rad io for easy use of co ntrol, best
audio and for viewing positioning.
Battery Compartment
Use 1 x 18650 lithium battery.
Page 10

Reset Hole
·Quickly press into the reset hole on the bottom of the rad io to reset the
microprocessor. It is recommended to u se a toothpick or other soft device
to reset the radio.
·Do not press to hard as you might damage the radio.
FM/AIR/SW Antenna
·Flip up a nd fully extend the whip a ntenna. For most stations, reception is
best when antenna is positioned vertically. Other st ations may have b etter
reception with the antenna positioned differently.
Handle Carry
·Use this carry strap for easy carrying when walking or camping outdoors.
Temperature Display
·When the radio is off, p ress and hold down #3 button for 2 seconds and
then quick press to change the display between °C and °F.
Page 11

SPECIFICATIONS
FM:
87.5 - 108(64-108)MHz
AM (MW):
522 - 1620kHz (9k step)
520 - 1710kHz (10k step)
SW:
1711 - 29999kHz
LW:
150-450kHz
AIR:
118- 137MHz
S/N (Signal to Noise) Sensitivity:
FM:
>3uV
MW:
>0.5mV/m
LW:
>10mV/m
SW:
>10uV
AIR:
>0.5uV
AM Selectivity:
>80dB
Number of Memories: 500
Batteries:
1 x 18650
DC In:
5V
Built-in Speaker:
8ohm 1W
Earphone Jack:
3.5mm
Dimensions:
157(W) x 92(H) x 32(D)mm
Weight:
265g(battery not included)
Accessories:
1 x Stereo earphone
1 x Specific bag
1 x External antenna
1 x USB charge cable
1 x 18650 lithium battery
1 x English user manual
Radio Bands
Page 12

 Loading...