

Page 1
Dual-HD Wireless IP Camera
Quick User Guide
Family use Stores use Indoor use
For more information, please visit our online website
http://www.cam158.com
Page 2
1. Download and install the application
A. Make sure your mobile device is properly connected to the network.
B. Search and download "BlueCam" in Google Play or the App Store.
2.Check the wireless network environment
Enable the router's DHCP functionality and ensure that it works under 2.4ghz.(5GHz is not
supported by Device)
Make sure your smartphone is connected to your router.
3. Connect device
Method 1: wireless connection (the connection method is suitable for YT series, KP series, QJ
series, WJ series, ML series models)
A. Power On the IP camera, the device will start from the voice prompt, "welcome to use, please
connect the network".(if you don't hear the voice prompt, press the reset button to restart the
device)
B. Add devices (for Android phones)
Step 1: start the application and click "+" (figure 1);
Step 2: click "wireless configuration" (figure 2);
Step 3: click "already heard the voice prompt" (figure 3);
Quick start guide
Android iOS
Page 3

Step 4: enter the wireless password and then click "connect WIFI" (figure 4);
figure2
figure1
Step 5: click "start" and wait for 30S.(figure 5);
Step 6: On the code completion interface, find the device to add and click the add button (figure
6).
Step 7: Find the device already added on the device list page, and the device is displayed online
(figure 7);
Step 8: click the play button, the security tips will pop up, and click ok to enter into the
user settings page (figure 8).
Step 9: modify the user name and password on the user-device page, click finish button to start
the real-time view (figure 9).
Note: A powerful username and password is strongly recommended by us to protect your privacy.
Page 4
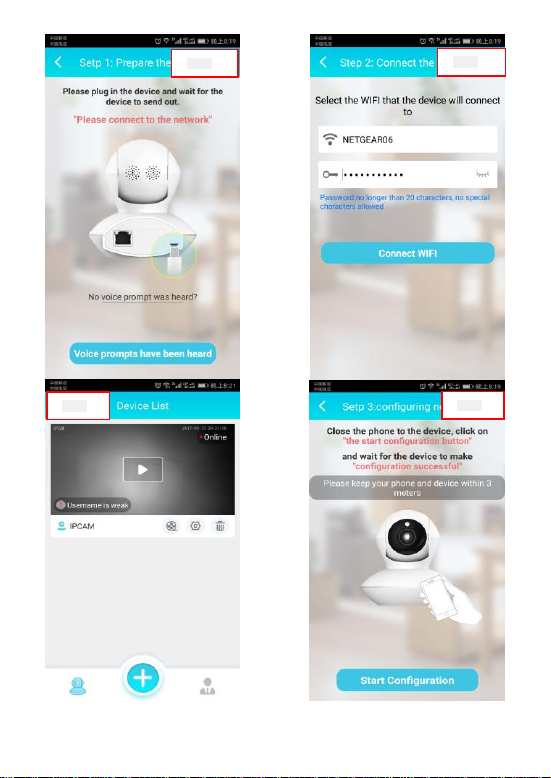
figure5
figure7
figure4
figure3
Page 5
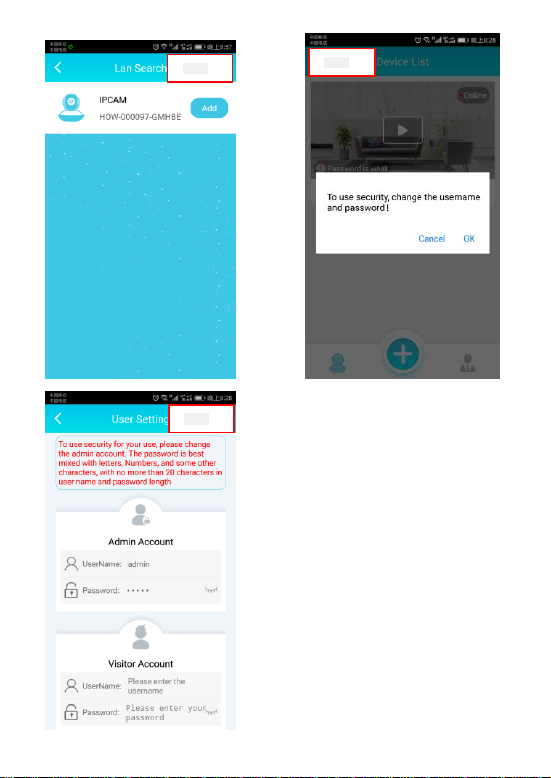
figure9
figure8
figure6
Page 6

If there is no device on the code success page, go back to step 2 and re-configure the device.
Reset button:
Press "reset" button for 5 seconds and the device will reboot (you can hear "reset success") and it will
automatically revert to factory settings. So you need to make a wifi setup again after reboot.
Note: when you try to reset the device, make sure it is powered on.
Page 7

Method 2: AP (hotspot) connection (the connection mode is applicable to QJ series, WJ series products)
Step 1: open the phone Settings, select WLAN Settings, search the wireless webcam ID, and the wifi
camera ID prefix is: HOW - etc. (figure 1);
Step 2: click ID, password: 168168168, complete WLAN connection (figure 2);
Step 3: Run the application of "BlueCam" and click "+" (figure 3);
Step 4: click "LAN search" to enter the LAN search page (figure 4);
Step 5: on the LAN search page, find the device to add, then click the add button (figure 5);
Step 6: Find the added devices on the device list page, and the device displays online (figure 6);
Step 7: click the play button to pop up the security tips, and click ok to enter the user settings page
(figure 7).
Step 8: Modify the user name and password on the user-device page, click the finish button to start the
real-time view (figure 8);
Note: we strongly recommend that you set up a powerful username and password to protect your
privacy.
Step 9: on the device list page, click the Settings button (figure 9);
Step 10: click on "WIFI Settings" (figure 10);
Step 11: select the network you want to connect to and enter your password, then click the Settings
button to restart and automatically connect to the wifi network (figure 11).
Note: don't power off the device when you reboot.
Page 8
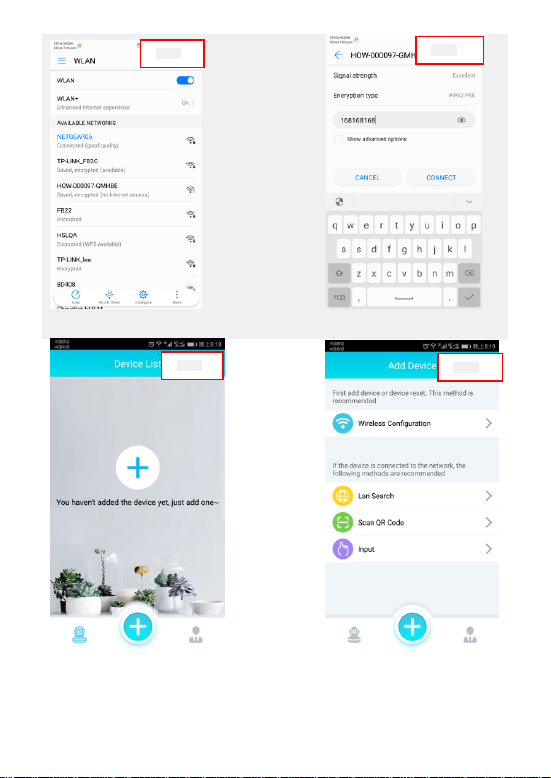
figure4
figure3
figure2
figure1
Page 9
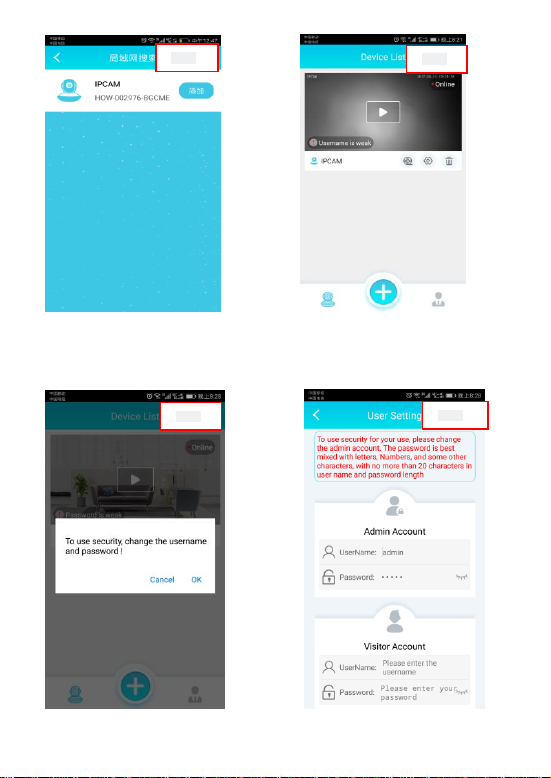
figure8
figure7
figure6
figure5
Page 10
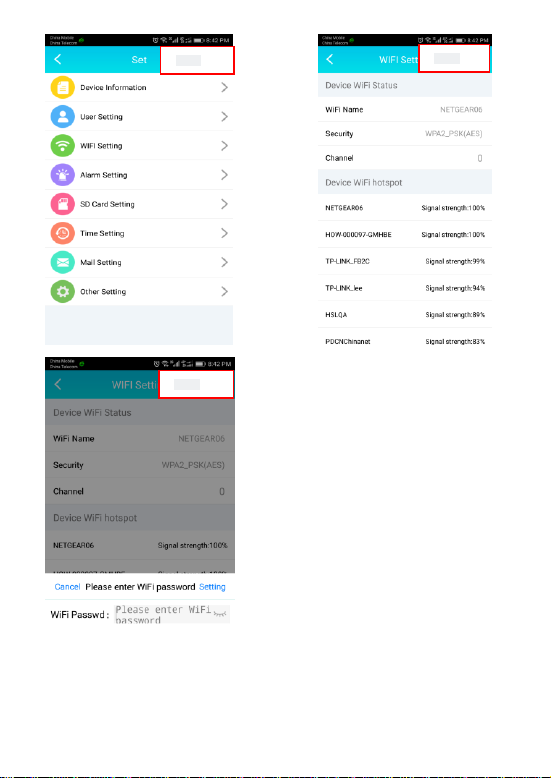
figure11
figure10
figure9
Page 11
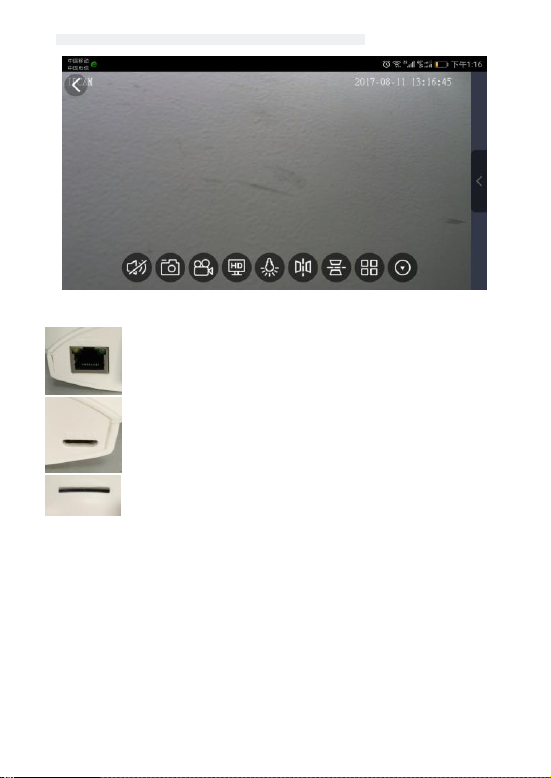
4. Look at these video settings and we'll take a smartphone for example.
Audio Photoing Recording Resolution LEDS, Left-Right mirror, UP-Down mirror, 4 Screen
5.Port and function
RJ45 port :use for connect internet by PC LAN
Micro USB port:use USB cable to supply power to camera
6.Accessories:
Power adapter x 1、USB cable x 1、bracket x 1、scews kit x 1、manual x 1
TF card slot:for TF card recording use
Page 12

Changes or modifications to this unit not expressly approved by the party responsible for compliance
could void the user's authority to operate the equipment.
FCC statement
This device complies with Part 15 of the FCC Rules: Operation is subject to
the following two conditions:
1. This device may not cause harmful interference and
2. This device must accept any interference that is received, including any interfer
ence that may cause undesired operation.
This devic e is acting as slave and operat ing in the 2.4 GHz (2412 ~2462 MHz)
band.
Ad Hoc function is supported but not able to operate on non-US frequencies.
NOTE: This equipment has been tested and found to comply with the limits for
a Class B digital device, pursuant to part 15 of the FCC Rules. These limits are
designed to provide reasonable protection against harmful interference in a
residential installation. This equipment generates uses and can radiate radio
frequency energy and, if not installed and used in accordance with the
instructions, may cause harmful interference to radio communications.
However, there is no guarantee that interference will not occur in a particular
installation. If this equipment does cause harmful interference to radio or
television reception, which can be determined by turning the equipment off and
on, the user is encouraged to try to correct the interference by one or more of
the following measures:
- Reorient or relocate the receiving antenna.
- Increase the separation between the equipment and receiver.
-Connect the equipment into an outlet on a circuit different from that to which
the receiver is connected.
-Consult the dealer or an experienced radio/TV technician for help
FCC Radio Frequency Exposure Statement: The device has been evaluated to meet general
RF exposure requirements. The device can be used in fixed/mobile exposure conditions.
The min separation distance is 20cm.
 Loading...