

Thank you for purchasing XFT-120G AED Trainer
Please read the instruction manual carefully and thoroughly before operating this device.
Also please keep it available for future reference.
1/20

Content
1. Product Introduction.........................................................................................................................................................3
2. Product Illustration...........................................................................................................................................................3
2.1 The Trainer.............................................................................................................................................................4
2.2 The Trainer Display Screen....................................................................................................................................6
2.3 The Remote Control...............................................................................................................................................7
2.4 Accessories...........................................................................................................................................................10
3.Operating Instruction.......................................................................................................................................................11
3.1 Preparation........................................................................................................................................................... 11
3.2 Power on and select training mode...................................................................................................................... 12
3.3 Connecting Electrode Pad....................................................................................................................................12
3.4 Follow the voice prompts.....................................................................................................................................13
3.5 Setting Interface................................................................................................................................................... 13
3.6 Shutdown............................................................................................................................................................. 16
4. Product maintenance...................................................................................................................................................... 16
4.1 The trainer maintenance.......................................................................................................................................16
4.2 Electrode maintenance.........................................................................................................................................16
4.3 Battery Disassembly and Maintenance................................................................................................................16
4.4 Working Condition and Storage Condition......................................................................................................... 18
5. Specification and Product Contents................................................................................................................................18
5.1 The Trainer........................................................................................................................................................... 18
5.2 Remote Control....................................................................................................................................................18
5.3 Product Contents.................................................................................................................................................. 19
6. After-sales Service..........................................................................................................................................................20
2/20
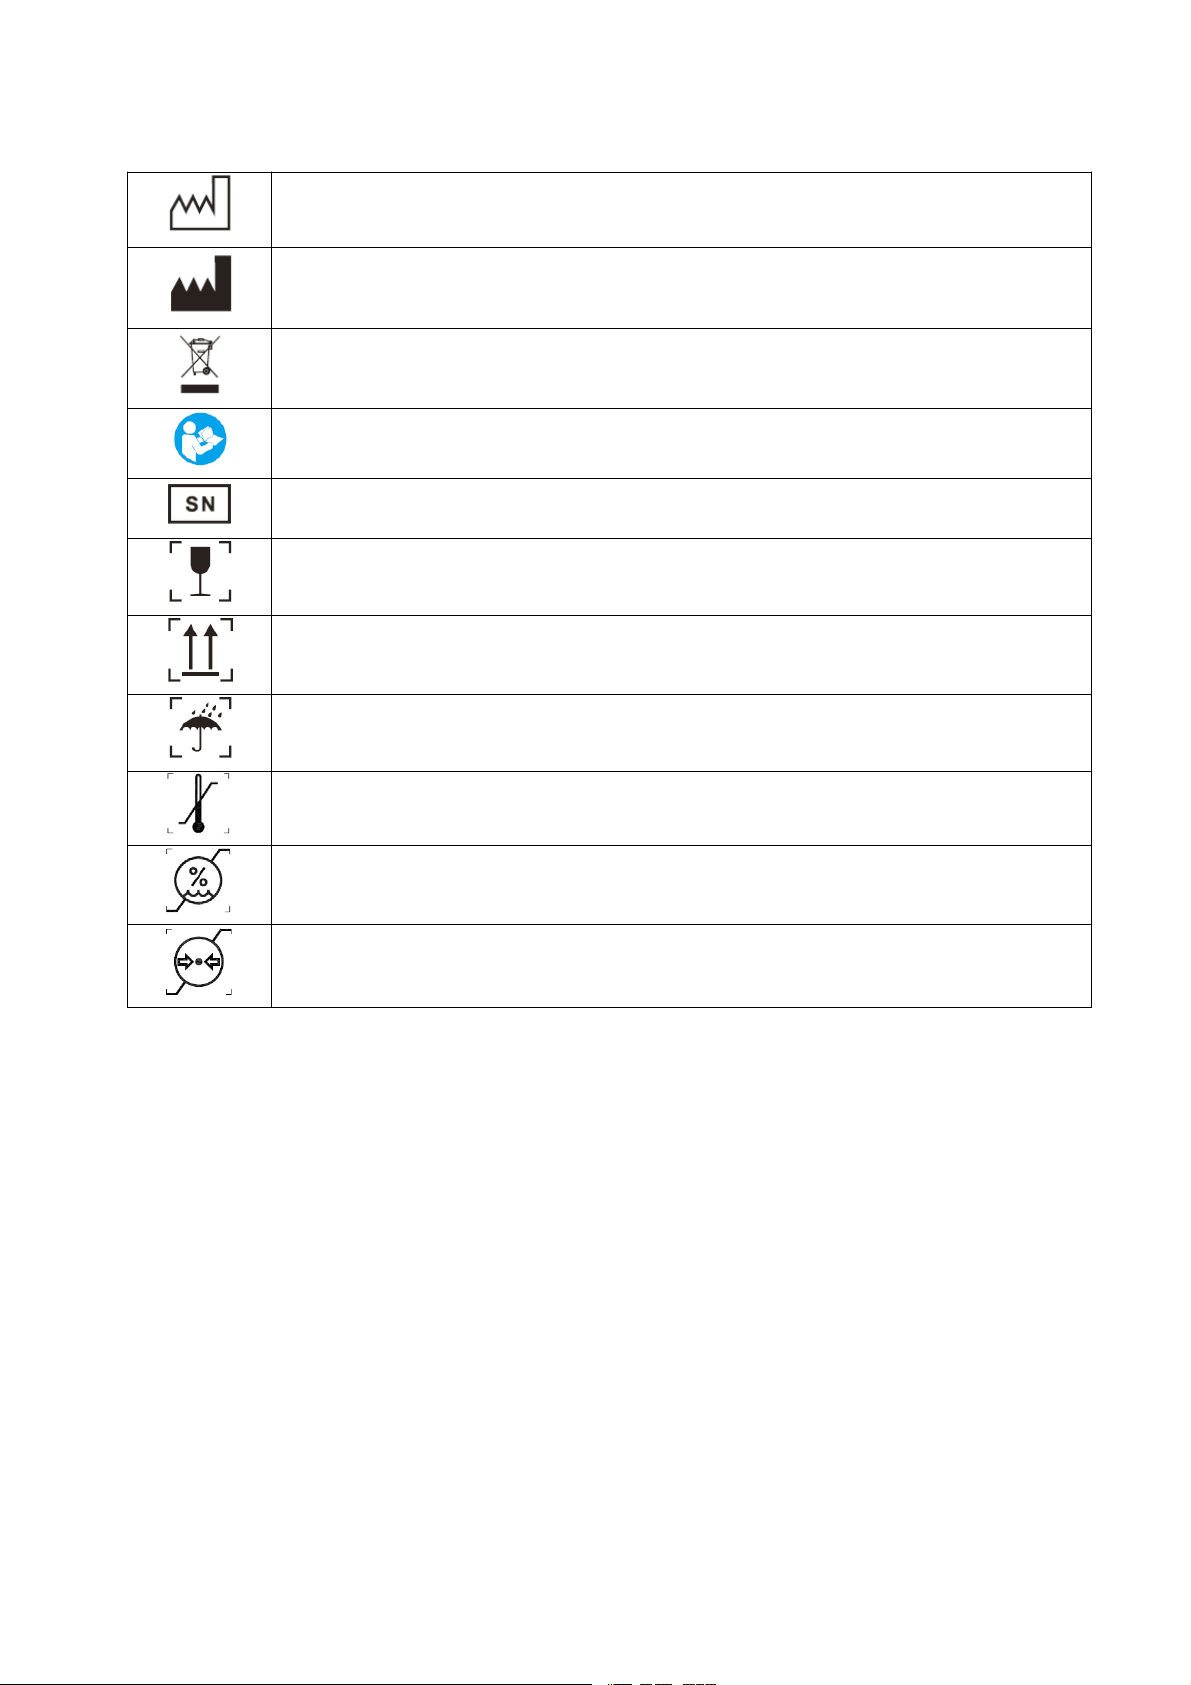
List of Symbols
Date of Manufacture
Manufacturer
This product must not be disposed of with other household waste
Refer to user manual
Serial Number
Fragile
Keep upward
Keep dry
Temperature limit
Humidity limitation
Atmospheric pressure limitation
1. Product Introduction
XFT-120G AED (Automated External Defibrillator) Trainer is specifically designed to train first-aid personnel before
they use a real clinical AED. The AED Trainer completely simulates the operation of AED in the training guide and
training program, but does not deliver high voltage electric shock, protecting the safety of trainees. It can be used to
help first-aid personnel get familiar with AED and master some necessary basic operating skills of using AED in the
first aid process. Before using an AED, first-aid personnel should first complete training courses on how to respond
calmly in a real accident. These training courses also include learning how to use an AED Trainer. A trained first-aid
personnel should know how to assess a patient's condition, such as loss of consciousness, respiratory arrest, cardiac
arrest, etc., and should be proficient in CPR procedures and related medical procedures.
2. Product Illustration
XFT-120G AED Trainer consists of the Trainer, Remote Control, Electrode Pads, Pad Sensors, Instruction Manual,
Power Adapter, and Storage Bag.
3/20
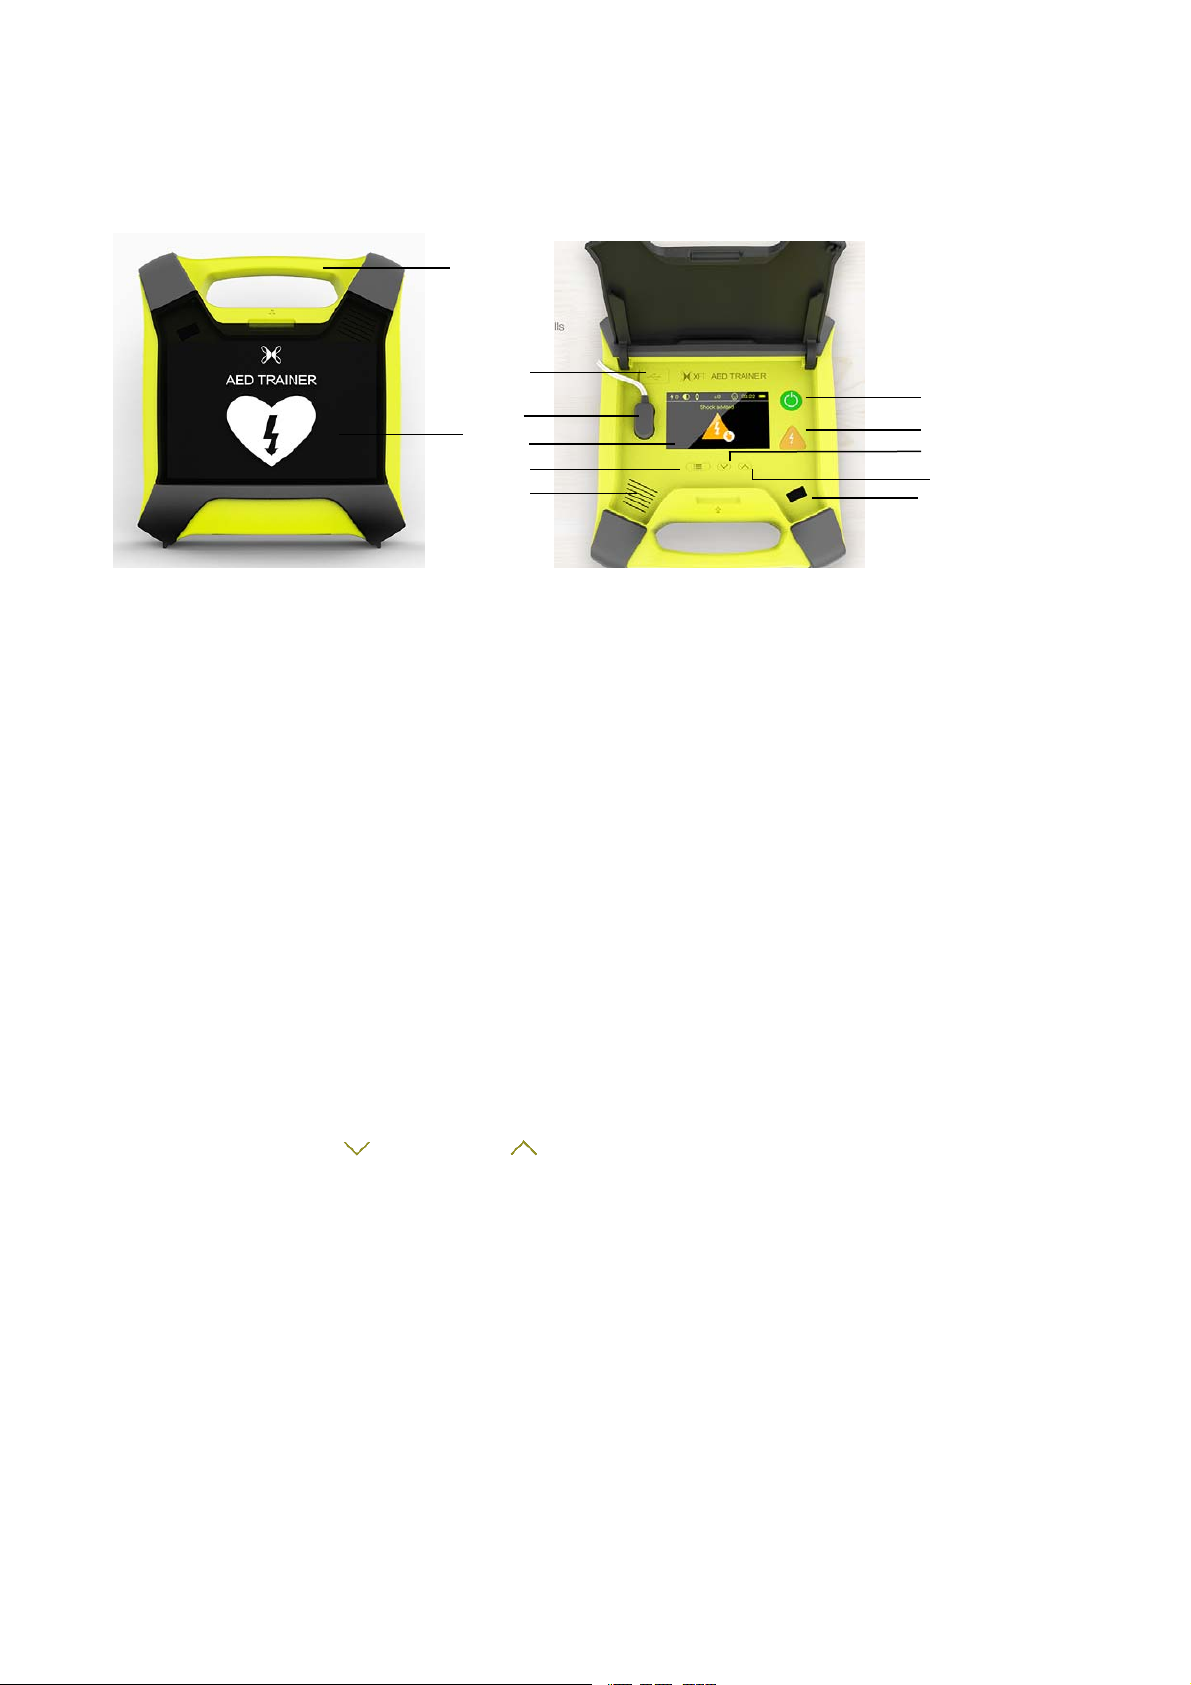
2.1 The Trainer
2.1.1. Front View
1
3
4
2
5
8
11
Fig. 1 Front View Fig.2 Open the Cover
1) Handle
2) Cover
When Open the cover, the AED Trainer will be turned one; when close the cover, the AED Trainer will be turned
off.
3) USB Interface
It is used to upgrade the software.
4) Electrode Socket:
It is used to connect the electrode pad.
5) Display Screen
When the Trainer is working, the screen will display the working status.
6) Power Button
Turn on the trainer by opening the cover, during this state, press the Power button to shut down the Trainer
7) Shock Button
Press this button to deliver shock. The button flashes when shock advised.
8) Setting Button
When the trainer is powered on, press and hold this Setting button for 3 seconds to enter the setting interface. Then
press the Donw button
settings. After the setting is completed, press and hold the Setting button for 3 seconds to exit the setting interface.
9) Up Button
When it is on the working interface, user can press this button to choose different scenarios;
When it is on Setting interface, user can press this button to switch the selection.
10) Down button
When it is on the working interface, user can press this button to choose different scenarios;
When it is on Setting interface, user can press this button to switch the selection.
11) Loudspeaker
12) Signal Receiving Window
When using the remote control, point it at this window to control the trainer.
or Up button to select the language, metronome, CPR wristband, and system
6
7
10
9
12
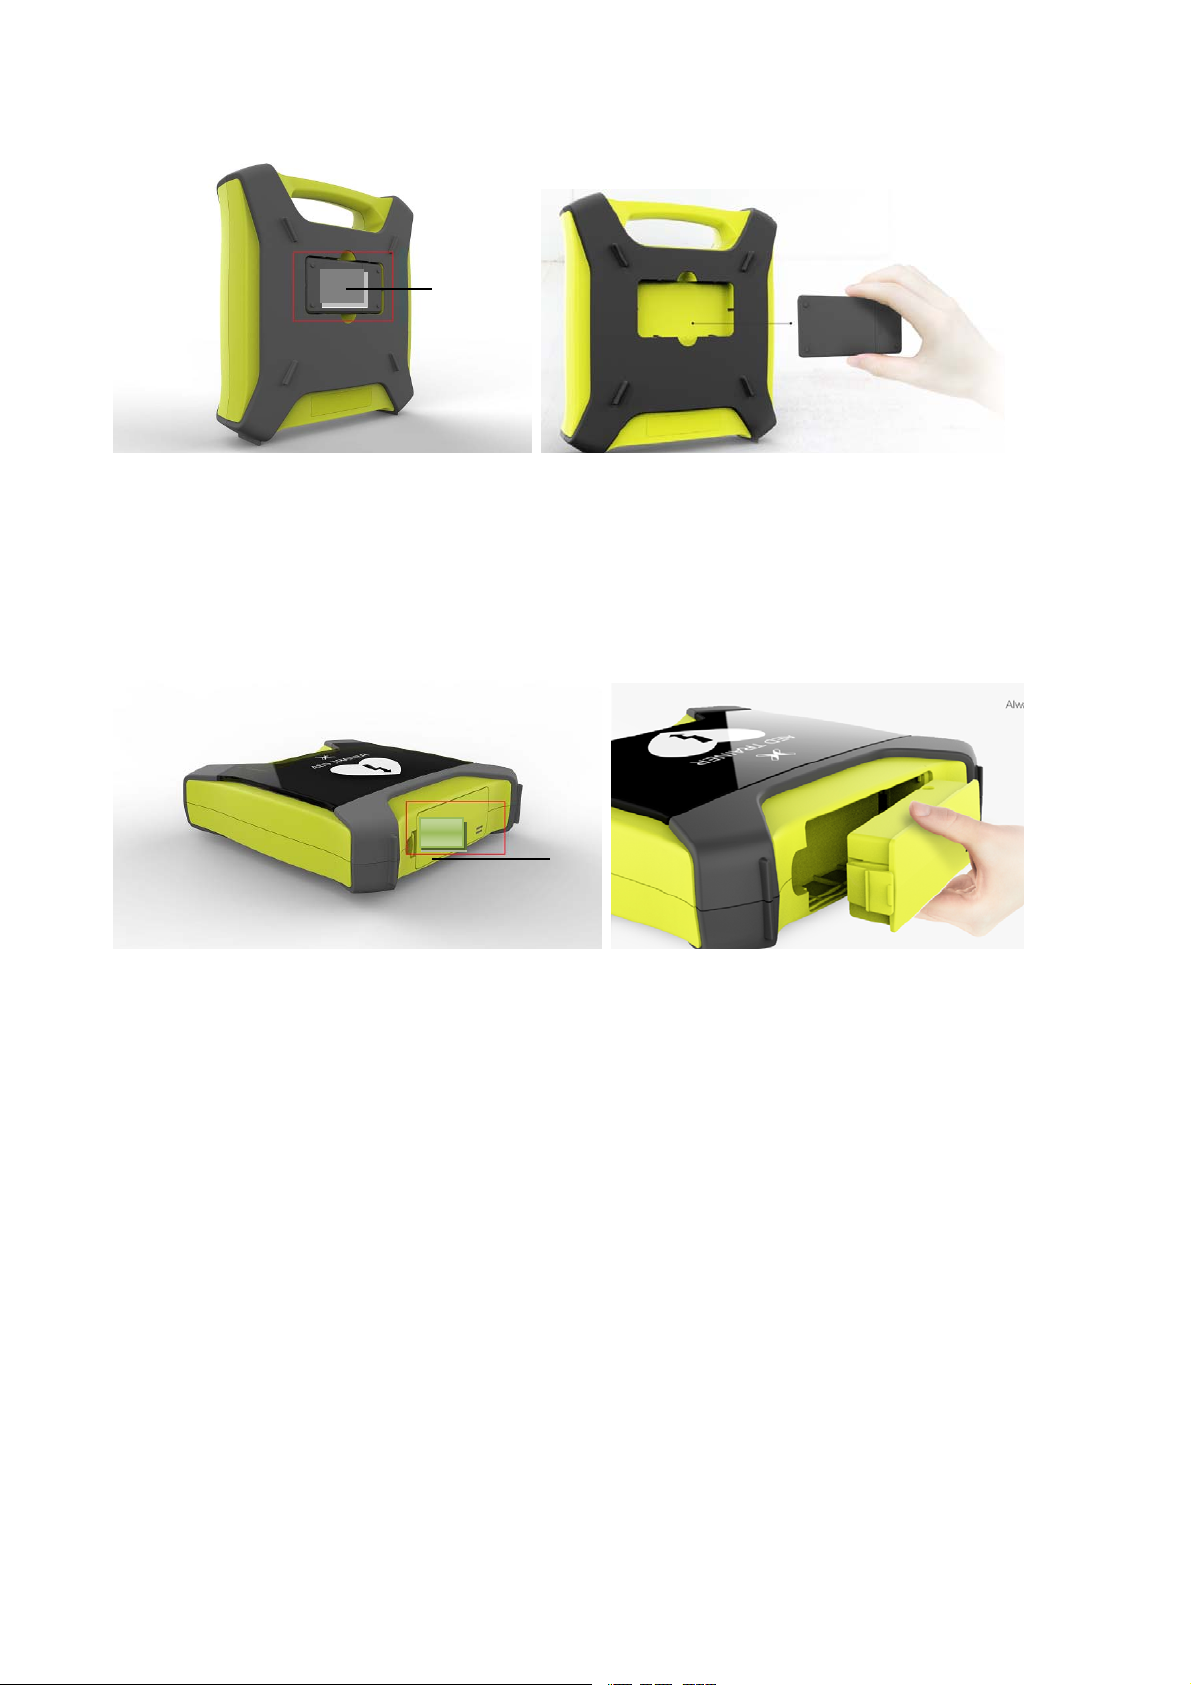
2.1.2 Rear View
4/20
1
Fig.3 Rear View Fig.4 Take Out the Remote Control
1) Remote Control
The remote control is stored in the back side of the AED Trainer.User can remove it from the trainer when doing
the training.
2.1.3 Botton View
1
Fig.5 Botton View Fig.6 Remove the Battery Module
1) Battery Module
The battery module is rechargeable. When charinging is need, user can remove the battery module from the AED
Trainer and connect it with charging adapter to do the charging.
5/20
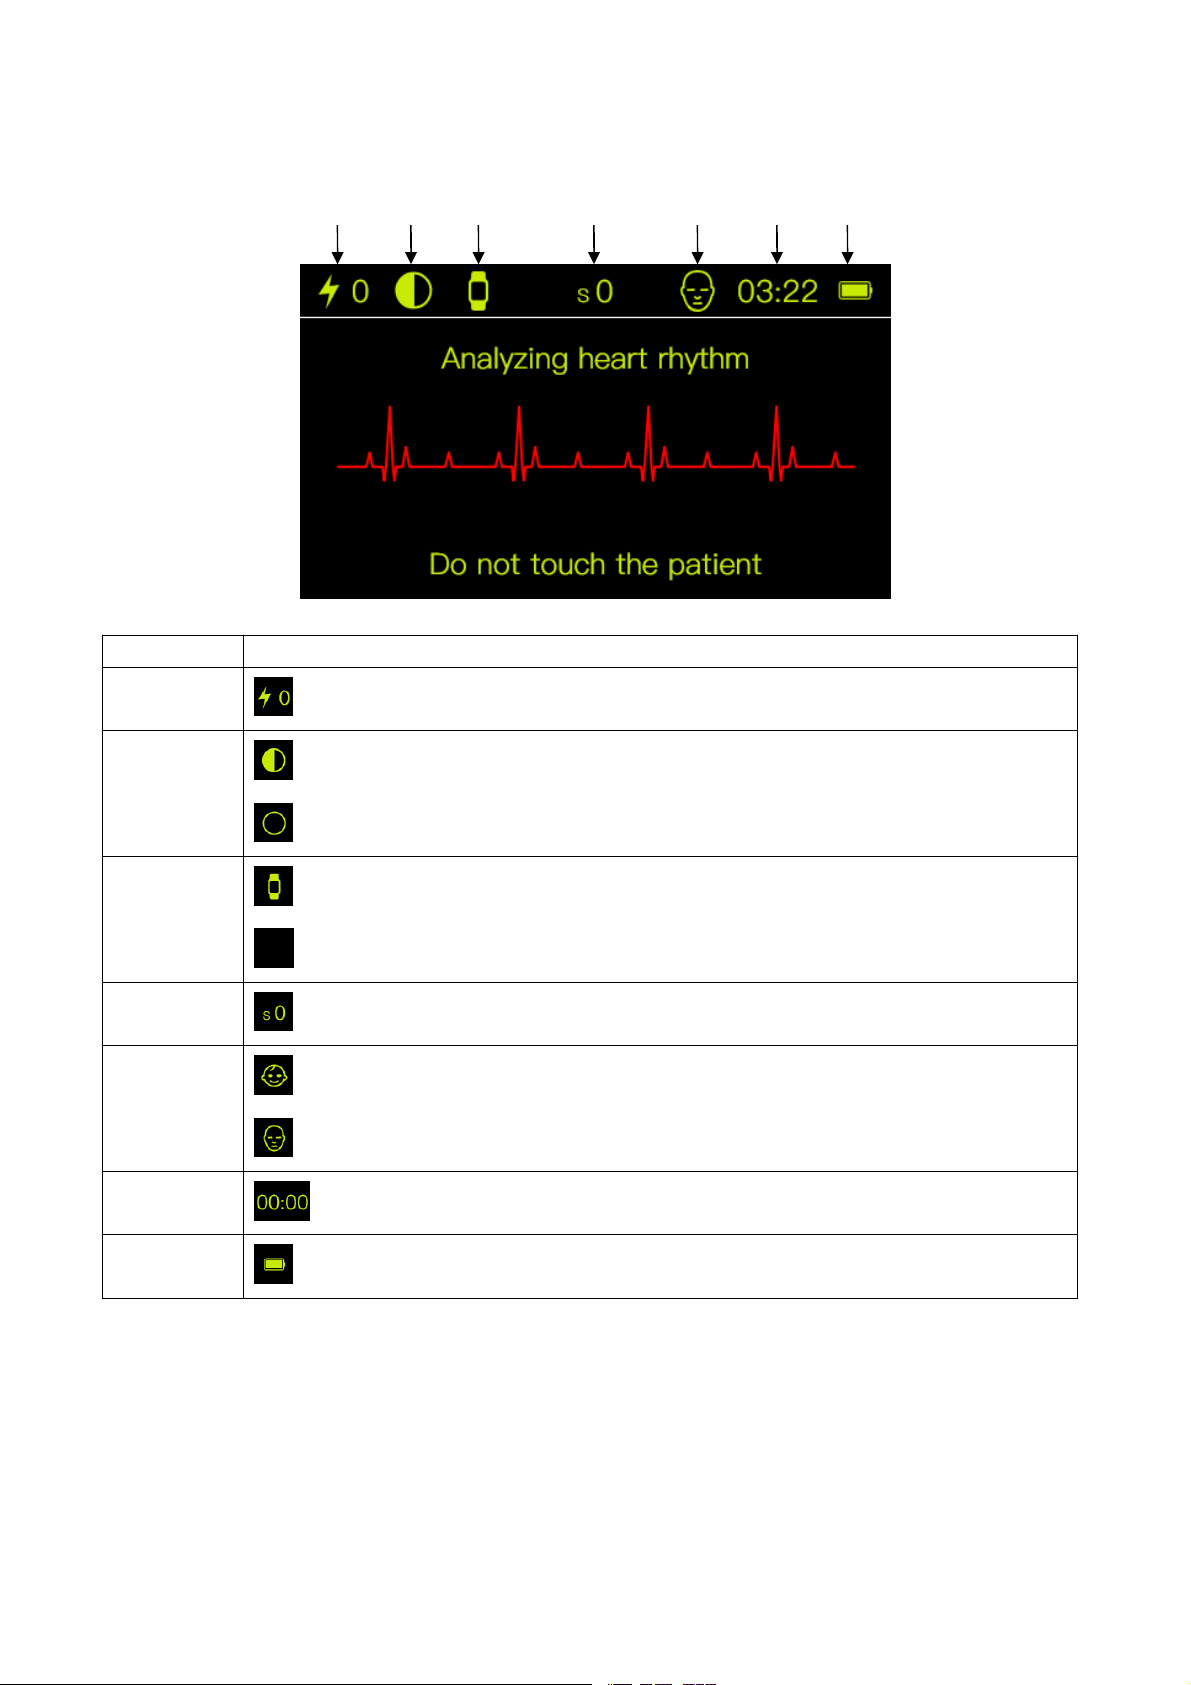
2.2 The Display Screen
123 4 56 7
Fig.7 Display Screen
No. Explanation
1
2
3
4
5
6
7
Indicates the times of shocks the Trainer has delivered “0” means no shock
Indicates that the trainer is currently in semi-automatic mode;
Indicates that the trainer is currently in the full-automatic mode.
Indicates that the trainer is connected to the CPR wristband;
Indicates that the trainer is not connected to the CPR wristband.
S means Scenario, the number 0-9 means the the scenario 0 to scenario 9.
Indicates that the trainer is currently in pediatric mode and uses child electrode pads;
Indicates that the trainer is currently in adult mode and uses adult electrode pads.
Indicates the time currently used by the trainer after it is powered on.
Indicates the current battery level of the trainer
6/20
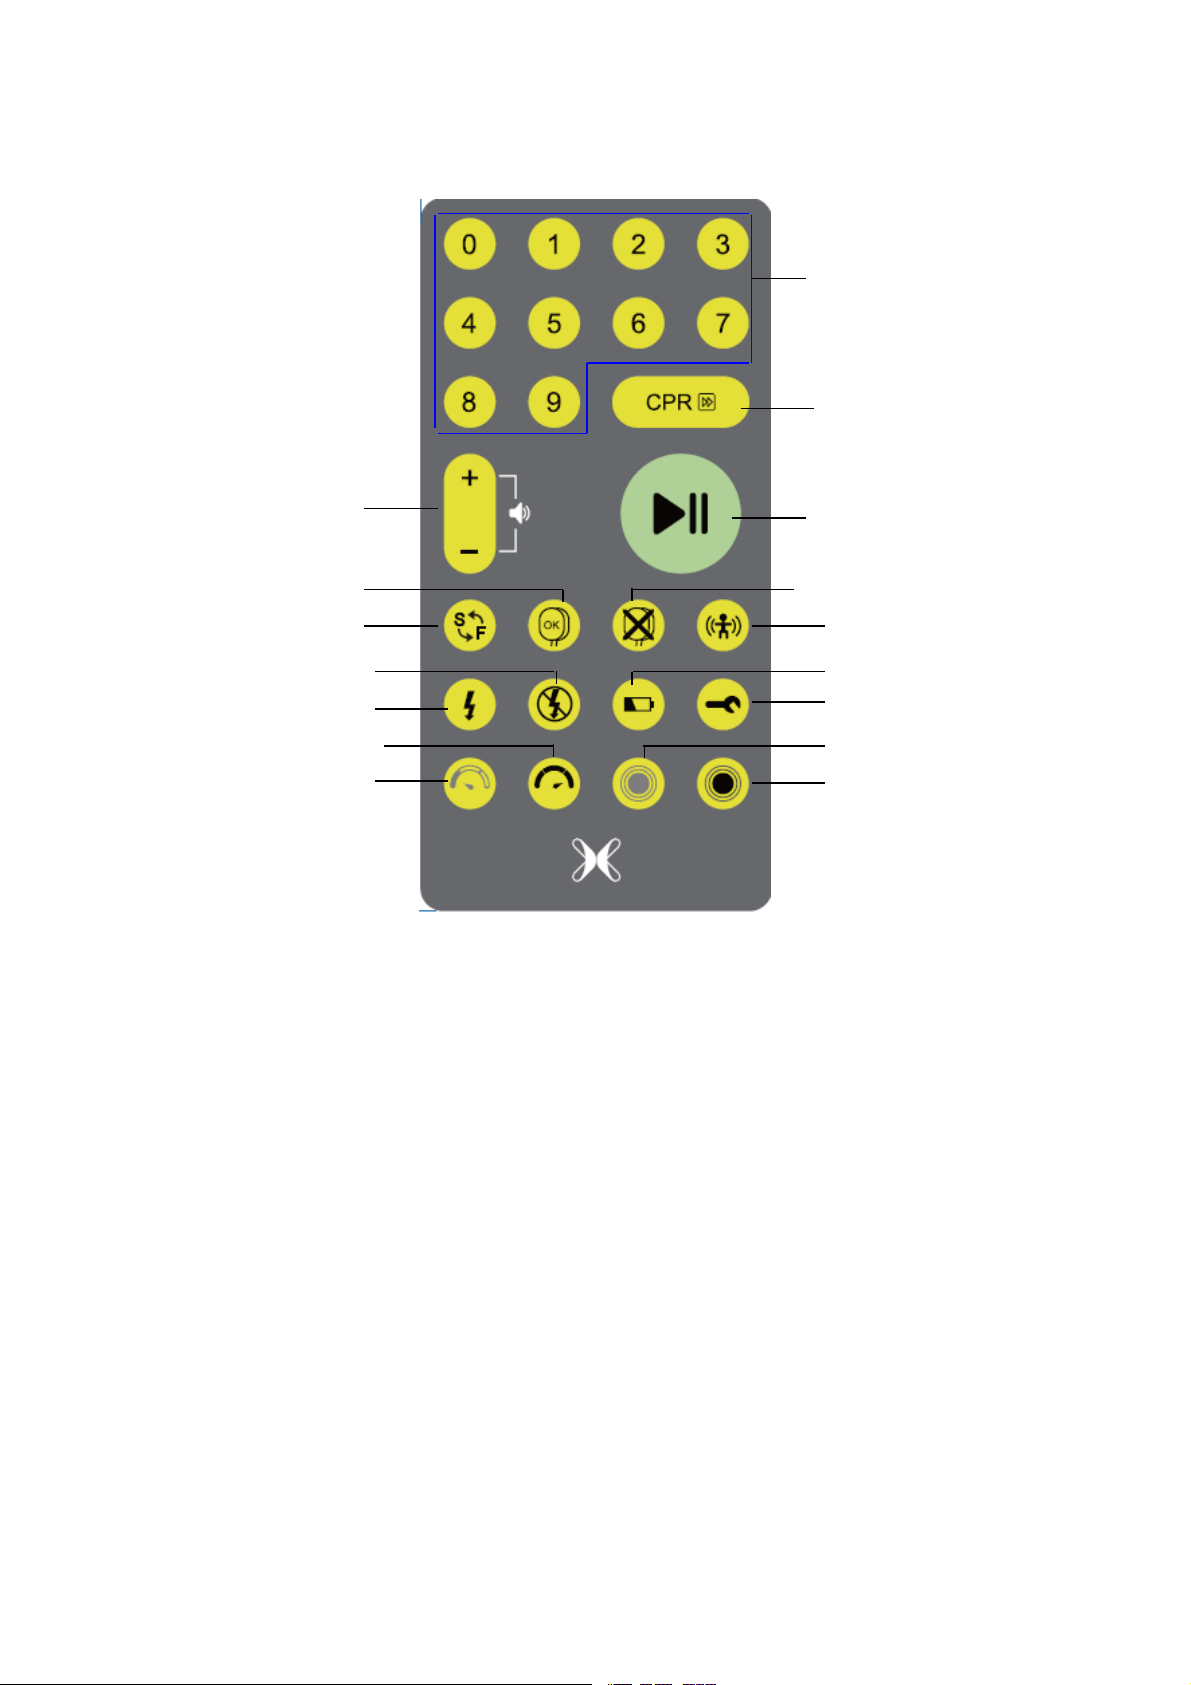
2.3 The Remote Control
d
y
p
d
p
m
Scenario Buttons
Stop CPR Button
Volume +/-Button
Simulate Electrode is Well Connecte
Semi/ Fully-automactic Button
Simulate a Non-shockable Rhyth
Simulate a Shockable Rhythm
Simulate the Compression is Too Fast
Simulate the Com
ression is Too Slow
1) Scenario Buttons
Press these buttons to select basic scenario from 0-9 scenario (see Table 3 for details of each scenario);
2) Stop CPR Button
If you press this button during the CPR process, you will end the CPR process ahead of time and go directly to the
next process.
3) Volume +/- Button
Press the + button to increase the volume;
Press the – button to reduce the volume.
4) Play/Pause Button
When the trainer is playing, press this button, the trainer will enter the pause state;
When the trainer is in pause state, press this button, the trainer will continue its play.
5) Semi/ Fully-automactic Button
Press this button to select between semi-automatic scenario or fully-automatic scenario.
6) Simulate Electrode is Well Connected
Press this button during training, the trainer enters into the electrode pads connect good program, and then
according to the voice prompt for training.
7) Simulated Electrode is not Well Connected:
Press this button during training, the trainer prompts “Press pads firmly to patient's bare chest”, and then prompts
“poor pads contact” and “replace pads”.
Fig. 6 Remote Control
7/20
Play/Pause Button
Simulate Electrode is not Well Connected
Simulate Motion Interference
Simulate Low Batter
Simulate System Error
Simulate the Compression is Too Soft
Simulate the Com
ression is Too Har

Fig. 7 Fig. 8
8) Simulate Motion Interference:
Press this button during the first heart rhythm analysis, the trainer prompts “Analysis interrupted (Fig. 9), Stop all
motion (Fig. 10)”; press this button during the second heart rhythm analysis, the trainer prompts “Stop all motion
(Figure 10), Cannot analyze (Figure 11)"
Pic 9 Pic 10
Pic 11
9) Simulate a Shockable Rhythm:
Press this button during training, the trainer enters into a shockable rhythm program, and then train according to
the voice prompts.
10) Simulate a Non-shockable Rhythm:
Press this button during training, the trainer enters into a non-shockable rhythm program, and then train according
to the voice prompts.
11) Simulate Low Battery
In the normal use of the trainer, press this button, the trainer screen prompts low battery. If you press this button
again, you will be prompted to replace the battery.
8/20

Fig. 12 Fig. 13
12. Simulate System Error:
In the normal use of the trainer, press this button, the trainer screen prompts ”System Error”..
Fig. 14
13. Simulate the Compression is Too Slow:
During the CPR process, when press this button, the trainer screen prompts to push faster.
Fig. 15
14. Simulate the Compression is Too Fast:
During the CPR process, when press this button, the trainer screen prompts to push slower.
Fig. 16
15. Simulate the Compression is Too Soft:
During the CPR process, when press this button, the trainer screen prompts to push harder.
9/20

Fig. 17
16. Simulate the Compression is too Hard:
During the CPR process, when press this button, the trainer screen prompts to push softer.
Fig. 18
2.4Accessories
Fig. 19
10/20

3. Operating Instruction
3.1 Preparation
3.1.1 Electrode pads placement
Take out the electrode from the package and place it on the manikin.
Note: If the adult mode is used, the adult electrode pads is attached to the position shown in Figure 20; if the child mode
is used, the child electrode pads is attached to the position shown in Figure 21.
Fig. 20 Adult electrode placement Fig. 21 Child electrode placement
3.1.2 Use with CPR Wristband
If you want to use the CPR wristband with the trainer, you need to connect the CPR wristband with the trainer. Turn
on the trainer firstly, then turn on the CPR wristband, after that the CPR wristband will automatically connect to the
trainer. If the CPR wristband or the trainer is turned off, the connection between the two devices will be interrupted. If
you want to reconnect, you need to reboot both.
Fig. 22 The trainer and the CPR wristband connected Fig. 23 CPR wristband and the trainer disconnected.
The connection status displayed on the CPR wristband screen is as follows:
CPR wristband screen
display
Unconnected icon: The icon will show when the CPR wristband is not connectedtothe
trainer. When the CPR wristband is turned on and the trainer is not turned on,theCPR
wristband will search for the trainer to connect. When the trainer is not connected, the
CPR wristband screen displays this icon.
Connected icon: The icon will show when the CPR wristband is connected to thetrainer.
Turn on the trainer first, and then turn on the CPR wristband. These two devices will
automatically connect; after the connection is successful, the icon will be displayed on
the CPR wristband screen.
11/20
Explanation

Disconnect icon: The icon will show when the CPR wristband is disconnected from the
trainer. When the CPR wristband is connected to the trainer, if the trainer is turned off,
this icon will be displayed on the CPR wristband screen.
3.2 Power On and Select Training Mode
Open the cover, (the power button ) light is on, and then select the training scenario through the remote control. The
display screen on the trainer will display the currently selected scenario mode number and perform related operations
according to the voice prompt. The last selected training mode will be remembered as the default mode for the next
boot.
Fig. 24
3.3 Connecting Electrode Pad
1) Take out the electrode pads (the adult electrode pads are pre-connected to the trainer);
2) Place the electrode pads to the manikin according to the illustration on the electrode pads;
3) Follow the voice prompts to perform related operations.
Fig. 25 Connecting electrode pad
Note: There are two types of training electrode: adult electrode pad and child electrode pad. The electrode pad for
training are similar in appearance to the electrode pad used in clinical AEDs, but do not conduct high voltage shocks.
Therefore, the training electrode pads are for training purposes only and should not be connected to the AED for first
aid.
12/20

Fig. 26 Adult Electrode pad and Child Electrode pad
Do not bend or stretch the electrode wires.
When pulling out the electrode from the trainer, press and hold the terminal to pull it out.
The factory default is to use the adult electrode, one end has been connected to the trainer; if you need to replace
with the child electrode, firstly pull out the adult electrode, and then replace it with a child's electrode. When
using a child's electrode, please pay attention to the difference between the placement method of the adult
electrode (see 3.1.1).
3.4 Follow the voice prompts
According to the selected training mode, the operation is performed according to the prompt voice of the trainer
Fig. 27 Follow the voice prompts to operate
3.5 Setting Interface
If the user needs more settings, he or she can go to the settings page to make related settings.
3.5.1 Language setting
1) Open the trainer’s cover to power on
2) Press and hold
3) Select the Language option by pressing the “
4) Press
5) Select the desired language by pressing the "
6) Press
to enter the language option setting page
to confirm the selection
for 3 seconds to enter the setting interface
”or“ ” button
"or" " button
13/20

7) Press the “ ”or“ ” button to return to the start page of setting
8) Press and hold
for 3 seconds to exit the setting interface. Then follow the voice prompts in the normal order
for training.
Fig. 28 Language setting
3.5.2 Metronome setting
1) Open the trainer’s cover to power on
2) Press and hold
for 3 seconds to enter the setting interface
3) Select the Metronome option by pressing the “
4) Press
to enter the Metronome setting page
”or“ ” button
5) Select the desired Metronome by pressing the "
6) Press
7) Press the “
8) Press and hold
to confirm the selection
”or“ ” button to return to the start page of setting
for 3 seconds to exit the setting interface. Then follow the voice prompts in the normal order
for training.
Fig. 29 Metronome setting
3.5.3 CPR Wristband Setting
1) Open the trainer’s cover to power on
"or" " button
2) Press and hold
for 3 seconds to enter the setting interface
14/20

3) Select the CPR wristband by pressing the “ ”or“ ” button
4) Press
to enter the CPR wristband setting page
5) Select the desired option by pressing the "
6) Press
7) Press the “
8) Press and hold
to confirm the selection
”or“ ” button to return to the start page of setting
for 3 seconds to exit the setting interface. Then follow the voice prompts in the normal order
for training.
"or" " button
3.5.4 System Setting
1)Open the trainer’s cover to power on
2) Press and hold
for 3 seconds to enter the System setting interface
3) Select the System option by pressing the “
4) Press
to enter the System settings page
5) Select the desired option by pressing the "
6) Press
7) Press the “
8) Press and hold
to confirm the selection
”or“ ” button to return to the start page of setting
for 3 seconds to exit the setting interface. Then follow the voice prompts in the normal order
for training.
Fig. 30 CPR wristband setting
”or“ ” button
"or" " button
15/20

Fig. 31 System setting
3.6 Shutdown
When the training is over, close the trainer’s cover to turn off the device. In addition, the trainer also has an automatic
shutdown function:
1) Low voltage automatic shutdown.
2) If it is in the setting interface for more than 8 minutes, it will automatically shut down.
3) If the trainer pauses for 8 minutes, it will automatically shut down if there is no operation.
4. Product Maintenance
4.1 TheTrainer Maintenance
If the main unit is dirty, wipe with soft cloth with water or neutral detergent. Wring it thoroughly and wipe the
main unit.
Do not wipe the main unit with thinner, benzine, etc.
Do not wipe the main unit with other volatile preparations.
Do not allow liquid such as water to flow into the inside of the main unit.
Do not store in a place exposed to direct sunlight, high temperature, humidity, dust, or corrosive gas.
Save the main unit, remote control, electrode pads, power adapter, and manual with a storage kit.
4.2 Electrode Maintenance
The electrode pads should be kept clean to avoid dust, oily substances, sticky substances, sticky substances and
other contaminants.
Do not scratch the surface with nails, brushes, etc.
Do not wash frequently. Please do not use detergent or hot water for cleaning.
Do not store in a place exposed to direct sunlight, high temperature, humidity, dust, or corrosive gas.
4.3 Battery Disassembly and Maintenance
1) The trainer battery installation: Insert the battery as shown
16/20

Fig. 32 The Trainer battery installation
2) The Trainer battery charging: When the battery is exhausted, please charge the battery in time.
Fig. 33 The Trainer battery charging
* After using for a while, if the volume is not normal or does not work properly, the battery may be running out. Please
replace the battery or charge the battery.
Battery installation for the Remote Control:
Fig. 34 Remote control battery removal diagram
17/20

Fig. 35 Remote control battery installation diagram
* Note that the battery anode is upward when the battery is installed. After using for a period of time, if the trainer's
response to the remote control is delayed or does not respond, the battery may be running out. Please replace it with a
new one
4) Safe use of rechargeable batteries:
◆ Do not charge/discharge more than the specified current.
◆ Do not short circuit the battery/battery pack, as this may cause permanent damage to the battery/battery pack.
◆ Do not burn or destroy the battery/battery pack.
◆ Do not expose the battery to adverse conditions such as extreme temperatures, deep cycling and overcharging,
otherwise battery life may be reduced.
◆ Store the battery/battery pack in a cool, dry place.
◆ Keep away from children.
※Rechargeable battery care instructions
Periodic charge and discharge: If the trainer is not used for a long time (when the battery is stored for more than 6
months), it is recommended to discharge the battery completely and then recharge it.If the battery is found to leak, stop
using it immediately and contact the supplier for disposal.
4.4 Working Condition and Storage Condition
Working Condition
Temperature: 5℃-40 ℃
Humidity: ≤80% (Non-condensing)
Atmospheric pressure: 86kPa-106kPa
Storage Condition
Temperature: -20℃-55℃
Humidity: ≤93% (Non-condensing)
Atmospheric pressure: 70kP a-106kPa
5. Specification and Product Contents
5.1The Trainer
Model: XFT-120G
Product Name: AED Trainer
Power:DC 7.4V/2600mAh,rechargeable lithium battery
Shutdown current: ≤10µA
Working current: ≤500mA
Size: 253*230*71mm
Weight: 865±35g
Rrechargeable lithium battery :ICR18650,7.4V 2600mAh, 37*67*19mm
5.2 Remote Control
Power:DC 3.0V(CR2032 Button cell)
Shutdown current: ≤5µA
Working current: ≤10mA
Size: 102*52*11mm
Weight: 30±5 g
18/20

5.3 Product Contents
Tab le 1
No. Content Quantity Unit Remarks
1 The Trainer 1 pc --
2 Remote Control 1 pc --
3 Adult Electrode Pads 1 Pair --
4 Child Electrode Pads 1 Pair --
5 Adult Pad Sensors 2 Pairs --
6 Child Pad Sensors 2 Pairs --
7 CPR Wristband 1 pc Optional
8 Battery 1 pc Rechargebale
9 Power Adapter 1 pc --
10 Instruction Manual 1 pc --
11 Storage Bag 1 pc --
Table2: Accessories ordering reference number
No. Accessories Ref. No
1 The Trainer 5010701001
2 Remote Control 5010701002
3 Adult Electrode Pads 4320010135
4 Child Electrode Pads 4320010132
5 Adult Pad Sensors 4320010134
6 Child Pad Sensors 4320010131
7CPRWristband
8 Battery 5030701001
9 Power Adapter 1140210033
10 Instruction Manual 4010701001
11 Storage Bag 4450701001
Table3: 10 preprogrammed scenarios in XFT-120G AED Trainer
Scenarios Description Operation
0 Ventricular Fibrillation-
With single-shock conversion
1 Ventricular Fibrillation-
With multiple-shocks required for conversion
19/20
Shockable rhythm
1shock
Non-shockable rhythm
Shockable rhythm
4shocks
Non-shockable rhythm

2 Troubleshooting Skills-
Defibrillation pads
3 Ventricular Fibrillation-
With two-shocks required for conversion
4 Non-Shockable Rhythm Non-shockable rhythm throught
5 Ventricular Fibrillation-
With two-shocks required for conversion
6 Ventricular Fibrillation-
With three-shocks required for conversion
7 Troubleshooting Skills-
Defibrillation pads with two shocks required
for conversion
8 Ventricular Fibrillation Ventricular fibrillation throught
Poor pad connection
Shockable rhythm
1shock
Non-shockable rhythm
Shockable rhythm
2shocks
Non-shockable rhythm
Shockable rhythm
2shocks
Non-shockable rhythm
Shockable rhythm
3shocks
Non-shockable rhythm
Poor pad connection
Shockable rhythm
2shocks
Non-shockable rhythm
9 Troubleshooting Skills-
Motion, low battery, with one shock required
for conversion
Motion artifacts
Shockable rhythm
1shock
Non-shockable rhythm
6.After-sales Service
1. The product is provided with a two-year warranty starting from the date of purchasing.
2. XFT will not provide free repair for the malfunctions caused by the following behaviors:
Disassemble or modify the product without authorization.
Accidentally blow or drop the product during use or transportation.
Lack of reasonable maintenance.
Operate not according to the instruction.
Repaired by unauthorized repair store.
3. When asking for warranty service, please take with the warranty card.
It is charged according to the stipulation of the repair service of the warranty.
Please contact XFT if you need warranty service.
Product Name: AED Trainer
Model: XFT-120G
Shenzhen XFT Medical Limited
Room203, Building 1, Biomedicine Innovations Industrial
Park,
#14 Jinhui Road, Pingshan
New District, Shenzhen, China
20/20
Date:2019/7/31
Doc. No.: XFT-120G-A
Version: C

FCC COMPLIANCE STATEMENT:
This device complies with part 15 of the FCC Rules.
Operation is subject to the following two conditions:
(1) This device may not cause harmful interference, and
(2) this device must accept any interference received,
including interference that may cause undesired operation.
Note: This equipment has been tested and found to comply with the limits for a Class
B digital device, pursuant to Part 15 of the FCC Rules. These limits are designed to
provide reasonable protection against harmful interference in a residential installation.
This equipment generates, uses and can radiate radio frequency energy and, if not
installed and used in accordance with the instructions, may cause harmful interference
to radio communications.
However, there is no guarantee that interference will not occur in a particular
installation. If this equipment does cause harmful interference to radio or television
reception, which can be determined by turning the equipment off and on, the user is
encouraged to try to correct the interference by one or more of the following
measures:
Reorient or relocate the receiving antenna.
Increase the separation between the equipment and receiver.
Connect the equipment into an outlet on a circuit different from that to which the
receiver is connected.
Consult the dealer or an experienced radio/TV technician for help.
Warning: Changes or modifications to this unit not expressly approved by the part
responsible for compliance could void the user's authority to operate the equipment.
FCC Radiation Exposure Statement
The device has been evaluated to meet general RF exposure requirement.
The device can be used in portable exposure condition without restriction.
 Loading...