

Page 1
1
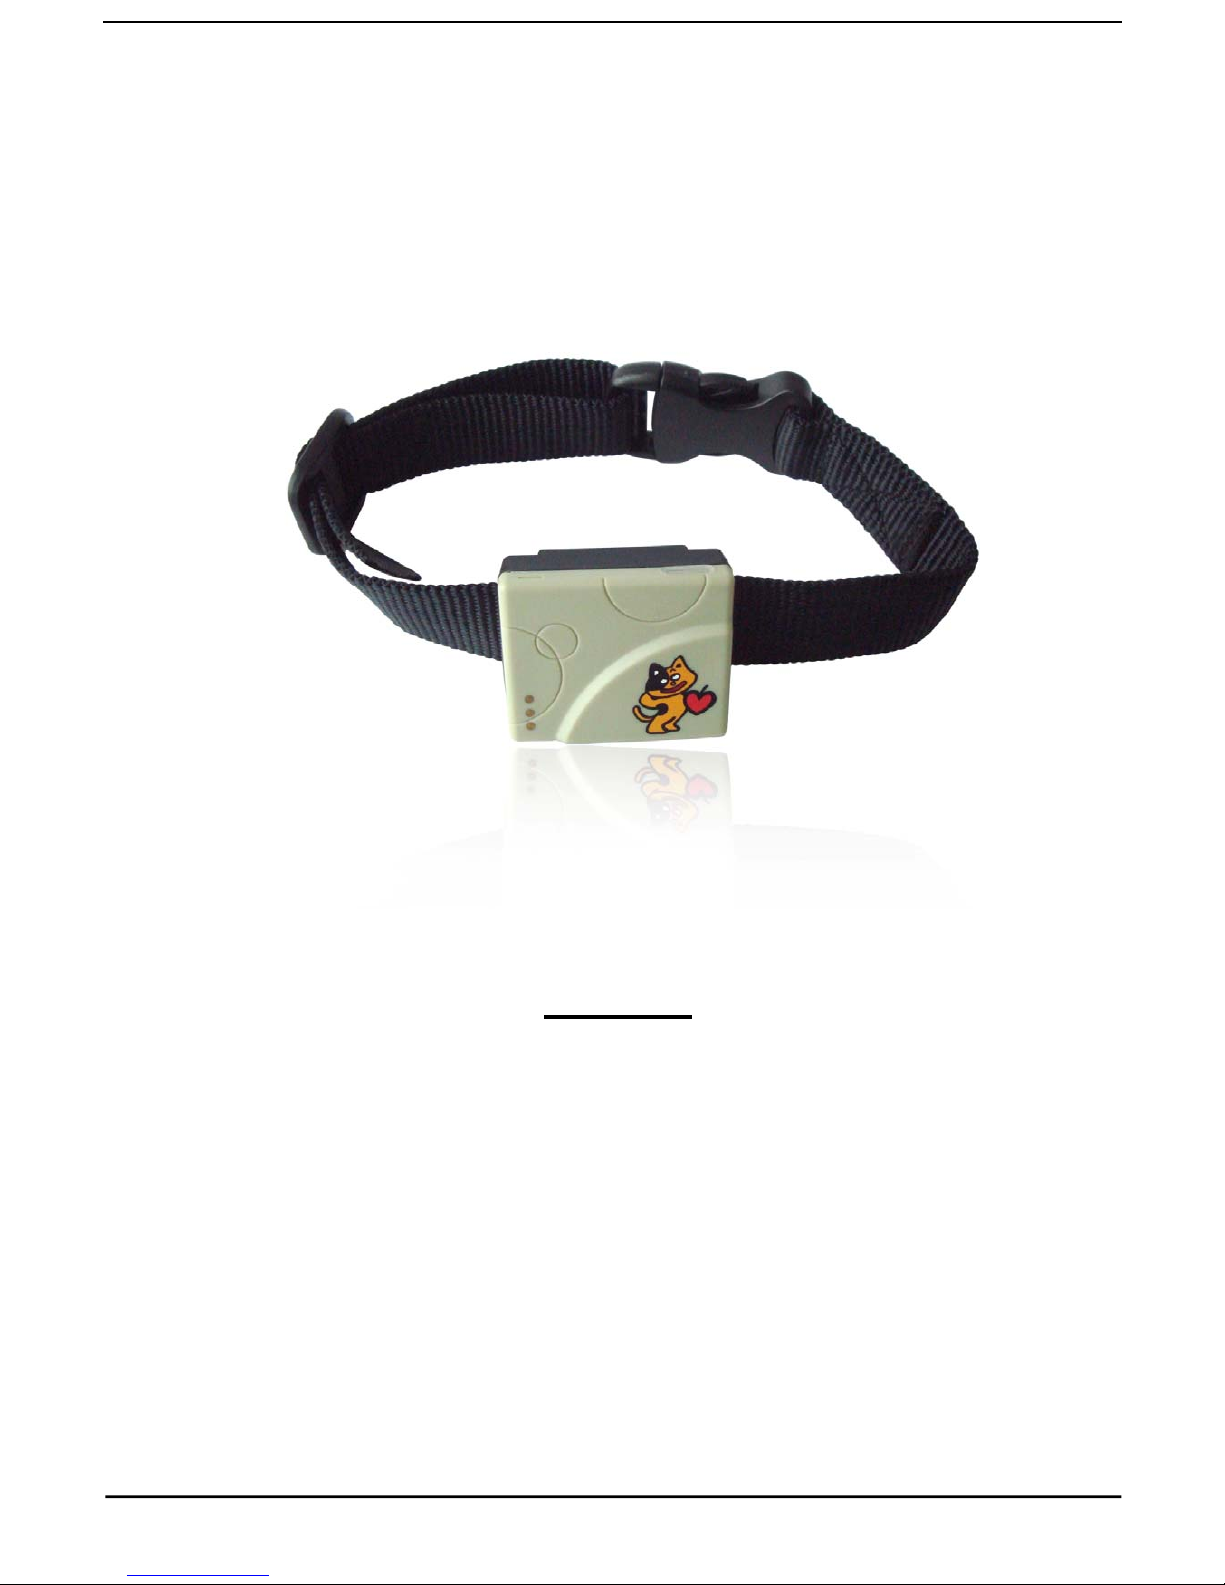
GSM/GPRS/GPS MINI TRACKER
USER MANUAL
Preface
Thank you for purchasing the Mini Gp s Tracker. This manual shows how to operate
the device smoothly and correctly. Make sure to read this manual carefully before
using this product. Please note that specification and information are subject to
changes without prior notice in this manual. Any change will be integrated in the latest
release. The manufacturer assumes no responsibility for any errors or omissions in
this document
Page 2

2
Content
1 Summary ---------------------------------------------------------------------------------- 3
2 Application --------------------------------------------------------------------------------- 3
3 Hardware Description
3.1 Front Face -------------------------------------------------------------------------------------- 3
3.2 Rear Face -------------------------------------------------------------------------------------- 3
3.3 Side Face -------------------------------------------------------------------------------------- 3
3.4 Interior --------------------------------------------------------------------------------------- 4
4 Specifications ---------------------------------------------------------------------------------------- 4
5 Usage
5.1 SIM card installation ----------------------------------------------------------------------- 5
5.2 Charger and charging ------------------------------------------------------------------------ 6
5.3 Startup ---------------------------------------------------------------------- 7
5.4 Initialization ---------------------------------------------------------------------- 7
5.5 Change the Password -------------------------------------------------------------------- 7
5.6 Authorization -------------------------------------------------------------------------- 8
5.7 Real-time Polling ------------------------------------------------------------------------ 8
5.8 Auto-Track ---------------------------------------------------------------------- 8
5.9 Geo-fence ----------------------------------------------------------------------- 9
5.10 Movement Alert ----------------------------------------------------------------------- 10
5.11 Overspeed Alert ---------------------------------------------------------------------- 10
5.12 Low battery Alert -------------------------------------------------------------------- 11
5.13 IMEI Check -------------------------------------------------------------------- 11
5.14 SMS Center -------------------------------------------------------------------- 11
5.15 GPRS Setting -------------------------------------------------------------------- 12
6 Cautions --------------------------------------------------------------------- 14
7 Faults & Solutions --------------------------------------------------------------------- 14
Page 3
3
1 Summary
Working based on existing GSM/GPRS network and GPS satellites, this product can
locate and monitor any remote targets by SMS or GPRS.
2 Applications
z Protect the child / the old / the disabled / pet etc
z Personnel management
z Covert Tracking
3 Hardware Description
Accessories including Color box,Belt,Built-in battery,Wall charger,Indoor charger and
Instruction CD.
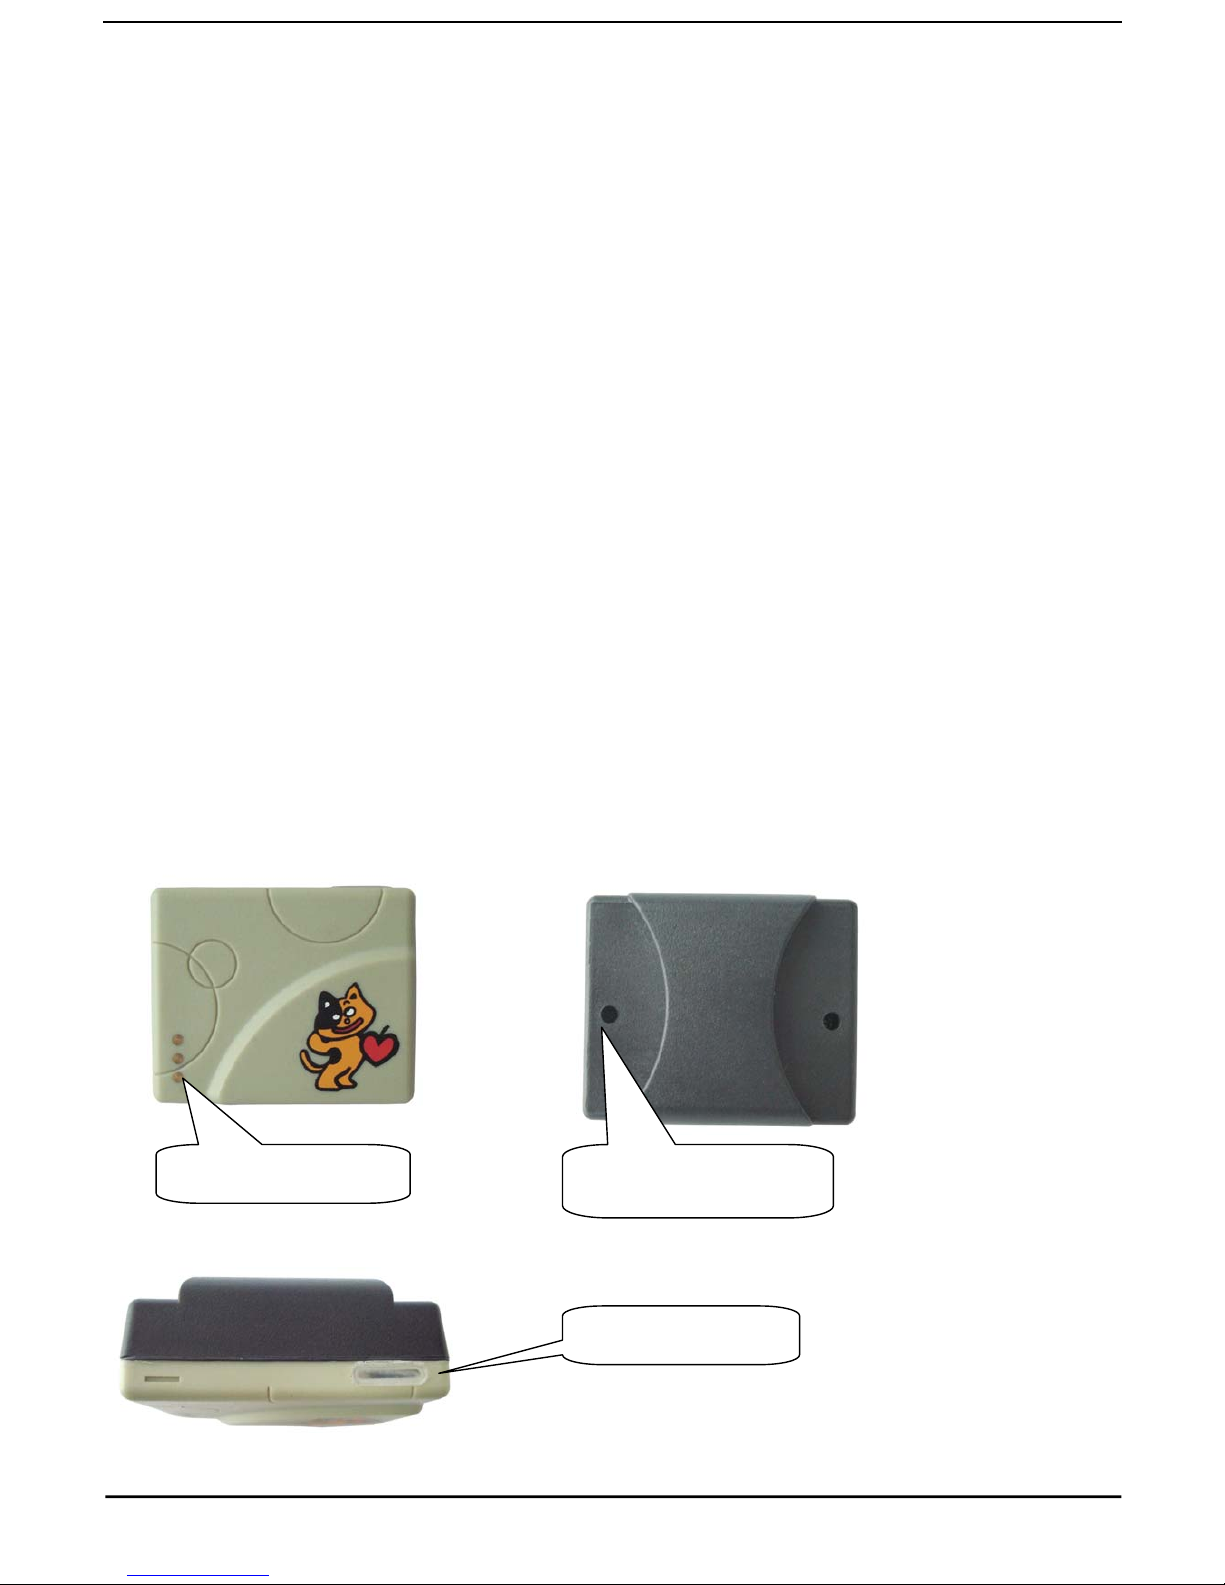
3.1 Front Face 3.2 Rear Face
3.3 Side Face
Open the back cover
byloosen the screws
Charging connector
The LED indicator
Page 4
4
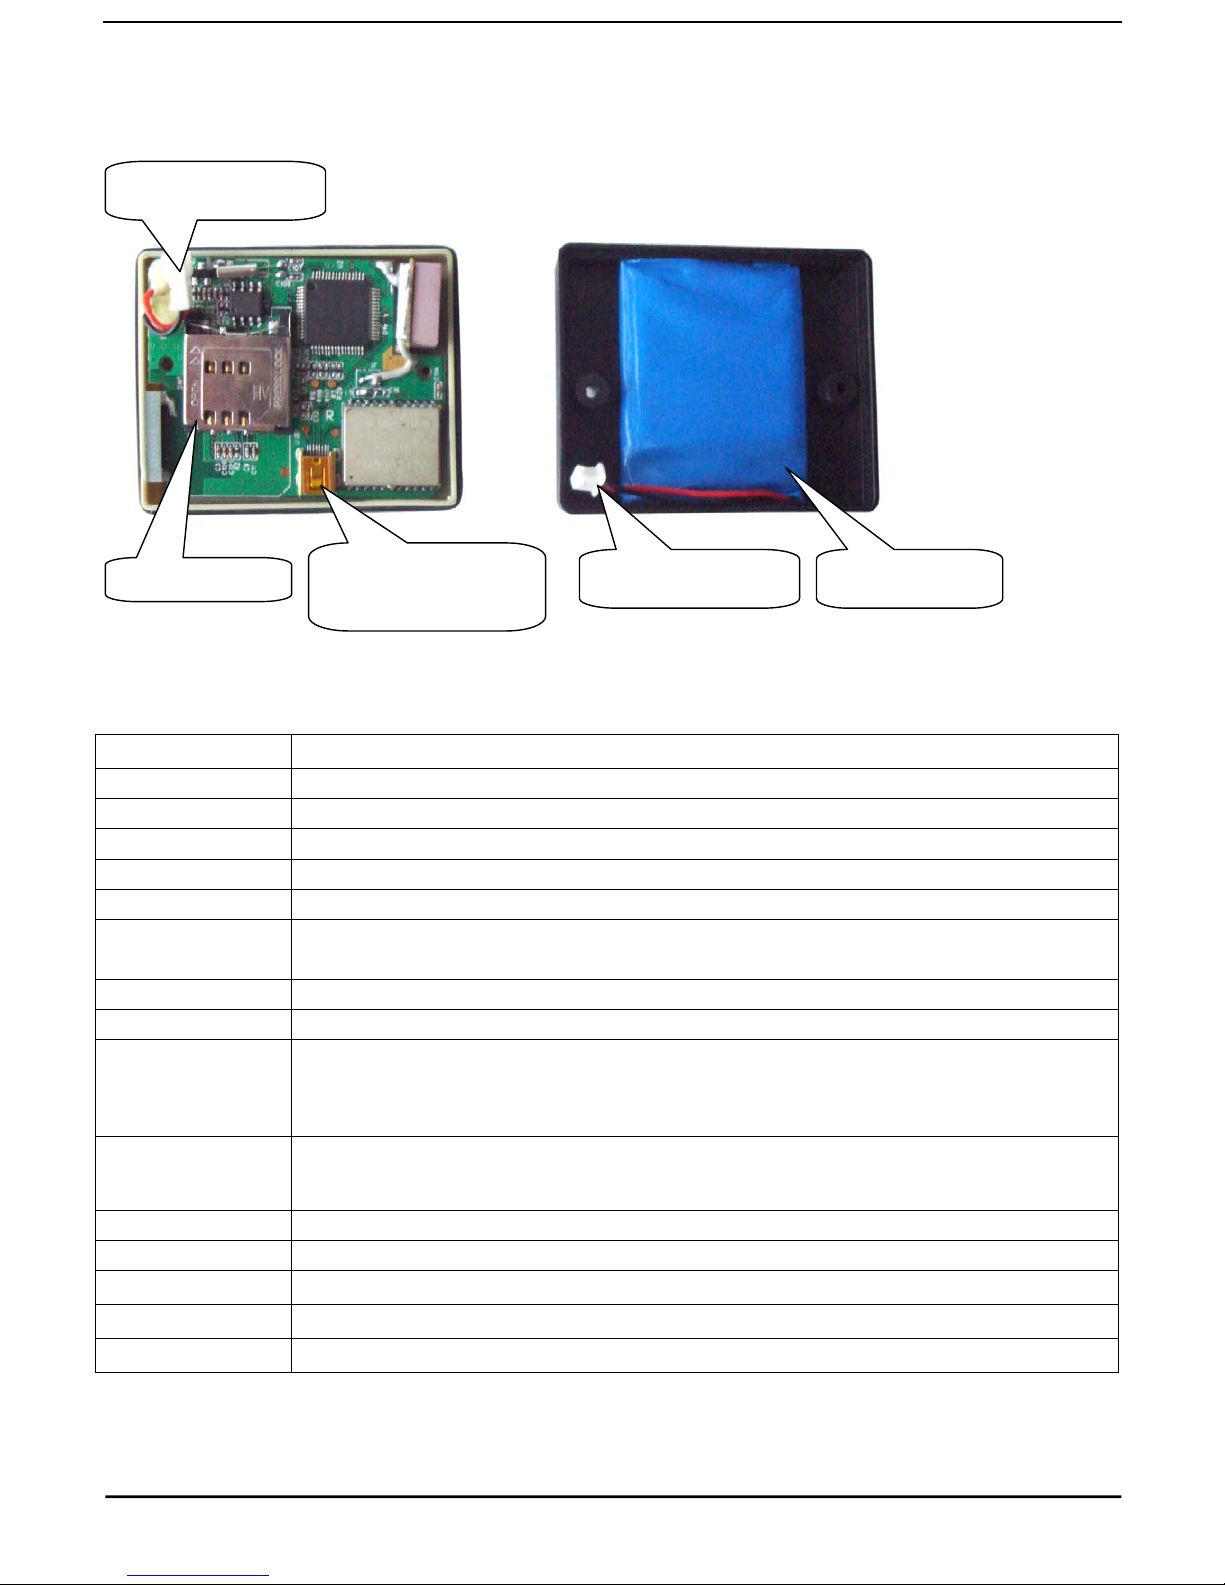
3.4 Interior
4 Specs.
Content Specs.
Dimension. 46(L)x39(W)x13(H) mm
Weight 35g
Network GSM/GPRS
Band 850/1800/1900Mhz or 900/1800/1900Mhz
GPS chip SIRF3 chip
GSM/GPRS
module
Enfora module
GPS sensitivity -159dBm
GPS accuracy 5m
Time To First Fix
Cold status 45s
Warm status 35s
Hot status 1s
Wall charger
110-220V input
5V output
Battery Chargeable changeable 3.7V 450mAh Li-ion battery
Standby 48hours
Storage Temp. -40°C to +85°C
Operation Temp. -20°C to +55°C
Humidity 5%--95% non-condensing
SIM Card slot
Battery connector
Built-in battery Battery connector
USB connector for
updating software
Page 5
5
5 Usage
5.1 SIM card installation
Make sure that there is no call transfer and call display is on, and PIN code off. The
SMS message must in Text format, can’t be identified for PDU format.
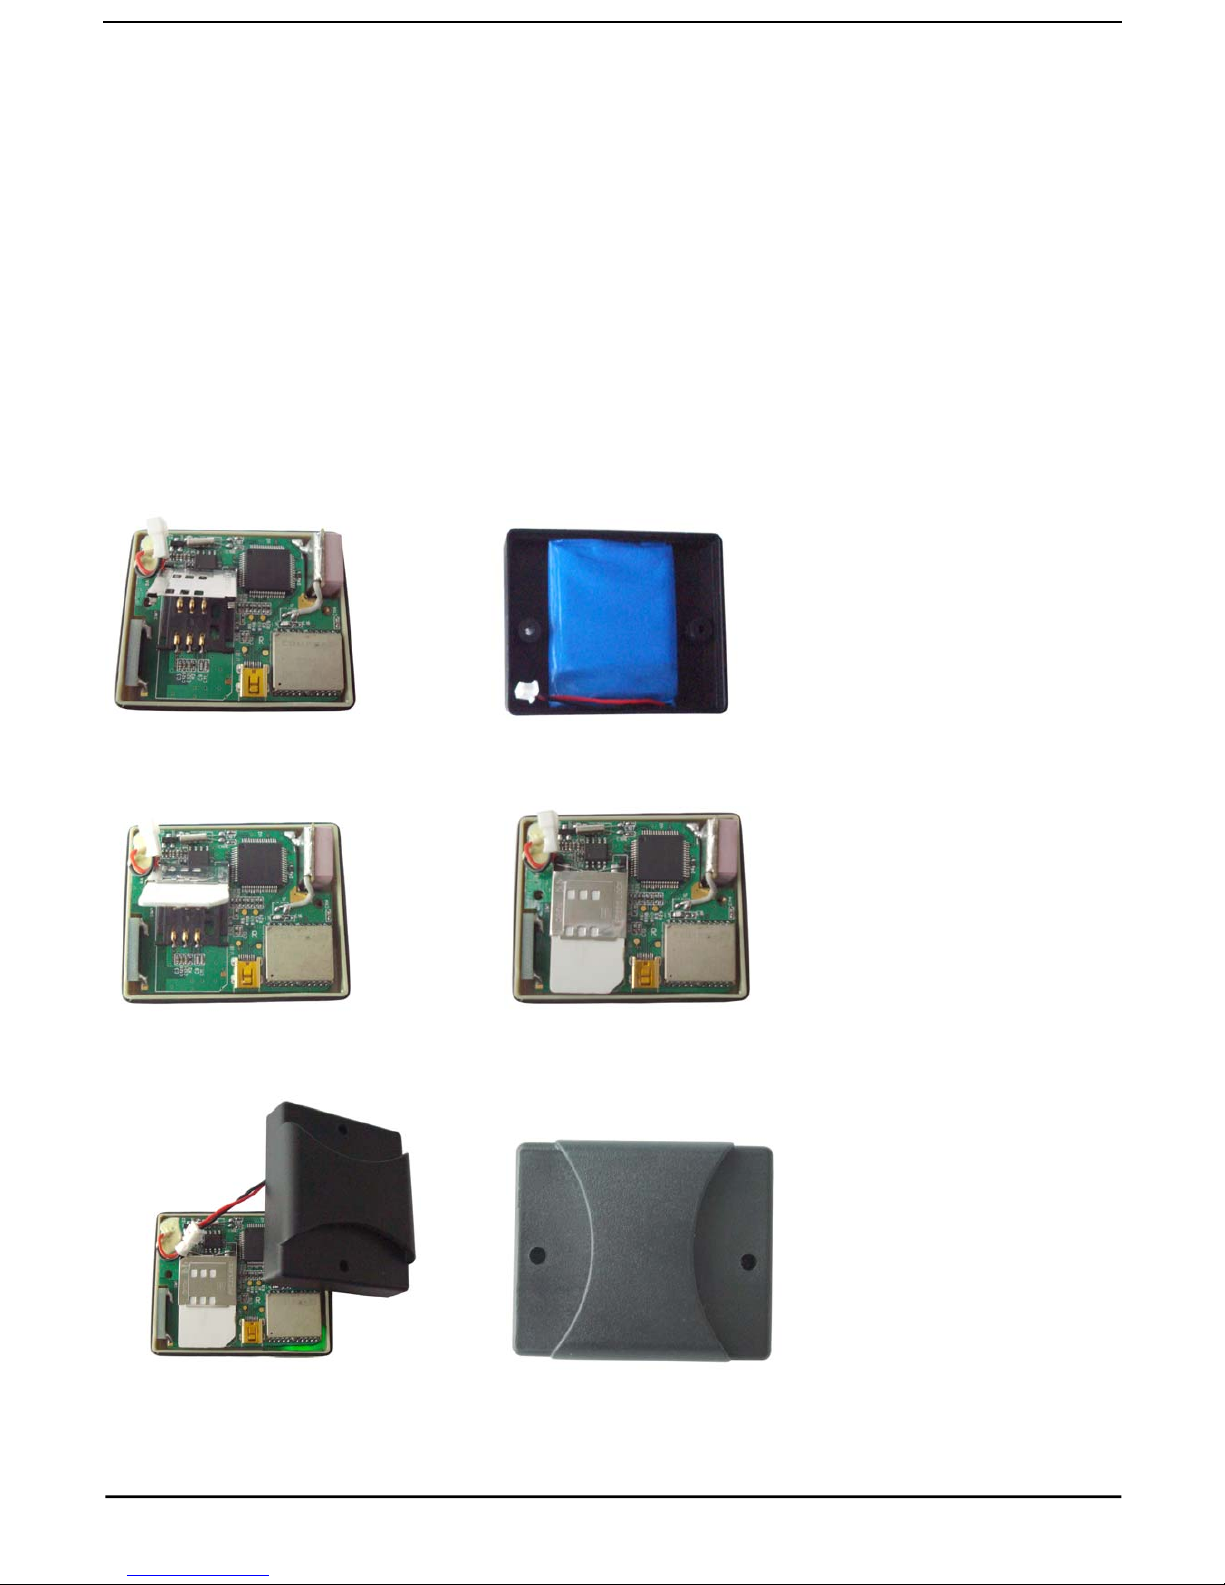
Steps:
5.1.1 Open the back cover by loosen the screws
5.1.2 Push the foil back and pull it up.
5.1.3 Insert the SIM card into the holder and press the foil down.
5.1.4 Connecting the battery as below, and close the back cover by tighten the screws.
Page 6
6
5.2 Charger and charging
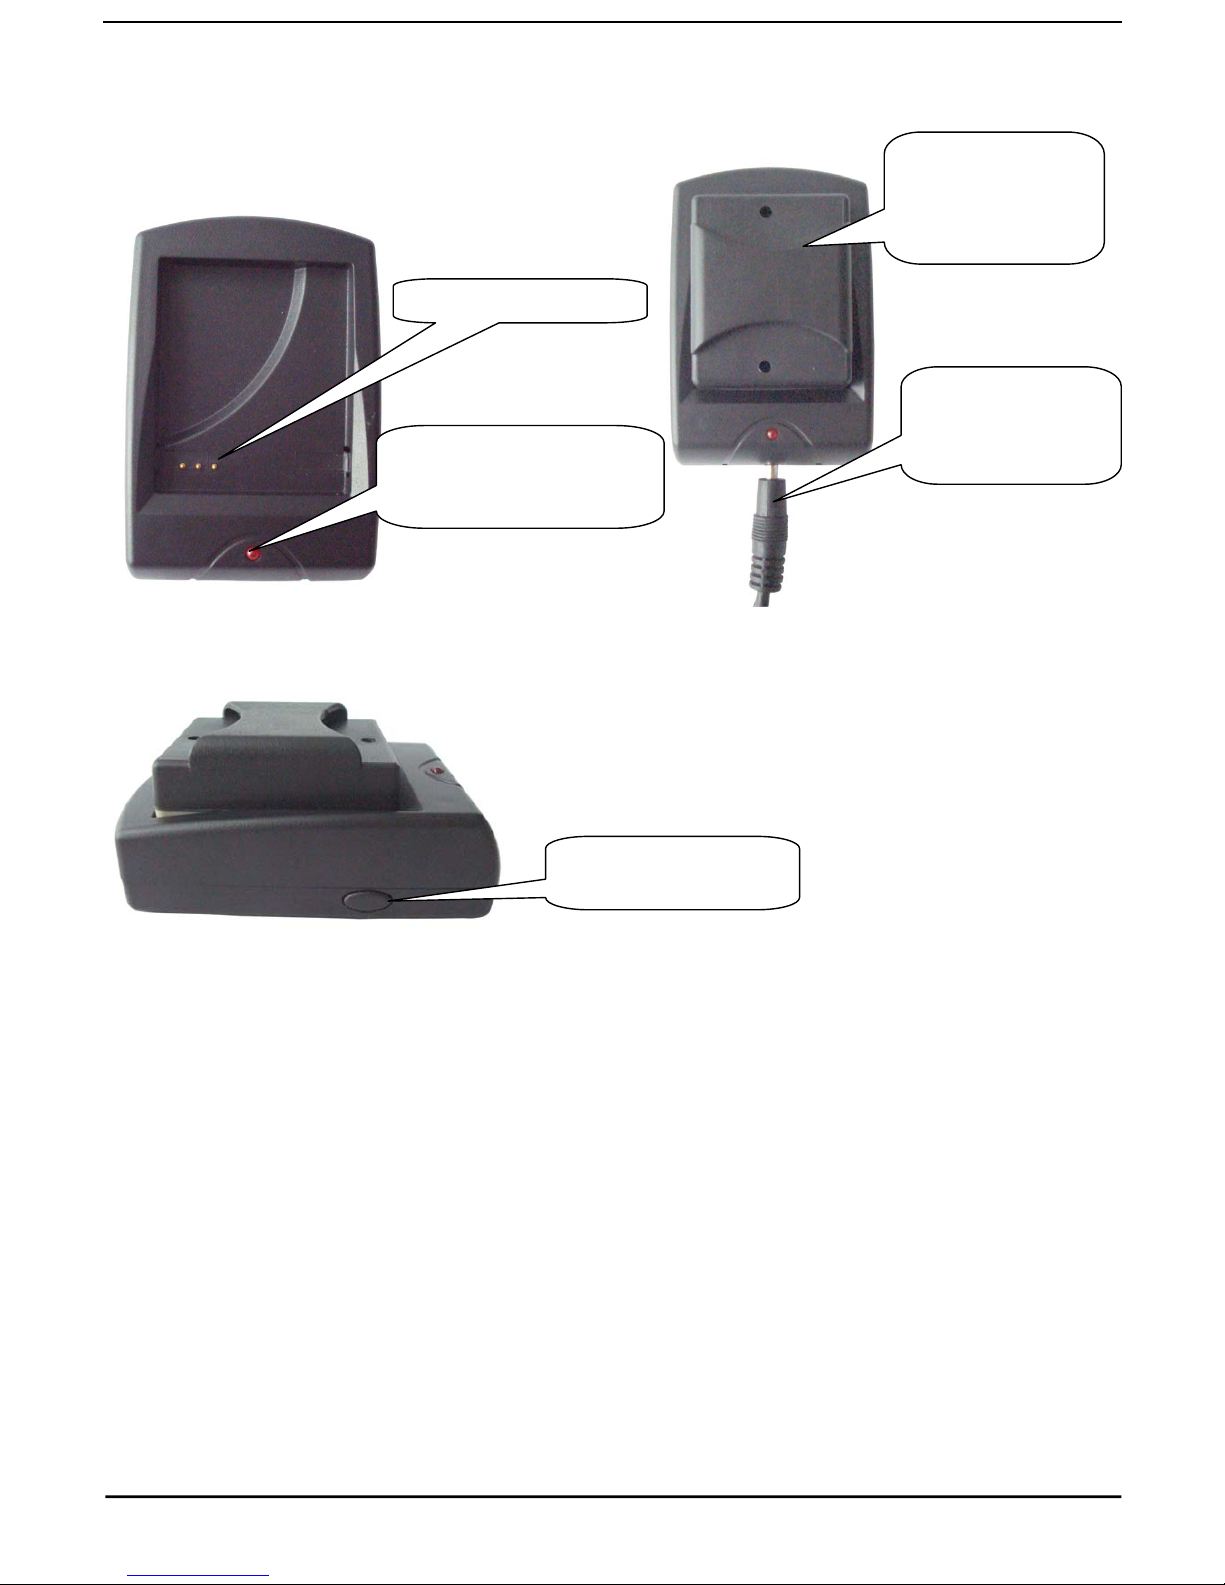
Do charge the battery to capacity in 8 -12 hours for the first use. Please use the battery
and charger provided by the manufacturer. This unit adopts built-in Li-ion battery, and
full battery will support around 48 hours use on end. After first use, the battery can be
charged fully in 3-5hours.
Cautions:
a: For it’s Li-ion battery, which contains harmful chemicals and may burst, please don’t bump,
puncture it violently and keep it off fire.
b: Please charge the battery in time to keep it working normally.
Put the tracker
into the slot for
charging directly
Power on/off button
of the charge
r
Connecting here
with wall charger
for charging.
The indicator is green
means charging while
Charging connecto
r
Page 7

7
5.3 Startup
z Put the SIM card in place and tighten the screws..
z The unit turns on automatically when connecting the tracker with battery,at this time
the indicator keep flashing quickly.
z In 30s to 60 seconds the indicator stop flashing when the unit receives GSM signal
as well as GPS signal.
z For the first use, please initialize the unit and restore it to default setting.( please
refer to 5.4 for instruction.)
z When this unit receives GPS signals normally , you can use it and do all the following
settings.
5.4 Initialization
Send SMS “begin+password” to the unit, it will reply “begin ok” and initialize all the
settings. (default password: 123456)
5.5 Change the Password
Send SMS password+old password+space+new password to change the password.
Remark:
5.5.1 Be sure keep the new password in mind, you have to consult your local agent to
restore the original setting in case of losing the new password.
5.5.2 Make sure the new password is in 6 digits, or else the tracker can not recognize
the password.
Page 8

8
5.6 Authorization
There are only 5 numbers able to be authorized.
5.6.1 Setup:Send SMS admin+password+space+cell phone number to be as a
authorized number. The other authorized numbers should be set up by the first
authorized number. If the number is successfully authorized, the unit will reply SMS.
“admin ok!”.
5.6.2 Cancel:Send SMS noadmin+password+space+authorized number to be delete
by the first authorized number to delete the authorized number.
5.6.3 For roaming purpose, you have to add your country code ahead of the cell phone
number, for example, please send admin123456 008613322221111 to tracker to set
13322221111 as an authorized number.
5.7 Real-time Polling
5.7.1 If there is no authorized number, when any number dials up the unit, it will report a
Geo-info; If there is already an authorized number, then it will not respond when an
unauthorized number calls it up.
5.7.2 When an authorized number dials up the unit, it will hang up and report a real-time
Geo-info as below:
lat: 22.566923 long: 114.051331 speed: 0.00 28/10/09 03:33 F:4.32V,0, Signal:F
imei:359587011016261 05 41.
5.8 Auto-T rack
5.8.1 To get a Geo-info at 30s intervals to the authorized numbers for 5 times.
Setup:Send SMS t030s005n+password to the unit, it will report a Geo-info every
Page 9

9
30s,total 5 times.(s: second, m: minute, h: hour). The setting must be in 3 digits and at
maximum 255 in value.
5.8.2 To get a Geo-info at 30s intervals to the authorized numbers for heaps of times.
Setup:Send SMS t030s***n+password to the unit, it will report a Geo-info every
30s,total heaps of times.
5.8.3 Cancel: Send notn+password to delete the “ auto track ”It will reply “notn ok!”.
Remark: the interval must not be less than 5s.
5.9 Geo-fence
This function is using for the owner to set up a geo-fence of the unit to restrict its
movements within a district. The unit will send the message to the authorized numbers
when it moves out of the district.The alert format as below:
lat: 22.566923 long: 114.051331 speed: 0.00 28/10/09 03:33 F:4.32V,0, Signal:F
stockade imei:359587011016261 05 41.9
5.9.1 Setup: When the unit stays immobile in a place for 3-10 minutes, the user can
send SMS stockade+password+space+latitude,longitude; latitude,longitude to unit to
set the restricted district. In case of breach, it will send a SMS “stockade!+geo-info” to
the authorized numbers every 3 minutes.
Remark: The first latitude&longitude is coordinate of the top left corner of the
Geo-fence, while the second latitude&longitude is the coordinate of the bottom right
corner.
5.9.2 Cancel: Send SMS nostockade+password to deactivate this function.It will reply
“nonostockade ok!”.
Page 10

10
5.10 Movement Alert
This function is using for the owner to get alarm when the unit
moves out of a restricted
district.(500m radius).
5.10.1 Setup: When the unit stays immobile in a place for 3-10 minutes, the user can
send SMS move+password to the unit, it will reply “move ok!”. In case of such a
movement, it will send a SMS “Move” along with a Geo-info to the authorized numbers
every 3 minutes, The alert format as below:
lat: 22.566923 long: 114.051331 speed: 0.00 28/10/09 03:33 F:4.32V,0, Signal:F
move imei:359587011016261 05 41.9
5.10.2 Cancel: Send SMS nomove+password to deactivate the movement alert. It will
reply “nomove ok!”.
5.11 Overspeed Alert
This function is using for the owner to control the target’s speed.
5.11.1 Setup: Send SMS speed+password+space+080 to the unit (suppose the speed
is 80km/h), and it will reply “speed ok!”. When the target moves exceeding 80 km/h, the
unit will send a SMS speed+080!+Geo-info to the authorized numbers. It will send such
a SMS again when the speed is low 80 km/h then exceed it within 3 minutes.The alert
format as below:
lat: 22.566923 long: 114.051331 speed:85.60 28/10/09 03:33 F:4.32V,0, Signal:F
speed imei:359587011016261 05 41.9
5.11.2 Cancel: Send SMS nospeed+password to deactivate the overspeed alert.It will
reply “nospeed ok!”.
Remark: It is recommended that the speed alarm is set at not less than 80km/h. For
Page 11

11
below that rate, it may cause the excursion of the GPS signal influenced by clounds etc.
5.12 Low battery Alert
It begins to send SMS to the user every 30 minutes when the battery voltage is or less
than 3.7V.
The alert SMS format as below:
lat: 22.566923 long: 114.051331 speed:0.00 28/10/09 03:33 L:3.68V,0, Signal:F
imei:359587011016261 05 41.9
5.13 IMEI Checking:
Send SMS imei+password to the unit to check the IMEI number of the tracker.
5.14 SMS Center
5.14.1 Setup:Send SMS adminsms+password+space+cell phone number to set the
SMS center.It will reply”adminsms ok if the setting is successful.
If the SMS center is set up, When an authorized number sends SMS to the tracker, the
tracker will reply a SMS with Geo-info & authorized number to SMS center.The SMS
format as below:
13100000000 lat: 22.566923 long: 114.051331 speed:0.00 28/10/09 03:33 F:3.88V,0,
Signal:F imei:359587011016261 05 41.9
5.14.2 Cancel:Send SMS noadminsms+password to cancel the SMS center.It will reply
SMS noadminsms ok!
Page 12

12
5.15 GPRS Setting
In order to use GPRS function, the user needs to set IP, Port and APN ( access point
name ) by cell phone.
( NOTE:
Some countries or regions should set APN’s User Name and APN’s
Password,please consult your local
service operator for information.)
5.15.1 Set an IP address and port:
Setup: Send SMS adminip+123456+space+IP address+space+port.
If setup successful, the tracker will reply SMS “adminip ok”
Cancel: Send SMS noadminip+123456
5.15.2 Set APN
Setup: Send SMS apn+123456+space+specify apn content.
If setup successful, the tracker will reply SMS “APN ok”.
Cancel: The old APN will be invalid automatically when a new APN is set.
5.15.3 Set APN’s User Name
Setup: Send SMS apnuser+123456+space+the sim card’s user name.
If setup successful, the tracker will reply SMS “apnuser ok”.
Cancel: The old APN user name will be invalid automatically when a new APN uer
name is set.
5.15.4 Set APN’s Password
Setup: Send SMS apnpasswd+123456+space+the sim card’s password.
If setup successful, the tracker will reply SMS “apnpasswrod ok”.
Cancel: The old APN password will be invalid automatically when a new APN password
is set.
5.15.5 GPRS transport protocols
Page 13
13
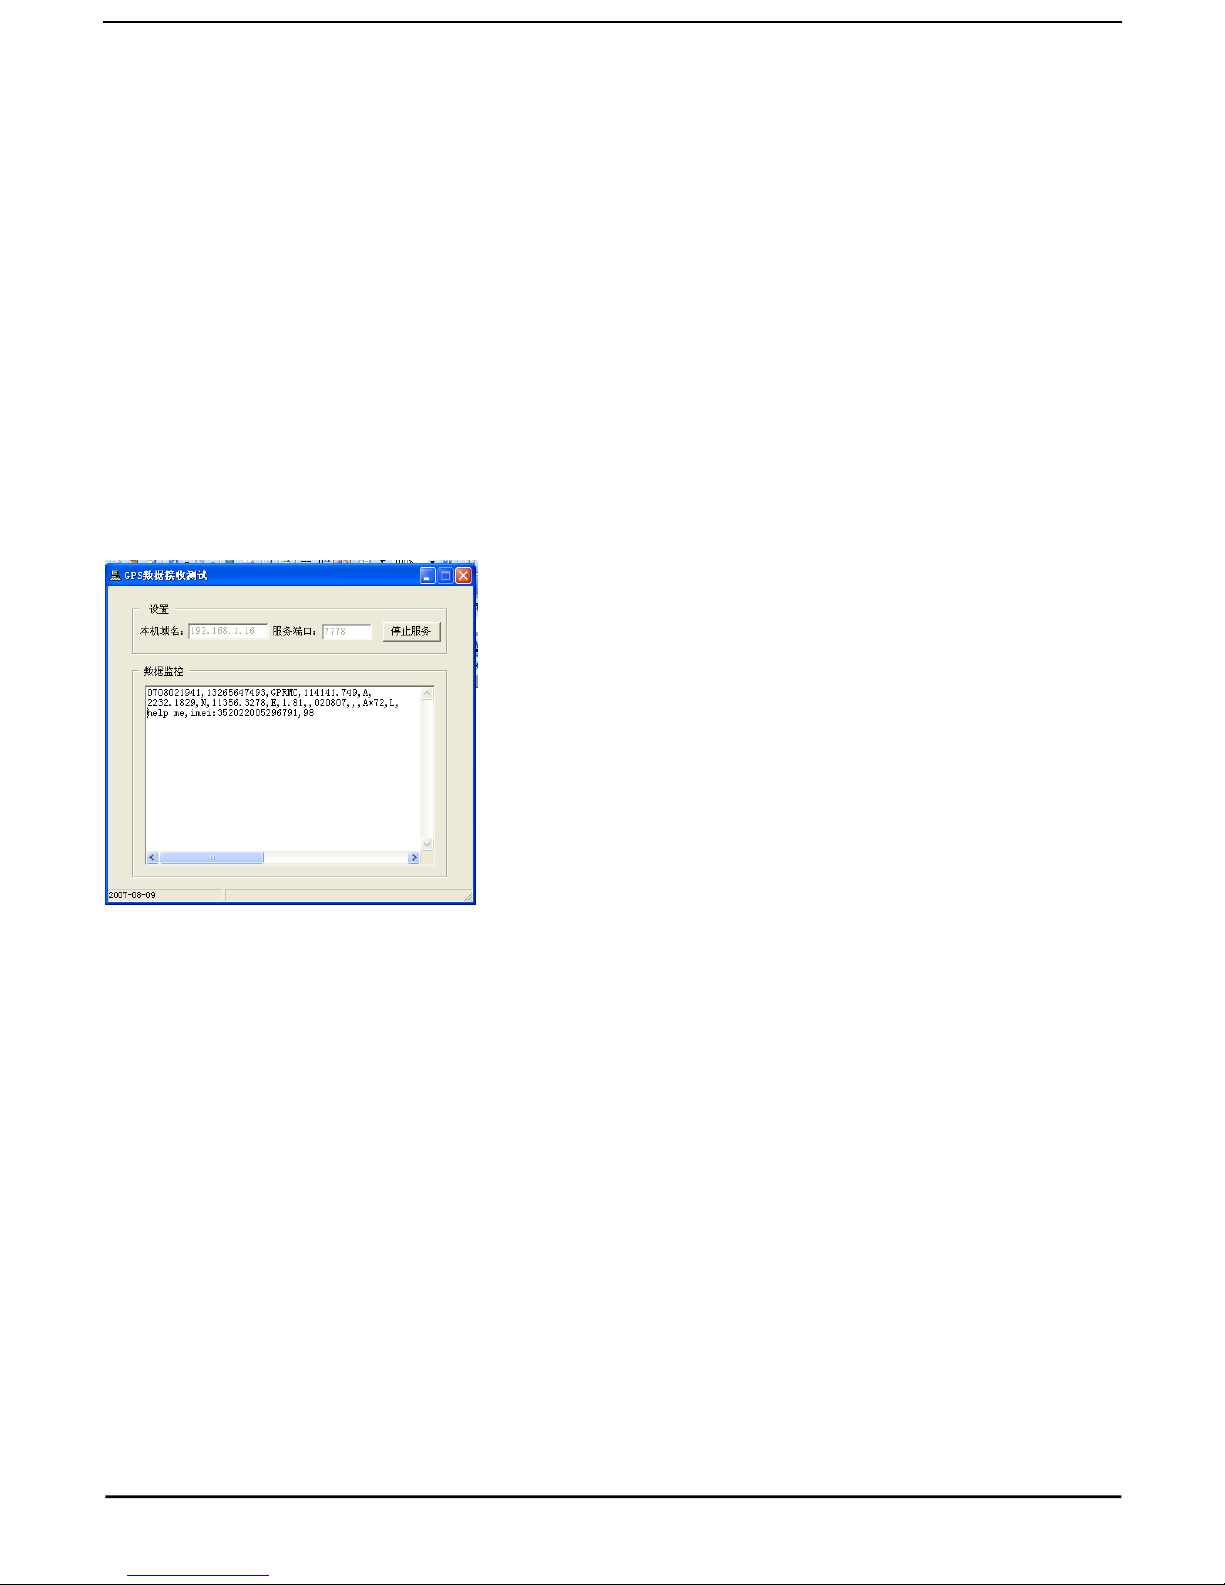
As soon as the IP & Port & APN are set up, the user can make a call or send SMS to
tracker. The tracker will hang up and report the coordinates to IP address.
The message format sent by tracker to IP address is as following:
Serial number + authorized number + GPRMC + GPS signal indicator + alert command
+ IMEI number +Battery voltage+ Number of satellites + CRC16 checksum.
For example, it will send GPS coordinates as below illustrated
091029025041,13145826175,GPRMC,025041.000,A,2234.0528,N,11403.0760,E,0.00
,0.00,291009,,,A*61,F,, imei:354776033427755,07,57.7,F:4.18V,0,136,720A
Notes:
◆Our gprs supports TCP or UDP protocol, so please confirm whether your GPRS
webserver supports TCP or UDP protocol before having the order.
◆ Please use the SIM card which is with GPRS function.
◆
Pls use the following SMS to set up GMT time in the SMS for the tracker
time
zone+password+space+ the customer’s GMT TIME
◆
Pls use the following SMS to set up YOUR website in the SMS for the tracker
home+password+space+
the customer’s WEBSITE
home+password+space+space (if there is no website in the SMS)
Page 14
14
6 Cautions
Please comply with the instructions to extend the unit life:
1. Keep the unit dry. Any liquid, i.e. rain, moisture, may destroy or damage the inside
circuitry.
2. Don’t use & store the unit in dusty places.
3. Don’t put the unit in overheated or overcooled places.
4. Handle carefully. Don’t vibrate or shake it violently.
5. Clear the unit with a piece of dry cloth. Don’t clean in chemicals, detergent.
6. Don’t paint the unit, this may cause some foreign materials left in between the parts.
7. Don’t disassemble or refit the unit.
8. Please use the battery and charger provided by manufacturer. Using other batteries
and chargers will cause unwanted situation.
9. Don’t dismount the antenna randomly, or use other antennas. This may interfere the
transmission, and increase the radiation as well.
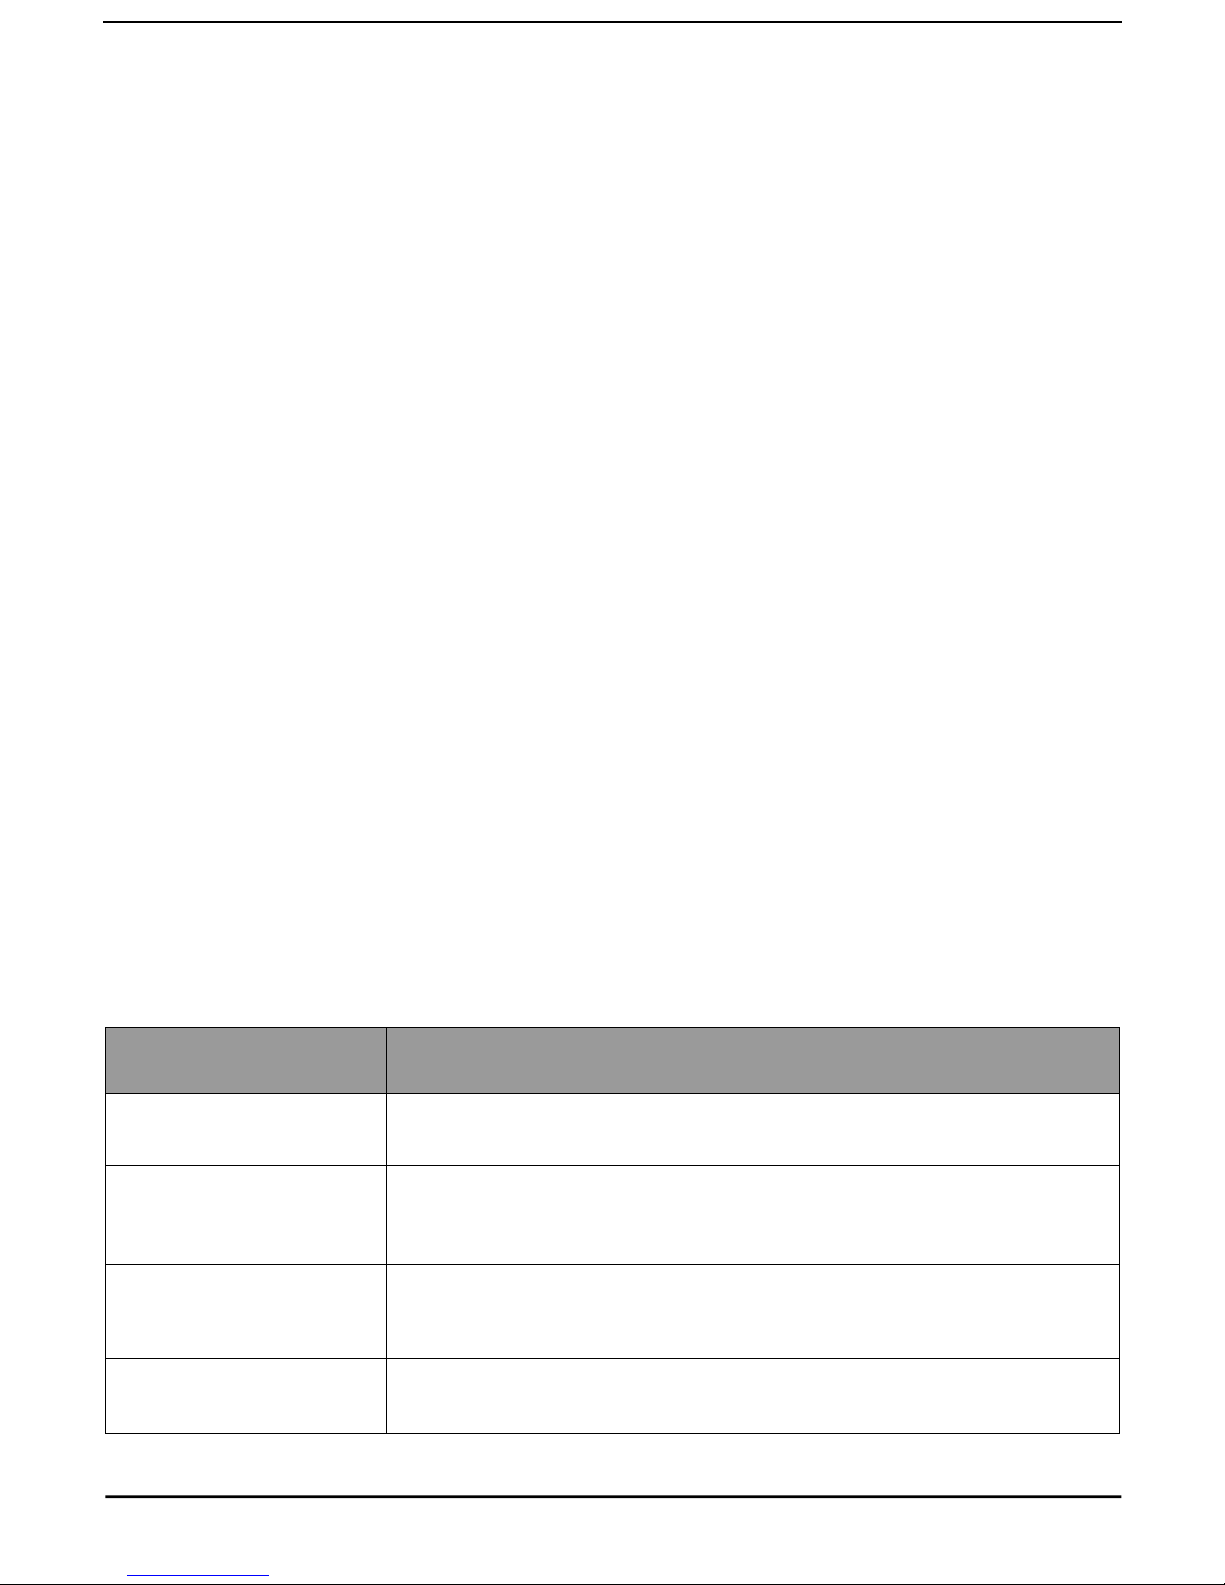
7 Faults & Solutions
Faults
Solution
No info display
Check the battery and see if it is fully charged or
correctly installed.
No SMS reply
In existence of an authorized number, an unauthorized
number dials up the unit . Please initialize the unit and re-se
t
up the authorized numbers.
Hangup Fail
Take out the battery and then insert it to restart up in
5
minutes later.
Location report in
digits of zeros.
Don’t use it in the place beyond reach of signals. Place the
unit outdoors, especially when starting it up.
 Loading...