

Xerox Splash PCI Series v5.x Installation Manual

Printing to Splash From
Windows NT
July 4, 1997
Splash T echnology, Inc.
Sunnyvale, California USA

Trademarks and Copyright
Splash and the Splash logo are trademarks of Splash Technology, Inc. Windows is a registered trademark and Windows NT is a
trademark of Microsoft Corporation, MajestiK and Regal and DocuColor are trademarks of Xerox, Incorporated. Acolor is a trademark of Fuji Xerox, Inc. AppleTalk is a registered trademark of Apple Computer, Inc. Nov ell NetWare is a trademark of Novell, Inc.
Adobe, the Adobe logo, Adobe Illustrator, PostScript, Adobe PStool, Adobe Type Manager, Adobe PageMaker and Adobe Photoshop are trademarks of Adobe Systems Incorporated, which may be registered in certain jurisdictions. QuarkXPress is a registered
trademark of Quark, Inc. All other brand or product names are trademarks of their respective holders.
Copyright © 1997 Splash Technology, Inc.
PN: 0014120-0102 Last revised: July 4, 1997. Your rights of ownership are subject to the limitations and restrictions imposed by the
copyright laws as outlined below.
PROPRIETARY RIGHTS NOTICE. The digitally encoded machine readable outline data for producing the typefaces provided
as part of your laser printer is copyrighted © 1981 Linotype-Hell AG. Copyright © 1993 Adobe System Incorporated. All Rights
Reserved. This data is the property of Linotype-Hell AG and Adobe Systems Incorporated and may not be reproduced, used,
displayed, modified, disclosed or transferred without the express written approval of Linotype-Hell AG and Adobe Systems
Incorporated.
It is against the law to copy, reproduce, or transmit including, without limitation, electronic transmission over any network any part
of the manual or program except as permitted by the Copyright Act of the United States, T itle 17, United States Code. Under the law,
copying includes translation into another language or format. However, you are permitted by law to write the contents of the
program into the machine memory of your computer so that the program may be executed. You are also permitted by law to make
working copies of the program, solely for your own use, subject to the following restrictions: (1) Working copies must be treated in
the same way as the original copy; (2) If you ever sell, lend, or give away the original copy of the program, all working copies must
also be sold, lent, or given to the same person, or destroyed; (3) No copy (original or working) may be used while any other copy
(original or working) is in use except within the terms of this license. The copyright notice that is on the original copy of the program
must accompany any working copies of the program.
The above is not an inclusive statement of the restrictions imposed on you under the Copyright Act. For a complete statement of
the restrictions imposed on you under the copyright laws of the United States of America, see Title 17, United States Code.
Page 2 Printing to Splash From Windows NT

Table of Contents
Introduction. . . . . . . . . . . . . . . . . . . . . . . . . . . . . . . . . . . . . . . . . . . . . . . . . . . . . . . . . . . . . . 5
System Requirements . . . . . . . . . . . . . . . . . . . . . . . . . . . . . . . . . . . . . . . . . . . . . . . . . . . .5
Chapter 1 — Setting Up For Printing to Splash . . . . . . . . . . . . . . . . . . . . . . . . . . . . . . . 7
Connecting Your Computer to the Splash Printer . . . . . . . . . . . . . . . . . . . . . . . . . . . . . . .7
Set Up for Printing to a Splash Print Spooler . . . . . . . . . . . . . . . . . . . . . . . . . . . . . . . . . .8
Set Up for Printing to Splash Over an
AppleTalk Network . . . . . . . . . . . . . . . . . . . . . . . . . . . . . . . . . . . . . . . . . . . . . . . . . . . . 11
Enabling the AppleTalk Printer Service . . . . . . . . . . . . . . . . . . . . . . . . . . . . . . . . . .11
Installing the Client Software For Windows NT . . . . . . . . . . . . . . . . . . . . . . . . . . . . . . 15
Installing the QuarkXPress PDF File . . . . . . . . . . . . . . . . . . . . . . . . . . . . . . . . . . . .23
Chapter 2 — Printing to Splash . . . . . . . . . . . . . . . . . . . . . . . . . . . . . . . . . . . . . . . . . . .25
Setting Splash Print Options . . . . . . . . . . . . . . . . . . . . . . . . . . . . . . . . . . . . . . . . . . . . . . 25
Using the Splash Print Options . . . . . . . . . . . . . . . . . . . . . . . . . . . . . . . . . . . . . . . . . . . .29
Setting Splash Tray Options . . . . . . . . . . . . . . . . . . . . . . . . . . . . . . . . . . . . . . . . . . .29
Setting Splash Color Options . . . . . . . . . . . . . . . . . . . . . . . . . . . . . . . . . . . . . . . . . .32
Setting Other Splash Options . . . . . . . . . . . . . . . . . . . . . . . . . . . . . . . . . . . . . . . . . .36
Creating a PostScript or EPS File . . . . . . . . . . . . . . . . . . . . . . . . . . . . . . . . . . . . . . . . . . 41
Deleting a Print Job . . . . . . . . . . . . . . . . . . . . . . . . . . . . . . . . . . . . . . . . . . . . . . . . . . . .42
Splash Color Correction . . . . . . . . . . . . . . . . . . . . . . . . . . . . . . . . . . . . . . . . . . . . . . . . .43
Splash Color Correction Notes . . . . . . . . . . . . . . . . . . . . . . . . . . . . . . . . . . . . . . . . . 44
Chapter 3 — Using the Splash Web Queue Manager . . . . . . . . . . . . . . . . . . . . . . . . . .45
Contents Page 3

Chapter 4 — Application Notes. . . . . . . . . . . . . . . . . . . . . . . . . . . . . . . . . . . . . . . . . . . . 53
Supported Windows NT Applications . . . . . . . . . . . . . . . . . . . . . . . . . . . . . . . . . . . . . . 53
General Driver Notes . . . . . . . . . . . . . . . . . . . . . . . . . . . . . . . . . . . . . . . . . . . . . . . . . . . 53
Duplicate Cover Pages . . . . . . . . . . . . . . . . . . . . . . . . . . . . . . . . . . . . . . . . . . . . . . . 53
Some Images Print With Limited Color . . . . . . . . . . . . . . . . . . . . . . . . . . . . . . . . . .53
Accidentally Printing EPS Files . . . . . . . . . . . . . . . . . . . . . . . . . . . . . . . . . . . . . . . . 54
Printing Gradient Fills . . . . . . . . . . . . . . . . . . . . . . . . . . . . . . . . . . . . . . . . . . . . . . . . 54
Network Notes . . . . . . . . . . . . . . . . . . . . . . . . . . . . . . . . . . . . . . . . . . . . . . . . . . . . . . . . 54
Novell NetWare Notes . . . . . . . . . . . . . . . . . . . . . . . . . . . . . . . . . . . . . . . . . . . . . . . 54
Application Notes . . . . . . . . . . . . . . . . . . . . . . . . . . . . . . . . . . . . . . . . . . . . . . . . . . . . . . 54
Canceling a Print Job . . . . . . . . . . . . . . . . . . . . . . . . . . . . . . . . . . . . . . . . . . . . . . . .54
QuarkXPress Notes . . . . . . . . . . . . . . . . . . . . . . . . . . . . . . . . . . . . . . . . . . . . . . . . . . 54
Save as TIFF and Adobe Photoshop 3.0 . . . . . . . . . . . . . . . . . . . . . . . . . . . . . . . . . . 55
Printing FreeHand for Windows NT Documents . . . . . . . . . . . . . . . . . . . . . . . . . . .55
Index. . . . . . . . . . . . . . . . . . . . . . . . . . . . . . . . . . . . . . . . . . . . . . . . . . . . . . . . . . . . . . . . . . . 57
Page 4 Printing to Splash From Windows NT

Introduction
The Splash™ Windows NT Client software allows a PC running Microsoft®
Windows NT (version 4.0 or later) to print to a Splash MajestiK™, Acolor™,
DocuColor™ 5750, DocuColor 5799, or Regal™ printer/copier. The driver software
lets your W indows™ applications communicate across an appropriate network with
a Splash Server . The Splash Serv er then processes your print jobs and sends them to
the printer/copier. Thus, you can develop documents with Windows-based
applications and then print your work on the Splash printer/copier.
This on-line manual describes how to install and use the Splash Client software
with Windows NT. If you are not already familiar with Windows NT procedures
and conventions, please refer to your Microsoft documentation before you attempt
to print to Splash.
System Requirements
The Splash Windows Client driver requires the following hardware and software:
■
An IBM AT or PS/2 (or 100%-compatible) computer with an 80486 or higher
processor
■
One 3.5" floppy disk drive, high-density (1.4MB) capacity
■
Hard disk drive
■
At least 16 MB of RAM
■
Microsoft Windows NT version 4.0 or later
■
Network hardware that works with the built-in Windows NT drivers to connect
your PC to the Splash print queue on the Novell or NT server
Refer to the Windows NT documentation for a description of
compatible hardware.
Introduction Page 5

Page 6 Printing to Splash From Windows NT

Chapter 1
Setting Up For Printing to Splash
This chapter explains how to connect your PC to the Splash printer/copier and how
to install the Splash Windows NT client software.
Connecting Your Computer to the Splash Printer
Before you can install the Splash Windows NT Client software, you must establish
a network connection to the Splash printer. There are several options for setting up
your Windows NT PC for printing to Splash. You can:
■
Connect to another Windows NT computer on your network that has been set
up as a print spooler for Splash,
■
Connect to a Novell NetWare print spooler that has been configured for
printing to Splash,
■
Configure your Windows NT system for direct printing to Splash over an
AppleTalk network, or
■
Configure your Windows NT system for direct LPR printing to Splash over a
TCP/IP network.
This chapter describes how to set up for printing through a Windows NT or Novell
NetWare print spooler that has been configured for printing to Splash. If no print
spooler is available, this chapter describes also how to set up for printing to Splash
over an AppleTalk network. The instructions provided in this chapter apply to both
Windows NT Server and Windows NT Workstation systems.
If your PC can connect to a Novell NetWare server, the system administrator
responsible for setting up print spoolers should refer to the appropriate Novell
NetWare documentation, and the Splash NetWare Direct documentation for
instructions on how to set up a Novell print queue for Splash. Refer to the chapter,
“Setting Up TCP/IP and NetWare Direct Printing to Splash,” in the
Reference
Setting Up For Printing to Splash Page 7
on-line manual.
Splash

If your PC is connected to a TCP/IP network, the system administrator should refer
to the chapter “Setting Up TCP/IP and Netware Direct Printing to Splash” in the
Splash Reference
to receive LPR print jobs. This Reference manual chapter includes also instructions
on how to set up Windows NT for LPR printing to Splash.
on-line manual for instructions on how to set up the Splash Server
Set Up for Printing to a Splash Print Spooler
This procedure describes how to connect to a W indo ws NT or Nov ell NetWare print
spooler that is set up for printing to Splash. All software needed to print to Splash is
automatically transferred to your computer when you connect to the print spooler
with the Windows NT Add Printer Wizard. You do not need the
Client
floppy disk for this procedure.
If a Splash print spooler is not available on your network, go to the section “Set Up
for Printing to Splash Over an AppleTalk Network” on page 11.
Exit any applications that you will use to print to Splash before you begin the set up
procedure.
To set up your Windows NT PC for printing to Splash:
1.
Start Windows NT.
Splash W/n NT
2.
Click the Start button, point to Settings, then choose Printers. The Printers
control panel appears.
3.
Double-click Add Printer.
Page 8 Printing to Splash From Windows NT
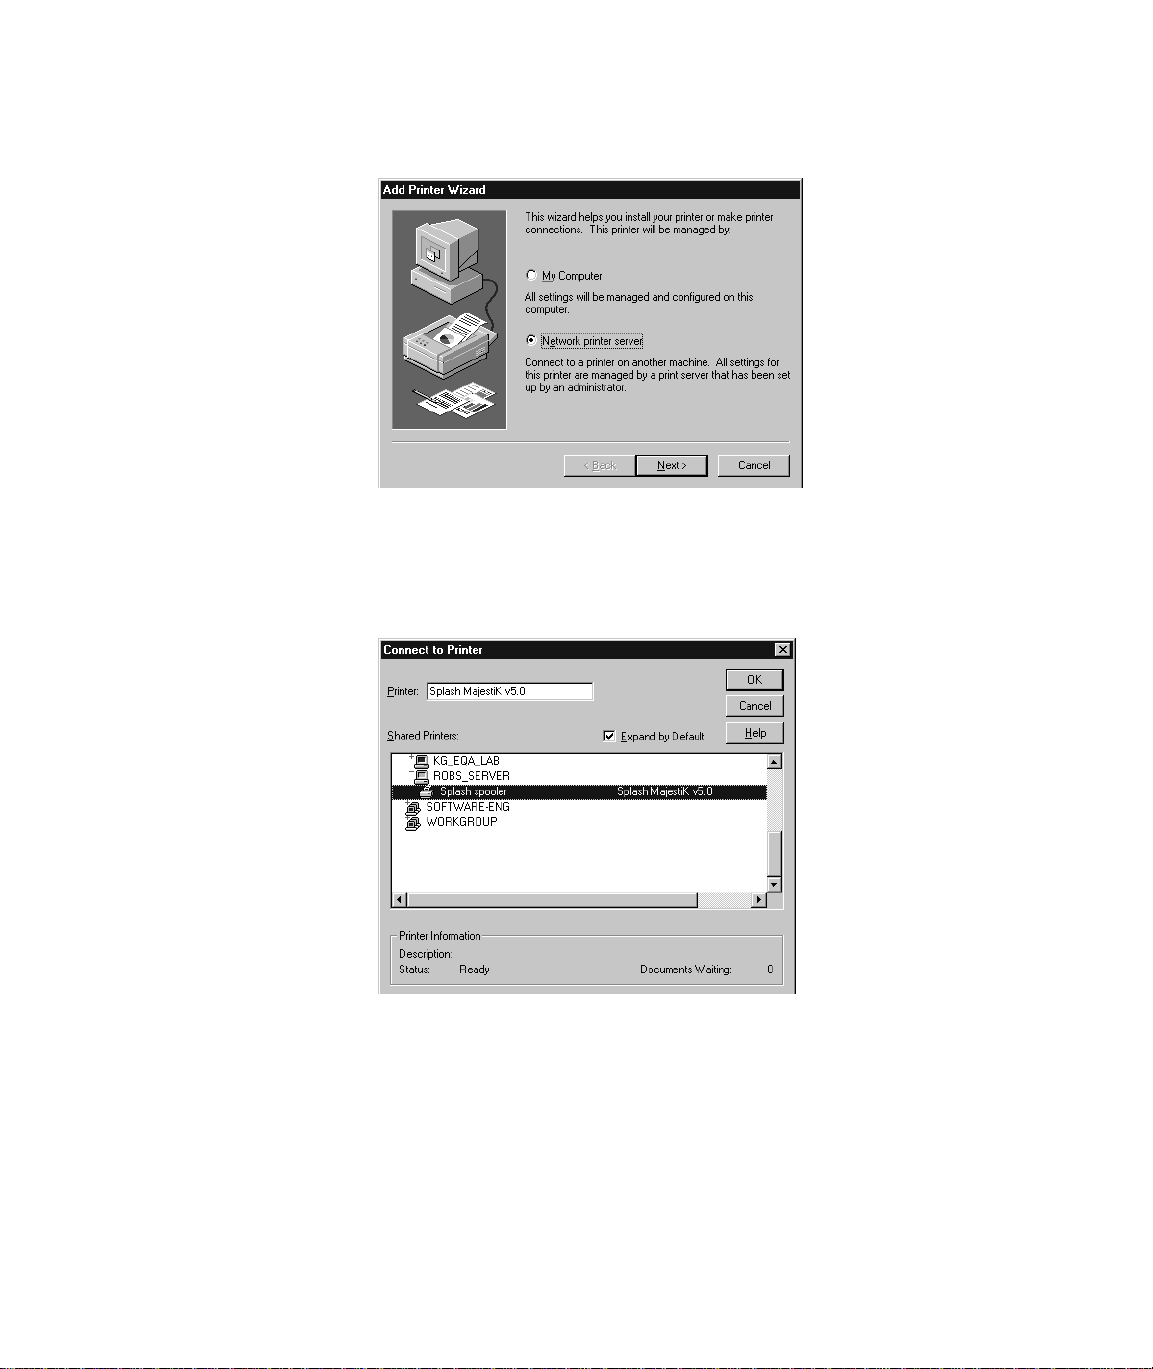
The Windows NT Add Printer Wizard appears.
4.
Select Network printer server to tell Windows NT that the Splash printer is
connected to your computer over a network, then click Next.
Windows NT displays a list of devices on your network.
5.
Locate the Splash print spooler and select it in the Shared Printers list.
Setting Up For Printing to Splash Page 9

6.
Click OK to continue.
7.
Select “Yes” if you want the Splash printer/copier to be the default printer for
your computer. Click Next to continue.
8.
Click Finish to complete printer setup. The Splash printer appears in the Printer
control panel.
Setup for the Splash print spooler is complete. The Splash client software was
automatically installed on your computer during printer setup. Go to the next
chapter of this manual to learn about the print features available with Splash.
Page 10 Printing to Splash From Windows NT

Set Up for Printing to Splash Over an
AppleTalk Network
If a Splash print spooler is not available on your network, you must install the
Splash W indo ws NT client software on your computer. All software needed to print
to a printer on an AppleTalk network is provided with Windows NT. No AppleTalk
bridge software is needed.
To install the Windows NT Client software, use the
disk provided with the Splash Server. Before you install the Splash Windows NT
client software, make a backup copy of the installation disk. Use the backup disk to
perform the installation.
You will need also the Windows NT system CD-ROM to complete the set up
procedure.
Splash Win NT Client
floppy
Enabling the AppleTalk Printer Service
If your PC is running W indows NT Server, the Microsoft AppleTalk printer service
is enabled when you install Windows NT. You can skip this part of the install
procedure and go on to the next section, “Installing the Client Software For
Windows NT” on page 15. If your PC is running Windows NT Workstation, you
must enable the Microsoft AppleTalk Printer Service before you can proceed with
the Splash Client software install.
Setting Up For Printing to Splash Page 11
To enable the AppleTalk Printer Service:
1.
Click the Start button, point to Settings, then choose Control Panels.
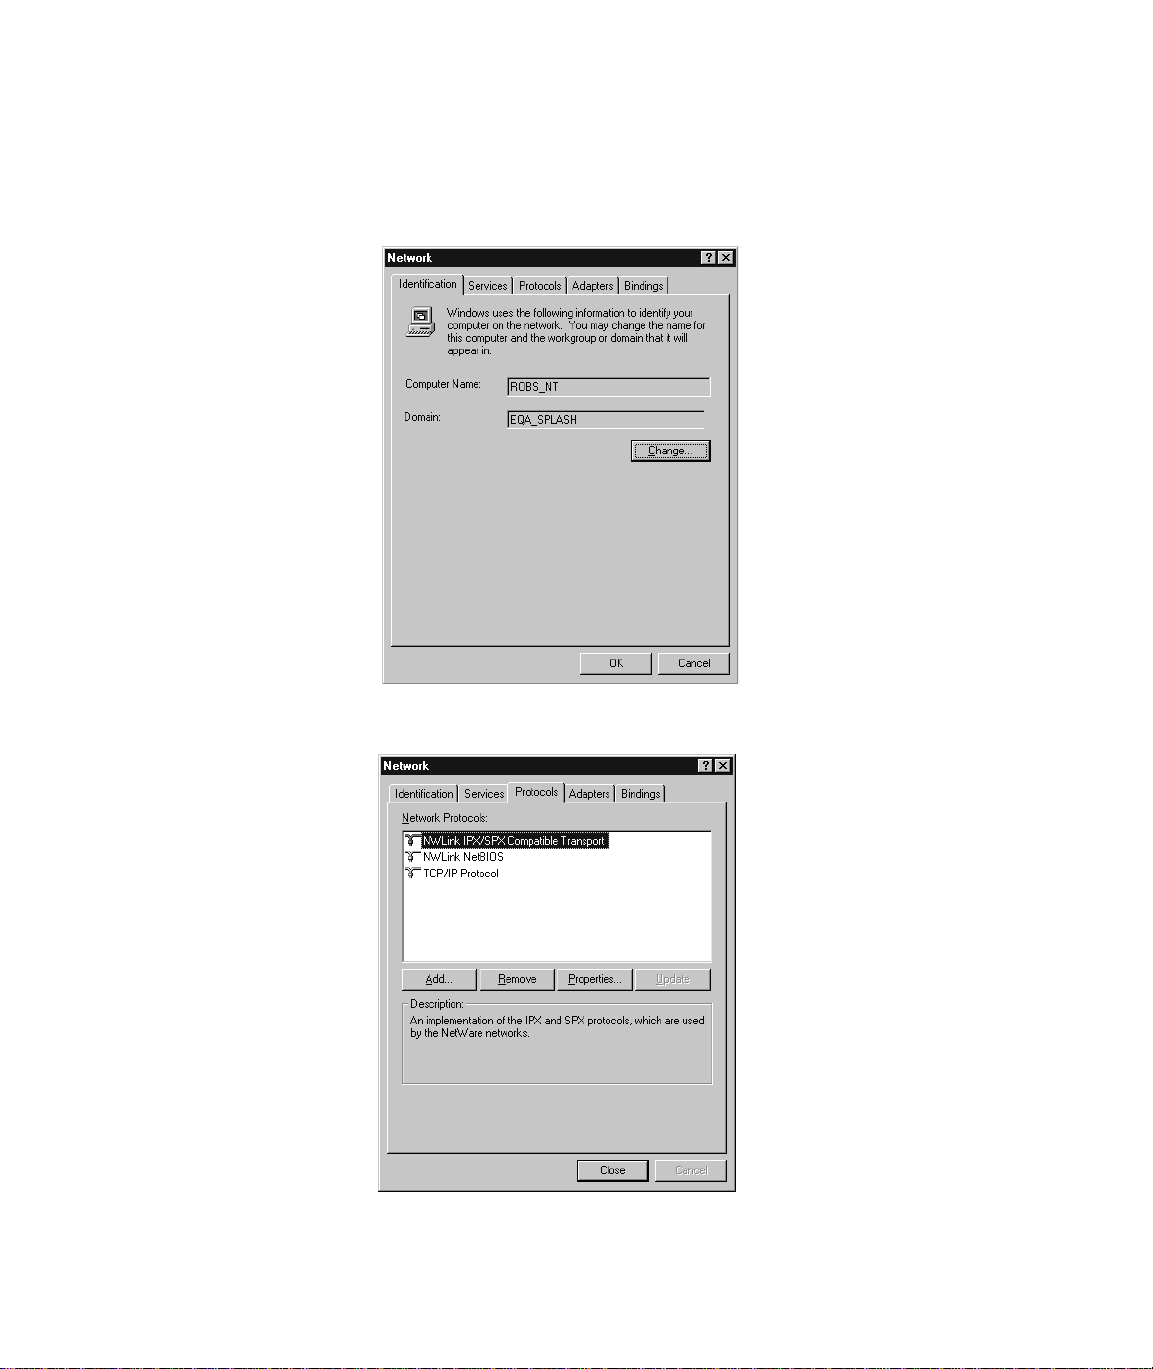
2.
Double-click the Network control panel to open it.
3.
Click the Protocols tab.
Page 12 Printing to Splash From Windows NT
4.
Click Add. Windows NT displays a list of network communications protocols
you can add to your system.
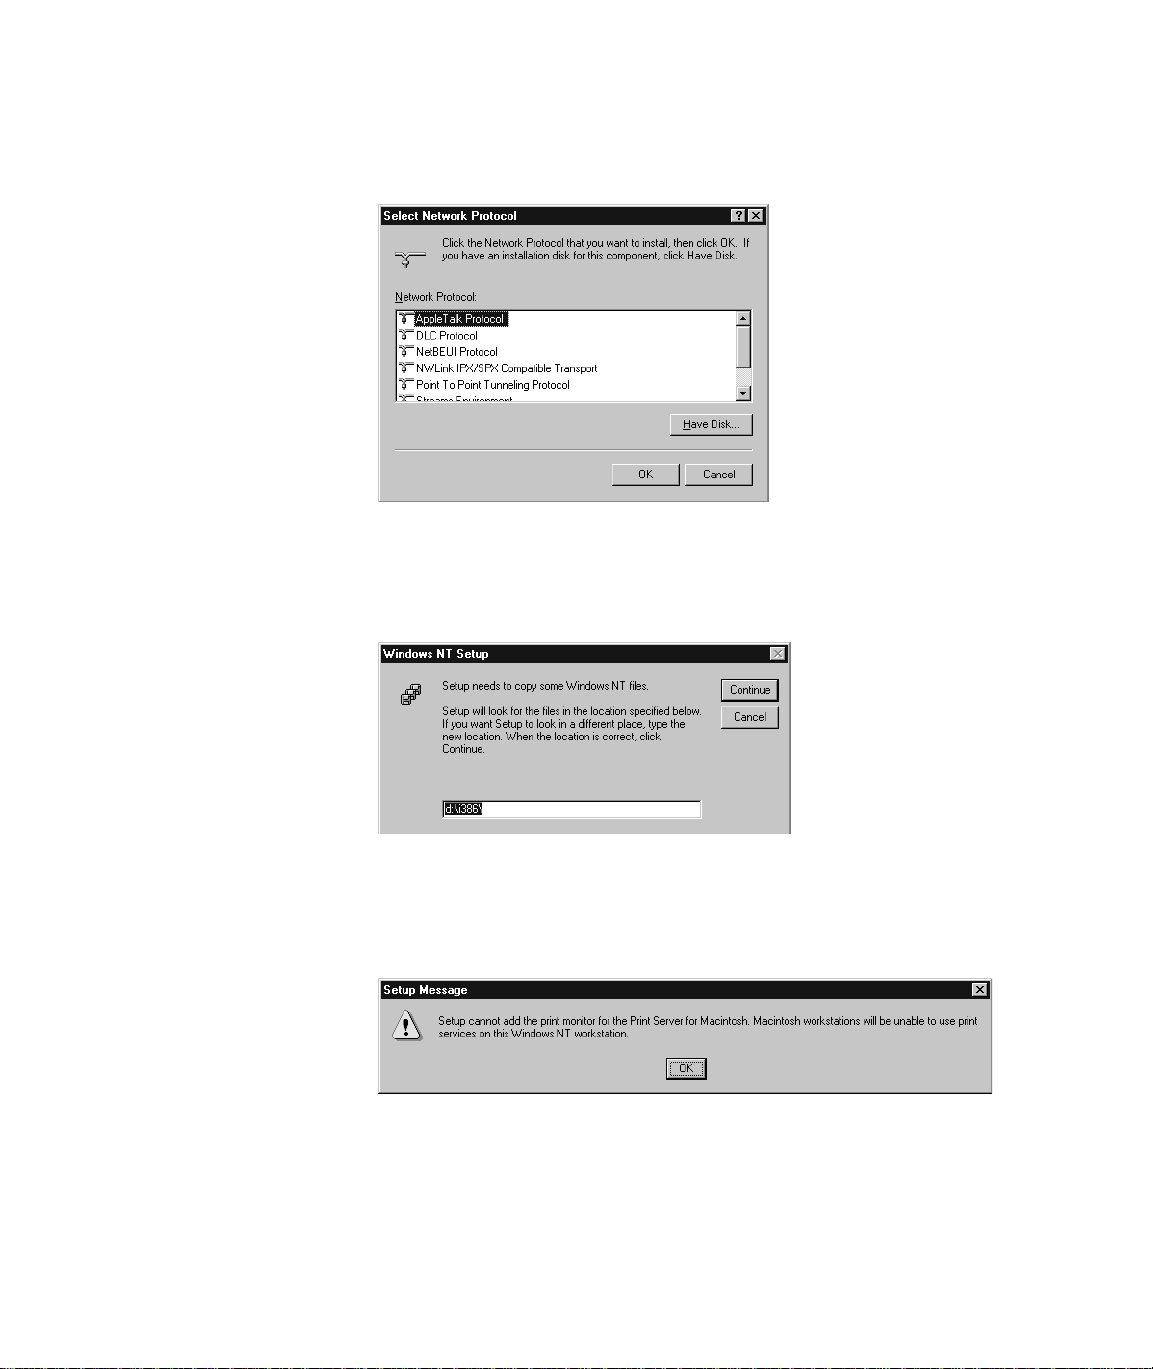
5.
Select “AppleTalk Protocol” in the Network Protocol list, then click OK.
Windows NT asks you to insert the Windows NT system CD-ROM in your
computer’s CD-ROM drive.
6.
Insert the Windows NT system CD-ROM in your computer’s CD-ROM drive,
enter the drive letter and path for the CD-ROM drive, then click Continue.
Another Windows NT message appears.
Setting Up For Printing to Splash Page 13

7.
Click OK.
8.
Select the network adapter type used by your computer to connect to the
network, select the network zone where your computer and the Splash printer
are located, then click OK.
A message appears.
9.
Click Yes. Windows NT restarts.
When Windows NT restarts, AppleTalk printer service is enabled for your PC. You
can now install the Splash client software for Windows NT and connect to the
Splash Server.
Page 14 Printing to Splash From Windows NT

Installing the Client Software For Windows NT
To install the Windows NT Client software, use the
disk provided with the Splash Server. Before you install the Splash Windows NT
Client driver, make a backup copy of the installation disk. Use the backup disk to
do the installation.
Exit any applications that you will use to print to Splash before you begin the set up
procedure.
To install the Splash Windows NT Client driver on a system running Windows NT:
1.
Locate the
2.
Start Windows NT.
3.
Click the Start button, point to Settings, and then choose Printers. The Printers
setup window appears.
Splash Win NT Client
floppy disk (provided with Splash).
Splash Win NT Client
floppy
Setting Up For Printing to Splash Page 15

4.
Double-click Add Printer. The Windows NT Add Printer Wizard appears.
5.
Select “My Computer” then click Next to continue the installation process.
The Add Printer Wizard asks you to select the port for your printer.
Page 16 Printing to Splash From Windows NT

6.
Click Add Port. A list of printer ports you can add appears.
7.
Select AppleTalk Printing Devices from the Available Printer Ports list, then
click New Port.
8.
Locate the Splash Server in the list of AppleTalk Printing Devices, select the
Splash Server, then click OK.
Setting Up For Printing to Splash Page 17

The Splash Server appears in the list of Available ports in the
Add Printer Wizard.
9.
Be sure the Splash Server is selected in the Available ports list, then click Next
to continue.
The Add Printer Wizard asks you to select the manufacturer and model for
your printer.
Page 18 Printing to Splash From Windows NT
 Loading...