

Page 1

Splash PCI Series v5.0
Set-Up Manual
July 4, 1997
Splash T echnology
Sunnyvale, California USA
Page 2

Trademarks and Copyright
Splash and the Splash logo are trademarks of Splash Technology Inc. Apple, Macintosh, LaserWriter, and AppleTalk are registered
trademarks of Apple Computer, Inc. MajestiK, Regal, and DocuColor are trademarks of Xerox, Incorporated. Acolor is a trademark
of Fuji Xerox, Inc. Novell Netware is a trademerk of Novell, Inc. Adobe, the Adobe logo, Adobe Illustrator, PostScript, Adobe T ype
Manager, Adobe PageMaker, and Adobe Photoshop are trademarks of Adobe Systems Incorporated, which may be registered in
certain jurisdictions. QuarkXPress is a registered trademark of Quark, Inc. Stuffit Expander Copyright © 1990-1997. All other brand
or product names are trademarks of their respective holders.
Copyright © 1997 Splash Technology, Inc.
PN: 0014114-0102 Last revised: July 4, 1997. Your rights of ownership are subject to the limitations and restrictions imposed by the
copyright laws as outlined below.
PROPRIETARY RIGHTS NOTICE. The digitally encoded machine readable outline data for producing the typefaces provided
as part of your laser printer is copyrighted © 1981 Linotype-Hell AG. Copyright © 1993 Adobe System Incorporated. All Rights
Reserved. This data is the property of Linotype-Hell AG and Adobe Systems Incorporated and may not be reproduced, used,
displayed, modified, disclosed or transferred without the express written approval of Linotype-Hell AG and Adobe Systems
Incorporated.
LZW Patent Notice:
U.S. Government Users:
defined at 48 C.F.R. 2.101 (OCT 1995), and more specifically “commercial computer software” and “commercial computer
software documentation” as such terms are used in 48 C.F.R. 12.212 (SEPT 1995). Consistent with 48 C.F.R. 12.212 and
48 C.F.R. 227.7202-1 through 227.7202-4 (JUNE 1995), the Licensed System is provided to U.S. Government End Users
(a) only as a commercial end item and (b) with only those rights as are granted to all other End Users pursuant to the terms
and conditions herein.
It is against the law to copy, reproduce, or transmit including, without limitation, electronic transmission over any network any part
of the manual or program except as permitted by the Copyright Act of the United States, T itle 17, United States Code. Under the law,
copying includes translation into another language or format. However, you are permitted by law to write the contents of the
program into the machine memory of your computer so that the program may be executed. You are also permitted by law to make
working copies of the program, solely for your own use, subject to the following restrictions: (1) Working copies must be treated in
the same way as the original copy; (2) If you ever sell, lend, or give away the original copy of the program, all working copies must
also be sold, lent, or given to the same person, or destroyed; (3) No copy (original or working) may be used while any other copy
(original or working) is in use except within the terms of this license. The copyright notice that is on the original copy of the program
must accompany any working copies of the program.
The above is not an inclusive statement of the restrictions imposed on you under the Copyright Act. For a complete statement of
the restrictions imposed on you under the copyright laws of the United States of America, see Title 17, United States Code.
This Licensed System includes an implementation of LZW licensed under U.S. Patent 4,558,302.
The Adobe Licensed System provided with this product is a “commercial item” as that term is
FCC Compliance
Note: This equipment has been tested and found to comply with the limits for a Class A digital device, pursuant to Part 15 of the
FCC Rules. These limits are designed to provide reasonable protection against harmful interference when the equipment is operated
in a commercial environment. This equipment generates, uses and can radiate radio frequency energy and, if not installed and used in
accordance with the instruction manual, may cause harmful interference to radio communications. Operation of this equipment in a
residential area is likely to cause harmful interference in which case the user will be required to correct the interference at his or her
own expense.
Shielded cables must be used with this equipment to maintain compliance with FCC regulations.
Page 2 Splash PCI Series v5.0 Set-Up Manual
Page 3
Canadian DOC Notice
This Class A digital apparatus meets all requirements of the Canadian Interference-Causing Equipment Regulations.
CET APPAREIL NUMERIQUE DE LA CLASSE A RESPECTE TOUTES LES EXIGENCES DU REGLEMENT SUR LE
MATÉRIAL BROUILLEUR DU CANADA.
Japanese VCCI Statement
CE Mark
DECLARATION OF CONFORMITY
We, Splash Technology, Inc, declare under our sole responsibility that the Splash products
to which this declaration relates are in conformity with the following standards or other normative documents:
EN55022/CSPR22 CLASS B
EN0082-1/IEC 801-2,3,4
following the provisions of :
89/336/EEC-EMC Directive
Splash Technology, Inc. 555 Del Rey Avenue, Sunnyvale, CA. 94086 USA
The signed and dated Declaration of Conformance is on file at the above address.
Page 3
Page 4

Page 4 Splash PCI Series v5.0 Set-Up Manual
Page 5

Table of Contents
Introduction. . . . . . . . . . . . . . . . . . . . . . . . . . . . . . . . . . . . . . . . . . . . . . . . . . . . . . . . . . . . . . 9
Product Features . . . . . . . . . . . . . . . . . . . . . . . . . . . . . . . . . . . . . . . . . . . . . . . . . . . . . . . .9
Splash PCI Series v5.0 Server Models . . . . . . . . . . . . . . . . . . . . . . . . . . . . . . . . . . .13
System Notes . . . . . . . . . . . . . . . . . . . . . . . . . . . . . . . . . . . . . . . . . . . . . . . . . . . . . . . . . 13
Registration Card . . . . . . . . . . . . . . . . . . . . . . . . . . . . . . . . . . . . . . . . . . . . . . . . . . .14
Compatible Applications . . . . . . . . . . . . . . . . . . . . . . . . . . . . . . . . . . . . . . . . . . . . . . . . 14
An Overview of Splash Adobe PostScript Printing . . . . . . . . . . . . . . . . . . . . . . . . . . . .15
About The Splash Server Manuals . . . . . . . . . . . . . . . . . . . . . . . . . . . . . . . . . . . . . . . . . 17
Chapter 1 — Setting Up the Splash Server . . . . . . . . . . . . . . . . . . . . . . . . . . . . . . . . . .19
Connecting the System . . . . . . . . . . . . . . . . . . . . . . . . . . . . . . . . . . . . . . . . . . . . . . . . . . 20
Splash Key . . . . . . . . . . . . . . . . . . . . . . . . . . . . . . . . . . . . . . . . . . . . . . . . . . . . . . . . . . .22
Setting Up the Splash Server . . . . . . . . . . . . . . . . . . . . . . . . . . . . . . . . . . . . . . . . . . . . .22
Copier Set-Up Notes . . . . . . . . . . . . . . . . . . . . . . . . . . . . . . . . . . . . . . . . . . . . . . . . . . . .25
Disable the Built-In Auto Tray Switching Option in Regal,
Acolor 93x, and DocuColor 5799 Copiers . . . . . . . . . . . . . . . . . . . . . . . . . . . . . . . .25
Installing the Splash Client Software . . . . . . . . . . . . . . . . . . . . . . . . . . . . . . . . . . . . . . .25
Setting Up TCP/IP and Novell NetWare
Client Printing . . . . . . . . . . . . . . . . . . . . . . . . . . . . . . . . . . . . . . . . . . . . . . . . . . . . . . . .25
Installing the Splash Plug-Ins for
Adobe Photoshop . . . . . . . . . . . . . . . . . . . . . . . . . . . . . . . . . . . . . . . . . . . . . . . . . . . . . .26
Splash Server System Performance . . . . . . . . . . . . . . . . . . . . . . . . . . . . . . . . . . . . . . . .27
Disk Size . . . . . . . . . . . . . . . . . . . . . . . . . . . . . . . . . . . . . . . . . . . . . . . . . . . . . . . . . .27
Memory Size . . . . . . . . . . . . . . . . . . . . . . . . . . . . . . . . . . . . . . . . . . . . . . . . . . . . . . . 31
Troubleshooting . . . . . . . . . . . . . . . . . . . . . . . . . . . . . . . . . . . . . . . . . . . . . . . . . . . . . . . 32
Splash Server On-Line Manuals . . . . . . . . . . . . . . . . . . . . . . . . . . . . . . . . . . . . . . . . . . . 34
Contents Page 5
Page 6

Chapter 2 — Using the Splash Server . . . . . . . . . . . . . . . . . . . . . . . . . . . . . . . . . . . . . . 35
Starting and Stopping the Server Application . . . . . . . . . . . . . . . . . . . . . . . . . . . . . . . . 36
Working With the Splash Server Application . . . . . . . . . . . . . . . . . . . . . . . . . . . . . . . . . 36
Starting and Stopping Printing . . . . . . . . . . . . . . . . . . . . . . . . . . . . . . . . . . . . . . . . . 37
Working With Print Jobs . . . . . . . . . . . . . . . . . . . . . . . . . . . . . . . . . . . . . . . . . . . . . . . . 38
Moving Jobs . . . . . . . . . . . . . . . . . . . . . . . . . . . . . . . . . . . . . . . . . . . . . . . . . . . . . . .38
Viewing and Editing Print Options for a Job . . . . . . . . . . . . . . . . . . . . . . . . . . . . . .39
Deleting Print Jobs . . . . . . . . . . . . . . . . . . . . . . . . . . . . . . . . . . . . . . . . . . . . . . . . . . 40
Setting Default Print Options . . . . . . . . . . . . . . . . . . . . . . . . . . . . . . . . . . . . . . . . . . 40
Checking a Print Job for Errors Before You Print . . . . . . . . . . . . . . . . . . . . . . . . . . . 42
Setting Splash Server Preferences . . . . . . . . . . . . . . . . . . . . . . . . . . . . . . . . . . . . . . . . . 44
Setting Server Preferences . . . . . . . . . . . . . . . . . . . . . . . . . . . . . . . . . . . . . . . . . . . .45
Setting Network Preferences . . . . . . . . . . . . . . . . . . . . . . . . . . . . . . . . . . . . . . . . . . . 47
Setting Features Preferences . . . . . . . . . . . . . . . . . . . . . . . . . . . . . . . . . . . . . . . . . . . 49
Setting Server Screening Preferences . . . . . . . . . . . . . . . . . . . . . . . . . . . . . . . . . . . .51
Setting Server Style Preferences . . . . . . . . . . . . . . . . . . . . . . . . . . . . . . . . . . . . . . . . 52
Setting CMYK Color Correction Profiles . . . . . . . . . . . . . . . . . . . . . . . . . . . . . . . . . . .53
Drop Printing Files to Splash . . . . . . . . . . . . . . . . . . . . . . . . . . . . . . . . . . . . . . . . . . . . .54
Drop Printing Notes . . . . . . . . . . . . . . . . . . . . . . . . . . . . . . . . . . . . . . . . . . . . . . . . .55
Starting a Log File . . . . . . . . . . . . . . . . . . . . . . . . . . . . . . . . . . . . . . . . . . . . . . . . . . . . . 56
Printing the Job Log . . . . . . . . . . . . . . . . . . . . . . . . . . . . . . . . . . . . . . . . . . . . . . . . . 57
Job Log Notes . . . . . . . . . . . . . . . . . . . . . . . . . . . . . . . . . . . . . . . . . . . . . . . . . . . . . .58
Adding Fonts to the Splash Server . . . . . . . . . . . . . . . . . . . . . . . . . . . . . . . . . . . . . . . . . 59
Enabling Font Downloading at the Splash Server . . . . . . . . . . . . . . . . . . . . . . . . . .59
Downloading Fonts to the Splash Server . . . . . . . . . . . . . . . . . . . . . . . . . . . . . . . . . 60
Font Downloading Notes . . . . . . . . . . . . . . . . . . . . . . . . . . . . . . . . . . . . . . . . . . . . .63
Splash Server Notes . . . . . . . . . . . . . . . . . . . . . . . . . . . . . . . . . . . . . . . . . . . . . . . . . . . . 64
Increasing the Maximum Number of Jobs That
Can Be in the Print Queues . . . . . . . . . . . . . . . . . . . . . . . . . . . . . . . . . . . . . . . . . . . . 64
Disable Type Reunion Extension . . . . . . . . . . . . . . . . . . . . . . . . . . . . . . . . . . . . . . . 64
Running Other Applications on the Splash Server . . . . . . . . . . . . . . . . . . . . . . . . . . 65
Print Job Name Notes . . . . . . . . . . . . . . . . . . . . . . . . . . . . . . . . . . . . . . . . . . . . . . . . 65
RIP While Receive . . . . . . . . . . . . . . . . . . . . . . . . . . . . . . . . . . . . . . . . . . . . . . . . . .65
Look Ahead Routing . . . . . . . . . . . . . . . . . . . . . . . . . . . . . . . . . . . . . . . . . . . . . . . . . 66
Job Processing Notes . . . . . . . . . . . . . . . . . . . . . . . . . . . . . . . . . . . . . . . . . . . . . . . . 66
Customizing the Splash Color Control Strip . . . . . . . . . . . . . . . . . . . . . . . . . . . . . . 66
Page 6 Splash PCI Series v5.0 Set-Up Manual
Page 7

Switching Network Protocols for the Splash Server . . . . . . . . . . . . . . . . . . . . . . . . . 67
Disabling EtherTalk . . . . . . . . . . . . . . . . . . . . . . . . . . . . . . . . . . . . . . . . . . . . . . . . .67
Server Disk Full . . . . . . . . . . . . . . . . . . . . . . . . . . . . . . . . . . . . . . . . . . . . . . . . . . . .67
Servers With Many Fonts Installed . . . . . . . . . . . . . . . . . . . . . . . . . . . . . . . . . . . . . .67
Splash Server Troubleshooting Notes . . . . . . . . . . . . . . . . . . . . . . . . . . . . . . . . . . . .68
Installer Notes . . . . . . . . . . . . . . . . . . . . . . . . . . . . . . . . . . . . . . . . . . . . . . . . . . . . . .68
Job Previews Notes . . . . . . . . . . . . . . . . . . . . . . . . . . . . . . . . . . . . . . . . . . . . . . . . . .68
PostScript Error Reported for a Successful Print Job . . . . . . . . . . . . . . . . . . . . . . . .68
Index. . . . . . . . . . . . . . . . . . . . . . . . . . . . . . . . . . . . . . . . . . . . . . . . . . . . . . . . . . . . . . . . . . . 69
Contents Page 7
Page 8

Page 8 Splash PCI Series v5.0 Set-Up Manual
Page 9

Introduction
Thank you for purchasing a Splash Professional Color Imaging Series Server.
The Splash™ PCI Series Server is a pre-configured PostScript print server designed
for the Xerox MajestiK, Regal, DocuColor 5799, or Acolor Series of digital color
copiers. The Splash PCI-E Series Server is for use with the DocuColor 5750 or
Acolor 620 series copiers. The Splash Server uses true Adobe™ PostScript
processing to deliver high-quality color images. Each Splash Server can be
connected to a single copier unit.
Your Splash Server is pre-configured with all software and hardware needed to
work as a powerful and flexible network print serv er. This manual describes how to
connect the hardware pieces included in the Splash PCI Series Server package, and
how to set up the system to function as a printer server. Information about how to
install the Splash printing software on Macintosh®, Microsoft ® Windows 3.1,
Windows 95, and Windows NT client computers, as well as detailed information
about Splash print features and product specifications are provided as on-line
documentation (pre-loaded on your Splash Server computer).
Product Features
All models of the Splash Professional Color Imaging Series Server provide:
■
The Splash Server application. This true Adobe PostScript™ CPSI software
(Configurable PostScript Interpreter Raster Image Processor) converts
Level 1 and Level 2 PostScript code into a pixel-by-pixel page description
that the printer/copier uses to print an image. The open platform Macintosh
architecture enables you to use virtually all commercially available Macintosh
hardware and software applications with Splash, including color management
systems and a variety of media input devices.
■
Printer drivers for local and network printing on a Macintosh. These drivers
convert the output from your applications to PostScript code.
Introduction Page 9
Page 10

Printer driver software for network printing from a personal computer running
■
Microsoft Windows NT, plus custom printer description files for printing to
Splash from Windows 95 or Windows 3.1. This software requires a PC-toMacintosh network bridge (such as Novell NetWare or Miramar MACLAN
Connect), or a TCP/IP network connection (Windows 95 or Windows NT).
Direct IPX printing. Provides an easy way for computers connected to a
■
Novell NetWare server to print to Splash. You do not need to install AppleTalk
connection software. Splash creates a native Novell IPX connection from the
Splash Server to the Novell server. Once set up and activated, it operates
automatically to send print jobs to the Splash Server each time a Novell client
computer prints to the Splash print queue on the Novell NetWare server. Splash
IPX printing is simple to set up and supports all Novell Ethernet frame types.
See the chapter “Setting Up TCP/IP and NetWare Direct Printing to Splash” in
the
Splash Reference
TCP/IP Direct Printing. Enables UNIX-style LPD/LPR printing to Splash over
■
on-line manual for more information.
a TCP/IP network. See the chapter “Setting Up TCP/IP and NetWare Direct
Printing to Splash” in the
Selectable full-color, screened, or high-speed grayscale printing for a wide
■
variety of page image sizes. (See the
Splash Reference
Splash Reference
on-line manual for information.
on-line manual for a
complete list of supported page image sizes.)
RGB color correction that enables each client workstation to match printed
■
output to their specific monitor. The powerful RGB color correction provides,
for the first time, the ability to color correct problem files properly and to
show true blue colors without any purple shift.
CMYK color correction that provides highly accurate press ink matching
■
for your color press proofs. Splash CMYK color correction automatically
compensates for differences between toner colors and press ink colors to
produce the closest possible match to press inks in the copier output.
Powerful mixed file color correction support. Splash is the first PostScript
■
server to separately color correct RGB and CMYK color types for a file. This
enables you to properly print many “problem” files with no adjustment.
ICC color output profiles for use with Apple’s ColorSync™ 2.0 color
■
management software. The custom ICC profiles enable Splash to support
multiple platforms and multiple CMS capabilities.
Adobe Photoshop Separation Tables for Splash. Enable you to use the
■
Adobe Photoshop Separations feature to create CMYK separations for
printing to Splash.
Page 10 Splash PCI Series v5.0 Set-Up Manual
Page 11

■
Separations support. Prints a composite proof for your separations documents
(including DCS files). With this Splash feature you can use any number of
color plates in your document. Splash simulates the full range of colors and
tints for PANTONE, DIC, or Toyo colors. You no longer need to convert spot
colors to process colors before you print. Splash separations enhances
workflow for color plate production.
■
The Splash Acquire plug-in module, for CMYK scanning locally with the
printer/copier using Adobe Photoshop. Scanning is performed directly into the
Splash Server (not over the network) to avoid network transfer delays.
■
The Splash Export plug-in module, for printing scanned images in
Adobe Photoshop directly to the printer/copier. This command prints directly
to the copier to avoid network transfer delays.
■
RIP While Receive. Splash RIPs a file as it is received whenever it is not
processing another job, which adds tremendous productivity gains in most
customer environments.
■
Continual Print. For many documents, Splash can process and print files at
copier-rated speeds. This feature is applied to print jobs at the printer driver.
■
Spool File Handling Options. For situations where the same, large PostScript
file is reprinted from time to time, the ability to save the spool file at the Server
can lead to significant productivity gains. The Splash Server can be configured,
if necessary, to spool all incoming files.
■
Job Ticketing. Macintosh clients can enter identification or job information to a
comment field for each job. Comments entered at the printer driver can be
viewed at the Splash Server and in the server’s printing log.
■
Save as TIFF. This feature enables designers to send a file to the Splash
Server, and then to view a bitmap of the processed file, without leaving their
workstations. Combined with separations support, this enables a designer to
view overprint and trapping ef fects during the design process, without the need
to actually make a print and go to the printer/copier to retrieve it. Most DTP
applications do not enable these effects to be viewed directly on the screen in
the application. This can significantly increase productivity during the
design process.
■
Progressives support. You can print up to four sheets of paper for a color
document with any combination of C, M, Y, and K color passes on each sheet.
This enables you to examine the result of adding each color pass to a print job.
Introduction Page 11
Page 12

Splash ColorCal. Software that calibrates Splash for consistent, accurate color,
■
regardless of changes in the copier’s color output that occur over time and
with changes in the environment. Splash ColorCal is a powerful tool for the
professional color image designer, but it is useful also for anyone who creates
business graphics or other less-technical color documents. Splash ColorCal
requires no special color knowledge and does not require the use of an
expensive densitometer. Splash ColorCal enables you to create and use
your own CMYK color profiles. See the chapter “Calibrating With Splash
ColorCal” in the
Look Ahead Routing. This smart look-ahead capability determines if there are
■
Splash Reference
on-line manual for more information.
any other files in the queue before yours. If not, then the Splash Server will
immediately begin to RIP your file. If another file is ahead of yours, the Splash
Server automatically spools your file. Multiple files can be received by the
Server at the same time. Jobs are placed in the print queue in the order in which
they have completed spooling. This prevents large jobs from blocking smaller
jobs that are sent to the server at the same time.
Print Job Preflighting. Screen spooled print jobs at the Splash Server for
■
PostScript errors before they print.
Splash Drop Printing. Print TIFF, EPS, and files in text-based processed
■
PostScript format, at the Splash Server or from any AppleTalk network client,
without using a special PostScript file downloader utility. Simply drag the
graphics file directly onto the Splash Server application window, or place them
in the shared Drop Folder on the Splash Server Power Macintosh.
A Macintosh Client Status Desk Accessory (DA). The Splash Status DA lets
■
you view and control print jobs, and receive printer/copier and server status
remotely from any Macintosh Client.
Optional Internet or Intranet Web Print Queue Manager. Enables remote clients
■
on any computer platform to view and control their print jobs at the Splash
Server. Requires a TCP/IP connection to the Splash Server and Netscape
Navigator 3.x or Microsoft Internet Explorer 3.x web browser. See the chapter
“Setting Up the Splash Web Queue Manager” in the
Splash Reference
on-line manual for more information.
35 Adobe Roman fonts. (See the
■
Splash Reference
on-line manual for a
complete list of fonts supplied with the Splash software.)
Adobe PostScript Level 2 support for automatic decompression of embedded
■
JPEG files prior to printing. This results in a significantly reduced transfer time
when printing JPEG files over a network.
A detailed, accurate log of print activity, to simplify tracking and billing.
■
Format commands let you show customer subtotals in the printed log.
Page 12 Splash PCI Series v5.0 Set-Up Manual
Page 13

Splash PCI Series v5.0 Server Models
The Splash PCI 640 Server provides:
■
64 MB of frame buffer memory to support the on-board PostScript Level 2
RIP. Upgradable to 128 MB.
■
400 x 400 dpi full contone printing for page sizes up to A4/Letter; visually
lossless 400 x 400 dpi for page sizes up to A3/11x17.
The Splash PCI 1280 Server provides:
■
128 MB of frame buffer memory to support the on-board PostScript
Level 2 RIP.
■
400 x 400 dpi full contone printing for all page sizes (with Document
Mode off).
The Splash PCI-E 320 Server provides:
■
32 MB of frame buffer memory to support the on-board PostScript
Level 2 RIP. Upgradable to 64 MB.
■
visually lossless 400 x 400 dpi contone printing for page sizes up to A4/Letter;
ColorTone 2-bit printing for page sizes through A3/11x17.
System Notes
IMPORTANT:
All of the sections and procedures that appear in this manual
assume that the Xerox printer/copier has been correctly installed, and is currently
functioning as a copier. In addition, the Xerox IFU Port Kit, part number
98K32870, must be installed in the Xerox MajestiK, Regal, or DocuColor Series
copier by a Xerox Service Representative. The IFU Port Kit provides the
connection port necessary for the Splash Server.
If there is a problem with the copier, contact Technical Support before you proceed
with setup of the Splash Server.
You must provide networking hardware and software for all client workstations
that will print to the Splash Server. Refer to the instructions provided with your
network products for instructions on how to connect the Splash Server and client
workstations to the network.
Introduction Page 13
Page 14

Additional internal memory may be required to run other applications on the Splash
Server (the Macintosh directly connected to the printer/copier), or to run multiple
Splash applications at the same time.
To run the Splash Web Queue Management option you must install additional
system memory on the Splash Server computer.
IMPORTANT:
Applications running on the Splash Server may respond slowly
while the Splash Server is processing print jobs. Avoid using other application
software on the Splash Server computer while the Server application is running.
Registration Card
Be sure to complete the Splash Registration Card and mail it to Splash Technology.
You will receive software upgrade notifications for your Splash Server.
Compatible Applications
The Splash Server prints PostScript-based files. The following Macintosh and
Windows applications have been tested with Splash:
QuarkXPress
■
Adobe Illustrator
■
Adobe PageMaker
■
Macromedia FreeHand
■
Adobe Photoshop
■
Microsoft Excel
■
Microsoft Word
■
Microsoft PowerPoint
■
®
™
®
®
™
The Splash Acquire and Export plug-ins require Adobe Photoshop v3.0 or later to
operate. Other applications that support Adobe Photoshop plug-ins may work with
Splash Acquire and Export, but have not been tested with the Splash Server.
Page 14 Splash PCI Series v5.0 Set-Up Manual
Page 15

An Overview of Splash Adobe PostScript Printing
The
Splash Server application
color correction.
The Splash Professional Color Imaging Series Server computer is called the
Splash Server
. The Splash Server is connected directly to the printer/copier.
is the software that controls printing and
UNIX
Network
Network (Client) Printing
Splash
Server
server
PC
PC
Mac
Client W orkstations
Printer/copier
MacMac
Local Printing
Splash
Server
Printer/copier
A Macintosh or W indows-based personal computer (Windows 95, Windows 3.1, or
Windows NT v4.0 or later) attached to the Splash Serv er by a network connection is
called a
Client.
The Splash Server supports:
■
N
etwork printing
■
L
ocal printing
Client workstations need to install the
from client workstations connected to the Splash Server.
from applications run on the Splash Server.
Splash printer driver
software to apply the
Splash printing features (such as color correction) to print jobs. Splash provides
custom client print drivers for Macintosh and PC workstations.
The Splash Server spools, processes, and performs color correction on the files
you print. The Splash Server application and the Splash printer driver control
the printing.
Introduction Page 15
Page 16

When you print a file to the MajestiK, Regal, DocuColor, or Acolor series
printer/copier:
1.
The Page Setup options available in each application come from the custom
Splash printer driver. When a file is sent to print, the printer driver converts the
commands generated by the application into PostScript code.
2.
When you print from a client computer, the Splash printer driver software
creates PostScript code and sends it over the network to the Splash Server.
Large files take longer to transfer—the length of transfer depends on file size
and network traffic.
Splash can receive print jobs from multiple network clients simultaneously.
3.
The Splash Server spools (temporarily stores) the intermediate PostScript
files on the hard disk where the Server application is located.
When you print from the Splash Server, the PostScript code is immediately
spooled and queued on the Splash Server hard disk.
4.
The Server application uses true Adobe PostScript code to calculate, pixel-bypixel, the image that will be generated by the printer. This is called Raster
Image Processing (RIP).
5.
If Splash Color Correction is enabled, the Splash Server application corrects
the color of the printed output to match the screen image of the selected
display type or to match the standard process ink colors used by commercial
printing presses. If both RGB and CMYK colors are present in the same
document, Splash color corrects separately for both color types.
6.
The file is sent to the printer/copier, where it is printed.
Page 16 Splash PCI Series v5.0 Set-Up Manual
Page 17

About The Splash Server Manuals
This manual explains how to set up the Splash Server hardware and software.
Information about how to set up remote clients for printing to Splash is provided in
other on-line manuals, which are pre-loaded on the Splash Server machine. The
Splash on-line manuals are also provided on the Splash software CD-ROM. See
“Splash Server On-Line Manuals” on page 34 for a list of on-line manuals.
To use the Splash Server, you should be familiar with Macintosh procedures and
conventions, such as how to start an application, how to open and close files, and
how to use the mouse. Refer to your
In certain geographical areas, such as the Asia/Pacific region, the printer/copier is
sold as the Xerox Acolor printer/copier. In other areas, the printer/copier is sold as
the Xerox MajestiK, Regal, or DocuColor printer/copier. The hardware
and software described in this manual are compatible with and operate in the same
way on any of these printer/copiers. We refer to the MajestiK, the Regal, the
DocuColor, and the Acolor as “the printer/copier” throughout this manual.
For more information about the MajestiK, Regal, DocuColor, or Acolor Color
Series, refer to the manuals provided with your printer/copier.
Macintosh User’s Guide
for information.
Introduction Page 17
Page 18

Page 18 Splash PCI Series v5.0 Set-Up Manual
Page 19

Chapter 1
Setting Up the Splash Server
In this chapter:
Connecting the System..................................................................... 20
Splash Key..........................................................................................22
Setting Up the Splash Server ........................................................... 22
Copier Set-Up Notes.......................................................................... 25
Installing the Splash Client Software............................................... 25
Setting Up TCP/IP and Novell NetWare Client Printing .................. 25
Installing the Splash Plug-Ins for Adobe Photoshop..................... 26
Splash Server System Performance................................................27
Disk Size.......................................................................................... 27
Memory Size.................................................................................... 31
Troubleshooting................................................................................. 32
Splash Server On-Line Manuals....................................................... 34
The Splash Server is a fully-equipped server/workstation that is pre-configured
with all needed software. This chapter describes how to connect the specific
hardware pieces included in the package, and how to start the system so that it will
function as a server.
Chapter 1: Setting Up the Splash Server Page 19
Page 20

Connecting the System
This section explains how to unpack and connect the Splash Server. If you are
familiar with installing and connecting a Macintosh computer, parts of this section
will serve as a review. However, you should read this entire section carefully to be
sure that your Splash Server will function correctly on the network.
To unpack and connect the Splash Server:
1.
Make sure that the Xerox MajestiK, Regal, DocuColor, or Acolor copier is
properly installed and connected, and that it is loaded with Letter or A4 size
paper. Use the MajestiK, Regal, DocuColor, or Acolor as a photocopier to
make sure that it is turned on and functioning correctly.
2.
The packing box for the Splash Server contains several component boxes.
Remove each of these boxes from the packing box. The box es for the CPU and
the display are heavy; you may want assistance in lifting and positioning these
boxes on your work surface.
3.
Compare the items listed on the Splash Server Packing List with the actual
contents of the Splash package. If any items are missing, contact your local
sales representative before you proceed.
4.
Unpack the display, keyboard, and Splash Server CPU.
5. Place the Splash Server CPU and the color display in the work area where
they will be used. You should position these components close to the
Xerox copier. The cable that connects the Splash Server CPU to the
copier is 6 meters (about 18 feet) in length.
6. Remove the keyboard from its box, and connect the ADB cable to the port on
the keyboard.
7. Connect the large end of the Splash Key to the ADB keyboard cable.
8. Connect the small end of the Splash Key to the ADB port on the back
of the Splash Server CPU.
Splash Key
Page 20 Splash PCI Series v5.0 Set-Up Manual
Page 21
9. The mouse is included in the box with the Splash Server CPU.
Remove the mouse, and connect it to the keyboard.
10. Connect one end of the GFI power cord to the socket on the back of the Splash
Server CPU, and the other end to the Macintosh power cable provided with the
Power Macintosh.
11. Connect the other end of the Macintosh power cable to a live, grounded
AC outlet.
12. Connect the color display to the Splash Server using the provided
cable. Tighten the thumbscrews to secure the cable.
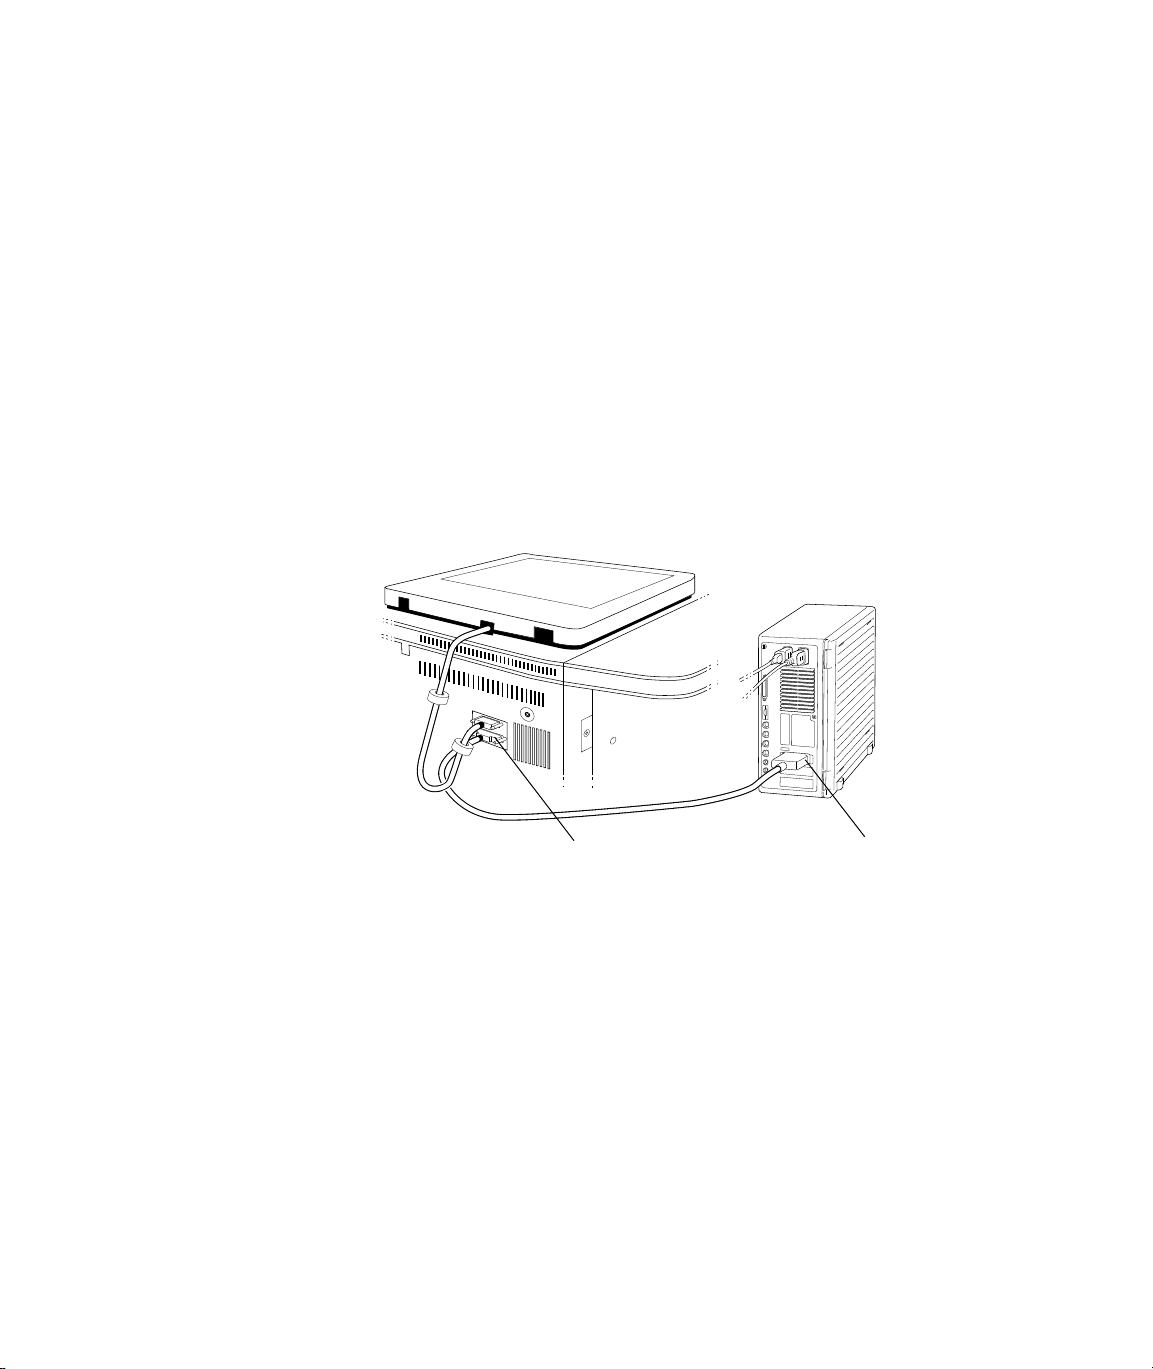
13. Unpack the Splash Accessories Kit. Connect one end of the Splash cable to the
connector on the Splash PCI board on the back of the Splash Server computer,
and the other end to the Xerox copier. Tighten the thumbscrews on the cable at
the printer/copier to secure the connection.
Printer/copier port
with 100-pin connector
Interface card
port, with 68-pin
connector
14. Connect the Splash Server CPU to your computer network.
You have completed connecting the Splash Server equipment.
Chapter 1: Setting Up the Splash Server Page 21
Page 22
Splash Key
The Splash Key is a hardware device that connects to the ADB port on your
computer, between the computer and the keyboard ADB cable. The Splash Key
prevents unauthorized use of the Splash Server and also provides maximum
security by locking the Splash Server application when the key is removed.
The Splash Server application runs normally when the Splash Key is connected to
the keyboard cable. To prevent unauthorized printing, shut down the Splash Server
CPU and remove the Splash Key from the keyboard cable. This locks the Splash
Server application until the Splash Key is replaced on the keyboard cable.
IMPORTANT:
the Splash Key.
Shut down the Splash Server CPU before removing or replacing
Setting Up the Splash Server
When you start up the Splash Server computer, the Splash Serv er application starts
automatically. You are asked to provide the product registration number for the
Splash Server software when you start the Splash Server for the first time.
To start the Splash Server for the first time:
1. Turn on the power for the color display.
2. Start up the Splash Server. (Press the Power key on the keyboard.)
3. The Splash Server takes a moment to start, and load its pre-installed software.
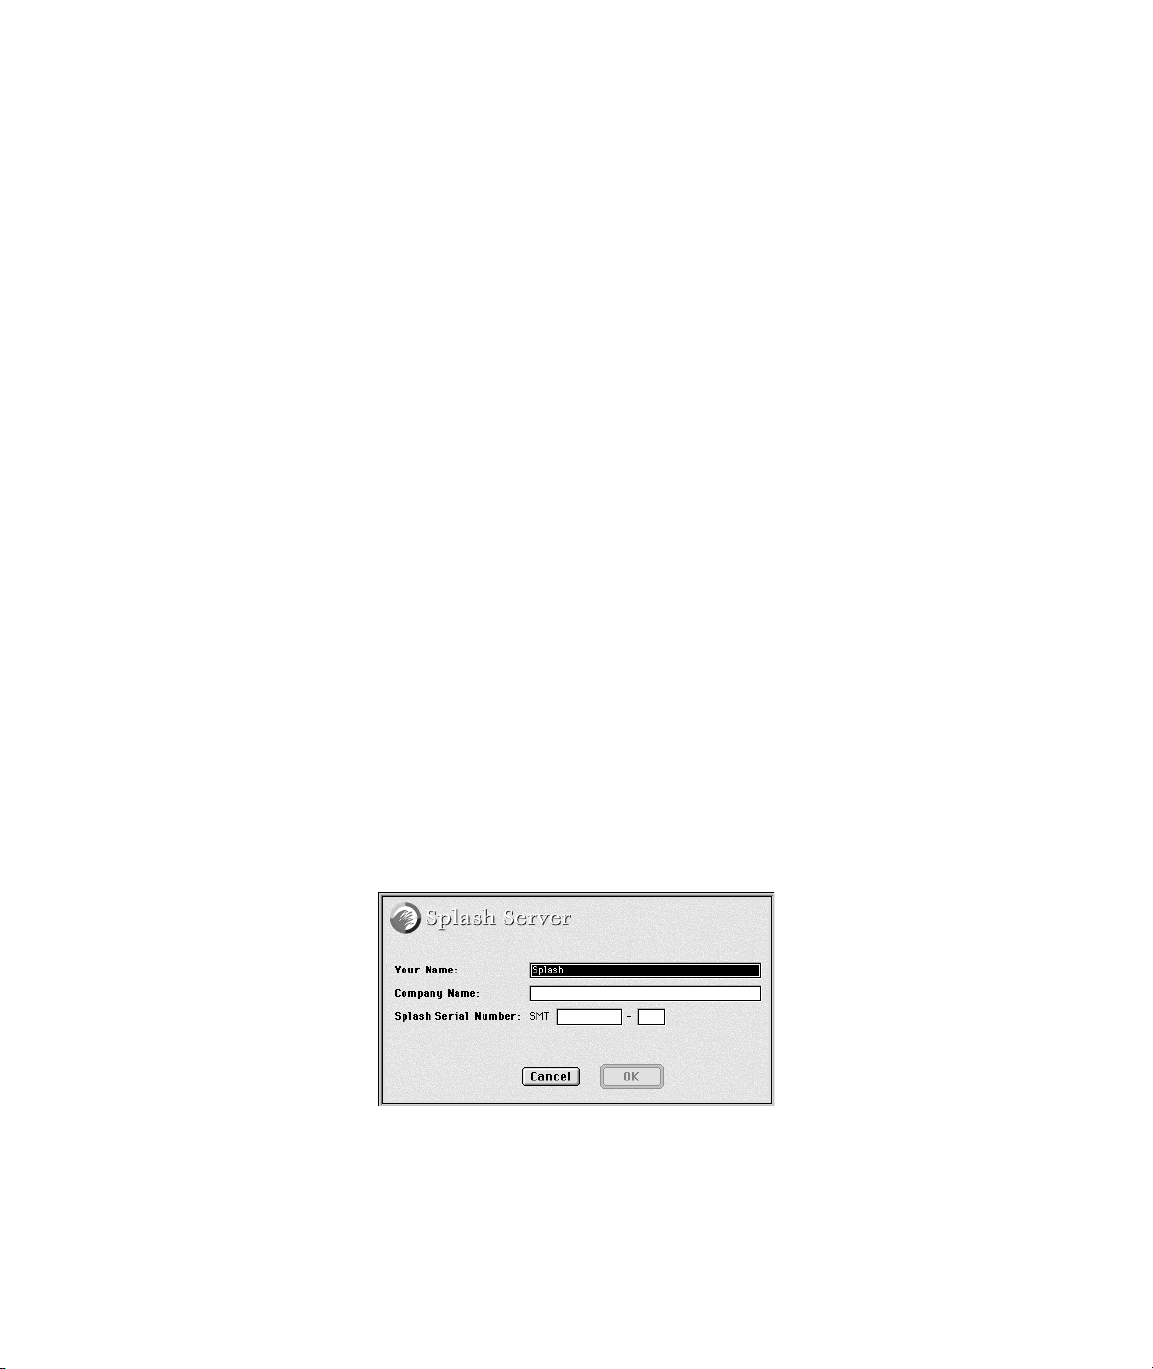
The Splash Server application starts automatically, and a product registration
dialog box appears.
Page 22 Splash PCI Series v5.0 Set-Up Manual
Page 23
4. Enter your name, the name of your company, and the serial number for the
Splash Server software. The serial number is located on the back side of the
Splash CD-ROM jewel case. Look for a number with the “SMT” prefix.
All alpha and number characters must be entered.
Note: The Splash Server software is pre-installed on the Splash Server.
It is not necessary to insert the CD-ROM in the computer.
5. When you have entered the software registration information, click OK.
The Splash Server application initializes the PostScript interpreter used for
printing. This process may take more than a minute.
6. When initialization is complete, Splash prints a start-up page to the
printer/copier. The appearance of the start-up page confirms that the Splash
Server is functioning correctly, and is properly connected to the printer/copier.
The Splash Server window appears.
Chapter 1: Setting Up the Splash Server Page 23
Page 24

7. To complete setup for the Splash Server, choose Preferences from the Server
menu. The Splash Server Preferences appear.
8. Select the model of your Xerox or Fuji Xerox copier from the
“Connected T o” menu:
■ Select MajestiK for a Xerox MajestiK or Acolor 630 series printer/copier.
■ Select Regal for a Xerox Regal or Acolor 930 series printer/copier.
■ Select DocuColor 5799 for a DocuColor 5799 printer/copier.
■ Select DocuColor 5750 for a DocuColor 5750 or Fuji Xerox Acolor 620
series printer/copier.
Note: Be sure to select the correct copier model. If the wrong copier model is
selected Splash will produce incorrect output for print jobs.
9. Click OK.
The Splash Server is ready to work with the printer/copier for color printing
and scanning.
Page 24 Splash PCI Series v5.0 Set-Up Manual
Page 25

Copier Set-Up Notes
Disable the Built-In Auto Tray Switching Option in Regal,
Acolor 93x, and DocuColor 5799 Copiers
T o a v oid problems printing to Regal, Acolor 93x series, or DocuColor 5799 copiers
from Splash, you must disable the “Automatic Tray Switching” feature of these
copiers. To do this:
1. At the copier, press the yellow “Clear-All” button.
2. At the copier keypad, press *, 0, 1, 2, 3, * to display the Tools Mode window.
3. Under “Auto Tray Switching” select “Off”.
Installing the Splash Client Software
Your Splash Server includes software that allows computers running MacOS,
Windows 3.1, Windows 95, or Windows NT to send print jobs to Splash over the
network. Splash provides an on-line manual for each supported client platform.
The Splash client manuals describe how to set up a client for printing to Splash
and how to use the Splash color printing features. Refer to the appropriate Splash
on-line manual for complete instructions on how to set up all client computers that
will send print jobs to Splash.
See the section “Splash Server On-Line Manuals” on page 34 for a list of
the Splash on-line manuals.
Setting Up TCP/IP and Novell NetWare
Client Printing
Splash makes it easy to print files to the printer/copier from clients on TCP/IP and
Novell NetWare networks. Splash supports LPR print jobs and jobs from TCP/IP
print queues set up on Windows NT or Novell NetWare servers. No AppleTalk
bridge software is needed.
See the chapter “Setting Up TCP/IP and NetWare Direct Printing to Splash” in the
Splash Reference on-line manual for complete instructions on how to enable print
services for TCP/IP and Novell NetWare clients.
Chapter 1: Setting Up the Splash Server Page 25
Page 26

Installing the Splash Plug-Ins for
Adobe Photoshop
Your Splash Server provides plug-in software for use with Adobe Photoshop 3.0 or
later. The Splash Acquire plug-in allows you to use the Xerox or Fuji Xerox printer/
copier as a scanner. The plug-in adds the command, “Splash Acquire” to the
Acquire submenu in Adobe Photoshop. When you choose the Splash Acquire
command, Splash scans the image that is placed on the printer/copier platen.
You can apply color correction to the scanned image, crop, rotate, and set the
resolution for the image, then save it as an Adobe Photoshop file.
The Splash Export plug-in lets you print directly to the Xerox or Fuji Xerox printer/
copier from Adobe Photoshop. The plug-in adds the command, “Splash Export”
to the Export submenu in Adobe Photoshop. If your AppleTalk network is used
heavily, you can use Splash Export to avoid transferring the print job over the
network. Use Splash Export as an alternative to the Adobe Photoshop “Print”
command.
Note: Adobe Photoshop is not provided with the Splash Server. You must install
Adobe Photoshop or Adobe Photoshop LE on the Splash Server to scan or print
with the Splash Acquire and Export commands.
The Splash Acquire and Export plug-ins are located in the Splash Folder on the
Splash Server. Open the Splash Extras folder, then open the Photoshop Plug-in
folder to find the Splash Acquire and Splash Export plug-ins. To install the plug-ins
move them to the folder where your other Adobe Photoshop plug-ins are located.
Usually, this is the Acquire/Export folder within the Plug-ins folder. However, if
you used the Preferences command in Adobe Photoshop to mo ve your plug-ins to a
different folder, drag the Splash plug-ins to this new folder.
Note: The Splash Acquire and Splash Export plug-ins work only on the Splash
Server computer. The Splash plug-ins do not work when used on client computers.
See the Splash Reference on-line manual for complete instructions on how to use
the Splash Acquire and Splash Export plug-ins.
Page 26 Splash PCI Series v5.0 Set-Up Manual
Page 27

Splash Server System Performance
The Splash Server is pre-configured to provide excellent performance as a network
print server, and to provide scanning capability with the Xerox copier. However,
when used in a large network environment with many users, you may find it
desirable to upgrade the memory or disk storage capacities of the Splash Server.
This section explains possible hardware configurations that will enhance the
capabilities of the Splash Server.
Disk Size
The Splash Server includes an internal hard disk drive with at least 800 MB of free
storage space. During normal operation of the Splash Server, free disk space is used
in several ways:
■ Images scanned with Adobe Photoshop are stored on the hard disk drive, and
remain there until they are deleted or moved onto another drive.
■ Files sent to the Splash Server for printing are temporarily stored on the
hard disk drive as they are processed. When a print job is complete,
its corresponding file is removed from the hard disk drive.
If the “Print and Save” option is selected in the printer driver, the print job
spool file is placed in the Hold queue on the Splash Server after it prints. If the
“Send and Hold” option is selected in the printer driver, the print job spool file
is sent to the Hold queue on the Splash Server but the job does not print.
Print jobs that are placed in the Hold queue on the Splash Server remain stored
on the hard disk drive until they are deleted.
If you have the optional Color Central Lite software, be aware that if you have
quit the Splash Server application but the Color Central application is still
running, print jobs continue to be accepted and stored on the hard disk drive for
future printing.
■ High-resolution files used with the optional Color Central’s APR feature are
stored on the hard disk drive.
■ Print jobs saved as TIFF files are placed in the TIFF folder—located in the
Splash folder. TIFF files remain in this shared folder until they are deleted.
T o delete files from this folder , drag them to the T rash and choose Empty T rash
in the Special menu from the Finder on the Splash Server.
Chapter 1: Setting Up the Splash Server Page 27
Page 28

Conserving Disk Space
Before adding more disk storage to the Splash Server, you should make sure that
the existing space is used to the best advantage:
■ Remove unused jobs spooled for printing. This can be done at the Splash
Server or from a Client Macintosh with the Splash Status DA (see the on-line
manual Printing to Splash From a Macintosh for information). If the optional
Splash Web Queue Manager is enabled for your server any client computer
can delete spool files stored at the Splash Server. A print job placed on hold
consumes disk space. The Hold queue of the Splash Server is designed for
short term use.
Likewise, a print job that resulted in a PostScript error will remain in the
Splash Server Error queue on the hard disk drive until it is removed. Use the
Splash Server application to delete errored jobs so they do not remain in the
Error queue.
■ Use the Adobe Photoshop file format for scanned images. Adobe Photoshop
provides the capability of saving scanned images in a variety of file formats.
The Photoshop file format is the most compact of the available formats, and the
difference can be significant. For example, a scanned image saved in the TIFF
file format may be 10 times the size of the same image saved in the Photoshop
file format. The Adobe Photoshop file format retains complete compatibility
with the Sample Image feature of Color Central.
■ Delete TIFF files you are no longer using from the TIFF folder (located in the
Splash folder).
■ Delete files from the Unprintable Files folder (located in the Splash Folder).
Note: Back up the contents of the Splash Server hard disk to safeguard against the
loss of information (image files and other data) stored on the Server hard disk.
Page 28 Splash PCI Series v5.0 Set-Up Manual
Page 29

Disk Upgrades
If you commonly encounter the error message that the disk is full on the Splash
Server, or if you want to install other Macintosh applications on the Splash Server
CPU, you should connect an external Macintosh SCSI hard disk drive. Replacing
the factory-supplied internal hard disk drive is not recommended.
When choosing the size of an external hard disk drive, consider the network
printing demands of the Splash Server. For example, if the network has 10 users
who commonly print Adobe Photoshop files that are 30MB in size, the result is
300MB of storage space that is in constant use for print spooling. In this case, a
500MB hard disk drive is the minimum size required for a disk upgrade.
When connecting an external hard disk drive,
■ Be sure to use an external SCSI hard disk drive that is Macintosh-compatible.
■ Make sure that the external hard disk drive is correctly terminated for use with
a Power Macintosh.
■ Make sure that the SCSI address of the external hard disk drive does not
conflict with any other SCSI address for peripherals connected to the Splash
Server . The internal hard disk dri v e is set to SCSI ID 0 (zero). You may use any
unoccupied SCSI ID number (1, 2, 4, 5, or 6).
■ Always shut down (power off) the Splash Server before you connect a
peripheral to the SCSI port.
The Macintosh User’s Guide, supplied with the Splash Server, contains detailed
instructions for connecting and using an external hard disk drive.
Copying Files to the External Hard Disk Drive
Once you have connected a suitable hard disk drive to the Splash Server, you
must transfer the Splash Server files to the new drive. If you have the optional
Color Central Lite application, transfer this to the new drive also. This causes the
external drive to be used to spool and store files.
To copy the required files to the external hard disk drive:
1. Create a backup copy of the internal hard disk drive of the Splash Server.
2. Copy the Splash folder to the external hard disk drive.
3. Copy the optional Color Central folder (if present) to the external hard
disk drive.
Chapter 1: Setting Up the Splash Server Page 29
Page 30

4. Delete the original copy of the Splash folder from the internal hard disk drive.
To do this, drag the Splash folder to the Trash and choose Empty Trash from
the MacOS Special menu.
5. Delete the original copy of the optional Color Central folder (if present) from
the internal hard disk in the same way.
6. Notify all network users that file sharing for the Splash Server will be turned
off, then stop Apple file sharing on the Splash Macintosh. To do this:
■ Open the MacOS Sharing Setup control panel.
■ Under File Sharing, click Stop.
■ Click OK in the dialog box that appears to confirm file sharing shutdown.
7. Click the name (text box) under the internal hard disk drive icon on the MacOS
desktop. The name becomes highlighted and surrounded by a white border to
show it is selected.
8. Choose Copy from the Edit menu.
9. T ype a new name for the internal hard disk drive. Choose any name, so long as
it is different from the original hard disk drive name.
10. Click the name under the new external hard disk drive icon to select the text.
11. Choose Paste from the Edit menu. The name of the internal hard disk drive is
pasted to rename the external hard disk drive.
12. Restart the Splash Server.
13. Reactivate file sharing for the Splash Server.
The transfer of files to the external hard disk drive is complete.
Page 30 Splash PCI Series v5.0 Set-Up Manual
Page 31

Memory Size
The Splash Server is equipped with adequate memory to function as a highperformance print server or scanner workstation. If you add memory to your
system, you can optimize printing efficiency in several ways:
■ The optional Color Central Lite package includes the Sampler application.
If more memory is available to the Sampler, it will be able to open larger color
image files.
■ As shipped by Adobe, the Adobe Photoshop memory partition is set to 13 MB.
For optimum performance, RAM available to Adobe Photoshop should be
three times the size of the image file. For example, when working with a 10MB
image file, Adobe Photoshop should have 30MB of RAM available. If there is
not sufficient RAM av ailable, Photoshop will temporarily store the color image
data on the hard disk drive instead of RAM. This reduces performance for
Adobe Photoshop when used for image processing.
■ The following minimum application memory configurations are recommended
for use with the Splash Server:
■ Splash Server: 8.8 MB minimum
■ Enterprise Networking: 1.028 MB minimum
■ Splash ColorCal: 2.7 MB minimum
■ Optional Color Central: 2.5MB minimum
■ Optional Sampler: 1.5 MB minimum
■ Adobe Photoshop: 13 MB minimum
Note: Splash Servers provide the memory needed to run the Splash Server
application only. If Adobe Photoshop or other applications will be run on the
server computer you will need to add memory to support those applications.
IMPORTANT:
The Virtual Memory option for your computer must remain off in
the Memory control panel before you can use the Splash Server application.
Chapter 1: Setting Up the Splash Server Page 31
Page 32

Troubleshooting
This section has troubleshooting tips, and explains some common problems that
you may encounter when setting up and connecting the Splash Server.
Note that all of the individual hardware and software components included with the
Splash Server have separate user’s manuals. If you are having a problem with a
particular component (such as the display), you should refer to the manual for that
component for more complete troubleshooting information.
Problem: The Splash Server is installed and connected, b ut does not start when the
power key on the keyboard is pressed.
Solutions:
■ Make sure the power cables for the Splash Server are connected to live,
grounded AC outlets.
■ Make sure the keyboard and Splash Key are properly plugged in, and that all
cable connections are secure. If a different Macintosh keyboard and cable are
available, try substituting them for the units provided with the Splash Server.
Problem: The Splash Server starts (with the start-up tone), b ut there is no image on
the display.
Solutions:
■ Make sure the power cable for the display is plugged into a live, grounded AC
outlet.
■ Make sure both ends of the display cable are connected.
■ Make sure the display is turned on (green power indicator light on the front
panel of the display).
■ Increase the brightness and contrast with the knobs on the front of the display.
■ If a different Macintosh-compatible display is available, try substituting it for
the display provided with the Splash Server.
Page 32 Splash PCI Series v5.0 Set-Up Manual
Page 33

Problem: The Splash Server starts, but the keyboard and/or mouse do not work.
Solutions:
■ Make sure the keyboard and Splash Key are plugged in, and that all cable
connections are secure. If a different Macintosh keyboard and cable are
available, try substituting them for the units provided with the Splash Server.
■ Make sure that the mouse is connected to the keyboard. If a different
Macintosh mouse is available, try substituting it for the mouse provided with
the Splash Server.
Problem: The Splash Server starts, but the Splash Server application reports that
there is a problem.
Solution:
The Splash Server application requires that several system extension files be
present in the Extensions folder within the System Folder, or the serv er application
will not open. A dif ferent error message appears for each required Splash e xtension
file that is missing:
■ The error message, “A postscript error has been reported by the PostScript
Interpreter” indicates that the “Splash Lib” extension is missing from the
Extensions folder.
■ The error message, “No Splash Card Found” indicates that the “Splash Board
Startup” extension is missing.
■ The error message, “The application ‘Splash Server’ could not be opened
because ‘DeviceSharedLib’ could not be found” indicates that the “Splash
Print Library” extension is missing.
■ The error message, “The application ‘Splash Server’ could not be opened
because ‘FIPLib PPC’ could not be found” indicates that the “Splash Spool
Lib” extension is missing.
■ The error message, “The application ‘Splash Server’ could not be opened
because ‘:obj:PowerPlantLib’ could not be found” indicates that the “Splash
UI Lib” extension is missing.
■ The error message, “The application ‘Splash Server’ could not be opened
because ‘MWRuntimeLib’ could not be found” indicates that the “Splash
Runtime Lib” extension is missing.
■ The error message, “The application ‘Splash Server’ could not be opened
because ‘Champ.mot’ could not be found” indicates that the “Splash Board
Enabler” extension is missing.
Chapter 1: Setting Up the Splash Server Page 33
Page 34

To resolve the problem, locate the missing extension file and move it back into the
Extensions folder within the System Folder.
If the error message reported by the Splash Server application does not appear in
the above list, refer to the chapter, “Splash Error Messages” in the Splash Reference
on-line manual for a list of error messages and what they mean.
Splash Server On-Line Manuals
Electronic versions of the manuals for the Splash Server are provided on the
Splash Server machine. The documentation files are located in the folder named
“Splash On-Line Documentation, ” which is a network-shared folder. All files are in
Adobe Acrobat format, and can be reviewed or printed using the Acrobat Reader
application on your client Macintosh or Windows machine.
The following on-line manuals are provided with the Splash Server:
■ Splash PCI Series v5.0 Set-Up Manual (this manual).
■ Splash PCI Series v5.0 Install Manual describes how to install a Splash Server
Kit interface card and software on a Power Macintosh.
■ Printing to Splash From a Macintosh describes how to install the Macintosh
Client software and how to print to the Splash Server from a Macintosh.
■ Printing to Splash From W indows 3.1 describes ho w to install the W indo ws 3.1
Client software and how to print to the Splash Server from a PC.
■ Printing to Splash From Windows 95 describes how to install the Windows 95
Client software and how to print to the Splash Server from a PC.
■ Printing to Splash From W indows NT describes ho w to install the Windows NT
Client software and how to print to the Splash Server from a PC.
■ Splash Reference describes how to use the Splash Acquire and Export plug-in
modules for Adobe Photoshop. This manual also provides supported page
sizes and product specifications for the Splash Servers, a list of provided fonts,
error message descriptions, a diagnostic procedure, and the Adobe PostScript
Language Addendum.
■ PANTONE Application Notes explains how to install and use the PANTONE
Professional Color Toolkit, provided with your Splash Server.
The Acrobat Reader is needed to view the Splash on-line manuals from a client
machine. (The Acrobat Reader is not required for printing to Splash).
Page 34 Splash PCI Series v5.0 Set-Up Manual
Page 35

Chapter 2
Using the Splash Server
In this chapter:
Starting and Stopping the Server Application................................36
Working With the Splash Server Application..................................36
Starting and Stopping Printing.........................................................37
Working With Print Jobs....................................................................38
Moving Jobs.....................................................................................38
Viewing and Editing Print Options for a Job.....................................39
Deleting Print Jobs...........................................................................40
Setting Default Print Options............................................................40
Checking a Print Job for Errors Before You Print.............................42
Setting Splash Server Preferences..................................................44
Setting Server Preferences..............................................................45
Setting Network Preferences...........................................................47
Setting Features Preferences..........................................................49
Setting Server Screening Preferences.............................................51
Setting Server Style Preferences.....................................................52
Setting CMYK Color Correction Profiles .........................................53
Drop Printing Files to Splash............................................................54
Starting a Log File ............................................................................. 56
Adding Fonts to the Splash Server.................................................. 59
Enabling Font Downloading at the Splash Server............................59
Downloading Fonts to the Splash Server.........................................60
Splash Server Notes.......................................................................... 64
Chapter 2: Using the Splash Server Page 35
Page 36

Starting and Stopping the Server Application
An alias for the Splash Server application is located in the Startup Items folder in
the Power Macintosh System Folder. This causes the Splash Server application to
open each time you start up the server computer . If desired, you can drag the Splash
Server alias to another location on the computer.
To prevent client computers from printing to Splash, quit the Splash Server
application. To do this, choose Quit from the File menu within the server
application. When you quit the server application, users (including a user working
on the Server) cannot choose the printer/copier as a print destination.
Double-click the Splash Server application icon (or restart the Power Macintosh) to
start the server application and resume printing to the printer/copier.
To control client printing to Splash, the server can be configured to spool and hold
all incoming print jobs (see page 45). This allows a Splash administrator to review
jobs and to determine which jobs print.
Working With the Splash Server Application
When the Splash Server application starts, the Splash Server window appears.
Page 36 Splash PCI Series v5.0 Set-Up Manual
Page 37

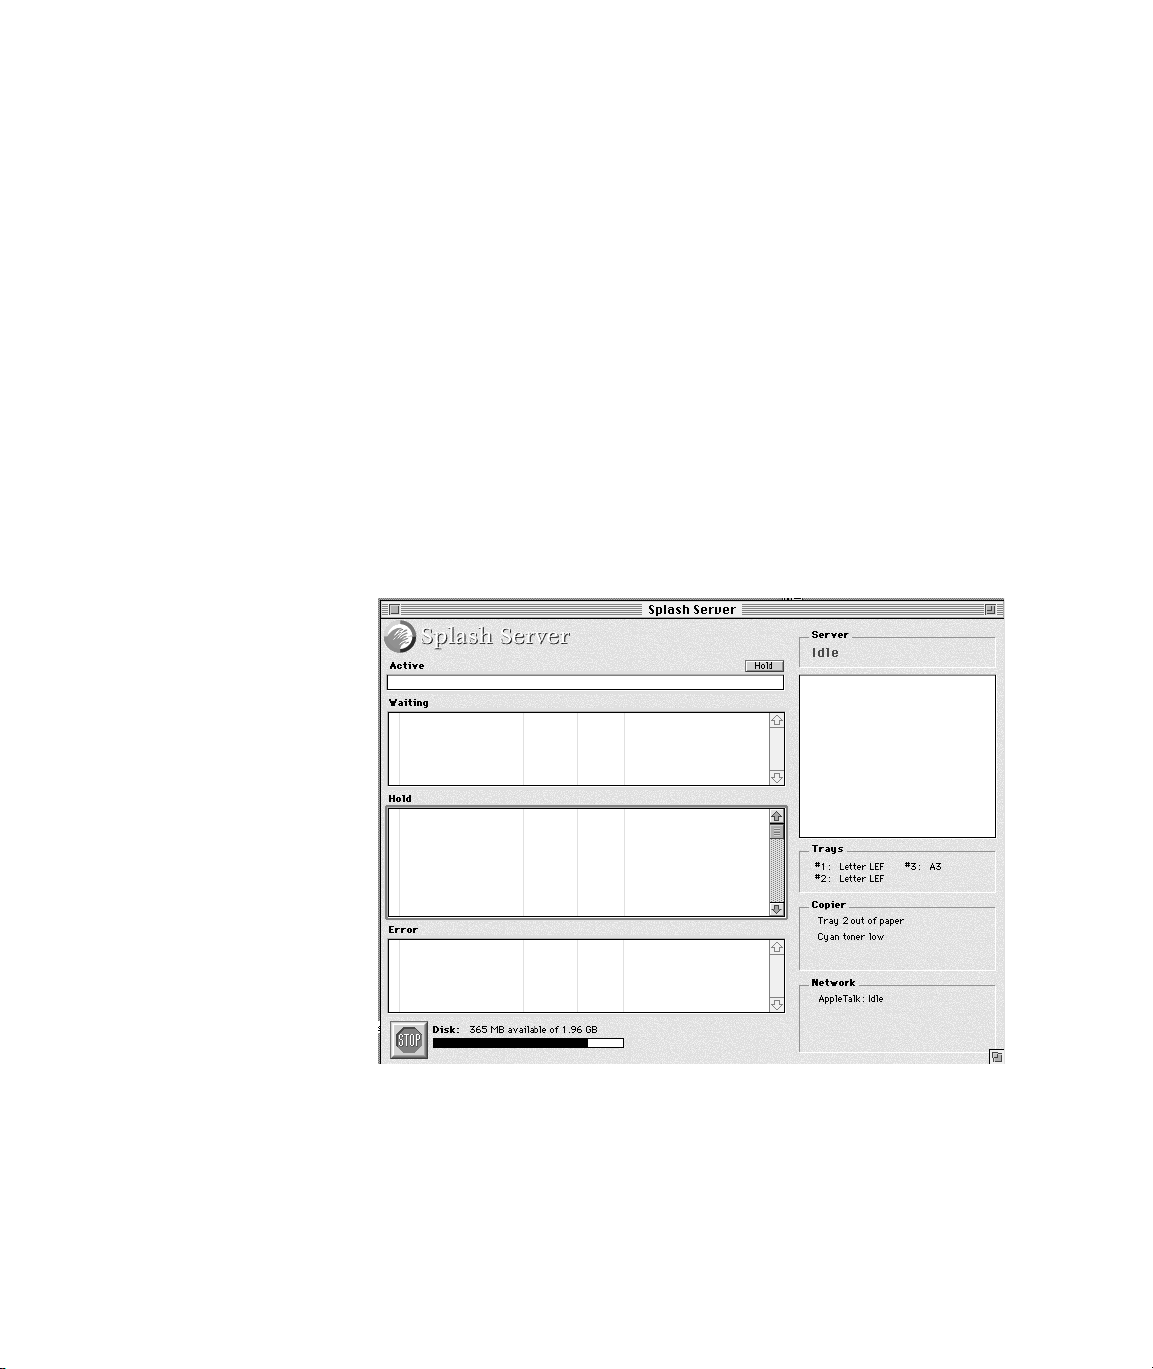
The Splash Server window displays information about the printer/copier
and the server, and lists all jobs being held or processed at the server.
■ The Active status area shows the currently processing print job.
■ The Waiting queue lists print jobs that are waiting to be processed by the
Splash Server.
■ The Hold queue lists print jobs that are spooled on the Splash Server’s hard
drive, but are temporarily stopped from printing. To print a job in this queue,
drag it to the Waiting queue.
■ The Error queue lists print jobs that did not print due to an error (such as an
empty paper tray at the printer/copier).
■ The Server status area shows the current state of the Splash Server.
■ The Trays status area shows the paper size currently loaded in each of the
printer/copier’s paper trays.
■ The Copier status area shows the current state of the printer/copier. If an
error occurs at the printer/copier, such as a tray out of paper error, a message
appears here.
■ The Network status area shows which network connections are active for the
Splash Server application and provides information about each. For example,
when a print job is received by the Splash Server over AppleTalk, IPX, or
TCP/IP, a message appears here.
Many elements of the Splash Server window, such as the print queues and the fields
within the print queues, are resizable. For example, you can drag the edges of the
Waiting queue to make it larger or smaller. Drag the edges of any field inside a
queue to resize the field.
Starting and Stopping Printing
A “Hold” button appears next to the Active job area in the Splash Server window.
Click this button to stop processing for the job that appears in the Active area. The
job moves to the bottom of the Hold queue.
A button at the bottom of the Splash Server window lets you temporarily halt
processing of files by the server.
Click Stop to halt print job processing on the Server.
Chapter 2: Using the Splash Server Page 37
Page 38

Client computers can send print jobs to the Splash Server while server
processing is stopped; all jobs are spooled to the Server’s startup disk and
appear in the Splash Server Waiting queue.
Click Go to resume processing and printing.
If you stop server processing while a print job is listed in the Acti v e queue, a dialog
box appears:
If you select Immediately and click OK Splash moves the job from the Active
queue to the Waiting queue.
If you select At the End of the Current Job in the Stop Processing dialog box,
Splash moves the active job to the Waiting queue after it prints, even if the spool
option selected for the job is “Print and Delete”.
Working With Print Jobs
To select a print job in one of the queues, click it. To select multiple jobs:
■ Hold down Shift and click any two jobs to select the two jobs and all jobs in
between (extend-select).
■ Hold down Command as you click jobs to select only the jobs you click.
If a selected print job has a preview image it appears on the upper-right side of the
Splash Server window.
Moving Jobs
To move a job from one queue to another—or to change its position in a queue—
drag it. For example, to print a job listed in the Hold queue, drag it to the
Waiting queue.
Page 38 Splash PCI Series v5.0 Set-Up Manual
Page 39

Viewing and Editing Print Options for a Job
To see information about a print job, double-click it. The Job Info window appears.
Click the Pages, Tray, Color, or Extras buttons to see the print options currently
selected for the job. If desired, you can change the print options for the job before it
prints. For example you can change the number of copies to print, the page size, the
paper tray, or color correction for the job.
Click Current Defaults in the bottom-right corner to apply your custom set
of Splash print option defaults to the job. (See “Setting Default Print Options” on
page 40 for information about how to create a custom set of Splash print
option defaults.)
If you click Original Defaults Splash resets all print options to match the factory
defaults set by Splash Technology.
The Splash print options are described in the Printing to Splash... on-line manuals
provided on the Splash Server hard disk.
If you double-click a print job in the Waiting queue, the Splash Server places a
temporary hold on the job while you view or edit job information. When you close
the job information box, the server releases the job for printing. The job moves to
the bottom of the Waiting queue.
Chapter 2: Using the Splash Server Page 39
Page 40

Deleting Print Jobs
To delete a job from the Splash Server queues, select it, then press the Delete key.
A dialog box asks you to confirm this action. Click Yes to delete the job.
To delete a job that currently is processing click the Stop button at the bottom
of the Server window (or choose Stop Processing from the Server menu).
A dialog box appears:
Select Immediately, then click OK. The job moves to the bottom of the Waiting
queue. Select the job, then press the Delete key.
Setting Default Print Options
Choose Current Defaults from the Jobs menu to create a custom set of page setup
and print option defaults. The Default Job Settings window appears.
Click the Pages, Tray, Color, Extras, and Graphic buttons to select default
print options.
Page 40 Splash PCI Series v5.0 Set-Up Manual
Page 41

The Force Paper Size to option lets you choose a specific paper size for all
jobs that use the default print options. If you select also the Scale to Paper Size
checkbox Splash scales the job to fit the paper size, and centers the image on the
page to prevent clipping. The same scaling factor is applied both horizontally and
vertically to maintain proportions for the image.
Refer to the Printing to Splash... on-line manuals for complete information about
the print options that appear in the Default Job Settings dialog box. The same
print options appear in the printer driver when you send a job to Splash from
your applications.
Graphic default options are applied by Splash when you drop print TIFF, EPS, and
PostScript files to Splash (see page 54).
If you click Original Defaults, Splash resets all print options to match the factory
defaults set by Splash Technology.
Click OK to save your custom set of print defaults.
Chapter 2: Using the Splash Server Page 41
Page 42

Splash uses the default print options in several ways:
■ Splash automatically applies default print options to graphics files (EPS and
TIFF formats) that are placed in the Drop Folder.
■ Splash automatically applies default print options to graphics files that are
dragged onto the Waiting or Hold queues in the Splash Server window.
Note: If you prefer, you can configure Splash to let you select print options
for EPS and TIFF files that are dragged to the Hold queue (see page 46).
■ If Splash receives a graphics file from a client on a TCP/IP network the server
automatically applies default print options to the job.
■ When you place a PostScript file in the Drop Folder, Waiting queue, or Hold
queue, Splash applies the default print options only if the file was not created
with the Splash client printer driver.
■ You can apply default print options to any job in the queues. To do this,
double-click the job then click “Defaults” in the Job Info window.
Checking a Print Job for Errors Before You Print
Splash can check a job for errors before it prints. The Splash Server Preflight
feature examines print jobs for potential problems such as:
■ PostScript errors
■ missing fonts and font substitution
■ paper size not available at the printer/copier.
To screen a print job for potential errors, select the job in the Splash Server
window, then choose Preflight from the Jobs menu. The job moves temporarily to
the Waiting queue for preflight processing.
Page 42 Splash PCI Series v5.0 Set-Up Manual
Page 43

T o see the results of preflight inspection, double-click the job in the queue. The Job
Info window appears.
Click to see
preflight report
Click Preflight Report to view a report created for the job.
The Preflight Results appear.
Click Print to create a hardcopy preflight report for the print job.
Chapter 2: Using the Splash Server Page 43
Page 44

Splash Preflight Notes
When you use Splash Preflight with a job in the Waiting or Hold queues, the
Splash Server places a temporary hold on the job during preflight examination.
When inspection is complete, the job moves to the bottom of the queue.
If you use Splash Preflight with a job in the Error queue and the job passes
preflight inspection, the job moves to the bottom of the Hold queue.
The Splash Preflight report does not show the correct number of pages to be printed
for jobs with the “Progressives” option selected.
Setting Splash Server Preferences
You can customize the Splash Server’s appearance and configure job processing
options with the Preferences command. To view and change Splash Server
preferences, choose Preferences from the Server menu in the Splash Server
application. The Splash Server Preferences appear.
Click any button at the top of the dialog box to see more server preferences.
The preferences are described in the sections that follow. When you are finished
click OK to apply your changes to the Splash Server.
Page 44 Splash PCI Series v5.0 Set-Up Manual
Page 45

Setting Server Preferences
Naming the Server
The Server name appears to remote clients who connect to the Splash Server over
an AppleTalk network. “Splash PCI Server” is the default name for the Splash PCI
Series Server. You must change the name of the server if you have more than one
Splash Server connected to the same network zone.
To change the server name, type a unique name in the Server Name field.
Be sure to give the Splash Server a name that clearly indicates that it is a color
printer/copier. If you have assigned a duplicate name, an error message appears,
and you are prompted to enter a different name.
Copier Configuration
Be sure that the Connected T o option in the Preferences dialog box is set to the
correct model of Xerox or Fuji Xerox color copier.
Job Processing Preferences
The Splash Server provides the following options for processing print jobs:
■ Select the Always Hold Incoming Jobs checkbox to place a temporary
hold on all print jobs received by the Splash Server. Incoming jobs go to the
bottom of the Hold queue and do not RIP or print. This allows a server
administrator to review all jobs before they print.
Note: When this server preference is selected, each print job received by the
server must be dragged from the Hold queue to the Waiting queue to print.
■ Select the Print Cover Page checkbox to print a standard cover page as the
final page for jobs that print from any tray to the top output tray.
Note: Splash does not print a cover page for:
• manual feed jobs
• jobs printed to the sorter
• print jobs that error and are transferred to the Error queue
• print jobs that use the Save as TIFF print driver option
• print jobs that use the Progressives print driver option
• print jobs that use the Separations print driver option
Chapter 2: Using the Splash Server Page 45
Page 46

■ Select the Allow Copier Interrupt checkbox to allow a user at the
printer/copier to press the Interrupt button at the copier to temporarily halt
printing of a sorter job. When this server preference is not selected, Splash
prevents the interruption of jobs printed to the sorter.
■ When the Compress ‘Save-As-TIFF’ Files checkbox is selected, Splash
applies RLE compression when it creates TIFF files. Select this server
preference to reduce the size of TIFF files created by the Splash Server.
(Splash creates a TIFF file when the “Save as TIFF” option is selected for the
job. See the Printing to Splash... on-line manuals for information about the
Save as TIFF print option.)
■ Select the Dragged Graphic Files Use Default Job Settings checkbox to
apply default print options to EPS and TIFF files when you drag them onto the
Splash Server Hold queue. (See page 40 for information about how to set
default print options.) This feature speeds printing if you frequently print
graphics files at the Splash Server.
If this checkbox is not selected, a new print options dialog box appears each
time you drag a graphics file onto the Splash Hold queue.
■ The Map A4/Letter and A3/Tabloid server preference is useful if you
frequently print on Letter and Tabloid paper sizes, but occasionally you receive
an A4 or A3 job. If this checkbox is selected and no A4 or A3 paper is loaded at
the printer/copier, Splash automatically converts the A4 job to print on Letter
paper. Jobs with A3 paper selected print on Tabloid paper.
Splash scales the job to fit the new paper size, and centers the image on the
page to prevent clipping. The same scaling factor is applied both horizontally
and vertically to maintain proportions for the image. After the job prints, a
spool file for the job appears in the Error queue with a message to indicate
that the paper size for the job was converted.
■ Error Timeout specifies how long server processing waits when an error,
such as paper tray empty, occurs during a print job. If the error condition is
not corrected within the time limit specified the server transfers the job to the
Error queue.
The timeout can be increased or decreased by 1 minute increments. The default
is 5 minutes. If the Error Timeout is set to zero minutes, an error causes
print processing to halt indefinitely until the error is corrected.
Page 46 Splash PCI Series v5.0 Set-Up Manual
Page 47

Update Fonts
The Update Fonts controls are provided for use with Kanji fonts. They do not
affect Roman fonts. Click Now in the Server preferences after you install Kanji
fonts on the Splash Server. If the At Startup checkbox is selected, the Splash
Server loads Kanji fonts when you restart the Splash Server application.
For information about how to install and download Roman fonts to the
Splash Server, see “Adding Fonts to the Splash Server” on page 59.
Setting Network Preferences
Click Network at the top of the Splash Server Preferences to vie w network printing
and queue management options for the Splash Server.
Enterprise Networking
When Enterprise Networking is enabled, Splash can receive print jobs from
clients on TCP/IP and IPX networks in addition to AppleTalk clients. Splash is able
to maintain all three network connections simultaneously. See “Setting Up TCP/IP
and NetWare Printing to Splash” in the Splash Reference on-line manual for
complete information about this Splash feature.
Chapter 2: Using the Splash Server Page 47
Page 48

Font Downloading
When Font Downloading is enabled, you can download the PostScript fonts that
are frequently used in your print jobs to the Splash Server. Downloaded fonts
become resident at the server and are not sent with print jobs. This speeds printing.
You can download fonts to the Splash Server from the server computer or from any
AppleTalk client computer. For information about how to install and download
Roman fonts to the Splash Server, see “Adding Fonts to the Splash Server” on
page 59.
Web Access
If the Splash Web Queue Management option is installed on your Splash Server,
clients on an Intranet or Internet can remotely view and control their jobs in the
Splash print queue. See “Setting Up the Splash Web Queue Manager” in the
Splash Reference on-line manual for information about this feature.
Remote Queue Management
Macintosh clients can view and control the Splash print queue remotely with the
Splash Status DA. The Remote Queue Management options control a client’s
ability to manipulate jobs in the Splash print queue. (If the Splash Web Queue
Management option is enabled for the server, the option you select here applies to
both Macintosh clients and Web Queue Manager users.)
■ Access All Files allows a client to view information for any job, put an y job on
hold, delete any job, change its position in the queue, and reprint any job that
initially had an error.
■ Access Own Files allows a client to remotely manage only their own
print jobs.
■ No Access allows a clients to view information for jobs, but they cannot
perform any queue management functions.
Page 48 Splash PCI Series v5.0 Set-Up Manual
Page 49

Setting Features Preferences
Click Features in the Splash Server Preferences to see more options for the
Splash Server.
Toner Limitation
Splash Toner Limitation prevents flaking in dense color areas of the job output.
This feature automatically limits the maximum amount of toner applied to the paper
to prevent flaking.
Splash provides three options for applying the Toner Limitation feature. This was
done because this feature increases processing time for jobs that use the Splash
v4.0 CMYK color correction. For normal composite color print jobs the increased
processing time is minimal. For separations jobs the processing time increase is
more significant.
■ Select Composite and Separations to protect all print jobs from toner flaking.
■ If you frequently use the Splash v4.0 CMYK color correction with separations
jobs select Composite Only to speed processing for your separations jobs.
■ Select None to disable the Toner Limitation feature.
When the Splash Toner Limitation feature is enabled, for best printing results,
enable Splash CMYK color correction for all documents that include CMYK data.
If the output shows small dark areas that are much darker than the surrounding dark
areas, either disable Splash Toner Limitation, or select a press CMYK profile for
CMYK color correction.
Chapter 2: Using the Splash Server Page 49
Page 50

Composite Spot Colors
When print jobs include PANTONE, Toyo, or DIC spot colors (created with an
application that supports these press ink colors), Splash will simulate the spot
colors in your composite prints.
To use this feature, select the Composite Spot Color type in the Splash Server
Preferences, then enable “Composite Spot Color Correction” in the printer driver
before you print. Splash produces output that simulates the spot color on a
printing press.
■ Select Type P to simulate PANTONE inks.
■ Select Type D to simulate DIC inks.
■ Select Type T to simulate Toyo inks.
Note: This feature supports only 100% (non-tinted) spot colors. For best results,
do not mix regular press CMYK colors in the same document with spot colors
when you use this feature. (Some press CMYK colors may be interpreted as
spot colors.)
Refer to the Printing to Splash... on-line manuals for information about how to
select the Composite Spot Color Correction feature at the printer driver.
Progressives
You can configure Splash to print up to four separate sheets for a print job. Each
sheet can have up to four color passes applied. This feature allows you to examine
the result of progressively adding color passes to your output.
To use this feature, select the number of sheets to print in the Progressives box,
then select the number of colors to print on each sheet.
At the printer driver choose “Print Progressives” before you print your document.
See the Printing to Splash... on-line manuals for information about how to select
Splash print options.
Page 50 Splash PCI Series v5.0 Set-Up Manual
Page 51

Setting Server Screening Preferences
Click Screens in the Splash Server Preferences to see the screening options for the
Splash Server.
Screening is applied to print jobs that are not printed in continuous tone (contone)
at the printer.
Splash provides several options for screened output:
■ Stochastic is the default Splash Server screening method. This method uses
random dot placement to prevent moiré patterns in the final output.
■ Application Defined allows an application, such as QuarkXPress, to control
screening for the print job.
■ Emulated LPI sets the screen ruling (lines per inch). For most purposes this is
set to 200.
■ Custom lets you design a custom screen. This option overrides application
screening when it is selected.
• Set the Frequency to 25 or less for smooth gradients. If you set this to a
number above 25 it may cause banding in printed gradients.
• Set the screen Angle for each color pass. For best results, position the
screens so that the dots form a symmetrical pattern. Incorrect screening
angles result in a moiré pattern in the final output.
• The Spot Function defines the shape of the screen dot. The default is
round. Click use default to return to a round dot.
Chapter 2: Using the Splash Server Page 51
Page 52

Setting Server Style Preferences
Click Style in the Splash Server Preferences to set other Splash options.
You can set the color and size for text in each of the server queues. To set the color,
click the color swatch on the far right.
The Apple color picker appears.
Use the scroll bar on the right to adjust brightness. Click in the color circle to select
a color or define a specific color with the text boxes on the left. Click OK to choose
the color and return to the Splash Preferences dialog box.
Page 52 Splash PCI Series v5.0 Set-Up Manual
Page 53

Setting CMYK Color Correction Profiles
Splash provides three standard CMYK press ink color correction profiles and ten
Custom CMYK profiles. The CMYK color correction profiles simulate commercial
press inks in your output when you print CMYK documents to Splash. To apply
color correction to a job, enable Splash CMYK Press Color Correction at the
printer driver, then select one of the three standard or ten custom CMYK profiles.
If needed, you can change the color profiles that are applied when the one of the
three standard CMYK profiles or the ten custom CMYK profiles is selected.
To change the CMYK color correction profiles choose Color Profiles from the
Server menu in the Splash Server application. The Color Profiles dialog
box appears.
See the chapter “Calibrating with Splash ColorCal” in the Splash Reference on-line
manual for complete information about the Splash CMYK Press Color Correction
profiles. The Splash ColorCal chapter explains also how to calibrate the printer/
copier for consistent, accurate color correction results.
Chapter 2: Using the Splash Server Page 53
Page 54

Drop Printing Files to Splash
The Splash Server prints TIFF files, EPS files, and files that are in text-based
processed PostScript format. You can print these files to Splash from the server
Power Macintosh or from any client with an AppleTalk or TCP/IP network
connection to the server. Use Splash drop printing instead of a PostScript file
downloader utility to print PostScript files to Splash.
There are two ways to drop print TIFF, PostScript, and EPS files to Splash:
■ Drag files onto the Splash Server Waiting queue or Hold queue.
For PostScript files, Splash copies the file to the server’s hard disk before
printing. For TIFF and EPS files, Splash creates a reference to the file for
printing. This allows you to print a large TIFF or EPS file from an external
drive (such as a SyQuest or Zip drive) without first copying the file to the
Splash Server’s hard disk.
■ Drag files to the Drop Folder in the Splash Folder.
All files copied to the Drop Folder are copied to the Splash Server hard disk.
If the file cannot be printed, it is moved to the Unprintable Files folder within the
Splash Folder. The Unprintable Files folder is automatically created by the Splash
Server when it receives a file it cannot print.
The Drop Folder and the Unprintable Files folder are pre-configured for network
sharing. These folders must remain in the Splash Folder to operate correctly with
the Splash Server application. For easy network access, an alias for the Drop folder
is located on the Splash Server desktop. Do not select the Drop Folder as the folder
you save to when you create a PostScript file.
If you drop print a PostScript file that was created with the Splash client software,
Splash uses the print options selected at the printer driver for the job. If the
PostScript file was not created with the Splash client software, Splash applies
the default print options to the job (see page 40).
Page 54 Splash PCI Series v5.0 Set-Up Manual
Page 55

When you drag a TIFF or EPS file onto the Splash Waiting or Hold queues to print
it, Splash automatically applies default print options, such as page size and orientation, to the file. If you prefer to set print options manually for files dragged onto the
Hold queue, deselect the Splash Server Preference that controls this feature (see
page 46). If you deselect this preference, a dialog box with print options appears for
each TIFF or EPS file you drag onto the Hold queue.
See “Setting Default Print Options” on page 40 for information on how to create a
custom set of default print options.
Note: If you save a spool file when you drop print a TIFF or EPS file that is not
located on the server’s hard disk, Splash cannot print the spool file if the original
TIFF or EPS file is moved.
Drop Printing Notes
Drop Printing EPS Files at the Server
EPS files that are dragged to the server window for printing cannot contain the “/”
character anywhere in the filename or in the directory path for the EPS file. The
directory path shows the location of the EPS file on the hard disk. It includes all
directories or folders starting with the hard disk name, and ending with the name of
the directory or folder that contains the EPS file.
Margins for Graphics Files
EPS and TIFF files printed with the “Scale to Paper Size” option selected always
print with 9mm margins on all sides, regardless of the copier or selected paper size.
Chapter 2: Using the Splash Server Page 55
Page 56

Setting the Paper Size for Graphic Files
When you drag a graphic file (such as an EPS or TIFF file) to the Hold queue in the
Splash Server window, a dialog box appears so you can select print options for the
file. There are two ways to select a paper size for the file:
■ click Graphic in the dialog box, then select a paper size from the “Paper”
menu, or
■ click Pages in the dialog box, the choose “Force Paper Size to” under Paper
Size Handling and select a paper size from the menu.
If you select one paper size for the file in the Graphic options, and another paper
size in the Pages options, the document will print incorrectly at the copier.
Starting a Log File
The Splash log file records information about each print job. If you quit the Splash
Server application, or if the Macintosh restarts, the log file automatically starts
recording as soon as the Server application starts up again. The log file is located in
the Splash Folder. If you move the file “Splash.log” out of the Splash Folder, the
server automatically begins a new log file.
To start a log file:
1. In the Splash Server application, choose Preferences from the Server menu.
The Splash Server Preferences appears.
2. Click Job Log in the Splash Server Preferences. The Log File options appear.
Page 56 Splash PCI Series v5.0 Set-Up Manual
Page 57

3. Select the Enable Logging checkbox to create a server log file and to begin
recording jobs in the log.
4. Type a name for the log file. The default name is “Splash.log”.
5. Select a button under Delete Log Entries After to specify how long Splash
maintains the current print log file.
6. Click OK.
The log file is saved ev ery time a print job is completed. You can view the log file in
any application that reads text files, or you can import the log file into a spreadsheet
application for billing purposes.
Printing the Job Log
Choose Print Log from the File menu to print the Splash Server job log file.
Splash displays a window with options for printing the job log.
The Print Job Log options let you sort job information by customer or by date, and
can add subtotal information for each customer. You can print all entries in the job
log, or only the entries added since the last job log printed. Select a paper source for
the job log then click Print.
Chapter 2: Using the Splash Server Page 57
Page 58

When you choose this server command, Splash applies special formatting to the
information in the Splash.log file and prints an easy-to-read report at the copier.
The log file report automatically groups print jobs by user and contains the
following fields for each job:
■ User Name shows the network identity of the client that sent the job to the
printer/copier
■ Document Name shows the name of the file sent to the printer/copier
■ Status indicates whether the job was completed or, for example, deleted or
placed on hold
■ Date indicates the date that the job was sent to the printer/copier
■ Start Time shows the time that Splash started processing the job
■ Elapsed Time the total time (in seconds) required to print the job; starts from
the time the job begins to be received at the server, ends at the time printing
completes at the copier
■ Process Time shows time CPSI spent processing (RIPping) the job, in seconds
■ Color Model shows whether the job was printed in grayscale or color
■ Manual Feed shows whether the bypass tray was used in the job
■ Paper T ype shows the type of paper used for a job printed to the bypass tray
■ Page Size shows the page size on which the job was printed
■ Pages Rendered shows the number of pages in the document
■ Color Pages Printed shows the number of pages printed in color
■ Black Pages Printed shows the number of pages that used black ink only
■ Cover Page shows if a cover page was printed for the job
■ Job Ticket shows information entered in the Document Comment field
at the printer driver
Job Log Notes
If you select the largest available paper size for printing the Job Log, and the paper
size is available in two dif ferent trays, the Job Log may print using paper from both
paper trays.
Page 58 Splash PCI Series v5.0 Set-Up Manual
Page 59

Adding Fonts to the Splash Server
The Splash Server provides 35 Roman PostScript fonts for use with your print jobs.
(See the Splash Reference on-line manual for a complete list of the fonts provided
with Splash.) Print jobs that use the PostScript fonts provided with Splash print
faster because these fonts are resident at the printer and are not downloaded with
the print job. If you frequently use fonts that were not provided with Splash, you
can download these fonts to the Splash Server to speed up printing.
You can use any PostScript font downloader utility to manage fonts on the
Splash Server. Splash provides a simple font downloader utility from Adobe.
The utility is located in the Splash Utilities folder on the Splash Server hard disk.
You can download fonts to Splash at the server computer or from any
AppleTalk client.
Enabling Font Downloading at the Splash Server
Before you can download fonts to the Splash you must enable font downloading in
the Splash Server Preferences. To do this:
1. In the Splash Server application choose Preferences from the Server menu,
then click Network at the top of the Preferences window. The Splash
Network preferences appear.
Select to
download fonts
2. Select the Font Downloading checkbox.
3. Click OK.
The Splash Server is ready to load fonts.
Chapter 2: Using the Splash Server Page 59
Page 60

While font downloading is taking place, the server cannot process print jobs. If the
server is processing a job when font downloading begins, Splash delays the font
downloading until the current job has completed processing. To avoid confusion,
click STOP in the Splash Server window to halt print processing before font
downloading begins.
As fonts download to Splash, the Server status area in the upper-right of the Splash
Server window shows the message “Updating Fonts”. After fonts are downloaded
this message continues to display while the Splash Server rebuilds its internal list
of fonts. When the Server status returns to “Idle” the Splash Server is ready to
receive and print jobs that use the downloaded fonts. Click GO in the Splash Serv er
window to continue print processing.
Note: When Font Downloading is enabled, a new option appears in the AppleTalk
Chooser. The new Chooser option is for downloading fonts only. To avoid
confusion for clients who are attempting to print to Splash, disable Font
Downloading in the Splash Server Preferences after you complete downloading
fonts to Splash.
Downloading Fonts to the Splash Server
This section describes how to use the Adobe font downloader provided in the
Splash Utilities folder on the Splash Server. Other font downloading utilities work
also with the Splash Server. The steps for downloading fonts are the same whether
you are at the Splash Server or at a client computer.
To download fonts with the Adobe font downloader:
1. Install the fonts on the Splash Server or client Macintosh as directed by the
font manufacturer.
2. At the computer where you installed the fonts, open the MacOS Chooser
(select Chooser from the Apple menu).
Page 60 Splash PCI Series v5.0 Set-Up Manual
Page 61

3. Click on the Splash driver icon or the LaserWriter 8 icon. If your AppleTalk
network is organized into zones, select the correct AppleTalk zone for the
Splash Server.
Font
downloader
option
Two options appear in the list for the Splash Server. The FontInstall option is
for downloading fonts to the server.
4. Select the Splash Server FontInstall option in the Chooser, then close the
Chooser window.
5. Double-click the Adobe Downloader icon. The Downloader utility opens.
6. Choose Download Fonts from the File menu. The downloader
window appears.
Chapter 2: Using the Splash Server Page 61
Page 62

7. Use the menu on the left to navigate to the Fonts folder on your computer.
The Fonts folder is located in the System Folder.
A list of the fonts installed on your computer appears on the left.
Download
to Disk 0
8. In the Device menu on the right, choose Disk 0.
9. Select a font you want to download to the Splash Server from the list on the
left, then click Add. The font appears in the list on the right.
• Add All moves all fonts to the list on the right.
• To remove a font from the list on the right, select it then click Remove.
10. When you have finished selecting fonts to download, click Download.
Page 62 Splash PCI Series v5.0 Set-Up Manual
Click to
download
fonts
Page 63

The fonts you selected are downloaded to the Splash Server. The Adobe utility
displays a status message as it downloads fonts to the Splash Server.
Note: Font downloading may take up to several minutes to complete.
When downloading is complete, a message appears.
11. Click OK. Choose Quit from the File menu to close the Downloader utility.
Font downloading to the Splash Server is complete.
Font Downloading Notes
Windows 3.1 Clients Connected With MACLAN Cannot Download
Fonts to Splash
Windows 3.1 clients that use Miramar System’s MACLAN Connect software to
connect to Splash cannot download fonts to the Splash Server with a font downloading utility. Fonts must be downloaded with print jobs.
Disk Space Limitations
Fonts that you download to the Splash Server take up disk space. If you have
limited hard disk space, limit the number of fonts you download.
Chapter 2: Using the Splash Server Page 63
Page 64

Splash Server Notes
Increasing the Maximum Number of Jobs That
Can Be in the Print Queues
The Splash Server application memory configuration allows up to 200 jobs in the
print queues (all queues combined). When this limit is exceeded, NetWare, Drop
Folder, and TCP/IP jobs will be received but not displayed or processed by the
server.
To increase the number of jobs the Server application can manage in the
print queues, you must allocate additional system memory to the Splash Server
application. Print jobs each take about 10K of memory, so for example, to manage
an additional 100 jobs in the print queues you must increase memory for the Splash
Server application by 1MB.
To allocate additional memory to the Splash Server application:
1. Quit the Splash Server application.
2. Click the Splash Server icon to select it, then choose Get Info from the File
menu in the MacOS Finder. The Splash Server Info dialog box appears.
3. Under “Memory Requirements” increase both the “Minimum Size” and the
“Preferred Size” amounts, then close the Info dialog box.
4. Open the Splash Server application to resume print job processing.
When the Splash Server runs out of system memory it stops receiving jobs and may
report PostScript errors for processing jobs.
Disable Type Reunion Extension
If you have the Type Reunion extension installed on the Splash Server, make sure
that it is disabled. This extension can cause the server to quit unexpectedly.
Page 64 Splash PCI Series v5.0 Set-Up Manual
Page 65

Running Other Applications on the Splash Server
Before using other applications on the Splash Server computer, click the Stop
button at the bottom of the Splash Server window. If the Splash Server is running,
other applications operate at reduced performance levels. When processing is
stopped, you can still print to the printer/copier from the Splash Server computer
(local printing). When you have finished using other applications, exit these
applications and click Go to continue Splash print processing. Any jobs sent to the
Server will then begin to print.
Print Job Name Notes
When the LaserWriter 8 driver cov er page “before document” option is selected for
a print job, the job name that appears in the Splash Server print queue for the job is
“Cover Page”. In the Document field of the Job Log the name of the job is
“Cover Page”.
RIP While Receive
The Splash Server has an automatic RIP While Receive capability. This increases
productivity significantly for all customers. Automatic RIP While Receive reduces
print wait time by increasing RIP efficiency by ensuring that the CPSI is never idle
while print jobs are present. RIP While Receive keeps track of all print jobs
(including jobs that are in transit to the Splash Server) and directs CPSI
processing of jobs as follows:
■ The currently processing job has highest priority and is completed first.
■ Completely spooled jobs are processed next. If there are two or more
completely spooled jobs waiting, the jobs are processed in the order they
were finished being received by the Splash Server. (If a smaller print job is
completely received by the Server before a larger job that was sent ahead of it,
the Server will process the smaller job first.)
■ If no completely spooled jobs are waiting, RIP While Receive begins CPSI
processing on a job as it is being received by the Splash Server. If two or
more jobs are in transit to the Splash Server, the job that began transmitting to
the server first is processed. All other jobs in transit to the server are
automatically spooled.
If an error occurs (for example, the correct paper tray not installed), the job errors
back into the queue when spooling completes. The job is restarted when the error is
corrected—it is not necessary to resend the job from the client.
Chapter 2: Using the Splash Server Page 65
Page 66

When a job is processed with RIP While Receive, instead of displaying the
percentage of the file processed in the Server Status Window, it shows the number
of kilobytes processed.
Look Ahead Routing
Splash allows multiple jobs to all be received and spooled simultaneously over the
network, instead of being forced to wait when any other job is already spooling.
This effectively eliminates productivity loss due to a blocking of the spooling
access in heavy use environments. Each job being received from the network
appears visually in the queue with an “R” next to it to indicate that it is currently
being received over the network and spooled. The “R” disappears once the job has
fully spooled and is active in the queue.
When multiple jobs are spooling, the first job to complete spooling is added at the
top of the queue (even if it was not the first job sent). This allows small files to
“jump” larger files that may still be spooling.
Because of Splash Look Ahead Routing, whene ver the queue is empty, the job RIPs
while receiving. If, at the time the job is sent, the queue is not empty, the job is
spooled. Thus, with Splash, productivity is significantly increased for customers in
all environments. Automatic RIP While Receive reduces printing time by virtually
eliminating the RIP time for many jobs whenever the queue is empty.
Job Processing Notes
The Splash Server occasionally reports during job processing that color correction
is being applied to a job for which color correction was not selected. This message
is incorrect. Similarly, the serv er will sometimes report that toner limitation is being
applied when this feature is not active. Disregard this message.
Occasionally, a print job will error with the message “Driver reported an error”.
T o determine the cause of the error , run Splash Preflight for the print job or drag the
job to the Waiting queue.
Customizing the Splash Color Control Strip
Splash provides a control strip option that prints color patches and an EPS file
on the output for print jobs with “Print Control Strip” selected at the printer driver.
If desired, you can customize the control strip file that prints on jobs. For example,
you can change the EPS file that prints on the job, or change the location or tint of
the color patches.
Page 66 Splash PCI Series v5.0 Set-Up Manual
Page 67

Note: Editing the control strip file requires knowledge of the PostScript language.
The file “ControlStripOptions.ps” is located in the SupportPS folder within the
Splash Folder on the Splash Server computer. The control strip file is in text-based
PostScript and includes comments that explain how to make changes to the
file. You can open and edit the PostScript file with any text-based editor,
such as SimpleText.
Switching Network Protocols for the Splash Server
Before you switch network protocols (from EtherTalk to LocalTalk for example),
quit the Splash Server application to avoid disrupting EtherTalk connections. If you
do not do this, the Splash Server application can freeze when the network protocol
is switched. You must restart the Splash Server and open the Server application to
resume printing.
Disabling EtherTalk
To disable EtherTalk on the Splash Server, point to Control Panels in the Apple
menu, then drag to choose the AppleTalk control panel. Choose “Printer Port” or
“Modem Port” in the Connect via menu to switch the AppleTalk network from
EtherTalk to LocalTalk. (This does not interfere with the ability to print to Splash
from Novell print queues with Splash NetWare Direct. Print jobs will resume
downloading to Splash from Novell NetWare print queues after the Splash Server is
restarted.)
Server Disk Full
If the Splash Server hard disk becomes full, a print job sent from a client will
appear in the Error queue with an “R” to indicate that it is being received by the
server. At the client computer, a message stating that the server hard disk is full
appears. When the job is canceled at the client, the job disappears from the Error
queue at the server.
Servers With Many Fonts Installed
If you add a large number of after market fonts to your Splash Server, you may
need to increase memory for the Server application to start up correctly. To do this,
close the Server application, select the icon and choose Get Info from the Finder
File menu and increase memory. See your Apple documentation for information.
Chapter 2: Using the Splash Server Page 67
Page 68

Splash Server Troubleshooting Notes
If the Splash Server reports that the paper size for a print job is not available, and
you have verified that the paper is loaded in a tray at the copier, check the status
message at the copier for more information. Also, verify that the copier is turned
on, and that the Splash cable is connected to both the copier and the Splash Server
computer.
Installer Notes
If you use the Splash Installer to remove the Splash software from the server
computer, the Installer may show a message that reports the software removal was
unsuccessful. This message appears when spool files or TIFF files are present in the
Spool Folder or TIFF Folder when you attempt to remove the Splash software.
However, the Splash Server application was successfully removed from the
computer's hard disk.
Job Previews Notes
The preview image for a print job may disappear when an error dialog box displays
at the Splash Server.
Occasionally the Splash Server will not show the correct preview image for a job
that has not been processed (RIPped) or a job in the Error queue.
PostScript Error Reported for a Successful Print Job
In rare cases, a job will print correctly, complete with cover page, then the job will
error back into the Server queue with a PostScript error . You can delete the job from
the Server queue.
Page 68 Splash PCI Series v5.0 Set-Up Manual
Page 69

Index
A
Access All Files option 48
Access Own Files option 48
Acquire plug-in 11, 14, 26
Active status 37
Adobe Downloader utility 61
Adobe Illustrator 14
Adobe PageMaker 14
Adobe Photoshop
compatibility 14
Export plug-in 11
file format vs. TIFF file format
file size 29
memory requirements/
recommendations 31
scanned image storage 27
separation tables for Splash 10
Splash Acquire plug-in 11, 14, 26
Splash Export plug-in 14, 26
Adobe Roman fonts 12
Allow Copier Interrupt option 46
Always Hold Incoming Jobs option 45
Angle, screening 51
Application Defined screening 51
Automatic Tray Switching, disabling 25
28
C
Calibration application 12
Canceling a print job 40
Client 15
Client software 25
CMYK profiles, custom 12
CMYK profiles, setting 53
CMYK separations for
Adobe Photoshop 10
Color Central Lite
note 27
Sampler application
Color Control Strip, editing 66
Color correction 10, 15, 16
Color correction, setting
CMYK profiles 53
ColorCal 12
ColorSync profiles for Splash 10
Composite Spot Colors 50
Compress Save-As-TIFF Files option 46
Connected T o option 45
Continual Print feature 11
Control strip 66
31
Copier identification at Splash Server 45
Copier status 37
Index Page 69
Page 70

Cover Page, printing 45
Export plug-in
11, 14, 26
Current Defaults button 39
Custom screening 51
D
Default print job settings 40
Deleting print jobs 40
DIC inks
Disk drive, adding an external drive 29
Disk size, Splash Server 27
Downloading fonts to server 59
Drop folder 12, 54
Drop printing files to Splash 54
50
E
Emulated LPI 51
External hard disk drive 29
F
Font Downloading option 48, 59
Fonts
provided with Splash 12
Fonts and disk space 63
Fonts, adding to server
Force Paper Size option 41
Frequency, screening 51
59
G
GO button 37
Graphic files
default print options 41
printing 54
Enterprise Networking 47
H
EPS file
default print settings 41
filename restrictions 55
paper size 56
print margins 55
printing 54
Error queue 37
Error Timeout option 46
Hard disk size, Splash Server 27
Hard drive, external 29
Hold button 37
Hold queue 37
I
Errors, checking for with Preflight 42
EtherTalk 67
Page 70 Splash PCI Series v5.0 Set-Up
ICC color profiles 10
Page 71

J
N
Job Info window 39
Job Ticketing for Macintosh clients 11
JPEG files 12
L
LaserWriter 8 cover page 65
Local printing
LocalTalk 67
Log file
description 12
field descriptions 58
maintaining the log 57
starting a new log 56
Look Ahead Routing 12, 66
LPR printing setup 25
LPR/LPD printing to Splash 10
15
NetWare Direct
introduction 10
minimum memory configuration 31
with EtherTalk 67
Network printing 15
Network protocols, switching 67
Network setup
Network status 37
No Access option 48
Node 15
Novell NetWare
introduction 10
print queues 67
Novell printing setup 25
25
O
Original Defaults button 39
M
P
Macromedia FreeHand 14
Manuals,on-line 17
Map A4/Letter and A3/Tabloid option 46
Memory configuration 64
Microsoft Excel 14
Microsoft PowerPoint 14
Microsoft W ord 14
Moving print jobs 38
Index Page 71
PANTONE inks 50
Paper size for EPS and TIFF files 56
Paper tray status 37
PostScript
error checking 42
file printing 54
PostScript error, job remains on Server 28
Page 72

PostScript file
default print settings 41
printing 12
printing with Drop folder 54
Preflighting print jobs 12, 42
Preview image 68
Print Cover Page option 45
Print jobs
default settings for
maximum number allowed in
server queues 64
spooling at the server 16
viewing options selected for 39
Print processing on Splash Server 15
Print queue color options 52
42
R
Raster image processing (RIP) 16
Registration number 22
Remote Queue Management options 48
Replacing the Splash Server internal
disk drive 29
RIP While Receive
RIP, definition 9
Running other applications on
Splash Server 14
11, 65
S
Print queue management 48
Printer drivers
Splash 15
Windows 10
Printing
preventing client printing 36
Printing activity log file 12
Product registration 22
Progressives 11, 50
Q
QuarkXPress 14
Save as TIFF 11, 27
Scale to Paper Size 41, 55
Scanned images 28
Scanning plug-in 11, 14, 26
Screening Method options 51
SCSI addresses 29
Selecting print jobs 38
Separations 11
Serial number 23
Server Name, setting 45
Server status 37
Setting the timeout length for errors 46
Splash CD-ROM, on-line manuals 17
Splash client software 25
Page 72 Splash PCI Series v5.0 Set-Up
Page 73

Splash Color Control Strip 66
Splash ColorCal, minimum memory
configuration 31
Splash Key 20, 22, 32, 33
Splash on-line manuals 17, 34
Splash PCI 1280 Server 13
Splash PCI 640 Server 13
Splash PCI-E Server
Splash Server
alias for 36
changing the server name 45
disk size 27
memory requirements 31
preferences 44
print processing 15, 27
registration number 22
replacing the internal disk drive 29
starting a log file 56
system performance 27
unpacking 20
virtual memory 31
13
System memory and print jobs
T
TCP/IP printing 10, 25
TIFF files
default print settings 41
format vs. Adobe Photoshop 28
paper size 56
print margins 55
printing
server disk space 27
Toner Limitation 49
Toyo inks 50
Trays status 37
Type Reunion 64
54
U
Unprintable Files folder 54
64
Splash Status DA 12
Spool file 11, 27
Update Fonts 47
V
Spooling multiple jobs 66
Spot Function, screening 51
Starting and stopping the Server 37
Stochastic screening 51
STOP button 37
Stop Processing dialog box 38
Style options 52
System configuration, virtual memory 31
Index Page 73
Virtual memory 31
Page 74

W
Waiting queue 37
W eb Access option 48
Web Print Queue Manager 12
Windows 3.1, printer driver 10
Windows 95, printer driver 10
Windows NT, printer driver
Workstation 15
X
Xerox IFU Port Kit 13
10
Page 74 Splash PCI Series v5.0 Set-Up
 Loading...