

Page 1

Phaser® 6200 Color Laser Printer
Copyright © 2002 Xerox Corporation. All Rights Reserved. 10
Specialty Printing
This section covers:
■ Automatic 2-sided printing — see page 10.
■ Manual 2-sided printing — see page 12.
■ Transparencies — see page 15.
■ Envelopes — see page 18.
■ Labels, Business Cards, Greeting Cards, CD/DVD Inserts, and CD/DVD Labels —
see page 19.
For a list of the acceptable papers, transparencies, envelopes, and labels that can be used in each tray,
refer to the Supported Papers section of the Trays and Paper Guide on the Interactive Documentation
CD-ROM or print the Paper Tips page from the printer’s front panel.
Automatic 2-sided printing
To have the printer do automatic 2-sided printing (duplexing):
■ The printer must be either a Phaser 6200 DP or Phaser 6200 DX model.
■ The paper must be loaded in a tray. The printer will NOT do automatic 2-sided printing on paper
loaded in the Multi-Purpose Tray.
■ Any supported paper size that is supported in the tray can be duplexed. Any supported paper type
(Plain Paper, Heavy Plain Paper, Letterhead, or Special) that can be loaded in the tray can be
duplexed.
■ The paper must have a weight of 75-105 g/m
2
(20 - 28 lb. bond).
Caution
DO NOT use any specialty media (such as glossy coated paper), envelopes, or labels for
2-sided printing. Any damage caused by duplexing specialty media may not be covered
under your printer warranty.
For best results with automatic 2-sided printing, do not use heavy toner coverage on the even-numbered
pages of your print job.
When you print any job, you can use the printer driver to select the orientation of the images on the
page: Portrait or Landscape. When you print 2-sided jobs, you also select the binding preference,
which determines how the pages turn; refer to the table on page 12 for the wording used in the printer
drivers for binding preference.
Page 2
Specialty Printing
Phaser® 6200 Color Laser Printer 11
To do automatic 2-sided printing:
1. Insert a stack of paper into the tray. For more information, refer to the Trays section of the
Trays and Paper Guide on the Interactive Documentation CD-ROM. Place the side to be
printed with the odd-numbered pages facedown with the top of the page at the back of the tray. If
using paper with pre-punched holes, place the holes toward the right side of the tray.
2. In the printer driver:
■ Select the tray containing the paper.
■ Select the orientation.
■ Select 2-sided printing, as described in the following table.
3. Send the job to the printer.
Portrait
Bind on Side Edge
Flip on Long Edge
Portrait
Bind on Top Edge
Flip on Short Edge
Landscape
Bind on Side Edge
Flip on Short Edge
Landscape
Bind on Top Edge
Flip on Long Edge
6200-58
PH
Page 3
Specialty Printing
Phaser® 6200 Color Laser Printer 12
Manual 2-sided printing
If the printer doesn’t have a duplex unit, you can still have the printer print on both sides of the paper.
However, you must have the printer print all of the odd-numbered pages first, reinsert the printed pages
in the tray, then have the printer print the even-numbered pages.
You can use Trays 1-3 or the Multi-Purpose Tray for manual 2-sided printing.
Paper specifics
■ When using the Multi-Purpose Tray, the paper must have a weight of 75 - 216 g/m
2
(20 - 58 lb.
bond).
■ When using the trays, the paper must have a weight of 75 - 105 g/m
2
(20 - 28 lb. bond).
■ For the best opacity and feed reliability, use Plain Paper that is 90 g/m
2
(24 lb. bond) paper.
■ 2-sided printing on specialty paper can shorten the life of printer components.
■ For best results, do not use heavy toner coverage on side 1 of a manual 2-sided print. Increase the
top margin on side 1 to at least 12 mm (0.48 in.).
■ Print quality may be degraded on the second side of manual 2-sided prints.
Setting the printer driver for two-sided printing
Macintosh
LaserWriter 8.6
or
LaserWriter 8.7
1. From the File menu, select Print.
2. In the Print dialog box, click after General and select Layout from the
pull-down menu.
3. Select Print on Both Sides.
4. Select a binding preference.
Windows 95,
Windows 98, or
Windows Me
1. From the File menu, select Print.
2. Click the Properties button.
3. On the Setup tab, select Print on 2 Sides.
4. Check or uncheck Bind on Top Edge.
Windows 2000
or
Windows XP
1. From the File menu, select Print.
2. Click the Properties button.
3. On the Layout tab for Print on Both Sides (Duplex), select either
Flip on Long Edge or Flip on Short Edge.
Windows NT
1. From the File menu, select Print.
2. Click the Properties button.
3. On the Page Setup tab for Print on Both Sides (Duplex Printing),
select either Long Edge or Short Edge.
Page 4
Specialty Printing
Phaser® 6200 Color Laser Printer 13
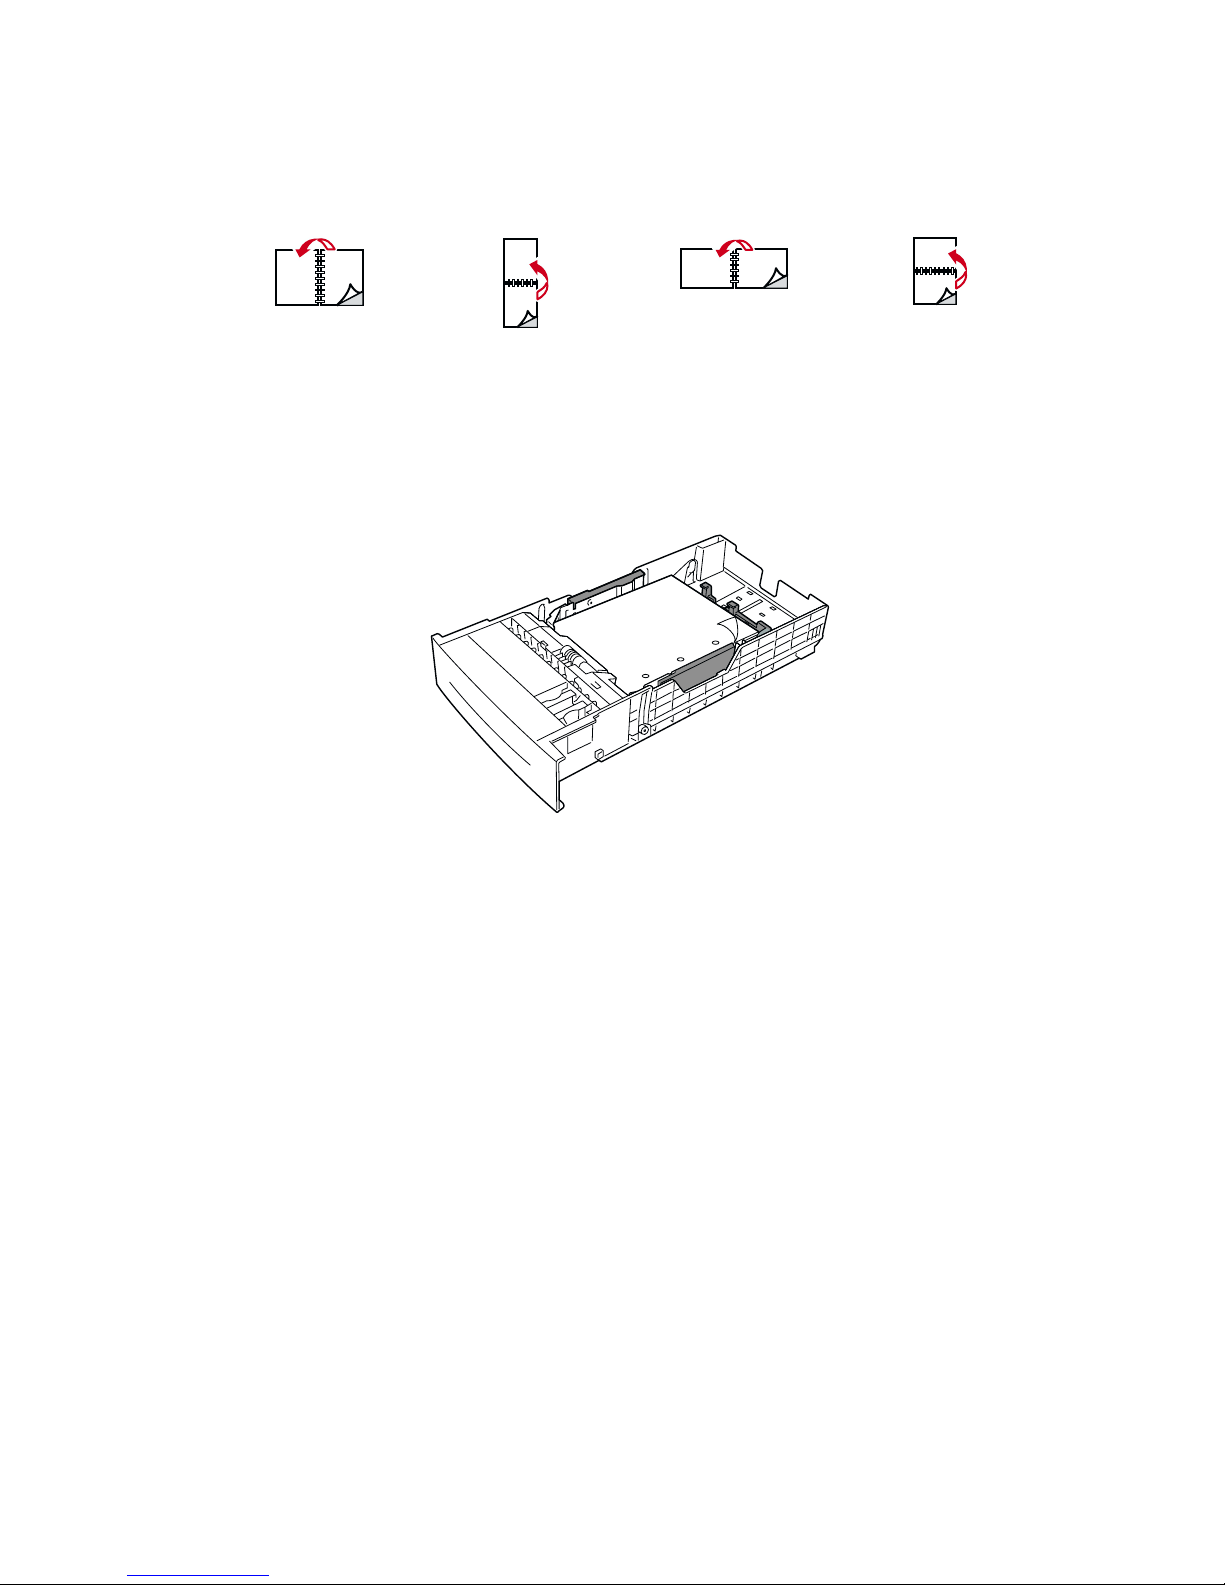
Manual 2-sided printing using Trays 1-3
Printing side 1
1. Insert a stack of paper into the tray. For more information, refer to the Trays section of the
Trays and Paper Guide on the Interactive Documentation CD-ROM. Place the side to be
printed faceup with the top of the page at the front of the tray.
2. In the printer driver, select the tray containing the paper.
3. Send the job to the printer so that the odd-numbered pages (side 1) are printed.
Printing side 2
1. Insert the paper printed with side 1 into the tray. Place the printed side 1 facedown with the top of
the page at the front of the tray; (the side to be printed is faceup)
.
2. In the printer driver, select the tray containing the paper.
3. Send the job to the printer so that the even-numbered pages (side 2) are printed.
6200-77
6200-78
Page 5

Specialty Printing
Phaser® 6200 Color Laser Printer 14
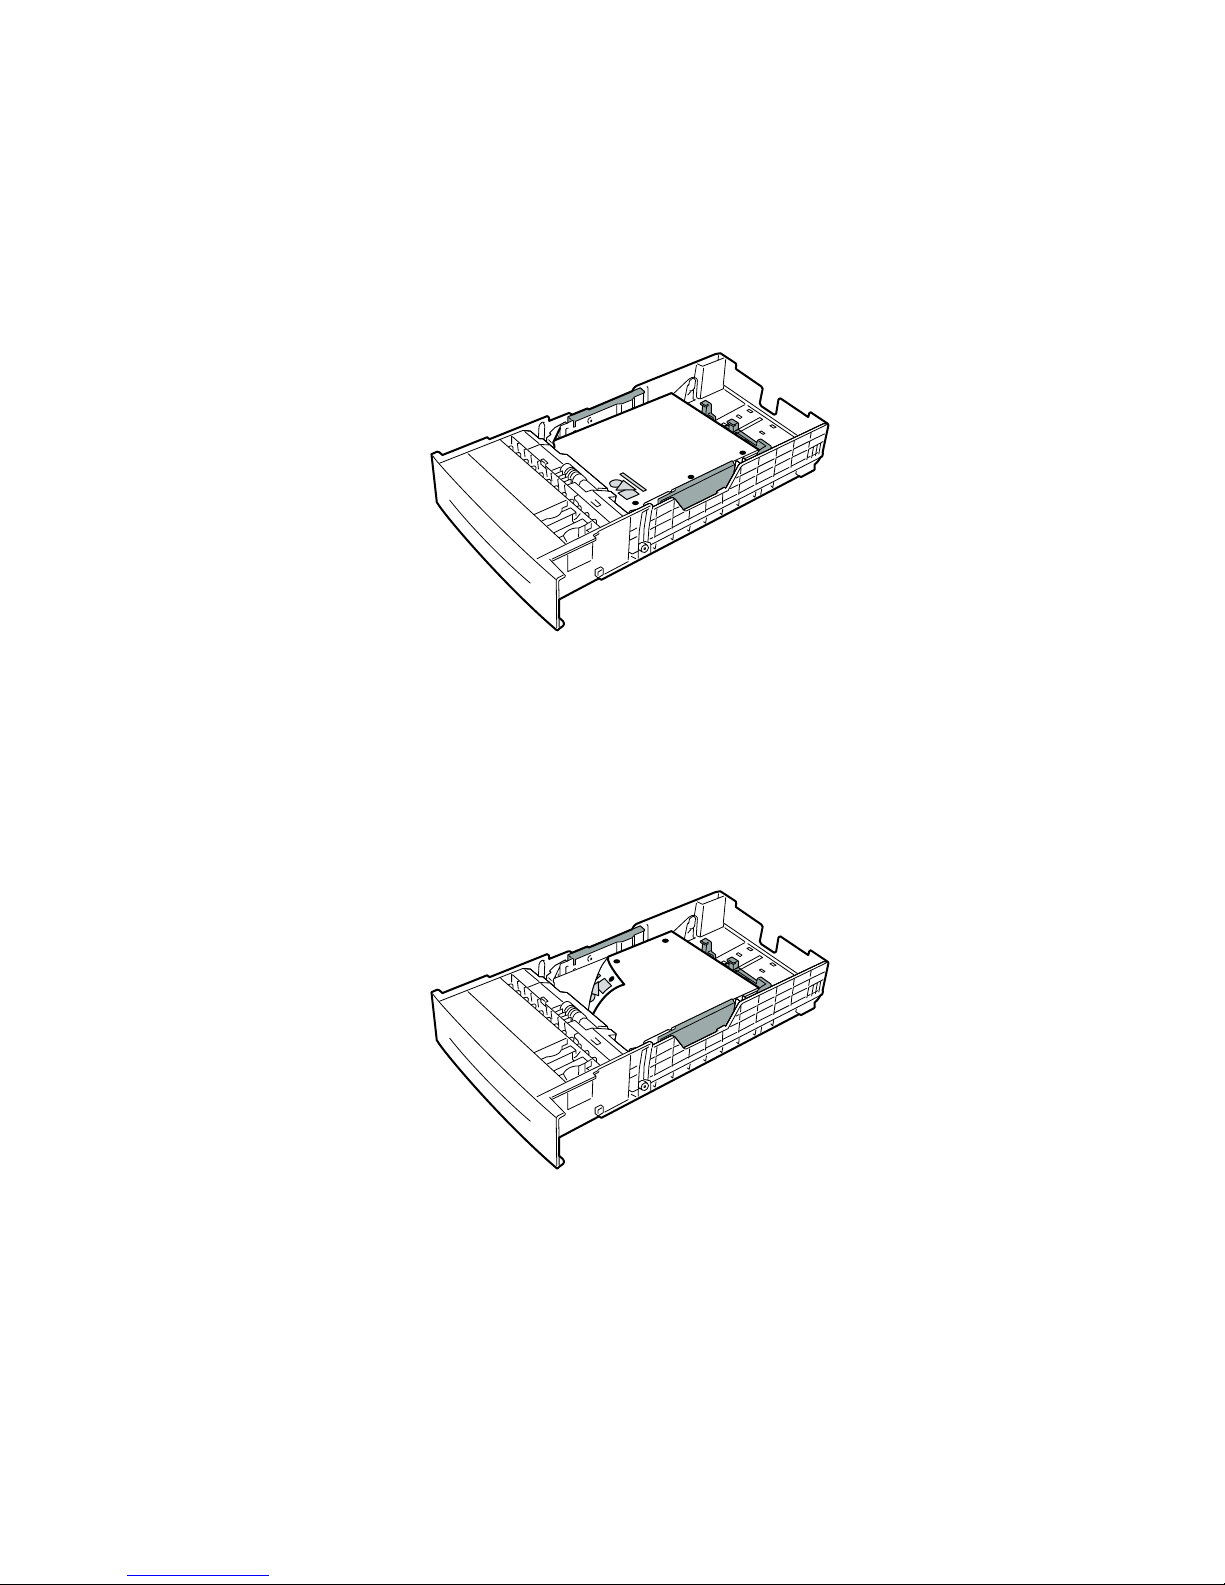
Manual 2-sided printing using the Multi-Purpose Tray
Printing side 1
1. Insert a stack of paper into the Multi-Purpose Tray. For more information, refer to the Trays
section of the Trays and Paper Guide on the Interactive Documentation CD-ROM. Load the
side to be printed facedown with the top of the page entering the printer first.
2. In the printer driver, select the Multi-Purpose Tray as the paper source.
3. Send the job to the printer so that the odd-numbered pages (side 1) are printed.
Printing side 2
1. Insert the paper printed with side 1 into the Multi-Purpose Tray. Place the printed side 1 faceup
with the top of the page entering the printer first.
2. In the printer driver, select the Multi-Purpose Tray as the paper source.
3. Send the job to the printer so that the even-numbered pages (side 2) are printed.
P
H
A
S
E
R
6200
6200-56
Page 6

Specialty Printing
Phaser® 6200 Color Laser Printer 15
Transparencies
Transparencies can be printed from Tray 1 or the Multi-Purpose Tray. Handle transparencies by the
edges and with both hands to avoid fingerprints and creases, which can cause poor print quality.
Xerox Phaser® 6200 Transparencies
Xerox recommends that you use Phaser® 6200 Transparencies, which have been specifically developed
for use with this type of printer fuser.
To order supplies and accessories, contact your local reseller or visit the Xerox web site at:
www.xerox.com/officeprinting/6200supplies
Using non-Phaser 6200 transparency film
The printer features a unique oil-less fuser. Phaser 6200 Transparency film is designed specifically to
work with the printer's fuser. If you want to use non-Phaser 6200 transparency film, you must use a film
that meets the following specifications:
■ Compatible with oil-less fuser systems
■ Fusing temperature: 178 degrees C
■ Electrical surface resistivity: greater than 7 x 10exp11 ohm/square
Any overhead transparency materials used with this printer must be compatible with the heat and
pressure of the oil-less fusing process. The materials must not discolor, melt, offset, or release
hazardous emissions when heated to 178 degress C for 0.2 seconds.
Overhead transparency materials that do not meet these specifications can produce poor image quality,
produce a jam in the printer, wrap around the fuser rollers and even melt on the fuser rollers. Some
non-Phaser 6200 transparencies have paper tape on the edge that can separate in the heat of the fuser,
leading to damage. Using non-Phaser 6200 transparencies may damage the fuser. Damage caused by
using non-Phaser 6200 transparencies is not covered under the warranty, service agreement, or Total
Satisfaction Guarantee.
Videos are available with instructions for loading transparencies. Videos are located on the
Interactive Documentation CD-ROM and on the Xerox web site at:
www.xerox.com/officeprinting/6200support/
Xerox Phaser® 6200 Premium Transparency Film
Size Description Part Number
A/Letter (U. S.)
8.5 x 11 in.
50 sheets 016-1948-00
A4 (Metric Letter)
210 x 297 mm
50 sheets 016-1949-00
Page 7

Specialty Printing
Phaser® 6200 Color Laser Printer 16
Note
Xerox and Xerox Phaser transparency films developed for other Xerox printers and copiers
are not meant to be used with this printer. Using non-Phaser 6200 transparencies may
damage the fuser and might not be covered under the warranty.
Printing transparencies from Tray 1
1. Fan the transparencies to release sheets that are stuck together.
2. Insert the transparencies into the tray. For more information, refer to the Trays section of the
Trays and Paper Guide on the Interactive Documentation CD-ROM.
3. Do not load transparencies above the transparency fill line, because it may cause a jam.
4. When the front panel prompts you to confirm or change the selected paper type:
a. Press the Down Arrow key to scroll to
Change, then press the OK key.
b. Scroll to
Transparency and press the OK key to save your selection.
5. In the printer driver, select either Tray 1 as the paper source or Transparencies as the paper type.
MAX
6200-59
MAX
Page 8

Specialty Printing
Phaser® 6200 Color Laser Printer 17
Printing transparencies from the Multi-Purpose Tray
1. Fan the transparencies to release sheets that are stuck together.
2. Insert the transparencies into the Multi-Purpose Tray; (maximum capacity is 50 sheets). For more
information, refer to the Trays section of the Trays and Paper Guide on the Interactive
Documentation CD-ROM.
3. When the front panel prompts you to confirm or change the selected paper type and size:
a. Press the Down Arrow key to scroll to
Change, then press the OK key.
b. Scroll to
Transparency and press the OK key to save your selection.
c. Scroll to the correct paper size and press the OK key to save your selection.
4. In the printer driver, select either Multi-Purpose Tray as the paper source or Transparencies as
the paper type.
6200-54
Page 9

Specialty Printing
Phaser® 6200 Color Laser Printer 18
Envelopes
Guidelines for envelope printing
■ Envelopes can only be printed from the Multi-Purpose Tray.
■ Use only paper envelopes.
■ Do not print on the back of the envelope.
■ Keep unused envelopes in their packaging to avoid the effects of moisture and dryness,
which can affect print quality and cause wrinkling. Excessive moisture causes the envelopes
to seal before or during printing.
■ Many applications include a tool for creating an envelope document. For example, Microsoft
Word includes an Envelopes and Labels feature in the Tools menu. Be sure to:
■ Select facedown.
■ Select the feed method with the image centered.
■ Clear Clockwise Rotation.
■ Load a maximum of 10 envelopes at a time. This printer is not designed to handle
high-capacity production envelope printing.
■ Envelopes may wrinkle depending on the weight and stiffness of the envelope. Envelopes
with short flaps work best; longer flaps are more likely to wrinkle.
Caution
Never use envelopes with windows or metal clasps; they can damage the printer. Damage
caused by using unsupported envelopes is not covered by your printer’s warranty.
Printing envelopes
1. Insert the envelopes short-edge feed into the Multi-Purpose Tray. For more information, refer to
the Trays section of the Trays and Paper Guide on the Interactive Documentation CD-ROM.
■ Place envelopes with the flap side up and top of the envelope towards the right of the printer.
(For A7 envelopes, place the flap side up but have the top of the envelope enter the printer
first.)
■ Maximum capacity is 10 envelopes.
6200-10
Page 10

Specialty Printing
Phaser® 6200 Color Laser Printer 19
2. When the front panel prompts you to confirm or change the selected paper type and size:
a. Press the Down Arrow key to scroll to
Change, then press the OK key.
b. Scroll to
Envelopes and press the OK key to save your selection.
c. Scroll to the correct envelope size and press the OK key to save your selection.
3. In the printer driver, select either Multi-Purpose Tray as the paper source or Envelopes as the
paper type.
4. Make a test print from your application to confirm that the orientation of your envelope is correct.
Note
The heat from the printing process can melt certain types of envelope glue. If the envelope
flap sticks shut after printing the test print, tuck the flaps inside the envelopes when printing
the remaining envelopes.
Labels, Business Cards, Greeting Cards,
CD/DVD Inserts, and CD/DVD Labels
Labels, business cards, greeting cards, CD/DVD inserts, and CD/DVD labels can only be printed from
the Multi-Purpose Tray. The number of sheets that can be loaded depends on the item.
Refer to the Supplies section of the Support Guide on the Interactive Documentation CD-ROM for
information on part numbers for ordering these items. To order supplies and accessories, contact your
local reseller or visit the Xerox web site at: www.xerox.com/officeprinting/6200supplies
Guidelines
■ Do not use vinyl labels.
■ If any of the labels, cards, or inserts on a sheet are missing, do not use that sheet; it may
damage printer components.
■ Store unused labels, cards, and inserts flat in their original packages.
■ Do not store labels, cards, or inserts in extremely dry or humid conditions or extremely hot or
cold conditions. Storing them in extreme conditions may cause them to jam in the printer or
cause print quality problems.
■ Rotate stock frequently. Long periods of storage in extreme conditions can cause the labels,
cards, and inserts to curl and jam the printer.
■ Print only on one side of the sheet of labels and inserts.
Item
Maximum number of sheets
Labels
25
Business cards
25
Greeting cards
25
CD/DVD labels
25
CD/DVD inserts
25
Page 11

Specialty Printing
Phaser® 6200 Color Laser Printer 20
Printing labels, business cards, greeting cards, CD/DVD inserts, and
CD/DVD labels
1. If printing on labels and your application has a setting for labels, use it as a template. Templates
for greeting cards, etc. are available at the Xerox Color Connection web site at:
www.colorconnection.xerox.com
2. Insert the sheets into the Multi-Purpose Tray. Place the side to be printed facedown with the top of
the sheet entering the printer first. For more information, refer to the Trays section of the Trays
and Paper Guide on the Interactive Documentation CD-ROM.
3. When the front panel prompts you to confirm or change the selected paper type and size:
a. Press the Down Arrow key to scroll to
Change, then press the OK key.
b. Scroll to the correct type and press the OK key to save your selection.
c. Scroll to the correct size and press the OK key to save your selection.
4. In the printer driver, select either Multi-Purpose Tray as the paper source or the paper type.
6200-55
 Loading...