

Page 1

Setup
®
Phaser
Color Laser Printer
6200
Guide
Page 2

Copyright © 2002, Xerox Corporation. All Rights Reserved. Unpublished rights reserved under the copyright laws of the United
States. Contents of this publication may not be reproduced in any form without permission of Xerox Corporation.
Copyright protection claimed includes all forms of matters of copyrightable materials and information now allowed by statutory
or judicial law or hereinafter granted, including without limitation, material generated from the software programs which are
displayed on the screen such as styles, templates, icons, screen displays, looks, etc.
®
XEROX
PhaserShare
, The Document Company®, the stylized X, CentreWare®, DocuPrint®, Made For Each Other®, Phaser®,
®
, the TekColor® icon, and WorkSet® are registered trademarks of Xerox Corporation. infoSMART™,
PhaserPort™, PhaserPrint™, PhaserSMART™, PhaserSym™, PhaserTools™, and the TekColor™ name are trademarks of
Xerox Corporation.
®
, Acrobat®, Acrobat® Reader®, Illustrator®, PageMaker®, Photoshop®, PostScript®, ATM®, Adobe Garamond®,
Adobe
®
, Carta®, Mythos®, Quake®, and Tekton® are registered trademarks and Adobe Jenson™, Adobe Brilliant Screens™
Birch
technology, and IntelliSelect™ are trademarks of Adobe Systems Incorporated or its subsidiaries which may be registered in
certain jurisdictions.
®
, LaserWriter®, LocalTalk®, Macintosh®, Mac® OS, AppleTalk®, TrueType2®, Apple Chancery®, Chicago®, Geneva®,
Apple
®
Monaco
, and New York® are registered trademarks, and QuickDraw™ is a trademark of Apple Computer Incorporated.
Marigold™ and Oxford™ are trademarks of AlphaOmega Typography.
Avery™ is a trademark of Avery Dennison Corporation.
®
and HP-GL® are registered trademarks of Hewlett-Packard Corporation.
PCL
Hoefler Text was designed by the Hoefler Type Foundry.
®
ITC Avant Guard Gothic
ITC Zapf Dingbats
, ITC Bookman®, ITC Lubalin Graph®, ITC Mona Lisa®, ITC Symbol®, ITC Zapf Chancery®, and
®
are registered trademarks of International Typeface Corporation.
Bernhard Modern™, Clarendon™, Coronet™, Helvetica™, New Century Schoolbook™, Optima™, Palatino™, Stempel
Garamond™, Times™, and Univers™ are trademarks of Linotype-Hell AG and/or its subsidiaries.
®
MS-DOS
Wingdings™ in TrueType
and Windows® are registered trademarks of Microsoft Corporation.
®
format is a product of Microsoft Corporation. WingDings is a trademark of Microsoft Corporation
and TrueType is a registered trademark of Apple Computer, Inc.
Albertus™, Arial™, Gill Sans™, Joanna™, and Times New Roman™ are trademarks of Monotype Corporation.
®
Antique Olive
is a registered trademark of M. Olive.
Eurostile™ is a trademark of Nebiolo.
®
and NetWare® are registered trademarks of Novell, Incorporated.
Novell
®
Sun
and Sun Microsystems® are registered trademarks of Sun Microsystems, Incorporated. SPARC® is a registered trademark
of SPARC International, Incorporated. SPARCstation™ is a trademark of SPARC International, Incorporated, licensed
exclusively to Sun Microsystems, Incorporated.
®
is a registered trademark in the US and other countries, licensed exclusively through X/Open Company Limited.
UNIX
NERGY STAR
As an E
efficiency. The E
®
partner, Xerox Corporation has determined that this product meets the ENERGY STAR guidelines for energy
NERGY STAR name and logo are registered U.S. marks.
This product uses code for SHA-1 written by John Halleck, which is being used with his permission.
This product includes an implementation of LZW licensed under U.S. Patent 4,558,302.
Other marks are trademarks or registered trademarks of the companies with which they are associated.
®
PANTONE
Colors generated by the Phaser 6200 Color Printer are four- and/or three-color process simulations and may not
match PANTONE-identified solid color standards. Use current PANTONE Color Reference Manuals for accurate colors.
PANTONE Color simulations are only obtainable on this product when driven by qualified Pantone-licensed software packages.
Contact Pantone, Inc. for a current list of qualified licensees.
Page 3
Contents
Setup and Quick Reference Guide
For instructions on how to unpack and set up your printer plus basic
information about using the printer, clearing jams, and ordering supplies, see
FPO
6200-90
Setting up the Printer . . . . . . . . . . . . . . . . . . . . . . . . . . . . . . . . . . . . . . . . . .1
Unpacking the printer . . . . . . . . . . . . . . . . . . . . . . . . . . . . . . . . . . . . . . . . . . . . . . . . . . . . . 1
Removing the packing tape . . . . . . . . . . . . . . . . . . . . . . . . . . . . . . . . . . . . . . . . . . . . . . . . . 4
Loading paper in the tray. . . . . . . . . . . . . . . . . . . . . . . . . . . . . . . . . . . . . . . . . . . . . . . . . . . 6
Preparing the toner cartridges . . . . . . . . . . . . . . . . . . . . . . . . . . . . . . . . . . . . . . . . . . . . . . 9
Installing the imaging unit . . . . . . . . . . . . . . . . . . . . . . . . . . . . . . . . . . . . . . . . . . . . . . . . . 10
Connecting the printer . . . . . . . . . . . . . . . . . . . . . . . . . . . . . . . . . . . . . . . . . . . . . . . . . . . . 13
Installing the printer driver . . . . . . . . . . . . . . . . . . . . . . . . . . . . . . . . . . . . . . . . . . . . . . . . 14
High-Capacity Feeder . . . . . . . . . . . . . . . . . . . . . . . . . . . . . . . . . . . . . . . .15
the Setup and Quick Reference Guide that ships with your printer.
You can find a PDF file of the Setup and Quick Reference Guide on the
Interactive Documentation CD-ROM.
Hard Drive . . . . . . . . . . . . . . . . . . . . . . . . . . . . . . . . . . . . . . . . . . . . . . . . . .16
Phaser 6200B to Phaser 6200N Upgrade Kit . . . . . . . . . . . . . . . . . . . . . 18
Phaser 6200N to Phaser 6200DP Upgrade Kit . . . . . . . . . . . . . . . . . . . . . 20
Memory . . . . . . . . . . . . . . . . . . . . . . . . . . . . . . . . . . . . . . . . . . . . . . . . . . . .21
Connection Setup . . . . . . . . . . . . . . . . . . . . . . . . . . . . . . . . . . . . . . . . . . . . 22
Moving . . . . . . . . . . . . . . . . . . . . . . . . . . . . . . . . . . . . . . . . . . . . . . . . . . . . .23
Supplies
For a complete list of supplies and accessories for your Phaser® 6200 Color Laser Printer, print the
Support Guide on the Interactive Documentation CD-ROM.
Copyright © 2002 Xerox Corporation. All Rights Reserved. i
Page 4
Setting up the Printer
This section covers the basic steps to set up the printer:
■ Unpacking the printer — see page 1.
■ Removing the packing tape — see page 4.
■ Loading paper in the tray — see page 6.
■ Preparing the toner cartridges — see page 9.
■ Installing the imaging unit — see page 10.
■ Connecting the printer — see page 13.
■ Installing the printer driver — see page 14.
Instructional videos for setting up the printer and installing upgrades are available on the
Interactive Documentation CD-ROM or the Xerox web site at:
www.xerox.com/officeprinting/6200support/
You can also refer to the printed Setup and Quick Reference Guide that comes with the printer.
Phaser® 6200 Color Laser Printer
Unpacking the printer
1. If you plan to use a High-Capacity Feeder, set it up first. Refer to the High-Capacity Feeder
section of this Setup Guide or the instruction sheet that comes with the High-Capacity Feeder.
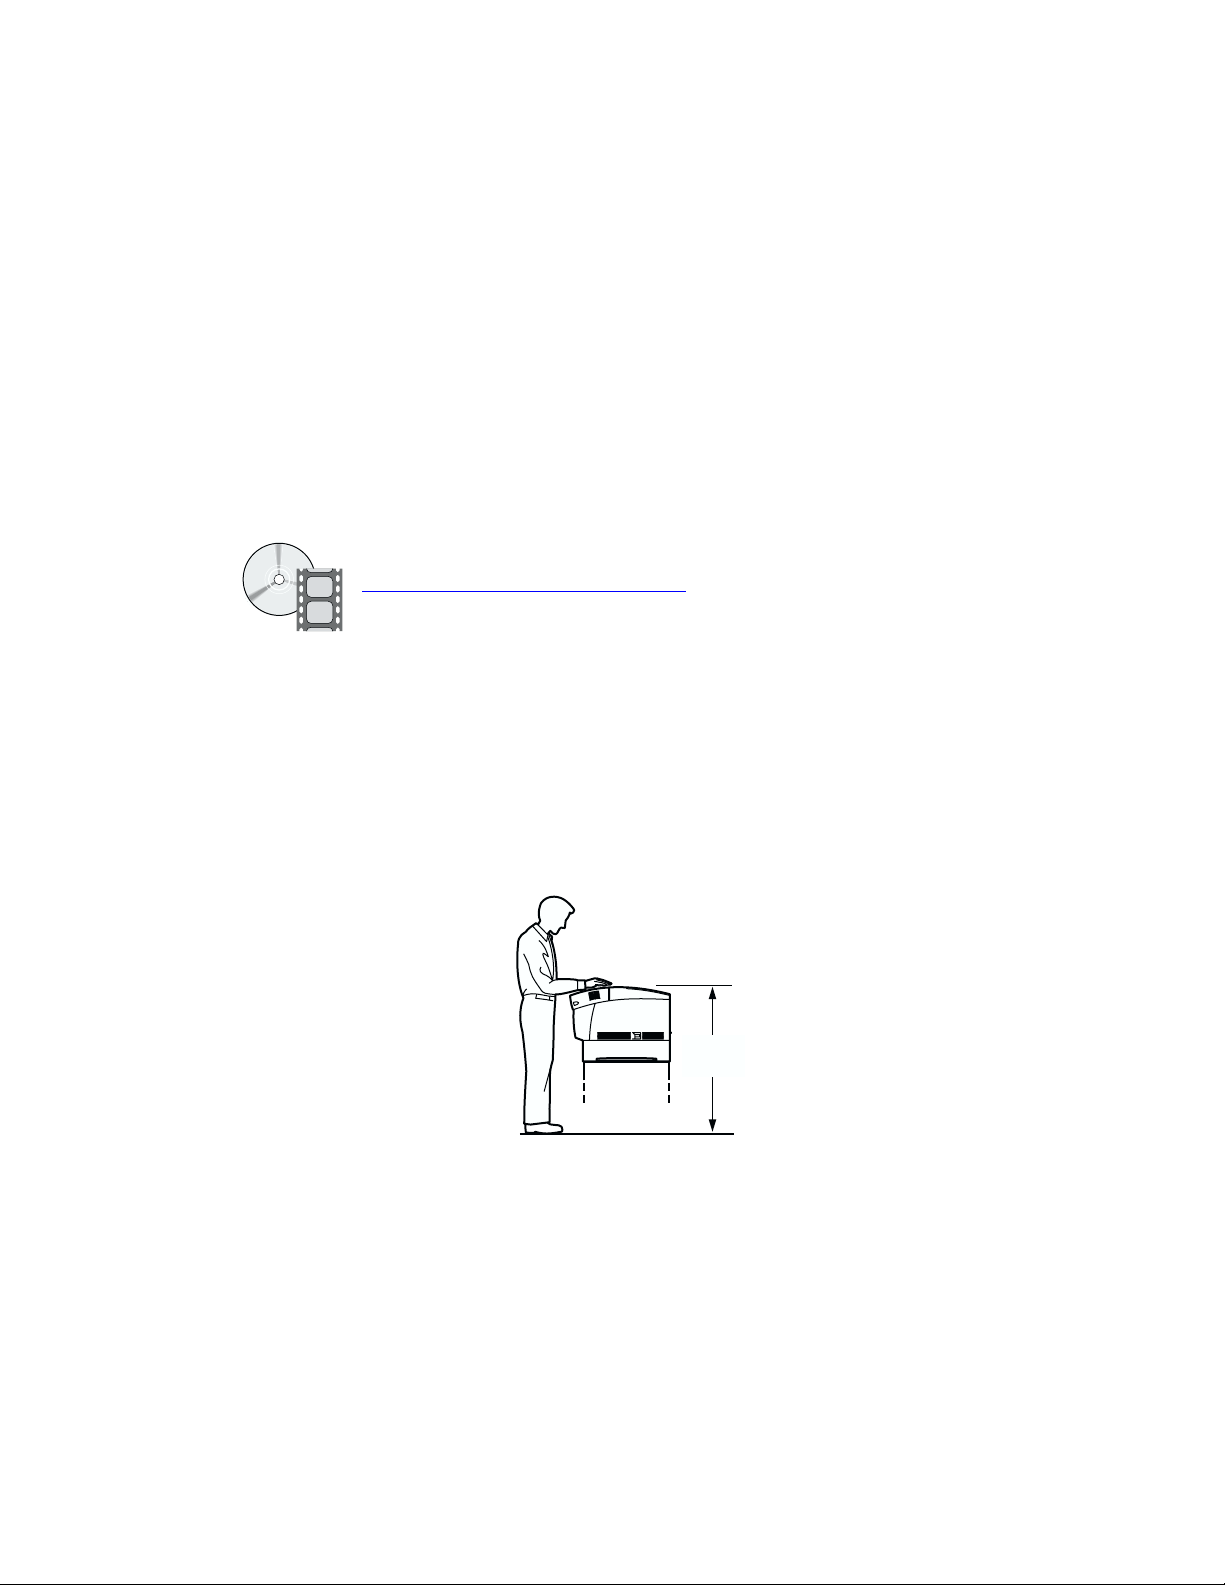
If you won’t be using a High-Capacity Feeder, plan to locate the printer on a sturdy table or
counter. The ideal height for the top of the printer is shown in the following illustration.
<
100 cm
(39 in.)
Copyright © 2002 Xerox Corporation. All Rights Reserved. 1
Page 5
Setting up the Printer
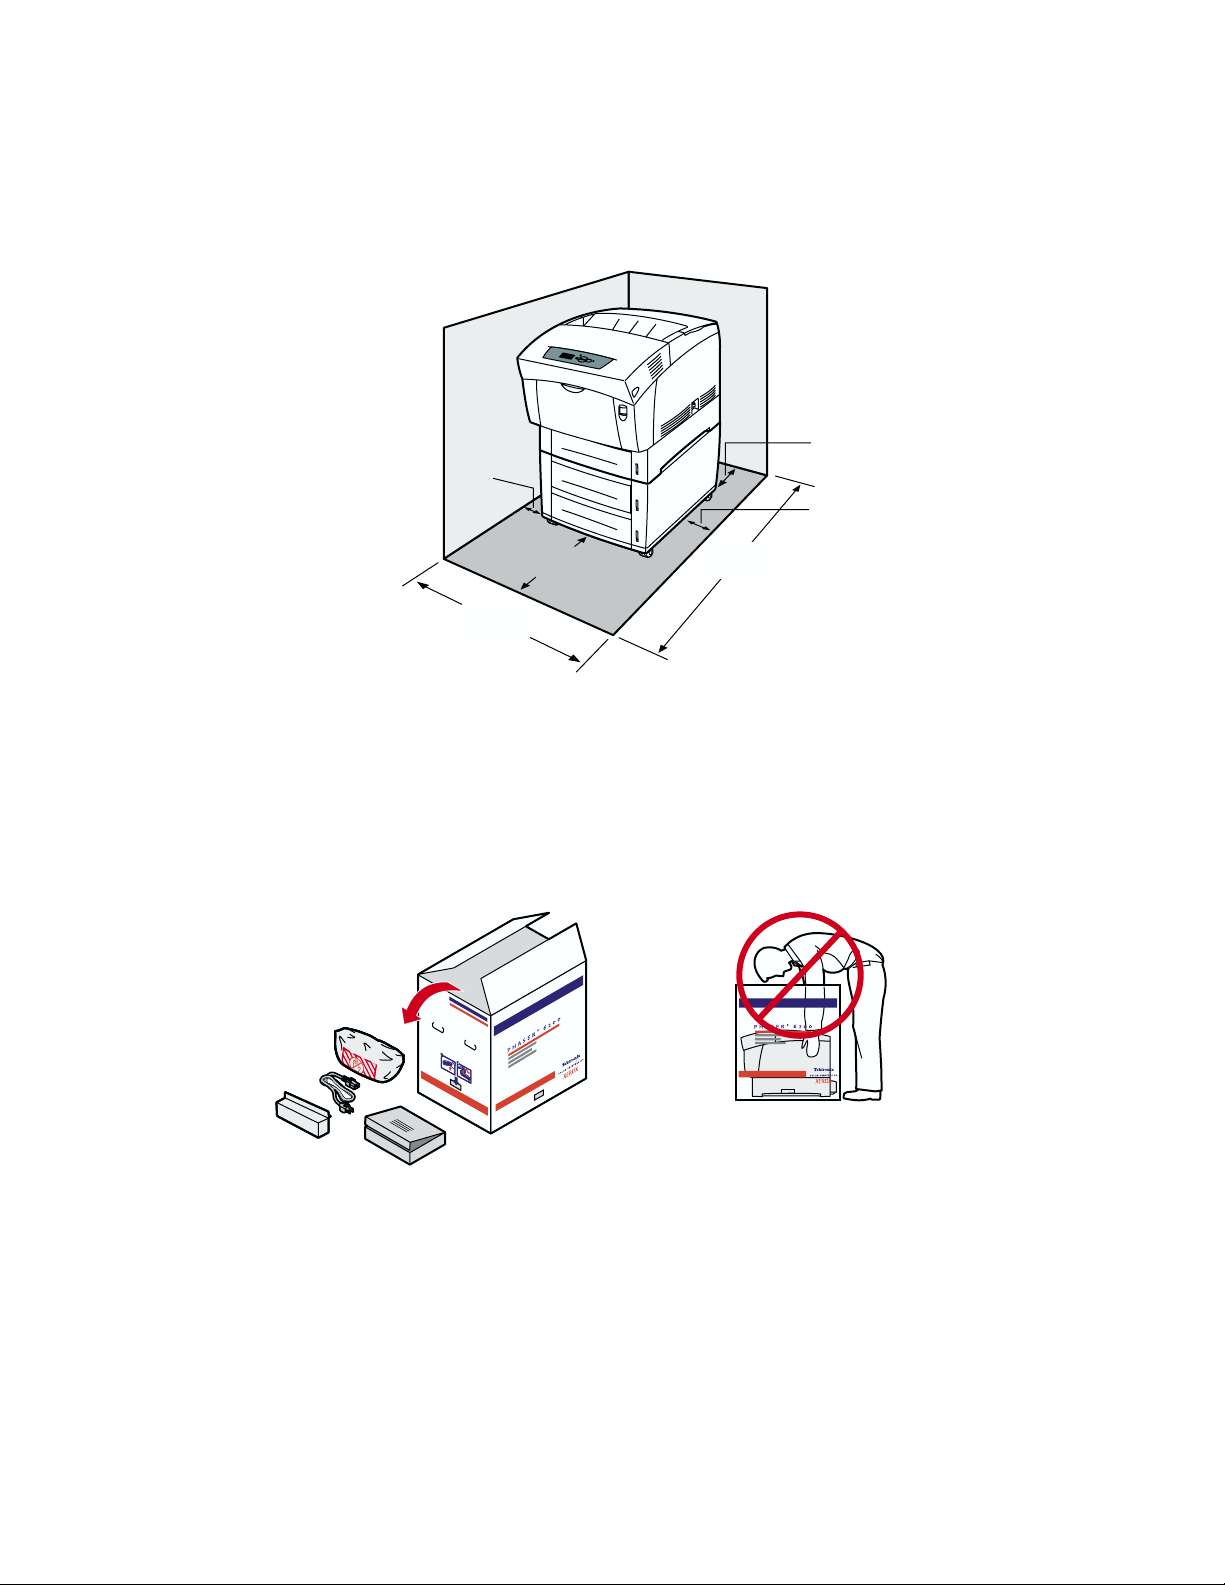
2. Decide where to place the printer, considering the minimum clearance requirements shown in the
following illustration. Place the printer in an area where there is adequate space for ventilation,
operation and servicing. For user safety considerations, refer to the User Safety Summary section
of the Support Guide on the Interactive Documentation CD-ROM.
20 cm
(8 in.)
10 cm
(4 in.)
74 cm
(29 in.)
60 cm
(24 in.)
144 cm
(57 in.)
15 cm
(6 in.)
Caution
Do not block or cover the slots and openings on the printer; without adequate ventilation, the
printer may overheat.
3. Open the top of the box and remove the power cord, tray cover, imaging unit, and box labeled
Read Me First.
Open Me First!
Caution
Do not attempt to lift the printer out through the top of the box.
Phaser® 6200 Color Laser Printer 2
Page 6

Setting up the Printer
4. Remove the tabs from all four sides of the printer box, then lift the box off the printer.
5. Using two people, lift the printer using the hand holds on the side of the printer, as shown in the
following illustration. Place the printer on the High-Capacity Feeder or on a stable surface.
36 kg
80 lbs.
Note
The printer ships with the power switch in the ON position. Do not connect the power cord or
plug it into an electrical outlet until instructed to do so.
Phaser® 6200 Color Laser Printer 3
Page 7
Setting up the Printer
Removing the packing tape
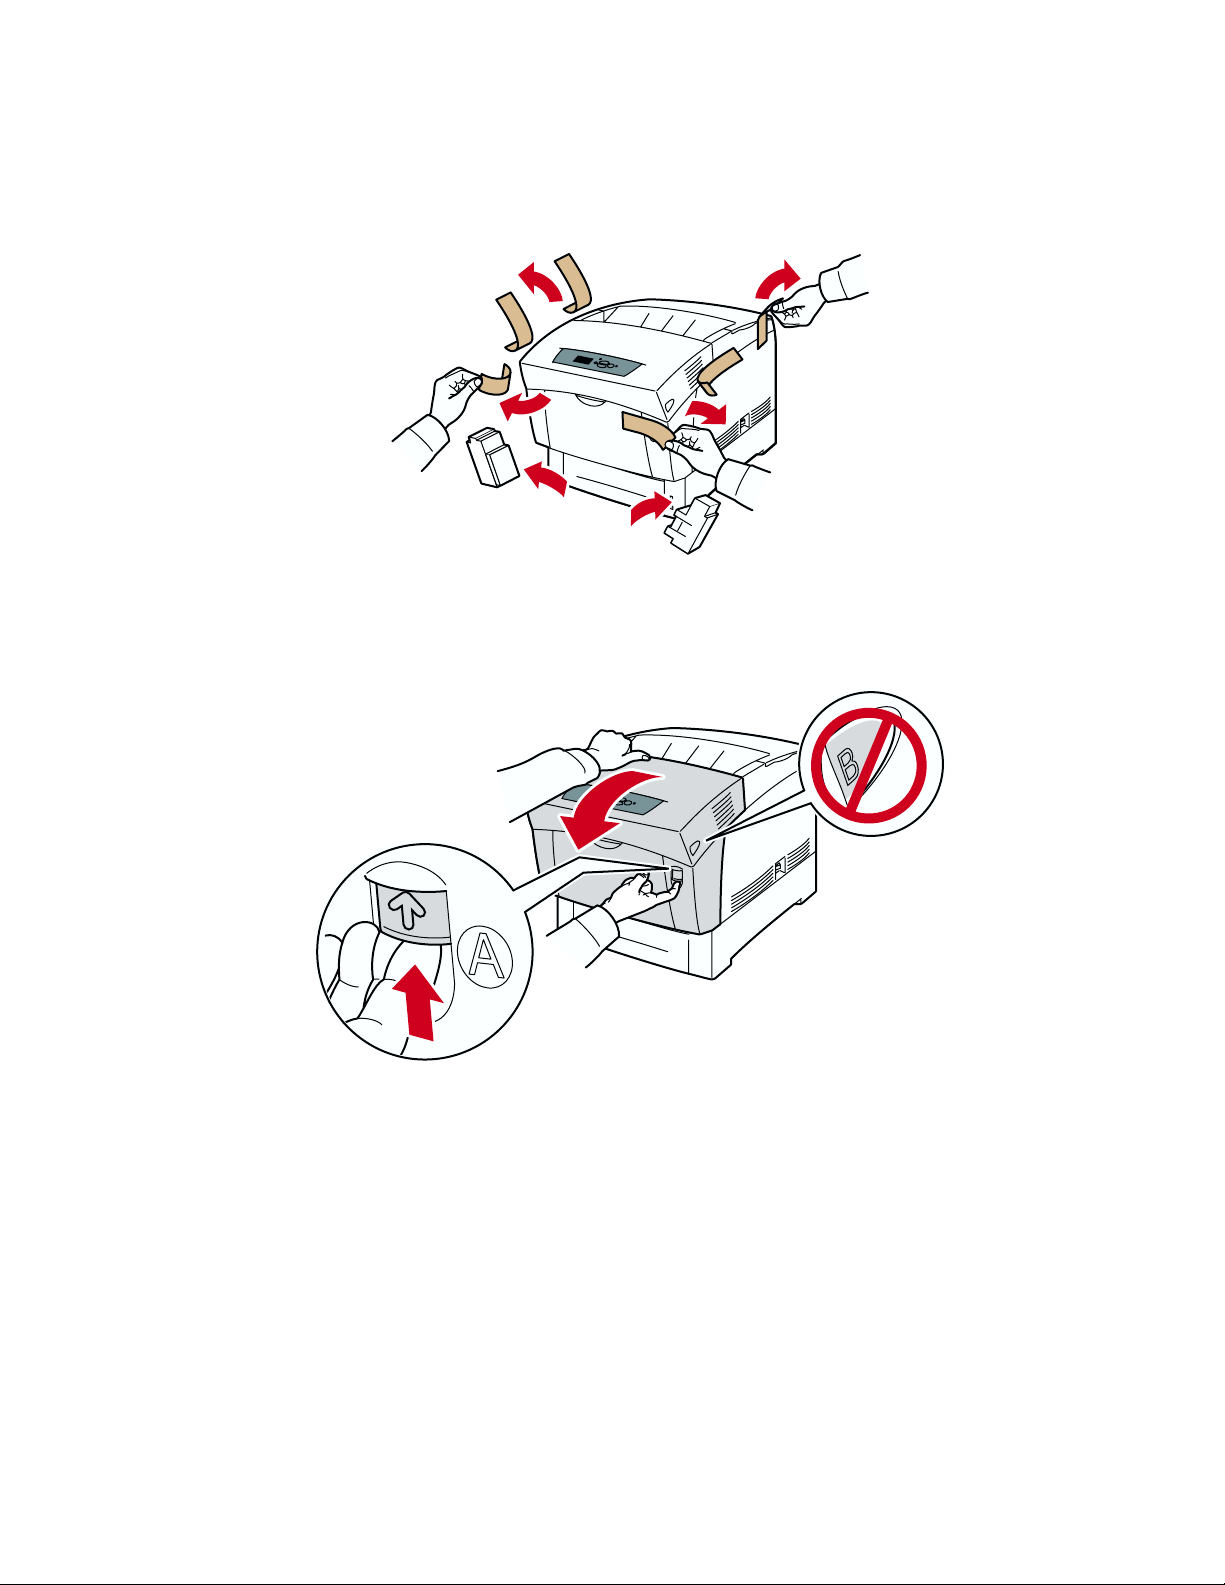
1. Remove the packing tape from the front, left side, and right side of the printer.
2. Remove the styrofoam blocks from the bottom corners of the printer.
3. Use the latch on the front of the printer to open Front Door A.
Phaser® 6200 Color Laser Printer 4
Page 8

4. Remove the packing tape from the inside of the printer.
5. Close the front door.
Setting up the Printer
Phaser® 6200 Color Laser Printer 5
Page 9

Setting up the Printer
Loading paper in the tray
For a list of the acceptable papers, transparencies, envelopes, and labels that can be used in each tray,
refer to the Supported Papers section of the Trays and Paper Guide on the Interactive Documentation
CD-ROM.
1. Pull the tray completely out of the printer, then remove the cardboard spacers from the sides of the
tray.
2. Adjust the guides:
■ Push the width guides outward.
■ Tilt the back guide forward, slide the guide, and insert the pins on the bottom of the guide
into the holes in the tray corresponding to the paper size you are loading.
Phaser® 6200 Color Laser Printer 6
Page 10

3. Fan the paper to release sheets that are stuck together.
Caution
DO NOT load card stock, glossy coated paper, photo paper, envelopes, labels, business
cards, greeting cards, CD/DVD labels, and CD/DVD inserts in Trays 1-3; use the
Multi-Purpose Tray instead. Refer to the Trays and Paper Guide on the Interactive
Documentation CD-ROM for more information about using the Multi-Purpose Tray.
Setting up the Printer
4. Insert the stack of paper into the tray. Place the paper under the front corner tabs and under the tabs
on the back guide.
■ For one-sided prints, place the side to be printed faceup with the top of the page at the front
of the tray.
■ For two-sided prints, place the side to be printed with the odd-numbered pages facedown
with the top of the page at the back of the tray. If using paper with pre-punched holes, place
the holes toward the right side of the tray.
Note
Observe the fill lines on the side of the tray. Do not load paper above the paper fill line (1),
because it may cause a jam. Do not load transparencies above the transparency fill line (2).
MAX
1
MAX
2
Phaser® 6200 Color Laser Printer 7
Page 11
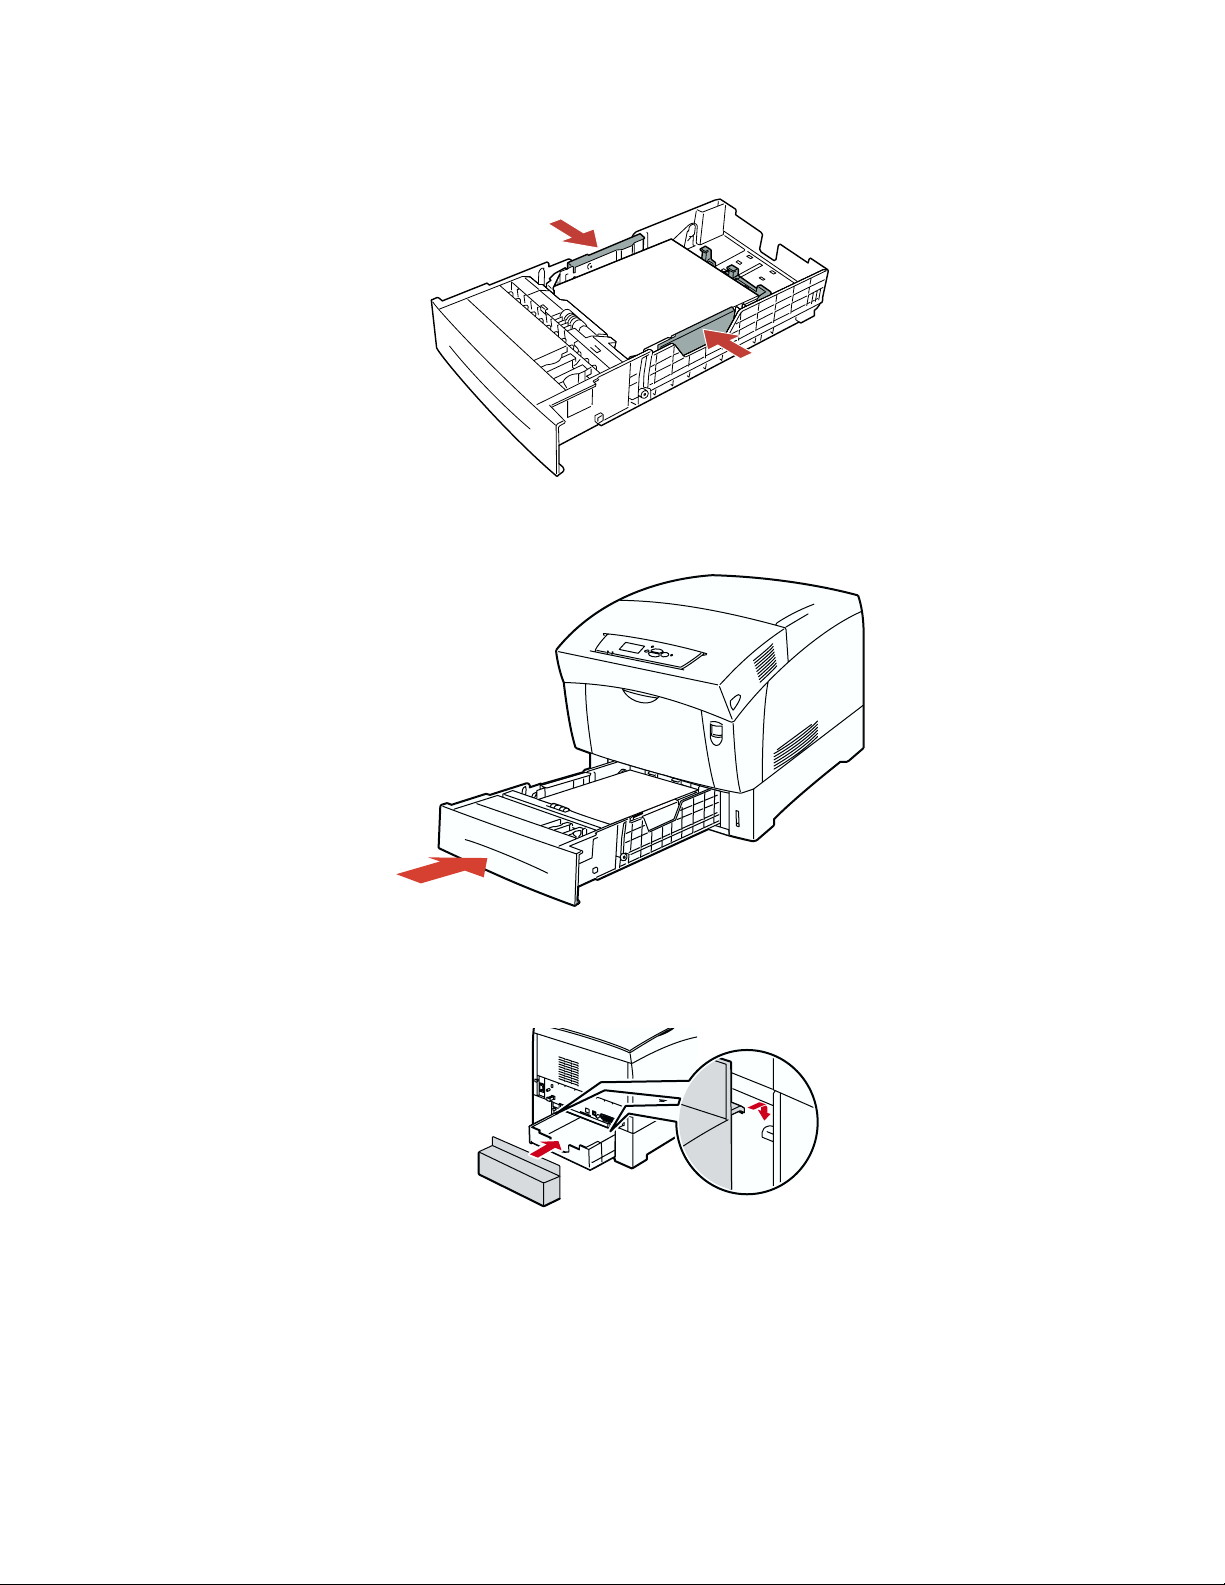
5. If necessary, push the width guides inward to match the size of the paper.
6. Insert the tray and push it completely into the printer.
Setting up the Printer
7. Install the tray cover on the back of the printer. Be sure to slip the hooks on the tray cover over the
tabs in the back of the printer.
Phaser® 6200 Color Laser Printer 8
Page 12

Preparing the toner cartridges
1. Remove the top cover and the packing sheet.
Setting up the Printer
2. Pull upward to remove the ribbons from the left side of the four toner cartridges.
4x
3. Reinstall the top cover.
Phaser® 6200 Color Laser Printer 9
Page 13

Installing the imaging unit
1. Use the latch on the front of the printer to open Front Door A.
Setting up the Printer
2. Press up on the tab and lift Top Door C.
3. Open the top of the bag containing the imaging unit, then remove the imaging unit from the bag.
Phaser® 6200 Color Laser Printer 10
Page 14

Setting up the Printer
4. Pull the four ribbons completely out of the imaging unit. There is a circle printed on the end of
each ribbon.
4x
5. Remove the shipping block from the imaging unit. Discard the shipping block.
6. Use one hand to hold the imaging unit by the handle. Use your other hand to support and guide the
imaging unit into the printer. Make sure that the rods on both sides of the imaging unit align with
the slots indicated by the arrows on the printer.
4.5 kg
10 lbs.
Phaser® 6200 Color Laser Printer 11
Page 15
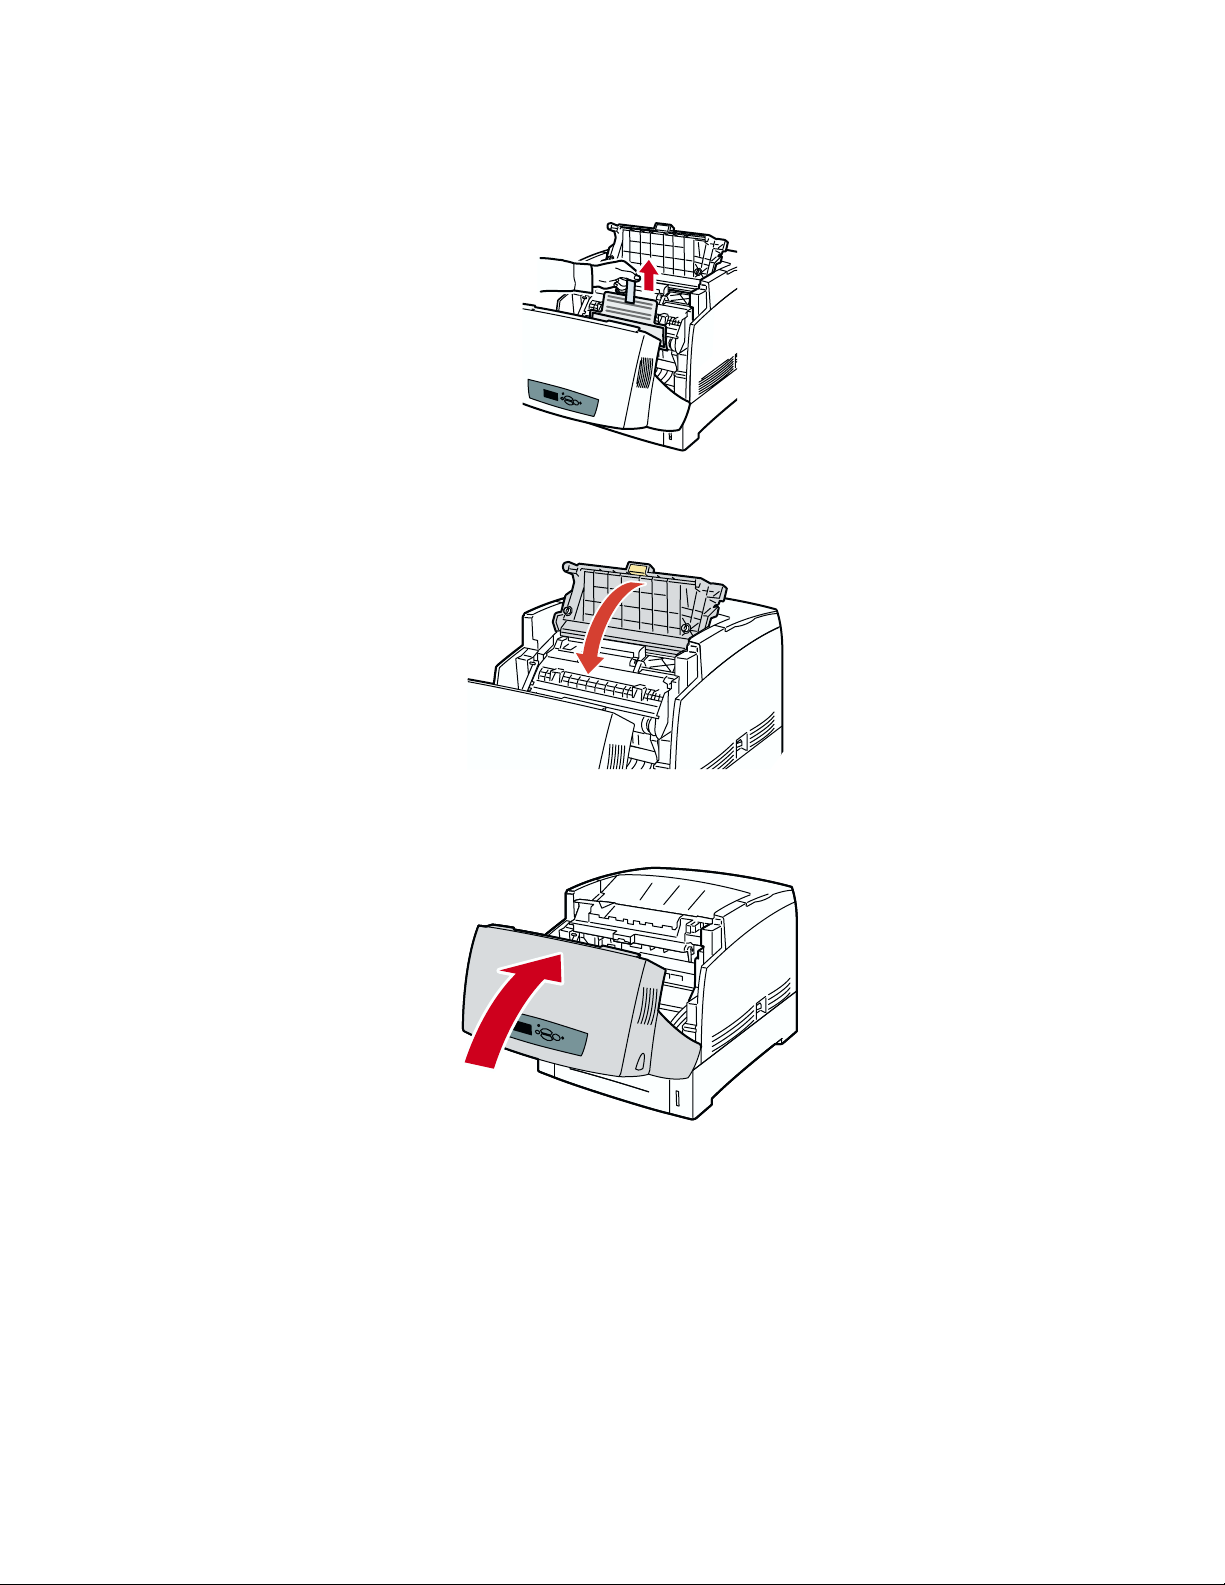
7. Pull up and remove the protective sheet from the front of the imaging unit.
8. Slowly and firmly close Top Door C until it latches.
Setting up the Printer
9. Close the front door.
Phaser® 6200 Color Laser Printer 12
Page 16
Setting up the Printer
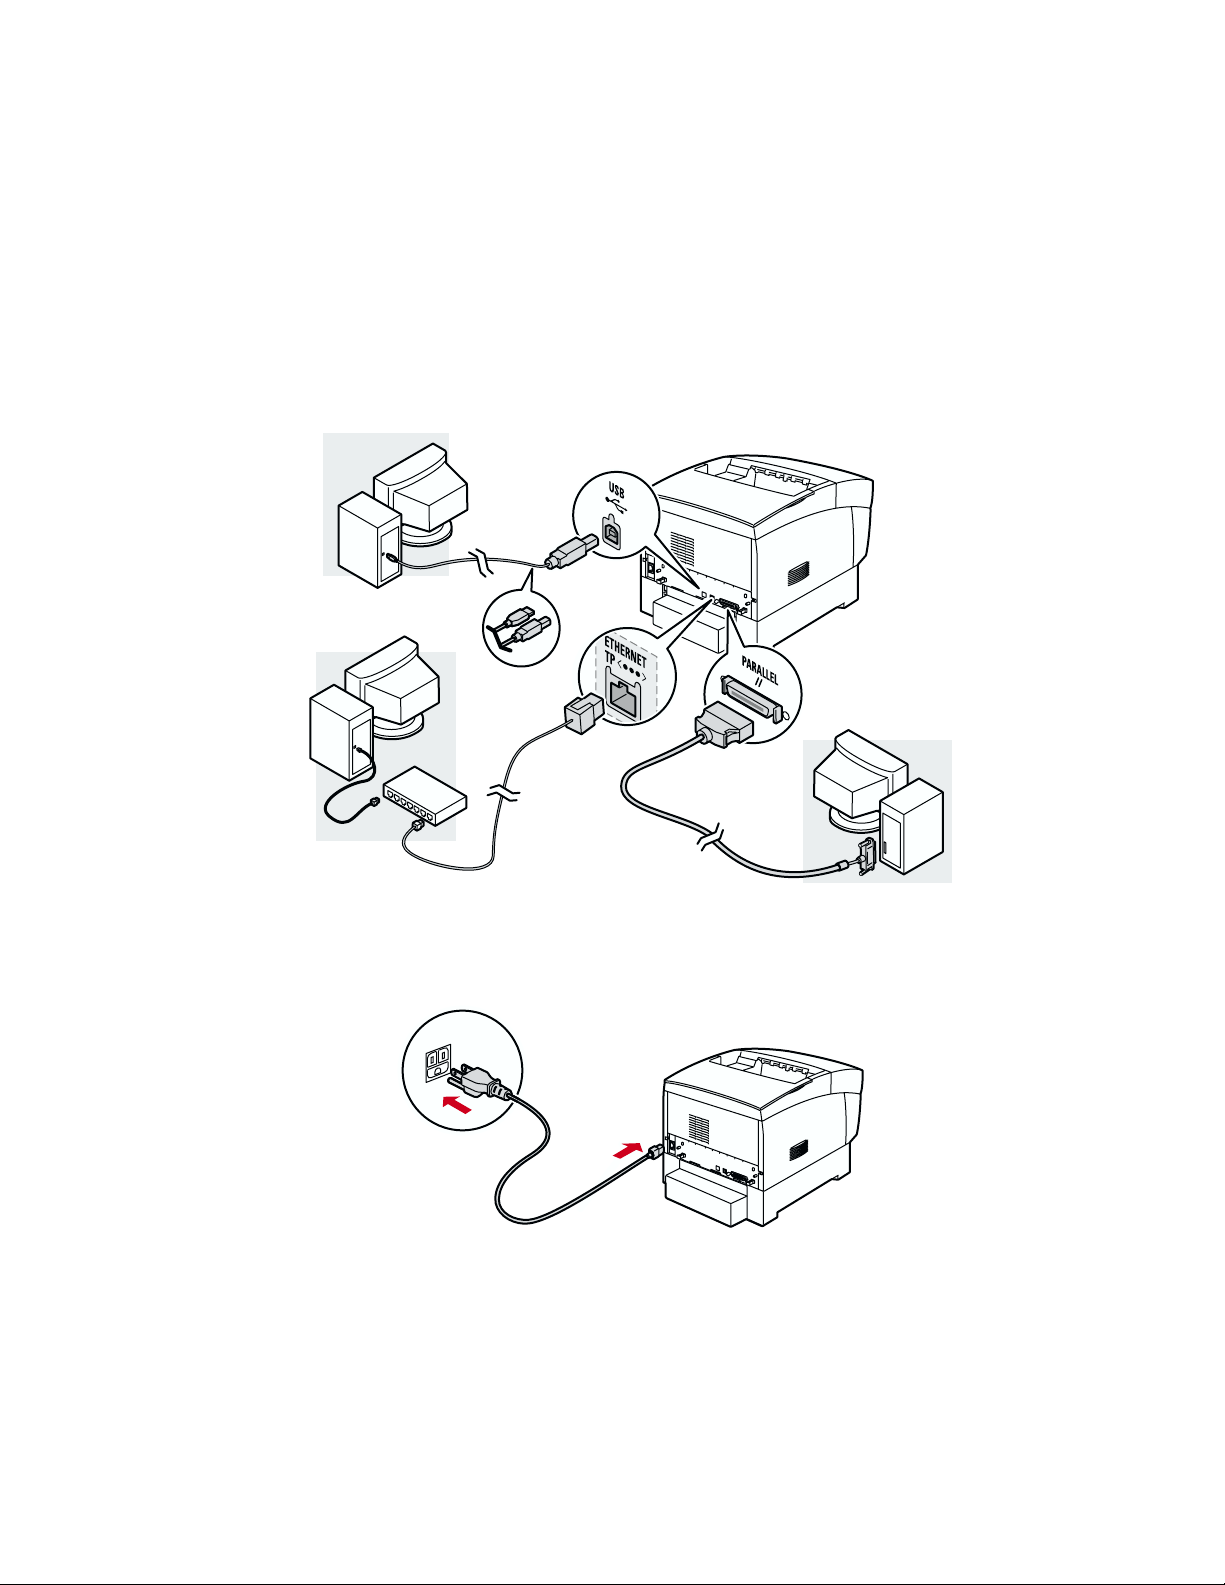
Connecting the printer
The printer can be connected to your computer in one of three ways:
■ Parallel
■ USB
■ Ethernet (not available on the Phaser 6200B model)
1. Connect the printer to your computer using the appropriate cable (not supplied with the printer).
Connect the cable to the proper slot on the back of the printer.
2. Connect the power cord (supplied with the printer) to the back of the printer, then plug the power
cord into an AC outlet.
Phaser® 6200 Color Laser Printer 13
Page 17
Setting up the Printer
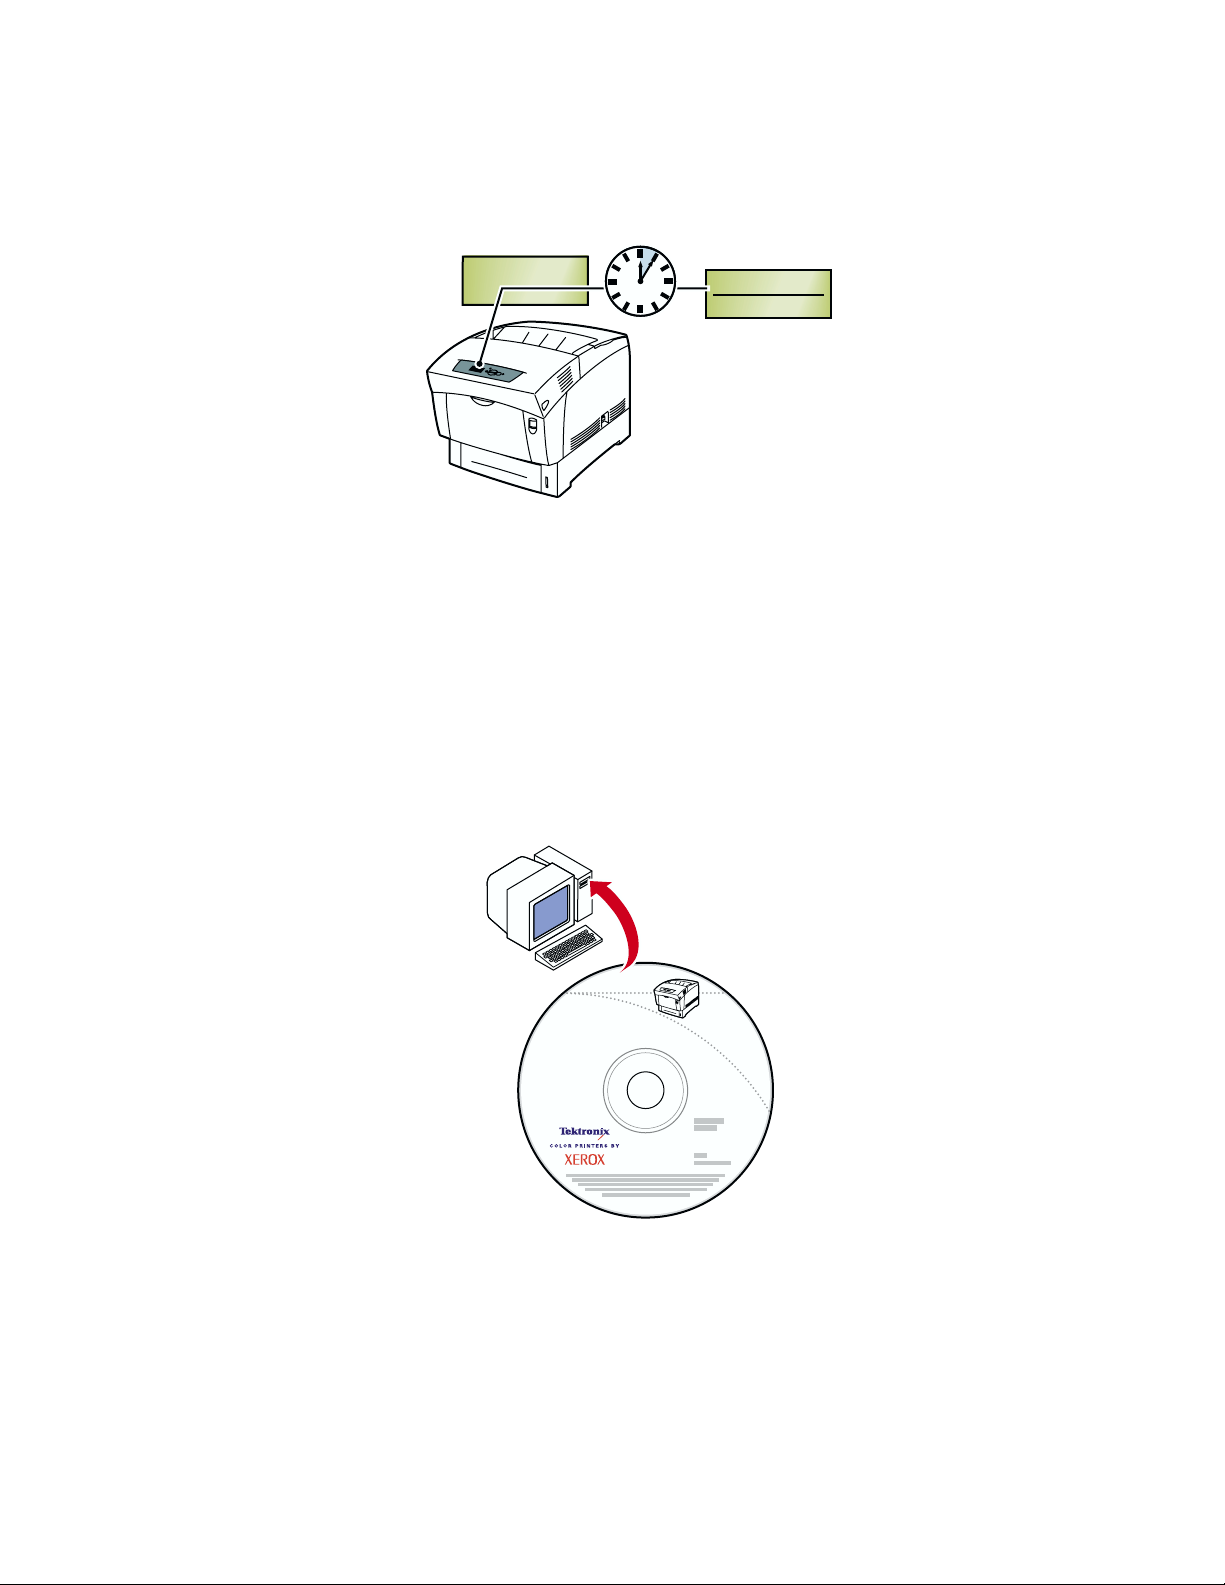
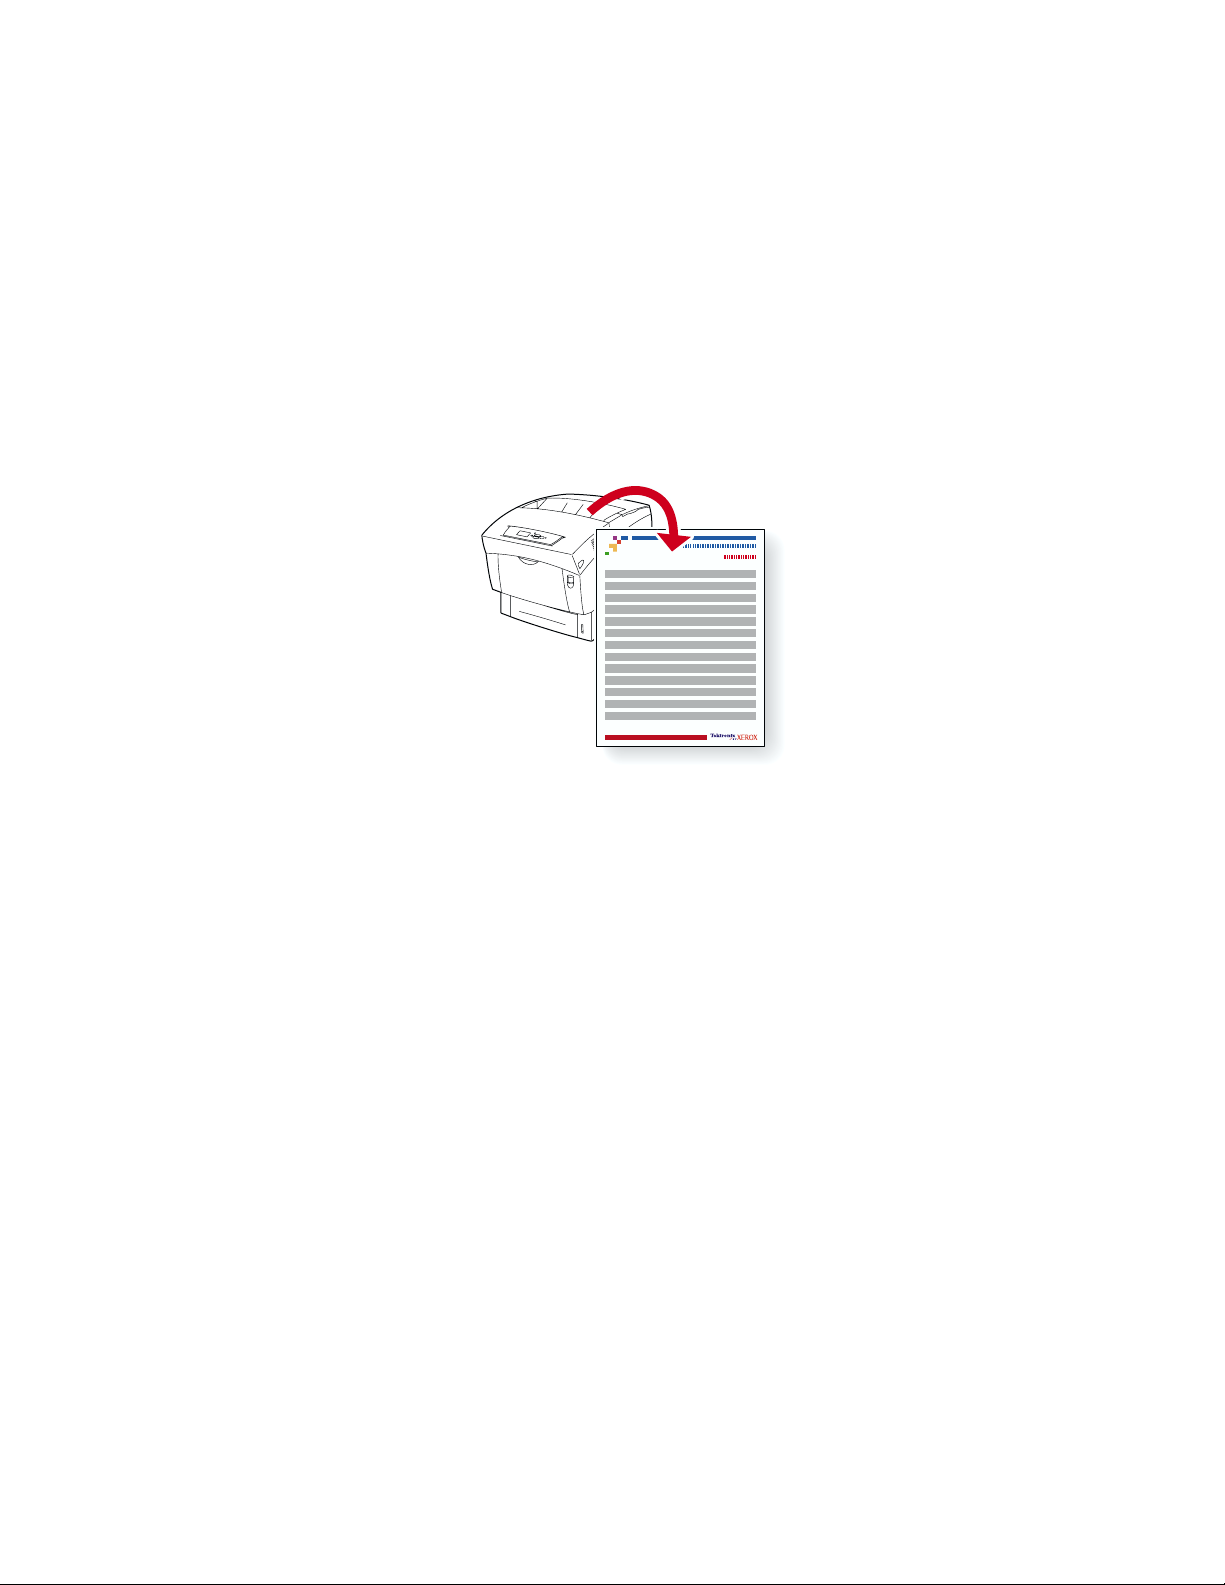
Once the printer has been plugged in and has warmed up, it prints the startup pages. Review these
pages for important information about your printer.
0:05:00
FIRST TIME WARM UP TAKES
ABOUT 5 MINUTES
PHASER 6200
READY TO PRINT
Menus
Note
When you turn the printer on for the first time, it takes approximately 5 minutes to warm up.
Installing the printer driver
1. Install the printer driver on your computer by inserting the Printer Installer and Utilities
CD-ROM in your computer’s CD-ROM drive.
2. Follow the installation instructions.
®
6200
Phaser
Color laser printer
Printer
Installer and Utilities
CD-ROM
Phaser® 6200 Color Laser Printer 14
Page 18

High-Capacity Feeder
Phaser® 6200 Color Laser Printer
1
2
4
4.2
1.1
1.2
1.3
3
5
4.1
35 kg
77 lbs
6
Copyright © 2002 Xerox Corporation. All Rights Reserved. 15
Page 19

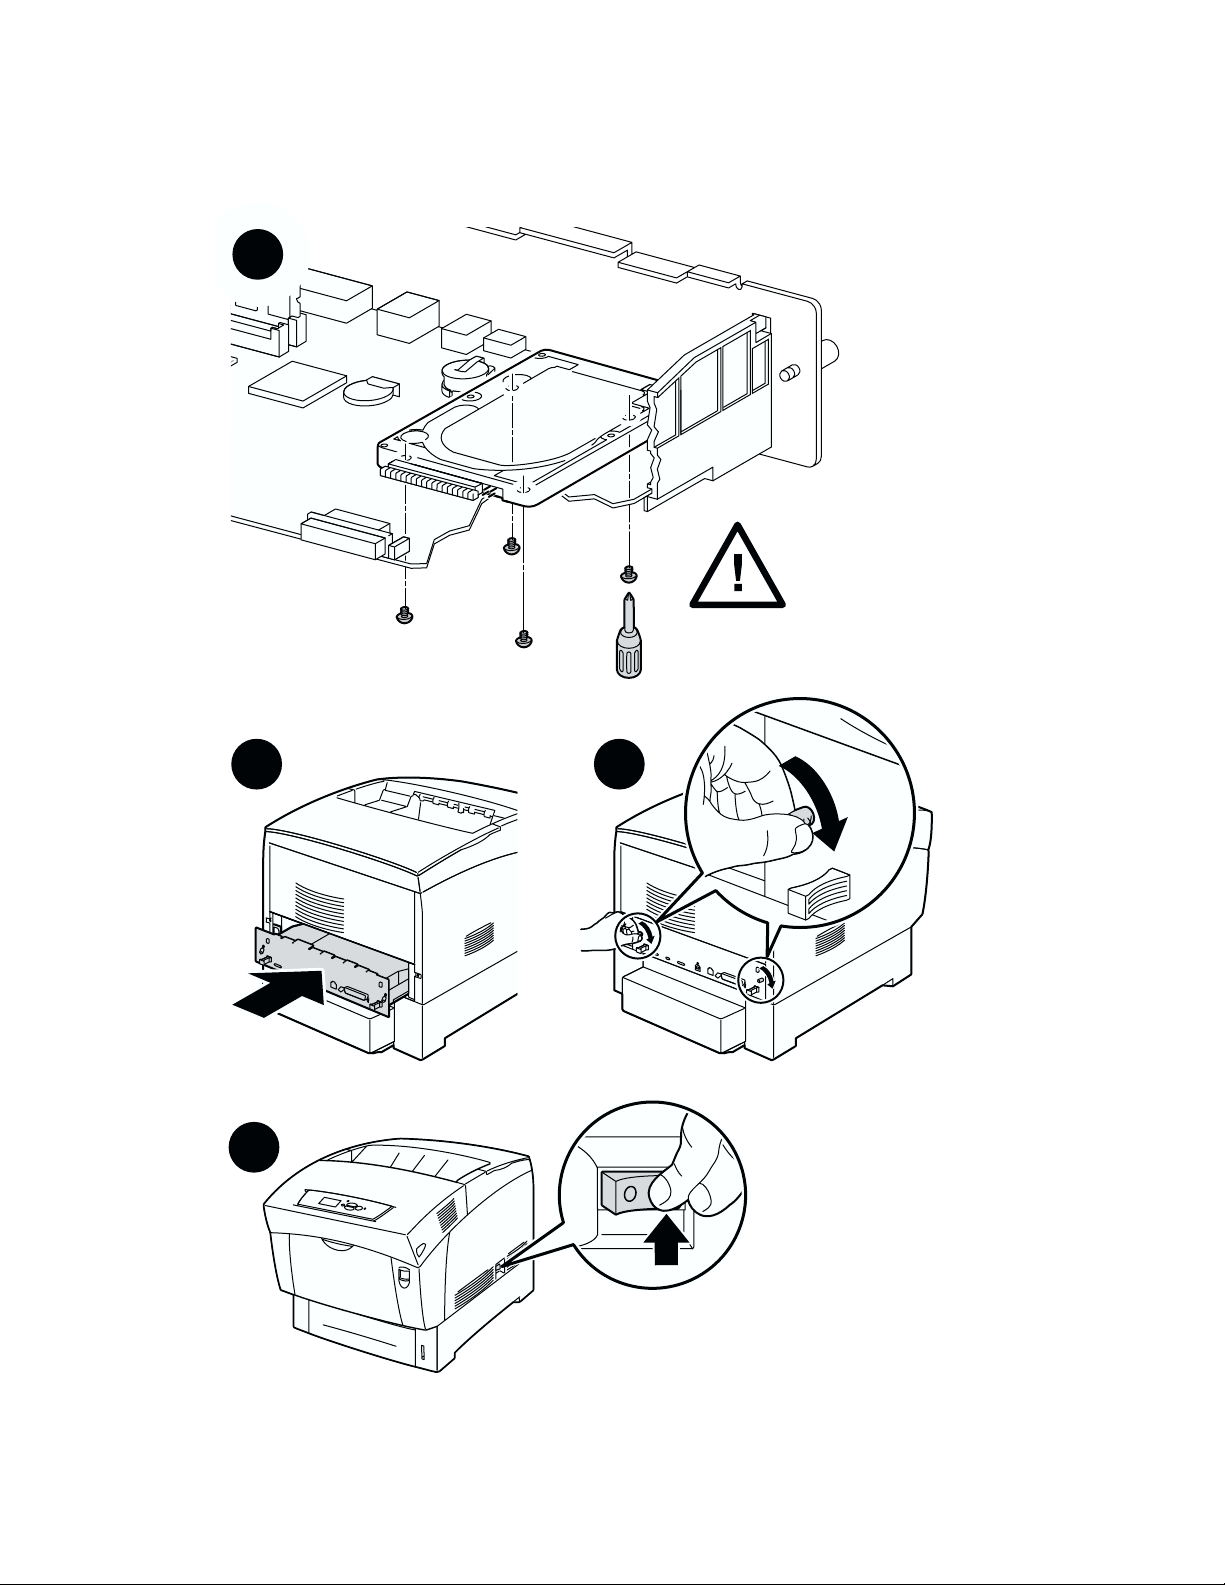
Hard Drive
Phaser® 6200 Color Laser Printer
1
3
2
4
4.1
4.2
5
Copyright © 2002 Xerox Corporation. All Rights Reserved. 16
6
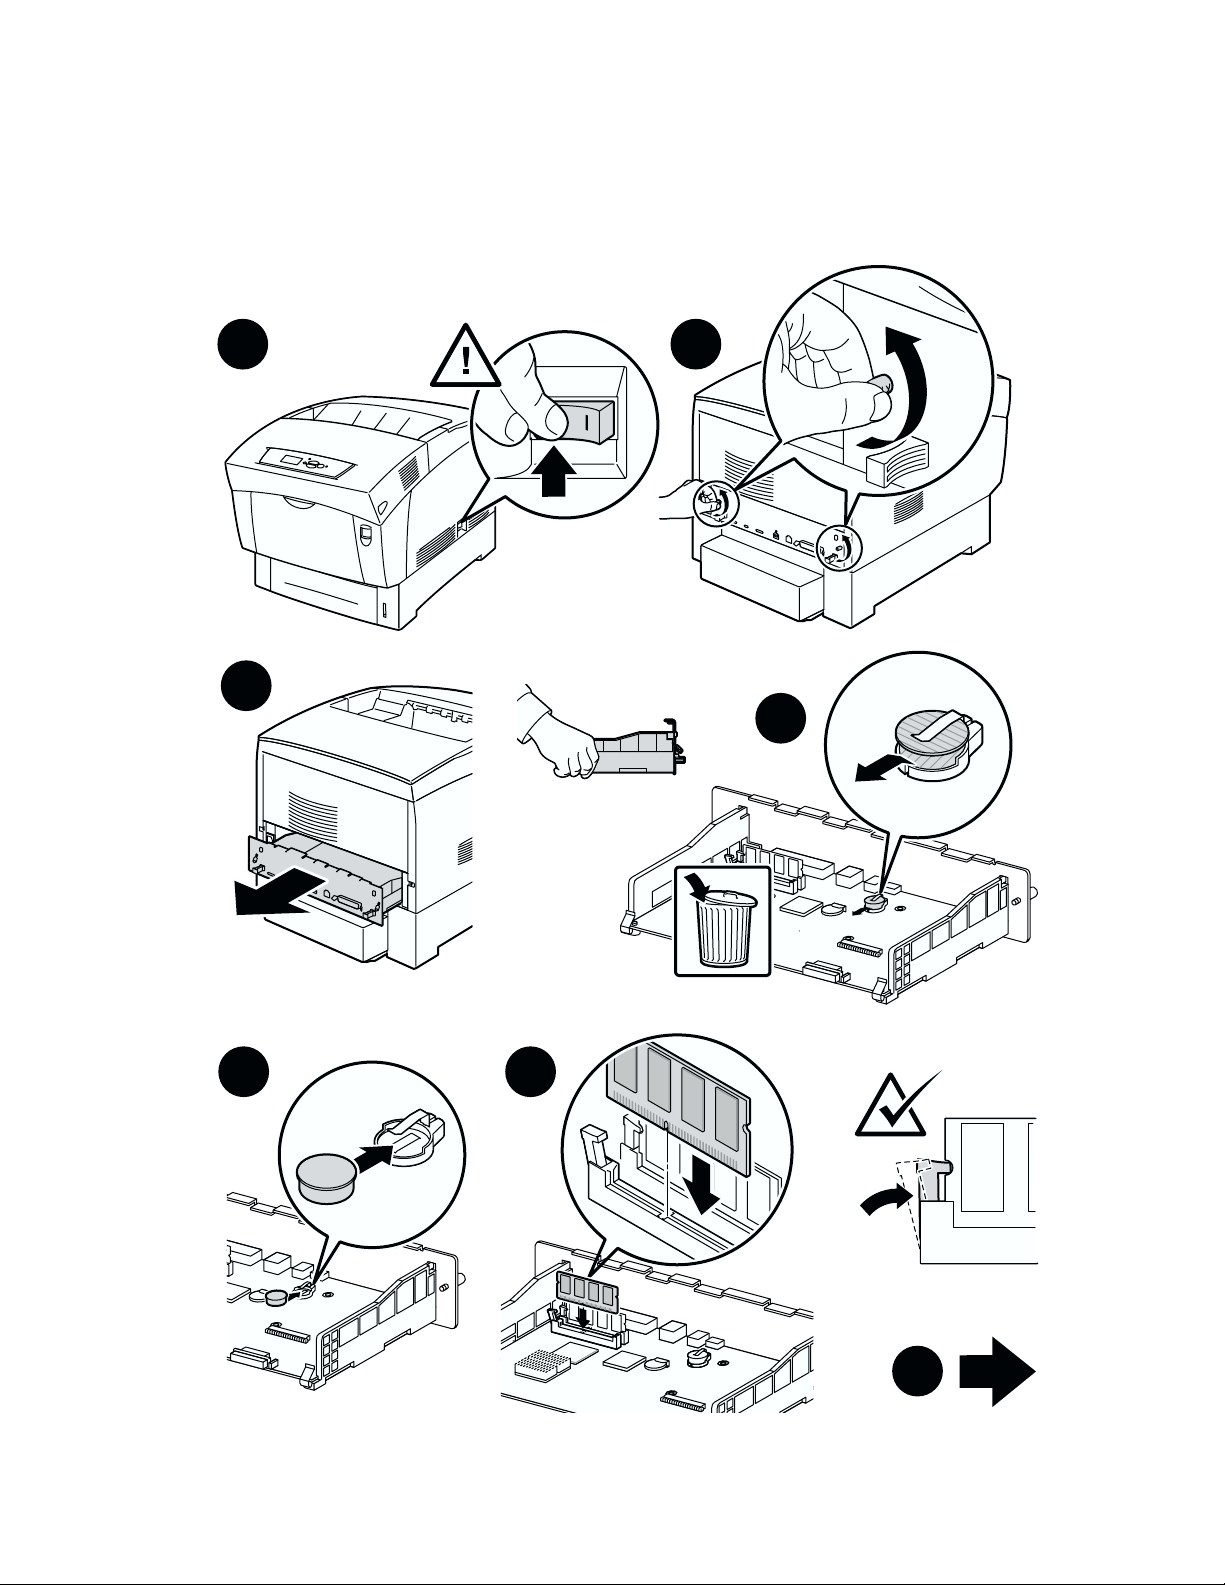
Page 20
Hard Drive
6
7
9
8
Phaser® 6200 Color Laser Printer 17
Page 21
Phaser 6200B to Phaser 6200N Upgrade Kit
Phaser 6200B to Phaser 6200N
Upgrade Kit
1
3
2
4
5
6
8
Phaser® 6200 Color Laser Printer 18
Page 22

Phaser 6200B to Phaser 6200N Upgrade Kit
98
10
11
Phaser® 6200 Color Laser Printer 19
Page 23

Phaser 6200N to Phaser 6200DP Upgrade Kit
Phaser 6200N to Phaser 6200DP
Upgrade Kit
1
2 3
4
5
6
Phaser® 6200 Color Laser Printer 20
7 8
Page 24

Memory
Phaser® 6200 Color Laser Printer
1
3
2
4
7 86
Copyright © 2002 Xerox Corporation. All Rights Reserved. 21
Page 25
Phaser® 6200 Color Laser Printer
Connection Setup
You can connect the printer to your computer in one of the following ways.
■ Parallel
■ USB
■ Network
For information about connecting to a network, view the the Connection Setup printable page, which is
stored in your printer along with other helpful printable pages. The following pages show the
Connection Setup printable page.
6200-51
All the printable pages have this format, with color bars at the top and at the bottom of the page. Print
these pages at the printer’s front panel.
For detailed information about connecting to a network, refer to the Networking Guide on the
Interactive Documentation CD-ROM.
Accessing printable pages
Access these pages from the Printable Pages Menu:
1. At the front panel, scroll to the
Up Arrow key and press the OK key.
2. Scroll to the desired printable page (such as
Up Arrow key and press the OK key.
Printable Pages Menu using the Down Arrow or
Connection Setup) using the Down Arrow or
Menu Map
For a complete list of printable pages, print the Menu Map:
1. Select
2. Select
Menus on the front panel and press the OK key.
Print Menu Map and press the OK key.
Copyright © 2002 Xerox Corporation. All Rights Reserved. 22
Page 26

PHASER® 6200 COLOR PRINTER
Connection Setup
USB Connection
The USB connection requires a standard A/B USB cable. The "A" end of the cable connects to the computer's USB port;
the "B" end connects to the printer's USB port.
Windows 98 or later
Connect the USB cable to the PC and follow the Add New Hardware Wizard to create the USB port. Follow the Add
Printer Wizard to install the printer driver from your printer's software CD-ROM. For more details, refer to the infoSMART
Knowledge Base at www.xerox.com/officeprinting/infoSMART, Document # 18215.
Macintosh (requires OS 9.0.4 or later)
A USB-connected printer will not show in the Chooser. Install the printer driver from your printer's software CD-ROM. Use
the Desktop Printer Utility (version 1.2 or later) to create a desktop USB printer. The utility is located in the PhaserTools
folder created during the software install. For more details, refer to the infoSMART Knowledge Base at
www.xerox.com/officeprinting/infoSMART, Document # 33225.
Parallel Connection
The printer's parallel connection uses a parallel cable to connect your computer's parallel port to the printer's parallel port.
Install the printer driver from your printer's software CD-ROM. Select the appropriate LPT parallel port.
Ethernet Connection (recommended)
Network
Use an Ethernet connection with two twisted-pair (Category 5/RJ-45) cables and an Ethernet hub. Connect the computer
to the hub with one cable and connect the printer to the hub with the second cable. Use any port on the hub except the
uplink port. TCP/IP and EtherTalk are the most common protocols used with Ethernet cables. To print using TCP/IP, each
computer and the printer requires a unique IP address. See Setting IP Addresses.
Standalone Use
Use a crossover cable to connect the printer directly to the computer via the Ethernet port.
Setting an IP address
If your computer is on a large network, contact your network administrator for the appropriate TCP/IP addresses and
additional configurations.
If you are creating your own small Local Area Network, or connecting the printer directly to your computer over Ethernet,
use this basic procedure. The printer and computer(s) should have unique IP addresses. It is important that the addresses
are similar, but not the same. For example, your printer can have the address 192.168.1.2 while your computer has the
address 192.168.1.3. Another device can have the address 192.168.1.4, and so on.
For more details, refer to the infoSMART Knowledge Base at www.xerox.com/officeprinting/infoSMART,
Document # 18545.
Page 1 of 3
Page 27

Note: If you use the installer from your printer's software CD-ROM, the IP Address is set automatically.
To manually set the printer's IP address:
1. At the printer's front panel, select Menus and press OK.
2. Scroll to the Connection Setup Menu and press OK.
3. Scroll to TCP/IP Address Menu and press OK.
4. Scroll to DCHP/BootP and press OK until it displays OFF.
5. Scroll to TCP/IP Address and press OK.
6. Enter an IP address like the example above.
7. Scroll to TCP/IP Network Mask and press OK.
8. Enter a network (subnet) address. (If you use the IP address in the above example,
set a Subnet Mask of 255.255.255.0)
9. Scroll to TCP/IP Gateway and press OK.
10. Enter a Gateway (router) address. (If you use the IP address in the above example,
set a Gateway address of 192.168.1.1)
11. Scroll to Exit and press OK.
To set a static IP address on your computer:
Windows 95/98/Me
1. From the Start menu, right-click Network Neighborhood and select Properties.
2. On the Configuration tab, select the TCP/IP protocol for your network card, then select Properties.
3. On the IP Address tab, select Specify an IP address. Enter an IP address and Subnet Mask, and click OK.
(If you use the IP address noted above, set a Subnet Mask of 255.255.255.0).
4. Click OK and restart Windows.
Windows 2000/XP
1. From the Start menu, right-click My Network Places and select Properties.
2. Right-click Local Area Connection and select Properties.
3. If you do not have TCP/IP available, you should first click Add and select Protocol. Click Add and select
Internet Protocol TCP/IP.
4. On the General tab, select the TCP/IP protocol for your network card. Click Properties.
5. On the General tab, select Use the following IP address. Enter an IP address and Subnet Mask, and then click
OK. (If you use the IP address in the above example, set a Subnet Mask of 255.255.255.0).
6. Click OK and restart Windows, if prompted.
Windows NT 4.x
1. From the start menu, right-click Network Neighborhood and select Properties.
2. On the Protocols tab, select TCP/IP Protocol and click Properties.
3. On the IP Address tab, select Specify an IP Address. Enter an IP Address and Subnet Mask in the field and
click OK. (If you use the IP address noted above, set a Subnet Mask to 255.255.255.0.)
4. Click OK and restart Windows.
Page 2 of 3
Page 28

Installing the Printer Driver
To download the latest printer drivers, access the Xerox web site at: www.xerox.com/officeprinting/support.
Windows 95/98/Me, Windows 2000/XP, and Windows NT 4.x
Install the printer driver from your printer's software CD-ROM. The software CD-ROM installer automatically installs
and identifies the printer during the installation process.
For more details, refer to the infoSMART Knowledge Base at www.xerox.com/officeprinting/infoSMART, Document
# 9178 for Windows 95/98/Me, Document # 36894 for Windows 2000, and Document # 11338 for Windows NT.
Macintosh
EtherTalk
If you use EtherTalk, Macintosh computers do not require IP addresses.
1. Open the AppleTalk Control Panel.
2. Verify that the Ethernet port is the selected network port.
3. To install the printer driver, double-click the installer on your printer's software CD-ROM.
4. Open the Chooser, select the LaserWriter driver.
5. From the right column of the Chooser, select the printer. Click Create to create the desktop printer.
For more details, refer to the infoSMART Knowledge Base at www.xerox.com/officeprinting/infoSMART,
Document # 2562.
Macintosh OS X
Macintosh OS X supports TCP/IP as the default protocol, as well as AppleTalk. For a TCP/IP installation,
follow the instructions provided to set an IP address in the printer.
1. Open the Print Center Utility.
2. Select the Add Printer... button.
3. Choose the connection type you desire.
For LPR, enter the IP address of the printer that you set previously. The Queue Name field can remain blank if the Use
default queue on server box is checked (by default). Other options are PS, or AUTO. Select the appropriate PPD for
the printer model under the Printer Model pull-down menu.
For AppleTalk, select the appropriate printer from the list that is displayed. The printer should autoconfigure at this point.
Note: You may need to enable AppleTalk via the Network Control Panel. Follow the onscreen instructions provided.
Other Resources
For more information on network setup and troubleshooting, refer to the Networking section of the
Interactive Documentation CD-ROM.
Page 3 of 3
Page 29
Phaser® 6200 Color Laser Printer
Moving
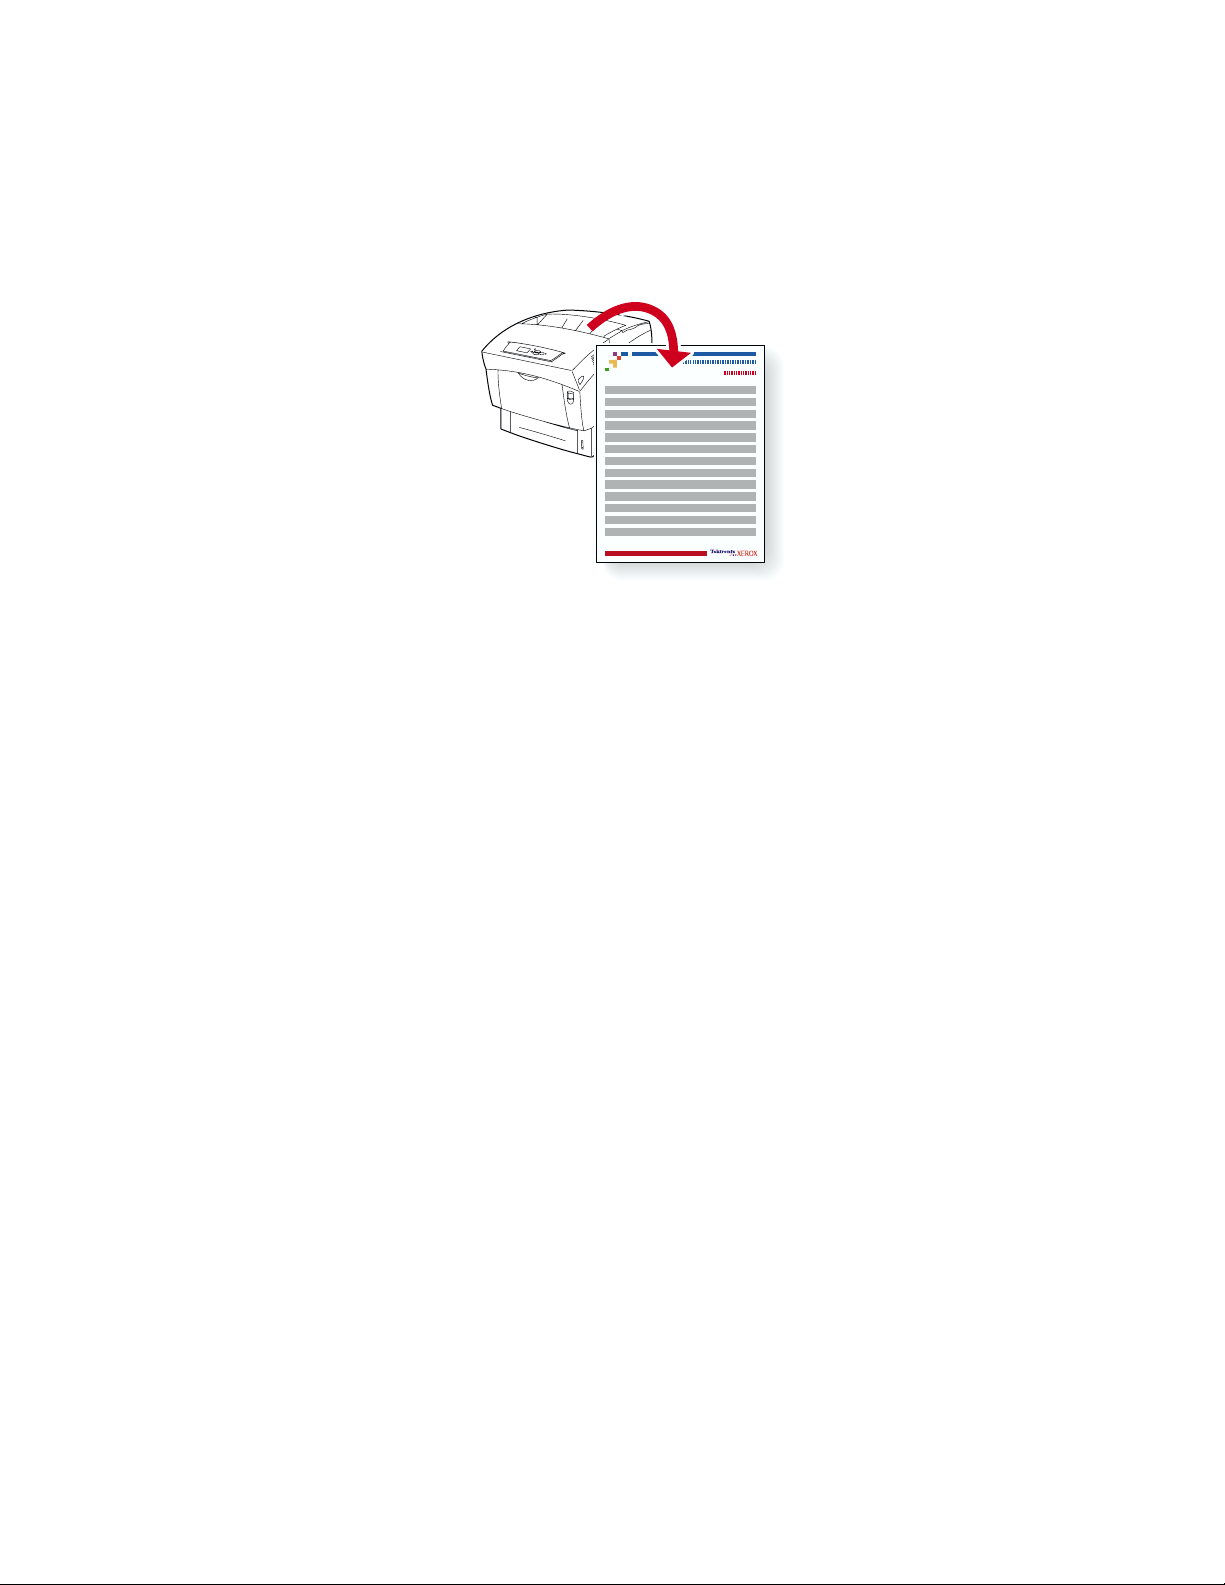
A large amount of information is stored in your printer as printable pages. The following page shows
the Moving Guide printable page, which describes how to safely move your printer.
6200-51
All the printable pages have this format, with color bars at the top and at the bottom of the page. Print
these pages at the printer’s front panel.
Accessing printable pages
Access these pages from the Printable Pages Menu:
1. At the front panel, scroll to the Printable Pages Menu using the Down Arrow or
Up Arrow key and press the OK key.
2. Scroll to the desired printable page (such as
Up Arrow key and press the OK key.
Moving Guide) using the Down Arrow or
Menu Map
For a complete list of printable pages, print the Menu Map:
1. Select
2. Select
Menus on the front panel and press the OK key.
Print Menu Map and press the OK key.
Copyright © 2002 Xerox Corporation. All Rights Reserved. 23
Page 30
PHASER® 6200 COLOR PRINTER
Moving Guide
Follow these guidelines to move the printer within the office or to prepare the printer for shipment.
Precautions regarding moving the printer
WARNING: Follow these guidelines to avoid injuring yourself or damaging the printer.
• Always use at least two people to lift the printer.
• Always turn off the printer using the power switch.
• Failure to repackage the printer properly for shipment can result in damage
to the printer not covered by the printer's warranty.
• Damage to the printer caused by improper moving is not covered by the printer's warranty.
Moving the printer within the office
The printer can be safely moved from one location within an office to another as long as it travels in an upright position,
gently over smooth surfaces. Any jarring movement, such as pushing the printer over a raised door threshold or across a
parking lot, can damage the printer.
Preparing the printer for shipment
To transport the printer by vehicle, the printer must be prepared according to a specific procedure. The printer must be
repackaged in an appropriate shipping carton. The Imaging Unit* and Transfer Roller need to be removed and stored in an
upright position. All Toner Cartridges must be locked in a normal operating position.
If you do not have all of the original packaging, order the repackaging kit from www.xerox.com/officeprinting/6200supplies
or contact your local Xerox service representative. Additional instructions for repackaging the printer are provided in the
repackaging kit and on the documentation CD-ROM. If you are unable to repackage the printer, contact your local Xerox
service representative regarding our repacking services.
*Note: Do not leave the Imaging Unit exposed to light for more than 10 minutes as damage could result. Use the dark bag
that came with the Imaging Unit or dark paper as a cover.
Page 1 of 1
 Loading...