

Page 1
multifunction printer
Phaser® 6180MFP
EN_CZ_PO_HU Rev A
Copyright © 2007 Xerox Corporation. All rights reserved.
www.xerox.com/office/6180MFPsupport
Quick
Use
Guide
Printer Tour 2
Printing
Tisk
Drukowanie
Nyomtatás
4
Copying
Kopírování
Kopiowanie
Másolás
6
Scanning
Snímání
Skanowanie
Szkennelés
7
Faxing
Faxování
Faksowanie
Faxolás
12
Troubleshooting 14
Odstraňování problémů
Rozwiązywanie problemów
Hibaelhárítás
Prohlídka tiskárny
Przewodnik po drukarce
A nyomtató áttekintése
Stručná uživatelská příručka
Skrócona instrukcja obsługi
Gyorsismertető
CZ
PO
HU
EN
Page 2
Printer Tour
Printer Tour
Prohlídka tiskárny
Przewodnik po drukarce
A nyomtató áttekintése
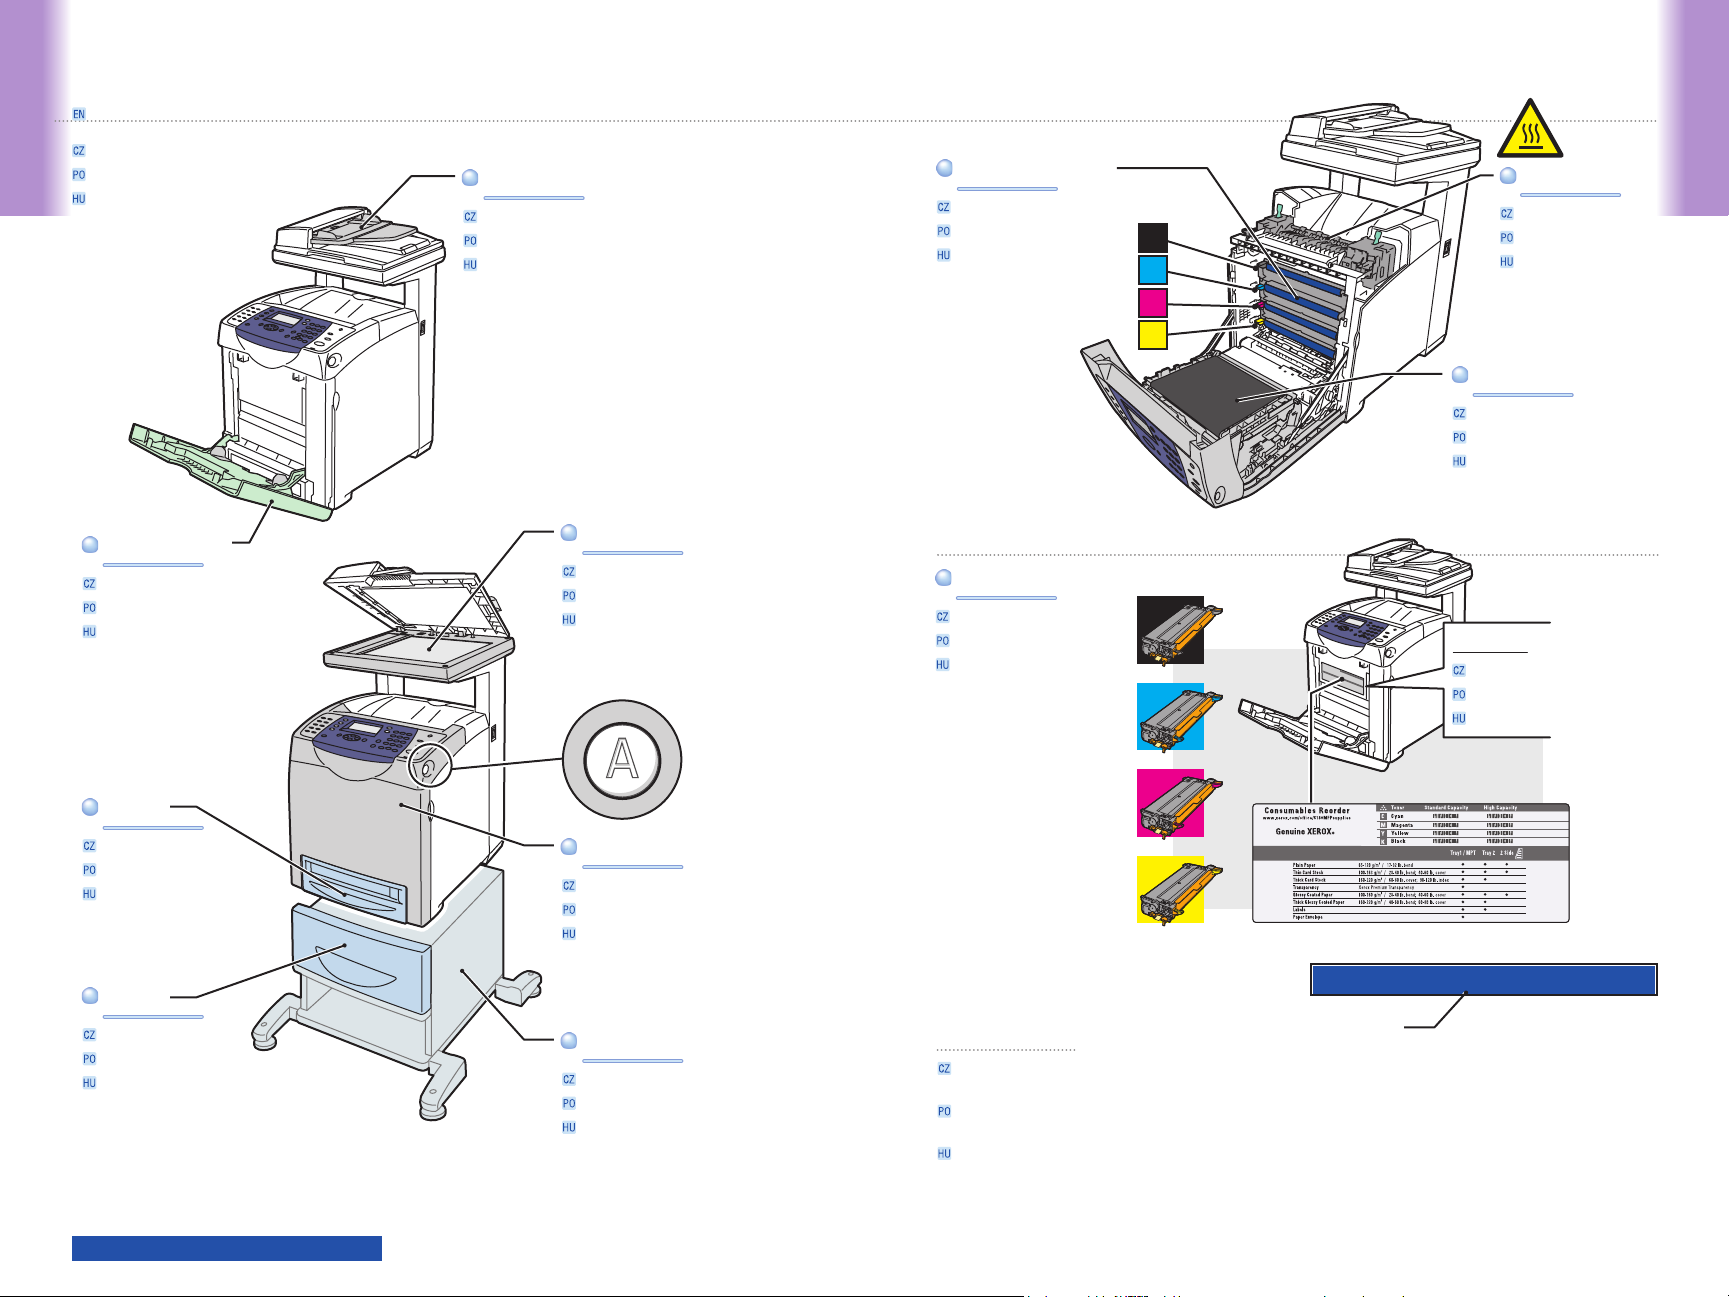
Automatic Document Feeder (ADF)Automatic Document Feeder (ADF)
Automatický podavač předloh (APP)
Automatyczny podajnik dokumentów (ADF)
Automatikus dokuadagoló (ADF)
Print CartridgesPrint Cartridges
Tiskové zásobníky
Wkłady drukarki
Nyomtatókazetták
C
M
Y
Printer Tour
Fuser
Fixační jednotka
K
Urządzenie utrwalające
Beégető
Transfer UnitTransfer Unit
Přenosová jednotka
Moduł transferu
Átvivőegység
Tray 1 (MPT)Tray 1 (MPT)
Zásobník 1 (MPT)
Taca 1 (MPT)
1. tálca (MPT)
Tray 2Tray 2
Zásobník 2
Taca 2
2. tálca
Tray 3Tray 3
Zásobník 3
Taca 3
3. tálca
ScannerScanner
Skener
Skaner
Szkenner
Door ADoor A
Dvířka A
Drzwi A
A ajtó
550-Sheet Feeder550-Sheet Feeder
Podavač na 550 listů
Podajnik na 550 stron
550 lapos adagoló
Print CartridgesPrint Cartridges
Tiskové zásobníky
Wkłady drukarki
Nyomtatókazetták
K
C
See the label.
Přečtěte si nálepku.
Patrz etykieta.
Lásd a címkét.
M
Y
www.xerox.com/office/6180MFPsupplies
For ordering supplies, contact your
local reseller, or visit the Xerox Supplies website.
Když budete chtít objednat spotřební materiál, obraťte se na místního prodejce nebo navštivte webové stránky
Spotřební materiál společnosti Xerox.
Aby zamówić materiały eksploatacyjne, skontaktuj się z lokalnym przedstawicielem lub odwiedź witrynę internetową
Xerox - Materiały biurowe.
Kellékek rendeléséhez lépjen kapcsolatba a helyi viszonteladóval, vagy látogasson el a Xerox kellékek weboldalára.
www.xerox.com/office/6180MFPsupport
2
Page 3
Printer Tour
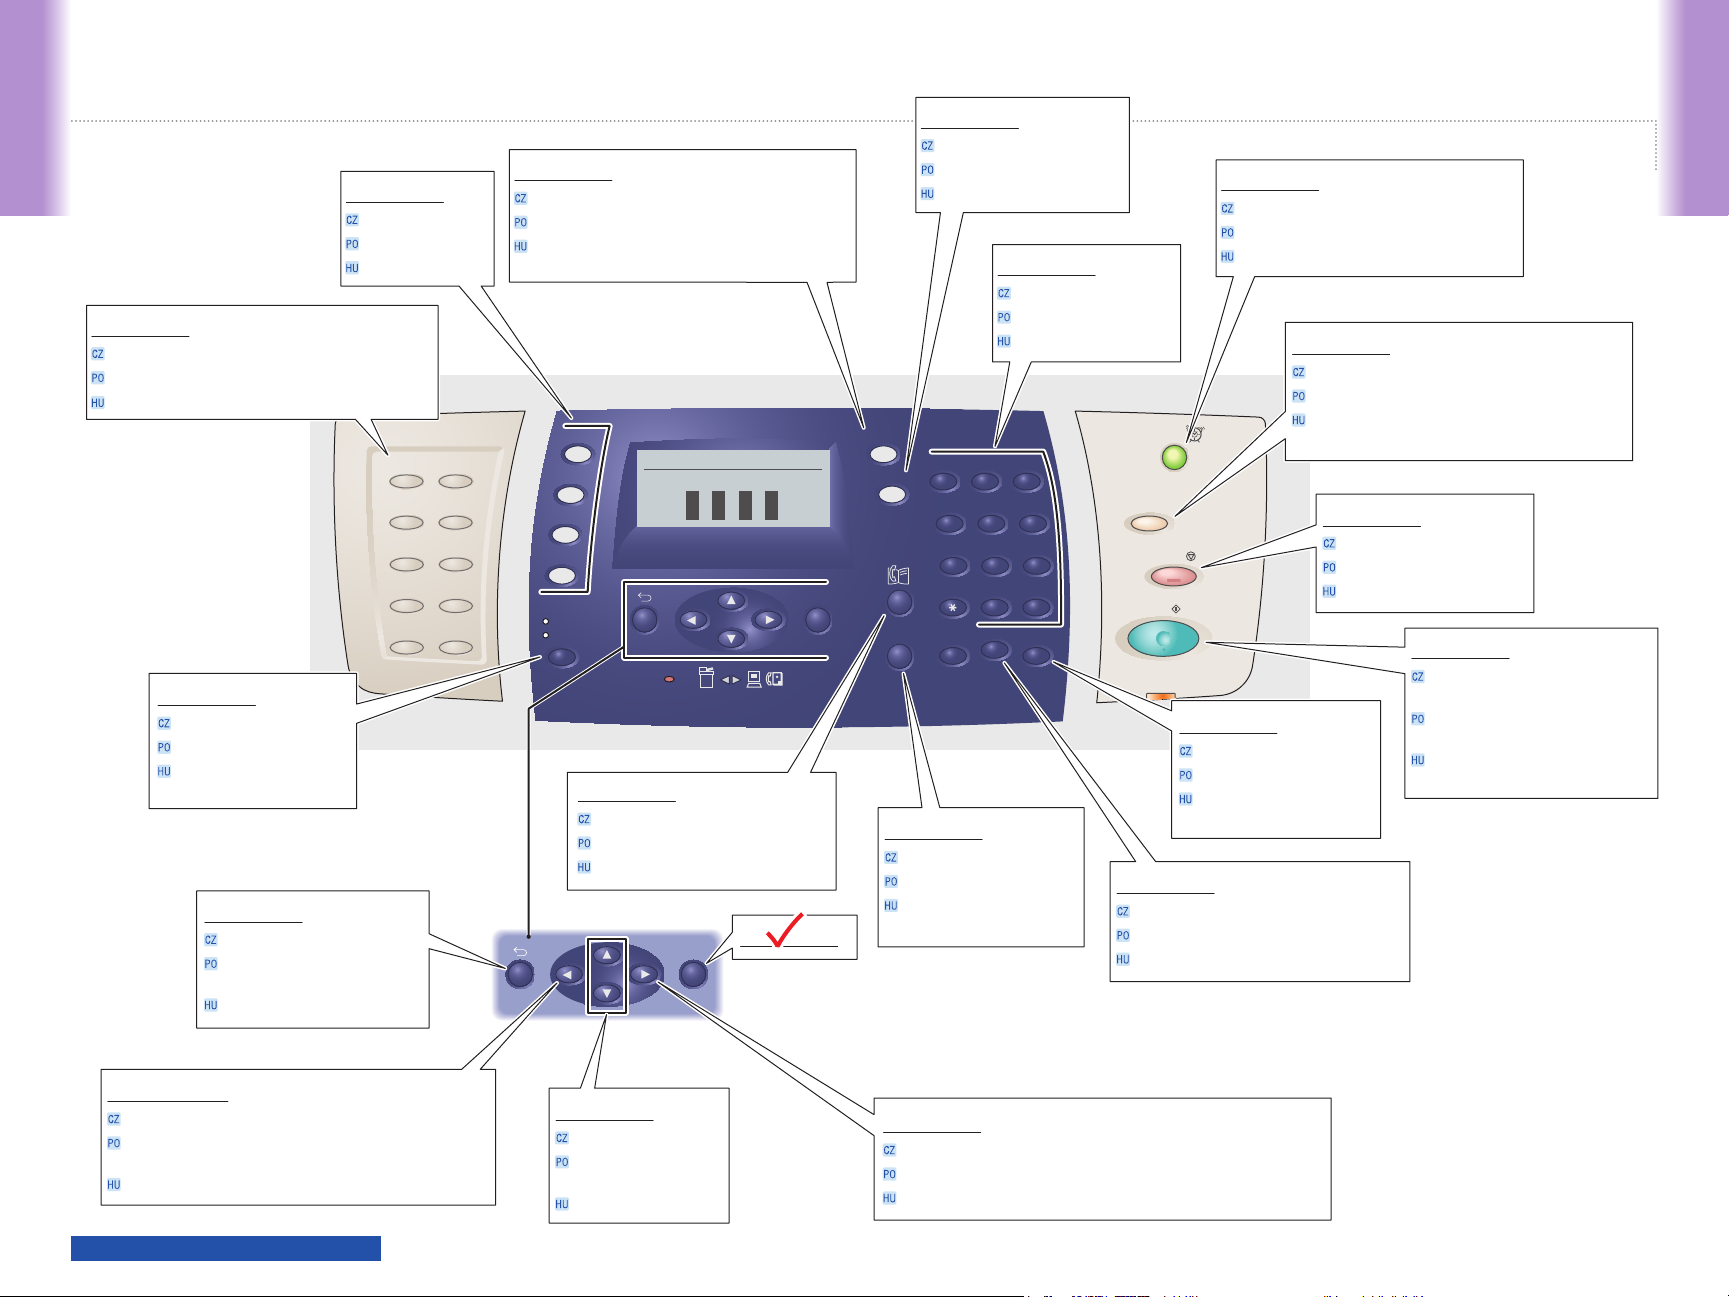
One touch Fax numbers 001 – 010
Zrychlená volba faxových čísel 001 - 010
Numery wybierania jednodotykowego faksów 001 - 010
Egygombos faxszámok, 001 - 010
Selects the color mode.
Výběr barevného režimu
Wybieranie trybu koloru.
A színes mód kiválasztására
szolgál.
Goes up one menu level.
Přechod na nabídku vyšší úrovně
Przechodzenie do wyższego
poziomu menu.
Egy menüszinttel feljebb léptet.
Selects a function.
Výběr funkce
Wybór funkcji.
Funkciót választ..
001 002
003 004
005 006
007 008
009 010
Displays the active jobs or Walk-Up Features.
Zobrazení aktivních úloh nebo funkcí Walk-Up
Wyświetlanie aktywnych prac lub funkcji Walk-Up.
Megjeleníti az aktív munkákat vagy Walk-Up
funkciókat.
Copy
Fax
E-mail
Scan
Color Mode
B&W
Color
Ready
C M Y K
OK
Job in Memory
Email and fax address book
E-mailový a faxový adresář
Spis adresów e-mail i numerów faksów.
E-mail és fax címjegyzék.
OK
OK
Enters the Setup menu.
Přechod do nabídky Nastavení
Przejście do menu Ustawienia.
Beléptet a beállítási menübe.
Job Status
@:./
System
1 2 3
GHI
4
PQRS
7
-_~
Manual Dial
Redial/
Pause
Enters fax numbers.
Zadávání faxových čísel
Wprowadzanie numeru faksu.
Faxszámok megadására
szolgál.
Alphanumeric keypad
Alfanumerická klávesnice
Klawiatura alfanumeryczna
Alfanumerikus billentyűzet
ABC
DEF
JKL MNO
5 6
TUV WXYZ
9
8
#
0
Speed Dial
C
Power Saver wake up
Aktivace z úsporného režimu
Wychodzenie z Trybu oszczędzania energii
Felébresztés az energiatakarékos üzemmódból
Resets the job settings to defaults.
Obnovení výchozího nastavení úlohy
Resetowanie ustawień pracy do wartości domyślnych.
Wake Up
Clear All
Stop
Start
Error
Alapértelmezésükre állítja vissza a
munkabeállításokat.
Cancels the current job.
Zrušení aktuální úlohy
Anulowanie bieżącego zadania.
Törli az aktuális munkát.
Accesses fax numbers.
Přístup k faxovým číslům
Wybieranie numerów faksów.
Faxszámok elérésére
szolgál.
Deletes alphanumeric characters.
Mazání alfanumerických znaků
Usuwanie znaków alfanumerycznych.
Alfanumerikus karaktereket töröl
Printer Tour
Starts a copy, scan, or fax job.
Spuštění úlohy kopírování, snímání
nebo faxování
Uruchamianie pracy kopiowania,
skanowania lub faksowania.
Másolást, szkennelést vagy faxolást
indít.
Goes up one level, or decreases a numeric value.
Přechod o úroveň výš nebo snížení číselné hodnoty
Przechodzenie do niższego poziomu lub zwiększanie wartości
liczbowej.
Egy menüszinttel feljebb léptet vagy számértéket csökkent.
www.xerox.com/office/6180MFPsupport
Scrolls up or down.
Posouvání nahoru a dolů
Przewijanie w górę lub
w dół.
Görget fel vagy le.
Goes down one level, or increases a numeric value.
Přechod o úroveň níž nebo zvýšení číselné hodnoty
Przechodzenie do niższego poziomu lub zwiększanie wartości liczbowej.
Egy menüszinttel lejjebb léptet vagy számértéket növel.
3
Page 4
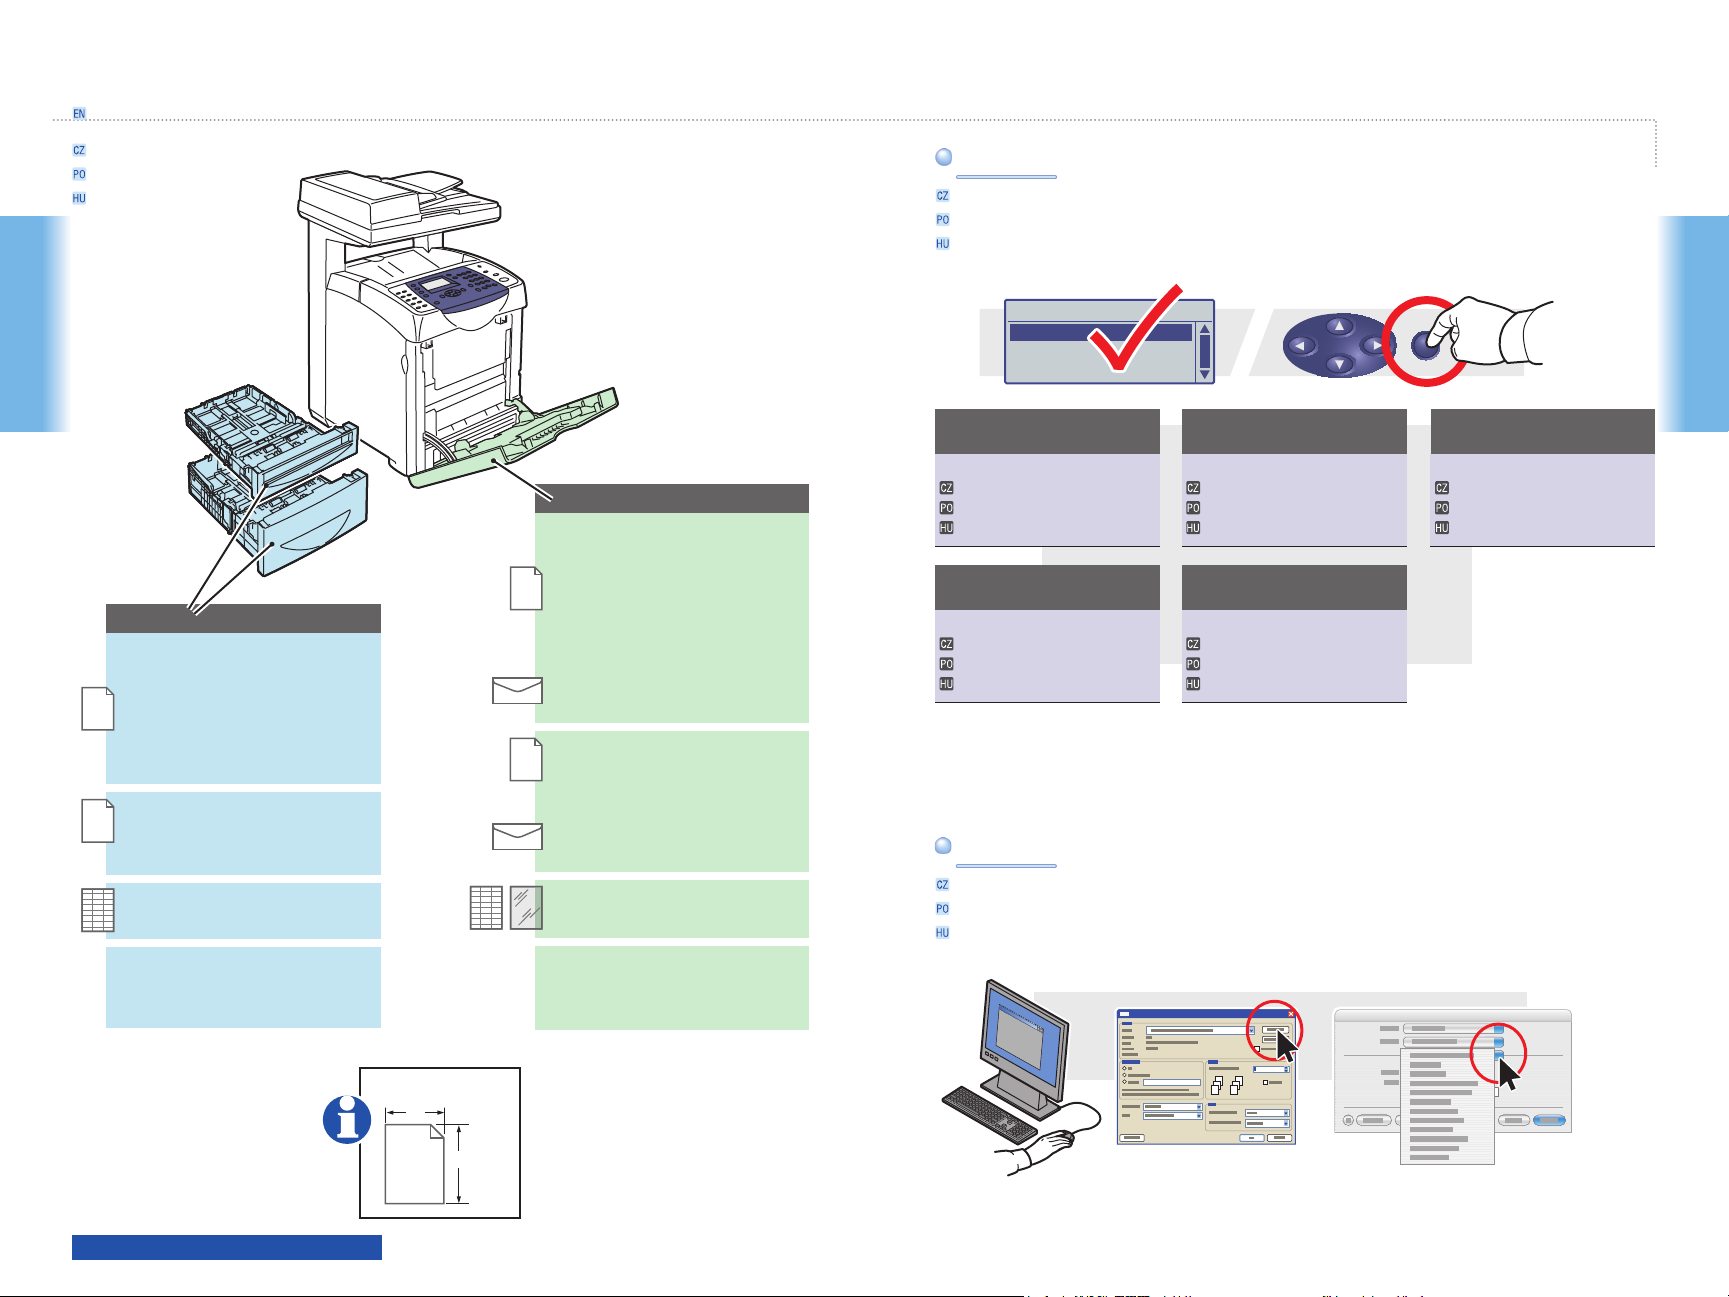
Supported Papers
Podporované druhy papíru
Obsługiwane rodzaje papieru
Támogatott papírok
Printing
Tray 2, 3
65 – 220 g/m
(17 lb. Bond – 80 lb. Cover)
A/Letter......................... 8.5 x 11.0 in.
Legal............................. 8.5 x 14.0 in.
Executive...................... 7.25 x 10.5 in.
Folio.............................. 8.5 x 13.0 in.
A4.................................. 210 x 297 mm
A5.................................. 148 x 210 mm
B5.................................. 176 x 250 mm
A/Letter......................... 8.5 x 11.0 in.
A4.................................. 210 x 297 mm
Custom.......................... (SE) x (LE)
SE: 148 – 216 mm (5.8 – 8.5 in.)
LE: 210 – 355.6 mm (8.2 – 14.0 in.)
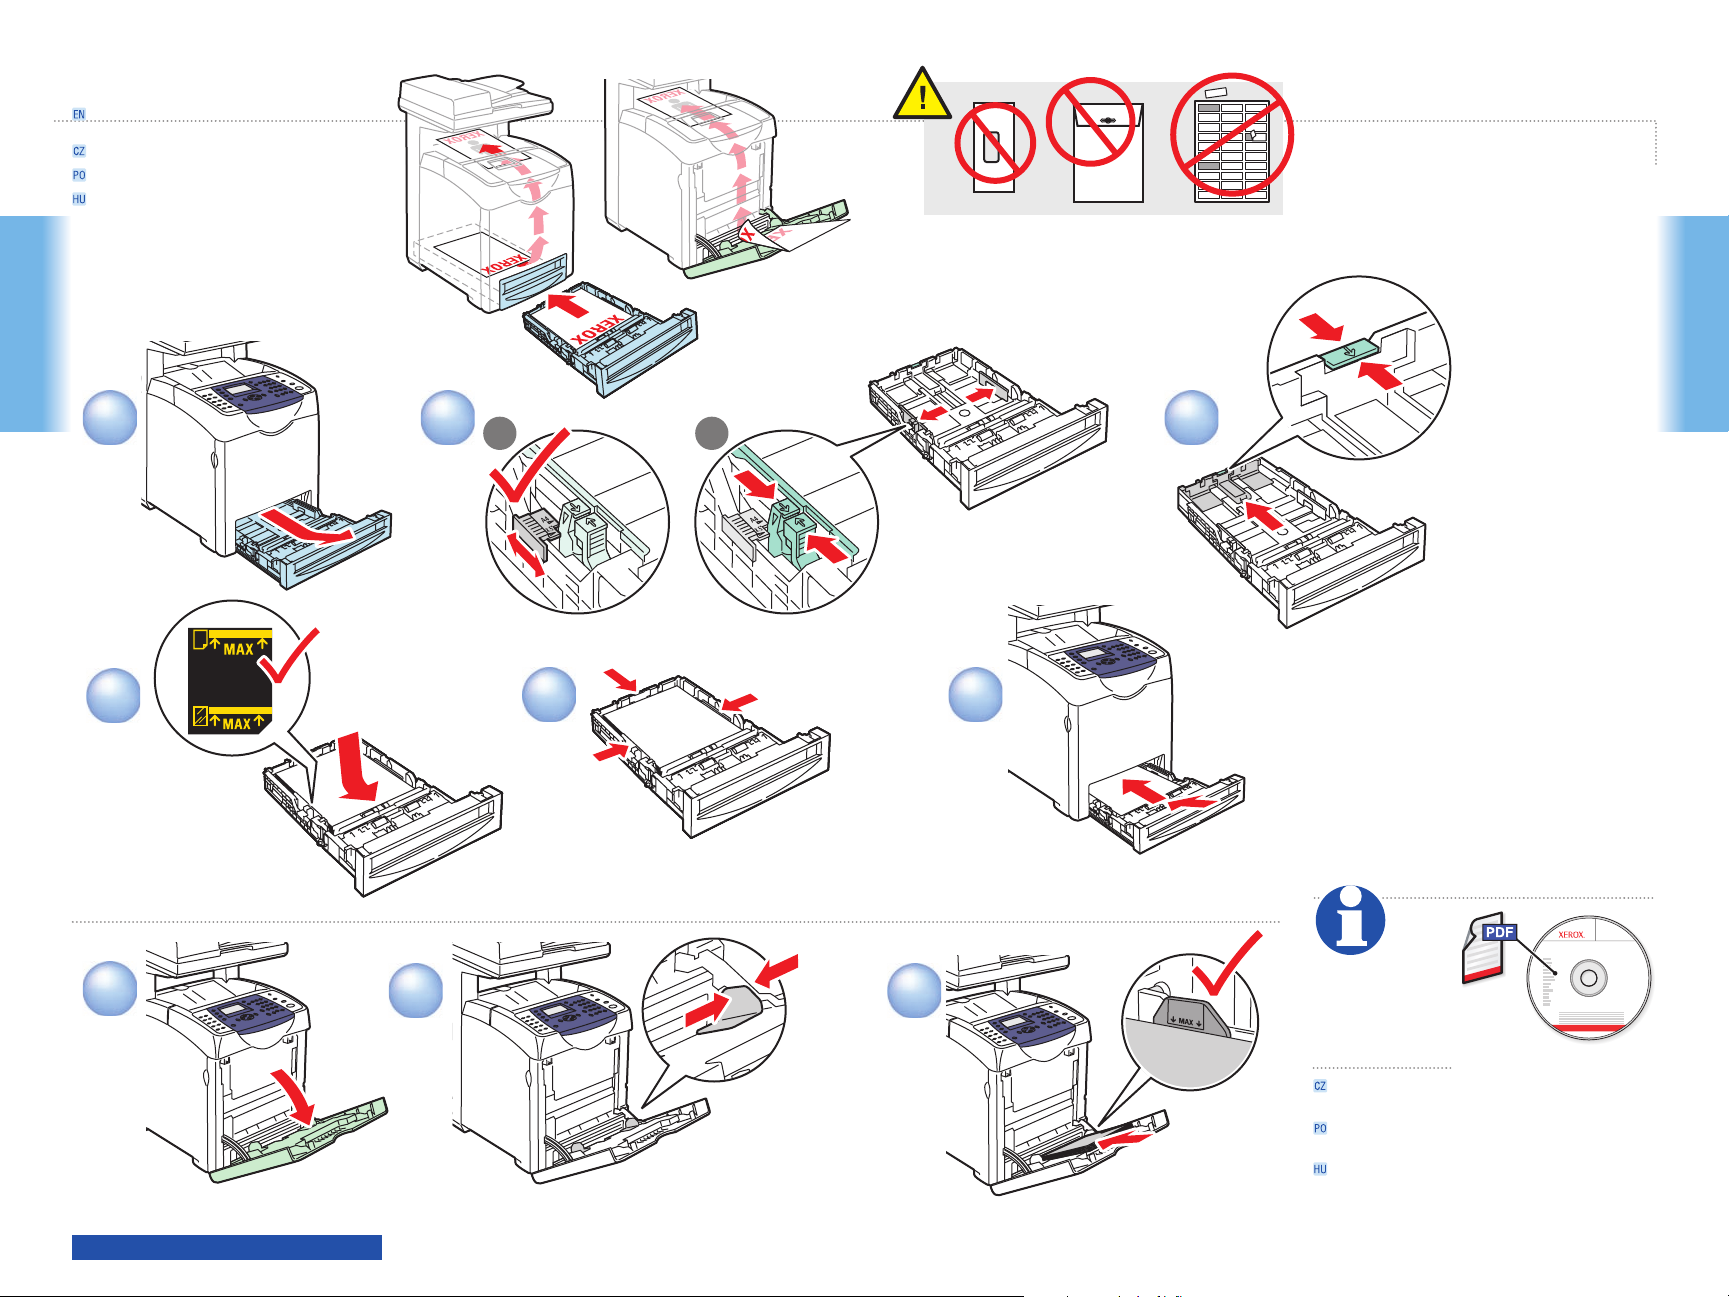
When loading paper: Select appropriate settings on the control panel.When loading paper: Select appropriate settings on the control panel.
Při vkládání papíru: Vyberte příslušná nastavení na ovládacím panelu.
Ładowanie papieru: wybierz odpowiednie ustawienia w panelu sterowania.
Papír betöltésekor: Válassza ki a megfelelő beállításokat a kezelőpanelen.
Printing
Tray 2
Paper Type Plain Paper
Paper Size.... Auto
Tray 1(MPT)
65 – 220 g/m
65-120 g/m
(17-32 lb. Bond)
Plain Paper
Obyčejný papír
2
Zwykły papier
Sima papír
2
100-163 g/m
(28 lb. Bond – 60 lb. Cover)
Thin Card Stock
Tenký tvrdý papír
Cienki karton
Vék.kart.készlet
2
(17 lb. Bond – 80 lb. Cover)
A/Letter......................... 8.5 x 11.0 in.
Legal............................. 8.5 x 14.0 in.
2
Executive...................... 7.25 x 10.5 in.
Folio.............................. 8.25 x 13.0 in.
#10 Commercial........... 4.1 x 9.5 in.
Monarch....................... 3.8 x 7.5 in.
A4.................................. 210 x 297 mm
A5.................................. 148 x 210 mm
B5.................................. 176 x 250 mm
DL................................. 110 x 220 mm
C5.................................. 162 x 229 mm
A/Letter......................... 8.5 x 11.0 in.
A4.................................. 210 x 297 mm
Custom.......................... (SE) x (LE)
SE: 76.2 – 220 mm (3.0 – 8.7 in.)
LE: 127 – 355.6 mm (5.0 – 14.0 in.)
100-160 g/m
(28 lb. Bond – 60 lb. Cover)
Glossy Paper
Lesklý papír
Papier błyszczący
Fényezett papír
When Printing: Select properties. Use the Xerox printer driver.When Printing: Select properties. Use the Xerox printer driver.
Při tisku: Vyberte vlastnosti. Použijte ovladač tiskárny Xerox.
Drukowanie: wybierz właściwości. Użyj sterownika drukarki Xerox.
Nyomtatáskor: Válassza ki a jellemzőket. Használja a Xerox nyomtató-illesztőprogramot.
2
160-220 g/m
(60-80 lb. Cover)
Thick Glossy Paper
Tlustý lesklý papír
Gruby papier o wysokim połysku
Vastag fényezett papír
PC
2
Mac
OK
160-220 g/m
(60-80 lb. Cover)
Thick Card Stock
Tlustý tvrdý papír
Gruby karton
Vastag karton
2
www.xerox.com/office/6180MFPsupport
Custom (SE) x (LE)
SE
LE
4
Page 5
Basic Printing
Základní tisk
Drukowanie podstawowe
Alapvető nyomtatás
Printing
Printing
1
4
1
2
2
2.1
2.2
5 6
3
3
See Printing
Basics in the
User Guide for
more information.
063-0000-00a
Phaser® 6180MFP Software and
Documentation CD-ROM
Printer Drivers
and Utilities
Installation Video
Windows®,
Mac OS
®
www.xerox.com/office/6180MFPsupport
Více informací naleznete v oddílu Základy tisku
v uživatelské příručce.
Patrz rozdział Drukowanie podstawowe w podręczniku
użytkownika, aby uzyskać więcej informacji.
További információt a Felhasználói útmutató Nyomtatás
alapjai c. fejezetében talál.
5
Page 6

Basic Copying
Základní kopírování
Kopiowanie podstawowe
Alapvető másolási műveletek
1
Copying
Load the original.Load the original.
Vložte předlohu.
Załaduj oryginał.
Helyezze be az eredeti dokumentumot.
4
65 – 120 g/m
2
(17 – 32 lb. Bond)
W: 148 – 216 mm (4.1 – 8.5 in.)
W
H: 210 – 355.6 mm (8.3 – 14 in.)
H
Ready to Copy Set 5
Paper Supply... Tray 2: Letter
Reduce/Enlarge.... 100%
Document Type... Text&Photo
2
Copy
Press the Copy button.Press the Copy button.
Stiskněte tlačítko Kopírovat.
Naciśnij przycisk Kopiowanie.
Nyomja meg a Másolás gombot.
Color Mode
5.1
B&W
Color
5
Ready to Copy Set 5
3
Paper Supply... Tray 2: Letter
Reduce/Enlarge.... 100%
Document Type... Text&Photo
ABC
@:./ DEF
1 2 3
GHI
JKL MNO
5 6
4
PQRS
TUV WXYZ
7
-_~
9
8
#
0
Select the number of copies.Select the number of copies.
Zvolte počet kopií.
Wybierz liczbę kopii.
Válassza ki a másolatok számát.
Copying
www.xerox.com/office/6180MFPsupport
OK
Navigate the menus for special
Navigate the menus for special
features or paper.
features or paper.
Procházením nabídek vyberte speciální funkce nebo
papír.
Aby wybrać funkcje specjalne lub papier, skorzystaj
z menu.
A menükből válassza ki a speciális funkciókat vagy a
papírt.
5.2
Select the Color Mode and then
Select the Color Mode and then
press the Start button.
press the Start button.
Vyberte Barevný režim a potom stiskněte tlačítko
Start.
Zaznacz opcję Tryb koloru, a następnie naciśnij
przycisk Start.
Válassza ki a Színes üzemmódot, majd nyomja meg a
Start gombot.
Start
063-0000-00a
Phaser® 6180MFP Software and
Documentation CD-ROM
See Copying
in the User Guide for
more information.
Více informací naleznete v oddílu Kopírování
v uživatelské příručce.
Patrz rozdział Kopiowanie w podręczniku użytkownika,
aby uzyskać więcej informacji.
További információkat a Felhasználói útmutató Másolás
c. fejezetében talál.
Printer Drivers
and Utilities
Installation Video
Windows®,
Mac OS
®
6
Page 7

Scanning
USB
Ethernet
Loading the original
Snímání
Skanowanie
Szkennelés
Depending on the printer’s
Depending on the printer’s
connection (USB or Ethernet), you
connection (USB or Ethernet), you
can send scanned files directly from
can send scanned files directly from
the printer’s control panel to a
the printer’s control panel to a
computer, an FTP server, or to
computer, an FTP server, or to
email. You can also scan directly
email. You can also scan directly
into an application from a
into an application from a
computer. To set up scanning for
computer. To set up scanning for
your connection, see the Features
your connection, see the Features
Setup Guide (printed booklet or
Setup Guide (printed booklet or
web) or Scanning in the User
web) or Scanning in the User
Guide.
Guide.
V závislosti na připojení tiskárny (USB nebo Ethernet)
je možné nasnímané soubory odeslat přímo z
ovládacího panelu tiskárny do počítače, serveru FTP
nebo e-mailu. Lze také snímat z počítače přímo do
aplikace. Před nastavením snímání pro konkrétní
připojení si prostudujte příručku k nastavení funkcí
(tištěná brožura nebo na webu) nebo oddíl Snímání
Scanning
v uživatelské příručce.
W zależności od połączenia drukarki (USB lub
Ethernet) można wysyłać zeskanowane pliki
bezpośrednio z panelu sterowania drukarki do
komputera, serwera FTP lub w postaci wiadomości
e-mail. Korzystając z komputera można również
skanować bezpośrednio do aplikacji. Aby
skonfigurować skanowanie dla danego połączenia,
patrz Podręcznik konfigurowania funkcji (drukowana
broszura lub strona web) lub Skanowanie w
podręczniku użytkownika.
063-0000-00a
Phaser® 6180MFP Software and
Documentation CD-ROM
Printer Drivers
and Utilities
Installation Video
Windows®,
®
Mac OS
A nyomtató csatlakoztatásától (USB vagy Ethernet)
függően a beszekennelt fájlokat a nyomtató
vezérlőpaneléről közvetlenül számítógépre, FTP
kiszolgálóra vagy e-mailbe küldheti. Számítógépről
közvetlenül alkalmazásba is szkennelhet. A
kapcsolatnak megfelelő szkennelési beállításokkal
kapcsolatban lásd a Funkciók beállítása útmutatót
(nyomtatott füzet vagy web) vagy a Felhasználói
útmutató Szkennelés fejezetét.
Vložení předlohy
Ładowanie oryginału
Az eredeti dokumentum behelyezése
65 – 120 g/m
(17 – 32 lb. Bond)
W: 148 – 216 mm (4.1 – 8.5 in.)
W
H: 210 – 355.6 mm (8.3 – 14 in.)
H
2
Scanning
www.xerox.com/office/6180MFPsupport
7
Page 8

Scanning from a computer
Snímání z počítače
Skanowanie z komputera
Szkennelés számítógépről
USB
2
PC
Mac
1
Launch the application to scan into
Launch the application to scan into
(import method varies by application).
(import method varies by application).
Spusťte aplikaci, v níž chcete snímat (způsob importu se liší podle aplikace).
Uruchom aplikację, do której chcesz skanować (metoda importowania różni się w zależności od aplikacji).
Indítsa el a fogadó alkalmazást (az importálás módja alkalmazásfüggő).
The ADF cannot preview.
S APP není náhled k dispozici.
Nie można uzyskać wstępnego
podglądu przy użyciu ADF.
Az ADF nem tudja végrehajtani az
előnézeti szkennelést.
3 4
PC
Scanning
Mac
Select the scan settings.Select the scan settings.
Zvolte nastavení snímání.
Wybierz ustawienia skanowania.
Válassza ki a szkennelési beállításokat.
PC
Scanning
Mac
Click the Preview button for a preview.Click the Preview button for a preview.
Klepnutím na tlačítko Náhled zobrazíte náhled.
Kliknij przycisk Przegląd, aby wyświetlić podgląd.
Az előnézet megtekintéséhez nyomja meg az Előnézet gombot.
www.xerox.com/office/6180MFPsupport
Click the Scan button.Click the Scan button.
Klepněte na tlačítko Snímat.
Kliknij przycisk Skanuj.
Kattintson a Szkennelés gombra.
8
Page 9

Copy
Fax
E-mail
Scan
Color Mode
B&W
Color
OK
Job in Memory
Job Status
System
Manual Dial
Scanning to a computer
Snímání do počítače
Skanowanie do komputera
Szkennelés számítógépre
1
Select settings in the Express Scan
Select settings in the Express Scan
Manager (application).
Manager (application).
Zvolte nastavení v aplikaci Správce expresního snímání.
Wybierz ustawienia w aplikacji Express Scan Manager.
Válassza ki a beállításokat az Express Scan Manager alkalmazásban.
PC
Mac
USB
Scan
Press the Scan button.Press the Scan button.
Stiskněte tlačítko Snímat.
Naciśnij przycisk Skanowanie.
Nyomja meg a Szkennelés gombot.
Service
32
Computer (Network)...
Server (FTP)...
Computer (USB)...
OK
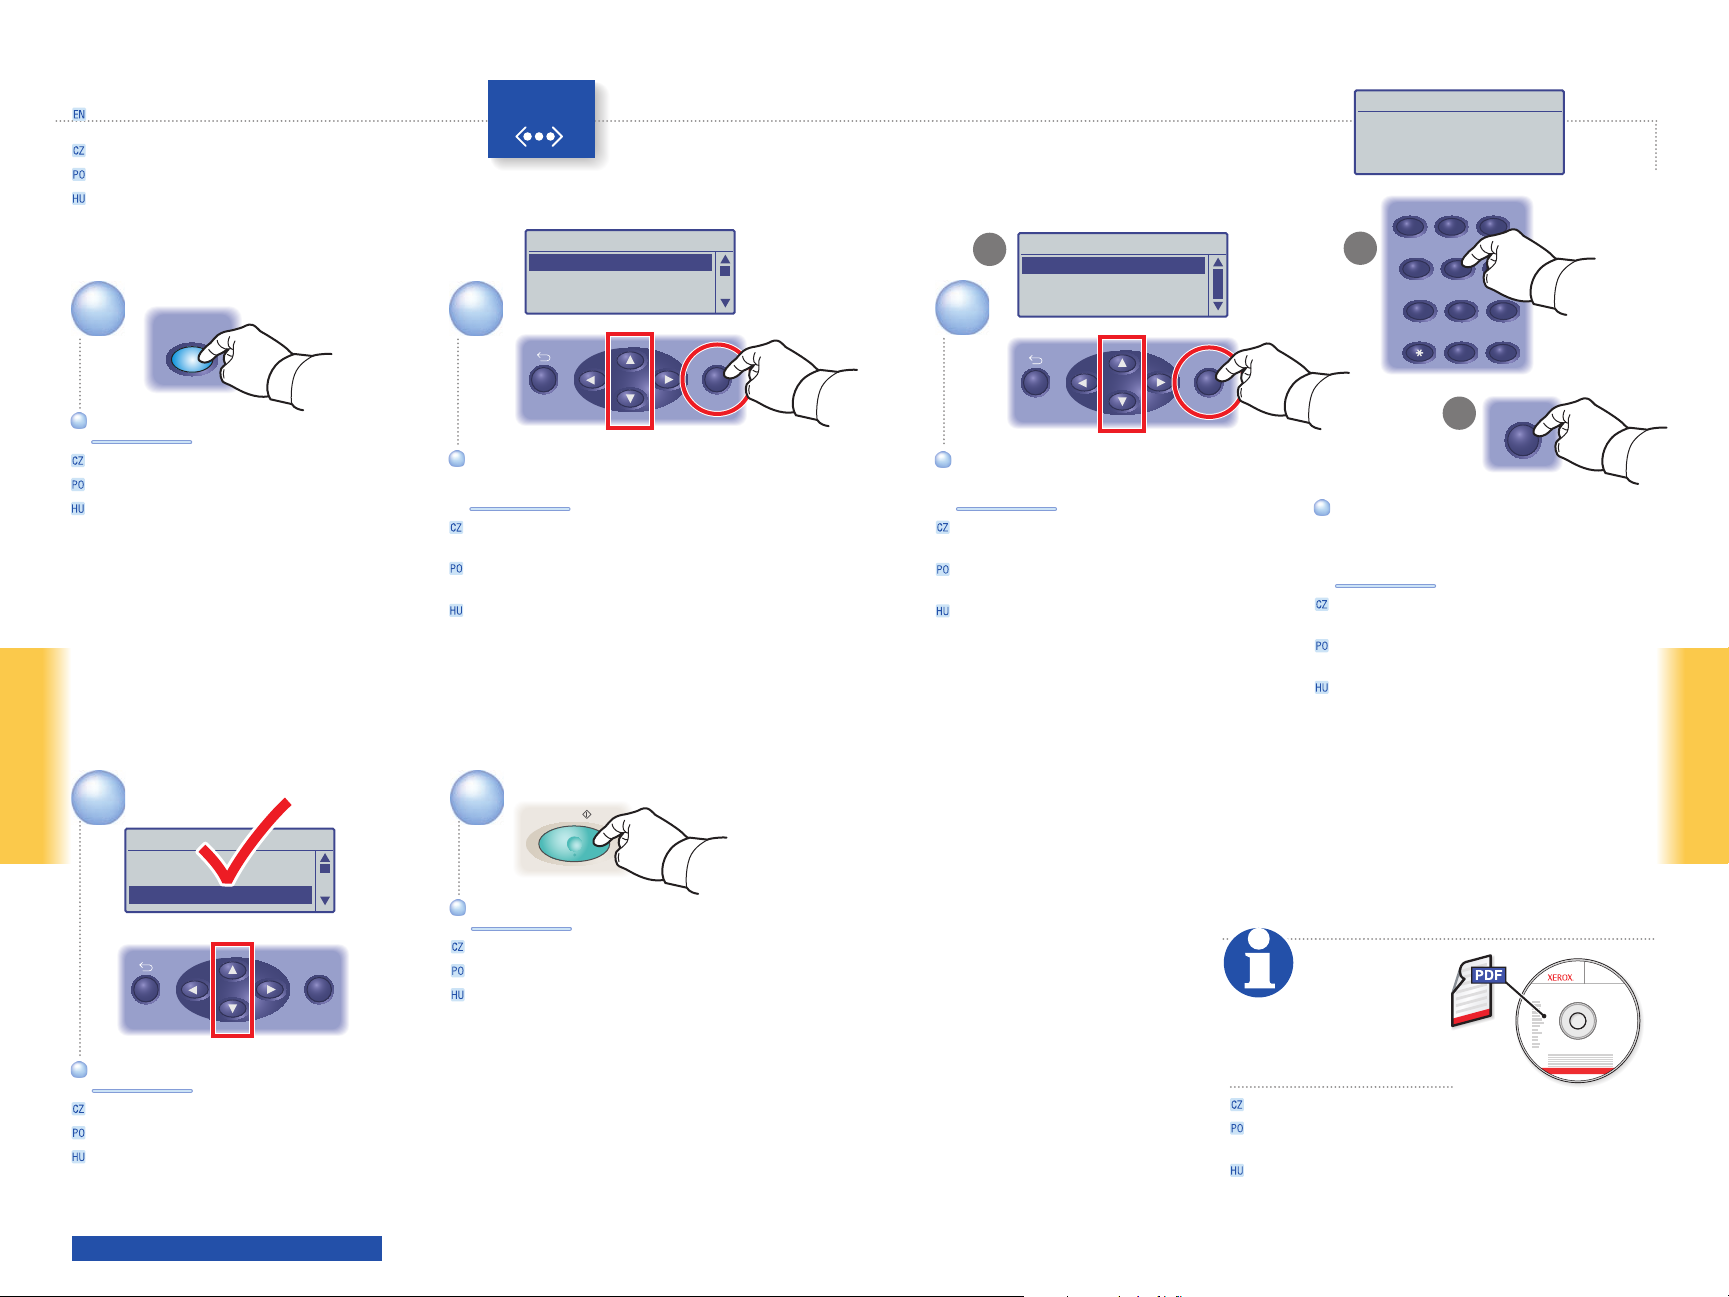
Scroll to select Computer (USB)...Scroll to select Computer (USB)...
Pomocí šipek vyberte položku Počítač (USB)...
Przewiń, aby wybrać Komputer (USB)...
Görgessen a Számítógép (USB) sorhoz...
4
Scanning
Press twice to display the file
Press twice to display the file
format options.
format options.
Dvojím stisknutím zobrazte možnosti formátu souboru.
Naciśnij dwukrotnie, aby wyświetlić opcje formatów
plików.
A fájlformátum-beállítások megjelenítéséhez kétszer
nyomja meg.
www.xerox.com/office/6180MFPsupport
x2
OK
5 6
Scroll to select the file format.Scroll to select the file format.
Pomocí šipek vyberte formát souboru.
Przewiń, aby wybrać format pliku.
Görgetéssel válassza ki a fájlformátumot.
File Format
TIFF
JPEG
PDF
BMP
6.2
OK
Start
063-0000-00a
Phaser® 6180MFP Software and
Documentation CD-ROM
Printer Drivers
and Utilities
See Scanning
Installation Video
Windows®,
Mac OS
®
in the User Guide
for more information.
6.1
OK
Press OK, and then Start.Press OK, and then Start.
Stiskněte tlačítko OK a potom tlačítko Start.
Naciśnij przycisk OK, a następnie przycisk Start.
Nyomja meg az OK, majd a Start gombot.
Více informací naleznete v oddílu Snímání
v uživatelské příručce.
Patrz rozdział Skanowanie w podręczniku
użytkownika, aby uzyskać więcej informacji.
További információkat a Felhasználói útmutató
Szkennelés c. fejezetében talál.
9
Scanning
Page 10

Scanning to a computer or FTP server
Ethernet
Snímání do počítače nebo na server FTP
Skanowanie do komputera lub serwera FTP
Szkennelés számítógépre vagy FTP kiszolgálóra
Scan
Press the Scan button.Press the Scan button.
Stiskněte tlačítko Snímat.
Naciśnij przycisk Skanowanie.
Nyomja meg a Szkennelés gombot.
Ready to Scan: 01 MyComputer
Scan to: MyComput...
File Format... MultipageTIFF
Resolution... 150 x 150
Scanning
Service
Computer (Network)...
Server (FTP)...
Computer (USB)...
Service
Computer (Network)...
2 31
Scroll to select
Scroll to select
Computer (Network)...
Computer (Network)...
or Server (FTP)...
or Server (FTP)...
Pomocí šipek vyberte položku Počítač (síť)...
nebo Server (FTP)...
Przewiń, aby wybrać Komputer (sieć)...
lub Serwer (FTP)...
Görgetéses választás Számítógép (hálózat)...
vagy Kiszolgáló (FTP)...
Server (FTP)...
Computer (USB)...
OK
[ ] Detail, [Enter]: Save
01 MyComputer
02 Jack Computer
03 Lab Computer
[ ] Detail, [Enter]: Save
05 ftp.mycolor.com
09 ftp.maxserver
OK
x2
Press twice to display the
Press twice to display the
address menu.
address menu.
Dvojím stisknutím zobrazte nabídku adresy.
Naciśnij dwukrotnie, aby wyświetlić menu adresu.
A címmenü megjelenítéséhez kétszer nyomja meg.
Ready to Scan: 01 MyComputer
Scan to: 01 MyComput...
File Format... MultipageTIFF
Resolution... 150 x 150
Ready to Scan: 05 ftp,mycolor.com
Scan to: 05 ftp.mycolo...
4
Scroll to select an address, and
Scroll to select an address, and
then press the OK button.
then press the OK button.
Pomocí šipek vyberte adresu a stiskněte tlačítko OK.
Przewiń kursor, aby wybrać adres, i naciśnij przycisk
OK.
Görgetéssel válasszon címet, majd nyomja meg az OK
gombot.
File Format... MultipageTIFF
Resolution... 150 x 150
OK
Scanning
5
Ready to Scan: 05 ftp,mycolor
Scan to: 05 ftp.mycol...
File Format... MultipageTIFF
Resolution... 150 x 150
OK
Scroll to select other settings.Scroll to select other settings.
Pomocí šipek vyberte další nastavení.
Przewiń, aby wybrać inne ustawienia.
Görgessen a többi beállításhoz.
www.xerox.com/office/6180MFPsupport
6
Start
Press the Start button.Press the Start button.
Stiskněte tlačítko Start.
Naciśnij przycisk Start.
Nyomja meg a Start gombot.
063-0000-00a
Phaser® 6180MFP Software and
Documentation CD-ROM
See Scanning
in the User Guide for
more information.
Více informací naleznete v oddílu Snímání v uživatelské příručce.
Patrz rozdział Skanowanie w podręczniku użytkownika, aby uzyskać
więcej informacji.
További információkat a Felhasználói útmutató Szkennelés c.
fejezetében talál.
Printer Drivers
and Utilities
Installation Video
Windows®,
Mac OS
®
10
Page 11
Scanning to Email
Snímání do e-mailu
Skanowanie do poczty e-mail
Szkennelés e-mailbe
E-mail
Ethernet
21
Enter Recipient
Email to...
From Setting...
File Format... MultiPageTIFF
Enter Email, [Enter]: Save
xybusiness@xy_
ABC
@:./ DEF
Recipient
3.1
Email Address...
Address Book...
Email Group...
3
OK
OK
3.2
1 2 3
GHI
JKL MNO
5 6
4
PQRS
TUV WXYZ
7
8
-_~
0
9
#
Press the E-mail button.Press the E-mail button.
Stiskněte tlačítko E-mail.
Naciśnij przycisk E-mail.
Nyomja meg az E-mail gombot.
Scanning
4 5
Enter Recipient
Email to...
From Setting....
File Format... MultiPage TIFF
Scroll to select other settings.Scroll to select other settings.
Pomocí šipek vyberte další nastavení.
Przewiń, aby wybrać inne ustawienia.
Görgessen a többi beállításhoz.
xybusiness@xyz
OK
Scroll to select Email to..., and
Scroll to select Email to..., and
then press the OK button.
then press the OK button.
Pomocí šipek vyberte položku E-mail komu... a
stiskněte tlačítko OK.
Przewiń kursor, aby wybrać E- mai l d o..., i naciśnij
przycisk OK.
Görgetéssel válassza az E-mail ide... sort, majd
nyomja meg az OK gombot.
Start
Press the Start button.Press the Start button.
Stiskněte tlačítko Start.
Naciśnij przycisk Start.
Nyomja meg a Start gombot.
Scroll to select an address type,
Scroll to select an address type,
and then press the OK button.
and then press the OK button.
Pomocí šipek vyberte typ adresy a stiskněte
tlačítko OK.
Przewiń kursor, aby wybrać typ adresu, i naciśnij
przycisk OK.
Görgetéssel válasszon címtípust, majd nyomja meg az
OK gombot.
See Scanning
in the User Guide for
more information.
Více informací naleznete v oddílu Snímání v uživatelské příručce.
Patrz rozdział Skanowanie w podręczniku użytkownika, aby uzyskać
więcej informacji.
További információkat a Felhasználói útmutató Szkennelés c.
fejezetében talál.
3.3
Enter an Email address if
Enter an Email address if
required, and then press the
required, and then press the
OK button.
OK button.
Zadejte e-mailovou adresu, je-li vyžadována, a
stiskněte tlačítko OK.
Wprowadź adres e-mail, jeśli jest to konieczne, i
naciśnij przycisk OK.
Írjon be egy e-mail címet (ha kell), majd nyomja meg
az OK gombot.
OK
063-0000-00a
Phaser® 6180MFP Software and
Documentation CD-ROM
Printer Drivers
and Utilities
Installation Video
Windows®,
Mac OS
®
Scanning
www.xerox.com/office/6180MFPsupport
11
Page 12
Faxing
Loading the original
Faxování
Faksowanie
Faxolás
You can enter fax numbers
You can enter fax numbers
manually or store them in an
manually or store them in an
address book. To set up faxing, see
address book. To set up faxing, see
the Features Setup Guide (printed
the Features Setup Guide (printed
booklet or web) or Faxing in the
booklet or web) or Faxing in the
User Guide.
User Guide.
You can send a fax directly from a
You can send a fax directly from a
computer using the PCL driver. See
computer using the PCL driver. See
Faxing in the User Guide.
Faxing in the User Guide.
Faxová čísla můžete zadávat ručně nebo je lze uložit
do adresáře. Před nastavením faxování si prostudujte
příručku k nastavení funkcí (tištěná brožura nebo na
webu) nebo oddíl Faxování v uživatelské příručce.
Pomocí ovladače PCL je možné odeslat fax přímo
z počítače. Další informace naleznete v oddílu
Faxování v uživatelské příručce.
Numery faksów można wpisywać ręcznie lub
przechowywać je w spisie adresów. Aby skonfigurować
faksowanie, patrz Podręcznik konfigurowania funkcji
(drukowana broszura lub strona web) lub Faksowanie
w podręczniku użytkownika.
Faks można wysłać bezpośrednio z komputera za
pomocą sterownika PCL. Patrz Faksowanie
podręczniku użytkownika.
063-0000-00a
Phaser® 6180MFP Software and
Documentation CD-ROM
Printer Drivers
and Utilities
Installation Video
Windows®,
®
Mac OS
Faxszámokat beírhat kézzel, vagy eltárolhatja őket egy
címjegyzékben. A faxolási beállításokkal kapcsolatban
lásd a Funkciók beállítása útmutatót (nyomtatott füzet
vagy web) vagy a Felhasználói útmutató Faxolás
fejezetét.
A PCL illesztőprogram segítségével közvetlenül
számítógépről is küldhet faxot. Ld. a Felhasználói
útmutató Faxolás fejezetét.
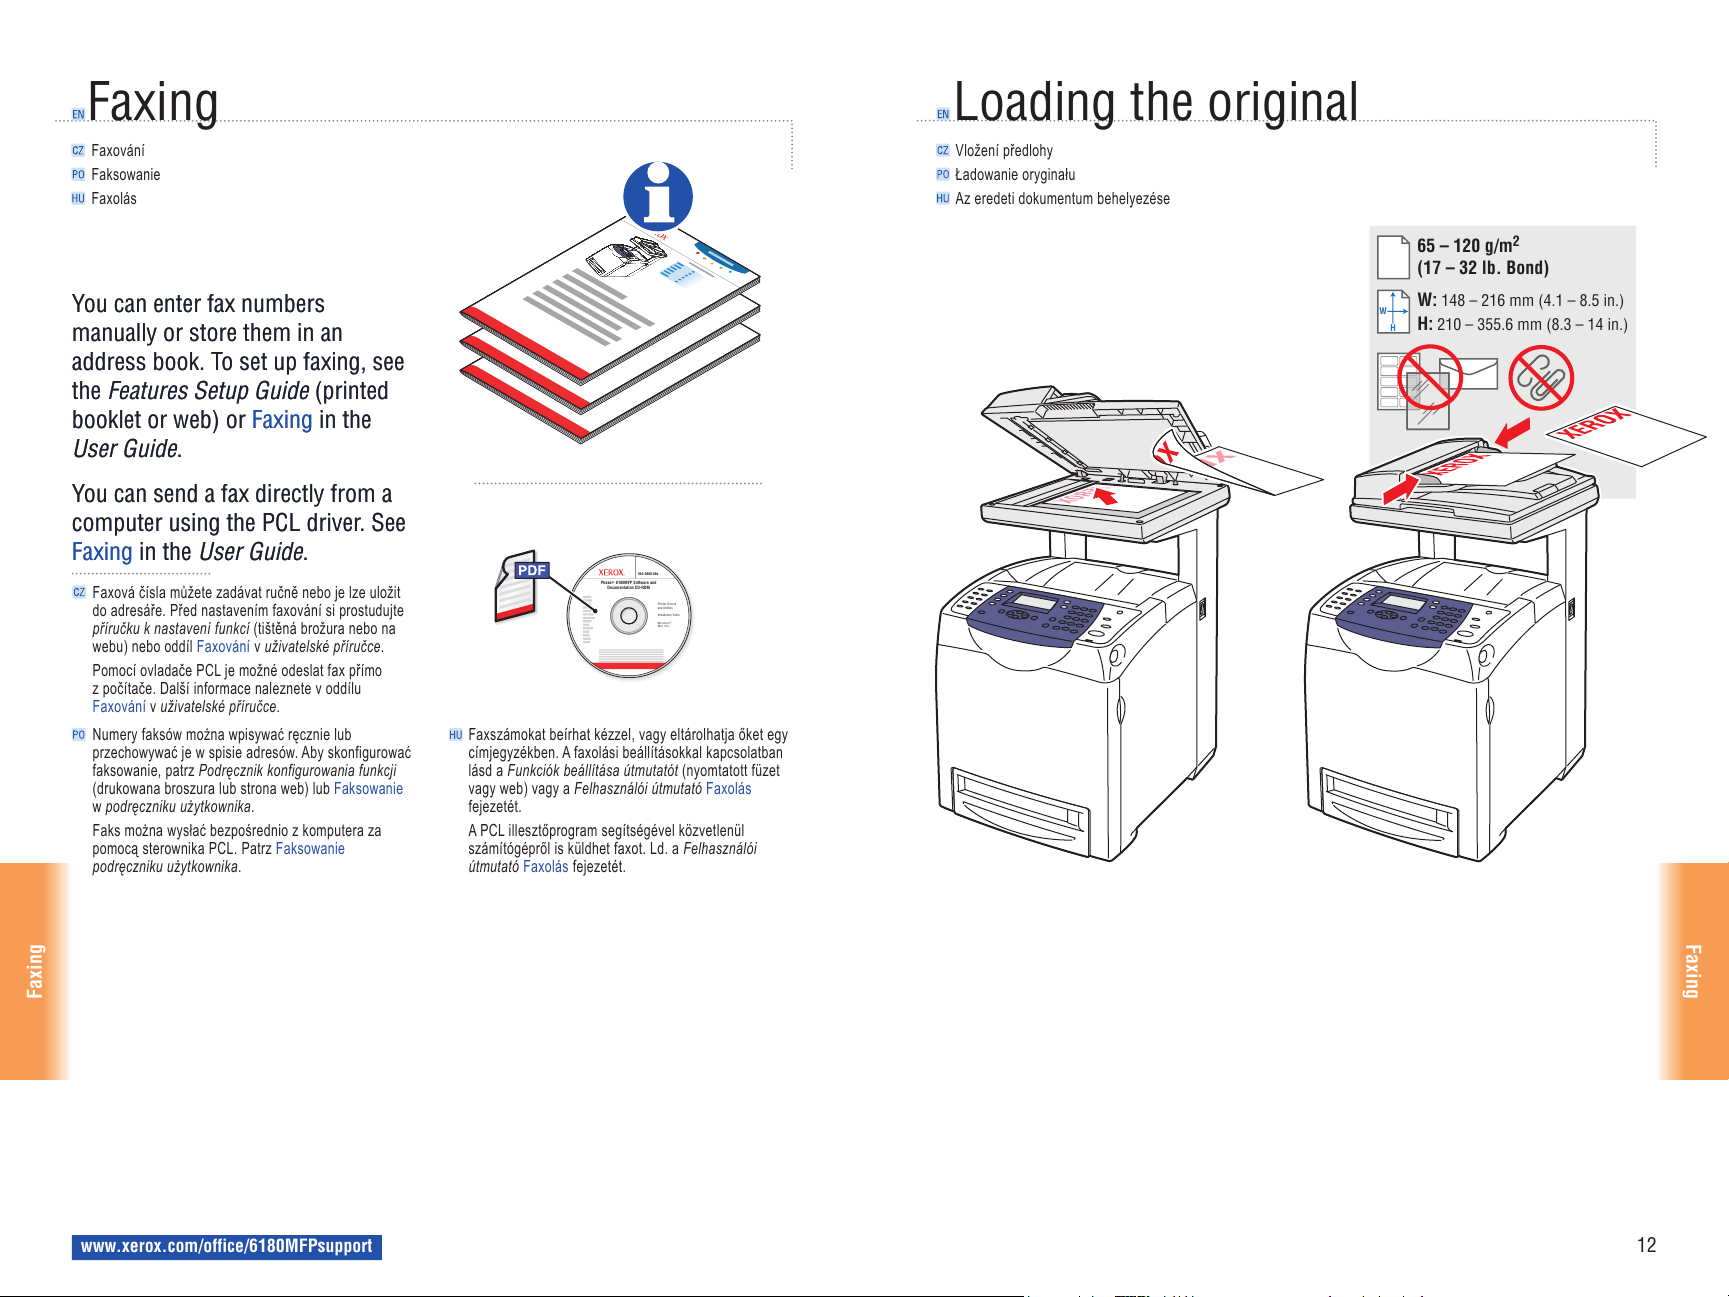
Vložení předlohy
Ładowanie oryginału
Az eredeti dokumentum behelyezése
65 – 120 g/m
2
(17 – 32 lb. Bond)
W: 148 – 216 mm (4.1 – 8.5 in.)
W
H: 210 – 355.6 mm (8.3 – 14 in.)
H
Faxing
www.xerox.com/office/6180MFPsupport
Faxing
12
Page 13

Basic Faxing
Základní faxování
Faksowanie podstawowe
Alapvető faxolási műveletek
1
Fax
2
Enter Recipient
Fax to...
Resolution... Standard
Ducument Type... Text
Enter Fax Number, [OK]: Save
503555_
ABC
@:./ DEF
Recipient
Fax Number...
Phone Book...
Group Dial...
OK
3 4
OK
4.1
1 2 3
GHI
JKL MNO
5 6
4
PQRS
TUV WXYZ
7
8
-_~
0
9
#
Press the Fax button.Press the Fax button.
Stiskněte tlačítko Fax.
Naciśnij przycisk Faks.
Nyomja meg a Fax gombot.
Ready to Fax: 5035551234
5
Fax to... 5035551234
Resolution... Standard
Ducument Type... Text
Confirm the fax number.Confirm the fax number.
Zkontrolujte faxové číslo.
Potwierdź numer faksu.
Ellenőrizze a faxszámot.
Faxing
Select Fax to...Select Fax to...
Vyberte položku Fax komu...
Wybierz Faks do...
Válassza a Fax ide..
6
Start
Press the Start button.Press the Start button.
Stiskněte tlačítko Start.
Naciśnij przycisk Start.
Nyomja meg a Start gombot.
Select Fax Number...Select Fax Number...
Vyberte položku Faxové číslo...
Wybierz Numer faksu...
Válassza ki a Faxszám..
Enter a fax number, and then
Enter a fax number, and then
press the OK button.
press the OK button.
Zadejte faxové číslo a stiskněte tlačítko OK.
Wprowadź numer faksu, a następnie naciśnij
przycisk OK.
Írja be a faxszámot, majd nyomja meg az OK gombot.
See Faxing in the
User Guide for more
information.
4.2
OK
063-0000-00a
Phaser® 6180MFP Software and
Documentation CD-ROM
Printer Drivers
and Utilities
Installation Video
Windows®,
Mac OS
Faxing
®
www.xerox.com/office/6180MFPsupport
Více informací naleznete v oddílu Faxování v uživatelské příručce.
Patrz rozdział Faksowanie w podręczniku użytkownika, aby uzyskać
więcej informacji.
További információkat a Felhasználói útmutató Faxolás c.
fejezetében talál.
13
Page 14

Troubleshooting
Odstraňování problémů
Rozwiązywanie problemów
Hibaelhárítás
Paper Jams
Zaseknutý papír
Zacięcia papieru
Papírelakadások
www.xerox.com/office/6180MFPsupport
Troubleshoooting
1
2
1
1
2
Troubleshoooting
14
Page 15
Paper Jams
Zaseknutý papír
Zacięcia papieru
Papírelakadások
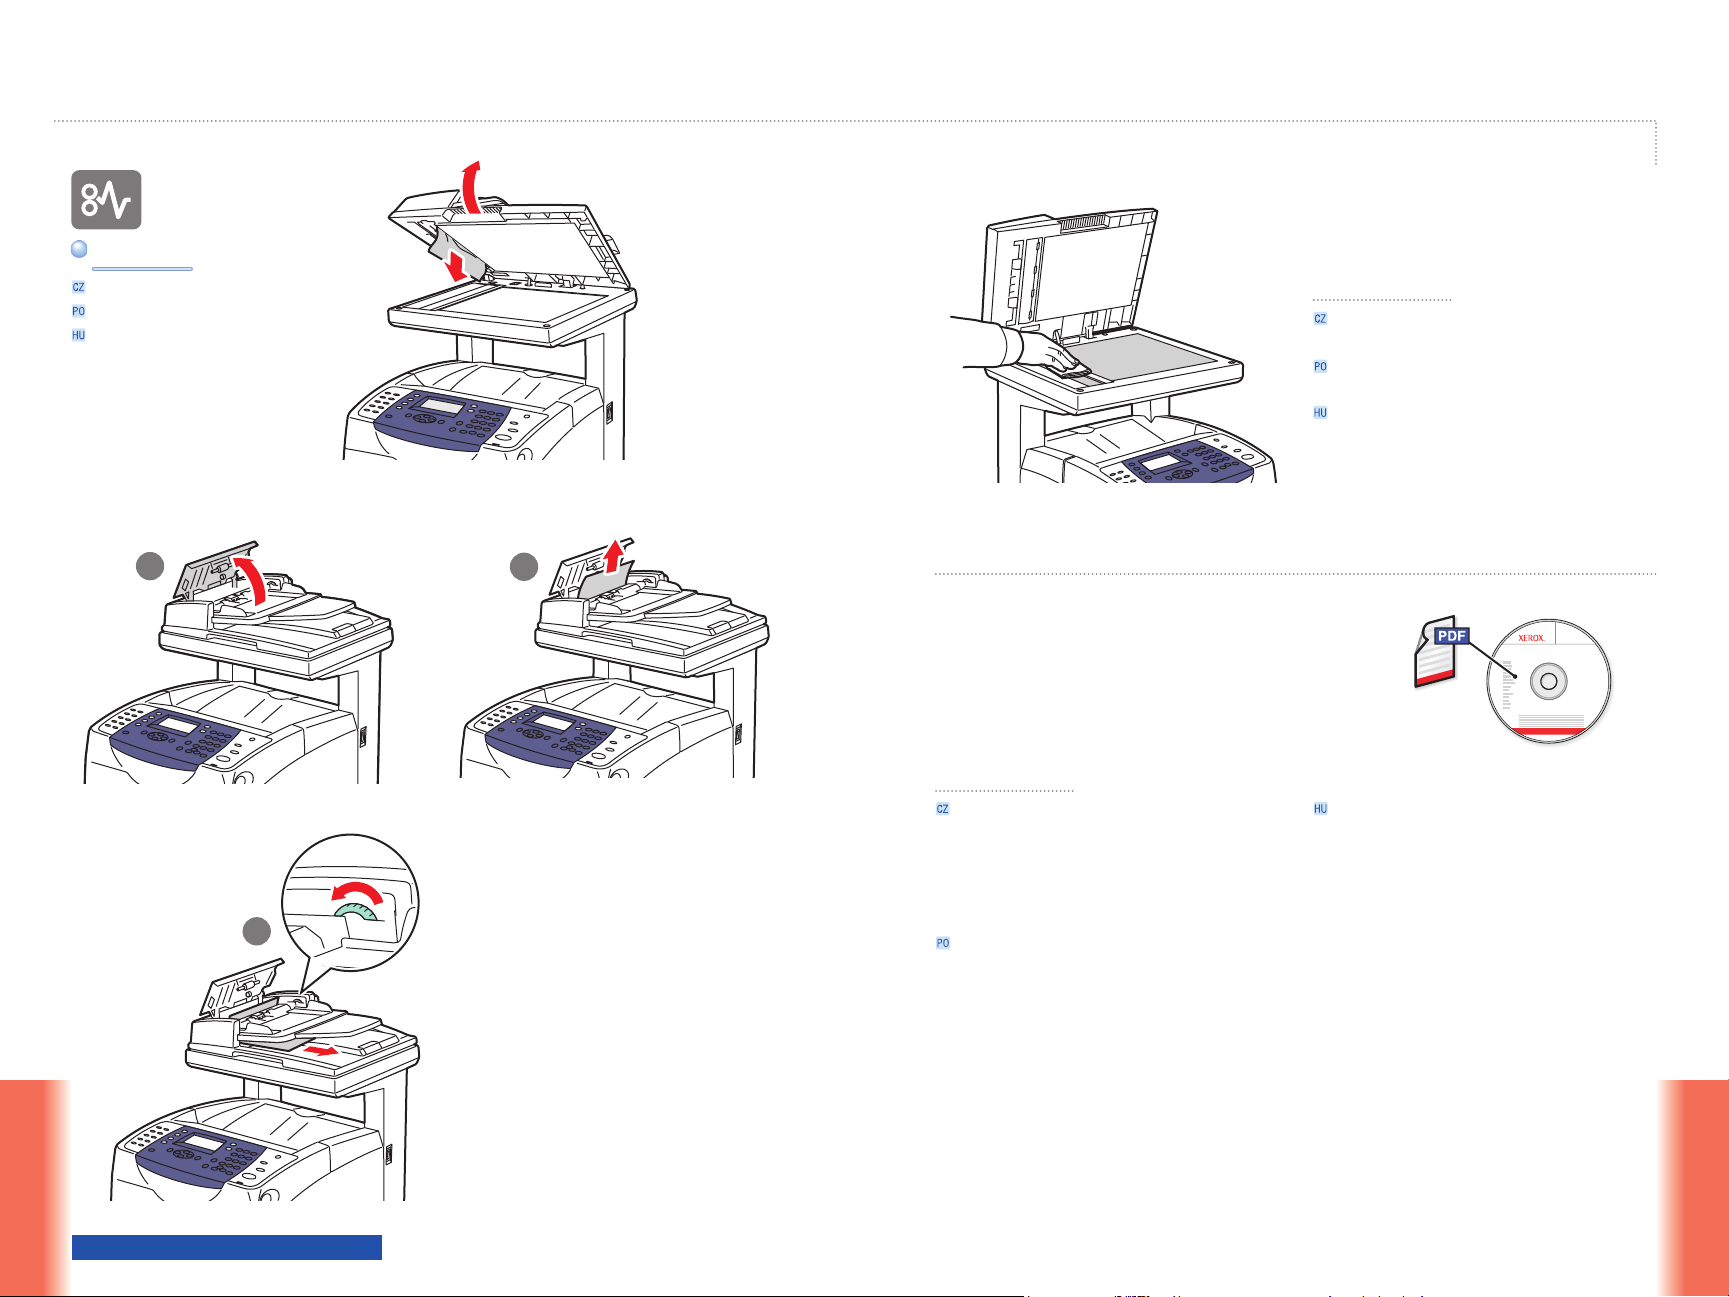
To clean the document glass: use a
moistened lint-free cloth.
Čištění skla pro předlohy: Používejte navlhčený
hadřík nepouštějící vlákna.
Do czyszczenia szyby dokumentów: używać
zwilżonej ściereczki.
A dokuüveg tisztítását nedves szöszmentes
törlőkendővel végezze.
1
3
2
See Troubleshooting in the User Guide for
more information on:
Paper jams
•
Print-quality problems
•
Color registration
•
Error messages
•
V oddílu Odstraňování problémů v uživatelské příručce
naleznete více informací o:
zaseknutém papíru
•
problémech s kvalitou tisku
•
soutisku barev
•
chybových hlášeních
•
Patrz Rozwiązywanie problemów w podręczniku
użytkownika, aby uzyskać więcej informacji o:
Zacięciach papieru
•
Problemach jakości wydruków
•
Rejestracji kolorów
•
Komunikatach o błędach
•
A Fel has zná lói út mut ató Hibaelhárítás c. fejezetében
olvashat bővebben a következő témákról:
Papírelakadások
•
Problémák a nyomtatás minőségével
•
Színregisztráció
•
Hibaüzenetek
•
Phaser® 6180 Software and
Documentation CD-ROM
063-0000-00a
Printer Drivers
and Utilities
Installation Video
Windows®,
Mac OS
®
Troubleshoooting
www.xerox.com/office/6180MFPsupport
Troubleshoooting
15
Page 16

More Information
Další informace
Więcej informacji
További információk
www.xerox.com/office/businessresourcecenter
www.xerox.com/office/6180MFPsupport
www.xerox.com/msds (U.S./Canada)
www.xerox.com/environment_europe
www.xerox.com/office/6180MFPsupport
Printer drivers and utilities
•
Quick Start Tutorials
•
User manuals and instructions
•
Online Support Assistant
•
Safety specifications (in User Guide)
•
Ovladače tiskárny a obslužné programy
•
Výukové programy pro rychlé spuštění
•
Uživatelské příručky a pokyny
•
Online Support Assistant (Asistent on-line podpory)
•
Bezpečnostní předpisy (v uživatelské příručce)
•
Sterowniki drukarki i programy narzędziowe
•
Poradniki szybkiego startu
•
Podręczniki użytkownika i instrukcje
•
Asystent pomocy online
•
Specyfikacje bezpieczeństwa (w Podręczniku
•
użytkownika )
Nyomtató illesztő- és segédprogramok
•
Gyorsútmutatók
•
Felhasználói kézikönyvek és útmutatók
•
Online Support Assistant (Online támogatás)
•
Biztonsági előírások (a Felhasználói útmutatóban)
•
www.xerox.com/msds (U.S./Canada)
www.xerox.com/environment_europe
Material Safety Data Sheets
Bezpečnostní specifikace materiálu
Informacje o bezpieczeństwie używanych
materiałów
Vegyi biztonsági adatlapok
www.xerox.com/office/businessresourcecenter
Templates, tips, and tutorials
Šablony, tipy a výukové programy (pouze
v angličtině)
Szablony, wskazówki i samouczki (tylko w języku
angielskim)
Sablonok, tippek és bemutatók (csak angolul)
Troubleshoooting
Troubleshoooting
16
 Loading...