

Page 1

The Xerox
DocuPrint NC60
Network Color Laser Printer
User Guide
Version 1.0
Page 2

Copyright protection claimed includes all forms and
matters of copyrightable materials and information now
allowed by statutory or judicial law or hereinafter granted,
including without limitation, material generated from the
software programs which are displayed on the screen such
as styles, templates, icons, screen displays, looks, etc.
Printed in the United States of America.
XEROX® and all Xerox product names and product
numbers mentioned in this publication are registered
trademarks of the Xerox Corporation. Other company
trademarks are also acknowledged. PCL is a trademark of
the Hewlett-Packard Company. MS, MS-DOS, Windows
NT, Microsoft LAN Manager, Windows 95 and
Windows 98 are trademarks of Microsoft Corporation.
Adobe, Adobe Type Manager, Adobe PageMaker, and
PostScript are trademarks of the Adobe Systems, Inc.
TrueType and Apple ColorSync are trademarks of Apple
Computer, Inc. OS/2 is a trademark of International
Business Machines Corporation. SunOS and Solaris are
trademarks of Sun Corporation. MacroMedia FreeHand is
a trademark of MacroMedia Corporation. QuarkXpress is a
trademark of Quark Corporation.
PANTONE® and other Pantone, Inc. trademarks are the
property of Pantone, Inc. © Pantone, Inc., 1999
This printer contains an emulation of the Hewlett Packard
PCL 5C command language (recognizes HP PCL 5C
commands) and processes these commands in a manner
compatible with Hewlett Packard LaserJet printer
products.
This product includes an implementation of LZW licensed
under U.S. Patent 4,558,302.
Changes are periodically made to this document.
Technical updates will be included in subsequent editions.
© 1998, 1999 by Xerox Corporation. All rights reserved.
Page 3

Contents i
Safety Notes ................................................................. i
Note, Caution and Warning Symbols ....................................... ii
Electrical Safety ...................................................................... iii
Laser Safety ............................................................................ v
Maintenance Safety................................................................ vi
Operational Safety ................................................................ vii
Ozone Safety........................................................................... x
Chapter 1
Getting to Know Your Printer
Introduction ........................................................................ 1-2
Printer Features ................................................................... 1-3
Print Speed ...................................................................... 1-3
Resolution ........................................................................ 1-4
Resident Fonts .................................................................. 1-4
Connectivity ..................................................................... 1-5
Color Matching Systems ................................................... 1-7
Printer Driver Software ..................................................... 1-8
..................................
DocuPrint NC60 User Guide
1-1
Page 4

Printer Components............................................................. 1-9
External Components ....................................................... 1-9
Interface Connectors ...................................................... 1-11
Covers............................................................................ 1-12
Internal Components...................................................... 1-14
Moving Your DocuPrint NC60............................................ 1-15
Simple Move .................................................................. 1-16
Complex Move ............................................................... 1-17
DocuPrint Documentation ................................................. 1-18
Printed Documentation .................................................. 1-18
DocuPrint NC60 CD ....................................................... 1-19
Printer Management Software CD .................................. 1-19
Using the CDs ................................................................ 1-20
Chapter 2
Loading Print Media
Recommended Media .......................................................... 2-2
Paper ............................................................................... 2-3
Transparencies ................................................................. 2-3
Labels and Envelopes........................................................ 2-3
Loading the Media Tray....................................................... 2-4
How to Load the Tray With Paper ..................................... 2-4
How to Load the Tray With Letterhead and
Three-Hole Paper.............................................................. 2-7
How to Load the Tray With Transparencies ....................... 2-8
The Manual Bypass Feeder Slot............................................ 2-9
The Manual Bypass Feeder Tray...................................... 2-10
How to Attach the Manual Bypass Feeder Tray ............... 2-11
How to Use the Manual Bypass Feeder Slot ..................... 2-12
...............................................
2-1
DocuPrint NC60 User Guide
Page 5

Chapter 3
Printing
Introduction ........................................................................ 3-3
Printing Options .................................................................. 3-4
Printer Driver Options .......................................................... 3-5
PostScript Printer Driver Features ......................................... 3-8
PCL 5C Printer Driver Features ........................................... 3-38
...................................................................
PostScript vs. PCL 5C Printer Driver Feature Comparison ... 3-6
Paper/Output................................................................... 3-8
Fonts.............................................................................. 3-16
PostScript....................................................................... 3-20
Printer Configuration ...................................................... 3-26
Xerox Features ............................................................... 3-27
Graphics ........................................................................ 3-34
Layout ........................................................................... 3-37
Watermarks ................................................................... 3-37
Paper/Output................................................................. 3-38
Xerox Features ............................................................... 3-47
Graphics ........................................................................ 3-50
3-1
Fonts.............................................................................. 3-51
Overlays......................................................................... 3-54
Printer Configuration ...................................................... 3-56
Using the Control Panel ..................................................... 3-57
The Display.................................................................... 3-58
The Keys ........................................................................ 3-59
The Indicator Lights........................................................ 3-62
Menu Options ................................................................ 3-63
Print a Password Job ...................................................... 3-66
Delete a Password Job .................................................... 3-67
Print an Internal Page .................................................... 3-68
Using the Optional Media Server ....................................... 3-69
Print to File..................................................................... 3-70
How to Print From the Media Server ............................... 3-71
DocuPrint NC60 User Guide
Page 6

Internet Printing ................................................................ 3-74
IPP................................................................................. 3-74
Email Send and Receive .................................................. 3-74
Chapter 4
Chapter 5
Maintaining the Printer
Regular Printer Maintenance................................................ 4-2
Cleaning the Printer ......................................................... 4-2
Replacing Toner, Oil and Other Consumables ................... 4-3
Density and Color Balance Adjustment Procedure................. 4-4
Troubleshooting
Before You Begin Troubleshooting ........................................ 5-2
Hardware......................................................................... 5-3
Software .......................................................................... 5-3
Printer Maintenance......................................................... 5-3
Consumables ................................................................... 5-3
Error Messages .................................................................... 5-4
How to Clear A Media Jam................................................... 5-5
Media Jam Areas .............................................................. 5-6
Fuser/Output Area Jam ..................................................... 5-7
Input/Transfer Drum/Print Drum Area Jam ....................... 5-9
Tray/Manual Feed Slot Jam ............................................ 5-10
......................................................
...........................................
4-1
5-1
Appendix A
DocuPrint NC60 User Guide
Print Quality Problems ....................................................... 5-11
Additional Sources of Troubleshooting Assistance ............... 5-16
Printer Specifications
Physical Specifications ......................................................... A-2
Environmental Specifications ................................................ A-3
Electrical Specifications ........................................................ A-4
Performance Specifications................................................... A-5
Controller Specifications....................................................... A-6
...............................................
A-1
Page 7

Appendix B
Notices and Certifications
FCC Notices…USA ............................................................... B-2
Radio Frequency ............................................................... B-2
Certifications…Canadian..................................................... B-5
60 HZ, 115V.................................................................... B-5
European Markets ............................................................... B-6
CE Certification ................................................................ B-6
Ethernet/Token Ring Accessories ....................................... B-6
EN55022......................................................................... B-7
Safety Extra Low Voltage Safety Approval............................. B-8
.......................................
B-1
Appendix C
Printer Options
Optional Equipment ............................................................ C-2
How to Install Additional Memory ........................................ C-5
Memory Installation Procedure ......................................... C-7
........................................................
C-1
DocuPrint NC60 User Guide
Page 8

DocuPrint NC60 User Guide
Page 9

Safety Notes
The Xerox DocuPrint NC60 color laser printer and the
recommended consumable supplies have been designed
and tested to meet strict safety requirements. Attention to
the following notes will ensure the continued safe
operation of your printer.
Safety Notes ❖ i
Page 10
Note, Caution and Warning Symbols
Note, Caution and
Warning Symbols
Throughout this User Guide and the other DocuPrint
guides, several symbols are used to emphasize useful,
important and critical information. They are as follows:
This symbol indicates particularly useful or helpful
information about your printer.
This symbol indicates a caution against performing any
action that may damage your printer or degrade
performance.
ii ❖ DocuPrint NC60 User Guide
This symbol indicates a warning against
performing any action that may lead to physical
injury.
When used in a step, the above symbols appear smaller
but are of equal importance.
Page 11

Electrical Safety
Electrical Safety
• Use the power cord supplied with your DocuPrint
NC60 printer.
• Do not use a ground adapter plug to connect the
printer to a power source receptacle that lacks a ground
connection terminal.
• Plug the power cable directly into a properly grounded
electrical outlet. Do not use an extension cord. If you
do not know whether an outlet is grounded, ask an
electrician to check the outlet.
You may get a severe electrical shock if you do not
connect the grounding conductors correctly.
• Do not place the printer where people may step on the
power cable.
• Do not place objects on the power cable.
Safety Notes ❖ iii
Page 12

Electrical Safety
• Do not override or disable electrical or mechanical
interlocks.
• Do not obstruct the ventilation openings. These
openings are provided to prevent overheating of the
printer.
Do not push objects into slots and openings on the
printer. Making a contact with a voltage point or
shorting out a part could result in fire or electrical
shock.
• If you notice unusual noises or odors, switch off the
printer power immediately. Disconnect the power
cable from the electrical outlet. Call an authorized
Xerox service representative to correct the problem.
• If any of the following conditions occur, switch off the
printer power immediately, disconnect the power
cable, and call an authorized Xerox service
representative.
iv ❖ DocuPrint NC60 User Guide
— The power cable is damaged or frayed.
— Liquid is spilled into the printer.
— The printer is exposed to water.
— Any part of the printer is damaged.
The power cord is attached to the printer as a plug-in
device at the back of the printer. In the event it is
necessary to remove all electrical power from the printer,
disconnect the power cord from the power receptacle.
Page 13

Laser Safety
Laser Safety
The use of controls or adjustments, or the
performance of procedures other than those
specified herein, may result in a hazardous
radiation exposure.
This equipment complies with all applicable safety
standards. With specific regard to laser, the equipment
complies with performance standards for laser products
set by government agencies as a Class 1 laser product. It
does not emit hazardous light; the beam is totally
enclosed during all modes of customer operation and
maintenance.
When performing various operator functions, you may
see laser warning labels. These labels are for the service
mode and are placed on or near panels or shields that
require a tool for removal. These panels are not to be
removed.
Safety Notes ❖ v
Page 14

Maintenance Safety
Maintenance Safety
• Do not attempt any maintenance procedure that is not
specifically described in the documentation supplied
with your printer.
• Do not use aerosol cleaners. The use of supplies that
are not approved may cause poor performance and
could create a dangerous condition.
• Use the supplies and cleaning materials only as
directed in this manual. Keep all of these materials out
of the reach of children.
• Do not remove the covers or guards that are fastened
with screws unless you are installing optional
equipment. Power should be OFF when performing
these installation. Except for user installable options,
there are no parts that you can maintain or service
behind these covers.
• Follow the maintenance procedures provided in
Chapter 4: Maintaining the Printer.
vi ❖ DocuPrint NC60 User Guide
Page 15

Operational Safety
Operational Safety
Your Xerox printer and supplies were designed and tested
to meet strict safety requirements. These include safety
agency examination, approval, and compliance with
established environmental standards.
Your attention to the following safety guidelines will help
to ensure the continued safe operation of your printer.
• Use the material and supplies specifically designed for
your printer. The use of unsuitable materials may result
in poor performance and possibly a hazardous
situation.
• Follow all warnings and instructions marked on, or
supplied with, the printer, options and supplies.
• Place the printer in a dust free area where the
temperature range is 50° F to 90° F (10° C to 32° C) and
the relative humidity is 15% to 85%.
• Choose a location for the printer allowing sufficient
space around the printer for operation and
maintenance. The minimum recommended room size
is 10 cubic meters/353 cubic ft. or approximately 8 ft. x
8 ft. x 8 ft. / 242 cm x 242 cm x 242 cm.
• Place the printer in an area where there is adequate
space for ventilation and servicing. The recommended
minimal spacing for operations is 10 in. (25 cm) behind
the printer, 10 in. (25 cm) on either side of the printer,
and 24 in. (61 cm) in front of the printer. For Service,
the suggested spacing is 4 ft. x 4 ft. (1.2m x 1.2m).
Safety Notes ❖ vii
Page 16
Operational Safety
• Do not place the printer near a heat source.
• Do not place the printer in direct sunlight.
• Do not place the printer in line with the cold air flow
from an air conditioning system.
• Place the printer on a level, solid surface with adequate
strength for the weight of the machine. The machine
weight without any packaging materials is 89 pounds
(40 kg).
• The printer is heavy. Exercise care in moving or
relocating the printer. Follow the recommended
procedure when moving the printer from one location
to another. See the section “Moving Your DocuPrint
NC60” (page 1-15).
Do not tilt the printer. Tipping or moving the machine
will cause fuser oil spillage, which will permanently
damage your printer.
viii ❖ DocuPrint NC60 User Guide
• Do not put containers of coffee or other liquids onto
the printer.
• Do not block or cover the slots and openings on the
printer. Without adequate ventilation, the printer may
overheat.
Be careful when working in areas identified with a
warning symbol. These areas may be very hot and
could cause personal injury.
Page 17

Operational Safety
• Frequent operation of the on/off switch is not
recommended.
• Keep hands, hair, and neckties away from the exit feed
rollers.
• Do not remove a media tray while printing.
• Do not open the covers while printing.
• Do not switch off the printer power while printing.
• Do not move the printer while printing.
Safety Notes ❖ ix
Page 18

Ozone Safety
Ozone Safety
This printer produces ozone during normal operation.
The ozone produced is heavier than air, and the quantity
is dependent on copy volume. Providing the proper
environmental parameters, as specified in the Operational
Safety section of these Safety Notes, ensures that
concentration levels meet safe limits.
If you need additional information about ozone, request
the Xerox publication, OZONE, 600P83222, from your
Xerox Authorized Reseller or Xerox Support.
x ❖ DocuPrint NC60 User Guide
Page 19

Getting to Know
Your Printer Chapter1
Introduction ...................................................................... 1-2
Printer Features ................................................................. 1-3
Print Speed .................................................................... 1-3
Resolution ...................................................................... 1-4
Resident Fonts ................................................................ 1-4
Connectivity ................................................................... 1-5
Color Matching Systems ................................................. 1-7
Printer Driver Software ................................................... 1-8
Printer Components ........................................................... 1-9
External Components ..................................................... 1-9
Interface Connectors .................................................... 1-11
Covers .......................................................................... 1-12
Internal Components .................................................... 1-14
DocuPrint Documentation ............................................... 1-18
Printed Documentation ................................................ 1-18
DocuPrint NC60 CD ..................................................... 1-19
Using the CDs .............................................................. 1-20
Chapter 1: Getting to Know Your Printer ❖ 1-1
Page 20

Introduction
Introduction
In this chapter, you will become familiar with the features
of your printer and learn where to locate specific printer
parts.
Before you use your printer, make sure that you perform
all of the steps outlined in the Quick Installation Guide that
came with your printer, and connect the necessary print
cables.
The Xerox DocuPrint NC60 color laser printer provides
brilliant full color laser prints on ordinary paper.
Recognizing that you may have special needs, Xerox
offers several optional equipment items to better meet
your requirements. These are explained in detail in
Appendix C: Printer Options.
Xerox, or your Xerox authorized reseller, may have
provided some or all of these options. First verify your
exact equipment options before proceeding further. If you
see features described in this section that are not available
with the equipment you have, you can easily add them
yourself. For more information, refer to the separate
Supplies/Options Guide provided with your printer.
1-2 ❖ DocuPrint NC60 User Guide
Page 21

Printer Features
Printer Features
Your DocuPrint NC60 has many special features that
allow you to achieve the color printing results you need
for your specific print job. Features vary slightly according
to the options you are using and the memory installed in
your printer. This section will help you become familiar
with your printer's features and capabilities.
Print Speed
Print speeds for printing on standard (Letter/A4) media
are as follows:
• Monochrome (Black & White):
— Fast Black mode: 16 PPM (pages per minute)
— Standard mode: 12.2 PPM
• Color (4-pass, CMYK): 3 PPM
• Fast Blue (2-pass, CK): 6.1 PPM (PostScript only)
• ZipColor (3-pass, CMY): 4 PPM (PostScript only)
• Full color transparencies: 1.7 PPM
• Monochrome transparencies: 6.1 PPM
Chapter 1: Getting to Know Your Printer ❖ 1-3
Page 22

Printer Features
Resolution
Resident Fonts
The resolution of your printed image is determined by the
number of printed dots per inch (dpi). The DocuPrint
NC60 provides the following resolution modes:
• Standard Mode (600 x 600 x 1 dpi)
• 1200 Quality Mode (PostScript only)
The following fonts are included with your printer:
• 35 Adobe Type 1 fonts (for use with PostScript only)
• 35 Intellifonts (for use with PCL 5C and PostScript)
• 10 TrueType fonts (for use with PCL 5C and PostScript)
PostScript Level 3 provides a total of 147 downloadable fonts.
These are available on the DocuPrint NC60 CD-ROM.
1-4 ❖ DocuPrint NC60 User Guide
Page 23

Printer Features
Connectivity
The DocuPrint NC60 supports the Win 95/Win98
Plug & Play standards and has the following standard
interfaces:
• Parallel port (IEEE 1284-B), ECP compatible
• Serial port (DB9), RS-232C
• 10 MB Ethernet (10Base-T & 10Base-2)
Optional Interfaces include:
•100 MB Ethernet
• Token Ring (UTP & DB9)
The following network Operating Systems are supported:
•Novell
— NetWare 3.1x, 4.1x (NDS & BEM), 5.0 (NDS & BEM)
—NDPS 1.1
•Microsoft
— Windows for Workgroups 3.1x (Peer-to-peer)
— Windows 95 (Peer-to-peer)
— Windows 98 (Peer-to-peer)
— Windows NT 3.51 and 4.0
•UNIX
—Sun OS 4.x
—Sun Solaris 2.4+
—HP/UX 9.x+
—IBM AIX 4.x
Chapter 1: Getting to Know Your Printer ❖ 1-5
Page 24

Printer Features
•IBM
—Warp Server 4.0
—LAN Server 4.0
— OS/2 Warp 4.0 (Peer-to-peer)
— OS/2 Warp Connect 3.0 (Peer-to-peer)
•Apple
— AppleTalk
The following network protocols are supported:
• Novell IPX
• AppleTalk (EtherTalk/TokenTalk)
•NetBEUI
•TCP/IP
•SNMP
• DLC/LLC
• HTTP
1-6 ❖ DocuPrint NC60 User Guide
Page 25

Printer Features
Color Matching
Systems
The following host-based color matching systems can be
used with the DocuPrint NC60:
•PANTONE
• Apple ColorSync 2.0 and 2.5
• Windows Image Color Matching (ICM) 1.0 and 2.0
For more detailed information on printer specifications and
connectivity, consult the System Administrator Guide on the
DocuPrint CD.
Chapter 1: Getting to Know Your Printer ❖ 1-7
Page 26

Printer Features
Printer Driver
Software
The printer driver is a piece of software that is loaded on
your workstation. Use of the proper printer driver for your
operating system and printer model is essential for getting
the best in color printing. It is important for two reasons:
1. Printer drivers provide access to features unique to
your printer. Although there are many print options
and features that are a part of the software
applications you use, your printer also contains many
distinctive features of its own. For example, your
DocuPrint NC60 drivers enable you to use the Xerox
Intelligent Color feature that is available in your
printer.
2. To print effectively, it is necessary for you to install
the correct printer driver. You can use either the
PostScript printer driver (recommended) or the
PCL 5c printer driver. The PostScript printer driver
allows access to more of the exclusive and powerful
Xerox printing features. For more information about
available drivers and operating systems supported by
your DocuPrint NC60, see the System Administrator
Guide on the DocuPrint CD.
1-8 ❖ DocuPrint NC60 User Guide
Application specific files that enable you to use your DocuPrint
NC60 with PageMaker, FreeHand, and QuarkXpress are
included in the installation software.
Page 27
Printer Components
Printer Components
External Components
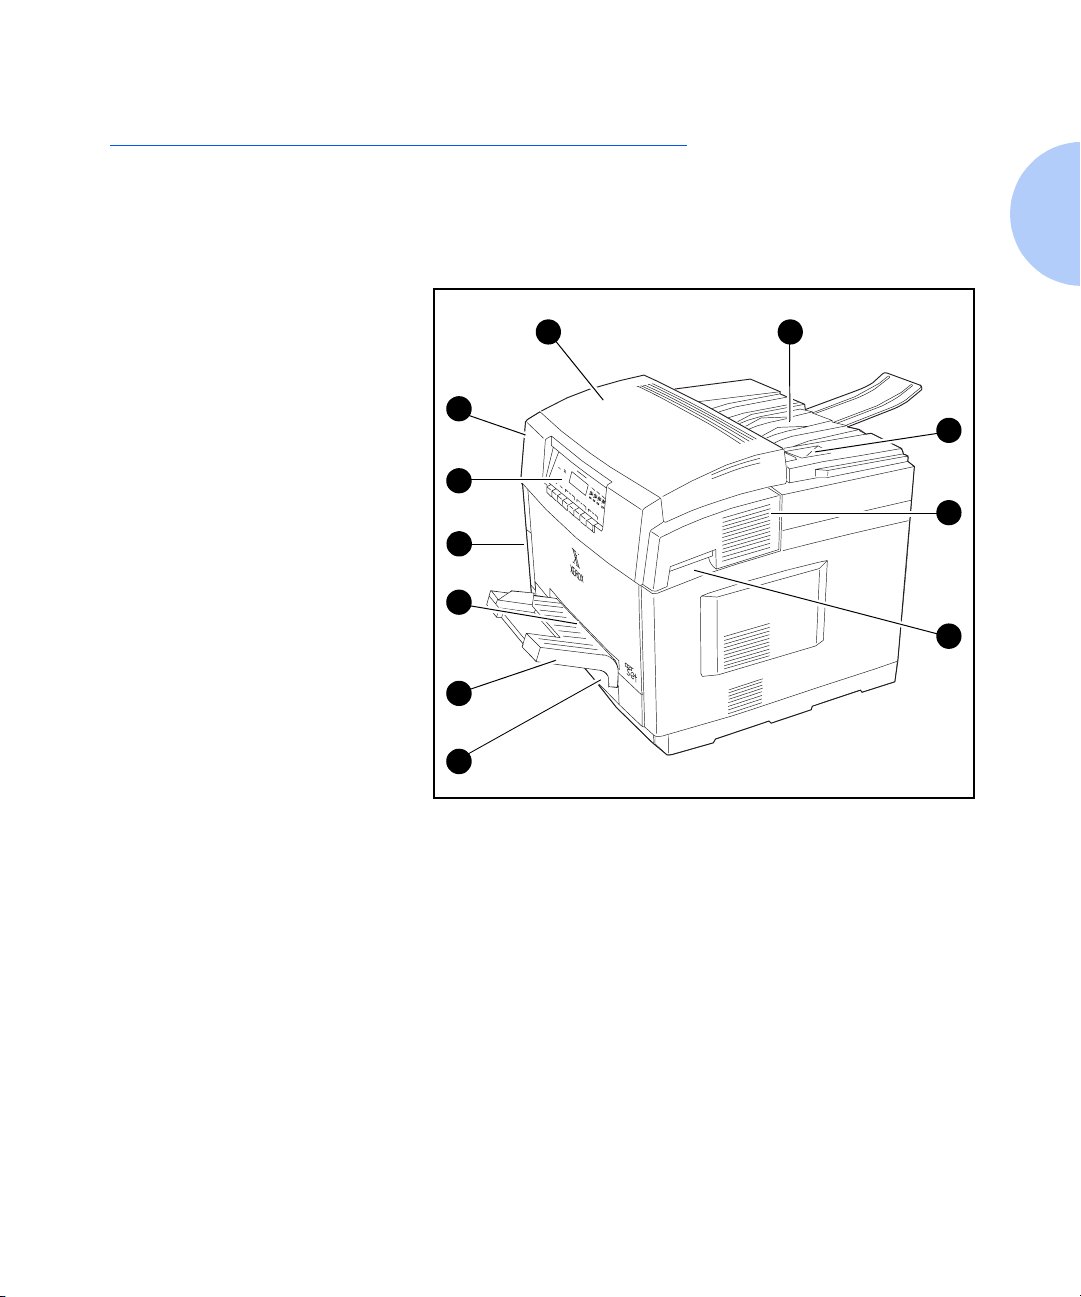
Front View
Fuser Cover
1
Control Panel
2
Media Server (optional)
3
Manual Bypass Feeder Slot
4
Manual Bypass Feeder Guide
5
Tray 1
6
Media Exit Area
7
Top Rear Cover Release
8
Front Cover
9
Front Cover Releases (2)
10
• Optional Lower Feeder not
shown
(see
Appendix C: Printer
).
Options
Use Figures 1.1 and 1.2 to identify the main exterior
components of your DocuPrint NC60.
Figure 1.1 Printer Components, Front View
1 7
10
8
2
9
3
4
10
5
6
Chapter 1: Getting to Know Your Printer ❖ 1-9
Page 28

Printer Components
Rear View
Figure 1.2 Printer Components, Rear View
Power Cord Receptacle
1
On/Off Switch
2
Lower Feeder Electrical
3
Connection
Safety Certification and
4
Voltage Information Label
Controller Pullout Panel
5
Screws
Interface Connectors
6
(see page 1-11)
5
1
2
3
4
6
5
1-10 ❖ DocuPrint NC60 User Guide
Page 29
Printer Components
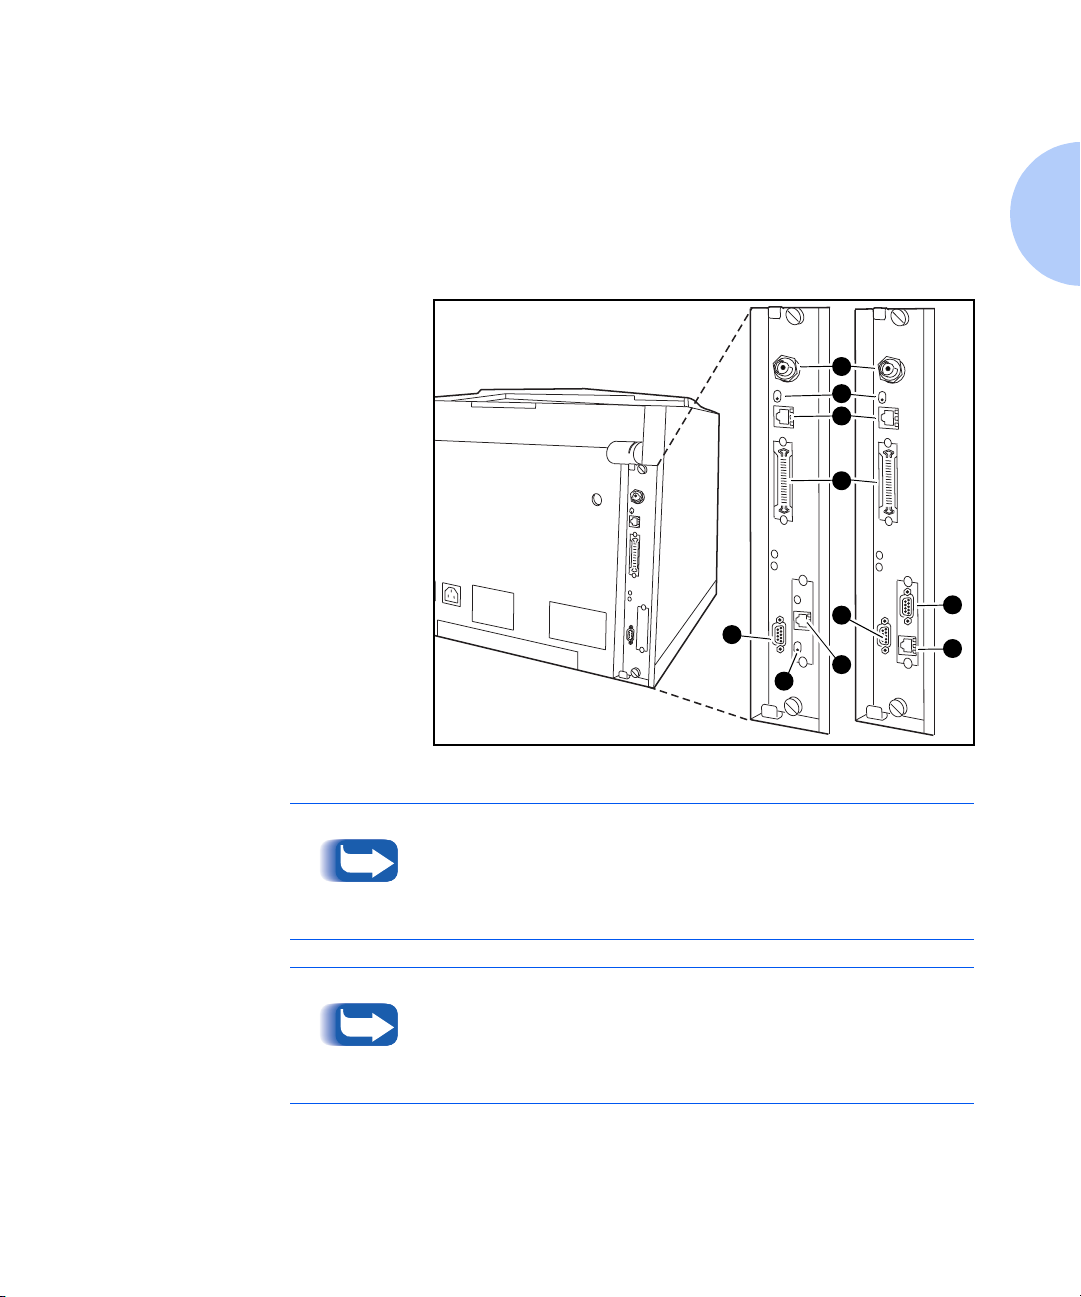
Interface Connectors
Network Indicator
1
LEDs
Ethernet (10MB)
BNC
2
RJ45
3
Parallel
P1284B
4
Serial
DB9
5
Options
Ethernet (10/100)
RJ45
6
Token Ring
DB9
7
RJ45
8
Your printer interface connectors are located on the back
of the printer as shown in Figure 1.3. Your printer comes
equipped with a standard Centronics parallel connector,
serial connector, and 10 MB Ethernet. In addition, space is
provided for an optional Network Interface card (either
Ethernet 10/100 or Token Ring).
Figure 1.3 Connection Interface Area
2
1
3
4
5
5
6
1
7
8
The installation of the optional 10/100 Ethernet card or Token
Ring card will disable the standard 10 MB Ethernet connector.
Detailed information about Network Interface Connectivity
can be found in the Technical Information Guide on the
Printer Management Software CD.
Chapter 1: Getting to Know Your Printer ❖ 1-11
Page 30

Printer Components
Covers
The DocuPrint NC60 has three covers, which are
identified in Figure 1.1 on page 1-9. Use the following
instructions to open each cover and gain access to the
internal components of your printer.
To Open the Front Cover:
Simultaneously grasp the two latches, located on the front
1
cover, and pull up to release them.
Do not attempt to open the Front Cover if the
paper tray is partially removed. Permanent
damage will occur.
Gently pull the cover up and toward you until it rests in a
2
lowered position.
1-12 ❖ DocuPrint NC60 User Guide
Do not leave the covers open for an extended period of
time. Prolonged exposure to light will damage the print
drum.
Page 31

Printer Components
To Open the Top Rear Cover:
Lift the release button, located on the Top Rear Cover.
1
Lift the cover up until it stands in an upright position.
2
To Open the Fuser Cover:
The Front Cover must be opened before you can
open the Fuser Cover.
Press the green Fuser Cover release button, located on the
1
Front Cover as shown.
Lift the Fuser Cover straight up and back until it rests in
2
an upright position.
Chapter 1: Getting to Know Your Printer ❖ 1-13
Page 32

Printer Components
Internal Components
Ozone Filter
1
Fuser Area
2
Fuser Cleaner Roller
3
Fuser Oil Bottle
4
Toner Collector
5
Print Drum
6
Black Toner Refill Doors
7
Color Toner Refill Doors
8
Serial Number Plate
9
Color Developer Unit
10
Black Developer Unit
11
Figure 1.4 shows how the DocuPrint NC60's internal
components are arranged. Two important groups of
internal components of your printer are the Consumables
(replenishable substances used by the printer that should
be kept on hand) and Maintenance Items (the parts that
require replacement). See the separate Supplies/Options
Guide to order these items.
Figure 1.4 Internal view of components
4
3
521
6 7
8 9
1011
1-14 ❖ DocuPrint NC60 User Guide
Instructions on how to replace Consumables and Maintenance
Items are packaged with each replacement item.
Page 33

Moving Your DocuPrint NC60
Please use caution when moving your printer.
If you need to move/relocate your printer, refer to the
following descriptions to determine which type of move
is desired.
•Simple Move
If you want to move the printer within the same
building (i.e., office to office, different floor), refer to
the Simple Move procedure.
•Complex Move
Moving Your DocuPrint NC60
If you want to move the printer via a freight carrier,
is highly recommended that you use the Xerox Repack
Kit to avoid printer damage
Options Guide for the proper part number.
. Refer to the Supplies/
it
Chapter 1: Getting to Know Your Printer ❖ 1-15
Page 34

Moving Your DocuPrint NC60
Simple Move
Power off the printer.
1
After turning off the printer, allow the Fuser
to cool to a safe temperature before handling.
Disconnect the power cord and interface cables.
2
Open the Front Cover (see page 1-12).
3
Open the Top Cover (see page 1-13) and remove the Fuser
4
assembly.
Place the Fuser in a separate box and do not allow the
5
Fuser to tip. Keep the Fuser level during transportation.
It is critical to keep the Fuser level at all times
during transportation. Permanent damage can
occur to the printer if the Fuser is allowed to tip,
spill oil, and be placed back into the printer.
Close the Top and Front Covers.
6
When the printer arrives at its new location, reinstall the
7
Fuser assembly.
If there is evidence of oil on the outside of the
Fuser, or if you suspect oil has been spilled, DO
NOT PLACE THE FUSER INTO THE PRINTER. A new
Fuser should be installed.
1-16 ❖ DocuPrint NC60 User Guide
Page 35

Moving Your DocuPrint NC60
Complex Move
It is highly recommended that you use the Xerox
Repack Kit for carrier shipments. Failure to do so
could result in permanent damage to the printer
Refer to the Supplies/Options Guide for the proper part
number of the Xerox Repack Kit. Follow the
instructions included with the Repack Kit, which
contains a shipping carton, packaging materials and
detailed instructions to prepare your printer for carrier
shipment.
.
Chapter 1: Getting to Know Your Printer ❖ 1-17
Page 36

DocuPrint Documentation
DocuPrint Documentation
Your DocuPrint NC60 is packaged with documentation in
both printed form and on CD. There are two CDs:
• DocuPrint NC60 CD, which contains documentation
and printer drivers.
• Printer Management Software CD, which contains
various Xerox-provided client software and the
documentation for them.
This section serves as a roadmap for the printed and CD
documentation
Printed
Documentation
Your DocuPrint NC60 was packaged with the following
pieces of printed documentation:
• Quick Install Guide, which shows you how to get
your printer up and running.
• User Guide (this book), which provides you with the
basic information needed to use your printer. (More
detailed information is contained in the System
Administrator Guide on your DocuPrint NC60 CD.)
• Quick Network Install Guide, which briefly shows
you how to connect your printer to a network in your
specific environment. (More detailed Network/
Environment information is contained in the Technical
Information Guide on your Printer Management
Software CD.)
1-18 ❖ DocuPrint NC60 User Guide
Page 37

DocuPrint Documentation
DocuPrint NC60 CD
Printer Management
Software CD
Your DocuPrint NC60 was also packaged with a CD that
contains the following pieces of documentation as PDF
files:
• User Guide (electronic version of this book)
• System Administrator Guide
The System Administrator Guide contains a
considerable amount of more detailed information.
• Supplies/Options Guide
DocuPrint NC60 printer drivers are also contained on this CD.
The majority of driver documentation is provided via the Help
files included with the drivers.
User Guides are provided for each of the major printer
management utilities. Consult the booklet enclosed with
the CD for more information.
Since both the DocuPrint NC60 CD and the Printer
Management Software CD contain so much important
information, please ensure that you save them and keep them
in a safe place.
Chapter 1: Getting to Know Your Printer ❖ 1-19
Page 38

DocuPrint Documentation
Using the CDs
The documentation on the Product CD is provided as PDF
files, which are opened in Adobe Acrobat Reader
(provided on the CD if you do not already have it
installed). These files contain hypertext links that enable
you to jump from the Table of Contents or Index directly
to the page where you are looking for information, as well
as from page to page where information is
cross-referenced. Simply move the cursor over a hypertext
link and it changes to a pointing finger. Then click on the
link to jump to the link’s destination.
The PDF files also enable you to print the specific pages
you need, rather than printing an entire chapter or
manual.
Both the DocuPrint NC60 CD and the Printer
Management Software CD are provided with installation
booklets in their respective jewel cases. You can also refer
to the ReadMe files on the CDs for more information.
1-20 ❖ DocuPrint NC60 User Guide
Page 39

Loading Print Media Chapter2
Recommended Media ........................................................ 2-2
Paper ............................................................................. 2-3
Transparencies ............................................................... 2-3
Labels and Envelopes ...................................................... 2-3
Loading the Media Tray ..................................................... 2-4
How to Load the Tray With Paper ................................... 2-4
How to Load the Tray With Letterhead and Three-Hole Paper
2-7
How to Load the Tray With Transparencies ..................... 2-8
The Manual Bypass Feeder Slot .......................................... 2-9
The Manual Bypass Feeder Tray .................................... 2-10
How to Attach the Manual Bypass Feeder Tray ............. 2-11
How to Use the Manual Bypass Feeder Slot ................... 2-12
Chapter 2: Loading Print Media ❖ 2-1
Page 40

Recommended Media
Recommended Media
Your DocuPrint NC60 will produce brilliant color images
on a wide variety of print media. Carefully choosing the
media for your printer is important in achieving the very
best images and in ensuring trouble-free operation.
Selecting quality paper and transparencies is
recommended for avoiding potential problems with
heat-intensive printing. Xerox strongly recommends that
you only use media and transparencies designed for use in
color laser printers. Tell this to your suppliers.
The paper you use should be dust-free, and have cleanly
cut edges. Don't use curled, wrinkled, or damp paper. Also
note that smoother surface paper will produce sharper
output resolution and better image detail. For the best
results, DO NOT use recycled paper, textile transfers,
glossy paper, photographic paper, embossed letterhead
paper, rough textured paper, linen, vellum or pre-printed
forms. Pre-printed letterhead paper designed for use in
laser printers or color copiers will perform well.
2-2 ❖ DocuPrint NC60 User Guide
Page 41

Recommended Media
Paper
Transparencies
Labels and Envelopes
16 - 24 lb. (60-90 g/m2) can be fed automatically via the
universal media tray. Several types of papers are sold by
Xerox resellers, or Xerox. Not all media is available in all
locations, though. Some of the popular Xerox sold papers
include Xerox 4024DP, Color Expressions, Xerox 60,
Xerox 80, and Xerox Colotech 90.
Your DocuPrint NC60 is ideal for creating bright, vivid
color transparencies, for use with an overhead projector.
Best results will be obtained by using Xerox brand
transparencies, which are especially designed for the best
images. Note that transparencies can be printed from
either the Manual Bypass Feeder Slot or the Universal
Media Tray.
For best performance do not load more than 75 transparencies
in the universal media tray or exceed the transparency fill line
indicated in the tray.
Black and white images can easily be printed on
laser-quality labels and envelopes from the Manual Bypass
Feeder Slot. DO NOT attempt to print labels or
envelopes in color, or via the Universal Media Tray, as
jams will occur. Best results will be obtained by carefully
selecting media that is designed for use in laser printers.
Attempting to print in color on labels could result in
damage to your printer.
Chapter 2: Loading Print Media ❖ 2-3
Page 42

Loading the Media Tray
Loading the Media Tray
How to Load the Tray
With Paper
The universal paper tray can be used for standard paper
weights of 16 - 24 lb. (60-90 g/m
supported paper sizes:
• Letter (8.5x11 in.)
• A4 (210x297 mm)
• Legal (8.5x14 in.)
• Executive (7.25x10.5 in.)
• A5 (148x210 mm)
• Invoice (5.5x8.5 in.)
• SP. Folio (216x315 mm)
• Folio (8.5x13 in.)
•8x10
• B5 (176x250 mm)
The printer automatically detects the standard sizes
(letter, A4, legal and executive). If none of the standard
sizes is detected, the printer utilizes the custom paper size
set in the Control Panel. You must set this to the current
paper size (see Chapter 3: Printing).
2
) and any of the
The DocuPrint NC60 is not designed to print
double-sided (duplex) prints. Attempting to produce
double-sided prints will damage your printer.
2-4 ❖ DocuPrint NC60 User Guide
The maximum capacity for transparencies in the
universal paper tray is 75 or the maximum transparency
fill line on the tray. Attempting to overload the tray may
cause jams.
Page 43

Loading the Media Tray
To load the tray with paper:
Grasp the handle of the tray, and completely remove it
1
from the printer.
Do not attempt to load paper into a partially
removed tray, as this may bend the paper tabs on
the tray and lead to paper jams.
Adjust the side and back edge guides to accommodate the
2
paper to be loaded. To adjust the back edge guide,
carefully pull the guide as shown, place it into the holes
indicated for the size desired, and then gently press the
guide securely into the holes.
Press down on the metal pressure plate until it is flat
3
against the bottom of the tray.
Chapter 2: Loading Print Media ❖ 2-5
Page 44
Loading the Media Tray
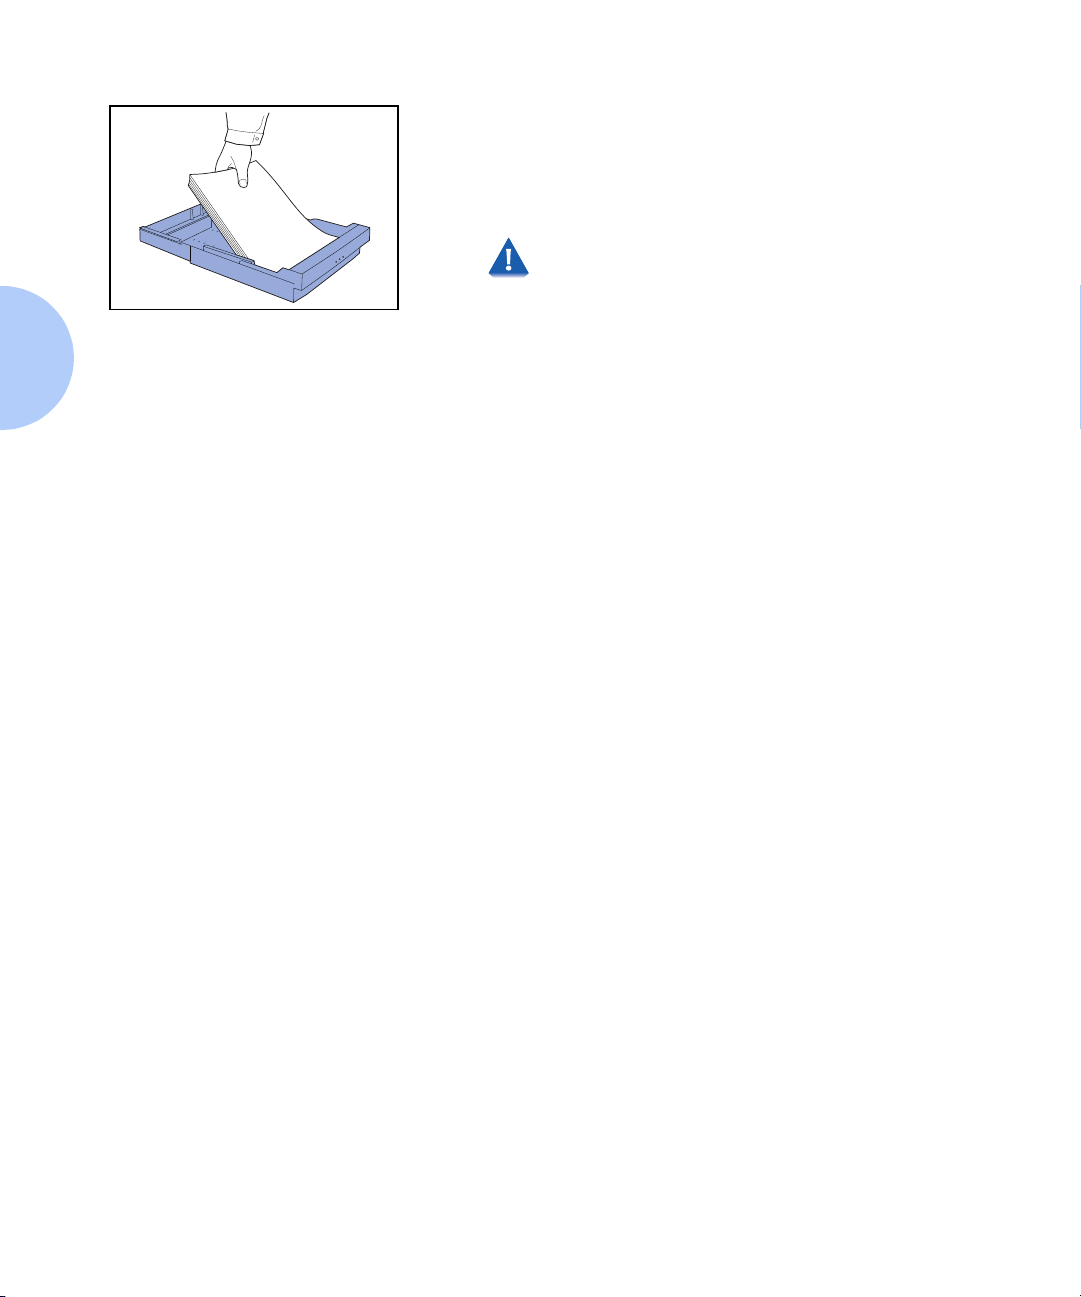
Gently fan the paper and place it into the tray so that the
4
side to be printed is facing up and the edge of the paper
nearest to the tray handle is inserted under the tabs as
shown. Do not fill the tray above the maximum fill line
indicated.
Do not place the paper in the tray and attempt to
force it under the tabs at the front of the tray. This
will bend the tabs which may result in paper jams.
Reinsert the tray into the printer.
5
2-6 ❖ DocuPrint NC60 User Guide
Page 45
Loading the Media Tray
How to Load the Tray
With Letterhead and
Three-Hole Paper
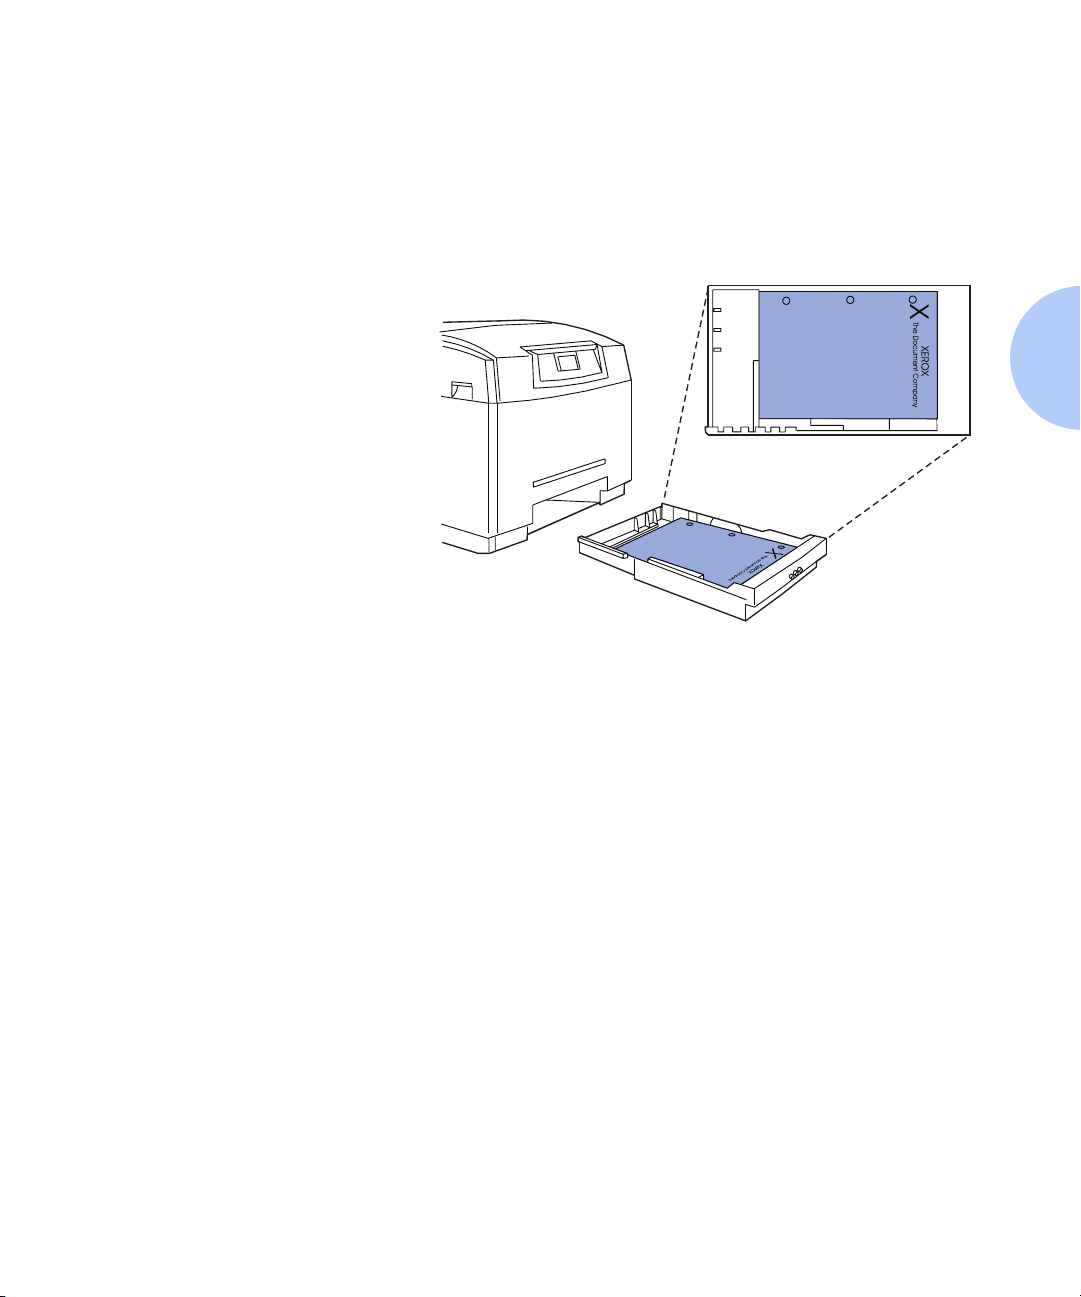
Load letterhead and three-hole paper in the same way
that you load plain paper (with the printed side up). The
typical orientation of letterhead and three-hole paper is
shown in Figure 2.1.
Figure 2.1 Letterhead and Three-Hole Paper Loaded In
The Media Tray
Chapter 2: Loading Print Media ❖ 2-7
Page 46

Loading the Media Tray
How to Load the Tray
With Transparencies
Load transparencies in the same way that you load paper.
Use recommended transparencies for optimum
performance. Do not fill the tray with more than 75
sheets or above the maximum transparency fill mark.
Your DocuPrint NC60 automatically detects transparencies at
the time of printing and adjusts the print settings to optimize
transparency quality.
Transparency Tray
If your printer has two trays, you can designate one of the
trays as the transparency tray. The printer will
automatically feed from the designated transparency tray
if the media is selected as “Transparency” in the driver.
You can designate a tray as the “Transparency Tray”
through either the printer's Control Panel or the
CentreWare DP software or CentreWare Internet Services.
See the System Administrator Guide on the DocuPrint NC60
CD for more information about how to designate a tray as
a Transparency Tray by using the Control Panel. To
designate a tray by using CentreWare DP, refer to the
CentreWare DP User Guide on the Printer Management
Software CD.
2-8 ❖ DocuPrint NC60 User Guide
If you have a designated transparency tray, you can very easily
insert separator sheets after each transparency. See
Chapter 3: Printing for details.
Page 47

The Manual Bypass Feeder Slot
The Manual Bypass Feeder Slot, located on the front of
the printer just above the media tray, allows you to print
on:
• A single sheet of media 16 to 24 lb. (60 - 90 g/m
letterhead paper.
•A transparency.
• A sheet of laser-quality labels (print in black only).
• A laser-quality envelope (print in black only).
The Manual Bypass Feeder Slot
2
) or
• A cover for a document set on a different stock from
16 - 24 lb. (60 - 90 g/m
In order to use the Manual Bypass Feeder Slot, you must attach
the Manual Bypass Feeder Tray and feed the media one sheet
at a time.
Inserting a sheet of media in the Manual Bypass Feeder Slot
will force printing on that sheet. This will override all
application, driver or printer settings.
2
) or letterhead paper.
Chapter 2: Loading Print Media ❖ 2-9
Page 48

The Manual Bypass Feeder Slot
The Manual Bypass
Feeder Tray
Your DocuPrint NC60 comes with a removable Manual
Bypass Feeder Tray. This tray attaches to the front of the
printer and guides individual sheets or envelopes as they
enter the Manual Bypass Feeder Slot. The Manual Bypass
Feeder Tray aligns each sheet correctly and helps to ensure
that it enters the printer smoothly.
Figure 2.2 The Manual Bypass Feeder Tray
2-10 ❖ DocuPrint NC60 User Guide
Page 49

The Manual Bypass Feeder Slot
How to Attach the
Manual Bypass
Feeder Tray
To attach the Manual Bypass Feeder Tray to the front of
the printer:
Orient the tray so that the edge with the two small tabs
1
and the support arms is facing the printer.
Align the tabs on the edge of the tray with the
2
indentations just inside of the Manual Bypass Feeder Slot,
and insert the edge of the tray into the slot.
Press gently on the top of the tray above the tabs until the
3
tabs fit securely into the indentations.
Rest the support arms against the front of the printer.
4
Chapter 2: Loading Print Media ❖ 2-11
Page 50

The Manual Bypass Feeder Slot
How to Use the
Manual Bypass
Feeder Slot
Media inserted in the Manual Bypass Feeder Slot overrides
the Paper Source selection in your driver. You can use this
to print a page (or cover) in a document set on a different
media than the remainder of the document. Simply insert
the media before the page is printed.
To print normally from the Manual Bypass Feeder Slot:
In your printer driver:
Select Manual Feed as the Paper Source in the DocuPrint
1
NC60 printer driver.
For envelopes or labels, select the correct option in the
2
Media Type in the DocuPrint NC60 printer driver.
At your printer:
When prompted by the Control Panel message, place the
3
media print-side down on the Manual Bypass Feeder Tray.
Before you load a sheet of labels into the Manual
Bypass Feeder Slot, make sure that the edges of the
labels are not loose or sticking up. Loose edges can
get stuck when the sheet passes through the
printer and can cause jams that are difficult to
clear.
2-12 ❖ DocuPrint NC60 User Guide
Page 51

The Manual Bypass Feeder Slot
Place the media against the right edge of the Manual
4
Bypass Feeder Tray. Push the side edge guide against the
left side of the media. The media should be flat against
the tray without any wrinkles or bent edges.
Push the media into the Manual Bypass Feeder Slot. The
5
media will be pulled into the printer.
The DocuPrint NC60 is not designed to print
double-sided (duplex) prints. Attempting to produce
double-sided prints will damage your printer.
Chapter 2: Loading Print Media ❖ 2-13
Page 52

2-14 ❖ DocuPrint NC60 User Guide
Page 53

Printing Chapter3
Introduction ...................................................................... 3-3
Printing Options ................................................................ 3-4
Printer Driver Options ........................................................ 3-5
PostScript vs. PCL 5C Printer Driver Feature Comparison . 3-6
PostScript Printer Driver Features ....................................... 3-8
Paper/Output ................................................................. 3-8
Fonts ............................................................................ 3-16
PostScript ..................................................................... 3-20
Printer Configuration .................................................... 3-26
Xerox Features ............................................................. 3-27
Graphics ...................................................................... 3-34
Layout ......................................................................... 3-37
Watermarks ................................................................. 3-37
PCL 5C Printer Driver Features ......................................... 3-38
Paper/Output ............................................................... 3-38
Xerox Features ............................................................. 3-47
Graphics ...................................................................... 3-50
Fonts ............................................................................ 3-51
Overlays ....................................................................... 3-54
Printer Configuration .................................................... 3-56
Chapter 3: Printing ❖ 3-1
Page 54

Printing
Using the Control Panel ................................................... 3-57
The Display .................................................................. 3-58
Menu Options .............................................................. 3-63
Using the Optional Media Server ..................................... 3-69
Print to File ................................................................... 3-70
How to Print From the Media Server ............................. 3-71
Internet Printing .............................................................. 3-74
IPP ............................................................................... 3-74
Email Send and Receive ................................................ 3-74
3-2 ❖ DocuPrint NC60 User Guide
Page 55

Introduction
Introduction
This chapter discusses the following issues related to
printing:
• The use of printer drivers
Features of the PostScript and PCL printer drivers are
compared and described.
• The use of the Control Panel
Basic functionality is described, including procedures
for printing and deleting password-protected files, and
printing internal pages.
• The use of the optional Media Server
This section discusses printing files directly from a disk
in the optional Media Server.
• Internet Printing
There is a brief discussion of web printing through IPP,
Xerox’s Workset technology that provides built-in
Email Send and Receive capability, distribute and print
functionality and remote monitoring.
Chapter 3: Printing ❖ 3-3
Page 56

Printing Options
Printing Options
With the DocuPrint NC60, you have a variety of options
for submitting a file for printing, depending on your
environment and preferences. These options are listed in
Table 3.1. For more detailed information on a particular
option, refer to the applicable User Guide located on the
Printer Management CD.
Table 3.1 DocuPrint NC60 Printing Options
Method Option Description
Print directly from
application.
Print via a print file
submission.
Direct connected printing The port is set to LPT1: (or equivalent)
Through a network The port is set to a network queue.
Through the mail port monitor The port is set to the Xerox mail port monitor and
the printer has an Email address.
Media Server Copy the print file to a floppy disk for use in the
optional Media Server.
CentreWare DP Send the print file to the printer using CentreWare
DP (Novell and NT networks).
CentreWare for SUN/Solaris Send the print file to the printer using CentreWare
for SUN/Solaris (UNIX SUN or Solaris platforms).
Xerox CentreWare TTY for UNIX Send the print file to the printer using CentreWare
TTY for UNIX (other supported UNIX platforms).
CentreWare Internet Services Send the print file to the printer using CentreWare
Internet Services (embedded Web server).
Attachment to a mail note Send the print file to the printer as an attachment to
a mail note (requires printer have an Email address).
3-4 ❖ DocuPrint NC60 User Guide
Page 57

Printer Driver Options
Your DocuPrint NC60 printer offers many special features
that are designed to produce the highest quality color and
black & white prints while giving you the flexibility you
need to print a variety of documents. These features are
accessed through the NC60 printer drivers and are
described in this chapter.
The way these features are accessed depends on both the
DocuPrint NC60 printer driver that you are using and
your operating system. Not all the features described in
this chapter are available in all operating systems. Use the
descriptions in this chapter as a general guide to help you
take advantage of the features available.
The information in this chapter is organized by printer
driver type (by the features specific to the PostScript
printer drivers and the features specific to the PCL 5C
printer drivers). Not all features are available for all
drivers. Refer to the section that matches the printer
driver you use.
Printer Driver Options
Chapter 3: Printing ❖ 3-5
Page 58

Printer Driver Options
PostScript vs. PCL 5C
Printer Driver Feature
Comparison
Table 3.2 DocuPrint NC60
PostScript vs. PCL 5C
Feature
Secure Print
Proof Print
Hold Job
Intelligent Color
Vivid Color
Photo Mode
ZipColor
Fax Friendly Black
Fast Blue
Expert Color Control
Document Halftone
1200 Quality
ImageFix
IntelliRes
Black Overprint
1
1
PostScript PCL 5C
Yes (see page 3-8) Yes (see page 3-39)
Yes (see page 3-9) Yes (see page 3-40)
Yes (see page 3-15) Yes (see page 3-46)
Yes (see page 3-27) Yes (see page 3-47)
Yes (see page 3-27) No
Yes (see page 3-27) Yes (see page 3-47)
Yes (see page 3-27) No
Yes (see page 3-28) No
Yes (see page 3-28) No
Yes (see page 3-30) No
Yes (see page 3-31) No
Yes (see page 3-31) No
Yes (see page 3-32) No
Yes (see page 3-32) No
Yes (see page 3-32) No
3-6 ❖ DocuPrint NC60 User Guide
Edge Smoothing
Enhanced Alignment
Watermarks
Page Overlays
Yes (see page 3-33) Yes
Yes (see page 3-33) Yes
Yes (see page 3-37) No
No Yes (see page 3-54)
Table 3.2 Page 1 of 2
Page 59

Table 3.2 DocuPrint NC60
PostScript vs. PCL 5C
Printer Driver Options
(continued)
Feature
Separators
Front Cover
Gray Scale
Save Toner
Unadjusted
Quad Dot
Smooth Screen
Use Application
Color Space
Disable CMYK
Coverage Limit
Process Black
Graphics
Save Settings
Restore Settings
1
Requires Hard Disk option.
2
Requires optional Tray 2.
2
PostScript PCL 5C
Yes Yes
Yes Yes
Yes Yes
Yes Yes
Yes Yes
Yes No
Yes No
Yes No
Yes No
Yes No
Yes Yes
Yes Yes
Table 3.2 Page 2 of 2
Chapter 3: Printing ❖ 3-7
Page 60

PostScript Printer Driver Features
PostScript Printer Driver Features
Your DocuPrint NC60 PostScript printer driver includes
many unique features provided by Xerox. These unique
features are provided to aid you in producing high quality
color as well as black and white prints. For information on
other features not described here, select Help in your
driver.
Paper/Output
Job Type
The Job Type menu enables you to select special
document output and control features provided by your
DocuPrint NC60. Keep in mind that your DocuPrint
NC60 may be configured with optional equipment.
Therefore, you may need to configure your printer driver
to recognize the installed options and special features
supported by your DocuPrint NC60. Be sure to check the
System (Printer) Configuration tab within your printer
driver to configure the Installable Options.
• Normal Print
The Normal Print option simply means that the job
will NOT be processed with any special delivery or
output features. Normal Print is the default setting.
• Secure Print (requires Hard Disk option)
The Secure Print option is designed for printing
confidential documents. This feature automatically
holds your document within the hard drive on your
DocuPrint NC60. When you're ready to retrieve your
job, you go to the Control Panel and release the job so
it will print when you are ready to retrieve it.
To send a Secure Print job, you need to enter a 4-digit
numeric password, where each digit of the password
can be any numeric value between 0 - 7. See “Print a
Password Job” (page 3-66).
3-8 ❖ DocuPrint NC60 User Guide
Page 61

PostScript Printer Driver Features
• Proof Print (Sample Set) (requires Hard Disk option)
The Proof Print option enables you to print and proof
a single copy of a document before printing the
remaining document sets/copies. The remaining sets
are held in the printer's hard drive until you release the
job at the Control Panel by entering a four-digit
numeric password. Each digit of the password can be
any numeric value between 0 - 7. See “Print a
Password Job” (page 3-66).
If no Hard Disk is installed, the job is not printed and is
deleted.
When using this feature, be sure to determine if the
Print dialog in your application provides a Collate
option. If it does, you must turn the Collate option
OFF in order for the Proof Print feature to work
properly. If you do not turn off the Collate option
within your application, the application may render
the entire job as a single document.
Be sure to print or delete your password jobs at the printer.
Password jobs are held indefinitely on the hard disk until
printed or deleted.
Chapter 3: Printing ❖ 3-9
Page 62

PostScript Printer Driver Features
Copies
The Copies feature enables you to select the number of
copies or document sets that will be printed.
Select Paper
The Paper Selection dialog enables you to choose the
paper and media options for your documents. Click the
Cover Sheet and Separators buttons for additional
options.
If the paper size or media type you select in the printer driver
are not available in the tray, the printer will request the proper
media. If the printer contains an acceptable alternative
medium, you can select this by pressing the Up or Down Value
key to display the choice, then press the Enter key to accept the
source.
•Paper Size
This field contains a list of the paper sizes that are
supported by your DocuPrint NC60. Keep in mind that
the available paper sizes and default settings may vary
according to your locale, the Job Type, and the
finishing features you have selected.
3-10 ❖ DocuPrint NC60 User Guide
Some paper sizes or types may not be valid selections
for certain types of print jobs.
Page 63

PostScript Printer Driver Features
•Media Type
This field contains a list of the media types that are
supported by your DocuPrint NC60.
—Paper
If no other media type is selected, paper is the
default medium.
— Transparencies
A sensor in the paper path of the printer detects the
presence of transparencies. When transparencies
are detected, the printer adjusts itself so that
transparency print quality is enhanced. You may
use tray 1, tray 2, or the Manual Feed slot to feed
transparencies for print.
For printers equipped with two trays: If a Transparency Tray
has been designated at the Control Panel or through the
CentreWare DP and CentreWare Internet Services software,
select transparencies in the printer driver to feed automatically
from the designated transparency tray.
— Envelopes/Labels
For printing on envelopes or labels, the printing
will be in black only, and the paper source will be
restricted to the Manual Feed slot.
Chapter 3: Printing ❖ 3-11
Page 64

PostScript Printer Driver Features
• Paper (Media) Source
The Paper (Media) Source field enables you to select
from the available paper trays on your DocuPrint
NC60. If the Paper Source is set to Auto Select, the
printer automatically selects a tray that matches the
paper size settings for the job. The Auto Select setting
is the default.
This printer offers a variety of Paper Size and Media
Type selections. When these features are available, the
Auto Select feature will use the Paper Size and Media
Type settings in your driver to pick the right tray for
the job, even if a paper tray is specified. If the size and
type are not currently loaded in an available tray, the
printer will prompt you to load the correct media.
•Front Cover
This dialog provides a way to choose the paper that
will be used for the First Page (Front Cover) of your
document.
— Front Cover Different
Select this option when you would like the first
page of your document to be printed on different
paper stock. This setting enables you to specify the
paper size or media type to be used for the front
cover page of the document.
3-12 ❖ DocuPrint NC60 User Guide
Page 65

PostScript Printer Driver Features
• Separators (requires Tray 2, Lower Feeder option)
This dialog provides a way to choose the paper that
will be used to separate each printed transparency.
—Separators
The Separators feature enables you to specify
whether paper separator pages will be inserted
between each transparency sheet.
Image Orientation
• Portrait orientation prints an image that is taller than
it is wide. When you view a page that is printed with a
Portrait orientation, you hold it with the long edges to
the sides.
• Landscape orientation prints an image that is wider
than it is tall. When you view a page that is printed
with a Landscape orientation, you hold it with the
short edges to the sides.
• Rotated Landscape orientation creates a document that
is wider than it is tall, but the images on each page are
rotated 180 degrees.
Chapter 3: Printing ❖ 3-13
Page 66

PostScript Printer Driver Features
Collation
Collated printing means that two or more copies of a
document are printed and delivered as separate document
sets, rather than separate sets of each page.
Collation selected - 1,2,3; 1,2,3; 1,2,3
Collation not selected - 1,1,1; 2,2,2; 3,3,3
Keep in mind that collated output may vary based on the
amount of memory in the printer, the optional
equipment installed on the printer, and the complexity of
your print jobs.
The Collate setting in certain applications may conflict with
the Collation setting in your Xerox printer drivers, causing
unexpected results. To avoid conflicts, turn collation OFF in
your application print dialog and ON in your printer driver. Do
NOT select collation in both the application and the printer
driver.
If your printer does not have sufficient RAM—nor a Hard Disk
option installed—to completely store the entire job, the job is
collated in smaller segments and printed with the requested
copy count. Subsequent collated segments are printed until the
entire job is complete.
3-14 ❖ DocuPrint NC60 User Guide
Page 67

PostScript Printer Driver Features
Hold Job
Select Hold Job to delay printing for a set period of time.
This enables you to get to the printer to load special
media, or to print out confidential material.
When you select this option, a message will remind you
that you have a limited period of time to press the Enter
button on the Control Panel in order to initiate the print
activity. If you do not press the Enter button within the
preset timeout, the job will be printed from the printer's
memory. The Hold Job timeout is set from the Control
Panel or through the CentreWare DP or CentreWare
Internet Services software.
Chapter 3: Printing ❖ 3-15
Page 68

PostScript Printer Driver Features
Fonts
The Fonts tab contains options that enable you to control
the way True Type fonts are handled by the printer driver
and the printer.
• Use Substitution Table
The Substitution Table helps you select a printer font
that is the closest match for the True Type font being
generated by the application. When the Use
Substitution Table check box is selected, the
Substitution Table becomes active.
The Font Substitution Table contains two list boxes:
— For True Type Font - lists the TrueType fonts that are
resident on your computer.
— Use Font Comparable To - lists the PostScript fonts
that are resident on the DocuPrint NC60.
Example...
If the Arial font is highlighted as the True Type Font,
and Helvetica is highlighted as the Comparable Font,
the printer driver is suggesting that the PostScript
Helvetica font is the closest font that the printer can
print to match the Arial TrueType font resident on
your computer.
3-16 ❖ DocuPrint NC60 User Guide
•Edit the Table
This button opens the Font Substitution Table, where
you can change the settings that define how True Type
fonts are handled by your DocuPrint NC60.
Page 69

PostScript Printer Driver Features
• Always Send to Printer
Select Always Send to Printer when you want to send
all the TrueType fonts contained within your
documents to the printer. This setting may result in
slower printing, but it will help ensure that the printed
document will look the same as it does on your
computer. It will also result in more consistent
document output when the same document is printed
on different printers.
• Always Substitute Printer Fonts
This option instructs the printer to substitute the
default printer fonts for any TrueType fonts it
encounters within a print job. When this option is
selected, the printer will substitute fonts automatically
as the job is being processed. This setting may improve
printing speed, but it may also result in documents
that look different when they are printed on different
printers.
When using this option, the printed fonts in your
document may not look the same as the fonts you see
on your computer.
•Update Soft Fonts
If, after installing a font, you do not see the new font
in your application’s list of available fonts, exit from
the application and then use this option to
automatically inform the printer driver of the newly
installed font. When you restart your application, the
list of fonts available to the application is updated.
Chapter 3: Printing ❖ 3-17
Page 70

PostScript Printer Driver Features
•Send Fonts As
—Send As
The Send As field contains several options which
define how your DocuPrint NC60 will receive and
process TrueType fonts. This setting affects the
selections available within the Font Substitution
table.
- Outlines (Type 1) - a scalable, vector-based font
that defines each character as a set of
instructions which determine the shape and size
of the character.
- Bitmaps (Type 3) - a non-scalable, rasterized
format that contains data for each pixel. Large,
complex bitmaps require considerably more
memory and processing time than other
formats.
- True Type (Type 42) - scalable, vector-based
fonts. This is the best way to print TrueType
fonts. You should also use this setting if you are
unable to print documents due to a shortage of
printer memory when using the Outline or
Bitmaps settings.
3-18 ❖ DocuPrint NC60 User Guide
- Don't Send - select this option when you do not
want to send one or more True Type fonts to the
printer.
Page 71

PostScript Printer Driver Features
— Send PostScript Fonts As
- Native Format (Type 1) - the set of 35 PostScript
fonts that are commonly installed on most
PostScript printers.
- Don’t Send - useful only if you have a spooler in
your system configuration that can supply these
fonts. Don’t Send does not substitute printer
fonts for PostScript fonts. When a PostScript
font is not available, the default printer font,
usually Courier, is used.
This feature is intended for users with advanced
font management experience.
• Restore (Use) Defaults
Click the Restore (Use) Defaults button to reset the
TrueType Fonts options to the printer driver default
settings.
Chapter 3: Printing ❖ 3-19
Page 72

PostScript Printer Driver Features
PostScript
The PostScript tab gives you access to the basic PostScript
features that are common to all PostScript drivers (as
opposed to the other tabs that are used to control the
special Xerox features.
PostScript Output Format
• Optimize for Speed
Select this option when print processing speed is more
important than file portability. This option will create
PostScript output that is optimized for faster printing.
However, it might not allow the full use of some
network print spooler features.
• Optimize for Portability
Select this option when file and page portability is
more important than print processing speed. This
option will create output that conforms with the
Adobe Document Structuring Conventions (ADSC).
Choosing this option ensures that each PostScript page
is independent of all other pages in a document. These
self-contained page objects help documents print
successfully on network spooler-based printers as well
as on remote printers. Choose this option if you intend
to print to a sophisticated spooler.
3-20 ❖ DocuPrint NC60 User Guide
If you experience printing or compatibility problems with some
applications, try printing the document with different
PostScript settings.
Page 73

PostScript Printer Driver Features
• Encapsulated PostScript (EPS)
You can produce EPS (Encapsulated PostScript) files of
a SINGLE PAGE created in one application and insert it
into a document in another application. The contents
of the page can include any combination of text,
graphics, and images. You can also use the EPS file for
creating archives and for printing documents on
remote printers (such as printers at a service bureau).
It is generally best to use an application to create EPS
files. When this is not possible, you can set up the
DocuPrint printer driver to create EPS files (select EPS
as the Job Type). The EPS files created by the printer
driver, however, do not include on-screen preview
images. When placed in a document, EPS files created
by the driver appear as blank spaces, as black boxes, or
as boxes with X’s, which are placeholders for the
image. When printed, the EPS image will appear on the
page as expected.
Not all applications can place EPS files in their
documents, so be sure to check your application
documentation to see if it supports the use of
Encapsulated PostScript files.
•Archive Format
This option improves file portability because it
suppresses many of the settings that might be specific
to a particular printer and might therefore prevent the
file from printing. Choose this option only if you want
long-term storage or intend to widely distribute a file
that might be printed on unknown destination
devices.
Chapter 3: Printing ❖ 3-21
Page 74

PostScript Printer Driver Features
PostScript Header
• Download Header With Each Print Job
This option configures the printer driver to send
header information to the DocuPrint NC60 each time
you print a document. This may result in slower job
processing, but it insures that the printer will have the
correct PostScript information needed to print your
documents the way they appear on your computer.
This option is strongly recommended for use with
shared network printers.
• Assume Header is Downloaded and Retained
This setting may be used when the correct PostScript
Header information has already been downloaded to
the DocuPrint NC60 and is currently resident in
printer memory. If you print to a local printer, this
setting may save printing time because the driver will
not send the header with each job. However, this
setting is not recommended for shared network
printers.
This option will be selected automatically when you
click the Send Header Now button.
•Send Header Now
Click this button to send the PostScript Header to the
DocuPrint NC60 immediately. The header will be
retained in the printer until it is restarted.
3-22 ❖ DocuPrint NC60 User Guide
Page 75

PostScript Printer Driver Features
Print PostScript Error Information
When this option is selected, an error sheet is printed
when an error occurs during the formatting or
transmission of a job. The error sheet indicates the page
where the error occurred and the type of error.
PostScript Timeout Values
• Job Timeout
The Job Timeout defines a time limit for the
completion of each print job. The printer will cancel
jobs that have not completed printing within the Job
Timeout interval.
A value of zero means that the job is never canceled. If
your DocuPrint NC60 is shared, do not specify a value
of zero.
• Wait Timeout
The Wait Timeout defines how long your printer will
wait to receive data during a print job. If the printer
has to wait more than that number of seconds to
receive data after a print job has started, it cancels the
print job and prepares to receive a new document. The
driver provides this time-out to allow a printer to
recover from a computer malfunction.
For network-shared printers, be sure to set a reasonable
time-out value that prevents your computer from
using excessive amounts of printer time during a
malfunction.
Chapter 3: Printing ❖ 3-23
Page 76

PostScript Printer Driver Features
Advanced PostScript Options
• PostScript Language Level
To optimize your DocuPrint NC60 features, make sure
the PostScript language level is set to the highest level
that your printer supports. Only consider using a lower
PostScript language level if printing problems occur.
The printer driver automatically sets the default value
to the highest PostScript language level supported by
the DocuPrint NC60.
• Data Format
— ASCII Data
Use the ASCII Data option to send all data in Adobe
Communication Protocol. ASCII Data format allows
the file to print on any printer.
— Tagged Binary Communications Protocol
Use the Tagged Binary Communications Protocol
option to send all data except special characters in
binary (8-bit) format over parallel or serial ports.
With this option, you do not need to set up the
DocuPrint NC60 to receive binary data.
3-24 ❖ DocuPrint NC60 User Guide
—Pure Binary Data
Use the Pure Binary Data option to send all data in
pure binary format.
Page 77

PostScript Printer Driver Features
• Send EOF (CTRL+D) Before/After Job
The Send EOF Before/After options direct the printer
driver to send the “CTRL+D” character before/after
each PostScript job. This character resets the system for
the next job.
If your driver provides a “Send EOF After Job” setting,
it should always be selected when printing to a
DocuPrint NC60 via a direct parallel port connection.
If this setting is not selected, the system may not be
able to separate individual jobs that are sent to it via
the parallel port.
• Display Alert for Incompatible Applications
Select this option to display an alert message when
driver features (such as N-up, Watermarks, Negative
Image, Mirror Image, or Scaling) are incompatible with
the application you are using. You can choose among
these options:
— Attempt to print the document using the current
driver settings, despite incompatibilities.
— Turn off the current driver settings for this print job
only and proceed with printing.
— Cancel the print job.
Chapter 3: Printing ❖ 3-25
Page 78

PostScript Printer Driver Features
Printer Configuration
The options on this tab enable you to configure your
printer driver to match the options that are installed on
your DocuPrint NC60. You should print a configuration
sheet for your printer, check the current configuration
and installed options, then modify the options on this tab
to match the printer configuration.
• Installable Options
The Installable Options list is where you customize
your printer driver to match the optional equipment
installed on your DocuPrint NC60. Select the items in
the Installable Options list to identify the optional
equipment on your printer.
•Memory Configuration
The Memory Configuration setting specifies the
amount of memory that is installed in your DocuPrint
NC60.
You can print a Configuration Sheet to determine how much
memory is installed in your DocuPrint NC60. The Total
System Memory is listed in Megabytes (MB).
3-26 ❖ DocuPrint NC60 User Guide
Page 79

PostScript Printer Driver Features
Xerox Features
Intelligent Color
When you choose Intelligent Color, the DocuPrint NC60
provides the optimum set for mixed content documents.
This will produce the best output for documents
containing text and bitmap graphics.
Vivid Color
Vivid Color produces bright, solid colors and should be
used for documents with graphics that include charts and
graphs. Use for most full color business documents.
Photo Mode
Photo Mode is the best color setting to use for
photographs or bitmap images from photo CDs.
ZipColor
The ZipColor setting increases the color printing speed of
your DocuPrint NC60 by eliminating the printing cycle
normally used for black toner. The black portions of your
documents are instead created by combining cyan,
magenta and yellow toner to create a process black color.
This setting is ideal for rush jobs because it enables the
DocuPrint NC60 to render images approximately 33%
faster. Use when full color print speed is most important
and very little black text is used in the document.
This setting is not recommended for documents
containing substantial amounts of black image content or
black text or when image quality is more important than
printing speed.
Chapter 3: Printing ❖ 3-27
Page 80

PostScript Printer Driver Features
Grayscale
Grayscale changes all the colors for the document you
select into black, white, and shades of gray. Use this
setting when you would like to print color documents in
monochrome for speed or when color information is not
important.
Fax Friendly
Fax Friendly changes your color document to patterns of
black and white. The different colors are rendered as
distinguishable black and white patterns. For example, a
pie chart which contains wedges of different solid colors
will be printed with a different pattern replacing each
color so that the distinction between the pieces is
maintained. Color text is also rendered as a pattern, but
the character is outlined. Anything that is black in your
document remains black and is not rendered as a pattern.
Use Fax Friendly to print a color document in a black and
white mode so that it can be used as a fax original or for
black and white copying.
3-28 ❖ DocuPrint NC60 User Guide
Fast Blue
Fast Blue prints a color document only in shades of blue
(cyan) and black. All color text and images in the
document are rendered in shades of blue while the text
and images that were originally black remain black. The
shades of blue maintain the distinction between parts of
your document which were originally in different colors.
Use Fast Blue to print color documents at twice the speed
of full color, while retaining more color information than
when using Grayscale.
Page 81

PostScript Printer Driver Features
Save Toner
Save Toner reduces the toner consumption needed to
print in color. The hues of each color do not change but
the colors are less saturated.
Use Save Toner to decrease the overall toner consumption,
produce lower cost prints, and provide draft copies of
your document.
Unadjusted
Unadjusted uses your application settings and does not
use any of the printer driver default settings. Use this
print mode when your application or operating system
has a color matching system (such as PANTONE or Image
Color Matching).
If you don't use Unadjusted print mode in conjunction with
your color matching system, the colors may not be what you
expect.
Chapter 3: Printing ❖ 3-29
Page 82

PostScript Printer Driver Features
Expert Color Control
Expert Color Control enables you to fine-tune the colors
in your printed document. The Color Adjustment
controls enable you to adjust the lightness, contrast, and
saturation settings for your documents. The Color Balance
controls enable you to adjust the range between
contrasting colors.
• Lightness
Lightness relates to the brightness of the color
produced. A higher setting lightens the colors on the
document overall, while a lower setting darkens the
colors overall.
•Contrast
Contrast adjusts the difference between light and dark
color. A lower setting gives a slight variation from light
to dark, and a higher setting gives a greater variation
from light to dark on your entire document.
• Saturation
Saturation affects the intensity of color or the amount
of chromatic color in proportion to its lightness. For
example, this is the aspect that distinguishes a pale red
from a bright red. A lower setting provides less color
saturation (is less colorful), while a higher setting
provides a higher color saturation (is more colorful) on
your document overall.
3-30 ❖ DocuPrint NC60 User Guide
• Color Balance
The three bars indicate a range between Cyan and Red,
Magenta and Green, and Yellow and Blue. As you slide
the bar, the saturation of the color increases in the
direction you slide the bar, and the saturation of the
color that the bar moves away from decreases. For
example, when you slide the bar toward red, the
amount of red increases on your document overall
while simultaneously the amount of cyan decreases.
Page 83

PostScript Printer Driver Features
Document Halftone
Halftone is the process by which images are printed as a
pattern of many small dots. The size and density of the
dots produce shades of light and dark in the image when
it is printed. Also, different combinations of the four
primary toner colors produce an extensive range of
possible colors. You can choose from three Halftone
Settings--Quad Dot, Smooth Screen and 1200 Quality.
•Quad Dot
Quad Dot produces clear, well-defined pictures and
graphics. It could result in faster printing.
• Smooth Screen
Smooth Screen halftones distribute the halftone dots
in a more random pattern in order to produce a
smoother effect for color sweeps. It also provides
smoother fine lines with less visible grain.
• 1200 Quality
1200 Quality produces a smooth gradation of tones
and finer detail in images such as photographs. You
can use this feature to produce finer halftone steps and
more grayscales.
Chapter 3: Printing ❖ 3-31
Page 84

PostScript Printer Driver Features
Image Enhancement
•ImageFix
This option is the best setting to use for photographs
or bitmap images. It automatically enhances RGB
images if the exposure level, color balance, sharpness,
brightness, or contrast settings in the original image
have not been optimized. Good images will not be
affected by this setting.
•IntelliRes
This selection improves the appearance of documents
you print from your web browser. Many images,
including web images, are of low resolution and do not
look well when printed. The exclusive imaging
technology built into IntelliRes will analyze these
images and optimize them for printing on your printer.
Advanced Features
• Black Overprint
Select this feature to print black text and graphics over
color backgrounds in order to overcome possible
misregistration (thin white outlines around the black
edges).
3-32 ❖ DocuPrint NC60 User Guide
• Use Application Color Space
Select this feature to use the color space specifications
provided by the application, as opposed to the color
space specifications provided by the DocuPrint NC60.
The color space specifications provided by the
DocuPrint NC60 are optimized to give the best printed
results. However, finer control of the color space
through the application is sometimes desired. If your
application cannot support this feature, the DocuPrint
NC60 default color space is used.
Page 85

PostScript Printer Driver Features
• Disable CMYK Coverage Limit
Select this feature to remove the 250% toner coverage
limit. The CMYK Coverage Limit should only be
disabled when you use a color management system
such as PANTONE or ICM.
Disabling the CMYK Coverage Limit may result in
excessive toner usage. This may cause permanent
damage to the fuser if it occurs frequently.
•Edge Smoothing
Select this feature to reduce the rough or jagged edges
of black text and line art.
• Enhanced Alignment
If your documents contain black lines, or black text
placed directly next to colored areas, you may want to
select Enhanced Alignment. When used, your
DocuPrint NC60 will automatically adjust itself to
improve the black image alignment next to colored
areas. Note that this feature is most valuable when
black and colored areas directly touch.
This feature will result in slower print speeds. For black lines or
text over color areas, use “Black Overprint” for best results.
Chapter 3: Printing ❖ 3-33
Page 86

PostScript Printer Driver Features
• Process Black Graphics
When this setting is selected, the black graphics of
your documents are created by combining cyan,
magenta and yellow toner to create a process black
color. This feature may reduce gloss differences in
some documents that have gray regions next to color
regions. Black text is not affected.
Graphics
Resolution
The resolution setting affects the amount of detail that is
reproduced on graphic images. Graphics resolution is
measured in dots per inch (dpi). Therefore, a 600 dpi
setting renders images using 600 dots (pixels) per every
inch of the image.
The image quality of printed documents typically
increases with higher resolution (dpi) and bits per pixel
settings, but it often results in slower print speed and
increased toner consumption.
Halftoning
• Use Printer's Settings
Choose this option if you would like to use the default
halftone screen settings that are available on your
DocuPrint NC60. See the section “Document Halftone”
(page 3-31) for available selections.
3-34 ❖ DocuPrint NC60 User Guide
Page 87

PostScript Printer Driver Features
• Use Settings Below
Choose this option if you would like to adjust the
halftone screen settings within the printer driver. This
makes it possible to adjust the screen frequency and
angle settings.
Do not change these settings unless you have experience using
halftones and are familiar with the requirements of your
application and printer.
• Screen Frequency / Angle
These settings specify the values for the number of
lines per inch (frequency) and angle of the pattern that
you want to use for halftone screens. If you are getting
a moire pattern when you print graphics such as
photographs or detailed images, you might want to
adjust these settings. However, the default printer
settings should work in most cases.
Some applications might be incompatible with the
Halftoning feature and might ignore any values you
specify. Also, the DocuPrint NC60 might use
halftoning procedures that do not use the frequency
and angle values you specify.
Chapter 3: Printing ❖ 3-35
Page 88

PostScript Printer Driver Features
Special
• Print as a Negative Image
The Negative Image option converts the black image
areas in the original to white, the white image areas to
black, and any dark gray image areas to light gray.
Printing a negative image may be useful for documents
that have a substantial amount of dark background
and/or light text and images.
Excessive use of the Negative Image option can cause
premature toner depletion and possible printer
damage.
• Print as a Mirror Image
This option flips the page image from left to right,
thereby reversing the image and all associated text.
This is like turning over a printed transparency and
viewing the back of it.
Scaling (Reduce / Enlarge)
The scaling factor specifies the amount that the image is
enlarged or reduced when it is printed. The scaling range
for the DocuPrint NC60 is from 25 percent to 400 percent,
although the limits may vary with different printer
drivers and operating systems. The default is 100 percent.
3-36 ❖ DocuPrint NC60 User Guide
Defaults
Click the Defaults button to return all settings on the
current tab to the original installation default settings.
Page 89

PostScript Printer Driver Features
Layout
Watermarks
Page Layout / N Pages Up
Click in the N Pages Up field to select the page layout
options which can be applied to your document.
Draw Outlines
When printing multiple images per page, the Draw
Outlines feature will print a line around the perimeter of
each page image. This feature helps delineate or separate
the individual page images.
The Watermark feature lets you create and print
background text, independent of that provided by the
printing application, across the first page or every page of
a document. The watermark definitions you create can be
used on any document.
The Watermark list box contains a list of all the
watermarks that are currently available. If you select a
watermark within this list, it will be printed on your
document(s). If you do not want a watermark to print,
select (None).
Some applications may not support watermark printing.
Chapter 3: Printing ❖ 3-37
Page 90

PCL 5C Printer Driver Features
PCL 5C Printer Driver Features
Your DocuPrint NC60 PCL 5C printer driver includes
several unique features provided by Xerox. These unique
features are provided to aid you in producing high quality
color as well as black and white prints. For information on
other features not described here, select Help in your
driver.
It is recommended that you use the PostScript printer driver for
best all around quality.
Paper/Output
Job Type
The Job Type menu enables you to select special
document output and control features provided by your
DocuPrint NC60. Keep in mind that your DocuPrint
NC60 may be configured with optional equipment.
Therefore, you may need to configure your printer driver
to recognize the installed options and special features
supported by your DocuPrint NC60. Be sure to check the
System (Printer) Configuration tab within your printer
driver to configure the Installable Options.
Documents which are held for an extended period of time will
be deleted automatically. The time limit for held jobs can be
modified on each DocuPrint NC60. Check with your System
Administrator for specific time limits.
3-38 ❖ DocuPrint NC60 User Guide
Page 91

PCL 5C Printer Driver Features
• Normal Print
The Normal Print option simply means that the job
will print in a normal manner. No password is
required. Normal Print is the default setting.
• Secure Print (requires Hard Disk option)
The Secure Print option is designed for printing
confidential documents. This feature automatically
holds your document within the Hard Disk on your
DocuPrint NC60. When you're ready to retrieve your
job, you go to the Control Panel and release the job so
it will print when you are ready to retrieve it.
To send a Secure Print job, you need to enter a 4-digit
numeric password, where each digit of the password
can be any numeric value between 0 - 7. See “Print a
Password Job” (page 3-66).
Chapter 3: Printing ❖ 3-39
Page 92

PCL 5C Printer Driver Features
• Proof Print (Sample Set)
The Proof Print option enables you to print and proof
a single copy of a document before printing the
remaining document sets/copies. The remaining sets
are held in the printer's print queue until you release
the job at the Control Panel.
To send a proof print, you need to enter a 4-digit
numeric password, where each digit of the password
can be any numeric value between 0 - 7. See “Print a
Password Job” (page 3-66).
When using this feature, be sure to determine if the Print
dialog in your application provides a Collate option. If it does,
you must turn the Collate option OFF in order for the Proof
Print feature to work properly. If you do not turn off the Collate
option within your application, the application may render the
entire job as a single document.
Be sure to print or delete your password jobs at the printer.
Password jobs are held indefinitely on the hard disk until
printed or deleted.
3-40 ❖ DocuPrint NC60 User Guide
Page 93

PCL 5C Printer Driver Features
Copies
The Copies feature enables you to select the number of
copies or document sets that will be printed.
Select Paper
The Paper Selection dialog enables you to choose the
paper and media options for your documents. Additional
features for the First (Cover) Page and Transparency
Separators are contained on separate tabs within this
dialog.
You must configure your printer driver to match the paper/
media that is loaded in your DocuPrint NC60. If the System
Configuration options are inaccurate or invalid for any
particular paper tray, the options available in the Paper/Output
and Paper Selection dialogs may be inaccurate or inaccessible.
•Paper Size
This field contains a list of the paper sizes that are
supported by your DocuPrint NC60. Keep in mind that
the available paper sizes and default settings may vary
according to your locale, the Job Type, and the
finishing features you have selected.
Some paper sizes or types may not be valid selections
for certain types of print jobs.
Chapter 3: Printing ❖ 3-41
Page 94

PCL 5C Printer Driver Features
•Paper Source
The Paper (Media) Source field enables you to select
from the available paper trays on your DocuPrint
NC60. If the Paper Source is set to Auto Select, the
printer automatically selects a tray that matches the
paper size settings for the job. The Auto Select setting
is the default.
This printer offers a variety of Paper Size and Media
Type selections. When these features are available, the
Auto Select feature will use the Paper Size and Media
Type settings in your driver to pick the right tray for
the job, even if a paper tray is specified. If the size and
type are not currently loaded in an available tray, the
printer will prompt you to load the correct media.
3-42 ❖ DocuPrint NC60 User Guide
Page 95

PCL 5C Printer Driver Features
•Media Type
This field contains a list of the media types that are
supported by your DocuPrint NC60.
— Paper: If no other media type is selected, paper is
the default medium.
— Transparencies: A sensor in the paper path of the
DocuPrint NC60 detects the presence of
transparencies. When transparencies are detected,
the DocuPrint NC60 adjusts itself so that
transparency print quality is enhanced. You may
use tray 1, tray 2, or the Manual Feed slot to feed
transparencies for print.
For printers equipped with two trays: If a Transparency Tray
has been designated at the Control Panel or through the
CentreWare DP software, click on the transparencies radio
button to feed stock automatically from the designated
transparency tray.
— Envelopes/Labels: For printing on envelopes or
labels, the printing will be in black only, and the
paper source will be restricted to the Manual Feed
slot.
Chapter 3: Printing ❖ 3-43
Page 96

PCL 5C Printer Driver Features
• Front Cover Different
Select this option when you would like the first page of
your document to be printed on different paper stock.
This setting enables you to specify the paper size or
media type to be used for the front cover page of the
document.
• Separators (requires Tray 2, Lower Feeder option)
The Separators feature enables you to specify whether
paper separator pages will be inserted between each
transparency sheet.
Image Orientation
• Portrait orientation prints an image that is taller than
it is wide. When you view a page that is printed with a
Portrait orientation, you hold it with the long edges to
the sides.
• Landscape orientation prints an image that is wider
than it is tall. When you view a page that is printed
with a Landscape orientation, you hold it with the
short edges to the sides.
3-44 ❖ DocuPrint NC60 User Guide
Page 97

PCL 5C Printer Driver Features
Collation
Collated printing means that two or more copies of a
document are printed and delivered as separate document
sets, rather than separate sets of each page.
Collation selected - 1,2,3; 1,2,3; 1,2,3
Collation not selected - 1,1,1; 2,2,2; 3,3,3
Keep in mind that collated output may vary based on the
amount of memory in the printer, the optional
equipment installed on the printer, and the complexity of
your print jobs.
The Collate setting in certain applications may conflict with
the Collation setting in your Xerox printer drivers, causing
unexpected results. To avoid conflicts, turn collation OFF in
your application print dialog and ON in your printer driver. Do
NOT select collation in both the application and the printer
driver.
If your printer does not have sufficient RAM—nor a Hard Disk
option installed—to completely store the entire job, the job is
collated in smaller segments and printed with the requested
copy count. Subsequent collated segments are printed until the
entire job is complete.
Chapter 3: Printing ❖ 3-45
Page 98

PCL 5C Printer Driver Features
Hold Job
Select Hold Job to delay printing for a set period of time.
This enables you to get to the DocuPrint NC60 to load
special media, or to print out confidential material.
When you select this option, a message will remind you
that you have a limited period of time to press the Enter
button on the Control Panel in order to initiate the print
activity. If you do not press the Enter button within the
preset timeout, the job will be printed from the printer's
memory. The Hold Job timeout is set from the Control
Panel or through the CentreWare DP or CentreWare
Internet Services software.
3-46 ❖ DocuPrint NC60 User Guide
Page 99

PCL 5C Printer Driver Features
Xerox Features
Intelligent Color
Intelligent Color produces bright, solid colors and should
be used for documents with graphics that include charts
and graphs. Use this setting for most full color business
documents
Photo Mode
Photo Mode is the best color setting to use for
photographs or bitmap images from photo CDs.
Grayscale
Grayscale changes all the colors for the document you
select into black, white, and shades of gray.
Save Toner
Save Toner reduces the toner consumption needed to
print in color. The hues of each color do not change but
the colors are less saturated.
Use Save Toner to decrease the overall toner consumption,
produce lower cost prints, and provide draft copies of
your document.
Chapter 3: Printing ❖ 3-47
Page 100

PCL 5C Printer Driver Features
Unadjusted Color
Unadjusted uses your application settings and does not
use any of the printer driver default settings. Use this
print mode when your application or operating system
has a color matching system (such as PANTONE or Image
Color Matching).
If you don't use Unadjusted print mode in conjunction with
your color matching system, the colors may not be what you
expect.
Resolution
The resolution setting affects the amount of detail that is
reproduced on graphic images. Graphics resolution is
measured in dots per inch (dpi). Therefore, a 600 dpi
setting renders images using 600 dots (pixels) per every
inch of the image.
The image quality of printed documents typically
decreases with lower resolution (dpi), but it results in
faster print speed.
3-48 ❖ DocuPrint NC60 User Guide
 Loading...