

Page 1

Getting Started
701P33236
WorkCentre M940
WorkCentre M950
COLOR INKJET PRINTER•COPIER•SCANNER•PC FAX
Page 2

Xerox Corporation
1350 Jefferson Road
Rochester, NY 14623
United States of America
Xerox Europe
Bessemer Road
Welwyn Garden City
Herts AL71HE
United Kingdom
©2000 by Xerox Limited. All rights reserved.
Copyright protection claimed includes all forms and matters of copyrightable
material and information now allowed by statutory or judicial law or hereinafter
granted, including without limitation, material generated from the software
programs which are displayed on the screen, such as icons, screen displays,
looks, etc.
Xerox®and all Xerox products mentioned in this publication are registered
trademarks of the Xerox Corporation.
Windows
TM
is a trademark of Microsoft Corporation. Product names and
trademarks of other companies are also acknowledged.
Publication number: 701P33236
Getting Started
Page 3

Table of Contents
GETTING STARTED
Welcome To Your WorkCentre 1
Unpacking 2
Setting Up Your Machine 3
Installing Print Heads 4
Loading Ink Cartridges 5-6
Installing Your Control Panel 7
Control Panel Functions 8
Installing Your Paper Tray 9
Loading Paper 10
Making Connections 11
Selecting Your Language 12
Aligning Your Print Heads 13
Making Copies 14
WorkCentre M950 15
Installing Software 16-17
Getting More Information 18
Getting Started
i
Page 4

Getting Started
Page 5

Getting Started
Thank you for purchasing the Xerox
WorkCentre M940/M950 Color Inkjet
Printer•Copier•Scanner•PC Fax.
This Getting Started guide combines
easy step-by-step instructions with
helpful notes and tips. Follow these
steps for a successful installation.
Visit www.xerox.com for useful
information on ordering supplies,
troubleshooting, and more.
WELCOME TO
YOUR WORKCENTRE
Getting Started
1
Page 6
CD
Warranty Card
Getting Started
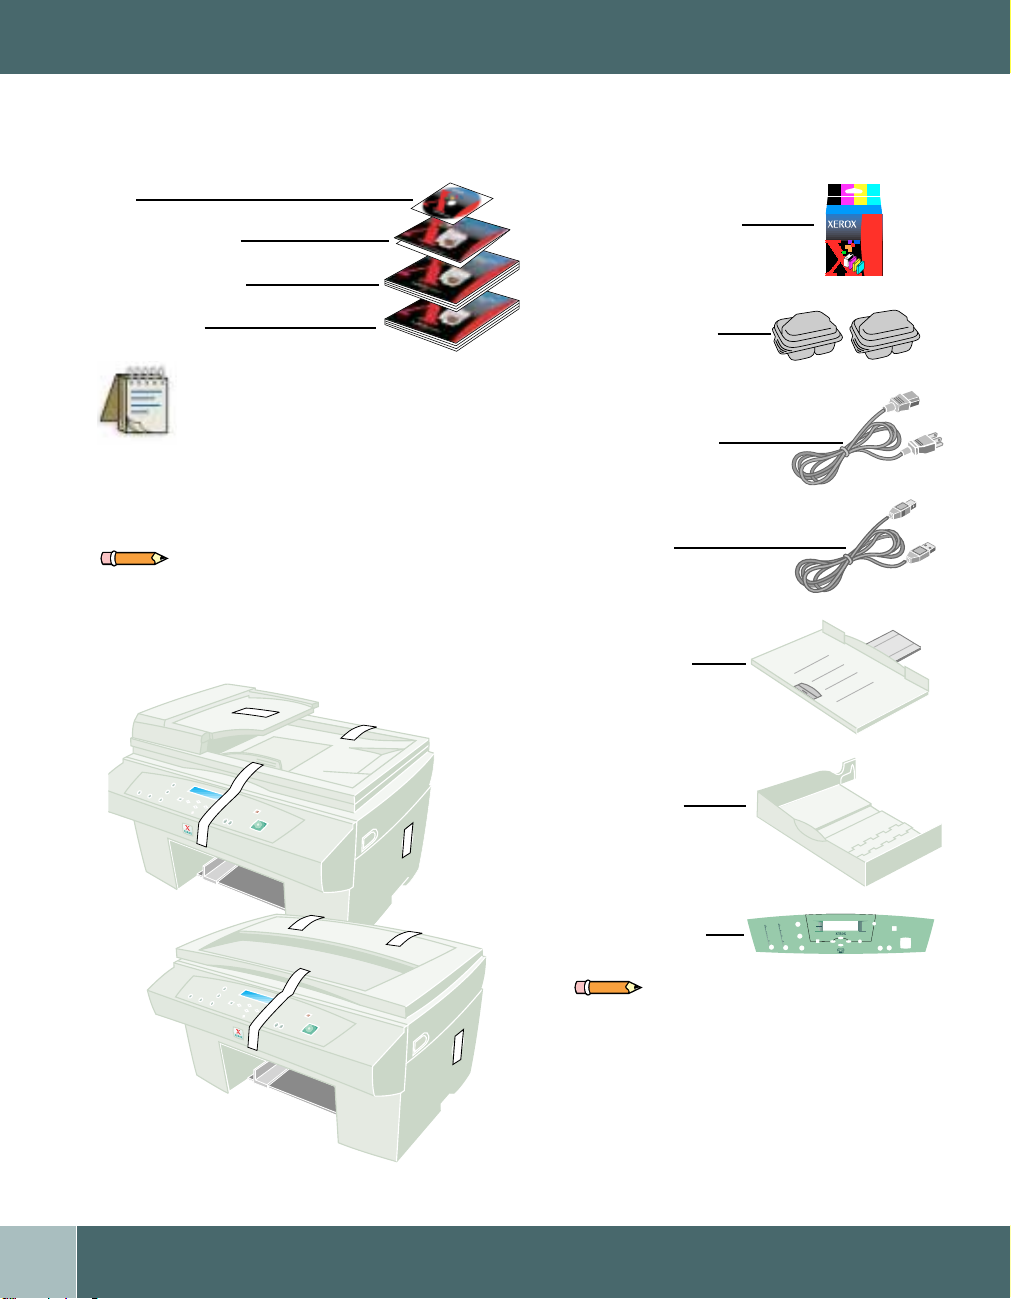
UNPACKING
Ink Cartridges (4)
Black Magenta Yellow Cyan
Y104
OCUPRINTM Series
D
ORKCENTREM Series
W
Cartridges
Y104
Ink
Catouche
d’Encre
Tintenpatrone
Cartuccia
inhiostro
Inkt Cartridge
Cartucho
de tinta
Russian ink
Cartridge
Chinese ink
Cartridge
User Guide
Tip: You should retain this guide in case you
have to reinstall your WorkCentre at some
time in the future.
Note: If any contents are missing visit www.xerox.com or
call 1-800-TEAM-XRX. Outside the US and Canada, call
your local Xerox Helpline.
WorkCentre M950
Print Heads (2)
AC Power Cord
USB Cable
Output Tray
Paper Tray
2
WorkCentre M940
Getting Started
+
Control Panel
-
Note: The Control Panel(s) that are supplied
with your WorkCentre are language sensitive.
If a Control Panel is not already installed on
your WorkCentre you should refer to page 7
of this guide.
Page 7
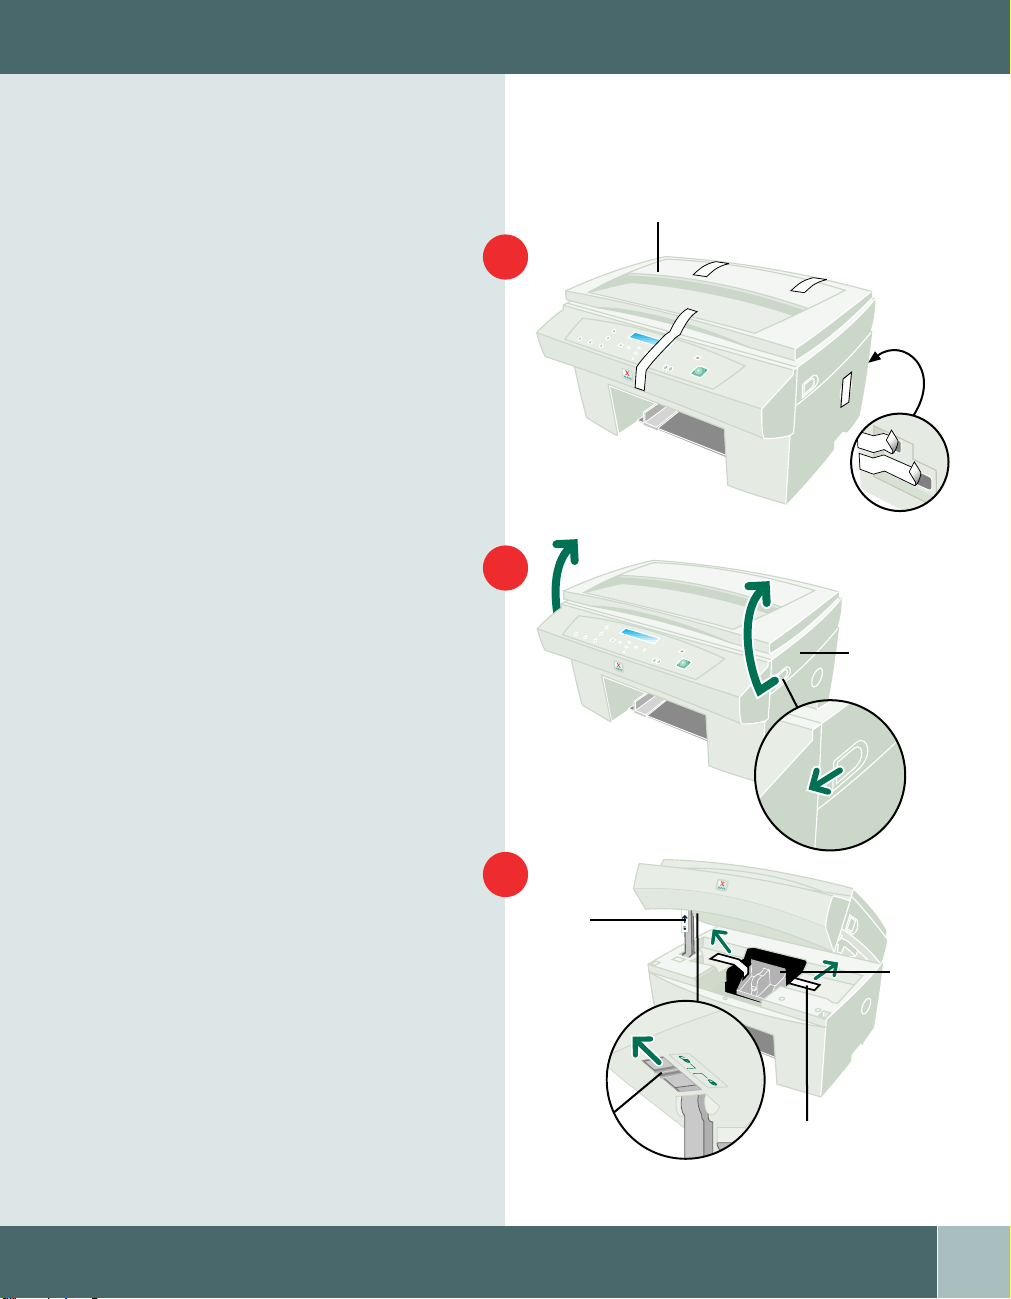
SETTING UP YOUR MACHINE
Setting Up Your Machine
Remove the shipping tape from the
front, back, and sides of the
WorkCentre. Also, remove the
protective foam from under the
Document Cover.
Pull the two release buttons toward
you and lift the Access Cover.
Document Cover
1
Remove all
shipping tape
2
Access
Cover
To prevent damage the WorkCentre
scanner chassis is shipped in the locked
position. Pull the lock towards you to
unlock the chassis.
Remove the Unlock Indicator Tab
taped to the chassis lock.
You should lock the scanner chassis
anytime you need to ship your
WorkCentre.
Remove the Shipping Tape that is
securing the Print Carriage.
3
Unlock
Indicator
Tab
Unlock
Print
Carriage
Shipping
Tape
Getting Started
3
Page 8

1
INSTALLING PRINT HEADS
Installing Print Heads
Black
Print Head
1
Print
Carriage
Print Head
Latch
Lift up
Inkjets
Avoid contact
2
3
4
Color
Print Head
Ensure that the access cover is open.
1
(Refer to page 3 to see how to open
the cover.)
Lift the Print Head Latch up to unlock
the print carriage.
Remove the black print head labeled
2
P100 from the plastic case.
Caution: Placing the print head on a hard
surface may cause damage to the inkjets.
Insert the Black Print Head into the left
3
side of the print carriage.
Remove the Color Print Head labeled
P105 from the plastic case and insert it
into the right side of the print carriage.
4
Getting Started
Lower the print head latch until it
4
clicks, to lock print heads into place.
2
3
4
Page 9
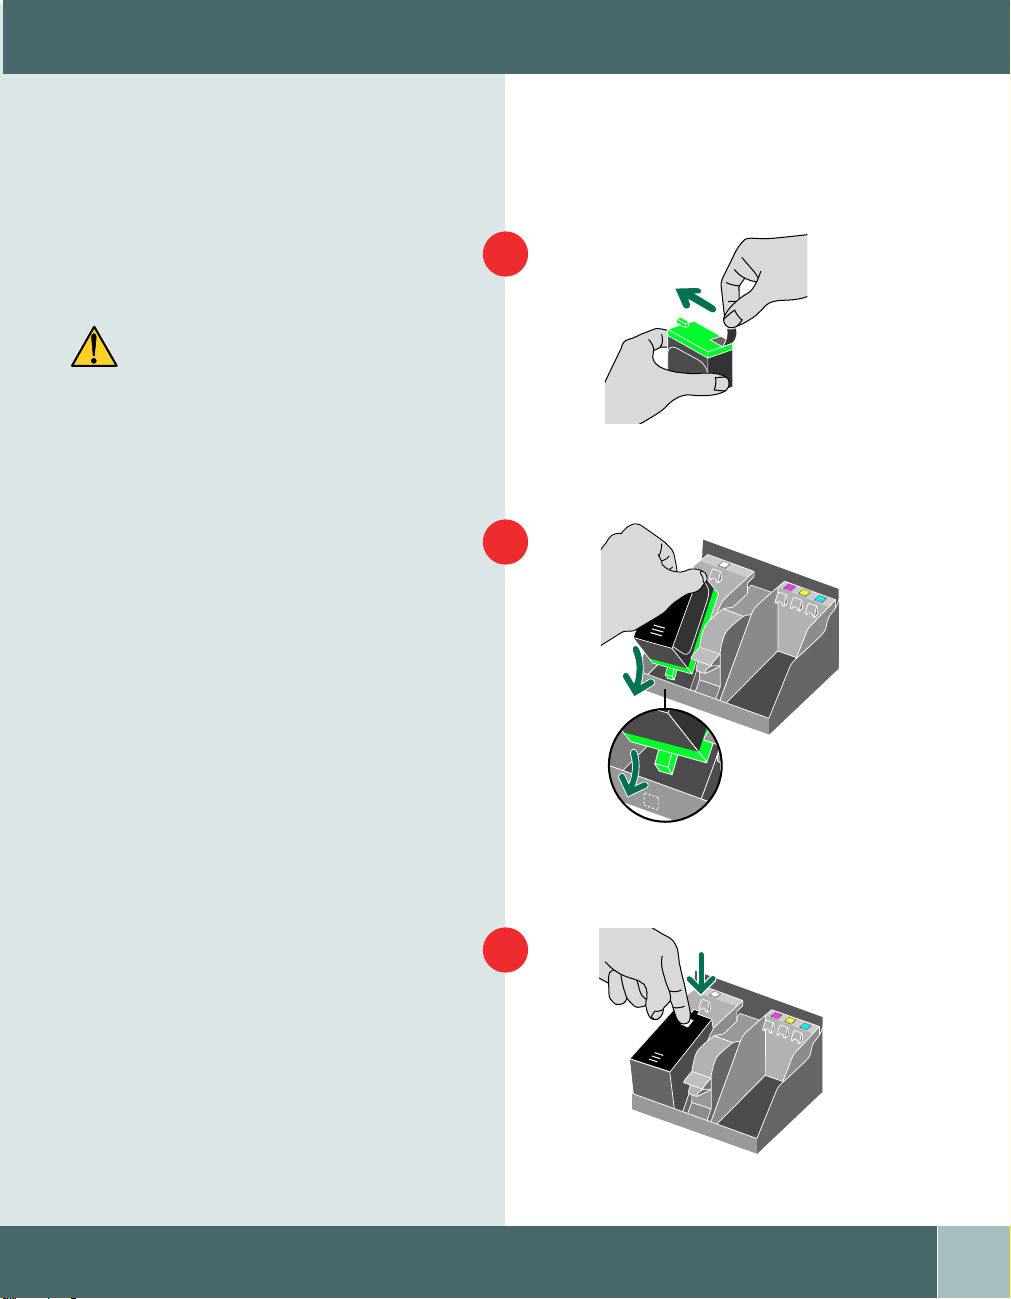
LOADING INK CARTRIDGES
Loading the Black Cartridge
Open the ink cartridge box. Unpack the
black ink cartridge and peel off the
foil seal.
Caution: Handle ink cartridges carefully to
prevent contact with ink.
Insert the green base of the ink
cartridge, heel first, into the black print
head numbered 1.
1
2
1
2
3
4
Push the ink cartridge down until it
clicks into place.
3
1
2
3
Getting Started
4
5
Page 10

LOADING INK CARTRIDGES
Loading the Color Cartridges
Unpack the magenta ink cartridge and
1
peel off the foil seal.
Insert the green base of the magenta ink
2
cartridge, heel first, into the color print
2
3
4
head numbered 2.
6
Tip: The number on the print head
corresponds to the ink cartridge number.
2
3
4
3
4
Magenta
Yellow
Cyan
Getting Started
Push the ink cartridge down until it
3
clicks into place. Repeat this process for
the remaining yellow and cyan
ink cartridges.
Page 11

INSTALLING YOUR CONTROL PANEL
1
3
4
4
3
2
1
Installing Your Control Panel
Push the access cover down until
completely closed.
Align the Control Panel within the
provided recess and panel buttons. Push
straight down firmly on both ends and
the middle to snap the panel into place.
1
Control Panel
2
Getting Started
7
Page 12

CONTROL PANEL FUNCTIONS
1
7
8
6
1. Paper Setup
2. Lighten/Darken
3. Display
3
4
13
5
15
14
2
11
+
12
-
9
10
9. Scan Mode
10. Navigator
11. Error Light
8
4. Menu/Exit
5. Clear/ Stop
6. Color
7. Quality
12. Select
13. Copy Quantity
14. Start
15. Power/Sleep
8. Reduce/Enlarge
Tip: Refer to this page as you go through the rest of this Getting Started guide.
It is an excellent reference for the control panel and its various functions
Getting Started
Page 13

INSTALLING YOUR PAPER TRAY
Installing Your Paper Tray
Holding the Paper Tray above the
surface, insert it into the WorkCentre
until it stops. Lower the tray straight
down onto the Back Tabs. Press the
back corners down until the tray is
in place.
The bottom of the paper tray will not
be flush with the desktop.
Place the Output Tray directly on top
of the paper tray.
1
Back Tabs
Paper Tray
2
Extend the output tray extension and
flip up the Paper Stop.
3
Output Tray
Paper Stop
Flip up
Getting Started
9
Page 14
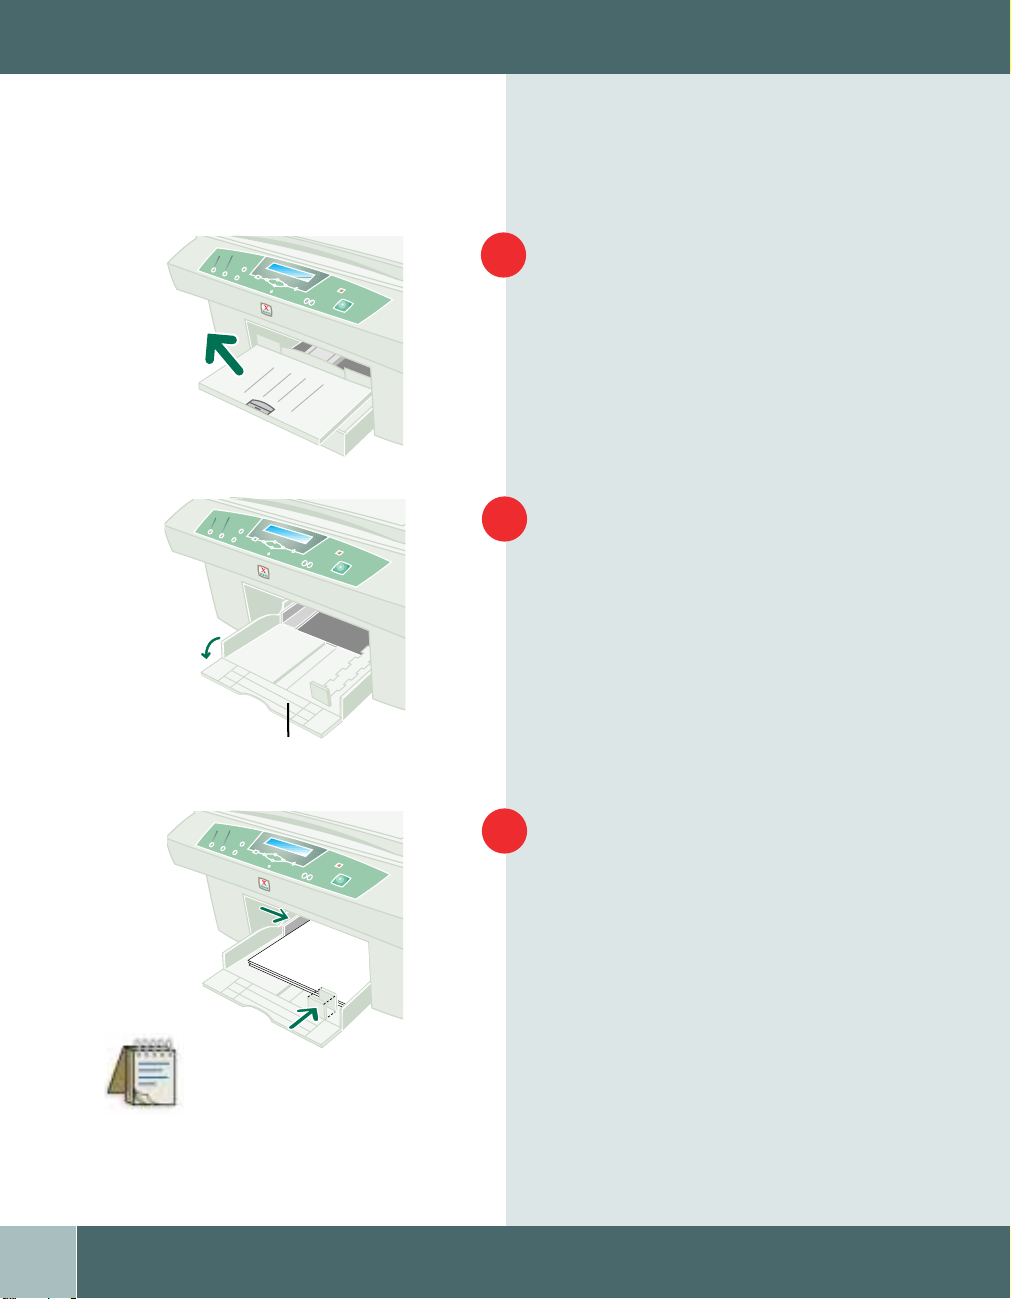
LOADING PAPER
Loading Paper
Remove the output tray to access the
1
paper loading area.
Open the front Paper Tray Door.
2
10
Paper Tray Door
Tip: Use the max fill icon on the paper tray to
ensure proper paper level.
Getting Started
Insert paper into the paper tray and
3
adjust both guides.
Close the front paper tray door.
Replace the output tray.
Page 15

MAKING CONNECTIONS
Connections
USB cable (shown)
2
Connect cable.
Note: Make sure that all shipping tape is removed
before connecting the cables.
Note: Your WorkCentre can be used as a stand alone
machine for copying. It is not necessary to connect
your PC when using your WorkCentre as a stand
alone machine.
Note: Use only a USB cable or a parallel cable when
connecting the WorkCentre and your PC. You must be
running Windows 98 or Windows 2000 to use a USB
cable. Otherwise use a parallel cable that is IEEE
1284-1994 compliant (Sold Separately).
AC power cord
Connect to the
WorkCentre and a
power outlet.
Note: When power is connected, the
WorkCentre will automatically go
through an audible priming cycle
which lasts for approximately 2
minutes. For optimum performance
do NOT unplug the copier.
1
Getting Started
11
Page 16

SELECTING YOUR LANGUAGE
Selecting Your Language
To change the language that is displayed
on your WorkCentre LCD display follow
the following steps.
1
2
3
4
Press the Menu button .
Press the up and down
navigation buttons until option “9
Language” displays.
Press the left and right
navigation buttons until you reach your
desired language.
Once you have found your desired
language, press the select button .
The LCD display should read
“Updating display language”.
Your WorkCentre LCD display should
now be set to your desired language.
12
Getting Started
Page 17

ALIGNING YOUR PRINT HEADS
Aligning Your Print Heads
For optimum print quality, your print
heads should be aligned. To align your
print heads follow these instructions.
On your control panel press the menu
button . Press the down
navigation button until option
“3. Maintenance” displays. Press the
right
“1. Clean Print Head1” displays.
Press the select button . The print
heads will complete a priming cycle
which lasts approximately 2 minutes.
On your control panel, press the menu
button . Press the down navigation
button until “3. Maintenance” displays.
Press the right navigation button
until option “6. Align Print Head”
displays. Press the select button .
An alignment page will print out.
Find the patterns that are best aligned in
line A. Then select the corresponding
pattern numbers on your control panel
by using the left and right
navigation buttons. Press the select
button to store your choice for
pattern A.
navigation button until
1
2
3
A
B
C
Go through the same procedure for
patterns B, C, and D until the display
reads “Ready to Copy”. The alignment
is now complete.
D
Getting Started
13
Page 18

MAKING COPIES
Making Copies
Lift the document cover and place the
1
original face down on the document
glass. Close the cover.
14
-
Getting Started
Select the number of copies desired
2
+
using the copy quantity buttons on the
main control panel.
Press start
The copies will exit to the paper
output tray.
Page 19

WorkCentre M950
WORKCENTRE M950
If you have purchased an M950, your
WorkCentre will come equipped with a
Set Document Feeder.
The Set Document Feeder (SDF) allows
you to quickly feed pages into the
WorkCentre to copy, scan, or fax. You
can feed up to 20 sheets at a time using
the SDF.
To use the SDF, insert your original(s)
face down into the feeder.
Refer to your User Guide for more
detailed information on how to copy,
scan, and fax.
Set Document Feeder (SDF)
Getting Started
15
Page 20

INSTALLING SOFTWARE
Note: If you have a USB connection
complete this page of instructions.
USB Connection for Windows 98
and 2000
(For parallel connection go to the next
page.)
Due to the robust and powerful
1
software, the installation may take 20-30
minutes.
Turn on your PC and start Windows.
If the PC requests driver software,
Select: Yes
(Wording may be different depending on
your PC’s operating system.)
CD Contents
• Control Centre 2.0
- Pagis Pro 3.0
- QuickLink III PC Fax
- TextBridge Pro
• MGI PhotoSuite
• Print and Twain Drivers
• Acrobat Reader
Insert the WorkCentre CD into the
2
CD-ROM drive of your PC. Software
installation begins automatically. Follow
the on-screen instructions to install the
print drivers and included software.
Your system is now completely ready for
operation. Please refer to the User Guide
or the online help for additional
information.
16
Getting Started
Page 21

INSTALLING SOFTWARE
Parallel Connection
Due to the robust and powerful
software, the installation may take 20-30
minutes.
Turn on your PC and start Windows.
If the PC requests driver software,
Select: No
(Wording may be different depending on
your PC’s operating system.)
Insert the WorkCentre CD into the
CD-ROM drive of your PC. Software
installation begins automatically.
If installation does not begin, open the
file Setup.exe on your CD-ROM drive.
Follow the on-screen instructions to
install the print drivers and included
software.
Your system is now completely ready for
operation. Please refer to the User Guide
or the online help for additional
information.
Note: If you have a parallel connection
1
complete this page of instructions.
2
CD Contents
• Control Centre 2.0
- Pagis Pro 3.0
- QuickLink III PC Fax
- TextBridge Pro
• MGI PhotoSuite
• Print and Twain Drivers
• Acrobat Reader
Getting Started
17
Page 22

GETTING MORE INFORMATION
Additional Information
You should refer to your WorkCenter
User Guide for the following information.
Chapter 2 - Copying
Chapter 3 - Printing
Chapter 4 - Customizing your
WorkCentre
Chapter 5 - Scanning
Chapter 6 - Faxing
Chapter 7 - Maintenance
Chapter 8 - Troubleshooting
For anwers to questions you might have
regarding your machine:
Visit the Xerox Web site at
http:\\www.xerox.com
Mail (US residents only):
Xerox Corporation
Attn.: Xerox Channels Group
PO Box 9604-7994
Webster, NY 14580-7994
Fax: 1-800-594-5023
Call our experts* at:
1-800-TEAM-XRX (1-800-832-6979)
*For support and service outside the
United States and Canada, refer to your
warrenty pack for local contacts.
18
Getting Started
 Loading...