

Page 1
®
Print
and
Fax
Drivers Guide
For Windows
Release 5.50
Page 2

31 January 2003
Copyright
©
2003 by Xerox Corporation. All rights reserved.
Printed in the United States of America.
XEROX
®
, The Document Company®, the digital X®, CentreWare®, and the
identifying product names and numbers herein are trademarks of XEROX
CORPORATION.
Other product names and images used in this guide may be trademarks or registered
trademarks of their respective companies and are hereby acknowledged.
ii
Page 3

Table of
Contents
What’s New in this Release? . . . . . . . . . . . . . . . . . . . . . . . . . . . . . . . . . viii
Print and Fax Driver Overview . . . . . . . . . . . . . . . . . . . . . . . . . . . . . . . viii
CentreWare Printer Drivers . . . . . . . . . . . . . . . . . . . . . . . . . . . . . . . . . . . ix
Enhanced View . . . . . . . . . . . . . . . . . . . . . . . . . . . . . . . . . . . . . . . . . . . . . ix
Standard View . . . . . . . . . . . . . . . . . . . . . . . . . . . . . . . . . . . . . . . . . . . . . . . x
PostScript . . . . . . . . . . . . . . . . . . . . . . . . . . . . . . . . . . . . . . . . . . . . . . . . . . xi
PCL . . . . . . . . . . . . . . . . . . . . . . . . . . . . . . . . . . . . . . . . . . . . . . . . . . . . . . . xi
Obtaining CentreWare Print and Fax Drivers . . . . . . . . . . . . . . . . . . . . . xi
CentreWare Print and Fax Drivers CD . . . . . . . . . . . . . . . . . . . . . . . . . . . xii
Downloading from the Web . . . . . . . . . . . . . . . . . . . . . . . . . . . . . . . . . . . . xii
WorkCentre and WorkCentre Pro PPD Files . . . . . . . . . . . . . . . . . . . . . . . xii
CentreWare Printer Driver Applications . . . . . . . . . . . . . . . . . . . . . . . . xiii
Xerox Printer Configuration Utility . . . . . . . . . . . . . . . . . . . . . . . . . . . . . xiii
Xerox Printer Installation Utility . . . . . . . . . . . . . . . . . . . . . . . . . . . . . . . xiii
TIFF Submission Tool . . . . . . . . . . . . . . . . . . . . . . . . . . . . . . . . . . . . . . . xiii
Font Management Utility . . . . . . . . . . . . . . . . . . . . . . . . . . . . . . . . . . . . . xiii
Print and Fax Driver Documentation . . . . . . . . . . . . . . . . . . . . . . . . . . xiv
CentreWare Print and Fax Drivers Guide for Windows . . . . . . . . . . . . . xiv
Help . . . . . . . . . . . . . . . . . . . . . . . . . . . . . . . . . . . . . . . . . . . . . . . . . . . . . xiv
Quick Reference Cards for Printer Drivers: . . . . . . . . . . . . . . . . . . . . xiv
Internet Support . . . . . . . . . . . . . . . . . . . . . . . . . . . . . . . . . . . . . . . . . . . . xv
Telephone Support . . . . . . . . . . . . . . . . . . . . . . . . . . . . . . . . . . . . . . . . . xv
Customer Tips . . . . . . . . . . . . . . . . . . . . . . . . . . . . . . . . . . . . . . . . . . . . . . xv
Chapter 1 Installing Windows Printer Drivers . . . . . . . . . . . . 1-1
Requirements . . . . . . . . . . . . . . . . . . . . . . . . . . . . . . . . . . . . . . . . . . . . . 1-2
Printer Drivers . . . . . . . . . . . . . . . . . . . . . . . . . . . . . . . . . . . . . . . . . . . . . 1-2
Xerox Windows Driver Installer . . . . . . . . . . . . . . . . . . . . . . . . . . . . . . . 1-2
Network Print Configurations . . . . . . . . . . . . . . . . . . . . . . . . . . . . . . . . 1-3
C
ENTREWARE PRINT AND FAX DRIVERS GUIDE
iii
Page 4

Peer To Peer . . . . . . . . . . . . . . . . . . . . . . . . . . . . . . . . . . . . . . . . . . . . 1-3
Through a Network print server . . . . . . . . . . . . . . . . . . . . . . . . . . . . . 1-3
Installing Printer Drivers in Windows Networks . . . . . . . . . . . . . . . . . 1-4
Direct Installation . . . . . . . . . . . . . . . . . . . . . . . . . . . . . . . . . . . . . . . . . . . 1-5
Direct Installation with a Peer To Peer Connection . . . . . . . . . . . . . . 1-5
Direct Installation Through a Network Printer Server Connection . 1-10
Distributed Installation . . . . . . . . . . . . . . . . . . . . . . . . . . . . . . . . . . . . . . 1-13
Copying Files to the Network . . . . . . . . . . . . . . . . . . . . . . . . . . . . . . 1-14
Configuring Installation Files . . . . . . . . . . . . . . . . . . . . . . . . . . . . . . 1-15
Distributing Installation Files . . . . . . . . . . . . . . . . . . . . . . . . . . . . . . 1-21
Installing Printer Drivers on a PC . . . . . . . . . . . . . . . . . . . . . . . . . . 1-22
Managing Configuration Files for Multiple User Groups . . . . . . . . 1-23
Point and Print . . . . . . . . . . . . . . . . . . . . . . . . . . . . . . . . . . . . . . . . . . . . 1-25
Installing Printer Drivers in Other Networks . . . . . . . . . . . . . . . . . . . 1-25
Configuring Printer Drivers . . . . . . . . . . . . . . . . . . . . . . . . . . . . . . . . 1-26
Configuring the Installable Options—Manually . . . . . . . . . . . . . . . . . . 1-26
Configuring the Installable Options—Automatically . . . . . . . . . . . . . . 1-28
Bi-Directional Printer Drivers . . . . . . . . . . . . . . . . . . . . . . . . . . . . . . . 1-30
Status Dialog . . . . . . . . . . . . . . . . . . . . . . . . . . . . . . . . . . . . . . . . . . . . . 1-31
Bi-Directional Driver Support . . . . . . . . . . . . . . . . . . . . . . . . . . . . . . . . 1-32
Supported Operating Systems . . . . . . . . . . . . . . . . . . . . . . . . . . . . . 1-32
Client-Based Implementations . . . . . . . . . . . . . . . . . . . . . . . . . . . . . 1-32
Server-Based Implementations . . . . . . . . . . . . . . . . . . . . . . . . . . . . . 1-32
Locating Installation Files on the CD . . . . . . . . . . . . . . . . . . . . . . . . . 1-33
Uninstalling Windows Printer Drivers . . . . . . . . . . . . . . . . . . . . . . . . 1-34
For Windows 9x and NT4.0 . . . . . . . . . . . . . . . . . . . . . . . . . . . . . . . . . . 1-34
For Windows 2000/XP . . . . . . . . . . . . . . . . . . . . . . . . . . . . . . . . . . . . . . 1-34
Chapter 2 Getting the Most From Your Printer Driver . . . . . . 2-1
Driver Structure . . . . . . . . . . . . . . . . . . . . . . . . . . . . . . . . . . . . . . . . . . . 2-2
General Tabs . . . . . . . . . . . . . . . . . . . . . . . . . . . . . . . . . . . . . . . . . . . . . . 2-3
Default Tabs . . . . . . . . . . . . . . . . . . . . . . . . . . . . . . . . . . . . . . . . . . . . . . . 2-4
Driver Help System . . . . . . . . . . . . . . . . . . . . . . . . . . . . . . . . . . . . . . . . . 2-5
Quick Reference Cards . . . . . . . . . . . . . . . . . . . . . . . . . . . . . . . . . . . . . . . 2-5
Chapter 3 Installing the Font Management Utility . . . . . . . . . 3-1
Installing the Font Management Utility . . . . . . . . . . . . . . . . . . . . . . . . 3-2
Accessing the Font Management Utility . . . . . . . . . . . . . . . . . . . . . . . . . 3-2
Using the Font Management Utility . . . . . . . . . . . . . . . . . . . . . . . . . . . . . 3-2
iv C
ENTREWARE PRINT AND FAX DRIVERS GUIDE
Page 5

Uninstalling the Font Management Utility . . . . . . . . . . . . . . . . . . . . . . 3-3
Chapter 4 Installing the TIFF Submission Tool . . . . . . . . . . . 4-1
Workstation Requirements . . . . . . . . . . . . . . . . . . . . . . . . . . . . . . . . . . 4-2
Supported Xerox Systems . . . . . . . . . . . . . . . . . . . . . . . . . . . . . . . . . . . 4-2
Installing the TIFF Submission Tool . . . . . . . . . . . . . . . . . . . . . . . . . . 4-3
Accessing the TIFF Submission Tool . . . . . . . . . . . . . . . . . . . . . . . . . . . 4-3
Using the TIFF Submission Tool . . . . . . . . . . . . . . . . . . . . . . . . . . . . . . . 4-3
Uninstalling the TIFF Submission Tool . . . . . . . . . . . . . . . . . . . . . . . . 4-4
Chapter 5 Problem Solving . . . . . . . . . . . . . . . . . . . . . . . . . . . 5-1
Troubleshooting a Problem . . . . . . . . . . . . . . . . . . . . . . . . . . . . . . . . . . 5-2
Common Issues . . . . . . . . . . . . . . . . . . . . . . . . . . . . . . . . . . . . . . . . . . . 5-3
Adobe Acrobat Printing . . . . . . . . . . . . . . . . . . . . . . . . . . . . . . . . . . . . . . 5-3
Booklet and Multiple-Up (N-Up) Printing . . . . . . . . . . . . . . . . . . . . . . . . 5-3
Euro Symbol . . . . . . . . . . . . . . . . . . . . . . . . . . . . . . . . . . . . . . . . . . . . . . . 5-4
PDF Printing . . . . . . . . . . . . . . . . . . . . . . . . . . . . . . . . . . . . . . . . . . . . . . . 5-4
Microsoft Applications . . . . . . . . . . . . . . . . . . . . . . . . . . . . . . . . . . . . . . . 5-5
PCL Printer Driver . . . . . . . . . . . . . . . . . . . . . . . . . . . . . . . . . . . . . . . . . . 5-6
Sample Set Not Supported in FrameMaker . . . . . . . . . . . . . . . . . . . . . . . 5-6
Watermarks . . . . . . . . . . . . . . . . . . . . . . . . . . . . . . . . . . . . . . . . . . . . . . . 5-7
WordPerfect . . . . . . . . . . . . . . . . . . . . . . . . . . . . . . . . . . . . . . . . . . . . . . . 5-7
Frequently Asked Questions . . . . . . . . . . . . . . . . . . . . . . . . . . . . . . . . . 5-8
C
ENTREWARE PRINT AND FAX DRIVERS GUIDE
v
Page 6

vi C
ENTREWARE PRINT AND FAX DRIVERS GUIDE
Page 7

Welcome to CentreWare Print and Fax
Drivers for Microsoft Windows
CentreWare is software that brings the power of your Xerox systems to your desktop.
CentreWare provides you with total access, viewing, and control of any Xerox system
to any connected desktop. CentreWare’s interactive drivers make printing and faxing
from the desktop simple to perform and easy to understand.
With this guide, administrators can install and configure CentreWare printer drivers
and general users can increase their productivity using the Xerox system’s printing
options.
What’s in this chapter:
What’s New in this Release? . . . . . . . . . . . . . . . . . . . . . . . . . . . . . . . . . . . viii
Print and Fax Driver Overview . . . . . . . . . . . . . . . . . . . . . . . . . . . . . . . . viii
Obtaining CentreWare Print and Fax Drivers . . . . . . . . . . . . . . . . . . . . . . xi
WorkCentre and WorkCentre Pro PPD Files . . . . . . . . . . . . . . . . . . . . . . . xii
CentreWare Printer Driver Applications. . . . . . . . . . . . . . . . . . . . . . . . . . xiii
Print and Fax Driver Documentation . . . . . . . . . . . . . . . . . . . . . . . . . . . . xiv
Internet and Telephone Support . . . . . . . . . . . . . . . . . . . . . . . . . . . . . . . . . xv
vii
Page 8

What’s New in this Release?
The CentreWare 5.50 release of the WorkCentre M and WorkCentre Pro printer
drivers supports the following new features and hardware:
WorkCentre M models 55/45/35
WorkCentre Pro models 90/75/65, and 55/45/35, and 40 Color / 32 Color
Color print and scan capability
Color added to Accounting
Finisher options
Bi-Directional printer drivers that after an initial setup, automatically
configure the driver with the installable options, report the current status of
the device, provide information on the current job, and a history of the last
twenty-five jobs on your Xerox system
Xerox Printer Configuration Utility
Xerox Printer Installation Utility
Print and Fax Driver Overview
A print and fax driver makes documents created with specialized software
applications (word processing, spreadsheets, graphics) compatible with a specific
printer. Each type of printer requires unique commands to print correctly and to
enable special features. For these reasons, different types of printers require their own
printer drivers to operate correctly.
viii
With CentreWare printer drivers, you can print from your workstation to a Xerox
system in a network environment. CentreWare drivers contain a variety of feature
options that you can use to customize your print jobs.
Integrated fax capabilities vary with each Xerox system. Not all Xerox printers
support both network printing and LAN fax submitted from the desktop. Check your
product-specific literature for more details. Other network fax options can be
configured with different models, using third-party software applications.
Page 9
CentreWare Printer Drivers
There are two kinds of views for CentreWare printer drivers:
Enhanced view
Standard view
Enhanced View
Printer drivers in enhanced view display the feature options on tabs within the driver.
These printer drivers are designed specifically for Xerox products. CentreWare
drivers in enhanced view are available for Windows 9x workstations. They are also
available for NT4/2000/XP drivers when Internet Explorer 5.01 or higher is installed
on your workstation. Please note that the driver graphic is representative. Driver
options and mimics will vary slightly depending on the operating system and model.
Printer Driver—Enhanced View
CentreWare Printer Drivers ix
Page 10
Standard View
Printer drivers in standard view conform to the Microsoft Windows driver standards.
The options are displayed in tree form, which is generic across many software
products. With CentreWare printer drivers in a Windows NT 4, 2000, or XP
environment, you can choose between enhanced and standard view by making your
selection on the Configuration tab.
Printer Driver—Standard View
x
Page 11

The CentreWare printer drivers are available in PostScript 3, PCL 5e, PCL 5c, and
PCL 6 (XL) printing formats.
PostScript
PostScript gives you greater ability to scale and manipulate images; it offers more
precision with high-end graphics. PostScript also provides you with different types of
error-handling and font substitution options.
PCL
PCL (Printer Command Language) generally has fewer advanced features than
PostScript. However, using PCL enables you to process most jobs faster.
Obtaining CentreWare Print and Fax Drivers
The following table shows the Xerox system models supported in this release of
CentreWare and the printer drivers that are available for Windows 95/98/Me/NT/
2000 and XP environments.
CentreWare Printer
Drivers
(Windows 95/98/Me/NT/
2000/XP)
PostScript WCP 90/75/65, 55/45/35, and
PCL 5e
PCL 5c WCP 40 Color / 32 Color CD/Web
PCL 6 (XL)
WorkCentre M and
WorkCentre Pro
(WCP) Models
40 Color / 32 Color
WorkCentre M 55/45/35,
WCP 90/75/65 and 55/45/35
WorkCentre M 55/45/35,
WCP 90/75/65 and 55/45/35
Location
CD/Web
CD/Web
Check availability on Web
site: www.Xerox.com
CentreWare Printer Drivers for Xerox WorkCentre M and WorkCentre Pro
Obtaining CentreWare Print and Fax Drivers xi
Page 12

CentreWare Print and Fax Drivers CD
The installation files for the Xerox system printer drivers are available on the
CentreWare Print and Fax Drivers CD.
For updates and additional information, check the Xerox Web site at
www.Xerox.com.
Downloading from the Web
Xerox system printer drivers can be downloaded from the Xerox Web site at
www.xerox.com
the Web site.
To download printer drivers:
1
Access the Xerox Web site and click the Drivers link.
2
Select your Xerox product family from the product family drop-down list and
click Search.
3
Select the desired Product, Operating System (Windows), and Language for the
printer driver.
4
Click Search.
5
From the Drivers list, select a driver.
6
Select Save from the File Download dialog.
. The installation files for all Xerox system models are available from
xii
7
Choose a location to download the file and click Save.
8
After the printer driver is downloaded, follow the instructions presented in
Chapter 1 for installing drivers.
WorkCentre and WorkCentre Pro PPD Files
A PostScript Printer Description (PPD) file is a readable text file that provides a
uniform approach to specifying special features for printer drivers that interpret
PostScript.
Xerox provides PostScript PPDs for all of the Xerox system models. They are
automatically installed with the printer driver.
Page 13

CentreWare Printer Driver Applications
The following applications are included on the CentreWare Print and Fax
Drivers CD:
Xerox Printer Configuration Utility
Xerox Printer Installation Utility
TIFF Submission Tool
Font Management Utility
Xerox Printer Configuration Utility
The Xerox Printer Configuration Utility is for System Administrators who would like
to set up standardized configuration files to enable users to quickly and easily install
their printer drivers.
Xerox Printer Installation Utility
The Xerox Printer Installation Utility is for users who would like to modify the printer
driver settings sent by the System Administrator before installing the drivers. System
administrators may also use this utility to install printer drivers directly onto a PC or
network server.
TIFF Submission Tool
With the TIFF Submission Tool, you can submit TIFF (Tagged Image File Format)
files directly to a Xerox system for printing. TIFF files print faster when they are sent
to the Xerox system in this format.
NOTE:
See Installing the TIFF Submission Tool on page 4-1 for more information.
A TIFF interpreter on your Xerox system is required for this tool.
Font Management Utility
The Font Management Utility is a tool used for managing fonts and printer lists.
Using this utility, fonts may be viewed, printed, downloaded to printers, and exported
to a file. Printers can be added or deleted from a printer list, which is used for adding
and deleting fonts from one or multiple printers.
See Installing the Font Management Utility on page 3-1 for more information.
CentreWare Printer Driver Applications xiii
Page 14

Print and Fax Driver Documentation
CentreWare Print and Fax Drivers Guide for Windows
This guide is intended for administrators who install and configure CentreWare
printer drivers and for users who want to know more information about printer drivers
and their installation.
The CentreWare Print and Fax Drivers Guide is available on the CentreWare Print
and Fax Drivers CD in electronic (PDF) format. If selected at the time of installation,
the Drivers Guide is placed on the user’s PC at ...\ Program Files \ Xerox \
WorkCentre Pro or \WorkCentre, depending on the printer model.
An English version of Adobe Acrobat Reader is provided on the CentreWare Print
and Fax Drivers CD. This works on most workstations running a non-English version
of Windows, except Windows 2000. You can download a reader for other languages
from Adobe at www.adobe.com/products/acrobat/readstep2.html
Help
The Help system is the primary source for information about using the printer drivers.
You can access the Help system through the Help buttons and What’s This? context
sensitive help. Included in the Help system are Quick Reference Cards for printer
drivers, feature descriptions, step-by-step procedures, Xerox system information,
problem-solving information, and support information.
.
xiv
Quick Reference Cards for Printer Drivers:
Feature Card—a quick reference card to help you locate the many printing
options that you can use through the printer driver to enhance the printing of your
documents.
Feature Facts—a quick reference card describing selected printing options, such
as Watermarks, Booklet Layout, and Stapling.
The Quick Reference Cards are provided in Adobe Acrobat PDF format.
Page 15

Internet Support
Visit Xerox on the Internet at www.Xerox.com. The Web site contains Xerox systems
product information, product overviews and support, and the latest information about
CentreWare printer driver releases.
Telephone Support
For additional assistance, you may contact the Xerox Welcome Center by telephone
to speak with a Product Support Analyst. Locate your Xerox system serial number on
the metal frame behind the front door, and record it in the space below before you
make your call.
Xerox System Serial Number:
The Xerox Welcome Center telephone numbers are listed in the following table. If the
Welcome Center telephone number for your country is not listed, it will be provided
to you when your Xerox system is installed. For future reference, please record the
telephone number in the space provided below.
Welcome Center Telephone Numbers:
UNITED STATES 800-821-2797
CANADA 800-939-3769 (800-93-XEROX)
Customer Tips
Additional tips and technical information for printer drivers are available at the Xerox
Web site, www.Xerox.com
Customer Tips cover specific issues that may require special procedures or
application notes regarding the operation and configuration of your Xerox system.
. Locate your product and access the Customer Tips link.
Internet Support xv
Page 16

xvi
Page 17

1
Installing Windows Printer Drivers
The CentreWare printer drivers support the special features and functions of Xerox
systems, enabling fast, efficient printing from your desktop. Installation instructions
for all current Windows environments are provided in this chapter.
What’s in this chapter:
Requirements. . . . . . . . . . . . . . . . . . . . . . . . . . . . . . . . . . . . . . . . . . . . . . . 1-2
Direct Installation . . . . . . . . . . . . . . . . . . . . . . . . . . . . . . . . . . . . . . . . . . . 1-5
Distributed Installation . . . . . . . . . . . . . . . . . . . . . . . . . . . . . . . . . . . . . . 1-14
Managing Configuration Files for Multiple User Groups . . . . . . . . . . . 1-23
Supported Driver Languages . . . . . . . . . . . . . . . . . . . . . . . . . . . . . . . . . 1-24
Configuring Printer Drivers . . . . . . . . . . . . . . . . . . . . . . . . . . . . . . . . . . 1-26
Bi-Directional Printer Drivers . . . . . . . . . . . . . . . . . . . . . . . . . . . . . . . . 1-30
Locating Installation Files on the CD. . . . . . . . . . . . . . . . . . . . . . . . . . . 1-33
Uninstalling Windows Printer Drivers . . . . . . . . . . . . . . . . . . . . . . . . . . 1-34
1-1
Page 18

Requirements
Printer Drivers
The minimum hardware requirements for the CentreWare printer drivers vary
based on the specific printer driver you are installing. At the most, you will need
7 MB of available hard disk space for any of the CentreWare Windows printer
drivers.
Internet Explorer 5.01 or higher installed on the workstation for NT4.0, 2000,
and XP drivers using Enhanced view.
Xerox Windows Driver Installer
The Xerox Windows Driver Installer consists of two utilities: the Xerox Printer
Configuration Utility and the Xerox Printer Installation Utility.
These utilities require:
Administrator privileges in NT4.0/2000/XP
Internet Explorer 5.0 or higher
LPR Port Monitor installed and running to connect Peer To Peer in a Windows
NT4.0 environment
Service Pack 2 installed on Windows 2000 systems
Service Pack 4 installed on Windows NT4.0 systems
1-2 Installing Windows Printer Drivers
Page 19

Network Print Configurations
Peer To Peer
In a Peer To Peer environment, a printer driver is installed on a workstation that is
connected to a printer. The printer driver resides only on the workstation. In this
setup, workstation users maintain their own printer defaults and configurations,
allowing different printer settings for each user.
Through a Network print server
In a Through a Network print server environment, a printer driver is installed on a
server and shared with other servers and workstations on the network. The printer
driver is downloaded to the workstation from the server. In this network setup, a
Network Administrator generally maintains the printer defaults and configuration.
Network Print Configurations 1-3
Page 20

Installing Printer Drivers in Windows Networks
You have two ways to install a Xerox printer driver and other components in
Windows environments.
Direct Installation
Use the Xerox Printer Installation Utility to install Xerox printer drivers quickly and
easily for your network printers. If you are a system administrator or user who has the
CentreWare Print and Fax Drivers CD or knows the network location where the
contents of the CD has been saved, you can configure settings for several printer
drivers at one time and install the drivers directly onto a PC or print server.
Distributed Installation
Copy the contents of the CentreWare Print and Fax Drivers CD to your network.
Then open the Xerox Printer Configuration Utility, set up a configuration file, and
distribute a packet of installation files containing the configuration file to users to
install the printer drivers on their PCs.
1-4 Installing Windows Printer Drivers
Page 21

Direct Installation
With the Xerox Printer Installation Utility, you can configure and install printer
drivers with a Peer To Peer connection or with a Through Network print server
connection.
In an NT4.0/2000/XP environment, you need administrator rights to run the Xerox
Printer Installation Utility. To install drivers onto a network server you must run the
Xerox Printer Installation Utility at the network server. You cannot install the drivers
remotely.
Direct Installation with a Peer To Peer Connection
To configure and install printer drivers with a peer to peer connection:
1
Insert the CentreWare Print and Fax Drivers CD into the CD-ROM drive. The
AutoRun program displays the available selections.
–or–
If the AutoRun is disabled on your workstation, open My Computer and doubleclick the CD-ROM drive. Double-click the Setup.exe file. The AutoRun program
displays the available selections.
2
Click Print and Fax Drivers > Install Your Windows Printer Driver. The
Xerox Printer Installation Utility opens.
3
Select a language on the We lc om e tab to view the utility.
Installing Printer Drivers in Windows Networks 1-5
Page 22

4
On the Configuration tab, select a language for your printer driver.
Figure 1-1: Xerox Printer Installation Utility, Configuration Tab
5
Select a printer model.
6
Choose one or more drivers. The printer and driver selections appear in the
Configuration Information box.
1-6 Installing Windows Printer Drivers
Page 23
7
Select Install Documentation to place on your workstation the CentreWare Print
and Fax Drivers Guide 5.50, a user reference guide for printer driver overview
and installation. Depending on the printer model you are installing, the
documentation is placed at ..\Program Files\Xerox\WorkCentre Pro or
\WorkCentre.
8
Select a printer from the Information box. Or, select more than one printer of the
same model if you want to install a PS and PCL driver for this printer.
9
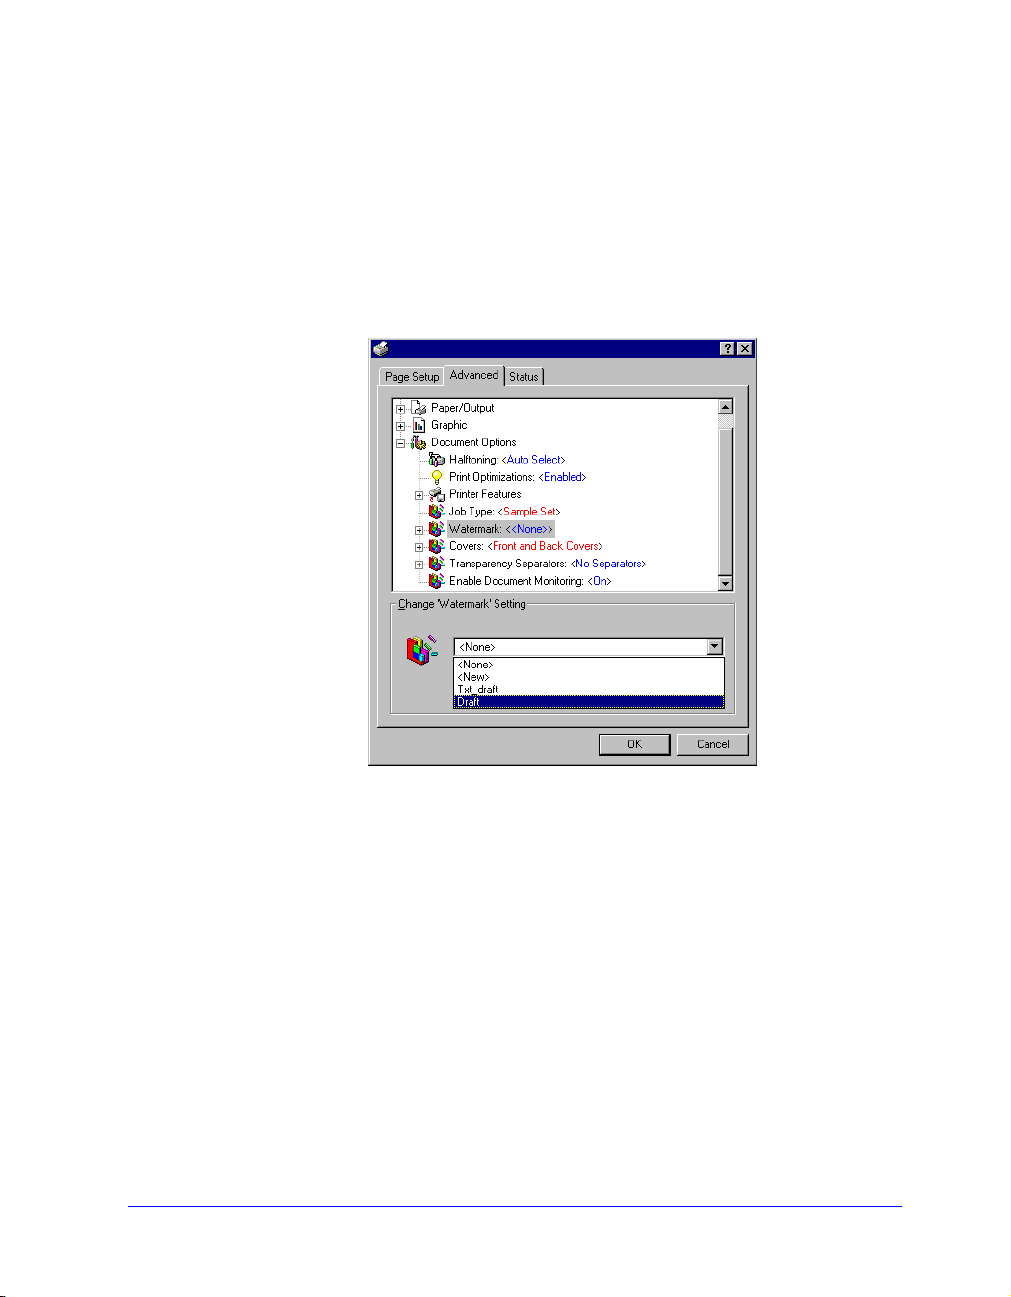
Click Connection.... The Connection dialog opens.
Figure 1-2: Connection Dialog. Peer To Peer Connection is selected.
10
Select Peer to Peer.
NOTE:
peer printing in a Windows 9x environment. If the Xerox Printer
Installation Utility detects a Windows 9x environment, the Peer To Peer
option is grayed out.
The Xerox Printer Installation Utility does not support peer to
Installing Printer Drivers in Windows Networks 1-7
Page 24

11
Enter the IP Address of your Xerox system and click OK.
The printer is configured with a Peer To Peer connection and the printer’s IP
address is added to the Connection column of the Configuration Information box.
-or-
Click Discovery.... The Discovery dialog opens and the installer searches your
local network for printers. The discovered printers appear in the Discovery list
box.
Figure 1-3: Discovery Dialog
12
Do one of the following:
a)
If your printer is listed in the Discovery list box, select the printer.
b)
Click OK. The printer is configured with a Peer To Peer connection and the
printer’s IP address is added to the Connection column of the Configuration
Information box.
-or-
a)
If your printer is not listed, enter a Subnet IP and Subnet Mask to search
through more of your network.
1-8 Installing Windows Printer Drivers
Page 25

b)
Click Go. The installer searches for the printer and adds it to the Discovery
list box.
c)
Select the printer and click OK. The printer is configured with a Peer To
Peer connection and the printer’s IP address is added to the Connection
column of the Configuration Information box.
NOTE:
printer's check box in the Configuration Information box is unchecked.
You may select another printer to configure.
13
14
After the printer has been configured with a connection type, the
Make your Replace Driver and Default Printer selections. Click the cell to toggle
between options.
Click Install. A message appears indicating when the installation is complete.
Installing Printer Drivers in Windows Networks 1-9
Page 26

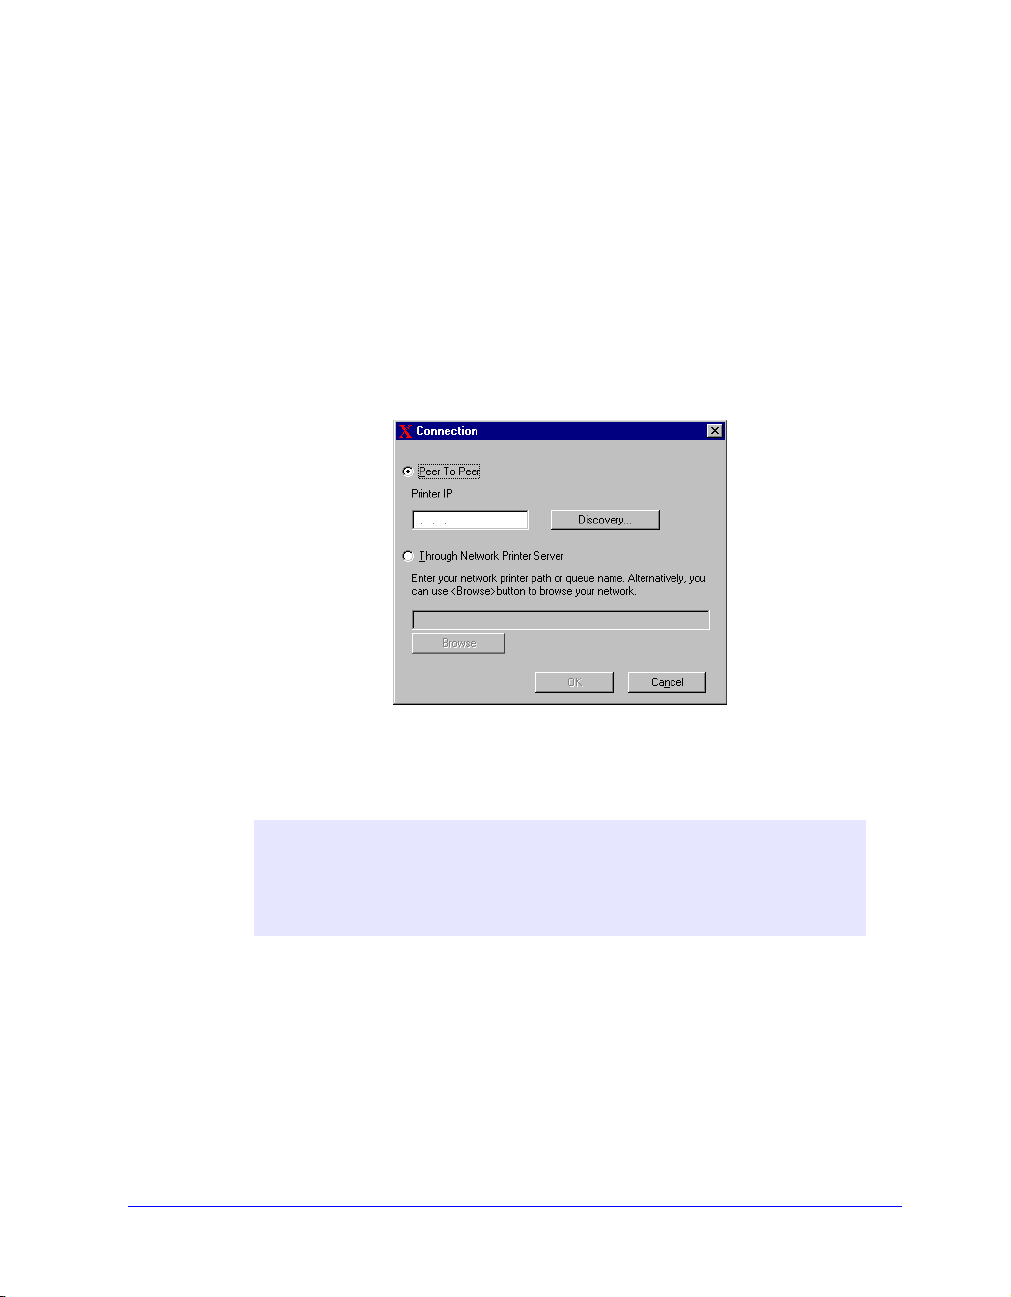
Direct Installation Through a Network Printer Server Connection
To configure and install printer drivers Through a Network Printer
Server connection:
1
Insert the CentreWare Print and Fax Drivers CD into the CD-ROM drive. The
AutoRun program displays the available selections.
–or–
If the AutoRun is disabled on your workstation, open My Computer and doubleclick the CD-ROM drive. Double-click the Setup.exe file. The AutoRun program
displays the available selections.
2
Click Print and Fax Drivers > Install Your Windows Printer Driver. The
Xerox Printer Installation Utility opens.
3
Select a language on the We lc om e tab to view the utility.
4
On the Configuration tab, select a language for your printer driver.
Figure 1-4: Xerox Printer Installation Utility, Configuration Tab
1-10 Installing Windows Printer Drivers
Page 27

5
Select a printer model.
6
Choose one or more drivers. The printer and driver selections appear in the
Configuration Information box.
7
Select Install Documentation to place the CentreWare Print and Fax Drivers
Guide 5.50, a user reference guide for printer driver overview and installation, on
your workstation. Depending on the printer model you are installing, the
documentation is placed at ..\Program Files\Xerox\WorkCentre Pro or
\WorkCentre.
8
Select a printer in the Information box.
NOTE:
example WorkCentre Pro 32 PostScript. After the printer has been
configured with a connection type, the printer’s check box in the
Configuration Information box is unchecked. You may select another
driver for the same printer and configure a connection or you may select
another printer to configure.
9
Click Connection.... The Connection dialog opens.
Figure 1-5: Connection Dialog. Through Network Printer Server is selected.
You may configure only one printer and driver at a time, for
Installing Printer Drivers in Windows Networks 1-11
Page 28

10
Select Through Network Printer Server.
11
Enter your network printer path or click Browse to browse to a shared printer.
Click OK. The network path to the printer is added to the Connection column of
the Configuration Information box and the printer is configured through the
network print server.
NOTE:
printer’s check box in the Configuration Information box is unchecked.
You may select another driver for the same printer and configure a
connection or you may select another printer to configure.
12
Make your Replace Driver and Default Printer selections. Click the cell to toggle
between options.
13
Click Install. A message appears indicating when the installation is complete.
After the printer has been configured with a connection type, the
1-12 Installing Windows Printer Drivers
Page 29

Distributed Installation
The Distributed Installation procedures are for system administrators who would like
to set up standardized configuration files for users to quickly and easily install their
printer drivers. Using the Xerox Printer Configuration Utility, you can customize the
driver installation process to meet your organization’s needs:
Use the Preconfigured File—Xerox provides a preconfigured file with the
Configuration Utility that contains standardized settings for all the drivers of
each supported printer model.
Customize Driver Settings—Using the Configuration Utility, you can specify
your own default settings for each driver.
Manage Different User Groups—By creating and saving different
configuration files, you can consistently manage driver distribution to different
user groups.
NOTE:
2000/XP environments.
The Distributed Installation procedure has four components to it:
1
2
3
4
The Xerox Printer Configuration Utility supports only Windows NT4.0/
Copying files to the network
Configuring installation files
Distributing installation files
Installing printer drivers on a PC
Installing Printer Drivers in Windows Networks 1-13
Page 30

Copying Files to the Network
To configure the installation packet that you send to users to install printer drivers on
their PCs, the contents of the CentreWare Print and Fax Drivers CD must be saved to
a location on your network.
To copy printer drivers:
1
Insert the CentreWare Print and Fax Drivers CD into the CD-ROM drive.
2
Copy the contents of the CentreWare Print and Fax Drivers CD to a location on
your network.
3
Make the Installer folder and language folders (for example, English, Français)
sharable on the network.
1-14 Installing Windows Printer Drivers
Page 31

Configuring Installation Files
The Xerox Printer Configuration Utility provides a simple way to set up a
configuration file that you send to users as part of a packet of installation files. With
the Xerox Printer Configuration Utility, you can select printer drivers for each
supported printer model, set up a network connection for a printer, choose whether to
replace drivers, and whether to make this printer the default printer. You also have the
option to configure the printer driver in several languages at the same time.
To set up the Configuration File, you can make your own selections, or you can
decide to use the Preconfigured File provided by Xerox.
Preconfigured File
Initially, this file is preconfigured by Xerox with all the drivers for each supported
printer model, with No as the option for Replace Drivers, and with No as the option
to make this printer the Default Printer.
When you click the Preconfigured File button and choose one of the
XeroxPrintersToInstall[Language].xml files, the preconfigured settings for each
printer model are added to the Configuration Information box. You may then:
Modify the preconfigured settings
Delete printers
Configure connection settings
Configure a silent installation
Choose to install documentation
For more information about the XeroxPrintersToInstall[Language].xml file and the
supported printer driver languages, See Supported Driver Languages on page
1-24.
NOTE:
settings.
Saving the file overwrites the preconfigured settings with your new
Installing Printer Drivers in Windows Networks 1-15
Page 32

Setting Up Connection Types
With the Xerox Printer Configuration Utility, you have the option to set up
configuration files for multiple printers, which may have different connection types.
For example, one printer may have a Peer To Peer connection and another printer a
Through Network Printer Server connection. The following configuration procedures
describe first the procedures for a Peer To Peer connection and then Through a
Network Printer Server connection.
To set up a configuration file:
1
Insert the CentreWare Print and Fax Drivers CD into the CD-ROM drive. The
AutoRun program opens.
2
Click Utilities > Xerox Printer Configuration Utility. The Xerox Printer
Configuration Utility opens.
3
Select a language on the We lc om e tab to view the utility.
Figure 1-6: Xerox Printer Configuration Utility, Welcome Tab
1-16 Installing Windows Printer Drivers
Page 33

4
On the Configuration tab, select one or more languages in which to configure a
driver.
Figure 1-7: Xerox Printer Configuration Utility, Configuration Tab
5
Select a printer model.
6
Choose a driver. The printer model and driver information appear in the
Configuration Information box.
You may choose other drivers for this printer and also select other printers and
drivers at this time to add to the Configuration Information box.
Installing Printer Drivers in Windows Networks 1-17
Page 34

7
Select from these options:
Silent Installation—to simplify installation for the user. After the user
opens the zip file you send containing the configuration and installation files
and clicks the Install.exe file, the printer drivers are automatically installed
on the user’s workstation.
Install Documentation—to place on the user’s workstation the CentreWare
Print and Fax Drivers Guide 5.50, a user reference guide for printer driver
overview and installation. Depending on the printer model you are installing,
the documentation is placed at ..\Program Files\Xerox\WorkCentre Pro or
\WorkCentre.
8
Select a printer from the Information box.
NOTE:
printer has been configured with a connection type, the printer’s check
box in the Configuration Information box is unchecked. You may select
another driver for the same printer and configure a connection or you may
select another printer to configure.
You may configure only one printer and driver at a time. After the
Choose either a Peer To Peer or Through Network Printer Server connection
and complete the associated dialogs.
Peer to Peer
a)
Choose Peer To Peer from the Connection group. The Discovery dialog
opens.
NOTE:
peer printing in a Windows 9x environment. If the Xerox Printer
Installation Utility detects a Windows 9x environment, the Peer To Peer
option is grayed out.
The Xerox Printer Installation Utility does not support peer to
1-18 Installing Windows Printer Drivers
Page 35

Figure 1-8: Discovery Dialog
b)
Select a network printer using the Discovery dialog. Click OK. The printer is
configured with a Peer To Peer connection and the printer’s IP address is
added to the Configuration Information box.
After the printer has been configured with a connection type, the printer's
check box in the Configuration Information box is unchecked. You may
select another printer to configure.
Installing Printer Drivers in Windows Networks 1-19
Page 36

Through Network Printer Server
a)
Choose Through Network Printer Server from the Connection group. The
Network Printer Path dialog opens.
Figure 1-9: Network Printer Path Dialog
b)
Enter the network printer path or click Browse to browse to a shared printer.
Click OK. The network path to the printer is added to the Connection
column of the Configuration Information box and the printer is configured
through the network print server.
After the printer has been configured with a connection type, the printer’s
check box in the Configuration Information box is unchecked. You may
select another driver for the same printer and configure a connection or you
may select another printer to configure.
9
Make your Replace Driver and Default Printer selections. Click the cell to toggle
between options.
10
Click Browse to open a dialog to browse to the location of the printer driver files
on the network.
11
Click OK to add the location of the printer driver files to the configuration file.
12
Click Save when you are ready to save the configuration file. A Save As dialog
opens. Choose a different folder than the default folder, otherwise you will
overwrite the default Preconfigured File.
If you are managing configuration files for multiple user groups, see Managing
Configuration Files for Multiple User Groups on page 1-23.
13
Click Save. Your settings are saved to the XeroxPrintersToInstall[Language].xml
file in the folder ..\Packet.
If you have chosen to configure the driver in more than one language, save the
configuration file for each language separately to the same Packet folder.
For more information about XeroxPrintersToInstall[Language].xml, see
Supported Driver Languages on page 1-24.
1-20 Installing Windows Printer Drivers
Page 37

Distributing Installation Files
When you have set up and saved your configuration file(s) to the Packet folder, you
are ready to distribute the installation packet for users to install printer drivers. You
may want to send one of the following notes depending on whether it will be a Silent
Installation or User Installation.
Silent Installation - Note to User
I have attached a zip file that enables you to install printer drivers.
1
Save the file to a temporary folder or to a folder on the desktop.
2
Unzip the file.
3
Double-click the Install.exe file. The printer drivers install automatically.
User Installation - Note to User
I have attached a zip file that enables you to install printer drivers.
1
Save the file to a temporary folder or to a folder on the desktop.
2
Unzip the file.
3
Double-click the XPIU.exe file. The Xerox Printer Installation Utility opens.
4
On the Welcome tab, select a language to view the utility.
5
On the Configuration tab, select the language you want for your driver.
6
Click the Help button to open the Help system.
7
In the Table of Contents, open How To Install a Xerox Printer Driver.
8
Follow the procedure: To install printer drivers using the configuration file
defaults.
Installing Printer Drivers in Windows Networks 1-21
Page 38

Installing Printer Drivers on a PC
After the zip file has been sent from the system administrator containing the
installation files, there are two ways to install printer drivers on your PC:
Silent Installation
User Installation
Silent Installation
Your system administrator sends you a zip file containing the installation files to
automatically install your printer drivers.
To install printer drivers automatically:
1
Save the file to a temporary folder or to a folder on the desktop.
2
Unzip the file.
3
Double-click the Install.exe file. The printer drivers install automatically.
User Installation
Your system administrator sends you a zip file containing all the files you need to
install your printer drivers. Included in these files is a configuration file with all your
printer driver settings.
To install printer drivers using the configuration file defaults:
1
Save the installation zip file your system administrator has sent to you to a
temporary folder or to a folder on the desktop.
2
Unzip the file and click XPIU.exe. The Xerox Printer Installation Utility opens.
3
Select a language on the We lc om e tab to view the utility.
4
On the Configuration tab, select a language for your driver.
5
Click Configuration File.
6
Open XeroxPrintersToInstall[Language].xml. The printer drivers with the
standardized settings preconfigured by the system administrator appear in the
Configuration Information box. See Supported Driver Languages on page 1-24.
7
Click Install. The printer drivers are installed.
1-22 Installing Windows Printer Drivers
Page 39

Managing Configuration Files for Multiple User Groups
To manage configuration files for different groups of users that use separate printers,
you can create separate configuration files for each group.
To manage configuration files for multiple user groups:
1
Follow the procedures to set up a configuration file for users. See Configuring
Installation Files on page 1-15.
2
Save the file for a group of users to a specific folder for that group.
3
Return to the Information box, repeat the configuration process for the next
group of users, and save the file to a different folder for that group.
For example, for Group A, save the configuration file to ...\Group A \ Packet \
XeroxPrintersToInstall[Language].xml. For Group B, save the configuration file
to ...\Group B \ Packet \ XeroxPrintersToInstall[Language].xml.
NOTE:
XeroxPrintersToInstall[Language].xml. Do not change the name. If you
do, the Xerox Printer Installation Utility will not recognize the file. Saving a
file with the same name to a common folder overwrites the previous
configuration settings.
There is only one configuration file for each supported language
Installing Printer Drivers in Windows Networks 1-23
Page 40

Supported Driver Languages
You may configure the printer driver in several languages at the same time.
Choose the Select Drivers Language button on the Configuration tab. A list of
supported languages opens. Make your language selections.
When you save your settings on the Configuration tab, you will have a
configuration file, XeroxPrintersToInstall[Language].xml, for each chosen
language.
For example, XeroxPrintersToInstallSVE.xml is the configuration file for a driver
configured in Swedish or XeroxPrintersToInstallDAN.xml for a driver configured
in Danish.
If you choose a language to configure the driver, but that language is not found on
a user’s operating system, the driver defaults to English. The supported languages
are listed below with a list of the language abbreviations that are used in the
configuration file, XeroxPrintersToInstall[Language].xml.
Supported Languages and Abbreviations
ENU English US NLD Nederlands
FRA Francais NOR Norsk
DEU Deutsch PTB Brazilian Portugues
DAN Dansk (Danish) PTE European Portugues
ESN Espanol SUO Suomi (Finnish)
ITA Italiano SVE Svenska
1-24 Installing Windows Printer Drivers
Page 41

Point and Print
This procedure assumes that a Xerox system on a network server has been installed
with the appropriate CentreWare printer driver prior to performing Point and Print.
To perform Point and Print:
1
At the client workstation, access the desired network Xerox system through
Network Neighborhood (Win 95/98/NT) or My Network Places (Me/2000/
XP). Browse to your printer.
2
Double-click the Xerox system icon. At the prompt, select to install the printer
driver. The Add Printer Wizard opens.
–or–
Click the Xerox system icon. Drag and drop the printer icon on the Printers
folder. The Add Printer Wizard opens.
3
Follow the Add Printer Wizard instructions.
The appropriate files for the selected Xerox system download to the client
workstation.
Installing Printer Drivers in Other Networks
The Xerox Installer supports Windows networks. To install drivers in other networks
use Microsoft’s Add Printer Wizard.
Installing Printer Drivers in Other Networks 1-25
Page 42

Configuring Printer Drivers
After installing your Xerox system printer drivers, you need to configure your printer
driver with the available options on your Xerox system. Each model can have
different installable options, for example, a High Capacity Feeder or a Finisher.
There are two ways to configure your printer driver with the installable options:
Manually—using the Installable Options dialog
Automatically—using the Bi-Directional Communication dialog
Configuring the Installable Options—Manually
To configure the Installable Options:
1
At the desktop, click Start > Settings > Printers.
2
Right-click the appropriate printer icon and select Properties (9x), Document
Defaults (NT 4.0), Printing Preferences (2000/XP).
3
Select the Configuration tab.
Figure 1-10: Configuration Tab on the Properties Dialog
1-26 Installing Windows Printer Drivers
Page 43

4
Click Installable Options and select the options that are available on your Xerox
system.
Figure 1-11: Installable Options Dialog
5
Click OK to save the settings and OK to close the Properties dialog.
6
Click OK to close the printer driver.
Configuring Printer Drivers 1-27
Page 44

Configuring the Installable Options—Automatically
If you have a TCP/IP network, the Windows printer drivers can, as an option, provide
Bi-Directional capabilities. The printer driver communicates with the printer through
your network and acquires information from the printer. See Bi-Directional Printer
Drivers on page 1-30.
To configure the Installable Options automatically:
1
At the desktop, click Start > Settings > Printers.
2
Right-click the appropriate printer icon and select Properties (9x), Document
Defaults (NT 4.0), Printing Preferences (2000/XP).
3
Select the Configuration tab.
Figure 1-12: Configuration Tab on the Properties Dialog
1-28 Installing Windows Printer Drivers
Page 45

4
Click Bi-Directional Setup.... The Bi-Directional Communication dialog opens.
Figure 1-13: Bi-Directional Communication Dialog
5
Enter the Device Name or TCP/IP address.
6
Select Enable Bi-Directional Communication.
7
Click OK. Bi-Directional communication is enabled. A Status button appears on
the Paper/Output tab of the printer driver. By clicking the Status button, you can
access current information about the printer. See Bi-Directional Printer Drivers
on page 1-30.
NOTE:
Community Name dialog and the server or client’s default SNMP
Community Name. If the name is not available, “Public” will appear. If
neither item appears, you can enter the information.
If the SNMP Community Name is unknown, Bi-Directional communication
will not be available for the drivers.
Click the SNMP Community Name button to display the SNMP
Configuring Printer Drivers 1-29
Page 46

Bi-Directional Printer Drivers
If you have a TCP/IP network, the Windows NT4.0/2000/XP printer drivers can, as
an option, provide Bi-Directional capabilities. With Bi-Directional communication, a
printer driver communicates with the printer through your network.
After an initial setup procedure, Bi-Directional communication automatically updates
the printer driver with the printer’s installed options and reports specific information
about the printer’s operational status, active jobs, completed jobs, and paper status in
your Xerox system.
NOTE:
properly for the printer, the network, or your workstation, the Bi-Directional
information does not appear.
If network communication is temporarily unavailable or is not configured
1-30 Installing Windows Printer Drivers
Page 47

Status Dialog
The Bi-Directional printer drivers have incorporated some of the reporting functions
of the CentreWare Conductor. These functions are reported on the Status dialog
available to you through the Status button on the Paper/Output tab.
The Status dialog shows the status of your Xerox system as well as specific
information about your print jobs. You can check the status of up to 25 jobs currently
in the print queue or you can verify the status of completed jobs. You can use this
dialog to check the properties of the paper loaded in different paper trays on your
printer and also the current paper levels in those trays. You can also use this dialog to
verify that your printer is functioning properly.
The Status dialog is divided into two sections. The upper portion reports the general
status of your Xerox system. The lower portion has three tabs and reports specific
information about Active Jobs, Completed Jobs, and the Paper Status in your Xerox
system.
Figure 1-14: Status Dialog, Paper Status Tab
Bi-Directional Printer Drivers 1-31
Page 48

Bi-Directional Driver Support
Supported Operating Systems
Bi-Directional drivers are supported for the following Microsoft Operating Systems:
Windows 95 Windows NT 4.0 (Workstation, Server, Enterprise Server)
Windows 98 Windows 2000 (Professional, Server, Advanced Server)
Windows Me Windows XP (Home, Professional)
Windows .NET (Server, Enterprise Server)
Client-Based Implementations
Bi-Directional drivers installed on a client workstation communicate with Xerox
systems via the following methods:
Device Settings SNMP over TCP/IP
Job Monitoring SNMP over TCP/IP
Job History SNMP over TCP/IP
Device Status SNMP over TCP/IP
Device Configuration Microsoft Point and Print functionality
Server-Based Implementations
Bi-Directional drivers installed on a server communicate with Xerox systems via
SNMP over TCP/IP or SNMP over IPX/SPX.
The data available in server-based drivers will not update on a regular basis. When
configuration changes are made, the driver must be reopened to detect the changes.
1-32 Installing Windows Printer Drivers
Page 49

Locating Installation Files on the CD
The installation .inf files for Windows Postscript (PS) and PCL printer drivers are
located in the Drivers folder of the CentreWare Print and Fax Drivers CD. Locate the
Drivers folder and open the Windows folder, as well as the folder for your particular
Xerox system model, for example, WCP55_WCP45_WCP35.
The Xerox system model folder contains individual driver folders categorized by
driver type—PS and PCL—and Windows operating system (9x, NT, 2000, or XP).
Therefore, the installation files (.inf) for a Windows 2000 PostScript driver for a
WorkCentre Pro 40 are located in:
\\...Drivers >
Windows >
WCP40C_WCP34C >
PS_40C_W2K_XP >
XW40CPS.inf
Locating Installation Files on the CD 1-33
Page 50

Uninstalling Windows Printer Drivers
NOTE:
Xerox system you are deleting is not the default printer. If so, select another printer
as the default.
Before you uninstall CentreWare Windows printer drivers, ensure that the
For Windows 9x and NT4.0
To uninstall the Windows 9x and NT4.0 printer drivers:
1
At the desktop, click Start > Settings > Printers.
2
Right-click on the icon for the Xerox system you want to delete and select
Delete.
3
A confirmation message appears. Click Ye s to delete the printer driver.
4
Rebooting your workstation is recommended.
For Windows 2000/XP
To uninstall the Windows 9x and NT4.0 printer drivers:
1
At the desktop, click Start > Settings > Printers.
2
Right-click on the icon for the Xerox system you want to delete and select
Delete.
3
A confirmation message appears. Click Ye s to delete the printer driver object.
4
Rebooting your workstation is recommended.
5
Open the Printers folder. Start > Settings > Printers.
6
Right-click in a blank area of the folder. A drop-down menu opens.
7
Select Server Properties. A Properties dialog opens.
8
Select the Drivers tab.
9
Select the printer driver you want to remove.
10
Select Remove. The printer driver is removed.
1-34 Installing Windows Printer Drivers
Page 51

2
Getting the Most From Your
Printer Driver
With the CentreWare printer drivers, you have an invaluable tool to save you time and
to increase your productivity. These drivers offer you over thirty-five feature options,
depending on the type of driver and the installable finisher options, for you to choose
how your document will look and print.
The Help system is the primary source for information about using the printer drivers.
At any time, you can access the Help system through the Help buttons on the driver.
For help on a single item in some drivers, click on the question mark (?) at the upper
right hand corner of the tab. If that is not available in your driver, right-click the
feature title to access the pop-up help. Through the Help system, you also have access
to two quick reference cards about printer driver features. They were developed so
that you can print and post them for a handy reference.
What’s in this chapter:
Driver Structure . . . . . . . . . . . . . . . . . . . . . . . . . . . . . . . . . . . . . . . . . . . . 2-2
Ta bs . . . . . . . . . . . . . . . . . . . . . . . . . . . . . . . . . . . . . . . . . . . . . . . . . . . . . . 2-3
Driver Help System . . . . . . . . . . . . . . . . . . . . . . . . . . . . . . . . . . . . . . . . . . 2-5
Quick Reference Cards . . . . . . . . . . . . . . . . . . . . . . . . . . . . . . . . . . . . . . . 2-5
2-1
Page 52

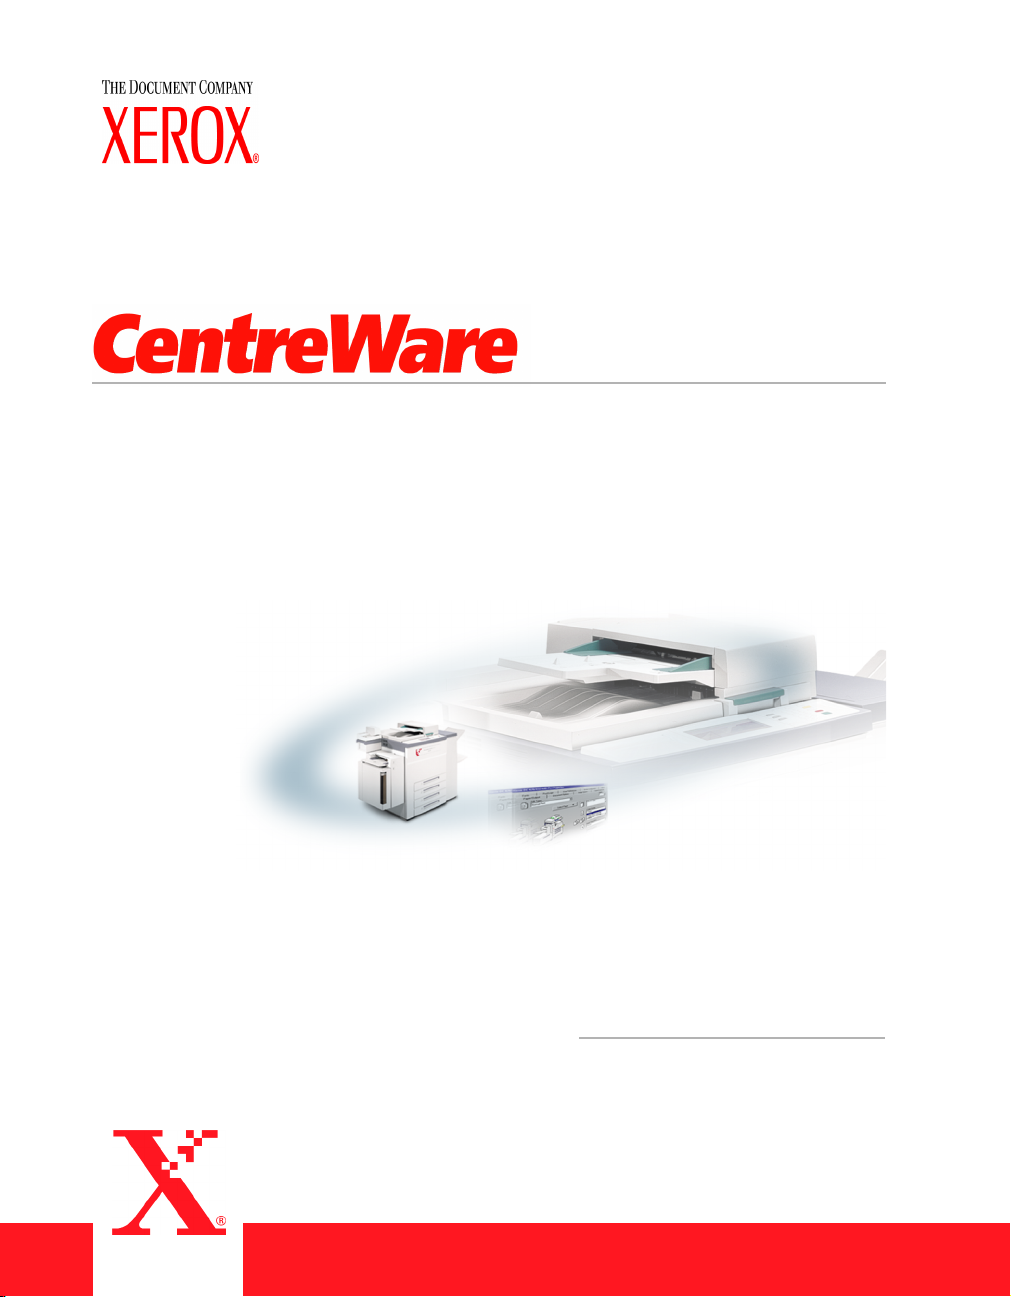
Driver Structure
The driver arranges the features on four tabs: Paper/Output, Advanced, Image
Options, and Layout/Watermark.
Figure 2-1: Printer Driver Interface
The features on the four tabs are organized for your convenience with the most
frequently used features available to you when you open the driver. Small icons are
placed next to the features so that you can quickly find the features you want. By
clicking on the icon you can go through the list of options for that feature. Or, use the
drop down list to see the options.
When chosen, certain features constrain other features. For example, if you
choose Collated, Booklet Staple, an icon appears on the printer driver next to
the Punch/Fold selection. When you select the icon a pop-up dialog appears
explaining why the feature is not available or why it is constrained to a particular
selection, as in this case, Booklet Fold.
2-2 Getting the Most From Your Printer Driver
Page 53

Tabs
Features vary on the driver tabs depending on the driver type and installable options.
General Tabs
These driver tabs are accessed through your application’s print dialog. Driver setting
changes on these tabs apply to the open document and application, and are temporary.
The Paper/Output tab has the most frequently used features. For example, you can
choose to print on two sides of the paper, select specific media on which to print, or
delay your print job to a time specified by you. The Paper/Output tab also presents the
finishing options, which may include—depending on the type of finisher you have
installed—collate, staple, fold, or punch options.
If you have enabled the optional Bi-Directional communication for your printer
driver, a Status button is added to your Paper/Output tab. When you choose this
button, the Status dialog opens and reports specific information about the printer’s
operational status as well as specific information about your print jobs. See Status
Dialog on page 1-31.
The Image Options tab groups together those features that are related to image
manipulation, such as Reduce/Enlarge, Lighten/Darken, or Mirror Image, a feature
that flips the image from left to right, thereby reversing the image and all associated
text.
The Layout/Watermark tab contains all features that relate to Booklet Layout and
Waterma rks.
The Advanced tab contains those features that infrequently change once set, such as
Request Banner Sheet, Request Offset, and Custom Paper Sizes.
Driver Structure 2-3
Page 54

Default Tabs
These driver tabs are accessed through the Printers folder and may be available only
with administrative rights. From the desktop select Start > Settings > Printers.
Right-click on your printer icon and select Properties (9x), Document Defaults
(NT 4.0), or Printing Preferences (2000/XP) from the menu. The printer driver
dialog appears. Driver settings from this dialog become the default settings. All the
General Tabs available through your application’s print dialog are available, as well
as some other tabs such as the Configuration tab and the Device Settings tab.
The Configuration tab contains three buttons: Bi-Directional Setup, Installable
Options, and Accounting. Each button opens a dialog to configure your driver.
Through Bi-Directional Setup you can enable Bi-Directional Communication.
You will then receive information through your driver about your print job,
Xerox system, and paper status. See Bi-Directional Printer Drivers on page 1-30.
Through Installable Options you can manually configure your driver with the
number of paper trays and installable options on your Xerox system.
Through Accounting you can set up the accounting features available to you. See
the Accounting topic in the Help System of your driver for more information.
The Device Settings tab contains features that relate to font settings and PostScript
settings.
2-4 Getting the Most From Your Printer Driver
Page 55

Driver Help System
The Help system is the primary source for information about using the printer drivers.
Each driver tab has a Help button for easy access to the Help system. Through this
Help button you can call up information on any feature on that tab or any other tab.
Among the useful items in the Help system is a menu of How To... procedures for
each feature. For example, How To Print a Booklet, Turn On or Off a Banner Sheet,
Print Transparencies, or Track Printer Use by Account.
The Help also has information about problem solving and various constraint
information such as, media size, media type, and finishing constraints.
Two Quick Reference cards about printer driver features are also among the support
information in the Help system.
Quick Reference Cards
Feature Card—Use this card to find out what a printer driver is, where it is
located, and how to use it. The card also contains the location on the printer
driver of each feature. Print the card to remind you of the many options you can
use and where they are located on the printer driver.
Feature Facts—Use this card to learn what you can do with some selected
features to enhance the printing of your documents. Print the card and post it as a
handy reference.
Driver Structure 2-5
Page 56

2-6 Getting the Most From Your Printer Driver
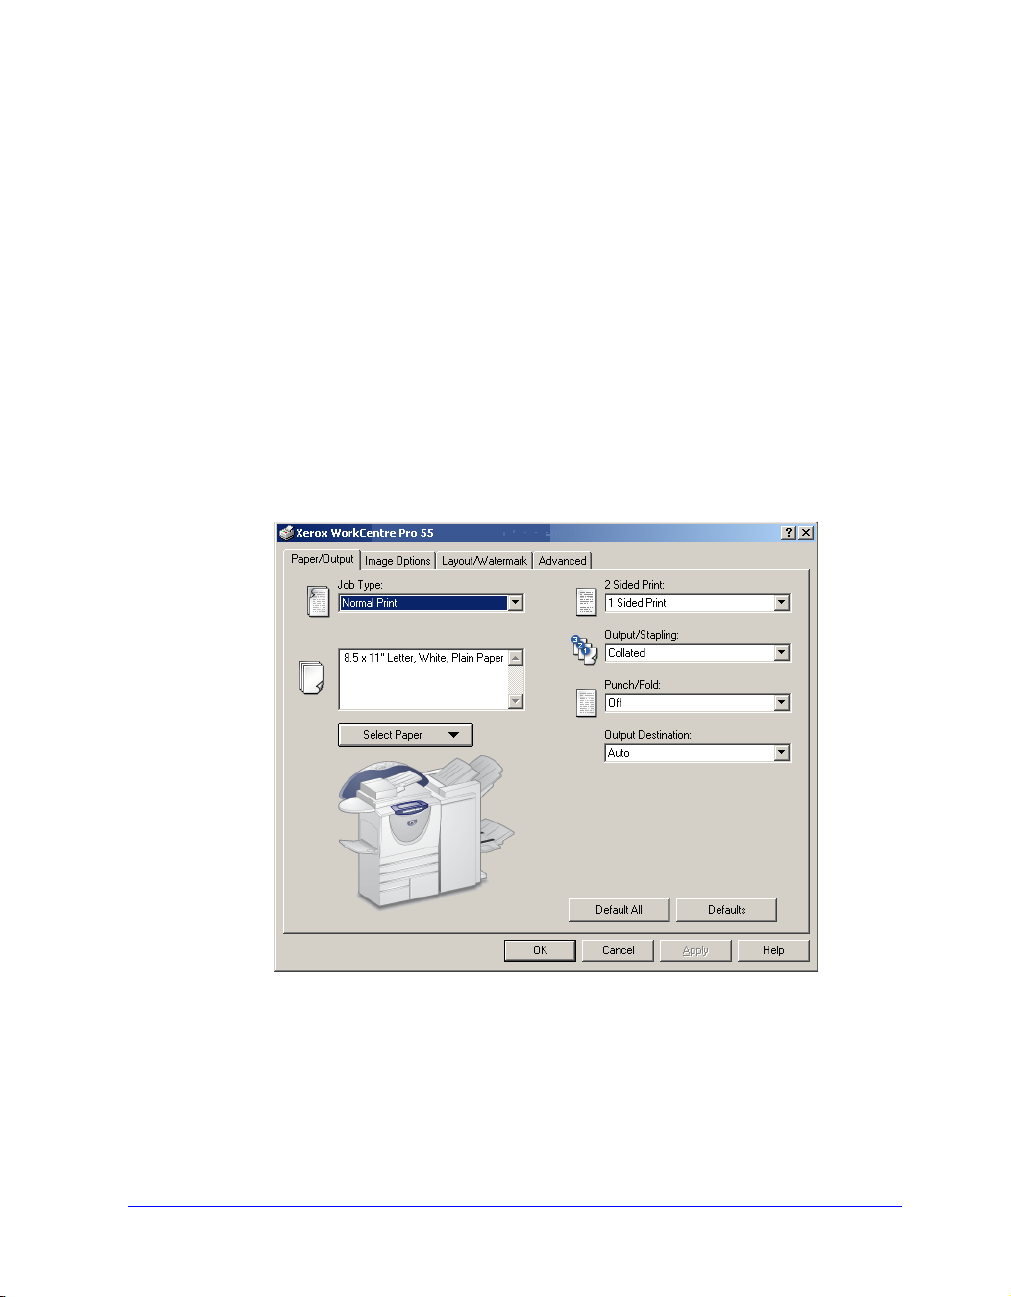
Page 57

3
Installing the Font Management Utility
The Font Management Utility is a tool used to maintain fonts on your network
printers. Font lists can be developed and modified for your printers. For example, if
you have special fonts that are used in documents but are not readily available on your
printer(s), you can use the Font Management Utility to download the required fonts to
the printers. Using the utility, fonts may be viewed, printed, downloaded to printers,
or exported to a file. You may also maintain printer lists for font management.
What’s in this chapter:
Installing the Font Management Utility . . . . . . . . . . . . . . . . . . . . . . . . . . 3-2
Accessing the Font Management Utility . . . . . . . . . . . . . . . . . . . . . . . . . . 3-2
Uninstalling the Font Management Utility . . . . . . . . . . . . . . . . . . . . . . . . 3-3
Modifying the Font Management Utility . . . . . . . . . . . . . . . . . . . . . . . . . . 3-3
Repairing the Font Management Utility . . . . . . . . . . . . . . . . . . . . . . . . . . 3-3
3-1
Page 58

Installing the Font Management Utility
To install the utility:
1
Insert the CentreWare Print and Fax Drivers CD into the appropriate drive. The
AutoRun program starts.
2
Click Utilities.
3
Click Install Font Management Utility.
4
The install wizard opens. Click Next.
5
Select the radio button to accept the license agreement. Click Next.
6
Type the user name and organization.
7
Select the Setup type: Complete or Custom. Click Next.
8
Click Install to install the utility on the workstation.
9
Click Finish to exit the install wizard.
The installation is complete.
Accessing the Font Management Utility
To access the utility in Windows environments:
From the desktop, select Programs > Xerox Font Management Utility > Font
Management Utility.
Using the Font Management Utility
The Help system is the primary source for information about using the Font
Management Utility. You can access the Help system through the Help buttons.
Included in the Help system are feature descriptions and step-by-step procedures.
3-2 Installing the Font Management Utility
Page 59

Uninstalling the Font Management Utility
To uninstall the Font Management Utility, use the Add/Remove Programs wizard in
the Control Panel folder. If you have access to the CentreWare Print and Fax Drivers
CD, you can modify and/or repair the Font Management Utility.
To uninstall the utility:
1
Double-click My Computer > Control Panel > Add/Remove Programs. The
Add/Remove Programs dialog opens.
2
Follow the procedures in the wizard to remove the Font Management Utility
from your system.
To modify the utility:
With this option, you can change which program features are installed.
1
Insert the CentreWare Print and Fax Drivers CD into the CD-ROM drive.
2
Click Utilities > Install Font Management Utility. The installation wizard
appears.
3
Select Modify. Click Next.
4
Select an application in the tree for modification. Click Next.
5
Click Install.
To repair the utility:
With this option, you can fix missing or corrupt files, shortcuts, and registry entries.
1
Insert the CentreWare Print and Fax Drivers CD into the CD-ROM drive.
2
Click Utilities > Install Font Management Utility. The installation wizard
appears.
3
Select Repair.
4
Click Install.
Uninstalling the Font Management Utility 3-3
Page 60

3-4 Installing the Font Management Utility
Page 61

4
Installing the TIFF Submission Tool
With the TIFF Submission Tool, you can submit TIFF (Tagged Image File Format)
and PDF (Portable Document Format) files directly to a Xerox system for printing.
The primary advantage of this application is that it does not add additional PostScript
information to the submitted file (often referred to as a PostScript wrapper). Instead,
the TIFF or PDF files are submitted as print-ready files. This enables the Xerox
system RIP (Raster Image Processor) to process TIFF and PDF files very quickly.
What’s in this chapter:
Workstation Requirements. . . . . . . . . . . . . . . . . . . . . . . . . . . . . . . . . . . . . 4-2
Supported Xerox Systems . . . . . . . . . . . . . . . . . . . . . . . . . . . . . . . . . . . . . 4-2
Installing the TIFF Submission Tool. . . . . . . . . . . . . . . . . . . . . . . . . . . . . 4-3
Accessing the TIFF Submission Tool . . . . . . . . . . . . . . . . . . . . . . . . . . . . 4-3
Uninstalling the TIFF Submission Tool . . . . . . . . . . . . . . . . . . . . . . . . . . 4-4
4-1
Page 62

Workstation Requirements
The TIFF Submission Tool can be used on workstations that meet the following basic
requirements:
Windows 98
Windows NT 4.0
Windows 2000
Windows XP
4 MB of hard drive space
Supported Xerox Systems
The following Xerox system models support TIFF printing via the TIFF Submission
Tool:
WorkCentre Pro 40 Color / 32 Color
WorkCentre Pro 55/45/35
WorkCentre Pro 90/75/65
WorkCentre M 55/45/35
4-2 Installing the TIFF Submission Tool
Page 63

Installing the TIFF Submission Tool
Use the following procedure to install the TIFF Submission Tool software on a
Windows workstation.
To install the TIFF Submission Tool:
1
Insert the CentreWare Print and Fax Drivers CD into the appropriate drive. The
AutoRun program starts.
2
Click Utilities.
3
Click Install TIFF Submission Tool.
4
Click Next on the opening dialog of the installation wizard.
5
Read the Software License agreement and click Ye s.
6
Enter your user and company information. Click Next.
7
Click Next on the Choose Destination Location dialog.
8
Click Next on the Select Program Folder dialog.
9
Click Finish. The CentreWare TIFF Submission Tool is ready for use.
Accessing the TIFF Submission Tool
To access the application on your PC:
From your desktop, select Start > Programs > Xerox CentreWare >
CentreWare TIFF Submission Tool.
Using the TIFF Submission Tool
The Help system is the primary source for information about using the TIFF
Submission Tool. You can access the Help system through the Help buttons. Included
in the Help system are feature descriptions and step-by-step procedures.
Installing the TIFF Submission Tool 4-3
Page 64

Uninstalling the TIFF Submission Tool
Use the following procedure to uninstall the TIFF Submission Tool software on a
Windows workstation.
To uninstall the TIFF Submission Tool:
1
Double-click My Computer > Control Panel > Add/Remove Programs. The
Add/Remove Programs wizard opens.
2
Follow the procedures in the wizard to remove the TIFF Submission Tool from
your system.
4-4 Installing the TIFF Submission Tool
Page 65

5
Problem Solving
Application, device, and network errors can occur in a variety of printing situations.
In many cases, simply restarting the application, the workstation, or the printer will
resolve the problem. This chapter includes some of the common problems and
Frequently Asked Questions that pertain to CentreWare Print and Fax Drivers and
printing to your Xerox system.
What’s in this chapter:
Troubleshooting a Problem . . . . . . . . . . . . . . . . . . . . . . . . . . . . . . . . . . . . 5-2
Common Issues . . . . . . . . . . . . . . . . . . . . . . . . . . . . . . . . . . . . . . . . . . . . . 5-3
Frequently Asked Questions . . . . . . . . . . . . . . . . . . . . . . . . . . . . . . . . . . . 5-8
5-1
Page 66

Troubleshooting a Problem
When a problem persists, document the error messages and gather information to
define the problem. The following problem-solving procedures are recommended:
Accurately define the problem. When, where, and how does the problem occur?
Reproduce the problem. Can the problem be reproduced consistently or is it an
intermittent problem?
Ask other users if they have encountered the problem, and keep a log to track
problem occurrences.
Examine the data for trends and the common attributes that may be related to the
problem. For example, does the problem occur only with a specific printer or on
a specific workstation/network configuration?
Review the product documentation, including the README files and problem
solving topics, to see if any similar problems are documented.
If a cause and solution to the problem cannot be identified, call the Xerox Welcome
Center to report the error information. Provide the support representative with the
documentation that you have gathered to define the problem.
5-2 Problem Solving
Page 67

Common Issues
This section discusses some common application and printer driver functionality
issues.
Adobe Acrobat Printing
All versions of Adobe Acrobat have exhibited various forms of distorted output when
printing from a PCL driver. Stray lines, random character spacing, and data loss have
been observed on various PDF documents. A CentreWare PostScript driver is
recommended for printing Acrobat PDF files.
Booklet and Multiple-Up (N-Up) Printing
Some applications do not support booklet or N-up printing.
Microsoft Word mail merge documents cannot be printed as booklets or N-up.
Occasionally, data loss can occur when printing a booklet from Adobe Acrobat in
Windows NT. If this occurs, turning off the Enable PostScript Passthru option
in the printer driver may resolve the problem.
With Windows 95/98/Me PCL drivers, you may need to reset the Booklet or
N-Up settings before you save your documents. Some applications, such as
Microsoft Word 97, will save the scaling setting with the document. When the
document is reopened later, the text and graphics may print in a reduced format
unless you reset the N-Pages Up option on the printer driver Layout/Watermark
tab to 1-Up prior to printing. It is generally best to reset this option to 1-Up
before you save and close your documents.
With the Windows 95/98/Me PCL5e printer driver, N-up and booklet printing
features do not work properly with Corel Draw version 8.
With the Windows 95/98/Me PCL5e printer driver, use PCL Raster mode to print
large N-Up/Booklet documents that do not print properly in Vector mode.
Common Issues 5-3
Page 68

Euro Symbol
The Xerox Euro font family was created to support the imaging of the Euro currency
symbol with fonts that do not yet support this character. The Xerox Euro font family
consists of the Euro symbol in various styles and weights designed to work in
conjunction with the most popular font styles. Many styles include a symbol at
numeric width, which conforms to the standard design rules of the Euro symbol, as
well as a designer version of the character, created to more closely resemble the
original font. To use the symbol, set the font selection to Xerox Euro and type the
keystroke that corresponds to the type style you are using.
Xerox Euro Fonts are provided on the CentreWare Print and Fax Drivers CD
within the ..English\Drivers\Fonts\Windows folder.
Additional information and font installation instructions are available through the
Internet on the Xerox Web site at www.xerox.com
should go to the Microsoft Web site to download a system update for the Euro
symbol.
. Windows 95/98/Me users
NOTE:
enable users to input and display the Euro symbol in applications that are Euro
symbol-enabled.
Free product updates for Windows 95/98/Me/NT and Windows 2000,
If the fonts on your printer are not updated to include the Euro, a box will be
printed instead of the Euro symbol. A workaround for this problem is to send
Euro fonts to the printer as bitmapped images.
For PCL drivers, select the Always Send to Printer option in the CentreWare
PCL driver when printing the Euro symbol. If problems persist when printing the
Euro symbol, select the Send as Graphics option.
PDF Printing
When printing a PDF, sending a large file may result in the printing of print limit
check error sheets or only a banner sheet. If this occurs, print the PDF file using
the PostScript printer driver or try printing the PDF file using LPR.
Windows 95/98/Me PCL5e printer drivers have occasional problems with some
PDF files, resulting in blank characters and incorrect fonts within the printed
documents.
5-4 Problem Solving
Page 69

Microsoft Applications
Excel
To change the job type options for any individual document, you must set the job
type from within Microsoft Excel (Page Setup dialog). Job type changes for an
individual document will not take effect if you invoke the CentreWare printer
driver from the Printers folder.
Excel will generate multiple print jobs instead of multiple copies of a single
document. This behavior can result in performance degradation, as well as
inoperability of features, such as Sample Set, which depend on multiple set
printing. There is no known workaround for this problem.
Excel may have occasional problems with documents that contain a mix of
portrait and landscape pages. Selecting a different printer driver, then reselecting
the original printer driver may help to resolve this problem.
PowerPoint
The Microsoft PowerPoint feature that optimizes black and white printing will
produce undesired results when Raster output is selected as the Graphics Mode in the
CentreWare PCL printer driver. Do not choose the black and white option in
PowerPoint if Raster output is required.
Word 6.0
If you access the printer drivers through Microsoft Word Version 6.0, any
changes made to the printer driver settings will be saved as the new default
settings. This will impact all applications that use the same printer driver.
Custom paper sizes will not work with Microsoft Word Version 6.0. This version
of Word will automatically change any custom paper size defined in the
CentreWare printer driver to the nearest standard paper size.
Word 6.0 may ignore some printer driver setting changes when the driver is
opened from Word and a file is printed immediately after the changes are made.
If this occurs, it may be necessary to close and reopen the Print dialog within
Word (File > Print).
Common Issues 5-5
Page 70

PCL Printer Driver
Raster Mode
Use the PCL Raster Mode option to print the following document types with the
Windows 95/98/Me PCL5e printer driver:
Web pages with animated images
Printing Corel Draw documents. Corel Draw may generate an excessive number
of Vector commands, which may result in large amounts of processing time for
each job.
Print Colored Text in Black
This feature may not work with some applications, or you may have to select the
option from within the application if it is supported. Certain applications, such as
WordPerfect and MS Publisher, always print text as graphics or may default to the
graphics mode when memory is low or when the text is very complex. When these
circumstances occur, the Print Colored Text in Black feature in the CentreWare PCL
printer drivers will not work.
Sample Set Not Supported in FrameMaker
Some applications generate print data that is intended for page printers rather than
document printers, like the WorkCentre Pro and WorkCentre series. When the print
data is sent in this format, both the WorkCentre Pro and the WorkCentre will print the
first set of a Sample Set job, but the remaining sets of the document will be
discarded. There is no known workaround for this problem.
5-6 Problem Solving
Page 71

Watermarks
The Watermark preview image in the printer drivers may not provide an exact
replica of the printed watermark under all conditions. This is primarily due to font
and/or resolution differences between the display monitor and the printer. Using
equivalent TrueType fonts instead of printer resident fonts will help minimize the
differences.
With some applications, the CentreWare PCL drivers may appear to print watermarks
in the foreground even when the background printing option is selected in the driver.
This is due to the different methods that applications use to send data to the printer.
The only known workaround for this problem is to reduce the density of the
watermark so that it will not overwrite the text in your document.
WordPerfect
If you encounter problems stapling multiple jobs as separate documents with
WordPerfect 8.x, install the service pack available for WordPerfect at
www.corel.com to correct the issue.
Sample Set job types will not work with WordPerfect 8.x for Windows.
B4, JIS, B4 ISO, B6, and A6 paper sizes do not print with WordPerfect 8.x for
Windows.
The scaling option in WordPerfect versions 7, 8, and 9 will override the Reduce/
Enlarge option in the CentreWare drivers. Use the scaling option in the Print/
Customize property sheet to adjust scaling rather than the CentreWare printer
driver Reduce/Enlarge option.
With WordPerfect 6.1, the Playbill font may not print correctly when the Use
Printer Fonts option is selected because the printer does not support the Playbill
font.
Common Issues 5-7
Page 72

Frequently Asked Questions
How do I obtain printer drivers?
Printer drivers are available on the CentreWare Print and Fax Drivers CD-ROM
or from the Xerox Web site at www.xerox.com
and Fax Drivers on page xi for more information.
How do I determine what printer driver is needed?
The following information is necessary to determine the correct printer driver:
model of your Xerox system, for example, WorkCentre Pro 55
operating system environment, for example, Windows NT
type of printer driver, for example, PostScript or PCL.
How do I obtain a custom driver for an environment such as DOS or a
mainframe platform?
For DOS or other platforms, which are not supported by CentreWare printer
drivers, the PDL (Printer Description Language) Reference Guide is available by
accessing Customer Tips at www.xerox.com
syntax information about the extended features of Xerox systems, which can be
used to customize printing in unsupported environments.
. See Obtaining CentreWare Print
. The PDL Reference Guide contains
5-8 Problem Solving
Page 73

Index
A
xiv
Adobe Acrobat Reader
Applications
xiii
B
Bi-Directional
Printer Drivers
1-30
Bi-Directional Driver Support
Client-Based
Operating Systems
Server-Based
1-32
1-32
1-32
C
CentreWare print and fax drivers
Applications
xiii
Configuring Installable Options
1-26
2-2
1-28
1-26
1-15
1-14
Automatically
Manually
Configuring Installation Files
Configuring printer drivers
Constraint Icon
Copying Files to the Network
D
Direct Installation
1-13
1-10
1-5
Client/Server Connection
Peer to Peer Connection
Distributed Installation
Configuration File
1-16
Configuring Installation Files
1-15
Copying Files to the Network
1-14
Distributing Installation Files
1-21
Installing Printer Drivers on a PC
1-22
Setting up Connection Types
1-16
Silent Installation
User Installation
1-22
1-22
Distributing Installation Files
Silent Installation Note
User Installation Note
Documentation
xiv
1-21
Driver Help System
About
Driver Structure
2-5
2-2
E
Enhanced View
Printer Drivers
ix
F
xiii
Font Management Utility
Installing
Uninstalling
Using
3-2
3-2
3-3
Frequently Asked Questions
1-21
1-21
5-8
ix
Page 74

G
Getting the Most From Your Printer
2-1
Driver
H
Help for print and fax drivers
xiv
I
2-2
Info button
Install Documentation
About
1-18
Installation Files
Location on CD
1-33
Installer
Requirements
1-2
Installing
1-4
1-4
1-4
3-2
1-22
4-1, 4-3
Direct Installation
Distributed Installation
Font Management Utility
Printer Drivers
Printer Drivers on a PC
TIFF Submission Tool
Introducing
Font Management Utility
TIFF Submission Tool
xiii
xiii
L
Languages
Supported
1-24
Locating Installation Files on the CD
1-33
M
Managing Configuration Files for
1-23
Multiple User Groups
P
xi
PCL
Point and Print
1-25
PostScript
xi
PPD Files
WorkCentre
WorkCentre Pro
Preconfigured File
xii
xii
1-15
Print and fax drivers
Applications
Documentation
Overview
viii
xiii
xiv
Printer Drivers
1-4
1-26
1-2
5-1
1-30
ix
x
5-3
Bi-Directional
Configuration
Enhanced View
Installing
Requirements
Standard View
2-3
Tabs
Problem Solving
Common issues
Microsoft Applications
PCL printer driver
5-6
R
Release
What’s New
viii
Requirements
Installer
Printer Drivers
1-2
1-2
S
Setting up Connection Types
Silent Installation
About
Note
1-21
1-18
Standard View
Printer Drivers
x
Supported Driver Languages
Abbrevations
1-24
5-5
1-16
x
Page 75

T
Tabs
2-3
4-3
xiii, 4-1
Printer Drivers
TIFF Submission Tool
Installation
Supported Xerox systems
Uninstalling
4-4
Workstation requirements
Troubleshooting a problem
U
Uninstalling
Font Management Utility
TIFF Submission Tool
Windows printer drivers
User Installation Note
1-21
Using
Font Management Utility
W
Welcome Centre
xv
What’s New in this Release?
Windows printer drivers
Uninstalling
1-34
Workstation requirements
TIFF Submission Tool
5-2
4-4
4-2
4-2
4-2
3-3
1-34
3-2
viii
X
Xerox Welcome Center
xv
 Loading...