

Page 1

User Guide
WorkCentre M24
Printer/Copier
Page 2

©
Xerox Corporation
Global Knowledge & Language Services
800 Phillips Rd. - Bldg. 845
Webster, New York 14580
Copyright© 2003 XEROX Corporation. All rights reserved.
Copyright protection claimed includes all forms and matters of copyrightable
material and information now allowed by statutory or judicial law or
hereinafter granted, including without limitation, material generated from
the software programs which are displayed on the screen such as icons,
screen displays looks, etc.
XEROX®, The Document Company®, the stylized X logo, and WorkCentre M24 are
trademarks.
Changes are periodically made to this document. Changes, technical
inaccuracies, and typographic errors will be corrected in subsequent
editions.
Product names used in this guide may be trademarks or registered trademarks
Page 3

USER GUIDE (COPIER) 1-1
User Guide (Copier) 1-1
Getting to Know Your Copier 1-1
Control Panel 1-4
Touch Screen 1-7
Power Switch 1-8
Audio Tones 1-8
Duplex Automatic Document Feeder (DADF) 1-8
Document Glass 1-8
Paper Trays 1-9
Output Trays 1-9
Power Saver Mode 1-10
Exiting the Power Saver Mode 1-10
Quick Start Guide to Copying 1-11
Making Copies Using the Duplex Automatic Document Feeder 1-11
Making Copies from the Document Glass 1-12
Making Copies Using Features 1-13
Loading Paper 1-17
Tray 1 1-17
Tandem Tray Module 1-17
3-Tray Module 1-17
Tray 5 (Bypass) 1-17
Auto Size Detect for Tray 5 (Bypass) 1-18
Auto Tray Switching 1-18
Loading Stock 1-19
Paper 1-19
Transparencies 1-21
Loading Paper into Trays 1, 2, 3, and 4 1-22
Loading Stock into Tray 5 (Bypass) 1-22
Loading 12 x 18 inch Paper 1-23
Loading SRA3 Paper into Tray 5 (Bypass) 1-24
Copier Features 1-25
iii
Page 4

USER GUIDE (COPIER) 1-1
Basic Copying Tab 1-25
Output Color 1-26
2 Sided 1-28
Reduce/Enlarge 1-31
Paper Supply 1-35
Added Features Tab 1-38
2 Sided 1-39
Output 1-42
Margin Shift 1-45
Border Erase 1-48
Image Quality Tab 1-50
Original Type 1-51
Auto Exposure 1-53
Lighter/Darker/Contrast 1-54
Sharpness/Saturation 1-55
Color Shift 1-56
Color Balance 1-57
Image Quality Presets 1-58
Output Format Tab 1-59
Multiple Up 1-60
Transparency Separators 1-63
Covers 1-66
Repeat Image 1-68
Poster 1-70
Mirror Image/ Negative Image 1-72
Scan Options Tab 1-73
Original Size 1-74
Mixed Size Originals 1-76
Bound Originals 1-77
Image Rotation 1-79
Original Orientation 1-80
Book Duplex 1-81
Job Assembly Tab 1-83
Stored Jobs 1-84
Build Job 1-86
Booklet Creation 1-88
iv
Duplex Automatic Document Feeder (DADF) (Optional
Page 5

USER GUIDE (COPIER) 1-1
Accessory) 1-89
Component Names and Functions 1-89
Document Specifications 1-90
Documents Not Recommended 1-91
Loading the Documents 1-91
Placing Documents on the Document Glass 1-91
Loading Documents in the DADF 1-92
Finisher (Optional Accessory) 1-93
Using the Finisher 1-93
Stapling Options 1-94
Job Status 1-96
Checking Current Jobs 1-96
Changing the Print Priority 1-97
Checking Completed Jobs 1-98
Outputting/Deleting Secure Prints 1-99
Outputting Sample Prints 1-101
Delayed Print 1-103
Deleting Stored Documents 1-105
Machine Status 1-107
Machine Information 1-109
Maintenance 1-110
Cleaning the DADF and Document Glass 1-110
Changing Toner Cartridges 1-111
Machine Specifications 1-114
Speed by Media 1-114
Dimensions and Weight 1-115
v
Page 6

USER GUIDE (PRINT) 2-1
User Guide (Print) 2-1
Overview 2-1
Printer Environments 2-2
As a Local Printer 2-2
As a Network Printer 2-3
Windows Network (SMB) 2-3
TCP/IP (LPD) 2-3
Installing the Print Drivers 2-5
vi
Page 7

USER GUIDE (PRINT) 2-1
Overview 2-5
Windows 95/98/Me 2-6
Installing PostScript or PCL Print Driver 2-6
Configuring the PostScript Print Driver on Windows 95/98/Me 2-8
Configuration Tab Settings 2-9
Options Tab Settings 2-12
Output Settings Tab Settings 2-13
Color Settings Tab Settings 2-15
Configuring the PCL Print Driver on Windows 95/98/Me 2-16
Print Driver Properties 2-16
Configuration Tab Settings 2-17
Printer Tab Settings 2-19
Document Default Properties 2-20
Windows NT 4.0 2-23
Installing PostScript or PCL Print Driver 2-23
Configuring PostScript Print Driver on Windows NT 4.0 2-26
Print Driver Properties 2-26
Installable Options Settings 2-27
Configuration Tab Settings 2-28
Print Driver Document Defaults 2-29
Advanced Tab Settings 2-30
Output Settings Tab Settings 2-34
Configuring the PCL Print Driver on Windows NT 4.0 2-36
Print Driver Properties 2-36
Configuration Tab Settings 2-37
Printer Tab Settings 2-39
Document Defaults 2-40
Windows 2000 and Windows XP 2-43
Installing PostScript or PCL Print Driver 2-43
Configuring the PostScript Print Driver on Windows 2000/XP 2-45
Print Driver Properties 2-45
Installable Options Settings 2-46
Configuration Tab Settings 2-47
Printing Preferences 2-48
Advanced Options Dialog Box Settings 2-49
Output Setting Tab Settings 2-53
Configuring the PCL Print Driver on Windows 2000/XP 2-55
vii
Page 8

USER GUIDE (PRINT) 2-1
Print Driver Properties 2-55
Configuration Tab Settings 2-56
Printer Tab Settings 2-58
Printing Defaults 2-59
Macintosh 2-62
Installing PostScript Print Driver 2-62
Setting the Print Driver Properties on Macintosh 2-64
Configure Settings 2-64
Printer Specific Options Settings 2-65
Basic Printing 2-69
Paper 2-69
Differences From Copying 2-69
Prior to Printing 2-70
Printing Procedure 2-70
Setting Printing Features 2-72
Switching Printer Off-line 2-73
Cancel Print/Check Print Job Status 2-74
Cancel Print from the Workstation 2-74
Canceling a Print Job Using Internet Services 2-74
Canceling a Print Job From the Printer 2-74
Canceling a Print Job in Process 2-75
Canceling a Print Job During Print 2-75
Canceling Jobs Stored in the Printer 2-76
Special Printing 2-77
viii
Page 9

USER GUIDE (PRINT) 2-1
Specifying Output Color for Printing in a PCL Driver 2-77
Printing with Black 2-77
Print Mode 2-78
Image Adjustment Mode 2-78
Black & High Speed 2-79
Black & Standard 2-80
Black & High Quality 2-81
Printing with Auto 2-82
Print Mode 2-83
Image Adjustment Mode 2-84
Image Auto Correction 2-86
Auto & High Speed 2-87
Auto & Standard 2-88
Auto & High Quality 2-89
Printing with Auto 2-90
Adjusting Color for Printing 2-91
Adjusting Image Settings (Brightness/Chroma/Contrast) 2-92
Adjusting Color Balance 2-94
Adjusting Profile Settings 2-95
Adjusting Detailed Settings 2-98
Options for the Text Group 2-98
Options for the Graphic Group 2-99
Options for the Photo Group 2-100
Options for the Whole Document 2-101
Secure Print 2-103
Setting Secure Print Jobs 2-103
Printing Secure Print Jobs 2-104
At the Workstation 2-104
At the Printer 2-105
Delayed Print 2-106
Setting Delayed Print Jobs 2-106
Printing Delayed Print Jobs 2-107
At the Workstation 2-107
At the Printer 2-107
Sample Print 2-108
ix
Page 10

USER GUIDE (PRINT) 2-1
Setting Sample Print Jobs 2-108
Printing Sample Print Jobs 2-109
At the Workstation 2-109
Internet Services 2-110
Overview 2-110
Introduction 2-110
Screen Structure 2-111
System Structure 2-112
Configuring the Browser 2-113
Netscape Communicator 2-113
Internet Explorer 2-114
Proxy Server and Port Number 2-115
Proxy Server Setting 2-115
Port Number Setting 2-115
Accessing Internet Services from the Workstation 2-116
Internet Services Features 2-117
Printing Documents Using the Services Feature 2-118
Printing Documents 2-119
Viewing/Deleting Jobs Using the Jobs Feature 2-120
Viewing the Active Jobs List 2-120
Deleting Jobs 2-121
x
Page 11

User Guide (Scan) 3-1
Scanning Overview 3-1
Scanning Using Mailboxes 3-2
Scanning Using Templates 3-2
How to Scan Using Mailboxes 3-3
Basic Scanning Tab 3-5
Output Color 3-6
Scanning Resolution 3-8
2 Sided Originals 3-9
USER GUIDE (SCAN) 3-1
Scan Options Tab 3-11
2 Sided Originals 3-12
Reduce/Enlarge 3-13
Using Presets 3-13
Using Variable% 3-14
Using Auto % 3-15
Scan Size 3-16
Bound Originals 3-17
Mixed Size Originals 3-19
Border Erase 3-20
Image Quality / File Format Tab 3-22
Original Type 3-23
Image Compression 3-24
Lighter/Darker/Contrast 3-25
File Format 3-26
Auto Exposure 3-27
How to Pause or Cancel a Scanning Job 3-28
xi
Page 12

USER GUIDE (SCAN) 3-1
How to Cancel Scanning Jobs from the Workstation 3-28
Checking or Deleting a Scan Job on the Machine 3-29
Checking a Scan Job 3-29
Deleting a Scan Job 3-30
Scanning in Batches 3-31
Managing Scanned Documents 3-32
Retrieving/Deleting Scanned Documents 3-32
Retrieving a Scanned Document 3-32
Deleting a Scanned Document 3-32
Configuring the Client for Scanning 3-33
Installing the Network Scanner Utility 3-33
Required Environment 3-33
Installation 3-34
Uninstallation 3-34
Changing Network Scanner Utility Settings 3-35
Importing Scanned Data 3-35
Importing to an Application 3-35
Scanning Document to Send as E-mail 3-36
Requirements 3-36
Scan and Mail 3-37
Fax 3-40
xii
Page 13

USER GUIDE (MACHINE ADMINISTRATOR) 4-1
User Guide (Machine Administrator) 4-1
Overview 4-1
System Settings 4-2
Setting and Changing the Administrator Password 4-3
Entering and Exiting the System Settings Mode 4-5
Entering the System Settings Mode 4-5
Exiting System Settings Mode 4-6
Changing Settings in System Settings Mode 4-6
Setting the Common Settings 4-7
Machine Clock/Timers Setting 4-8
Audio Tone Settings 4-10
Setting Screen Defaults 4-12
Paper Tray Attributes 4-13
Setting Printing Priority Defaults 4-17
Image Quality Adjustment 4-18
Image Quality Setting 4-18
Auto Gradation Adjustment 4-21
Reports Settings 4-23
Other Machine Settings 4-24
Copy Mode Settings 4-24
Basic Copying Presets 4-25
Copy Defaults 4-26
Copy Control 4-39
Original Size Defaults 4-40
Setting Reduce/Enlarge Presets 4-41
xiii
Page 14

USER GUIDE (MACHINE ADMINISTRATOR) 4-1
Setting Custom Colors 4-42
Network Settings 4-42
Print Mode Settings 4-43
Allocate Memory 4-44
Others (Print Mode Settings) 4-47
Scan Mode Settings 4-48
Basic Scanning Presets 4-48
Setting Scan Defaults 4-49
Setting the Scan Size Defaults 4-53
Setting the Output Size Defaults 4-54
Setting Reduce/Enlarge Presets 4-55
Other Settings (Scanner) 4-56
Setting/Deleting Mailboxes 4-58
Auditron 4-59
Create/Check Accounts 4-60
Deleting/Resetting Data by Account 4-61
Enabling Auditron Mode 4-62
System Administrator Data 4-63
Delete/Reset All Account Data 4-64
Printing Meter Reports 4-65
Internet Services 4-66
Fax 4-67
xiv
Page 15

USER GUIDE (TROUBLESHOOTING) 5-1
User Guide (Troubleshooting) 5-1
Paper Jam Clearance 5-2
Paper Jams at the Top Left Cover 5-3
Paper Jams at the Left Center Cover 5-4
Paper Jams at the Bottom Left Cover 5-4
Paper Jams in Trays 1 to 4 5-5
Paper Jams in Tray 5 (Bypass) 5-5
Paper Jams in the Duplex Unit 5-6
Paper Jams in the Finisher 5-6
Paper Jams on the Finisher Top Cover 5-6
Paper Jams on the Finisher Interface 5-7
Paper Jams on the Center Tray Exit 5-7
Document Jams 5-8
Document Jams on the Left Cover (Top) 5-8
Jams on Original Input Area and Document Glass 5-9
Stapler Faults 5-10
Resolving Hardware Problems 5-11
Toner Cartridge 5-11
Resolving Programming Problems 5-12
Resolving Processor Problems 5-13
Resolving Output Quality Problems Using Basic Copying,
xv
Page 16

USER GUIDE (TROUBLESHOOTING) 5-1
Added Features, and Image Quality Tabs 5-16
Calling for Service 5-20
Fault Codes 5-21
xvi
Page 17
Safety Notes/Regulatory
Information
WorkCentre M24
Printer/Copier
Page 18

Page 19

Electrical Safety
Safety Notes/Regulatory Information
The Xerox WorkCentre 24 and the recommended supplies have
been designed and tested to meet strict safety requirements.
Attention to the following notes will ensure the continued safe
operation of your printer/copier.
• Use only the power cord supplied with this equipment.
• Plug the power cord directly into a correctly grounded
electrical outlet. Do not use an extension cord. If you do not
know whether or not an outlet is grounded, consult a qualified
electrician.
• Do not use a ground adapter plug to connect this equipment to
an electrical outlet that lacks a ground connection terminal.
WARNING: You may get a severe electrical shock if the outlet
is not correctly grounded.
• Do not place the printer/copier where people may step on or
trip on the power cord. Do not place objects on the power cord.
• Do not override or disable electrical or mechanical interlocks.
• Do not obstruct the ventilation openings. These openings are
provided to prevent overheating of the machine.
WARNING: Never push objects of any kind into slots or
openings on this equipment. Making a contact with a voltage
point or shorting out a part could result in fire or electrical
shock.
iii
iii
Page 20
SAFETY NOTES/REGULATORY INFORMATION
• If any of the following conditions occur, immediately switch off
the power to the machine and disconnect the power cord from
the electrical outlet. Call an authorized Xerox service
representative to correct the problem.
– The machine emits unusual noises or odors.
– The power cord is damaged or frayed.
– A wall panel circuit breaker, fuse, or other safety device
has been tripped.
– Liquid is spilled into the press.
– The machine is exposed to water.
– Any part of the machine is damaged.
Disconnect Device
The power cable is the disconnect device for this equipment. It is
attached to the back of the machine as a plug-in device. To
remove all electrical power from the machine, disconnect the
power cable from the electrical outlet.
Laser Safety
Use of controls, adjustments, or procedures other than those
specified in this documentation may result in a hazardous
exposure to laser radiation. This equipment complies with
international safety standards. With specific regard to laser
safety, the equipment complies with performance standards for
laser products set by government, national, and international
agencies as a Class 1 laser product. It does not emit hazardous
light, as the beam is totally enclosed during all phases of customer
operation and maintenance.
iv
Page 21

Maintenance Safety
SAFETY NOTES/REGULATORY INFORMATION
• Do not attempt any maintenance procedure that is not
specifically described in the documentation that is supplied
with your press.
• Do not use aerosol cleaners. The use of supplies that are not
approved may cause poor performance of the press, and
could create a dangerous condition.
• Use the supplies and cleaning materials only as directed in
this manual. Keep all of these materials out of the reach of
children.
• Do not remove the covers or guards that are fastened with
screws. There are no parts behind these covers that you can
maintain or service.
Do not perform any maintenance procedures unless you have
been trained to do them by a Xerox representative, or unless a
procedure is specifically described in one of the manuals included
with your press.
Operational Safety
Your Xerox equipment and supplies were designed and tested to
meet strict safety requirements. These include safety agency
examination, approval, and compliance with established
environmental standards.
Your attention to the following safety guidelines will help ensure
the continued safe operation of your digital press:
• Use the materials and supplies specifically designed for your
digital press. The use of unsuitable materials may result in
poor performance of the machine and possibly a hazardous
situation.
• Follow all warnings and instructions that are marked on or
supplied with the machine.
• Place the machine in a room that provides adequate space for
ventilation and servicing.
• Place the machine on a level, solid surface (not on a thick pile
carpet) that has adequate strength to support the weight of the
machine.
v
Page 22

SAFETY NOTES/REGULATORY INFORMATION
• Do not attempt to move the machine. A leveling device that
was lowered when your machine was installed may damage
the carpet or floor.
• Do not set up the machine near a heat source.
• Do not set up the machine in direct sunlight.
• Do not set up the machine in line with the cold air flow from an
air conditioning system.
• Do not place containers of coffee or other liquid on the
machine.
• Do not block or cover the slots and openings on the machine.
Without adequate ventilation, the machine may overheat.
• Do not attempt to override any electrical or mechanical
interlock devices.
WARNING: Be careful when working in areas identified with
this warning symbol. These areas may be very hot and could
cause personal injury.
Ozone Safety
If you need any additional safety information concerning the
machine or materials, contact your Xerox representative.
This product produces ozone during normal operation. The ozone
is heavier than air, and the quantity is dependent on print volume.
Providing the correct environmental parameters, as specified in
the Xerox installation procedures, ensures that concentration
levels meet safe limits.
If you need additional information about ozone, request the Xerox
publication, OZONE, 600P83222, by calling 1-800-828-6571 in
the USA. For a French language version, call 1-800-828-6571 in
the USA, then press 2.
vi
Page 23

Notices
Radio Frequency Emissions
FCC
The following applies to the product when equipped with the
Token Ring or Banyan Vines connectivity options:
This equipment has been tested and found to comply with the
limits for a Class A digital device, pursuant to Part 15 of the
Federal Communications Commission Rules. These limits are
designed to provide reasonable protection against harmful
interference when the equipment is operated in a commercial
environment. This equipment generates, uses, and can radiate
radio frequency energy and, if not installed and used in
accordance with the instruction manual, may cause harmful
interference to radio communications. Operation of this equipment
in a residential area is likely to cause harmful interference in which
case the user will be required to correct the interference at his/her
own expense.
SAFETY NOTES/REGULATORY INFORMATION
In Canada
Changes or modifications to this equipment not specifically
approved by the Xerox Corporation may void the user’s authority
to operate this equipment.
Shielded cables must be used with this equipment to maintain
compliance with FCC regulations.
This digital apparatus does not exceed the Class A limits for radio
noise emissions from digital apparatus as defined in the Radio
interference regulations of Industry Canada.
vii
Page 24
SAFETY NOTES/REGULATORY INFORMATION
Safety Extra Low Voltage Approval
The Xerox WorkCentre 24 is in compliance with various
governmental agencies and national safety regulations. All system
ports meet the Safety Extra Low Voltage (SELV) circuits for
connection to customer-owned devices and networks. Additions of
customer-owned or third-party accessories that are attached to
the press must meet or exceed the requirements previously listed.
All modules that require external connection must be installed per
the installation procedure.
Certifications in Europe
The CE marking that is applied to this product symbolizes Xerox
Europe’s Declaration of Conformity with the following applicable
Directives of the European Union as of the dates indicated:
January 1, 1995: - Council Directive 73/23/EEC amended by
Council Directive 93/68/EEC, approximation of the laws of the
member states related to low voltage equipment.
January 1, 1996: - Council Directive 89/336/EEC, approximation
of the laws of the member states related to electromagnetic
compatibility.
Changes or modifications to this equipment not specifically
approved by Xerox Europe may void the user’s authority to
operate the equipment.
Shielded cables must be used with this equipment to maintain
compliance with the EMC Directive 89/336/EEC.
This equipment is not primarily intended for use in a domestic
environment.
A full declaration defining the relevant Directives and referenced
standards can be obtained from your Xerox Europe
representative.
WARNING: In order to allow this equipment to operate in
proximity to Industrial, Scientific and Medical (ISM)
equipment, the external radiation from ISM equipment may
have to be limited or special mitigation measures taken.
WARNING: This is a Class A product. In a domestic
environment, this product may cause radio interference, in
which case the user may be required to take adequate
measures.
viii
Page 25

Regulatory Information
US Regulatory Information
SAFETY NOTES/REGULATORY INFORMATION
Fax Send Header Requirements: The Telephone Consumer
Protection Act of 1991 makes it unlawful for any person to use a
computer or other electronic device, including a Fax machine, to
send any message unless such message clearly contains in a
margin at the top or bottom of each transmitted page or on the first
page of the transmission, the date and time it is sent and an
identification of the business or other entity, or other individual
sending the message and the telephone number of the sending
machine or such business, other entity or individual. (The
telephone number provided may not be a 900 number or any other
number for which charges exceed local or long distance
transmission charges.)
To enter the telephone number identifying the machine, and the
header text information (business name), please refer to the
"WorkCentre M24 SA Guide, under Fax, located on the
WorkCentre M24 User Documentation CD. To enter the date and
time, please refer to the "Changing Settings in System Settings
Mode", "Setting the Common Settings in the WorkCentre 24
Machine Administrator User Guide located on the WorkCentre
M24 User Documentation CD. Data Coupler Information: This
equipment complies with Part 68 of the FCC rules and the
requirements adopted by the Administrative Council for the
Terminal Attachments (ATCA) A label is fixed to the rear cover of
the product that contains, among other information, a product
identifier in the format US:AAAEQ##TXXXX. If requested, this
number must be provided to the Telephone Company.
ix
Page 26

SAFETY NOTES/REGULATORY INFORMATION
A plug and jack used to connect this equipment to the premises
wiring and telephone network must comply with the applicable
FCC Part 68 rules and requirements adopted by the ACTA. A FCC
compliant telephone cord and modular plug is provided with this
equipment.
You may safely connect the machine to the following standard
modular jack: USOC RJ-11C using the compliant telephone cord
(with modular plugs) provided with the installation kit. See
installation instructions for details.
To order the correct service from the Telephone Company please
quote the codes listed in the table: Facility Interface Code (FIC),
Service Order Code (SOC), USOC Jack Code and Ringer
Equivalence Number (REN)
FIC SOC USOC Jack REN
02LS2 9.0F RJ-11C 0.2
WARNING: Ask your local telephone company for the
modular jack type installed on your line. Connecting this
machine to an unauthorized jack can damage telephone
company equipment. You not Xerox, assume all
responsibility and/or liability for any damage caused by the
connection of this machine to an unauthorized jack.
The REN is used to determine the number of devices that may be
connected to a telephone line. Excessive RENs on a telephone
line may result in the devices not ringing in response to an
incoming call. In most but not all areas, the sum of the RENs
should not exceed five (5.0). To be certain of the number of
devices that may be connected to a line, as determined by the
total RENs, contact the local Telephone Company. The REN for
this product is part of the product identifier that has the format
US:AAAEQ##TXXXX. The digits represented by ## are the REN
without a decimal point (e.g., 02 is a REN of 0.2)
x
Page 27

SAFETY NOTES/REGULATORY INFORMATION
If this Xerox equipment causes harm to the telephone network, the
Telephone Company will notify you in advance that this temporary
discontinuance of service may be required. But if advanced notice
isn't practical, the Telephone Company will notify the customer as
soon as possible. Also, you will be advised of your right to file a
complaint with the FCC if you believe it is necessary.
The Telephone Company may make changes in it facilities,
equipment, operations, or procedures that could affect the
operation of the equipment. If this happens, the Telephone
Company will provide advance notice in order for you to make
necessary modifications to maintain uninterrupted service.
If trouble is experienced with this Xerox equipment, for repairs or
warranty information, please contact the Xerox Welcome Center
telephone number 800-821-2797. If the equipment is causing
harm to the telephone network, the Telephone Company may
request that you disconnect the equipment until the problem is
resolved.
Repairs to the machine should be made only by a Xerox
representative or an authorized Xerox Service agency. This
applies at any time during or after the service warranty period. If
an unauthorized repair is performed, the remainder of the
warranty period is null and void.
This equipment must not be used on party lines. connection to
party line service is subject to state tariffs. Contact the state public
utility commission, public service commission, or corporation
commission for information.
If your office has specially wired alarm equipment connected to
the telephone line, ensure the installation of this Xerox equipment
does not disable your alarm equipment. If you have questions
about what will disable alarm equipment, consult your telephone
company or a qualified installer.
xi
Page 28

SAFETY NOTES/REGULATORY INFORMATION
Canadian Regulatory Information
This product meets the applicable Industry Canada technical
specifications. The Ringer Equivalence Number (REN) is an
indication of the maximum number of devices allowed to be
connected to a telephone interface. The termination on an
interface may consist of any combination of devices subject only
to the requirement that the sum of the RENs of all the devices
does not exceed 5.
The Canadian REN value of this equipment is 0.2
Repairs to certified equipment should be made by an authorized
Canadian maintenance facility designated by the supplier. Any
repairs or alterations made by the user to this equipment, or
equipment malfunctions may give the telecommunications
company cause to request the user to disconnect the equipment.
Users should ensure for their own protection the electrical ground
connections of the power utility, telephone lines and internal
metallic water pipe system, if present, are connected together.
This precaution may be particularly important in rural areas.
CAUTION: Users should not attempt to make such connections
themselves, but should contact the appropriate electrical
inspection authority or electrician, as appropriate.
xii
Page 29

European Regulatory Information
Radio Equipment & Telecommunications Terminal Equipment
Directive
This Xerox product has been self-certified by Xerox for panEuropean single terminal connection to the analogue public
switched telephone network (PSTN) in accordance with Directive
1999/5/EC.
The product has been designed to work with the national PSTNs
and compatible PBXs of the following countries:
UK
Ireland
France
Germany
Italy
Spain
In the event of problems you should contact your local Xerox
representative in the first instance.
SAFETY NOTES/REGULATORY INFORMATION
This product has been tested to and is compliant with TBR21, a
specification for terminal equipment for use on analogue-switched
telephone networks in the European Economic Area.
The product may be configured to be compatible with other
country networks. Please contact your Xerox representative if it
needs to be reconnected to another country's network. There are
no user-adjustable settings in the product.
NOTE: Modification of this product, connection to external control
software or to external control apparatus not authorized by Xerox,
will invalidate its certification.
xiii
Page 30

SAFETY NOTES/REGULATORY INFORMATION
It’s Illegal in the USA
Congress, by statute, has forbidden the reproduction of the
following subjects under certain circumstances. Penalties of fine
or imprisonment may be imposed on those guilty of making such
reproductions.
1. Obligations or Securities of the United States Government,
such as:
Certificates of Indebtedness National Bank Currency
Coupons from Bonds Federal Reserve Bank Notes
Silver Certificates Gold Certificates
United States Bonds Treasury Notes
Federal Reserve Notes Fractional Notes
Certificates of Deposit Paper Money
Bonds and Obligations of certain agencies of the government,
such as FHA, etc.
Bonds. (U.S. Savings Bonds may be photographed only for
publicity purposes in connection with the campaign for the sale
of such bonds.)
Internal Revenue Stamps. (If it is necessary to reproduce a
legal document on which there is a canceled revenue stamp,
this may be done provided the reproduction of the document is
performed for lawful purposes.)
Postage Stamps, canceled or uncanceled. (For philatelic
purposes, Postage Stamps may be photographed, provided
the reproduction is in black and white and is less than 75% or
more than 150% of the linear dimensions of the original.)
Postal Money Orders.
Bills, Checks, or Drafts of money drawn by or upon authorized
officers of the United States.
Stamps and other representatives of value, of whatever
denomination, which have been or may be issued under any
Act of Congress.
2. Adjusted Compensation Certificates for Veterans of the World
Wars.
3. Obligations or Securities of any Foreign Government, Bank, or
Corporation.
xiv
Page 31

SAFETY NOTES/REGULATORY INFORMATION
4. Copyrighted material, unless permission of the copyright
owner has been obtained or the reproduction falls within the
“fair use” or library reproduction rights provisions of the
copyright law. Further information of these provisions may be
obtained from the Copyright Office, Library of Congress,
Washington, D.C. 20559. Ask for Circular R21.
5. Certificates of Citizenship or Naturalization. (Foreign
Naturalization Certificates may be photographed.)
6. Passports. (Foreign Passports may be photographed.)
7. Immigration Papers.
8. Draft Registration Cards.
9. Selective Service Induction Papers that bear any of the
following Registrant’s information:
Earnings or Income Dependency Status
Court Record Previous military service
Physical or mental condition
Exception: U. S. Army and Navy discharge certificates may be
photographed.
10. Badges, Identification Cards, Passes, or Insignia carried by
military personnel, or by members of the various Federal
Departments, such as FBI, Treasury, etc. (unless photograph
is ordered by the head of such department or bureau.)
Reproducing the following is also prohibited in certain states:
Automobile Licenses - Drivers’ Licenses - Automobile
Certificates of Title.
The above list is not all inclusive, and no liability is assumed for its
completeness or accuracy. In case of doubt, consult your attorney.
xv
Page 32

SAFETY NOTES/REGULATORY INFORMATION
It’s Illegal in Canada
Parliament, by statute, has forbidden the reproduction of the
following subjects under certain circumstances. Penalties of fines
or imprisonment may be imposed on those guilty of making such
copies.
1. Current bank notes or current paper money.
2. Obligations or securities of a government or bank.
3. Exchequer bill paper or revenue paper.
4. The public seal of Canada or of a province, or the seal of a
public body or authority in Canada, or of a court of law.
5. Proclamations, orders, regulations or appointments, or notices
thereof (with intent to falsely cause same to purport to have
been printed by the Queen’s Printer for Canada, or the
equivalent printer for a province).
6. Marks, brands, seals, wrappers or designs used by or on
behalf of the Government of Canada or of a province, the
government of a state other than Canada or a department,
board, Commission or agency established by the Government
of Canada or of a province or of a government of a state other
than Canada.
7. Impressed or adhesive stamps used for the purpose of
revenue by the Government of Canada or of a province or by
the government of a state other than Canada.
8. Documents, registers or records kept by public officials
charged with the duty of making or issuing certified copies
thereof, where the reproduction falsely purports to be a
certified copy thereof.
9. Copyrighted material or trademarks of any manner or kind
without the consent of the copyright or trademark owner.
The above list is provided for your convenience and assistance,
but it is not all inclusive, and no liability is assumed for its
completeness or accuracy. In case of doubt, consult your solicitor.
xvi
Page 33

Environmental Notices for the USA
As an ENERGY STAR® partner, Xerox Corporation has
determined that this printer/copier model meets the ENERGY
STAR guidelines for energy efficiency.
ENERGY STAR is a registered United States trademark.
The ENERGY STAR Program is a team effort between the
Environment Protection Agency and the office equipment industry
to promote energy-efficient copiers, printers, fax, multifunction
machines, personal computers, and monitors. Reducing product
energy consumption helps combat smog, acid rain and long-term
changes to the climate by decreasing the emissions that result
from generating electricity.
Environmental Notices for Canada
Terra Choice Environmental Services, Inc. of Canada has verified
that this Xerox product conforms to all applicable Environmental
Choice EcoLogo requirements for minimized impact to the
environment.
SAFETY NOTES/REGULATORY INFORMATION
Environment Canada established the Environmental Choice
program in 1988 to help consumers identify environmentally
responsible products and services. Copier, printer, digital press,
and fax products must meet energy efficiency and emissions
criteria, and exhibit compatibility with recycled supplies. Currently,
Environmental Choice has more than 1600 approved products
and 140 licensees. Xerox has been a leader in offering EcoLogo
approved products. In 1996, Xerox became the first company
licensed to use the Environmental Choice EcoLogo for its copiers,
printers, and fax machines.
xvii
Page 34

SAFETY NOTES/REGULATORY INFORMATION
Product Recycling and Disposal
Xerox operates a worldwide equipment takeback and reuse/
recycle program. Contact your Xerox sales representative (1-800ASK-XEROX) to determine whether this Xerox product is part of
the program. For more information about Xerox environmental
programs, visit www.xerox.com/environment.html.
If your product is not part of the Xerox program and you are
managing its disposal, please note that the product may contain
lead, mercury and other materials whose disposal may be
regulated due to environmental considerations. For recycling and
disposal information, contact your local authorities. In the United
States, you may also refer to the Electronic Industries Alliance
web site at www.eiae.org.
xviii
Page 35

Symbols
SAFETY NOTES/REGULATORY INFORMATION
Conventions
Standardized conventions have been used in this manual to assist
you in visually locating and identifying information quickly.
CAUTION: This symbol alerts you to an action that may cause
damage to hardware, software, or result in the loss of data.
WARNING: Warnings alert you to an action that may cause
bodily injury.
The 1 2 3... symbol indicates the beginning of a task or work
process you should use to complete a procedure and is followed
by the first step of a numbered procedure, task, or work process.
1
2
3
NOTE: This calls your attention to information that is helpful, but
not essential to complete a procedure or task.
xix
Page 36

SAFETY NOTES/REGULATORY INFORMATION
xx
Page 37

Copying User Guide
WorkCentre M24
Printer/Copier
Page 38

Page 39

TABLE OF C ONTENTS
Table of Contents
Getting to Know Your Copier 1
Control Panel 4
Touch Screen 7
Power Switch 8
Audio Tones 8
Duplex Automatic Document Feeder (DADF) 8
Document Glass 8
Paper Trays 9
Output Trays 9
Power Saver Mode 10
Exiting the Power Saver Mode 10
Quick Start Guide to Copying 11
Making Copies Using the Duplex Automatic Document Feeder 11
Making Copies from the Document Glass 12
Making Copies Using Features 13
Loading Paper 17
Tray 1 17
Tandem Tray Module 17
3-Tray Module 17
Tray 5 (Bypass) 17
Auto Size Detect for Tray 5 (Bypass) 18
Auto Tray Switching 18
Loading Stock 19
Paper 19
Transparencies 21
Loading Paper into Trays 1, 2, 3, and 4 22
Loading Stock into Tray 5 (Bypass) 22
Loading 12 x 18 inch Paper 23
Loading SRA3 Paper into Tray 5 (Bypass) 24
Copier Features 25
iii
Page 40

TABLE OF CONTENTS
Basic Copying Tab 25
Output Color 26
2 Sided 28
Reduce/Enlarge 31
Paper Supply 35
Added Features Tab 38
2 Sided 39
Output 42
Margin Shift 45
Border Erase 48
Image Quality Tab 50
Original Type 51
Auto Exposure 53
Lighter/Darker/Contrast 54
Sharpness/Saturation 55
Color Shift 56
Color Balance 57
Image Quality Presets 58
Output Format Tab 59
Multiple Up 60
Transparency Separators 63
Covers 66
Repeat Image 68
Poster 70
Mirror Image/ Negative Image 72
Scan Options Tab 73
Original Size 74
Mixed Size Originals 76
Bound Originals 77
Image Rotation 79
Original Orientation 80
Book Duplex 81
Job Assembly Tab 83
Stored Jobs 84
Build Job 86
Booklet Creation 88
iv
Duplex Automatic Document Feeder (DADF) (Optional
Page 41

Accessory) 89
Component Names and Functions 89
Document Specifications 90
Documents Not Recommended 91
Loading the Documents 91
Placing Documents on the Document Glass 91
Loading Documents in the DADF 92
Finisher (Optional Accessory) 93
Using the Finisher 93
Stapling Options 94
Job Status 96
Checking Current Jobs 96
Changing the Print Priority 97
Checking Completed Jobs 98
Outputting/Deleting Secure Prints 99
Outputting Sample Prints 101
Delayed Print 103
Deleting Stored Documents 105
TABLE OF C ONTENTS
Machine Status 107
Machine Information 109
Maintenance 110
Cleaning the DADF and Document Glass 110
Changing Toner Cartridges 111
Machine Specifications 114
Speed by Media 114
Dimensions and Weight 115
v
Page 42

TABLE OF CONTENTS
vi
Page 43

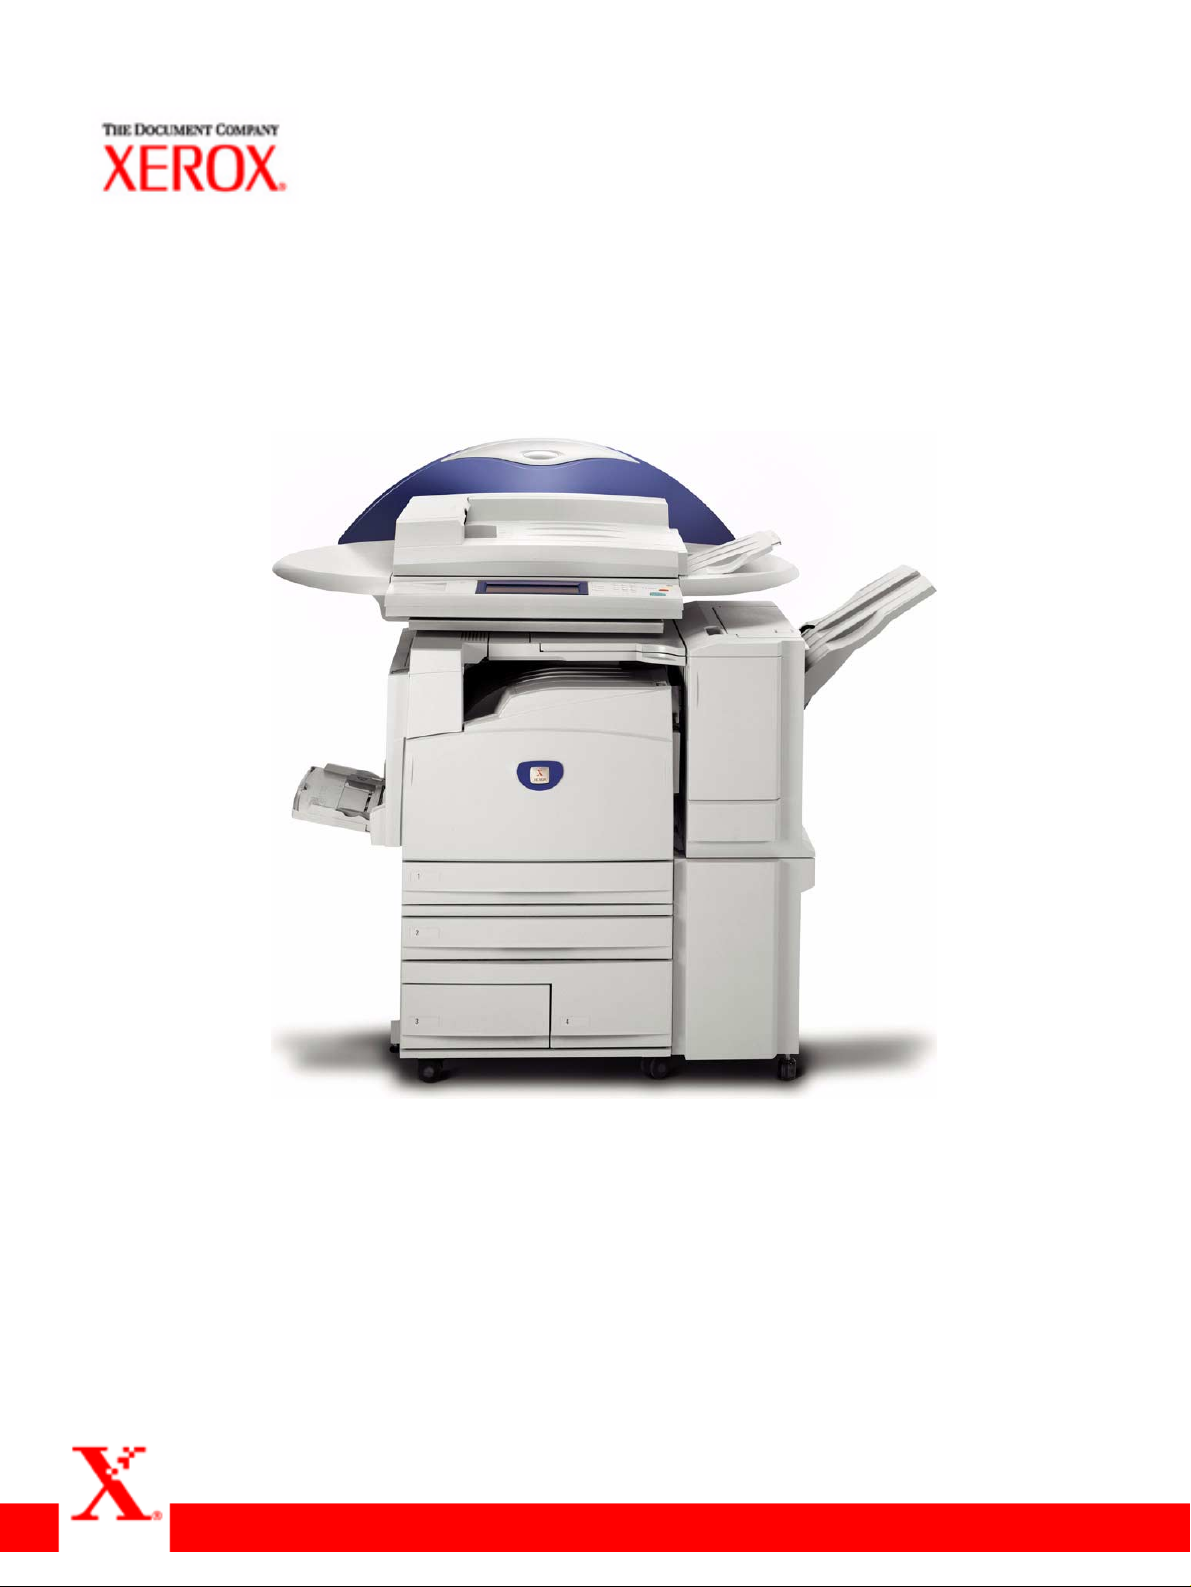
1. User Guide (Copier)
Getting to Know Your Copier
Your new Xerox WorkCentre M24 works as a digital copier. This
section will provide an introduction to the WorkCentre M24 which
is also referred to as the WorkCentre 24.
For more information about copy features, refer to the section
entitled Copier Features in this chapter.
1
1–1
Page 44

USER GUIDE (COPIER)
4
10
8
9
11
2
1
3
5
6
7
12
13
14
15
17
16
1–2
Page 45

Number Name Function
USER GUIDE (COPIER)
1
2 Original Input Area Location where originals are fed onto platen glass for copying.
3 Original Catch Tray Original return area.
4 Control Panel Used to program the copier for individual jobs.
5 Center Output Tray Output delivered here face down.
6 Power Switch Powers machine On/Off.
7 Front Door Panel Access for consumables replacement.
8 Trays 1 Adjustable paper tray: 5.5x8.5 in. through 11x17 in. (A5 through
9 Trays 2, 3 & 4 (Tandem
10 Tray 5 (Bypass) For specialty papers (i.e. Transparencies, Heavyweight, and
Duplex Automatic
Document Feeder
(DADF)
(Optional Accessory)
Tray Module)
(Optional Accessory)
Automatically feeds up to 50 documents. Also works as a
Document Glass cover when making copies from the platen
glass.
A3) holding up to 520 sheets based on paper weight.
Tray 2 - Adjustable paper tray: 5.5x8.5 in. through 11x17 in. (A5
through A3) holding up to 520 sheets based on paper weight.
Trays 3 & 4 - High capacity paper trays holding a total of 2000
sheets of 8.5 x 11 in. (A4 and B5) based on paper weight.
non-standard sizes) which cannot be loaded in Trays 1 - 4.
11 Casters Lockable casters for mobility and safety.
12 Left Upper Cover Push the release lever up to access the paper path.
13 Duplex Cover Open this cover to access paper path.
14 Left Side Middle Cover Access to paper path.
15 Left Side Lower Cover Access to paper path.
16 Trays 2, 3 & 4 (3- Tray
Module)
(Optional Accessory)
17 Finisher
(Optional Accessory)
18 Stand (Not Shown)
(Optional Accessory)
19 Convenience Shelf (Not
Shown)
Tray 2, 3 & 4 - Adjustable paper tray: 5.5x8.5 in. through 11x17
in. (A5 through A3) holding up to 520 sheets based on paper
weight.
Finisher (Optional Accessory) that accommodates up to 1000
sheets of output and offers stapling options.
Used to place the machine at the desired operator level.
Workspace for copies, prints, or originals.
1–3
Page 46

USER GUIDE (COPIER)
Control Panel
Contrast Dial Touch Screen Numeric Keypad
The Control Panel is used to program individual jobs.
• The Numeric Keypad is used to enter copy quantity or other
numeric information.
• The Contrast Dial adjusts the brightness of the touch screen.
• The Touch Screen is where you make selections for the jobs
you are programming.
Access Use this feature to change machine default settings, and to create
or modify user access numbers.
Power Saver Lights up green and is initiated automatically if the machine is left
idle for a specific amount of time. Press the Power Saver button
to bring the machine back to full power after the warm-up period.
1–4
Page 47

USER GUIDE (COPIER)
Interrupt Stops the printer/copier during the current job. This allows
another job to be run. There are two indications that the job has
been interrupted:
• The printer/copier displays a message indicating that Job
Interrupt has been selected, and it is ready to copy.
• The indicator light flashes to acknowledge that the Interrupt
button has been selected. The light will continue to flash until
the printer/copier has completed the activity in process. The
light will remain constant to identify interrupt has occurred and
a new job can be programmed.
After Interrupted jobs are complete, press the Interrupt button
again to return the machine to the first job.
Clear All Returns the machine to the original Default State. When the Clear
All button is selected in Interrupt mode, default settings are
applied only to the interrupting job.
Stop Pressing Stop will halt the copy job in process at the completion of
the current activity. A message asking if you want to press Start
to continue the job or Clear All to cancel the job is displayed on
the Touch Screen.
Start Initiates a job or continues the copying process.
Clear Clears an incorrect numeric entry.
1–5
Page 48

USER GUIDE (COPIER)
Job Memory Indicator lights when data is stored in the machine's memory.
Features Allows you to alternate between scanning and copying feature
Online Indicator lights when data is being received from a client.
screens.
Job Status Allows you to check or cancel jobs currently executing, or to
check or print saved documents.
Machine Status Allows you to check the machine status, meters, the state of
consumables, and output reports.
1–6
Page 49

Touch Screen
y
Message
Area
Selection
Buttons
Press the buttons and tabs displayed in the Touch Screen to
select features or respond to on screen instructions. The selected
buttons are highlighted to indicate activation. Buttons that do not
have three-dimensional shadows are not active, and cannot be
selected.
Ta b
USER GUIDE (COPIER)
Unused
Memory
Quantit
Message Area Messages such as machine status and operation instructions are
displayed here
Unused Memory The amount of memory remaining to store a scanned original is
displayed prior to output.
Quantity The copy quantity is entered using the keypad, and appears in the
upper right corner of the message area. Select between 1 - 999.
Tab Feature Tabs displayed on the Touch Screen contain the
programmable selections available for each feature.
Selection Buttons Allow for the selection of feature / functions required for the
desired output. Buttons identified, as More… have additional
features, which will be displayed when this button is selected.
1–7
Page 50

USER GUIDE (COPIER)
Power Switch
The power switch is located on the right top corner of the machine.
Press the switch to the ( | ) position to turn the power on.
Ground Fault Protector Located at the rear of the machine where the power cord attaches.
The Ground Fault Protector removes all power from the machine if
a fault is detected in the power to the printer/copier. To reset the
GFI, press the switch in.
Audio Tones
Tone volume may be adjusted or turned off in System Settings
mode. Three types of Audio Tones are available to assist the
operator in selecting features and functions.
Single Tone Acknowledges when a feature is selected, or a job has been
completed.
Double Tone Acknowledges an alert, such as a paper jam or consumable
replacement.
Triple Tone Acknowledges an improper selection or an error in button
selection has occurred.
Duplex Automatic Document Feeder (DADF)
Automatically feeds up to 50 documents onto the glass for
copying. Documents must be placed face up into the Document
Handler.
Document Glass
When using the Document Glass the original document must be
placed face down and in the upper left-hand corner of the
Document Glass.
NOTE: The DADF must be closed for the Auto Color option to
function
1–8
Page 51

USER GUIDE (COPIER)
Paper Trays
Trays 1,2,3 and 4 are located at the lower front of the printer/
copier. Tray 5 (Bypass) is located on the left side of the printer/
copier.
Tandem Tray Module Trays 1and 2 are adjustable from 5.5x8.5 in. through 11x17 in. (A5
through A3) and can accommodate up to 520 sheets based on
paper weight. Trays 3 and 4 are high capacity paper trays and
can accommodate a total of 2000 sheets, 8.5x11 in. (A4 and B5)
based on paper weight.
3-Tray Module Trays 1 through 4 are adjustable from 5.5x8.5 in. through 11x17 in.
(A5 through A3) and can accommodate up to 520 sheets based
on paper weight
Tray 5 (Bypass) Feeds specialty papers i.e. Transparencies, Extra Heavyweight
and non-standard sizes and 12x18 in.
Trays 1 - 4 can feed paper weights 64 to 105 gsm. The machine
automatically detects the size and orientation of loaded paper.
The paper type however must be set on the control panel. Bond
paper is the default setting. Plain or Recycled paper in trays must
be identified on the control panel for maximum efficiency and
image quality. This is set in System Settings mode.
Output Trays
The Center Output Tray delivers output face down, and holds up
to 400 sheets. The Center Output Tray holds up to 200 sheets
when the Finisher (optional accessory) is installed.
The Finisher Tray (optional accessory) holds up to 1000 sheets,
and can staple dual and single staples.
NOTE: The WorkCentre 24 printer/copier should not be moved
after it has been installed. Moving may damage the equipment,
carpet or floor. If equipment must be moved, please contact your
Xerox representative for assistance.
1–9
Page 52

USER GUIDE (COPIER)
Power Saver Mode
Power Saver Mode automatically cuts off the electricity to the
machine if it is left unused for a certain duration. The Power Saver
feature has two modes, a Low Power mode and Sleep mode. The
machine enters the Low Power mode after the preset time has
elapsed if the machine is left unused for a fixed period of time.
The machine then enters the Sleep mode if a further preset time
elapses.
• Low Power mode
In this mode, the power to the control panel and fuser unit is
lowered to save power. The display goes out, and the Power
Saver button on the control panel lights. To use the machine,
press the Power Saver button. Power Saver goes out to
indicate that the Power Saver feature is canceled. The default
is 15 minutes.
• Sleep mode
In this mode, the power is lowered more than in the Low
Power mode. The display goes out, and the Power Saver
button on the control panel lights. To use the machine, press
the Power Saver button. Power Saver goes out to indicate that
the Power Saver feature is canceled. The Sleep mode default
is 45 minutes after Low Power mode is engaged.
For more information on setting Power Saver mode timers, refer to
the User Guide (Machine Administrator).
Exiting the Power Saver Mode
The Power Saver mode can be exited in two ways:
• By pressing the Power Saver button
• By receiving a print job
1–10
Page 53

Quick Start Guide to Copying
This section will lead you quickly through a number of features
and steps used in making copies.
For more information about copy features, refer to the section
entitled Copier Features, in this chapter.
Making Copies Using the Duplex Automatic Document Feeder
1 Place original in the Original Input Area face up. A stack of up to
50 originals may be place in the tray.
2 Slide the documents forward until the green indicator lights,
indicating the document is inserted correctly.
USER GUIDE (COPIER)
3 Adjust the side guide to the size of the paper. The guide should
just touch the side of the document.
4 Press the Start button.
5 Remove the copies from the output tray. Remove the originals
from the Original Catch Tray of the DADF.
1–11
Page 54

USER GUIDE (COPIER)
Making Copies from the Document Glass
1 Open the Document Cover.
2 Place the original face down on the Document Glass, aligning the
left rear corner with the registration guide.
3 Close the cover before making a copy.
4 Press the Start button.
5 Remove the copies from the output tray. Remove the original
document from the Document Glass.
1–12
Page 55

Making Copies Using Features
The feature tabs on the Touch Screen enable you to configure the
printer/copier to suit your copying needs.
The procedure below leads you quickly through a number of
features you may want to use in making copies. It assumes that
the feature tabs are in the default configuration.
For more information about copy features, refer to the section
entitled Copier Features, in this chapter.
1 Press Clear All to clear any previous programming
Use any of the following steps that apply to your job and desired
outcome.
2 Use the Numeric Keypad to enter the desired quantity. If you make
a mistake, press the Clear button on the numeric keypad to clear
an incorrect quantity
USER GUIDE (COPIER)
3 Select the option in Output Color if a setting other than the default,
Auto Color, is desired.
Perform one of the following:
• Press the desired Output Color option on the Basic Copying
tab.
•Press More… to see additional options
Press the desired option and press the Save button to return to
the Basic Copying screen.
1–13
Page 56

USER GUIDE (COPIER)
4 Select an option under 2 Sided if a setting other than the default, 1
to 1 Sided, is desired.
If another option is desired, perform one of the following:
• 1 to 1 Sided for default one-sided copies.
• 1 to 2 Sided for two-sided copies from one-sided input.
•Press Head to Head for two-sided, head-to-head output,
as for books.
•Press Head to Toe for two-sided, head to toe output, as for
calendars.
• 2 to 2 Sided for two-sided copies from two-sided input.
You must specify the original orientation and the copy
orientation.
•Press Head to Head for two-sided head-to-head output,
as for books.
•Press Head to Toe for two-sided, head-to-toe output, as
for calendars.
• 2 to 1 Sided for one-sided copies from two-sided originals.
•Press Head to Head if your original documents are two-
sided, head-to-head.
•Press Head to Toe if your original documents are two-
sided head-to-toe.
Select the icon that most closely resembles the Original
Orientation for the loaded document(s). Press Close.
5 Select an option in Reduce/Enlarge if a setting other than the
default, 100%, is desired.
If another option is desired, perform one of the following:
• Press the desired Reduce/Enlarge option on the Basic
Copying screen.
•Press More… to see additional options.
Press the desired option and touch the Save button to return to
the Basic Copying screen.
1–14
Page 57

USER GUIDE (COPIER)
6 Select an option in Paper Supply if a tray other than the default,
Auto Paper, is desired.
If another option is desired, perform one of the following:
• Press the desired Paper Supply option on the Basic Copying
screen.
•Press More… to see additional options.
Press the desired option and touch the Save button to return to
the Basic Copying screen.
7 On the Added Features tab, select Output to program the desired
copy output option.
•Press Collated for collated output. Collated will automatically
be selected when the DADF is used.
•Press Collated / Stapled to direct output to the Finisher
(optional Accessory). Press Finisher Tray to set the Output
Destination. Press Stapling on the Output screen to select
the Original Orientation and Staple Position on the output.
Press the desired option and touch the Save button to return to
the Basic Copying screen.
8 On the Image Quality tab, select Original Type to display the
Original Type screen.
• Press an option for Original Type if a setting other than the
default is desired.
Press the Save button to return to the Image Quality screen.
1–15
Page 58

USER GUIDE (COPIER)
9 If other features are desired, select the appropriate feature tab
and feature button on the Touch Screen.
10 Perform one of the following:
• If you use the Duplex Automatic Document Feeder, place the
document face up into the Original Input Area. The Document
Feeder Lamp lights when the document is in the correct
position. Ensure that the paper guide is against the original
document.
• Raise the Document Cover and place the document face
down on the Document Glass.
• Ensure that the document lies against the registration area
at the left rear corner of the glass.
• Lower the Duplex Automatic Document Feeder (DADF).
11 Press the Start button.
12 When copying is completed, perform the following:
• Remove the copies from the Center Output Tray or Finisher
Tray on the right side of the printer/copier.
• Remove the original document(s) from the Document Glass or
Original Catch Tray.
1–16
Page 59

Loading Paper
Tray 1
Tandem Tray Module
USER GUIDE (COPIER)
This section contains basic information about loading paper and
transparencies, and about using paper trays. It also includes some
paper usage guidelines for the WorkCentre 24.
For more information about the materials you can use, refer to the
Recommended Materials for the WorkCentre 24.
Tray 1 can accommodate an assortment of standard paper sizes,
from 5.5x8.5 through 11x17 inch, and A3 through B5. Tray 1 has
width and length adjustment guides that can be adjusted if the
paper size in the tray needs to be changed.
3-Tray Module
Tray 5 (Bypass)
Trays 1,2,3 and 4 hold the paper supply for the WorkCentre 24
printer/copier.
Trays 1 and 2 can accommodate an assortment of standard paper
sizes, from 5.5x8.5 through 11x17 inch, and A3 through B5. Trays
1 and 2 have width and length adjustment guides that can be
adjusted if the paper size in the tray needs to be changed. Trays 3
and 4 can accommodate 8.5x11 inch, A4 or B5 paper.
Trays 1 through 4 can accommodate an assortment of standard
paper sizes, from 5.5x8.5 through 11x17 inch, and A3 through B5.
Trays 1 through 4 have width and length adjustment guides that
can be adjusted if the paper size in the tray needs to be changed.
Tray 5 (Bypass) is located on the left side of the printer/copier.
Tray 5 (Bypass) can accommodate transparencies and other
specified paper stocks, and various paper sizes up to 12x18 in.
Tray 5 (Bypass) has the capacity to hold up to 100 sheets.
1–17
Page 60

USER GUIDE (COPIER)
Auto Size Detect for Tray 5 (Bypass)
Certain standard paper sizes can be automatically detected in
Tray 5 (Bypass) by selecting Auto Size Detect on the Tray 5
programming screen. The following paper sizes can be used with
the Auto Size Detect feature:
• US/Canada - 5.5x8.5 in. LEF/SEF, 8x10 in. LEF, 8.5x11 in.
LEF/SEF, 8.5x13 in. SEF, 8.5x14 in. SEF, 11x17 in. SEF.
• Europe - A5 LEF/SEF, A4 LEF/SEF, A3 SEF, B5 LEF/SEF, B4,
Postcard (100 x 148mm).
All other paper sizes must be specified using the selections under
Standard Size, or by inputting the size under Non-standard size.
For example, you must specify 12x18 inch when using that paper
size.
NOTE: A paper size mismatch message will be displayed if you try
a job with Auto Size Detect selected and a paper size that is not
included in the list above.
Auto Tray Switching
The Auto Tray Switching feature enables the printer/copier to
automatically switch to another tray when a tray runs out of paper.
The trays must be loaded with the same size paper in the same
orientation (long edge feed or short edge feed).
Auto Tray Switching must be enabled in System Settings mode,
with the same paper type assigned to two or more trays.
Auto Tray Switching may be enabled only for Trays 1, 2, 3, and 4.
Tray 5 (Bypass) cannot be enabled for Auto Tray Switching.
The default for Auto Tray Switching is On with Trays 1, 2, 3, and 4
enabled. To use Auto Tray Switching with the default settings, load
the trays you want to use with the same size paper in the same
orientation. Select the paper tray button for the tray with the lowest
number on the Control Panel. For example, if you load Trays 1
and 2 with the same size paper and the same orientation, select
the Tray 1 Paper Supply button on the Basic Copying tab of the
Touch Screen. The printer/copier draws from Tray 1 until it is
empty, then switches automatically to Tray 2.
1–18
Page 61

Loading Stock
Paper
USER GUIDE (COPIER)
Load the paper into Trays 1, 2, 3, and 4 with the preferred printing
side up.
Load the paper into Tray 5 (Bypass) with the preferred printing
side down.
The capacity of the tray varies with the paper weight that is loaded
in the tray.
NOTE: For the best results, use only the recommended paper
sizes, paper weights, or paper types. If you do not use
recommended papers, you may experience copy quality
problems, paper jams, or possible component failures.
If you are loading pre-drilled paper load it into Tray 5 (Bypass) with
the undrilled long edge as the leading edge (holes to the left) for 1
sided output, the undrilled long edge as the trailing edge (holes to
the right) for 2 sided output.
1–19
Page 62

USER GUIDE (COPIER)
NOTE: Do not load paper above the fill line of the paper tray edge
guides.
NOTE: Fan the desired paper before loading it into the Tray.
Straighten the paper stack each time the paper tray is opened.
Close the paper tray slowly to avoid shifting the paper stack. This
ensures that the paper is in the correct position when the paper
tray is in the operating position.
If paper feeding or copy curl problems occur, flip the paper over in
the tray and make the copies again. If the performance improves,
continue to load the paper in this manner. Testing has shown that
paper handling and copy performance vary with room
temperature, humidity, paper quality, image area on copies, etc.
All of these variables interact and, in some cases, you must
decide which paper loading method works best.
NOTE: Coated papers are very susceptible to humidity. Multifeeds
are much more likely with humidity greater than 40%.
Environmental conditions may require that coated paper be fed
one sheet at a time from Tray 5 (Bypass).
1–20
Page 63

Transparencies
Transparencies can only be fed from Tray 5 (Bypass). Stripeless
transparencies are recommended. Striped transparencies must be
loaded with the stripe face up, on the left side of the tray.
NOTE: Use only the transparencies recommended in the
Recommended Materials for the WorkCentre 24.
After loading the transparencies you can program the copier
printer to insert a blank separator page between transparencies by
using the Transparency Separators feature.
For more information about the Tranparency Separators feature,
refer to the section entitled Transparency Separators, in this
chapter.
Follow these guidelines to prevent static build up when using
transparencies:
• Place no more than twenty 8.5x11 inch or A4 transparencies in
Tray 5 (Bypass) at one time.
• Place only one 11x17 in. or A3 transparency in Tray 5
(Bypass) at a time.
USER GUIDE (COPIER)
• Remove the transparencies from the Center Output Tray
before running additional sets.
NOTE: Transparencies cannot be delivered to the Finisher Tray.
For more specific information about materials that have been
tested and approved for use in the WorkCentre 24, refer to the
Recommended Materials for the WorkCentre 24. Information is
also available off the main Xerox web site (www.xerox.com) and
will be updated periodically.
1–21
Page 64

USER GUIDE (COPIER)
Loading Paper into Trays 1, 2, 3, and 4
1 To load a paper tray, pull the tray out.
2 Fan the paper and load the desired paper into the tray by aligning
the edge of the paper against the left edge of the tray. The side to
be copied should be facing up.
Do not fill the paper tray above the fill line.
3 Adjust the paper guides if necessary, until they lightly touch the
paper.
4 Push the tray in gently until it comes to a stop.
Loading Stock into Tray 5 (Bypass)
The number of sheets that can be loaded in Tray 5 (Bypass)
varies with the weight of the stock.
NOTE: Paper stocks which exhibit difficulties when fed from Trays
1,2,3 and 4 may be fed more reliably from Tray 5 (Bypass).
Do not add paper during a copying job. Do not interleave
transparencies with paper in Tray 5 (Bypass).
NOTE: Make sure to select the appropriate paper type (i.e.
transparencies, heavyweight paper). This will ensure that the
images are fused properly in the printing/copying process.
1 Open Tray 5 (Bypass) by grasping the tray and gently pushing it
away and down from the printer/copier.
2 Check the position of the front edge paper guide for Tray 5
(Bypass).
NOTE: The guide should only be set to the 12 inch position for
papers wider than A3 (297 mm), such as 12x18 inches.
1–22
Page 65

USER GUIDE (COPIER)
3 Fan the paper and load paper with the side to be copied or printed
on facing down. Insert the paper lightly along the paper guide on
the front side of the machine until it comes to a stop.
4 Adjust the back edge paper guide until it lightly touches the paper.
NOTE: Do not load mixed size paper into the tray. Do not load
materials above the fill line located on the paper guide
5 Select the appropriate size and type for the paper you have
loaded.
6 Remove all stock from Tray 5 (Bypass) after the job is complete.
Dust and moisture can cause copy quality defects.
Loading 12 x 18 inch Paper
Use Tray 5 (Bypass) for 12x18 inch (305 x 457 mm) paper.
1 Open Tray 5 (Bypass) by grasping the tray and gently pushing it
away and down from the printer/copier.
2 Adjust the front edge paper guide for Tray 5 (Bypass) to the 12x18
position.
3 Load up to 100 sheets of 12x18 inch (305 x 457 mm) 20 lb. paper
into Tray 5 (Bypass). Load paper with the side to be copied or
printed on facing down.
4 Adjust the back edge guide until it lightly touches the paper.
5 Select 12x18 in. under Standard Size, and select the appropriate
type for the paper you have loaded.
6 When the job is complete, return the paper guides for Tray 5
(Bypass) to their normal position.
1–23
Page 66

USER GUIDE (COPIER)
Loading SRA3 Paper into Tray 5 (Bypass)
1 Open Tray 5 (Bypass) by grasping the tray and gently pushing it
away and down from the printer/copier.
2 Adjust the front edge paper guide to the closest position forward
beyond the 12x18 in. position.
3 Load the SRA3 paper into Tray 5 (Bypass). Load the paper with
the side to be printed on facing down.
4 Adjust the back edge guide until it lightly touches the paper.
NOTE: SRA3 paper is not recommended for copy jobs.
Performance using this paper size may vary. The maximum image
area is 303 x 476.6mm with a guaranteed area of 297 x 476.6mm.
CAUTION: Do not place any objects or materials other than the
appropriate stock on Tray 5 (Bypass). Printer/copier damage may
occur.
1–24
Page 67

Copier Features
Basic Copying Tab
Output Color Allows you to select the colors to be used for copying.
USER GUIDE (COPIER)
Below is a brief description of each feature available on the Basic
Copying tab. Each feature is explained in detail on the following
pages.
2 Sided Allows you to select one or two-sided originals, with options for
one or two-sided output.
Reduce/Enlarge Allows you to select the size of the output image from automatic
reduction/enlargement, preset values, or variable independent
ratios for the image length and width.
Paper Supply Allows you to select the tray that contains the correct output paper
size and type.
1–25
Page 68

USER GUIDE (COPIER)
Output Color
The Output Color feature allows you to select the desired output
color.
The following options are available:
Auto The Auto Color option enables the copier to determine if the
document is black and white or color. If the document is black and
white, the Black option is selected automatically. If the document
is colored, the Full Color option is selected.
The DADF must be closed for the Auto Color option to function. In
order for the scanner to accurately sense color on a document, the
color area must be greater than 50 mm
2
inches
). If the color area is less, select the Full Color option.
Also some very dark colors may be sensed as black. In this case,
select the Full Color option as well.
2
(approximately 2
NOTE: With Auto selected, the printer/copier runs at the speed for
color copying, even if the originals are B/W.
NOTE: The sensitivity of Auto for detecting color vs. B/W can be
adjusted in System Settings mode under Output Color
Recognition.
Full Color Enables the copier to make copies using all four toner colors:
Yellow, Magenta, Cyan and Black.
Black The Black option should be selected when the desired output is a
black and white copy. Black and white copies can be made from
any original. With Black selected only Black toner is used.
Dual Color The Dual Color option enables the copier to make copies in two
preset colors. The color of colored areas and black areas of the
document can be specified.
Single Color The color setting Red, Green, Blue, Yellow, Magenta, or Cyan can
be selected.
NOTE: Custom colors can be programmed in System Settings
mode under Setting Custom Colors.
1–26
Page 69

USER GUIDE (COPIER)
You can select several Output Color options from the Basic
Copying tab or select the More… button to get a complete set of
options.
1 On the Basic Copying tab select More… under Output Color to
display the Output Color screen.
2 Select the desired option:
•Auto
• Full Color
• Black
• Dual Color
• Single Color
3 Select Start to make copies or Save to select additional features.
NOTE: Dual Color cannot be used with Negative Image.
NOTE: When Single Color or Dual Color is selected, Original Type
cannot be selected.
1–27
Page 70

USER GUIDE (COPIER)
1 to 1 Sided Makes one-sided copies from one-sided input. This is the default
1 to 2 Sided Makes two-sided copies from one-sided input.
2 to 2 Sided Makes two-sided copies from two-sided input.
2 Sided
Use the 2-Sided feature to select one or two-sided originals, with
options for one or two-sided output.
The following options are available:
setting.
2 to 1 Sided Makes one-sided copies from two-sided input.
NOTE: Some options are not available without a DADF.
1–28
Page 71

USER GUIDE (COPIER)
You can select several 2 Sided options from the Basic Copying tab
or use the Added Features tab.
1 On the Basic Copying tab select More… under 2 Sided.
2 Select the desired option:
• 1 to 1 Sided
• 1 to 2 Sided
•Select Head to Head for two-sided, head-to-head output,
as for books.
•Select Head to Toe for two-sided, head-to-toe output, as
for calendars.
1–29
Page 72

USER GUIDE (COPIER)
• 2 to 2 Sided
Select the option for your Originals
• Head to Head if your originals are two-sided, head-tohead.
• Head to Toe if your originals are two-sided, head-to-toe.
Select the option for your Copies
• Head to Head for two-sided, head-to-head output, as for
books.
• Head to Toe for two-sided, head-to-toe output, as for
calendars.
• 2 to 1 Sided
•Select Head to Head if your originals are two-sided, head-
to-head.
•Select Head to Toe if your originals are two-sided, head-
to-toe.
3 Select the icon that most closely resembles the Original
Orientation for the loaded document(s).
4 Select Start to make copies or Close to select additional features.
NOTE:1 to 2 Sided or 2 to 2 Sided cannot be selected when using
Auto Size Detect for Tray 5 (Bypass), Repeat Image, Book
Duplex, Transparency Separators, Poster, or Booklet Creation.
1–30
Page 73

USER GUIDE (COPIER)
Reduce/Enlarge
The Reduce/Enlarge feature allows you to copy the image at
different magnifications. Copies may be reduced to 25% or
enlarged to 400%, in 1% increments.
The following options are available:
100% Copies are the same size as the original. This is the default
setting.
Auto% This option automatically reduces or enlarges the copy, based on
the size and orientation of the document and the paper supply
selected. This option is applied only to standard size documents.
The copy image will be reduced or enlarged in the same
proportions for X (horizontal) and Y (vertical) directions.
Auto Paper selection is not available when Auto% is selected.
Presets% There are 7 preset percentages to choose from. The selected
percentage displays in the value box on the Reduce/Enlarge
screen. These presets can be changed in System Settings mode.
1–31
Page 74

USER GUIDE (COPIER)
Variable% Select the Variable% option to enter the desired percentage for
Reduce/Enlarge. Use either the up and down arrows or the
number buttons that display on the Touch Screen.
Independent X-Y% Select the Independent X-Y% option to copy the image at
different, independent magnifications from 25% to 400% for the X
and Y directions.
For example, you can enlarge the image to 129% in the X
direction and reduce it to 64% in the Y direction by using the
Touch Screen arrows.
Independent X-Y% Auto The Auto option automatically calculates the reduction and
enlargement based on the original document size and on the
output paper size when using Independent X-Y%. The copy image
will be reduced or enlarged in the different proportions for X and Y
directions.
You can select several Reduce/Enlarge options from the Basic
Copying tab or select the More… button to get a complete set of
options.
Using Presets%
1 On the Basic Copying tab select More… under Reduce/Enlarge.
2 On the Reduce/Enlarge screen, select the Presets% option.
3 Select 100%, Auto%, or the desired preset percentage.
4 Select Start to make copies or Save to select additional features.
1–32
Page 75

USER GUIDE (COPIER)
Using Variable%
1 Under Reduce/Enlarge on the Basic Copying tab select More…
2 On the Reduce/Enlarge screen, select the Variable% option.
3 Perform one of the following:
• Press the arrow buttons to increase or decrease the
percentage value in increments of 1.
• Use the Numeric Keypad on the Touch Screen to enter a
specific percentage from 25 through 400. Press the Clear (C)
button to clear the value entered.
4 Select Start to make copies or Save to select additional features.
1–33
Page 76

USER GUIDE (COPIER)
Using Independent X-Y%
1 Under Reduce/Enlarge on the Basic Copying tab select More…
2 On the Reduce/Enlarge screen, select the Independent X-Y%
option.
3 Perform one of the following:
• Press the up arrow to increase the percentage value for X,
X&Y, or Y in increments of 1.
• Press the down arrow to decrease the percentage value for X,
X&Y or Y in decrements of 1.
•Press Auto.
4 Select Start to make copies or Save to select additional features.
1–34
Page 77

Paper Supply
The Paper Supply option enables you to select output paper size
and type.
The Basic Copying tab displays the Auto Paper selection feature.
This option enables the copier to automatically detect the original
document size and select the same standard size paper from
Trays 1,2, 3, or 4.
The Basic Copying tab also displays the contents of three other
trays enabling you to specify your selection for output size. The
Paper Supply More… button enables you to access the Paper
Supply screen.
USER GUIDE (COPIER)
The paper size displayed for Trays 1, 2, 3, and 4 is set when you
adjust the paper guides as part of the process of loading paper.
The paper type for the trays can be set in System Settings mode.
You may select both the paper size and paper type on the detail
screen when loading paper into Tray 5 (Bypass).
1 On the Basic Copying tab under Paper Supply, select one of the
following:
•Select Auto to enable the copier to automatically select the
appropriate paper.
•Select More… to display the Paper Supply screen.
2 If More... is selected, select the tray that displays the desired
paper.
3 Select Start to make copies or Save to select additional features.
1–35
Page 78

USER GUIDE (COPIER)
Programming the Paper Supply for Tray 5 (Bypass)
You must select the paper size and paper type when loading
paper into Tray 5 (Bypass). Auto Size Detect can be used with
standard size paper.
1 On the Basic Copying tab select More… under Paper Supply.
2 Select Tray 5 (Bypass) to display the Tray 5 (Bypass) screen.
3 Perform one of the following to select Paper Size:
•Select Auto Size Detect.
•Select Standard Size.
• Select the paper size from the list. Use the up and down
arrows to see more selections.
•Select Non-standard Size and enter in the X (width) and Y
(length) dimensions by using the arrows.
• Press the left or right arrows to decrease or increase the X
dimension (140-483mm).
• Press the up or down arrows to increase or decrease the Y
dimension (100-305mm).
1–36
Page 79

USER GUIDE (COPIER)
4 Select the appropriate Paper Type using the up and down arrow
buttons. You can select Plain, Bond, Recycled, Transparency, and
Lightweight - Extra Heavyweight paper.
5 Select Save to return to the Paper Supply screen.
6 Select Start to make copies or Save to select additional features.
NOTE:Paper Tray 5 cannot be used with the following features:
Auto Size Detect with 1 to 2-Sided and 2 to 2-Sided, Auto
Reduction/Enlargement, Auto Center, Corner Shift, Negative
Image, Mirror Image, Book Duplex, Booklet Creation, Multiple Up,
Repeat Image, Bound Originals and Poster.
1–37
Page 80

USER GUIDE (COPIER)
Added Features Tab
Below is a brief description of each feature available on the Added
Features tab. Each feature is explained in detail on the following
pages.
2 Sided Allows you to select one or two-sided originals, with options for
one or two-sided output.
Output Enables you to select the desired output order and destination of
the output.
Margin Shift Enables you to center a document image, shift the image to one
edge or move the image to a specified edge of the output copy.
Border Erase Allows you to erase any undesired images around the border or
center of a document.
1–38
Page 81

USER GUIDE (COPIER)
2 Sided
Use the 2 Sided feature to select one or two-sided originals, with
options for one or two-sided output.
The following options are available:
1 to 1 Sided Makes one-sided copies from one-sided input. This is the default
setting.
1 to 2 Sided Makes two-sided copies from one-sided input.
2 to 2 Sided Makes two-sided copies from two-sided input.
2 to 1 Sided Makes one-sided copies from two-sided input.
NOTE: Some options are not available without a DADF.
1–39
Page 82

USER GUIDE (COPIER)
You can select several 2 Sided options from the Basic Copying tab
or the Added Features tab.
1 On the Added Features tab select 2 Sided.
2 Select the desired option:
• 1 to 1 Sided
• 1 to 2 Sided
•Select Head to Head for two-sided, head-to-head output,
as for books.
•Select Head to Toe for two-sided, head-to-toe output, as
for calendars.
1–40
Page 83

USER GUIDE (COPIER)
• 2 to 2 Sided
Select the option for your Originals
• Head to Head if your originals are two-sided, head-to-
head.
• Head to Toe if your originals are two-sided, head-to-toe.
Select the option for your Copies
• Head to Head for two-sided, head-to-head output, as for
books.
• Head to Toe for two-sided, head-to-toe output, as for
calendars.
• 2 to 1 Sided
•Select Head to Head if your originals are two-sided, head-
to-head.
•Select Head to Toe if your originals are two-sided, head-
to-toe.
3 Select the icon that most closely resembles the Original
Orientation for the loaded document(s).
4 Select Start to make copies or Close to select additional features.
NOTE:1 to 2-Sided or 2 to 2-Sided cannot be selected when using
Auto Size Detect for Tray 5 (Bypass), Repeat Image,
Transparency Separators, Poster, or Booklet Creation.
1–41
Page 84

USER GUIDE (COPIER)
Collated Collated sets are delivered to the output tray.
Uncollated Uncollated sets are delivered to the output tray.
Output
The Output feature enables you to select the destination of the
output and determine whether it will be collated or uncollated.
The following options are available:
Auto The copier automatically determines which output mode (collated
or uncollated) for the job and delivers the copies to the output tray.
Collated refers to copies that are delivered as sets. Each copy set
is in the order in which the originals were place in the DADF. For
example, if the originals are placed in the DADF in 1, 2, 3 order
and you want to make 3 copies, the copy sets will output in 1, 2, 3
order.
Uncollated refers to copies that are delivered in the order in which
they were copied. For example, if the originals are placed in the
DADF in 1, 2, 3 order and you want to make 3 copies, the copy
sets will output in 1, 1, 1, 2, 2, 2, 3, 3, 3 order.
1–42
Page 85

USER GUIDE (COPIER)
1 On the Added Features tab select Output.
2 Select the desired option:
•Auto
• Collated
• Uncollated
3 If you have a Finisher (optional accessory), select the desired
Output Destination:
• Center Output Tray
• Finisher Tray
4 Select Start to make copies or Save to select additional features.
1–43
Page 86

USER GUIDE (COPIER)
Stapling
This section describes the procedure for programming the Output
feature to staple output. You must have a Finisher (optional
accessory) to staple output.
1 On the Added Features tab select Output.
2 Select Collated/Stapling.
3 Select Stapling. The Stapling screen is displayed.
4 Select the desired stapling position.
The Finisher Tray is automatically selected as the Output
Destination.
5 Select the desired Original Orientation:
• Head to Top
• Head to Left
Select Save.
1–44
6 Select Start to make copies or Save to select additional features.
Page 87

USER GUIDE (COPIER)
Margin Shift
The Margin Shift feature allows you to shift the position of the
image on the copy. The image can be centered on the copy or
moved to the top, bottom, left or right. When copying both sides,
different settings can be set for Side 1 and Side 2.
The following types of Margin Shift are available:
No Shift Copies are made without shifting the original. This is the default
setting.
Auto Center Select this to center an image on the copy when the original and
copy paper are a different size. It may also be used to center a
reduced or enlarged image on the output paper.
Corner Shift Select this to move your image to a specified corner.
Variable Shift Select this to move your image up, down, left or right by entering
in a value. The range is from 0 to 50mm in 1mm increments.
1–45
Page 88

USER GUIDE (COPIER)
Using the Auto Center Feature
1 On the Added Features tab select Margin Shift.
2 Select Auto Center.
3 Select Start to make copies or Save to select additional features.
1–46
Page 89

USER GUIDE (COPIER)
Using the Margin Shift/Variable Shift Feature
1 On the Added Features tab select Margin Shift.
2 Select Margin Shift/Variable Shift.
3 Select the desired option:
• Side 1
• Side 2
4 Select the desired shift option:
• No Shift
• Auto Center
• Corner Shift
• Press the arrow icon that illustrates the desired location of
the image on the output copy.
• Variable Shift
• Press the left arrow to shift the image toward the left edge.
Press the right arrow to shift the image toward the right
edge.
• Press the up arrow to shift the image toward the top edge.
Press the down arrow to shift the image toward the bottom
edge.
5 Select the icon that most closely resembles the Original
Orientation for the original.
6 Select Start to make copies or Save to select additional features.
1–47
Page 90

USER GUIDE (COPIER)
Top & Bottom For Normal the default is 2mm. For Variable Erase the default is
Left & Right For Normal the default is 2mm. For Variable Erase the default is
Border Erase
The Border Erase feature enables you to eliminate unwanted
marks near the edges of the original from the output copy. The
range for Border Erase is 0 through 50mm in 1mm increments.
Border Erase options can be used individually or combined
together:
5mm.
5mm.
Center The default is 0mm.
The selected settings are applied to both sides of 2-sided copies.
When the image is reduced or enlarged, the selected percentage
will be applied to the Border Erase. For example, if Variable Erase
is set to 30mm, a 50% reduction will result in 15mm of border
erase on the output.
When making copies the copier adds a margin of 2mm to all sides.
This cannot be eliminated.
1–48
Page 91

USER GUIDE (COPIER)
1 On the Added Features tab select Border Erase.
2 Select Variable Erase.
3 Press the up or down arrows to increase or decrease the Border
Erase amount(s) for Top & Bottom, Left & Right, and Center.
4 Select the icon that most closely resembles the Original
Orientation for the loaded document(s).
5 Select Start to make copies or Save to select additional features.
1–49
Page 92

USER GUIDE (COPIER)
Image Quality Tab
Below is a brief description of each feature available on the Image
Quality tab. Each feature is explained in detail on the following
pages.
Original Type Enables you to select the type of original document you wish to
copy to ensure optimum copy quality.
Auto Exposure Prevents the background color of an original from appearing on
the output copies.
Lighter/Darker/Contrast Allows you to adjust the lightness, darkness and contrast of the
output copy.
Sharpness/Color
Saturation
Allows you to adjust the amount of edge definition and the overall
richness of the color of the output copy
Color Shift Allows you to shift all of the copy colors toward the adjacent hue.
Color Balance Enables you to set the balance of Yellow, Magenta, Cyan and
Black by varying degrees of density for each color.
Image Quality Presets Automatically adjusts the image quality settings to produce output
with various predetermined effects.
1–50
Page 93

USER GUIDE (COPIER)
Original Type
The Original Type feature enables you to define the kind of original
document you wish to copy. The copier automatically makes
adjustments to optimize the copy based on the original type.
The following types are available:
Text & Photo Use for original documents that contain pictures and printed text,
as you often see in magazines or professional journals.
NOTE:This is the default setting. Originals do not have to contain
photographs and text. Simply use this setting to apply the best
sharpness and density levels automatically for optimum color
quality on all your color copies.
Text Use for text documents composed of fine line characters or other
high contrast documents with bright, dense colors. Selecting this
option suppresses background color.
Photo Use for photographs or lithographs.
Other Color Originals Use for original documents containing colored background such
as maps, originals marked by highlighter pens, and documents
printed on inkjet printers.
1–51
Page 94

USER GUIDE (COPIER)
1 On the Image Quality tab select Original Type.
2 Select the type of Original:
• Text & Photo
Select the Photo Type that best describes the photo in the
original document
• Halftone: Use this option when copying from newspapers
or magazines
• Photograph: Use this option when copying photos
• Color Copies: Use this option when copying Xerographic
reproductions
• Text
• Photo
Select the Photo Type that best describes the photo in the
original document
• Halftone: Use this option when copying from newspapers
or magazines
• Photograph: Use this option when copying photos
• Color Copies: Use this option when copying Xerographic
reproductions
• Other Color Originals
Select the option that best describes the original document
• Map: Use this option when copying from originals with
colored backgrounds such as maps
• Highlighted Originals: Use this option when copying from
originals marked with highlighter pen
• Inkjet Originals: Use this option when copying from
originals made on Inkjet printers
3 Select Start to make copies or Save to select additional features.
1–52
Page 95

Auto Exposure
This feature prevents the background color of an original from
appearing on the output copy. A newspaper or colored paper are
examples of this type of original.
USER GUIDE (COPIER)
1 On the Image Quality tab select Auto Exposure.
2 Select On.
3 Select Start to make copies or Save to select additional features.
1–53
Page 96

USER GUIDE (COPIER)
Lighter/Darker/Contrast
The Lighter/Darker feature enables you to adjust the overall
lightness or darkness of the output copy. Contrast allows you to
adjust the clearness of the image. If you increase the Contrast,
the copy appears sharp & vivid and is composed of mainly high
and low density elements. If you decrease the Contrast, the copy
is softer and renders more uniformly using mid-tones.
There are seven levels of adjustment for Lighter/Darker and five
levels of adjustment for Contrast.
1 On the Image Quality tab select Lighter/Darker/Contrast.
2 Press the up and down arrows to Lighten or Darken the original.
3 Press the up and down arrows to adjust the Contrast the original.
4 Select Start to make copies or Save to select additional features.
1–54
Page 97

Sharpness/Saturation
The Sharpness feature allows you to adjust the amount of edge
definition on the copies. The Color Saturation feature allows you
to adjust the overall richness of color on the copy. There are five
levels of adjustment for each feature.
USER GUIDE (COPIER)
1 On the Image Quality tab select Sharpness/Saturation.
2 Press the up and down arrows to increase or decrease the
Sharpness of the original.
3 Press the up and down arrows to adjust the Color Saturation of
the original.
4 Select Start to make copies or Save to select additional features.
NOTE:Color Saturation cannot be adjusted when the Black is
selected for Output Color.
1–55
Page 98

USER GUIDE (COPIER)
Color Shift
The Color Shift feature allows you to shift all of the copy colors
toward the adjacent hue.
If you select one of the Warm buttons, the red colors shift toward
the yellow hue, the green colors shift toward the cyan hue, and the
blue colors shift toward the magenta hue. All colors between these
original colors also shift in the same direction.
If you select one of the Cool buttons, the red colors shift toward
the magenta hue, the blue colors shift toward the cyan hue, and
the green colors shift toward the yellow hue. Again, all colors
between these original colors also shift in the same direction.
1 On the Image Quality tab select Color Shift.
2 Press the button for the desired Color Shift ranging from Coolest
to Warmest.
3 Select Start to make copies or Save to select additional features.
NOTE:Color Shift cannot be adjusted when Black is selected for
Output Color.
1–56
Page 99

Color Balance
The Color Balance feature allows you to adjust the balance
between colors and the overall amount of color on the output
copies. You can adjust the levels of all four process colors
(Yellow, Magenta, Cyan, and Black) for their low, medium and high
density ranges.
USER GUIDE (COPIER)
1 On the Image Quality tab select Color Balance.
2 Select the button for the color you want to adjust.
3 Select the desired density (Low, Medium, High) and perform one
of the following:
• Press the up arrow to increase the amount of color to be
added.
• Press the down arrow to decrease the amount of color to be
added.
4 Select Start to make copies or Save to select additional features.
1–57
Page 100

USER GUIDE (COPIER)
Image Quality Presets
The Image Quality Presets feature automatically changes Image
Quality settings to produce various predetermined effects.
The following options are available:
Normal Makes no changes to the image quality and produces copies with
the same quality and density of the original. This is the default
setting.
Lively Uses the highest color saturation to produce rich, vivid output
colors.
Bright Produces a sharp, clear image on the copy.
Warm Produces a soft image on the copy by transforming low density
colors into light and reddish colors. Use this setting to apply a light
pink tone to skin colors and to give a soft tone to dark, warm
colors.
Cool Produces a strong, clear blue tone on the copy. This setting can
be used to make the blue color of water stronger and to make
dark, cold colors clearer.
Background Suppression Prevents undesired marks or images that are printed on the back
of an original from appearing on the output copies.
Auto Contrast Adjusts brightness and saturation to produce clearer looking
images.
1 On the Image Quality tab select Image Quality Presets.
2 Press the button for the desired option.
1–58
3 Select Start to make copies or Save to select additional features.
 Loading...