

Page 1

Using a LaserWriter 8.x driver
Some printer drivers use PostScript printer description files (PPDs) to get
information about a specific printer . The following instructions ar e for using
the printer with the LaserWriter 8.x driver; follow manufacturer’s
instructions when using other drivers.
Click on the following topics for more information:
■
Installing a LaserWriter 8.x driver
■
Setting up a LaserWriter 8.x driver with a Phaser 550 printer
■
Using a LaserWriter 8.x driver with a Phaser 550 printer
Page 2

Installing a LaserWriter 8.x driver
Note
The LaserWriter 8.x driver software is available from Apple Computer; see
your local Apple dealer for details. Refer to the LaserWriter driver’s
documentation,
the driver.
During installation, the LaserWriter 8.x driver leaves other
versions of the LaserWriter driver (such as 7.x and 6.x) intact,
but overwrites an earlier version of the LaserWriter 8.x driver.
LaserWriter 8.x Update Guide
, for instructions on installing
Page 3

Setting up a LaserWriter 8.x driver with a Phaser 550 printer
The LaserWriter 8.x driver uses printer-specific PPDs (PostScript Printer
Description files) for information on a printer’s page sizes, printing options,
and media type options. To use the LaserWriter 8.x driver with a Phaser 550
printer, do the following steps depending on the version of the driver you
are using. If the printer is busy, it may take some time to complete this
configuration procedure; you may want to do this procedure when the
printer is idle. You only have to configure a printer once.
Click on the following topics for more information:
■
Setting up the LaserWriter 8.3 driver
Setting up an earlier version (8.0, 8.1, 8.2) the
■
LaserWriter 8.x driver
Page 4
Setting up the LaserWriter 8.3 driver
1.
Follow the instructions in Using the Installer to install the
printer description files. Select one of the standard options to
automatically install all of the printer’s software, or select the
PPD files for drivers and applications
2.
Open the
3.
Select the
4.
Select your printer from the list.
5.
Still in the
6.
If the correct PPD file is installed on your hard disk, it is
automatically selected.
If the correct PPD file is not properly installed, the following
dialog box opens showing the location of the PPD files you
installed in Step 1.
Chooser
LaserWriter 8
Chooser
.
, click the
driver icon.
Setup
option.
button to see a list of options.
PPD
Page 5

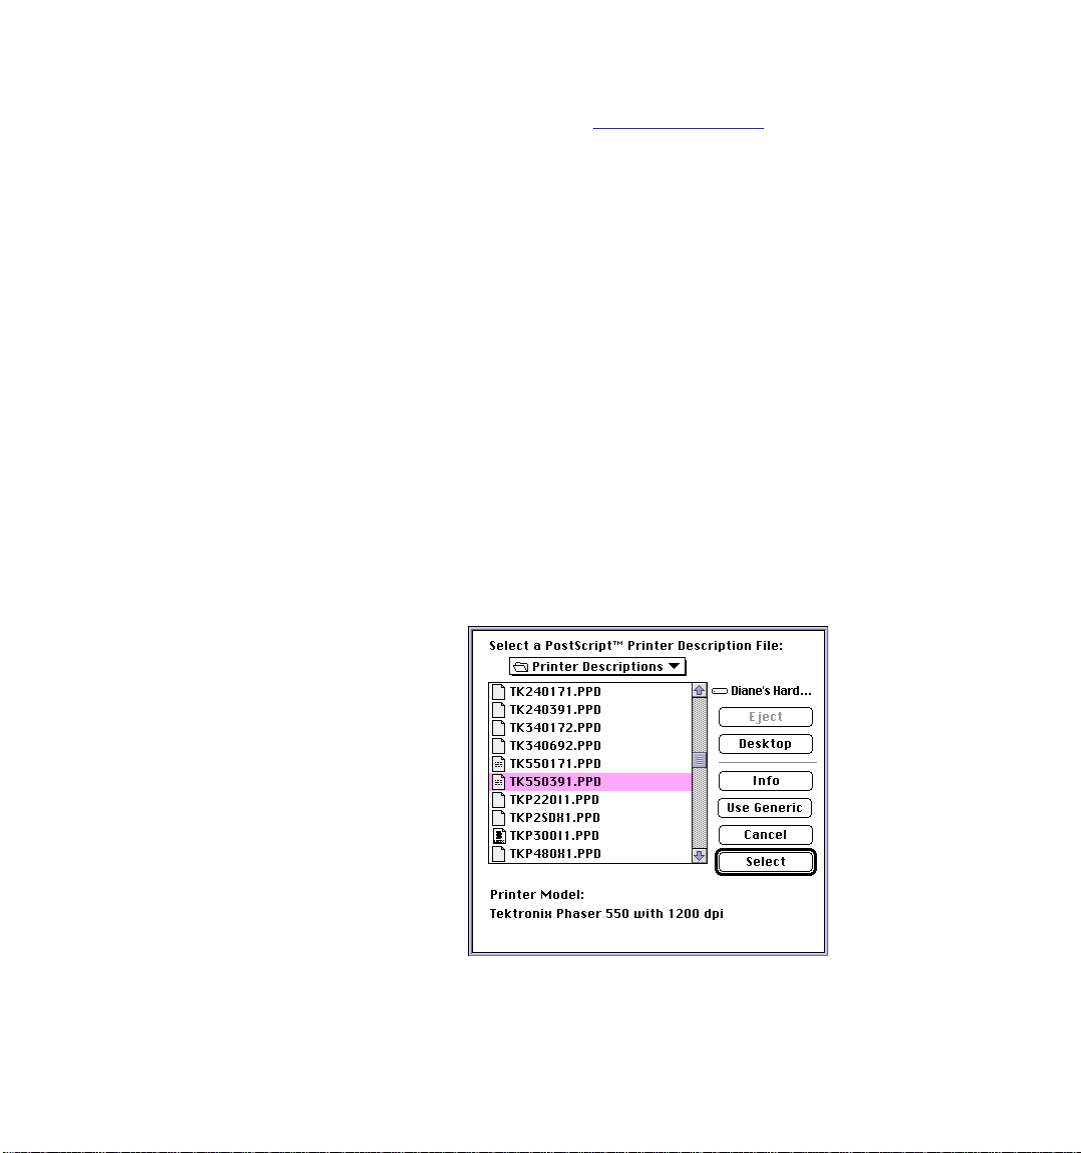
Highlight one of the following
■
Use the
TK550171.PPD
file with the standard version of the printer
(with 17 fonts).
■
Use the
TK550391.PPD
file with the printer’s extended features
option (with 39 fonts).
PPD
files and click
Select
:
Note
If you are not sure of the number of fonts installed in your printer,
the printer’s startup page lists the number of fonts installed.
7.
In the dialog box that appears, select the appropriate items under
Installable Options
8.
Click the
Chooser’s
then click OK.
close box.
Page 6

Setting up an earlier version (8.0, 8.1, 8.2) the LaserWriter 8.x driver
1.
Follow the instructions in Using the Installer to install the
printer description files. Select one of the standard options to
automatically install all of the printer’s software, or select the
PPD files for drivers and applications
2.
Open the
3.
Select the
4.
Select your printer from the list.
5.
Still in the
6.
In the dialog box that appears, click the
see the full range of options.
Chooser
LaserWriter 8
Chooser
.
, click the
driver icon.
Setup
option.
button to see a list of options.
More Choices
PPD
button to
Note
7.
8.
Do not use the
PPD files. Continue with this procedure to properly set up the
driver.
Click the
the next dialog box.
Record the information on
Installed
Printer Info
; you will need this information later. Click OK.
Auto Setup
button, then click the
button; errors can occur with the
PostScript Version
Update info
and
Total Memory
button in
Page 7

9.
Click the
Extensions folder
10.
Highlight one of the following
and click
Select PPD
, inside the
Select
:
button; the
System Folder
PPD
Printer Descriptions
folder in the
, is displayed.
files you installed in Step 1,
■
Use the
TK550171.PPD
(with 17 fonts).
■
Use the
TK550391.PPD
option (with 39 fonts).
Note
If you are not sure of the number of fonts installed in your printer,
the printer’s startup page lists the number of fonts installed.
11.
Make sure the information under
printer you have and the
in Step 8.
12.
Click
Select
.
file with the standard version of the printer
file with the printer’s extended features
Printer Model
PostScript Version
matches the
information you got
Page 8

Note
13.
14.
If the information under
use the closest printer name, and call Tektronix Customer
Support in the U.S. and Canada at 1-800-835-6100 for the latest
PPD file. Outside the U.S. and Canada, contact your local
Tektronix reseller. You can also download the latest PPD files
from the Tektronix Bulletin Board Service (BBS).
Click
Configure
Installable Options
has installed. Check other options either
Not Installed,
Click OK in two dialog boxes and close the
. In the field for
as appropriate.
Printer Model
, select the amount of memory your printer
is not an exact match,
Memory Configuration
Installed
Chooser
or
.
under
Page 9

Using a LaserWriter 8.x driver with a Phaser 550 printer
From the
menu to select the printer’s supported paper sizes.
From the
paper trays in the
File
menu, open the
File
menu, open the
Paper Source
Page Setup
Print
field.
dialog box. Use the
dialog box. Select media options and
Paper
pop-up
In the
Print
dialog box, click the
dialog box. There are printer-specific features listed at bottom of the
dialog box.
Options
button to see the
Print Options
Page 10

The LaserWriter 8.3 driver offers ColorSync options.
Page 11

Using the Installer
To install the printer’s software, follow this procedure:
1.
Disable virus detection software before starting the
application. Either refer to the virus software’s documentation for
instructions, or
Shift
key to start the computer with extensions off.
2.
Use either the Phaser 550 diskettes or CD-ROM.
■
Floppy diskettes:
diskette into your computer’s disk drive.
Installer
Restart
the Macintosh while holding down the
Insert the Printer Software for the Macintosh
CD-ROM:
■
CD-ROM drive.
3.
Double-click the
the following dialog box appears:
4.
Select one of the standard options or select individual options;
Command
Insert the Phaser 550 CD-ROM into your computer’s
Phaser 550 Installer
-click to select more than one item. Then click
icon. Click
Continue
until
Install
.
Page 12

5.
If you click the Standard button, the following dialog box
appears. This option installs the Standard printer software.
Source: 070-9117-00 C2
 Loading...