


Version 2.0
February 2020
702P06965
Xerox
®
Instant Print Kiosk
User Guide

© 2020 Xerox Corporation. All rights reserved. Unpublished rights reserved under the copyright laws of the United
States. Contents of this publication may not be reproduced in any form without permission of Xerox Corporation.
Copyright protection claimed includes all forms of matters of copyrightable materials and information now allowed by
statutory or judicial law or hereinafter granted, including without limitation, material generated from the software
programs which are displayed on the screen such as styles, templates, icons, screen displays, looks, and so on.
®
Xerox
and Xerox and Design®, CentreWare®, Scan to PC Desktop®, and Xerox Secure Access Unified ID System
are trademarks of Xerox Corporation in the United States and/or other countries.
®
Adobe
Reader®, Adobe®Type Manager®, ATM™, Flash®, Macromedia®, Photoshop®, and PostScript®are trademarks
of Adobe Systems Incorporated in the United States and/or other countries.
®
Apple
, Bonjour®, EtherTalk™, TrueType®, iPad®, iPhone®, iPod®, iPod touch®, Mac®, and Mac OS®are trademarks of
Apple Inc., registered in the U.S. and other countries. AirPrint
Google Cloud Print
™
web printing service, Gmail™webmail service, and Android™mobile technology platform are
®
and the AirPrint Logo®, are trademarks of Apple Inc.
trademarks of Google, Inc.
Microsoft
®
, Windows Vista®, Windows®, OneDrive®, and Windows Server®are trademarks of Microsoft Corporation in
the United States and other countries.
McAfee
®
, ePolicy Orchestrator®, and McAfee ePO™are trademarks or registered trademarks of McAfee, Inc. in the
United States and other countries.
PANTONE
UNIX
Wi-Fi CERTIFIED Wi-Fi Direct
®
and other Pantone, Inc. trademarks are the property of Pantone, Inc.
®
is a trademark in the United States and other countries, licensed exclusively through X/ Open Company Limited.
®
is a trademark of the Wi-Fi Alliance.
®

Table of Contents
1 Safety ..........................................................................................................................................7
Notices and Safety............ . ................ . .............. . . ................ . .............. . . ............... . ................ . ... 8
Electrical Safety . . . ............... . .............. . . ................ . .............. . . ............... . . .............. . . ............... . .. 9
General Guidelines .. . .............. . . ............... . . .............. . . .............. . . ............... . . .............. . . ........ 9
Power Cord Safety Information . . .............. . . ............... . . .............. . . .............. . . ............... . . ...... 9
Emergency Power Off.......... . . ............... . ............... . . .............. . ................ . . .............. . . ......... 10
Operational Safety.... . . ............... . . .............. . ................ . . .............. . ................ . ............... . . ........ 11
Operational Guidelines....... . ............... . ............... . ................ . . .............. . ................ . ........... 11
Ozone Release ............ . ............... . . .............. . ................ . . .............. . ................ . ............... . .. 11
Kiosk Location........ . .............. . . ................ . .............. . . ............... . . ............... . .............. . . ....... 11
Kiosk Supplies .. . . ............... . . .............. . . ............... . ............... . . .............. . . ............... . . ........... 12
Maintenance Safety.............. . . ............... . . .............. . . .............. . . ............... . . .............. . . ............. 13
Kiosk Symbols ........... . . ............... . . .............. . . ............... . . .............. . . ............... . ............... . . ........ 14
Environmental, Health, and Safety Contact Information ..... . ............... . . .............. . ................ . . 15
2 Features ....................................................................................................................................17
Parts of the Kiosk ...... . . .............. . . ............... . ............... . . .............. . . ............... . . .............. . . ......... 18
Left Front View . .............. . . ............... . . .............. . . .............. . . ................ . .............. . . ............. 18
Left Rear View ........... . .............. . . ................ . .............. . . ............... . ............... . . .............. . . ... 19
Internal Components..... . . ............... . . .............. . . ............... . . .............. . . .............. . . .............. 20
Document Feeder .... . . ............... . ................ . .............. . . ................ . .............. . . ............... . . ... 21
User Interface Assembly ........... . ................ . . .............. . ................ . ............... . ............... . . ... 22
Office Finisher LX ............... . ............... . . .............. . . ............... . . .............. . . ............... . ........... 23
Front Door Electronic Lock. .............. . ................ . . .............. . ................ . ............... . ............... . . ... 24
Deactivating the Front Door Electronic Lock.............. . . .............. . . .............. . . ............... . . .... 24
Changing the Front Door Electronic Lock Pass Code ......... . .............. . . ............... . . .............. 24
Powering On and Off the Kiosk............ . ................ . . .............. . ............... . . ............... . ............... . 26
Powering On the Kiosk ...... . . .............. . . ............... . ............... . . .............. . . ............... . . ........... 27
Powering Off the Kiosk.......... . . ................ . .............. . . ............... . . .............. . . .............. . . ....... 28
Restarting the User Interface . . ............... . . .............. . . ............... . . .............. . . .............. . . ....... 29
Powering On the User Interface ...... . . .............. . . ............... . . .............. . . .............. . . .............. 30
Powering Off the User Interface......... . . .............. . . ............... . . .............. . . ............... . ........... 30
Services ...... . . .............. . ............... . . ............... . . .............. . ................ . . .............. . ............... . . ....... 31
Information Pages .. ................ . . .............. . ................ . ............... . . .............. . . ............... . . ........... 32
Logging In ............ . . .............. . ................ . . .............. . . .............. . . ............... . . .............. . .............. 33
Logging in to the Kiosk User Interface....... . . .............. . . ............... . . .............. . . ............... . . ... 33
Accessing Device Management............... . . ............... . .............. . . ................ . .............. . . ...... 33
Automatic Data Collection .............. . ................ . .............. . . ................ . .............. . . ............... . . ... 34
Billing and Usage Information .......... . ............... . ................ . .............. . . ................ . .............. . . .. 35
More Information............. . ................ . .............. . . ................ . .............. . . ............... . ............... . . . 36
Xerox®Instant Print Kiosk
User Guide
3

Table of Contents
Getting Help ............... . ................ . . .............. . ................ . ............... . . .............. . ................ . . 36
Locating the Serial Number... . . ................ . .............. . . ............... . . ............... . .............. . . ....... 36
3 Paper and Media ....................................................................................................................39
Supported Paper . . .............. . ............... . . ............... . ............... . ................ . . ............. . . ................ . 40
Recommended Media ........ . . ............... . . .............. . . ............... . ............... . . .............. . . .......... 40
Ordering Paper.. . . ............... . ................ . .............. . . ................ . .............. . . ............... . ........... 40
General Paper Loading Guidelines . . .............. . . ............... . ............... . . .............. . . ............... . . 40
Paper That Can Damage Your Kiosk .. .............. . . ............... . . .............. . . .............. . . .............. 40
Paper Storage Guidelines .......... . . ............... . . .............. . . ............... . ............... . . .............. . . ... 41
Supported Paper Types and Weights ............... . . ............... . . .............. . . .............. . . .............. 41
Supported Standard Paper Sizes. ............... . . .............. . . ............... . . .............. . ................ . . ... 41
Supported Paper Sizes and Weights for Automatic 2-Sided Printing. . . ............... . . .............. 42
Loading Paper..... . . ............... . . .............. . . .............. . . ............... . . .............. . . ............... . . .............. 43
Identifying Non-Default Media at the Kiosk User Interface .. . . ................ . .............. . . ......... 43
Automatic Tray Switching .............. . . .............. . . ............... . . .............. . ................ . . .............. 43
Loading Paper in Trays 1–4 ...... . . .............. . ................ . . .............. . ............... . . ............... . . .... 43
4 Maintenance ...........................................................................................................................47
General Precautions ...... . .............. . . ............... . . .............. . . .............. . . ................ . .............. . . ...... 48
Cleaning the Kiosk ........... . . .............. . ................ . ............... . ............... . ................ . .............. . . ... 49
Cleaning the Document Glass and Document Cover.. . . ............... . . .............. . . ............... . . ... 49
Cleaning the Document Feed Rollers . . .............. . . .............. . . ............... . . .............. . . ............. 50
Cleaning the Second-Side Scanning Lens Assembly ....... . . ............... . . .............. . . ............... . 51
Cleaning the Kiosk Exterior.... . . .............. . ............... . . ............... . . .............. . ................ . . ....... 53
Cleaning the Printhead Lenses . . . .............. . . ............... . . .............. . . .............. . . ............... . . .... 54
Routine Maintenance....... . . .............. . . ............... . ............... . . .............. . . ............... . . .............. . . .. 56
Replacing the Toner Cartridges...... . ................ . . .............. . . .............. . . ............... . . .............. . 56
Replacing the Waste Toner Container... . . ............... . . .............. . . ............... . ............... . . ........ 58
Replacing the Drum Cartridges........... . . .............. . . ............... . . .............. . . ............... . ........... 60
Replacing the Transfer Belt Cleaner ................ . . ............... . .............. . . ................ . . .............. 63
Replacing the Second Bias Transfer Roller. . ............... . . .............. . . ............... . . .............. . . ..... 66
Replacing Staple Cartridges ......... . .............. . . ................ . ............... . ............... . ................ . . 68
Emptying the Hole Punch Waste Container ............. . . .............. . . ............... . . .............. . . ...... 70
Ordering Supplies............. . . .............. . . ............... . ............... . . .............. . ................ . . .............. . ... 73
Consumables .... . . ............... . ............... . . .............. . ................ . . .............. . ................ . ........... 73
Routine Maintenance Items............ . .............. . . ................ . .............. . . ............... . . .............. 73
Other Supplies ............. . . .............. . . ................ . .............. . . ............... . . .............. . . ............... . 73
When to Order Supplies ......... . . ............... . . .............. . . .............. . . ............... . . .............. . ....... 73
Recycling Supplies.......... . . ............... . . .............. . . ............... . . .............. . . .............. . . .............. 74
Moving the Kiosk ........... . . .............. . . .............. . . ............... . . .............. . . ............... . . .............. 74
5 Troubleshooting......................................................................................................................75
General Troubleshooting . ............... . . .............. . . ............... . . .............. . . .............. . . ............... . . .... 76
Kiosk Power Switches .. . . ............... . . .............. . . ............... . ............... . . .............. . ................ . . 76
Restarting the Kiosk ........... . . ................ . .............. . . ............... . ................ . .............. . . .......... 76
4
Xerox®Instant Print Kiosk
User Guide

Table of Contents
Kiosk Does Not Power On or User Interface Touch Screen is Blank . ................ . ............... . .. 77
Troubleshooting User Interface Error Messages......... . . .............. . . .............. . . ............... . . .... 77
Clearing a Dark Screen on the User Interface............ . . ............... . . .............. . . ............... . . ... 79
Restarting or Powering Off the User Interface ............... . . ............... . . .............. . . ............... . 79
Resetting the Credit Card Reader ........... . . .............. . . ............... . . .............. . . .............. . . ....... 79
Troubleshooting Credit Card Reader Errors ................ . . .............. . ............... . . ............... . . .... 80
Kiosk Resets or Powers Off Frequently .. . ............... . ............... . ................ . .............. . . .......... 80
Document Fails to Print............... . . .............. . . ............... . . .............. . . ............... . ............... . . . 81
Kiosk is Making Unusual Noises.... . . .............. . . ............... . ............... . . .............. . . ................ . 81
Automatic 2-Sided Printing Problems .............. . . ............... . . .............. . . .............. . . .............. 81
Date and Time Are Incorrect.......... . ............... . . ............... . .............. . . ................ . . .............. 81
Scanner Errors............. . ................ . . .............. . ................ . ............... . ............... . ................ . . 82
Jams........ . . ............... . . .............. . . ............... . ............... . . .............. . . ............... . . .............. . . ......... 83
Clearing Paper Jams . ............... . . .............. . . ............... . . .............. . . .............. . . ............... . . .... 83
Clearing Jams in the Office Finisher LX. . . ............... . . .............. . . ............... . ............... . . ........ 95
Minimizing Paper Jams ................ . . ............... . ............... . ................ . . .............. . ................ . 97
Troubleshooting Paper Jams ........... . . .............. . . ............... . . .............. . . .............. . . .............. 98
Clearing Staple Jams... . ................ . .............. . . ................ . .............. . . ............... . ................ 100
Clearing Hole Punch Jams .. . ................ . . .............. . ................ . ............... . . .............. . ......... 102
Print-Quality Problems.............. . ............... . . .............. . . ............... . . .............. . . ............... . ......... 103
Controlling Print Quality........... . . .............. . ................ . . .............. . . .............. . . ............... . . .. 103
Troubleshooting Print-Quality Problems........ . . ............... . ............... . . .............. . ................ 104
Copy and Scan Problems.......... . . ............... . . .............. . . ............... . ............... . . .............. . ......... 107
Fax Problems .. . ............... . . .............. . ................ . . .............. . ................ . ............... . . .............. . . . 108
Problems Sending Faxes. . . ................ . .............. . . ............... . . .............. . . .............. . . ............ 108
Getting Help .. ............... . . ............... . .............. . . ................ . . .............. . ............... . . ............... . ... 109
User Interface Messages...... . . .............. . . ............... . . .............. . . ............... . ............... . . ...... 109
A Specifications........................................................................................................................ 111
Kiosk Configurations and Options .......... . . ............... . .............. . . ................ . .............. . . ........... 112
Standard Features....... . .............. . . ............... . ............... . . .............. . . ................ . .............. . . 112
Available Configurations .. ............... . . .............. . . ............... . . .............. . . .............. . . ............ 112
Options and Upgrades ........... . ................ . . .............. . . .............. . . ............... . . .............. . ..... 112
Physical Specifications . . . .............. . . ............... . . .............. . . .............. . . ............... . . .............. . ..... 114
Base Configuration ............ . . ................ . .............. . . ............... . ............... . . .............. . . ........ 114
Configuration without Office Finisher LX.............. . . .............. . . ............... . . .............. . . ....... 114
Clearance Requirements ........... . .............. . . ............... . . .............. . . .............. . . ............... . . .. 114
Environmental Specifications . .............. . ............... . . ............... . .............. . . ................ . . ............ 115
Temperature............ . . ............... . ................ . .............. . . ................ . .............. . . ............... . . . 115
Relative Humidity .......... . . ............... . . .............. . . ............... . . .............. . . .............. . . ............ 115
Elevation .... . . .............. . ................ . . .............. . . ............... . ............... . . .............. . ................ 115
Electrical Specifications............ . . ................ . .............. . . ............... . ............... . . .............. . . ........ 116
Recycling Supplies.......... . . ............... . . .............. . . ............... . . .............. . . .............. . . ............ 116
Performance Specifications ........... . . .............. . . ............... . . .............. . . ............... . . .............. . . ... 117
Printing Resolution............. . . ................ . .............. . . ............... . ............... . . .............. . . ........ 117
Print Speed . . . .............. . ................ . . .............. . . ............... . ............... . . .............. . ................ 117
Xerox®Instant Print Kiosk
User Guide
5

Table of Contents
B Regulatory Information...................................................................................................... 119
FCC Compliance Information Statement.............. . . ............... . . .............. . ................ . . ............ 120
Basic Regulations. . . .............. . . ............... . . .............. . ................ . . .............. . . .............. . . ............ 121
United States FCC Regulations... . ................ . ............... . ............... . ................ . . .............. . . 121
Environmental Benefits of Duplex Printing .......... . . ............... . ............... . . .............. . ......... 121
Paper Types ..... . .............. . . ............... . . ............... . .............. . . ................ . .............. . . ........... 121
Power Consumption and Activation Time.......... . . .............. . . ............... . . .............. . . .......... 121
Default Power Saver Settings ...... . . .............. . . ............... . . .............. . . ............... . ............... . 122
Eco Logo Certified to Office Machines CCD-035.............. . . .............. . . ............... . . ............ 122
Copy Regulations .. . .............. . . ............... . . .............. . . ............... . . .............. . . .............. . . ............ 123
United States......... . . .............. . ................ . . .............. . ............... . . ............... . .............. . . ..... 123
Canada............. . ................ . ............... . . .............. . ................ . . .............. . ................ . ......... 124
Other Countries.............. . . ............... . . .............. . . ............... . . .............. . . .............. . . ............ 125
Safety Certification . ............... . ............... . . ............... . . ............. . . ................ . . .............. . ........... 126
Material Safety Data Sheets ............. . . .............. . . ............... . . .............. . . ............... . ............... . 127
C Recycling and Disposal ....................................................................................................... 129
All Countries .............. . . ............... . . .............. . . .............. . . ............... . . .............. . . ............... . . ..... 130
North America .... . . ............... . . .............. . . .............. . . ............... . . .............. . . ............... . . ............ 131
Other Countries.. ............... . ............... . . .............. . ................ . . .............. . . ............... . ............... . 132
6
Xerox®Instant Print Kiosk
User Guide

Safety
1
Your kiosk and the recommended supplies are designed and tested to meet strict safety requirements.
Attention to the following information ensures the continued safe operation of your Xerox
This chapter contains:
• Notices and Safety.. . ............... . . .............. . . ............... . . .............. . . .............. . . ............... . . .............. . .. 8
• Electrical Safety .. .............. . . ............... . . .............. . . ............... . . .............. . . .............. . . ............... . . ...... 9
• Operational Safety.......... . . .............. . . ................ . .............. . . ............... . . .............. . . .............. . . ....... 11
• Maintenance Safety... . . ................ . ............... . ............... . ................ . .............. . . ................ . ........... 13
• Kiosk Symbols .. . ............... . .............. . . ................ . . .............. . ............... . . ............... . .............. . . ....... 14
• Environmental, Health, and Safety Contact Information....... . . ............... . ............... . . .............. . . ... 15
®
kiosk.
Xerox®Instant Print Kiosk
User Guide
7

Safety
Notices and Safety
Read the following instructions carefully before operating your kiosk. Refer to these instructions to
ensure the continued safe operation of your kiosk.
Your Xerox
include safety agency evaluation and certification, and compliance with electromagnetic regulations
and established environmental standards.
The safety and environment testing and performance of this product are verified using Xerox
materials only.
®
kiosk and supplies are designed and tested to meet strict safety requirements. These
®
WARNING: Unauthorized alterations, which can include the addition of new functions or
connection of external devices, can affect the product certification. For details, contact your
®
Xerox
representative.
8
Xerox®Instant Print Kiosk
User Guide

Electrical Safety
GGeenneerraall GGuuiiddeelliinneess
WARNING:
• Do not push objects into slots or openings on the kiosk. Touching a voltage point or shorting
out a part could result in fire or electric shock.
• Do not remove covers or guards fastened with screws unless you are installing optional
equipment and are instructed to do so. Power off the kiosk when performing these
installations. Disconnect the power cords when removing covers and guards for installing
optional equipment. Except for user-installable options, there are no parts that you can
maintain or service behind these covers.
The following are hazards to your safety:
• The power cords are damaged or frayed.
• Liquid is spilled into the kiosk.
• The kiosk is exposed to water.
Safety
• The kiosk emits smoke or the surface is unusually hot.
• The kiosk emits unusual noise or odors.
• The kiosk causes a circuit breaker, fuse, or other safety device to activate.
• Any part of the kiosk is damaged.
If any of these conditions occurs, do the following:
1. Power off the kiosk immediately.
2. Disconnect the power cords from the electrical outlet.
3. Call an authorized service representative.
PPoowweerr CCoorrdd SSaaffeettyy IInnffoorrmmaattiioonn
Before operating your kiosk, read the following instructions carefully. For details, contact your Xerox
representative.
WARNING:
• The electrical supply for the device must meet the requirements stated on the data plate on
the rear of the device. If you are not sure that your electrical supply meets the requirements,
consult your local electricity provider or a licensed electrician.
• Do not use an extension cord.
®
• Do not remove or modify the power cords.
• Refer to these instructions to ensure the continued safe operation of your kiosk.
• Use the power cords supplied with your kiosk.
®
Xerox
Instant Print Kiosk
9
User Guide

Safety
• Plug the power cords directly into a properly grounded electrical outlet. Ensure that each end of
the cord is connected securely. If you do not know if an outlet is grounded, ask an electrician to
check the outlet.
• Do not use a ground adapter plug to connect the kiosk to an electrical outlet that does not have a
ground connection terminal.
WARNING: Avoid the potential of electrical shock by ensuring that the kiosk is grounded
properly. Electrical products can be hazardous if misused.
• Verify that the kiosk is plugged into an outlet that provides the correct voltage and power. Review
the electrical specification of the kiosk with an electrician, if necessary.
• Do not place the kiosk in an area where people can step on the power cords.
• Do not place objects on the power cords.
• If either of the power cords becomes frayed or worn, replace the cord immediately.
• Do not unplug or plug the power cords while the kiosk is powered on.
• To avoid electrical shock and damage to the cords, when unplugging the power cords, grasp the
plug.
• The electrical outlet must be near the kiosk and must be easily accessible.
The power cords are attached to the kiosk as plug-in devices on the back of the kiosk. If it is necessary
to disconnect all electrical power from the kiosk, disconnect the power cords from the electrical outlet.
For details, refer to Powering On and Off the Kiosk.
EEmmeerrggeennccyy PPoowweerr OOffff
If any of the following conditions occur, power off the kiosk immediately, then disconnect the power
cords from the electrical outlet. Contact an authorized Xerox
problem:
• The equipment emits unusual odors or makes unusual noises.
• The power cords are damaged or frayed.
• A wall panel circuit breaker, fuse, or other safety device is tripped.
• Liquid is spilled into the kiosk.
• The kiosk is exposed to water.
• Any part of the kiosk is damaged.
®
service representative to correct the
10
Xerox®Instant Print Kiosk
User Guide

Safety
Operational Safety
Your kiosk and supplies are designed and tested to meet strict safety requirements. The requirements
include safety agency examination, approval, and compliance with established environmental
standards.
Your attention to the following safety guidelines helps to ensure the continued, safe operation of your
kiosk.
OOppeerraattiioonnaall GGuuiiddeelliinneess
• Do not remove any paper trays while the kiosk is printing.
• Do not open the doors when the kiosk is printing.
• Do not move the kiosk when it is printing.
• Keep hands, hair, neckties, jewelry, and so on, away from the exit and feed rollers.
• Covers that require tools for removal protect the hazardous areas within the kiosk. Do not remove
the protective covers.
• Do not override any electrical or mechanical interlock devices.
• Do not attempt to remove paper that is jammed deeply inside the product. Power off the kiosk
promptly and contact your local Xerox
• Ensure that the rear right cover is attached. Open this cover to connect an interface cable.
®
representative.
OOzzoonnee RReelleeaassee
This kiosk produces ozone during normal operation. The amount of ozone produced depends on copy
volume. Ozone is heavier than air and is not produced in amounts large enough to harm anyone.
Install the kiosk in a well-ventilated room.
For details in the United States and Canada, go to www.support.xerox.com.
KKiioosskk LLooccaattiioonn
• Place the kiosk on a level, solid, non-vibrating surface that is strong enough to hold its weight. To
find the weight for your kiosk configuration, refer to Physical Specifications.
• Do not block or cover the slots or openings on the kiosk. These openings provide ventilation and
prevent the overheating of the kiosk.
• To ensure space for operation and servicing, place the kiosk in an amply sized area.
• Place the kiosk in a dust-free area.
• Do not store or operate the kiosk in an extremely hot, cold, or humid environment. For details,
refer to Temperature or Relative Humidity.
• Do not place the kiosk near a heat source.
• Do not place the kiosk in direct sunlight.
• Do not place the kiosk in locations susceptible to vibrations.
• To avoid exposure to light-sensitive components, do not place the kiosk directly in a cold air flow
from an air conditioning system.
®
Xerox
Instant Print Kiosk
User Guide
11

Safety
• For optimum performance, only use the kiosk at the elevations specified. For details, refer to
Elevation.
KKiioosskk SSuupppplliieess
• Use the supplies designed for your kiosk. The use of unsuitable materials can cause poor
performance and a possible safety hazard.
• Follow all warnings and instructions marked on, or supplied with, the product, options, and
supplies.
• Store all consumables according to the instructions on the package or container.
• Keep all consumables away from the reach of children.
• Never throw toner, toner cartridges, drum cartridges, or waste cartridges into an open flame.
• When handling cartridges, such as toner cartridges, avoid skin or eye contact. Eye contact can
cause irritation and inflammation. Do not attempt to disassemble the cartridge, as doing so can
increase the risk of skin or eye contact.
Caution: Use of non-Xerox supplies is not recommended. The Xerox Warranty and Service
Agreement do not cover damage, malfunction, or degradation of performance caused by the
use of non-Xerox supplies, or the use of Xerox supplies not specified for this kiosk.
12
Xerox®Instant Print Kiosk
User Guide

Safety
Maintenance Safety
• Do not attempt any maintenance procedure that is not specifically described in the
documentation supplied with your kiosk.
• Clean the device with a dry lint-free cloth only.
WARNING: Do not use aerosol cleaners. Aerosol cleaners can be explosive or
flammable when used on electromechanical equipment.
• Do not burn any consumables or routine maintenance items. For information on Xerox
recycling programs, refer to www.support.xerox.com.
• When installing the device in a hallway or similar restricted area, additional space requirements
can apply. Ensure that you comply with all workspace safety regulations, building codes, and fire
codes for your area.
®
supplies
Xerox
®
Instant Print Kiosk
User Guide
13

Safety
Kiosk Symbols
Symbol Description
Warning or Caution:
Ignoring this warning can cause serious injury or even death.
Ignoring this caution can cause injury or property damage.
Hot surface on or in the kiosk. Use caution to avoid personal injury.
Do not burn the waste toner container.
Do not expose the drum cartridge to light for more than 10 minutes.
Do not touch the drum cartridge.
Hot surface. Wait the indicated time before handling.
Warning:
Moving parts. Use caution to avoid personal injury.
14
Xerox®Instant Print Kiosk
User Guide

Safety
Environmental, Health, and Safety Contact Information
For details on Environment, Health, and Safety in relation to this Xerox®product and supplies, contact
the following customer help line:
United States and Canada: 1-800-ASK-XEROX (1-800-275-9376)
For product safety information in the United States and Canada, go to www.support.xerox.com.
Xerox
®
Instant Print Kiosk
User Guide
15

Safety
16
Xerox®Instant Print Kiosk
User Guide

2
Features
This chapter contains:
• Parts of the Kiosk ............ . ............... . . ............... . .............. . . ................ . .............. . . ............... . . ....... 18
• Front Door Electronic Lock..... . ............... . . .............. . . ............... . . .............. . . ............... . ............... . . . 24
• Powering On and Off the Kiosk. . . ............... . . .............. . . ............... . . .............. . . .............. . . .............. 26
• Services........ . . ............... . . .............. . . ............... . ............... . . .............. . ................ . . .............. . . ......... 31
• Information Pages ....... . . .............. . . ................ . .............. . . ............... . ............... . . .............. . . .......... 32
• Logging In .. . .............. . . ................ . .............. . . ............... . ............... . . .............. . . ............... . . ........... 33
• Automatic Data Collection .... . ............... . . .............. . . ............... . . .............. . . ............... . ............... . . . 34
• Billing and Usage Information . .............. . . ............... . . .............. . ................ . . .............. . . ............... . 35
• More Information ............ . . .............. . . ............... . . .............. . . .............. . . ............... . . .............. . ....... 36
Xerox®Instant Print Kiosk
User Guide
17
Features
Parts of the Kiosk
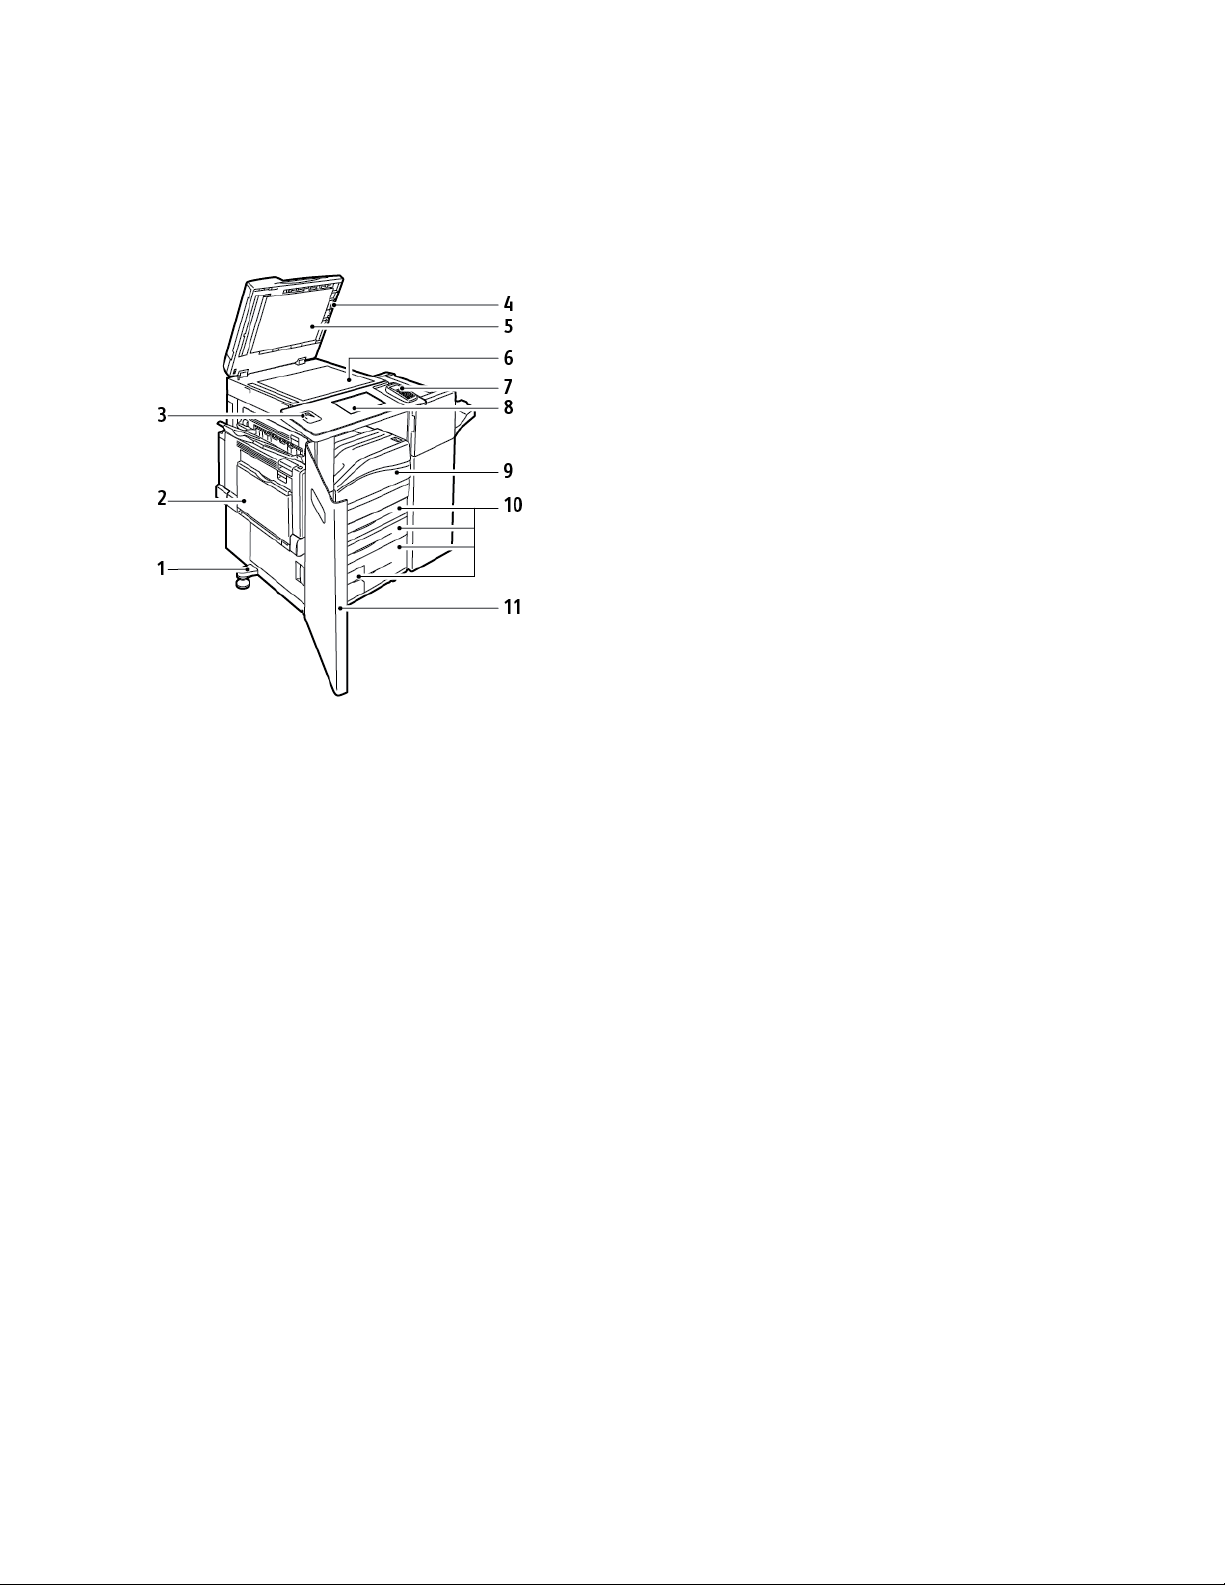
LLeefftt FFrroonntt VViieeww
1. Leveler Foot
2. Tray 5
3. USB Port
4. Lint-Free Cloth Compartment
5. Document Feeder
6. Document Glass
7. Credit Card Reader
8. User Interface Touch Screen
9. Front Cover
10. Trays 1-4
11. Optional Front Door
18
Xerox®Instant Print Kiosk
User Guide

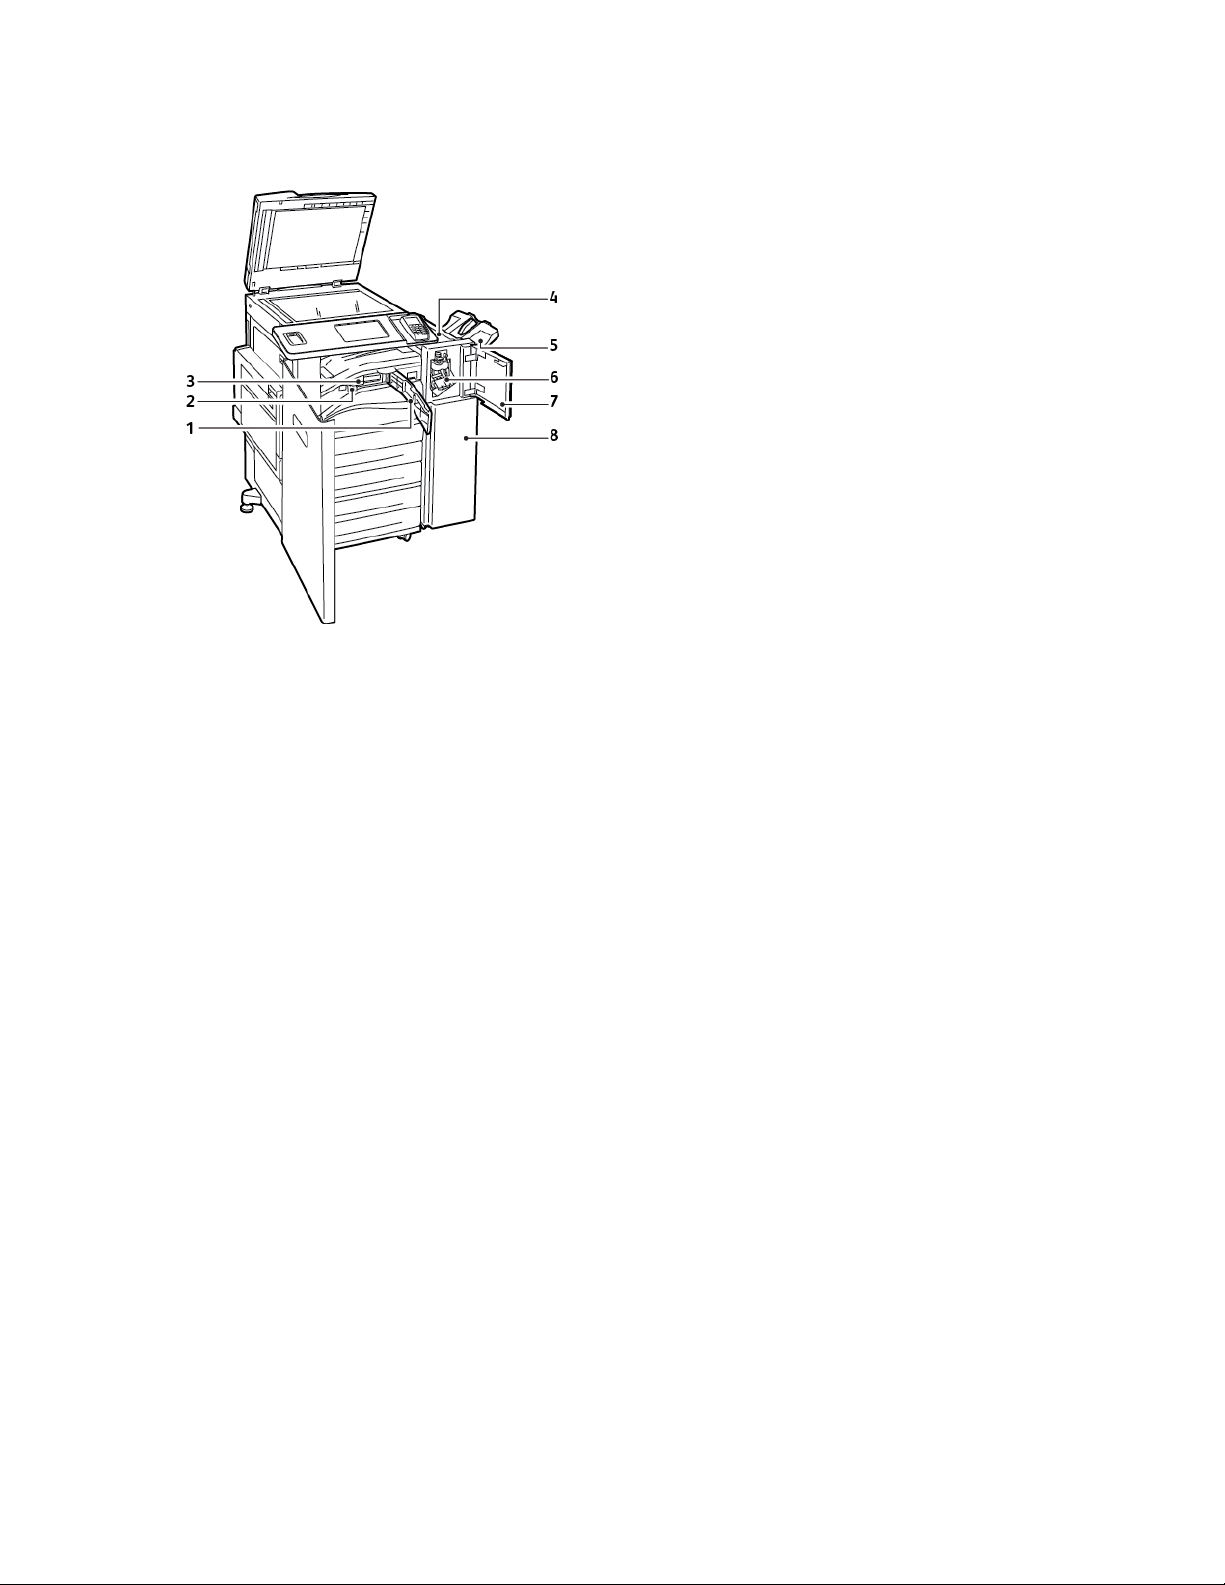
LLeefftt RReeaarr VViieeww
Features
1. Rear Right Cover
2. Two USB Type A Ports
3. Seven Segment Display
4. USB Memory Port, for service only
5. Ethernet Connection
Note: Ensure that the rear, right cover is attached. When connecting an interface cable, open
the rear, right cover.
6. Door D Release Lever
7. Door A Release Lever
8. Door B Release Lever
9. Door C Release Lever
Xerox
®
Instant Print Kiosk
User Guide
19

Features
IInntteerrnnaall CCoommppoonneennttss
1. Second Bias Transfer Roller
2. Fuser Assembly
3. Drum Cartridge Release Lever
4. Toner Cartridges
5. Main Power Switch
6. Transfer Belt Cleaner
7. Waste Container
8. Drum Cartridges
9. Drum Cartridge Cover
20
Xerox®Instant Print Kiosk
User Guide

DDooccuummeenntt FFeeeeddeerr
Features
1. Confirmation Indicator
2. Top Cover
3. Document Guides
4. Document Feeder Tray
5. Document Output Tray
6. CVT Glass
7. Document Glass
Xerox
®
Instant Print Kiosk
User Guide
21

Features
UUsseerr IInntteerrffaaccee AAsssseemmbbllyy
1. USB Port
2. User Interface Touch Screen
The User Interface (UI) Assembly consists of the user interface touch screen, USB port, and the Credit
Card Reader.
The UI Assembly:
• Displays the current operating status of the kiosk
• Provides access to copy, print, scan, and fax features
• Provides access to information pages
• Prompts you to load paper, replace supplies, and clear paper jams
• Displays errors and warnings
• Connects to a USB Flash drive for scan and print access
3. Credit Card Reader
22
Xerox®Instant Print Kiosk
User Guide
OOffffiiccee FFiinniisshheerr LLXX
Features
1. Front Transport Cover
2. Hole Punch Waste Container (optional)
3. Hole Punch Unit (optional)
4. Finisher Top Cover
5. Right Tray
6. Staple Cartridge
7. Finisher Front Cover
8. Office Finisher LX
Xerox
®
Instant Print Kiosk
User Guide
23

Features
Front Door Electronic Lock
The optional front door includes an electronic combination lock with a touch-sensitive keypad. The
lock protects internal parts of the Kiosk from unauthorized physical access using a 6-digit pass code.
DDeeaaccttiivvaattiinngg tthhee FFrroonntt DDoooorr EElleeccttrroonniicc LLoocckk
To deactivate the front door electronic lock:
1. Touch the electronic lock keypad.
Two numbers on the keypad illuminate.
2. Touch and release either of the illuminated numbers, then touch and release the other
illuminated number.
The entire keypad illuminates.
3. Type the lock pass code, then touch OK.
The lock deactivates and the front door can be opened.
Note:
• The default pass code is 123456.
• The first time that you use the device, it is strongly recommended that you change the pass code. For details, refer to Changing the Front Door Electronic Lock Pass Code.
4. To reactivate the lock, close the front door.
The lock reactivates automatically.
CChhaannggiinngg tthhee FFrroonntt DDoooorr EElleeccttrroonniicc LLoocckk PPaassss CCooddee
To change the front door electronic lock pass code:
1. Touch the electronic lock keypad.
Two numbers on the keypad illuminate.
2. Touch and release either of the illuminated numbers, then touch and release the other
illuminated number.
The entire keypad illuminates.
3. Type the lock pass code, then touch OK.
The lock deactivates.
Note: The default pass code is 123456.
4. To enter a new pass code, touch SET, then enter a new six-digit pass code.
24
Xerox®Instant Print Kiosk
User Guide

5. To confirm the new pass code, touch OK, then enter the new pass code again.
6. To save the pass code, touch OK.
The electronic lock activates automatically.
Note: It is recommended that you record the new pass code, as you cannot deactivate the
lock without it.
Features
Xerox
®
Instant Print Kiosk
User Guide
25

Features
Powering On and Off the Kiosk
The kiosk has two power switches.
Note: Powering on and off the kiosk does not affect the user interface touch screen. The touch
screen is powered on and off separately using a plunger switch. For details, refer to Powering
On the User Interface or Powering Off the User Interface.
• The main power switch controls the main power to the kiosk. The main power switch is located
behind the front cover.
Note: For kiosks configured with a front door, to access the front cover, open the front
door.
• The secondary power switch controls power to the kiosk electronic components, and when
powered off, initiates a software-controlled shutdown. The secondary power switch is located
behind a clear plastic door in area F. Area F is located above the front cover.
The preferred method to power on and power off the kiosk is to use the secondary power switch.
Caution:
• To prevent a kiosk malfunction or damage to the internal hard drive:
– Power off the secondary power switch.
– Power off the user interface. For details, refer to Powering Off the User Interface.
– After the screen goes dark, wait 10 seconds, then power off the main power switch.
• Do not plug in or unplug the power cords while the power switch is in the On position.
26
Xerox®Instant Print Kiosk
User Guide
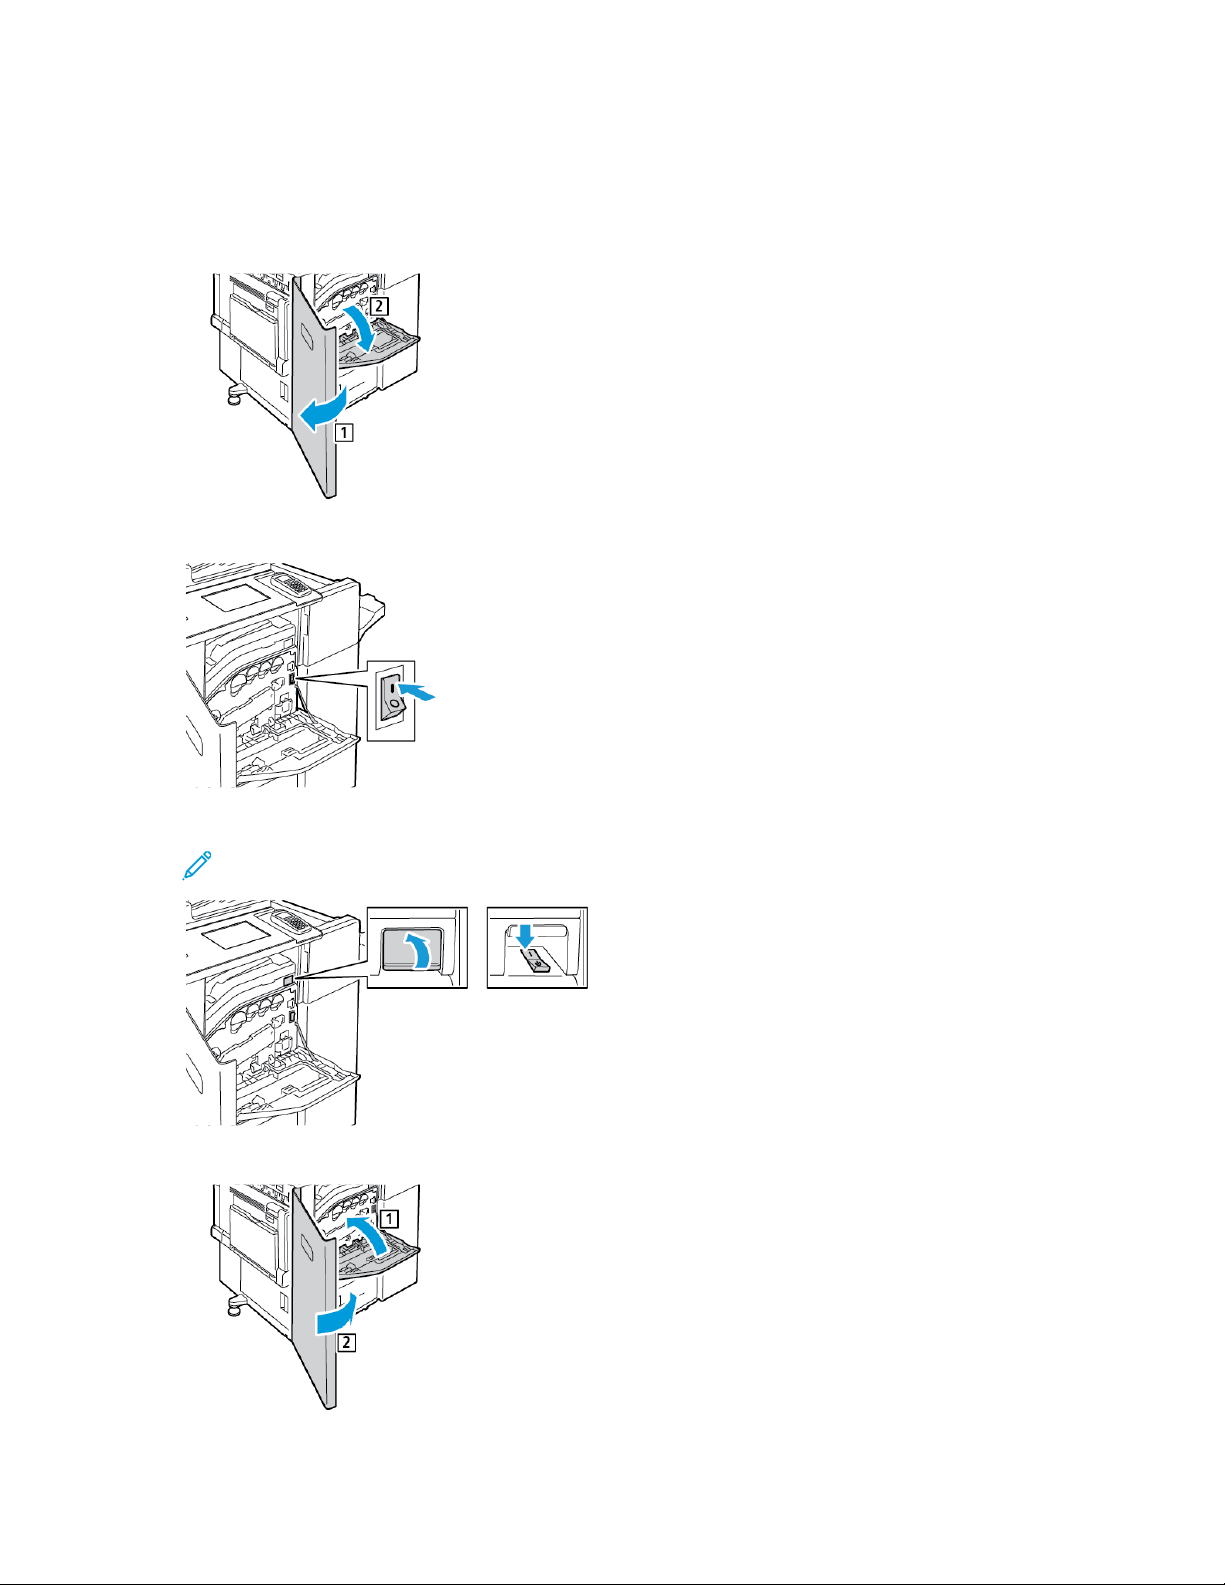
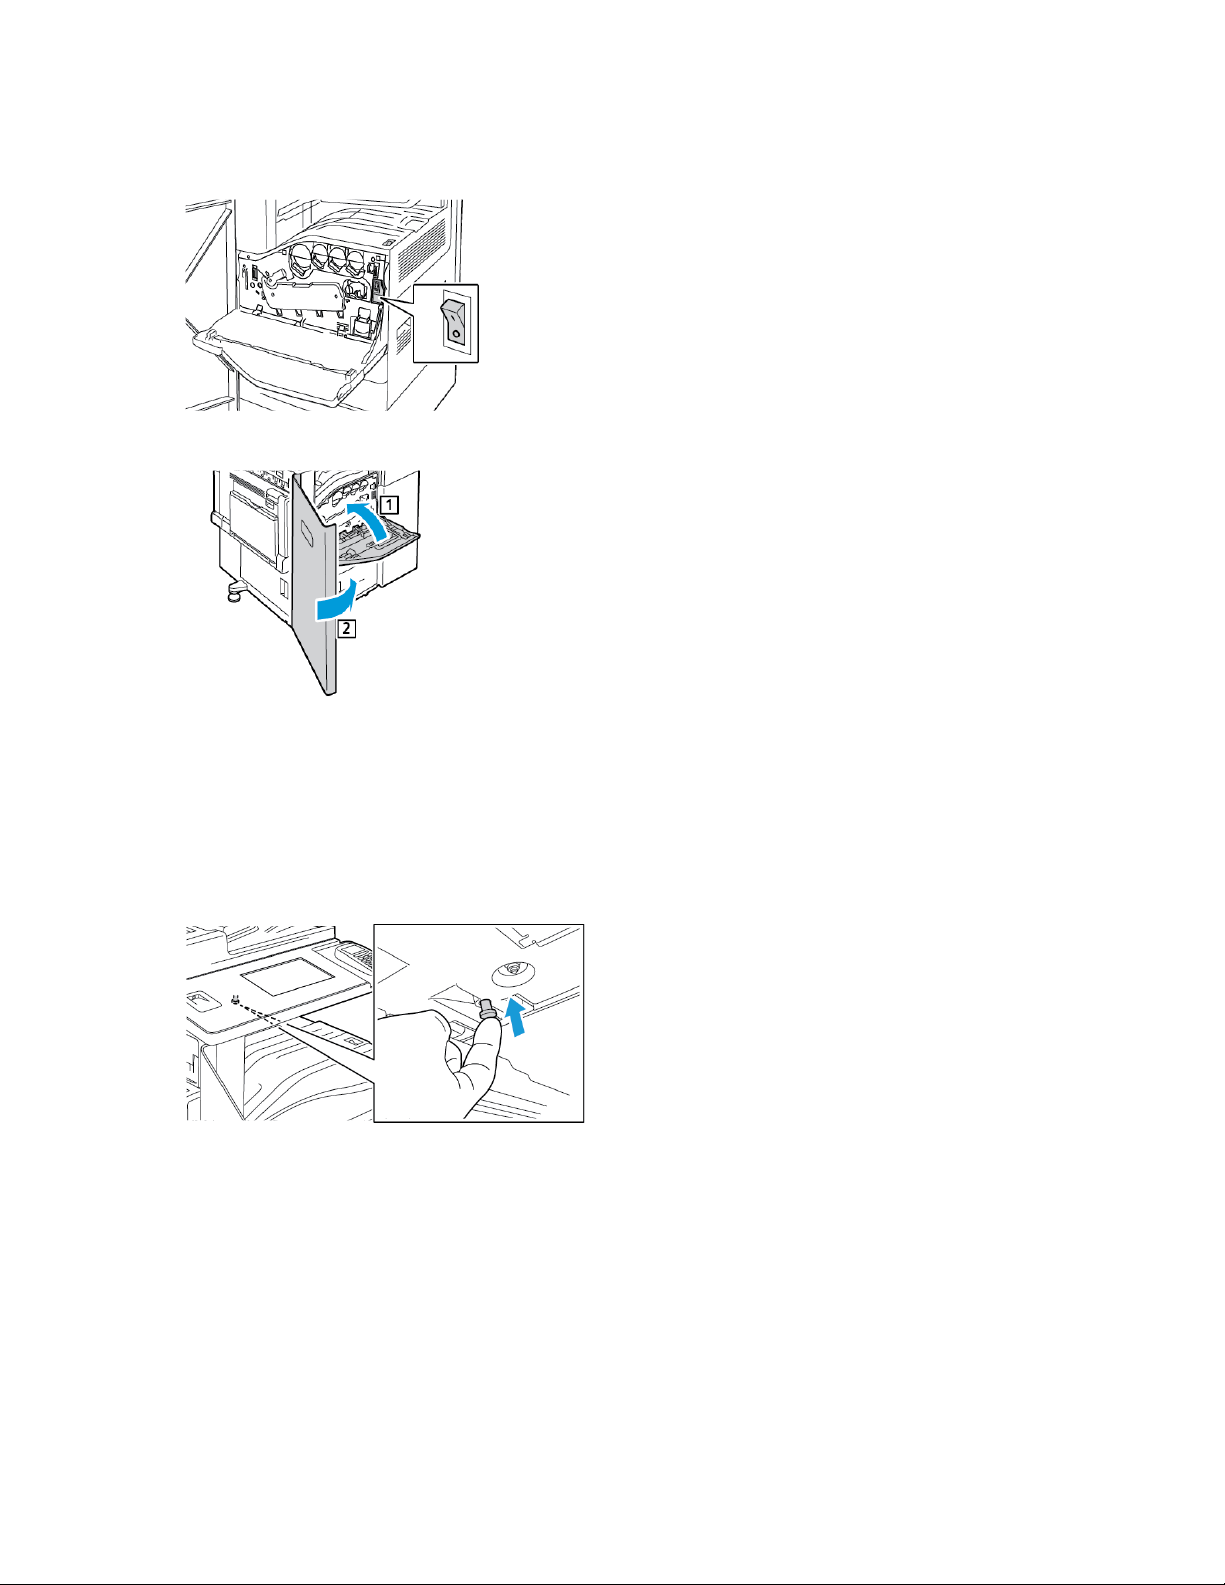
PPoowweerriinngg OOnn tthhee KKiioosskk
To power on the kiosk:
1. Open the front door (1), if installed, then open the front cover (2).
2. Power on the main power switch.
Features
3. Power on the secondary power switch.
Note: The secondary power switch is located behind a clear plastic door.
4. Close the front cover (1), then close the front door (2), if installed.
Xerox®Instant Print Kiosk
User Guide
27
Features
To power on the touch screen user interface, refer to Powering On the User Interface.
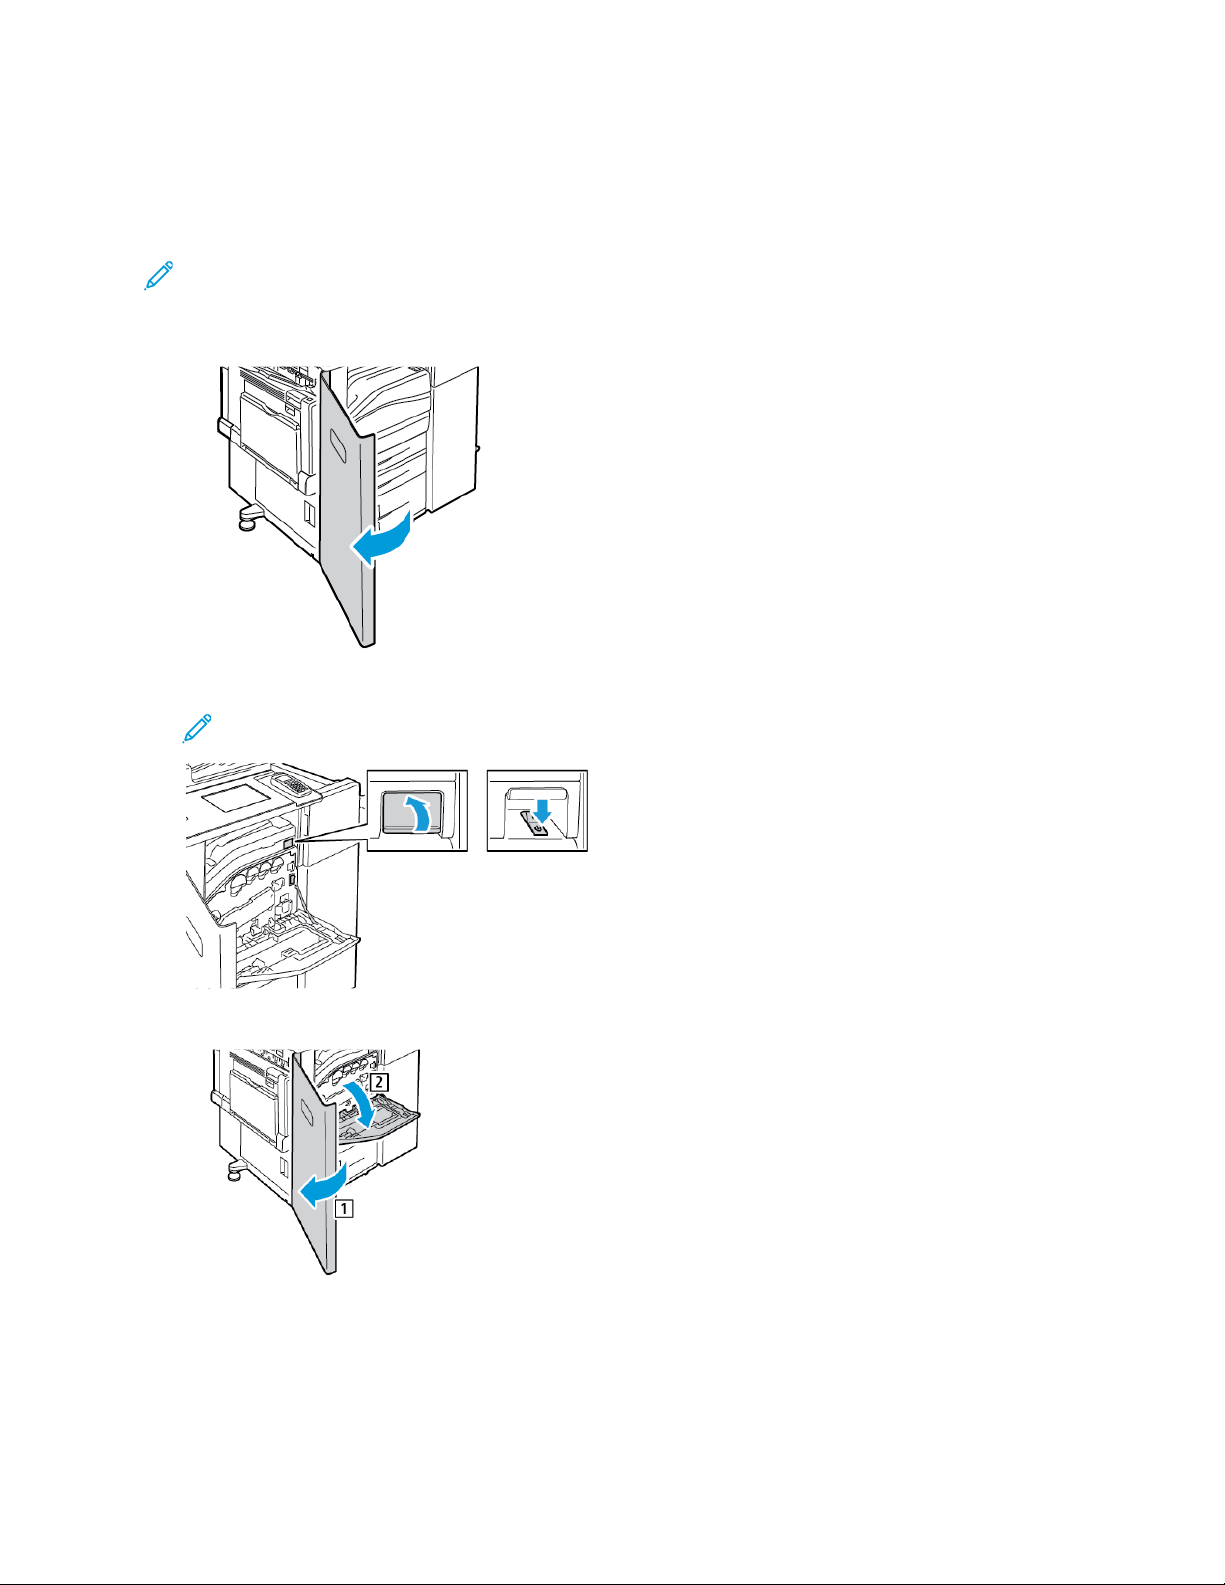
PPoowweerriinngg OOffff tthhee KKiioosskk
Note: To connect a cable or move the kiosk, power off both power switches.
1. Ensure that there are no jobs in the queue.
2. Open the front door, if installed.
3. Power off the secondary power switch, then wait 10 seconds before proceeding.
Note: The secondary power switch is behind a clear plastic door in area F.
4. Open the front cover (2).
28
Xerox®Instant Print Kiosk
User Guide
5. Power off the main power switch.
6. Close the front cover (1) then, if installed, close the front door (2).
Features
To power off the user interface, refer to Powering Off the User Interface.
RReessttaarrttiinngg tthhee UUsseerr IInntteerrffaaccee
1. If installed, open the optional front door.
2. Locate the kiosk plunger switch. To locate the plunger switch, from the front of the device, reach
under the left front area of the User Interface.
3. To restart the User Interface, choose an option:
• Press in and hold the plunger switch for 10 seconds, then release the plunger switch.
• Press in and hold the plunger switch for 2 seconds, then release the plunger switch. At the
touch screen, touch Restart.
The User Interface powers off, then powers on.
4. If installed, close the optional front door.
Xerox
®
Instant Print Kiosk
User Guide
29

Features
PPoowweerriinngg OOnn tthhee UUsseerr IInntteerrffaaccee
To power on the User Interface:
1. If installed, open the optional front door.
2. To locate the kiosk plunger switch, from the front of the device, reach under the left front of the
User Interface.
3. Press in and hold the plunger switch for 2 seconds, then release the plunger switch.
The kiosk User Interface powers on.
4. If installed, close the optional front door.
PPoowweerriinngg OOffff tthhee UUsseerr IInntteerrffaaccee
1. If installed, open the optional front door.
2. To power off the User Interface, perform the following:
a. To locate the kiosk plunger switch, from the front of the device, reach under the left front of
the User Interface.
b. Press in and hold the plunger switch for 2 seconds, then release the plunger switch.
3. Select Power off.
4. If installed, close the optional front door.
30
Xerox®Instant Print Kiosk
User Guide

Features
Services
For information on printing, copying, scanning, and faxing, refer to the Quick Start Guide at www.
support.xerox.com.
Note: For faxing, system administrator login credentials are required to enable and configure
the feature. For details, refer to the System Administrator Guide at www.support.xerox.com.
Xerox
®
Instant Print Kiosk
User Guide
31

Features
Information Pages
Your kiosk has a printable set of information pages stored on its internal hard drive. Information
pages include configuration and demonstration pages. For details about printing information pages,
refer to the System Administrator Guide at www.support.xerox.com.
32
Xerox®Instant Print Kiosk
User Guide

Features
Logging In
Logging in is the process in which you identify yourself to the kiosk for authentication.
When you receive an alert indicating that the device requires attention, to view the alert, log in to the
kiosk user interface, then access Device Management. For details, refer to Logging in to the Kiosk User
Interface and Accessing Device Management.
LLooggggiinngg iinn ttoo tthhee KKiioosskk UUsseerr IInntteerrffaaccee
To log in to the kiosk user interface:
1. From the left edge of the kiosk touch screen, swipe from left to right.
2. From the Access menu, touch Device Login.
3. For UserID, type admin. For Password, type the kiosk user interface password.
Note: For the default kiosk user interface password, refer to the Welcome letter that you
received when the kiosk was installed.
The Device menu appears.
AAcccceessssiinngg DDeevviiccee MMaannaaggeemmeenntt
To access Device Management:
1. Log in to the kiosk user interface as an administrator. For details, refer to Logging in to the Kiosk
User Interface.
2. From the Device menu, touch Device Management.
The kiosk functions appear.
Xerox
®
Instant Print Kiosk
User Guide
33

Features
Automatic Data Collection
This kiosk automatically collects data and transmits it to a secure offsite location. Xerox®or a
designated service provider uses this data to support and service the kiosk, or for billing, supply
replenishment, or product improvement. Automatically transmitted data can include product
registration, meter read, supply level, kiosk configuration and settings, software version, and problem
or fault code data. Xerox
on your kiosk, or any of your information management systems.
®
cannot read, view, or download the content of documents saved or printed
34
Xerox®Instant Print Kiosk
User Guide

Features
Billing and Usage Information
Billing and kiosk usage information appears on the Billing Information screen. The impression counts
shown are used for billing.
Note: To view billing and usage information, refer to the System Administrator Guide at www.
support.xerox.com.
Xerox
®
Instant Print Kiosk
User Guide
35

Features
More Information
Resource Location
Installation Guide Packaged with the kiosk.
Other documentation for your kiosk www.support.xerox.com
Recommended Media List United States: www.support.xerox.com
Technical support information for your kiosk,
including online technical support and Online
Support Assistant
Information pages Refer to the System Administrator Guide at www.support.
Order supplies for your kiosk www.support.xerox.com
Local sales and support center www.xerox.com/office/worldcontacts
®
Xerox
Third party and open source software To locate third party and open source software disclosure
Direct online store www.direct.xerox.com/
www.support.xerox.com
xerox.com
notices and terms and conditions, go to the product page at:
www.support.xerox.com
GGeettttiinngg HHeellpp
If you need assistance during or after kiosk installation, visit the Xerox®website for online solutions
and support at www.support.xerox.com.
If you require further assistance, contact Xerox Technical Customer Support for the United States and
Canada at 1-800-835-6100.
To assist you, Xerox Technical Customer Support needs the following information:
• The nature of the problem
• The serial number of the kiosk
• The fault code
• The name and location of your company
If you need more help using your kiosk:
1. Refer to this User Guide.
2. Contact the system administrator.
3. Visit the Xerox
®
website at www.support.xerox.com.
LLooccaattiinngg tthhee SSeerriiaall NNuummbbeerr
When contacting Xerox®for assistance, ensure that you have the kiosk serial number. The serial
number is behind door A, on a metal plate toward the rear of the kiosk. The serial number starts with
the letters DZK.
1. To open door A, perform the following:
36
Xerox®Instant Print Kiosk
User Guide

a. Open tray 5 as shown (1).
b. While lifting the release lever (2), open door A (3).
2. On a metal plate toward the rear of the kiosk, locate the kiosk serial number.
®
3. Before contacting Xerox
for assistance, record the serial number.
4. Close door A and tray 5.
Features
Xerox®Instant Print Kiosk
User Guide
37

Features
38
Xerox®Instant Print Kiosk
User Guide

3
Paper and Media
This chapter contains:
• Supported Paper ............... . . .............. . . .............. . . ............... . . .............. . . ............... . . .............. . . ..... 40
• Loading Paper............ . ............... . ............... . . ............... . .............. . . ................ . . ............. . . ............. 43
Xerox®Instant Print Kiosk
User Guide
39

Paper and Media
Supported Paper
Your kiosk is designed to use various paper and other media types. To ensure the best print quality
and to avoid jams, follow the guidelines in this section.
For best results, use Xerox
RReeccoommmmeennddeedd MMeeddiiaa
A list of paper and media recommended for your kiosk is available at:
• In the United States: www.xerox.com/rmlna Recommended Media List
OOrrddeerriinngg PPaappeerr
To order paper or other media, contact your local reseller or go to www.support.xerox.com.
GGeenneerraall PPaappeerr LLooaaddiinngg GGuuiiddeelliinneess
• Do not overfill the paper trays. Do not load paper above the maximum fill line in the tray.
®
paper and media recommended for your kiosk.
• Adjust the paper guides to fit the paper size.
• Fan paper before loading it in the paper tray.
• If excessive jams occur, use paper or other approved media from a new package.
PPaappeerr TThhaatt CCaann DDaammaaggee YYoouurr KKiioosskk
Some paper and other media types can cause poor output quality, increased paper jams, or can
damage your kiosk. Do not use the following:
• Rough or porous paper
• Inkjet paper
• Non-laser glossy or coated paper
• Photocopied paper
• Folded or wrinkled paper
• Paper with cutouts or perforations
• Stapled paper
• Envelopes with windows, metal clasps, side seams, or adhesives with release strips
• Padded envelopes
• Plastic media
• Iron-on transfer paper
Caution: Use of non-Xerox supplies is not recommended. The Xerox Warranty and Service
Agreement do not cover damage, malfunction, or degradation of performance caused by the
use of non-Xerox supplies, or the use of Xerox supplies not specified for this kiosk.
40
Xerox®Instant Print Kiosk
User Guide

Paper and Media
PPaappeerr SSttoorraaggee GGuuiiddeelliinneess
Storing your paper and other media properly contributes to optimum print quality.
• Store paper in dark, cool, relatively dry locations. Most paper is susceptible to damage from
ultraviolet and visible light. The most damaging ultraviolet light to paper comes from the sun and
from fluorescent bulbs.
• Minimize the exposure of paper to bright light for extended time periods.
• Maintain constant temperatures and relative humidity.
• Avoid storing paper in attics, kitchens, garages, or basements. These spaces tend to collect
moisture and can be damp.
• Store paper flat, on pallets, cartons, shelves, or in cabinets.
• Avoid food or drinks in the area where you store or handle paper.
• Do not open sealed packages of paper until you are ready to load them into the kiosk. Leave
stored paper in the original packaging. The paper wrapper protects the paper from moisture loss
or gain.
• Some special media is packaged inside resealable plastic bags. Store the media inside the bag
until you are ready to use it. Keep unused media in the bag and reseal it for protection.
SSuuppppoorrtteedd PPaappeerr TTyyppeess aanndd WWeeiigghhttss
Trays Types and Weights
Trays 1–4
• Plain, Bond, Hole Punched, Letterhead, Pre-Printed, Recycled, Plain Reloaded, and
Custom (60–105 g/m²)
• Lightweight Cardstock, and Lightweight Cardstock Reloaded (106– 169 g/m²)
• Cardstock, and Cardstock Reloaded (170–256 g/m²)
• Lightweight Glossy Cardstock, and Lightweight Glossy Card Reloaded (106–169
g/m²)
• Glossy Cardstock, and Glossy Cardstock Reloaded (170–256 g/m²)
SSuuppppoorrtteedd SSttaannddaarrdd PPaappeerr SSiizzeess
Tray Number
Tray 1
Tray 2 of the High-Capacity Tandem Tray Module
North American Standard Sizes
• Letter (8.5 x 11 in.)
• Legal (8.5 x 14 in.)
• Tabloid (11 x 17 in.)
• Letter (8.5 x 11 in.)
• Legal (8.5 x 14 in.)
• Tabloid (11 x 17 in.)
Trays 3 and 4 of the High-Capacity Tandem Tray
Module
Letter (8.5 x 11 in.)
Xerox®Instant Print Kiosk
User Guide
41

Paper and Media
SSuuppppoorrtteedd PPaappeerr SSiizzeess aanndd WWeeiigghhttss ffoorr AAuuttoommaattiicc 22-SSiiddeedd PPrriinnttiinngg
Standard North American Sizes
• Letter (8.5 x 11 in.)
• Legal (8.5 x 14 in.)
• Tabloid (11 x 17 in.)
Paper weights from 60 g/m² through 256 g/m² can be used for automatic 2-sided printing.
42
Xerox®Instant Print Kiosk
User Guide

Paper and Media
Loading Paper
IIddeennttiiffyyiinngg NNoonn--DDeeffaauulltt MMeeddiiaa aatt tthhee KKiioosskk UUsseerr
IInntteerrffaaccee
When loading non-default media into any of the paper trays, it is necessary to log in to the device as
administrator and identify the size and type of the loaded media. For details, refer to the System
Administrator Guide at www.support.xerox.com.
Note: The Xerox Instant Print Kiosk supports various paper and other media types. For details,
refer to Supported Paper.
AAuuttoommaattiicc TTrraayy SSwwiittcchhiinngg
During a copy job, if certain conditions are met, the printer can switch between the paper trays
automatically. To enable automatic tray switching, for Paper Supply, select Auto Select, then load the
same orientation, size, type, and color paper in more than one tray. If the paper runs out during the
copy job, to continue printing, the device switches to another tray.
LLooaaddiinngg PPaappeerr iinn TTrraayyss 11––44
1. Open the front door, if installed.
2. Pull out the tray until it stops.
3. Remove any paper that is a different size or type than the paper to be used.
®
Xerox
Instant Print Kiosk
43
User Guide

Paper and Media
4. To move out the length and width guides:
a. Pinch the guide lever on each guide.
b. Slide the guides outward until they stop.
c. Release the levers.
5. Flex the sheets back and forth and fan them. Align the edges of the stack on a level surface. This
action separates any sheets that are stuck together and reduces the possibility of jams.
Note: To avoid jams and misfeeds, do not remove paper from its packaging until you are
ready to use it.
44
Xerox®Instant Print Kiosk
User Guide

Paper and Media
6. Load paper in the tray. Do one of the following actions:
• For long-edge feed, insert letterhead and pre-printed paper facing down with the top edge
toward the front. Load hole-punched paper with the holes to the left.
• For short-edge feed, insert letterhead and pre-printed paper facing down with the top edge to
the left. Load hole-punched paper with the holes toward the rear of the kiosk.
Note: Do not load paper above the maximum fill line. Overfilling the tray can cause
paper jams.
7. Adjust the length and width guides to fit the paper.
Xerox®Instant Print Kiosk
User Guide
45

Paper and Media
8. Close the tray.
9. Close the front door, if installed.
Note: If you load non-default media into any of the paper trays, you must identify the media
size and type at the user interface. For details, refer to the System Administrator Guide at www.
support.xerox.com.
46
Xerox®Instant Print Kiosk
User Guide

4
Maintenance
This chapter contains:
• General Precautions ........... . ................ . ............... . . .............. . . ............... . . .............. . ................ . . ... 48
• Cleaning the Kiosk . . .............. . . ............... . . .............. . . ............... . ............... . . .............. . . ............... . . 49
• Routine Maintenance............. . ............... . . ............... . ............... . ................ . .............. . . ................ . 56
• Ordering Supplies... . .............. . . ............... . . .............. . . ............... . ............... . . .............. . . ................ . 73
Xerox®Instant Print Kiosk
User Guide
47

Maintenance
General Precautions
Caution: When cleaning your kiosk, do not use organic or strong chemical solvents or aerosol
cleaners. Do not pour fluids directly into any area. Use supplies and cleaning materials only as
directed in this documentation.
WARNING: Keep all cleaning materials out of the reach of children.
WARNING: Do not use pressurized spray cleaning aids on or in the kiosk. Some pressurized
sprays contain explosive mixtures and are not suitable for use in electrical applications. Use of
pressurized spray cleaners increases the risk of fire and explosion.
WARNING: Do not remove the covers or guards that are fastened with screws. You cannot
maintain or service any parts that are behind these covers and guards. Do not attempt any
maintenance procedure that is not described in the documentation supplied with your kiosk.
WARNING: Internal parts of the kiosk can be hot. Use caution when doors and covers are open.
• Do not place anything on top of the kiosk.
• Do not leave the covers and doors open for any length of time, especially in well-lit places. Light
exposure can damage the imaging units.
• Do not open covers and doors during printing.
• Do not tilt the kiosk while it is in use.
• Do not touch the electrical contacts or gears. Doing so can damage the kiosk and cause the print
quality to deteriorate.
• Ensure any parts removed during cleaning are replaced before you plug in the kiosk.
48
Xerox®Instant Print Kiosk
User Guide

Maintenance
Cleaning the Kiosk
CClleeaanniinngg tthhee DDooccuummeenntt GGllaassss aanndd DDooccuummeenntt CCoovveerr
To ensure optimum print quality, clean the document glass regularly. Cleaning helps avoid output
with streaks, smears, and other marks that transfer from the glass while scanning documents.
1. Use a lint-free, lightly-dampened cloth. Clean the document glass and the CVT glass to its left.
Note: There is a lint-free cloth stored in a compartment on the underside of the document
feeder.
2. Use a lint-free cloth and Xerox®Cleaning Fluid to clean the underside of the document cover and
the document feeder.
Xerox®Instant Print Kiosk
User Guide
49

Maintenance
CClleeaanniinngg tthhee DDooccuummeenntt FFeeeedd RRoolllleerrss
Dirt on the document feed rollers can cause paper jams or deteriorate print quality. For best
performance, clean the document feed rollers once a month.
1. Lift the lever and open the top cover of the document feeder.
2. While turning the rollers, wipe them with a clean, lint-free cloth moistened with water.
Caution: Do not use alcohol or chemical cleaners on the document feed rollers.
50
Xerox®Instant Print Kiosk
User Guide

Maintenance
CClleeaanniinngg tthhee SSeeccoonndd--SSiiddee SSccaannnniinngg LLeennss AAsssseemmbbllyy
The second-side scanning lens assembly allows you to make 2-sided scans and copies with a single
pass of the original. If your model includes a second-side scanning lens assembly, it is located along
the left side of the document cover. The assembly consists of the mirrored glass strip, a metal strip, a
white-plastic strip, and rollers. To ensure the best image quality when scanning or making 2-sided
copies, clean all parts of the assembly.
To clean the second-side scanning lens assembly:
1. To access the second-side scanning lens assembly, lower the lever under the left side of the
document cover.
2. To separate the left end of the document cover from the lens assembly, continue to lower the
lever.
Xerox®Instant Print Kiosk
User Guide
51

Maintenance
3. Using a soft cloth moistened with water, wipe the mirrored glass, metal strip, both sides of the
white-plastic strip, and the rollers. If dirt is difficult to remove, moisten a soft cloth with a small
amount of neutral detergent. Then wipe them dry with a soft cloth.
Caution: To prevent damage to the film around the glass, do not press heavily on the
mirrored glass.
4. Return the document cover to its original position, ensuring the lever is locked in place. If you
touch the document cover with your bare hands, clean the cover before closing the document
feeder.
52
Xerox®Instant Print Kiosk
User Guide

Maintenance
CClleeaanniinngg tthhee KKiioosskk EExxtteerriioorr
Regular cleaning keeps the User Interface (UI) free from dust and dirt.
1. To remove fingerprints and smudges, clean the User Interface with a soft, lint-free cloth.
2. Use a soft, lint-free cloth to clean the outside of the output tray, paper trays, and other exterior
areas of your kiosk.
Xerox®Instant Print Kiosk
User Guide
53

Maintenance
CClleeaanniinngg tthhee PPrriinntthheeaadd LLeennsseess
The kiosk is constructed with four printhead lenses. Clean all lenses as described in the following
procedure.
Caution: Do not perform this procedure when the kiosk is copying or printing.
1. Open the front door (1) and the front cover (2).
2. Turn the belt tension lever to the left.
3. Pull the drum cartridge cover down until it clicks into the open position.
4. Each of the four printheads has its own cleaning tool. Slowly pull the LED printhead cleaner out
until you can see the three dots.
Note: The LED printhead cleaner does not detach from the kiosk.
54
Xerox®Instant Print Kiosk
User Guide

5. Slowly push the LED printhead cleaner back into the printhead until it stops.
6. Repeat Step 4. and Step 5. for each printhead.
7. Close the drum cartridge cover.
Maintenance
8. Turn the belt tension lever to the right to return it to the locked position.
9. Close the front cover (1) and the front door (2).
Xerox®Instant Print Kiosk
User Guide
55

Maintenance
Routine Maintenance
RReeppllaacciinngg tthhee TToonneerr CCaarrttrriiddggeess
A message appears on the User Interface (UI) when you must replace a toner cartridge.
Caution: Do not perform this procedure when the kiosk is copying or printing.
1. Open the front door (1) and the front cover (2).
2. Place your fingers under the lip of the toner cartridge, then pull the toner cartridge straight out of
the kiosk.
3. Remove the new toner cartridge from the packaging. Tilt the cartridge up and down, then left
and right 10 times.
56
Xerox®Instant Print Kiosk
User Guide

Maintenance
4. Hold the new toner cartridge with the arrow facing up, then push the cartridge in slowly until it
stops.
5. Push gently on the toner cartridge to ensure that it is seated.
6. Close the front cover (1) and the front door (2).
Xerox®Instant Print Kiosk
User Guide
57

Maintenance
RReeppllaacciinngg tthhee WWaassttee TToonneerr CCoonnttaaiinneerr
A message appears on the User Interface (UI) when you must replace the waste toner container.
When replacing the waste toner container, clean the printhead lenses. For details, refer to Cleaning
the Printhead Lenses.
Caution: Spread paper on the floor to catch possible toner spills.
WARNING: If you spill any toner in the kiosk, wipe it up using a moist cloth. Never use a
vacuum cleaner to remove spilled toner. Sparks inside the vacuum cleaner can cause a fire or
explosion.
WARNING: If you accidentally get toner on your clothes, lightly dust them off as best as you
can. If some toner remains on your clothes, use cool water, not hot, to rinse off the toner. If
toner gets on your skin, wash it off with cool water and a mild soap. If you get toner in your
eyes, wash it out immediately with cool water and consult a doctor.
Caution: Do not perform this procedure when the kiosk is copying or printing.
1. Open the front door (1) and the front cover (2).
2. Remove the new waste toner container from the packaging. Retain the packaging.
3. Pull the used waste toner container out slowly while supporting it with your other hand.
58
Xerox®Instant Print Kiosk
User Guide

Maintenance
4. Place the used waste toner container in the plastic bag, then seal it firmly using the zipper.
5. Place the used waste toner container in the empty box.
Note: For details on waste toner container disposal, refer to Recycling and Disposal.
6. Hold the left side of the new waste toner container and slide it into the kiosk until it clicks.
7. Clean the printhead lenses. For details, refer to Cleaning the Printhead Lenses.
8. Close the front cover (1) and the front door (2).
Xerox®Instant Print Kiosk
User Guide
59

Maintenance
RReeppllaacciinngg tthhee DDrruumm CCaarrttrriiddggeess
A message appears on the control panel when you must replace a drum cartridge.
Caution: Do not expose the drum cartridge to direct sunlight or strong indoor fluorescent
lighting. Do not touch or scratch the surface of the drum.
1. Open the front door (1) and the front cover (2).
2. Turn the belt tension lever to the left.
3. Pull the drum cartridge cover down until it clicks into the open position.
60
Xerox®Instant Print Kiosk
User Guide

Maintenance
4. Grip the orange handle of the drum cartridge as shown, then pull the drum cartridge straight out
of the kiosk. Place the used drum cartridge in the plastic bag and place in the box.
WARNING: Do not touch any toner adhering to the drum cartridge.
Note: If you want to return used supplies for recycling, follow the instructions included with
the new supplies. If the instructions or shipping label is not available, for more information,
go to www.support.xerox.com.
5. Remove the packing material from the end of the new drum cartridge.
6. Rest the new cartridge, along with its black plastic protective shield, in the cartridge slot. Make
sure to load the cartridge in the direction of the arrow on the top of the shield.
7. With the guides inserted in the slot, remove the black paper sheet by pulling it in the direction
shown.
8. Remove the tape from the top of the cartridge shield.
9. Hold the shield, then use the orange handle to push the cartridge into the kiosk.
Xerox®Instant Print Kiosk
User Guide
61

Maintenance
10. Continue to push the orange handle until it stops.
11. Carefully remove the protective shield.
12. Push the drum cartridge until it stops.
13. Close the drum cartridge cover.
14. To return the belt tension lever to the locked position, turn it to the right.
62
Xerox®Instant Print Kiosk
User Guide

Maintenance
15. Close the front cover (1) and the front door (2).
16. Dispose of the protective shield and tape as normal office waste.
RReeppllaacciinngg tthhee TTrraannssffeerr BBeelltt CClleeaanneerr
A message appears on the User Interface (UI) when you must replace the transfer belt cleaner.
Caution: Do not perform this procedure when the kiosk is copying or printing.
1. Open the front door (1) and the front cover (2).
2. Turn the orange lever to the right to unlock the belt cleaner.
3. Turn the orange knob counterclockwise until it releases.
Xerox®Instant Print Kiosk
User Guide
63

Maintenance
4. Pull the transfer belt cleaner straight out of the kiosk.
WARNING: Do not touch any toner adhering to the transfer belt cleaner. Do not tilt the
transfer belt cleaner or toner can spill.
5. Remove the new transfer belt cleaner from the packaging. Retain the packaging.
6. Place the used transfer belt cleaner in the plastic bag.
7. Remove the protective cover from the new transfer belt cleaner.
Caution: Do not touch the surface of the transfer belt cleaner. Doing so can deteriorate
image quality.
64
Xerox®Instant Print Kiosk
User Guide

Maintenance
8. Support the new transfer belt cleaner with your left hand and slide the assembly straight into the
opening until it stops.
9. Push the orange knob in, then turn it clockwise until snug.
10. Turn the orange lever to the left to lock the belt cleaner.
11. Close the front cover (1) and the front door (2).
Xerox®Instant Print Kiosk
User Guide
65

Maintenance
RReeppllaacciinngg tthhee SSeeccoonndd BBiiaass TTrraannssffeerr RRoolllleerr
When it is time to replace the bias transfer roller, a message appears on the kiosk touch screen.
To replace the bias transfer roller:
1. Open tray 5 and Door A:
a. To open tray 5, lower the tray (1).
b. While lifting the release lever (2), open the top, left cover A as shown (3).
WARNING: The area around the fuser can be hot. To avoid injury, use caution.
Caution: Do not touch the transfer belt. Touching the belt can reduce image quality or
damage the transfer belt. Do not touch the transfer roller. Touching the roller can reduce
image quality.
2. Remove the new transfer roller from the packaging. Retain the packaging.
66
Xerox®Instant Print Kiosk
User Guide

3. Push the orange lever in the direction shown.
4. Lift the used transfer roller out of the kiosk.
Note: Do not touch any toner adhering to the transfer roller.
Maintenance
5. Place the used transfer roller in the plastic bag.
Xerox®Instant Print Kiosk
User Guide
67

Maintenance
6. Place the new transfer roller in the kiosk (1) and (2), and press down until the transfer roller clicks
into place (3).
7. Remove the protective cover from the transfer roller.
8. Close door A, then close tray 5.
RReeppllaacciinngg SSttaappllee CCaarrttrriiddggeess
A message appears on the User Interface (UI) when a staple cartridge is empty.
68
Xerox®Instant Print Kiosk
User Guide

Maintenance
RReeppllaacciinngg SSttaapplleess iinn tthhee MMaaiinn SSttaapplleerr ooff tthhee OOffffiiccee FFiinniisshheerr LLXX
WARNING:
Do not perform this procedure while the kiosk is copying or printing.
1. Open the finisher door as shown.
2. Reach into the finisher cabinet and pull the stapler toward you until it stops.
3. Push the stapler to the right as shown.
4. Grip the staple cartridge by the orange handle and pull it firmly toward you to remove it.
5. Remove any loose staples or other debris from inside the finisher.
®
Xerox
Instant Print Kiosk
User Guide
69

Maintenance
6. Pinch both sides of the staple case (1) and remove the staple case from the cartridge (2).
7. Insert the front side of the new staple case into the staple cartridge (1), then push the rear side
into the cartridge (2).
8. Grip the staple cartridge by the orange handle and insert it into the stapler until it clicks to lock in
place.
9. Close the finisher front door.
EEmmppttyyiinngg tthhee HHoollee PPuunncchh WWaassttee CCoonnttaaiinneerr
For models with a hole punch, when the hole punch waste container is full, a message appears on the
User Interface (UI).
70
Xerox®Instant Print Kiosk
User Guide

Maintenance
EEmmppttyyiinngg tthhee HHoollee PPuunncchh WWaassttee CCoonnttaaiinneerr iinn tthhee OOffffiiccee FFiinniisshheerr
LLXX
WARNING: Do not perform this procedure while the kiosk is copying or printing.
1. Open the front door, if installed.
2. Lift the finisher transport top cover, then open the front transport cover.
3. Pull out the hole punch waste container.
Xerox®Instant Print Kiosk
User Guide
71

Maintenance
4. Empty the container.
5. Insert the container and slide it all the way into the finisher.
6. Close the finisher front transport cover, then close the top cover.
7. Close the front door, if installed.
72
Xerox®Instant Print Kiosk
User Guide

Maintenance
Ordering Supplies
When contacting Xerox® for assistance, be prepared to provide the kiosk serial number. For the serial
number location, refer to Locating the Serial Number.
CCoonnssuummaabblleess
Consumables are kiosk supplies that get depleted during the operation of the kiosk. Consumable
supplies for this kiosk are the Genuine Xerox® Toner Cartridges in Cyan, Magenta, Yellow, and Black.
Note: Each consumable includes installation instructions.
Caution: Use of toner other than Genuine Xerox®Toner can affect print quality and kiosk
reliability. This toner is the only toner designed and manufactured under strict quality controls
by Xerox
RRoouuttiinnee MMaaiinntteennaannccee IItteemmss
Routine maintenance items for this kiosk include the following:
®
for specific use with this kiosk.
• Toner Cartridges (Cyan, Magenta, Yellow, and Black)
• Waste Container
• Second Bias Transfer Roller
• Hole Punch Waste Container
Note: Each routine maintenance item includes installation instructions.
OOtthheerr SSuupppplliieess
Other supplies are items required for options on certain kiosk configurations or accessories, but are
not required for daily kiosk use.
Other supplies for this kiosk include the following:
• Staple Refills for the Office Finisher LX
• Staple Cartridge for the Office Finisher LX
• Drum Cartridge
WWhheenn ttoo OOrrddeerr SSuupppplliieess
When supplies are depleted, an alert that indicates that the device requires attention appears on the
user interface. You cannot operate the kiosk until you have replenished the depleted supply. To view
the supply type that needs replenishment, log in to the device as an administrator, then access Device
Management. For details, refer to Logging in to the Kiosk User Interface and Accessing Device
Management.
To prevent an interruption in kiosk usage, it is recommended that you keep a spare set of each of the supplies listed in Routine Maintenance Items and Other Supplies.
You can order supplies from your local reseller or from www.support.xerox.com.
®
Xerox
Instant Print Kiosk
User Guide
73

Maintenance
Caution: Use of non-Xerox supplies is not recommended. The Xerox Warranty and Service
Agreement do not cover damage, malfunction, or degradation of performance caused by the
use of non-Xerox supplies, or the use of Xerox supplies not specified for this kiosk.
RReeccyycclliinngg SSuupppplliieess
For information on Xerox®supplies recycling programs, go to www.support.xerox.com.
Supplies include a prepaid return label. Be sure to use the label to return used components in their
original boxes for recycling.
MMoovviinngg tthhee KKiioosskk
• Always turn off the kiosk and wait for the kiosk to shut down. Switch off the kiosk. For information,
refer to Powering On and Off the Kiosk.
• Disconnect the power cords from the back of the kiosk.
• To avoid spilling toner when moving the kiosk, keep the kiosk level.
Note:
• To prevent toner from spilling when moving the kiosk over a long distance, remove the drum
cartridges and toner cartridges.
• To protect the kiosk from damage, pack the kiosk inside a box.
74
Xerox®Instant Print Kiosk
User Guide

5
Troubleshooting
This chapter contains:
• General Troubleshooting ............... . ................ . ............... . . .............. . ................ . . .............. . .......... 76
• Jams............... . . .............. . ............... . . ............... . .............. . . ................ . .............. . . ............... . . ....... 83
• Print-Quality Problems... . . ............... . . .............. . ................ . . .............. . ................ . ............... . ....... 103
• Copy and Scan Problems . ................ . .............. . . ............... . . .............. . . ............... . ................ . ...... 107
• Fax Problems.... . . ............... . . .............. . . .............. . . ............... . . .............. . . ............... . . .............. . . ... 108
• Getting Help ....... . ............... . . .............. . . ............... . . .............. . . ............... . ............... . . .............. . . . 109
Xerox®Instant Print Kiosk
User Guide
75

Troubleshooting
General Troubleshooting
This section contains procedures to help you locate and resolve problems. Resolve some problems by
simply restarting the kiosk.
KKiioosskk PPoowweerr SSwwiittcchheess
The kiosk has three power switches:
• For the User Interface (UI): A power on/off plunger switch for the UI is located beneath the UI.
For details, refer to Restarting the User Interface and Powering Off the User Interface.
• For the kiosk:
– The main power switch is located behind the front door.
– A secondary power switch is located behind a clear plastic door in area F. Area F is located
just above the front cover.
For details, refer to Powering On and Off the Kiosk.
RReessttaarrttiinngg tthhee KKiioosskk
Note:
• Before you begin, ensure that the main power switch is in the ON position and remains in
the ON position throughout this procedure.
• Restarting the kiosk does not require you to restart the User Interface.
• If you cannot resolve a problem by restarting the kiosk, refer to the table in this chapter
that best describes the problem.
1. Open the front door, if installed.
2. Locate the main power switch and the secondary power switch. For details, refer to Powering On
and Off the Kiosk.
3. Ensure that the main power switch is in the ON position.
4. Power off the secondary power switch.
The kiosk powers off.
Note: The User Interface does not power off or restart during this procedure. If you wish to
restart the User Interface refer to Restarting the User Interface.
5. After the message, The Kiosk Screen is Unable to Connect to the Device., appears on the User
Interface, power on the secondary power switch.
The kiosk powers on and reconnects to the User Interface automatically. This process takes
several minutes. After the kiosk has powered on fully, the main screen appears on the User
Interface.
6. Close the front door, if installed.
76
Xerox®Instant Print Kiosk
User Guide

Troubleshooting
KKiioosskk DDooeess NNoott PPoowweerr OOnn oorr UUsseerr IInntteerrffaaccee TToouucchh
SSccrreeeenn iiss BBllaannkk
Probable Causes Solutions
The power cords are not plugged correctly into the
outlets.
Something is wrong with the outlet connected to the
kiosk.
One of the power switches is not powered on. Power off both the kiosk power switches. For details,
The kiosk is connected to an outlet with a voltage or
frequency that does not match the kiosk
specifications.
The Enablement box requires resetting. Unplug, then plug in the power cord for the
Power off the kiosk, then plug the power cords
securely into the outlets.
• Plug another electrical appliance into the outlet,
then check if the appliance operates properly.
• Try a different outlet.
refer to Powering Off the User Interface. Wait 2
minutes, then power on all 3 power switches. For
details, refer to Powering On and Off the Kiosk.
Use a power source with the correct voltage and
frequency for the device. For details, refer to Electrical
Specifications.
Enablement box, located on the lower right side of
the device.
Caution: Plug the three-wire cord (with grounding prong) directly into a grounded AC outlet
only. Do not use a power strip. If necessary, contact a licensed electrician to install a properly
grounded outlet.
TTrroouubblleesshhoooottiinngg UUsseerr IInntteerrffaaccee EErrrroorr MMeessssaaggeess
User Interface Error Message
The device requires attention.
Please ask for assistance.
• The kiosk screen is unable to
connect to the device. Check to
be sure the device is powered
on. If the problem persists,
please ask for assistance.
• Device not able to detect local
connectivity. Please contact
your system administrator for
assistance.
Probable Causes Solutions
The device requires administrator
intervention.
The device is not powered on. Power on the device. For details,
The USB cable that connects the
User Interface to the device is
disconnected.
The device requires restarting. Restart the device. For details, refer
Contact the system administrator,
or refer to the System
Administrator Guide at www.
support.xerox.com.
refer to Powering On and Off the
Kiosk
Connect the USB cable from the
User Interface to the machine in
either of the 2 available ports.
toPowering On and Off the Kiosk.
Xerox®Instant Print Kiosk
User Guide
77

Troubleshooting
User Interface Error Message
• Device not able to detect DNS
connectivity. Please contact
your system administrator for
assistance.
• Device not able to detect
internet connectivity. Please
contact your System
Administrator for assistance.
Probable Causes Solutions
The Ethernet cable is
disconnected.
The Ethernet cable is connected to
the wrong port on the device.
The Ethernet outlet is not live.
The device or User Interface
requires restarting.
Connect the Ethernet cable. For
further support, contact your
system administrator, or refer to
the System Administrator Guide at
www.support.xerox.com.
Connect the Ethernet cable to the
correct port. For further
information, refer to the System
Administrator Guide at www.
support.xerox.com.
• Plug an alternate network
device into the Ethernet outlet
to check that the alternate
device is able to connect to the
network.
• Locate a live Ethernet port.
Restart the machine and the User
Interface. For details, refer to
Powering On and Off the Kiosk.
Unable to communicate with
payment server. Please ask for
assistance.
Unable to check connectivity
configuration.
• The device requires attention.
Please ask for assistance.
• The device requires attention.
We are unable to complete
your job at this time. Please
ask for asisstance to complete
your job, or select ‘Check Out’.
Any other User Interface error
message where a spinning wheel
displays for an extended period of
time.
The User Interface requires
restarting.
The device or User Interface
requires restarting.
The device is experiencing a
system error and requires system
administrator intervention.
The device or User Interface
requires restarting.
Restart the User Interface. For
details, refer to Powering On and
Off the Kiosk.
Restart the device and the User
Interface. For details, refer to
Powering On and Off the Kiosk.
Contact the system administrator.
Restart the device and the User
Interface. For details, refer to
Powering On and Off the Kiosk.
78
Xerox®Instant Print Kiosk
User Guide

Troubleshooting
CClleeaarriinngg aa DDaarrkk SSccrreeeenn oonn tthhee UUsseerr IInntteerrffaaccee
If the kiosk touch screen is dark, to activate the UI, perform the following steps:
1. Locate the plunger switch under the UI console.
2. Press in the plunger switch briefly, then release the plunger switch.
For information on restarting or powering off the touch screen, refer to the System Administrator
Guide at www.support.xerox.com.
RReessttaarrttiinngg oorr PPoowweerriinngg OOffff tthhee UUsseerr IInntteerrffaaccee
To restart or power off the User Interface, refer to the following:
• Restarting the User Interface
• Powering Off the User Interface
RReesseettttiinngg tthhee CCrreeddiitt CCaarrdd RReeaaddeerr
1. If the credit card reader is not working normally, press the Yellow button and the # button
simultaneously until the credit card reader beeps.
Xerox®Instant Print Kiosk
User Guide
79

Troubleshooting
TTrroouubblleesshhoooottiinngg CCrreeddiitt CCaarrdd RReeaaddeerr EErrrroorrss
Issue Probable Causes Solutions
The message Lane Closed appears
on the credit card reader..
The credit card reader is not
functioning properly.
The credit card reader does not
accept the credit card or payment
card.
The credit card reader beeps
repeatedly.
The credit card reader requires
resetting.
The credit card reader requires
resetting.
The device is not powered on. Power on the device. For details,
The User Interface requires
restarting.
The credit card or payment card is
not supported.
The credit card reader requires
replacing.
Reset the credit card reader. For
details, refer to Resetting the
Credit Card Reader.
Reset the credit card reader. For
details, refer to Resetting the
Credit Card Reader.
refer to Powering On and Off the
Kiosk.
Restart the User Interface. For
details, refer to Powering On and
Off the Kiosk.
Use a supported credit card or
payment card. For further
information on supported cards,
refer to accepted payment
methods notice at the facility.
Contact the system administrator.
KKiioosskk RReesseettss oorr PPoowweerrss OOffff FFrreeqquueennttllyy
Probable Causes Solutions
The 2 power cords are not plugged into the outlet
correctly.
The kiosk is plugged into an uninterruptible power
supply (UPS), extension cord, or power strip.
A network configuration problem exists. Unplug the network cable. If the problem is resolved,
A system error occurred. Contact your Xerox
80
Xerox®Instant Print Kiosk
User Guide
Power off the kiosk, confirm that the power cords are
correctly plugged into the kiosk and the outlet, then
power on the kiosk. For details, refer to Powering On
and Off the Kiosk.
Do not use an uninterruptible power supply (UPS),
extension cords, or power strip. Always plug each
power cord directly into an electrical outlet.
contact your network administrator to reconfigure
your network installation.
®
representative with the error
code and message. Check the User Interface (UI)
fault history. For details, refer to the System
Administrator Guide at www.support.xerox.com.

Troubleshooting
DDooccuummeenntt FFaaiillss ttoo PPrriinntt
Probable Causes Solutions
Selected tray has wrong paper size loaded. When the user receives a message indicating that the
device requires attention:
1 Log in as administrator and access Device
Management. For details, refer to the System
Administrator Guide.
2 For the tray indicated, load the correct size paper.
3 Touch Close.
4 Exit Device Management. For details, refer to the
System Administrator Guide.
The kiosk is not installed on the network properly. Ensure that the kiosk is connected to the network.
Refer to the System Administrator Guide.
KKiioosskk iiss MMaakkiinngg UUnnuussuuaall NNooiisseess
Probable Causes Solutions
One of the trays is not installed correctly. Open and close the tray from which you are printing.
There is an obstruction or debris inside the kiosk. Power off the kiosk and remove the obstruction or
debris. If you cannot remove it, contact your
®
Xerox
service representative.
AAuuttoommaattiicc 22--SSiiddeedd PPrriinnttiinngg PPrroobblleemmss
Probable Causes Solutions
Unsupported or incorrect paper. Ensure that you are using the correct paper. Do not
use transparencies, envelopes, labels, or reloaded
paper for automatic 2-sided printing. For details, refer
to Supported Paper Sizes and Weights for Automatic
2-Sided Printing.
DDaattee aanndd TTiimmee AArree IInnccoorrrreecctt
If a Set Time Error appears on the kiosk touch screen, set the time. The steps below can be performed
by an administrator. For details, refer to the System Administrator Guide at www.support.xerox.com.
Xerox
®
Instant Print Kiosk
User Guide
81

Troubleshooting
Probable Causes Solutions
The Date and Time Setup is set to Manual (NTP
Disabled).
The time zone, date, or time is set incorrectly. Set the time zone, date, and time manually.
To change the Date and Time to Automatic, enable
NTP in Xerox
®
CentreWare®Internet Services.
SSccaannnneerr EErrrroorrss
Probable Causes Solutions
Scanner is not communicating. Power off the kiosk, and check the scanner cable.
Wait two minutes and power on the kiosk again.
If the problem is not resolved, contact your Xerox
service representative.
®
82
Xerox®Instant Print Kiosk
User Guide

Troubleshooting
Jams
CClleeaarriinngg PPaappeerr JJaammss
To avoid damage, always remove jammed paper carefully without tearing it. Try to remove the paper
in the same direction that it normally moves through the kiosk. Even a small piece of paper left in the
kiosk can cause a jam. Do not reload paper that has jammed.
Note:
• Paper jam clearance requires that you log in to the device user interface and access Device
Management. For details, refer to Logging in to the Kiosk User Interface and Accessing
Device Management.
• Do not touch the printed side of the paper when removing it. The printed side of jammed
pages can smudge, and the toner could stick to your hands. Avoid spilling any toner inside
the kiosk.
WARNING:
• If you accidentally get toner on your clothes, lightly dust them off as best as you can. If
some toner remains on your clothes, use cool water, not hot, to rinse off the toner.
• If toner gets on your skin, wash it off with cool water and a mild soap.
• If toner gets in your eyes, wash it out immediately with cool water and consult a doctor.
Xerox
®
Instant Print Kiosk
User Guide
83

Troubleshooting
CClleeaarriinngg JJaammss aatt TTrraayyss 11––44
1. Open the front door, if installed.
2. Pull the tray out toward you until it stops.
3. Remove the paper from the tray.
4. If the paper is torn, remove the tray completely and check inside the kiosk for torn pieces of
paper.
5. Reload the tray with undamaged paper, then push the tray in until it stops.
84
Xerox®Instant Print Kiosk
User Guide

Troubleshooting
6. On the user interface, touch Confirm.
7. Close the front door, if installed.
For details on logging in to the device user interface, refer to the System Administrator Guide.
CClleeaarriinngg JJaammss aatt DDoooorr AA
1. Open tray 5 and Door A:
a. To open tray 5, lower the tray (1).
b. While lifting the release lever (2), open the top, left cover A as shown (3).
WARNING: The area around the fuser can be hot. Use caution to avoid injury.
Caution: Do not touch the transfer belt. Touching the belt can reduce image quality or
damage the transfer belt. Do not touch the transfer roller. Touching the roller can reduce
image quality.
®
Xerox
Instant Print Kiosk
User Guide
85

Troubleshooting
2. Remove the jammed paper.
3. If paper jams at the exit to the output tray, remove the paper by carefully pulling it straight out
in the direction shown.
Note: Toner can adhere to the transfer roller. Adherence of toner does not affect print
quality.
86
Xerox®Instant Print Kiosk
User Guide

4. If paper is jammed in the fuser, pull green lever A1 to open the fuser exit gate.
5. Remove the paper as shown.
Troubleshooting
Note: If the paper is torn, remove all torn pieces from the kiosk.
If the paper is jammed at the bottom entry of the fuser, remove it as shown.
Xerox®Instant Print Kiosk
User Guide
87

Troubleshooting
6. Return the green lever A1 to its normal position.
7. Close door A, then close tray 5.
CClleeaarriinngg JJaammss aatt DDoooorr BB
1. To open door B, perform the following steps:
a. Open tray 5 (1).
88
Xerox®Instant Print Kiosk
User Guide

b. To open door B, while lifting the release lever (2), open door B (3).
2. Remove the jammed paper.
Note: If the paper is torn, remove all torn pieces from the kiosk.
3. Close door B, then close tray 5.
CClleeaarriinngg JJaammss aatt DDoooorr CC
Troubleshooting
1. Pull the release lever and open door C.
2. Remove the jammed paper as shown.
Note: If the paper is torn, remove all torn pieces from the kiosk.
3. For paper jammed in the upper position, look inside the kiosk to remove it.
Note: If the paper is inaccessible, refer to Clearing Jams at Door A.
®
Xerox
Instant Print Kiosk
User Guide
89

Troubleshooting
4. For paper jammed in the tray feed roller:
a. Open the front door, if installed.
b. Open the tray and remove the paper.
90
Xerox®Instant Print Kiosk
User Guide

c. Close the front door, if installed.
5. Close door C.
Troubleshooting
CClleeaarriinngg JJaammss aatt DDoooorr DD
1. Open tray 5 and Door A:
a. To open tray 5, lower the tray (1).
b. While lifting the release lever (2), open the top, left cover A as shown (3).
WARNING: The area around the fuser can be hot. Use caution to avoid injury.
Caution: Do not touch the transfer belt. Touching the belt can reduce image quality or
damage the transfer belt. Do not touch the transfer roller. Touching the roller can reduce
image quality.
Xerox
®
Instant Print Kiosk
User Guide
91

Troubleshooting
2. Lift the lever up to open door D.
3. Remove the jammed paper as shown.
Note: If the paper is torn, remove all torn pieces from the kiosk.
4. Close door D.
5. Close door A, then close tray 5.
92
Xerox®Instant Print Kiosk
User Guide

Troubleshooting
CClleeaarriinngg JJaammss iinn tthhee DDooccuummeenntt FFeeeeddeerr
1. Lift the lever and open the top cover of the document feeder as shown.
2. If the original is not caught in the entry to the document feeder, pull it straight out in the
direction shown.
3. If the message on the User Interface (UI) instructs you to turn the green wheel, turn it in the
direction shown. Turning the green wheel moves the original out of the feeder.
4. If the message instructs you to open the inner cover, lift the lever with the green tab to open the
inner cover.
Xerox
®
Instant Print Kiosk
User Guide
93

Troubleshooting
5. Turn the green wheel in the direction shown to move the original out of the feeder. Carefully
remove the jammed original.
6. Close the inner cover, then close the top cover, pressing it down until it clicks into place.
7. If the original is not visible when the top cover is opened, lift the document cover and remove the
original.
8. If the original is not visible when the document cover is opened, lift the document feeder tray,
then remove the paper.
9. Lower the document feeder tray.
10. If the original is not wrinkled or torn, load it into the feeder again following the instructions on
the touch screen.
Note: If performing a copy job or a scan job, after clearing the document feeder jam, reload
the entire document set, including the pages already scanned. The kiosk restarts the job.
94
Xerox®Instant Print Kiosk
User Guide

Troubleshooting
Caution: Torn, wrinkled, or folded originals can cause jams and damage the kiosk. To copy torn,
wrinkled, or folded originals, use the document glass.
CClleeaarriinngg JJaammss iinn tthhee OOffffiiccee FFiinniisshheerr LLXX
CClleeaarriinngg JJaammss UUnnddeerr tthhee FFiinniisshheerr TToopp CCoovveerr
1. Pull up the lever on the top cover.
2. Open the top cover by rotating it to the left.
3. Remove the jammed paper.
Note: If the paper is torn, remove all torn pieces from the finisher.
4. Close the top cover of the finisher.
Xerox
®
Instant Print Kiosk
User Guide
95

Troubleshooting
CClleeaarriinngg JJaammss iinn tthhee OOffffiiccee FFiinniisshheerr LLXX TTrraannssppoorrtt
1. Open the front door, if installed.
2. Lift the handle of the center tray straight up to open the transport cover.
3. Remove the jammed paper.
Note: If the paper is torn, remove all torn pieces from the finisher.
96
Xerox®Instant Print Kiosk
User Guide

Troubleshooting
4. Close the transport cover.
5. Close the front door, if installed.
MMiinniimmiizziinngg PPaappeerr JJaammss
The kiosk is designed to function with minimal paper jams using Xerox®supported paper. Other
paper types can cause jams. If supported paper jams frequently in one area, clean that area of the
paper path. To avoid damage, always remove jammed paper carefully without tearing it. Try to
remove the paper in the same direction that it normally moves through the kiosk. Even a small piece
of paper left in the kiosk can cause a jam. Do not reload paper that has jammed.
The following actions can cause paper jams:
• Using damaged paper
• Using unsupported paper
• Loading paper incorrectly
• Overfilling the tray
• Adjusting the paper guides improperly
You can prevent most jams by following a simple set of rules:
• Use only supported paper. For details, refer to Supported Paper.
• Follow proper paper handling and loading techniques.
• Always use clean, undamaged paper.
• Avoid using paper that is curled, torn, moist, creased, or folded.
• Fan the paper to separate the sheets before loading into the tray.
• Observe the paper tray fill line; never overfill the tray.
• Remove transparencies from the output tray immediately after printing.
• Adjust the paper guides in all trays after inserting the paper. An improperly adjusted guide can
cause poor print quality, misfeeds, skewed prints, and kiosk damage.
• Store paper in a dry location.
• Use only Xerox
®
paper and transparencies designed for the kiosk.
Avoid the following:
Xerox
®
Instant Print Kiosk
User Guide
97

Troubleshooting
• Polyester coated paper that is designed specifically for inkjet printers
• Highly glossy or coated paper
• Paper that is folded, wrinkled, or excessively curled
• Fanning transparencies before loading in the paper tray
• Loading more than one type, size, or weight of paper in a tray at the same time
• Loading hole-punched paper or paper with folded corners or staples in the document feeder
• Overfilling the paper trays
• Allowing the output tray to overfill
• Allowing the output tray to fill with more than a few transparencies
For information on supported paper, refer to the UI Paper and Media Information Pages, or refer to
Supported Paper.
TTrroouubblleesshhoooottiinngg PPaappeerr JJaammss
MMuullttiippllee SShheeeettss PPuulllleedd TTooggeetthheerr
Probable Causes Solutions
The paper tray is too full. Remove some of the paper. Do not load paper past
fill line.
The edges of the paper are not even. Remove the paper, align the edges, and then reload
it.
The paper is moist from humidity. Remove the paper from the tray, and replace it with
new, dry paper.
Too much static electricity is present.
Using unsupported paper. Use only Xerox
Humidity is too high for coated paper. Feed paper one sheet at a time.
• Try a new ream of paper.
• Do not fan transparencies before loading in tray.
®
-approved paper. For details, refer to
Supported Paper.
JJaammss iinn tthhee DDooccuummeenntt FFeeeeddeerr
Probable Causes Solutions
Unsupported paper of the wrong size, thickness, or
type.
Originals are torn, previously stapled, bent, or folded. Ensure that the originals are not torn, bent, or folded.
Use only Xerox®-approved paper. For details, refer to
Supported Paper.
If previously stapled, remove all staples and separate
the sheets by fanning them.
98
Xerox®Instant Print Kiosk
User Guide

Probable Causes Solutions
Troubleshooting
The documents loaded in the document feeder
exceed the maximum capacity allowed.
Improperly adjusted document feeder guides. Adjust the paper guides to fit snugly against the
Place fewer documents in the document feeder.
paper loaded in the document feeder.
PPaappeerr MMiissffeeeeddss aanndd PPaappeerr SSiizzee JJaammss
Probable Causes Solutions
The paper is not correctly positioned in the tray.
The paper tray is too full. Remove some of the paper. Do not load paper past
The paper guides are not correctly adjusted to the
paper size.
The tray contains warped or wrinkled paper. Remove the paper, smooth it out, and reload it. If it
1 Remove the misfed paper and reposition it
properly in the tray.
2 Adjust the paper guides in the tray to match the
size of the paper.
the fill line.
1 Remove the paper.
2 Adjust the paper guides in the tray to match the
size of the paper.
3 Replace the paper.
still misfeeds, do not use that paper.
The paper is moist from humidity. Remove the moist paper and replace it with new, dry
paper.
Using paper of the wrong size, thickness, or type. Use only Xerox
Supported Paper.
Non-default media has been loaded and has not
been identified at the User Interface.
Identify the media size and type at the User
Interface. For details, refer to the System
Administrator Guide at www.support.xerox.com.
®
-approved paper. For details, refer to
PPaappeerr JJaamm MMeessssaaggee SSttaayyss OOnn
Probable Causes Solutions
Some paper remains jammed in the kiosk. Recheck the media path and make sure that you
have removed all the jammed paper.
One of the kiosk doors is open. Check the doors on the kiosk. Close any door that is
open.
Note: Check for and remove torn pieces of paper in the paper path.
Xerox
®
Instant Print Kiosk
User Guide
99

Troubleshooting
JJaammss DDuurriinngg AAuuttoommaattiicc 22--SSiiddeedd PPrriinnttiinngg
Probable Causes Solutions
Using paper of the wrong size, thickness, or type. Use paper of the correct size, thickness, or type. For
details, refer to Supported Paper Sizes and Weights
for Automatic 2-Sided Printing.
Paper is loaded in the wrong tray. The paper must be loaded in the correct tray. For
details, refer to Supported Paper.
Tray is loaded with mixed paper. Load the tray with only one type and size of paper.
CClleeaarriinngg SSttaappllee JJaammss
CClleeaarriinngg SSttaappllee JJaammss iinn OOffffiiccee FFiinniisshheerr LLXX
WARNING: Do not perform this procedure while the kiosk is copying or printing.
1. Open the finisher door as shown.
2. Reach into the finisher cabinet and pull the stapler toward you until it stops.
3. Push the stapler to the right as shown.
100
Xerox®Instant Print Kiosk
User Guide
 Loading...