

Page 1

Xerox® Wide Format IJP 2000
User Guide
Page 2
Xerox® and Xerox and Design®, and CentreWare® are trademarks of Xerox Corporation in the United States and/or other
countries.
Internet Explorer, Microsoft, Windows, Windows Server, and Windows Vista are trademarks or registered trademarks of Microsoft
Corporation in the U.S. and other countries.
MontaVista Linux is a registered trademark of MontaVista Software, Inc.
In this manual, safety instructions are preceded by the symbol . Always read and follow the instructions before
performing the required procedures.
If bank bills are printed by a printer or securities are printed illegally, it assumes that you violate the law and you suffer
punishment regardless of whether to use those printouts.
If a malfunction occurs with the machine's hard disk or other storage media, any received or stored data including registered
configurations may be lost. Xerox is not responsible for any direct or indirect damages arising from or caused by such data
loss.
Xerox is not responsible for any breakdown of machines due to infection of computer virus or computer hacking.
Important
1. Parts of this manual are subject to change without prior notice.
2. We welcome any comments on ambiguities, errors, omissions, or missing pages.
3. Never attempt any procedure on the machine that is not specifically described in this manual. Unauthorized operation
can cause faults or accidents. Xerox is not liable for any problems resulting from unauthorized operation of the equipment.
An export of this product is strictly controlled in accordance with Laws concerning Foreign Exchange and Foreign Trade of
Japan and/or the export control regulations of the United States.
Page 3

1
3
2
5
4
7
6
9
8
11
10
13
12
15
14
16
18
17
20
19
Xerox Wide Format IJP 2000
User Guide
Preface
Thank you for selecting the Xerox Wide Format IJP 2000.
This user guide describes operating instructions and
precautions for using the Xerox Wide Format IJP 2000. To get
the most out of the Xerox Wide Format IJP 2000 and to use it
effectively, be sure to read this User Guide before use.
This guide is intended for first-time users of the Xerox Wide
Format IJP 2000 (hereinafter called "the machine"), and
describes how to use the Print feature, how to clear paper
jams, the daily maintenance procedures, how to set various
setting items, and various precautions.
This guide assumes that you have a basic understanding and
operating knowledge of your personal computer and network
environment. For the basic information and operating
instructions of your personal computer and network
environment, refer to the documentation provided for your
personal computer, operating system, and network system.
After reading this guide, be sure to keep this guide so you can
refer to it handy for quick reference whenever you have
trouble with the machine's operation or some failure occurs
while using the machine.
Table of Contents
Before Using the Machine
CentreWare® Internet Services
Daily Management and Maintenance
Problem Solving
ìSystem Administrator Menu Settings
Appendix
Xerox Corporation
Index
Page 4

Table of Contents
Table of Contents
Preface .........................................................................................................................................................................................................................3
Table of Contents....................................................................................................................................................................................................4
Types of Manuals ....................................................................................................................................................................................................9
Using This Guide ................................................................................................................................................................................................... 10
Safety Notes ........................................................................................................................................................................................................... 13
Environment............................................................................................................................................................................................................ 21
Regulation ...............................................................................................................................................................................................................22
Legal Notice ............................................................................................................................................................................................................ 23
Chapter 1 Before Using the Machine.....................................................................................25
1.1 Machine Components............................................................................................................................................................. 26
1.2 Power Source ..............................................................................................................................................................................30
1.2.1 Switching the Power On........................................................................................................................................................30
1.2.2 Switching the Power Off .......................................................................................................................................................31
1.2.3 Saving Power Consumption While the Machine is not in Use...............................................................................32
1.3 Energy Saver Mode .................................................................................................................................................................. 33
1.3.1 Exiting the Energy Saver Mode..........................................................................................................................................33
1.4 Control Panel .............................................................................................................................................................................. 34
1.4.1 Adjusting Screen Contrast....................................................................................................................................................35
1.4.2 Switching Language ...............................................................................................................................................................35
1.4.3 Touch Screen .............................................................................................................................................................................36
1.4.4 Text Entry....................................................................................................................................................................................37
1.5 Loading/Replacing Paper....................................................................................................................................................... 38
1.5.1 Replacing/Cutting Roll Paper ..............................................................................................................................................38
1.5.2 Loading Cut Sheet Paper (Bypass)....................................................................................................................................41
1.5.3 Switching Between Trays......................................................................................................................................................41
1.5.4 Tray Heaters...............................................................................................................................................................................42
1.6 Configuring Paper Setting..................................................................................................................................................... 43
1.7 Media............................................................................................................................................................................................. 45
1.7.1 Media Type.................................................................................................................................................................................45
1.7.2 Unusable Media .......................................................................................................................................................................46
1.7.3 Handling and Storing Media...............................................................................................................................................47
1.8 Billing Meters.............................................................................................................................................................................. 48
1.9 Checking Consumables........................................................................................................................................................... 49
1.10 Checking Machine Information.......................................................................................................................................... 50
1.11 Job Status..................................................................................................................................................................................... 52
4
Table of Contents
Page 5

Table of Contents
1.12 Cancelling a Job ........................................................................................................................................................................53
1.13 Delete All Jobs............................................................................................................................................................................ 54
Chapter 2 CentreWare® Internet Services .........................................................................55
2.1 Overview of CentreWare Internet Services .................................................................................................................... 56
2.1.1 What is CentreWare Internet Services?..........................................................................................................................56
2.1.2 Setting Up for Using CentreWare Internet Services..................................................................................................57
2.1.3 Starting CentreWare Internet Services...........................................................................................................................59
2.1.4 CentreWare Internet Services Screen Components...................................................................................................60
Chapter 3 Daily Management and Maintenance.............................................................63
2.2 Machine Settings ...................................................................................................................................................................... 62
3.1 Replacing Consumables ......................................................................................................................................................... 64
3.1.1 Used Consumables..................................................................................................................................................................65
3.1.2 Replacing an Ink Cartridge ..................................................................................................................................................65
3.1.3 Replacing a Waste Ink Cartridge....................................................................................................................................... 68
3.1.4 Replacing a Print Head..........................................................................................................................................................70
3.2 Cleaning the Machine............................................................................................................................................................. 73
3.2.1 Removing Ink Stains in the Print Head Side of the Print Unit...............................................................................73
3.2.2 Removing Ink Stains in the Ink Receiving Side of the Print Unit..........................................................................75
3.3 Print Head Maintenance........................................................................................................................................................ 77
3.3.1 Making a Test Print.................................................................................................................................................................77
3.3.2 Cleaning the Print Head........................................................................................................................................................78
3.3.3 Carrying out Calibration........................................................................................................................................................79
3.3.4 Performing a Joint Adjustment..........................................................................................................................................80
Chapter 4 Problem Solving.........................................................................................................87
4.1 Troubleshooting ........................................................................................................................................................................ 88
4.1.1 Machine Problems...................................................................................................................................................................89
4.1.2 Paper Jam Problems ...............................................................................................................................................................90
4.1.3 Image Quality Problems .......................................................................................................................................................91
4.1.4 Problems during Printing.......................................................................................................................................................94
4.1.5 Problems with CentreWare Internet Services...............................................................................................................95
4.2 Error Messages........................................................................................................................................................................... 96
Table of Contents
5
Page 6

Table of Contents
Chapter 5 ìSystem Administrator Menu Settings ..........................................................103
4.3 When a Paper Jam Occurs..................................................................................................................................................... 97
4.3.1 Paper Jams in the Roll Unit..................................................................................................................................................98
4.3.2 Paper Jams in the Bypass (Manual) Feed Table or Upper Unit............................................................................99
4.3.3 Paper Jams inside the Upper Roll Paper Cover.........................................................................................................101
4.3.4 Paper Jams in the Paper Stack Tray (Optional)........................................................................................................102
5.1 System Administrator Menu Settings Overview.........................................................................................................104
5.1.1 Step 1 Displaying the System Administrator Menu...............................................................................................104
5.1.2 Step 2 Selecting the Desired Item ................................................................................................................................. 105
5.1.3 Step 3 Configuring a Feature........................................................................................................................................... 106
5.2 System Administrator Menu List ......................................................................................................................................107
5.3 Common Settings ...................................................................................................................................................................109
5.3.1 Machine Clock / Timer Settings.......................................................................................................................................109
5.3.2 Audio Tones ............................................................................................................................................................................111
5.3.3 Default Language.................................................................................................................................................................112
5.3.4 Paper Tray Priority................................................................................................................................................................112
5.3.5 Maintenance...........................................................................................................................................................................113
5.3.6 Other Settings ........................................................................................................................................................................113
5.3.7 Detailed Settings...................................................................................................................................................................114
5.4 Print Settings ............................................................................................................................................................................116
5.4.1 Job Recovery........................................................................................................................................................................... 116
5.4.2 Detailed Settings...................................................................................................................................................................117
5.5 Network Settings.....................................................................................................................................................................118
5.5.1 Port Settings............................................................................................................................................................................119
5.5.2 Protocol Settings ...................................................................................................................................................................120
5.5.3 SSL / TLS Settings.................................................................................................................................................................. 122
5.5.4 Detailed Settings...................................................................................................................................................................122
5.6 System Admin Settings ........................................................................................................................................................123
5.6.1 System Administrator's ID................................................................................................................................................123
5.6.2 System Administrator's Password.................................................................................................................................. 124
5.6.3 Maximum Login Attempts ................................................................................................................................................125
5.7 Authentication / Security Settings...................................................................................................................................126
5.7.1 Password Entry Control Panel..........................................................................................................................................126
5.7.2 Overwrite Hard Disk ............................................................................................................................................................. 127
Chapter 6 Appendix ...................................................................................................................129
6.1 Optional Components...........................................................................................................................................................130
6
Table of Contents
Page 7

Table of Contents
6.2 Notes and Restrictions..........................................................................................................................................................131
6.2.1 Notes and Restrictions on the Use of the Machine ................................................................................................ 131
6.2.2 Notes and Restrictions on the Use of the Print Feature........................................................................................131
6.2.3 Notes and Restrictions for IPv6 Connection..............................................................................................................132
Table of Contents
7
Page 8

Table of Contents
8
Table of Contents
Page 9

Types of Manuals
The following Guides are available.
Guides for the Machine
User Guide (this guide)
Describes the daily maintenance procedures, how to use the Print feature, how to clear paper jams, how to set
various setting items, and notes and restrictions.
Guides for the Optional Components
The guides for the optional components provide information such as how to operate the optional components, and
how to install software.
Types of Manuals
9
Page 10

Using This Guide
This guide gives you information on how to use the Print feature of the machine.
Organization of This Guide
This guide consists of the following chapters:
Chapter 1 Before Using the Machine
This chapter identifies the machine components, and describes the basic operations of the machine, such as how to
turn the power on and off, how to operate the control panel, how to exit the Energy Saver mode, and how to load
paper.
Chapter 2 CentreWare® Internet Services
This chapter describes how to operate the Print feature and the CentreWare Internet Services feature.
Chapter 3 Daily Management and Maintenance
This chapter describes how to replace consumables and clean the machine.
Chapter 4 Problem Solving
This chapter describes solutions to various problems you may have with the machine.
Chapter 5 ìSystem Administrator Menu Settings
This chapter describes how to configure the System Administrator Menu settings.
Chapter 6 Appendix
This chapter describes the machine specifications, optional components, and notes and restrictions.
10
Using This Guide
Page 11

Conventions
This guide uses the following marks depending on the described contents.
Important
Provides important information that you should know and check before using or operating the
machine.
Note
Refer
Provides information that may be useful when you are using or operating the machine.
Provides cross-references to the content.
The following symbols are used in this guide.
" "
[ ]
< >
>
A cross-reference included in this guide.
Indicates the names of features, input values, input examples, and the messages displayed on the touch
screen.
Indicates the names of the screens, menus, buttons, and tabs displayed on the touch screen.
Indicates the names of the menus, windows, dialog boxes, buttons, tabs, files, and folders displayed on your
computer screen.
Indicates the buttons and indicators on the control panel.
Indicates the keys on your computer keyboard.
Indicates the order of selecting the menu items.
Example: Select [Start] > [All Programs].
Paper orientation is described in this guide as follows:
Portrait
Landscape
Load paper in portrait orientation, viewing the bypass (manual) feed table at the front.
Load paper in landscape orientation, viewing the bypass (manual) feed table at the front.
LEF - Portrait Orientation SEF - Landscape Orientation
A
A
Paper feed direction
A
A
Paper feed direction
The screen shots and machine illustrations in this guide are of the machine with various optional components
installed. Some of the items and features on the screen shots or illustrations may not be displayed or available on
your machine depending on its configuration.
The information on various drivers and utility software in this guide may not apply to your drivers and utility
software depending on their version upgrade.
In this guide, "personal computer" and "work station" are collectively called "computer".
Microsoft
®
Windows® Operating System is referred to as "Windows".
The description of operations in this guide are mainly based on Windows 7. If using an operating system other
than Windows 7, the operating procedures and the screen appearance may be different in your environment.
Using This Guide
11
Page 12

12
Using This Guide
Page 13

Safety Notes
Flammable Explodable Electric
shock
Heated
surface
Moving
object
Pinched
fingers
Caution
Prohibited No fire Do not
touch
Do not use
in bathroom
Do not tear
down
Keep away
from wet
Never touch
with wet hand
Instructions Unplug Ground/
Earth
Before using this product, read "Safety Notes" carefully for safety use.
This product and recommended supplies have been tested and found to comply with strict safety requirements
including safety agency approvals and compliance with environmental standards. Follow the following instructions
for safety use.
Any unauthorized alteration including an addition of new functions or connection to external devices may not be covered by
the product warranty. Contact your local Xerox representative for more information.
Follow all warning instructions marked on this product. The warning marks stand for the followings:
Used for item that if not followed strictly, can lead death or severe or fatal injuries and the possibility
to do it is comparatively high.
Used for items that if not followed strictly, can lead to severe or fatal injuries.
Used for items that if not followed strictly, can cause injuries to user or damages to machine.
: A symbol for items to pay attention to when handling machine. Follow instructions carefully to
use machine safely.
: A symbol for prohibited items. Follow instructions carefully to avoid any dangerous acts.
: A symbol for items that must be performed. Follow instructions carefully to carry out these
essential tasks.
Safety Notes
13
Page 14

Electrical Safety
WARNING
This product shall be operated by the power source as indicated on the product's data plate. Consult your
local power company to check if your power source meets the requirements.
WARNING: Connect this product to a protective earth circuit.
This product is supplied with a plug that has a protective earth pin. The plug fits only into an earthed
electrical outlet. This is a safety feature. If the plug doesn't fit to the outlet, contact an electrician to
replace the outlet to avoid risk of electric shock. Never use an earthed adapter plug to connect the product
to the electrical outlet that has no earth connection terminal.
Improper connection of a grounding conductor may cause electric shock.
Plug the power cord directly into a grounded electrical outlet. To prevent overheat and a fire accident, do
not use an extension cord, a multi-plug adaptor or a multiple connector. Consult your local Xerox
representative to check if an outlet is grounded.
Connect this product to a branch circuit or an outlet that has larger capacity than the rated ampere and
voltage of this product. See the data plate on the rear panel of this product for its rated ampere and
voltage.
Never touch the power cord with wet hands. It may cause electric shock.
Do not put an object on the power cord.
Always keep the plug connection free of dust. The dusty and damp environment may bring about minute
electric current in a connector. It may generate heat and eventually cause a fire accident.
To avoid the risk of electric shock and a fire accident, only use the power cord supplied with this product or
the ones designated by Xerox.
The power cord is exclusive use for this product. Do not use it for any other product.
Do not damage or alter the power cord. Damage and alteration may generate heat and eventually cause
electric shock or a fire accident.
If the power cord is damaged or insulated wires are exposed, contact your local Xerox representative for
its replacement. Do not use a damaged or uninsulated cord to avoid the risk of electric shock and a fire
accident.
14
Safety Notes
Page 15

CAUTION
When cleaning this product, always switch off and unplug it. Access to a live machine interior may cause
WARNING
CAUTION
electric shock.
Do not unplug or re-plug this product with the switch on. Plugging and unplugging a live connector may
deform the plug and generate heat, and eventually cause a fire accident.
Hold the plug not the cord when unplugging this product, or it may damage the cord and cause electric
shock or a fire accident.
Always switch off and unplug the machine when it is not used over weekends or long holidays. It may
cause deterioration of insulations and eventually electric shock or a fire accident.
Once a month, switch off this product and check if
the power cord is plugged firmly into an electrical outlet;
the plug is not excessively heated, rusted or bent;
the plug and electrical outlet are free of dust; and
the power cord is not cracked or worn down.
Once you notice any unusual condition, switch off and unplug this product first and contact your local
Xerox representative.
Machine Installation
Do not locate this product where people might step on or trip over the power cord. Friction or excessive
pressure may generate heat and eventually cause electric shock or a fire accident.
Never locate this product in the following places:
Near radiators or any other heat sources
Near volatile flammable materials such as curtains
In the hot, humid, dusty or poorly ventilated environment
In the place receiving direct sunlight
Near cookers or humidifiers
Locate this product on a level and sturdy surface that can withstand a weight of 992 lbs. (450 kg).
Otherwise, if tilted, the product may fall over and cause injuries.
Safety Notes
15
Page 16

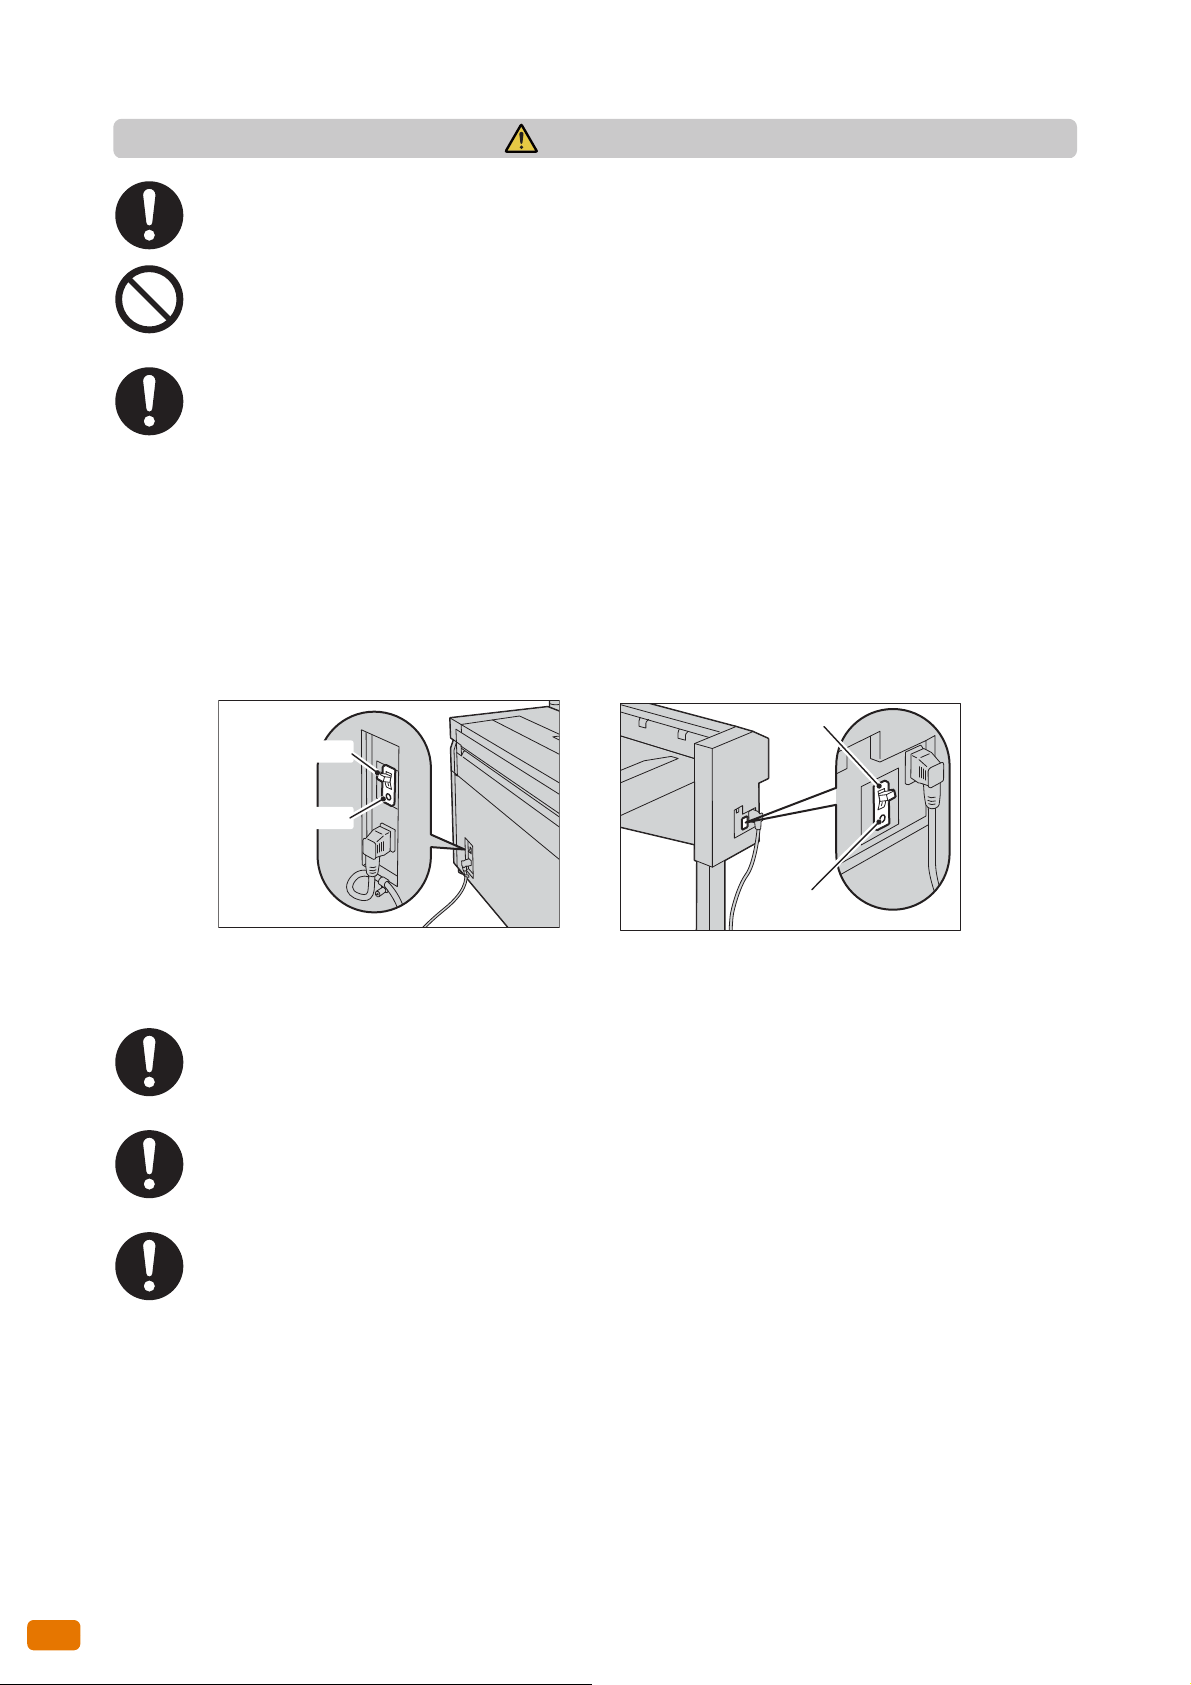
Locate this product in a well-ventilated area. Do not obstruct ventilation openings of the product.
With the Paper Stack Tray (optional) attached
Keep the minimum clearance as follows for ventilation and an access to the power plug. Unplug the
product if an abnormal condition is noted.
Do not incline the product at more than 10 degree angle. Otherwise, it may fall over and cause injuries.
10°
Left
Right
Left
Right
10°
Rear
10°
Front
Rear
Front
10°
Always lock the feet of this product after installation. Otherwise, it may fall over or slide and cause injuries.
2
3
1
When moving this product, always switch off and unplug it. Otherwise, a power cord may be cracked and
overheated, and eventually may cause electric shock and a fire accident.
16
Safety Notes
Page 17
OTHERS
To keep this product in a good performance and condition, always use it in the following environment:
WARNING
Temperature: 59 - 86°F (15 - 30°C)
Humidity: 20 - 80%
When the product is left in a chilly room and the room is rapidly warmed up by heater, dew condensation
may form inside the product and cause a partial deletion on printing.
For measures to prevent the machine from moving and overturning in case of earthquake, please consult
with your local Xerox representative.
Operational Safety
Do not carry out any other maintenance procedures not described in the documentation.
This product features safety design not to allow operators access to hazard areas. The hazard areas are
isolated from operators by covers or protectors which require a tool to remove. To prevent electric shock
and injuries, never remove those covers and protectors.
To avoid the risk of electric shock and a fire accident, switch off and unplug the product promptly in the
following conditions, then contact your local Xerox representative.
The product emits smoke or its surface is unusually hot.
The product emits unusual noise or odor.
The power cord is cracked or worn down.
A circuit breaker, fuse or any other safety device becomes activated.
Any liquid is spilled into the product.
The product is soaked in water.
Any part of the product is damaged.
Be careful not to injure your fingers when using the cutter to cut the roll paper.
Do not insert any object into slots or openings of this product.
Do not put any of the followings on the product:
Liquid container such as vases or coffee cups
Metal parts such as staples or clips
Heavy objects
If liquid is spilled over or metal parts are slipped into the product, it may cause electric shock or a fire
accident.
Do not use conductive paper such as origami paper, carbonic paper or conductively-coated paper. When
paper jam occurs, it may cause short-circuit and eventually a fire accident.
When cleaning this product, use the designated cleaning materials exclusive to it. Other cleaning
materials may result in poor performance of the product. Never use aerosol cleaners to avoid catching fire
and explosion.
Safety Notes
17
Page 18
CAUTION
Always follow all warning instructions marked on or supplied with this product.
Power Breaker
Test Button
Paper Stack Tray (Optional)
Printer Unit
To avoid the risk of burn injuries, never touch the area with the "High Temperature" mark on.
Keep electrical and mechanical safety interlocks active. Keep the safety interlocks away from magnetic
materials. Magnetic materials may accidentally activate the product and cause injuries or electric shock.
A ground fault interrupter is embedded in this product. If current leakage occurs, the ground fault
interrupter automatically cuts off power circuit to prevent electric shock and a fire accident. The ground
fault interrupter is normally ON [(indicated as "|")]. Check once a month if the ground fault interrupter
works properly in accordance with the following procedures:
(1) Turn off the power switch of the machine.
(2) Press the TEST button while power breaker (main power switch) is on.
If the power breaker (main power switch) turns off, it shows that the power breaker (main power
switch) is operating correctly.
(3) Turn the power breaker on.
Power Breaker
If the circuit does not work properly, contact your local Xerox representative.
When pulling out the roll unit, do it gently. If pulled out with too much force, the unit can hit and injure
your knees.
To move this product to another location, contact your local Xerox representative.
Ventilate well during extended operation or mass printing. It may affect the office air environment due to
odor such as ozone in a poorly ventilated room.
Provide proper ventilation to ensure the comfortable and safe environment.
Test Button
18
Safety Notes
Page 19

Consumable
WARNING
CAUTION
Store all consumables in accordance with the instructions given on its package or container.
Keep ink cartridges out of the reach of children. If a child accidentally lick or swallow ink or get it in the
eye, consult a physician immediately.
If ink spills onto your hands, wash it off.
If you get ink in the eye, wash it out immediately. If you have sore eyes, consult a physician immediately.
This product uses roll printing paper. Be careful not to drop it as it is heavy and may cause injuries.
Do not lay the paper roll on the machine or on any unstable surface. The paper roll can fall, causing
injuries.
Safety Notes
19
Page 20

Location of Warning and Caution Labels
Always follow all warning instructions marked on or supplied with this product.
To avoid the risk of burn injuries, never touch the area with the "High Temperature" mark on.
20
Safety Notes
Page 21

Environment
For environmental protection and efficient use of resources, Xerox reuses returned ink cartridges to make recycle
materials or energy recovery.
Proper disposal is required for ink cartridges no longer needed. Do not open ink cartridges. Return them to your
local Xerox representative.
Environment
21
Page 22

Regulation
Radio Frequency Emissions (Class A)
This product has been tested and found to comply with the limits for a class A digital device, pursuant to
International Standard for Electromagnetic Interference (CISPR Publ. 22) and Radiocommunication Act
1992 in Australia/New Zealand. These limits are designed to provide reasonable protection against
harmful interference when the product is operated in a commercial environment. This product generates,
uses, and can radiate radio frequency energy and, if not installed and used in accordance with the
customer documentation, may cause harmful interference to radio communications. Operation of this
product in a residential area is likely to cause harmful interference in which case the user is required to
correct the interference at their own expense.
This device complies with part 15 of the FCC rules. Operation is subject to the following two conditions:
(1) This device may not cause harmful interference and (2) This device must accept any interference
received, including interference that may cause undesired operation.
This Class A digital apparatus complies with Canadian ICES-003. Cet appariel numérique de la classe “A”
est conforme à la norme NMB-003 du Canada.
Changes and modifications to this product not specifically approved by Xerox may void the user's
authority to operate this equipment.
Product Safety Certification (CB)
This product is certified by the following agency using the safety standards listed.
Agency
SEMKO IEC60950-1:ed. 2
Standard
22
Regulation
Page 23

Legal Notice
Printing certain documents may be illegal in your country. Penalties of fines or imprisonment may be
imposed on those found guilty. The following are examples of items that may be illegal to print in your
country.
Currency
Banknotes and checks
Bank and government bonds and securities
Passports and identification cards
Copyright material or trademarks without the consent of the owner
Postage stamps and other negotiable instruments
This list is not inclusive and no liability is assumed for either its completeness or accuracy. In case of
doubt, contact your legal counsel.
Legal Notice
23
Page 24

24
Legal Notice
Page 25

Chapter 1 Before Using the Machine
This chapter identifies the machine components, and describes the basic operations of the machine, such as how to
turn the power on and off, how to operate the control panel, and how to exit the Energy Saver mode.
1.1 Machine Components................................................................................................................................. 26
1.2 Power Source................................................................................................................................................... 30
1.3 Energy Saver Mode.......................................................................................................................................33
1.4 Control Panel...................................................................................................................................................34
1.5 Loading/Replacing Paper ...........................................................................................................................38
1.6 Configuring Paper Setting......................................................................................................................... 43
1.7 Media .................................................................................................................................................................45
1.8 Billing Meters .................................................................................................................................................. 48
1.9 Checking Consumables............................................................................................................................... 49
1.10 Checking Machine Information ..............................................................................................................50
1.11 Job Status......................................................................................................................................................... 52
Page 26
1
Before Using the Machine
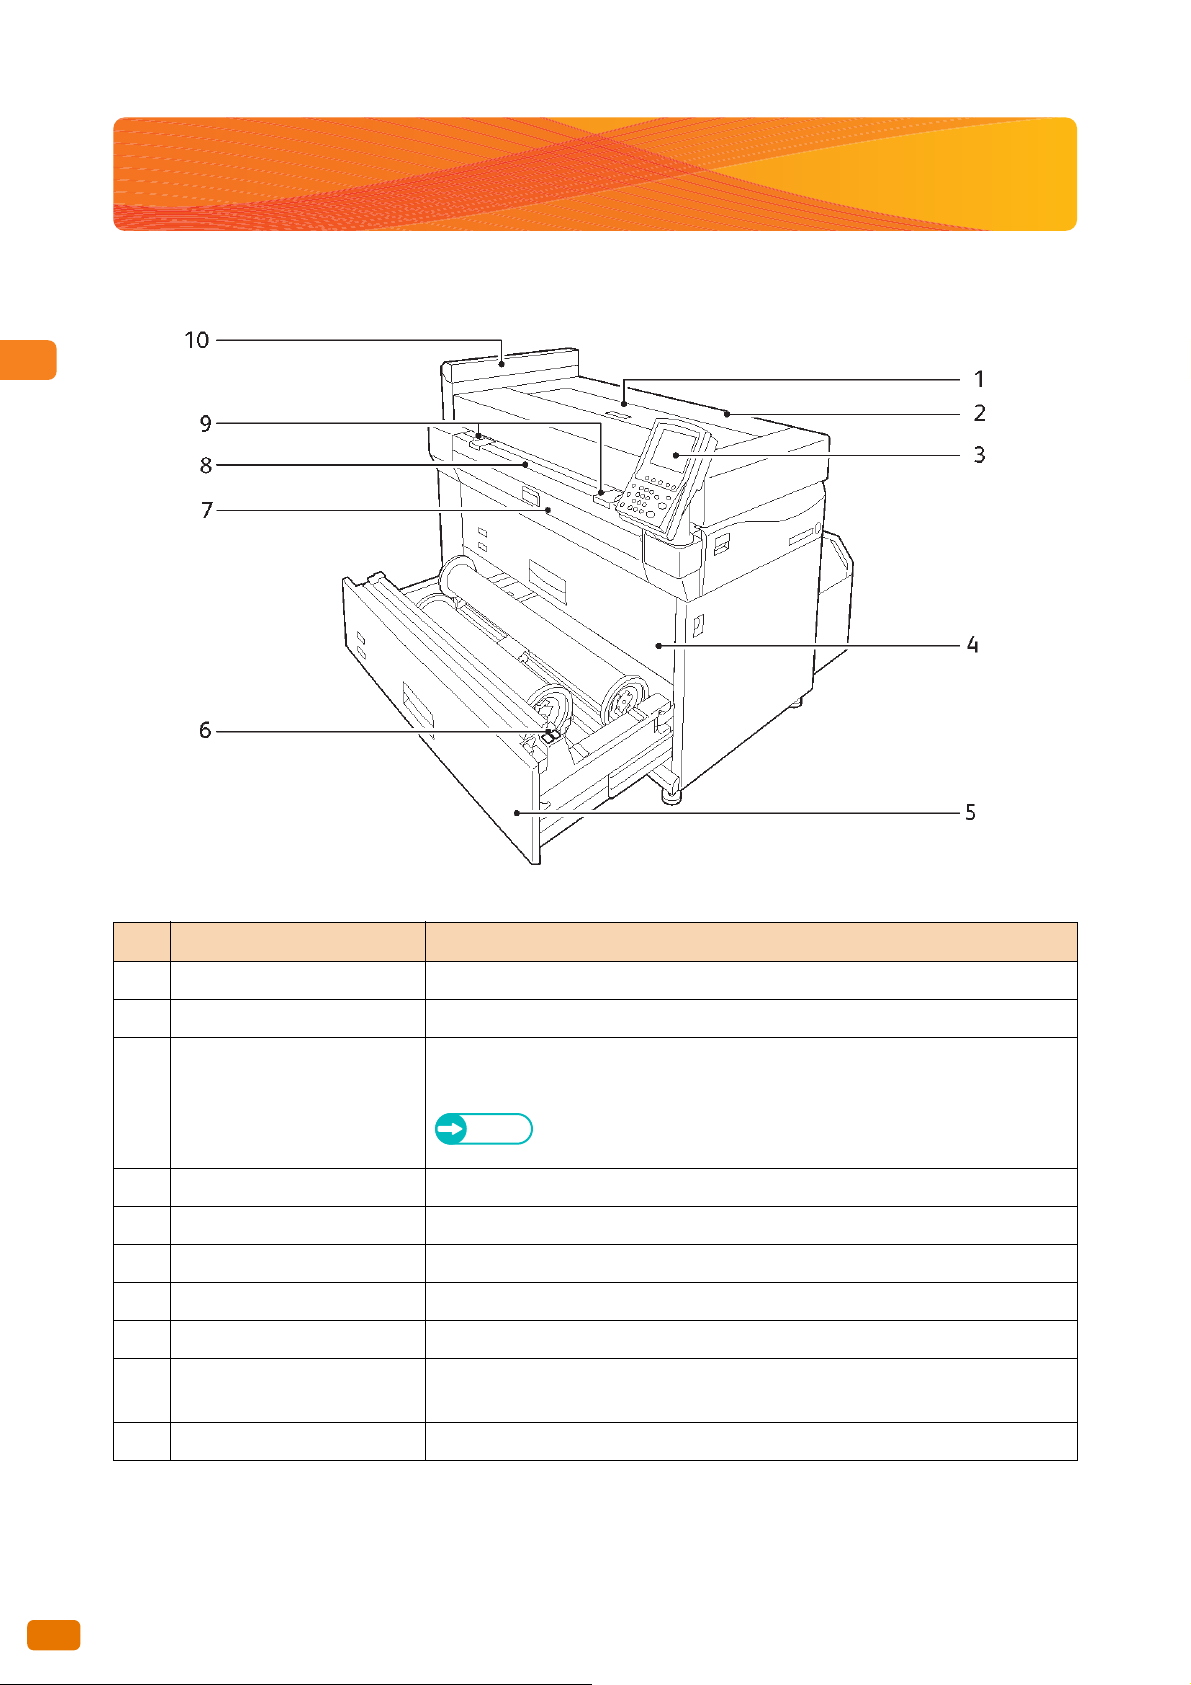
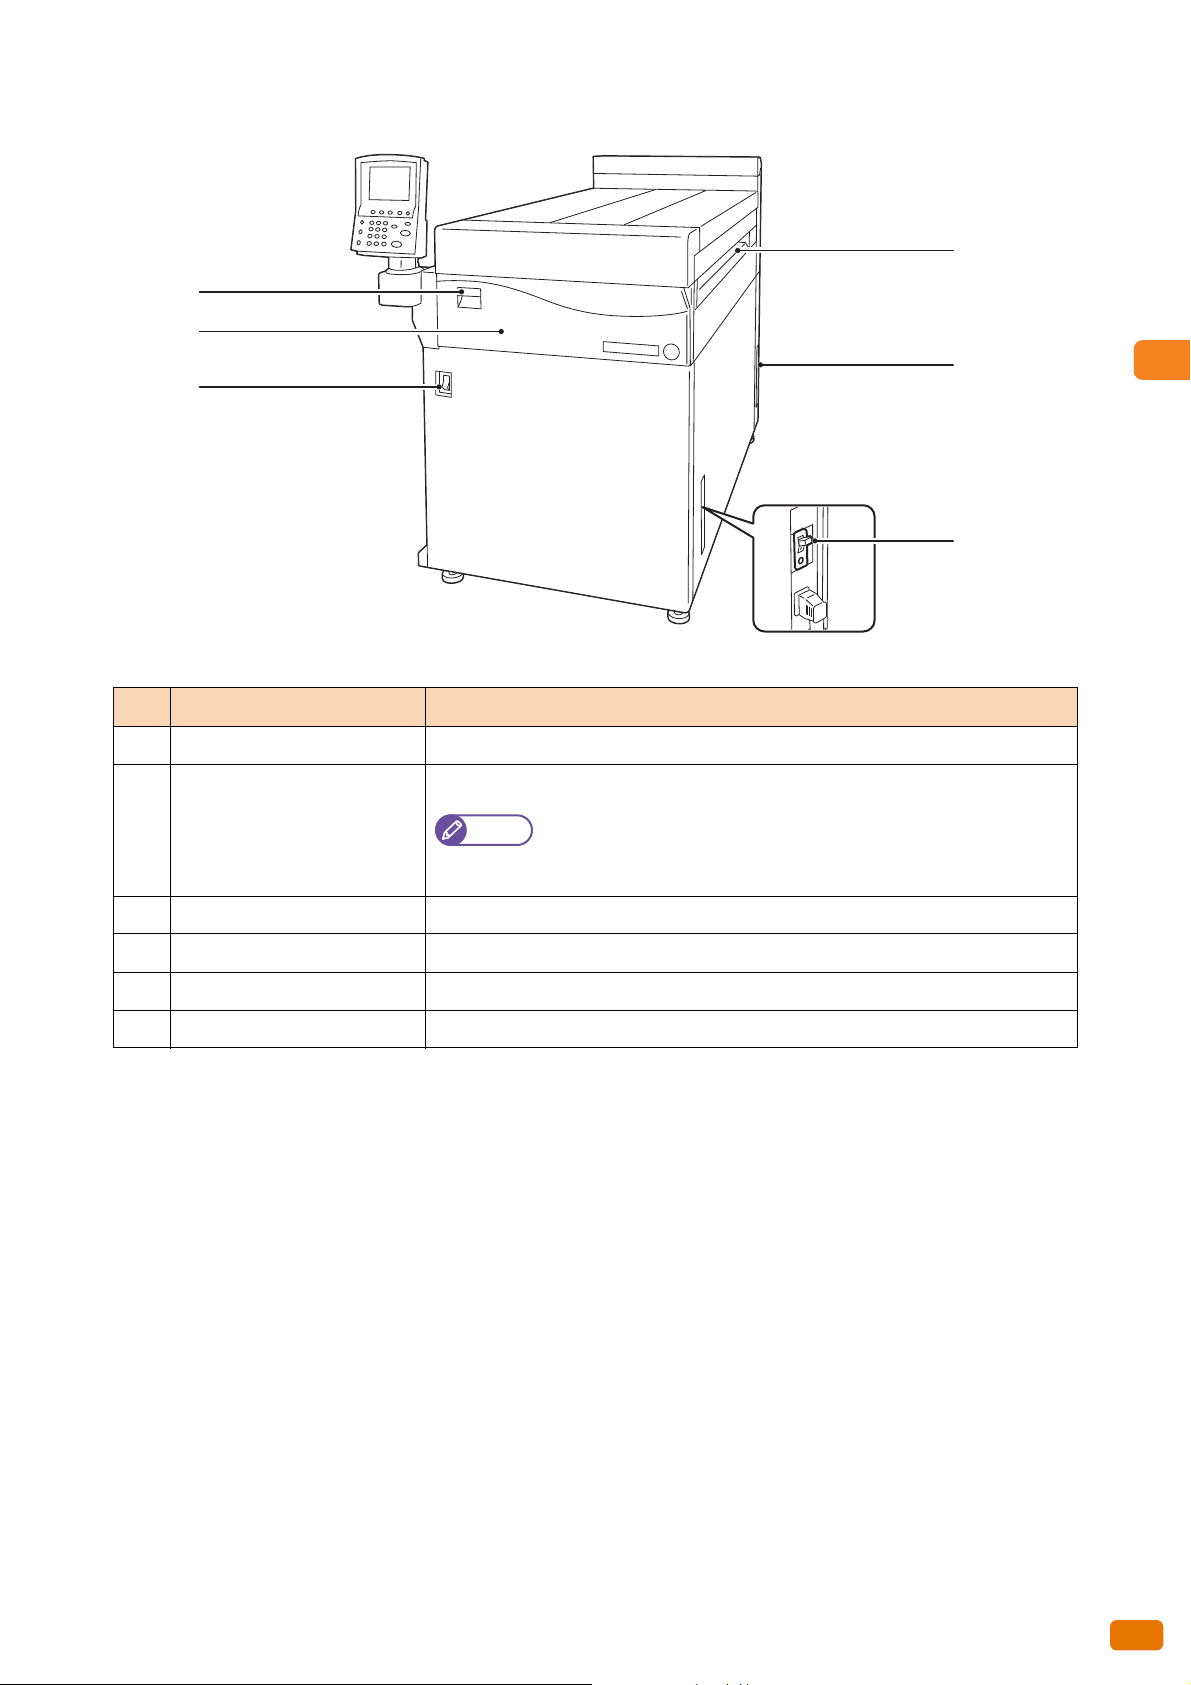
1.1 Machine Components
This section describes the machine components and their functions.
No. Component Function
1 Print head cover Open this cover when replacing a print head.
2 Upper unit Open this cover to clear a paper jam or replace a waste ink cartridge.
3 Control panel Directly touch the buttons and tabs displayed on the touch screen to operate the
machine.
Refer
4 Roll 1/2 unit Load roll paper into this unit.
5 Roll 3/4 unit (4-roll model) Load roll paper into this unit.
6 Paper cutter button Trims the lead edge of roll media.
7
Paper path cover Open this cover to clear a paper jam.
8 Bypass (manual) feed table Load media here when making prints onto cut sheet.
9 Manual feeder guide
(Optional)
10 Ink cover Open this cover when replacing an ink cartridge.
Aligns both edges of paper when loading paper into the bypass (manual) feed table.
For more information, refer to "1.4 Control Panel" (p. 34).
26
1.1 Machine Components
Page 27
Before Using the Machine
1
12
13
14
16
17
15
No. Component Function
12 Exit tray Printed media are output from this exit. face up.
13 Rear cover Contains the LAN port, service port, and media heater switch.
14 Power breaker A power breaker of the machine.
15 Power switch Used to switch the power to the machine on/off.
16 Front cover Open this cover when replacing a waste ink cartridge.
17 Upper unit release lever Pull up this lever to open the upper unit.
Note
These ports and switch are intended to be used only by our
customer engineers For more information, contact your local Xerox
representative.
1.1 Machine Components
27
Page 28
1
Before Using the Machine
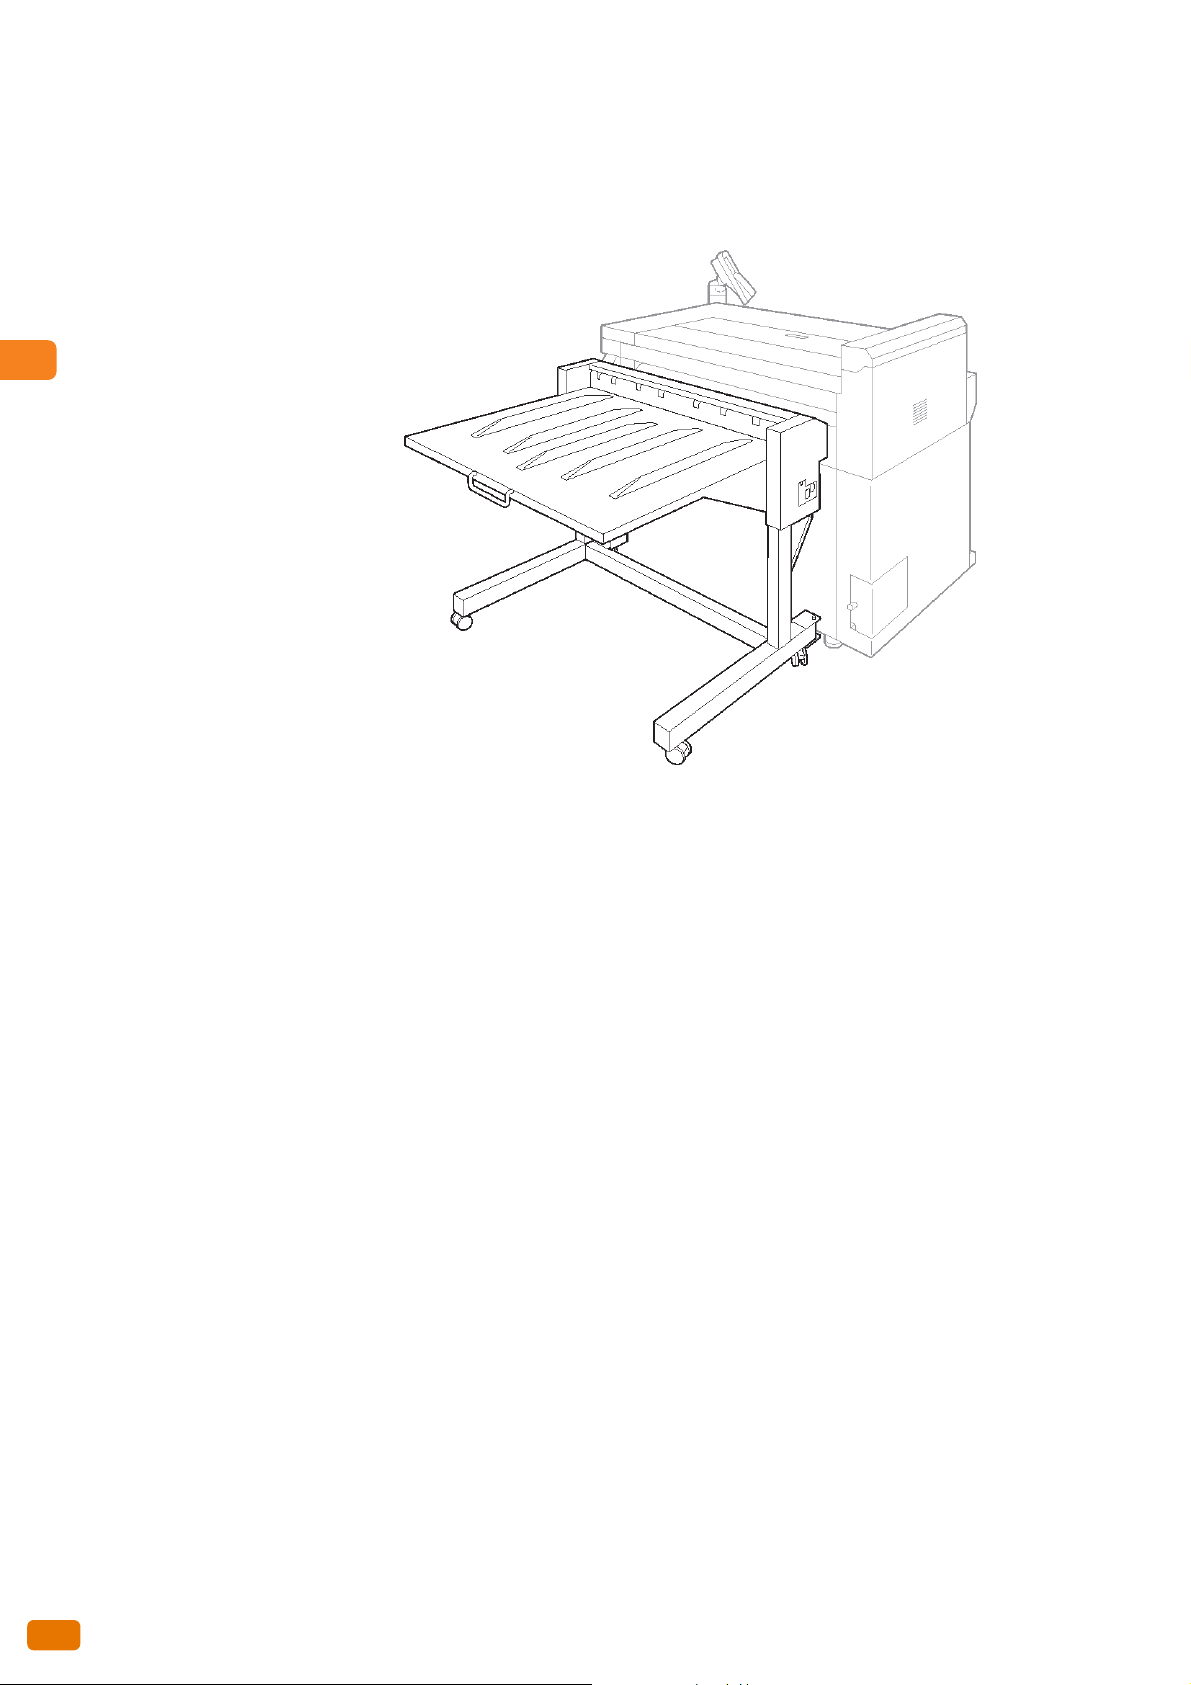
Paper Stack Tray (Optional)
This tray can accommodate printed sheets on the tray or underneath the tray.
You can eject up to 150 sheets of paper on the tray.
28
1.1 Machine Components
Page 29

Before Using the Machine
1
Note
Paper support
Depending on the size of paper you use, pull out the paper support.
1.1 Machine Components
29
Page 30
1
Before Using the Machine
1.2 Power Source
Important
Note
Steps
Note
1.2.1 Switching the Power On
The machine warms up and becomes ready to print within about 10 minutes after being powered on.
The Energy Saver feature allows you to reduce the power consumption of the machine, saving electricity.
Refer
Do not turn off the power straight after turning the power switch on. If you turn the power off before the "Ready"
message appears on the touch screen, the system could be damaged.
The machine consumes 11W or less even when the power switch is turned off. To avoid consuming (or save) this
standby power, turn the power breaker OFF. For information on how to do this, refer to "1.2.3 Saving Power
Consumption While the Machine is not in Use" (p. 32).
For information on the Energy Saver feature, refer to "1.3 Energy Saver Mode" (p. 33).
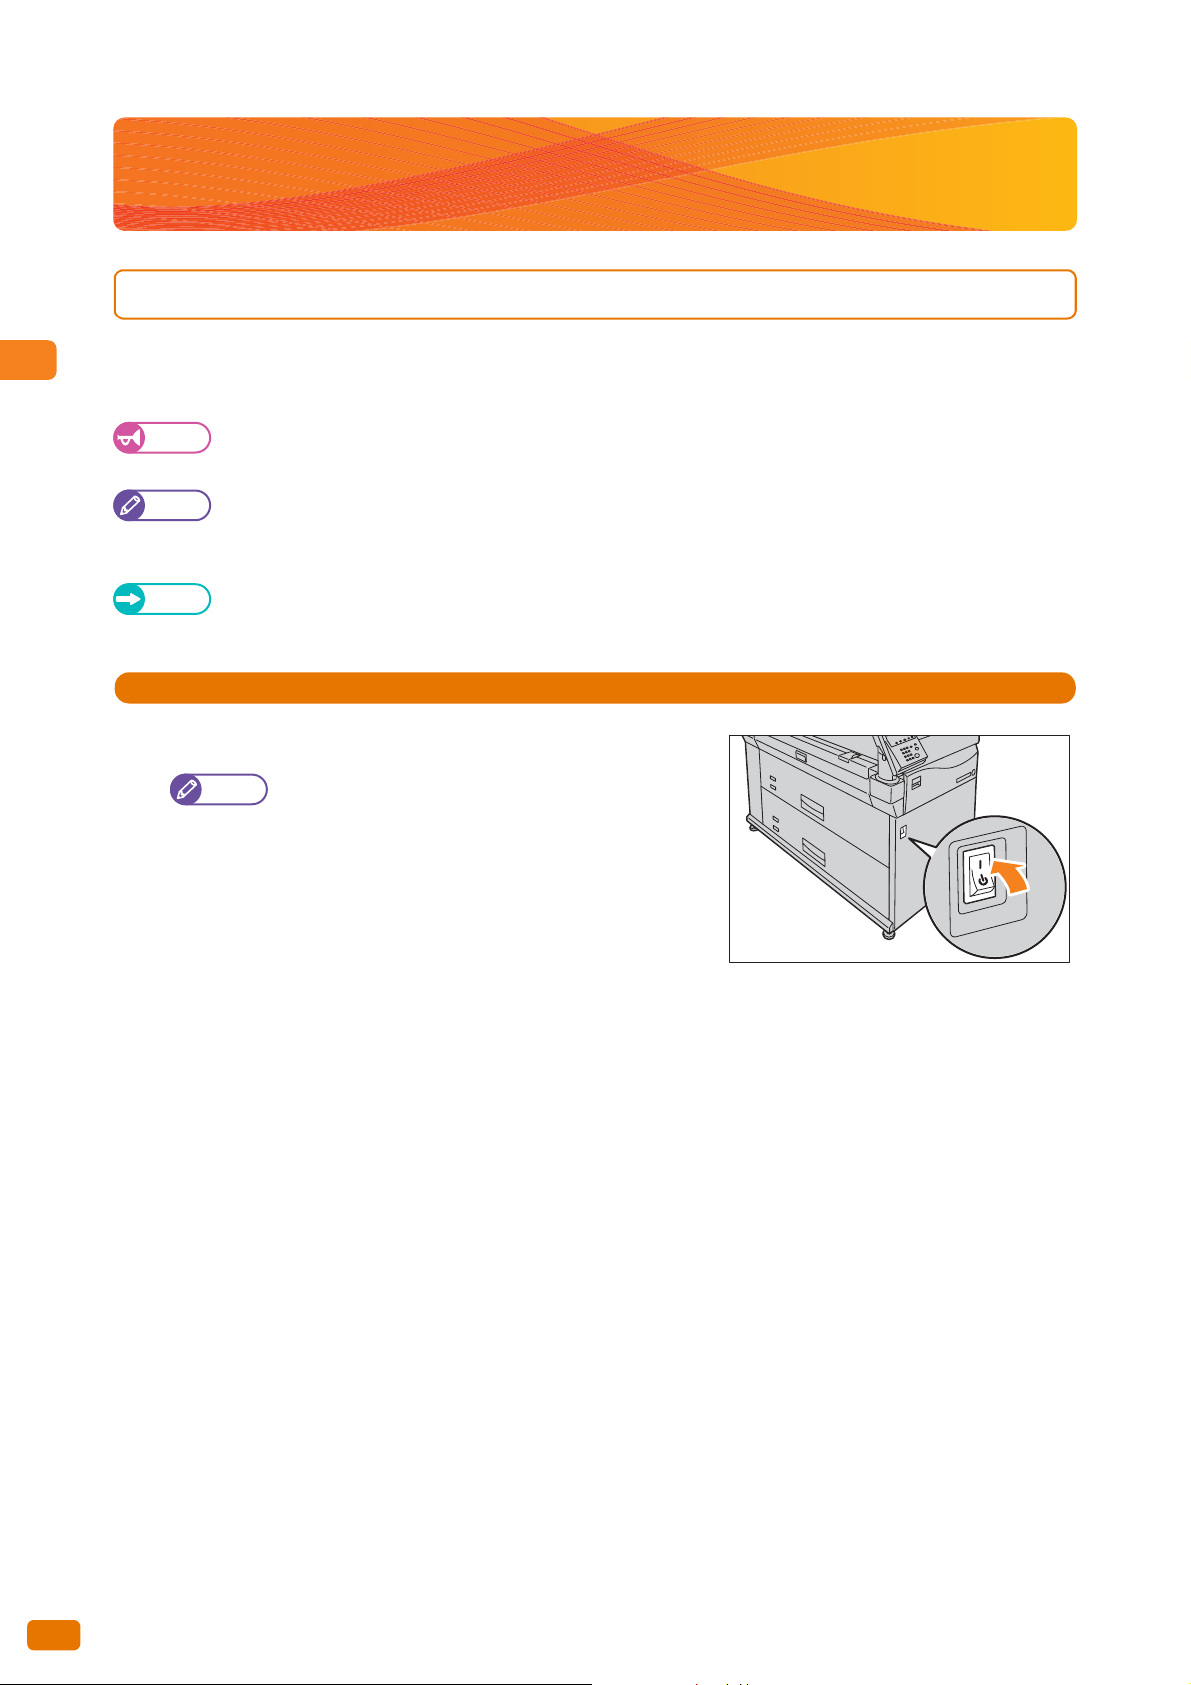
1.
Press the power switch to the [|] position to switch the power on.
The "Please wait..." message indicates that the machine
is warming up. The machine cannot be used while it is
warming up.
30
1.2 Power Source
Page 31

Before Using the Machine
1
1.2.2 Switching the Power Off
Steps
Important
Switch the power off at the end of a day or if the machine is not used for a long time.
1.
Press the power switch to the [ ] position to switch the power
off.
The power switches off after a message appears on the touch
screen.
Do not switch the power off in the following conditions.
Otherwise, the data being processed may be erased.
- Data is being received (The [Transmitting] indicator
on the control panel is blinking)
- Printing is being processed
After paper is completely output, wait for five seconds
or more before switching the power off.
When switching the power off and then on, make sure that the touch screen is turned off before you
switch the power back on.
Switching the power breaker off while the power switch is on might cause malfunctions.
1.2 Power Source
31
Page 32

1
Before Using the Machine
1.2.3 Saving Power Consumption While the Machine is not in Use
Steps
Steps
The machine consumes 11W or less even when the power switch is turned off. To avoid consuming (or save) this
standby power, follow the steps below to turn the power breaker OFF.
Turning the Power Breaker Off
1.
2.
Switch the power off.
After making sure that the touch screen on the control panel is turned off, turn the power breaker off.
Turning the Power Breaker On
1.
2.
Turn the power breaker on.
Switch the power on.
32
1.2 Power Source
Page 33

Before Using the Machine
1
1.3 Energy Saver Mode
Steps
Transmitting
Supplies Language Power Saver
Job Status
Machine Status
Log In/Out
Start
Stop
Clear All
<Power Saver> button
The machine provides the "Energy Saver feature" that reduces power consumption to save electricity if the machine
is not used for the specified time.
After the time specified in [Auto Power Saver] elapsed, the machine automatically enters the Energy Saver mode,
the touch screen goes out, and the <Power Saver> button on the control panel lights up.
Note
1.3.1 Exiting the Energy Saver Mode
The Energy Saver mode is exited when:
The <Power Saver> button is pressed
A job is received
The settings are configured via CentreWare
For information on how to specify [Auto Power Saver], refer to " Auto Power Saver" (p. 110).
®
Internet Services
1.
Press the <Power Saver> button on the control panel.
The <Power Saver> button goes out to indicate that the Energy
Saver mode is exited.
2
1
456
789
.
3
C
0
1.3 Energy Saver Mode
33
Page 34

1
Before Using the Machine
1.4 Control Panel
1
2
3
456
789
0
C
.
Transmitting
Job Status
Machine Status
Log In/Out
Supplies Language Power Saver
Clear All
Stop
Start
1
2
3
4
5
6
78
9
10
11
12
No. Component Function
Touch screen Displays messages and buttons required for the operation of various features. You
1
can access the machine features by directly touching the touch screen.
Supplies button Press this button to check the status of consumables.
2
Language button Press this button to switch the language.
3
Power Saver button Press this button to exit the Energy Saver mode.
4
Contrast adjustment dial Allows you to adjust the contrast of the touch screen.
5
Clear All button
6
These buttons do not function.
Stop button
Start button
C (Clear)button Press this button to cancel a numerical character you have entered with the
7
numeric keypad.
Numeric keypad Use the numeric buttons on the keypad to enter numerical characters.
8
Log In/Out button Press this button to display the System Administration Menu screen. Pressing this
9
button displays the screen to enter the system administrator's user ID.
Machine Status button Press this button to check the machine status and meters, or to check the status of
10
paper.
Job Status button Press this button to check the completed jobs.
11
Transmitting indicator Blinks during data communication with a device other than the machine.
12
34
1.4 Control Panel
Page 35

Before Using the Machine
1
1.4.1 Adjusting Screen Contrast
Steps
Steps
1.
Turn the contrast adjustment dial to adjust the contrast of the
touch screen.
1.4.2 Switching Language
1.
2.
3.
Press the <Language> button on the control panel.
Select the desired language.
Press [Save].
Power Saver
Clear All
Stop
1.4 Control Panel
35
Page 36

1
Before Using the Machine
1.4.3 Touch Screen
Note
Feature buttons
Entry field
Selection buttons
Message field
Tabs
Arrow buttons
Some tabs or selection buttons are not displayed depending on whether or not optional products are installed or
the setting status. The disabled items or buttons are indicated by a light dotted line.
Ta b
Feature button
Message field
Selection button
Entry field
Arrow button
Item Description
Displays each menu screen.
Displays a setting screen.
Displays a message such as the machine status or operation guide.
Press this button to highlight it.
Symbol "..." included in a button name such as the [Others...] button indicates that, if
such a button is pressed, the appropriate setting screen is displayed.
Directly enter a numeric value using the numeric keypad.
The allowable range is indicated in parentheses ( ).
Press the [], [], [], or [] arrow button to change a numeric value.
36
1.4 Control Panel
Page 37

Before Using the Machine
1
1.4.4 Text Entry
During operations, you may encounter a screen requesting text to be entered.
Item Description
Entering alphabets and numerals
Entering symbols Press [Symbol].
Entering a space Press [Space].
Deleting characters Press [Back]. This deletes one character at one time.
Press [Alphanumeric].
To enter upper-case alphabets, press [Shift]. To toggle to the previous mode, press
[Shift] again.
1.4 Control Panel
37
Page 38

1
Before Using the Machine
1.5 Loading/Replacing Paper
Steps
Note
CAUTION
1.5.1 Replacing/Cutting Roll Paper
Load roll paper in the Roll Unit.
Once the paper has been loaded, cut the leading edge of the paper.
This product uses roll printing paper. Be careful not to drop it as it is heavy and may cause injuries.
Important
When loading roll paper, be careful not to pinch your fingers.
When removing the piece of tape holding the edge of the roll paper from unraveling, make sure to completely
remove the adhesive. If the adhesive gets inside the machine, print quality may decrease.
When loading paper of different type, size, or weight, change the paper settings after you finish loading the
paper. For information on how to do this, refer to "1.6 Configuring Paper Setting" (p. 43).
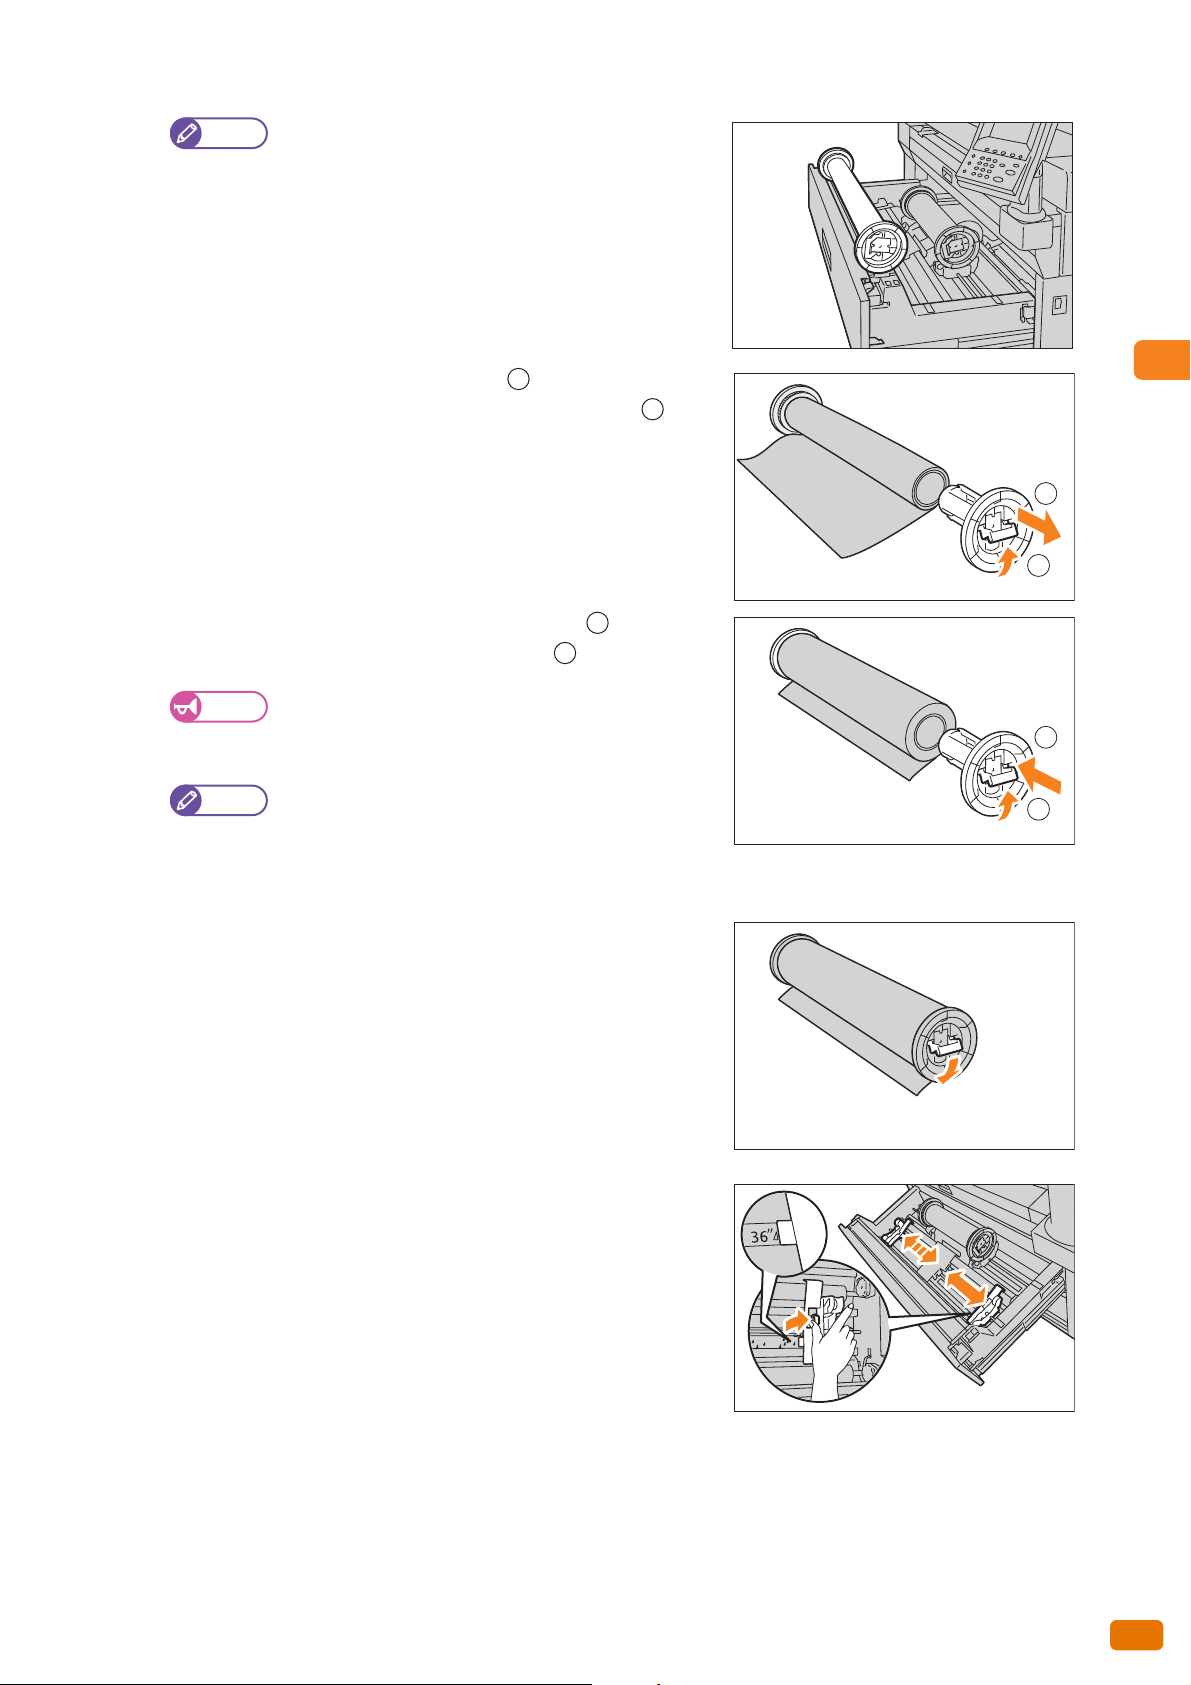
1.
2.
3.
Have a new roll paper ready.
Pull out the roll unit.
When you want to just cut the leading edge of the roll
paper without replacing with new roll paper, go to Step
9.
Remove the core of the roll paper from the roll unit.
38
1.5 Loading/Replacing Paper
Page 39
Before Using the Machine
1
Note
Important
Note
1
2
1
2
You can place the roll paper in front of the roll unit.
4.
Pull up the handle of the paper holder ( ), and pull out the
paper holder from both edges of the core of roll paper ( ).
5.
6.
While pulling up the handle of the paper holder ( ), install the
paper holder in both edges of the roll paper ( ).
Push down the handle of the paper holder to fix the paper holder.
1
2
1
2
When installing the paper holder in the roll paper, put
the roll paper on a stable place such as the floor to
prevent the roll paper from being dropped or toppled.
There are two types of paper holders: 3-inch core paper
holder and 2-inch core paper holder (option).
Use the paper holder that meets the core size of the
paper to be loaded.
7.
While holding the green lever of the roll unit, move the saddle to
adjust it to the width of the roll paper to be loaded.
1.5 Loading/Replacing Paper
39
Page 40

1
Before Using the Machine
8.
Note
Note
Make sure that the roll paper's winding direction is correct, and
place the paper holder onto the saddle.
9.
Rotate the roll paper, and insert the leading edge of roll paper
under the roller.
The roll paper is automatically conveyed and stops.
10.
11.
Press the paper cutter button to cut the leading edge of paper.
Remove the trimmed piece of paper.
When the roll paper is not fed smoothly because its
leading edge is damaged, cut the leading edge using a
cutter knife or a similar tool before loading the paper.
If you press the paper cutter button once, 5.9 in. (150
mm) of the paper is cut. If you hold down the paper
cutter button, the paper comes out until you release the
button, and it is cut at the position where you release the
button.
40
12.
1.5 Loading/Replacing Paper
Gently push the roll unit back into the machine all the way until it
stops.
Page 41

Before Using the Machine
1
1.5.2 Loading Cut Sheet Paper (Bypass)
Steps
Important
Note
Steps
Important
When using cut sheets for print, load the cut sheet via the bypass (manual) feed table.
Important
Note
When loading paper of different type, size, or weight, change the paper settings before printing. For information
on how to do this, refer to "1.6 Configuring Paper Setting" (p. 43).
Paper of up to 78.7 in. (2,000 mm) in length can be loaded.
1.
Align both edges of the paper against the scale, and insert the
paper until it is conveyed automatically.
The paper is automatically conveyed and stops.
1.5.3 Switching Between Trays
When the selected tray has run out paper, you can manually switch to another tray to continue printing.
Load paper one sheet at one time.
If paper is curled, hold the curled corners with both
hands when inserting the paper.
Do not release your hands from the paper until it is
conveyed. If you release your hands when you hear a
sound, the paper may get jammed.
It is convenient to use the optional manual feeder guide when loading paper into the bypass (manual)
feed table.
1.
2.
Press [Source].
Select a paper tray that contains paper of which the
size is larger than the print size. If you select a tray that
contains paper of which the size is smaller than the
print size, it causes the machine inside to get dirty.
Select the paper tray you want to use, and press [Close].
Printing is resumed.
1.5 Loading/Replacing Paper
41
Page 42
1
Before Using the Machine
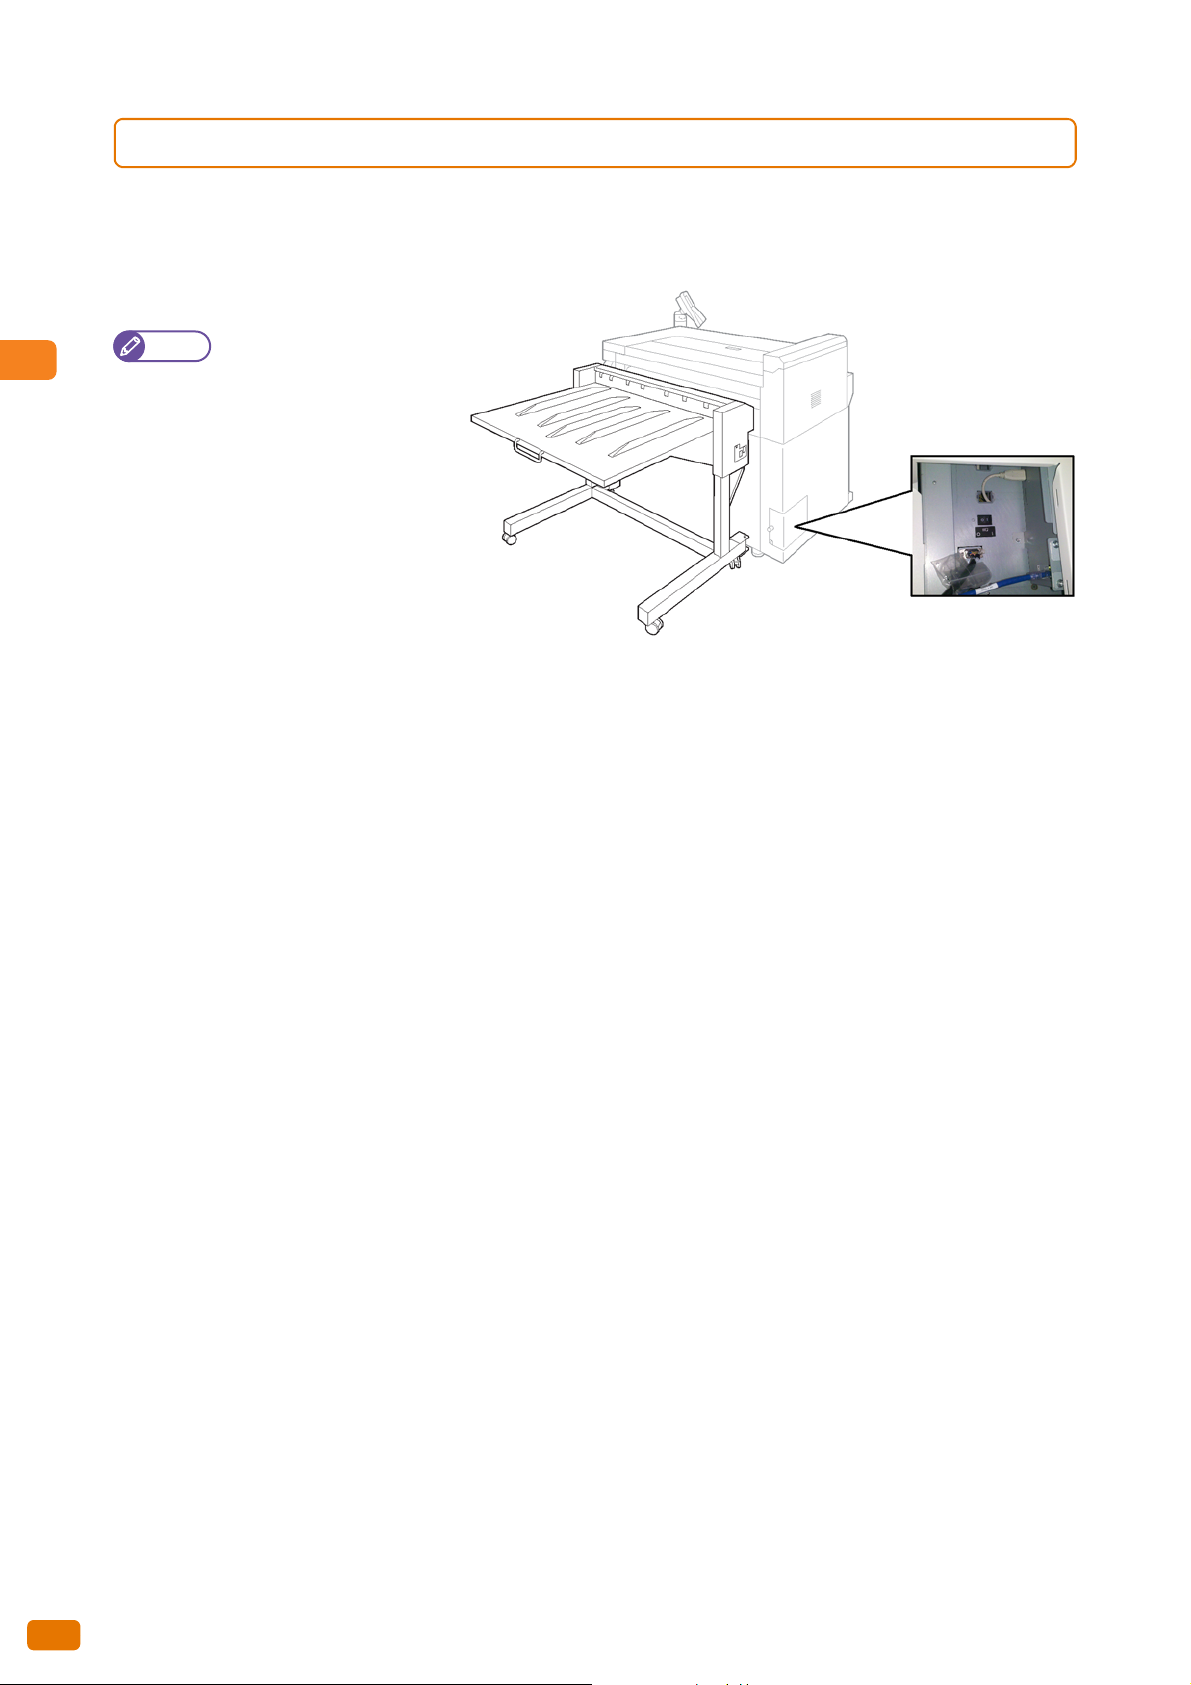
1.5.4 Tray Heaters
This machine features paper tray heaters. In humid environments these may help remove moisture from the paper
to improve print quality and/or paper feeding.
The paper tray heater switch is located behind the cover which is positioned under the ink supply system.
Note
The tray heater is used in
high temperature / high
humidity conditions (86
o
(30
C), 80% RH)
o
F
42
1.5 Loading/Replacing Paper
Page 43

Before Using the Machine
1
1.6 Configuring Paper Setting
Steps
When you have loaded paper into a tray for the first time or changed the type, size, or weight of paper, be sure to
specify the type or size of paper.
1.
2.
3.
Press the <Machine Status> button.
Press the [Media/Settings] tab.
Select the desired tray.
4.
5.
6.
Select the desired item.
In this example, select [Size Series].
Select an item to fit the paper loaded into the paper tray.
Press [Save].
1.6 Configuring Paper Setting
43
Page 44

1
Before Using the Machine
7.
Note
Repeat steps 4. to 6. to specify [Paper Type], [Weight], and [Roll Core Size].
If you select [Manual] in step 3., [Roll Core Size] is not displayed.
8.
Press [Close] until the display returns to the Ready screen.
Size series
The following shows the size series of available roll paper and manual feed cut sheets.
Size Series Paper width
A series
JIS B series
ISO B series
Special A series
Arch series - 1
Arch series - 2
ANSI series
*1 Displayed when the item number [70] in [Detailed Settings] is set to [1]. For more information, refer to "5.3.7 Detailed Settings"
(p. 114).
*2 Displayed when the item number [70] in [Detailed Settings] is set to [2]. For more information, refer to "5.3.7 Detailed Settings"
(p. 114).
A0, A1, A2, A3
B0, B1, B2, B3
B0, B1, B2, B3
880mm, 860mm*2, 620mm, 625mm*2, 440mm, 435mm*2, 310mm
42", 36", 24", 18", 12"
42", 30", 24", 15", 12"
42", 34", 22", 17", 11"
*1
Paper Type
Select the desired paper type from [Plain], [Matte coated], [Gloss], [Tracing], [Matte film], and [Backlit film].
Note
Tracing paper is displayed as "Tracing" on the touch screen.
Weight
Select from [Light], [Standard], and [Heavy].
In normal use, set to [Light].
Roll Core Size
Select the desired size from [2inch core roll] and [3inch core roll].
Note
Select the same roll core size as the loaded roll paper. If this setting is incorrect, the remaining paper level cannot
be correctly detected.
44
1.6 Configuring Paper Setting
Page 45

Before Using the Machine
1
1.7 Media
WARNING
Use of unrecommended media may result in paper jams, lower print quality, malfunctions, or damage to the
machine. To achieve optimum performance of the machine, we recommend that you use only media recommended
by Xerox.
If you wish to use media other than that recommended by Xerox, contact your local Xerox representative.
Do not use conductive paper such as origami paper, carbonic paper or conductively-coated paper. When paper
jam occurs, it may cause short-circuit and eventually a fire accident.
Important
1.7.1 Media Type
The printed image may fade due to moisture such as water, rain or vapor. For more information, contact your
local Xerox representative.
When using generally used paper (known as printable paper) for printing, ensure that it complies with the following
specifications. However, it is encouraged that you use the recommended media to achieve clear print results.
Type
Roll Paper
Media Type
Weight/thickness
Plain paper
Coated paper
Glossy paper
IJ Tracing paper
IJ Film
64 to 190g/m
2
Loadable
Paper Size
A0, A1, A2, A3 (width)
JIS B0, JIS B1, JIS B2, JIS B3 (width)
ISO B0, ISO B1, ISO B2, ISO B3 (width)
Special A0 (880/860 mm) (width)
Special A1 (620/625 mm) (width)
Special A2 (440/435 mm) (width)
Special A3 (310 mm) (width)
34", 22", 17", 11"
36", 24", 18", 12"
42", 30", 15"
Width: 279.4 - 1,067 mm
Outside diameter of the roll: 180 mm or
less
Paper Name Weight Size
Premium 75 g/m
Performance 75 g/m
Coated paper 83 g/m
Recommended Paper
2
2
2
A0 to A2
A0 to A3
42", 36",
A0
1.7 Media
45
Page 46

1
Before Using the Machine
Type
Media Type
Weight/thickness
Loadable
Paper Size
Manual
feed
Important
1.7.2 Unusable Media
Using media not recommended by Xerox may cause a paper jam or machine malfunction. Use media
recommended by Xerox.
Plain paper
Coated paper
A0, A1, A2, A3, A4
JIS B0, JIS B1, JIS B2, JIS B3, JIS B4
ISO B0, ISO B1, ISO B2, ISO B3, ISO B4
Glossy paper
IJ Tracing paper
IJ Film
Special A0 (880/860 mm), Special A1 (620/625 mm), Special A2 (440/435 mm)
Special A3 (310 mm)
34", 22", 17", 11", 8.5"
36", 24", 18", 12", 9"
42", 30", 15"
64 to 190g/m
2
Width: 210 - 1,067 mm
Length: 210 - 2,000 mm
Printing on paper that differs from the paper type and size selected in the print driver, or printing from a tray that
does not support the loaded paper may result in a paper jam. To ensure correct printing, select the correct paper
size, paper type, and paper tray.
For more information about media type such as coated paper types that can be used for roll paper feed and
paper types that can be used for manual feed, contact your local Xerox representative.
Transparencies
Digital coated paper (glossy type)
Peel-off film (transparent/white/strong&white)
Bookbinding paper (210 g/m2)
Cloth transfer paper
Aqua-transfer paper
Star tracing paper
OK top-coat paper (128 g/m2)
Labels
Kent paper
Carbon paper
Xerographic photo paper
Xerographic films
Paper which has been previously printed with ink that will
change in quality at 155 degree C
Paper with staples, clips, ribbons, or tape
Electric spectaculars film
NK special simplex art paper (127/157/209 g/m2)
Art flux (cross)
High class Japanese paper for color copy
Color cloth transfer paper
Super tracing paper 55/60
High class tracing paper
Heat-sensitive paper
Black origami paper
Chemical Japanese paper
Paper with piping
Xerographic tracing paper
Paper which is tightly stuck together due to static electricity
Specially-coated paper
Paper which was printed once by an other printer or copy
machine
46
Paper with non-smooth face such as rough printing paper
or fibered paper
1.7 Media
Wrinkled, creased, or torn paper
Page 47

Before Using the Machine
1
Paper pasted up with glue, adhesive paper
Paper that is too thick or thin
Damp or wet paper
When you use acid paper, the print result may blur.
If this happens, change the paper to acidfree paper.
1.7.3 Handling and Storing Media
Handling Media
Do not use media that has been folded, creased, or heavily curled. It may result in paper jams.
Storing Media
The optimum environment for storing media is a place where the humidity is 40 to 45%. Keep the followings in
mind when storing media:
Moisture is not good for media. For storage, keep the media in the document wrapping and store it in a
comparatively dry place. Vellum especially should be put into a plastic or moisture-proof bag.
When the machine is not used for extended intervals, remove the media and store it accordingly.
Treated colored paper
1.7 Media
47
Page 48

1
Before Using the Machine
1.8 Billing Meters
Steps
Note
Transmitting
Supplies Language Power Saver
Job Status
Machine Status
Log In/Out
Start
Stop
Clear All
<Machine Status> button
On the [Billing Meters] screen, you can check the number of printed pages measured by individual meters.
1.
Press the <Machine Status> button on the control panel.
2.
3.
Press the [Billing Meters] tab.
Check each meter on the displayed screen.
Meter 1
Area Count
Length Count
Displays the sum total of the surface area printed in black
2
and white by the machine so far. (Unit: m
)
Displays the sum total of the length printed in black and
white by the machine so far. (Unit: m or 0.1 m)
2
1
456
789
.
3
C
0
Meter 2
Area Count
Displays the sum total of the surface area printed in color by the machine so far. (Unit: m
Length Count
Displays the sum total of the length printed in color by the machine so far. (Unit: m or 0.1 m)
Serial Number
Displays the serial number of the machine.
Whether to print in black and white or color is determined depending on the color mode of the print
driver. If data in black and white is set to the color mode using the print driver, it is counted as a color
print.
A test print is also counted. For information on test printing, refer to "3.3.1 Making a Test Print" (p. 77).
2
)
48
1.8 Billing Meters
Page 49

Before Using the Machine
1
1.9 Checking Consumables
Steps
Note
Transmitting
Supplies Language Power Saver
Job Status
Machine Status
Log In/Out
Start
Stop
Clear All
<Supplies> button
The [Supplies] screen allows you to check the status such as the remaining amount of consumables. The status of
consumables is shown as "OK" or "Replace Soon".
1.
Press the <Supplies> button on the control panel.
2.
Check the status of consumables on the displayed screen.
Ink Cartridge
The screen displays "Replace Soon" when the ink cartridge is
empty.
The screen also shows estimated ink level for each ink cartridge.
(This includes the indicator bar which is divided into 20%
increments and the percentage value of 10% increments.)
Depending on your usage of ink, it is recommended that you
prepare new ink cartridges before they are exhausted, by taking
into account the ink level.
2
1
456
789
.
3
C
0
Once any one of the five cartridges (K1, M, Y, C, and
K2) becomes empty, the machine can no longer
perform printing.
Print Head
The amount of printed ink is displayed for each print head. If the amount of consumed ink exceeds 2,500ml,
"Replace Soon" appears.
Waste Ink Cartridge
"OK", "Replace Soon", or "Replace Now" is displayed depending on the amount of waste ink pooled in a waste ink
cartridge.
Refer
For information on how to replace consumables, refer to "3.1 Replacing Consumables" (p. 64).
1.9 Checking Consumables
49
Page 50

1
Before Using the Machine
1.10 Checking Machine Information
Steps
Note
Refer
Transmitting
Supplies Language Power Saver
Job Status
Machine Status
Log In/Out
Start
Stop
Clear All
<Machine Status> button
The [Machine Info.] screen allows you to check the machine configuration and to switch between the print modes.
1.
Press the <Machine Status> button on the control panel.
2.
Check machine information on the displayed screen.
You can change the tab, which is displayed first
when the <Machine Status> button has been
pressed. For information on the setting
procedure, refer to "5.3.7 Detailed Settings" (p.
114).
For information on the billing meters, refer to "1.8
Billing Meters" (p. 48).
For information on paper information or setting,
refer to "1.6 Configuring Paper Setting" (p. 43).
2
1
456
789
.
3
C
0
Machine Information
You can check the machine serial number, machine configuration, and software version on the [Machine Info.]
screen.
50
1.10 Checking Machine Information
For m ainten a nce/support:
Tells you whom to contact when making inquiries about maintenance and operation.
Serial Number
Indicates the serial number of the machine.
MAC Address
Indicates the MAC address of the machine.
Page 51

Before Using the Machine
1
Machine Configuration
Refer
Press [Machine config.] to display the [Machine config.] screen.
You can check the following information:
Configuration code
Memory size
Software Versions
Press [Software Versions] to display the [Software Versions] screen.
You can check the following information:
Control panel
Te x t
Controller
Printer
Print Mode
Press [Print Mode] to display the printer online/offline switching
screen.
Select the following print mode, and press [Save].
Online
Enables receiving data from the computer.
Offline
Disables receiving data from the computer. Up to the
currently received data is printed, and the subsequent data is
not received.
Supplies
Press [Supplies] to display the [Supplies] screen.
For more information on the [Supplies] screen, refer to
"1.9 Checking Consumables" (p. 49).
1.10 Checking Machine Information
51
Page 52

1
Before Using the Machine
1.11 Job Status
Steps
Note
<Job Status> button
Select a job on the [Job Status] screen to display detailed information on the completed jobs.
1.
Press the <Job Status> button on the control panel.
2.
3.
4.
Check the completed jobs.
Select a job to see the details.
Check the job details on the displayed screen.
Press [ ] to display the previous screen, and
press [ ] to display the next screen.
Press [Update] to refresh the display.
Transmitting
Job Status
Machine Status
Log In/Out
Supplies Language Power Saver
2
1
456
789
.
3
C
0
Clear All
Stop
Start
52
1.11 Job Status
Page 53

Before Using the Machine
1
1.12 Cancelling a Job
Steps
The following describes how to stop a job that has been sent to the machine.
1.
2.
Press the <Stop> button on the control panel.
Select <Ok> if you want to stop.
1.12 Cancelling a Job
53
Page 54

1
Before Using the Machine
1.13 Delete All Jobs
Steps
The following describes how to delete all jobs from the memory.
1.
2.
Press the <Delete All> button on the control panel.
Select <Ok> if you want to delete all jobs from the memory.
54
1.13 Delete All Jobs
Page 55

Chapter 2 CentreWare® Internet Services
This chapter describes how to operate the Print feature and CentreWare Internet Services.
Note
2.1 Overview of CentreWare Internet Services ......................................................................................... 56
2.2 Machine Settings...........................................................................................................................................62
The information on various drivers in this guide may not apply to your drivers depending on their version
upgrade.
Page 56

2
Print Feature and CentreWare Internet Services
2.1 Overview of CentreWare Internet Services
2.1.1 What is CentreWare Internet Services?
CentreWare Internet Services is a software application that enables you to remotely access the machine by using the
web browser on your computer when TCP/IP connection is available.
With CentreWare Internet Services, you can track the usage of the machine and change the setting values for the
machine features, without going to the machine's control panel.
56
2.1 Overview of CentreWare Internet Services
Page 57

Print Feature and CentreWare Internet Services
2
2.1.2 Setting Up for Using CentreWare Internet Services
Steps
Requirements
Your computer must support TCP/IP networking to use CentreWare Internet Services.
CentreWare Internet Services has been tested successfully with the following web browsers:
Refer
®
Internet Explorer® 7
®
Internet Explorer® 8
®
Internet Explorer® 9
®
Internet Explorer® 10
If you encounter problems during setup, refer to "4.1.5 Problems with CentreWare Internet Services" (p. 95).
Microsoft
Microsoft
Microsoft
Microsoft
Setting up your Web browser
Before using the service, make sure that Internet Options in your Web browser are set properly.
The following describes how to set up Internet Explorer 9.0.
1.
2.
3.
4.
Select [Internet Options] from the [Tools] menu.
On the [General] tab, click [Settings] for [Temporary Internet Files].
In the [Settings] dialog box, select [Every visit to the page] or [Every time you start Internet Explorer] for
[Check for newer versions of stored pages:].
Click [OK].
Proxy server and port number
Proxy Server
We recommend that you access this service directly, not through a proxy server.
Note
If using a proxy server, specifying the machine's IP address in the browser may result in slower responses,
preventing some screens from being displayed. In this case, set your browser not to access the machine's IP
address via a proxy server. For information on how to make this setting, refer to the browser Help section.
2.1 Overview of CentreWare Internet Services
57
Page 58

2
Print Feature and CentreWare Internet Services
Port Number
Steps
Note
Note
By default, the port number for the service is set to "80". The port number can be changed in [Properties] > [Protocol
Settings] > [HTTP]. Port Number must be in the range of 1 to 65535.
If you have changed the default port number, in the address bar of your Web browser, enter the IP address or the
Internet address followed by a colon ":" and the assigned port number.
For example, if you have changed the port number to "8080", enter the address as shown below.
http://[the machine's IP address]:8080/
or
http://[the machine's Internet address]:8080
Note
If you have enabled encrypted communication, you need to enter the address beginning "https" instead of "http"
in the browser address field in order to access CentreWare Internet Services.
Setting on the machine
Set the IP address for the machine, which will be used to access CentreWare Internet Services in it.
Note
You can skip this step when the machine is already assigned an IP address.
1.
2.
3.
4.
5.
6.
On the [System Administrator Menu] screen, press [System Settings] > [Network Settings].
For information on how to display the [System Administrator Menu] screen, refer to "5.1 System
Administrator Menu Settings Overview" (p. 104).
Press [Protocol Settings] > [IPv4 - IP Address]
Specify the IP address using the numeric keypad.
Press [Save].
Press [Close] several times until the [System Administrator Menu] screen is displayed.
Press [Close].
When a message prompting you to reboot the machine appears, follow the message to reboot the
machine.
58
2.1 Overview of CentreWare Internet Services
Page 59
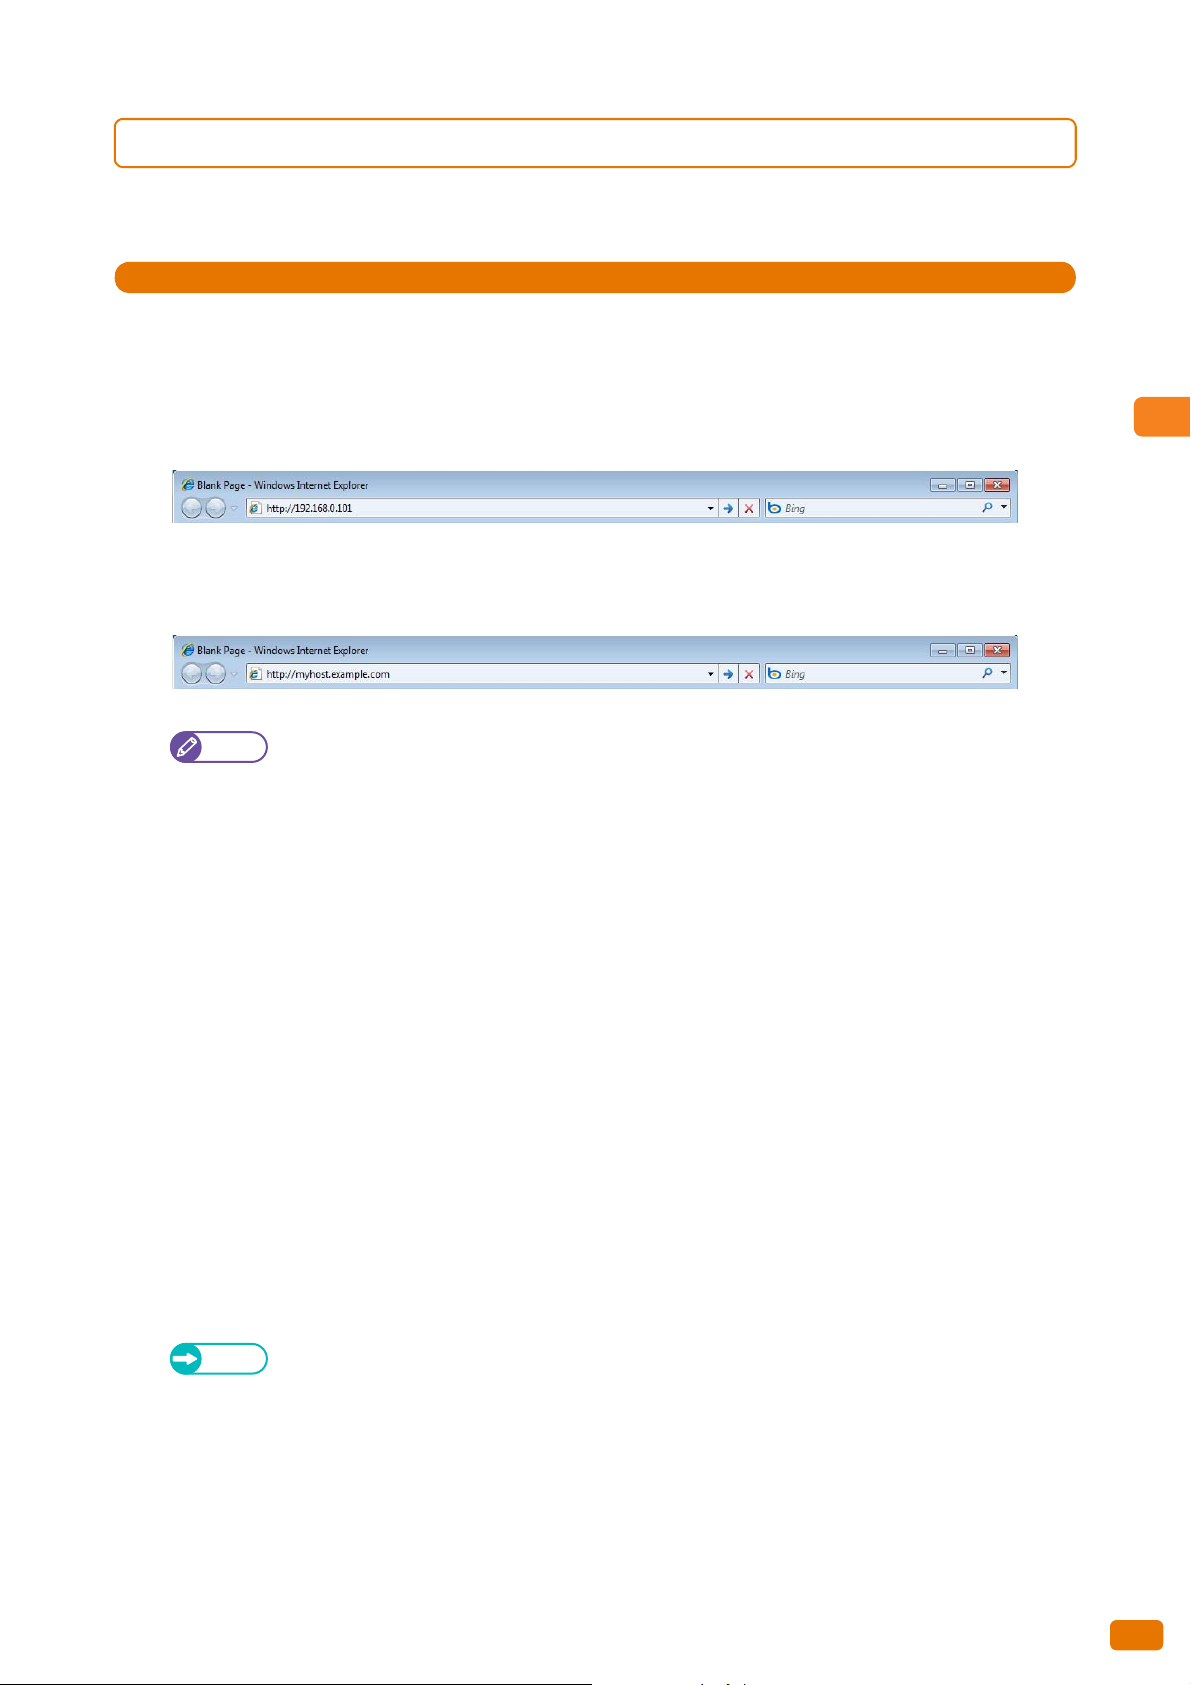
Print Feature and CentreWare Internet Services
2
2.1.3 Starting CentreWare Internet Services
Steps
Note
Refer
The following describes how to connect to CentreWare Internet Services from your computer.
1.
2.
Start your web browser.
Enter the machine's IP address or Internet address in the browser address field, and press the <Enter> key.
IP address entry example
Example - http://192.168.0.101
Internet address entry example (When the machine's Internet address is myhost.example.com)
Example - http://myhost.example.com
If your network uses DNS (Domain Name System) and the machine's host name is registered in the
domain name server, you can access the machine using the Internet address which consists of the host
name and the domain name. For example, if the host name is "myhost", and the domain name is
"example.com", then the Internet address is "myhost.example.com".
Ask your system administrator for the IP address or Internet address.
When specifying a port number, enter the IP address or the Internet address followed by a colon ":" and
the assigned port number.
If you have enabled encrypted communication by selecting the [Enabled] check box under [Network Settings] > [Protocol Settings] > [HTTP] > [Secure HTTP (SSL)] on the [Properties] tab, you need to enter the
address beginning "https" instead of "http" in the browser address field in order to access CentreWare
Internet Services.
IP address entry example
Example - https://192.168.1.1/
Internet address entry example
Example - https://myhost.example.com/
If authentication while attempting to log in as system administrator fails, the following message is
displayed in the right frame of web browser:
"Login failed."
If the number of times of failed attempts to log in as system administrator exceeds the limit allowed, the
following message is displayed in the right frame of web browser:
"Switch the machine Off and then On for System Administrator login."
If you encounter problems during setup, refer to "4.1.5 Problems with CentreWare Internet Services" (p.
95).
2.1 Overview of CentreWare Internet Services
59
Page 60
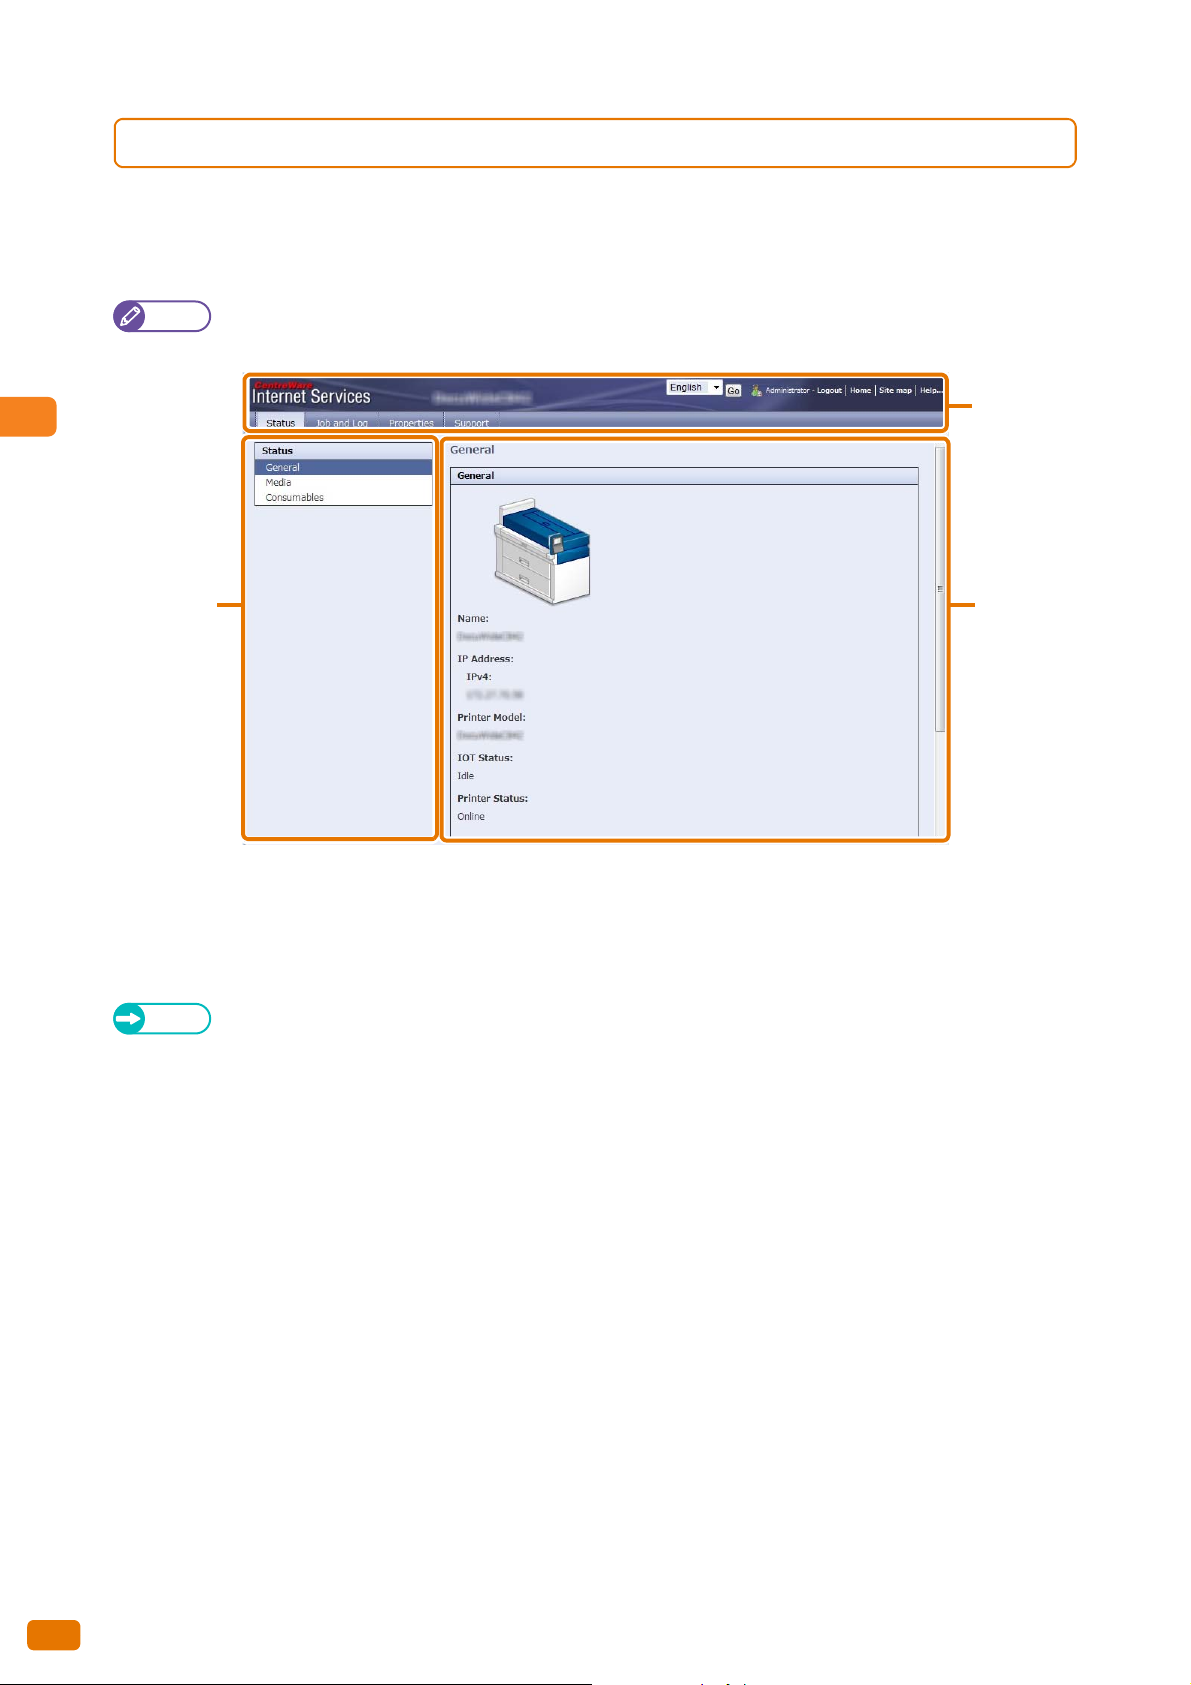
2
Print Feature and CentreWare Internet Services
2.1.4 CentreWare Internet Services Screen Components
Top fra m e
Left frame
Right frame
The CentreWare Internet Services screen consists of three frames (separate screens).
The information displayed in each frame depends on the feature selected: [Status], [Job and Log], [Properties], or
[Support].
Note
Clicking [Help] in the top frame displays the CentreWare Internet Services help. For more information on the
functions in CentreWare Internet Services, refer to the Help sections.
Upper frame
The top frame is located at the upper part of the window. This frame contains the logo, model name, the Help link,
user information, and tabs to access each of the functions of the service.
Refer
For information on each function provided by CentreWare Internet Services, refer to the Help section which can
be displayed by clicking [Help] in this frame.
Left frame
The contents in the left frame vary depending on the function you selected. When you select a function, the left
frame displays items and information available for that function.
60
2.1 Overview of CentreWare Internet Services
Page 61

Print Feature and CentreWare Internet Services
2
Right frame
Note
The right frame displays information and status of the machine and the [Refresh] button. Click [Refresh] to update
the display to the current status.
The table below lists the main functions you can perform using CentreWare Internet Services.
Tab Name Major Function
Status
Job and Log
Properties
Support
For information on each of the configurable items in CentreWare Internet Services, refer to the Help section
which can be displayed by clicking [Help] in the upper right of the CentreWare Internet Services screen.
If you make changes via CentreWare Internet Services while the machine control panel is in use, the changes you
have made will not immediately take effect on the control panel. In such a case, the changes you have made will
be available when the machine is turned off and then on again.
Some of the settings may require you to enter a user ID and password to change them. The user ID is the System
Administrator ID, which is set on the machine. By factory default, the user ID (System Administrator ID) is
"11111", and the password is "x-admin".
For information on how to change the System Administrator ID and password, refer to "5.6 System Admin
Settings" (p. 123).
Displaying the machine status
The status of paper trays and consumables such as ink cartridges is displayed.
Displaying jobs in queue, deleting those jobs, displaying completed jobs, and
displaying error history
Checking and changing a variety of settings
You can check the settings for items such as Machine configuration and
Interface, settings, and change those as necessary.
Displaying support information
2.1 Overview of CentreWare Internet Services
61
Page 62

2
Print Feature and CentreWare Internet Services
2.2 Machine Settings
Note
Steps
Note
Refer
Note
Note
The following describes how to configure the settings at the machine user interface.
CentreWare Internet Services can also be used to make these settings. For details, refer to the Help section which
can be displayed by clicking [Help] in the upper right of the CentreWare Internet Services screen.
1.
2.
3.
4.
5.
6.
7.
8.
On the [System Administrator Menu] screen, press [System Settings] > [Network Settings].
For information on how to display the [System Administrator Menu] screen, refer to "System
Administrator Menu Settings Overview" (p. 104).
Check that [LPD] is set to [Enabled] for [Port Settings].
For information on the LPD port setting, refer to "5.5.1 Port Settings" (p. 119).
Press [Close] to return to the [Network Settings] screen.
When the machine is already assigned an IP address, go to Step 7.
Press [Protocol Settings] > [IPv4 - IP Address]
Specify the IP address using the numeric keypad.
Press [Save].
Press [Close] several times until the [System Administrator Menu] screen is displayed.
Press [Close].
When a message prompting you to reboot the machine appears, follow the message to reboot the
machine.
62
2.2 Machine Settings
Page 63

Chapter 3 Daily Management and
Maintenance
This chapter describes how to replace consumables and clean the machine.
3.1 Replacing Consumables.............................................................................................................................. 64
3.2 Cleaning the Machine ................................................................................................................................. 73
3.3 Print Head Maintenance............................................................................................................................ 77
Page 64

3
Daily Management and Maintenance
3.1 Replacing Consumables
CAUTION
We recommend you to use the following consumables as they are manufactured to meet the specifications of the
machine.
Type of Consumables Product Code Quantity/Box
Ink cartridge-Black
Ink cartridge-Cyan
Ink cartridge-Magenta
Ink cartridge-Yellow
Waste ink cartridge
Print head*
* Only one type of print head is supplied; the same type of print head is attached at all of five installation locations.
Important
Note
The use of consumables not recommended by Xerox may degrade image quality and performance. Use only
consumables recommended by Xerox.
Make sure the ink cartridges are properly installed to all of the following five bays: K1, M, Y, C, and K2.
We recommend that you always keep spare consumables available.
Handling consumables
Always follow the instructions on the packaging or the bottle when storing consumables.
Do not unpack consumables before use. Avoid storing consumables in the following locations:
- In high temperature and humid locations
- Near heat-generating devices
- Areas exposed to direct sunlight
- Dusty areas
8R13152 1 unit (2L)/box
8R13153 1 unit (2L)/box
8R13154 1 unit (2L)/box
8R13155 1 unit (2L)/box
8R13157 1 unit/box
8R13156 1 unit/box
64
When using consumables, carefully read precautions for use that are instructed on their bodies or packages.
When calling your local Xerox representative to order consumables, have the product codes ready.
The proper treatment is required for used ink cartridge, waste ink cartridge, and print head. Dispose of used ink
cartridges, waste ink cartridges, and print heads in accordance with local regulations.
Keep ink cartridges out of the reach of children for safety. If a child swallows or licks accidentally or if ink gets
into child's eye, consult a physician immediately.
If ink adheres to your hand when you handle an ink cartridge, flush with water. If ink gets into your eye, flush
with water immediately.
If an abnormality such as a pain in the eye is found, consult your physician immediately.
3.1 Replacing Consumables
Page 65

Daily Management and Maintenance
3
3.1.1 Used Consumables
CAUTION
Dispose of used ink cartridges, waste ink cartridges, and print heads in accordance with local regulations.
3.1.2 Replacing an Ink Cartridge
To prevent possible static discharge when connecting the network cable to the Ink Container, touch the
machine frame to discharge any static prior to connecting the network cable.
The remaining amount of ink can be viewed in the [Supplies] screen on the touch screen.
An ink cartridge can be replaced at any time.
Important
Do not shake an ink cartridge before using it.
Make sure the ink cartridges are properly installed to all of the following five bays: K1, M, Y, C, and K2.
Ink cartridges are arranged in the order of black 1 (K1), magenta (M), yellow (Y), cyan (C), and black 2 (K2) from
the bypass (manual) feed table side to the back. The label of each ink cartridge indicates the ink color.
Install ink cartridges at all of five locations: three locations for cyan, magenta, and yellow, and two locations for
black.
Install each ink cartridge at the correct location as specified on the label.
Even if printing is specified in black and white, it consumes not only black inks but also color inks. All the color inks
are consumed so that the print heads are protected.
Refer
For more information on the [Supplies] screen, refer to "1.9 Checking Consumables" (p. 49).
Replace ink cartridges soon.
Replace ink cartridges.
Note
The number of pages that the machine can print after this
message is displayed is approximately 20 pages.
The remaining page yield for print jobs is applicable when A0
size documents with image density of 6% are used. The value
is only an estimate and varies depending on the conditions
such as the content printed, paper size, paper type, and the
machine operating environment.
Replace an ink cartridge.
Replace an ink cartridge.
The machine can no longer print if this message is displayed.
3.1 Replacing Consumables
65
Page 66

3
Daily Management and Maintenance
Steps
Removing the ink cartridge
Important
Note
1.
2.
3.
4.
5.
Have a new ink cartridge ready.
Open the ink cover.
When you open the cover while the machine is running a print job, the machine stops operation after the
page currently being processed has been printed.
Disconnect the network cable (1).
Dispose of the used ink cartridge in accordance with
local regulations.
Grasp the nozzle between fingers, pinch, and pull to remove (2).
Slide the nozzle along the track beneath the cartridge and into
the notch.
6.
Remove the ink cartridge.
66
3.1 Replacing Consumables
Page 67

Daily Management and Maintenance
3
Installing the new ink cartridge
Note
1.
2.
Remove the protective cover from the replacement ink cartridge.
Place the ink cartridge in the proper location.
3.
4.
Remove the nozzle from the track and attach it to the ink car-
tridge (1).
Connect the network cable (2).
The label affixed inside the ink cover depicts ink color
location.
The ink nozzle is keyed and color-coded.
5.
Close the ink cover.
3.1 Replacing Consumables
67
Page 68

3
Daily Management and Maintenance
3.1.3 Replacing a Waste Ink Cartridge
Steps
When a waste ink cartridge is filled with waste ink, the following message appears on the touch screen. Take the
appropriate action as instructed in the message.
Replace a waste ink cartridge soon.
Replace a waste ink cartridge.
Replace a waste ink cartridge.
The machine can no longer print if this message is displayed.
Important
1.
2.
If you wait until the message "Replace Waste Ink Cartridge" is
displayed, the printer is forced to stop even if it is operating
because the waste ink cartridge is full, and this may result in a
paper jam.
We recommend that you always replace the waste ink cartridge
prior to the display of the message.
Have a new waste ink cartridge ready.
Make sure that the machine is not operating, and pull up the
upper unit release lever to open the upper unit.
68
3.
3.1 Replacing Consumables
Open the front cover.
Page 69

Daily Management and Maintenance
3
4.
Note
Important
Pull out the waste ink cartridge carefully.
Always store the used waste ink cartridge in a
horizontal place to prevent ink from being dropped. Be
careful to handle ink of the waste ink cartridge.
Dispose of waste ink cartridge in accordance with local
regulations.
5.
6.
7.
Install a new waste ink cartridge.
Close the front cover.
Close the upper unit.
Be careful not to pinch your fingers.
If the waste ink cartridge is not installed correctly, the
message does not disappear, and the machine does
not start running.
3.1 Replacing Consumables
69
Page 70

3
Daily Management and Maintenance
3.1.4 Replacing a Print Head
Steps
Note
Note
When the amount of ink sprayed from the nozzle of a print head exceeds the specified value, the print head
replacement message appears on the touch screen.
On the touch screen, check the [Supplies] screen to see which print head needs to be replaced. The amount used of
ink at each print head can also be viewed in the [Supplies] screen.
Refer
Print head needs to be replaced soon.
For more information on the [Supplies] screen, refer to "1.9 Checking Consumables" (p. 49).
1.
2.
3.
4.
5.
Have a new print head ready.
On the [System Administrator Menu] screen, press [Print Head Maintenance] > [Replacing Print Head].
For information on how to display the [System Administrator Menu] screen, refer to "5.1 System
Administrator Menu Settings Overview" (p. 104).
Select the print head to be replaced.
If necessary, you can select multiple print heads. To
replace all of five print heads, select [All].
Press [Start].
Press [Yes].
70
3.1 Replacing Consumables
Page 71
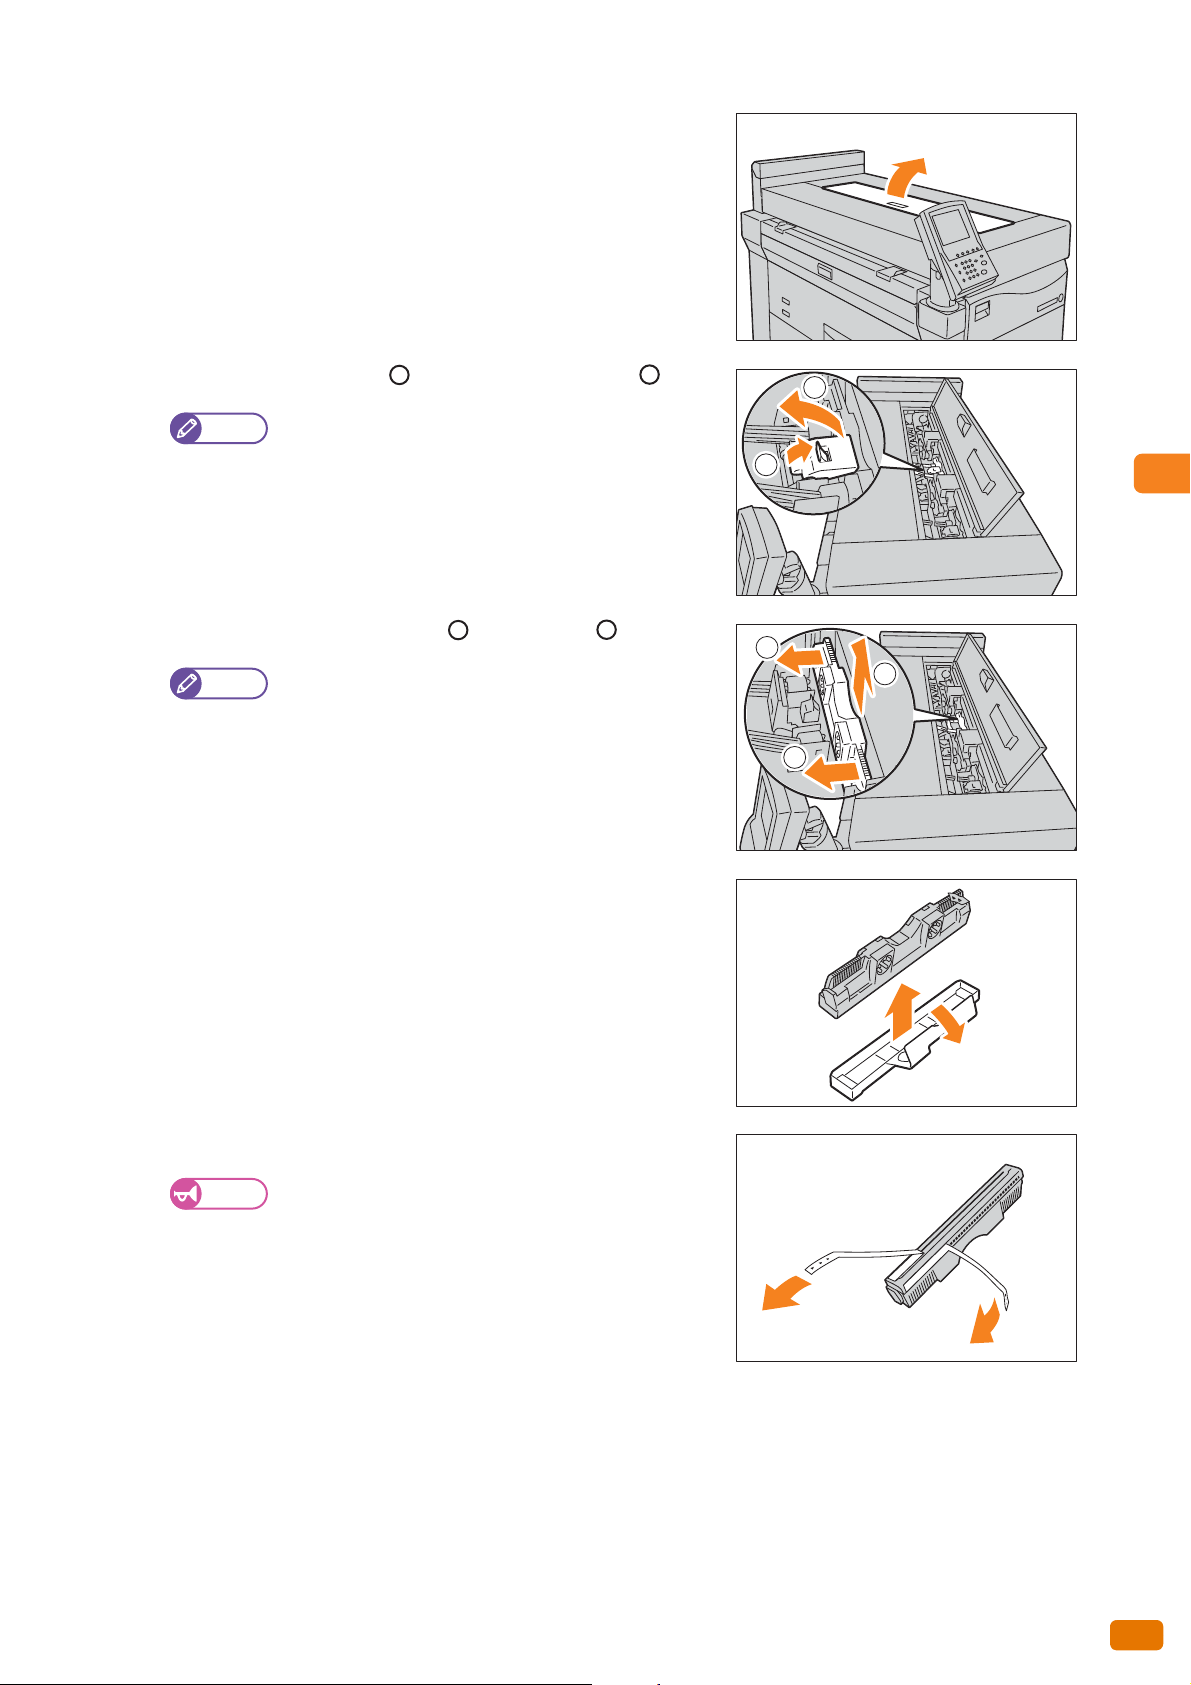
Daily Management and Maintenance
3
6.
Note
Note
Important
1
2
2
When message "Ready to replace a print head" appears, open
the print head cover.
You can check that ink is removed from the tube connected to the
print head selected on the replacement screen.
7.
8.
9.
While pulling up the tab ( ), lift the lever toward you ( ).
Fold the print head toward you ( ) to pull out it ( ).
Remove the cover from a new print head.
Only the lever of the print head selected in step 4. is
unlocked, and the others are locked. Do not attempt to
lift the lever forcedly.
1
Install the cover removed from a new print head on
the used print head, and return it to your local Xerox
representative.
2
1
1
2
1
10.
Peel two protection tapes from a new print head.
After peeling the protection tapes, keep your hand off
on the contact surface and nozzle surface of the print
head.
3.1 Replacing Consumables
71
Page 72

3
Daily Management and Maintenance
11.
Note
Note
2
Insert a new print head in an oblique direction ( ), and push
up so that it is located vertically ( ).
The print head can be installed only in one direction.
1
2
2
1
12.
13.
14.
15.
Return the lever back to its original position.
Close the print head cover.
Press [Done].
Message [Setting print head.] appears.
It takes approximately 10 minutes to set up the print head.
After the replacement of all the print heads has been
completed, press [Replaced].
To continuously replace other print head, press
[Replace more], and repeat steps 2 to 13 to make
replacement.
After the replacement of print heads has been completed, proceed to "3.3.3 Carrying out Calibration" (p. 79).
72
3.1 Replacing Consumables
Page 73

Daily Management and Maintenance
3
3.2 Cleaning the Machine
Important
Steps
Important
WARNING
CAUTION
1
2
1
2
This section describes how to clean the machine.
When cleaning this product, use the designated cleaning materials exclusive to it. Other cleaning materials may
result in poor performance of the product. Never use aerosol cleaners, or it may catch fire and cause explosion.
When cleaning this product, always switch off the power, and unplug the product. Access to a live machine
interior may cause electric shock.
Do not use benzene, paint thinner, or other volatile liquids or spray insect repellent on the machine as doing so
may discolor, deform, or crack covers.
If it is difficult to remove dirt, try gently wiping with a firmly wrung soft cloth moistened with a small amount of
neutral detergent. Then, wipe with a dried cloth.
Do not use cleaning agents other than water or neutral detergent.
Cleaning the machine with an excessive amount of water may cause the machine to malfunction or damage
paper during printing.
You can get some of the ink on your hands while performing cleaning procedures. It is recommended that you
wear disposable gloves while performing cleaning.
3.2.1 Removing Ink Stains in the Print Head Side of the Print Unit
If the print head side of the print unit is dirty, it causes ink drops to be attached on the print surface.
Important
1.
Turn off the power switch ( ) and the power breaker of the
machine ( ).
If the print surface gets dirty after ink stains on the print head were removed, consult your local Xerox
representative.
Turn off the power switch and the power breaker when
cleaning to avoid the risk of electric shock.
3.2 Cleaning the Machine
73
Page 74

3
Daily Management and Maintenance
2.
Important
Note
Important
Pull up the upper unit release lever to open the upper unit.
3.
4.
Wipe both edges of the print head with lint-free cleaning cloth.
Keep your hand off on parts other than the print head
cleaning area.
To clean the ink receiving side, refer to "3.2.2 Removing
Ink Stains in the Ink Receiving Side of the Print Unit"
(p. 75).
If it is difficult to get the dirt out of the print head,
wipe off with wet lint-free cleaning cloth.
Wipe areas surrounding the print heads with lint-free cleaning
cloth.
74
5.
3.2 Cleaning the Machine
Close the upper unit.
Be careful not to pinch your fingers.
Page 75

Daily Management and Maintenance
3
3.2.2 Removing Ink Stains in the Ink Receiving Side of the Print Unit
Steps
Note
If the ink receiving side of the print unit is dirty with excessive ink, it causes the rear side of the print surface to get
dirty.
Important
To clean the ink receiving side of the print unit, be sure to switch the machine to the cleaning mode on the
control panel.
1.
2.
On the [System Administrator Menu] screen, press [Print Head Maintenance] > [Internal Cleaning].
Press [Yes].
The machine enters the cleaning mode.
3.
When message "Preparing" disappears, pull up the upper unit
release lever to open the upper unit.
For information on how to display the [System Administrator Menu] screen, refer to "5.1 System
Administrator Menu Settings Overview" (p. 104).
4.
Wipe off the black plastic surface with a dry cloth.
3.2 Cleaning the Machine
75
Page 76

3
Daily Management and Maintenance
5.
Important
Close the upper unit.
Be careful not to pinch your fingers.
6.
7.
Press [Finish].
Message "Exiting internal cleaning mode." appears.
Press [Done] to exit the cleaning mode.
76
3.2 Cleaning the Machine
Page 77

Daily Management and Maintenance
3
3.3 Print Head Maintenance
Steps
Note
Note
Follow the procedure shown below to maintain the print head.
Step 1 Make a test print, and check the image quality (status of the print head).
Making a Test Print ............................................................................................................................................................ p. 77
Step 2 Clean the print head.
Cleaning the Print Head................................................................................................................................................... p. 78
Step 3 Make a test print again, and check the image quality (status of the print head).
Making a Test Print ............................................................................................................................................................ p. 77
Step 4 If the problem is not resolved, replace the print head.
Replacing a Print Head..................................................................................................................................................... p. 70
Step 5 After replacing the print head, carry out calibration.
Carrying out Calibration................................................................................................................................................... p. 79
3.3.1 Making a Test Print
1.
2.
3.
On the [System Administrator Menu] screen, press [Print Head Maintenance] > [Test Print].
Select a type of paper to be used for test printing, and press
[Start].
Press [Yes].
For information on how to display the [System Administrator Menu] screen, refer to "5.1 System
Administrator Menu Settings Overview" (p. 104).
Manual feed cannot be selected.
4.
Press [Done] to end test printing.
A sheet of the test chart is then printed.
3.3 Print Head Maintenance
77
Page 78

3
Daily Management and Maintenance
3.3.2 Cleaning the Print Head
Steps
Note
Note
Refer
1.
2.
On the [System Administrator Menu] screen, press [Print Head Maintenance] > [Head Cleaning].
For information on how to display the [System Administrator Menu] screen, refer to "5.1 System
Administrator Menu Settings Overview" (p. 104).
Select the print head to be cleaned and press [Start].
Multiple print heads cannot be selected from among
[1] to [5]. To clean all of five print heads, select [All].
3.
Press [Yes].
It takes approximately 3 minutes to clean the print head.
4.
5.
If the status of the print head is not improved by print head cleaning, proceed to "3.1.4 Replacing a Print Head" (p.
70).
Press [Done] to end print head cleaning.
Make a test print again to check the status of the print head.
For information on test printing, refer to "3.3.1 Making a Test Print" (p. 77).
78
3.3 Print Head Maintenance
Page 79

Daily Management and Maintenance
3
3.3.3 Carrying out Calibration
Steps
Note
Note
A chart is printed out automatically for calibration.
After replacing a print head or moving the machine, be sure to carry out calibration.
1.
2.
On the [System Administrator Menu] screen, press [Print Head Maintenance] > [Calibration].
Select a type of paper to be used for calibration.
3.
4.
Press [Start].
Press [Yes].
Calibration starts.
To continue with [Replacing print head], proceed to step 2.. For information on [Replacing print head],
refer to "3.1.4 Replacing a Print Head" (p. 70).
For information on how to display the [System Administrator Menu] screen, refer to "5.1 System
Administrator Menu Settings Overview" (p. 104).
Select a roll unit that contains paper of size A0 or larger.
If the correct type of paper is not selected, [Start] can-
not be initiated.
5.
Press [Done] to end calibration.
3.3 Print Head Maintenance
79
Page 80

3
Daily Management and Maintenance
3.3.4 Performing a Joint Adjustment
Steps
Note
Note
1.
On the [System Administrator Menu} screen, press [Print Head Maintenance] > [Joint Adjustment].
For information on how to display the [System Administrator Menu] screen, refer to "5.1 System
Administrator Menu Settings Overview" (p. 104).
2.
Feathering must be turned off to enable the manual joint adjustment, press [Feathering], press [Off], press
[Save].
[Input Adjustment Value] is hidden when [Feathering] is turned On.
80
3.3 Print Head Maintenance
Page 81

Daily Management and Maintenance
3
3.
Note
Press [Calibration].
4.
Select a type of paper to be used for calibration.
5.
6.
Press [Start].
Press [Yes] to confirm calibration start.
Select a roll unit that contains paper of size A0 or larger. If the correct type of paper is not selected,
[Start] cannot be initiated.
3.3 Print Head Maintenance
81
Page 82

3
Daily Management and Maintenance
7.
Press [Done] when calibration is complete.
8.
9.
Press [Print Adjustment Chart].
Select A0 size or larger to check all joints.
82
10.
3.3 Print Head Maintenance
Press [Start].
Page 83

Daily Management and Maintenance
3
11.
Press [Yes] to print adjustment chart.
12.
13.
Press [Done] when test print is complete.
Use the chart to check the status of the joints.
3.3 Print Head Maintenance
83
Page 84

3
Daily Management and Maintenance
Close-up view
2
1
3
No. Chart Ta r g e t
1 Head number Number of the target pint head
Example: "HEAD 1-2" shows the prints by print head 1 and 2.
2 Cyan / Magenta patch To check the clearance in X-axis
3 Black short line To check the clearance in Y-axis
84
3.3 Print Head Maintenance
Page 85

Daily Management and Maintenance
3
14.
Note
Note
Press [Input Adjustment Value] to adjust the position of each print head in the X-direction (right / left) and
the Y-direction (up / down).
Input Adjustment Value is only valid with the Feathering is turned Off.
Since the position of every print head can be adjusted, you should choose the way which involves the
least adjustment.
Example: adjusting print head 1 and 2 to adjust joint 1.
3.3 Print Head Maintenance
85
Page 86

3
Daily Management and Maintenance
86
3.3 Print Head Maintenance
Page 87

Chapter 4 Problem Solving
This chapter describes solutions to various problems you may have with the machine.
4.1 Troubleshooting............................................................................................................................................. 88
4.2 Error Messages ............................................................................................................................................... 96
4.3 When a Paper Jam Occurs......................................................................................................................... 97
Page 88

4
Problem Solving
4.1 Troubleshooting
Take proper action according to the following troubleshooting procedures.
The power is not turned on Action "Machine Problems" (p. 89).
No Yes
Touch screen is not bright
enough.
A message is displayed Action "Machine Problems" (p. 89).
Paper jam problems Action "Paper Jam Problems" (p. 90).
Image quality problems Action "Image Quality Problems" (p. 91).
Problems during printing Action "Problems during Printing" (p. 94).
If the error is not resolved even after following the above procedure, contact your local Xerox representative.
Action "Machine Problems" (p. 89).
No Yes
No Yes
No Yes
No Yes
88
4.1 Troubleshooting
Page 89
Problem Solving
4
4.1.1 Machine Problems
Refer
Refer
Check the status of your machine again before contacting us.
Symptom Check Remedy
The power is not
turned on
Touch screen is
dark.
Is the power turned on? Turn the power on.
"Power Source" (p. 30)
Is the plug connected to a
receptacle?
Is the power cord disconnected
from the machine?
Turn the power switch and the power breaker off and connect the
power cord firmly. Then turn the power breaker and the power
switch on again.
Refer
"Power Source" (p. 30)
Is the <Power Saver> button lit? The machine is in the Energy Saver mode. Press the <Power
Saver> button on the control panel to exit the Energy Saver
mode.
"Energy Saver Mode" (p. 33)
"Adjusting Screen Contrast" (p. 35)
Is the Contrast adjustment dial
kept set to a darker value?
Refer
Use the Contrast adjustment dial to make adjustment.
Is the backlight turned off? The backlight lights up when:
A button on the control panel is pressed.
A message is
displayed
A system error has occurred.
Has a paper jam occurred?
Is the message "Please wait..."
displayed?
Refer
Refer
"Error Messages" (p. 96)
"When a Paper Jam Occurs" (p. 97)
If the message is displayed for more than 5 minutes, contact your
local Xerox representative.
4.1 Troubleshooting
89
Page 90

4
Problem Solving
4.1.2 Paper Jam Problems
Refer
Refer
For information on how to remove jammed paper, refer to "When a Paper Jam Occurs" (p. 97).
Symptom Check Remedy
Media is often
jammed or
wrinkled.
Is the appropriate type of media
being used?
Correctly load the appropriate type of media.
"Media" (p. 45)
Is the media loaded correctly? Correctly load the media.
Refer
"Loading/Replacing Paper" (p. 38)
Is the media damp? Replace with media just unpacked.
"Loading/Replacing Paper" (p. 38)
"Loading/Replacing Paper" (p. 38), "Configuring
Are the media settings correct for
the media loaded?
Refer
Set the correct media size series and media type/weight to match
the media loaded.
Paper Setting" (p. 43)
Are there any jammed sheets or
torn pieces of paper still
remaining inside the machine or is
there a foreign object in the
Open the front door and pull out the roll unit to remove the torn
paper or the foreign object.
Refer
"When a Paper Jam Occurs" (p. 97)
machine?
Media does not
exit the machine
fully, and the trail
edge sticks at the
exit.
Is the media electrostatically
charged?
Take appropriate measures against static electricity. For example,
maintain proper room temperature and humidity.
90
4.1 Troubleshooting
Page 91

Problem Solving
4
4.1.3 Image Quality Problems
Refer
When the image quality of the printed output is poor, identify the symptom in the following table to perform the
corresponding remedy.
If the image quality does not improve even after the remedy is performed, contact your local Xerox representative.
Symptom Check Remedy
Part of the image
is missing on the
printed output.
(smudged or
unclear)
Is the media damp? If the media is damp, some parts of the original may not be
printed or may be unclear. Replace with media just unpacked.
"Loading/Replacing Paper" (p. 38)
"Loading/Replacing Paper" (p. 38)
Is the loaded media folded or
wrinkled?
Is part of the image outside of the
Refer
Remove the defective media or replace with media just unpacked.
Refer
Recreate the original so that the image fit to the printable area.
printable area?
The print heads may be clogged. Perform the print head cleaning two or three times
Refer
"Cleaning the Print Head" (p. 78)
If this symptom occurs after you have run a continuous print job,
wait for 30 seconds or more before starting the next print job.
Whenever an interval of 30 seconds or more elapses, the machine
automatically performs the print head cleaning.
Operate the machine in the room temperature at 68ºF (20ºC) and
the humidity at 50%. This will stabilize the performance of the
print head.
Dirt appears at
regular intervals.
The printed sheet
has dirty at its
leading edge or
back side.
Is the message "Print head needs
to be replaced soon." displayed?
Replace the print head.
"Replacing a Print Head" (p. 70)
Is the paper path dirty? Run a print job of a few pages.
If the symptom does not improve, contact your local Xerox
representative.
Internal components are soiled. Contact your local Xerox representative.
Is the paper path dirty with ink? Use a lint-free cleaning cloth to wipe off ink adhering to the
paper path (upper and lower surfaces) in the print unit.
Refer
"Removing Ink Stains in the Print Head Side of
the Print Unit" (p. 73)
"Removing Ink Stains in the Ink Receiving Side of
the Print Unit" (p. 75)
4.1 Troubleshooting
91
Page 92
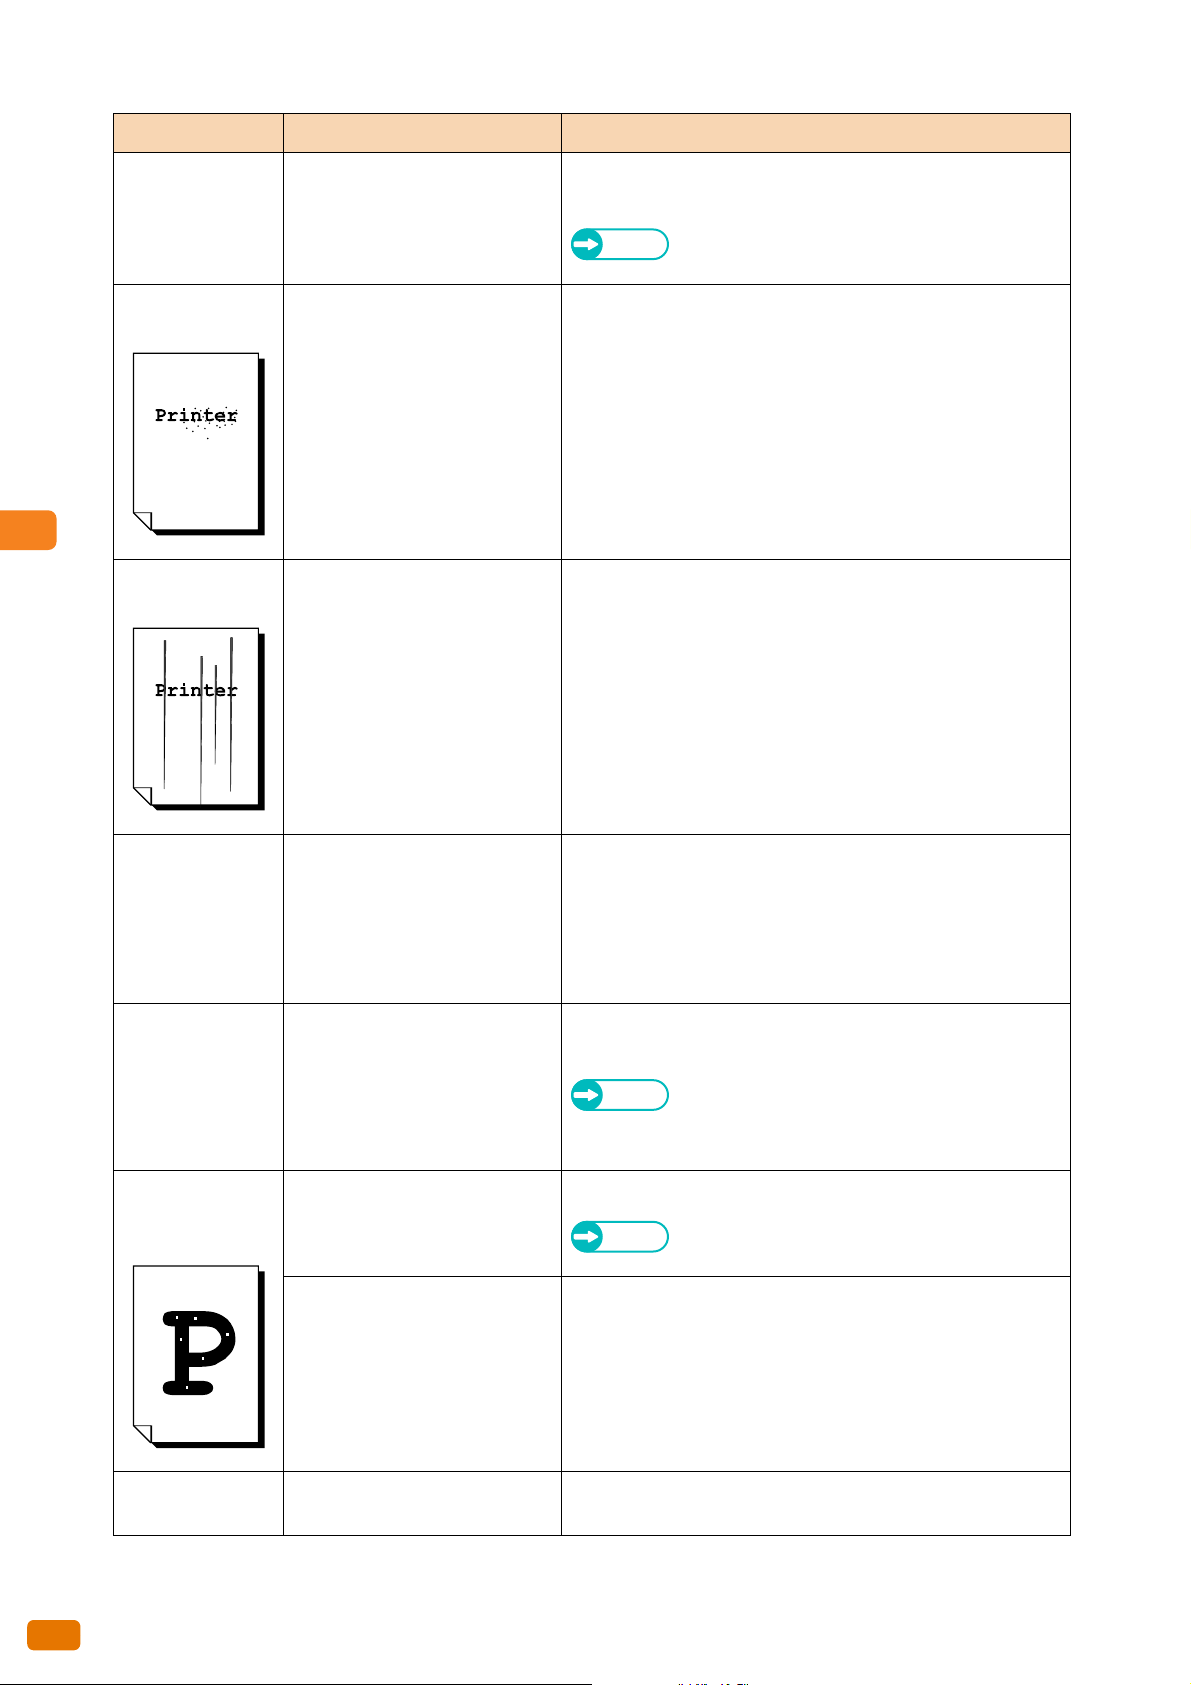
4
Problem Solving
Symptom Check Remedy
Loss of one or
more colors from
one print head
Unwanted black
dots are printed.
Unwanted black
lines are printed.
Check consumables to see if the
head is overdue for replacement.
If over 2,500 ml, the print head is due for replacement. Replace
the print head.
Refer
"Replacing a Print Head" (p. 70)
Internal components are soiled. Contact your local Xerox representative.
Internal components are soiled. Contact your local Xerox representative.
Unwanted black
lines are printed at
the trail edge of
the printed sheet
in manual feed
mode.
Streaks appear on
the printed sheet.
Unwanted white
dots appear in
black filled areas.
Is the paper size larger than the
original?
The machine needs to print black lines to prevent print head
clogging.
Print on paper which is the same size as the original.
The print heads may be clogged. Wait for 30 seconds or more before starting the next print job.
Alternatively, perform the print head cleaning two or three times
Refer
"Cleaning the Print Head" (p. 78)
"Removing Ink Stains in the Print Head Side of
the Print Unit" (p. 73)
Is the appropriate type of media
being used?
Load the appropriate type of media.
Refer
"Media" (p. 45)
Internal components are soiled. Contact your local Xerox representative.
92
Nothing is printed.
4.1 Troubleshooting
There may be a system
malfunction.
Contact your local Xerox representative.
Page 93

Problem Solving
4
Symptom Check Remedy
The printed image
is misaligned or
skewed.
Image is lost on
the edge of paper.
The printed sheet
has ink drops on it.
A mixture of colors
appear on the
printed sheet
Is the media loaded correctly? Correctly load the media.
"Loading/Replacing Paper" (p. 38)
Is part of the image outside of the
Refer
Recreate the original so that the image fit to the printable area.
printable area?
Is the area around the print head
contaminated by ink?
Perform the print head cleaning two or three times
Refer
"Cleaning the Print Head" (p. 78)
Clean the ink receiving side and the print head side of the print
unit.
Refer
"Removing Ink Stains in the Print Head Side of
the Print Unit" (p. 73)
"Removing Ink Stains in the Ink Receiving Side of
the Print Unit" (p. 75)
Is the print head dirty with ink? Try to run a print job again.
If the problem persists, perform the print head cleaning two or
three times.
Refer
"Cleaning the Print Head" (p. 78)
Image density is
too light or uneven
on the first printed
sheet during a
continuous print
job.
The print heads may have been
clogged.
Try to run a print job again.
4.1 Troubleshooting
93
Page 94

4
Problem Solving
4.1.4 Problems during Printing
This section describes how to troubleshoot problems during printing.
Symptom Check Remedy
Unable to print.
Is the network cable disconnected
Connect the network cable to the computer.
from the computer?
Is the network cable disconnected
Connect the network cable to the machine.
from the machine?
Is the printer status Offline? Check the setting for [Print Mode]. Select [Online] if the status is
[Offline].
"Print Mode" (p. 51)
"Print Settings" (p. 116)
Has an error occurred on the
machine?
Are the IP address and Subnet
Mask set correctly?
Is the network between the
Refer
Check the error message, and follow the instructions to solve the
problem.
Set the correct IP address and Subnet Mask.
Refer
Consult with your network administrator.
computer and the machine
working?
Is the port enabled? Set the port in use to Enabled.
Refer
"Port Settings" (p. 119)
Is the machine connected to
multiple computers?
Is the media of the specified size
loaded?
Wait for a while, and then try printing again.
Load the specified size media in the machine.
Refer
"Loading/Replacing Paper" (p. 38)
Switch to another available tray to continue printing.
Refer
"Switching Between Trays" (p. 41)
94
4.1 Troubleshooting
Page 95

Problem Solving
4
4.1.5 Problems with CentreWare Internet Services
Refer
This section describes the causes and recommended remedies for problems that may occur while using CentreWare
Internet Services.
Symptom Check Remedy
Unable to connect to
CentreWare Internet
Services.
The [Update] button is
not working.
Selecting the menu on
the left frame does not
update the right frame
contents.
The screen display is
distorted.
The latest information is
not displayed.
The [Apply] button does
not reflect the new
settings.
Is the machine working
properly?
Is the Internet address
correctly entered?
Is a proxy server being used? Depending on the proxy server, connections may not be
Are you using a specified
browser?
Is the window size for the
browser too small?
Is the display refreshed? Press the [Update] button.
Are all entered values correct? If a value outside of the permitted range is entered, the
Check if the machine is powered on.
Confirm the Internet address again. If the problem persists,
enter an IP address to make a connection.
possible. Set the browser not to "Use proxy server or set that
particular address not to use a proxy server.
Confirm if your browser is supported.
"Setting Up for Using CentreWare Internet
Services" (p. 57)
Change the window size for the browser.
update will automatically change the value to that within the
range.
The [Apply] button
displays a message on the
browser, such as [The
server returned an invalid
or unrecognized response]
and [No Data].
Unable to delete jobs.
Is it during operation or after
operation by the control panel
on the machine?
Is the entered password
correct?
Is the machine working
properly?
The machine is processing. Wait for a while and then press the [Update] button.
When the automatic reset function is configured, any setting
by CentreWare Internet Services is not applied until the
setting time passes. Wait for a while.
Entry in [Password] does not match that in [Re-enter
Password]. Enter the correct password.
Reboot the machine.
4.1 Troubleshooting
95
Page 96

4
Problem Solving
4.2 Error Messages
Important
This section describes how to solve the problem when an error message appears.
The message displayed may vary depending on each error.
Error Message Cause Remedy
A fault has occurred.
Switch the machine Off and
then On.
If the trouble persists, call for
service.
XXX-XXX
An internal error occurred.
Turn the power switch off and wait for a
while. After the <Main Power> indicator
on the control panel goes out, turn the
power switch on again.
If the message persists, record the
displayed contents [XXX-XXX].
Then, turn the power switch off, and
after the touch screen goes out, contact
your local Xerox representative.
96
4.2 Error Messages
Page 97

Problem Solving
4
When a paper jam occurs, the machine stops, and a paper jam error message appears on the touch screen. Clear the
CAUTION
paper jam according to the message.
Remove the jammed paper gently as not to tear it. If the paper is torn, remove all the torn pieces, making sure that
none remain inside the machine.
If a paper jam error message is still displayed even after you clear the jam, jammed paper remains in some other
part of the machine.
When the paper jam is cleared, printing resumes from the point right before the paper jam occurred.
4.3 When a Paper Jam Occurs
Always follow all warning instructions marked on or supplied with this product.
To avoid the risk of burn injuries, never touch the area with the "High Temperature" mark on.
Do not attempt to remove a paper deeply jammed inside the product, particularly a paper wrapped around
the fusing unit or the heat roller.
Otherwise, it may cause injuries or burns. Switch off the product immediately and contact your local Xerox
representative.
Important
When a paper jam occurs, check the error message to see the position of the jam before pulling out the jammed
paper. Otherwise, the jammed paper may be torn and pieces may remain inside the machine, causing
malfunctions.
If any piece of jammed paper remains inside the machine, the paper jam message does not disappear.
Be sure to clear paper jams while the machine's power is on. Otherwise, the data being processed may be erased.
Do not touch the components inside the machine, as this may cause print failure.
4.3 When a Paper Jam Occurs
97
Page 98

4
Problem Solving
4.3.1 Paper Jams in the Roll Unit
Steps
1.
2.
3.
Pull out the roll unit with both hands.
While pulling the green lever at the right edge, open the roll unit
cover.
Take the following action depending on the status of the jammed paper.
If the jammed paper is not found
(1)
Rotate the roll paper backwards.
(2) Then, reload the roll paper.
98
If the jammed paper is cut
(1)
Remove the jammed paper.
(2) Rotate the roll paper backwards.
(3) Then, reload the roll paper.
4.3 When a Paper Jam Occurs
Page 99

Problem Solving
4
If the jammed paper is not cut
Refer
Steps
(1)
Move the cutter to cut the paper.
(2) Remove the cut piece of paper.
(3) Rotate the roll paper backwards.
(4) Then, reload the roll paper.
For information on how to load the roll paper, refer to
"1.5.1 Replacing/Cutting Roll Paper" (p. 38).
4.
5.
1.
Close the roll unit cover.
Gently push the roll unit back into the machine all the way until
it stops.
4.3.2 Paper Jams in the Bypass (Manual) Feed Table or Upper Unit
Make sure that the machine is not operating, and pull up the
upper unit release lever to open the upper unit.
2.
Pull up the lever [A].
4.3 When a Paper Jam Occurs
99
Page 100

4
Problem Solving
3.
Important
Note
Take the following action depending on the status of the jammed paper.
Do not touch the black plastic component in the print unit. You can get ink on your hands.
If you can find the jammed paper through the opening:
(1)
Remove the jammed paper from the opening.
If the paper edge is located behind the print unit, hold
both edges of paper, and remove the paper toward you
while pulling out degree by degree in the feeding
direction.
If you cannot find the jammed paper through the opening:
(1)
Pull up the handle [B].
(2) Remove the paper jammed inside the paper feed area.
(3) Pull down the handle [B].
100
4.
4.3 When a Paper Jam Occurs
Return the lever [A] back to its original position.
 Loading...