

Page 1
Scan to PC Desktop Professional
Scan to PC Desktop Professional
Workgroup Edition v8
Workgroup Edition v8
Orientation Guide
Orientation Guide
Maximizing Your Productivity with Scanning and
Your Xerox WorkCentre Pro Multifunction Device
Training Topics:
•Scanning to the Desktop
•Scanning to the Desktop - Settings
•Introducing the PaperPort Desktop
•Splitting Desktop and Viewing Page Thumbnails
•Working with Documents from Any Folder
•Working with ePaper on the Desktop
•Combining Documents on the Desktop
•Creating PDF Files
•Creating Secure PDF Files
•Creating Text Searchable PDF Files
•PDF Editing
•Managing Documents at the Desktop
•Linking to Additional Applications
•Repurposing Documents - OCR
Xerox Corporation –Scan to PC Desktop Professional Workgroup Edition v8 –Orientation Guide
1
Page 2

Advanced Topics*:
•Advanced OCR
•Create Audio Documents from Paper
and Digital Documents
•OCR Batch Processing
•Paper to Digital Forms Conversion
•PDF Batch Conversion
*Advanced Topics will not be covered in Nuance’s web-based Scan to
PC Desktop End User Training Sessions unless specifically requested.
Xerox Corporation –Scan to PC Desktop Professional Workgroup Edition v8 –Orientation Guide
2
Page 3
Scanning to the Desktop
Scanning to the Desktop
Scanning at the Xerox WorkCentre Pro
The PaperPort Image Retriever tool included with Scan to PC Desktop completely
automates the scanning process so that each new scanned image is there waiting for
you on your PaperPort desktop by the time you physically return to your office from
scanning at the MFP.
1. Load the paper into the document feeder on the Xerox
WorkCentre Pro.
2. Select “Network Scanning”from the control screen.
3. Select your template from the list
OR
Use the scan-to-email feature to email the scanned images to
yourself as an email attachment.
4. Press the green Start button. Walk back to your PC and
Image Retriever will deliver the scanned image back to your
PC and save it onto the PaperPort Desktop. The PaperPort
Desktop will be open and your scanned image will be on the
PaperPort Desktop with a red box around it.
Xerox Corporation –Scan to PC Desktop Professional Workgroup Edition v8 –Orientation Guide
3
Page 4
Scanning to the Desktop--
Scanning to the Desktop
You can adjust the Image Retriever Settings to control how scanned images are
delivered to your PC.
Settings
Settings
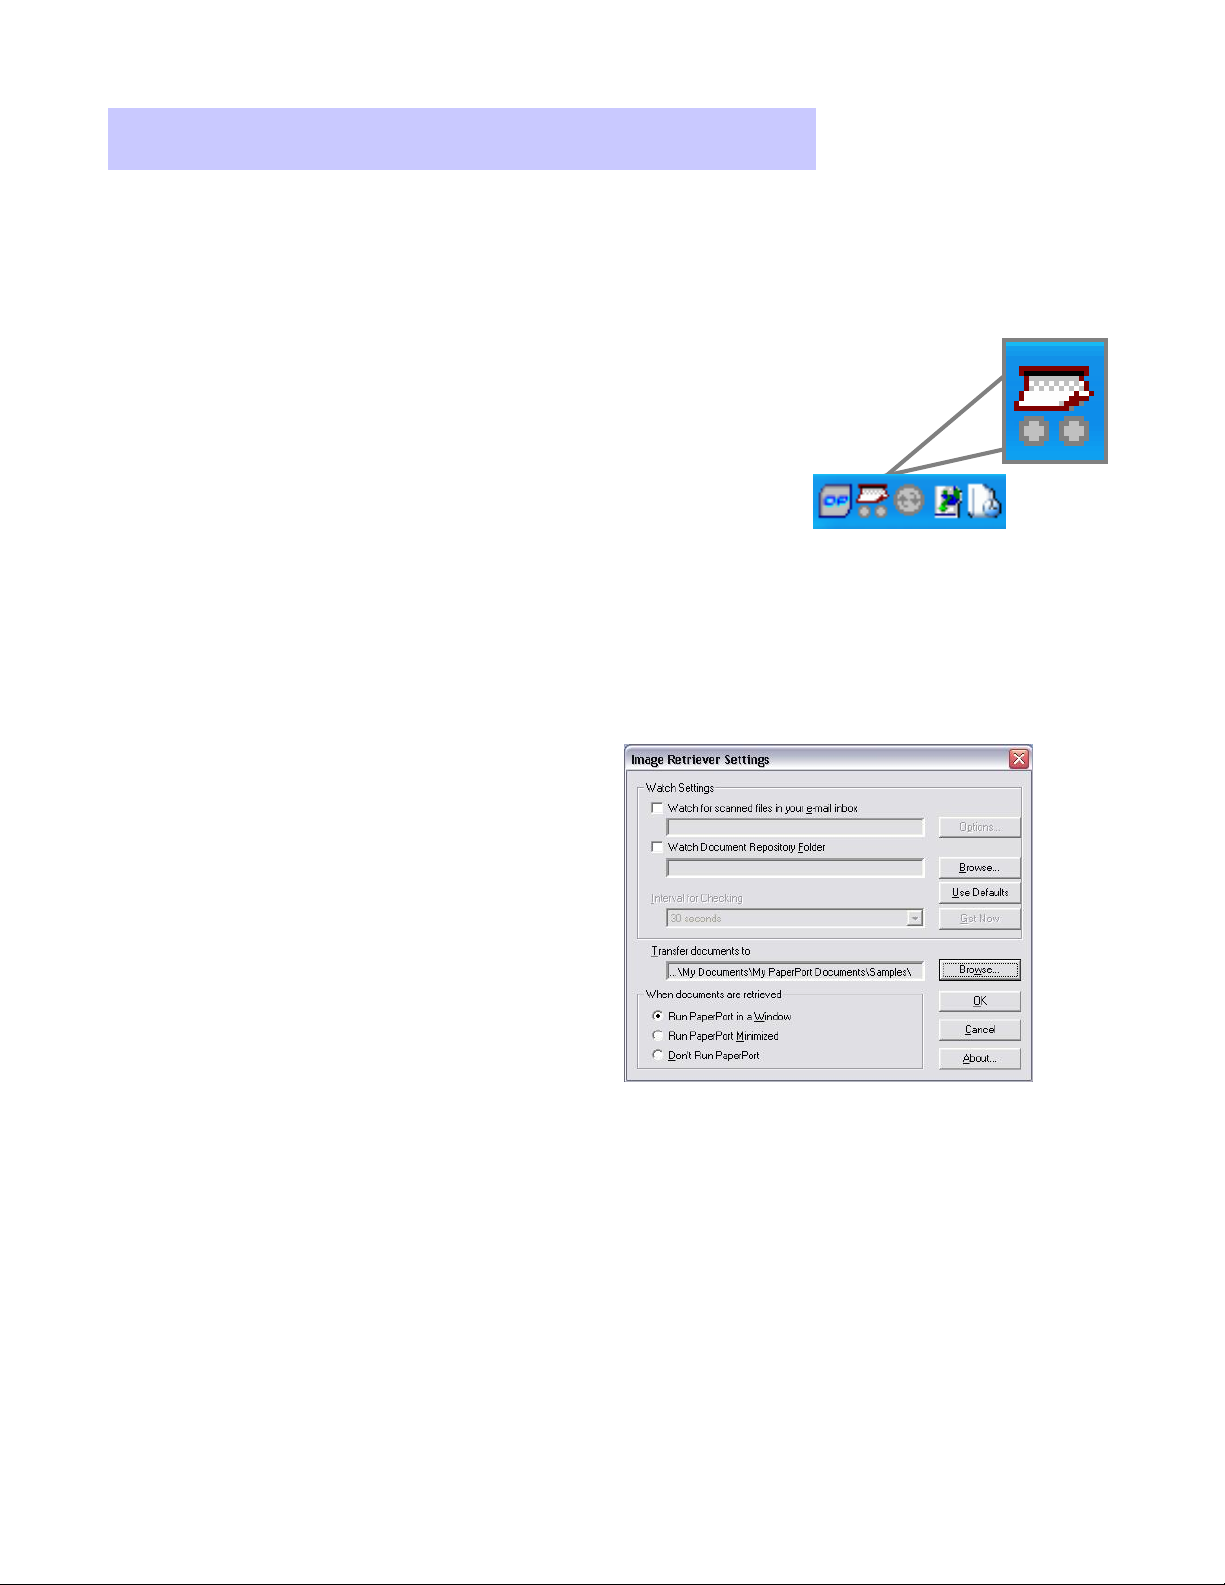
Starting Image Retriever
1. If Image Retriever is already running on your PC,
you will see the Image Retriever icon in your
Systray in the lower right corner of your Windows
Desktop near the clock.
2. If it is not running on your PC, go to Start > All
Programs > ScanSoft PaperPort Pro 10.0 > Image
Retriever. The Image Retriever icon will appear in
System Tray in the lower right corner of your
Windows Desktop near the clock.
Adjusting Image Retriever Settings
1. Double click on the Image Retriever
icon in the Systray.
2. From the Image Retriever Settings
window, select the desired settings
for the Image Retriever tool:
• From the Watch Settings, select if
you would like Image Retriever to
monitor your email inbox, a network
folder, or both.
• Select the interval with which you would like Image Retriever to
monitor your selected folder. As an alternative, you can select “Never”from the
“Interval for Checking”drop-down menu. If you select “Never, you can click on
the “Get Now”button to manually retrieve your images.
• Browse to the folder where Image Retriever should deliver your scanned files.
• Select “Run PaperPort in a Window”when documents are retrieved.
• Select OK to close the window.
Xerox Corporation –Scan to PC Desktop Professional Workgroup Edition v8 –Orientation Guide
4
Page 5
Introducing the PaperPort Desktop
Introducing the PaperPort Desktop
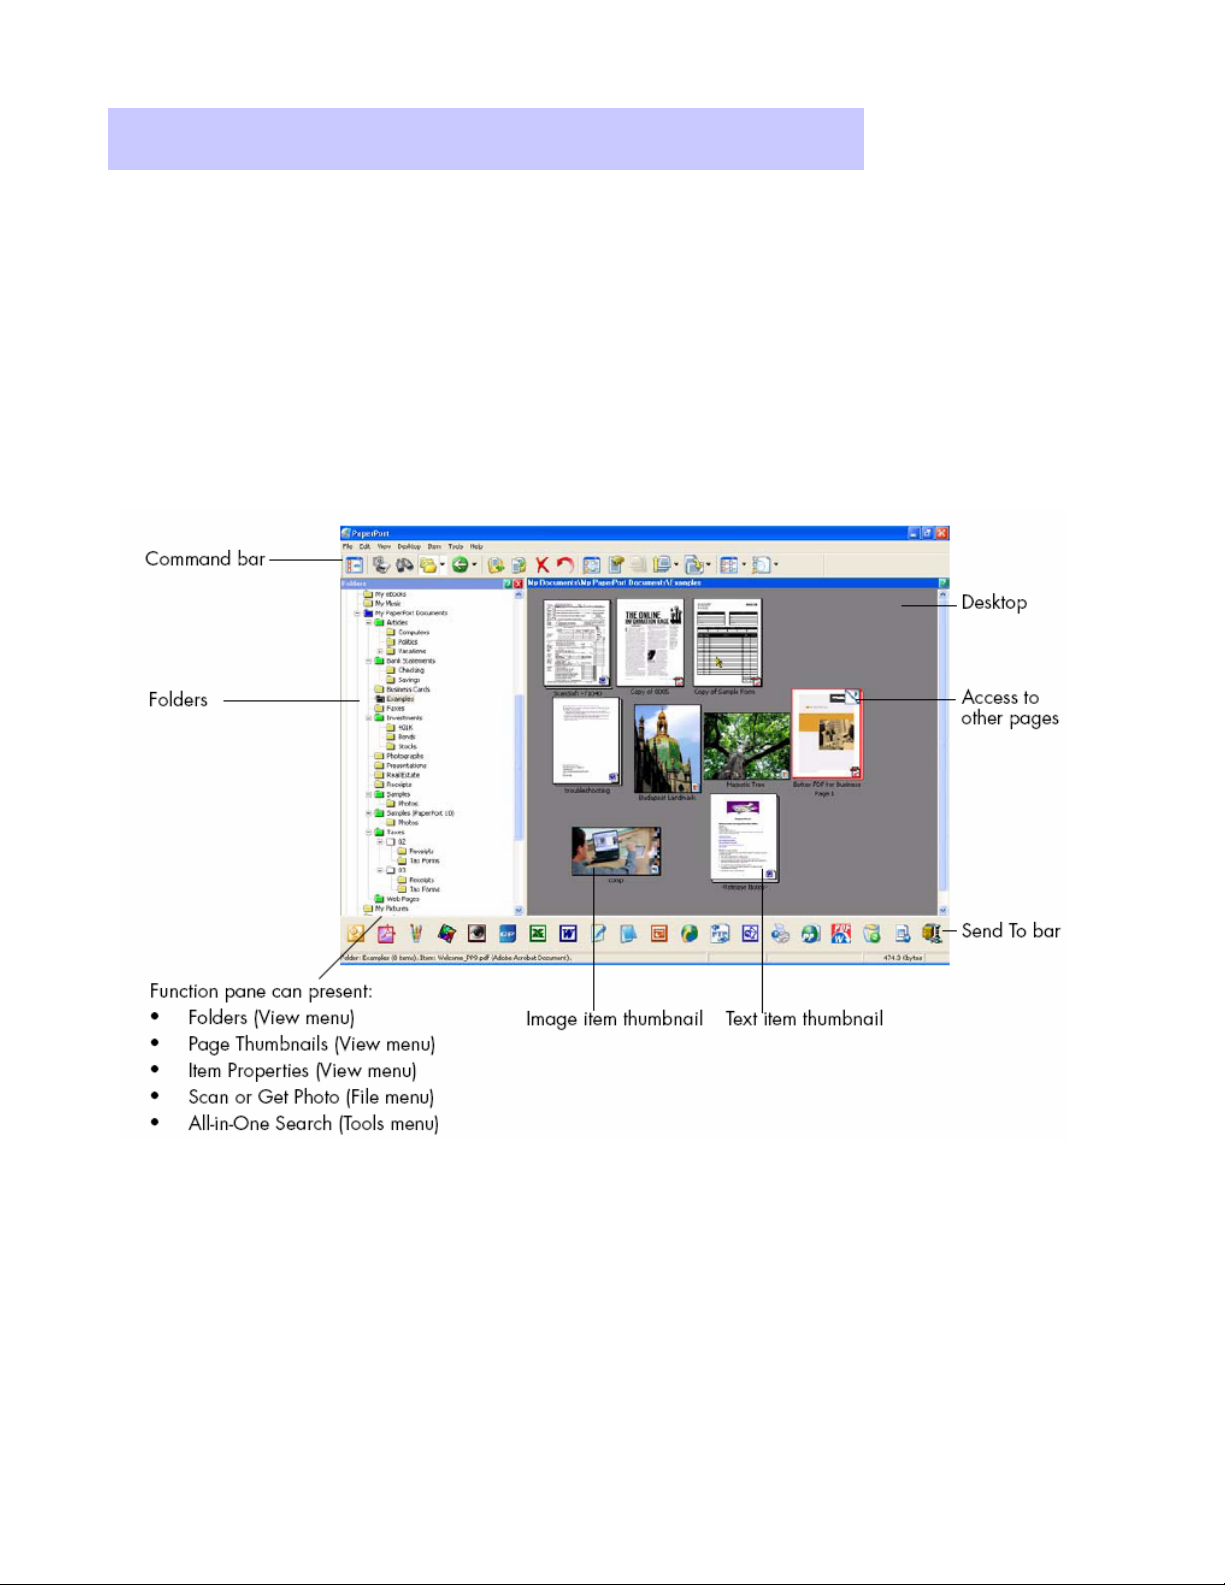
The PaperPort desktop appears with the Folders pane when you first
start the program. It displays your documents, as well as the tools you
can use to manage them. PaperPort offers all the tools necessary to
organize, find, and use documents, images, and PDF files.
Xerox Corporation –Scan to PC Desktop Professional Workgroup Edition v8 –Orientation Guide
5
Page 6

Working with Documents from Any Folder
Working with Documents from Any Folder
PaperPort folders are simply Windows folders that you want to use with
PaperPort. PaperPort displays folders in the Folders pane on the left side of the
PaperPort desktop. Initially, the Folders pane shows a set of folders designed to
help you get started using PaperPort.
Adding additional folders to PaperPort’s Folder View
Your PaperPort Desktop integrates seamlessly with your existing Windows
Explorer file structure.
To add a new folder to your PaperPort Desktop:
• Select the Folder icon from Command Bar.
• Select “Folder Manager”from the drop-down menu.
• Select “Add”from the Folder Manager window.
• Browse to folder you want to add (local or network) and select OK. Then close
the window. Your newly added folder will appear at the bottom of the Folder
Pane
• Folders can be color coded to aid in organization by selecting the folder in the
Folder Pane, right click on the mouse and selecting Properties from the dropdown menu.
Xerox Corporation –Scan to PC Desktop Professional Workgroup Edition v8 –Orientation Guide
6
Page 7
Splitting Desktop and Viewing Page Thumbnails
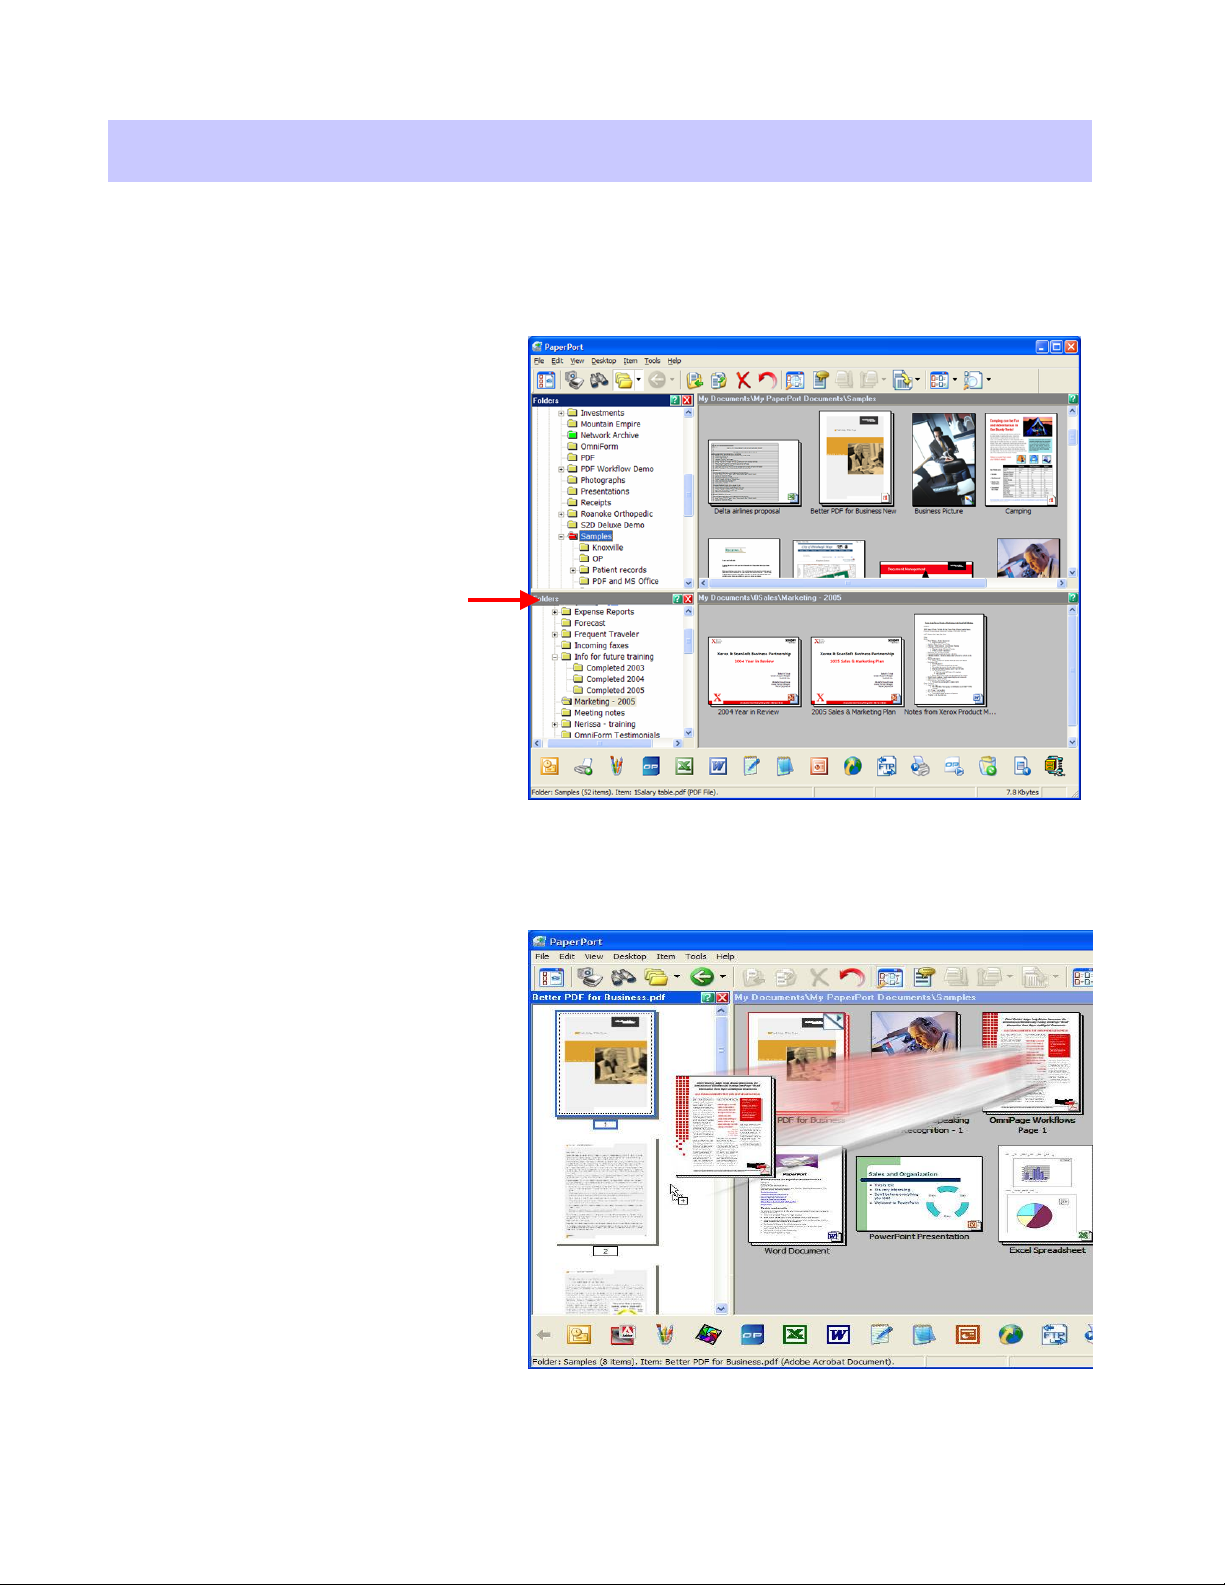
Splitting Desktop and Viewing Page Thumbnails
Split Desktop
Splitting the desktop into two parts makes it easier to copy and move items and pages
between different folders.
1. To split the desktop, go
to Desktop > Split
Desktop. A horizontal
splitter will appear which
is moveable.
2. Place the cursor on the
splitter and drag the
splitter up and down to
the desired location.
Page Thumbnails
The Page Thumbnails pane displays the page thumbnails of a selected PDF file in
Desktop View.
1. Click once on the PDF file
to select it.
2. Go to View > Page
Thumbnails. Each page
of the PDF file will be
displayed in the left pane.
3. You can use this pane for
reordering pages in a
multi-page document with
drag and drop, inserting
pages, deleting pages,
copying pages, and
cutting pages.
Xerox Corporation –Scan to PC Desktop Professional Workgroup Edition v8 –Orientation Guide
7
Page 8

Working with ePaper on the Desktop
Working with ePaper on the Desktop
ePaper is represented on the PaperPort desktop as PDF files. The PaperPort
desktop displays all files as visual thumbnails (MS Office, PDF, TIFF, and JPEG).
Annotating scanned images and PDF files
1. To annotate a scanned image or a PDF file, double click on its thumbnail on
the PaperPort Desktop to launch the file in Page View.
2. All annotation options are available to you by selecting the icons on the left
vertical column of the Page View or by selecting Annotation from the Menu
Bar.
3. To save the annotations with your image, just select the Desktop icon and
select Yes to save the annotations.
Xerox Corporation –Scan to PC Desktop Professional Workgroup Edition v8 –Orientation Guide
8
Page 9

Combining Documents on the Desktop
Combining Documents on the Desktop
You can combine, or stack, individual PDFs or documents of different file types into
multipage PDFs.
Stacking and Unstacking PDF files
1. PDF file thumbnails can be
copied, stacked and
unstacked just as you would
with physical paper
documents.
2. To stack, or combine, two
PDF images one on top of
the other to create a new
document, you can either:
• Select one PDF and then
drag that image with the
mouse on top of the other
PDF file.
• Select both images you want to combine using the mouse and holding down the Control
key at the same time. Then select the Stack icon from the Command Bar.
• In both cases, the result will be a combined new PDF file with multiple pages.
Combining Multiple Files into PDF Files
1. Select documents or images
that you want to combine
using the mouse and holding
down the Control key at the
same time. These items can
be different file types. For
example, you could select a
MS Word and MS Excel file.
2. Right click and select
“Combine Items into PDF”.
3. A copy of each of the selected files will be combined into one multipage PDF file and
the PDF file will be saved on the PaperPort Desktop.
Xerox Corporation –Scan to PC Desktop Professional Workgroup Edition v8 –Orientation Guide
9
Page 10

Creating PDF Files
Creating PDF Files
Combining paper documents and digital documents typically requires several
steps…printing, scanning…and lots of time. With PaperPort Professional 10,
documents from all of your MS Office applications can be printed directly to the
PaperPort Desktop and then automatically combined with scanned images to create a
new unified digital PDF documents. Also, you can convert batches of documents into
PDF files using PDF Create!. Please see the Advanced section of the Orientation
Guide for information on batch creation of PDF files for archival or distribution
purposes.
Creating PDF files from Inside of Other Applications
1. PaperPort Professional 10 includes a
Print Driver that enables you to print a
PDF file from any desktop application
directly to the PaperPort desktop or to
the location of your choice.
2. From within the desired application, go
to File > Print and then select
“ScanSoft PDF Create!”as your
printer.
3. To specify additional properties for the
file when using ScanSoft PDF Create!,
click the Properties button to the right
of the printer list. Physical properties
of the PDF are represented on the first
tab, and additional options such as
watermarks and security are available
on the second tab.
4. Select OK and you will be prompted to
select where you want your PDF files
saved.
5. If you choose to save the PDF file
back to a PaperPort folder, this new
PDF file can then be stacked with any
of your existing PDF images to create
a new document.
Xerox Corporation –Scan to PC Desktop Professional Workgroup Edition v8 –Orientation Guide
10
Page 11

Creating Secure PDF Files
Creating Secure PDF Files
In PaperPort Professional 10, you can adjust the security level of your PDF files. There are
two types of passwords in the program. The open password restricts document
accessibility: you can only open it by supplying the password when prompted. The
permissions password allows users to define how the document may be used. If it is not
specified, further use of the file is possible without any restrictions.
PDF Security from the PaperPort Desktop
1. To control PDF Security Settings
from the PaperPort Desktop, right
click on the PDF and select “PDF
Security”.
2. From the “PDF Security”window,
check the options to control
opening, printing, or editing the
PDF file.
3. Click on “OK”to activate your
security settings for the PDF file.
PDF Security from the PDF Create! Assistant
1. To control PDF Security Settings from the PDF Create! Assistant, click on the
wrench icon to open the “PDF Properties”window.
2. Click on the “PDF Settings”tab, and click on the “Advanced”button next to the
Security drop-down menu to access the security controls for that document.
Xerox Corporation –Scan to PC Desktop Professional Workgroup Edition v8 –Orientation Guide
11
Page 12

Creating Text Searchable PDF Files
Creating Text Searchable PDF Files
Text searchable PDF is the file format of choice for digital archiving applications. With
PaperPort Professional 10 and OmniPage Pro 15 installed on your PC, converting paper to a
fully text searchable PDF file is an automatic process directly from your PaperPort desktop or
directly from the network.
Creating Text Searchable PDF from the PaperPort Desktop
1. Select the file you want to convert with a
click of the mouse on PaperPort desktop.
2. Select File from the Menu Bar and Save As
from the drop down menu.
3. In the Save “FileName”As window, select
the location where you want to save the text
searchable PDF file, name the file, select
“PDF Searchable Image”as the file type and
then click on “Save”.
4. PaperPort and OmniPage will then
automatically convert your scanned image
into a fully text searchable PDF file and
place the file in your designated location.
PDF Editing
PDF Editing
1. Go to Start > All Programs > ScanSoft
PDF Converter Pro 3.
2. Click File > Open. Browse to the PDF
that will be edited.. Click Open.
3. Use the tools in the Organizer Toolbar
to edit the PDF file.
4. Click File > Save to save the changes
to the PDF file.
Xerox Corporation –Scan to PC Desktop Professional Workgroup Edition v8 –Orientation Guide
12
Page 13

Managing Documents at the Desktop
Managing Documents at the Desktop
With PaperPort Professional 10, you can organize and index all of your scanned image files
and text based documents. Using PaperPort's All-in-One Search tool, finding the file that you
need is as simple as knowing a word or phrase from the file for which you are searching.
1. Select the scanned image file you want to add
to your PaperPort document management
system.
2. Right click on the mouse and select “Add to All-
in-One Search”from the drop-down menu list.
3. PaperPort will automatically perform OCR on
the text within your selected image file and add
that text to the PaperPort All-in-One Search
database.
4. Alternatively, on a regular basis, you can select Search from the PaperPort Command
Bar click on the arrows to display the “Use All-in-One index”check box. Select that box
and click on “Update Index”. PaperPort will then index all of the image files and text-
based files within folders mapped to your PaperPort desktop.
5. To find files in any folder (local or network) mapped to your PaperPort Desktop, you
need only know a word or phrase contained within the file.
6. Click on the “Search”button on the PaperPort Command Bar to initiate a text sensitive
or keyword search.
7. In the “Containing indexed text”field,
type in the word or phrase from the file
for which you are searching.
8. Ensure that the “Use All-in-One Index”
and “Exact Match”options are
selected. Then click on the “Search”
button in the Search pane.
9. All-in-One Search will search all
folders mapped to your desktop and
return to you a list, ranked by
relevance, of all files containing your
search criteria.
10.Double click on the file from the search
results list and you will be taken to the
thumbnail view of that file on your
PaperPort Desktop.
Xerox Corporation –Scan to PC Desktop Professional Workgroup Edition v8 –Orientation Guide
13
Page 14

Linking to Additional Applications
Linking to Additional Applications
Your PaperPort Desktop makes it easy for you to integrate scanned images into other
applications on your workstation or the network.
1. Simply select the scanned image that
you want to work with and, using the
mouse, drag and drop that scanned
image on to the desired application icon
on the Send To Bar.
2. The desired application will automatically
launch with the scanned image
integrated into that application’s
workflow.
Filling in Scanned Forms with Form Typer
FormTyper is a PaperPort program that enables you to fill in forms, such as insurance
forms, registration cards, and medical forms, that you scan to the PaperPort Desktop.
1. PaperPort Professional 10 includes a feature
that enables you to fill data into blank
scanned forms. Scan the blank form back to
the PaperPort Desktop.
2. Drag the blank form to the FormTyper link
on the SendTo Bar. FormTyper will detect
where the underlines are on the form and
underline them in blue. You can also add
additional fields by selecting “Place
Manually”from the Fields menu.
3. Click on one of the blue underlines and
begin typing in text. To move to the next
field, press the Tab key.
4. Save the form back to the PaperPort
Desktop by going to “Save to PaperPort
Desktop As”from the Form menu. Name
the form and click on OK.
5. You will see that a filled in copy of your form
is saved to the PaperPort Desktop.
Xerox Corporation –Scan to PC Desktop Professional Workgroup Edition v8 –Orientation Guide
14
Page 15

Repurposing Documents--
Repurposing Documents
OCR
OCR
Differences between Basic Text Capture and Document
Conversion to MS Word:
• In both Basic Text Capture and Document Conversion, the text and paragraphs in
the document will be retained.
• When using Basic Text Capture, all of the document’s formatting and layout will be
lost. The formatting and layout will be retained in Document Conversion.
• All embedded images will be removed when using Basic Text Capture. Embedded
images will be retained with Document Conversion.
• All color text will be changed to black and white text when using Basic Text
Capture. Color text will be retained when using Document Conversion.
Basic Text Capture from the Desktop
1. Directly from the PaperPort desktop you can capture and convert sections of scanned
images to fully editable basic text documents.
2. Select the image file you want to convert from the PaperPort desktop with a single
mouse click.
3. Click on the MS Word icon on the PaperPort Send To Bar. MS Word will
automatically launch and and convert your image file into a basic text document
within MS Word.
Xerox Corporation –Scan to PC Desktop Professional Workgroup Edition v8 –Orientation Guide
15
Page 16

Introducing the OmniPage Desktop
Introducing the OmniPage Desktop
Menu Bar
Standard
Toolbar
OmniPage
Toolbox
Original Image View Text Editor View
Xerox Corporation –Scan to PC Desktop Professional Workgroup Edition v8 –Orientation Guide
16
Page 17

Repurposing Documents--
Repurposing Documents
Document Conversion to MS Word
1. Select the image file you want to
convert from the PaperPort desktop
with a single mouse click.
2. Click on the OmniPage Pro 15 icon
on the PaperPort Send To Bar.
OmniPage Pro will automatically
launch and load your image file into
the application.
3. Select the 1-2-3 button from the
OmniPage Toolbox.
4. Select Finish Processing Existing
Pages.
5. OmniPage will now perform OCR on
your image file and convert the
scanned image into editable text.
OCR
OCR
6. Use the OCR Proofreader to correct
any words that OmniPage is not sure
that it recognized correctly. Select OK
when Proofreading is complete
7. Select the Look In location, File Name
and Files of type (MS Word) from the
Save As window. Ensure that the Save
and Launch radio button is also
checked.
8. OmniPage will save and automatically
launch your file as a new MS Word
document.
Xerox Corporation –Scan to PC Desktop Professional Workgroup Edition v8 –Orientation Guide
17
Page 18

Advanced Topics*
*Advanced Topics will not be covered in Nuance’s web-based Scan to
PC Desktop End User Training Sessions unless specifically requested.
Xerox Corporation –Scan to PC Desktop Professional Workgroup Edition v8 –Orientation Guide
18
Page 19

Repurposing Documents
Repurposing Documents
–
Advanced OCR
–
Advanced OCR
Manual Zoning for Complex Documents
OmniPage has additional options that allow improved recognition for complex
documents.
1. Select the image file you want to
convert from the PaperPort
desktop with a single mouse click.
2. Click on the OmniPage Pro 15 icon
on the PaperPort Send To Bar.
OmniPage Pro will automatically
launch and load your image file into
the application.
3. Click on the 2-Automatic button in
the OmniPage Toolbox.
OmniPage will automatically zone
the document and recognize it.
4. Verify that the True Page
formatting button is selected in the
Text Editor.
5. If OmniPage did not properly
recognize some parts of the
document, use the tools in the Image
Panel to adjust the size or change the
type of Text, Graphics, and Table
zones.
6. When you have finished modifying
the zones, click on the 2-Automatic
button to re-recognize the document.
7. Select “Yes”to re-recognize the
document.
8. Click on the 3-Save to File button in
the OmniPage Toolbox.
9. Select the Look In location, File Name and Files of type (MS Word) from the
Save As window. Ensure that the Save and Launch radio button is also checked.
10. Click on “OK”to save the document and open it in MS Word.
Xerox Corporation –Scan to PC Desktop Professional Workgroup Edition v8 –Orientation Guide
19
Page 20

Repurposing Documents
Repurposing Documents
–
Advanced OCR
–
Advanced OCR
Create Audio Documents from Paper and Digital Documents
OmniPage features RealSpeakTMText-To-Speech for converting documents into audio
files.
1. Select the image file you want to
convert from the PaperPort
desktop with a single mouse click.
2. Click on the OmniPage Pro 15 icon
on the PaperPort Send To Bar.
OmniPage Pro will automatically
launch and load your image file into
the application.
3. Click on the 2-Automatic button in
the OmniPage Toolbox.
OmniPage will automatically zone
the document and recognize it.
4. Click on the 3-Save to File button in
the OmniPage Toolbox.
5. Select “Wave Audio Converter”as the
output format under Files of Type.
6. Click the Options button to specify the
speed and voice to be used for
creating the audio file. Please note
that selecting a voice using a
language other than that of the
original document will not cause
translation of the file to occur. The
audio created by mixing the text and
the voice languages would sound like
gibberish to a native speaker of the
voice language.
7. Select the Look In location and File Name from the Save As window. Ensure that
the Save and Launch radio button is also checked.
8. Click on “OK”to save the document and open it in your default WAV player.
Xerox Corporation –Scan to PC Desktop Professional Workgroup Edition v8 –Orientation Guide
20
Page 21

Repurposing Documents
Repurposing Documents
–
Advanced OCR
–
Advanced OCR
OCR Batch Processing
OmniPage Pro 15 includes a full batch manager for automated processing of files.
One of the most common processes is detailed below.
Batch Conversion to Text Searchable PDF
Using the Xerox WorkCentre Pro and OmniPage Pro 15, you can scan multiple documents
into a network folder and then schedule OmniPage to convert all these scanned images to
fully text searchable PDF files automatically at a pre-determined point in time.
1. Go to Start > All Programs >
ScanSoft OmniPage 15.0 >
OmniPage Batch Manager.
2. The Batch Manager tool will launch.
Go to File > Create Job. From the
Job Wizard window, click on
“Normal Job”, name the job, and
click on “Next”.
3. On the Start & Stop window, select
“Recurrent…”in the Start Time
drop down menu, and check the
“Delete Input Files”checkbox. Click
Next.
4. On the Job Recurrence window,
select the Start Time and your
preferred Recurrence Pattern.
Click Next.
5. Select “Fresh Start”. Click Next.
6. There are a number of options
available for the input files. In most
cases, these files will have been
scanned to a local or a network
folder. In that case, select “Load
Files”. Otherwise, choose the
appropriate input location for your
files. Click Next.
Xerox Corporation –Scan to PC Desktop Professional Workgroup Edition v8 –Orientation Guide
21
Page 22

Repurposing Documents
Repurposing Documents
7. Click the Browse button, then
click Advanced. Browse to the
folder where the files are
located. Click the Add Folders
button, then OK.
8. In the “Create New Document”
section, check “For Each Image
File”. Click Next.
9. Select “Recognize Images”.
Click Next.
10. Set the appropriate languages
and dictionaries for the
documents to be processed.
Click Next.
–
Advanced OCR (con
–
Advanced OCR (con
’t)t)
’
11. In this step, the save location is
selected. Choose the
appropriate location for the files.
The most common option is to
select “Save”. Click Next.
12. From the File Type menu,
select “PDF with Image on
Text”. For naming options,
select “Use input file names”.
Select the entire list under the
Input column at the base of the
window and click the “Specify
Output Folder”button. Browse
to the appropriate folder and
click OK. Click Next.
13. Select “Finish Workflow”. Click
Finish.
Xerox Corporation –Scan to PC Desktop Professional Workgroup Edition v8 –Orientation Guide
22
Page 23

PDF Batch Conversion
PDF Batch Conversion
Batch conversion to PDF
1. Open the PDF Create! Assistant by
going to Start > All Programs >
ScanSoft PDF Create! 2.0 > PDF
Create! Assistant.
2. Drag and drop documents and images
into the PDF Create! Assistant window.
3. From the drop-down menu, select to
“Create One PDF per file”or to
“Combine into one PDF document”.
4. Click on the “PDF Create”button and
you will be prompted to select where
you want your PDF files saved.
Paper to Digital Forms Conversion
Paper to Digital Forms Conversion
1. Go to Start > All Programs >
ScanSoft PDF Converter Pro 3.
2. Click File > Open. Browse to the
PDF form that will be filled in. Click
Open
3. Once the form is open in PDF
Converter Professional, click on the
PDF icon in the top command bar.
Choose “Auto Form Typer”from the
list.
4. The fields will automatically be
recognized and named on the open
PDF form.
5. To alter the names or any of the other properties of the fields on the PDF form,
right-click on the field and select Properties from the menu.
6. Once the form is customized, click the Hand icon in the Command Bar to begin
filling out the form.
Xerox Corporation –Scan to PC Desktop Professional Workgroup Edition v8 –Orientation Guide
23
 Loading...