


Software Version 9.0
702P00861
October 2012
FreeFlow® Web Services
Book Assembly Supplement

Copyright © 1996-2012 Xerox Corporation. All rights reserved. Xerox® and Xerox and Design®,
FreeFlow®, FreeFlow Output Manager®, and FreeFlow Process Manager® are trademarks of Xerox
Corporation in the United States and/or other countries. BR#3102
While every care has been taken in the preparation of this material, no liability will be accepted by Xerox Corporation
arising out of any inaccuracies or omissions.
Printed in the United States of America.
Companies, names, and data used in examples herein are fictitious unless otherwise noted.
Changes are periodically made to this document. Changes, technical inaccuracies, and typographical errors will be
corrected in subsequent editions.
Document Version 1.0: (October 2012).

Table of Contents
Introduction ............................................................................................................ 5
Navigating this Document ............................................................................................................... 6
Book Assembly Setup ......................................................................................................................... 7
Book Assembly Printing Workflows and JDF Job Tickets................................................... 7
Supported JDF Job Ticket Parameters ........................................................................... 8
FreeFlow Print Server Stock Library/ Printer Setup ................................... 9
Configure the FreeFlow Print Server Stock Library ................................................... 9
Create a FreeFlow Print Server Print Queue ............................................................. 12
Load and Validate Xerox Printer Trays ....................................................................... 12
Workflow 1: FreeFlow JMF Service Print Workflow ............................... 15
FreeFlow JMF Service ....................................................................................................................... 15
Summary of Steps ................................................................................................................ 15
Installing JMF Service on the Web Service Server ................................................. 16
System Check .......................................................................................................................... 16
Create Users & Groups ........................................................................................................ 16
JMF Service Printer Registration .................................................................................... 17
CLI Command Line Interface .......................................................................................... 18
FreeFlow Web Services Server ..................................................................................................... 19
Check Stock Library .............................................................................................................. 19
Define a JMF Output Device for Book Assembly ................................................... 19
Create a Book Assembly Job Type ................................................................................ 21
Validate the Book Assembly Job Type ........................................................................ 24
Workflow 2: FreeFlow Output Manager® Print Workflow .................. 25
FreeFlow Output Manager ............................................................................................................ 25
FreeFlow Web Services Server ..................................................................................................... 27
Check Stock Library .............................................................................................................. 27
Define Output Device for Book Assembly ................................................................. 27
Create a Book Assembly Template ............................................................................... 28
Validate the Book Assembly Template ...................................................................... 29
Book Assembly Use Case Example .............................................................. 31
Saddle Stitched Booklet ................................................................................................................. 31
Additional Setup Procedures ........................................................................................................ 37
FreeFlow JMF Service Setup ............................................................................................. 37
FreeFlow Output Manager
®
Setup ............................................................................... 41
Book Assembly Supplement
iii


Introduction
This guide describes how to integrate FreeFlow® Web Services with the Book Assembly
optional module. Web Services Book Assembly allows customers to take multiple files and file
types, perform a soft-proof and dynamically create bound books or other finishing options
from virtually any location.
• The actual routing of the job is normally assigned as part of the pricing setup of a
template or job type. The JDF information is sent via JMF messages to the next module in
the workflow
• A FreeFlow Web Services Output Device is created to route the jobs to the appropriate
FreeFlow module
For more information on all Web Services printing workflows, and integrations with other
FreeFlow applications, refer to the FreeFlow Web Services Print Service Provider Guide.
Book Assembly Supplement 5
Introduction FreeFlow® Web Services
Use Case
p
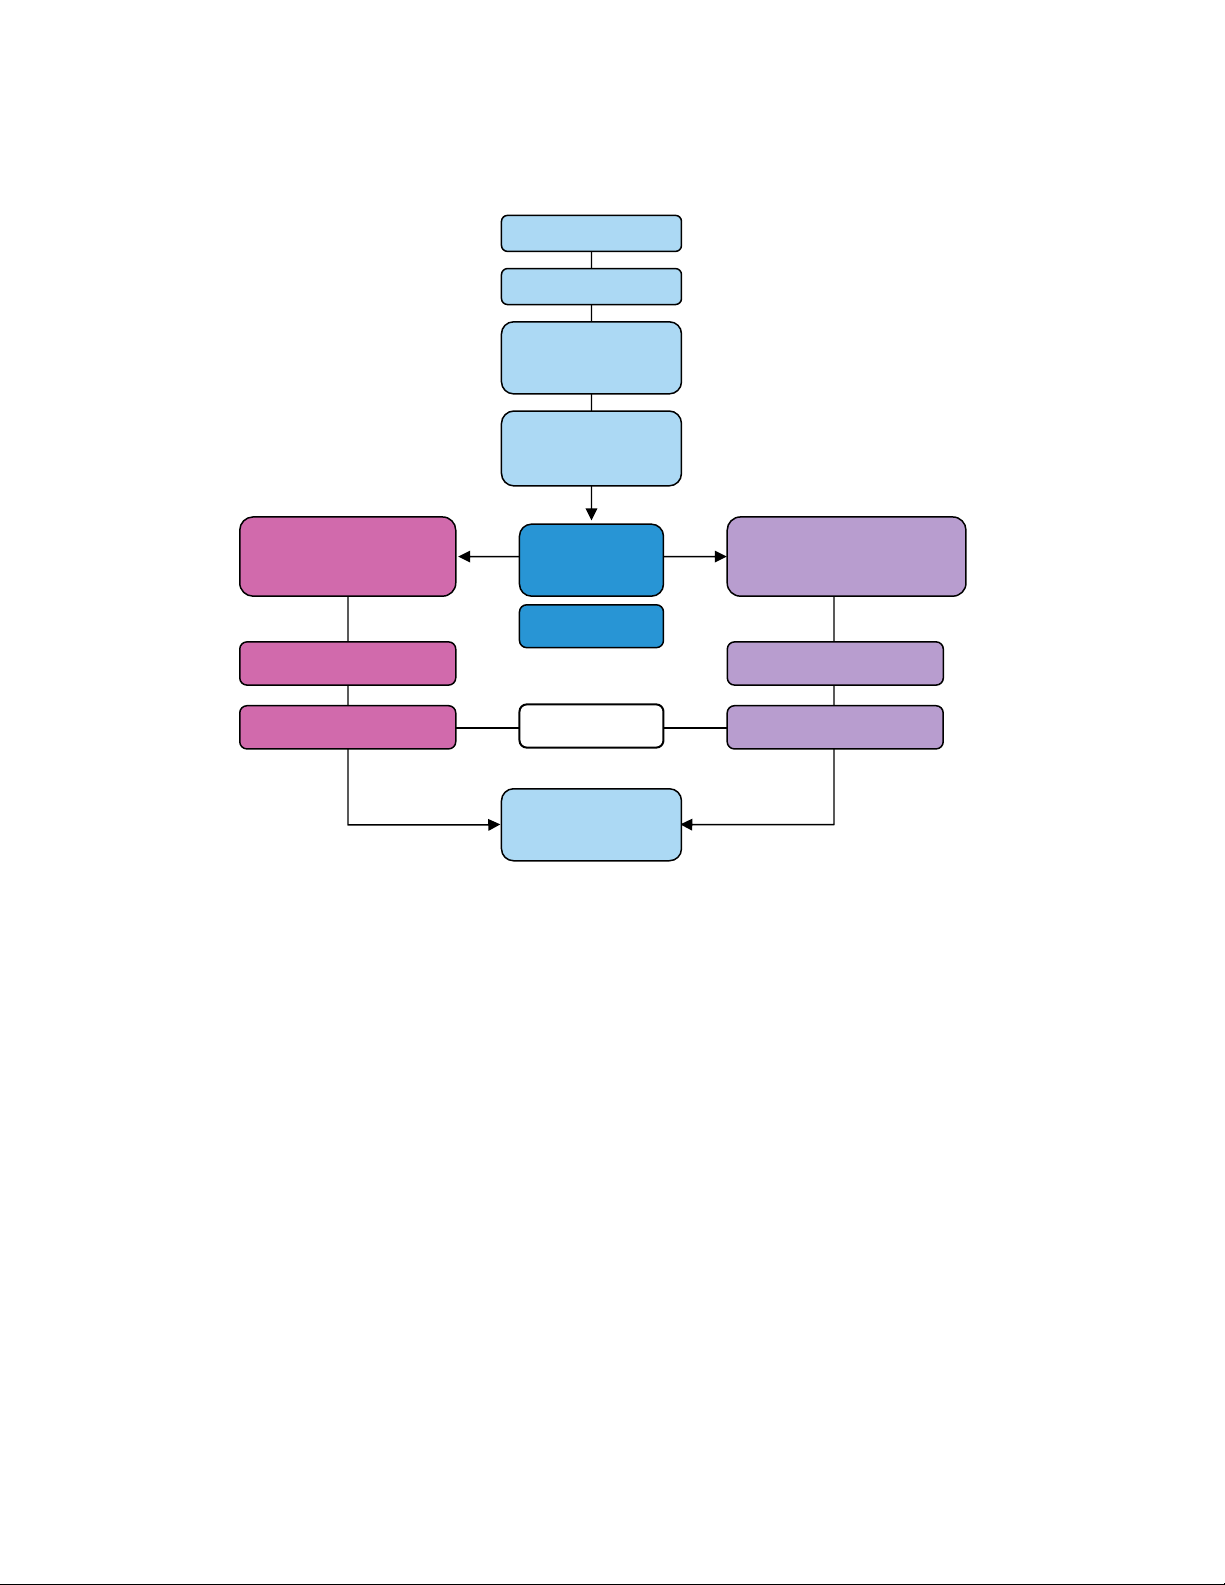
Navigating this Document
Workflow 1
Print Workflow using
FreeFlow JMF Service
FreeFlow JMF Service
Web Services Server
Introduction
Book Assembly Setup
Book Assembly
Printing Workflows
and JDF Tickets
FreeFlow Print Server
Stock Library / Printer
Setu
Select
Workflow
Execute Steps
Web Server
Web Services
Book Assembly
Workflow 2
Print Workflow using FreeFlow
Output Manager
FreeFlow Output Manager
Web Services Server
®
Additional References for Book Assembly
• FreeFlow Web Services Print Buyer Guide
• FreeFlow Web Services Print Service Provider Guide
• FreeFlow JMF Service User Guide
• FreeFlow Print Server on-line help
Reference materials may be obtained from the Xerox Analyst or by visiting the Support and
Drivers section on xerox.com.
6 Book Assembly Supplement

FreeFlow® Web Services Introduction
Book Assembly Setup
1. FreeFlow Print Server
- Configure the FreeFlow Print Server Stock Library
- Create a FreeFlow Print Server printer queue for the Book Assembly print workflow
- Load and validate applicable stocks in Xerox printer trays
2. Select a Web Services Book Assembly Print Workflow
- Workflow 1: FreeFlow JMF Service Print Workflow
• Install FreeFlow JMF Service co-resident on the Web Services server and
configure JMF Service
- Workflow 2: FreeFlow Output Manager
• Configure print queue on FreeFlow Output Manager
In both printing workflows, the JDF ticket with the job properties associated with the Book
Assembly job is routed to the FreeFlow Print Server (DFE). JMF messaging is used to
communicate the status of the job through the printing workflow back to the Web Services
Production Queue.
3. FreeFlow Web Services
- Check Stock Library with Print Server Stock Library
- Define a FreeFlow Output Device for the Book Assembly print workflow
- Create a Book Assembly Template
®
Print Workflow
Book Assembly Printing Workflows and
JDF Job Tickets
FreeFlow Web Services achieves automation in production printing by implementing JDF/JMF
Printing Workflows in combination with Xerox production printers.
For more information on all Web Services printing workflows, and integrations with other
FreeFlow applications, refer to the FreeFlow Web Services Print Service Provider Guide.
Select a Print Workflow and follow the instructions to setup and configure each FreeFlow
component for Book Assembly. FreeFlow Web Services Book Assembly can only be used with
the following JDF/JMF printing workflows:
1. FreeFlow JMF Service: installed on the same server as FreeFlow Web Services
- Workflow 1: FreeFlow JMF Service Print Workflow
2. FreeFlow Output Manager: a specific queue is selected in FreeFlow Output Manager
- Workflow 2: FreeFlow Output Manager Print Workflow
Both workflows use JDF digital printing Process for Book Assembly jobs. The job ticket
parameters supported in the JDF ticket are outlined in Supported JDF Job Ticket Parameters
on the next page.
A Web Services Output Device is created to route the job to the appropriate FreeFlow
component in the printing workflow.
Book Assembly Supplement
7

Introduction FreeFlow® Web Services
Note
The FreeFlow Process Manager
Web Services supports submission of standard jobs (i.e., no page exceptions) to Process
Manager via JDF Intent, which does not carry the necessary JDF parameters required to
process a Book Assembly job. Refer to the Web Services Print Service Provider Guide for more
information on supported printing workflows for Process Manager
®
workflow cannot be used with Web Services Book Assembly.
Supported JDF Job Ticket Parameters
Since JDF is an emerging standard, not all possible job ticket attributes from FreeFlow Web
Services are currently supported by the JDF printing path. When following one of the two
printing workflows (JMF Service or Output Manager), the job parameters below can be
transferred via JDF process:
• Number of Copies
• Media (weight, size, color, type)
• Sides imaged (one side, two sides, head-to-toe)
Finishing
• Saddle Stitch (fold and stitch)
• Folding
Covers (for Book Assembly)
• Add Front Cover (media, print on front, print on back)
• Add Back Cover (media, print on front, print on back)
Insert Tabs (for Book Assembly)
• Insert after page number
• Media (weight, size, color, type, sequence number)
• Tab Text
Exceptions Pages (for Book Assembly)
• Media (weight, size, color, type)
• Sides imaged (one side, two sides, head-to-toe)
8 Book Assembly Supplement
FreeFlow Print
Server Stock Library/
Printer Setup
FreeFlow Print Server requires the following setup:
• Configure the FreeFlow Print Server Stock Library.
• Create a FreeFlow Print Server printer queue for Book Assembly print workflow.
• Load and validate applicable stocks in Xerox printer trays.
Note
You must configure the Web Services Stock Library with the required stocks before creating a
Book Assembly template and assigning the stock to the template.
Configure the FreeFlow Print Server Stock Library
Create the stock in the FreeFlow Print Server Stock Library that will be used in the FreeFlow
Web Services Book Assembly workflow for all supported segments of the Book Assembly.
• To set up FreeFlow Print Server Stock Library parameters, refer to the FreeFlow Print Server
online help: Adding a new stock.
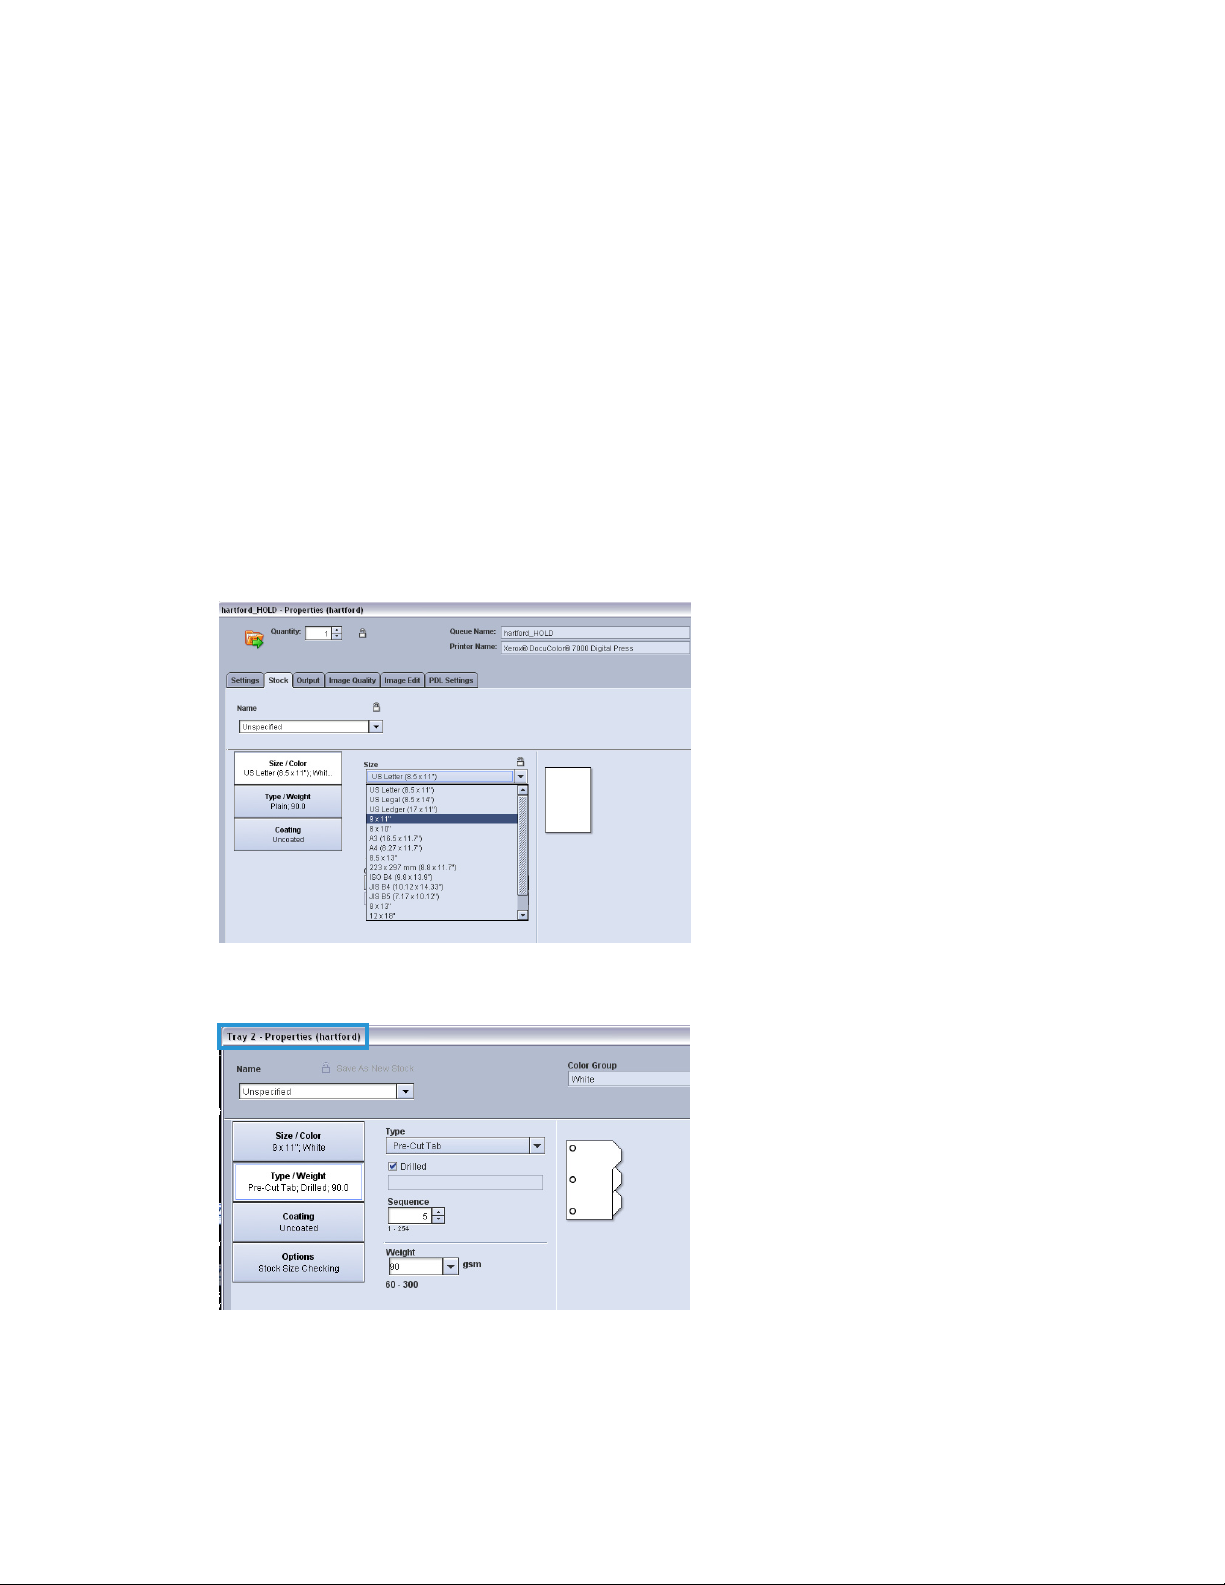
Important Note
The FreeFlow Print Server Stock Library must match both the Web Services Stock Library and
the stock assigned to the Book Assembly template. See figures below, and refer to Section 2:
FreeFlow JMF Service Print Workflow; Create a Book Assembly Job Type for more information
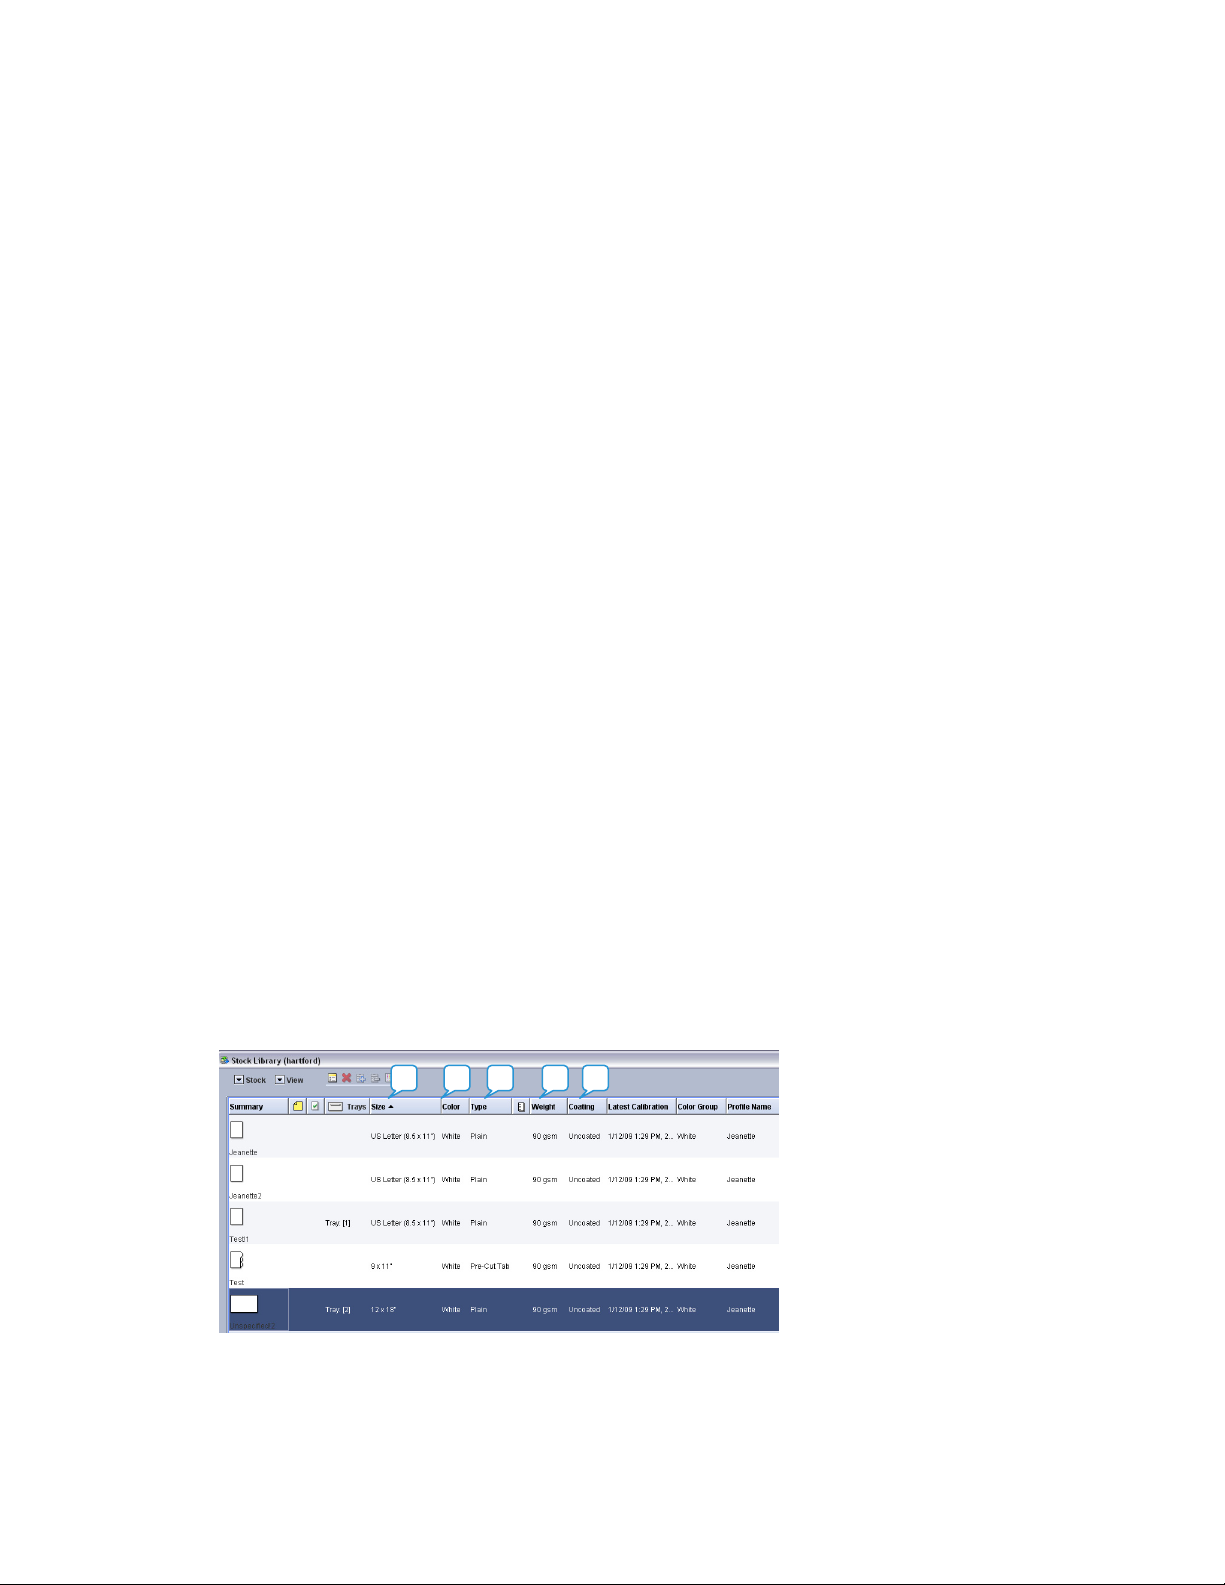
FreeFlow Print Server Stock Library
A B C D E
Book Assembly Supplement 9

FreeFlow Print Server Stock Library / Printer Setup FreeFlow® Web Services
Web Services Stock Library
ABC DE
Note
To determine the JDF ticket properties supported on the Web Service JDF Ticket for the
FreeFlow Print Server, refer to: Introduction; Supported JDF Ticket Parameters.
FreeFlow Print Server / Web Services Stock Library Fields
FreeFlow Print Server Stock Library
10 Book Assembly Supplement

FreeFlow® Web Services FreeFlow Print Server Stock Library / Printer Setup
FreeFlow Web Services Stock Library
Note
The Web Services Stock Library provides several Paper Stock Coating options to choose from,
and not all options map to a corresponding coating attribute on the FreeFlow Print Server. The
option(s) defined for each stock in the Web Services Stock Library should match the attribute
selected for the stock on the FreeFlow Print Server exactly. In addition, the options defined for
each side of the stock (front/back) should be identical
Book Assembly Supplement
11
FreeFlow Print Server Stock Library / Printer Setup FreeFlow® Web Services
Create a FreeFlow Print Server Print Queue
Create a Printer Queue on the FreeFlow Print Server for Book Assembly Jobs.
• To set up a FreeFlow Print Server Print Queue parameters, refer to the FreeFlow Print
Server online help: How do I create a queue?
Ensure that all the stocks used in the Web Services Book Assembly workflow have been defined
in both the FreeFlow Web Services Stock Library and the FreeFlow Print Server Stock Library.
Refer to FreeFlow Print Server Stock Library / Printer Setup; Configure the FreeFlow Print Server
Stock Library for more information.
The stock selected in the window [Adding a Print Queue] is the default stock used for jobs that
are submitted that have no stock specified. This stock is also used when Print Queue Override is
selected.
In some cases, the default stock corresponds to the stock required to run the job at the printer,
which represents the main body of the job; all other pages are treated as Exception Pages. If,
for example, the Book Assembly job requires “Letter 90 gsm” and “Tab (9x11)” stock, and one
of the paper trays on the FreeFlow Print Server is “unspecified” – when the job is processed, the
Print Server may request a third stock even though it is not used in the job.
Load and Validate Xerox Printer Trays
12 Book Assembly Supplement

FreeFlow® Web Services FreeFlow Print Server Stock Library / Printer Setup
FreeFlow Print Server Exception Pages
All the jobs that are received from a Web Services Book Assembly workflow will appear in the
FreeFlow Print Server designated Printer Queue as Exception Pages.
For more information regarding the JDF ticket properties supported on the Web Service JDF
Ticket for the FreeFlow Print Server, see figures below, and refer to Introduction; Supported
JDF Ticket Parameters.
FreeFlow Print Server Stock Library / Printer Setup is now complete. To continue, select a Print
Workflow in the sections that follow to setup and configure each FreeFlow component for
Book Assembly.
Book Assembly Supplement
13


Workflow 1:
FreeFlow JMF
Service Print Workflow
FreeFlow JMF Service
FreeFlow Web Services Book Assembly workflow is supported through FreeFlow JMF Service,
which is available independent of the Web Services software. Customers may acquire the JMF
Service software by contacting their Xerox Analyst or by downloading it from the Support and
Drivers section on xerox.com.
Note
The JMF Service software must be installed co-resident on the Web Services server
The JDF ticket with the job properties associated with the Book Assembly job are routed to the
FreeFlow Print Server (DFE). JMF messaging is used to communicate the status of the job
through the printing workflow back to the Web Services Production Queue.
Summary of Steps
1. Install FreeFlow JMF Service co-resident on the Web Services server
2. Perform a System Check
3. Create Users & Groups
4. Run Printer Registration
5. Execute key CLI (Command Line Interface) commands
Reference Materials
• FreeFlow JMF Service User Guide
The FreeFlow JMF Service User Guide contains install instructions, and a complete list of syntax
for the CLI (Command Line Interface).
Book Assembly Supplement 15

FreeFlow JMF Service Print Workflow FreeFlow® Web Services
Installing JMF Service on the Web Service Server
FreeFlow JMF Service is intended to run on a single host and cannot reside on the same server
with any other FreeFlow applications except Web Services.
The logged on user must have administrator rights to install programs on a Windows platform.
The installation will ask for the following information:
• Installation root directory. The default is [C:\Program Files\Xerox\FreeFlow JMF Service]
Perform the steps below to install the JMF Service application. If the install program does not
start automatically, double-click the install.exe file.
1. Select a language from the pull-down menu. Click <OK>.
2. Click<Next> in the Introduction screen.
3. In the Software License Agreement screen, select [I accept...] to accept the End User
License Agreement. Click <Next>.
4. In the [Choose Install Set] screen, select both [FreeFlow JMF Service] and [Printer
Registration]. Click <Next>.
5. In the [Choose Install Folder] screen, accept the default install directory or enter an
alternate install location. Click <Next>.
6. In the [Choose Shortcut Folder] screen, select a Shortcut Folder option. Click <Next>.
7. Review the install options at the Pre-Installation Summary screen. Click <Install>.
8. Select [Done] to complete the software installation and reboot the system.
After you reboot the system, under [Start: Xerox FreeFlow Software: FreeFlow JMF Service], the
following shortcuts are available:
• Services – this shortcut is used when stopping and starting the FreeFlow JMF Service
• Command Line – this shortcut is used to invoke the FreeFlow JMF Service CLI commands
System Check
At the Installed Products dialog, ensure that the [FreeFlow JMF Service] checkbox is selected.
Click <OK>.
Create Users & Groups
FreeFlow JMF Service relies on the underlying Operating System security mechanism for
authentication. All authenticated users must have an account on the host on which JMF
Service is running. Authorization is enforced through the Command Line Interface (CLI), which
must reside on the same host on which JMF Service is running.
The CLI uses the credentials associated with the logged in user for authorization purposes.
Only a single access level is supported: Xerox FreeFlow JMF Service Administrators.
Prior to executing any CLI commands, this group must be created and the user must be
associated with it.
Perform the following to configure the user group:
1. Right-click [My Computer] and select [Manage].
2. Open the Local Users and Groups folder and open the Groups folder.
3. Select the [Xerox FreeFlow JMF Service Administrators] Group.
4. Add users to the group. If necessary, first create any specific users whom you want to have
access to the application.
16 Book Assembly Supplement

FreeFlow® Web Services FreeFlow JMF Service Print Workflow
Note
It is important to add the user who set up and administers the Web Services server to this
group.
5. Close the [Computer Management] window and login as one of the users added to the
Xerox FreeFlow JMF Service Administrators group.
JMF Service Printer Registration
Only those users who are members of the Xerox FreeFlow JMF Service Administrators group
can add or edit a Xerox printer in the Printer Registration application.
Close the [Computer Management] window and login as one of the users added to the group:
1. Select [Programs: Xerox FreeFlow Software: Printer Registration].
2. Select [Add] to add the Xerox Printer.
3. The Add Printer Wizard displays.
Book Assembly Supplement
17

FreeFlow JMF Service Print Workflow FreeFlow® Web Services
4. Enter the IP address or Printer Name and click <Identify configuration>. The application
will automatically identify the printer model and controller type.
5. Select the queue, enter the Queue name and click <Finish>.
6. Select [Start: Programs: Xerox FreeFlow Software: Xerox FreeFlow JMF Service: Command
Line].
CLI Command Line Interface
FreeFlow JMF Service does not maintain its own list of configured production printers. You
must use the FreeFlow Printer Registration application to add and configure printers.
Once you have added the necessary production printers, you will need to bring up a Command
Prompt and use the following JMF Service CLI commands to register the printers into the
FreeFlow JMF Service:
18 Book Assembly Supplement

FreeFlow® Web Services FreeFlow JMF Service Print Workflow
1. Invoke the “xomupddev” command to retrieve the list of updated printers from the Printer
Registration application. For information on how to use the FreeFlow Printer Registration
application, refer to online help for that application.
2. Invoke the “xomlisdev” command. This command displays the printers updated in the JMF
Service.
FreeFlow Web Services Server
The FreeFlow Web Services server requires the following:
• Check Stock Library with Print Server Stock Library
• Define a FreeFlow Output Device for the Book Assembly print workflow
• Create a Book Assembly Template
Check Stock Library
Check the Web Services Stock Library with the Print Server Stock Library.
Note
You must configure the Web Services Stock Library with the required stocks before creating a
Book Assembly template and assigning the stock to the template. Refer to Section 1: FreeFlow
Print Server Stock Library / Printer Setup for more information
Define a JMF Output Device for Book Assembly
To create a FreeFlow Output Device for FreeFlow JMF Service:
1. Select [Settings: Output Devices].
2. Click <Add>; the [Add Device] dialog box appears.
3. In the Device Name field, type a <name>.
4. In the Device Group dropdown list, select [Digital].
5. In the Machine Type dropdown list, select [FreeFlow JMF Service].
6. Click <OK>.
7. In the Press Sheet Sizes sub-panel, select the sizes.
Book Assembly Supplement
19

FreeFlow JMF Service Print Workflow FreeFlow® Web Services
Note
The Device Description name can be changed.
Output Channels Setup
To setup the path for the job files and Job Tickets to be transferred to the JMF Service after
approval of a job:
1. Select the [Output Channels] tab.
2. Select the [JMF over HTTP] option button.
3. Select the [Device supports multi-queue system] checkbox.
4. In the Port field, type <7781>.
Note
Port 7781 is the FreeFlow JMF Service server's default port.
5. In the IP Address field, type the <IP address> or the server <host name> where JMF Service
is installed (i.e., FreeFlow Web Services IP address).
Note
Do not use localhost in place of the IP address as it will cause job transmission problems or
failures. Input the IP address only.
6. To enable this submission path in FreeFlow Web Services, select
[Proc_DigitalPrinting_1.2_General.jdf].
Enter the IP address where JMF
Service is installed. Do not
change the Port field
Set the Produce JDF Output field to:
Proc._DigitalPrinting_1.2_General
Registered Printers / Queues
7. Click <Save>.
20 Book Assembly Supplement

F
rBo
C
.InPryo
.NWdico
.
b
t
m
x
y
f
g
n
l
t
5
t
s
w
e
i
l
m
y
e
s
s
s
a
e
s
m
h
F
t
e
o
d
e
t
s
m
e
a
a
T
t
n
n
g
i
g
o
d
e
e
o
r
a
e
p
s
e
t
y
o
o
a
s
e
w
w
S
e
e
o
M
e
g
e
l
e
o
M
s
e
d
S
a
B
i
a
n
t
e
e
a
g
t
c
e
f
c
e
u
:
a
:
eeFlow® We
Services
FreeFlow J
F Service Pri
t Workflow
reate a B
1
Duplicate
i. In the
Assem
In the
ii.
that
iii. In the
“My E
displa
iv. In the
v.
In the
notes
bindin
ook Asse
he binding st
Main menu, s
bly] window i
Binding Style
ost resemble
dialog box th
ample Binder
ed success m
Binding Style
[General] tab
or the custo
has a spine,
bly Job
le:
lect [Print Se
displayed.
area, click a
the one you
t opens, assi
”). After the b
ssage.
area, select t
in the Bindin
er, and select
enter the spin
ype
tings: Job Ty
d review the
eed to creat
n a name to
nder style is s
he style that
Style definiti
the default c
e details.
es: Book Ass
ample bindin
, and click th
he binder sty
uccessfully du
ou just creat
on area, speci
mponent (C
mbly]. The [B
styles; selec
icon.
e you have cr
plicated, clos
d.
fy any intern
lor or B/W pa
ook
the style
ated (e.g.,
the
l notes /
es). If the
the remaini
icing), you wi
u should set
2
Define the
i.
Select
and A
ote
hen selecting
mensions of
mpleting thi
3
Select and
The previe
i. Select
ii.
Defin
a) Cl
b) In
ok Assembly
g tabs of the
l define the c
he spine to <
page sizes:
he [Page Siz
).
page sizes, y
he binder an
information,
price the mat
added in thi
he [Material
the binding
ck <Add Mat
the row of bl
in material n
fil
Supplement
Binding Style
aracteristics
ixed> and wi
] tab, and th
u can use th
the position
refer to the F
rials. The ma
s tab is used
] tab.
aterial types
rial>.
nk fields that
me and pric
definition are
f the Book A
th to <0>.
n select the r
[Add Previe
f the pages
eeFlow Web
terials are us
s the top lay
and prices. T
opens at the
.
(Page Size,
sembly job. F
quired page
(or Edit Previ
ithin the bin
ervices Print
d for pricing
r in the Print
add a mater
end of the Av
aterials, Spli
or Saddle Stit
ize checkbox
w) link to de
er. For instru
ervice Provid
nd preview p
uyer preview
al:
ilable Materi
ting and
h jobs,
s (e.g., A4
ine the
tions on
r Guide.
rposes.
als area,
21

F
r22
W
h
r
.
oin
S
o
m
a
n
f
t
s
d
h
y
c
sPa
e
e
t
c
e
oPri
P
c
W
n
s
n
m
a
p
C
y
t
o
t
e
o
x
o
t
f
t
a
e
e
s
h
u
t
o
a
d
&
c
e
p
n
c
r
b
c
n
p
e
h
r
o
e
l
o
a
c
o
n
o
a
s
o
n
h
t
t
o
e
e
o
e
e
v
e
e
o
i
o
l
a
t
n
t
o
W
o
S
e
e
s
w
W
n
p
s
g
C
O
eeFlow JMF
N
ote
hen defining
t
e binder. For
P
int Service Pr
4
Define co
-
You c
of the
be pri
N
ote
Y
u can split o
formation.
You can sp
•
componen
You can sp
•
which you
-
If you
you ca
uploa
i. Select
ervice Print
binding mate
instructions o
vider Guide.
ponent impo
n define a ge
book. For exa
ted on one pr
f color pages
lit off (define
s (split color
lit off (define
pecify Color
split off color
n additionall
ing the file.
he [Splitting]
orkflow
rials, you can
completing
itions
eral impositi
ple, you mig
inter, the colo
nd black an
a different im
ages, split B
a different im
hannels in th
pages for all
split off pag
tab.
se the Prope
his informati
n and then d
ht want the b
r pages on an
white pages
position for) t
W pages) as i
position for)
e component
omponents f
s that the Pri
ties link to de
n, refer to th
fine excepti
lack and whit
other, and th
t different le
he Color Pag
ndicated in st
olor pages fr
definition as i
r which Color
t Buyer ident
FreeFlow®
fine the prop
FreeFlow W
n imposition
pages of a b
cover on yet
vels. See belo
and the B&
ep iv below
m all compo
ndicated in st
channels are
ifies as color
eb Services
rties of
b Services
for parts
ooklet to
another.
for more
page
ents for
ep v below
defined,
ages when
Click t
ii.
iii. Modif
iv. For ea
a) In
b) S
c) D
v. To spli
Chann
a)
b) S
c) T
e <All> (D
the impositi
h componen
the Binder ar
eparate imp
a
ges] checkbo
lect the [Com
fine the imp
color pages
els tab (refer
In
the Binding
cording to th
a
lect the [Proc
additionally
nt Buyer; in t
<
rocess Colors
cli
k <OK>.
evice and Im
n details as n
that you wa
a, select the
sition for the
in the Binde
ponent’s]
sition for the
or all compo
o step 6).
rea, select [S
Color Chann
ss Colors]
plit the color
e Binding are
> (Black & W
osition) butt
eeded, and cli
t to split off
Color Pages c
area).
ents for whic
lit Colors] (by
button; fill in
pages accordi
a, select [Spli
ite Content)
heckbox for
utton.
omponent a
ls).
n.
ck <OK>.
nd define a d
plitting the c
mponent, se
d click <OK>.
color pages
definition of
the impositio
ng to the con
Colors (By C
button, fill
Bo
ifferent impo
mponent (e.
ect the [Split
re defined in
he Print Provi
, and click<
ent as define
ntent ...)], clic
in the imposit
k Assembly
ition for:
., to define
olor
the Color
der
K>.
d by the
k the
ion and
upplement

F
rBo5.6.7.
b
n
e
t
i
d
o
n
e
c
e
odePa
O
A
o
e
a
o
o
h
k
a
h
s
g
w
e
n
o
s
n
e
e
t
s
e
n
o
a
a
y
e
a
d
a
y
o
c
t
o
r
a
p
a
e
e
d
d
a
t
t
o
e
o
d
e
e
e
s
e
y
e
p
M
m
n
o
g
i
W
w
e
a
t
b
n
y
S
n
e
g
o
n
o
e
a
t
b
s
p
a
e
e
eeFlow® We
Define pric
i.
ii. Fill in
For each c
i. In the
ii. For ea
iii. Click <
To add a C
i.
ii.
iii. In the
iv.
With n
the Bi
select
per un
ordere
a)
E
b) S
definit
a)
S
b) Fil
•
•
•
•
•
c) T
In the
Click <
Comp
page”
For th
Services
ing.
o component
ding Style ag
d), select the
he pricing inf
t depending
.
mponent in t
Component a
sure the chec
lect the comp
h tab (Gener
ion area for t
lect the tab.
l in the detail
When fillin
can select t
In the [Pap
Category a
In the [Col
In the [Fini
side.
In the [Prici
discounts) t
selected.
add the pric
fine here, sel
ge area.
K>.
omponent to
Binding Style
dd Compon
[New Compo
nent type. F
nd select [P
Component
selected in th
in in the Bin
[Pricing] tab.
rmation and
n page size,
e Binding st
rea:
box for the c
onent by click
l, Paper Sele
e componen
, noting the f
in the [Gene
o sided print
r Selection] t
d a Paper Ty
r Channels] t
hing] tab, sel
g] tab, defin
hat will be ad
of the stock
ct the [Add P
he Binding s
area, select t
nt>.
ent] dialog b
r example, to
ges].
ou added, p
Component
ing area and
click <OK>. Y
nd discounts
le, define the
mponent is s
ing its name (
tion, Color Ch
:
llowing point
al] tab for th
ing. If you do
b, you can se
e from stock.
b, select eith
ct the [Lamin
the prices fo
ed to the ba
efined in the
per Price] ch
yle:
he Binding St
x, specify th
insert a trans
rform the sub
FreeFlow J
area (if a co
the compone
u should set t
epending on
details as foll
elected.
e.g., Color Pa
annels, Finish
s:
Color or B/
not, printing
lect [Add Pap
r [Process] or
ation], [Textu
r the particul
e cost, depen
stock library
ckbox at the
le.
Component
arent overla
-steps under
F Service Pri
ponent is sel
nt will no lon
he base price
the number
ws:
es).
ing, and Prici
pages comp
ill be one-sid
r] to add a P
[Black & Whi
re], and num
r component
ding on the o
o the price th
ottom of th
ame, and sel
page, call it “
tep 6 above.
t Workflow
cted, click
er be
and price
f copies
g) in the
nents, you
d.
per
e].
er of print
(and
tions
t you
Price per
ect the
Overlay
ok Assembly
Supplement
23

F
r24
V
.2.3.4.5.6.7.8.9.101112
S
h
e
s
W
f
f
e
a
e
w
A
o
y
G
P
t
n
r
W
s
u
d
e
t
p
n
e
[
e
h
w
E
h
e
z
e
e
a
]
d
l
s
o
u
e
r
h
h
t
e
e
l
P
o
k
d
l
A
o
e
d
n
eBoo
l
n
n
n
w
e
k
W
o
S
p
e
A
c
a
w
eeFlow JMF
ervice Print
orkflow
FreeFlow®
eb Services
alidate t
1
Log in as a
In the Ord
In [Book A
In the [Upl
Upload>.
In the [De
(and spine
In the [De
i. Use th
ii. Defin
iii. Previe
iv. Click <
In the [Sh
i. Specif
ii. Click <
iii.
Complete
Log back i
. Select [Tas
device and
. Verify that
. Click <App
the correct
to arr
definit
Click <
e Book A
Print Buyer U
r Jobs page,
sembly: Intro
oad Files] win
hen you hav
ine Binding S
width, when
ine Compone
[Move Up],
nge the book
the page typ
and check t
dd to Cart>
pping Cart]
the quantity
et Quote>.
ion.
roceed to C
he order.
to the Print S
ks: Production
correct run si
the job conta
ove> to mov
Output Devic
ssembly J
er administr
nder Order a
duction page
ow, browse t
uploaded al
yle] window,
resent) in the
ts] window:
Move Down],
content.
and paper f
e PDF.
and <Checko
indow:
to print.
nsure that th
eckout>.
rvice Provide
] and check t
e, and that t
ins the correc
the job to th
s.
ob Type
tor.
Book Assemb
, click <Start
o the file(s) y
the files, clic
elect the [bin
displayed fie
[Add] Tabs, [
r each comp
t>.
quote is corr
account.
at the job wa
e job was ad
imposition a
Printing Qu
y, click <Start
rinting>.
u want to up
<Continue>.
ding style], a
ds. Click <Co
dd Blanks] a
nent (file).
ect according
s associated
ed to the qu
d verify the j
ue, and chec
Ordering>.
oad: click <O
d then set th
tinue>.
d [Duplicate
to the Book
ith the corre
ue.
ob ticket det
that the file
en:
page size
] button
ssembly
t output
ils.
as sent to
k Assembly
upplement

Workflow 2:
FreeFlow Output
®
Manager
FreeFlow Output Manager
In addition to FreeFlow JMF Service (see Section 2: FreeFlow JMF Service Print Workflow),
FreeFlow Web Services Book Assembly workflow is supported through FreeFlow Output
Manager. In both printing workflows, the JDF ticket with the job properties associated with
Book Assembly is routed to the FreeFlow Print Server (DFE). JMF messaging is used to
communicate the status of the job through the printing workflow back to the Web Services
Production Queue.
Print Workflow
To configure a Print Queue on FreeFlow Output Manager for a Book Assembly workflow:
1. Click <Queue Manager>.
2. In the next window, enter a <name> in the Queue Name field.
Book Assembly Supplement 25

FreeFlow Output Manager® Print Workflow FreeFlow® Web Services
3. Click <Next> and select the required printer for Associated Printers. Click <Next>.
4. Click <Create Queue>.
5. Click <Edit Queue Properties>.
6. Under Basic Properties, select [Yes] in the Accepting Jobs and Release Jobs fields.
7. Select the [Xompdlana.bat] checkbox, and select the [Preprocessing Program] option
under Job Processing Options.
8. Select the [Supported] checkbox, and in the Keep Completed Jobs fields for [Minimum],
[Maximum] and [Default] options, respectively, select [3 days].
26 Book Assembly Supplement

FreeFlow® Web Services FreeFlow Output Manager® Print Workflow
9. Under [Paper Stock], enter <1-254> instead of 0-254 in the Order field.
13. Click <OK> to save the changes.
FreeFlow Web Services Server
The FreeFlow Web Services server requires the following:
• Check Stock Library with Print Server Stock Library
• Define a FreeFlow Output Device for Book Assembly print workflow
• Create a Book Assembly Template
Check Stock Library
Check the Web Services Stock Library with the Print Server Stock Library.
Note
You must configure the Web Services Stock Library with the required stocks before creating a
Book Assembly template and assigning the stock to the template. Refer to Section 1: FreeFlow
Print Server Stock Library / Printer Setup for more information.
Define Output Device for Book Assembly
To set up the Output Device on the Web Services server:
1. Log in as the Print Provider.
i. Navigate to [Print Settings: Production: Output Devices].
2. Create an Output Manager Output Device:
i. Click <Add> under [Output Devices]
ii. Enter values in the following fields:
a) Device Name: <Any Custom Name>
b) Device Group: <Digital>
c) Machine Type: <FreeFlow Output Manager>
Book Assembly Supplement
27

FreeFlow Output Manager® Print Workflow FreeFlow® Web Services
3. Click <OK> and navigate to [Output Channels].
4. Select [JMF over HTTP].
5. Enter the <IP address> of the system on which FreeFlow Output Manager is installed.
6. In the port field, enter <7781>.
7. Select the [Proc_DigitalPrinting_1.2_General] option for Production JDF Output field.
8. Click the <Device support multi queue system> link.
9. Select [Available Queues], and select the queue created above.
Create a Book Assembly Template
1. Create the template.
i. In the Main menu, select [Accounts: Store Setup: Templates]
ii. In the Accounts area, select the Print Buyer account for which you are creating the
template.
iii. In the Template List area, click the <Create a New Book Assembly Template> link.
The [Upload Files] window is displayed.
2. Upload the files.
i. In the [Upload Files] window, click <Browse...>; choose a file that will be in the book,
and click <Open>.
ii. Click <Upload> to add the file to the book. The file will be listed in the Uploaded Files
list on the right.
iii. Repeat this process to add other files (e.g., cover file, other book files).
iv. Click <Continue>. The [Define Binding Style] window is displayed.
28 Book Assembly Supplement

F
rBo3.4.5.Bo
V
.2.
.4.5.
b
s
i
C
s
w
e
t
o
e
e
e
i
eSta
i
epa
m
o
osel
o
ode<O
C
t
t
y
F
h
t
o
y
G
P
t
n
n
M
h
h
v
p
a
e
e
a
o
y
b
s
C
o
e
a
n
a
k
h
d
p
a
s
w
a
E
h
e
o
m
p
u
a
t
,
a
p
y
n
t
p
e
o
e
p
c
w
m
e
T
e
r
g
n
l
d
n
m
f
e
a
o
e
h
r
o
t
m
b
[
o
e
p
e
M
d
m
y
e
s
w
c
e
g
d
a
n
c
<
d
n
d
e
n
r
u
w
s
n
o
A
eeFlow® We
Define the
i.
ii. Click <
Define the
the windo
Properties]
i.
ii. To alt
iii. Perfor
iv. Click <
Complete
i. In the
ii. Specif
iii. Click <
In the
and a
the Sp
and di
To alt
select
comp
a) S
b) In
d
c) Cl
d) S
e) Cl
f) R
a) T
b) T
c) T
ta
d)
T
other
Services
binding style.
[Define Bindi
applicable,
ne Width (e.g
ontinue>. T
plays a grap
Components.
, the default
for selected
r page Type
he page Typ
nent, and sel
r the page Ty
lect the comp
the [Select P
fine a comm
ck<Select>.
lect the page
ndard Qualit
ck <Apply>. T
peat step ii a
ge and paper
adjustment
duplicate a
change the l
ect the [Mov
add tabs to
specificatio
add blank p
fine the blan
K>.
ontinue>. T
he template
[Save as Tem
emplate deta
the folder in
inish>.
g Style] wind
aterial (e.g., 1
., 0.050).
e [Define Co
ic of the first
For any Com
alues for the
ages area on
nd Paper val
and Paper v
ct [Cover] as
pe and Paper
onent.
ges] text box
n page and p
Type and pa
) in the [Cha
he componen
ove for all se
Types.
to the Com
omponent, s
cation of a C
Up] or [Mov
Component,
s in the [Add
ges to a Com
page specifi
e [Save as Te
efinition.
late] windo
ils.
which the te
Free
w, select the
.5 inch D-Rin
ponents] wi
page of the fi
onent (uploa
page Type a
the right side
es for the Co
lues. If one o
he page Typ
values for spe
enter the <p
per Type.
er type for th
ger Properti
t is listed on t
s of pages fo
onents (sets
lect the comp
mponent in
Down] butto
select the co
Tabs] dialog
onent, select
ations in the
mplate] wind
, specify a <t
plate should
Flow Output
required Bin
), Book Asse
dow is displa
le you upload
ded file) you
d Paper are d
of the windo
ponent, sele
the Compon
.
cific pages in
ge numbers>
se pages (e.
s] for selecte
e left side of
which you w
f file pages) i
onent, and cli
he book, sele
ns as needed.
ponent, click
ox and click
the compone
Add Blank Pa
w is displaye
mplate name
be created.
anager® Pri
ing style (e.g.,
bly Size (e.g.,
ed. This win
d.
elect in the le
isplayed in th
.
t the compo
nts is a cove
the file:
for which yo
., B/W pages
pages area.
the screen.
nt to define
the book, as
ck [Duplicate
t the compo
<Add Tabs>,
OK>.
nt, click <Add
ges] dialog b
.
> (title), and f
t Workflow
Binder),
A4), and
ow lists
ft side of
[Changer
ent and
, select the
want to
ith
eparate
needed:
].
ent and
define the
Blanks>;
x, and click
ill in the
definit
Click <
template cre
e Book A
Print Buyer u
emplate and
pping Cart]
the print qu
et Quote>.
ion.
roceed to C
he order.
to the Print S
Supplement
tion is compl
ssembly
er.
add the order
indow.
ntity.
nsure that th
eckout>.
rvice Provide
te.
emplate
to your shop
quote is corr
account.
ing cart.
ect according
to the Book
ssembly
29
ok Assembly
alidate t
1
Log in as a
Select the
3
In the [Sh
i. Specif
ii. Click <
iii.
Complete
Log back i
ok Assembly

FreeFlow Output Manager® Print Workflow FreeFlow® Web Services
6. Select [Tasks: Production] and check that the job was added to the queue.
7. Verify that the job contains the correct imposition and verify the job ticket details.
8. Click <Approve> to move the job to the Printing Queue, and check that the job was sent to
the correct Output Devices.
30 Book Assembly Supplement

Book Assembly Use
4
Case Example
There are many ways to setup and use the Book Assembly module in FreeFlow Web Services.
This section includes the setup instructions for 1 common scenario:
• Saddle Stitched Booklet
To take full advantage of the job ticketing features, we will use either FreeFlow JMF Service or
FreeFlow Output Manager
sections later in this chapter that cover the specific setup procedures for JMF Service and
Output Manager.
®
to pass a JDF job ticket to the FreeFlow Print Server. There are
Saddle Stitched Booklet
It is quite common for customers to upload 8.5x11 documents to be imposed onto 11x17
sheets, which are then stitched and folded to a final size of 8.5x11. In the following example,
we will upload 2 or more documents, specify the page for the front cover file, and submit the
job. Imposition is done in Web Services before transferring the job to either JMF Service or
Output Manager.
1. Log into FreeFlow Web Services as a Print Service Provider.
2. Navigate to [Print Settings: Production: Paper Sizes].
3. Make sure that 11x17 paper size is listed. If not, select [New Size]; enter a name: 11x17,
Width: 11, Height: 17, and click <Save>.
4. Navigate to [Print Settings: Production: Stock Library]. Configure the required stocks on
both the printer and the Web Services Stock Library. Create two stocks as indicated in the
table below:
Note
The names must match exactly the names defined in your printer’s Stock Library:
Saddle Stitched Cover Saddle Stitched Book Block
Name: Cover ! 11x17 Name: Standard ! 11x17
Size: 11x17 Size: 11x17
Color: White Color: White
Type: Plain Type: Plain
Weight: 220 GSM Weight: 90 GSM
Book Assembly Supplement 31

Book Assembly Use Case Example FreeFlow® Web Services
5. Select [Print Settings: Job Business Flow: Book Assembly: Saddle Stitch].
6. Under [General: Spine] select [Fixed] and set the Width to <0>.
7. Select the [Splitting] tab and deselect the [Split] options (see below).
Note
You only need to split these sections if the Printer (output device) does not support the
different stocks that will be defined for Saddle Stitched booklets in the upcoming steps. When
splitting, the sections of the booklet are printed separately.
8. Select the [Edit Imposition] icon
9. Select a previously defined Output Device (e.g., DC700_JMF_SS) that uses “JDF Process:
Proc_DigitalPrinting_1.2_General.” This output device should have the 11x17 page size
enabled.
under Summary.
32 Book Assembly Supplement

FreeFlow® Web Services Book Assembly Use Case Example
10. Program the imposition as follows:
i. [Press Sheet Size]: 11x17, [Orientation]: Landscape, [Imposition Method]: Multiple-
Up, [Work Style]: Work and Back (Top-Top 2 plates), [Page Order]: Saddle-Stitched.
11. Click <OK>.
12. Select the [Page Size] tab.
13. Make sure the [8.5x11] and [11x17] checkboxes are selected.
Note
The Page sizes defined above are what will show up as options to the Print Buyer during Book
Assembly.
14. Under [Components], select [Color Pages 2 sides].
Note
The Components that are defined can be used for all Book Assembly jobs. As such, it is
suggested to create individual components for each Book Assembly type. This will reduce
confusion for the Print Buyer as it will prevent them from selecting options that do not apply to
the Book Assembly job type.
15. Make sure the checkbox for [Two Sides] is selected to allow duplex printing on this stock.
Book Assembly Supplement
33

Book Assembly Use Case Example FreeFlow® Web Services
Note
There are 3 kinds of Components: Pages, Tabs, and Cover. When you use different Component
Types in one job it has significant impact on the workflow. Each component type will get
imposed separately. In the case of a Saddle Stitched booklet, if you use a Component Type:
[Cover], those pages will be imposed first and then the next component type (i.e.: Pages) will
be imposed. This can explain why you may not get the final expected imposed results.
16. Select the [Paper Selection] tab.
17. Create a [Paper Category] for the customer to choose from (you can have several). The
name of this category appears in the [Paper Selection] drop down menu for the Print
Buyer. Examples of categories that might appear: Uncoated, Glossy, Standard, High
Quality, etc.
18. Click the <Add Paper> button under the Paper List. Select a stock from the Web Services
Stock Library. Make sure it is the 11x17 size. This will link a stock to a specific Paper
Category.
19. Select the [Color Channels] tab. Click <Process> to allow Color.
20. Select the [Finishing] tab and deselect the [Activate Laminating] checkbox.
21. Click <Save>.
22. Under [Components], with the [Color Pages 2 sides] highlighted, click the <Duplicate>
icon.
23. Name the new Component: <Saddle Stitch Cover>.
Note
By duplicating the [Color Pages 2 sides] component, we are creating a Component Type of
Pages, which we are only naming as a cover. This allows us to impose the entire job together
(same Component Types) while allowing page exceptions for a heavy weight stock. If you
create a new Component Type of Cover, then it will break apart the job during imposition.
34 Book Assembly Supplement

FreeFlow® Web Services Book Assembly Use Case Example
24. Select the new Saddle Stitch Cover component, and then the [Paper Selection] tab.
25. Rename the [Paper Category] to <Standard Cover>. Remember, this is what the Print
Buyer will see in the drop down menu so make it meaningful to the Print Buyer.
26. Under the [Paper] List, highlight the existing stock and click <Remove Paper>.
27. Click <Add Paper> and choose a heavy weight 11x17 cover stock from the Stock Library.
28. Click <Save>.
29. Log in to Web Services as a Print Buyer to a site that has Book Assembly ordering – like the
test account, for example.
30. Select [Order a Book Assembly] job and click <Start Printing>.
31. Select [Browse], choose a cover file, and click <Upload>.
32. Select [Browse], choose a file for the main book file and click <Upload>.
33. Click <Continue>.
34. Select the [Saddle Stitch] radio button and [8.5x11] or [Letter] for the Book Assembly size.
35. Click <Continue>.
36. Select the page for the front cover.
37. Under [Change Properties for Selected Pages], select the [Saddle Stitch Cover] type and
click <Apply>.
38. All the other pages should default to: [Color Pages 2 sides].
39. (Optional) Click <PDF Preview>.
40. Click <Add to Cart and Checkout>. Complete the checkout process.
41. Log in to Web Services as the Print Provider.
Book Assembly Supplement
35

Book Assembly Use Case Example FreeFlow® Web Services
42. Select [Tasks: Production] to show all jobs in the production queue.
43. Notice the Output Device above highlighted in red.
44. Select the [Device and Imposition] button to check and update the settings. For the
purposes of this scenario, change the Output Device to <DC700_JMF_SS> and reset the
imposition as defined earlier in step 6.
45. Click <OK>.
Note
After changing the Device and Imposition settings, the job will disappear from the Production
Queue. You need to manually refresh the window by selecting [Show All] or the [Refresh] icon.
46. Select [Approve]. The job will be submitted to the specified Output Device via JMF.
47. Select [Tasks: Printing]. This will show jobs submitted to print and their status. The status
icons appear below:
48. If you see the icon with the Arrow and Red exclamation, there has been an internal error.
You may need to recheck your JMF setup, or there is a communications error.
Note
Due to the JMF Service being a command line application, it can be difficult to troubleshoot
files not arriving at the Output Device. It is usually easier to rebuild and re-sync the JMF
printers than to troubleshoot the problem. The re-sync process “xomupddev” does not take
effect for printers that have active jobs in them through JMF submission. Refer to the FreeFlow
JMF Service User Guide for more information.
49. If you are submitting the job through Output Manager, log into Output Manager.
50. Select the [Job Manager] tab. Select the new job and click <View Job Properties>. You
should see the job ticketing under the [Output] and [Special Pages] areas.
51. Check the FreeFlow Print Server for the job. The following information should have made
it to the printer: Job Name and #, Quantity, Saddle Stitched, Special Pages. The size of
the job should be "11x17." You can check this by right clicking on the job and selecting
[Properties] and then the [Special Pages] tab. The Saddle Stitched imposition should
appear under the [Stapling / Finishing] area and will probably read “Bi-Fold Stapled
Multiple Sheets”. If your printer does not support Saddle Stitch, then this information will
be lost / ignored.
36 Book Assembly Supplement

FreeFlow® Web Services Book Assembly Use Case Example
Additional Setup Procedures
The following sections describe the setup procedures for FreeFlow JMF Service and FreeFlow
Output Manager
®
.
FreeFlow JMF Service Setup
Note
The JMF Service can accept either JDF Intent or JDF Process jobs from Web Services. Book
Assembly jobs should only use JDF Process, which appears in Web Services as:
“Proc_DigitalPrinting_1.2_General”
Set up printers in Printer Registration on the Web Services server:
1. Select [Start: Programs: Xerox FreeFlow Software: Print Administration: Printer
Registration].
Note
Printer Registration should be run on the Web Services server and not set to pull the Registered
Printers from a remote system. The synchronize step below may not work with a remote
system.
2. A list of products will appear. At a minimum, select the options listed below and click
<OK>.
3. Click <Add>.
4. Enter the <IP address> of the printer and click <Identify Configuration>.
Note
The printer information should update automatically. If it is not a FreeFlow Print Server then
you might need to input the printer model and controller type manually.
Book Assembly Supplement
37

Book Assembly Use Case Example FreeFlow® Web Services
5. Click <Next> and <Next> again. Do not select the checkbox to ‘Automatically register all
queues at printer.’
6. Click <Retrieve Queue List>. The default queue set as the FreeFlow Print Server will
appear.
7. From the drop down menu, select the appropriate queue.
8. Enter a <Custom Name> for the printer. This name will only appear in printer registration
and in the queue selection later in the Web Services Output Device selection.
9. Click <Next>.
10. From the drop down menu, select [FreeFlow Output Manager
Note
While not actually connecting to FreeFlow Output Manager, this is really simply intended to
serve as a production print path.
38 Book Assembly Supplement
®
].

FreeFlow® Web Services Book Assembly Use Case Example
9
11. Click <Finish>. The printer is now ready for use in Printer Registration.
12. From a command line (DOS Prompt) type: <xomupddev> <Enter> to synchronize printers
with JMF Service.
Note
A message will only be displayed if there is an error.
13. To see the active JMF Printers, from a command line type <xomlisdev> <Enter>.
14. JMF Printers are now ready for use in Web Services.
15. Select [Print Settings; Output Devices: Add].
16. Enter the <Device Name>, select [Digital] in the Device Group field, and select [FreeFlow
JMF Service]. Click <OK>.
Note
Use a descriptive name for your printer. Include information like the
‘Printer_SubmissionMethod_Asst.’ For example, when setting up a printer for Book Assembly
jobs use a name like “DC700_JMF_BA” where “BA” designates Book Assembly and will use JDF
Process
Book Assembly Supplement
39

Book Assembly Use Case Example FreeFlow® Web Services
17. Update the Device Description to match the name of the Output Device.
18. Select the Paper sizes available for printing. You should have at least 8.5x11 and 11x17
defined.
19. Select the [Output Channels] tab.
20. Select [JMF over HTTP], and input the <IP Address> of the Web Services Server.
Note
Do not use localhost for the IP Address. This will cause some jobs to fail to pass through the
JMF Service and yield unpredictable results.
21. Select [Proc_DigitalPrinting_1.2_General] from the Produce JDF Output field.
22. Select the [Device supports multi-queue system] checkbox.
23. Select the [Available Printers] button.
24. Select only the checkbox for the desired Printer and click <OK>.
25. Click <Save> and <Save> again.
26. Select the [Imposition] tab. Set the Page size and Imposition settings based on the
application or scenario.
27. The Output Device is now ready for use with Book Assembly jobs.
40 Book Assembly Supplement

FreeFlow® Web Services Book Assembly Use Case Example
FreeFlow Output Manager® Setup
Note
The JMF Service can accept either JDF Intent or JDF Process jobs from Web Services. Book
Assembly jobs should only use JDF Process, which appears in Web Services as:
“Proc_DigitalPrinting_1.2_General”
Set up printers in Printer Registration:
1. Select [Start: Programs: Xerox FreeFlow Software: Print Administration: Printer
Registration] on the system being used for Printer Registration. If this step is not
performed on the Output Manager server, set the ‘Registered Printer List Locator’ with the
IP of the system being used.
2. A list of products should appear. If not, select [Options: Installed Products]. At a minimum,
select [Output Manager] and click <OK>.
3. Click <Add>.
4. Enter the <IP address> of the printer and click <Identify Configuration>.
Note
The printer information should update automatically. If it is not a FreeFlow Print Server then
you might need to input the printer model and controller type manually
Book Assembly Supplement
41

Book Assembly Use Case Example FreeFlow® Web Services
5. Click <Next> and <Next> again. Do not select the checkbox to ‘Automatically register all
queues at printer.’
6. Click <Retrieve Queue List>. The default queue set as the FreeFlow Print Server will
appear.
7. From the drop down menu, select the appropriate queue.
8. Enter a <Custom Name> for the printer.
9. Click <Next>.
42 Book Assembly Supplement

FreeFlow® Web Services Book Assembly Use Case Example
10. From the drop down menu, select [FreeFlow Output Manager®].
9
10. Click <Finish>. The printer is now ready for use in Printer Registration.
11. Launch Output Manager and log in as an administrator.
12. Select the [Printer Manager] tab.
13. Click the <Change Printer List> button and select the required printer. Click on <Next>
and <Done>.
14. Select the [Queue Manager] tab.
15. Click the <New Queue> button. In the window that appears, enter a <custom name> for
Queue Name field.
16. Click <Next>. Click <Next> again to skip Job Splitting at this time.
17. Select the required printer for [Associated Printers]. Click <Next>.
Book Assembly Supplement
43

Book Assembly Use Case Example FreeFlow® Web Services
18. Click <Create Queue>.
19. In the next window, click the <Edit Queue Properties> button.
20. Select the [Yes] radio button for the Accepting Jobs and Release jobs fields under ‘Basic
Properties.’
21. Under Preprocessing Program, select the radio button and the [xompdlana.bat] checkbox
22. Select the checkbox for [Keep Completed Jobs] and select [3] days for Minimum,
Maximum and Default options (you can set these times as desired).
23. Under [Paper Stock], enter <1-254> instead of 0-254 for the Order field. If you forget, an
error message will appear when saving the queue settings.
24. Click <OK> to save the changes.
25. Login to Web Services as a Print Provider.
26. Navigate to [Print Settings: Production: Output Devices].
27. Click the <Add> button under Output Devices.
44 Book Assembly Supplement

FreeFlow® Web Services Book Assembly Use Case Example
28. Enter the <Device Name>, select [Digital] in the Device Group field, and select [FreeFlow
Output Manager
®
]. Click <OK>.
Note
Use a descriptive name for your printer. Include information like the
‘Printer_SubmissionMethod_Asst.’ For example, when setting up a printer for Book Assembly
jobs use a name like “DC700_JMF_BA” where “BA” designates Book Assembly and will use JDF
Process.
29. Click <OK> and navigate to the Impose tab.
30. Ensure that [Impose all jobs} is selected for ‘Imposition Preferences’ and click <Save>.
31. Select the [Output Channels] tab.
32. Select [JMF over HTTP], and input the <IP Address> of the Web Services Server.
33. Select [Proc_DigitalPrinting_1.2_General] from the Produce JDF Output field.
34. Select the [Device supports multi-queue system] checkbox.
35. In the current window, click <Available Queues> and select the queue created earlier in
Output Manager. After selecting the checkbox, click <OK>, and then click <Save>.
36. The Output Device is now ready for use with Book Assembly jobs.
Book Assembly Supplement
45


 Loading...