

Page 1

Version 7.0
March 2009
701P49687
FreeFlow® Web Services
Integration Guide
Book Assembly Supplement
Page 2

Xerox Corporation
Global Knowledge and Language Services
800 Phillips Road - Bldg. 218-01A
Webster, NY 14580
Copyright © 1996-2009 Xerox Corporation. All rights reserved. XEROX®, Xerox Canada Ltd®, Xerox Limited®, The
Document Company®,FREEFLOW®, FREEFLOW® MAKEREADY, FREEFLOW® OUTPUT MANAGER, FREEFLOW®
PROCESS MANAGER, and all identifying numbers used in connection with the Xerox products mentioned in this
publication are trademarks of XEROX CORPORATION. Copyright protection claimed includes all forms and matters of
copyrightable material and information now allowed by statutory or judicial law or hereinafter granted, including
without limitations, material generated from the software programs which are displayed on the screen such as styles,
templates, icons, screen displays looks, etc.
While every care has been taken in the preparation of this material, no liability will be accepted by Xerox Corporation
arising out of any inaccuracies or omissions.
Other company trademarks are acknowledged as follows:
Adaptec®, the Adaptec logo, SCSlSelect®, and EZ-SCSI® are trademarks of Adaptec, Inc
Adobe PDFL - Adobe PDF Library Copyright © 1987-2008 Adobe Systems Incorporated
Adobe®, the Adobe logo, Acrobat®, the Acrobat logo, Acrobat Reader®, Distiller®, Adobe PDF JobReady™, PostScript®,
and the PostScript logo are either registered trademarks of Adobe Systems Incorporated in the United States and/or
other countries. All instances of the name PostScript in the text are references to the PostScript language as defined by
Adobe Systems Incorporated unless otherwise stated. The name PostScript also is used as a product trademark for
Adobe Systems’ implementation of the PostScript language interpreter, and other Adobe products.
Copyright 1987 - 2008 Adobe Systems Incorporated and its licensors. All rights reserved.
Autologic® is a registered trademark of Autologic Information International, Inc.
Compaq® and QVision® are registered United States Patent and Trademark Office, for Compaq Computer Corporation.
DEC, DEC RAID, and Redundant Array of Independent Disks are registered trademarks of Digital Equipment Corporation.
Dundas - This software contains material that is © 1997-2000 DUNDAS SOFTWARE LTD., all rights reserved.
Imaging Technology provided under license by Accusoft Corporation.
ImageGear © 1996-2005 by AccuSoft Corporation. All Rights Reserved.
Intel® and Pentium® are registered trademarks of Intel Corporation.
Novell® and NetWare® are registered trademarks of Novell, Inc. in the United States and other countries.
Oracle® is a registered trademark of Oracle Corporation Redwood City, California
ScanFix® Image Optimizer and ImagXpress are either registered marks or trademarks of Pegasus Imaging Corp.
Copyright© 1997-2008 Pegasus Imaging Corp. all rights reserved.
Sony™ and Storage by Sony™ are trademarks of Sony.
Preps™ is a registered trademark of Creo Inc. All rights reserved.
PANTONE® and other Pantone Inc. trademarks are the property of Pantone Inc. All rights reserved.
Quark® and QuarkXpress® are registered trademarks of Quark, Inc.
StorageView™ is a trademark of CMD Technology, Inc.
Page 3

TIFF® is a registered trademark of Aldus Corporation.
Windows®, Windows XP®, Windows Server® 2003, and Internet Explorer are trademarks of Microsoft Corporation;
Microsoft® and MS-DOS® are registered trademarks of Microsoft Corporation.
Portions Copyright © 2001 artofcode LLC.
This software is based in part on the work of the Independent JPEG Group.
Portions Copyright © 2001 URW++. All Rights Reserved.
This product includes software developed by the Apache Software Foundation.
Copyright © 1999-2003 The Apache Software Foundation. All rights reserved.
This software is based in part on the work of Graeme W. Gill.
© Press-sense Ltd. 2002-2007. All rights reserved
Includes Adobe® PDF Libraries and Adobe Normalizer technology
The Graphics Interchange Format© is the Copyright property of CompuServe Incorporated. GIFSM is a Service Mark of
CompuServe Incorporated.
Portions contain an implementation of the LZW algorithm licensed under U.S. Patent 4,558,302
Parts of this software Copyright © 2004-2006 Enterprise Distributed Technologies Ltd. All Rights Reserved.
Parts of this software Copyright ©1995-2003, The Cryptic Foundation Limited. All Rights Reserved.
Parts of this software are a SSLv3/TLS implementation written by Eric Rescorla by Claymore Systems, Inc. All Rights
Reserved.
Parts of this software Copyright © 2002, Lee David Painter and Contributors. Contributions made by Brett Smith,
Richard Pernavas, Erwin Bolwidt.
Parts of this software Copyright © 1995-2005, Jean-loup Gailly and Mark Adler.
All other product names and services mentioned in this publication are trademarks of their respective companies. They
are used throughout this publication for the benefit of those companies, and are not intended to convey endorsement or
other affiliation with the publication.
Companies, names, and data used in examples herein are fictitious unless otherwise noted.
Changes are periodically made to this document. Changes, technical inaccuracies, and typographical errors will be
corrected in subsequent editions
Printed in the United States of America.
Changes are periodically made to this document. Changes, technical inaccuracies, and typographic errors will be
corrected in subsequent editions.
Page 4

Page 5

Table of Contents
Book Assembly Workflow Summary ............................................................... i
Navigating the Document ................................................................................................................ii
Book Assembly References ..............................................................................................................iii
Book Assembly Setup Summary....................................................................................................iii
Book Assembly Printing Workflows & JDF Job Tickets .......................................................iv
Supported JDF Job Ticket Parameters ............................................................................v
1 Workflow 1: FreeFlow JMF Service Print Workflow.....................1-1
FreeFlow JMF Service Co-Resident with FreeFlow Web Service................................. 1-1
Reference .................................................................................................................................1-2
Install JMF Service: Same server as FreeFlow Web Service .............................1-2
System Check: Same Computer as FreeFlow Web Service...............................1-2
Create Users & Groups: Same Computer as FreeFlow Web Service ............1-3
JMF Service Printer Registration: Same Server as FreeFlow Web Service .1-3
CLI Command Line Interface: Same Server as FreeFlow Web Service....... 1-5
FreeFlow JMF Service Legacy Configuration....................................................................... 1-6
Install JMF Service............................................................................................................... 1-6
System Check......................................................................................................................... 1-6
Create Users & Groups....................................................................................................... 1-6
JMF Service Printer Registration ...................................................................................1-7
CLI Command Line Interface.........................................................................................1-7
List Locator Application for Legacy Configuration ..............................................1-7
2 Workflow 1: FreeFlow Web Server.....................................................2-1
Workflow 1: FreeFlow Web Server requires the following: ...............................2-1
Define a JMF Output Device for Book Assembly............................................................... 2-1
Output Channels Setup ..................................................................................................... 2-1
Create a Book Assembly Job Type ...............................................................................2-3
Validate the Book Assembly Job Type....................................................................... 2-6
Check Stock Library .............................................................................................................2-6
3 Workflow 1: FreeFlow Print Server.....................................................3-1
Check FreeFlow Print Server Stock Library............................................................................ 3-1
Create a FreeFlow Print Server Print Queue......................................................................... 3-2
Load & Check FreeFlow Xerox Printer Trays ........................................................................3-2
FreeFlow Print Server Exception Pages ..................................................................................3-3
Stock Library Worksheet for FreeFlow Print Server & FreeFlow Web Server ........3-4
FreeFlow Web Services Stock Library Fields ............................................................3-8
4 Workflow 2: Output Manager Print Workflow..............................4-1
Integration Guide – Book Assembly Supplement v
Page 6

5 Workflow 2: FreeFlow Web Server.....................................................5-1
Workflow 2: FreeFlow Web Server requires the following: ...............................5-1
Define Output Device for Book Assembly: ...........................................................................5-1
Create a Book Assembly Template.......................................................................................... 5-2
Validate the Book Assembly Template.................................................................................. 5-3
Check Stock Library..........................................................................................................................5-4
6 Workflow 2: FreeFlow Print Server.....................................................6-1
Workflow 2: FreeFlow Print Server requires the following:............................... 6-1
Check FreeFlow Print Server Stock Library............................................................................ 6-1
Create a FreeFlow Print Server Print Queue......................................................................... 6-2
Load & Check FreeFlow Xerox Printer Trays ........................................................................6-3
FreeFlow Print Server Exception Pages ..................................................................................6-4
Stock Library Worksheet for FreeFlow Print Server & FreeFlow Web Server ........6-4
Stock Library Worksheet for FreeFlow Print Server & FreeFlow Web Server ........6-5
FreeFlow Web Services Stock Library Fields......................................................................... 6-9
7 Use Case Samples....................................................................................7-1
Saddle Stitched Booklet ................................................................................................................7-1
Additional Setup procedures.......................................................................................................7-7
FreeFlow JMF Service Setup............................................................................................ 7-7
FreeFlow Output Manager Setup .............................................................................. 7-11
vi Integration Guide – Book Assembly Supplement
Page 7

Book Assembly
Workflow Summary
This guide describes how to integrate FreeFlow® Web Services with the Web Services Book
Assembly option. Book Assembly allows Customers to take multiple files and file types, perform
a soft-proof and dynamically create bound books or other finishing options from virtually any
location.
• The actual routing of the job is normally assigned as part of the pricing setup of a
template or job type. The JDF information is sent via JMF messages to the next module.
• A FreeFlow Web Services Output Device is created to route the Web Services jobs to the
appropriate FreeFlow module.
For more information on all the Web Services Print Workflows and Web Services FreeFlow
Integrations, refer to the FreeFlow Web Services 7.0 Integration Guide.
Integration Guide – Book Assembly Supplement i
Page 8

Book Assembly Workflow Summary FreeFlow Web Services
Navigating the Document
Book Assembly Workflow Summary
READ
Workflow1: Print Workflow using
FreeFlow JMF Service
Workflow 1 JMF Service
A. FreeFlow JMF Service Co-Resident with
FreeFlow Web Service
B. FreeFlow JMF Service: Legacy Configuration
Book Assembly References
Book Assembly Setup Summary
Book Assembly Printing Workflows & JDF
Tickets
Select
Workflow
Execute
Steps
@Web
Server or
JMF Client
@Output
Manager
Workflow 2: Print Workflow using FreeFlow
Output Manager
Workflow 2 : Output Manager
Workflow 1: FreeFlow Web Server Workflow 2: FreeFlow Web Server
Workflow 1: FreeFlow Print Server Workflow 2: FreeFlow Print Server
USE CASE WEB SERVICES BOOK ASSEMBLY
ii Integration Guide – Book Assembly Supplement
@Web
Server
@Print
Server
Page 9

FreeFlow Web Services Book Assembly Workflow Summary
Book Assembly References
• FreeFlow Web Services Print Buyer Guide
• FreeFlow Web Services Print Service Provider Guide
• JMF Service User Guide
• FreeFlow Print Server on-line help
• FreeFlow Web Services Integration Guide
Reference materials may be obtained from the Xerox Analyst or by visiting the Support &
Drivers section on Xerox.com.
Book Assembly Setup Summary
1. Select a Web Services Book Assembly Print Workflow
– Workflow 1: FreeFlow JMF Service Print Workflow
-FreeFlow Web Server: Install on Web Server (Recommended) & Configure JMF
Service.
<Or>
– Workflow 2: FreeFlow Output Manager Print Workflow
-FreeFlow Output Manager: Configure print queue on the FreeFlow Output Manager.
In both printing workflows the JDF ticket with the job properties associated with Book
Assembly is routed to the FreeFlow Print Server (DFE). JMF messaging is used to
communicate the status of the job through the printing workflow back to the Web
Services Production Queue.
2. FreeFlow Web Services
– Define a FreeFlow Output Device for Book Assembly print workflow.
– Create a Book Assembly Template
– Check Stock Library with Print Server Stock Library
3. FreeFlow Print Server
– Create a FreeFlow Print Server printer queue for Book Assembly print workflow
– Check stock library
– Load and Check applicable stocks in Xerox printer trays
Integration Guide – Book Assembly Supplement iii
Page 10

Book Assembly Workflow Summary FreeFlow Web Services
Book Assembly Printing Workflows & JDF
Job Tickets
FreeFlow Web Services achieves automation in production printing by implementing JDF/JMF
Printing Workflows in combination with Xerox production printers. Customers can also acquire
JMF Service software by contacting their Xerox Analyst or by downloading it from the Support
and Drivers section on Xerox.com.
For more information on all the Web Services Print Workflows and Web Services FreeFlow
Integrations, refer to the FreeFlow Web Services 7.0 Integration Guide.
Select a Print Workflow and follow the instructions to setup and configure each FreeFlow
component for Book Assembly.
FreeFlow Web Services Book Assembly can only be used with the following JMF Printing
Workflows:
1. FreeFlow JMF Service Print Workflow: Installed on the same server as FreeFlow Web
Services (recommended). Also refer to the Legacy Configuration: installed on a standalone PC client.
– Section: Workflow 1: FreeFlow JMF Service Print Workflow
2. FreeFlow Output Manager Print Workflow: A specific queue would be selected on the
FreeFlow Output Manager.
– Section: Workflow 2: Output Manager Print Workflow
Both workflows use the JDF digital printing process for Book Assembly jobs. The job ticket
parameters supported in the JDF ticket are outlined in section: Supported JDF Job Ticket
Parameters.
A FreeFlow Web Services Output Device is created to route the FreeFlow Web Services job to
the appropriate FreeFlow component in the printing workflow.
Note
The FreeFlow Process Manager workflow cannot be used for the FreeFlow Web Services
Book Assembly option.
iv Integration Guide – Book Assembly Supplement
Page 11

FreeFlow Web Services Book Assembly Workflow Summary
Supported JDF Job Ticket Parameters
Since JDF is an emerging standard, not all possible job ticket attributes from FreeFlow Web
Services are currently supported by the JDF printing path. When following one of the two
printing workflows (via JMF Service or Output Manager), the job parameters below can be
transferred via JDF process:
• Number of Copies
• Media (weight, size, color, type)
• Sides imaged (one side, two sides, head-to-toe)
Finishing
• Saddle Stitch (fold and stitch)
• Folding
Covers (for Book Assembly)
• Add Front Cover (media, print on front, print on back)
• Add Back Cover (media, print on front, print on back)
Insert Tabs (for Book Assembly)
• Insert after page number
• Media (weight, size, color, type, sequence number)
• Tab Text
Exceptions Pages (for Book Assembly)
• Media (weight, size, color, type)
• Sides imaged (one side, two sides, head-to-toe)
Integration Guide – Book Assembly Supplement v
Page 12

Book Assembly Workflow Summary FreeFlow Web Services
[This page left intentionally blank]
vi Integration Guide – Book Assembly Supplement
Page 13

1 Workflow 1:
FreeFlow JMF Service
Print Workflow
Select a Web Services Book Assembly Print Workflow:
Workflow 1: FreeFlow JMF Service Print Workflow: Two options that are supported by the Book
Assembly workflow:
• Recommended: Install on Web Services (Co-Resident) & Configure JMF Service
– Section entitled FreeFlow JMF Service Co-Resident with FreeFlow Web Service
• Legacy Configuration: Install on a Local stand alone PC & Configure JMF Service
– Section entitled FreeFlow JMF Service Legacy Configuration
The JDF ticket with the job properties associated with Book Assembly is routed to the FreeFlow
Print Server (DFE). JMF messaging is used to communicate the status of the job through the
printing workflow back to the Web Services Production Queue.
1
FreeFlow JMF Service Co-Resident with
FreeFlow Web Service
Recommended configuration, installed on the FreeFlow Web Services server.
Summary of Steps:
1. Install
2. Perform a System Check
3. Create Users & Groups
4. Run Printer Registration
5. Execute key CLI (Command Line Interface) commands
To obtain the latest JMF Service User Guide and the latest version of this software, visit the
FreeFlow Web Services section in the Support & Drivers section on Xerox.com=.
Integration Guide – Book Assembly Supplement 1-1
Page 14

Workflow 1: JMF Service Print Workflow FreeFlow Web Services
Reference
JMF Service User Document
Description: Complete install instructions for JMF Services and complete list of and syntax for
CLI (Command Line Interface)
Install JMF Service: Same server as FreeFlow Web Service
FreeFlow JMF Service is intended to run on a single host and cannot reside on the same server
with any other FreeFlow applications except Print Manager and Web Services.
The logged on user must have administrator rights to install programs on a Windows platform.
The installation will ask for the following information:
• Installation root directory. The default is "C:\Program Files\Xerox\FreeFlow JMF Service".
Perform the following steps to install the product:
If the install program does not start automatically, double-click the install.exe file.
1. Select a language from the pull-down menu. Click OK.
2. Click Next in the Introduction screen.
3. In the Software License Agreement screen, select the “I accept...” option to accept the End
User License Agreement terms. Click Next.
4. In the Choose Install Set screen, select both FreeFlow JMF Service and Printer
Registration. Click Next.
5. In the Choose Install Folder screen, accept the default install directory or enter an
alternate install location. Click Next.
6. In the Choose Shortcut Folder screen, select a Shortcut Folder option. Click Next.
7. Review the install options at the Pre-Installation Summary screen. Click Install.
8. Select Done to complete the software installation and reboot the system.
After you reboot the system, under the Start menu "Xerox FreeFlow Software- >FreeFlow JMF
Service", the following shortcuts are available:
• Services: This shortcut is used when stopping and starting the FreeFlow JMF Service.
• Command Line: This shortcut is used to invoke the FreeFlow JMF Service CLI commands.
System Check: Same Computer as FreeFlow Web Service
At the Installed Products dialog, ensure that the Free Flow JMF Service check box is selected.
Click OK.
1-2 Integration Guide – Book Assembly Supplement
Page 15

FreeFlow Web Services Workflow 1: JMF Service Print Workflow
Create Users & Groups: Same Computer as FreeFlow Web Service
FreeFlow JMF Service relies on the underlying operating system security mechanism for
authentication.
All authenticated users must have an account on the host on which FreeFlow JMF Service is
running. Authorization is enforced through the Command Line Interface (CLI) which must
reside on the same host on which FreeFlow JMF Service is running.
The CLI uses the credentials associated with the logged in user for authorization purposes.
Only a single access level is supported - "Xerox FreeFlow JMF Service Administrators".
Prior to executing any CLI commands, this group must be created and the user must be
associated with it.
Perform the following to configure the user group:
1. Right-click My Computer and select Manage.
2. Open the Local Users and Groups folder and open the Groups folder.
3. Select the “Xerox FreeFlow JMF Service Administrators” Group.
4. Add users to the group. If necessary, first create any specific users whom you want to have
access to the application.
Note
It is important to add the user who setup and administers the FreeFlow Web Server to this
group.
5. Close the Computer Management window and login as one of the users added to the
Xerox FreeFlow JMF Service Administrators group.
JMF Service Printer Registration: Same Server as FreeFlow Web
Service
Only those users that are members of the Xerox FreeFlow JMF Service Administrators group
can add or edit a Xerox printer in the Printer Registration application.
Close the Computer Management window and login as one of the users added to the group.
1. Select ->Programs->Xerox Free Flow Software->Printer Registration.
2. Select Add to add the Xerox Printer.
Integration Guide – Book Assembly Supplement 1-3
Page 16
Workflow 1: JMF Service Print Workflow FreeFlow Web Services
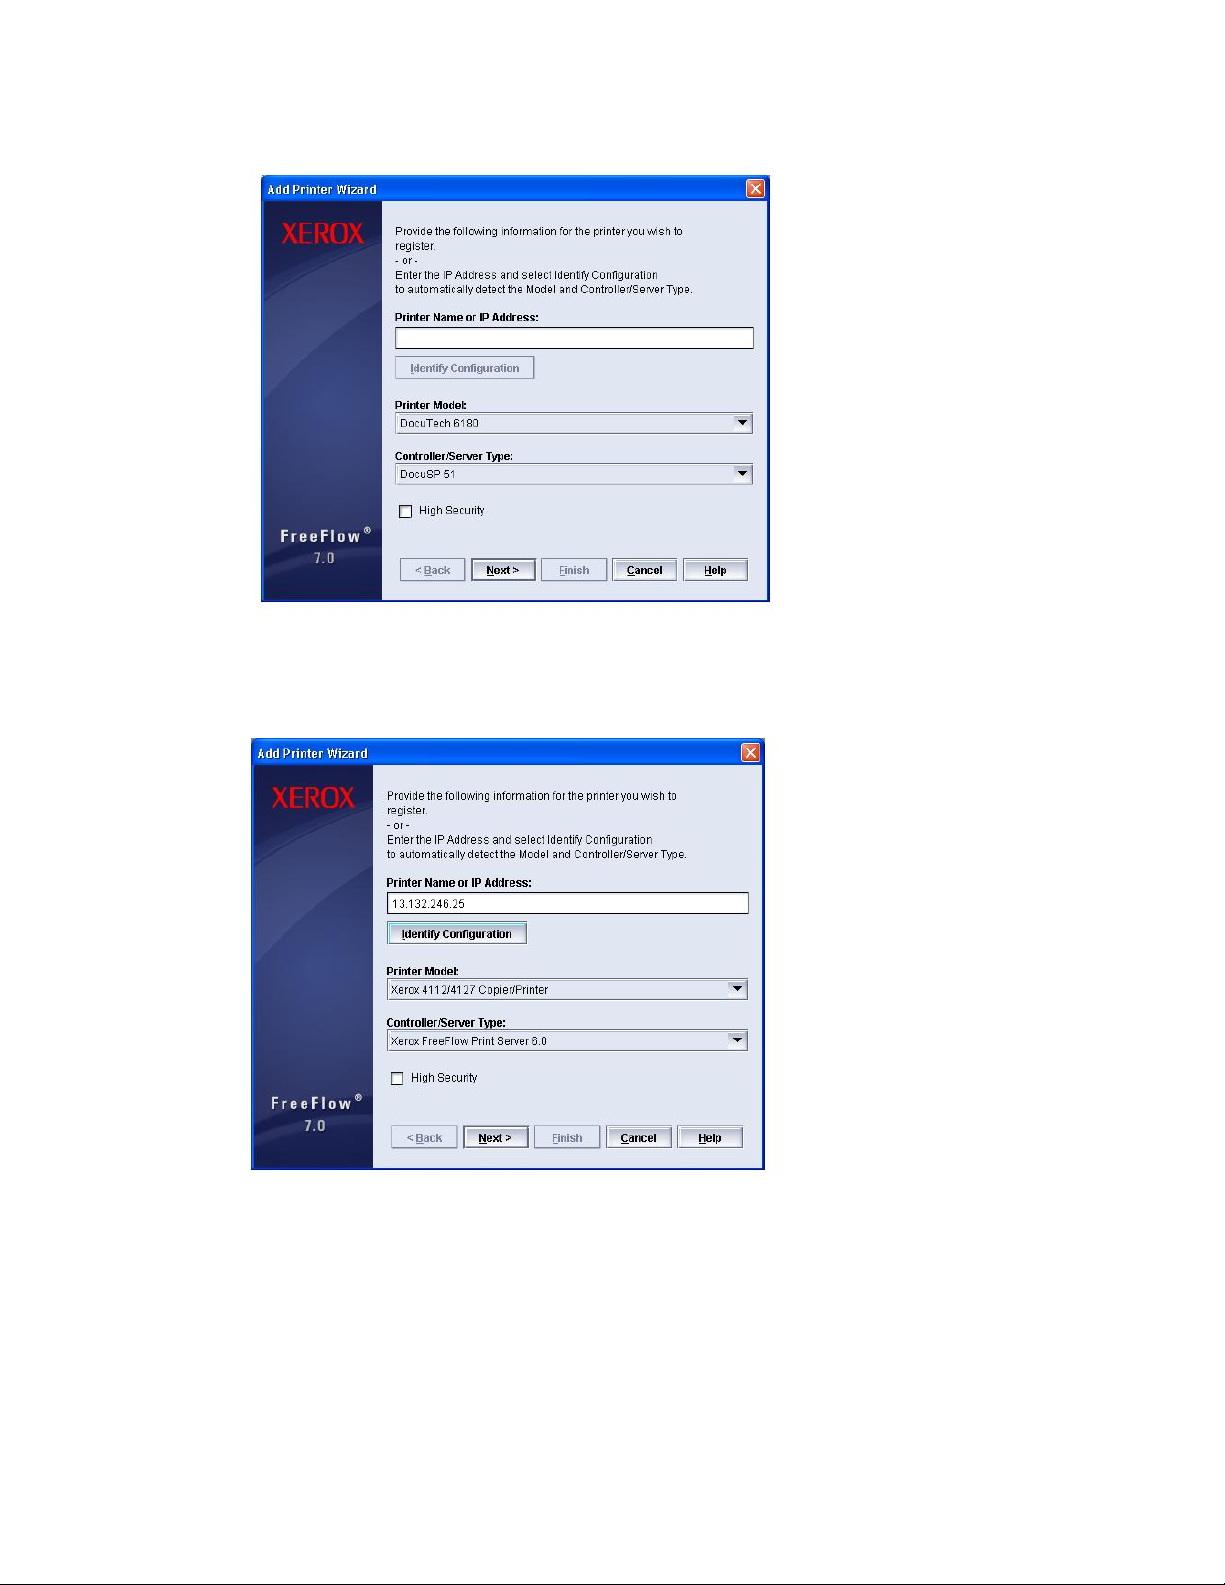
3. The Add Printer wizard will be displayed.
4. Enter the IP address or Printer Name and click Identify configuration. The application will
automatically identify the printer model and controller type.
1-4 Integration Guide – Book Assembly Supplement
Page 17
FreeFlow Web Services Workflow 1: JMF Service Print Workflow
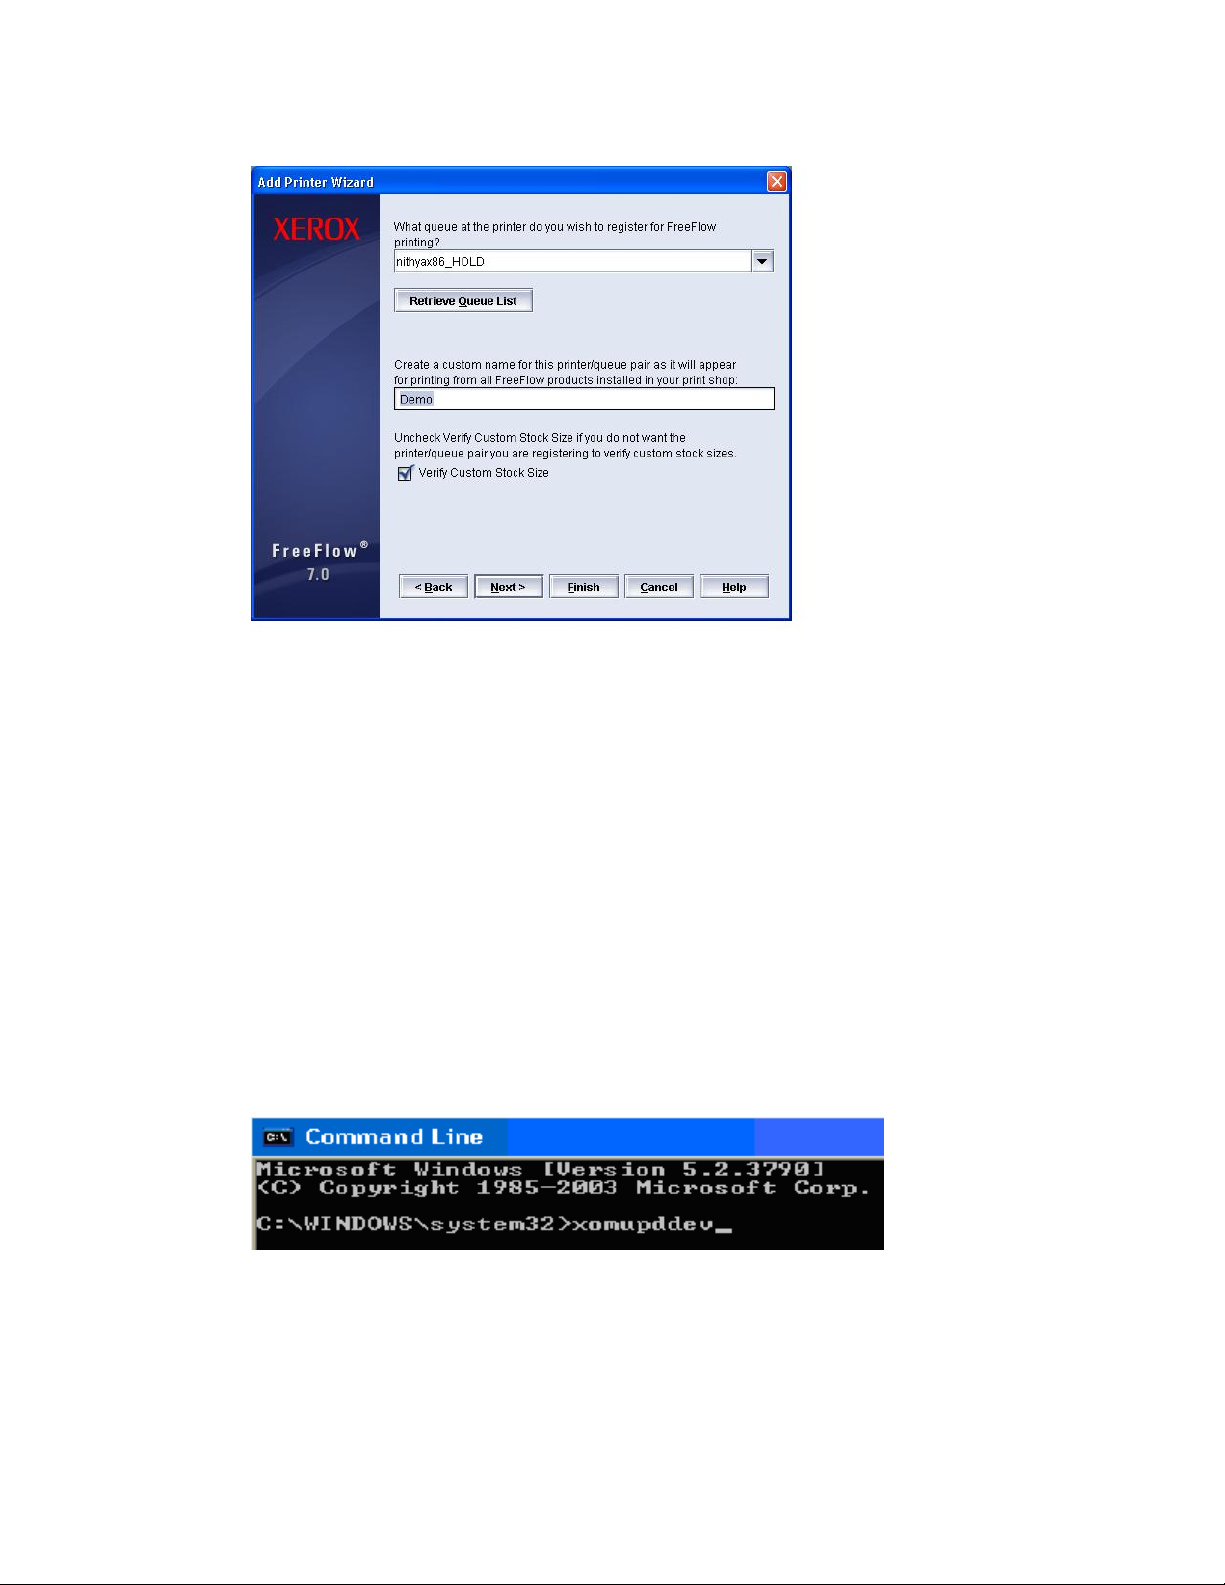
5. Select the queue, enter the Queue name and click Finish.
6. Select Start->Programs->Xerox Free Flow Software->Xerox Free flow JMF Service 7.0->
Command line.
CLI Command Line Interface: Same Server as FreeFlow Web
Service
The JMF Service does not maintain its own list of configured production printers. You must use
the FreeFlow Printer Registration application to add and configure printers.
Once you have added the necessary production printers, you will need to bring up a Command
Prompt and use the following FreeFlow JMF Service CLI command to register the printers into
the FreeFlow JMF Service:
• Invoke the xomupddev command to retrieve the list of updated printers from the Printer
Registration application. For information on how to use the FreeFlow Printer Registration
application, see the online help for that application.
• Invoke the xomlisdev command
Integration Guide – Book Assembly Supplement 1-5
Page 18
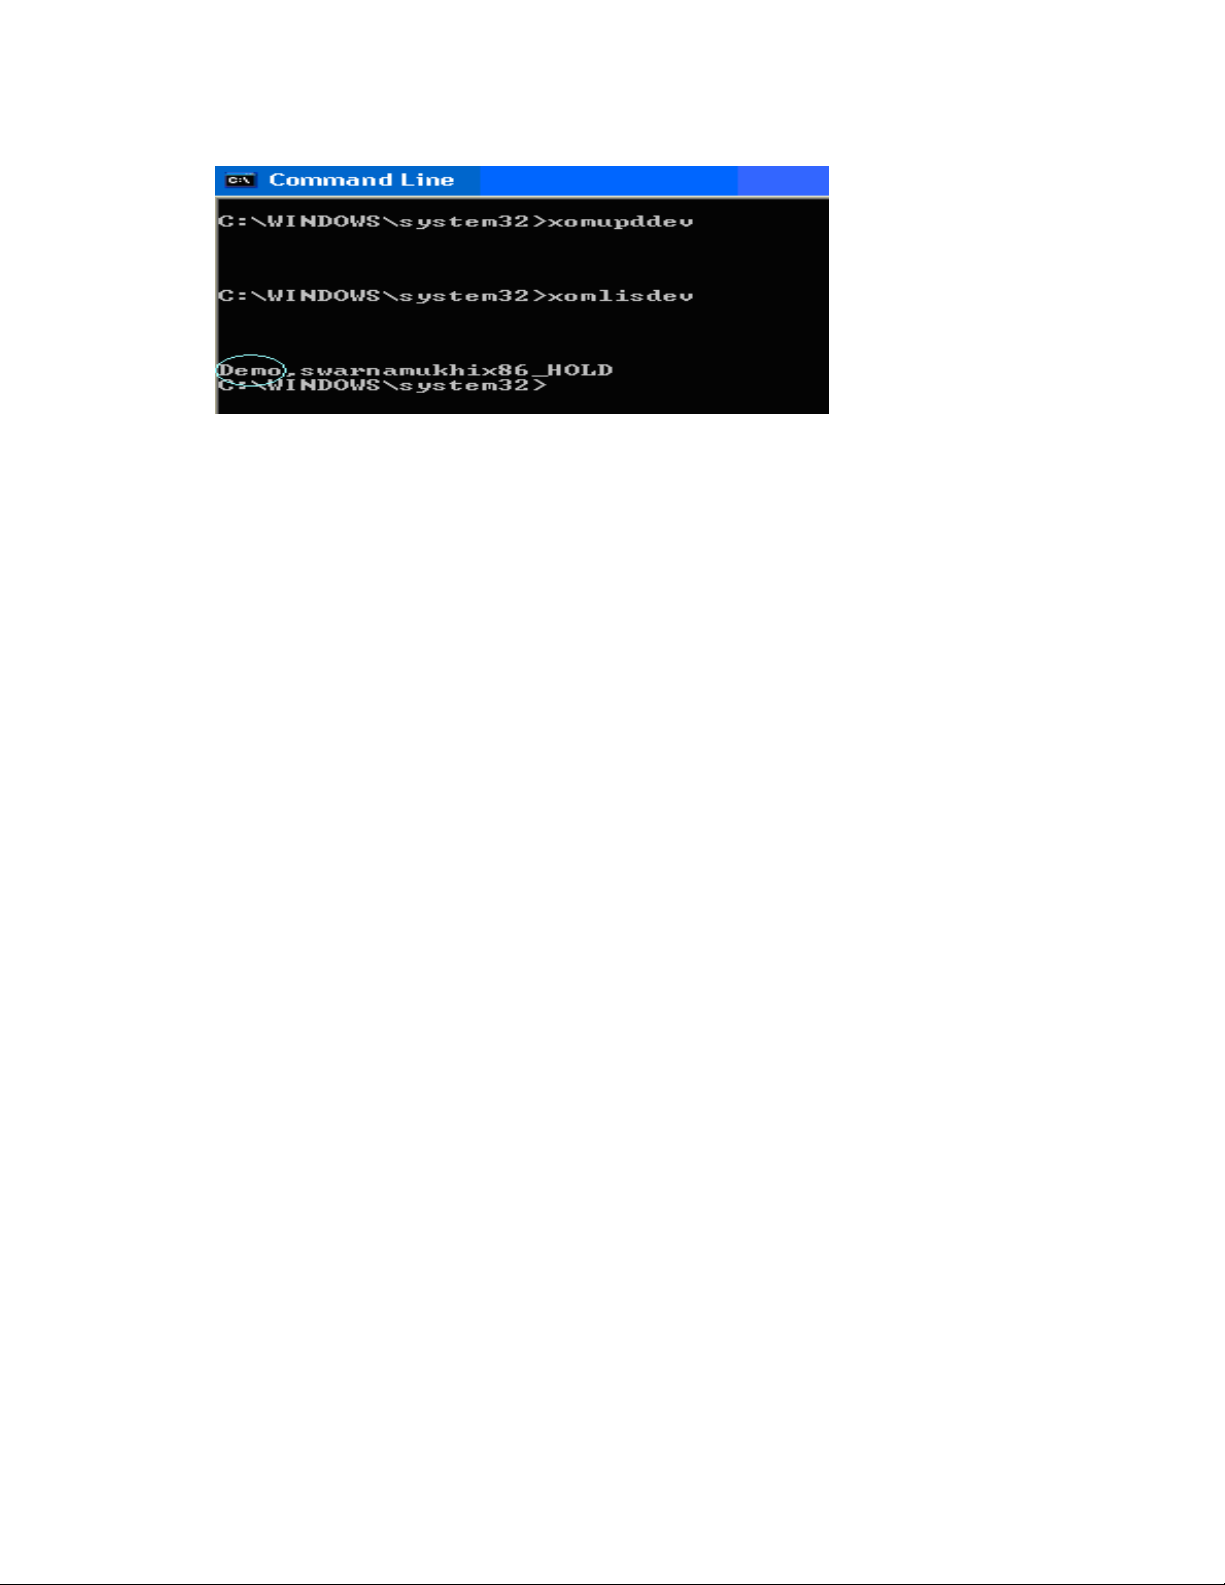
Workflow 1: JMF Service Print Workflow FreeFlow Web Services
This command displays the printers updated in the JMF services.
FreeFlow JMF Service Legacy
Configuration
Install JMF Service
FreeFlow JMF Service is intended to run on a single host and cannot reside with any other
FreeFlow applications except Print Manager and Web Services.
Refer to section: Install JMF Service: Same server as FreeFlow Web Service.
System Check
At the Installed Products dialog, ensure that the Free Flow JMF Service check box is selected.
Click OK.
Create Users & Groups
FreeFlow JMF Service relies on the underlying operating system security mechanism for
authentication.
All authenticated users must have an account on the host on which FreeFlow JMF Service is
running. Authorization is enforced through the Command Line Interface (CLI) which must
reside on the same host on which FreeFlow JMF Service is running.
Refer to section:
1-6 Integration Guide – Book Assembly Supplement
Page 19
FreeFlow Web Services Workflow 1: JMF Service Print Workflow
Create Users & Groups: Same Computer as FreeFlow Web Service.
JMF Service Printer Registration
Refer to section: JMF Service Printer Registration: Same Server as FreeFlow Web Service.
CLI Command Line Interface
Refer to section: CLI Command Line Interface: Same Server as FreeFlow Web Service.
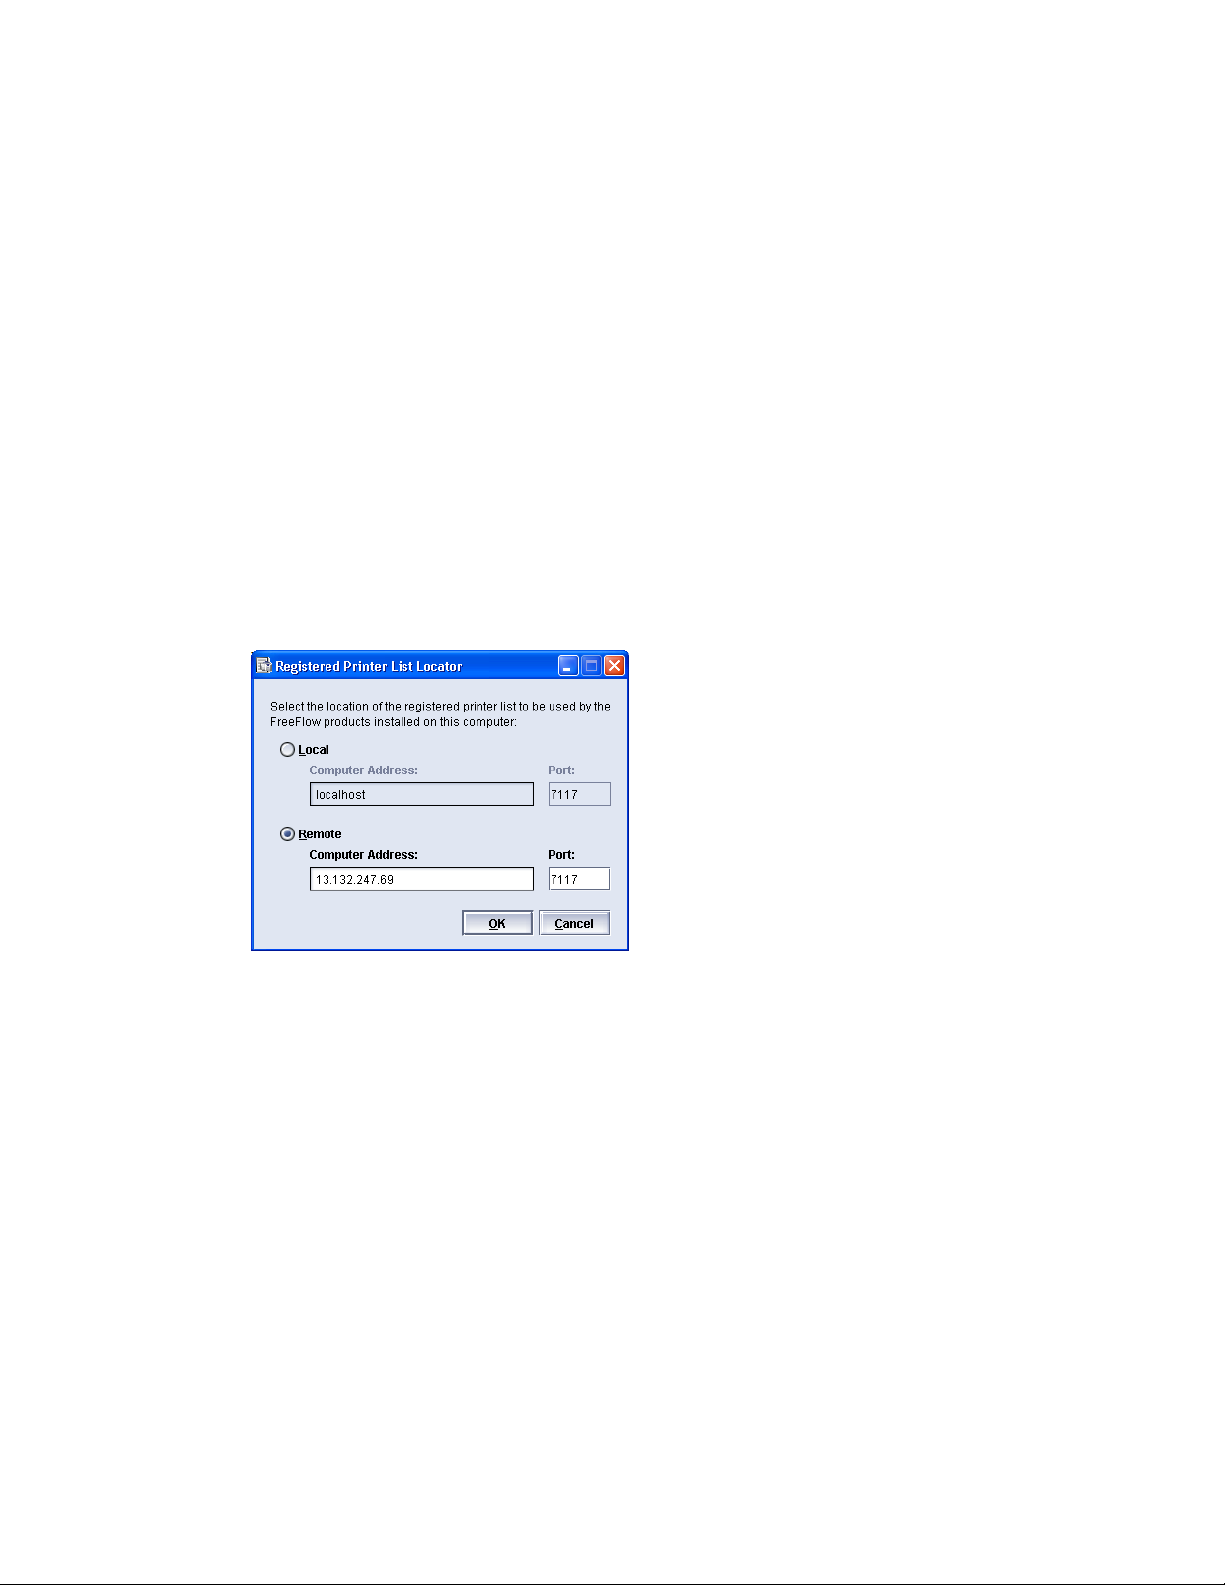
List Locator Application for Legacy Configuration
This step is only required only for the Legacy Configuration:
1. Make sure that both computers (WS machine and JMF machine) are running under the
same Windows user name and password.
2. Select Start->Programs->Xerox FreeFlow Software->Printer Administration->Registered
Printer List Locator.
3. Select remote and set the IP address of the machine on which JMF Service installed.
Integration Guide – Book Assembly Supplement 1-7
Page 20

Page 21

2 Workflow 1:
FreeFlow Web
Server
Workflow 1: FreeFlow Web Server requires the following:
• Define a FreeFlow Output Device for Book Assembly print workflow.
• Create a Book Assembly Template
• Check Stock Library with Print Server Stock Library
Define a JMF Output Device for Book
Assembly
2
To create a FreeFlow output device for FreeFlow JMF Service:
1. Select Settings > Output Devices.
2. Click Add; the Add Device dialog box appears.
3. In the Device Name field, type a name.
4. In the Device Group dropdown list, select Digital.
5. In the Machine Type dropdown list, select FreeFlow JMF Service.
6. Click OK.
7. In the Press Sheet Sizes sub-panel, select the sizes.
Note
You can change the Device Description name.
Output Channels Setup
To set up the path for the job files and Job Tickets to be transferred to the FreeFlow JMF
Service after approval of a job:
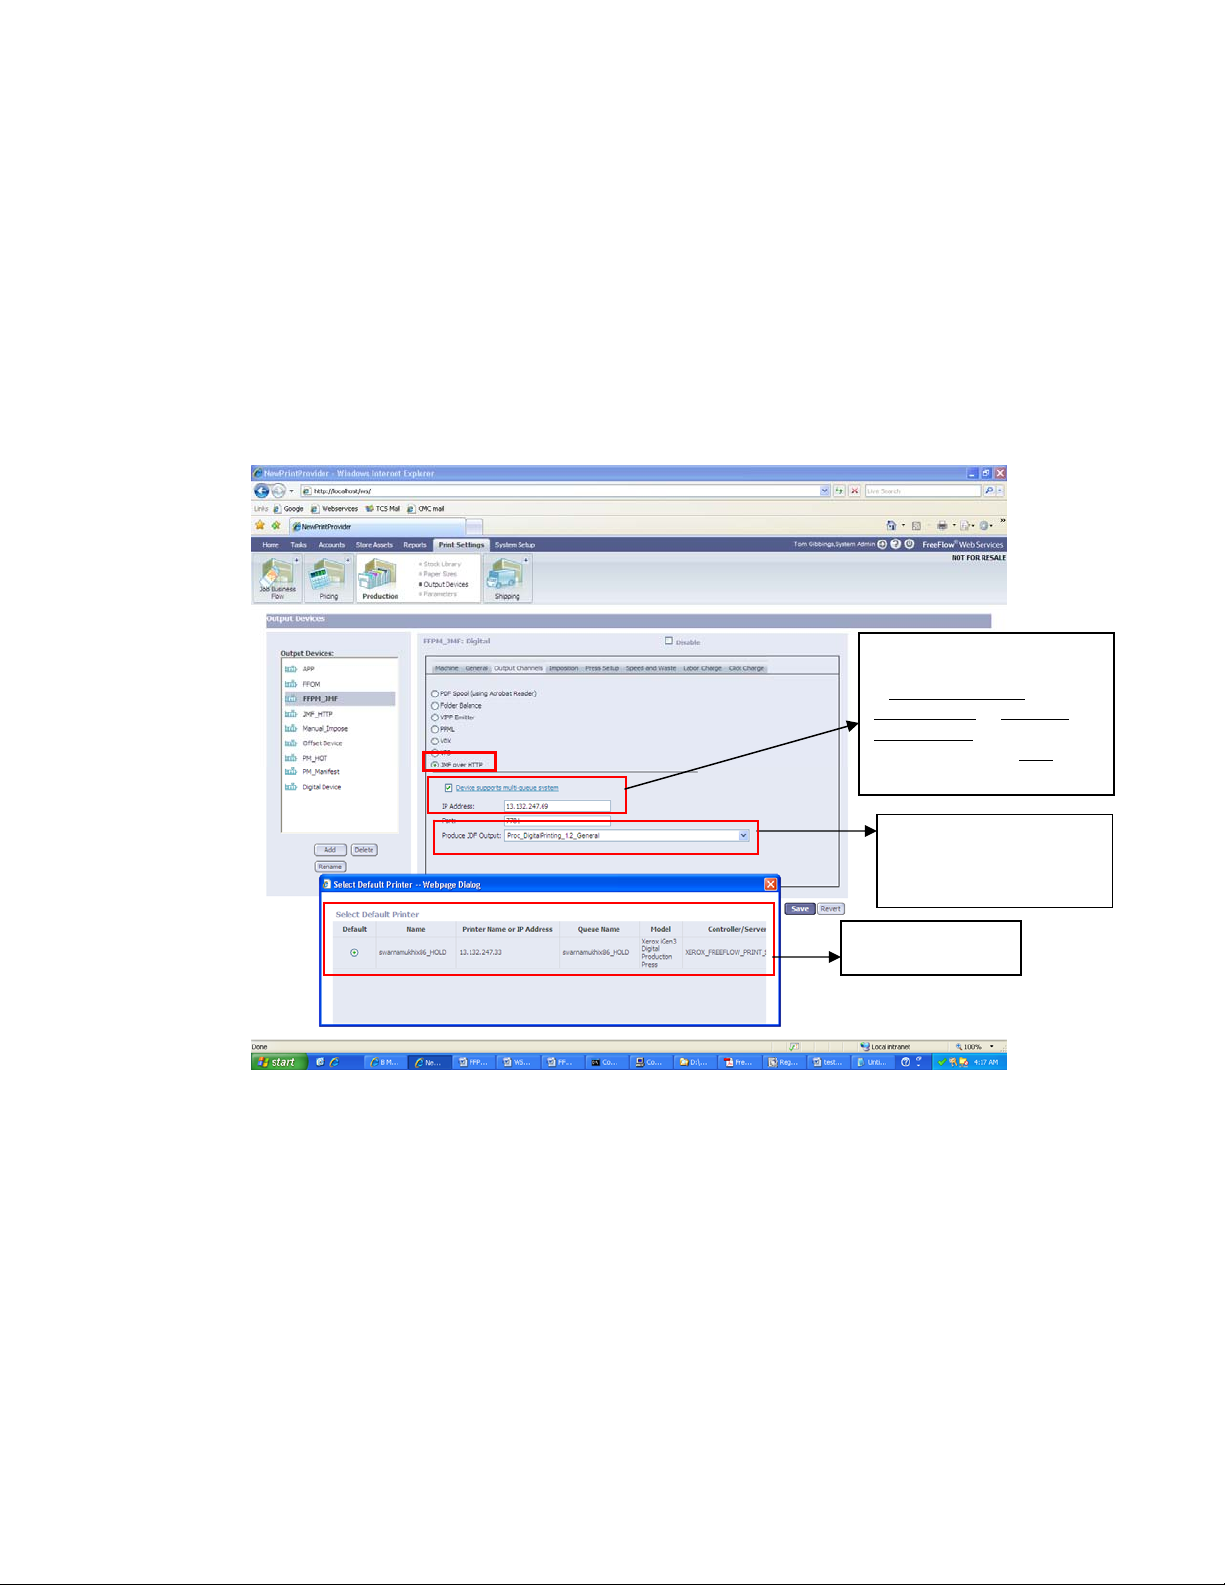
1. Select the Output Channels tab.
2. Select the JMF over HTTP option button.
3. Select the Device supports multi-queue system check box.
4. In the Port field, type 7781.
Integration Guide – Book Assembly Supplement 2-1
Page 22
Workflow 1: Web Services Print FreeFlow Web Services
Q
Note
Port 7781 is the FreeFlow JMF Service server's default port. If the port is changed on the
FreeFlow JMF Service server it needs to be defined here respectively
5. In the IP Address field, type the IP address or the server host name where FreeFlow JMF
Service is installed (it is the PC Client IP for Legacy Configuration or FreeFlow Web Services
IP for JMF Service co-resident with Web Service).
Note
You should NOT use localhost in place of the IP address as it will cause job transmission
problems or failures. Input the IP address only.
6. To enable this submission path in FreeFlow Web Services , select
Proc_DigitalPrinting_1.2_General.jdf
In field, enter the IP address
where JMF installed
(Standalone-Legacy
configuration or FreeFlow
Web Services)
Do not change the Port
field
7. Click Save.
Produce JDF Output field
set to:
Proc._DigitalPrinting_1.2_
Registered Printers/
ueues
2-2 Integration Guide – Book Assembly Supplement
Page 23

FreeFlow Web Services Workflow 1: JMF Service Print Workflow
Create a Book Assembly Job Type
1. Duplicate the binding style
a. In the main menu, select Print Settings > Job Types > Book Assembly. The Book
Assembly window is displayed.
b. In the Binding Styles area, click and review the sample binding styles that come with
the system. Then select the style that most resembles the one you need to create, and
click
c. In the dialog box that opens, assign a name to the binder style you have created (for
example, My Example Binder). After the binder style is successfully duplicated, close
the displayed success message.
d. In the Binding Styles area, select the style you just created.
e. In the General tab in the Binding Style definition area, specify any internal notes,
notes for the customer, and select the default component (Color or B/W pages). If the
binding has a spine, enter the spine details.
In the remaining tabs of the Binding Style definition area (Page Size, Materials, Splitting
and Pricing), you will define the characteristics of the Book Assembly. For Saddle Stitch
jobs, you should set the spine to FIXED and width to 0.
2. Define the page sizes:
a. Select the Page Size tab, and then select the required page size check boxes (for
example, A4 and A5).
Note
When selecting page sizes, you can use the Add Preview (or Edit Preview) link to define
the dimensions of the binder and the position of the pages within the binder. For
instructions on filling in this information, see the Print Service Provider Guide.
3. Select and price the materials. The materials are used for pricing and preview purposes.
The preview added in this tab is used as the top layer in the Print Buyer's preview.
a. Select the Materials tab.
b. Define the binding material types and prices. To add a material:
i. Click Add Material
ii. In the row of blank fields that opens at the end of the Available Materials area,
.
fill in material name and price.
Note
When defining binding materials, you can use the Properties link to define the
properties of the binder. For instructions on filling in this information, see the Print
Service Provider Guide.
Integration Guide – Book Assembly Supplement 2-3
Page 24

Workflow 1: Web Services Print FreeFlow Web Services
4. Define component impositions.
You can define a general imposition, and then define exception impositions for parts of
the book. For example, you might want the black and white pages of a booklet to be
printed on one printer, the color pages on another, and the cover on yet another.
Note
You can split off color pages and black and white pages at different levels:
– You can split off (define a different imposition for) the Color Page and the B&W Page
components (Split Color pages, Split B&W pages)—as indicated in substep d.
– You can split off (define a different imposition for) color pages from all components
for which you specify Color Channels in the component definition—as indicated in
substep e.
¾ If you split off color for all components for which Color channels are defined, you
can additionally split off pages that the print buyer identifies as color pages when
uploading the file.
a. Select the Splitting tab.
b. Click the All
(Device and Imposition) button.
c. Modify the imposition details as needed, and click OK.
d. For each component that you want to “split off and define” a different imposition:
i. In the Binder area, click the check box for splitting the component (for example,
to define a separate imposition for the Color Pages component, click the Split
Color Pages check box in the Binder area).
ii. Click the component’s
button.
iii. Define the imposition for the component and click OK.
e. To split color pages for all components for which color pages are defined in the Color
Channels tab (see Step 6).
i. In the Binding area, select Split Colors (by Definition of the Print Provider
according to the Color Channels).
ii. Click the Process Colors
iii. Click the
button, fill in the imposition, and click OK.
button, fill in the imposition, and click OK.
iv. To additionally split the color pages according to the content as defined by the
Print Buyer, in the Binding area, select Split Colors (By Content ...), click the
Process Colors (Black & White Content)
button, fill in the imposition, and click
OK.
2-4 Integration Guide – Book Assembly Supplement
Page 25

FreeFlow Web Services Workflow 1: JMF Service Print Workflow
5. Define pricing.
a. With no component selected in the Component area (if a component is selected, click
the Binding Style again in the Binding area and the component will no longer be
selected), click the Pricing tab.
b. Fill in the pricing information and click OK. You should set the base price and price per
unit depending on page size, and discounts depending on the number of copies
ordered.
6. For each component in the Binding style, define the details as follows:
a. In the Component area:
i. Ensure the check box for the component is selected.
ii. Select the component by clicking its name (for example, Color Pages).
b. For each tab (General, Paper Selection, Color Channels, Finishing, and Pricing) in the
definition area for the component.
i. Select the tab.
ii. Fill in the details. Note the following points:
¾ When filling in the General tab for the Color Pages or B/W Pages components,
you can select two sided printing; if you do not, printing will be one-sided.
¾ In the Paper Selection tab, you can click Add Paper to add a Paper Category and
a Paper type from stock.
¾ In the Color Channels tab, select either Process or Black & White.
¾ In the Finishing tab, select the Lamination, Texture, and number of print side.
¾ In the Pricing tab, define the prices for the particular components (and discounts)
that will be added to the base cost, depending on the options selected.
To add the price of the stock defined in the stock library to the price that you define here,
select the Add Paper Price check box at the bottom of the Price per Page area.
iii. Click OK.
7. To add a component to the Binding style:
a. In the Binding Styles area, select the Binding Style.
b. Click Add Component.
c. In the New Component dialog box, specify the component name, and select the
component type (For example, to insert a transparent overlay page, call it Overlay
page and select Pages).
d. For the component you added, perform the substeps in Step 6.
Integration Guide – Book Assembly Supplement 2-5
Page 26

Workflow 1: Web Services Print FreeFlow Web Services
Validate the Book Assembly Job Type
1. Log in as a Print Buyer User administrator.
2. In the Order Jobs page, under Order a Book Assembly, click Start Ordering.
3. In the Book Assembly: Introduction page, click Start Printing.
4. In the Upload Files window, browse to the file(s) you want to upload, click Open, click
Upload. When you have uploaded all the files, click Continue.
5. In the Define Binding Style window, select the binding style, and then set the page size
(and spine width, when present) in the displayed fields. Click Continue.
6. In the Define Components window:
a. Use the Move Up, Move Down, Add Tabs, Add Blanks and
arrange the book content.
b. Define the page type and paper for each component (file).
c. Preview and check the PDF.
d. Click Add to Cart and Checkout.
7. In the Shopping Cart window.
a. Specify the quantity to print.
b. Click Get Quote. Ensure that the quote is correct according to the Book Assembly
definition.
c. Click Proceed to Checkout.
8. Complete the order.
9. Log back into the Print Service Provider account.
10. Click Tasks > Production and check that the job was associated with the correct output
device and correct run size, and that the job was added to the queue.
11. Verify that the job contains the correct imposition and verify the job ticket details.
12. Click Approve to move the job to the Printing queue, and check that the file was sent to
the correct output devices.
(Duplicate) button to
Check Stock Library
Check Stock Library with Print Server Stock Library.
Refer to Section: Stock Library Worksheet for FreeFlow Print Server & FreeFlow Web Server.
2-6 Integration Guide – Book Assembly Supplement
Page 27
3 Workflow 1:
FreeFlow Print Server
Workflow 1: FreeFlow Print Server requires the following:
• Check stock library.
• Create a FreeFlow Print Server printer queue for Book Assembly print workflow.
• Load and Check applicable stocks in Xerox printer trays.
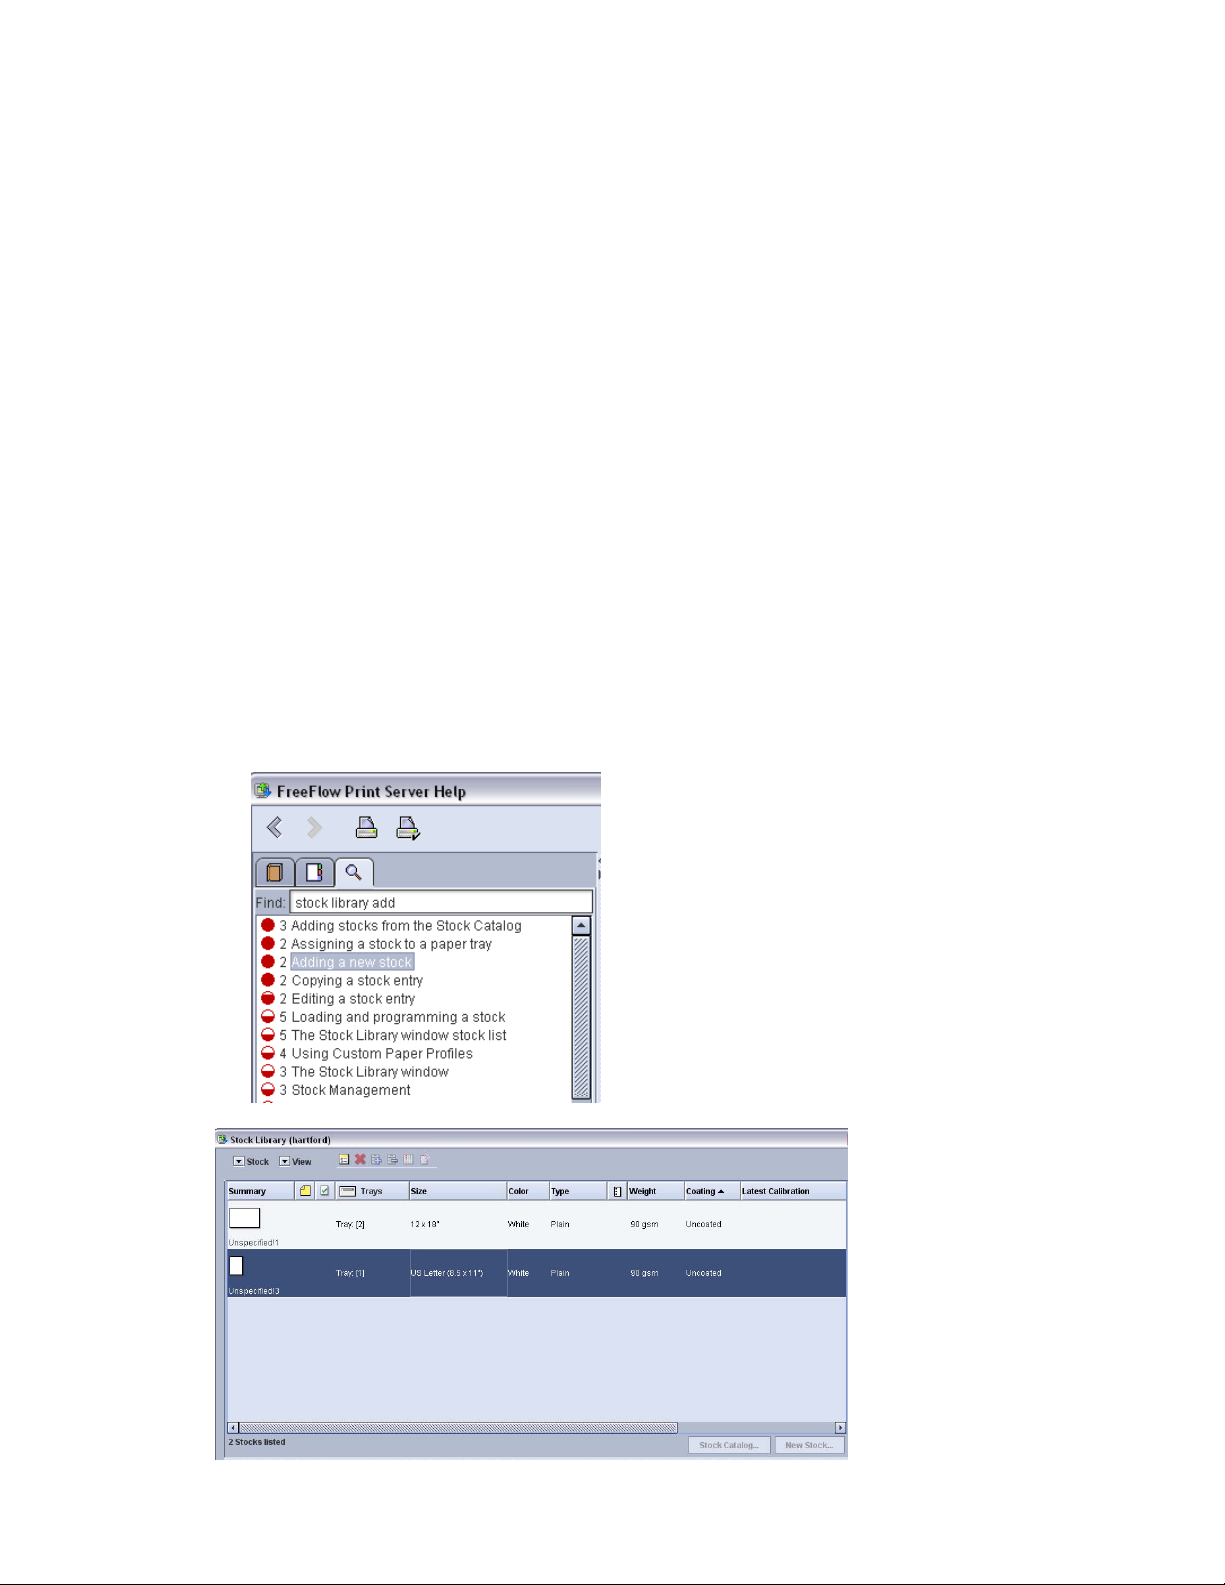
Check FreeFlow Print Server Stock Library
3
Create the stock in the FreeFlow Print Server Stock Library that will be used in the FreeFlow
Web Services Book Assembly Workflow for all supported segments of the Book Assembly.
• To set up a FreeFlow Print Server Stock Library parameters, refer to the online help.
Integration Guide – Book Assembly Supplement 3-1
Page 28

Workflow 1: FreeFlow Print Server FreeFlow Web Services
Create a FreeFlow Print Server Print
Queue
Create a Printer Queue on the FreeFlow Print Server for Book Assembly Jobs.
• To set up a FreeFlow Print Server Print Queue parameters, refer to the online help.
Assure that all the stocks used in the Web Services Book Assembly Workflow have been
defined in both the FreeFlow Web Services Stock Library and in the FreeFlow Print Server Stock
Library.
The stock selected in the window of adding a Print Queue is the default stock used for jobs
that are submitted and have no stock specified. This stock is also used when the Print Queue
Override is selected. A worksheet is provided in the Section: Stock Library Worksheet for
FreeFlow Print Server & FreeFlow Web Server.
Load & Check FreeFlow Xerox Printer
Trays
3-2 Integration Guide – Book Assembly Supplement
Page 29

FreeFlow Web Services Workflow 1: FreeFlow Print Server
FreeFlow Print Server Exception Pages
All the jobs that are received from a Web Services Book Assembly workflow will appear in the
FreeFlow Print Server designated Printer Queue as Exception Pages.
To see the JDF ticket properties supported on the Web Service JDF Ticket for the FreeFlow Print
Server, refer to the screen image below.
Refer to section Supported JDF Job Ticket Parameters.
Integration Guide – Book Assembly Supplement 3-3
Page 30

Workflow 1: FreeFlow Print Server FreeFlow Web Services
Stock Library Worksheet for FreeFlow
Print Server & FreeFlow Web Server
IMPORTANT NOTE:
The FreeFlow Print Server Stock Library must match both the Web Services Stock Library
and stock assigned to the Book Assembly template.
Refer to Web Services Sections: Create a Book Assembly Job Type and FreeFlow Web Services
Stock Library Fields.
To see the JDF ticket properties supported on the Web Service JDF Ticket for the FreeFlow Print
Server
Refer to Section: Supported JDF Job Ticket Parameters.
3-4 Integration Guide – Book Assembly Supplement
Page 31

FreeFlow Web Services Workflow 1: FreeFlow Print Server
FreeFlow Print Server: PS Stock Library
Web Server: WS Stock Library
Both Stock
Libraries
must match
in Syntax
WS: stock
item name
WS: type
WS: color
WS: weight
(gsm)
WS:US
weight
WS: size
Output
Device
PS:
name
PS: size PS:
color
PS:
type
PS:
weight
Print Queue
Name
(over-ride
=off)
Xerox
Printer:
Tray
PS: Other
info.
Both Stock
Libraries
must match
in Syntax
WS: stock
item name
WS: type
WS: color
WS: weight
(gsm)
WS:US
weight
WS: size
Output
Device
PS:
name
PS: size PS:
color
PS:
type
PS:
weight
Print Queue
Name
(over-ride
=off)
Xerox
Printer:
Tray
PS: Other
info.
Integration Guide – Book Assembly Supplement 3-5
Page 32

Workflow 1: FreeFlow Print Server FreeFlow Web Services
Example:
FreeFlow Print Server: PS Stock Library
Web Server: WS Stock Library
Both Stock
Libraries
must match
in Syntax
WS: stock
item name
WS: type Plain
WS: color White
WS: weight
(gsm)
WS:US
weight
WS: size US letter
Output
Device
PS:
name
Test!1 Tray 1
90 gsm
Hartford_hold
PS: size PS:
color
8.5 x 11
PS:
type
PS:
weight
Print Queue
Name
(over-ride
=off)
Xerox
Printer:
Tray
PS: Other
info.
Xerox Printer
name=
8000AP_Speed
y
3-6 Integration Guide – Book Assembly Supplement
Page 33

FreeFlow Web Services Workflow 1: FreeFlow Print Server
Both Stock
Libraries
must match
in Syntax
PS:
name
PS: size PS:
color
PS:
type
PS:
weight
Print Queue
Name
(over-ride
=off)
Xerox
Printer:
Tray
PS: Other
info.
WS: stock
item name
WS: type Pre-cut
WS: color White
WS: weight
(gsm)
WS:US
weight
WS: size 9.0 x 11.0
Output
Device
Tabs Tray 2
Tab
Drilled
Seq. 5
90 gsm
Hartford_hold
Xerox Printer
name=
8000AP_Speed
y
To see the JDF ticket properties supported on the Web Service JDF Ticket for the FreeFlow Print
Server
Refer to section: Supported JDF Job Ticket Parameters
Integration Guide – Book Assembly Supplement 3-7
Page 34

Workflow 1: FreeFlow Print Server FreeFlow Web Services
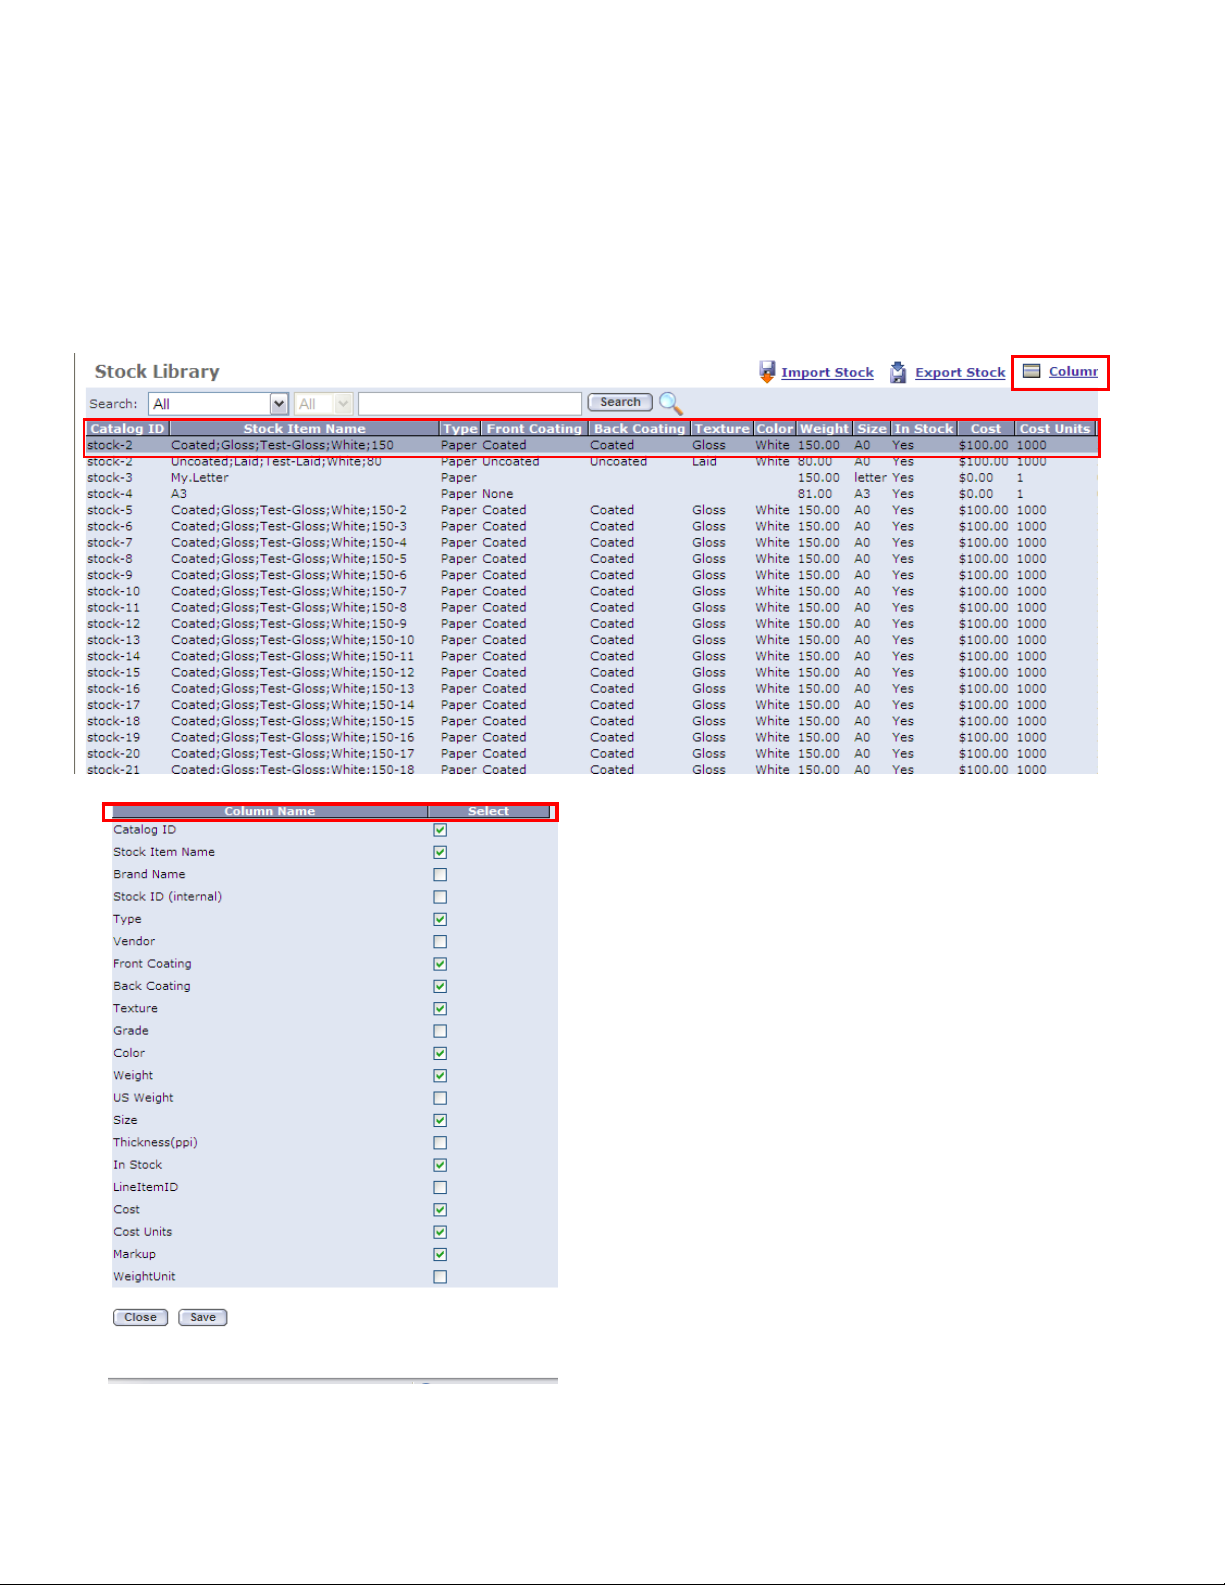
FreeFlow Web Services Stock Library Fields
3-8 Integration Guide – Book Assembly Supplement
Page 35

FreeFlow Web Services Workflow 1: FreeFlow Print Server
Integration Guide – Book Assembly Supplement 3-9
Page 36

Page 37

4 Workflow 2: Output
Manager Print
Workflow
Select a Web Services Book Assembly Print Workflow:
Workflow 2: FreeFlow Output Manager Workflow: Two options that are supported by the Book
Assembly workflow:
• FreeFlow Output Manager: Configure print queue on the FreeFlow Output Manager
In both printing workflows the JDF ticket with the job properties associated with Book
Assembly is routed to the FreeFlow Print Server (DFE). JMF messaging is used to communicate
the status of the job through the printing workflow back to Web Services Production Queue.
1. Click Queue Manager.
4
2. New Queue. In the next window type a name in the Queue Name field.
Integration Guide – Book Assembly Supplement 4-1
Page 38

Workflow 2: Output Manager Workflow FreeFlow Web Services
3. Click Next and select the required printer for Associated Printers. Click
Next.
4. Click Create Queue
5. Click Edit Queue Properties
6. Under Basic Properties, select Yes in the Accepting Jobs and Release jobs fields
7. Select the Xompdlana.bat check box and select the Preprocessing Program option, under
Job Processing Options
8. Select the Supported check box and in the Keep Completed jobs fields for Minimum,
Maximum and Default options, respectively, select 3 days.
4-2 Integration Guide – Book Assembly Supplement
Page 39

FreeFlow Web Services Workflow 2: Output Manager Workflow
9. Under Paper Stock, type 1-254 instead of 0-254 for Order field.
10. Click OK to save the changes.
Integration Guide – Book Assembly Supplement 4-3
Page 40

Page 41

5 Workflow 2:
FreeFlow Web Server
Workflow 2: FreeFlow Web Server requires the following:
• Define a FreeFlow Output Device for Book Assembly print workflow.
• Create a Book Assembly Template
• Check Stock Library with Print Server Stock Library.
Define Output Device for Book
5
Assembly:
To set up the output device in the Web Services:
1. Log in as the Print Provider
– Navigate to Print Settings-> Production-> Output Devices.
2. Create an Output Manager Output device. To add an output device, perform the
following:
d. Click Add , under Output Devices
e. Enter values in the following fields,
¾ Device Name: Any Custom Name
¾ Device Group: Digital
¾ Machine Type: FreeFlow Output Manager
3. Click OK and navigate to output channels.
4. Select JMF over HTTP.
5. Enter the IP address of the system on which FreeFlow Output Manager is installed.
Integration Guide – Book Assembly Supplement 5-1
Page 42

Workflow 2: FreeFlow Web Services FreeFlow Web Services
6. In the port field, type 7781.
7. Select Proc_DigitalPrinting_1.2_General option for Production JDF Output filed.
8. Click the Device support multi queue system link.
9. Select Available Queues and select the queue created above.
Create a Book Assembly Template
1. Create the template.
a. In the main menu, select Accounts > Store Setup > Templates.
b. In the Accounts area, select the Print Buyer account for which you are creating the
template.
c. In the template list area, click the Create a New Book Assembly Template link.
The Upload Files window is displayed.
2. Upload the files.
a. In the Upload Files window, click Browse.., choose a file that will be in the book, and
click Open.
b. Click Upload to add the file to the book. The file will be listed in Uploaded Files list on
the right.
c. Repeat this process to add other files (for example, cover file, other book files).
d. Click Continue.
The Define Binding Style window is displayed.
3. Define the binding style.
a. In the Define Binding Style window, select the required Binding style (e.g., Binder),
and where relevant, Material (e.g., 1.5 inch D-Ring), Book Assembly Size (e.g., A4), and
the Spine Width (e.g., 0.050).
b. Click Continue.
The Define Components window is displayed. This window lists and displays a graphic of
the first page of the file you uploaded.
5-2 Integration Guide – Book Assembly Supplement
Page 43

FreeFlow Web Services Workflow 2: FreeFlow Web Services
4. Define the components. For any component (uploaded file) you select in the left side of
the window, the default values for the page Type and Paper are displayed in the Changer
Properties for selected pages area on the right side of the window.
a. To alter page type and paper values for the component, select the component, and
select the page type and paper values. If one of the components is a cover, select the
component, and select Cover as the page type
b. To alter the page type and paper values for specific pages in the file.
i. Select the component.
ii. In the Select Pages text box, type the page numbers for which you want to define
a common page and paper type.
iii. Click Select.
iv. Select the page type and paper type for those pages (for example, B/W pages
with Standard Quality) in the Changer Properties for selected pages area.
v. Click Apply. The component is listed in the left side of the screen.
vi. Repeat sub Step b for all sets of pages for which you want to define separate
page and paper types.
c. Perform adjustments to the components (sets of file pages) in the book, as needed:
¾ To duplicate a component, select the component, and click
¾ To change the location of a component in the book, select the component and
click the Move Up or Move Down buttons as needed.
¾ To add tabs to a component, select the component, click Add Tabs, define the
tab specifications in the Add Tabs dialog box, and click OK.
¾ To add blank pages to a component, select the component, click Add Blanks,
define the blank page specifications in the Add Blank Pages dialog box, and click
OK.
d. Click Continue. The Save as Template window is displayed.
5. Complete the template definition.
a. In the Save as Template window, specify a template name (title), and fill in the other
template details.
b. Specify the folder in which the template should be created.
c. Click Finish.
(Duplicate).
Book Assembly template creation is complete
Validate the Book Assembly Template
1. Log in as a Print Buyer user.
2. Select the template and add the order to your shopping cart.
3. In the Shopping Cart window.
a. Specify the quantity to print.
b. Click Get Quote. Ensure that the quote is correct according to the Book Assembly
definition.
c. Click Proceed to Checkout.
4. Complete the order.
5. Log back into the Print Service Provider account.
6. Click Tasks > Production and check that the job was added to the queue.
7. Verify that the job contains the correct imposition and verify the job ticket details.
8. Click Approve to move the job to the Printing queue, and check that the job was sent to
the correct output devices.
Integration Guide – Book Assembly Supplement 5-3
Page 44

Workflow 2: FreeFlow Web Services FreeFlow Web Services
Check Stock Library
Check Stock Library with Print Server Stock Library.
Refer to Section: Stock Library Worksheet for FreeFlow Print Server & FreeFlow Web Server.
5-4 Integration Guide – Book Assembly Supplement
Page 45

6 Workflow 2:
FreeFlow Print Server
Workflow 2: FreeFlow Print Server requires the following:
• Define a FreeFlow Output Device for Book Assembly print workflow.
• Create a Book Assembly Template
• Check Stock Library with Print Server Stock Library.
Check FreeFlow Print Server Stock Library
6
Create the stock in the FreeFlow Print Server Stock Library that will be used in the FreeFlow
Web Services Book Assembly Workflow for all supported segments of the Book Assembly.
• To set up a FreeFlow Print Server Stock Library parameters, refer to the online help.
Integration Guide – Book Assembly Supplement 6-1
Page 46

Workflow 2: FreeFlow Print Server FreeFlow Web Services
Create a FreeFlow Print Server Print
Queue
Create a Printer Queue on the FreeFlow Print Server for Book Assembly Jobs.
• To set up a FreeFlow Print Server Print Queue parameters, refer to the online help.
Make sure that all the stocks used in the Web Services Book Assembly Workflow have been
defined in both the FreeFlow Web Services Stock Library and FreeFlow Print Server Stock
Library.
The stock selected in the window of adding a Print Queue is the default stock used for jobs
that are submitted and do not have a stock specified. This stock is also used when the Print
Queue Override is selected. A worksheet is provided in Section: Stock Library Worksheet for
FreeFlow Print Server & FreeFlow Web Server.
6-2 Integration Guide – Book Assembly Supplement
Page 47

FreeFlow Web Services Workflow 2: FreeFlow Print Server
Load & Check FreeFlow Xerox Printer
Trays
Integration Guide – Book Assembly Supplement 6-3
Page 48

Workflow 2: FreeFlow Print Server FreeFlow Web Services
FreeFlow Print Server Exception Pages
6-4 Integration Guide – Book Assembly Supplement
Page 49

FreeFlow Web Services Workflow 2: FreeFlow Print Server
Stock Library Worksheet for FreeFlow
Print Server & FreeFlow Web Server
The FreeFlow Print Server Stock Library must match both the Web Services Stock Library and
Stock assigned to the Book Assembly template.
Refer to Web Services sections: Create a Book Assembly Template and FreeFlow Web Services
Stock Library Fields.
FreeFlow Print Server: PS Stock Library
Web Server: WS Stock Library
Both Stock
Libraries
must match
in Syntax
WS: stock
item name
WS: type
WS: color
WS: weight
(gsm)
WS:US
weight
WS: size
Output
Device
PS:
name
PS: size PS:
color
PS:
type
PS:
weight
Print Queue
Name
(over-ride
=off)
Xerox
Printer:
Tray
PS: Other
info.
Integration Guide – Book Assembly Supplement 6-5
Page 50

Workflow 2: FreeFlow Print Server FreeFlow Web Services
Both Stock
Libraries
must match
in Syntax
WS: stock
item name
WS: type
WS: color
WS: weight
(gsm)
WS:US
weight
WS: size
Output
Device
PS:
name
PS: size PS:
color
PS:
type
PS:
weight
Print Queue
Name
(over-ride
=off)
Xerox
Printer:
Tray
PS: Other
info.
6-6 Integration Guide – Book Assembly Supplement
Page 51
FreeFlow Web Services Workflow 2: FreeFlow Print Server
Example:
FreeFlow Print Server: PS Stock Library
Web Server: WS Stock Library
Both Stock
Libraries
must match
in Syntax
PS:
name
PS: size PS:
color
PS:
type
PS:
weight
Print Queue
Name
(over-ride
=off)
Xerox
Printer:
Tray
PS: Other
info.
WS: stock
item name
WS: type Plain
WS: color White
WS: weight
(gsm)
WS:US
weight
WS: size US letter
Output
Device
Test!1 Tray 1
90 gsm
8.5 x 11
Hartford_hold
Xerox Printer
name=
8000AP_Spee
dy
Integration Guide – Book Assembly Supplement 6-7
Page 52

Workflow 2: FreeFlow Print Server FreeFlow Web Services
Both Stock
Libraries
must match
in Syntax
WS: stock
item name
WS: type Pre-cut
WS: color White
WS: weight
(gsm)
WS:US
weight
WS: size 9.0 x 11.0
PS:
name
Tabs Tray 2
90 gsm
PS: size PS:
color
PS:
type
Tab
Drilled
Seq. 5
PS:
weight
Print Queue
Name
(over-ride
=off)
Xerox
Printer:
Tray
PS: Other
info.
Xerox Printer
name=
8000AP_Spee
dy
Output
Device
Hartford_hold
6-8 Integration Guide – Book Assembly Supplement
Page 53
FreeFlow Web Services Workflow 2: FreeFlow Print Server
FreeFlow Web Services Stock Library
Fields
Integration Guide – Book Assembly Supplement 6-9
Page 54

Workflow 2: FreeFlow Print Server FreeFlow Web Services
6-10 Integration Guide – Book Assembly Supplement
Page 55
FreeFlow Web Services Workflow 2: FreeFlow Print Server
Integration Guide – Book Assembly Supplement 6-11
Page 56

Workflow 2: FreeFlow Print Server FreeFlow Web Services
[This page intentionally left blank]
6-12 Integration Guide – Book Assembly Supplement
Page 57

7 Use Case Samples
There are many ways to setup and use the Book Assembly module in FreeFlow Web Services.
Included are the setup directions for 1 common scenario:
• Saddle Stitched Booklet
To take full advantage of the job ticketing feature, we will use either FreeFlow JMF Service or
FreeFlow Output Manager to pass a JDF job ticket to the FreeFlow Print Server. There are
sections later in this chapter that cover the setup procedures for JMF Service and Output
Manager.
Saddle Stitched Booklet
It is quite common for customers to upload 8.5x11 documents to be imposed onto 11x17
sheets which are then stitched and folded to a final size of 8.5x11. In this scenario, we upload
2 or more documents, specify the page for the front cover file, and submit the job. Imposition
is done in Web Services before transferring the job to either JMF Service or Output Manager.
1. Log into FreeFlow Web Services as a Print Service Provider.
2. Navigate to Print Settings > Production > Paper Sizes.
3. Make sure the 11x17 paper size is listed. If not, select New Size and enter a Name: 11x17,
Width: 11, Height: 17 and select Save.
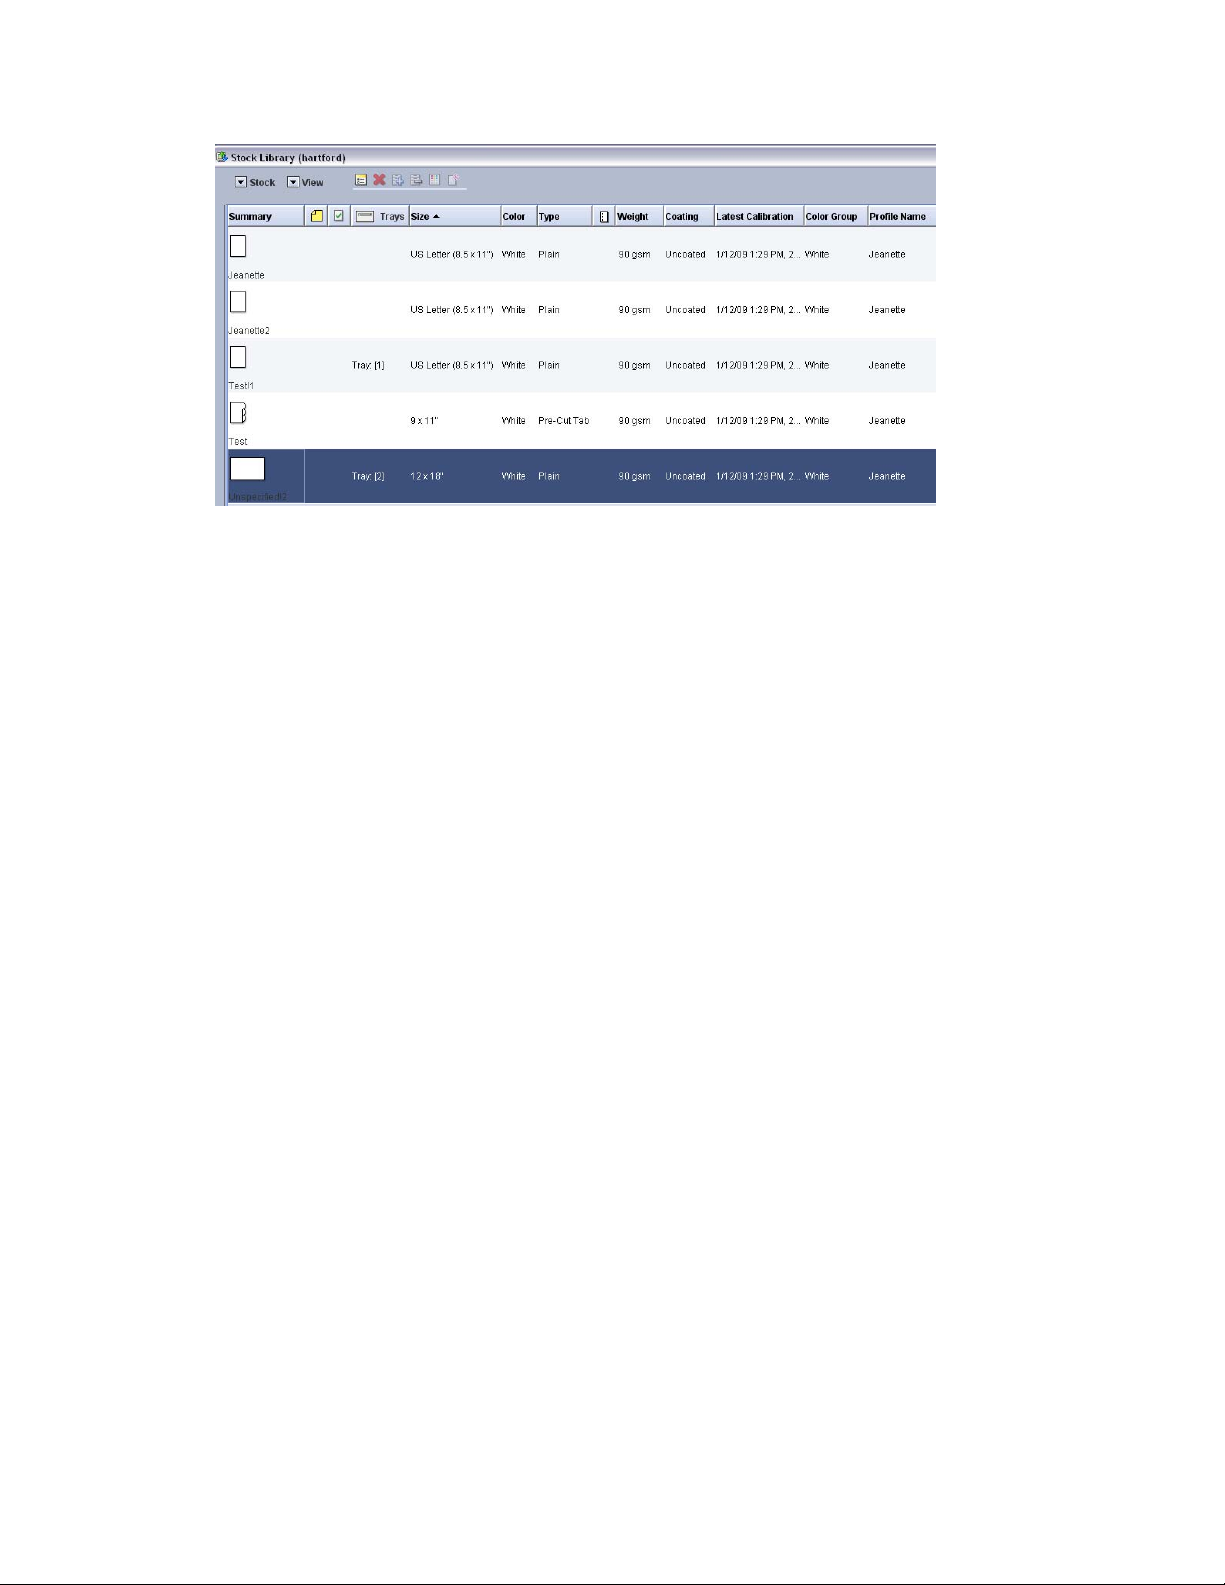
4. Navigate to Print Settings > Production > Stock Library. Configure the required stocks in
both your printer and Web Services stock library. Create two stocks like below: (the names
must match what is defined in YOUR printer’s stock library):
7
Saddle Stitched Cover Saddle Stitched Guts
Name: Cover ! 11x17 Name: Standard ! 11x17
Size: 11x17 Size: 11x17
Color: White Color: White
Type: Plain Type: Plain
Weight: 220 GSM Weight: 90 GSM
Integration Guide – Book Assembly Supplement 7-1
Page 58

Use Case Samples FreeFlow Web Services
5. Select Print Settings > Job Business Flow > Book Assembly > Saddle Stitch.
6. Under the General tab, Under Spine: Select Fixed and set the Width: 0.
7. Select the Splitting tab and deselect the Split options (below).
Note
You only need to split these sections if the Printer (Output Device) does not support the
different stocks that will be defined for Saddle Stitched booklets in the upcoming steps.
When splitting, the sections of the booklet are printed separately.
8. Select the Edit Imposition icon
7-2 Integration Guide – Book Assembly Supplement
under the word Summary.
Page 59

FreeFlow Web Services Use Case Samples
9. Select a previously defined Output Device (e.g. DC700_JMF_SS) that uses the JDF Process:
Proc_DigitalPrinting_1.2_General. (This output device should have the 11x17 page size
enabled).
10. Program the imposition as follows:
– Press Sheet Size: 11x17, Orientation: Landscape, Imposition Method: Multiple-Up,
Work Style: Work And Back (Top-Top 2 plates), Page Order: Saddle-Stitched.
11. Click OK.
12. Select the Page Size tab.
13. Make sure the 8.5x11 and 11x17 checkboxes are selected.
Note
The Page sizes defined above are what show up as options to the Print Buyer during Book
Assembly.
14. Under Components, select Color Pages 2 sides.
Note
The components that are defined can be used for ALL Book Assembly jobs. As such, it is
suggested to create individual components for each Book Assembly type. This will reduce
confusion for the Print Buyer as it will keep them from selecting options that do not apply
to the Book Assembly job type.
15. Make sure the checkbox for Two Sides is selected to allow duplex printing on this stock.
Note
Integration Guide – Book Assembly Supplement 7-3
Page 60

Use Case Samples FreeFlow Web Services
There are 3 kinds of Components: Pages, Tabs, Cover. When you use different
Component Types in one job it has significant impact on the workflow. Each component
type will get imposed separately. So with a Saddle Stitched booklet, if you use a
Component type: Cover, then those pages will be imposed first and then the next
component type (i.e.: Pages) will be imposed. This can explain why you may not get the
final expected imposed results.
16. Select the Paper Selection tab.
17. Create a Paper Category for the customer to choose from (You can have several). The
name of this category appears in the Paper Selection drop down for the Print Buyer. Some
of the categories that might appear: Uncoated, Glossy, Standard, High Quality, etc.
18. Click the Add Paper button under the Paper List. Select a stock from the Web Services
Stock Library. Make sure it is the 11x17 size. This will link a stock to a specific Paper
Category.
19. Select the Color Channels tab. Select Process to allow Color.
20. Select the Finishing tab. Clear the Activate Laminating checkbox.
21. Click Save.
22. Under Components, with the Color Pages 2 sides highlighted, click the Duplicate icon.
23. Name the new Component: Saddle Stitch Cover.
Note
By duplicating the Color Pages 2 sides component, we are creating a Component Type of
Pages which we are only naming as a cover. This allows us to impose the entire job
together (same component types) while allowing page exceptions for a heavy weight
stock. If you create a new Component Type of Cover then it will break apart the job
during imposition.
24. Select the new Saddle Stitch Cover component and then the Paper Selection tab.
7-4 Integration Guide – Book Assembly Supplement
Page 61

FreeFlow Web Services Use Case Samples
25. Rename the Paper Category to Standard Cover. Remember this is what the Print Buyer
will see in the drop down menu – make it meaningful to the Print Buyer.
26. Under the Paper List, highlight the existing stock and click Remove Paper.
27. Click Add Paper and choose a heavy weight 11x17 cover stock from the Stock Library.
28. Click Save.
29. Log in to Web Services as a Print Buyer to a site that has Book Assembly ordering. (Like the
test account).
30. Select Order a Book Assembly job and click Start Printing.
31. Select Browse, choose a cover file, and click Upload.
32. Select Browse, choose a file for the main book file and click Upload.
33. Click Continue.
34. Select the Saddle Stitch radio button and 8.5x11 or Letter for the Book Assembly size.
35. Click Continue.
36. Select the page for the front cover.
37. Under Change properties for selected pages: Select the Saddle Stitch Cover type and
click Apply.
38. All the other pages should default to: Color Pages 2 sides.
39. (Optional) Click PDF Preview.
40. Click Add to Cart and Checkout. Complete the checkout process.
41. Log in to Web Services as the Print Provider.
Integration Guide – Book Assembly Supplement 7-5
Page 62
Use Case Samples FreeFlow Web Services
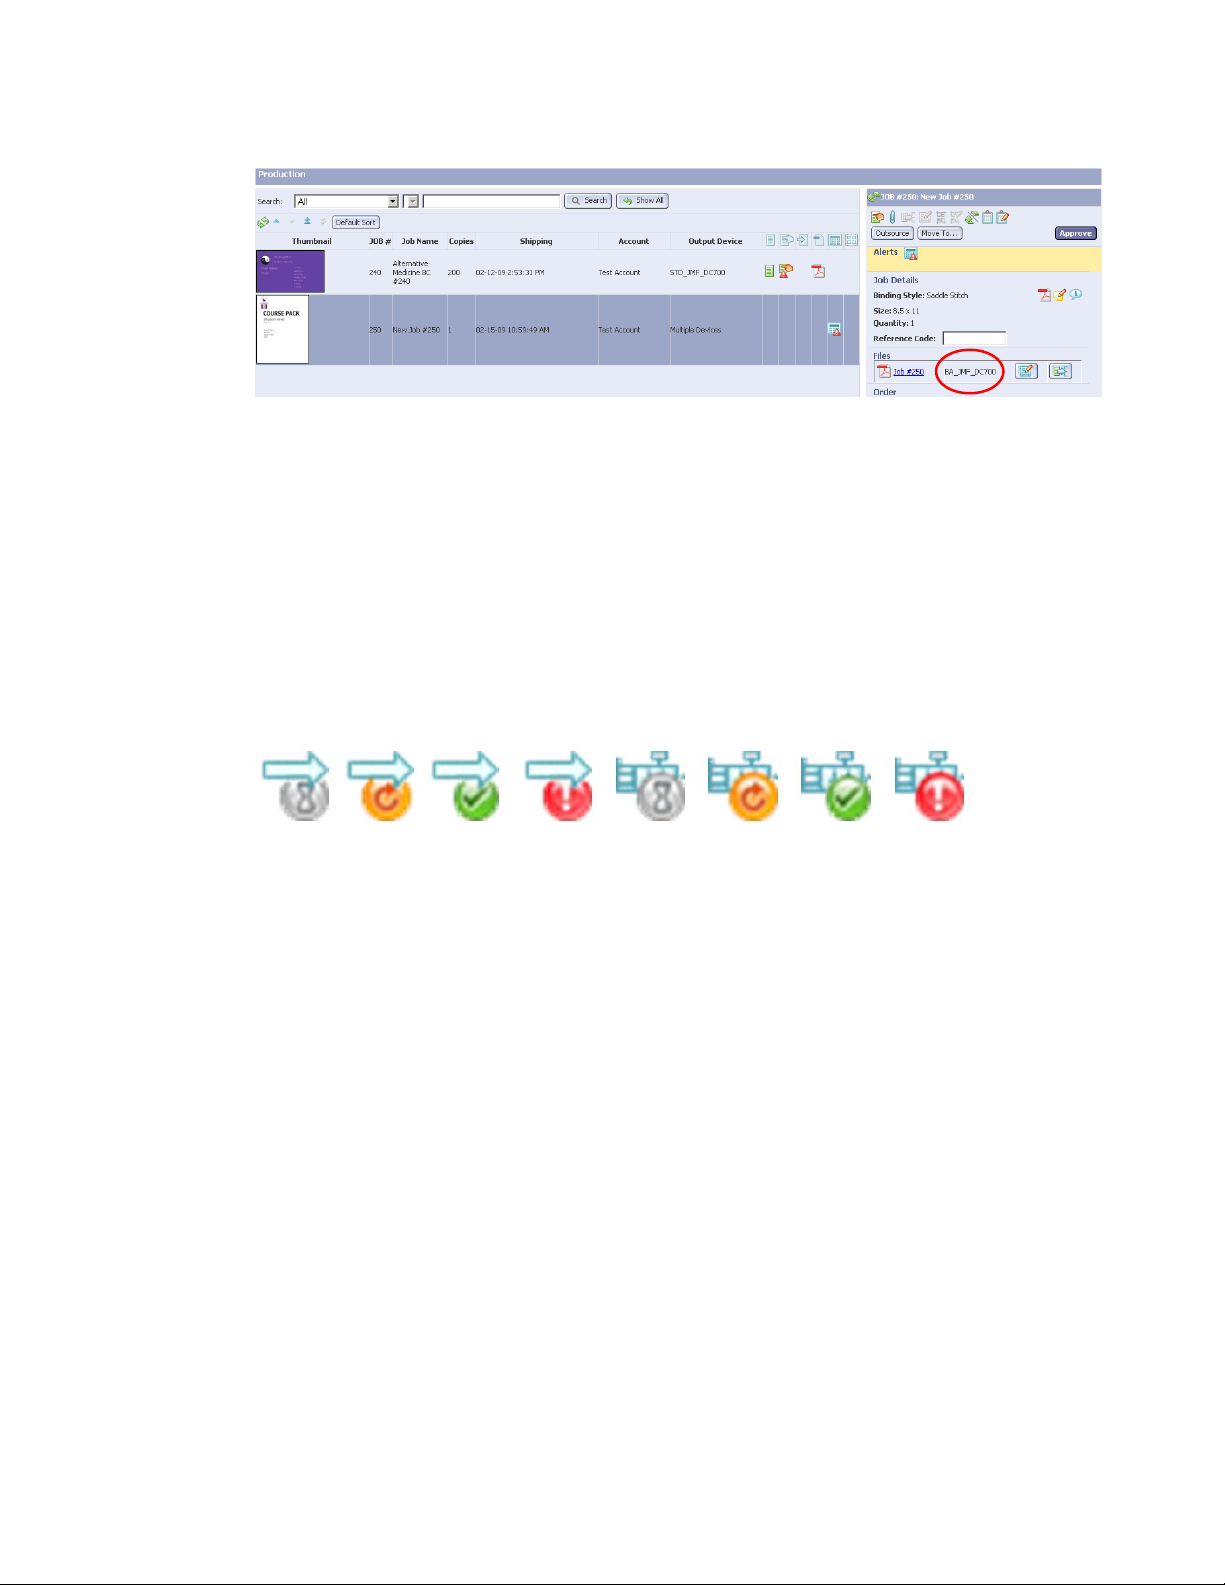
42. Select Tasks > Production to show all jobs in the production queue.
43. Notice the Output Device above in red.
44. Select the Device and Imposition button to check and update the settings. For the
purposes of this scenario, change the Output Device to DC700_JMF_SS and reset the
imposition as defined earlier in step 6.
45. Click OK.
Note
After changing the Device and Imposition settings, the job will disappear from the
Production Queue. You need to manually refresh the window by clicking Show All or the
Refresh icon.
46. Select Approve. The job will be submitted to the specified Output Device via JMF.
47. Select Tasks > Printing. This will show jobs submitted to print and their status.
48. The status icons look like these:
49. If you see the icon with the Arrow and Red exclamation there has been an internal error.
You may need to recheck your JMF setup or there is a communications error.
Note
Due to the JMF Service being a command line application, it can be difficult to
troubleshoot files not arriving at the Output Device. It is usually easier to rebuild and resync the JMF printers than to troubleshoot it. The re-sync process (xomupddev) does not
take effect for printers that have active jobs in them through JMF submission. This is
documented in the FreeFlow JMF Service User Guide 701P48823 in section 1.4.1.
50. If you are submitting the job through Output Manager, log in to Output Manager.
51. Select the Job Manager tab. Select the new job and click View Job Properties. You should
see the job ticketing under the Output and Special Pages areas.
52. Check the FreeFlow Print Server for the job. The following information should have made
it to the printer: Job Name and #, Quantity, Saddle Stitched, Special Pages. Job should be
11x17. You can check this by right clicking on the job and selecting Properties and then
the Special Pages tab. The Saddle Stitched imposition should appear under the Stapling /
Finishing area and will probably read “Bi-Fold Stapled Multiple Sheets”. If your printer
does not support Saddle Stitch then this information will be lost / ignored.
7-6 Integration Guide – Book Assembly Supplement
Page 63

FreeFlow Web Services Use Case Samples
Additional Setup procedures
The following sections describe the setup procedures for FreeFlow JMF Service and FreeFlow
Output Manager.
FreeFlow JMF Service Setup
Note
The JMF Service can accept either JDF Intent or JDF Process jobs from Web Services. Book
Assembly jobs should only use the JDF Process which is shown in Web Services as:
Proc_DigitalPrinting_1.2_General.
Set up printers in Printer Registration on the Web Services 7.0 server:
1. Select Start > Programs > Xerox FreeFlow Software > Print Administration > Printer
Registration.
Note
Printer Registration should be run ON the Web Services server and NOT set to pull the
Registered Printers from a remote system. The Synchronize step below may not work with
a remote system.
2. A list of products will appear. Select at least the following and click OK.
3. Select Add.
Integration Guide – Book Assembly Supplement 7-7
Page 64

Use Case Samples FreeFlow Web Services
4. Input the IP address of the printer and click Identify Configuration.
Note
The printer information should update automatically. If it is not a FreeFlow Print Server
then you might need to input the printer model and controller type manually.
5. Click Next and Next again. Do not select the check box to Automatically register all
queues at printer.
6. Click Retrieve Queue List. The default queue set as the FreeFlow Print Server will appear.
7. From the drop down menu, select the appropriate queue.
8. Input a Custom Name for the printer. This will only appear in printer registration and in
queue selection later in the Web Services Output Device selection.
9. Click Next.
10. From the drop down menu select FreeFlow Output Manager.
Note
While we are not actually connecting to FreeFlow Output Manager this is really a
production print path.
7-8 Integration Guide – Book Assembly Supplement
Page 65

FreeFlow Web Services Use Case Samples
11. Click Finish. The printer is now ready for use in Printer Registration.
12. Synchronize printers with JMF Service:
– From a command line, (DOS Prompt) type: xomupddev <enter>
Note
A message will only be displayed if there is an error.
13. To see the active JMF Printers:
– at command line type: xomlisdev <enter>
14. JMF Printers are now ready for use in Web Services.
15. Select Print Settings > Output Devices > Add.
16. Enter the Device Name, select Digital in the Device Group field, and select FreeFlow JMF
Service. Click OK.
Note
Use a descriptive name for your printer. Include information like the
Printer_SubmissionMethod_Asst. For example, when setting up for Book Assembly jobs
use a name like: DC700_JMF_BA where BA designates Book Assembly and will use the
JDF Process Intent.
Integration Guide – Book Assembly Supplement 7-9
Page 66

Use Case Samples FreeFlow Web Services
17. Update the Device Description to match the name of the Output Device.
18. Select the Paper sizes available for printing. Should have at least 8.5x11 and 11x17.
19. Select the Output Channels tab.
20. Select JMF over HTTP, and input the IP Address of the Web Services Server.
Note
Do NOT use localhost for the IP Address. This will cause some jobs to not pass through the
JMF Service and give unpredictable results.
21. Select Proc_DigitalPrinting_1.2_General for Produce JDF Output.
22. Select Device supports multi-queue system.
23. Select the Available Printers button.
24. Select only the checkbox for the desired Printer and Select OK.
25. Click Save and Save again.
26. Select the Imposition tab. Set the Page size and Imposition settings based on the
application or scenario.
27. The Output Device is ready for use with Book Assembly jobs.
7-10 Integration Guide – Book Assembly Supplement
Page 67

FreeFlow Web Services Use Case Samples
FreeFlow Output Manager Setup
Note
FreeFlow Output Manager can accept either JDF Intent or JDF Process jobs from Web
Services. Book Assembly jobs should only use JDF Process that appears in Web Services as
Proc_DigitalPrinting_1.2_General.
Setup printers in Printer Registration:
1. Select Start > Programs > Xerox FreeFlow Software > Print Administration > Printer
Registration on the system being used for Printer Registration. If not done on the Output
Manager server, set the Registered Printer List Locator with the IP of the system being
used.
2. A list of products should appear. If not, select Options > Installed Products. Select at least
Output Manager and click OK.
3. Click Add.
4. Input the IP address of the printer and click Identify Configuration.
Note
The printer information should update automatically. If it is not a FreeFlow Print Server,
you might need to input the printer model and controller type manually.
Integration Guide – Book Assembly Supplement 7-11
Page 68

Use Case Samples FreeFlow Web Services
5. Click Next and Next again. Do not select the check the box to automatically register all
queues at printer.
6. Click Retrieve Queue List. The default queue set at the FreeFlow Print Server will appear.
7. From the drop down menu, select the appropriate queue.
8. Input a Custom Name for the printer.
9. Click Next.
10. From the drop down menu, select FreeFlow Output Manager.
11. Click Finish. The printer is now ready for use in Printer Registration.
12. Launch Output Manager and log in as an administrator.
13. Select the Printer Manager tab.
14. Click the Change Printer List button. Select the required printer. Click on Next and Done.
7-12 Integration Guide – Book Assembly Supplement
Page 69

FreeFlow Web Services Use Case Samples
15. Select the Queue Manager tab.
16. Click the New Queue button. In the next window, enter any custom name for Queue
Name field.
17. Click Next. Click Next again to skip Job Splitting at this time.
18. Select the required printer for Associated Printers. Click Next.
19. Click Create Queue.
20. In the next window, click the Edit Queue Properties button.
21. Select the Yes radio button for Accepting Jobs and Release jobs fields under Basic
Properties.
22. Under Preprocessing Program, select the radio button and the checkbox: xompdlana.bat
Integration Guide – Book Assembly Supplement 7-13
Page 70

Use Case Samples FreeFlow Web Services
23. Select the checkbox for Keep Completed Jobs field and select 3 days for Minimum,
Maximum and Default options. (You can set these times as desired).
24. Under Paper Stock, enter 1-254 instead of 0-254 for Order field. If you forget, an error
message will appear when saving the queue settings.
25. Select OK to save the changes.
26. Login to Web Services as Print Provider.
27. Navigate to Print Settings > Production > Output Devices.
28. Click the Add button under Output Devices.
29. Enter a Device Name, select Digital, select FreeFlow Output Manager, and click OK.
Note
Use a descriptive name for your printer. Include information like the
Printer_SubmissionMethod_Asst. For Example when setting up for Book Assembly jobs
use a name like: DC700_OM_BA, where BA designates Book Assembly and will use the
JDF Process Intent.
30. Click OK and navigate to the Impose tab.
31. Ensure that Impose all jobs is selected for Imposition Preferences and click Save.
32. Navigate to the Output Channels tab.
33. Select JMF over HTTP, and input the IP Address of the Output Manager Server.
7-14 Integration Guide – Book Assembly Supplement
Page 71

FreeFlow Web Services Use Case Samples
34. Select Proc_DigitalPrinting_1.2_General for Produce JDF Output.
35. Select Device supports multi-queue system.
36. In the opened window, click Available Queues and select the queue created earlier in
Output Manager. After selecting the checkbox, click OK and then click Save.
37. The Output Device is now ready for use with Book Assembly jobs.
Integration Guide – Book Assembly Supplement 7-15
Page 72

 Loading...