

Page 1

Version 7.00
February 2009
DWS15V7.0E-02
®
FreeFlow
Web Services
Integration Guide
FreeFlow® Web Services
Page 2

©2009 Xerox Corporation. All rights reserved. Xerox and the sphere of connectivity design and all product names mentioned in this
publication are trademarks of Xerox Corporation in the United States and/or other counties.
Other company trademarks are also acknowledged.
Adaptec®, the Adaptec logo, SCSlSelect®, and EZ-SCSI® are trademarks of Adaptec, Inc.
Adobe PDFL - Adobe PDF Library Copyright © 1987-2008 Adobe Systems Incorporated.
Adobe®, the Adobe logo, Acrobat®, the Acrobat logo, Acrobat Reader®, Distiller®, Adobe PDF JobReady™, and PostScript®, and
the PostScript logo are either registered trademarks or trademarks of Adobe Systems Incorporated in the United States and/or
other countries. All instances of the name PostScript in the text are references to the PostScript language as defined by Adobe
Systems Incorporated unless otherwise stated. The name PostScript also is used as a product trademark for Adobe Systems'
implementation of the PostScript language interpreter, and other Adobe products.
Copyright 1987 - 2008 Adobe Systems Incorporated and its licensors. All rights reserved.
Autologic® is a registered trademark of Autologic Information International, Inc.
Compaq® and QVision® are registered United States Patent and Trademark Office, for Compaq Computer Corporation.
DEC, DEC RAID, and Redundant Array of Independent Disks are registered trademarks of Digital Equipment Corporation.
Dundas - This software contains material that is (c) 1997-2000 DUNDAS SOFTWARE LTD., all rights reserved.
Imaging Technology provided under license by Accusoft Corporation.
ImageGear © 1997 by AccuSoft Corporation. All Rights Reserved.
Intel® and Pentium® are registered trademarks of Intel Corporation.
Novell® and NetWare® are registered trademarks of Novell, Inc. in the United States and other countries.
Oracle® is a registered trademark of Oracle Corporation Redwood City, California
ScanFix® Image Optimizer and ImagXpress are either registered marks or trademarks of Pegasus Imaging Corp. Copyright ©
1997-2008 Pegasus Imaging Corp. All rights reserved.
SonyTM and Storage by SonyTM are trademarks of Sony.
PANTONE ™ and other Pantone, Inc. trademarks are the property of Pantone Inc.
Preps™ is a registered trademark of Creo Inc. All rights reserved.
Quark® and QuarkXpress® are registered trademarks of Quark, Inc.
StorageView™ is a trademark of CMD Technology, Inc.
TIFF® is a registered trademark of Aldus Corporation.
Windows®, Windows XP®, Windows Server® 2003, and Internet Explorer are trademarks of Microsoft Corporation; Microsoft®
and MS-DOS® are registered trademarks of Microsoft Corporation.
Portions Copyright © 2001 artofcode LLC.
This software is based in part on the work of the Independent JPEG Group.
Portions Copyright © 2001 URW++. All Rights Reserved.
This product includes software developed by the Apache Software Foundation.
Copyright © 1999-2008 The Apache Software Foundation. All rights reserved.
This software is based in part on the work of Graeme W. Gill.
© Press-sense Ltd. 2002-2008. All rights reserved.
Includes Adobe® PDF Libraries and Adobe Normalizer technology
The Graphics Interchange Format © is the Copyright property of CompuServe Incorporated. GIFSM is a Service Mark property of
CompuServe Incorporated.
Portions contain an implementation of the LZW algorithm licensed under U.S. Patent 4,558,302.
Parts of this software Copyright © 2004-2006 Enterprise Distributed Technologies Ltd. All Rights Reserved.
Parts of this software Copyright © 1995-2003, The Cryptix Foundation Limited. All Rights Reserved.
Parts of this software are a SSLv3/TLS implementation written by Eric Rescorla and licensed by Claymore Systems, Inc. All Rights
Reserved.
Parts of this software Copyright © 2002, Lee David Painter and Contributors. Contributions made by Brett Smith, Richard Pernavas,
Erwin Bolwidt.
Parts of this software Copyright © 1995-2005, Jean-loup Gailly and Mark Adler.
All other product names and services mentioned in this publication are trademarks of their respective companies. They are used
throughout this publication for the benefit of those companies, and are not intended to convey endorsement or other affiliation
with the publication.
Companies, names, and data used in examples herein are fictitious unless otherwise noted.
Printed in the United States of America.
Changes are periodically made to this document. Changes, technical inaccuracies, and typographic errors will be corrected in
subsequent editions.
Document Version: 1.0 (December 2008)
Page 3

Table of Contents
Introduction 1
Concepts ............................................................................................. 1
Where To Go From Here........................................................................ 1
Process Manager Integration 3
Integration .......................................................................................... 4
Defining the Root Directory of the ‘Hot Folders’ as Shared ................... 4
Defining an Output Device for the FreeFlow Process Manager .............. 5
Creating a New Output Device.............................................................................................................. 5
Output Channels Set-up.......................................................................................................................... 6
Hot Folders................................................................................................................................................ 6
JMF Over HTTP ...................................................................................................................................... 7
Defining Workflows ............................................................................. 8
Printing a Web Services Job to FreeFlow Process Manager ................... 9
Process Manager Manifest Integration 11
Prerequisites ..................................................................................... 12
Getting Started ........................................................................................................................................ 12
Process Manager Checklist .................................................................................................................................... 12
Integration ........................................................................................ 13
Defining the Root Directory of the ‘Hot Folders’ as Shared ................. 13
Creating an Output Device for the Process Manager Manifest ............ 14
Output Channels Set-up........................................................................................................................ 15
Hot Folders.............................................................................................................................................. 15
Connect to a Process .............................................................................................................................................. 15
Page 4

<$paratext
Defining Workflows ............................................................................ 16
Printing a Web Services Job to FreeFlow Process Manager .................. 17
Output Manager Integration 19
Integration ........................................................................................ 20
Setup.......................................................................................................................................................... 20
Job Printing: ............................................................................................................................................. 20
Defining an Output Device for FreeFlow Output Manager ................... 20
Create a New Output Device................................................................................................................ 20
Output Channels Set-up......................................................................................................................... 21
Defining Queues ..................................................................................................................................... 21
Printing a Job to FreeFlow Output Manager ........................................ 22
System Requirements ....................................................................... 23
Web Services Requirements .................................................................................................................. 23
FreeFlow Output Manager Minimum Requirements........................................................................ 23
References ........................................................................................ 23
JMF Service 25
Defining an Output Device for FreeFlow® JMF Service......................... 25
Output Channels Set-up......................................................................................................................... 25
Printing a FreeFlow® Web Services Job to FreeFlow JMF Service.......... 26
Print Manager – Advanced Print Path 27
Creating a ‘Cold Folder’ Directory for Approved Jobs .......................... 27
®
Defining an Output Device for FreeFlow
Path .................................................................................................. 27
Output Channels Set-up......................................................................................................................... 28
Defining Printers..................................................................................................................................... 29
Printing a FreeFlow® Repository Job using FreeFlow® Print Manager –
Advanced Print Path .......................................................................... 29
Print Manager – Advanced Print
Web Servicesii
Page 5

Table of Contents
VIPP Emitter Integration 31
Defining a Web Services VIPP Emitter-enabled Device ........................ 31
Web Services VIPP Emitter Job in the Production Queue...................... 31
Fonts ......................................................................................................................................................... 31
Web Services VIPP Emitter Workflow ................................................. 32
Print Buyer Side....................................................................................................................................... 32
Print Service Provider Side .................................................................................................................... 32
VPC Structure .................................................................................... 33
Print from DocuShare Integration 35
Prerequisites..................................................................................... 35
System Requirements ....................................................................... 35
FreeFlow Web Services Requirements ................................................................................................ 35
DocuShare Minimum Requirements.................................................................................................... 35
Configuring the DocuShare Server..................................................... 36
Defining a Xerox DocuShare Connection............................................ 36
Removing a DocuShare Connection ................................................... 37
Printing from DocuShare ................................................................... 37
FreeFlow Repository Integration 39
Integration ........................................................................................ 39
Prerequisites ............................................................................................................................................. 39
Defining a Connection to a FreeFlow Repository................................. 39
Synchronizing Web Services with the Repository .............................. 40
Transferring a Template Selection from a Repository to a Customer Collection......................... 40
Choosing the Repository Item(s).......................................................................................................... 41
Saving Templates..................................................................................................................................... 41
Template Pricing ..................................................................................................................................... 41
Printing a Job Based on a Repository Template.................................. 42
iiiIntegration Guide
Page 6

<$paratext
Web Servicesiv
Page 7

1
Introduction
Concepts
This guide describes how to integrate FreeFlow® Web Services with the following FreeFlow® output devices:
FreeFlow
FreeFlow
FreeFlow
FreeFlow
FreeFlow
FreeFlow output devices covered in this document utilize JDF job ticket format.
JDF format can be sent in either of the following two ways:
Hot Folder
JMF over HTTP
The method chosen depends largely on the particular type of output device, and this method impacts the
parameters that are available to the output device.
®
Process Manager
®
Output Manager
®
JMF Service
®
Print Manager – Advanced Print Path
®
Print Manager – Advanced Print Path utilizes Xerox’s XPIF job ticket format. The three other
Where To Go From Here
The chapters in this guide are organized according to output device. In addition to the above mentioned
FreeFlow output devices, this guide also discusses integration of Web Services with VIPP Emitter and
DocuShare. It is therefore necessary only to go the chapters that are relevant to the particular output devices
being integrated with Web Services.
Page 8

Introduction
Web Services2
Page 9

2
Process Manager Integration
FreeFlow® Process Manager automates your repetitive pre press activities and increases the overall efficiency of
your workflow by creating automated workflows for your jobs.
Combined with FreeFlow
Web-to-Print and adds automation for the pre press process.
Web Services 7.0 supports transferring files over HTTP or by using ‘Hot Folders’ still exists.
®
Web Services, the FreeFlow Process Manager accepts documents uploaded by the
Page 10

Process Manager Integration
Integration
To integrate between Web Services and FreeFlow Process Manager:
Set-up:
1 Define the workflows in the FreeFlow Process Manager software.
2 If the workflows in the FreeFlow Process Manager are defined to work with ‘Hot Folders’, you must define
the ‘Hot Folders’ root directory location as shared on the network.
Ignore Step 2 if the workflows in the FreeFlow Process Manager are defined to work with JMF
over HTTP.
3 Define a dedicated output device in Web Services for the FreeFlow Process Manager.
Job Printing:
4 Printing a job in Web Services: The job is sent with the relevant information and files to the relevant
FreeFlow Process Manager workflow, either over HTTP or by using ‘Hot Folders’ depending on the
definition in the output device and the workflow.
5 The job is processed in the FreeFlow Process Manager depending on the defined workflow.
This document shows the process for Step 2 and describes Steps 3 and 4. For details on definitions and usage of
the FreeFlow Process Manager (Steps 1, 2 and 5), refer to the relevant Xerox User Guides.
Defining the Root Directory of the ‘Hot Folders’ as Shared
To define the root directory of the 'Hot Folders' as shared:
1 Right-click the Root directory where the ‘Hot Folders’ are located, and select Properties.
2 Click the Sharing tab.
3 Select Share this folder; the
4 Click Permissions and ensure that everyone has
5 Click OK; the folder properties becomes the active window.
6 Click OK.
Share name appears.
Full Control.
Web Services4
Page 11
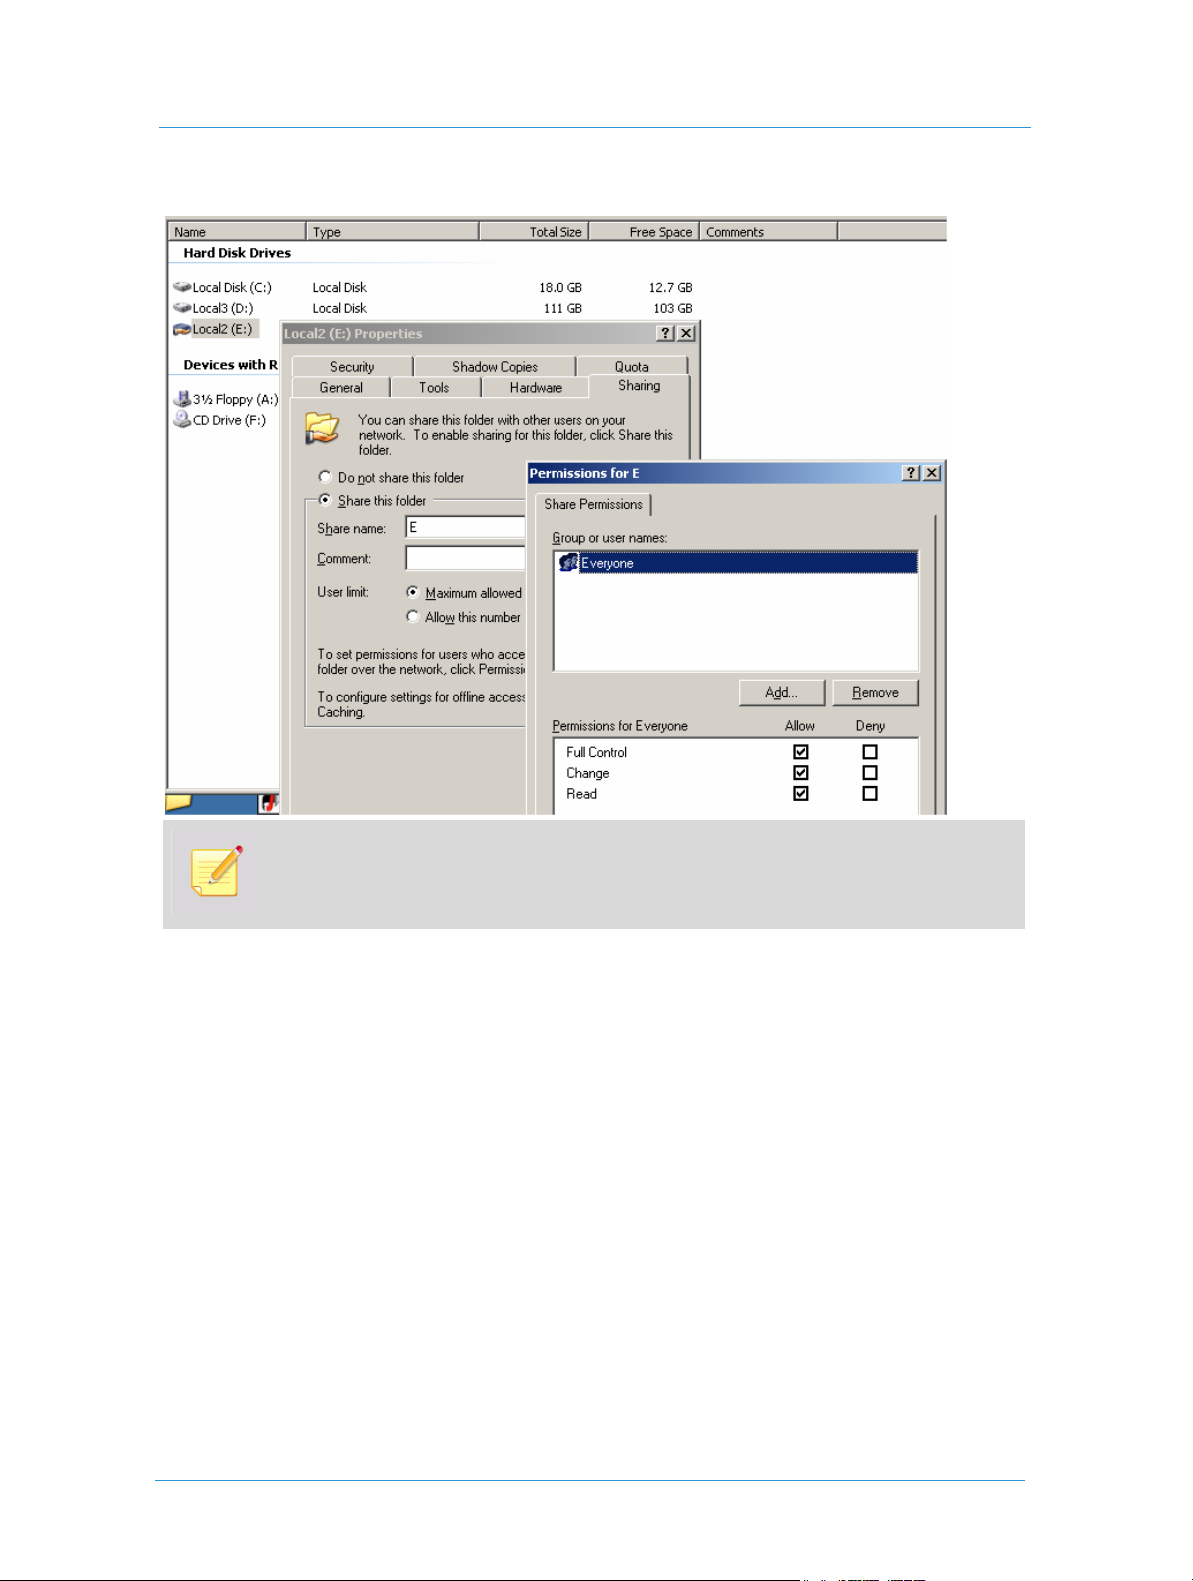
Figure 1: The Sharing tab
Defining an Output Device for the FreeFlow Process
Ensure that the Permissions are set for Full Control.
IMPORTANT: All ‘Hot Folder’ directories must reside on the same drive.
Defining an Output Device for the FreeFlow Process Manager
Creating a New Output Device
To create a Web Services output device for the FreeFlow Process Manager:
1 In Web Services, select Print Settings > Production > Output Devices.
2 Click the Add button (below the Output Devices list); the
3 Type the Device Name.
4 In
Device Group, select Digital.
Add Device dialog box appears.
5Integration Guide
Page 12

Process Manager Integration
Machine Type, select FreeFlow Process Manager.
5 In
6 Click OK to save the settings and to close the
Output Devices list, and the output device specifications appear to the right of the list.
7 In
Press Sheet Sizes, select the required sizes.
Add Device dialog box; the new output device is added to the
The Device Description name can be changed.
Output Channels Set-up
To set up the path for the job files and for Job Tickets to be transferred to the FreeFlow Process Manager after
approval of a job, in the
Output Devices window, select Process Manager as the output device, and click Output
Channels.
To connect to FreeFlow Process Manager using ‘Hot Folders’, see Hot Folders.
To connect to FreeFlow Process Manager using HTTP, see JMF Over HTTP.
Hot Folders
When using ‘Hot Folders’ for connection with the FreeFlow Process Manager, complete the following steps:
1 Select Folder Balance from the Output Channels list.
2 In
Produce JDF Output, select the Intent_1.2_General option from the drop down list (this is the only JDF
option that is supported with the FreeFlow Process Manager).
By selecting Intent_1.2_General, a JDF format file is automatically created and includes certain job
property settings for this specific job, and a link to the production file. (If None is left as the selected option,
the JDF file will not be created and sent.) This option supports the following job ticket properties:
Number of Copies.
Media (weight, size, color, type).
Sides imaged (one side, two sides, head-to-toe).
3 Select the Send Production File with JDF option. This enables sending the production file together with the
JDF Job Ticket.
4 In
Local Folder Path, type the shared root directory where the ‘Hot Folder’ directories were created and
linked in the FreeFlow Process Manager application.
5 Enter the root drive (not the shared name); for example:
6 Define the workflow as follows:
Web Services6
Page 13

Defining an Output Device for the FreeFlow Process
a Select the check box belonging to the Device supports multi-queue system link, and click the link.
b In the
7 In the
Security Setup dialog box appears.
8 Type the computer name (IP address or server name), user name and password of the server where the
‘Hot Folder’ directories are located.
9 Click OK; the window closes.
10 In the Folder Path field, type the shared name of the root directory. This is where the FreeFlow Process
Manager ‘Hot Folder’ directories have been created (example: e).
11 Click Send a Test File to test the definitions. Testing is done by sending a JDF Job Ticket and the PDF
resource. This will place a PDF in the root directory named test_page.pdf.
12 Click Yes in the resulting dialog box.
Select Processes dialog box that opens, select the processes that are in the workflow and click
Save. (To update the processes list, click the Add Processes button.)
Folder Type dropdown list (below the Manifest-driven Hot Folder link) select Network; the
JMF Over HTTP
When using JMF over HTTP for connection with the FreeFlow Process Manager, complete the following
steps:
1 Select JMF over HTTP from the
Output Channels list.
2 Select the Device supports multi-queue system check box.
3 In the
4 In the
IP Address field, type the IP address of the server where the FreeFlow Process Manager is installed.
Port field, specify 7779 (the default port for the FreeFlow Process Manager server).
7Integration Guide
Page 14
Process Manager Integration
5 In the
Produce JDF output dropdown list, select Intent_1.2_General. This option supports the following
job ticket properties:
Number of Copies.
Media (weight, size, color, type).
Sides imaged (one side, two sides, head-to-toe).
6 Click OK.
Defining Workflows
This definition enables you to create multiple workflows for electronically transferring the job file either to target
folders linked to the FreeFlow Process Manager ‘Hot Folders’, or over HTTP.
Consider ‘Hot Folders’ as ‘watched folders’ by FreeFlow Process Manager. When a JDF/PDF
combination is sent, Web Services creates a sub folder in FreeFlow Process Manager named
Files. This is where the PDF resource is copied to. The JDF (the file the FreeFlow Process
Manager uses for production) is placed up one level in the directory you created and designated
as the ‘Hot Folder’. For a non-JDF/PDF transfer, the PDF is placed in this directory.
To connect to the workflows previously set up in the FreeFlow Process Manager:
1 In the Output Devices > Output Channels window, click the Device supports multi-queue system link;
the
Select Default Workflow dialog box appears.Once this link is clicked, the user sees a No Data to Display
message indicating that no workflows are available in Web Services yet. Proceed to the next step to define
workflows.
\
i If entering this link at a later stage (after the output device has already been set up),
the user sees a list of workflows already available and registered in Web Services.
ii The Web Services registered workflows list may not reflect the actual list of
workflows currently defined in the FreeFlow Process Manager. To synchronize
Web Services registered workflows and FreeFlow Process Manager workflows, use
the
Available Workflows option, as defined in the next step.
2 Click the Available Workflows button to synchronize with FreeFlow Process Manager; the workflows
previously set up appear in the
Enable Workflows window.
Web Services8
Page 15

When using ‘Hot Folders’, workflows that appear on the list are workflows that:
a Are enabled within the FreeFlow Process Manager
b Have at least one item defined in the workflow.
c Were associated with a Hot Folder.
When using HTTP, workflows that appear on the list are workflows that:
a Are enabled within the FreeFlow Process Manager.
b Have at least one item defined in the workflow.
3 Select the relevant workflows for this output device.
4 Click OK.
5 Select the workflow to serve as default and click OK.
6 Click Save.
Printing a Web Services Job to FreeFlow Process
Printing a Web Services Job to FreeFlow Process Manager
To approve a Web Services based job for printing through FreeFlow Process
Manager:
1 Select Tasks and click the Production icon.
2 Select the required job in the
3 To verify the selected FreeFlow Process Manager workflow, or to select a different workflow for the job,
complete the following steps:
a Click in the
registered in Web Services appears.
b Accept the selected workflow or change it by selecting a different workflow.
c Click Select.
If no workflow is selected, the workflow set as the default is used.
Job Info panel (next to the Device name); a window with a list of workflows currently
Approval Queue.
4 Select Approve order to submit all jobs connected to the same order (of the selected job, if there is more
than one job).
5 Click Approve.
9Integration Guide
Page 16

Process Manager Integration
6 If the
JMF over HTTP option is selected on the Output Device set-up:
The job file is bundled in a MIME encoded package together with the JMF message and JDF Job
Ticket, and is sent over HTTP to the IP address defined in the
The job appears in the relevant workflow in FreeFlow Process Manager, where the production print can
Output Channel set-up.
be completed.
7 If
Folder Balance was defined in the Output Device set-up:
The job is transferred to the designated ‘Hot folder’ created in the
Output Device set-up. The job appears in
the relevant workflow in FreeFlow Process Manager, where the production print can be completed.
8 The approval is successful when appears in the
9 Jobs that fail in the
Printing Queue are generally due to network errors . Examine the Device set-up to
Status column.
diagnose this problem.
Web Services10
Page 17

3
Process Manager Manifest Integration
Web Services 7.0 supports integration with the FreeFlow Process Manager that enables Web Services in its Print
Provider side to select an order and submit the jobs within the same order as a group to the FreeFlow Process
Manager. Web Services generates a Manifest which is submitted to the FreeFlow Process Manager designated
‘Hot Folder’.
FreeFlow Process Manager receives the manifest file, processes the jobs through specified workflows, and
generates the Bill of Materials (BOM) which can be used to enable kitting and order fulfillment.
The Manifest option is supported only when transferring files using ‘Hot Folders’.
Page 18

Process Manager Manifest Integration
Prerequisites
This section provides you with the information you need to work with Process Manager Integration.
Getting Started
Before getting started, you will need to gather some Process Manager client information; the IP address or server
name, User Name and Password. You will also be expected to have configured the Process Manager client prior
to integrating Web Services manifest. For detailed procedures, refer to the FreeFlow Process Manager Manifest
Technology Walkthrough Example Guide. The checklist below is a guideline to assist you with the configuration
steps.
Process Manager Checklist
Create the Manifest files directory structure in Process Manager.
This includes the following:
E:\HotFolder (set as "shared permission")
Create a Process Manager MAX Hot Folder on the E drive associated with the Workflow. Configure the hot
folder to show the available workflows and receive the manifest job by setting the Target WorkFlow to
Submitted with Documents.
E:\FreeFlow\MAXConfigUI.exe
Navigate to the Manifest Configuration Tool (MAXConfigUI.exe) in the FreeFlow directory on the E drive.
Launch it and load the new Web Services Manifest Configuration file (WS manifestconfig.xml) by selecting
the Load button, load from a file. The manifest process will use this configured mapping of rows and
columns in the generation of the csv file.
Now you can proceed to the FreeFlow Web Services client and learn the steps required for a manifest job.
Web Services12
Page 19

Defining the Root Directory of the ‘Hot Folders’ as
Integration
To integrate between Web Services and FreeFlow Process Manager:
Set-up:
1 Define the Manifest Hot Folder in the FreeFlow Process Manager software.
2 If the workflows in the FreeFlow Process Manager are defined to work with ‘Hot Folders’, you must define
the ‘Hot Folders’ root directory location as shared on the network.
3 Define a dedicated output device in Web Services for the FreeFlow Process Manager.
Job Printing:
4 Printing a job in Web Services: The job is sent with the relevant information and files to the relevant
FreeFlow Process Manager workflow by using ‘Hot Folders’ depending on the definition in the output
device and the workflow.
5 The job is processed in the FreeFlow Process Manager depending on the defined workflow.
This document shows the process for Step 2 and describes Steps 3 and 4. For details on definitions and usage
of the FreeFlow Process Manager (Steps 1, 2 and 5), refer to the relevant Xerox User Guides.
Defining the Root Directory of the ‘Hot Folders’ as Shared
To define the root directory of the 'Hot Folders' as shared:
1 Right-click the Root directory where the ‘Hot Folders’ are located, and select Properties.
2 Click the Sharing tab.
3 Select Share this folder; the
4 Click Permissions and ensure that everyone has
5 Click OK; the folder properties becomes the active window.
6 Click OK.
Share name appears.
Full Control.
13Integration Guide
Page 20

Process Manager Manifest Integration
Figure 1: The Sharing tab
Ensure that the Permissions are set for Full Control.
IMPORTANT: All ‘Hot Folder’ directories must reside on the same drive.
Creating an Output Device for the Process Manager Manifest
To create a Web Services output device for the FreeFlow Process Manager:
1 In Web Services, select
2 Click the Add button (below the Output Devices list); the
3 Type the Device Name. For example, Manifest.
4 In the
5 In the
6 Click OK to save the settings and to close the
7 In
Device Group field, select Digital.
Machine Type field, select FreeFlow Process Manager.
Output Devices list, and the output device specifications appear to the right of the list.
Press Sheet Sizes, select the required sizes.
Print Settings > Production > Output Devices.
Add Device dialog box appears.
Add Device dialog box; the new output device is added to the
The Device Description name can be changed.
Web Services14
Page 21

Creating an Output Device for the Process Manager
Output Channels Set-up
To set up the path for the job files and for Job Tickets to be transferred to the FreeFlow Process Manager after
approval of a job, in the
Output Channels. For more information about connecting to FreeFlow Process Manager using ‘Hot Folders’,
see Hot Folders.
Output Devices window, select Process Manager as the output device, and click
Hot Folders
When using ‘Hot Folders’ for connection with the FreeFlow Process Manager, complete the following steps:
1 Continuing in the
Channels.
2 Select Folder Balance from the Output Channels list.
3 In
Produce JDF Output, select the Intent_1.2_General option from the drop down list (this is the only
JDF option that is supported with the FreeFlow Process Manager).
By selecting Intent_1.2_General, a JDF format file is automatically created and includes certain job
property settings for this specific job, and a link to the production file. (If None is left as the selected
option, the JDF file will not be created and sent.) This option supports the following job ticket properties:
Number of Copies.
Media (weight, size, color, type).
Sides imaged (one side, two sides, head-to-toe).
4 Select the Send Production File with JDF option. This enables sending the production file together with
the JDF Job Ticket.
Local Folder Path, type the shared root directory where the ‘Hot Folder’ directories were created and
5 In
linked in the FreeFlow Process Manager application. Enter the root drive (not the shared name); for
example, D:
6 In the Folder Path field, type the shared name of the root directory. This is where the FreeFlow Process
Manager ‘Hot Folder’ directories have been created (example: e).
Output Devices window, select the newly created output device and click Output
Connect to a Process
1 In the Folder Type dropdown list (below the Manifest-driven Hot Folder link) select Network; the
Security Setup dialog box appears.
2 Type the computer name (IP address or server name), user name and password of the server where the
‘Hot Folder’ directories are located.
3 Click OK; the window closes.
4 Click Manifest-driven Hot Folder; the
5 Click Special Hot Folders; the
6 Select the relevant
Manifest Hot Folder.
Enable Manifest Hot Folder dialog box appears.
Manifest-driven Hot Folder window appears.
15Integration Guide
Page 22
Process Manager Manifest Integration
7 Click OK.
8 Click Save; the
Enable Manifest Hot Folder window closes.
i You must define the designated ‘Manifest Folder’ in the FreeFlow Process Manager
before performing this step.
ii The Manifest option creates a CSV (Comma Separated Value) file containing data
of the jobs in the specific Manifest, sent together with the job files and Job Ticket.
9 Click Send a Test File to test the definitions. Testing is done by sending a JDF Job Ticket and the PDF
resource. This will place a PDF in the root directory named test_page.pdf.
10 Click Yes in the resulting dialog box.
Defining Workflows
This definition enables you to create multiple workflows for electronically transferring the job file to target
folders linked to the FreeFlow Process Manager ‘Hot Folders’.
Consider ‘Hot Folders’ as ‘watched folders’ by FreeFlow Process Manager. When a JDF/PDF
combination is sent, Web Services creates a sub folder in FreeFlow Process Manager named
Files. This is where the PDF resource is copied to. The JDF (the file the FreeFlow Process
Manager uses for production) is placed up one level in the directory you created and designated
as the ‘Hot Folder’. For a non-JDF/PDF transfer, the PDF is placed in this directory.
Manifest uses the "submitted with Documents" Hot Folder to process the jobs in the Manifest or Order Jacket
file (.csv).
To connect to the workflows previously set up in the FreeFlow Process Manager:
1 In the Output Devices > Output Channels window, click the Device supports multi-queue system link;
the
Select Default Workflow dialog box appears.Once this link is clicked, the user sees a No Data to Display
message indicating that no workflows are available in Web Services yet. Proceed to the next step to define
workflows.
\
i If entering this link at a later stage (after the output device has already been set up),
the user sees a list of workflows already available and registered in Web Services.
ii The Web Services registered workflows list may not reflect the actual list of
workflows currently defined in the FreeFlow Process Manager. To synchronize
Web Services registered workflows and FreeFlow Process Manager workflows, use
the
Available Workflows option, as defined in the next step.
2 Click the Available Workflows button to synchronize with FreeFlow Process Manager; the workflows
previously set up appear in the
3 Select the relevant workflows for this Manifest output device.
Enable Workflows window.
Web Services16
Page 23

Printing a Web Services Job to FreeFlow Process
4 Click OK.
5 Select the workflow to serve as default and click OK.
6 Click Save.
Printing a Web Services Job to FreeFlow Process Manager
To approve a Web Services based job for printing through FreeFlow Process Manager:
1 Select Tasks and click the
2 Select the required job in the
3 To verify the selected FreeFlow Process Manager workflow, or to select a different workflow for the job,
complete the following steps:
a Click in the
registered in Web Services appears.
b Accept the selected workflow or change it by selecting a different workflow.
c Click Select.
If no workflow is selected, the workflow set as the default is used.
When using ‘Hot Folders’, workflows that appear on the list are workflows that:
a Are enabled within the FreeFlow Process Manager
b Have at least one item defined in the workflow.
c Were associated with a Hot Folder.
d Have a Print node in them.
4 Select Approve order to submit all jobs connected to the same order (of the selected job, if there is more
than one job). If the
created containing data regarding all jobs in the order. This is delivered with the production files and Job
Tickets.
Production icon.
Approval Queue.
Job Info panel (next to the Device name); a window with a list of workflows currently
Manifest option is defined for the Process Manager > Output Device, a Manifest file is
5 Click Approve.
6 If
Folder Balance was defined in the Output Device set-up:
The job is transferred to the designated ‘Hot folder’ created in the
in the relevant workflow in FreeFlow Process Manager, where the production print can be completed.
7 The approval is successful when appears in the
8 Jobs that fail in the
diagnose this problem.
Printing Queue are generally due to network errors . Examine the Device set-up to
Status column.
Output Device set-up. The job appears
17Integration Guide
Page 24

Process Manager Manifest Integration
Web Services18
Page 25

4
Output Manager Integration
FreeFlow® Output Manager is a server-based output manager designed to provide a single point of job
management for network production printing. It addresses the needs of the Publishing and Print-On-Demand
environments. FreeFlow Output Manager includes load balancing to address capacity and asset utilization
requirements, such as job splitting, color splitting and copy splitting capabilities for robust cluster printing.
FreeFlow Output Manager accepts jobs in JDF/JMF format and can support clients that use this format.
FreeFlow Output Manager accepts documents from FreeFlow
printers based on load, availability and job requirements. This increases printer efficiency and productivity.
Web Services uses JMF (Job Messaging Format) when transferring files to and from FreeFlow Output Manager.
JMF is a standardized XML document that is often used for job submission, Snapshots of job and device status,
Dynamic job update and more.
If you will be printing Book Assembly jobs on a FreeFlow Output Manager device, you must
define certain Web Services settings appropriately. For more information, refer to the FreeFlow
Web Services Book Assembly Setup Guide.
®
Web Services and automatically routes them to
Page 26

Output Manager Integration
Integration
The integration between Web Services and FreeFlow Output Manager comprises the following steps:
Setup
1 Defining available Printers on the FreeFlow® Printer Administration.
2 Defining available Queues on the FreeFlow Output Manager software and connecting them to the available
printers in the FreeFlow Printer Administration.
3 Defining a dedicated output device in Web Services for FreeFlow Output Manager.
Job Printing:
4 Printing a job in Web Services: The job is sent, over HTTP, to FreeFlow Output Manager with relevant
information and files.
5 The job is processed in FreeFlow Output Manager and printed.
This document describes Steps 3 and 4. For details on definitions and usage of the FreeFlow Printer
Administration and FreeFlow Output Manager (Steps 1, 2 and 5), refer to the relevant Xerox User Guides.
Defining an Output Device for FreeFlow Output Manager
Create a New Output Device
To create a Web Services output device for FreeFlow Output Manager:
1 In the Web Services web site, select Print Settings > Production > Output Devices.
2 Click the Add button; the
3 Type a name in
4 Select Digital in the
5 Select FreeFlow Output Manager in
6 Click OK to close the
settings for the output device are shown to the right of the list.
Device Name field.
Add Device dialog box appears.
Device Group dropdown list.
Machine Type dropdown list.
Add Device dialog box; the output device is added to the Output Devices list. The
The Device Description name can be changed to a familiar name.
Web Services20
Page 27

Defining an Output Device for FreeFlow Output
Output Channels Set-up
To set up the path for the job files and Job Tickets to be transferred to FreeFlow
Output Manager after approval (submission) of a job:
1 In the Output Devices window, select the Output Channels tab
2 Select the JMF over HTTP radio button.
3 Select the Device supports multi-queue system check box.
4 Type the IP address or the server host name where FreeFlow Output Manager is installed, in the
Address
5 Type 7781 in the
6 In the
the following job ticket properties:
General
Finishing
7 Click Save.
field.
Port field.
Produce JDF Output drop down list, select the Intent_1.2_General option. This option supports
Number of Copies.
Media (weight, size, color, type).
Sides imaged (one side, two sides, head-to-toe).
Folding.
Defining Queues
The IP Address should be set and saved prior to defining queues, as explained above.
IP
To connect to the queues previously set-up in FreeFlow Output Manager:
1 In the Output Devices > Output Channels window, click the Device supports multi-queue system link;
the
Queue Selection dialog box appears.
If you follow this link at a later stage (after the output device is set up), users see a list of queues
available and registered in Web Services.
The Web Services registered queues list may not reflect the actual list of queues currently defined in
FreeFlow Output Manager. To synchronize Web Services registered and FreeFlow Output Manager
defined queues, use the Available Queues option, as defined in the next Step.
21Integration Guide
Page 28

Output Manager Integration
2 Click Available Queues for synchronizing with FreeFlow Output Manager; the list of queues currently
defined and available in FreeFlow Output Manager appears.
3 Select the relevant queues for this output device by selecting one or more check boxes.
4 Click OK.
5 Select the queue you want to serve as the default and click OK.
6 Click Save.
Printing a Job to FreeFlow Output Manager
To approve a Web Services-based job for printing through FreeFlow Output Manager:
1 In the Web Services web site, select Tasks > Production.
2 Select a
3 Verify that the output device is set to Output Manager (this can be viewed in the Job Info panel on the right
4 Accept the selected FreeFlow Output Manager queue or select a different queue for the job:
5 Click Approve.
Production Queue job.
side of the window). If the output device is not Output Manager, click and adjust the
dropdown list.
i Click in
queues currently registered in Web Services.
ii Accept the selected queue or change the Queue Selection by selecting a different
iii Click Select.
If no target queue has been selected, the queue that is set as default will be used.
The job file is bundled in a MIME encoded package together with the JMF message and JDF
Job Ticket and is sent over HTTP to the IP address defined in the Output Channels set-up.
The job appear in the relevant queue in FreeFlow Output Manager, where it is possible to
complete the production print.
Job Info next to the Device name; a dialog box appears with a list of Output Manager
Output Device
Queue name.
6 The approval is successful when the icon appears in the
7 Jobs that fail in the
Device set-up to diagnose this problem.
Printing Queue are generally due to network errors (the icon appears). Examine the
Status column.
Web Services22
Page 29

System Requirements
Web Services Requirements
Web Services Requirements
Integration enabled on the FlexLM license
FreeFlow Output Manager Minimum Requirements
FreeFlow Output Manager version 6.0 or higher
References
System Requirements
FreeFlow
FreeFlow
FreeFlow
®
Output Manager Install Guide
®
Output Manager User Guide
®
Printer Administration User Guide
23Integration Guide
Page 30

Output Manager Integration
Web Services24
Page 31

5
JMF Service
If you will be printing Book Assembly jobs on a FreeFlow JMF Service device, you must define
certain Web Services settings appropriately. For more information, refer to the FreeFlow Web
Services Book Assembly Setup Guide.9
For more information on installing and configuring FreeFlow JMF Service, refer to the FreeFlow JMF
Service User Guide.
Defining an Output Device for FreeFlow® JMF Service
To create a FreeFlow output device for FreeFlow JMF Service:
1 Select Settings > Output Devices.
2 Click Add; the
3 In the
4 In the
5 In the
6 Click OK.
7 In the
Device Name field, type a name.
Device Group dropdown list, select Digital.
Machine Type dropdown list, select FreeFlow JMF Service - JMF Service.
Press Sheet Sizes sub-panel, select the sizes.
Add Device dialog box appears.
You can change the Device Description name.
Output Channels Set-up
To set up the path for the job files and Job Tickets to be transferred to the FreeFlow
JMF Service after approval of a job:
1 Select the Output Channels tab.
2 Select the JMF over HTTP option button.
3 Select the Device supports multi-queue system check box.
4 In the
IP Address field, type the IP address or the server host name where FreeFlow JMF Service is installed.
Page 32

JMF Service
5 In the
6 In the
7 Click OK.
To define the printers, complete the steps defined in Defining Printers on page 29.
Port field, type 7781.
Port 7781 is the FreeFlow JMF Service server's default port. If the port is changed on the
FreeFlow JMF Service server it needs to be defined here respectively.
Produce JDF Output drop down list, select the Intent_1.2_General option: This option supports the
following job ticket properties:
General
Number of Copies.
Media (weight, size, color, type).
Sides imaged (one side, two sides, head-to-toe).
Finishing
Folding.
Printing a FreeFlow® Web Services Job to FreeFlow JMF Service
To approve a Web Services job for printing through FreeFlow JMF Service:
1 Select Tasks > Production.
2 Select the required job in the
3 Verify that the output device value is
window). If the output device is not set to
the
Output Device dropdown list.
4 Accept the selected
i Click in the
ii Change the printer selection by selecting a different printer name.
iii Click OK.
5 Click Approve.
6 If the approval is successful, appears in the
7 Jobs that fail in the
output device set-up to diagnose this problem.
JMF Service printer or select a different printer for the job:
Printing Queue are generally due to network errors, indicated by . Examine the
Approval Queue.
JMF Service (can be viewed on the Job Info panel, right side of the
JMF Service, click and in the Edit Imposition dialog box, edit
Job Info panel.
Status column.
Web Services26
Page 33

6
Print Manager – Advanced Print Path
Creating a ‘Cold Folder’ Directory for Approved Jobs
To create a shared ‘Cold Folder’ directory:
1 Create a folder on a local or remote computer.
2 Right-click the created folder and select Properties.
3 Click the
4 Select Share this folder; the share name will appear.
5 Click Permissions and ensure that everyone has Full Control.
6 Click OK; changes are saved and
7 Click OK.
8 Open
to the shared folder defined in Step 1. If you are prompted to enter user name and password, enter it (login
to the remote computer) and select the Remember my password option.
Sharing tab.
Folder Properties become the active window.
My Network Places on the FreeFlow
Another way to map the folder is with Tools > Map Network Drive in Windows Explorer.
®
Web Services server and setup a new network place that points
Defining an Output Device for FreeFlow® Print Manager –
Advanced Print Path
To create a FreeFlow output device for FreeFlow Print Manager – Advanced Print Path:
1 Select Settings > Output Devices tab.
2 Click Add below the
3 In the
4 In the
5 In the
6 Click OK.
Device Name field, type a name.
Device Group dropdown list, select Digital.
Machine Type dropdown list, select FreeFlow Print Manager Service – Advanced Print Path.
Output Devices list; the Add Device dialog box appears.
Page 34

Print Manager – Advanced Print Path
7 In the
Press Sheet Sizes sub-panel, select the sizes.
You can change the Device Description name.
Output Channels Set-up
To set up the path for the job files and Job Tickets to be transferred to the FreeFlow
Print Manager – Advanced Print Path after approval of a job:
1 Select the Output Channels tab.
2 Select the Application Launcher option button.
3 Select the Device supports multi-queue system check box.
4 In the
5 In the
Folder Type dropdown list, select Network.
Application dropdown list, select Xerox FreeFlow Printer (this may be the only available selection).
This option supports the following job ticket properties:
General
Number of Copies.
Print range.
Sides imaged (Simplex/Duplex).
Finishing
Collation.
Stapling
Drilling
Output bin
Output order
Face up/down
Off set
Paper attributes
Account Name
User Name
6 Type the shared ‘Cold Folder’ directory name into the
Folder Path; this is the folder to which the Job Ticket
and resources are transferred when the job is approved for printing.
7 Click Security; the
8 In the
Computer field, type the IP of the remote computer where the ‘Cold Folder’ directory was created.
Security Setup dialog box appears.
9 Click OK.
Web Services28
Page 35

Printing a FreeFlow® Repository Job using
Defining Printers
To connect to the printers previously set-up in the FreeFlow® Printer Administration:
1 Click the Device supports multi-queue system link.
When clicking this link the user will see a ‘
available in Web Services yet. At least one printer needs to be defined, as explained in the next step.
When accessing this link at later stage (after the output device is already set-up), the user sees
a list of printers available and registered in Web Services.
The Web Services registered printers list may not reflect the actual list of printers currently
defined in the FreeFlow
registered and FreeFlow Common Printer Administration defined printers, use the
Printers
option, as defined in the following step.
2 Click Available Printers for synchronizing with FreeFlow Printer Administration; the list of printers
currently defined and available in the FreeFlow Printer Administration appears.
3 Select the printers appropriate for this output device.
4 Click OK.
5 Select the printer to be the default and click OK.
6 Click Save.
No Data to Display’ message that indicates that no printers are
®
Common Printer Administration.To synchronize Web Services
Available
Printing a FreeFlow® Repository Job using FreeFlow®
Print Manager – Advanced Print Path
To approve a job that originates from an external repository:
1 Select Tasks > Production.
2 Select the job in the
The job appears with a Manual Impose icon in the Job Info panel. The icon for the job is
also unique. Both of these factors identify this job as a Repository or Catalog-ready job.
3 Verify that the output device value is
Info panel, right side of the window). If the output device is not set to
, click and in the Device and Imposition dialog box, edit the Output Device dropdown list.
Path
Approval Queue.
Print Manager - Advanced Print Path (this can be viewed on the Job
Print Manager - Advanced Print
29Integration Guide
Page 36

Print Manager – Advanced Print Path
4 Accept the selected FreeFlow Print Manager - Advanced Print Path printer or select a different printer for
the job:
i Click in the
Job Info panel, next to the Device name.
ii Change the printer selection by selecting a different printer name.
iii Change the Quantity if required.
iv Click OK.
5 Click Approve.
6 If the approval is successful, appears in the
Status column.
The job is submitted directly to the output device.
7 Jobs that fail in the
Printing Queue are generally due to network errors, indicated by . Examine the
output device set-up to diagnose this problem.Synchronize with External Repository set-up, and the
FreeFlow Repository set-up to diagnose this problem.
Web Services30
Page 37

7
VIPP Emitter Integration
FreeFlow® Web Services VIPP Emitter is a module designed specifically for Xerox digital front ends that have
VIPP (Variable Data Intelligent PostScript Printware) already installed and licensed. The purpose of the VIPP
Emitter module is to significantly decrease the amount of RIP and server time.
The VIPP Emitter must be activated through a dedicated FlexLM license.
Defining a Web Services VIPP Emitter-enabled Device
1 On the Print Services Provider side, select Print Settings > Production > Output Devices > Output Channels.
2 Click the VIPP Emitter option button; the
3 Select one of the
Local – Specifies an absolute folder path within the local server.
FTP – Specifies the full ftp path for transferring jobs via the Internet to any remote computer (i.e.
format: ftp://www.print-provider.com).
Network – Specifies the transfer of jobs to any computer within the local network (the network server
directory must be specified as the following: \ …).
4 Define the
5 Select one of the
Folder Type dropdown list options:
Folder Path field; define a full folder path (according to the folder type method chosen).
Imposition Preferences dropdown list options:
Output Devices sub-panel updates with the VIPP Emitter fields.
Web Services VIPP Emitter Job in the Production Queue
A VIPP Emitter Job located in the Production Approval queue is identified by the icon.
Upon approval, the VIPP Project Container (VPC) is created with the SETPROJECT destination as defined in
the VIPP Submission Folder.
This is an XML VIPP format within the Project Container.
The VPC is placed at the destination specified in the Site > Output Devices > Output Channel
> Folder
Path.
Fonts
The VIPP Emitter workflow supports all font types supported by Web Services standard workflows, including
true type fonts. However, true type fonts must be installed on the DFE's RIP for production; type1 fonts will be
embedded in the job.
Page 38

VIPP Emitter Integration
Web Services VIPP Emitter Workflow
VIPP Emitter Workflow describes the Web Services / VIPP Emitter integrated workflow. A variable data
workflow in Web Services provides you with an easy method to create and order highly flexible and very
sophisticated jobs, utilizing simple and intuitive browser-based tools. VIPP is a print stream which enables an
efficient, printer-rate variable data printing method. The integration between both tools provides owners of
Xerox printers who use a VIPP-enabled digital front end and Web Service with the most powerful and flexible
production tool on the market.
Print Buyer Side
To order a variable data Job using the Web Services / VIPP Emitter integrated
workflow:
1 Log in to Web Services, select Order Jobs and click the Print Documents from Our Catalog > Start Order
button; the
2 Select a template created for a variable data workflow.
Choose a Template window appears.
3 Upload a database and complete the instructions to create the job.
4 Proof and complete the job order, through confirmation.
Print Service Provider Side
After Print Buyer confirmation, the VIPP Emitter job is transferred to the Print Service Provider side and
appears in the
Continues with the following steps:
1 Select
2 Set up a VIPP Emitter-enabled output device; specific templates are targeted to this output device.
3 Approve the VIPP Emitter job for production; the server automatically creates a VIPP Variable Project
Container (VPC file).
Production Approval queue (indicated by the VIPP ).
Print Settings > Production > Output Devices > Output Channels.
Web Services uses the Folder Balance output channel and places the VPC in the designated
folder as defined in the
Output Devices > Output Channels
The VPC must be processed on the Digital Front End according to the Xerox VIPP Emitter
documentation.
Folder Path dropdown list, located in Print Settings > Production >
.
Web Services32
Page 39

VPC Structure
VPC Structure
Figure 2: The VPC must be processed on the Digital Front End according to the Xerox VIPP documentation.
%!
[(projects) (PUXR44-241)]
SETPROJECT
(var_data.xml) SETLMFILE
(project.xjt) STARTXML
33Integration Guide
Page 40

VIPP Emitter Integration
Web Services34
Page 41

8
Print from DocuShare Integration
Xerox DocuShare Enterprise Content Manager offers businesses a flexible, easy-to-deploy, Web-based software
application that delivers sophisticated, yet highly personalized content management capabilities to every
knowledge worker.
The integration between FreeFlow Web Services and Xerox DocuShare comprises the following steps:
1 Configuring the DocuShare server.
2 Defining in Web Services a connection to Xerox DocuShare.
3 Printing a document from DocuShare; Web Services is launched.
4 Following the steps in Web Services to complete the order.
Prerequisites
Xerox DocuShare software installed and correctly set up. For information on the Xerox DocuShare, refer to
the relevant Xerox User Guides.
The integration must be activated on the FlexLM license.
System Requirements
System requirements can be divided into the following:
FreeFlow Web Services
Docushare
FreeFlow Web Services Requirements
FreeFlow Web Services 7.0
Integration enabled on the FlexLM license
DocuShare Minimum Requirements
DocuShare Version 5.0
Page 42

Print from DocuShare Integration
Configuring the DocuShare Server
1 Browse to: <drive letter>:\Xerox\DocuShare\amber\templates\en.
2 Create a directory called ‘local’ within the en directory.
3 From the en\system directory, copy the FFWS.vdf file into the local directory.
4 Using Notepad, in the local directory, modify the following statements in the FFWS.vdf file, as
indicated:
a In the following statement:
<define id="enable">true</define>
Set: define id
to: true:
b In the following statement:
<define id="FFServerURL">http://FF_Print_Server_URL/</define>
Replace: FF_Print_Server_URL
with the Web Services URL.
c In the following statement:
<define id="FFWSID">ds1</define>
Replace: ds1
with the ID that will be configured in web server; by default the ID is
To find out the DocuShare ID, it is recommended that you contact your site’s DocuShare
Administrator. If you cannot access an ID, contact Customer Support.
Defining a Xerox DocuShare Connection
In order to connect to Xerox DocuShare, carry out the following steps:
1 Log in to FreeFlow Web Services.
2 Navigate to
3 In the
4 Select the Enable checkbox.
5 Enter the values for the following parameters and click OK:
System Setup > Integration > External Systems.
Systems pane, select DocuShare.
DocuShare.
DocuShare Server ID
DocuShare Server IP
DocuShare Root
DocuShare Domain
Web Services36
Page 43

Account Name
Password
Removing a DocuShare Connection
To remove a server from the list:
1 Select the server and click Remove.
2 Click OK.
Printing from DocuShare
To initiate a print job from DocuShare, perform the following steps:
1 Initiate the print job
a Log in to one of the configured DocuShare servers.
Removing a DocuShare Connection
b Select the file that you want to print.
c On the file that you selected, right-click and select FF WS Print. TheFreeFlow
is launched and the
2 Log into Web Services by typing the Web Services User Name and password, and clicking Login.
3 Choose the Job Type and Edit Properties
a Choose a Job Type specific to the document that is being ordered from the DocuShare.
b Click Next; the
c Edit the properties and click Next.
There is a slightly different workflow if a native application is selected (Microsoft Word, or
PowerPoint etc.).
4 Review Job before Placing Order
a Review the File Report (document pre-flight).
b Click the Click here to review these problems link and fix the problems, or select I want the Print
Provider to resolve these problems check box.
Login window appears.
Edit Properties window appears.
®
Web Services web site
c Click Continue; the
d Click Add to Cart and Checkout.
5 Complete the Order
Preview the Job window appears.
37Integration Guide
Page 44

Print from DocuShare Integration
Depending on the Printer Profile and Account Preferences, the following steps can vary.
a In the
Shopping Cart, click the Get Quote button.
b Click Proceed to Checkout.
c Complete the Choose a Shipping Address, Choose Your Shipping Options.
d Click Continue in each successive window.
e Select All Billing and Ship to: and Summary Information.
f Click Place Your Order.
g Review the
Order Confirmation.
h Click Continue Shopping or Logout.
Web Services38
Page 45

9
FreeFlow Repository Integration
FreeFlow Web Services can integrate with the following optional repositories, however, only one repository can
be enabled, configured and synchronized:
Xerox DocuShare
Microsoft SharePoint
Document Library *
* Document Library - As of Web Services 6.0, Document Library will no longer be supported. To continue
using templates in Web Services that are based on files from Document Library, the following two steps must be
carried out:
1 Export the data to the Windows file system or to Microsoft SharePoint, using the Document Library
Migration Utility. This utility resides in the "<Install Drive>\FreeFlow " folder as "DLMigration.exe".
2 Update the reference of the templates in Web Services to refer to the new location of the data instead of to
Document Library.
This is carried out by running an update procedure on the Web Services server from the following URL:
http://localhost/newsway/utils/dlimport.asp. In the browser, enter the name of the Exported Data
description file and click on the Start Migration button.
Integration
The integration between Web Services and any of the repository options comprises the following steps:
1 Defining, in Web Services, a connection to the relevant repository.
2 Synchronizing Web Services with the Repository to create templates in Web Services.
3 Printing a job, based on a Repository template.
Prerequisites
Repository software installed and correctly set up.
The integration must be activated through the FlexLM license.
All templates in the Repository software must be designated as Catalog-ready.
Defining a Connection to a FreeFlow Repository
In order to define a connection to a FreeFlow Repository, carry out the following steps:
Page 46

FreeFlow Repository Integration
1 Log in to FreeFlow Web Services.
2 Navigate to
3 Select FreeFlow Repository and in the
4 In the Server IP: field, enter the IP address or Host Name where the RMS (Repository Management
Software) server is installed.
5 In the Port: field, enter 8090.
6 In the Service Address: field, enter /RepositoryService.asmx.
7 Enter the username defined as the Repository software login username.
8 Enter the password defined for the username.
9 Click on OK to save.
System Setup > Integration > External Systems.
FreeFlow Repository panel, select the Enable checkbox.
Generally, the RMS server is installed on the same server as FreeFlow Web Services. However,
the RMS server needs to be configured to work with repositories installed anywhere on the
network (this is carried out through a FreeFlow Administration Tool which is a part of the Web
Services installation).
Synchronizing Web Services with the Repository
To add a template from a FreeFlow Repository into Web Services, carry out the Synchronize with External
Repository procedure as described below.
Transferring a Template Selection from a Repository to a Customer Collection
To transfer a template selection from a repository to a customer collection, carry out the following steps:
1 Navigate to
2 Select the target customer from the Customers list.
3 Click Synchronize with External Repository; the Choose Document Source window appears.
4 Click the FreeFlow Repository radio button.
5 Click the Start Import Wizard button.
Accounts -> Store Setup -> Templates.
Update internal cache informs Web Services to connect to a defined repository, retrieve all
available catalog ready items for the time of synchronization and bring them into the internal
Web Services cache. Then the synchronization takes place. If the checkbox is not selected, Web
Services will use the internal cache that was updated the last time the connection to the
repository had been made.
Web Services40
Page 47

Synchronizing Web Services with the Repository
Choosing the Repository Item(s)
To select any displayed repository items, carry out the following steps:
1 Select the checkbox next to each document to be imported.
2 When all of the desired documents have been selected, click Next.
The following steps require selecting the Job Type, Properties, and Template attributes. If
multiple items are selected, the items will have the same attributes. If the properties are
completed in the Repository, the information will populate the Template Attribute step.
Saving Templates
To save the imported templates in the selected Customer/Directory, carry out the following steps:
1 Choose a job type and click Next; the
The attribute that is defined here can affect the pricing if Job Type Pricing is the Default Pricing
model.
2 Edit any properties to reflect the document properties and click Next; the
appears.
3 Define the appropriate template attributes and in the
the Repository item.
Select the Save Full Path Info checkbox to add the Full Path Info to the Template
information that will be available to the Print Buyer.
At anytime during the process, the Back button can be used to return to a previous window
and the
4 Click Finish.
Cancel button can be used to cancel the process.
Edit Properties window appears.
Create In pane, browse to the target folder for adding
Template Pricing
Template Attributes window
At this stage, the template has been added to the account’s template.
The icon appearing with the template name is has a different look than a static, variable and
archive icons.
41Integration Guide
Page 48

FreeFlow Repository Integration
If necessary, Template Pricing and Printer Selection can be applied to the template by selecting the Pricing
button.
Printing a Job Based on a Repository Template
To approve a Xerox Repository-based job in FreeFlow Web Services for printing, carry out the following steps:
1 In Web Services, click on Tasks -> Production; the
2 Select the relevant job in the
Xerox Repository Items can be printed only through the FreeFlow Print Manager software that
is defined in FreeFlow Web Services as an output device carrying the name
Manager - Advanced Print Path
If such an Output Device was defined prior to importing the Repository items into Web Services
(Synchronize with external repository action, as detailed above), then these items receive the
designated output device automatically. Otherwise, before moving to the next step, it is necessary
to change the output device by clicking .
3 Click Approve.
Approval queue.
.
Production window appears.
FreeFlow Print
Web Services42
 Loading...