


Version 7.00
December 2008
DWS01V7.0E-02
FreeFlow™ Web Services
Print Service Provider Guide
Web Services

©2008 Xerox Corporation. All rights reserved. Xerox and the sphere of connectivity design and all product names mentioned in this
publication are trademarks of Xerox Corporation in the United States and/or other counties.
Other company trademarks are also acknowledged.
Adaptec®, the Adaptec logo, SCSlSelect®, and EZ-SCSI® are trademarks of Adaptec, Inc.
Adobe PDFL - Adobe PDF Library Copyright © 1987-2008 Adobe Systems Incorporated.
Adobe®, the Adobe logo, Acrobat®, the Acrobat logo, Acrobat Reader®, Distiller®, Adobe PDF JobReady™, and PostScript®, and
the PostScript logo are either registered trademarks or trademarks of Adobe Systems Incorporated in the United States and/or
other countries. All instances of the name PostScript in the text are references to the PostScript language as defined by Adobe
Systems Incorporated unless otherwise stated. The name PostScript also is used as a product trademark for Adobe Systems'
implementation of the PostScript language interpreter, and other Adobe products.
Copyright 1987 - 2008 Adobe Systems Incorporated and its licensors. All rights reserved.
Autologic® is a registered trademark of Autologic Information International, Inc.
Compaq® and QVision® are registered United States Patent and Trademark Office, for Compaq Computer Corporation.
DEC, DEC RAID, and Redundant Array of Independent Disks are registered trademarks of Digital Equipment Corporation.
Dundas - This software contains material that is (c) 1997-2000 DUNDAS SOFTWARE LTD., all rights reserved.
Imaging Technology provided under license by Accusoft Corporation.
ImageGear © 1997 by AccuSoft Corporation. All Rights Reserved.
Intel® and Pentium® are registered trademarks of Intel Corporation.
Novell® and NetWare® are registered trademarks of Novell, Inc. in the United States and other countries.
Oracle® is a registered trademark of Oracle Corporation Redwood City, California
ScanFix® Image Optimizer and ImagXpress are either registered marks or trademarks of Pegasus Imaging Corp. Copyright ©
1997-2008 Pegasus Imaging Corp. All rights reserved.
SonyTM and Storage by SonyTM are trademarks of Sony.
PANTONE ™ and other Pantone, Inc. trademarks are the property of Pantone Inc.
Preps™ is a registered trademark of Creo Inc. All rights reserved.
Quark® and QuarkXpress® are registered trademarks of Quark, Inc.
StorageView™ is a trademark of CMD Technology, Inc.
TIFF® is a registered trademark of Aldus Corporation.
Windows®, Windows XP®, Windows Server® 2003, and Internet Explorer are trademarks of Microsoft Corporation; Microsoft®
and MS-DOS® are registered trademarks of Microsoft Corporation.
Portions Copyright © 2001 artofcode LLC.
This software is based in part on the work of the Independent JPEG Group.
Portions Copyright © 2001 URW++. All Rights Reserved.
This product includes software developed by the Apache Software Foundation.
Copyright © 1999-2008 The Apache Software Foundation. All rights reserved.
This software is based in part on the work of Graeme W. Gill.
© Press-sense Ltd. 2002-2008. All rights reserved.
Includes Adobe® PDF Libraries and Adobe Normalizer technology
The Graphics Interchange Format © is the Copyright property of CompuServe Incorporated. GIFSM is a Service Mark property of
CompuServe Incorporated.
Portions contain an implementation of the LZW algorithm licensed under U.S. Patent 4,558,302.
Parts of this software Copyright © 2004-2006 Enterprise Distributed Technologies Ltd. All Rights Reserved.
Parts of this software Copyright © 1995-2003, The Cryptix Foundation Limited. All Rights Reserved.
Parts of this software are a SSLv3/TLS implementation written by Eric Rescorla and licensed by Claymore Systems, Inc. All Rights
Reserved.
Parts of this software Copyright © 2002, Lee David Painter and Contributors. Contributions made by Brett Smith, Richard Pernavas,
Erwin Bolwidt.
Parts of this software Copyright © 1995-2005, Jean-loup Gailly and Mark Adler.
All other product names and services mentioned in this publication are trademarks of their respective companies. They are used
throughout this publication for the benefit of those companies, and are not intended to convey endorsement or other affiliation
with the publication.
Companies, names, and data used in examples herein are fictitious unless otherwise noted.
Printed in the United States of America.
Changes are periodically made to this document. Changes, technical inaccuracies, and typographic errors will be corrected in
subsequent editions.
Document Version: 2.0 (December 2008)

Table of Contents
Introduction 1
FreeFlow Web Services......................................................................... 1
The Print Service Provider Guide.......................................................... 1
Web Services User Overview 3
Accessing Web Services ...................................................................... 4
Accessing Web Services locally............................................................................................................... 4
Status Icon ...................................................................................................................................................................5
Frequently Used Terminology .............................................................. 5
Navigating Web Services ......................................................................................................................... 6
Logging Out of Web Services................................................................................................................. 6
Conventions Used in Web Services ...................................................... 7
Managing Queues ..................................................................................................................................... 7
Displaying and Hiding Queue Columns .................................................................................................................8
Sorting Jobs .................................................................................................................................................................8
Repositioning Jobs .....................................................................................................................................................8
Using Web Services Features ............................................................... 9
Managing Attachments ............................................................................................................................ 9
Uploading Files ...........................................................................................................................................................9
Downloading Files .................................................................................................................................................. 10
Importing and Exporting Database Files ............................................................................................................ 10
Generating and Editing Job Tickets .................................................................................................... 12
Defining System Settings 13
Configuring System Properties .......................................................... 14
Defining Connection Properties .......................................................................................................... 14
Allowing FTP Uploads .......................................................................................................................... 14
Defining Calendar and Work Hours.................................................................................................... 15
Defining the PDF Preview.................................................................................................................... 16
Enabling Remote Assistance................................................................................................................. 16

Print Service Provider Guide
Setting Up an SSL Server....................................................................................................................... 17
Defining Language ............................................................................. 17
Defining Terms and Conditions.......................................................... 18
Customizing the Home Page............................................................... 19
Defining the Customize Link ................................................................................................................ 19
Defining the Logout link........................................................................................................................ 20
Accessing the FAQ Link........................................................................................................................ 20
Customizing Help ................................................................................................................................... 21
Defining Contact Information .............................................................................................................. 21
Defining the Contact Us Link ............................................................................................................................... 22
Defining Home Page Text..................................................................................................................... 22
Defining Home Page Images ................................................................................................................ 23
Setting System User Privileges ......................................................... 23
Print Buyer User Privileges Tables ........................................................................................................................24
Defining Print Service Provider Users ................................................ 26
Defining System Email Settings......................................................... 27
Verifying System Fonts...................................................................... 28
Setting Job Expiration Time Limits ..................................................... 29
Customizing Fields ............................................................................ 29
Editing a Dropdown List....................................................................................................................... 30
Defining Data Export .......................................................................... 31
Defining Credit Card Integration ......................................................... 31
Integrating Web Services with Other Systems ................................... 32
Defining Print Settings 33
Defining Production Parameters........................................................ 34
Setting Image Resolution Warning....................................................................................................... 34
Setting Size Difference ........................................................................................................................... 34
Setting Default Gutters .......................................................................................................................... 35
Managing Output Devices ................................................................. 36
Adding Output Devices ......................................................................................................................... 36
Defining General Output Device Parameters .................................................................................... 36
Web Servicesii

Table of Contents
Accessing the Output Device list ......................................................................................................... 36
Adding ICC Profiles to the System .......................................................................................................................37
Defining Output Device Channels ...................................................... 38
Removing Output Devices .................................................................................................................... 40
Defining Print Imposition ................................................................... 41
Defining Third-party Imposition Jobs ................................................. 47
Defining Press Setup Parameters for Pricing Calculation ................... 48
Setting Speed and Waste .................................................................. 48
Defining Labor Charges ..................................................................... 49
Defining Click Charges ...................................................................... 50
Managing the Stock Library............................................................... 50
Importing and Exporting Stock ........................................................... 51
Searching the Stock Library .............................................................. 52
Setting Paper Sizes ........................................................................... 54
Defining Shipping ............................................................................. 55
Defining Carriers..................................................................................................................................... 55
Defining Shipping Methods .................................................................................................................. 55
Defining Carrier Pricing ......................................................................................................................... 58
UPS ............................................................................................................................................................................ 58
USPS - United States Postal Service .....................................................................................................................59
FedEx Online .......................................................................................................................................... 60
Registering with FedEx ........................................................................................................................................... 60
Defining Shipping Method Groups ..................................................................................................... 62
Account Setup 63
Account Setup Overview.................................................................... 64
Using the Accounts Pane....................................................................................................................... 65
Creating a New Account..................................................................... 66
Defining General Settings for a New Account .................................................................................. 66
Defining Users for a New Account...................................................................................................... 67
Defining the Account Checkout Process ............................................................................................ 69
iiiPrint Service Provider Guide

Print Service Provider Guide
Managing Accounts............................................................................ 71
Managing Account Access..................................................................................................................... 71
Modifying Account Preferences ........................................................................................................... 71
Defining Account Utilities ...................................................................................................................................... 72
Defining the PDF Preview ..................................................................................................................................... 74
Defining Self Registration Details .........................................................................................................................74
Defining Pricing Settings ........................................................................................................................................75
Setting the Account Job-ordering Windows ........................................................................................................78
Defining Account Branding ................................................................................................................................... 79
Selecting Shipping Method Groups for the Account........................................................................ 80
Managing Users ....................................................................................................................................... 81
Defining User Groups Settings............................................................................................................. 83
Managing the Account Departments ................................................................................................... 84
Defining the Account Cost Centers..................................................................................................... 84
Defining Email Notification Settings................................................................................................... 86
Customizing Order Fields at the Account Level................................................................................ 87
Store Setup 89
Catalog Overview .............................................................................. 90
Superstore Catalogs................................................................................................................................. 90
Superstore Look and Feel ....................................................................................................................................... 91
HTML Catalogs....................................................................................................................................... 94
Creating and Managing Superstore Catalogs..................................... 95
Managing Superstores............................................................................................................................. 95
Moving a Category ...................................................................................................................................................95
Copying a Category ..................................................................................................................................................95
Renaming a Category ...............................................................................................................................................95
Deleting a Category .................................................................................................................................................96
Creating a Superstore.............................................................................................................................. 96
Adding Products to a Superstore.......................................................................................................... 97
Defining Superstore Content Using the Add Products Option .......................................................................97
Defining Superstore Content Using the Add Queries Option .........................................................................97
Removing Items from the Content List ............................................................................................................... 99
Applying a Layout Theme to a Superstore.......................................................................................... 99
Using the Edit Layout Theme Wizard ................................................................................................................100
Defining the Items Area....................................................................................................................... 102
Defining the Cross Sale Area .............................................................................................................. 102
Defining the Navigation Pane............................................................................................................. 103
Adding Messages................................................................................................................................... 104
Previewing the Superstore or Category ............................................................................................. 104
Creating and Managing HTML Catalogs ............................................ 105
Managing HTML Catalogs .................................................................................................................. 105
Renaming a Catalog ...............................................................................................................................................105
Web Servicesiv

Table of Contents
Deleting a Catalog ..................................................................................................................................................105
Creating an HTML Catalog ................................................................................................................. 105
Adding Templates to an HTML Catalog ...........................................................................................................106
Setting HTML Catalog Template Parameters ...................................................................................................106
Defining a Catalog’s Properties ...........................................................................................................................107
Exporting an HTML Catalog.............................................................................................................. 110
Sending an HTML Catalog by Email................................................................................................. 110
Managing the Cross Sales Library .................................................... 110
Managing Cross Sales ........................................................................................................................... 111
Duplicating a Cross Sale .......................................................................................................................................111
Deleting a Cross Sale .............................................................................................................................................111
Creating and Populating Cross Sales.................................................................................................. 111
Removing a Product from a Cross Sale .............................................................................................................112
Managing the Image Library............................................................. 112
Managing Folders.................................................................................................................................. 112
Creating a New Folder ..........................................................................................................................................112
Renaming a Folder .................................................................................................................................................112
Deleting a Folder ...................................................................................................................................................112
Managing Images................................................................................................................................... 113
Changing the Image Display Mode .....................................................................................................................113
Moving One or More Images Between Folders ...............................................................................................113
Creating a Copy of One or More Images in Another Folder .........................................................................113
Renaming an Image ...............................................................................................................................................113
Deleting One or More Images .............................................................................................................................113
Downloading One or More Images ....................................................................................................................114
Uploading Images ..................................................................................................................................................114
Managing the Database Library........................................................ 115
Adding a Database to the Library....................................................................................................... 115
Checking a Database............................................................................................................................. 115
Deleting a Database .............................................................................................................................. 115
Updating a Database............................................................................................................................. 116
Job Business Flow 117
General Overview ............................................................................. 118
Joblets.............................................................................................. 119
Managing Joblets ................................................................................................................................... 120
Renaming a Joblet ..................................................................................................................................................120
Deleting a Joblet .....................................................................................................................................................121
Disabling a Joblet ...................................................................................................................................................121
Creating a New Joblet ...........................................................................................................................................121
Editing a Joblet...................................................................................................................................... 121
vPrint Service Provider Guide

Print Service Provider Guide
Changing a Joblet Description .............................................................................................................................121
Adding a Joblet Option .........................................................................................................................................122
Enabling a Joblet Option ......................................................................................................................................122
Disabling a Joblet Option .....................................................................................................................................122
Deleting a Joblet Option .......................................................................................................................................122
Changing the Sequence of Joblet Options .........................................................................................................122
Joblet Types ........................................................................................................................................... 123
Lamination ..............................................................................................................................................................123
Number of Pages ...................................................................................................................................................123
Paper ........................................................................................................................................................................123
Folding .....................................................................................................................................................................124
Binding ....................................................................................................................................................................124
Page Size ..................................................................................................................................................................125
Colors .......................................................................................................................................................................125
Collating ..................................................................................................................................................................125
Drilling .....................................................................................................................................................................126
Numbering ..............................................................................................................................................................126
Job Types ......................................................................................... 127
How Many Job Types to Create?........................................................................................................ 128
Managing Job Types ............................................................................................................................. 128
Renaming a Job Type ............................................................................................................................................128
Deleting a Job Type ...............................................................................................................................................129
Disabling a Job Type .............................................................................................................................................129
Duplicating a Job Type .........................................................................................................................................129
Editing a Job Type .................................................................................................................................................129
Creating a Simple Job Type ................................................................................................................. 129
Adding General Information to a Job Type ......................................................................................................130
Intent .......................................................................................................................................................................130
Ordering Sequence ................................................................................................................................................134
Settings ....................................................................................................................................................................137
Job Type Groups................................................................................................................................... 141
Templates ........................................................................................ 143
Template Types ..................................................................................................................................... 143
Template Creation................................................................................................................................. 143
Template Structure................................................................................................................................ 144
Content ....................................................................................................................................................................144
Intent .......................................................................................................................................................................144
File Report ..............................................................................................................................................................144
Managing Templates............................................................................................................................. 144
Renaming a Template ............................................................................................................................................144
Deleting a Template ..............................................................................................................................................145
Copying a Template ...............................................................................................................................................145
Moving a Template ................................................................................................................................................145
Editing a Template ................................................................................................................................................145
Adding an Archive to a Template .......................................................................................................................146
Web Servicesvi

Table of Contents
Managing the Workflow Policy of a Template ..................................................................................................146
Managing the Access Rights of a Template .......................................................................................................146
Sending a Template as MailToPrint ....................................................................................................................147
Enabling a Template for Inventory ....................................................................................................................148
Creating a New Template .................................................................................................................... 149
Adding General Information to a Template ......................................................................................................149
Upload File ..............................................................................................................................................................149
Specifying the Intent .............................................................................................................................................150
Using the File Report ............................................................................................................................................150
Variable Information .............................................................................................................................................152
Defining the Ordering Sequence .........................................................................................................................153
Defining the Settings .............................................................................................................................................153
Creating a New Template from an Existing Job.............................................................................. 154
Creating Variable Data Templates..................................................... 155
Select Variable Data Fields .................................................................................................................. 155
Selecting Variable Text Fields ..............................................................................................................................155
Selecting Variable Image Fields ...........................................................................................................................156
Defining Variable Data Field Properties ........................................................................................... 156
Text Fields ...............................................................................................................................................................156
Image Fields ............................................................................................................................................................163
Advanced Options .................................................................................................................................................165
Arrange Fields........................................................................................................................................ 172
Changing the Sequence of Fields ........................................................................................................................172
Splitting Fields into Several Tabs ........................................................................................................................173
Pricing 175
Pricing Overview .............................................................................. 176
Concepts................................................................................................................................................. 176
Calculation Model ..................................................................................................................................................176
Line Item .................................................................................................................................................................177
Tax Package ............................................................................................................................................................178
Pricing Process Overview .................................................................................................................... 178
Setup ........................................................................................................................................................................178
Job Pricing ...............................................................................................................................................................179
Order Pricing ..........................................................................................................................................................179
Price Management .................................................................................................................................................180
Setup ............................................................................................... 181
Set-up Tax Packages ............................................................................................................................. 181
Managing the Tax Packages .................................................................................................................................182
Managing Taxes ......................................................................................................................................................184
Set-up Job Type Pricing ....................................................................................................................... 186
Selecting a Job Type ..............................................................................................................................................186
Selecting a Template ..............................................................................................................................................186
viiPrint Service Provider Guide

Print Service Provider Guide
Setting-up Intent Pricing...................................................................................................................... 186
Intent Pricing Examples .......................................................................................................................................188
Setting-up Manual Pricing.................................................................................................................... 191
Price Management ........................................................................... 192
Manually Pricing a Job.......................................................................................................................... 192
Checking and Modifying Job Pricing ................................................................................................. 193
Checking and Modifying Order Pricing............................................................................................. 193
Line Item Library .............................................................................. 195
Types of Line Items.............................................................................................................................. 195
Setup Line Items ....................................................................................................................................................195
Result Line Items ...................................................................................................................................................195
Managing the Line Item Library ......................................................................................................... 195
Searching for a Line Item .....................................................................................................................................196
Creating a New Line Item ....................................................................................................................................196
Editing Line Items .................................................................................................................................................196
Managing Site Customization Skins 199
Creating Skins................................................................................. 200
Accessing The Skin Editor .................................................................................................................. 200
Customizing the Login Page................................................................................................................ 200
Customizing the Site Frame ................................................................................................................ 201
Customizing the Launch Pad .............................................................................................................. 202
Customizing the Email Banner ........................................................................................................... 203
Customizing the Catalog Banner ........................................................................................................ 204
Saving and Previewing Views.............................................................................................................. 204
Editing Skin Elements...................................................................... 205
Uploading Images ................................................................................................................................. 206
Editing the Final Design ...................................................................................................................... 207
Uploading Designs .......................................................................... 208
Converting HTML Pages to .mht Files ............................................................................................. 208
Activating Page Elements ................................................................ 209
Selecting Languages .............................................................................................................................. 211
Specifying First Page After Login....................................................................................................... 211
Defining User Privilege Views ............................................................................................................ 212
Defining and Editing for the Various User Types ............................................................................................212
Managing the Skin Library ............................................................... 213
Accessing the Skin Library ...................................................................................................................................213
Assigning Skins to Print Buyers.......................................................................................................... 214
Designating a Default Skin .................................................................................................................. 214
Web Servicesviii

Table of Contents
Production Management 215
Production Queue Overview............................................................. 216
Managing Jobs in the Production Queue ........................................... 217
Managing the Production Queue Job List......................................................................................... 217
The Job Details Panel........................................................................................................................... 217
Viewing and Editing Job Properties................................................................................................... 219
Attaching Files to the Job .................................................................................................................... 220
Viewing and Modifying a Job’s Crop and Bleed Parameters.......................................................... 221
Editing Job Imposition......................................................................................................................... 222
Manual Impose ...................................................................................................................................... 225
Imposition Schemes ..............................................................................................................................................225
Ganging Jobs for Production .............................................................................................................. 227
Layout Maker Overview .......................................................................................................................................227
Printing Jobs Using the Layout Maker ...............................................................................................................228
Printing Book Assembly Jobs on More Than One Output Device.............................................. 229
Creating a Job Ticket ............................................................................................................................ 230
Editing a Job Ticket.............................................................................................................................. 231
Viewing Book Assembly Job Details ..................................................................................................................231
Managing Notifications and Alerts .................................................. 232
Producing Jobs ................................................................................ 234
Outsourcing Jobs to a Partner Print Service Provider .................................................................... 234
Print Service Provider Workflow ........................................................................................................................234
Partner Print Service Provider Workflow ..........................................................................................................235
Changing the Status of a Job ............................................................................................................... 235
Approving a Job for Printing .............................................................................................................. 236
Delivery Queue ................................................................................ 237
Delivery Queue Overview ................................................................................................................... 237
Managing the Jobs for Delivery Panel ............................................................................................... 238
Managing Delivery in the Batch Order Panel................................................................................... 239
Viewing Carrier Tracking Status ..........................................................................................................................239
Editing Delivery Information ..............................................................................................................................240
Printing Shipping Labels .......................................................................................................................................241
Estimating Shipping Costs ...................................................................................................................................241
Approving Jobs for Delivery ................................................................................................................................242
Managing the Shipped Deliveries Panel ............................................................................................ 242
Track Jobs ....................................................................................... 244
Searching for Jobs ................................................................................................................................. 244
Defining Job Search Criteria ................................................................................................................................244
Defining and Saving Job Search Information ...................................................................................................247
Managing Tracked Jobs........................................................................................................................ 247
ixPrint Service Provider Guide

Print Service Provider Guide
Viewing Job Details ...............................................................................................................................................248
Changing Job Status ..............................................................................................................................................248
Deleting Jobs .......................................................................................................................................................... 249
Viewing and Editing Job Properties ...................................................................................................................250
Viewing and Editing Job Pricing .........................................................................................................................250
Viewing and Editing Job Ticket ..........................................................................................................................251
Viewing and Editing Order Pricing ....................................................................................................................251
Reprinting Job ........................................................................................................................................................252
Saving a Job as a Template ...................................................................................................................................253
Searching for an Order .........................................................................................................................................253
Direct Marketing Links 255
DirectSmile Image Generator........................................................... 256
Installing DirectSmile Image Generator............................................................................................ 256
New Setup ...............................................................................................................................................................256
Verification .............................................................................................................................................................256
Upgrade ...................................................................................................................................................................257
Creating a Template with a DirectSmile Image................................................................................ 257
Ordering a Job from a Template with a DirectSmile Image. ......................................................... 259
XMPie PersonalEffect Integration .................................................... 260
Installing XMPie PersonalEffect ........................................................................................................ 260
New Setup ...............................................................................................................................................................260
Upgrade ...................................................................................................................................................................261
XMPie PersonalEffect Server Information....................................................................................... 261
Print Service Provider Side ...................................................................................................................................261
Importing an XMPie PersonalEffect Template to the Web Services System ..............................................263
Print Buyer Side .....................................................................................................................................................264
Restrictions and Known Limitations ..................................................................................................................265
USADATA......................................................................................... 265
Installing USADATA ........................................................................................................................... 265
Verification .............................................................................................................................................................266
Upgrade ...................................................................................................................................................................266
Creating a Template with a USADATA Database .......................................................................... 267
Ordering a Job with a USADATA Database.................................................................................... 269
Local DB List Acquisition .................................................................. 271
Installing Local DB List Acquisition.................................................................................................. 271
New Setup ...............................................................................................................................................................271
Upgrade ...................................................................................................................................................................272
Creating a Template with a Local Database...................................................................................... 273
Ordering a Job with a Local Database............................................................................................... 275
Web Servicesx

Table of Contents
Credit Card 277
Integrating with Web Services Credit Card Vendors ......................... 278
Adding Web Services Credit Card Service Vendors........................... 279
Excel Pricing 281
Settings in Web Services................................................................. 282
Assigning Excel Pricing to a Print Buyer .......................................................................................... 282
Importing/Exporting the Excel Pricing File .....................................................................................................282
Excel Pricing File Format.................................................................. 283
Understanding the File Format........................................................................................................... 283
Column A ................................................................................................................................................................283
Column B ................................................................................................................................................................284
Column C ................................................................................................................................................................288
Column D ...............................................................................................................................................................289
Excel Pricing with the Book Assembly Module............................................................................... 289
Excel Programming and Useful Excel Functions ............................... 290
IF Function ............................................................................................................................................ 290
Sample IF Syntax ...................................................................................................................................................290
Vlookup Function................................................................................................................................. 290
MATCH.................................................................................................................................................. 291
INDEX................................................................................................................................................... 291
DGET Function.................................................................................................................................... 291
VBA......................................................................................................................................................... 292
Set 293
Set Definitions ................................................................................ 294
Binding Styles......................................................................................................................................... 294
Components........................................................................................................................................... 294
Set Pricing............................................................................................................................................... 294
Defining a Set Job Type.................................................................... 295
Defining Binding Properties................................................................................................................ 295
Setting General Properties ....................................................................................................................................295
Setting Page Size Properties .................................................................................................................................296
Setting Material Properties ...................................................................................................................................296
Setting Pricing Properties .....................................................................................................................................296
Defining Component Properties ........................................................................................................ 296
General Properties .................................................................................................................................................296
xiPrint Service Provider Guide

Print Service Provider Guide
Paper Selection Properties ....................................................................................................................................297
Color Channel Properties .....................................................................................................................................297
Finishing Properties ...............................................................................................................................................297
Pricing Properties ...................................................................................................................................................297
Defining a Set Preview..................................................................... 298
Preparation ............................................................................................................................................. 299
Optional Spine ........................................................................................................................................................299
Establish the Preview Size ....................................................................................................................................299
Establish the Left and Right Page Position .......................................................................................................300
Setting up a New Preview .....................................................................................................................................301
Setting up a Binding Preview ...............................................................................................................................301
Producing a Set Job .......................................................................... 301
Web Servicesxii

List of Figures
Figure 1: Web Services Toolbox ..................................................................................................................... 4
Figure 2: Status Icon on the Status Bar.......................................................................................................... 5
Figure 3: Frequently Used Terminology ........................................................................................................ 5
Figure 4: Links.................................................................................................................................................... 6
Figure 5: Queues................................................................................................................................................ 7
Figure 6: Import Database ............................................................................................................................. 10
Figure 7: Print Buyer User Privileges............................................................................................................ 24
Figure 8: Default Gutter................................................................................................................................. 35
Figure 9: Print Imposition Option Graphic Representations................................................................... 43
Figure 10: Original Business Card with no Bleed....................................................................................... 45
Figure 11: Re-scaled Business Card .............................................................................................................. 45
Figure 12: Reduced Size Business Card ....................................................................................................... 45
Figure 13: Account Setup - General Info window ..................................................................................... 64
Figure 14: Export Account dialog box......................................................................................................... 65
Figure 15: Account Setup - New User window .......................................................................................... 68
Figure 16: User Types and their privileges................................................................................................... 69
Figure 17: Account Setup - Checkout window........................................................................................... 70
Figure 18: Account Setup - Preferences window, Utilities panel............................................................. 72
Figure 19: Account Setup - Preferences window, Pricing panel .............................................................. 75
Figure 20: Account Setup - Cost Centers window ..................................................................................... 85
Figure 21: Panel Layouts ................................................................................................................................ 91
Figure 22: Account Selection List ................................................................................................................. 96
Figure 23: Account Selection List ............................................................................................................... 106
Figure 24: Joblet Library............................................................................................................................... 120
Figure 25: Job Type Library ......................................................................................................................... 128
Figure 26: Job Type Intent Tab................................................................................................................... 131
Figure 27: Job Type Ordering Sequence Tab............................................................................................ 136
Figure 28: Job Type - Settings - Quantity .................................................................................................. 138
Figure 29: Quantity Example....................................................................................................................... 139
Figure 30: Job Type Groups ........................................................................................................................ 142
Figure 31: Detailed File Report ................................................................................................................... 151

List of Figures
Figure 32: Selective Upload .......................................................................................................................... 155
Figure 33: Output Format ............................................................................................................................ 159
Figure 34: Simple Drop-down Menu .......................................................................................................... 160
Figure 35: Complex Drop-down Menu...................................................................................................... 162
Figure 36: Position Links .............................................................................................................................. 167
Figure 37: Suffix ............................................................................................................................................. 168
Figure 38: Group Centering ......................................................................................................................... 169
Figure 39: Empty Fields ................................................................................................................................ 170
Figure 40: Identical Input Fields.................................................................................................................. 171
Figure 41: Style Selection .............................................................................................................................. 172
Figure 42: Multiple-tax Package................................................................................................................... 183
Figure 43: Area-dependent Tax ................................................................................................................... 185
Figure 44: Planner with Multiple Quantities.............................................................................................. 187
Figure 45: Product Base Price with Ranges ............................................................................................... 188
Figure 46: Manual Job Pricing...................................................................................................................... 192
Figure 47: Job Pricing for Intent-priced Job.............................................................................................. 193
Figure 48: Order Pricing Result Matrix ...................................................................................................... 194
Figure 49: JBF Option Line Item ................................................................................................................ 197
Figure 50: Production Queue window....................................................................................................... 216
Figure 51: Job Properties dialog box........................................................................................................... 219
Figure 52: ITrims & Bleeds Editor - Advanced tab.................................................................................. 221
Figure 53: Device and Imposition dialog box ........................................................................................... 222
Figure 54: Imposition Scheme: Vertical Orientation................................................................................ 225
Figure 55: Imposition Scheme: Horizontal Orientation .......................................................................... 226
Figure 56: Imposition Scheme: Close Up View ........................................................................................ 226
Figure 57: Layout Maker window................................................................................................................ 228
Figure 58: Job Ticket Creation dialog box ................................................................................................. 230
Figure 59: Delivery window.......................................................................................................................... 237
Figure 60: Delivery Information dialog box .............................................................................................. 240
Figure 61: Track Jobs - Search window...................................................................................................... 245
Figure 62: Track Jobs - Job List window.................................................................................................... 245
Figure 63: Advanced Search dialog box...................................................................................................... 246
Figure 64: Track Jobs ribbon........................................................................................................................ 246
Figure 65: Change Job Status window ........................................................................................................ 249
Figure 66: Job Pricing dialog box ................................................................................................................ 250
Figure 67: Order Pricing dialog box............................................................................................................ 251
Web Servicesxiv

Figure 68: Reprint dialog box....................................................................................................................... 252
Figure 69: Save Job As Template dialog box............................................................................................. 253
Figure 70: Enter Variable Data .................................................................................................................... 270
Figure 71: Excel Pricing Information Flow ............................................................................................... 281
Figure 72: Stages of a Set Preview............................................................................................................... 299
xvPrint Service Provider Guide

List of Figures
Web Servicesxvi

List of Tables
Table 1: Value Definition Filters..................................................................................................................... 7
Table 2: System User Privileges..................................................................................................................... 23
Table 3: Default Print Buyer User Abilities................................................................................................. 25
Table 4: Print Service Provider User Abilities............................................................................................. 26
Table 5: Stock Library Categories ................................................................................................................ 52
Table 6: Background Image Width ............................................................................................................... 93
Table 7: Default Joblets ................................................................................................................................ 119
Table 8: Lamination sides options .............................................................................................................. 123
Table 9: Lamination type options ............................................................................................................... 123
Table 10: Binding options ............................................................................................................................ 124
Table 11: Color options................................................................................................................................ 125
Table 12: Drilling options............................................................................................................................. 126
Table 13: Ordering Sequence Properties ................................................................................................... 134
Table 14: Quote then Upload...................................................................................................................... 135
Table 15: Quantity Example ........................................................................................................................ 139
Table 16: Template Ordering Sequence Properties.................................................................................. 153
Table 17: Advanced Properties Example................................................................................................... 165
Table 18: Base Price ...................................................................................................................................... 189
Table 19: Base Price ...................................................................................................................................... 190
Table 20: File Upload Dimensions ............................................................................................................. 208
Table 21: Tab Alignment Options .............................................................................................................. 210
Table 22: Notifications ................................................................................................................................. 232
Table 23: Alerts .............................................................................................................................................. 233
Table 24: Configuration Check.................................................................................................................... 262
Table 25: Vendor Account Details ............................................................................................................. 278
Table 26: Column A Fields .......................................................................................................................... 284
Table 27: Column C Fields........................................................................................................................... 288

List of Tables
Web Servicesxviii

1
Introduction
FreeFlow Web Services
FreeFlow Web Services™ is a Business Flow Automation solution that allows you to create, customize, order,
print, and deliver print jobs in one streamlined operation.
Web Services enables you to respond to changing market conditions, as well as leverage new business
opportunities by providing you with the following features:
Personalized, on-demand, printing capabilities – integrate independent and data-based variable information
to create variable data jobs and campaigns.
Advanced reprint abilities – access jobs and templates for reprinting or updating print material.
Advanced tracking abilities – you and your customers can track orders from the moment they enter your
organization, until they arrive at their final destination.
Simplified production and ordering process – generate jobs, receive automated pre-flighting, and create soft
proofs prior to ordering. Make use of pre-press capabilities, output management, delivery, and billing
abilities. The entire process is designed to reduce the number of interactions with your customers.
An open system - communicate with your customers’ system and with your own peripheral systems; you can
receive orders from any environment including branded websites, emails, intranet, procurement systems, or
print drivers, as well as interact with other systems that provide diverse services.
The Print Service Provider Guide
The Print Service Provider guide provides you with instructions for managing the administration and production
workflows, with the purpose of:
Introducing Web Services software features.
Entering and organizing data that is processed by Web Services, allowing you to provide automatic price
generation and enabling job production.
Assisting your organization in configuring Web Services printing, account, and system settings.
Enabling quick implementation of Web Services so you can improve and enhance your business.
Before working with the guide, we recommend that you complete the comprehensive Customer Driven
Deployment Program (CDDP) and gain the implementation skills that will enable you to begin working with
your customers.

Introduction
Web Services2

2
Web Services User Overview
The FreeFlow Web Services User Overview describes terminology, conventions, and features used in Web
Services.
The chapter includes the following sections:
Accessing Web Services
Frequently Used Terminology
Conventions Used in Web Services
Using Web Services Features

Web Services User Overview
Accessing Web Services
Web Services runs on the Windows operating system. As a Print Service Provider user, you can access Web
Services either via the internet (World Wide Web), or on an intranet, by typing a Uniform Resource Locator
(URL) into an Internet Explorer browser address field. Print Buyers can access the Print Buyer application site
using either Internet Explorer, Mozilla Firefox, or Apple Safari browsers.
To access Web Services in a browser
1 Open an Internet browser window.
2 Type the Web Services URL into the browser address text field.
For example: http://x.x.x.x/Web Services/
3 Press Enter on your keyboard; Web Services is accessed.
Disable your browser Pop-up Blocker to ensure that Web Services’s various windows and dialog
boxes are able to appear.
Accessing Web Services locally
A computer with Web Services installed locally is called an Web Services Server.
Ensure that the Web Services server is dedicated (used solely as a network server) and that the
application installation is on an internal driver, and not on an external one.
The Web Services
Figure 1: Web Services Toolbox
Toolbox appears in the top-right corner of the Web Services Server desktop.
Status Indicator
Web Services4
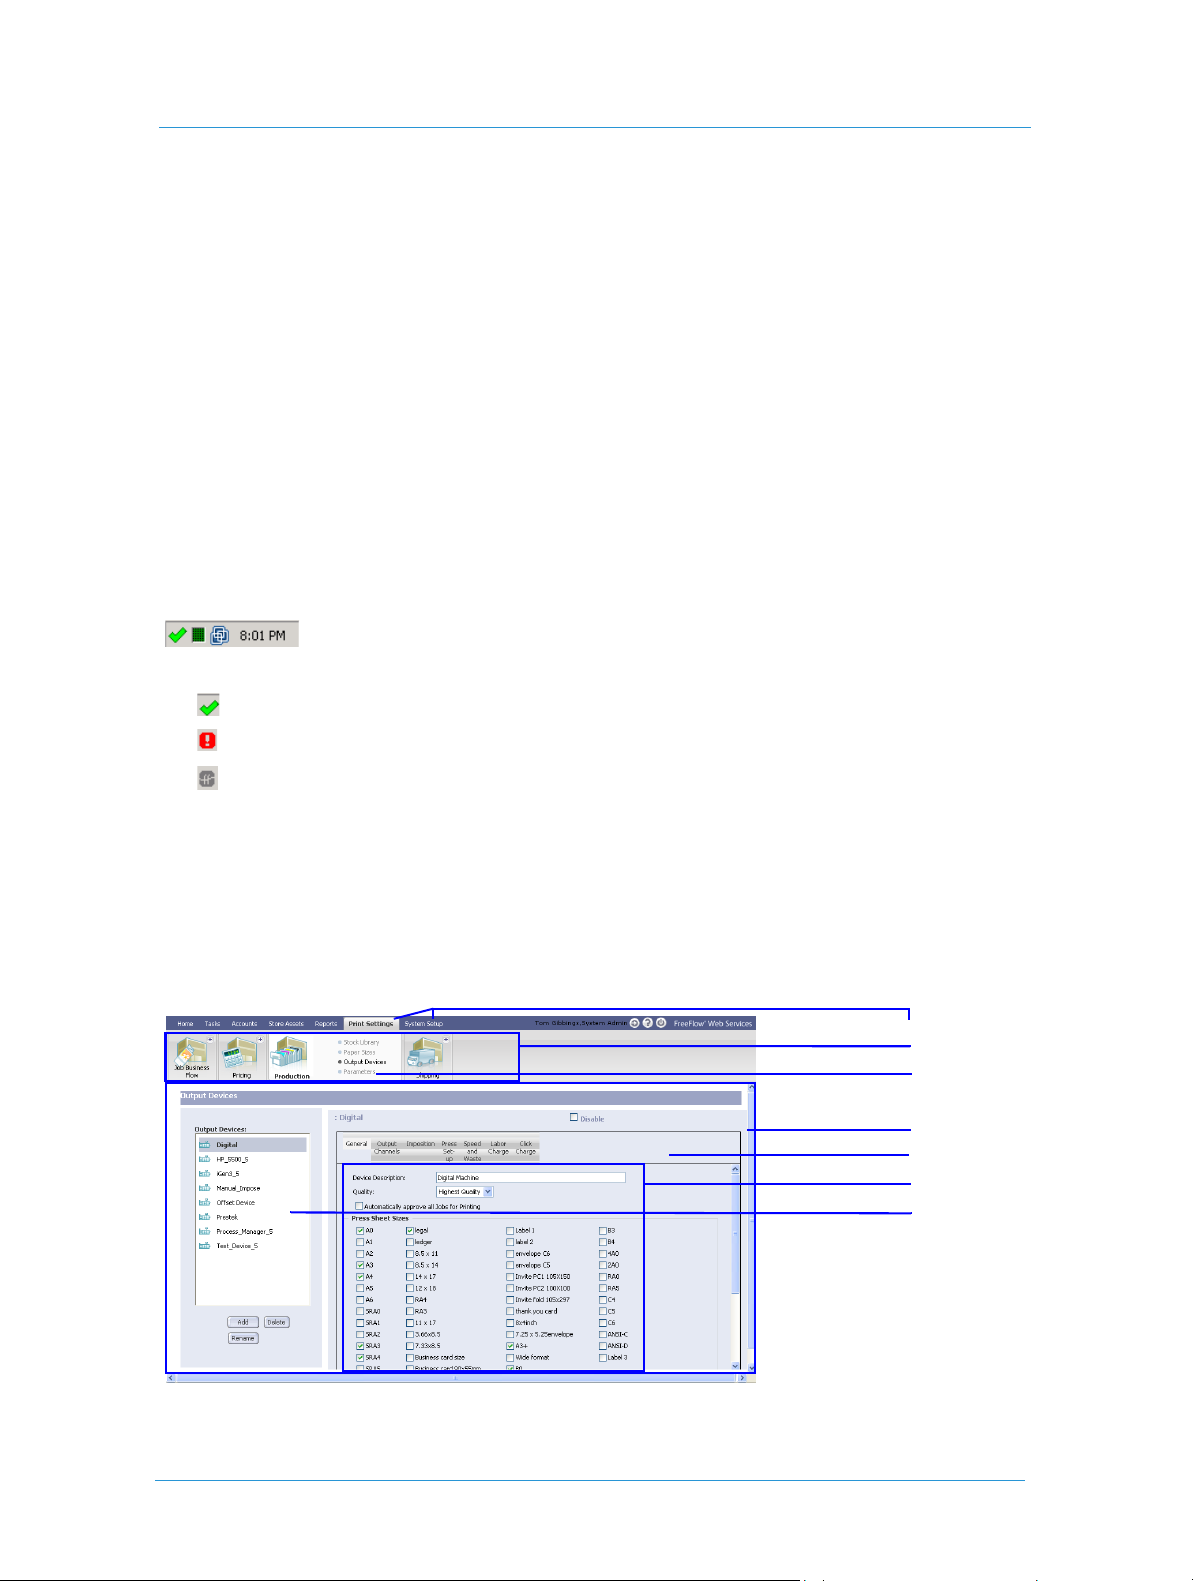
Frequently Used Terminology
You can use the Web Services
Start Director – start running the Internet Information server and the Web Services processes.
Start Director – stop running the Internet Information server and the Web Services processes.
Restart Director – stop and restart the Internet Information server and the Web Services processes.
Log Window – open the system feedback window. A full record of all past actions, and their execution
Toolbox to perform the following tasks:
times, available to facilitate application trouble shooting.
Task Manager – open the Windows Task Manager.
Explorer – open Windows Explorer.
Status Icon
The status icons, located on the Status Bar at the bottom-right corner of the desktop, indicate two operational
modes of the system:
Figure 2: Status Icon on the Status Bar
– indicates the system is operating; both the Internet Information server and Web Services are running.
– indicates the system is in the process of becoming operational or shutting down.
– indicates not operating correctly; either the Internet Information server or Web Services is down. The
Connection Failure prompt appears.
Frequently Used Terminology
Figure 3 and Figure 4 describe terminology used in the Print Service Provider interface structure.
Figure 3: Frequently Used Terminology
Menus
Ribbons
Ribbon
Menus
Window
Panel
Sub-panel
Pane
5Print Service Provider Guide

Web Services User Overview
Figure 4: Links
Connected
Help
The following list describes Web Services Print Service Provider user interface terminology:
Screen – refers to the entire monitor screen, including the operating system toolbars.
Window – part of the screen; opens by clicking any of the Workflow or Administration tabs in the Web
Services taskbar.
Panel – part of a window; can contain sub-panels.
Sub-panel – part of a panel.
Pane – a large box, usually located on the left side of the window.
Operation Button – used for performing various operations; appears in a panel or a sub-panel, or below a
pane.
Log Out
Home Page
Navigating Web Services
After logging in to Web Services, do not use the browser toolbar buttons. Click the selected menu to refresh the
display, and use the menus, ribbons, and ribbon menus to navigate within Web Services.
buttons appear when the option to return to a previous window or to move to a following window exists.
Previous and Next
If you want the application open in more then one browser window, do not open another browser tab; open
another browser window instead.
Logging Out of Web Services
Ensure that you use Web Services’s log out link (displayed in Figure 4) and not the window’s close control, or
browser
File menu command, when you want to log out of the application.
Web Services6

Frequently Used Terminology
Conventions Used in Web Services
Web Services uses several interface conventions. These conventions are documented below, and are referred to
throughout the documentation.
Managing Queues
Figure 5: Queues
Search
Filter
Val ue
Definition
Filters
Search
Field
Job Details
Positioning
Arrows
Queues are used in Web Services to display the current status of jobs. You can view and edit jobs in each queue
by clicking icons in the queue columns, or in the
All queues have the following features and tools:
Search Filter – a dropdown list containing an alphabetically ordered list of search criteria.
Value Definition Filters – a dropdown list containing definitions to filter the search. For value definition
filter descriptions, refer to Table 1.
Column selection
Job sorting according to column
Job repositioning
Job details viewing and editing
Table 1: Value Definition Filters
Filter Definition
< Less than
>Greater than
<= Less than or equal to
>= Greater than or equal to
<> Not equal to
Job Details pane.
7Print Service Provider Guide
Web Services User Overview
Table 1: Value Definition Filters (Continued)
Filter Definition
=Equal to
Like Similar to
Displaying and Hiding Queue Columns
Queues show job information according to the columns that are displayed. You can select which columns to
display or hide.
To display and hide queue columns:
1 Click Column Selection; the Column Selection dialog box appears, the number of selected check boxes
corresponds with the number of columns displayed in the queue.
2 Select or clear check boxes to display or hide columns.
3 Click
OK; queue columns are displayed or hidden, as defined in Step 2.
Adding more than ten columns can distort the view of the individual columns.
When the Payment Method column is selected, the payment method appears as PO, CC, or
EDD. For more information, refer to Defining Pricing Settings on page 75.
Process indicates that the processing of the job(s) has not yet been completed.
Sorting Jobs
You can sort information in queues according to columns.
Click a column heading to arrange queue information in alphabetical, ascending or descending order; the or
arrow appears in the column header, indicating the directional order in the column.
Repositioning Jobs
When a job enters a queue, the job is positioned according to the system-assigned job number. You can
reposition the job within the queue.
To move jobs up or down one row:
1 Select one or more job rows and click or
2 Repeat Step 1 until the job is queued as you want it.
Web Services8

Using Web Services Features
To move a job to the top or to the bottom of the queue:
Select the job and click ; the job moves to the bottom of the queue.
Select the job and click ; the job moves to the top of the queue.
To restore the queue to the original status:
Click Default Sort; the jobs appear in the original queue positions (lowest number at the top and the highest
number at the bottom).
To update the queue with new jobs:
Click the Refresh button; new jobs entered to the system appear in the queue.
Using Web Services Features
You can use several features within Web Services to store or modify information, all of which can be accessed
from various locations within the application.
Managing Attachments
You can upload files to jobs and download attached files to any folder in your system.
Uploading Files
Click Upload Files or Upload Images; the Upload File dialog box appears.
To upload a single file, click the Upload a single file radio button, and complete the instructions in the
Upload File dialog box.
To upload multiple files, click the Upload multiple files, using FTP Multi-file Upload radio button, and
complete the instructions in the
To work with the FTP Multi-file Upload option, you must enable and activate the FTP
functionality on your server:
To verify that FTP is active on your ser ver, see the Installation Guide, Configuring FTP User
Permission.
To enable FTP Upload, navigate Web Services to System Setup > Basic > General > File
Upload
. For more information, refer to Allowing FTP Uploads on page 14.
Upload File dialog box.
9Print Service Provider Guide
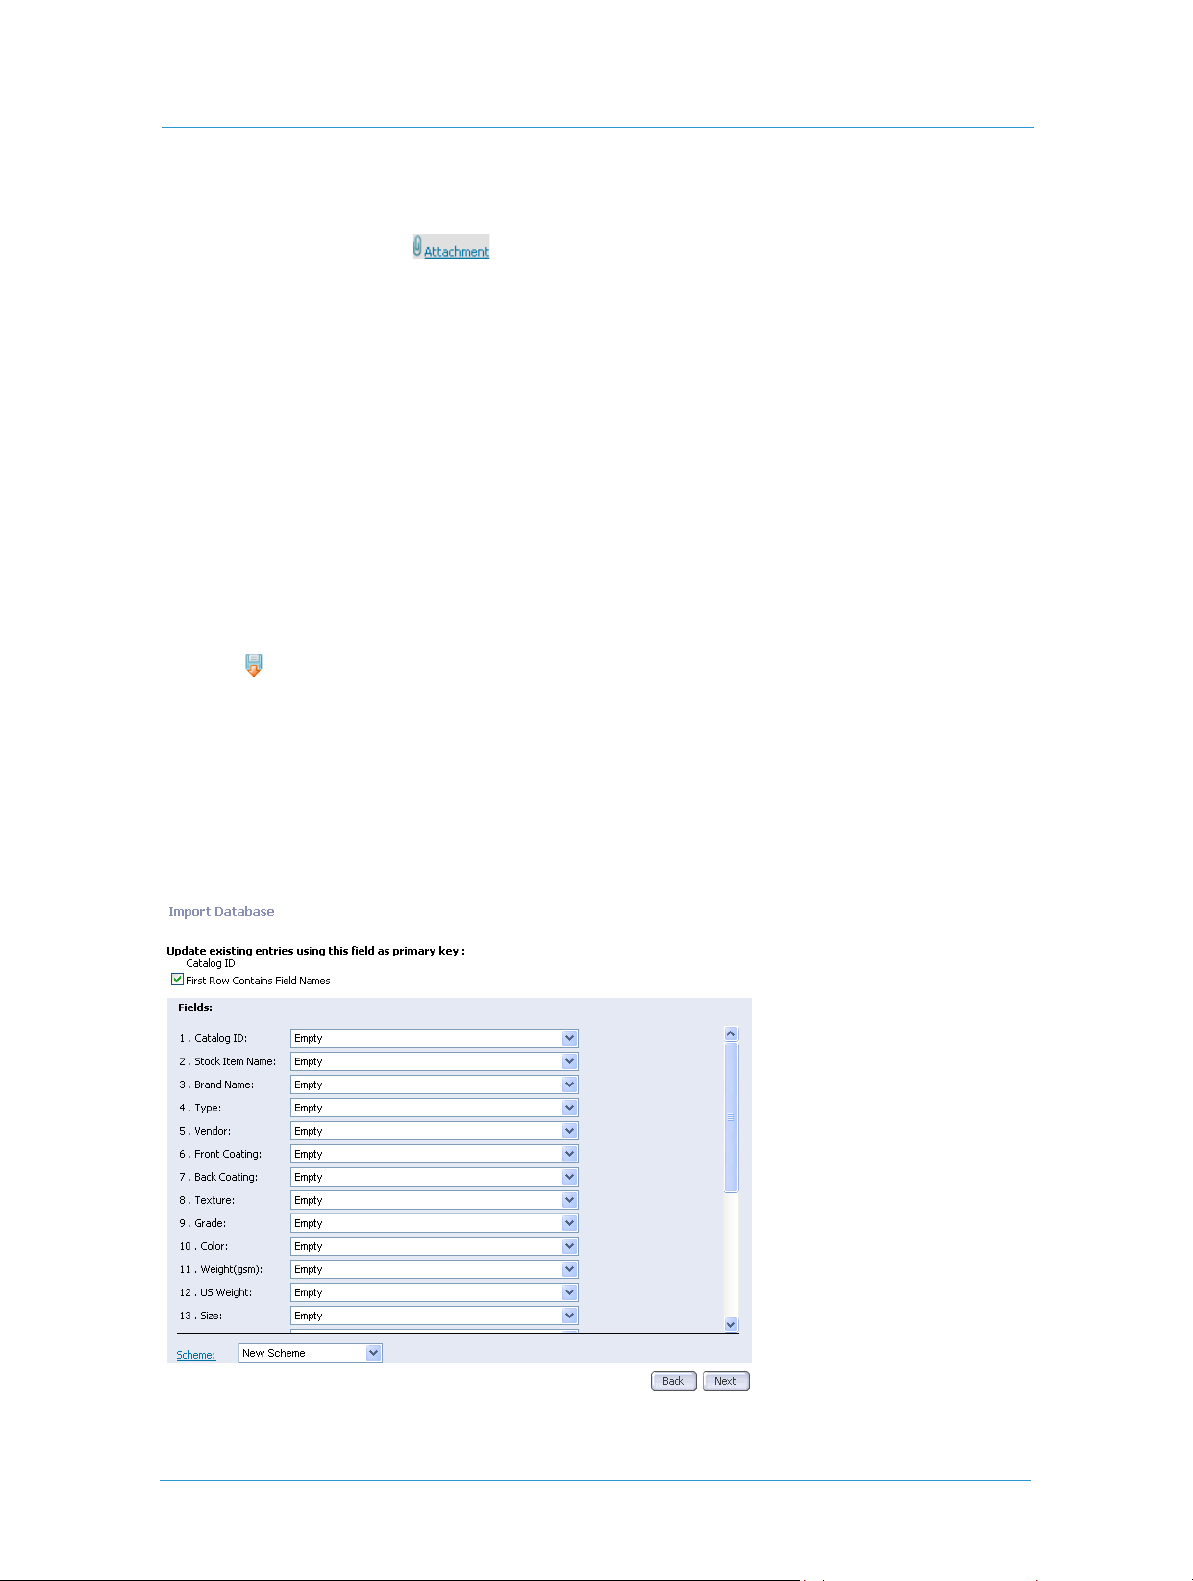
Web Services User Overview
Downloading Files
3 Select a target file and click ; the Download File dialog box appears.
4 Complete the instructions in the
5 Click
Close.
Download File dialog box.
Importing and Exporting Database Files
You can use database files when you need to create variable data jobs containing many parameters, or when you
populate lists of users, addresses, stock, and other database elements.
Import – import an Excel file from within or outside the system.
Export – create an Excel file of the data contained in an associated list.
To import a database list:
1 Click Import; the Import dialog box appears.
2 Browse to the target file and choose one of the following options:
Select File Format – select the file type and encoding values in the dropdown lists.
Upload, Using a Custom Scheme – select a customer scheme option in the dropdown list. For
information on how to create customer schemes, refer to To define a new mapping scheme: on page 11.
3 Click
Start Uploading; the Import Database dialog box appears.
Figure 6: Import Database
Web Services10

Using Web Services Features
To prevent the first row of data appearing in the printed job, select the
checkbox.
First Row Contains Field Names
To map fields:
Choose one of the following options in the Scheme dropdown list:
New Scheme – define a new field mapping scheme.
Last Used – map according to the scheme that was last used. For more information, refer to To create a
new database mapping scheme: on page 11.
To define a new mapping scheme:
1 Select New Scheme from the dropdown list.
2 Map the names with valid field names in the dropdown lists.
3 Click
Next; the Import Finished dialog box appears.
Problematic names, for example Login Name, where a login name already exists, appear with
the icon, and the
The Link to Import Report File link accesses an Excel file worksheet containing the
imported names. You can edit the Excel file.
Message column contains an explanation.
4 Click
Close.
To create a new database mapping scheme:
1 Click the Scheme link; the Scheme Management dialog box appears.
2 Select
3 Type a new scheme name and click
4 Click
New Scheme and click Save As; the Save As dialog box appears.
OK; the new scheme name appears in the list.
Close.
To export an internal system list:
1 Click Export; the Export dialog box appears.
2 Select the file type and encoding in the dropdown lists, and click
appears.
3 Complete the instructions in the dialog box, and save the file in a folder.
Export; the Download File dialog box
11Print Service Provider Guide

Web Services User Overview
Generating and Editing Job Tickets
The Job Ticket is a document containing information detailing job production, finishing, delivery, and pricing.
The Job Ticket can be printed out and completed by the various people in the print production process.
A
Job Ticket can be generated, viewed, and edited from either the Production or Printing windows, or from any
active Job Tracking status window.
The Job Ticket appears in MS Word format. Ensure not to delete job information data links from
within the MS Word document.
Job Ticket notes that are internal, or those that are either from, or for the Print Buyer, are
entered manually.
To view a Job Ticket:
1 Select a job, and click Open Job Ticket; the Job Ticket Creation dialog box appears.
2 Select one or more of the following options:
Production
Finishing
Delivery
Pricing Information
3 Click Set Printing Deadline; the Printing Date dialog box appears, the current date is selected.
4 Set the desired time and date and click
5 Click
6 Click
7 Complete the instructions for downloading the Job Ticket to a suitable location.
Set Finishing Deadline, and repeat Step 4 to set the finishing deadline parameters.
OK; the Download File window appears.
OK; the date appears in the Job Ticket Creation dialog box.
To edit the Job Ticket:
1 Select a job, and click Edit Job Ticket; the Job Ticket appears in MS Word format.
2 Edit and save the document.
Web Services12

3
Defining System Settings
This chapter describes how you configure the application system settings when initiating FreeFlow Web Services
for the first time, and periodically, as the need arises. Some system settings are configured as system defaults on a
global level, such as the system language, and company contact data, whereas other settings can be adjusted at
the account level after the system has been configured, such as Print Buyer account email settings. This chapter
includes the following sections:
Configuring System Properties
Configuring System Properties
Defining Language
Defining Terms and Conditions
Customizing the Home Page
Setting System User Privileges
Defining Print Service Provider Users
Defining System Email Settings
Verifying System Fonts
Setting Job Expiration Time Limits
Customizing Fields
Defining Data Export
Defining Credit Card Integration
Integrating Web Services with Other Systems

Defining System Settings
Configuring System Properties
You configure system properties when you initiate the application for the first time, or when you perform
periodic application system maintenance. These settings are the default system parameters suited to your
organization’s daily operational business needs, and includes the following parameter settings:
Web Services Server Address – the DNS name (URL) of your server.
Connections – the maximum number of simultaneous users.
File Upload – allowing FTP for multiple file uploads.
Calendar Options – your company’s working days and hours, and Print Buyer calendar options for ordering
services.
Date and Time Format – the date and time display format.
PDF Preview – whether to include footers or watermarks in your Print Buyer’s PDF preview.
Remote Support – whether the Web Services Support Department have access to your server system options
to assist with system complications and service difficulties.
To define the system properties in the
Properties
window appears.
System Properties window, select System Setup > General; the System
Defining Connection Properties
You can define your server DNS name (URL) and define the maximum number of simultaneous users in your
system, which might be important if you experience performance problems. You can enable Secure Sockets
Layer (SSL) server security features to accommodate Print Buyers with content-sensitive print jobs on your
‘certified as secure’ site. (SSL certification is required to enable SSL.)
To define connection properties:
1 In the Server Address field of the System Properties window, enter the DNS name of your web site.
2 In the
3 To enable SSL server security features, on the
Maximum Users dropdown list, select the maximum number of users authorized to work
simultaneously.
Connections sub-panel, select the Use Secure Connection
check box and click
page 17.
Save. For more information regarding SSL server, refer to Setting Up an SSL Server on
Allowing FTP Uploads
You can determine whether or not to allow users to upload multiple files with File Transfer Protocol (FTP) and
define the FTP port. You can also determine whether or not those Print Buyers require authentication after FTP
upload is allowed, in which case, you determine the Print Buyer’s user name and password.
To allow FTP uploads:
1 On the File Upload sub-panel, in the System Properties window, select the Allow FTP Upload option.
2 Type a valid FTP port value in the
FTP Port value field (the default port being 21).
Web Services14

3 (Optional) Select the
Requires Authentication check box.
a Type a user name and password in the respective fields and click
Save.
b From the computer on which the Web Services server is installed, click the
Computer
c Navigate to
d Select
and select Manage; the Computer Management window appears.
Local Users and Groups > Users and right-click the Users folder.
New User; the New User dialog box appears.
e Type the user name and password in the respective fields.
f Select the
User cannot change password and Password never expires check boxes. (Ensure the other
two check boxes are cleared.)
g Click
h Navigate to
i Select
j Click the
Create.
D: > NewEdition > temp > FtpRoot > FtpUploadRoot (where D is the drive on which Web
Services is installed) and right-click the
Properties and in the Security tab, click Add; the Select or Users Groups dialog appears.
Locations button and in the resulting Locations dialog box, select the valid computer name
FtpUploadRoot folder.
and click OK.
k Type the user name in the field and click OK.
Start menu, right-click My
Defining Calendar and Work Hours
You can specify your company’s operational hours and days for providing print production and services, thus
defining your Print Buyer’s calendar options for ordering and receiving print production services.
To define calendar and work hours:
1 On the Calendar Options sub-panel in the System Properties window, use the dropdown lists to define your
company’s operating hours, as well as the days for the weekend.
2 On the
Date and Time Format sub-panel, use the dropdown lists to select the date and time formats and the
separators, and click
Save.
15Print Service Provider Guide

Defining System Settings
Defining the PDF Preview
PDF Previews provide both you and your Print Buyers the ability to view the job before it is actually produced,
which is useful for verifying the accuracy of the job. Footers and watermarks appear in the PDF preview, which
are especially provided to prevent Print Buyers from using the preview as a means of printing the job on printers
other than those in your system or organization.
1 On the
2 Click the
3 Select the
4 Click
PDF Preview sub-panel, in the System Properties window, click the Footer File dropdown box and
choose one of the following options:
None - if you do not want to add a footer to the PDF preview.
SampleFooter.pdf – a PDF preview footer option.
Footer File link and upload footer image(s) to add additional footer file options to the dropdown
menu.
Enable Watermark check box to add a watermark to the PDF; the Watermark Text and Font fields
are activated.
When you clear the Water mar k check box, the system-defined watermark cannot be used at the
Account level.
a Type a value in the
b Define the
Save.
Font settings.
Watermark Text field.
Enabling Remote Assistance
You can authorize and enable FreeFlow Web Services Support to access your server system options remotely for
assistance with any system complications and service difficulties.
To enable remote Web Services support:
1 On the Remote Support sub-panel, in the System Properties window, select the Allow Remote Support
option.
2 Type the remote IP and password values of your Web Services server in the
3 Click
Save.
Remote IP and Password fields.
Web Services16

Defining Language
Setting Up an SSL Server
You can set up a Secure Sockets Layer (SSL) communications protocol on your Web Services server, which
enables server security features that verify incoming Print Buyer identity and content integrity, and provides
network transmission encryption.
To set up SSL:
1 Acquire and install a valid server certificate to establish SSL communications on your system.
Only one server certificate can be attached to a web site.
2 Ensure the
window) to enable the server on which you want to use SSL to be assigned to port 443 (the default port for
secure communications).
3 Ensure that port 443 is open for both inbound and outbound connections in case a Firewall is configured
on a local network.
Use Secure Connection check box is selected (Connections sub-panel, in the System Properties
Defining Language
You can define your Web Services site default language and the languages available to Print Buyers when they
access the Web Services home page. When you define languages, you automatically set the unit of measurement
applied to your jobs, inches or millimeters, to suit countries of the languages you define.
To define languages:
1 Select System Setup > Languages; the Languages window appears.
2 In the
3 On the
4 Click
Default Languages dropdown list, select the default language for the site.
Languages Available on Customer Interface panel, select the check boxes for the languages you
support.
Save.
17Print Service Provider Guide

Defining System Settings
Defining Terms and Conditions
You can define the Terms and Conditions for your Print Buyers to accept before they place their job orders.
Use HTML conventions when applying character and paragraph formatting to Terms and
Conditions text. Text is saved in HTML format.
To define Terms and Conditions:
1 Select System Setup > Terms And Conditions; the Terms And Conditions window appears.
2 In the
3 Click the
4 Click
5 Repeat steps 2 through 4 to define the terms and conditions in other languages.
Language list, select the language.
Te xt pane and type the valid text within.
Save.
Web Services18

Defining Terms and Conditions
Customizing the Home Page
You can customize home page elements, including the GUI link settings, home page text, and images. The
home page serves as the login page.
Defining the Customize Link
You can create a button link to a customized window containing text and images designed for your Print
Buyers’ use. Alternatively, you can define the button to direct Print Buyers to an external 'Customize' Page
option to enable your Print Buyers access to an external web page.
To define the Customize link:
1 Select System Setup > Home Page Customization > Customize; the Customize Link dialog box appears.
2 In the
3 If you select
4 If you select
5 In the
Customize Link dialog box, select one of the following option buttons:
Do not use Customize page – to not display the Customize Page link on the home page.
Use System 'Customize' Page – to display the Customize Page link and connect it to a customized
page. Continue with Step 3.
Use External 'Customize' Page – to link your Print Buyers to an external web page. Continue with
Step 4.
Use System 'Customize' Page,
i From the
ii In the
iii In the
i From the
ii In the
i In the
Home Page Customization window, click Save.
Language list, select a language.
Title field, type a name for the customized window and button.
Text field, type a message (such as Terms and Conditions) and click OK.
Use External 'Customize' Page,
Language list, select a language.
Title field, type a name for the customized window and button.
URL field, enter the external web page’s URL address and click OK.
19Print Service Provider Guide

Defining System Settings
Defining the Logout link
You can define whether your Print Buyers, after logging out, are automatically redirected back to your Login
window, or to a different web site.
By default, Print Buyers are automatically redirected back to your Login window.
To define the Logout link:
1 Select System Setup > Home Page Customization > Logout; the External Home Page Links dialog box
appears.
2 Select the
3 Define the login and logout URL, and click
Use External URL check box to direct your Print Buyers to an external website.
OK.
Accessing the FAQ Link
The FAQ button accesses the Web Services FAQ (Frequently Asked Questions) page, which contains a collection
of commonly asked questions about Web Services, and the respective answers. You can provide your Print
Buyers access to the Web Services FAQ page(s) or any other page(s), and present the page(s) either within your
Web Services home page (as a panel) or as an independent, floating window.
Only page files located externally to the Web Services server can be displayed within an
independent floating window.
To access the FAQ link:
1 Select System Setup > Home Page Customization > FAQ; the FAQ Page dialog box appears.
2 In the
FAQ P a g e dialog box, select one of the following option buttons:
Do not use FAQ page if you do not want the FAQ Page link to be displayed on the home page
Use System FAQ Page for your Print Buyers to access the Web Services FAQ pages
Use External FAQ Page to link your Print Buyers to an external web page.
If you select
Use External FAQ Page, insert the target URL in the field, and click OK.
Select Always on top to make sure the FA Q Pa ge window, when open, remains open over the
Home Page window.
Web Services20

Defining Terms and Conditions
Customizing Help
You can customize your Web Services online Help.You can provide your Print Buyers with access to the Web
Services online Help files that are located within the application, or to an external Help system on the Internet.
Additionally, you can configure the Help to appear either within your Web Services home page (as a panel) or as
an independent, floating window. Alternatively, you can ‘hide’ the Help button altogether, effectively disabling
Help access.
Only web pages that are located on the Web Services server can be placed inside the Web
Services window.
To customize Help:
1 Select System Setup > Home Page Customization > Help; the Help dialog box appears.
2 In the
Help dialog box, select one of the following option buttons:
Do not use Help if you do not want the Help button to be displayed on the home page, or
Show System Help for your Print Buyers to access the Web Services Help pages, or
Use External Help to link your Print Buyers to external Help pages.
If you select
Use External Help, insert the target URL in the field, and click OK.
Click Always on top to make sure the Help window, when open, remains open over the Web
Services
window.
Defining Contact Information
You can define your Web Services site Contact Us information, such as telephone numbers and email
addresses. The information you define provides a choice of options your Print Buyers can use to correspond
directly with your organization.
To define contact information:
1 Select System Setup > Contact Details; the Contact Information window appears.
2 Insert the information details in the fields, and click
Save.
21Print Service Provider Guide

Defining System Settings
Defining the Contact Us Link
You can define the target of the Contact Us link. Generally used to access Web Services’s Contact Us site
information page, you can define the
your own organization’s web site.
To define the Contact Us link:
1 Select System Setup > Home Page Customization > Contact Us; the Contact Us Page dialog box appears.
Contact Us link to target a different URL address on the internet, such as
2 In the
3 Click
Contact Us Page dialog box, select one of the following option buttons:
Do not use Contact Us Page – do not display the Contact Us link on the home page.
Use System Contact Us Page – use the system Contact Us page.
Use External Contact Us Page – enter the target URL in the field.
OK.
Click Always on top to make sure the Contact Us Page window, when open, remains open over
the
Web Services window.
Defining Home Page Text
You can define and edit home page text, including the language, main title, subtitle and body text.
To define Home Page text:
1 Select System Setup > Home Page Customization, and in the Select Language to Edit dropdown list, select
the home page text language.
2 In the
Main Title field, type the text you want to appear as the title for the home page.
3 Type the text that you want to appear as the subtitle and body of the home page, in their respective fields, and
click
Save.
You can have more languages added to the Select Language to Edit list. For more information
regarding languages, refer to your local distributor.
Web Services22

Setting System User Privileges
Defining Home Page Images
You can define three separate home page image areas; the company logo image, the home page image, and an
advertisement image. Make sure images to be used are located in the system
information about uploading images, refer to Managing Attachments on page 9.
To define Home Page images:
1 Select System Setup > Home Page Customization, and in the Customization dialog box, click one of the
three image areas; the
2 Upload the image required and select it.
Image Customization folder appears.
Images Library. For further
3 Click
Save.
Setting System User Privileges
Table 2 lists the default Web Services system users and their privileges.
Table 2: System User Privileges (Sheet 1 of 2)
System User Description
Print Buyer Side
Administrator Full user abilities, including account administration. The Administrator can
design jobs, send jobs to the Shopping Cart, and place orders. In addition, the
Administrator is responsible for determining the user privileges of all members
of the Print Buyer organization.
Supervisor Full user abilities except access to account administration. The Supervisor can
design jobs, send jobs to the Shopping Cart, and place orders.
Designer Responsible for designing simple jobs and jobs based on variable data and
variable data fields.
Super User Creates jobs using templates, iForm, and variable data. Can order jobs.
User Creates jobs using templates, iForm, and variable data. Cannot order jobs.
Guest New or occasional users who can create jobs based on Print Account
catalogs.
Custom As a default, creates jobs using templates, iForm, and variable data. Cannot
order jobs. Custom allows the Print Buyer to create an additional user type
with specific abilities.
23Print Service Provider Guide

Defining System Settings
Table 2: System User Privileges (Sheet 2 of 2)
System User Description
Print Service Provider Side
System Administrator Responsible for the administration of the Print Service Provider side of Web
Services and the general system settings.
Operator Responsible for operating Web Services’s workflow.
Manager Has the ability to view the Info Center as well as the Task and Management
parameters. Can create new Job Types and can modify templates and pricing.
Print Buyer User Privileges Tables
A System Administrator sets the default Print Buyer system user abilities at the Print Service Provider System
Setup level. However, you can change the Print Buyer system user abilities per customer at the Print Service
Provider Accounts level.
To change Print Buyer user abilities:
1 Select System Setup > Advanced > User Types.
2 Clear or select the check boxes to assign or remove privileges.
3 Click
To restore the privilege defaults, click
To revert back to the last saved configuration, click Revert.
Figure 7: Print Buyer User Privileges
Save.
Reset Defaults.
Web Services24

Table 3: Default Print Buyer User Abilities
Privileges Privilege Level
Administrator Supervisor Designer Super User User Guest Custom
Setting System User Privileges
User Administration
Manage Template
Library
View Jobs of other Users
(from the same
Customer)
Place an Order/Get
Quote
Upload Job Content
Edit Job Properties
Use Form Editor
Use Variable Data
Use Variable Data
Archive
Send MailToPrint
Download Plugins
View Address Book
3
333
333
33 3
333
333
333
3 333333
3 333333
333
333
3 333333
Edit Contact Details
3 333333
25Print Service Provider Guide

Defining System Settings
Table 4: Print Service Provider User Abilities
Feature Ability
System Admin Operator Manager
Print Service Provider Administration
Print Service Provider Track Jobs
Print Service Provider Production
Print Service Provider Delivery Desk
Print Service Provider Info Center
Pricing
Job Ticket Library
Customers
3
33 3
33 3
33 3
33 3
33
33
33
Defining Print Service Provider Users
You can define which members of your company are authorized to be operators of your Web Services system
and create a user account for each employee, giving them their respective user privileges.
To define system users, select
current users.
To define a new User:
System Setup > Users; the Print Service Provider Users window appears, listing the
1 In the Print Service Provider Users window, click Add.
2 Insert the First Name and Last Name field values.
3 In the
4 In the
5 In
Login Name field, accept the default, or insert a login name.
Password field, insert a password.
User Type dropdown list, select one of the following User Type options:
System Admin
Operator
Manager
For information regarding Print Service Provider user types and their system privileges, refer to Defining
Print Service Provider Users on page 23.
To delete a user from the Users list, select the user and click Delete, and Yes.
To search for a user, insert the user name in the search field, and click Search.
To reset the Users list to display all users, click Reset.
To reset the Users list to the original status after making changes that have not been saved, click Revert.
Web Services26

Defining System Email Settings
Defining System Email Settings
You can direct job notification emails to one or several users in your Print Buyer’s organization as well as
service provider users in your organization. Notification emails are an effective, automated method of notifying
of a specific job’s general status which may require a ‘warning’. Notification categories such as ‘Job Arrived at
the Pre-Press Queue’ or ‘Job Price Changed’, or ‘Job Arrived at the Print Buyer Approval Queue’ are sent.
You can set system email settings as a default for all your Print Buyers in the Email window, as
described in this section. Alternatively, email settings defined in the
are for specific Print Buyers. For more information regarding email settings for specific Print
Buyers, refer to Defining System Email Settings on page 27.
To set up an email account for notification:
1 Select System Setup > Advanced > Email; the Email window appears.
Accounts Customers window
2 In the
3 Select which events should trigger email notification, and click the adjacent
Email Account panel, define the following field values:
SMTP Server – The name of your SMTP server.
Account Name – Specifies the SMTP server account name necessary for authentication.
Password – Specifies the SMTP server password necessary for authentication.
Email Address for Testing – Type an email address for testing the account.
Contacts link; the respective
dialog box appears.
4 Define who appears as the email sender, and which users receive notification. You can direct email
notification for the following specific job events:
Price Failure – Notifies that the system is not configured correctly to generate a price, due to several
possible reasons. For example, an output device wrongly configured, or a parameter missing from the
job description.
Job Arrived at the Artwork Queue – Notifies that the job is at the artwork queue.
Job Arrived at the Production Queue – Notifies that the job is at the production queue.
Order Confirmation – Notifies the Print Buyer that an order has been placed.
Job Price Has Been Changed – Notifies the Print Buyer that a quoted price has been changed.
Job Shipped – Notifies the Print Buyer that a job has been shipped.
Inventory Below Minimum Level – Notifies the Print Buyer that the number of copies of an item in the
inventory has dropped below the minimum set level.
Preorder Jobs Expiration – Notifies the Print Buyer that a job remains in the Saved Jobs, Approval
Queue, or Shopping Cart for longer than the allotted time, and is about to expire.
Shipped Jobs Expiration – Notifies the Print Buyer that a shipped job remains in the shipped status for
longer than the allotted time, and is about to expire.
Job Arrived at the Print Buyer Approval Queue – Notifies the Print Buyer that a job has arrived at the
Print Buyer Approval queue.
5 For each event, on the
sender email address.
Sender panel, select a Sender option button, or select Other Email and define the
27Print Service Provider Guide

Defining System Settings
6 For each event, on the
Email
field (if required), and click OK; all settings are saved, and the dialog box closes.
7 In the
Email window, click Save.
Recipients panel, select the target recipients and insert an email address in the Other
Verifying System Fonts
You can verify the fonts and font parameters supported within your Web Services system.
Font parameters include:
Font Name – Specifies the font name.
Font Family – Specifies the font family type.
Font Type – Specifies if a ‘true’ or ‘open’ font type.
File Name – Specifies the name of the font file.
Comments – Notifies of administrator comments defined for the font.
You verify system fonts in the
To access the
Fonts window, select System Setup > Advanced > Fonts; the Fonts window appears, containing the
following elements:
Available Fonts table – Lists the fonts supported in the Web Services system.
Refresh button – Scans the system and updates the Available Fonts list with new font additions.
Imposition Marks Font dropdown list – Lists fonts used for imposition marks.
Compatibility dropdown list – Select one of the following options:
Acrobat 2.0 (PDF 1.1)
Acrobat 3.0 (PDF 1.2)
Fonts window.
In the event of RIP (Raster Image Processing) font incompatibility, your Print Buyer can create a PDF file
compatible with the listed Adobe® Acrobat® versions (and up). If a Print Buyer creates a PDF, the
embedded font format must conform with your organization’s needs.
The system supports both True Type and Open Type fonts. If Open Type fonts are chosen and
the job has a font that does not support the Open Type format, the system embeds the True Type
font.
Web Services28

Customizing Fields
Setting Job Expiration Time Limits
You can define time periods for automatic job expiration–at which point jobs are automatically deleted from
the system–to prevent the accumulation of jobs that are no longer required. This option removes jobs from the
queue that are no longer valid, or have lapsed due to Print Buyer indecision. This function serves to reduce
system ‘cluttering’, and maximizes Web Services’s ability to perform at top speed.
You can apply these definitions to jobs in any of the following statuses:
Jobs not yet ordered:
Design
Print buyer Approval
Shopping Cart
Jobs already ordered:
Shipped
Received
To define expiration dates:
1 Select System Setup > Advanced > Job Expiration; the Job Expiration Settings window appears.
2 In the
Pre-order Jobs Expiration and Shipped Jobs Expiration dropdown lists, select the how many days a
job remains in the system prior to being deleted, and respectively, the number of days a warning appears
prior to the deletion, and click
OK.
Customizing Fields
You can customize fields used for Print Buyer contact information, address information, account information,
and order forms throughout the system. You can also change the order in which fields appear in the various
views, deem them as ‘mandatory’ fields, assign dialog boxes, choose whether they are to be ‘free text’, or
‘dropdown’ list boxes, and choose the panels where these items are to appear.
You enable customizing fields in the
To access the
Fields
window appears.
Customize Fields window, select System Setup > Advanced > Customized Fields; the Customize
To customize fields:
1 In the Customize Fields window, select Enable Customize Fields.
2 Select one of the following tabs:
Customize Fields window.
Contact Information – customize Print Buyer user Contact Information fields located throughout the
system.
Address – customize Print Buyer user address fields located throughout the system.
Account Information – customize the Print Buyer user Account Information fields located on the
Accounts
General Info panel.
29Print Service Provider Guide

Defining System Settings
Order – customize the fields on the Print Buyer Order forms located throughout the system.
3 Select a field row, and click or to edit the field’s panel location.
4 Select the
5 Select the
6 In the
7 In the
Visible check box to define that a field will be visible in the system.
Mandatory check box to define that a field is marked as mandatory for data entry.
Field Caption column, customize the field name.
Field Type column, choose Free Text or Dropdown List.
8 If you choose the dropdown list option, edit the list. For information regarding editing the dropdown list,
refer to Editing a Dropdown List.
9 Click
Save.
Editing a Dropdown List
You can define the options available in a dropdown list, when customizing fields.
To edit a dropdown list:
1 After choosing the dropdown list option in the Customize Fields window, Field Type column, click Edit List;
the
Custom Field Options dialog box appears.
2 Click the
3 Click
Add new Custom Field Option link, and type a value in the resulting field.
Add; the newly added value is listed in the dialog box.
4 Repeat Steps 2 and 3 for additional field options, and click
5 Click
Save.
Done.
For information regarding customizing fields at the account level, refer to Customizing Order Fields at the
Account Level on page 87.
Web Services30

Defining Credit Card Integration
Defining Data Export
You can integrate your Web Services system with peripheral systems within your organization specifically
designed and dedicated to perform tasks which enhance your services, such as accounting or estimation
software systems. An XML file with job or order data can be transferred through the Web Services server to the
other systems when the following events occur in Web Services:
Get Quote – a Print Buyer has clicked Get Quote in the Web Services Shopping Cart.
Job Order – a Print Buyer has placed an order.
Edit Imposition – a Print Service Provider operator has clicked Edit Imposition in the Production Queue.
Job Shipped – a Print Service Provider operator has clicked Approve Delivery in the Delivery Queue.
You define the integration with external systems in the
To access the
appears.
Web Services Links window, select System Setup > Integration; the Web Ser vices Links window
Web Services Links window.
To enable an Web Services link:
1 In the Web Services Links window, select the Enable check box adjacent to the system link to be enabled.
2 In the
3 Click
Folder Path field, define a path to a folder in which to store the XML file.
Save.
Defining Credit Card Integration
You can enable Print Buyers to pay for your services through an Credit Card service. Credit Card is available
depending on licensing authorization.
To define Credit Card payments:
1 Select System Setup > Integration > Credit Card; the Credit Card window appears.
2 In the
Payment Service dropdown list, select a service option and click Settings; the Payment Service
Settings
dialog box appears.
3 Type data into the fields (for example
Service type) and click
You obtain personalized Credit Card service data only after registering with participating
payment organizations, done typically via the Credit Card service provider web site.
4 Define the field values, and click
OK.
Save.
Account ID, Store Key, or Merchant ID, depending on the Payment
31Print Service Provider Guide

Defining System Settings
Integrating Web Services with Other Systems
You can integrate your Web Services application to with other systems located within your overall system.
To integrate with another system:
1 Select System Setup > Integration > External Systems; the External Systems window appears.
2 In the
3 Select the
4 Click
5 When the external system is configured correctly, click
Systems list, select a system; the right panel shows either an Enable check box or data fields.
Adobe CS3 appears in the Systems list by default. Additional external systems appear in the
Systems list in accordance with your Web Services licence agreement.
Enable check box (when provided) and type the valid data received from the external system
organization into the fields.
Check Configuration; the Production Server Tests window appears showing a configuration diagnostic
report.
When the system is configured correctly, the
configured incorrectly, the status appears as ‘
Production Server Tests window status appears as ‘Passed’. If
Failed’, and a possible failure reasons are listed.
OK.
Web Services32

4
Defining Print Settings
This chapter describes how you define your print settings and service provision parameters. Options and
defaults presented here include print output methods available, stock, setup and imposition options, finishing
options and shipping alternatives. The chapter includes the following sections:
Defining Production Parameters
Managing Output Devices
Defining Output Device Channels
Defining Print Imposition
Defining Third-party Imposition Jobs
Defining Press Setup Parameters for Pricing Calculation
Setting Speed and Waste
Defining Labor Charges
Defining Click Charges
Managing the Stock Library
Importing and Exporting Stock
Searching the Stock Library
Setting Paper Sizes
Defining Shipping

Defining Print Settings
Defining Production Parameters
You can define the level at which Web Services issues a warning for problems with image resolution and size of
uploaded files, and define the default gutter settings for automatic imposition.
Setting Image Resolution Warning
The default image resolution DPI value is the minimum image resolution a Print Buyer is required to use, when
uploading a file to the system. When an uploaded file contains images with a resolution lower than the value set
in the system, Web Services issues a warning message.
To set the minimum acceptable DPI:
1 Select Print Settings > Production > Parameters; the Production Properties window appears.
2 In the
3 Click
File Upload panel, type the minimum acceptable DPI threshold in the Warn User when image
resolution is below:
Save.
field.
Setting Size Difference
You can set the maximum possible size difference between a job type’s properties and the properties of an
uploaded file. When a Print Buyer orders a job, the job type, subtype, and job size are defined. If an uploaded
file’s dimensions differ from those defined in the system’s job subtype (by exceeding the percentage value set in
the system), the job subtype changes from
To set size difference:
1 Select Print Settings > Production > Parameters; the Production Properties window appears.
2 In the
3 Click
File Upload panel, type the maximum acceptable size difference between job type properties and the
properties of uploaded files.
Save.
Defined to Custom, and Web Services issues a warning message.
Web Services34

Setting Default Gutters
You can define the default gutter settings for automatic imposition. You use the Gutters setting to define the
default vertical and horizontal space between the single jobs in an imposition matrix. The system default setting
is 0.156” (3 mm), which is the standard setting. This setting is applied to jobs by the Web Services imposition
algorithm unless a different setting is specified for the job type or template on which the job is based. You can
change the default setting here, and provide a different setting for specific job types and templates, or you can
change the imposition settings just before sending a job to be printed.
Figure 8: Default Gutter
To set the default gutters
1 Select Print Settings > Production > Parameters; the Production Properties window appears.
2 In the
3 Click
Imposition Defaults panel, type the default horizontal and vertical gutter values in the Horizontal and
Vertical fields, respectively.
OK.
35Print Service Provider Guide

Defining Print Settings
Managing Output Devices
The Output Devices list shows all of the output devices currently defined in your system. In the Output Devices
list, you can perform the following actions:
Add devices
Remove devices
Rename devices
Adding Output Devices
You can add output devices to the system.
To add an output device:
1 In the Output Devices window, click Add; the Add Device dialog box appears.
2 Type a name and select the device group to which the device will be added.
3 In the
4 Click
Device Group dropdown list, select Copier, Digital, or Offset.
If you select
Digital, in the Machine Type dropdown list, select one of the preset device options, or Custom.
OK.
Defining General Output Device Parameters
You can define the output devices that are used in the system. Assign names for the output devices logically,
either relating the device(s) to a folder to which jobs are transferred and stored (for later processing), or relating
to an output device especially configured to receive and print jobs automatically.
Accessing the Output Device list
You define output devices by first accessing the Output Devices window.
To access the
are listed, the
To define general output device parameters:
1 In the Output Devices window, select a device in the Output Devices list.
Output Devices window, select Print Settings > Production > Output Devices; the output devices
General tab is active.
2 In the General view, in the
3 In the
Quality dropdown list, choose either Cost Effective or Highest Quality.
Device Description field, type a name for the device.
Web Services36

Managing Output Devices
4 (Optional) Select
When selected, jobs sent to production arrive at the
sent to the
5 In the
6 In the
7 In the
Press Sheet Sizes sub-panel, select the sheet sizes supported by the output device.
Colors sub-panel, select which color options the output device supports. The options are:
B/W – black and white
Process – cyan, magenta, yellow and black
Spot – special colors (such as PMS colors)
Color Units dropdown list, select the maximum number of color units supported by the output
Automatically approve all Jobs for Printing to approve all jobs for automated printing.
Production Queue and are automatically approved and
Printing Queue.
device.
8 In the
9 Click
Convert RGB to CMYK via ICC Profile dropdown list, select an ICC profile for converting RGB to
CMYK. Alternatively, select
OK.
None.
Adding ICC Profiles to the System
You can add ICC profiles to your Site Customization system. For more information about Site Customization,
refer to Editing Skin Elements on page 205.
To add ICC profiles:
1 In the Output Devices window, select a device in the Output Devices list.
2 In the
3 Select the ICC profile and click
4 Click
General view, click the Convert RGB to CMYK via ICC Profile link; the Messages dialog box appears.
Select File; the file name appears in the Convert RGB to CMYK via ICC
Profile
field.
OK.
37Print Service Provider Guide

Defining Print Settings
Defining Output Device Channels
You can define the format and the transmission protocol of data transferred by FreeFlow Web Services. You can
direct print job files to an output device or to a ‘storage’ folder for later processing.
The system output device channel options include:
PDF Spool – specifies the output is a PostScript file
Folder Balance – specifies the output is a PDF file
VIPP Emitter – specifies the output is variable data format for HP devices
PPML (Personalized Print Markup Language) – specifies the output is XML-based printer language for
variable data printing (defined by PODi)
VDX – specifies the output is variable data format for KODAK devices
VPS – specifies the output is variable data format for Creo devices
JMF over HTTP – specifies the output is a PDF document sent using HTTP protocol
To transfer a job in PostScript format:
1 In the Output Devices window, click the Output Channels tab.
2 Select an output device, and in the right panel, select
3 In the
4 In the
Device Name dropdown list, select a device.
Print Method dropdown list, select a PostScript level.
PDF Spool (using Acrobat Reader).
5 Select one of the following parameter options:
Use Printer Halftone Screens – halftone screening occurs, using the printer's screening mechanism.
Download Asian Fonts – Asian fonts are embedded in the resulting file.
Attach Copies Parameter – attaches the number of copies automatically (one copy is attached if the
option is cleared).
Attach Duplex Mode Parameter – includes all Duplex Mode parameters with the job. Clear this option
if the output device does not support duplex mode, or when the parameter is to be set manually.
6 (Optional) Click
7 Click
OK.
Print Test Page to send a test page to print.
To transfer a job in PDF format:
1 In the Output Devices window, click the Output Channels tab.
2 Select an output device, and in the right panel, select
3 (Optional) In the
Production file with JDF
Produce JDF Output dropdown list, select a job definition format option. Select the Send
option and in the Local Folder Path field, and define the path.
Folder Balance.
4 Select or clear the
Device supports multi-queue system option.
Web Services38

Managing Output Devices
You can add, edit, and delete queues by clicking the Device supports multi-queue system link.
5 To transfer jobs to Macintosh computer platforms, select the
Macintosh Target option; the system
compresses the job name to less than 30 characters.
6 In the
Folder Type dropdown list, select one of the following methods to store jobs:
Local – specifies an absolute folder path within the local server.
FTP – specifies the full ftp path for transferring jobs via the Internet to any remote computer (i.e.
format: ftp://www.print-service-provider.com).
Network – specifies the transfer of jobs to any computer within the local network (the network server
directory must be specified as the following: \ …).
You can define computer IP address, User name, and password values for the FTP or Network
option, when either is selected.
7 In the
8 Click
9 Click
Folder Path field, define a full folder path (according to the folder type method chosen).
Send a Test File and confirm the subsequent confirmation messages.
OK.
To transfer a variable data format job:
1 In the Output Devices window, click the Output Channels tab.
2 Select an output device, and in the right panel, select one of the following variable data formats:
VIPP Emitter
PPML
VDX
VPS
3 To transfer jobs to Macintosh computer platforms, select the Macintosh Target option; the system
compresses the job name to less than 30 characters.
4 In the
Folder Type dropdown list, select one of the following methods to store jobs:
Local – specifies an absolute folder path within the local server.
FTP – specifies the full ftp path for transferring jobs via the Internet to any remote computer (i.e.
format: ftp://www.print-service-provider.com).
Network – specifies the transfer of jobs to any computer within the local network (the network server
directory must be specified as the following: \ …).
39Print Service Provider Guide

Defining Print Settings
You can define computer IP address, User name, and password values for the FTP or Network
option, when either is selected.
5 In the
6 (Optional) Click
7 Click
Folder Path field, define a full folder path (according to the folder type method chosen).
For VIPP Emitter:
i In the
ii In the
For PPML: In the Resources Path field, define the full resources path.
For VPS:
i In the
ii In the
OK.
Imposition dropdown list, define job imposition parameters.
VIPP Emitter Submission Folder field, define the full folder path.
Resources Path field, define the full resources path.
Imposition dropdown list, define the imposition parameters.
Send a Test File.
To transfer a job in PDF format over the HTTP protocol:
1 In the Output Devices window, click the Output Channels tab.
2 Select an output device, and in the right panel, select
3 Select or clear the
Device supports multi-queue system option.
JMF over HTTP.
You can add, edit, and delete queues by clicking the Device supports multi-queue system link.
4 Define
5 In the
6 Click
IP Address and Port field values.
Produce JDF Output dropdown list, select an output device.
OK.
Removing Output Devices
You can remove output devices using the following:
1 In the
2 Click
Output Devices window, select the output device to remove.
Delete and Yes; the device is removed from the list.
Web Services40

Defining Print Imposition
Defining Print Imposition
You can define print imposition orientation and optimization, depending on the selected output device. The
system automatically imposes job pages into signatures (a unit of job arrangement within the imposition). You
can impose jobs manually if the job is not defined to be automatically imposed by the system. Choose whether
to use a color bar, determine both margin and color bar positioning, and the dimensions for each sheet size.
To define print imposition:
1 In the Output Device window, click Imposition.
2 In the
3 Click
Imposition Preferences dropdown list, choose Impose all Jobs.
If you want the jobs arriving at this device to be un-imposed, choose
Imposition Settings; the Edit Imposition dialog box appears showing the selected output device, the
Do not impose.
press sheet size, and the following imposition option fields:
Imposition Method – sets if the job is printed Same-Up or Multiple-Up
Wor k St yle – defines if the job is printed on one side of the press sheet, or both sides, and how the
front of the press sheet relates to the back
Page Order – the page order in which the job is imposed
Page Rotation – the rotation of pages on the print sheet
Alignment – the alignment of the printed area to the center or edges of the press sheet
Fill Policy – the option of using entire sheet or the exact amount of items to print per sheet
A graphic representation of a print sheet appears next to each imposition option field in the Edit
Imposition
dialog box. When you select an imposition option, the graphic representation
updates, displaying how the imposition option impacts on the printing. For a breakdown of
imposition options, see Figure 9 on page 43.
4 In the
Imposition Method dropdown list, choose one of the following methods:
Same-Up – the printing of data on the same side of a sheet.
Multiple-Up – the printing of two or more pages of data on the same side of a sheet, for example, 2-up,
3-up or 4 up.
The print sheet graphic representation updates to reflect the chosen imposition method option.
5 In the
Wor k St yle dropdown list, select one of the following styles:
Simplex – printing on one side of the sheet only.
Perfecting – printing both sides of a sheet of paper in the same pass through the press.
Work and Tumble – different pages are assembled so that they are on one plate. One side is printed
and the sheet is turned from front to rear so that you are using the opposite edge as the gripper edge
and then the second side is printed. The product is then cut apart to make two finished items.
Work and Back – printing one side of a sheet with one set of plates, then the other side of the sheet
with a set of different plates.
41Print Service Provider Guide

Defining Print Settings
Work and Turn – different pages are assembled so that they are on one plate. One side is printed and
then the sheet is turned over so that you are using the same gripper edge and then the second side is
printed. The product is then cut apart to make two finished items
The print sheet graphic representation updates to the selected work style option.
6 In the
Page Order dropdown list, select one of the following options:
Not Specified – no specification to page order.
Cut & Stack – sheets are cut to specification, then stacked one on top of the other.
Saddle-stitched – binds the pages of a section where the folded pages are stitched through the fold
from the outside, using a wire staple.
Perfect Bound – sheets ground or trimmed at the spine and are held to the cover by glue. This creates a
squared off back.
The print sheet graphic representation updates to reflect the selected page order option.
7 In the
Page Rotation dropdown list, select one of the following options:
Do Not Rotate
Rotate 90°
Best Fit
The print sheet graphic representation updates to reflect the selected page rotation option.
8 In the
9 In the
Alignment dropdown list, select a print alignment option.
Fill Policy dropdown list, choose one of the following options:
Full – fills the entire print sheet.
Exact – prints the sheet with the exact of specified print, saving printer-usage costs and ink.
The print sheet graphic representation updates to reflect the chosen fill policy option.
Web Services42

Figure 9: Print Imposition Option Graphic Representations
Defining Print Imposition
To set the press sheet margins:
In the Margins tab, type values in the Margin fields.
43Print Service Provider Guide

Defining Print Settings
To set the press sheet gutters and bleeds:
1 In the Gutters and Bleeds tab, type values in the Horizontal Gutters and Vertical Gutters fields.
You can override the values which appear on the Gutters and Bleeds tab, inherited from the
system default (set in the
Production Properties window).
2 Type values in the four
Bleed fields.
3 Select one of the following radio button bleed options:
Regular Bleeds – the default option, suitable where a Print Buyer uploads a PDF with the bleed already
properly defined.
It is generally recommended that you use this option, as you create a default setting. You select other options
only when fixing a specific job in the
Production Queue.
Example: business card of 3.5x2.
i Your Print Buyer uploads the business card PDF with bleeds. Therefore, the size of an uploaded
PDF equals 3.75 x 2.25.
ii After uploading the PDF, your Print Buyer defines the bleeds in the four
and Bleeds
tab, and continues with the job order.
Bleed fields on the Gutters
iii The job arrives at production showing the correct Print Buyer-defined bleeds.
When an uploaded job requires bleeds, but no bleeds were created in the uploaded file, you can fix the
problem in one of the following ways:
Re-scale Jobs – enlarges the size of the job to the size with bleeds and enables to specify bleeds. The
size of the job remains as specified, but the design is distorted so it can be cropped to its original page
size. The difference between the job and the enlarged job equals the bleeds configurations. Refer to
Figure 10 and Figure 11.
Reduce Job Size – crops off the edges of the original file, reducing the job size. Refer to Figure 10 and
Figure 12.
Use the Reduce Job Size option with caution, as some parts of the image may be cut. Use it only
when you are sure the result maintains the entire image.
Web Services44

Figure 10: Original Business Card with no Bleed
Figure 11: Re-scaled Business Card
Defining Print Imposition
Figure 12: Reduced Size Business Card
45Print Service Provider Guide

Defining Print Settings
To add labels and marks to the press sheet:
On the Labels and Marks tab, select one or more of the following options:
Job Info – displays the job number, Print Buyer name, date of production, and other valid job data.
Crop Marks and Folding Info – displays crop marks, indicated by solid lines, fold marks, indicated by a
dashed line at the location of each fold. 'In' or 'Out' above the dashed line refers to the fold direction and a
number under the line reflects the fold order.
Registration Marks – by default, displays four registration marks located on each edge of the press sheet.
Gutters, Job Width and Height – displays the gutters, job width, and height values.
Color Bar and Separation Names – displays CMYK and gray scale color bars and separation names that
appear according to the separation color.
To set custom color bar elements:
1 On the Custom Color Bar tab, in the Color Bar File dropdown list, select a color bar option.
To add additional color bar files to the dropdown list:
a Click the
Color Bar File link; the Color Bar Files dialog box appears.
b Upload files to your Web Services system.
For more information about uploading files, refer to Uploading Files on page 9.
2 Type color bar position and dimensions values (in inches) in the
Position and Dimensions fields.
To set an ICC profile:
On the ICC Profile tab, in the Convert RGB to CMYK via ICC Profile dropdown list, select an ICC profile for
converting RGB to CMYK. Alternatively, select
Adding ICC Profiles to the System on page 37.
\
You can upload ICC Profile files by clicking the Convert RGB to CMYK via ICC Profile link.
Click OK to save the print imposition settings and close the Edit Imposition dialog box.
None. For information about adding ICC profiles, refer to
Web Services46

Defining Print Imposition
Defining Third-party Imposition Jobs
You can define jobs to be imposed by a third-party application.
To define a job to be imposed by a third-party device:
1 In the Output Devices list, select Manual_Impose; the Manual Impose panel appears.
2 (Optional) In the
RGB to CMYK. Alternatively, select
Convert RGB to CMYK via ICC Profile dropdown list, select an ICC profile for converting
None.
You can upload ICC Profile files by clicking the Convert RGB to CMYK via ICC Profile link.
3 Click the
4 (Optional) In the
Production file with JDF
Local Folder Path field, define the path.
5 Select or clear the
Output Channels tab.
Produce JDF Output dropdown list, select a job definition format option; the Send
checkbox is active; select the Send Production file with JDF option and in the
Device supports multi-queue system option.
You can add, edit, and delete queues by clicking the Device supports multi-queue system link.
6 To transfer jobs to Macintosh computer platforms, select the
compresses the job name to less than 30 characters.
Macintosh Target option; the system
7 In the
Folder Type dropdown list, select one of the following methods to store jobs:
Local – specifies an absolute folder path within the local server.
FTP – specifies the full ftp path for transferring jobs via the Internet to any remote computer (i.e.
format: ftp://www.print-provider.com).
Network – specifies the transfer of jobs to any computer within the local network (the network server
directory must be specified as the following: \ …).
You can define computer IP address, User name, and password values for the FTP or Network
option, when either is selected.
8 In the
9 Click
10 Click
Folder Path field, define a full folder path (according to the folder type method chosen).
Send a Test File and confirm the subsequent confirmation messages.
OK.
47Print Service Provider Guide

Defining Print Settings
Defining Press Setup Parameters for Pricing Calculation
You can define Setup Time, Pass Setup Time, and Print Head Setup Time configurations.
These settings are required for calculating pricing based on production costs. If you plan to
calculate pricing based on price lists, these settings are not required.
To define press setup
1 In the Output Device window, click Press Setup.
2 In the
3 In the
4 For offset devices, define the minutes needed to set up each print head per pass in the
Setup Time field, define the minutes needed for the initial output device setup.
Pass Setup Time field, define the minutes needed for setting up one pass through the device.
Time
box, and click OK.
Print Head Setup
Setting Speed and Waste
You can configure speed and waste definitions according to whether the device is offset, digital, or copier.
To set speed and waste parameters for offset devices:
1 In the Output Device window, click Speed and Waste.
2 In the
3 In the
4 In the
5 In the
6 Click
Output Device list, select the offset output device.
Run Length field, define the number of copies required.
Speed field, define the amount of sheets to run per hour.
Was te field, define the approximate percentage of run sheet waste (derived from output device
adjustments, run sheet examination, or other waste factors).
Add for additional job runs; define the parameters in the resulting fields.
7 In the
8 Click
Production Factors sub-panel, define speed and waste factors in the Process Color, Spot Color, and
Paper Weight fields.
(Optional) Click
fields.
OK.
Add for additional weights to be added to the job; define the parameters in the resulting
Web Services48

Defining Labor Charges
To define speed and waste parameters for digital devices or copiers:
1 In the Output Device window, click Speed and Waste.
2 Select the digital output device from the
3 In the
4 (Optional) Click
5 In the
6 Click
Paper Weight and Speed by Paper Size fields, define the required parameters.
Add to add more runs to the job; define the parameters in the resulting fields.
Production Factors sub-panel, define the Process Color, Spot Color, and Duplex Mode speed factors.
OK.
Output Device list.
Defining Labor Charges
You can define labor and mark-up charges used to calculate the production cost of a job.
To define a digital labor charge:
1 In the Output Devices window, click Labor Charge.
2 In the
3 In the panel fields, define the following values:
Output Device list, select the digital output device.
Mark-up percentage
Labor expenses per hour
Minimum labor charge per minute
4 Click OK.
To define an offset labor charge:
1 In the Output Devices window, click Labor Charge.
2 In the
3 In the panel fields, define the following values:
4 Click OK.
Output Device list, select the offset output device.
Mark-up percentage
Plate fee
Labor expenses per hour
Minimum labor charge per minutes
Process wash-up cost (in monetary terms)
Spot wash-up costs (in monetary terms)
49Print Service Provider Guide

Defining Print Settings
Defining Click Charges
You can use external devices for digital print jobs, and calculate the cost per click in the production costs.
To define a click charge:
1 In the Output Devices window, select a digital output device in the Output Devices list.
2 Click the
3 In the panel fields, define the following values:
Mark-up percentage
Color page ‘click’ costs
Black and white page ‘click’ costs
4 Click OK.
Click Charge tab.
Managing the Stock Library
You can list here the paper stock used for printing and non-paper products that you sell, such as mugs or pens.
Use the
Import and export stock
Search for Stock Library items
Add, duplicate, edit, or delete Stock Library items
You define stock by first accessing the
To access the
appears listing the available stock items.
Stock Library to do the following:
Stock Library window.
Stock Library window, select Print Settings > Production > Stock Library; the Stock Library window
Web Services50

Managing the Stock Library
Importing and Exporting Stock
You can import your stock list from a text or comma separated value (CSV) file. In addition, you can export
your stock list to a file.
To import a file of stock item:
1 In the Stock Library window, click Import Stock.
2 In the Stock Import dialog box, define the file path, or browse to the file to be imported.
3 Select the file type and encoding, and click
To erase the current information and use only the data from the imported file, select Overwrite
database
To keep the current information and add the data from the imported file, select Add to existing
database
4 Map the stock item names to the provided fields, and click
.
.
Start Uploading; the Import Database window appears.
Next and OK.
To export a file of stock item:
1 In the Stock Library window, click Export Stock.
2 In the
3 Click
4 Save the file in the required location.
Export Stock dialog box, select the file type and encoding.
Export; in the Download File dialog box, click the link to be exported.
51Print Service Provider Guide

Defining Print Settings
Searching the Stock Library
You can define search filters to populate the Stock Library list. The Stock Library is organized in columns
according to categories.
Table 5: Stock Library Categories
Categories Definition
Catalog ID
Stock Item Name
Type
Ve nd or
Front Coating
Back Coating
Texture
Color
Weight (gsm)
Size
In Stock
Type Details
Media Set Count
Cost
Price
Catalog identification number.
Name of the stock item.
General material type.
Vendor name.
Front coating method.
Back coating method.
Finishing texture.
Stock color.
Stock weight in grams per square meter.
Stock size.
Stock availability.
Specific stock material definition.
Information on the number of sheets in a set. For example for tabs.
Print Service Provider’s expenses per pre-defined range.
Print Buyer’s expenses per pre-defined range.
Price Units
Price of a single unit of measurement type for providing pricing calculation basis.
For example, a unit of weight, such as a kilogram.
Multi Price
Indicates whether there is more than one range of pricing per stock item.
To search a Stock Library item:
1 In the Stock Library window, select the stock type in the Search list; the value definition filter box (located to
the right of the
2 In the value definition filter dropdown list, select a value definition filter. For information about the value
definition filter, refer to Table 1 on page 7.
3 In the text field, define the relevant search information.
4 Click
Search; the search results are displayed.
Search list) updates, listing the relevant filters.
Web Services52

To add a new Stock Library item:
1 In the Stock Library window, click New.
Managing the Stock Library
2 In the
New Paper dialog box, define the new stock properties, and click OK.
You can use the Edit List link to edit properties from the drop-down list.
To duplicate a Stock Library item:
1 In the Stock Library window, select the library stock item to duplicate.
2 Click
Duplicate; the selected item is duplicated and added to the bottom of the list.
To edit a Stock Library item:
1 In the Stock Library window, select the item to edit.
2 Click
Edit, edit the stock properties in the Edit Item dialog box, and click OK.
To delete a Stock Library item:
1 In the Stock Library window, select the item to delete.
2 Click
Delete and Yes; the selected item is deleted.
53Print Service Provider Guide

Defining Print Settings
Setting Paper Sizes
You can define parent and run sheet sizes, sizes for job stock, and create custom sheet sizes or modify existing
sizes. You define paper sizes by first accessing the
Paper Size window.
To access the
listing the available stock items.
Paper Size window, select Print Settings > Production > Paper Sizes; the Paper Size window appears
To modify paper size:
1 In the Paper Size window, select the paper size; the size name, width, and height appear in the Custom Paper
Size
fields.
Paper size width and height are in metric or imperial standard measurements, depending on the
user language selected.
2 In the
3 Click
Width and Height fields, define new size parameters.
OK.
To define a custom size:
1 In the Paper Size window, click New Size;
2 In the
Custom Paper Size fields, define a name and the size parameters, and click OK.
To delete paper size:
1 In the Paper Size window, select the paper size to delete.
2 Click
Delete; after confirming the paper is not being used in any job, click Yes.
Avoid deleting paper sizes used in output devices, Stock Library definitions, and the Job Ticket
Library
. When used paper sizes in these locations have been deleted, an error message indicating
the paper size no longer exists appears upon attempted use. Existing paper stock of the deleted
size is not utilized and remains in stock.
Web Services54

Managing the Stock Library
Defining Shipping
You can coordinate transport and delivery of goods to Print Buyers as you complete print jobs.
Defining Carriers
Upon completion of a job’s production process, you can configure whether the job is to be collected by the
Print Buyer or his agent, or you can select an international or local carrier to ship the job.
To define carriers
1 Select Print Settings > Shipping; the Carriers window appears.
2 Select the carrier(s) available in your system, and click
OK.
Defining Shipping Methods
You can integrate with local and international carriers, set your shipping prices, and enable the reception of
online shipping costs.
To define a new shipping method:
1 Select Print Settings > Shipping > Shipping Methods; the Shipping Methods window appears.
2 Click
3 In the
4 In the
5 In the
Add; a new New Shipping Method name entry appears in the left panel.
Shipping Method Description field, type the shipping method name.
Carrier dropdown list, select a carrier, or choose one of the following options:
Pick-up by Customer – no carrier is assigned; you can choose to enable or disable pricing.
Custom – a previously assigned carrier will ship the job.
Pricing Module dropdown list, select a pricing module; the panel below the list updates with fields or
tabs.
Weight/Volume – shipment pricing is based on weight or volume.
Online – shipment pricing is based on an online quotation from the carrier. (Only available for the
participating carriers.)
Direct Mail – shipment pricing is based on the number of copies being shipped.
55Print Service Provider Guide

Defining Print Settings
Setting the Weight/Volume pricing module:
For pricing set by weight:
a On the
By Weight tab, select the Enabled check box; define the Description field value, and in the Unit
dropdown list, select the units of weight.
b (Optional):
i To add a location zone, click the
zone and define the
Details field values. Click Add.
Add Zone From Library link; the Zone Library appears. Select the
ii To add extra location fields, click .
c To define specific shipping locations, type field values in the
To cover all locations, select
d Click the
Tax tab; the Select Tax Package dropdown list appears.
Everywhere.
e Assign a tax package suited to the carrier and the shipping region, as defined in
Tax Library. For information about defining tax packages in the Tax Library, refer to Tax Package on
From and To fields.
Print Setting > Pricing >
page 178.
For pricing set by volume:
a On the
By Volume tab, select the Enabled check box; edit the Description field as required.
b (Optional):
i To add a location zone, click the
zone and define the
Details field values. Click Add.
Add Zone From Library link; the Zone Library appears. Select the
ii To add extra location fields, click .
c To define specific shipping locations, type field values in the
To cover all locations, select
d Click the
Tax tab; the Select Tax Package dropdown list appears.
Everywhere.
From and To fields.
e Assign to the shipping method a tax package suited to the carrier and the shipping region, as defined in
Print Setting > Pricing > Tax Library. For information about defining tax packages in the Tax Library,
refer to Tax Package on page 178
When you set (enable) pricing by both weight and volume, the system always defaults to the
method with the highest fee.
Web Services56

Setting the Online pricing module:
Managing the Stock Library
a Select the
Enabled check box; define the Description field value, and in the Delivery Method
dropdown list, select delivery method.
b (Optional) Type a markup percentage and a handling fee value in the fields provided.
c Verify the user parameters for the following fields:
Account and Meter Number (FedEx)
Username and Password (UPS)
d In the
Select Tax Package dropdown list, assign a package suited to the carrier and the shipping region,
as defined in
Tax Library, refer to Tax Package on page 178.
Print Setting > Pricing > Tax Library. For information about defining tax packages in the
Setting the Direct Mail pricing module:
a Select the
b To add a markup, select the
Enabled check box; edit the Description field as required.
Use Mark-up check box; type a markup percentage and define the fields.
c (Optional) To add a new range, click ; define the fields in the new range.
d In the
6 Click
Select Tax Package dropdown list, assign to the shipping method a tax package suited to the
carrier and the shipping region, as defined in
about defining tax packages in the
Save.
Tax Library, refer to Tax Package on page 178.
Print Setting > Pricing > Tax Library. For information
57Print Service Provider Guide

Defining Print Settings
Defining Carrier Pricing
This section is for customers choosing to use the Online Shipping option.
You can select one of the following four carrier pricing models:
UPS – Fixed, Excel, Online. The UPS Access Attributes section describes how to obtain the UPS Online
Pricing Access Attributes.
USPS – Fixed, Excel, Online. Access Attributes has been predefined for use in United States Postal Service
(USPS) Online Pricing.
FedEx – Fixed, Excel, Online. Use FedEx excel tables (FedEx.xls) to calculate shipping prices.
Any other carrier – pricing models are Fixed, Excel.
UPS
UPS Access Attributes
UPS Online Tools is a Web based shipping application which is customizable for your company’s business needs.
Whether for creating greater efficiencies in the mail room or for lowering overall costs due to better controls
over shipping activities, the UPS OnLine® Tool streamlines shipping without the addition of expensive hardware
or software. The UPS Shipping tool is available in the latest XML technology and provides access to all UPS
services. The UPS Shipping tool is ideal to network the shipping of activities within different retail locations,
dealers or branch offices. It is also a good solution for mail rooms in large corporations or campus environments
(from UPS Web site).
You must have a valid UPS account to obtain UPS Online Pricing Secure Attributes.
Registering with UPS
To use the UPS Online Pricing Model, you must register with ups.com and request a XML access key (Access
Key). Access to this service is free. This is required to send and receive information from the UPS rate database.
To register, go to the UPS registration page (www.ups.com/myups/registration?loc=en_US) and fill out the
form. You must also request a XML access key and agree to the terms of the access license. A valid XML access
key will then be provided via e-Mail.
After completing the UPS registration, you will receive the following two Online Pricing Secure Attributes:
Username and Password.
Receiving the Access Key
After you have registered, use your user name and password to login. Keep your user name and password close to
hand, as you will need it, as well as your XML access key, to query the database.
Web Services58

Managing the Stock Library
To get access key:
1 After logging in, click the Get Access Key option on the navigation menu; the Get Access Key window
appears, prompting you to select which type of key you are requesting.
2 Select
To receive your XML access key, you need to have the Developer's Key from the email sent to you after
registering. Submit the form and examine your email for the XML Access Key.
After completing this procedure, you will have the Online Pricing Secure Attribute: Access Key (XML Access
Key) as requested.
To download th e R at e s an d S er vice Guide from UPS, surf to www.ups.com/content/us/en/
resources/service.
XML Access Key.
USPS - United States Postal Service
USPS Access Attributes
USPS Web Tools provides easy access to shipping information and services for your customers. Integrating
these APIs into your web site, enables your customers to utilize the functions provided by the USPS without
ever leaving your web site. USPS Web Tools is integrated into your Web Services system; the USPS Shipping
API Server communicates over HTTP using XML (Extensible Markup Language).
Registering with USPS
To communicate between Web Services and USPS.com, Web Services customers must have their own user ID
and password. The user ID and password that you have received is for your organization to use in accordance
with the Terms and Conditions of Use agreed to during your registration process. This user ID and password is
not to be shared with others outside your organization, nor is it to be packaged, distributed, or sold to any other
person or entity.
To register, your customers must surf to the USPS Web Tools web site (/www.uspswebtools.com/) and agree to
the Terms and Conditions of Use agreement, and then receive their own unique password and user ID.
When the company using the USPS Web Tool commences it’s use, it is necessary to update the information
held at the ICCC (USPS Internet Customer Care Center) to reflect the true name of the company using the
Web Tools.
59Print Service Provider Guide

Defining Print Settings
FedEx Online
FedEx Online allows Web Services users to ship Jobs to any destination throughout the world, after receiving and
agreeing to the FedEx Online shipping price.
You must first register with FedEx, and create a valid FedEx Online account in order to work
with FedEx Online.
Registering with FedEx
To open a FedEx Online account:
1 Go to https://www.fedex.com/us/OADR/index.html; the FedEx Online Account
Registration
window appears.
2 Click
3 Click
4 Complete the requested information; create a personal ID (i.e. first name and last name together, such as
5 Click
6 Type the contact information values in the fields provided.
7 Click
8 Type the Credit Card values in the fields provided; FedEx will email a message to you containing your new
9 Record and store the new Account Number, together with your User ID and Password.
Sign up for an account without a discount.
Sign Up Now! (Ignore the User ID and Password request.).
FIRSTLAST).
I Accept; the Contact Information form appears.
Continue; the Credit Card Information form appears.
account number.
Web Services60

Managing the Stock Library
Receiving a Meter Number
The Meter Number is required to integrate FedEx into Web Services’s Shipping Methods.
The following procedure is only required for acquiring the Meter Number.
To acquire the Meter Number:
1 Surf to http://www.fedex.com/us/software/; the FedEx Ship Manager Software window appears.
2 Click the
3 Click
4 Select a country and click
5 Accept the terms and click
6 Click
7 Click
8 Click
appears on the Desktop.
9 Double-click the FedEx Ship Manager icon; the FedEx Ship Manager wizard appears.
10 Complete the Wizard steps. Your Meter Number is provided in the final step.
Download Software link for FedEx Ship Manager software; the Install Shield Wizard appears.
Next; the Installation Country Selection window appears.
Next; the License Agreement window appears.
Next; the Destination Folder window appears.
Next; the Custom Setup window appears.
Next; the Ready to Install the Program window appears.
Install, and then Finish in the Install Shield Wizard Completed window; the FedEx Ship Manager icon
61Print Service Provider Guide

Defining Print Settings
Defining Shipping Method Groups
Define specific shipping method groups for locality and convenience, to be made available for your Print Buyers
during the job ordering procedure. After shipping method groups are defined, the options chosen appear in the
Accounts > Account Setup > General Info > Default Shipping Method dropdown list, available for selection. For
information on shipping methods on the
Account on page 80.
To define a new Shipping Method Group:
1 Select Print Settings > Shipping > Shipping Method Groups; the Shipping Methods Groups window appears.
Account level, refer to Selecting Shipping Method Groups for the
2 Click
3 Select a shipping method and carrier, and click ; the shipping method and carrier is moved to the
4 Repeat the previous Step for each additional shipping method and carrier.
5 Click
Add; a list of shipping methods and associated carriers appears in the center pane.
Shipping Methods
OK.
pane.
Group
Web Services62

5
Account Setup
When you start working with a Print Buyer, one of your first tasks is setting up an account for this buyer. You
can also modify the account for an existing Print Buyer. Various account settings affect the look and feel of the
FreeFlow Web Services Graphic User Interface (GUI). In addition, some Print Buyer’s work environments and
ordering workflows require certain account settings.
The Account Setup chapter is composed of the following sections:
Account Setup Overview.
Creating a New Account.
Managing Accounts.

Account Setup
Account Setup Overview
This section describes the Account Setup window and how to use it.
To access and use the Account Setup Window:
1 On the Web Services menu, select Accounts > Account Setup. By default, General Info is selected on the
Account Setup ribbon, and the Account Setup - General Info window is displayed.
Figure 13: Account Setup - General Info window
The window includes the Accounts pane (left side of the window), and the General Info window (right side
of the window).
2 You create new accounts from window. For more information, see Creating a New Account on page 66.
3 You manage accounts from this window. To do so, select the
to the action that you want to perform, and from the
information on managing accounts, see Managing Accounts on page 71.
The order in which you perform the two tasks in Step 3 is insignificant. That is, you can first
select an account or you can first select a ribbon option.
Account Setup ribbon option that is appropriate
Accounts pane, select the relevant account. For more
Web Services64

Using the Accounts Pane
In the Accounts pane, you can perform the following activities:
Search for accounts:
a Type the name of the account that you want to search for in the
Accounts Setup - General Info window displays the requested account information. The title of the
Account pane changes to
b Click
Import accounts: You can import accounts into the Account Setup window. Click . and in the Import
Reset to restore the Accounts pane to list all accounts.
Accounts (Filtered).
Name field and click Search. The
dialog box that appears, select the file that contains the accounts that you want to import. For more
information on uploading files, see Uploading Files on page 9.
Export accounts: You can export the accounts listed in the Accounts pane to a database file.
a Click .; the
Figure 14: Export Account dialog box
Export Account dialog box appears.
b Select the Users check box to include information on the account users in the exported file.
c To define the file format: select the
d Click
e In the
Delete an account: Select the account that you want to delete and click . A confirmation message
Export; the system creates the account according to your settings. A zip file is also created.
Download File window, save the account files.
File Type and the Encoding from the respective dropdown lists.
appears and you are requested to confirm the delete.
Select an account to view additional account details, and/or modify account settings. You can view general
account settings in the
Account Setup - General Info window, and you can view and modify additional
65Print Service Provider Guide

Account Setup
account settings by selecting one of the
Accounts on page 71.
Create a new account by clicking Add. For more information, see Creating a New Account on page 66.
Account Setup ribbon options. For more information, see Managing
Creating a New Account
Before you start working with a new Print Buyer, you need to create an account for this buyer, and define basic
settings:
Defining General Settings for a New Account.
Defining Users for a New Account.
Defining the Account Checkout Process.
Additional account settings are either optional or required for certain ordering workflows and work
environments. For information of these options, see Managing Accounts on page 71.
Defining General Settings for a New Account
To define general information for a new account:
1 Select Accounts > Account Setup > General Info; the Account Setup - General Info window is displayed. See
Figure 13. The window includes the
(right side of the window).
Accounts pane (left side of the window), and the General Info window
2 In the
3 In the
4 To allow account access to the system, make sure the
5 Define general contact information on the
Accounts pane, click Add; New Customer # is added to the Accounts pane, where # is the account ID
number that is automatically assigned by the system.
General Info window, fill in mandatory Print Buyer information:
a Type a customer name in the
system name
b If relevant, from the
None—(default) if the Parent Customer feature is not necessary.
This Customer is Parent—assign this account as a parent of other accounts.
Parents—list of existing parent options that can be assigned to the account.
accounts are enabled.)
a Fill in the mandatory first name, last name and email fields.
b Fill in the other contact fields.
c To add the account address:
New Customer # that was automatically entered by the system.
Parent Customer dropdown list, select one of the following options:
Customer Name field (mandatory step); this name replaces the default
Contact Information tab:
Disable Account check box is clear. (By default, all new
Web Services66

Creating a New Account
i Click
ii Fill in the address fields and click
6 Click the
Edit Address; the Edit Address dialog box appears.
OK; the address appears beneath the Edit Address link and in the
Address Book.
Account Information tab, and fill in the following account information fields—Address, City,
Telephone number.
7 On the
If you entered an address in the
address are automatically entered into the
Shipping and Billing tab, define the default shipping and billing information for this account.
Contact Information tab (Step 5 in this procedure), the account name and
Shipping and Billing tab. However, you can define another name
and address that will be used as the shipping and/or billing information for this account.
If you did not enter an address in the
Contact Information tab, or if you want to define other shipping and
billing addresses, perform the following steps:
a To define the shipping address, click
contact and address details, and click
b To define the billing address, click
and address details, and click
8 On the
9 Click
Shipping and Billing tab, select the default shipping method.
OK to save the settings.
Shipping Address; the Address Book appears. Fill in the shipping
Save.
Billing Address; the Address Book appears. Fill in the billing contact
Save.
Defining Users for a New Account
To define users for a new account:
1 In the Accounts > Account Setup ribbon, select Users.
2 On the
Users pane, click Add to create a user.
67Print Service Provider Guide

Account Setup
Figure 15: Account Setup - New User window
3 Define an Admin user for the account:
a Fill in the Login Name, User Type (Admin) and Password.
b Fill in the Contact Information.
4 Click
Save.
5 To define additional users:
You can use Figure 16 to help you decide the appropriate user type. This figure indicates the default
privileges available to each type of user. (Select
System Setup > Advanced > User Types to display these user
types and their privileges.)
Web Services68

Figure 16: User Types and their privileges
When you define additional users, it is important that you consider the following factors:
By default, only those users defined as Administrator, Supervisor or Designer user types
have Upload File privileges.
It is highly recommended that you not change the default privileges for each user type;
making such changes will impact those user types for all Print Buyer accounts.
A Supervisor is a Print Buyer with privileges to order and approve jobs and create new
templates. The only thing that a Supervisor cannot do is manage users.
Creating a New Account
6 To add users more efficiently, you can import a CSV file containing the users’ details, as follows:
a Click (Export Users) under the User’s area to export a CSV file to your desktop. Select the CSV
file type and click
Export. Using this file will ensure that you provide correctly structured information.
b Edit the file and fill in the details of the users. Mandatory fields are customer, login, password and
privilege. It can also contain other information such as cost center and department.You can copy and
paste information into this CSV file from an existing Excel sheet of users, if one exists.
c Click (Import Users) to import the final CSV file and view the user’s details. When importing the
file, be sure to select the
Select File Format radio button in the Import Users dialog box.
7 You can define additional user information. For information, see Managing Users on page 81.
Defining the Account Checkout Process
Defining the checkout process is one of the basic steps that you need to perform when you create a Print Buyer
account. The checkout process consists of the steps that the Print Buyer follows after clicking
Shopping Cart and until the end of the ordering process. The process covers information that will be presented
to the Print Buyer concerning shipping, billing, payment and confirmation requirements.
Checkout in the
69Print Service Provider Guide

Account Setup
To define the checkout process:
1 In the Accounts > Account Setup ribbon, click Checkout. The Accounts Checkout window appears.
Figure 17: Account Setup - Checkout window
2 By default, all the items in the Checkout window are selected. Clear the check boxes of items that should not
be presented to the Print Buyer in the Shipping Details, Order Details, and Confirmation checkout steps.
3 Click
Save when done.
Web Services70

Creating a New Account
Managing Accounts
You can start working with the account after defining the basic account settings. (For details on basic account
settings, see Creating a New Account on page 66). However, there are additional account settings that you can
modify. These include accounts preferences, which have default settings that are used if you do not change
them, and additional account settings that you might have to change, depending on your work environment,
and the ordering workflows that you use.
This section includes the following procedures:
Managing Account Access.
Modifying Account Preferences.
Selecting Shipping Method Groups for the Account.
Managing Users.
Defining User Groups Settings.
Managing the Account Departments.
Defining the Account Cost Centers.
Defining Email Notification Settings.
Customizing Order Fields at the Account Level.
Managing Account Access
To manage account access to the system:
Select Accounts > Account Setup. The General Info ribbon option is selected by default and the Account Setup -
General Info
To allow access to the system, make sure the Disable Account check box is clear.(By default, all new
accounts are enabled.)
To temporarily deny access to the system, select the Disable Account check box. To restore access, clear the
Disable Account check box.
To delete an account from the system, select the account and click (Delete icon). A customer delete
confirmation message appears, requesting that you confirm that you want to delete this Print Buyer from
the system.
window appears.
Modifying Account Preferences
You can use the predefined system account preferences, or you can modify preferences to meet your specific
account and workflow needs. Some preferences are account-related, and some preferences are workflowrelated. If you want to use a specific ordering workflow, you may be instructed to make necessary preference
adjustments.
You can define the following account preferences:
Defining Account Utilities
71Print Service Provider Guide

Account Setup
Defining the PDF Preview.
Defining Self Registration Details.
Defining Pricing Settings.
Setting the Account Job-ordering Windows.
Defining Account Branding.
To modify the account preferences:
1 In the Accounts > Account Setup ribbon, click Preferences. The Account Setup - Preferences window
appears.
2 Modify the preferences as needed. The following sections explain the various preference options that you
can modify.
Defining Account Utilities
This section describes the Utilities panel of the Preferences window, where you define workflow-related
parameters, as shown in the following figure.
Figure 18: Account Setup - Preferences window, Utilities panel
To enable the account with the Print Driver and Selective Upload:
In the Utilities panel of the Account Setup - Preferences window, do the following:
1 To allow the Print Buyer to create variable (personalized and/or VDP database) templates, select
Selective Upload
Selective Upload allows you to define text strings and images as personalized information, to be
displayed with a different value every time a job is ordered. If you do not select this option, the
Print Buyer cans still order personalized or variable database jobs; however, the Print Buyer will
be prevented from creating these templates.
2 To allow the Print Buyer to print jobs using a local print driver, select
panel.
3 To determine from which job types the Print Buyer can select when the Print Buyer clicks
from My Computer
Group
field in the Utilities panel.
in the Utilities panel.
Enable Print Driver in the Utilities
Print Document
in the launch pad and from the print driver, select a group of job types in the Job Type
Web Services72
Enable

To define the account userflow:
In the Utilities panel of the Account Setup - Preferences window, do the following:
Creating a New Account
1 Select
Force Terms and Conditions confirmation before ordering if you want account users to select the
confirm terms and conditions check box before the ordering process can be completed.
2 Select
Enable sharing of typed data in identical template field to allow account users to modify multiple
items in VI templates, using the same data that was entered for the first template.
3 Select
Allow Ordering Jobs Without Content to allow account users to order jobs without attaching a
content file.
4 Select
Allow file attachment to allow account users to attach missing files or additional files to a job before
the job is sent to production.
When the Allow file attachment check box is selected, a content file can be attached to the job:
From the Job Properties window, before the job is sent by the account user to the Shopping
Cart
.
From the Job Properties window that you and the account user can access from the Tra ck
Jobs
window.
If a content file was not included with the order, the account user can forward the file separately,
and you can attach the file during the production stage.
5 From the
6 From the
Use Customer Default—the default address is used, as defined in the Accounts > Account Setup >
As entered by the User—the address is defined by the account user during the job-ordering
Flow of Print documents from your computer dropdown list, choose one of the options.
Default Shipping/Billing Address dropdown list, choose one of the following options:
General Info > Shipping
and Billing. tab.
procedure.
To set authentication parameters:
In the Utilities panel of the Account Setup - Preferences window, do the following:
1 To require accounts to change their passwords on a regular basis, select the
option button and fill in the
2 To require accounts to use a complex password, select the
Days field. (Default is that password never expires.)
Force Complex Password Security check box;
your account must create a password that complies with the following rules:
The password must be at least seven characters long.
The password must contain characters from three of the following four categories:
English uppercase characters (A through Z).
English lowercase characters (a through z).
Digits (0 through 9).
Special characters (e.g., !, $, #, %).
The account user password is stored in encrypted form in the database.
Maximum Password Age: Days
73Print Service Provider Guide

Account Setup
Defining the PDF Preview
The PDF preview feature allows you and your account users to view the job before it is produced. This is useful
for verifying the accuracy of the job.
To define the PDF preview:
1 In the PDF Preview panel of the Account Setup - Preferences window, select one of the following options
from the
None—no footer is applied to the PDF preview.
Use System Default—the system default PDF preview is defined in the PDF Preview panel of the
Footer File dropdown list:
System Properties window, which is accessed in System Setup > Basic > General.
Select one of the listed PDF preview footers that was added to the list. For details, see Step 2.
2 To add footer file options to the dropdown menu, click the
3 Open the
None—no watermark is required.
Use System Default—use the system default watermark, as defined in the PDF Preview panel of the
Watermark dropdown list and select one of the following options:
System Properties window, which is accessed in System Setup > Basic > General.
Custom—create the account watermark. When you select Custom, you can type into the Wate rm ark
Text
field, and select options from the two dropdown lists of the Font field.
Footer File link and download footer image(s).
Defining Self Registration Details
The Self Registration feature is useful for new and occassional user situations. This feature allows users that
access your home page to enter the site without a user name and password, and perform activities that you have
defined for such users. This “guest” is required to register during the checkout process, and complete the order
through the
To enable a workflow for a guest user (occassional user):
1 In the Self Registration panel of the Account Setup - Preferences window, select Enable Guest Workflow to
allow a guest user to access the system; the
2 Type the URL that directs the guest user to the system home page.
Credit Card service.
Guest Access Path field appears.
3 When you want supervisor approval each time a guest enters the system, select the
checkbox.
Send an email message each time a user has registered is automatically selected if you select
Approval Required in step 3.
Approval Required
Web Services74

Creating a New Account
a Click the
b Type the email address of the person in your organization who oversees guest usage of the system; an
email message is sent to this address, and the approver can approve or decline each new guest user that
registers into the system.
4 When you do not require supervisor approval but want to receive an email each time a user registers, select
the
Send an email message each time a user has registered check box, and clear the Approval Required
check box.
a Click the
b Type the email address of the person in your organization who oversees guest usage of the system; an
email message is sent to this address informing that a guest user has registered into the system.
Contacts link; the Approval Email Contact dialog box appears.
Contacts link; the Approval Email Contact dialog box appears.
Defining Pricing Settings
In the Pricing panel of the Account Setup - Preferences window, you define various pricing settings for each
account.
Figure 19: Account Setup - Preferences window, Pricing panel
To define the account pricing mode:
You can define pricing for a specific account.
From the
Not defined at this level—you do not want to activate the pricing model, and want the system to scan to
Excel—to activate the customer pricing model, and base the pricing on an Excel-based data sheet. To work
External—to activate the customer pricing model and transfer the job data to an external MIS system that
Customer Pricing Model dropdown list, select one of the following options:
the next pricing model in the pricing hierarchy for activation.
with the Excel option, see work with the Excel pricing option: on page 76.
is integrated with your system. For more information on transferring information to external systems, see
Integrating Web Services with Other Systems on page 32.
75Print Service Provider Guide

Account Setup
To work with the Excel pricing option:
1 From the Customer Pricing Model dropdown list, select Excel; the Excel File link and dropdown box
appear.
2 From the
3 To add Excel files to the
a Click the
b Upload one or more valid XLS files and click
Excel File dropdown list, select an Excel file from the list.
Excel File dropdown list:
Excel File link; the Pricing Excel Files dialog box appears.
Continue; the new files appear in the Pricing Excel Files
dialog box.
c Select the new files and click
4 Click
Save.
Select File; the new files appear in the Excel File dropdown list.
To define pricing options:
You can set the pricing options that the account user encounters during the job-ordering process:
Hide Price from Customer—prevent the user that is ordering jobs from seeing the price after requesting a
quote.
Disable Shipping Date—prevent the user that is ordering jobs from setting a shipping date.
Allow Ordering Unpriced Jobs—enable job-ordering, even when there is a problem with the system-
generated pricing
Disable Shipping Price—you and the account users will not see the shipping price. The system ignores the
shipping price; the shipping price and taxes are not added to the total price, and are not included when the
cost is exported to an Excel file.
Force Cost Center—require the user that is ordering jobs to include a cost center name during the job-
ordering procedure.
Force Reference Code—require the user that is ordering jobs to include a reference code during the job-
ordering procedure.
.
To define shipping and account taxes:
Taxes are defined at the system level. When your account users have specific tax-definition needs, you can select
a tax for each account, at the account level. For more information about defining taxes, refer to the Pricing
Process Overview on page 178
Select an option from the
Customer Tax dropdown list.
To define payment methods:
You can provide your account users with one or all of the following payment methods:
Purchase Order (PO) is the standard payment method:
Web Services76

Creating a New Account
a Select
b To require account users to type the job's PO number during the ordering process, select
Credit Card (CC) allows account users to pay for your services through an Credit Card service. For further
PO (Purchase Order); the Force PO Number option is activated, and PO (Purchase Order) is
added to the
Number
Default Payment Method dropdown list.
.
Force PO
information on using credit card payments, refer to Adding Web Services Credit Card Service Vendors on
page 279.
Select
CC (Credit Card); CC (Credit Card) is added to the Default Payment Method dropdown list, and is
available according to licensing authorization.
Electronic Direct Debit (EDD) allows account users to pay for your services through a Credit Card service
that supports Electronic Direct Debit (EDD).
Select
EDD (Electronic Direct Debit); EDD (Electronic Direct Debit) is added to the Default Payment
Method
dropdown list, and is available according to licensing authorization. For more information on
licensing authorization, see Defining Credit Card Integration on page 31.
In the ordering process, account users select the payment method that is most suitable to their business from
among the payments systems that you support.
The CC and EDD payment methods are only available after you install the Business Links
module. For more information, refer to Defining Data Export on page 31.
To define the default payment method:
You can define a default payment method that will be used for all the account’s ordering processes, unless the
another method is selected. The various ordering processes include
Print Driver.
When only one option is listed in the Default Payment Method dropdown, this option is automatically the
Shopping Cart, Catalog, MailToPrint, and
default payment method.
When there is more than one option in the Default Payment Method dropdown list, you need to select a
the default payment method.
To define an account discount:
You can define a permanent discount for this account that will automatically be applied when calculating
quotes.
In the
Discount field, type the discount value.
77Print Service Provider Guide

Account Setup
Setting the Account Job-ordering Windows
In the GUI panel of the Account Setup - Preferences window you define the windows that appear when the
account users order jobs.
To define the windows that the account accesses when creating a job:
1 From the Default Order Jobs Page dropdown list, choose the job page option that will appear when the
account user enters the system.
Launch Pad—provide the account user with direct access to the job-ordering and job tracking functions.
Template View—provide the account user with a list of template options for job-ordering.
2 From the
Default Template View dropdown list, select one of the default template views. This view will
appear when an account user wants to initiate a job based on a template. For more on templates referCatalog
Overview on page 90.
Root Folder—set the top folder in the template library as the folder that the account user accesses when
creating a job from a template.
Specific Folder—the Folder link appears, allowing you to access the Choose Folder dialog box. Select
the folder that the account user accesses when creating a job based on a template.
Catalog—select a specific catalog in the template library as the catalog that the account user accesses
when creating a job from a template. Select a catalog from the
Catalog dropdown list.
Web Services78

Creating a New Account
Defining Account Branding
In the Branding panel of the Account Setup - Preferences window you define the appearance of the account
pages.
To define branding options:
1 In the Branding panel, select an option from the Customer Logos dropdown list:
Use System Default—use the Print Provider Logo as defined in System Setup > Basic > Home Page
Customization
Select one of the listed logos.
Customer Logos allow you to add a unique account logo to the top left corner of the account
window. This is advantageous when a specific account decides that the standard Web Services
look-and-feel is adequate, and the addition of the account's logo is sufficient.
. For more information on customization, see Customizing the Home Page on page 19.
To add logos to the
Customer Logos dropdown list, click the Customer Logos link and download
additional images.
2 From the
Print Service Provider Name
Customer Name
Browser Title dropdown list, choose one of the following options:
The value that you set in Browser Title determines the name that appears in the following locations:
The tooltip that appears over the Application icon in the notification area located on the bottom-right
of the screen.
Browser name that appears in the title bar.
3 From the
Default—the system default skin as defined in Store Assets > Skins. For more information, refer to
Skin dropdown list, select one of the Skin options:
Editing the Final Design on page 207.
System Standard—the Web Services skin.
Skin—select a personalized skin for the account application.
4 Type a URL for the branded
Home Page.
79Print Service Provider Guide

Account Setup
Selecting Shipping Method Groups for the Account
You can select groups of shipping methods from among the available shipping method groups that are defined in
the system. These groups are then available to the account users during the job ordering process, and the account
user can select the shipping method to be used for a specific job order. For more information on shipping
method groups, refer to Defining Carriers on page 55.
To enable shipping methods selection:
1 Select Accounts > Account Setup > General Info, and click Shipping Method Groups; the Shipping Method
Groups
panel appears.
2 Do one of the following:
To select all shipping methods:
i Select the
ii From the
will be used whenever a shipping method is not selected for a particular job order.
If you do not select a default shipping method, the system uses the system default method.
To select a shipping group:
i Clear the
ii In the
iii The available shipping groups become active. Select the shipping method groups that you want to
make available to the account.
iv From the
3 Click
OK to save the settings.
All Shipping Methods check box; all the shipping methods are available to account users.
Default Shipping Method dropdown list, select a default shipping method. This method
All Shipping Methods check box.
Default Shipping Method field, select a shipping method.
Default Shipping Method dropdown list, select a default shipping method.
Web Services80
 Loading...