

Page 1

Version 7.00
December 2008
DWS02V7.0E-02
FreeFlow™ Web Services
Print Buyer Guide
Web Services
Page 2

©2008 Xerox Corporation. All rights reserved. Xerox and the sphere of connectivity design and all product names mentioned in this
publication are trademarks of Xerox Corporation in the United States and/or other counties.
Other company trademarks are also acknowledged.
Adaptec®, the Adaptec logo, SCSlSelect®, and EZ-SCSI® are trademarks of Adaptec, Inc.
Adobe PDFL - Adobe PDF Library Copyright © 1987-2008 Adobe Systems Incorporated.
Adobe®, the Adobe logo, Acrobat®, the Acrobat logo, Acrobat Reader®, Distiller®, Adobe PDF JobReady™, and PostScript®, and
the PostScript logo are either registered trademarks or trademarks of Adobe Systems Incorporated in the United States and/or
other countries. All instances of the name PostScript in the text are references to the PostScript language as defined by Adobe
Systems Incorporated unless otherwise stated. The name PostScript also is used as a product trademark for Adobe Systems'
implementation of the PostScript language interpreter, and other Adobe products.
Copyright 1987 - 2008 Adobe Systems Incorporated and its licensors. All rights reserved.
Autologic® is a registered trademark of Autologic Information International, Inc.
Compaq® and QVision® are registered United States Patent and Trademark Office, for Compaq Computer Corporation.
DEC, DEC RAID, and Redundant Array of Independent Disks are registered trademarks of Digital Equipment Corporation.
Dundas - This software contains material that is (c) 1997-2000 DUNDAS SOFTWARE LTD., all rights reserved.
Imaging Technology provided under license by Accusoft Corporation.
ImageGear © 1997 by AccuSoft Corporation. All Rights Reserved.
Intel® and Pentium® are registered trademarks of Intel Corporation.
Novell® and NetWare® are registered trademarks of Novell, Inc. in the United States and other countries.
Oracle® is a registered trademark of Oracle Corporation Redwood City, California
ScanFix® Image Optimizer and ImagXpress are either registered marks or trademarks of Pegasus Imaging Corp. Copyright ©
1997-2008 Pegasus Imaging Corp. All rights reserved.
SonyTM and Storage by SonyTM are trademarks of Sony.
PANTONE ™ and other Pantone, Inc. trademarks are the property of Pantone Inc.
Preps™ is a registered trademark of Creo Inc. All rights reserved.
Quark® and QuarkXpress® are registered trademarks of Quark, Inc.
StorageView™ is a trademark of CMD Technology, Inc.
TIFF® is a registered trademark of Aldus Corporation.
Windows®, Windows XP®, Windows Server® 2003, and Internet Explorer are trademarks of Microsoft Corporation; Microsoft®
and MS-DOS® are registered trademarks of Microsoft Corporation.
Portions Copyright © 2001 artofcode LLC.
This software is based in part on the work of the Independent JPEG Group.
Portions Copyright © 2001 URW++. All Rights Reserved.
This product includes software developed by the Apache Software Foundation.
Copyright © 1999-2008 The Apache Software Foundation. All rights reserved.
This software is based in part on the work of Graeme W. Gill.
© Press-sense Ltd. 2002-2008. All rights reserved.
Includes Adobe® PDF Libraries and Adobe Normalizer technology
The Graphics Interchange Format © is the Copyright property of CompuServe Incorporated. GIFSM is a Service Mark property of
CompuServe Incorporated.
Portions contain an implementation of the LZW algorithm licensed under U.S. Patent 4,558,302.
Parts of this software Copyright © 2004-2006 Enterprise Distributed Technologies Ltd. All Rights Reserved.
Parts of this software Copyright © 1995-2003, The Cryptix Foundation Limited. All Rights Reserved.
Parts of this software are a SSLv3/TLS implementation written by Eric Rescorla and licensed by Claymore Systems, Inc. All Rights
Reserved.
Parts of this software Copyright © 2002, Lee David Painter and Contributors. Contributions made by Brett Smith, Richard Pernavas,
Erwin Bolwidt.
Parts of this software Copyright © 1995-2005, Jean-loup Gailly and Mark Adler.
All other product names and services mentioned in this publication are trademarks of their respective companies. They are used
throughout this publication for the benefit of those companies, and are not intended to convey endorsement or other affiliation
with the publication.
Companies, names, and data used in examples herein are fictitious unless otherwise noted.
Printed in the United States of America.
Changes are periodically made to this document. Changes, technical inaccuracies, and typographic errors will be corrected in
subsequent editions.
Document Version: 2.0 (December 2008)
Page 3

Table of Contents
Introduction ......................................... 1
About FreeFlow Web Services............................................................... 1
About this Guide.................................................................................. 1
Basic Concepts .................................................................................... 2
Jobs and Templates .................................................................................................................................. 2
Job Flow..................................................................................................................................................... 3
Getting Started.................................................................................... 4
Main Interface Components ................................................................................................................... 4
Ordering Jobs........................................ 5
Ordering Workflows............................................................................. 5
Ordering Jobs from Superstore Catalogs .............................................. 6
Optional Wizard Steps............................................................................................................................. 6
Job Specification .........................................................................................................................................................7
Variable Information .................................................................................................................................................7
Upload File ..................................................................................................................................................................8
File Report ...................................................................................................................................................................8
Preview ...................................................................................................................................................................... 11
Job Summary ............................................................................................................................................................ 11
Job Details ................................................................................................................................................................ 11
Ordering Static Jobs ............................................................................................................................... 12
Ordering Variable Information Jobs ................................................................................................... 13
Ordering Personalized Jobs ................................................................................................................................... 13
Ordering Variable Data Jobs ................................................................................................................................. 14
Ordering from Variable Data Archive ................................................................................................................. 16
Ordering Jobs from HTML Catalogs .................................................... 18
Main Workflow ....................................................................................................................................... 18
Additional Ordering Options ............................................................................................................... 18
Ordering Inventory Jobs..................................................................... 19
Ordering to Inventory............................................................................................................................ 19
Page 4

Print Buyer Guide
Ordering from Inventory....................................................................................................................... 20
Ordering Jobs from Files Stored on the User’s Computer.................... 20
Ordering Book Assembly Jobs ............................................................ 21
Uploading Print Files.............................................................................................................................. 21
Setting Binding Style............................................................................................................................... 22
Preflight Report....................................................................................................................................... 22
Defining Job Components..................................................................................................................... 23
Ordering ................................................................................................................................................... 24
Shopping Cart and Order Checkout.................................................... 25
Handling Jobs in Shopping Cart........................................................................................................... 25
Order Price Calculation.......................................................................................................................... 26
Order Checkout....................................................................................................................................... 26
Setting Shipping Parameters ................................................................................................................................... 26
Placing Order ............................................................................................................................................................27
Tracking Jobs ....................................... 29
Job Queues and Statuses................................................................... 29
Searching for a Job ............................................................................ 30
Main Features of the Search Window.................................................................................................. 30
Search Options ........................................................................................................................................ 31
Job Details and Related Operations ..................................................................................................... 32
Job Activities ..................................................................................... 32
Managing Templates ............................. 35
Templates Repository........................................................................ 35
Template Types ....................................................................................................................................... 36
Controls and Operations........................................................................................................................ 36
Searching for Templates......................................................................................................................... 37
Creating Templates ........................................................................... 37
Workflows and Wizards......................................................................................................................... 37
Simple Job Templates .............................................................................................................................................38
Composite Job Templates ......................................................................................................................................38
Creating Static Templates ...................................................................................................................... 39
Uploading Content to a Template .........................................................................................................................39
Setting Template Properties ...................................................................................................................................39
Preflight Check of Uploaded File .......................................................................................................................... 40
Saving Templates as Static ......................................................................................................................................40
Web Servicesii
Page 5

Table of Contents
Creating VI Templates ........................................................................................................................... 40
Setting VI Workflow ............................................................................................................................................... 41
Creating VI Fields ....................................................................................................................................................41
Defining Properties of VI Fields ........................................................................................................................... 42
Arranging VI Fields ................................................................................................................................................. 43
Saving VI Template .................................................................................................................................................43
Creating Book Assembly Templates .................................................................................................... 44
Template Activities............................................................................ 44
Setting Workflow Policy......................................................................................................................... 45
Setting MailToPrint Option................................................................................................................... 46
Defining VI Fields using iForm Editor.................................................. 48
Defining the Basic Field Properties...................................................................................................... 48
Text Fields ................................................................................................................................................................. 48
Image Fields ..............................................................................................................................................................52
Advanced Options ................................................................................................................................................... 54
Job Assets ........................................... 59
Catalog Library.................................................................................. 59
Managing Catalogs .................................................................................................................................. 59
Creating a New HTML Catalog ............................................................................................................................59
Adding Templates to HTML Catalogs .................................................................................................................59
Exporting Catalog Content ....................................................................................................................................60
Template Display Setup ......................................................................................................................... 60
Catalog Properties Setup........................................................................................................................ 60
Setting Display Parameters ..................................................................................................................................... 61
Setting Workflow Parameters ................................................................................................................................ 61
Setting Variable Information Fields ......................................................................................................................62
Setting Order Parameters .......................................................................................................................................62
Setting Delivery Parameters ................................................................................................................................... 62
Setting Price Preview ...............................................................................................................................................63
Setting Email Options ............................................................................................................................................. 63
Finishing the Setup Procedure ...............................................................................................................................63
Image Library .................................................................................... 64
Managing the Image Library.................................................................................................................. 64
Uploading Images to the Library ........................................................................................................................... 64
Inventory........................................................................................... 65
Managing Inventory Templates ............................................................................................................ 65
Variable Data Files............................................................................. 66
Managing the Library.............................................................................................................................. 66
Database Features ................................................................................................................................... 66
iiiPrint Buyer Guide
Page 6

Print Buyer Guide
Account Administration ......................... 67
Introduction ...................................................................................... 67
General Account Settings .................................................................. 68
General Contact Information................................................................................................................ 68
Default Starting Page .............................................................................................................................. 68
General Shipping and Billing Addresses.............................................................................................. 68
Setting Account Users ....................................................................... 69
Managing Users ....................................................................................................................................... 69
Creating a New User ...............................................................................................................................................69
User List Tools .........................................................................................................................................................70
User Starting Page ....................................................................................................................................................70
Shipping and Billing .................................................................................................................................................71
User Types and Privileges...................................................................................................................... 71
Setting User Groups .......................................................................... 73
Creating a New Group ........................................................................................................................... 73
Deleting a Group..................................................................................................................................... 73
Setting Departments ......................................................................... 74
Setting Cost Centers.......................................................................... 74
Creating a New Cost Center.................................................................................................................. 74
Modifying a Cost Center Budget .......................................................................................................... 75
Setting Email Notifications ................................................................ 76
Handling the Address Book ................................................................ 77
Managing Contacts.................................................................................................................................. 77
Contact Display ........................................................................................................................................................77
Searching for a Contact ...........................................................................................................................................77
Creating a New Contact ..........................................................................................................................................78
Toolbar Activities ....................................................................................................................................................78
Print Driver Configuration ..................... 79
Installing Print Driver ........................................................................ 80
Prerequisites (Windows Vista Only) .................................................................................................... 80
Installation on Macintosh, Windows 2000, 2003, XP, and Vista .................................................... 81
Macintosh .................................................................................................................................................................. 81
Windows .................................................................................................................................................................... 81
Ordering Jobs through the Print Driver............................................... 82
Web Servicesiv
Page 7

Table of Contents
Glossary ............................................... v
Index ..................................................vii
vPrint Buyer Guide
Page 8

Print Buyer Guide
Web Servicesvi
Page 9

List of Figures
Figure 1: Job Type - Job - Template relationships ....................................................................................... 2
Figure 2: Job flow stages................................................................................................................................... 3
Figure 3: Job Specification page ...................................................................................................................... 7
Figure 4: Upload File page ............................................................................................................................... 8
Figure 5: File Report page ................................................................................................................................ 8
Figure 6: Preflight report view......................................................................................................................... 9
Figure 7: Editing wizard steps ....................................................................................................................... 10
Figure 8: Variable Fields ................................................................................................................................. 13
Figure 9: Uploading variable records............................................................................................................ 14
Figure 10: Variable Data archive................................................................................................................... 16
Figure 11: Defining components of a Book Assembly job....................................................................... 23
Figure 12: Shopping cart................................................................................................................................. 25
Figure 13: Search window .............................................................................................................................. 30
Figure 14: Templates window........................................................................................................................ 35
Figure 15: Selective Upload tools.................................................................................................................. 41
Figure 16: iForm Editor dialog box (example for a variable image field)............................................... 42
Page 10

List of Figures
Web Servicesviii
Page 11

1
Introduction
About FreeFlow Web Services
FreeFlow Web Services is a business workflow management software application designed for the printing
industry. The application serves as a platform for communication between the Print Service Provider and the
Print Buyer.
Addressing all of the needs of Print Buyers, FreeFlow Web Services provides a complete e-Commerce Ready
platform, with flexible ordering flow and information management capabilities. FreeFlow Web Services also
provides Print Buyers with such tools as variable data, libraries of templates and images, one-to-one marketing
and receiving a price online.
Features and capabilities of the FreeFlow Web Services for Print Buyers include:
Flexible ordering tools
Pre-defined ordering workflows
Online specification of jobs to be ordered
Ordering variable information jobs
Tracking status of ordered jobs
Account management tools
About this Guide
The Print Buyer Guide is designed for all Print Buyers that intend to work with the FreeFlow Web Services
system and encompasses all facets of Print Buyer administration and production workflow. The primary goals of
the Print Buyer Guide are as follows:
To acquaint the Print Buyer with the distinctive software features of the FreeFlow Web Services system
To provide reference information for the Print Buyer
To guide the Print Buyer in the main workflows of job ordering, setting up templates and administration.
Page 12
Introduction
Basic Concepts
Jobs and Templates
The basic terms and their definitions, as used in FreeFlow Web Services, are:
Job Type - parameters describing a print job, such as a business card, flyer, letterhead, etc., that can be
produced by the Print Service Provider.
Job Content - a content file that builds a specific print job when combined with a typical Job Type.
Job - a combination of a Job Type with a Job Content. Jobs can be created in the system for one-time use or
can be saved as templates for repeated use.
There are three categories of jobs in the system:
Simple jobs - jobs that contain one uploaded content file
Book Assembly jobs - composite jobs that contain a number of uploaded files or multiple components
such as cover and text pages printed on different stock.
Non-paper jobs - jobs that don’t require printing or that are printed on non-paper substrate, such as
mugs, shirts or pens.
Temp lat e - a Job Type combined with a specific Job Content and saved for repeated use, whether for
reprints or for creating variable information instances.
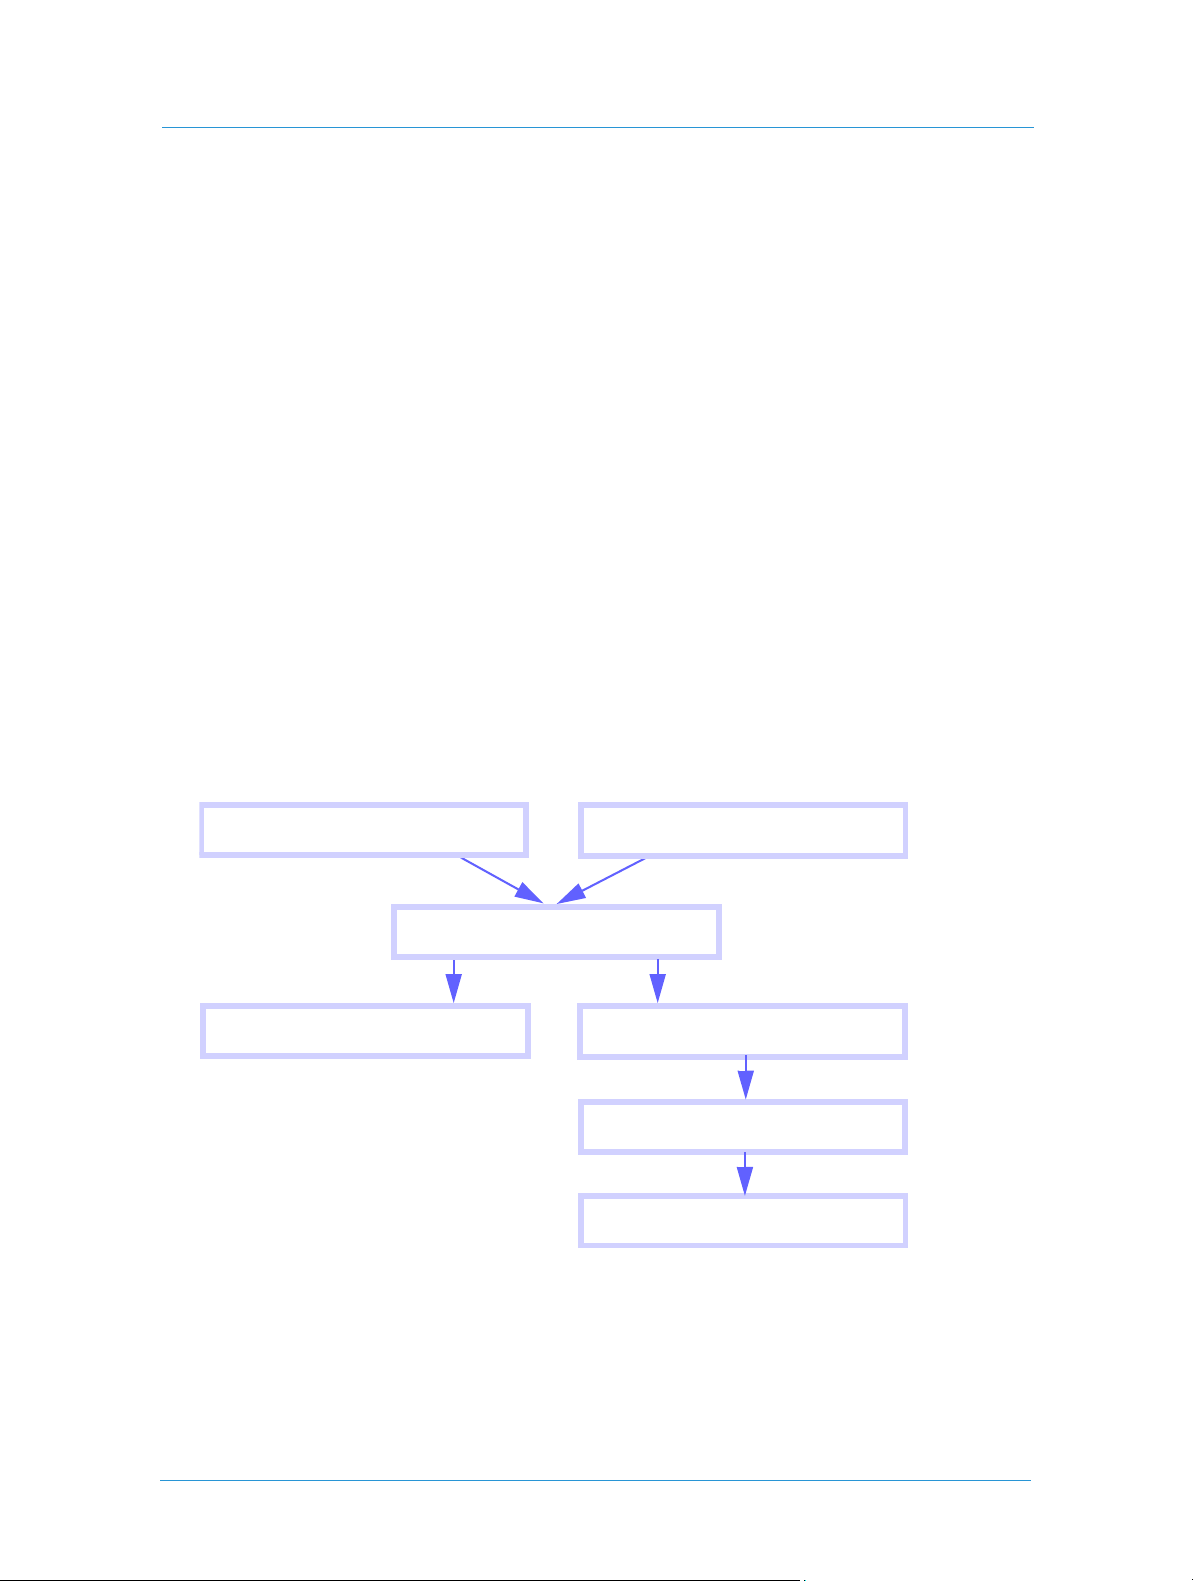
Figure 1: Job Type - Job - Template relationships
Job Type
Job
Order Job
Two types of templates can be created based on a Simple job:
Static templates - contain constant job content.
Static templates have permanent, unchanging job content. Each time a job based on the same static template
Job Content
Save Job as Template
Create Job
Order Job
Web Services2
Page 13

Basic Concepts
is re-printed, the result looks the same. The Book Assembly templates are conceptually the same as Static
templates.
See Creating Static Templates on page 39.
Vari ab le Inf o r m atio n (VI ) templates - contain variable fields and are used for creating Personalized or
Variable Data jobs. Variable fields are created by using the Selective Upload feature, and variable field
properties are modified by using iForm Editor. See Creating VI Fields on page 41 and Defining VI Fields
using iForm Editor on page 48.
VI templates enable processing of single and multiple variable records. Personalized jobs contain single
variable data record entered into the variable fields. Multiple personalized instances can be created, based
on uploaded variable data. Each template instance is based on one variable data record and represents a
personalized job. A collection of such instances can be saved as a template containing an archive of variable
data. See Ordering Variable Information Jobs on page 13 for uploading variable data.
Job Flow
A Print Buyer user orders jobs to be printed by the Print Service Provider. Each ordered job goes through the
following stages:
Figure 2: Job flow stages
Navigation to required Job Type
Job creation and specification
Adding job to Shopping Cart
Order checkout
Production and Delivery
Marking job as Received
The Print Buyer creates and specifies a job and adds the job to the shopping cart. The transfer of a job to the
Print Service Provider side is initiated by ordering the job. The production and delivery stages are controlled by
the Print Service Provider. The Print Buyer indicates that the ordered job was received.
Each order is a separate entity and can contain several jobs. When a Print Buyer submits a job order, it is a
contractual step.
3Print Buyer Guide
Page 14

Introduction
Getting Started
The FreeFlow Web Services system operates in the Windows environment, using an Internet browser interface.
In addition, Print Buyers can access the relevant application pages from the Mac operating system.
To log in to the Print Buyer side of the FreeFlow Web Services application, enter your user name and
password, and click
The system verifies your credentials and opens the Print Buyer interface, according to your user type.
See User Types and Privileges on page 71 for setting user types.
It is possible to change the user interface language to any one of the enabled languages on the login screen. Each
language is connected in the system to an appropriate measurement system. Choosing US English results in the
use of the imperial system units of measurement, while choosing UK English or any other language results in the
use of the metric system units.
Main Interface Components
When logging in, a Print Buyer user accesses the Print Buyer side interface. The user type of the user is indicated
in the upper part of the screen.
Login.
The Print Buyer interface is divided into four main pages:
Order Jobs - allows ordering jobs of any type. See Ordering Workflows on page 5.
Track Jobs - allows tracking the status of ordered jobs. See Tracking Jobs on page 29 for job states and tracking
tools.
Manage Templates - allows management of all system assets (templates, catalogs, archives, images, inventory,
etc.). See Managing Templates on page 35 and Job Assets on page 59.
Manage Account - allows account administration (account details, users, departments, etc.). See Account
Administration on page 67.
Only Print Buyer users assigned the Administrator, Supervisor or Designer privileges can access
and work with the
The additional controls in the upper part of the screen are:
Shopping Cart - shows the shopping cart with all the jobs that are already added to the cart and awaiting ordering.
For working with the shopping cart, see Shopping Cart and Order Checkout on page 25.
Software Downloads - allows downloading of the applications and system features enabled by the Print Service
Provider.
Manage Templates and Manage Account pages.
Help - provides the user with On-Line Help information and navigational tools.
Logout - allows the user to log out of the system.
Web Services4
Page 15

2
Ordering Jobs
Ordering Workflows
When logging in to FreeFlow Web Services as a Print Buyer user, the Order Jobs page opens. Default view of the
starting page is set for each Print Buyer user defined in the system. The initial
a launch pad, as a job catalog or as a template repository.
The
Order Jobs launch pad provides alternative starting points for ordering jobs:
Order from Our Catalog - provides the Print Buyer user with several workflows for ordering Simple jobs.
Jobs are ordered either from a Superstore catalog or from an HTML catalog.
Superstore catalogs are designed and supplied to a Print Buyer by the Print Service Provider and have a
customized look and feel. See Ordering Jobs from Superstore Catalogs on page 6.
HTML catalogs can be also supplied by the Print Service Provider or created by an authorized Print Buyer
user. See Ordering Jobs from HTML Catalogs on page 18.
When you start ordering a job, the type of workflow initiated depends on the type of catalog and/or the
template chosen for job creation.
Order Jobs page can be viewed as
Any Print Buyer user is enabled to order jobs from a catalog or folder specified in the user
settings. See User Starting Page on page 70 for setting user access.
Print Documents from Your Computer - provides the Print Buyer user with the workflows for ordering jobs
based on content files stored on the user's computer.
Order a Book Assembly - provides the Print Buyer user with the workflow for ordering composite jobs.
The Order a Book Assembly option appears when working with a Print Service Provider
that offers the Book Assembly feature.
The entire workflow, as described in this chapter, can be performed by users with job ordering
privileges. Only these users can create a job and have it directly sent for printing. Others can only
create a job and send it for approval.
Page 16
Ordering Jobs
Ordering Jobs from Superstore Catalogs
A superstore catalog has a customized look and feel, according to Print Buyer requirements.
1 On the
The next page opens. The catalog defined in the user’s settings is displayed by default.
If the products in catalog are divided into categories, the navigation panel on the left side of the screen
displays the list of categories. The number of products in each category is indicated next to the category
name.
If a
the jobs are shown. The list of jobs to be ordered later appears under the summary, in the
pane. Customizable marketing messages and cross sales items can appear on the screen (optional).
2 Click a category name in the navigation pane, under
button under the category name in the central pane, to open the category and view included products.
3 Start the ordering workflow by clicking the
OR
Click the
the indicated job type.
4 Click the
Items On Hold pane.
Order Jobs page, click the Start Ordering button under Order from Our Catalog.
Shopping Cart summary is displayed on the screen, the number of jobs in the cart and the total price for
Items On Hold
Select Category, or click the corresponding Select
If the Upload your own designs button appears, you can start ordering a job with uploading
your own design file, without drilling into the category. The products created by uploading
new files can be directly ordered and/or saved for future use.
Add to Cart button under the required job.
Upload button to start a workflow that includes creation and ordering of a new product based on
Hold button to add a product to the list of items to be ordered later. The product appears in the
Optional Wizard Steps
When ordering from a Superstore catalog, the ordering workflow depends on the type of ordered job. The
wizards can represent any combination of the following steps:
Job Specification
Variable Information
Upload File
File Report
Preview
Job Summary
Job Details
Web Services6
Page 17
Ordering Jobs from Superstore Catalogs
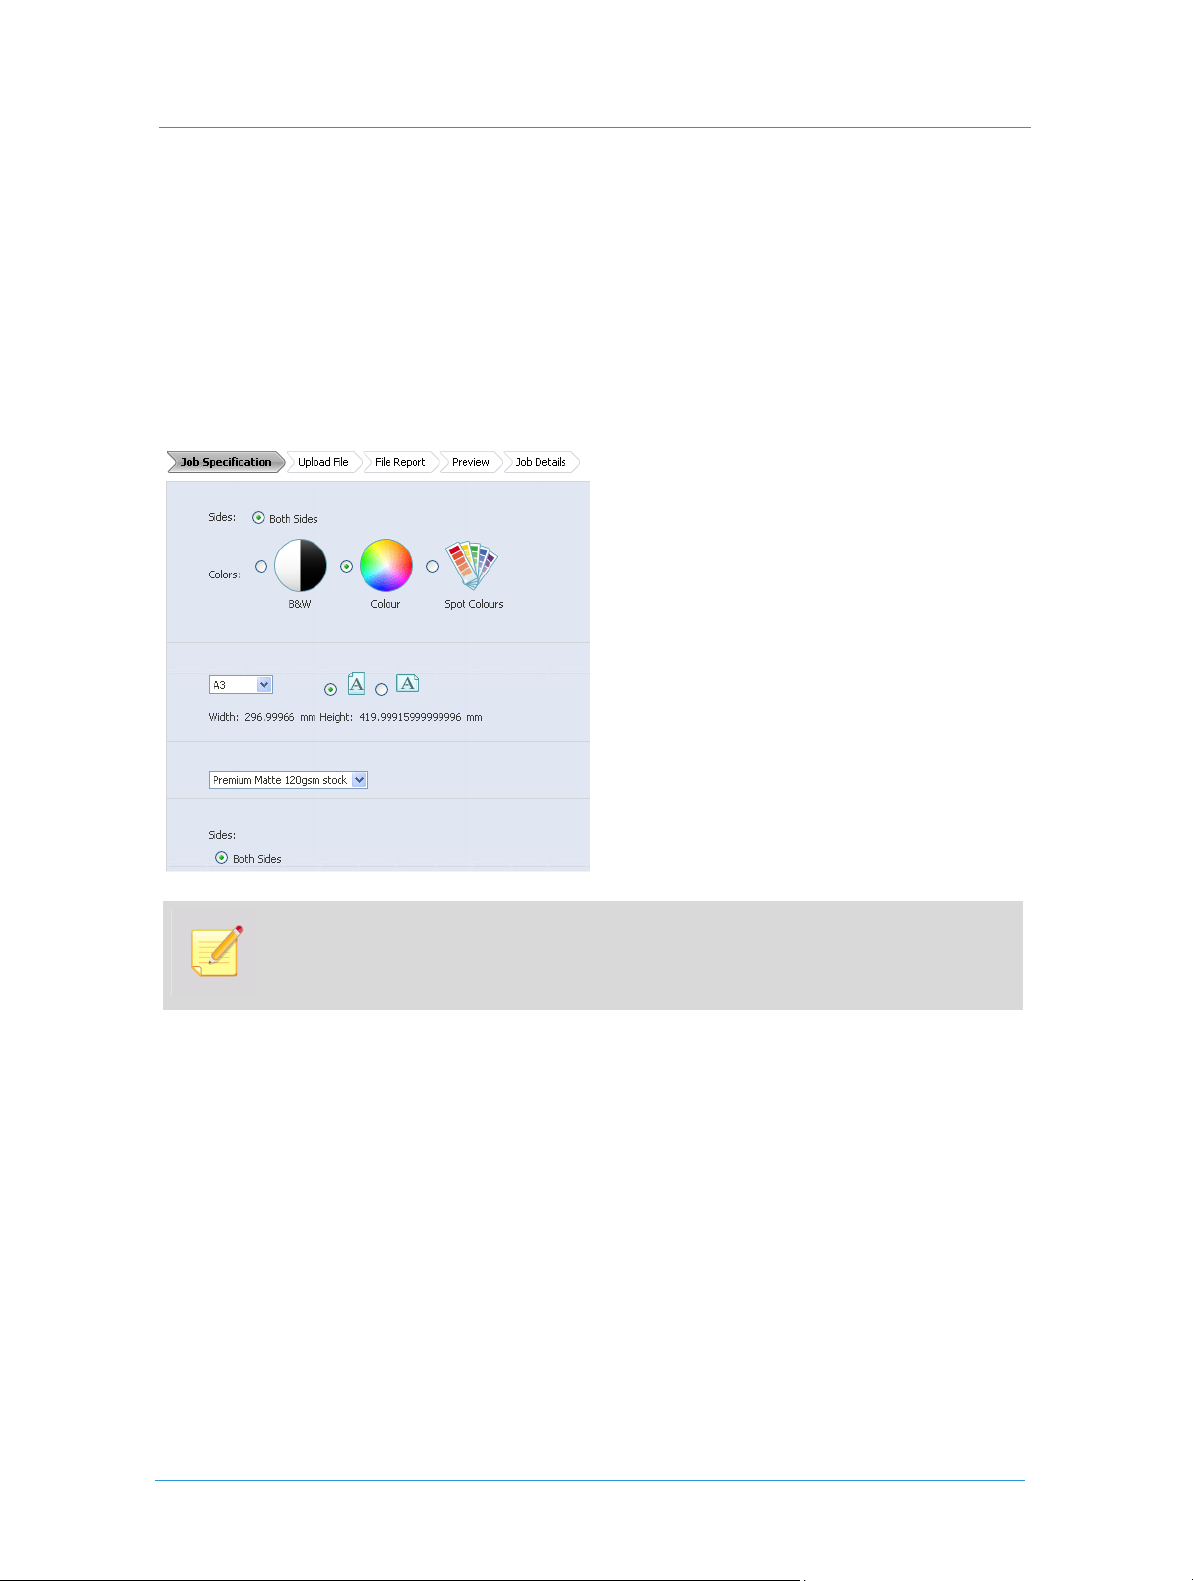
Job Specification
When a job is ordered based on a template that enables changes to the default job properties, the ordering
workflow includes the
design.
The user can change only those job properties enabled for change by the template designer. There can be
different job intent parameters enabled for change: color settings, sides to print, job size and orientation, paper
stock, and different finishing options such as type of folding, lamination, etc.
Figure 3: Job Specification page
Job Specification step. This step is always enabled when a user is uploading his own
When a job parameter is changed, the price for the job is updated, if the Print Service Provider
has defined this parameter to affect the total job price.
See Setting Template Properties on page 39 for enabling changes to job properties on the Job Specification page
of the ordering wizard.
Variable Information
The Var i a b le Info r ma t i on wizard step is included in the ordering workflow when a selected template is a VI
template. Any VI template allows one of the following:
Personalizing the job manually
Uploading variable records from an external Variable Data file
Selecting the personalized job instances from the records of a Variable Data archive already included in the
template.
The content of the
Vari a b l e I nf or m at ion step differ, depending on the enabled personalization option.
7Print Buyer Guide
Page 18

Ordering Jobs
Upload File
The ordering workflow includes the Upload File step when a job is created by uploading a design file to a selected
job type.
Figure 4: Upload File page
1 Click the Browse button and navigate to the file to be uploaded.
2 Choose the file and click
3 Click
When the processing is completed, the ordering wizard proceeds to the
Continue. The preflight check starts.
The system checks for mismatches between the parameters of the created job and the properties defined in
the job type.
If you prefer not to upload a file to the job at this stage but attach it later, select the Send Files
Separately
checking the job. See Attaching Files to a Job on page 11.
Open.
File Report step.
radio button and click Continue. The wizard proceeds to the next step without
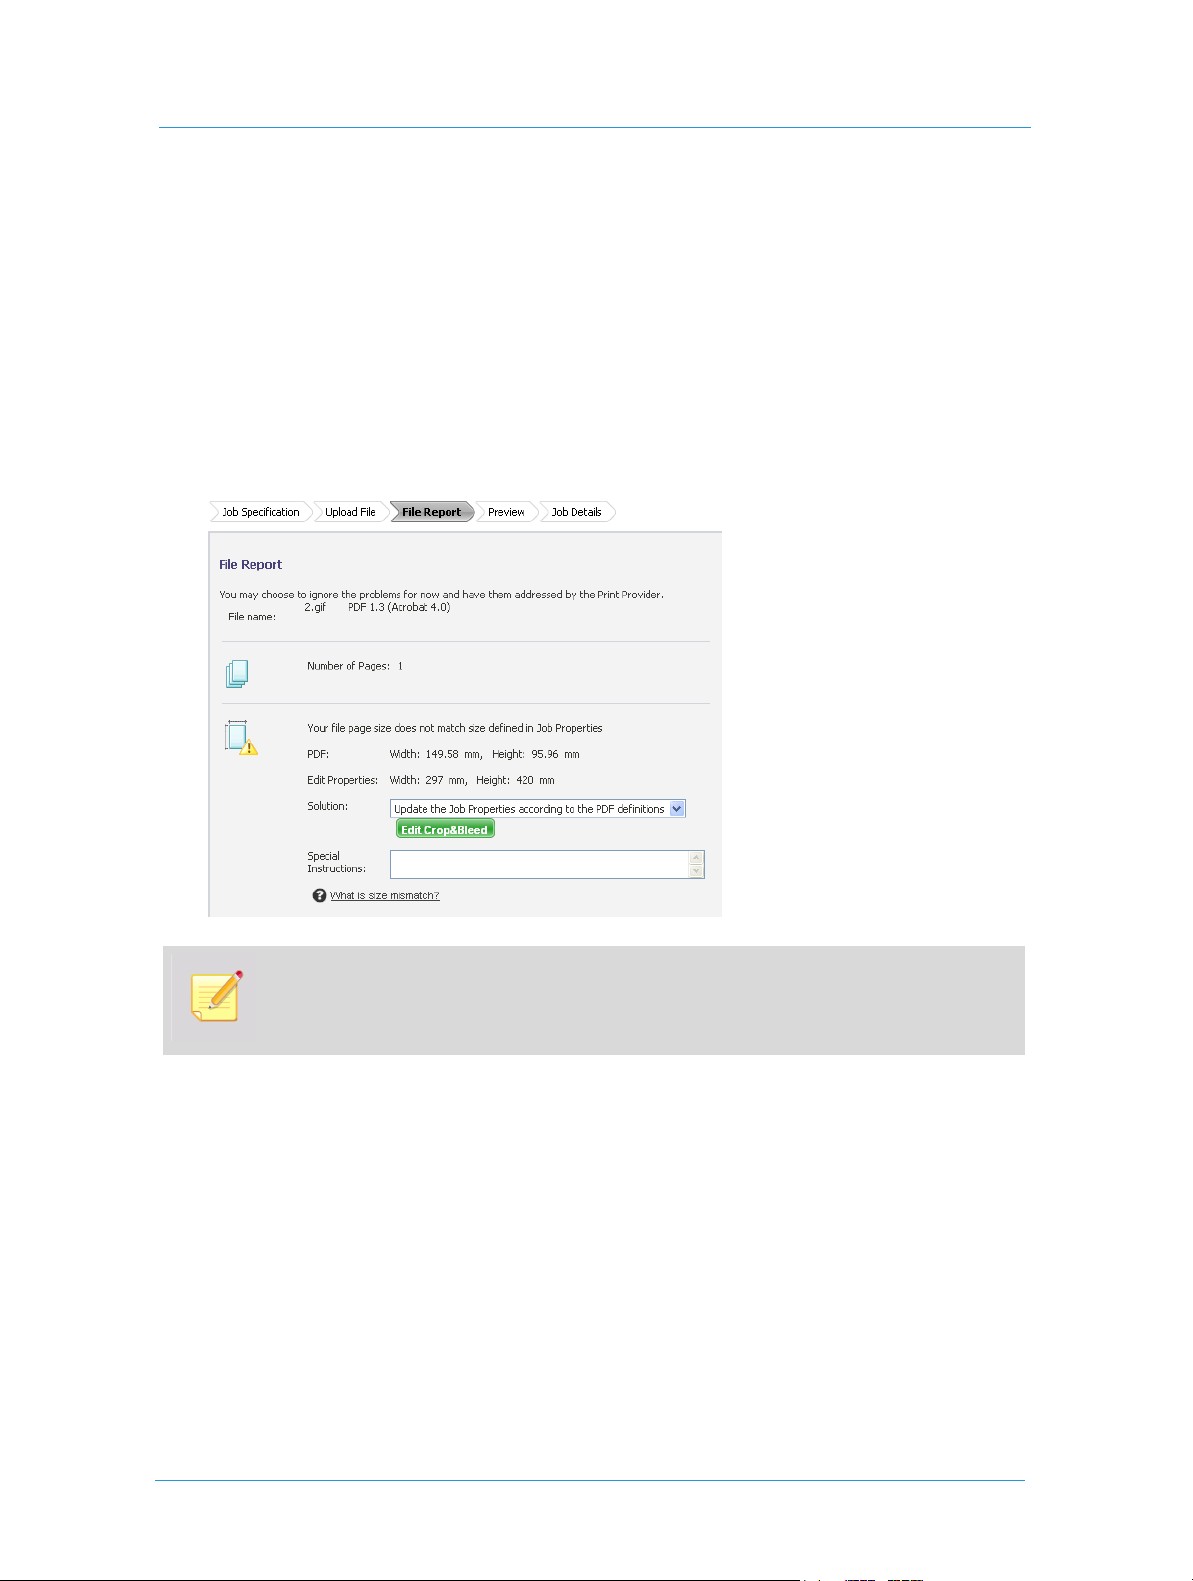
File Report
The File Report wizard step, if enabled by the Print Service Provider, can be contained in any ordering workflow
that includes the
during the preflight check of a job, after uploading a new design.
Figure 5: File Report page
Upload File step. The File Report wizard step allows viewing and handling problems discovered
Web Services8
Page 19
Ordering Jobs from Superstore Catalogs
If problems are discovered, and your Print Service Provider allows ordering jobs with problems, you can choose
to ask the Print Service Provider to solve them. Otherwise, you can handle the problems by yourself.
If you choose to ask the Print Service Provider to solve the problems, select the appropriate check box in
the lower part of the screen.
If you choose to review the discovered problems, use the Click here to review these problems link to open
the preflight report.
The detailed report appears displaying the problems and ways to handle them. Each problem in the report
is provided with a link that opens an additional information page containing the problem description and/
or instructions on how to solve the problem.
Figure 6: Preflight report view
You can review the preflight report and not handle the problems, or solve only some of the
problems. The same check box asking your Print Service Provider to solve the problems is
available at any stage of working on the report.
The general solution provided for each discovered problem (excluding font and low-resolution images) is to
update the job type properties with the properties of the uploaded file. A number of additional solution options
are provided for each problem in the
Solution drop-down list. The Special Instructions field allows entering
customer comments addressed to the Print Service Provider.
Editing Page Size
If the page size of the uploaded file does not fit the one defined in the job type, there are several ways to handle
this problem:
Update the job type properties according to the uploaded file.
Leave the job type properties unchanged.
9Print Buyer Guide
Page 20
Ordering Jobs
1 To update the job type properties according to the uploaded file, set the appropriate option in the
drop-down box.
When the job type properties are updated according to the uploaded file, the price might
become tentative.
2 To leave the page size as defined in the job type, set the appropriate option in the
3 To edit the page size of the created job, click the
Edit Crop&Bleed button that appears under the Solution
Solution drop-down box.
drop-down box.
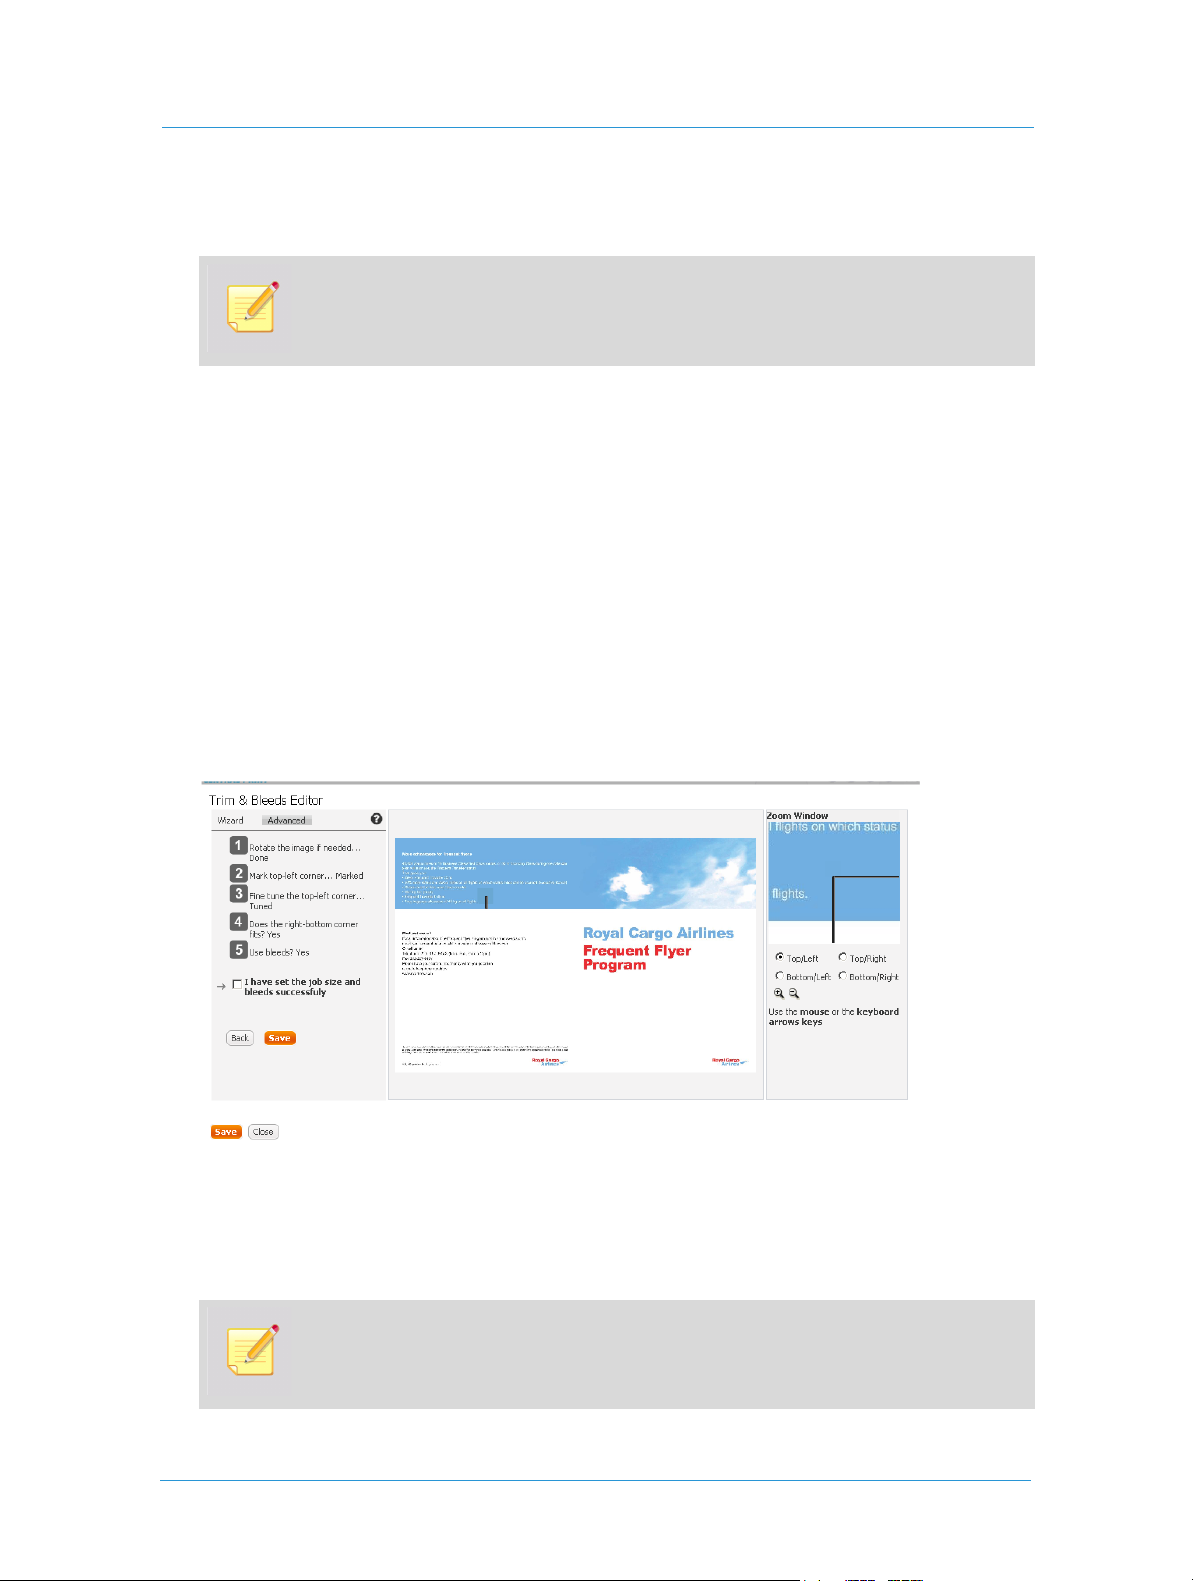
The
Trim & Bleeds Editor wizard appears, allowing you to make the necessary corrections to the page size
and to the proportions of the uploaded file.
4 Click
Start to run the wizard.
5 Use the controls of the first wizard step to rotate the job pages, if necessary.
6 Click
7 Follow the instructions provided by the wizard until the
Next. The next step instructions appear.
I have set the job size and bleeds successfully
check box appears on screen.
Figure 7: Editing wizard steps
Solution
8 If you are sure that your settings are correct, mark this check box and click Save.
The job preflight check is run again, and the file report is updated.
9 Review the updated report to ensure that the problem is solved.
If you don’t mark the I have set the job size and bleeds successfully check box and click on
the
Save button, an additional check box appears. Mark this check box in order to ask the
Print Service Provider to solve the page size problem.
Web Services10
Page 21

Ordering Jobs from Superstore Catalogs
Preview
The Preview wizard step can be included in any ordering workflow. The preview pane contains a toolbar that
allows the following operations:
Choose a required job page for preview using the Page drop-down list
Rotate job pages clockwise or counterclockwise
Toggle the preview zoom between the real size and the window size
View a low resolution PDF preview of the job
Refresh the preview.
Job Summary
The job summary pane can be added to any step of the ordering wizard.
The job summary pane displays the name and properties of a created job, a total job price and a default number
of copies to be ordered. The number of copies can be changed by choosing one of the predefined quantities
from the
When the number of copies is changed, the
job price.
Copies drop-down list, or typing a quantity in the field, according to the type of displayed control.
Update Price button appears, allowing the user to recalculate the
The
Attachment link (if appears) allows attaching design files (image files, font packages, etc.) to a created job.
Attaching Files to a Job
1 Click the Attachment link. The Attachments dialog box opens.
2 Use the toolbar icons to rename, delete and download additional files to the job.
3 Click the
4 Navigate to the location where the required file is saved and upload it to the job, or upload multiple files to
the Print Service Provider FTP site using the upload to FTP option.
5 Click
6 Highlight any file in the list and click the
file is sent to the Print Service Provider’s production queue.
Upload Files button to open the Upload File dialog box.
Continue. The file(s) are added to the list of attachments in the Attachments dialog box.
Mark for Production button. The preflight check is run, and the
Job Details
The Job Details wizard step can be included in any ordering workflow. Default job name, job type, and job
creation date are displayed in this pane.
In addition, the following settings are enabled for the user:
A default job name can be changed, if required
A cost center can be chosen from predefined options
A note can be entered.
11Print Buyer Guide
Page 22
Ordering Jobs
Job Details step is usually the last step of the ordering workflow and is followed by adding a created job to
The
the shopping cart and ordering the job.
Ordering Static Jobs
The following is an example workflow when you order a static job.
1 Select a job in the catalog by clicking the corresponding
If the selected job is static, the
2 Click the
PDF Low resolution Proof icon on the preview toolbar to verify the job design.
Preview page opens, displaying the job preview. See Preview on page 11.
Add to Cart button.
The low-resolution PDF is created and saved. The next time you access this job, the preview
will be available immediately.
3 Close the proof and mark the
4 Click
Continue.
I have reviewed the proof and accept it check box under the preview.
The Print Service Provider can enable additional information on the Preview page such as job
details and job properties summary. See Job Summary on page 11 and Job Details on page 11.
5 Click the
If changes are enabled by the Print Service Provider to the job properties, the
Specification
Add to Cart wizard button. The job is created and added to the shopping cart.
wizard page opens. See Job Specification on page 7.
Job
The catalog appears; this allows proceeding to ordering of additional jobs. You can complete the ordering
process at a later time.
OR
Click the
Add to Cart and Order button.
The shopping cart appears, enabling you to get quotes for the jobs to be ordered and to complete the
ordering process.
The number of copies can be changed in the shopping cart, by choosing one of the
predefined options from the
Quantity drop-down list or by typing in the text box, according
to the type of displayed control.
6 To complete the ordering workflow, see Shopping Cart and Order Checkout on page 25.
Web Services12
Page 23
Ordering Jobs from Superstore Catalogs
Ordering Variable Information Jobs
Personalized products are ordered based on VI templates containing variable fields. When you enter text into
variable fields, the text appears as a part of the print job, formatted according to the field definitions in the
template. VI jobs containing a single personalized record are created manually. VI jobs containing multiple
personalized records can be created manually instance by instance, or all instances can be created
simultaneously by uploading variable information records from an external database file. If the uploaded
variable records are saved with the job as a variable data archive, the job instances to be ordered can be selected
from this archive.
The following are three example workflows for ordering VI jobs.
Ordering Personalized Jobs
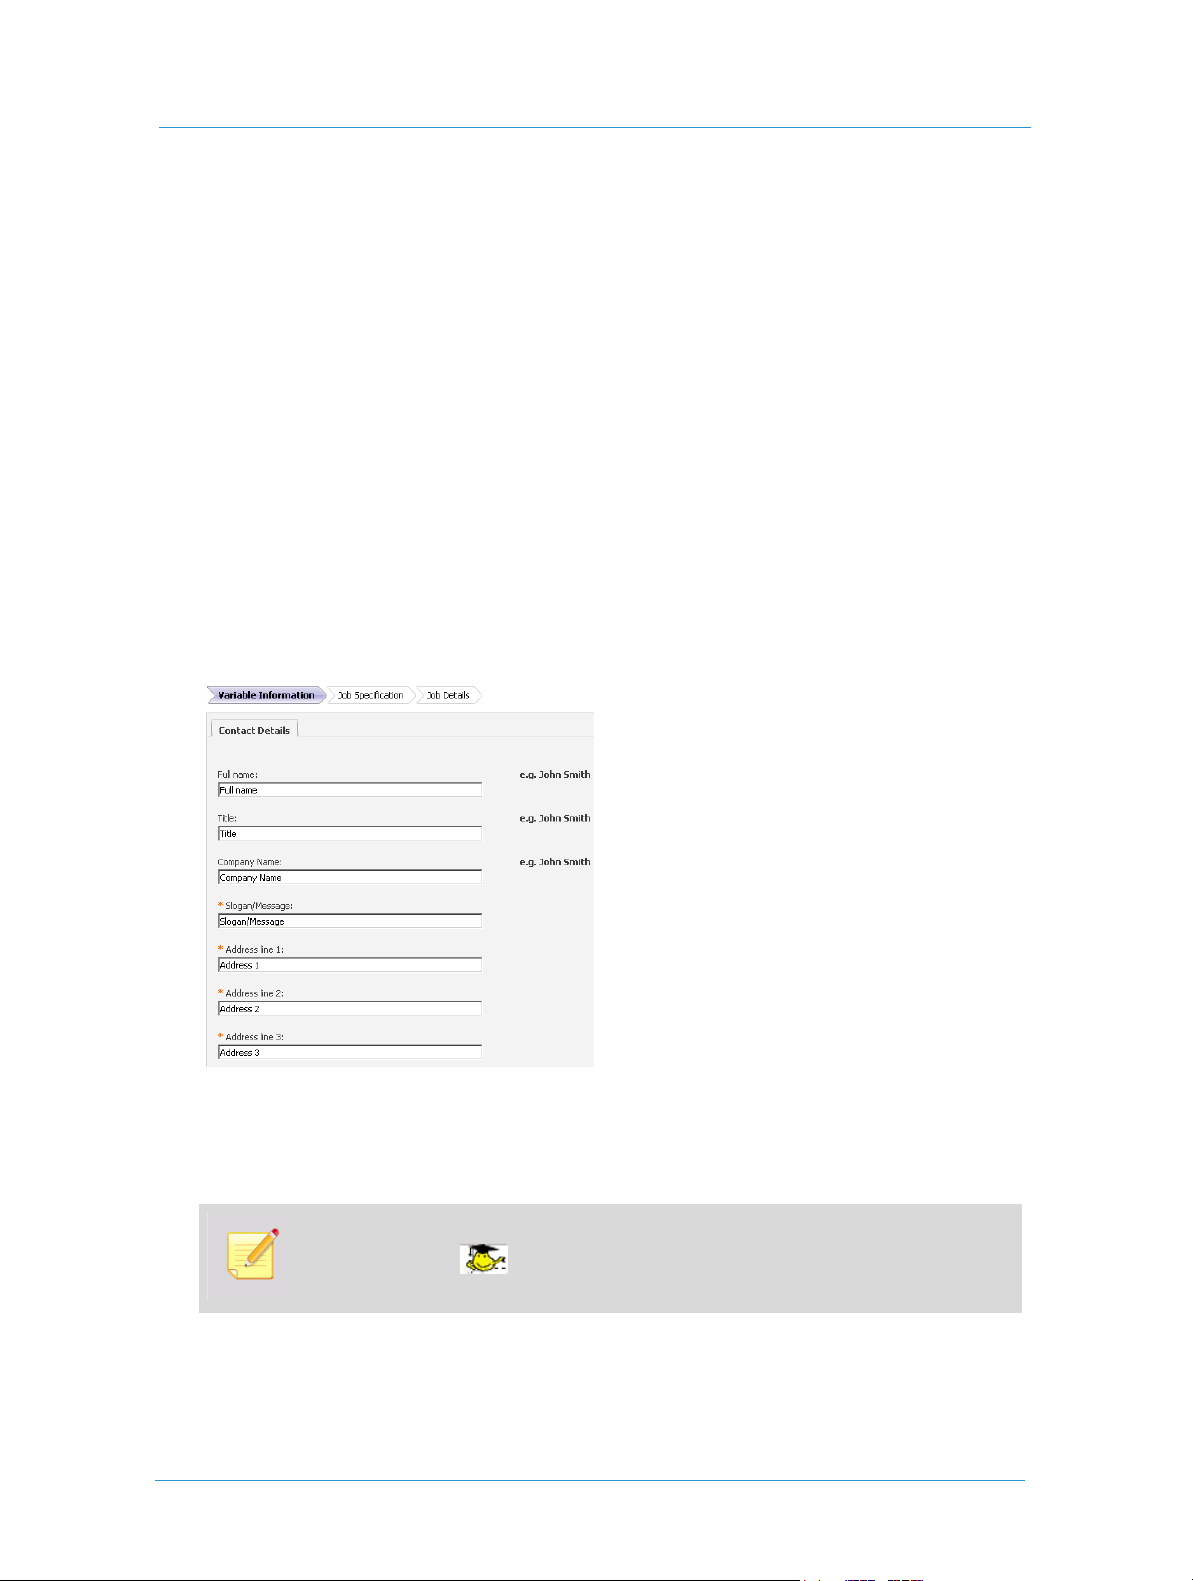
1 Select a job in the catalog by clicking the corresponding Add to Cart button.
If the selected job includes variable fields enabling personalization, the
displaying the fields.
Figure 8: Variable Fields
The page can contain the job preview and job summary panes, which depends on the settings at the Print
Service Provider side. See Job Summary on page 11 and Preview on page 11.
2 Enter information in the variable fields.
Vari a b l e I nf or m at ion page opens,
3 Click
When typing in a field, a dashed frame appears in the preview pane surrounding the entered
information. If the icon is attached to the frame, the field is user-movable, and you
can drag and drop it to any location inside the job page area.
Continue. The Job Specification page opens. See Job Specification on page 7.
13Print Buyer Guide
Page 24
Ordering Jobs
4 Make necessary changes to the job properties enabled for modification, and click
The
Job Details page opens. See Job Details on page 11.
Continue.
5 Enter information in the empty fields, set the shipping date and change the job name, if necessary.
6 Click the
Add to Cart wizard button. The job is created and added to the shopping cart.
The catalog is displayed; this allows proceeding to the ordering of additional jobs. You can complete the
ordering process at a later time.
OR
Click the
Add to Cart and Order button.
The shopping cart appears, enabling you to get a quote for the jobs to be ordered and to complete the
ordering process.
7 To complete the ordering workflow, see Shopping Cart and Order Checkout on page 25.
Ordering Variable Data Jobs
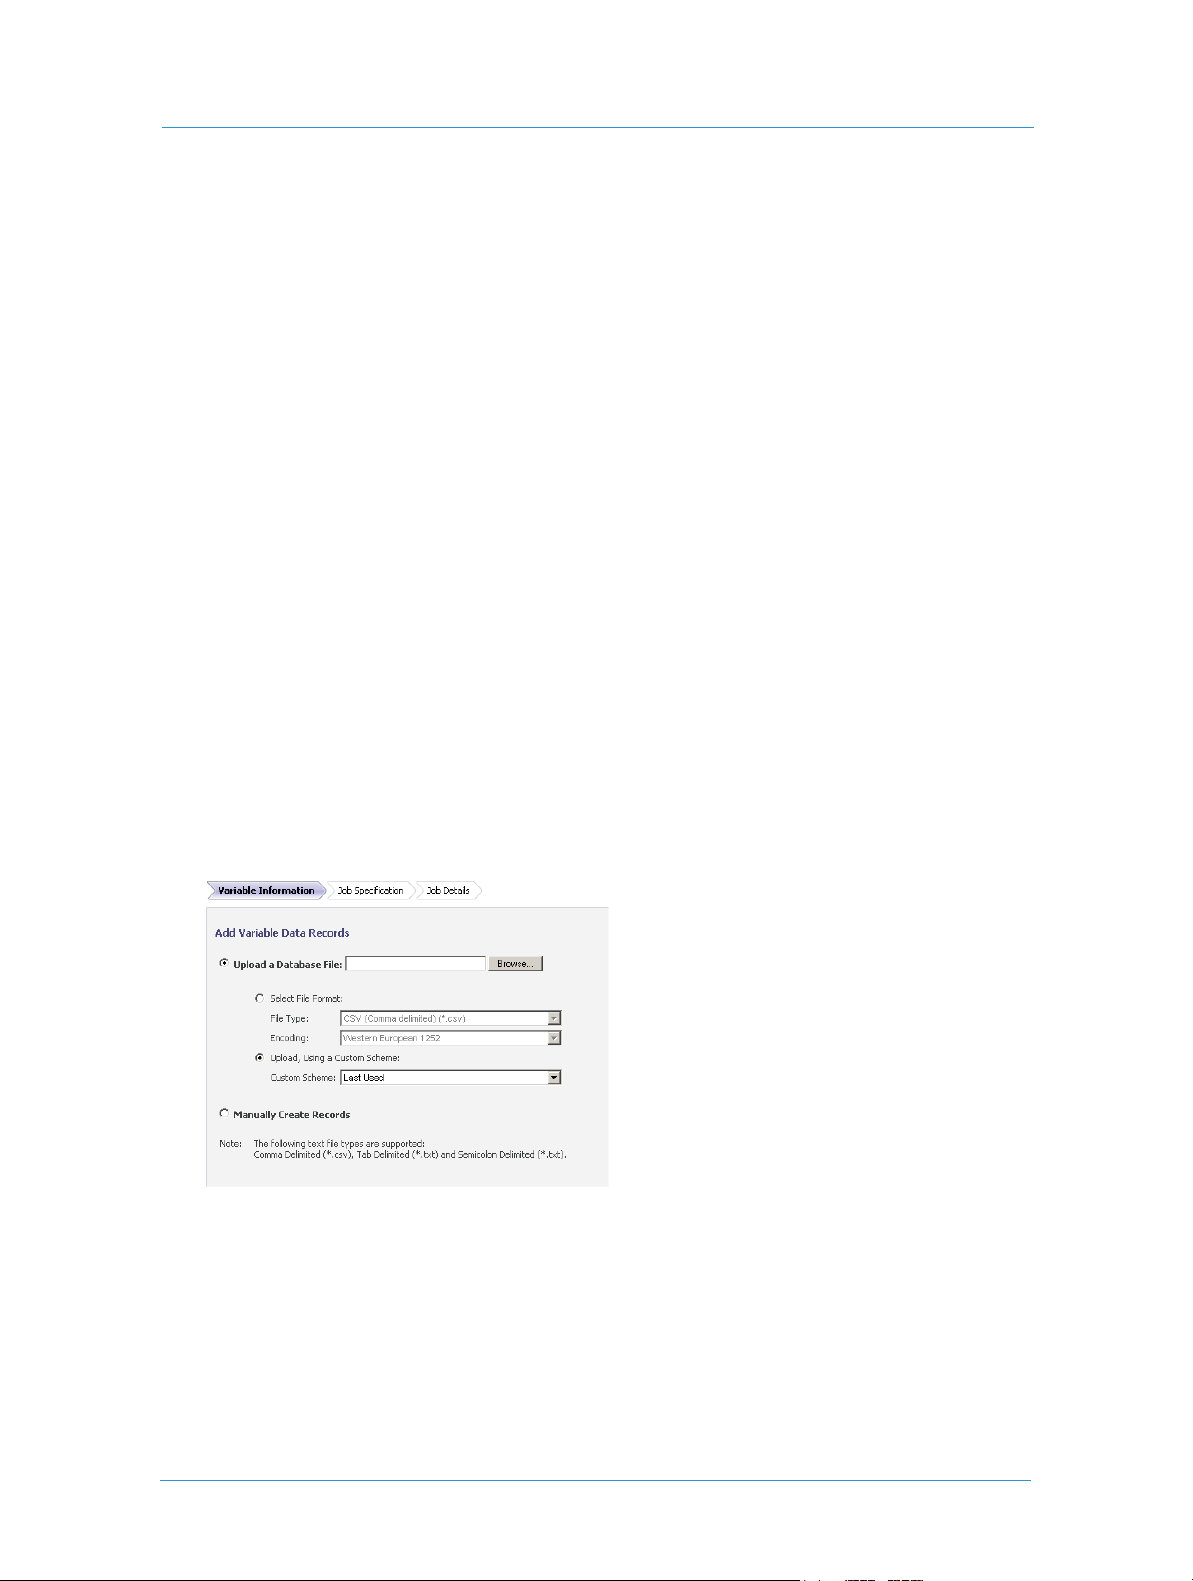
Uploading Variable Records
1 Select a job in the catalog by clicking the corresponding Add to Cart button.
If the selected product is based on a template that enables creation of multiple personalized instances, the
controls of the
database file.
Vari a b l e I nf or ma tion page allow the user to upload Variable Data records from an external
Figure 9: Uploading variable records
2 Choose the Upload a Database File radio button and click Browse to navigate to a file to be uploaded. Select
the file and click
3 Choose the
Open.
Select File Format radio button and select the type and encoding of the file to be uploaded.
OR
Choose the
Upload, Using a Custom Scheme radio button and select a mapping scheme from the drop-
down list.
4 Click
Continue. The next wizard page opens.
Web Services14
Page 25
Ordering Jobs from Superstore Catalogs
Mapping Variable Records
1 Select First Row Contains Field Names.
2 Map variable records of the uploaded file to the variable fields of the job by choosing the required options
from the drop-down lists next to the field captions. Set the
fields that should not be personalized.
Do not import from database option in the
3 To open the
Scheme Management dialog box and save the new mapping scheme, click the Scheme link.
OR
Choose an existing mapping scheme from the drop-down list.
4 Click
Continue. The system processes the uploaded information and creates personalized instances.
Editing Variable Records
The additional editing panel appearing on the right side of the screen allows the user to edit created instances.
Any instance can be viewed, edited manually or removed, and new instances can be added.
When you select a field name in the list of field names above the list of records, the list of names will display the
values for this field.
The same editing panel appears when the user chooses the Manually Create Records radio
button on the
records manually.
1 On the editing panel, select a field name from the upper drop-down menu, to view the list of variable
values uploaded for this field.
2 Select one of the records in the list. The selected record appears in the appropriate field, and the other
fields are updated with the information relevant to that variable data form on the left.
Vari a b l e I nf or ma tion wizard page. This allows the user to create multiple variable
3 To add a new record to the list, modify an existing record in a field on the left side and click the
under the editing panel.
4 To delete records from the list, click the
5 To preview the job in low-resolution PDF format, click the
Remove button.
PDF Preview link.
Use the navigation buttons under the preview to move between the records.
6 To remove all records from the job, click the
7 To add variable records from another database file, click the
8 To export the variable information to an external database file, click the
9 To save the changes made to the variable data, click the
10 Click
Continue.
Clear Database button.
Import Database button.
Export Database button.
Save button.
New button
15Print Buyer Guide
Page 26
Ordering Jobs
Ordering
The job is processed, and the Job Details wizard page opens. See Job Details on page 11.
Additional optional wizard steps can be included in the workflow, depending on settings made by
the Print Service Provider.
1 Enter the job details in the empty fields and change the job name, if necessary.
2 Click the
The catalog appears; this allows proceeding to the ordering of additional jobs. You can complete the
ordering process at a later time.
OR
Click the
The shopping cart appears, enabling you to get quotes for the jobs to be ordered and to complete the
ordering process.
3 To complete the ordering workflow, see Shopping Cart and Order Checkout on page 25.
Add to Cart wizard button. The job is created and added to the shopping cart.
Add to Cart and Order button.
Ordering from Variable Data Archive
1 Select a job in the catalog by clicking the corresponding Add to Cart button.
If the selected product contains an archive of Variable Data, the table of personalized instances appears.
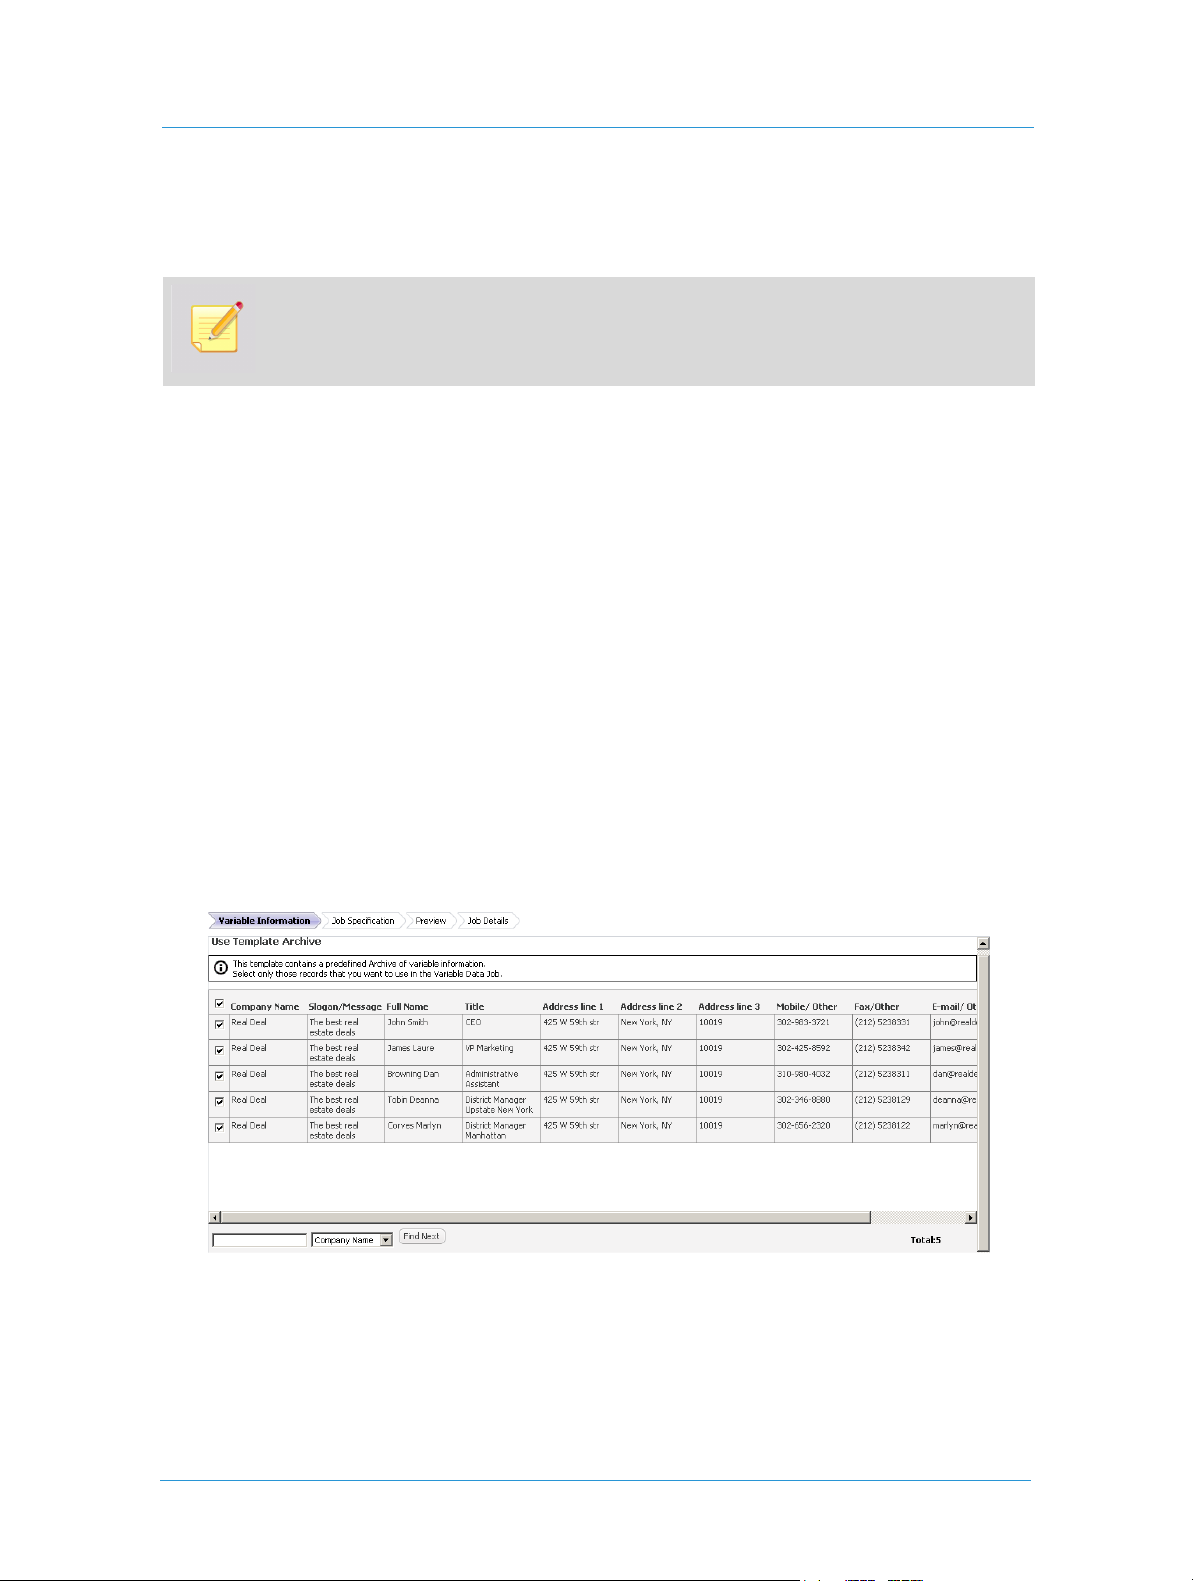
Figure 10: Variable Data archive
Each row in the Use Template Archive table represents one instance of the job. The rows are provided with
selection check boxes. All instances are displayed in the table and marked to be ordered by default.
Web Services16
Page 27
Ordering Jobs from Superstore Catalogs
2 Find required records in the table using the search engine at the bottom of the screen: choose a field name
from the drop-down list of variable fields and enter the record you are searching for.
The relevant row is highlighted in the table.
3 Clear the check boxes for instances that will be not ordered at this time.
You can add variable data records to the archive. Use the Add Records link to access the
appropriate tool for editing Variable Data archive manually (see Editing Variable Records on
page 15 for details).
4 Click
Continue. The Preview page opens. See Preview on page 11.
The preview displays the first record in the archive. To see all records, click the
toolbar icon. The
PDF Preview dialog box opens. Use the navigation buttons under the preview to move
PDF Low-resolution Proof
between the records.
The low-resolution PDF is created and saved. The next time you access this job, the
preview will be available immediately.
5 Close the
6 Mark the
The
7 Change the number of copies to be ordered and click the
PDF Preview dialog box and return to the Preview page of the wizard.
I have reviewed the proof and accept it check box under the preview panel, and click Continue.
Summary page opens. See Job Summary on page 11.
Update Price button.
A recalculated price is shown.
8 Click the
Add to Cart wizard button. The job is created and added to the shopping cart.
The catalog appears; this allows proceeding to the ordering of additional jobs. You can complete the
ordering process at a later time.
OR
Click the
Add to Cart and Order button.
The shopping cart appears, enabling you to get quotes for the jobs to be ordered and to complete the
ordering process.
9 To complete the ordering workflow, see Shopping Cart and Order Checkout on page 25.
17Print Buyer Guide
Page 28

Ordering Jobs
Ordering Jobs from HTML Catalogs
Products included in HTML catalogs are represented by thumbnails, with the details displayed below. When you
are ordering from an HTML catalog, you order one item at a time without going through the shopping cart.
Main Workflow
1 On the Order Jobs page, click the Start Ordering button under Order from Our Catalog.
The default catalog appears, as defined in the user settings. The catalog content is displayed to the right.
Each product in the catalog is provided with a link used to start the ordering procedure.
2 Click the
3 On the next screen, verify the product details and price. The displayed default price is calculated for the
default number of copies shown in the
4 Change the number of copies to be ordered.
When you are ordering a VI job, the variable information fields appear among other job details.
5 From the predefined options of the drop-down menus, choose the information to be printed in the variable
fields, or enter required information manually.
6 Click
7 On the next screen, verify the price components and total price, payment method and shipping address for
the job you are ordering.
8 View all job pages. By default, the first job page is shown in the preview. Use the
box above the job preview to navigate the pages.
9 Click the
10 Click
The order is issued to the Print Service Provider.
Start Order link under a product to be ordered.
Number of copies field.
Continue.
Page Number drop-down
PDF Preview link to view the job soft proof.
Place Your Order. The order confirmation appears, displaying the job and order details.
Additional Ordering Options
There are additional options for ordering jobs based on HTML catalogs or templates. Information contained in
any HTML catalog can be exported to an external HTML page, which can then be used as the starting point for
ordering. These options enable employees in a Print Buyer organization to order their print matter without
logging into the system, while maintaining centralized design and budgetary control.
There are two features that enable employees to order jobs from an external HTML page:
Exporting HTML - exporting a catalog/template to an external HTML page that is saved and then placed
on the Print Service Provider’s Internet site or on the Print Buyer organization’s Intranet site. Jobs can be
ordered directly from the site.
Web Services18
Page 29

Ordering Inventory Jobs
Sending MailToPrint - exporting a catalog/template to an external HTML page that is distributed to
specific employees by email. The employees receive the HTML page attached to an email message that
permits ordering from the attached page.
Users receiving the HTML page by email are specified in the MailToPrint settings. There are also approval
settings that determine whether the jobs ordered from this specific page by a specified user are sent directly
to production or to employers with higher privileges for approval. In the latter case, when an employee
issues a job order, a request for approval is sent to the predefined addresses.
See Setting MailToPrint Option on page 46 for setting MailToPrint workflow and email addresses.
The ordering workflow for these two options is the same as described in the Main Workflow above.
Ordering Inventory Jobs
Your Print Service Provider can enable specific jobs to be printed and stored in the Print Service Provider’s
facilities. When this option is enabled for a template, the jobs can be printed to inventory and ordered to
inventory. Printing to inventory can be enabled for static jobs only. See Inventory on page 65 for managing
inventory templates.
Ordering to Inventory
Ordering jobs to inventory is performed from the same Inventory window where the inventory templates are
managed.
1 Click the
opens.
2 Find a required inventory template by name using the search engine above the list of templates. Entering
the complete name into the field locates the specific template. Entering a character string locates all
templates with names beginning with the character string.
3 Use
other attribute.
4 Select the required template from the list of search results and click the
template details.
The shopping cart opens. The job is added to the shopping cart and indicated by the icon.
5 Set the number of copies to be printed to inventory.
6 Complete the ordering procedure (see Shopping Cart and Order Checkout on page 25).
Manage Templates tab and then click the Inventory option in the left menu. The Search window
Advanced Search to narrow the search results by adding filtering criteria such as template number or
Print to Inventory button under the
19Print Buyer Guide
Page 30

Ordering Jobs
Ordering from Inventory
Ordering jobs from inventory is performed from the template repository. In the template repository, inventory
templates are indicated by the icon. When an inventory template is selected, the number of job copies
currently stored in the inventory is displayed with the template details.
1 Select an inventory template on the
ordered from inventory.
2 The
3 Set the number of copies to be ordered from inventory.
4 Complete the ordering procedure (see Shopping Cart and Order Checkout on page 25).
Add to Cart and Order button appears. Click the button to add the job to the shopping cart.
The shopping cart opens. The job is added to the shopping cart and indicated by the icon.
Templa tes page and note the maximum number of copies that can be
Ordering Jobs from Files Stored on the User’s Computer
To order jobs using the files stored on the user’s computer:
1 On the
The
2 Select a required job type and click the
The ordering wizard starts.
The wizard is comprised of different ordering steps, depending on the selected job type. See the
corresponding example wizards in the Ordering Jobs from Superstore Catalogs section above.
Order Jobs page, click Start Ordering under Print Documents from Your Computer.
Choose Job Type screen appears, displaying the types of jobs that can be ordered.
Select button.
3 Perform the necessary operations on each wizard page. See Optional Wizard Steps on page 6.
4 Click the
The
ordering process at a later time.
OR
Click the
The shopping cart appears, enabling you to get quotes for the jobs to be ordered and to complete the
ordering process.
5 To complete the ordering workflow, see Shopping Cart and Order Checkout on page 25.
Add to Cart wizard button. The job is created and added to the shopping cart.
Order Jobs page appears; this allows proceeding to the ordering of additional jobs. You can complete the
Add to Cart and Order button.
Web Services20
Page 31
Ordering Book Assembly Jobs
Workflow for ordering Book Assembly jobs includes the following steps:
Uploading Print Files
Setting Binding Style
Preflight Report
Defining Job Components
Ordering
To order jobs composed from a number of print files or components:
Ordering Book Assembly Jobs
1 On the
2 To proceed to the first wizard step, click the
Order Jobs page, click the Start Ordering button under Order a Book Assembly.
When running the wizard for the first time, a screen appears introducing the wizard. This
screen can be skipped the next time the user runs the wizard by marking the appropriate
checkbox.
Start Printing button.
The
Upload Files wizard page appears, with instructions for the user regarding the work procedure.
Uploading Print Files
1 To upload files one by one, choose the Upload a File radio button.
Locate the files to be included in the job using the
files to the job by clicking the
OR
To upload multiple files simultaneously, choose
The Print Service Provider’s FTP site window opens. Select the files and drag and drop them to the
window.
The file names appear in the
Upload button.
Uploaded Files pane.
Browse button, select the files one by one and add the
Use FTP Multi-File Upload radio button.
Any file uploaded to the job can be removed at this stage.
2 When all files are added, click
binding style.
Continue to proceed to the next screen, which allows the user to define the
21Print Buyer Guide
Page 32

Ordering Jobs
Setting Binding Style
1 On the Define Binding Style page, choose the book binding from enabled options.
For each binding style chosen, an appropriate set of additional parameters is enabled.
2 Define all additional binding parameters.
3 Click
Continue. The system uploads and verifies the set of files.
Preflight Report
If there are files that have print-related problems, the message “Done with errors” appears, and the problematic
files are indicated by warning icons. The
1 Click the link to start the preflight check and display the file report.
The user can proceed with ordering, regardless of the problems. If the user decides to
continue anyway, the appropriate check box should be marked in the lower part of the screen.
The system checks color settings, fonts in use and images included in the files. The
appears.
2 Click
Continue. The wizard proceeds to the next step where job components can be defined.
PDF Preflight link appears for each file that has print-related problems.
File Upload Report
Web Services22
Page 33

Defining Job Components
The Define Components window appears.
Figure 11: Defining components of a Book Assembly job
Ordering Book Assembly Jobs
The left pane of the window displays the list of uploaded files, in the uploading order, and includes details.
Properties of the whole book are displayed in the
Book Summary pane.
A composite job can start with a single file based on which book components can be
created. It can be defined which pages of the file are cover, which are B&W and which have
color content.
1 To add tabs to the book, click the
The
Add Tabs dialog box opens.
Add Tabs button.
2 Choose the tab type and paper quality and enter text for each new tab. Enter the number of pages to be
followed by the tab. Repeat until all tabs are defined, and click
OK.
The new tabs appear in the list of components.
3 To add blank pages to the book, click on the
The
Add Blank Pages dialog box opens.
Add Blanks button.
4 Choose whether the new blank pages are color or B/W, and choose the paper quality. Enter the number of
blank pages to be added. Enter the numbers of the pages to be followed by the blank pages, and click
OK.
The new blank pages appear in the list of components.
5 Change the order of components in the list using the
Move Up and Move Down control buttons located at
the top of the components list.
23Print Buyer Guide
Page 34

Ordering Jobs
6 To change the properties of a particular component, select the component in the list.
The component properties appear on the right side of the window, in the
pages
pane.
Any change to one of the properties requires resetting all properties. As a result, all items in
the components list are removed.
Change properties for selected
7 Make the necessary changes to the type and paper quality of the selected component and click
The component details are changed in the list.
8 To define page exceptions, enter the page numbers in the
components, and click
The numbers of the selected pages appear in the pane, and the appropriate settings are enabled.
9 Make the necessary changes and click
10 Preview the book in low-resolution PDF format, and run the preflight check.
Select.
Apply.
Select Pages text box under the list of
Apply.
Ordering
1 Click the Add to Cart wizard button. The job is created and added to the shopping cart.
The first wizard page appears; this allows proceeding to the ordering of additional Book Assembly jobs. You
can complete the ordering process at a later time.
OR
Click the
The shopping cart appears, enabling you to get quotes for the jobs to be ordered and to complete the
ordering process.
2 To complete the ordering workflow, see Shopping Cart and Order Checkout on page 25.
Add to Cart and Order button.
Web Services24
Page 35

Shopping Cart and Order Checkout
Shopping Cart and Order Checkout
When the user clicks the Add to Cart and Order button of any ordering wizard, the shopping cart appears
allowing the ordering workflow to be completed.
Figure 12: Shopping cart
A unique number is assigned by the system to each job when it is added to the shopping cart.
When ordering from the shopping cart, all the jobs appearing on one page of the shopping cart
are combined in one order.
Handling Jobs in Shopping Cart
1 Click the note icon next to a job number to enter or edit a note for this job.
The note can be viewed by the Print Service Provider and can serve as a communication channel for special
instructions between the Print Buyer and the Print Service Provider.
2 For any job that is not to be ordered at this time:
Click
Save for Later to remove the job from the shopping cart and transfer it to Saved Jobs for future use.
OR
Click
Delete to permanently delete the job from the shopping cart.
3 Click the job name link to return to the ordering wizard page, where the job properties, content and details
can be modified, if required.
25Print Buyer Guide
Page 36

Ordering Jobs
Order Price Calculation
1 In the Quantity box, set or type the number of job copies to be printed for each job.
2 Click
3 If you accept the prices, click the
Get Quote to calculate the price of each job in the order and the cumulative quote for the order.
Proceed to Checkout button.
Order Checkout
The standard order checkout procedure completes the ordering workflow and consists of the following steps:
Selection of shipping address and method
Selection of payment method
Reviewing order summary
Placing the order
The procedure can be customized according to the Print Buyer requirements.
Setting Shipping Parameters
1 To modify the displayed shipping address, click Edit on the Choose a Shipping Address screen.
2 To select another shipping address, click the
page 77 for details.
3 To enter a new shipping address, click the
Show Address Book link. See Handling the Address Book on
Enter a New Shipping Address link.
4 To ship to more than one address, click the
5 After the appropriate address(es) have been added, click
The
Choose Your Shipping Options screen appears.
6 Set the shipping date using the calendar.
7 If a choice of shipping methods is available, select the required shipping method, and click
Ship to Multiple Addresses link.
Continue.
Continue.
Web Services26
Page 37

Shopping Cart and Order Checkout
Placing Order
1 On the Place the Order screen that appears, choose a payment method from the options enabled by the
Print Service Provider.
2 Verify the order information, choose a cost center for each job in the order and complete the
Code
fields for each job, if required.
3 Click the
The
4 Click the
Place Your Order wizard button.
Order Confirmation screen appears indicating that the order is placed and displaying the order details.
Continue Shopping button to return to the Order Jobs screen.
For jobs that have not proceeded to order checkout, viewing and modifying the job properties is
enabled. For a job that has proceeded to checkout, only viewing of the job parameters is enabled.
Reference
27Print Buyer Guide
Page 38

Ordering Jobs
Web Services28
Page 39

3
Tracking Jobs
Job Queues and Statuses
The Track Jobs page allows the user to view lists of jobs in different statuses, to order jobs that are ready to be
ordered and are waiting in the shopping cart, to repeate orders and approval cycles, to save jobs as templates, to
edit job properties and to search for jobs according various criteria.
Following are the job queues and statuses defined in the system:
Saved Jobs - the jobs created and saved previously and ready for ordering. These jobs can be viewed by the
Print Service Provider but are not ordered until the Print Buyer adds them to the shopping cart and orders
them.
Shopping Cart - the jobs placed in the shopping cart. See Shopping Cart and Order Checkout on page 25.
Approval - the jobs ordered by users that are not assigned the approval privileges, and are waiting for
approval by a Supervisor or Administrator. The
and enables approval or rejection.
Printing - the ordered jobs currently in the Production queue on the Print Service Provider side.
Shipping - the ordered jobs the Print Service Provider has shipped.
Received - the ordered jobs the Print Buyer has received from the Print Service Provider.
Approval queue displays all of the jobs awaiting approval,
Page 40

Tracking Jobs
Searching for a Job
The Search window is accessed by clicking on the Search option under the list of job statuses on the Track Jobs
page.
Figure 13: Search window
The same window can be accessed by clicking the View Status button under Order Status on the
Order Jobs page.
Main Features of the Search Window
The window is composed of the following elements:
Search engine and the Advanced Search button - a search mechanism that offers a variety of methods to
locate a specific job or a number of jobs characterized by common criteria. See Search Options on page 31
for details.
Search results table - lists the jobs that have been discovered by the search. The table contains a number of
attribute columns. Clicking on a column header sorts the list of jobs by attribute.
Use the
search results table. The list of all available job attributes is displayed in this dialog box. When an attribute is
selected, a column with this attribute name appears in the search results table, and the relevant information is
displayed.
Excel Report button - the user can export the search results into an Excel file. Clicking on this button
accesses a dialog box, which allows the user to determine which attributes will appear in the Excel file. When
an attribute is selected in the dialog box, a column with this attribute name appears in the Excel file.
This feature is optional; the export is enabled if the appropriate module was purchased by your Print Service
Provider.
Column Selection button to open the appropriate dialog box where you can set appearance of the
Job details pane - displays parameters of a job selected in the search results table and provides links for
related operations.
Web Services30
Page 41

Searching for a Job
Search Options
Search options available in the Status drop-down list are as follows:
All - displays jobs in all possible queues and statuses.
All (excluding deleted) - displays jobs in all possible queues and statuses, except for deleted jobs.
Saved Jobs, Pending Approval, Ready for Printing, Shipped, Received, Artwork - displays jobs in their respective
queues.
Rejected - displays all jobs rejected by the Supervisor or Administrator in the Approval queue.
Deleted - displays all deleted jobs.
Ready to Order, Ordered, Not ordered - displays all jobs in the corresponding status.
Additional filtering criteria can be entered in the search boxes:
The Search dropdown box allows selecting an attribute to be filtered. The list of attributes includes general
job identification attributes, pricing attributes, order details and status, shipping information and user
details.
The command drop-down box next to the Search box is used for setting the filter type as text-based or
numerical. Options included in this drop-down list depend on the type of attribute selected in the
box.
Search
The following table lists and describes all optional filter settings:
Command Options
Filter Type Command Description
1 Text-based Like Search for all job names containing a letter, letters or word
entered into the next text box.
2 Numerical > Search for all job numbers larger than the number entered
in the next text box.
< Search for all job numbers smaller than the number
entered in the next text box.
<= Search for all job numbers smaller than or equal to the
number entered in the next text box.
=> Search for all job numbers larger than or equal to the
number entered in the next text box.
<> Search for all job numbers smaller or larger than the
number entered in the next text box.
= Search for all job numbers equal to the number entered in
the next text box.
31Print Buyer Guide
Page 42

Tracking Jobs
The text box next to the command box is used for entering letters or numbers that represent the search
target.
Advanced search enables the user to enter a specific status and attributes that narrow the scope of the
search. The
Advanced Search button accesses the appropriate dialog box, where several of these attributes
can be combined.
Job Details and Related Operations
The job details pane is provided with the following links to additional information and tools:
PDF Preview - allows the user to preview a selected job in PDF format.
Note - accesses a dialog box, where a note for the Print Service Provider can be added or edited.
Preflight - starts the preflight operation and displays the file report that includes colors, fonts and images
information.
Variable D a ta - appears only when a VI job is selected in the search results table. Clicking on this link
accesses the
import the records from an external database file to the selected job. See Ordering Variable Information Jobs
on page 13 for details.
Attachments - allows the user to attach design files (fonts, images, etc.) to the job.
Optional activities buttons - the operations enabled for a job depend on the status of the job. Accordingly,
there are different combinations of operation buttons for different jobs selected in the search results table.
See Job Activities on page 32 for details.
Edit Variable Data dialog box, which allows the user to create variable records manually or to
Job Activities
Depending on the type and status of a job selected in the search results table of the Search window or in any of
the
Tra ck Jobs queues, the following command buttons may appear on the screen:
Add to Cart - transfers the selected job to the shopping cart for receiving a price quote and ordering. See
Shopping Cart and Order Checkout on page 25 for working with the shopping cart.
Re-order - sends a copy of the selected job to the shopping cart. Appears for jobs in the Printing, Shipping
and
Received queues.
Delete Job - deletes the job from the system.
Duplicate Job - creates a new job that is identical to the selected job. Appears for jobs in the Saved Jobs
queue and adds duplicate jobs to the same queue.
Edit Properties - accesses the Edit Properties dialog box, allowing the user to view and edit the job
properties.
Move to Received - transfers the selected job to the Received queue notifying the Print Service Provider that
the job has been received. Appears for jobs in the
Save as Template - saves the selected job as a template for future use. Appears for jobs in the Saved Jobs,
Printing, Shipping and Received queues.
Shipping queue.
Web Services32
Page 43
Job Activities
The Save As Template button appears only for users with Manage Template privileges. See
User Types and Privileges on page 71.
Variable D a t a - appears when a VI job is selected in the Saved Jobs queue. Clicking this button accesses the
Edit Variable Data dialog box, allowing the user to create variable records manually or to import the records
from an external database file to the selected job. See Ordering Variable Information Jobs on page 13 for
details.
Send Approval Email - appears when a job is selected in the Saved Jobs queue. It is used for receiving
feedback on a job from one or more reviewers before the job is ordered. The user enters the subject,
comments and email addresses of approvers. The approval cycle is carried out by email and does not
require the approvers to be system users. The recipients receive an email message, add comments and click
Accept or Reject.
Each time a recipient accepts or rejects a job, the initiator receives an Approval Status email
indicating the recipient’s action.
An Administrator, Supervisor or Super User can approve and order any job regardless of the
approval status.
33Print Buyer Guide
Page 44

Tracking Jobs
Web Services34
Page 45
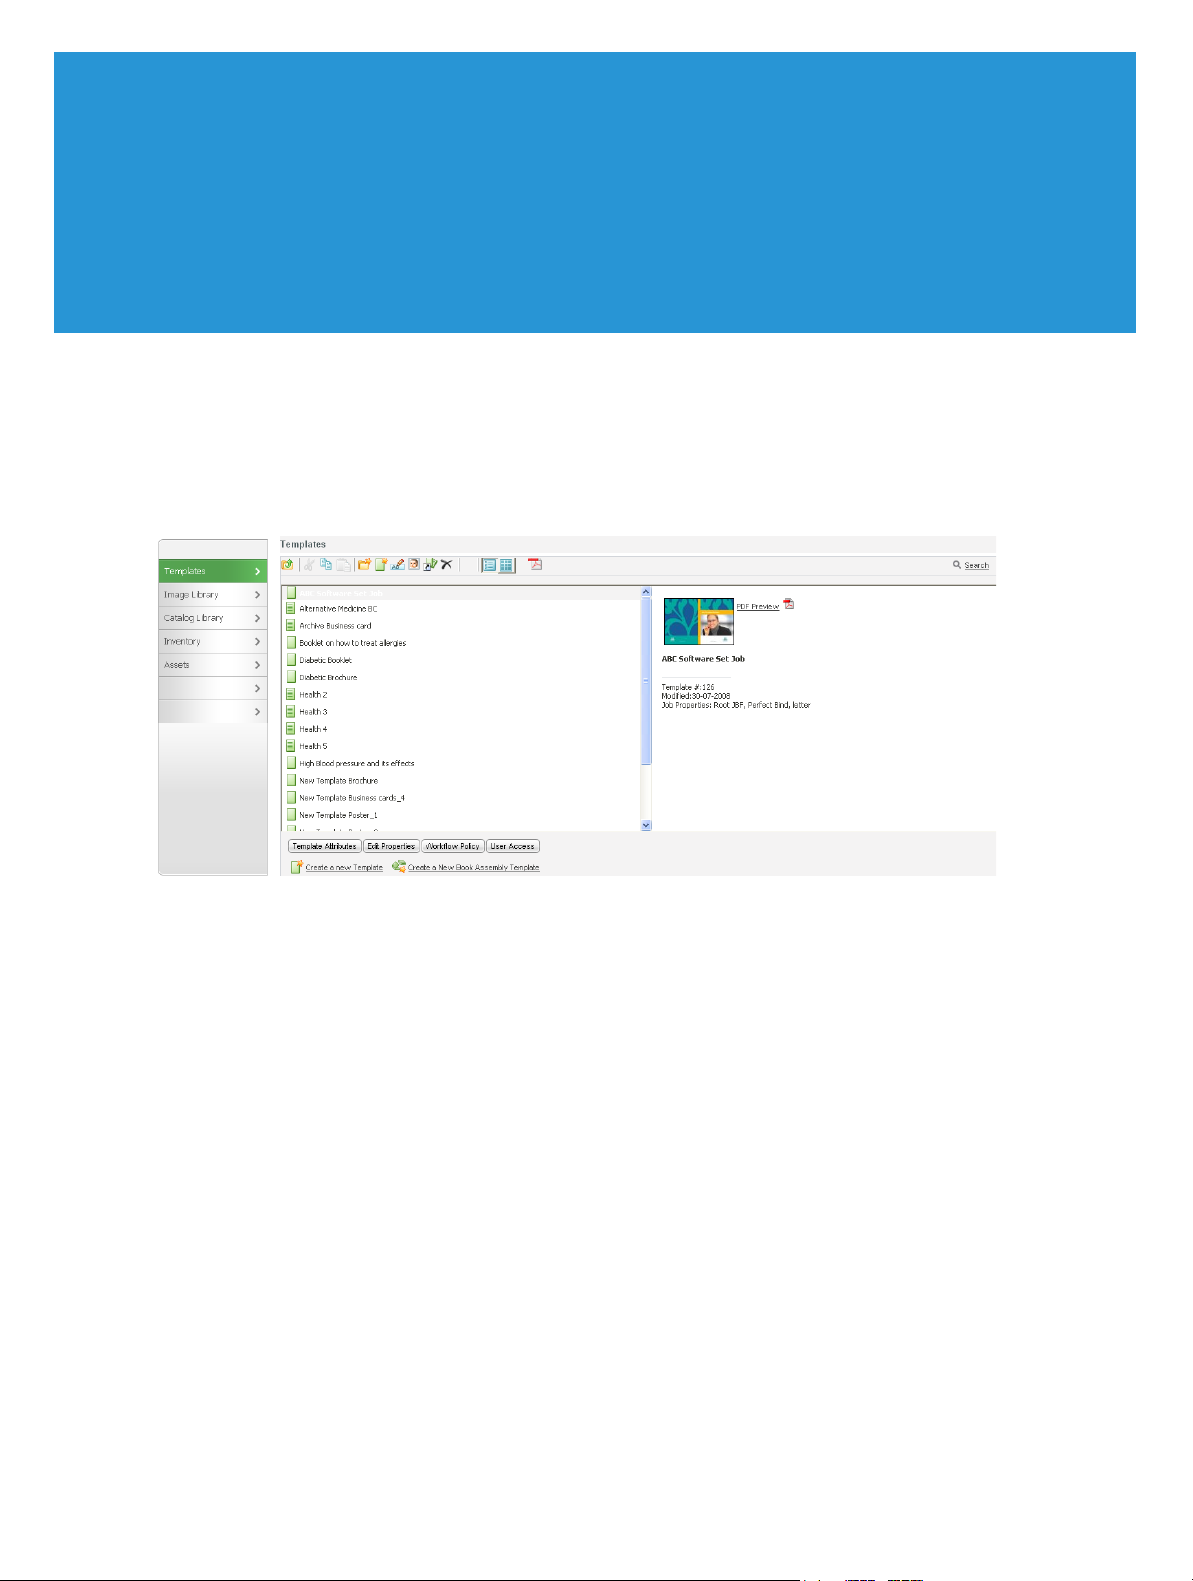
4
Managing Templates
Templates Repository
When the user clicks on the Manage Templates tab, the Tem pl ate s window opens by default.
Figure 14: Templates window
The repository of available templates is displayed in the central pane of the window. Information for a selected
template/folder is displayed on the right side of the window.
The window toolbar provides the user with the tools to manage the templates and the repository. See Controls
and Operations on page 36.
The
Search link enables the user to find a specific template or group of templates. See Searching for Templates
on page 37.
Page 46
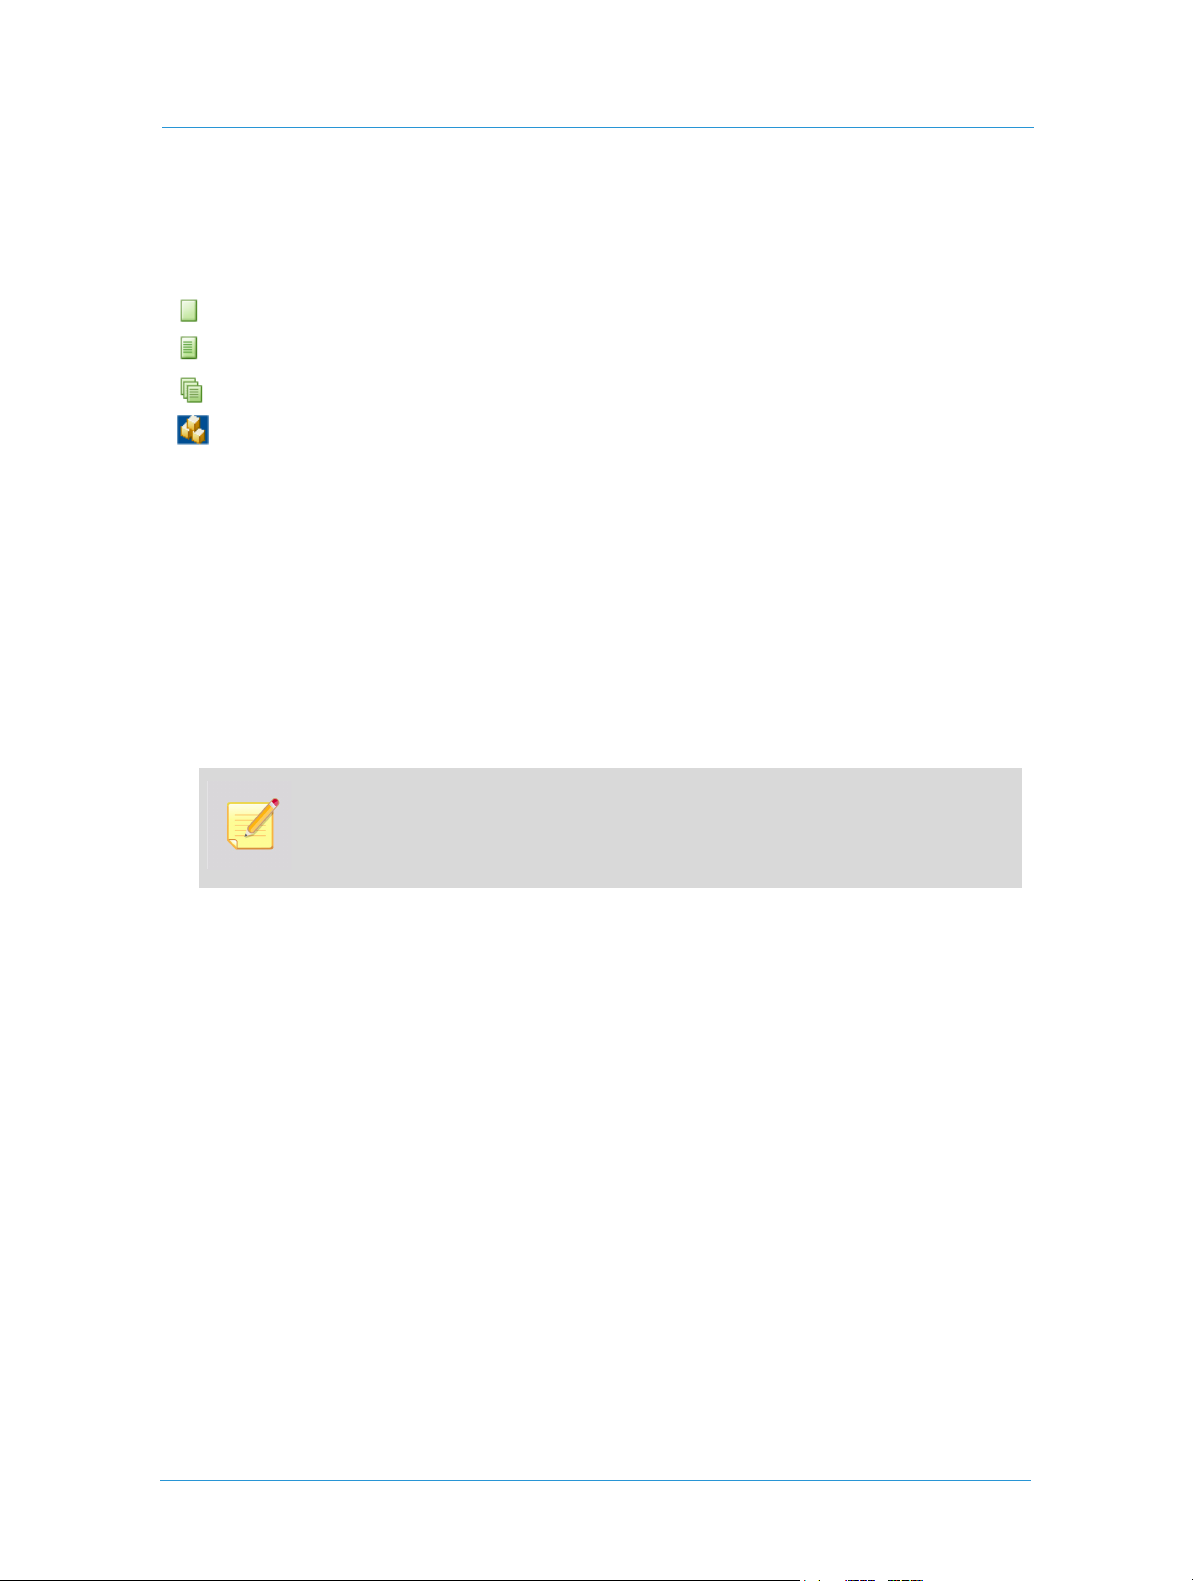
Managing Templates
Template Types
Template types are indicated by the following icons:
- indicates static templates (simple and composite).
- indicates VI templates for creating Personalized or Variable Data jobs.
- indicates VI templates already containing a Variable Data archive.
- indicates static templates for the jobs that can be printed to inventory and ordered from inventory.
See Basic Concepts on page 2 for job - template relationships.
Controls and Operations
The Temp lat es screen toolbar contains icons for standard operations such as cutting, copying, pasting, renaming
and deleting any selected item, and creating a new folder.
In addition, there are control icons and links that initiate a number of specific operations:
Create New Template - opens the Choose Job Type page and initiates the workflow for creating static and VI
templates.
The same workflow is initiated when you click on Create a New Template at the bottom of
the screen. See Creating Static Templates on page 39.
Clicking on
composite templates. See Creating Book Assembly Templates on page 44.
Catalog Link - opens the Choose Catalog dialog box,.which enables locating a specific catalog in the catalog
library and adding it to the templates repository.
View list - displays a list of folders and templates in default view mode in one hierarchical level, and the
appropriate information for the selected folder/template:
If a folder is selected, the folder’s name and icon are displayed.
If a template is selected, the basic template information is displayed, such as name, job type, colors, page size
and last modification date.
If the selected template is a VI template that contains an archive of variable records, the number of records is
displayed.
View thumbnails - enables viewing the template repository items as thumbnails. This view displays only the
names and thumbnails.
PDF Preview - enables displaying a PDF preview of the selected template.
Search link - accesses the screen used to search for templates.
Create a New Book Assembly Template initiates the workflow for creating
Web Services36
Page 47

Creating Templates
Searching for Templates
The search mechanism offers a variety of methods to locate a specific template or a group of templates that
share common criteria.
1 Click on
2 Enter a complete or partial template name or template number in the search text box.
The mechanism searches and displays all suitable templates in the repository. The more complete the
template name, the more precise the search.
3 The
4 Click the
Advanced search enables the user to enter specific status and attributes, or combine several of these
attributes, to narrow the scope of the search.
5 Click the
displayed on the screen. In this dialog box, the entire list of the template attributes is shown. Select the
check boxes for the attributes that are to be displayed.
6 Click the
you to select attributes that will appear in the Excel file. When an attribute is selected, the relevant
information appears in the Excel file.
7 Select a template in the
activities are displayed in the lower section of the window (see the Controls and Operations section on
page 36).
8 Click the
Search to open the search window.
Search Results table includes attribute columns. Click on a column header to sort the list of templates.
Advanced Search button to open the Advanced Template Search dialog box.
Column Selection button to open the dialog box for selecting the attribute columns to be
Excel Report button to export the search results to an Excel file. The dialog box opens enabling
Search Results pane to view the template details. The details and the enabled
Folder View button to return to the Tem pl at es window.
Creating Templates
The operations described in this section can be performed only by users assigned a privilege for managing
templates. The users can create templates of any type and add them to the template repository for future use.
There are different workflows for creation of static, VI and Book Assembly templates. The system provides the
user with different creation wizards.
Workflows and Wizards
There are two main creation workflows, according to the following template classification:
Simple job templates - static and VI templates containing one uploaded content file
Composite job templates - Book Assembly templates containing a number of uploaded files.
37Print Buyer Guide
Page 48

Managing Templates
Simple Job Templates
The workflow for creation of a static template allows the user to:
Upload content to a Job Type
Add and remove properties
Define parameters to be enabled for editing when a job is created based on this template
Modify default properties (intent) defined in a Job Type.
See Creating Static Templates on page 39.
The workflow for creating VI templates includes all of the above and the following additional operations:
Creating variable fields in uploaded PDF files using the Selective Upload feature
Defining properties of the variable fields using the iForm Editor feature
Uploading Variable Data records to the variable fields.
See Creating VI Templates on page 40.
The wizard for creating static/VI templates is initiated by clicking the
Create New Template toolbar icon or the
appropriate link at the bottom of the screen, and includes the following steps:
General Properties
Content
Intent
File Report
Variable Information
Composite Job Templates
The workflow for creating Book Assembly templates includes the following operations:
Uploading a set of files
Setting the binding properties
Changing the properties of separate book components independently of one another:
Setting page exceptions
Adding / removing tabs and blank pages.
See Creating Book Assembly Templates on page 44.
The wizard is initiated by clicking the corresponding link at the bottom of the screen, and includes the following
steps:
Upload Files
Define Binding Style
File Upload Report
Define Components
Save As Template
Web Services38
Page 49

Creating Templates
Creating Static Templates
Uploading Content to a Template
1 On the Te mpl ates screen, click Create a new Template to initiate the template creation wizard.
You can go back to the templates repository at any stage of template creation by clicking the
Back To Library button or Back to Template Library.
Choose Job Type dialog box appears.
The
2 Select a required Job Type and click
3 On the
4 Click
5 Click
6 On the
7 Click
General Properties wizard page, enter all necessary details and related notes.
Change Thumbnail to replace the template thumbnail by one uploaded from the dedicated library.
Save and Continue to proceed to the next step.
Content wizard page, navigate to the required content file and upload it.
Save and Continue to proceed to the next step.
Select. The template creation wizard opens.
Setting Template Properties
1 On the Intent wizard page, in the Visible column, select the options to display when creating a job based on
this template.
The intent options reflect the properties of the selected Job Type. No option that is not
defined in the Job Type can be added.
2 Configure how the properties are organized on the
when a job is ordered based on this template:
Job Specification page of the ordering wizard, initiated
a Add a new tab to break the
ordering wizard:
i Click the
ii Enter a new tab name and description in the dialog box that opens, and click
A row with the new tab name is added to the list of intent options.
b Use the
move it to the required position.
See Job Specification on page 7 for description of the ordering wizard page.
Add Tab button.
Move up and Move Down buttons to organize the properties: select a property in the list and
Job Specification page into several tabs when displaying intent in the
OK.
39Print Buyer Guide
Page 50

Managing Templates
3 Modify the default settings defined in the Job Type:
a Select an intent option and click the
from this template.
b Change the settings, modify the step name, enter a description and click
4 Click the
Remove button to remove a selected option from the intent list.
Edit button to add or remove selection options when ordering jobs
Save.
Preflight Check of Uploaded File
1 Click Save and Continue. The preflight check of the uploaded content file is performed, and the File Report
wizard page opens.
2 Use the
OR
Click
See File Report on page 8 for more information about the preflight report and related operations.
Click here to review these problems link to open the report and handle the discovered problems.
Save and Continue to save the template with the discovered problems.
Saving Templates as Static
1 Click Save and Continue.
The template creation wizard proceeds to the
The preview of the uploaded file is displayed on this page. See Preview on page 11 for preview controls.
Vari a b l e I nf or mati o n page.
2 Set the template type to
3 Click
Finish.
The created template is saved as a static template and added to the list on the
The
Variable I n f or ma t i o n page is not included in the workflow for ordering jobs based on this template.
Static (no variable information). This is the default.
Te mp la te s screen.
Creating VI Templates
1 On the Te mpl ates screen, click Create a new Template.
The template creation wizard is initiated.
2 Perform all steps of the static template workflow from Uploading Content to a Template and up to Preflight
Check of Uploaded File.
The template creation wizard proceeds to the
creation wizard goes through the following steps:
Setting VI Workflow
Creating VI Fields
Defining Properties of VI Fields
Arranging VI Fields
Saving VI Template
Vari a b l e Inf o rm a t io n page. From this point, the VI template
Web Services40
Page 51

Creating Templates
Setting VI Workflow
The controls and operations enabled for jobs containing VD archives are different from controls and
operations for jobs that can be personalized manually or by uploading records from external database files.
To configure the first
Vari a b l e I nf or m at ion page in the workflow for ordering jobs based on this template:
1 From the drop-down menu, choose one of the two VI workflow options:
Personalize (single record ordering) - for ordering jobs with one variable data record.
VDP (database upload/editing) - for ordering jobs with multiple variable data records.
When you choose any of the two options, the
Selective Upload and iForm Editor buttons become enabled.
These button are used for creating and defining variable fields.
Creating VI Fields
1 Click the Selective Upload button.
The
Modify PDF page appears, displaying the uploaded PDF file.
2 From the drop-down menu of the
Choose Select Text Area to enable selecting text fields.
Drag the cursor over the text to select it.
OR
Choose Select Graphic/Image Area to enable selecting image fields.
Select an image by dragging the selection frame around the object.
Select Text/Image button on the toolbar:
The
Selected Fields dialog box appears.
Figure 15: Selective Upload tools
41Print Buyer Guide
Page 52

Managing Templates
Selected fields appear in the dialog box and represent the created variable fields.
3 Rename the created fields by selecting items in the list and by typing new names in the text box at the bottom
of the dialog box.
The variable fields are created. VI jobs can be ordered based on this template, and personal information can
be entered manually or uploaded to the prepared fields.
4 Using the navigation buttons under the preview, move to another template page and repeat Step 2 and Step
3, if required.
5 Click
OK. The PDF preview closes, and the user is returned to the Vari ab l e I n for ma t io n page of the template
creation wizard.
When the variable fields are chosen using the Selective Upload feature, the application examines
all of the fonts that are used in these fields and verifies that a matching font exists on the server.
The user can choose a replacement font, whether a matching font has been found or not.
Defining Properties of VI Fields
1 Click the iForm Editor button.
iForm Editor dialog box opens. The created fields are listed in the left Field Name pane.
The
Figure 16: iForm Editor dialog box (example for a variable image field)
Web Services42
Page 53

2 Set the properties of the created variable fields:
Creating Templates
a Select a field in the
Field Name list.
The relevant properties appear to the right, in the settings pane.
b Set the field properties.
3 Click
Advanced Options to define rules for the selected field.
See Defining VI Fields using iForm Editor on page 48 for a description of VI field types, properties and
rules.
4 Click
OK to close the iForm Editor dialog box and return to the Vari a b l e Inf o rm a t io n page of the template
creation wizard.
5 Click
The next page opens, allowing the user to define the arrangement of the variable fields at the
Information
Save and Continue.
Va ri ab le
step of the job ordering workflow.
Arranging VI Fields
The ability to distribute the variable fields over several pages is important in the following circumstances:
A large number of variable fields is defined.
The template has several pages with variable fields on each page.
The variable fields have different context.
Splitting of the variable field list can be done manually or, in case of multi-page templates, automatically.
1 Select a field and click
2 Select a tab and rename it using the
3 Use
Move Up and Move Down to change the order of fields on a page or to move a selected field to a
Add Tab to create manually a new page in the ordering wizard.
Edit button.
required page.
4 Use the
Split Steps by Pages button to automatically distribute fields by pages.
The list of variable fields is broken into several pages.
Saving VI Template
1 Click Finish. The template is created and saved.
The new template appears in the repository, in the
Templa tes window.
43Print Buyer Guide
Page 54

Managing Templates
Creating Book Assembly Templates
1 On the Te mpl ates screen, click Create a New Book Assembly Template.
The
Upload Files wizard page appears with the instructions for the user regarding the work procedure.
2 Perform steps of the Book Assembly jobs ordering workflow, from Uploading Print Files and up to Defining
Job Components, as described in the Ordering Book Assembly Jobs section.
3 Click
4 Enter the template title and fill in the details and comments fields. In the
Continue. The template creation wizard proceeds to the Save As Template page.
folder for the new template, and click
The new template is saved, and the user is returned to the
Finish.
Templa tes screen.
Create In field, choose a destination
Template Activities
When an item is selected from the template repository, a combination of control buttons appear. The control
buttons enable a number of management and setting operations for a selected template or catalog, according to
the template/catalog type:
Edit Properties - appears for all template types. Runs the same wizard used to create the selected template.
See Setting Template Properties on page 37 for editing procedures.
Wor kf low Pol icy - appears for all template types. Opens a dialog box to allow users with Manage Template
privileges to set additional requirements in the job ordering workflow. See Setting Workflow Policy on
page 45.
User Access - appears for any template selected in the repository. Opens a dialog box to assign access rights
for both User Groups and Users. See Managing Users on page 69.
Manage Archive - appears only for Variable Information templates. Accesses the screen that allows the user
to import variable records from an external database file, to export variable records to an external database
file, and to remove or edit the variable records included in the template. See the corresponding information
in the Ordering Variable Information Jobs section on page 13.
MailToPrint - appears when a static or VI template is selected. Opens a dialog box that allows setting the
MailToPrint properties and the email address to which to send selected template information as an HTML
page. Jobs can then be ordered by the user directly from the sent HTML page. See Setting MailToPrint
Option on page 46 for setting MailToPrint option.
The buttons do not appear when a folder is selected from the templates repository.
Web Services44
Page 55

Template Activities
Setting Workflow Policy
1 On the Te mpl ates screen, select a template in the list and click Workflow Policy to configure additional
settings in the ordering workflow. These settings take effect when a job is ordered based on this template.
The
Wor kf low Pol icy dialog box allows setting mandatory actions in the job ordering workflow, adding
input fields and setting some variable fields to require approval.
2 To set mandatory actions related to the soft proof, mark the
Require Preview check box.
When this check box is marked, the user ordering from this template is required to review the soft proof of
the job prior to ordering.
The following options are enabled:
JPG Preview and PDF Preview radio buttons - the preview is displayed in the selected format.
The user must accept preview in order to continue - when selected, the check box I have examined
the Job Preview and approve it for printing
appears on the preview page of the ordering wizard. To add
the job to the cart or add the job to the cart and order, this check box must be selected.
3 Select the
Force Reference Code check box to make the reference code field mandatory when a job is
ordered based on this template.
4 Under
Additional Input Fields, mark the required Job Name, Reference Code, and Cost Center check boxes
to set these fields to appear in the job ordering workflow and require completion before continuing with
the procedure.
5 Under
Approval Policy, mark the Apply Supervisor Approval By-pass Fields check box. An additional pane
opens in the dialog box.
This additional section appears only when you edit a VI template.
6 Specify the variable fields in the template that require Supervisor approval:
a Mark the
b Mark the
Modification check box to set the field to require approval when the field text is modified.
Overflow/Empty check box to set the field as one that requires approval when the text is
longer than the text box or the field is left empty.
7 Click
OK to save changes to the workflow defined in the template.
45Print Buyer Guide
Page 56

Managing Templates
Setting MailToPrint Option
User that receives a MailToPrint email message can order jobs using a sent HTML page. The MailToPrint
settings define the user addresses and a number of requirements for a job ordered from the emal.
See Additional Ordering Options on page 18 for MailToPrint feature explanation.
The MailToPrint ordering option can be set for any static or VI template residing in the
repository.
Uploading of Variable Data records from an external database file is not enabled for VI templates
designated as MailToPrint templates.
1 On the
Te mp la te s screen, select a template in the list and click MailToPrint to set the ordering policy for jobs
ordered based on this template and from this email.
The MailToPrint policy is set for specific email. If you create another MailToPrint with the
same template but with another email address, you can define different policy.
The
Send MailToPrint Properties dialog box appears allowing you to define the ordering policy:
2 Select
The Job must be approved by a supervisor... to hold the order in the shopping cart until it is
approved by the Supervisor.
3 Select
An order is created after... to create an order automatically without Supervisor approval. The next
settings are enabled.
4 Choose the number of days from order to shipping from the
5 Mark the
Show Price Before Processing the Order check box to view the price before the job is submitted
Days to Deliver drop-down list.
to the Print Service Provider. If this check box is clear, jobs are ordered without price verification.
6 Mark the
Show the Reference Code Input Field check box to display the reference code text box during
ordering. If this check box is clear, the field does not appear.
7 Mark the
Ask for User Login check box to allow only users with a user name and password to order jobs
from this template. If this check box is clear, any user that has access to the MailToPrint email can order the
jobs.
8 Mark the
9 From the
be used for ordering jobs, or set
10 From the
Allow File Attachments check box to allow attaching additional files to the ordered job.
This email message can be used drop down list, choose the number of times the same email can
No Limit.
Max number of copies allowed per order drop-down list, choose the maximum number of job
copies that can be ordered from this template.
The
Email Options pane allows specifying the MailToPrint message information and addresses:
11 In the
Message Subject field, enter the text to appear in the email message subject line.
Web Services46
Page 57

Template Activities
12 In the
Recipient Email field, enter the email addresses to receive the message. Use a comma or semicolon
to separate addresses. Use the
Address Book link for convenient entry of frequently used email addresses
from the address book.
13 Select the default user name from
Default Login Profile. When no login is required, all jobs ordered using
the email appear with the default user’s credentials.
14 Set the default code in the
15 In the
Personalized Message Header field, enter the text to appear in the email message header.
Default Reference Code field.
The control buttons allow exporting the selected template to an external HTML page used for job ordering:
16 Click the
Export HTML button to export the selected template information to an external HTML page and
save it for future use. The page can then be uploaded to the Print Service Provider’s Internet site or to the
Print Buyer organization’s Intranet site, and used for ordering jobs.
17 Click the
Send MailToPrint Properties dialog box, as described above.
Send MailToPrint button. The template information is sent to the email addresses specified in the
47Print Buyer Guide
Page 58

Managing Templates
Defining VI Fields using iForm Editor
Use the iForm Editor to specify:
Text alignment and boundaries properties.
Font properties.
Properties that govern the behavior of fields during ordering.
Properties that control the display of fields in the printed job.
Defining the Basic Field Properties
1 If the iForm Editor dialog box does not open automatically, click the iForm Editor button on the Define
Fields
tab of the Var iable I n for ma tion page. The iForm Editor opens, along with the Layout Preview dialog
box.
2 For each field adjust the settings as necessary. Refer to the detailed tasks below.
3 If necessary, access the
4 Click
OK; the iForm Editor is closed and the Define Fields tab is displayed again.
Advance Options area. Refer to the detailed tasks below.
Text Fields
iForm Editor feature enables to define text fields’ input rules and behavior, alignment and boundaries, and font
properties.
Defining Input Restrictions on Fields
You can define several input restrictions on fields:
No restrictions.
A field is mandatory.
A field is mandatory and its value must differ from the default value.
A field’s value must be changed or be left empty.
To mark a field as mandatory:
1 Select the field.
2 Select
Input Field text cannot be Blank in the Field Input list.
To mark a field as mandatory and different from the default:
1 Select the field.
2 Select
Input Field text must be changed and cannot be Blank in the Field Input list.
Web Services48
Page 59

To mark a field as must be changed or left empty:
1 Select the field.
Defining VI Fields using iForm Editor
2 Select
Input Field text must be changed or empty in the Field Input list.
Defining Non-Editable Fields
Non-editable fields are used for captions. The caption has to be made variable in order to be able to move it on
the template according to values of other fields, but requires no input from the user during ordering.
1 Select the field.
2 Select the
Non-Editable check box.
Defining Non-Printable Fields
Non-printable fields are used for data collection.
1 Select the field.
2 Select the
Do not print this field check box.
Defining User Moveable Fields
User moveable fields can be interactively moved by the Print Buyer during ordering.
1 Select the field.
2 Select the
User moveable check box.
Defining Pinned Fields
Pinned fields are useful in cases when a template contains some fields that are to be updated manually for a
certain job, and other fields that will be uploaded from a database. You need to mark the manually updated
fields as Pinned, the application will enable the Print Buyer to type the values of Pinned fields and will then
enable to upload a variable database to the other fields.
1 Select the field.
2 Select the
Pinned check box.
Defining the Target Audience of a Field
The target audience of a field enables to make a field visible or invisible according to the user type viewing the
variable data form.
1 Select the field.
2 Select the appropriate option in the
View By list.
49Print Buyer Guide
Page 60
Managing Templates
Defining Field Format
Field format rules warn the user when the data entered is not formatted correctly, and in some cases corrects the
typed data. The formats are:
Special formats for phone numbers and zip codes.
Special formats for emails.
ALL UPPER CASE, all lower case, Sentence case or Initial Caps.
Limit the acceptable charactres.
Other, custom, formats.
The field format correction and warning is applied only to manual entry of data using the variable
fields for personalized jobs.
1 Select the field.
2 Select the required format from the
Field Format list.
OR
Click
Field Format link for more options.
Defining Drop-down Menu Fields
Drop-down lists are used to simplify the user's interaction with the application, to improve accuracy of data input
and to reduce costly mistakes. There are two types of drop-down lists – simple and complex.
It is important to remember that while the drop-down lists have many benefits, changing them
(adding, editing or removing values) requires editing the template. Therefore, it is preferable not to
create drop-down lists for fields which values might need to be changed by users.
Simple drop-down lists are used to limit the number of options for a specific variable field, and at the same time
to facilitate fast and accurate entry of data when creating the print job.
Complex drop-down lists are used in cases when the values of several fields are interdependent. In such a case
you can create a drop-down list on one field (the leading field), and connect each value in drop-down list to a set
of values in other fields. I.e. a change in one field will cause a pre-defined change in other fields as well. A
common example of such a case would be a company with offices in several locations. When ordering a business
card or letterhead, an employee has only to select a location, and then the appropriate address, city, fax, etc. will
be filled in automatically.
Defining a Simple Drop-down Menu
1 Select the field.
2 Select
3 Click
Dropdown Menu in the Field Type list; to the right of the Field Type appear a drop-down icon and
two new buttons:
Add List; the Add List dialog box appears.
Add List and List Management.
Web Services50
Page 61
4 Enter several values, use comma as a separator between the values.
Defining VI Fields using iForm Editor
5 Click
OK to save the list and close the window.
Defining a Complex Drop-down Menu
To simplify this task it will be presented through an example. For the sake of the example we will assume that
you have a leading field called Office Name and two fields connected to it: Office Address and Office Fax.
The instructions below are for creating the table manually. You can also import a table that you
have created in Excel.
1 Select the field.
2 Select
3 Click
4 Click
5 Type the table name (Office) and click
6 Create the primary column:
Dropdown Menu in the Field Type list; to the right of the Field Type appear a drop-down icon and
two new buttons:
List Management; the List Management dialog box appears.
Add Table; the New Table dialog box opens.
Add List and List Management.
OK.
a Select the name of the leading field (Office Name) in the list.
You will be creating several columns of values, each column connected to one field. Generally,
you can create the columns in any sequence you wish, and then define which of these columns is
the primary (leading) field. It is, however, more convenient to start with the leading field and then
add the fields depending on it.
b Type the first value in the empty text field (New York).
c Click
Add Row; another row is added to this column.
d Type another value (London), continue adding rows and values as necessary.
e Select the radio button above the Office Name column to indicate that this is the
Primary Column
(leading field).
7 Create connected fields:
a Click
Add Column; another column is added to the table. The new column has the same number of
rows as the primary column.
b Select the name of a field to be changed based on the value of the primary column in the list (Office
Address in our example), and type the values for this field for each of the values in the primary
column.
c Add a column for another connected field (Office Fax).
51Print Buyer Guide
Page 62

Managing Templates
8 Click
OK to save the table and close the window.
Look at the field names: the leading field has a drop-down list icon. All the connected fields are
marked with a lock icon and have the same color rectangle marking that they belong to the same
drop-down list group. Had the form contained more than one drop-down list field, each group
would have been marked by a different color.
Defining Composite Fields
Composite fields are used when you have a paragraph that is not variable with variable strings inside it. The
length of variable strings affects the flow of text in the paragraph.
A good example would be a direct mail campaign for a supermarket, promoting a specific product in the
supermarket according to the preferences of the recipient:
“In our fruit department you will find fresh pineapples every day!”
The sentence in this example is the “composite” field, while the name of the department and the product are its
children fields. Most of the standard field properties can be applied to the children fields.
1 Select the field.
2 Select
3 Select the children fields:
Composite from the Field Type list; the Composite properties are displayed.
a Select the word or words you want to become one field and click the word selection icon ; the
selected string is highlighted and a field is added to the list under the composite field.
b Repeat for additional strings.
4 Click
Save.
Image Fields
iForm Editor feature enables to define image fields’ input rules, behavior, alignment and boundaries.
Defining Input Restrictions on Fields
You can define several input restrictions on image fields:
No restrictions.
A field is mandatory (an image must be selected).
A field is mandatory and its value must differ from the default value (default image must be changed and an
image must be selected).
A field’s value must be changed (default image must be changed).
To mark a field as mandatory:
1 Select the field.
2 Select
An Image Must Be Selected in the Field Input list.
Web Services52
Page 63

To mark a field as mandatory and different from the default:
1 Select the field.
Defining VI Fields using iForm Editor
2 Select
To mark a field as must be changed:
1 Select the field.
2 Select
Default Image Must Be Changed and an Image Must Be Selected in the Field Input list.
Default Image Must Be Changed in the Field Input list.
Defining Non-Editable Fields
1 Select the field.
2 Select the
Non-Editable check box.
Defining Non-Printable Fields
Non-printable fields are used for data collection.
1 Select the field.
2 Select the
Do not print this field check box.
Defining User Moveable Fields
1 Select the field.
2 Select the
User moveable check box.
Defining Pinned Fields
1 Select the field.
2 Select the
Pinned check box.
Defining the Target Audience of a Field
1 Select the field.
2 Select the appropriate option in the
View By list.
Controlling the Image Upload Policy
You can define several image upload options:
Do not allow image upload – will force the user to select an image from the available selection.
Allow upload to the job folder – the user will be able to upload the image, but it will be available only for
this job.
53Print Buyer Guide
Page 64

Managing Templates
Allow upload to the personal folder – the user will be able to upload the image to a personal folder, hence
only he will be able to use this image while ordering in the future.
Allow upload to the selected folder – the user will be able to upload the image to a predefined folder in the
public library.
Use access to the public image library – the user will be able to upload the image to any folder in the public
image library.
To define the policy:
1 Select the field.
2 Select the required
Image Upload option.
Controlling the Image Selection GUI
You can control whether the images for selection will be displayed during ordering as a drop-down list or as a
slider control.
1 Select the field.
2 Select the required
Image Selection GUI option.
Enabling the Image Editor
When image editing is enabled, the user after uploading an image can crop, scale or rotate it as needed using the
interactive Image Editor tool.
1 Select the field.
2 Select the
Use Image Editor check box.
Advanced Options
In many cases of generic designs for personalization, specific values used in the job can affect the design. The
advanced options of iForm Editor are designed to deal with these situations. See example of advanced properties
in the table below.
Name Title Tel Mobile Email
Janice Jones President 444-555123 422-555345 janice@global.com
John Smith Vice President 444-555125 422-555348 john@global.com
James Cook Supervisor 444-555321
Carol Donaldson Project Manager 444-555327 carol@global.com
In this example each one of the employees for whom a business card should be printed, requires different data
fields. One doesn't have a mobile phone, another doesn't have a mobile or email.
Web Services54
Page 65

Defining VI Fields using iForm Editor
The options for dealing with this type of situation are:
Create one design and leave gaps in it. This option is not valid in professional quality print jobs.
Create several different designs. This is a valid and common solution but it requires maintaining different
design versions and requires an extra decision by the user as to when to use each design.
The advanced options of iForm Editor address this issue by defining flexible rules that deal with these changes
ad-hoc:
Position links handle the vertical and horizontal position of fields relative to position of other fields. This
can be related to the size of a fields or to absence of data in a field.
Suffix enables you to specify a constant suffix in a field, so that the ordering user has to type only the
changing information, a situation that is common to emails. This reduces unnecessary typing of data and
thus possible errors.
Group Centering is used to balance “white space” resulting from such changes as vertically or horizontally
modified position links, changes in the number of lines in a multiline field, or horizontal centering of fields
with varying length.
Empty Fields is used to remove labels and captions for fields that have been left blank.
Identical Input Fields is used to specify several fields that use the same data, so that the ordering user has to
enter the data only once and all the connected fields are populated automatically. This reduces unnecessary
typing of data and thus possible errors.
Style Selection is used for instances where a field's style (font, font size, and font color) might require
adjustment.
Defining Advanced Options
1 Click Advanced Options; the Advanced Options dialog box opens with the Positions Links tab selected.
2 Click
Defining Position Links
1 Select the field you would like to re-position (for example, City) and click Add; the field is added into the
2 Select the empty field (for example, Address 2) in the
3 Leave the relative positioning radio button at its default selection.
4 A text message at the bottom of the window indicates the nature of the change (for example, “In case
5 Repeat the process for each field that needs repositioning.
6 Click
OK when you finish modifying the advanced options.
Moved Field text box and a Leading Field drop-down list appears.
Leading Field and select the Ver tical L i n k check box.
This ensures that the vertical location of the field being repositioned (City) will be affected by the vertical
position (or the absence) of the other field (Address 2).
‘Address 2’ is empty ‘City’ will be placed in ‘Address 2’ position”).
Apply.
55Print Buyer Guide
Page 66

Managing Templates
Defining a Suffix
1 In the Advanced Options window, click the Suffix tab.
2 Select the field where the suffix does not change (for example, Agent email) and click
to the
Fields with Suffix area.
3 Fill in the suffix (for example, @royalcargo.com) in the
4 Click
Apply.
Field Suffix field.
Add. The field is added
Defining Advanced Group Centering
1 In the Advanced Options window, click the Group Centering tab.
2 Create a block of fields to act a s group by clicking
New Group and entering a name for the group of fields
(for example, Customer).
3 Indicate whether horizontal or vertical centering should be performed for the group.
4 For each field that will be in the group, select the field and click
5 Click
Apply.
Add.
The application calculates the enclosing rectangle for the fields in the group and the vertical or horizontal center
of the rectangle. When a job is ordered, the application checks the existing fields in the order, recalculates the
enclosing rectangle and aligns the new vertical or horizontal center to the original point. It then positions the text
accordingly.
Handling Empty Fields
1 In the Advanced Options window, click the Empty Fields tab.
2 For each field whose label should be removed if the field is empty, select the field and click
added to the
3 When done, click
Empty Fields Definitions area.
Apply.
Handling Identical Input Fields
1 In the Advanced Options window, click the Identical Input Fields tab.
2 Click
3 For each field sharing identical information with another field, select the field and click
4 When done, click on
New Group and enter a name for the field (for example, Customer Name).
Add.
Apply.
Add. The field is
Web Services56
Page 67

Defining Advanced Style Selection
1 In the Advanced Options window, click the Style Selection tab.
Defining VI Fields using iForm Editor
2 To adjust a style item for a group of fields, click
The
Add Group dialog box appears.
a Specify the
Group Name (for example, Customer).
b Select the type of item (Font, Font Size, or Color) in the
the
Add Group dialog box.
c Add fields to the group by selecting each field and clicking
Add Group.
Group Type drop down box, and click OK in
Add.
d Select the allowable style item values (for example, select the allowable fonts if you selected Font from
the drop down list) for the fields in the group.
e Repeat this for each group and style combination.
57Print Buyer Guide
Page 68

Managing Templates
Web Services58
Page 69

5
Job Assets
Catalog Library
A catalog is a collection of templates containing job designs, based on which the Print Buyer can order jobs.
HTML catalogs can be created and distributed to users within Print Buyer organizations via email or through the
organization's web site. Superstore catalogs are created by the Print Service Provider.
On the
Manage Templates page, click Catalog Library in the left menu to enter the library.
A list of available catalogs is displayed in the central pane of the screen. When a catalog is selected in the list, the
catalog content is displayed to the right. When an HTML type catalog is selected, the template’s thumbnails and
details are displayed. See the Ordering Jobs from HTML Catalogs section on page 18 for a description of the
ordering workflow for HTML catalogs. When a Superstore type catalog is selected, the template categories are
displayed. See the Ordering Jobs from Superstore Catalogs section on page 6 for a description of the ordering
workflows for Superstore catalogs.
Templates in catalogs cannot be organized in folders because the catalog is a flat structure with no
hierarchical levels.
Managing Catalogs
The list of catalogs is provided with the tools for creating and managing HTML catalogs.
Creating a New HTML Catalog
1 To create a new catalog, click the New Catalog button under the list of catalogs.
2 In the
3 Click
Adding Templates to HTML Catalogs
1 Use the Add Templates button to open the Choose Template dialog box, which enables adding templates to
Add Catalog dialog box that appears, enter the new catalog name.
OK. The catalog is created and appears in the list.
a selected catalog.
Any template enabled for the user account can be located using this dialog box. The toolbar buttons enable
performing the following navigation and management operations: renaming and deleting templates, creating
new folders and moving one level up to navigate to a required template.
2 Select a required template in the list or in a folder.
Page 70

Job Assets
3 Click the
4 Click
Select button to add the selected template to the created catalog.
Close to return to the Catalog Library.
Exporting Catalog Content
1 Select a catalog in the library.
2 Use the
email addresses of the users to receive the catalog HTML page.
OR
Use the
Print Service Provider Internet site or to the Print Buyer organization Intranet site, and used for ordering
jobs.
Send MailToPrint button to set the ordering policy for jobs ordered from this catalog via email, and
Export HTML button to export the catalog to an external HTML page that can be uploaded to the
Template Display Setup
Clicking the Edit link beneath each template in an HTML catalog opens a dialog box that enables setting the
ordering options and information to be displayed for the current template.
1 From the
that a user can order from this template, when using the catalog.
Max number of copies allowed per order drop-down list, choose a limit for the number of copies
2 Mark the
number of copies for price calculation and click
3 Mark the
information to be displayed. Click
displayed for the current template is the template Job Type.
4 Mark the
Enter the information to be displayed. Click
the default job size as defined in the Job Type.
5 In the
value is the template name.
6 Click
OR
Click
Price check box to display a price per selected number of copies with this template. Select the
Calculate.
Format check box to display the format, as it appears in the text field, with this template. Enter the
Default to display the default format name. The default format value
Size check box to display the size, as it appears in the text field, with this template in this catalog.
Default to display the default size. The default value displayed is
Description text field, enter the information to be displayed as the template description. The default
OK to save the changes, close the dialog box and return to the catalog library.
Cancel to discard the changes and close the dialog box.
Catalog Properties Setup
To set or edit the properties of a catalog, select it in the catalog library and click the Properties button. The
Catalog Properties dialog box opens, and enables you to define the ordering workflow for the selected catalog.
The setting procedure includes:
Setting Display Parameters
Setting Workflow Parameters
Web Services60
Page 71

Catalog Library
Setting Variable Information Fields
Setting Order Parameters
Setting Delivery Parameters
Setting Price Preview
Setting Email Options
Finishing the Setup Procedure
Setting Display Parameters
In the Display Parameters section, specify the display parameters for all templates included in the catalog:
1 From the
The
Changing a value in a dimension field automatically changes the thumbnail size setting to
2 In the
Thumbnail size drop-down list, choose the thumbnail size to display templates in the catalog.
Width and Height fields display the thumbnail dimensions in pixels according to the selected size.
Custom.
Items in row field, specify the number of thumbnails to be placed in one row in the template display
area.
3 Enter the text to appear in the welcome message on the catalog display.
Setting Workflow Parameters
In the Wor kf low Par ameters section, define the ordering and approval parameters for jobs ordered from the
selected catalog:
1 In the
2 Select
This Catalog Can Be Used drop-down box, select the number of times this catalog template can be
used for ordering jobs.
The job requires supervisor approval... to send a supervisor approval email prior to placing the
order.
In the
Approvers field, enter the email addresses of people to receive the approval query. Use a comma or
semicolon to separate addresses. Use the
Address Book link for convenient entry of email addresses.
OR
Select
An order is created after the user approves the job to enable creating an order automatically upon
user approval.
3 Mark the
Ask for User Login check box to allow only users with a user name and password to order jobs
from the catalog.
4 Clear the check box to allow any user that has access to the MailToPrint email (see email settings below) to
order jobs from the catalog.
5 Select the user profile from the
Default Login Profile drop-down list. If no login is required, all jobs
ordered using the email defined below appear with the credentials of this user.
61Print Buyer Guide
Page 72

Job Assets
Setting Variable Information Fields
In the Var i a b l e Inf o rm a t io n section, set the default values of the variable field properties taken from:
The last entry - the variable data templates will be automatically populated by the variable data that was
entered when the variable data templates were last used.
The recent entries - the application collects the variable data entered into each template, when it was used for
ordering from the HTML catalog. When ordering, the user can select from these records, or type other data.
The original design - the default text in the variable data fields will be the same text that was entered into the
templates at the design stage.
Setting Order Parameters
In the Order Parameters section, enable the following options and fields when ordering from the selected catalog:
1 Select
2 Select
3 Select
4 Select
5 Select
Allow Job Name Modification to enable changing a default job name during ordering.
Show the Reference Code Input Field to display the reference code text box during ordering.
Clear this check box if the user does not have to use reference codes.
Default Reference Code to set the default reference code.
Show Cost Center to display the cost center text box during ordering.
Allow File Attachments to enable file attachments to the job during ordering.
Setting Delivery Parameters
In the Delivery Parameters section, enable/disable the following delivery parameters:
1 Select
2 Select
3 Select
4 When the above option is enabled, the following two options are provided:
Allow Shipping Date Modification to enable changing the shipping date.
Clear the check box to disable this option.
Default time from Order to Shipping to enable setting the number of days from the time the order is
approved until the job is shipped.
Allow Shipping Address Modification to enable changing the shipping address.
Clear the check box to disable this option.
Select Always approve Shipping Address to require that the users always verify and approve the
shipping address.
Select Disable Address Book Access to deny user access to the system address book (recommended for
B2C applications).
Web Services62
Page 73

Setting Price Preview
In the Quote and Preview section, enable price preview before jobs are submitted for print:
Catalog Library
1 Mark the
OR
Clear the check box to hide the price. Jobs are ordered without price preview.
Show Price to the User check box to show the price before jobs are ordered.
Setting Email Options
For the catalogs that will be sent as MailToPrint, set email options:
1 In the
2 In the
Email Subject field, enter the text to appear in the subject line of email messages to which the
catalog HTML page will be attached.
Recipient Email field, enter the email addresses of employees to receive the catalog HTML page. Use
a comma or semicolon to separate addresses.
Use the
Address Book link for convenient entry of email addresses.
Finishing the Setup Procedure
1 Click OK to save changes made to the catalog properties, close the Catalog Properties dialog box and return
to the catalog library.
OR
Cancel to close the dialog box without saving changes and return to the catalog library.
Click
The default catalog settings are restored.
63Print Buyer Guide
Page 74

Job Assets
Image Library
The image library stores image files that can be uploaded to templates and jobs. The supported image formats
are: JPG, JPEG, PDF, TIF, and TIFF.
Clicking
is displayed. The list can be searched to locate a required folder by entering the folder name or part of the folder
name in the
Reset button clears the Search box and search results.
The image files residing in the selected folder are listed to the right of the folders pane, and a thumbnail and
parameters of the selected image file are displayed on the right side of the screen.
Image Library in the side menu of the Manage Templates page opens the library. A list of library folders
Search Folder text field. Clicking the Search button initiates the search process for the folder. The
Managing the Image Library
1 Use the toolbar buttons above the list of library folders to manage the list of folders: to create a new folder,
to rename or delete an existing folder.
2 Use the toolbar buttons above the list of image files in a selected folder to manage the files and change the
list display mode:
There are buttons supporting standard file management operations such as cutting, copying, pasting,
renaming and deleting files in the list. In addition, you can toggle the file view mode using the
View thumbnails buttons. You can also download any image file in the library to any available location using
the
Download image(s) button.
3 Use the
Upload Images button to add images to the library.
View list and
Uploading Images to the Library
To upload images to the library:
1 Click the
2 To upload a single file, select
3 To upload multiple files, use the FTP multi-file upload option. Select the appropriate radio button and follow
the wizard instructions.
Upload Images button. The Upload File dialog box appears.
Upload a single file and follow the wizard instructions.
To use FTP for uploading multiple files, the Allow FTP Upload option must be enabled by the
Print Service Provider for the specific Print Buyer.
Web Services64
Page 75

Inventory
Inventory
Jobs ordered from inventory templates can be printed and stored in the Print Service Provider storage facilities,
instead of being immediately shipped to the delivery destination. Using the Inventory feature, the Print Buyer
can order larger numbers of job copies than are currently needed, store them at the Print Service Provider
facility and receive the jobs immediately, when the need arises. See the Ordering Inventory Jobs section on
page 19 for ordering jobs from inventory and printing jobs to inventory.
The
Inventory screen controls enable the user to:
Search and sort inventory templates by template details
Change inventory template properties
Preview inventory templates in PDF format
View inventory jobs, including order and storage information
Track all inventory orders
Managing Inventory Templates
1 On the Manage Templates page, click Inventory in the side menu. The Inventory - Search screen opens.
2 Use the search engine to locate specific inventory templates or groups of templates.
The search results are shown on the screen in the
various information columns.
3 Click the
Advanced Inventory Search dialog box, enter the available details and click Search. The search results are
displayed.
4 Click the
appear in the
attribute is selected, the corresponding column appears in the table.
5 Click the
6 Select a template in the
template thumbnail displays the front page and orientation. The template can be previewed in lowresolution PDF format, and the template properties can be viewed and modified.
7 Click the
page 44 for details.
8 Click the
input fields. See Setting Workflow Policy on page 45 for details.
9 Click the
be saved for future use or sent to a specific user by email, allowing the user to order the jobs directly. See
Setting MailToPrint Option on page 46 for details.
Advanced Search button to add filtering criteria to get more precise search results. In the
Column Selection button to open a dialog box that enables the user to configure which columns
Search Results table. All available template attributes are listed in the dialog box. When an
Excel Report button to export inventory template information to an external Excel file.
Search Results table. The template details are displayed under the table. The
Edit Properties button to view and modify the template properties. See Template Activities on
Workflow Policy button to view and modify the workflow, define mandatory actions and add
MailToPrint button to export the template information to an external HTML page. The page can
Search Results table, which displays template details in
65Print Buyer Guide
Page 76

Job Assets
Variable Data Files
The database files in .txt and .csv format are stored in the Assets library. These files contain Variable Data
records that can be uploaded to VI templates and jobs.
Managing the Library
1 On the Manage Templates page, click Assets in the side menu.
The
Asset Management screen opens. The list of all database files stored in the system is displayed.
Three control buttons under the list allow you to manage the library:
2 Click
3 Click
4 Click
New to open the Upload Asset dialog, which enables browsing and uploading new databases.
Edit to open the same dialog and enable uploading databases to replace existing ones.
Delete to delete a database file selected in the list.
Database Features
When a file is selected in the list, the file details are displayed on the right side of the Asset Management screen.
Asset information is divided into several pages:
The General page allows viewing and modifying the name of an asset selected in the list and enables entering
a description of the asset.
The Asset Scheme page enables the user to create a mapping scheme between the database fields and the
variable fields of a template/job, and to change field name captions, if the database includes field names.
The Linked Templates page shows the templates that currently use the selected asset. This assists the user in
avoiding actions that might adversely affect the linked templates.
Web Services66
Page 77

6
Account Administration
Introduction
The Manage Account options provide the administrator with the ability to define the general contact and email
information for the Print Buyer account, to manage Print Buyer users, user groups, departments and cost
centers, and to handle the address book.
Account setting options are accessed by selecting them from the left menu. The following management
operations are available:
Account - defines a general Print Buyer contact and address, and sets the default starting page for the
account users logging on to the Print Buyer software application. See General Account Settings on page 68.
Users - defines and manages account users and sets an individual starting page for each user logging on to
the Print Buyer software application. See Setting Account Users on page 69.
User Groups - creates user groups and assigns users to groups. See Setting User Groups on page 73.
Departments - defines and manages departments in the Print Buyer organization. See Setting Departments
on page 74.
Cost Centers - defines and manages cost centers in the Print Buyer organization. See Setting Cost Centers
on page 74.
Address Book - handles the Print Buyer address book. See Handling the Address Book on page 77.
Email - sets notifications to be sent by email when specific events take place at the Print Service Provider
side. See Setting Email Notifications on page 76.
Page 78

Account Administration
General Account Settings
General account settings include defining the general Print Buyer contact, shipping and billing addresses, and
setting the default starting page for users logging on to the Print Buyer software application.
When you click on the
Manage Account tab, the Account option is selected by default.
General Contact Information
1 Enter the contact details of a specific user who will serve as the general Print Buyer contact. Enter the details
in the
Contact Information fields: contact name, job title, company name, phone and fax numbers and email
address.
2 Click
Edit Address to enter/modify the contact details and the Print Buyer contact address.
Default Starting Page
1 From the Default Order Jobs Page menu, choose the default view of the starting page. This page is displayed
when an account user logs on to the application:
Choose the Launch Pad option to set the initial Order Jobs page to be viewed as a launch pad. A launch
pad provides different starting points for job ordering.
Choose the Template View option to set the initial Order Jobs page to be viewed as a catalog or a list of
templates residing in the repository or in a specific folder.
2 If the starting page is set to template view, choose from the following options:
Root Folder - to view the entire templates repository.
Specific Folder - to view templates residing in a specific folder.
When this option is selected, the
Catalog - to view a catalog on the initial Order Jobs page. When this option is selected, the Catalog drop-
down box appears. From the drop-down list, choose any catalog available in the system.
Folder link appears, which allows choosing a folder to be viewed.
3 Save the settings or click
Revert to discard the changes.
General Shipping and Billing Addresses
The Shipping and Billing page displays the shipping and billing addresses of the Print Buyer organization. The
links access the address book, where new addresses can be entered or existing addresses can be chosen. For more
information, see Handling the Address Book on page 77.
Web Services68
Page 79
Setting Account Users
Setting Account Users
Users are employees of the Print Buyer organization who are allowed to work with the system.
To define users, go to
opens. All Print Buyer users are listed and user details can be set and modified.
Manage Account and click on Users in the left menu. The User Information window
Managing Users
The window displays a comprehensive list of all the users associated with the specific Print Buyer. The list of
users is searchable and buttons are provided for list management.
Any user that is not assigned administrator privileges can be disabled by marking the Disable
User Account
Creating a New User
To create a new user:
1 Click the
The new user is created and appears in the list under the default name “New User”.
The default user settings are displayed in the right pane.
2 In the
and enter all necessary user information.
Add button under the list of users.
Contact Information pane, replace the default name by editing the FirstName and LastName fields
check box in the upper part of the screen.
3 Enter the user identification information in the
4 Choose an option from the
user. See User Types and Privileges on page 71.
When you choose
5 Use the
addresses are set. Each time the user issues a job order, a request for approval is sent to these approvers.
Approval Email Settings link to open a dialog box, where the approval rules and approver email
User, Designer or Custom user type, the Approval Email Settings link appears.
This workflow bypasses the automatic approval of jobs by Supervisor. This option should
be used only when you need to set that specific approvers will approve the orders of a
specific user.
User Type drop-down list to define which usage privileges are assigned to the
Login Name and Password fields.
69Print Buyer Guide
Page 80

Account Administration
6 Click the
The
Cost Centers
a Select a cost center and click
Assign link to assign a cost center to the user.
Cost Center Assignment dialog box opens. All defined account cost centers are listed in the Customer’s
pane. See Setting Cost Centers on page 74 to create a list of cost centers.
Add. The cost center is moved to the User Assigned Cost Centers pane and
assigned to the user.
b Click
c Select the
Add All to assign to the user the account cost centers that are in the list at the moment.
All Cost Centers check box above the assignment area if you want also the all cost centers
added in the future to be automatically assigned to the user.
d Use
e Click
7 From the
Remove and Remove All buttons to cancel assignments.
Close to save assignments and return to the Users window.
Department drop-down list, choose the user’s department. See Setting Departments on page 74
for creating a list of departments.
8 Enter information in the
9 Click the
Edit Address link under contact information fields to modify the user details and address. The user
IP Filter field.
information is modified in the address book.
10 Save the settings or click
Revert to discard the changes.
User List Tools
The toolbar buttons enable the following operations:
1 Click the
2 Click the
3 To delete a user, select the user from the list and click the
Import Users button to import users from an external database file.
Export Users button to export the list of users to an external database file.
Delete User button.
The list of users is searchable:
1 Enter the user’s name or initial letters in the text field and click
Search.
The list of users is filtered and the specified user (or a number of users) is displayed.
2 Click
Reset. The text box is cleared and the entire list of users is displayed.
User Starting Page
1 From the Order Jobs Page drop-down list, choose the view of the starting page, displayed when this user logs
on to the system:
To use the general account settings, choose Use Customer Default.
See Default Starting Page on page 68 for default settings.
Choose the Launch Pad option to set the initial Order Jobs page to be viewed as a launch pad that
provides different starting points for the job ordering.
OR
Web Services70
Page 81

Setting Account Users
Choose the
Template View option to set the initial Order Jobs page to be viewed as a catalog or a list of
templates in the repository or in a specific folder.
2 If the initial
To use the general account settings, choose Use Customer Default.
Order Jobs page was set to template view, choose from the following options:
See Default Starting Page on page 68 for default settings.
Choose Root Folder to view the entire repository of templates.
Choose Specific Folder to view templates residing in a specific folder.
When this option is selected, the
Choose Catalog to view a catalog on the initial Order Jobs page.
The
User Catalog drop-down box appears.
To use the general account settings, choose Use Customer Default.
Folder link appears, enabling selection of a folder to be viewed.
See Default Starting Page on page 68 for default settings.
OR
Choose another option to view another catalog on the starting page when the user logs on to the
system.
Shipping and Billing
Each user can have either a personal shipping and billing address or can use the default account shipping
address. If the check boxes above the addresses are selected, the
addresses of the Print Buyer organization. The links access the address book where new address information
can be entered or existing addresses can be chosen.
Shipping and Billing page displays the
1 Clear the check boxes above the addresses.
2 Use the address links to access the address book.
For address book information see Handling the Address Book on page 77.
3 Select the user in the address book and click
4 Save the settings or click
Revert to discard the changes.
Select. The address on the screen is changed.
User Types and Privileges
When a new user is created by the administrator, a user type must be assigned to define the user responsibilities
and privileges in the system.
The default user types defined in the system are:
Admin - Has full user privileges, including account administration. An administrator can design jobs, send
jobs to the shopping cart and place orders. In addition, an Administrator is responsible for setting user
privileges.
Supervisor - Has privileges similar to those of an administrator but without access to account
administration. The Supervisor can design jobs, send jobs to the shopping cart and place orders.
Designer - Is responsible for designing jobs and creating templates.
Super User - Creates jobs through the use of templates and can order jobs.
User - Creates jobs through the use of templates but cannot directly order jobs.
71Print Buyer Guide
Page 82

Account Administration
Guest - New or occasional user. Can only create jobs based on templates supplied by the Print Service
Provider for this purpose.
Custom - By default, creates jobs through the use of templates but cannot order jobs.
The Custom option allows creating an additional user type with custom privileges.
User privileges are set by default by the system, according to assigned user type. The following table shows the
default user type privileges.
Privilege Assigned to
Administrator Supervisor Designer Super User User Guest Custom
Account administration
Manage template library
View jobs of other
account users
Place an order/Get
quote
Upload job content
Edit job properties
Use iForm Editor
Use variable data
Use variable data archive
Send MailToPrint
Download plug-ins
View address book
3
333
333
33 3
333
333
333
33333 3
33333 3
333
333
3333333
Edit contact details
The privilege settings can be changed by the Print Service Provider, so it is important to verify
the settings in advance, before you start to assign user types to users.
3333333
Web Services72
Page 83

Setting User Groups
Setting User Groups
To create groups of account users, go to Manage Account and click on User Groups in the left menu to open
the corresponding window.
User groups can be granted either ordering rights or no access rights, for each template residing in
the template repository.
The list of groups in the
User Groups pane is managed using the Add and Delete buttons located under the list.
Creating a New Group
To create a new user group:
1 Click the
2 On the
enter a description.
3 Go to the
on a user) to manage the list of group users.
4 Save the settings or click
Add button. The new group is added to the list.
General page, change the default name of the new group that appears in the Group Name field, and
Users page to add users to the created group. Use the Add and Remove buttons (or double-click
Revert to discard the changes.
Deleting a Group
To delete a group from the list in the User Groups pane:
1 Select a user group in the list.
2 Click the
Delete button under the list. The group is deleted.
The users that were the members of the group are not affected by the group deletion.
73Print Buyer Guide
Page 84

Account Administration
Setting Departments
Account departments are set in order to facilitate control of job ordering and budget expenditure, for your
internal reporting needs.
In the
Manage Account left menu, select Departments to open the Department Management window. A list of
departments defined for the account is shown, with a number of users assigned to each department.
1 To add a new department to the list, enter a name for the new department and click
The new department appears in the list. When a department is added to the list, its name is added to the
Department drop-down box on the user creation pane. See Creating a New User on page 69 for assigning
users to departments. The number of users assigned to the department appears in the department row.
2 To rename a department, select it in the list and change the name that appears in the
field. Click
3 To delete a department from the list, select it and click
department are not affected by the deletion.
4 Use the
5 Use the
Update. The department is renamed.
Delete. The users that were assigned to the
Import link to import a list of departments from an external file.
Export link to export the list of defined departments to an external file.
Add.
Department Name
Setting Cost Centers
An account cost center is for the use and convenience of the Print Buyer. Its main objective is to facilitate control
of job ordering and budget expenditure.
In the
Manage Account left menu, select the Cost Centers option. A list of cost centers defined for the account is
shown. Each cost center record includes a cost center code number. When a cost center is selected in the list, its
details appear in the right pane fields.
Creating a New Cost Center
1 Click Add under the list of cost centers.
The
Add Cost Center dialog box opens.
2 Enter a name and a code number for the new cost center, and click
The new cost center appears in the list and is selected. The settings pane for the created cost center appears
to the right. The cost center ID generated by the system is displayed.
3 Enter information in the detail fields.
4 Mark the
The
5 Click the button to open the
6 Enter the total amount of money allocated to the specific cost center and click
The amount appears in the
Enable Budget check box to enable budget settings.
Set Budget button appears.
Set Cost Center Budget dialog box.
To ta l field.
OK.
OK.
Web Services74
Page 85

Setting Cost Centers
7 Enter the budget name and minimum budget for the cost center.
When the minimum is reached, the budget administrator receives a warning notice. See Modifying a Cost
Center Budget below.
8 Enter the email address of the administrator to receive an automatically forwarded warning notification
that the cost center budget has been exceeded.
9 Click
Update to save the cost center settings.
Modifying a Cost Center Budget
1 Select a cost center in the list.
The previously set details and budget are displayed to the right.
The total amount allocated to the cost center is displayed in the
budgeted money is displayed in the
Remaining Budget field. The system-calculated amount of budgeted
money already used by the selected cost center appears in the
1 Mark the
The
2 Click the button to open the
Enable Budget check box to enable changes to the cost center budget.
Set Budget button appears.
Set Cost Center Budget dialog box.
3 Enter the total amount of money allocated to the cost center and click
The amounts displayed in the
4 Click
Update to save changes made to the budget of the selected cost center.
To ta l and Remaining Budget fields are reset.
To ta l field. The remaining amount of
Used Budget field.
OK.
75Print Buyer Guide
Page 86

Account Administration
Setting Email Notifications
The administrator can set the systems notifications to be sent by email to account users when specific events take
place at the Print Service Provider side.
Sending notifications can be triggered by the following events:
Order confirmation
Job price change
Job shipped
Inventory below minimum level
Preorder job expiration
Shipping job expiration
Job arrival at the Print Buyer approval queue
To set the email notifications:
1 Go to
Manage Account and select the Email option in the left menu.
The
Email window opens, displaying the list of events. The Use System Default Email Settings check box is
marked by default, and events in the list are selected according to the default settings.
2 Clear the check box to enable changes to the settings.
3 Mark a check box for an event and click the
Contacts link in the event row.
A dialog box opens, which allows setting the email addresses of the sender and recipients.
Each notification can be issued by one sender to one or more recipients in the Print Buyer
organization. The system activates the notification automatically. The sender is the person
appearing as the originator of the email.
4 To specify the sender email address, select one of the provided radio buttons in the
Sender section.
If you choose a print provider or a Print Buyer user, the system sends notifications from a known email
address saved in the system for this user.
If you choose the
5 In the
6 Click
Recipients section, select one or more recipients from the provided options, or add email addresses in
the
Other Email field.
OK The selected options are displayed in the Email window.
Other Email option, enter the sender’s email address.
7 Set the senders and recipients for all required events and click
The email notifications are set.
Save.
Web Services76
Page 87

Handling the Address Book
Handling the Address Book
The address book is used to store and access contact information. The address book is accessible throughout
the system from various workflows.
To handle the system address book, go to
menu.
Manage Account page and select the Address Book option in the left
Managing Contacts
Contact Display
When the window opens, all defined contacts are shown in the Addresses pane. The contacts in the book can be
divided into the following three groups:
Users - Includes all Print Buyer users. Users are automatically added to the address book when they are
created. The user addresses can be viewed by all Print Buyer users. Print buyer users cannot be added or
deleted via the address book.
Personal - Includes the user’s private contacts. Allows users to manage and view their own private contacts.
Every Print Buyer user can add addresses to this group. However, these addresses cannot be viewed or
used by other users.
Public - Includes public addresses. New addresses can be added to this group by an administrator and
viewed by all users.
When one of the above groups is selected in the
selected group are displayed. When
All is selected, all contacts are listed.
Show Group drop-down box, the contacts belonging to the
When a contact is selected in the list, contact and address information is displayed to the right of the list pane.
Searching for a Contact
To find a contact in the address book:
1 Select a required contact group from the
contacts is displayed.
2 In the text box above the list, enter the name of the contact to search for, and click
filtered and the relevant contact is displayed.
3 Enter
Reset to clear the text box and return to the entire list of contacts.
Show Group drop-down list, or select All. The relevant list of
Search. The list is
77Print Buyer Guide
Page 88

Account Administration
Creating a New Contact
1 Click the New button under the list of contacts.
2 In the
3 Enter contact information and address details in the fields on the right pane.
4 In the
5 Click
New Address dialog box, enter the new contact name and click OK.
The new name appears in the contact list and is selected.
Belongs to Group field, choose one of the two provided options to assign the created contact to the
Personal or Public group.
The Belongs to Group field is available to an administrator only, as a means of moving
contacts from the Personal group to the Public group or vice-versa. Any contact selected in
the list can be moved to another group by selecting another option.
Save. The contact is created and the contact information is saved.
Toolbar Activities
The toolbar buttons in the contacts pane enable the following operations:
Rename Address - renames a contact selected in the list.
Duplicate Address - duplicates a contact selected in the list.
Import Addresses - imports contacts from an external database file.
Export Addresses - creates and exports the list of contacts to an external database file.
Delete Address - deletes a contact selected in the list.
Web Services78
Page 89

A
Print Driver Configuration
The Print Driver feature enables the Print Buyer to send jobs from any professional work environment (e.g. MS
Office, Freehand, and PhotoShop that is run under the operating system installed on either Macintosh or PC
computers) directly to the
the pipeline between the Print Buyer desktop and the Print Service Provider. During this process, native-format
files are transparently converted to PDF files.
Production queue on the Print Service Provider side. The Print Driver thereby acts as
Print Driver is supplied by the Print Service Provider and can be downloaded by using the
control in the upper part of the screen. See Main Interface Components on page 4.
In order the Print Buyer to be able to use the Print Driver, the following is required:
To have a user name and password of a Print Buyer account
To install the Print Driver on the client computer.
When installing the Print Driver on a client computer, a new printer bearing the Print Service
Provider name is added to the list of printers in the system.
This chapter provides instructions for installing the Print Driver under Macintosh and Windows. Following
installation, the uploading a job with the Print Driver is described.
Software Downloads
Page 90

Print Driver Configuration
Installing Print Driver
This section provides instructions for installing Print Driver, and includes the following sections:
Prerequisites (Windows Vista Only)
Installation on Macintosh, Windows 2000, 2003, XP, and Vista
Prerequisites (Windows Vista Only)
Windows Vista has a built-in ability to automatically reduce the potential of security breaches in the system by
enabling a feature called User Account Control (UAC). The UAC forces users that are part of the local
administrator group to run as though they were regular users with no administrative privileges.
When the UAC feature is enabled, a security warning appears during the Print Driver installation procedure. To
prevent this security warning from appearing, it is advised to disable the UAC feature prior to the installation
procedure:
1 Click
2 Type UAC into the
3 Click the
4 Clear the
5 Restart the computer to apply the changes.
6 Carry out the Print Driver installation.
Start > Control Panel.
Search input field; the UAC window appears.
Turn User Account (UAC) on or off link; the corresponding dialog box appears.
Use User Account Control (UAC) to help protect your computer check box, and click OK.
Following the installation procedure, you can enable the UAC feature by selecting the Use User
Account Control (UAC) to help protect your computer
Control
dialog box.
check box in the Turn on User Account
Web Services80
Page 91

Installing Print Driver
Installation on Macintosh, Windows 2000, 2003, XP, and Vista
To install the Print Driver:
1 Log in to FreeFlow Web Services and click
appears.
2 Click the
3 Click
4 Select the
The Print Driver downloading dialog box is opened, and the
seconds.
5 Click
Print Driver link; the Print Driver dialog box appears.
Continue; the Software License Agreement dialog box appears.
I accept check box and click Continue.
Run.
If the File Download dialog box does not appear, right-click on the Print Driver link; the installer
appears. Follow the installer instructions.
If you are installing the Print Driver on a Macintosh computer, refer to the Macintosh
section below.
If you are installing the print driver under a Windows operating system, refer to the
Windows section below.
Software Downloads; the Software Downloads dialog box
Macintosh
1 Click Continue.
File Download dialog box appears after several
2 Click the
software installation has been completed, the
3 Click
4 Enter the password for a Macintosh Super User and click
5 When the software has been successfully installed, click
Macintosh HD icon to install the software on Macintosh HD destination volume; after the
Easy Install window appears.
Upgrade; the Authenticate window appears.
OK; the Install Software windows appear.
Close.
Windows
1 Click Next; the Customer Information window appears.
2 Type the user name and organization name, respectively, and select one of the
buttons.
3 Click
4 Select a setup type and click
5 Click
6 Click
Next; the Setup Type window appears.
Next; the Ready to Install the Program window appears.
Install; the Print Driver installation begins.
Finish to complete the process.
Install this application radio
81Print Buyer Guide
Page 92

Print Driver Configuration
Ordering Jobs through the Print Driver
To order a job through the Print Driver:
1 Select the file to be ordered and click
2 Select the
3 Click
4 Type the user name and password and click
5 Continue with the workflow as outlined in the Ordering Workflows chapter.
Print Driver printer and set the appropriate parameters.
Print; the Print Driver Login window appears.
Print; the Print window appears.
OK; the Choose Job Type window appears.
Web Services82
Page 93

Glossary
Catalog A collection of templates containing job designs from which the Print Buyer can
order ready-to-print jobs or create and order new jobs.
Intent A set of properties of a print job.
Job The entire material to be printed.
Job Type An entity that is described by a set of basic job properties. Users create new jobs
by uploading design files to a Job Type.
Job Ticket A document that specifies the production and finishing materials and schedules
as well as the delivery and pricing details.
Output Device Any machine that produces printed material.
PDF (Portable
Document Format)
Personalized job A VI job that utilizes the ability to incorporate personal data with the job content
Print Buyer Any individual or organization that purchases printed material produced by a
Print Buyer Side FreeFlow Web Services is a system that provides an open line for communication
Print Driver A feature that enables the users in the Print Buyer organization to print jobs
Print Service
Provider
Process Colors The four basic colors of ink used in color printing (Cyan, Magenta, Yellow and
Run (length of run) The total number of job copies ordered.
Selective Upload A feature that allows the Print Buyer to create variable fields in a PDF file of any
A computer file format for publishing and distributing electronic documents
(text, image, or multimedia) with the same layout, formatting, and font attributes
as in the original; is widely used in commercial printing and on the Web.
and represents one personalized job instance. See Variable Data jobs for contrast.
printing facility.
between the Print Service Provider and the Print Buyer. The Print Buyer side
refers to the FreeFlow Web Services interface that is viewed by the Print Buyer.
directly from their DTP applications, utilizing the standard Print command.
Individual or organization that produces printed material.
Black).
static job. This functionality is used in creation of VI templates.
Spot Colors Special, pre-mixed colors that are used in addition to process colors, or in
conjunction with Black.
Page 94

Print Buyer Guide
Surcharge An additional charge that is levied (often as a percentage of the original charge)
when extra demands are made to the printing process (i.e. Urgent or Express time
printing).
Templ at e A job file which has been saved in order to serve as the basis for the structure and
general layout of future jobs.
User Any individual in the Print Service Provider and Print Buyer organization who is
working with the FreeFlow Web Services system.
Variable Data job A VI job that utilizes the ability to incorporate multiple variable instances with
the job content.
Vari a b le I n for ma t ion
job
A job incorporating variable fields with personal data or variable data.
Web Servicesvi
Page 95

Index
A
Account 67
default ordering page 68
general contact 68
general settings 68
shipping and billing 68
users 69
Add to Cart 6
Address Book 67, 77
contact groups 77
toolbar 78
Advanced search 30
Approval Email Settings 69
Approvers 61
Asset Management 66
Assets 59
uploading 66
Assets library 66
Attachments 11, 32
B
Basic concepts 2
Binding parameters 22
Binding style 22, 24
Book summary 23
C
Catalog
export content 60
set order approval 61
set properties 60
Catalog library 59
management 59
Catalog Link 36
Catalog properties
delivery parameters 62
display 61
email options 63
order parameters 62
price preview 63
VI field defaults 62
workflow 61
Column Selection 37, 65
Composite job
add blank pages 23
add tabs 23
creation workflow 38
defining components 23
page exceptions 24
templates 38
Composite template 36
Contact
create new 78
search 77
Contact group
Personal 77
Public 77
Users 77
Cost center
create new 74
remaining budget 75
setting budget 74
Cost Centers 67, 74
Cross sales 6
D
Database files 66
Default Order Jobs Page 68
Define Components 23
Departments 67, 74
management 74
E
Editing page size 9
Editing variable data 15
Email notifications 67, 76
events 76
recipients 76
Events
notified by email 76
Excel Report 30, 37, 65
Export HTML 60
Page 96

Print Buyer Guide
F
File Report 6, 8, 40
H
Help 4
HTML
exporting 18
sending MailToPrint 19
HTML catalog 59
add template 59
create 59
ordering procedure 18
set ordering options 60
template display setup 60
I
Image formats 64
Image library 64
download images 64
management 64
search 64
upload images 64
view 64
Intent 7, 40
Interface language 4
Inventory 65
Inventory jobs 19
Inventory templates 36, 65
edit properties 65
MailToPrint 65
search 65
workflow policy 65
Items On Hold 6, 25
J
Job 2
Add to Cart 32
Delete Job 32
Duplicate Job 32
Edit Properties 32
Move to Received 32
Re-order 32
Save as Template 32
Send Approval Email 33
Variable Data 33
Job Content 2
Job Details 6, 11
Job flow 3
Job intent 7
Job queue
approval 29
printing 29
received 29
saved jobs 29
shipping 29
shopping cart 29
Job Specification 6, 7
Job Summary 6, 11
Job summary
attachments 11
Job Type 2
default settings 40
L
Login screen 4
Logout 4
M
MailToPrint 19, 61
Approval Parameters 46
Command Buttons 47
E-Mail Options 46
MailToPrint Option 46
Manage Account 4, 67
Manage Templates 4
Managing templates 35
Manual personalization 13
Mapping scheme 15
Mapping variable records 15
Mapping VI fields 14
Mark for Production 11
Marketing message 6
Modify PDF 41
N
Number of copies 11, 12, 18
O
Order checkout 25
Order Jobs 4
Order status 30
Ordering
Add to Cart 6
composite jobs 5
Web Servicesviii
Page 97

Index
from Freehand 79
from HTML page 18
from Inventory 20
from MS Office 79
from PhotoShop 79
from Superstore 6
from superstore catalogs 6
from user computer 5
from VD archive 16
MailToPrint 19
multiple personalized instances 14
order confirmation 27
personalized 13
privileges 5
static jobs 12
through Print Driver 82
to Inventory 19
Upload 6
VI jobs 13
VI workflow settings 41
wizard settings 39, 41
Ordering job 3
Ordering wizard
file report 8
job details 11
job summary 11
preview 11
Ordering workflow
shopping cart 25
upload file 8
variable information 7
P
Payment method 18
PDF Preflight 22
Personalization method 7
Personalized job 3
Preflight
file report 40
uploaded file 40
Preflight check 8
Preflight report 9
editing page size 9
solutions 9
Preview 6, 11
Price components 18
Print buyer interface 4
Print Driver 79
downloading 79
installation 80, 81
Macintosh 81
ordering jobs 82
Vista 80
Windows 81
Privilege level 4
R
Remaining Budget 75
S
Searching for a job 30
Searching for templates 35
Selective Upload 3, 41
image fields 41
text fields 41
Send MailToPrint 60
Shopping Cart 4, 6, 25
Get Quote 26
Shopping cart
placing order 27
Simple job
templates 38
Soft proof 11, 18
Software Downloads 4
Static template 2, 36
creating 39
creation workflow 38
Superstore
ordering 6
Superstore catalog 59
Supervisor approval 61
T
Template 2
advanced search 37
create new 36, 37
edit properties 44
inventory 36
list view 36
MailToPrint 44
manage archive 44
PDF preview 36
personalized 36
preflight check 40
properties 39
save as static 40
static and composite 36
thumbnail view 36
ixPrint Buyer Guide
Page 98

Print Buyer Guide
types 36
user access 44
VD archive 36
workflow policy 44
Template Attributes 37
Templates
management 35
repository 35
search 35, 37
Track Jobs 4, 29
Track jobs
activities 32
job details 32
job status 31
search 30
search options 31
Trim & Bleeds Editor 10
U
Upload File 6
Upload multiple files 21
Uploading content 39
Uploading variable data 14
Used Budget 75
User
catalog 71
cost center 70
create 69
department 70
ordering page 70
shipping and billing 71
user type 69
User Groups 67, 73
create new 73
User list 70
User privileges 71
Administrator 71
Custom 72
Designer 71
Guest 72
Super User 71
Supervisor 71
User 71
User types 69, 71
Users 67
V
Variable Data archive 16
Variable Data job 3
Variable Data records 14
Variable fields 3
Variable Information 6, 7
VD archive
navigation 17
VI fields
advanced settings 43
arrangement 43
create 41
define 48
editing properties 42
VI template 3, 36
create new 40
creation workflow 38
W
Workflow Policy 45
Web Servicesx
 Loading...