

Page 1

Version 16.0.3.0
December 2020
702P08488
Xerox
®
FreeFlow
User Guide
®
VI Explorer
Page 2

© 2020 Xerox Corporation. All rights reserved. XEROX®and XEROX and Design®, FreeFlow®, FreeFlow Makeready®,
FreeFlow Output Manager
®
, FreeFlow Process Manager®, VIPP®, and GlossMark®are trademarks of Xerox
Corporation in the United States and/or other countries. Other company trademarks are acknowledged as follows:
Adobe PDFL - Adobe PDF Library Copyright © 1987-2020 Adobe Systems Incorporated.
®
Adobe
PostScript
, the Adobe logo, Acrobat®, the Acrobat logo, Acrobat Reader®, Distiller®, Adobe PDF JobReady™, InDesign®,
®
, and the PostScript logo are either registered trademarks or trademarks of Adobe Systems Incorporated in
the United States and/or other countries. All instances of the name PostScript in the text are references to the
PostScript language as defined by Adobe Systems Incorporated unless otherwise stated. The name PostScript also is
used as a product trademark for Adobe Systems implementation of the PostScript language interpreter, and other
Adobe products. Copyright 1987-2020 Adobe Systems Incorporated and its licensors. All rights reserved. Includes
®
Adobe
Intel
PDF Libraries and Adobe Normalizer technology.
®
, Pentium®, Centrino®, and Xeon®are registered trademarks of Intel Corporation. Intel Core™Duo is a trademark
of Intel Corporation.
Intelligent Mail
Macintosh
®
is a registered trademark of the United States Postal Service.
®
, Mac®, and Mac OS®are registered trademarks of Apple, Inc., registered in the United States and other
countries. Elements of Apple Technical User Documentation used by permission from Apple, Inc.
®
Novell
and NetWare®are registered trademarks of Novell, Inc. in the United States and other countries. Oracle®is a
registered trademark of Oracle Corporation Redwood City, California.
PANTONE
™
and other Pantone Inc. trademarks are the property of Pantone Inc. All rights reserved. QR Code™is a
trademark of Denso Wave Incorporated in Japan and/or other countries.
®
TIFF
is a registered trademark of Aldus Corporation.
The Graphics Interchange Format© is the Copyright property of CompuServe Incorporated. GIFSM is a Service Mark
of CompuServe Incorporated.
Windows
Explorer are trademarks of Microsoft Corporation; Microsoft
®
, Windows®10, Windows Server®2012, Windows Server®2016, Windows Server®2019 and Internet
®
and MS-DOS®are registered trademarks of Microsoft
Corporation.
All other product names and services mentioned in this publication are trademarks or registered trademarks of their
respective companies. They are used throughout this publication for the benefit of those companies, and are not
intended to convey endorsement or other affiliation with the publication.
Companies, names, and data used in examples are fictitious unless otherwise noted.
While every care has been taken in the preparation of this material, no liability is accepted by Xerox Corporation arising
out of any inaccuracies or omissions.
Changes are made periodically to this document. Changes, technical inaccuracies, and typographical errors are
corrected in subsequent editions.
Produced in the United States of America.
Page 3

Table of Contents
1 FreeFlow VI Explorer Software Installation .........................................................................5
Getting Started........................................................................................................................ 6
Program Download ............. ............................................................................................... 6
Specialty Imaging and Barcode Font Download ........ ................... .............. .............. .......... 6
System Requirements............................................................................................................... 7
Proof Print ................................................................................................................. .............. 9
Upgrade Information.. .............. .............. ................................. .............................................. 10
Installation Instructions....... .............. ................... .............. ................... .............. .............. .... 11
Licensing............ ................................. .............. .............. ..... .............. .............. ................... ... 12
License Installation... .............. .............. ............................................... ............................ 12
2 Program Overview...................................................................................................................17
VI Suite Customer Forum ....................................................................................................... 18
3 Using VI Explorer and the GUI............................................................................................19
Window Components............................................................................................................. 20
Title Bar............... .............. .............. ..... .............. .............. ................... .............. .............. 21
Menu Bar..... ................... .............. .............. ..... .............. .............. ................................. ... 21
Tool Bar Buttons and List Boxes ............ .............. .............. ................... .............. .............. 21
Graphical Display Section.......... .............. ................... .............. .............. ..... .............. ....... 24
Bottom Tool and Status Bars............................................................................................ 24
Menu Selections....................................................................................... .............. ................ 27
File Menu...................................................................................................... .............. ..... 27
Help menu............................................................ ............................................... ............ 51
4 VI Explorer Watched Folders Client .....................................................................................53
Window Elements ........................................................................................... .............. ......... 54
Title Bar............... .............. .............. ..... .............. .............. ................... .............. .............. 54
Menu Bar..... ................... .............. .............. ..... .............. .............. ................................. ... 54
Watched Folders or Output Folders List............................................................................. 55
Watched Folder and Output Folder Details Area ............................................................... 55
Status Area .................................. ................................. .............. .............. ................... .... 56
Function Buttons ..... ................................. ....................................................................... 56
File Ready Check ..... ................................. .............................................................................. 57
Xerox®FreeFlow®VI Explorer
User Guide
3
Page 4

Table of Contents
4
Xerox®FreeFlow®VI Explorer
User Guide
Page 5

1
FreeFlow VI Explorer Software Installation
This chapter contains:
• Getting Started........ .............. .............. ................................. ....................................................... 6
• System Requirements. ................... .............. .............. ................... .............. .................................. 7
• Proof Print............... .............. .............. ..... .............. .............. ................................. ....................... 9
• Upgrade Information........ .............. ................... .............. .............. ................... .............. ........... 10
• Installation Instructions............................................................................... .............. ................ 11
• Licensing.................................................................................... .............. ................................. . 12
FreeFlow VI Explorer can be included with the distribution of FreeFlow VI Compose software. If not
supplied with that software, order it from your Xerox Sales representative. Customers within the USA
can order software from the Xerox eStore. For more information, refer to Getting started.
Note: If you purchase software from the Xerox eStore, follow the instructions at the eStore
website, and provide the required information. After the order is processed, a license file is
emailed to you. After you receive the license file, to install and activate the license, follow the
instructions in Licensing.
In addition to an overview of the download process in Getting started, this section of the document
describes:
• System requirements
• Proof print
• Upgrade information
• Installation instructions
• Licensing
Back up customized files
Before upgrading or uninstalling the software, back up any customized files for later use.
Updates are released as Full Installations
You can install any FreeFlow VI Suite 16.0.3.0 software update over any prior release of the
FreeFlow VI Suite. Installation of VI Suite components require Administrator privileges.
Before you update an installation, stop active products
Before you update an installation, stop any active products, such as FreeFlow VI eCompose
software or VI eCompose software services.
Xerox®FreeFlow®VI Explorer
User Guide
5
Page 6

FreeFlow VI Explorer Software Installation
Getting Started
Before you begin, first download the software from the Xerox website. Download instructions are
provided here. After you have downloaded the appropriate files you can proceed to the installation
instructions that follow.
PPrrooggrraamm DDoowwnnllooaadd
To download FreeFlow VI Explorer electronically, go to www.xerox.com/support, search for VIPP, then
select Software. If required, set the Operating System type appropriate for your target platform to
display the correct installer file. Click the FreeFlow VI Explorer installer file.
The software has no trial period. To obtain the license file, order the VI Explorer license kit. If ordering
from the Xerox eStore, the license file is provided as part of the eStore download. If you are not using
the Xerox eStore, work with your Xerox sales representative to order the license kit.
Note: The program is downloaded in ISO format. Use the ISO file to burn a CD, then use the
CD to install the program.
SSppeecciiaallttyy IImmaaggiinngg aanndd BBaarrccooddee FFoonntt DDoowwnnllooaadd
To download Specialty Imaging and Barcode fonts, go to www.xerox.com/support. Search for VIPP,
then select Software.
Note: When you download fonts, you are instructed to review an End User License Agreement.
To download the fonts, you are required to review and accept the End User License Agreement.
If you do not accept the End User License Agreement, the program exits the font download
page.
6
Xerox®FreeFlow®VI Explorer
User Guide
Page 7

System Requirements
FreeFlow VI Explorer Software Installation
VI Explorer (VIE) is a Windows-based tool used to view VIPP®applications. You can open any VIPP
®
application and browse through the pages. VIE renders the VIPP®application on the screen using the
same VI Compose interpreter that the printer uses, ensuring that what you see on screen matches
what you print at the target print device. For this reason, it is recommended that when upgrading a
component of the VI Suite of products, you upgrade all your components to the same version and
patch or Service Pack level. VIE provides other powerful features, such as demographic information on
the file being viewed, and can perform VIPP
®
to make VIPP
page-independent files to take advantage of printers with Page Parallel Rip (PPR)
®
Normalization. VIPP®Normalization is the process used
capabilities.
You can install the VI Explorer on a Windows PC, with a 32-bit or 64-bit system. Virtualization is
supported. If you are using virtualization, each node must have a unique MAC address to license the
product. Xerox provides support for the VI Explorer software. Xerox does not provide support for the
configuration of the virtual systems.
The minimum software and hardware requirements are as follows:
• Windows 10, Windows Server 2012 (including R2), Windows Server 2016 and Windows Server
2019
• Intel Pentium 4, Intel Centrino, Intel Xeon, Intel Dual Core or better processor
• 4 Gbytes RAM
• 20–Gbyte hard drive
• DVD-ROM and CD-ROM drive
• Internet access to activate the license
Multi-Processor controllers (DFE) such as CiPress PS RIP Users:
The architecture of the FFPS CiPress and similar multi-processor devices requires a pageindependent file be submitted to the controller. To manage this action, the VI Compose software
on CiPress has been modified to VIPP
®
Normalize a VI Project Container file before passing the
file on to print.
The process of VIPP
printing. An alternative to VIPP
®
Normalization can add a significant amount of time prior to the application
®
Normalization in-line is to use the FreeFlow VI Explorer VIPP
Normalization option. The FreeFlow VI Explorer VIPP®Normalization option allows the VIPP
Normalization to happen outside of the controller. After the VIPP®file has been VIPP
®
Normalized, it can be sent to the controller.
The following minimum screen resolution and color settings are recommended when editing any
of the available DRAW commands on the Windows PC:
• Set the desktop area to at least 1024 x 768
• Set the color palette to 256 colors or better
• Set the font size to Small Fonts or Large Fonts
Caution: Lower resolutions can cause unexpected results.
Lines or characters of less than 1 point
When using lines or characters of less than 1 point, you may need to use the zoom options in VI
Explorer to see the lines or characters displayed on the screen.
®
®
Xerox
®
FreeFlow®VI Explorer
User Guide
7
Page 8

FreeFlow VI Explorer Software Installation
Object selection
No objects can be selected in the GUI windows. Some Hot Spots are not available.
8
Xerox®FreeFlow®VI Explorer
User Guide
Page 9

FreeFlow VI Explorer Software Installation
Proof Print
VI Explorer can use any PostScript print device available in the Windows Printer panel to proof print
pages from the application. Without a license for that printer, you are limited to under 10 pages for
proof print pages. If a license is available for that device, there is no limitation. To license such a
device, contact your local Xerox sales representative.
Note: The version of FreeFlow VI Compose installed on the PostScript printer must be the same
version, or higher, than the version of VI Compose shipped with your version of VI Explorer.
Xerox
®
FreeFlow®VI Explorer
User Guide
9
Page 10

FreeFlow VI Explorer Software Installation
Upgrade Information
If you have a prior installation of the VI Explorer and you have customized the installation files, for
example, you made changes to the xgfdos.run or xgf.def file, it is recommended that you print or
copy those files. After the upgrade, you can put back the customized changes.
10
Xerox®FreeFlow®VI Explorer
User Guide
Page 11

FreeFlow VI Explorer Software Installation
Installation Instructions
For software download instructions, refer to Program Download. You can download Service Pack zip
files from the same location. Install Service Pack software over the base software.
Note: System administrator credentials are required to install the software.
1. To install the software, extract the zip file.
2. Double-click the setvies.exe file. Install the software on the local device. Follow the onscreen
prompts.
If you select your computer C drive for the download location, the installation process creates a
viewer folder on the C:\ drive. The viewer folder contains program files, help files, Wizard libraries,
sample forms, and images. A FreeFlow VI Explorer entry is added to the Windows Start menu.
Xerox
®
FreeFlow®VI Explorer
User Guide
11
Page 12
FreeFlow VI Explorer Software Installation
Licensing
The VI Explorer software requires a production license file to operate. There is no trial period with the
VI Explorer software.
Note: The ability to access VIE remotely through Terminal Services is available when activated
in the license file. Ensure that you request this ability when obtaining the license.
LLiicceennssee IInnssttaallllaattiioonn
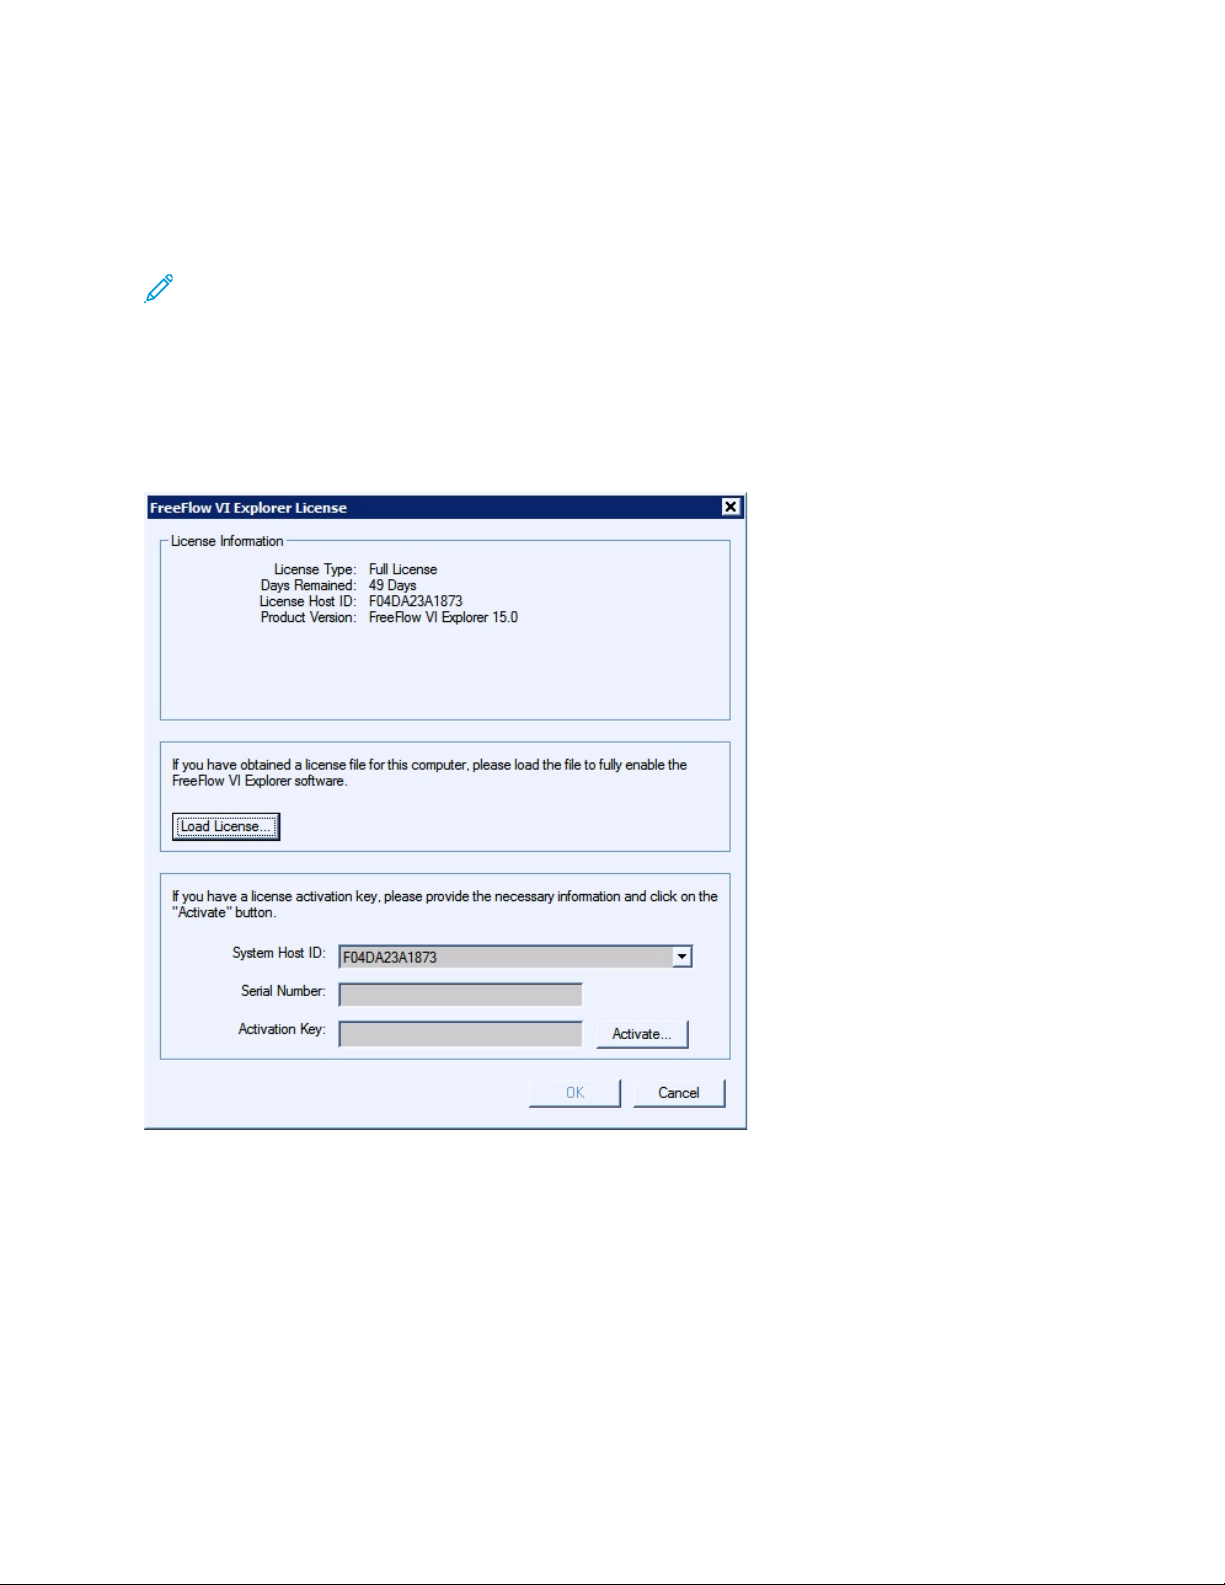
To open the FreeFlow VI Explorer License panel, click Help→Install/Update Software License. This
panel provides access to information about the installed license and two unique licensing options. Use
the panel to choose the option suited to your location.
License panel options:
License Information
This panel includes:
12
Xerox®FreeFlow®VI Explorer
User Guide
Page 13

FreeFlow VI Explorer Software Installation
License Type
Days Remaining The number of days until the existing license expires.
License Host ID VIE finds and displays this information from your computer.If a valid license
file has been loaded, the Host ID used by the license is shown.
Product Version The installed version of the VIE software.
If you have obtained a license file
Use this option when you have received in email a license *.dat file. When the file is delivered,
store it in a safe and accessible place on your computer.
For further instructions, refer to Using the Load License option.
If you have an activation key
The information in this panel is designed for users who have received a software activation key as
part of the software license kit for the VIE software.
If you do not have the license kit, and are in a location that requires this option, contact your
Xerox sales representative to purchase the software license kit for the VI Explorer software. After
the order is processed, a kit containing the software activation key and serial number, if provided,
is shipped to the customer location.
For further instructions, refer to Using the Activation Key option.
Xerox
®
FreeFlow®VI Explorer
User Guide
13
Page 14
FreeFlow VI Explorer Software Installation
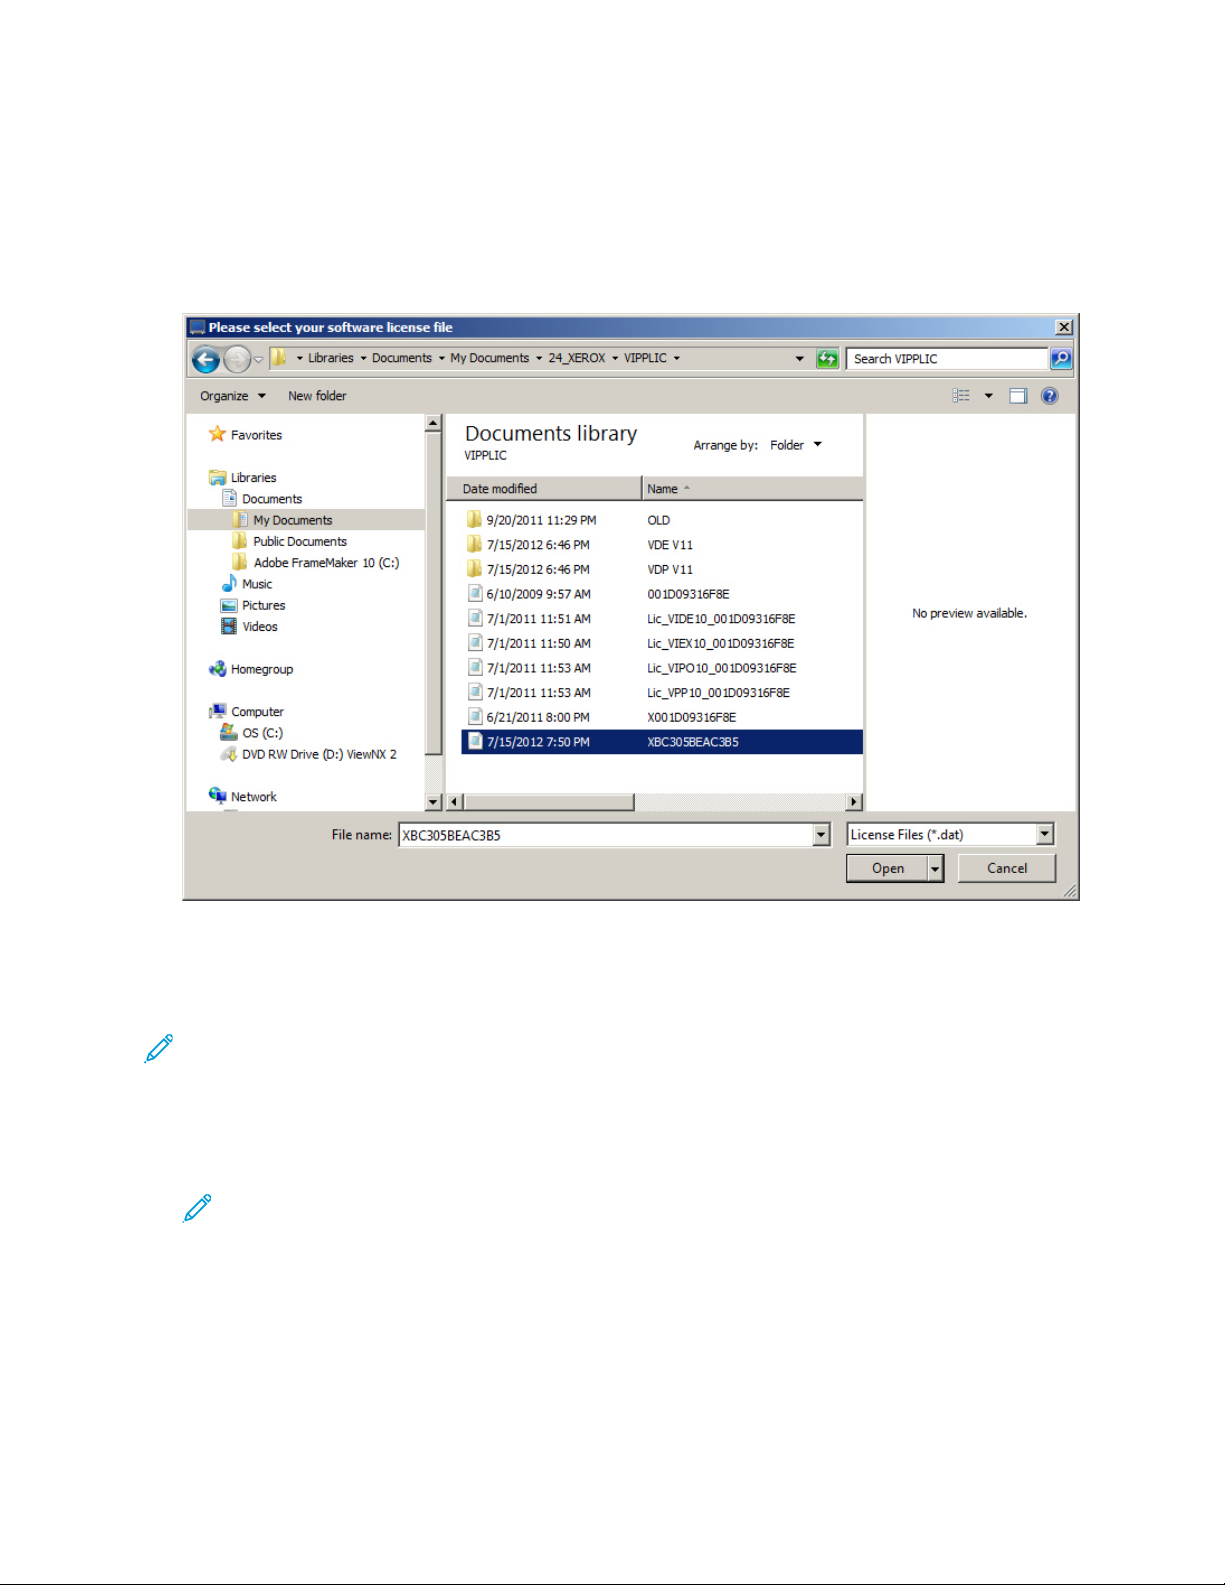
UUssiinngg tthhee LLooaadd LLiicceennssee OOppttiioonn
To activate the VI Explorer license using a license file:
1. Select the Load License option.
2. Browse to the location of the license file, select it, then click OK. The license installs. The new
license information is displayed at the top of the license panel.
3. To activate the license, select OK.
UUssiinngg tthhee AAccttiivvaattiioonn KKeeyy OOppttiioonn
Note: For future upgrades and support, retain in a safe location the software activation key
and serial number if provided.
If you have the software activation key, you can use the automated license process:
1. For the license HostID, choose one of the available System Host IDs. The default is
recommended.
Note: If the automated license process fails, before you contact Xerox Technical Support
for assistance, obtain the hardware System Host ID string and the software activation key.
2. Enter the serial number of the device where the software is installed.
3. Enter the software activation key in the area provided, then click Activate.
4. The Xerox License Server returns a form requesting additional information. Fill in the form as
requested, then select OK. The information and the software activation key are submitted to the
Xerox License Server to validate the license request.
14
Xerox®FreeFlow®VI Explorer
User Guide
Page 15

FreeFlow VI Explorer Software Installation
5. If additional information is required, a new screen requesting additional information appears. Fill
in the required information, then select OK.
6. The Xerox License Server validates the information.
• If the information supplied matches the Xerox records, the server enables the license.
• If the information supplied does not match the Xerox records, the server returns an error code.
If an error code is generated, and you require assistance, report the error code to your local
Xerox representative.
If the information entered is valid, a license file is generated and loaded to your system. Details
of the license appear in the License Information area of the License screen. To apply the license,
click OK.The license is applied.
If the automated license activation fails, for assistance, contact Xerox Technical Customer
Support. Ensure that you have the System Host ID of the workstation and the Software
Activation Kit available. Further assistance can result in a license file being emailed to you. If a
license file is emailed to you, you can activate the license manually.
Note: If you fail to connect to the license server using the method shown, you can go to
any Internet-connected device and log in to the portal using this URL: https://www.
xeroxlicensing.xerox.com/activation.
Enter the activation key, then follow the onscreen prompts. Ensure that you know the
System Host ID of the PC where VIE is installed. A license file is emailed to you. Move the
license to a safe location on the VIE system. To install the license, use the Load License
option.
Xerox
®
FreeFlow®VI Explorer
User Guide
15
Page 16

FreeFlow VI Explorer Software Installation
16
Xerox®FreeFlow®VI Explorer
User Guide
Page 17

2
Program Overview
This chapter contains:
• VI Suite Customer Forum ....... ............................................... ..................................................... 18
This User Guide is designed to provide information about how to use Variable Information Explorer
(VIE).
The VI Explorer is a Graphical User Interface (GUI) program designed to allow users to preview and
verify VI jobs and projects, to provide easy access to Normalization and Demographics services, and
to modify existing PDF files with embedded EPS.
The VI Explorer:
• Allows viewing and previewing of VIPP
• Allows printer operators to identify what resources a job might require using the Demographics
services.
• Allows printer operators to break up the job into pieces by generating a page-independent version
of the job using the Normalization services.
• Integrates Demographics and Normalization into a workflow by using the Watch Folders support
for Normalization and Demographics that is shipped with VIE.
®
jobs.
• Allows users to modify PDF files with embedded EPS, and to use a supplied batch file to enable an
automated process to embed EPS information into PDF files.
Note: A license is required to use VI Explorer. For information, refer to Proof Print.
For a review of Demographics and Normalization services, refer to the VI Compose Services section of
the VI Compose User Guide.
For a review of the basic information about VI Compose and the VIPP
sections of the FreeFlow Variable Information Suite Documentation:
• VIPP
• VIPP
• VIPP
• VIPP
• The FreeFlow VIDesign Pro User Guide contains useful background information.
®
and VI Compose overview section in the FreeFlow VI Compose User Guide
®
data streams section in the FreeFlow VI Compose User Guide
®
resources section in the FreeFlow VI Compose User Guide
®
Commands section in the VIPP®Language Reference Manual
®
language, refer to these
Xerox®FreeFlow®VI Explorer
User Guide
17
Page 18

Program Overview
VI Suite Customer Forum
Xerox hosts a Community Support Forum. The VI Suite Customer forum is now part of this larger
support forum, allowing you to post and review information about Xerox products and services all
from one location. To log into this customer forum community, go to http://VIPPsupport.xerox.com.
18
Xerox®FreeFlow®VI Explorer
User Guide
Page 19

3
Using VI Explorer and the GUI
This chapter contains:
• Window Components..... ................... .............. .............. ................................. ............................ 20
• Menu Selections.................. .............. ......................................................................................... 27
The VI Explorer window provides a graphical preview of selected VI jobs and projects, and the GUI
tools used to prepare them. VI Explorer includes several tools that provide easy access to
Normalization and Demographics services.
Each of the menu selections and GUI elements are described in these sections:
• Window Components
• Menu Selections
Xerox®FreeFlow®VI Explorer
User Guide
19
Page 20

Using VI Explorer and the GUI
Window Components
The VI Explorer window consists of these basic components:
• Title bar
• Menu bar
• Tool bar buttons and list boxes
• Graphical Display section
• Bottom tool and status bars
These components are found at the top of the VI Explorer screen:
• Title bar
• Menu bar
20
Xerox®FreeFlow®VI Explorer
User Guide
Page 21

Using VI Explorer and the GUI
• Tool bar buttons and list boxes
TTiittllee BBaarr
The title bar provides this information:
• Product name
• Folder name
• Project name
When a project is open the title bar provides both the folder and project name, for example:
Folder: xerox/Project: goljob. When working on a single resource, the name of the
resource is displayed, for example: [C:\xgfc\xerox\goljob\bill.frm].
In addition to the product title, the title bar contains standard Windows buttons that are used to
control the size of the VI Explorer window on the desktop and to close the program.
MMeennuu BBaarr
When the VI Explorer window is accessed, the menu bar appears near the top of the window.
The drop-down menus available from the menu bar are:
• File menu
• Help menu
• Activity indicator
Descriptions of the menu options can be found in Menu Selections.
AAccttiivviittyy IInnddiiccaattoorr
The activity indicator helps you determine whether VI Explorer is still performing the requested
operation. When lengthy VIPP
the gears on the activity indicator turn.
®
processing such as a long file copy or search operation takes place,
TTooooll BBaarr BBuuttttoonnss aanndd LLiisstt BBooxxeess
Use the buttons on the tool bars of the VI Explorer window to perform numerous tasks relating to file
operations, viewing files, and Help.
This section describes the function of each button or list box available on the tool bar, in order,
®
Xerox
FreeFlow®VI Explorer
User Guide
21
Page 22

Using VI Explorer and the GUI
beginning at the top left most button.
Note: Windows ToolTips are enabled on each button and list box found on all the VI Explorer
tool bars. The pop-up information allows you to quickly identify each of the available functions.
OOppeenn VVIIPPPP®®AApppplliiccaattiioonn oorr PPrroojjeecctt
This button allows you to open an existing VIPP®application for viewing, you can apply the optional
Demographics and Normalization services.
When you select this button, the Please choose the file to load window displays. Use this window to
select an existing VIPP
the name of the last directory from which you loaded a file. If this is the first time after installation
that you are loading a file, the Look in field defaults to the VI Explorer file folder that was loaded on
the system when you installed the VI Explorer.
®
application. When you first access this window, the Look in field will display
PPrrooooff PPrriinntt
This button allows you to print a job to verify the printed output. This option is intended for short run printing for use in proofing the output of an application. Only use this option with a PostScript printer. This option is the same as the File→Proof Print option, which is more fully described in Proof Print.
CCrreeaattee VVII PPrroojjeecctt ffrroomm CCuurrrreennttllyy LLooaaddeedd AApppplliiccaattiioonn
Use this button if you have an application that was created with an earlier release of VI Compose (VI
Interpreter) and want to create a Project for that application. Using this button will allow you to
create a Project directory for the application, copy the associated resources from their previous
location to the Project directory, and create a VI Project File (a file with an extension of .vpf). Once
the .vpf file is created, VI Explorer will automatically load the newly created file into the VI Explorer
window.
EExxppoorrtt VVII PPrroojjeecctt CCoonnttaaiinneerr
Use this button to create a compressed archive file from the currently loaded VI Project. The
compressed archive file can then be used for activities such as an email attachment, archiving,
deployment, etc.
When you select this option, the Please select export destination window allows you to specify the
directory and file name to use for the archive file to be created. Once you specify a directory and file
name, and select Save, VI Explorer creates the compressed archive file. The compressed archive file
will have a file extension of .vpc.
RReessuubbmmiitt VVIIPPPP®®AApppplliiccaattiioonn
Use this button to resubmit a VIPP®application for processing.
HHaalltt
This button is enabled during application processing functions, use it to halt the present action.
22
Xerox®FreeFlow®VI Explorer
User Guide
Page 23

Using VI Explorer and the GUI
HHeellpp
Use this button to access the VI Explorer Help option. When Help is open, use the Contents, Index,
and Search tabs to locate help information.
HHaanndd TTooooll
Use this tool to move, or pan, the image displayed in the Graphical Display section of the VI Explorer
window.
ZZoooomm IInn TTooooll
Use this tool to enlarge the view of a particular portion of the displayed output. To return to the
original view use the Zoom menu found on the horizontal tool bar at the bottom of the screen.
FFiirrsstt PPaaggee
Click on this arrow to access the first page of a multi-page VIPP®application.
PPrreevviioouuss PPaaggee
Click on this arrow to access the previous page of a multi-page VIPP®application.
NNeexxtt PPaaggee
Click on this arrow to access the next page of a multi-page VIPP®application.
LLaasstt PPaaggee
Click on this arrow to access the last page of a multi-page VIPP®application.
PPoorrttrraaiitt
Use this button to change the job displayed in the Graphical Display section to portrait orientation
(display height greater than width).
LLaannddssccaappee
Use this button to change the job displayed in the Graphical Display section to landscape orientation
(display width greater than height).
Note: Selecting landscape or portrait orientation does not determine the actual orientation
that is used to print the job. You must ensure that the actual job is formatted correctly, and
that you select the correct orientation for the job when you specify the options for the printer
you will use to print the job. In general, when you print the application, specify the same
orientation that you selected using the graphics tool bar.
Xerox
®
FreeFlow®VI Explorer
User Guide
23
Page 24

Using VI Explorer and the GUI
AAccttuuaall SSiizzee
Use this button to expand the viewed page in the Graphical Display section to the actual size of the
page.
FFiitt IInn WWiinnddooww
Use this button to visually reduce the page so that the entire page can be viewed in the Graphical
Display section window.
FFiitt WWiiddtthh
Use this button to visually expand or reduce the page so that the viewed page is the width of the
Graphical Display section window.
GGrraapphhiiccaall DDiissppllaayy SSeeccttiioonn
The center portion of the VI Explorer screen is used to display a graphical representation of the pages
in the active VIPP
®
job or project.
BBoottttoomm TTooooll aanndd SSttaattuuss BBaarrss
The tool and status bars at the bottom of the VI Explorer screen contain information about the
graphical display of the active job, and the status of that job.
The tool bar displayed horizontally across the bottom of the Graphical Display section of the VI
Explorer window contains these buttons and list boxes:
ZZoooomm MMeennuu
Use this box to indicate or select the percentage by which to increase or decrease the magnification
of the contents of the Graphical Display section.
Change the magnification using one of these methods:
• Manually enter a magnification percentage value in the zoom menu box and then press Enter. If
you exceed the maximum allowed zoom value an error message will be produced.
• Use the drop-down Zoom menu to select one of the following options:
– - 50%
– - 75%
– - 100%
– - 150%
– - 200 %
– - Maximum (value)
– - Actual Size
24
Xerox®FreeFlow®VI Explorer
User Guide
Page 25

Using VI Explorer and the GUI
– - Fit in Window
– - Fit Width
Note: VI Explorer automatically calculates the maximum magnification value available and
indicates that value in parentheses. The calculated value will change depending on the current
view produced in the graphical display.
PPaaggee IInnddiiccaattoorr
These buttons allow you to access the first, next, previous or last page of a multi-page VIPP
application. You can also enter a specific page number and press Enter to access that page.
®
MMeeddiiaa SSiizzee DDrroopp--ddoowwnn MMeennuu
This box allows you to select the media size for the job and view how the job appear on various paper
sizes. A checkmark appears next to an item when the feature is selected.
To view the application correctly, from the Media size menu, select the correct media size. When you
change the paper selection using the Media size menu, the Graphical Display section of the window
changes automatically, based on the selection.
Note: Although the Media menu can be used to select and view how the application appears
on various paper sizes, the option selected on this menu does not determine the actual paper
size used to print the job. Ensure that the actual job is formatted correctly, and that the correct
paper size is selected for the job when you specify the options for the printer to print the job. In
general, when printing the application, specify the same paper size selected from the Media
size menu.
Caution: Changing the media selection can cause problems with the VIPP®application. For
example, a form that is formatted for A4 may not print at all when Tabloid is selected from the
Media menu, and an application that is set up for US Letter may not look the same when you
change the media to A4. Always ensure that you check the Graphical Display section each time
the media selection is changed to verify if the application displays correctly.
Select any of the following paper sizes, or enter a custom page size.
Index Card: 3 x 5 in. A4 Tab: 225 x 297 mm PRC16K: 195 x 270 mm
Postcard: 3.5 x 5.5 in. SRA4: 225 x 320 mm PRC 8K: 270 x 390 mm
Statement: 5.5 x 8.5 in. SRA3: 320 x 450 mm 7 x 7 in.
Executive: 7.25 x 10.5 in. SRA2: 450 x 640 mm 8 x 10 in.
US Letter: 8.5 x 11 in. ISO B7: 88 x 125 mm 8 x 13 in.
US Folio: 8.5 x 13 in. ISO B6: 125 x 176 mm 9 x 11 in.
US Legal: 8.5 x 14 in. ISO B5: 176 x 250 mm 330 x 488 mm (13 by 19.2 in.)
Tabloid: 11 x 17 in. ISO B4: 250 x 353 mm 363 by 521 mm (14.33 x 20.5 in.)
Tabloid Oversized: 12 x 18 in. ISO B3: 353 x 500 mm 364 x 572 mm (14.33 x 22.5 in.)
A7: 74 x 105 mm ISO B2: 500 x 707 mm 364 x 660 mm (14.33 x 26.0 in.)
A6: 105 x 148 mm ISO B1: 707 x 1000 mm Custom Media
Xerox®FreeFlow®VI Explorer
User Guide
25
Page 26

Using VI Explorer and the GUI
A5: 148 x 210 mm JIS B7: 91 x 128 mm
A4: 210 x 297 mm JIS B6: 128 x 182 mm
A3: 297 x 420 mm JIS B5: 182 x 257 mm
A2: 420 x 594 mm JIS B4: 257 x 364 mm
A1: 594 x 841 mm JIS B3: 364 x 515 mm
A0: 841 x 1189 mm JIS B2: 515 x 728 mm
A4: Oversized 223 x 297 mm JIS B1: 728 x 1030 mm
The Custom selection allows you to specify a custom paper size. When you select Custom, the Custom
Media window appears. Enter the paper size using points as the unit of measurement, then click OK.
Minimum and maximum values are displayed on the Custom Media window.
MMeeddiiaa SSppeecciiffiiccaattiioonn IInnddiiccaattoorr
This box indicates the defined specifications for the media used for this application.
PPaaggee SSiiddee IInnddiiccaattoorr
This box indicates the side of the page on which the currently selected information will print.
SSttaattuuss BBaarr
The status bar contains information about the current status of the VIPP®application. The text
displayed in the status bar changes depending upon the current activity of the program.
26
Xerox®FreeFlow®VI Explorer
User Guide
Page 27

Using VI Explorer and the GUI
Menu Selections
VI Explorer functions are accessed via the File drop-down menu. Help and information about the
program can be located in the Help drop-down menu.
FFiillee MMeennuu
The File menu provides these functions:
• Open
• Create Project
• Export Project Container
• Import Roman PostScript Fonts
• Import Special PostScript Fonts
• Proof Print
• Get Job Demographics
• Normalize Job
• Demographics/Normalization Options ...
• View Demographics Report (XML)
• View Demographics Report (Database)
• View Normalized Job
• View Original Job
• Modify PDF with Embedded EPS
• Recent Files
• Exit
OOppeenn
This option allows you to open an existing VIPP®file or application.
When you access File→Open, the Please choose the file to load window opens, and the Look in field
displays the name of the last directory from which you loaded a file. If this is the first time after
installation that you are loading a file, the Look in field defaults to the VI Explorer file folder that was
loaded on the system when you installed the VI Explorer.
Xerox
®
FreeFlow®VI Explorer
User Guide
27
Page 28

Using VI Explorer and the GUI
The File name field will contain the name of the file you select by browsing for and clicking on the
appropriate file name. Use the Look in drop-down list, or the icons on the left side of the window to
navigate to the file. Standard Windows icons are provided at the top of the window to facilitate the
search, add a new folder, or to change the way the files are viewed in the window.
The Files of type field allows you to view all files (*.*), or to view only files of these types:
• VI Project File (*.vpf)
• VI Project Container (*.vpc)
• VIPP
• VIPP
• VIPP
• VIPP
®
Line Mode (*.lm)
®
Database Mode (*.dbm)
®
Native Mode (*.nm)
®
Submission (*.sub)
• Data Submission (*.dat)
CCrreeaattee PPrroojjeecctt
When you have opened a file other than an existing VI Project file, use the Create Project menu selection to create a new VI Project. The menu selection is available only when a non-project file is open. When you choose the Create Project option, the VI Explorer Project Wizard is invoked.
28
Xerox®FreeFlow®VI Explorer
User Guide
Page 29

Using VI Explorer and the GUI
Folder Name
Enter the name of the folder where you want to store the project. Use up to 32 characters for the
folder name.
Project Name
Enter the name to assign to the project. This name is used as the directory name for the project and
as the name of the project file. VI Explorer adds the file extension .vpf to the project file. Use up to 32
characters for the project name.
When specifying a folder or project name, constrain the name to 32 characters or less, and do not use
a space or any of the following characters:
/ : * ? \ " < > I ( ) [ ] { } ' ' ~ ! @ # $ % ^ & + = , ;
Note: Only one project file can be associated with a project directory. If an existing project
name is specified in the Project Name field when you select Next, the Wizard displays a
message box. You are asked to overwrite the existing project which deletes the old project and
replaces it with a new project. If you respond Yes, a message box appears asking you to
confirm the action.
Xerox
®
FreeFlow®VI Explorer
User Guide
29
Page 30

Using VI Explorer and the GUI
Author
Enter information about the author. Entries in this panel are limited to 512 characters.
Title
Enter the title of the project. Entries in this panel are limited to 512 characters.
30
Xerox®FreeFlow®VI Explorer
User Guide
Page 31

Using VI Explorer and the GUI
Version
Enter version information for the project. Entries in this panel are limited to 512 characters.
Description
Enter the description of the project. Entries in this panel are limited to 512 characters.
Xerox
®
FreeFlow®VI Explorer
User Guide
31
Page 32

Using VI Explorer and the GUI
Keywords
Optional keywords are used when searching, archiving, or indexing the project. Keywords must be
separated by commas. Entries in this panel are limited to 512 characters.
Copyright
Use the boilerplate copyright information provided in the Copyright field or add additional
information. Entries in this panel are limited to 512 characters.
Use a Copyright File Template
To import a file that contains boilerplate copyright information into the project attributes, enable the
Use a Copyright File Template. When you use the template, the Browse feature is enabled, which
allows you to select the file to import. The file size limitation is 512 bytes. Format checks are not
performed for the file that is imported.
32
Xerox®FreeFlow®VI Explorer
User Guide
Page 33

Using VI Explorer and the GUI
Name
Use this window to review the names of the resources that are associated with the project, and to
determine the scope of each resource. The scope of the resource defines the use as a Local, Foldershared, or Global-shared resource. For more information about scope, refer to the VI Projects topic in
the FreeFlow VI Compose User Guide.
Use Resource
Three option buttons allow you to define the scope of the selected resource. Choose among the
following selections:
• In this project only (Local)
• Between Projects in Same Folder (Folder-shared)
• Between All Folders (Global)
Description
Entries in the Description panel are limited to 512 characters.
After you are finished with the window, select Finish. VI Explorer creates the new project directory,
copies in the appropriate files, and loads the newly created project into the VI Explorer window.
EExxppoorrtt PPrroojjeecctt CCoonnttaaiinneerr
The export option allows you to create a compressed archive file from the currently loaded VI Project.
The compressed archive file can then be used for activities such as an email attachment, archiving,
deployment, and so on.
Select File→Export Project Container. The Please select export destination window appears.
®
Xerox
FreeFlow®VI Explorer
User Guide
33
Page 34

Using VI Explorer and the GUI
Specify the file name and destination for the archived file. After you specify a directory and file
name, select Save. VI Explorer creates the compressed archive file. The compressed archive file has a
file extension of .vpc.
IImmppoorrttiinngg FFoonnttss
Select one or more fonts using one of the options described below. The fonts will be converted into
regular PS fonts and placed in the C:\vviewer\fonts directory. Also, as part of the font conversion
process, the file C:\vviewer\xgf\encoding\fontlist (for roman fonts) or C:\vviewer
\xgf\encoding\nullfl (for special fonts) will be updated with the newly imported font names.
By default, the VIPP
/SFAAxxxx (in nullfl) where xxxx is a number ranging from 0000 to 999999. The resulting
fontlist or nullfl file can be edited to change these names or add font family information.
Within the VI Explorer, the font key names cannot be more than 10 characters long, not counting the
backslash (e.g. /RFAA123456), due to current constraints in the GUI menu display width format;
however, this limit should be sufficient for most purposes since VIPP
short names used as shortcuts for the long font names.
Important: Fonts are often subject to licensing agreements and must be used in accordance
with the terms of the agreement. You are responsible for checking the licensing agreement for
any fonts and complying with the terms before installation for use with the VI Explorer.
®
font names are of the incremental form /RFAAxxxx (in fontlist) or
®
font key names are meant to be
IImmppoorrtt RRoommaann PPoossttSSccrriipptt FFoonnttss
This option allows you to import PFA and PFB type fonts using the Standard Roman or Latin
Character set as described in Adobe PostScript language Reference Manual.
34
Xerox®FreeFlow®VI Explorer
User Guide
Page 35

Using VI Explorer and the GUI
Use Import Roman PostScript Fonts for fonts using the Standard Roman (or Latin) Character Set as
defined in Adobe's PostScript Language Reference Manual. This is the option generally used for Latin
Type 1 fonts delivered by font vendors. These fonts are suitable for re-encoding using the default reencoding table, and can be referenced in the xgf\encoding\fontlist file.
Note: Xerox Specialty Imaging fonts must be imported into the VI Explorer using the Import
Roman Fonts option described above in order for VIE to find the fonts and render them on the
screen. A pattern representing the special effect appears on-screen, as the effect is only
generated on the FFPS when the application is printed.
IImmppoorrtt SSppeecciiaall PPoossttSSccrriipptt FFoonnttss
This option allows you to import PFA and PFB type fonts using any other character set (typically
barcode fonts or fonts converted from other legacy formats).
Use Import Special PostScript Fonts for fonts using any other character set (typically barcode fonts
or fonts converted from other legacy formats). These fonts must not be re-encoded and must be
referenced in the xgf\encoding\nullfl file.
®
Xerox
FreeFlow®VI Explorer
User Guide
35
Page 36

Using VI Explorer and the GUI
PPrrooooff PPrriinntt
This option allows you to print a job to verify the printed output. This option is intended for short-run
printing for use in proofing the output of an application. This option can only be used with a
PostScript printer.
Page Limitation
VI Explorer is a design tool that allows you to test subsets of the print job data. Do not use VI
Explorer to test print jobs that exceed 100 pages. For best results, Xerox recommends that you
limit the size of the subsets to 20 pages.
Page Range Selection
Page range selection in Proof Print refers to logical pages, which may not correspond exactly to the physical pages shown in the graphic display. Base your print page selection on the desired logical pages not the physical page numbers. When you select File→Proof Print, the Proof Print window displays. Use this window to select the locally attached or network PostScript printer on which to print the application, specify the print criteria to use, and select any related resources.
36
Xerox®FreeFlow®VI Explorer
User Guide
Page 37

Use Evaluation License
Use this box to specify that you are using the VIPP
default is to leave this box blank. Refer to the VIPP
information about VIPP
®
evaluation licenses and how they impact the print jobs.
®
Evaluation license to print the job. The
®
Language Reference Manual for more
Do Not Send mis Resources (ps, eps)
Use this box to stop sending any miscellaneous resources to the printer.
Using VI Explorer and the GUI
Do Not Send img Resources (tiff, jpeg)
Use this box to stop sending any images to the printer.
Page Range
Use the Page Range boxes to define the range of pages to print. Select the range of pages to be
printed based on the desired logical page numbers, not the physical page numbers. You can print:
• All pages
• Current Page
• Selected Pages
Select Resources for Additional Printout
Use this option to select resources to include in the job. The list contains the VIPP
®
application
resources associated with the item you have selected to print.
GGeett JJoobb DDeemmooggrraapphhiiccss
Refer to VI Compose Services in the FreeFlow VI Compose User Guide for information about Job
Demographics.
Select the destination for the Demographics report using the Browse for Folder window. When the
destination is selected and the OK button is clicked, VI Explorer runs the Demographics report for the
job open in VI Explorer. On-screen icons and the status bar at the bottom of the VI Explorer screen
indicate the progress of the report. When complete, the report can be accessed in XML or Database
format. Refer to View Demographics Report (XML) and View Demographics Report (Database).
Xerox
®
FreeFlow®VI Explorer
User Guide
37
Page 38

Using VI Explorer and the GUI
Note: This option is not available when the VI Explorer is displaying a Demographics report or
Normalized job.
NNoorrmmaalliizzee JJoobb
Use the Normalization feature to transform the job open in VI Explorer so that it can be preprocessed. For information about Job Normalization, refer to the VI Compose Services topic in the
FreeFlow VI Compose User Guide.
Use the Browse for Folder window, then select the destination for the Normalized job. Click OK. VI
Explorer Normalizes the job open in VI Explorer. The onscreen icons and the status bar at the bottom
of the VI Explorer screen indicate progress.
38
Xerox®FreeFlow®VI Explorer
User Guide
Page 39

Using VI Explorer and the GUI
Note: This option is not available when the VI Explorer is displaying a Demographics report or
Normalized job.
DDeemmooggrraapphhiiccss oorr NNoorrmmaalliizzaattiioonn OOppttiioonnss
Choose the Demographics or Normalization options.
Xerox®FreeFlow®VI Explorer
User Guide
39
Page 40

Using VI Explorer and the GUI
Load Profile
Use this option to load a predefined job profile to use with the job. VI Explorer produces a window in
which you can locate and select the needed profile.
Save Profile
Use this option to save a new or updated profile in the appropriate directory.
40
Xerox®FreeFlow®VI Explorer
User Guide
Page 41

Using VI Explorer and the GUI
Demographics Options
These options allow you to select the format of the report and the information to include.
• Output Format: Choose one or both
– XML File
– Database File
• Contents
– Resource Checking Information
– Demographics Information
– ACCLOG Information
For more information about the content contained in the report, refer to the VI Compose Services
topic in the FreeFlow VI Compose User Guide.
Normalization Options
Normalization options include:
• Mark Normalized Pages: Choose this option, then select the check box to mark the normalized
pages of the job with a red circled N. For more information, refer to View Normalized Job.
• Emit %%Page DSC for Front Pages Only: For duplex jobs, select this option to emit the page
delimiters % %Page: in the normalized file for front pages only. If you want to split the file into
several chunks later for parallel ripping for instance, this option prevents splitting between the
front and back of a page.
Folder Options
Xerox
®
FreeFlow®VI Explorer
User Guide
41
Page 42

Using VI Explorer and the GUI
To add a date and time stamp to the demographics output file, select the check box for Add Date/
Time Stamp to Output Filename.
VViieeww DDeemmooggrraapphhiiccss RReeppoorrtt ((XXMMLL))
If you selected the XML File output format for the Demographics report, you can select this option to
view that report in XML format.
42
Xerox®FreeFlow®VI Explorer
User Guide
Page 43

Using VI Explorer and the GUI
VViieeww DDeemmooggrraapphhiiccss RReeppoorrtt ((DDaattaabbaassee))
If you selected the Database File output format for the Demographics report, you can select this
option to view that report in Database format.
Xerox®FreeFlow®VI Explorer
User Guide
43
Page 44

Using VI Explorer and the GUI
VViieeww NNoorrmmaalliizzeedd JJoobb
After you have created a normalized job, you can use the View Normalized Job option to view the pages of the job in the Graphical Display section. When the Mark Normalized Pages option is checked, the normalization process inserts a circled N at the bottom of each page.
44
Xerox®FreeFlow®VI Explorer
User Guide
Page 45

Using VI Explorer and the GUI
VViieeww OOrriiggiinnaall JJoobb
Use the View Original Job option to view the original job when a Normalized job or Demographics
report is being displayed in the VI Explorer.
MMooddiiffyy aa PPDDFF wwiitthh EEmmbbeeddddeedd EEPPSS
VIPP®supports the use of PDF files as variable resources. However, VIPP®can use only the actual
PDF file when printing to an APPE engine. When printing to a PostScript engine, VIPP
modify the PDF by embedding EPS information into the PDF. The process to embed the PDF file with
EPS can be done in one of these ways:
• Using the File→Modify PDF with Embedded EPS option in VI Explorer.
• In line, using VI Design Pro or VI Design Express, when adding PDF files to your project.
®
needs to
Xerox
®
FreeFlow®VI Explorer
User Guide
45
Page 46

Using VI Explorer and the GUI
• Using the supplied batch file embed.bat to create an automated process to embed EPS
information into PDF files.
Embedding EPS and processing time
VI Explorer and the VI design tools, VI Design Pro and VI Design Express, detect any PDF file
added to a project. If the PDF is not embedded with EPS, the programs asks users if they want to
embed the EPS information into the PDF. This process can take several seconds for each PDF.
Processing time increases with page complexity, and when using multiple-page PDFs. To avoid
interruption of your design work by this task, before editing the job, embed the EPS information in
batch mode. For more information, refer to Automating the Embedding Process.
Advanced PDF options
Advanced PDF options such as transparency are lost when generating the EPS image file, but are
retained in the PDF file. When printing the PDF to the PS interpreter, VIPP
®
uses the embedded
EPS language.
Do not use this option with the FFPS Adobe Print Engine (APPE)
When you design applications targeting the FFPS APPE that uses PDF resources, it is not necessary
to use this option. APPE can ingest directly the PDF resources in a VIPP
®
application.
Automating the Embedding Process
VI Explorer includes a batch file, embed.bat, which can be used in a user-defined process to
automate the embedding process. Execute the process on the Windows PC where the VI Explorer
version is installed and licensed, otherwise, the process fails.
46
Xerox®FreeFlow®VI Explorer
User Guide
Page 47

Using VI Explorer and the GUI
To validate that the embed.bat file is installed and configured properly, perform the following
steps. All examples use Windows 7.
1. Ensure that embed.bat is in your Execution Path.
Note: To use this process, ensure that you are familiar with the use of batch files, setting
environment variables, and general security and permission administration.
From the Windows screen, to open the Start menu, click the Windows icon. Click Control Panel.
When the Control Panel is open, select System and Security, then select System. From the left
side of the screen, choose Advanced System Settings then open the Advanced tab.
Click Environment Variables.
For System variables, scroll to the Path definition, select it, then click Edit. Inspect the contents
of the path environment variable.
®
Xerox
FreeFlow®VI Explorer
User Guide
47
Page 48

Using VI Explorer and the GUI
If the path to the embed.bat file is not a part of the path environment variable, place your cursor
at the end of the variable contents, then type the following text:
;C:\vviewer\pdftops
Note: The leading semicolon is required in the path.
When the path has been entered and verified, click OK.
48
Xerox®FreeFlow®VI Explorer
User Guide
Page 49

Using VI Explorer and the GUI
2. Open a command prompt.
From the Windows screen, to open the Start menu, click the Windows icon. Click All Programs.
Click Accessories, then right-click Command Prompt. A menu appears. From the menu, select
Run as Administrator.
Change the directory to the root of your C: drive. Type:
cd c:\
Xerox®FreeFlow®VI Explorer
User Guide
49
Page 50

Using VI Explorer and the GUI
3. To test the embed.bat file, create or identify a directory on your system that contains the PDF
files that you want to embed. For example: C:\embed_test.
Place one or more PDF files in the directory. This example uses two PDF files: file1.pdf and file2.
pdf.
Invoke the embed.bat file, specifying the full path of the directory. The following example shows
typical output:
c:\>embed c:\embed_test
Embedding PDF files in directory c:\embed_test
Processing c:\embed_test\file1.pdf
Embed operation returned: 0
Processing c:\embed_test\file2.pdf
Embed operation returned: 0
The return value of 0 indicates that both files have been embedded successfully.
If you repeat the command, the following information appears:
c:\>embed c:\embed_test
Embedding PDF files in directory c:\embed_test
Processing c:\embed_test\file1.pdf
Embed operation returned: 1
Processing c:\embed_test\file2.pdf
Embed operation returned: 1
A return value of 1 indicates that both files were embedded previously and no further processing
of that file is necessary. The processing is considered a success.
Possible return values:
0 Success
1 Already embedded, no further action taken Success.
-1 to -199 License error. For details, refer to the console output.
-201 Invalid parameters to pdftonps.exe file.
-202 PDF Library init error.
-203 Error opening the input file.
-204 Input file permissions error.
-205 PDF Library internal error.
50
Note: Technical details:
• The embed.bat batch file acts as an ease-of-use wrapper around a VI Explorer
component pdftonps.exe. The return values shown in the table are returned by the
pdftonps.exe component.
Xerox®FreeFlow®VI Explorer
User Guide
Page 51

Using VI Explorer and the GUI
• Users wishing to customize the embedding operation, or otherwise integrate
embedding into the workflow, can inspect the contents of the embed.bat file to see
how to invoke the pdftonps.exe component directly, or make a copy of the embed.bat
file to a different name, and make alterations to the batch file to suit their purposes.
• With either method, to function, pdftonps.exe requires a licensed installation of VI
Explorer.
• The pdftonps.exe file cannot be moved from the location in the VI Explorer installation
directory because the pdftonps.exe file depends on other installed libraries and
resources.
RReecceenntt FFiilleess
This option displays the last four files that you loaded on the VI Explorer. Use File→Recent Files to select and reload one of the listed files.
EExxiitt
This option allows you to exit the VI Explorer.
HHeellpp mmeennuu
The Help menu provides access to the online help for VI Explorer, as well as version and copyright
information about the VI Explorer.
FFrreeeeFFllooww VVII EExxpplloorreerr HHeellpp
This option accesses the VI Explorer Online Help. Use the Contents, Index and Search tabs to locate
help information.
AAbboouutt FFrreeeeFFllooww VVII EExxpplloorreerr
This option provides copyright and version information for the VI Explorer application.
Xerox
®
FreeFlow®VI Explorer
User Guide
51
Page 52

Using VI Explorer and the GUI
52
Xerox®FreeFlow®VI Explorer
User Guide
Page 53

4
VI Explorer Watched Folders Client
This chapter contains:
• Window Elements ...................... .............. .................................................................................. 54
• File Ready Check ........... ................................. .............. .............. ................... .............. .............. . 57
The VI Explorer Watched Folders Client (WFC) allows you to specify one or more directories where
Demographics or Normalization information can be placed for retrieval for reports (Demographics), or
used to streamline the job process (Normalization). An optional profile can be associated with each
watched folder, which controls the processing of all jobs submitted from that folder. All VIPP
found in each watched folder are checked at each watch interval to determine file readiness.
You can start the VI Explorer Watched Folders Client from the VI Explorer program folder or the VI
Explorer Watched Folders Client icon. The client runs as a background process.
You can tell that the Watched Folders Client is running by the presence of the icon in the Windows
task bar. To display the client options, right-click the VI Explorer Watched Folders Clienticon. The
following options appear:
• Restore VI Explorer Watched Folders Client: Maximizes the VI Explorer Watched Folders Client
window.
• Exit: Exits the Watched Folders Client. If you exit the client, folders are not watched until the client
is restarted.
®
jobs
The VI Explorer Watched Folders Client window is used to control and monitor watched folders.
Note: When the client is invoked, the watch process is inactive.
Xerox®FreeFlow®VI Explorer
User Guide
53
Page 54

VI Explorer Watched Folders Client
Window Elements
The VI Explorer Watched Folders Client window consists of these elements:
• Title bar
• Menu bar
• Watched folders / Output folders list
• Watched folder and Output folder details area
• Status area
• Function buttons
TTiittllee BBaarr
The title bar displays the product name: FreeFlow VI Explorer Watched Folders Client.
MMeennuu BBaarr
The Menu bar provides access to the File and Help menus.
These options are available from the File menu:
Hide Watched Folders Client Returns the VI Explorer Watched Folders Client window to a task bar icon.
Input File Disposition Controls what happens to watched jobs after they are submitted to VI
Explorer. There are two submenu choices:
Delete Input File:
Deletes the job from the watched folder. This setting is the default.
Move Input File to Saved Jobs Folder:
Moves the job to the Saved Jobs folder contained under each watched
folder.
Exit Exits the Watched Folders Client. The folders are no longer watched.
54
Xerox®FreeFlow®VI Explorer
User Guide
Page 55

VI Explorer Watched Folders Client
The Help menu provides access to the About option, which displays the version information of the VI
Explorer Watched Folders Client.
WWaattcchheedd FFoollddeerrss oorr OOuuttppuutt FFoollddeerrss LLiisstt
Lists the folders currently defined for watching, and the output folder for reports.
WWaattcchheedd FFoollddeerr aanndd OOuuttppuutt FFoollddeerr DDeettaaiillss AArreeaa
This portion of the VI Explorer Watched Folder Client shows the details about watched and output
folders, and allows you to select locations of and for those folders, and allows you to choose either the
Demographics or Normalization option.
Watched Folder
Use the Browse button to browse for and select the folder to watch.
Output Folder
Use the Browse button to browse for and select the folder into which information is placed.
Enable Demographics
To enable Demographics, select the check box, then select from these options for the
Demographics report.
• Output Format: Choose one or both:
– XML File
– Database File
For more information, refer to the VI Compose Services topic in the FreeFlow VI Compose User
Guide.
• Contents
– Resource Checking Information
– Demographics Information
– ACCLOG Information
Enable Normalization
To enable the Normalization feature, select the check box, then select from these options:
• Mark Normalized Pages: Places a marker on each normalized page in the job.
• Emit % % Page DSC for Front Pages Only: Emits page delimiters in the normalized file for front
pages only.
Folder Options
Select the check box for the appropriate options for the job:
• Use Nub File: Browse for and choose the Nub file associated with the job.
• Add Date/Time Stamp to Output File: To add a Date and Time stamp to the output filename,
enable this option.
®
Xerox
FreeFlow®VI Explorer
User Guide
55
Page 56

VI Explorer Watched Folders Client
SSttaattuuss AArreeaa
The Status area at the bottom of the Watched Folder Client displays the current watch interval,
which can be changed using the Change Interval button. The Status area shows the current method
used to check file readiness and indicates if folders are being watched.
FFuunnccttiioonn BBuuttttoonnss
The function buttons appear on the right side of the VI Explorer Watched Folders window:
Note: Profiles can be shared between VI Explorer and Watched Folders Client. However, VI
Explorer cannot modify settings that it does not use, such as Nub File. A profile created by, or
modified in the Watched Folders Client has values for Demographics and Normalization
enabled. Since VI Explorer ignores these values, any profile created by VI Explorer has the
values set to false.
Button Name
Resume/Pause Resume starts or resumes watched folder processing; Pause pauses the
Change Interval Changes the current watch interval. When you click this button, a
File Ready Check Used to select the method used to determine when a file is actually for
Add Watch Allows you to add a folder to the watched list.
Delete Watch Allows you to delete the selected folder from the watched list.
Save Changes Saves the current changes for the selected folder.
Load Profile Allows you to browse for and select a profile to use or edit.
Save Profile Saves the current profile in the selected folder.
Help Provides access to the VI Explorer online help facility.
Description
processing.
Change Watched Folders Interval window appears, which allows you to
change the interval in seconds. The status area on the VI Explorer
Watched Folders window shows the watch interval.
job submission, preventing processing and submitting files that are not
yet ready for job submission. This selection is indicated in the Status
area of the window. For more information, refer to File ready check.
56
Xerox®FreeFlow®VI Explorer
User Guide
Page 57

VI Explorer Watched Folders Client
File Ready Check
The file-ready check feature allows you to choose the method you want VI Explorer to use to
determine if a file is ready for use. Using this feature prevents problems that can occur when the WFC
encounters a file that may not be ready for submission. For example, a large file that is still being
transferred or copied from a remote location or files being built on the fly by an automated process.
The File Ready Check button invokes this dialog:
The dialog offers two choices to select for file readiness before a file is actually picked up for job
submission:
Check for Existence of Flag File
Used to signal the WFC directly when a file is ready for job submission by creating a flag file. The
flag file is an empty, 0-byte file that you create. In addition to having the same name as the job
file, this file requires the additional extension: ._File_Ready_For_Submission_.
The flag file for myVIProject.vpc, becomes:
myVIProject.vpc._File_Ready_For_Submission_
Copy the flag file to the same watched folder as the job file. The flag file uses the naming
convention described in this topic. After the job file has been successfully transferred, copy the flag
file to the watched folder only. If, during the polling intervals, the flag file is not found, it is
assumed that the file transfer has not completed. It is only when the flag file is found that the
WFC makes the job file available for processing.
Check for File Size Changes
This is the default setting in which the WFC checks and monitors changes in the file size at every
watch interval. If the size of the file to be submitted does not change at all within the specified
period of time, the file is considered ready for job submission and is processed at that time, even if
a flag file does not exist. The range of time is from 5–1800 seconds. The default threshold is 60
seconds.
When using the Check for File Size Changes option, if large files are transferred or copied from a
®
Xerox
FreeFlow®VI Explorer
User Guide
57
Page 58

VI Explorer Watched Folders Client
remote location to the watched folder, and the time it takes for the file transfer is longer than the
current watch interval, the file size changes during the transfer are monitored and the file is not
picked up for job submission until file size growth is not detected within the specified time. Choose
a period of time for the watch interval, taking this information into consideration:
• The file size changes to be detected by the operating system
• The speed of file transfer or copy
When the Check for File Size option is active, files may no longer be picked up and submitted for
processing when found at every watch interval. The effective submission rate is based on the file
size check threshold and the watch interval. Even for small files, job submission takes place after
the threshold is reached, assuming the watch interval is smaller than the threshold time.
A small threshold, for example, 5 seconds, can be used for small files, but for large files the time
threshold might not be long enough. Change the threshold accordingly.
58
Xerox®FreeFlow®VI Explorer
User Guide
Page 59

Page 60

 Loading...