

Page 1

Version 16.0.3.0
December 2020
702P08482
Xerox
®
FreeFlow
User Guide
®
VI eCompose
Page 2

© 2020 Xerox Corporation. All rights reserved. XEROX®and XEROX and Design®, FreeFlow®, FreeFlow Makeready®,
FreeFlow Output Manager
®
, FreeFlow Process Manager®, VIPP®, and GlossMark®are trademarks of Xerox
Corporation in the United States and/or other countries. Other company trademarks are acknowledged as follows:
Adobe PDFL - Adobe PDF Library Copyright © 1987-2020 Adobe Systems Incorporated.
®
Adobe
PostScript
, the Adobe logo, Acrobat®, the Acrobat logo, Acrobat Reader®, Distiller®, Adobe PDF JobReady™, InDesign®,
®
, and the PostScript logo are either registered trademarks or trademarks of Adobe Systems Incorporated in
the United States and/or other countries. All instances of the name PostScript in the text are references to the
PostScript language as defined by Adobe Systems Incorporated unless otherwise stated. The name PostScript also is
used as a product trademark for Adobe Systems’ implementation of the PostScript language interpreter, and other
Adobe products. Copyright 1987 - 2020 Adobe Systems Incorporated and its licensors. All rights reserved. Includes
®
Adobe
Intel
PDF Libraries and Adobe Normalizer technology.
®
, Pentium®, Centrino®, and Xeon®are registered trademarks of Intel Corporation. Intel Core™Duo is a trademark
of Intel Corporation.
Intelligent Mail
Macintosh
®
is a registered trademark of the United States Postal Service.
®
, Mac®, and Mac OS®are registered trademarks of Apple, Inc., registered in the United States and other
countries. Elements of Apple's Technical User Documentation used by permission from Apple, Inc.
®
Novell
and NetWare®are registered trademarks of Novell, Inc. in the United States and other countries. Oracle®is a
registered trademark of Oracle Corporation Redwood City, California.
PANTONE
™
and other Pantone Inc. trademarks are the property of Pantone Inc. All rights reserved. QR Code™is a
trademark of Denso Wave Incorporated in Japan and/or other countries.
®
TIFF
is a registered trademark of Aldus Corporation.
The Graphics Interchange Format© is the Copyright property of CompuServe Incorporated. GIFSM is a Service Mark
of CompuServe Incorporated.
Windows
and Microsoft Edge (Chromium) are trademarks of Microsoft Corporation; Microsoft
®
, Windows®10, Windows Server®2012, Windows Server®2016, and Windows Server®2019, OneDrive®,
®
and MS-DOS®are registered
trademarks of Microsoft Corporation.
All other product names and services mentioned in this publication are trademarks or registered trademarks of their
respective companies. They are used throughout this publication for the benefit of those companies, and are not
intended to convey endorsement or other affiliation with the publication.
Companies, names, and data used in examples herein are fictitious unless otherwise noted.
While every care has been taken in the preparation of this material, no liability will be accepted by Xerox Corporation
arising out of any inaccuracies or omissions.
Changes are periodically made to this document. Changes, technical inaccuracies, and typographical errors will be
corrected in subsequent editions.
Produced in the United States of America.
Page 3

Table of Contents
1 FreeFlow VI eCompose Installation ...................................................................................... 7
Getting Started...... . ............................... ............................................................. . .................... 8
Program Download ............... . ............................................................ . . .............................. 8
Documentation Download............................. . ............................................................ . . ..... 8
Barcode Font Download............... . . ............................................................. ....................... 8
Specialty Imaging............... ............................... . ............................................................ . .. 8
Important Upgrade Information............................................. . .............................. . ................. 9
vipo.ini Configuration File Information......................................................... . ......................... 10
Installation Requirements.................. . ............................................................ . . ..................... 12
VIeC Installation.... . ............................................................ . ............................... ................... 14
VIeC Licensing . ............................... . ............................................................ . ......................... 15
Using the Load License Option .............................. ............................... ............................ 16
Using the Activation Key Option .. . ............................................................ . . ..................... 16
VIeC Configuration Options ........ . ............................................................ . . ............................ 18
VIeC Server and Client ............................................ ............................... . ......................... 18
VIeC Client Only ................ . ............................... ............................................................. . 18
VIeC Server Node Servicing a VIeC Cluster............................ ............................... . ........... 18
Additional VIeC Functions............................. . . .............................. . ........................................ 19
lpr Job Submission Installed on a VIeC Server ........................ ................................................ 20
Additional VIeC Printer Creation ....................................................... . ............................... ..... 21
Web-Enabling the VIeC Application ....... . . .............................. ................................................ 22
Defining VIeC Web Security Levels..................................... .............................. . . .............. 22
VIeC Server Node Installation ........................................................... . ............................... ..... 28
VIeC Web Job Submission Service (WJSS) Installation........................ ............................... . .... 31
VIeC Services Installation ...................................................... . . .............................. . ............... 32
Installation Procedures .................................................. ............................... . .................. 32
Uninstalling VI eCompose Services................................................... ............................... . 38
Adobe Acrobat and Reader ......................... ............................... . ........................................... 39
Create an Adobe Acrobat or Reader Privileged Folder ................... ............................... . .... 39
Adjust Security Settings ... .............................. . . ............................................................ . ... 39
2 VI eCompose Overview .........................................................................................................41
VI Suite Customer Forum ....................... . . ............................................................ .................. 42
VIeC .. ............................... . ............................................................ . .............................. . . ....... 43
VIeC Support for FreeFlow Process Manager .............................. . ........................................... 45
Workflow ........................... . ............................... ............................................................. . 45
Limitations.............................................................. ............................... . ......................... 45
SAP Device Type for VI Compose ............................................................. . . ............................ 46
VIeC Dispatch................... . ............................... ............................................................ . . ....... 47
Xerox®FreeFlow®VI eCompose
User Guide
3
Page 4

Table of Contents
VIeC Services........................... . ............................................................. ............................... . 48
Setting up and Debugging VI eCompose Services .............................. .............................. 48
VIeC Web ............................. . .............................. . ............................................................ . . ... 49
VIeC Configuration Options ........ . ............................................................ . . ............................ 50
VIeC Multiple Instance .......... . .............................. . . ......................................................... 50
VIeC Server and Client ............................................ ............................... . ......................... 52
VIeC Client Only ................ . ............................... ............................................................. . 53
VIeC Server Node Servicing a VIeC Cluster............................ ............................... . ........... 54
vipo.ini Configuration Settings .................................................... ............................... . ........... 56
Optional .ini Entries................... . ............................... . ...................................................... 58
3 Using VIeC ...............................................................................................................................59
VIeC Server and Client ................ . . .............................. ............................... ............................ 60
Using VIeC Local Server ..................... . ............................................................ . . ..................... 61
File Menu Options..................... . ............................................................. ......................... 61
Job Selection Menu Options ................. ............................................................ . . .............. 63
Help Menu Options.......................... . . .............................. . ............................................... 63
Using the VIeC Job Submission Client ...... .............................. . . .............................................. 64
Window Elements ......................................................... . .................................................. 64
Job Creation Area Field Descriptions ......................... . . ..................................................... 66
Specifying PDF Output File Names..................... . ............................................................ . 72
Specifying an Index File.............................. . ............................................................. ....... 75
Template Field Descriptions ............. . ............................................................ . .................. 79
Using VIeC Watched Folders Client ............................. . . ......................................................... 80
Window Elements ......................................................... . .................................................. 80
Adding Watched Folders ........... ............................................................. . ......................... 82
File Ready Check.............................. ............................................................. . .................. 82
Command Line Options for VIeC Watched Folders Client.. . . .............................. ................ 83
Bulk Processing ...................................... . . ............................................................ .................. 84
Housekeeping ...................... ............................................................. . .................................... 85
4 Using BOOKMARK, PDF Features, and Project Containers..............................................87
Using the VIPP®BOOKMARK Command ......................................................... . . ..................... 88
Extended Bookmarks .. . ............................... . ........................................................... . . ....... 88
Using VIPP
PDF/X Support .... . .............................. . . ........................................................... . . ..................... 91
Using VI Project Containers ........ ............................................................. . . ............................ 92
®
PDF Interactive Features......................... ............................... ............................ 90
5 Using lpr to Submit VIeC Jobs .............................................................................................93
Lpr Client ...................................................... . . .............................. . ........................................ 94
Lpr Command Syntax for the Windows OS ................... . ............................... .......................... 95
Parameter Definitions ................................ . ............................... . ........................................... 96
Parameter Defaults...................................................... . ............................... .......................... 97
Example Lpr Job Submissions ..................... . ............................................................. .............. 98
4
Xerox®FreeFlow®VI eCompose
User Guide
Page 5

Table of Contents
6 VIPP®Job to PDF File Conversion .......................................................................................99
PDF Security Options ........................... ............................... . ................................................ 100
VIeC Security Options Dialog ............... . ............................................................ . ............ 100
VIeC Configuration..... . ............................... . ........................................................... . . ..... 101
Personalized Open Passwords for Split PDFs.. ............................... . .................................. 102
Font Locations .......................... ............................... . ........................................................... 105
Assigning a Job Options File............. ............................... . .................................................... 106
PDF Resources and Compatibility with APPE.......... . .............................. . ............................... 107
7 Using VIeC Services............................................................................................................. 109
Definitions.................................................... . . .............................. ....................................... 110
VI eCompose Server........... . ............................................................ . .............................. 110
VI eCompose Service .......................................... ............................... . ........................... 110
Constraints ............................................ . . ............................................................ ................ 111
8 Using VIeC Dispatch........................................................................................................... 113
VIeCD Data Flow .................. . .............................. . ............................................................ . . . 115
VIeCD IncomingFolders Filters ...... .............................. . . ....................................................... 116
Eligibility: CommandTemplates, RuleVars, and the DispatchRule Fieldname.......................... 117
Index File......... . ............................................................. ............................... . ................ 117
RuleVars .................. . .............................. . . ........................................................... . ......... 118
Reserved Index File Field Name........ . . .............................. .............................................. 118
AutoRun Filters ....................................... . .............................. . ............................................. 119
Processing.............. . ............................... ............................................................. . ................ 120
VIeCD Job Life Cycle.............................. . . ............................................................ ................ 121
Ineligible ........................... . ............................... ............................................................ 122
Rule Conflict ......................................... ............................... . ......................................... 122
Eligible........................................................ . ............................... ................................... 122
Pending ..................................... ............................... . .................................................... 122
Current ........ . . .............................. ............................... .............................. . . ................... 122
Held...................... ............................... . ............................................................ . ............ 123
Complete.......... ............................... . ............................................................ . ................ 123
Dispatch Filters .................. ............................... . ............................................................ . ..... 124
Dispatch Rule Files ..................................... . ............................... .......................................... 125
System Built-in Macros............................................ ............................... . ....................... 131
Rule File Variable References................................................... . . .............................. ....... 132
Special Character Sequences in CSV and XML Index Files .................................................. . . . 133
VIeC Dispatch Window . . . .............................. ............................................................. . ......... 134
Pending Jobs. . .............................. . . ........................................................... . . ................... 135
Eligible Jobs.......................... . . .............................. ............................... .......................... 135
Conflict Jobs .......................... . .............................. . ........................................................ 136
Completed Jobs ............................................................ . ............................... ................. 136
File Menu............ ............................... .............................. . . ............................................ 137
Edit Menu...................... ............................................................. . .................................. 137
Trace Menu........................ . ............................................................. .............................. 140
Xerox®FreeFlow®VI eCompose
User Guide
5
Page 6

Table of Contents
9 Using VIeC Web................................................................................................................... 141
Accessing VIeC Using the Web Browser.................... ............................................................ 142
Job Status and Submission... . . ............................................................ ............................... . .. 143
Job Status Panel ..................................... . . .............................. ....................................... 143
Submit Job: Job Submission Panel.................. . . .............................. . ............................... 144
Administration........................................... . ............................... .......................................... 146
User and Group Administration...................... ............................................................. . . . 146
Server Administration....................... . . ........................................................... . ................ 147
Cluster Administration ............................................... . .............................. . .................... 149
Basic Authentication Quick Setup........ . ............................... . ................................................ 152
Performing Basic Authentication ............................................................ . ....................... 152
Disable Basic Authentication.............................. . ............................... ............................ 152
Web Browser Notes............................................ ............................... . .................................. 153
Starting and Stopping the Web Application ............................... . ............................... .......... 154
Changing the Port for HTTP and HTTPS ................................... .............................. . . ............ 155
10 VIeC Web Job Submission Service................................................................................. 157
11 How VIPP
Set Up the VIPP®Application .................................. . ........................................................... 160
Setting up VIeC and the VIeC Index Template....................... . ............................................. 162
Passing Data from the Index Template ......... . . ............................................................ ......... 164
®
BOOKMARK Interacts with Dispatch........................................................ 159
6
Xerox®FreeFlow®VI eCompose
User Guide
Page 7

1
FreeFlow VI eCompose Installation
This chapter contains:
• Getting Started.................. . .............................. . ............................................................ . ............. 8
• Important Upgrade Information......................................................... .............................. . . ......... 9
• vipo.ini Configuration File Information....... . . ........................................................... . .................. 10
• Installation Requirements.............................. . ............................................................ . .............. 12
• VIeC Installation............... . . ............................................................ ............................... . ........... 14
• VIeC Licensing ............................. ............................................................ . . ................................ 15
• VIeC Configuration Options ................... . . ............................................................ . ..................... 18
• Additional VIeC Functions.......................................... .............................. . . ................................ 19
• lpr Job Submission Installed on a VIeC Server ............................................................. . .............. 20
• Additional VIeC Printer Creation ................................ .............................. . . ................................ 21
• Web-Enabling the VIeC Application............. . .............................. . . .............................................. 22
• VIeC Server Node Installation ......... . . ............................................................ . ............................ 28
• VIeC Web Job Submission Service (WJSS) Installation..... ............................... ............................ 31
• VIeC Services Installation........................................................ . .................................................. 32
• Adobe Acrobat and Reader ............................... . . .............................. ......................................... 39
Note: Refer to the following information:
• Install locally
Install locally VIeC and all components. You are required to log in locally, with system
administrator credentials. Installations from a remote location, or using Windows Terminal
Services, are not supported and do not work as expected.
• Virtual machine
You can install VI eCompose on a virtual machine with a unique MAC address or UUID. However,
no support is provided for the VM environment.
• Updates are released as Full Installers.
• You can install any FreeFlow VI Suite 16.0.3.0 update over any prior release of the FreeFlow VI
Suite. Installation of VI Suite components require system administrator privileges.
• Before any update installation, stop all active VI eCompose modules.
• Before any update installation, stop all active VI eCompose modules, such as FreeFlow VI
eCompose or VI eCompose services.
Xerox®FreeFlow®VI eCompose
User Guide
7
Page 8

FreeFlow VI eCompose Installation
Getting Started
Before you begin, first download the software from the Xerox website. Download instructions are
provided here. After you have downloaded the appropriate files, you can proceed to the installation
instructions that follow.
PPrrooggrraamm DDoowwnnllooaadd
To download VI eCompose, go to www.xerox.com/support, select Software & Platforms, select
FreeFlow, select FreeFlow Variable Information Suite, select Driver & Downloads. If necessary, to
display the correct installer file, select the Operating System type appropriate for your target
platform. To download the installer, click the VI eCompose installer file.
Note: Programs are delivered in .zip format. You can download the programs directly to the
target device. If the device does not have Internet access, copy the .zip file on the target
device. Extract the zip file, which contains .exe file for the FreeFlow VI eCompose installation.
DDooccuummeennttaattiioonn DDoowwnnllooaadd
English language versions of the FreeFlow Variable Information Suite documentation is available for
download. Go to www.xerox.com/support, select Software & Platforms, select FreeFlow, select
FreeFlow Variable Information Suite, and select Documentation.
BBaarrccooddee FFoonntt DDoowwnnllooaadd
To download barcode fonts, go to www.xerox.com/support, search for VIPP, then select Software.
Note: When downloading fonts, you are directed to review an End User License Agreement. To
download the fonts, review and accept the End User License Agreement. If you do not accept
the End User License Agreement, you exit from the font download page.
SSppeecciiaallttyy IImmaaggiinngg
Xerox Specialty Imaging is not supported when generating PDF as the output format. VIeC does not
support any Specialty Imaging effects.
8
Xerox®FreeFlow®VI eCompose
User Guide
Page 9

FreeFlow VI eCompose Installation
Important Upgrade Information
When you have a previous VI eCompose software version earlier than 16.0.3.0 installed on your
system and you are upgrading to a new version of VIeC, before you uninstall the earlier version, it is
recommended that you install version 16.0.3.0 or later.
To enhance security, the internal password hash algorithm for the eCompose Web Application (HTTP)
and Secure Web Application (HTTPS) have been upgraded from MD5 to 256-bit SHA-2. As a result,
user passwords generated on versions of eCompose prior to version 15.0 no longer function, and
before users can log in again, a one-time password reset is required.
A new password utility (sha2passwd.exe) has been provided to help in this transition. The utility can
be invoked from the command line or from a batch file and works by resetting the indicated user
password in the Web Application password file (vtpw.pwd). It is recommended that the administrator
uses this utility to reset each user password to a unique temporary password. When the password is
reset and provided to the user, the user logs in using the temporary password and immediately
changes the password to a password of their choice.
How to use the sha2passwd.exe utility:
Bring up a command prompt and change directory to the eCompose bin directory, X:\Program
Files(x86)\Xerox\VIPP\xvtp\bin, where X is the partition where the VI eCompose software
is installed.
Note: For the utility to function properly, the current working directory needs to be the
eCompose bin directory.
Invoke the utility, specifying the name of the password file, the user name of the user, and the new
(temporary) password.
Then the password for that user is reset. If the specified user is not present in the password file, the
user and their new password are added to the password file. Example:
sha2passwd vtpw.pwd john changeMeSoon
Result: the password file vtpw.pwd is updated for the user name john with a 256-bit SHA-2 hash for
the password changeMeSoon. John can use that password to log in, then use the Web interface to
change the password immediately.
Xerox
®
FreeFlow®VI eCompose
User Guide
9
Page 10
FreeFlow VI eCompose Installation
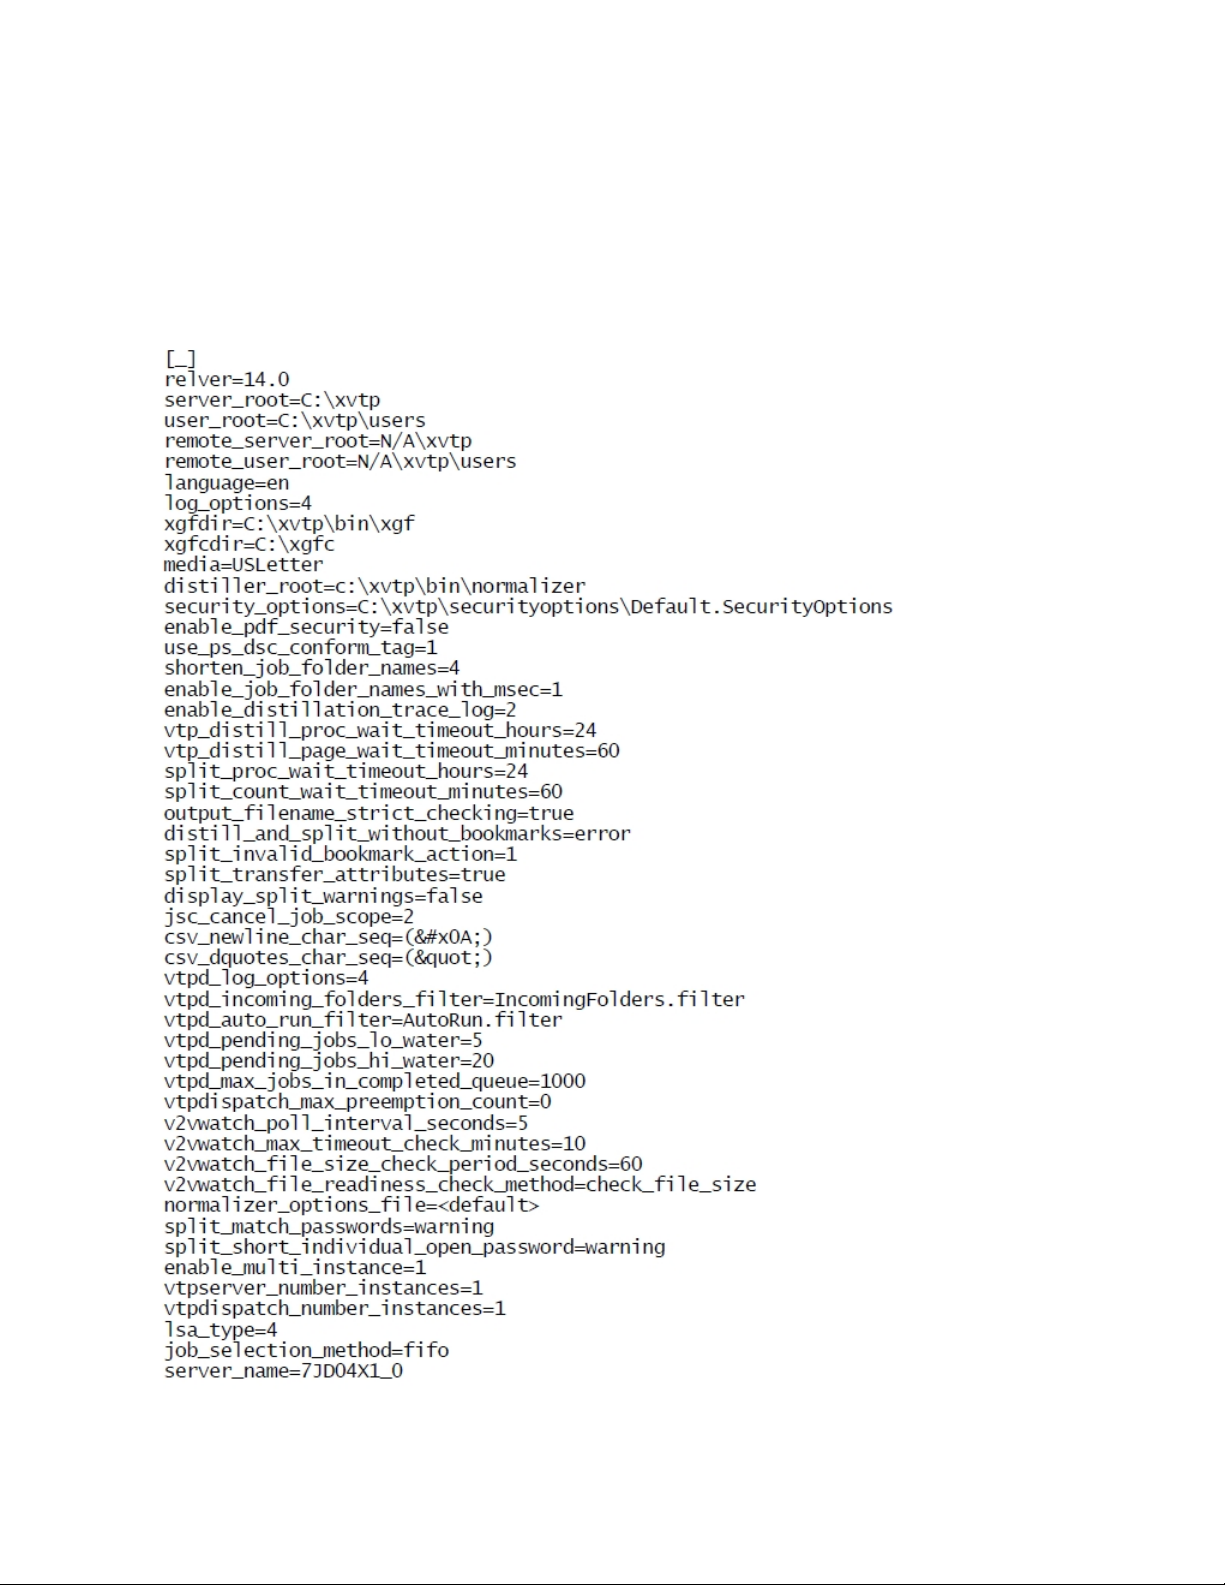
vipo.ini Configuration File Information
The configuration of the VIeC installation is specified in the vipo.ini file at C:\ProgramData
\Xerox\VIPP\VIPO\vipo.ini for Windows 10, Windows Server 2012 including R2, Windows
Server 2016, and Windows Server 2019.
The vipo.ini file is similar to this example:
10
Xerox®FreeFlow®VI eCompose
User Guide
Page 11

FreeFlow VI eCompose Installation
A key entry is user_root=
• A VIeC Server processes any job submitted with user_root.
• A VIeC Job Submission Client submits local jobs to the appropriate location with user_root.
• The VIeC installation program adjusts the user_root entry according to the configuration that you
select:
– VIeC Server and Client
– Client only
– VIeC Server Node servicing a VIeC Cluster
Note: The use of remote_user_root and the associated remote_server_root entries
were intended for use with a developer license configuration that is no longer available. Both
entries are deprecated, so ignore the entries mentioned in older or other external
documentation.
Note: Manual edits of the .ini and .conf files are discussed in the related sections of this
guide.
Xerox
®
FreeFlow®VI eCompose
User Guide
11
Page 12

FreeFlow VI eCompose Installation
Installation Requirements
VIeC can be installed on workstations that run in these environments:
• Windows 10, Windows Server 2012 including R2 32-bit and 64-bit platforms, Windows Server
2016, and Windows Server 2019 64-bit platform only
• Intel Pentium 4, Intel Centrino, Intel Celeron, Intel Xeon, or Intel Core Duo or better processor
• 2 Gbytes or more RAM for each instance.
• 5 Gbytes or more available hard drive space
• 1024 x 768 monitor screen resolution. The higher resolution is preferred.
• DVD-ROM or CD-ROM drive
• Microsoft .NET Framework 4.8 (installed)
Requirements to Run Multiple Instances of VIeC
For best results, a minimum of one CPU core and 2 Gbytes of RAM is required for each instance of
VIeC. If Dispatch is involved, enough CPU or memory for all simultaneous post-processing operations
is required. The requirements vary, based on the load and complexity of the jobs that need
processing.
A minimum configuration for four instances, without considering VIeC Dispatch, is a quad core
system with at least 8 Gbytes of RAM, running on a 64-bit operating system. Note that 32-bit
operating systems are not able to address enough RAM to support the 8 Gbyte minimum RAM. If
there is Dispatch post-processing or other system loads, more CPU and RAM capacity is required.
Requirements to Run the VIeC Web Job Submission Service
The general rule is that each Normalizer instance determined by the vinip.ini setting nip_
number_of_instances requires one CPU core and 2 Gbytes of RAM, just as with the initial VIeC multiinstance configuration. After the CPU and RAM allocations are made, further adjustments can be
required. A dual-core system with 4 Gbytes of RAM would initially have nip_number_of_instances set
to 2.
The expected use of WJSS is the submission of many small jobs with a few pages. WJSS can support
the submission or any job, small or large. This can mean that the memory footprint requirement for a
given Normalizer instance is less than 2 Gbytes. A high volume of small jobs can put a different load
on network and disk I/O, which can push the overall system to being more I/O bound than CPU
bound. When the system is up and running, users can see benefits from running more instances than
there are cores, or they may need less working RAM than a system with different workflow
requirements. On-site experimentation is encouraged.
PDF/VT-1
The Additional Profile Options dialog available from the Job Submission Client includes an option to
create PDF/VT-1 compliant PDF files in addition to including Media and Finishing options. When
using PDF/VT-1 and Media Finishing, always consider this information:
• Media and Finishing options and PDF/VT-1 compliance are applied only to the Master PDF file
and not to any child PDF files that are split from the master PDF. While the master PDF file can
12
Xerox®FreeFlow®VI eCompose
User Guide
Page 13

FreeFlow VI eCompose Installation
include Media and Finishing options and be PDF/VT-1 compliant, any child PDFs split from the
master PDF do not have such features included.
• Not all printer devices honor PDF files that contain Media and Finishing requests or that are
compliant with the PDF/VT-1 standard. Only the digital front end (DFE) systems that are
supported honor the feeding and finishing requests.
Supported Print Servers
Xerox FreeFlow Print Server (FFPS) version 9.3 SP1 or above.
Trial Period
The initial installation of VIeC provides a 60-day trial period. After the trial-period, a production
license is required for system functionality. You can activate the production license anytime during or
after the trial period.
Note: The trial detects prior installations of VIeC and cannot activate the trial if the software
was installed more than 60 days before. Do not change the system clock to circumvent the
license mechanism because VIeC detects changes and cannot operate on that system.
The System Host ID of the Windows workstation and the product release version are required to get a
license. When a license is not available immediately, the software can be installed, and the license
can be activated later.
System administrator login credentials and privileges are required to install the VIeC software.
Modify/Read and Execute/Write privileges are required on the drive and directories where VIeC is
installed.
Xerox
®
FreeFlow®VI eCompose
User Guide
13
Page 14

FreeFlow VI eCompose Installation
VIeC Installation
1. Download the VI eCompose .zip file, then extract the files to get the .exe file for the installation.
For more information on downloading VI eCompose, refer to Program download.
2. Run the .exe file. To install the software, follow the onscreen instructions.
a. Accept the Software License Agreement.
b. Choose the following options from the install set:
• Client and Server: This option requires a software license.
• Client Only: This option requires access to a remote server.
• Server Node: This option services a cluster.
• LPR Setup: This option appends the LPR feature to an existing VI eCompose installation.
• LPR Job Submission: If you want to submit jobs through LPR, for LPR print driver
installation, select Yes.
3. When prompted, provide the following VIeC configuration information for your system:
• Choose the Default Job Folder name.
• Choose the drive location for the program and customer files.
• Choose the drive that contains VIPP
®
customer files, such as the xgfc directory.
• Choose the available VIeC Servers on the network.
• Choose the default media size: A4 or US Letter.
• Choose the shortcut folder to create a product icon.
For more information about the available configuration options, refer to VIeC configuration
options.
4. After the installation completes, restart your system.
To convert the trial license to a product unit, order the VI eCompose License kit. After the order is
processed, the license kit is delivered. Included in the license kit is the software activation key. To
activate your software, follow the instructions in Using the Activation Key Option. Not all locations
across the world support the use of license enablement using the automated license activation
process. If the license kit does not contain the software activation key, obtain a license file, then
follow the instructions in Using the Load License Option.
14
Xerox®FreeFlow®VI eCompose
User Guide
Page 15

FreeFlow VI eCompose Installation
VIeC Licensing
If the software has not been installed previously on your device, VI eCompose software installs with a
60-day trial period. To use the product after the 60-day trial period, to convert the trial to a fully
licensed version of the product, purchase a production license. Without a valid license, the software is
not usable.
The process to license VI eCompose depends on where and how VI eCompose was purchased. VI
eCompose software has unique licensing requirements based on the geographical region. When you
purchase VI eCompose software, the licensing requirements for your region are included in the kit.
• System clock
Do not attempt to change the system clock to circumvent the license. VIeC software detects
changes. If tampering is attempted, the software fails to operate.
• Manual Load License process
When using the manual process of the Load License option, you are provided a license file. License
files have the file extension *.dat for all VI products that are generated using an automated
process. The process saves the file as HardwareAddress.dat, where HardwareAddress is the
address of the computer on which the product is licensed. It is possible to receive more than one
product license file with identical file names. It is your responsibility to ensure that you do not
overwrite existing licenses when saving a new product license. When license files that are used on
a single computer are set to expire at the same time, you can request one file that activates all VI
products on that computer.
• VIeC Clients do not require a license.
• A workstation in a client-only configuration accesses a remote, licensed VIeC Server to process
To manually load or activate your VIeC license, from the menu bar on one of the main Dispatch,
Local, or Web Server panels, select Help→Install/Update Software License. You can use this option
to view how many days remain in the trial version or view the status of the license.
When you select the Install/Update Software License option, a VI eCompose License panel appears.
The panel provides access to information about the installed license and two unique licensing options.
Use the panel to choose the option suited to your location. The panel includes license information:
• License Type
• Days Remained: The number of days until the existing license expires.
• License Host ID: VleC software finds and displays the information from your computer. If a valid
• Product Version: The installed version of the VIeC software.
If you have obtained a license file: Use this option when you have received a license file with the file
extension *.dat. When the file is delivered, ensure that you store the file in a safe and accessible place
on your computer.
®
VIPP
license file has been loaded, the Host ID used by the license is shown.
jobs.
Note: When you install an upgrade to an existing version of VIeC software with a valid license,
the software finds and activates the previously installed license. No further action is required
until the license expires.
For instructions, refer to Using the Load License option.
If you have an activation key: The information in the panel is designed for users who have received a
®
Xerox
FreeFlow®VI eCompose
User Guide
15
Page 16

FreeFlow VI eCompose Installation
software activation key as part of the software license kit for the VIeC software.
If you do not have the license kit, and are in a location that requires this option, to purchase the
software license kit for the VIeC software, contact your Xerox sales representative. After the order has
been processed, a license kit is shipped to you. The license kit contains the software activation key
and serial number, if provided.
For further instruction, refer to Using the Activation Key option.
UUssiinngg tthhee LLooaadd LLiicceennssee OOppttiioonn
To activate the VI eCompose license using a license file:
1. Select the Load License option.
2. Browse to the location of the license file, select it, then click OK.
3. The license will be installed. The new license information will be displayed at the top of the
license panel.
4. Select OK to activate the license.
UUssiinngg tthhee AAccttiivvaattiioonn KKeeyy OOppttiioonn
Note:
• Retain the software activation key and serial number in a safe location for future upgrades
or support.
• If you have the software activation key, you can use the automated license process.
1. For System Host IDs, choose one of the available options for the license Host ID. The default is
recommended.
Note: If the automated license process fails, when you contact Xerox Technical Support for
assistance, have available the hardware System Host ID string and the software activation
key.
2. For Serial Number, enter the serial number of the device where the software is installed.
3. For Software Activation Key, enter the information, then click Activate.
4. The Xerox License Server can request additional information. Enter the requested information,
then select OK.
This information and the Software Activation Key are submitted to the Xerox License Server.
5. If additional information is required to validate the license request, a new screen appears. Enter
the required information, then select OK.
The Xerox License Server validates the information and enables the license or returns an error
code if the information supplied does not match the Xerox records.
6. If an error code is generated, for assistance, contact your local Xerox representative and report
the error code.
7. If the information entered is valid, a license file is generated and loaded to your system. Details
of the license appear in the License Information area of the License screen. To apply the license,
click OK. When the OK button is selected, the license is applied.
16
Xerox®FreeFlow®VI eCompose
User Guide
Page 17

FreeFlow VI eCompose Installation
Sometimes, the automated license activation fails. If the license activation fails, for assistance,
contact Xerox Technical Support. Ensure that you have available the System Host ID of the
workstation and the software activation key supplied in the Software Activation Kit. If the license is
emailed to you, you can activate the license manually.
Note:
• If connecting to the license server fails, you can go to any Internet-connected device and
log in to the portal using this URL: https://www.xeroxlicensing.xerox.com/activation
• Enter the activation key, then follow the onscreen prompts. Ensure that you have available
the System Host ID of the VIeC system. Xerox emails a license file to you. Move the license
to a safe location on the VIeC system, then use the Load License option to install the
license.
Xerox
®
FreeFlow®VI eCompose
User Guide
17
Page 18

FreeFlow VI eCompose Installation
VIeC Configuration Options
During installation, you are required to select the VIeC software configuration for your site. To
determine which of the available VIeC configuration options is appropriate, click the links and review
the information.
• VIeC Server and Client
• VIeC Client only
• VIeC Server Node servicing a VIeC Cluster
VVIIeeCC SSeerrvveerr aanndd CClliieenntt
This is the default configuration that results from a typical single-workstation VIeC installation.
Choose this option to install the following components on a single workstation:
• Local VIeC Server
• Job Submission Client
• Watched Folders Client
• VIeC Web Application
• VIeC Secure Web Application
• VIeC Dispatch Server
This option is discussed in detail in VIeC configuration options, a section of the FreeFlow VI
eCompose User Guide.
VVIIeeCC CClliieenntt OOnnllyy
Choose this option to install the following components in a client-only configuration:
• Job Submission Client
• Watched Folders Client
No license is required. An existing VIeC Server is required on the network where the client can submit
jobs.
Note: The installation script requires that you select the Remote Server Drive. Before the path
can be entered on the client installation, an available VIeC Server on the network is required.
The client requires access to the server.
For more information about this option, refer to VIeC configuration options, in the FreeFlow VI
eCompose User Guide.
VVIIeeCC SSeerrvveerr NNooddee SSeerrvviicciinngg aa VVIIeeCC CClluusstteerr
Choose this option to install a VIeC Server Node servicing a VIeC Cluster. This is an advanced option
to be used by system administrators only. Refer to VIeC configuration options, a section of the
FreeFlow VI eCompose User Guide, for more complete information.
18
Xerox®FreeFlow®VI eCompose
User Guide
Page 19

FreeFlow VI eCompose Installation
Additional VIeC Functions
Additional functionality can be added either during or after the initial installation of VIeC. To add the
additional functionality, you must log into an account with administrator access on the PC. Insert the
CD you created previously into the PC's CD/DVD drive. The installation should start automatically. If
the installation does not start automatically, browse the CD to the Windows folder and double-click
on the setviec.exe file to start the installation. Follow the on-screen instructions to add additional
functionality.
Installation of these additional functions are described in these sections:
• lpr job submission installed on a VIeC Server
• Additional VIeC printer creation
• Web-enabling the VIeC Server
• VIeC Server Node installation
• VIeC Services installation
Xerox
®
FreeFlow®VI eCompose
User Guide
19
Page 20

FreeFlow VI eCompose Installation
lpr Job Submission Installed on a VIeC Server
To install the lpr job submission option for VIeC, select lpr printing during VIeC installation, or select
Install VI eCompose LPR Option from the VIeC program folder after VIeC installation.
This option must be installed on each VIeC Client machine that will be running lpd and receiving lpr
jobs for submission to VIeC for processing.
Note: To successfully install lpr job submission:
• Log on locally to the system where the VIeC LPR Printing installer will execute using a login
account that has Administrator rights. Installations from a remote location, or using
Windows Terminal Services, will not work as expected.
• Ensure that VIeC Client is installed on the Windows system that is receiving the lpr jobs.
• Ensure that you have Control Panel access.
Access to the Control Panel varies between Windows or Windows Server Operating Systems in use.
Adjust these instructions according to your operating system.
1. From the Start button, go to Settings→Control Panel.
2. At the Control Panel, find and double-click Administrative Tools.
3. In the Administrative Tools window, find and double-click Services.
4. In the Services window, find TCP/IP Print Server. When the option is present skip to Step 8, when
not continue to the next step.
5. Install TCP/IP Print Server. Go to Settings→Control Panel→Add Remove Programs.
6. Click on the Add/Remove Windows Components icon on the left.
7. Check Other Network File and Print Services, then click Next and Finish.
8. Return to Control Panel→Administrative Tools→Services and double-click TCP/IP Print Server.
9. Select Automatic for the Startup Type.
10. Click Start, then click OK.
20
Xerox®FreeFlow®VI eCompose
User Guide
Page 21

FreeFlow VI eCompose Installation
Additional VIeC Printer Creation
You can create additional VIeC printers.
Note:
• Characters in printer name
The VIeC printer name cannot exceed 64 characters and must consist of only alphanumeric,
dash (-), and underscore (_) characters. All other characters result in errors or unexpected
outcomes.
• At the end of each step in the wizard, click the Next button as required.
• Access varies.
Access to programs and settings varies according to the Windows or Windows Server operating
system in use. Adjust these instructions according to your operating system.
1. From the Start menu, go to Settings→Printers.
2. To launch the Add Printer wizard, double-click Add Printer.
3. Select Local Printer.
Note: Ensure that this setting is not selected: Automatically detect and install my Plug and
Play printer.
4. Select xvtp port.
5. For the manufacturer, select Generic. For the printer type, select Generic/Text Only.
6. When prompted, select Keep existing driver.
7. For printer name, enter the virtual printer name for the lpr-to-VIeC command.
Note: Ensure that the virtual printer is not selected as the default printer.
8. When prompted, select Do Not Share This Printer.
9. To bypass printing a test page, select No, then click Finish.
Xerox
®
FreeFlow®VI eCompose
User Guide
21
Page 22

FreeFlow VI eCompose Installation
Web-Enabling the VIeC Application
Note: Access to programs and settings varies according to the operating system in use:
Windows 10, Windows Server 2012 including R2, Windows Server 2016, and Windows Server
2019. Adjust these instructions according to the operating system.
To enable the VIeC Server to accept VIPP
1. To start the VIeC Server, use one of these options:
• Select Start→All Programs→Xerox FreeFlow VI eCompose xx→VI eCompose Web Server.
• On the lower right side of the computer screen, right-click the VIeC Server icon, then select
Launch Web Application.
A small icon appears in the lower right corner of the window. The VIeC Server is web-enabled.
2. Obtain the system Network Identification or the IP address.
• To obtain the Network Identification, select Start→Settings→Control Panel→System, then
click the Computer Name tab. The system identification is the full computer name, for
example: lab computer.
• To obtain the IP address, from a command prompt, enter ipconfig. The IP address is the
multiple-part number, for example: 11.1.1.111.
3. Start a Web browser on the VIeC Server or anywhere that has TCP/IP access to the system. In the
browser address field, type the web-enabled VIeC Server address. Click the Job Submission link.
You can submit VIPP
®
jobs to the web-enabled VIeC Server.
®
jobs using the Web:
Caution: It is recommended that you do not leave the VIeC Web installation at the default
level of security. For more information, refer to Defining VIeC Web security levels.
DDeeffiinniinngg VVIIeeCC WWeebb SSeeccuurriittyy LLeevveellss
There are four types of security supported by VIeC Web:
No security, HTTP only Anyone with TCP/IP access to the VIeC Web Application can submit,
view, retrieve all jobs, and perform VIeC Web and VIeC Server
administration. The HTTP setting can be an acceptable level of
security for a VIeC installation on a LAN that is not connected to a
larger network, such as in a training environment. The No Security
HTTP only setting is not recommended for a production environment.
HTTP Basic Authentication Allows user account-level security with user passwords and group
security on an area-by-area basis. The HTTP Basic Authentication
option is preferred to the No security, HTTP only option.
Note: Passwords transferred between the client and Wb
browser are transmitted as plain text and are not encrypted.
22
Xerox®FreeFlow®VI eCompose
User Guide
Page 23

FreeFlow VI eCompose Installation
HTTPS (HTTP Secure) over SSL
(Secure Sockets Layer)
The HTTPS option encrypts the traffic between client Web browsers
and the VIeC Web Application.
Note: Using SSL alone does not provide any user name,
password, or group configuration capability.
HTTPS via SSL with HTTP Basic
Authentication
This is the preferred level of security for a VIeC Web installation.
HTTPS and SSL combine the user name, password, and group
configuration capabilities of HTTP Basic Authentication with the
transaction encryption provided with SSL. This security level is
obtained by applying at the same time the Basic Authentication and
SSL configurations.
NNoo SSeeccuurriittyy,, HHTTTTPP OOnnllyy
This is the default security level at installation. Xerox recommends that you change this security level
when the VIeC Servers are accessible from the internet and to protect sensitive information found in
production environments.
HHTTTTPP BBaassiicc AAuutthheennttiiccaattiioonn
The VIeC Web implementation of HTTP Basic Authentication allows the VIeC administrator to set up
a system of user-by-user access to controlled areas or realms. The VIeC administrator can associate
user names with access to a specific realm or with named groups that are designated as having
access to a specific realm.
Security for non-web-enabled VIeC installations can be restricted by setting read and write access on
a user or group basis. To set the read and write access, on the operating system where the VIeC server
is hosted, use the permissions mechanism of the file system.
After a VIeC Server is web-enabled, the read and write access at the operating system file system
level is performed by the VIeC Web Application. The VIeC administrator can provide equivalent
security. The VIeC Web support for Basic Authentication is an important part of providing that level
of security.
HTTP Basic Authentication can be used with HTTP using the vtpweb.exe application or HTTPS.
To enable Basic Authentication for VIeC Web:
1. Click Basic Authentication Quick Setup.
2. In the required fields, type the needed information, then click Perform Quick Setup.
To review the current settings and note areas that needs correction, use the Results screen.
Xerox
®
FreeFlow®VI eCompose
User Guide
23
Page 24

FreeFlow VI eCompose Installation
3. For additional security options, use the following options.
While not strictly a component of HTTP Basic Authentication, when HTTP Basic Authentication is
enabled and active, additional security-related options can be configured:
• Strict Passwords
The administrator can require and configure the use of strict passwords. If strict passwords
are enabled, the following criteria apply:
– A password must contain at least eight characters.
– A password must contain both letters and numbers.
– A password must contain both lowercase and uppercase letters.
– A password must contain at least one special character such as .#!$
24
Xerox®FreeFlow®VI eCompose
User Guide
Page 25

FreeFlow VI eCompose Installation
– A password must not contain the contextual information such as the user name or
website name.
To enable requiring strict passwords, manually change vipo.ini, then restart the web
Application. To enable strict passwords, use a text editor to add or change the line as follows:
vtpw_require_strict_passwords=1
A value of 0 indicates that strict passwords are not required.
• Password Reuse
Administrators can configure disallowing the reuse of passwords. If disallowing password
reuse is enabled, users cannot use the same password more than once.
To disallow password reuse, manually change vipo.ini, then restart the web Application. To
disallow password reuse, use a text editor to add or change the line as follows:
vtpw_disallow_password_reuse=1
A value of 0 indicates that password reuse is allowed.
• Login Session Expiration
Administrators can configure a login session expiration time out. If a user session is not active
for longer than the specified time out, the session logs out and requires the user to log in
again to resume the activity.
To enable login session expiration, manually change vipo.ini, then restart the web Application.
To enable login session expiration, use a text editor to add or change the line as follows:
vtpw_session_maxduration_minutes=30
The number specified is the session expiration login time out value in minutes. A value of 0
indicates that the session never times out.
• Unsuccessful Login Attempt Lockout
Administrators can configure the number of times a user can unsuccessfully attempt to login
before the account is locked.
To enable an unsuccessful login attempt lockout, manually change vipo.ini, then restart the
web Application. To enable unsuccessful login attempt lockout, use a text editor to add or
change the line as follows:
vtpw_unsuccess_login_max_attempt=5
The number specified is the maximum number of times a user can make unsuccessful
attempts to log in before the account is locked. A value of 0 indicates that there is no limit on
the number of unsuccessful login attempts.
Xerox
®
FreeFlow®VI eCompose
User Guide
25
Page 26

FreeFlow VI eCompose Installation
• Account Lockout Duration
Administrators can configure how long a user waits after a lockout occurs before the user can
attempt another log in.
To change the user wait time after a lockout, manually change vipo.ini, then restart the web
Application. To change the duration, use a text editor to add or change the line. For example:
vtpw_account_lockout_duration_minutes=2
The number specified is the number of minutes a user is required to wait before attempting
to log in again. A value of 0 indicates that there is no wait before the user is allowed to
attempt a login.
HHTTTTPPSS ((HHTTTTPP SSeeccuurree)) oovveerr SSSSLL ((SSeeccuurree SSoocckkeettss LLaayyeerr))
Beyond Basic Authentication, it can be useful to secure the communication channel between the
client browser and the VIeC Web Application directly.
VIeC implementation of HTTPS (secure web Application)
1. The SSL Certificate needs to be installed from IIS.
2. To open the IIS Manager, in the Run command, type inetmgr or search for Internet
Information Service in the Start menu.
3. In the Connections pane on the left side of the window, to change the port, navigate to
Server→Sites→Default Web Site.
4. Click FreeFlow VIeCompose. On the right side of the window, you can find the Browse Folder.
5. To launch Web Application, click Browse *.80(http), or to launch Secure Web Application, click
Browse *.443(https).
6. By default, there is a self-signed SSL certificate and that certificate needs to be changed to the
correct SSL certification.
7. From the client browser, replace http in the VIeC Web browser URL with https:
https://url_name
or
https://nn.n.n.nnn, where nn.n.n.nnn is the IP address.
SSSSLL CCeerrttiiffiiccaattee IInnssttaallllaattiioonn
The following instructions guide you through the SSL installation process on Microsoft IIS 7. If you
have more than one server or device, you need to install the certificate on each server or device that
you need to secure.
To install the SSL certificate, refer to the following instructions:
1. Launch IIS Manager. Click Start→Control Panel→Administrative Tools→Internet Information
Services (IIS) Manager.
2. Select your server name. In the left Connections menu, select the server name as host where you
want to install the certificate.
3. Navigate to the Security section. In the center menu, click the Server Certificates under the
Security section near the bottom.
26
Xerox®FreeFlow®VI eCompose
User Guide
Page 27

FreeFlow VI eCompose Installation
4. Click Complete Certificate Request. In the right Actions menu, click Complete Certificate
Request.
5. Browse to your Server Certificate. In the Complete Certificate Request wizard field, to browse
and select your Server Certificate file that you saved on the desktop of your server, click ….
6. Name your certificate. Enter a Friendly Name, which is an internal reference name that is used to
distinguish the file later. It is recommended that you include the Certification Authorities name
and expiration date.
7. Click OK.
The installed certificate appears in the refreshed Server Certificate List.
Binding your Certificate to your Website
Proceed with the following steps, which help you assign or bind the SSL certificate to the appropriate
website.
1. Access your Sites folder. From the left Connections menu, expand the name of your server,
expand the Sites folder, then expand the Default Web Site folder.
2. In the right Actions menu, click Bindings.
3. In Site Bindings window, click Add.
Note: If you already have the appropriate site binding created, click Edit then change the
SSL Certificate accordingly.
4. In Add Site Bindings window, enter the following information:
• For Type, select HTTPS
• For IP Address, select All Unassigned. If you have multiple IP addresses, select the IP address
that applies.
• For Port, enter 443 unless SSL traffic appears on another port.
• For SSL Certificates, select the friendly name of the SSL certificate that you installed. To
confirm the validity details of the certificate, click View.
• To finish binding the SSL certificate to your live website, click OK.
Note: For changes to take effect, you need to restart your server.
OOppeennSSSSLL LLiicceennssee SSttaatteemmeenntt
This product includes software developed by the OpenSSL Project for use in the OpenSSL Toolkit,
http://www.openssl.org/.
Xerox
®
FreeFlow®VI eCompose
User Guide
27
Page 28
FreeFlow VI eCompose Installation
VIeC Server Node Installation
This is an advanced option for use by the VIeC system administrator. Before you install a VIeC Server,
you must:
• Obtain a license for each VIeC Server
• Map a network drive (for example, X) to the shared drive on the file server
On each workstation on which a VIeC Server has to be installed, select VIeC Server Node servicing a
VIeC Cluster.
When prompted, choose the network drive of the file server that has been set up for use by the VIeC
Cluster.
During installation, for each workstation on drive C, the user_root is set automatically to:
user_root=X:\Program Files(x86)\Xerox\VIPP\xvtp\users
This indicates that each VIeC Server treats jobs placed on the file server as if they were local; that is,
it processes jobs on the file server and places the output on the file server.
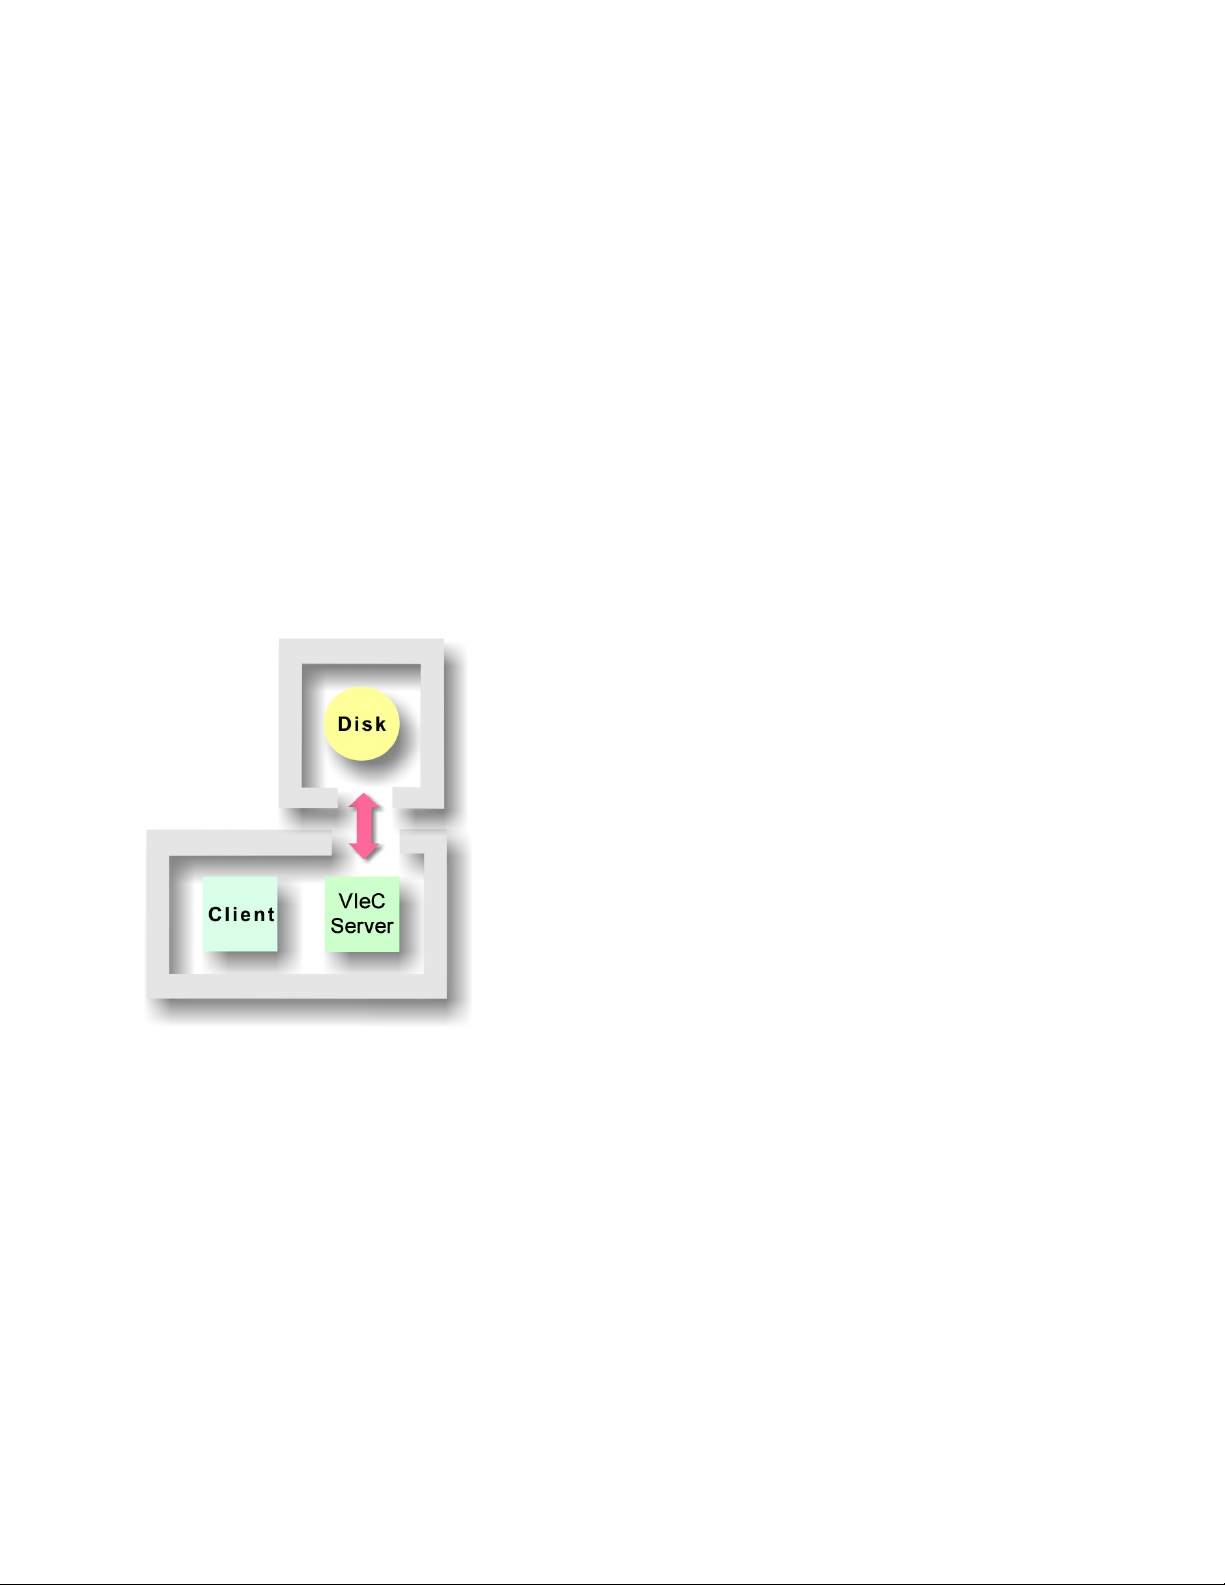
After bringing up the first VIeC Server, you will have a configuration similar to this:
To test the installation, submit a small local job from the Job Submission Client on the VIeC Server.
The job results are generated on the file server, not on the VIeC Server workstation.
28
Xerox®FreeFlow®VI eCompose
User Guide
Page 29
FreeFlow VI eCompose Installation
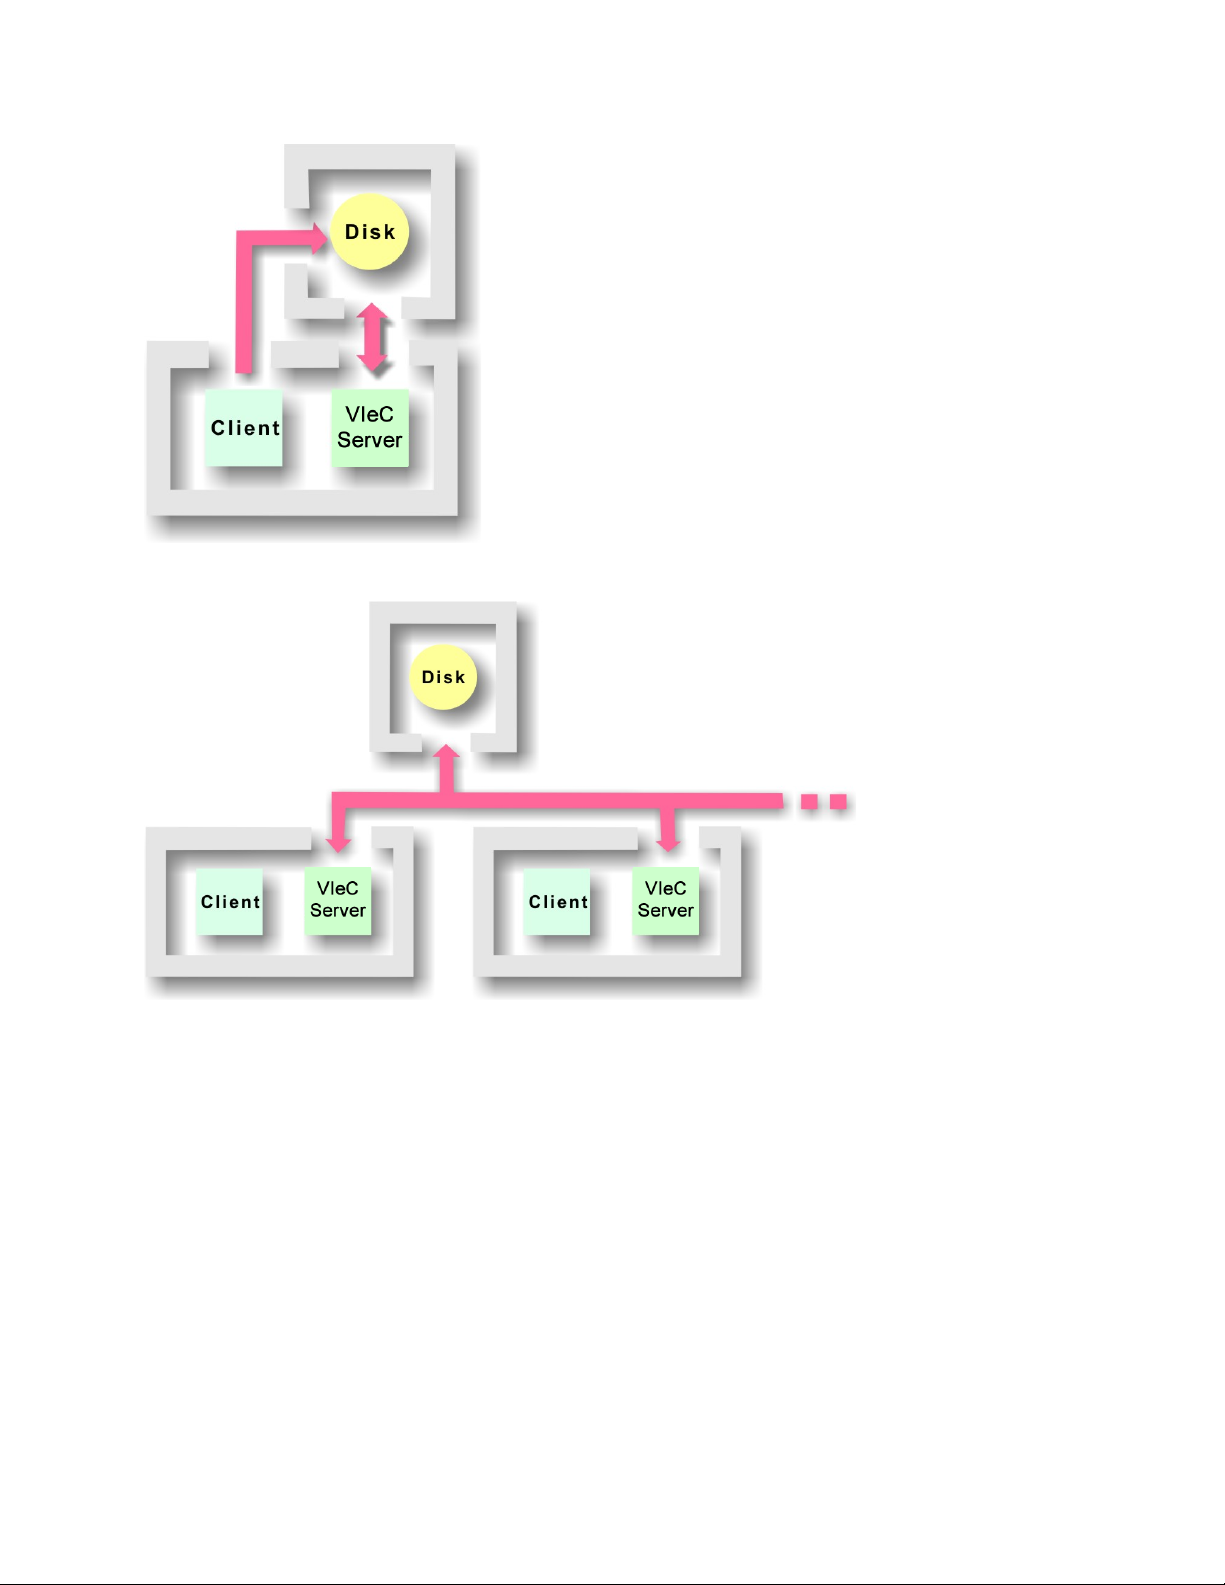
More VIeC Servers can be added to the Cluster by repeating this installation process.
During the installation process, a skeleton directory structure is installed on the file server, which
makes it appear to VIeC Clients as a VIeC Server. This allows VIeC Clients to submit jobs to the file
server as if they were a VIeC Server. Now, Client-only installations can be pointed at the file server to
set up a VIeC Cluster.
VIeC Server Nodes in a Cluster cooperate transparently when selecting jobs, that is they do not get in
each other's way. You can add Server Nodes to the Cluster to improve the job turnaround time or
remove them for maintenance while the Cluster itself is active, as long as at least one VIeC Server
Node is servicing the Cluster. Before you remove a node, ensure that you shut down the node
gracefully. The only impact on clients is in the improvement or degradation of their job turnaround
time.
®
Xerox
FreeFlow®VI eCompose
User Guide
29
Page 30

FreeFlow VI eCompose Installation
30
Xerox®FreeFlow®VI eCompose
User Guide
Page 31

FreeFlow VI eCompose Installation
VIeC Web Job Submission Service (WJSS) Installation
To run VIeC Web Job Submission Service, you must have the following installed software:
• FreeFlow VI eCompose, version 16.0, or later. If this is a new install, reboot the system before
installing VIeC Web Job Submission.
• Microsoft .NET Framework 4.6.1
WJSS can be hosted as a Windows Service or by Internet Information Services (IIS). To host WJSS by
IIS, the following software is required:
• Internet Information Services (IIS) 7
• Microsoft Web Deploy (3.0 or later), an extension of IIS
The following files are required. They are included in the VIeC installation zip file, under the ..\..
\WJSS folder:
• WJSSProxyServer.zip
• WJSSTestClient.zip
Microsoft Visual Studio 2013/17, for modifications to the WJSS Test Client, is optional software.
Note: When installing VIeC, be sure to select the Client and Server configuration (first option)
and follow steps to complete installation. Reboot the system when requested.
For further WJSS installation instructions, refer to VIeComposeWJSS.pdf in the ..\..\WJSS
folder.
Xerox
®
FreeFlow®VI eCompose
User Guide
31
Page 32

FreeFlow VI eCompose Installation
VIeC Services Installation
Before you begin installing VIeC Services:
• To verify that the Local Server and the Job Submission Client are functioning properly, on the local
printer with GUI consoles, test the latest VIeC setup.
• Procedures and screens can vary. The screenshots and procedures in this section are based on a
Windows 7 system. When installing on a different operating system, the procedures and screens
can vary.
VI eCompose Services are intended to run as Windows Services. While the service component files are
installed physically in the bin directory as part of the VI eCompose installation process, the service
component files are not installed as Windows Services. Your system administrator can install the files
on a case-by-case basis. Familiarity with the Windows Services administration is recommended for
anyone wanting to install, run, or uninstall one or more of the VI eCompose Services.
The VI eCompose Services and their associated executable files are as follows:
FreeFlow VI eCompose Service vtpsrvc.exe
FreeFlow VI eCompose Watched Folders Service vtpfsrvc.exe
FreeFlow VI eCompose Dispatch Service vtpdsrvc.exe
FreeFlow VI eCompose Web Job Submission Service vinipmsrvc.exe
To install or uninstall the services on Windows 10, Windows Server 2012 including R2, Windows Server
2016, and Windows Server 2019, two Java Scripts are included with the VI eCompose installation:
• InstallServices.js
• UnInstallServices.js
To execute the scripts, go to the X:\Program Files(x86)\Xerox\VIPP\xvtp\bin directory,
where X is the drive where VIeC is installed. To install or uninstall the VIeC services, double-click the
appropriate file. Elevated system administrator privileges are required to install and uninstall services
on Windows 10, Windows Server 2012 including R2, Windows Server 2016, and Windows Server 2019.
IInnssttaallllaattiioonn PPrroocceedduurreess
Follow these steps to install VI eCompose Services:
1. Ensure that no VI eCompose clients, servers, or services are running.
2. From a DOS command prompt, change to the X:\Program Files(x86)\Xerox\VIPP
\xvtp\bin directory, where X is the partition where the VI eCompose software is installed.
32
Xerox®FreeFlow®VI eCompose
User Guide
Page 33

FreeFlow VI eCompose Installation
3. At the prompt, enter the command InstallServices or InstallServices.js. The
system uninstalls existing VIeC services and installs the new version as shown:
4. Optional, but recommended: From the Windows Startup folder at C:\ProgramData
\Microsoft\Windows\Start Menu\Programs\Startup, remove or delete the shortcut
for VI eCompose Local Server.
After you are finished, to complete the installation, follow the instructions in the following sections:
• Configure automatic startup for local access
• Confirm automatic startup for local access
• Edit the.ini file for remote access
• Add a new user for remote access
• Configure automatic startup for remote access
• Confirm automatic startup for remote access
CCoonnffiigguurree AAuuttoommaattiicc SSttaarrttuupp ffoorr LLooccaall AAcccceessss
Use these steps to configure the desired VI eCompose Services to start automatically at system bootup.
1. From the Windows Control Panel, navigate to Administrative Tools, then select Services. This can
be at Control Panel→Administrative Tools→Services, or as follows, at Control Panel→System
and Security→Administrative Tools→Services.
Scroll down in the Services dialog until you see the six VI eCompose services. These services are
initially set to start manually and to use the Local System account. Select the services that you
want to start automatically.
2. Right-click the VI eCompose service, then select Properties from the menu. A dialog window
appears.
3. Change the Startup type to Automatic. After you change the startup type, click Apply and then
click OK.
®
Xerox
FreeFlow®VI eCompose
User Guide
33
Page 34

FreeFlow VI eCompose Installation
CCoonnffiirrmm AAuuttoommaattiicc SSttaarrttuupp ffoorr LLooccaall AAcccceessss
Restart the local machine and examine the Task Manager to ensure that the desired VIeC services
are running automatically. Test again with GUI consoles, such as Job Submission Client, to verify that
they are working properly.
EEddiitt tthhee ..iinnii FFiillee ffoorr RReemmoottee AAcccceessss
Note: This step is necessary only if the drive that contains the user root is a network or mapped
drive. If the user root drive is on the same physical printer, you can skip this step.
After the VIeC Service is installed and verified on the local printer, manually change the vipo.ini
file. Use a text editor to change the line:user_root=X:\Program Files(x86)\Xerox\VIPP
\xvtp\users to user_root=\\SERVERNAME\USERS, where X is the partition where the VI
eCompose software is installed.
Save the .ini file in the original location.
• SERVERNAME and USERS: In the .ini file, SERVERNAME is the Network Computer Name ID of
the system, and USERS is a user-defined folder name ID that maps to the VIeC root user folder
path X:\Program Files(x86)\Xerox\VIPP\xvtp\users.
• Make the USERS folder a shared folder, then set up the proper read and write access permissions.
• For remote access: For mapped or shared drives, it is recommended that you use UNC paths, for
example: \\SERVERNAME\USERS. Otherwise, for local access, continue to use designated drive
letters and local paths, for example: C:\Program Files(x86)\Xerox\VIPP\xvtp\users.
AAdddd aa NNeeww UUsseerr ffoorr RReemmoottee AAcccceessss
1. Navigate to the panel where user accounts are managed for your operating system. This can be
at Control Panel→Users and Passwords, Control Panel→User Accounts; or as follows, at Control
Panel→User Accounts and Family Safety→User Accounts→Manage Accounts.
2. Create a new login account by clicking the Create a New Account link or Add, then follow the
instructions in the dialog windows that appear.
In addition to any basic information necessary to create a new user, ensure to enter login and
password information in addition to assigning Administrator privileges to the account.
When the new user is created, a window appears with the details of the new account created.
CCoonnffiigguurree AAuuttoommaattiicc SSttaarrttuupp ffoorr RReemmoottee AAcccceessss
First configure automatic startup for local access as explained in Configure automatic startup for
local access. Then reconfigure the installation to use the VI eCompose Services account:
1. From the Windows Control Panel, navigate to Administrative Tools and select Services. This can
be at Control Panel→Administrative Tools→Services, or as follows, at Control Panel→System
and Security→Administrative Tools→Services.
Scroll down in the Services dialog until you see the six VI eCompose services. Right-click on a
VIeC service, then select Properties from the menu.
2. Click Log On tab of the Properties dialog window.
3. From the Log On dialog, select This account, then click Browse.
34
Xerox®FreeFlow®VI eCompose
User Guide
Page 35

FreeFlow VI eCompose Installation
4. When the system produces a list of available accounts, highlight VI PDF Services, then click OK. A
new screen appears.
5. If your operating system displays a screen that looks like the password is preset, it is not. You
must enter a new password, confirm the password, then click OK.
6. If the screen from step 4 appears, select the correct location, then select the user name using the
Check Names option.
7. After you enter the password, VI eCompose Dispatch Service is associated with the VI PDF
Services account. When a dialog window appears that confirms the change, click OK.
The system returns to the Services window, that shows that VI eCompose Dispatch Service has a
Startup Type of Automatic and a Log On As of .\VI PDF Services.
8. Repeat the steps in this section for each VI eCompose component service that will automatically
run at system boot up. Ensure that all VI eCompose component services are associated with the .
VI PDF Services log on.
CCoonnffiirrmm AAuuttoommaattiicc SSttaarrttuupp ffoorr RReemmoottee AAcccceessss
VI eCompose services are installed now and configured but are not running. You can start the services
manually.
Follow these steps to confirm that the system can operate as a true hands-free VI eCompose services
device to start up automatically.
1. Close the Services dialog, then restart the PC. After the PC restarts, do not log in. Leave the PC at
the desktop login dialog.
Note: After the login dialog appears, it can take VI eCompose components an additional
minute or two to completely start up and synchronize the operations.
Xerox
®
FreeFlow®VI eCompose
User Guide
35
Page 36

FreeFlow VI eCompose Installation
2. After waiting 1–2 minutes, go to a different device on the network, then ping the device that is
running the VI eCompose components. The information consists of specific reply information,
ping statistics, and approximate round-trip times.
If you get timeouts, there can be a software firewall that runs on the VI eCompose component
device, or some other security barrier is in place. Before you continue, resolve the issues, then get
a successful ping.
3. After the device that runs VI eCompose components return a successful ping, test the operation.
Log in remotely to the VI eCompose Server. This action is possible when the VI eCompose
component device is running VI eCompose Web server as a service. Log in remotely using the
name/FreeFlowVIeCompose/ or the IP-address/FreeFlowVIeCompose/ of the VI eCompose
component device, depending on how the network is set up.
36
Xerox®FreeFlow®VI eCompose
User Guide
Page 37

FreeFlow VI eCompose Installation
4. As a test, submit a sample job to VI eCompose. The example shows the submission of the
billb.lm job. The example shows that the VI eCompose component device accepted and
processed job without anyone being physically logged in to that device.
When someone logs into the device where VI eCompose services are running, and the account
has VI eCompose components installed to start automatically at login, one or more dialog boxes
appear, indicating that a VI eCompose server is already running as a Windows Service. This
action is normal. Only one instance of a VI eCompose server can run on the device at a time, and
since there is already one running as a service, another instance cannot be started from the
desktop.
To use a VI eCompose component in normal GUI mode, go back to the Services dialog, then use
the right-click menu on the corresponding service. Select Stop.
After the service has stopped, start the VI eCompose component in GUI mode. For example, click
Start→All Programs→Xerox FreeFlow VI eCompose xx→VI eCompose Local Server.
Note: When a VI eCompose component is running in normal GUI mode, and an attempt
to run the component as a service is made, an error message is produced. In this example,
only one instance is allowed, and the Services dialog produces an error message. To resume
operating the component as a service, shut down the normal instance of the server.
SSeettuupp MMuullttiippllee IInnssttaanncceess ooff VVIIeeCC SSeerrvveerr aanndd DDiissppaattcchh aass SSeerrvviicceess
When starting as Windows services, VIeC Server and VIeC Dispatch modules look for the following
entries in the .ini configuration file:
• vtpserver_number_instances=S
• vtpdi spatch_number_instances=D
The S and D are integers that determine how many instances of VIeC Server and VIeC Dispatch are
launched when running as Windows Services. Note that these entries are relevant only for Services
startup in the multi-instance mode. The entries are ignored when VIeC Server and VIeC Dispatch are
started as standard GUI applications from the Start→All Programs menu.
Requirements to Run Multiple Instances of VIeC
For best results, a minimum of one CPU or core and 2 Gbytes of RAM is required for each instance of
VIeC. If Dispatch is involved, enough CPU memory is required for all simultaneous post-processing
operations, which vary based on the load and complexity of the jobs to be processed.
A minimum configuration for four instances. without taking Dispatch into account, is a quad core
system with at least 8 Gbytes of RAM, running on a 64-bit operating system. The 32-bit operating
systems are not able to address enough RAM to support the 8 Gbytes minimum RAM. If there is
Dispatch post-processing or other system loads, more CPU and RAM can be added as required at the
site.
STOREVAR command error
Error
VIPP_invalid_combination; OffendingCommand: STOREVAR_VIPOmulti
The VIPP_invalid_combination error is raised when the STOREVAR VIPP command is used in
a job submitted to VIeC that is running in multi-instance mode. The main purpose of STOREVAR is to
allow rolling numbers to pass from one job to the next in a sequential fashion, but multiple VIPP
Xerox®FreeFlow®VI eCompose
User Guide
®
37
Page 38

FreeFlow VI eCompose Installation
jobs running in parallel defeats the intended goal.
The use of the STOREVAR VIPP command in your production jobs on VIeC software depends upon
your knowledge of how STOREVAR is used.
• If STOREVAR is used in a way that forbids multiple parallel instances, for example, rolling
numbers, terminate all running VIeC modules. Reset the .ini entry enable_multi_
instance=0.
– This action disables the multi-instance mode for VIeC Server and Dispatch, which prevents the
STOREVAR error. :
– To run VIeC again in multi-instance mode, set the same .ini entry to enable_multi_
instance=1. You can run multiple instances of VIeC Server and Dispatch on the same
device.
• If STOREVAR is used in a way that allows multiple parallel instances, you can use the following
syntax for STOREVAR:
data (file name) /M STOREVAR
The /M switch disables the STOREVAR error detection when VIeC is run in multi-instances mode.
Note that when this switch is used, if two jobs are running in parallel, and STOREVAR executes
with the same file name, an error occurs, or the final content of the file referenced by STOREVAR
can be incorrect.
UUnniinnssttaalllliinngg VVII eeCCoommppoossee SSeerrvviicceess
Follow these steps to uninstall VI eCompose Services:
1. Ensure that no VI eCompose servers or services are running.
2. Run the UninstallServices or UninstallServices.js batch file from the \xvtp\bin directory:
38
Xerox®FreeFlow®VI eCompose
User Guide
Page 39

FreeFlow VI eCompose Installation
Adobe Acrobat and Reader
If you are using PDF files as VIPP®resources in your VIPP®application and you need to view the PDF
file output from VIeC using Adobe Acrobat or Reader, ensure that you are using Adobe Acrobat
10.1.6 or later or Reader 10.1.6 or later.
To view PDF files that contain VIPP
Acrobat or Adobe Reader privileged folder. To use an Adobe Acrobat or Adobe Reader privileged
folder, create the folder, then set enhanced security options for that folder. The steps to complete
that process follow.
CCrreeaattee aann AAddoobbee AAccrroobbaatt oorr RReeaaddeerr PPrriivviilleeggeedd FFoollddeerr
To create an Adobe Acrobat or Reader privileged folder, follow these steps:
1. In Acrobat or Reader, select Edit→Preferences, or to open the Preferences folder, press Ctrl+K.
2. In the Categories menu, select Page Display.
3. From the Show reference XObject targets list, select Always.
4. To insert the directory containing the PDFs generated by VIeC in the Location of referenced files
field, select Browse for Location.
®
PDF resources, the PDF files must be opened from an Adobe
Note:
• It is recommended that you select the VIeC incoming folder instead of the folder
containing a specific job.
• As long as all of the PDFs generated by VIeC are under the same incoming folder hierarchy,
all referenced PDFs can be found and properly displayed.
AAddjjuusstt SSeeccuurriittyy SSeettttiinnggss
To adjust Security settings, follow these steps:
1. If the Preferences Panel is not already open, select Edit→Preferences, or press Ctrl+K.
2. In the Categories menu, select Security (Enhanced).
3. Ensure that Enable Enhanced Security is selected.
4. Click Add Folder Path, then specify the same folder as specified for the location of the referenced
files.
Note: Referenced XObjects are independent of the Enhanced Security check box. The state of
the check box does not govern viewing of referenced XObjects.
Any of the following states can cause Acrobat or Reader to display Missing:, followed by the name
of the PDF resource:
• The version of Acrobat or Reader does not support Referenced XObjects.
• The preferences are set up incorrectly.
• The PDF file was opened from a non-privileged folder.
Xerox
®
FreeFlow®VI eCompose
User Guide
39
Page 40

FreeFlow VI eCompose Installation
40
Xerox®FreeFlow®VI eCompose
User Guide
Page 41

2
VI eCompose Overview
This chapter contains:
• VI Suite Customer Forum .................................. . . .............................. ......................................... 42
• VIeC ............................................ . ............................................................. ............................... . 43
• VIeC Support for FreeFlow Process Manager ......................................... . .................................... 45
• SAP Device Type for VI Compose..... . . ............................................................ . ............................ 46
• VIeC Dispatch............................... ............................... . ............................................................ . 47
• VIeC Services ........................ ............................................................ . . .............................. ......... 48
• VIeC Web ......................................... .............................. . . ......................................................... 49
• VIeC Configuration Options ................... . . ............................................................ . ..................... 50
• vipo.ini Configuration Settings . . . .............................. ............................................................. . . ... 56
Xerox®FreeFlow®VI eCompose
User Guide
41
Page 42

VI eCompose Overview
VI Suite Customer Forum
Xerox hosts a Community Support Forum. The VI Suite Customer forum is now part of this larger
support forum, allowing you to post and review information about Xerox products and services all
from one location. Please take a minute to log into this customer forum community: http://
vippsupport.xerox.com.
42
Xerox®FreeFlow®VI eCompose
User Guide
Page 43

VI eCompose Overview
VIeC
VIeC is a client/server application that allows you to generate Adobe PDF documents from VIPP®based variable data applications and forward the applications to other processes within the
environment.
VIeC extends the VIPP
generate Adobe PDF files from the same data files sent to a VIPP
files, along with information from the data record that produced the PDF files, can then be passed to
a user-defined process using VIeC Dispatch. The files can be integrated into processes within the
environment, which can include email servers or archive systems. In addition, the VIeC Server can
forward the data submission file or the Master PDF file to an identified VIPP
for the Master PDF, to a print device available to the Printer dialog box on the Windows server for
hard copy output.
A standard VIPP
directly to the VI eCompose server. No changes in the data or VIPP
resources are installed on the VIeC Server just as they are installed on a printer disk. VIeC uses the
same resource management structures.
VIeC operates like any other VIPP
use the VIeC lpr client to submit to VIeC. In addition, VIeC provides other job submission clients:
®
workflow into electronic distribution and archive by providing the ability to
®
application that is submitted to a VIPP®-enabled print device can be submitted
®
-enabled printer. A job submitted to the print device using lpr can
®
-enabled print device. The PDF
®
-enabled print device, or
®
resources are required. VIPP
®
• Watched Folder client
• Web submission client
• Job Submission client
• VIeC Web Job Submission Service (WJSS)
Note: WJSS is a web-based submission method to enable faster production of jobs through the
VIeC Server. Although WJSS is often used for small jobs, WJSS is not limited by the size of the
job. Using WJSS bypasses the standard VI eCompose processing model to provide faster job
turnover by improving the latency between processed jobs. For more information, refer to VIeC
Web Job Submission Service.
A VIPP
®
job processed by the VIeC Server results in the generation of an Adobe PDF file. This PDF file
is output to a named directory on the server. You can specify a print path. The data file processed by
VIeC, or the Master PDF file, is forwarded to the print device after the data file is processed by VIeC.
This action allows both electronic and hard copy printing from a single job submission.
Any job that uses the VIPP
®
BOOKMARK command can be enhanced to create individual sets of PDF
files. For example, a statement run that contains 10,000 customer records can be split into 10,000
individual variable-length customer PDF statements. These PDF files, along with additional
information contained in the bookmark, can be dispatched to a user-defined process that can include,
but is not limited to, web presentment, archive, or viewing systems, all without making any changes
to the data or the workflow.
PDF Interactive features such as PDF Bookmarks, PDF notes, or URLs, can be added to the PDF output
file using the VIPP
®
SETPIF command. In the statement customer records example, several
additional PDF bookmarks can be set to guide the user to different sections within the statement. You
can place PDF notes in the PDF file and insert a URL into the PDF that can link the user to additional
web sites.
The built-in variable VARDataFileName is set when the job is processed by VIeC. The variable
contains the name of the data file when submitted directly, or the name of the submission data file
specified in the VI Project Container that gets submitted for processing.
®
Xerox
FreeFlow®VI eCompose
User Guide
43
Page 44

VI eCompose Overview
For more information about VIeC, refer to Using VIeC.
44
Xerox®FreeFlow®VI eCompose
User Guide
Page 45

VI eCompose Overview
VIeC Support for FreeFlow Process Manager
VIeC has been modified to support a simple, but limited, interface with FreeFlow Process Manager 7.0
or later. This interface is designed to provide a hands-free method to process a VIPP
deliver a single PDF file into the Process Manager workflow.
®
application and
WWoorrkkffllooww
The FreeFlow Process Manager/VIeC integration workflow is described below.
1. A VIPP
2. VIeC processes the VIPP
3. VIeC performs file clean-up, deleting the VI container file and other files as required.
4. The Process Manager takes control of the PDF file and performs the next action in the Process
®
VI Container file, .vpc, that contains all the VIPP®resources and data submission file is
passed to the Process Manager. The Process Manager verifies that the .vpc file is a VIPP
container file. If it is of another type, the Process Manager raises an error. If the VI Container is
a valid VIPP
VIeC is watching.
processing completes without an error, the PDF file is passed to the watched folder that the
Process Manager is watching.
Manager workflow.
®
VI Container, the Process Manager posts the .vpc file to a watched folder that
®
VI Container file and passes a status to the Process Manager. If
®
VI
LLiimmiittaattiioonnss
This special FreeFlow Process Manager and VIeC integration is designed to provide an easy to
configure and easy to use pathway to process VIPP
file into the Process Manager workflow. Because of this ease of configuration and ease of use, many
of the advanced features of VIeC are not available when installed in this manner. For example, none
of the available clients are accessible, dispatch is not accessible, and distill options such as Distill and
Split are not accessible. The FreeFlow Process Manager and VIeC configuration allows the user to
pass only a VIPP
the single PDF file to Process Manager automatically.
®
.vpc file to the Process Manager and have VIeC process the file and pass back
®
applications, then pass the resulting single PDF
If you require the full functionality of VIeC, select the Standard installation process. The Standard
installation process installs VIeC using the standard package and allows access to all the clients,
features, and the dispatch module. If required, you can configure Process Manager and VIeC to
work together using Watched Folders and VIeC Dispatch. For more information refer to FreeFlow VI
eCompose Installation.
Xerox
®
FreeFlow®VI eCompose
User Guide
45
Page 46

VI eCompose Overview
SAP Device Type for VI Compose
The Xerox FreeFlow VI Systems, Applications and Products in Data Processing (SAP) Device Type and
Form provides functionality and feature integration with the FreeFlow VI Compose and VI eCompose
products. Although SAP provides support for many output devices, this support does not include the
VI enabled printers and VI enabled eCompose Servers (VIPP
The FreeFlow VI SAP Solution allows SAP users to access the more advanced feature set of the VIPP
scripting language, providing a fast, efficient, effective, and flexible method for printing or creating
Adobe PDF files from a delimited XML or line data (print ready data) files.
®
to PDF).
®
The sample device type and form are provided in a zip file, VISAPDT.ZIP, that can be downloaded
from www.xerox.com. Go to the Support & Drivers webpage and search for VIPP
®
, then select the
Software option. The zip file is found in the Utilities & Applications section. Ensure that the contents
of the zip file are reviewed by the SAP systems administrator.
SAP uses the legacy VIPP
®
path using the Just Send the Data model. VIPP®resources, such as fonts,
images, and forms, must be uploaded to the printer XGFC folders. Uploading can be done during the
development of the VIPP
®
application. When the resources are available to the print device or the
FreeFlow VI eCompose server, the SAP print job can be processed using the SAP Device Type that is
configured with the VIPP
®
start commands. In effect, this process is sending the data to the target
device.
The only requirement is that FreeFlow VI Compose is installed and licensed on the target print device.
If the SAP administrator needs to output PDF, those VIPP
®
jobs can be sent to the FreeFlow VI
eCompose server.
46
Xerox®FreeFlow®VI eCompose
User Guide
Page 47

VI eCompose Overview
VIeC Dispatch
VIeC Dispatch (VIeCD) is the generic mechanism by which VIeC jobs that have been distilled and
split, or split into pages, are sent, or dispatched, to other programs or functions such as:
• Email
• Fax
• DocuShare repository
VIeCD monitors VIeC output and performs post-processing using a customer-specified back-end. Postprocessing is completed in accordance with parameters and other data embedded in a job. Postprocessing is communicated to the dispatch mechanism using the index file, specifically the splitfile
index record field names and values, of completed VIeC jobs.
Because different applications require different workflows, VIeCD handles these types of workflow
simultaneously:
• Jobs in which the entire VIeC-to-VIeCD process runs automatically, such as an interface with a
DocuShare repository.
• Jobs that require verification of VIeC output before the dispatch proceeds, such as an interface
with an email disbursement system.
VIeCD inspects, or polls, the VIeC Incoming Folders directories in the context of a user-specified filter
and compares the field names of the first record from the splitfile index of the VIeC job against a
repository of dispatch rules. If a completed VIeC job is associated with a single dispatch rule, it is
considered eligible for dispatch and becomes a VIeCD job. If a VPTD job is either manually approved
for processing or meets the user-specified criteria for autorun, from another filter, VIeCD resolves and
applies the appropriate dispatch rule for each record of the splitfile index of the VIeC job .
Each of the splitfile records of the VIeCD job in the context of a dispatch rule effectively defines a
subtask of the VIeCD job. Processing of each subtask first, optionally writes the contents of one or
more splitfile index records to disk and then performs a single invocation of a rule-specified external
program. For example, an email client interface. The results of subtask processing are accumulated in
a log file in the Incoming directory of the VIeC job and represent the results of the overall VIeCD job.
This VIeC component is discussed in detail in Using VIeC Dispatch.
Xerox
®
FreeFlow®VI eCompose
User Guide
47
Page 48

VI eCompose Overview
VIeC Services
VIeC and VIeC Servers can be initiated from a Windows Service, which allows the various servers to
be initiated and to perform operations without requiring a manual logon. Launching and activating
VIeC and VIeC servers when the system is booted up allows a hands-off VIeC system. Use of VIeC
Services depends entirely upon the proper installation of the functionality. For a complete description
of the installation process, and related background information, refer to VIeC Services installation.
A VI eCompose Server is one of the following VI eCompose components:
• FreeFlow VI eCompose
• FreeFlow VI eCompose Watched Folders Client
• FreeFlow VI eCompose Dispatch
• FreeFlow VI eCompose Secure Web Application
• FreeFlow VI eCompose Web Application
These components, once running, perform various operations related to VI eCompose.
This VIeC component is discussed in detail in Using VIeC Services.
SSeettttiinngg uupp aanndd DDeebbuuggggiinngg VVII eeCCoommppoossee SSeerrvviicceess
Before setting up VI eCompose Services, it is recommended that you configure and test each
individual VI eCompose module as a GUI application so that you can verify the workflow and see the
job processing in action. After you configure and test each VI eCompose module, start a VI
eCompose Service, one at a time, and verify the workflow again as each service starts. If there is a
problem, stop VI eCompose services one at a time in the reverse order of startup, then check if the
problem goes away when a particular VI eCompose Service stops.
Note: While all VI eCompose Services are installed with the batch or script file provided, not all
Services need to be used or even started. Each customer requirement is different, so customize
the VI eCompose configuration as needed.
When you use VI eCompose Services on systems that access remote file servers on network-mounted
drives or shared folders, it is recommended that you modify the appropriate .ini options using a
UNC path format. For example, to access the remote folder X:\Program Files(x86)\Xerox
\VIPP\xvtp\users mapped to a shared folder named VIPOUSERS on a file server named
MyFileServer, the UNC path is:
user_root=\\MyFileServer\VIPOUSERS
Note: It is critical to ensure that any file system that is accessed remotely has the proper read-
write permissions for the user account that runs VI eCompose Services. Failure to set up the
user account with the appropriate read-write permissions causes jobs to fail.
48
Xerox®FreeFlow®VI eCompose
User Guide
Page 49

VI eCompose Overview
VIeC Web
VIeC Web allows you to use the web browser to:
• Submit VIPP
• Create new or additional VIeC user accounts
• Administer VIeC Servers remotely
• Administer VIeC Web passwords and other security functions This VIeC component is discussed in
detail in Using VIeC Web.
®
jobs
Xerox
®
FreeFlow®VI eCompose
User Guide
49
Page 50

VI eCompose Overview
VIeC Configuration Options
VIeC allows you to increase the performance of the VIeC environment in several ways:
• Upgrading the server running VIeC to a multi-core platform and increasing the memory
• Multiple VIeC systems can be run in a cluster configuration in which all the servers act together to
process available jobs
• Multiple instances of VIeC can be enabled and run on a single server
With a multi-core server, you will see improvements using any one, or a combination of the listed
configurations. It is acceptable to have multiple servers in a cluster configuration, each running
multiple instances of the VIeC engine.
The configuration options available to the site are listed in these sections:
• VIeC Multiple Instance
• VIeC Server and Client
• VIeC Client only
• VIeC Server Node servicing a VIeC Cluster
VVIIeeCC MMuullttiippllee IInnssttaannccee
You can run multiple concurrent instances of VIeC and VIeC Dispatch on a single platform. This
option can be run as often as needed, however, it is limited by the capabilities of the computer on
which VIeC is installed. The two types of multiple instance support are as follows:
• Multiple VIeC Instance Support
VI eCompose (VIeC) has been modified to support multiple concurrent instances of the VIeC
server on a single platform. End-to-end processing time of individual jobs is not be reduced by this
new feature, however in the presence of multiple jobs, this feature enables more than one job to
be picked up and processed at a time. This action can improve the VIeC server throughput
performance significantly when running multiple jobs on a server that has multiple CPUs installed.
Users supply suitable hardware to take full advantage of these changes. This implementation
does not require multiple processors to run. When using a server that supports multiple processors,
greater throughput performance benefits are seen.
• Multiple Dispatch Instance Support
VI eCompose has been modified to support multiple instances of the Dispatch module. This
modification allows multiple instances of Dispatch to process jobs simultaneously. As with
multiple VIeC instance support, the end-to-end processing time of individual jobs is not reduced
by this new feature, however in the presence of multiple jobs, this feature enables more than one
job to be picked up and processed at a time.
When the server is started after installing VIeC, a single instance of VIeC is started. You can start
additional instances of VIeC. From the VIeC Program Group in Windows, click Start→All Programs,
then start the VI eCompose Local Server option. There are two ways to start instances of VIeC
Dispatch:
• You can start instances of VIeC Dispatch in a similar manner to starting additional instances of
VIeC.
• From the task bar, click the VIeC icon, then select Launch Dispatch.
50
Xerox®FreeFlow®VI eCompose
User Guide
Page 51

VI eCompose Overview
An icon appears in the task bar for each running instance of VIeC or Dispatch.
Note:
• Only one Manual Job Submission panel can be displayed, no matter how many instances of
VIeC are active.
• Multiple instances and billing information:
– When multiple instances are running, billing information is derived from the contents of
the accounting logs in the same manner as when running multiple VIeC nodes in a
VIeC cluster.
– The Billing Meter reading is accurate only when one instance of VIeC is running.
Unlike nodes in a VIeC Cluster in which only a common job pool is shared, multiple VIeC/VIeCD
instances share the job pool and accounting and log files, profiles, security options, distiller job
options, and any dispatch filters and rules on that particular system. Be careful when you configure,
edit, or otherwise change settings that can be accessed by the running instances of either VIeC or
VIeC Dispatch on a given system. It is recommended that only one VIeC/VIeCD instance runs on a
given system when configuring or setting up for production, and that multiple instances are started
only when the production configuration is deemed ready.
The number of instances of VIeC/VIeCD to run depends on the capability of the hardware, the
number of CPUs and amount of RAM, and the specific workflow. It is recommended that one
instance of a server is launched for each CPU or core and 2 Gbytes of RAM on the system. It is
recommended to launch one instance of a server from a logged in account in interactive mode, not
running the instances as a service. From the logged in account, evaluate performance, throughput,
and the number of instances adjusted.
MMuullttiippllee IInnssttaanncceess ooff VVIIeeCC SSeerrvveerr aanndd DDiissppaattcchh aass SSeerrvviicceess
When starting as Windows services, VIeC Server and VIeC Dispatch modules look for the following
entries in the .ini configuration file:
• vtpserver_number_instances=S
• vtpdi spatch_number_instances=D
The S and D are integers that determine how many instances of VIeC Server and VIeC Dispatch are
launched when running as Windows Services. Note that these entries are relevant only for Services
startup in the multi-instance mode. The entries are ignored when VIeC Server and VIeC Dispatch are
started as standard GUI applications from the Start→All Programs menu.
STOREVAR command error
Error
VIPP_invalid_combination; OffendingCommand: STOREVAR_VIPOmulti
The VIPP_invalid_combination error is raised when the STOREVAR VIPP command is used in
a job submitted to VIeC that is running in multi-instance mode. The main purpose of STOREVAR is to
allow rolling numbers to pass from one job to the next in a sequential fashion, but multiple VIPP
jobs running in parallel defeats the intended goal.
The use of the STOREVAR VIPP command in your production jobs on VIeC software depends upon
your knowledge of how STOREVAR is used.
®
Xerox
®
FreeFlow®VI eCompose
User Guide
51
Page 52

VI eCompose Overview
• If STOREVAR is used in a way that forbids multiple parallel instances, for example, with rolling
numbers, after you terminate all the running VIeC modules, reset the .ini enable_multi_
instance=0
– The command disables the multiple-instance mode for VIeC Server and Dispatch, which
prevents the STOREVAR error.
– To run VIeC again in multiple-instance mode, set the same .ini entry to enable_multi_
instance=1. You can run multiple instances of VIeC Server and Dispatch on the same
device.
• If STOREVAR is used in a way that allows multiple parallel instances, you can use the following
syntax for STOREVAR:
data (file name) /M STOREVAR
The /M switch disables the STOREVAR error detection when VIeC is run in multi-instances mode.
Note that when this switch is used, if two jobs are running in parallel, and STOREVAR executes
with the same file name, an error occurs, or the final content of the file referenced by STOREVAR
can be incorrect.
VVIIeeCC SSeerrvveerr aanndd CClliieenntt
This is the default configuration that results from a typical single-workstation VIeC installation. The
following components are installed on a single workstation:
• Local VIeC Server
• Job Submission Client
• Watched Folders Client
• VIeC Web Servers
• VIeC Dispatch Server
LLooccaall JJoobb SSuubbmmiissssiioonn
If you install a VIeC Server and Client on drive C, user_root is set automatically to user_root=
C:\Program Files (x86)\Xerox\VIPP\xvtp\users.
These settings specify that a VIeC Client feeds jobs to a VIeC Server, both on the same workstation,
as shown.
RReemmoottee JJoobb SSuubbmmiissssiioonn
Optionally, you can specify an existing VIeC Server on the network for use in remote job submission.
When using this option, map a network drive, for example, X, to the remote VIeC Server.
52
Xerox®FreeFlow®VI eCompose
User Guide
Page 53

VI eCompose Overview
The remote_user_root is set automatically to remote_user_root=X:\ProgramFiles(x86)
\Xerox\VIPP\xvtp\users.
These settings result in the Client feeding jobs either to the local or remote VIeC Server, as shown
below:
Note: This option is not in any way related to submitting jobs to a cluster configuration. This
clarification is made explicitly as there has been some confusion in the past: This option and its
associated remote_user_root and remote_server_root entries were intended for use with a
developer license configuration which is no longer available. As such their use is deprecated and
is to be ignored, if mentioned in older or other external documentation.
VVIIeeCC CClliieenntt OOnnllyy
In a Client-only configuration, these components are installed on the workstation:
• Job Submission Client
• Watched Folders Client
In this configuration on drive C, the user_root is automatically set to user_root=X:\Program
Files(x86)\Xerox\VIPP\xvtp\users, where X is the partition where the VI eCompose
software is installed.
Xerox®FreeFlow®VI eCompose
User Guide
53
Page 54

VI eCompose Overview
Note also that multiple Clients can be mapped to the same remote VIeC Server.
Therefore, a single VIeC Server can be shared as a workgroup resource. However, since the single VIeC
Server processes jobs sequentially, this cannot provide satisfactory job turnaround as the size or
number of jobs and clients increases.
VVIIeeCC SSeerrvveerr NNooddee SSeerrvviicciinngg aa VVIIeeCC CClluusstteerr
VIeC does not rely on any particular network protocol to submit jobs, consume jobs, or report status
of jobs. Instead, VIeC relies on directory structures, disk-based mailboxes, and sentinel files to perform
these operations.
VIeC Server administrators control security using file system read/write permissions mechanisms that
are native to the operating system where VIeC was installed. Permissions are applied to directories
within this structure on a user-by-user or group-by-group basis, as appropriate.
A VIeC Server can be made available for remote use by sharing the server install directory, for
example, D:\xvtp of the drive on which the VIeC Server is installed. Windows clients can then
access the VIeC Server by mapping a network drive on their workstation, for example, X, to the shared
location on the server drive and selecting the mapped drive during installation.
IInnccoommiinngg JJoobbss FFoollddeerr
To provide security for sensitive customer information and to support load-balancing of jobs, the
output of jobs submitted to a given VIeC Server, whether on a networked file system or on the local
disk, is sent to a pre-designated destination folder within that VIeC Server directory structure.
Administrators of VIeC Servers control security via the file system read/write permissions mechanism.
Permissions are applied to directories within this structure on a user-by-user or group-by-group basis,
as appropriate.
An example of a VIeC Server installation follows. Note that this example is incomplete for clarity.
54
Xerox®FreeFlow®VI eCompose
User Guide
Page 55

VI eCompose Overview
The incoming jobs directory is created during VIeC Server installation. The incoming jobs directory
contains the default incoming folder. Any number of alternate incoming folders can be created under
the incoming jobs directory.
During VIeC installation, a shortcut to the incoming jobs directory is placed on the desktop.
As shown in the previous example, John Doe has an incoming directory incoming that contains his
default incoming folder, default. He also has two alternate incoming folders, alt1 and alt2, that he
can rename as desired. In addition, he can create additional incoming folders as needed. A shortcut
to X:\Program Files(x86)\Xerox\VIPP\xvtp\users\John_Doe\incoming has been
added to John Doe's desktop for easy access to his incoming folders.
If John wants to submit a simple VIPP
®
line mode job for distillation, he must specify the destination
folder, default in this example, via the Job Submission Client when submitting his job, bigjob.lm. The
VIeC Server creates a directory for the new job under the specified destination folder; the directory
name is generated using the user name, the job name, and the date and time, for example, John_
Doe_bigjob_lm_2001_10_12_14_08_35. The generated PDF file is placed in that folder. The .
cfg file and the status subdirectory are by-products of processing the job and can be ignored. These
by-products are used by the Job Submission Client when it displays extended information about the
job.
Xerox
®
FreeFlow®VI eCompose
User Guide
55
Page 56

VI eCompose Overview
vipo.ini Configuration Settings
In most situations, the configuration file, vipo.ini, is not to be edited manually; however, you can
change some options. If the vipo.ini file has been edited, before installation of the new software
version, make a copy of the modified file as a backup. After the new version is installed successfully,
you can edit the .ini file.
On Windows 10, Windows Server 2012 including R2, Windows Server 2016, and Windows Server
2019, the .ini file is in C:\ProgramData\Xerox\VIPP\VIPO.
Note: On Windows platforms, the vipo.ini file is located in the Application Data or Program
Data folder, which can be hidden by default, so the folder is invisible to regular users. To make
hidden files and folders visible, open the control panel Folder Options dialog. In the View tab,
select Show hidden files and folders.
vipo.ini lines
relver=xx Do not change these settings.
server_root=C:\Program Files (x86)
\Xerox\VIPP\xvtp
user_root=C:\Program Files (x86)\Xerox
\VIPP\xvtp\users
remote_server_root=N /A\xvtp This entry is deprecated. Ignore this setting.
remote_user_root=N/A\xvtp\users
media=USLetter Do not change this setting.
use_ps_dsc_conform_tag = 1 1 = true
vtp_distill_proc_wait_timeout_hours=24 The number of hours that VIeC waits before timing out a
vtp_distill_page_wait_timeout_minutes=60 The number of minutes that VIeC waits before timing
split_proc_wait_timeout_hours=24 The number of hours VIeC waits before timing out split
Notes
You can change the path to use UNC paths.
0= false
distilling process.
out a distilling page.
processing.
split_count_wait_timeout_minutes=60 The number of minutes that VIeC waits before timing
out a split count process.
output_filename_strict_checking=true true = Turn on strict file name checking.
false = Turn off strict file name checking.
distill_and_split_without_bookmarks=error error = When bookmarks are not found, an error is
returned.
split_invalid_bookmark_action=1 Refer to Using the VIPP BOOKMARK command.
split_transfer_attributes=true true = Turn on split transfer attributes.
false = Turn off split transfer attributes.
jsc_cancel_job_scope=2 Refer to Function buttons.
56
Xerox®FreeFlow®VI eCompose
User Guide
Page 57

VI eCompose Overview
vipo.ini lines
##pdf_user_password=? Refer to PDF security options.
##pdf_owner_password=? Refer to PDF security options.
csv_newline_char_seq=(
) Refer to Special Character Sequences in CSV and XML
csv_dquotes_char_seq=(") Refer to Special Character Sequences in CSV and XML
vtpd_pending_jobs_lo_water=5 Do not change these settings.
vtpd_pending_jobs_hi_water=15
vtpdispatch_max_preemption_count=10
v2vwatch_max_timeout_check_minutes=10
security_options=C:\Program Files (x86)
\Xerox\VIPP\xvtp\securityoptions
\Default. SecurityOptions
enable_pdf_security=false true = Turn on PDF security.
display_split_warnings=false true = Turn on the split warning display.
Notes
Index Files.
Index Files.
Defines the file in which security options are saved.
false = Turn off PDF security.
false = Turn off the split warning display.
v2vwatch_poll_interval_seconds=5 Sets the polling time in seconds. The default polling time
is 5 seconds.
v2vwatch_file_size_check_period_seconds=60 Sets the V2VWatch file size check period time in seconds.
The default file size check period is 60 seconds.
normalizer_options_file=<default>
enable_mu lti_instance=1 1 = On, enable multiple instances.
0= Off, disable multiple instances.
vtpserver_number_instances=N N= The number of instances.
Refer to Multiple Instances of VIeC Server and Dispatch
as Services.
vtpdispatch_number_instances=N N= The number of instances.
Refer to Multiple Instances of VIeC Server and Dispatch
as Services.
shorten_job_folder_names=0 To shorten the folder paths to VIeC jobs so that more
characters are available for the file name, change the
value to 1. The character path is 259 characters.
enable_distillation_trace_log=0 0= Off, disables the trace log.
1= On, enables the trace log on errors only.
2= On, enables the trace log on errors and warnings.
4= On, always creates a trace log.
Xerox®FreeFlow®VI eCompose
User Guide
57
Page 58

VI eCompose Overview
vipo.ini lines
split_match_passwords=error error = When passwords do not match, an error is
split_short_open_password=error error = When the short open password is incorrect, an
split_short_permissions_password=error error = When the short permission password is incorrect,
split_short_individual_open_password=error error = When the short individual password is incorrect,
Notes
The log file is always placed in the same folder as the
PDF file.
returned.
error is returned.
an error is returned.
an error is returned.
OOppttiioonnaall ..iinnii EEnnttrriieess
CCrreeaattee aa LLoogg FFiillee ooff tthhee DDiissttiillllaattiioonn PPhhaassee
To create a log file of the distillation phase:
Log files are not created automatically. To enable the creation of log files one of the following entries
must be set in the vipo.ini configuration file:
• To create a log file on distillation errors only:
enable_distillation_trace_log=1
• To create a log file on distillation errors or warnings:
enable_distillation_trace_log=2
• To create a log file on every job:
enable_distillation_trace_log=4
58
Xerox®FreeFlow®VI eCompose
User Guide
Page 59

3
Using VIeC
This chapter contains:
• VIeC Server and Client ............................ . ............................... ................................................... 60
• Using VIeC Local Server ........................................................... ............................... . .................. 61
• Using the VIeC Job Submission Client ............................................... . . .............................. ......... 64
• Using VIeC Watched Folders Client ..... . ............................... ....................................................... 80
• Bulk Processing ................................................. . . .............................. ......................................... 84
• Housekeeping .. . .............................. . ............................................................ . . ............................ 85
Note: Refer to the following information:
• VIeC does not impose limitations on the length of file names. The Windows operating system has
a maximum file name length. A fully qualified file name path has a maximum of 259 characters.
The 259 characters include the drive letter, intermediate folder names, backslashes, and a file
name. Since all paths begin with X:\, where X is a drive letter, a file name path is limited to the
remaining 256 characters.
• Because VIeC has job-naming conventions that add a date and time stamp, and optionally, the
VIeC user ID to the job folder name, and because of the output directory hierarchy, it is
recommended that the length of job file names be kept to 90 or fewer characters. The actual
maximum length depends on the job setup, which includes the location of the VIeC users folder,
the length of the VIeC user ID, the output destination folder in the incoming directory, and so on.
Xerox®FreeFlow®VI eCompose
User Guide
59
Page 60

Using VIeC
VIeC Server and Client
A VIeC Server must be running and accessible by the Job Submission Client in order for VIPP®jobs to
be processed via VIeC. Each VIeC Server automatically starts when the workstation on which it is
installed boots, and it subsequently runs as a background process.
You can tell a VIeC Server is running by the presence of its icon in the Windows task bar. The icon is
located, by default, in the lower-right corner of the desktop. Right-click the VIeC Local Server icon to
display these options:
Launch Job Submission Client
Select this option to open the VI eCompose Job Submission Client window.
Launch Watched Folders Client
Select this option to open the VIeC Watched Folders Client window. For more information on the VIeC
Watched Folders feature, refer to Using VIeC Watched Folders Client.
Launch Web Server
Select this option to open the VI eCompose Web Server Window. For information on the VIeC Web
Server, refer to Using VIeC Web.
Launch Secure Web Server
Select this option to open the VI eCompose Secure Web Server Window. For information on the VIeC
Secure Web Server, refer to Using VIeC Web.
Launch Dispatcher
Select this option to open the VI eCompose Dispatch Window. For information on the VIeC Dispatch
option, refer to Using VIeC Dispatch.
Restore VI eCompose Local Server
Select this option to maximize the VI eCompose Local Server window, allowing access to more Server
options.
Exit
Select this option to exit the Server. If you exit the Server, VIeC jobs will not be processed by that
workstation until the Server is restarted. You can restart the Server from the workstation Start menu
at Start→Programs→VI eCompose→VI eCompose Server.
60
Xerox®FreeFlow®VI eCompose
User Guide
Page 61

Using VIeC
Using VIeC Local Server
The VI eCompose Local Server window provides access to the File, Job Selection, and Help drop-down
menu options.
You can maximize the VIeC Local Server window in one of two ways:
• Double-click its task bar icon.
• Rright-click its task bar icon, then choose Restore VI eCompose Local Server from the menu.
Clicking the X button in the upper right corner of the window does not cause the Server to exit;
instead it minimizes the Server to its taskbar icon. Jobs are still processed.
To exit the VIeC Local Server, either select Exit from the File menu or select Exit from the task-bar
icon right-click menu.
FFiillee MMeennuu OOppttiioonnss
These options are available from the File menu:
• Pause Server: Pauses or unpauses the Server. You must pause the Server before dumping an
accounting file.
• Save Logfile: Used when reporting software problems.
• Clear Logfile: Used when diagnosing software problems.
• Dump Accounting File: Saves accounting information to a file, then clears. Refer to Accounting
file format for a list of fields included in accounting files.
• Show Billing Meters: Tracks the number of pages distilled, pages split, and PDF files generated on
the Server.
Note: The Billing Meter reading is accurate only when one instance of VIeC is running.
When multiple instances are running, billing information is derived from the contents of
the accounting logs in the same manner as when running multiple VIeC nodes in a
VIeC cluster.
• Exit: Exits the Server; jobs will not be processed.
AAccccoouunnttiinngg FFiillee FFoorrmmaatt
The accounting file is a field-delimited format file. There is no header on the accounting file. Each
record in the accounting file is delimited with commas. These fields are included in each record:
• VIeC Server Name
• User Name
• Input Job Name
• Distill Start Date
• Distill End Date
• Distill Start Time
• Distill End Time
• Distill CPU Time Used, in seconds. This field is not yet available.
Xerox
®
FreeFlow®VI eCompose
User Guide
61
Page 62

Using VIeC
• Distill Result, Completed or Failed
• Distill Message, empty if Result is "Completed", otherwise within double quotes
• Number Distill Pages
• Distill PDF Name
• Split Start Date
• Split End Date
• Split Start Time
• Split End Time
• Split CPU Time used, in seconds. This field is not yet available.
• Split Result, "Completed" or "Failed"
• Split Message, empty if result is "Completed", otherwise within double quotes
• Number Split Pages
• Number Split Files
The following is a sample accounting file record:
MYSERVER,John_Doe,bigj ob.ps,2001-09-18,2001-09-18,16:35:39,16:36:19,0,
Completed,,1060,bigjob.pdf,2001-09-18,2001-09-18,16:36:20,16:37:05,0,
Completed,,1060,1060
When you select Dump Accounting File from the File menu in the VIeC Local Server window, a
corresponding XML-formatted Accounting file is created automatically. Both accounting files have
the same file name except for the file extension *.acct and *.xml.
The following is an example of an XML-formatted Accounting file.
62
Xerox®FreeFlow®VI eCompose
User Guide
Page 63

Using VIeC
JJoobb SSeelleeccttiioonn MMeennuu OOppttiioonnss
To determine the order in which the VIeC Server processes jobs, from the Job Selection menu, select
one of these options:
• First In First Out (FIFO)
• Shortest Job First (SJF)
• Longest Job First (LJF)
The length of a job is based on the size of the VIPP
®
file submitted for processing.
HHeellpp MMeennuu OOppttiioonnss
These options are available from the Help menu:
• VIeC Help: Provides access to the online help facility.
• About: Displays the VIeC Server version information.
Xerox
®
FreeFlow®VI eCompose
User Guide
63
Page 64

Using VIeC
Using the VIeC Job Submission Client
To select and configure a job for submission, use the VIeCompose Job Submission Client window.
WWiinnddooww EElleemmeennttss
The VI eCompose Job Submission Client window consists of these elements:
• Title bar: Displays the product name.
• Menu bar: Provides access to the File and Help menus.
• File: The File menu provides access to the Exit option. Select this option to close the Job
Submission Client window. Closing this window while a job is in progress does not cancel the job.
The job continues to process to completion unless explicitly canceled.
• Help: The Help menu provides access to the About option, which displays the version information
of the VIeC Job Submission Client.
• Job creation area: Contains the fields necessary to select and configure a job for submission. For
a description of each of the fields, refer to Job Creation Area Field Descriptions.
• VIeC job status area: Provides the status of each job submitted, including the number of pages
distilled and split, and the number of files split.
When a job submission has been successfully completed, the PDF documents generated can be
found and viewed using Adobe Acrobat or Reader. In the Job Status list, select the job folder entry,
then double-click to invoke a File Selection dialog. If Adobe Acrobat or Reader is not present or the
file cannot be opened, an error message appears.
64
Xerox®FreeFlow®VI eCompose
User Guide
Page 65

Using VIeC
Note: Adobe Reader is not supplied with VIeC. Obtain Adobe Reader from the Adobe
website: www.adobe.com.
Function buttons
These buttons appear at the bottom of the VIeC Job Submission Client window:
View Current Session Jobs, View All Pending Jobs, /View All Jobs: Choose a button to view the
following:
• Current session jobs that are submitted only within the current session
• All pending jobs from the currently selected user folder that are not yet processed and completed,
or whose Cancel requests have not yet been acknowledged by the Server, whether the jobs were
submitted before or after the current session began
• All jobs from the currently selected user folder, whether the jobs were submitted before or after
the current session began
Cancel Selected Job: Click this button to cancel the job during processing. Before clicking this
button, in the VIeC job status area, select the job. Depending on the job processing status at the time
of cancellation, the job runs to completion before the cancellation request is initiated by VIeC.
You can select multiple jobs and submit a request to cancel the jobs as a group. By default, only the
jobs from your folders and from the folders of the default_user can be canceled. To change the
default, use one of these valid settings in the VIeC configuration file vipo.ini:
• ## You can cancel jobs only from your folders ##
jsc_cancel_j ob_scope=1
• ## You can cancel jobs from the folders of default_user ##
jsc_cancel_j ob_scope=2
• ## You can cancel jobs from any other user folders ##
jsc_cancel_j ob_scope=8
Note: Job cancellation requests are submitted only by the client. Jobs must be processed by
VIeC Server before the jobs can be cancelled. A cancellation request submitted by the client
while the server is not running or is in a paused state, does not process until the server executes
a VIeC job.
Job Name and Job Status column headers
To sort the list of jobs, left-click Job Name or Job Status.
• Job Name: When you left-click Job Name, it sorts the job list by the job name or by the job datetime stamp, in ascending or descending order, one sorting type per mouse click, in the following
sequence:
– Sort by Job Name, in alphabetic ascending order A to Z, from the top
– Sort by Job Name, in alphabetic descending order Z to A, from the top
Xerox
®
FreeFlow®VI eCompose
User Guide
65
Page 66

Using VIeC
– Sort by the Date-Time stamp, in ascending order with the latest at the bottom
– Sort by the Date-Time stamp, in descending order with the latest at the top. This option is the
default.
• Job Status: When you left-click Job Status, it sorts the job list alphabetically, based on the status
string in ascending or descending order, one sorting type per mouse left-button click.
Submit Job: To submit the job after completing the appropriate fields in the job creation area, click
this button.
Help: To access the VIeC online help facility, click this button.
JJoobb CCrreeaattiioonn AArreeaa FFiieelldd DDeessccrriippttiioonnss
The following fields are in the job creation area of the VIeC Job Submission Client window.
Data File
Enter the name of the data file or browse to locate the VIPP
This data file name can be a VIPP
®
line mode, database mode, native mode, or XML mode print file
such as .lm, .dbf, .nm, or .xml, or a VI Project Container .vpc file, or a PDF file with bookmarks.
Init (Nub) File
®
data file or print file to be submitted.
Enter the name of the init file to be used when processing the job. Specify this file for each raw data
file, one without a VIPP
appropriate VIPP
®
preamble.
®
preamble such as STARTLM. For these jobs, the init (nub) file supplies the
Current Profile
Optional. Load or save a profile using the Load Profile or Save Profile buttons. Profiles are sets of
previously used job submission options that save you from re-entering the data. The default folder for
loading and saving profiles is the Profiles folder belonging to the current VIeC user, as selected in the
Job Submission Client dialog. You can browse any other directories on the VIeC Client system for
loading or saving profiles, including the virtual printers profile directory located in the <server_root>/
profiles directory. For example: C:\Program Files (x86)\Xerox\VIPP\xvtp\profiles.
For more information, refer to Profile files.
Job Type
Select one of these job types:
Distill Only
Distill and Split into Pages Requires that bookmarks are present in the VIPP
command. If bookmarks are not present in the VIPP
successfully, however, no splitting occurs.
®
job using the BOOKMARK
®
job, the job processes
Split into Pages Only PDF files require one or more bookmarks.
User Name
Enter the user name, which is most often the logon name of the current user. The default_user is used
by lpr and is not normally used from within the Job Submission Client.
Job Server
66
Xerox®FreeFlow®VI eCompose
User Guide
Page 67

Using VIeC
The default option is local. Select the default option, regardless of whether the server is on the same
physical machine or out on the network. The remote option is deprecated. Do not select the remote
option.
Output Folder
Select the destination folder for the job. The destination folders are named folders on the disks that
you do not browse for a path, but choose from named directories that you or an administrator
created in a special pre-designated location under control of the VIeC Server.
Printer Action
Conditional action of optional job printing is selected. Select one of the options listed. This option is
available only when a Printer for VIPP Job Output has been selected.
print_always
print_if_job_completes
Print Master PDF (Raw)
Print Master PDF (Simplex)
Print Master PDF (Duplex)
Print Master PDF (TumbleDuplex)
Sends the job to the selected printer no matter what the outcome of
the VIeC job submission.
Sends the job to the selected printer only if the job completes
successfully to VIeC.
Sends the Master PDF file to print directly on a specific printer that
can handle or process a PDF datastream.
Note: When Print Master PDF is selected, the PDF file must not be
moved from the original destination. When the Print Master PDF
option is selected, do not invoke the Dispatch Module to move the
Master PDF.
Sends the Master PDF to Adobe Reader, which is used as a proxy to
send the PDF to the selected printer for 1-sided or simplex printing.
Sends the Master PDF to Adobe Reader, which is used as a proxy to
send the PDF to the selected printer for 2–sided or duplex printing.
If the selected device does not support the Duplex printing option, the job
defaults to Simplex mode.
Sends the Master PDF to Adobe Reader, which is used as a proxy to
send the PDF to the selected printer for Tumble-Duplex printing.
If the selected device does not support the Tumble-Duplex option, the job
defaults to Simplex mode.
Note: Using the Simplex, Duplex or Tumble-Duplex modes can result
in loss of the PDF transparency feature and tends to be slower than
sending raw data. When fast throughput is desired, it is
recommended that you do not use these features when processing
jobs.
Note:
• VIeC attempts to generate a PDF file and does not submit a job directly to a printer based
on the Printer Action setting.
• VIeC sends to the printer the submission file, not the PDF files.
Printer for VIPP Job Output
Specify the printer for printing the job that was submitted to VIeC for processing. If you do not want
®
Xerox
FreeFlow®VI eCompose
User Guide
67
Page 68

Using VIeC
the job to print, select none.
Only PostScript printers are listed. Ensure that VI Compose is installed on the printer selected for
®
VIPP
job output and ensure that any resources are available for the VIPP®job.
To print a Master PDF, select the appropriate target printer. Ensure that the device is capable of
printing PDF files.
Output Filename Template
Select a pre-defined Output Filename template from a list or create an Output Filename template
using the Output Filename template wizard. The template you select is applied to the job being
processed. The output file name of the PDF files being produced is controlled with the Output
Filename template.
This option is available only when the VI eCompose Job Type option is set to Distill and Split into
Pages or Split into Pages Only.
For more information on this option, refer to Specifying PDF output file names.
Index File Template
Select the default index template or define an Index file template using the Index template wizard.
The Index template is applied to the job being processed. Use the Index Template wizard to add
additional fields, from the VIPP
®
BOOKMARK, to the index file generated by VIeC when the job type
option is set, to Distill and Split into Pages, or Split into Pages only. VIeC generates a commaseparated file and an XML index file. The index files are used by VIeC Dispatch, or other third-party
components to identify individual PDF records and additional data contained in the BOOKMARK for
that record. For example, an email address, location ID, or printer address.
This option is available only when the VIeC Job Type option is set to Distill and Split into Pagesor
Split into Pages Only.
For more information, refer to Specifying an index file.
Note: The PDF filename is based on the name of the data submission file. When using the
Distill OnlyJob Type, the output PDF filename uses the data submission filename as the output
PDF filename. If a single .character is included as part of the data file filename, VIeC considers
this a file extension and replaces this information with the .pdf file extension. If the . character
is a part of the filename, include an additional .character followed by at least one other valid
character. The second period character is treated as the file extension. VIeC replaces the
second period with the .pdf file extension, and maintains the first period in the filename.
For example:
• If the submission file name is P31199-SS.234, the resulting PDF filename is P31199-SS.pdf
• If the submission file name is P31199-SS.234.xx, the resulting PDF filename is P31199-
SS.234.pdf
Using the other Job Type options allows you to use the Output Filename Template. The value
DFNAME, or the option Add Data Filename, results in the same file name as the job submission data
file being used as part of the file name template.
PPrrooffiillee FFiilleess DDeeffiinneedd
A profile contains a list of parameters and values that are used to process a job. You can generate a
profile from the VI eCompose Job Submission Client screen.
68
Xerox®FreeFlow®VI eCompose
User Guide
Page 69

Using VIeC
1. In the VI eCompose Job Submission Client screen, select the required options.
Note: Do not include a data file name in the profile. You can use all the other fields.
2. Click Save Profile, then assign a profile name.
3. After you save a profile, download it. Click Load Profile, then select the required profile. This
action populates the options in the VI eCompose Job Submission Client for submitting the job,
based on that profile. Profiles are assigned when you use other available submission clients, such
as the Watched Folder Client.
A sample profile:
Note: All available job parameter options are listed in the table at the end of this section.
For more profile options, access the VI eCompose Job Submission Client File menu, then select
Additional Profile Options.
These options are available:
• Include media and finishing options
• Append ‘End of File’ marker (% %EOF)
• Select Job Options file
Include Media and Finishing Options: Use this option only when the target device for the PDF is the
FFPS APPE. The option places media and finishing information into the PDF, so that when processed
by the FFPS APPE engine, feeding and finishing are included. The option increases the size of the PDF
created, sometimes significantly, depending on the amount of feeding and finishing in the job.
Append End of File Marker (%%EOF): This option inserts a %% EOF end-of-file marker into the
data file being processed. The end-of-file marker signifies the end of a print run when processing linemode data.
Select Job Options File: An Adobe Job Options file specifies to the rendering engine how to process
the PDF file. Options such as resolution, color options, and down sampling can affect the size and look
of the PDF generated. The option allows you to select any of the default Adobe Job Options files or
any Job Option files that you generated using Adobe Acrobat.
Profile Files: A profile requires job parameters for the VIeC job submitted from the lpr command. The
table lists the acceptable job parameters.
Xerox
®
FreeFlow®VI eCompose
User Guide
69
Page 70

Using VIeC
Job parameter
AppendEOFTrailer <Empty> false Acceptable values:
DistillJobOptions=filename Default The filename is an existing
Parameter default
Parameter description
• true
• false
When set to true, VIeC inserts the
%%EOF marker at the end of the
data submission files associated
with the profile. An end-of-file
marker is sometimes required to
terminate a line-mode data file.
Acrobat Distiller job options file.
Refer to Assigning a job options
file. The job options file must be
moved to a location accessible to
the PDF authoring engine: X:
\Program Files(x86)\Xerox
\VIPP\xvtp\bin
\normalizer\settings.
When manually entering the
name of the Adobe Job Options
file, use the fill job options file
name. You can enter the file name
with or without angled brackets.
For example, you can enter the
Adobe Job Options file High_
Quality_USLetter.joboptions as
High_Quality_USLetter.
joboptions or as <High_
Quality_USLetter.
joboptions>.
IncludeMediaAndFinishingOptions=true
IndexFileTemplate=text <FS=':'>FileName:InputFile:
InitFile=text No default (Optional) VIPP
JobType=text distill_only Acceptable values:
70
Xerox®FreeFlow®VI eCompose
<Empty> false This option adds feeding and
finishing information to the PDF.
Use only if the target print device
is an FFPS APPE engine. This
option increases the size of the
generated PDF.
This option controls header
EndSplitDate:EndSplitTime:
OutputDir:Pages:
FileSequence:Bookmark
creation and bookmark extraction
in the index file that is generated
as part of VIeC file-splitting
output.
prepends to the submitted data
file.
User Guide
®
startup file that
Page 71

Using VIeC
Job parameter
NotificationCommandStr=text <empty> (optional) A single command string sent to
Parameter default
Parameter description
• distill_only
• distill_and_split into PDF files
• split_only into PDF files
the Operating System for
execution. The command string
can include parameters and has a
maximum length of 1024 bytes.
The command string cannot
contain multiple commands
separated by a semicolon or other
delimiter.
For more information, refer to
System built-in macros.
Note: If you set the
notification command
string to the default value
<empty>, the value
disables the command
execution, regardless of the
value in the
NotifyOnErrorOrWarning
entry.
NotifyOnErrorOrWarning=text false (boolean) Indicates that a notification
command executes when a VIPP
job is processed and completes
with warnings or fails due to an
error.
Acceptable values:
• false: Disables execution of the
Notification command.
• true: Executes the Notification
command when an error or a
warning occurs.
• error: Executes the Notification
command only when an error
occurs.
• warning: Executes the
Notification command only
when a warning occurs.
• always: The Notification
command is always executed.
Upon success, the JOB_
STATUS_MSG macro contents
should be empty.
OutputFilenameTemplate=text <DFNAME><DIGITS=6>.pdf Controls the names created for the
PDF output files.
®
Xerox®FreeFlow®VI eCompose
User Guide
71
Page 72

Using VIeC
Job parameter
OutputFolderName=text Default Folder location of VIeC job output.
Job parameter Parameter default Parameter description.
PrinterAction=print-action print_if_job_completes This is a conditional action when
PrinterName=text None Specifies the printer for printing
Parameter default
Parameter description
you select optional job printing.
Select one of these options:
print_always: Sends the job to the
selected printer no matter what
the outcome of VIeC job
submission.
print_if_job_completes: Sends
the job to the selected printer only
if the job completes successfully
by the VIeC server.
the job submitted to VIeC for
processing. If you do not want the
job to print, select none. Ensure
that VI Compose is installed on
the printer selected for VIPP
output. Ensure that resources for
the VIPP
PostScript printers are listed.
®
job are available. Only
®
job
The default location for loading and saving the profiles is the user Profiles directory. You can select
any other directory on the client for loading and saving profiles, including the virtual printers profile
directory, in <server_root>/profiles. For example: C:\Program Files (x86)\Xerox
\VIPP\xvtp\profiles, where <server_root> is defined in the vipo.ini configuration file.
SSppeecciiffyyiinngg PPDDFF OOuuttppuutt FFiillee NNaammeess
You can use a template to specify how PDF file names are formatted during the PDF split operation.
To create a template, in the VIeC Job Submission Client window, next to the Output Filename
Template field, click Create Template. The Create an Output Filename Template window appears.
TTeemmppllaattee SSyynnttaaxx
Enclose the template syntax within matching < >. All other characters, other than characters that are
invalid for file names and those described here, are treated as literal characters in the resulting output
file name generated by VIeC.
By default, strict file name checking is performed on file name templates. These characters are
considered invalid:
\ / : * ? " < > I ' ' ~ ! $ ^ & , ; [ ] { } ( ) % # = + @ tab and blank space
You can modify the default behavior by setting the following value in the VIeC configuration file vipo.
ini:
72
Xerox®FreeFlow®VI eCompose
User Guide
Page 73

Using VIeC
output_filename_strict_checki ng=false
By setting the value to false, these invalid characters are considered valid literals in the file name
template:
[ ] { } ( ) % # = + @
Note: The square brackets, [ ], must be escaped, preceded by a backslash character \ to be valid
literals in the template syntax. For example: filename_\[OK\].pdf. Use the other
characters without the escape backslash.
[Fn] An optional field number that can appear in any
order or number after a DFNAME or BKMARK.
For example, [F2] indicates to use field 2 of
DFNAME or BKMARK. Valid values for n are 0–
99.
[x..y] An optional range modifier that can appear in
any order or number after a DFNAME or
BKMARK. For example, [0..5] indicates to use
character 0–5 of DFNAME or BKNAME. Valid
values for x and y are 0–99.
<BKMARK[x..y][Fn]> Uses the bookmark field. The values [x..y] and
[Fn] are optional.
<DFNAME[x..y][Fn]> Uses the data file name. The values [x..y] and
[Fn] are optional. When producing multiple files,
the data file name is the first part of the file
name.
<DIGITS=n> The number of digits to use in the output file
names when multiple files are produced. If only
a single PDF file is produced, no digits are used
in the output file name. Valid values for n are 1–
10.
<FS='char'> A field separator character that is required if
[Fn] is used. Valid values for char are any
printable ASCII character except: [ ] < >.
You can use more than one FS designation. If used
within [ ], FS has an effect only within those [ ]. If
used outside of the [ ], FS takes effect until the next
FS is encountered outside of the [ ].
<GET_INDEX_WITHOUT_SPLIT> Indicates that the resulting PDF file goes
through the split process without actually being
split into smaller PDF child files. However, the
corresponding CSV/XML index files are
generated, which then allows VIeC Dispatch to
process the job.
You can submit a Distill Only VIPP®job with the nonsplit option to generate the job index files needed to
process the distilled PDF file with the Dispatch
module.
Xerox®FreeFlow®VI eCompose
User Guide
73
Page 74

Using VIeC
EExxaammpplleess
The following data file name and bookmarks will produce the named files in the table below when
the indicated templates are used:
data file name = mybigjob.lm
pg1 bookmark = account number 01234:xyz
pg2 bookmark = account number 43210:abc
Template syntax Output file names
<DFNAME><DIGITS=3>.pdf mybigjob001 .pdf mybigjob002.pdf ...
<DFNAME[0..4]><DIGITS=5>.pdf mybig00001.pdf mybig00002.pdf ...
<FS=' '><BKMARK[F2][0..4]>_<DIGITS=4>.pdf 01234_0001 .pdf 43210_0002.pdf ...
In the last example, the syntax specifies to extract field number 2 (zero based) from the bookmark
using a space as the field delimiter, then extract digits 0 through 4 from that result and use that as
the first part of the file name. Then append the literal character _, followed by 4 digits that increment
with each file produced.
TTeemmppllaattee FFiieelldd DDeessccrriippttiioonnss
Use the buttons on the Create an Output Filename Template window to build the template. As you
click the buttons, the selections appear in the display window. The default template is
<DFNAME><DIGITS=6>.pdf
You can manually edit the template shown in the display window. Ensure that you follow the
template syntax rules.
Add Data Filename
Adds <DFNAME> to the displayed template at the current insertion point, if legal, otherwise,
<DFNAME> is added at the most logical insertion point.
Add Bookmark
Adds <BKMARK> to the displayed template at the current insertion point, if legal, otherwise,
<BKMARK> is added at the most logical insertion point.
Add File Split Count
Adds <DIGITS=n> to the displayed template at the current insertion point, if legal, otherwise,
<DIGITS=n> is added at the most logical insertion point. The n value is specified in the box to the
right of the button.
Add Field Separator
Adds <FS='char'> to the displayed template at the current insertion point, if legal, otherwise, <FS=
'char'> is added at the most logical insertion point. The char value is specified in the box to the right
of the button.
Add Field Index
74
Xerox®FreeFlow®VI eCompose
User Guide
Page 75

Using VIeC
Adds <Fn> to the displayed template at the current insertion point, if legal, otherwise, <Fn is added at
the most logical insertion point. The n value is specified in the box to the right of the button.
Add Start/End Index
Adds [x..y] to the displayed template at the current insertion point, if legal, otherwise, [x..y] is added
at the most logical insertion point. The x start index and y end index are specified in the boxes to the
right of the button.
Undo Changes
Undoes the last change. You can undo multiple changes by clicking this button multiple times.
Redo Changes
Redoes the last change. You can redo multiple changes by clicking this button multiple times.
OK
Saves the changes and closes the template window. The template created appears in the window
under the Output Filename Template field in the Job Submission Client window.
Help
Provides access to the online help facility.
Cancel
Closes the template window without saving any changes.
SSppeecciiffyyiinngg aann IInnddeexx FFiillee
During the PDF splitting process, two index files are automatically created: an ASCII file formatted in
Comma Separated Values (CSV) and a corresponding XML-formatted index file. Both have the same
file name, except for the file extension (*.csv and *.xml).
This is a sample of output for an automatically generated XML-formatted index file:
Xerox
®
FreeFlow®VI eCompose
User Guide
75
Page 76

Using VIeC
You can also use a template to specify the contents of the index file header and index file record. To
create a template, click Create Template next to the Index File Template field on the VIeC Job
Submission Client window. The Create an Index File Template window appears; the default template
appears in the display window.
Additional checks are made when creating and supplying an Index File Template to make sure the
field names have the appropriate syntax for XML tag creation. These characters are invalid for
template field names:
\ / : * ? " < > | ( ) [ ] { } ' ' ~ ! @ # $ % ^ & + = , ; tab and blank space.
TTeemmppllaattee SSyynnttaaxx
The Create an Index File Template window consists of the following eight fields: seven index file fields
and a bookmark field. A defined Field separator bullet character separates each field. For more
information, refer to Header Field Separator.
• FileName
• InputFile
• EndSplitDate
• EndSplitTime
• OutputDir
• Pages
76
Xerox®FreeFlow®VI eCompose
User Guide
Page 77

Using VIeC
• FileSequence
• Bookmark
The first seven fields are names of corresponding fields in each line of the index file generated by
VIeC. Only the names of these seven fields can be changed in the Index File Template.
The the eighth field, the bookmark field, can be replaced with as many field names as needed, each
separated by the defined field separator. For more information, refer to the Bookmark field bullet and
Bookmark Field Separator.
Note: All fields in the index file header and index file record are enclosed in double quotes. This
feature cannot be turned off.
Field separator A field separator is a single character that
separates the index file fields and bookmark
fields. The separator is used to generate the
field separators in the index file header and in
each index file record. You can change the field
separator used in the template. The syntax for
the field separator is
<FS='char'>
Where 'char' is any printable ASCII character except:
[ ] < >. The field separator in the default template is a
comma (,).
Bookmark field You can replace the bookmark field with an
unlimited number of field names. Each
bookmark field name appears in the index file
header.
Use the following syntax with any bookmark field
name in the template to control which portions of
the bookmark are extracted and placed into the
corresponding fields in each index file entry
generated by VIeC.
Note: The default template places the entire
bookmark into the last field of each index file.
[x..y] Uses a substring of Bookmark from zero-based
indices x to y. This is an optional range modifier
that can appear in any order or number after
the fixed fields in the template. Valid values for
x and y are 0–99.
Xerox
®
FreeFlow®VI eCompose
User Guide
77
Page 78

Using VIeC
[Fn] Uses field number n of the bookmark according
to BFS. This is an optional field number that can
appear in any order or number after the fixed
fields in the template. Valid values for n are 0–
99.
<BFS='c'> A bookmark field separator (BFS) that must be
specified if [Fn] is used. Valid values for c are
any printable ASCII character except: [ ] < >.
You can use more than one BFS designation. If used
within [ ], it only has an effect within those [ ]. If used
outside of the [ ], c takes effect until the next BFS is
encountered outside of the [ ].
EExxaammpplleess
The following bookmark contents will produce the index file headers and index file records below
when the indicated templates are used:
bookmark contents = John Doe 123-45-456
Example 1:
Template <FS=':'>Fld1:Fld2:Fld3:Fld4:Fld5:Fld6:Fld7:BookFld1|
<BFS=' '>[F1]:BookFld 2|[0. .2] :BookFld3| [F2] [0..2]
Index file header produced Fld1:Fld2:Fld3:Fld4:Fld5:Fld6:Fld7:BookFld1:BookFld2:
BookFld3
Index file record produced outfi1e_001.pdf:infile:10-2-01:"23:56:34":"c:\user
\...":5:1- 50:Doe:Joh:123
Example 2:
Template <FS=':'>FldA:FldB:FldC:FldD:FldE:FldF:FldG:Bookfield1|
<BFS=' '>[F1]: Bookfield2|[F2][<BFS='-'>[F2]]
Index file header produced FldA:FldB:FldC:FldD:FldE:FldF:FlgG:Bookfield1:
Bookfield2
Index file record produced outfile_003.pdf:infile:10-2-01:"13:06:14":"c:\user
\...":7:3-80:Doe:456
Example 3:
Template <FS=','>Fld1,Fld2,Fld3,Fld4,Fld5,Fld6,Fld7,Fi rstNam|
<BFS=' '>[F0],LastNam |[F1],Num|[F2][<BFS='-'>[F0]]
Index file header produced Fld1,Fld2,Fld3,Fld4,Fld5,Fld6,Fld7,FirstNam,LastNam,
Num
Index file record produced file_xyz.pdf,infile,10-7-01,14:29:14,c:\user\...,4,10-
100,John,Doe,123
78
Xerox®FreeFlow®VI eCompose
User Guide
Page 79

Using VIeC
TTeemmppllaattee FFiieelldd DDeessccrriippttiioonnss
To build the template, use the buttons in the Create an Index File Template window. The selections
appear in the display window. The default template is shown:
Note: You can manually edit the template shown in the display window. Ensure that you follow
the template syntax rules.
• Header Field Separator: Adds the index field separator to the displayed template at the current
insertion point, if legal, otherwise, the separator is added at the appropriate insertion point. In the
box to the right of the button, specify the field separator.
• Bookmark Field Separator: Adds the bookmark field separator to the displayed template at the
current insertion point, if legal, otherwise, the separator is added at the appropriate insertion
point. In the box to the right of the button, specify the field separator.
• Add Field Index: Adds <Fn> to the displayed template at the current insertion point, if legal, the
separator is added at the most logical insertion point. Fn is specified in the box to the right of the
button.
• Add Start/End Index: Adds [x..y] to the displayed template at the current insertion point, if legal,
otherwise, [x..y] is added at the most logical insertion point. The x start index and y end index are
specified in the boxes to the right of the button.
• Undo Changes: Undoes the last change. You can undo multiple changes by clicking this button
multiple times.
• Redo Changes: Redoes the last change. You can redo multiple changes by clicking this button
multiple times.
• OK: Saves the changes and closes the template window. The template created appears in the
window under the Index File Template field in the Job Submission Client window.
• Help: Provides access to the online help facility.
• Cancel: Closes the template window without saving any changes.
Xerox
®
FreeFlow®VI eCompose
User Guide
79
Page 80

Using VIeC
Using VIeC Watched Folders Client
The VIeC Watched Folders Client (WFC) allows you to specify one or more directories where VIPP
jobs can be placed for automatic submission to VIeC. A VIeC remote or local user and an optional
profile are associated with each watched folder, which controls the processing of all jobs submitted
from that folder. Submitted jobs can be monitored using the Job Submission Client in the same
manner as for lpr-submitted jobs. All VIPP
watch interval to determine file readiness.
Note: Due to the overhead required to monitor Watched Folders, it is recommended that no
more than six Watched Folders be defined for each system. Although there is no hard limit on
the number of Watched Folders you can define, the hard limit for the Watched Folder names is
3072 bytes. Assuming that the average Watched Folder name watchedFolderPath,
userName (scope),profileName.pfl can contain 200 bytes, this would make a
practical limitation of 15 Watched Folders.
You can start the Watched Folders Client from the VIeC program folder or from the right-click menu of
the VIeC Local Server icon. The Client runs as a background process. A VIeC Server must be running
for the watched folders to process.
You can tell the Watched Folders Client is running by the presence of the icon in the Windows task
bar. To display the Watched Folders Client options, right-click the VIeC Watched Folders Client icon.
The options appear:
• Restore VI eCompose Watched Folders Client: Maximizes the VIeC Watched Folders Client
window.
• Exit: Exits the Watched Folders Client. If you exit the client, folders are not watched until the client
is restarted.
®
jobs found in each watched folder are checked at each
®
The VI eCompose Watched Folders Client window is used to control and monitor watched folders.
Note: When the client is invoked, the watch process is inactive.
WWiinnddooww EElleemmeennttss
The VIeC Watched Folders Client window consists of these elements:
Title bar Displays the product name VI eCompose Watched
Folders Client.
Menu bar Provides access to the File and Help menus. These
options are available from the File menu:
Hide Watched Folders Client Returns the VIeC
Watched Folders Client window to a task-bar icon.
Input File Disposition Controls what happens to
watched jobs after they are submitted to VIeC. There
are two submenu choices:
Delete Input File: Deletes the job from the watched
folder. This option is the default.
Move Input File to Saved Jobs Folder: Moves the job
to the Saved Jobs folder contained under each
watched folder.
80
Xerox®FreeFlow®VI eCompose
User Guide
Page 81

Using VIeC
Exit Exits the Watched Folders Client. Folders are no
longer watched.
Help The Help menu provides access to the About
option, which displays the version of VIeC Watched
Folders Client.
Watched folders list Lists the folders currently defined for watching.
Watched folder details area Shows the details for the selected watched folder in
the watched folders lis: the folder name, VIeC user
associated with the folder, and the profile. If a profile
is specified, the contents of the file appear in the
Profile Contents box. The Browse button allows you
to browse for the folder you want to add to the
watched list.
Status area Displays the current watch interval, which can be
changed using the Change Interval button, and the
current method used to check file readiness. The
status area indicates if folders are being watched
currently.
FFuunnccttiioonn BBuuttttoonnss
These buttons appear on the right side of the VIeC Watched Folders window:
Resume/Pause
Resume starts or resumes watched folder processing. Pause stops the Watched Folders Client from
watching the folder and no further jobs are queued. Up to 120 jobs that have been submitted prior to
selecting the Pause button continue to process until the jobs are completed.
Change Interval
Changes the current watch interval. When you click the Change Interval button, a Change Watched
Folders Interval window appears that allows you to change the interval in seconds. The status area in
the VIeC Watched Folders window shows the watch interval.
File Ready Check
Used to select the method to determine when a file is ready for job submission, preventing processing
and submitting files that are not yet ready for job submission. This selection is indicated in the Status
area of the window. For more information, refer to File ready check.
Add Folder
Used to expand the dialog where the watch folders are managed. In the expanded dialog, you can
add, delete, and save the changes in the watched folder.
Add
Allows you to add a folder to the watched list.
Delete
Allows you to delete the selected folder from the watched list.
Xerox
®
FreeFlow®VI eCompose
User Guide
81
Page 82

Using VIeC
Save
Saves the current changes for the selected folder.
Close
Closes the dialog that is expanded when you click the Add Folder button.
AAddddiinngg WWaattcchheedd FFoollddeerrss
To add a new watched folder:
1. Click Browse, then select the new folder. The folder appears in the Watched Folder box in the
watched folder details area.
2. From the VIeC User selection box in the watched folder details area, select the user. The selected
user is used for all the jobs submitted from that new watched folder.
3. From the Profile File selection box for the jobs to submit to the watched folder, select the profile.
4. To add the new watched folder to the current list of watched folders, click Add Watch.
FFiillee RReeaaddyy CChheecckk
The file ready check feature allows you to choose the method you want VIeC to use to determine if a
file is ready for use in a VIeC application. Using this feature prevents problems that can occur when
the WFC encounters a file that is not ready for submission. For example, a large file that is still being
transferred or copied from a remote location or files being built on the fly by an automated process.
The File Ready Check button invokes the Method to Check for File Readiness dialog.
The dialog offers two choices to check for file readiness before a file is picked up for job submission:
Check for Existence of Flag File
Used to signal the WFC directly when a file is ready for job submission by creating a flag file. The
flag file is an empty, 0-byte file that you create. In addition to having the same name as the job
file, the flag file must have the additional extension: ._File_Ready_For_Submission_.
The flag file for myVIProject.vpc, becomes: myVIProject.vpc._File_Ready_For_
Submission_
Copy the flag file to the same watched folder as the job file. The flag file uses the naming
convention described. After the job file has been successfully transferred, copy the flag file to the
watched folder only. If, during the polling intervals, the flag file is not found, it is assumed that the
file transfer has not completed. It is only when the flag file is found that the WFC makes the job
file available for processing.
Check for File Size Changes
The Check for File Size Changes is the default setting in which the WFC checks and monitors
changes in the file size at every watch interval. If the size of the file for submittal does not change
within the specified period of time, the file is considered ready for job submission and is processed
at that time, even if a flag file does not exist. The range of time is 4–1800 seconds. The default
threshold is 60 seconds.
When using the Check for File Size Changes option, if large files are transferred or copied from a
remote location to the watched folder, and the time it takes for the file transfer is longer than the
current watch interval, the file size changes during the transfer are monitored and the file is not
picked up for job submission until file size growth is not detected within the specified time. Choose
82
Xerox®FreeFlow®VI eCompose
User Guide
Page 83

Using VIeC
a period of time for the watch interval, taking this information into consideration:
• The file size changes to be detected by the operating system
• The speed of file transfer or copy
When the Check for File Size option is active, files may no longer be picked up and submitted for
processing when found at every watch interval. The effective submission rate is based on the file
size check threshold as well as the watch interval. Even for small files, job submission takes place
after the threshold is reached, assuming the watch interval is smaller than the threshold time.
For example, a small threshold of 5 seconds can be used for small files. For large files, change the
threshold accordingly.
CCoommmmaanndd LLiinnee OOppttiioonnss ffoorr VVIIeeCC WWaattcchheedd FFoollddeerrss
CClliieenntt
VIeC Watched Folders Client has two command parameters:
v2vwatch autostart noshow
These parameters are optional and can appear in any order or case on the command line.
autostart VIeC Watched Folders Client starts watching folders
immediately. Press the Resume button on the
Watched Folders Client dialog.
noshow VIeC Watched Folders Client starts in iconized or
minimized size.
Both of these options facilitate the automatic command-line start of the VIeC Watched Folders
Client.
Note: Depending on the system environment, the full path name of the VIeC Watched Folders
Client executable needs to be specified. For example: C:\Program Files(x86)\Xerox
\VIPP\xvtp\bin\v2vwatch.exe param1 param2.
Xerox
®
FreeFlow®VI eCompose
User Guide
83
Page 84

Using VIeC
Bulk Processing
Note: The capability to support bulk processing has been retained to support backward
compatibility with older VIeC configurations. VIeC Dispatch provides an intelligent way to
control the PDF files generated by VIeC. If you are considering using bulk processing
capabilities, consider using VIeC Dispatch instead.
Bulk processing allows a VIeC user to direct the PDF output of multiple jobs to a single bulk directory,
typically to facilitate batch or other automated post-processing of VIeC-generated output.
The VIeC system administrator must ensure that the system is upgraded to a VIeC software version
that supports bulk processing. If you do not upgrade the system, jobs submitted to the bulk folder are
processed in the same manner as non-bulk jobs and the results are generated in individual subfolders
on a per-job basis.
To enable bulk processing, if not automatically created during installation, each user is required to
create two additional directories, \incoming\bulk and \incoming\bulk_status, as shown:
Jobs sent to a bulk destination folder have the PDF output sent to \user\incoming\bulk, while
the status folders and files for those jobs accumulate in \user\incoming\bulk_status. All
PDFs generated using Distill Only, Distill and Split, and Split Only options, and the index file for each
submitted job, are placed in \user\incoming\bulk.
Note: Ensure that the job and file-naming conventions and split templates do not cause output
file name clashes that result in overwritten files.
84
Xerox®FreeFlow®VI eCompose
User Guide
Page 85

Using VIeC
Housekeeping
During job processing, VI eCompose creates job folders and files that are left behind after each job is
completed. It is highly recommended to set up a separate cleanup process that regularly removes or
archives old job folders. At least once a month, or more frequently when running a large number of
jobs every day, run the cleanup process. Existing old job folders accumulate on the VI eCompose user
directories, and can significantly slow down the search task that looks for jobs to process. It is
recommended that you clean up the temporary folders used by the system for the user accounts
running in the VI eCompose Server.
On Windows 10, Windows Server 2012 including R2, Windows Server 2016, and Windows Server
2019, a user temporary folder is located on the C drive:
C:\Users\[USERNAME]\AppData\Local\Temp\
Where [USERNAME] is the User Account name for the VI eCompose server.
Xerox
®
FreeFlow®VI eCompose
User Guide
85
Page 86

Using VIeC
86
Xerox®FreeFlow®VI eCompose
User Guide
Page 87

4
Using BOOKMARK, PDF Features, and Project Containers
This chapter contains:
®
• Using the VIPP
• Using VIPP
• PDF/X Support ............................................... . ............................................................. .............. 91
• Using VI Project Containers............. . . ............................................................ . ............................ 92
BOOKMARK Command ........ . ............................................................ . .............. 88
®
PDF Interactive Features..... . ............................... ................................................... 90
Xerox®FreeFlow®VI eCompose
User Guide
87
Page 88

Using BOOKMARK, PDF Features, and Project Containers
Using the VIPP®BOOKMARK Command
VIPP®BOOKMARK can be used in any VIPP®mode to generate a bookmark on the PDF document.
The syntax is:
(bookmark contents) BOOKMARK
Where bookmark contents is the text that will appear on the PDF bookmark generated by VIeC.
Variables are allowed.
The following example will create a PDF bookmark containing John Doe 687863456 which is John
Doe's name and social security number, on the specified page.
DBF file:
EExxtteennddeedd BBooookkmmaarrkkss
An extended bookmark is a transparent PDF note, which is usually visible from the comment section
of the completed PDF only. Extended bookmarks are used only with the dispatch function of VIeC.
Extended bookmarks can contain information up to 64 K. Regular bookmarks contain up to 256
characters. The contents of the extended bookmark is treated as follows:
• Appended to the contents of the regular bookmark
• Linked to a regular bookmark
• Created after the regular bookmark
Several extended bookmarks can be created in a sub-document between two consecutive regular
bookmarks.
This syntax is used to create an extended bookmark:
(bookmark contents) [ /EX optl opt2 ] BOOKMARK
Where:
/EX Tells BOOKMARK to create an extended
bookmark rather than a regular bookmark.
opt1 An integer that tells the VIeC splitter how to
handle the child PDF file:
• 0 Do not produce the child PDF file
• 1 Produce the child PDF file but do not include
bookmark in it.
• 2 Produce the child PDF file and include a
bookmark in it. This is the default. All extended
88
Xerox®FreeFlow®VI eCompose
User Guide
Page 89

Using BOOKMARK, PDF Features, and Project Containers
bookmarks within a sub-document require the
same opt1 value.
opt2 An integer that tells the VIeC splitter how to
handle the extended bookmark:
• 0 Do nothing with the extended bookmark.
• 1 Merge the extended bookmark with the
associated regular bookmark for index file
processing, but do not include the bookmark in
the child PDF file.
• 2 Merge the extended bookmark with the
associated regular bookmark for index file
processing and include the bookmark in the child
PDF file.
opt2=0 Can be used to insert comments or instructions
in the main PDF file present only in this file.
The combination opt1=0 and opt2=2 is irrelevant. The command acts as opt2=1.
This example creates an extended bookmark that instructs the VIeC splitter to produce a child PDF
file that does not contain the extended bookmark. However, this extended bookmark is included in
the VIeC index file and, with appropriate VIeC Dispatch and mail server settings, triggers an email to
John Smith with the child PDF file attached.
Xerox®FreeFlow®VI eCompose
User Guide
89
Page 90

Using BOOKMARK, PDF Features, and Project Containers
Using VIPP®PDF Interactive Features
A complete set of VIPP®PDF Interactive Features (PIF), available in VIPP®4.0 and later, allow you to
create interactive elements when the VIPP
®
VIPP
PIF and details about each related command, refer to the VIPP®Language Reference Manual.
®
job is rendered into a PDF document. For an overview of
90
Xerox®FreeFlow®VI eCompose
User Guide
Page 91

Using BOOKMARK, PDF Features, and Project Containers
PDF/X Support
VIeC includes partial support for PDF/X. Only the most important PDF/X-3 and PDF/X-1a constructs
are recognized and passed from the master PDF to the child PDF. To generate valid PDF/X child
documents via the splitting process from a VALID PDF/X master, you must set the following entry in
vipo.ini (located in the Windows folder) and restart VIeC:
split_t ransfer_attributes=true
Attributes for the child documents will be set to match the master's attributes.
Xerox
®
FreeFlow®VI eCompose
User Guide
91
Page 92

Using BOOKMARK, PDF Features, and Project Containers
Using VI Project Containers
VI Project Containers VPC or .vpc, are a convenient way to archive, exchange, and deploy VIPP
applications. VPCs are created with VI Design Pro software.
When creating an application with VI Design Pro, you work typically with a sample print file
containing a limited number of records. The sample print file is shown as a local resource in the
notebook display and is the file with the blue gear icon. By definition, this is sample data and is not
intended for use in a production run.
VIeC software is intended for use in a production environment because it knows about VI Project
Containers and does not use the VPC sample data if a production submission file is also in the VPC.
Note: A VPC sent to the VIeC Server requires a production submission file, however, a VPC
submitted to the VIeC Server that contains only a sample data file is not rejected and is
submitted for processing.
To add a production submission file to the VI Project from within VI Design Pro, follow these steps:
1. From the notebook display, right-click the Local folder icon. A menu appears.
2. To add the production submission file to the project, from the menu, select Add Resource To
Project. Submission files require an extension of .lm .nm, or .dbf. The submission file has a small
number 1 in the file icon, indicating that it is submission file 1.
Note: VI Design Pro allows you to add multiple submission files to the project, but the VIeC
Server processes submission file 1 only, and all other files are ignored.
3. Export the project as a VPC from VI Design Pro. On the VI eCompose tool bar, click Export VI
Project Container.
®
92
Xerox®FreeFlow®VI eCompose
User Guide
Page 93

5
Using lpr to Submit VIeC Jobs
This chapter contains:
• Lpr Client ..... . ............................................................ . .............................. . . ................................ 94
• Lpr Command Syntax for the Windows OS ............................... ............................... . .................. 95
• Parameter Definitions ............................................ ............................... . .................................... 96
• Parameter Defaults .................................................. . . .............................. ............................... ... 97
• Example Lpr Job Submissions ................................ . ............................... ..................................... 98
Using lpr to submit VIeC jobs provides the lpr command syntax for the Windows OS.
Note: Refer to the following information:
• Characters in job files
Job files that are submitted through an lpr command cannot contain blank spaces, pound signs
(#), equal signs (=), or colons (:) in the file names.
• LPR requirements:
– Ensure that both the TCP/IP Print Server and Print Spooler services are installed and activated
on the system. On Windows Server 2008 and Windows 7 systems, the TCP/IP Print Server
service is a named LPD Service and that is not enabled by default. Install the LPD Service,
enable the LPD Service, then install the VI eCompose LPR Printing submission feature.
– When submitting jobs to VIeC through lpr commands, the VIeC Server console shows the job
names with extra numeric tags, or IDs, appended to the file extension. Because all lpr jobs are
sent to a common spool area, the extra tags are needed to avoid file name collisions and
guarantee unique name identifiers. The unique tags generated by the system are appended
to the original files before file submission and processing by the VIeC Server. The resulting
files do not have the extra numeric tags.
Xerox®FreeFlow®VI eCompose
User Guide
93
Page 94

Using lpr to Submit VIeC Jobs
Lpr Client
Instructions for adding one or more lpr clients are provided in lpr job submission installed on a VIeC
Server in the installation section of this document.
94
Xerox®FreeFlow®VI eCompose
User Guide
Page 95

Using lpr to Submit VIeC Jobs
Lpr Command Syntax for the Windows OS
lpr -S servername -P printername printfilename
Windows does not accept the -T option or parameters on the lpr command line. Any lpr jobs use the
defaults as described in Parameter defaults.
For submission of .pdf, .vpc, or other non-text jobs, ensure that you use the -o l option on the lpr
command. The lpr command is the last parameter before the job file name. For example:
lpr -S HostName -S XVTPrinterName -o l BinaryJobFile
For more information on lpr command parameters, on the command line, type lpr.
Note: The -o l option can be used for all data file submissions, as it is preferable for the job
data stream to be treated as raw bytes when the print spooler takes the file from lpr. For
example:
lpr -S ServerIP -P XVTPrinter -o l JobName
Where:
-o l indicates that the submission file is treated as raw data and passed to VIeC
unfiltered. If not specified, some submission files are lost and no files are
submitted to VIeC.
Xerox
®
FreeFlow®VI eCompose
User Guide
95
Page 96

Using lpr to Submit VIeC Jobs
Parameter Definitions
printfilename
The printfilename is the VIPP
just the data submission file of a job that has been previously deployed on the system where the
VIeC server is running.
printername
The printername is an lpr-to-VIeC printer defined on a VIeC Client on Windows running an lpd server.
Note: You can create the initial printer name in two ways:
• From the VIeC program folder, use the Install VI eCompose LPR Option.
• When you install VIeC, use the lpr option.
servername
The servername is an IP address or hostname of a VIeC Client running lpd. The host name is defined
in the file winnt/system32/drivers/etc/hosts.
®
print file that is submitted to VIeC. The print file can be a VPC file or
96
Xerox®FreeFlow®VI eCompose
User Guide
Page 97

Using lpr to Submit VIeC Jobs
Parameter Defaults
When using the lpr command for job submissions to VI eCompose, the user destination is determined
in this order:
1. If the user that is logged onto the system has a folder in the VIeC users directory, the folder
becomes the default folder for all lpr submissions sent with the user account. For example, if John
Smith is the user: ../xvtp/users/JohnSmith
2. The default_user folder ../xvtp/users/default_userbecomes the default for all lpr
submissions if the user that is logged onto the system does not have a folder inr the VIeC users
directory.
The default profile used for lpr submissions is determined in this order:
1. If the lpr_default.pfl profile exists under the current default_user folder (e.g. ../xvtp/users/
default_user/profiles/*.pfl or ../xvtp/users/JohnSmith/profiles/*.pfl)
this will be used by the lpr submission.
2. If the VIeC lpr printer name is XVTPrinter the XVTPrinter.pfl profile will be used if it exists under
the generic profiles directory (../xvtp/profiles/XVTPrinter.pfl).
3. If none of the above apply, internal defaults will be used.
Given the above, if you always want to use the default_user folder as the default destination for all lpr
submissions you must make sure that the user who is currently logged-on to the system does not
have a folder under the VIeC users directory.
Xerox
®
FreeFlow®VI eCompose
User Guide
97
Page 98

Using lpr to Submit VIeC Jobs
Example Lpr Job Submissions
This section provides three examples of jobs submitted via lpr.
1. This job prints the xyz.lm file using lpr_default.pfl of the default_user if a profile exists; otherwise
it uses XVTPrinter.pfl from the generic profile directory:
lpr -S HostName -P XVTPrinter -o l xyz.lm
2. This job prints the xyz.lm file using lpr_default.pfl of the user johndoe if a profile exists; otherwise
it uses XVTPrinter3.pfl from the generic profile directory:
lpr -S HostName -P XVTPrinter3 -o l xyz.lm
98
Xerox®FreeFlow®VI eCompose
User Guide
Page 99

6
VIPP
This chapter contains:
• PDF Security Options. . ............................................................. . ................................................ 100
• Font Locations ................................ . . .............................. ............................... .......................... 105
• Assigning a Job Options File......................... .............................. . . ............................................ 106
• PDF Resources and Compatibility with APPE...................... ............................... . ....................... 107
®
Job to PDF File Conversion
Xerox®FreeFlow®VI eCompose
User Guide
99
Page 100

®
VIPP
Job to PDF File Conversion
PDF Security Options
To set PDF security options while originating PDF documents, from the Job Submission Client, use the
VI eCompose Security Options dialog. To open the dialog, when the Job Submission Client is open,
either press Ctrl-S or go to File→Security Options.
Note: If the VI eCompose Server is not installed on the system, the Security Options dialog is
not accessible from the Job Submission Client.
VVIIeeCC SSeeccuurriittyy OOppttiioonnss DDiiaalloogg
Use the Security Options dialog to enable or disable PDF Document Security, verify current security
options, modify settings, and enter passwords. When you click Save or Save As Options, the interface
automatically updates the SecurityOptions file with the new settings.
There are two levels of security applicable to PDF documents:
Open Locks the PDF and restricts file open and read access. If the Open password is set,
the PDF document cannot be opened unless the password is supplied.
Permissions Locks all of the PDF document security settings in the file. If the Permissions
password is set, none of the security settings of the PDF document can be
changed unless the password is supplied.
MMaasstteerr PPDDFF
If you want the master or parent PDF to be secured during distillation, or access a secured master
PDF for splitting, select Enable Password Security, then provide passwords.
If a valid Open password is provided, VIeC uses this password for two purposes:
• To secure the master PDF during distillation with file open and read access restrictions.
• To access a secured master PDF for splitting purposes.
VIeC does not transfer this password to any PDF file generated because of the split process. This
means that, if the original PDF file was produced with an Open password, this Open password is not
set for any of the split files generated. If you want to secure split files with individual Open passwords,
refer to Split PDFs and Examples: Personalized Open Passwords For Split PDFs.
If a valid Permissions password is provided, VIeC uses this password and security options to secure the
master PDF during distillation. If the master PDF is found to be secured during the splitting process,
VIeC automatically transfers its permissions settings to each of the split files generated. As a result,
all child PDF documents inherit all the security settings of the parent PDF file and have the
Permissions password set. Security settings passed on to child PDF documents do not include the
Open password from the parent PDF. Those security settings are locked, and regular users cannot
change the settings unless they know the password.
If you select Enable Password Security, Open and Permissions passwords cannot match, both be
empty, or contain less than the minimum required 6 characters.
100
Xerox®FreeFlow®VI eCompose
User Guide
 Loading...