

Page 1

Version 16.0.3.0
December 2020
702P08479
Xerox
®
FreeFlow
User Guide
®
VI Compose
Page 2

© 2020 Xerox Corporation. All rights reserved. XEROX®and XEROX and Design®, FreeFlow®, FreeFlow Makeready®,
FreeFlow Output Manager
®
, FreeFlow Process Manager®, VIPP®, and GlossMark®are trademarks of Xerox
Corporation in the United States and/or other countries. Other company trademarks are acknowledged as follows:
Adobe PDFL - Adobe PDF Library Copyright © 1987-2020 Adobe Systems Incorporated.
®
Adobe
PostScript
, the Adobe logo, Acrobat®, the Acrobat logo, Acrobat Reader®, Distiller®, Adobe PDF JobReady™, InDesign®,
®
, and the PostScript logo are either registered trademarks or trademarks of Adobe Systems Incorporated in
the United States and/or other countries. All instances of the name PostScript in the text are references to the
PostScript language as defined by Adobe Systems Incorporated unless otherwise stated. The name PostScript is used
as a product trademark for Adobe Systems implementation of the PostScript language interpreter, and other Adobe
products. Copyright 1987-2020 Adobe Systems Incorporated and its licensors. All rights reserved. Includes Adobe
®
PDF Libraries and Adobe Normalizer technology.
®
Intel
, Pentium®, Centrino®, and Xeon®are registered trademarks of Intel Corporation. Intel Core™Duo is a trademark
of Intel Corporation.
Intelligent Mail
Macintosh
®
is a registered trademark of the United States Postal Service.
®
, Mac®, and Mac OS®are registered trademarks of Apple, Inc., registered in the United States and other
countries. Elements of Apple Technical User Documentation used by permission from Apple, Inc.
®
Novell
and NetWare®are registered trademarks of Novell, Inc. in the United States and other countries. Oracle®is a
registered trademark of Oracle Corporation Redwood City, California.
PANTONE
™
and other Pantone Inc. trademarks are the property of Pantone Inc. All rights reserved. QR Code™is a
trademark of Denso Wave Incorporated in Japan and/or other countries.
®
TIFF
is a registered trademark of Aldus Corporation.
The Graphics Interchange Format© is the Copyright property of CompuServe Incorporated. GIFSM is a Service Mark
of CompuServe Incorporated.
Windows
Explorer are trademarks of Microsoft Corporation; Microsoft
®
, Windows®10, Windows Server®2012, Windows Server®2016 and Windows Server®2019, and Internet
®
and MS-DOS®are registered trademarks of Microsoft
Corporation.
All other product names and services mentioned in this publication are trademarks or registered trademarks of their
respective companies. They are used throughout this publication for the benefit of those companies, and are not
intended to convey endorsement or other affiliation with the publication.
Companies, names, and data used in examples are fictitious unless otherwise noted.
While every care has been taken in the preparation of this material, no liability is accepted by Xerox Corporation arising
out of any inaccuracies or omissions.
Changes are made periodically to this document. Changes, technical inaccuracies, and typographical errors are
corrected in subsequent editions.
Produced in the United States of America.
Page 3

Table of Contents
1 FreeFlow VI Compose Licensing and Installation.............................................................. 9
Getting Started..................... ............................. ............................. ....................................... 10
Program Download ....................... ..... ................... ..... ........................ ..... ........................ . 10
Specialty Imaging and Barcode Font Download ............................................................... 10
VI Suite Customer Forum ......................... ..................................................... ......................... 11
Demonstration and Production Modes ................................................................................... 12
Demonstration Mode ....................................................................................................... 12
Production Mode ........................................... ............................. ............................. ........ 12
Installation Overview . ..... ........................ ............................. ............................. ..................... 13
Install the VI Compose Software...................................................................................... 13
Obtain a VI Compose License .................. ........................ ..... ........................ ..... .............. 13
Complete the Installation .. ..... ........................ ............................. ............................. ....... 14
Font Installation ............... ..... ........................ ........................ ..... ........................ ..... .............. 15
VI Compose Installation on FreeFlow Print Server (Solaris) DFEs..... ........................ ..... ........... 16
Customized File Backup ................................................................................................... 16
Software Installation ....................................................................................................... 16
License Installation... ................... ..... ........................ ..... ........................ ..... ..................... 19
VI Compose Upgrade Instructions for Windows FreeFlow Print Server Devices............. ........... 20
Customized File Backup ................................................................................................... 20
Software Upgrade Installation ...... ..... ................... ..... ........................ ..... ........................ . 21
VI Compose Installation on the EFI DFEs Driving Xerox Print Engines..................................... 24
Software Installation ....................................................................................................... 25
License Installation... ................... ..... ........................ ..... ........................ ..... ..................... 35
Installing the Makeready Applications Program Interface (API)......... ..... ........................ ..... ... 40
Makeready Software Installation ..................................................................................... 40
Installing the Makeready Applications Program Interface (API)........................................ 41
Configuring the Makeready Applications Program Interface (API) ........ ............................ 41
VI Compose Installation on DocuPrint NPS Devices......... ..... ........................ ..... ..................... 54
Customized File Backup ................................................................................................... 54
Software Installation ....................................................................................................... 55
License Installation... ................... ..... ........................ ..... ........................ ..... ..................... 56
2 Variable Information Suite documentation ......................................................................59
Intended Audience ..................................................... ............................. ............................. . 60
Documentation Overview....................................................................................................... 61
3 VIPP®and VI Compose overview........................................................................................63
Basic Concepts.... ............................. ............................. ............................. ............................ 64
®
VIPP
and PostScript ....................................................................................................... 64
Xerox®FreeFlow®VI Compose
User Guide
3
Page 4

Table of Contents
®
-enabled Devices .................................................................................................... 64
VIPP
Repositories . ..... ........................ ..... ........................ ..... ................... ..... ........................ ..... 65
VI Projects ....................................................................................................................... 65
SAP Device Type for VI Compose .......................... ........................ ..... ........................ ..... ....... 70
Using PDF Resources with VIPP
Printing the VIPP
Printing the VIPP
Printing the VIPP
Printing the VIPP
®
Application on a Legacy PostScript RIP ....... ............................. ........... 72
®
Application to a PostScript Printer....................................................... 73
®
Application on an APPE RIP ..... ............................. ............................. . 74
®
Application to FFPS APPE..................... ............................. .................. 74
Producing a PDF from a VIPP
®
APPE, PDF/VT, and Embed EPS Options ................. .............. 71
®
Application, VI eCompose, or PDF Export ............. ..... ....... 76
Adobe Acrobat and Adobe Reader Information....................... ..... ........................ ..... ....... 76
Printing PDF Files with Referenced XObjects.............. ..... ........................ ..... ..................... 77
®
VIPP
and Variable Information Suite Applications................. ........................ ....................... 78
VI Compose Functionality ..... ..... ........................ ..... ........................ ..... ................... ..... .... 78
FreeFlow
FreeFlow
FreeFlow
FreeFlow
FreeFlow
FreeFlow
®
VI Design Pro.............. ..... ........................ ..... ........................ ..... ..................... 80
®
VI eCompose .......... ..... ........................ ..... ................... ..... ........................ ..... 81
®
VI Design Express........ ..... ........................ ..... ........................ ..... ..................... 83
®
VI Explorer ............... ............................. ........................ ..... ........................ ..... 83
®
VIPP®Manage................ ..... ........................ ..... ........................ ...................... 84
®
VI Compose Open Edition ................. ............................. ....................................... 85
4 VIPP®Data Streams ..............................................................................................................87
Native Mode.......................................................................................................................... 89
Line Mode.................. ..... ........................ ........................ ..... ........................ ..... ..................... 90
Listing.... ........................ ..... ........................ ..... ........................ ........................ ..... ........... 90
Record Processing Entry .................... ........................ ..... ........................ ..... ..................... 90
Database Mode ..................................................................................................................... 92
Selecting Database Field Names ........... ............................. ........................ ...................... 93
XML Mode ............................................................................................................................. 94
XML Data Structure Overview ................... ........................ ............................. .................. 94
XML Variables .................................................................................................................. 94
Printing XML Variables ..................................................................................................... 96
Stripping Blank and Control Characters ......................... ..... ........................ ...................... 96
Prefixed Delimited Transactional Data ..... ................... ..... ........................ ..... ........................ . 97
Linking the Data with the JDT, DBM, or XJT..................................................... ....................... 98
Record Structures ......................... ........................ ..... ........................ ..... ........................ ..... ... 99
Record Length..................... ............................. ................................................................ 99
Vertical Control ............... ........................ ..... ........................ ..... ........................ ............... 99
Line Printer and Field Delimited Data... ..... ........................ ........................ ..... ................ 100
Prefix.... ..... ........................ ..... ........................ ........................ ..... ........................ ..... ..... 100
Record Structures and Mode/Presentation Relationship........................................................ 101
Functions...................... ..... ........................ ..... ........................ ........................ ..... ................ 102
Conditional Processing ......................................................................................................... 104
Dynamic Boxes ...... ............................. ........................ ..... ........................ ............................ 105
Data Driven Graphics ........................................................................................................... 106
Native Mode Prefix .............................................................................................................. 107
4
Xerox®FreeFlow®VI Compose
User Guide
Page 5

Table of Contents
Distribution List ............ ..... ........................ ..... ........................ ........................ ..... ................ 108
End of File ................ ..... ........................ ..... ........................ ..... ........................ .................... 109
Coding Examples .......................................... ............................. ............................. ............. 110
Native Mode Coding ................. ..... ........................ ..... ................... ..... ........................ ... 110
Line Mode File .... ..... ........................ ..... ........................ ..... ........................ .................... 110
Job Descriptor Ticket................. ..... ........................ ..... ................... ..... ........................ ... 110
Database File................................................................................................................. 111
Data Base Master file ................... ..... ........................ ............................. ....................... 112
XML Mode Coding .................. ....................................................................................... 112
XML............................................................................................................................... 113
5 VIPP®Resources .................................................................................................................. 115
Resource Types .... ........................ ........................ ..... ........................ ..... ........................ ..... . 116
VI Project..................... ............................. ..................................................................... 116
VI Compose and Setup Files........................................................................................... 117
Fonts ............. ................................................................................................................ 118
Forms .............. ..... ........................ ........................ ..... ........................ ..... ....................... 123
Segments ............ ........................ ..... ........................ ..... ........................ ..... ................... 123
Images .............................. ............................. ........................ ..... ........................ ..... ..... 123
PDF Files as Resources ............................ ............................. ............................. ............. 124
Job Descriptor Tickets .......................................................................... .......................... 124
XML Job Tickets ............................................................................................................. 124
Data Base Masters......................................................................................................... 124
Distribution Lists ....................................................................................... ..................... 124
Text Files. ..... ..... ........................ ..... ........................ ..... ................... ..... ........................ ... 125
FreeFlow Makeready RDO Files ............................................. ............................. ............ 125
Resource Access and Management .. ............................. ............................. .......................... 126
Managing VIPP
®
Resources ............... ............................................................................ 127
6 VI Compose Files and Utilities.......................................................................................... 129
Link and setup files ..................... ..... ........................ ..... ........................ ..... ................... ..... .. 130
xgfunix.run link file (UNIX and Windows FFPS).............. ............................. .................... 130
xgfdos.run link file (VI Windows products).......... ..... ........................ ..... ................... ..... .. 135
General defaults setup file ............................................................................................. 136
Utilities and Demonstration files . ............................. ............................. ........................ ..... .. 139
xgfprint ............ ............................. ............................. ................................................... 139
VI Project Container Filter.............................................................................................. 140
®
VIPP
Manage .............................................................................................................. 140
VI Compose version information.................................................................................... 140
License Request forms.................................................................................................... 140
®
VIPP
demonstration files ............ ..... ................... ..... ........................ ..... ....................... 140
Demonstration file list. ............................. ........................ ..... ........................ ..... ............ 141
7 VIPP®File Examples ...........................................................................................................147
Example 1: Bank Statement with Images Using Native Mode .............................................. 148
Print File Example ................................................. ............................. ............................ 148
Xerox®FreeFlow®VI Compose
User Guide
5
Page 6

Table of Contents
Form File Example.................. ........................ ..... ........................ ..... ........................ ..... . 149
Example 2: Sales Report Using Line Mode ... ........................ ..... ........................ .................... 151
Print File Example ................................................. ............................. ............................ 151
Job Descriptor Ticket File Example .......................................................................... ....... 152
Example 3: Sales Report Using RPE Line Mode .. ..... ........................ ........................ ..... ......... 154
Print File Example ................................................. ............................. ............................ 154
Form File Example.................. ........................ ..... ........................ ..... ........................ ..... . 155
Job Descriptor Ticket File Example .......................................................................... ....... 156
Example 4: Invoice Using RPE Prefixed Line Mode .............................. ............................. ..... 158
Print File Example ................................................. ............................. ............................ 158
Form File Example.................. ........................ ..... ........................ ..... ........................ ..... . 159
Job Descriptor Ticket File Example .......................................................................... ....... 162
Example 5: Mailing Using Database Mode ...................... ..... ........................ ..... ................... 165
Print File Example ................................................. ............................. ............................ 165
Data Base Master File Example....................... ........................ ..... ........................ ..... ..... 165
Example 6: Bank Statement Using Dynamic Boxes and Data-Driven Graphics ...................... 167
Print File Example ................................................. ............................. ............................ 167
Job Descriptor Ticket File Example .......................................................................... ....... 169
8 Standard lists, tables, keys, and attributes...................................................................... 175
Standard Font Lists and Encoding Tables................................ .............................................. 176
Re-encoded Font List File.................................................. ............................. ................. 176
Macintosh Character Set.................. ..... ........................ ..... ........................ .................... 176
PostScript-Encoded Font List File ............................................................................. ....... 176
PC-8 Encoding Table File .................................................................. ............................. . 177
pcsun Encoding Table File ................ ..... ........................ ..... ........................ .................... 177
ISO Latin 1 Encoding Table .................. ..... ........................ ........................ ..... ................ 177
UTF-8 Encoding Table...................... ..... ........................ ..... ........................ .................... 177
win1252 Encoding Table...................... ..... ........................ ........................ ..... ................ 178
Standard GEPkeys, PATkeys, BATkeys, and Colorkeys........ ..... ........................ ..... ................... 179
Graphic Element Property Keys and Colorkeys ................................................................ 179
Pattern Keys .................................................................................................................. 179
Standard Background Attributes .................................................................................... 179
Solid Coated and Uncoated Custom Colors .... ..... ........................ ..... ........................ ..... . 179
Predefined PCC Tables ......... ............................. ............................. ........................ ..... ......... 180
Predefined Multi-Up Definitions ................. ..... ........................ ........................ ..... ................ 181
Predefined Multiple-Byte Encoding Table....... ..... ........................ ..... ........................ ............. 182
9 Printing with VI Compose.................................................................................................. 183
Decomposition Services ............... ........................ ..... ........................ ..... ........................ ..... . 184
Referencing Decomposed Forms Using a Generic Method .............................................. 184
Referencing forms Decomposed in DocuPrint NPS .......... ............................. ................... 184
Referencing Forms Decomposed in the FreeFlow Print Server........... ..... ........................ .. 185
Referencing Decomposed Images in DocuPrint NPS Devices................... ..... ................... 185
Referencing Decomposed Images in the FreeFlow Print Server .... ..... ........................ ..... . 186
Decomposition Services Hints and Tips .... ............................. ........................ ..... ............ 186
6
Xerox®FreeFlow®VI Compose
User Guide
Page 7

Table of Contents
Using VI Compose on Specific Printers ..................... ............................. ........................ ..... .. 189
VIC Considerations for iGen .................... ............................. ............................. ............. 189
VIC considerations for DocuPrint NPS ..... ....................................................................... 189
VIC Considerations for FreeFlow Print Server ............................................. ..................... 191
VIC Considerations for DocuColor Devices... ..... ........................ ........................ ..... ......... 196
VIC considerations for the Office Environment ............................................................... 196
Storing VIPP
®
VIPP
®
Resources on Office Printers.............. ............................. .......................... 197
Command Differences................... ........................ ..... ........................ ..... ............ 197
VI Compose and FreeFlow Makeready ................................................................................. 199
VI Compose/Makeready API overview............................................................................ 199
How VI Compose calls the RDO file ........................ ..... ........................ ........................ ... 200
®
VIPP
Using an RDO File in a VIPP
Text........... ..... ................... ..... ........................ ..... ........................ ..... ................... 201
®
Job................................................................................... 205
LCDS Migration.. ..... ........................ ............................. ........................ ..... ........................ ... 207
General Description ......................... ............................. ............................. .................... 207
Basic LCDS................... ............................. ..................................................................... 208
LCDS and VIPP
LCDS and VIPP
®
resources ............................................................. ................................ 208
®
Commands................... ..... ........................ ..... ........................ ............. 209
Conversion Examples .. ..... ........................ ........................ ..... ........................ ..... ............ 210
LCDS Migration Hints and Tips.................... ..... ........................ ............................. ......... 212
10 Specialty Imaging with VIPP®........................................................................................ 215
Specialty Imaging Features.................... ..... ........................ ..... ........................ .................... 220
Programming Support.......................................... ............................. ............................. ...... 222
Using Specialty Imaging... ............................. ........................ ..... ........................ ..... ............ 223
Download and Install the Specialty Imaging Fonts............... ..... ........................ ............. 223
Set the FreeFlow Print Server to Use Specialty Imaging.................................................. 223
FFPS Printer Support Restrictions.................................................................................... 226
Demonstration Jobs ..................... ........................ ..... ........................ ..... ........................ ..... . 228
Using Specialty Imaging Effects......... ..... ........................ ..... ........................ ..... ................... 229
Limitations........................................................................................................................... 233
Design Considerations for Correlation Mark....... ..... ........................ ............................. ......... 235
Correlation Mark Text Limitations and Requirements.......................... ............................ 236
Correlation Mark Color Swatches.................................................................................... 236
Design Considerations for FluorescentMark Color ................................................................. 239
FluorescentMark Limitations and Requirements ............................................................. 239
Designing Documents with FluorescentMark Colors........................................................ 244
Two-Layer Fluorescent Text.......... ..... ........................ ..... ........................ ..... ................... 246
Design Considerations for GlossMark
GlossMark Text Limitations and Requirements.. ........................ ............................. ......... 248
GlossMark Colorkey Table......................... ........................ ..... ........................ ..... ............ 249
Designing Documents with GlossMark Text ......... ............................. ............................. . 249
Design Considerations for Infrared Color ....................................... ............................. .......... 251
Infrared Colorkeys.............. ..... ........................ ........................ ..... ........................ ..... ..... 251
Designing Documents with Infrared Color............................ ............................. ............. 251
Infrared Colorkey Tables.................... ............................. ............................. ................... 251
®
Text .......................................................................... 248
Xerox®FreeFlow®VI Compose
User Guide
7
Page 8

Table of Contents
Designing Documents with Infrared Color............................ ............................. ............. 253
Design Considerations for MicroText Font................. ..... ........................ ..... ................... ..... .. 256
MicroText Font Limitations and Requirements................................................................ 256
MicroText Font Table.... ............................. ..................................................... ................ 257
Designing Documents with MicroText Fonts ..... ........................ ............................. ......... 258
Design Considerations for Void Pantograph... ..... ........................ ..... ........................ ............. 259
11 VI Compose Services ........................................................................................................ 261
Normalization........................................................................................................ .............. 262
Demographics.. ........................ ..... ........................ ............................. ............................. ..... 264
File samples.... ..... ........................ ........................ ..... ........................ ..... ........................ ..... . 268
Travel_us.vpr.................................................................................................................. 268
ACCLOG report 1......... ..... ........................ ........................ ..... ........................ ..... ............ 270
ACCLOG report 2.................................................................................................................. 271
Demographics report 1 ........................... ............................. ............................. ............. 273
Demographics report 2 ........................... ............................. ............................. ............. 273
8
Xerox®FreeFlow®VI Compose
User Guide
Page 9

1
FreeFlow VI Compose Licensing and Installation
This chapter contains:
• Getting Started.......................................................................................................................... 10
• VI Suite Customer Forum ........................................................................................................... 11
• Demonstration and Production Modes ....................................................................................... 12
• Installation Overview ............ ..... ........................ ........................ ..... ........................ ..... .............. 13
• Font Installation ............ ........................ ..... ........................ ..... ........................ ..... ..................... 15
• VI Compose Installation on FreeFlow Print Server (Solaris) DFEs..................... ............................ 16
• VI Compose Upgrade Instructions for Windows FreeFlow Print Server Devices ............................ 20
• VI Compose Installation on the EFI DFEs Driving Xerox Print Engines....... ..... ........................ ..... 24
• Installing the Makeready Applications Program Interface (API)......................... ......................... 40
• VI Compose Installation on DocuPrint NPS Devices .................... ..... ........................ ..... .............. 54
FreeFlow
Compose license and software. These topics are discussed:
• Getting started
• VI Suite Customer Forum
• Demonstration and Production modes
• Installation overview
• Font installation
• VI Compose Installation on FreeFlow Print Server (Solaris) DFEs
• VI Compose Upgrade Instructions for Windows FreeFlow Print Server Devices
• VI Compose Installation on the EFI DFEs (Driving Xerox print engines)
• VI Compose / Makeready API Installation
• VI Compose Installation on DocuPrint NPS Devices
®
VI Compose Licensing and Installation provides information to begin installation of the VI
Xerox®FreeFlow®VI Compose
User Guide
9
Page 10

FreeFlow VI Compose Licensing and Installation
Getting Started
Before you begin, first download the software from the Xerox website. Download instructions are
provided here. After you have downloaded the appropriate files you can proceed to the installation
instructions that follow.
PPrrooggrraamm DDoowwnnllooaadd
VI Compose can be delivered pre-loaded on the device, or can be downloaded as outlined below.
Verify that VI Compose is loaded on the device by locating the xgf directory on the device hard drive.
When the xgf directory is not present VI Compose has not been loaded onto the device, download
the program, then refer to Installation overview to locate installation information for the device.
To download the VI Compose software electronically, go to www.xerox.com/support, search for VIPP,
then select Software. If necessary, set the Operating System type appropriate for your target
platform to display the correct installer file. Under Utilities & Applications, click FreeFlow VI Compose
16.0.3.0 to download.
Note: Program delivery Programs are delivered in .iso or .exe format. These files can be
downloaded directly to the target device. When the device does not have Internet access, copy
the EXE file on the target device, or use the ISO file to burn a CD from which the program can
be installed.
SSppeecciiaallttyy IImmaaggiinngg aanndd BBaarrccooddee FFoonntt DDoowwnnllooaadd
To download Specialty Imaging and Barcode fonts, go to www.xerox .com/support, then search for
VIPP, select Software, and click on one of the Fonts to download..
Note: When downloading fonts, you will be directed to review an End User License Agreement.
In order to download the fonts you must review and accept the End User License Agreement. If
you do not accept the End User License Agreement, you will exit from the font download page.
10
Xerox®FreeFlow®VI Compose
User Guide
Page 11

FreeFlow VI Compose Licensing and Installation
VI Suite Customer Forum
Xerox hosts a Community Support Forum. The VI Suite Customer forum is now part of this larger
support forum, allowing you to post and review information about Xerox products and services all
from one location. Refer to this customer forum community: http://VIPPsupport.xerox.com.
Xerox
®
FreeFlow®VI Compose
User Guide
11
Page 12

FreeFlow VI Compose Licensing and Installation
Demonstration and Production Modes
You can install the VI Compose software in two modes, Demonstration and Production.
DDeemmoonnssttrraattiioonn MMooddee
When VI Compose is installed without a production license file, it is considered to be installed in
demonstration mode. Demonstration mode is a full-featured version of VI Compose with two
exceptions:
• Customer support is not available
• Page volume limitations are imposed
VI Compose limits the number of pages that can be printed when running in Demonstration mode.
The limit is device-dependant and varies between 10 and 200 pages. VIPP
page volume limit will abort with the following error message:
Where:
n is the page volume limit for that device.
This error message indicates that the demonstration page capacity for the device has been exceeded
On some DocuColor printers, the error does not appear. Instead, jobs stop when the demonstration
limit is reached. The limit is 10, 57, 150 or 200 pages and depends upon the device.
®
jobs that exceed this
PPrroodduuccttiioonn MMooddee
To enable the Production mode, install a valid VI Compose license on the device. In production mode
®
VIPP
information about running VI Compose in Production mode.
jobs can be run without any page limitations. Contact a Xerox representative for more
12
Xerox®FreeFlow®VI Compose
User Guide
Page 13

FreeFlow VI Compose Licensing and Installation
Installation Overview
The following sections provide the general steps required to:
• Install the VI Compose software
• Obtain a VI Compose License
• Complete the installation
IInnssttaallll tthhee VVII CCoommppoossee SSooffttwwaarree
Use this table to locate the software installation instructions for the device.
Note: You cannot install VI Compose on a Virtual machine, no support is provided for the VM
environment.
When installing VI Compose on this device: Go to this Chapter:
DocuPrint NPS (monochrome and color) VI Compose Installation on DocuPrint NPS Devices
All FreeFlow Print Server-based controllers including
FreeFlow Print Server controllers for monochrome and
color devices (including iGen)
External EFI controllers VI Compose Installation on the EFI DFEs (Driving
FreeFlow Makeready VI Compose / Makeready API Installation
VI Compose Installation on FreeFlow Print Server
(Solaris) DFEs
Xerox print engines)
OObbttaaiinn aa VVII CCoommppoossee LLiicceennssee
An existing license from an earlier version of the software will not enable this new version. A new
license is required for every major software release whether it is an upgrade or a new install.
Use the following instructions to request a new license.
WWiinnddoowwss LLiicceennssiinngg
For either an UPGRADE to an existing installation or for a NEW installation:
1. Locate the Get Host ID utility, which can be found at Start Menu→All Programs→FreeFlow VI
Compose program group.
2. Click on the Get Host ID utility, this will open a Window displaying the HostID and Version
Number. You will need this information when talking to a Xerox representative.
3. Contact the Xerox License Administrator.
Xerox
®
FreeFlow®VI Compose
User Guide
13
Page 14

FreeFlow VI Compose Licensing and Installation
UUNNIIXX // SSoollaarriiss -- NNeeww IInnssttaallllaattiioonn
1. Install the VI Compose software.
2. Locate the ..\xgf directory on the hard drive where VI Compose was installed.
• When A4 paper size was selected during the software installation, print the vipplrfxe.ps file.
• When USLetter paper size was selected during the software installation, print the vipplrfus.ps
file
3. Contact a Xerox representative.
UUNNIIXX // SSoollaarriiss -- UUppggrraaddee ttoo aann EExxiissttiinngg IInnssttaallllaattiioonn
1. Locate the ..\xgf directory on the hard drive where VI Compose was installed.
• When A4 paper size was selected during the software installation, print the vipplrfxe.ps file.
• When USLetter paper size was selected during the software installation, print the vipplrfus.ps
file
2. Contact a Xerox representative.
Note: When updating the FFPS, you can use the FFPS Update Manager to update the VI
Compose software.
CCoommpplleettee tthhee IInnssttaallllaattiioonn
Follow the instructions found in the device-specific chapters listed in Install the VI Compose software.
14
Xerox®FreeFlow®VI Compose
User Guide
Page 15

FreeFlow VI Compose Licensing and Installation
Font Installation
During installation of VI Compose on VIPP®-enabled devices, and when installing VDP, VIE, and VIeC,
options for font installation is provided. Install only the fonts you use. When you avoid installing
unnecessary fonts, you save time and use less of the available memory on your VIPP
Specific information about Specialty Imaging fonts is located in Specialty Imaging with VIPP.
Support of OTF/TTF fonts is PostScript-interpreter dependant. Some PostScript interpreters support
OTF/TTF fonts. If the PostScript interpreter where VI Compose is installed supports OTF and TTF
fonts, you can use the fonts in VIPP
®
code.
You can place an OTF or TTF font in the same directory where PostScript fonts usually reside. When
you copy the OTF or TTF files to the font directory, delete the .otf and .ttf file extensions. After you
copy the fonts to the font directory, the fonts can be referenced from within the VIPP
the font file name, not the internal PostScript font name (/FontName).
As an example, to use the font RosewoodStd-Regular.otf:
1. Copy C:/WINDOWS/Fonts/RosewoodStd-Regular.otf to:
• x:\vide\fonts\RosewoodStd-Regular for VDP
• x:\vviewer\fonts\RosewoodStd-Regular for VIE
• /opt/XRXnps/resources/ps/fonts/RosewoodStd-Regular for FFPS (UNIX
systems)
• x:\efi\server\adobe\fonts\RosewoodStd-Regular for EFI
• x:\CXP6000\General\RIP\fonts\RosewoodStd-Regular
• x:\xvtp\bin\normalizer\fonts for VIeC
2. Use the font as a PostScript font in the VIPP
®
code. Use the font file name as in one of these
options:
• Option 1, if no re-encoding is needed:
®
-enabled device.
®
code, using
/RosewoodStd-Regular 20 SETFONT
• Option 2, if re-encoding is needed:
Use SETENCODING:
[ /NRWSR /RosewoodStd-Regular ] (sun8) SETENCODING
Or, add the following line to encoding/fontlist:
/NRWSR /RosewoodStd-Regular
Select the font with the VIPP
®
font name:
/NRWSR 20 SETFONT
Xerox
®
FreeFlow®VI Compose
User Guide
15
Page 16

FreeFlow VI Compose Licensing and Installation
VI Compose Installation on FreeFlow Print Server (Solaris) DFEs
Use these instructions to install the VI Compose software and license on all devices driven by the
FreeFlow Print Server.
CCuussttoommiizzeedd FFiillee BBaacckkuupp
During an upgrade customized VIPP®files located in /usr/xgf/src and /usr/xgf/encoding,
are overwritten with new files of the same name. The system automatically copies and renames
those directories as a form of backup for customized files. The back up versions of the original
directories are /usr/xgf/ src.$OLDVER and /usr/xgf/encoding.$OLDVER, where
$OLDVER represents the previous version of VI Compose. When customized files exist in either of the
original directories, it is your responsibility to merge the customized contents of those files with the
new versions.
Xerox recommends that additional copies of all customized files be stored external to the system or
printed as hardcopy backup. This is extremely important if the customized file is not included in the
list below..
xgf/src/arb.def Arabic configuration file
xgf/src/cjk.def Asian configuration file
xgf/src/xgf VI Compose startup file
xgf/src/xgf.bat Background attribute (bat) keys
xgf/src/xgf.def VI Compose system defaults
xgf/src/xgf.gep Color and graphical element property (gep) keys
xgf/src/xgf.mup Multi-Up definitions
xgf/src/xgf.pcc Standard pcc definitions
xgf/src/xgfunix.run VI Compose startup definition file
xgf/encoding/fontlist Generic format encoding font list
xgf/encoding/nullfl Null encoding font list
Note: Any previous customization of the VI Compose environment will not be valid in a new
upgrade. Copying the old files has the potential of rendering the new functionality unusable.
Any customization will have to be repeated on the new files after a successful upgrade.
SSooffttwwaarree IInnssttaallllaattiioonn
This section contains software installation and upgrade instructions for VI Compose on FreeFlow Print
Server devices.
To install VI Compose software to FFPS systems supporting the FFPS Update Manager, use the
Update Manager to install the latest available VI Compose software. Refer to your FFPS
documentation for more information about the FFPS Update Manager. If not using the FFPS Update
Manager then follow the process below.
16
Xerox®FreeFlow®VI Compose
User Guide
Page 17

FreeFlow VI Compose Licensing and Installation
IInnssttaallll VVII CCoommppoossee oonn aa FFrreeeeFFllooww PPrriinntt SSeerrvveerr DDeevviiccee
To install VI Compose software on a FreeFlow Print Server device:
1. From www.xerox.com/support, download the FreeFlow VI Compose 16 software .iso file. For more
information, refer to Program download.
2. Burn the downloaded .iso file to a CD.
3. Open a terminal session on the workstation where VI Compose software is installed.
4. Log in as root.
5. Insert the CD that contains the .iso file into the Solaris drive.
6. To access the software directory, enter:
cd /cdrom/vippXX/Solaris/[X86|Sparc]
Where:
XX Is the software version
Note: If you are using a tar file, you can download the DSPVIPxx.i386.tar file or the sparc.
tar file. Move the tar file to the /var/tmp directory. At the root prompt, enter the following
text: tar -xvf DSPVIPxx.i386 (or sparc).tar
7. Execute the installation script command. Enter:
sh ./vippinstall
The installation script checks the environment setup and looks for an existing VI Compose
software package. When the system finds a software package, the following messages appear:
VIPxx package was found. Installation cannot continue unless this
existing package is removed first.
May I uninstall this existing package now?
8. To uninstall the existing software package, enter y.
Directories with customized files are backed up during this step. The installation script provides
the specifics of the backup.
Removal of <VIPxx> was successful.
Welcome to the VI Compose package installer for FreeFlow Print Server
[sparc|i386].
This process installs the package for VI Compose xx s/w release.
Build VIPP xx: build date and time
NOTICE:
This stage of the installation can be exited at any time by typing CTRL-C.
9. To continue, press Enter.
Xerox
®
FreeFlow®VI Compose
User Guide
17
Page 18

FreeFlow VI Compose Licensing and Installation
10. Installation requires input for the Default Media setting.
• For A4 media, enter 1.
• For the default USLetter media, enter 2.
This message appears:
Default Media Setting: USLetter
Is this setting correct?
11. When the setting is correct, enter y. When the setting is incorrect, enter n.
12. When this message appears, to continue, press Enter.
WARNING: This stage of the installation must NOT be interrupted.
Otherwise, installation of VI Compose s/w is corrupted.
These system messages appear:
Processing package instance <VIPxx> from /cdrom/vipxx/Solaris/[X86|
Sparc]
Installing Xerox FreeFlow Print Server VIPP Update xx as <VIPxx>
Installation of <VIPxx> was successful.
Exiting vippinstall for package VIPxx with status 0.
13. Restart the FreeFlow Print Server.
14. Validate the installation.
VVIIPPPP®®GGoollddeenn JJoobb
To validate the installation or upgrade run the VIPP®Golden Job.
1. At the FreeFlow Print Server Print Services window, select Logon→Logon and log on as System
Administrator.
2. Program the paper trays with the paper stocks shown in the table in the next step.
Select the appropriate paper size in the Size area. When the A4 version of VI Compose was
selected during the software installation, select A4. When the USLetter version was selected
during installation, select USLetter.
Ensure that White is selected in the Color area.
In the Type area, select Custom, then enter the color name from the Type column of the
following Paper Tray Setup table.
3. Select OK.
Repeat the steps described in the previous step for each paper tray listed in this table:
Tray
Size Color
Type
Stock Name
1 US Letter or A4 White Yellow Unspecified
2 US Letter or A4 White Green Unspecified
3 US Letter or A4 White Plain Unspecified
4. Load paper trays 1, 2, and 3 with the paper stocks programmed in the previous step.
18
Xerox®FreeFlow®VI Compose
User Guide
Page 19

FreeFlow VI Compose Licensing and Installation
5. From a terminal window, enter:
cd /usr/xgf/demo
6. To print the Golden Job, enter this command:
print -d <queue name> goljobv
Or, use the SUN CDE file manager to print the data file.
The completed job should consist of 43 single-sided pages. Pages 1 and 43 are printed on Tray 1
stock (yellow), pages 8, 10, and pages 25 through 27 are printed on Tray 2 stock (green). The
remaining pages are printed on Tray 3 stock (plain).
LLiicceennssee IInnssttaallllaattiioonn
To run in production mode, ensure that VI Compose is fully licensed. Use these steps to determine
whether the license has been installed, and to install it when it has not been installed.
1. Determine whether a VI Compose license has been installed; at the UNIX workstation, enter:
pkginfo | grep vip
Look for package name XRXvipp. When the package is found a license has been installed and no
further action is necessary. When not, follow these steps to acquire a license:
• Obtain the Host ID number - At a UNIX command tool window enter hostid to display the
number
• Call a Xerox representative to obtain the license file.
The license will be issued in an email. Upon receipt of the license string, follow the steps outlined
below.
2. Log on as the FreeFlow Print Server Administrator. In the System Administrator window select
Setup→<Feature Licenses>
3. In the License Manager Window select the Variable Information Production Printware option;
then:
• Select the License pull-down menu option
• Select Load License File...
• Follow the GUI options to locate the license file
• Select <OK>
4. Verify that the license string has been correctly installed by entering:
cd /usr/xgf/demo
print -p <queuename> imgdemo.nm
5. When the PostScript Error Page option is enabled and the license string was not installed correctly
or has expired, the message "VIPP_license_failed" will appear on a PostScript error page. Restart
the system. From the FreeFlow Print Server Print Services window, select System→Restart.
Xerox
®
FreeFlow®VI Compose
User Guide
19
Page 20

FreeFlow VI Compose Licensing and Installation
VI Compose Upgrade Instructions for Windows FreeFlow Print Server Devices
Use these instructions to upgrade the VI Compose software on all devices driven by the Windows
FreeFlow Print Server (FFPS).
CCuussttoommiizzeedd FFiillee BBaacckkuupp
During an upgrade, customized VIPP®files located in % XPS_HOME2 %\resources\xgf\src and
%XPS_HOME2 %\resources\xgf\encoding are overwritten with new files of the same name. To
prevent the loss of data in those customized files, the installer automatically copies them to %XPS_
HOME2 %\resources\xgf_backup before the new files are installed. When customized files exist
in the xgf_backup directory, it is your responsibility to merge the customized contents of those files
with the new versions
Note: If the resources\xgf directory cannot be found at C:\Program Files (x86)
\Xerox-PS\, the current default setting for the environment variable XPS_HOME2, obtain
the value of XPS_HOME2 as follows: Click on the Windows Start icon, right click on Computer,
select Properties, click on Advanced system settings, select the Advanced tab, click on the
Environment Variables... button and scroll down in the System variables menu to locate XPS_
HOME2.
Typically, customization is done in one of the following files. Even though the following files will be
backed up during an upgrade installation, Xerox recommends that additional copies of all customized
files be stored external to the system or printed as hardcopy backup. This is extremely important if
the customized file is not included in the list below.
xgf\src\arb.def Arabic configuration file
xgf\src\cjk.def Asian configuration file
xgf\src\xgf VI Compose startup file
xgf\src\xgf.bat Background attribute (BAT) keys
xgf\src\xgf.def VI Compose system defaults
xgf\src\xgf.gep Color and graphical element property (GEP) keys
xgf\src\xgf.mup Multi-Up definitions
xgf\src\xgf.pcc Standard pcc definitions
xgf\src\xgfunix.run VI Compose startup definition file
xgf\encoding\fontlist Generic format encoding font list
xgf\encoding\nullfl Null encoding font list
Note: Any previous customization of the VI Compose environment will not be valid in a new
upgrade. Copying old files has the potential of rendering new functionality unusable. Any
customization will have to be repeated in the new files after a successful upgrade.
20
Xerox®FreeFlow®VI Compose
User Guide
Page 21

FreeFlow VI Compose Licensing and Installation
SSooffttwwaarree UUppggrraaddee IInnssttaallllaattiioonn
This section contains software upgrade installation instructions for VI Compose on Windows FFPS
devices.
On Windows FFPS supporting the FFPS Update Manager, use the Update Manager to upgrade to the
latest available VI Compose software. Refer to your Windows FFPS documentation for additional
information. If not using the Update Manager then follow the process below:
1. Download the VI Compose .iso file to Windows FFPS and either burn the .iso to a CD or extract its
contents using a utility such as WinRAR.
2. Go to the Windows_FFPS folder. You see three files: updateVIPP.bat, XRXxgf.msi, and readme.txt
which is the most up-to-date copy of these instructions in text format.
3. Stop the Windows FFPS software if it is currently running.
Xerox
®
FreeFlow®VI Compose
User Guide
21
Page 22

FreeFlow VI Compose Licensing and Installation
4. Execute the updateVIPP.bat installation script via a Windows PowerShell or Command Prompt
with administrative privileges:
C:\>.\updateVIPP.bat
The installation script will check the environment setup and look for an existing version of VI
Compose software. If the VI Compose software wasn't previously installed via the Windows FFPS
installer, the following message will be displayed and the upgrade installation process will
terminate:
When VI Compose software is found, the upgrade installation will proceed and messages will be
displayed indicating that the above mentioned files in xgf\src and xgf\encoding are being
backed up.
When the back-up is complete, updateVIPP.bat will invoke XRXxgf.msi to replace/overwrite all of
the files in the xgf directory and subdirectories. Messages will be displayed during this process.
22
Xerox®FreeFlow®VI Compose
User Guide
Page 23

FreeFlow VI Compose Licensing and Installation
Note: The Locale registry key is used for determining whether to install the US Letter or A4
version of the software.
5. Restart the Windows FFPS software and follow the steps in the next section to validate the VI
Compose software upgrade installation.
VVIIPPPP®®GGoollddeenn JJoobb
To validate the installation, run the VIPP®Golden Job. Note that some knowledge of Windows FFPS is
required.
1. At the Xerox FFPS window, log on as System Administrator.
2. Program paper trays 1, 2, and 3 with the paper stocks shown in the table below.
Tray
1 US Letter or A4 White Yellow Unspecified
2 US Letter or A4 White Green Unspecified
3 US Letter or A4 White Plain Unspecified
Size Color
3. Load paper trays 1, 2, and 3 with the paper stocks programmed in the previous steps.
4. Submit the demo job ..\xgf\demo\goljobv
Ensure that the completed job is consist of 43 single-sided pages. Pages 1 and 43 are printed on
Tray 1 stock (yellow); pages 8, 10, and 25 through 27 are printed on Tray 2 stock (green), and the
remaining pages are printed on Tray 3 stock (plain).
Type
Stock Name
Xerox
®
FreeFlow®VI Compose
User Guide
23
Page 24

FreeFlow VI Compose Licensing and Installation
VI Compose Installation on the EFI DFEs Driving Xerox Print Engines
Use these instructions to install the VI Compose software and license on a EFI DFE.
Note: When you upgrade or uninstall this software, ensure that you take back up of any
customized files that can be required at a later date.
24
Xerox®FreeFlow®VI Compose
User Guide
Page 25

FreeFlow VI Compose Licensing and Installation
SSooffttwwaarree IInnssttaallllaattiioonn
This section contains instructions for installing VI Compose software on the EFI DFEs. Refer to
Possible warning and error dialogs for more information.
To install VI Compose software to FFPS systems supporting the FFPS Update Manager, use the
Update Manager to install the latest available VI Compose software. Refer to your FFPS
documentation for additional information about the FFPS Update Manager. If not using the FFPS
Update Manager then follow the process below.
The VI Compose software can be downloaded, refer to Program download for more information. Once
downloaded, the VI Compose .iso file must be burnt to a CD to install to the EFI system.
To install VI Compose software on the EFI DFE for DocuColor systems:
1. Insert the VI Compose CD. When not auto launched, launch the VI Compose Setup Program
using one of these methods:
• The Run window:
Select Start→Run to access the Run window, then click Browse to make sure that the CD
drive, or alternate network location, and setup.exe are listed in the Open field (for example,
E:\windows\setup.exe). When the correct drive and file name are selected, click OK.
• Windows Explorer:
Access root on the VI Compose CD or the alternate location when the distribution CD was
copied to a network server for network installation. Locate and click the windows\setup
executable file.
Note: Exit all other Windows programs prior to running the Setup Program.
2. Read the Welcome to FreeFlow VI Compose window, then click Next. Different levels of software
will display different Welcome messages.
Xerox®FreeFlow®VI Compose
User Guide
25
Page 26

FreeFlow VI Compose Licensing and Installation
3. Read the Software License Required window. A new license is required to run this version of VI
Compose, existing licences will not work. The System Host ID and Product Version are produced
on this screen, record this information, it is required to obtain a new license. Click Yes to continue
with the installation.
4. Read the Software License Agreement window, then click Yes to accept the License Agreement
and continue with the installation.
26
Xerox®FreeFlow®VI Compose
User Guide
Page 27
FreeFlow VI Compose Licensing and Installation
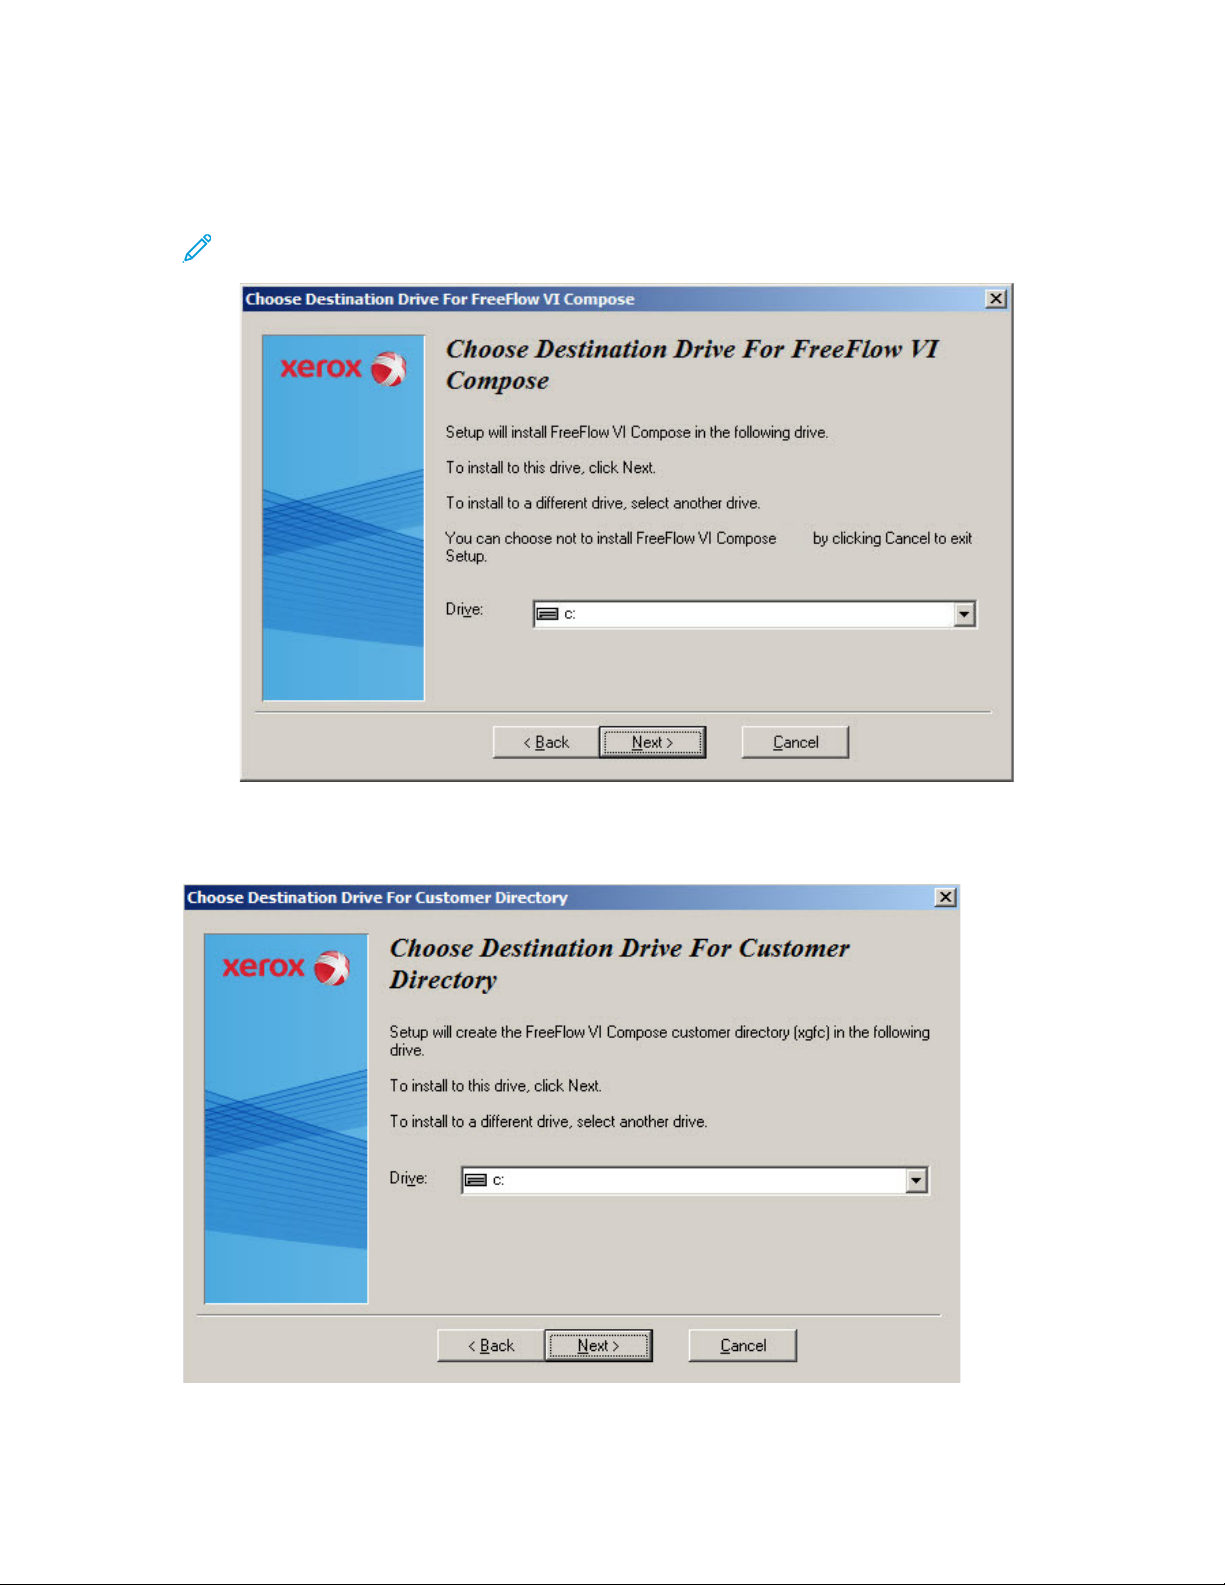
5. From the Choose Destination Drive For FreeFlow VI Compose window, make sure that the correct
drive displays in the Drive field, or use the drop-down list box to select the correct drive in the
Drive field, then click Next.
Note: DO NOT use the C: drive on the DocuColor Series DFEs. For more information, refer to
the Customer Expectations Document (CED) supplied with the device.
6. From the Choose Destination Drive For Customer Directory window, make sure that the correct
drive displays in the Drive field, when not, use the drop-down list box to select the correct drive in
the Drive field, then click Next.
Xerox®FreeFlow®VI Compose
User Guide
27
Page 28

FreeFlow VI Compose Licensing and Installation
7. When a previous version of the software has been detected a Warning screen appears. Select the
Next option to continue the installation (a backup copy of the xgf directory (xgf_bak). Select
Back to enter a different drive, or, select Cancel to exit the installation process.
8. When a previous version of the xgfc directory exists, a screen is produced to notify you of the
directory's existence. No customer files will be overwritten.
28
Xerox®FreeFlow®VI Compose
User Guide
Page 29

FreeFlow VI Compose Licensing and Installation
9. From the Select Default Media window, click the button that represents the default paper size to
use in VIPP
®
applications, then click Next.
Default media choices are:
• A4 - specifies use of A4 size paper (8.25 by 11.75 inches or 210 by 297 mm) as the default
media.
• USLetter - specifies use of USLetter size paper (8.5 by 11 inches or 216 by 279 mm) as the
default media.
Xerox
®
FreeFlow®VI Compose
User Guide
29
Page 30

FreeFlow VI Compose Licensing and Installation
10. Use the Select Program Folder window to select the program folder from which to launch VIPP®related items. Use the default program folder that appears in the selection window, or scroll
through the list box to select a different folder. Once the folder is selected, click Next.
Caution: Do not select StartUp as the VI Compose program folder.
11. When the Start Copying Files window is displayed, verify the settings specified in the previous
steps, then click Next to install the software using the settings specified in the previous steps.
30
Xerox®FreeFlow®VI Compose
User Guide
Page 31

FreeFlow VI Compose Licensing and Installation
12. A window appears showing the installation progress. When the process is complete, a Software
license Query window is produced:
13. When a license for VI Compose is available, select Yes, then Next. When no license is available,
select No.
14. From the license selection window, navigate to the license file, select the license file, and click
Open.
Xerox®FreeFlow®VI Compose
User Guide
31
Page 32

FreeFlow VI Compose Licensing and Installation
15. When the license for VI Compose had previously been installed or an invalid license was
previously attempted for installation, a window containing one of these messages may be
produced:
• This file already exists. Replace existing File? Yes/No
• Access is denied. OK
Click Yes and/or OK as appropriate.
16. When the Software License Activation Complete window appears, it means that the installation
successfully activated the license for VI Compose.
When the Choose Server or File window is produced, the selected license file is invalid. Go to
Installing the License for more information. Another opportunity to specify the license file is
provided.
17. The Setup Complete window provides information on the location of the VI Compose release
notes so they can be accessed at any time. After clicking Finish to complete the installation, a
prompt to restart the system is displayed.
This completes the installation. Proceed to VIPP Golden Job to validate the installation.
Possible warning and error dialogs
Possible warning or error dialogs are described here.
Setup Complete With Warning
When the Setup Complete With Warning window is displayed, a license was not provided, or
something was wrong with the license that was provided. In order to obtain a valid license, contact a
Xerox representative and provide the Host ID number and the Product Version. Upon receipt of the
license, click on Start→All Programs, go to the appropriate VI Compose group, then click on Activate
Software License. The installation does not need to be repeated.
32
Xerox®FreeFlow®VI Compose
User Guide
Page 33

FreeFlow VI Compose Licensing and Installation
Note: Click on Start→All Programs→FreeFlow VI Compose x.x→Get Host ID at any time to
display the valid host ID.
Previous FreeFlow VI Compose Installation Found
When this window is displayed, the system has determined that the installation is an upgrade to an
existing VI Compose installation. When this is correct, click Next to continue. When this is not correct,
or to ensure that no unexpected updates occur, click Back to return to the previous window to correct
the entries, or click Cancel to exit the installation.
Xerox
®
FreeFlow®VI Compose
User Guide
33
Page 34

FreeFlow VI Compose Licensing and Installation
Previous Customer Directory Installation Found
When this window is displayed, the system has assumed that this is an upgrade to a previous version
of VI Compose.
34
Xerox®FreeFlow®VI Compose
User Guide
Page 35

FreeFlow VI Compose Licensing and Installation
When upgrading an existing VI Compose installation, new directories may be added for an existing
customer directory, existing files will not be overwritten. Select Next to continue the installation.
®
VIPP
Golden Job
The VI Compose CD includes many demonstration test files that are automatically loaded in the \xgf
\demo directory on the DFE during software installation. Upon completion of the licensing and
installation process, the VIPP
®
golden job should be run in order to validate that the process has been
completed successfully.
To submit the VIPP
®
golden job (goljobv) located in the xgf\demo directory, select File→Import.
Scroll to usr\xgf\demo and select the goljobv file.
Back up VIPP
®
resource files
In addition to regular backups of the xgf and xgfc directory structures, backups should always be
performed upon completion of the installation and prior to reinstalling any software on the DFE, or in
the event that installation of new DFE software is required. Performing frequent backups will decrease
the likelihood of losing important information in the event of hard drive failure.
Backup is a customer responsibility, and the backup frequency should be based on the backup
procedures in place at the customer site.
LLiicceennssee IInnssttaallllaattiioonn
The VI Compose license is installed during the initial device setup process, or when the license is
unavailable, it is installed after the initial setup process is complete. When the license is not installed,
VI Compose will only run in Demonstration mode. Production mode is activated by obtaining a VI
Compose license and installing a device-specific license string.
Xerox
®
FreeFlow®VI Compose
User Guide
35
Page 36

FreeFlow VI Compose Licensing and Installation
OObbttaaiinn tthhee LLiicceennssee SSttrriinngg
To obtain a VI Compose license, supply the Host ID and product version to a Xerox representative.
The information was displayed on the Software License Required screen when the software was
installed. GetHostID.exe can also be invoked to produce the required information. Once the required
is obtained information follow these steps:
1. Contact your Xerox representative. Provide the Host ID and product version. The serial number of
the printer targeted for installation, and relevant customer account information may also be
requested. Specific delivery instructions should be communicated to a Xerox representative.
2. A license file is generated and sent via an email attachment to the email account provided during
Step 1.
IInnssttaalllliinngg tthhee LLiicceennssee
To complete the license installation:
1. Upon receipt of the license, save the attachment (.dat file) to an appropriate media to transfer to
the DFE.
2. Determine which license installation process to use. Read the information found in the sections
referenced in this bulleted list for more information:
• Activation during software installation - This is the easiest way to install the license.
• Simple activation - Use this process to install the VI Compose license when VI Compose
software has been installed but is running in Demonstration mode. It is also the default
licensing process during software installation.
• Advanced activation - Use this process to install the VI Compose license in a location other
than the default. This option is available during initial installation or when VI Compose is
running in Demonstration mode.
Note: The C: drive on the DFE is the default location for the installation unless an alternate
location is specified. To avoid potential space limitations, the Xerox representative should
specify a drive other than the C: drive as the destination volume. Xerox recommends
installation of the license in the xgf directory.
3. Store the Ethernet card (NIC) number and the VI Compose license file in a safe location for use in
the event that the software needs to be reloaded at a future date.
AAccttiivvaattiioonn DDuurriinngg SSooffttwwaarree IInnssttaallllaattiioonn
The simplest way to activate the license is to have it available before beginning the VI Compose
installation; the installation process will prompt you for the location of the license file and do all the
work necessary to copy it to the proper location with the proper name, automatically performing the
activation process.
When this message appears during the VI Compose installation, the license has already been
activated and it is not necessary to read the rest of this chapter:
36
Xerox®FreeFlow®VI Compose
User Guide
Page 37

FreeFlow VI Compose Licensing and Installation
SSiimmppllee AAccttiivvaattiioonn
To activate the license after the software is installed:
1. Copy the license file to E:\xgf\src. Replace E:\ with the appropriate drive designator when
this is not the drive on which VI Compose was installed.
2. Rename the license file to license.dat.
3. Activate the license; from the Start menu choose Programs→FreeFlow VI Compose
xx→Activate Software License.
When activation is complete an Activation Complete dialog, which indicates that the license has been
activated successfully, is displayed; and VIPP
®
jobs can be printed in Production mode.
When VI Compose does not run in Production mode, go to VI Compose / Makeready API Installation
for more information.
Xerox
®
FreeFlow®VI Compose
User Guide
37
Page 38

FreeFlow VI Compose Licensing and Installation
AAddvvaanncceedd AAccttiivvaattiioonn
Use this method to activate the license when:
• The organization keeps its licenses in a central location
• The license will not be placed under the E:\xgf\... directory hierarchy
1. Begin the license activation process, from the Start menu choose All Programs→FreeFlow VI
Compose x.x→Activate Software License.
This dialog appears when no license is found. Contact the License Administrator and provide then
the HostID and Version number displayed on this screen:
2. Once you have obtained the license file from the License Administrator, place it in your system.
Browse to the license file, highlight it and select Open.
3. Click Browse. The system produces a standard file selection dialog box from which the license file
is located and selected. After selecting the license file, click Next.
38
Xerox®FreeFlow®VI Compose
User Guide
Page 39

FreeFlow VI Compose Licensing and Installation
4. Click Finish to complete the license activation process. The license has been successfully
activated when this message is displayed:
5. Click OK to exit the activation process. When VIPP®jobs can now be printed in Production mode,
do not read the rest of this chapter. When not, go to VI Compose / Makeready API Installation.
Xerox
®
FreeFlow®VI Compose
User Guide
39
Page 40

FreeFlow VI Compose Licensing and Installation
Installing the Makeready Applications Program Interface (API)
In this document, the FreeFlow VI Compose for Makeready is referred to as Makeready. This chapter
describes the basic installation of the Makeready API. The Makeready API provides VI Compose the
capability to call out RDO files created in the Makeready module.
Installation and configuration of Makeready is described in the FreeFlow Installation Guide.
For a description of Makeready and an overview of the VI Compose interface, refer to VI Compose
and FreeFlow Makeready.
Where to install
VI Compose does not have to be installed on the Makeready PC. However, you must install the
Makeready API, which is found in the Makeready folder, on the VI Compose.
File backup
When upgrading or uninstalling this software, be sure to back up any customized files that may be
required at a later date.
Prerequisites for Installing the Makeready API
In order to enable the Makeready API, you must have:
• The VI Compose installation CD
• The Makeready software
• User-supplied Hummingbird NFS mount software or similar
The installation of Makeready involves:
• Makeready software installation
• Installing the Makeready Applications Program Interface (API)
• Configuring the Makeready Applications Program Interface (API) including mounting the VDI
directory on the target print device
MMaakkeerreeaaddyy SSooffttwwaarree IInnssttaallllaattiioonn
This is a standard Makeready installation. Refer to the FreeFlow Installation Guide for complete
instructions on standard installations. All components to support the VI workflow are installed as part
of the standard Makeready installation, with the exceptions of the VI Compose for Makeready API,
which is described in the following section.
40
Xerox®FreeFlow®VI Compose
User Guide
Page 41

FreeFlow VI Compose Licensing and Installation
IInnssttaalllliinngg tthhee MMaakkeerreeaaddyy AApppplliiccaattiioonnss PPrrooggrraamm
IInntteerrffaaccee ((AAPPII))
The VI Compose CD contains a Makeready directory containing the VI Compose and Makeready
Applications Program Interface (API) Installation. To install the VI Compose for Makeready API:
1. Insert the VI Compose software CD into the CD drive.
2. Cancel out of the VI Compose installation procedure when it auto-initializes.
3. View the files contained on the CD drive.
4. Open the Makeready folder on the VI Compose CD.
5. Double-click the installation file setupvdi.exe.
6. After the installation completes, the PC must be re-booted.
CCoonnffiigguurriinngg tthhee MMaakkeerreeaaddyy AApppplliiccaattiioonnss PPrrooggrraamm
IInntteerrffaaccee ((AAPPII))
Ensure that when Makeready and VI Compose have been installed on the Makeready PC, that PC and
any target print devices, are configured. This involves:
• Makeready configuration
• NFS mounting of the VDI directory
• Identify networked print devices
MMaakkeerreeaaddyy CCoonnffiigguurraattiioonn
The VDI directory represents the mount point for the NFS mounted file system. The screen captures
below show the location of a VDI directory named vijobs.
Xerox
®
FreeFlow®VI Compose
User Guide
41
Page 42

FreeFlow VI Compose Licensing and Installation
After the VDI directory is shared using Hummingbird NFS or similar software, mount the shared
directory at the printer's controller. For UNIX systems like those driving FreeFlow Print Server and
DocuPrint, use the mount command. Typically, the mount point is created just under the xgfc
directory. Choose any name for the mount point, then create a directory by that name. In our
42
Xerox®FreeFlow®VI Compose
User Guide
Page 43

FreeFlow VI Compose Licensing and Installation
example, the name chosen is: /usr/xgfc/vijobs
Last, ensure that the new mount point is included in the libraries defined to VI Compose by the
SETMPATH command, or by the SETPPATH command when using VI Projects, by adding the new
mount point to the startup xgfunix.run or xgfdos.run file. Be aware that UNIX devices may error out
when they do not find the mount point readily upon boot up.
When the VIPP
®
RUN command calls out a VDI file, it looks for that file as it would any other
miscellaneous file. It searches for the file in each library defined by SETMPATH. In this case, one of
the miscellaneous libraries points to the mount point, and the search will be directed to the VDI
directory. When VI Compose finds the VDI file, it reads the name of the subdirectory that contains
the RDO structure and an index to the TIFF files. VI Compose then processes each TIFF image in
succession similarly to the way VI Compose works with Decomposition Service.
Xerox
®
FreeFlow®VI Compose
User Guide
43
Page 44

FreeFlow VI Compose Licensing and Installation
NNFFSS MMoouunnttiinngg ooff tthhee VVDDII DDiirreeccttoorryy
Makeready uses the user-supplied Hummingbird NFS Maestro Server, or similar software, to share, or
export, local directories over the network. This software must be installed and configured to export
the VDI directory. Also configure the Printer to mount the exported Makeready directory. A VI
Compose/ Makeready directory is normally created under the xgfc directory as the mount point.
A network administrator should be involved in setting up the NFS mount and export of the VDI
directory to the target print device. Procedures to do this will vary from system to system.
The procedure below should be used as a guide only. It is based on mounting a Decomposition
Services directory to a FreeFlow Print Server system. This procedure is covered in the FreeFlow System
Administrator Guide for FreeFlow Applications with Document Library, Section 3, Procedure:
Configuring the FreeFlow Print Server Decomposition Service. The configuration process may change
based on the network configuration and the target device.
44
Xerox®FreeFlow®VI Compose
User Guide
Page 45

FreeFlow VI Compose Licensing and Installation
The critical steps for Makeready setup are shown here:
1. Start the Control Panel and choose NFS Maestro Server.
Once you open the NFS Server window, you will no longer see a reference to Hummingbird.
®
Xerox
FreeFlow®VI Compose
User Guide
45
Page 46

FreeFlow VI Compose Licensing and Installation
2. Select the Exported File Systems tab to view this screen:
46
Xerox®FreeFlow®VI Compose
User Guide
Page 47

FreeFlow VI Compose Licensing and Installation
3. Select the ... button (Browse) in the Exported File System field. This dialog is produced:
4. Browse to and highlight the VDI directory, then press OK.
5. When the Exported File Systems window is displayed, ensure that the Restrict Access to Hosts box
is NOT selected, then press Insert followed by Apply.
Xerox
®
FreeFlow®VI Compose
47
User Guide
Page 48

FreeFlow VI Compose Licensing and Installation
6. When access rights have not been set to Everyone, Hummingbird will prompt you to approve it
now. Select Yes when you see this dialog:
48
Xerox®FreeFlow®VI Compose
User Guide
Page 49

FreeFlow VI Compose Licensing and Installation
7. When Yes is selected the system produces a Permissions window. Three variations of that screen
are shown here, use them as examples to set the appropriate information for the system.
Xerox®FreeFlow®VI Compose
User Guide
49
Page 50

FreeFlow VI Compose Licensing and Installation
8. After you have set up permissions return to the control panel shown here. Double-click NFS
Maestro Server.
This window is displayed:
50
Xerox®FreeFlow®VI Compose
User Guide
Page 51

FreeFlow VI Compose Licensing and Installation
9. Double-click Server Status. This window is displayed:
Xerox®FreeFlow®VI Compose
User Guide
51
Page 52

FreeFlow VI Compose Licensing and Installation
10. Select the tab labeled Advanced. This screen is produced:
11. Check that the correct VDI directory name appears in the Current Exports window, and click
Reload Exports.
To set UNIX to re-establish the mount point every time it is rebooted, get the UNIX system
administrator to edit the /etc/vfstab file.
Caution: The syntax of the /etc/vfstab file may change, depending on the operating
system and/or version in use. Always validate the correct syntax for the system before making
any modifications. The examples shown are provided for a Solaris 8 system.
Add an entry along the lines of:
13.245.64.152:/G/Product_Z/Marketing - /usr/xgfc/VDI_dir nfs -
yes bg,rw,hard,retry=5
Notice that "-" is entered to prevent UNIX from attempting to perform a file system check (fsck) on
the volume. Also ensure that bg is specified in the option string so that UNIX knows it can skip the
mount point when the VDI volume is not available when you boot the printer controller. This entry
tells UNIX to attempt to reconnect to the volume in the background when it cannot find the
connection on the first attempt. Last, specify a hard link when you connect to the volume with rw (or
read-write) privileges.
52
Xerox®FreeFlow®VI Compose
User Guide
Page 53

IIddeennttiiffyy NNeettwwoorrkkeedd PPrriinntt DDeevviicceess
FreeFlow VI Compose Licensing and Installation
The VI Compose software at the print device must be aware of its resource directory structure. Failure
to properly identify a resource path will result in this error message and the VIPP
®
job will abort.
VIPP_no_vali d_path_or_access_denied
The VIPP
®
programmer should work closely with the system administrator to ensure that:
• all Makeready resource files are located in the Makeready VDI directory
• the correct mount point has been identified at the print device
• the xgfunix.run file has been modified to point to that directory
The system administrator must create a directory under the xgfc directory on the print device to
match the name of the NFS mount point. For example:
/usr/xgfc/VDI_dir
Update mislib
The final step in the installation process is to update VI Compose's list of miscellaneous libraries
(mislib) by updating the VI Compose Initialization files, xgfunix.run or xgfdos.run.
The xgfunix.run file is located in the /usr/xgf/src directory on all UNIX based systems. Look for
the SETMPATH command and make the changes shown in bold text.
On Windows-based systems, edit xgfdos.run, which is usually found in C:\xgf\src. The line you
enter is shown below. When you have installed the program on a drive other than C:, replace it with
the drive designation for the xgfc directory.
(C:\\xgfc\\VDI_dir\\) % path for VDI files
When you are using VI Projects, also add this line to the list of directories defined by SETPPATH.
Note: Controller reboot
Any changes to VIPP
®
configuration files require a reboot of the FFPS controller.
®
Xerox
FreeFlow®VI Compose
User Guide
53
Page 54

FreeFlow VI Compose Licensing and Installation
VI Compose Installation on DocuPrint NPS Devices
Use these instructions to upgrade VI Compose software and install the VI Compose license on all
DocuPrint NPS devices including DocuPrint NPS color devices.
VI Compose software is installed in Demonstration mode during the normal DocuPrint NPS software
installation process. There are no special installation instructions for the initial installation of the VI
Compose software. However, in order to run the software in Production mode a VI Compose license
must be installed and activated.
When VI Compose has already been installed, these two directories will exist on the system:
• /usr/xgf
• /usr/xgfc
CCuussttoommiizzeedd FFiillee BBaacckkuupp
During an upgrade, customized VI Compose files located in /usr/xgf/src and /usr/xgf/
encoding are overwritten with new files of the same name. The system automatically copies and
renames those directories as a form of backup for customized files. The back up versions of the
original directories are /usr/xgf/src.$OLDVER and /usr/xgf/encoding.$OLDVER, where
$OLDVER represents the previous version of VI Compose. When customized files exist in either of the
original directories, it is your responsibility to merge the customized contents of those files with the
new versions found in the most recent /usr/xgf/src/ and /usr/xgf/encoding directories.
Typically, customization is done in one of the following files. Even though the file contents will be
backed up during an upgrade installation, Xerox recommends that the files be printed as hardcopy
backup.
xgf/src/xgfunix.run VI Compose startup definition file
xgf/src/xgf.pcc standard pcc definitions
xgf/src/xgf.mup Multi-Up definitions
xgf/src/xgf.gep color and graphical element property (gep) keys
xgf/src/xgf.bat background attribute (bat) keys
xgf/src/xgf.def VI Compose system defaults
xgf/encoding/fontlist (found in xgf\encoding)
Note: Any previous customization of the VI Compose environment will not be valid in a new
upgrade. Copying the old files has the potential of rendering the new functionality unusable.
Any customization will have to be repeated on the new files after a successful upgrade.
54
Xerox®FreeFlow®VI Compose
User Guide
Page 55

FreeFlow VI Compose Licensing and Installation
SSooffttwwaarree IInnssttaallllaattiioonn
An upgrade may be necessary to load the latest version of the VI Compose software. Upgrading VI
Compose software from the CD will not overwrite the customer files located in /usr/xgfc, however
it will overwrite the /usr/xgf directories.
Performing an upgrade maintains the validity of an installed license file.
To upgrade VI Compose on a DocuPrint NPS controller:
1. Log on the system at the "root user" security level.
2. Locate the existing VIPP
pkginfo -c VIPP | grep VIPP
pkginfo | grep XRXdpxgf
®
VIPP
is the package category of the VI Compose software as it is loaded as an upgrade.
XRXdpxgf is the package name of the VI Compose software as it is loaded with NPS software.
Note: Do not remove the package named XRXdpvipp as this is the Xerox DocuPrint
Licensing package. When the package is removed, the Show License Status command will
report Could not get any license status even though the license files are present and active.
To correct this problem, the NPS software will have to be reinstalled.
When more than one VIPP
all be removed; use a last installed to first installed order when removing them.
®
package name(s), enter:
®
package name is displayed (other than XRXdpvipp, they must
3. Remove the existing package(s):
pkgrm package name
Where:
package name is the result from Step 2. For example: pkgrm VIPxx
4. Log on as administrator in the NPS/IPS Command Line administrator window. Enter: Privilege
Administrator Password (Contact the system administrator for the correct password.)
5. Begin the software installation. Enter:
Install Update From CDROM
Enter the UNIX root password when prompted. Contact the system administrator for the correct
password.
6. When the VIPP
®
files were previously customized enter those changes in the new files now. Refer
to Customized file backup.
7. Validate the software installation by printing /usr/xgf/demo/goljob. Place color stock in
trays 1, 2, and 3 as follows:
• Tray 1 - Yellow
• Tray 2 - Green
• Tray 3 - White
The completed job consists of 43 single-sided pages. Pages 1 and 43 are printed on yellow stock,
pages 8, 10, 25, 26, and 27 are printed on green stock and the remaining pages are printed on
white stock.
Xerox
®
FreeFlow®VI Compose
User Guide
55
Page 56

FreeFlow VI Compose Licensing and Installation
LLiicceennssee IInnssttaallllaattiioonn
1. Determine if a VI Compose license has been installed. At the UNIX workstation, enter:
pkginfo | grep VIP
When XRXdpvipp is included on the list of packages a license has been installed and no further
action is necessary. When not included, proceed to the next step.
2. Acquire the license, refer to Obtain a VI Compose License for more information.
3. After receipt of the license string, follow one of these two options to complete the license
installation:
IInnssttaallll tthhee LLiicceennssee ffrroomm FFaaxxeedd IInnffoorrmmaattiioonn
To install the license from faxed information:
Log on as Privilege Administrator and at the DocuPrint NPS user interface window, enter: Install
Feature License
When prompted, enter the information received from a Xerox representative. When complete, a
message similar to this example is displayed:
IInnssttaallll tthhee LLiicceennssee ffrroomm aa DDiisskk oorr EEmmaaiill
To Install the license from a disk or email:
Copy license.dat from the email to a floppy disk. Insert the floppy disk into the floppy drive of the
NPS controller and at the user interface enter:
Install FlexLicense From Floppy
At the prompt, Floppy disk inserted? (no to quit) enter:
Y
The system will report the number of licenses that have been pre-pended to the license file. Then,
when prompted for another disk, enter:
N
Finally, at the Floppy disk inserted? (no to quit) prompt, enter:
N
56
Xerox®FreeFlow®VI Compose
User Guide
Page 57

FreeFlow VI Compose Licensing and Installation
VVaalliiddaattee LLiicceennssee IInnssttaallllaattiioonn
1. To validate the license installation, log on as administrator in the NPS/IPS Command Line
administrator window and enter:
Show License Status
This is an example of the results of the command:
XRX_VIPP_Software License will expire in xxx days.
Where
xxx is the number of days that the license is valid.
2. Restart the NPS sequencer. At the command prompt, enter:
Restart Sequencer
LLiicceennssee PPrroobblleemm SSoollvviinngg
Perform these actions in sequence when the VI Compose license string is not accepted by Install
Feature License or Install FlexLicense From Floppy, or when after a successful installation of the VI
Compose license string, Production mode is not activated:
• Use Show License Status to check for the existence of installed licenses.
• Re-enter the VI Compose license string exactly as delivered by a Xerox representative. Remember
that the license string is case sensitive; enter it exactly as shown. Contact a Xerox representative
when there is a question about a character.
• Check that the correct VI Compose license string has been installed in the corresponding printer.
Remember that the VI Compose license string is printer specific. Use the Show Hostid command
to display the Host ID and compare it with the one in the fax sent by a Xerox representative.
• Check that the Host ID entered in the VI Compose License Request Form is correct. When it is not,
contact a Xerox representative.
• Contact a Xerox representative to confirm the accuracy of the VI Compose license string they
provided.
• Contact the Xerox Help Line.
Xerox
®
FreeFlow®VI Compose
User Guide
57
Page 58

FreeFlow VI Compose Licensing and Installation
58
Xerox®FreeFlow®VI Compose
User Guide
Page 59

2
Variable Information Suite documentation
This chapter contains:
• Intended Audience .................................................................................................................... 60
• Documentation Overview.................... ............................. ........................ ..... ........................ ..... 61
The FreeFlow
Information Compose software, its use of VIPP
for the FreeFlow Variable Information Suite (VIS).
This chapter includes these sections:
• Intended audience
• Documentation overview
®
VI Compose User Guide provides background information on FreeFlow Variable
®
files, resources and datastreams, and documentation
Xerox®FreeFlow®VI Compose
User Guide
59
Page 60

Variable Information Suite documentation
Intended Audience
FreeFlow Variable Information Suite Documentation is intended for:
• Application programmers who want to produce a VIPP
• Layout designers who want to use VIPP
®
to encode the layout definitions for line, database, and
XML mode users
• Developers of advanced layout design applications who want to include VIPP
resources produced by their products for example, VIPP
• System administrators responsible for system configuration, security, and license information
®
data stream for native mode users
®
®
emitters
as a format for the
Note: When using VI Compose or any of the Variable Information Suite of applications, it is
®
assumed that you have experience using the VIPP
that you have a basic knowledge of the VIPP
®
programming language. It is also assumed
programming conventions.
It is also assumed that you have a working knowledge of the computer and its operating
conventions, including how to:
• use a mouse and standard menus and commands
• open, save, and close files
60
Xerox®FreeFlow®VI Compose
User Guide
Page 61

Variable Information Suite documentation
Documentation Overview
English language versions of the FreeFlow VI Compose User Guide and all other Variable Information
Suite documentation can be downloaded from www.xerox.com/support and refer to Program
download. When requested to click on Software, click on Documentation instead.
FreeFlow Variable Information Suite Documentation includes these books:
What's New
This book provides an overview of new features, enhancements and software fixes since the last
release.
FreeFlow VI Compose User Guide
This book provides the background information required to understand and use VI Compose and
its applications. It describes the files and utilities provided with the software, the resources
necessary to build both legacy jobs and VI Projects, and the basics of printing VIPP
Compose.
FreeFlow VI Compose (Open Edition) Installation and Overview
This book provides instructions for installing VI Compose on non-Xerox printing devices.
®
jobs using VI
®
VIPP
Language Reference Manual
This book documents the VIPP
®
commands, VI Compose error messages, and programming tips.
FreeFlow VI Design Pro User Guide
This book contains information on the features and functions provided by VI Design Pro, as well as
how to use these capabilities to access, view, modify, create, and execute VIPP
®
applications.
FreeFlow VI Design Express User Guide
This book contains information on the features and functions provided by VI Design Express, as
well as how to use these capabilities to access, view, modify, create, and execute VIPP
®
applications.
FreeFlow VI eCompose User Guide
This book contains information on using VI eCompose to create and dispatch Adobe PDF
documents, and to remotely administer VI eCompose Web servers.
FreeFlow VI Explorer User Guide
This book contains information about how to use VI Explorer, a GUI program that allows users to
preview and verify VI jobs and projects, and provides easy access to Normalization and
Demographics services.
®
VIPP
Manage User Guide
This book provides information on the use of the VIPP
®
Manage utility, which is used with VIPP®enabled desktop or office print devices to load VI Compose software and production license, install
VI Compose patch files, and manage VI resources.
FreeFlow VI eCompose Dispatch SDK
This Software Developer's Kit provides information about VI eCompose Dispatch Module
functionality.
®
Xerox
FreeFlow®VI Compose
61
User Guide
Page 62

Variable Information Suite documentation
FreeFlow VI eCompose Workshop
This book contains a tutorial designed to familiarize you with the operation and use of VI
eCompose.
FreeFlow Variable Information Suite Glossary and Quick Reference
The glossary contains a list of the terms and acronyms needed to use VI Compose and its
applications. The quick reference is a printable version of the Quick Reference Card, which contains
a list of all VIPP
®
commands and variables sorted by function and variables by type.
FreeFlow VI SAP Device Type Installation and User Guide
This book describes how to install and use the Xerox VIC Device type, form, and test job in SAP.
Note: For information about VI Compose training contact a Xerox representative.
62
Xerox®FreeFlow®VI Compose
User Guide
Page 63

3
VIPP
This chapter contains:
• Basic Concepts........................................................................................................................... 64
• SAP Device Type for VI Compose................................................................................................ 70
• Using PDF Resources with VIPP
• VIPP
• FreeFlow
This User Guide is designed to provide information about how to use a properly installed version of VI
Compose. Refer to FreeFlow VI Compose Licensing and Installation for installation instructions.
Variable Information Production PrintWare (VIPP
that provides nearly unlimited capability and flexibility to its users. VIPP
of variable information (VI) applications. VIPP
of the variable data to process, as well as the appearance of the pages to be produced.
Xerox has implemented a VIPP
functions written with the PostScript language. VI Compose adds to PostScript functionality and
enhances the ability to print complicated documents at the rated speed of the print device. This
means that the job containing variable data, images, logos, and other memory-intensive job
segments can be printed without the delays and large intermediary files that are encountered in
applications similar to VI Compose.
The VIPP
consider when using the VIPP
Variable Information Suite applications that add functionality and make VIPP
These chapters describe VIPP
®
and VI Compose overview
®
APPE, PDF/VT, and Embed EPS Options ................................... 71
®
and Variable Information Suite Applications.... ........................ ........................ ..... ........... 78
®
VI Compose Open Edition ......................................................................................... 85
®
) is a variable document composition language
®
can be used to describe both the structure and logic
®
interpreter, VI Compose (VI Compose), as a set of high level
®
and VI Compose program overview provides the background information you need to
®
language and VI Compose to print the jobs. It also describes the
®
and VI Compose functionality in more detail:
®
is dedicated to the design
®
easier to use.
VIPP®data streams Describes the modes in which VIPP®jobs are created
®
resources Describes resources used to create the VIPP®jobs
VIPP
VI Compos e files and utilities Lists the files and utilities provided with VIPP
Standard lists, tables, keys, and attributes
®
VIPP
file examples
Printing with VI Compose
Xerox®FreeFlow®VI Compose
User Guide
®
63
Page 64

®
VIPP
and VI Compose overview
Basic Concepts
VI Compose is PostScript software that sits on the printer and allows you to produce complex
documents and print them at production speeds. VI Compose features and functions provide
enhanced variable data printing performance through the use of cached object elements, dynamic
text flow, data driven graphics, data formatting, conditional processing, and workflow improvements.
Those elements are all described in greater detail in other sections of the VI Compose documentation
set.
In order to use VIPP
• Ensure that VIPP and PostScript are not mixed
• What VIPP-enabled devices are
• What Repositories are
• What VI Projects are
VVIIPPPP®®aanndd PPoossttSSccrriipptt
The first thing to remember about using the VIPP®language is ensuring that VIPP®commands and
PostScript is not mixed in the programs. The only time PostScript code can be safely used is in selfcontained resources (such as EPS files) that will be used as forms or segments in a VIPP
Project.
The technical reason for not mixing VIPP
notation syntax similar to PostScript. VI Compose has been implemented using the PostScript
language and is required to run inside a PostScript interpreter. Because of this situation, intermixing
®
VIPP
code is not compliant with the VIPP
expecting a compliant VIPP
with future VI Compose releases. For this reason, mixed code is not supported and must be absolutely
avoided.
and PostScript code may happen to work in some circumstances. However, this kind of mixed
®
and VI Compose effectively, you need to understand these basic concepts:
®
job or VI
®
and PostScript is that the VIPP®language uses a postfix
®
®
data stream. There is no assurance that such jobs will work correctly
language specifications and will break any application or utility
VVIIPPPP®®--eennaabblleedd DDeevviicceess
The term VIPP®-enabled is used throughout the documentation to describe the devices that support
the VIPP
Xerox printer, however, VI Compose can also be used on these VIPP
• DocuPrint NPS (monochrome and color)
• FreeFlow Print Server
• External EFI and controllers
• FreeFlow MakeReady
• Limited Xerox Office Devices
Not all devices are supported in all countries
Limited support
64
®
language. The obvious application for VI Compose is as device-resident software on a
®
-supported devices:
Contact a local Xerox representative for an updated list of supported printers.
Limited support is provided for Xerox Office Devices. Validate VIPP
in an Office device for VIPP
®
enablement.
®
operability prior to purchase
Xerox®FreeFlow®VI Compose
User Guide
Page 65

VIPP®and VI Compose overview
VI Compose can also be used to run VIPP®either permanently or on a job-by-job basis on a VIPP
®
imager (PostScript-enabled printer, fax machine, computer screen, etc.). To use VIPP®capabilities with
a VIPP
• Embed VIPP
®
imager:
®
commands in the print data
• Describe the document layout in a Job Descriptor Ticket (JDT), XML Job Ticket (XJT), or a Data
Base Master (DBM), which you then make available to the VIPP
®
imager
Whenever possible, use supported devices that run a PostScript interpreter with access to a local file
system, for example, a DocuPrint NPS, FreeFlow Print Server, or a PC or UNIX workstation. These
®
devices access VIPP
resources in shared libraries on that file system. In addition, other file systems
can be NFS mounted to provide additional resource libraries.
Desktop VIPP
access VIPP
delete, and print VIPP
®
-enabled printers, such as N-Series, DocumentCentre, or Phaser printers, can also
®
and VI Compose on a local file system. VIPP®Manage is used to control, download,
®
resources to the printer disk, or to send self-contained VIPP®jobs to diskless
printers.
When devices with access to a local file system are not available, use supported devices that run a
PostScript interpreter without a file system, for example, a diskless DocuPrint N40. These devices must
embed resources in the data stream before a file is submitted to the printer.
RReeppoossiittoorriieess
A repository is a collection of VIPP®resources and projects that is associated with a single xgfdos.run
(Windows) or xgfunix.run (FreeFlow Print Server) file. On FreeFlow Print Server, there is a single
xgfunix.run file, and thus a single repository. On Windows there can be multiple xgfdos.run files, one
for VI Compose, one for VI Design Pro, one for VI eCompose, and others for possible user-defined
repositories.
The xgfdos.run and xgfunix.run files contain VIPP
directories. For VI Projects, the command is SETPPATH which is used in conjunction with
SETPROJECT, refer to Project directory structure. For non-project (legacy) resources, the commands
are SETEPATH, SETFPATH, SETIPATH, SETJPATH, and SETMPATH.
®
commands that determine the VIPP®resource
VVII PPrroojjeeccttss
VI Projects provide a mechanism that enables Variable Information Suite applications to manage all
the resources of a job as a single entity. VIPP
by project can be manipulated as a single VIPP
and physically grouping them as part of a VI Project, which is the logical grouping of the physical
resources used by the job at one or more steps in the job life cycle.
VI Projects allow you to identify, organize, and store the resources of a job under a single name (the
project) and group the jobs by family (the folder). A folder is a collection of projects that share some
common features. For example, a Service Bureau creates one folder per customer, and stores each of
that customer's jobs as a project under that folder. This is a sample structure:
Customer Folder A
Job 1
Job 2
Job 3
Customer Folder B
®
job resources that are organized and stored in libraries
®
job. Handling job resources is simplified by logically
®
Xerox
FreeFlow®VI Compose
User Guide
65
Page 66

®
VIPP
and VI Compose overview
Job 1
Job 2
Job 3
Customer Folder C
Job 1
Job 2
Job 3
The physical components of a VIPP
®
job consist of resources such as:
• Pictures in TIFF, EPS, or JPEG format
• Job Descriptor Tickets (JDT) or Data Base Masters (DBM)
• XML Job Tickets (XJT)
• Forms or segments in VIPP
®
or PostScript format
• Fonts
• Encoding tables
• Submission files
• Production data
• Editable versions of some resources in application-specific format
• Viewable versions of the job in Adobe PDF format
• Pre-processed objects stored in optimized application-specific format
• VI Project File (VPF)
For additional information, refer to VIPP resources.
VI Project File (VPF)
A VI Project File contains all the information needed for a single project. A VPF always has a .vpf
extension, and is stored in its project's directory (which also contains the rest of the project's local
resources, refer to Project resource scope and Project directory structure).
Applications handling VI Projects need to know more than the location of the components on the file
system in order to provide high-level functionality. For example, because VIPP
®
does not enforce
naming conventions for the files containing the project's components, the type of the named
component (form, segment, etc.) must be provided in the VPF.
The VPF contains four kinds of information about each project, which are stored as XML elements or
attributes:
• Bibliographic information
• VIPP
• Non-VIPP
®
resources
®
resources
• Historical information
66
Xerox®FreeFlow®VI Compose
User Guide
Page 67

VIPP®and VI Compose overview
Note: A .vpf file will be contained in VI Projects created by FreeFlow VI Design, or by software
provided by a third party who has implemented the VI Projects SDK. Projects created by a third
party who has not implemented the VI Projects SDK, will not have a .vpf file, and are not
supported by Xerox.
VI Project Containers
A VI Project Container (VPC or .vpc) is a compressed archive file containing the physical grouping of
all the VI Project's resources, including the VPF. VPCs always have a file e xtension of .vpc. VPCs
simplify the transferring of projects between applications, devices, or locations.
The FFPS has the ability to accept a VI Container (VPC) as a print file. By enabling the VPCF filter
(found under the FFPS Queue menu) a VPC file can be deployed, a VPC file can be deployed and
printed, or you can print and forget a VPC file. These options will expand a VI Container file, then,
depending upon the selections you make, can print the data file and can delete all files once the job
is printed.
Project resource scope
Each project resource has one of the following scopes:
• Local
• Folder-shared
• Global-shared
Local resources are resources that can only be used by the project to which they pertain. Local
resources are stored in the project's directory (refer to Project directory structure).
Folder-shared resources are resources that can be shared among all projects in a specific folder. A logo
shared across all projects within a folder assigned to a specific department can be assigned a foldershared scope. Folder-shared resources are stored in one of the folder-shared directories within the
folder to which they pertain (refer to Project directory structure).
Global-shared resources are resources that can be shared among all projects in all folders accessible
by the application. A company logo may be shared across all the projects within a company. In this
case it makes sense to avoid storing the logo in every folder or project. Global-shared resources are
stored in one of the repository's global-shared directories (refer to Project directory structure).
Local resources take precedence over folder-shared and global-shared resources, i.e. when a resource
in local scope is also available with the same name in either of the other two scopes, the local
resource will be used. Also, folder-shared resources take precedence over global-shared resources.
Sharing resources at folder-shared or global-shared scope saves storage space, ensures consistency,
and simplifies maintenance.
Project directory structure
Following is an example of a set of project resource directories for a single repository. Note that the
names of the directories are arbitrary, and can be any valid file names.
Xerox
®
FreeFlow®VI Compose
User Guide
67
Page 68

VIPP
®
and VI Compose overview
The names of the global-shared, folder parent, and folder-shared directories (in red) are determined
by the value of the VIPP
®
command SEPPTATH, which is defined in the file xgfdos.run (Windows) or
xgfunix.run file (UNIX) for the repository. The global-shared and folder parent directories do not have
to be in the same directory; they can be anywhere in the file system, and their locations are
independent of one another. In fact, a global-shared directory can be a subdirectory of a folder
parent, as in the default structure shown below.
Within one folder parent, the names of the possible folder-shared directories in each of the folders are
the same, although a folder does not need to have all of the possible folder-shared directories
allowable for a folder parent. Folder2 above illustrates this. Other folder parents may have different
names for the folder-shared directories.
The names of the folders and projects (in blue) are determined by the value of the VIPP
SETPROJECT, which must appear in each project-based VIPP
®
job, and gives the folder and project
®
command
names for the job. The VPF file for a project also stores the folder and project names for the project.
The folder names must be unique, i.e. two folder parents cannot each have a subdirectory with the
same folder name. However, two folders can contain projects with the same name. The uniqueness of
the folder names ensures that a given combination of folder name and project name identifies at
most one project.
During the first installation, VIPP
®
is configured by default with the following VI Projects repository:
The root path for xgfc will be either /usr/xgfc on UNIX systems, X:\xgfc on Windows systems (X
being a drive chosen at installation time) and %XPS_DATA%\data\xgfc on Windows FFPS.
Creating and editing VI Projects
VI Design Pro can be used to edit and create VI Projects. For more information on this tool, refer to
68
Xerox®FreeFlow®VI Compose
User Guide
Page 69

the FreeFlow VI Design Pro User Guide.
VIPP®and VI Compose overview
Xerox
®
FreeFlow®VI Compose
User Guide
69
Page 70

®
VIPP
and VI Compose overview
SAP Device Type for VI Compose
The Xerox FreeFlow VI SAP Systems, Applications and Products in Data Processing Device Type and
Form provide functionality and feature integration with the FreeFlow VI Compose and VI eCompose
products. Although SAP provides support for many output devices, this support does not include the
VI enabled printers and VI enabled eCompose Servers (VIPP
The FreeFlow VI SAP Solution allows SAP users to access the more advanced feature set of the VIPP
scripting language, providing a fast, efficient, effective, and flexible method for printing (or creating
Adobe PDF files) from a delimited (XML or line data (print ready data)) data file.
®
to PDF).
®
The sample device type and form are provided in a zip file (VISAPDT.ZIP) that can be downloaded
from the www.xerox.com site. Go to the Support & Drivers section and search for VIPP
®
, then select
the Software option. The zip file will be found under the Utilities & Applications section. The contents
of the zip file should be reviewed by the SAP systems administrator.
SAP will use the legacy VIPP
®
path using the Just Send the Data model. VIPP®resources, fonts,
images, forms, and so on, must be uploaded to the printer's XGFC folders, which can be done during
the development of the VIPP
®
application. Once the resources are available to the print device, or the
FreeFlow VI eCompose server, the SAP print job can be processed using the SAP Device Type that has
been configured with the VIPP
®
start commands. This is, in effect, just sending the data to the target
device.
The only requirement is that FreeFlow VI Compose is installed and licensed on the target print device.
If the SAP administrator needs to output PDF, those VIPP
®
jobs can be sent to the FreeFlow VI
eCompose server or the VI eCompose Web Job Submission Service (WJSS).
70
Xerox®FreeFlow®VI Compose
User Guide
Page 71

VIPP®and VI Compose overview
Using PDF Resources with VIPP®APPE, PDF/VT, and Embed EPS Options
VI Compose can support applications with PDF resources in the legacy PostScript RIP, in the Adobe
PDF Print Engine (APPE) RIP, and in the various PDF output capabilities of FreeFlow VI Suite (VI
eCompose and PDF Export functions). However, the process to enable the use of PDF resources, and
the structure and output of those PDF resources differ depending on the intended RIP or target for
applications that use them.
VI Design Express (Adobe InDesign plug-in) and VI Design Pro tools support using PDF resources in
the creation of VIPP
tools is again, determined by the intended target for the VIPP
The purpose of this section is to describe how to use PDF resources in VIPP
targeted RIPs mentioned above. The following sections are included:
• Printing the VIPP application on a legacy PostScript RIP
• Printing the VIPP application on an APPE RIP
• Producing a PDF from a VIPP application (VI eCompose or PDF Export)
®
applications. However, the process to use and display PDF resources in these
®
application.
Xerox
®
applications for the
®
FreeFlow®VI Compose
User Guide
71
Page 72

®
VIPP
and VI Compose overview
PPrriinnttiinngg tthhee VVIIPPPP®®AApppplliiccaattiioonn oonn aa LLeeggaaccyy
PPoossttSSccrriipptt RRIIPP
VIPP®can use TIFF, JPEG, EPS, and PS files as image resources for VIPP®applications targeting a
PostScript RIP. The exception to this is when using VI Design Express, where any Adobe InDesign
image format including PDF can be used for static (not for variable) images. This is because, when a
®
VIPP
files.
Prior to the VI Suite 11.0 release, PDF resources could not be used as variable resources in a VIPP
application targeting a PostScript RIP. With VI Suite 11.0 or above software, PDF files can be used as
static or variable resources in VIPP
to embed EPS information into the PDF file. Once a PDF resource file has gone through the process to
embed EPS image information into the PDF, VIPP
PostScript RIP by using the EPS embedded information. However, when using this process, advanced
imaging features such as transparency will be preserved inside the EPS image itself (flattening) but
the transparency attribute will be lost. Thus, when printing to the PostScript RIP, transparency
interactions with other parts of the page, if any, will be lost (to keep transparency, etc., you should
target the APPE RIP).
application is exported using VI Design Express, all static images are converted to EPS image
®
®
applications targeting the PostScript RIP by following the process
®
will be able to process that PDF image in the
The process to embed EPS information into PDF resources will increase the size of the PDF file used in
the application. Once EPS information has been embedded into the PDF, this process does not have
to happen again. However, there is no option to remove the EPS information from the PDF resource
file.
Embed EPS Information
The process to embed EPS information into the PDF resource(s) is enabled using either VI Design
Pro or VI Design Express. This release does not include a standalone process for embedding EPS
information.
Embed EPS information with VI Design Pro
VI Design Pro (VDP) is an Interactive Design Environment for generating VIPP
Customers using VI Design Pro need to be competent in the VIPP
®
programming language. VI
®
applications.
Design Pro provides a menu option under the File menu, Modify PDF with Embedded EPS, to
embed EPS information into the PDF resources. This option will allow you to browse to a folder
containing the PDF files you want to embed EPS information into. You may select one or more PDF
files. Select Open to start the process. This could take several seconds per PDF selected. The PDF
72
Xerox®FreeFlow®VI Compose
User Guide
Page 73

VIPP®and VI Compose overview
with embedded EPS information will increase in file size.
If you select not to embed EPS information using this option, they will be embedded automatically
under the hood in temporary copies of the PDF files (in order to properly display the PDF image in
the VDP window) and you will be prompted when you save your application to replace the original
PDF files.
Embed EPS information with VI Design Express
VI Design Express (VDE) provides two options to process PDF resources and add EPS image
information into a PDF.
• During the Export of a document
During the Export of a VI Design Express application, the export process will identify PDF
resources that have not been modified with EPS information and add EPS information to each
PDF. This process can take a few seconds for each PDF depending on the size of the original
PDF image. The resulting PDF will increase in size because of the added EPS information. The
time it takes to embed EPS information into each PDF will also add time to the Export function.
• During a Batch process (recommended) prior to the design of a document
The batch process is recommended as this is easier to manage and will overall take less time
than the Export option. To batch process PDF resources, copy the resources to a folder. Access
the PDF Batch Processing option from the VDE Options menu. Then browse to the folder
location containing the PDF files. When the folder is selected, the batch process automatically
begins. Depending on the number of PDF files in the folder, this process can take several
seconds or minutes. The status of the files being processed is indicated on a status bar. Once
the PDF files have been processed in this manner the PDF files do not have to go through this
process again and the Export function will not flag these files as needing EPS information.
Once this process has been completed, move the PDF resources to your asset folder and use
the PDF resource as you would any other image.
VI Design Express will render the PDF file in the Adobe InDesign GUI, but will use the EPS
information when printing to a VIPP
®
-enabled PostScript RIP.
PPrriinnttiinngg tthhee VVIIPPPP®®AApppplliiccaattiioonn ttoo aa PPoossttSSccrriipptt PPrriinntteerr
Printing a VIPP®application using PDF resources to a PostScript printer with VI Compose 11.0 and
above will generate printed output. VI Compose will identify that it is running in a PostScript RIP and
will read the EPS information in the referenced PDF file. It will use that information to render the PDF
image. If the original PDF file had no advanced PDF features such as transparency, you will notice no
difference in the output. If the original PDF used advanced features, because you are printing the EPS
information on a PostScript RIP, those features, such as transparency interactions with other parts of
the page, will be lost.
If your job uses PDF resources that for some reason do not have EPS information embedded into the
PDF file a gray text box with the image file name will print instead of the PDF image. This indicates
that you need to supply either a PDF resource that has embedded EPS information or call an
equivalent version of the image in a supported format. Failing to do this the job will abort after 10
pages to avoid wasted paper on production jobs.
When printing to a PostScript RIP, it is recommended that you do not use PDF resource files with
advanced PDF features. Such features are only supported by the APPE RIP.
Xerox
®
FreeFlow®VI Compose
User Guide
73
Page 74

®
VIPP
and VI Compose overview
PPrriinnttiinngg tthhee VVIIPPPP®®AApppplliiccaattiioonn oonn aann AAPPPPEE RRIIPP
The APPE RIP can process PDF resource files natively so no embedding of EPS information into the
PDF resource is required when targeting the APPE RIP.
Because VI eCompose and APPE support PDF resources, PDF resource files with advanced PDF
features such as transparency are supported.
PDF/VT is the variable implementation of PDF for the APPE engine. VI Compose will insert media and
finishing information into a PDF using PDF/VT. The VIPP
®
application, when printed to the FFPS
APPE, will pass media and finishing requirements to the FFPS.
®
VIPP
applications processed by VIeC will also generate PDF files with embedded media and
finishing options. PDF files generated when using the "Export to PDF" options in VDE or VDP will also
have embedded media and finishing options in the PDF file. However, the media and finishing
commands will only be supported when printing to an FFPS with APPE.
When designing a VIPP
®
job using VI Design Pro or VI Design Express, it is likely the tool will ask if
you want to embed EPS information into the PDF. Only say yes if the application, at some,point is
printed to a PostScript engine. If you know that the job will only be printed to VI eCompose or FFPS
APPE then it is useless to embed EPS information into the PDF resource. A VIPP
®
job targeted for the
APPE RIP can use PDF, EPS, JPG, TIF and PS image resource types.
PPrriinnttiinngg tthhee VVIIPPPP®®AApppplliiccaattiioonn ttoo FFFFPPSS AAPPPPEE
Printing a VIPP®application using PDF resources to FFPS APPE will generate printed output.
The FFPS APPE RIP with PDF/VT support requires VI Compose 12.0 (or above) and FFPS 93 (latest
available version or above). Failure to use these software versions will result in printing problems.
®
VIPP
currently supported.
A VIPP
some additional configuration. Either a VIPP
Queue settings must be configured.
VIPP
has been verified printing to the FFPS APPE engine. and EFI or other APPE printers are not
®
job with PDF resources that you intend to process through the FFPS APPE print path requires
®
Code Marker
A VIPP
Design Pro. If the VIPP
®
marker (% UsePDFXObjects: true) can be added to the submission file manually using VI
®
application is generated using VI Design Express and PDF resources are
detected in the job, the tool will add the marker automatically to the VIPP
FFPS will act on this marker and route the VIPP
®
marker must be present in the VIPP®code, or, the FFPS
®
®
application to the APPE print path.
code. When present,
FFPS Queue Settings (Recommended)
This is the recommended method for routing VIPP
®
jobs with PDF resources to the APPE print
path. Two queue options need to be set:
• The Format option should be set to PDF and the override option checked
• The PDF Processing option should be set to Adobe PDF Print Engine.
®
VIPP
jobs without PDF resources can also be sent to this queue if required. For more information
on these settings check with your FFPS analyst.
74
Xerox®FreeFlow®VI Compose
User Guide
Page 75

VIPP®and VI Compose overview
Xerox®FreeFlow®VI Compose
User Guide
75
Page 76

VIPP
®
and VI Compose overview
VIPP®jobs with or without PDF resources that are processed through the APPE print path will take
slightly longer to process and appear in the FFPS processing queue.
PPrroodduucciinngg aa PPDDFF ffrroomm aa VVIIPPPP®®AApppplliiccaattiioonn,, VVII
eeCCoommppoossee,, oorr PPDDFF EExxppoorrtt
Processing a VIPP®application using PDF resources to a VI eCompose server or PDF Export functions
(VI Suite 12.0 and above) will generate PDF output. VI eCompose will identify that it is running in an
Adobe Normalizer interpreter and will use the PDF information instead of the embedded EPS
information. This is because Adobe Normalizer can add references to external PDF resources in the
PDF output. If the PDF resources contain advanced PDF features such as transparency these will be
honored. The default action for VI eCompose is to embed all externally referenced PDF files in the
final PDF file generated when processing a VIPP
by job basis or as a global change with the SETPARAMS command. For more details review the
SETPARAMS command in the VIPP
/PDFXembed. It is recommended that you do not change this default.
®
Language Reference Manual and look for the parameter option
®
application. You can change this behavior on a job
AAddoobbee AAccrroobbaatt aanndd AAddoobbee RReeaaddeerr IInnffoorrmmaattiioonn
A PDF output created out of a VIPP®application using PDF resources, often referred to as PDF
referenced XObjects, can be viewed using Adobe Acrobat or Adobe Reader under the following
conditions:
76
Xerox®FreeFlow®VI Compose
User Guide
Page 77

VIPP®and VI Compose overview
1. The version of Adobe Acrobat or Adobe Reader must be 10.1.6 or above as 10.0 does not work.
2. You must open the PDF output from an Adobe Acrobat/Reader privileged folder. To declare such a
folder you must edit the following Acrobat/Reader options in the Preferences menu. See screen
shots below:
• Category: Page Display
Under Reference XObjects View Mode set Show reference XObject targets to Always.
and
• Category: Security (Enhanced)
Under Privileged Locations click on Add Folder Path and set Location of referenced files to
the directory containing the PDFs generated by VIeC or any parent directory.
If, when viewing the PDF output, you see gray text boxes with the image name instead of the
rendered image, then one or more of the following conditions is true:
• the version of Adobe Acrobat or Reader does not support references to XObjects
• the settings in Acrobat/Reader as discussed above are not correct
• the EPS information was not embedded in the PDF resources
• the referenced PDF is not accessible. External reference is not valid if you choose not to embed
NOTES
Select the VIeC incoming folder
Under Location of referenced files, it is recommended that you select the VIeC incoming folder
instead of the folder containing a specific job. As long as all of the PDF's generated by VIeC are
under the same incoming folder hierarchy then all referenced PDFs should be found and properly
displayed.
PDF referenced XObjects are independent of the Enhanced Security checkbox.
The state of the checkbox does not govern viewing of PDF referenced XObjects
PPrriinnttiinngg PPDDFF FFiilleess wwiitthh RReeffeerreenncceedd XXOObbjjeeccttss
A PDF output with referenced XObjects produced by a VIPP®job is primarily intended to be printed
on an FFPS APPE. If such a PDF is printed on a PostScript printer it will first undergo a PDF to
PostScript conversion. In most cases this conversion will ignore the PDF references and image the
XObject using the EPS information (if present) or print a gray text box.
Xerox
®
FreeFlow®VI Compose
User Guide
77
Page 78

®
VIPP
and VI Compose overview
VIPP®and Variable Information Suite Applications
VIPP®functionality provides the foundation on which these Variable Information Suite applications
are based:
All of the Variable Information Suite applications are described in more detail in their respective User
Guides.
VI Design Pro (VDP) Provides an Interactive Design Environment (IDE) for VIPP®application
design. A limited GUI interface and wizards are available to assist in
the creation of VIPP
syntax assistance. The three panels of VI Design Pro allow you to see
the data driving the application design (line, delimited, or XML data), a
GUI representation of the application in real time, and the VIPP
Changes made in the GUI will update the VIPP
®
VIPP
code will update the GUI display.
VI Design Pro requires knowledge of the VIPP
language. If you are not a programmer, ask a Xerox representative
about third-party GUI design tools that can be used to create VIPP
jobs. Most of these tools provide VIPP®design capabilities using a drag
and drop interface and require no prior VIPP
experience.
®
applications. A Smart Editor provides command
®
code. Changes to the
®
programming
®
programming
®
Code.
®
VI eCompose (VIeC) Provides the ability to create files in Adobe PDF format, complete with
bookmarks and links, then dispatch those files to any defined location
(directory folder, email, print device, etc.) via a user defined process.
Administer the VIPP
from any PC with permission to access those servers. Provides a Web
Job Submission Service (WJSS) to create large numbers of small jobs in
Adobe PDF format.
VI Design Express (VDE) A plug-in application for InDesign Creative Suite (Mac OS/X and
Windows), that allows designers with minimal programming experience
to quickly create VIPP
VI Explorer (VIE) Provides a GUI interface, which allows programmers to preview and
verify VI jobs and projects, and to provide easy access to Normalization
and Demographics services.
VI Compose Services Provides functionality in addition to the normal workflow.
VI Compose services provide demographic information about the jobs
for reports and tracking, and a normalization feature, which transforms
®
VIPP
jobs so that they can be pre-processed before they are printed or
imaged.
®
jobs and VI eCompose Web Servers remotely
®
jobs using delimited or XML data.
VVII CCoommppoossee FFuunnccttiioonnaalliittyy
VI Compose is device-resident and requires no extra virtual memory. VIPP®resources, such as forms
and images, can be retained on the printer or network. Network traffic and production time are
reduced because only the unformatted variable data file with the initial start commands is required
for printing and imaging.
In VI Compose, VIPP
®
commands are a set of page layout functions bundled as a PostScript prolog,
78
Xerox®FreeFlow®VI Compose
User Guide
Page 79

VIPP®and VI Compose overview
which allow imaging and data processing applications to produce a data stream output supported by
any VIPP
VIPP
®
-enabled PostScript output device.
®
data streams must be processed by a PostScript interpreter, which accesses resources such as
VI Compose, forms, images, and JDTs, and other required resources.
VI Compose processes data streams in these modes, which are described in detail in VIPP data
streams:
• Native mode
• DataBase mode
• Line mode
• XML mode
The VIPP
®
Language allows you to enhance, reformat, and colorize legacy output (line data) from
COBOL or CICS programs, generated by the data center and targeted toward fan-fold line printers. In
addition, the VIPP
®
Language has composition features that handle other data streams. Delimited
database data, tagged or fixed record data, even-tagged delimited data, such as output from SAP or
other client server type applications, can be formatted using the VIPP
®
VIPP
VIPP
and VI Compose features and functions
®
and VI Compose features and functions:
®
Language.
• Provide optimal throughput and efficiency for image and data processing applications.
• Support resource pre-rasterization and caching.
• Allows use of PDF, EPS, TIFF, JPEG, PostScript files, and text files (TXT) files as variable resources.
Refer to Using PDF resources with VIPP (APPE, PDF/VT, and Embed EPS options) for details on PDF
use with VIPP
®
.
• Provide direct access to PostScript PDL, which supports rich TIFF images, curved boxes, and
PostScript fonts with scaling and rotation.
• Speed the page composition process by composing the pages on the imaging device when the
imaging occurs. Since this is not a conversion process, no intermediate files are produced.
• Allow VIPP
®
jobs to remain independent of the evolution of PostScript. VI Compose can use
higher- level PostScript operators as soon as they become available allowing you to take
advantage of performance improvements without modifying the jobs.
• Allow printing without converting documents.
• Allow you to print line mode jobs on PostScript-enabled devices using PostScript functions without
altering print files.
• Enable PostScript formatting and printing of database and XML files, including forms and logos,
on supported PostScript devices.
• Convert character-based information to Code 39, Code128, EAN, UPCA, 2OF5, POSTNET, PDF417,
MAXICODE, DATAMATRIX, Aztec, QRcode, and IMB (4-State barcode) barcode output.
• Save network bandwidth since the formatting files and resources (for example, images) can be
stored at each printer and only the variable data portion of the document is sent for each print
run.
• Allow you to take full advantage of powerful PostScript features without investing in costly
PostScript training.
• Allow production of data-driven graphics from variable input data.
®
Xerox
FreeFlow®VI Compose
User Guide
79
Page 80

®
VIPP
and VI Compose overview
• Provide text highlighting using lines, boxes, shading, and outlines.
• Enable text reflow across frames, including pages.
• Print multi-page PDF, TIFF, Decomp, or FreeFlow Makeready RDO files, allowing the assembly of
pre-composed document segments into a larger document using conditional logic and data values
to drive construction of the document.
• Allow you to combine numeric variables, numeric constants, and arithmetic operators into a single
operand using arithmetic expressions.
• Provide expanded support for date and time using Commands and variables.
• Include solid coated and uncoated color simulation as supported by FreeFlow Print Server using
®
VIPP
• Support the application of a color tint to any CMYK or RGB Colorkey argument to a VIPP
list of predefined Colorkeys.
®
command referencing a Colorkey.
• Support conditional text, forms, images, and pages.
• Provide font attributes and numeric format commands.
• Provide ZSORT capabilities (Imposition).
• Provide date and time functions.
• Support horizontal and vertical printing with multi-byte fonts (primarily Chinese, Japanese and
Korean (CJK) fonts).
• Support for Specialty Imaging.
• Support for printing Arabic text strings.
• Cutmarks - places makes on the paper for trim operations
• OMR - supports both bubble forms and automated mail OMR
• 4-State barcode - support for the 4-state barcode
In addition to the features and functions of VI Compose, VIPP
®
functionality has been expanded
with the addition of the following programs:
• FreeFlow
• FreeFlow
• FreeFlow
• FreeFlow
• FreeFlow
®
VI Design Pro (VDP)
®
VI eCompose (VIeC)
®
VI Design Express (VDE)
®
VI Explorer (VIE)
®
VIPPManage (VM)
FFrreeeeFFllooww®®VVII DDeessiiggnn PPrroo
VI Design Pro includes a Graphical User Interface (GUI), application templates, and Smart Editor
features that simplify the creation and modification of the VIPP
full support of the VIPP
and modify existing VIPP
®
command set in order to create new VIPP®jobs or VI Projects or to view
®
jobs or VI Projects created in one of the following modes:
• Native mode
• Line mode
• Database mode
80
Xerox®FreeFlow®VI Compose
User Guide
®
jobs or VI Projects. VDP provides
Page 81

• XML mode
VIPP®and VI Compose overview
VI Design Pro provides a What You See Is What You Get (WYSIWYG) representation of the job. This
provides an interactive environment in which to create the VIPP
®
jobs or VI Projects, and represents
how the job will print on the output device.
VI Design Pro is the only GUI-based product that can use all of the capabilities provided by VIPP
®
to
process data-driven graphics, data-driven conditional processing, transactional printing, and database
publishing. However, there are third-party GUI design tools that can be used by non-programmers,
which provide VIPP
®
design capabilities using a drag and drop interface.
VDP features and functions
The features and functionality available from VI Design Pro provide the following benefits:
• An easy-to-use GUI to help you access, view, modify, and create VIPP
• Full support of the VIPP
®
command set using GUI capabilities (with the exception of
®
jobs or VI Projects
demographics and normalization, which are not intended for use with VI Design Pro)
• Availability of powerful PostScript features without costly PostScript training
• Templates that assist in creating new jobs
• A VI Project feature to bundle project components into physical and logical groups
• An interactive Smart Editor feature to easily add or modify VIPP
®
commands or edit command
parameters and values in source files
• Easy access and viewing capability for all files and resources associated with the job
• Maximum control of the document layout
• Immediate WYSIWYG display of output changes without having to print the job
• Automatic generation and display of VIPP
®
code as changes are made
• Terminal Services provides the capability to access VDP via Remote Desk Top
• Can generate PDF output directly from the design tool, or can generate .vpc or VIPP
®
templates for fast printing on VIPP®-enabled devices
FFrreeeeFFllooww®®VVII eeCCoommppoossee
VI eCompose allows you to generate documents in Adobe Portable Document Format (PDF) from
®
VIPP
-based variable data jobs. The FreeFlow VI eCompose User Guide provides an overview of the
features and functions available, describes different installation configurations, and explains how to
use the software.
Note: Throughout the Variable Information Suite Documentation, the term PDF refers to
Adobe Portable Document Format files; Distiller is an Adobe Acrobat program.
VI eCompose processes VIPP
®
VIPP
job to VI eCompose:
• VIeC Job Submission Client (including a web-based client)
• Watched Folders Client
• lpr
When you use the VIPP
smaller PDF files at bookmark boundaries. This can be used to create fully customized PDF sets per
customer record.
®
jobs to produce PDF output files. Use the following options to submit a
®
BOOKMARK command in the VIPP®job, VIeC splits the PDF output file into
Xerox
®
FreeFlow®VI Compose
User Guide
81
Page 82

®
VIPP
and VI Compose overview
In addition to using bookmark contents as page split delimiters, use bookmarks to determine the
format of the PDF output file names and include them in the correlating index file produced with the
job.
Thus, there are several possible workflows:
• In the absence of bookmarks, use VIeC to create the PDF file(s).
• Distill with bookmarks to create the PDF file with bookmarks and defer the split (making it a
separate step). Optionally, split the PDF file with bookmarks into smaller PDF files with an index
file.
• Distill with bookmarks and split as one integrated process, to create the PDF file with bookmarks
and then split that file into smaller PDF files with an index file.
As each job is processed, billing meters on the appropriate VIeC Server are incremented to track the
number of pages distilled, pages split, and PDF files generated. A server-level accounting file also
tracks resources used on a per-job basis.
VI eCompose functionality can be accessed either directly at a VIeC Server, or remotely using VI
eCompose Web and an internet browser. With VIeC Web, VIPP
®
jobs can be submitted to a webenabled VIeC Server, create new or additional VIeC user accounts, and administer VIeC Servers via a
web browser.
VI eCompose output can be dispatched to other programs or functions such as email, fax programs,
or a DocuShare repository using VIeC Dispatch. Dispatch monitors VIeC output and performs postprocessing via a customer-specified back-end. Post-processing is completed in accordance with
parameters and other data embedded in a job, and is communicated to the dispatch mechanism via
the index file of completed VIeC jobs.
VIeC features and functions
VIeC seamlessly integrates the capabilities of VI Compose with the Adobe Acrobat. It provides
numerous enhancements over previous VIPP
• Accepts as input not only standard VIPP
XML mode), but also VIPP
®
jobs submitted as VI Project Containers (.vpc).
• Splits output into multiple PDF files at specified page boundaries through the use of the VIPP
®
to PDF solutions. VIeC:
®
print files (line mode, database mode, native mode,
®
BOOKMARK command.
• Generates a per-job index file to assist you in correlating specific output files with their
corresponding input records.
• Generates an accounting file to enable you to track jobs submitted, page counts per job, and
other job information.
• Tracks the number of pages distilled, pages split, and output files generated via three separate
billing meters.
• Enables clients to submit jobs for processing both locally and remotely using the CPU/disk of a
VIeC Server on a network.
• Enables you to configure multiple VIeC Servers to cooperatively process jobs submitted to a
common file Server (in this configuration, the combination of the shared file Server and VIeC
Servers forms a VIeC Cluster).
• Allows you to use VIPP
create interactive elements when the VIPP
®
PDF Interactive Features, a set of VIPP®commands that allows you to
®
job is rendered into a PDF document.
• Allows you to submit jobs to VI eCompose via lpr, enabling you to use VIeC from a mainframe
host and/or enabling automated workflow.
82
Xerox®FreeFlow®VI Compose
User Guide
Page 83

VIPP®and VI Compose overview
• Allows you to submit jobs to VI eCompose from user-defined watched folders, and to ensure that
the submitted files are ready for processing using the file ready check option.
• Allows you to direct the PDF output of multiple jobs to a single bulk directory to facilitate batch or
other automated post-processing of VIeC generated output.
• PDF Splitter module supports PDF Security. Some PDF-Security permissions are passed from the
main PDF document to all child PDF files generated during the split process. This includes unique
PDF passwords per child PDF.
• When a job submission is successfully completed, the PDF documents generated can be found and
viewed by selecting the job folder entry in the Job Status list and double-clicking to invoke a File
Selection dialog.
• VIeC Dispatch provides a mechanism by which VIeC jobs can be sent to other software such as
DocuShare, email, and fax programs.
• VIeC Web allows you to submit VIeC jobs to remote servers without the need for specialized job
submission client software other than a web browser, resulting in less software for network
administrators to maintain.
• VIeC Web and HTTPs can be used to submit VI eCompose jobs through network fire walls where
mapping or mounting a remote drive might not be allowed, making remote VI eCompose Servers
available to users with the appropriate access permissions.
• Provides Multiple Instance support for VIeC and or VIeC Dispatch engine on a single server.
• Cloud ready Web Job Submission Server (WJSS) version available in the standard configuration,
for more information, refer to the FreeFlow VI eCompose User Guide.
FFrreeeeFFllooww®®VVII DDeessiiggnn EExxpprreessss
VI Design Express (VDE) is an application plug-in for use with Adobe®InDesign and Adobe InDesign
Creative Cloud. For information on the supported versions, refer to the FreeFlow VI Design Express
User Guide.
Available as a download, VDE is designed to allow a graphic artist to:
• Create applications that contain variable information.
• Export those applications to a VI Project Container (VPC) file.
• Print the application at production speed on a Xerox VIPP
• Process the VPC using VI Design Pro, VI Explorer, or VI eCompose.
• Emit PDF files directly from VDE.
In addition, VDE allows the graphic artist to do all of that without having to learn VIPP
programming techniques or the VIPP®language.
VDE is available on both Mac OS X and Windows platforms, and is designed to facilitate creation of
variable data applications that take advantage of the speed the VIPP
a familiar design environment.
®
-enabled print device.
®
software provides, from within
®
FFrreeeeFFllooww®®VVII EExxpplloorreerr
VI Explorer is a Graphical User Interface (GUI) program designed to allow programmers to preview
and verify VI jobs and projects, and to provide easy access to Normalization and Demographics
services.
®
Xerox
FreeFlow®VI Compose
User Guide
83
Page 84

®
VIPP
and VI Compose overview
VI Explorer:
• Allows viewing and verification of VIPP
®
jobs.
• Allows printer operators to identify what resources a job might require via Demographics.
• Allows printer operators to break the job up into pieces by generating a page-independent version
of the job via Normalization.
• Integrates Demographics and/or Normalization into a workflow by using the Watched Folders
support for Normalization/Demographics that is shipped with VI Explorer.
• Terminal Services provides the capability to access VIE via Remote Desk Top
FFrreeeeFFllooww®®VVIIPPPP®®MMaannaaggee
VIPP®Manage is a Windows based utility that provides a GUI for the management of VIPP
®
resources on the disk of a VIPP®-enabled desktop or office print device, and for managing VIPP®jobs
and resources on diskless printers.
84
Xerox®FreeFlow®VI Compose
User Guide
Page 85

VIPP®and VI Compose overview
FreeFlow®VI Compose Open Edition
The VIC(OE) software is a modified version of VI Compose software supported on Xerox print
engines. The VIC(OE) software has been modified to install on non-Xerox Windows devices and to
support license activation through normal Xerox channels.
Due to internal operational differences between Xerox and non-Xerox Windows print devices, some
limitations will apply. These limitations exist mainly around the areas of feeding and finishing, but
can also be exist in other areas. For example, in jobs where VIPP
information to the device. Because Xerox has no control over the third party devices, operations that
are normal for Xerox devices may not be allowed on the third party device. Because of these possible
limitations, Xerox recommends that all jobs run to a third party device are fully validated before
running in production.
Because Xerox has no engineering support for non-Xerox Windows production devices, any issue
reported will be validated against a similar Xerox production device. If the Xerox production device
exhibits the same issue, Xerox will fix the issue in a software patch and provide the fix to the
customer to install and verify. If this does not fix the issue on the non-Xerox Windows production
device, Xerox may be unable to assist further.
For more information, refer to FreeFlow
®
VI Compose (Open Edition) Installation and Overview.
®
will attempt to write file position
Xerox
®
FreeFlow®VI Compose
User Guide
85
Page 86

VIPP
®
and VI Compose overview
86
Xerox®FreeFlow®VI Compose
User Guide
Page 87

4
VIPP
This chapter contains:
• Native Mode.............................................................................................................................. 89
• Line Mode.................................................................................................................................. 90
• Database Mode .. ..... ........................ ........................ ..... ........................ ..... ........................ ..... ... 92
• XML Mode ............. ..... ........................ ............................. ........................ ..... ........................ ..... 94
• Prefixed Delimited Transactional Data ..................... ..... ........................ ..... ........................ ........ 97
• Linking the Data with the JDT, DBM, or XJT........... ..... ........................ ........................ ..... ........... 98
• Record Structures ....... ..... ........................ ..... ........................ ............................. ......................... 99
• Record Structures and Mode/Presentation Relationship.................. ..... ........................ ............. 101
• Functions......... ........................ ..... ........................ ..... ........................ ............................. ......... 102
• Conditional Processing .................................................... ............................. ............................ 104
• Dynamic Boxes ................. ..... ........................ ..... ........................ ........................ ..... ................ 105
• Data Driven Graphics ........ .................................................................................. ..................... 106
• Native Mode Prefix .................................................................................................................. 107
• Distribution List... ..... ........................ ............................. ............................. ............................. . 108
®
Data Streams
• End of File....... ..... ........................ ..... ........................ ............................. ............................. ..... 109
• Coding Examples ..... ........................ ........................ ..... ........................ ..... ........................ ..... . 110
®
VIPP
jobs can be sent to print in one or more of these modes:
Native mode The default, a PostScript data stream comprised of
Line mode A non-PostScript data stream processed by the single
®
VIPP
commands only.
®
VIPP
command STARTLM. Line mode is page
oriented; it reads a page of data at a time and prints
that data using either listing or RPE presentation
options as defined in a Job Descriptor Ticket (JDT).
Xerox®FreeFlow®VI Compose
User Guide
87
Page 88

VIPP
®
Data Streams
Database mode A non-PostScript data stream processed by the single
XML mode An XML data stream processed by the single VIPP
®
VIPP
command STARTDBM. Database mode is
record oriented; it reads one record at a time and
calls the Data Base Master (DBM), which processes
the record data. Each call to the DBM can use the
record data to print one or more pages, one or more
lines, or store the record data in memory for use at a
later time.
®
command STARTXML. XML data is parsed and then
printed on pages according to the layout instructions
contained in an XML Job Ticket (XJT).
Note:
Prefixed Delimited Transactional Data
While not a VIPP
®
mode, it is listed here to describe a capability in the VI Design Express
design tool plug-in to Adobe InDesign to generate simple to moderate complex
transactional documents driven by prefixed delimited transactional data. VI Design Express
can also be used to create promotional documents using delimited or promotional XML
data.
The purpose of line mode, database mode, and XML mode as opposed to native mode, is to keep
data production and data presentation as independent as possible, allowing you to design the layout
and update the jobs without modifying the application.
Line mode, database mode, and XML mode also enable processing of data including conditional
processing at the page, record, and field/tag levels at the target VIPP
®
-enabled device. This allows
you to send data files directly to the printer, bypassing lengthy composition steps on the host. The
primary advantages of this method are:
• Faster production of the data file at the host
• Minimum amount of data sent over the network
• Optimal processing speed of PostScript at the printer
The data in line or database mode jobs is further organized into records, or lines, which may have one
of these structure variants:
• Variable or fixed record length
• Control codes or Printer Control Characters (PCC)
• Line printer or field delimited data
• Non-prefixed or prefixed data
All four variants may be combined, which provides 16 different record structures.
VIPP
®
native mode, line mode, database, and XML mode commands are described in the VIPP
®
Language Reference Manual. Many VIPP®commands are available in all three modes.
88
Xerox®FreeFlow®VI Compose
User Guide
Page 89

VIPP®Data Streams
Native Mode
VIPP®native mode refers to files comprised of VIPP®commands only. These commands are used to
place text, images, graphics, logos, forms, and segments directly on a page. Native mode can be used
for these purposes:
• To produce a VIPP
Production of the data stream is accomplished using an application, a converter, or a
postprocessor.
®
native mode data stream that directly controls the page composition process.
• To encode resources such as forms, segments, JDTs, and DBMs. Resources are encoded by the
layout designer using a text editor or any advanced VIPP
®
user interface such as VI Design Pro.
Native mode commands may also be embedded in line mode data streams. Refer to Native mode
prefix .
®
VIPP
mode invocation for these files. For this reason, native mode is the default VIPP
native mode files are processed directly by the PostScript interpreter. There is no explicit native
®
mode.
TIP
To avoid confusion, use the .nm extension for native mode jobs, and the .lm extension for line mode
jobs.
Xerox
®
FreeFlow®VI Compose
User Guide
89
Page 90

®
VIPP
Data Streams
Line Mode
Line mode refers to legacy type data streams, such as LCDS jobs, and is sometimes referred to as line
or print ready data. For more information, refer to LCDS migration. Data typically consists of ASCII or
EBCDIC with fixed or variable length records, and also includes prefixed (tagged) and/or field
delimited data streams. Line mode allows you to read, process, and format the line printer data, lineby-line and column-by-column. It is most often used for transactional type jobs such as a telephone
billing statement.
Use the VIPP
®
STARTLM command to start line mode.
With line mode, the page composition of the line printer data is controlled by a JDT, which is provided
as a parameter to the VIPP
®
VIPP
Line mode is further divided into two presentation options, defined in these sections:
• Listing
• Record processing entry
commands used to define the desired presentation of the line printer data.
®
line mode initiator STARTLM command. A JDT is a file that contains the
LLiissttiinngg
The listing presentation option is the line printer emulation presentation used to print internal sysouts
that do not require sophisticated presentation capabilities.
When this option is used, page layout features such as orientation, margins, grid, font, and form are
defined globally for a page using a JDT. In addition, page numbering, automatic zebra striping, and
frame generation can also be used.
The automatic font scaling feature allows scaling of a fixed pitch font according to the grid, which is
the number of Characters Per Line (CPL) and number of Lines Per Page (LPP). For more information,
refer to SETFONT.
Page delimiting is controlled by setting a maximum number of LPP or using an explicit page delimiter
such as Form Feed (FF) or Skip to channel one when PCC is used. For more information, refer to
SETGRID, SETPCC, SETPBRK, and SETSKIP.
The listing presentation option is initiated by a STARTLM sequence invoking a JDT with listing
specifications.
RReeccoorrdd PPrroocceessssiinngg EEnnttrryy
The Record Processing Entry (RPE) presentation option allows each record to be split into fields that
can be printed any number of times and at any location on the page. RPEs can contain specific
presentation attributes such as position on the page, line spacing, font, color, alignment, and rotation.
The RPE presentation option is initiated by a STARTLM sequence, which invokes a JDT that contains
RPE definitions.
The RPE fields are defined horizontally using one of these:
• character position and field length
• field number
The RPE fields are defined vertically using one of these:
90
Xerox®FreeFlow®VI Compose
User Guide
Page 91

VIPP®Data Streams
• line number (FROMMLINE)
• prefix (SETRPEPREFIX, RPEKEY)
Refer to FROMLINE and RPEKEY for more information.
Field definitions, location on the page, and presentation attributes for a given group of lines or a
given prefix are coded in an RPE definition. Page delimiting is controlled the same way as in the
listing presentation option. Line printer files built with one data record per page, referred to as
unformatted records, can also be processed, one line per page, using this option.
Xerox
®
FreeFlow®VI Compose
User Guide
91
Page 92

®
VIPP
Data Streams
Database Mode
Database mode is used to process a single file containing delimited records. The delimited file is
typically created as an extraction or query from a relational database. Jobs processed using database
mode include mail-merge or promotional jobs.
Database mode uses these file types:
• Database file
• Data Base Master (DBM) for processing variable fields
• JDT for global page layout definitions (optional)
Records in a database file may be fixed or variable in length, and must have the same sequence and
number of fields. Use the SETDBSEP command to define the field delimiter as any character such as a
comma. The structure of the database file is defined in the first record, which consists of the field
names and their sequence within the record.
A Data Base Master is a template file in which field names are used as place holders for each variable
item. It can also reference other VIPP
®
VIPP
place holders. PostScript or EPS files can be called as forms or segments in a DBM.
Database mode is initiated by submitting a database file beginning with a STARTDBM sequence.
STARTDBM passes a DBM name to VI Compose. VI Compose reads the first record of the database
file and registers the field names. For subsequent records, VI Compose replaces the DBM field names
with the appropriate value, then recomposes and images each page of the DBM. Dynamic
composition of the page occurs when lines and paragraphs using variables from the database file are
reformatted. Variables can also be used to reference forms, logos, and media.
When no DBM name is provided to the STARTDBM command, a DBM name must be supplied with
each record in a DBM_NAME field. Use this capability to process a different DBM for each record.
Page transition is controlled by the PAGEBRK command in the DBM. Page overflow is controlled by
the SETLKF command.
Reference database fields in the DBM using one of these methods:
• Use a field name to directly replace a string operand of any native mode command such as SHx,
• Embed the field name(s) in a string, encapsulated between "$$" and ".", or between "[=" and "=]",
native mode. PostScript cannot be used to code a DBM because PostScript drivers do not allow
Note: Use .dbf and .dbm extensions for database files and Data Base Masters to facilitate file
type identification.
SETFORM, SETMEDIA, ICALL, or SCALL.
and followed by the VSUB command. VSUB replaces each field name by its value when the DBM
is processed. Use this method when a field name must be merged with other fixed text, like a field
name occurring in the middle of a paragraph.
®
resources such as segments and images. The DBM is coded in
Global page layout definitions (such as duplex, page size, Multi-Up, index definitions, and others) can
be executed once along with the DBM. Place the definitions before the STARTDBM command either
in the database file or grouped in a JDT called by SETJDT, or include them in the DBM using an IF/
ENDIF construct.
92
Xerox®FreeFlow®VI Compose
User Guide
Page 93

VIPP®Data Streams
SSeelleeccttiinngg DDaattaabbaassee FFiieelldd NNaammeess
A database field name must be recognized by VI Compose as being a valid (legal) field name. All field
names must be defined using 7-bit ASCII characters and must not contain spaces or any of these
characters:
% / \ ( ) { } [ ] < >
Failure to use a valid field name can result in VI Compose errors or unexpected results. To avoid these
issues when defining a field name, Xerox recommends use of the following syntax:
XXXXzzzzzz
Where:
X is one or more uppercase alphanumeric (ASCII) characters.
z is one or more lowercase alphanumeric (ASCII) characters.
Avoid using database names that contain all uppercase or all lowercase characters as doing so may
inadvertently create a field name that conflicts with a PostScript or VIPP
®
reserved word. This conflict
creates an illegal field name. Also avoid field names that use all numeric characters or strings that
could be interpreted as a numeric value, again these are considered illegal field names.
Examples of valid field names:
• Fname
• FIRSTname
• Form101
Examples of field names to avoid:
fname all lower case field names can conflict with PostScript Reserved Words
®
FNAME all upper case field names can conflict with VIPP
(Fname) field names cannot be enclosed between ( ), { }, [ ] or < > characters
F name field names cannot contain spaces
101 will be interpreted as a numeric value and is an invalid field name
16#10 is treated as a radix number and is an invalid field name
123E5 is treated as a real number and is an invalid field name
Any non ASCII string field names must be comprised of ASCII characters only
Reserved Words
Xerox®FreeFlow®VI Compose
User Guide
93
Page 94

®
VIPP
Data Streams
XML Mode
XML mode enables the processing of XML data.
XML mode is initiated by a STARTXML sequence. This sequence can be placed at the beginning of an
XML file together with an initial % ! line or used in a submission file after a SETLMFILE sequence that
references an XML file.
The name of an XJT must be provided as an operand to STARTXML.
An XJT is a file that contains instructions on how to process and arrange the XML data into a
document. It is similar to a line mode JDT. It contains all global layout definitions for the document
(orientation, forms, medias, frames, fonts, colors, etc.) plus an XML Processing Definition (XPD) table
(BEGINXPD/ENDXPD) that describes specific actions to be performed on specific XML tags (BTA/ETA,
BTS/ETS).
XXMMLL DDaattaa SSttrruuccttuurree OOvveerrvviieeww
XML data is ASCII text data organized in a tree structure.
Each node of the tree has a name, or tag, encapsulated between left and right angle brackets (< and
>). Tags are usually found in pairs consisting of a start-tag and an end-tag.
Each node may contain text between the start and end tags. Nodes with no contents may be
compacted as a single tag called an empty-tag. The formats of the 3 types of tags are:
• start-tag <Tagname>
• end-tag </Tagname>
• empty-tag <Tagname/>
For more information on the XML language, refer to http://www.w3.org/TR/REC-xml
XXMMLL VVaarriiaabblleess
During the processing of an XML file VI Compose accumulates the node contents and places them
into a dictionary of variables. Each variable is registered with a VIPP
A VXVpath for a given node content consists of all the parent node names including the node itself
preceded by a carat (^).
Example:
Assuming this XML data tree:
®
XML Variable path (VXVpath).
The node contents John will be registered with this VXVpath:
94
Xerox®FreeFlow®VI Compose
User Guide
Page 95

VIPP®Data Streams
^invoices^invoice^customer^fname
When a node tag has attributes, the attribute values will be registered with a VXVpath created by
concatenating the VXVpath of the node and the attribute name preceded by @. In the example
above, the attribute values home and work will be registered with this VXVpath:
^invoices^invoice^customer^phone^@type
A VXVpath can be abbreviated to any sub-path extracted from its right part. For example, the first
VXVpath above can be abbreviated to:
^invoice^customer^fname
Such a sub-path is called a VXVname.
A VXVname is mapped to its VXVpath according to the current context at the time it is used, refer to
BTA and BTS commands. When a VXVname maps two or more VXVpaths, VIPP
®
chooses the closest
match to the current VXVpath. When it is not unique the job will abort with the message:
®
VIPP
_ambiguous_name in _name
meaning that the VXVname must be additionally qualified to remove the ambiguity.
A VXVname can be used in the same manner as any variable name to replace a VIPP
®
command
operand, or it can be embedded in a VSUB string.
When a VXVpath has not yet been created it returns an empty string. When a node is entered its
VXVpath, and all previous VXVpaths that are children of this node, are reset. For these reasons
VXVpaths do not need to be explicitly initialized or reset.
In addition to native VXVpaths created by the processing of the XML data, create custom VXVnames
using the SETVAR or ADD / SUB commands.
A custom VXVname will be registered with a VXVpath created by expanding the VXVname with the
current VXVpath. Thus, custom VXVnames benefit from the implicit initialization and reset of
VXVpaths.
Example:
Assuming the XML data above, the phone numbers may be registered by this code during the
processing of the phone data:
In this example ^customer^hphone and ^customer^wphone are registered with these VXVpaths:
This more streamlined coding can be used to produce the VXV paths that follow:
Xerox®FreeFlow®VI Compose
User Guide
95
Page 96

®
VIPP
Data Streams
PPrriinnttiinngg XXMMLL VVaarriiaabblleess
The XML file may be encoded using any supported encoding, and the node contents, the text
between the start and end tags assigned to XML variables can be printed with any SHx command.
The font used must have been encoded (see SETENCODING) with an encoding matching the XML
file.
XML files encoded using UTF-16 are supported, providing the XML data begins with a UTF-16 BOM
(OxFFFE or OxFEFF). Note that UTF-16 XML data is converted to UTF-8 on the fly, so the node
contents must be printed with UTF-8 encoded fonts.
SSttrriippppiinngg BBllaannkk aanndd CCoonnttrrooll CChhaarraacctteerrss
Stripping duplicate and extra spaces and ignoring control characters such as CR, LF, and tab, is the
regular behavior of an XML parser. There are two ways to change this behavior:
The XML way Place the data for which spaces and control characters must be preserved withii
CDATA sections encapsulated between special delimiters.
<![CDATA[ ...data ...]]>
so for example:
<string3><![CDATA[ 3 spaces ]]></string3>
The VIPP
®
way Set the /TextFilter parameter to false to disable spaces and control character
filtering. However, when this parameter is set to false, unexpected results may occur
because the control characters used to structure the XML data (for viewin in a text
editor for instance) are now part of the contents.
Use one of these examples to work around these effects:
• Add a third empty proc before ETA (partial contents action):
• Specifically set TextFilter for each node for which you want to turn off the filtering.
96
Xerox®FreeFlow®VI Compose
User Guide
Page 97

VIPP®Data Streams
Prefixed Delimited Transactional Data
VI Design Express has the capability to create simple to moderately complex transactional
documents driven by prefixed delimited transactional data files. For more complex transactional
applications, VI Design Express can be used to create the base of the transactional document and the
VI Design Pro tool or Xerox Professional Services can be engaged to add the complexity required.
Transactional documents deliver critical content to the end customer. Examples of transactional
documents include Phone Bills, Credit Card Statements, Invoices, Inventory Reports, etc. Transactional
documents that include cross selling advertising are called Trans Promo documents and can be used
to add value to the transactional documents you create. Using VI Design Express and prefixed
delimited data you can create these types of documents quickly and easily.
Below is an example of a prefixed transactional data file. This example shows three customer record
sets.
For more information on using FreeFlow VI Design Express to generate transactional documents using
prefixed delimited transactional data, refer to the Prefixed Delimited Transactional Data section of
the FreeFlow VI Design Express User Guide.
Xerox
®
FreeFlow®VI Compose
User Guide
97
Page 98

®
VIPP
Data Streams
Linking the Data with the JDT, DBM, or XJT
To create the link between the data file and the JDT, DBM, or XJT file, use one of these methods:
• Use the application program to produce a STARTLM or STARTDBM or STARTXML sequence at
the top of the data file.
• Use the job or print submission process, for example, JCL or the print server task to:
– parse the print file data or print file attributes to determine the appropriate JDT, DBM, or XJT
to use
– concatenate a STARTLM or STARTDBM or STARTXML sequence at the top of the print file
• Use the print submission process to create a submission file that references both the print file
(SETLMFILE) and the JDT (STARTLM), or DBM (STARTDBM), or XJT (STARTXML) and forwards it to
the printer rather than the print file.
• Use the XGFNub or Virtual printer setting available on DocuPrint NPS or FreeFlow Print Server
systems to start the printer using the appropriate JDT, DBM, or XJT file. This allows just the data
file without any special VIPP
®
start commands to be sent directly to the printer.
98
Xerox®FreeFlow®VI Compose
User Guide
Page 99

VIPP®Data Streams
Record Structures
The VIPP®language supports these record structures:
Record length Either variable or fixed length
Vertical control Through control codes or Printer Control Characters
(PCC)
Line printer and field delimited data
Prefix Either non-prefixed or prefixed data
RReeccoorrdd LLeennggtthh
Records can have either a variable or fixed length.
A record with variable length format is a succession of bytes ending with a valid record delimiter such
as a LF, CR, or CRLF. This is the default. Maximum record length is provided by the SETBUFSIZE
command.
A record with fixed length format consists of a fixed number of bytes regardless of the content.
Record size is provided by the SETBUFSIZE command (F) option.
Note: Variable and fixed length records cannot be mixed within a job.
VVeerrttiiccaall CCoonnttrrooll
Vertical spacing is controlled by control codes or by Printer Control Characters (PCC).
Control codes control vertical spacing with specific control characters (such as CR, LF, or FF) in the
data stream. This is the default.
Printer Control Characters (PCC) inserted as the first byte of each record will control vertical spacing.
Refer to BEGINPCC and SETPCC for PCC definition and enabling information.
Keep this information in mind:
• Vertical control mechanisms are exclusive. When PCC is used, FF are processed as print data. CR
and LF are processed as record delimiters but do not influence the vertical spacing. For this reason
CR and LF cannot be used as PCC values for variable length records as they are first interpreted as
record delimiters.
• On fixed length records, CR and LF are processed as print data. When no PCC is used each record
is assigned a print-and-space spacing.
• On variable length records with no PCC, the sequences CR, LF, and CRLF are all equivalent to print-
and-space. Specific overprint processing (single CR) can be enabled using the OVERPRINT_on
command.
• When no PCC is used, an FF occurring in the middle of a record causes the record to be split in 2
parts. This behavior (as well as the value of the FF sequence) can be changed by the SETPBRK
command.
• Advanced vertical control is also available through the SETSKIP command. Refer to SETSKIP for
more information.
®
Xerox
FreeFlow®VI Compose
User Guide
99
Page 100

®
VIPP
• Vertical control only applies to line mode. In database mode vertical control is performed by
Data Streams
native mode commands in the DBM.
LLiinnee PPrriinntteerr aanndd FFiieelldd DDeelliimmiitteedd DDaattaa
Data can be formatted either as line printer or as field delimited data.
When formatted as line printer data, each record is a line of data formatted with a line printer
presentation. Print files that consist of line printer records are intended for printing on impact printers.
This format is intended for use with the Listing or RPE presentation options.
Field delimited records consist of a succession of fields separated by a predefined field delimiter. In
general, these files are produced by a database extraction. This format is intended for use with
database mode or the Line mode RPE presentation option.
Field delimited is a compact format provided for jobs with a finite number of data items per record,
such as mailings, insurance contracts, and registration files.
PPrreeffiixx
A prefixed record consists of a prefix followed by data, line printer, or field delimited related to the
prefix. This format is intended for use with the RPE presentation option, which allows you to locate
and place each field in the record.
Prefix is a compact format that does not contain unnecessary spaces. This format is provided for jobs
such as invoices or bank statements that have an indeterminate number of data items per page.
100
Xerox®FreeFlow®VI Compose
User Guide
 Loading...