

Page 1

9.0
701P50824
FreeFlow Process Manager® Operator
and Administrator Guide
FreeFlow 9.0 Process Manager
Operator/Administrator Guide
Page 2

© 1996-2010 Xerox Corporation. All rights reserved. Xerox®, FreeFlow®, FreeFlow
Makeready®, FreeFlow Output Manager®, FreeFlow Process Manager®, and the
sphere of connectivity design are trademarks of Xerox Corporation in the US
and/or other countries.
Adaptec®, the Adaptec logo, SCSlSelect®, and EZ-SCSI® are trademarks of
Adaptec, Inc.
Adobe PDFL - Adobe PDF Library Copyright © 1987-2008 Adobe Systems
Incorporated.
Adobe®, the Adobe logo, Acrobat®, the Acrobat logo, Acrobat Reader®, Distiller®,
Adobe PDF JobReady™, PostScript®, and the PostScript logo are either registered
trademarks of Adobe Systems Incorporated in the United States and/or other
countries. All instances of the name PostScript in the text are references to the
PostScript language as defined by Adobe Systems Incorporated unless otherwise
stated. The name PostScript also is used as a product trademark for Adobe
Systems’ implementation of the PostScript language interpreter, and other Adobe
products.
Copyright 1987 - 2008 Adobe Systems Incorporated and its licensors. All rights
reserved.
Autologic® is a registered trademark of Autologic Information International,
Inc.Compaq® and QVision®® are registered United States Patent and Trademark
Office, for Compaq Computer Corporation.
DEC, DEC RAID, and Redundant Array of Independent Disks are registered
trademarks of Digital Equipment Corporation.
Dundas - This software contains material that is © 1997-2000 DUNDAS
SOFTWARE LTD., all rights reserved.
Imaging Technology provided under license by Accusoft Corporation.
ImageGear © 1996-2005 by AccuSoft Corporation. All Rights Reserved.
Intel® and Pentium® are registered trademarks of Intel Corporation.
Novell® and NetWare® are registered trademarks of Novell, Inc. in the United
States and other countries.Oracle® is a registered trademark of Oracle Corporation
Redwood City, CaliforniaScanFix® Image Optimizer and ImagXpress are either
registered marks or trademarks of Pegasus Imaging Corp. Copyright© 1997-2008
Pegasus Imaging Corp. All rights reserved.
Sony™ and Storage by Sony™ are trademarks of Sony.
Preps™ is a registered trademark of Creo Inc. All rights reserved.
PANTONE® and other Pantone Inc. trademarks are the property of Pantone Inc.
All rights reserved.
Quark® and QuarkXpress® are registered trademarks of Quark, Inc.StorageView
is a trademark of CMD Technology, Inc.
™
TIFF® is a registered trademark of Aldus Corporation.
Page 3

Windows®, Windows XP®, Windows Server® 2003, and Internet Explorer are
trademarks of Microsoft Corporation; Microsoft® and MS-DOS® are registered
trademarks of Microsoft Corporation.
Portions Copyright © 2001 artofcode LLC.
This software is based in part on the work of the Independent JPEG Group.
Portions Copyright © 2001 URW++. All Rights Reserved.
This product includes software developed by the Apache Software Foundation.
Copyright © 1999-2003 The Apache Software Foundation. All rights reserved.
This software is based in part on the work of Graeme W. Gill.
© Press-sense Ltd. 2002-2007. All rights reserved
Includes Adobe® PDF Libraries and Adobe Normalizer technology
The Graphics Interchange Format© is the Copyright property of CompuServe
Incorporated. GIFSM is a Service Mark of CompuServe Incorporated.
Portions contain an implementation of the LZW algorithm licensed under U.S.
Patent 4,558,302
Parts of this software Copyright © 2004-2006 Enterprise Distributed Technologies
Ltd. All Rights Reserved.
Parts of this software Copyright ©1995-2003, The Cryptic Foundation Limited.
All Rights Reserved.
Parts of this software are a SSLv3/TLS implementation written by Eric Rescorla
by Claymore Systems, Inc. All Rights Reserved.
Parts of this software Copyright © 2002, Lee David Painter and Contributors.
Contributions made by Brett Smith, Richard Pernavas, Erwin Bolwidt.
Parts of this software Copyright © 1995-2005, Jean-loup Gailly and Mark Adler.
Page 4

Page 5

Table of Contents
1 About this guide........................................................................................1-1
Audience..................................................................................................................................1-1
How to recognize important information..................................................................1-1
Conventions..............................................................................................................1-1
Indicators...................................................................................................................1-2
Related information............................................................................................................1-2
FreeFlow Process Manager documentation.................................................1-3
Windows related information............................................................................1-3
Using FreeFlow Process Manager Online Help.........................................................1-3
Obtaining additional support..........................................................................................1-3
2 About FreeFlow Process Manager .....................................................2-1
FreeFlow Process Manager applications.....................................................................2-1
The Workflow Builder application....................................................................2-2
The Workflow Submission Client application..............................................2-2
The Workflow Job Manager application.......................................................2-3
Post-installation setup........................................................................................................2-3
Logging in to the FreeFlow Process Manager applications.................................2-7
Authorization error message..............................................................................2-7
Group membership and authorization..........................................................2-7
Managing production printers........................................................................................2-8
Xerox FreeFlow Common Printer Administrators group..........................2-9
Registering and adding a production printer..............................................2-9
3 Workflow Builder........................................................................................3-1
About Workflow Builder.....................................................................................................3-1
Workflow process icons......................................................................................................3-2
Building workflows...............................................................................................................3-7
FreeFlow Process Manager® Operator and Administrator Guide
FreeFlow 9.0 Process Manager Operator/Administrator Guide
i
Page 6

Table of Contents
Configuring process settings........................................................................................3-10
Rules for building workflows...............................................................................3-8
Building a new workflow......................................................................................3-8
Creating fail branches...........................................................................................3-9
Exporting workflows..............................................................................................3-9
Importing workflows ............................................................................................3-9
Ensuring imported workflow compatibility..................................3-10
About Input............................................................................................................3-10
Configuring Image Enhancement settings...............................................3-11
Configuring Convert Settings..........................................................................3-11
Manual Conversion tab........................................................................3-12
Microsoft® Office conversion setup...............................................3-13
Restrictions on PDF conversion.........................................................3-14
Working with PDF files..........................................................................3-14
About Join...............................................................................................................3-15
Limitations for Join................................................................................3-15
Configuring Optimize Settings.......................................................................3-16
To configure the General Optimize settings ...............................3-16
About PDF Boxes settings...................................................................3-17
About PDF Boxes ......................................................................3-18
About Color settings..............................................................................3-19
Importing a legacy workflow with a Color Manage node
.......................................................................................................................3-20
About Spot Colors settings ................................................................3-21
To configure Image Quality settings .............................................3-21
Ensuring Color Manage workflow consistency between the
server and a remote client ...........................................................3-22
Configuring Preflight settings.........................................................................3-22
To generate the preflight profile repository on a clean
install ....................................................................................................3-23
ii
FreeFlow Process Manager® Operator and Administrator Guide
FreeFlow 9.0 Process Manager Operator/Administrator Guide
Page 7

Table of Contents
To configure Preflight settings .........................................................3-23
Upgrading legacy workflows that contain Job Level Edit nodes
.....................................................................................................................................3-24
About Watermarks..............................................................................................3-24
About Bates numbers ........................................................................................3-24
Adding page numbers ......................................................................................3-24
Insert, Duplicate, and Delete pages.............................................................3-25
Inserting pages........................................................................................3-25
Duplicating pages..................................................................................3-27
Deleting pages.........................................................................................3-28
Adding a Barcode................................................................................................3-28
To configure Barcode settings ..........................................................3-29
To configure the barcode readable text .......................................3-31
To configure barcode data ................................................................3-32
Configuring Imposition settings....................................................................3-32
To configure Imposition settings - General tab .........................3-33
Guidelines for Cell Clustering ............................................................3-34
About Job types .....................................................................................3-36
To configure Imposition settings - Crop Marks tab..................3-37
PDF Page Box Considerations ...........................................................3-39
Maximum N-Up considerations .......................................................3-40
Automatic stock type considerations ............................................3-41
Configuring Preps settings ..............................................................................3-42
Limitations for Imposition and Preps ............................................3-43
About Review.........................................................................................................3-43
Configuring Notify settings.............................................................................3-44
Setting up a watermark in an email attachment ..................................3-46
Configuring Print settings.................................................................................3-46
To configure Print settings..................................................................3-47
Fault handling for Print ........................................................................3-47
FreeFlow Process Manager® Operator and Administrator Guide
FreeFlow 9.0 Process Manager Operator/Administrator Guide
iii
Page 8

Table of Contents
Creating conditional branches.....................................................................................3-52
Configuring Save settings ................................................................................3-47
Saving a job ticket with the PDF file for reprinting...................3-48
Configuring JDF Export settings....................................................................3-49
About JDF Export options...................................................................3-49
Fault handling for JDF Export............................................................3-50
JDF and Color Manage.........................................................................3-50
Limitations when creating JDF Tickets in Adobe Acrobat
Professional......................................................................................................3-51
To specify the number of pages.......................................................3-51
To specify the pages in the range....................................................3-52
Guidelines for successful conditional branching.....................................3-53
Adding and configuring branch conditions.................................3-54
Conditional branch conditions..........................................................3-56
Condition Definitions............................................................................3-57
Linking conditional branches ............................................................3-58
About external process settings.....................................................................3-59
About the Copy Count Divisor......................................................................................3-59
About the Copy Count Divisor and Review nodes................................................3-60
To enable the Copy Count Divisor..............................................................................3-60
Setting up repository credentials................................................................................3-60
Advanced administration...............................................................................................3-61
Checking the status of a process ..................................................................3-61
Setting the number of concurrent processes and the copy count
divisor.................................................................................................................3-61
About hot folders...............................................................................................................3-62
Hot folders and Join............................................................................................3-62
Hot folders and Zip files.......................................................................3-62
Hot folders and JDF...............................................................................3-63
Hot folders and error checking..........................................................3-64
iv
FreeFlow Process Manager® Operator and Administrator Guide
FreeFlow 9.0 Process Manager Operator/Administrator Guide
Page 9

Table of Contents
Hot folders: supported files ...............................................................3-64
Hot folders and read-only files..........................................................3-64
Hot folders on mapped or shared drives and resources..........3-64
Limitations when setting up directories as input/output
hot folders for more than one feature.....................................3-64
To manage hot folders.......................................................................................3-64
Managing hot folders.........................................................................................3-65
Setting up or modifying a hot folder...........................................................3-65
Deleting a hot folder .........................................................................................3-66
Pausing and resuming hot folder monitoring...........................................3-67
Configuring the hot folder system settings...............................................3-67
Submitting a job to a hot folder....................................................................3-68
Submitting an RDO to a hot folder...............................................................3-68
Submitting a job ticket file (*.xpf) to a hot folder for
reprinting..........................................................................................................3-69
To submit an .xpf job ticket to a hot folder for
reprinting.............................................................................................3-70
Error conditions.......................................................................................3-71
Imposition handling with .xpf tickets.............................................3-71
Submitting .xml workflow files to a hot folder.........................................3-71
To submit .xml workflow files to a hot folder..............................3-72
Error conditions for dynamic workflows........................................3-72
Submitting .vpc files to a hot folder ............................................................3-72
VPC file limitations.................................................................................3-73
Using third party external processes.........................................................................3-73
Setting up external processes.........................................................................3-74
Managing external processes.........................................................................3-74
Guidelines for using third party external processes...............................3-75
Setting up third party input and output hot folders................3-76
Setting up folder-based profiles.......................................................3-76
FreeFlow Process Manager® Operator and Administrator Guide
FreeFlow 9.0 Process Manager Operator/Administrator Guide
v
Page 10

Table of Contents
Setting up CLI profiles..........................................................................3-77
Adding or editing a CLI profile..........................................................3-78
Setting up the SMTP Server.............................................................................3-78
Setting up the proxy server .............................................................................3-79
Automatic Job and Job History Deletion.................................................................3-79
Archive Job History Records Setup................................................................3-79
Optimizing system performance with hot folder and job deletion
options...............................................................................................................3-79
4 Workflow Submission Client..................................................................4-1
About Workflow Submission Client...............................................................................4-1
Workflow Submission Client main window................................................................4-2
Job submission......................................................................................................................4-2
Submitting a job.....................................................................................................4-3
Limitations for Save File List...............................................................................4-3
Submitting Zip files................................................................................................4-3
Submitting VI Containers (.vpc) ......................................................................4-4
Submitting a file with saved job ticket information for
reprinting.............................................................................................................4-4
About RDOs............................................................................................................................4-5
Submitting RDOs....................................................................................................4-5
To submit an RDO and produce an RDO (RDO reprint).............4-5
RDO limitations.......................................................................................................4-6
Remote Workflow Submission Client...........................................................................4-6
5 Workflow Job Manager...........................................................................5-1
About Workflow Job............................................................................................................5-1
Logging into Workflow Job Manager...........................................................................5-2
The Workflow Job Manager main window................................................................5-2
The Status area.......................................................................................................5-3
The Jobs area ..........................................................................................................5-4
vi
FreeFlow Process Manager® Operator and Administrator Guide
FreeFlow 9.0 Process Manager Operator/Administrator Guide
Page 11

Table of Contents
The Jobs area columns ........................................................................................5-4
Managing Jobs......................................................................................................................5-4
About the status of a job.....................................................................................5-5
About purging report data..................................................................................5-6
About documents in Adobe Acrobat..............................................................5-6
Viewing preflight results......................................................................................5-7
Viewing print results..............................................................................................5-8
Modifying workflow settings..............................................................................5-9
Pause a job.............................................................................................................5-10
Approve a job at a Review step......................................................................5-11
Fail a job..................................................................................................................5-12
Modifying the copy count................................................................................5-13
Printing a hardcopy proof.................................................................................5-14
Adding a recipient to a Notify step with no recipient address
specified............................................................................................................5-16
Creating reports.................................................................................................................5-17
Viewing Web Services Job Instructions....................................................................5-19
Remote Workflow Job Manager Client.....................................................................5-20
Managing jobs from third party management information system
(MIS)................................................................................................................................5-21
Assigning and configuring a workflow for an incoming third
party job............................................................................................................5-21
Selecting files for an incoming third party job.........................................5-22
Viewing the JDF file for an incoming third party job............................5-22
Viewing the job instructions for an incoming third party job............5-23
6 MAX Submission Client...........................................................................6-1
MAX Submission Client......................................................................................................6-2
MAX Submission Client Interface..................................................................................6-3
Configure Hot Folders and Custom Field Labels........................................6-3
Shop Order.................................................................................................................6-4
FreeFlow Process Manager® Operator and Administrator Guide
FreeFlow 9.0 Process Manager Operator/Administrator Guide
vii
Page 12

Table of Contents
Add Order Item.......................................................................................................6-5
Address Book............................................................................................................6-5
Order Items Files and Folders..........................................................................................6-6
7 Setting up Preps.........................................................................................7-1
Starting Preps Automation Server.................................................................................7-1
To configure the Preps default workflow....................................................................7-2
Creating and saving Preps Job files..............................................................................7-3
Selecting a device type for Preps versions prior to 5.3.3......................................7-3
Missing hardware key error..............................................................................................7-3
Using Preps with Adobe Acrobat...................................................................................7-4
viii
FreeFlow Process Manager® Operator and Administrator Guide
FreeFlow 9.0 Process Manager Operator/Administrator Guide
Page 13

1
About this guide
This guide provides information and procedures for using the FreeFlow Process
Manager application.
This chapter explains the information found in this guide and how the information
is organized, including:
• Identifying the audience and the basic skills required to use this guide
effectively
• Explaining the standard conventions and cues that highlight important
information
• Listing related documentation you might find helpful
• Listing available online FreeFlow Process Manager Help systems
• Providing information on obtaining additional information
NOTE
If you are using Process Manager for the first time, it is recommended that
you read About FreeFlow Process Manager , in this guide.
Audience
This guide is intended for administrators and operators.
How to recognize important information
The following sections provide the conventions and indicators that are used in
this guide.
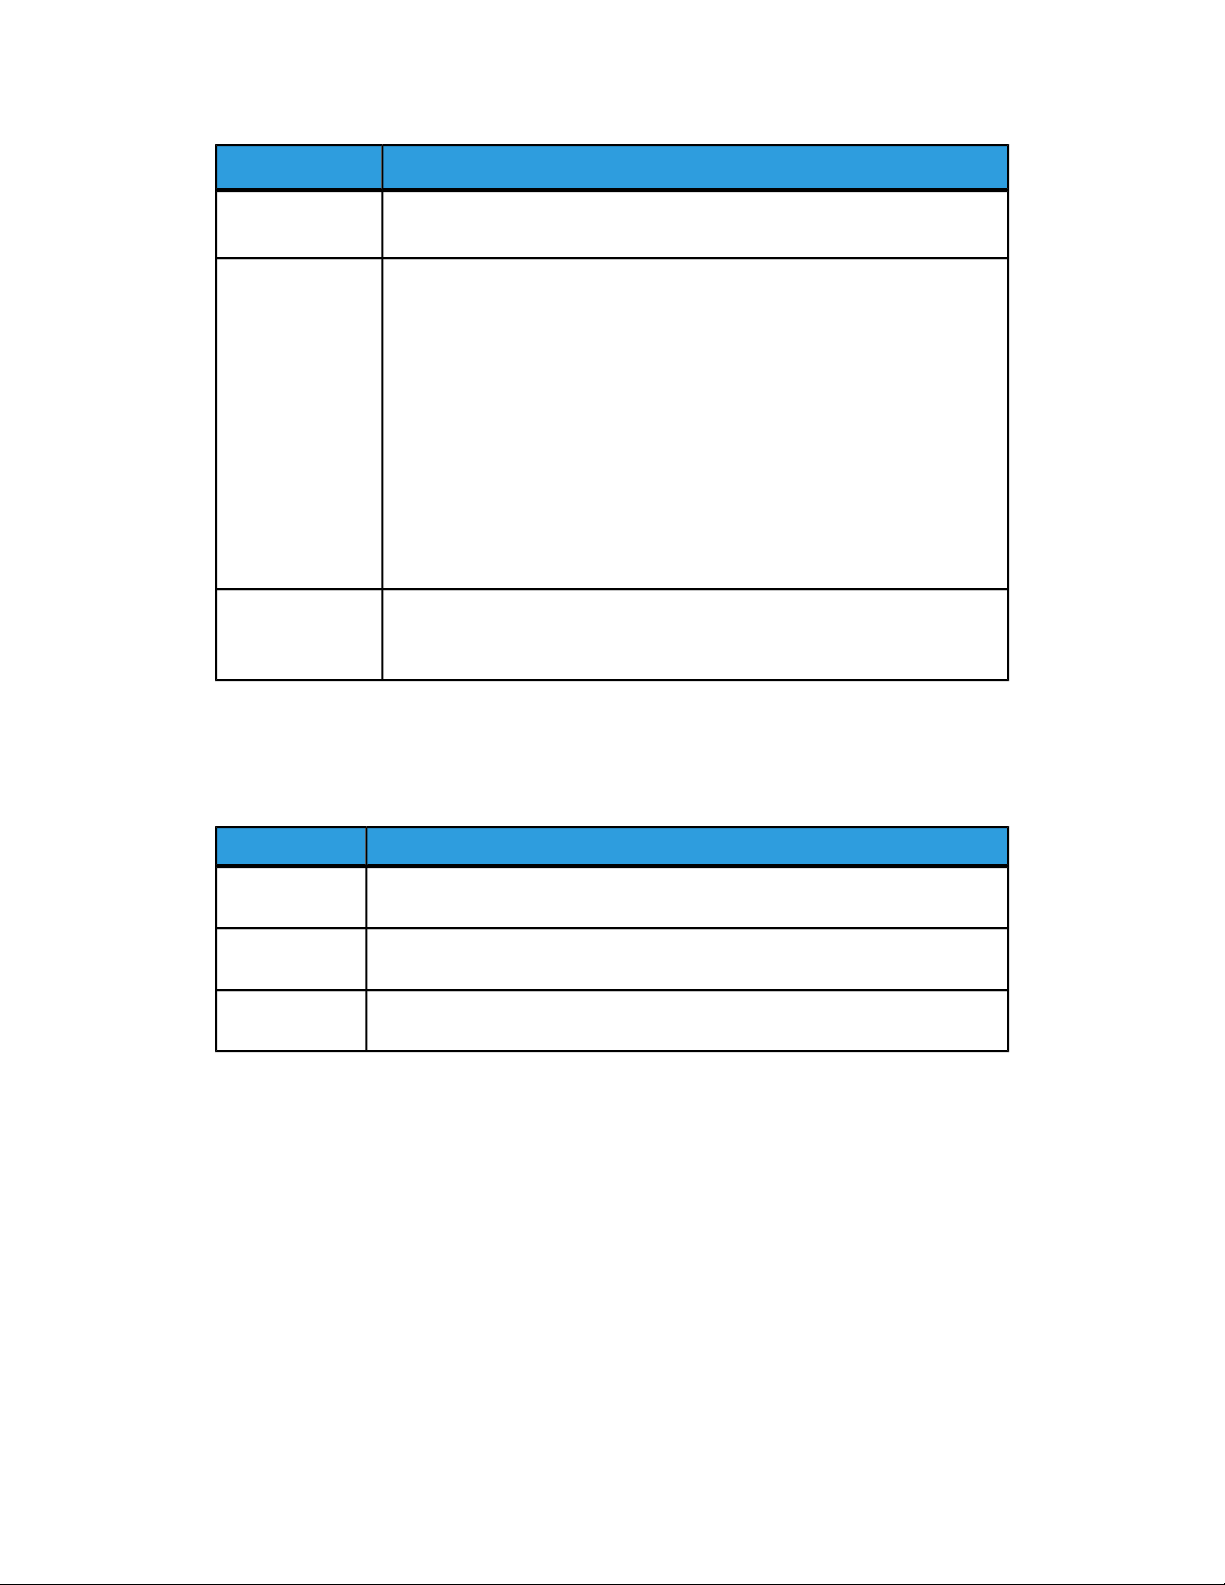
Conventions
This guide uses the conventions listed in the table below to help you recognize
information.
FreeFlow Process Manager® Operator and Administrator Guide
FreeFlow 9.0 Process Manager Operator/Administrator Guide
1-1
Page 14
About this guide
DescriptionConvention
<Angle brackets>
Bold
Italics
Variable information is enclosed in angle brackets (for example, select
<filename>).
• Names of options you select, including toolbar buttons and buttons in
dialog boxes, are enclosed in square brackets (for example, select Close).
Menu commands are also displayed in square brackets, with the menu
name appearing first, then a colon, followed by the option name (for
example, select File > Close).
• Text you should enter exactly as it appears is displayed in bold (for
example, enter test1.rdo).
• Within procedures, the names of keys to press are displayed in capital
letters and enclosed in angle brackets (for example, press ESCAPE).
Keyboard combinations are represented by the plus sign (+) between
names of keys (for example, press CONTROL+C to copy).
Titles of documents and manuals that provide additional information on
the current topic are displayed in italics (for example, theProduction Printing
Setup Guide).
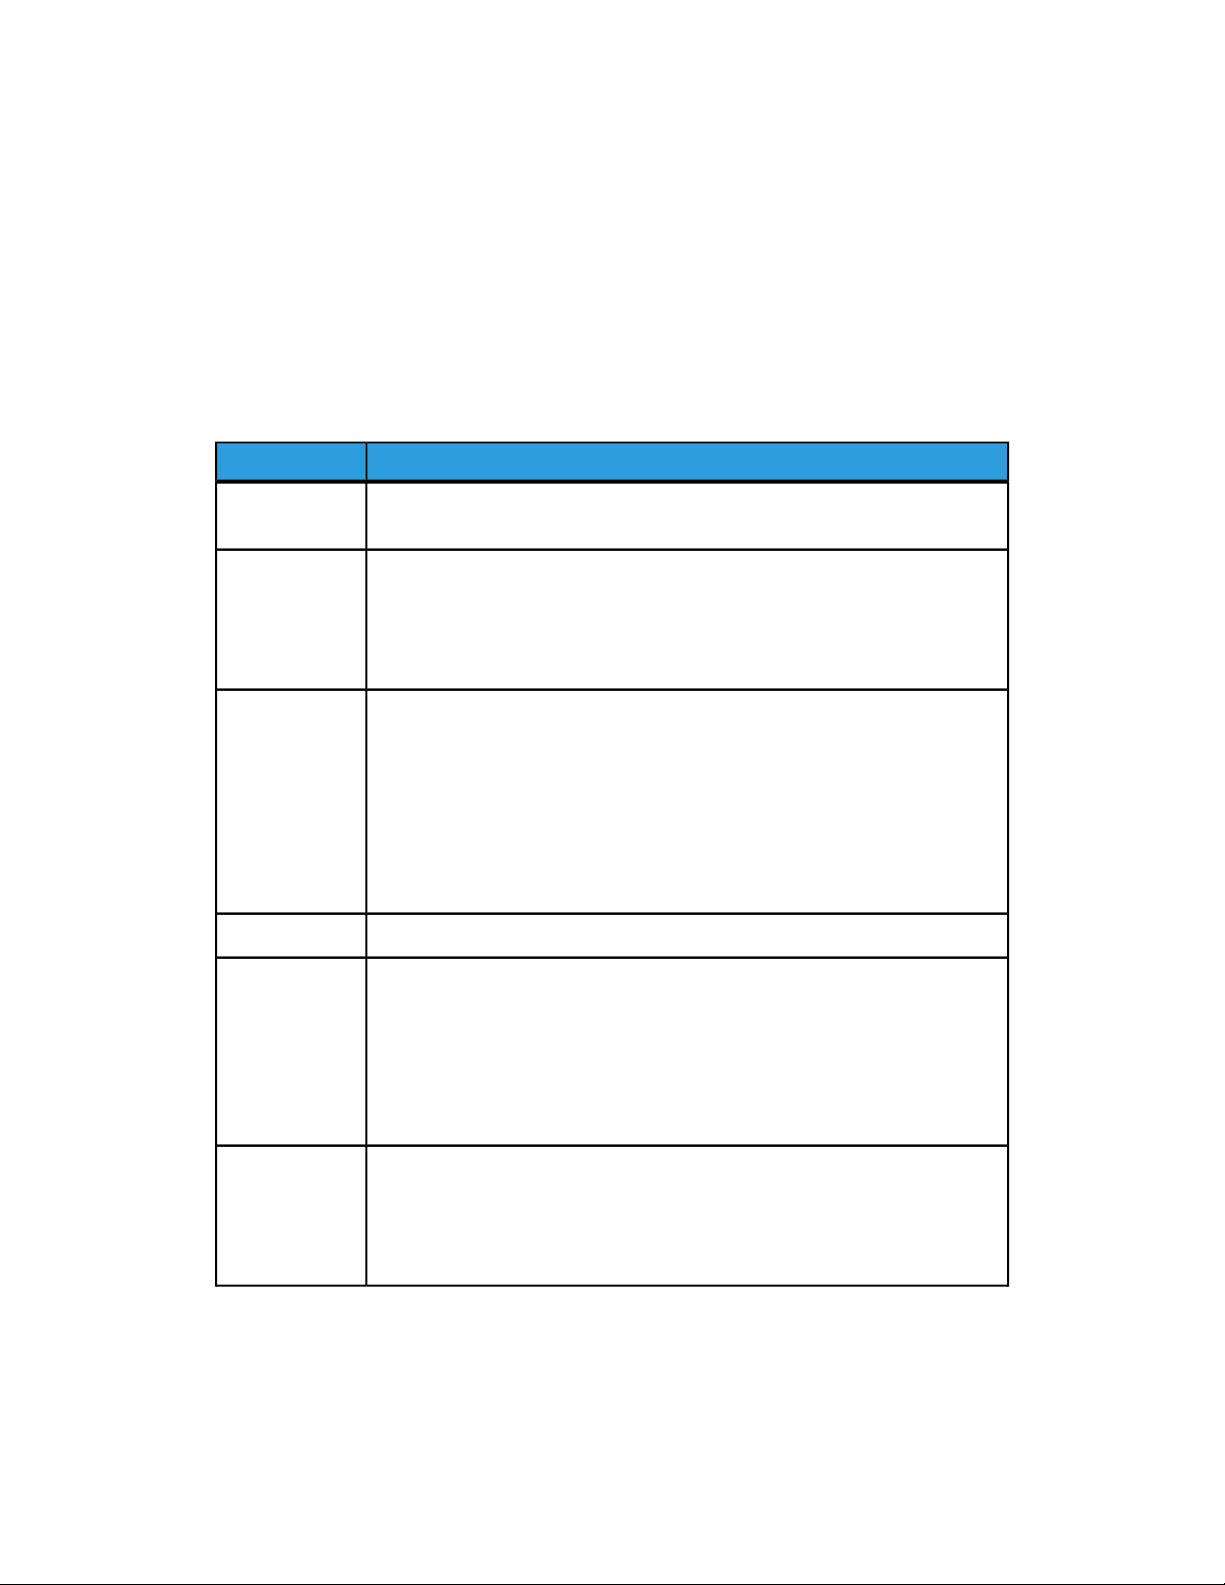
Indicators
This guide uses the following indicatorsto help you recognize important
information:
DescriptionIndicator
NOTE
CAUTION
WARNING
A NOTE indicate important or supplemental information for a task or
procedure.
A CAUTION indicate that you may loose data or damage equipment if care
is not taken when performing the task or procedure following the caution.
A WARNING indicates that you may cause personal injury or death if care is
not taken when performing the task or procedure following the warning.
Related information
This section lists additional materials you may need, or find helpful, when using
your FreeFlow Process Manager system.
To order the Xerox documentation listed below, contact your Xerox Representative.
1-2
FreeFlow Process Manager® Operator and Administrator Guide
FreeFlow 9.0 Process Manager Operator/Administrator Guide
Page 15

About this guide
FreeFlow Process Manager documentation
For more information on FreeFlow Process Manager, refer to the following
publications:
• Xerox FreeFlow System Administrator
• Xerox FreeFlow Security Document
Windows related information
Microsoft provides user and administrators with several different resources to
support the operating system environment.
• Windows Online Help - Windows includes extensive online Help for all aspects
of the operating system.
• Windows Microsoft Web site - Microsoft has a World Wide Web site that
contains the latest operating system news and information about upgrades.
The URL for this site is:
http://www.microsoft.com/
Using FreeFlow Process Manager Online Help
This section provides a brief overview of the type of Help available online from
the FreeFlow Process Manager software.
You can access the Process Manager Online Help system by selecting Help in the
Help menu. You can also access Help by selecting the Help button, when available,
in dialog boxes.
Obtaining additional support
For additional information about the following topics, contact your Xerox
Representative.
• X-PRESS FAX
• FreeFlow FAQ Xerox web site
• Xerox Welcome Center
FreeFlow Process Manager® Operator and Administrator Guide
FreeFlow 9.0 Process Manager Operator/Administrator Guide
1-3
Page 16

About this guide
1-4
FreeFlow Process Manager® Operator and Administrator Guide
FreeFlow 9.0 Process Manager Operator/Administrator Guide
Page 17

2
About FreeFlow Process Manager
This section provides information about Xerox FreeFlow Process Manager
applications, hardware and software components, preparatory steps for workflow
building and job management, user and group access, the log in process, adding
and removing printers, and backup and restore functions.
Related Topics:
FreeFlow Process Manager applications
Logging in to the FreeFlow Process Manager applications
Managing production printers
FreeFlow Process Manager applications
FreeFlow Process Manager consists of five applications that allow you to proicess
jobs using automated workflows:
• Workflow Builder - allows you to create and manage worklfows
• Workflow Submission Client - allows you to submit jobs to workflows
• Workflow Job Manager - allows you to manage submitted jobs
• MAX (Manifest Automation from Xerox) - automates job submission by
processing order jacket files from upstream systems
• MAX Submission Client - allows you to submit order jacket files for MAX
processing
Related Topics:
The Workflow Builder application
The Workflow Submission Client application
The Workflow Job Manager application
FreeFlow Process Manager® Operator and Administrator Guide
FreeFlow 9.0 Process Manager Operator/Administrator Guide
2-1
Page 18

About FreeFlow Process Manager
The Workflow Builder application
Use Workflow Builder to:
• Create workflows
- Use graphical tools to assemble customized workflows from workflow
process steps.
- Configure the settings for workflow process steps.
- Enable workflows to receive jobs.
- Disable workflows to modify them or to prevent job submission.
- Import and export workflows and their associated hot folders.
• Set up and manage hot folders.
• Add external PDF processes to support third party software.
• Set up Notify attributes on the SMTP server; set up the Proxy server.
• Set up repository credentials.
• Configure the remote conversion workstation
Related Topics:
FreeFlow Process Manager applications
The Workflow Submission Client application
The Workflow Job Manager application
The Workflow Submission Client application
Use Workflow Submission Client to:
• Select files for submission from Windows or from a document repository.
• Select an optional job ticket for submission with the files.
• Submit the files to one of the automated workflows.
• Modify the workflow process settings.
• View the job ticket and resolve job ticket conflicts.
• Launch Workflow Builder
• Submit files remotely from a workstation or server with Remote Workflow
Submission Client installed.
• Save and load a file list.
Related Topics:
FreeFlow Process Manager applications
The Workflow Builder application
The Workflow Job Manager application
2-2
FreeFlow Process Manager® Operator and Administrator Guide
FreeFlow 9.0 Process Manager Operator/Administrator Guide
Page 19

About FreeFlow Process Manager
The Workflow Job Manager application
Use Workflow Job Manager to:
• View job details and status.
• Review and edit jobs in Adobe Acrobat.
• Edit process settings.
• Resubmit jobs.
• Approve, fail, pause, or delete jobs.
• Generate, view, and export reports.
• Perform selected tasks remotely from a workstation or server with Remote
Workflow Job Manager Client installed.
Related Topics:
FreeFlow Process Manager applications
The Workflow Builder application
The Workflow Submission Client application
Post-installation setup
The table below provides a post-installation checklist you must complete after
your FreeFlow Process Manager system has been installed.
NOTE
This checklist assumes that a Xerox Representative has installed of all
hardware and software necessary to run the FreeFlow Process Manager
system.
FreeFlow Process Manager® Operator and Administrator Guide
FreeFlow 9.0 Process Manager Operator/Administrator Guide
2-3
Page 20

About FreeFlow Process Manager
OverviewProcedure
Configure document
repository connections
Create user accounts; add
or edit user contact
information; change XDL
Admin account password
Use the FreeFlow Administration Tool to configure the connection
between FreeFlow Process Manager and the supported document
repositories.
For detailed procedures on configuring repository connections, refer
to the FreeFlow Administration Tool online Help system.
Creating User Accounts
Process Manager user accounts are created and managed using
the Windows Local Users and Groups functionality in the Computer
Management application. Users that are created and added to the
appropriate Process Manager group accounts using Windows appear
in the FreeFlow Administration Tool list of users.
Storing User contact information
The FreeFlow Administration Tool is used to view user accounts that
have been created in Windows, and to add or edit user contact
information.
Changing the XDL Admin account password
The FreeFlow Administration Tool allows you to change the
password for the XDL Admin account. This password is set during
the installation of the software.
For detailed procedures on creating user accounts, refer to the
Windows online help. For detailed procedures on adding or editing
user contact information or changing the XDL Admin account
password, refer to the FreeFlow Administration Tool online Help
system.
Manage production
printers for workflows
Production printers must be added to FreeFlow Process Manager
before you attempt to drag a Print process into a workflow during
the workflow building process.
A common printer interface enables all FreeFlow applications to
maintain a single database of configured printers and to have a
common job setup GUI interface across FreeFlow applications. The
common printer interface includes the following utilities:
• Registerd Printer List Locator
Allows you to set whether the registered printer list in use by a
FreeFlow applicaton is located on a local computer or on a
remote computer.
• Printer Registration
Allows you to register and manage supported production printers
and queues for use by FreeFlow software applications. To
configure the Print process step in a workflow, production printers
must first be added via the FreeFlow Printer Registration
application.
• Printer Status/Job Status Tool
Allows you to status jobs, queues, and printers.
For additional information, refer to the online Help for the
Registered Printer List Locator, Printer Registration, or the Printer
Status/Job Status Tool.
2-4
FreeFlow Process Manager® Operator and Administrator Guide
FreeFlow 9.0 Process Manager Operator/Administrator Guide
Page 21

About FreeFlow Process Manager
OverviewProcedure
Configure the SMTP server
Set up workflows
Generate the preflight
profile repository on a
clean install.
Create or modify preflight
profiles.
The Simple Mail Transport Protocol (SMTP) Server is used for e-mail
notification. The SMTP Setup dialog, accessed via the Workflow
Builder application, allows you to identify the mail server for
outgoing mail or notifications, define authentication parameters,
and establish the maximum size for e-mail attachments.
For details, refer to the following procedure in the online help:
“Setting up the SMTP Server.”
Four default workflows are provided with the software: Simple, Main,
Reprint, and Bill of Materials. Modify these workflows or create your
own, based on the needs of your organization.
For details, refer to the following procedure in the online help:
“Configuring process settings;” or “Building a new workflow.”
Preflight profiles do not exist on a clean install. You will need to
generate the profile repository.
For details, refer to the following procedure in the online help:
“Configuring preflight settings.”
You may want to modify the preflight profiles that are provided
with FreeFlow Process Manager.
For details, refer to the following procedure in the online help:
“Creating preflight profiles.”
Set the default job option
in Adobe Acrobat
Upgrade legacy workflows
that contain the Job Level
Edit process.
For the Convert process, you can select from various job options, or
create custom job options, to generate optimal PDFs in Process
Manager. The default job option that is displayed in Process
Manager is selected in Adobe Acrobat Distiller. You can ensure that
Process Manager displays the desired Adobe Acrobat Distiller default
job option by selecting a profile from the Default Settings drop box
in Acrobat Distiller.
For details, refer to the following procedure in the online help:
“Configuring Convert settings.”
In previous versions, 6.0 and below, of FreeFlow Process Manager,
all job level edit functions (for example, watermarks, page
numbering, page rotation) were available via a single Job Level Edit
dialog. Legacy workflows that contain Job Level Edit processes will
perform as they did in earlier versions, but you will not be able to
edit them. To use previous versions (6.0 and below) job level edit
functions, save the existing Job Level Edit workflow, and it will be
converted into a series of individual, Watermark, Bates Numbering,
Page Numbering, Flip and Rotate nodes, as appropriate.
For details, refer to the following procedure in the online help:
“Upgrading legacy workflows that contain the Job Level Edit
process.”
FreeFlow Process Manager® Operator and Administrator Guide
FreeFlow 9.0 Process Manager Operator/Administrator Guide
2-5
Page 22

About FreeFlow Process Manager
OverviewProcedure
Ensure Color Manage
workflow consistency
between the server and a
remote client.
Importing legacy (version
5.0 and below) workflows
with a Color Manage node.
Import ICC profiles
ICC profile rights
Set up hot folders
Workflows that include color management can become inconsistent
between the Process Manager server and the remote client when
profiles are uninstalled on the server.
Color profiles are now managed in the Optimize node Color tab.
If you import a legacy workflow with a Color Manage node into
FreeFlow Process Manager, the legacy Color Manage icon is
converted to an Optimize icon and the settings transfer
automatically to the Optimize settings Color tab.
For information, refer to the Ensuring Color Manager workfllow
consistency between the server and a remote client procedure.
Import any required ICC profiles.
You must own the rights to use the ICC profiles accessed by FreeFlow
Process Manager.
For details, refer to the following procedure in the online help: “To
import an ICC profile.”
You can open a common browse folder dialog and select or create
a folder in the system via the Hot Folders dialog in Workflow Builder.
You can:
• Pause/resume all hot folders or individual hot folders.
• Enable file clustering on a per hot folder basis.
• Enable Hot Folder scheduling.
Set up external processes
Set up Preps
For details, refer to the following procedure in the online help:
“Setting up a hot folder.”
You may want to add external processes to support third party
software, or to set up third party scripts.
For details, refer to the following procedure in the online help: “Using
third party external processes.”
To use Preps, you will need to install it, configure the default Preps
workflow, and create and save Preps job files.
For details, refer to the following procedure in the online help:
“Setting up Preps.”
2-6
FreeFlow Process Manager® Operator and Administrator Guide
FreeFlow 9.0 Process Manager Operator/Administrator Guide
Page 23

About FreeFlow Process Manager
Logging in to the FreeFlow Process Manager applications
Process Manager user accounts are created and managed using the Windows
Local Users and Groups functionality in the Computer Management application.
During install, Xerox FreeFlow Process Manager Administrators and Xerox
FreeFlowProcess Manager Operators groups are created. Your administrator then
populates these groups with users. Permissions to launch applications are based
on group membership. For more information, see Group membership and
authorization.
Related Topics:
Authorization error message
Group membership and authorization
Authorization error message
The Windows operating system caches a user’s group membership information.
If you add yourself to an authorization group (e.g., Xerox FreeFlow Process
Manager Administrators) and then try to launch an application, you will receive
an error message indicating you do not have permission to launch FreeFlow
Process Manager applications.To rectify this issue, log off and then log back on.
Related Topics:
Logging in to the FreeFlow Process Manager applications
Group membership and authorization
Group membership and authorization
The following table shows authorization based on membership in FreeFlow Process
Manager Administrators or FreeFlow Process Manager Operators groups.
FreeFlow Process Manager® Operator and Administrator Guide
FreeFlow 9.0 Process Manager Operator/Administrator Guide
2-7
Page 24

About FreeFlow Process Manager
OperatorAdministrator
Can launch Workflow Job Manager, Workflow
Submission Client, Manifest Automation from
Xerox (MAX) and MAX Submission Client
Can launch FreeFlow Adminstrator Tool and
perform all adminstrative tasks
Can launch Workflow Job Manager, Workflow
Submission Client, Manifest Automation from
Xerox (MAX) and MAX Submission Client
Cannot launch Workflow BuilderCan launch Workflow Builder
Can launch FreeFlow Adminstrator Tool and
edit repository connnection information
NOTE
Printer Registration also supports user authentication through the
operating system and application-level authorization through membership
in operating system groups.
Related Topics:
Logging in to the FreeFlow Process Manager applications
Authorization error message
Managing production printers
A common printer interface enables all FreeFlow applications to maintain a single
database of configured printers and to have a common job setup GUI interface
across FreeFlow applications. The common printer interface includes the following
utilities:
• Registered Printer List Locator: Allows you to set whether the registered
printer list in use by a FreeFlow application is located on a local computer or
a remote computer.
• Printer Registration: Allows you to register and manage supported production
printers and queues for use by FreeFlow software applications. To configure
the Print process step in a workflow, production printers must first be added
via the FreeFlow Printer Registration application.
• Printer Status/Job Status Tool: Allows you to status jobs, queues, and printers.
NOTE
When building a workflow containing the Print node, you must register the
printer associated with the Print node.
Related Topics:
Xerox FreeFlow Common Printer Administrators group
Registering and adding a production printer
2-8
FreeFlow Process Manager® Operator and Administrator Guide
FreeFlow 9.0 Process Manager Operator/Administrator Guide
Page 25

About FreeFlow Process Manager
Xerox FreeFlow Common Printer Administrators group
In order to make changes to registered printers with the Printer Registration tool,
a user must be a member of the Xerox FreeFlow Common Printer Administrators
group.
Related Topics:
Managing production printers
Registering and adding a production printer
Registering and adding a production printer
1. Select Start > Programs > Xerox FreeFlow Software > Printer Registration,
or in Workflow Job Manager, select Launch > Printer Registration. The
Installed Products dialog displays.
2. Ensure the radio button for Process Manager is marked.
3. Select OK.
4. In the Printer Registration dialog, select the desired task: Add, View/Edit, or
Delete.
5. For additional information about registering and managing printers, select
Help in the Printer Registration dialog to open the online Help.
For additional information about Production Printing, refer to the online Help
for the Registered Printer List Locator, Printer Registration, or the Printer
Status/Job Status Tool.
Related Topics:
Managing production printers
Xerox FreeFlow Common Printer Administrators group
FreeFlow Process Manager® Operator and Administrator Guide
FreeFlow 9.0 Process Manager Operator/Administrator Guide
2-9
Page 26

About FreeFlow Process Manager
2-10
FreeFlow Process Manager® Operator and Administrator Guide
FreeFlow 9.0 Process Manager Operator/Administrator Guide
Page 27

3
Workflow Builder
With Xerox FreeFlow Workflow Builder you can create workflows by dragging
and dropping processes into a sequence. You can also choose system configuration
options. Optionally, you can configure and add third party software workflow
components to a workflow to enhance the flexibility and capabilities of the
Process Manager system.
Related Topics:
Using third party external processes
About Workflow Builder
A workflow is a sequence of uniquely configured steps that define how a
document is processed. Use Workflow Builder to:
• Create workflows
• Use graphical tools to assemble customized workflows from workflow
-
process steps.
- Configure the settings for workflow process steps.
- Enable workflows to receive jobs.
- Disable workflows to modify them or to prevent job submission.
• Import and export workflows.
• Take processes offline and change concurrency counts.
• Create preflight profiles by launching Adobe Acrobat.
• Set up and manage hot folders.
• Add external PDF processes to support third party software.
• Set up third-party scripts.
• Set up Notify attributes on the SMTP server; set up the Proxy server.
• Set up repository credentials.
FreeFlow Process Manager® Operator and Administrator Guide
FreeFlow 9.0 Process Manager Operator/Administrator Guide
3-1
Page 28
Workflow Builder
Workflow process icons
The Workflow Builder Insert menu allows you to insert processes into a displayed
workflow.
To insert a process, select a process in a workflow, and select Insert > item. The
new process is inserted to the right of the selected process.
Workflow processes are also available as icons in the Workflow Process Options
area. The icons can be dragged and dropped into the workspace to assemble a
workflow.
DescriptionProcess Icon
Input
Image
Enhancement
Convert
Optimize
Displays automatically as the first workflow node when you select Enter
during new workflow creation.
Automatic Image Enhancement (AIE) optimizes sharpness, color balance,
saturation, exposure, noise reduction and contrast of TIFF, JPEG, and BMP
images, whether standalone or embedded in a PDF. AIE also supports redeye
removal for humans and shadow detail enhancement. The AIE feature works
only for color and grayscale images.
Converts documents submitted to the workflow to PDF. Converts the following
formats: MS Word, MS PowerPoint, MS Excel (includes Microsoft Office 2007),
MS Publisher, Adobe Photoshop, JPG, JPEG, TIFF, TIFF-IT, TIF, BMP, PS, RDO,
Quark Xpress (QXD and QXP), VPC, and EPS.
Allows you to flatten PDFs by converting them to Postscript and back to PDF
again. Uses Acrobat Preflight Fixups to automatically correct job problems.
You can select an Adobe Acrobat Distiller job option to generate optimal
PDFs.
Combines multiple PDF files into a single PDF file.Join
The Optimize process allows you to automatically correct common problems
with PDF files. You can embed missing fonts, define PDF boxes and flatten
document transparencies and overprints. The transparency and overprint
flattening render the document objects to ensure that optimized documents
RIP with the expected appearance.The Optimize process node can also
perform ICC-based color conversion and spot color suffix normalization.You
can also create a PDF/X-1a compliant PDF.
Preflight
3-2
Uses an Adobe Acrobat preflight profile to validate and check formatting,
verify the image, fonts, and verify references to OPI image server images.
Fixups in Acrobat Preflight profiles can be used to automatically correct many
PDF problems including PDF box manipulation, resizing to PDF contents and
dealing with non-printing content and PDF Layers.
FreeFlow Process Manager® Operator and Administrator Guide
FreeFlow 9.0 Process Manager Operator/Administrator Guide
Page 29

Workflow Builder
DescriptionProcess Icon
Watermarks
Bates
Numbering
Allows you to add a text or image watermark to selected pages of an input
PDF file. You can specify a combination of images or text, in various
alignments, that can appear either underneath or on top of the page content.
Selected pages may be specified as all pages, odd or even pages, landscape
or portrait pages, specific document pages, or as a page range (for example,
pages 1-5, 8).
Process Manager also supports negative page numbers in the page ranges.
A negative number indicates that it is counted from the end of the document
instead of from the beginning. For example, "1 - -1" means the range is from
the first page to the last page. "3 - -2" means that the range is from the third
page to the second to last page. "-3 - -2" means that the range is from the
third to last page to the second to last page. Ensure that you do not enter an
invalid page range. For example, "3 - 2" and "-2 - -3" are invalid because the
page range is inverted.
Allows you to add bate stamps to selected pages of an input PDF file. Bate
stamps consist of a page number with optional leading zeros and an optional
fixed text prefix. An optional extra line of fixed text can appear either above
or below the page number. Selected pages may be specified as all pages, odd
or even pages, landscape or portrait pages, specific document pages, or as a
page range (for example, pages 1-5, 8).
Process Manager also supports negative page numbers in the page ranges.
A negative number indicates that it is counted from the end of the document
instead of from the beginning. For example, "1 - -1" means the range is from
the first page to the last page. "3 - -2" means that the range is from the third
page to the second to last page. "-3 - -2" means that the range is from the
third to last page to the second to last page. Ensure that you do not enter an
invalid page range. For example, "3 - 2" and "-2 - -3" are invalid because the
page range is inverted.
Page Numbering
Allows you to add page numbers to selected pages of an input PDF file.
Selected pages may be specified as all pages, odd or even pages, landscape
or portrait pages, specific document pages, or as a page range (for example,
pages 1-5, 8).
Process Manager also supports negative page numbers in the page ranges.
A negative number indicates that it is counted from the end of the document
instead of from the beginning. For example, "1 - -1" means the range is from
the first page to the last page. "3 - -2" means that the range is from the third
page to the second to last page. "-3 - -2" means that the range is from the
third to last page to the second to last page. Ensure that you do not enter an
invalid page range. For example, "3 - 2" and "-2 - -3" are invalid because the
page range is inverted.
FreeFlow Process Manager® Operator and Administrator Guide
FreeFlow 9.0 Process Manager Operator/Administrator Guide
3-3
Page 30

Workflow Builder
DescriptionProcess Icon
Barcodes
Rotate Pages
Allows you to add a barcode to your workflow. You can specify the barcode
type or symbology, symbology-specific options, width, height, padding,
inclusion of human-readable text, placement, alignment, rotation, frequency,
size and other options. Selected pages may be specified as all pages, odd or
even pages, landscape or portrait pages, specific document pages, or as a
page range (for example, pages 1-5, 8).
Process Manager also supports negative page numbers in the page ranges.
A negative number indicates that it is counted from the end of the document
instead of from the beginning. For example, "1 - -1" means the range is from
the first page to the last page. "3 - -2" means that the range is from the third
page to the second to last page. "-3 - -2" means that the range is from the
third to last page to the second to last page. Ensure that you do not enter an
invalid page range. For example, "3 - 2" and "-2 - -3" are invalid because the
page range is inverted.
Allows you to rotate selected pages in the PDF file 90 degrees right or left,
or 180 degrees. Selected pages may be specified as all pages, odd or even
pages, landscape or portrait pages, specific document pages, or as a page
range (for example, pages 1-5, 8).
Process Manager also supports negative page numbers in the page ranges.
A negative number indicates that it is counted from the end of the document
instead of from the beginning. For example, "1 - -1" means the range is from
the first page to the last page. "3 - -2" means that the range is from the third
page to the second to last page. "-3 - -2" means that the range is from the
third to last page to the second to last page. Ensure that you do not enter an
invalid page range. For example, "3 - 2" and "-2 - -3" are invalid because the
page range is inverted.
Flip Pages
Allows you to flip selected pages in the PDF file horizontally or vertically to
create a mirror image. Selected pages may be specified as all pages, odd or
even pages, landscape or portrait pages, specific document pages, or as a
page range (for example, pages 1-5, 8).
Process Manager also supports negative page numbers in the page ranges.
A negative number indicates that it is counted from the end of the document
instead of from the beginning. For example, "1 - -1" means the range is from
the first page to the last page. "3 - -2" means that the range is from the third
page to the second to last page. "-3 - -2" means that the range is from the
third to last page to the second to last page. Ensure that you do not enter an
invalid page range. For example, "3 - 2" and "-2 - -3" are invalid because the
page range is inverted.
3-4
FreeFlow Process Manager® Operator and Administrator Guide
FreeFlow 9.0 Process Manager Operator/Administrator Guide
Page 31

Workflow Builder
DescriptionProcess Icon
Insert Pages
Delete Pages
Allows you to insert blank pages or pages from a PDF into the document at
specific locations. When inserting blank pages, you can insert a specific number
of blank pages, you can insert blank pages until the document reaches a
specific number of total pages, or you can insert blank pages until the
document reaches a multiple of a specific number of pages (for example, if
the multiple is set to 5, a 7 page document will have three blank pages inserted
at the specified location).
When inserting pages you can select the specific locations where the pages
will be added. Selected pages may be specified as all pages (Duplicate and
Insert page nodes only), odd or even pages, landscape or portrait pages, all
but the first or last page, the first or last page only, the second or second to
last page only, specific document pages, or as a page range (for example,
pages 1-5, 8).Process Manager also supports negative page numbers in the
page ranges. A negative number indicates that it is counted from the end of
the document instead of from the beginning. For example, "1 - -1" means the
range is from the first page to the last page. "3 - -2" means that the range is
from the third page to the second to last page. "-3 - -2" means that the range
is from the third to last page to the second to last page. Ensure that you do
not enter an invalid page range. For example, "3 - 2" and "-2 - -3" are invalid
because the page range is inverted.
Allows you to delete document pages at specified locations. Selected pages
may be specified as all pages (Duplicate and Insert page nodes only), odd or
even pages, landscape or portrait pages, all but the first or last page, the first
or last page only, the second or second to last page only, specific document
pages, or as a page range (for example, pages 1-5, 8). Process Manager also
supports negative page numbers in the page ranges. A negative number
indicates that it is counted from the end of the document instead of from
the beginning. For example, "1 - -1" means the range is from the first page
to the last page. "3 - -2" means that the range is from the third page to the
second to last page. "-3 - -2" means that the range is from the third to last
page to the second to last page. Ensure that you do not enter an invalid page
range. For example, "3 - 2" and "-2 - -3" are invalid because the page range is
inverted.
Insert Duplicate
Pages
Allows you to duplicate (create copies) of specific pages in a document.
Selected pages may be specified as all pages (Duplicate and Insert page
nodes only), odd or even pages, landscape or portrait pages, all but the first
or last page, the first or last page only, the second or second to last page only,
specific document pages, or as a page range (for example, pages 1-5, 8).
Process Manager also supports negative page numbers in the page ranges.
A negative number indicates that it is counted from the end of the document
instead of from the beginning. For example, "1 - -1" means the range is from
the first page to the last page. "3 - -2" means that the range is from the third
page to the second to last page. "-3 - -2" means that the range is from the
third to last page to the second to last page. Ensure that you do not enter an
invalid page range. For example, "3 - 2" and "-2 - -3" are invalid because the
page range is inverted.
FreeFlow Process Manager® Operator and Administrator Guide
FreeFlow 9.0 Process Manager Operator/Administrator Guide
3-5
Page 32

Workflow Builder
DescriptionProcess Icon
Resize
Impose
Crop
Allows you to select a specific size, or a size based on a percentage of the
original image size. For TIFFs, JPGs, or BMPs, the image is resized; for PDFs,
the page is resized. Selected pages may be specified as all pages, odd or even
pages, landscape or portrait pages, specific document pages, or as a page
range (for example, pages 1-5, 8).
Process Manager also supports negative page numbers in the page ranges.
A negative number indicates that it is counted from the end of the document
instead of from the beginning. For example, "1 - -1" means the range is from
the first page to the last page. "3 - -2" means that the range is from the third
page to the second to last page. "-3 - -2" means that the range is from the
third to last page to the second to last page. Ensure that you do not enter an
invalid page range. For example, "3 - 2" and "-2 - -3" are invalid because the
page range is inverted.
Allows you to select an imposition template to apply to the job. Supports
repeated, sequential, alternating and cut & stack multiup imposition. Supports
saddle and perfect bound booklet and calendar imposition. Also allows the
addition of crop marks to the imposed document. You can specify which face
of the sheet to place marks on and the PDF boxes on which to place crop
marks.
Allows you to automatically crop jobs consisting of one or more PDF pages
and JPEG, TIFF, or BMP file images. For PDF documents, crops the pages; for
JPEG, TIFF, or BMP files, crops the images. Selected pages may be specified
as all pages, odd or even pages, landscape or portrait pages, specific document
pages, or as a page range (for example, pages 1-5, 8).
Process Manager also supports negative page numbers in the page ranges.
A negative number indicates that it is counted from the end of the document
instead of from the beginning. For example, "1 - -1" means the range is from
the first page to the last page. "3 - -2" means that the range is from the third
page to the second to last page. "-3 - -2" means that the range is from the
third to last page to the second to last page. Ensure that you do not enter an
invalid page range. For example, "3 - 2" and "-2 - -3" are invalid because the
page range is inverted.
Pressmarks
3-6
Allows you to add a pressmark image to selected pages of an input PDF file.
You can specify the pressmark placement, rotation, frequency, and
transparency. Selected pages may be specified as all pages, odd or even
pages, landscape or portrait pages, specific document pages, or as a page
range (for example, pages 1-5, 8).
Process Manager also supports negative page numbers in the page ranges.
A negative number indicates that it is counted from the end of the document
instead of from the beginning. For example, "1 - -1" means the range is from
the first page to the last page. "3 - -2" means that the range is from the third
page to the second to last page. "-3 - -2" means that the range is from the
third to last page to the second to last page. Ensure that you do not enter an
invalid page range. For example, "3 - 2" and "-2 - -3" are invalid because the
page range is inverted.
FreeFlow Process Manager® Operator and Administrator Guide
FreeFlow 9.0 Process Manager Operator/Administrator Guide
Page 33

Workflow Builder
DescriptionProcess Icon
Review
Notify
Print
Save
JDF Export
Can be used multiple times, at critical points in a workflow, to view, check
and edit the PDF file using Adobe Acrobat.
When stopped at the Review step, you can change process settings, resubmit
the job to a previous step for additional processing, view a soft proof, or print
a hardcopy proof.
You can approve the job and allow it to move to the next step in the workflow,
or you can fail the job. If you save the PDF after editing it in Acrobat, the
edited PDF will be moved to the next step in the workflow.
If there is a Print step after the Review step, you can select Copies to access
the Copies dialog and change the number of copies to print.
Provides job status notification via e-mail. allows you to attach preflight
results and job files up to a maximum size of 1 GB.
Allows you to print PDF, VPC, or RDO (for reprint) files to a specified production
printing queue using a specified job ticket.
For information about reprinting RDOs, refer to the topic “About submitting
RDOs.”
Allows you to save all supported file types from the workflow to a specified
location in a Windows file system or document repository. Also allows saving
of an XPIF job ticket, if available, with the job.
The output file of a JDF export task can be re-imported and re-run by dropping
it into a hot folder associated with an appropriate workflow. The files
associated with the JDF must exist in the same location as the original job.
Conditional
External Process
Conditional branching provides an added level of logic to a workflow, allowing
it to examine the properties of submitted jobs, and then act accordingly
without human intervention.
You can add one or more conditional branches to a workflow, each with one
or more user-designated conditions that specify the desired attributes or
properties of the submitted jobs.
External Process enables the integration of third party workflow components.
Workflow components may be integrated via hot folders or via Command
Line Interface.
Building workflows
You can create new Workflows or duplicate an existing workflow. To build or
modify a workflow, you perform the following basic steps:
• Drag and drop process icons into the workspace. Processes move from left to
right in the workflow.
• Configure the process settings, as needed, to meet the requirements of the
workflow.
• Save and enable the workflow.
FreeFlow Process Manager® Operator and Administrator Guide
FreeFlow 9.0 Process Manager Operator/Administrator Guide
3-7
Page 34

Workflow Builder
NOTE
All workflows are disabled after an upgrade or migration. A pop-up message
displays if you try to enable a workflow that requires additional configuration.
Complete the configuration, and then enable the workflow.
Rules for building workflows
Apply the following rules when you sequence workflow process steps in the
workspace:
Input is the first step in any workflow. Input is automatically displayed in the
workspace when you begin a new workflow.
If Convert exists in a workflow, it must precede the following processes:
• Join
• PDF Optimize
• Preflight
• Impose
• Bates Numbering
• Page Numbering
• Watermarks
• Rotate Pages
• Flip Pages
• Print
• Barcodes
• Pressmarks
Building a new workflow
To build a new workflow, drag and drop process icons into the workspace,
configure the process settings to meet the workflow requirements, and then save
and enable the workflow.
1. Launch Workflow Builder.
2. In the Workflows toolbar, select New. A new workflow is added to the list. A
highlighted name cell is provided for editing.
3. Select the desired process from the Workflow Process Options area, and drag
and drop the process into the workflow workspace into the desired position.
4. If necessary, configure the process settings.
5. Select Save and Enable,
NOTE
A Workflow must be enabled before it can accept new jobs for processing.
3-8
FreeFlow Process Manager® Operator and Administrator Guide
FreeFlow 9.0 Process Manager Operator/Administrator Guide
Page 35

Workflow Builder
Creating fail branches
You may also add fail branches -- contingency workflow steps for fail conditions.
For example, after a Preflight process, you might want to add a fail branch that
contains the following:
• A Notify process that contains Preflight results.
• A Review process, to check or edit the document.
The workflow defaults to having no fail branches open. You can open a branch
by clicking on the “plus” icon and collapse the branch by clicking on the “minus”
icon.
1. Select the desired fail branch process and drag it downward, after the desired
process in a workflow.
2. Drag the process into the gray space holder that appears after the red arrow.
NOTE
You can also place a fail branch after a process step as follows: Select,
and then Copy a process, point to the desired position in the workflow,
and select Paste as Fail Branch from the Edit menu.
Exporting workflows
The Process Manager export/import workflow function provides workflow
portability and a method for backing up and restoring workflows and their
associated hot folders and other resources.
NOTE
Custom preflight profiles must be exported from within Adobe Acrobat.
NOTE
A .wfc folder displays in the export save location, along the .xml file. It
contains configuration files, hot folder, and other workflow information
to enable workflow and hot folder restoration during import.
1. In Workflow Builder, select a workflow or multiple workflows.
2. Select File > Export and save the workflows to the desired location.
Importing workflows
Import any required custom preflight profiles before importing a workflow.
FreeFlow Process Manager® Operator and Administrator Guide
FreeFlow 9.0 Process Manager Operator/Administrator Guide
3-9
Page 36

Workflow Builder
To import a workflow, you must first generate an .xml workflow file by exporting
a workflow. The .xml file can then be imported into Workflow Builder on the same
Process Manager server or imported into Workflow Builder on a second Process
Manager server.
NOTE
Only .xml files can be selected.
NOTE
If the .xml file is incorrectly formatted, an error message similar to this
displays: “The file complete path does not contain readable workflow
data.”
NOTE
If the .xml file contains workflows of the same names, the following
message displays: Cannot import the following workflows [workflow
names]. Existing workflows of the same name already exist. Please rename
or delete the existing workflows first. “Names are not case-sensitive:
“Newsletter Workflow” is the same as “newsletter workflow”.
1. In Workflow Builder, select File > Import.
2. In the Open window, browse to the desired workflow XML file.
The workflow is fully restored, including any referenced directories and hot folders
that were deleted after the workflow was exported.
Ensuring imported workflow compatibility
Workflows can be successfully imported from one Process Manager server system
to another Process Manager server if both servers have the same software version
of Process Manager and if all the configurations on the second server are
compatible.
The following items should be checked for compatibility:
• Preps jobs lists and custom templates
• Fonts used in Bates Numbering, Page Numbering, Watermarks
• ICC profiles used in Optimize
• Adobe Acrobat Preflight profiles used in Preflight
Configuring process settings
About Input
When you create and name a new workflow and select Enter. An Input node
automatically displays at the beginning of the workflow.
3-10
FreeFlow Process Manager® Operator and Administrator Guide
FreeFlow 9.0 Process Manager Operator/Administrator Guide
Page 37

Workflow Builder
In Workflow Builder, the Input node does not have a settings dialog. In Workflow
Job Manager, you can open the Input settings dialog and view a list of the original
input files, the file path, file size and date modified. Input files can also be viewed
via the tool tip.
Configuring Image Enhancement settings
To access the Image Enhancement Settings, double-click the Image Enhancement step in a
workflow.
Image Enhancement allows the application of a range of image processing
operations that optimize the sharpness, color balance, saturation, exposure, noise
reduction and contrast of TIFF, JPEG, and BMP images, whether standalone, or
embedded in a PDF. Image Enhancement also supports redeye removal for
humans and shadow detail enhancement. The Image Enhancement feature
works for only color and grayscale images.
Limitations for Image Enhancement
• Image Enhancement can be applied only to raster image files such as TIFFs,
JPEGs, and BMPs. It also supports those files if they are embedded in PDFs.
• The image quality improvement for BMPs may be minimal.
• Image Enhancement red eye reduction applies only to photographs of humans,
and not to photographs of animals.
• The Exif data that is found in some JPEG files is not currently supported by
Image Enhancement and will result in the loss of resolution information.
• If you include the Image Enhancement process in a FreeFlow Process Manager
workflow and submit the job to a DocuSP 5.1 or a Xerox FreeFlow Print Server,
ensure that you submit it to a queue for which Image Enhancement is not
enabled.
• If you have the option of performing the Image Enhancement processing in
either FreeFlow Process Manager or in the current DocuSP 5.1 or Xerox FreeFlow
Print Server , for reasons of flexibility and performance, it is recommended
that you do so in FreeFlow Process Manager, rather than in DocuSP 5.1 or
Xerox FreeFlow Print Server.
Configuring Convert Settings
Process Manager automates the processing of PDF documents. The Convert
process step enables Microsoft Word Microsoft Excel, Microsoft PowerPoint,
Microsoft Publisher, Adobe Photoshop, JPG, JPEG, BMP, TIFF, TIFF-IT, TIF, PS,
VPC, QXD, QXP, RDO, and EPS document types to be converted to a PDF document
for submission to Process Manager workflows.
You can select from various job options to generate optimal PDFs for Microsoft
Office (including Microsoft Office 2007) or PS files. The job options include the
basic Adobe Acrobat Distiller set with the addition of various Xerox-specific job
options, including DocuColor iGen3. You can also create custom job options in
Adobe Acrobat Distiller for use in Process Manager.
FreeFlow Process Manager® Operator and Administrator Guide
FreeFlow 9.0 Process Manager Operator/Administrator Guide
3-11
Page 38

Workflow Builder
The default job option that displays in Process Manager is selected in Adobe
Acrobat Distiller.
The Flatten submitted PDF files for printing option allows you to re-process
PDF files with known printing problems. "Flattening" converts a PDF file to
PostScript, and then converts it back to a PDF file. This feature may result in a
loss of features and image degradation, including:
• Loss of transparency.
• Loss of some interactive features such as thumbnails, bookmarks, article
threads, logical structure and trapping information.
• Loss of functionality of other interactive features such as forms, hyperlinks,
JavaScript.
• Loss of some annotations such as comments, embedded files, embedded
media such as video/audio, and references to external files or media.
Related Topics:
Manual Conversion tab
Microsoft Office conversion setup
Restrictions on PDF conversion
Depending on the submission method, PDFs created by a Process Manager Convert node may
have restrictons on their use. If you purchase a PDF conversion license, all PDFs are unrestricted.
Working with PDF files
Manual Conversion tab
QuarkXPress files must be manually converted to PDFs before they can be
processed in a workflow. To do this:
• Set up a working directory via the Convert Settings dialog. Files are held in the
directory until they are manually converted.
• Set up an email notification address via the Convert Settings dialog. This
allows you to send an e-mail message to indicate that a QuarkXPress document
is waiting to be converted to PDF. A message will be sent for each document
processed.
NOTE
The SMTP server must be configured to enable email notification.
• Manually convert the files to PDF via QuarkXPress and save the converted files
in the working directory to continue workflow processing.
3-12
FreeFlow Process Manager® Operator and Administrator Guide
FreeFlow 9.0 Process Manager Operator/Administrator Guide
Page 39

Workflow Builder
Related Topics:
Configuring Convert Settings
Microsoft Office conversion setup
Restrictions on PDF conversion
Depending on the submission method, PDFs created by a Process Manager Convert node may
have restrictons on their use. If you purchase a PDF conversion license, all PDFs are unrestricted.
Working with PDF files
Microsoft® Office conversion setup
1. Enable Microsoft Office conversion.
a) Log in as XDL_ADMIN.
b) Launch the Microsoft Office applications once.
c) Log off.
2. If Process Manager is installed on Windows Server 2008, configure DCOM.
a) Log in as administrator.
b) Open Control Panel > Administrative Tools > Component Services.
c) In the left pane, open Console Root > Component Services > Computers
> My Computer > DCOM Config.
d) Select No for all warning dialog boxes that display.
e) Close Component Services.
3. Disable User Account Control
a) Click Start, and then Control Panel.
b) In Control Panel, select User Accounts.
c) In the User Accounts window, select User Accounts.
d) In the User Accounts tasks window, select
Turn User Account Control on or off.
e) If UAC is currently configured in Admin Approval Mode, the User Account
Control message appears. Click Continue.
f) Clear the Use User Account Control (UAC) to help protect your computer
check box, and then select OK.
g) Select Restart Now to apply the changes.
FreeFlow Process Manager® Operator and Administrator Guide
FreeFlow 9.0 Process Manager Operator/Administrator Guide
3-13
Page 40

Workflow Builder
Related Topics:
Configuring Convert Settings
Manual Conversion tab
Restrictions on PDF conversion
Depending on the submission method, PDFs created by a Process Manager Convert node may
have restrictons on their use. If you purchase a PDF conversion license, all PDFs are unrestricted.
Working with PDF files
Restrictions on PDF conversion
Depending on the submission method, PDFs created by a Process Manager Convert node may
have restrictons on their use. If you purchase a PDF conversion license, all PDFs are unrestricted.
PDF conversion jobs submitted using the following methods have restrictions on
e-mailed PDFs:
• Hot Folders
• MAX
• MAX Submission Client
• JDF
• JMF
• a remote Workflow Submission client without Adobe Acrobat installed
If the job is submitted using one of the listed methods, PDFs e-mailed by a Notify
node have the following restrictions:
• low resolution proofs are watermarked
• high-resolution proofs are watermarked and cannot be edited or printed
PDFs from jobs submitted by the Workflow Submission Client running on the
Process Manager system do not have restrictions.
Related Topics:
Configuring Convert Settings
Manual Conversion tab
Microsoft Office conversion setup
Working with PDF files
Working with PDF files
• Adobe does not support PDF files larger than 2.25 GB on the Windows platform.
• PDF files containing more than 30,000 pages and are not supported.
• If the input PDF file requires a password to open the PDF file, most operations
will fail.
3-14
FreeFlow Process Manager® Operator and Administrator Guide
FreeFlow 9.0 Process Manager Operator/Administrator Guide
Page 41

Workflow Builder
Related Topics:
Configuring Convert Settings
Manual Conversion tab
Microsoft Office conversion setup
Restrictions on PDF conversion
Depending on the submission method, PDFs created by a Process Manager Convert node may
have restrictons on their use. If you purchase a PDF conversion license, all PDFs are unrestricted.
About Join
Join combines, or concatenates, multiple PDF files into a single PDF file. All the
PDF files must exist before you attempt to use the Join process.
Files in a multiple-file job are processed separately until they reach the Join
process.
• Once files are joined, only one set of parameters and one job ticket apply.
• The Join process may be placed anywhere in a workflow. Hoewever, only you
can have only one Join process per workflow.
• Once files are joined, they job cannot be resubmitted to a point before the
Join process.
When multilpe PDF files are joined using this process, a PDF bookmark will be
inserted into the resulting PDF at the beginning of each joined section with the
original name of each input file being used as the bookmark title. For example,
if the files One.pdf, Two.pdf, and Three.pdf, which have 1, 2, and 3 pages,
respectively, are joined, the resulting 6-page PDF file will have a bookmark named
"One.pdf" pointing to page 1, a bookmark named "Two.pdf" pointing to page 2,
and a bookmark named "Three.pdf" pointing to page 4.
Related Topics:
Limitations for Join
Limitations for Join
Bookmarks, logical structure, internal hyperlinks, and article threads within PDF
files might not be preserved by the PDF Join component.
Related Topics:
About Join
FreeFlow Process Manager® Operator and Administrator Guide
FreeFlow 9.0 Process Manager Operator/Administrator Guide
3-15
Page 42

Workflow Builder
Configuring Optimize Settings
The Optimize process allows you to modify a PDF file to be PDF/X compliant,
specify how fonts should be embedded, define PDF Box settings, configure spot
color settings, manage color profiles, and configure image quality settings for
hairline correction and the removal of color trapping layers.
The Optimize Options dialog includes five tabs: General, PDF Boxes, Color, Spot
Colors, and Image Quality. The availability of dialog options varies, depending
on whether the Create a document that complies with PDF/X standards option
is selected, for example:
• When compliance is selected, font embedding is automatically set to ON, and
output compliance error handling is available.
• When compliance is not selected, font embedding is automatically set to OFF;
Color Management is enabled, and independent use of the PDF Box is enabled.
Related Topics:
To configure the General Optimize settings
About PDF Boxes settings
About Color settings
Importing a legacy workflow with a Color Manage node
About Spot Colors settings
To configure Image Quality settings
Ensuring Color Manage workflow consistency between the server and a remote client
To configure the General Optimize settings
The General tab allows you to select a Settings File, define compliance criteria,
designate font embedding options, and optimize for fast web viewing.
1. In the Settings File area, select from the following to load a settings file:
• pdfx-1a2001.xml (pre-installed settings file)
• pdfx-1a2003.xml (pre-installed settings file)
NOTE
If created, other user-defined settings files are also displayed.
2. In the Compliance area, mark the check box for
Create a document that complies with PDF/X standards and select from
the following options:
• PDFX-1a 2001
• PDFX-1a 2003
3-16
FreeFlow Process Manager® Operator and Administrator Guide
FreeFlow 9.0 Process Manager Operator/Administrator Guide
Page 43

Workflow Builder
3. In the Fonts area, select from the following:
• Embed Fonts Selected by default and grayed out when compliance is
selected.
• Embed as subset to minimize the document file size.
• Select Embed all fonts to enable future text editing. If a font has been
previously subset embedded, it will be fully embeddded. This option
increases the file size.
NOTE
The font family must be loaded on the PC. Only fonts with the appropriate
permission bits will be embedded.
4. In the Fast Web Viewing area, mark the check box for
Optimize the document for fast web view to enable fast page-at-a-time
downloading from web servers.
5. Select
Show job submitter the settings file name only. Settings details will be hidden
to display only the Settings File drop box to job submitters. All other dialog
features are hidden.
Related Topics:
Configuring Optimize Settings
About PDF Boxes settings
About Color settings
Importing a legacy workflow with a Color Manage node
About Spot Colors settings
To configure Image Quality settings
Ensuring Color Manage workflow consistency between the server and a remote client
About PDF Boxes settings
The PDF Boxes tab allows you to define PDF Box settings. The availability of
dialog options varies, depending on whether the
Create a document that complies with PDF/X standards option is selected in
the General tab.
When the check box for Set crop box to media box is checked:
• If a PDF document has a crop box, it is replaced with one the size of the media
box.
• If the PDF document does not have a crop box, one is generated and set to
the size of the media box.
FreeFlow Process Manager® Operator and Administrator Guide
FreeFlow 9.0 Process Manager Operator/Administrator Guide
3-17
Page 44
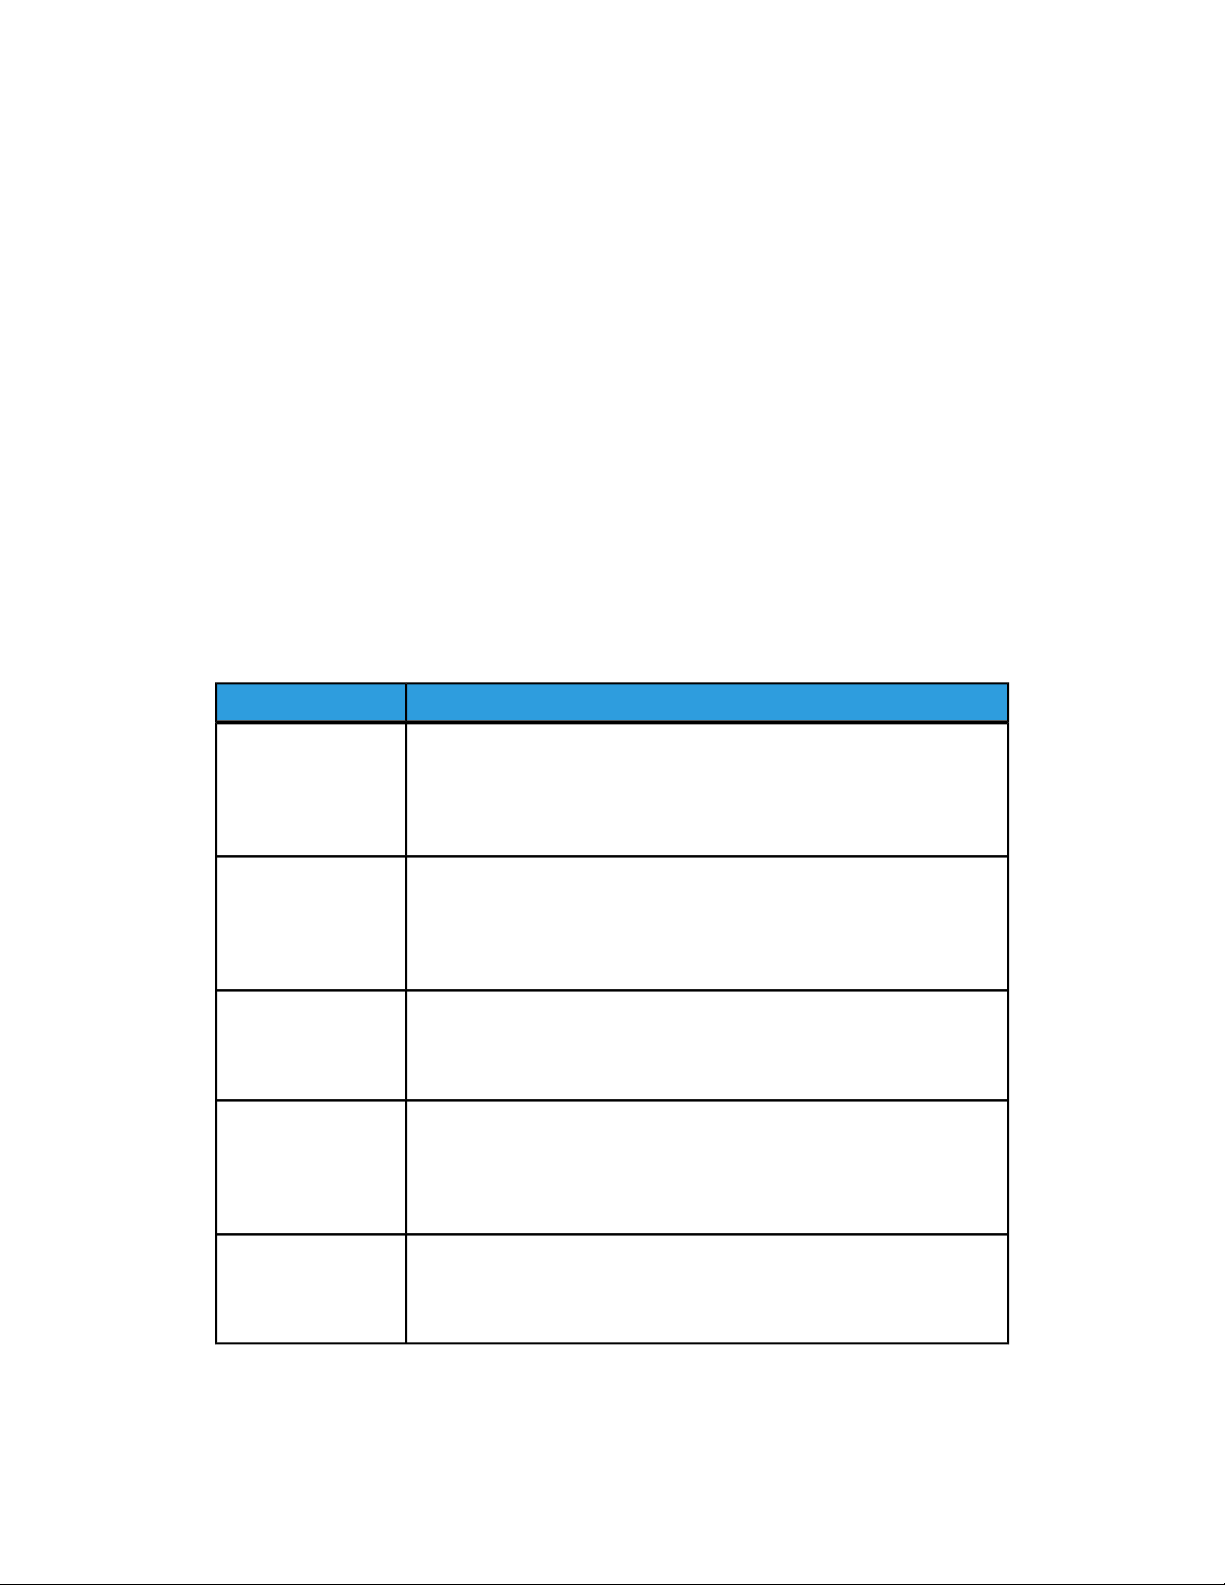
Workflow Builder
When the trim box and art box are missing, or when the bleed box is missing,
you can choose how to handle the job.
Related Topics:
Configuring Optimize Settings
To configure the General Optimize settings
About Color settings
Importing a legacy workflow with a Color Manage node
About Spot Colors settings
To configure Image Quality settings
Ensuring Color Manage workflow consistency between the server and a remote client
About PDF Boxes
The following table describes the PDF media box, bleed box, trim box and art
box.
Media box
Crop Box
Bleed box
Trim box
Art box
DescriptionPDF Box
Page size; contains all the objects of a page, including text and images
that appear on the page or that bleed or extend off the edge of the
finished document. Media box dimensions are always greater than or
equal to the trim box dimensions. Media box dimensions are always
greater than or equal to the bleed box dimensions.
The crop box represents the region in which the page contents are
trimmed when displayed or printed. It defines how the page contents
are placed on the output medium. The crop box dimensions are always
greater than or equal to the trim, art, and bleed box. The crop box
dimensions are always smaller than or equal to the media box.
Represents an extended area around the trim box at which contains
content that will be trimmed during finishing. A document that requires
a bleed also requires a bleed box. The bleed box must be smaller than
the media box, and can be the same or larger than the trim box.
Represents the final finished size of the document after printing and
finishing. A document intended for commercial printing requires a trim
box. The trim box must be smaller than the media box, and can be the
same as the bleed box. Trim marks are nominally placed around the trim
box.
Represents an area of the page (for example, a piece of clip art) to be
positioned when the PDF content is placed in an application, such as a
page layout program. The art box must be smaller than the bleed box.
Trim and art boxes may have the same dimensions.
3-18
FreeFlow Process Manager® Operator and Administrator Guide
FreeFlow 9.0 Process Manager Operator/Administrator Guide
Page 45

Workflow Builder
About Color settings
The Optimize step settings Color tab allows you to select the output color space,
source color space, define the appropriate action when an error occurs, and select
the desired transparency.
In the Output Color Space area, the Change all colors in document drop box
allows you to define the desired output color space:
• Convert colors to gray (alway available)
• Convert colors to CMYK (alway available)
NOTE
The following options are available only if
Create a document that complies with PDF/X standards is not selected
on the General tab:
• Don't change colors -- to gray out the Source Color Space options; prevent
color changes in the document.
• Manage Color profiles -- to enable color management. This enables the
Don't change ICC profiles for [xx] option in the CMYK, RGB and Gray drop
boxes in the Profiles to use section. Enables Treat managed [xx] as.
• Convert colors to RGB: In the ICC profile drop box, select the desired profile.
NOTE
The Color Manage node from earlier versions of FreeFlow Process Manager
is replaced by the Manage Colors profiles option.
NOTE
You must own the rights to use the ICC profiles accessed by FreeFlow
Process Manager.
Selecting the Use Output Intent, if present, for Source Color Space check box
allows the document's output intent to override the designated source color
space profile.
FreeFlow Process Manager® Operator and Administrator Guide
FreeFlow 9.0 Process Manager Operator/Administrator Guide
3-19
Page 46

Workflow Builder
In the Source Color Space area, the following information applies to the CMYK,
RGB, and Gray drop box options:
• Treat untagged [CMYK, RGB, or Gray] as: Assigns the selected ICC profile
to all non-profiled [CMYK, RGB, or Gray] objects.
• Treat managed [CMYK, RGB, or Gray] as: Available when "Manage Color
Profiles" is selected in the "Change all colors in document" area. Assigns the
selected ICC profile to all profiled [CMYK, RGB, or Gray] objects.
• Treat all [CMYK, RGB, or Gray] as: Assigns the selected ICC profile to both
non-profiled and profiled [CMYK, RGB, or Gray] objects.
• Don't change ICC profiles for [CMYK, RGB, or Gray]: Available with "Manage
Color Profiles" selection. Grays out the [CMYK, RGB, or Gray] profile. Preserves
the original profile of [CMYK, RGB, or Gray] objects within the document.
Related Topics:
Configuring Optimize Settings
To configure the General Optimize settings
About PDF Boxes settings
Importing a legacy workflow with a Color Manage node
About Spot Colors settings
To configure Image Quality settings
Ensuring Color Manage workflow consistency between the server and a remote client
Importing a legacy workflow with a Color Manage node
If you import a legacy workflow with a Color Manage node into FreeFlow Process
Manager, the Color Manage icon is converted to an Optimize icon and the settings
transfer automatically to the Optimize settings Color tab.
Related Topics:
Configuring Optimize Settings
To configure the General Optimize settings
About PDF Boxes settings
About Color settings
About Spot Colors settings
To configure Image Quality settings
Ensuring Color Manage workflow consistency between the server and a remote client
3-20
FreeFlow Process Manager® Operator and Administrator Guide
FreeFlow 9.0 Process Manager Operator/Administrator Guide
Page 47

Workflow Builder
About Spot Colors settings
The Spot Color tab allows you to keep spot colors, convert to common CMYK
standard colors, or to convert to an alternative color space. It provides a
normalization process with the ability to allow you to specify how to treat
PANTONE® Color values with C, CV, U, CVC, and CVU suffixes.
NOTE
If no spot colors are defined in the exclusion list, then all spot colors in the
document will be converted. Objects that contain multiple spot colors must
have all of their spot colors defined in the exclusion list or the objects will be
converted to the Output Color Space. The exclusion list appears below the
text box.
Related Topics:
Configuring Optimize Settings
To configure the General Optimize settings
About PDF Boxes settings
About Color settings
Importing a legacy workflow with a Color Manage node
To configure Image Quality settings
Ensuring Color Manage workflow consistency between the server and a remote client
To configure Image Quality settings
The Hairline Correction feature thickens stroke lines within a document that
may be too thin for printing purposes.
The Remove color trapping layers option allows you to eliminate color trap
layers from the PDF. Color trap layers are originally intended to provide fill
between two objects that abut in a document but end up printing with white
space along the abutting borders. Color trap layers solve the issue by printing an
overlapping border between the abutting objects.
NOTE
Removal of trap layers is supported for traps created by Prinergy, Prinect and
Esko Graphics.
FreeFlow Process Manager® Operator and Administrator Guide
FreeFlow 9.0 Process Manager Operator/Administrator Guide
3-21
Page 48

Workflow Builder
Related Topics:
Configuring Optimize Settings
To configure the General Optimize settings
About PDF Boxes settings
About Color settings
Importing a legacy workflow with a Color Manage node
About Spot Colors settings
Ensuring Color Manage workflow consistency between the server and a remote client
Ensuring Color Manage workflow consistency between the
server and a remote client
Workflows with color management enabled in the Optimize node can become
inconsistent between a Process Manager server and remote client when profiles
are uninstalled on the server. Use the following procedure to ensure workflow
consistency.
1. Disable the Workflow.
2. Open the Optimize node.
3. Enable the workflow to reset the profile database.
Related Topics:
Configuring Optimize Settings
To configure the General Optimize settings
About PDF Boxes settings
About Color settings
Importing a legacy workflow with a Color Manage node
About Spot Colors settings
To configure Image Quality settings
Configuring Preflight settings
The preflight validation depends on the profile you select. The administrator
defines preflight profiles using Adobe Acrobat Professional's profile repository
and Xerox custom profiles.
3-22
FreeFlow Process Manager® Operator and Administrator Guide
FreeFlow 9.0 Process Manager Operator/Administrator Guide
Page 49

Workflow Builder
The Xerox FreeFlow Recommended Preflight profile, provided with the FreeFlow
Process Manager product, includes the following checks:
• Font is not embedded
• Image resolution is less than 250 ppi
• Bitmap (1bit monochrome) image resolution is less than 600 ppi
• Document is damaged and needs repairs
• PDF contains errors or is damaged
Related Topics:
To generate the preflight profile repository on a clean install
To configure Preflight settings
To generate the preflight profile repository on a clean install
Preflight profiles do not exist on a clean install. After a clean install, do the
following to generate the profile repository:
1. Select Start > Programs > Adobe Acrobat Professional.
2. In the Advanced menu, select Preflight. This generates the profile repository
from which you can select profiles in the Preflight Settings dialog.
3. Close Adobe Acrobat Professional.
Related Topics:
Configuring Preflight settings
To configure Preflight settings
To configure Preflight settings
1. In the Select Preflight profiles that submitters can choose from text box,
select the desired profiles.
The profiles will be listed in the Select the default profile drop box.
2. In the Select the default Preflight profile drop box, select a default profile.
Related Topics:
Configuring Preflight settings
To generate the preflight profile repository on a clean install
FreeFlow Process Manager® Operator and Administrator Guide
FreeFlow 9.0 Process Manager Operator/Administrator Guide
3-23
Page 50

Workflow Builder
Upgrading legacy workflows that contain Job Level Edit nodes
In previous versions of FreeFlow Process Manager (2.0 through 4.0), all job level
edit functions (for example, watermarks, page numbering, page rotation) were
available via a single Job Level Edit dialog. In this version, you must add an
individual process step to the workflow for each function. Legacy workflows that
contain Job Level Edit processes will perform as they did in earlier versions, but
you will not be able to edit them. To use this version of job level edit functions,
save the existing Job Level Edit workflow, and it will be converted into a series of
individual, Watermark, Bates Numbering, Page Numbering, Rotate and Flip nodes,
as appropriate.
About Watermarks
Up to 1000 user-configured text and image watermarks can be set up and applied
to each page of an input PDF file. The List box shows watermarks that have been
configured. The attributes for a selected watermark are displayed in the
Description area. Image and text icons to the left of each watermark indicate
the watermark type.
NOTE
All watermarks in the Watermarks list are applied to the job and are applied
in the order in which they are listed.
Image watermarks can be transparent or opaque, scaled, rotated, variably
positioned from the document edge and can appear either underneath or on
top of the page content.
Text watermarks can consist of multiple lines with hard line breaks. They can be
created in a variety of font types, sizes and colors; can be transparent or opaque,
rotated, or variably positioned from the document edge; and can appear either
underneath or on top of the page content.
About Bates numbers
Bates numbering can be added to an input PDF file. Bates numbering consists
of a page number with optional leading zeros and an optional fixed text prefix.
An optional line of fixed text can appear either above or below the bates number.
Adding page numbers
Page numbers can be added to a PDF file. Page numbers are available in a
selection of styles, including 1, 2, 3; I, II, III; or i, ii, iii. Options include adding a
prefix and/or suffix, and selecting font, color, and position.
3-24
FreeFlow Process Manager® Operator and Administrator Guide
FreeFlow 9.0 Process Manager Operator/Administrator Guide
Page 51

Workflow Builder
Insert, Duplicate, and Delete pages
The following three page page editing nodes are available:
• The Insert Pages node allows users to:
- insert a set number of blank pages at specified locations.
- insert blank pages until the document reaches a certain number of pages.
- insert blank pages until the document reaches a multiple of a certain
number of pages.
- insert another document into a document at a specified location.
• Delete Pages allows users to delete pages at specified locations.
• Duplicate Pages allows users to copy pages at specified locations. With this
feature, you can specify a specific number of copies, or you can set it to use
the copy count setting for the job to determine the number of duplicate pages.
- When specifying the number of pages, this feature will create a the number
of copies specified in the Number of duplicates per page text box. For
example, if the document has 4 pages (1, 2, 3, 4), and you set this feature
to make two copies of the First Page Only, the output pages will be 1, 1, 1,
2, 3, 4. In this instance the feature literally makes 2 duplicates of the first
page.
- When the copy count for the job is used by selecting the
Set automatically based on job quantity check box, the outcome will be
slightly different. For example, the same 4 page document with the job
ticket copy count set to 2 and the feature set to make copies of the First
Page Only, the output pages will be 1, 1, 2, 3, 4. In this instance the feature
ensures there are 2 copies of the first page.
Related Topics:
Inserting pages
Duplicating pages
Deleting pages
Inserting pages
1. Double-click the Insert Pages process in a workflow.
2. To insert blank pages, select Blank Pages from the Insert Type pull-down
menu. Then perform the following:
a) Select the radio button corresponding to the number of blank pages you
want to insert.
The Number of Pages text box setting will determine the specific number
of blank pages inserted, the number of blank pages to be added to reach
a specific number of total pages, or the number of blank pages that will be
added until the document reaches a multiple of this setting.
FreeFlow Process Manager® Operator and Administrator Guide
FreeFlow 9.0 Process Manager Operator/Administrator Guide
3-25
Page 52

Workflow Builder
b) Select whether to use PDF boxes or a specific blank page size and orientation
to insert in the Blank page size section.
NOTE
See About PDF Boxes for information on these settings.
c) Go to step 4.
3. To insert pages from a PDF file, select Pages from file from the Insert Type
pull-down menu. Then perform the following:
a) Select the browse button to the right of the Insert filename text box.
b) Navigate to the location of the PDF file containing the pages to be inserted.
c) Select the PDF file and selct Open.
d) Go to step 4.
4. From the Insert location pull-down menu specifiy the location of the pages
to be inserted.
NOTE
Selected pages may be specified as all pages (Duplicate and Insert page
nodes only), odd or even pages, landscape or portrait pages, all but the
first or last page, the first or last page only, the second or second to last
page only, specific document pages, or as a page range (for example,
pages 1-5, 8).
NOTE
Process Manager also supports negative page numbers in the page ranges.
A negative number indicates that it is counted from the end of the
document instead of from the beginning. For example, "1 - -1" means the
range is from the first page to the last page. "3 - -2" means that the range
is from the third page to the second to last page. "-3 - -2" means that the
range is from the third to last page to the second to last page. Ensure
that you do not enter an invalid page range. For example, "3 - 2" and "-2
- -3" are invalid because the page range is inverted.
• Insert before selected locations: select this option to insert the pages
before the locations specified in the Insert location pull-down menu.
• Insert after selected locations: select this option to insert the pages after
the locations specified in the Insert location pull-down menu.
5. Select OK.
Related Topics:
Insert, Duplicate, and Delete pages
Duplicating pages
Deleting pages
3-26
FreeFlow Process Manager® Operator and Administrator Guide
FreeFlow 9.0 Process Manager Operator/Administrator Guide
Page 53

Workflow Builder
Duplicating pages
1. Double-click the Insert Duplicate Pages process in a workflow.
2. Enter the number of duplicate pages you want to add in the
Number of duplicates per page text box.
• Select the Set automatically based on job quantity check box to add
duplicate pages at the specified locations based on the copy count setting
in the job ticket associated with the job. Click here for a description of the
difference between this setting and the Number of Duplicates per page
setting.
3. From the Apply to pages pull-down menu specify the location of the pages
to be duplicated.
NOTE
Selected pages may be specified as all pages (Duplicate and Insert page
nodes only), odd or even pages, landscape or portrait pages, all but the
first or last page, the first or last page only, the second or second to last
page only, specific document pages, or as a page range (for example,
pages 1-5, 8).
NOTE
Process Manager also supports negative page numbers in the page ranges.
A negative number indicates that it is counted from the end of the
document instead of from the beginning. For example, "1 - -1" means the
range is from the first page to the last page. "3 - -2" means that the range
is from the third page to the second to last page. "-3 - -2" means that the
range is from the third to last page to the second to last page. Ensure
that you do not enter an invalid page range. For example, "3 - 2" and "-2
- -3" are invalid because the page range is inverted.
• Insert duplicates after each page: This option is only available when
All pages, All but first page, All but last page, or Page range is selected
in the in the Apply to pages pull-down menu. Selecting this option inserts
duplicate pages after each page in the selected page range.
• Insert duplicates after set of continuous pages: This option is only
available when All pages, All but first page, All but last page, or
Page range is selected in the in the Apply to pages pull-down menu. Select
this option to insert the duplicate pages at the end of the selected page
range.
4. Select OK.
FreeFlow Process Manager® Operator and Administrator Guide
FreeFlow 9.0 Process Manager Operator/Administrator Guide
3-27
Page 54

Workflow Builder
Related Topics:
Insert, Duplicate, and Delete pages
Inserting pages
Deleting pages
Deleting pages
1. Double-click the Delete Pages process in a workflow.
2. From the Delete Pages pull-down menu specifiy the location of the pages to
be deleted.
NOTE
Selected pages may be specified as all pages (Duplicate and Insert page
nodes only), odd or even pages, landscape or portrait pages, all but the
first or last page, the first or last page only, the second or second to last
page only, specific document pages, or as a page range (for example,
pages 1-5, 8).
NOTE
Process Manager also supports negative page numbers in the page ranges.
A negative number indicates that it is counted from the end of the
document instead of from the beginning. For example, "1 - -1" means the
range is from the first page to the last page. "3 - -2" means that the range
is from the third page to the second to last page. "-3 - -2" means that the
range is from the third to last page to the second to last page. Ensure
that you do not enter an invalid page range. For example, "3 - 2" and "-2
- -3" are invalid because the page range is inverted.
3. Select OK.
Related Topics:
Insert, Duplicate, and Delete pages
Inserting pages
Duplicating pages
Adding a Barcode
The Barcode node allows you to add a variety of barcodes to your workflows.
You can specify the barcode type or symbology, font, placement, alignment,
rotation, frequency, and size.
3-28
FreeFlow Process Manager® Operator and Administrator Guide
FreeFlow 9.0 Process Manager Operator/Administrator Guide
Page 55

Workflow Builder
You can specify additional symbology-specific barcode options. For example:
• Two-digit or 5-digit supplements.The supplement is a second barcode, separate
from the primary barcode and positioned to its right.
• A checksum, for barcode verification, which may be either optional or
mandatory.
• Start and stop characters that bracket the bar code content.
Related Topics:
To configure Barcode settings
To configure the barcode readable text
To configure barcode data
To configure Barcode settings
1. To open the Add Barcode dialog, double-click the Barcode process in a
workflow.
2. In the Barcode tab, specify the barcode symbology from the drop box.
3. In the Options area, select from the following:
NOTE
Options vary depending on the selected symbology.
• Include check digits to enable barcode verification.
• Include start character to include a start character in the barcode.
• Include stop character to include a stop character in the barcode.
• Force height to minimum of 15% of width
FreeFlow Process Manager® Operator and Administrator Guide
FreeFlow 9.0 Process Manager Operator/Administrator Guide
3-29
Page 56

Workflow Builder
4. In the Size area, specify the following:
• Font Size: Select or type the desired font size. This is an approximation of
the width of the narrowest bar in the bar code in mils (one thousandths of
an inch). The Bar Codes node does not require you to have bar code fonts
installed on the FreeFlow system.
• Height: Select or type the desired barcode height.
NOTE
The size of the human-readable text is not included in the requested bar
code height. If you specify height = 1 inch, the total size of the graphic is
one inch plus the height of the readable text extending above or below
the bar code.
NOTE
Height can be specified in inches or millimeters, except for PostNet (Japan)
and QR Code because the height for those types is determined uniquely
to bar width or cell size.
• Horizontal padding: Select or type the desired padding to control the
amount of white space on either side of the barcode.
• Vertical padding: Available for QR Code type only. Select or type the desired
padding to control the amount of white space at the top or the bottom of
the barcode.
5. Select the desired degree of rotation, in increments of 90 degrees. The icon
changes to reflect the selected rotation.
6. Select or type the horizontal position from the PDF document box: From left,
Center, or From right.
7. Select or type the vertical position from the PDF document box: From top,
Center, or From bottom.
8. Select the position relative to Crop Box, Media Box, Bleed Box, Trim Box or
Art Box.
NOTE
You can specify offset in inches or in millimeters either as positive (inward
from the selected box), or negative (outward from the selected box)
numbers. Default placement is Top-Left of the Crop Box, with horizontal
and vertical offsets (0.0, 0.0).
9. In the Apply to pages area, specify the pages upon which the barcode will
appear.
• If Page range is selected, enter a text string using commas and hyphens.
For example, select 1-3, 7, 12-14, 17 to print bar codes on pages 1 through
3, on page 7, on pages 12 through 14, and on page 17.
3-30
FreeFlow Process Manager® Operator and Administrator Guide
FreeFlow 9.0 Process Manager Operator/Administrator Guide
Page 57

Workflow Builder
Process Manager also supports negative page numbers in the page ranges.
A negative number indicates that it is counted from the end of the
document instead of from the beginning. For example, "1 - -1" means the
range is from the first page to the last page. "3 - -2" means that the range
is from the third page to the second to last page. "-3 - -2" means that the
range is from the third to last page to the second to last page. Ensure that
you do not enter an invalid page range. For example, "3 - 2" and "-2 - -3"
are invalid because the page range is inverted.
NOTE
Various order jacket file variables are supported by FreeFlow Process
Manager MAX, Manifest Automation from Xerox.. You can enter variable
data syntax in the page range text box. For example, given an Order jacket
file (OJF) with columns 1, 2, 3, 4 containing page range data 1-3, 7, 12-14,
17 respectively, you can enter text $CSV1$, $CSV2$, $CSV3$, $CSV4$
into the page range text box. If OJF column contains an invalid page
range, the workflow will fail with an invalid page range error in Workflow
Job Manager.
10. Select Always use these settings to prevent users from modifying the settings.
The settings will appear in the Submission Client controls, but will be grayed
out and unchangeable.
11. Select OK to accept the changes or select another tab to continue configuring.
View the dynamic effect of your selections in the Preview window at the bottom
of this dialog, or click the Preview button to preview the barcode placement in
the document.
Related Topics:
Adding a Barcode
To configure the barcode readable text
To configure barcode data
To configure the barcode readable text
If the barcode symbology supports it, the Readable Text tab allows you to specify
that the data encoded in the bar code prints in a human-readable format. The
default is disabled.
NOTE
The size of the human-readable text is not included in the requested bar code
height. If you specify height = 1 inch, the total size of the graphic is one inch
plus the height of the readable text extending above or below the bar code.
FreeFlow Process Manager® Operator and Administrator Guide
FreeFlow 9.0 Process Manager Operator/Administrator Guide
3-31
Page 58

Workflow Builder
Related Topics:
Adding a Barcode
To configure Barcode settings
To configure barcode data
To configure barcode data
You can specify the data to be encoded as a bar code.
In the When sheets are part of the barcode data area, the selected count
direction is applied to all three variables (SheetNumber, SignatureNumber, and
SheetInSignature).
NOTE
If bar code frequency is set to Even Pages or Odd Pages, the Bar Codes node
treats the document as duplex, and the Sheet Number variable increments
for every bar code (i.e., not for every PDF page), while the TotalSheets variable
is half the number of PDF pages. The document is also treated as duplex if
any of the Signature variables are used.
Related Topics:
Adding a Barcode
To configure Barcode settings
To configure the barcode readable text
Configuring Imposition settings
The Imposition process allows you to define the placement of page elements to
increase production press efficiency and to create specific applications-for
example, booklets.
If Preps is installed on the computer, the initial Imposition Settings dialog allows
you to choose one of the following:
• Specify imposition settings: When you select OK, displays the FreeFlow Process
Manager Imposition Settings dialog, in which you can establish the desired
settings.
• Use Preps job file: When you select OK, displays the Preps Imposition Settings
dialog, in which you can select Preps templates.
3-32
FreeFlow Process Manager® Operator and Administrator Guide
FreeFlow 9.0 Process Manager Operator/Administrator Guide
Page 59

Workflow Builder
Related Topics:
To configure Imposition settings - General tab
Guidelines for Cell Clustering
About Job types
To configure Imposition settings - Crop Marks tab
PDF Page Box Considerations
Maximum N-Up considerations
Automatic stock type considerations
To configure Imposition settings - General tab
The General tab allows you to select a job type and establish settings-for example,
orientation, stock, margins, and various signature options.
The following Pages on sheet side options are available:
• Repeated fills a multi-up sheet side with copies of a single page.
• Sequential places a single page in each cell of the multi-page up.
• Cut and Stack arranges the order that the images are printed on the sheets
so the printed sheets can be cut and easily stacked into one copy of the final
document.
• Alternating places the pages sequentially, but alternating the front side and
the back side of a page.
By specifying cell-relative position for the PDF image (logical page) within an
imposed sheet cell, you can use a single set of imposition parameters with jobs
of different sizes within an overall size range.
FreeFlow Process Manager® Operator and Administrator Guide
FreeFlow 9.0 Process Manager Operator/Administrator Guide
3-33
Page 60

Workflow Builder
The following signature options are available:
• Signature Shift to specify an incrementing offset for incoming PDF pages on
the output paper stock for Book, Pamphlet, and Calendar job styles.
• Single signature when cleared, to specify the number of sheets per signature
segment; when selected, to place all sheets in one signature.
• Sheets per signature to enter the number of sheets that will comprise a single
segment of a multiple-segment signature document, from 1-999.
Multiple-segment signatures are used for perfect bound books. Available when
Single signature checkbox is unchecked.
• Fill last segment to fill the document with blank sheets to ensure the last
segment in the job is filled to the value specified in Sheets per signature.
Available when Single signature checkbox is not selected.
NOTE
The number of sheets in the final signature may not equal the requested
value when Sheets per signature does not divide evenly into the number
of sheets.
Related Topics:
Configuring Imposition settings
Guidelines for Cell Clustering
About Job types
To configure Imposition settings - Crop Marks tab
PDF Page Box Considerations
Maximum N-Up considerations
Automatic stock type considerations
Guidelines for Cell Clustering
A cell is the area on a sheet occupied by a multipage imposition scheme. Cell
Clustering provides the option of pulling together cells on a sheet in a way that
results in cell sizes that contain the imposed page images with no waste space
between cells. The Cell Cluster is positioned and aligned as a single entity.
• Cell Clustering is not available for Standard and Signature job types. The cells
in a signature job configuration are pulled together using the "Binding-edge"
alignment option.
• With Autofit off it is possible to yield cell sizes that when clustered, produce
a layout area that exceeds the dimensions of the paper stock. As a result, only
3-34
FreeFlow Process Manager® Operator and Administrator Guide
FreeFlow 9.0 Process Manager Operator/Administrator Guide
Page 61

Workflow Builder
a portion of the NxN cell matrix may appear on the cell with the rest of the
cells partially or completely clipped by the defined paper stock size.
• With Cell Clustering OFF, the imposition entities being controlled are the
individual page images with respect to position, alignment, and autofit. With
Cell clustering ON, the entity being controlled is the entire cluster of cells.
Related Topics:
Configuring Imposition settings
To configure Imposition settings - General tab
About Job types
To configure Imposition settings - Crop Marks tab
PDF Page Box Considerations
Maximum N-Up considerations
Automatic stock type considerations
FreeFlow Process Manager® Operator and Administrator Guide
FreeFlow 9.0 Process Manager Operator/Administrator Guide
3-35
Page 62

Workflow Builder
About Job types
The following job types are available via the Imposition Settings dialog:
• Standard: The pages are printed in a sequential order with one page on one
side of a sheet of defined paper stock. There is one Standard job type, for
which you can specify the image orientation and sides imaged.
• Signature: Two separate pages are printed side-by-side on one side of a sheet
of paper. All Signature documents are 2-Sided. The pages of the document
are sequenced when printed to produce output that can be folded to create
a booklet type of document. There are three signature job types, characterized
by the fold (binding edge) of the document:
- Signature Booklet: Landscape, fold (binding edge) is parallel to short edge
of the stock
- Signature Calendar: Head To Toe orientation, fold (binding edge) is parallel
to short edge of the stock
- Signature Pamphlet: Portrait orientation, fold (binding edge) is parallel to
the long edge of the stock
• N-Up: The pages are printed in sequential order with each page of the
document appearing a specified number of times (n) on the same side of a
sheet of paper. (This is also known as multiple imposition or tiling.) Each copy
of the page is called a cell. There are multiple N-Up job types:
- 2-Up -- each page is imaged twice on one side of a sheet of paper.
- 2-Up Flip Left -- each page is imaged twice on one side of a sheet of paper
with the left most image rotated 180 degrees.
- 2-Up Flip Right -- each page is imaged twice on one side of a sheet of paper
with the right most image rotated 180 degrees.
- 3-Up -- each page is imaged three times on one side of a sheet of paper.
- 3-Up Flip Left -- each page is imaged three times on one side of a sheet
of paper with the left most image rotated 180 degrees.
- 3-Up Flip Right -- each page is imaged three times on one side of a sheet
of paper with the right most image rotated 180 degrees.
- 4-Up -- each page is imaged four times on one side of a sheet of paper.
There is no flip option for 4-Up.
3-36
FreeFlow Process Manager® Operator and Administrator Guide
FreeFlow 9.0 Process Manager Operator/Administrator Guide
Page 63

Workflow Builder
- 8-Up -- each page is imaged eight times on one side of a sheet of paper.
There is no flip option for 8-Up.
- 16-Up -- each page is imaged sixteen times on one side of a sheet of paper.
There is no flip option for 16-Up.
- Custom N-Up -- Allows the user to specify rows and columns in combination
with Orientation, Sides Imaged, Margins, Paper Stock, and Autofit options.
If Custom N-Up is not selected, Rows (maximum of 16), Columns (maximum
of 16), and Pages on Sheet Side; Repeated; SequentiaI; Cut and Stack;
Alternating are grayed out.
- Maximum N-Up: Given an input page size, calculates how many of those
pages can be fit onto the sheet.
Related Topics:
Configuring Imposition settings
To configure Imposition settings - General tab
Guidelines for Cell Clustering
To configure Imposition settings - Crop Marks tab
PDF Page Box Considerations
Maximum N-Up considerations
Automatic stock type considerations
To configure Imposition settings - Crop Marks tab
1. In the Imposition Settings dialog, select the Crop Marks tab.
2. In the Crop mark box window, select from the following:
• Media Sheet to define the crop margin relative to the sheet regardless of
imposition job type. Range is 0 to remaining width of paper stock for Left
FreeFlow Process Manager® Operator and Administrator Guide
FreeFlow 9.0 Process Manager Operator/Administrator Guide
3-37
Page 64

Workflow Builder
and Right controls, and 0 to remaining height of paper stock for Top and
Bottom controls.
• Media Cell to define the crop margin relative to each cell on the sheet.
Range is 0 to remaining width of cell for Left and Right controls, and 0 to
remaining height of cell for Top and Bottom controls.
• Cell Cluster to define the crop margin relative to each cell cluster on the
sheet.
• PDF Crop Box to define the boundary for the contents of the page when
it is displayed or printed.
• PDF Trim Box to define the finished dimensions of the page after trimming.
• PDF Bleed Box to define the amount of extra area to image outside of the
final page size defined by the PDF Trim Box.
• PDF Art Box to define the area of the page where PDF content is placed.
NOTE
Bleed, Trim, and Art boxes must be smaller than or equal to the defined
PDF Crop Box.
3. In the crop marks offsets area, specify offsets from the edges of the selected
crop mark box:
• Top, Bottom, Left, and Right to set the desired offsets.
• Uniform to define all offsets; defined by the Top offset.
• Inward offset to place offsets inside the perimeter of the selected box.
• Outward offset to specify offsets outside the perimeter of the selected
box.
NOTE
The Outward offset option is disabled for media sheet crop marks.
NOTE
Offsets must be all inward or all outward. Negative offset values are not
allowed.
NOTE
For the PDF box options, the above options define the box relative to the
size of the PDF page being imposed. The box is affected by and moved
according to all transformations of the page such as Autofit, Margin, and
Page Image Position/Alignment settings. The range is 0 to 60 inches and
the metric equivalent. Use care with this option as it is possible to specify
a box rectangle that exceeds the actual page size or that is clipped off
by the sheet cell(s) during imposition.
3-38
FreeFlow Process Manager® Operator and Administrator Guide
FreeFlow 9.0 Process Manager Operator/Administrator Guide
Page 65

Workflow Builder
4. Select from the following Sheet Face options:
• Mark both sides to place crop marks on the front and back of sheets. This
is the default selection when a duplex job is defined.
• Mark front side only to place crop marks on the front side of sheets. This
is the default selection when a simplex job is defined.
• Mark back side only to place crop marks on the back of sheets.
5. Select from the following Interval options:
• Mark every sheet to apply crop marks to all sheets in the output.
• Mark first sheet to apply crop marks to the first sheet in the output
• Mark last sheet to apply crop marks to the last sheet in the output.
• Mark every to apply crop marks to every "n" sheet as defined by the user
via the sheets spin box. Range: 1 to 500.
• Starting with the first sheet to start crop marks on the first sheet when
selected, or on sheet(s) N when not selected.
6. Select from the following Size and Color options:
• Crop mark length: Defines the length of the crop mark from corner offset
outward to the edge of the cell, sheet, or page.
• Crop mark color: Defines the color of the crop mark.
• Crop mark bleed: Defines the distance between the crop marks and the
corner of the rectangle the crop marks identify. For example, if the bleed
length is set to "0," the horizontal and vertical crop mark lines that form a
corner would meet. Larger values space the lines away from each other.
Related Topics:
Configuring Imposition settings
To configure Imposition settings - General tab
Guidelines for Cell Clustering
About Job types
PDF Page Box Considerations
Maximum N-Up considerations
Automatic stock type considerations
PDF Page Box Considerations
• The PDF Boxes allow you to perform an "automated crop" by using a box
defined within the PDF, rather than tailoring a workflow specific to an input
FreeFlow Process Manager® Operator and Administrator Guide
FreeFlow 9.0 Process Manager Operator/Administrator Guide
3-39
Page 66

Workflow Builder
document type. You can use the PDF boxes to meet specific job
requirements-for example, the PDF Art Box can represent document fold lines.
• The PDF Media box option is not supported in imposition, but you can create
an equivalent during imposition via the Paper Stock setting. The PDF Media
Box describes the whole area of the PDF document including gutters and trim
areas. All other box definitions are sub-areas of the media box. It is not
changeable by the user and is established when the PDF document is created.
• The Trim, Bleed and Art boxes must be smaller than the Crop Box. Box edges
defined in the input document that are beyond the corresponding crop box
edge are limited to the crop box edge during imposition.
• You can select which of the four supported PDF boxes to be used for positioning
and autofit. Note that the PDF page is not clipped by the selected box unless
margins are applied. Enabling autofit will cause the selected box to scale to
fit the sheet cell it is being imposed into. PDF page data may bleed outside
of the selected box into any sheet cell waste-space created during autofit
scaling as long as it does not intrude into a neighboring imposition cell.
• Bleeds beyond the selected PDF box are disabled if any margins are applied.
• From the perspective of downstream workflow components, page size in the
output document is the selected paper stock upon which the input document
is imposed.
• You can make PDF box definitions unique on a page-by-page basis. Asymmetric
imposition results occur if these definitions are not consistent throughout the
document.
Related Topics:
Configuring Imposition settings
To configure Imposition settings - General tab
Guidelines for Cell Clustering
About Job types
To configure Imposition settings - Crop Marks tab
Maximum N-Up considerations
Automatic stock type considerations
Maximum N-Up considerations
• Maximum N-up might benefit workflows where resource utilization is of a
higher-priority than layout scheme.
• The N-up cell count is based on the size of the configured imposition reference
box (PDF box) on the first page of the document only. If the selected reference
3-40
FreeFlow Process Manager® Operator and Administrator Guide
FreeFlow 9.0 Process Manager Operator/Administrator Guide
Page 67

Workflow Builder
box is not of consistent size throughout the input document, unusual clipping
or seemingly asymmetric output will result.
• The application of gutters when this feature is used with imposition cell
clustering will be accounted for in the layout computations and therefore,
total N-up cells maybe be reduced as a result.
• The use of gutters in conjunction with imposition cell clustering may result in
a reduction of total N-up cells.
• If the input page size reference is larger than the selected stock size, a Standard
non-Autofit job style output results.
• If the number of pages in the input document cannot fill all the cells for the
N-up, a partial N-up output results.
• Autofit functionality is not available with this configuration.
• The maximum number of rows and/or columns is limited to 16 in each direction.
• Maximum N-Up cannot be used to automatically configure the printed stock.
Related Topics:
Configuring Imposition settings
To configure Imposition settings - General tab
Guidelines for Cell Clustering
About Job types
To configure Imposition settings - Crop Marks tab
PDF Page Box Considerations
Automatic stock type considerations
Automatic stock type considerations
The Automatic Paper Stock type option selects or creates a custom stock
configuration that completely contains the cells of a specified job type. This
option is useful for "intermediate" imposition steps in multi-imposition workflows.
Imposition result vs. print result: The automatic stock feature produces an
imposition result - not a print result. The stock size defined by the code logic
cannot be communicated to the print component logic.
Stock dimensions based on reference box: The stock dimensions are based on
the resulting cell layout of the job type and the size of the configured imposition
reference box (PDF box) on the first page of the input document only. If the
reference box is inconsistent in size throughout the input document, unusual
clipping or unexpected border-gutter space may result.
Regional prioritization: If you prioritize the automatic selection to one of the
standard named stock configurations, you may further constrain the standard
stock type used by regionality.
FreeFlow Process Manager® Operator and Administrator Guide
FreeFlow 9.0 Process Manager Operator/Administrator Guide
3-41
Page 68

Workflow Builder
For each of the options, If no stock among the set is large enough to encompass
the layout area, a Custom type is created.
• If a standard stock type is identified, orientation is dynamically configured to
choose a stock orientation that minimizes post-imposition waste areas.
• If the subsequent layout exceeds the size of an identifiable standard stock
type, a Custom stock type that encompasses the layout area is created.
• If you choose not to prioritize among standard stock types, a stock type that
wholly encompasses the layout area is created. This might equate
dimensionally to a standard named stock type.
Maximum size: The maximum size for an automatic stock is 60" in either direction.
Both Maximum N-up and Automatic stock selected: If you select both Maximum
N-up and Automatic stock configurations, the result is a Standard, non-Autofit
job style output as the maximum number of cells that can be fit onto a undefined
area is always equal to one.
Related Topics:
Configuring Imposition settings
To configure Imposition settings - General tab
Guidelines for Cell Clustering
About Job types
To configure Imposition settings - Crop Marks tab
PDF Page Box Considerations
Maximum N-Up considerations
Configuring Preps settings
If Preps is installed on the computer, the initial Imposition Settings dialog allows
you to choose one of the following:
• Specify imposition settings: Displays the Imposition Settings dialog, in which
you can establish the desired imposition settings.
• Use Preps job file: Displays the Preps Imposition Settings dialog, in which you
can select Preps job files.
In Preps, job files are layout masters used in conjunction with a set of pages to
produce imposed jobs. The Administrator establishes the selectable job files from
the Preps software. The Preps dialog settings allow you to select from a list of
Preps imposition job files.
Related Topics:
Limitations for Imposition and Preps
3-42
FreeFlow Process Manager® Operator and Administrator Guide
FreeFlow 9.0 Process Manager Operator/Administrator Guide
Page 69

Workflow Builder
Limitations for Imposition and Preps
• If a workflow with branching contains an Impose node in more than one
branch, the node in only one branch receives job ticket information. For
Conditional branches, the top branch receives job ticket information. For Fail
branches, the main branch receives job ticket information.
• JDF imposition parameters cannot be translated into Preps imposition.
• Non-printable content such as bookmarks, sounds, movies, logical structure,
hyperlinks, and article threads will not be preserved by the Preps imposition
component.
• When you submit a job to a Process Manager workflow that includes Imposition
with Preps, ensure that the Preps application is not running if the license is
only for one instance of Preps.
Related Topics:
Configuring Preps settings
About Review
The Review process allows you to view the PDF file in its current state and approve
or fail the document. When a workflow is stopped at a Review step, in Workflow
Job Manager you can also perform the following functions, depending on the
makeup of the workflow:
• View and edit the file using Adobe Acrobat Professional.
• Print a hardcopy proof.
• Modify the copy count.
• Change process settings and resubmit the job.
FreeFlow Process Manager® Operator and Administrator Guide
FreeFlow 9.0 Process Manager Operator/Administrator Guide
3-43
Page 70

Workflow Builder
Configuring Notify settings
The Notify process provides job status notification via e-mail. Examples of uses
include:
• Job start notification: Notifies the operator that the job is beginning.
• Preflight fail notification: Notifies the operator when preflight fails, which
allows immediate intervention.
• Job finish notification: Notifies the operator that the job is completed.
Email attachments
If you choose to attach job files, the recipient will be able to remotely proof,
validate, or repair the PDF file. Compound document types, such as RDOs, cannot
be attached. The email notification will fail if the file exceeds the limitation.
You can add a watermark to the email attachment.
NOTE
Email notification requires configuration of the SMTP server via the
Workflow Builder application.
1. To access the Notification Settings dialog, double-click the Notification step
in a workflow.
NOTE
In the FreeFlow Administration Tool, the administrator can modify the
user's contact information and email address. When the user logs in to
Process Manager, the To and From fields in the Notification Settings
dialog are automatically set to that email address.
2. Select from the following:
• Use the job submitter's email address: Picks up the job submitter's email
address as configured in the FreeFlow Administration Tool and uses it as
the sender address for the notification.
• Use the following address: Allows you to enter an email address. By default,
the text field displays the email address of the logged-in user. When
submitting a job via a hot folder, the user set up in the hot folder dialog is
the submitting user, and his/her email is used in the notification when that
option is selected.
3. In the To text box, type the recipient(s) e-mail address(s). Be sure to separate
multiple addresses with semicolons.
4. If desired, select Send copy of notification to sender to send a copy to the
sender.
5. Select Enter recipient address during job processing to gray out and clear
the "To:" field and hold the job when the Notify step is reached. You must then
enter recipient addresses before continuing with the job.
3-44
FreeFlow Process Manager® Operator and Administrator Guide
FreeFlow 9.0 Process Manager Operator/Administrator Guide
Page 71

Workflow Builder
6. Select Enable Custom Subject Line to enter a text string of your choice in the
text box, or to select which of the following options to include in the subject
line:
• Append Job ID
• Append Job Name
• Append Job Status
7. Select which of the following options to include in the body of the mail note:
• Job ID
• Job Name
• Job Status
• Job Submit Date
• Preflight Results
• Job Files
• Low Res version
8. To include a watermark on the job file, see Setting up a watermark in an email
attachment .
NOTE
Job files will include the PDF files at this stage of the processing.
NOTE
Attached Job files can be viewed, but not printed or edited.
NOTE
All options, except Preflight Results and Job Files, are selected by default.
When Job Files is selected, Send low resolution image is selected by default.
9. Type a message with a maximum of 256 characters.
10. Select Allow job to continue even if no notification is sent to ensure that
the job does not fail if the email notification is not sent due to lack of recipient
address or other failure.
NOTE
When selected, along with Enter recipient address during job processing,
the job will stop at Notify, but it will continue as successfully completed
when you select Resume, if you do not enter a recipient.
FreeFlow Process Manager® Operator and Administrator Guide
FreeFlow 9.0 Process Manager Operator/Administrator Guide
3-45
Page 72

Workflow Builder
Setting up a watermark in an email attachment
With the Unlimited User Conversion License you can add a fully customizable
security watermark to email attachments.
If properly licensed, you can disable the security watermark by clearing the
Specify the text to be applied as watermark on PDF email attachments check
box.
Without the Unlimited User Conversion License, the attachment watermark
defaults to PROOF. You can append customized text to PROOF. The Unlimited User
Conversion restrictions apply when submitted via hot folders and not via Workflow
Submission Client.
The watermark does not appear on the job document.
In Workflow Builder, select Options > Email Attachment Watermark Setup
to change the watermark settings.
Configuring Print settings
The Print settings dialog allows you to print PDF, VPC, or RDO (for reprint) files
to a specified production print queue using a specified job ticket. A job ticket
stores all your document information for printing to a production printer.
Using the Print settings dialog, you can:
• Open a job ticket from a Windows file or document repository.
NOTE
Job tickets can be applied only to workflows that contain the Print task.
• Access the Job Setup dialog for production printing and make the desired
changes.
If the printer is not available on a standalone client
If you attempt to open the Print Settings dialog on a Workflow Job Manager or
Workflow Submission Client standalone client and an error message states that
the current printer is not available, you will need to obtain the list of registered
printers.
On the standalone client, Select Start > Programs > Registered Print List Locator.
In the Registered Print List Locator dialog, select Remote and enter the computer
address of the Printer Administration server.
Related Topics:
To configure Print settings
Fault handling for Print
3-46
FreeFlow Process Manager® Operator and Administrator Guide
FreeFlow 9.0 Process Manager Operator/Administrator Guide
Page 73

Workflow Builder
To configure Print settings
1. To access the Print Settings dialog, double-click the Print step in a workflow.
2. In the Select printers that submitters can choose from text box, select the
desired printers. The printers will populate the Select the default printer drop
box.
NOTE
Printers are added to the list in the
Select printers that submitters can choose from text box via the Printer
Registration application.
3. In the Default printer drop box, select the appropriate default printer.
4. Select Job Setup to open the Job Setup dialog from production printing. Make
the desired selections. Options vary depending on the selected printer.
Related Topics:
Configuring Print settings
Fault handling for Print
Fault handling for Print
When printing fails in a workflow without a Fail node, Process Manager will retry
printing. By default, the workflow will retry printing for up to 30 minutes before
failing. Workflows waiting to retry printing are not counted in the number of
active tasks.
Related Topics:
Configuring Print settings
To configure Print settings
Configuring Save settings
The Save process allows you to copy all supported file types to a specified location
within a document repository or Windows File system. Dialog options include:
Save job ticket information: Allows you to save the job ticket (XPIF) with the
PDF file for reprinting purposes.
Related Topics:
Saving a job ticket with the PDF file for reprinting
FreeFlow Process Manager® Operator and Administrator Guide
FreeFlow 9.0 Process Manager Operator/Administrator Guide
3-47
Page 74

Workflow Builder
Saving a job ticket with the PDF file for reprinting
NOTE
To save the job ticket, a Print process must be included in the workflow prior
to the Save process.
The Save the job ticket option in the Save Settings dialog allows you to save
the job ticket (.xpf) information with the PDF file for reprinting purposes. An .xpf
job ticket is automatically saved in the same folder as the PDF. The last settings
that were used to successfully process the Print node are saved.
To associate the .xpf job ticket with the file to be processed, save an .xpf job
ticket using the following naming convention:
• file name. file extension.xpf, for example:
- PDF file name = brochure.pdf
- .xpf file name = brochure.pdf.xpf
NOTE
.xpf job tickets must be in the same directory as the files to be processed. If
you move or rename the job files, you must also move and rename the
associated .xpf job ticket.
Using Workflow Submission Client to reprint
Submit only the saved PDF file to the reprint workflow. Process Manager
automatically picks up the associated job ticket and applies it to all print nodes
in the workflow.
Using a hot folder to reprint
You must submit the saved PDF file and the associated .xpf file to the reprint
workflow. The files are dropped into the Waiting for Job Ticket folder inside the
hot folder. Process Manager applies the saved job ticket to all print nodes in the
workflow.
Related Topics:
Configuring Save settings
3-48
FreeFlow Process Manager® Operator and Administrator Guide
FreeFlow 9.0 Process Manager Operator/Administrator Guide
Page 75

Workflow Builder
Configuring JDF Export settings
Job Definition Format (JDF) is a universal job ticket format. JDF capabilities
enable Process Manager to use existing JDF job tickets and to create new JDF
job tickets.
JDF job tickets are submitted via a hot folder. The hot folder is monitored by the
Process Manager application, which looks for JDF tickets and submits them to
the workflow.
JDF Export settings allow you to designate a JDF Export file destination. The
filename cannot exceed 80 characters, and the directory path cannot exceed
160 characters.
The output file of a JDF export task can be reimported and rerun by dropping it
into a hot folder associated with an appropriate workflow. The files associated
with the JDF must be in the same location as the original job.
1. To access the JDF Export Settings dialog, double-click the JDF Export step in
a workflow.
2. In the Export Options section, select from the following:
• Export the Process Manager workflow job as a new JDF to export the
supported workflow nodes as JDF.
• Export the JDF submitted with any modifications made by external processes
to export the submitted JDF. If external processes are present in the
workflow, the exported JDF will contain the changes made by the external
process nodes.
Related Topics:
About JDF Export options
Fault handling for JDF Export
JDF and Color Manage
About JDF Export options
If you export the workflow JDF by selecting
Export the Process Manager workflow job as a new JDF the JDF Export node
functions as it always has.
If you submit a JDF file to a workflow that contains a JDF Export node:
• If the job does not encounter an External Process node, the JDF Export node
exports a copy of the submitted JDF file.
• If the job encounters an External Process node, and you select the option to
send the JDF and an XML file by selecting
Export the JDF submitted with any modifications made by external processes,
FreeFlow Process Manager® Operator and Administrator Guide
FreeFlow 9.0 Process Manager Operator/Administrator Guide
3-49
Page 76

Workflow Builder
the JDF Export node exports a copy of the JDF file returned by the External
Process node.
• If the job encounters an External Process node, and you do not select the
option to send the JDF and an XML by selecting
Export the Process Manager workflow job as a new JDF, the JDF Export
node exports a copy of the submitted JDF file.
• If you select to export the submitted JDF file and a JDF file was not submitted
to the workflow, the JDF Export node will fail.
• In all cases that a JDF file is exported, the exported JDF file is updated to
reference the PDF file being exported.
When exporting a JDF file, the margin information is read from the JDF file.
Therefore, if the left and right margin values are different in JDF export, the JDF
adds the values and divides the total by two to make the values the same for
import. The same applies for the top and bottom margin.
Related Topics:
Configuring JDF Export settings
Fault handling for JDF Export
JDF and Color Manage
Fault handling for JDF Export
Errors are logged in the Windows Event log and display in the Job Manager status
display area. The following errors cause the export operation to fail:
• The workflow contains a non-supported task.
• The workflow does not contain all the tasks it needs.
Related Topics:
Configuring JDF Export settings
About JDF Export options
JDF and Color Manage
JDF and Color Manage
When submitting a JDF ticket to a workflow, only the color profile being used by
the JDF ticket is visible in the Color settings in the Optimize node. Normally, when
submitting jobs, all default options - the set of installed CMYK color profiles, and
the srgb color space profile.icm - are visible.
3-50
FreeFlow Process Manager® Operator and Administrator Guide
FreeFlow 9.0 Process Manager Operator/Administrator Guide
Page 77

Workflow Builder
NOTE
To enable color management, the Optimize node settings should be set as
follows: in the General tab, de-select the check box for
Create a document that complies with PDF/X standards. In the Color tab,
in the Change all colors in document drop box, select Manage Color profiles.
NOTE
When the JDF ticket specifies a color profile, the color profile must be installed
on the Process Manager Server or the job will fail.
Related Topics:
Configuring JDF Export settings
About JDF Export options
Fault handling for JDF Export
Limitations when creating JDF Tickets in Adobe Acrobat Professional
To create a JDF ticket in Adobe Acrobat Professional for submission to FreeFlow
Process Manager, for the JDF ticket to be handled properly, you must specify the
number of pages in the document or the pages in the range.
Related Topics:
To specify the number of pages
To specify the pages in the range
To specify the number of pages
1. Select Start > Programs > Adobe Acrobat Professional.
2. In Adobe Acrobat Professional, select Advanced > Print Production
> JDF Job Definitions.
3. Select New.
4. In the Create New Job Definition dialog, browse to the desired selection and
select Save. The file path displays in the Filename text box.
5. Select Create and Edit.
6. In the Edit JDF Job Definitions dialog, select Add Section.
7. In the Number of Pages section, enter the appropriate value.
8. Select OK.
9. Close the dialog.
10. Exit Adobe Acrobat Professional.
FreeFlow Process Manager® Operator and Administrator Guide
FreeFlow 9.0 Process Manager Operator/Administrator Guide
3-51
Page 78

Workflow Builder
Related Topics:
Limitations when creating JDF Tickets in Adobe Acrobat Professional
To specify the pages in the range
To specify the pages in the range
1. Select Start > Programs > Adobe Acrobat Professional.
2. In Adobe Acrobat Professional, select Advanced > Print Production
> JDF Job Definitions.
3. Select New.
4. In the Create New Job Definition dialog, browse to the desired selection and
select Save. The file path displays in the Filename text box.
5. Select Create and Edit.
6. In the Edit JDF Job Definitions dialog, select Add Section.
7. Select Add File.
8. In the Pages to use in Document section, enter a value for
Pages in the Range.
9. Select OK.
10. Close the dialog.
11. Exit Adobe Acrobat Professional.
Related Topics:
Limitations when creating JDF Tickets in Adobe Acrobat Professional
To specify the number of pages
Creating conditional branches
Conditional branching provides an added level of logic to a workflow, allowing
it to examine the properties of submitted jobs, and then act accordingly without
human intervention.
You can add one or more conditional branches to a workflow, each with one or
more user-designated conditions that specify the desired attributes or properties
of the submitted jobs.
During execution, the condition(s) of each branch are compared with the
information retrieved from the job. The first branch whose conditions or
specifications “match” the properties retrieved from the job will be taken.
Each Conditional node can include up to 12 branches; each branch can include
up to 12 conditions that must be satisfied.
3-52
FreeFlow Process Manager® Operator and Administrator Guide
FreeFlow 9.0 Process Manager Operator/Administrator Guide
Page 79

Workflow Builder
You can specify two main categories of conditions:
• PDF-related conditions
• JDF ticket-related conditions
• The branches of a Conditional node can be merged into a common workflow.
Conditional branching provides an alternative to using Preflight as a means
to filter and route jobs.
Guidelines for successful conditional branching
Number of branches and conditions: A Conditional node is limited to 12
outbound branches. Each branch can have up to 12 conditions.
Nested branching: Nesting occurs when a Conditional node directly follows a
branch of another Conditional node. You can have up to two nested Conditional
nodes.
Execution sequence: Branches are checked from the top branch to the bottom.
The top branch conditions are checked first. If the conditions are satisfied, the
top branch is taken. Otherwise, the second branch is checked, and so on. Branch
order is defined in the Conditional Branch Settings dialog.
Fail branches: A Fail branch can be added to Conditional node. The Fail branch
is not considered part of the Conditional Branch and is not displayed in the
Conditional Branch Settings dialog.
JDF Export: Workflows with a Conditional Branch do not support JDF Export.
Conditions from more than one category: Different categories can be combined
in one branch. For example, a branch can contain both PDF and JDF conditions.
Modifying conditional branches in Workflow Submission Client: You can add
or remove conditions for a Conditional branch. You cannot do the following:
• Add or remove branches.
• Rearrange the order of the branches.
• Change branch names.
Failed status: A job will fail if:
• None of the conditional branches match the job and there is no pass-through
branch.
• If the necessary information is not available to evaluate a condition. For
example, if a PDF file is submitted to a branch with a PDF bleedbox condition
and bleedbox is not defined in the PDF file, the job will fail.
FreeFlow Process Manager® Operator and Administrator Guide
FreeFlow 9.0 Process Manager Operator/Administrator Guide
3-53
Page 80

Workflow Builder
Adding and configuring branch conditions
You can place a Conditional process anywhere in a workflow that a decision must
be made. Node configuration is perforned via the Branch Conditions Branch
Name dialog, where you add branches and define or edit their conditions. Twelve
branches are allowed per Conditional node, 12 conditions are allowed per
Conditional branch.
1. In Workflow Builder, drag and drop a Conditional process into the workflow.
The Conditional Branch Settings dialog automatically opens.
2. Select New Branch.
3. In the Branch Conditions dialog, enter a name in the Branch name text box.
The name display in the dialog title later, when you open the dialog to view
or edit conditions.
The options in the This branch will only accept area ensure that only the
desired file types are examined by the branch. For example, if you select PDF
format files and you submit a .doc file to the workflow, the system does not
attempt to apply PDF-only conditions to the file. The branch is skipped; no
errors are generated.
4. In the This branch will only accept area, select from the following:
• PDF format files: To enable the addition of PDF conditions.
• Documents submitted with JDF job tickets: To enable the branch to accept
only files submitted with JDF job tickets and to enable the addition of
JDF-specific conditions.
• Select both options.
• Select neither option.
5. In the Conditions that must be met drop box, select from the following:
• Any: To establish that one or more conditions must be met for the branch
to be considered a match.
• All: To establish that all conditions must be met for the branch to be
considered a match.
6. In the Conditions to add area, select a condition.
NOTE
Refer to the Conditional branch conditions table for a description of the
conditions and their qualifiers. Qualifiers vary based on the selected
condition, for example,”PDF format files.”
7. Select the desired qualifiers for the condition.
8. After all fields are configured, select Add to add the condition and display it
in the Conditions List.
9. Add more conditions, if desired, up to 12 per branch.
3-54
FreeFlow Process Manager® Operator and Administrator Guide
FreeFlow 9.0 Process Manager Operator/Administrator Guide
Page 81

Workflow Builder
A workflow process must follow a conditional branch or the workflow cannot be
saved.
FreeFlow Process Manager® Operator and Administrator Guide
FreeFlow 9.0 Process Manager Operator/Administrator Guide
3-55
Page 82

Workflow Builder
Conditional branch conditions
2nd Qualifier1st QualifierConditionAvailable For
PDF Only
Number of Impressions
*Number of Pages
Mediabox Width
Mediabox Height
Trimbox Width
Trimbox Height
Bleedbox Height
Bleedbox Width
Artbox Height
Artbox Width
Cropbox Height
Cropbox Width
Maximum Bleed Size*
Author
Title
Subject
Keyword
Creator
Producer
Equal to
Not equal to
Less than or equal to
Greater than
Does not contain
Starts with
Ends with
Is equal to
Make a numeric
selection
Enter textContains
JDF Job Ticket Only
Always
Color or B&W
First Page Orientation
Same
All Page Sizes Equal
Customer Billing
CodeCustomer ID
Customer Job Name
Customer Order ID
Extension
NoneAll B&W
Containing any
grayscale or color
images
NonePortrait
Landscape
YesNoAll Page Orientations
Enter textContains
Does not contain
Starts with
Ends with
Is equal to
Enter textJob name File
3-56
FreeFlow Process Manager® Operator and Administrator Guide
FreeFlow 9.0 Process Manager Operator/Administrator Guide
Page 83

Contains
Does not contain
Starts with
Ends with
Is equal to
Workflow Builder
2nd Qualifier1st QualifierConditionAvailable For
Number of Copies*
Equal to
Not equal to
Less than or equal to
Greater than
Make a numeric
selection
Condition Definitions
For a list of available conditions and their qualifiers, see Conditions to Add.
Number of copies
The value that a Conditional Branching node uses for the “number of copies”
condition is the copy count value associated with the job at the time of
Conditional branching execution.
FreeFlow Process Manager® Operator and Administrator Guide
FreeFlow 9.0 Process Manager Operator/Administrator Guide
3-57
Page 84

Workflow Builder
A copy count value is associated with a job through the following ways:
• If an XPIF ticket was submitted with the Job (for example as part of an RDO)
and it has a copy count value, that value will be considered the Job copy count
value.
• If a JDF ticket was submitted with the job and it has a copy count value, that
value will be considered the Job copy count value.
• If the user sets a value for the Quantity attribute in FreeFlow Process Manager
MAX, Manifest Automation from Xerox, that value is considered the Job copy
count value.
• If the user sets a copy count value during Review in Job Manager, that value
is considered the Job Copy count value from that point on.
• If Imposition affects copy count switch is set in the WorkFlow Builder, and the
copy count value has been modified by Imposition, once the job reaches the
Conditional branching node, the modified value is considered the Job copy
count value for Conditional Branching.
• If the job has no associated copy count value, Conditional branching fails
when it examines the number of copies condition. A message saying no copy
count value is available message displays.
NOTE
Printer copy count value is not the same as Job copy count value. The
number of copies condition of Conditional branching works independently
of the Print nodes in a workflow and the copy count values, if any, set
during workflow design.
Number of impressions
This is the number of copies multiplied by number of pages in PDF file.
Maximum bleed size
If a Trim Box and a Bleed Box are defined, and the Trim Box is contained within
the Bleed Box, then the Bleed size is the four offsets from the four sides of the
Bleed Box to the four sides of the Trim Box, and the Maximum Bleed size is the
greatest of the four.
Linking conditional branches
The branches of a Conditional node can be merged into a common workflow
once they have been processed. Follow these rules:
• If a link is used, all of the branches of a Conditional node must merge.
• The branches of one conditional node cannot merge with branches of another
Conditional node.
1. Right-click the Conditional node to which you wish to add a link.
3-58
FreeFlow Process Manager® Operator and Administrator Guide
FreeFlow 9.0 Process Manager Operator/Administrator Guide
Page 85

Workflow Builder
2. Select Create Common Links. Links display at the end of the branches for
that node. Another link displays beneath the first workflow, creating a common
workflow.
3. Drag and drop the necessary workflow processes into the common workflow
to continue processing the job.
About external process settings
Process Manager allows you to configure up to 5 external processes to use as
process options in Workflow Builder.
External Processes are indicated either by a plus symbol or, if you choose an
existing process icon, by a plus symbol overlay.
1. Set up the profiles for each external process node defined in Workflow Builder.
2. In the Process Name Settings window choose which profiles can be selected.
3. Select the default profile.
About the Copy Count Divisor
You can enable the system to adjust the copy count to maintain the original
quantity intent for workflows that contain multiple-up impositions. The value is
changed to output the original quantity of the original document given that the
imposition node has changed the PDF document to contain multiple instances
of the original document.
In the Job Manager Copy Count and the Print node Job Setup dialogs, the quantity
value is modified when you:
• Process the job through a Xerox imposition node (not Preps) that is multi-up
repeated.
• Enable the Copy Count Divisor switch.
• Use Print nodes that do not have Always use these settings selected.
Example: If the original document is 1 page, the original quantity is 100 copies,
and the imposition is 4-up repeated, then the post imposition copy count quantity
will be 25, since each copy of the imposed document now contains 4 copies of
the original document.
NOTE
Multiple imposition nodes will divide the copy count when each node executes.
If there is a JDF Export node in the workflow, the JDF ticket created through the
JDF export node does not include the modified copy count.
FreeFlow Process Manager® Operator and Administrator Guide
FreeFlow 9.0 Process Manager Operator/Administrator Guide
3-59
Page 86

Workflow Builder
About the Copy Count Divisor and Review nodes
Review nodes and the Copy Count Divisor in Imposition nodes interact as follows:
• Review nodes that follow an Imposition node that changes the copy count
will have two values for quantity:
- Quantity (original document)
- Quantity (imposed document)
• Imposition nodes that follow a Review node will use the quantity defined in
the Review node to calculate updated quantities using the Copy Count Divisor.
• If there is an Imposition node that uses the copy count between a Review
node and a Print node the quantity defined within a Print node will not be
used by the Review node.
To enable the Copy Count Divisor
1. In Workflow Builder, select Options > Processes to display the Processes
dialog.
2. Select the Impose process, then select Settings to open the Impose Process
Settings dialog.
3. Mark the check box for Imposition affects copy count.
Setting up repository credentials
Repository credentials are used in all transactions that require logging into a
repository in FreeFlow Process Manager. This includes:
• Add Repository File in Workflow Submission Client.
• Browse Repository in the Save and JDF export nodes.
• Hot folders - When you create a hot folder, you must specify the “Submitting
user” whose repository credentials are associated with the hot folder: either
a member of the Process Manager Administrator group or a member of the
Operators group. This informs the system whose repository credentials to use
when a job must access a repository during hot folder submission.
• Resubmit operation in Workflow Job Manager.
Prior to performing operations that require repository access, you must set up
and save your repository credentials in FreeFlow Process Manager. Credentials
are set up and saved per user. Once a user has RMS credentials saved, all future
repository transactions by that user through the Workflow Builder, Workflow
Submission Client, or Workflow Job Manager use the same saved RMS credentials.
3-60
FreeFlow Process Manager® Operator and Administrator Guide
FreeFlow 9.0 Process Manager Operator/Administrator Guide
Page 87

Workflow Builder
Before setting up repository credentials in FreeFlow Process Manager, you must
have previously:
• Set up an account on the repository.
• Set up a link between the desired repository and FreeFlow Process Manager
via the FreeFlow Administration Tool.
Advanced administration
Checking the status of a process
The Processes dialog lists information about each process, including:
• Name
• Status
• Concurrent count
Take Offline/Set Online: Allows you to change the offline or online status of a
selected process; pauses jobs that reach the process. Available if no jobs are using
the process. The option displays as a context menu option when you right-click
a process.
Settings: Opens the Process Settings dialog.
1. In Workflow Builder, select Options > Processes to display the Processes
dialog.
2. Select a process and select Take Offline/Set Online to change the status.
3. Close the Processes dialog.
Setting the number of concurrent processes and the copy count divisor
The Process Settings for the Process dialog allows you to:
• Select the number of concurrent processes. This sets the number of instances
of a process that can be used to concurrently process jobs.
• Place the process online or offline.
• Turn the copy count divisor functionality on or off, available for Imposition
only.
To set the number of concurrent processes
1. In Workflow Builder, select Options > Processes to display the Processes
dialog.
2. Select a process, then select Settings to open the Process Settings for Process
dialog.
3. Select the number of concurrent processes, from 1-4.
4. As appropriate, select or clear the check box to place the process online.
FreeFlow Process Manager® Operator and Administrator Guide
FreeFlow 9.0 Process Manager Operator/Administrator Guide
3-61
Page 88

Workflow Builder
5. Select OK to accept the changes and close the Process Settings for Process
dialog.
6. Close the Processes dialog.
About hot folders
The hot folder function allows you to designate one or more folders on your
system to be monitored, at set intervals, by the Process Manager application.
When a file is detected in a hot folder, it is automatically submitted to the
workflow associated with that hot folder.
Hot folders and Join
To process multiple files as a single joined file, you can:
• Use a Zip file to submit the jobs to a hot folder.
• Submit an .xml workflow with a folder to a dynamic workflow.
• Submit an .xml workflow with a Zip file to a dynamic workflow.
If you do not use these methods to submit multiple files to a hot folder, each file
is processed as a separate job, even if the associated workflow contains a Join
task.
Hot folders and Zip files
A hot folder can unzip a Zip file containing multiple PDFs or mixed file formats.
The files are processed either as separate jobs or as a single job depending on
the properties of the hot folder.
Hot folders can process Zip files that contain all supported file types.
Hot folders support the following Zip file formats:
• Microsoft Windows Compressed (zipped) files
• WinZip 7.0 and 8.0 zipped files
Hot folders do not support:
• Folders inside a Zip file, except for .CON directories when a matching .rdo is
present. Folders inside the Zip file are unzipped but are not submitted.
• Nested Zip files (a Zip file within a Zip file)
• Files for which, when unzipped, there is not enough room on the drive. If
problems occur, the file is moved to the error folder.
The following limitations apply to InfoZip files:
3-62
FreeFlow Process Manager® Operator and Administrator Guide
FreeFlow 9.0 Process Manager Operator/Administrator Guide
Page 89

Workflow Builder
LimitItem
64 KNumber of files
4 GBUncompressed size of a single file
4 GBCompressed size of a single file
256 TBTotal size of archive
Maximum path/filename length (characters)
DOS: 256
Unix: 1024
CD-ROM 8 level sub directory; depending on
the type of file system
Hot folders and JDF
Job Definition Format (JDF) job tickets can be submitted via a hot folder. JDF is
a universal job ticket format. JDF capabilities enable Process Manager to use
existing JDF job tickets and to create new JDF job tickets. The JDF job ticket is
created with a third party submission tool.
The following workflow processes support JDF:
• Optimize
• Convert
• Join
• Print
• Impose
The workflow processes currently supports the following types of JDF Intent:
• Business card
• Postcard
• Common paper sizes (letter, legal, A3, A4, tabloid, etc.)
• Saddle stitch , corner stitch, side stitch
• Soft cover
JDF files take precedence over other files types; they are processed first.
NOTE
By default, if the job has completed successfully, the JDF is placed in the
hotfolder named “Output”. If the job fails, it will be placed in a hotfolder
named “Error”.
FreeFlow Process Manager® Operator and Administrator Guide
FreeFlow 9.0 Process Manager Operator/Administrator Guide
3-63
Page 90

Workflow Builder
Hot folders and error checking
Non-supported file types are moved to an Unsupported Files folder within the
hot folder. It is the user’s responsibility to manually delete these files from the
folder.
Hot folders: supported files
The hot folder supports the same files that are supported through the Workflow
Submission Client: Adobe Photoshop (currently supported version), Bitmap, JPG,
JPEG, Microsoft Office 2007, Microsoft Publisher (Excel, PowerPoint, and Word),
PDF, RDO,TIFF, TIFF-IT, VPC, QXD, EPS and PS.
Hot folders and read-only files
Read-only files are not picked up by the hot folder.
Hot folders on mapped or shared drives and resources
To work properly, full access for the hot folder must be granted to XDL_ADMIN,
particularly if the hot folder is on a mapped drive. XDL_ADMIN passwords must
match client and server.
Limitations when setting up directories as input/output hot folders for more than one feature
Within Process Manager, users can set up directories as input/output hot folders
for Process Manager Hot Folders (for job submission), QuarkXPress file conversion,
and Third party external processes. When setting up a directory as an input or
output hot folder, make sure that it is not being used as a hot folder for either
of the other two features, by visiting their corresponding dialogs.
The system does not currently perform conflict checking across these different
features.
To manage hot folders
You can use the Hot Folders dialog to manage hot folders independently of
workflows.
1. Select Options > Hot Folders, or right-click a workflow listed in the Workflows
dialog.
2. Perform the necessary actions.
3-64
FreeFlow Process Manager® Operator and Administrator Guide
FreeFlow 9.0 Process Manager Operator/Administrator Guide
Page 91

Workflow Builder
3. Close the Hot Folders dialog.
Managing hot folders
The Hot Folders dialog options include:
New: Opens the New Hot Folder dialog.
Modify: Opens the Hot Folder dialog for the selected hot folder.
Delete: Deletes the selected hot folder. Also available as a context menu by
right-clicking an item listed in the Hot Folders window.
Pause: When selected, the hot folder mechanism processes all files currently in
the selected hot folder. It stops scanning for new files after all current files are
processed. The button toggles between the pause and resume states.
Resume: When selected, the hot folder mechanism resumes monitoring the
selected hot folder at the defined interval. The button toggles between the pause
and resume states.
Settings: Opens the Hot Folder System Settings dialog.
Stop/Start: Allows you to stop/start the hot folder services, effectively
pausing/resuming all hot folders at once.
Status line: (bottom of screen) Lists the total number of hot folders, the Processing
or Paused status, and the monitoring interval.
Setting up or modifying a hot folder
The New Hot Folder or Hot Folder (for modifying a hot folder) dialogs contain
the following options:
Hot folder location: Lists the full file location path for the hot folder associated
with the selected workflow.
Browse: Opens a common browse folder dialog and allows you to select or create
a folder in the system.
Target Workflow: Lists all workflows in the system. The list reflects the sort order
of the Workflows dialog.
Submitted with documents Target Workflow: This option, in the Target Workflow
drop down menu, supports the hot folder submission of .xml workflows that have
been exported from the Workflow Builder application as well as hot folder
submission of MAX order jacket files.
Submitting User: Allows you to a specify the user whose repository credentials
will be associated with the hot folder: either a member of the Process Manager
Administrator group or a member of the Operators group. This informs the system
whose credentials to use when a job must access a repository during hot folder
submission.
FreeFlow Process Manager® Operator and Administrator Guide
FreeFlow 9.0 Process Manager Operator/Administrator Guide
3-65
Page 92

Workflow Builder
NOTE
If the submitting user does not have saved repository credentials, the job will
fail if attempting to access a repository during hot folder submission.
Submission Options: Specifies whether to always submit multiple files as separate
jobs, always as a single job, or as a single job only when the selected workflow
contains a Join process.
The following options are available when
Enable file clustering, Enable hot folder scheduling, and
Set scheduled times for hot folders individually are selected in the Hot Folder
System Settings dialog:
Enable file clustering for this hot folder: Enables the system to wait until the
specified number of files are placed in the hot folder before processing them.
Number of files: Allows you to specify the minimum number of files before
processing is initiated on the set. The default is 2; the maximum is 100.
Enable scheduling for this hot folder: Enables the scheduling functions:
• Time of Day: Allows you to specify the times during the day that you want
the hot folder scanned. The default is 12:00 AM.
• Add: Available if Enable scheduling for this hot folder is selected. Adds the
selected time of day to the list. If you try to add a time more than once, the
Time Already Added message displays.
• Scheduled times: Available if Enable scheduling for this hot folder is selected.
Lists the times during a day when the hot folder system scans the hot folder
for files. A maximum of 10 polling times can be set.
NOTE
Intervals between polling times cannot be smaller than the hot folder
scan interval.
• Remove: Removes the select time from the list.
OK: Closes the dialog and saves the settings.
Cancel: Closes the dialog and does not save the settings.
Waiting for Job Ticket folder: Each hot folder contains a Waiting for Job Ticket
folder. When submitting .xpf job tickets with a job file, both items must be placed
into this folder.
Deleting a hot folder
This option is available when a hot folder is not paused.
1. Workflow Builder, select Options > Hot Folders.
2. Select a hot folder.
3. Select Delete, and then select Yes to confirm the deletion.
4. Close the Hot Folders window.
3-66
FreeFlow Process Manager® Operator and Administrator Guide
FreeFlow 9.0 Process Manager Operator/Administrator Guide
Page 93

Workflow Builder
Pausing and resuming hot folder monitoring
The hot folder monitoring function can be paused in order to perform any
necessary actions.
Configuring the hot folder system settings
The Hot Folder System Settings dialog allows you to set the scan interval, to
enable file clustering, and to select between scheduling all hot folders for the
same times of day or scheduling hot folders individually. It contains the following
options:
Scan Interval: Sets the time between system scans of the hot folders for new
files. The default interval is 10 seconds. The available range is 10 - 100 seconds.
Workflows are submitted as files are found, unless clustering or scheduling is
enabled.
Enable automatic file submission rate adjustment: Limits the submission of
jobs from the hot folder when the processing capacity has been reached. Jobs
may stay in the hot folder until previously submitted jobs have completed
processing.
Enable file clustering: Enables the system to wait until the specified number of
files are placed in the hot folder before processing them. The number is set on a
per hot folder basis. If selected, the scan interval is set to 10 seconds and grayed
out.
Enable hot folder scheduling: Enables the scheduling function.
NOTE
The clustering and scheduling options each have the ability to invoke the
system to submit jobs independent of the other’s settings. If both clustering
and scheduling are selected, then reaching either the clustering number of
files or the scheduled time results in the submission of hot folder files as
workflow jobs.
Set scheduled times for each hot folder individually: Allows you to specify times
on a per hot folder basis.
Use the following scheduled times for all hot folders: Allows you to specify
times for all hot folders.
Related Topics:
Automatic Job and Job History Deletion
Optimizing system performance with hot folder and job deletion options
FreeFlow Process Manager® Operator and Administrator Guide
FreeFlow 9.0 Process Manager Operator/Administrator Guide
3-67
Page 94

Workflow Builder
Submitting a job to a hot folder
NOTE
Read-only files are not picked up by a hot folder.
1. Locate the desired file using Windows Explorer.
2. Use Windows Explorer to copy, move, paste, or drag and drop the file into the
appropriate hot folder. The submission is automatically processed.
NOTE
If you move a file into a hot folder, you will not be able to retrieve it. The
system automatically deletes the files from the hot folder. Copy the file
if you need to retrieve it.
Submitting an RDO to a hot folder
CAUTION
If you are submitting an RDO to a hot folder, do not open, copy, move,
delete, or rename an RDO document using Windows Explorer. You will
corrupt the document.
To ensure better processing, when submitting RDOs to a hot folder, ensure that
all contents inside the .CON are copied before copying the RDO file. If either the
RDO or the .CON folder is missing from the hot folder, the file will not be processed.
You must then manually delete the file from the hot folder.
NOTE
Successful submission of linked RDOs (an RDO containing a link to another
RDO) and set labeling RDOs via Workflow Submission Client or hot folders
cannot be assured.
1. Select Start > Programs > Xerox FreeFlow Software > File.
NOTE
To submit files to a hot folder, you can also use FreeFlow Web Services.
2. In File Manager, navigate to the appropriate RDO.
NOTE
In File Manager, the .CON file is not visible.
3. Right-click the file. In the context menu, select Copy.
3-68
FreeFlow Process Manager® Operator and Administrator Guide
FreeFlow 9.0 Process Manager Operator/Administrator Guide
Page 95

Workflow Builder
4. In the Copy dialog, select To. Type the path to the desired hot folder, for
example, C:\\Documents and Settings\\Administrator\\Desktop\\RDO
Hot Folder.
NOTE
To display the path to the desired hot folder, select Options > Hot Folder
and locate the hot folder path.
5. Select OK. The file is automatically submitted to the workflow associated with
the hot folder.
Submitting a job ticket file (*.xpf) to a hot folder for reprinting
You can save an .xpf job ticket file with the PDF file for reprinting purposes by
including a Save process in a workflow and selecting Save job ticket information
in the Save Settings dialog.
NOTE
You can also create the job ticket with FreeFlow Print Manager Advanced
Print Path.
To associate the .xpf job ticket file with the files to be picked up by the hot folder
for processing, the .xpf job ticket file is automatically saved along with the PDF
file, in the location designated in the Save settings, using the following naming
conventions:
• File name: <file name\><file ext\>.<file ext\>
• .xpf job ticket name: <file name\><file ext\>xpf.<file ext\>xpf.xpf
When submitting files in a folder, the following naming conventions are used:
• Folder name: <folder name\>
• .xpf job ticket name: <folder name\>.xpf
NOTE
If you are not using a hot folder for submission, you can submit only the
saved PDF to a reprint workflow. The .xpf associated with the file is
automatically picked up and applied.
FreeFlow Process Manager® Operator and Administrator Guide
FreeFlow 9.0 Process Manager Operator/Administrator Guide
3-69
Page 96

Workflow Builder
To submit an .xpf job ticket to a hot folder for reprinting
Waiting for Job Ticket folder: The job file and its associated .xpf must be placed
in the Waiting for Job Ticket folder inside the hot folder.
When submitting subdirectories that contain job files associated with either .xpf
files or .xml files, copy the directories first, and wait until all the files are copied
before dropping the .xpf or .xml file into the hot folder.
When an .xpf job ticket is submitted to the hot folder’s Waiting for Job Ticket
folder, with an associated job file, the job ticket is applied to all the print nodes
in the workflow associated with the hot folder.
1. Locate the saved PDF. The PDF is in the location that was designated in the
Save settings when the job was initially processed.
2. Locate the associated .xpf job ticket. The .xpf should be in the same location
as the PDF, and the associated .xpf file name should match the PDF. For
example:
• File name = newsletter.pdf
• Job ticket name = newsletter.pdf.xpf
3. Do one of the following:
• For a file: Drag and drop or copy and paste the file to be processed and its
associated .xpf into the Waiting for Job Ticket folder inside the hot folder.
NOTE
To reprint via Workflow Submission Client, submit only the saved PDF file
to the reprint workflow. Process Manager automatically picks up the
associated job ticket and applies it to all print nodes in the workflow.
• For a folder: Drag and drop or copy and paste the folder to be processed
and its associated .xpf into the Waiting for Job Ticket folder inside the hot
folder. The .xpf file must be outside the folder to be processed. Each file in
the folder is submitted separately as a single job with the job ticket.
4. The job prints using the job ticket.
NOTE
If the Print node has Always use these settings selected, the Print node
setting overwrites the .xpf job ticket; otherwise, the .xpf job ticket
overwrites the Print node settings.
3-70
FreeFlow Process Manager® Operator and Administrator Guide
FreeFlow 9.0 Process Manager Operator/Administrator Guide
Page 97

Workflow Builder
Error conditions
• JDF is a “job ticket” and cannot be associated with an .xpf.
• Since RDO files already contain an internal job ticket, any associated .xpf file
and the RDO are moved to the Unsupported Files folder.
• If the .xpf ticket is invalid, the .xpf file and the associated document are moved
to the Unsupported Files folder.
• .xpf files without any associated document are ignored.
• .xpf files placed in the hot folder outside the Waiting for Job Ticket folder, are
moved to the Unsupported Files folder.
Imposition handling with .xpf tickets
• If the .xpf ticket contains Imposition information and the workflow contains
Imposition nodes, imposition information is applied to the first imposition
node automatically.
• If the Imposition node has Always use these settings selected, the Imposition
node settings overwrite the .xpf ticket; otherwise, the .xpf ticket overwrites the
Imposition node settings.
• If the .xpf ticket contains any imposition information and the workflow does
not contain any imposition node, the imposition information is ignored.
Submitting .xml workflow files to a hot folder
This feature allows you to submit exported workflow(s) in xml format, with either
a file or a folder containing several files, to a hot folder.
The .xml file name must match the name of its associated file or folder to be
picked up for hot folder processing.
Dynamic workflows: Files are submitted to a dynamically created “Submitted
with documents” workflow, which is available in the target workflow drop box.
Each time a new job is submitted to a dynamic workflow, a new workflow, with
a unique workflow Id, is created. Dynamic workflows are not visible and are
deleted from the Process Manager database when jobs using the workflows are
deleted. Data from the dynamically created workflow is available for accounting
information, but the “Submitted with documents” workflow does not contain
any accounting info.
Matching file names: The .xml must be named <filename\>.<filename\>.<file
ext\>ext\>.xml to be associated with <filename\>.<file ext\>.
Matching folder names: The .xml must be named <folder <folder\>name\>.xml
to be associated with <folder\>.
FreeFlow Process Manager® Operator and Administrator Guide
FreeFlow 9.0 Process Manager Operator/Administrator Guide
3-71
Page 98

Workflow Builder
When submitting a folder to a hot folder, the .xml must be outside the submitted
folder. Each file in the folder is submitted as a single job to each of the workflows
in the .xml file.
To submit .xml workflow files to a hot folder
1. Create the desired workflow in Workflow Builder.
2. To create an .xml workflow file, export the workflow. Ensure that the .xml file
name matches the name of the PDF file or the folder that you will be
submitting to the workflow. If the workflow name does not match, rename it.
NOTE
The workflow does not need to exist or be enabled in Workflow Builder
to process the .xml.
3. In Workflow Builder, set up a hot folder using the target workflow
Submitted with documents.
4. Using Windows Explorer, locate the .xml file and the matching file or folder
you will be submitting.
5. Copy, move, paste, or drag and drop the .xml and its matching file or folder
into the Submitted with documents hot folder.
NOTE
If you are submitting a folder to a hot folder, ensure the .xml is outside
the folder.
6. The submission is automatically processed.
Error conditions for dynamic workflows
• If a workflow contains a print node and a printer is not available, the job will
fail.
• The following dynamic workflow file names are restricted; files will be moved
to the Unsupported Files folder:
- Unsupported Files folder.xml
- Waiting for Job Ticket. xml
- Manifest Status.xml
Submitting .vpc files to a hot folder
VPC files can be submitted only to workflows containing Review, Print, Save,
Convert and Impose processes. Jobs submitted to workflows with processes other
than these will fail.
3-72
FreeFlow Process Manager® Operator and Administrator Guide
FreeFlow 9.0 Process Manager Operator/Administrator Guide
Page 99

Workflow Builder
VPC file limitations
• Review: Identification of the number of document sets within a VI Container
is limited to database mode VIPP and PPML print files. Selection of a set, or
a range of sets is limited to database mode VIPP print files. Viewing and
editing VI containers via Adobe acrobat requires conversion to PDF.
• Convert: Supports conversion of VI Containers with VIPP print files. Once the
VI container is converted to PDF, the VI job remains as a PDF file throughout
the remainder of the workflow.
• Impose: Supports VI containers converted to PDF
• Preflight: Supports VI containers converted to PDF. Validates that all required
elements of the VI Container Job are contained in the VI Container and that
the container is a valid VI container. If validation is sucessful the job will pass;
otherwise, it will fail.
• Print: Limited to DocuSP DFEs.
Using third party external processes
Administrators can add up to 5 external processes from third party software.
Select Options > External Processes to configure external processes. Each process
can have a combined maximum of 10 folder-based and CLI profiles.
Submitting to third party processes via hot folders: Folder-based profiles allow
the submission of jobs from third party processes via hot folders. During setup,
each profile is assigned to a process input hot folder, a process output hot folder,
and an optional errors hot folder.
For folder-based profiles, third party software must be installed and running on
the Process Manager server or a third party machine in order to use external
processes in a workflow. When the Process Manager workflow reaches the third
party step, the job is retrieved by the third party application, processed, and then
returned to the Process Manager workflow to complete any remaining workflow
steps.
Running third party scripts: CLI profiles are available for input via command
line interfaces and scripts. During setup, each profile is assigned a file name and
location for the script, optional parameters, and locations for the input and output
files.
Once an external process is set up, it displays in Workflow Process Options area,
where the operator can drag it into a workflow and select the desired profile.
FreeFlow Process Manager® Operator and Administrator Guide
FreeFlow 9.0 Process Manager Operator/Administrator Guide
3-73
Page 100

Workflow Builder
Related Topics:
Setting up external processes
Managing external processes
Guidelines for using third party external processes
Setting up the SMTP Server
Setting up the proxy server
Setting up external processes
The External Processes Setup dialog allows you to set up or edit process icons,
names, and profiles, or to delete a profile from the Process Profiles list. It includes
the following options:
Process icon: Allows you to select an icon.
Process name: Allows you to enter a name for the external process.
Process profiles: Lists, by name, the existing profiles up to a maximum of 10.
Listed profiles are selectable.
Add folder profile: Available if 9 or fewer profiles are configured. Opens the
Folder Profile Setup dialog, which allows you to enter a new configuration. If
there are ten profiles configured when Add is selected, the Maximum Allowed
error dialog displays.
Add CLI profile: Opens the CLI Profile Setup dialog which allows you to enter a
new configuration.
Edit: Opens the setup dialog for the selected profile.
Delete: Deletes the selected profile with a confirmation dialog.
Related Topics:
Using third party external processes
Managing external processes
Guidelines for using third party external processes
Setting up the SMTP Server
Setting up the proxy server
Managing external processes
The External Processes dialog allows you to move or delete processes and provides
access to the external process configuration dialogs. It includes the following
options:
Move Left: Moves a selected process one space to the left.
Move Right: Moves a selected process one space to the right.
3-74
FreeFlow Process Manager® Operator and Administrator Guide
FreeFlow 9.0 Process Manager Operator/Administrator Guide
 Loading...