

Page 1

701P49053
September 2008
FreeFlow® Makeready
Quick Reference
Guide
Page 2

Xerox Corporation
Global Knowledge and Language Services
800 Phillips Road - Bldg. 218-01A
Webster, NY 14580
© 2008 Xerox Corporation. All rights reserved. Xerox® and the sphere of connectivity design are trademarks of
Xerox Corporation in the US and/or other countries.
Page 3

1
INTRODUCTION
You have just opened one of the most
helpful books you will ever find about
FreeFlow® Makeready.
What makes it so useful?
This guide gives easy-to-follow instructions to provide quick proficiency in
FreeFlow® Makeready.
It is also designed to help you maximize your productivity by providing solutions to problems that can hinder workflow.
How?
The FreeFlow Makeready Quick Reference Guide provides practical answers
to your questions and takes you step-by-step through daily basic operator
activities. These activities include: simple scanning, image editing, makeready,
printing, and file storage and management tasks.
And there is much more:
You’ll also find plenty of tips, shortcuts and tricks that will make your job easier.
1 – 1
Page 4

1
Questions and Answers
1
Follow these steps
to get help with your
INTRODUCTION
questions or problems:
The FreeFlow® Makeready online Help system is an excellent source
of information. You can access it from Help on the FreeFlow
application’s menu bar. The Help topics will walk you through the
solutions to most of your questions.
You can also access the context-sensitive (ballon) Help system in the
FreeFlow® Makeready application you’re using by positioning the
cursur over a button.
1 – 2
Page 5
1
INTRODUCTION
4
2
3
Have a more specific problem? Call X-PRESS FAX at 1-800979-9709 in the USA and request document number 12300 to
receive a complete index of documented solutions, along with
complete instructions for using the X-PRESS FAX system.
A FreeFlow Frequently Asked Questions (FAQ) web site is
available at
find the appropriate FreeFlow link. Select [Support] under that
link. Under the FAQ heading, select the desired topic link to
display the FAQ page for that topic.
If you cannot find the answer, try other resources, like:
• Customer Software Release Document (CSRD) for FreeFlow®
Makeready
• System Administrator Guide
• Production Printing Setup Guide
www.xerox.com. Search using the word “freeflow”, then
1 – 3
Page 6
1
INTRODUCTION
5
If your machine is down or you cannot solve a problem, call 1-800821-2797 in North America for the Xerox Welcome Center. Have
your FreeFlow system serial number available. If the operator
cannot talk you through a fix, he or she will place a service call for
you or escalate your problem to a second level analyst.
1 – 4
Page 7
1
INTRODUCTION
Conventions
Quick Points
In case of Emergency:
Power off your FreeFlow System if you notice any unusual noises or odors and call your local Xerox Customer Support
Center immediately.
Important reminders:
Never remove any covers or guards that are secured with screws. There are no operator serviceable parts inside.
Safety Symbols
Symbol What it Means
Used whenever a procedure, condition, or
statement, if not strictly observed, could
WARNING
CAUTION
result in personal injury.
Used whenever a procedure, condition, or
statement, if not strictly observed, could
result in damage to the equipment, or in
the loss of data or documents.
1 – 5
Page 8

1
INTRODUCTION
Other Conventions Used in this Guide
Conventions and What They Mean
Check Boxes The name of a check box is displayed in bold, followed by the word check box: Select the Check
Menu Options Menu options are displayed in bold and enclosed in square brackets:
Tabs in Dialog
Boxes
Buttons Buttons in a dialog box are displayed in bold and enclosed in square brackets: Select [Button
Option Buttons Option buttons are indicated by the word “select,” followed by the name of the option button, in
List Boxes The name of a list box is displayed in bold, followed by the word list box: Select the List Box
Text Boxes The name of a text box is displayed in bold, followed by the word text box: Select the Text B o x
Keyboard Keys The name of the key is displayed in bold capital letters, and enclosed in angle brackets: Press
Text Text that should be typed exactly as it appears is displayed in bold, preceded by the word Type:
Toolbar Buttons The name of the toolbar button is displayed in bold, exactly as it appears on the tool tip:
Referring to other
documents
Box name check box.
“Mark” directs you to place a check mark in the check box.
“Clear” directs you to remove a check mark from the check box.
Select [Menu name: Option name].
The name of a tab is displayed in bold: Select the Tab name tab.
name].
bold: Select the Option Button name option button.
name list box.
A specific selection in a list box is displayed in bold, followed by the word option: Select the
Option name option in the List Box name list box.
name text box.
<KEY NAME>.
Typ e text.
Variable text (varies depending on your desired selection) is displayed in bold lower-case letters,
and enclosed in angle brackets: Type <filename>.
Select the Toolbar Button name toolbar button.
The title of a referenced document is displayed in italics preceded by its chapter number:
Chapter <n>, Document Title.
The name of a section in a referenced document is displayed in italics, followed by the page on
which it is located: Section on page <n-n>.
1 – 6
Page 9

1
INTRODUCTION
U.S.A. Copyright Laws
Quick Points
More information:
Get more information from the Copyright office, Library of Congress, Washington, D.C. 20559. Ask for Circular R21.
This list of documents is not all-in clusive:
No liability is assumed for its completeness or accuracy.
Never Print These US Government Documents
Federal legislation forbids anyone from copying the following documents. Penalties of
fines or imprisonment may be imposed on those guilty of making such copies.
Certificates of indebtedness
United States Bonds
National Bank Currency
Treasury Notes
Coupons from bonds
Federal Reserve Notes
Federal Reserve Bank Notes
Fractional Notes
Silver Certificates
Certificates of Deposit
Gold Certificates
Paper Money
Bonds and obligations of certain agencies of the
government, such as FHA, etc.
1 – 7
Page 10

1
INTRODUCTION
Other Documents That are Illegal to Print
US Savings Bonds
EXCEPTION: US Savings Bonds may be photographed only for publicity purposes in connection with the campaign for
the sale of such bonds.
Internal Revenue Stamps
EXCEPTION: If necessary to copy a legal document on which there is a canceled revenue stamp, this may be done,
provided the reproduction of the document is performed for lawful purposes.
Postage Stamps, canceled or not canceled
EXCEPTION: Postage Stamps may be photographed, provided the reproduction is in black and white, and is less than
3/4 or more than 1-1/2 times the linear dimensions of the original.
Postal Money Orders
Bills
Checks
Drafts for money drawn by or upon authorized officers of the United States
Stamps and other representatives of value, of whatever denomination, which have been or may be issued under any
Act of Congress
Adjusted Compensation Certificates for Veterans of World Wars
Obligations or Securities of any foreign government, bank, or corporation
Copyrighted material
EXCEPTION: If the permission of the copyright owner has been obtained or the copying falls within the “fair use” or
library reproduction rights provisions of the copyright law.
Any author’s book without the author’s consent
Certificates of Citizenship or Naturalization
EXCEPTION: Foreign Naturalization Certificates may be photographed.
1 – 8
Page 11

1
INTRODUCTION
Other Documents That are Illegal to Print (Continued)
Immigration Papers
Draft Registration Cards
Selective Service Induction Papers which bear any of the following information:
• Registrant’s earnings or income
• Registrant’s previous military service
• Registrant’s dependency status
• Registrant’s physical or mental condition
Registrant’s court record
Badges, Identification Cards, Passes, or insignia carried by military personnel, or by members of the various federal
departments and bureaus, such as the FBI or Treasury
EXCEPTION: If ordered by the head of such a federal department or bureau, copying or printing is permitted.
EXCEPTION: U.S. Army and Navy discharge certificates may be reproduced.
1 – 9
Page 12

1
INTRODUCTION
Canadian Laws
Documents That are Illegal to Print in Canada
Parliament, by statute, has forbidden the reproduction of the following subjects under certain circumstances. Penalties of
fines or imprisonment may be imposed on those guilty of making such copies.
Current bank notes or current paper money.
Obligations or securities of a government or bank.
Exchequer bill paper or revenue paper.
The public seal of Canada or of a province, or the seal of a public body or authority in Canada, or of a court of law.
Proclamations, orders, regulations, or appointments, or notices thereof (with intent to falsely cause same to purport to
have been printed by the Queen’s Printer for Canada, or the equivalent printer for a province).
Marks, brands, seals, wrappers, or designs used by or on behalf of the Government of Canada or of a province, the
government of a state other than Canada or a department, board, Commission, or agency established by the
Government of Canada or of a province or of a government of a state other than Canada.
Impressed or adhesive stamps used for the purpose of revenue by the Government of Canada or of a province or by the
government of a state other than Canada.
Documents, registers, or records kept by public officials charged with the duty of making or issuing certified copies
thereof, where the reproduction falsely purports to be a certified copy thereof.
Copyrighted material or trademarks of any manner or kind without the consent of the copyright or trademark owner.
NOTE: The above list is pro vided for yo ur convenien ce and ass istan ce, but it is n ot all incl usive, an d no liabili ty is ass umed
for its completeness or accuracy. In case of doubt, consult your solicitor.
1 – 10
Page 13

2
GETTING
2
GETTING
STARTED
STARTED
System Startup and Shutdown
Quick Points
Shortening startup time:
If there is a MOD platter in the MOD drive while the drive is powering up, your startup time is shorter.
Powering On the System
Follow these instructions for powering on your system and hardware options. It is very important that you power on the
hardware components in the order presented below.
Step Action
To power on your system:
1
2
3
4
5
6
7
If there is a Redundant Array of Independent Discs (RAID) attached to the workstation, power on the
RAID.
If there is a scanner attached to the workstation, power on the scanner.
If there is a Windows printer attached to the workstation, power on the printer.
If you plan to use an optional Magneto Optical Drive (MOD) attached to the workstation, power on the
MOD. As soon as the MOD drive is powered on, insert a MOD platter (an optical disk) into the MOD
drive.
Power on the monitor.
Power on the workstation.
Log into the network.
NOTE: By default, FreeFlo w s oftware applications are instal le d in [Start: Programs: Xerox FreeFlow
Software] although the installer allows you to select an alternative directory if you choose.
2 – 1
Page 14

2
GETTING
STARTED
Powering Off the System
Follow these instructions for powering off your system and hardware options. It is very important that you power down the
hardware components in the order presented below.
Step Action
To power off your system:
1
From the Windows taskbar, select [Start: Shut Down].
2
3
4
5
6
7
Select [Shut down] from the What do you want the computer to do? drop-down list.
Select [OK] to shut down the PC and power off the server processor (CPU).
Power off the monitor.
If necessary, power off the MOD drive.
If necessary, power off the scanner.
If necessary, power off the RAID.
NOTE: DO NOT power off the RAID for a normal shutdown. Power off the RAID only if you plan to
move it.
2 – 2
Page 15
2
GETTING
STARTED
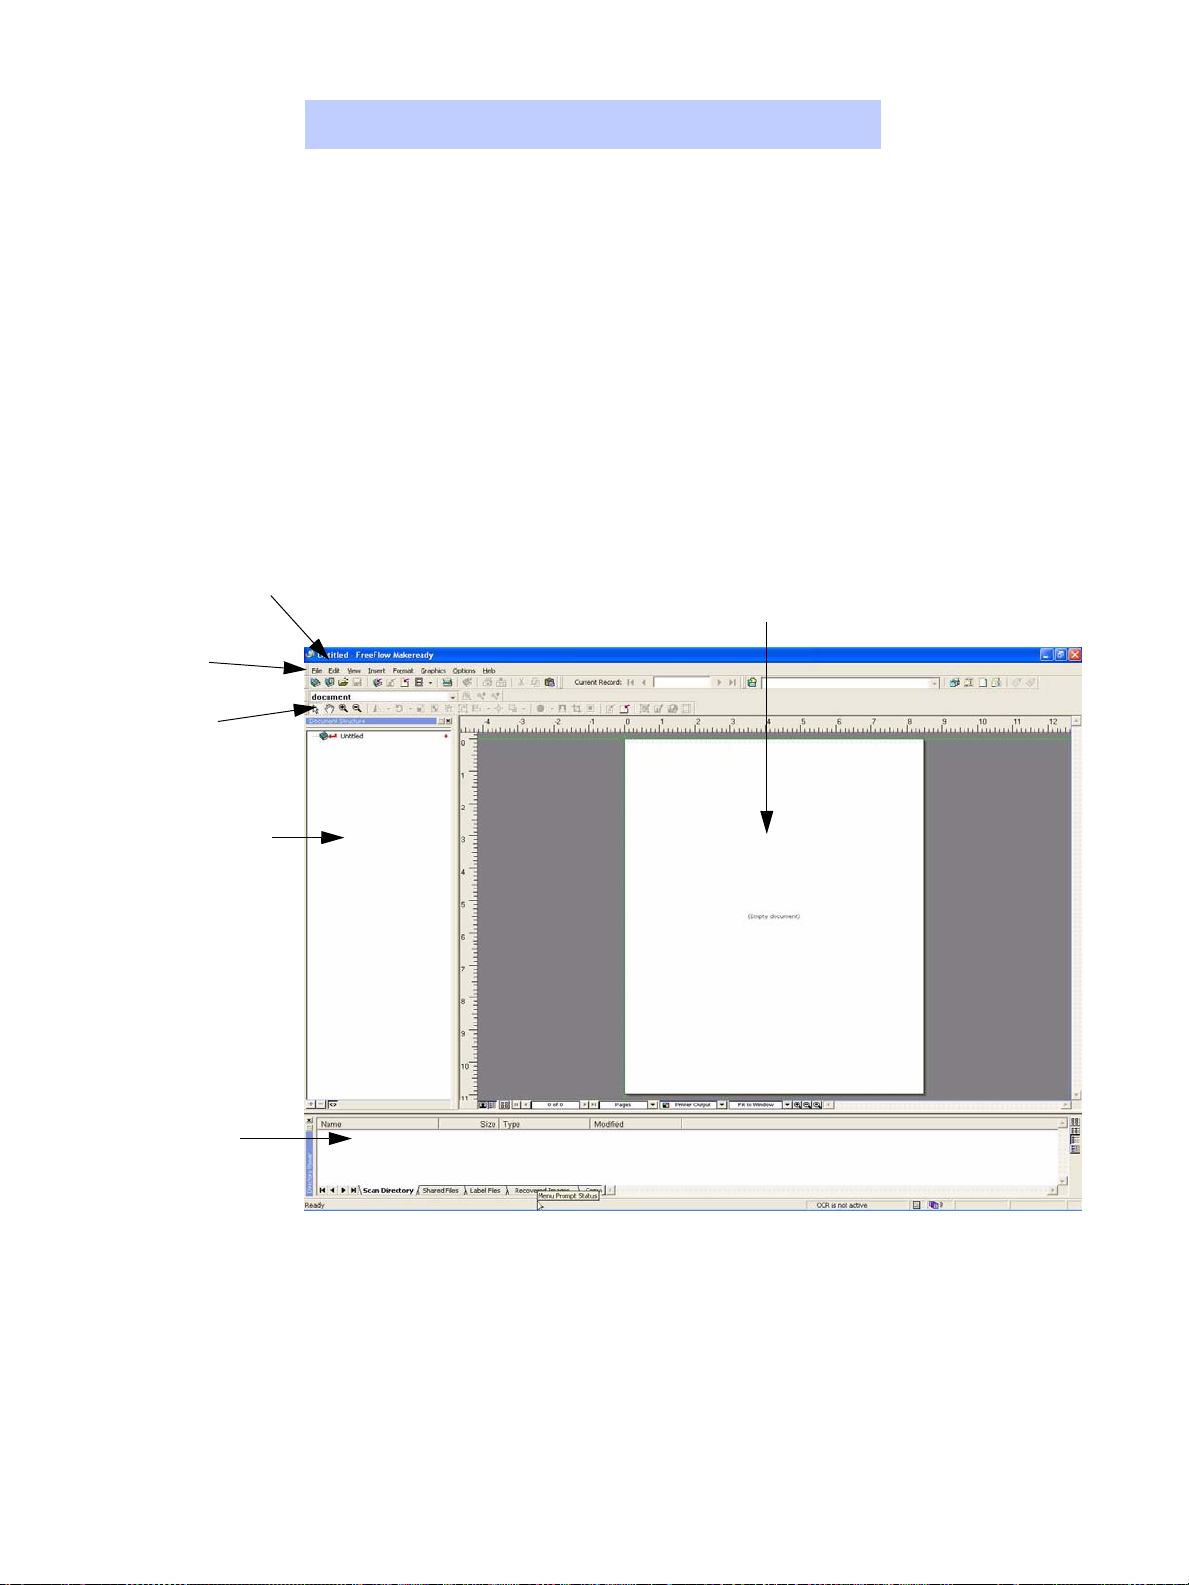
Starting FreeFlow Makeready
Select [Start: Programs: Xerox FreeFlow Software:
FreeFlow Makeready] from the Windows taskbar to open
FreeFlow Makeready.
Title Bar
Menu Bar
Toolbars
Document Structure
window
The following screen shows the default display of the
FreeFlow Makeready window. You can select [View: Reset
Workspace] to display the FreeFlow Makeready window
below.
Page View window
Directory Viewer
FreeFlow Makeready application window
2 – 3
Page 16

2
GETTING
STARTED
Creating a New RDO
Quick Points
Wizards:
When you use a wizard, you answer questions about the RDO you want to create, and FreeFlow Makeready does all the
setup work. Select the Wizards tab in the New dialog box, and choose the appropriate wizard.
Templates:
If you usually create the same kinds of RDOs over and over, you can create templates to save time. For directions on
creating templates, refer to the FreeFlow Makeready Help system.
RDO is the 3-letter extension for the Raster Document Object file type. The RDO file type is used primarily with FreeFlow
Makeready, but you can use RDOs with other FreeFlow applications, or convert them to PostScript or PDF files.
An RDO is a document file made up of images. An RDO has two parts:
A PostScript wrapper which contains all the information about the structure and format of the pages in your document.
A .CON directory that holds the TIFF, JPEG, PostScript, and Adobe PDF files that make up the pages of your document.
When you create an RDO, FreeFlow Makeready creates both of these parts automatically.
CAUTION:
Do not move, copy, rename, or delete an RDO using Windows Explorer.
If you do, the content (.CON) directory will not be included in the operation, and the RDO will be corrupted. Use
File Manager to perform these operations on RDO files.
Step Action
With FreeFlow Makeready open:
1
2
3
4
Select [File: New].
Select the Documents tab.
• Select the Blank RDO Document icon to create a new RDO with the default document settings for
a Standard RDO.
OR
• Select a different icon on the Documents tab to create an RDO with specific settings, or select one
of the preconfigured RDT (template) files.
NOTE: Template files contain some defined document settings, which may include a destination
printer, paper stocks, the job type, and margins, as well as many other options.
Select [OK].
2 – 4
Page 17
3
USING
SCAN AND PRINT
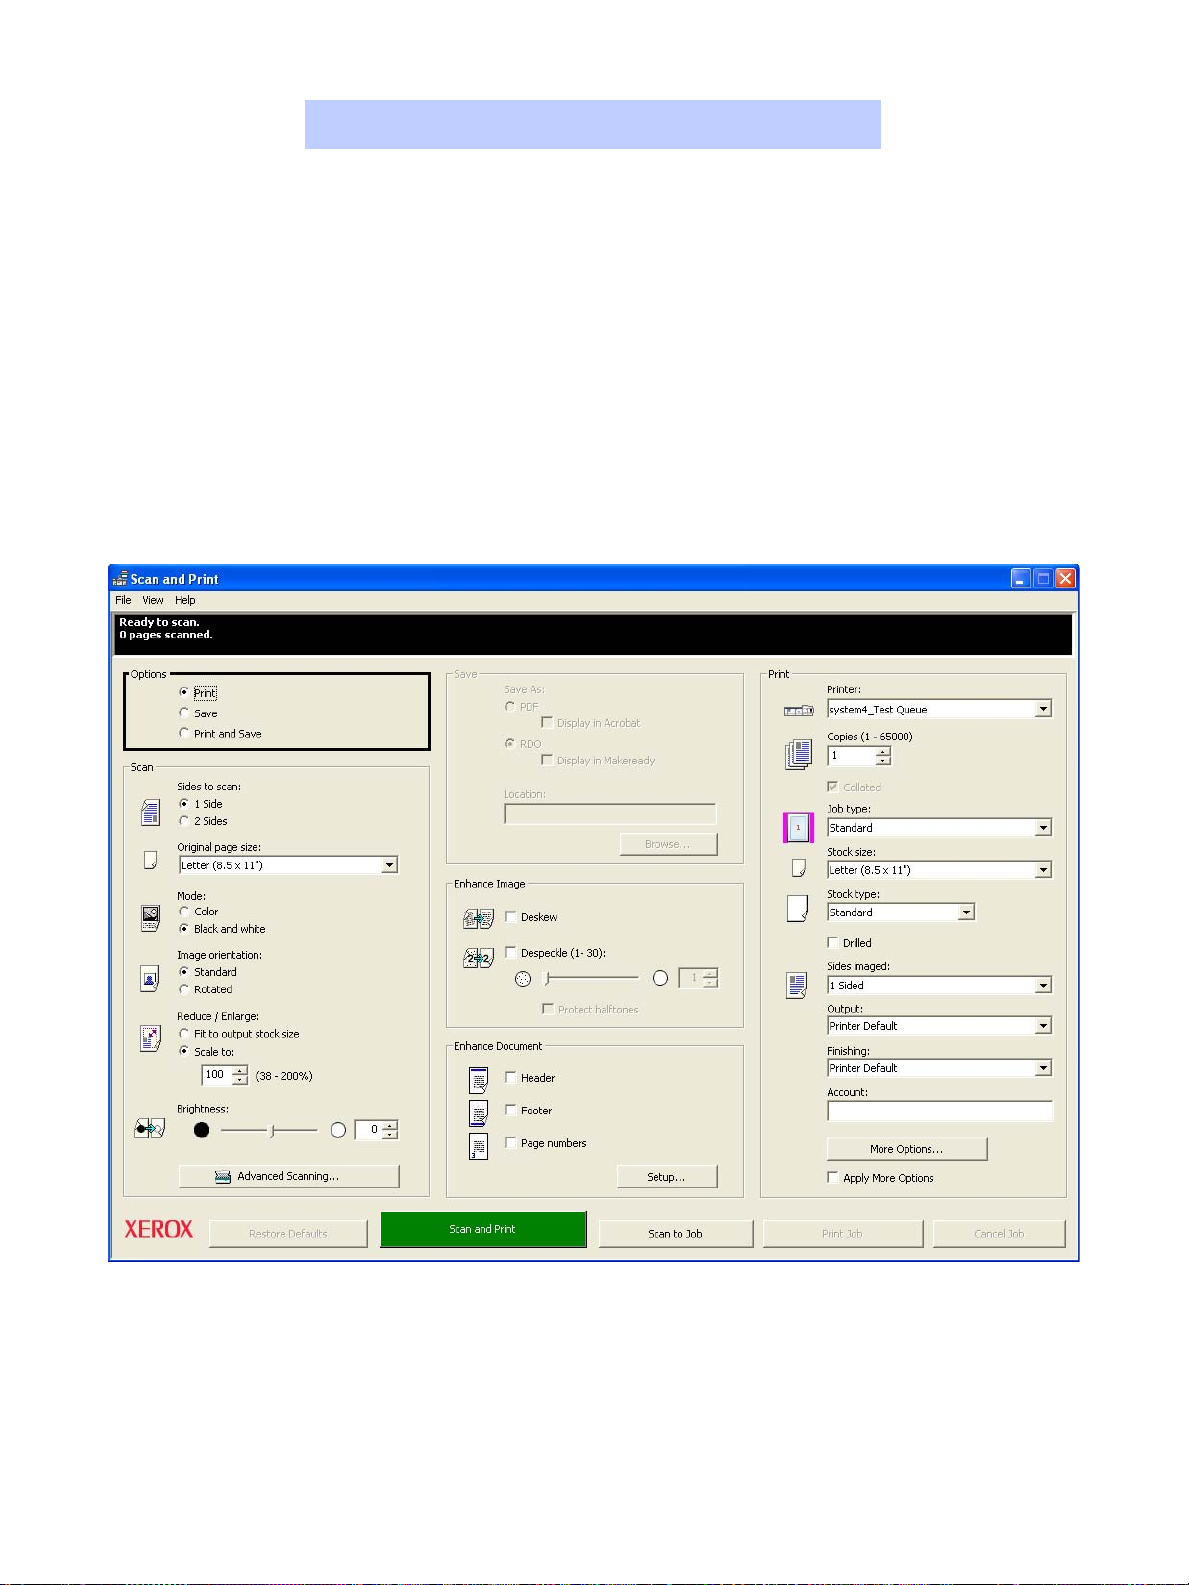
Introducing Scan and Print
Scan and Print is designed to simulate a copier. The scanner creates a temporary digital file which it uses to complete the
copy. You can also create a PDF or RDO file, in black and white or in color.
NOTE: For color scanning, ensure that your scanner is color-capable.
To open Scan and Print, select [Start: Programs: Xerox FreeFlow Software: Scan And Print].
Scan and Print main application window
3 – 1
Page 18
3
USING
SCAN AND PRINT
Scan and Print a Black and White or Color Original
Quick Points
Scan and Print options:
Scan and Print options available for a job depend on the printer you specify in the Printer list box.
Image orientation:
Image rotation is limited to 90 degrees to the right.
Scan and Print allows you to create a copy of any black and white or color original you scan.
Scan
options
Step Action
With Scan and Print open:
1
2
3
Place a hardcopy document on the scanner glass or into the multi-sheet feeder.
Select [Print] in the Options section.
In the Scan section, make selections for:
• Sides to scan
• Page size of your original document
•Mode
• Image orientation
• Reduce/Enlarge
•Brightness
Enhance
options
…continued
3 – 2
Page 19

3
USING
SCAN AND PRINT
Step Action
4
5
6
In the Enhance Image section:
Select [Deskew] or [Despeckle] (black and white mode only).
• Deskew eliminates the skew of an image.
• Despeckle removes stray pixels that appear as “dirt” on an image.
In the Enhance Document section:
a) To add headers, footers, or page numbers to your document, mark the appropriate check boxes.
b) Select the [Setup] button.
c) Define header, footer, or page numbering properties on the appropriate tabs.
Select [OK].
…continued
3 – 3
Page 20

3
USING
SCAN AND PRINT
Scan and Print a Black and White or Color Original - Continued
Print
options
[Advanced
Scanning]
button
[More Options]
button
Step Action
7
8
9
10
11
In the Print section, make selections for:
•Printer
• Number of copies
• Job type
• Stock size and type
• Number of sides imaged
• Output location
• Finishing options
• Account name or number, if desired.
Select [Advanced Scanning] to open the scan ticket, where you can make more detailed settings to
your scan job.
Select [More Options] to open the Job Setup dialog and make changes to the default job ticket for the
selected printer.
NOTE: To disable all additional optio ns wit hout h aving to c hange each one indiv iduall y, clear the Apply
More Options check b ox.
Select [Scan and Print] to activate the copying process.
NOTE: The green button on the scanner does not activate Scan and Print.
When you have finished, close Scan and Print.
3 – 4
Page 21

3
USING
SCAN AND PRINT
Scan and Print Large Jobs
Quick Points
Scan and Print options:
Scan and Print options available for a job depend on the printer you specify in the Printer list box.
Viewing ar ea:
The three-line viewing area at the top of the Scan and Print screen gives you information on scanning status (line 1), the
number of pages scanned (line 2), and printing status and other information messages (line 3).
You can use Scan and Print to build large copying jobs with the Scan to Job button. Large jobs are defined as those with
page counts that exceed the capacity of the scanner's multi-sheet feeder. Refer to your scanner documentation to
determine the capacity.
Step Action
With Scan and Print open:
1
2
3
4
5
[Scan to Job] button
Place the first portion of your job into the multi-sheet feeder.
Set your job options (steps 2 through 8 in Scan and Print a Black and White or Color Original on page
3-2).
Select [Scan to Job].
After the first portion of your job has scanned, place the second portion of your job in the multi-sheet
feeder.
Select [Scan to Job].
…continued
3 – 5
Page 22

3
USING
SCAN AND PRINT
Step Action
6
7
8
Repeat steps 4 and 5 until your entire job has been scanned.
Select [Print Job]. Your document is submitted to the printer you selected.
When you have finished, close Scan and Print.
3 – 6
Page 23
3
USING
SCAN AND PRINT
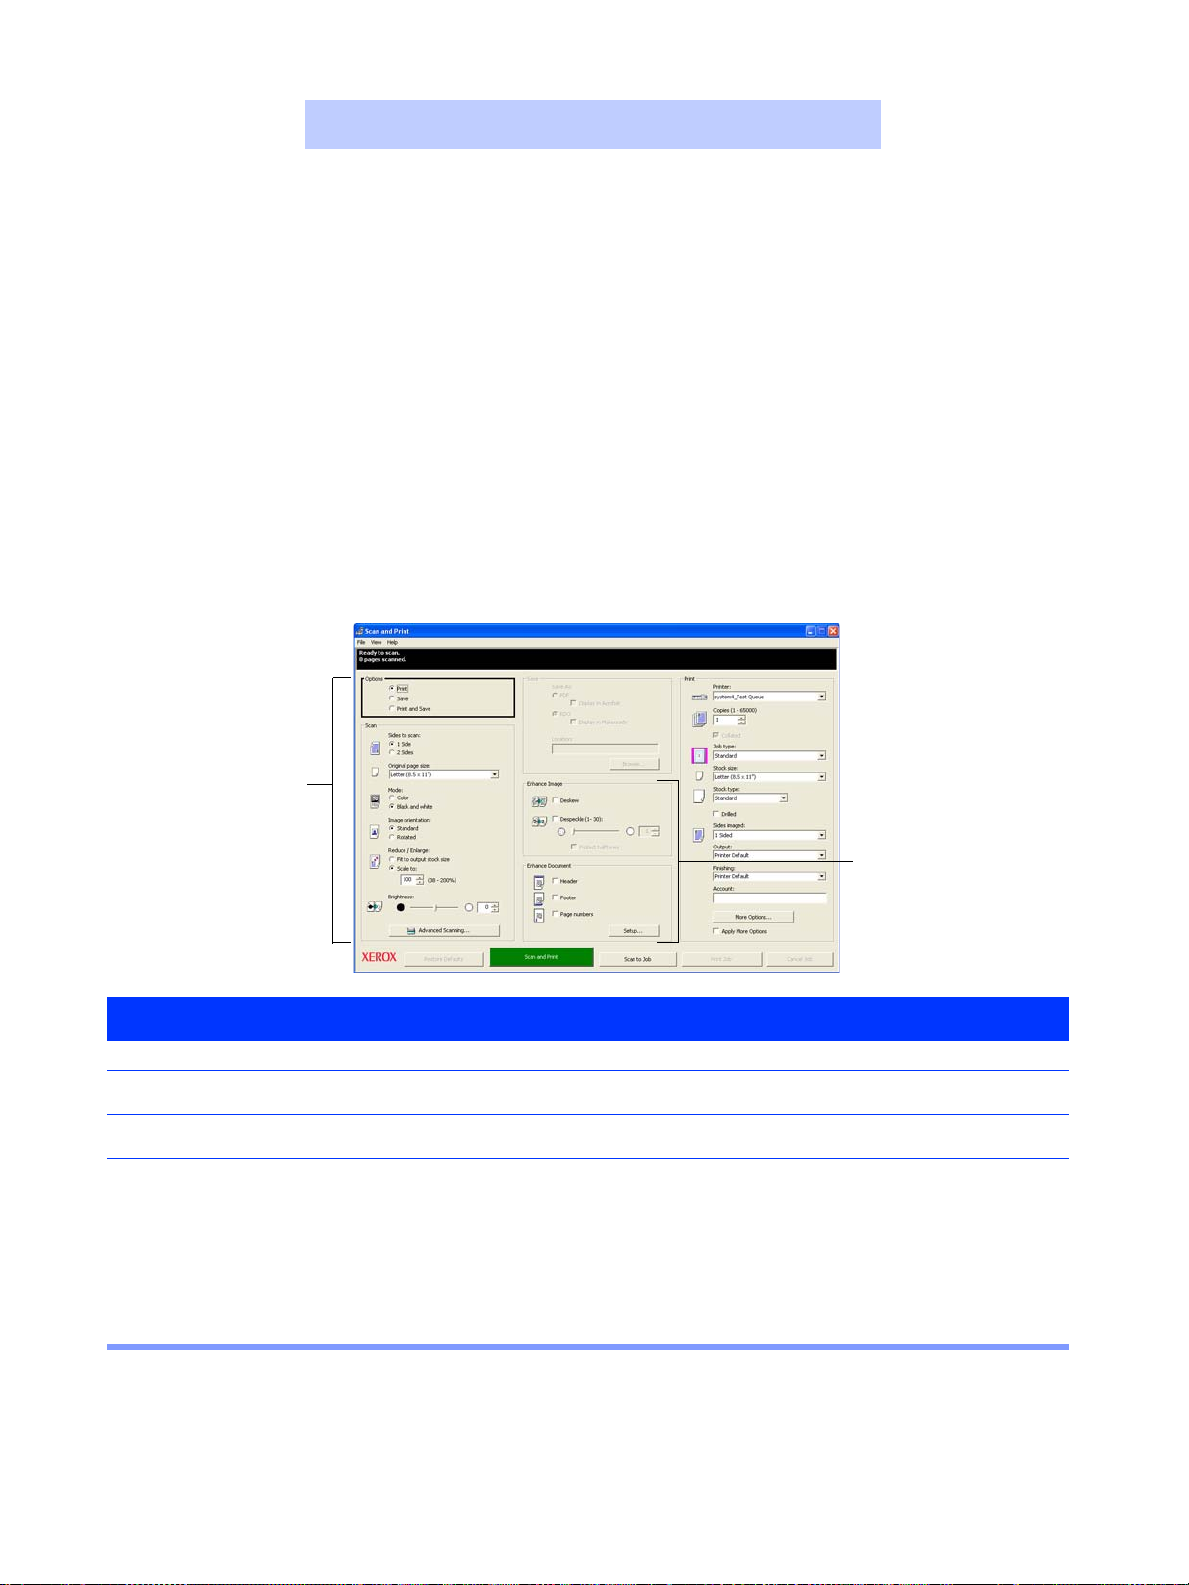
Scan and Save Documents
Quick Points
Using factory default settings:
You can use the factory defaults for Scan and Print by selecting [File: Restore Factory Defaults] or by selecting the
[Restore Defaults] button.
You can scan a black and white or color document and save it as an RDO or an Adobe PDF using Scan and Print. You can
save the document into a directory in the Windows file system or supported repository.
Select a Save
option.
Scan and Save
Step Action
With Scan and Print open:
1
2
3
4
Place a hardcopy document on the scanner glass or the multi-sheet feeder.
Select [Save] in the Options section.
Set your job options (steps 2 through 8 in Scan and Print a Black and White or Color Original on page
3-2).
In the Save section:
a) Select [PDF] or [RDO].
If you want your document to display immediately after scanning, mark:
• Display in Acrobat check box for PDF files or
• Display in Makeready check box for RDO files.
b) Select the [Browse] button. The Save As dialog box displays.
Save section
becomes
active.
NOTE: The following options are not available when saving as an Adobe PDF; Copies, Stock type,
Sides imaged, Output, Finishing, and Account.
…continued
3 – 7
Page 24
3
USING
SCAN AND PRINT
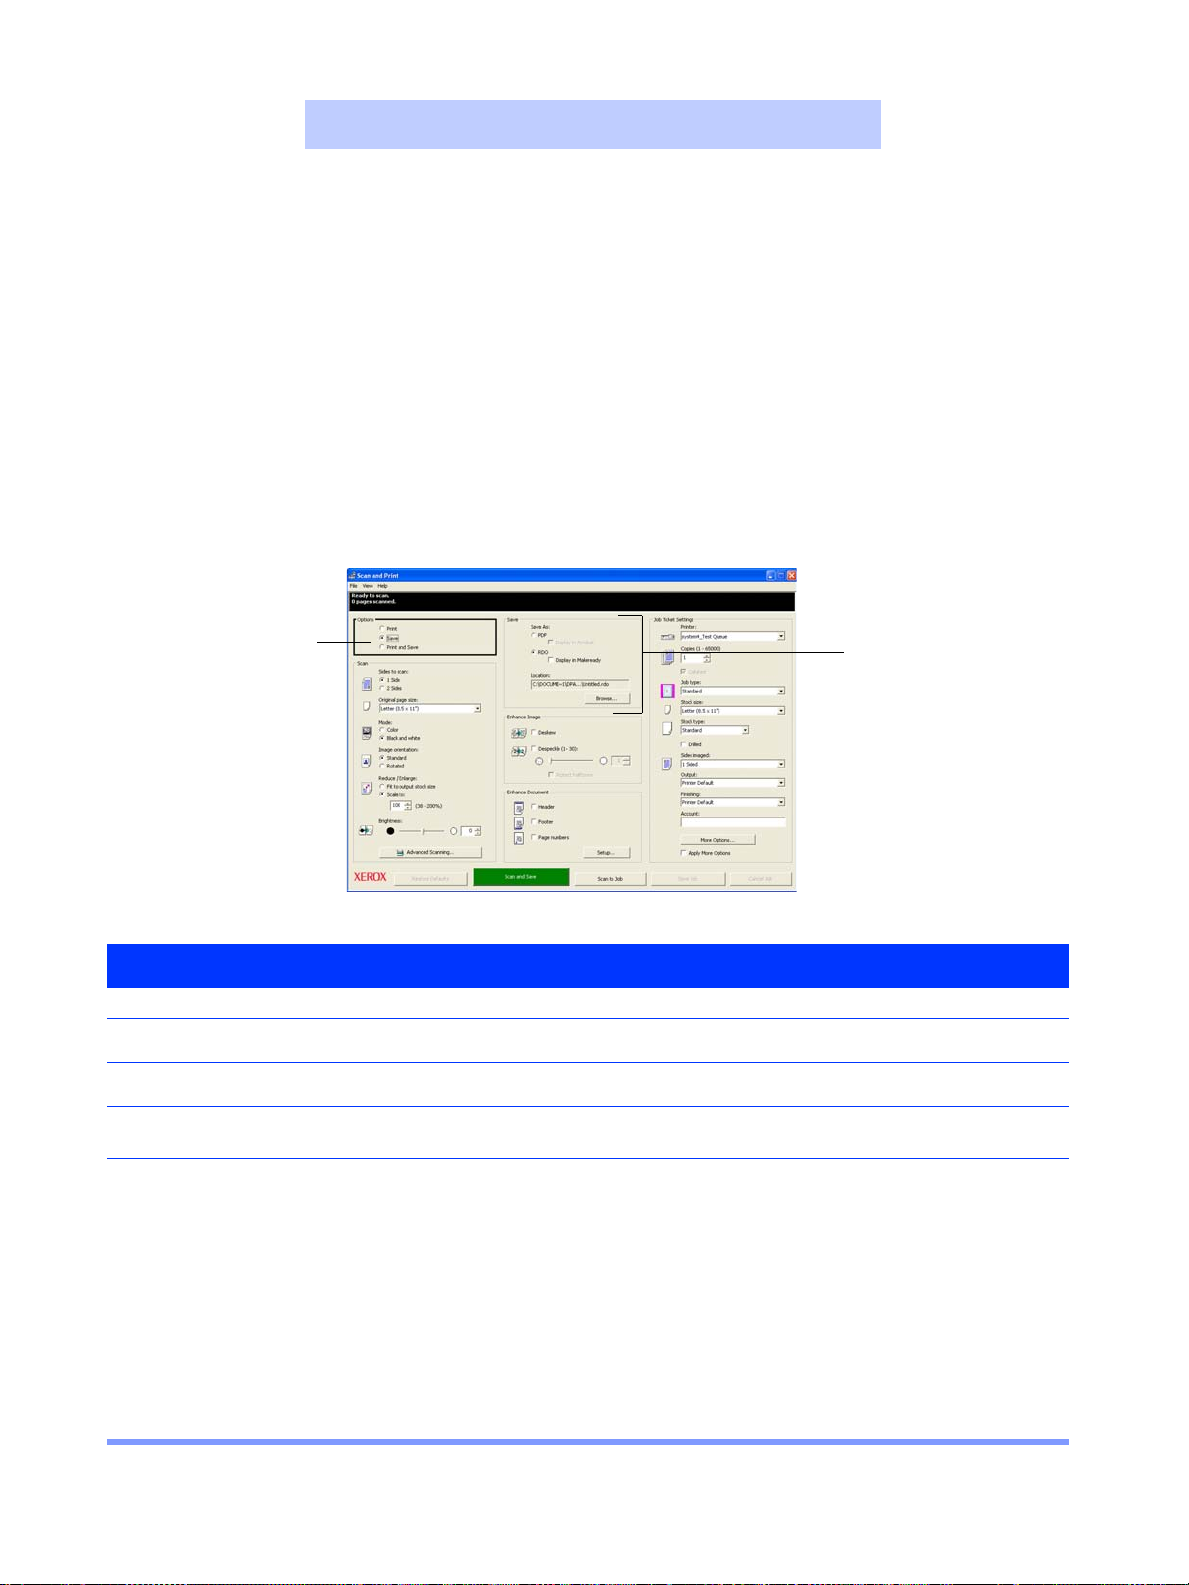
Scan and Save Documents - Continued
Save As dialog box
Step Action
5
6
7
Use the Save in drop-down list to navigate to and select the location where you want to store your file.
Type the name of your file in the File name text box.
Select PDF Files (*.pdf) or RDO Files (*.rdo) from the Save as type list box.
NOTE: When Save As: PDF is selected in the Save section, the Print section on the right side of the
screen changes to PDF Options. When Save As: RDO is selected, this section changes to Job Tick et
Settings section.
…continued
3 – 8
Page 25

3
USING
SCAN AND PRINT
Scan and Save Documents - Continued
Save as PDF Save as RDO
Step Action
8
9
10
11
12
Select [Save] or [OK] to close the Save As dialog box and return to Scan and Print. The path for your
job displays in the Location box.
Select a printer from the Optimize for or the Printer drop-down list.
Select other appropriate options from this section.
Select [Scan and Save]. Your file is saved to the specified location.
When you have finished, close Scan and Print.
3 – 9
Page 26

3
USING
SCAN AND PRINT
Scan, Print, and Save an RDO or PDF
You can scan a black and white or color document, print it and then save it as an RDO or
PDF using Scan and Print. You can save the RDO or PDF into a directory in the Windows
file system or supported repository.
Scan, Print and Save
Step Action
With Scan and Print open:
1
2
3
4
5
6
Place a hardcopy document on the scanner glass or in the multi-sheet feeder.
Select [Print and Save] in the Options section. The green button at the bottom of the screen is
activated for Scan, Print & Save.
Set your job options (steps 2 through 8 in Scan and Print a Black and White or Color Original on page
3-2).
In the Save section:
a) Select [PDF] or [RDO].
If you want your document to display immediately after scanning, mark:
• Display in Acrobat check box for PDF files or
• Display in Makeready check box for RDO files.
b) Select the [Browse] button. The Save As dialog box displays.
Use the Save in drop-down list to navigate to and select the Windows location where you want to store
your file.
Type the name of your file in the File name text box.
…continued
3 – 10
Page 27

3
USING
SCAN AND PRINT
Step Action
7
8
9
10
Select RDO Files (*.rdo) or PDF Files (*.pdf) from the Save as type list box.
Select the [Save] button to close the Save As dialog box and return to Scan and Print. The path for
your job displays in the Location box.
Select [Scan, Print & Save].
When you have finished, close Scan and Print.
3 – 11
Page 28

3
USING
SCAN AND PRINT
3 – 12
Page 29
4
SCANNING
SCANNING
Scanning to an RDO
Quick Points
Image quality and scanning:
For best image quality when scanning, select the destination printer you plan to use when printing the RDO. Why?
When you scan an image, the image resolution dictates the quality of the image. If you scan an image at 300 dots per
inch (dpi), and the printer can produce 600 dpi, the image quality is slightly distorted.
Step Action
To scan directly to an RDO:
1
2
3
4
5
6
Settings dialog showing Scan to RDO option
Open FreeFlow Makeready.
NOTE: You can open an existing RDO and add images to it or add images to the new RDO.
Select [Options: Settings] from the menu bar.
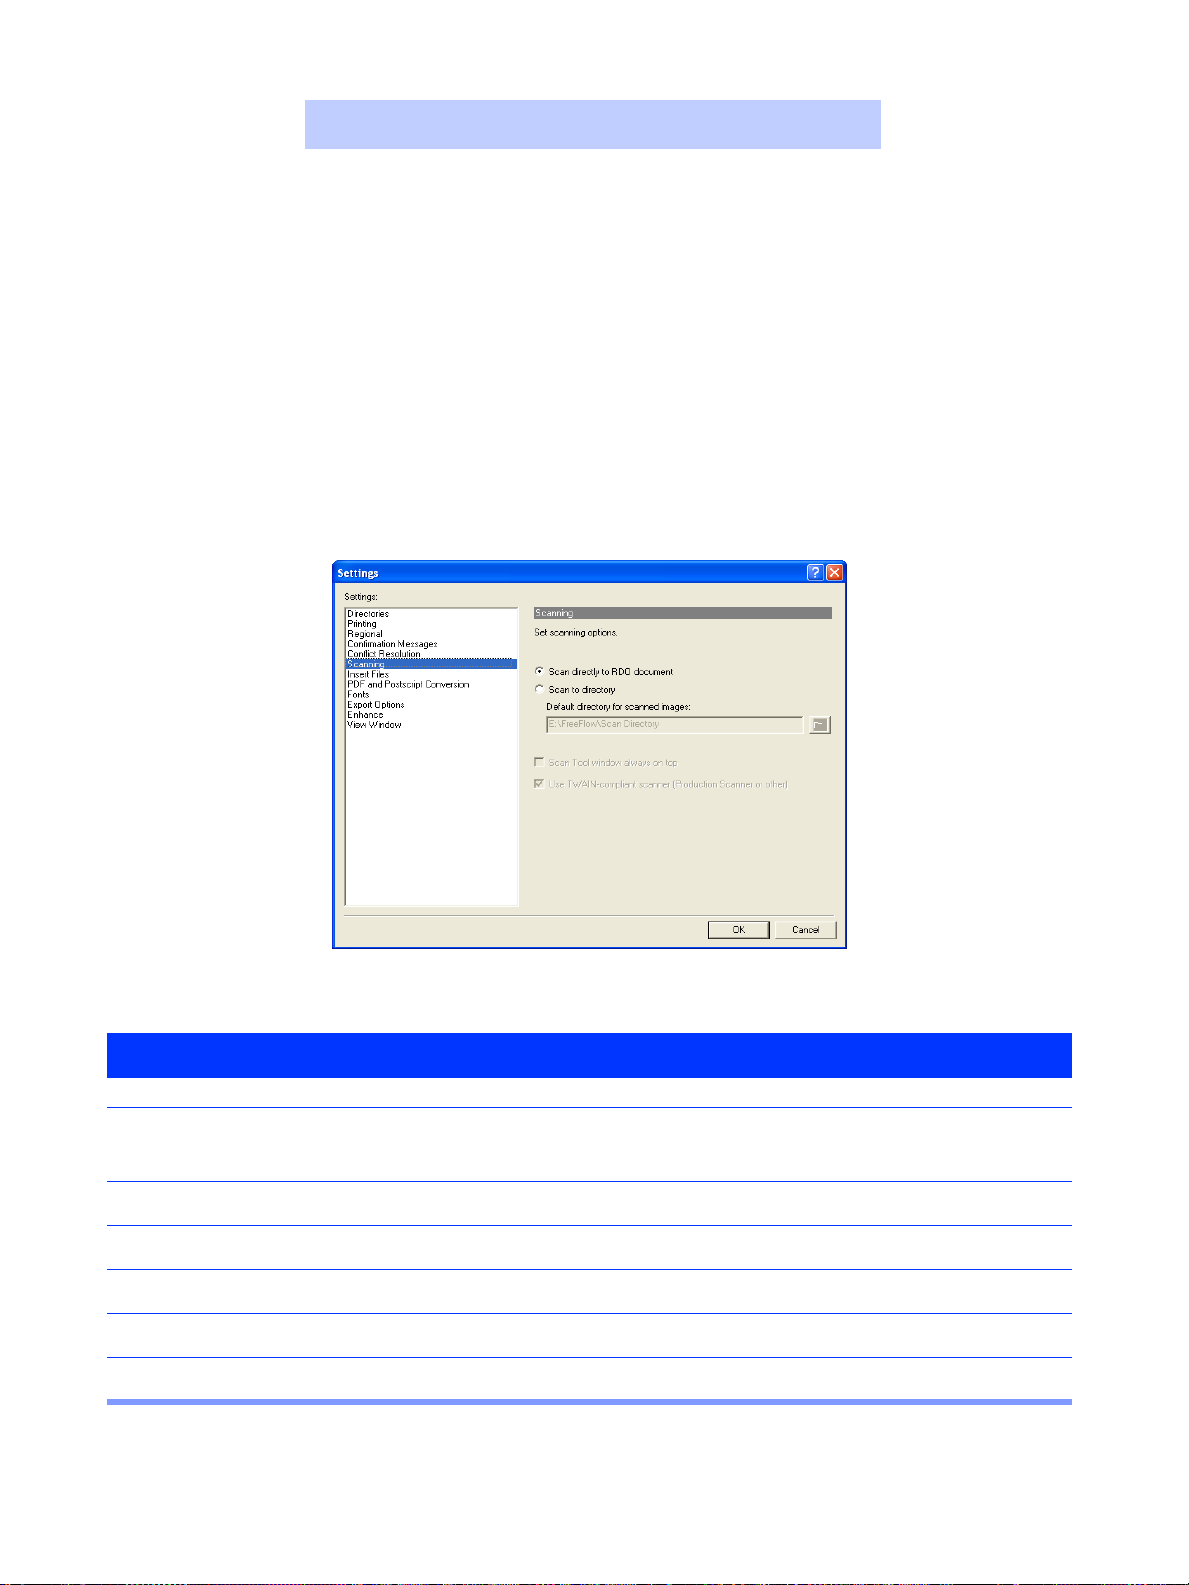
Select [Scanning] from the Settings list box.
Select Scan directly to RDO document.
Select [OK] to close the Settings dialog and return to FreeFlow Makeready.
Select [Insert: Scan Images] to open the scanning application and scan your images.
4 – 1
Page 30
4
SCANNING
Scanning to a Directory
Quick Points
Using the Directory Viewer:
You can drag and drop images from the Scan Directory tab in the Directory Viewer into any RDO you wish. This moves a
TIFF file into an RDO. To copy a TIFF file into an RDO, hold <CTRL> while dragging.
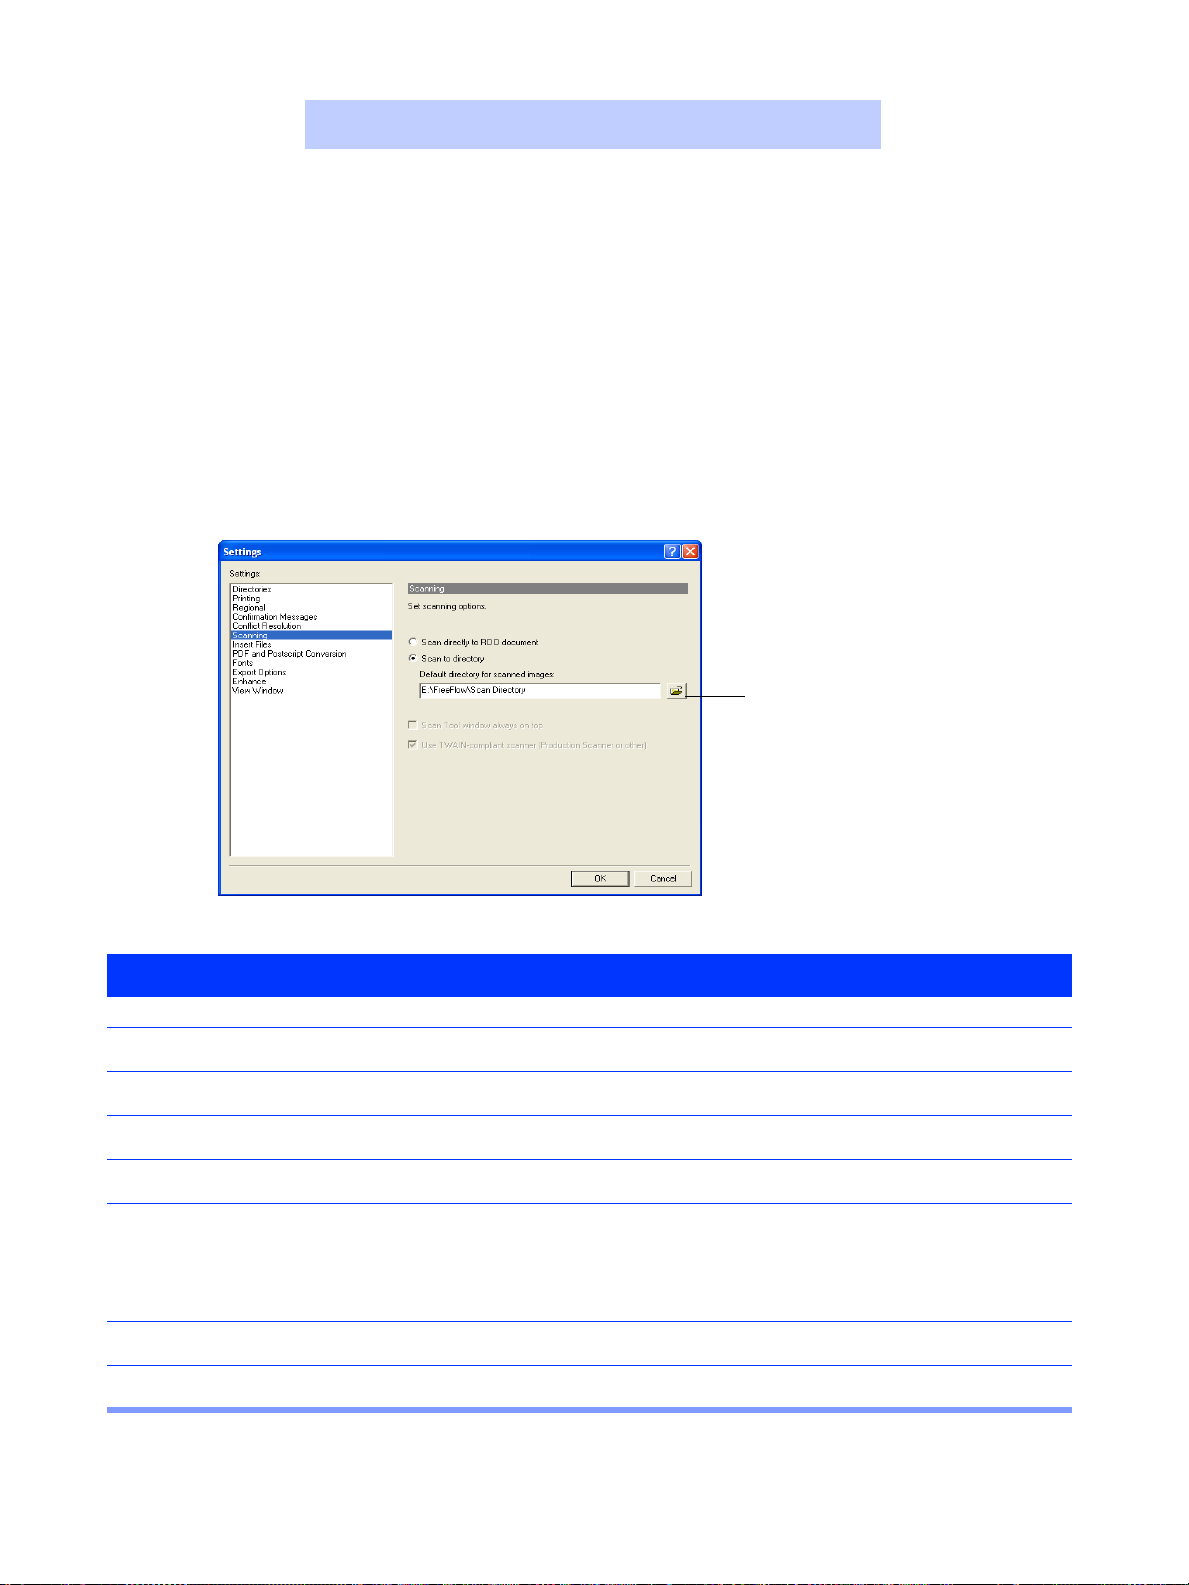
[Browse for Folder]
button
Settings dialog showing Scan to Directory option
Step Action
To scan to a directory:
1
2
3
4
5
6
7
Open FreeFlow Makeready.
Select [Options: Settings] from the menu bar.
Select [Scanning] from the Settings list box.
Select Scan to directory.
Type a complete directory path in the Default directory for scanned images text box, or select the
[Browse for Folder] button. The default path is e:\FreeFlow\Scan Directory.
NOTE: This causes the TIFF files created to di splay in the Scan Directory tab in the Directory Viewer
window. If the Directory Viewer window is not displayed, you can select [View: Directory Viewer].
Select [OK] to close the Settings dialog box and return to FreeFlow Makeready.
Select [Insert: Scan Images] or the [Scan Images] toolbar button to open the scanning application.
4 – 2
Page 31

4
SCANNING
Creating a Standard RDO
Quick Points
Defining the printer family:
It’s a good idea to specify the printer you plan to use to print your RDO. That way, the FreeFlow Makeready software will
display only the options your printer can support.
Standard RDOs can be 1-sided or 2-sided. Standard RDOs are printed with one page per side of a sheet of paper. You can
add any supported content (TIFF, JPEG, PostScript, Adobe PDF, or another RDO) to a standard RDO. For more
information on adding (inserting) existing files to an RDO, see Chapter 5, RDOs and Other File Types.
Step Action
With FreeFlow Makeready open:
1
2
3
4
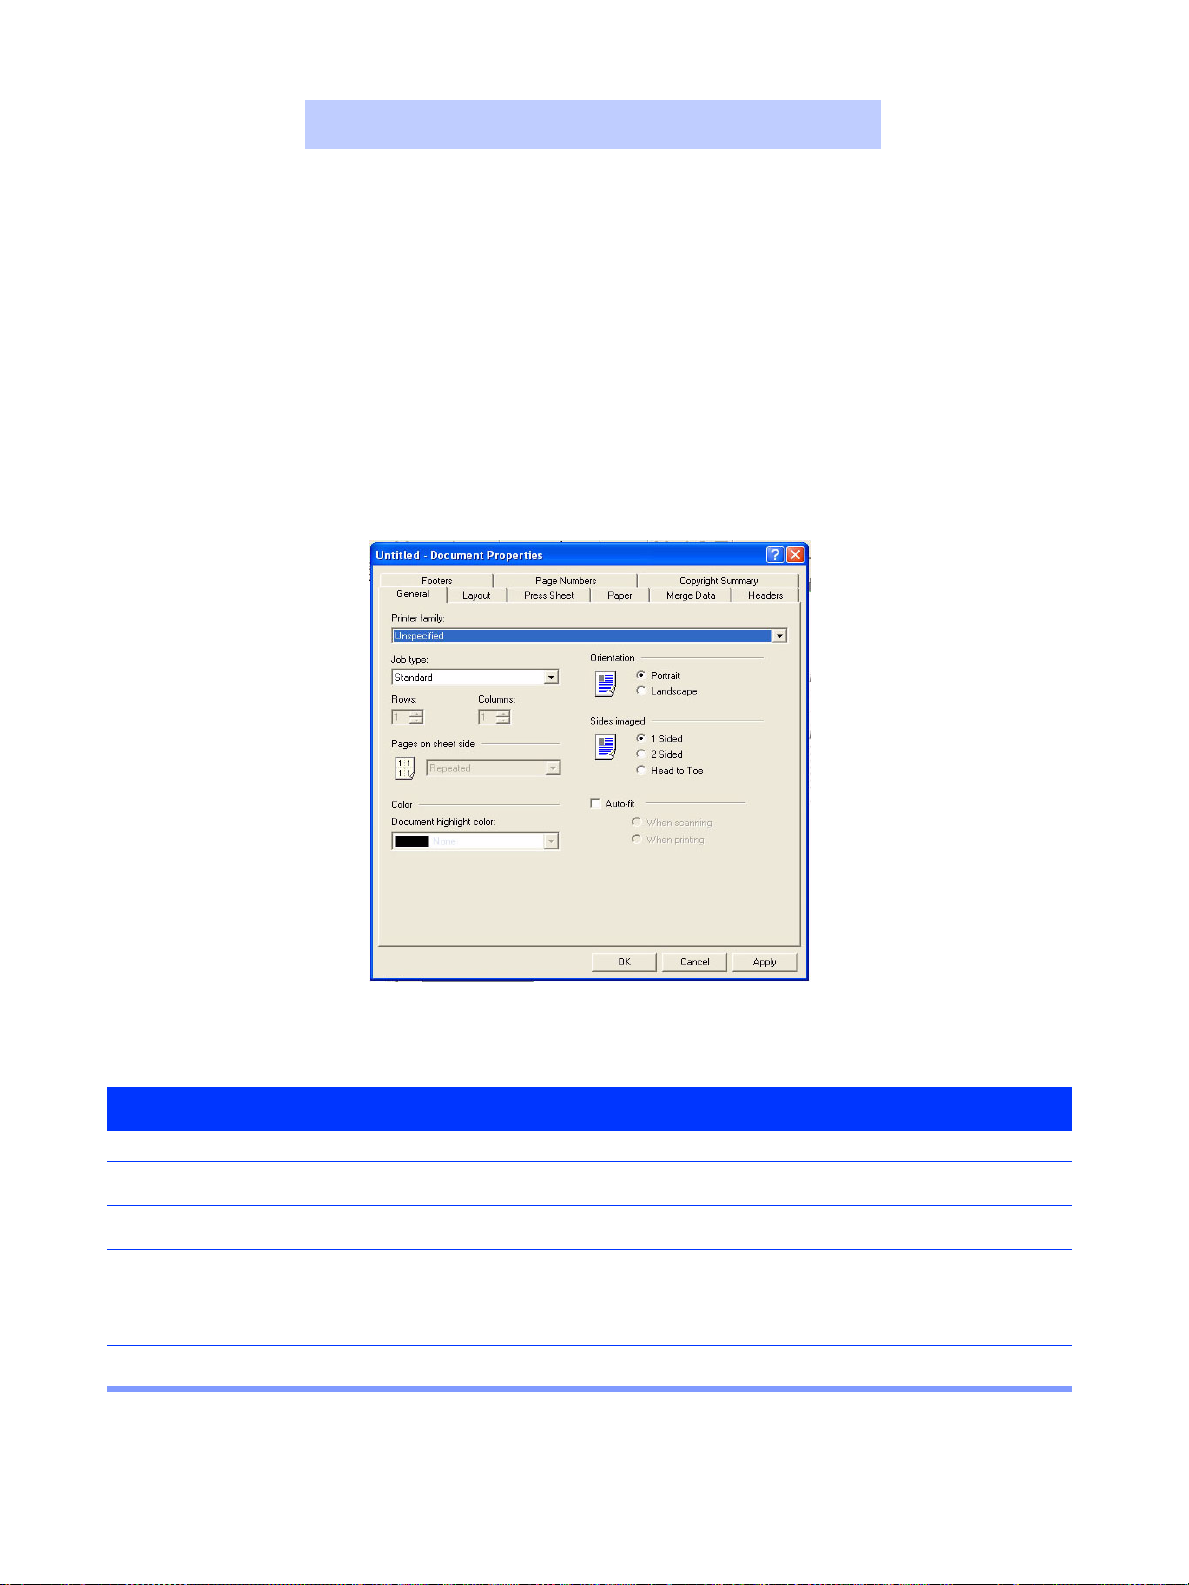
Document Properties dialog box
Select [Format: Document Properties] from the menu bar.
NOTE: The Press Sheet tab options are unavailable for this type of job.
Select the General tab.
You can select a site-specific printer from the Printer family drop-down list. Select [Unspecified] if you
are unsure which printer you plan to use to print the RDO.
NOTE: Only printers defined on your workstation display in the Printer family drop-down list.
Select [Standard] from the Job type drop-down list.
…continued
4 – 3
Page 32

4
SCANNING
Step Action
5
6
7
8
9
10
11
12
13
14
15
Select [Portrait] or [Landscape] in the Orientation section.
Select [1Sided], [2Sided], or [Head to Toe] in the Sides imaged section.
Mark or clear the [Auto-Fit] check box.
NOTE: If you mark the Auto-Fit check box, the When scanning and When printing option buttons
become available. Select one of these buttons to determine when to auto-fit your images.
If you selected a highlight color printer from the Printer family drop-down list, you can select a
highlight color for your RDO from the Document highlight color drop-down list.
You can select the Layout tab to define margins and the default image position for pages in your RDO.
You can select the Paper tab to edit the default paper stock or to define up to nine additional paper
stocks for your RDO. You can also define covers for your RDO on the Paper tab.
NOTE: Paper Stock #1 is the default stock for the document.
You can select the Headers tab to apply and define the appearance of a document-wide header.
You can select the Footers tab to apply and define the appearance of a document-wide footer.
You can select the Page Numbers tab to apply and define the appearance of document-wide page
numbers.
Select [OK] to close the Document Properties dialog box.
You can now scan images, [Insert: Scan Images], or insert images, [Insert: File], into the RDO.
When you are ready to print the RDO, select [File: Production Print]. Select your desired printer from
the Target Destination drop-down list, specify the Job Ticket settings, and select [Submit All] to
submit the print job.
4 – 4
Page 33

4
SCANNING
Creating a Signature RDO
Quick Points
Three types of signatures:
FreeFlow Makeready features three types of signature jobs:
• Book in which the page width is greater than the page height.
• Calendar, in which the page height is greater than the page width and pages are printed head-to-toe.
• Pamphlet, in which the page height is greater than the page width.
Multi-segment signatures:
FreeFlow Makeready enables you to create a document style that is composed of a grouping of multiple, folded sheets
(signatures) which comprise the entire book.
Signature-shift can be a problem in single-signature, high page-count documents. The multi-segment signature option
provides a practical solution.
Signature jobs are always 2-sided. Signature jobs are printed side-by-side on one side of a sheet of paper. You can then
fold the printed document to create a book, calendar, or pamphlet.
Signature Document Example
…continued
4 – 5
Page 34

4
SCANNING
Step Action
With FreeFlow Makeready open:
1
2
Select [Format: Document Properties] from the menu bar.
NOTE: If you have an RDO open, you will be prompted to save your changes before opening a new
document. You can have only one RDO open in one instance of FreeFlow Makeready at a time. You
can, however, open multiple insta nces of FreeF low Makeready.
Select the General tab.
3
4
5
6
7
Select the desired printer from the Printer family drop-down list.
NOTE: Not all printers support the signature job type.
From the Job type drop-down list, select the desired Signature type. Check the Quick Points on
page 4-5 for descriptions of Signature types.
While the General tab is still displayed, mark the Auto-Fit check box if you plan to scan hardcopy to
add pages to your signature RDO. (You should also select the When scanning option button.)
Select the Layout tab to define margins, signature options, and the default image position for pages in
your RDO.
NOTE: Marking the Fill last segment check box ensures that the last segment of a multi-segment
signature is filled to the specified number of sheets per signature.
Select the Press Sheet tab to specify how you want the document pages imposed for printing.
…continued
4 – 6
Page 35

4
SCANNING
Creating a Signature RDO — continued
Using Press Sheet enables printers to print faster, and saves resources by making use of large sheets of paper.
For example, an 8.5” x 11” signature book with two sheets per signature can be reimposed using a 2-up 11” x 17” sheet,
resulting in two copies of the signature on the sheet. The sheet is then folded and cut at the fold.
Press Sheet options are:
None (default)
Calendar - flip top
Calendar - flip bottom
The Press Sheet option is available when the job type is set to signature book, and the Sheets per signature is set to 2. If
Sheets per signature is set to anything other than 2, and a Press Sheet option (other then None) is selected, then Sheets
per signature is reset to 2, and disabled. Sides imaged is also set to 2, and disabled.
Step Action
8
9
10
11
12
Select the Paper tab to edit the default paper stock or to define up to nine additional paper stocks for
your RDO. You can also define covers for your RDO on the Paper tab.
NOTE: Paper Stock #1 is the default stock for the document.
On the Headers and Footers tabs you can apply and define the appearance of document-wide
headers and footers.
Select the Page Numbers tab to apply and define the appearance of document-wide page numbers.
On the Headers and Footers tabs you can apply and define the appearance of document-wide
headers and footers.
CAUTION:
If you change the default paper stock for a Signature RDO in the production print job ticket,
do not save the job ticket into the RDO. If you do, the default stock for the RDO changes,
and you will have to reposition all the images in the RDO.
When you are ready to print the RDO, select [File: Production Print]. Select your desired printer from
the Target Destination drop-down list, specify the Job Ticket settings, and select [Submit All] to
submit the print job.
4 – 7
Page 36

4
SCANNING
Creating an N-Up RDO
Quick Points
Opening a new RDO:
If you have an RDO open, you will be prompted to save your changes before opening a new document. You can have
only one RDO open in one instance of FreeFlow Makeready at a time. You can, however, open multiple instances of
FreeFlow Makeready.
Inserts are not available:
You cannot add inserts (direct or blank) to an RDO that is defined as 2-Up Flip, 3-Up Flip, signature, N-up flip.
Printing N-Up Flip RDOs:
Always create the document so that the page is 1/N the size of the paper stock selected at print time.
In N-Up, “N” is a variable, and refers to the number of pages you specify to be printed on a single sheet.
For an N-Up RDO, you can specify 2, 3, 4, 8, or 16 pages per sheet, or you can select “Custom,” which allows you to
specify up to 8 rows and 8 columns of pages per sheet. You can also specify 1-sided or 2-sided printing.
When you select “Custom” you can also define how the pages will appear on the sheet. Options are:
Repeated, which fills a multi-up sheet with N copies of the same page (see Creating an N-Up RDO —
continued on page 4-9)
Sequential, which places consecutive pages of the RDO in each cell of the multi-up sheet
Alternate, which places pages sequentially, but alternates the pages on the front and back of the
sheet. In this mode, page 2 is placed on the back of page 1 on the sheet, page 4 on the back of page
3, etc. Thus, the odd pages appear on the front of the sheet and the even pages appear on the back.
4 – 8
Page 37

4
SCANNING
Creating an N-Up RDO — continued
N-Up Examples
Step Action
With FreeFlow Makeready open:
1
2
3
4
5
6
7
Select [File: New].
Select the Wizards tab.
Select the [N-Up RDO Wizard] icon.
Select [OK] to close the New dialog box and start the wizard.
Select the desired printer from the Printer family drop-down list.
NOTE: Not all printers support the N-Up job type.
Make selections as the N-Up wizard walks you through all the decisions you need to make regarding
an N-Up RDO.
Select [Finish] to complete the wizard. The New RDO Information dialog box displays with a summary
of your selections.
…continued
4 – 9
Page 38

4
SCANNING
Creating an N-Up RDO — continued
N-Up Wizard, Step 1 of 8
Step Action
8
9
10
Mark the Add pages to the new document when the wizard finishes check box if you want to scan
or insert files to the RDO after the wizard completes.
You can select Using the Insert Scan Images dialog or Using the Insert File dialog if this check box
is marked.
Select [OK] to close the New RDO Information dialog box and begin editing the RDO.
NOTE: Before you make ex tensive cha nges to yo ur new N-U p RDO, it's a good idea to save an d name
your document.
CAUTION:
If you change the default paper stock for an N-Up RDO on the production print job ticket,
do not save the job ticket into the RDO, or you will have unexpected results.
When you are ready to print the RDO, select [File: Production Print]. Select your desired printer from
the Target Destination drop-down list, specify the Job Ticket settings, and select [Submit All] to
submit the print job.
4 – 10
Page 39

4
SCANNING
Creating an N-Up Flip RDO
Quick Points
Notes on N-Up Flip:
• 3-Up Flip Left – each page is imaged three times on one side of a sheet of paper with the left-most image rotated 180 degrees.
• 3-Up Flip Right – each page is imaged three times on one side of a sheet of paper with the right-most image rotated 180
degrees.
• Not all printers support the N-Up Flip job type
• The Press Sheet Imposition tab options are unavailable for this type of job.
N-Up Flip is an RDO formatting option in which multiple copies of the same RDO page are printed side by side on one
sheet of paper with one copy rotated 180 degrees. “N” is a variable, and refers to the number of pages you specify to be
printed on a single sheet. N-Up Flip choices are:
2-Up Flip Left
2-Up Flip Right
3-Up Flip Left
3-Up Flip Right
NOTE: N-Up Flip RDOs can be printed as 1-sided or 2-sided, but cannot be printed duplex head-to-toe.
3-Up Flip Right Orientation Example
…continued
4 – 11
Page 40

4
SCANNING
Creating an N-Up Flip RDO — continued
Select a job type.
Select “Auto-Fit”
and “When
scanning.”
Document Properties dialog box, General tab
Step Action
To create an N-Up Flip RDO:
1
2
3
4
5
6
7
8
Open a new RDO in FreeFlow Makeready.
Select [Format: Document Properties].
Select the General tab.
You can select a site-specific printer from the Printer family drop-down list. Select [Unspecified] if you
are unsure which printer you plan to use to print the RDO.
Select [2 Up flip left], [2 Up flip right], [3 Up flip left], or [3 Up flip right] from the Job type drop-down
list.
Select [1Sided] or [2Sided] in the Sides imaged section.
It is strongly suggested that you mark the Auto-Fit check box if you plan to scan a hardcopy document
to add pages to your N-Up Flip RDO.
You should also select When scanning.
If you selected a highlight color printer from the Printer family drop-down list, you can select a
highlight color for your RDO from the Document highlight color drop-down list.
…continued
4 – 12
Page 41

4
SCANNING
Creating an N-Up Flip RDO — continued
Document Properties dialog box, Paper tab
Step Action
9
10
11
12
You can select the Layout tab to define margins and the default image position for pages in your RDO.
You can select the Paper tab to edit the default paper stock or to define up to nine additional paper
stocks for your RDO. You can also define covers for your RDO on the Paper tab.
NOTE: The default paper size for N-Up flip RDOs is 17 x 11 inches.
You can further modify your RDO from the OCR, Headers, Footers, and Page Numbers tabs.
CAUTION:
If you change the default paper stock for an N-Up Flip RDO on the production print job
ticket, do not save the job ticket into the RDO or you will have unexpected results.
When you are ready to print the RDO, select [File: Production Print]. Select your desired printer from
the Target Destination drop-down list, specify the Job Ticket settings, and select [Submit All] to
submit the print job.
4 – 13
Page 42

4
SCANNING
4 – 14
Page 43
5
RDOS AND
5
RDOS AND
OTHER FILE TYPES
OTHER FILE TYPES
Inserting an Adobe PDF, JPEG, or TIFF File into an RDO
Using Mixed Pa per S ize s:
When importing an Adobe PDF file, FreeFlow Makeready automatically preserves the page sizes of the Adobe PDF
pages which enables automatic programming of mixed sizes as page exemptions.
NOTE: This is only true if you select that option in the application settings window. Also, a PDF, JPEG, TIFF, or
RDO can dictate the document stock size. Again, this is only true if you select the appropriate option in the
application settings window.
Step Action
With an RDO open:
1
2
3
4
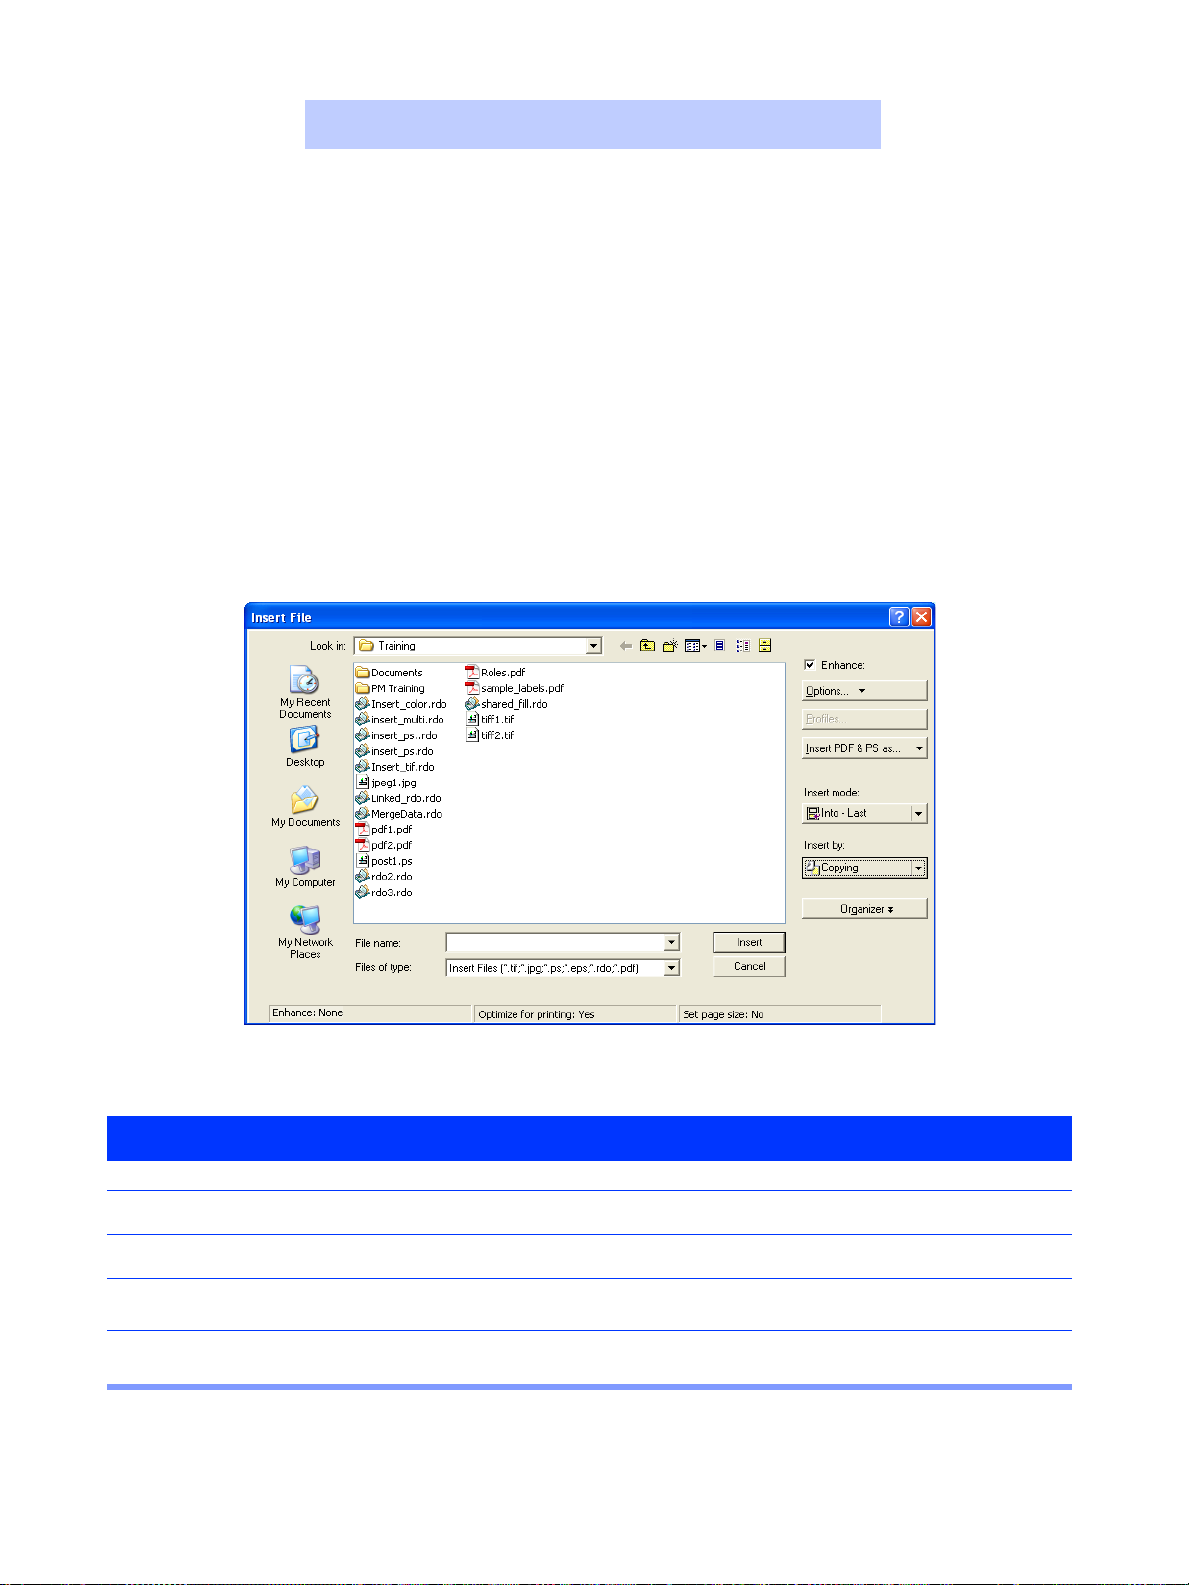
Insert File dialog box
Specify the insertion point in the Document Structure window.
Select [Insert: File].
Select either [PDF Files (*.pdf)], [JPEG Files (*.jpg *.jpeg *.jpe)], or [TIFF Files (*.tif)] from the Files
of type drop-down list.
Use the Look in drop-down list to navigate to the location where your file resides.
…continued
5 – 1
Page 44

5
RDOS AND
OTHER FILE TYPES
Step Action
5
6
7
8
9
10
11
Select the desired file.
NOTE: The maximum file size allowed is 200 MB.
Clear or check the Enhance check box. (Enhancements are not applied to Adobe PDF files).
Select the appropriate option from the Insert Mode drop-down list.
Specify the appropriate option from the Insert By drop-down list: Copying or Moving.
Select [Insert].
NOTE:
• PDF: If you select a PDF file with multi ple bookmark s, FreeFlow Makerea dy convert s the bookma rks
to RDO tags (provided th at the boo kmark s are gr ou ped for con tin uou s p a ge ranges) and retains the
original titles.
• JPEG and TIFFs: You may receive a message regarding a resolution adjustment to your JPEG or
TIFF image before you can complete the insert. Select [Yes] to continue.
Once the process is complete, you can specify another file to insert.
When you have finished, select [Done].
5 – 2
Page 45

5
RDOS AND
OTHER FILE TYPES
Inserting Multiple Files into an RDO
Quick Points
Insert mode and Insert by:
You cannot change the Insert mode and Insert byoptions in the Insert File dialog box for each individual file you add to
the Organizer window. The files are added as a group, and these options are applied when you complete the Insert
command.
Step Action
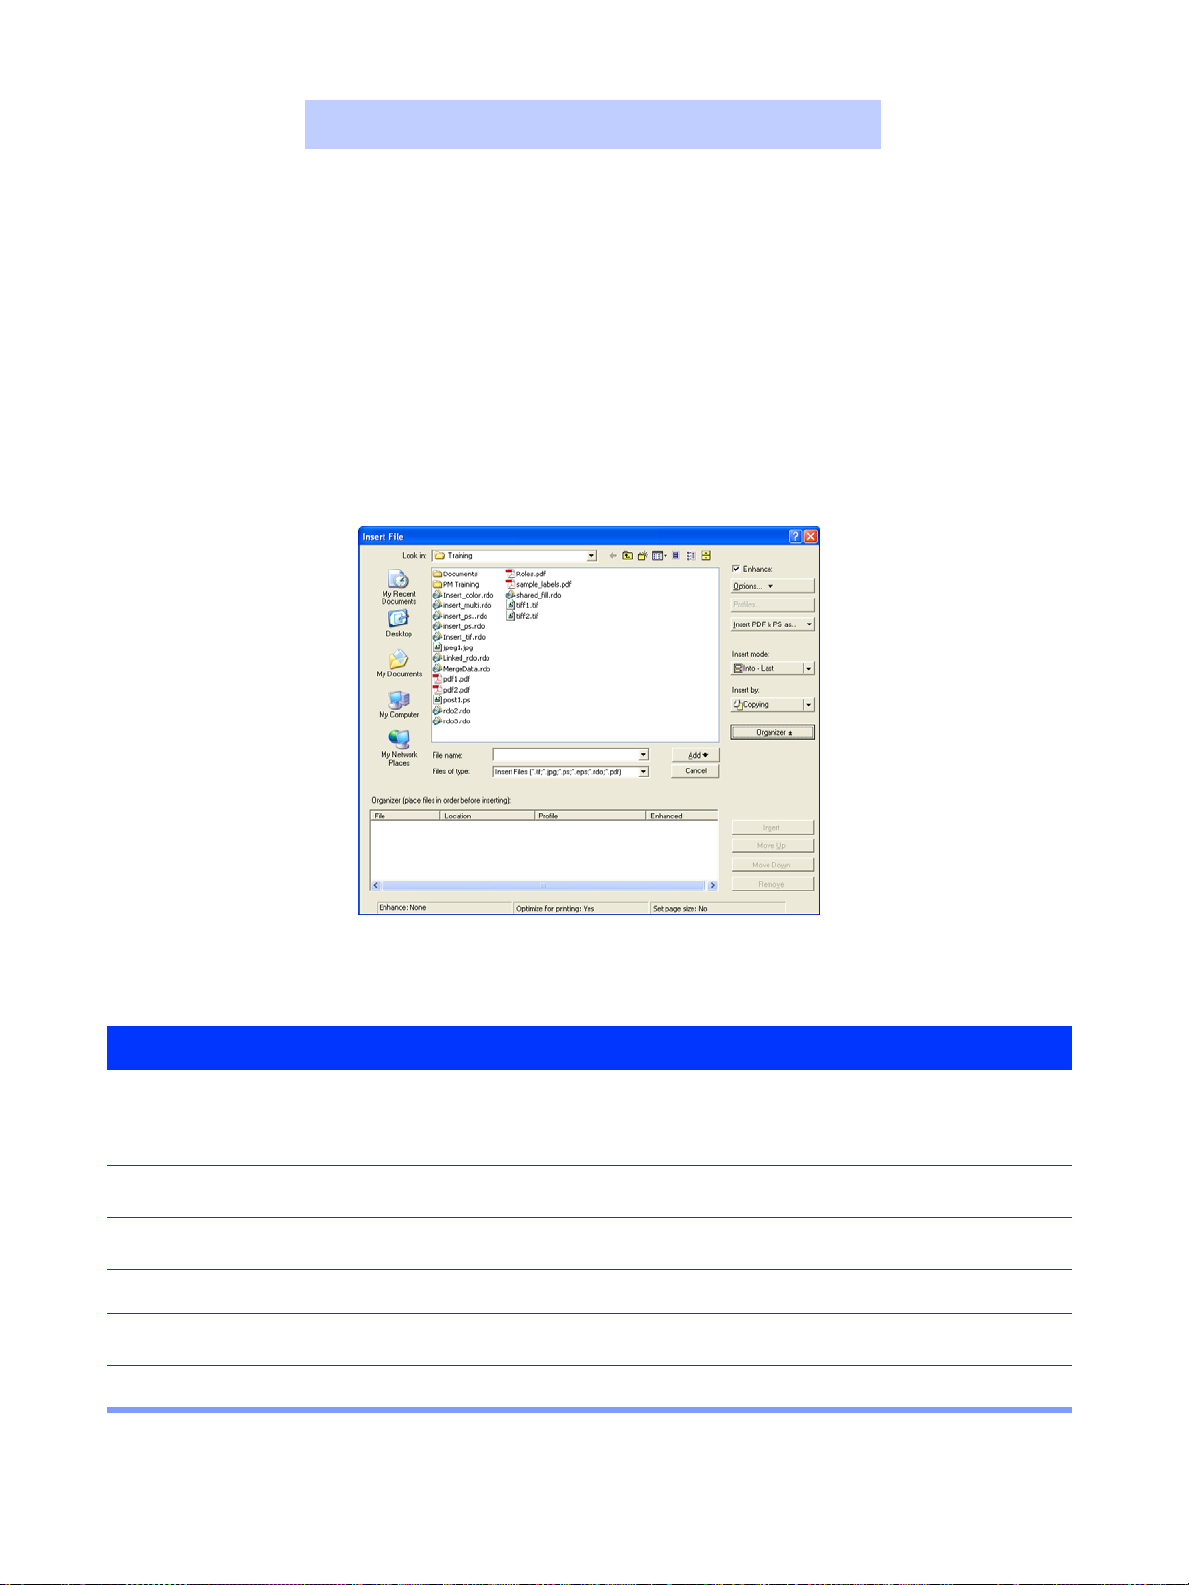
With an RDO open:
1
Specify the insertion point in the Document Structure window.
2
3
4
5
6
7
Select the appropriate insert mode from [Insert: Insert Mode].
Select [Insert: File].
Select the desired file type from the Files of type drop-down list.
Use the Look in drop-down list to navigate to the Windows location where your file resides.
Select the desired file.
Select the [Organizer] button.
NOTE:
• If you select [Insert] before displaying the Organizer window, the file is inserted into the RDO
immediately.
• Notice that the [Insert] button changes to [Add] when the Organizer window is displayed.
• You can add files to the Organizer from the Windows file system.
…continued
5 – 3
Page 46
5
RDOS AND
OTHER FILE TYPES
Inserting Multiple Files into an RDO — continued
Quick Points
Removing a file:
You can remove a file from the Organizer window by highlighting the file and selecting the [Remove] button.
Step Action
8
9
10
11
12
13
Insert File Dialog box with Organizer window
Select [Add] to add the selected file to the Organizer window.
NOTE: You can add as many files as you wish to the Organizer window. Keep in mind, however, that
inserting a large number of files will take longer.
Navigate to and select another file, then select [Add] to add the file to the Organizer window. Once the
process is complete, you can specify another file to insert.
Mark or clear the Enhance check box. (Enhancements are applied only to TIFF files and JPEG files,
not to PostScript or Adobe PDF files.)
Select the appropriate option from the Insert Mode drop-down list.
Select [Insert] to insert all the files displayed in the Organizer window into the RDO, in the order they
appear in the window.
When you have finished, select [Done] to close the Insert File dialog box.
5 – 4
Page 47

5
RDOS AND
OTHER FILE TYPES
Inserting a Data Merge Object into an RDO
A data merge object represents data whose content can vary for each copy of the document printed. Users create data
merge objects and add them to RDOs. Data for the data merge object comes from a delimited text file, usually a CSV file
or a TXT file.
Step Action
With an RDO open:
1
2
3
4
5
Specify the insertion point in the Document Structure window.
Select [Insert: Merge Text] from the menu bar. A merge data message displays.
Select [OK]. The Browse for merge data dialog box displays.
Select a CSV file or a TXT file.
Select [Open]. The [Insert Merge Text] data option window displays.
…continued
5 – 5
Page 48

5
RDOS AND
OTHER FILE TYPES
Step Action
6
7
8
Select [OK]. The Insert Merge Text dialog box displays.
You can change the following properties:
• Font name, style, size, and color
•Opacity
• Location of the merge text on the page
• Text rotation
• The text itself
• The page range
NOTE: You can also change the location of the data merge object by dragging and dropping it in the
Page View window.
Use the Insert Field button to insert variable data fields into the text box.
NOTE: Use the [ABC] button to display text in the Insert Merge Dialog box as it will appear on each
printed page. Use the arrow keys on the Navigation toolbar to display the next data object.
Select [OK].
5 – 6
Page 49

5
RDOS AND
OTHER FILE TYPES
Saving an RDO as an Adobe PDF File
When you create an Adobe PDF file from an RDO, all the formatting of the RDO is captured in the Adobe PDF file.
However, job ticket options, such as covers, inserts, and tabs, are not stored in the Adobe PDF file.
Repository Icon
Save As dialog box
Step Action
With an RDO open:
1
2
3
4
5
Select [File: Save As].
Select [PDF Files (*.pdf)] from the Save as type drop-down list.
Use the Save in drop-down list and the directory window below it to navigate to the directory where the
new Adobe PDF file will be stored.
NOTE: Y o u may also sa ve an Adobe PDF file into a reposi tory. T o do so, click on the Reposito ry icon in
the Save As dialog box, log in to the desired server, then select the desired repository and folder.
Type the file name for the new Adobe PDF file in the File name text box.
Select [Save] to close the Save As dialog box and create the Adobe PDF file.
5 – 7
Page 50

5
RDOS AND
OTHER FILE TYPES
Exporting RDO Pages to Other
File Formats
You can export some or all pages of an RDO to a different file type. When you export all pages of an RDO into a TIFF,
JPEG, PostScript, or Adobe PDF file, the formatting from the RDO is preserved. However, the paper stock is not
maintained.
Quick Points
Selecting a range of pages:
You can select a non-sequential range of pages in the RDO by pressing <CTRL> while clicking on each desired page in
the Document Structure window.
Export dialog box
Step Action
With an RDO open:
1
2
3
4
5
Select one or more pages of the RDO from the Document Structure window.
Select [File: Export].
Use the Export to drop-down list and the directory window below it to navigate to the directory where
the exported file will be stored.
Select the desired file type (TIFF, JPEG, PostScript, or PDF) from the Export as Type drop-down list.
Type the new file name in the File name text box.
You can select [Options] to define the
compression settings and file type for
the exported file.
The options available vary based on
the file type you are exporting.
…continued
5 – 8
Page 51

5
RDOS AND
OTHER FILE TYPES
Step Action
6
7
8
Select [OK] to save your settings.
Select [Export]. You can perform another export when the export is complete.
Select [Close].
5 – 9
Page 52

5
RDOS AND
OTHER FILE TYPES
Converting an Adobe PDF File to an RDO
There are many ways to convert an Adobe PDF file to an RDO with FreeFlow Makeready.
As discussed earlier, you can insert an Adobe PDF file directly into an RDO. This is not the same as converting the Adobe
PDF file, but it does allow you to do some job ticket programming that only RDOs can use. When you insert an Adobe PDF
file into an RDO, however, you may detect a loss of image quality.
If the image quality of the RDO is very important for your site, use Network Agent to convert an Adobe PDF file to an RDO.
Quick Points
Is Network Agent enabled?
Right-click on the Network Agent icon in the Windows system tray. Ensure that the Disabled check box is cleared.
Conversion tip:
Converting an Adobe PDF file to an RDO does not convert Adobe PDF pages to TIFF images.
Using Network Agent
The file name for an Adobe PDF file converted to an RDO using the Network Agent is <filename.pdf.rdo>.
Step Action
Setting up Network Agent to convert Adobe PDF files to RDO files:
1
2
3
Create a source directory (e.g., E:\pdf-convert) and a destination directory (e.g., E:\rdo-output) using
File Manager or Windows Explorer.
Place the Adobe PDF file you want to convert in the source directory. The new RDO document you are
about to create will be stored in the destination directory.
To open Network Agent, select [Start: Programs: Xerox FreeFlow Software: Printer
Administration: Network Agent].
…continued
5 – 10
Page 53
5
RDOS AND
OTHER FILE TYPES
Step Action
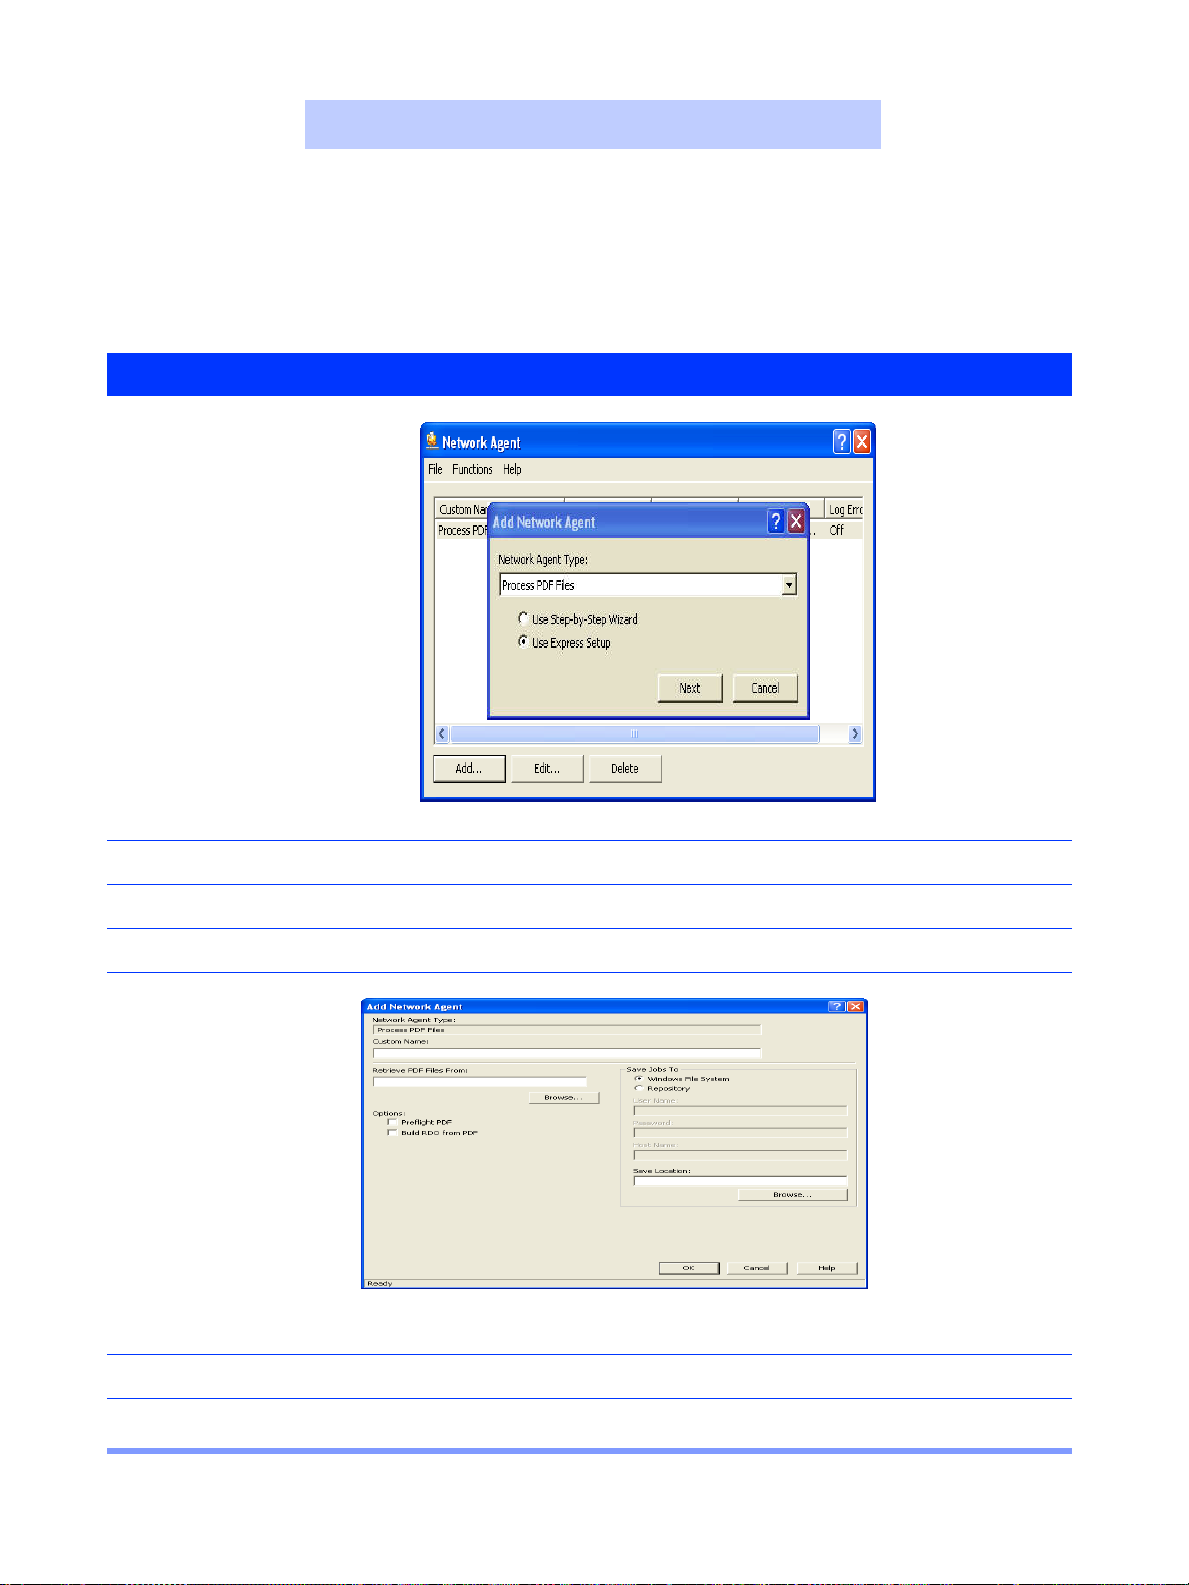
4
5
6
7
Add/Edit Network Agent dialog box
Select [Add].
Select [Process PDF Files] from the Network Agent Type drop-down list.
Mark the [Use Express Setup] radio button and select [Next].
Add Network Agent dialog box
Enter a custom name for the network agent.
8
Use the [Browse] button to navigate to and select the source directory (e.g., E:\pdf-convert) in the
Retrieve PDF Files From section.
5 – 11
Page 54

5
RDOS AND
OTHER FILE TYPES
Step Action
9
10
11
12
13
Clear the Preflight PDF check box.
Mark the Build RDO from PDF check box.
Select Windows file system in the Save jobs to section.
NOTE: Select Repository if you are saving the job to a location in a supported repository.
Navigate to and select the destination directory (e.g., E:\rdo-output) from the Save Location list box.
Select [OK]. The Network Agent Setup dialog box displays with the new Network Agent information
you just defined.
5 – 12
Page 55

5
RDOS AND
OTHER FILE TYPES
Converting an Adobe PDF File to an RDO — continued
Quick Points
Network Agent notification:
To receive status messages for Network Agent, right-click on the Network Agent icon. Ensure that the Message
Notification check box is marked.
Network Job Log dialog box
Step Action
Using Network Agent to create an RDO file from an Adobe PDF file:
1
2
3
4
5
Use File Manager to copy the desired Adobe PDF file to the source directory, E:\pdf-convert,
directory.
After about 30 seconds, a FreeFlow message box displays: “New Network Agent Jobs Have Arrived” if
Message Notification has been enabled (see the Quick Point on this page).
Select [OK].
Double-click on the Network Agent icon in the Windows system tray to display the Network Job Log
dialog box. The status of your RDO files is logged here.
Open FreeFlow Makeready.
Navigate to and open the RDO in the destination directory, E:\rdo-output\<filename>
.pdf.rdo.
5 – 13
Page 56

5
RDOS AND
OTHER FILE TYPES
Repairing a Broken Link
FreeFlow Makeready allows you to restore a linked file that has been moved or deleted from its original location. If you
open an RDO file that has been programmed with linked components and the components have been moved or deleted,
FreeFlow Makeready provides a message that the links are broken and provides an option to restore the broken links.
Step Action
In FreeFlow Makeready:
1
2
3
4
5
6
Select [File: Open].
Select an RDO file. The file opens and displays a broken link message.
Select [Yes]. The Replace Broken Link dialog box displays.
Use the Look in window of the Replace Broken Link dialog box to search for the linked file.
Select the file you are looking for.
Select [Open]. The file opens in FreeFlow Makeready. The link has been restored.
5 – 14
Page 57

6
IMAGE
6
IMAGE
EDITING
EDITING
Using the Transparent Option
Quick Points
Edit Mode in FreeFlow Makeready:
Many of the functions available in edit mode are also enabled in the FreeFlow Makeready Image Editor.
The advantage of using edit mode instead of the Image Editor is that you remain in the FreeFlow Makeready application
window.
The Transparent property is available only for black and white images.
There are two colors of pixels in an image: black and white. If the image is Transparent, the white pixels are not displayed.
This allows you to overlay images and display only the black pixels (the content) of the image, without the edges.
Color section
Image Properties dialog box
Step Action
To change an image to Transparent using the Image Editor:
1
2
To change an image to Transparent in the FreeFlow Makeready main application window:
1
2
3
4
In FreeFlow Makeready, select [Graphics: Edit in Image Editor]. The Image Editor window displays.
In the Image Editor window, select [Options: Transparent Mode].
Select the image in the Page View window or in the Document Structure window.
Right-click and select Image Properties. The Image Properties dialog box displays.
Select Transparent in the Color section.
Select [OK].
6 – 1
Page 58

6
IMAGE
EDITING
Editing an Image
Quick Points
Save before editing:
Always save your image before opening edit mode. Changes to images edited using edit mode are automatically saved
to the image. If you do make a mistake…
Using Edit Mode for Black and Whi te or Color Images
Step Action
With an RDO open:
1
2
3
4
5
Edit Mode active in FreeFlow Makeready
Select an image from the Document Structure window.
Double-click on the selected image in the Page View window. Four bounding lines display on the
selected image in the Page View window.
Move one or more of the bounding lines to select a specific area of the image for editing.
Right-click inside the bounding lines in the Page View window to display the available editing
commands for the selection.
When you have finished editing the image, select any item in the Document Structure window to exit
edit mode.
6 – 2
Page 59

6
IMAGE
EDITING
Editing an Image — continued
Using Image Editor for Black and White Images
Quick Points
When do you need a bounding box?
When you want to perform one of the following editing commands in Image Editor:
Cut, Copy, Frame, Fill, Crop, and Invert
Why do you need a bounding box?
When you select a command from the [Edit] menu, the Image Editor applies the command to yhe image area defined by
the bounding box.
You can use Image Editor for black and white or grayscale images only.
Step Action
With an RDO open:
1
2
Image Editor application window
Select one or more black and white or grayscale images from the Document Structure window.
Select [Graphics: Edit in Image Editor]. The Image Editor opens, displaying the selected image(s).
NOTE: For each image selected in the Document Structure window, a separate instance of the Image
Editor displays.
…continued
6 – 3
Page 60

6
IMAGE
EDITING
Step Action
3
4
5
6
If necessary, create a bounding box on the image by clicking and dragging diagonally.
Select the desired editing command from the [Edit] menu.
When you have finished, select the [Exit] button to close the Image Editor and return to FreeFlow
Makeready.
Select [Yes] to confirm your changes.
6 – 4
Page 61
6
IMAGE
EDITING
Editing an Image — continued
Quick Points
Flattening images:
Flattening an image in Adobe PhotoShop “fuses” the image into a single layer. Some File types use laters to enable
editing imagage information on one layer without effecting the image information of other layers. However, multiple
layers within a file increases the file size.
Using Adobe PhotoShop for Col or Images
You can only use Adobe PhotoShop for color images if you have purchased and installed Adobe PhotoShop on your
system.
Step Action
With an RDO open:
1
2
3
4
Adobe PhotoShop application window
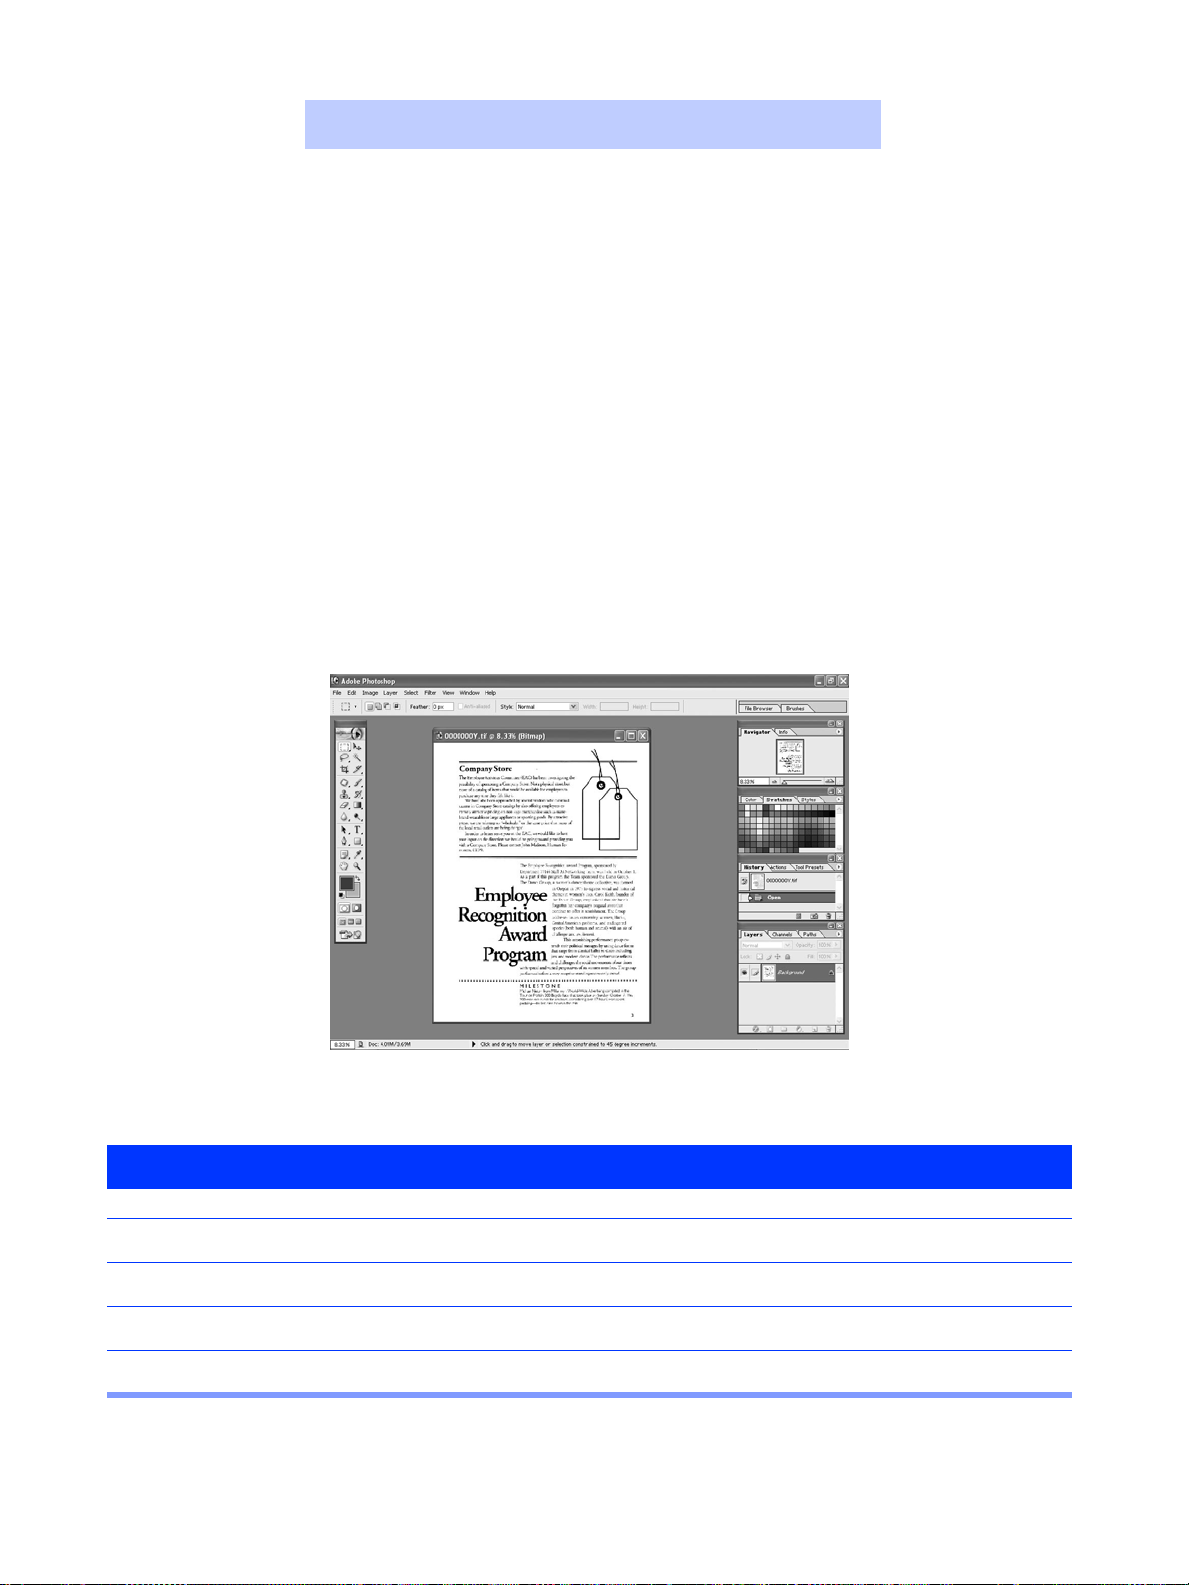
Select one or more color images from the Document Structure window.
Select [Graphics: Edit in PhotoShop].
Select [OK] to the confirmation message. Adobe PhotoShop opens, displaying the selected image.
Select the desired editing command from the menu or toolbar.
6 – 5
Page 62

6
IMAGE
EDITING
Step Action
5
6
7
8
9
Select [Layer: Flatten Image] from the PhotoShop menu bar.
…continued
Close the image in Adobe PhotoShop.
Select [Yes] to confirm your changes.
Close PhotoShop and return to FreeFlow Makeready.
Select [Yes] to update the image in FreeFlow Makeready.
6 – 6
Page 63

6
IMAGE
EDITING
Editing an Adobe PDF Segment in FreeFlow Makeready
FreeFlow Makeready provides an Adobe PDF editing feature that allows you to change the content of a segmented Adobe
PDF containing separate text and image components.
Step Action
With an RDO open:
1
Select the desired Adobe PDF page from the Document Structure window.
2
3
Select [Graphics: Edit PDF page].
Select one of the icons on the page from the Document Structure window. The icons are labeled as
Text or Image.
…continued
6 – 7
Page 64

6
Editing a Text Object
IMAGE
EDITING
Edit font style,
size, and color
Edit location
Edit rotation
Edit text
Text Properties dialog box Text Properties dialog box,
Step Action
To edit a text object:
1
2
3
Select a text object in the Adobe PDF.
Right-click in the Page View window and select [Text Properties] to display the Text Properties dialog
box.
You can change the following properties:
• Font name, style, size, and color
• Rotation of the text object
• Location of the text object on the page
• The text itself.
NOTE: You can also change the location of the object by dragging and dropping in the Page View
window.
Select [OK].
showing edits
…continued
6 – 8
Page 65

6
IMAGE
EDITING
Editing an Image Object
If you select an Image object in the Adobe PDF, you can right-click in the Page View window and select from a number of
editing commands. You can Cut, Copy, or Delete all or part of the image.
Select [Fill Image] to display the Fill Image dialog box and apply a fill to all or part of the image.
Select [Frame Image] to display the Frame Image dialog box and apply a frame to the image.
Select [Crop] to display the Crop dialog box and crop the image.
Select any Enhance feature from the Enhance submenu, or set and apply several Enhance features using the Custom
option.
Select [Image Properties] to display the Image Properties dialog box. You can change image size and location on the
page.
NOTE:
• You can also change the location of an image by dragging and dropping in the View window.
• You cannot change the opacity of a color image.
• You can select one of the sizing handles on the image and rotate or scale the image.
6 – 9
Page 66

6
IMAGE
EDITING
Using the Register Enhance Settings
To access the Register Enhance settings, select [Graphics: Enhance > Custom] [Register]. There are settings for text or
graphics optimization, and settings for horizontal and vertical Alignment and Ignore Edge. The following pages explain
these settings.
CAUTION:
You can lose image content using the Register feature as shown in some of the following examples. Any
image content beyond the image edges is removed from the image.
Let’s look at how the Register settings affect the position of the image content using the following image as an example.
Image Edge
Original Image
…continued
6 – 10
Page 67

6
IMAGE
EDITING
Register allows you to define the position of the image content (the black pixels). When you register the above image, you
are moving the black pixels of the image. The size of the image does not change. For example, if you apply a Horizontal
alignment setting of .4 inches, Left to the original image, you move the image AWAY FROM the left edge of the image
content by .4 inches; the image content shifts to the right. The image appears as follows:
NOTE: You can apply the
riginal
osition of left
dge of image
ontent
.4 in
10.16mm
horizontal alignm en t with
respect to the right edge of
the image. Y ou ca n also
apply the vertical alignment
with respect to the top or
bottom edge of the image.
…continued
6 – 11
Page 68

6
IMAGE
EDITING
The Ignore Edge setting works with the Alignment setting. When you type a value in the Ignore Edge text box, the
software disregards the black pixels as being the edge of the image, and applies a margin of the specified value from the
actual edge of the image, including the white pixels. Then from that point, the horizontal alignment begins.
For example, if you apply a Horizontal alignment setting of 1 inch, Left with an Ignore Edge setting of 1 inch to the
original image, the image appears as follows:
Original
position of left
edge of image
content
1 in
25.4mm
1 in
25.4mm
Ignore edge
Horizontal alignment
This section of the
original image is cut
from the image.
6 – 12
Page 69

6
IMAGE
EDITING
Enhancing Images
FreeFlow Makeready provides enhancement features for black and white images, as well as a separate set of
enhancement features for color images. These features allow you to improve the overall appearance of your images.
Applying One Enhance Feature
Step Action
With an RDO open:
1
Select the desired images, pages or sections from the Document Structure window.
2
Select [Graphics: Enhance > <feature name>]. The default setting for the feature is applied to the
selected images or pages.
…continued
6 – 13
Page 70

6
IMAGE
EDITING
Applying Several Enhance Features
Image Enhance Options dialog box in FreeFlow Makeready
Step Action
With an RDO open:
1
2
3
4
5
6
7
Select the desired images, pages, or sections from the Document Structure window.
Select [Graphics: Enhance > <feature name>]. The default setting for the feature is applied to the
selected images or pages.
Mark the check box for an Enhancement feature in the Image Enhance options list box (such as,
Despeckle) to enable the feature.
Select the feature name to display the settings for the feature.
Adjust the settings for the feature as needed for the selected images.
Repeat steps 3 through 5 until you have enabled all the desired Enhancement features.
You can mark the Save options as default check box to update the default settings to those you
specified.
6 – 14
Page 71

6
IMAGE
EDITING
Step Action
8
9
10
11
Select [Pages] from the first drop-down list in the Apply to section.
NOTE: The options in the first drop-down list change, depending on whether the RDO is 1-sided or 2sided.
…continued
Select [All], [Selected], or [Range] from the second drop-down list in the Apply to section to indicate
the pages that you want to enhance.
If you selected [Range], specify the starting and ending pages in the appropriate text boxes in the
Apply to section.
Select [OK] to apply all the Enhance features you enabled.
NOTE: You can use the [Reset] button in the Image Enhance Options dialog box to reset all the
Enhance features to their default settings.
6 – 15
Page 72

6
IMAGE
EDITING
6 – 16
Page 73

7
EDITING
7
EDITING
ADOBE PDF FILES
ADOBE PDF FILES
Rotating an Adobe PDF in an RDO
Quick Points
Maintaining segmented PDF integrity:
When inserting a PDF into an RDO, ensure that the Convert option in the Insert dialog is set to Convert PostScript and
PDF files to PDF pages.
FreeFlow Makeready allows you to rotate Adobe PDF pages in an RDO. You can also edit individual elements of a
segmented Adobe PDF file (an Adobe PDF file that contains separate text and image components). If you are unsure if
your Adobe PDF is segmented, select an Adobe PDF page from the Document Structure window. If the PDF is editable,
the [Graphics: Edit PDF Page] option will be available from the menu bar, and each element of the PDF will be listed
separately in the Document Structure window. If the edit option is not available from the menu bar, then the PDF is not
editable.
Step Action
To rotate an Adobe PDF file in an RDO:
1
2
PDF page in Page View
Open an RDO that contains an Adobe PDF file.
The PDF displays in the Page View window.
Your document may need a different paper size to accommodate the rotated page. If so:
a) Select [Format: Document Properties].
b) On the Paper tab, select the [Edit Default Stock] button.
c) Select a paper size that will accommodate the rotated page from the Size drop-down list.
d) Select [OK]. The document displays in the Page View window on a sheet of the selected size.
…continued
7 – 1
Page 74
7
EDITING
ADOBE PDF FILES
Rotating an Adobe PDF in an RDO — continued
Paper has been resized to accommodate page rotation
Step Action
3
4
5
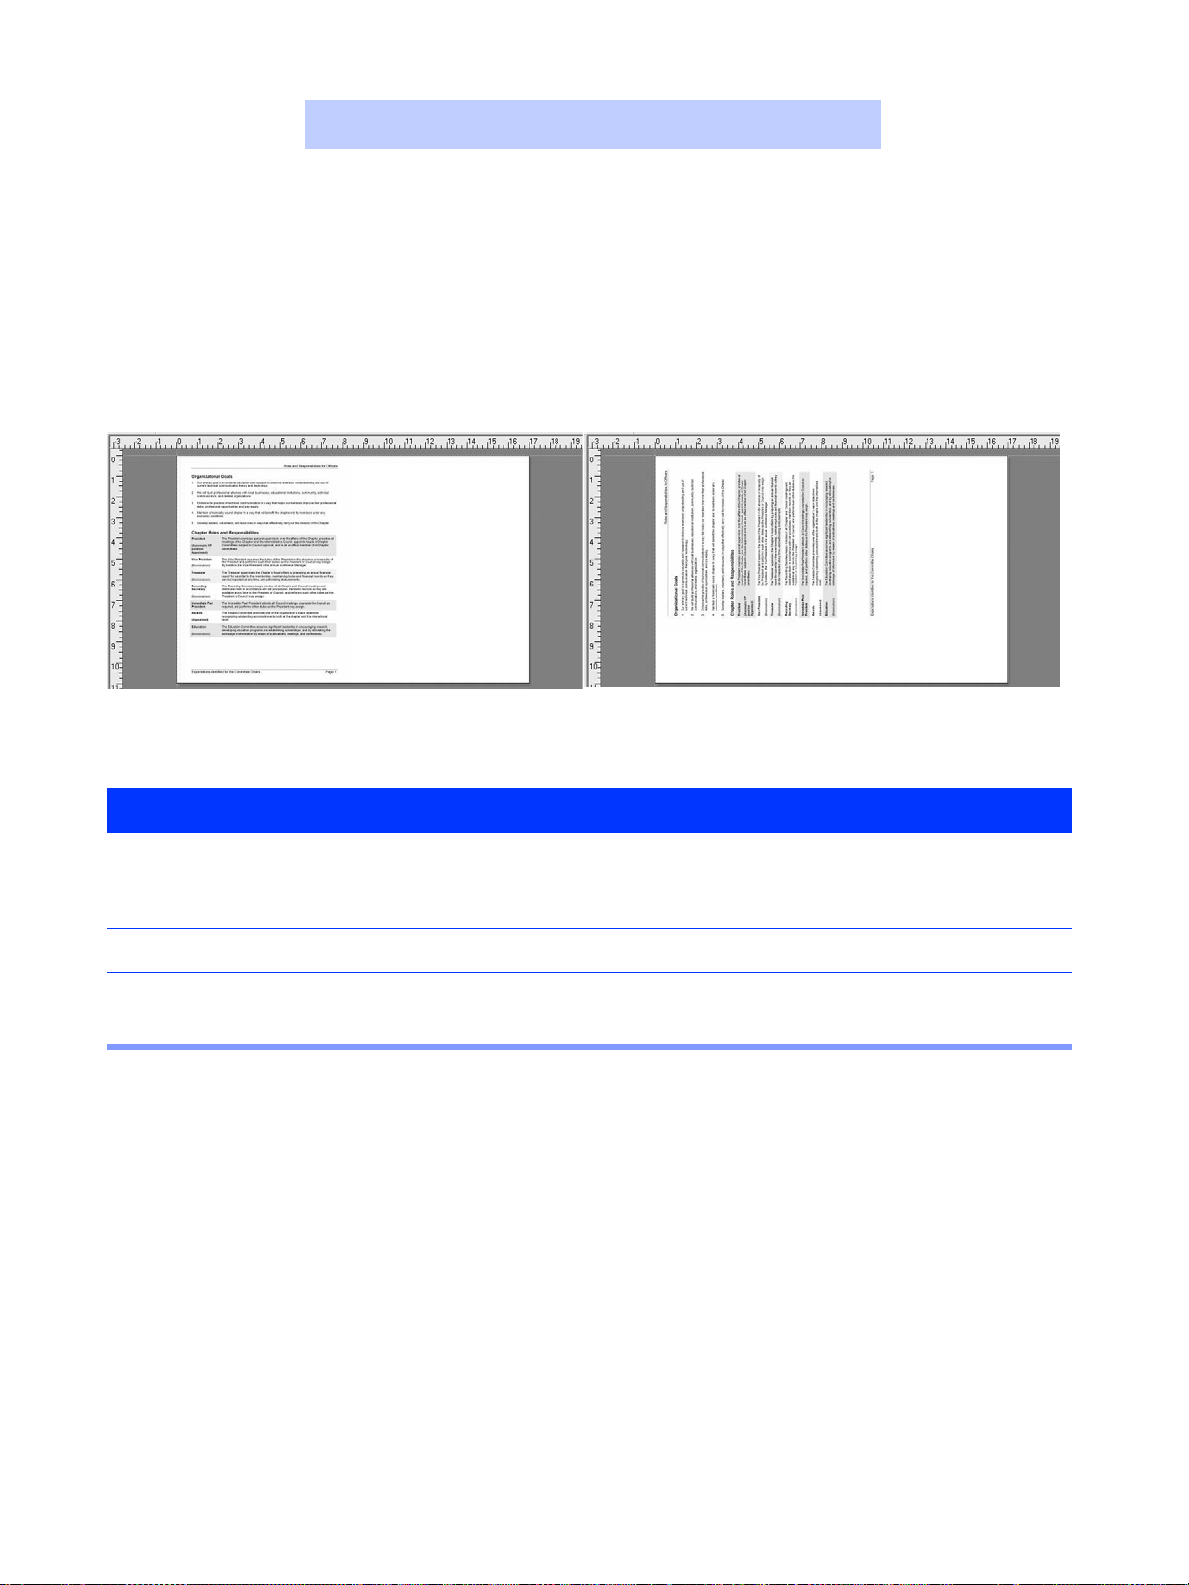
Select the elements you want to rotate.
NOTE: You can choose to rotate the entire document, one or more pages, or one or more elements
within a page.
Select [Graphics: Rotate].
Select Left, Right, or 180. The results display in the Page View window.
NOTE: You may select a page element at any edge or corner and drag it to rotate it to any angle.
Rotated PDF page
7 – 2
Page 75
7
ADOBE PDF FILES
Scaling an Adobe PDF
EDITING
To preserve the proportions of
the original page, mark the
Constrain proportions check
box.
You can scale objects other than
those selected in the Document
Structure window by changing
the selections in the Apply to
section.
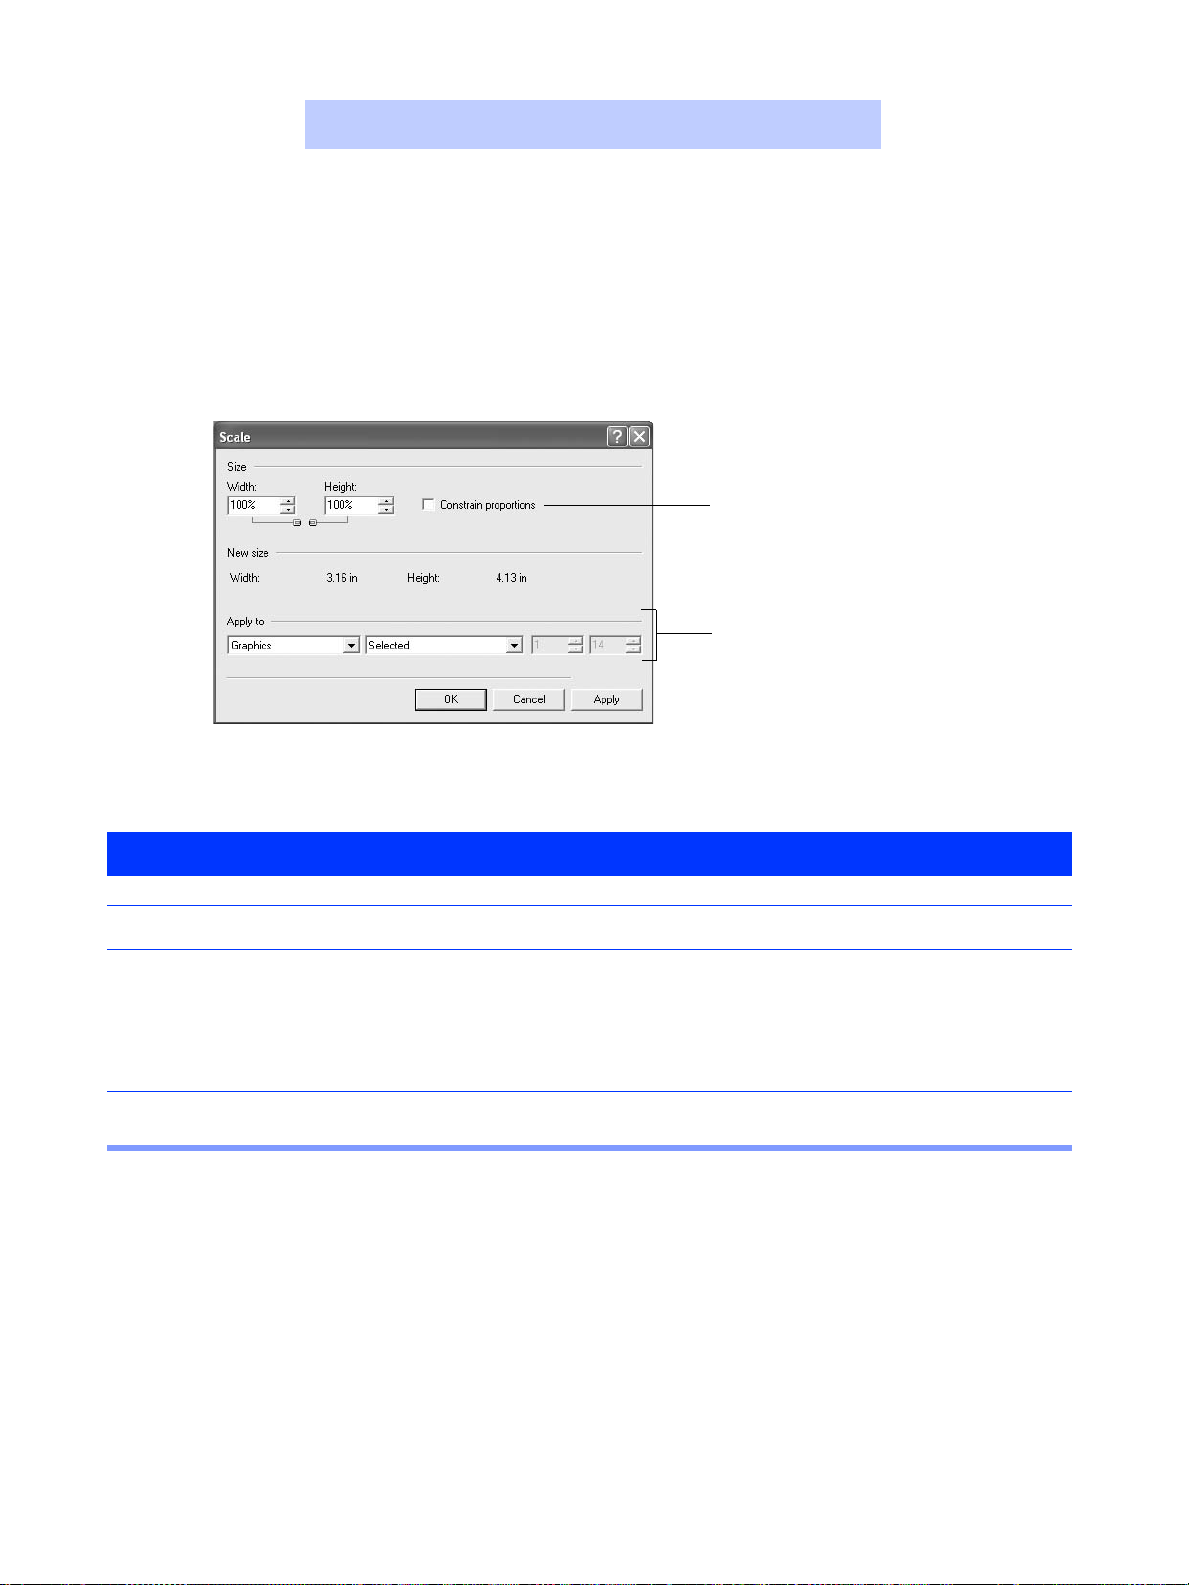
Scale dialog box
Step Action
To scale an Adobe PDF file in an RDO:
1
2
3
Open an RDO that contains an Adobe PDF file. The PDF displays in the Page View window.
Your document may need a different paper size to accommodate the rotated page. If so:
a) Select [Format: Document Properties].
b) On the Paper tab, select the [Edit Default Stock] button.
c) Select a paper size that will accommodate the rotated page from the Size drop-down list.
d) Select [OK]. The document displays in the Page View window on a sheet of the selected size.
Select [Graphics: Scale] from the menu bar. The Scale dialog displays.
…continued
7 – 3
Page 76

7
EDITING
ADOBE PDF FILES
Scaling an Adobe PDF — continued
The Height box is unavailable if
the Constrain proportions
check box is marked.
The new dimensions display in
the New size section.
Scale dialog showing scaling selections
Step Action
4
5
6
Enter the scale percentage in the Width box. This is the size you want the scaled page to be in relation
to that of the original document.
Enter a value in the Height box.
Select [OK]. The scaled page displays in the Page View window.
7 – 4
Page 77
7
EDITING
ADOBE PDF FILES
Editing a Rotated Adobe PDF
After you have rotated a PDF page you may find that you need to make further edits.
Rotated PDF page
Step Action
To edit a rotated PDF page or element:
1
2
3
4
5
6
7
Open an RDO that contains a rotated PDF page.
In the Document Structure window, select a PDF page, and expand it, displaying all of the objects on
the page.
In either the Page View window or the Document Structure window, select the text object you wish to
edit.
Select [Graphics: Edit].
Make the desired changes.
Select [OK].
Select [Graphics: Edit PDF page] from the menu bar. The PDF page editor closes.
NOTE: If the PDF page remains open, other Graphics functions may not function properly.
7 – 5
Page 78

7
EDITING
ADOBE PDF FILES
7 – 6
Page 79
8
WORKING WITH
8
WORKING WITH
RDO FILES
RDO FILES
Changing RDO Properties
Quick Points
Page numbering:
There are two ways to enable page numbering: Select [Insert: Page Numbers] to use the Page Numbering wizard, or use
the Page Numbers tab in the Document Properties dialog box
Step Action
With an RDO open in FreeFlow Makeready:
1
2
3
4
Document Properties dialog box, General tab
Select [Format: Document Properties].
Select the desired tab.
Specify the settings for your RDO.
NOTE: You can make changes in any number of tabs. You can select [Apply] before moving to the
next tab, but this is not required.
Select [OK] when you are finished changing the RDO properties.
8 – 1
Page 80

8
WORKING WITH
RDO FILES
Applying Highlight Color to an Image
You define the highlight color for an RDO in the Document Properties dialog box. You can then apply this color to individual
images or pages of the RDO.
NOTE: You must have a highlight color-capable printer attached to your FreeFlow machine and defined in the Printer
Administration application before you can apply highlight color to an image.
Colorize dialog box for full
Colorize dialog box for
highlight color printer family
Step Action
With an RDO open in FreeFlow Makeready:
1
2
3
4
5
6
7
Select [Format: Document Properties].
Select a highlight color-capable printer from the Printer family drop-down list.
Select the desired highlight color for the RDO from the Document highlight color drop-down list.
Select [OK] to close the Document Properties dialog box and apply your changes.
Select a page or an image from the Document Structure window.
Select [Graphics: Colorize]. The Colorize dialog box displays, with several shades of the specified
highlight color available.
Select a shade. The Colorize dialog box closes, and the color is applied to the selected page or image.
color or unspecified
printer family
8 – 2
Page 81

8
WORKING WITH
Tips for Arranging Objects
RDO FILES
Arranging Objects on RDO Pages
Quick Points
Guides default options:
You can change or reset the default options for the Guides in FreeFlow Makeready by selecting [View: Guides].
FreeFlow Makeready allows you to place up to 100 objects on a single page of an RDO. You can add objects to a page by
scanning or inserting images, or by pasting cut or copied images into the page.
NOTE: Select Insert Into–First or Insert Into–Last as the insert mode to place multiple objects on a page.
A separate icon displays below the page icon in the Document Structure window for each object on the page. FreeFlow
Makeready uses “layering” to organize the objects on the page: objects are displayed as though they are stacked on the
page. The last object icon under the page icon in the Document Structure window is on top of the stack, and the first object
is on the bottom.
Use the features on the following pages with the Page View window to arrange the objects on a page.
One
page
Document Structure window with
multiple objects per page
Step Action
With FreeFlow Makeready open:
1
2
Select [View: Rulers] and [View: Guides >
Show Guides] to display the rulers and
guides, if they are not displayed.
Select the desired object or objects from the
Document Structure window.
8 – 3
Page 82

8
WORKING WITH
RDO FILES
Arranging Objects on RDO Pages — continued
Quick Points
Arranging images:
Refer to the FreeFlow Makeready online Help system for more information on changing the order of images or aligning
images in your RDO.
Changing Image Order
Select an image object.
Arranging objects on an RDO page
Step Action
With an RDO open:
1
2
3
Select an image from the Document Structure window.
Select [Graphics: Order].
Select the appropriate option:
• Bring to Front
• Send to Back
• Bring Forward
• Send Backward
NOTE: The options on the Order submenu allow you to rearrange the order of images stacked on a
page.
8 – 4
Page 83

8
WORKING WITH
RDO FILES
Arranging Objects on RDO Pages — continued
Changing Image Alignment
The options on the Align submenu allow you to rearrange the images on a
page relative to the margin. This does not affect the order of images on the
page.
Step Action
With an RDO open:
1
2
3
Select one or more images from the Document Structure window.
Select [Graphics: Align].
Select the appropriate option.
…continued
8 – 5
Page 84
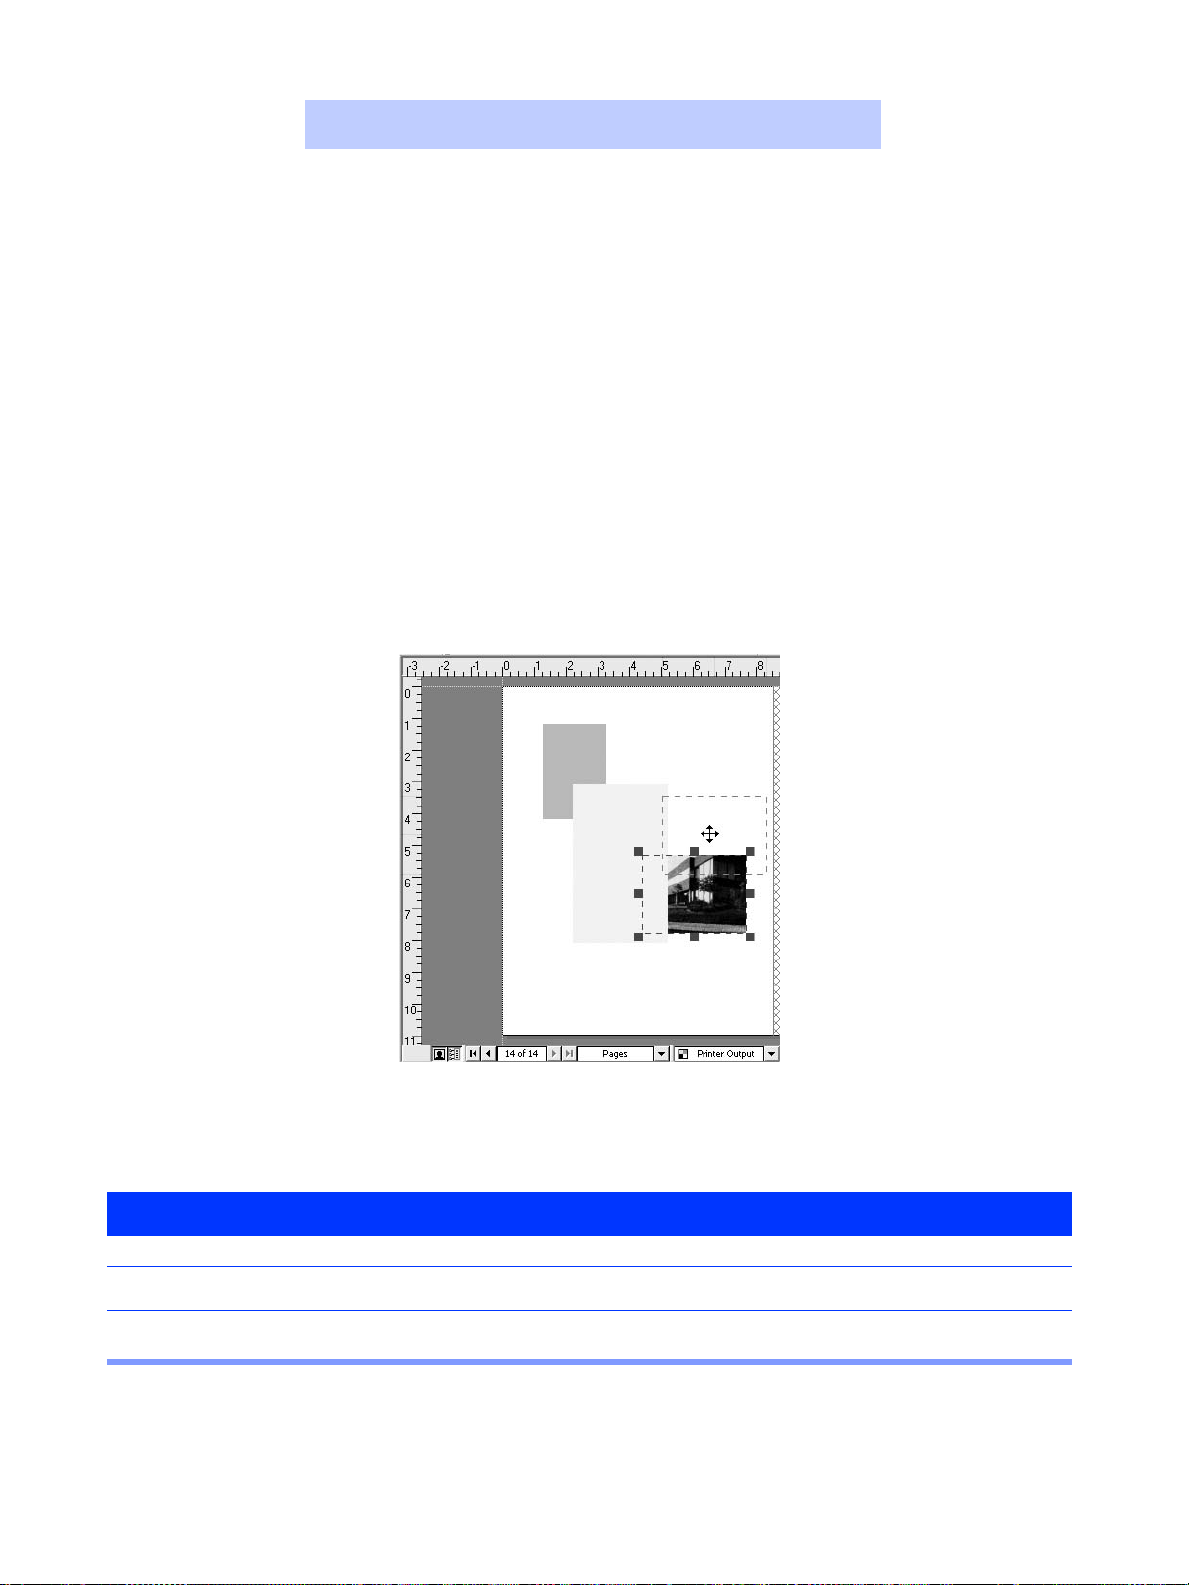
8
WORKING WITH
RDO FILES
Arranging Objects on RDO Pages — continued
Quick Points
Moving images:
You can move all the images in an RDO by selecting the book icon in the Document Structure window and selecting
[Graphics: Move]. This is useful if you decide to bind an RDO or print on drilled paper after adding content.
Moving Images
The Move feature allows you to reposition the images on a page. This does not affect the
order of images on the page.
Step Action
With an RDO open:
1
2
Moving an object using drag and drop
Select an image from the Document Structure window.
You can drag the image to the desired position on the page, or select [Graphics: Move] to display the
Move dialog box and move the image from its current position by a specified amount.
8 – 6
Page 85

8
WORKING WITH
RDO FILES
Arranging Objects on RDO Pages — continued
Quick Points
Non-fusible elements:
Headers, footers, page numbers, and label objects are not included in the fused image.
Fusing all Images on a Page
The Fuse feature allows you to create a single image from all the images on a page.
NOTE: When fusing a page containing both black and white and color images, you may detect a loss of image quality.
Fuse dialog box
Step Action
With an RDO open:
1
2
3
4
Select a page or a group of images from the Document Structure window.
Select [Graphics: Fuse]. The Fuse dialog box displays.
Mark or clear the Include shared Images and Include shared Fills check boxes.
Select [OK] to close the dialog box and fuse the specified page(s).
NOTE: You cannot fuse a label object. For more information see page 13-4.
You can fuse pages other than
those selected in the Document
Structure window by changing
the selections in the Apply to
section.
8 – 7
Page 86

8
WORKING WITH
RDO FILES
Using Light Table View
Quick Points
Light Table notes:
• Light Table is available only in Book Layout and Print Layout views,
• Page content is moved as a whole; individual objects on the page cannot be selected.
Light Table View allows you to view the page displayed and the page behind it in a signature document at the same time
so image alignment can be verified. The displayed page appears in black and white, while the page behind it appears in a
user-selectable color.
Signature document in Printer Output view (default Preview
mode)
Previewing with Light Table
With a signature RDO open:
Select [View: Color Preview] [Light Table] or select Light Table from the Preview drop-down list below the Page View
window.
The page to be printed on the back of the page displayed appears in a highlight color.
Signature document in Light Table view
8 – 8
Page 87

8
WORKING WITH
Settings dialog bo
RDO FILES
Using Light Table View — continued
Changing the Light Table Color
x
Step Action
To Change the Light Table Color:
1
2
3
4
5
6
Select [Options: Settings].
Select [Back side color] to display the Standard Colors palette.
To set a custom color, select [Customize]. The Custom Color Picker dialog displays.
Set a new color by using the color wheel or by typing in values.
Select [OK] to exit Custom Color Picker.
Select [OK] to save your settings.
Custom Color Picker
8 – 9
Page 88

8
WORKING WITH
RDO FILES
Using Light Table View — continued
Changing Page Registratio n
To align the images on this page, the top
page content needs to move to the left.
Step Action
To align the front page to the back:
1
2
Before registration After registration
Signature RDO in Light Table view
Select the page in the Page View window.
Tap the arrow keys to move the page content in the corresponding direction.
OR
Select [Graphics: Move] and enter vertical and horizontal values for the amount you want the page
content to move.
OR
In the Page View window, drag the page image to the desired position.
8 – 10
Page 89

8
WORKING WITH
RDO FILES
Using Specialty Imaging
Quick Points
Xerox FreeFlow Print Server support only:
Specialty Imaging is supported only on supported production printers with Xerox FreeFlow Print Server Digital Front
Ends.
Limitations:
• Requires purchasing and installation of Xerox Specialty Imaging fonts. Contact your Xerox representative for more information.
• Unicode characters are nor supported.
Inserting Specialty Imaging
Step Action
With an RDO open:
1
Specialty Imaging dialog box
Select [Insert: Specialty Imaging].
8 – 11
Page 90

8
WORKING WITH
RDO FILES
Step Action
2
3
4
5
6
7
Select the appropriate hidden text from the Typ e drop-down list.
®
• GlossMark
• FluorescentMark
• MicroText
• Correlation Mark
In the Font section, specify the font settings.
• Font
• Font Style
•Size
• Font Color
In the Position from margin section, specify the position of the hidden text.
• Horizontal
•Vertical
In the Tex t section:
a) Enter the text.
b) Select the position of the text from the toolbar.
In the Apply to section, specify what to apply the hidden text to:
•All pages
• Selected
• Range (Specify the range of pages.)
Select [Apply].
Tex t
8
Select [OK].
NOTE:
• Any image, including Specialty Imaging, will create a fault in a job if it is placed outside of the page
margins.
• When using MicroText, zooming to 400% is recommended for easier text viewing.
8 – 12
Page 91

8
WORKING WITH
RDO FILES
Arranging Pages in an RDO
Quick Points
Stand ard W indows commands app ly:
To perform these operations you can also:
• Right-click on an object in the Document Structure or the Page View window and select Cut, Copy, or Delete.
•Use <CTRL> + X, <CTRL> + C, and <CTRL> + V for Cut, Copy, and Paste, respectively.
Copying or Moving Pages
Step Action
With an RDO open:
1
2
3
4
5
6
Deleting Pages
Step Action
With an RDO open:
1
In the Document Structure window, select the page(s) that you want to move or copy.
•To move the page(s), select [Edit: Cut].
•To copy the page(s), select [Edit: Copy].
The content of the page(s) is copied to the Windows Clipboard.
Select [OK].
Specify the insertion point in the Document Structure window.
Select an insert mode from [Insert: Insert Mode].
Select [Edit: Paste] to paste the page(s).
In the Document Structure window, select the page(s) that you want to delete.
2
3
Select [Edit: Delete].
Select [OK].
8 – 13
Page 92

8
WORKING WITH
RDO FILES
Arranging Pages in an RDO — continued
Quick Points
Page counts:
Blank pages are included in the page count in a document, because they are sent through the printer fuser. Direct
inserts do not go through the fuser and do not incur a charge.
Color depth options:
Color depth options are dependent upon the printer selected.
Adding a Blank Page with a Blank Image
Insert Blank Page dialog box
Step Action
With an RDO open:
1
2
Specify the insertion point in the Document Structure window.
Select an insert mode from [Insert: Insert Mode].
Define a new paper stock for the
blank page.
Use the Width and Height boxes and
the Constrain Proportions check box
to change the dimensions of the
blank image.
Set image resolution and color depth.
…continued
8 – 14
Page 93

8
WORKING WITH
RDO FILES
Step Action
3
4
5
6
7
Select [Insert: Blank Page].
NOTE: You cannot insert a blank page into another page.
Enter the number of blank pages you wish to insert.
Select Page with Blank Image.
Select a paper stock, or select [Edit All Stocks] to define a new stock.
Select [OK] to close the dialog box and create the blank page. The page displays in the Page View
window, on the specified paper stock.
8 – 15
Page 94
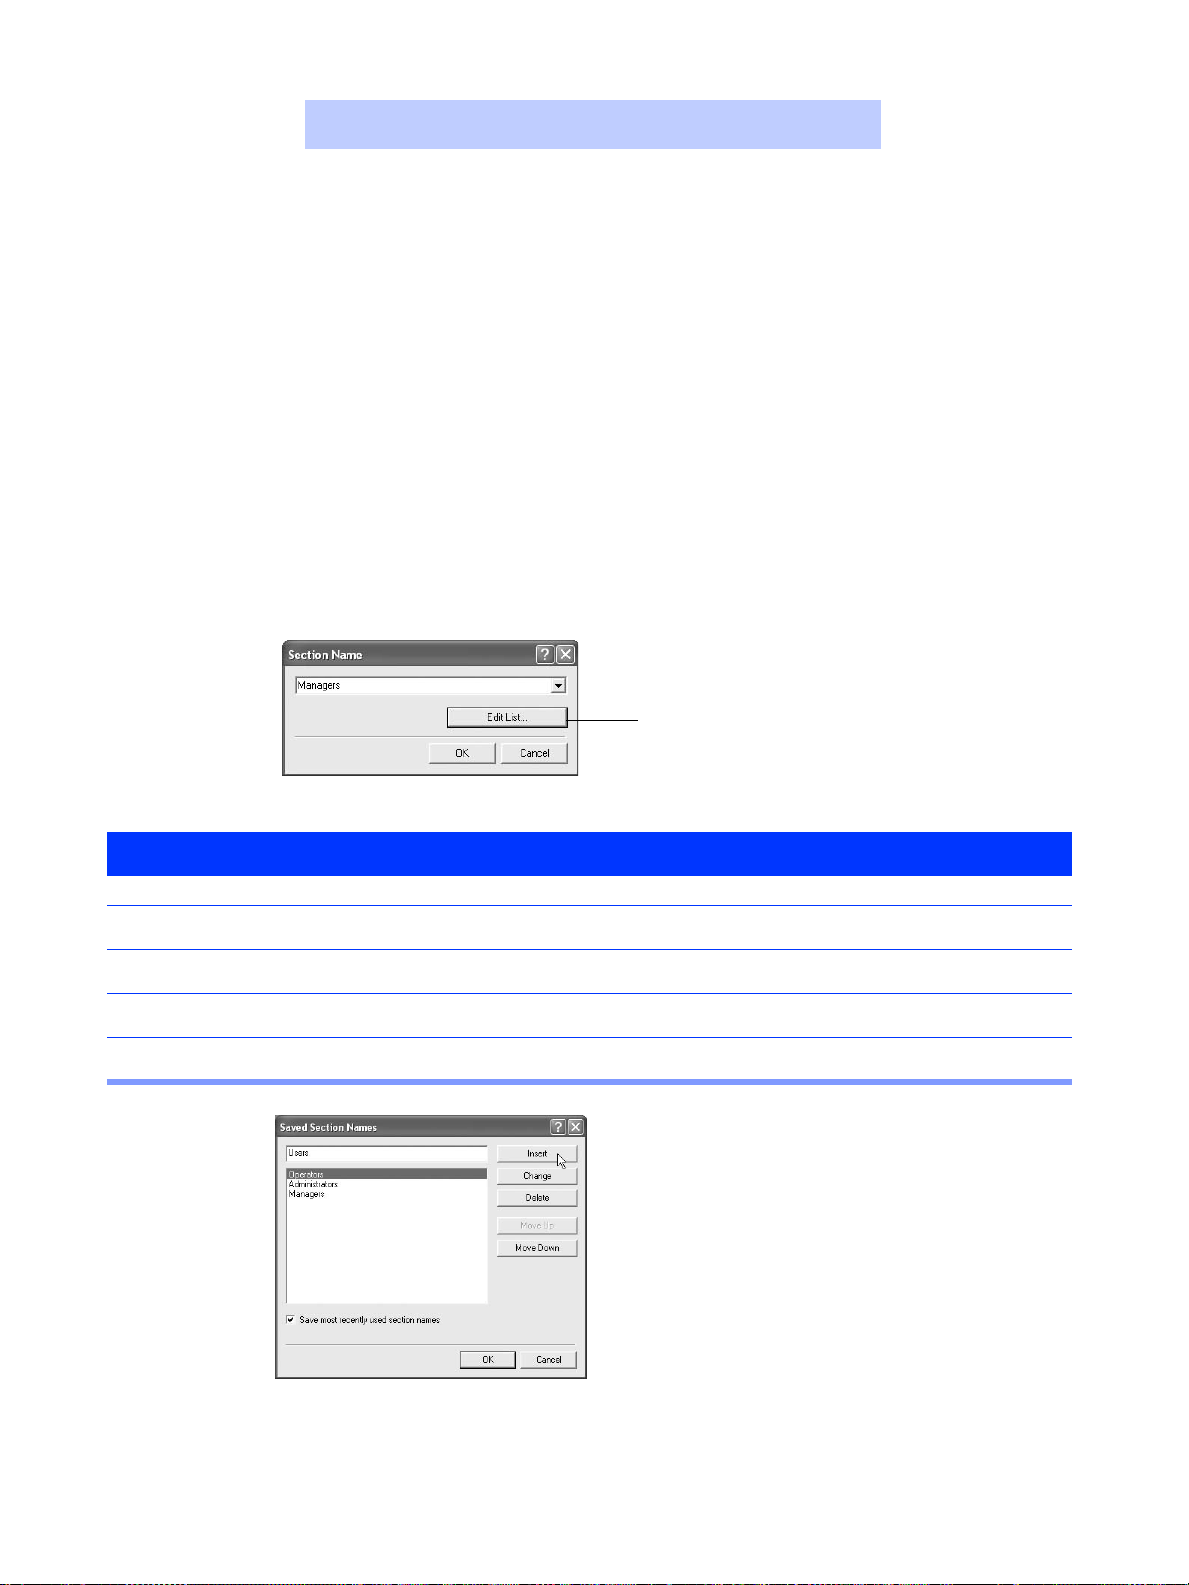
8
WORKING WITH
RDO FILES
Arranging Pages in an RDO — continued
Quick Points
Section level information:
Select [Format: Sections] to change the section level properties, such as headers, footers, and page numbers.
Working with Sections
You can create sections in your RDOs and define separate properties (paper stock,
headers, footers, and page numbers) for each section.
.
Section Name dialog box
Step Action
To create one or more sections in an RDO:
1
2
3
4
Select the pages you want to include in the section from the Document Structure window.
Select [Insert: Tag Section].
Enter a section name or select one from the drop-down list.
Select [OK] to close the Section Name dialog box.
In the Saved Section Names dialog
you can set up and maintain a list of
all section tag names in FreeFlow
Makeready.
To edit the existing section names at
any time, select [Edit: Section
Names].
The [Edit List] button opens the
Saved Section Names dialog.
Saved Section Names dialog box
8 – 16
Page 95
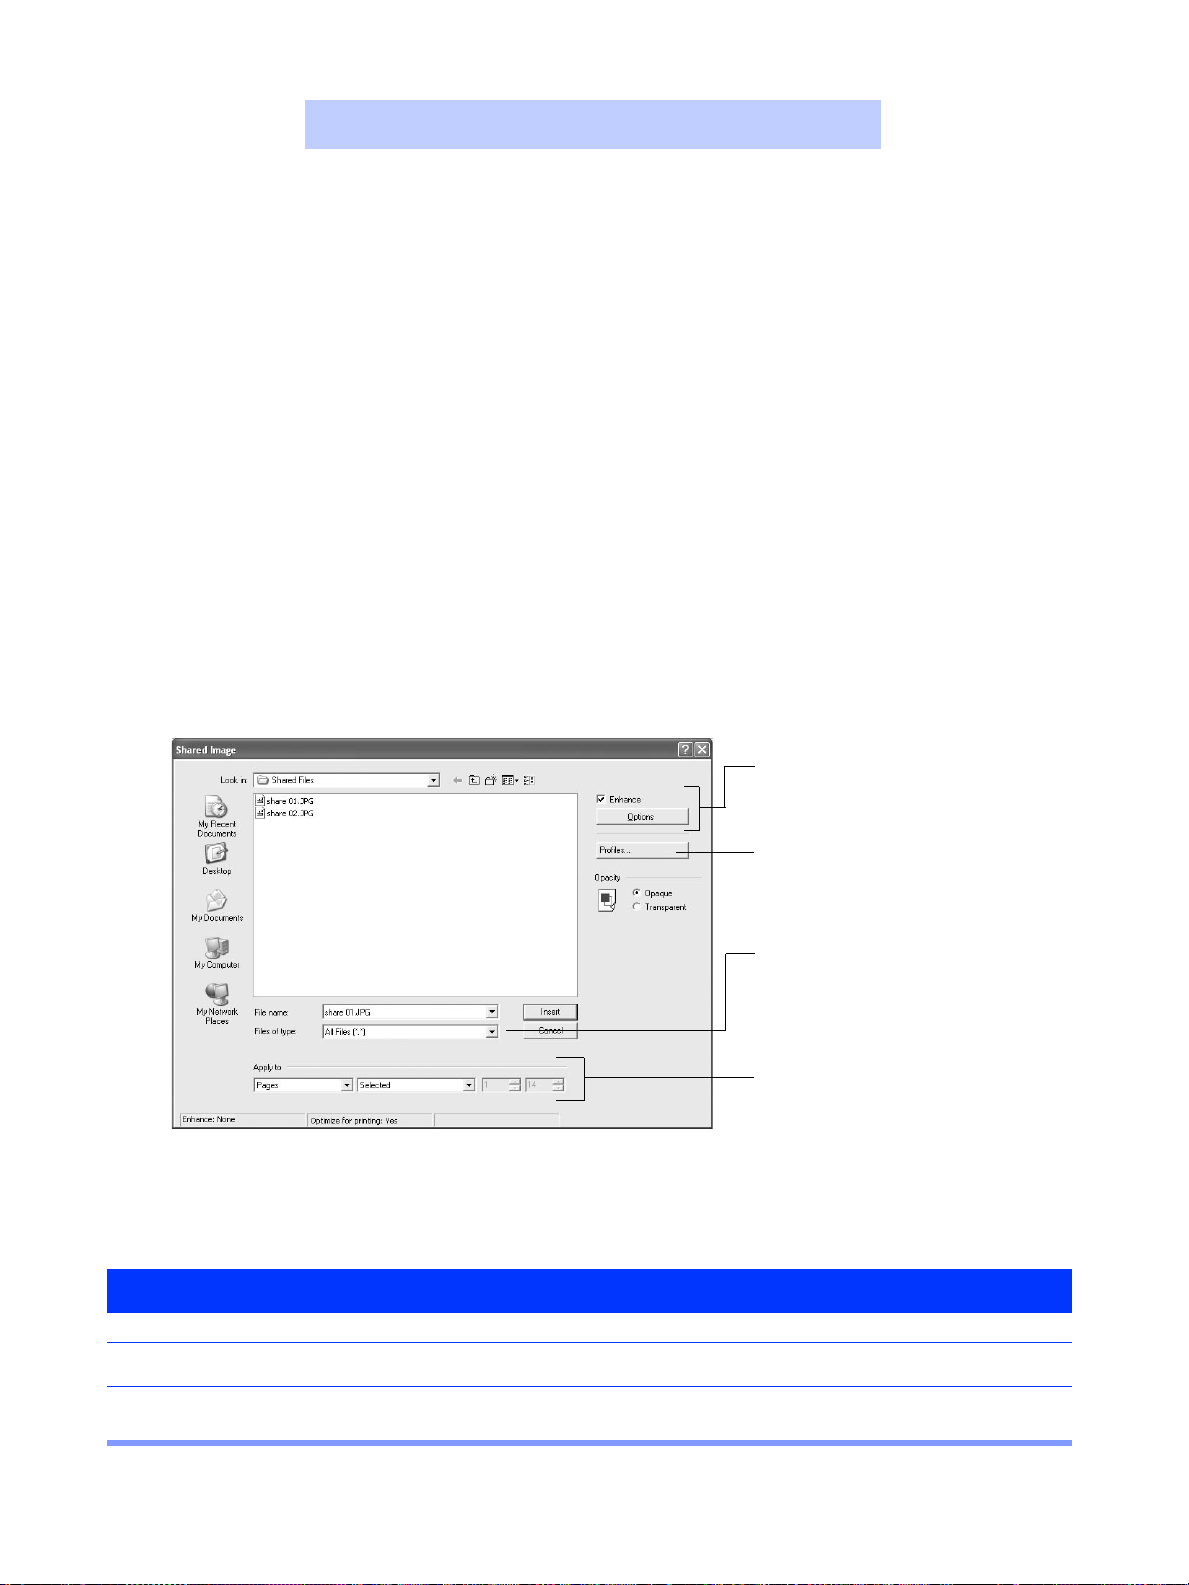
8
WORKING WITH
RDO FILES
Working with Shared Images
Quick Points
Where are shared images in serted?
A shared image is inserted at the default position specified in the Image Properties dialog box.
Insert Mode tip:
The [Insert Into-Last] insert mode allows the shared image to appear on top of other images on the pages that share the
file.
A shared image appears on multiple pages of an RDO. Only TIFF and JPEG files can be shared, however, you can also
create a shared file. When you add a shared image to a range of RDO pages, the image file is linked to all pages in the
range. If you move a shared image, it moves on all pages that share it.
Inserting from a File
Define and apply
enhancements.
You can specify an ICC profile
for a color image.
Select All Files to view all
available JPEG and TIFF files.
To share a file on pages other
than those selected in the
Document Structure window,
change the selections in the
Apply to section.
Shared Image dialog box
Step Action
In an open RDO:
1
2
Select an insert mode from [Insert: Insert Mode].
In the Document Structure window, select the pages to which you want to add the shared file.
…continued
8 – 17
Page 96

8
WORKING WITH
RDO FILES
Step Action
3
4
5
6
Select [Insert: Shared Image From File].
Select [All Files] from the Files of type drop-down list.
Use the Look in drop-down list to locate the JPEG or TIFF file you want to share.
Select [Insert].
8 – 18
Page 97

8
WORKING WITH
RDO FILES
Working with Shared Images — continued
Inserting from Crosshairs
Inserting a shared image from an existing image
Step Action
In an open RDO:
1
2
3
4
5
6
Select an insert mode from [Insert: Insert Mode].
In the Document Structure window, select the page that contains the image you want to share.
From either the Directory Structure window or the Page View window, select the image from which you
want to create a shared image.
Select [Graphics: Edit] to enter Edit Mode.
Using the mouse, drag the crosshairs to position them around the area you want as your new image.
Select [Insert: Shared Image From Crosshairs]. The Shared Image From Crosshairs dialog box
displays.
…continued
8 – 19
Page 98

8
WORKING WITH
RDO FILES
Working with Shared Images — continued
Shared Image From Crosshairs dialog box
Step Action
7
8
9
10
11
12
To insert the image into the document, mark the Add shared image to document check box.
To save a copy of the new image to a file for future use, mark the Add shared image to library check
box.
Define image placement position in the Position from margin section.
NOTE: The sections in steps 9 through 11 are available only if you marked the Add shared image to
document check box.
Select opacity for the new image.
Define on what pages the image will be shared in the Apply to section.
Select [OK].
NOTE: If you marked the Add shared image to library check box you will be prompted to name your
file and save it. If you save it to the default location, it will appear in the Shared Files tab of the
Directory Viewer window.
…continued
8 – 20
Page 99

8
WORKING WITH
RDO FILES
Working with Shared Images — continued
Deleting a Shared Image
Select Yes.
Step Action
To delete a shared image:
1
2
3
4
Select the shared image you want to delete.
Select [Edit: Delete].
Select [Yes] to the deletion confirmation message.
• Select [Yes] to delete the image from all pages
OR
• Select [No] to delete the image from the current page only.
Select whether to delete the shared image from
all pages, or only from the current page.
8 – 21
Page 100

8
WORKING WITH
RDO FILES
Preparing to Print
With FreeFlow Makeready, you can do most of your pre-print work.
Paper Stocks
Quick Points
Defining paper stocks:
Remember to define separate paper stocks for covers, tabs, and inserts you plan to use in your RDO.
Printing on different paper stocks:
• Special paper stocks for color documents, covers, tabs, and direct inserts may require some paper tray changes at the printer.
• Changing Stock 1 will change the default paper stock for the entire RDO. (This was set in Document Properties.)
You can define up to 12 paper stocks in a single RDO. The number, size, and type of paper stocks available depend on the
selected printer family.
Paper Stocks dialog box
Step Action
With an RDO open:
1
2
3
4
Select [Format: Paper Stocks].
Select a paper stock from the Stock list box.
Edit the definition of the stock using the selections below the Stock list box.
Select [OK] to close the dialog box.
You can change the size,
type, color, and weight for
each paper stock.
8 – 22
 Loading...