

Page 1

Version 6.1
April 2021
702P08592
Xerox
Help
®
FreeFlow
®
Core
Page 2

© 2021 Xerox Corporation. All rights reserved. Xerox®, Xerox and Design®, and FreeFlow®are trademarks of Xerox
Corporation in the United States and/or other countries.
This software includes software developed by Adobe Systems Incorporated.
Adobe, the Adobe logo, the Adobe PDF logo, PDF Converter SDK, Adobe Acrobat Pro DC, Adobe Reader DC, and PDF Library
are either registered trademarks or trademarks of Adobe Systems Incorporated in the United States and/or other countries.
Google Chrome
Microsoft
Server, and Internet Explorer
™
browser is a trademark of Google LLC.
®
, Windows®, Edge®, Microsoft Language Pack, Microsoft Office 2013, Microsoft Office 2016, Microsoft SQL
®
are registered trademarks of Microsoft Corporation in the United States and/or other
countries.
®
Apple
, Macintosh®, Mac®, Mac OS®, and Safari®are trademarks or registered trademarks of Apple, Inc., registered in the U.
S. and other countries.
Mozilla Firefox is a trademark of Mozilla Foundation in the U.S. and other countries.
BR7702
Page 3

Table of Contents
1 Overview ..................................................................................................................................... 7
The Xerox®FreeFlow®Core Software ..................... ........................ . ........................ ................. 8
Language and Units ............... ......................... ......................... ........................ . ................ 8
2 User Roles and Passwords....................................................................................................... 9
Administrator................................ ......................... ........................ . ........................ ............... 10
Operator.......... ......................... ......................... ........................ . ...................... .. ................... 11
Job Status Monitor............................... ........................ . ........................ ......................... ........ 12
3 Job Management and Status ..............................................................................................13
Submit Job Dialog......................... ......................... ........................ . ........................ ............... 14
Job Status Tab ................................... . ...................... .. ....................... ......................... ........... 15
Job Files........... ....................... .. ....................... ......................... ........................ . .............. 15
Job Resubmission............. .. ....................... ......................... ......................... ..................... 16
Job Retention ................................... ........................ . ........................ ....................... .. ..... 16
Job Group ....................... ......................... ........................ . ...................... .. ....................... 16
4 Printer Management and Status Tab.................................................................................17
Printers .. .. ....................... ......................... ......................... ........................ . ........................ .... 18
Job Submission Regulation.......................... ......................... ........................ . ........................ . 19
Job Ticket Verification. ......................... ........................ . ........................ ......................... ........ 20
JDF Settings.................... ......................... ........................ . ........................ ......................... .... 21
Understanding Printer Management ... ......................... ........................ . ...................... .. ......... 22
5 Workflow Setup .......................................................................................................................23
The Workflow Setup Tab .......... . ........................ ....................... ......................... ..................... 24
About Presets............................... . ...................... .. ....................... ......................... ........... 24
Creating Workflows............................ ......................... ......................... ........................ . ... 24
Collect Job Documents.................. ........................ . ...................... .. ....................... ........... 26
Workflow Components................... ......................... ........................ . ........................ ........ 27
Workflow Process Common Controls.................................. ......................... ...................... 62
PDF Box Selection Behavior............................. ......................... ......................... ............... 68
Job Group Sequence Behavior................... ......................... ........................ . ..................... 68
Workflow Process Variables ...................... ........................ ....................... .. ....................... 68
Process Variable Operations .... .. ....................... ......................... ......................... .............. 68
Workflow Process Number Variables................. ......................... ......................... .............. 71
Process Number Variable Calculations............. . ........................ ......................... ............... 71
Job Ticket Updates ..... .. ....................... ......................... ......................... ........................ . ....... 73
Xerox®FreeFlow®Core
Help
3
Page 4

Table of Contents
6 Administration.........................................................................................................................75
Job Submission Configurations ................................... . ........................ ....................... .. ......... 76
Hot Folder Setup ............ . ........................ ......................... ........................ . ........................ ..... 77
Scripting ... ....................... ......................... ........................ . ........................ ...................... 77
Workflow Destinations ..... ........................ . ........................ ......................... ...................... 78
Manifest Automation from Xerox Setup .......... ......................... ........................ . ............... 78
FreeFlow
Region Tab................................ ........................ . ........................ ....................... .. ................... 82
Security Tab................ ......................... ......................... ........................ . ........................ ........ 83
LPD Gateway .................. ......................... ......................... ........................ . ........................ .... 84
LPR Printing ................................. ....................... ......................... ......................... ........... 84
LPR Job Tickets ............ .. ....................... ......................... ......................... ........................ . 84
LPQ Queries ..................... ......................... ......................... ........................ . ..................... 89
LPRM Command ..................... .. ....................... ......................... ......................... .............. 90
JMF Gateway... .. ....................... ......................... ........................ . ........................ ................... 91
JMF Submission and Workflow Job Routing........................ ........................ . ..................... 91
JMF Submission and JDF XSLT Processing .......................... ......................... ..................... 91
Command Line Interface (CLI) . ...................... . ........................ ......................... ...................... 92
®
Core Reports..................... ......................... ........................ . ...................... .. ..... 80
7 Notifications Setup.................................................................................................................93
Notification Recipients.......... ........................ . ...................... .. ....................... ......................... 94
Job Notifications....................... ......................... ......................... ........................ . .................. 95
Preflight Notifications ........ ........................ . ...................... .. ....................... ......................... ... 96
Job Submission Notifications ........ ......................... ......................... ........................ . .............. 97
System Notifications..... . ...................... .. ....................... ......................... ......................... ....... 98
Email Notification Setup .................. .. ....................... ......................... ......................... ........... 99
SMTP Settings ................................. ....................... .. ....................... ......................... ....... 99
8 User Access Setup................................................................................................................ 101
Adding or Editing Users........ ....................... .. ....................... ......................... ....................... 102
9 FreeFlow®Core Exchange.................................................................................................. 103
Import to Xerox®FreeFlow®Core Tab....................... ......................... ........................ . ......... 104
Export from Xerox
Required Items and Import/Export.............. ......................... ......................... ....................... 106
FreeFlow
®
Core Exchange CLI ............. ......................... ........................ . ...................... .. ....... 107
®
FreeFlow®Core Tab............. ......................... ......................... ................ 105
10 FreeFlow®Core Reports ................................................................................................... 109
FreeFlow®Core Reports CLI ............. ......................... ......................... ........................ . ......... 110
11 FreeFlow®Core Submit .................................................................................................... 111
Connecting to Xerox®FreeFlow®Core...... ......................... ......................... ........................ . . 112
Submitting Jobs... ........................ . ........................ ......................... ......................... ............. 113
4
Xerox®FreeFlow®Core
Help
Page 5

Table of Contents
12 FreeFlow®Core Cloud Print ............................................................................................. 115
FreeFlow®Core Cloud Print Client ........... ........................ . ...................... .. ....................... ..... 116
FreeFlow
Connecting to a FreeFlow
Configuring Printers ............... ......................... ......................... ........................ .............. 116
®
Core Cloud Print Server...... ........................ . ........................ ......................... .. 116
®
Core Cloud Print Server ..................... ....................... ............ 116
13 FreeFlow®Core Configure ............................................................................................... 119
Enabling the FreeFlow®Core Configure Cloud Print Server..................... ........................ . ...... 120
Enabling Active Directory and Single Sign-in ................... . ........................ ....................... .. ... 121
Mapping Active Directory Groups............................... . ........................ ......................... .. 121
Removing Active Directory Groups ...................... ........................ . ...................... .. .......... 121
Database and Service Accounts ................................ ......................... ........................ . ......... 122
Customer Override .......... ........................ . ........................ ......................... ........................ . .. 123
A Job Properties....................................................................................................................... 125
Job Information.............. ........................ . ........................ ......................... ......................... .. 126
Job File ........................................ ........................ . ...................... .. ....................... ................ 127
Print Information ............ .. ....................... ......................... ........................ . ........................ .. 130
Job Metadata ..... ........................ ....................... .. ....................... ......................... ................ 133
Manifest Automation from Xerox............ . ........................ ......................... ......................... .. 134
JMF . ....................... ......................... ......................... ........................ . ...................... .. .......... 135
Workflow .... ....................... .. ....................... ......................... ........................ . ....................... 138
PDF/VT Variables........ ........................ . ........................ ......................... ......................... ...... 140
External Process Node Variables.............. . ........................ ......................... ......................... .. 141
Additional Variables........... ........................ . ...................... .. ....................... ......................... . 142
Xerox®FreeFlow®Core
Help
5
Page 6

Table of Contents
6
Xerox®FreeFlow®Core
Help
Page 7

1
Overview
This chapter contains:
®
• The Xerox
®
Xerox
solution that intelligently automates and integrates the processing of print jobs. From file preparation
to final production, this solution provides a hands-free workflow that operates easily, adapts
effortlessly, scales quickly, and delivers consistently. The modularity and scalability of Xerox
FreeFlow®Core affords even small to mid-size businesses the opportunity to take advantage of the
tremendous value proposition prepress automation delivers. Adding advanced capabilities is as simple
as adding modules for increased automation and potential.
Xerox
This platform is the core engine that enables automated and integrated solutions across market
needs, including web-to-print, automated finishing, and even extending to digital publishing.
FreeFlow®Core is the next generation in workflow solutions from Xerox. It is a browser-based
®
FreeFlow®Core also serves as the backbone of all new Xerox production workflow solutions.
Note: Xerox®FreeFlow®Core is fully configurable, with individual modules offering greater
control over the workflow and the flexibility to add the components that are best suited to your
needs. Certain features are not available depending upon the product configuration purchased.
For more information, refer to Workflow Component Configurations and Job Submission
Configurations.
FreeFlow®Core Software ...... ......................... ......................... ........................ . .......... 8
®
Xerox®FreeFlow®Core
Help
7
Page 8

Overview
The Xerox®FreeFlow®Core Software
The Xerox®FreeFlow®Core user interface includes the following tabs:
• Job Management and Status: Allows Operators and Administrators to submit and manage jobs in
• Print Management and Status Tab: Allows Operators and Administrators to manage and monitor
• Workflow Setup: Allows Administrators to manage workflows.
• Administration: Allows Administrators to manage hot folders, notifications, Xerox
• Region Tab: Allows Administrators to manage Regional Setting Measurement Units.
• Security Tab: Allows Administrators to manage log in, lockout, and password reuse.
®
Xerox
printing from Xerox
users, security settings, FreeFlow
FreeFlow®Core.
®
FreeFlow®Core.
®
Core Reports, FreeFlow®Core Exchange, and region.
®
FreeFlow®Core
LLaanngguuaaggee aanndd UUnniittss
The Xerox®FreeFlow®Core is a web-based application. The web browser locale settings determine
the language and units used in the Xerox
The following languages are supported:
• English
• French
• Italian
• Russian
®
FreeFlow®Core UI.
• Dutch
• German
• Portuguese
• Spanish
If there is no translation for the language defined in the browser locale, the Xerox
UI defaults to US English.
®
FreeFlow®Core
8
Xerox®FreeFlow®Core
Help
Page 9

2
User Roles and Passwords
This chapter contains:
• Administrator................. . ........................ ......................... ......................... ........................ . ........ 10
• Operator .................... . ...................... .. ....................... ......................... ......................... .............. 11
• Job Status Monitor.............. .. ....................... ......................... ......................... ........................ . ... 12
By default, Xerox
Logged-on users are logged off automatically after 30 minutes of inactivity.
®
FreeFlow®Core opens to a login screen. The user must log on to access the system.
Xerox®FreeFlow®Core
Help
9
Page 10

User Roles and Passwords
Administrator
The administrator has access to the entire system:
• Job Management and Status tab functions: Submit Job Dialog and Job Status Tab.
• Printer Management and Status Tab
• Workflow Setup
• Administration tab functions: Hot Folder Setup, Notifications Setup, User Access Setup, Region,
FreeFlow
• Core Server Utilities, available on a server desktop: FreeFlow
Reports, FreeFlow
and FreeFlow
• Core Client Utilities: FreeFlow
®
Core Reports, FreeFlow®Core Exchange, and Security Tab
®
®
Core Cloud Print Server, FreeFlow®Core Certificates, FreeFlow®Core License,
®
Core Configure
®
Core Submit, and FreeFlow®Core Cloud Print Client
Core Exchange, FreeFlow®Core
Note: Only one Administrator can be logged in to Xerox®FreeFlow®Core at any given time.
10
Xerox®FreeFlow®Core
Help
Page 11

User Roles and Passwords
Operator
The Operator has access to the following:
• Job Management and Status tab functions: Submit Job Dialog and Job Status Tab
• Printer Management and Status Tab
• Core Client Utilities: FreeFlow
Multiple operators can be concurrently logged on to Xerox
®
Core Submit, FreeFlow®Core Cloud Print Client
®
FreeFlow®Core.
Xerox
®
FreeFlow®Core
11
Help
Page 12

User Roles and Passwords
Job Status Monitor
The Job Status Monitor has read-only access to the Job Status Tab window.
Multiple job status monitors can be logged on concurrently to Xerox
®
FreeFlow®Core.
12
Xerox®FreeFlow®Core
Help
Page 13

3
Job Management and Status
This chapter contains:
• Submit Job Dialog.......... . ........................ ......................... ......................... ........................ . ........ 14
• Job Status Tab ................... ......................... ......................... ........................ . ...................... .. ..... 15
The Job Management and Status tab allows Operators and Administrators to submit and manage
jobs. The user can select Submit Job and Job Status using the tab menu.
Refer to: Submit Job Dialog, Job Status Tab
Xerox®FreeFlow®Core
Help
13
Page 14

Job Management and Status
Submit Job Dialog
The Submit Job dialog allows the user to upload one or more documents. The user can submit the
associated Xerox
user uploads the documents and their associated job tickets at the same time, from the same
location, use the following name convention:
• filename.ext: document
• filename.ext.xpf: print ticket
Submit Job options include:
• Submit All Documents as a Job Group: Determines whether documents are submitted as a single
Job Group or as separate jobs.
• Use as Job Name: This field allows the user to define the job name for jobs that are submitted.
• Workflow Destination: This field allows the user to define the workflow to which jobs are
submitted.
• Job Priority: This field allows the user to define the priority of the job submission.
– Normal: Jobs are queued for processing after any pending jobs that are already in the
system.
– High: Jobs are queued for processing before any pending jobs that are already in the system.
• Printer Destination: This field allows the user to define the Printer Destinations or Printer Group
that is used to print the selected job.
®
Printing Instructions Format (XPIF) print tickets to the selected workflow. If the
Note: Jobs that are processing already in the system have higher priority than
submitted jobs.
• Distribute By: This field allows the user to define the distribution method for the Printer
Destinations within a Print Group.
• Override Job Ticket Settings: This field allows the user to define or override job ticket settings
from uploaded job tickets.
– If the user selects a Printer Destinations, the available job ticket settings show values for the
selected Printer Destination. Refer to Printer Job Ticketing.
– If the user selects In Workflow for the Printer Destination, a subset of job ticket settings is
enabled.
During workflow submission, job ticket selections are merged with uploaded job tickets.
Note: The Submit Job dialog does not display uploaded job ticket settings.
Additionally, the user does not have the option to remove settings from uploaded job
tickets.
• Pass Through: If a user selects Pass Through, FreeFlow
Destination with no alterations.
• Submit Job in a Held State: If a user selects Submit Job in a Held State, the job does not process
until the job is released in Job Management manually or the selected release date and time
occurs. The offset that you select refers to the UTC timezone. The default offset value corresponds
to the timezone of the browser.
®
Core sends the job to the selected Printer
14
Xerox®FreeFlow®Core
Help
Page 15

Job Management and Status
Job Status Tab
The Job Status tab allows the user to view Active Jobs, Held Jobs, Completed Jobs, Failed Jobs,
Cancelled Jobs, or All Jobs.
Job Management functions in the Job Status tab include the following:
• Printer Destination
: This field allows the user to define the Printer Destination that is used to print the selected job.
• Edit Job Ticket: This field allows the user to edit the job ticket. Refer to: Printer Job Ticketing.
During print submission, job ticket selections are merged with the Printer Destination Job Ticket
defaults.
Note: The Edit Job Ticket interface does not support use of variables when invoked
from the Job Status tab.
• Finisher Destination
: This field allows the user to define the Finisher Destination that is used to save a JDF description
of the selected job.
• Resume: This field allows the user to resume a paused job.
• Submit Job Commands: These options allow the user to Resubmit, Delete, or Cancel jobs. Jobs
can be resubmitted to the same workflow or to a different workflow. Refer to: Job Resubmission.
• Hold Job Commands: These options allow the user to Hold, Hold Until which specifies a release
time, or Release jobs
• Printer Job Commands: These options allow the user to Release, Hold, or Cancel jobs at the
Printer Destination. Printer Job Commands require print server support for the relevant commands
over IPP.
• List Area: This option shows the jobs in the system, based on the selected status. To view Job
Properties, users can click the information icon
next to the job in the Job Status list.
To filter jobs, users can search jobs on either their Job Names or Workflow.
• Navigation Area: This field enables navigation for the List Area. Users can use the navigation
links and buttons to browse through the jobs in the system. Alternatively, users can search for a
specific job by Job ID.
JJoobb FFiilleess
The Job Properties contain links to the following job files:
• Document: The job file as it has been processed by the workflow.
• Original Document: The job file as it was submitted to Xerox
®
FreeFlow®Core.
Xerox
®
FreeFlow®Core
15
Help
Page 16
Job Management and Status
• Preflight Report: The report, in PDF or XML format, from the Preflight task.
JJoobb RReessuubbmmiissssiioonn
The Resubmit dialog allows the user to resubmit jobs in a paused or terminal state. Completed, failed,
canceled, or aborted jobs are considered to be in a terminal state.
Resubmission uses the original document and the original job ticket as defined after the initial job
submission. The user can choose to edit the job ticket as part of resubmission.
During resubmission, the user can also select to edit resubmit jobs to another workflow. Jobs
resubmitted to a different workflow appear as new jobs in the List Area.
• Job Resubmission behavior is the same as the Submit Job Dialog.
• Additionally, job resubmission is not available for jobs submitted as a Job Group or for individual
jobs in job groups.
JJoobb RReetteennttiioonn
Jobs that are completed, cancelled, or aborted are retained for at least 24 hours before they are
automatically deleted from the system. Jobs are automatically deleted once an hour. Failed jobs are
retained indefinitely.
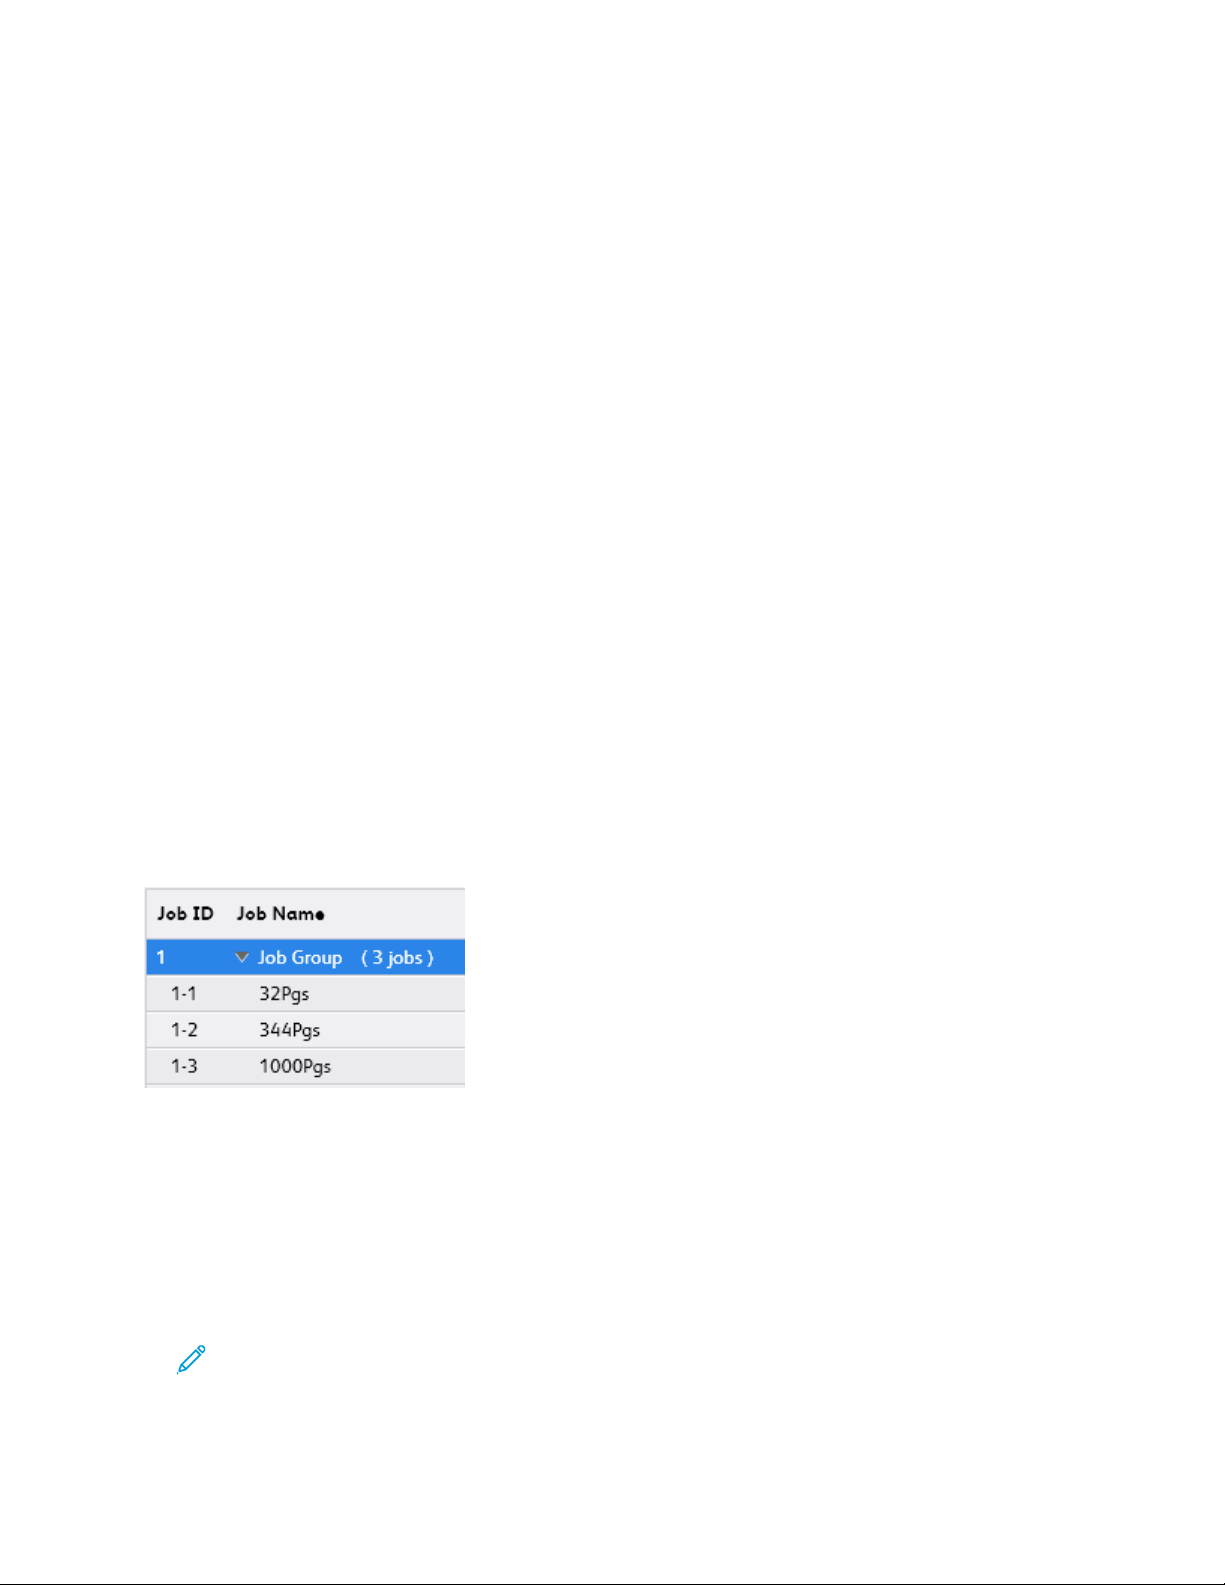
JJoobb GGrroouupp
Depending on how jobs were submitted and the components that are in the workflow, jobs are
processed individually or as part of a job group. Job Groups appear in the List Area as jobs that
contain other jobs.
Click the triangle next to the Job Group name to see jobs in a job group:
Jobs in a job group are processed through the workflow independently with the following exceptions:
• The Join component combines multiple job group jobs into a single job.
• Individual job group jobs cannot be deleted or resubmitted.
• If the Collect All Members of Job Group option is enabled in the workflow component, the Save,
Print and Finish components submit jobs based on their sequence in the job group.
• If the Collect All Members of Job Group option is enabled in Imposition, jobs in a group job are
combined during imposition.
16
Note: Job Group Imposition requires the output management license. Refer to
Workflow Component Configurations.
Xerox®FreeFlow®Core
Help
Page 17

4
Printer Management and Status Tab
This chapter contains:
• Printers .......................... . ........................ ......................... ......................... ........................ . ........ 18
• Job Submission Regulation........... . ........................ ....................... .. ....................... ..................... 19
• Job Ticket Verification....................... ......................... ......................... ........................ . .............. 20
• JDF Settings..... . ........................ ......................... ......................... ........................ . ...................... 21
• Understanding Printer Management ......................... . ........................ ......................... ............... 22
The Printer Management and Status tab allow operators and administrators to manage Xerox
FreeFlow®Core printer destinations.
• Printers area: This area shows configured printers and their status. The list of printers is
populated automatically based on the configured Printer Destinations. See also: Understanding
Printer Management.
• Edit Printer: Allows the user to edit the printer properties, including Job Submission Regulation,
Job Ticket Verification and JDF Mapping settings.
• Workflow Printer Destinations: This field shows configured printer destinations and their status.
• Printer Destination controls: Allow the user to add, copy, edit, and delete printer destinations.
• Printer Groups Tab Controls: Allow the user to aggregate multiple printer destinations into a
printer groups.
• Job Submission controls: Allow the user to suspend and resume job submissions to the selected
Printer Destination.
• Printer Status and Consumables: This field shows detailed printer and consumable status.
®
Xerox®FreeFlow®Core
Help
17
Page 18

Printer Management and Status Tab
Printers
To access the printer settings, from the Printers list, select Edit.
• Name: This field defines a name for the printer. If a name is not defined, the model information
retrieved from the print server is used as the name of the printer in the printers list.
• This printer supports SNMP: This field indicates that Xerox
communicate with the printer using SNMP.
®
FreeFlow®Core is to attempt to
18
Xerox®FreeFlow®Core
Help
Page 19

Printer Management and Status Tab
Job Submission Regulation
If Xerox®FreeFlow®Core software loses connectivity with a printer, the software suspends job
submission automatically to the Printer Destinations folders, even if Job Submission Regulation is
enabled. When the printer is available, Xerox
If queues are missing or not accepting jobs, job submission pauses. If queues reappear or resume
accepting jobs, job submission resumes.
If Job Submission Regulation is enabled, Xerox
and resume job submission automatically to Printer Destinations.
Job Submission Regulation is based on the following:
• Print engine state: If the Print engine state feature is enabled, when a print engine state stops
for longer than the defined threshold, job submission pauses. When the print engine state
changes to Ready or Warning, job submission resumes.
• Available spool space: If the Available spool space feature is enabled, when the available spool
space at the print server falls below the defined threshold, job submission pauses. When Available
spool space at the print server is above the defined threshold, job submission resumes. print
server spool space is monitored using SNMP.
• Number of Uncompleted Jobs at the Printer: If the Number of Uncompleted Jobs at the Printer
feature is enabled, when the number of active jobs in the print server is greater than the defined
threshold, job submissions pause. When the number of active jobs in the print server falls below
the defined threshold, job submission resumes.
®
FreeFlow®Core resumes job submission automatically.
®
FreeFlow®Core uses additional criteria to suspend
Note: Use of additional criteria for Job Submission Regulation requires an output
management license. Refer to Workflow Component Configurations.
Xerox
®
FreeFlow®Core
19
Help
Page 20

Printer Management and Status Tab
Job Ticket Verification
Xerox®FreeFlow®Core job ticketing always reflects the options reported by the print server when
queried for capabilities. Therefore, print ticketing defined in Xerox
®
FreeFlow®Core does contain
constructs that are not reported as supported by the print server.
However, job tickets submitted to Xerox
®
FreeFlow®Core can have different capabilities than the
target printer. The Job Ticket Verification options allow the user to define policies for handling
constructs that a given printer does not support.
• Fail Jobs Containing Stock Names not Defined at Printer: This setting prevents submission of
jobs to the printer if the specified stock name does not exist at the print server.
• Use simplified Stock Name Matching: This setting modifies print tickets to use simpler media
definition if the print server supports this feature. If the print server does not support simpler
media definition, it reverts to nominal behavior for defining media and media attributes.
• Remove Unsupported Settings: This setting removes job ticket settings that Xerox
®
FreeFlow
Core supports from the job ticket if the print server does not support the settings.
Note: Xerox®FreeFlow®Core does not send job ticket settings it does not support to
the print server.
• Remove Unsupported Stock Properties: This option removes stock attributes that Xerox
®
FreeFlow®Core supports from the job ticket if the print server does not support the stock
attributes.
®
20
Xerox®FreeFlow®Core
Help
Page 21

Printer Management and Status Tab
JDF Settings
When a job is sent to a printer that communicates with the JDF protocol, the following settings affect
how FreeFlow Core sends the JDF job ticket and the print file.
When you submit a Xerox
job ticket instructions are sent to the printer in a predefined JDF construct. Depending on the printer,
it is possible that you need to modify the default Xerox
print ticket instructions to a JDF format and a value that the printer supports.
To modify the predefined attribute construct for the JDF print ticket, specify an alternative JDF
construct and value in a .txt or .csv file.
®
FreeFlow®Core job to a printer that communicates with the JDF protocol,
®
FreeFlow®Core JDF construct for specific
To upload the file, in the GUI, select Printer Management and Status→Edit a Printer→JDF
Mapping, then upload the modified file. A template file is located on the Xerox
®
FreeFlow®Core
server at X:\Program Files\Xerox\FreeFlow Core\Support\JDFMapperTemplate.
txt. For FreeFlow
FreeFlow
®
Cloud Print client, at X:\Program Files\Xerox\FreeFlow Core Cloud Print
®
Cloud Print configuration, the template file is in the same location as the
\Support\JDFMapperTemplate.txt.
To allow the JDF printer to retrieve the print file from FreeFlow Core, instead of FreeFlow Core sending
the file to the JDF printer, enable Printer Retrieves the File for Printing.
Xerox
®
FreeFlow®Core
21
Help
Page 22

Printer Management and Status Tab
Understanding Printer Management
Xerox®FreeFlow®Core printing is configured and managed using three interrelated objects:
• Printers: Printers represent a connection to the print server and a print engine. Each Printer is
associated with one or more Printer Destinations.
– Print Engine capabilities, state, and job submission regulation are managed at the printer
level.
– Printers are added or removed from Xerox
Printer Destinations are added or removed.
®
– The FreeFlow
Printers.
• Printer Destinations: Printer Destinations represent a print submission configuration. Each Printer
Destination represents a connection to a specific print queue and a set of job ticketing defaults.
Each Printer Destination can be associated with one or more print presets.
• Printer Groups: Printer Groups are an assembly of Printer Destinations. When you select the
printer groups within a print node or job submission, from the Distribute by menu, you are
required to select a distribution method for the use of the printer destinations in the printer
groups.
Core Cloud Print Configuration application can add or remove the Cloud
®
FreeFlow®Core automatically as needed when
• Print Presets: Print Presets represent an association between job processing configuration and
one or more Printer Destinations. Print Presets defines that the jobs are submitted automatically
to Printer Destinations. They also define rules for the selection of Printer Destinations.
22
Xerox®FreeFlow®Core
Help
Page 23

5
Workflow Setup
This chapter contains:
• The Workflow Setup Tab ................................. ........................ . ........................ ....................... .. . 24
• Job Ticket Updates ................................. . ........................ ......................... ......................... ........ 73
Xerox®FreeFlow®Core
Help
23
Page 24
Workflow Setup
The Workflow Setup Tab
The Workflow Setup tab allows an administrator to manage workflows and the processes and output
destinations used to build workflows. The tab includes the following:
• Components: The area on the left of the screen that shows components available for building
workflows. Components represent workflow operations such as imposition and printing.
• Presets: The area on the left of the screen that shows presets for the selected component. For
details, refer to: About Presets.
• Workflow Canvas: The canvas provides an area for creating or editing workflows. This canvas also
provides an area for defining document conversion options.
• Workflow List: This field shows the workflows in the system.
AAbboouutt PPrreesseettss
Xerox®FreeFlow®Core manages workflow configuration using presets. When a Component is
configured, that configuration is stored as a preset that is available globally. For details, refer to:
Workflow Components.
Caution: When the preset is updated, the updated preset is used automatically in all workflows
in Xerox
preset name, select the Info button.
®
FreeFlow®Core. To view a list of workflows that use the selected preset, next to the
CCrreeaattiinngg WWoorrkkfflloowwss
Workflows in Xerox®FreeFlow®Core consist of a sequence of component presets.
To create a workflow, you can drag process presets from the Components and Presets panels to the
Workflow canvas.
• Component icon: To add a blank preset to configure and save as a new preset, drag a component
icon to the Workflow canvas.
• Preset icon: To add a saved configuration preset, drag a preset icon to the Workflow canvas.
Caution: When the preset is updated, the updated preset is used automatically in all
workflows in Xerox
preset, next to the preset name, select the Info button.
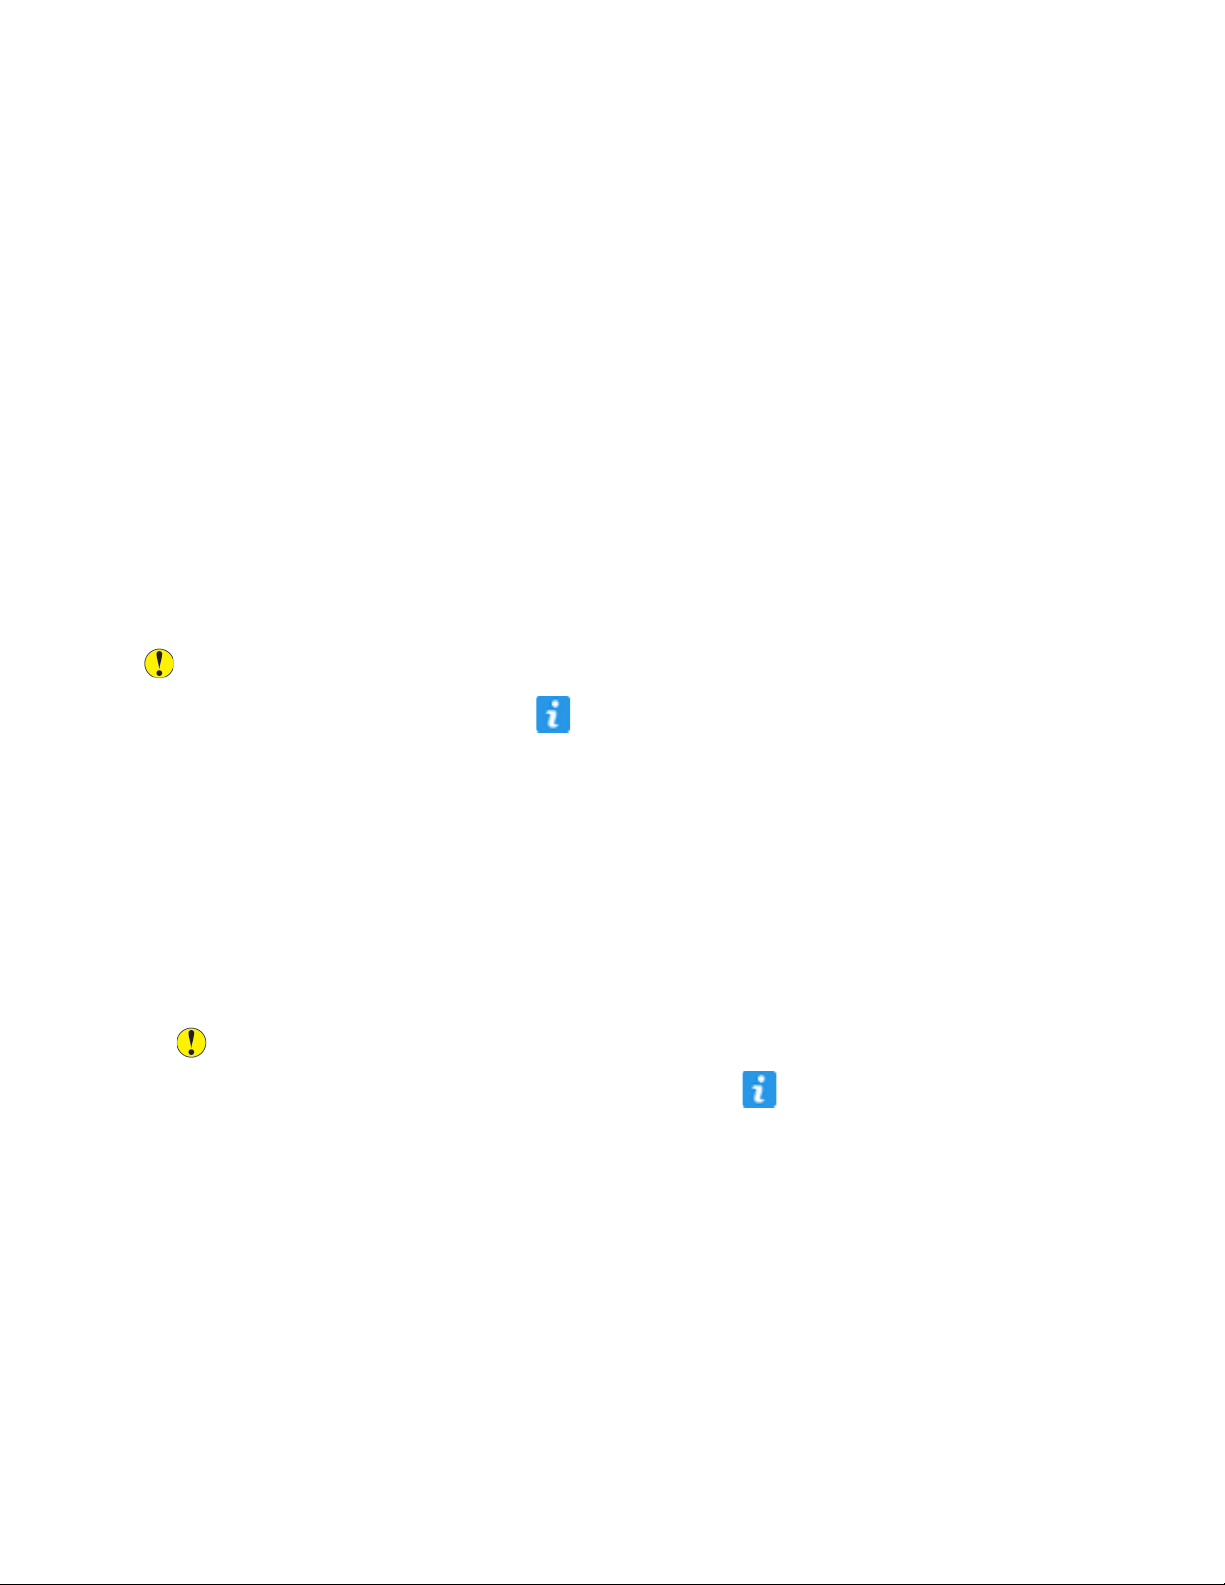
EExxeeccuuttiioonn PPaatthhss
Workflows can include one or more execution paths.
®
FreeFlow®Core. To view a list of workflows that use the selected
24
Xerox®FreeFlow®Core
Help
Page 25
Workflow Setup
Execution paths in a workflow can be merged into any existing workflow component. To merge an
execution path into a component, drag and drop the end of the execution path into the component
icon.
The execution paths are merged then into the component.
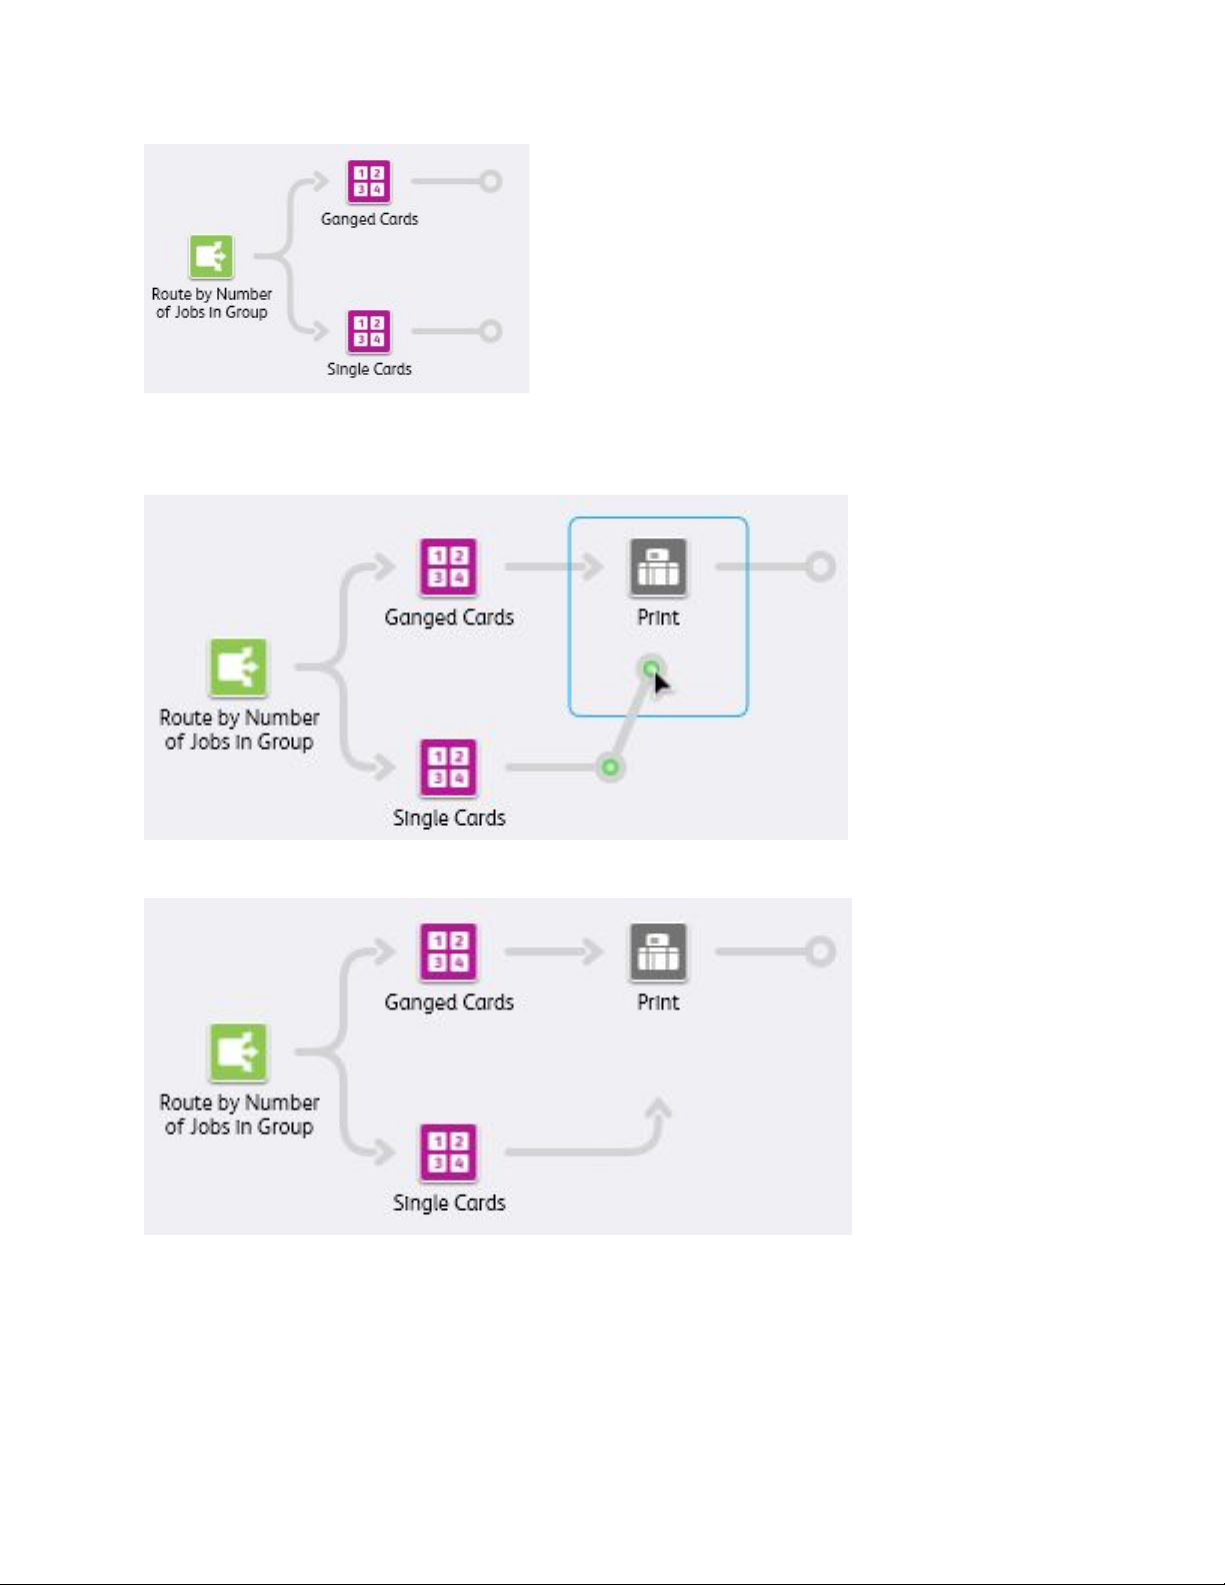
To disconnect an execution path from a component, from the component icon menu, select
Disconnect→<preset name>.
Xerox
®
FreeFlow®Core
25
Help
Page 26
Workflow Setup
Execution paths can be connected to upstream component icons as well.
CCoolllleecctt JJoobb DDooccuummeennttss
Some workflow components support an option to Collect Job Documents.
When this option is enabled, the workflow component defers execution for jobs that are part of a job
26
Xerox®FreeFlow®Core
Help
Page 27
Workflow Setup
group until all members of the job group either have reached the component or have processed
through an execution path in the workflow that prevents them from reaching the workflow
component.
Workflow components can enable additional functionality when the Collect Job Documents option is
enabled.
WWoorrkkffllooww CCoommppoonneennttss
Workflow components represent the types of operations that Xerox®FreeFlow®Core can include as
part of a workflow.
WWoorrkkffllooww CCoommppoonneenntt CCoonnffiigguurraattiioonnss
Xerox®FreeFlow®Core is a fully configurable software, with an individual module that offers greater
control over the workflow and the flexibility to add the components that best suit your needs.
Depending on the product configuration that you have purchased, certain features are not available.
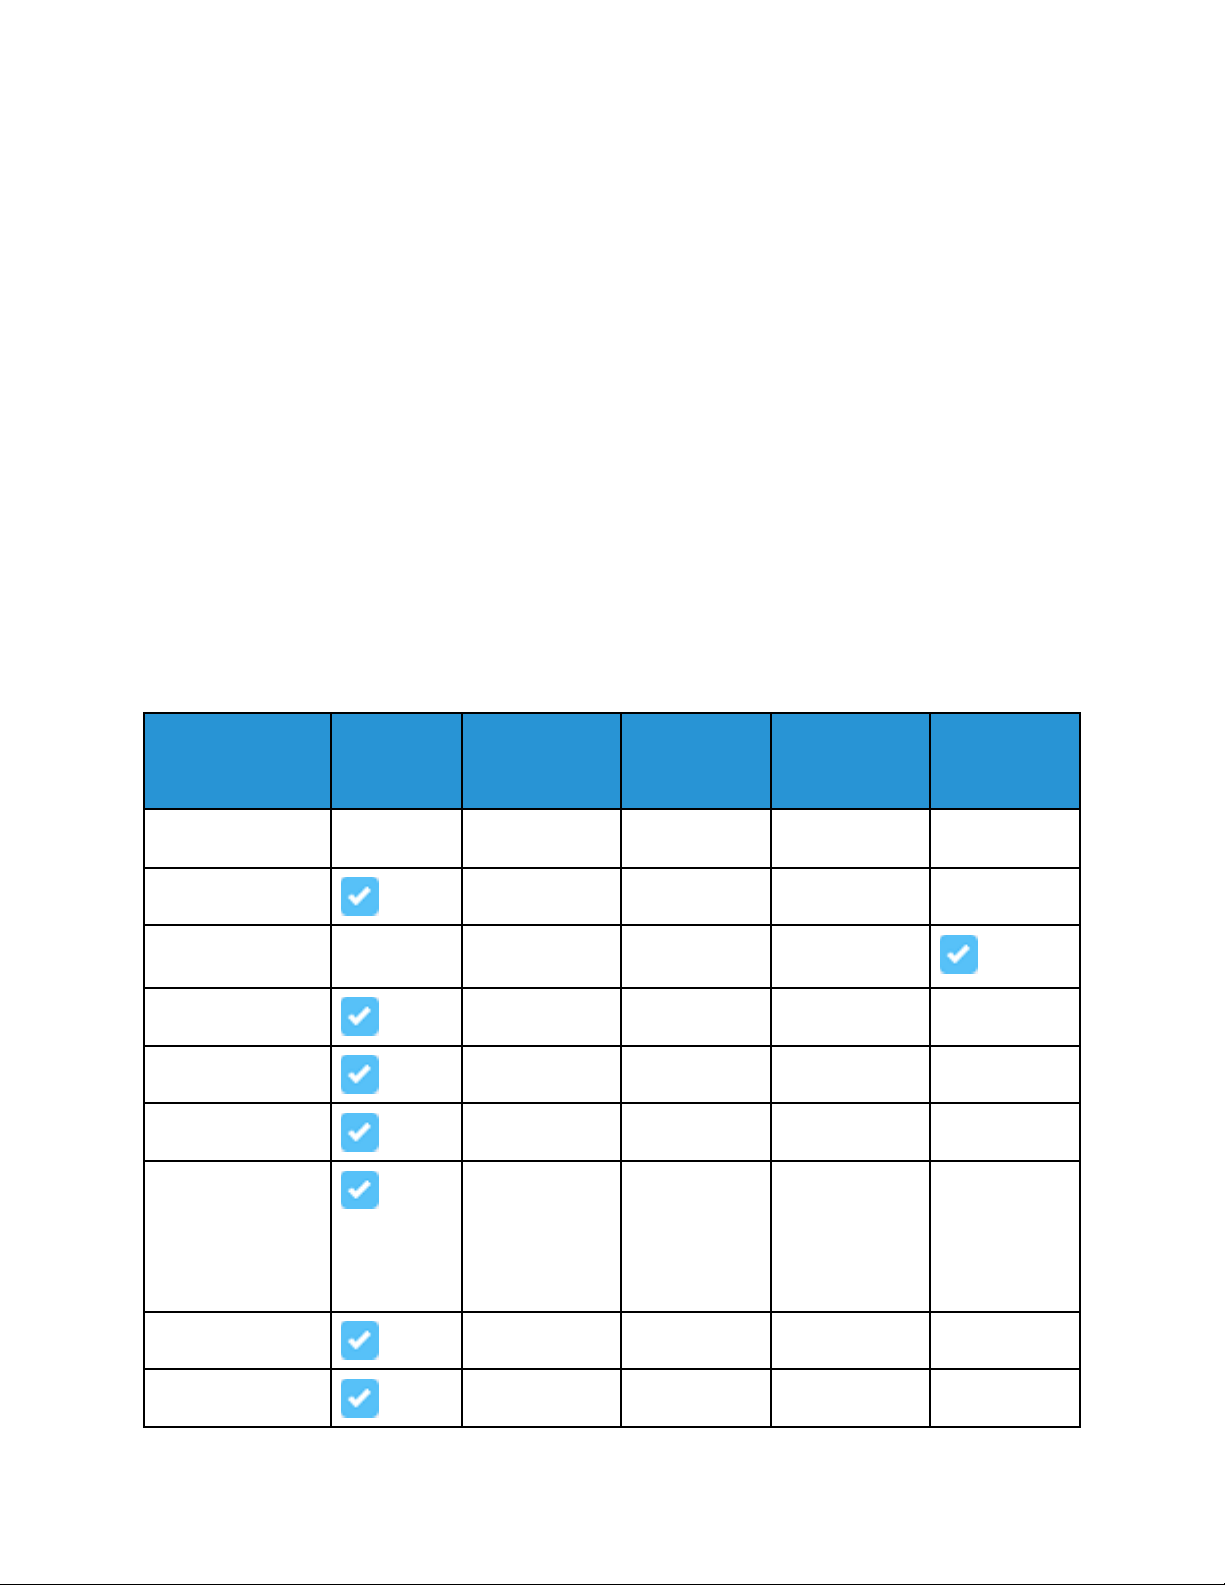
For the features that are available within each product configuration, refer to the table.
• The Xerox
®
FreeFlow®Core Base software module is required.
• You can purchase optional modules. Optional modules provide more capabilities on top of the
®
Xerox
Component
Workflow creation Linear
Conversion
Conversion: VIPP (.
vpc)
Preflight
Enhance images
Imposition PDF/VT-1
Finish: Supported
when configured
along with the
Xerox
IntegratedPLUS
Finishing solution
FreeFlow®Core Base software.
®
Xerox
FreeFlow
Core Base
workflows
®
Advanced
Prepress
(optional)
Advanced
Automation
(optional)
Rules-based
workflows
Output
Management
(optional)
Variable
Data
(optional)
Save
Print
Xerox®FreeFlow®Core
Help
27
Page 28
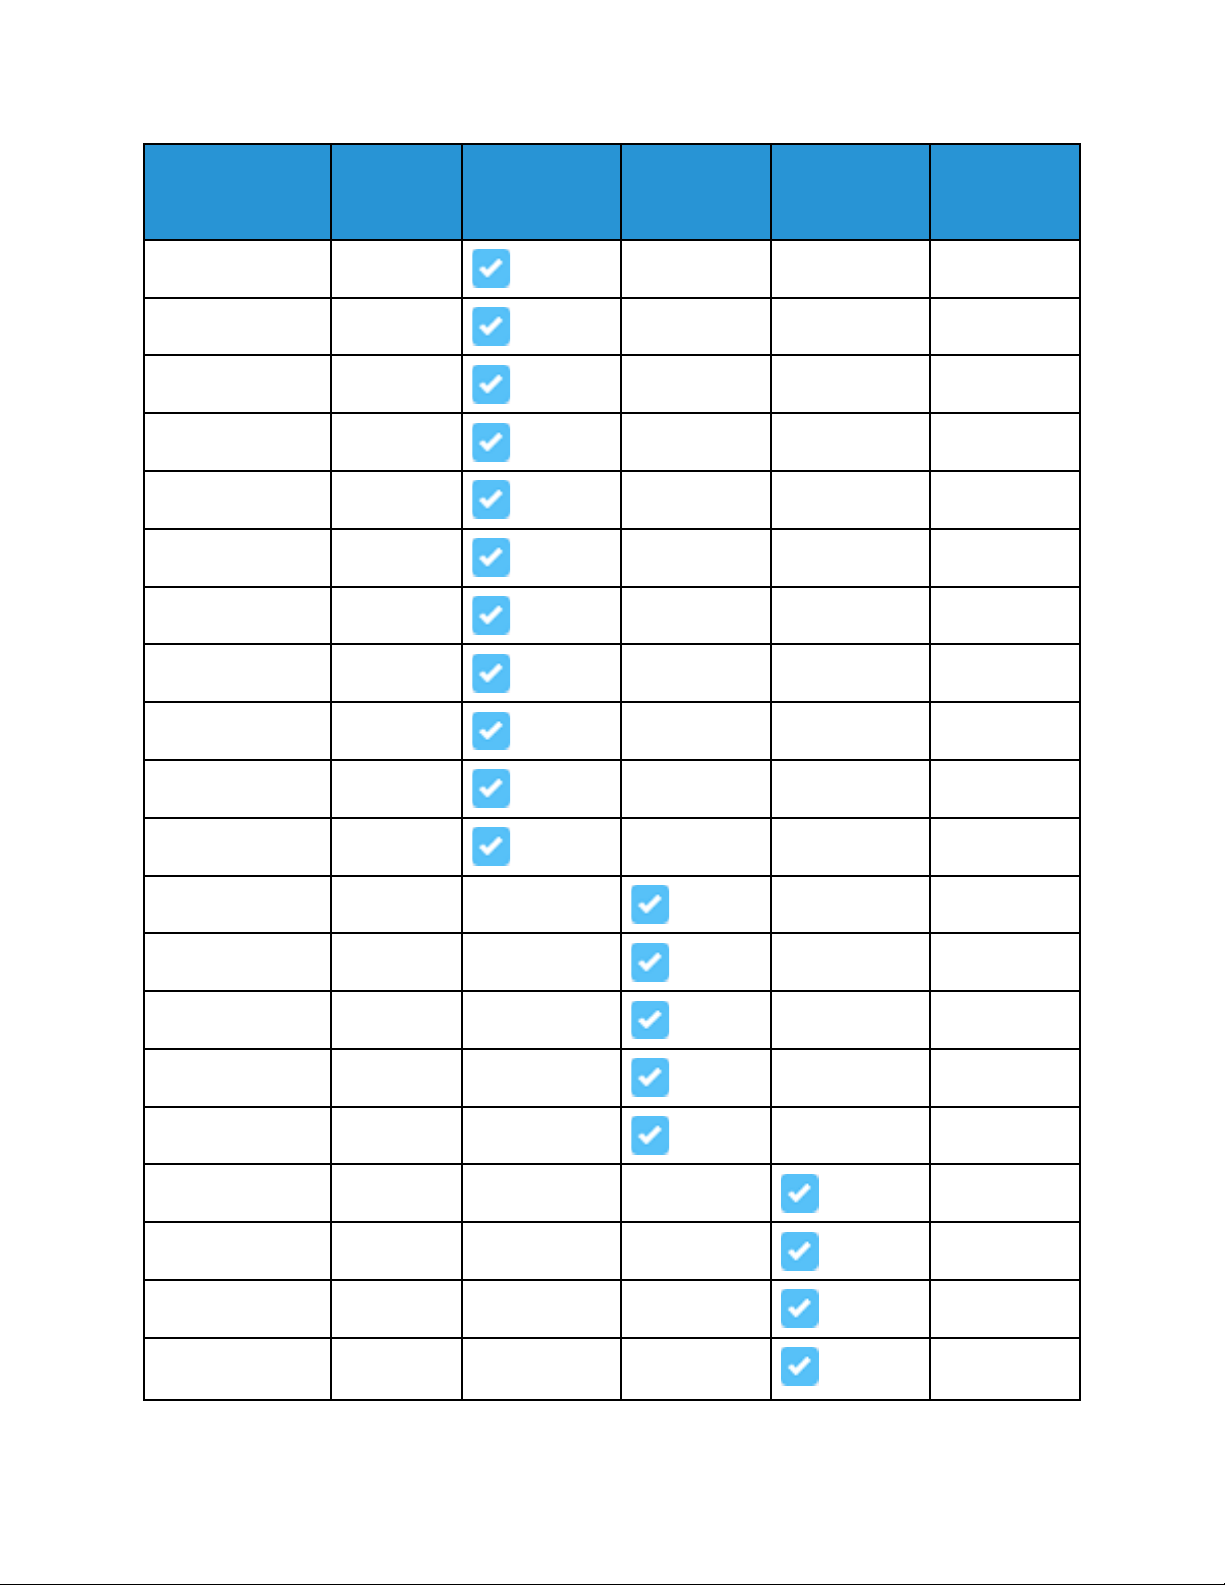
Workflow Setup
®
Xerox
FreeFlow
Component
Optimize
Manage color
Barcode PDF/VT-1
Watermarks
Pressmarks
Page numbers
Resize pages
Rotate pages
Insert pages
Core Base
®
Advanced
Prepress
(optional)
Advanced
Automation
(optional)
Output
Management
(optional)
Variable
Data
(optional)
PDF/VT-1
PDF/VT-1
PDF/VT-1
PDF/VT-1
PDF/VT-1
PDF/VT-1
Delete pages
Join
Route
Printer routing
Finisher routing
Split PDF/VT-1
External process
Distribute
Collect
Color split
Job group
imposition
PDF/VT-1
PDF/VT-1
PDF/VT-1
28
Xerox®FreeFlow®Core
Help
Page 29
Workflow Setup
Component
Job group printing
Printer job
submission
regulation
Printer job
distribution
Printer job
accounting
Review
Printer Groups
Pass Through Job
Submission
Job Submission
with Release Date
®
Xerox
FreeFlow
Core Base
®
Advanced
Prepress
(optional)
Advanced
Automation
(optional)
Output
Management
(optional)
Variable
Data
(optional)
Note: If the corresponding optional modules are purchased and enabled as part of the Xerox
FreeFlow®Core product configuration, the Variable Data optional module enables the
processing of individual PDF/VT records for the components noted in the table. Specific
enhancements for PDF/VT files are outlined, as applicable, in the component descriptions that
appear later in the section.
CCoonnvveerrtt
The Convert component allows you to convert files to PDF.
®
Xerox
• PostScript (.ps)
• Encapsulated PostScript (.eps)
• JPEG (.jpg, .jpeg)
• Portable Network Graphics (.png)
• TIFF (.tif, .tiff)
• Microsoft Word (.doc, .docx)
• Microsoft Excel (.xsl, .xslx)
• Microsoft PowerPoint (.ppt, .pptx)
• Microsoft Publisher (.pub)
FreeFlow®Core accepts the following application file types:
®
When the Variable Data license is enabled, FreeFlow Core also accepts VIPP Project Containers (.vpc)
and VIPP (.dbf, .vpn, .nm, .lm) files. Also, files without an extension or with an unknown extension are
processed through VIPP conversion if they include VIPP commands.
®
Xerox
FreeFlow®Core
Help
29
Page 30

Workflow Setup
Note: Text files (.txt, .csv) are not parsed for VIPP commands as they are submitted to Manifest
Automation from Xerox (MAX).
A Convert component is added automatically and invisibly to the beginning of all workflows.
Font Handling
If possible, fonts are embedded during conversion.
Handling of missing fonts or fonts that do not allow embedding depends on the format of the
document being converted:
• PostScript and Encapsulated PostScript: Missing fonts are referenced in the PDF. Conversion
status is set to Success. Use Preflight to detect missing fonts.
• Microsoft Office: Missing fonts are substituted. Fonts that are substituted are embedded in the
PDF. Conversion status is set to Warning for Microsoft Word and Success for all other
Microsoft Office files.
• VIPP Project Container: Font handling is based on settings from the selected joboptions file.
Conversion status is set to Warning.
Note: Microsoft Office conversion of documents with 3D formatting options, such as
depth and color gradients for text and shape colors, can produce unexpected results.
Note: The following TIFF features are unsupported: JPEG compression and YCbCr color
space. In addition, TIFF transparencies are flattened during conversion.
PS, VIPP, and PDF Generation Options
Workflow settings for PS, EPS, and VIPP conversion settings are available in the Options control at the
top right corner of the workflow canvas.
• Job Options file: Defines the location of the selected Adobe
using the Document Selection Common Controls.
• VIPP Init File: Defines the location of the VIPP initialization file using the Document Selection
Common Controls Document Selection Common Controls.
The selected VIPP init file is prepended to:
– VIPP (.dbf, .vpn, .nm, .lm) files
– files without an extension
– files with an unknown extension
– text (.txt, .csv) files
Note: The VIPP init file is not prepended to VIPP Project Container (.vpc) files. Also,
workflows that specify a VIPP Init file cannot be used with Manifest Automation from
Xerox (MAX).
• PDF Generation: Determines whether the conversion will generate a single PDF file, a PDF/vt with
metadata that FreeFlow Core can use to ascertain record boundaries, or a PDF for each record in
the VIPP file.
®
Acrobat®Distiller joboptions file
30
Note: VIPP Specialty Imaging functions are not supported.
Xerox®FreeFlow®Core
Help
Page 31

Workflow Setup
PPrreefflliigghhtt
The Preflight component allows you to inspect and correct PDF files using Adobe®Acrobat®or Callas
pdfToolbox preflight profiles.
Preflight Checks
Enables preflight checks without the use of a preflight profile. Preflight checks that fail result in a
preflight error.
• Fonts Not Embedded: Enables preflight checks to ensure that all fonts are embedded.
• Color/Grayscale Image Resolution: Enables preflight checks to ensure that color and
grayscale image resolution is within the range defined in the Higher Than and Lower Than
settings.
• Bitmap Image Resolution: Enables preflight checks to ensure that 1-bit image resolution is
equal to or greater than the defined Minimum Resolution and equal to or less than the
defined Maximum Resolution.
• Check Width and Height: Enables preflight checks to ensure the width and height of the
selected PDF box using the size checks from the Routing Common Controls. This option
supports the use of Workflow Process Number Variables.
Preflight Using Profile
Enables preflight checks and fixups using a preflight profile created in Adobe
pdfToolbox.
®
Acrobat®or Callas
• Preflight Variables: Defines the values for variables required by the selected pdfToolbox
preflight profile.
Note: pdfToolbox Process Plans are not supported.
• File: Defines the location of the selected preflight profile using the Document Selection
Common Controls.
Preflight Using Process Plan
Enables preflight checks and fixups using a preflight process plan created in Adobe
®
Callas pdfToolbox.
Preflight Report Format
Defines the format for preflight reports.
Note: PDF Preflight reports are saved as text for jobs with more than 1000 warnings or
errors.
Preflight Report Language
Defines the language used for preflight reports.
Preflight Report Details
Defines the level of detail in the preflight report.
Pause Jobs
Specifies when to pause jobs after preflight:
Acrobat®or
Xerox
®
FreeFlow®Core
31
Help
Page 32

Workflow Setup
• When Fixups are Applied: If preflight profile fixups are applied to the job, this option pauses
the jobs.
• When a Warning Occurs: If preflight profile checks result in a warning, this option pauses the
jobs.
• When an Error Occurs: If preflight profile checks or fixups result in an error, this option
pauses the jobs.
Note: If the preflight profile cannot be executed, jobs fail in the Preflight component.
OOppttiimmiizzee
The Optimize process allows you to streamline documents to ensure more efficient and reliable
processing downstream in the workflow.
Optimize PDF Tab
• Convert to PDF Standard: This option enables conversion of the job to the selected PDF/X or
PDF/A ISO standard.
– Set Output Intent To: This option defines the output intent ICC profile for the job. Output
intents are required for PDF/X conversion.
– ICC profiles up to version 4 are supported. ICC profiles are retrieved from the operating
system and are listed using the ICC profile name, which can differ from the file name.
– To add more ICC profiles, install them in the operating system and restart the server.
– Use Document Output Intent Profile If Present: If this option is enabled and if the
document contains an output intent profile, the document output intent profile is retained
during the PDF/X conversion. Otherwise, the output intent is set to the defined output intent
profile.
Note: PDF/X-4p conversion does not support use of the document output intent
profile.
• Embed Fonts If Needed: This option embeds fonts that are not embedded in the PDF already. To
enable embedding, ensure that fonts are installed on the Xerox
®
FreeFlow®Core server or are
available in the location defined in Fonts.
– Fonts: This field defines the location of more fonts that can be used for embedding in place
of missing fonts. This option also allows the user to manage fonts in the Xerox
®
FreeFlow
®
Core sandbox.
– Font Substitution Configuration File: This field defines the pdfToolbox configuration file
that is used when embedding fonts. This configuration file controls font substitution behavior
in the Optimize process.
Note: Fonts are embedded as subsets. If fonts have a flag that indicates that
embedding is not allowed, the fonts are not embedded.
• Remove Unneeded Transparencies: This option removes transparency groups from pages that do
not contain transparent objects.
• Flatten Transparent Objects: This option flattens transparent objects and objects whose
appearance is affected by transparent objects.
32
Xerox®FreeFlow®Core
Help
Page 33

Workflow Setup
– Xerox®FreeFlow®Core renders transparent objects as a mix of raster and vector content,
some of which can use overprint.
– These documents can have an unexpected appearance in Adobe
accurate representation of these documents in Adobe
®
Acrobat®, click Tools→Print
®
Acrobat®. To see an
Production→Output Simulation.
• Define Page Geometry Based on Cut Marks: This option searches for registration color cut marks
in the PDF. This option adjusts the PDF TrimBoxes and BleedBoxes to match any cut marks that
are found.
• Remove Printer’s Marks: Removes marks such as cut marks, registration marks, registration text,
and color patches outside of the BleedBox or TrimBox.
Note: If both options are selected, the removal action occurs before the Define Page
Geometry Based on Cut Marks function.
• Add Bleed by Scaling Document: This option proportionally scales documents so that all edges
have a bleed that is equal to or larger than the Bleed Distance.
• Auto-Correct Page Geometry: This option adjusts PDF boxes to ensure proper nesting according
to the PDF/X standard.
• Optimize for Fast Web View: This option linearizes PDF to enable byte streaming over the
Internet.
• Flatten Form Fields: This option changes PDF form fields into non-interactive PDF content.
Note: Flattening some form field types, such as pop-up windows, renders only the
selected values, if any. This appearance can differ from the PDF appearance in a viewer.
• Remove Printer’s Marks: This option removes printer marks outside of the document BleedBox or
TrimBox.
• Discard Hidden Layers: This option removes content in hidden layers and flattens remaining
layers.
• Remove Objects Completely Outside of: This option removes objects that are completely outside
of the selected PDF TrimBox.
• Convert Fonts to Outlines: This option turns fonts into graphic elements.
• Fix potential font problems: This option fixes font issues, such as missing fonts.
• Mirror Bleed when No Bleed: This option creates a bleed using mirrored image content within the
TrimBox.
• Pixel Replication Bleed when No Bleed: This option creates a bleed using the pixel content on
the edge of the TrimBox.
Optimize Images Tab
• Downsample Color/Gray images: Change the resolution of color and gray images whose
resolution is higher than the defined threshold.
• Recompress Color/Gray images: Change the compression method and quality of color and gray
images.
• Downsample 1-Bit images: Change the resolution of 1-bit images whose resolution is higher than
the defined threshold.
• Recompress 1-Bit images: Change the compression method and quality of 1-bit images.
Xerox
®
FreeFlow®Core
33
Help
Page 34

Workflow Setup
• Remove invisible image data: Removes image data that is not visible.
• Reduce 16-Bit Images to 8-Bit: Changes the bit depth of 16-bit images to 8 bits.
• Convert specified Spot Color to Specified CMYK color: Converts a spot color to a CMYK color for
text and graphics.
• Convert specified CMYK Color to new CMYK color: Converts a CMYK color to a new CMYK color
for text and graphics.
Optimize Metadata Tab
• Override PDF Document Properties: Override the contents of the standard PDF metadata fields.
• Remove Thumbnails: Remove PDF thumbnails from the job.
• Remove All Annotations: Remove all PDF annotations from the job.
• Discard Actions: Remove all PDF actions from the job.
IImmppoossee
The Impose process allows you to define the placement of page elements to increase production
press efficiency and to create specific applications, for example, booklets.
Imposition Press Sheet Tab
Press Sheet Size
Specifies the size of the imposed document:
• A predefined size: Imposes the document to the selected size. Press Sheet Sizes can have fixed
dimensions or a fixed and an automatic dimension. Custom sizes can be added to the list of
available paper sizes. This option supports use of Workflow Process Number Variables for
defining Press Sheet Sizes.
• Automatic: This option imposes the document to a press sheet size that is based on the
dimensions of the input document, the number of rows and columns, and the margin and
gutter distances.
• Automatic with Size Options enabled: Selects the Press Sheet Size from the specified sizes to
ensure the least amount of waste.
Orientation
This option specifies the orientation as Portrait, Landscape, or Automatic. If Automatic is selected,
the orientation is selected based on input document dimensions and the selected layout options.
Sides Imaged
Specifies plex for the imposed layout. This option supports the use of the Sides Imaged attribute
from the submitted print ticket.
Note: The Sides Imaged selection will impact how the Cut Mark Press Sheet Sides selection
is applied to the imposed PDF.
Imposition Layout Tab
The Imposition Layout Tab defines the arrangement and placement of document pages on the
imposed layout.
34
Xerox®FreeFlow®Core
Help
Page 35

Workflow Setup
Page Order
The Page Order feature specifies how input document pages are placed on the imposed layout.
The following options are available:
• Repeated: This option places the same document page multiple times on the layout. To ensure
that the number of finished sets reflects the required quantity, the print quantity is adjusted in
Repeated imposition.
• Cut and Stack: This option places the document pages vertically through the stack in one
layout position, before putting pages in the next layout position.
– By default, the stack height is based on the number of pages in the document. To override
the default setting, click Define number of sheets per stack.
– The Pad with blank pages at end of stack feature sets the number of sheets for each
stack. By default, the last stack has fewer pages than the other stacks. To ensure that the
number of sheets in the last stack matches the number of sheets in each stack, the option
adds blank pages.
• Cut and Split: When imposing a single PDF, this option places the document pages vertically
through the stack in one layout position. The Cut and Split option is a variant of the Cut and
Stack option, that ensures jobs in a Group or PDF/vt records remain in a single layout position
on the imposed document. The Cut and Split option is used with the Job Groups or PDF/vt
documents with the Apply to Each Variable Data Record option enabled. Refer to Imposition
and Job Groups and Imposition and PDF/VT Jobs.
– Retain Job Order When Ganging: This option imposes documents vertically, based on the
Job Group Sequence Behavior.
– When the Retain Job Order When Ganging option is disabled, to minimize waste, the
imposition reorders jobs.
• Sequential: This option places document pages in all layout positions on one sheet side, before
placing document pages on the next sheet side.
• Signature: This option defines either booklet or calendar imposition, depending on the Rows
and Columns selection.
– Define number of sheets per signature: By default, the number of pages in a page
signature is based on the number of pages in the document. The number of sheets for a
signature can override the default.
Pad with blank pages at end of signature: While setting the number of sheets for each
signature, the last signature has fewer pages than the other signatures. To ensure that the
number of sheets in the last signature matches the number of sheets in other signatures,
the Pad with blank pages at end of signature option adds blank pages.
– Signature shift: This option defines the distance to shift to compensate for creep for
pages in nested signatures. Workflow Process Number Variables is used for defining
Signature Shift.
– Shift Direction: This option uses the Towards Binding Edge feature to shift pages to the
outermost signature at nominal positions. Pages in other signatures are shifted
progressively toward the signature spine. The Shift Direction feature uses the Away From
Binding Edge option to place pages in the innermost signature at nominal positions.
Pages in other signatures are shifted progressively away from the signature spine.
– Resize pages when shifting to preserve page content: This option uses the Towards
Binding Edge feature to shift pages and prevent content from disappearing into the
binding edge. The Resize pages when shifting to preserve page content option uses the
®
Xerox
FreeFlow®Core
Help
35
Page 36

Workflow Setup
Away from Binding Edge feature to shift pages and prevent content from disappearing
into the non-binding edge.
• Job Group: This option places jobs in a Job Group or records PDF/vt jobs in separate page cells
in the layout. Refer to Imposition and Job Groups and Imposition and PDF/VT Jobs.
– Repeat Jobs to Fill Sheet When Possible: This option duplicates jobs when there are not
enough jobs to fill the imposed layout.
– The print quantity is adjusted, based on the number of times each job was duplicated. If
duplication results in enough jobs to fill a layout, jobs are imposed.
• Manual: This option places document pages in a layout, based on the order defined in the
manual page-order table. The following options are available:
– Page: The page entries in the manual page-order table define the starting page from the
input document placed in the corresponding position in the layout.
– Increment: This option defines the interval at which the input document pages create
additional layout pages. For example, if the Increment is set to 2 and page is set to 1, the
pages imposed are 1,3,5 and so on.
– Auto Increment: Based on the number of entries in the manual page-order table, the Auto
Increment feature defines the Increment values.
The list of pages and increments in the manual page-order table represents a pattern, used to
map input document pages to a layout. The pattern is repeated until all input document pages
are mapped to a layout page cell.
Page numbers used in the Manual page-order table are positive or negative. Negative numbers
reference pages relative to the end of the document, with page -1 as the last page of the
document.
• Apply to Each Variable Data Record: This option defines if the Page order applies to the
entire PDF file or to each record within a PDF/vt file.
Rows and Columns
This option specifies the number of Rows and Columns in a layout:
• Fixed Rows and Columns: This option specifies the number of rows and columns in a layout.
• Auto Rows and Columns: To ensure the least amount of waste in the imposed layout, the Auto
Rows and Columns feature calculates the number of rows and columns in the layout.
Note: Using the first page in the job size, perform the number of rows and columns
calculation,
– When the Auto Rows and Columns feature is used with the Automatic orientation
feature, the orientation that results in the least amount of waste is selected automatically.
– When the Auto Rows and Columns feature is used with Automatic sheet size, with two or
more Size options selected, the sheet size that results in the least amount of waste is
selected automatically.
– When the Auto Rows and Columns feature is used with the Automatic sheet size feature,
and when two or more Size options are selected, the media size and orientation are
optimized for the least amount of waste.
36
– Add a 90° rotated row or column when possible: This option determines if a rotated row
of pages fit in the layout. On confirmation, the rotated row is added. The number of pages
in the rotated row is calculated automatically.
Xerox®FreeFlow®Core
Help
Page 37

Workflow Setup
Add a 90° rotated row or column when possible: When Add a 90° rotated row or column
when possible option is combined with the Automatic press sheet size, and when the size
options are enabled, the layout is optimized for orientation and sheet size. The additional
page cells are included in the calculations of waste, used to select the number of rows and
columns, press sheet size, and orientation.
• Auto Columns, Fixed Rows: This option determines a fixed number of rows with an automatic
number of columns.
• Auto Rows, Fixed Columns: This option determines a fixed number of columns with an
automatic number of rows.
• Asymmetric Rows and Columns: To ensure the least amount of waste in the imposed layout,
the number of rows and columns is calculated. When Page Order is set to Job Group, the
Asymmetric Rows and Columns feature is available. Jobs in the job group are of different
sizes.
– Layout Style: This option determines the jobs in the job group to impose together.
Guillotine Cut: This option imposes documents recursively in columns and rows that
preserve the ability to separate jobs with a guillotine cutter.
Laser Cut: This option imposes the documents by filling the sheets to the maximum.
– Maximum Waste: This option defines the maximum percentage of the imposed blank
layout. If a layout exceeds the defined Maximum Waste percentage, the jobs in the
layout and the rest of the jobs are not imposed.
Note: When the Asymmetric Rows and Columns feature is selected, Imposition
Layout Modes, non-uniform Gutters, and Gutter Marks are unavailable. Asymmetric
layouts are clustered.
Impose Relative to
This option defines the PDF box used for imposition, using the PDF Box Selection Behavior.
Note: Size is defined based on the size of the selected box in the first page of the
document.
Cell Clustering
This option controls if pages in the layout are abutted or spread out on the press sheet.
Scale Mode: This option defines a scaling mode applied to the layout. Scaling is performed
according to the Content Scaling Common Controls behavior.
Horizontal and Vertical Alignment
This option defines placement of clustered layout on the press sheet or alignment of pages in a
non-clustered layout. Placement is performed according to the Content Placement Common
Controls behavior.
Imposition Gutters Tab
Margins
This field defines the distance from the edge of the imposed layout that is unavailable for placing
input document pages.
Uniform margins are applied to all edges of the press sheet. Non-uniform margins are defined as
®
Xerox
FreeFlow®Core
Help
37
Page 38

Workflow Setup
either absolute or as Edge Relative margins.
• Edge Relative: Margin distances are defined relative to the Top-Left Corner and the Bottom-
Right Corner. For each corner, margin values are defined for the Long Edge and the Short Edge.
The margins are applied to the top or left and to the bottom or right edges depending on the
imposition press sheet size and orientation.
For square press sheets, the Long Edge margin is applied to the top or bottom edge. Similarly,
Short Edge margin is applied to the left or right edge.
• Absolute Gutters: Margin distances are defined for the Left, Top, Right, and Bottom edges.
The margin distance increases the layout size used for press sheet size selection calculations.
Similarly, the margin distance also reduces the page cell size that is used in scaling calculations.
Row and Column Gutters
This field defines the distance between rows or columns in the layout that is unavailable for placing
input document pages. Support use of Workflow Process Number Variables for defining gutter
distances.
The aggregate row and column distances increase the layout size used for press sheet size selection
calculations. Similarly, the aggregate distances of the gutters also reduce the page cell size used in
scaling calculations around the page cell.
Non-uniform gutters are defined in a table starting from the top-most or left-most gutter.
Imposition Cut Marks Tab
The Cut Marks tab provides the ability to add multiple cut marks to the imposed document.
Cut Marks Contents Tab
Placement Area
Defines the layout area that is used for placing cut marks.
• Press Sheet: Places cut marks relative to the press sheet. Press Sheet trims marks require an
Inward Offset to appear within the imposed layout.
• Page Cell: Places cut marks relative the cells in the layout. Page Cell trims marks require and
Inward Offset to appear within the imposed layout.
• Cell Cluster: Places cut marks relative to the perimeter of the placed document pages in the
layout. The cell cluster perimeter is based on the PDF Box selected in the Impose Relative To
selection in the Layout tab.
• Gutters: Places cut marks in the median of the selected gutters.
• PDF Box: Places cut marks relative to the selected PDF box using the PDF Box Selection
Behavior.
Type
Defines Single Line, Double Line, or Cross Line cut marks.
Gray Value
Defines shade of gray for cut marks.
38
Xerox®FreeFlow®Core
Help
Page 39

Workflow Setup
Cut Mark Dimensions
Specifies the cut mark Length, Bleed, and Line Thickness. The bleed distance for cut marks defines
the distance between the edge of the reference box and the start of the cut mark.
Cut Marks Placement Tab
Page Selection Common Controls: Apply Only to Pages selections are not applicable to imposition
output.
Press Sheet Sides
• Defines sides of sheet in which cut marks are to be placed.
• When Sides Imaged is set to Simplex, all document pages are considered to be on the Front
Side.
Offset Direction
Determines whether the specified offset is inward or outward from the nominal placement
Offset Values
Defines offset from nominal cut mark placement.
Imposition Layout Modes
Imposition Layout Modes includes controls for overriding the behavior of specific page cells in the
layout. To use these controls, you need to enable the required override mode, then click on the icon.
• Horizontal Alignment Override Mode:
Allows the user to override the horizontal alignment
mode for each cell in the layout. To define the horizontal alignment override, click on the page cell
in the layout. To perform the alignment, refer to Content Placement Common Controls
• Vertical Alignment Override Mode:
Allows the user to override the vertical alignment mode
for each cell in the layout. To define the vertical alignment override, click on the page cell in the
layout. To perform the alignment, refer to Content Placement Common Controls
• Page Scale Mode:
Allows the user to override the scaling mode for each cell in the layout. To
define the scaling override, click on the page cell in the layout. To perform the scaling, refer to
Content Scaling Common Controls
• Row Transform Mode:
Allows the user to specify 180–degree rotation for layout rows. To
specify the layout row rotation, in the override mode, click on the rotation icon
that is displayed appears when you hover over a layout row.
• Column Transform Mode:
Allows the user to specify 180-degree rotation for layout
columns. To specify the column rotation, in the override mode, click on the rotation icon
that appears when you hover over a layout column.
®
Xerox
FreeFlow®Core
39
Help
Page 40

Workflow Setup
• Cell Transform Modes: Allows the user to specify 180-degree rotation, horizontal flip, and
vertical flip for layout cells. To specify the cell rotation and flips, in the override mode, click on the
rotation
, horizontal flip
, and vertical flip
icons that appear when you hover over a layout cell.
Imposition Stages
Imposition Stage: Each imposition process can execute up to three imposition operations or stages
as part of an imposition preset. The imposed layout from the Primary Stage is used as the input for
the Secondary Stage and the imposed layout from the Secondary Stage is used as input for the
Tertiary Stage.
Imposed Document PDF Boxes
The imposed PDF CropBox is set to match the imposed press sheet size. PDF boxes inside the CropBox
are set to match the perimeter of the matching boxes on the imposed layout. For example, the
imposed PDF TrimBox is set to the perimeter of the imposed document TrimBoxes on the imposed
layout.
IImmppoossiittiioonn aanndd JJoobb GGrroouuppss
The jobs in a Job Group are imposed nominally as separate jobs. To impose jobs in a job group using
job group imposition, enable the Collect Job Documents option for the imposition node.
1. From the File menu, click Collect Job Documents.
2. From the Job Documents folder, select the jobs that you want to impose and print.
Job Group imposition differs from nominal imposition in the following ways:
• Impose Relative to: The PDF box size is based on the first page of the first job. The size is used for
all documents in the multiple-document job.
• Repeated, Cut and Stack, Sequential, Signature, and Manual Page Order: Jobs are imposed
separately. To pad imposed jobs to a multiple of two pages and join to a single job, for the If
Sides Imaged feature, click Two Sided or Head to Toe.
• Cut and Split: To impose Jobs into a single PDF, jobs in the job group are added to one column in
the layout, before the jobs are added to the next column in the layout. Individual jobs in the job
group are imposed to remain within a single column of the imposed layout.
• Job Group Page Order:
– Imposition determines the number of Rows and Columns required for the layout. Imposition
determines the number of jobs that impose as a group. Excess jobs that do not fill the
imposition sheet are not imposed.
– Each job in the group is padded to match the number of pages in the longest job.
40
Xerox®FreeFlow®Core
Help
Page 41

Workflow Setup
– To impose the jobs, the Cut and Stack Page Order is used. Each job has its position in the
imposed layout.
– The imposed job is added to the output for Job Group.
Imposition overflow for Fixed Rows and Columns; Auto Rows and Columns; Auto Columns,
Fixed Rows and Fixed Columns, Auto Rows:
– The job group imposition process is repeated until all jobs in the job group are imposed or
until the number of unimposed jobs is less than the number of Rows and Columns required for
the imposed layout.
– If the job group does not contain enough jobs to fill a layout, the jobs are not imposed, and
are added unimposed to the output for Job Group.
– Depending on the number of jobs in the Job Group, results include a mix of imposed and
unimposed jobs.
Imposition for Asymmetric Rows and Columns:
– Asymmetric imposition creates a document for each imposed layout, even when imposing
PDF/vt documents.
– The job group imposition process is repeated until all jobs in the job group are imposed or
until the percentage of unused media in a layout exceeds the specified Maximum Waste.
Based on the Job Group Sequence Behavior, jobs in a job group are added to layouts. When a
layout exceeds the Maximum Waste threshold, all remaining jobs overflow, unimposed.
Depending on the number of jobs in the Job Group, a Job Group generates that includes a
mix of imposed and unimposed jobs.
• Multi-Stage Imposition: The job group imposition behavior is used in the last stage of a multiple-
stage imposition template. Other stages impose for nominal imposition behavior.
IImmppoossiittiioonn aanndd PPDDFF//VVTT JJoobbss
When the Apply to Each Variable Record imposition option is enabled, the records in a PDF/VT file
are nominally imposed as if they were separate jobs.
PDF/VT imposition differs from nominal imposition in the following ways:
• Impose Relative to: The PDF box size is based on the first page of the first record. This size is
used for all records in the PDF/VT file.
• Repeated, Sequential, Signature, and Manual Page Order: Records are imposed separately.
Additionally, each record is padded to ensure records print in separate imposed sheets. The record
boundaries on the imposed PDF are adjusted to match the pages in each imposed record.
• Cut and Stack: Records are added to a column in the layout before they are added to the next
column in the layout.
• Cut and Split: Records are added to a column in the layout before they are added to the next
column in the layout. Individual records in the job group are imposed so they remain within a
single column of the imposed layout.
• Job Group Page Order:
1. Imposition determines the number of rows and columns required for the layout. This
determines the number of records that can be imposed as a group.
2. Each record in this group is padded to match the number of pages in the longest record.
®
Xerox
FreeFlow®Core
41
Help
Page 42

Workflow Setup
3. The records then are imposed using the Cut and Stack Page Order. Each record ends up in its
own position on the imposed layout.
4. Finally, new record boundaries are defined to match the pages in the imposed records.
The job group imposition process is repeated until all records in the PDF/VT have been imposed.
• Imposition and Job Ticket Updates:
– Job Ticket Updates for imposition include additional functionality vs. job ticket updates from
other components.
– Covers (Print None, Print Inside, Print Outside), Sides Imaged Exceptions, Chapter Starts,
Sheet Inserts: Before imposition, blank pages are added to the input document to consume
these job ticket settings.
Cover and Sheet Insert: Media information is converted to Media Exceptions.
– Color Exceptions: Imposed pages are defined as color if at least one page in the layout is
defined as color.
– Media Exceptions: Imposed pages are assigned a media exception if at least one page in the
layout is defined as having a media exception.
If multiple pages in the layout are defined as having a media exception, then the media
exception for the page with the lowest page number is assigned to the impose page.
Note: Job Group and Cut and Split Page Orders are not supported. PDF/VTand one-sided
imposition are not explicitly supported.
MMaannaaggee CCoolloorr
The Manage Color component converts document colors to the defined Destination Profile color
space. Also, It can homogenize spot color names and appearances as well as set knockout and
overprint for text and vector objects.
• Convert Colors: Specifies whether color is conversion enabled. It supports the following color
conversion modes:
– Using ICC Profiles: Converts to RGB, CMYK, or Gray color space.
– Using N-Channel ICC Profiles: Converts to N-Channel color space.
– Using ICC DeviceLink Profile: Converts from two pre-defined color spaces using an ICC
DeviceLink profile.
Note: ICC Profile and N-Channel ICC Profile conversion can be applied to All
objects or to RGB, CMYK, or Gray objects.
If Convert Colors Using ICC Profiles or N-Channel ICC Profiles is enabled:
– Convert Spot Colors: Defines whether spot colors are converted to the destination ICC profile.
– Source RGB, CMYK, and Gray Profiles: Define default ICC profiles used for ICC profile color
space conversion. If source profiles are not embedded in the job files, default profiles are
used.
– Destination Profile: Define the destination color space for ICC profile color conversion.
42
Xerox®FreeFlow®Core
Help
Page 43

Workflow Setup
Note: ICC profiles up to version 4 are supported. ICC profiles are retrieved from the
operating system and are listed using the ICC profile name, which can differ from
the filename. To add additional ICC profiles, install them in the operating system
and restart the server.
– Use Document Output Intent Profile If Preset: If enabled and if the document contains an
output intent ICC profile, documents are converted to the output intent profile. Otherwise,
documents are converted to the defined destination profile.
– Rendering Intent: Defines the rendering intent used for color conversion.
Note: N-Channel ICC Profiles must use the clrt tag to specify the colorant names
and the XYZ or Lab values used to define the appearance of these colorants. NChannel conversion can produce unexpected output when used with transparency,
overprint, and smooth shades.
If Convert Colors Using ICC DeviceLink Profiles is enabled:
– Device Link Profile: Defines the ICC Device Link profiles to use for color conversion.
• Make Pantone Spot Color Names Consistent: Normalizes the spelling of Pantone and HKS spot
color names. Additionally, normalizes spot colors that use different names but have the same
appearance. The name of the first spot color found is used.
• Normalize Spot Color Appearance: Normalizes spot colors that use different CMYK values but
have the same name to use the same CMYK values. The CMYK values of the first spot color found
are used.
• Convert Registration Color: Converts registration color objects to the selected color.
• Knock Out White Vector and Text Objects: Sets white vector and text to knockout.
• Overprint Black Vector and Text Objects: Sets black vector and text to overprint.
EEnnhhaannccee IImmaaggeess
The Enhance Images component provides the ability to intelligently enhance document images.
Selected image enhancements are applied if they improve the appearance of document images.
The following image enhancements are available:
• Contrast
• Saturation
• Balance Colors
• Reduce Red Eye: Red eye reduction does not apply to images of animals
• Exposure
• Increase Shadow Detail
• Sharpness
• Noise Reduction: Enhance Images supports RGB and grayscale TIFF, JPEG, and BMP images
embedded in a PDF. EXIF information is not retained on enhanced images
Xerox
®
FreeFlow®Core
43
Help
Page 44

Workflow Setup
BBaarrccooddee
The Barcode component provides the ability to add multiple 1D or 2D barcodes to the document.
Barcodes are added in the order in which they are placed on the barcodes table.
Barcode Contents Tab
• Name: Defines a descriptive name for the barcode.
• Symbology: Defines the barcode type. When a symbology is specified, symbology-specific options
appear.
• Font Size for 1D symbologies: Although the Barcode process does not require the use of barcode
fonts, the barcode size is specified as a Font Size. The barcode font sizes map to minimum bar
widths.
• Cell Size (pixels per cell) for 2D symbologies: The size defines the width, in pixels, of the
individual barcode cells. Barcodes are rendered at 600 dpi.
• Fits Into for 2D symbologies: The width defines the maximum width of the overall barcode. The
barcode is rendered to be as large as possible within the defined width. The barcode dimensions
are calculated to ensure cells are rendered using complete pixels at 600 dpi.
Note: The Quiet Zones are considered part of the barcode and are preserved when
rendering the barcode into the dimensions specified in the Fits Into setting.
• Barcode Height: This option specifies the bar height for 1D barcodes that support variable height.
Note: When Enforce Minimum is enabled, it overrides defined barcode height to
ensure barcode meets minimum height requirements for the selected symbology.
• Horizontal, Vertical Quiet Zones: This field specifies the distance from the edge of the barcode to
mask with the background color.
• Color, Background Color: This field defines the color of the barcode contents and background.
Custom colors can be added to the list of available colors. Custom colors can be defined as CMYK,
RGB, or Grayscale colors.
• Background Opacity: This field defines the translucency of the background color.
• Include Caption: This field adds a readable barcode caption to 1D barcodes that support
captions. Symbology-specific caption options appear under the caption font formatting
parameters.
• Text and Paragraph Formatting Common Controls:
– Barcode caption text alignment is based on the Content Placement Common Controls.
– The Quiet Zones are considered part of the barcode. Placement is done to the edge of the
quiet zones.
• Scale Caption to Barcode: This field sets the font size for the barcode caption based on the
barcode length.
• Horizontal, Vertical Alignment and Offset: This variant of the Content Placement Common
Controls uses the perimeter of the barcode as the reference box for text alignment and placement
of the barcode caption.
Barcode Data Tab
The content of a barcode is defined by adding text, including Workflow Process Variables and barcode
variables to the Barcode Data Value field.
44
Xerox®FreeFlow®Core
Help
Page 45

Workflow Setup
• Select Values to Add: Control used to add content to the Barcode Data Value. In addition to text,
the following barcode variables are supported:
– Job ID: The Xerox
– Job ID in Group: The Xerox
®
FreeFlow®Core Job ID.
®
FreeFlow®Core Job ID within a job group.
– Job Number in Group: A sequence number within a job group.
– Number of Documents in Job Group: Total number of jobs in a job group.
– Sheet Number: Counter for the number of sheets in the job.
– Number of Sheets in Job: Total number of sheets in the job.
– Sheet Number in Signature: Counter for the number of sheets in a signature.
– Number of Sheets in Signature: Total number of sheets for each signature. This value
matches the Sheets per Signature attribute.
– Signature Number: Total number of signatures in a job. This value is calculated by dividing
the Number of Sheets in Job by the Sheets per Signature value.
– Record Number: Counter for the number of records in a PDF/VT file.
– Number of Records in Job: Total number of records in a PDF/VT file.
– Sheet Number in Record: Counter for the number of sheets in a PDF/VT record.
– Number of Sheets in Record: Total number of sheets in a PDF/VT record.
– Barcode Number: Counter for the number of times a barcode is added to the document.
Nominally, variables, such as counters and total number of sheets, map every page in the document
to a sheet. However, variables increment for every two pages in the document when odd or even
pages are selected in the Page Selection Common Controls or when a signature variable is added to
the barcode.
• Include Leading Zeros: When enabled, adds leading zeroes to variables.
– Set Total Digits from Number of Pages: Defines the number of digits in the barcode variable
based on the number of pages in the document.
– Total Digits: Defines the number of digits in the barcode variable.
• Sides Imaged: Defines whether the print is 1-sided or 2-sided for the barcode counters. Supports
the use of the Sides Imaged attribute from the submitted print ticket.
• Sheet Counting Order: Defines whether counting variables increment or decrement.
• Sheets per Signature: Defines the assumed number of sheets for each signature used by the
variables in the barcode process. Supports use of the Imposition Sheets per Signature attribute.
• Sheet Number Start Number: The number from which to start adding sheet numbers to the
document. Supports use of Workflow Process Number Variables.
Barcode Placement Tab
• Content Placement Common Controls
• Page Selection Common Controls
The Barcodes component includes an option to collect job documents. For information, click Collect
Job Documents. To enable the option, hover over the Barcodes component. From the menu that
appears, access the Workflow Canvas area, then make your selections.
®
Xerox
FreeFlow®Core
Help
45
Page 46

Workflow Setup
To ensure that job group variables do not change while processing the jobs in the Job Group, the
Barcodes feature enables the Collect Job Documents option.
WWaatteerrmmaarrkkss
The Watermarks component provides the ability to add multiple text and image watermarks to the
document. Watermarks are added in the order in which they are placed in the watermarks table.
Watermarks Contents Tab
• Type: Defines whether to insert a text, image, PDF, or Merge PDF pages watermark.
• Name: Defines a descriptive name for the text or image watermark.
Text Watermarks
• Text: Text to be added to the document.
• Text and Paragraph Formatting Common Controls
• Opacity: Defines translucency of placed text or image watermarks.
Image and PDF Watermarks
• Image or PDF File: Defines the location of the selected document using the Document Selection
Common Controls.
• Image: Supports JPEG (.jpeg, .jpg), Portable Network Graphics (.png), TIFF (.tif, .tiff), and BMP (.
bmp) documents.
• PDF: When adding PDF image watermarks to PDF/VT jobs, the PDF must be PDF/X-4 compliant.
Merge PDF Pages
• Merge PDF Pages: When Merge PDF Pages is selected, each page of the selected PDF is merged
into the matching page of the job.
• PDF File: Defines the location of the selected document using the Document Selection Common
Controls.
Note: When merging PDF Pages to PDF/VT jobs, the PDF must be PDF/X-4 compliant.
• Restart merge when all pages have been used: Defines whether to continue merging PDF pages
if the last page in the merged PDF is reached before the last page of the job is reached. If
enabled, after the last page of the merged PDF is reached merging continues with the first page
of the merged PDF and proceeds until a PDF page is merged into all job pages.
• Content Scaling Common Controls
• Opacity: Defines translucency of placed text or image watermarks.
Watermarks Placement Tab
• The Layer Order feature allows you to define the watermark placement above or below existing
content in the document.
• Content Placement Common Controls
• Page Selection Common Controls
The Watermarks component includes an option to Collect Job Documents. The Collect Job
Documents option is enabled from the menu that appears when you hover over the Watermarks
46
Xerox®FreeFlow®Core
Help
Page 47

Workflow Setup
component in the Workflow Canvas area.
To ensure that job group variables do not change while processing the jobs in the Job Group, the
Watermarks feature enables the Collect Job Documents option.
PPrreessssmmaarrkkss
The Pressmarks process provides the ability to add multiple pressmarks to the document. Pressmarks
are added in the order in which they are placed on the pressmarks table.
Pressmarks Contents Tab
• Type: Defines the pressmark to add to the document. Supported pressmarks include registration
marks, lay marks, and color swatches or bars.
– Solid Marks: Solid rectangles most often used for finishing device control.
– Registration Marks: Small targets printed outside the page area used to align different
separations when printing color documents.
– Sequence Marks: Marks used in book printing to ensure that folded signatures are in the
expected sequence.
– Lay Marks: Marks used to register content to press sheets.
– Line Marks: Lines used to mark the location of operations such as cutting or perforating.
– Color Swatches/Bars: Small squares of color that represents the RGB and CMYK solids and
tints.
• Name: Defines a descriptive name for the pressmark.
• Swatch Width, Height: Defines the width and height of each swatch in a pressmark. Also used to
define the overall dimensions of registration marks or the lay marks.
• Color: Defines the color of Solid Marks, Sequence Marks, or Line Marks. Custom colors can be
added to the list of available colors. Custom colors can be defined as CMYK, RGB, Grayscale, or
Spot Colors.
• Line Thickness: Defines the thickness of the lines in the registration, Lay, and Line Marks.
Line Mark Options
• Line Start (horizontal, vertical): Location of the start of the Line Mark. Defined as a distance
from the origin; defined in the Content Placement Common Controls.
• Line End (horizontal, vertical): Location of the end of the Line Mark. Defined as a distance from
the origin; defined in the Content Placement Common Controls.
Horizontal and Vertical Offset controls are not available when adding Line Marks.
• Dash: Length of dashes in dashed Line Marks.
• Gap: Length of gaps in dashed Line Marks.
Xerox
®
FreeFlow®Core
47
Help
Page 48

Workflow Setup
Sequence Mark Options
• Horizontal, Vertical Offset: Incremental adjustment to the placement of each sequence mark.
• Wrapping: Defines how sequence marks are placed after they have been offset to the Wrap
Width or Height.
• Wrap Width, Height: Define the offset distance at which to wrap sequence marks.
• Sequence Mark Type: Defines whether to place Plain or Numbered sequence marks. Numbered
sequence marks have a number that increments with the placement of each sequence mark.
• Sequence Start Number: The number from which to start adding Sequence Mark numbers.
Supports use of Workflow Process Number Variables.
Pressmarks Placement Tab
• Content Placement Common Controls
• Page Selection Common Controls: Unlike other content, registration marks are aligned to the
center of the mark.
PPaaggee NNuummbbeerrss
The Page Numbers component provides the ability to add page numbers in various formats to the
document.
Page Numbers Contents Tab
• Start Number: The number from which to start adding page numbers to the document. Supports
use of Workflow Process Number Variables.
• Number Format: Defines format used for the page numbers.
Note: The alphabetic page number formats use the English alphabet.
• Include Leading Zeroes: When enabled, adds leading zeroes to page numbers.
– Set Total Digits from Number of Pages: Defines the number of digits in the page numbers
based on the number of pages in the document.
– Total Digits: Defines a fixed number of digits in the page numbers.
• Prefix and Suffix: Defines text that is concatenated with the page numbers.
• Text and Paragraph Formatting Common Controls
• Increment Page Numbers Based On: Defines whether page numbers are incremented based on
all pages in the document or based on the numbered pages.
Page Numbers Placement Tab
• Content Placement Common Controls
• Page Selection Common Controls
The Page Numbers component includes an option to Collect Job Documents. This option is enabled
from the menu that appears when you hover over the Page Numbers component in the Workflow
Canvas area.
To ensure that the job group variables do not change while processing the jobs in the job group, Page Numbers enables theCollect Job Documents option.
48
Xerox®FreeFlow®Core
Help
Page 49

Workflow Setup
RReessiizzee PPaaggeess
The Resize Pages process defines how the selected PDF boxes or contents in the document pages are
resized.
RReessiizzee CCoonntteennttss TTaabb
• Resize: Defines whether Resize modifies the PDF contents or the PDF boxes.
• Resize Relative To: Defines the PDF box or the PDF contents to use as the source size for resizing.
– If resizing a PDF box that is not defined in the job file, the PDF Box Selection Behavior is used
to define the selected PDF box before resizing.
– If resizing the contents, the PDF boxes are not modified.
• Proportionally Resize Relative To: The selected PDF box is resized to the target dimensions. Other
PDF boxes are scaled by the same amount as the selected PDF box to ensure the relationship
between the PDF boxes is retained as the document is resized.
Note: When resizing only the selected PDF box, Resize, if required, resizes other PDF
boxes to ensure proper nesting of the Trim, Bleed, Crop, and Media PDF boxes.
• Method
– By Percent: Resizes the selected PDF box or the contents by a defined percentage.
– To Size: Resizes the selected PDF box or the contents to a defined size. Supports use of
Workflow Process Number Variables for defining the Width and Height.
– To Size Offsets: Resizes the selected PDF box or the contents by the defined distance.
– By Percent Offsets: Resizes the selected PDF box or the contents by the defined percentage.
– Offset Direction: When resizing by offsets, defines whether to offset inward or outward.
• Content Scaling Common Controls
RReessiizzee PPllaacceemmeenntt TTaabb
• Content Placement Common Controls
• Page Selection Common Controls
RRoottaattee PPaaggeess
The Rotate Pages process updates the PDF page rotation property, adjusting it in 90-degree
increments.
• Rotate Pages: Defines the rotation to apply to the selected pages.
• Page Selection Common Controls: Changing the PDF rotation property in a PDF does not rotate
the PDF. As such, the PDF Job Properties remain unchanged. Refer to: Job Properties.
IInnsseerrtt PPaaggeess
The Insert Pages process inserts pages at defined locations in the document.
• Type: Defines the type of page insertion.
Xerox
®
FreeFlow®Core
49
Help
Page 50

Workflow Setup
– Blank Pages: Add blank pages to the document.
– Document: Add the pages from a PDF to the document.
– Job Pages: Add job pages to the document.
– Blank Pages Fill: Add blank pages to the document until the Final Document Page Count is
reached.
– Document Fill: Add the pages from a PDF to the document until the Final Document Page
Count is reached.
– Job Pages Fill: Add job pages to the document until the Final Document Page Count is
reached.
When inserting Blank Pages:
– Insert Size, Orientation: Defines the dimensions and orientation of inserted blank pages.
– Insert Size Same As: Defines the PDF box to use to set the dimensions of inserted blank
pages.
– Number of Inserts: Defines the number of blank pages to insert at each insertion point in the
PDF. Supports use of Workflow Process Number Variables.
When a blank page is inserted, the Location attribute and the Page Selection Common
Controls are used to define the insertion point in the PDF. The blank pages match the size of
the selected PDF box of the page relative to which blank pages are inserted into the PDF.
When inserting PDF document pages:
– File: Document Selection Common Controls
When inserting Blank Pages, PDF document pages, or Job Pages to fill a document:
– Final Document Page Count: Defines the page count that must be reached before blank
page fill or document fill stops. The page count can be an exact number or a multiple of the
specified number. Supports use of Workflow Process Number Variables.
When inserting Job Pages:
– Divide Print Quantity by Number of Inserts: Divides the print quantity based on the number
of times job pages are inserted into the document.
– Set Automatically Based on the Print Quantity: Defines the Number of Inserts so that the
number of times each page is in the document matches the Print Quantity. After inserting Job
Pages, quantity is set to 1.
When inserting Blank Pages or Job Pages:
– Number of Inserts: Defines the number of job pages to insert at each insertion point in the
PDF. Supports use of Workflow Process Number Variables.
– The Number of Inserts can be defined as a fixed value or can be based on the value of the
selected Manifest Job Property.
– Page Selection Common Controls are subject to a specific page number when inserting blank
pages or PDF document pages to fill a document.
• Location: Defines whether the insertion is to happen before or after the locations specified by the
Page Selection Common Controls.
50
Xerox®FreeFlow®Core
Help
Page 51

Workflow Setup
– If inserting Job Pages, options to insert job pages Before or After Each Set of Contiguous
Pages become available.
– A PDF/VT is created when inserting PDF/X-4 job pages Before or After Each Set of
Contiguous Pages.
• Page Selection Common Controls: Page Selection Common Controls are subject to a specific page
number when inserting blank pages or PDF document pages to fill a document.
• Job Ticket Updates
DDeelleettee PPaaggeess
The Delete Pages component allows you to remove document pages.
Page Selection Common Controls
Job Ticket Updates
RRoouuttee
The Route component allows you to automate decisions about the execution path that a job is to
take in the workflow.
Use the Routing Common Controls to define rules for routing jobs to one or more workflow execution
paths. Each row in the Routing Rules table creates a unique execution path in the workflow.
Note: Routing is applied to individual jobs in a Job Group.
DDiissttrriibbuuttee
The Distribute component allows you distribute jobs between multiple workflow execution paths.
• Select Workflow Path By
Selecting The Next Available (Round Robin): Use round robin scheduling to select between the
defined workflow execution paths.
• Distribution Rules
– Always Available: Jobs are always sent to these workflow paths when selected per the round
robin scheduling.
– Available Based on Job Characteristics: Jobs are sent to these workflow paths when selected
according to the round robin scheduling if the job matches the selected Job Characteristic
Presets. If the job does not match the selected Job Characteristics, Distribute skips the
workflow path and continue evaluating other Distribution Rules.
– None Available: Jobs that cannot be sent to any of the defined Distribution Rules are sent
to the None Available workflow path.
Note: Jobs are distributed to workflow paths based on the Job Group Sequence Behavior. After
jobs are distributed, they continue processing according to the job group behavior.
®
Xerox
FreeFlow®Core
Help
51
Page 52

Workflow Setup
CCoolllleecctt
The Collect component allows you aggregate jobs. Collected jobs are held until one of the defined
release conditions is met.
One of each of the following conditions can be added to the Release Conditions:
• Time of Day: Jobs are released at the specified time.
Day of Week: Combined with Time of Day, this option defines the days of the week when jobs are
released.
• Collected Documents are Held for: Jobs are released when the first job has been held for the
defined number of minutes.
• Time Since Last Job was Collected: Jobs are released when the last collected job has been held
for the defined number of minutes.
• Number of Collected Documents: Jobs are released when the number of held jobs reaches the
defined number.
• Number of Pages in Collected Documents: Jobs are released when the number of pages in the
held jobs reaches the defined number.
• Number of Impressions in Collected Documents: Jobs are released when the number of
impressions in the held jobs reaches the defined number.
When Release Collected Jobs as a New Job Group is enabled, collected jobs are combined into a
new Job Group. Jobs are sequenced nominally based on the order in which they were collected.
Note: Jobs that are copied into the new Job Group are also new jobs.
• Job Group Name: Defines the name for Job Groups Created by Collect.
Note: Variables used to name the Job Group are evaluated using the first job in the job
group.
• Define Job Groups: Determines how Job Groups are created.
– Define a Single Job Group: All released jobs are added to a single Job Group.
– Define Job Groups Using Job Properties: Released jobs are added to multiple job groups
using the defined Job Properties. Jobs that have the same value for the defined Job
Properties are put into the same job group.
• Sort Jobs in Groups Using Job Properties: Enables sorting of jobs within a job group based on
the defined properties.
– When the Release Collected Jobs is enabled, this option defines the job sequence in new job
groups.
– When the Release Collected Jobs is disable, this option updates the job sequence in existing
job groups.
• Order Job Groups: Enables release of Job Groups based on the sort order specified for the
selected variable.
Note: Although Job Groups are released according to the Order Job Group settings, the Job
Groups process in parallel.
52
Xerox®FreeFlow®Core
Help
Page 53

Workflow Setup
SSpplliitt
The Split component allows you to split jobs into multiple execution paths in the workflow.
• Split By: Defines the method for splitting jobs.
– Split Each Variable Data Record: Defines whether the Page Selections defined in the split
rules apply to PDF/VT files or to each record within PDF/VT files.
– Split Rules when splitting by Pages: Use the Page Selection Common Controls to define the
subset of pages that are submitted to each workflow execution path. The pages submitted to
each execution path, if any, appear as a separate job in a Job Group.
– Split Rules when splitting by Segments
– Divide Into Equal Segments: Jobs are divided into a Job Group in which the number of
jobs matches the value defined in the Number of Segments field. Job Pages are divided
between jobs in the Job Group as evenly as possible.
– Divide Into Fixed Page Segments: Jobs are divided into a Job Group. The Number of
Pages setting defines the number of pages for each job.
– Divide Short Segments Into Fixed Page Segments: If this option is not enabled, the
last job in the Job Group can have fewer pages than the other jobs in the Job Group.
– Divide Short Segments Into Fixed Page Segments: If this option is enabled,
FreeFlow Core splits the job into multiple jobs. The result is that the number of pages
matches one of the defined Number of Pages values and makes as few short
segments as possible.
– Number of Pages for Short Segments: Defines the number of pages into which
the short segments can be divided.
– Interleave Short Segments with Full Segments: Modifies placement of short
segments in the Job Group to ensure that all short segments are next to the full
segments.
– Short Segment Location: Defines where in the Job Group to place short
segments.
– Split Rules when splitting by Quantity
– Divide Print Quantity Evenly: Jobs are divided into a Job Group in which the number of
jobs matches the value defined in the Number of Jobs field. The print quantity is divided
between jobs in the Job Group as evenly as possible and ensure that the overall quantity
for the Job Group is the same as the input job quantity.
– Divide Into Fixed Print Quantity Jobs: Jobs are divided into a Job Group. The Print
Quantity per Job setting defines the quantity for each job. The last group in the Job
Group can have a smaller quantity than the other jobs in the Job Group.
– Split Rules when splitting by Records
– Divide Records Evenly: Jobs are divided into a Job Group in which the number of jobs
matches the value defined in the Number of Jobs field. The Variable Data Records are
divided between jobs in the Job Group as evenly as possible.
– Divide Into Fixed Record Jobs: Jobs are divided into a Job Group. The Records per Job
Xerox
®
FreeFlow®Core
53
Help
Page 54

Workflow Setup
setting defines the number of variable data records in each job. The last job in the Job
Group can have fewer Variable Data Records than the other jobs in the Job Group.
– Divide Record By Selection: A PDF/VT file with the records defined in the Record
Selection field for the split rule is sent to each workflow execution path.
– All Records: Send all records in the document.
– Record Intervals: Send every N record, starting with the defined record number,
where N represents a number of records.
– Record Range: Send specified records. This option supports both positive and
negative numbers. Negative numbers are relative to the last record in the PDF/VT
with record -1 representing the last record.
– Split Rules when splitting by Bookmarks
– Bookmark Start or End Interval: This rule specifies whether an encountered bookmark is
the beginning or end of an interval.
– Divide Bookmarks Evenly: Jobs are divided into a Job Group in which the number of jobs
matches the value defined for the Number of Jobs field. The bookmark-defined intervals
are divided between jobs in the Job Group as evenly as possible.
– Divide Into Fixed Bookmark Delineated Jobs: Jobs are divided into a Job Group. The
Bookmarks per Job setting defines the number of bookmark-defined intervals in each
job. The last job in the Job Group can have fewer bookmark-defined intervals than the
other jobs in the Job Group.
– Divide Bookmarks By Selection: A file with the bookmark intervals defined in the
Bookmark Delineated field for the split rule is sent to each workflow execution path.
– All Intervals: Send all bookmark intervals in the document.
– Interval Designation: Send every N bookmark interval, starting with the defined
bookmark interval number, where N represents a number of intervals.
– Interval Range: Send specified bookmark intervals. This option supports both positive
and negative numbers. Negative numbers are relative to the last bookmark interval in
the file. -1 represents the last interval.
• Append Rule Name to Job Name: Defines whether the rule name is appended to the job name
when a rule triggers a split operation.
• Maintain Sub Job Order: The split produces the sub job order, and it is maintained throughout
the Workflow.
• Job Ticket Updates
JJooiinn
The Join component concatenates jobs in a Job Group into a single job. If jobs in a job group process
through multiple execution paths, Join concatenates all jobs in the execution path that includes the
Join component. Jobs are joined based on the order defined in the Job Group Sequence Behavior.
Join supports Job Ticket Updates.
Join and PDF/VT jobs
While joining PDF/VT and PDF files, the PDF files are joined as a record within a PDF/VT file. Ensure
that the PDF file is PDF/X-4 compliant.
54
Xerox®FreeFlow®Core
Help
Page 55

Workflow Setup
The resultant PDF on joining PF/X-4 files is PDF/VT, with each PDF file defined as a record.
CCoolloorr SSpplliitt
The Color Split component separates jobs into color and monochrome jobs that can be reassembled
either manually or at the printer. The Color Split component generates a Job Group with a
monochrome and a color job.
• Color Insert Handling: Defines how to adjust the monochrome print ticket based on the expected
assembly of the mono and color jobs.
– Merge In Printer: To enable insertion of split color pages at the printer, the monochrome job
ticket is adjusted.
– Merge Manually: To enable manual insertion of split color pages, the monochrome job ticket
is adjusted. Each contiguous set of color pages is replaced with a single-sheet insert in the
monochrome job.
• Monochrome Job
Color Insert Stock
Defines the Stock Name to use for the sheet inserts that represent the color pages that were
removed from the job.
• Color Job
Append “Color Inserts” to Job Name
Defines how a file is renamed for the Color Insert job.
• Page Selection
– Check Color Coverage: Determines whether to evaluate color coverage when you determine
whether a page is color or monochrome. If you do not select the check box for Check Color
Coverage, A page with any color pixels is specified as a color page.
– Minimum Color Coverage: Defines how the color content coverage threshold is used to
determine if a page can be added to the color job.
Note: Coverage is rounded upward. When the Minimum Color Coverage is set to
1%, pages with any color content are added to the color job. Setting the Minimum
Color Coverage to 1% is significantly faster than other selections.
– PDF Box: Constrains the Minimum Color Coverage evaluation to the selected PDF Box when
the Minimum Coverage Threshold is above 1%.
– Use Job Ticket Settings: Determines whether to evaluate the job print ticket when you
determine which PDF pages are assumed to be on the same sheet. If monochrome PDF pages
are considered to be on the same sheet as a color page, they are added to the color job.
– Sides Imaged: Defines whether the print is 1-sided or 2-sided when you determine which PDF
pages are on the same sheet.
Note: The Sides Imaged setting overrides the setting for 1-sided or 2-sided printing
as defined in the job ticket, unless the job ticket is set to use the Sides Imaged Job
Property.
– Job Ticket Updates
Xerox
®
FreeFlow®Core
55
Help
Page 56

Workflow Setup
RReevviieeww
The Review component provides the capability to pause a job and send the job information to a designated recipient for review. After review, the job can be released in the Job Management user interface.
Name
Defines a descriptive name for the Review node.
Sender
Defines the email address of the sender of the review email. If you have set up email addresses in
the User Access component, you can select from the list of email addresses in the Sender area.
Alternatively, you can add the required email addresses in the Additional Sender Address or To
(separate addresses with semicolons) text fields.
Enable Subject Line
Defines the email title information to be sent.
Message Content
Defines the information to send within an email.
Allow Job to Continue
This option enables the job to continue processing, even if there is a problem sending the review
email.
EExxtteerrnnaall
The External component allows you to integrate third-party software products into Xerox®FreeFlow Core workflows.
When Type is set to Script, when the system executes the workflow component, it performs a CLI
call. The CLI call concatenates the following attributes:
• The URI defined in the script. The following URI formats are supported:
– script.xxx (Sandbox Location)
– <drive letter>:\folder\script.xxx
• The text string is defined in the Parameters field.
Carriage returns are removed automatically from the Parameters field.
Note: Variables unique to the external process component are listed in the External Process
Node Variables section of Job Properties.
®
Xerox
• If the exit code is a value other than 0, the job fails.
FreeFlow®Core determines the job status based on the script exit code.
®
• If the exit code is 0, the job completes.
• If the script does not explicitly return an exit code, the default value is returned. The default value
is 0.
When a job completes, a PDF is named according to the name defined in $FFin$, in the location
defined by $FFout$. The PDF is used as the job document. Otherwise, the current document is used.
56
Xerox®FreeFlow®Core
Help
Page 57

Workflow Setup
Each time a script executes, Xerox®FreeFlow®Connect archives the contents of the stdout and
stderr folders to XML files in the sandbox, in the External Process Status subfolder of the
Scripts folder. The folder is accessible using the server file system.
To save the job to the Input to External Process folder, set Type to Hot Folder. When the
submitted file is received in the Output from External Process folder, the job continues
processing.
The Send the current ticket to the external process selection sends the current Xerox
®
Programming
Information Format (XPIF) ticket for the job to the external process.
Note: If the Xerox®Programming Information Format (XPIF) ticket is sent to the Hot Folder
external process, the XPIF ticket is returned with the job file before the job continues
processing.
The Timeout selection defines the number of seconds to wait before it is assumed that there was a
problem with the external process.
The External component includes an option to collect job documents. For information, refer to Collect
Job Documents. To enable the Collect Job Documents option, hover over the External component.
From the menu that appears, access the Workflow Canvas area, then make your selections.
To ensure that job group variables do not change while processing the jobs in the Job Group, the
Collect Job Documents option is enabled.
The External node has an option to specify more FreeFlow Core variables. To view the list of these
variables, select the Search icon. You can pass and update these variables using the specified script.
PPrriinntt
The Print component allows you to submit jobs to IPP-based Printer Destinations.
The Print components can:
• Send All Jobs to a Single Printer
• Select the Printer Based on Job Characteristics: Jobs are sent to a Printer Destination using the
Routing Common Controls.
• Distribute Jobs Between Selected Printer Destinations: Jobs are distributed between defined
Printer Destinations. To select a Printer Distribution, select one of the following options:
– Selecting The Next Available (Round Robin): To select between the defined printer
destinations, use round-robin scheduling. If Job Submission Regulation is enabled, jobs are
not distributed to Printer Destinations for which job submission has been suspended.
– Selecting The First Available: Send jobs to the first Printer Destination in the list for which
job submission has not been suspended by Job Submission Regulation.
The Pause Job Before Sending to Printer option pauses jobs in Xerox
jobs reach the Printer component.
If the Pause Job Before Sending to Printer option is enabled, the job resumes using the Job Status
user interface or a JMF ResumeQueueEntry signal.
®
FreeFlow®Core when the
The Print component includes an option to Collect Job Documents. This option is enabled from the menu that appears when you hover over the Print component in the Workflow Canvas area.
To submit jobs to the print server in the order defined in the Job Group Sequence Behavior, the Print
component enables the Collect Job Documents option.
®
Xerox
FreeFlow®Core
Help
57
Page 58

Workflow Setup
Note: If you are printing to a print server with the Collect Job Documents option enabled,
FreeFlow Core uses a single Printer Destination for all connections to that print server. The
Printer Destination is shared by all Print presets that submit to print server.
Printer Destination
• Name of Printer Destination: Defines a descriptive name for the Printer Destination.
• Printer: Determines whether to create a printer destination using an existing printer or a new
printer.
• Name: Defines a name for the printer. If a name is not defined, the Model information retrieved
from the print server is used as the name of the printer in the Printers list.
• DNS Name or IP Address: Defines the hostname or IP address for the print server. If the printer
supports JDF/JMF connectivity, the JMF port number :<JMF port number> is appended to the
hostname or IP address. For example: xxx.xxx.xxx.xxx:8010.
• Get Printer Info: Retrieves printer capabilities from the print server. This information is used to
populate the printer description, the list of queues, if any, and the job ticketing options.
– If available printer options change, to retrieve updated capabilities from the print server, you
can select Refresh Printer Info on an existing printer.
– For example, if the media library is changed or an output destination is added to the printer
configuration.
Tip: Print server queues that are not accepting jobs do not appear in the list of returned
queues.
Note: When you connect to a Fiery print server, ensure that one of the default queues of print,
hold, or direct is enabled.
Ensure that the following protocols are enabled in the print server:
• IPP Printing: Enables the retrieval of supported job ticketing and print submission.
• JDF Printing: Enables retrieval of supported job ticketing and print submission.
– JDF Printing is supported for printers that use an EFI
®
Fiery®print server.
– To enable JDF printing, on the Fiery controller, install the Fiery Productivity Pack.
– After you install the productivity pack, in the Server menu, invoke Free Flow
®
Core
®
Configure. To configure the JDF settings in the Job Submission section, use the Fiery
Command Workstation.
– After you enable JDF printing, to add virtual printers and configure Job Ticket Defaults, use
Device Center.
– When FreeFlow Core retrieves Printer Info, the virtual printers created at the EFI
®
Fiery
®
controller appear as Print server queues.
• LPR Printing: Enables print submission, does not provide for retrieval for supported job ticketing.
• SNMP: Enables device type discovery using the Standard Device Description.
• XBDS: To fetch the capabilities of office and production DMP printers, ensure that the XBDS
protocol is enabled on the printer.
After Xerox
®
FreeFlow®Core retrieves Printer Info, the following options become available:
• Printer Queue Name: Name of the queue to use for job submission.
58
Xerox®FreeFlow®Core
Help
Page 59

Workflow Setup
Note: This option is available for print servers that support multiple queues only.
• Define Job Ticket Defaults: Enables the use of default job ticket settings for print submission.
• Secure Printing: Enables the use of Secure IPP for print submission.
Before you do Secure Printing, download a certificate from the print server using the FreeFlow
®
Core
Certificates utility. Secure Printing requires a print server with SSL/TSL enabled.
Note: Secure Printing is supported on Xerox®FreeFlow®Print Servers and EFI®Fiery®print
servers.
Printer Job Ticketing
Printer job ticketing defaults are defined in the Xerox®FreeFlow®Core Printer Destinations.
To access the job ticket settings, click Apply Job Ticket Settings→
Edit Job Ticket Settings.
Setup Tab
• Job Name: Defines the jobs name in the print server. For job groups, the sub-job names define the
print server job name, not the job group name.
• Quantity: Defines the number of copies for the job. The option to use printer default overrides the
nominal precedence so that the Xerox
®
FreeFlow®Core default quantity and the quantity in
incoming job tickets is ignored.
• Main Stock: List is based on the current stock library of the print server. When you hover over the
stock name, a tool tip appears that shows the Stock properties retrieved from the print server.
Stocks loaded in the printer trays are marked with a
icon.
• Sides Imaged: Defines whether the printer is programmed for Simplex or Duplex mode of
printing.
• Color: Defines the color mode used for printing.
• Collation: Defines the page sequence used for printing.
• Output Order: Defines the print order and face orientation used for printing.
• Output Location: Defines the destination for printed sheets.
• Slip Sheets: Defines the insertion of blank sheets between sets when printing.
• Offset: Defines when to change the output position of the printed stack.
• Number of Leading Banner Pages: Defines the number of pages in the PDF, starting with the
first page, which is treated as a banner page by the print server.
• Sender: Defines the Sender Name in the print server.
Xerox
®
FreeFlow®Core
59
Help
Page 60

Workflow Setup
Exceptions Tab
Exception Pages: Defines stock, plex and color mode for specific pages within a job. Exception
Pages supports negative page numbers. If needed, negative numbers are converted to the
appropriate positive numbers when sending the job to the print server.
Inserts Tab
Sheet Inserts: Defines printer sheet inserts, for example, a blank piece of paper or a pre-printed page,
that are inserted between printed pages in a job. Sheet Inserts supports negative page numbers. If
needed, negative numbers are converted to the appropriate positive numbers when sending the job
to the print server.
Note: Page ranges for Sheet Inserts and Exception Pages start with the first page in the PDF.
This enables page exceptions and sheet inserts on Leading Banner Pages. However, this also
means that page ranges must compensate for the number of Leading Banner Pages in the
document.
Finishing Tab
• Finishing Orientation: Defines whether the finishing options apply to portrait or landscape pages.
• Finishing: Defines the available finishing on the print server. The following integrated finishing
operations are supported:
– Stapling
– Hole Punching
– Folding
– Booklet Making
– Multiple Finishing
– DFA Finishing Profiles
– Custom DFA Finishing Profiles
Job Submission Methods and Job Ticketing
The default Printer Destination job ticketing values can be overridden during job submission. Different
submission mechanisms support different levels of job ticketing:
• Job Submission Client: All Printer Destination job ticketing using Job file + XPIF upload. Quantity
and Main Stock overrides.
• LPR: Printer Destination job ticketing using a concatenated file or using LPR arguments.
• JMF: Printer Destination job ticketing using JDF.
• Hot Folder: All Printer Destination job ticketing using XPIF.
• MAX: All available Printer Destination job ticketing options using a manifest field referencing an
XPIF file. Quantity and Main Stock use manifest columns.
– Finishing, Special Pages, or Sheet Inserts defined using XPIF or JDF replace all Finishing,
Special Pages, or Sheet Inserts defined in the default job ticket.
– Job ticketing supports the print ticketing attributes available in the Printer Destination in
addition to media attributes. Other job ticketing attributes are not supported.
60
Xerox®FreeFlow®Core
Help
Page 61

Workflow Setup
FFiinniisshh
Finisher Destinations saves a JDF layout description of the Xerox®FreeFlow®Core job.
The Finish component can Send All Jobs to a Single Finisher or use the Routing Common Controls
to Select the Finisher Based on Job Characteristics.
Pause Job Before Sending to Finisher pauses jobs in Xerox Finish component. If this option is enabled, the job must be resumed using either the Job Status UI or a JMF ResumeQueueEntry signal.
Two types of finisher presets are available:
• Inline finishers: Generates a JDF that contains the Xerox
required for Ultimate Bindery to release the held Xerox
finisher is properly configured.
• Offline finishers: Generates a JDF without the Xerox
®
FreeFlow®Core when they reach the
®
FreeFlow®Core print server job ID
®
FreeFlow®Core print server job after the
®
FreeFlow®Core print server job ID.
Note: Ultimate Bindery processes jobs using a FIFO queue. This ensures that the job group
order defined during job submission to Xerox
®
FreeFlow®Core is retained when finishing jobs.
Finisher Destination
• JDF Location: Document Selection Common Controls
• Media Weight: Defines the media weight used by the finisher to fine-tune paper handling.
• Source Tray: Defines the tray to use for feeding the job when you use the Bourg Sheet Feeder.
• Sheet Inserts: Defines the trays to use for finisher sheet inserts when you use the Bourg Sheet
Feeder.
The Bourg Sheet Feeder supports the following Source Tray values:
• Printer: For sheets that go through the Print Engine Bypass.
• Tray-1: For sheets fed out of the top Tray in the Bourg Sheet Feeder.
• Tray-2: For sheets fed out of the High Pile bottom tray in the Bourg Sheet Feeder.
The Finish component includes an option to Collect Job Documents. The option is enabled from the
menu that appears when you hover your mouse over the Finish component in the Workflow Canvas
area.
To save JDF files based on the order defined in the Job Group Sequence Behavior, the Finish
component enables the Collect Job Documents option.
SSaavvee
The Save feature saves a copy of the job file to the defined File Location.
• File Location: Document Selection Common Controls.
Note: Requires a URI that supports write access.
• To name the file that you want to save, click File Name.
• For the Job Ticket to Save feature, select an opton:
Xerox
®
FreeFlow®Core
61
Help
Page 62

Workflow Setup
– Don’t Save the Job Ticket: Do not save a job ticket.
– Submitted Job Ticket: Saves the job ticket as it is consumed during job submission, but
before it is modified by the workflow.
– Workflow Job Ticket: Save the job ticket as it is modified by the workflow.
• The Save Job Ticket As feature determines whether to save an XPIF or a JDF job ticket.
• The When Setting The PDF Location in the JDF feature determines the URI scheme to use for
the reference to the PDF, within the saved JDF.
The Save component includes an option to Collect Job Documents. This option is enabled from the
menu that appears when you hover over the Save component in the Workflow Canvas area.
To save jobs based on the order defined in the Job Group Sequence Behavior, the Save component
enables the Collect Job Documents option.
WWoorrkkffllooww PPrroocceessss CCoommmmoonn CCoonnttrroollss
Workflow processes include common controls whose behavior is defined globally. These controls, if
used by the workflow process, will always have coherent behavior.
RRoouuttiinngg CCoommmmoonn CCoonnttrroollss
Hot Folders can send jobs to a specific workflow based on job characteristics. Based on job
characteristics, the Route component can send jobs to a specific workflow execution path, or the Print
and Finish components can send jobs to a specific destination.
These tasks are accomplished by defining routing rules composed of the following:
• Job Characteristics: Define checks of job properties that must be true for the routing rule to be
considered true.
• Job Destination: If the job characteristics are true, then the job is sent to the associated
destination. Job Destinations are as follows:
– Workflows: Used with Hot Folder job routing.
– Workflow execution paths: Used with the Route component.
– Printer Destinations: Used with Print component job routing.
– Finisher Destinations: Used with Finish component job routing.
Routing rules are evaluated in the order in which they are defined in the routing common control. The
routing rules are evaluated until the job matches the specified Job Characteristics.
Job Characteristic Presets
The job characteristic presets define the job conditions that must be true for a routing rule to be true.
An example of a condition: Quantity is less than 1000.
This condition will be true if the defined job property (Quantity) is less than 1000.
Within the job characteristic preset, conditions are grouped into sets. The user can define whether All
Conditions in the Set Must be Met or Any Condition in the Set May be Met in order for the set to
be considered true.
Similarly, the job characteristics preset can contain multiple sets of conditions. The user can define
62
Xerox®FreeFlow®Core
Help
Page 63

Workflow Setup
whether All Sets Must be Met or Any Set May be Met in order for the job characteristics preset to be
considered true.
Each set can contain up to 25 conditions. Each job characteristics preset can contain up to three sets
of conditions.
Job Properties
The job properties defined in the job characteristic presets are evaluated differently depending on
their types:
• Numbers are evaluated using the following variables:
– is equal to
– is greater than
– is greater than or equal to
– is less than
– is less than or equal to
– is not equal to
– is a multiple of
– is not a multiple of
• Text is evaluated using the following variables:
– contains
– does not contain
– is equal to
– starts with
– ends with
– is not equal to
– is blank
– is not blank
Note: When Text is selected, a new check box Make Text Comparison case-insensitive
is available. When you select check box for Make Text Comparison case-insensitive,
text comparison is done, even if the text is case insensitive.
• Sizes are evaluated using the following variables:
– is equal to
– is not equal to
– fits into
– does not fit into
– fits between
– does not fit between
Dimensions for the fits into/does not fit into checks ignore orientation. For example, Width: 11,
Height: 17 with Units set to Inches fit 11 x 17 inch and 17 x 11-inch documents.
®
Xerox
FreeFlow®Core
Help
63
Page 64

Workflow Setup
Selection of Any for a 2-dimensional size results in the specified dimension not being evaluated.
• Enumerations are evaluated using the following variables:
– is
– is not
• Finishing enumeration is evaluated using the following variables:
– Includes
– Does not Include
• Boolean enumerations are evaluated using the following variables:
– is equal to
– is not equal to
Note: Boolean enumerations always have a value of True or False.
For a complete list of variables, refer to Job Properties.
Printer Related Properties
Job properties can evaluate job information against information retrieved from a Printer. The
following options are supported.
• Main Stock is:
– loaded on device
– not loaded on device
– available on device
– not available on device
Note: A device returns information about loaded media if the Main Stock list in the
Printer Destination default job ticket setting includes media with a green checkbox next
to the name.
• Finishing is:
– supported on device
– not supported on device
• Printer Destination Status:
– equals on device <status>
– not equals on device <status>
Note: Printer Destination status values represent specific states as seen in the Printer
Management and Status.
For a complete listing of variables, refer to Job Properties.
PPaaggee SSeelleeccttiioonn CCoommmmoonn CCoonnttrroollss
These controls allow the user to define rules that are used to determine the document pages
impacted by a workflow process. The pages affected by a workflow process must meet all the criteria
specified in the Page Selection and Apply Only to Pages controls.
64
Xerox®FreeFlow®Core
Help
Page 65

Workflow Setup
• Page Selection: Defines the pages that are modified by the workflow process.
– All Pages: Modify all pages in the document.
– Page Intervals: Modify every N pages starting with the defined page number.
– Page Range: Modify specified pages. Supports both positive and negative numbers. Negative
numbers are relative to the last page of the document with page -1 representing the last
page of the document.
• Apply Only to Pages: Creates subsets of the the defined Page Selection to pages that match the
selected properties:
– Orientation: Landscape or Portrait
– Parity: Odd or Even
– Size: Size comparisons from Routing Common Controls
– Bookmarks: Text comparison from Routing Common Controls
• Apply to Each Variable Data Record: Defines whether the Page Selections defined in the
common control apply to PDF/VT files or to each record within PDF/VT files.
CCoonntteenntt PPllaacceemmeenntt CCoommmmoonn CCoonnttrroollss
This feature allows the user to define rules that are used to determine the coordinates for placing
content on the document.
• Rotation: Defines clockwise rotation of content to be placed on the page.
• Position Relative To: Defines the PDF box to use as the basis for evaluating the alignment rules in
other content placement common controls. The selection of the PDF box is based on the PDF Box
Selection Behavior.
Note: The label for this common control is customized to the process. So, for example,
the label is Resize Relative To in the Resize process.
• Horizontal Alignment, Vertical Alignment: Alignment controls define how content is placed on
the target area of the document. Left and Right alignment aligns content based on the input
document edges. Binding Edge and Non-Binding Edge aligns content based on the sheet edges.
• Horizontal Offset, Vertical Offset: Adjustment to the nominal content placement resulting from
evaluation of other content placement common controls. This option supports positive and
negative values. Positive values offset content in the specified direction. Negative values offset
content in the direction opposite of the specified direction. This option supports use of Workflow
Process Number Variables.
• Horizontal Direction, Vertical Direction: Specifies whether content is aligned to the inside or the
outside of the selected PDF box.
TTeexxtt aanndd PPaarraaggrraapphh FFoorrmmaattttiinngg CCoommmmoonn CCoonnttrroollss
This option allows the user to define text and paragraph formatting options.
• Font: Provides a list of fonts installed on the Xerox
Note: To add more fonts, install them in the operating system, then restart the server.
• Size: Defines the size of the font.
®
FreeFlow®Core server.
Xerox
®
FreeFlow®Core
65
Help
Page 66

Workflow Setup
• Color: Defines the color of the font. Custom colors can be added to the list of available colors.
Custom colors can be defined as CMYK, RGB, Grayscale, or Spot colors.
• Text Alignment: Defines the alignment for a block of text.
– None: Aligns text based on the horizontal alignment defined in the Content Placement
Common Controls.
– Left, Right, Center Align: Overrides the text alignment that is defined implicitly in the
Content Placement Common Controls.
– Justify: When using a width other than Zero, this option wraps text at the defined width and
spaces the text so it is aligned to both sides of the paragraph.
– Fit: When using a width other than Zero, this option decreases the font size, if needed, to
ensure all text fits within the specified width. Alignment of the block of text is based on the
alignment in the Content Placement Common Controls.
– Compress: When using a width other than Zero, this option scales text horizontally, if needed,
to ensure all text fits within the specified width. Alignment of the block of text is based on the
alignment in the Content Placement Common Controls.
Note: Text is not compressed to less than 10% of the original width.
• Width: Defines a width for the text watermark. When the width is a value other than zero, the
text wraps at the width distance.
• Line Spacing: Defines vertical space between lines in a paragraph.
CCoonntteenntt SSccaalliinngg CCoommmmoonn CCoonnttrroollss
These controls allow the user to specify how content is scaled to fit into a target area of the
document.
• None: Content is placed without scaling.
• Fit: Scales content proportionally to fit the target area.
• Uniform Fill: Scales content proportionally to fill entire target area.
• Stretch Fit: Scales content anamorphically to fill entire target area.
66
Xerox®FreeFlow®Core
Help
Page 67

Workflow Setup
• Fit Width: Scales content proportionally to fill width of target area.
• Fit Height: Scales content proportionally to fill height of target area.
• Width, Height: Defines the dimensions of the target area for scaling.
– For Imposition, the Press Sheet Size is used to define the target Width and Height.
– For Resize using Offsets, the Resize Relative To selection and the Offset values are used to
define the target Width and Height.
DDooccuummeenntt SSeelleeccttiioonn CCoommmmoonn CCoonnttrroollss
These controls allow you to specify the location (URI) for file system operations. The following URI
types are available:
• Xerox
®
FreeFlow®Core Sandbox: Available when you select the sandbox in the Location
dialog.
For example, MyFile.pdf.
• Local Path: To access, type the path in the location field. Ensure that the path is a valid URI that
points to a local drive in the Xerox
®
FreeFlow®Core server.
For example, C:\MyFile.pdf.
• UNC: To access, type the path in the location field. Ensure that the path is a valid URI that points
to a shared windows folder.
For example, \\Server\MyFile.pdf.
Note: By default, the Xerox®FreeFlow®Core service runs as the Local System account.
Access to network resources requires additional configuration. For more information,
refer to the Xerox
®
FreeFlow®Core Installation Guide.
FTP: To access, type the path in the location field. Ensure that the URI is URL-encoded and the
credentials are in the URI. FTP access is read only.
For example, ftp://user:password@Server/MyFile.pdf.
• SFTP: To access, type the path in the location field. Ensure that the URI is URL-encoded and the
credentials are in the URI. SFTP access is read only. Xerox
®
FreeFlow®Core also supports
certificates, private keys, and SSH fingerprint keys.
• For example, http://sftpuser:password@Server/MyFile.pdf.
• HTTP: To access, type the path in the location field. Ensure that the URI is URL-encoded and the
credentials are in the URI. Only HTTP basic authentication is supported. HTTP access is read only.
For example, http://user:password@Server/MyFile.pdf.
• HTTPS: To access, type the path in the location field. Ensure that the URI is URL-encoded and the
®
credentials are in the URI. HTTPS access is read only. Xerox
FreeFlow®Core also supports
certificates, private keys, and SSH fingerprint keys.
• For example, ftp://httpsuser:password@Server/MyFile.pdf.
®
Xerox
FreeFlow®Core
Help
67
Page 68

Workflow Setup
PPDDFF BBooxx SSeelleeccttiioonn BBeehhaavviioorr
If the selected PDF box is not defined in the PDF, the component falls back to using another PDF box
as follows:
• The ArtBox falls back to the TrimBox.
• The TrimBox falls back to the BleedBox.
• The BleedBox falls back to the CropBox.
• The CropBox falls back to the MediaBox.
JJoobb GGrroouupp SSeeqquueennccee BBeehhaavviioorr
The sequence of jobs in a Job Group is based on the following:
• Submit Job: Jobs are sequenced in the order in which they appear in the Submit Job Dialog
Document List.
• Manifest Jobs: Jobs are sequenced in the order in which they appear within the Manifest. Refer
to: Manifest Automation from Xerox Setup.
• JMF Jobs: Jobs are sequenced in the order in which they appear within the Run List in the JDF submitted during Job Group Sequence Behavior.
• Zip files: Jobs are sequenced alphabetically based on their filenames.
• Split Jobs: When splitting a job, the resultant jobs are sequenced based on the order of the Rules
table in the Split component.
• Split jobs in a job group: When splitting a jobs in a job group, additional jobs are sequenced
based on the order of the Rules table in the split component. In addition, these additional jobs are
sequenced after the job from which the additional job was created.
WWoorrkkffllooww PPrroocceessss VVaarriiaabblleess
All components support use of process variables as part of their configuration.
To use a process variable, type in the variable name as part of the content in a text field. Runtime
variables are evaluated and replaced with their current value during execution.
For example, a barcode or watermark preset with the variable $FFwfjob.Id$ results in the addition of
a barcode or watermark that contains the Xerox
Note: Newline control characters, \n and \r\n, are replaced by carriage returns for settings that
support carriage returns.
The units for localized variables such as $FFwfjob.documentWidth$ are defined during startup by
reading the Measurement System configuration in the Region and Language control panel of the
®
Xerox
For a complete list of variables, refer to Job Properties .
FreeFlow®Core server.
®
FreeFlow®Core job ID of the job.
PPrroocceessss VVaarriiaabbllee OOppeerraattiioonnss
You can manipulate the value from a variable using one of the following operations:
68
Xerox®FreeFlow®Core
Help
Page 69

String Operations
• Substring: $FF<variable name>.substring(x,y)$
– x - start position: The first character occupies position 0
– y - number of characters
Examples: Variable = wfJob.JobName, Value = Abecedaria
$FFwfJob.jobName.substring(5)$ daria
$FFwfJob.jobName.substring(0,4)$ Abec
$FFwfJob.JobName.substring(-3,2)$ ri
• Trim: $FF<variable name>.ltrim(x)$; $FF<variable name>.rtrim(x)$
– x - character up to which to trim.
Examples: Variable = wfJob.JobName, Value = Abecedaria
$FFwfJob.jobName.Itrim()$ Abecedaria
$FFwfJob.jobName.Itrim()$ Abecedaria
$FFwfJob.jobName.Itrim(d)$ aria
Workflow Setup
$FFwfJob.jobName.rtrim(d)$ Abece
Number Operations
• Pad: $FF<variable name>.pad(x)$
– x - number of digits
Examples: Variable = wfDoc.Pages, Value = 1
$wfDoc.Pages.pad(5)$ 00001
• Format: $FF<variable name>.numberFormat(a,b,c,d)$
– a - units, mm and in.
– b - number of integers
– c - number of fractionals
– d - include radix and separators true, false
Examples: Variable = wfDoc.documentWidth, Value = 8.5in
Numbers are stored using an internal unit of measure.
$FFwfdoc.documentWidth.numberFormat(mm,4,2,false)$ 021590
$FFwfdoc.documentWidth.numberFormat(mm,4,2,true)$ 0,215.90
$FFwfdoc.documentWidth.numberFormat(in,4,2,true)$ 0,008.50
$FFwfdoc.documentWidth.numberFormat(in,4,2,false)$ 000850
Xerox
®
FreeFlow®Core
69
Help
Page 70

Workflow Setup
New Process Variable Operations
Format: $FFtimeStamp.Format(a,b,c,d,e,f,g,h,i)$
• a - include milliseconds true/false
• b - month before date true/false
• c - date separator. For example, the format using a comma as separator is March 30, 2020
• d - Month format num/numpad/3lettertext/fullmonthtext. For example: 3/03/Mar/March
• e - Hour format num/numpad. For example: 7/07
• f - AM/PM true/false – if false use 24 hour clock values
• g - full year true/false
• h- optional, UTC offset time in the format of +/- HH:MM
• i- optional, true/false. True results in the additional text of UTC offset with an offset value defined
for the h option
The date precedes the current time and requires the substring operation to be enabled on the output.
For example, March 10, 2014 7:21:15.206 PM:
$FFtimeStamp.Format(true,true,-,numpad,num, true, true)$ 03-10-2014 7:21:15.206 PM
$FFtimeStamp.Format(false,true,/,numpad,numpad, false, false)$ 03/10/14 19:21:10
$FFtimeStamp.Format(false,true,‘,’,numpad,numpad, true, false).substring(-4,4)$ 1 PM
$FFtimeStamp.Format(true,true,-,numpad,num, true, true,-05:00, true)$ 03-10-2014
7:21:15.206 PM UTC offset -05:00
Array Operations
• Join: $FF<variable name>.join(x)$
– x - separator character
Examples: Variable = joinedJobNames, Value = array with Job n
$FFwfJobjoinedJobNames(,)$ Job 1,Job 2,Job 3,...
$FFwfJobjoinedJobNames(\r\n)$
Job 1
Job 2
Job 3
• Range: $FF<variable name>.range(a,b).join(x)$
– a - start array item
– b - number of array items
Examples: Variable = joinedJobNames, Value = array with Job n
$FFjoinedJobNames.range(0,2).join(,)$ Job 1,Job 2
The following variables do not support variable operations:
70
Xerox®FreeFlow®Core
Help
Page 71

Workflow Setup
– $FFwfjob.PDFVTRecordNumber$
– $FFwfjob.PDFVTNumberOfRecords$
– $FFwfjob.PDFVTPagesInRecord$
– $FFwfjob.PDFVTSheetNumberInRecord$
– $FFwfjob.PDFVTSheetsInRecord$
– $FFtimeStamp$
– $FFwfDoc.totalNumberedPages$
– $FFwfdoc.ColorantNames$
– $FFwfdoc.CurrentBookmark$
WWoorrkkffllooww PPrroocceessss NNuummbbeerr VVaarriiaabblleess
Number settings can support the use of process variables as part of their configuration. Number
settings that support process variables include a menu that lists available variables.
These variables include Number MAX variables and, sometimes, additional variables are applicable to
the specific setting.
If the selected variable is undefined for a given job, the Default Value setting defines a fixed value
that can be used
PPrroocceessss NNuummbbeerr VVaarriiaabbllee CCaallccuullaattiioonnss
Number settings can support calculated values as part of their configuration. Calculated values can
be defined using arithmetic formulas. The following operations are supported:
• Addition
• Subtraction
• Multiplication
• Division
• Parentheses to change the order of operations
In addition, the formula can also include other Process Variables.
Xerox
®
FreeFlow®Core
Help
71
Page 72

Workflow Setup
Example: ($FFwfdoc.pages$ / 2) + 1
If the selected variable is undefined for a given job, the Default Value setting defines a fixed value to
use. For calculated values, there is a Round Up option, which calculates the values that contain
decimals rounding up to the nearest integer. If the Round Up option is not selected, decimals values
are truncated.
72
Xerox®FreeFlow®Core
Help
Page 73

Workflow Setup
Job Ticket Updates
Workflow components that support job ticket updates will modify both the job file and ticket. The
ticket is modified to ensure exceptions and sheet inserts reference the original job page as the
number of job pages changes due to component processing.
Job Ticket Updates are supported for the following:
• Covers
• Stock Exceptions
• Sides Imaged Exceptions
• Color Exceptions
• Chapter Starts
• Sheet Inserts
Xerox
®
FreeFlow®Core
73
Help
Page 74

Workflow Setup
74
Xerox®FreeFlow®Core
Help
Page 75

6
Administration
This chapter contains:
• Job Submission Configurations................................... ......................... ......................... .............. 76
• Hot Folder Setup .................................... . ...................... .. ....................... ......................... ........... 77
• Region Tab................. ....................... .. ....................... ......................... ......................... .............. 82
• Security Tab .............................. ........................ ....................... .. ....................... ......................... 83
• LPD Gateway .... ........................ . ........................ ......................... ......................... ...................... 84
• JMF Gateway .............. ........................ ....................... .. ....................... ......................... .............. 91
• Command Line Interface (CLI) ......... ......................... ........................ . ...................... .. ................ 92
Xerox®FreeFlow®Core
Help
75
Page 76
Administration
Job Submission Configurations
Xerox®FreeFlow®Core is fully configurable, with individual modules offering greater control over the
workflow and the flexibility to add the components that are suited best to your needs. Certain
features are not available depending on the product configuration purchased.
The table that follows defines the features that are available for each product configuration. The
®
Xerox
FreeFlow®Core Base module is required. Optional modules provide more capabilities.
Component
Hot Folder
LPD/LPR
LPD/LPR Routing
JMF/JDF
JMF Routing
JMF plus JDF XSLT
Hot Folder Scripting
Hot Folder Routing
Manifest Automation
from Xerox (MAX)
®
Xerox
FreeFlow
Core Base
®
Advanced Prepress
Advanced Automation
76
Xerox®FreeFlow®Core
Help
Page 77

Administration
Hot Folder Setup
Hot Folder Setup allows administrators to define hot folders and associate them with an existing
workflow.
Hot Folders are used to process both supported job files and manifests. Job files submitted to a hot
folder are associated with a Xerox
naming conventions:
• For a document, use filename.ext
• For a print ticket, use filename.ext.xpf
Input Hot Folder Name defines the name for the hot folder configuration.
The Hot Folder Location is a location where job files are monitored. The following Universal Resource
Identifier (URI) formats are supported:
• Folder (Sandbox Location)
• <drive letter>:\folder\
• \\server\share\folder\
Note: When defining Hot Folder Locations within Windows Shared Folders, the Hot Folder
Location uses a folder within the shared directory.
Job Priority defines the priority for jobs submitted to the workflow. For more information about
job priority, refer to the Submit Job Dialog.
®
Programming Information Format job ticket, using the following
SSccrriippttiinngg
When the Hot Folder option to Execute Script Prior to Workflow is enabled, the system issues a CLI
call in response to retrieving a file in the Hot Folder. The CLI call concatenates the following
attributes:
• The URI defined in the Script. The following URI formats are supported:
– script.xxx (Sandbox Location)
– <drive letter>:\folder\script.xxx
• The text string defined in the Parameters. This field has two predefined variables:
– $FFin$ the URI of the file that was put into the Hot Folder
– $FFout$ the URI of the folder where the script is to output a valid job file
Note: Other variables are not supported in the Hot Folder Scripting tab.
Each time a script executes, Xerox
XML files in the Manifest Status subfolder of the Hot Folder. This subfolder is accessible using the
filesystem of the host.
Note: When scripting is enabled the Hot Folder will accept files of any type. However, the
output file from the script must be a file type supported by Xerox
must be placed in the location defined by the $FFout$ variable.
®
FreeFlow®Core archives the contents of stdout and stderr to
®
FreeFlow®Core. The file
®
Xerox
FreeFlow®Core
Help
77
Page 78

Administration
XXSSLLTT PPrroocceessssiinngg ooff HHoott FFoollddeerr JJoobbss
The XSLT processor used for transforming JDF job tickets is available also using a command line
application. This command line application can be used along with hot folder scripting to transform
an XML file into a manifest, for example.
To invoke the XSLTprocessor from a hot folder, enable scripting in the hot folder and do the following:
• Set <Xerox
value in the Script field.
• Append the location of an XML stylesheet to the default $FFin$, $FFout$/File.txt variables in the
Parameters field.
®
FreeFlow®Core installation directory>\transformXML.bat as the
Note: If the transformXML.bat file is moved from the Xerox®FreeFlow®Core
installation directory, the file does not function properly.
WWoorrkkffllooww DDeessttiinnaattiioonnss
Hot Folders can send jobs to a specific workflow destination or select a workflow destination based on
job characteristics. The workflow destinations can be a Pass Through destination.
To select workflow destinations, use the Routing Common Controls.
When Select Workflow Based on Job Characteristics is enabled, the Hot Folder Options selection
allows the user to define PS, VIPP, and PDF Generation Options for jobs submitted to the workflow.
MMaanniiffeesstt AAuuttoommaattiioonn ffrroomm XXeerrooxx SSeettuupp
Manifest Automation from Xerox connects the order-management system of the print provider, print
MIS, or other Web to Print systems with automated print production. Manifest Automation from
Xerox simplifies integration by enabling hot folder submission of order information using a delimited
file, the manifest: .csv and .txt.
During manifest processing, Xerox
Note: Rows starting with a pound sign are not processed.
The manifest information in each row is mapped to job metadata based on the Manifest Automation from the Xerox Setup configuration. The files listed in a manifest are submitted to a workflow based on the Hot Folder Workflow Destinations settings.
Manifest Automation from Xerox configurations is associated with individual hot folders. Multiple
manifest configurations can be used with a single workflow by associating multiple hot folders. Each
hot folder has its own Manifest Automation from the Xerox configuration, with the same workflow.
Build job name using data fields: By default, manifest jobs are named using the filename of the
PDFs. Enabling this option allows the use of static text and manifest variables for job naming.
®
FreeFlow®Core retrieves a job file for each row in the manifest.
SSttaannddaarrdd FFiieellddss
• File Name: Specifies the location (URI) of the job file to be submitted for processing. The
following URI formats are supported:
– job.xxx
– <drive letter>:\folder\job.xxx
78
Xerox®FreeFlow®Core
Help
Page 79

Administration
– \\server\share\folder\job.xxx
– ftp://username:password@server/path/folder/job.xxx
– sftp://username:password@server:port/path/folder/job.xxx
– http://username:password@server/path/job.xxx
– https://username:password@server/path/job.xxx
– file:///path/folder/job.xxx
When you use a local path or a UNC as the URI, the File Name field can contain either the entire
path to the file or the file name. If the File Name field contains the file name, ensure that the
rest of the URI is defined using one of the following mechanisms:
– Folder Name: Specifies the path to the job file.
– Default Source File Location: Specifies a default path for all files in the manifest.
Note: When you use HTTP or FTP URIs, files without an extension or with an unknown
extension are assumed to be PDF files.
• Quantity: Specifies the print quantity. The value in the Quantity field overrides the quantity in the
XPIF.
• Paper Stock Name: Specifies the main stock for the job. The value in the Paper Stock Name field
overrides the main stock in the XPIF.
• XPIF File Name: Specifies the location of the XPIF job ticket associated with the job. The
following URI formats are supported:
– <drive letter>:\folder\job.xxx
– \\server\share\folder\job.xxx
– ftp://username:password@server/path/folder/job.xxx
– http://username:password@server/path/job.xxx
– file:///path/folder/job.xxx
• Printer Destination: Specifies the Printer Destination or Printer Group to use in the first printer
preset in the workflow.
• Distribute By: Defines the algorithm to use for distributing jobs within a Printer Group. The valid
values are:
– 0 for Round Robin
– 1 for First Available
– 2 for Completion Time
• Order ID: Specifies that manifest rows with a given order ID are submitted as jobs within a job
group. This option allows creation of multiple job groups from rows that have the same group key.
The jobs in the job groups are sequenced based on the Job Group Sequence Behavior.
• Group Key: Defines manifest rows with a given order ID value to be submitted as jobs within a
job group.
All rows in a manifest that have the same value for the order ID and group key columns are
submitted as a single job group.
• Hold Job: Defines whether a job is set to the Held state. The designations are Y for yes and N for
no.
®
Xerox
FreeFlow®Core
Help
79
Page 80

Administration
• Hold Until: Defines the date and time for the job release. The format used is the ISO date format
with the time in 24-hour format, YYYY-MM-DD HH:MM. For UTC times, the format is YYYY-MM-DD
HH:MM Z±HH:MM.
CCuussttoomm FFiieellddss
You can add more custom fields to the Manifest Automation from Xerox configuration. When
configured, these fields behave in the same manner as the standard fields.
Note: Manifest Automation from Xerox supports up to 100 columns of data in a manifest.
MMaanniiffeesstt PPrroocceessssiinngg
The options that follow are available:
• Column delimiter: Defines the delimiter used in the manifest.
• Text Qualifier: Defines the character that you can use to surround values in a manifest. This value
can be set to none, single quotes or double quotes.
• Process the first row as data: Defines whether or not manifest processing skips processing of the
first row of data in the manifest.
• Abort Manifest Processing If Errors Are Encountered: Determines whether to continue
processing a manifest if errors occur during processing of individual manifest rows.
• Abort Order In Manifest If Errors Are Encountered: Determines whether to continue processing
an order in a manifest if errors occur during processing of individual manifest rows in an order.
MMaanniiffeesstt SSttaattuuss
A status file is created after a manifest is processed and placed in the manifest status subdirectory in
the hot folder. The status file contains the original manifest content and a status column with
descriptive status messages.
The name of the status file is composed of:
• The original filename
• .status if there were no submission errors or .error.status if there were errors
• The original extension
A status file indicates the success or failure of the job submission. The status file does not indicate the
status of the jobs in the workflow.
UUnniiccooddee MMaanniiffeessttss
Manifests that use Unicode characters must be encoded as utf-8 text. These manifests also must
include a byte-order mark (BOM).
FFrreeeeFFllooww®®CCoorree RReeppoorrttss
The FreeFlow®Core Reports feature enables you to export Xerox®FreeFlow®Core job data. You can
access the same data using the Xerox
80
Xerox®FreeFlow®Core
Help
®
FreeFlow®Core Reports application.
Page 81

Administration
By default, FreeFlow®Core Reports does not collect data for the generation of reports. To enable a data collection, refer to Enabling Data Collection. When data collection is disabled, collection stops and jobs processed are not available in the report.
For more information, refer to FreeFlow
®
Core Reports.
EEnnaabblliinngg DDaattaa CCoolllleeccttiioonn
To enable data collection, do the following:
1. Click the Administration tab.
2. Select Core Reports.
3. Click the star symbol on the upper right of the screen.
4. Select the check box for Enable Data Collection.
Xerox
®
FreeFlow®Core
81
Help
Page 82

Administration
Region Tab
This tab allows administrators to manage Regional Setting Measurement Units.
82
Xerox®FreeFlow®Core
Help
Page 83

Administration
Security Tab
This tab allows administrators to set policies for Account Lockout, Auto LogOut, and Password
Reuse.
Xerox
®
FreeFlow®Core
83
Help
Page 84

Administration
LPD Gateway
Xerox®FreeFlow®Core supports the following LP functionality:
• LPR Job Submission
• LPQ Queries
• LPRM Command
LLPPRR PPrriinnttiinngg
Syntax: lpr<options> file
LPR print submission is supported for any file that can be converted to PDF.
The lpr command supports the following options.
Option Description
-S Name or IP address of the FreeFlow®Core server
-P Name or ID of the workflow that processes the jobs. For Pass Through job
submission, the workflow name is Pass Through. For a Pass Through job
submission, a printer destination name is required, using the -C"<options>"
option.
-J Job Name. This job name overrides the job names in the XPIF file. The
default is the file name.
-# (number) Number of copies. Overrides the quantity in the XPIF file and the quantity
specified using the -C argument.
-C"<options>" Job Ticket settings. Overrides values in the XPIF file.
-x Compatibility with SunOS v4.1.x and earlier
LLPPRR JJoobb TTiicckkeettss
LPR printing supports job ticketing using the following:
• XPIF Job Tickets concatenated at the start of the print file. This option is supported for PS, PDF,
and VIPP files.
• Job Ticketing as defined using the -C argument
• Job Ticketing as defined using LPR arguments
LPR -C options allow the LPR client to do the following:
• Construct an XPIF print ticket for submission with the print job
• Define job variables and submission parameters
Syntax: lpr-C["name1][(option1[,options2])][names2"]
• name1 maps to job-recipient-name
• name2 maps to job-sheet-message
84
Xerox®FreeFlow®Core
Help
Page 85

-C Job Parameters
Option Description
C("printer=<name>") The Printer Destination Name. Overrides the Printer
Destination in the first Print component in the workflow.
Administration
C("variable=<variableName:
variableValue>")
C("fileExtension=<extension>") Specifies the extension for files that do not have an extension
C("printergroup=PGroup:N") Printer Group Name and Distribution method. Where N can be
C("holdUntil=<date/time>") Specifies a job release time in the ISO format YYYY-MM-DD
C(“hold") Specifies that a job is submitted in the held state.
Adds variables to the job. Variables can override existing
variables. Variables can define new variables. Variables can be
used in text fields with the following syntax:
$FF<variableName>$
either of these three values 0, 1 and 2. It represents the
Distribution Option.
• 0: Round robin
• 1: First available
• 2: Completion Time
HH:MM. The time from the FreeFlow
UTC-defined time, the format is YYYY-MM-DD HH:MM Z±HH:
MM.
®
Core server is used. For
-C Job Ticket Parameters
Supported XPIF attributes are documented as part of the Xerox®FreeFlow®Core SDK. The Xerox
FreeFlow®Core SDK is available at: https://www.xerox-solutions.net/developers.
®
Option
C("copies=<n>") copies
C("simplex") sides='one-sided'
C("duplex") sides='two-sided-long-edge'
C("tumble") sides='two-sided-short-edge'
C("collated") sheet-collate=collated
C("uncollate") or C(uncollated) sheet-collate=uncollated
C("flip") page-delivery='same-order-face-down'
C("frontcover=<print:size:type:color:weight>") cover-front
C("backcover=<print:size:type:color:weight>") cover-back
C("slipsheet") separator-sheets
XPIF Attribute
Example:
-C("frontcover=<print-both:USLetter:
cardstock:220>")
Xerox®FreeFlow®Core
Help
85
Page 86

Administration
Option
C("sg=<n>") output-bin=stacker-N where N is 1 or 2. If <n>
C("account=<text>") job-account-id
C("recipient=<name>") job-recipient-name
XPIF Attribute
separator-sheets-type=slipsheet
is 0, output-bin is set to 'top'
-C Job Ticket Stock Parameters
Option
C("media=size:type<modulus>:color:weight)">") media-col values
XPIF Attribute
Examples:
C("media=A4:plainPrecutTab 5:Blue:90")
C("media=A4:plain:White:90")
C("media=A4:White")
Carets (^) are not used for custom color
names that use spaces
C("mediaSize=<size>") media-size/x-dimension
media-size/y-dimension
Keywords:
USLetter, USLegal, USLedger (17x11 in),
Tabloid, USStatement, a0-a10, isob0isob10, jisb0-jisb10
Keywords are converted to x, y dimensions
Example:
C("mediaSize=A3")
Dimensions:
Values <100 are considered inches
Values > 100 are considered mm
Example:
C("mediaSize=10 12")
Considered 10" x 12" stock
C("mediaType=<type>") media-col/media-type
Mapping for mediaType values not
supported in XPIF
86
plain=media-type='stationary'
plainPreCutTab <modulus>
Xerox®FreeFlow®Core
Help
Page 87

Administration
Option
XPIF Attribute
- media-type='pre-cut-tabs'
- media-order-count=<modulus>
plainDrilled
- media-type='stationary'
- media-hole-count='3'
drilled=media-hole-count='3'
drilledPreCutTab <modulus>
- media-type='pre-cut-tabs'
- media-order-count=<modulus>
- media-hole-count='3'
drilledFullCutTab
- media-type='full-cut-tabs'
- media-hole-count='3'
drilledTransparency
- media-type='transparency'
- media-hole-count='3'
Examples: C("mediaType=bond:3") hole
count =3
C("mediaType=pre-cut-tabs:5") modulus =5
C("mediaColor=<color>") media-col/media-color
Use carets to enclose values with spaces C
("mediaColor=^Hello Kitty Pink^")
C("mediaWeight=<weight>") media-col/media-weight-metric
C("opacity=<transparency|opaque>") media-col/media-type-transparency
media-col/media-type-stationary
C("prefinish=<option>") <option> can be any mediaType value
-C Job Ticket Finishing Parameters
Note: Corner and Edge values relate to a portrait document. The LPD client selects the correct
portrait finishing option for landscape documents. For example, to staple the top of a
landscape document, the client selects twoStaplesLeft.
-C Finishing values do not have XPIF equivalents. Most values are mapped by the LPD gateway.
Xerox
®
FreeFlow®Core
87
Help
Page 88

Administration
Option
C("finishing=<finishingOption1>, finishing=
[<finishingOption2> ...finishing=
<finishingOptionN>])">")
XPIF Attribute
Stitching value mappings:
oneStapleTopLeft=20
oneStapleBottomLeft=21
oneStapleTopRight=22
oneStapleBottomRight=23
twoStaplesLeft=28
twoStaplesTop=29
twoStaplesRight=30
twoStaplesBottom=31
centerStapleLeft=32
centerStapleTop=33
centerStapleRight=34
centerStapleBottom=35
fourStaplesLeft=40
fourStaplesRight=42
Hole Punching (must specify count and
placement):
Count Mappings:
twoHolePunch = 90
threeHolePunch = 91
fourHolePunch = 92
Placement Mappings:
punchLeft = 93
punchTop = 94
punchRight = 95
punchBottom = 96
Coil Punching Mappings:
coilPunchLeft = 254
coilPunchRight = 256
Fold Mappings:
zFoldHalfSheetBindRight = 1008
zFoldHalfSheetBindLeft = 1011
triCFoldInsideLeft = 1000
triCFoldOutsideLeft = 1005
88
triZFoldInside = 1001
Xerox®FreeFlow®Core
Help
Page 89

Administration
Option
C("booklet=<fold:squareFold:trim>") fold value mapping:
XPIF Attribute
triZFoldOutside = 1012
Other mappings
none = 3
Examples:
C("finishing=triCFoldOutsideLeft)
C("finishing=twoStaplesLeft twoHolePunch
punchLeft zFoldHalfSheetBindLeft")
C("finishing=centerStapleBottom, finishing=
twoHolePunch punchRight, finishing=
zFoldHalfSheetBindLeft")
multiSheet = 111
multiSheetInside = 113
multiSheetStapled = 110
inside = 1003
outside = 1004
squareFold value mapping:
none = none
veryLow = low-2
low = low-1
normal = normal
high = high-1
veryHigh = high-2
Trim (Width of document after trim):
Values less than 100 are considered to be inches
Values greater than 100 are considered to be mm
Examples:
C("booklet=multiSheetInside:veryLow:254")
C("booklet=Outside")
C("finishingprofile=<finishingTemplate>") finishing-template
LLPPQQ QQuueerriieess
Syntax: lpq<options> file
The LP system assigns a three-digit job number to received jobs. This number is displayed in the lpq
response. This number is not correlated to Xerox
®
FreeFlow®Core Job IDs.
Xerox
®
FreeFlow®Core
Help
89
Page 90

Administration
The lpq command supports the following options.
Option Description
-S Name or IP address of Xerox®FreeFlow®Core server
-PFreeFlowCore (or if –P is not
used)
-PListWorkflows List Xerox
-P<workflow name or id> Lists jobs for the specified workflow
+ Display information at specified interval in seconds
List all jobs
®
FreeFlow®Core workflows
Use quote marks if the workflow name includes spaces Lpq -P"WorkflowX"
LLPPRRMM CCoommmmaanndd
Syntax: lprm<options>
The lprm command supports the following options.
Option Description
-S Name or IP address of Xerox®FreeFlow®Core server
-j<lp job number> Line printer job number for the job to be deleted
90
Xerox®FreeFlow®Core
Help
Page 91

Administration
JMF Gateway
Xerox®FreeFlow®Core supports JMF submission. The JMF client connects to http://
hostname:7751/ and performs a KnownDevices query to retrieve a list of workflows. The client
performs a SubmitQueueEntry query to submit jobs to a workflow. Other valid JMF client connections
are http://<DNS name>:7751/FreeFlowCore and for Cloud Configurations https://<DNS
Name>:7759/<tenantname>.
JJMMFF SSuubbmmiissssiioonn aanndd WWoorrkkffllooww JJoobb RRoouuttiinngg
When Hot Folder Workflow Destinations routing is enabled, Xerox®FreeFlow®Core advertises a
routing workflow to JMF clients. This workflow name is HFRoutingWorkflow_<<Hot Folder Name>>.
Jobs submitted to this workflow using JMF use the Hot Folder routing rules to select a workflow.
Note: For Pass Through capability, select the Pass Through workflow.
JJMMFF SSuubbmmiissssiioonn aanndd JJDDFF XXSSLLTT PPrroocceessssiinngg
When JDF XSLT processing is enabled, Xerox®FreeFlow®Core transforms the JDF content of JMF
submissions using a defined XSLT. The output of the XSLT is submitted to Xerox
processing.
Note: Supported JMF commands, signals and JDF attributes are documented as part of the
FreeFlow
solutions.net/developers.
®
Core SDK. The FreeFlow®Core SDK is available at https://www.xerox-
®
FreeFlow®Core for
Xerox
®
FreeFlow®Core
91
Help
Page 92

Administration
Command Line Interface (CLI)
The CLI functionality enables the processing of scripts for job submission. The following commands
are supported:
• ffcprijob: Command to submit the primary or parent job.
• ffcadddoc: Command to add a child job to the primary or parent job.
• ffcclosejob: Command to close the primary or parent job that is in an open state. Only the jobID
argument is needed.
To access the list of available arguments, add the -h or help to command line command. The
arguments use [ ] to contain the argument parameter. If the parameter contains a space or /
character,” “ characters are needed.
The arguments are:
• -j: Primary or parent job ID
• -d: Job file name with full path
• -t: XPIF file name with full path
• -n: Job name
• -r: Job priority, either normal or high
• -w: Workflow destination name
• -p: Printer destination name
• -h: Held date time. For UTC-defined time, the format is YYYY-MM-DD HH:MM Z±HH:MM.
• -I: Infinite hold or manual release
• -o: Keep job in open state.
Example scripts:
Submit a job with the held and open state:
ffcprijob -d["D:\ TestData\16color.pdf"] -t["D:\TestData\16color.pdf.xpf"] -n[CliSubmitJob] -r
[Normal] -w[CLIDemoPrint] -p["New Printer Destination"] -h["14/02/2020 17:20:00"] -o
Add a child job with the open state to parent job that is in the open state:
ffcadddoc -j[“10”] -d["D:\ TestData\16color.pdf"] -t["D:\TestData\16color.pdf.xpf"] -o
Close the parent job that is in the open state:
ffcclosejob -j[“10”]
Create a batch file that submits PDF files from a specified directory using the batchfilename
command:
batchfilename C:\Users\Administrator\Desktop\
@SETLOCAL
@ECHO ON
for %%a in (%1*.pdf) do ffcpriJob -d[%%a] -w[SaveF]
92
Xerox®FreeFlow®Core
Help
Page 93

7
Notifications Setup
This chapter contains:
• Notification Recipients................................ ......................... ........................ . ........................ ..... 94
• Job Notifications......... ........................ . ........................ ....................... .. ....................... .............. 95
• Preflight Notifications .............................. ......................... ........................ . ........................ ........ 96
• Job Submission Notifications ................................ ....................... .. ....................... ..................... 97
• System Notifications .............. ......................... ........................ . ........................ ....................... .. . 98
• Email Notification Setup .... ......................... ........................ . ...................... .. ....................... ....... 99
The notification service monitors the system and sends out email notifications when relevant events
occur.
Xerox®FreeFlow®Core
Help
93
Page 94

Notifications Setup
Notification Recipients
Select the users to receive system notifications. Notifications can be sent to users with Administrator
privileges.
Enabling notifications requires at least one Xerox
address.
®
FreeFlow®Core Administrator with a valid email
94
Xerox®FreeFlow®Core
Help
Page 95

Job Notifications
Enable notifications when the following job events occur:
• A job fails.
• A Conversion Warning occurs.
Notifications Setup
Xerox
®
FreeFlow®Core
95
Help
Page 96

Notifications Setup
Preflight Notifications
Enable notifications when the following preflight events occur:
• Fixups are applied to a job.
• Preflight checks return a warning.
• Preflight checks or fixups return an error.
96
Xerox®FreeFlow®Core
Help
Page 97

Job Submission Notifications
Enable notifications when the following events occur:
• An Unsupported File is Detected.
• An Error Occurs Processing the File.
Notifications Setup
Xerox
®
FreeFlow®Core
97
Help
Page 98

Notifications Setup
System Notifications
Enable System Notifications when the following events occur:
• Server Resources are running out of space.
– Notifications are sent when the system is low on memory or disk space.
– Notifications are sent when the database is low on table space.
• License Expires/Expired within 30 days
– Notifications are sent when the License Expires/Expired is within 30 days.
98
Xerox®FreeFlow®Core
Help
Page 99

Notifications Setup
Email Notification Setup
The two options available for Email Notification Setup are:
• E-mailed from: This field defines the sender email address used for notification.
• Use Xerox E-Mail: To designate the use of a Xerox server email address for sending notifications,
select this check box.
SSMMTTPP SSeettttiinnggss
• Server Address: This field defines hostname or IP address for the SMTP server.
• Port: This field defines the port used for communicating with the SMTP server.
Note: Common ports are 25, 2525, 465, 475, and 587.
• SSL: This field enables encryption of communication between the notification service and the
SMTP server.
• Username and Password: This field contains the credentials for authenticating with the SMTP
server.
Note: Using a single space for both the username and password fields allows Xerox®FreeFlow
Core to connect to SMTP servers that do not require authentication.
The E-Mail Notification Setup includes a Test button that is used to validate connectivity. The Test
button generates an email to the first enabled user in the Notification Recipients list.
Note: The notification service requires exceptions in the Windows firewall and in any installed
antivirus software.
®
Xerox
®
FreeFlow®Core
99
Help
Page 100

Notifications Setup
100
Xerox®FreeFlow®Core
Help
 Loading...