

Page 1

Version 12.0, October 2006
701P45629
Xerox FreeFlow Accxes
System & Web Print
Management Tool
Setup
Guide
Page 2

Prepared by:
Xerox Corporation
Global Knowledge and Language Services
800 Phillips Road 845-17S
Webster, New York 14580
©2006 by Xerox Corporation. All rights reserved.
Copyright protection claimed includes all forms and matters of copyrightable
material and information now allowed by statutory judicial law or hereinafter
granted, including without limitation, material generated from the software programs
which are displayed on the screen such as icons, screen displays, looks, etc.
Printed in the United States of America.
XEROX® and all Xerox product names mentioned in this publication are
trademarks of XEROX CORPORATION.
®
XEROX
, WIDE FORMAT PRINT SYSTEM 8850, WIDE FORMAT PRINT
SYSTEM 8825, WIDE FORMAT PRINT SYSTEM 8830, WIDE FORMAT PRINT
SYSTEM 510, WIDE FORMAT PRINT SYSTEM 721P, 6030 WIDE FORMAT, 6050
WIDE FORMAT, 6204 WIDE FORMAT SOLUTION, Synergix Scan System,
FreeFlow Accxes, FreeFLow Accxes Client Tools, Account Management Tool, and
the Web Print Management Tool are trademarks of the XEROX Corporation.
Internet Explorer is a copyright protected program of Microsoft Corporation.
®
Netscape
is a registered trademark of Netscape Communications Corporation.
PostScript is a trademark of Adobe Systems Incorporated.
AutoCAD
®
and DWF™ are registered trademarks of Autodesk, Inc.
One or more of the fonts listed within this document may be a registered trademark
of Morisawa & Company, Ltd. or DYNALAB, Inc.
Changes are periodically made to this document. Changes, technical inaccuracies,
and typographic errors will be corrected
in subsequent editions.
ii FreeFlow Accxes Printer System and Web Print Management Tool Setup Guide
Page 3

Table of Contents
Table of Contents................................................................................................. iii
Introduction...........................................................................................................1
Basic Requirements..........................................................................................1
Web Print Management Tool................................................................................2
Overview...........................................................................................................2
Starting the Web Print Management Tool .........................................................2
TCP/IP Address Parameters from the Printer Control Panel.............................3
510, 8825, 8830, 8850 Printers:.....................................................................3
Security.............................................................................................................4
Changing the system password.....................................................................4
FTP Scan Destinations..................................................................................4
Disk Image Overwrite ....................................................................................4
Enabling the Scan System to communicate with the FreeFlow Xerox Wide
Format Printer ...................................................................................................4
Configuration & Settings Test Prints.....................................................................5
Printing a Test Print...........................................................................................5
From the Web Print Management Tool:.........................................................5
From the Printer Control Panel......................................................................5
Viewing the Test Prints......................................................................................5
Configuration Test Print Sample....................................................................6
Configuration Test Print Details.....................................................................6
Settings Test Print Sample .......................................................................... 10
Printer Setup.......................................................................................................11
Configuration settings......................................................................................11
Emulation settings...........................................................................................11
Configuring System Defaults...........................................................................12
Utility Settings..................................................................................................13
Driver and Client Software Installation................................................................14
Drivers.............................................................................................................14
Installation....................................................................................................14
Client Tools .....................................................................................................14
Overview......................................................................................................14
Installation....................................................................................................14
Account Management Tool .............................................................................14
Overview......................................................................................................14
Installation....................................................................................................14
Configure Remote Printer Status Messages (6030/6050 printers only)..............15
FreeFlow Accxes Printer System and Web Print Management Tool Setup Guide iii
Page 4

iv FreeFlow Accxes Printer System and Web Print Management Tool Setup Guide
Page 5

Introduction
The purpose of this Guide is to provide experienced Systems Administrators with the required
information for setting up a Xerox Wide Format Printer within a variety of network environments.
FreeFlow Accxes Version 12.0 supports the following printers: 510 series, 721P, 6030, 6050,
6204, 8825, 8830, and 8850. Version 12.0 supports the YKE/YKE-N controllers.
Although not all tasks are required for setup within every network environment, the list of typical
communications setup tasks inclu des:
Printing a printer configuration test print.
Setting up the Printer, including changing the password, installing the help files, and setting the
printer defaults in the Web Print Manager Tool.
Enabling the Scan System to communicate with the FreeFlow Xerox Wide Format Printer.
Installing the drivers.
Installing the Client Tools (ACT) on user workstations, which enables users to send print jobs that
can override the default printer settings.
Installing the Account Management Tool (AMT) on one workstation, from which media usage data
and scanner usage data can be retrieved from the printer’s controller.
Basic Requirements
A working knowledge of your network operating environment.
Appropriate cabling to connect your printer and Scan System to the network.
NOTE: Make sure that the network cabling is compliant with the Ethernet specification for
the environment in which the printer is being installed.
A workstation with the appropriate operating system software installed for that station.
TCP/IP General Setup Requirements: IP Address, Subnet Mask, & Default Gateway:
For small networks — consisting of several network-connected
devices/workstations and a hub. It is necessary to set up the printer with an
individual IP Address and a Subnet Mask (matching the subnet mask being
used by all the other local area network-connected devices). Unless a router
(gateway) is being used to gain access to the larger wide area network, a
Default Gateway address is NOT needed.
For large networks — consisting of many network-connected
devices/workstations, multiple hubs and routers. It is mandatory to set up the
printer with an individual IP Address, Subnet Mask (to match the SUB network
that the printer is on), and Default Gateway address (the router address that
the printer will use to gain access to the larger, wide area network).
FreeFlow Accxes Printer System and Web Print Management Tool Setup Guide 1
Page 6

Web Print Management Tool
Overview
As part of the FreeFlow Accxes firmware, the Web Print Management Tool is accessed from your
workstation using the Netscape 8.0 (or newer), Internet Explorer 6.0 (or newer), or Mozilla 1.7.5
(or newer) and Mozilla FireFox 1.5 (or newer) web browser. To access the Web Print
Management Tool, you need to enter the IP address of your printer in the URL box of your
browser ("Address" in Explorer or "Location" in Netscape) and press ENTER.
The Web Print Management Tool enables three major functions:
y Provides print job management and status tracking
Provides control over the printer’s default settings
y
y Provides a method to enable job accounting for printing, copying and scanning media
usage data to be saved in the FreeFlow Accxes Controller’s job log file. The data is
retrieved via an External Account Server, such as the Account Management Tool (AMT).
Note that this tool does not manipulate any network operating system print queues, such as UNIX
lpr/lpd queues.
Starting the Web Print Management Tool
When accessing the Web Print Management Tool, you must have a working connection between
your computer and the printer’s FreeFlow Accxes Controller. To access the Web Print
Management Tool perform the following steps:
• Start your Web browser. If your browser starts up in the Mail or News mode, go to the
Browser mode.
• To access the Web Print Management Tool, you may need to set your browser so that it
will not try to access the FreeFlow Accxes Controller through a proxy server. To deselect
a proxy connection within your browser, perform the following steps.
Deselecting a Proxy in Netscape
• Select Preferences from the Edit menu.
• Click on the drop arrow next to the Advanced item and click on Proxies.
• In the Proxies dialog, select Direct connection to the Internet.
• Click OK.
Deselecting a Proxy in Internet Explorer
• Select Tools > Internet Options from the toolbar.
• Click on the Connections tab > LAN Settings.
• Deselect the Access the Internet using a proxy server check box.
• Click OK.
• In the browser URL box enter http:// followed by the printer’s IP address, (for example, for
the YKE/YKE-N System Administrator or the test print set produced at the time of your printer’s
installation. When the power is switched on the 721p printer, the controller also sends a
test print to the printer.
• Configure Remote Printer Page (6030/6050 WIDE FORMAT printers only):
- Select UTILITIES > Configure Remote Printer
- Put in the IP address of the remote printer, and the job queue name of that printer,
where FreeFlow Accxes will send the print job data to the 6030/6050. The LPR remote
job queue name is in the plt (00-99) format, with an extension letter of t, c, h, p, v, or
http://13.240.20.38. If you don’t know the printer’s IP address, see your
2 FreeFlow Accxes Printer System and Web Print Management Tool Setup Guide
Page 7

NONE. Your choices will show on the screen, for example: (plt00t). An example queue
name is "plt99" when NONE is selected.
- Press the Update Printer button to set your choices.
NOTE: See the Configure Remote Printer Status Messages at the end of this document.
• Select CONFIGURATION > NETWORK > TCP/IP.
- Check that the Subnet Mask, IP Address, and Gateway settings are correct. These are
needed so that your workstation will be able to communicate with your FreeFlow Accxes
compliant scanner and printer.
- If the printer is not properly auto negotiating with the network, then set the
Speed/Duplex to something other than "Auto". The other selectable options are "10
Mbps - Half Duplex", "10 Mbps - Full Duplex", 100 Mbps - Half Duplex", and "100 Mbps Full Duplex". The Auto setting will properly auto negotiate with a YKE/YKE-N’s 1000
Mbps switch.
- Select HELP to access further information from the Help files.
TCP/IP Address Parameters from the Printer Control Panel
510, 8825, 8830, 8850 Printers:
Perform the following steps:
1. At the Printer Control Panel, when the display shows <IDLE>, press ONLINE
2. When the display shows <PAUSED>, press ENTER
3. When the display shows <UTILITIES>, press NEXT
4. When the display shows <SETUP I/O PORTS>, press ENTER.
5. When the display shows <SCSI>, press NEXT until the display shows <ETHERNET
TCP/IP>. Press ENTER.
Once you have access the ETHERNET TCP/IP menu, perform the following steps at the printer
control panel to enable DHCP or RARP/BOOTP:
6. Press the NEXT key until DHCP ENABLE=OFF or RARP/BOOTP ENABLE=OFF is
displayed.
7. Press the ENTER key followed by the NEXT key to change the setting to ON, then press
the ENTER key.
NOTE: Verify that you have DHCP enabled.
8. Press the EXIT key as many times as required to go back to PAUSED mode.
9. Press the ONLINE
10. Wait 60 seconds and cycle the printer power. The printer will reflect the new TCP/IP
address after booting up.
11. Printer a CONFIGURATION & SETTINGS TEST PRINT and save it for future reference.
key to put the printer back on line. The display will show IDLE.
.
.
.
FreeFlow Accxes Printer System and Web Print Management Tool Setup Guide 3
Page 8

Security
Any user can view the Web Print Management Tool pages. The printer is required to make any
changes. The default password is the number 0, so it needs to be changed in order to preserve
your settings from being changed by others.
Changing the system password
1. In the Web Print Management Tool, click on UTILITIES and then PASSWORD.
2. When the Password page displays, enter the current printer password in the designated
field (a number in the range 0 to 99999). For security reasons, the asterisk character
appears for each password digit.
3. Enter the new printer password and then again to verify.
4. Press the Update Printer button. If the entered password matches the correct system
password, you have write-access to the printer settings. The FreeFlow Accxes Controller
will send back a message stating either “Password verification passed” or “Password
verification failed.”
FTP Scan Destinations
You need to configure 4 FTP destinations for scanned images in the Web Print Management
Tool. Once a scan destination has been configured, Scan System users can choose a
destination via the Sample key on the scanner control panel. The scanned image will be sent to
the selected FTP destination and no file will remain on the controller’s hard disk. Select
CONFIGURATION > SCANNER. Select the Help file for more information.
Disk Image Overwrite
This security feature provides for 3-pass overwrite and 1-pass verification of all image data
temporarily stored on the Accxes hard drive. The feature has two modes: Immediate Image
Overwrite (IIO) and On-Demand Image Overwrite (ODIO). In the Web Print Management Tool,
select CONFIGURATION > SECURITY SETTINGS> Change Immediate Image Overwrite.
Select the HELP file for more information.
Enabling the Scan System to communicate with the FreeFlow Xerox Wide Format Printer
In the Web Print Management Tool, select CONFIGURATION > PRINTER > DDS ENABLED. Be
sure that the DDS Enabled checkbox is selected. If it is not selected, than the COPY/SCAN
functionality will be disabled.
4 FreeFlow Accxes Printer System and Web Print Management Tool Setup Guide
Page 9

Configuration & Settings Test Prints
The first task that is performed with ALL network environment setups is the printing of
Configuration and Settings test prints. You can print them using the Web Print Management Tool
or the Printer Control Panel.
Printing a Test Print
From the Web Print Management Tool:
1. On the Web Print Management Tool, select UTILITIES> Test Print.
2. Select Normal Test to get both a Configuration and Settings Test Print.
From the Printer Control Panel
(510, 8825, 8830, 8850 printers only):
CONFIGURATION Test Print
1.
While the Printer is NOT printing, at the Control Panel press the ONLINE key. PAUSED will be
displayed.
Press the ENTER key and the UTILITIES menu will be displayed.
2.
Press the ENTER key and the TEST PRINT menu will be displayed.
3.
Press the ENTER key again and <ALL> will be displayed.
4.
Press the NEXT key as many times as required to choose the PRINTER CONFIGURATION
5.
Test Print.
Press the ENTER key again to enable the selected Test Print, and the displayed menu will
6.
return to UTILITIES.
Press the EXIT key twice and the display will return to PAUSED.
7.
Press the ONLINE key to put the Printer back on line and print out your Test Print.
8.
SETTINGS Test Print
Repeat Steps 1-4 above.
Step 5: Select PRINTER SETTINGS Test Print.
Repeat Steps 6-8 above.
Viewing the Test Prints
The purpose of test prints is to provide a record of current system settings for use in daily
operations, network communications setup, and restoration of desired parameters in cases of
unexpected change (such as through accidental use of the Restore Factory Default utility). Test
print sets should be saved at the following times:
y When the initial install is complete and default settings are defined.
y Anytime default settings are changed.
Note: For the 721 printer only, the test print is generated when the power is switched on.
The reference set of the test print pages should be stored with the machine service log.
FreeFlow Accxes Printer System and Web Print Management Tool Setup Guide 5
Page 10
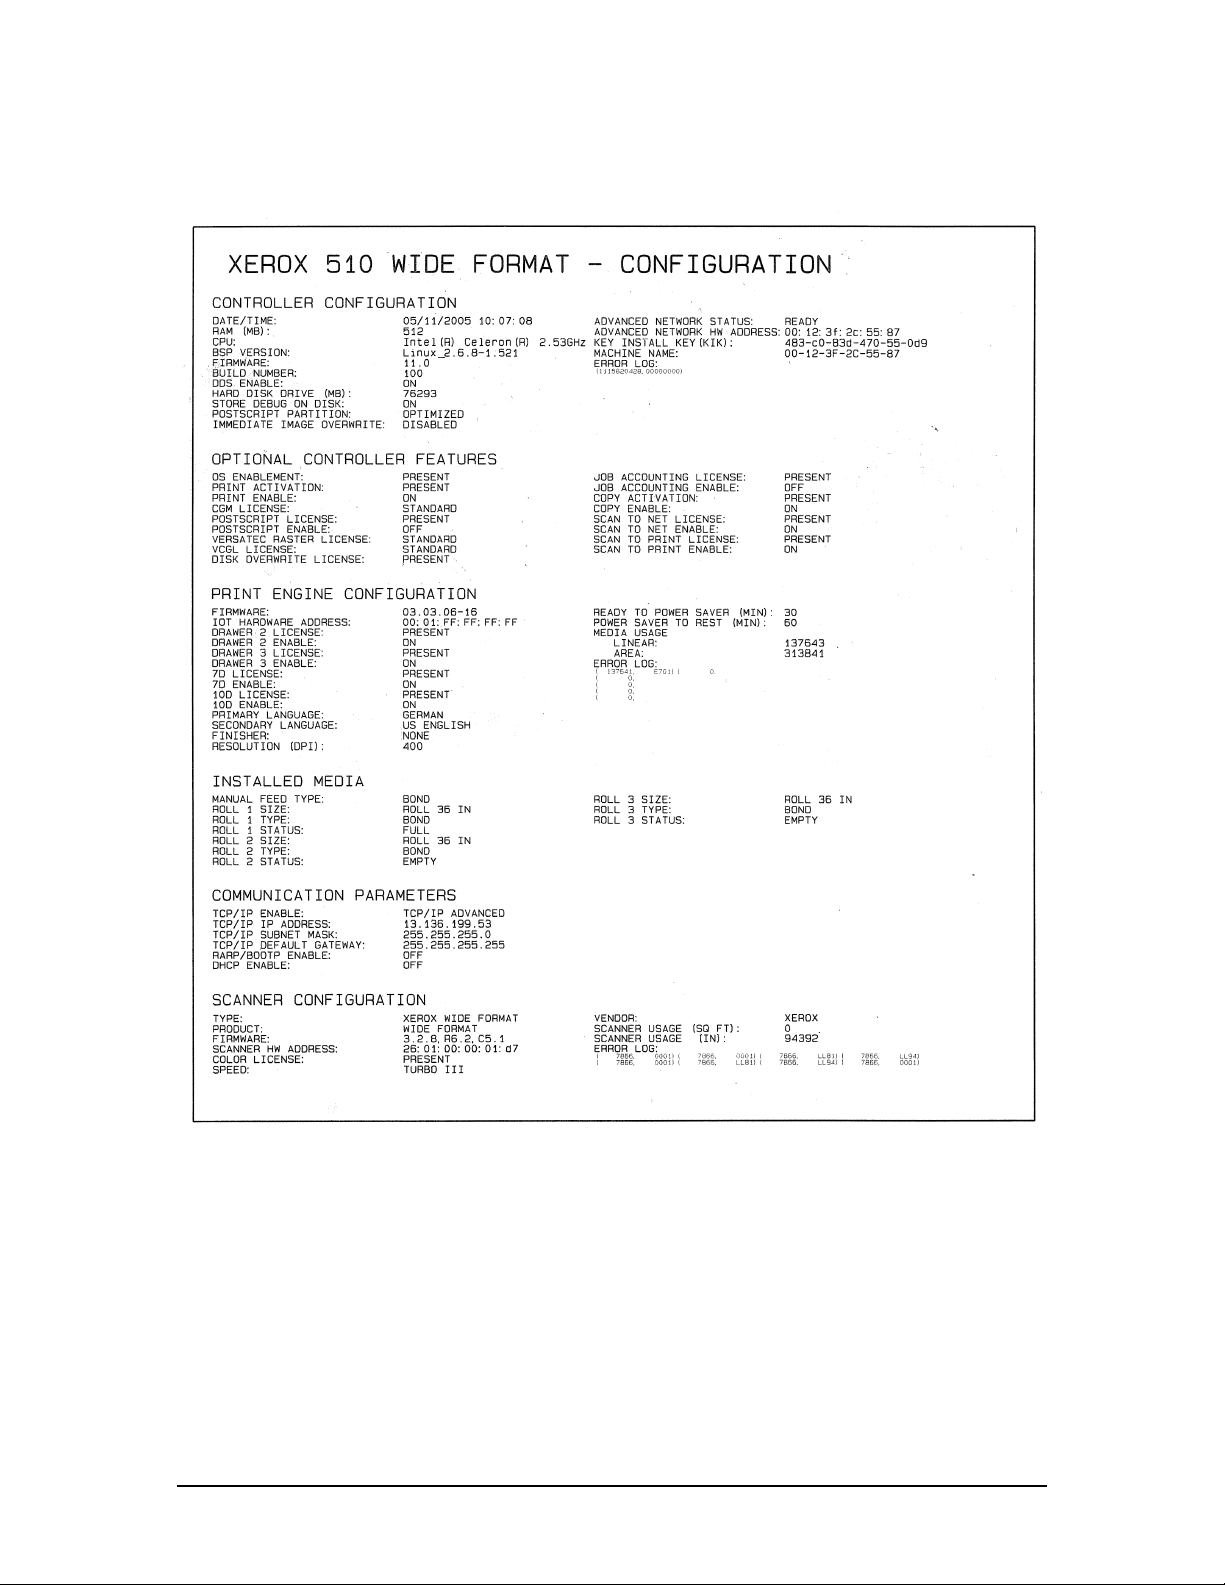
Configuration Test Print Sample
An explanation of the main features follows the sample.
Configuration Test Print Details
The key information in the sections of the above test print is listed below. Go to the tables in the
Web Print Management Tool section of this guide to see the navigational paths to follow to locate
where on the Web Print Management Tool this information is accessed.
The Key Install Key (KIK) is important when adding features. When downloading multiple
Feature Keys, download all the keys before rebooting the Accxes System. This allows you to
download all the keys that use the same KIK number. If you reboot, a new KIK number will be
created and you will have to obtain the new KIK number.
6 FreeFlow Accxes Printer System and Web Print Management Tool Setup Guide
Page 11

COMMUNICATION PARAMETERS
This section lists the TCP/IP IP Address, Subnet Mask, and Default Gateway.
TCP/IP ENABLE displays ADVANCED when the 10/100 Ethernet Card/Port
on the controller (10/100/1000 Ethernet Card/Port for the YKE/YKE-N
controller) is activated at the Printer Control Panel.
CONTROLLER CONFIGURATION:
Notice that the type of controller and FreeFlow Accxes Firmware version are
listed in this section.
ADVANCED NETWORK STATUS: The Advanced Network HW Address is
the embedded NIC card and the address is used to redeem feature keys.
Status of the 10/100/1000 Ethernet Card/Port. READY shows that this is the
printer’s currently active TCP/IP network interface. DISABLED shows that the
card/port is not enabled. The card/port must display READY in order to
support Scan-to-Net, document retrieval, and Web Print Management Tool
functions.
DDS ENABLE: When the DDS is enabled, the AccXES controller will
configure itself for use with a scanner. The YKE/YKE-N controller has DDS
automatically enabled. For the other controllers, this must be enabled in order
for the controller to communicate with the Scan System.
IMMEDIATE IMAGE OVERWRITE (IIO): provides for immediate deletion and
verification of image data no longer needed by FreeFlow Accxes. It has
minimal impact on print and copy times because only areas of the disk that
have been written are deleted and verified. Note that enabling IIO doesn't
provide security for previously processed images. For full deletion and
verification, On-Demand Image Overwrite is recommended in conjunction with
enabling IIO.
OPTIONAL CONTROLLER FEATURES:
This section lists the standard features, and which ones require a feature key
license in order to activate them. The following is a list of the optional feature
keys.
XEROX WIDE FORMAT Scan System Features
Scan-to-Net Feature Key – to create an electronic file from a scanned
image.
Scan-to-Print Feature Key – to scan, create a preview, and send the
scanned image to the printer when the Scan-to-Net feature is present.
Color Enablement Feature Key – allows color scanning when the Scanto-Net feature is present. (shows in the Scanner Configurations section of
the test print)
Speed Enhancement Turbo II Feature Key – 4 inches per second (ips)
for 36” wide media. (shows in the Scanner Configurations section of the
test print)
Speed Enhancement Turbo III Feature Key –7.33 inches per second
(ips) for 36” wide media. (shows in the Scanner Configurations section of
the test print)
:
FreeFlow Accxes Printer System and Web Print Management Tool Setup Guide 7
Page 12

XEROX WIDE FORMAT 6030/6050 Print System:
Print Server Enablement Feature Key – Enables print and copy mode for
a remote printer.
XEROX WIDE FORMAT Printers and Scan Systems
:
Job Accounting Feature Key – Job accounting enables the tracking of
media usage data. The Account Management Tool (AMT), or some other
external accounting tool, is used to assign a User ID, Account ID, and
Printer ID. It then collects and tallies the stored data from the printers.
PostScript Feature Key – This enables the interpretation of Adobe Post
Script 3, PDF 1.4, 1.5, and 1.6 for the YKE/YKE-N controller, and PDF 1.3
for all other controllers.
Disk Image Overwrite Feature Key – Enables the security options for
overwriting image data on the hard drive.
OS Enablement Feature Key – Enables the YKE/YKE-N controller to
print, copy, and scan.
AutoCAD – Supports the DWG, DWF, and DXF file formats generated by
Autodesk applications. Enables printing of AutoDesk DWF format files.
Requires an Advanced Network Hardware Address and a Machine ID.
XEROX WIDE FORMAT 6204 Print System
:
6204 5D– Use to enable 5 D size prints per minute printing speed.
Requires an Advanced Network Hardware Address and a Machine ID.
XEROX WIDE FORMAT 510 Print System
:
Drawer 2 Feature Key– Use to enable usage of the second roll feed
drawer for operation.
Drawer 3 Feature Key– Use to enable usage of the third roll feed drawer
for operation.
7D Feature Key– Use to enable operational speed of 7 D size prin ts per
minute.
10D Feature Key– Use to enable operational speed of 10 D size prints per
minute.
PRINT ENGINE CONFIGURATION
This section shows the FreeFlow Accxes firmware version, the IOT hardware
address, the paper roll drawers that are present, the language, if a finisher is
attached, resolution (DPI), power saver minutes, and media usage.
INSTALLED MEDIA
This section lists the size and type of media installed in the printer.
SCANNER CONFIGURATION
8 FreeFlow Accxes Printer System and Web Print Management Tool Setup Guide
Page 13

This section shows the Scan System’s hardware address, the firmware
version, if a color license or speed enhancement feature is present, and the
scanner usage.
FreeFlow Accxes Printer System and Web Print Management Tool Setup Guide 9
Page 14

Settings Test Print Sample
Go to the tables in the Printer Setup, Web Print Management Tool section of
this document to see the navigational paths for system settings and
processing defaults listed on the below test print. Then you can select the
Web Print Management Tool Help file for further information.
10 FreeFlow Accxes Printer System and Web Print Management Tool Setup Guide
Page 15
Printer Setup
Configuration settings
In the Web Print Management Tool, select the following navigational paths to get to the option.
Then select HELP to access the help files for more information.
Options Navigational Path in the Web Print Management Tool
Accounting Mode CONFIGURATION > ACCOUNTING
Active User Setup CONFIGURATION > MISCELLANEOUS
Date/Time CONFIGURATION > MISCELLANEOUS > DATE/TIME
Disk Image Overwrite CONFIGURATION > SECURITY
Display units (English or metric) CONFIGURATION > MISCELLANEOUS
FTP CONFIGURATION > SCANNER
Language CONFIGURATION > PRINTER
Network CONFIGURATION > NETWORK
Scanner CONFIGURATION > SCANNER
Toner Density (not for 6030/6050) CONFIGURATION > PRINTER > TONER DENSITY
Timeout CONFIGURATION > MISCELLANEOUS
When using Active User Setup, this text box is used to specify any one of 10 parameter sets to use as the
default processing parameters. The default value is set 0. Valid input range is from 1 to 9.
Emulation settings
In the Web Print Management Tool, select the following navigational paths to get to the option.
Then select HELP to access the help files for more information.
Options Navigational Path in the Web Print Management Tool
CalComp EMULATION > CALCOMP 906/907
CGM EMULATION > CGM
HPGL EMULATION > HPGL
Pen Patterns EMULATION > PEN PATTERNS
Pen Palettes EMULATION > PEN PALETTES
TIFF EMULATION > TIFF
VCGL EMULATION > VCGL
VDS EMULATION > VDS
FreeFlow Accxes Printer System and Web Print Management Tool Setup Guide 11
Page 16

Configuring System Defaults
In the Web Print Management Tool, select the following navigational paths to get to the option.
Then select HELP to access the help files for more information.
Options Navigational Path in the Web Print Management
Tool
Banner Page SYSTEM DEFAULTS > MISCELLANEOUS
Collation SYSTEM DEFAULTS > MEDIA
Contrast
Copies
Document Type SYSTEM DEFAULTS > RENDERING
Diagnostic Page SYSTEM DEFAULTS > MISCELLANEOUS
Error Page SYSTEM DEFAULTS > MISCELLANEOUS
Finishing
Justification
Labels SYSTEM DEFAULTS > PLOT LABELS
Lightness SYSTEM DEFAULTS > RENDERING
Line Scale Mode SYSTEM DEFAULTS > TRANSFORM
Margins SYSTEM DEFAULTS > MARGINS
Maximum Plot Length SYSTEM DEFAULTS > MEDIA > MEDIA DEFAULTS
Media Size SYSTEM DEFAULTS > MEDIA > MEDIA DEFAULTS
Media Size Detect Set (use marked
area)
Media Source SYSTEM DEFAULTS > MEDIA > MEDIA DEFAULTS
SYSTEM DEFAULTS > RENDERING
SYSTEM DEFAULTS > MEDIA
SYSTEM DEFAULTS > MISCELLANEOUS
SYSTEM DEFAULTS > MARGINS
SYSTEM DEFAULTS > MEDIA > MEDIA DEFAULTS
Media Type SYSTEM DEFAULTS > MEDIA > MEDIA DEFAULTS
Mismatch Queue Enabled SYSTEM DEFAULTS > MEDIA > MEDIA DEFAULTS
Mirror Image SYSTEM DEFAULTS > TRANSFORM
Oversize and Undersize Margins SYSTEM DEFAULTS > MEDIA > MEDIA DEFAULTS
Plot Labeling SYSTEM DEFAULTS > PLOT LABELS
Plot Nesting SYSTEM DEFAULTS > COMPOSITION
Print Quality Mode SYSTEM DEFAULTS > RENDERING
Raster Image Scale Mode SYSTEM DEFAULTS > TRANSFORM
Render Mode SYSTEM DEFAULTS > RENDERING
Rotation SYSTEM DEFAULTS > TRANSFORM
Scaling SYSTEM DEFAULTS > TRANSFORM
Single Page Job SYSTEM DEFAULTS > COMPOSITION
Stamps SYSTEM DEFAULTS > STAMPS
12 FreeFlow Accxes Printer System and Web Print Management Tool Setup Guide
Page 17

Vector Halftone SYSTEM DEFAULTS > RENDERING
The mismatch queue will display only jobs with media mismatch issues and will report the
necessary action on the page. You can also cancel any or all mismatch jobs simultaneousl y.
The active queue page shows only the jobs in progress, allowing you to cancel or change
priority on any or all jobs simultaneously.
After you have set the printer defaults and processing defaults, print out Configuration and
Settings test prints. Store them as a reference with the machine service log.
Utility Settings
In the Web Print Management Tool, select the following navigational paths to get to the option.
Then select HELP to access the help files for more information.
Options Navigational Path in the Web Print Management Tool
Configure remote printer (for
6030/6050 only)
Factory Default Settings UTILITIES > RESET PRINTER DEFAULTS
File Upload UTILITIES > UPLOAD
Help files UTILITIES > INSTALL HELP FILES
Password UTILITIES > PASSWORD
Remote IP Address UTILITIES > CONFIGURE REMOTE PRINTER
Restart Controller UTILITIES > SHUTDOWN
Shutdown Controller UTILITIES > SHUTDOWN
Test Print UTILITIES > TEST PRINT
UTILITIES > CONFIGURE REMOTE PRINTER
FreeFlow Accxes Printer System and Web Print Management Tool Setup Guide 13
Page 18

Driver and Client Software Installation
Drivers
HP-GL/2, AutoCAD and PostScript Drivers are supported by the FreeFlow Accxes firmware.
Installation
For installation instructions, see the Drivers & Client Software Installation Guide.
Client Tools
Overview
The FreeFlow Accxes Client Tools (ACT) application runs on a PC or Solaris workstation. The
tools enable a user to send print jobs, to retrieve scanned files over the network, and to save
images. Selections made in the Client Tools will temporarily override the default settings of the
FreeFlow Accxes supported printer and scanner.
Installation
For installation instructions, see the Drivers & Client Software Installation Guide. The ACT and
AMT software can be installed during the same install.
Account Management Tool
Overview
The FreeFlow Accxes Account Management Tool (AMT) application is used to retrieve job
accounting data from multiple printers that use FreeFlow Accxes firmware, version 7.0, or greater.
This application replaces the Accounting Tab functionality of the FreeFlow Accxes Client Tools.
It is recommended that the AMT software be loaded on only one workstation that is
password protected. The AMT install password is AMTPASSWORD.
Installation
For installation instructions, see the Drivers & Client Software Installation Guide. The ACT and
AMT software can be installed during the same install.
14 FreeFlow Accxes Printer System and Web Print Management Tool Setup Guide
Page 19

Configure Remote Printer Status Messages (6030/6050 printers only)
Status Message Reason/Circumstances
Attempting to communicate with this printer.
This page will refresh until the process completes.
followed by:
Contacting the remote printer, please wait...
Communication with the printer was successful.
The printer link is up.
The attempt to contact the printer has failed.
The printer link is down.
The printer is currently being used by another user.
Please try later.
The remote printer Ethernet address is invalid. Submitting an invalid IP.
The remote printer queue number is invalid. Submitting an invalid queue number.
Your session has been cancelled.
Initiating a session to update the
remote IP address and remote
Queue.
If the effort to contact the remote
printer was successful.
Remote printer time out.
Attempting to change the IP when
another Web Print Management Tool
session is active.
Canceling the remote session.
FreeFlow Accxes Printer System and Web Print Management Tool Setup Guide 15
Page 20

 Loading...