

Page 1

Version 2.2
Software Version 1.5.xx
August 2011
Xerox® Wide Format
TM
FreeFlow
User Guide
FreeFlowTM Accxes® Control
FreeFlowTM Accxes® Control 7142
FreeFlowTM Accxes® Control Pro
FreeFlowTM Accxes® Submit
Accxes® Control
Page 2

©2011 Xerox Corporation. All rights reserved. Xerox and the sphere of connectivity design, FreeFlow® Accxes® Control
and other Xerox product names and identifying Xerox product numbers mentioned in this publication, are trademarks of
Xerox Corporation in the United States and/or other counties.
Microsoft and Windows are registered trademarks of Microsoft Corporation in the United States and/or other countries.
PostScript, Adobe and Acrobat are registered trademarks of Adobe Systems Incorporated.
Epson is a registered trademark of Seiko Epson Corporation.
HP is a registered trademark of Hewlett-Packard Corporation.
Apple and Macintosh are registered trademarks of Apple Computer Inc. in the United States and/or other countries.
Océ is the registered trademarks of Océ-Technologies B.V.
Products in this publication are referred to by their general trade names. In most, if not all cases, these designations are
claimed as trademarks or registered trademarks of their respective companies.
Printed in the United Kingdom.
Changes are periodically made to this document. Changes, technical inaccuracies, and typographic errors will be
corrected in subsequent editions.
Document Version: 2.2 (August 2011).
Page 3

Table of Contents
Introduction ..........................................................................................................vii
Accxes Control Base............................................................................................................... vii
Accxes Control 7142.............................................................................................................. vii
Accxes Control Pro .................................................................................................................. vii
Accxes Submit .......................................................................................................................... vii
Accxes Control – Key Features...................................................................................................... viii
Accxes Control – All Versions............................................................................................. viii
Accxes Control 7142 – Additional Features ............................................................... viii
Accxes Control Pro – Additional Features.................................................................... viii
Accxes Control Feature Matrix ........................................................................................... ix
System Requirements...........................................................................................................................x
1 Installation.................................................................................................1-1
Installation Procedure..................................................................................................................... 1-1
Licensing Accxes Control................................................................................................................1-2
Overview....................................................................................................................................1-2
Before you begin...................................................................................................................1-2
Obtaining your Accxes Control license from the World Wide Web ................. 1-3
Activating Accxes Control.............................................................................................................. 1-4
2 Tutorial.........................................................................................................2-1
Overview................................................................................................................................................2-1
Before you start..................................................................................................................................2-1
Accxes Control Settings ..................................................................................................................2-2
General tab..............................................................................................................................2-2
Printers tab............................................................................................................................... 2-3
Printer Groups tab................................................................................................................. 2-5
Paper Sizes tab ....................................................................................................................... 2-5
Workflows tab......................................................................................................................... 2-6
Hotfolders tab ........................................................................................................................2-9
Accounting tab.................................................................................................................... 2-12
General tab........................................................................................................................... 2-12
Testing Example Set-up............................................................................................................... 2-13
Overview................................................................................................................................. 2-13
Access Control Main Interface ..................................................................................... 2-13
FreeFlow Accxes Submit.................................................................................................. 2-14
FreeFlow Accxes Control User Guide iii
Page 4

Table of Contents
3 Accxes Control Administration ...........................................................3-1
Overview................................................................................................................................................3-1
Accxes Control Settings ..................................................................................................................3-1
Printers tab............................................................................................................................... 3-2
Printer Groups tab................................................................................................................. 3-6
Paper Sizes tab ....................................................................................................................... 3-7
Workflows tab......................................................................................................................... 3-8
Hotfolders tab ........................................................................................................................3-9
Accounting tab.................................................................................................................... 3-15
General tab........................................................................................................................... 3-16
Accxes Control Main Interface ................................................................................................. 3-18
Accxes Control Job Editor............................................................................................................ 3-24
Job Editor – Options..........................................................................................................3-28
Job Editor – Viewer............................................................................................................ 3-30
4 Accxes Client Tools and Print Drivers ...............................................4-1
Introduction......................................................................................................................................... 4-1
Accxes Client Tools ...........................................................................................................................4-1
Windows and Mac Print Drivers ..................................................................................................4-2
Windows Print Driver ...........................................................................................................4-2
MAC PPD...................................................................................................................................4-7
Third Party Windows Print Driver ...................................................................................4-7
5 Accxes Submit...........................................................................................5-1
Overview................................................................................................................................................5-1
System Requirements...................................................................................................................... 5-1
Installation...........................................................................................................................................5-2
Before you start ..................................................................................................................... 5-2
Installation Procedure......................................................................................................... 5-2
Configure Accxes Submit for first use.......................................................................................5-3
Introduction ............................................................................................................................5-3
Before you start ..................................................................................................................... 5-3
Accxes Submit – Configuration...................................................................................................5-4
Printers field.............................................................................................................................5-5
Size Ranges field.................................................................................................................... 5-7
Viewer field..............................................................................................................................5-7
Units field ................................................................................................................................. 5-7
Accxes Submit User Interface......................................................................................................5-8
Main Menus and Icons ....................................................................................................... 5-9
Job Options........................................................................................................................... 5-10
Documents list..................................................................................................................... 5-11
Document options............................................................................................................. 5-12
iv FreeFlow Accxes Control User Guide
Page 5

Table of Contents
6 Example Configurations and Workflows ........................................6-1
Introduction......................................................................................................................................... 6-1
Specific Printer Configurations....................................................................................................6-2
Xerox Wide Format Accxes-based Monochrome Printers.................................... 6-2
Xerox Wide Format 7142 Colour Printer ..................................................................... 6-2
Epson 9700 Wide Format Colour Printer .................................................................... 6-3
HP1055 Wide Format Colour Printer............................................................................6-3
HP4000 Wide Format Colour Printer............................................................................6-4
Xerox 252 Small Format Colour Printer ....................................................................... 6-4
Xerox 4112 Small Format Monochrome Printer......................................................6-5
Océ 9800 with ReproDesk.................................................................................................6-5
Common Workflows.........................................................................................................................6-8
Print Size Control Workflow ..............................................................................................6-8
Default Print Mode Workflow..........................................................................................6-9
Default Finishing Workflow ........................................................................................... 6-10
Rotation Workflow Applied in Printer tab................................................................6-11
Print Report Workflow ...................................................................................................... 6-12
Multi-page Document Workflows ...........................................................................................6-13
Multi-Page Document Warning Workflow .............................................................. 6-13
Split Multi-page Document Workflow....................................................................... 6-14
Subset Support Workflow............................................................................................... 6-14
......................................................................................................................... 6-15 Caldera Workflows
Access to the Caldera workstation.............................................................................. 6-15
............................................................................................................. 6-15 Caldera Workflows
Applying Example Rules and Workflows ..............................................................................6-16
PDF Conversion ............................................................................................................................... 6-21
File format conversion example for Accxes Control Pro.................................... 6-21
PDF Conversion Workflow.............................................................................................. 6-21
PDF Conversion Example................................................................................................ 6-22
Email Configuration ...................................................................................................................... 6-25
Notify Workflow.................................................................................................................. 6-26
Configure Accxes Control to Email printer status alerts.................................... 6-27
AutoCAD DWG Configuration .................................................................................................. 6-28
Experimental workflow for Accxes Control Pro...................................................... 6-28
7 Appendix A .................................................................................................7-1
PJL Commands................................................................................................................................... 7-1
8 Appendix B .................................................................................................8-1
Accxes Control Supported File Formats...................................................................................8-1
9 Index.............................................................................................................9-1
FreeFlow Accxes Control User Guide v
Page 6

Page 7

Introduction
Xerox® Wide Format FreeFlowTM Accxes® Control and Submit are part of the Xerox®
Wide Format FreeFlow
Format FreeFlow
for large and small format documents. FreeFlow
submission software.
There are three levels of Accxes Control, and the features of the software are
controlled by the purchased license type:
TM
TM
Accxes® Productivity Tools software suite. The Xerox® Wide
Accxes® Control software is a powerful print management solution
TM
Accxes® Submit is the client job
Accxes Control Base
This solution provides queue management for Xerox FreeFlow Accxes-based wide
format printers.
Accxes Control 7142
This solution provides queue management for Xerox FreeFlow Accxes-based wide
format printers plus Xerox 7142 wide format colour printers.
Accxes Control Pro
This solution provides queue management for Xerox FreeFlow Accxes-based wide
format printers and Xerox 7142 wide format colour printers plus printers from all
manufacturers (either through inbuilt drivers, or using Microsoft Windows Drivers).
Accxes Control Pro also provides electronic printing, for example by PDF to file or
email.
Accxes Submit
Accxes Submit is a free Windows client used to submit print files to the Accxes Control
queue. Files must be in a print ready format such as .plt, .tif, etc. See Appendix B
Accxes Control Supported File Formats for a list of supported file formats.
FreeFlow Accxes Control User Guide vii
Page 8

Introduction FreeFlow Accxes Control
Accxes Control – Key Features
Accxes Control – All Versions
• Accxes Controller Support – Direct printing support for Accxes-based printers.
• Multiple Device Support – Supports multiple devices for whatever printer type
identified in each Accxes Control version.
• Accxes Client Tools and Accxes Submit support – Clients can use either software
tool to submit files into Accxes Control for onward routing to any printer
configured within Accxes Control.
• Job Editor and Image Viewer – Inbuilt editor to view specific job request
information and modify if required. Also provides confirmation of image layout,
detected size and title block location.
• Automatic/Manual Queue Control – Jobs can be automatically printed on a first
come first served basis, manually nominated or depending upon parameters files
can be printed, held and reprinted.
• Load Balancing and Failover – Split jobs across multiple devices on a first come
first served basis or in the event of a printer being unavailable.
• Remote Queue Management – Using Accxes Client Tools.
• Rule-based Printing – Route jobs depending upon printer capabilities.
• Job Interrupt – Interrupt print jobs for high priority work.
• Client PostScript Driver – PostScript printer driver for Windows and Apple Mac
client workstations (Requires PostScript option to be installed on the Accxes
controller).
Accxes Control 7142 – Additional Features
• Adds support for Xerox Wide Format 7142 colour inkjet printer.
• Automatic Colour Job Detection – Route colour documents to colour printer.
• Client PostScript Driver – PostScript printer driver for Windows and Apple Mac
client workstations providing PostScript support for 7142.
• Rule-based Printing – Route jobs depending upon colour and monochrome make-
up of the print file.
• Job Accounting – Keep track of all work for monitoring and charging purposes.
Accxes Control Pro – Additional Features
• Adds Third Party Printer Support – Print to any device with a Windows printer
driver.
• File Format Conversion – Conversion of document format for archive, distribution
and for supported print file format.
• Electronic Output – Automated electronic distribution.
viii FreeFlow Accxes Control User Guide
Page 9

FreeFlow Accxes Control Introduction
Accxes Control Feature Matrix
Feature Control Control 7142 Control Pro
Accxes-based Printer Support
Windows – Direct Support
7142 Print Support
6204 BPS Support
Windows – GDI Third Party Printer Support
Automatic Colour Job Detection
Job Editor
Accxes Client Tools / Accxes Submit Support
Automatic / Manual queue control
Multiple device support
Load Balancing and Failover
Remote Queue Management
9 9 9
1
91 91
9
8 9 9
1
91
9
8 8 9
8 9 9
9 9 9
9 9 9
9 9 9
9 9 9
9 9 9
9 9 9
9
Rule Based Printing
Job Interrupt
Client PostScript Print Driver
Automatic Title Block Detection
Job Accounting
Automatic File Format Conversion
Electronic Output (File or Email)
1
Windows – Direct (Also used as an Alternative 6204BPS option): Depends upon the
9 9 9
9 9 9
2
93 93
9
9 9 9
8 9 9
8 8 9
8 8 9
print device supporting Accxes Control file formats (No file format conversion
supported) and the print device supporting basic PJL commands used to separate sets,
control size/scaling and copy count. This option must be tested prior to purchase.
2
Postscript printing is only supported on FreeFlow Accxes enabled printers with the
postscript feature installed.
3
Supports Postscript printing to FreeFlow Accxes enabled printers with the postscript
feature installed and provides PostScript support for the 7142.
FreeFlow Accxes Control User Guide ix
Page 10

Introduction FreeFlow Accxes Control
System Requirements
The Xerox
minimum PC specification to function correctly.
‐ Intel Core 2 Duo 3.0Ghz
‐ 150Gb available disk space
‐ 3Gb RAM (4Gb RAM recommended)
‐ Virtual machine environments are supported, though performance may be less
‐ Windows XP, Windows 7 or Windows Server 2003, 2008 or 2008 R2. 32 or 64-bit.
NOTE: The functionality provided by Accxes Control can be very intensive on system
resources (CPU and Memory). It is not recommended to run Accxes Control on the
same system as other resource intensive processes, for example SQL Server.
®
Wide Format FreeFlowTM Accxes® Control software requires the following
than on a dedicated system.
(Windows 7 (or Server 2008 R2) 64-bit is recommended for best performance.)
Terminal Services
Xerox recommends Accxes Control be installed on a PC local to where the print
administrator can manage the print queues. A special license file will be required if
Accxes Control is to be administered using Microsoft Remote Desktop Connection
(RDP). The standard license file does not allow the software to be run via Microsoft
Terminal Services. Because MS RDP uses the Terminal Services engine, this also
prevents the software being launched on an RDP connection. However RDP is a
common way to administer Servers where it may be possible to install Accxes Control.
If this is a requirement, Xerox will issue a license with Terminal Services support on
request. Please ask your supplier if this is a requirement.
Xerox recommends a dedicated host PC, but this is not mandatory, if a non-dedicated
machine is used, the PC specification must appreciate all the applications on the host
computer.
When third party Windows print drivers are used, they must produce a supported file
format. Your sales representative should be engaged to ensure configurations using
third part print drivers will operate. This should be tested as required.
x FreeFlow Accxes Control User Guide
Page 11

1 Installation
You will need the following to complete installation:
• Xerox FreeFlow Accxes Productivity Tools Installation CD or download the latest
installation kit from
• Xerox FreeFlow Accxes Control License file or Activation Code.
Note: Administrator permissions are required to install this software.
Installation Procedure
1. Insert the Accxes Productivity Tools CD into your CD-ROM drive or double-click the
exe file downloaded from the website shown above.
2. If the CD does not begin the Autorun function, perform the following:
a. Open Windows Explorer
b. Select your CD-ROM drive
c. Double-click Accxes Control Setup.exe
The Xerox Wide Format splash screen is displayed.
3. Follow the instructions in the Accxes Control set-up window and select [Next] as
directed to begin installation.
Review the Software End User License Agreement.
4. Accept the terms of the license agreement and select [Next] in order to continue.
5. Accept the default installation folder and select [Next] to continue.
6. Accept the default queue folder and select [Next] to continue.
7. Click [Install] to begin the installation.
The Accxes Control set-up window displays the successful completion of the
installation.
8. Select [Finish].
9. Start the Accxes Control application by:
Selecting Start > All Programs > Xerox > FreeFlow Accxes > Accxes Control
10. Select your default language. Uncheck the box to disable displaying the language
selection again and click [OK] to start the application.
11. Complete the necessary steps to license the software in the following section
entitled, Licensing Accxes Control.
12. Once Licensed, the chapter entitled, Example Configurations and Workflows
cover typical workflows to perform common requirements. Customers can use the
Tutorial chapter in order to get started using the software.
http://downloads.xwfsolutions.com/ffapt/
1
FreeFlow Accxes Control User Guide 1-1
Page 12
Installation FreeFlow Accxes Control
Licensing Accxes Control
Overview
To activate and use Accxes Control, a license key file is required.
Accxes Control is licensed to the Host ID of your computer and the license information
only needs to be entered the first time you open Accxes Control.
You must have administration rights to license Accxes Control.
Before you begin
To license Accxes Control you will need the following:
Host ID
Serial Number
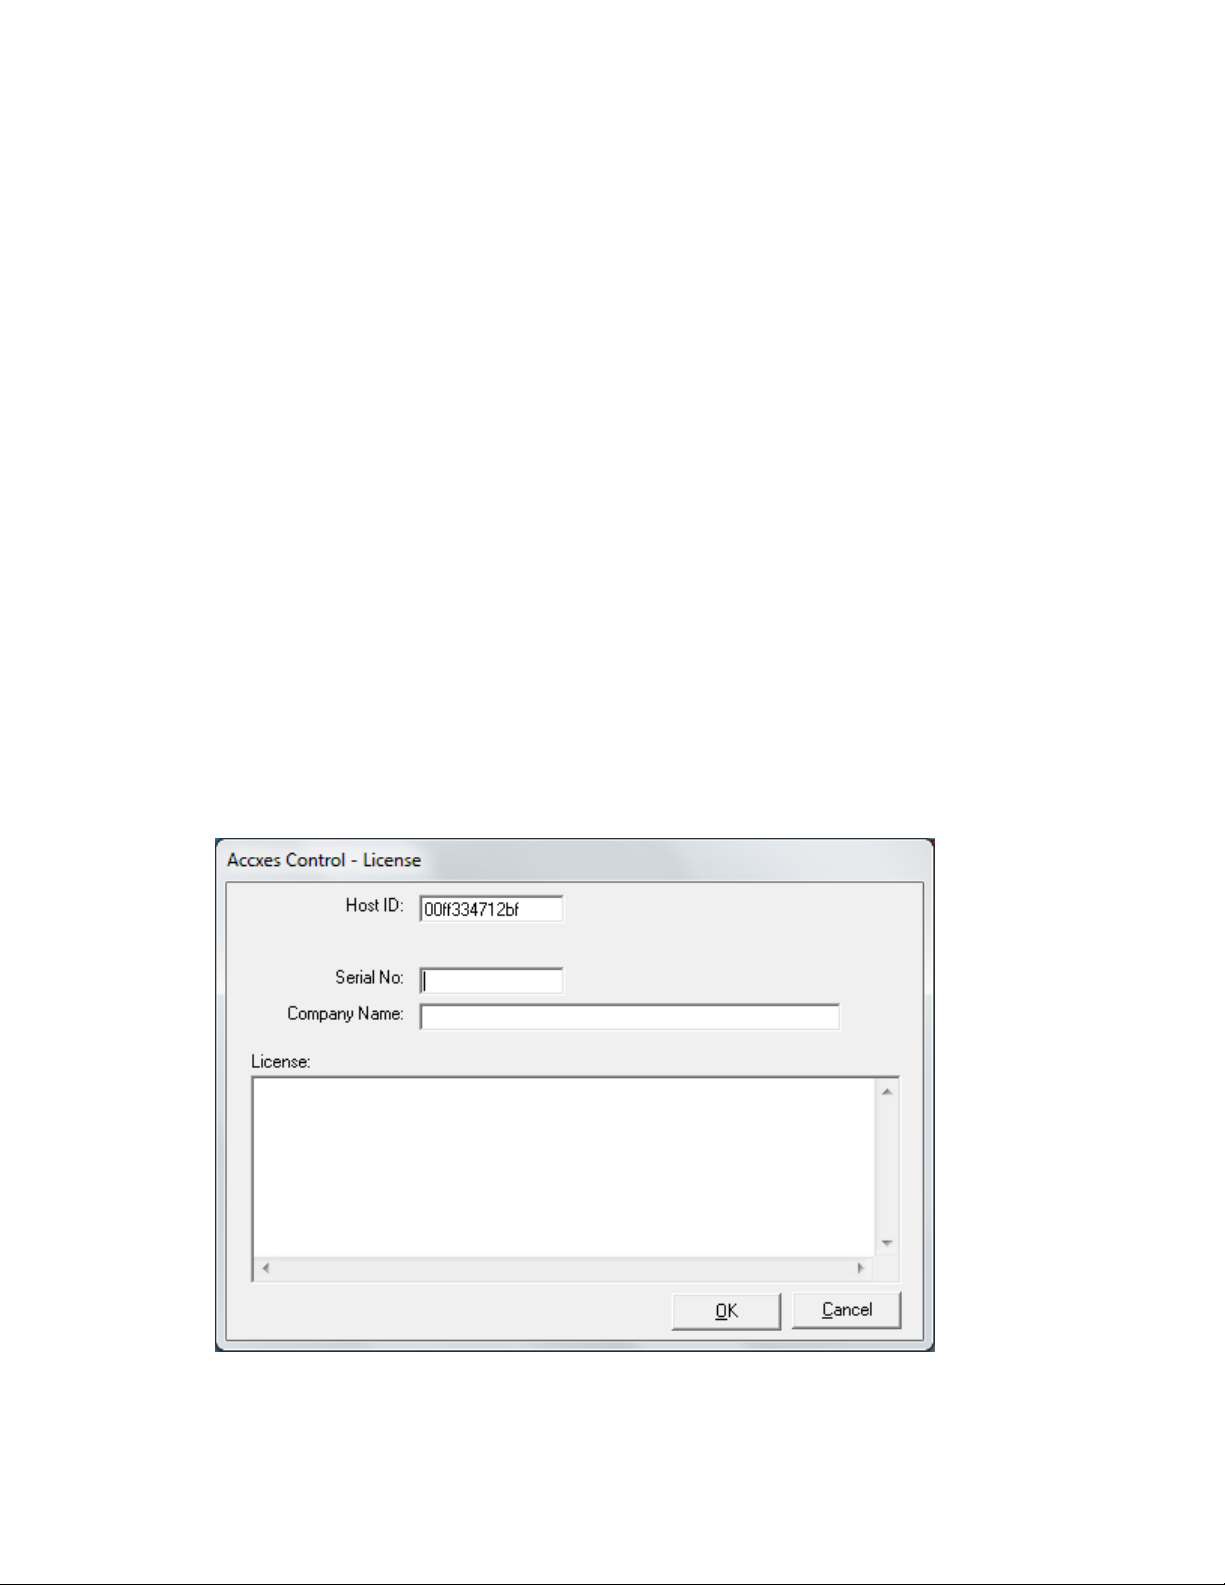
Host ID
The Host ID (Mac Address) as displayed in the Accxes Control license window. This is
displayed when you first launch Accxes Control as shown in figure 1.1
Fig 1.1
1-2 FreeFlow Accxes Control User Guide
Page 13

FreeFlow Accxes Control Installation
Serial Number
The Serial Number that came with the software. This can be found printed on the
software installation CD.
The activation key information is also located as a file on the CD.
Note: Be sure to keep this information safe since you will need it if you ever need to
reactivate the license or move the software onto another PC workstation. If the
license file needs to be moved due to a PC failure, please contact your Xerox service
representative.
Obtaining your Accxes Control license from the World Wide Web
Notes
An activation key is issued with the purchase of the software.
The activation key is located on the software installation CD along with a serial
number also located on the CD.
In order to obtain your Accxes Control license, you must have an internet
connection.
To obtain an Accxes Control license:
Go to the following Xerox Software Activation Portal (SWAP) website:
https://www.xeroxlicensing.xerox.com/activation/
Enter the activation key
Click [Next].
On the following screen, enter the details below:
a. Host ID (Ensure this is entered exactly as displayed on your host PC)
b. Serial Number
Note: If you have a separate Accxes Control Pro upgrade activation key, you
should enter the same serial number from the base software – NOT the
Accxes Control Pro upgrade serial number.
Click [Next].
On the following screen, enter your customer user information details:
c. Company Name
d. First and Last Contact Name
e. Address
f. Email Address
Click [Next].
On the following screen, verify your user information and click [Save and Download
License File].
Save the license file (.DAT file) to a desired location on your computer hard drive.
Note: Keep a copy of the .DAT file with all its required information in the event
that you ever need to reactivate the license.
Having downloaded the license file, the software needs activating as explain in the
next section of this chapter.
FreeFlow Accxes Control User Guide 1-3
Page 14

Installation FreeFlow Accxes Control
Activating Accxes Control
Before you can use the Accxes Control application, you must activate it.
1. Correctly enter the following information into the appropriate fields of the Accxes
Control License window:
a. The HOST ID will automatically have been entered.
b. The Serial Number that came with the software.
c. Your company name
d. Correctly enter your license information into the License field:
i. Ensure the license information is entered exactly as it was
provided from the SWAP website – including alphanumeric
characters and any upper/lower case letters.
ii. Drag and drop the downloaded .DAT file into the Accxes Control
license field.
e. Select [OK].
Accxes Control verifies the license and starts automatically.
If you receive a Windows warning regarding Accxes Control, be sure to allow
or permit any required access.
2. Once Licensed, the Appendices cover standard installations completed by Xerox
Wide Format installation engineers; customers can use the Tutorial in order to get
started using the software.
1-4 FreeFlow Accxes Control User Guide
Page 15

2 Tutorial
Overview
This Tutorial will cover the following example set-up for Accxes Control Pro:
(For other versions of Accxes Control, you will only be able to perform those activities
relevant to your software version)
Three printers in Accxes Control
‐ FreeFlow Accxes Xerox Wide Format monochrome device (Accxes
Control all versions)
‐ Xerox Wide Format 7142 (Accxes Control 7142 and Pro)
‐ Small Format device. (Accxes Control Pro only)
Configure monochrome print sizes A2 and larger to be queued to an Accxes-
based Xerox Wide Format monochrome device. (Accxes Control all versions)
Configure colour print sizes A2 and larger to be queued to the Xerox 7142
Wide Format colour printer. (Accxes Control 7142 or Accxes Control Pro)
Configure print sizes A3 and A4 to be queued to the small format device
(Accxes Control Pro only).
This example set-up will help explain a number of the functions provided by Accxes
Control and how to set these up.
2
Before you start
1. Ensure the Accxes Control application is closed.
2. Ensure all print devices to be used by Accxes Control are switched on and
operating correctly on the network.
3. Install print drivers on the PC hosting Accxes Control for the wide and small
format print devices intended to be used by Accxes Control.
4. All required actions in this tutorial are preceded by the following bullet:
5. Paragraphs without bullets are for information purposes.
6. Take careful note of any WARNING or CAUTION notes. These will be identified
along with a symbol and red font.
FreeFlow Accxes Control User Guide 2-1
Page 16

Tutorial FreeFlow Accxes Control
Accxes Control Settings
The first time Accxes Control is started, the Settings window will automatically open.
At any time thereafter, the settings can be accessed from the Accxes Control main
window by clicking [Spooler] and then [Setup].
From the Settings window, seven tabs identify the following options:
Printers
Printer Groups
Paper Sizes
Workflows
Hotfolders
Accounting
General
Note: Accxes Control will not function until the print queue location has been
configured in the General tab and a minimum of one printer has been configured in
the Printers tab.
Each tab is explained as follows:
General tab
The General tab contains the following selections:
Print Queue Location
This is a folder on the local PC that will be used to store all documents in the print
queue. It can get very large, so must be located on a drive with lots of free space. On a
new installation it will default to: C:\Accxes Control\Print Queue
Automatically Delete Jobs
Select this option, and enter a time after which all successfully printed jobs will be
deleted from the queue. This is recommended on all unattended Accxes Control
systems to prevent the hard disk becoming full.
Activate automatic printing at start-up
Select this option to enable printing to start automatically when Accxes Control is
opened. With this option disabled, a user must manually release each print job
received.
For the purposes of this tutorial and for initial configuration of Accxes Control, it is
recommended to leave this in manual mode. This allows checking that the rules are all
working as intended before testing print output.
2-2 FreeFlow Accxes Control User Guide
Page 17

FreeFlow Accxes Control Tutorial
Printers tab
The Printers tab is used to select Printers and their Available Page Sizes.
Note:
FFA Control Base only supports printing to Xerox FreeFlow Accxes devices.
FFA Control 7142 adds printing to the Xerox Wide Format 7142.
FFA Control Pro adds the capability of printing to non-Xerox FreeFlow Accxes
devices and small format devices.
Click [Add], to open the Add Printer window (Figure 2.1).
Fig 2.1
Xerox FreeFlow Accxes Monochrome Devices – Accxes Control All Versions
In the Name field, give your Xerox FreeFlow Accxes Wide Format printer the
following name: Wide Format Monochrome Device
In the Type field, select FreeFlow Accxes.
This selection is only used for Xerox Wide Format devices that are controlled by a
FreeFlow Accxes controller. For all other wide format devices, select either
Windows – GDI to use a printer through its windows driver, or Windows – Direct
for printers which directly support the required file formats.
In the Printer field, enter the IP address of the FreeFlow Accxes printer.
When selecting an Accxes-based printer, also enable the tick box ‘Allow printer to
select automatic page sizes’ and click [OK] to return to the Printers tab.
Click [Apply].
FreeFlow Accxes Control User Guide 2-3
Page 18

Tutorial FreeFlow Accxes Control
Xerox Wide Format 7142 – Accxes Control 7142 and Pro
Click [Add] to open the Add Printer window.
In the Name field, give your Xerox Wide Format 7142 printer the following name:
Wide Format Colour Device
In the Type field, select Xerox 7142.
This selection is only used for Xerox Wide Format 7142 devices. For all other wide
format devices, select either Windows – GDI to use a printer through its windows
driver, or Windows – Direct for printers which directly support the required file
formats.
In the Printer field, enter the IP address of the Xerox Wide Format 7142 printer.
Click [Properties] and wait while the printer driver is installed and configured with
three default print modes. When finished, the Printer Properties window will open
displaying three default print modes: Draft, Normal and Quality.
You may return to the Printer Properties window at any time to view/edit the existing
print modes and create new modes.
Click [OK] to close the Printer Properties window.
Click [OK] to return to the Printers tab.
The default roll size will display ROLL_A0. Only change this to reflect a different roll
size loaded on the printer.
Click [Apply].
Non-Xerox and Small Format Devices – Accxes Control Pro Only
Click [Add] to open the Add Printer window.
In the Name field, give your non-Xerox small format device the following name:
Small Format Device.
Each printer must be assigned a unique Accxes Control name. Once created, the
only way to change the name is to remove the printer and add it again.
In the Type field, select Windows - GDI.
Select Windows – GDI to use a printer through its windows driver, or Windows –
Direct for printers which directly support the required file formats.
In the Printer field, use the drop down to select the desired Windows printer from
the list of printers installed on your PC workstation hosting Accxes Control.
Click [Properties] to open the Printer Properties window.
Click [Add] in order to create one default print mode.
In the New Print Mode window enter the name, ‘Normal’ and click [OK].
2-4 FreeFlow Accxes Control User Guide
Page 19

FreeFlow Accxes Control Tutorial
This opens the Windows print driver properties.
Click [OK] to close the Windows print driver properties.
Click [OK] to close the Accxes Control Printer Properties window.
You may return to the Accxes Control Printer Properties window at any time to
view/edit the existing print modes and create new modes.
Click [OK] to return to the Printers tab.
When using a printer configured as a Windows – GDI printer in Accxes Control, you
must select which page sizes are available on the printer and are required for use in
Accxes Control.
To select page sizes, highlight the previously added Windows printer in the Print
Queues field and click [Add] alongside the Available Page Sizes field.
Highlight A3 and A4 page sizes and click [OK] to return to the Printers tab.
Click [Apply].
Printer Groups tab
The Printer Groups tab is used to configure load balancing and failover. These options
are not part of this tutorial. For more information see the chapter entitled, Accxes
Control Administration.
Paper Sizes tab
When a print job is received by Accxes Control, the physical size of the file to be
printed is compared to the selected Paper Sizes – the nearest page size is selected.
Your printer may not have all these sizes available. Therefore, by selecting only the
page sizes available in your printer(s), you can avoid mismatch errors by forcing
everything to print onto the nearest available size.
This function is particularly beneficial when a folding device is installed or when
oversize long documents are detected.
If a small format device is used (Pro version only), Accxes Control will compare the
page size selected here to the available sizes selected in the Printers tab when the
small format printer was configured.
Enable all the following: ISO_A0, ISO_A1, ISO_A2, ISO_A3 and ISO_A4.
Uncheck all other selections.
FreeFlow Accxes Control User Guide 2-5
Page 20

Tutorial FreeFlow Accxes Control
Oversize Margin
The Oversize Margin field, specifies how much larger the physical size of the print file
can be and still be forced to the nearest smaller available print size. This is especially
important when printing previously scanned images, where the detected page size
may be fractionally larger than the actual size of the image detail, or when printing
non-available print sizes.
E.g. Forcing ANSI or ARCH sizes to ISO output.
Note: If the oversize margin is set too small, prints may be forced to a larger paper
size than required. Experimentation is necessary to ensure the desired result,
particularly when printing scanned images.
Use the default Oversize Margin: 5%.
Click [Apply].
Workflows tab
Notes
Accxes Control uses workflows to change properties for print jobs and determine
printer destinations.
Workflows can be applied to print jobs manually, or automatically using hotfolder
rules. (See the section in this chapter entitled, Hotfolders tab for an explanation)
All workflows must have a unique name. Use [Add] and [Remove] buttons next to the
Configured Workflows field to create and delete workflows.
Each workflow may be configured to specify a set of Mandatory and/or Default
options for print jobs:
Mandatory Options will always override any settings in the print job. E.g. this
can be used to force all print jobs to be folded.
Default Options will only be applied if the option has not been specified
already inside the print job.
E.g. this can be used to specify default folding commands for files produced
through a third party print driver that does not support Xerox Wide Format
folding commands; or to apply a print mode for an inkjet device when no other
print mode was specified in the print job.
Be sure the required workflow is highlighted before adding, editing or removing any
Mandatory Options and Default Settings.
Select either the Mandatory Options or Default Options tab depending on the desired
behaviour. Mandatory Options are forced and Default Options are applied if they do
not exist in the print job.
2-6 FreeFlow Accxes Control User Guide
Page 21

FreeFlow Accxes Control Tutorial
Use the [Add], [Edit] and [Remove] buttons to the right of the options category lists,
to manage options. Depending on the option selected, you may have to type a value
or select from the drop-down list or both.
When applying options, the available ‘settings’ will be listed in a drop down field.
Some ‘values’ will also be listed in a drop down field. Some options require values to
be entered based upon individual requirements. The Add Setting window will display
help text to aid this process.
When printers were added in the Printers tab, clicking [Apply] while still in the Printers
tab will automatically create a workflow for each device. This workflow configures the
mandatory destination for the device and a default option for a colour render mode if
colour is supported by the print device.
The following specific additions need to be made in order to work correctly with the
7142 and small format devices (Only relevant to Accxes Control 7142 and Accxes
Control Pro):
Wide Format Colour Device Workflow – Accxes Control 7142 and Pro Only
In the event that a print job destined for the 7142 colour device does not include a
required print mode (Draft, Normal or Quality), FFA Control will apply the first print
mode in the list. This may be an unwanted setting. In such an event, applying the
following workflow ensures the print mode is set to Normal.
Default Options
MEDIANAME1 Size, Media and Layout = Normal
1
MEDIANAME will call the corresponding PRINTMODE. The names are interchangeable.
Highlight the workflow called, Wide Format Colour Device.
This is the name given to the device when created in the Printers tab.
Select the Default Options tab.
Select Size, Media and Layout and click [Add].
In the Setting window, use the Setting drop down field to select MEDIANAME.
Use the Value drop down field to select “Normal”.
Click [OK] to close the Setting window and return to the Workflows tab.
Click [Apply].
FreeFlow Accxes Control User Guide 2-7
Page 22

Tutorial FreeFlow Accxes Control
Small Format Device Workflow – Accxes Control Pro Only
In the event that a print job destined for a small format device does not include a
required print mode, FFA Control will apply the first print mode in the list. This may be
an unwanted mode with additional print functions applied. In such an event, the
following workflow ensures the print mode is set to Normal.
The Mandatory Options workflow in the table below is required to ensure small format
devices handle print sizes correctly when they are scaled to print A4 and A3.
Mandatory Options
Size, Media and Layout FITTOPRINTERSIZE = TRUE
Default Settings
1
MEDIANAME will call the corresponding PRINTMODE. The names are interchangeable.
MEDIANAME1 Size, Media and Layout = Normal
Highlight the workflow called, Small Format Device.
This is the name given to the device when created in the Printers tab.
Select the Mandatory Options tab.
Select Size, Media and Layout and click [Add].
In the Setting window, use the Setting drop down field to select
FITTOPRINTERSIZE.
Use the Value drop down field to select TRUE.
Click [OK] to close the Setting window and return to the Workflows tab.
Select the Default Options tab.
Select Size, Media and Layout and click [Add].
In the Setting window, use the Setting drop down field to select MEDIANAME.
Use the Value drop down field to select “Normal”.
Click [OK] to close the Setting window and return to the Workflows tab.
Click [Apply].
2-8 FreeFlow Accxes Control User Guide
Page 23

FreeFlow Accxes Control Tutorial
Hotfolders tab
WARNING
When creating or configuring a hotfolder, you MUST choose, or create, an empty
folder – DO NOT CHOOSE THE ROUTE OF C:\ OR ANY OTHER DRIVE ON YOUR
WORKSTATION – any files within the hotfolder will be removed by Accxes Control and
files lost cannot be recovered.
Hotfolders determine the source of print jobs for Accxes Control. It is possible to use
multiple hotfolders in order to control input to Accxes Control from various sources.
Network hotfolders listen on network ports for print jobs from print drivers, Xerox
FreeFlow Accxes Client Tools or FreeFlow Accxes Submit. Windows directory
hotfolders, look for incoming print jobs in Windows folders on the hard disk drive.
One Network hotfolder is automatically created when Accxes Control is installed, but
is not automatically enabled. Once at least one additional hotfolder has been created,
the existing Network hotfolder can be removed if required.
All hotfolders can have multiple rules and workflows applied to make changes to how
files are printed.
Hotfolders have the following settings:
Path (Folder Hotfolders Only) – The folder where Accxes Control should look for
jobs.
Port (Network Hotfolders Only) – The TCP port on which Accxes Control should
listen for jobs. Use 2000 for Use with Accxes Client Tools and Accxes Submit.
Each network Hotfolder must have a unique port number.
Filter (Folder Hotfolders Only) – Wildcard expression to determine which
filenames are processed.
Forward To – If enabled, print jobs will be sent to the specified folder after
processing. This is useful if a print job should be processed twice. E.g. Print and
output to PDF.
Enable Hotfolder – Jobs for the highlighted hotfolder are only processed if the
hotfolder is enabled by clicking this checkbox.
Rules – Rules are a powerful way for Accxes Control to determine how to
process a job based on its source and attributes. E.g. Size, Finishing
Requirements, etc.
Note: If no rules are applied, no workflow will be applied and print jobs will be sent to
the default printer using the options included in the print job. This will still provide
typical queue control functions to manage the printer queue in the Accxes Control
Main Interface.
FreeFlow Accxes Control User Guide 2-9
Page 24

Tutorial FreeFlow Accxes Control
Rules are identified by numbers and are processed in numerical order.
Each rule can have one or more conditions and one workflow applied.
If all the conditions for a rule are met, then the specified workflow is applied to
the job.
When conditions are met, the job will still move on to the next rule unless ‘Stop
at this rule if it is true’ is enabled.
When conditions are not met, the print job moves on to the next rule, its
associated conditions and workflow.
Conditions – Once a Rule has been added, one or more conditions may be
applied.
Workflow – Selects a workflow to be applied if the selected conditions are met.
Stop at this rule if it is true – If this checkbox is marked, then no further rules
are processed if the conditions of the current rule are met.
Highlight the Network folder on port 2000 and enable it by clicking ‘Enable
Hotfolder’.
The next tasks in this tutorial explain how to configure the rules to send small format
print jobs to a small format printer, colour wide format print jobs to a wide format
colour printer and monochrome wide format print jobs to a wide format monochrome
printer.
In order to achieve this, three rules must be set-up as follows (Reading through the
three rules before you start will help understand what is being achieved.):
Rule 1
Rule 1 is used to send files to the small format printer when they are identified as A4
and A3 size.
Highlight ‘Network’ in the top field
Below the Rules field, click [Add]
Rule number ‘1’ will be listed in the Rules field and ‘Always’ will be displayed in the
Conditions field.
Highlight ‘Always’ in the Conditions field and click [Edit]
In the Type dropdown field, select ‘Size’.
In the left field, select this symbol <= (Less than or equals) and in the right field
select ISO_A3. Click [Ok].
A condition will now be listed as: Print Size <= ISO_A3. Highlight this line and in
the Workflow dropdown field, select Small Format Device.
Click the ‘Stop at this rule if it is true’ checkbox. (This ensures files meeting this rule
have the workflow applied and do not move on to any further rules)
2-10 FreeFlow Accxes Control User Guide
Page 25

FreeFlow Accxes Control Tutorial
Rule 2
Because at the end of Rule 1 we enabled the checkbox ‘Stop at this rule if it is true’,
Rule 1 will have processed any A3 and A4 files from the print job. Therefore any
remaining files must be larger page sizes and still consist of monochrome and colour
documents. The next task performed by rule 2 is to send all wide format colour files to
the wide format colour printer.
Below the Rules field, click [Add]
‘2’ will be listed in the Rules field and ‘Always’ will be displayed in the Conditions
field.
Highlight ‘Always’ in the Conditions field and click [Edit]
In the Type dropdown field, select ‘Options’.
In the Category dropdown field, select ‘Rendering’
In the left Setting field, select CONTAINSCOLOUR. In the centre field, select =. In
the right Value field, select ‘TRUE’. Click [OK].
A condition will now be listed as: CONTAINSCOLOUR = TRUE. Highlight this line
and in the Workflow dropdown field, select Wide Format Colour Device.
Click the ‘Stop at this rule if it is true’ checkbox.
Rule 3
Because at the end of Rule 2 we enabled the checkbox ‘Stop at this rule if it is true’,
Rule 2 will have processed any colour files larger than A3 from the print job. Therefore
the only remaining files will be wide format monochrome documents. The next task
performed by rule 3 is to send all wide format monochrome files to the wide format
monochrome printer.
Below the Rules field, click [Add]
‘3’ will be listed in the Rules field and ‘Always’ will be displayed in the Conditions
field.
Highlight ‘Always’ in the Conditions field.
In the Workflow dropdown field, select Wide Format Monochrome Device.
Click [Apply].
FreeFlow Accxes Control User Guide 2-11
Page 26

Tutorial FreeFlow Accxes Control
Accounting tab
In the Accounting tab, Accxes Control can be configured to record any print settings
that can be identified or processed by Accxes Control.
For the purposes of this Tutorial, the following settings will only capture the basic
information. You can then see what does get captured and determine any additional
settings you wish to measure.
Mark the Enable Accounting checkbox.
Click [Apply].
General tab
The General tab will already contain the path to the default Print Queue Location
where all jobs in the Accxes Control queue are located. Do not change this location.
In order to begin testing Accxes Control it should begin in Manual mode and
configured not to delete any files.
Uncheck the box labelled ‘Automatically Delete Jobs’.
Uncheck the box labelled ‘Activate automatic printing at startup’.
Click [OK] to close the Accxes Control Settings and start the Accxes Control Main
Interface
If a Windows Security Alert appears, tick the relevant boxes and allow access of
FFA Control to your network
Proceed to the next section entitled, Testing Example Set-up.
2-12 FreeFlow Accxes Control User Guide
Page 27
FreeFlow Accxes Control Tutorial
Testing Example Set-up
Overview
This example set-up will use Accxes Submit to send a print job to Accxes Control. This
print job should contain file types according to the version of software installed.
E.g. one small format file (Control Pro), one wide format colour file (Control 7142 and
Pro) and one wide format monochrome file (Control - All versions).
Testing printing from a print driver necessitates going back into the Accxes Control
Settings and creating a new Network hotfolder using a Port number configured to
receive jobs from print drivers. E.g. Port 9100. Then recreate the same rules as
explained in the previous section for the new hotfolder.
Access Control Main Interface
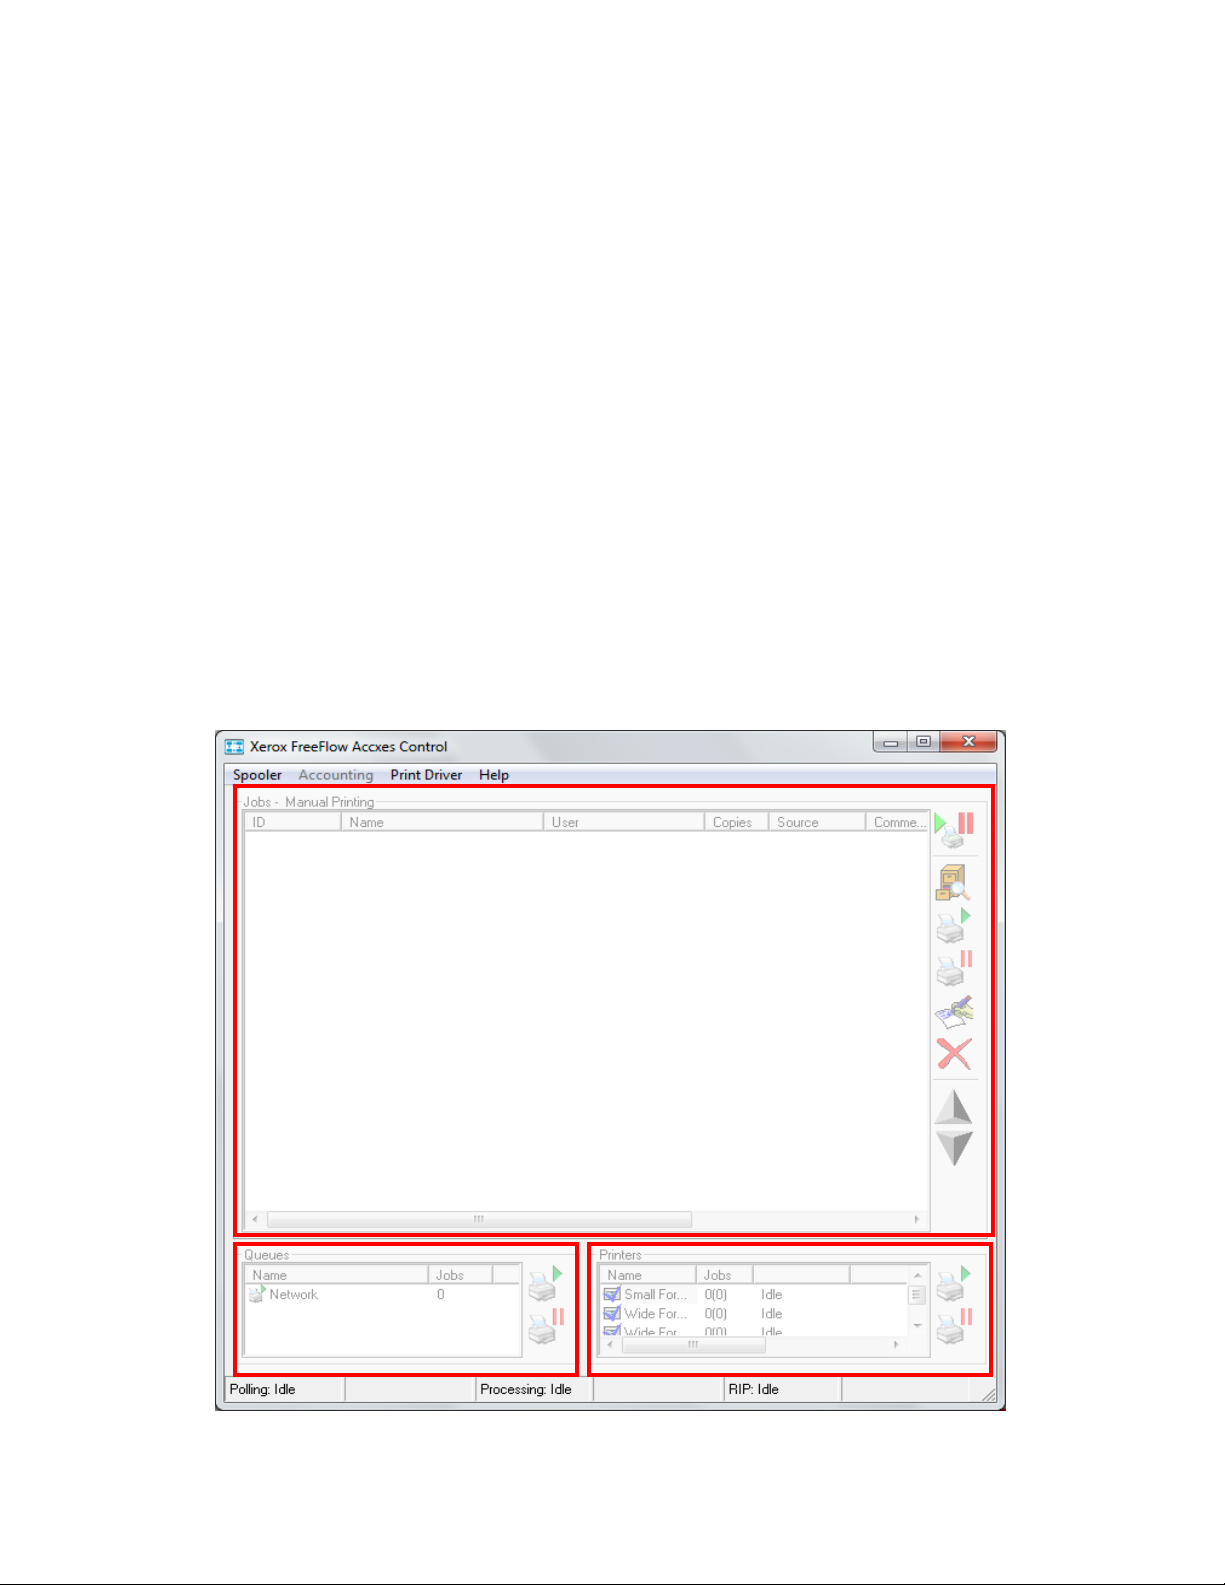
Once the settings have been completed in the previous section of this chapter, the
Accxes Control Main Interface will open as shown below in figure 2.2
Incoming Print
Queues (Hotfolders)
Accxes Control Print Job Queue
Outgoing Print
Queues (Printers)
Fig 2.2
FreeFlow Accxes Control User Guide 2-13
Page 28

Tutorial FreeFlow Accxes Control
Upon first start-up, no jobs will be listed in the Accxes Control Print Queue and the
Toggle Automatic Printing button (Top right icon in Main Interface) will be
deactivated. (I.e. Will not look pressed in.) This depends upon unchecking ‘Activate
automatic printing at startup’ in the General tab of Accxes Control Settings.
The Incoming Print Queues field will list the queues created in the Hotfolders tab of
Accxes Control Settings. (If you have followed this tutorial before first use, there
should be just one queue listed, called Network.) By default, this queue will open ready
for printing identified by a green arrow.
The Outgoing Print Queues field (Also known as the outgoing printers) will list the
printers created in the Printers tab of Accxes Control Settings. By default, the printers
will also open ready for printing identified by a blue tick. If not, check the following
situations:
Printers are not paused in the Windows Operating System
Printers are switched on and not reporting any faults such as open door, media
empty or toner/ink required, etc.
Before sending jobs to Accxes Control, you must first configure FreeFlow Accxes
Submit as explained in the next part of this section.
FreeFlow Accxes Submit
Print jobs may be sent to FreeFlow Accxes Control in any one of the following ways:
Drag and drop in to hotfolders
Printer drivers configured to print to a network port within Accxes Control.
Accxes Client Tools configured in the Accxes Client Tools Device Manager to
print to the network port 2000 within Accxes Control.
FreeFlow Accxes Submit configured to print to the network port 2000 within
Accxes Control.
This tutorial covers FreeFlow Accxes Submit to test the configuration of Accxes
Control. Accxes Submit is covered in more detail in chapter 5 entitled, Accxes Submit
in this guide.
Download the latest version of the Xerox FreeFlow Accxes Submit software from
the following website:
http://downloads.xwfsolutions.com/ffapt/Install%20Kits/
Install FreeFlow Accxes Submit and start the software from: Start > All Programs >
Xerox > FreeFlow Accxes > Accxes Submit.
When Accxes Submit is first started, the Settings window will open. Before using the
software you must configure at least one printer.
Click [New]
2-14 FreeFlow Accxes Control User Guide
Page 29
FreeFlow Accxes Control Tutorial
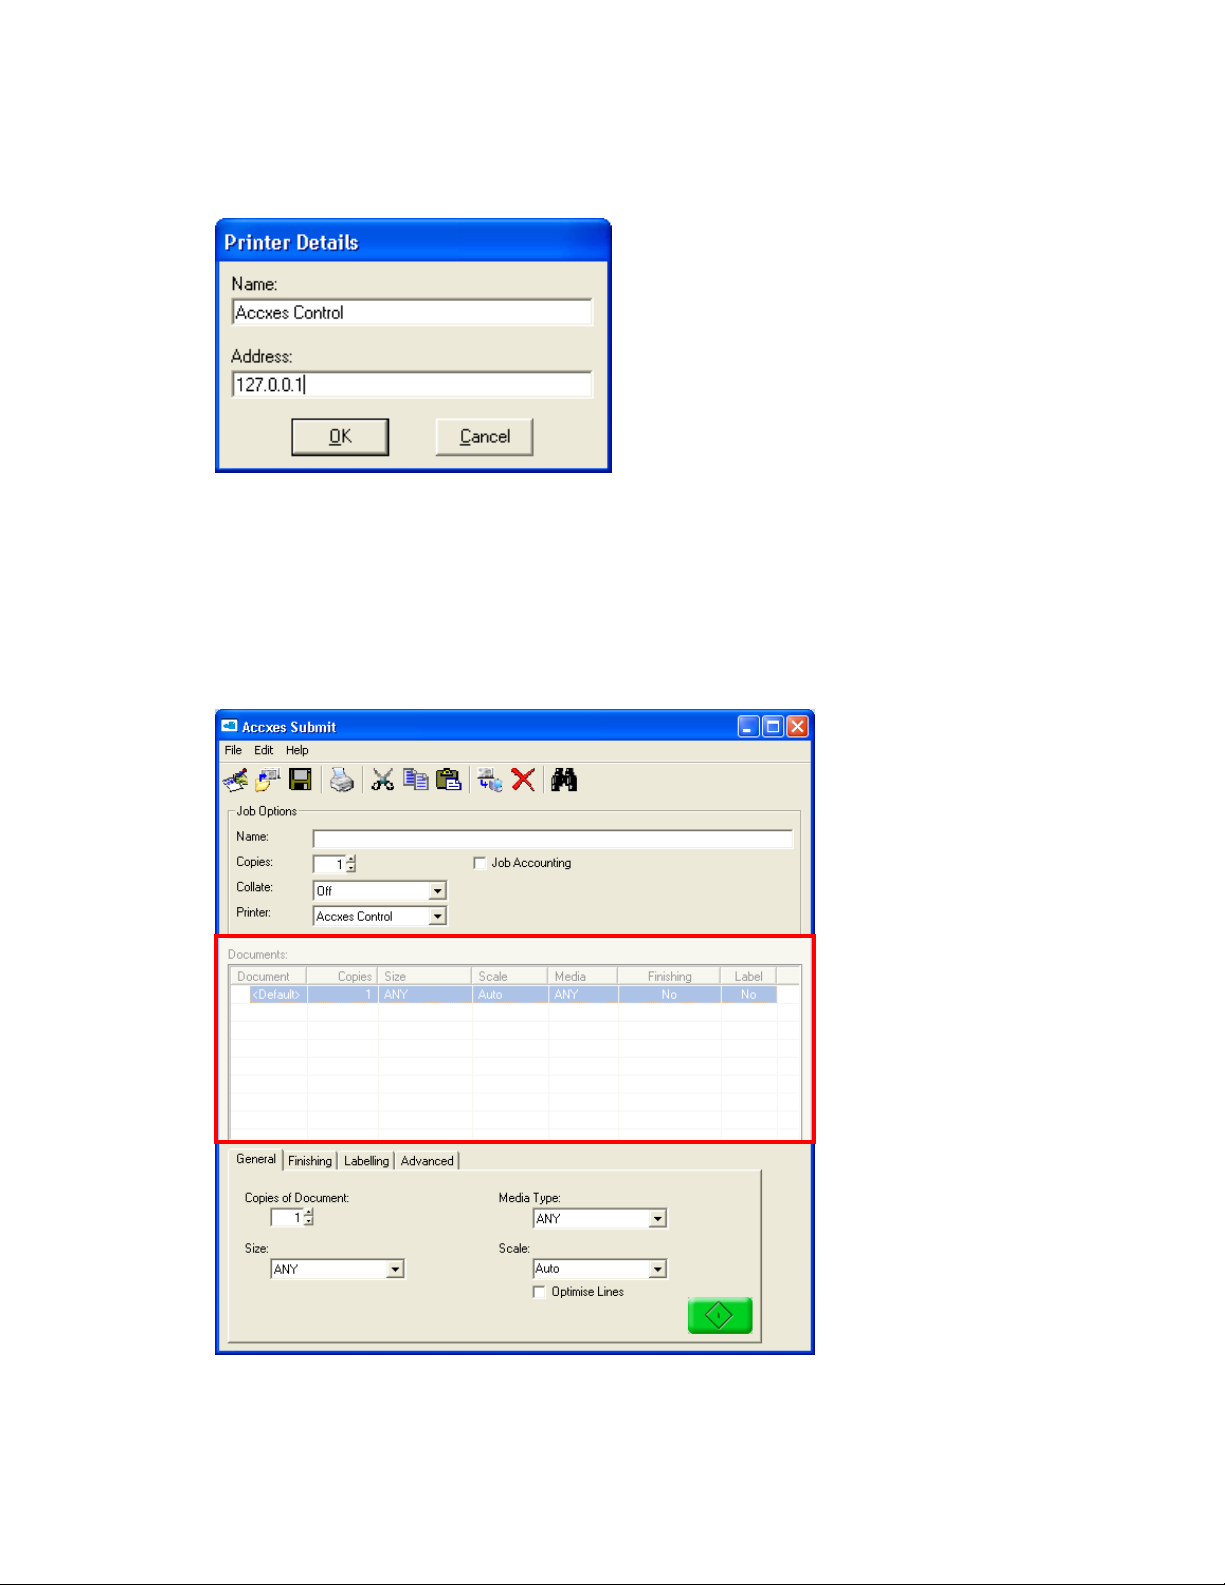
In the Printer Details window, enter the following details:
Name: Accxes Control
Address: Enter the TCP/IP address of the
PC hosting Accxes Control. If Accxes
Submit is installed on the same PC as
Accxes Control, the address should be:
127.0.0.1 as shown in figure 2.3
Fig 2.3
Click [OK} to verify connection to Accxes Control and return to the Accxes Submit
Settings Window.
Uncheck the unwanted Size Ranges so that you are left with ISO and Roll enabled.
Click [OK] to start the Accxes Submit Main Interface shown in figure 2.4
Job Queue
(Documents)
Fig 2.4
Accxes Submit will be covered in more detail later in this guide. For the purposes of
the tutorial, continue with the instructions in this section.
FreeFlow Accxes Control User Guide 2-15
Page 30
Tutorial FreeFlow Accxes Control
Locate three suitable files according to the Accxes Control license type. E.g. for Accxes
Control Pro, at least one of the files should be colour and at least one of the files
should be monochrome.
Drag and drop the three files into the Accxes Submit Job Queue.
Without making any further changes, documents will print at their original size.
However, for the purposes of this tutorial, we will set the sizes to ensure we can verify
the successful application of the rules within Accxes Control.
Highlight one monochrome document in Accxes Submit and use the Size
dropdown field near the bottom of the application to select ISO_A1 (Scaling is
automatic).
Highlight one colour document in Accxes Submit and use the Size dropdown field
to select ISO_A1.
Highlight the remaining document in Accxes Submit and use the Size dropdown
field to select ISO_A4.
Submit the print job by clicking the large green print button.
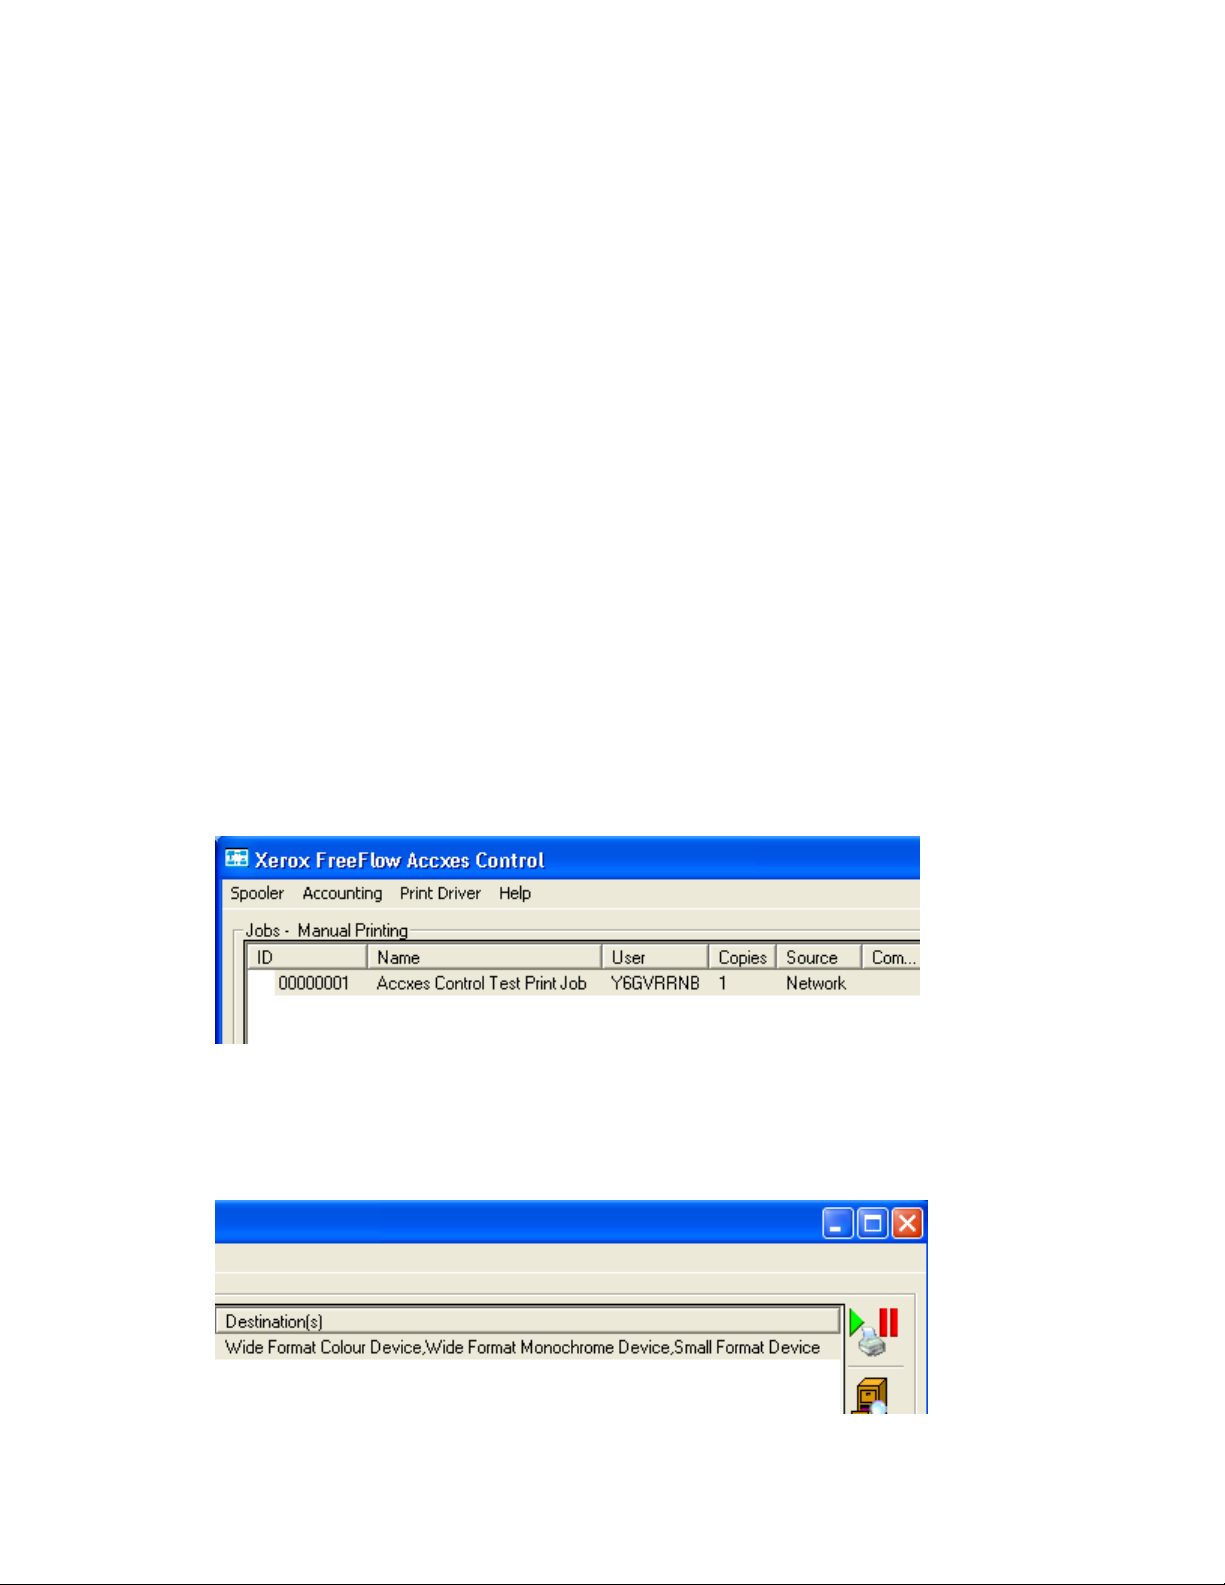
After a few moments, the print job will appear in the Accxes Control Print Queue. Once
processed it will be identified as a new job by having no icon as shown in figure 2.5
Note: All incoming print jobs are processed by Accxes Control to verify size, mono,
colour makeup of the file and identify rules and workflows to be applied.
Fig 2.5
Look to the right side of the listed print job to see the printers identified as the
Destination(s) (Figure 2.6) required to print the files according to the rules and
workflows created earlier.
Fig 2.6
2-16 FreeFlow Accxes Control User Guide
Page 31

FreeFlow Accxes Control Tutorial
View the print job in the Accxes Control Job Editor by either double clicking the job
in the Accxes Control Print Queue or highlight the job and click the View icon
(Shown below) in the Accxes Control Main Interface:
The Job Editor opens as shown in figure 2.7
Fig 2.7
The Job Editor lists each file (Or page of a multi-page document) contained within the
print job and provides detail about the original size of the file, intended print size,
copy count and identified printer. Use this information to verify that the files are set
to print on the devices you expect as per the hotfolder rules configured earlier in this
tutorial.
If you believe the destination devices appear incorrect for the files chosen, first view
the files to ensure, which are colour and monochrome.
Double-click the first file in the Job Editor or highlight the file and click the View
icon shown below:
FreeFlow Accxes Control User Guide 2-17
Page 32

Tutorial FreeFlow Accxes Control
The viewer opens as shown in figure 2.8. In the example below, the viewer identifies
how Accxes Control has analysed the file.
In this case True Colour and the physical size of the file are displayed in the lower
right corner of the viewer. This means if Accxes Control has been configured as
explained in this tutorial, the file should have been processed for printing to the Wide
Format Colour Device (Accxes Control 7142 or Accxes Control Pro only).
Fig 2.8
Click the right arrow button in the Viewer toolbar to view the next file in the Job
Editor.
In the example overleaf (Figure 2.9), the viewer identifies how Accxes Control has
analysed the file.
In this case Black & White and the physical size of the file are displayed in the lower
right corner of the viewer. That means if Accxes Control has been configured as
explained in this tutorial, the file should have been processed for printing to the Wide
Format Monochrome Device (Accxes Control all versions).
2-18 FreeFlow Accxes Control User Guide
Page 33

FreeFlow Accxes Control Tutorial
Fig 2.9
Click the right arrow button to review the remaining document(s) to verify size
and colour.
Close the Viewer.
Check the list of files in the Job Editor to check the Print Size. Check that the A1
size files are identified for the Wide Format devices and that the A4 size file is
identified for the Small Format device.
If the destination printers still appear incorrect based upon your observations,
check/edit the rules in the hotfolders tab configured earlier in this tutorial.
Once the correct print destinations of each file have been confirmed, click [OK] to
close the Job Editor and print the job by click the Print icon (Shown below) in the
Accxes Control Main Interface:
This concludes the tutorial. For further information the use of Accxes Control, please
refer to the remainder of this guide.
FreeFlow Accxes Control User Guide 2-19
Page 34

Tutorial FreeFlow Accxes Control
[This page left intentionally blank]
2-20 FreeFlow Accxes Control User Guide
Page 35

3 Accxes Control
Administration
Overview
Accxes Control Administration includes the activities for setting up Accxes Control and
managing the Accxes Control print queue in the Accxes Control Main Interface. These
activities are common to all versions of Accxes Control unless otherwise indicated.
The chapter entitled, Tutorial covers an example set-up for Accxes Control that helps
gain a quick understanding for a typical use of Accxes Control Pro – splitting print jobs
according to size and colour.
It is essential that the entire administrator guide be used in order to gain a fuller
understanding of Accxes Control.
3
Accxes Control Settings
The first time you start Accxes Control, the Settings window will open. A basic
configuration of the software must be completed before the Accxes Control Main
Interface will start.
A basic configuration of the software includes at least one printer (Destination
printer), one hotfolder, one rule and one workflow.
At any time thereafter, the settings can be accessed again by clicking [Spooler] and
then [Settings], from the Accxes Control Main Interface.
From the Settings window, seven tabs contain all the Accxes Control set-up options:
Printers tab
Printer Groups tab
Paper Sizes tab
Workflows tab
Hotfolders tab
Accounting tab
General tab
The Accxes Control functions within each tab are explained in the following pages.
FreeFlow Accxes Control User Guide 3-1
Page 36

Accxes Control Administration FreeFlow Accxes Control
Printers tab
The Printers tab is used to create/configure the outgoing printers (Or print queues)
intended for use with Accxes Control.
Once a printer has been created, click [Apply] to ensure its corresponding default
workflow is created in the Workflows tab.
Print Queues Field
The Print Queues field lists the printers configured within Accxes Control. Use the
[Add], [Edit] and [Remove] buttons to administer printers.
Accxes-based printers and the Xerox 7142 printer are created within Accxes Control.
All other Windows-based printer must first have a suitable Windows printer driver
installed on the host Operating System and proven to work correctly, before starting
the Accxes Control software. Such drivers should be installed and proven before
starting Accxes Control and adding them for use within the software.
When clicking [Add], the Add Printer window will open (Figure 3.1)
Fig 3.1
The options within the Add Printer window are explained as follows:
Name – Each printer must be assigned a unique name. Once created, the only
way to change the name is to remove the printer and add it again.
Location – This can be used to identify the physical location of the printer listed
in the Printers field of the Accxes Control Main Interface.
3-2 FreeFlow Accxes Control User Guide
Page 37

FreeFlow Accxes Control Accxes Control Administration
Type – The Type drop down field lists four options:
Type field
FreeFlow Accxes Direct print support for Accxes-based printers only
Windows - Direct Prints through the printer port of the selected Windows
print driver and is used to send files to any printer that
supports printer languages produced by Accxes Control
such as HPGL and TIFF – See PJL Support below
Windows - GDI Print to a Windows print driver utilising the Windows
printer driver for processing and access to the printer.
Xerox 7142 Direct printing to Xerox 7142 printers only
When using FreeFlow Accxes, image processing is performed on the Accxesbased printer controller.
When using Windows - GDI and the Xerox 7142, jobs are processed through the
Windows GDI printer driver. Using Windows drivers puts a lot more demand on
the host PC system resources. Hence, take note of the minimum host PC
requirements stated in this guide.
When FreeFlow Accxes or Windows Direct is selected, an additional option in
the Add Printer window is made available called, “Allow printer to select
automatic page sizes”. Most users would not need to enable this option and
instead, use the Paper Sizes tab to select only those sizes that they wish Accxes
Control to process. When doing so, if the output is still not what one would
expect, then tick this option and test the output. (For additional information on
handling page sizes, see Paper Sizes tab on page 3-7)
PJL Support - When Windows - Direct is selected, an additional field called PJL
Support is made available. This drop down field contains four options:
PJL Support field
Basic PJL Support Devices that support basic PJL commands such as HP
inkjets and the 6204BPS
All Accxes PJL Printing to Accxes controllers through a Windows printer
port
No PJL Support Devices that support Accxes Control file formats but do
not support any PJL commands
OCE Job Ticket Printing to Océ ReproDesk, Engineering Exec, etc. by
using Océ RCF (Remote Control Format) – Océ version of
PJL
FreeFlow Accxes Control User Guide 3-3
Page 38

Accxes Control Administration FreeFlow Accxes Control
Printer – Depending upon the type of printer selected in the Type drop down
field, the use of the Printer field will change as follows:
Type field Printer field
FreeFlow Accxes Enter TCP/IP address of the Accxes-based printer
Windows - Direct Select locally installed Windows printer driver
Windows - GDI Select locally installed Windows printer driver
Xerox 7142 Enter TCP/IP address of the Xerox 7142 printer
Enable Status Reporting – When Accxes Control is configured to work with
email notification, enabling this option means emails can be sent to an
administrator to identify issues with Accxes controlled printers. (E.g. Toner
replacement, door open, etc.) For all other devices, the specific printer detail
depends upon what the printer sends back to its printer driver.
Show status on error – This option causes Accxes Control to use pop-up
Windows on the PC hosting Accxes Control to identify issues with the printer.
The specific printer detail depends upon what the printer sends back to its
printer driver.
Email – Used to identify the email address of the person or persons that should
be emailed regarding Status Reporting and errors as indicated above. The use
of Email is configured in the General tab. (See the section in this chapter
entitled, General tab.)
Delay – Helps prevent emails from being sent that highlight brief errors such as
those encountered when someone opens and closes a door on the printer. It is
recommended this value be set to at least 60 seconds or longer depending on
the time taken to complete such tasks as media and toner replacement.
Repeat – Sends a reminder if a problem remains uncorrected for more than the
specified time. The default value is 30 minutes.
3-4 FreeFlow Accxes Control User Guide
Page 39

FreeFlow Accxes Control Accxes Control Administration
Printer Rules – This option is used to apply fixed rules and workflows that need
to be applied to all print jobs sent to a specific printer.
Clicking the Printer Rules button opens the Window shown in figure 3.2 below:
Fig 3.2
Rules and Workflows are applied in the same way as shown in the Hotfolder
tab. See the chapter entitled, Example Configurations and Workflows for an
example on applying Workflows here.
Available Page Sizes Field
When viewing printers in the Printers tab, the Available Page Sizes Field is used to
apply the media sizes available for use in the printer.
When highlighting Accxes-based printers, the Available Page Sizes Field will not be
available as sizes are selected automatically by the Accxes controller.
With Xerox 7142 printers, this option will list the A0 roll size by default. This can be
changed to suit customer configurations for alternative roll sizes.
All Windows printers will display the A4 size by default. Additional sizes can be added
according to those sizes available in the Windows print driver – including custom sizes.
Alongside the Available Pages Sizes field, click [Add] to see a list of all available sizes
for the highlighted printer. There must be at least one page size field applied at all
times. All sizes selected must be available in the printer.
Unwanted page sizes are removed by highlighting and clicking [Remove]. A page size
can only be removed if it leaves at least one size in the Available Page Sizes field.
FreeFlow Accxes Control User Guide 3-5
Page 40

Accxes Control Administration FreeFlow Accxes Control
Printer Groups tab
Printer groups can be created by combining printers of similar capabilities for the
purpose of load balancing and failover.
Once a printer group has been created, click [Apply] to ensure it is available for
selecting in the Hotfolders tab.
Load Balancing is a means of sending print jobs to different printer based upon the
number of print jobs already being processed in the print queue to another printer. By
adding more than one printer to a print group, jobs can be directed to a printer group
rather than a specific printer, thereby enabling Accxes Control to automatically route
print jobs.
Example: If two wide format printers are added to a printer group configured
for load balancing, print jobs being directed to that group will be managed by
Accxes Control as follows:
Accxes Control will check the first printer in the list and if it is busy, it will check
the next printer in the list. The job will automatically be sent to the first printer
with no current print jobs in the print queue. If both printers are busy, Accxes
Control will send the print job to the printer with the smallest current job list.
Failover is a means of re-routing print jobs to a different printer based upon Accxes
Control identifying a problem on a printer in the same printer group or currently
processing printer.
Example: If two wide format printers are added to a printer group configured
for failover, print jobs being directed to that group will be managed by Accxes
Control as follows:
If Accxes Control receives information of a fault with a printer (Dependent upon
reporting supported by specific printers and printer drivers), it will send any jobs
not yet sent to that printer, to the next available printer.
Some printers can accept multiple print jobs into their controllers during and
before printing. Therefore once a printer fault has been rectified, existing
unprinted jobs should restart from that printer controller. If not, all jobs sent to
that printer will have to be resent from the Accxes Control Main Interface.
To create a printer group, click [Add]. Type a suitable name, such as ‘monochrome
devices’ or ‘colour devices’ and click [OK]. In the Printers field, all printers set-up in
Accxes Control from the Printers tab will be listed. To assign one or more printers to
any group, first highlight the printer group and then double click the required
printer(s) or highlight the printer(s) and click the right arrow button. Repeat this for
any other printer groups.
Note: Any printer can be a member of multiple groups.
To remove printers from a group; select the group name, click on the highlighted
printer(s) to be removed from the group and click the left arrow button.
To remove an entire printer group, highlight the group name and click [Remove].
3-6 FreeFlow Accxes Control User Guide
Page 41

FreeFlow Accxes Control Accxes Control Administration
Paper Sizes tab
FreeFlow Accxes Control is designed to detect multiple paper sizes, including nonstandard size documents. Your printer may not have all sizes available for the
designated print job or it may not be capable of handling certain non-standard sizes.
Therefore, by selecting only the page sizes available in your printer, you can avoid
mismatch errors by forcing printing on to the nearest available media size.
For example, this can be beneficial when a folding device is installed because folders
are designed to produce standard size folded packets from standard page sizes.
Another example of when additional media sizes should be used is when customers
may print long documents. Long documents are identified by Accxes Control as a roll
size (E.g. Roll_A0). If only standard ISO sizes are selected in the Paper Sizes tab, long
documents will be truncated to the nearest standard size. To avoid that, it is necessary
to enable additional sizes such as Roll_A0, Roll_A1, etc. to ensure long documents are
printed the correct size.
When attempting to work out the page sizes you need to enable, sample print jobs
can be submitted to Accxes Control. These jobs can then be viewed within the Job
Editor to determine the detected page sizes.
Select available page and roll sizes with a tick and un-tick any page and roll sizes that
are not available. The dimensions for a highlighted page or roll size are displayed to
the right of the size selected.
Once required page sizes have been selected, click [Apply] to ensure they are available
for selecting in the Workflows and Hotfolders tab.
Oversize Margin
The Oversize Margin field is used to specify how much larger the page size of the print
file can be and still be forced to the nearest smaller page size for printing. This is
especially important when printing previously scanned images, where the detected
page size may be fractionally larger than the actual size of the image detail; or when
printing non-available print sizes. E.g. Forcing ANSI or ARCH sizes to ISO output.
Note: If the oversize margin is set too small, prints may be forced to a larger paper
size than required and result in large margins and incorrect print orientation.
Experimentation is required to ensure the desired result, particularly when printing
scanned images or other non-standard size documents.
FreeFlow Accxes Control User Guide 3-7
Page 42

Accxes Control Administration FreeFlow Accxes Control
Workflows tab
Workflows combine with rules to create a powerful combination that Accxes Control
uses to provide all the rule-based printing functions of the system. Workflows
determine a required activity, or activities, based upon one or more conditions that
are applied to rules in the Hotfolders tab and/or the Printer Rules button of the Add
Printer Window in the Printers tab.
Once a workflow has been created, click [Apply] to ensure it is available for use in the
Hotfolders tab.
Each workflow can be configured with specific mandatory and default options for
print jobs processed within the system. Mandatory options are created under the
Mandatory Options tab and default options are created under the Default Options
tab. The two options are explained below:
Mandatory Options
Always override any settings in the print job. E.g. this could be used to force all
print jobs to be folded.
Default Options
Only apply if the command does not already exist in the print job. E.g. this could
be used to print to a Xerox Wide Format printer and have folding applied, where
the file was produced through a third party print driver that does not support
Xerox Wide Format printers and their commands for folding.
Workflow names must be unique. Use the [Add] and [Remove] buttons next to the
Configured Workflows field to create and remove workflows.
For any workflow, you must decide whether the required workflow function(s) should
be mandatory or default. Mandatory Options are forced and Default Options are
applied if they do not exist in the print job. Then select either the Mandatory or
Default Options tab within which to configure the required workflow functions.
Numerous mandatory and default options can be applied within the same workflow.
Be sure the required workflow is highlighted before adding, editing or removing any
options.
Within the Mandatory or Default Options tabs, highlight the first required option and
click [Add]. Depending on the option selected, you may have to type a value, select
from a drop-down list or both. (Help text is displayed to aid in this task.) Continue to
add further options as required. Any applied options will be highlighted in bold font.
Highlight the required option before clicking [Add], [Edit] or [Remove].
Workflow options are numerous and varied; in order to help understand how to use
them, example workflows can be found in the chapter entitled, Example
Configurations and Workflows in this guide. There is also a complete list of all the
options, their associated settings and values in Appendix A – PJL Commands.
3-8 FreeFlow Accxes Control User Guide
Page 43

FreeFlow Accxes Control Accxes Control Administration
Hotfolders tab
WARNING
When creating or configuring a hotfolder, you MUST choose, or create, an empty
folder – DO NOT CHOOSE THE ROUTE OF C:\ OR ANY OTHER DRIVE ON YOUR PC
WORKSTATION – any files within the hotfolder will be removed by Accxes Control and
files lost cannot be recovered.
Hotfolders determine the source of print jobs for Accxes Control. It is possible to use
more than one hotfolder in order to control input to Accxes Control from various
sources. E.g. Client Tools (Port 2000), Print Drivers (Port 9100, etc.) and Windows
hotfolders.
Hotfolders can be network ports or Windows folders.
Network hotfolders listen on specified ports for print jobs from print drivers, Xerox
FreeFlow Accxes Client Tools and FreeFlow Accxes Submit.
Windows directory hotfolders, look for incoming print jobs in Windows folders on the
hard disk drive of the PC workstation hosting Accxes Control.
One Network hotfolder is automatically created when Accxes Control is installed – but
is not automatically enabled.
Once at least one additional hotfolder has been created, the existing Network
hotfolder can be removed if required.
All hotfolders can have multiple rules and workflows applied to make changes to how
files are printed.
Hotfolder settings are explained as follows.
Add and Remove buttons
Used for adding new hotfolders and removing unwanted hotfolders. Existing
hotfolder names cannot be edited. You must create a new hotfolder with the required
name and remove the unwanted hotfolder.
Hotfolder Type
Select either Network or Folder. The Network option uses network ports to receive
print jobs from print drivers and client tools. Folder is used to import jobs from a
Windows folder on the Operating System hosting Accxes Control.
Path
Folder Hotfolder Type only – Path to the Windows folder where Accxes Control should
look for print jobs. This option is only displayed when ‘Folder’ is chosen as the
Hotfolder Type as shown in figure 3.3 overleaf:
FreeFlow Accxes Control User Guide 3-9
Page 44

Accxes Control Administration FreeFlow Accxes Control
Fig 3.3
Filter
Folder Hotfolder Type only – Wildcard expression to determine which filenames are
processed. This option is only displayed when ‘Folder’ is chosen as the Hotfolder Type
as shown in figure 3.3 above.
Forward files to
If enabled, print jobs will be sent to the specified folder after processing. This is useful
if a print job should be processed twice. E.g. Print and output to PDF.
Split Multi-Page Documents
If enabled, Accxes Control will split multi-page documents and process each page
according to the rules assigned to the hotfolder. E.g. all the wide format pages in one
document can be sent to a wide format device and the small format pages sent to a
small format device.
Enable Hotfolder
Jobs for the highlighted hotfolder are only processed if the hotfolder is enabled by
checking this box.
Create Windows Printer
Clicking this button AFTER configuring a network hotfolder installs a PostScript print
driver on the PC hosting Accxes Control. This driver can be shared and used by
applications to print files into the Accxes Control print queue.
Port
Network Hotfolder Type only – The TCP port on which Accxes Control should listen for
print jobs. Port 2000 is used with Accxes Client Tools and Accxes Submit. Port numbers
beginning 9100 are typically used with print drivers. Each network hotfolder must
have a unique port number. The Port option is only displayed when ‘Network’ is
chosen as the Hotfolder Type as shown in figure 3.4 overleaf:
3-10 FreeFlow Accxes Control User Guide
Page 45

FreeFlow Accxes Control Accxes Control Administration
Fig 3.4
Network ports cannot have filters applied. All other options for ‘Forward files to’, ‘Split
Multi-Page Documents’ and ‘Enable Hotfolder’ have the same function as described
previously for folder hotfolders.
Rules
All hotfolders can have one or more rules applied. Rules determine the order of job
processing based on their source and attributes. E.g. Size, Finishing Requirements, etc.
Note: If no rules are specified for a hotfolder, no workflow will be applied and the job
will be sent to the default printer using the options included in the print job. This will
still provide typical queue control functions to manage the printer queue.
Rules are identified by numbers and are processed in numerical order.
Each rule can have one or more conditions and one workflow applied.
If all the conditions for a rule are met, then the specified workflow is applied to the
job.
FreeFlow Accxes Control User Guide 3-11
Page 46

Accxes Control Administration FreeFlow Accxes Control
When conditions are met, the job will still move on to the next rule unless ‘Stop at this
rule if it is true’ is enabled.
When conditions are not met, the print job moves on to the next rule, its associated
conditions and workflow.
Conditions
Once a Rule has been added, one or more conditions may be applied. Highlight a rule
and add conditions as required.
Conditions explained:
When adding conditions to a rule, the default condition is ‘Always’. This means the
selected workflow will always be applied. To change the condition, highlight the
existing condition and click [Edit] or click [Add] and then [Edit] to create and edit a
new condition.
Adding or editing a condition opens the Edit Rule window. The Type drop-down field
lists the following options:
Always – Always apply the current workflow.
Size – Enables two further fields:
The left field lists the following standard symbols:
< Less than
<= Less than or equals
<> Not equal
= Equals
> Greater than
>= Greater than or equals
The right field lists the media sizes enabled in the Paper Sizes tab.
Options – Enables four further fields:
Category All the same options as listed in the Workflows tab
Setting All the PJL options for the selected Category
Qualifier Equals, Not equals, Less than, Greater than, LIKE, NOT
LIKE and UNDEFINED
Value Specific to the PJL option selected in the Setting field.
All commands are documented in Appendix A – PJL Commands.
3-12 FreeFlow Accxes Control User Guide
Page 47

FreeFlow Accxes Control Accxes Control Administration
Figure 3.5 displays an example condition used to identify prints that are less than or
equal to A3:
Fig 3.5
Figure 3.6 displays an example condition used to identify prints that are colour:
Fig 3.6
Any number of rules and any number of conditions to a rule can be applied as
required. But each must be set-up one at a time. Some conditions can only be edited
by being removed and added again.
Having set a condition, the next step is to apply the workflow required as a result of
the condition(s) being met.
FreeFlow Accxes Control User Guide 3-13
Page 48

Accxes Control Administration FreeFlow Accxes Control
Workflow
Workflows created in the Workflows tab will be listed in the Workflow dropdown field
of the Hotfolders tab. Once at least one rule and one condition have been applied,
one of the workflows listed in this field can also be applied.
E.g. A hotfolder has a rule added with a condition configured as per the size option
example shown on the previous page (Fig 3.5) to identify A3 size prints. The Workflow
dropdown field can then be used to select a Small Format Device.
This will determine that any document or page identified by Accxes Control as either
an A3 or A4 will print to the designated small format printer.
Stop at this rule if it is true
If this checkbox is enabled for a highlighted rule (With configured condition(s) and
workflow) then no further rules will be applied to any documents meeting the current
condition(s). If the conditions are not met, the print jobs move on to be processed by
the next rule in the list.
Rule, Condition and Workflow Example
In this example the following three rules, conditions and workflows are assigned to
one network hotfolder.
Rule Condition Workflow Stop at this rule if it is true
1 Print Size <= ISO_A3 Small Format Device Enabled
The configuration of Rule 1 means any documents equal to or less than A3 size will be
printed to the small format device and no other rule processing will take place on
those documents. That leaves only wide format monochrome and colour documents
larger than A3 to continue to be processed by the remaining rules.
Rule Condition Workflow Stop at this rule if it is true
2 CONTAINSCOLOUR = TRUE Wide Format Colour
Device
Enabled
The configuration of Rule 2 means any documents larger than A3 and containing
colour will be printed to the wide format colour device and no other rule processing
will take place on those documents. That leaves only wide format monochrome
documents to continue to be processed by the remaining rule.
Rule Condition Workflow Stop at this rule if it is true
3 Always Wide Format Monochrome
Device
N/A
Rule 3 is the last rule and therefore it can be left with an ‘Always’ condition and a
workflow of ‘Wide Format Monochrome Device’ since the only documents left to be
processed are wide format monochrome.
Additional Rules and Workflow examples can be found in the chapter entitled,
Example Configurations and Workflows later in this guide.
3-14 FreeFlow Accxes Control User Guide
Page 49

FreeFlow Accxes Control Accxes Control Administration
Accounting tab
Accounting for print jobs in Accxes Control can be used to capture any detail of a print
job that is detectable by Accxes Control. For example, this can include whether colour
was detected in the document, percentage of colour, Page Printer used, etc.
When the ‘Enable Accounting’ checkbox is checked, the following default information
will be logged by FFA Control:
Printed Date
Printed Time
Accxes Control Print Queue ID
Document ID (Documents contained in a job)
Copy Count
Additional options that can be captured are selected by clicking [Add]. This opens the
Edit Rule Window where all the Categories and Settings are available to be chosen.
Experimentation is required to verify the settings available.
An Accounting log can be downloaded and imported into Excel. This menu option is
covered in the section entitled, Accxes Control Main Interface later in this chapter.
FreeFlow Accxes Control User Guide 3-15
Page 50

Accxes Control Administration FreeFlow Accxes Control
General tab
The General tab (Figure 3.7) contains the following selections:
Print Queue Location
SMTP Mail Server
Lookup User Email Addresses
Accxes Control Email Address
Automatically Delete Jobs
Activate automatic printing at startup
Use AutoDesk application for DWG support
Fig 3.7
Print Queue Location
This is the folder on the PC hosting Accxes Control that is used as the master print
queue. It is automatically configured during the installation of Accxes Control and
should not be changed.
3-16 FreeFlow Accxes Control User Guide
Page 51

FreeFlow Accxes Control Accxes Control Administration
In the event that a corrupted print job halts the processing of Accxes Control, the
number of the job will be identified in the Accxes Control Main Interface. Note the
number of the corrupted print job, close Accxes Control, navigate to the master queue
location, identify the folder with the same corrupted job number listed in the master
queue and either delete or remove the folder for further investigation. Finally reopen
Accxes Control.
SMTP Mail Server
If Accxes Control is to be configured for email print notifications, this field is used to
enter the TCP/IP address of the SMTP Mail Server Address.
It is essential that the PC hosting Accxes Control is able to PING the Mail Server.
Lookup User Email Addresses
If Accxes Control is configured to work within a Windows domain environment,
enabling this checkbox will use information from submitted print jobs to
communicate with an active directory server in order to try and locate the correct
email address. If this fails it will take at least a minute to time out before the print job
completes printing.
If there is no active directory contactable from Accxes Control, depending upon
number of users and if login names are the same as email address, Accxes Control can
be configured to add the @name to create email addresses. Alternatively, Accxes
Control can be set-up to send emails to a defined list of email addresses.
Further detail on email configuration can be found in the chapter entitled, Example
Configurations and Workflows. Testing will be necessary to identify the extent to
which Accxes Control is capable of working with email.
Accxes Control Email Address
The Email address of Accxes Control. This must be a valid email address set-up within
the customer environment by the customer IT support and enables Accxes Control to
email information to the appropriate users.
Automatically Delete Jobs
Enabling this checkbox means print jobs are deleted following a specified time in the
print queue. The time for each job is defaulted to six hours and can be changed once
the checkbox is enabled.
Activate automatic printing at startup
Enabling this checkbox means Accxes Control begins printing automatically once it
has been opened. It is recommended to leave this disabled while Accxes Control is
being set-up and tested. Leaving this function disabled is also recommended for print
rooms that wish to retain manual control over network printing to the printers.
Use AutoDesk application for DWG support
This option is experimental and only suitable for customers that use AutoCAD DWG
files that use the same pen table, layout and only one layout space.
Further detail on the use of this function is provided in the chapter entitled, Example
Configurations and Workflows later in this guide.
FreeFlow Accxes Control User Guide 3-17
Page 52

Accxes Control Administration FreeFlow Accxes Control
Accxes Control Main Interface
The Accxes Control application is opened from Start > All Programs > Xerox >
FreeFlow Accxes > Accxes Control
The main interface will only open once the software has been configured with at least
one printer and one hotfolder.
Once configured, the Accxes Control Main Interface (Figure 3.8) is used to manage
the print queue.
Accxes Control Print Job Queue
Incoming Print Outgoing Print
Queues (Hotfolders) Queues (Printers)
Fig 3.8
At the bottom of the Accxes Control Main Interface the current processing activities
are identified as:
Polling - Polling the hotfolders for print jobs to import into Accxes Control
Processing - Analysing print jobs within Accxes Control
RIP - Printing jobs from Accxes Control
3-18 FreeFlow Accxes Control User Guide
Page 53

FreeFlow Accxes Control Accxes Control Administration
The menus along the top of the Main Interface provide the following functions:
Spooler menu
Automatic Printing
Settings
Save Settings
Load Settings
Exit
Accounting menu
Save Activity
Clear Activity Log
Print Driver menu
Toggle automatic printing on and off.
Enter Accxes Control Settings.
Save a back-up of all the Accxes Control settings configured
in each tab: Printers, Printer Groups, Paper Sizes, Workflows,
Hotfolders, Accounting and General.
Used to restore all the settings from the back-up.
Exit the Accxes Control application.
If enabled, this saves a CSV file of all the print job
information captured by Accxes Control as configured in the
Accounting tab of the Accxes Control Settings.
Once the activity has been saved, this menu option clears
the log ready to record new data. When selecting this
option, the user will be prompted to first save the log.
Customise Driver
Options
Create PPD (Mac OS)
Create Windows
Driver
Help menu
Change Language
Help F1
About
Used to configure a custom PPD by selecting options from
all the Categories, Settings and Values available within
Accxes Control. This should be completed before creating
the PPD for Mac OS or Windows driver. E.g. Add the folding
commands so that the folder can be selected when printing
from an application on a Mac.
Creates the PPD in order to configure a print driver from a
Mac. Printing from a Mac uses LPR, the TCP/IP address of
the PC hosting Accxes Control and the PPD created and
saved in this menu.
Creates the Windows print driver files (32bit and 64bit) in a
designated folder.
Change the language used in Accxes Control
Opens the Accxes Control User Guide
Displays license information and is used to upgrade the
Accxes Control license by clicking [About] and then
[Upgrade].
FreeFlow Accxes Control User Guide 3-19
Page 54

Accxes Control Administration FreeFlow Accxes Control
Accxes Control Print Job Queue
The Print Job Queue field lists all the pending, current and completed print jobs within
Accxes Control. To the right of this field are the control buttons.
Print jobs will be listed in the order they appear in the print queue and in automatic
mode, they will print in that order. The order, top to bottom or bottom to top, can be
switched by clicking the ID menu bar.
All jobs remain in the queue until the time specified in the General tab of the Settings
menu or until they are manually deleted.
Print jobs are listed under the following column headings:
ID --- A sequential number applied by Accxes Control as each job arrives in the queue
Name --- Job name from the print job. This name will depend upon the software and
method used to submit the job.
User --- Name of the user submitting the print job where this is identified by Windows.
Copies --- Number of copies detected in the job file.
Source --- The Accxes Control hotfolder used to import the job.
Comments --- Field that can be configured within Accxes Control to display
information such as a warning about a multi-page document.
Submitted --- Date and time the print job was imported by Accxes Control.
Destination --- Identity of the output print queue determined by the rules and
workflows configured within Accxes Control.
As well as the listed options above, the print queue also uses the following icons to
display the status of the print jobs:
Print Job Status
Incoming
Analysing
No Icon
Printing
Printed
Paused
Error
Identifies a new job currently being imported into Accxes
Control.
A new print job currently being analysed by Accxes Control
to identify properties such as size, colour, etc.
A print job with no icon signifies a new print job that has
completed the analysing phase.
A print job currently being processed and sent to the printer.
A print job that has completed processing and sent to the
print device(s).
A print job on hold and/or being viewed in the Job Editor.
One or more documents in a print job errors. Float mouse
over icon to view error message.
3-20 FreeFlow Accxes Control User Guide
Page 55

FreeFlow Accxes Control Accxes Control Administration
The control buttons to the right of the print job queue are used to perform the
following functions:
Control buttons
Automatic
Printing
View
Print
Hold / Pause
Toggles automatic printing on and off. When setting up
Accxes Control, there is an option in the General tab to
activate automatic printing at start-up. If this is selected,
this button in the main window will look pressed in
(Automatic printing mode On). To stop automatic printing,
click this button so it does not look pressed in.
Opens the Job Editor in order to view the print properties of
a highlighted print job. Double clicking a print job in the
print queue will also open the Job Editor.
The same icon is also used within the Job Editor to open
documents in the viewer.
Print any highlighted print job when automatic printing is
off.
Also used to reprint any highlighted print job whether
automatic printing is on or off.
Place any highlighted print job on hold.
Pause the current print job.
To continue printing, click the print button.
New Job
Opens the Job Editor where a new print job can be created.
Print files are added by drag and drop.
Properties to determine how the files are to be printed are
then applied as described in the section entitled, Accxes
Control Job Editor.
Delete
Deletes any highlighted print job listed in the print queue
and permanently removes it from Accxes Control.
Also used to delete individual documents from a print job
within the Job Editor.
Deleted print jobs cannot be restored.
Up/Down
Two separate buttons used to move highlighted print jobs
up and down the listed order in the Accxes Control print
queue.
FreeFlow Accxes Control User Guide 3-21
Page 56

Accxes Control Administration FreeFlow Accxes Control
Queues field
The Queues field displays the hotfolders currently configured for use within Accxes
Control in the Hotfolders tab. These are the source of the print jobs and may be
network print queues and Windows folders configured as hotfolders.
The current status of the queue is identified by a green arrow, signifying ready for use,
or a red paused symbol.
Any queue can be highlighted and importing started or paused using the control
buttons to the right of the Queues field shown below:
Start
Pause
Printers field
The Printers field lists the printer(s) set-up in the Printers tab of Accxes Control.
3-22 FreeFlow Accxes Control User Guide
Page 57

FreeFlow Accxes Control Accxes Control Administration
Double clicking a listed printer will open a printer status window (Figure 3.9). The
specific information provided by the printer status window depends upon what
information a printer sends back to its print driver. Accxes-based devices will provide
detail on media status, door open and toner replacement.
Fig 3.9
Any printer queue can be paused offline (Indicated by a red paused symbol over the
printer icon) or put online (Indicated by a blue tick over the printer icon).
The printer queue status is changed between pause and start by using the control
buttons to the right of the Printers field or the same buttons in the printer status
window:
Start
Pause
FreeFlow Accxes Control User Guide 3-23
Page 58

Accxes Control Administration FreeFlow Accxes Control
Accxes Control Job Editor
Double clicking a print job in the Accxes Control Job Queue or highlighting a print job
and clicking the following icon opens the Job Editor (Figure 3.10):
The Job Editor provides the following functions:
• View the print properties of each document in the print job.
• Change the print properties of each document in the print job, including rules
and workflows.
• Deselect documents from being printed by un-ticking one or more of them.
• Permanently delete documents from the job list.
• Drag and drop additional print files to the job list.
• View the documents/pages in the Viewer
Highlighting a file in the top pane of the Job Editor will display all the supported
printer properties
2
in the Options pane in the lower half of the Job Editor.
1
.
Fig 3.10
1
For a list of file formats supported by the viewer, please see Appendix B.
2
Supported printer properties are PJL commands applied by Xerox Wide Format Clients and
Drivers, some third party drivers and specific commands applied by Accxes Control. The
supported PJL commands used by Accxes Control are listed in Appendix A.
3-24 FreeFlow Accxes Control User Guide
Page 59

FreeFlow Accxes Control Accxes Control Administration
Single page documents
If the print job contains more than one document (Figure 3.11) – E.g. Batch printing
from Accxes Client Tools – each document will be listed separately in the Job Editor.
Print properties can be changed for each document.
Fig 3.11
Deselect one or more documents from being printed by un-ticking the document.
Delete one or more documents by highlighting and clicking the delete icon.
Double clicking a document or highlighting it and clicking the view icon will open the
file in the viewer (Example: Figure 3.12)
Fig 3.12
FreeFlow Accxes Control User Guide 3-25
Page 60

Accxes Control Administration FreeFlow Accxes Control
Multi-page documents – Split by Accxes Control
If a print job contains a multi-page document and Accxes Control is configured to
split multiple pages, the Job Editor will identify the job type as a Set (Figure 3.13).
Fig 3.13
Double clicking a multi-page document (Set) again (Or highlighting it and click the
view icon) will open each page in the Job Editor (Figure 3.14).
Each page can then be viewed by double clicking it or highlighting it and click the view
icon.
Print properties can be changed for each page.
Fig 3.14
3-26 FreeFlow Accxes Control User Guide
Page 61

FreeFlow Accxes Control Accxes Control Administration
Multi-page documents – Not split by Accxes Control
If a print job contains a multi-page document and Accxes Control is not configured to
split multiple pages, the Job Editor will identify a multi-page job type as a Document
(Figure 3.15).
Fig 3.15
Double clicking the file will open the document in the viewer (Figure 3.16) allowing
the user to scroll through the pages using either the arrow buttons in the viewer or the
arrow keys on your keyboard.
Page numbers are identified in the lower left corner of the viewer.
Print properties affect the entire multi-page document.
Fig 3.16
FreeFlow Accxes Control User Guide 3-27
Page 62

Accxes Control Administration FreeFlow Accxes Control
Job Editor – Options
In the top pane of the Job Editor, each document is listed together with its ID, Source,
Name/Format, Copies/Pages, Size, Print Size and Destination.
While highlighting a document in the top pane, specific job options can be viewed
using the Options tabs in the lower pane.
The Job Options tabs replicate the names of the options available in the Workflows
and Hotfolders tabs of the Accxes Control Settings.
By selecting each tab, the user can view the current properties detected and applied
by Accxes Control.
For example:
Job tab Identifies the copy count.
Finishing tab Identifies location of title block as determined automatically
by Accxes Control – Can be used to apply finishing
commands automatically without having to select folding
in clients and drivers.
Rendering tab Identifies whether the file contains any colour and the
percentage of colour detected. – Such information can be
used to modify rules and workflows to send prints with low
colour to monochrome devices or determine the difference
between colour CAD and colour Graphics.
In order to make changes to print job properties, first highlight the relevant file(s) in
the top pane of the Job Editor. Select the required Option tab and click [Add]. The Add
Setting window will open where the print job settings are listed. Use Appendix A to
help determine the required settings.
Note: When wishing to add multiple settings, each must be added in turn.
However, the simplest and most common changes to print properties are the
destination and size of a print job or document. To make such changes, highlight one
or more files in the top pane of the Job Editor and click [Workflow]
The following window opens, where either a single Workflow or Hotfolder rule can be
applied.
3-28 FreeFlow Accxes Control User Guide
Page 63

FreeFlow Accxes Control Accxes Control Administration
Selecting ‘Apply Single Workflow’ will change the drop down field to list the workflows
currently configured in the Workflows tab of the Accxes Control Settings.
By choosing one of the listed workflows, all the mandatory options and default
settings currently associated with that workflow will be applied. This provides a simple
method of quickly changing the print size and or output destination.
Selecting ‘Use Hotfolder Rules’ will change the drop down field to list the hotfolders
currently configured in the Hotfolders tab of the Accxes Control Settings.
By choosing one of the hotfolders listed here, all of the rules currently associated with
that hotfolder will be applied.
FreeFlow Accxes Control User Guide 3-29
Page 64

Accxes Control Administration FreeFlow Accxes Control
Job Editor – Viewer
Documents are viewed by a double click or by highlighting a document and clicking
the following icon within the Job Editor (Figure 3.17):
Fig 3.17
The bottom of the viewing window will display the page number to identify single or
multi-page documents, the detected file format, the detected colour mode and the
detected real image size (Physical and file size).
While viewing, clicking the left mouse zooms in, click and drag with the left mouse
zooms to a specific area and clicking the right mouse zooms out.
Once the Viewer is open, further documents in a print job and further pages in multipage documents, can be viewed by clicking the arrow buttons in the Viewer toolbar or
by using the left and right arrow buttons on the computer keyboard.
3-30 FreeFlow Accxes Control User Guide
Page 65

FreeFlow Accxes Control Accxes Control Administration
The Viewer toolbar provides the following functions:
Toolbar menu
Undo
Copy
Navigation Tool
Selection Tool
Zoom
Zoom to Title
Block
Undo editing functions.
Copies a selection of the image into another application.
The required part of the image to be copied is made using
the Selection tool.
Pan around the image.
Make selections in the image for copying into another
application such as Word. The mouse is used to click, drag
and then release around the required selection. The area
inside the selection is copied.
Zoom in and out of the image. The left and right mouse
buttons also perform the same functions providing the
selection tool is not in use.
To zoom to a specific area, hold down the left mouse button,
drag the mouse around the required area and release.
Zooms the view to the area determined by Accxes Control to
be the title block of the drawing. If title block information
was sent with the file, such as when printing using Accxes
Submit with Finishing options applied, this icon will zoom to
the area determined to be the title block by the commands
sent with the print job.
Zoom to fit
window
Used to fit entire image in window. The middle mouse
button (On 3 button wheel mouse) also performs this
function.
0
Rotate
Mirror
Scroll
Rotate the image left or right by 90
Mirrors the image.
Scroll through view of a multi-page document and/or each
document in a set. The left and right arrow keys on the
computer keyboard perform the same functions.
Title Block
Selection
No Title Block
Four buttons used to identify automatic title block selection
or used to manually select the title block position.
No title block selected; or use to deselect the title block
selection.
FreeFlow Accxes Control User Guide 3-31
Page 66

Accxes Control Administration FreeFlow Accxes Control
[This page left intentionally blank]
3-32 FreeFlow Accxes Control User Guide
Page 67

4 Accxes Client Tools
and Print Drivers
Introduction
Print jobs can be submitted to Accxes Control hotfolders in a number of ways. This
chapter explains how to do this using Accxes Client Tools and Print Drivers.
For information on the specific print options available within Accxes Client Tools and
Printer Drivers, please see their appropriate user documentation.
Accxes Submit is an alternative to Accxes Client Tools and is explained in the next
chapter of this guide.
Accxes Client Tools
4
First ensure Accxes Control has been configured within the Hotfolders tab with a
network hotfolder and a corresponding port 2000. Accxes Client Tools only submits
print jobs to port 2000.
Accxes Client Tools is the free client software available with all Xerox Wide Format
Accxes-based printers. It is also downloadable from
When intended for use with Accxes Control, the Accxes Client Tools software is
installed in the same way but configured differently as explained below:
Once installed, start Accxes Client Tools and go to the Device Manager tab.
In the Device Manager click the button to ‘Create a new device’.
In the Device Name field enter the name ‘Accxes Control’.
In the IP Address field enter the TCP/IP address of the PC workstation hosting Accxes
Control. If Accxes Client Tools is being configured on the same computer used to host
Accxes Control, the TCP/IP address must be set to the following: 127.0.0.1
Deselect the checkbox called, ‘Accxes to Client Communications’.
Click the button to ‘Accept the device parameters’.
Enable the Accxes Control device as a Default Printer within Accxes Client Tools. All
Accxes Client Tools selections for print properties, size, copy count, finishing options,
etc. are all supported by Accxes Control.
www.xerox.com.
FreeFlow Accxes Control User Guide 4-1
Page 68

Accxes Client Tools and Print Drivers FreeFlow Accxes Control
Windows and Mac Print Drivers
There are three print driver configurations that can be used to print jobs into Accxes
Control:
Windows Print Driver – Either locally installed on the computer hosting Accxes
Control. Or 32bit and 64bit print driver files that include custom print options
for installing on user PC workstations.
MAC PPD – PPD used in conjunction with a valid network port to print files from
a MAC to Accxes Control
Third Party Windows Print Driver – Depends upon the driver creating a
supported file format and print options being recognised by Accxes Control.
Experimentation will be required.
Windows Print Driver
Once Accxes Control has been configured, a Windows print driver can be created.
Note: The Windows printer driver created by Accxes Control is automatically
generated to support the local configuration. Because each driver is custom
generated, it is not possible for the driver to be Microsoft signed, as any changes
would invalidate the signature. For this reason you will see a signature warning
message when installing the Accxes Control printer driver. It may also be necessary to
modify local system policies to allow installation of unsigned printer drivers.
There are two Windows Print Driver configurations that can be created for use with
Accxes Control:
Locally installed print driver
Custom Windows Driver
Locally installed print driver
The print driver locally installed on the same computer hosting Accxes Control is
created within the Hotfolders tab and can only be created for network hotfolders.
In the Accxes Control Hotfolder tab, first highlight the network hotfolder required for
use with the created print driver. This means all printing through the new print driver
will be subject to the rules currently configured for use with that hotfolder.
With the network hotfolder selected, click [Create Windows Printer]. A windows print
driver will be installed automatically and configured for use with the Accxes Control
network port highlighted in the Hotfolders tab when the print driver was created. This
print driver can be shared for use as per any other Windows print driver.
4-2 FreeFlow Accxes Control User Guide
Page 69

FreeFlow Accxes Control Accxes Client Tools and Print Drivers
Custom Windows Driver
Before creating the Custom Windows Driver, you can add specific print options you
wish to be available in the print driver.
Note: This same menu is used to customise the PPD for use in Mac OS environments.
Print driver options are customised by clicking [Customise Driver Options] in the Print
Driver menu of the Accxes Control Main Interface. This opens the Edit Print Driver
Options window (Figure 4.1).
Multiple custom options can be applied.
Fig 4.1
Creating custom print options consists of applying an option in the Option field by
clicking [Add] and then for each option multiple values can be applied in the Values
field by clicking [Add].
The values entered here are the same as those available in the Workflows and
Hotfolders tabs.
FreeFlow Accxes Control User Guide 4-3
Page 70

Accxes Client Tools and Print Drivers FreeFlow Accxes Control
Example
The following example adds the finishing options to a custom PPD, which are required
for use with a Xerox Wide Format folder:
Alongside the Options field, click [Add] to open the Edit Rule window (Figure 4.2).
Fig 4.2
In the Category drop down field select Finishing and in the Setting drop down field
select FINISHPROGID. This identifies the fact that you wish to apply finishing
programs.
Click [OK] to return to the Edit Print Driver Options window.
Alongside the Values field, click [Add] to open the Setting window (Figure 4.3).
Fig 4.3
Note: When Accxes Control has been configured to print to an Accxes-based printer
with a folder installed, Accxes Control will automatically install the available folder
options. In such a case, the Value drop down field shown above will list all the
available fold options.
4-4 FreeFlow Accxes Control User Guide
Page 71

FreeFlow Accxes Control Accxes Client Tools and Print Drivers
Choose the first setting you wish to apply and click [OK].
Repeat the preceding steps to apply additional finishing programs (Values) and any
other Options and Values you may require.
In this example, the Edit Print Driver Options contains the values as shown in figure
4.4
Fig 4.4
Click [OK] to close Edit Print Driver Options.
The Custom Windows Driver can now be created by clicking [Create Windows Driver]
in the Print Driver menu situated on the Accxes Control Main Interface. This opens a
Windows browser where you choose the location to create the Windows driver files.
Both 32bit and 64bit Windows drivers will be created; each in their own named folder.
Before using these driver files you must first create/identify the Accxes Control
network hotfolder to be used in conjunction with the Custom Windows Driver and the
port number associated with the chosen network hotfolder.
Note: For use with Windows print drivers, the Accxes Control network port numbers
can be almost any number in the recommended range of 9100, 9200, 9300, etc.
Individual network hotfolders can have their own unique port number applied which
means specific network queues can be created to provide full control on how
administrators wish Accxes Control to operate with various users and network print
queues.
FreeFlow Accxes Control User Guide 4-5
Page 72

Accxes Client Tools and Print Drivers FreeFlow Accxes Control
When installing the Windows print driver, the first step is to add the correct network
printer port as follows:
Add Printer Port
On the Windows Operating System, open the Printers and Faxes window
From the File menu, open Server Properties
Go to the Ports tab and click [Add Port]
In the Printer Ports window, select Standard TCP/IP Port and click [New Port]
In the Add Standard TCP/IP Printer Port Wizard, click [Next]
In the Printer Name or IP Address field, enter the TCP/IP address of the PC
hosting Accxes Control and click [Next]
In the next window, select Custom and click [Settings]
Change the Port Number field so that it is the same number associated with the
required network hotfolder in Accxes Control and click [OK]
Click [Next] and click [Finish] to return to the Printer Ports window.
Click [Close] to return to the Print Server Properties window and click [Close] to
return to Printers and Faxes.
Having added the correct printer port, a Windows printer is added in the usual way be
selecting the Windows port and choosing the required 32bit or 64bit driver files. Once
complete, the printer preferences will be available as shown in the example below:
When checking the Printing
Preferences, the additional
custom options will be listed as
shown in the example left.
4-6 FreeFlow Accxes Control User Guide
Page 73

FreeFlow Accxes Control Accxes Client Tools and Print Drivers
MAC PPD
Setting up a Mac to print to an Accxes Control network hotfolder requires a Mac OS
PPD and a network port created on the Mac.
The first task is to create the Mac OS PPD within Accxes Control. The PPD is created
from the Create PPD (Mac OS) option in the Print Driver menu of the Accxes Control
Main Interface. The PPD contains standard driver options such as size, copies, etc. If
additional custom options are required in the PPD, such as the ability to choose the
folder when printing on a Mac, first choose the Customise Driver Options before
creating the Mac PPD. The Mac PPD is customised by adding all the required options
exactly as explained in the previous section of this chapter under the heading entitled,
Custom Windows Driver. The customise option affects the PPD, which is used for
both Mac and Windows. Once the driver has been customised, the Mac PPD can be
created, containing all the standard and additional custom options required.
When setting up the Mac, an LPR, LP or IP port must be selected (Note: the
terminology changes across different Mac OS). The TCP/IP address entered in the port
set-up must be the IP address of the Windows PC hosting Accxes Control. The queue
name will be the network port number used in Accxes Control. Then select the PPD
created within Accxes Control.
Third Party Windows Print Driver
Third party print drivers (Provided with the print device) can sometimes be used
providing they produce a supported file format and print options recognised by
Accxes Control. Experimentation of such use will be required. To aid this process,
demo licenses of Accxes Control can be provided prior to purchase.
Setting up a third party print driver to print to the Accxes Control network hotfolder
also requires the network port be configured exactly as explained earlier in this
chapter under the heading entitled, Add Printer Port.
FreeFlow Accxes Control User Guide 4-7
Page 74

Accxes Client Tools and Print Drivers FreeFlow Accxes Control
[This page left intentionally blank]
4-8 FreeFlow Accxes Control User Guide
Page 75

5 Accxes Submit
Overview
Xerox Wide Format FreeFlow Accxes Submit is part of the Xerox Wide Format
FreeFlow Accxes Productivity Tools suite of software.
Accxes Submit is license-free Windows client software used to submit printable file
formats to FreeFlow Accxes Control software.
Accxes Submit can also be used as an alternative to Accxes Client Tools for print job
submission to Accxes-based printers.
Files submitted using the Accxes Submit client software must be in a print ready
format, supported by either FreeFlow Accxes Control and/or Accxes-based printers. For
a list of supported file formats by Accxes Control, see Appendix B in this guide and for
Accxes-based printers, see the relevant printer specification sales sheet.
This chapter covers the installation, configuration and use of Accxes Submit with
Accxes Control.
5
System Requirements
The Xerox® Wide Format FreeFlowTM Accxes® Submit software requires the following
minimum PC specification to function correctly.
• Min 2.0Ghz Processor, 2Gb RAM, 10Gb available disk space.
• Windows XP, Windows 7, 32-bit and 64-bit – with latest service packs.
FreeFlow Accxes Control User Guide 5-1
Page 76

Accxes Submit FreeFlow Accxes Control
Installation
Before you start
Download the latest FreeFlow Accxes Submit installation kit from:
http://downloads.xwfsolutions.com/ffapt/Install%20Kits/
Administrator permissions are required to install this software.
Installation Procedure
1. Double-click the Accxes Submit Setup.exe file to being the installation.
2. Click [Next] to continue the installation.
Review the Software End User License Agreement
3. Accept the terms of the license agreement and select [Next] in order to continue.
4. Accept the default installation folder and select [Next] to continue.
5. Click [Install] to begin the installation.
The Accxes Control set-up window displays the successful completion of the
installation.
6. Select [Finish].
Proceed to the next section to configure Accxes Submit for first use.
5-2 FreeFlow Accxes Control User Guide
Page 77

FreeFlow Accxes Control Accxes Submit
Configure Accxes Submit for first use
Introduction
Once installed, Accxes Submit must be configured to use at least one print device
before the software starts.
This chapter explains the basic set-up of the software.
Before you start
Accxes Submit attempts to verify the connection to any printer configured within the
application. If the connection is unsuccessful, the printer will not be installed and the
software cannot be used. Therefore, before you start, ensure the following:
1. If Accxes Submit is intended for use with the Accxes Control software, ensure the
Accxes Control software is running and correctly configured with at least one
enabled network hotfolder.
2. Configuration of Accxes Submit with Accxes Control will require the TCP/IP
address of the PC hosting Accxes Control and the port number associated with the
enabled network hotfolder within Accxes Control.
3. If Accxes Submit is intended for direct use with an Accxes-based printer, ensure
the printer is on and correctly configured on the network.
4. Configuration of Accxes Submit with an Accxes-based printer also requires the
TCP/IP address of the Accxes Controller.
FreeFlow Accxes Control User Guide 5-3
Page 78

Accxes Submit FreeFlow Accxes Control
Accxes Submit – Configuration
Start the Accxes Submit application from:
Start > All Programs > Xerox > FreeFlow Accxes > Accxes Submit
The language selection window will open first. Select your default language and
uncheck the box to disable displaying the language selection again.
Click [OK] to continue starting the application.
The Settings window will open (figure 5.1). Note: Accxes Submit will not run until at
least one printer has been configured. Once correctly configured, Accxes Submit will
start normally. The Settings window can be accessed at any time from the File >
Settings menu.
Fig 5.1
5-4 FreeFlow Accxes Control User Guide
Page 79

FreeFlow Accxes Control Accxes Submit
Printers field
In the Settings window, below the Printers field, click [New] to open the Printer Details
window shown below:
Accxes-based Printers
If configuring Accxes Submit to print direct to a Xerox Wide Format Accxes-based
printer, enter the name of the printer in the Name field and the TCP/IP address of the
Accxes controller in the Address field.
FreeFlow Accxes Control
If configuring Accxes Submit to print to FreeFlow Accxes Control software, enter the
name of the Accxes Control network hotfolder in the Name field and the TCP/IP
address of the PC hosting Accxes Control in the Address field.
It is possible to set up more than one printer in Accxes Submit to print to more than
one network hotfolder in Accxes Control. Different Accxes Control network hotfolders
are addressed by adding the network port number to the TCP/IP address in the
Address field as shown in the example below:
Example
Two network hotfolders have been configured within Accxes Control:
One hotfolder is created with the name ‘Wide Format Colour’ and configured to
use port 9500. Everything printing to this hotfolder is sent to a wide format
colour device and does not use any rules to affect processing.
A second hotfolder is created with the name ‘Automatic’ and configured to use
port 9600. Everything printing to this hotfolder is subject to rules that split print
jobs according to size and colour.
Within Accxes Submit, configure the first printer to address the Wide Format
Colour hotfolder using port 9500 as follows:
FreeFlow Accxes Control User Guide 5-5
Page 80

Accxes Submit FreeFlow Accxes Control
In the Printer Details Name field, enter a name such as ‘Wide Format Colour’ or
anything else that identifies the wide format colour device.
In the Address field, the correct
hotfolder queue is addressed by
entering xx.xx.xx.xx:9500 (TCP/IP
address, colon, port number Where xx.xx.xx.xx represents the
TCP/IP address of the PC hosting
Accxes Control) – See example
right:
Within Accxes Submit, configure the second printer to address the Automatic
hotfolder using port 9600 as follows:
In the Printer Details Name field, enter a name such as ‘Automatic’ or anything
else that identifies the automatic print queue of the Accxes Control application.
In the Address field, the correct
hotfolder queue is addressed by
entering xx.xx.xx.xx:9600 (TCP/IP
address, colon, port number Where xx.xx.xx.xx represents the
TCP/IP address of the PC hosting
Accxes Control) – See example
right:
When Accxes Submit is started, both print queues will be listed in the Printer
field as shown in the example below:
5-6 FreeFlow Accxes Control User Guide
Page 81

FreeFlow Accxes Control Accxes Submit
Size Ranges field
The Size Ranges field is used to determine the print sizes available to the user for
selecting when re-sizing print jobs.
In order to avoid users having to navigate a large dropdown list that may include
unused media sizes, it is recommended to disabled the unused size ranges.
In the example shown in figure 5.1 both ANSI and ARCH are disabled, leaving just ISO
and roll sizes available.
Viewer field
FreeFlow Accxes Submit is intended for use with print ready file formats. It is
therefore possible to configure the software to use a viewer in order to visually check a
file prior to print submission. Experimentation with various viewers is necessary.
If Accxes Submit has been installed on the same PC used to host the FreeFlow Accxes
Control software, it is possible to use the Accxes Control application to view print files
within the Accxes Submit application. This is configured by entering the path of the
Accxes Control viewer application in the Viewer field exactly as follows, including the
quotes:
"C:\Program Files\xerox\FreeFlow Accxes\Accxes Control\FFAcontrol.exe" –F
Units field
This field sets the default units used within the Accxes Submit application. Use the
dropdown to select mm, cm or inches.
Once all the above has been configured click [OK] in the Settings window in order to
run the Accxes Submit application. The next section of this chapter explains the
Accxes Submit User Interface.
FreeFlow Accxes Control User Guide 5-7
Page 82

Accxes Submit FreeFlow Accxes Control
Accxes Submit User Interface
The Accxes Submit User Interface is explained in four main areas (Figure 5.2):
Main Menus and Icons – Menus for Accxes Submit settings, Job and Document
options.
Job Options – Changes made here affect all the documents in the print job.
Documents List (Print Job) – Documents listed here make up the print job.
Document Options – Changes made here affect individually highlighted
documents in the print job.
Main Menus and Icons
Job Options
Documents List (Print Job)
Document Options
Fig 5.2
Each area of the Accxes Submit User Interface is explained in the following pages.
5-8 FreeFlow Accxes Control User Guide
Page 83

FreeFlow Accxes Control Accxes Submit
Main Menus and Icons
File menu
Creates a new print job – removes all existing documents
New
Open
Save
and returns print settings to defaults.
Opens a previously saved print job.
Saves the documents in the print job and all the print job
settings – note this saves a reference to locations of the
various documents in the print job. It does not save the
actual documents themselves.
Save As
Print
Settings
Exit
Edit menu
Cut
Copy
Paste
Copy Options
Paste Options
As above but can be used to save an existing job with a
different name.
Submits the current print job to Accxes Control or an Accxesbased printer.
Opens the Settings window to edit printers, media sizes,
viewer and units.
Exit the Accxes Submit application.
Removes one or more highlighted documents from the
Documents List.
Used to create additional copies of one or more highlighted
documents in the Documents List.
Pastes a document or documents in the Documents List
after selecting either Cut or Copy.
Copies the print options for one highlighted document.
Pastes the print options to one or more highlighted
documents.
Opens a Windows explorer to select and insert a new
Insert
Delete
View
document below the currently highlighted document.
Removes one or more highlighted documents from the
Documents List.
Opens the currently highlighted document in the Viewer.
Help menu
Change Language
About
FreeFlow Accxes Control User Guide 5-9
Change language used in Accxes Control
Displays the installed version of Accxes Submit.
Page 84

Accxes Submit FreeFlow Accxes Control
Job Options
Job Options
Name
Copies
Collate
Printer
Job Accounting
Automatically populated with the name of the first
document in the Documents List, or the name of a
previously saved print job. Can also be used to type any
name or message required to display in the Accxes Control
Main Interface job Queue.
Copies of every document in the entire print job.
Off, Reverse or Forward. Sets the collation required for the
entire print job when printed as a set.
Selects the desired printer from the list of devices created in
the Settings window.
When enabled, the User ID and Account ID field appear in
order to enter Job Accounting data that can be used to
identify Accxes-based account details.
5-10 FreeFlow Accxes Control User Guide
Page 85

FreeFlow Accxes Control Accxes Submit
Documents list
The Documents List of the Accxes Submit Main Interface (Shown below) lists all the
documents and their print modes in the current print job.
The document settings identified in the Documents line called <Default> affects all
documents added to the list. Changing these default document print options changes
all subsequently added documents. It does not change documents already in the
Documents list.
FreeFlow Accxes Control User Guide 5-11
Page 86

Accxes Submit FreeFlow Accxes Control
Document options
Document options are spread across four tabs: General, Finishing, Labelling and
Advanced. Each tab is explained as follows:
General tab
General tab
Copies of Document
Size
Media Type
Scale
Optimise Lines
Changes the copy count for one or more highlighted
documents.
Default is ANY and means the document will print at its
original size. Use the dropdown field to change the print size
for one or more highlighted documents.
Default is ANY and means documents will automatically
print using the default print mode and rules within Accxes
Control. Any additional print modes created within Accxes
Control get downloaded to Accxes Submit when the printer
is created in the Settings window. These print modes are
then available to be chosen by the user when submitting
print jobs. When printing to a Wide Format Colour Inkjet
Device, such options listed here can identify print modes
such as Draft, Normal and Quality.
Default is Auto and means the document will be scaled to
whatever size is chosen in the Size field. A list of default
scaling percentages is also listed in this field.
Ensures print lines are maintained when reducing a
document size. Otherwise reduction of fine lines could result
in them almost disappearing.
Prints the current print job.
5-12 FreeFlow Accxes Control User Guide
Page 87

FreeFlow Accxes Control Accxes Submit
Finishing tab
Finishing tab
Enable Finishing
Program
Title Block
Intelligent Title
Block
Makes the finishing options available so that folding options
can be applied to one or more documents.
Default is BYPASS and means documents are not folded.
Once Finishing is enabled, the Program field lists the fold
programs available for the Xerox Wide Format installed
folder. The fold programs are either downloaded direct from
an Accxes-based printer or from Accxes Control, when
printers are added in the Settings window.
Default is DON’T CARE and means any folded documents
will be folded according to the most appropriate settings
based upon the orientation of the document. The dropdown
field is used to set alternative title block positions required
when printing direct to an Accxes-based printer. However,
when Accxes Submit is used to print through Accxes Control,
the software uses automatic Title Block detection.
Default is disabled. When enabled, this option works
together with other folded selections to help the Accxes
controller work out whether the mix of document size,
orientation, fold style and title block selection are valid. If
not, Accxes will automatically change the parameters to
produce what it believes is the correct output.
Experimentation is required.
FreeFlow Accxes Control User Guide 5-13
Page 88

Accxes Submit FreeFlow Accxes Control
Labelling tab
Labelling tab
Enable Label
Text
Font
Size
Shading
Rotate
Location X Y
Makes the label option available.
Free text field used to type whatever label the user requires.
Choice of font for the label.
Choice of font size.
Shading of font. White is 0, Black is 100 and numbers inbetween provide levels of grey.
Rotation of the label. Experimentation is required.
XY location of the label on the print. Experimentation is
required.
5-14 FreeFlow Accxes Control User Guide
Page 89

FreeFlow Accxes Control Accxes Submit
Advanced tab
Advanced tab
Media Source
Justification X Y
Rotate
Mirror X Y
Default is Auto and means media choice will be made based
upon best choice by the printer or by any default workflows
applied within Accxes Control. Additional Media Sources will
be listed here when a new printer with additional options is
added in the Settings window.
Default is CENTER, CENTER and means the image will be
centred on the page. Changing this can help ensure an
image smaller than the smallest roll size available is printed
on one side of the sheet thereby making trimming only
necessary on one side. The dropdown fields provide options
for Left, Right, Top and Bottom. Output depends upon the
printer capabilities.
Default is Auto and means rotation of the image on the
page will be automatic to provide the best fit. The dropdown
fields provide options to rotate the image 0, 90, 180 or 270
degrees.
Mirrors the image in either the X or Y plane or both.
FreeFlow Accxes Control User Guide 5-15
Page 90

Accxes Submit FreeFlow Accxes Control
[This page left intentionally blank]
5-16 FreeFlow Accxes Control User Guide
Page 91

6 Example
Configurations and
Workflows
Introduction
A powerful function of Accxes Control is the ability to use workflows and rules to
determine how different files are handled.
This chapter details a number of example configurations and workflows to cover some
of the most common tasks such as:
Specific Printer Configurations – Example set-ups for various printer types
Common Workflows – Workflows required for use with most Windows printer drivers
Notify Workflow – Prints a report identifying printer or printers used to output the
print job
Multi-Page Documents Workflows – Workflows determining how to handle multipage documents
Example Rules and Workflows Application – Example of how rules need to be
configured to use some of the example workflows covered in this chapter
Email Configuration – Setting up Accxes Control to use email for tasks such as
notifying the Administrator as to the status of the printer and print jobs
AutoCAD DWG Configuration – Setting up Accxes Control to use email for tasks such
as notifying the Administrator as to the status of the printer and print jobs
Correct configuration of Accxes Control may require a combination of one or more
workflows to achieve the desired control of print jobs.
For example, the Specific Printer Configurations explain principles that can help to set
up other Windows printers. In addition, all small format printers also need the Print
Size Control common workflow applied that force documents to fit to the size of the
media requested.
6
CAUTION
The information in this section is provided as a guide only. It uses known examples to
help explain workflow principles that may be successful when applied to various other
printer types. Periodic changes to print devices, printer drivers and Operating Systems
will result in different settings that need to be applied. Experimentation is required.
FreeFlow Accxes Control User Guide 6-1
Page 92

Example Configurations and Workflows FreeFlow Accxes Control
Specific Printer Configurations
Specific printer configurations require experimentation in order to achieve the
required control over such print options as size, duplex, stapling, image justification,
etc. PostScript print drivers often produce better results than Windows PCL print
drivers. Depending upon specific printer functions, experimentation is required.
This section covers a number of examples that will help identify principles that can be
applied when configuring alternative devices.
Remember to click [Apply] after creating any printer so that a corresponding workflow
is created within Accxes Control that addresses the printer queue. All printers are
configured within the Printers tab of Accxes Control Spooler Settings.
Xerox Wide Format Accxes-based Monochrome Printers
Xerox Wide Format Accxes-based Monochrome Printers
Name Use product name
Type FreeFlow Accxes
Printer Enter the TCP/IP address of the Accxes Controller
There are no print modes or media sizes necessary to configure.
Xerox Wide Format 7142 Colour Printer
Xerox 7142 Wide Format Colour Printer
Name Xerox7142
Type Xerox 7142
Printer Enter the TCP/IP address of your Xerox 7142 printer
Properties > Print Mode Automatically creates Draft, Normal and Quality
Print Mode Properties
Print Modes
Draft
Normal
• Coated Media, 360dpi, Bi-Directional, 1
Pass, Variable Dot on, No wave mode
• Coated Media, 360dpi, Uni-Directional, 2
Pass, Variable Dot on, Wave 1
Quality
• Coated Media, 720dpi, Uni-Directional, 2
Pass, Variable Dot on, Fine & Wave 1
When returning to the FFA Control Printers tab, the media size will automatically have
been entered as Roll_A0. This can be changed by clicking [Add] in the Available Page
Sizes field in the Printers tab of Accxes Control Spooler Settings
6-2 FreeFlow Accxes Control User Guide
Page 93

FreeFlow Accxes Control Example Configurations and Workflows
Epson 9700 Wide Format Colour Printer
Epson 9700 Wide Format Colour Printer
Name Epson 9700
Type Windows – GDI
Printer Select the Windows print driver previously installed for the Epson 9700
Properties > Print Mode Create Print Modes to reflect print quality settings available in driver
for Speed and Quality
In the Epson print driver set the [Roll Paper Option] to turn on Auto Rotate and
configured to work with the installed paper size.
Also in the print driver set the default size to A4. This ensures small sizes are not
printed in the centre of a larger sheet and does not stop larger sizes from being
printed.
HP1055 Wide Format Colour Printer
HP1055cm Plus Wide Format Colour Printer
Name HP1055
Type Windows – GDI
Printer Select the Windows print driver previously installed for the HP1055cm
Properties > Print Mode Normal
Print Mode Properties
Print Mode Normal
• Default print size: A3
• Loaded Media: A0 Roll
• Autorotate: On
• Extended margins: NOT selected
• Processing in computer
• Fast Raster Printing
When returning to the FFA Control Printers tab, add all available sizes for the HP1055.
FreeFlow Accxes Control User Guide 6-3
Page 94

Example Configurations and Workflows FreeFlow Accxes Control
HP4000 Wide Format Colour Printer
HP4000ps Wide Format Colour Printer
Name HP4000
Type Windows – GDI
Printer Select the Windows print driver previously installed for the HP4000ps
Properties > Print Mode Normal
Print Mode Properties
Print Mode Normal
• Default print size: A3
• Loaded Media: A0 Roll
• Autorotate: On
• Margins: Small
• Normal Print Quality: Drawings / Text
When returning to the FFA Control Printers tab, add all available sizes for the HP4000.
Xerox 252 Small Format Colour Printer
Xerox 252 Small Format Colour Printer
Name Xerox252
Type Windows – GDI
Printer Select the Windows PS print driver previously installed for the Xerox252
Properties > Print Mode Normal, Simplex, Duplex, Simplex Stapled and Duplex Stapled
Print Mode Properties
Print Modes
1
Specific to the Xerox 252 when printing through FFA Control to obtain correct output orientation. Such
settings require testing per printer type.
6-4 FreeFlow Accxes Control User Guide
Normal and Simple
Duplex
Duplex Stapled
Simplex Stapled
• No change. Click Edit to open printer
properties and close it again
• Top, Bottom
• Duplex Top, Bottom
• Stapled Left, Bottom
• Include staple mixed sizes as requested by
the customer
• Stapled Left, Bottom
• Include staple mixed sizes as requested by
the customer
1
1
1
Single
1
Single
Page 95

FreeFlow Accxes Control Example Configurations and Workflows
Xerox 4112 Small Format Monochrome Printer
Xerox 4112 Small Format Monochrome Printer
Name Xerox4112
Type Windows - GDI
Printer Select the Windows PS print driver previously installed for the
Xerox4112
Properties > Print Mode Add: Normal, Simplex, Duplex, Simplex Stapled and Duplex Stapled
Print Mode Properties
Print Modes
Normal and Simple
Duplex
Duplex Stapled
Simplex Stapled
• No change. Click Edit to open printer
properties and close it again
• 2 Sided Print
• 2 Sided Print
• 1 Staple Mixed Sizes
• 1 Staple Mixed Sizes
When returning to the FFA Control Printers tab, add the sizes available in both printers
for A3 and A4.
Océ 9800 with ReproDesk
Sending print jobs to an Océ 9800 with ReproDesk requires a printer and file
conversion workflow to be created. This ensures the correct print commands are
created that ReproDesk understands and that PDF files are converted since the
ReproDesk Server has a problem processing PDF files natively.
First create a Windows print driver on the PC hosting Accxes Control, using the
Generic/Text Only driver. Set the port for print to file and do not test this print driver.
Next create a printer for the ReproDesk Server within the Printers tab of Accxes
Control Spooler Settings using the following configuration:
Océ 9800 with ReproDesk
Name Oce9800
Type Windows - Direct
Printer Select the Windows Generic/Text Only print driver previously installed
for the Océ 9800
PJL Support OCE Job Ticket
FreeFlow Accxes Control User Guide 6-5
Page 96

Example Configurations and Workflows FreeFlow Accxes Control
Océ 9800 ReproDesk – PDF to Tiff Workflow
Having created the ReproDesk printer, the PDF file format conversion workflow needs
to be created and correctly applied.
In the Workflows tab of Accxes Control Spooler Settings create a workflow called,
PDFtoTIFF.
The PDFtoTIFF workflow needs to be configured with the following Mandatory
Options:
Mandatory Options
Option Setting Value
CONVERTPDFTO TIF Destination
CONVERTPSTO TIF
RASTERRESOLUTION 300
GREYSCALE1BIT FALSE Rendering
RENDERMODE Grayscale
Other DITHERGREY DIFFUSE
Before proceeding, click [Apply].
Having created the PDF to TIFF conversion workflow, it must be applied as a default
workflow directly to the 9800 printer created above.
This is accomplished as follows:
• Return to the Printers tab
• Select the Océ 9800 ReproDesk printer and click [Edit]
• In the Edit Printer window, click [Printer Rules]
• Add one rule and configure it as listed in the table below:
Rule Condition Workflow Stop at this rule if it is true
1 Always PDFtoTIFF Disabled
• Click [OK] to return to the Printers tab
6-6 FreeFlow Accxes Control User Guide
Page 97

FreeFlow Accxes Control Example Configurations and Workflows
Access to the Océ ReproDesk Server
Before Accxes Control can submit files to the ReproDesk Server, access to the Server
must first be established as follows:
• Have the customer create a new queue on the ReproDesk Server called, Qcontrol
• On the PC hosting FFA Control, map a network drive to the Qcontrol queue on
the ReproDesk Server.
Océ 9800 Workflow
The final task is to configure the Océ 9800 ReproDesk workflow by applying the
following Mandatory Options and Default Settings in the workflow:
Mandatory Options
Option Setting Value
Job PRINTTOFILE_D
Destination PAGEPRINTER This is set by default when printer created
Rendering RENDERMODE Greyscale
Other DITHERGREY DIFFUSE
Default Settings
Option Option Option
Size, Media and Layout PAPER ANY
3
Where R:\ is the mapped drive to the queue on the ReproDesk Server.
3
R:\$JOBNAME$.*\$JOBNAME$.plt
The Océ ReproDesk Server is finally addressed through rules in the Hotfolders tab in
Accxes Control by selecting the Océ 9800 printer created earlier.
FreeFlow Accxes Control User Guide 6-7
Page 98

Example Configurations and Workflows FreeFlow Accxes Control
Common Workflows
This section lists a number of commonly used workflows required for use with most
Windows printers.
All workflows are created in the Workflows tab of Accxes Control Spooler Settings and
are applied to either a rule in the Hotfolders tab or to a specific printer in the Printers
tab.
When applying a workflow in the Hotfolders tab, the workflow is used as a result of
one or more conditions applied to a rule. When a workflow is applied to a specific
printer in the Printers tab, the workflow is applied automatically to everything printed
to that device regardless of the rules.
Print Size Control Workflow
The Print Size Control workflow is necessary for all small format printers tested to
date. It may also be required for some non-Xerox wide
print drivers.
This workflow is used to ensure images are scaled correctly to the size determined by
the user. Not applying this workflow can result in an image being printed with its
borders cropped.
Note that this workflow may also need to be used in-conjunction with specific
changes to the Windows print driver settings configured within Accxes Control. For
example, maximise margins or extended margins may also need to be applied.
When a printer is set-up in the Printers tab, clicking [Apply] creates a corresponding
workflow in the Workflows tab with the same name. Locate the workflow for your
printer and add to it, the following Mandatory Option:
Mandatory Options
Option Setting Value
Size, Media and Layout FITTOPRINTERSIZE = TRUE
format printers using Windows
6-8 FreeFlow Accxes Control User Guide
Page 99

FreeFlow Accxes Control Example Configurations and Workflows
Default Print Mode Workflow
If a print job is submitted without a user defined print mode (E.g. Not selected or
available when printing from Accxes Submit or Accxes Client Tools or Print Drivers),
Accxes Control will apply the first print mode in the alphabetical list of print modes for
that printer. In order to define a print mode, it must first exist as an available print
mode in the list of print modes already configured for each printer within Accxes
Control. Defining an unavailable print mode is the same as not defining any print
mode.
On wide format inkjet devices an undefined print mode can result in an unwanted
high quality print mode being used such as Best. On small format devices this could
result in an unwanted setting such as Duplex being applied.
If the user defines an available print mode when submitting the print job, that setting
will override this workflow. However, in the event that a print mode has not been
defined or an unavailable print mode has been defined, this workflow overrides the
print job and ensures a default print mode is automatically applied within Accxes
Control.
This example applies a standard default print mode called ‘Normal’.
When a printer is set-up in the Printers tab, clicking [Apply] creates a corresponding
workflow in the Workflows tab with the same name. Locate the workflow for your
printer and add to it, the following Default Setting:
Default Settings
Option Setting Value
MEDIANAME2 Size, Media and Layout = Normal
2
MEDIANAME will call the corresponding PRINTMODE. The names are interchangeable.
FreeFlow Accxes Control User Guide 6-9
Page 100

Example Configurations and Workflows FreeFlow Accxes Control
Default Finishing Workflow
Similar to the Default Print Mode workflow above, if a print job is submitted without
user defined finishing options (E.g. DIN C 210 x 297 folded size for Xerox Wide
Format folders), the print job will not be folded.
If the user defines correct finisher options when submitting the print job, those
settings will override this workflow. However, in the event that finishing options have
not been defined, this workflow overrides the print job and ensures default finishing
options are automatically applied.
This example applies a standard finishing option to create a DIN 210 fold on a Xerox
Wide Format folder.
When a printer is set-up in the Printers tab, clicking [Apply] creates a corresponding
workflow in the Workflows tab with the same name. Locate the workflow for your
printer and add to it, the following Default Setting:
Default Settings
Option Setting Value
Finishing FINISHPROGID “DIN C 210x297”
Automatic Title Block Detection
Accxes control will use automatic title block detection one any document where the
position is not explicitly specified using Accxes Client Tools, Accxes Submit or the
Windows printer driver. In order to allow Accxes Control to apply automatic title block
detection make the following selections for title block position in the various client
tools:
From Accxes Submit, select: DONTCARE
From Accxes Client Tools, select: Default
From the Accxes print drivers, select: No Preference
6-10 FreeFlow Accxes Control User Guide
 Loading...