

Page 1

Version 1.5
Software Version 1.5
April 2011
Xerox® Wide Format
®
FreeFlow
Accxes® Control v1.5
Quick Start Guide
Page 2

Xerox®, the sphere of connectivity design, Xerox Wide Format FFA® Indexer & FFA® Copy, and acronyms, are trademarks of Xerox
Corporation in the United States and/or other countries. Xerox Corporation 2010 All rights reserved.
Page 3

Xerox® FreeFlow® Accxes® Control
Table of Contents
Introduction .............................................................................................................. 2
System Requirements........................................................................................... 3
Installation ................................................................................................................ 4
Installation procedure........................................................................................................................ 4
Licensing Accxes Control................................................................................................................... 5
Tutorial........................................................................................................................8
Overview ...................................................................................................................................................8
Before you start..................................................................................................................................... 8
Accxes Control Settings ..................................................................................................................... 9
General .......................................................................................................................................... 9
Printers ....................................................................................................................................... 10
Printer Groups ......................................................................................................................... 11
Paper Sizes................................................................................................................................11
Workflows ................................................................................................................................. 13
Hotfolders ................................................................................................................................. 16
Testing Example Set-up ..................................................................................................... 18
iii
Page 4

Xerox® FreeFlow® Accxes® Control
Introduction
Xerox® Wide Format FreeFlow® Accxes® Control is a part of the Xerox® Wide Format
FreeFlow® Accxes® Productivity Tools suite of software. The Xerox® Wide Format
FreeFlow® Accxes® Control software is a powerful print management solution for large and
small format documents.
There are three levels of Accxes Control, and the features of the software are controlled by
the license type you have purchased:
Accxes Control
This solution is for environments where only prints to Xerox FreeFlow Accxes wide
format printers will be connected.
Accxes Control 7142
This solution is for environments with Xerox 7142 wide fomat colour printers. It also
supports Xerox FreeFlow Accxes wide format printers.
Accxes Control Pro
This solution supports printers from all manufacturers (either through built drivers, or
using Microsoft Windows Drivers). It also provides electronic printing, for example by
PDF to file or email.
Page 5

Xerox® FreeFlow® Accxes® Control
System Requirements
The Xerox® Wide Format FreeFlow® Accxes® Control software requires the following
minimum PC specification to function correctly.
‐ IntelCore2Duo2.0Ghz,2GBRAM,50GBAvailablediskspace
‐ Virtualmachineenvironmentsaresupported,thoughperformancemaybelowerthanona
dedicatedsystem.
‐ WindowsXP,Windows7orWindowsServer2003,2008or2008R2.32or64bit.
(Windows
NOTE: The functionality provided by Accxes Control can be very intensive on system resources
(CPU and Memory). It is not recommended to run Accxes Control on the same system as
other resource intensive processes, for example SQL Server.
A special license file will be required if Accxes Control will be administered using Microsoft
Remote Desktop Connection. Please ask your supplier if this is a requirement.
7(orServer2008R2)64bitisrecommendedforbestperformance.)
- 3 -
Page 6

Xerox® FreeFlow® Accxes® Control
Installation
You will need the following to complete installation:
‐ Xerox FreeFlow Accxes Productivity Tools Installation CD
‐ Xerox FreeFlow Accxes Control License file, or Activation Code
Administrator permissions are required to install this software.
Installation procedure
1. Insert the Accxes Productivity Tools CD into your CD-ROM drive.
2. If the CD does not begin the Autorun function, then do the following:
a. Open Windows Explorer
b. Select your CD-ROM drive
c. Double-click either: [Accxes Control Setup.exe].
The Xerox Wide Format screen is displayed.
3. Follow the instructions in the Accxes Control set-up window, and select the [Next]
button as directed to begin the installation.
View the displayed Software End User license Agreement.
4. Select [Next] in order to continue and to accept the terms of the license agreement.
5. Select [Next] and continue the installation, and accept the default installation folder.
6. The Accxes Control Set-up window displays the successful completion of the installation.
7. Select [Finish].
8. Start the Accxes Control application by:
Selecting Start > All Programs > Xerox > FreeFlow Accxes >Accxes Control
9. Complete the license steps in the section Licensing Accxes Control.
10. Once licensed, refer to the section Tutorial to get started
Quick Start Guide -4 -
Page 7
Xerox® FreeFlow® Accxes® Control
Licensing Accxes Control
Overview
Accxes Control is licensed to the Host ID of your computer. The license information only needs
to be entered the first time you open Accxes Control. You must have administration rights to
license Accxes Control.
Note
To activate and use either Accxes Control, a license key file is required.
Before you begin
To license Accxes Control, you will need the following:
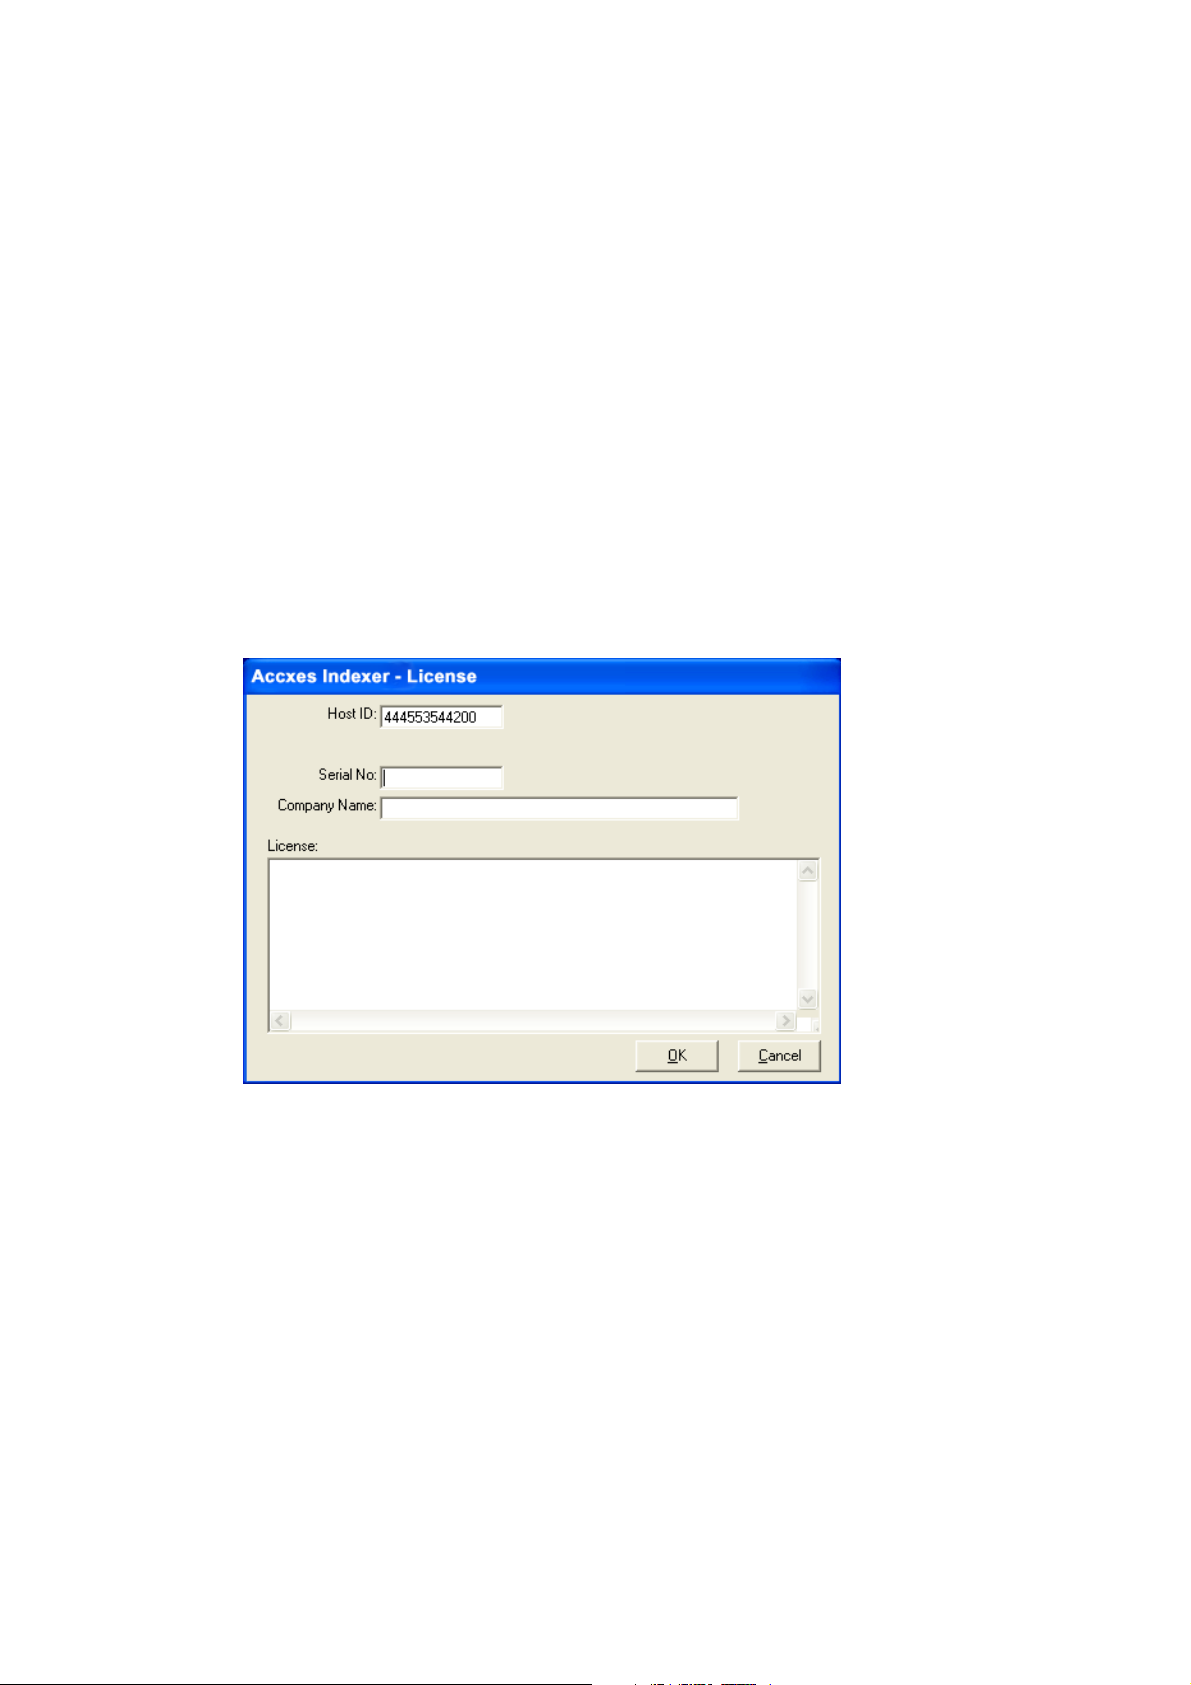
1. The Host ID (Mac Address) as displayed in the Accxes Control license window; this is
displayed when you first launch Accxes Control, as shown in the following illustration:
Note
The preceding illustration represents the Accxes Indexer application; however, the
Accxes Control license window reflects the same type of information as shown in the
illustration.
2. The serial number that came with the software.
The serial number is located on the software installation CD. The activation key
information is also located the CD.
Note
Keep a copy of all this required information should you ever need to reactivate the
license.
- 5 -
Page 8

Xerox® FreeFlow® Accxes® Control
Obtaining your Accxes Control license from the World Wide Web
Notes
‐ An activation key is issued with the purchase of the software.
‐ The activation key is located on the software installation CD. The serial number is also
located on this CD.
‐ In order to obtain your Accxes Control license, you must have an internet connection.
To obtain an Accxes Control license:
1. Go to the following Xerox Software Activation Portal (SWAP) website:
https://www.xeroxlicensing.xerox.com/activation/
2. Enter the activation key.
3. Click on the Next button.
4. On the next screen, enter the following:
o Your Hardware Address (Host ID)
o Your Serial Number
NOTE: If you have a separate Accxes Control Pro upgrade activation key,
you should enter the same serial number from the base software,
NOT the Accxes Control Pro Upgrade serial number.
5. Click on the Next button.
6. On the next screen, enter your customer user information, including:
o Company name
o First and Last Name
o Address
o Email address
7. Click on the Next button.
8. On the next screen, verify your user information and click the Save and
Download License File button.
9. Save the License File (.DAT file) to the desired location on computer’s hard
drive.
Note
Keep a copy of .DAT file with all its required information in the event that you
ever need to
reactivate the license.
10. In order to activate your software, proceed to Activating Accxes Control.
Quick Start Guide -6 -
Page 9

Xerox® FreeFlow® Accxes® Control
Activating Accxes Control
Before you can use the Accxes Control application, you must activate it.
1. Correctly enter the following information into the appropriate fields of the Accxes
Control License window:
a. Verify your PC Host ID (MAC) Address
It is essential that the Host ID entered at the SWAP URL site matches EXACTLY the
same as the Host ID shown in the Accxes Control License window.
2. Correctly enter your license information into the license text area of the Accxes Control
3. Select [OK].
4. For instructions on quickly setting up the Accxes Control applications, refer to the section
b. Enter the Serial number that came with the software
It is essential that your serial number is entered EXACTLY as shown on the license
sheet which came with your software installation CD, and it must match the serial
number that was entered at the SWAP site.
c. Enter your company name
license window.
‐ Ensure that the license information is entered EXACTLY as it was provided to you
from the SWAP website (including alpha/numeric characters and any upper/lower
case letters).
‐ Drag and drop the downloaded .DAT file into the Accxes Control license area.
Accxes Control verifies the license and then automatically starts.
Tutorial
- 7 -
Page 10

Xerox® FreeFlow® Accxes® Control
Tutorial
Overview
This Tutorial will cover the following example set-up:
- Two printers in Accxes Control; a Freeflow Accxes Xerox Wide
Format and a small format device.
- Configure print sizes A2 and larger, to be queued to the wide
format device and print sizes A3 and A4 to be queued to the small
format device (Accxes Control Pro only).
- Configure print jobs A2 and larger, that are created from a CAD
application using a non-Xerox print driver* to print to the Xerox
device and have folding commands applied.
This example set-up will help explain a number of the functions
provided by Accxes Control and how to set these up.
*Non-Xerox print driver must produce a supported print file format.
Before you start
- Complete the installation activities and licence Accxes Control as
explained in Section 1.
- Switch on the print devices that will receive print jobs from Accxes
Control.
- Install print drivers on the PC hosting Accxes Control for the wide
and small format devices that Accxes Control will be submitting
jobs to.
- On the client PC(s) configure the Xerox Wide Format print drivers
that will print to Accxes Control. These print drivers should use a
Microsoft Standard TCP/IP Port in Raw mode, with the IP address
of the PC
- You may also wish to configure Xerox Freeflow Accxes Client Tools
software on the client systems to send jobs to Accxes Control. This
can be achieved by simply adding a new device to client tools, and
entering the IP address of the system hosting Accxes Control.
- All of the actions that must be performed in this tutorial are
preceded by the following bullet:
- Paragraphs without bullets are for information purposes.
hosting Accxes Control, and a port number of 2000.
Quick Start Guide -8 -
Page 11

Xerox® FreeFlow® Accxes® Control
Accxes Control Settings
The first time you start Accxes Control, the Settings window will
automatically open.
At any time thereafter, the settings can be accessed from the Accxes
Control main window by clicking [Spooler] and then [Setup].
From the Settings window, seven tabs identify the following options:
Printers
Printer Groups
Paper Sizes
Workflows
Hotfolders
Accounting
General
Note: Accxes Control will not function until the print queue location
has been configured in the General tab and a minimum of one
prinrer has been configured.
General
The General tab contains the following selections:
Print Queue Location
This is a folder on the local PC that will be used to store all documents
in the print queue. It can get very large, so must be located on a drive
with lots of free space. On a new installation it will default to:
C:\Accxes Control\Print Queue
Automatically Delete Jobs
Select this option, and enter a time after which all successfully printed
jobs will be deleted from the queue. This is recommended on all
unattended Accxes Control systems to prevent the hard disk becoming
full.
Activate automatic printing at startup
Select this option to enable printing to start automatically when
Accxes Control is opened. With this option disabled, a user must
manually release each print job received.
- 9 -
Page 12

Xerox® FreeFlow® Accxes® Control
Printers
The Printers tab is used to select Printers and their Available Page
Sizes.
Accxes Control Pro is required to print to non Xerox Freeflow Accxes
devices.
Click [Add], to open the Add Printer window as shown in figure 2.1.
Fig 2.1
In the Name box, give your Xerox Freeflow Accxes Wide Format
printer the following name: Wide Format Device
In the Type box, select Freeflow Accxes.
Note: This selection is only used for Xerox Wide
Format devices that are controlled by a Freeflow
Accxes controller. For all other wide format devices,
select either Windows – GDI to use a printer through
its windows driver, or Windows – Direct for printers
which directly support the required file formats.
In the Printer box, enter the IP address of the Freeflow Accxes
printer.
When selecting an AccXES-based printer, enable the tick box
‘Allow
printer to select automatic page sizes’ and click [OK] to return to
the Printers tab.
Click [OK]
Click [Add], to open the Add Printer window again.
In the Name box, give your small format printer the following
name: Small Format Device
(Each printer must be assigned a unique Accxes
Control name. Once created, the only way to change
this name is to remove the printer and add it again.)
Quick Start Guide -10 -
Page 13

Xerox® FreeFlow® Accxes® Control
In the Type box, select Windows - GDI.
In the Printer box, select the desired Windows printer from the list.
(The drop down field will display the printers available
Click [OK]
When using a printer configured as a Windows – GDI printer in Accxes
Control, you must select which page sizes are available on the printer.
To select page sizes, first highlight the previously added Windows
printer in the Print Queues box and click the [Add] button
alongside the Page Sizes box.
Select all available page sizes then click [OK].
To remove page sizes, first highlight the Windows printer in the Print
Queues field, and then highlight the page size to be removed in the
Page Sizes field and click [Remove].
Printer Groups
Printer Groups are used to manage Load Balancing between similar
printers. Load Balancing allows Accxes Control to automatically select
the first available printer from the defined Printer group..
Printer Groups are not used in this tutorial.
Paper Sizes
When a print job is received by Accxes Control, the physical size of the
file to be printed is compared to the selected Paper Sizes, and the
nearest page size is selected.
Your printer may not have all these sizes available. Therefore, by
selecting only the page sizes available in your printer(s), you can avoid
mismatch errors by forcing everything to print onto the nearest
available size.
This function is particularly beneficial when a folding device is
installed.
If a small format device is used (Pro version only), Accxes Control will
compare the page size selected here to the available sizes selected in
the Printers tab when the small format printer was configured.
Check ISO_A0, ISO_A1, ISO_A2, ISO_A3 and ISO_A4. Uncheck all
other selections.
Oversize Margin:
The Oversize Margin field, specifies how much larger the size of the
print file can be and still be forced to the nearest smaller available
print size. This is especially important when printing previously
scanned images, where the detected page size may be fractionally
larger than the actual size of the image detail, or when printing nonavailable print sizes.
E.g. Forcing ANSI or ARCH sizes to ISO output.
on the host PC.)
- 11 -
Page 14

Xerox® FreeFlow® Accxes® Control
Note: If the oversize margin is set too small, prints may be forced to a
larger paper size than required. Experimentation is necessary to ensure
the desired result, particularly when printing scanned images.
As a good starting point, set the Oversize Margin to 5%.
Quick Start Guide -12 -
Page 15

Xerox® FreeFlow® Accxes® Control
Workflows
Accxes Control uses workflows to change properties for print jobs and
determine destinations.
Workflows can be applied manually, or automatically using hotfolder
rules. (See Hotfolders
This tutorial will explain an example set-up.
All workflows must have a unique name. Use [Add] and [Remove]
buttons next to the Configured Workflows box to create and delete
workflows.
Each workflow may be configured to specify a set of Mandatory and
Default options for print jobs.
Mandatory options will always override any settings in the print
job.
E.g. this could be used to force all print jobs to be overprinted with
a label.
Default options will only be applied if the option has not been
specified already inside the the print job.
E.g. this could be used to specify default folding commands for
files produced through a third party print driver that does not
support Xerox Wide Format printer commands for folding.
Be sure the required workflow is highlighted before adding, editing or
removing any Mandatory Options and Default Settings.
Select either the Mandatory Options or Default Options tab depending
to the desired behaviour.
Use the [Add], [Edit] and [Remove] buttons to the right of the
category list, to manage options. Depending on the option selected,
you may have to type a value, select from the drop-down list or both.
When applying options, the available ‘settings’ will be listed in a drop
down field. Some ‘values’ will also be listed in a drop down field. Some
options require values to be entered based upon individual
requirements. The Add Setting window will display help text to aid this
process.
The next task is to configure two workflows. One workflow will set the
destination to the small format device. The other workflow will set the
destination the wide format device. In addition, this workflow will
apply folding commands for the wide format device if not already
available in the print job.
Click [Add]; type the name ‘Small F’ to denote jobs for small
format printing and click [OK].
Highlight the ‘Small F’ workflow just created.
Click the Mandatory Options below, highlight ‘Destination’ and
click [Add]. The Add Setting window (Fig 2.2) will open with
Destination displayed in the Category field.
In the Setting dropdown field, select PAGEPRINTER
- 13 -
section for an explanation)
Page 16

Xerox® FreeFlow® Accxes® Control
In the Value dropdown field, select Small Format Device and click
[OK].
Fig 2.2
In the Configured Workflows field, Click [Add]. Type the name
‘Wide F’ to denote jobs for wide format printing with folding
applied and click [OK].
Highlight the ‘Wide F’ workflow and click the Default Settings tab
below.
Highlight ‘Finishing’ in the lower left pane and click [Add]
When applying finishing information, there are a number of selections
that can be made. This tutorial will cover the basic options, with some
explanation to cover typical usage.
The Add Setting window will open with Finishing listed in the category
field.
In the Setting field, click the drop down and select
FININTTITLEBLOCK. (This setting denotes the use of intelligent
title block. This is a method used by the AccXES controller in an
attempt to have the folded packet to exit the folder with the title
block in the correct place. This cannot be guaranteed because the
orientation of an electronic file can vary.)
In the Value field, click the drop down and select: TRUE (This turns
intelligent title block on.) Click [OK] to add this first setting and
then click [Add] again to continue adding the next setting.
In the Setting field, click the drop down and select
FINISHPROGID. (This setting denotes the style of the folded
packet. E.g. 210, 190, 190+20, etc.)
In the Value field, type: “210” (Including the quotes) Click [OK] to
add this setting and then click [Add] again to continue adding the
next setting.
Quick Start Guide -14 -
Page 17

Xerox® FreeFlow® Accxes® Control
In the Setting field, click the drop down and select TITLEBLOCK.
(This setting denotes the position of the title block in the
electronic file. This setting will work together with the intelligent
title block selection in order to help position the title block
correctly in the finished folded packet. A good default for most
images is lower right, when a wide format image is viewed in the
landscape orientation. Electronic files that are 180
will be folded with the title block in the wrong place. The only way
to correct this is to select a title block position of upper left.)
In the Value field, click the drop down and select: LOWERRIGHT.
Click [OK] to close the window.
With the Wide F workflow still selected, click the Mandatory
Options tab. Highlight ‘Destination’ and click [Add]. The Add
Setting window (Fig 2.2) will open with Destination displayed in
the Category field.
In the Setting dropdown field, select PAGEPRINTER
In the Value dropdown field, select Wide Format Device and click
[OK].
0
upside down
- 15 -
Page 18

Xerox® FreeFlow® Accxes® Control
Hotfolders
WARNING: When choosing a hotfolder, ensure this is a new, empty
directory, as any files/folders within it will be removed.
Hotfolders determine the source of print jobs for Accxes Control. All
hotfolders can have workflows applied to make changes as explained
in the previous section.
Network Hotfolders, listen for print jobs from print drivers or Xerox
Freeflow Accxes client tools. Folder Hotfolders, look for print jobs in
folders on disk.
A Network hotfolder is automatically created when Accxes Control is
installed. Providing a new hotfolder has been created, the Network
hotfolder can be removed if required.
Hotfolders have the following settings:
Path (Folder Hotfolders Only)
- The folder where Accxes Control should look for jobs.
Port (Network Hotfolders Only)
- The TCP port on which Accxes Control should listen
Filter(Folder Hotfolders Only)
- Wildcard expression to determine which filenames are
Forward To - If enabled, print jobs will be sent to the specified
Enable Hotfolder
- Jobs for the highlighted hotfolder are only processed
Rules - Rules are a powerful way for Accxes Control to
Note: Without any rules – no workflow will be applied and the job
will be sent to the default printer using the options included in the
print job. This will still provide typical queue control functions to
manage the printer queue.
Conditions - Once a Rule has been added, one or more conditions
for jobs. Use 2000 for Use with Accxes Client Tools.
Each network Hotfolder must have a unique port
number.
processed
folder after processing. This is useful if a print job
should be processed twice, eg. Print and Output to PDF.
if the hotfolder is enabled by clicking this checkbox.
determine how to process a job based on its source and
attributes. E.g. Size, Finishing Requirements, etc.
Rules are identified by numbers and are processed in
the order listed. Each rule has one or more conditions.
If all the conditions for a rule are met, then the
specified workflow is applied to the job.
may be applied.
Quick Start Guide -16 -
Page 19

Xerox® FreeFlow® Accxes® Control
Workflow - Selects a workflow to be applied if the selected
If the ‘Stop at this rule if it is true’ checkbox is marked,
Highlight ‘Network’ in the top field
Below the Rules field, click [Add]
- ‘1’ will be listed in the Rules field and ‘Always’ will be
Highlight ‘Always’ in the Conditions field and click [Edit]
In the Type dropdown field, select ‘Size’.
In the left field, select <= (Less than or equals) and in the right
field select ISO_A3. Click [Ok].
A condition will now be listed as: Print Size <= ISO_A3. Highlight
this line and in the Workflow dropdown field, select Small F. Click
the Stop at this rule if it is true checkbox.
This configures print jobs A3 or smaller to be sent to the small
format device.
Below the Rules field, click [Add]
- ‘2’ will be listed in the Rules field. Highlight ‘2’ and
Highlight the second rule and in the Workflow dropdown field,
select Wide F.
This configures print jobs that were not matched by the previous
rule (eg larger than A3) to be sent to the wide format device.
Click [OK] at the bottom of the Settings window to close the
window and proceed with testing example set-up.
conditions are met.
then no further rules are processed if the conditions of
this current rule are met.
displayed in the Conditions field.
‘Always’ will be displayed in the Conditions field.
- 17 -
Page 20

Xerox® FreeFlow® Accxes® Control
Testing Example Set-up
Do not start automatic printing in Accxes Control at this time.
The main Accxes Control window will be displayed as shown below.
(Fig 2.3)
No jobs should be listed in the Jobs pane and the Toggle Automatic
Printing button (Top right of window) will be deactivated.
The Queues pane shows the defined Hotfolders.
The Printers pane shows the defined printers.
Highlight each printer listed in the Printers pane and click the
Pause Printing button to the right. You should now see both
printers in the Printers pane overlaid with a red paused symbol.
This will ensure no printing commences until the first tests have
been proven successful.
Open a suitable application and using one the Xerox Wide Format
print drivers previously configured to print the Accxes Control PC,
print an A4 size document.
After a few moments, the print job will appear in the Jobs pane of the
Accxes Control window and will be identified as a new job by having
no icon as shown below (Fig 2.4):
Fig 2.3
Quick Start Guide -18 -
Page 21

Xerox® FreeFlow® Accxes® Control
Fig 2.4
The Destination column will identify the device that the print job
will be sent too.
Note: If the destination listed in the Jobs pane does not display
the correct device, double check the configuration in the Printers
tab, Workflows tab and Hotfolders tab as covered earlier in this
tutorial.
In order to ensure this is working correctly, continue with the
following actions:
Click the [Toggle Automatic Printing] button (Top right of
the Accxes Control Window) so that it is depressed. The
listed job will then be queued and identified with printer
icon.
Highlight the paused Small Format Device and click the Play
button to the right to release the queue. The print job will be
printed on the device configured earlier in this tutorial. The
print job will now be identified as printed by a printer icon
overlaid with a blue tick, as shown below (Fig 2.5).
Click the [Toggle Automatic Printing] button (Top right of
the Accxes Control Window).
Fig 2.5
Open a suitable application and using the same Xerox Wide
Format print driver, print an A2 size document.
After a few moments, the print job will appear in the Jobs pane
of the Accxes Control window and will be identified as a new job
by having no icon as shown above in fig 2.4 The Destination
column will identify the device that the print job will be sent to.
- 19 -
Page 22

Xerox® FreeFlow® Accxes® Control
Click the [Toggle Automatic Printing] button (Top right of
the Accxes Control Window). The listed job will then be
queued.
Highlight the paused Wide Format Device and click the play icon
to the right. The job will be sent to the wide format device
configured earlier in this tutorial.
While print jobs are listed in the Jobs pane, the print properties can be
opened, documents viewed, and the print queue order changed. To
view and edit a job, simply double click the entry in the queue.
For further details on the advanced features of Accxes Control, please
contact you Xerox representative.
Quick Start Guide -20 -
 Loading...