

Page 1

Administrator
Guide
701P39663
April 2003
Page 2

Copyright © 1999-2003 Xerox Corporation. All Rights Reserved.
Publication number: 701P39663
Copyright protection claimed includes all forms of matters of copyrightable materials
and information now allowed by statutory or judicial law or hereinafter granted,
including without limitation, material generated from the software programs which
are displayed on the screen such as styles, templates, icons, screen displays, looks,
etc.
XEROX®, The Document Company®, X® (Stylized), DataGlyph, Document
Centre, CentreWare, DocuShare®, FlowPortTM, DocuStamp, PaperWare and
Document Token are trademarks of or licensed to Xerox Corporation.
Adobe® and Acrobat® are registered trademarks of Adobe Systems, Incorporated.
Lotus, Lotusphere, and Lotus Notes® are registered trademarks and Notes and
DominoTM are trademarks of Lotus Corporation. Pagis® and TextBridge are
registered trademarks of ScanSoft, Inc. Microsoft, Microsoft Windows, Microsoft
Word, Microsoft ExchangeTM, Microsoft Internet Explorer, Microsoft Office,
Imaging for Windows, MS, MS-DOS, and Windows are registered trademarks of
Microsoft Corporation. Netscape Navigator and Netscape Enterprise Server are
registered trademarks of Netscape Communications Corporation. HP, PCL, and HP
Deskjet are registered trademarks of Hewlett-Packard Company. IBM is a registered
trademark of International Business Machines Corporation. Java, Java Runtime
Environment, JRE, Java Archive, JAR, and Sun Solaris are trademarks or registered
trademarks of Sun Microsystems, Inc. All other product names are trademarks/
tradenames of their respective owners.
Notice
Specifications described in this publication are subject to change without notice. Use
of some features may be limited by your hardware or software configuration. Contact
your dealer or Xerox for details.
April 2003
Page 3

Contents i
Chapter 1 Welcome ........................................................................... 1-1
About FlowPort and PaperWare..................................................1-3
What's in this guide ......................................................................1-4
Where to find more information ...................................................1-5
How to get help.............................................................................1-5
Chapter 2 Getting started .................................................................. 2-1
Logging in.....................................................................................2-2
About the FlowPort Web Centre Administration window............2-4
Logging out...................................................................................2-5
Chapter 3 Managing user accounts ................................................. 3-1
Creating a user account ...............................................................3-2
Setting up a user’s account to receive Internet faxes ...............3-4
Setting up a user’s account to use Network Accounting...........3-6
Creating login credentials ........................................................3-7
Shared Login Credentials .......................................................3-10
Setting a local printer as the user's default printer ................3-11
Changing the user’s account information ..................................3-12
Changing the admin’s account information ...............................3-13
Deleting a user account..............................................................3-14
Viewing the list of users..............................................................3-14
Contents 3
Page 4

Chapter 4 Creating form templates .................................................. 4-1
About form templates....................................................................4-2
Controlling access to forms ......................................................4-4
Creating a form template .............................................................4-5
Editing a form template..............................................................4-20
Deleting a form template ............................................................4-21
Chapter 5 Managing the FlowPort server ....................................... 5-1
Changing the server’s configuration settings ..............................5-2
Restarting and shutting down the FlowPort service ....................5-4
Starting the FlowPort service after a shutdown...........................5-5
Backing up and Restoring the FlowPort server files....................5-5
Viewing administrative messages.................................................5-7
Chapter 6 Managing applications and services ............................... 6-1
Viewing the installed applications and services...........................6-2
Configuring applications and services.........................................6-2
Configuring the Authentication Service....................................6-3
Configuring the Distribute Document application ...................6-4
Configuring the Internet Fax Receive Service ..........................6-5
Installing new applications and services....................................6-10
Appendix A FlowPort Security ........................................................... A-1
Portal Security............................................................................. A-2
Xerox Network Scanning Service ................................................ A-4
Xerox Network Scanning Directory Watching Service ............... A-5
4 Xerox FlowPort Administrator Guide
Configuring the Network Accounting application ....................6-6
Configuring the TextBridge OCR Service ................................6-7
Configuring the Xerox Network Scanning Service ...................6-7
Using Form Cleaner .................................................................6-8
Using Patch Manager ...............................................................6-9
Page 5

Welcome Chapter1
About FlowPort and PaperWare ................................................ 1-3
What's in this guide .................................................................... 1-4
Where to find more information ................................................. 1-5
How to get help ........................................................................... 1-5
Chapter 1: Welcome 1-1
Page 6

Welcome
Welcome to Xerox FlowPort. FlowPort provides a set of server
applications that lets you seamlessly integrate paper documents
within your electronic document processes.
Using FlowPort you can:
• Share your paper documents with others through email, Internet
fax, remote printing, or storage to a Web repository.
• Access your stored documents and print them on a network
printer or distribute the documents.
• Store a document and receive a Document Token—a piece of
paper that represents the stored document—that you can later
use to copy, Internet fax, or email the actual document.
• Receive and access Internet faxes by printing the entire fax,
storing the fax and retrieving it later using a Document Token,
or viewing the fax on the Web.
1-2 Xerox FlowPort Administrator Guide
Page 7

About FlowPort and PaperWare
FlowPort provides an innovative paper user interface called
PaperWare. Using PaperWare forms with a Xerox Document
Centre or an Internet fax device, you instruct your FlowPort server
to distribute, store, and retrieve your paper and electronic
documents.
The following applications are included with your FlowPort server:
Distribute Document—Scans paper documents and distributes the
resulting electronic documents through email, Internet fax, remote
printing, or storage to a document repository. The application
features a PaperWare form called a Distribute Document Cover
Sheet. You scan the Cover Sheet with your printed document to
provide distribution instructions to a Document Centre or an
Internet fax machine.
Document Token—Accesses a document stored in a repository
using a Document Token form—a piece of paper that represents the
stored document. When you want to retrieve the stored document,
you scan the one-page Document Token to print the original
document, or scan a Document Token with a Distribute Document
Cover Sheet to retrieve and distribute the stored document.
About FlowPort and PaperWare
Document Catalog—Accesses the documents stored in a
repository using a Document Catalog form—a printed list of the
repository's contents with a checkbox for each stored object. To
retrieve stored documents, mark the checkboxes for the documents
you want and scan the form to print the original documents. When
using a Document Catalog form with a Distribute Document Cover
Sheet, you can distribute the retrieved documents, regardless of
their original format.
Internet Fax Mailbox—Receives Internet faxes and prints, stores,
and accesses the faxes. When storing received faxes, the FlowPort
server can print a one-page Document Token of the fax and inform
you in an email message of the URL in which the fax is stored.
FlowPort 2.1.1 SP3 now lets you receive an Internet Fax and use
OCR technology to convert it to one of many popular document
formats. For more information, please contact Xerox Flowport
Technical Support.
Chapter 1: Welcome 1-3
Page 8

What's in this guide
What's in this guide
Login Sheet—Specifies your personal identification number (PIN)
on a Login Sheet form when submitting jobs that require
authentication. You can use a Login Sheet at a Document Centre as
an alternative to logging in at the device's control panel, or when
submitting jobs to the FlowPort server from an Internet fax
machine.
PaperWare Copy—Prints copies of documents. As the default
application, it makes a copy of your document when you scan a
Document Token, Document Catalog, or document at a Document
Centre without a PaperWare Cover Sheet.
Document Options—Adds document management fields to a
document when you store it in a repository, and charges print jobs
to your account on a Document Centre network accounting system.
The application uses a Document Options Sheet that you place after
a Distribute Document Cover Sheet to add fields or account
information to the document.
Network Accounting—Charges each printing job to an Account
ID set up on a Document Centre network accounting system.
In addition to this chapter, this guide includes the following:
Chapter 2 Getting started—Explains how to log in and out, and
describes the administrator's Web Centre.
Chapter 3 Managing users—Describes how to set up, edit, and delete
user accounts, and how to edit the admin account.
Chapter 4 Creating form templates—Provides an overview of form
templates, and explains how to create, edit, and delete form
templates.
Chapter 5 Managing the FlowPort server—Details the server
management tasks you perform.
1-4 Xerox FlowPort Administrator Guide
Page 9

Chapter 6 Managing applications and services—Describes how to
view, install, and configure applications and services,
including Patch Manager and Form Cleaner.
Appendix A How to use security on the FlowPort server—Explains how
to use security features to restrict access to the FlowPort
server.
Where to find more information
Xerox FlowPort Installation and Setup Guide
The guide provides a checklist of system requirements and
step-by-step instructions for installing and setting up the FlowPort
server.
On-line Help
On-line help describes FlowPort features and provides step-by-step
instructions for both the administrator and the user. To open Help,
click the help link located in the upper right corner of the Web
Centre.
Where to find more information
How to get help
Xerox FlowPort User Guide
The guide describes how use PaperWare forms to distribute, store,
and retrieve documents, and how to create new forms.
For questions about FlowPort, visit the Xerox Support web site at
www.xerox.com/support/
Chapter 1: Welcome 1-5
Page 10

1-6 Xerox FlowPort Administrator Guide
Page 11

Getting started Chapter2
Logging in ................................................................................... 2-2
About the FlowPort Web Centre Administration window .......... 2-4
Logging out ................................................................................. 2-5
Chapter 2: Getting started 2-1
Page 12

Logging in
Logging in
As the FlowPort administrator, you set up user accounts, create
form templates for users, and manage the FlowPort server. You
perform these tasks in the FlowPort Web Centre Administration
window.
This chapter explains how to log in and out as the FlowPort
administrator. It also provides an overview of the Web Centre.
When the FlowPort software was installed, the administrator
account was created automatically. The user name, admin, is the
only account with administrative privileges for the FlowPort server.
To log in:
Open a Web browser.
1
Note: If you are using Netscape Navigator on the same
computer as the FlowPort server, you must set Navigator's
priority to low to avoid performance problems. To set the
priority, right-click the Windows taskbar and click Tas k
Manager. On the Processes tab, right-click netscape.exe,
point to Set Priority, and click Low.
2-2 Xerox FlowPort Administrator Guide
In the Address (or Location) box, type the FlowPort server's name
2
and press ENTER. For example, if the server's name is fish, you
type http://fish.
Page 13

Logging in
The FlowPort Welcome page displays. You enter your username
and password in the area shown below.
In the username box, type admin.
3
In the password box, type the admin password.
4
Click Login.
5
Any new system messages that require your attention are displayed
after you log in.
You can add your name to the administrator account, so users will
know you are the administrator, and change the default password.
Refer to the “Changing the admin’s account information” section
on page 3-13.
Chapter 2: Getting started 2-3
Page 14
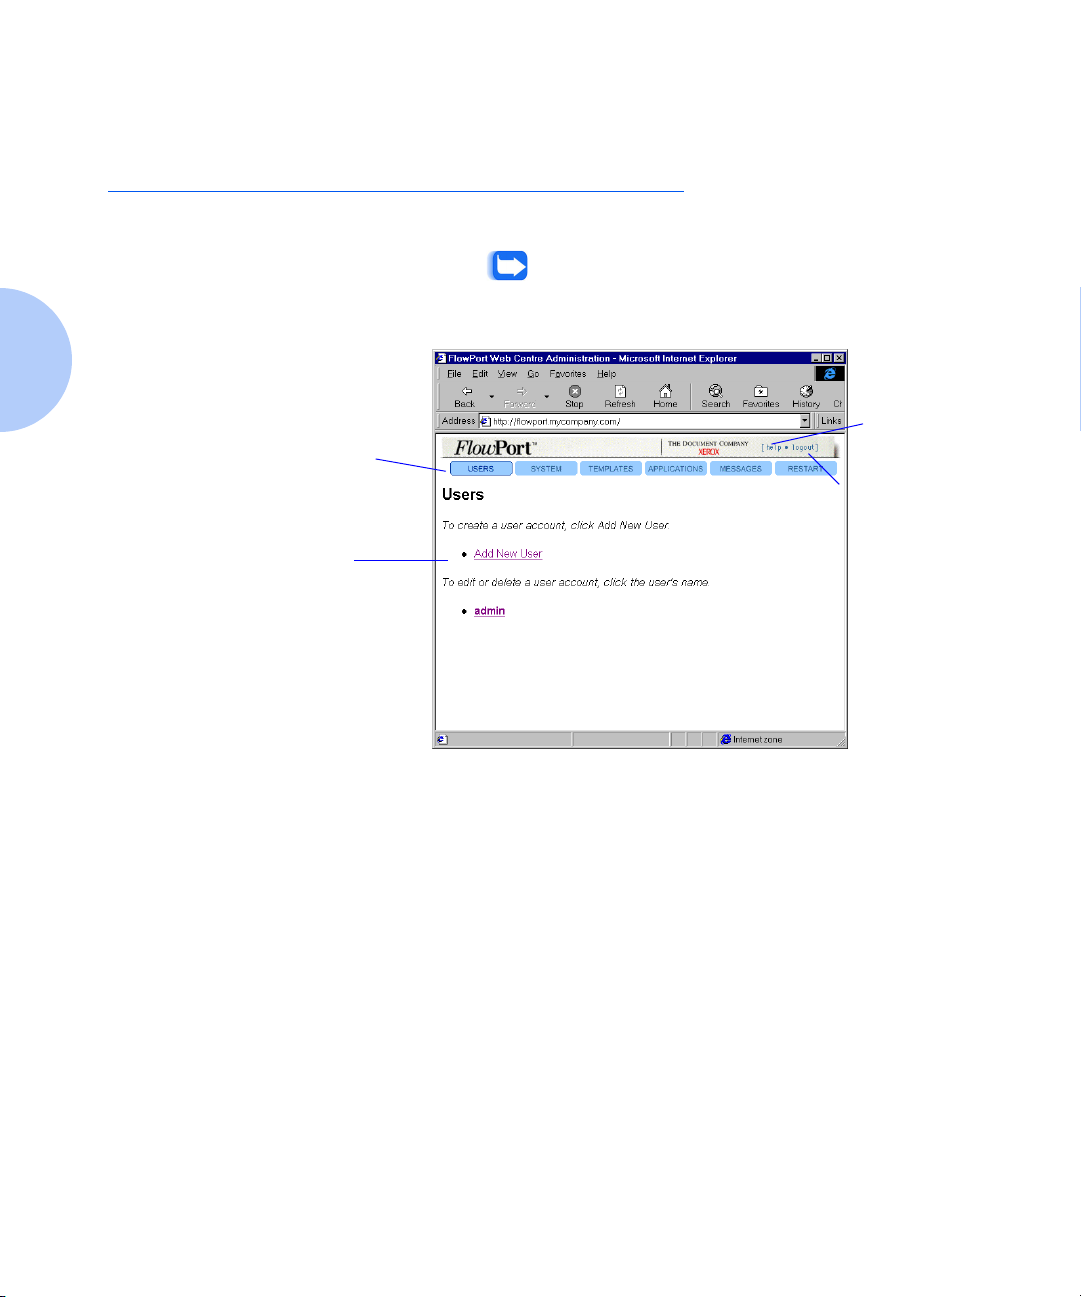
About the FlowPort Web Centre Administration window
About the FlowPort Web Centre
Administration window
After logging in as the admin, the following window is displayed.
Note: If the System Configuration window opens after
logging in, you need to configure the system. Refer to the
Installation and Setup Guide for more information.
Links to the FlowPort
administrator pages
Create, edit, and delete
user accounts from this
page
Click to open
on-line help
Click to log out of the
Web interface
The links to the FlowPort administrator pages let you do the
following:
Users—Create, edit, and delete user accounts, including Internet
Fax options.
System—Change the FlowPort server's configuration settings.
Templates—Create form templates, from which users can create
their own forms.
Applications—Configure, install, and get information about
FlowPort applications and services.
Messages—View administrative messages.
Restart—Restart or shut down the FlowPort service.
2-4 Xerox FlowPort Administrator Guide
Page 15

Logging out
Logging out
To log out:
Click the logout link located in the upper right corner of the Web
1
Centre.
The FlowPort Welcome page displays, from which you can log in
again.
Note: If you close your Web browser or go to another Web site,
you are not be logged out of FlowPort. You should always click the
logout link to log out.
Chapter 2: Getting started 2-5
Page 16

2-6 Xerox FlowPort Administrator Guide
Page 17

Managing user accounts Chapter3
Creating a user account ...............................................................3-2
Setting up a user’s account to receive Internet faxes ...............3-4
Setting up a user’s account to use Network Accounting...........3-6
Creating login credentials ........................................................3-7
Shared Login Credentials .......................................................3-10
Setting a local printer as the user's default printer ................3-11
Changing the user’s account information ..................................3-12
Changing the admin’s account information ...............................3-13
Deleting a user account..............................................................3-14
Viewing the list of users..............................................................3-14
Chapter 3: Managing user accounts 3-1
Page 18

Creating a user account
You manage FlowPort user accounts from the Users page. On this
page, you can perform the following tasks:
• Create a user account
• Change a user's account information
• Delete an account
• View the list of FlowPort users.
Creating a user account
To enable users to access FlowPort through a Web browser, you
must create an account for each user. After you've set up the
account, the user can start using PaperWare forms.
When creating an account, you must provide the user's login name,
email address, and default printer. You can also enter the optional
account information or let the user provide the information. After
you create the account, the user can change any of the information
you specify.
Note: You can also add a large number of users from a database.
To create a user account:
3-2 Xerox FlowPort Administrator Guide
Click the Users button.
1
Click the Add New User link.
2
On the Add New User page, enter the following information:
3
First Name—User’s first name, which is printed with the last name
on PaperWare forms.
Last Name—User’s last name, which is printed with the first name
on PaperWare forms.
User Name (required)—Name used to log in to FlowPort.
Email Address (required)—User’s email address (for example,
jsmith@bestcompany.com).
Page 19

Creating a user account
Default Printer (required)—The printer or Internet fax device on
which the user prints PaperWare forms, or the email address to use
when emailing PaperWare forms.
• For printers, specify the fully qualified printer name (for
example, documentcentre1.bestcompany.com).
Note: FlowPort supports the Xerox Document Centre, any
networked lpr-enabled printer, and a local PCL printer. To
set up a user's account to print to a local printer, refer to the
“Setting a local printer as the user's default printer” section
on page 3-11.
• For Internet fax devices, specify the Internet fax address (for
example, internetfax@bestcompany.com).
•For the Email PDF File printer type, specify the user's email
address. PaperWare forms are emailed as PDF attachments,
which allows the user to print forms outside a firewall.
Printer Type (required)—Type of printer selected as the default
printer.
Default Form Size—Paper size used to print PaperWare forms on
the default printer. Options are US Letter and A4.
Job Confirmation Method—Method by which the user is notified
when a PaperWare-initiated job has been successfully processed.
Options are Printer and Email.
Note: To receive a Document Token when storing a
document in a repository that supports access, the Job
Confirmation Method must be set to Printer.
Create Document Tokens—
Users can select whether or not a
Document Token is created when they store a document to a
repository. Note that this feature is only available to users if
the FlowPort administrator has set the “Enable Document
Tokens” system parameter.
Locale—Language used to display the FlowPort Web Centre
interface. System Default displays the interface in the language set
on the System page. Therefore, any time you change the Locale
setting on the System page, the user's Locale setting also changes.
PIN and PIN Again—User’s four-digit code that is specified on a
Login Sheet when using private forms, and when using shared and
public forms if you change the default security settings.
Password and Password Again—User’s password for logging in
to the FlowPort Web Centre and at the Xerox Document Centre
control panel.
Chapter 3: Managing user accounts 3-3
Page 20

Creating a user account
Include Password & PIN in Email to User—Provides the user's
password and PIN, if specified, in the email message that is
automatically sent to the user after the account is created.
Click the Submit button.
4
Click Continue to set up the user's applications.
5
On the User Profile page, click the link for the application you
6
need to set up.
On the application page, specify the appropriate options.
7
For information on setting up the applications, refer to the “Setting
up a user’s account to receive Internet faxes” section on page 3-4
and the “Setting up a user’s account to use Network Accounting”
section on page 3-6.
Click OK.
8
FlowPort sends an email message to the new user that explains how
to get started using FlowPort and provides your email address.
Setting up a user’s
account to receive
Internet faxes
To set up a user’s account to receive Internet faxes, you specify the
type of mail server to use to receive the faxes and how you want
FlowPort to process incoming faxes. FlowPort can process the
faxes in the following ways:
• Store faxes to a repository
• Store faxes to a repository and print a Document Token for each
stored fax
• Print faxes.
You can also have FlowPort send an email message to the user
when an Internet fax is received.
To set up a user’s account to receive Internet faxes:
Click the Users button.
1
Click the user’s name whose account you want to set up to receive
2
Internet faxes.
On the User Profile page, click the Internet Fax Mailbox link.
3
Click the Enable button.
4
3-4 Xerox FlowPort Administrator Guide
Page 21

Creating a user account
Specify the type of mail server to use to receive Internet faxes
5
and then click Next.
Accept Internet Faxes via the FlowPort SMTP Mail
Server—FlowPort receives Internet faxes using its built-in SMTP
mail server.
Note: This option displays if Internet Fax SMTP Service
Enabled is set on the Internet Fax Receive Configuration
page.
Accept Internet Faxes via a POP3 Mailbox on Another
Server—FlowPort receives Internet faxes by polling a POP3 mail
server.
Note: This option displays if Internet Fax POP3 Mail
Polling Enabled is set on the Internet Fax Receive
Configuration page.
Do Not Accept Incoming Internet Faxes for This
User—FlowPort does not receive Internet faxes.
If you chose to accept Internet faxes via a POP3 mailbox, enter the
6
following information and then click Next.
User Name for POP3 Mailbox Account—Specifies the user's
account name for the POP3 mailbox.
Password for POP3 Mailbox Account—Specifies the user's
password for the POP3 mailbox.
Host Name of POP3 Mailbox Server—Specifies the host name of
the server running the POP3 mail server.
Mail Domain—Specifies the mail domain name.
Choose how to process incoming faxes and then click Next.
7
Notify By Email—Sends an email message to the user when an
Internet fax is received.
Print Document—Prints the entire fax on the user’s default
printer.
Store Document in Repository—Stores the fax in a repository.
To use this option, you must specify a repository in step 8.
Print Document Token—Prints a one-page document that
represents the stored document on the user’s default printer.
If you chose to store Internet faxes in a repository, select the type of
8
repository to use, enter the repository information, and then click
Next.
Chapter 3: Managing user accounts 3-5
Page 22

Creating a user account
Click Save.
9
On the confirmation page, click Continue.
10
Setting up a user’s
account to use Network
Accounting
Network Accounting is an optional feature of the Xerox Document
Centre. If the feature is installed on the machine, you can specify
the Account ID to which the FlowPort user charges printing jobs.
To set up a user’s account to use Network Accounting:
Click the Users button.
1
Click the user’s name whose account you want to set up to use
2
Network Accounting.
On the User Profile page, click the Network Accounting link.
3
On the Network Accounting page, set the following options:
4
Network Accounting Account ID—Specifies the Account ID set
on the Document Centre network accounting system. See your
Document Centre administrator for the Account IDs you can use to
charge printing jobs.
Network Accounting User ID—Specifies the User ID set on the
Document Centre network accounting system. See your Document
Centre administrator for the list of User IDs set up for the machine.
Note: The IDs you specify override the default Account ID
and User ID set on the Default Network Accounting
Configuration page. Refer to the “Configuring the Network
Accounting application” section on page 6-6.
3-6 Xerox FlowPort Administrator Guide
Click Save.
5
On the confirmation page, click Continue.
6
Page 23

Creating a user account
Creating login
credentials
FlowPort 2.1.1 SP3 has a new feature called “Login Credentials”
that allows users to change a repository username and password,
but still use existing forms that require a login.
For example, to access a Docushare Collection, you must supply
your DocuShare User Name and Password. In FlowPort 2.1.1 SP3,
each user maintains a list of uniquely named login credentials,
where each login credential contains credential information such
as:
• the name of the credential
• the repository user name
• the user’s password for the repository
A DocuShare login credential would appear as the following:
Name: joesmith Purchasing Server
DocuShare User Name: joesmith
DocuShare Password: *******
When users creates a PaperWare form that requires repository
information (such as a Document Token), they must specify the
login credential they wish to use. They select a named credential (if
one has been created by them or the FlowPort administrator), or
they create a new login credential. In the example above, Joe Smith
created a login credential named “joesmith Purchasing Server.”
For any new forms that Joe creates that require access to the
repository on the Purchasing Server, Joe simply needs to specify
that credential by name, and not worry about the user name or
password. In the future, if Joe’s DocuShare password changes, only
the credential must be edited - not any of the forms using that
credential. All existing forms could still be used without
modification.
To set up a user’s account with a login credential:
Click the Users button.
1
Click the user’s name whose account you want to add a login
2
credential.
On the User Profile page, click the Credentials link.
3
Chapter 3: Managing user accounts 3-7
Page 24

Creating a user account
3-8 Xerox FlowPort Administrator Guide
Page 25

Creating a user account
On the Manage Login Credentials page, select a repository or
4
click on an existing login credential to edit. Enter information into
the following fields. Exact field names and options may be
different, depending on the repository. Use online help for more
information.
Name for these login credentials—Enter a name for the
credentials you are creating. Once you create this set of credentials,
this name will appear in the menu labelled Log in as:.
Selecting a name from the Log in as menu will cause FlowPort to
use the login information (for example, user name and password)
which had been specified when that set of login credentials was
created.
Recommendation: construct a name that identifies both the
repository and the login name used for that repository, because the
Log in as menu will contain all names created for all repositories of
the current type.
User Name—Enter the user name for the respository
Password—The password used for login.
Click Save.
5
On the confirmation page, click Continue.
6
Chapter 3: Managing user accounts 3-9
Page 26

Shared Login
Credentials
Login credentials created under the “admin” account are shared
credentials.
Shared Credentials can be used by all users for logging in to
document repositories, and can be saved in Form Templates. If the
login information changes, updates to these credentials here will
affect all forms defined using those templates or credentials.
Credentials are available for use (but not editing) by all users, and
are available for use in Form Templates. Click on 'Add new shared
credentials' to add new login credentials for that repository. Click
on the credentials name to edit or delete that shared credential.
Deleting credentials from this list will make all forms using those
credentials unusable (though if the forms are editable they can still
be edited).
3-10 Xerox FlowPort Administrator Guide
Page 27

Creating a user account
Setting a local printer
as the user's default
printer
FlowPort allows you to print to a local PCL printer from a
computer running Windows NT.
To set a local printer as the user’s default printer:
Click the Users button.
1
Click the user name whose account you want to set up to print to a
2
local PCL printer.
On the User Profile page, click the Change User Account
3
Information link.
In the Default Printer box, enter the user's computer name and
4
printer name, separated by a forward slash (/). For example,
jims-pc/HP DeskJet 870Cse.
In the Printer Type box, select PCL Printer.
5
Click the Submit Changes button.
6
Go to the user's computer to set the TCP/IP Print Server to start and
7
run automatically.
At the user's computer, click the Start button, point to Settings, and
8
click Control Panel.
Double-click Services.
9
Click the TCP/IP Print Server and click the Startup button.
10
For Startup Type, click Automatic.
11
Click OK and then Close.
12
Chapter 3: Managing user accounts 3-11
Page 28

Changing the user’s account information
Changing the user’s account
information
To change the user’s account information:
Click the Users button.
1
Click the user name whose account information you want to
2
change.
On the User Profile page, click the Change User Account
3
Information link.
On the Change User Account Information page, change any of
4
the following information:
User Name (required)—Name used to log in to FlowPort.
First Name—User’s first name, which is printed with the last name
on PaperWare forms.
Last Name—User’s last name, which is printed with the first name
on PaperWare forms.
Email Address (required)—User’s email address.
Default Printer (required)—The printer or Internet fax device on
which the user prints PaperWare forms, or the email address to use
when emailing PaperWare forms.
3-12 Xerox FlowPort Administrator Guide
• For printers, specify the fully qualified printer name (for
example, documentcentre1.bestcompany.com).
• For Internet fax devices, specify the Internet fax address (for
example, internetfax@bestcompany.com).
•For the Email PDF File printer type, specify the user's email
address. PaperWare forms are emailed as PDF attachments,
which allows the user to print forms outside a firewall.
Printer Type—Type of printer selected as the default printer.
Default Form Size—Paper size used to print PaperWare forms on
the default printer.
Job Confirmation Method—Method by which the user is notified
when a PaperWare-initiated job has been successfully processed.
Note: To receive a Document Token when storing a
document in a repository that supports access, the Job
Confirmation Method must be set to Printer.
Page 29

Changing the admin’s account information
Create Document Tokens—Users can now select whether or
not a Document Token is created when they store a
document to a repository. Note that this feature is only
available to users if the FlowPort administrator has set the
“Enable Document Tokens” system parameter
Locale—Language used to display the FlowPort Web Centre
interface. System Default displays the interface in the language set
on the System page. Therefore, any time you change the Locale
setting on the System page, the user's Locale setting also changes.
Change PIN—Click to change or delete the user's PIN.
New PIN and New PIN Again—User’s four-digit code that is
specified on a Login Sheet when using private forms, and when
using shared and public forms if you change the default security
settings. (Make sure Change PIN is checked.)
Change Password—Click to change or delete the user's password.
New Password and New Password Again—User’s password for
logging in to the FlowPort Web Centre and at the Xerox Document
Centre control panel. (Make sure Change Password is checked.)
Click the Submit Changes button.
5
Changing the admin’s account
information
As the FlowPort administrator, you are identified as “admin” to
users. You can specify both your first name and last name, which
will be included in the email message that is automatically sent
when you create a new user account. You should change the
default password to a password you prefer.
To change the admin’s account information:
Click the Users button.
1
Click the admin link.
2
On the User Profile page, click the Change User Account
3
Information link.
The Change User Account Information page displays.
In the First Name box, type your first name.
4
Chapter 3: Managing user accounts 3-13
Page 30

Deleting a user account
Your name appears on the Users page as the administrator.
Deleting a user account
After you delete a user’s account, the user cannot log in to FlowPort
and any forms the user created are no longer valid. Any documents
the user stored in a repository are unaffected.
To delete a user account:
In the Last Name box, type your last name.
5
In the Password and Password Again boxes, type the password
6
you want to use for logging in to the FlowPort Web Centre
Administration window.
Click the Submit Changes button.
7
Click the Users button.
1
Click the user name whose account you want to delete.
2
Note: You cannot delete the admin account.
3
4
5
Viewing the list of users
To view the list of users:
1
3-14 Xerox FlowPort Administrator Guide
On the User Profile page, click the Delete User link.
To confirm the deletion, click the Delete button.
Click Continue.
Click the Users button.
The list of FlowPort users displays on the page.
Page 31

Creating form templates Chapter4
About form templates....................................................................4-2
Controlling access to forms ......................................................4-4
Creating a form template .............................................................4-5
Editing a form template..............................................................4-20
Deleting a form template ............................................................4-21
Chapter 4: Creating form templates 4-1
Page 32

About form templates
About form templates
A form template is a sample PaperWare sheet that helps users to get
started creating their own forms. You can create any number of
form templates, which users can access on the Forms and
Applications page.
This chapter describes the types of form templates you can create,
and explains how to create, edit, and delete templates.
The Form Templates page lists the applications you can use to
create form templates:
• You use the Distribute Document application to create Cover
Sheet form templates. Cover Sheets enable users to distribute
paper documents in a variety of ways: through email, Internet
fax, remote printing, and storage to a Web repository.
• You use the Document Options application to create Options
Sheet form templates. With an Options Sheet users can add
document management fields to a document when storing it in a
repository, or charge print jobs to their accounts on a Document
Centre network accounting system.
After you create and save a form template, it is immediately
available to all FlowPort users. Users can print the form and start
using it, or they can edit the form template to create their own
forms.
4-2 Xerox FlowPort Administrator Guide
Page 33

About form templates
The types of form templates you create depend on the needs of your
group. For example, you can create a template for distributing
paper documents to office co-workers by email. Or, you can set up
a template that lets users distribute a document in several ways:
through email, storage to a repository, and remote printing.
The form template shown below provides users with a cover sheet
that they can use to email the URL of a stored document. The user
marks any of the Send To checkboxes and the checkbox of the
repository in which to store the document, and then scans the form
with the document.
Figure 4.1 Cover Sheet Form Template
Chapter 4: Creating form templates 4-3
Page 34

About form templates
Controlling access to
forms
When you create a form template, you can set the default access to
the form by specifying who can use it. Users can change the default
form access when editing a template to create forms.
The access options are:
Public—Allows anyone to use the form. Authentication is required
when a user submits the form from an untrusted portal and guest
access is disabled.
Shared—Allows anyone to use the form, provided guest access is
set up (the default). If guest access is disabled, user authentication
is required.
Private—Allows only the form's owner to use the form. The owner
must provide authentication.
Note: For more information on forms and when authentication is
required, refer to the “FlowPort Security” appendix on page A-1.
4-4 Xerox FlowPort Administrator Guide
Page 35

Creating a form template
To create a form template:
1
2
Creating a form template
Click the Templates button.
The Form Templates page displays the applications you can use to
create form templates.
Click the Create New Template link under the application you
want to use.
The Form Template Creator opens. The Distribute Document Form
Template Creator is shown below.
Click title goes here and type a title for the form template in the
3
Title box. Click OK.
Chapter 4: Creating form templates 4-5
Page 36

Creating a form template
From the menu, select an item.
4
Click the blue arrow on the form (to indicate the location of the
5
checkbox label or text).
In the window, enter the information and then click OK.
6
For information about the options that appear in the window, refer
to Table 4.1 on page 4-7.
The checkbox label or text display on the template. You can repeat
steps 4 through 6 to add another checkbox label.
Under Limit Form Access To, click one of the following to specify
7
who can use the form:
Public Use—Allows anyone to use the form. Authentication is
required when a user submits the form from an untrusted portal and
guest access is disabled.
Shared Use—Allows anyone to use the form, provided guest
access is set up (the default). If guest access is disabled, user
authentication is required.
Private Use—Allows only the form’s owner to use the form. To
use the form, the owner must provide authentication.
Note: Users can change the Limit Form Access To setting
when they create forms based on this template.
The template appears on the Form Templates page under the
application you used to create it. The template is immediately
available to users on the Forms and Applications page.
4-6 Xerox FlowPort Administrator Guide
Click the Save button.
8
Click the Continue button.
9
Page 37

Creating a form template
The following table describes the options that display when
creating a form template.
Table 4.1 Form template options
If you selected this menu
item:
Heading Heading—The heading text you want to appear on the form.
Email Recipient Email Address—The email address for an individual or a
Internet Fax Recipient Internet Fax Address—The individual's Internet fax
These options display:
group. You can add more than one email address by
separating each address with a comma.
Checkbox Label—The text you want to appear on the
template (usually the name of the individual or group).
Send URL If Available—Click to email the document's
URL, instead of emailing the actual document. To use this
option, you must add a checkbox for the URL of a document
repository on the form template.
File Format for Scanned Documents—The file format of
the document after it's scanned. TIFF allows users to perform
OCR (optical character recognition) on the document. For all
other formats, except PDF Image Only, FlowPort performs
OCR on the document using TextBridge from ScanSoft, Inc.
address.
Checkbox Label—The text you want to appear on the
template (usually the person's name).
Send In Internet Fax Base Mode Format—Click to send
the document in minimal fax mode, an Internet fax standard.
To ensure the reliability of Internet fax receptions, it is
recommended that you use this option.
Chapter 4: Creating form templates 4-7
Page 38

Creating a form template
Table 4.1 Form template options (continued)
If you selected this menu
item:
Remote Printer Printer Name—The fully qualified printer name (printer
These options display:
name and domain name), Internet fax address, or email
address (when Email PDF File is the printer type).
Printer Type—The type of printer specified.
Checkbox Label—The text you want to appear on the
template (usually the printer name).
Network Accounting User ID—The User ID set for network
accounting on a Xerox Document Centre. See your
Document Centre administrator for the list of User IDs set up
for the machine.
Network Accounting Account ID—The Account ID set for
network accounting on a Xerox Document Centre. See your
Document Centre administrator for the Account IDs you can
use to charge printing jobs.
Note: The Network Accounting IDs you specify for a
remote printer override all Account IDs and User IDs
set on other form templates (Network Accounting
checkboxes on the Distribute Document Cover Sheet
form template and on the Document Options form
template) and for the user's Network Accounting
application options.
Document Management Field Checkbox Label—The text you want to display on the form
4-8 Xerox FlowPort Administrator Guide
(usually the field name).
Field Name—The document management field name that
you want to associate with the document stored in a
repository. For information about the field names you can
use for each repository, refer to Table 4.2 on page 4-17.
Field Value—The value of the field specified above.
Hidden—To automatically assign the name and value to
each document stored in a repository. If you click Hidden,
the checkbox label does not display on the form template.
Therefore, you should provide a title for the form template
that describes the form's use
Handprint Region—To include a checkbox and a
rectangular area in which to add a handwritten document
management field to the document when it is stored in a
DocuShare collection.
Page 39

Creating a form template
Table 4.1 Form template options (continued)
If you selected this menu
item:
Email Subject Subject—The subject text you want to appear on the
Network Accounting Checkbox Label—The text you want to display on the form
These options display:
template.
Tip: You might include several subject checkboxes,
from which a user can check the appropriate message
subject.
(usually the account to charge).
Network Accounting User ID—The User ID set for network
accounting on a Xerox Document Centre. See your
Document Centre administrator for the list of User IDs set up
for the machine.
Network Accounting Account ID—The Account ID set for
network accounting on a Xerox Document Centre. See your
Document Centre administrator for the Account IDs you can
use to charge printing jobs.
Note: The Network Accounting IDs you specify for a
Network Accounting checkbox override the Account
ID and User ID set for the user's Network Accounting
application options.
Chapter 4: Creating form templates 4-9
Page 40

Creating a form template
Table 4.1 Form template options (continued)
If you selected this menu
item:
DocuShare Collection Checkbox Label—The text you want to appear on the
These options display:
template (usually the DocuShare collection name).
URL for a DocuShare Collection—The complete URL of
the collection.
Tip: Open another browser window, go to the
DocuShare collection you want to use, copy all of the
text that appears in the Address (or Location) box,
and paste it into the URL for a DocuShare
Collection box.
Login as: select a login credential to use for the specified
DocuShare collection, or select Add new login to create a
new login credential. If you choose to add a new login, enter
a valid Docushare user name and password in the fields
provided.
If there are no existing login credentials, enter a name in the
Name for these login credentials field, and enter a valid
DocuShare user name, password, and Domain (if required see online help) in the fields provided.
File Format for Scanned Documents—The file format of
the document after it's scanned. TIFF allows users to
perform OCR (optical character recognition) on the
document. For all other formats, except PDF Image Only,
FlowPort performs OCR on the document using TextBridge
from ScanSoft, Inc.
4-10 Xerox FlowPort Administrator Guide
Page 41

Creating a form template
Table 4.1 Form template options (continued)
If you selected this menu
item:
FTP Directory Checkbox Label—The text you want to appear on the
These options display:
template (usually the directory name).
FTP Host Name—The fully qualified name or IP address of
the destination file server. For example:
ftpserver.mycompany.com or 12.123.456.78.
Name for a Remote FTP Directory—The directory path in
which to store documents. For example: /ftp-public/
mydocuments.
Login as: select a login credential to use for the specified
FTP server, or select Add new login to create a new login
credential. If you choose to add a new login, enter a valid
FTP user name and password in the fields provided.
If there are no existing login credentials, enter a name in the
Name for these login credentials field, and enter a valid
FTP user name and password in the fields provided.
File Format for Scanned Documents—The file format of
the document after it's scanned. TIFF allows users to
perform OCR (optical character recognition) on the
document. For all other formats, except PDF Image Only,
FlowPort performs OCR on the document using TextBridge
from ScanSoft, Inc.
Domino.Doc Repository Checkbox Label—The text you want to appear on the
template (usually the repository name).
URL for a Domino.Doc Library—The URL of the
Domino.Doc library.
Tip: In a browser window, go to the Domino.Doc
library you want to use, and log in. Before opening a
file cabinet in the library, copy all of the text that
appears in the Address (or Location) box, and paste
it into the URL for a Domino.Doc Library box.
Login as: select a login credential to use for the specified
Domino.doc repository, or select Add new login to create a
new login credential. If you choose to add a new login, enter
a valid Domino.doc user name and password in the fields
provided.
If there are no existing login credentials, enter a name in the
Name for these login credentials field, and enter a valid
Domino.doc user name and password in the fields provided.
Chapter 4: Creating form templates 4-11
Page 42

Table 4.1 Form template options (continued)
If you selected this menu
item:
Domino.Doc Repository
(continued)
These options display:
Domino.Doc File Cabinet Name—The name of the file
cabinet in the library you specified.
Tip: In a browser window, go to the Domino.Doc
library you specified in the URL for a Domino.Doc
Library box, and log in. Select a file cabinet in the
library and, if prompted, log in. At the top of the
Domino.Doc workspace, the name of the file cabinet
displays to the right of the file cabinet icon. Copy the
name into the Domino.Doc File Cabinet Name box.
Do not copy the space at the end of the name.
Domino.Doc Binder Name—The name of the binder within
the file cabinet you specified.
Tip: In a browser window, go to the Domino.Doc
library you specified in the URL for a Domino.Doc
Library box, and log in. Select the file cabinet you
specified in the Domino.Doc File Cabinet Name box
and, if prompted, log in. Select the binder you want
to use. At the top of the Domino.Doc workspace, the
name of the binder displays to the right of the binder
icon. Copy the name into the Domino.Doc Binder
Name box. Make sure you do not copy the space at
the end of the name.
Domino.Doc Profile Name—The Domino.Doc document
profile, or type, to associate with a document when it is stored
in the specified binder using a Distribute Document Cover
Sheet.
Tip: In a browser window, go to the Domino.Doc
library you specified in the URL for a Domino.Doc
Library box, and log in. Select the file cabinet you
specified in the Domino.Doc File Cabinet Name box
and, if prompted, log in. Select the binder you
specified in the Domino.Doc Binder Name box. On
the Actions sidebar, click the New Document button.
Under Document Profile, select a document type
from the menu. Enter the document type you selected
in the Domino.Doc Profile Name box. On the
Actions sidebar, click the Cancel button.
4-12 Xerox FlowPort Administrator Guide
Page 43

Creating a form template
Table 4.1 Form template options (continued)
If you selected this menu
item:
Documentum Repository Checkbox Label—The text you want to appear on the
These options display:
template (usually the repository name).
Documentum Docbase Name—The name of the
Documentum docbase, or repository.
Documentum Object ID—The 16-character combination of
hexadecimal digits (0-9, A-F) that uniquely identifies the file
or folder.
Login as: select a login credential to use for the specified
Documentum repository, or select Add new login to create a
new login credential. If you choose to add a new login, enter
a valid Documentum repository user name and password in
the fields provided.
If there are no existing login credentials, enter a name in the
Name for these login credentials field, and enter a valid
Documentum repository user name and password in the fields
provided.
Chapter 4: Creating form templates 4-13
Page 44

Creating a form template
Table 4.1 Form template options (continued)
If you selected this menu
item:
Microsoft Exchange 2000 Web
Folder
These options display:
Checkbox Label—The text you want to appear on the
template (usually the repository name).
URL for an Exchange Web Folder—The complete URL of
the Web Folder. For example: http://hostname/public/
foldername.
Note: Open Windows Explorer or My Computer and
double-click the Web Folders icon. Locate the folder
you want to use, right-click on it, and then click
Properties. Copy all of the text that appears after
Location and paste it into the URL for an Exchange
Web Fol d e r box. Then type or copy and paste the
folder name that displays at the top of the Properties
window after the text in the URL for an Exchange
Web Fol d e r box.
Login as: select a login credential to use for the specified
Exchange web folder, or select Add new login to create a
new login credential. If you choose to add a new login, enter
a valid Exchange web folder user name and password in the
fields provided.
If there are no existing login credentials, enter a name in the
Name for these login credentials field, and enter a valid
Exchange web folder user name and password in the fields
provided.
4-14 Xerox FlowPort Administrator Guide
Page 45

Creating a form template
Table 4.1 Form template options (continued)
If you selected this menu
item:
Domino Repository Checkbox Label—The text you want to appear on the
These options display:
template (usually the repository name).
Domino Server Name—The Domino server's Internet host
name. For example: hostname.domainname.com.
Note: Do not enter the server's host name in Notes
format (hostname/orgunit/org).
Database Path—The pathname for the database. Use a
forward slash (/) to separate directory names. For example:
announcement.nsf or hr/resume.nsf.
Note: Do not include the data directory (for example,
c:\lotus\domino\data\) in the pathname.
Form Name—The name of the form to use when creating a
document in the database. For example: Employee Profile.
Note: If the Domino form requires certain fields, then
you must also include the corresponding Document
Management Fields on the form template. Your
Domino administrator can provide you with the list of
any required fields.
Login as: select a login credential to use for the specified
Domino repository, or select Add new login to create a new
login credential. If you choose to add a new login, enter a
valid Domino repository user name and password in the
fields provided.
If there are no existing login credentials, enter a name in the
Name for these login credentials field, and enter a valid
Domino repository user name and password in the fields
provided.
Chapter 4: Creating form templates 4-15
Page 46

Creating a form template
Table 4.1 Form template options (continued)
If you selected this menu
item:
Windows Shared Folder Checkbox Label—The text you want to appear on the
These options display:
template (usually the repository name).
UNC Directory Path—The UNC (Universal Naming
Convention) directory path in which to store or retrieve
documents. A UNC pathname begins with \\, indicating that
the directory is located on a remote computer. For example:
\\computername\sharename
Login as: select a login credential to use for the specified
Windows shared folder, or select Add new login to create a
new login credential. If you choose to add a new login, enter
a valid Windows shared folder user name and password in the
fields provided.
If there are no existing login credentials, enter a name in the
Name for these login credentials field, and enter a valid
Windows shared folder user name and password in the fields
provided.
File Format for Scanned Documents—The file format of
the document after it's scanned. TIFF allows users to perform
OCR (optical character recognition) on the document. For all
other formats, except PDF Image Only, FlowPort performs
OCR on the document using TextBridge from ScanSoft, Inc.
4-16 Xerox FlowPort Administrator Guide
Page 47

Creating a form template
The following table describes the field names that you can enter for
each type of repository.
Table 4.2 Repository Field Names
Repository Document Management Field
DocuShare Collection You can enter the following Field Names:
Title—Lets you add a title field to the stored document
(corresponds to the DocuShare Title property).
Description—Lets you add a description field to the stored
document (corresponds to the DocuShare Summary
property).
Abstract—Lets you add an abstract field to the stored
document (corresponds to the DocuShare Description
property). You can store more than one Abstract field with
the document.
Keywords—Lets you add a keyword field to the stored
document (corresponds to the DocuShare Keywords
property).You can store more than one Keywords field with
the document.
author—Lets you add an author field to the stored document
(corresponds to the DocuShare author property). You must
type author in lower-case letters.
You can also enter the name of a DocuShare custom
property. For example, your DocuShare administrator may
have created a custom property to let users add a budget
center or case number to stored documents. To include a
custom property, you must type its name in the Field Name
box exactly as it appears in the DocuShare Name box. To
add custom properties, see your DocuShare administrator.
FTP Directory You can enter the following Field Names:
Title—Adds a title field to the stored document (corresponds
to the Title property).
Description—Adds a description field to the stored
document (corresponds to the FTP Description property).
Chapter 4: Creating form templates 4-17
Page 48

Creating a form template
Repository Document Management Field
Domino.Doc Repository You can enter the following Field Names:
Documentum Repository You can enter the following Field Names:
Table 4.2 Repository Field Names (continued)
Title—Adds a title field to the stored document (corresponds
to the Title property).
Description—Adds a description field to the stored
document, if the document's profile includes the field.
You can also enter the name of a Domino.Doc custom field.
For example, your Domino.Doc administrator may have
created a custom property to let users add a budget center or
case number to stored documents. To include a custom
property, you must type its name in the Field Name box
exactly as it appears in the Profile associated with the
Domino.Doc binder in which the document is stored. To add
custom properties, see your Domino.Doc administrator.
Title—Adds a title field to the stored document (corresponds
to the Documentum Title property).
Description (or Subject)—Adds a description/subject field
to the stored document (corresponds to the Documentum
Subject property).
Keywords—Adds keywords to the stored document
(corresponds to the Documentum Keywords property).
Separate individual keywords with a comma; do not include a
space before or after the comma.
Authors—Adds an authors field to the stored document
(corresponds to the Documentum Authors property).
You can also enter the names of any valid Documentum
custom properties. If the custom property supports multiple
values, you must enter a separate document management
field for each custom property value.
4-18 Xerox FlowPort Administrator Guide
Page 49

Table 4.2 Repository Field Names (continued)
Repository Document Management Field
Creating a form template
Microsoft Exchange 2000 Web
Folder
Domino Repository You can enter the following Field Names:
You can enter the following Field Names:
Title—Adds a title field to the stored document.
Description—Adds a description field to the stored
document (corresponds to the Comments field in Outlook).
Keywords—Adds a keyword field to the stored document.
You can store more than one keywords field with the
document.
author—Adds an author field to the stored document.
You can also enter the name of a Exchange custom field. For
example, your Exchange administrator may have created a
custom field to let users add a budget center or case number
to stored documents. To include a custom field, you must
type its name in the Field Name box exactly as it is defined
by your administrator.
Exchange custom field names often include a schema name,
like "urn:schemas-microsoft-com:office:office." A full
Exchange custom field name could be
"urn:schemas-microsoft-com:office:office:Version" or
"urn:schemas:contacts:callbackphone." To add custom fields,
see your Exchange administrator.
Title—Lets you add a field named "Title" to the stored
document.
Description—Lets you add a field named "Description" to
the stored document.
You can also enter the name of a Domino custom field. For
example, your Domino administrator may have created a
custom field to let users add a budget center or case number
to stored documents. To include a custom field, you must
type its correct name in the Field Name box. Obtain the list of
supported field names from the Domino administrator.
Windows Shared Folder You can enter the following Field Name:
Title—Lets you add a field named "Title" to the stored
document.
Chapter 4: Creating form templates 4-19
Page 50

Editing a form template
Editing a form template
To edit a form template:
1
2
3
4
5
6
7
Click the Templates button.
On the Form Templates page, click the checkbox for the form
template that you want to edit.
Click the Edit button located under the template.
The template displays in the Form Template Editor.
On the form, click the link for the item you want to edit.
In the window that displays for the item, make the change you want
and click OK.
You can repeat steps 4 and 5 to make more changes.
Click the Save button.
Click the Continue button.
8
If you changed the form template's title, FlowPort creates a new
template and doesn't overwrite the previous template. If you didn't
change the form template's title, FlowPort saves the original form
template with your change; it does not create a new form template.
The new or revised form template appears under the application
name on the Form Templates page, and is immediately available
to users on the Forms and Applications page.
4-20 Xerox FlowPort Administrator Guide
Page 51

Deleting a form template
When you delete a form template, users will no longer be able to
use the template to create their own forms. Any forms that users
previously created based on the template are unaffected.
To delete a form template:
1
2
3
4
5
Deleting a form template
Click the Templates button.
On the Form Templates page, click the checkbox for the form
template that you want to delete.
Click the Delete button located under the template.
On the confirmation page, click OK.
Click the Continue button.
Chapter 4: Creating form templates 4-21
Page 52

Deleting a form template
4-22 Xerox FlowPort Administrator Guide
Page 53

Managing the FlowPort
server Chapter5
Changing the server’s configuration settings ..............................5-2
Restarting and shutting down the FlowPort service ....................5-4
Starting the FlowPort service after a shutdown...........................5-5
Backing up and Restoring the FlowPort server files....................5-5
Viewing administrative message ..................................................5-7
Chapter 5: Managing the FlowPort server v 5-1
Page 54

Changing the server’s configuration settings
This chapter describes the administrative tasks you may need to
perform.
These tasks include the following:
• Changing the server's configuration settings
• Shutting down and starting the FlowPort service
• Backing up your FlowPort files.
Changing the server’s configuration
settings
To change the server’s configuration settings:
Click the System button.
1
On the System Configuration page, enter the following
2
information:
Administrator’s Email Address (required)—FlowPort
administrator’s email address.
Mail Host (required)—Fully qualified name (mail server name and
domain name) of the outgoing mail server, capable of receiving
SMTP connections.
Default Printer (required)—The printer or Internet fax device on
which to print PaperWare forms, or the email address to use when
emailing PaperWare forms. The default printer you select
automatically displays on the Add New User page when you create
a new user account.
5-2 v Xerox FlowPort Administrator Guide
• For printers, specify the fully qualified printer name (for
example, documentcentre1.bestcompany.com).
Note: FlowPort supports the Xerox Document Centre, any
networked lpr-enabled printer, and a local PCL printer. To
set up a user's account to print to a local printer, refer to the
“Setting a local printer as the user's default printer” section
on page 3-11.
Page 55

Changing the server’s configuration settings
• For Internet fax devices, specify the Internet fax address (for
example, internetfax@bestcompany.com).
•For the Email PDF File printer type, specify the user's email
address. PaperWare forms are emailed as PDF attachments,
which allows the user to print forms outside a firewall.
Default Printer Type—Type of printer selected as the default
printer.
Default Form Size—Paper size used to print PaperWare forms on
the default printer. Options are US Letter and A4.
Font—Font used to print PaperWare forms. Options include the
fonts installed on your computer.
Enable Document Tokens—Select this option to allow users to
configure their own Create Document Tokens option. The user's
Create Document Tokens option controls whether or not Document
Tokens are created when storing documents to a repository. A user
may change their Create Document Tokens option only if you
select this option. Deselect the Enable Document Tokens option to
turn off the creation of Document Tokens when FlowPort
distributes documents to repositories, and to turn off all users’
ability to select the Create Document Tokens option.
Locale—Language used to display the FlowPort Web Centre
interface.
Proxy Host—Address of your proxy server, if one is used for
communication with a FlowPort or DocuShare server outside of
your corporate Intranet.
Proxy Port—Port number of the proxy server used (required if you
specified a Proxy Host).
Click the Apply button.
3
Chapter 5: Managing the FlowPort server v 5-3
Page 56

Restarting and shutting down the FlowPort service
Restarting and shutting down the
FlowPort service
FlowPort runs as a Windows NT service on your server. You can
restart or shut down the FlowPort service from the Restart page.
Figure 5.1 Restart page
To restart or shut down the FlowPort service:
1
2
3
5-4 v Xerox FlowPort Administrator Guide
Click the Restart button.
In the Reason box, type a brief explanation for the restart or
shutdown.
Click the Restart button, or click the Shutdown button.
The service shuts down after two minutes or after all jobs are
processed, if less than two minutes. Any incomplete jobs will
restart after the service is running. While the service is shut down,
it does not accept any new jobs.
Page 57

Starting the FlowPort service after a shutdown
Starting the FlowPort service after a
shutdown
The FlowPort service restarts automatically after you restart the
Windows NT server. However, if you shut down the FlowPort
service and did not shut down the server, you need to restart the
FlowPort service.
To restart the service after a shutdown:
Click the Windows NT Start button, point to Settings, and click
1
Control Panel.
Double-click Services.
2
In the Services window, click FlowPort Server and then click the
3
Start button.
Click the Close button.
4
Backing up and Restoring the
FlowPort server files
FlowPort files are automatically backed up at the specific time or
interval set on the System page. The default backup time is 1:00am
every day.
To restore the FlowPort server files:
Ensure that FlowPort version 2.1.1 SP3 is currently installed in the
1
directory to which you'll want to restore from your backup.
(Installing FlowPort in a different directory than the original one
from which the backup was created is allowed.)
Insert the current FlowPort Installation CD into a CD drive.
2
From a Command Prompt window, change to the drive letter of the
3
CD drive, and then enter the command
cd Bin\Util
Chapter 5: Managing the FlowPort server v 5-5
Page 58

In the Command Prompt window, run the file RestoreFlowport.bat
4
with these three parameters:
- the full path to the backup zip file,
- the name of the directory to which FlowPort is to be
restored, and
- the FlowPort admin user's password.
Note: the pathnames must not contain any blanks.
For example:
RestoreFlowport.bat
D:\Backup\FlowPort-2-2-0-79_Backup.zip
C:\Xerox\Flowport adminpassword
Note: adminpassword is the current password for the
FlowPort admin user.
Restart the FlowPort Server service.
5
5-6 v Xerox FlowPort Administrator Guide
Page 59

Viewing administrative messages
The FlowPort server displays new administrative messages after
you log in. Previous messages are stored in a file that you can view
at any time.
To view administrative messages:
Click the Messages button.
1
Click the Display button located to the left of the message file you
2
want to view.
Scroll to the bottom of the window to view the most recent
3
messages in the file.
Viewing administrative messages
Chapter 5: Managing the FlowPort server v 5-7
Page 60

Viewing administrative messages
5-8 v Xerox FlowPort Administrator Guide
Page 61

Managing applications
and services Chapter6
Viewing the installed applications and services...........................6-2
Configuring applications and services.........................................6-2
Configuring the Authentication Service....................................6-3
Configuring the Distribute Document application ...................6-4
Configuring the Internet Fax Receive Service ..........................6-5
Configuring the Network Accounting application ....................6-6
Configuring the TextBridge OCR Service ................................6-7
Configuring the Xerox Network Scanning Service ...................6-7
Using Form Cleaner .................................................................6-8
Using Patch Manager ...............................................................6-9
Installing new applications and services....................................6-10
Chapter 6: Managing applications and services 6-1
Page 62

Viewing the installed applications and services
The FlowPort server includes a suite of applications and services.
You can view the list of installed applications and services, install
new ones, and configure certain applications and services. This
chapter describes how to manage FlowPort applications and
services.
Viewing the installed applications
and services
To view the applications and services that are installed on the
server:
Click the Applications button.
1
The applications installed on the FlowPort server are listed under
View Documentation for Installed Applications; the installed
services are listed under View Documentation for Installed
Services.
Configuring applications and
services
To configure applications and services:
Click the Applications button.
1
Under Configure Applications and Services, click the link for the
2
application or service that you want to configure.
On the configuration page, set the options required for your site.
3
Click the Submit Changes button.
4
For information on how to configure individual applications, see
the following sections.
6-2 Xerox FlowPort Administrator Guide
Page 63

Configuring applications and services
Configuring the
Authentication Service
The Authentication Service enables you to determine the level of
security needed for the FlowPort server. You can specify which
input devices, or portals, the FlowPort server will accept jobs from,
and the type of user authentication required when submitting
PaperWare forms.
For more information on the user authentication that is required
when submitting the different types of forms from trusted and
untrusted portals, refer to the “FlowPort Security” appendix on
page A-1.
To configure the Authentication Service:
Click the Applications button.
1
Under Configure Applications and Services, click the
2
Authentication Service link.
Under Portal Authentication Mode, click one of the following to
3
specify the FlowPort server’s access level:
Trust All Portals—The FlowPort server accepts jobs from any
Xerox Document Centre and Internet fax device.
Trust Only Listed Portals—The FlowPort server accepts jobs
from specified Xerox Document Centres.
Trust No Portals—The FlowPort server doesn't accept jobs from
any device.
Under Default Form Authentication Mode, click one of the
4
following to specify the default access setting for form templates:
Public Use—Allows anyone to use the form. Authentication is
required when a user submits the form from an untrusted portal and
guest access is disabled.
Shared Use—Allows anyone to use the form, provided guest
access is set up (the default). If guest access is disabled, user
authentication is required.
Private Use—Allows only the form's owner to use the form. The
owner must provide authentication.
Note: When creating a form template using the Form
Template Creator, you can change this setting. Each form
template you create can allow a different level of access.
If you clicked Trust Only Listed Portals, click the Edit Portal
5
List button.
Chapter 6: Managing applications and services 6-3
Page 64

Configuring applications and services
In the Add a New Trusted Portal box, type the Xerox Document
6
Centre’s fully qualified name.
Note: You cannot add an Internet fax machine to a list of
trusted portals.
Click the Add Portal button.
7
Repeat steps 8 and 9 to add another Xerox Document Centre.
8
Click the Continue button.
9
On the Authentication Service page, click the Continue button.
10
Configuring the
Distribute Document
application
The Distribute Document application enables you to scan paper
documents and distribute the resulting electronic documents
through email, Internet fax, remote printing, or storage to a Web
repository. The application uses a Cover Sheet that you place on
top of your printed document before scanning it at a device.
To configure the application, you can change the email message
text that is used when emailing a document or the URL of a
document stored in a repository. You can also change the name of
the Cover Sheet automatically provided to users and control the
menu items that display when users create their own forms using
the Cover Sheet Creator.
To configure the Distribute Document application:
Click the Applications button.
1
Under Configure Applications and Services, click the Distribute
2
Document link.
In the Email Message Text box, change the message text sent with
3
an attached image document to an email recipient. An email
message is automatically sent when a Distribute Document Cover
Sheet is used to email a scanned document.
In the URL Email Message Text box, change the message text
4
sent with the URL of a document’s location to an email recipient.
An email message is automatically sent when a Distribute
Document Cover Sheet is used to store a document in a repository
and email the recipient without attaching the image document.
6-4 Xerox FlowPort Administrator Guide
Page 65

Configuring applications and services
In the Initial Form Title box, change the title of the form
5
automatically provided to new users. The default form title is Scan
to Myself.
Under Cover Sheet Creator/Editor Menu, customize the menu
6
available on the user’s Cover Sheet Creator by clearing the
checkbox corresponding to the menu item you want to remove.
Click the Configure button.
7
Configuring the
Internet Fax Receive
Service
The Internet Fax Receive Service provides the network capability
to receive Internet faxes from a remote device and process the
received documents.
To configure the Internet Fax Receive Service:
Click the Applications button.
1
Under Configure Applications and Services, click the Internet
2
Fax Receive Service link.
Under Internet Fax Mailbox Type, click one of the following
3
options:
Internet Fax SMTP Service Enabled—Click to have FlowPort
receive Internet faxes using its built-in SMTP mail server.
Internet Fax POP3 Mail Polling Enabled—Click to have
FlowPort receive Internet faxes by polling a POP3 mail server.
Internet Fax Disabled—Click to not have FlowPort receive
Internet faxes.
If you chose to enable the Internet Fax SMTP Service, enter the
4
mail domain name of the SMTP mail server in the FlowPort
SMTP Server Mail Domain Name box.
If you chose to enable Internet Fax POP3 Mail Polling, enter the
5
following information:
Mailboxes Host Name—Host name of the POP3 mail server.
Mailboxes Mail Domain Name—Mail domain name of the POP3
mail server.
PaperWare Mailbox User Name—Special Internet fax user name
to which Internet fax devices can send documents. When FlowPort
receives documents for the “PaperWare” user, it processes the
document as a PaperWare job.
Chapter 6: Managing applications and services 6-5
Page 66

Configuring applications and services
PaperWare Mailbox Password—Password assigned to the
Internet fax user name specified above.
Click the Apply button.
6
Configuring the
Network Accounting
application
Network Accounting is an optional feature of the Xerox Document
Centre. It provides the ability to track the machine’s usage by
having users enter a preset User ID and Account ID. If the feature
is installed on the Document Centre, you can set up a default
account for all FlowPort users to charge for their print jobs.
To configure the Network Accounting application:
Click the Applications button.
1
Under Configure Applications and Services, click the Network
2
Accounting link.
On the Network Accounting Configuration page, set the
3
following options:
Network Accounting Account ID (required)—The default
account ID.
Network Accounting User ID (required)—The default user ID.
Note: The Account ID and User ID you specify must be set
up on a network accounting system. See your Document
Centre administrator.
Click the Set Defaults button
4
6-6 Xerox FlowPort Administrator Guide
Page 67

Configuring applications and services
Configuring the
TextBridge OCR
Service
The TextBridge OCR Service enables the FlowPort Distribute
Document application to convert scanned documents to editable
formats, such as Microsoft Word and Adobe PDF. This service
uses the TextBridge Pro 9.0 application from ScanSoft, Inc.
To configure the TextBridge OCR Service:
Click the Applications button.
1
Under Configure Applications and Services, click the
2
TextBridge OCR Service link.
On the TextBridge OCR Service Configuration page, set the
3
following options:
Temporary Files Directory (required)—Directory in which the
TextBridge OCR service writes its temporary files. If you are using
TextBridge to recognize large Microsoft Office documents, you
may want to change the location as temporary copies of Office
documents are also written to this directory.
Default Language?—Language in which FlowPort assumes
documents are written.
Click the Submit Changes button.
4
Configuring the Xerox
Network Scanning
Service
This service is discussed in Appendix A. Please see “Xerox
Network Scanning Service” section on page A-4
Chapter 6: Managing applications and services 6-7
.
Page 68

Configuring applications and services
On the Xerox Network Scanning Service page, set the following
1
options:
Guest Username—Guest login name used at a Xerox Document
Centre to send a job to the FlowPort server. The default username,
NSA, allows any user to submit a job to the FlowPort server from a
Xerox Document Centre.
Change Password—Click to change or delete the Guest Password.
Guest Password and Password Again—Guest password used at a
Xerox Document Centre. The default password, nsa, allows any
user to submit a job to the FlowPort server from a Xerox Document
Centre.
TCP/IP Port (required)—Port number used for the Xerox Network
Scanning Service. You should keep the port set to 21.
Click the Submit Changes button.
2
Using Form Cleaner
Form Cleaner is a utility used to delete large numbers of forms in
one operation.
6-8 Xerox FlowPort Administrator Guide
Page 69

Configuring applications and services
With Form Cleaner:
• You can set the maximum number of forms you want to delete.
• You can select one or more users whose forms you will delete,
and you can select one or more types of forms to delete. More
than one User and Form Type can be selected by using the Shift
key.
• There is a check box if you want to delete Old versions only – in
other words, keep the most recent version of any form.
• When you’ve made the selections, click Delete. A status report
will display indicating how many forms were deleted.
• We recommend that this be done periodically for a number of
reasons: backups will be faster, and the FlowPort database
(MSDE) will not become too large.
Using Patch Manager
Patch Manager, as the name implies, is used to install and uninstall
patches, or view installed patches. Patches are typically fixes for
problems reported by customers through the SPAR process. Not
ALL FlowPort patches are designed to be installed with the Patch
Manager. It is MANDATORY that you read the README file that
is included with every patch.
As a rule, Patch Manager is used to install patches that are designed
to be uninstalled (if so desired).
When a programmer gets a Java program development kit, a small
program or utility called "jar" is included. The jar utility lets you
create, list, and extract the individual files from a JAR file.
Ordinarily, a browser user will not need to "open" or view a JAR
file directly.
Chapter6: Managing applications and services6-9
Page 70

Installing new applications and services
To run patch Manager, click on Patch Manager in the list of
installed applications:
Installing new applications and
services
FlowPort applications and services are installed as Java Archive
(JAR) files on the FlowPort server. To install a new application or
service, you import its JAR file.
To install new applications and services:
Click the Applications button.
1
Under Install New Applications and Services, click the Install
2
New Application or Service link.
In the Install Application or Service window, enter the URL of
3
the JAR file that you want to install.
Click the Install Application or Service button.
4
6-10 Xerox FlowPort Administrator Guide
Page 71

FlowPort Security Appendix A
Portal Security............................................................................. A-2
Xerox Network Scanning Service ................................................ A-4
Xerox Network Scanning Directory Watching Service ............... A-5
Appendix A: FlowPort Security A-1
Page 72

Portal Security
Portal Security
The FlowPort server's default security settings provide guest access
to FlowPort and allow any device to submit jobs for processing. If
appropriate, it is recommended that you use the default security
setup and allow users to control access to their forms by making
them private.
However, if you need to restrict access to the server, you can
disable guest access or control the devices that can submit jobs to
the FlowPort server. When you restrict access to the server, users
are required to provide authentication before submitting a job.
If guest access is set up (the default), any user can submit a public
or shared form to FlowPort without providing authentication.
FlowPort requires authentication only when a user submits a
private form.
Table A.1 Submitting jobs with guest access
Type of Portal
Submitting Job
Trusted or Untrusted Anyone can use the form
Public Form Shared Form Private Form
to submit a job.
Anyone can use the form
to submit a job.
Only the form's owner can
use the form to submit a
job. To use the form, the
owner must provide
authentication by scanning
a Login Sheet or logging in
at the Xerox Document
Centre control panel.
A-2 v Xerox FlowPort Administrator Guide
Page 73

If guest access is disabled, users submitting shared or private forms
to FlowPort must provide authentication. Any user can submit a
public form from a trusted portal.
Table A.2 Submitting jobs with guest access disabled
Portal Security
Type of Portal
Submitting Job
Trusted Anyone can use the form
Untrusted Anyone who provides
Public Form Shared Form Private Form
to submit a job.
authentication can use the
form to submit a job. To
use the form, the user must
provide authentication by
scanning a Login Sheet or
logging in at the Xerox
Document Centre control
panel.
You configure the Authentication Service to specify which input
devices, or portals, the FlowPort server will accept jobs from, and
the type of user authentication required when submitting
PaperWare forms. Refer to the “Configuring the Authentication
Service” section on page 6-3. You disable the guest access by
configuring the Xerox Network Scanning Service. Refer to the
“Configuring the Xerox Network Scanning Service” section on
page 6-7.
Anyone who provides
authentication can use the
form to submit a job. To
use the form, the user must
provide authentication by
scanning a Login Sheet or
logging in at the Xerox
Document Centre control
panel.
Anyone who provides
authentication can use the
form to submit a job. To
use the form, the user must
provide authentication by
scanning a Login Sheet or
logging in at the Xerox
Document Centre control
panel.
Only the form's owner can
use the form to submit a
job. To use the form, the
owner must provide
authentication by scanning
a Login Sheet or logging in
at the Xerox Document
Centre control panel.
Only the form's owner can
use the form to submit a
job. To use the form, the
owner must provide
authentication by scanning
a Login Sheet or logging in
at the Xerox Document
Centre control panel.
Appendix A: FlowPort Security v A-3
Page 74

Xerox Network Scanning Service
The Xerox Network Scanning service supports the Xerox Network
Scanning TCP/IP protocol, and enables the FlowPort server to
accept scanned documents and PaperWare forms from devices such
as the Xerox Document Centre series.
Most Xerox Document Centres use ftp to send jobs to FlowPort. If
you disable the ftp server, FlowPort will still be able to process
other jobs received through FlowPort's Internet Fax features or
through the Xerox Network Scanning Directory Watching Service
(see following page).
Disable FTP Server
On some networks, ftp servers are not allowed. Select the “Disable
FTP Server” checkbox to disable FlowPort's ftp server. If you
disable FlowPort's ftp server, then the remaining configuration
options on this screen will not be used.
A-4 Xerox FlowPort Administrator Guide
Page 75

Xerox Network Scanning Directory Watching Service
Xerox Network Scanning Directory
Watching Service
Note: This service is not installed during FlowPort installation. You
must install the “FileWatching.jar” application manually. See
“Installing new applications and services” on page 6-10.
The Xerox Network Scanning Directory Watching service provides
an alternative mechanism for submitting jobs to FlowPort by
Document Centres which can use SMB instead of ftp, thus allowing
FlowPort to operate in environments in which the ftp protocol is not
used.
The Xerox Network Scanning Directory Watching service watches
a specified directory, looking for files or folders representing
FlowPort jobs which have arrived from Xerox Document Centres.
When FlowPort finds that a FlowPort job exists in the watched Job
Submission Directory, FlowPort processes the job. The FlowPort
administrator can enable or disable the Xerox Network Scanning
Directory Watching service. The directory in which FlowPort's
Xerox Network Scanning Directory Watching service looks for
these files and the time interval at which the directory is checked
for these files is configurable.
Appendix A: FlowPort Security v A-5
Page 76

Xerox Network Scanning Directory Watching Service
You can change the following configuration options:
Enable Service
Select this checkbox to enable FlowPort's Xerox Network Scanning
Directory Watching service. If you enable FlowPort's Xerox
Network Scanning Directory Watching service, then FlowPort jobs
sent to the directory configured as the Job Submission Directory get
processed as FlowPort jobs. Such jobs can be sent by certain Xerox
Document Centres using a mechanism such as SMB.
Your FlowPort server's processing of other jobs received through
FlowPort's ftp server will not be affected by the setting of the
"Enable Service" checkbox, as long as FlowPort's ftp server has not
been disabled from the FlowPort admin user's Xerox Network
Scanning Service configuration page.
FlowPort is installed with the ftp server enabled and the Xerox
Network Scanning Directory Watching service disabled.
Your FlowPort server's processing of other jobs received through
FlowPort's Internet Fax features will not be affected by the setting
of the "Enable Service" checkbox.
Job Submission Directory
Specify the full pathname of the directory to be watched by the
Xerox Network Scanning Directory Watching service for incoming
jobs. The default directory is named "inbox". For example, if your
FlowPort server is installed in C:\Xerox\FlowPort, then the default
value of the path specified here would be
"C:\Xerox\FlowPort\inbox".
Polling Interval (seconds)
Specify the time interval in seconds at which FlowPort's Xerox
Network Scanning Directory Watching service checks the
configured Job Submission Directory for new jobs to be processed
by FlowPort. The default Polling Interval is set to the minimum
allowed value of 5 seconds. The maximum allowed value is 120.
Using a larger value reduces the time that FlowPort spends
checking for jobs, but increases the overall time it takes for
FlowPort to process a job, because processing of a job doesn't begin
until after the Xerox Network Scanning Directory Watching service
finds the job in the configured Job Submission Directory.
A-6 v Xerox FlowPort Administrator Guide
 Loading...