

Administrator
Guide
Versio n 2.1

Copyright © 1999-2000 Xerox Corporation. All Rights Reserved.
Publication number: 613P08631
Copyright protection claimed includes all forms of matters of
copyrightable m aterials and information now allow ed by statutory or
judicial la w or here inafter gr ant ed, inc luding wi thout l imitat ion, mat erial
generated from the sof tware pr ogr ams which are disp layed o n t he scre en
such as styles, templates, icons, scre en displays, looks, etc.
XEROX®, The Document Company®, the stylized X, DataGlyph,
Document Centre, CentreWare, DocuShare, PaperWare, are registere d
trademarks and FlowPor t, Document Token, and DocuStamp are
trademarks of Xerox Corporation or its subsidiaries.
Adobe and Acrobat are registered trademarks of Adobe Systems,
Incorpora ted. Lotus, Lotusphere, and Lotus Notes are registered
trademarks and Notes and Domino are trademarks of Lotus Corporation.
Pagis and TextBridge are registered trademarks of ScanSoft, Inc.
Microsoft, Microsoft Windows, Microsoft Word, Microsoft Exchange,
Microsof t Internet Explorer, Microsof t Office, Imaging for W indows, MS,
MS-DOS, and Win d ow s are registered trademarks of Microsoft
Corporation. Netscape Navigator and Netscape Enterprise Server are
registered trademarks of Netscape Communications Corporation. HP,
PCL, and HP Deskjet are registered trademarks of Hewl ett-Packard
Company. IBM is a registered trademark of International Business
Machines Corpor ati on. Java, Java Runtime Environment, JRE, Java
Archive, JAR, and Sun Solaris are trademarks or register ed trademarks
of Sun Microsystem s, Inc. All other product name s are trademarks/
tradenames of t h ei r respective owners.
Notice
Specificati ons des cribe d in t his pu bli cation ar e sub ject to change wi thout
notice. Use of some features may be limited by your hard ware or
software conf iguration. Contact your dealer or Xerox for details.
August 2000

Contents i
Chapter 1 Welcome .................................................................. 1-1
About FlowPort and PaperWare®.........................................1-3
What's in this guide.............................................................1-4
Where to find more information...........................................1-5
How to get help...................................................................1-5
Chapter 2 Getting started ........................................................ 2-1
Logging in........... ...................... ........... ...................... .........2-2
About the FlowPort Web Centre Administration window.......2-4
Logging out.......................... ............ ..................... ..............2-5
Chapter 3 Managing user accounts ......................................... 3-1
Creatin g a user account..... ...................... ............ ................3-2
Setting up a use r ’s acc o unt to rece ive Internet faxes...... . ... 3-4
Setting up a use r’s acc o unt to use Net wo r k Acc ou nting.....3-6
Setting a local printer as the user's default printer.............3-7
Changing the user’s account information.............................3-8
Changing the admin’s account information .........................3-9
Deleting a user account.....................................................3-10
Viewing the list of users ..................................................... 3-10
Contents ❖ ii i

Chapter 4 Creating form templates ......................................... 4-1
About form templates ..........................................................4-2
Controlling access to forms...............................................4-4
Creatin g a for m te mplate ..... ............ ..................... ............ ..4-5
Editing a fo r m template..... ...................... ............ ..............4-19
Deleting a form template...................................................4-20
Chapter 5 Managing the FlowPort server ................................ 5-1
Changing the server’s configuration settings........................5-2
Restarting and shutting down the FlowPort service ...............5-4
Starting the FlowPort service after a shutdown.....................5-5
Backing up the FlowPort server files......................................5-5
Viewing administrative messages.........................................5-6
Chapter 6 Managing applications and services ....................... 6- 1
Viewing the installed applications and services.....................6-2
Configuring applications and services ...................................6-2
Configuring the Authentication Service .............................6-3
Configuring the Distribute Document application..............6-4
Configuring the Internet Fax Receive Service......................6-5
Configuring the Network Accounting application .............. 6-6
Configuring the TextBridge OCR Service............................6-7
Configuring the Xerox Network Scanning Service..............6-7
Installing new applications and services............................... 6-8
Appendix A How to use security on the FlowPort server ............. A-1
iv ❖ Xerox F lowPor t A dmin istra tor G uide

Welcome Chapter1
About FlowPort and PaperWare® ....................................... 1-3
What's in this guide ........................................................... 1-4
Where to find more information ......................................... 1-5
How to get help ................................................................. 1-5
Chapter 1: Welcome ❖ 1-1

Welcome
Welcome to Xerox FlowPort. FlowPort p rovides a set of
server applications that lets you seamlessly integrate
paper documents within your electronic document
processes.
Using FlowPort you can:
• Share your paper d ocu ments with others through
email, Internet fax, remote prin ting, or storage to a
Web repository.
• Access your stored docu ments and print them on a
network printer or distribute the docum en ts.
• Store a document and receive a Document Token—a
piece of paper that represen ts th e stored
document—that you can later use to copy, Internet
fax, or email the actual docume nt.
• Receive and access Internet faxes by printing the entire
fax, storing the fax and retrieving it later using a
Document Token, or viewing the fax on the Web.
1-2 ❖ Xerox Flow Port Admin istr ator G uide

About FlowPort and PaperWare®
FlowPort provides an innovative paper use r inte rface
called PaperWare. Using PaperWare forms with a Xerox
Document Centre or an Internet fax device, you instruct
your FlowPort server to distribute, store, and retrieve your
paper and electronic documents.
The following applicat ions are included with yo ur
FlowPort server:
Distribute Document—Scans paper documents and
distributes the resulting electronic documents through
email, Internet fax, remote prin ting, or storage to a
document repo sito ry. The application featu res a
PaperWare form called a Distribute Document Cover
Sheet. You scan the Cover Sheet with your printed
document to provide distribution instru ctio ns to a
Document Cent re or an Internet fax machine.
Document Token—A ccesses a document stored in a
repository using a Document Token form—a piece of
paper that represents the stored document. When you
want to retrieve the stored docu ment, you scan the
one-page Document Token to print the original
document, or scan a Document Token with a Distribute
Document Cover She et to retrieve and distribute the
stored document.
About FlowPo rt and PaperWare®
Document Catalog—Accesses the documents stored in a
repository using a Document Catalog form—a printed list
of the repository's conte nts with a checkbox for each
stored object. To retrieve stored documents, mark the
checkboxes for the docu ments you want and scan th e
form to print the original documents. When using a
Document Catalog f orm with a Distribute Document
Cover Sheet, you can distribute th e retrieved documents,
regardless of their original format.
Internet Fax Mailbox—Receives Intern et fax es and
prints, stores, and accesses the faxes. When st orin g
received faxes, the FlowPort server can print a one-page
Document Token of the fax and inform you in an email
message of the URL in which the fax is stored.
Chapter 1: Welcome ❖ 1-3

What's in th is guide
Login Sheet—Specifies your personal i de ntific ation
number (PIN) on a Login Shee t form when submitting
jobs that require auth entication. You can use a Login
Sheet at a Docum ent Centre as an alternative to logging
in at the device's control panel, or when submitting jobs
to the FlowPo rt server from an In ternet fax m a chine.
PaperWare Copy—Prints copies of documents. As the
default application, it makes a co py of your document
when you scan a Document Token, Document Catalog, or
document at a Document Centre w itho ut a PaperWare
Cover Sheet.
Document Optio ns—Adds document management fields
to a document when you store it in a repository, and
charges print jobs to your account on a Document Centre
network accounting system. The application uses a
Document Options Sheet that you place after a Distribute
Document Cover Sheet to add fields or account
information to the document.
Network Accounting—Charges each printing job to an
Account ID set up on a Document Centre network
accounting system.
What's in this guide
In addition to this chapter, this guide includes the
following:
Chapter 2 Getting started—Explains how to log in and out, and
describes the administrator's Web Centre.
Chapter 3 Managing users—Describes how to set up, edit, and
delete user accounts, and how to edit the admin
account.
Chapter 4 Creating form templates—Provides an overview of
form templates, and explains how to create, edit, and
delete form templates.
Chapter 5 Managing the FlowPort server—Details the server
management tasks you perform.
1-4 ❖ Xerox Flow Port Admin istr ator G uide

Chapter 6 Managing applications and services—Describes how
to view, install, and configure applications and services.
Appendix A How to use security on the Fl owPort server—Explains
how to use security features to restrict access to the
FlowPort server.
Where to find more information
Xerox FlowPort Installation and Setup Guide
The guid e p rovid es a c heck list of s yst em req uir ements and
step-by-step instructions for installing and setting up the
FlowPort server.
On-line Help
On-line help describes FlowPort features and provides
step-by-step instructions for both the admin istrat or an d
the user. To open Help, click the help link located in the
upper right corner of the Web Centre.
Where to fi nd mo re i nform at ion
How to get help
Xerox FlowPort User Guide
The guide describes how use PaperWare forms to
distribute, store, and retrieve documents, and how to
create new forms.
For questions about FlowPort, visit our Web site at
www.xerox.com/flowport
.
Chapter 1: Welcome ❖ 1-5

1-6 ❖ Xe rox F lowP ort Adm inis trat or Gu ide

Getting started Chapter2
Logging in ..... ...................... ............ ..................... ............. 2-2
About the FlowPort Web Centre Administration window ..... 2-4
Logging out ...... ............ ..................... ............ .................... 2-5
Chapter 2: G ettin g st arte d ❖ 2-1

Logging in
Logging in
As the FlowPort administrator, you set up user accounts,
create form templates for users, and manage the FlowPort
server. You perform these tasks in the FlowPort Web
Centre Administration window.
This chapter explains how to log in and out as the
FlowPort administrator. It also provides an overview of
the Web Centre .
When the FlowPort software was installed, the
administrator account was created automatically. The
user name, admin, is the only account with administrative
privileges for the FlowPort server.
To log in:
Open a Web browser.
1
Note: If you are using Netscape Navigator on the same
computer as the FlowPort server, you must set
Navigator's priority to low to avoid performance
problems. To set the priority, right-cl i ck the Windows
NT taskbar and click Task Manag er. On t he
Processes tab , ri ght-cl i ck netsc a pe.ex e , point to Set
Priority, and click Low.
2
2-2 ❖ Xerox Flow Port Admin istr ator G uide
In the Address (or Location) box, type the FlowPort
serv er's name and p ress ENT ER. For e xa mple , i f the
serve r's name is fish , you typ e http://fish.
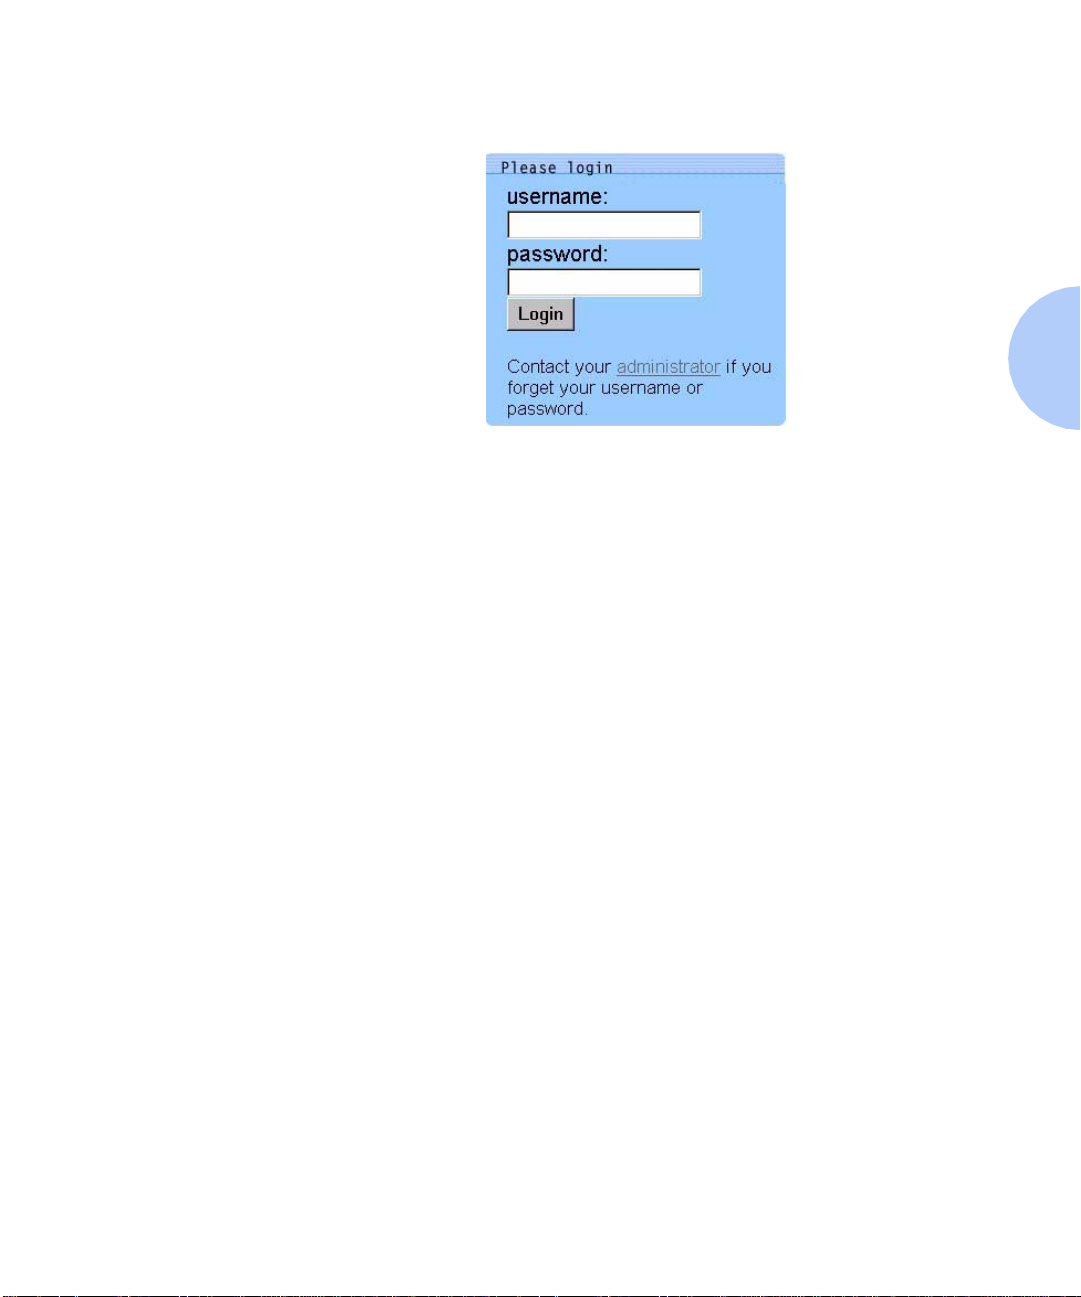
Logging in
The FlowPort Welcome page displays. You enter your
username and password in the area shown below.
In the username box, type admin.
3
In the password box, type the admin password. The
4
default password is 22222.
Click Login.
5
Any new syst em messages t hat require your at t ention are
displayed after you log in.
You can add your n ame to the administrator acc ou nt, so
users will know you are the administrator, and change the
default password. Refer to the “Changing the admin’s
account informat ion” section on page 3-9.
Chapter 2: G ettin g st arte d ❖ 2-3
About the FlowP ort Web C entre Adm inistra tion windo w
About the FlowPort Web Centre
Administration window
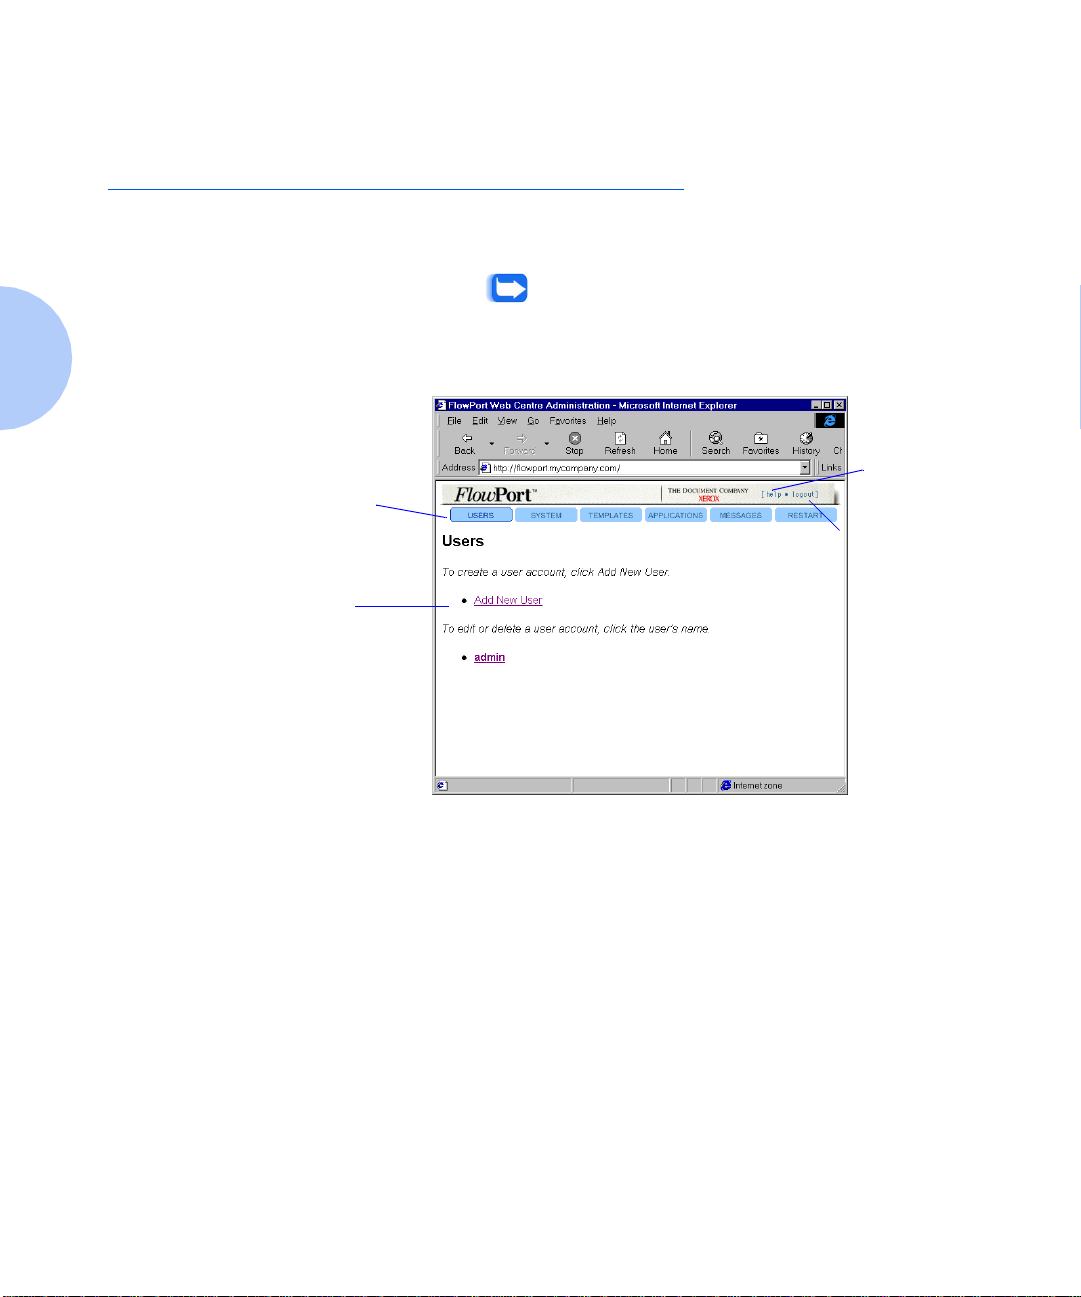
After logging in as the admin, the following window is
displayed.
Note: If the System Configuration window opens after
logging in, you need to configure the system. Refer to
the Inst a l l ati on and Setup Guide fo r mor e information.
Figu re 2.1 FlowPort We b Cent re Admini strat ion window
Links to the FlowPort
administrator pages
Create, edit, and
delete user accounts
from this page
Click to open
on-line help
Click to log out of
the Web interface
The links to the FlowPort administrator page s let you do
the following:
Users—Create, edit, and delete user accounts.
System—Change the FlowPo rt se rver's configuration
settings.
Templates—Create form templates, from which users can
create their own forms.
Applications—Configure, install, an d ge t in formation
about FlowPort applications and services.
Messages—View administrative messages.
Restart—Restart or shut down the FlowPort service.
2-4 ❖ Xerox Flow Port Admin istr ator G uide

Logging out
Logging out
To log out:
Click the logout link located in the upper right corner of
1
the Web Centre.
The FlowPort Welcome page displays, from which you
can log in again.
Note: If you close your W eb browser or go to another Web site,
you are not be logged out of F l owPo rt. Yo u shou ld alwa ys cl i ck
the logout link to log o u t.
Chapter 2: G ettin g st arte d ❖ 2-5

2-6 ❖ Xe rox F lowP ort Adm inis trat or Gu ide

Managing user accounts Chapter3
Creatin g a user account ....... ..................... ............ ............. 3-2
Setting up a user’s account to receive Internet faxes ........ 3-4
Setting up a user’s account to use Network Accounting ... 3-6
Setting a local printer as the user's default printer ........... 3-7
Changing the user’s account information ........................... 3-8
Changing the admin’s account information ........................ 3-9
Deleting a user account ................................................... 3-10
Viewing the list of users ................................................... 3-10
Chapter 3: Man aging user accounts ❖ 3-1

Creating a user account
You manage Flo wP or t user acc ou n ts fr o m the Users page.
On this page, you can pe rfo rm the following tasks:
• Create a user account
• Change a user's account information
• Delete an account
• View the list of FlowPort users.
Creating a user acco unt
T o enable users to access FlowPort through a W eb browser,
you must create an account for each user. After you've set
up the account, the user can start using Pap erWare forms.
When creating an account, you must provide the user's
login name, email address, and de fault printer. You can
also enter the optional account information or let the user
provide the information. After you create the account,
the user can c hange any of the informat ion you speci fy.
To create a user account:
1
2
3
3-2 ❖ Xerox FlowP ort Ad minis tra tor G uide
Click the Users button.
Click the Add New User link.
On the Add New User page, enter the following
information:
First Name—User’s first name, which is printed with the
last na m e on PaperWare fo rms.
Last Name—User’s last name, which is printed with the
first n a m e on Pape rWare fo rms.
User Name (required ) —Name u sed to log i n t o FlowPo rt .
Email Address (requi red)—User’s email address (for
example, jsmith@bestcompany.com).

Creating a user account
Default Printer (required ) —The printer or Inte rnet fax
device on which the user prints PaperWare forms, or the
email address to use when emailing PaperWare forms.
• For printers, specify the fully qualified printer name
(for exampl e, documentcentre1 .b estcompany.com) .
Note: FlowPort supports the Xerox Document Centre,
any networked lpr-enabled printer, and a local PCL
printer. To set up a user's account to print to a local
printer, refe r to the “Setting a l oc al printer as the user's
default printer” sectio n on page 3-7.
• For Internet fax devices, specify the Internet fax address
(for example, inter net fax@bestcompan y.com).
•For the Email PDF File printer type, specify the user's
email address. PaperWare forms are emailed as PDF
attachments, which allows the user to print forms
outside a firewall.
Printer Type (required)—Type of printer selected as the
default printer.
Default Form Size—Paper size used to print PaperWare
forms on the default printer. Options are US Letter and
A4.
Job Confirmat ion Meth od—Method by which the user is
notified when a PaperWare-initiated job has been
successfully processed. Options are Printer and Email.
Note: To receive a Document Token when storing a
document in a repository that supports access, the Job
Confir mati on M et hod mu st be set to Printer.
Locale—Language used to display the FlowPort We b
Centre interface. System Default displays the interface in
the language set on the System page. Therefore, any time
you change the Locale setting on the System page, the
user's Locale setting also changes.
PIN and PIN Again—Use r’s four-digit co de that is
specified on a Login Sheet when using p rivate forms, and
when using shared and public forms if you change the
default security settings.
Password and Password Again—User’s password for
logging in to the FlowPort Web Centre and at the Xerox
Document Centre control panel.
Include Password & PIN in Email to User—Pro v ides the
user's password and PIN, if specified, in the email message
that is automatically sent to the user after the account is
created.
Chapter 3: Man aging user accounts ❖ 3-3

Creating a user account
Click the Submit button.
4
Click Continue to set up the user's applications.
5
On the User Profile pag e, click the li nk for the
6
application you need to set up.
On the application page, specify the appropriate options.
7
For information on setting up the applications, refer to
the “Setting up a user’s account to receive Internet faxes”
section on page 3-4 and the “Setting up a user’ s account to
use Network Accounting” section on page 3-6 in this
chapter.
Click OK.
8
FlowPort sends an em ail message to the new user tha t
explains how to get started using FlowPort and provides
your email addres s .
Setting up a user’ s
account to receive
Internet faxes
To set up a user’s account to receive Internet faxes, you
specify the type of mail server to use to receive the faxes
and how you want FlowPort to process incoming faxes.
FlowPort can process the faxes in the following ways:
• Store faxes to a repository
• Store faxes to a repository and print a Document Token
for ea ch stored fax
•Print faxes.
You can also have Flow P ort send an email message to the
user when an Internet fax is received.
To set up a user’s account to receive Internet faxes:
Click the Users button.
1
Click the user’s name whose account you want to set up
2
to receive Internet faxes.
On the User Profile page, c lick the Internet Fax Mailbox
3
link.
Click the Enable button.
4
3-4 ❖ Xerox FlowP ort Ad minis tra tor G uide

Creating a user account
Specify the type of mail server to use to receive
5
Internet faxes
Accept Internet Faxes via the FlowPort SMTP Mail
Server—FlowPort receives Internet faxes using its built-in
SMTP mail server.
Note: This option displays if Internet Fax SMTP
Service Enabled is set on the Internet Fax Receive
Configuration page.
Accept Internet Faxes via a POP3 Mailbox on Another
Server—FlowPort re c eives Internet faxes by polling a
POP3 mail server.
Note: This option displays if Internet Fax POP3 Mail
Polling Enabled is set on the Internet Fax Receive
Configuration page.
Do Not Accept Incoming Internet Faxes for This
User—FlowPort do es not rec eive Internet fa xes.
If you chose to accept Internet faxes via a POP3 mailbox,
6
enter the following information and then click Next.
User Name for POP3 Mailbox Account—Specifies the
user's account name for the POP3 mailbox.
Password for POP3 Mailbox Account—Specif ies the
user's password for the POP3 mailbox.
Host Name of POP3 Mailbox Server—Specifies the host
name of the server running the POP3 mail server.
Mail Domain—Specifies the mail domain name.
and then click Next.
Choo s e how to proce ss incom ing fax es and th en click
7
Next.
Notify By Email—Sends an email message to the user
when an Internet fax is received.
Print Document—Prints the entire fax on the user’s
default printer.
Store Document in Repository—Stores th e f ax in a
repository. To use this option, you must specify a
reposit o ry in st e p 8.
Print Document Token—Print s a o ne-page docum ent
that r epresents the st o red document on the u s er’s default
printer.
Chapter 3: Man aging user accounts ❖ 3-5
 Loading...