

Page 1
User Guide
Versio n 2.1
Page 2

Copyright © 1999-2000 Xerox Corporation. All Rights Reserved.
Publication number: 613P08641
Copyright protection claimed includes all forms of matters of
copyrightable m aterials and information now allowed by statutor y or
judicial la w or here inafter gr ant ed, inc luding wi thout l imitat ion, mat erial
generated from the sof tware pr ogr ams which are disp layed o n t he scre en
such as styles, templates, icons, screen displays, looks, etc.
XEROX®, The Document Company®, the stylized X, DataGlyph,
Document Centr e, CentreWar e, DocuShare, Pa perWare®, ar e registered
trademarks and FlowPor t, Document T oken, and DocuStamp are
trademarks of Xerox Corporation or its subsidiaries.
Adobe and Acrobat are registered trademarks of Adobe Systems,
Incorpora ted. Lotus, Lotusphere, and Lotus Notes are regist ered
trademarks and Notes and Dom i no are trademarks of Lotus Corporation.
Pagis and TextBridge are registered trademarks of ScanSoft, Inc.
Microsoft, Microsoft Windows, Microsoft Word, Microsoft Exchange,
Microsof t Internet Expl orer, Mi crosoft Office, Imaging for Wi ndows, MS,
MS-DOS, and Win d ow s are registered trademarks of Microsoft
Corporation. Netscape Navigator and Netscape Enterprise Server are
registered trademarks of Netscape Communications Corporation. HP,
PCL, and HP Deskjet are registered trademarks of Hewlett-Packard
Company. IBM is a registered trademark of International Business
Machines Corpor ati on. Java, Java Runtime Envi ronm ent, JRE, Java
Archive, JAR, and Sun Solaris are trademarks or registered trademarks
of Sun Microsystem s, Inc. All other product names are trademarks/
tradenames of t h ei r respective owners.
Notice
Specificati ons des cribe d in t his pu bli cation ar e sub ject to change wi thout
notice. Use of some features may be limited by your hardware or
software conf iguration. Contact your dealer or Xerox for details.
August 2000
Page 3

Contents i
Chapter 1 Welcome .................................................................. 1-1
About FlowPort and PaperWare®........................................ 1-2
Benefits of FlowPort..........................................................1-2
Applications included in this release..................................1-2
What’s in this gu ide .......... ...................................... ............1-4
Where to find more information........................................... 1-6
Online help......................................................................1-6
Contacti n g yo ur Fl owPort administrator.... ........................ 1-6
Going to the FlowPort web site.......... ......... ...................... 1-6
Chapter 2 Getting started ........................................................ 2-1
Login to the FlowPort Web Centre........................................2-2
About the Web Centre......................................................... 2-4
Taking the Quickstart tutorial.............................................. 2-5
Logout from FlowPort ............................... ...........................2-5
Contents ❖ ii i
Page 4

Chapter 3 Quick look at using FlowPort .................................. 3-1
Introduction to FlowPort......................................................3-2
Document management scenarios.......................................3-4
Scan to email...................................................................3-5
Distributing documents multiple ways...............................3-6
Storing a document with special information ....................3-8
Accessing documents with Document Tokens..................3-10
Retrieving documents with Document Catalogs...............3-11
Distributing previously stored documents........................3-12
Distributing single stored documents...........................3-13
Distributing m ulti-stored documents .........................3-15
Copying a stored document to another repository...........3-17
Retrieving your documents when traveling......................3-18
Getting a form at anytime ..............................................3-19
Getting Help about a form............. ......... ........................3-20
Chapter 4 Using FlowPort forms .............................................. 4- 1
Scanning in FlowPort forms..................................................4-2
Scanning forms in the Xerox Document Centre................. 4-2
Scanning forms by Internet Fax........................................4-3
Printing forms with fax-size DataGlyphs........................4-3
Sending the Internet Fax job..........................................4-5
Using Cover Sheets a nd other types of forms ........................4-6
Cover Sheets................................................. ................... 4-6
Access Sheets................................................................... 4-7
Options Sheet.. ...................................... ..........................4-7
Login Sheet......................................................................4-7
Tips about using forms........................................................4-8
Marking a ch eckbox.........................................................4-8
Getting a new copy of a FlowPort form .............................4-8
iv ❖ Xero x Flo wPor t Use r Gu ide
Printing He lp for a FlowPort form......................................4-9
Page 5

Chapter 5 FlowPort capabilities ............................................... 5-1
Distributing your documents to the digital world..................5-3
Emailing a document with FlowPort.................................. 5-3
Confirming your document was sent or received................5-6
What if the email address was wrong? ..........................5-6
What about other mail server problems?.......................5-6
Authentica tion problems...............................................5-6
Emailing a stored document URL......................................5-7
Distributing a document by Internet Fax.........................5-11
Sending a document to a remote printer .........................5-12
Distributing a document in
multiple ways........ ...................................... ...................5-14
Storing documents to a repository...................................... 5-18
Repository Information...................................................5-21
Storing a document with docu ment man age ment f ields..5 -2 5
Repository document management fields........................5-29
Creating a Document Options Sheet ...............................5-33
Using the Document Options Sheet................................5-36
Retrieving your stored documents from a repository............5-37
Retrieving and printing with a Document Token..............5-37
Emailing a stored document...........................................5-38
Distributing a stored document in other ways.................5-40
Creating a Document Token...........................................5-43
Using a Document Token ...............................................5-45
Creating a Document Catalog........................................5-46
Using a Document Catalog.............................................5-47
Receiving Internet Faxes through FlowPort ..........................5-49
Your Internet Fax address...............................................5-51
Using Network Accounting with FlowPort...........................5-52
Printing with your Network Accounting ID......................5-52
Using a form to set Network Accounting IDs................... 5-53
Setting your default Network Accounting ID....................5-55
Conte n ts ❖ v
Page 6

Chapter 6 Managing FlowPort forms ...................................... 6-1
Using the Forms and Applications page................................6-2
Creatin g a new for m... ........................ .................................6- 5
Pointers to information about creating forms.................... 6-6
Editing an existing form.......................................................6-7
Previewing a form................................................................6-8
Sorting yo ur forms......... ...................................... ................6-9
Printin g forms...... ...................................... ........................6-10
Deleting a form.................................................................6-11
Using previous versions of a form.......................................6-11
Viewing and printing multiple page forms..........................6-13
Chapter 7 Specifying user preferences and printers .................. 7-1
Changing your account information.....................................7-2
Setting your application options...........................................7-4
Setting you r Internet Fax options...................................... 7-4
Setting you r Network Accounting options .........................7-5
Specifying a printer..............................................................7-7
Chapter 8 Using shared and private forms .............................. 8-1
vi ❖ Xerox F low Port Us er G uide
Printing to a Document Centre or other networked printer 7-7
Printing to a local printer..................................................7-8
Printing to an Internet Fax device.....................................7-9
Security and your FlowPort system.......................................8-2
Special security policies defined by your administrator.......8-3
Public, shared, and private forms.........................................8-4
Defining a shared or private form.....................................8-5
Using a private or shared form .........................................8-5
Providing authentication when you use FlowPort forms.........8-6
Creating a Login Sheet.....................................................8-6
Using the Login sheet.......................................................8-7
Protecting access to your Login Sheet............................8-8
Login at the Document Centre.......................................... 8-9
Page 7

Appendix A Viewing documents scanned by FlowPort ................ A-1
Viewing scanned documents................................................ A-2
Viewing PDF docu men t s....................... ............................A-2
Viewing TIFF documents. .......... ........................ ................A-2
Troubleshoo ting multi-pag e TIF F viewing problems..... .... ... ... A-3
Index ..................................................................................IX-1
Contents ❖ vi i
Page 8

viii ❖ Xerox Flow Port User Guid e
Page 9

Welcome Chapter1
Welcome to Xerox FlowPort. FlowPort enables you to
transform your paper do cuments easily into electronic
documents, so that you can share and access them in your
digital workplace. It uses an innovative paper user interface
called PaperWare
This c h apter p rovides an overview of FlowPo rt, contents
of this guide, and where to find additional information
about FlowPort.
This chapter contain s the fo llowing:
About FlowPort and PaperWare® ....................................... 1-2
®
.
Benefits of FlowPort ........................................................ 1-2
Applications included in this release ................................ 1-2
What’s in this guide ........................................................... 1-4
Where to find more information ......................................... 1-6
Online help .................................................................... 1-6
Contacting your FlowPort administrator .......................... 1-6
Going to the FlowPort web site ....................................... 1-6
Chapter 1: Welcome ❖ 1-1
Page 10

About FlowPort and PaperWare®
About FlowPort and PaperWare®
FlowPort provides an innovative paper use r inte rface
called PaperWare. Using FlowPort PaperW are forms with a
Xerox Document Centre or an Internet Fax device, you
instruct your FlowPort server to distribute, store, and
retrieve your paper and electronic documents.
Benefit s of Fl owPort
Applications include d
in this release
FlowPort brings you an intelligent and powerf ul way t o
integrate your paper documents into electronic workflow ,
with benefits t h a t include:
• one touch distribution of a document to email
recipients
• one touch storage of documents to a repository (such
as Xerox DocuShare , Microsoft Exchange Folder, and
Lotus Notes)
• easy retrieval of stored documents using Do cument
Tokens and Do cument Catalogs
• output to a wide va riet y of rec ipien ts simultaneously
(by email, Internet Fax , re mote printing, and storag e)
FlowPort currently provides you with the following
applications.
Distribute Document—Scans paper documents and
distributes the resulting electronic documents through
email, Internet Fax, remote p rinting, or storage to a
document repo sito ry. The application featu res a FlowPort
form called a Distribute Document Cover Sheet that you
scan with your printed document to provide distributio n
instructions to a Xerox Document Centre or an Int ern et
Fax machine.
1-2 ❖ Xerox F lowP ort U ser Gui de
Docume nt Token—A ccesses a document stored in a
repository using a Document Token form that rep rese nts
the stored document. When you want to retrieve the
stored document, yo u scan the one-page Document
Token to print the original document, or scan a
Document Token with a Distribute Document Cover
Sheet to retrieve and distribute the stored document.
Page 11

About FlowPo rt and PaperWare®
Document Catalog—Accesses the documents stored in a
repository using a Documen t Cata log form, which is a
printed list of the repository's contents with a checkbox
for each stored object. T o retrieve stored documents, mark
the checkboxes for the documents you want and scan the
form to print the original documents. When using a
Document Catalog f orm with a Distribute Document
Cover Sheet, you can distribute th e retrieved documents,
regardless of their original format.
Internet Fax Mailbox—Receives Internet Faxes so that
you can print, store, and access the faxes. When storing
received faxes, the FlowPort server prints a one-page
Document Token of the fax and emails the URL where the
fax is s tored.
Login Sheet—Specifies your personal identification
number (PIN) on a Login Shee t form when submitting
jobs that require auth entication. You can use a L og i n
Sheet at a Xerox Doc ume nt Centre as an alternative to
logging in at the device's control panel, or when
submitting jobs to the FlowPort serv er from an Internet
Fax machine.
PaperWare Copy—Prints copies of documents. As t he
default application, it makes a co py of your document
when you scan a Document Token, Document Catalog, or
document at a Xerox Document Ce ntre without a Cover
Sheet.
Document Optio ns —Adds document management fields
to a document when you store it to a repository, and
charges print jobs to your account on a Document Centre
network accounting system. The application uses a
Document Options Sheet that you place after a Distribute
Document Cover Sheet to add fields or account
information to the document.
Network Accounting—Charges each printing job to an
Account ID set up on a Document Centre network
accounting system.
Chapter 1: Welcome ❖ 1-3
Page 12

What’s in thi s gui de
What’ s in this guide
Chapter 2 Getting Started
This guide d escribes ho w you can use the basic FlowPort
applications to simplify your work with paper.
Using FlowPort you can:
• Share your paper documents with others through
email, Internet Fax, remote p rinting, or storage to a
repository.
• Access your stored documents and print them on a
network printer or distribute the docum en ts.
• Store a document and rece ive a Document Token, a
piece of paper that represen ts th e stored document,
that you can later use to copy, Internet Fax, or email
the actual document.
• Receiv e an d access Internet Faxes by printing the
entire fax, storing the fax and retrieving it later using a
Document Token, or viewing the fax on the Web.
In addition to this chapter, this guide includes these
chapters:
Chapter 3 Quick look at using FlowPort
Chapter 4 Using FlowPort forms
1-4 ❖ Xerox F lowP ort U ser Gui de
Describes how to log on to the FlowPort Web Centre, use
features of the Web Centre, open the online Quickstart
tutorial, and logout.
Introduces you to FlowPort, presents a nu mber of quick
scenarios for using FlowPort to scan, store, and distribut e
paper documents, and to access stored documents
seamlessly.
Provides procedures to scan forms by a Xerox Document
Centre or submit them by Internet Fax. A lso describe s
how to get fresh copies of a form or get prin ted help.
Page 13

What’s in this guide
Chapter 5 FlowPort capabilities
Provides a task-oriented approach to using your FlowPort
applications. Choose a task and follow the specific steps
required to create a form and use it fo r that task.
Chapter 6 Manag ing FlowPort forms
Describes how to create, view, print, and edit forms in the
Web Centr e.
Chapter 7 Specifying user pre feren ces and printers
Provides details about setting your user account
information and specifying printers.
Chapter 8 Using shared and private forms
Describes how to add security to your forms an d stored
documents, and how to authenticate yourself as a user
when you use a secure form.
Appendix A Vi ew ing documents scanne d by FlowPort
Gives in formation and troubleshooting pointers about
viewing multi-page TIFF docum en ts that a re emailed or
stored by FlowPort.
Chapter 1: Welcome ❖ 1-5
Page 14

Where to find more information
You can get more information in several places.
Online help
Contacting your
FlowPort
administrator
Y ou can access online help in the FlowPort Web Centre by
clicking the help link in the upper right corner of the
window. Refer to the “Getting started” chapter on page
2-2 for informati on about how to use the Web Centre
window.
Yo ur F lowPort administrator can provide you with
information about your local FlowPort system.
For example, your administrator can assist you with using
your Xerox Document Centre with FlowPort. Your
administrator can also help you if you forget your
FlowPort password, or tell you how to locate do cument
repositories on your network su ch as Xerox DocuShare,
Microsoft Exchange, or Lotus Notes/Domino, for
scanning and storin g documents.
Contact your FlowPort administrator with questions
about using your local version of FlowPort.
To obtain your FlowPort administ rator’s e-mail address:
In your We b browser, go to the FlowPort Login/Welcome
1
page.
In the Login box, click the link "Contact your
2
administrator...." A help window is opened, displaying
the ema il address for your FlowPort adm in istrator.
Going to the
FlowPor t w eb site
1-6 ❖ Xerox FlowP ort U ser G uid e
To get more inf or mation about FlowP ort, visit the
following web site:
http://www.xerox.com/flowport
Page 15

Getting started Chapter2
This chapter desc r ibes how to login to the FlowPor t Web
Centre, use features of the Web Centre, open the online
Quickstart Tutorial, and logout.
This chapter contain s the fo llowing:
Login to the FlowPort Web Centre ...................................... 2-2
About the Web Centre ....................................................... 2-4
Ta king the Quickstart tutorial ............................................ 2-5
Logout from FlowPort ........................................................ 2-5
Chapter 2: Gett ing sta rted ❖ 2-1
Page 16

Login to the F low Port We b C entr e
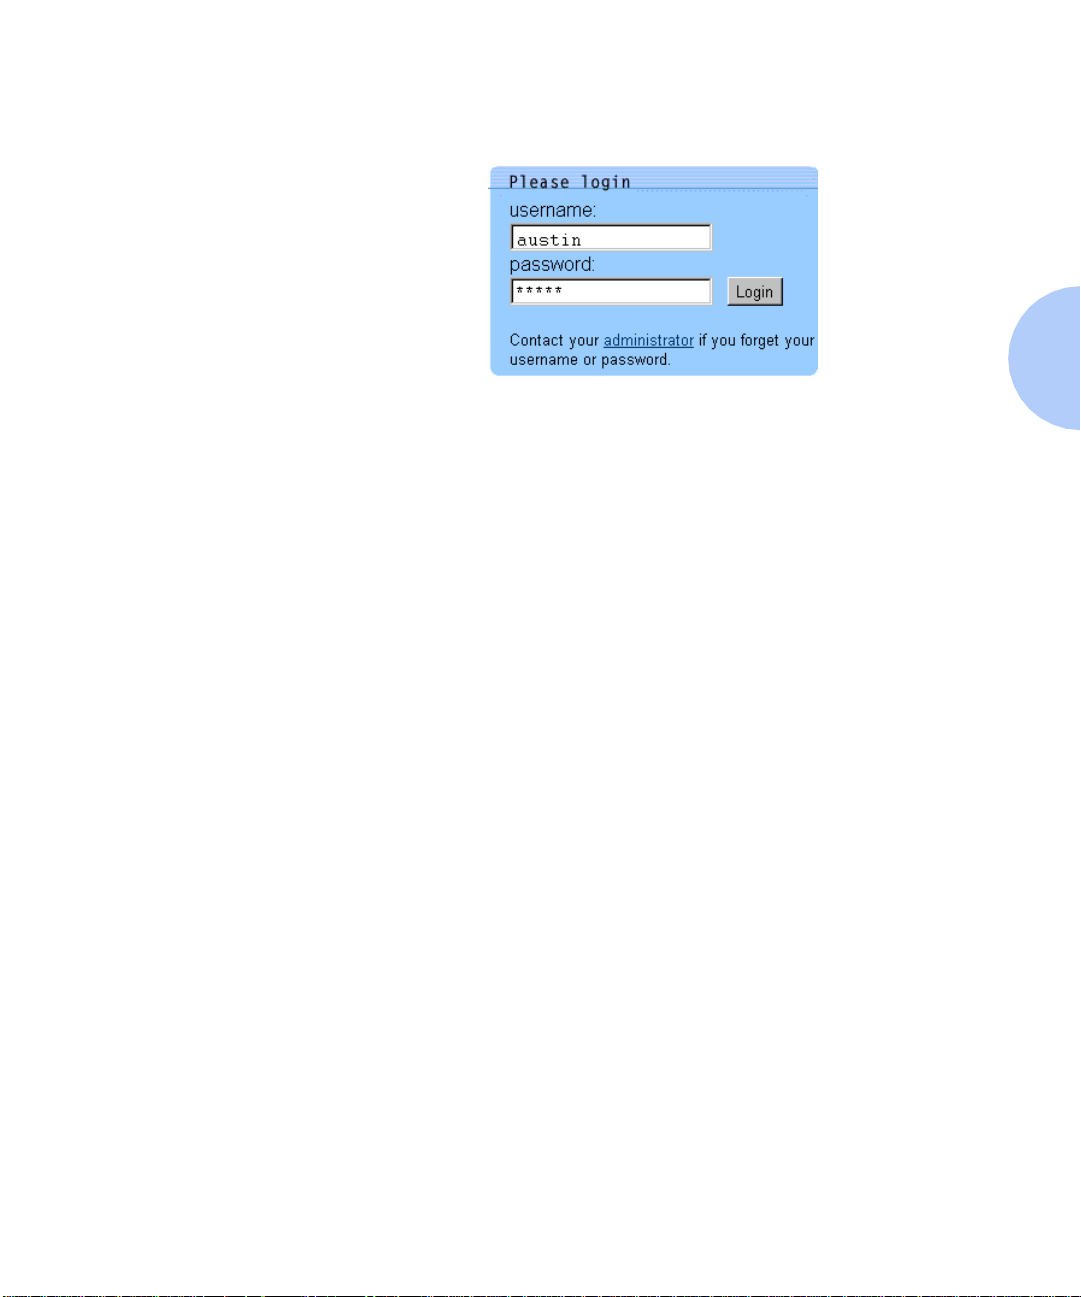
Login to the FlowPort W eb Centre
As a FlowPort user, you use paper forms to distribute,
store, and retrieve your documents directly from a digital
copier or Int ernet Fax devi ce. I n the Fl owPor t Web Centre,
you can customize and print your own forms to carry out
these ta sks.
To log in to the FlowPor t Web Centre:
You are sent a ‘Welcome to Flo wP o rt ’ email message when
1
your FlowPort administrator adds you as a user. The email
mess a g e c ontai ns the Flo wPort Welcom e page U RL, your
user name and password to login, and if required, your
personal identification number (PIN, see page 8-6 for
information about using the PIN).
The URL consists of “http://” followed by th e name of the
FlowPort server. For example, if the server’s name is fish,
the URL will be http://fish.
Enter the FlowPort URL in the Location or Address line of
2
your Web browser.
2-2 ❖ Xerox F lowP ort U ser Gui de
The F lo wPort Welco m e page is disp la yed.
Note: Create a bookmark for the FlowPort We lcome
page. In Netsc ape , click B oo k m arks and select Add
Bookmark. In Internet Explorer, open the Favorites
menu and select Add to Favorites. The bookmark
‘Welcome to FlowPort’ is added to your Bookmarks or
Favorites list. You can select it any time to access the
FlowPort page.
Page 17
Login to the FlowPort Web Centre
In the Login box, enter your user name and password.
3
Click Login.
4
The We b Centre opens to your user page.
Chapter 2: Gett ing sta rted ❖ 2-3
Page 18

About the Web Cen tre
About the Web Centre
The Fl owPort Web Centre window is shown in the
following diagram.
Click the Forms
button to view,
print, and create
forms
Click to open help window
Links to the
Web Centre
pages
Click to start
QuickStart tutorial
Click to logout
The links to the Web Centre pages allow you to do the
following:
• IntroSee an introduction to the Web Centr e and
open a Quicks ta rt tut ori al. Click th e lin k at the bo ttom
of the page if you do not want this page displayed each
time you lo gin.
2-4 ❖ Xerox F lowP ort U ser Gui de
• FormsCreate new forms, and view, print, edit, or
delete your existing forms.
• AccountChange your accou nt information,
including user name, password, email address,
personal identification n umber (PIN) used by yo ur
Login Sheet, and default printer.
• OptionsSpecify application options, including
options for receiving Intern et faxe s.
Page 19

Taking the Quickstart tutorial
A brief “Quickstart” online tutorial introduces you to
FlowPort and gets you started with printing and using a
FlowPort PaperWare form.
The Quickstart instructs you to do the following:
• Print y ou r first Cover Sheet.
• Proc ess the Cover Sheet in a Xerox Document Centre,
to scan and email a document to yourself in just one
step.
• Receiv e an d view the scanned docum ent on your
desktop.
• Look at ot her tasks you can perform with FlowPort
forms.
To open the Quickstart tutorial:
Click the blue graphic that says step me through the
1
Quick Start.
Taking the Quic ksta rt tu toria l
2
Logout fr o m F lowPort
To logout from the FlowPo r t Web Centre:
1
The Q uicksta rt online help window o pens. U se the gre en
back and forward arrows to navigate through the pages.
When you a re finished, click the u p per right corner of the
window to close it.
Click th e lo gout link in th e upper right c orner of the Web
Centre interface. You are returned to the Welcome page
Note: Closing your Web browser or going to another
Web site does not l og you ou t of FlowPort. You should
always click the logout link to logout.
Chapter 2: Gett ing sta rted ❖ 2-5
Page 20

2-6 ❖ Xerox FlowP ort U ser G uid e
Page 21

Quick look at using FlowPort Chapter3
This chapter introduces you to FlowPort, and
demonstrates a numbe r o f ways you can use FlowPort’s
PaperWare forms to simplify scanning, distributing, and
storing your hard copy documents for later access.
Use this chapter as a companion to Chapter 5, “FlowPort
capabilities.” Each scenario described in this chapter refers
to detailed steps in Cha p ter 5 that you can follow to
perform that task.
This chapter contain s the fo llowing:
Introduction to FlowPort .................................................... 3-2
Document management scenarios ..................................... 3-4
Scan to email ................................................................. 3-5
Distributing documents multiple ways ............................. 3-6
Accessing documents with Document Tokens ................ 3-10
Retrieving documents with Document Catalogs ............. 3-11
Distributing previously stored documents ...................... 3-12
Copying a stored document to another repository ......... 3-17
Retrieving your documents when traveling .................... 3-18
Getting a form at anytime ............................................ 3-19
Getting Help about a form .............. ......... ..................... 3-20
Chapter 3: Quick look at using FlowP ort ❖ 3-1
Page 22

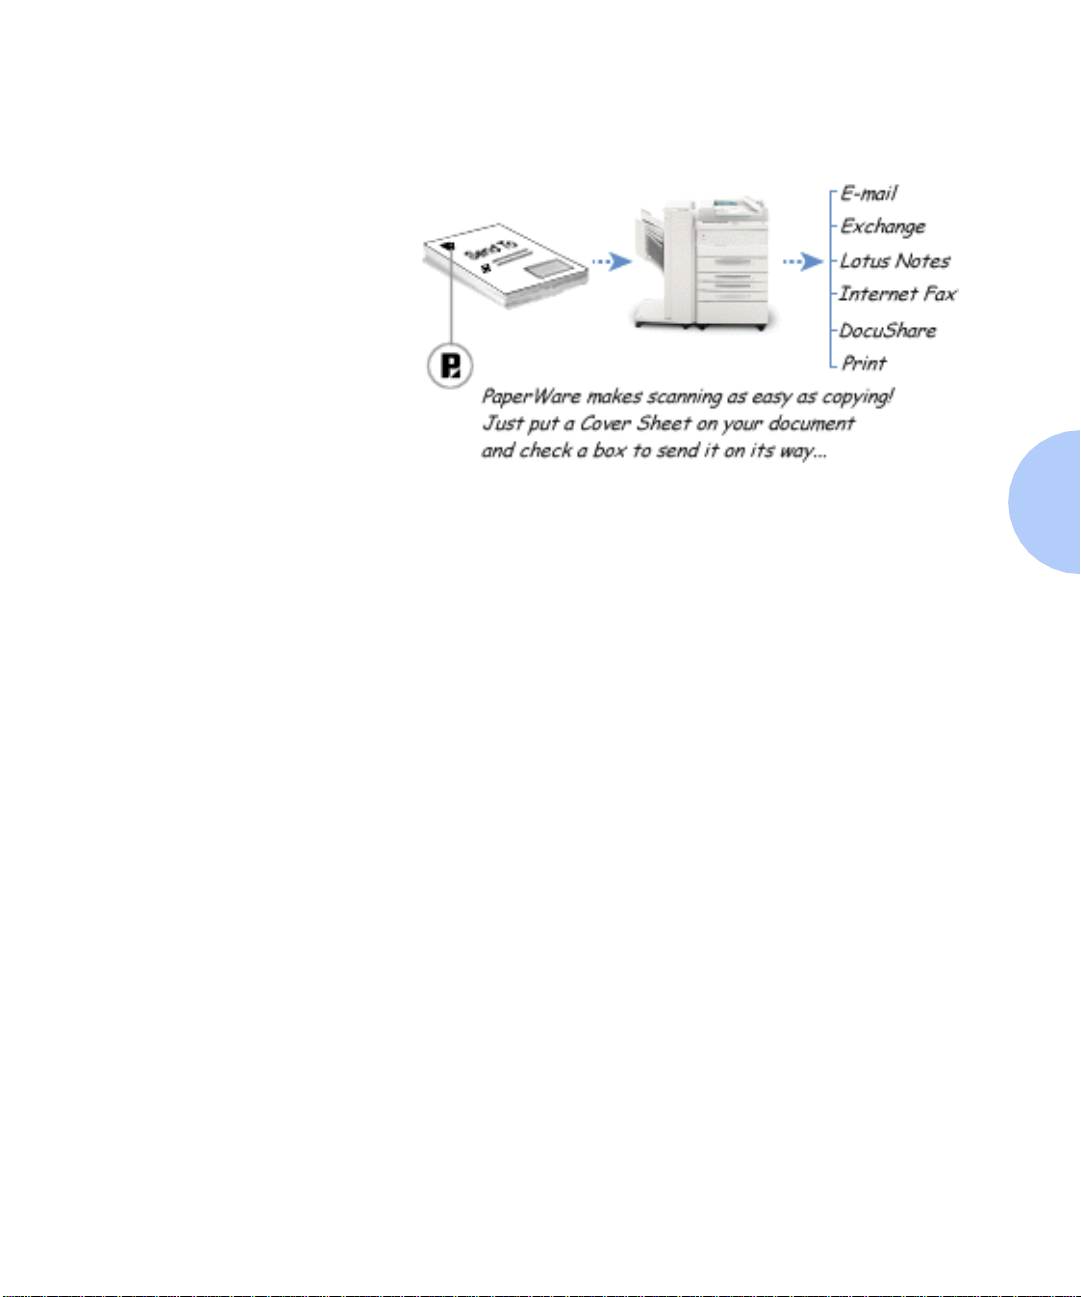
Introduct ion t o Flo wPort
Introduction to FlowPort
FlowPort enables you to easily t ransform your paper
documents into electronic f orm, so that you can
distribute and access them within the digit al world of
your office.
For instance, FlowPort lets you scan an d:
• store d ocu ments
• email documents
• Internet Fax documents
• remotely print your docu ments
• later print and route your stored do cuments for
emailing, storage, Internet Fax, or remote printing .
To help you with these tasks, FlowPort provides you with
PaperWare forms. Using DataGlyph
PaperWare forms contain machine-readable instructions.
The DataGlyph is locat ed in the lower right quandrant of
each example form shown in this chapter.
To process your documents, you typically use a Co ver
Sheet to give instructions to the FlowPort server. The
Cover Sheet information is scanned in with a digital
device, such as a Docu ment Centre or Internet F ax
machine.
Figure 3.1 illustrates how you can enter FlowPort
PaperWare forms in a digital device like the Xerox
Document Centre to perform various tasks.
®
technology,
3-2 ❖ Xerox F lowP ort U ser Gui de
Page 23
Introduction t o Flo wPort
Figure 3.1 Xerox Document Center
In the same way, you can submit forms by Internet Fax.
You can use an Acce ss Sh eet, such as a Document Token
or Document Catalog, to access and retrieve a stored
document for printing or distributing.
Chapter 3: Quick look at using FlowP ort ❖ 3-3
Page 24

Docume nt ma nag eme nt sc ena rio s
Document management scenarios
A list of document management scen arios is provided in
Table 3.1. Each scenario is explained in more detail in the
following sections.
Table 3.1 Document management scenarios
Scenario Description
Scan to email; page3-5 If you email documents frequentl y to an i m portant
recipi e n t— j u st create a C ov e r Sheet fo r th is t a sk an d
use it repeatedly.
Distribut ing documents multiple ways; page 3-6 Email, Internet Fax, remotely print, and store a paper
document all in one step
Storing a document with special information;
page 3-8
Accessing documents with Document Tokens;
page 3-10
Retrieving doc ument s with Docume nt Ca talog s;
page 3-11
Use a work flow Cove r S heet to st or e a docu ment w ith a
title, su m mary, keywords, an d o ther information, to
help make sharing your documents easy.
Carry a single Document Token in place of a 50-page (or
more) stored document.
Use a Document Catal og to select and pri nt the exact
combination of documents you need.
Distributing previousl y sto red documents;
page 3-12
Copying a stored document to another
repository; page 3-17
Retrieving your documents when traveling;
page 3-18
Getting a form at anytime; page 3-19 Re-fetch a fresh version of any form d irectly from the
Getting Help about a form; page 3-20 Get printe d h elp about a PaperWare form any time.
Distribute a stored document by em ail, Internet fax, or
remote pr in ti n g.
Copy a stored docum ent to another repository.
When traveling, retrieve an d print documents that ar e
stored at your workplace
digital device— no need to go to the desktop.
3-4 ❖ Xerox F lowP ort U ser Gui de
Page 25
Document management sce narios
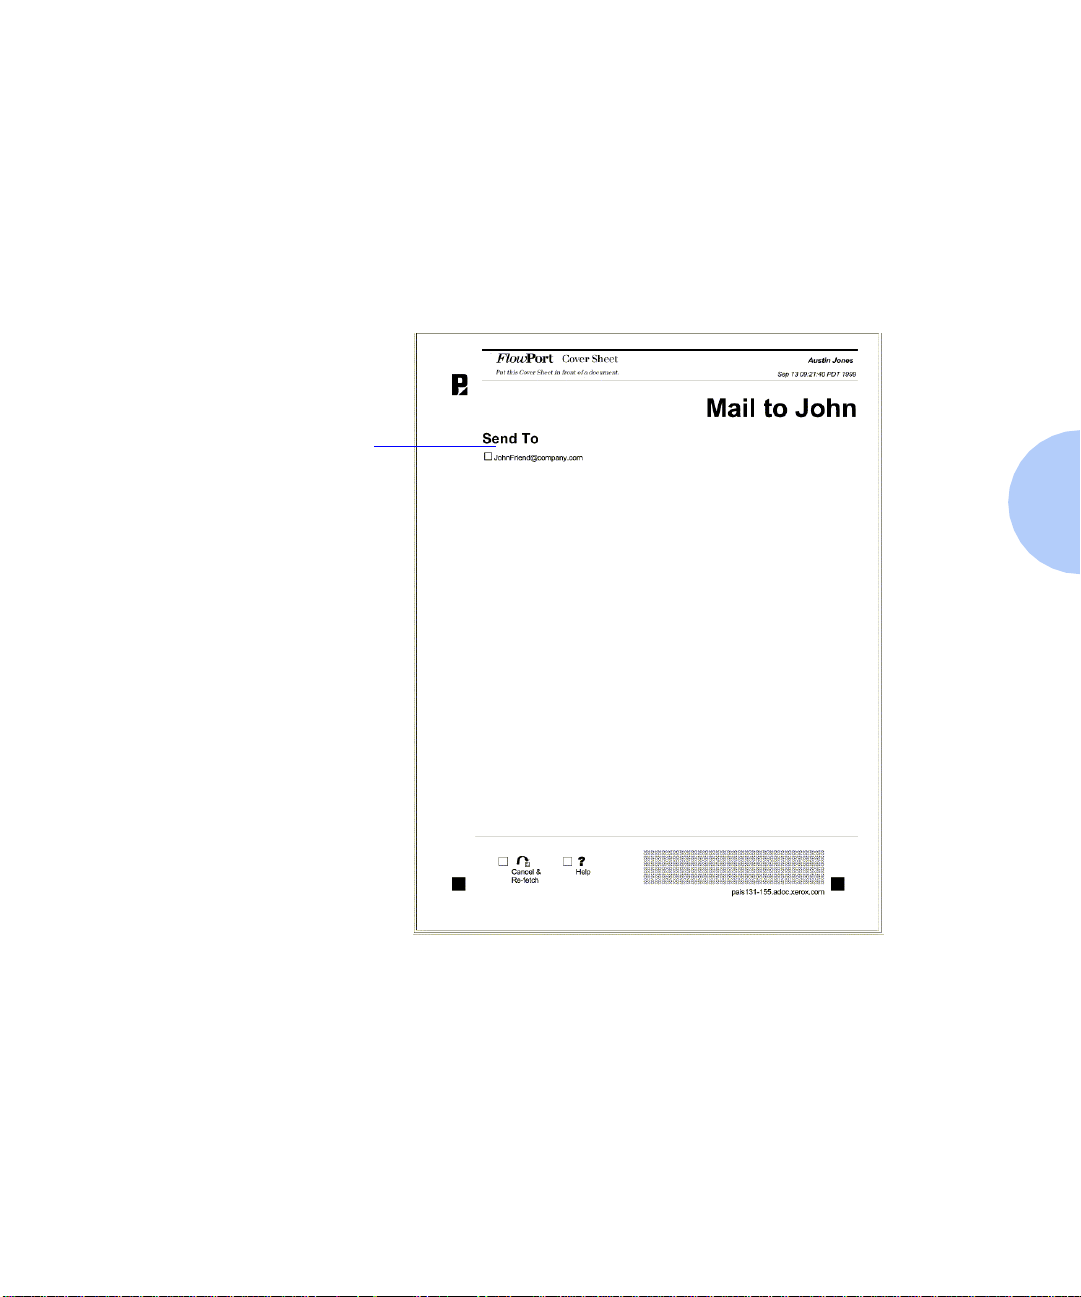
Scan to email
Checkbox for emailing
to John Friend
TIP: This Cover sheet is
specially created with a
checkbox pre-checked,
so the email address is
always selected
With FlowPort, scanning to email is as easy as copying.
For example, if you email documents frequently to an
important recipient, you can create a Document
Distribution Cover Sheet with one email recipient, as
follows:
Figure 3.2 Document Distribution Cover Sheet to one
recipient
When you ha ve a hardcopy document to send to a single
1
person , m a rk the che ckbox for
JohnFriend @com pany.com.
Put this Cover Sheet in front of the document.
2
Chapter 3: Quick look at using FlowP ort ❖ 3-5
Page 26

Docume nt ma nag eme nt sc ena rio s
Put both in the Xerox Document Centre; select the Scan
3
tab/FlowPort scan template, and press the Start button (or
fax them from an Internet fax device to
flowport@your-FlowPort-addressname. See “Sending the
Internet Fax job” section on page 4-5).
The document is emailed as a PDF or TIFF image
attachment.
Note: The example form above was created with the
email checkbox pre-checked. When you create a form,
you can make a ch eckbox pre-checked if you want that
option always to be selected.
For detailed steps, refer to the “Emailing a document with
FlowPort” section on page 5-3.
Distributing
documents multiple
ways
You can email, Internet Fax, sto re, an d remotely print a
document.
In the FlowPort Web Centre, you create a Cover Sheet
with checkboxes for emailing, storing to a repository,
submitting an Internet Fax, printing to a remote location,
or any combination of these tasks. Figure 3.3 illustrates an
example of a Cover She et.
3-6 ❖ Xerox F lowP ort U ser Gui de
Page 27
Checkboxes
for email
Checkboxes
for selecting
an email
subject
Checkbo xes
for storing in a
repository
Document management sce narios
Figure 3.3 Cover Sheet with Checkboxes
Checkbox for
Internet faxing
Check this option to send
an image attachment as
well as the URL of a
document (when both an
email and a repository
checkbox a re marked)
Checkboxes for
remote printing
For example, to email a document to two recipients and
then Interne t Fax the document, perform the follow i ng
steps:
Mark the app ro priate Email to an d Internet Fax to
1
checkboxes.
Chapter 3: Quick look at using FlowP ort ❖ 3-7
Page 28

Docume nt ma nag eme nt sc ena rio s
Place this Cover Sheet and the document into a Xerox
2
Document Centre or an Internet Fax machine.
Select the Scan tab/FlowPort scan template on a
3
Document Centre (or an Internet Fax machne sending to
flowport@FlowPort-InternetFaxAddress) and press Start.
The document is emailed and faxed, all in one step.
For detailed steps, refer to the “Distributing a document
in multiple ways” section on page 5-14.
Storing a document
with special
information
You can store a docu ment to a document repository with
identifying information—Title, Summary, Keywords, and
other document ma nagement fields that help you
organize and share your doc ume nts.
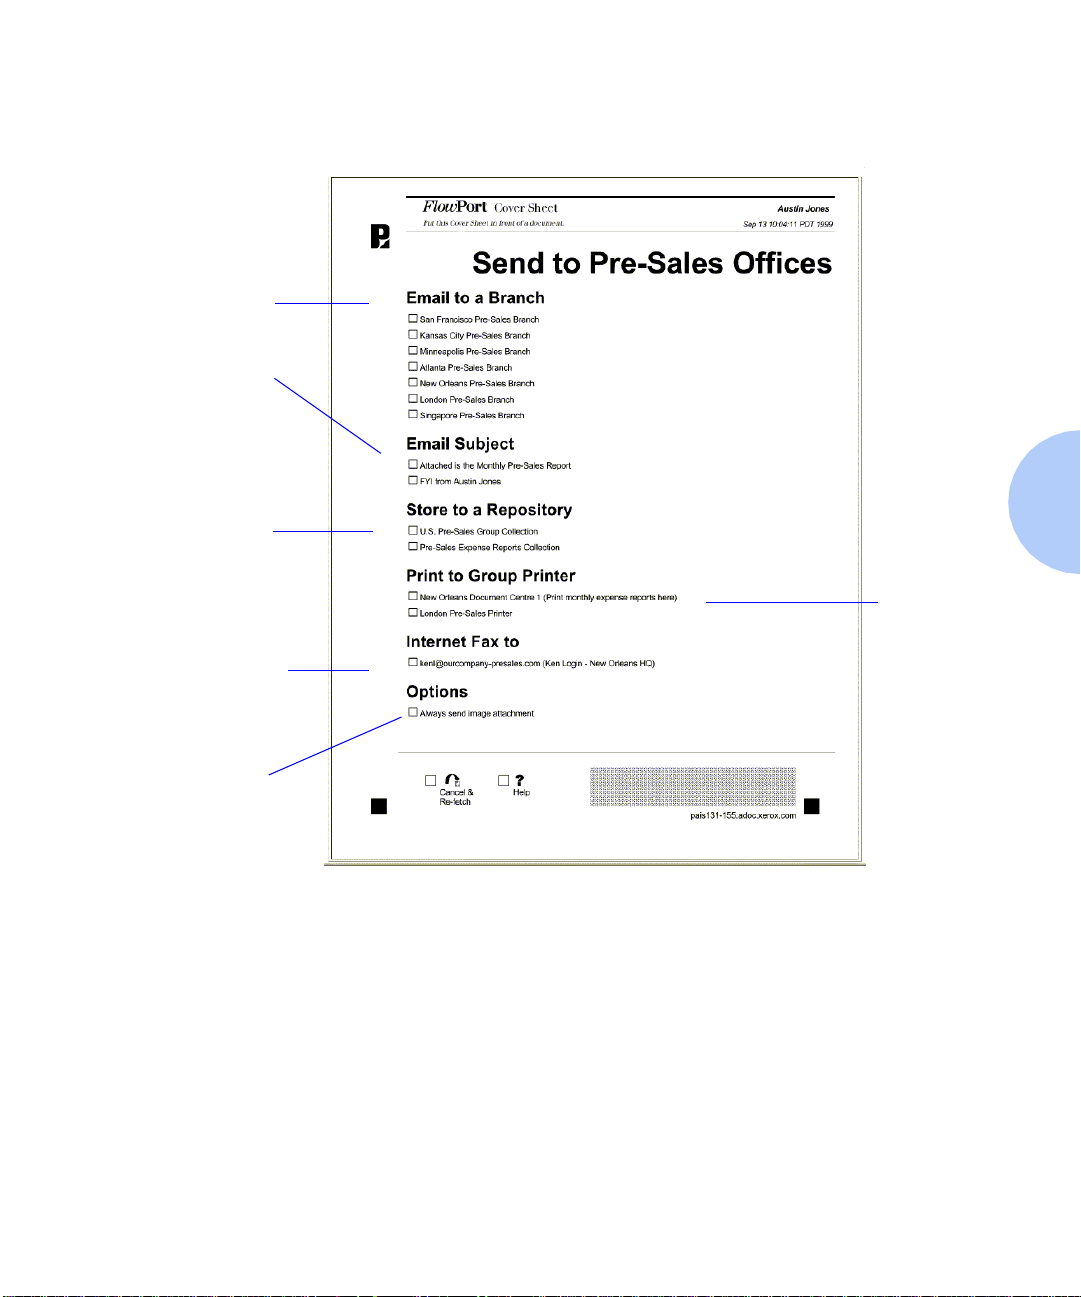
For examp l e, t h e w ork f low Cov er Sheet (Fig u r es 3.4) lets a
member of the marketing group store a document by
product name such as tagging it as an article, brochure, or
press release. At the same time, the marketing member
can send the sales team a m essag e wit h a URL pointer to
the stored documen t, print it at a group printer, or both.
3-8 ❖ Xerox F lowP ort U ser Gui de
Page 29

Marketing checkbox stores to a repository
Product checkboxes store the document
with a “Ti tle” that is the product name.
Type of Do cument check b oxes store t he
document with a “Summary” describing
the type o f document.
Notify checkboxes send email with the URL
of the stor ed document t o the Sales Group,
print th e d ocument at a remote pri nter, or
both.
Document management sce narios
Figure 3.4 Cover Sheet with Spec ial Information
For more information, re fer to the following sections:
• “Storing docu ments to a repository” section on
page 5-18 to store to a repository (example: Marketin g
checkbox).
• “Storing a document with document manage ment
fields” section on page 5-25 to associate a Title,
Summary, and other fields with the stored document
(for example, Type of Docum ent and Product
checkboxes).
• “Emailing a stored document URL” section on page 5-7
to ema il a UR L (example: Sales Group checkbox).
Chapter 3: Quick look at using FlowP ort ❖ 3-9
Page 30
Docume nt ma nag eme nt sc ena rio s
• “Sending a document to a remote printer” sectio n on
page 5-12 to send to a remote printer (example: Palo
Alto Printer checkbox)
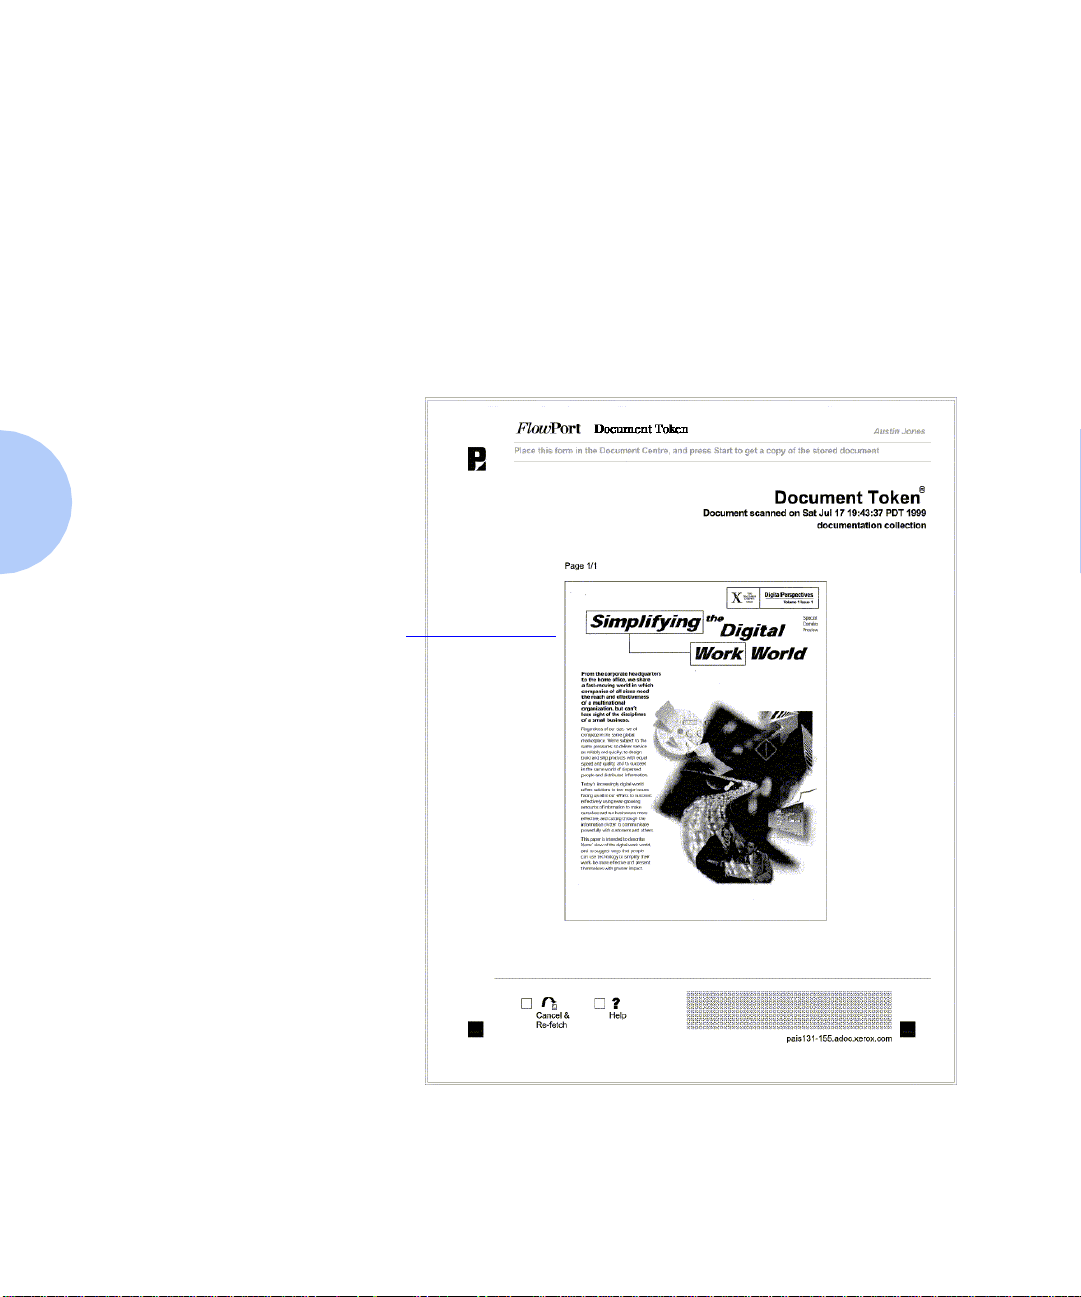
Accessing documents
with Document
Tokens
Document Token has a
thumbnail image of
the documen t that th is
Token repre sen ts
When you store a document to a repository that supports
access from FlowPort, you receive a PaperWare Document
®
Token
document you stored. Figure 3.5 illustrates an examp le of
a Document Token.
Figure 3.5 Document Token
which is a piece of paper that re presents the
3-10 ❖ Xero x Flo wPor t Us er G uide
You can use a Document T oken to re trieve, print, re-route,
or re-fax the original docume nt b y scanning this one
page, even if that document is a large file.
Page 31

Document management sce narios
For more information, re fer to the following sections:
• “Storing docu ments to a repository” section on
page 5-18
• “Retrieving and printing w ith a Document Token”
sect io n on pa ge 5-37 and “E mailing a stored document
URL” section on page 5-7.
Retrieving documents
with Document
Catalogs
You can get direct access to the documents in an
electronic document repository with a paper Document
Catalog.
In the FlowPort Web Centre, you can create a Document
Catalog, which is a PaperWare form, that lists the
contents of a repository. Figure 3.6 illustrates a n e xample
of a Document Catalog.
Figure 3.6 Document Catalog
DocuShare collection
in a Web Browser
Document
Catalog form
Chapter 3: Quick look at using FlowPort ❖ 3-11
Page 32

Docume nt ma nag eme nt sc ena rio s
Use the Documen t Catalog to select and retrieve
documents at the Document Centre or Internet Fax
device. For example, to get a printed copy of one or more
documents, just mark their checkboxes and scan in the
Document Catalog.
Note: Document Catalogs can be created for
repositories that support access by FlowPort, such as an
FTP directory or a Xerox DocuShare collection.
For more information, re fer to the following sections:
• “Creating a Document C atalog” section on pag e 5-46.
• “Using a Document Ca talo g” section on page 5-47.
Distributing
previously stored
documents
Y ou can email, Internet Fax, or remotely print a document
that you have stored to a repository without hav ing to
retrieve and print it.
Create a Document Distrib ut ion Cover Sheet in the
FlowPort Web Centre, with ch eckb oxes for email , Inte rnet
Fax, remote printing, or storing, as shown in Figure 3.7.
Figure 3.7 Document Distribution Cover Sheet
3-12 ❖ Xero x Flo wPor t Us er G uide
Page 33

Document management sce narios
Distributing single stored documents
There are two methods to distributing a single store d
document.
• Mark checkb oxes on the Cover Sheet and place it in
front of a Document Token that repres ents one stored
document, as shown in Figure 3.8
Figure 3.8 Cover Sheet in front of a Document Token
that represents one stored document
Chapter 3: Quick look at using FlowPort ❖ 3-13
Page 34

Docume nt ma nag eme nt sc ena rio s
• Place the Cover Sheet in front of a Document Catalog,
with a checkbox marked, to select the stored document
you want to distribute, as shown in Figure 3.9.
Figure 3.9 Cover Sheet in front of a Document Catalog
with one stored document selected
Document selected
3-14 ❖ Xero x Flo wPor t Us er G uide
Page 35

Document management sce narios
Distr ibuting multi-sto red docu m ents
There are two methods for distributing multi-stored
documents.
• P lace the C over Sheet in front of a Do c ument Ca talog
that can represent more than one stored document.
— Mark chec kboxes on the Document Catalog to
select the documents that you w ou ld like t o
distribute, as shown in Figure 3.10.
— Place both sheets into a Xerox Document Centre or
Internet Fax device (selecting the Scan tab and
FlowPort scan template on a Document Centre) and
scan the documents.
Figure 3.10 A Cover Sheet in front of a Document
Catalog that represents more than one
stored document
Chapter 3: Quick look at using FlowPort ❖ 3-15
Page 36

• Place the Cover Sheet in front of two or more
Document Tokens, or a Document Token and a
Document Catalog, or any combination of Document
Tokens and Do cument Catalogs (a lso calle d Access
Sheets), as shown in Figure 3.11.
Place all the sheets in the digital device and scan the
documents.
Note: You can place any number and combination of
Document Tokens and Document Catalogs after a
Cover Sheet.
Figure 3.11 A Cover Sheet combined with Document
Tokens and Document Catalogs
3-16 ❖ Xerox Flo wPort U ser G uid e
For more information, re fer to the following sections:
• “Emailing a document with FlowPort” section on
page 5-3
• “Distributing a document in multiple ways” section on
page 5-14.
Page 37

Document management sce narios
Copyi n g a s tored
document to another
repository
Once you store a do cument to a repository t hat supports
access by FlowPort and re ceived a Document Token, you
can use the Docume nt Token to copy the document to
another repository. For example, you can c opy the stored
document to a Do cuS hare Collection, Lotus Notes
database repository a M i crosoft Exchange Folder o r
another repository.
To copy a stored document to another repository:
Create a Document Distribution Cover Sheet that has
1
checkboxes for any repository you want, as shown in
Figure3.12.
Figure 3.12 Document Cover Sheet that shows a new
repository
Plac e t he Cov er Sheet (w ith checkbox es marked) in front
2
of the D ocument Token.
Put both forms in a Xerox Document Centre (select the
3
Scan tab and FlowPort scan template) or an Internet Fax
machine (send to flowpor t @ FlowP o rt-Internetfa xAddr ess,
your server's Internet Fax a ddress), a nd press St art .
The document is stored in the selected repository.
For more information, re fer to the following sections:
• “Creating a Document Token” section on page 5-43
• “Storing docu ments to a repository” section on
page 5-18.
Chapter 3: Quick look at using FlowPort ❖ 3-17
Page 38

Docume nt ma nag eme nt sc ena rio s
Retrieving your
documents when
traveling
When traveling, you do not have to take all your
hardcopies with yo u. You can carry Document Tokens or
Document Catalo gs that represent docume nts stored in a
repository on your company intranet.
Figure 3.13 Document Token and Document Catalog
Follow these guidelines to use these forms when you are
away from your off ice:
• If you are at a location inside your company (within
your company's fire w all) , y ou can use Document
Tokens and Do cument Catalogs in any Document
Centre with a template that points to a FlowP or t
server; or you can use the m in an Internet Fax device.
Fax the documents from an Internet Fax device to
flowport@your-FlowPort-addressname (see “Scanning forms
in the Xerox Document Centre” section on page 4-2)
to determine if a Document Centre points to a
FlowPort server).
3-18 ❖ Xero x Flo wPor t Us er G uide
• If yo u are ou tside your company (at a hotel or other
office location), you can Internet Fax your D ocument
T okens and Document Catalogs to the FlowPort server.
The stored documents will be retrieved and faxed back
to the Internet Fax d evice.
For more information, re fer to the following sections:
• “Retrieving and printing w ith a Document Token”
section on page 5-37
• “Using a Document Ca talo g” section on page 5-47.
Page 39

Document management sce narios
Getting a form at
anytime
You can copy a version of any form directly on a cop i er.
There is no need to go back to your PC t o prin t a n ew
form.
Y ou can also print a new form by marking the checkbox at
the bottom of the form that says Cancel & Re-fetch, as
shown in Figure 3.14.
Figure 3.14 PaperWa re form with the Cancel & Re-fetch
box
Put an ‘X’ in the Cancel
& Re-fetch box
Scan the form in a digital device (a Xerox Document
Centre with the Scan tab and FlowPort scan t emplate
selected). A new version is printed out for you. If you
check Cancel & Re-fetch, any other checkbox you mark
on the form is not processed, unless you also marked the
Help bo x at the bottom of the form.
Note: The Cancel & Re-fetch checkbox is normally
not ava i l a ble on Int ernet faxable forms.
For more information, refer to the “Getting a new copy of
a FlowPort form” section on page 4-8.
Chapter 3: Quick look at using FlowPort ❖ 3-19
Page 40

Docume nt ma nag eme nt sc ena rio s
Getting Help about a
form
You can get printed help about a form when using the
Document Centre. Mark the Help checkbox on a ny form,
as shown in figure 3-12.
Figure 3.15 PaperWa re form with the Help box checked
Put an ‘X’ in the
Help box
Scan th e form to get a print ed sheet a bout ho w to use the
form. If you ch eck He lp, any other checkbox you mark on
the form is not processed unless you also marked the
Cancel & Re-fetch box at the bottom of th e form.
Note: Internet-faxable f orms gener ally do not have a
Help box, due to the size of the Da ta Gl y p h on the form.
For more information, re fer to the “Printing Help for a
FlowPort form” section on page 4-9.
3-20 ❖ Xero x Flo wPor t Us er G uide
Page 41

Using FlowPort forms Chapter4
This chapter describes the four kinds of FlowPort’s
PaperWare forms and how to submit them. You can scan
forms in a Xerox Document Centre, or enter them in an
Internet Fax device and fax them to the FlowPort server.
Also included are steps to get a co py of a form when you
need one, and to pri n t help a bout a form.
This chapter contain s the fo llowing:
Scanning in FlowPort forms ................................................ 4-2
Scanning forms in the Xerox Document Centre ............... 4-2
Scanning forms by Internet Fax ...................................... 4-3
Printing forms with fax-size DataGlyphs ...................... 4-3
Sending the Internet Fax job ........................................ 4-5
Using Cover Sheets a nd other types of forms ...................... 4-6
Cover Sheets . ...................................... ........................... 4-6
Access Sheets ................................................................. 4-7
Options Sheet ........... ......... ...................................... ...... 4-7
Login Sheet .................................................................... 4-7
Tips about using forms ...................................................... 4-8
Marking a ch eckbox ....................................................... 4-8
Getting a new copy of a FlowPort form ........................... 4-8
Printing He lp for a FlowPort form .................................... 4-9
Chapter 4: Using FlowPort form s ❖ 4-1
Page 42

Scannin g in F low Port fo rms
Scanning in FlowPort forms
There are currently two input portals from which you can
scan in FlowPort forms. These portals are:
• Xerox Document Centre
• Internet Fax device
The following sections describe how to process your forms
in each of these devices.
Scanning forms in the
Xerox Document
Centre
Y ou can scan FlowPort forms in a Xerox Document Centre
that is scan enabled.
Note: The Xerox Document Centre must be enabled to
send jobs to the FlowPort server.
If a Document Centre is FlowPort enabled, you can press
the Scan or Network Scanning tab on the Touch Screen to
view the list of scan templates such as “FlowPor t.xst” or
the default template (default.xst), which may be set to
scan your forms to FlowPort. Check w ith your F lowPort
administrator if you do not kno w if a Xerox Document
Centre is enabled for FlowPort or do not know the name
of the FlowPort sca n templ ate.
Refer to Chapter 1: Welcome, to get the email address of
your FlowPort administrator.
To scan a FlowPort form in the Xerox Document
Centre:
1
Mark the appropriate ch eckbox es on the f orm.
Depending o n whether the form is a Co ver She et or an
Access Sheet, it can be placed in the device alone or with
accompanying pages.
4-2 ❖ Xerox F lowP ort U ser Gui de
Page 43

Scan ni ng i n F low Po rt for ms
At a Xerox Document Centre, perform the following:
2
A Place the form (and any accompanying documents) in
the docu ment f eede r. A single form such a s a Doc ument
Token or Document Catalog can be placed on the
scanner platen.
B On the control panel, press the Scan or Network
Scanning tab.
Caution: You cannot scan forms to FlowPort if
Image Quality is set to Photo.
C Select a FlowPort scan template. (In a FlowPort-enabled
Xerox Docum en t Ce ntre, this is genera lly default.xst;
or a FlowPort scan template such as FlowPort.xst is
auto-highlighted. Chec k with yo ur FlowPort
administrator.)
D Press the Start button.
Note: You may nee d to login at t he Document Ce nt r e or
use a Login Sheet; for example, if you use a private
FlowPort form or your administrator has defined special
security policies.
See the “Security and your FlowPor t system” section on
page 8-2.
Scanning forms by
Interne t Fa x
If you are traveling and have access to an Intern et Fax
device, you can submit yo ur PaperWare forms to the
FlowPort server via Internet Fax.
When you Int er net Fa x a Pa pe rWare form to t he Flow Po r t
server, the results are sent back to the sender of the fax. If
you send jobs from an Internet Fax device, the results are
sent back by FlowPort and printed to that device. If the
Internet Fax machine is not able to print, you can specify
your own email address as the sender and th e results will
be emailed to you.
Printing forms with fax-size DataGlyphs
A DataGlyph is the region of small characters in the lower
right of a PaperWare form that encodes information for
processing the form. If you int en d to sen d a form by
Internet Fax, it is recommended that you print it with
larger size DataGlyph characters, suitable to typical
Internet Fax resolution.
Chapter 4: Using FlowPort form s ❖ 4-3
Page 44

Scannin g in F low Port fo rms
Note: If the DataGlyph is ripped, marked, or too light,
FlowPort may have trouble processing your form.
To print a fo r m with Internet Fax-size Da ta Glyphs :
Log in to the FlowPort Web Centre (refer to the “Login to
1
the FlowPort Web Centre” section on page 2-2).
Click the Forms button.
2
In the Forms and Applications page, create the form you
3
want to use, or if the form already exists, locate it on the
page. (Refer to th e “ C reating a new form” section on
page 6-5.)
Click the selection box to the left of the form. For
4
example:
Click Print.
5
In the Print Chooser window, make sure t ha t the de f a ult
6
Printer Name and Printer Type are correct.
4-4 ❖ Xerox F lowP ort U ser Gui de
For DataGlyph size, se le ct the size according to the
7
resolution of the Internet fax device on which you will
process the form.
Regular fine mode—use for forms to be scanned using
superfine resolution.
Small standard mode—use for forms to be scanned using
fine resolution.
Large standard mode—use for forms to be scanned using
standard re solution. Wh en using Large standard mode,
the DataGlyph region is significantly larger, and the
printed form does no t have the He lp and Cancel &
Re-fetch chec kboxes .
Click OK.
8
Page 45

Scan ni ng i n F low Po rt for ms
Sending the Internet Fax job
To Internet Fax your forms to the FlowPort server:
Place the form and any accompanying docume nts into
1
the In t ernet Fax device.
Refer to the “Using Cover Sheets and other types of
forms” section on page 4-6 for more about the order in
which you plac e Pa pe rWare forms .
Make sure the Internet Fax device is set to Text Mode.
2
Use an I nternet Fa x addre s s like the f o llowing:
3
flowport@FlowPort-InternetFaxAddress
flowport is a default Internet Fax address for submitting
PaperWare forms to the FlowPort server.
FlowPort-InternetFaxAddress is the address designated by
your administrator for the FlowPort server to receive
Internet Fax es.
You can see the Internet Fax address for your FlowPort
serv er by opening up your I nt ernet Fa x application
options page. Click the Options button, and then the
Internet Fax Mailbox link. At the top of the screen, your
personal Int ernet Fax address is di s played in quot es. The
text that appears after the “@” is your FlowPort Internet
Fax ad dress name. When you Internet Fa x forms to the
FlowPort server, replace the user name (whic h appe a r s
before the “@”) with flowport.
Note: Unless specified, a Login Sheet is not requi red
when submitting jobs by Internet Fax. However, you are
required to use a Login Sheet if using a shared or private
form, or if your FlowPort adm inis trat or has specified
that all jobs have user name s and passwords.
See the “Security and your FlowPort system”
section on page 8-2.
Chapter 4: Using FlowPort form s ❖ 4-5
Page 46

Using Cov er S hee ts an d o ther types of form s
Using Cover Sheets and other types of forms
PaperWare provides you with four kinds of forms. They
are used differently, and if combined in a job, are placed
in a particular order according to the type of form.
Table 4.1 summarizes the four type s of forms and how
they are used .
Ta ble 4.1 PaperWare form types
Form Example Summary of where to place in a job
Cover Sheet Distribute Document Place in front of document pages to start a new job.
Access Sheet Document Token
Document Catalog
Options Sheet Document Options Place after a Cove r Sheet (cannot be used without a Cover
Login Sheet Login Sheet Place in fro nt of an entire PaperWare job, to provide login
Cover Sheets
Example Distribute Document Cover Sheet
A Cover Sheet is placed first in a job, and can be followed
by a document. It starts a FlowPo rt jo b.
A Cover Sheet gives instructions about what to do with
the document that follows it.
You can place more tha n o ne Cove r S heet in a stack, if
you want to batch your PaperWare forms. The jobs are run
in the sequence in which they are entered. Each time the
FlowPort server detects a new Cover S he et, it ends th e
previous job and starts a new job.
Place by itself, with other Access Sheets or after a Cover
Sheet.
Sheet).
authentication.
4-6 ❖ Xerox F lowP ort U ser Gui de
Page 47

Using Cove r Sh eets a nd ot her t ypes of for ms
Access Sheets
Examples Document Token, Document Catalog
Options Sheet
Examples Document Options Sheet
An Access Sheet represents a document. It can be used as
if it were the original document.
An Access Sheet can be used (placed in a device) alone to
retrieve and copy the stored document.
You can also place an A ccess Sheet with other Access
Sheets, or after a Cover She et. If placed after a Cover
Sheet, the Access Sheet is used as if it were the original
document. For examp l e, a Distribute Document Cover
Sheet can be used w ith a D ocument Token to email a
stored document.
An Options Sheet is placed af te r a Cover Sheet to add
instructions about processing.
An Options Sheet is used with a Cover or Access Sheet; the
Option s Shee t is place d just after th e Cover S heet or
before the Access Sheet.
Note: You can use an Option Sheet without a
Cover Sheet or Access Sheet only if document
management information is not required for
document processing. For example, if Network
Accounting data is only required, a Cover or
Access Sheet is not needed to process the job.
Login Sheet
The Login Sheet, placed on top of the paper stack,
provides authentic ation for a FlowPort job. The Login
Sheet is typically used for private PaperWare forms. In
some instances, the FlowPo rt administrator may require
FlowPort users to login before submitting a job to the
FlowPort server. The Login Sheet is used to satisfy this
requirement.
Note: You can only use one Login Sheet for each
PaperWare job.
See the “Using the Login sheet” section on page 8-7 for
more information about the Login Sheet.
Chapter 4: Using FlowPort form s ❖ 4-7
Page 48

Tips about using forms
Tips about using forms
This section provides helpful tips for using PaperWare
forms.
Marking a checkbox
Getting a new copy
of a FlowPort form
When you mark checkboxes on a PaperWare form, follow
these guidelines for the best processing results:
• Mark checkbox with an 'X,' or fill in the entire box.
• Use a dark pen if possible (faint pencil marks may not
be detected)
For example:
If you have a form that h as been used and wish to obtain
a new form with checkbox es u nmarked, you can get a
fresh printout of any Pa p erWare form without goi ng to
the FlowPort Web Centre by doing the following steps.
Mark an 'X' in the Cancel & Re-fetch checkbox at t he
1
bottom of the PaperWare form.
4-8 ❖ Xerox F lowP ort U ser Gui de
Note: When you mark the Cancel & Re-fetch box, it
cancels out all other checkboxes on the form (except for
the Help box, which you can check to print help on
using the form). If you mar k any othe r checkb ox
options, they are not processed.
Forms printed using Large Standard Mode
DataGlyphs d o not have the Cancel & Re-fetch box.
Page 49

Tips about using forms
Place the form in the input device.
2
Refer to the “Scanning forms in the Xerox Document
Centre” section on page 4-2 to process the form.
A clean unmarked version of the form is printed.
Printing Help for a
FlowPort fo r m
You can print a Help pag e about using a PaperWare form
by checking the Help box and scanning in the form.
The Help sheet provides general inform ation about using
that type of form.
To get PaperWare form information:
Mark an 'X' in the Help checkbox at the bottom of the
1
form.
Note: When you mark the Help box, it cancels out all
other ch e ckboxes on the form (e xcept f or the Cancel &
Re-fetch box, whic h you can check to re-print the form
at the same time you are retr i e ving help). If you mark
any other checkbox options, they are not processed.
Forms printed using Small Standard Mode or Large
Standard Mode DataGlyphs do not have the Help
box.
Place the form in the input device.
2
Refer to the “Scanning forms in the Xerox Document
Centre” section on page 4-2 to process the form.
A Help page about using this FlowPort form is printed.
Chapter 4: Using FlowPort form s ❖ 4-9
Page 50

4-10 ❖ Xerox Flo wPort U ser G uid e
Page 51

FlowPort capabilities Chapter5
This chapter provides a task-oriented approach to using
your FlowPort applications. Choose a task and follow the
specific steps required to create a form and use it for that
task.
Tasks are divided into the following:
• Distributing your paper documents to the digital world
• Storing documents to a repository
• Retrieving stored documents from a repository
• Receiving Internet Faxes through FlowPort
This chapter contain s the fo llowing:
Distributing your documents to the digital world ................ 5-3
Emailing a document with FlowPort ................................ 5-3
Confirming your document was sent or received .............. 5-6
What if the email address was wrong? ........................ 5-6
What about other mail server problems? ..................... 5-6
Authentica tion problems ............................................. 5-6
Emailing a stored document URL .................................... 5-7
Distributing a document by Internet Fax ....................... 5-11
Sending a document to a remote printer ....................... 5-12
Distributing a document in multiple ways ..................... 5-14
Chapter 5: F low Port c apabi litie s ❖ 5-1
Page 52

FlowPort ca pabilitie s
Storing documents to a repository .................................... 5-18
Repository Information ................................................. 5-21
Storing a document with docu ment man age ment f ields 5-25
Repository document management fields ...................... 5-29
Creating a Document Options Sheet ............................. 5-33
Using the Document Options Sheet .............................. 5-36
Retrieving you r stor ed documents from a repo sitory ... .... ... 5-37
Retrieving and printing with a Document Token ............ 5-37
Emailing a stored document ......................................... 5-38
Distributing a stored document in other ways ............... 5-40
Creating a Document Token ......................................... 5-43
Using a Document Token .............................................. 5-45
Creating a Document Catalog ...................................... 5-46
Using a Document Catalog ........................................... 5-47
Receiving Internet Faxes through FlowPort ........................ 5-49
Your Internet Fax address ............................................. 5-51
5-2 ❖ Xerox F lowP ort U ser Gui de
Using Network Accounting with FlowPort ......................... 5-52
Printing with your Network Accounting ID .................... 5-52
Using a form to set Network Accounting IDs ................. 5-53
Setting your default Network Accounting ID .................. 5-55
Page 53

Distribu ting your documen ts to the digita l world
Distributing your documents to the digital world
Emailin g a document
with FlowPort
You can email a document by creating a D istribute
Document Cover Sheet, an d then scanning it to FlowPort
with the document.
To create a Distribute Document Cover Sheet for
emailing a document:
Login to the FlowPort Web Centre (refer to the “Login to
1
the FlowPort Web Centre” section on page 2-2).
Click the Forms button.
2
In the Forms and Applications page, under Distribute
3
Document, click the Create New Cover Sheet link.
In the Cover Sheet Creator page, click title goes here and
4
enter a title in the Title box .
From the menu, click Email Recipient.
5
On the form, click the blue arrow icon (below the Send To
6
heading).
In the Email Recipient wi ndow, enter the following:
7
• Email address—the address for an individual or group.
You can enter more than o ne address, separated by
commas.
•In the Checkbox l abel—enter a label to appear on the
form beside the checkbox.
• Send URL if available—click the checkbox to email
the URL of the repository that contains the document,
instead of emailing the actual document. To use this
option, you must add a checkbox for the URL of a
document repository on the form. See “Ema iling a
stored document URL” section on page 5-7.
Chapter 5: F low Port c apabi litie s ❖ 5-3
Page 54

Distrib uting yo ur d ocume nt s to t he digit al w orld
For File Format for Scanned Documents (optional), you
8
can select one of the following formats for scanned
documents:
• TIFF—creates a TIFF image.
• PDF Image Only—creates a simple PDF file .
• PDF (searchable text)—creates a PDF file with
• Other—creates a file format you choose from the
Click OK.
9
The checkbo x and label d isplay on the f orm.
You can repeat steps 5 to 9 for additional email
checkboxes.
page-by-page search capability.
menu.
Note: TIFF allow users to perform OCR (optical
character recog n ition ) on the document. For all other
formats, except PDF Image Only, FlowPort performs
OCR on the document using TextBridge from ScanSoft,
Inc.
Note: You may want a checkbox option to be always
selected
—for example, if it is the only checkbox on the
form. To make the checkbox pre-selected, click the
checkbox on the form.
5-4 ❖ Xerox F lowP ort U ser Gui de
T o add an Email Subject:
10
A From the menu, click Email Subject.
B On t h e form, cl i ck a blue ar row.
C In the Subject box, enter th e text you want and click OK.
Note: By adding one or more Email Subjects, you can
select a message subject when emailing a document.
For Limit Form Access To, click one of the following to
11
specify who can use t he f orm:
• Public Use—allows anyone to use the form. You need
to authenticate if an administrator has created special
security requirements.
• Shared Use—al lows any local FlowPort user to use the
form, provided ‘guest’ access is enabled on the
Document Cen t re. See yo ur administrator if you are
not sure.
Page 55

Distribu ting your documen ts to the digita l world
• Private Use—allows only the form's owner (providing
authentication) to use the form.
Note: In general, create a form as ‘Public’ or you may
need to provide authenticat ion s uch as a Login Sh eet, as
described below. Refer to Chapter 8: Using shared and
private forms.
Click the Save & Print button.
12
Click the Continue button.
13
The form appears on the Forms and Applications page
and is printed at your default printer.
To scan the Cover Sheet and document to FlowPort:
Place your Cover Sheet on top of a document that you
1
want to email .
If the Cover Sh ee t is ‘P ri vate,’ or your sy st em has security
restrictions, provide authentication by placing a Login
Sheet on top of the Cover Sheet or login at the Document
Centre. See “Login at the D ocument Centre” section on
page 8-9.
Mark checkboxes to all email recipients you want to send
2
the document.
Refer to the “Scanning in FlowPort forms” secti o n o n
3
page 4-2 to process the Cover Sheet and document in a
Xerox Document Cent re or a Inte rnet Fax device.
Chapter 5: F low Port c apabi litie s ❖ 5-5
Page 56

Distrib uting yo ur d ocume nt s to t he digit al w orld
Confirming your
document was sent
or received
When you email a document using a Distribute
Document Cover She et , you receive one of the following:
• If your Cov er Sh eet was su ccessfully processed, a
confirmation sheet is printed with a list of the email
recipients.
• If there was a pr oblem proc essing the Cover Sheet, an
error message is printed. It may show a pictu re of the
Cover Sheet, indicating any problems such as
checkboxes that must be marked in order to process
the form.
Note: If your Job Confirmation Method is not set to
Printer, then confirmations and errors are issu ed using
the method you selected. To select a job confirmation
method, click the Ac count b utton .
What if the email address was wrong?
If you entered an incorrect email address when creating
the Cover Sheet, the document will not be emailed
successfully. An “unable to deliver mail” message is sen t
by the mail server back to th e ow ner of the Cover Sheet.
What about other mail server problems?
If the mail server that receives the email is not operating,
does not recognize the email re cipient address, or is
unable to deliver the email for other reasons, any “unable
to deliver mail” message is sent back to the owner of the
Cover Sheet.
5-6 ❖ Xerox F lowP ort U ser Gui de
Authentication problems
If you have problems processing the Distribute Document
Cover Sheet , check to see whet her it is ‘Pr ivate ’ or ‘Sha red’
(indicated in the upper right corner). If chec ked ‘ P rivate ’
or your Administrator has placed special secu rity
restrictions on your Xerox Do cument Centre, you may
need to authenticate the job; for example, a Login Sheet is
required. See the “Providing authentication when you use
FlowPort forms” section on page 8-6.
Page 57

Distribu ting your documen ts to the digita l world
Emailing a stored
document URL
If you prefer not to email a document as an image
attachment, which uses space in the mailbox of the email
recipients, you can store a document in a repository and
email the URL to rec ipients .
The Distribute Document C over Sheet must include two
types of checkboxes: a chec k bo x for the repository and
checkboxes for em ail rec ipients .
First, create a Distribute Document Cover Sheet, and then
scan it to FlowPort with the document .
To create a Distribute Document Cover Sheet for
storing a document and emailing the URL:
Log in to the FlowPort Web Centre (refer to the “Login to
1
the FlowPort Web Centre” section on page 2-2).
Click the Forms button.
2
In the Forms and Applications page, under Distribute
3
Document, click the Create New Cover Sheet link.
In the Cover Sheet Creator page, click title goes here and
4
enter a title in the Title box .
From the menu, click Email Recipient.
5
On the form, click the lower blue arrow icon (below the
6
Send To heading).
In the Email Recipient wi ndow, enter the following :
7
Email address—the address for an individual or group.
You can enter more than o ne address, separated by
commas.
Checkbo x label—the text that appears on the form
(usually the name of the email recipient).
Send URL if available—click to email the URL of the
repository that contains the document, instead of
emailing the actual document. To use this option, you
must add on the form, a checkbox for the URL of the
specified repository.
This feature allows you to scan the document to a
repository at the same time it emails to r eci pients the URL
to the document.
Chapter 5: F low Port c apabi litie s ❖ 5-7
Page 58

Distrib uting yo ur d ocume nt s to t he digit al w orld
Click OK.
8
The checkbo x and label d isplay on the f orm. You can
repeat steps 5 to 8 to add any other email checkboxes.
T o add an Email Subject:
9
A From the menu, click Email Subject.
B On t h e form, cl i ck a blue ar row.
C In the Subject box, enter th e text you want and click OK.
From the menu, select Heading.
10
Click the lowest blue arrow icon.
11
Note: Although you can select an option for File Format
for Scanned Documents, if you are emailin g th e URL of
a stored document, the document is stored in the format
you select for the Repository checkbox. Refer to Step 19
on page 5-9
Note: By adding one or more Email Subjects, you can
select a message subject when emailing a document.
5-8 ❖ Xerox F lowP ort U ser Gui de
In the Heading box, type in a heading for a repository
12
checkbox or c heckbo xes (fo r example, Store To).
Click OK.
13
From the menu, click one of the repository menu items.
14
For sto ring a do cume nt and emailing the UR L, you can
select an item for one of these repositories:
•Documentum Repository
•DocuShare Collection
• Domino Repository
• Domino.Doc Reposi tory
•FTP Directory
• iManage Repository
• Microsoft Exchange 2000 Web Folder
Click the lowest blue arrow icon.
15
In the window, enter the following:
16
Checkbox Label—displays text you want to appear on
the form (usually the repository name).
Page 59

Distribu ting your documen ts to the digita l world
Other repository information—the repo s it ory address ,
user name, password, or other information. (To view help,
click a link for an option.).
Note: If you change your repository user name or
password afterward, the Cover Sheet is invalid.
Click OK.
17
The checkbo x and label d isplay on the f orm. You can
18
repeat steps 15 to 17 to add ot her repository checkboxes.
Note: When you store a document to a repository that
supports access, a Document Token is printed if your job
confirmati on metho d (i n the Ac count page) is se t to
Printer.
For File Format for Scanned Documents, select one of
19
the following:
• TIFF—creates a TIFF image.
• PDF Image Only—creates a simple PDF file .
• PDF (searchable text)—creates a PDF file with
page-by-page search capability.
• Other—creates a file format you choose from the
menu.
Note: TIFF allow users to perform OCR (optical
character recog n ition ) on the document. For all other
formats, except PDF Image Only, FlowPort performs
OCR on the document using TextBridge from ScanSoft,
Inc.
Click OK.
20
For Limit Form Access To, click one of the following t o
21
specify who can use t he f orm:
• Public Use—allows anyone to use the form. You will
need to authenticate if an administrator has created
special security requirements.
• Shared Use—al lows any local FlowPort user to use the
form, provided ‘guest’ access is enabled on the
Document Cen t re. See yo ur administrator if you are
not sure.
Chapter 5: F low Port c apabi litie s ❖ 5-9
Page 60

Distrib uting yo ur d ocume nt s to t he digit al w orld
• Private Use—allows only the form's owner (providing
Click the Save&Print button.
22
Click the Continue button.
23
The form appears on your Forms and Applications
pageand is printed at your default printer.
To scan the Cover Sheet and document to FlowPort
Place your Cover Sheet on top of the document you want
1
to distribute.
If the Cover Sh ee t is ‘P ri vate,’ or your sy st em has security
restrictions, provide authentication by placing a Login
Sheet on top of the Cover Sheet or login at the Document
Centre. Refer to Chapter 8: Using sh ared and priv ate forms .
Note: If you select Public Use or Shared Use, any
Document Token that is printed as a result of storing a
document to DocuShare with this Co ver Sheet w ill also
be public or shared.
authentication) to use the form.
Note: In general, create a form as ‘Public’ or you may
need to provide authenticat ion s uch as a Login Sh eet, as
described below. Refer to Chapter 8: Using shared and
private forms.
Note: When you store a document to a repository, the
stored documen t inherits the permissions of that
repository.
5-10 ❖ Xero x Flo wPor t Us er G uide
Mark the repository checkbox, and a checkbox for each
2
email recipient to receive the URL.
Refer to the “Scanning in FlowPort forms” secti o n o n
3
page 4-2 to process the Cover Sheet and document.
Note: When you store a document to a repository that
supports acce ss by Fl o wport, a Docume nt Token is
printed as a confirmation if your Job Confir m ation
Method is Printer. The Document Token represents the
stored document, and can be used to retrieve and print
it. To select a confirm ation method, click the Accoun t
button.
Page 61

Distribu ting your documen ts to the digita l world
Distributing a
document by Internet
Fax
You can Internet F ax a document by cre ating a Distribute
Document Cover She et , and th en scanning it to FlowPort
with the document.
To create a Distribute Document Cover Sheet to
Internet fax a document:
Login to the Fl o wPort Web Cent re (refer to the “Logging
1
in to the FlowPort We b Centre” section in chapter 1).
Click the Forms button.
2
In the Forms and Applications page, under Distribute
3
Document, click the Create New Cover Sheet link.
In the Cover Sheet Creator tool, click title goes here and
4
enter a title in the Title box.
From the menu, click Internet Fax Recipient.
5
On the form, click the lower blue arrow icon (below the
6
Send To heading ).
In the Internet Fax window, enter the following:
7
Internet Fax address—address of the Internet fax
machine.
Checkbox label—text to appear on the form (usually the
Inte rnet fax machin e name or a ddress).
Send in Internet fax base mode format—keep this box
checked if you are sending the document to an Internet
fax machine.
Note: Uncheck this box only if you are sending the
document to another user's FlowPort In tern et Fax
mailbox and wish to send it in finer mode.
Click OK.
8
The checkbo x and label display on the form. You can
repeat steps 5 through 8 to add more Internet Fax
addresses.
For Limit Form Access To, cl ick one of the followi ng to
9
specify who ca n us e th e f orm .
Chapter 5: Flow Port cap abil ities ❖ 5-11
Page 62

Distrib uting yo ur d ocume nt s to t he digit al w orld
• Public Use—allows anyone to use the form. You will
• Shared Use—al lows any local FlowPort user to use the
• Private Use—allows only the form's owner (providi ng
Click the Save & Print button.
10
Click the Continue button.
11
The form appears on your Forms and Applications page
and is printed at your default printer.
only need to authenticate if an administrator has
created spe c ial sec urity re quirements.
form, provided ‘guest’ access is enabled on the
Document Cen t re. See yo ur administrator if you are
not sure.
authentication) to use the form.
Note:In general, create a form as ‘Public’ or you may
need to provide authenticat ion s uch as a Login Sh eet, as
described below. Refer to Chapter 8: Using shared and
private forms.
Sending a document
to a remote printer
To scan the Cover Sheet and document to FlowPort:
1
2
You can print a document to a remote printer b y creating
a Distribute Document Cover Sh eet, and then scanning it
to FlowPort with the document.
To create a Distribute Document Cover Sheet for
remote printing:
1
Place your Cove r S heet on top of a doc umen t yo u wan t to
send by Internet Fax, and mark the Internet Fax
checkbox.
If the Cover Sh ee t is ‘P ri vate,’ or your sy st em has security
restrictions, provide authentication by placing a Login
Sheet on top of the Cover Sheet or login at the Document
Centre. See page 8-6.
Refer to the “Scanning in FlowPort forms” secti o n o n
page 4-2 to process the Cover Sheet and document in a
Xerox Document Centre or a Internet fax dev ice.
Login to the FlowPort Web Centre (refer to the “Logging
in to the FlowPort We b Centre” section in chapter 1).
5-12 ❖ Xero x Flo wPor t Us er G uide
Page 63

Distribu ting your documen ts to the digita l world
Click the Forms button.
2
In the Forms and Applications page, under Distribute
3
Document, click the Create New Cover Sheet.
In the Cover Sheet Creator page, click title goes here and
4
enter a title in the Title box .
From the menu, click Remote Printer.
5
On the form, click the lower blue arrow icon (below the
6
Send To heading).
In the Remote Printer window, enter the following:
7
Printer name— pr i nter or Internet fax device on which to
prin t, or the email addres s to use wh en emailing
documents.
Note: To get the name of a netwo r ked Xerox Do cument
Centre or other printer that is at a remote location,
contact the system administrator. Click the Printer
Name link in the Remo te P r i nter wi ndow fo r more
information about prin ter names.
Printer type—type of printer.
Checkbo x label—text you want to appear on the form
(usually the printer name).
Network Accounting User ID (optional)—your User ID
for Network Accounting.
Network Accounting Account ID (optional)—the
Account ID to which this print job will be charged.
Note: The Network Accounting IDs must b e regi stere d
for the specified printer. For more information, see
“Using Network Ac counting with FlowP ort” s ec tion on
page5-52.
Click OK.
8
The checkbo x and label d isplay on the f orm. You can
repeat steps 5 through 8 to add more printers.
Chapter 5: Flow Port cap abil ities ❖ 5-13
Page 64

Distrib uting yo ur d ocume nt s to t he digit al w orld
For Limit Form Access To, click one of the following to
9
specify who can use t he f orm.
• Public Use—allows anyone to use the form. You will
• Shared Use—al lows any local FlowPort user to use the
• Private Use—allows only the form's owner (providing
Click the Save & Print button.
10
In the foll owing s creen, click the Conti nue button.
11
The form appears on your Forms and Applications page
and is printed at your default printer.
To scan the Cover Sheet and document to FlowPort:
only need to authenticate if an administrator has
created spe c ial sec urity re quirements.
form, provided ‘guest’ access is enabled on the
Document Cen t re. See yo ur administrator if you are
not sure.
authentication) to use the form, .
Note: In general, create a form as ‘Public’ or you may
need to provide authenticat ion s uch as a Login Sh eet, as
described below.
Distributing a
document in
multiple ways
5-14 ❖ Xero x Flo wPor t Us er G uide
Place your Cove r S heet on top of a doc umen t yo u wan t to
1
print remotely, and mark the printer checkbox.
If the Cover Sh ee t is ‘P ri vate,’ or your sy st em has security
restrictions, provide authentication by placing a Login
Sheet on top of the Cover Sheet or login at the Document
Centre. See page 8-6.
Refer to the “Scanning in FlowPort forms” secti o n o n
2
page 4-2 to process the Cover Sheet and document in a
Xerox Document Centre or an Internet fax device.
You can email, Internet Fax, sto re to a repository,
remotely print a document, or perform a combinat ion of
these tasks all at once. Create a Distribute Document
Cover Sheet with checkboxes for all the tasks you want to
perform, and select the appropriate checkboxe s before
you scan in the form.
Page 65

Distribu ting your documen ts to the digita l world
To create a Distribute Document Cover Sheet for
distributing a document in multiple ways:
Login to the FlowPort Web Centre (refer to the “Login to
1
the FlowPort Web Centre” section on page 2-2).
Click the Forms button.
2
In the Forms and Applications page, under Distribute
3
Document, click the Create New Cover Sheet link.
In the Cover Sheet Creator page, click title goes here and
4
enter a title in the Title box .
From the m enu, select the type of checkbox you want to
5
add. The menu lets you add the following checkboxes for
distribution:
• Email recipient—an em ail recipient 's address.
• Internet Fax Recipient—an Internet F a x recipient's
address .
• Remote printer—the name of a remote print er.
• Documentum Repository—the name of a
Document u m doc ba se .
• DocuShare Collection—the URL of a DocuShare
collection.
• Domino Repository—the Domino server name and
database path.
• Domino.Doc Repository—th e URL of a Do mino.Doc
library.
• FTP Directory—the fully qualified na me or I P a ddress
of an FTP file server.
• iManage Repository—the fully qualified name of an
iManage server and a database name.
• Lotus Notes/Domino —the SMTP a ddr es s of a Notes or
Domino re p o sitory.
• Microsoft Exchange 2000 Web Folder—the UR L of an
Exchange Web Folder.
• Microsoft Exchange Folder—the SMTP address of a
Microsoft Exchange public folder.
Chapter 5: Flow Port cap abil ities ❖ 5-15
Page 66

Distrib uting yo ur d ocume nt s to t he digit al w orld
On the form, click the lower blue arrow icon (below the
6
Send To heading).
In the window t hat is opened, enter th e requir ed
information.
Email checkbox—refer to the “Emailing a docume nt
with Fl o wPort” s ection on page 5-3 in this chapter .
Repository checkbox—refer to the “S to ring docume nts
to a repo sitory” section on pag e 5-18.
Internet fax checkbox—refer to the “Distributing a
document by Internet Fax” section on page 5-11.
Remote print checkbox—refer to th e “Sending a
document to a remote printer” section on page 5-12.
It is recommended that if you have different kinds of
7
checkboxes on a form, separate them with headings such
as Send to, Store to, Internet fax to, or Pri n t to .
To add a heading:
A From the menu, click Heading.
B On the form, click the blue arrow at the place where you
C In the Heading window, en ter a heading.
D Click OK.
want the heading lo ca ted.
5-16 ❖ Xero x Flo wPor t Us er G uide
For File Format for Scanned Documents, select one of
8
the following:
• TIFF—creates a TIFF image.
• PDF Image Only—creates a simple PDF file .
• PDF (searchable text)—creates a PDF file with
page-by-page search capability.
• Other—creates a file format you choose from the
menu.
Note: TIFF allows you to perform OCR (optical
character recognition) on the document. For all other
forma ts , except PDF Image Only, FlowPort performs
OCR on the document using TextBridge from ScanSoft,
Inc.
Click OK in the window.
9
The checkbo x and label d isplay on the f orm.
Page 67

Distribu ting your documen ts to the digita l world
You can repeat steps 5 through 9 to add more checkboxes.
10
For Limit Form Access To, click one of the following to
11
specify who can use t he f orm.
• Public Use—allows anyone to use the form. You will
only need to authenticate if an administrator has
created spe c ial sec urity re quirements.
• Shared Use—al lows any local FlowPort user to use the
form, provided ‘guest’ access is enabled on the
Document Cen t re. See yo ur administrator if you are
not sure.
• Private Use—allows only the form's owner (providi ng
authentication) to use the form.
Note: In general, create a form as ‘Public’ or you may
need to provide authenticat ion s uch as a Login Sh eet, as
described below.
Click the Save & Print button.
12
In the foll owing s creen, click the Conti nue button.
13
The form appears on your Forms and Applications page
and is printed at your default printer.
To scan the Cover Sheet and document to FlowPort:
Place your Cover Sheet in front of th e document you want
1
to distribute, marking checkboxes for the tasks you want
to perform.
Note: If you mark an Email checkbox and a Store to
Repository checkb ox at the s a me time, by default the
document will be stored, and only a URL will be sent to
email recipients. If you wish to send the document itself
(as an email attachment), de-select Send URL if
available when you create the Email checkbox.
If the Cover Sh ee t is ‘P ri vate,’ or your sy st em has security
restrictions, provide authentication by placing a Login
Sheet on top of the Cover Sheet or login at the Document
Centre. See page 8-6.
Refer to the “Scanning in FlowPort forms” secti o n o n
2
page 4-2 to process the Cover Sheet and document in a
Xerox Document Cent re or a Inte rnet Fax device.
Chapter 5: Flow Port cap abil ities ❖ 5-17
Page 68

Storing docu ment s to a rep osit ory
Storing documents to a repository
To store a document to a repository you need to cre ate a
Distribute Document Cover Sheet, and then scan to
FlowPort with the document.
To create a Distribute Document Cover Sheet for
storing a document to a respository:
Login to the FlowPort Web Centre (refer to the “Login to
1
the FlowPort Web Centre” section on page 2-2).
Click the Forms button.
2
In the Forms and Applications page, under Distribute
3
Document, click the Create New Cover Sheet link.
In the Cover Sheet Creator tool, click title goes here and
4
enter a title in the Title box .
Create a repository checkbox. From the menu, select a
5
repository. You can select one of these repositories:
5-18 ❖ Xero x Flo wPor t Us er G uide
•Documentum Repository
•DocuShare Collection
• Domino Repository
• Domino.Doc Reposi tory
•FTP Directory
• iManage Repository
• Lotus Notes/Domino
• Microsoft Exchange 2000 Web Folder
• Microsoft Exchange Folder
Note: You can create a Cover Sheet with checkboxes for
more than one kind of repository.
On the form, click the lower blue arrow icon (below the
6
Send To heading).
In the Repository wind o w, ent e r the fol lowin g :
7
Checkbox Label—displays text you want to appear on
the form (usually the repository name).
Page 69

Storing documents to a repository
Note: If you change your repository user name or
password afterward, the Cover Sheet will no longer
work.
Other repository information—the repo s it ory address ,
user name, password, or other information. To view help,
click a link for an option.
Note: Refer to Table 5.1 for information regarding
specific repositories.
For File Format for Scanned Documents, select one of
8
the following:
• TIFF—creates a TIFF image.
• PDF Image Only—creates a simple PDF file .
• PDF (searchable text)—creates a PDF file with
page-by-page search capability.
• Other—creates a file format you choose from the
menu.
Note: TIFF allows you to perform OCR (optical
character recognition) on the document. For all other
forma ts , except PDF Image Only, FlowPort performs
OCR on the document using TextBridge from ScanSoft,
Inc.
Click OK.
9
The checkbo x and label d isplay on the f orm. You can
10
follow steps 5 to 9 to add other repository checkboxes.
Note: When you scan a document to a repository that
supports both storage and access by Flowport, a
Document Token is printed if your job confirmation
method (in the Account page) is set to Printer. Storing to
the following repositories will ge nerate a Document
Token:
Documentum
DocuShare
Domino
Domino.Doc
iManage
Microsoft Exchange
Microsoft Exchange 2000 Web Folder
Chapter 5: Flow Port cap abil ities ❖ 5-19
Page 70

Storing docu ment s to a rep osit ory
For Limit Form Access To, click one of the following to
11
specify who can use t he f orm.
• Public Use—allows anyone to use the form. You will
only need to authenticate if an administrator has
created spe c ial sec urity re quirements.
• Shared Use—al lows any local FlowPort user to use the
form, provided ‘guest’ access is enabled on the
Document Cen t re. See yo ur administrator if you are
not sure.
Note: If you select Public Use or Shared Use, any
Document Token that is printed as a result of storing a
document to a repository such as DocuShare, will also
be public or shared.
• Private Use—allows only the form's owner (providing
authentication) to use the form.
Note: In general, create a form as ‘Public’ or you may
need to provide authenticat ion s uch as a Login Sh eet, as
described below.
Click Save & Print.
12
Click Continue. The form appears on your Forms and
13
Applications page and is printed at your default printer.
To scan the Cover Sheet and document to FlowPort:
Plac e your Co ver Sheet o n top of th e do cumen t you want
1
to store.
Mark the checkbox to the repository where the document
2
will be stored.
If the Cover Sh ee t is ‘P ri vate,’ or your sy st em has security
restrictions, provide authentication by placing a Login
Sheet on top of the Cover Sheet or login at the Document
Centre. See page 8-6.
Note: When you store a document to a repository, the
stored documen t inherits the permissions of that
repository.
Refer to the “Scanning in FlowPort forms” secti o n o n
3
page 4-2 to process the Cover Sheet and document in a
Xerox Document Centre or an Internet fax devic e.
5-20 ❖ Xero x Flo wPor t Us er G uide
Page 71

Storing documents to a repository
Repository
Information
Ta ble 5.1 Repository Information Page 1 of 4
Repository Repository Information
FTP Directory Checkbox Label—The text you want to appear on the form (usually the
director y nam e).
FTP Host Name—The fully quali fied name or IP address of the destinat ion file
server. For example: ftpserver.mycompany.com or 12.123.456.78.
Name for a Remote FTP Directory— The directory pat h for storing
documents. For example: /ftp-public/mydocument s.
FTP Remote Host User Name—The user name used for login (can be
"anonymous" if enabled for this FTP site).
FTP Remote Host Password—The password used for login.
DocuShare Collection Checkbox Label—The text you want to appear on the form (usually the
DocuShare collection name).
URL for a DocuShare Collection—The complete URL of the collection.
DocuShare User Name—Your DocuShare user name. Yo u mus t have Reader
and Writer permissions to the collection you specified.
DocuShare Password—Your DocuShare password.
Table 5.1 contains data required t o complete the
repository address window.
Note: Open another browser window, go to the DocuShare collection you
want to use, copy all of the text that appears in the Address (or Location)
box, and pa st e it into the URL for a DocuShare Collection box.
Note: Any forms created uses the same DocuShare user name and
password you specify, unl ess the information is c h anged.
Microsoft Exchange Folder Checkbox label—The text you want to appear on the form (usually the public
folder name).
Exchange SMTP Addres s—T he SM TP address of the folder to store scanned
documents.
Note: To find the address, open Mic rosoft Outlook. Rig h t-click the pu blic
folder, then click Properties. Click the Summary (or Administration) tab,
click the Personal Address Book button, and th en c lick OK. Open your
Address Book and select Personal Address Book (or Contacts) from the
Show Names from the menu. Double-click the public folder name. Click
the E-mail Addresses tab to di sp lay the SM TP address ( or in the Contact
window, double -c li c k th e pu bl ic fol d er nam e listed in th e E-mail section ,
and then click the E-mail Addresses tab in the Properties window to
display the SMTP address.)
Chapter 5: Flow Port cap abil ities ❖ 5-21
Page 72

Storing docu ment s to a rep osit ory
Ta ble 5.1 Repository Information Page 2 of 4
Repository Repository Information
Lotus Notes/Domino Checkbox Label—The text you want to appear on the form (usuall y the
database name) .
Lotus Notes/Dom ino SMTP Address—T he SM TP address of the repository to
store scan ned doc ument s. See y our Notes or Domi no ad minist ra tor i f you don't
know the addre ss.
Domino.Doc Repository Checkbox Label—The text you want to appear on the form (usually the
repository name ).
URL for a Domino.Doc Library—The URL of the Domino.Doc library.
Note: In a browser window, go to the Domino.Doc library you want to
use, and login . Before openi n g a file c abinet in the library, copy all of th e
text that appears in the Address (or Location) box, and paste it into the
URL for a Domino.Doc Library box.
Domino.Doc User Name—Your Domino Web login name, which could be the
same as the your Notes short name. You must have Editor or Manager access
level to t he file cabinet you specify. See your Domino adm inistrator if you don't
remember your access level.
Domino.Doc Password—Your Domino Internet password. See your Domino
administrator if you don't remember your password.
Domino.Doc File Cabinet Name—T he nam e of the file cabinet in the library
you specified.
Note: In a browser window, go to the Domino.Doc library you specified in
the URL for a Domino.Doc Library box, and lo gin. Se le ct a fi le cabi ne t i n
the library and, if prompted, log in. At the top of the Domino.Doc
workspace, the n ame of the file cabinet disp lays to the right of the file
cabinet ic on. Copy the n a m e in to the Domino .Doc Fil e Cabinet N ame
box. Do not copy the space at the end of the name.
Domino.Doc Binder Name—The name of the binder within the file cabinet
you specified.
Note: In a browser window, go to the Domino.Doc library you specified in
the URL for a Domino.Doc Library box, and log in. Select the file cabinet
you specified in the Domino.Doc File Cabinet Name box and, if
prompted, login. Select the binder you want to use. At the top of the
Domino.Doc worksp ace, the na me of the bind er displays to the rig h t of
the binder icon. Copy the name into the Domino.Doc Binder Name box.
Make sure you do not copy the space at the end of the name.
5-22 ❖ Xero x Flo wPor t Us er G uide
Page 73

Ta ble 5.1 Repository Information Page 3 of 4
Repository Repository Information
Storing documents to a repository
Domino.Doc Repository
(continued)
Documentum Repository Documentum Docbase Name—The nam e of the Documentum docbase, or
iManage Repository iManage Server Name/Database Name—The fully qualified name of the
Domino.Doc Profile Name—The Domin o.Doc document profile, or type, to
associate w ith a document when it i s stored in the specified binder using a
Distribute Document Cover Sheet.
Note: In a browser window, go to the Domino.Doc library you specified in
the URL for a Domino.Doc Library box, and log in. Select the file cabinet
you specified in the Domino.Doc File Cabinet Name box and, if
prompted, log in. Select the binder you specif ied in the Domino.Doc
Binde r N a m e box. On the Actions sidebar, click the New Document
button. Under Document Prof ile, select a document type from the menu.
Enter the document type you selected in the Domino.Doc Profile Name
box. On the Actions sidebar, click the Cancel button.
repository.
Documentum Object ID—T he 16-c har acter c ombinati on of hex ade cimal di gits
(0-9, A-F) that uniqu ely identifies the file or folder.
Documentum Remote Host User Name—The user name used for login to
the Documentum system.
Documentum Remote Host Password—The password used for login to the
Documentu m sy stem.
iManage server and the database nam e. For example:
imanageserver.mycompany.com/imana gedb.
iManage Folder Path—The name of the iManage folder within the specified
database.
iManage Remote Host User Name—The user name used for login to the
iManage system.
iManage Remote Host Password—The password used for login to the
iManage system.
Chapter 5: Flow Port cap abil ities ❖ 5-23
Page 74

Storing docu ment s to a rep osit ory
Ta ble 5.1 Repository Information Page 4 of 4
Repository Repository Information
Microsoft Exchange 2000
Web Folder
Domino Repository Domino Server Name—The Domi no s erver 's In ternet h ost name. F or e xampl e:
URL for an Ex change Web Folder—The complet e URL of the Web Folder. For
example: http://hostname/ public/folderna me .
Note: Open Windows Explorer or My Computer and double-click the Web
Folde rs icon. Locate th e folder you want to use, right-click on it , and then
click Properties. Copy all of the text that appears after Location and
paste it in to the UR L f or an Ex c han ge W eb Fol de r box. Then type or copy
and paste the folder name that displays at the top of the Properties
window after the text in the URL for an Exchange Web Folder box.
Exchange User Name—The user's Windows 2000 user name. The user must
have sufficient access permissions to the Web Folder you specify.
Exchange Passwor d — The user's Windows 2000 password.
hostname.domain name. com.
Note: Do not ente r th e se rver's ho st nam e in Not e s for mat (hostn am e/
orgunit/org).
Database Path— The pathname for the database. Use a forward sl ash (/) to
separate directory names. For example: announcement.nsf or hr/resume.nsf.
Note: Do not inclu d e th e da ta direc t ory (for example,
c:\lotus\domino\data\) in the pathname.
Form Name—The name of the form to use when crea ti ng a docum ent in the
database. For example: Employee Profile.
Note: If the Domi no for m re q uires certa in fiel d s , th en you mu st al so
include the corresponding Document Management Fields on the form
template. Your Domino administrator can provide you with the list of any
required fie ld s .
Web Login Name—The Domin o user 's W eb logi n name . The user mus t have at
least Author ac cess level to the specified database. See your Domino
administrator if you don't know t he user's Web l ogin name or access level.
Note: Do not e n ter the l og in name used to acc ess Domino through Notes.
Web Password— The Dom ino user's Interne t password. See your Domino
administrator if you don't know t he password.
5-24 ❖ Xero x Flo wPor t Us er G uide
Page 75

Storing documents to a repository
Storing a document
with document
management fiel ds
Yo u store a document with associated fields (or
"properties") by creating a Distribute Document Cover
Sheet with Document Management Field checkboxes and
then scanning to FlowPort with the do cument.
You can also add Docume nt Management F i eld
checkboxes to a Document Options Sheet, which is placed
after your Cover Sheet. See th e “Creating a Document
Options Sheet” section on page 5-33.
Note: For some repositories such as Microsoft
Exchange or Lotus Notes, the property text will be
stored with the document as an attached XML
data file. The repository administrator may have
set up the repository to specially process these
attached data files.
To create a Distribute Document Cover Sheet for
storing with document management fields:
Login to the FlowPort Web Centre (refer to the “Login to
1
the FlowPort Web Centre” section on page 2-2).
Click the Forms button.
2
In the Forms and Applications page, under Distribute
3
Document, click the New Cover Sheet.
In the Cover Sheet Creator tool, click title goes here and
4
enter a title in the Title box .
Create a repository checkbox; from the menu, click a
5
repository. You can select one of these repositories:
•Documentum Repository
•DocuShare Collection
• Domino Repository
• Domino.Doc Reposi tory
•FTP Directory
• iManage Repository
• Lotus Notes/Domino
• Microsoft Exchange 2000 Web Folder
• Microsoft Exchange Folder
On the form, click on the lower blue arrow icon (below
6
the Send To heading).
Chapter 5: Flow Port cap abil ities ❖ 5-25
Page 76

Storing docu ment s to a rep osit ory
In the Repository window, enter the following:
7
Checkbox Label—the text you want to appear on the
form next to the checkbox (usually the repository name).
Other repository information—the repository a ddress,
user name, password, or other information. (To view help,
click a link on a field name.)
Note: If you change your repository user name or
password afterward, the Cover Sheet will no longer
work.
For File Format for Scanned Documents, select one of
8
the following:
• TIFF—creates a TIFF image.
• PDF Image Only—creates a simple PDF file .
• PDF (searchable text)—creates a PDF file with
page-by-page search capability.
• Other—creates a file format you choose from the
menu.
Note: TIFF allows you to perform OCR (optical
character recognition) on the document. For all other
forma ts , except PDF Image Only, FlowPort performs
OCR on the document using TextBridge from ScanSoft,
Inc.
5-26 ❖ Xero x Flo wPor t Us er G uide
Click OK.
9
The checkbo x and label d isplay on the f orm. You can
repeat steps 5 th ro ug h 9 to add ot her repository
checkboxes.
Note: When you scan a document to a repository
supported for both storage and access, a Docum ent
T oken is printed if your job confirmation method (in the
Accoun t page) is set to Pri nter.
As an option, you can add a heading above the field or
10
property checkboxes.
A From the menu, select Heading.
B Click on the blue arrow icon.
C Enter a Heading in the window; for example, "Store with
Document Management Information".
D Click OK.
Page 77

Storing documents to a repository
From the menu, click Document Management Field.
11
Click on the lower blue arrow.
12
In the window, enter the following:
13
Checkbo x label—the text you want to appear on the
form next to the checkbox ( usually the val ue of the
property , such as "Case-2401").
Field name—name of the field.
Note: Property names are usually case-sensitive; enter
names exactly as they are defined for a repository.
Field Value—value of the field.
Hidden—click if you want all the documents stored to
the repository to have this value automatically associated
with them. No document management field checkbox
appears on the form if you select Hidde n.
Handprint region—click to include a checkbox and a
rectangular area on the form, which lets you add a
handwritten document management field to the
document when it is stored in a DocuShare collection.
Refer to Table 5.2 for detail information regarding the
document management fields for a specific repository.
Click OK.
14
The checkbo x and label d isplay on the f orm. You can
repeat steps 10 through 14 to add more property
checkb oxes.
For Limit Form Access To, click one of the following to
15
specify who can use t he f orm.
• Public Use—allows anyone to use the form. You only
need to authenticate if an administrator has created
special security requir ements.
• Shared Use—al lows any local FlowPort user to use the
form, provided ‘guest’ access is enabled on the
Document Cen t re. See yo ur administrator if you are
not sure.
Note: If you select Public Use or Shared Use, any
Document Token that is printed as a result of storing a
document to a repository such as DocuShare, will also
be public or shared.
Chapter 5: Flow Port cap abil ities ❖ 5-27
Page 78

Storing docu ment s to a rep osit ory
• Private Use—allows only the form's owner (providing
authentication) to use the form.
Note: In general, create a form as ‘Public’ or you may
need to provide authenticat ion s uch as a Login Sh eet, as
described below.
Click the Save & Print button.
16
Click the Continue button.
17
The form appears on your Forms and Applications page
and is printed at your default printer.
To scan the Cover Sheet and document to FlowPort:
Place your Cove r S heet on top of a doc umen t yo u wan t to
1
store.
If the Cover Sh ee t is ‘P ri vate,’ or your sy st em has security
restrictions, provide authentication by placing a Login
Shee t on top of it or login at the Docu m ent Cen tre. Se e
page 8-6.
Refer to the “Scanning in FlowPort forms” secti o n o n
2
page 4-2 to process the Cover Sheet and document in a
Xerox Document Centre or a Internet fax dev ice.
Note: When you store a document to a repository that
supports both storage and access, a Document Token is
printed as a confirmation if your Job Confirmation
Method is Printer. The Document T oken re presents the
stored document, and can be used to retrieve and print
it. To select a confirm ation method, click the Account
button.
5-28 ❖ Xero x Flo wPor t Us er G uide
Page 79

Storing documents to a repository
Repository document
management fiel ds
Table 5.2 Repository Document Management Fields Page 1 of 4
Repository Document Management Field
FTP Directory Field Name—the name of the document management field. You can
Microsoft Exchange Folder Field Name—the name of the docum ent management field. You can
Table 5.2 contains do cument management f i eld
information for a supported FlowPort repository.
enter the follow ing field names:
• Titl e—lets you add a title field to the stored document (corresponds to
the Title property).
• Description—lets you add a description field to the stored document
(corresponds to the FTP Description property).
Field Value—t he valu e of the field sp ec if ie d in th e Field Name box. For
example, a val ue for the titl e field name could be FlowPort Brochure Copy.
enter the follow ing field names:
• Titl e—lets you add a title field to the stored document (corresponds to
the Title property).
• Description—lets you add a description field to the stored document
(corresponds to the Exchange Description property).
Field Value—t he valu e of the field sp ec if ie d in th e Field Name box. For
example, a val ue for the titl e field name could be FlowPort Brochure Copy.
Note: The field values are stored with the document in an attached
XML data file. (The repository administrator may have set up the
reposito ry to specia l ly pr oc es s th e se a t tac h ed da t a files.)
Lotus Notes/Domino Field Name—the name of the document management field. You can
enter the follow ing field names:
• Titl e—lets you add a title field to the stored document (corresponds to
the Title property).
• Description—lets you add a description field to the stored document
(corresponds to the Notes/Domino Description property).
Field Value—t he valu e of the field sp ec if ie d in th e Field Name box. For
example, a val ue for the titl e field name could be FlowPort Brochure Copy.
Note: The field values are stored with the document in an attached
XML data file. (The repository administrator may have set up the
reposito ry to specia l ly pr oc es s th e se a t tac h ed da t a files.)
Chapter 5: Flow Port cap abil ities ❖ 5-29
Page 80

Storing docu ment s to a rep osit ory
Table 5.2 Repository Document Management Fields Page 2 of 4
Repository Document Management Field
DocuShare Collection Field Name—the name of the document management field. You can
enter the follow ing field names:
• Titl e—lets you add a title field to the stored document (corresponds to
the DocuShare Title property).
• Description—lets you add a description field to the stored document
(corresponds to the DocuShare Summary property).
• Abstract—lets you add an abstract field to the stored document
(corresponds to the DocuShare Description property). You can store
more than one Abstract field with the document.
• Keywords—lets you add a keyword fiel d to th e sto re d document
(corresponds to the DocuShare Keywords property). You can store
more than one Keyw ords fie ld wit h the document.
• author—lets you add an author field to the stored document
(corresponds to the DocuShare author property). You must type
author in lower-case letters.
Y o u can al so e nter t he n ame of a Doc uSha r e cust om pr ope rty. For example,
your DocuShare administrator may have created a custom property to let
users add a budget center or case number to stored documents. To include
a custom prop erty, you must type its nam e in the Field Name box exactly
as it appears in the DocuShare Name box. To add custom pr operties, see
your DocuShare administrator.
Field Value—t he valu e of the field sp ec if ie d in th e Field Name box. For
example, a val ue for the titl e field name could be FlowPort Brochure Copy,
and brochure could be a value for keywords
include vali d HTM L m arkup tags for text formatting (such as <i>, <b>, or
<font>).
Note: In DocuShare, you can view the field values of a document
stored in a coll ection by c licking the Service s button located to the
right of the d oc um ent.
. The field value ca n also
5-30 ❖ Xero x Flo wPor t Us er G uide
Page 81

Storing documents to a repository
Table 5.2 Repository Document Management Fields Page 3 of 4
Repository Document Management Field
Domino.Doc Repository Field Name—The name of the document management field. You can
enter the follow ing field names:
• Titl e—lets you add a title field to the stored document (corresponds to
the Title property).
• Description—lets you add a description field to the stored document,
if the document's profile includes the field.
Y ou can also enter the nam e of a Domino.Doc custom field. For example,
your Domino.Doc administrator may have cr eated a custom pr operty to let
users add a budget center or case number to stored documents. To include
a custom prop erty, you must type its nam e in the Field Name box exactly
as it appears in t he Prof ile as soc ia ted with th e Domino. Doc binder in which
the document is stored. To add custom properties, see your Domino.Doc
administrator.
Field Value—t he valu e of the field sp ec if ie d in th e Field Name box. For
example, a val ue for the titl e field name could be FlowPort Brochure Copy.
Note: In Domino.Doc, you can view the document's property values
by clicking the Document's name in its Binder. Some fields have a
constra in ed se t of va l u es . For example, a pro per ty named
Department might only allow values Accounting , Legal, a n d Human
Resources.
Documentum Repository Field Name—the name of the document management field. You can
enter the follow ing field names:
• Titl e—lets you add a title field to the stored document (corresponds to
the Documentum Title property).
• Description (or Subject)—lets you add a description/subject field to
the stored document (corresponds to the Documentum Subject
property).
• Keywords—lets you add keywords to the stored document
(corresponds to the Documentum Keywords property). Separate
individual keywords with a comma; do not include a space before or
after the comma.
• Authors—lets you add an authors field to the stored document
(corresponds to the Documentum Authors property).
Field Value—t he valu e of the field sp ec if ie d in th e Field Name box. For
example, a value for the title field nam e could be FlowPort Brochure Copy,
and brochure could be a value for keywords.
Chapter 5: Flow Port cap abil ities ❖ 5-31
Page 82

Storing docu ment s to a rep osit ory
Table 5.2 Repository Document Management Fields Page 4 of 4
Repository Document Management Field
iManage Repository Field Name—the name of the document management field. You can
enter the follow ing field names:
• Titl e—lets you add a title field to the stored document (corresponds to
the iManage Title property).
• Description—lets you add a description field to the stored document
(corresponds to the iManage Description property).
Field Value—t he valu e of the field sp ec if ie d in th e Field Name box. For
example, a value for the title field nam e could be FlowPort Brochure Copy.
Domino Repository Field Name—the name of the document management field. You can
enter any custom field name the Domino adminis trator has created for the
database. Obtai n the list of field names from the administrator.
Field Value—t he valu e of the field sp ec if ie d in th e Field Name box.
Note: You can view the d ocument's field values by opening it in a
browser window or Notes client. However, the Domino Application
Designer determines which document fields display.
Microsoft Exchange 2000 Web
Folder
Field Name—the name of the document management field. You can
enter the follow ing field names:
• Title—lets you add a title field to the stored document.
• Description—lets you add a description field to the stored document
(corresponds to the Comments field in Outlook).
• Keywords—lets you add a keyword field to the stored document. You
can store more than one keywords field with the document.
• author—lets you add an author field to the stored document.
Y o u can als o enter the na me of a Exch ange cust om fiel d. For exampl e, you r
Exchange admi nistrator may have cr eated a custom field to let users add a
budget center or case number to stored documents. To include a custo m
field, you must type its name i n the Field Name box exactly as it is defined
by your administrator.
Exchange cus tom field names often inc lude a schema name, like
"urn:schemas-microsoft-com:offic e:office." A full Exchange custom field
name could be "urn:schemas-microsoft-com:office:office:Version" or
"urn:schemas:contacts:callbackphone." To add custom fields, see your
Exchange admi nistrator.
Field Value—t he valu e of the field sp ec if ie d in th e Field Name box. For
example, a val ue for the titl e field name could be FlowPort Brochure Copy,
and brochure could be a value for keywords.
5-32 ❖ Xero x Flo wPor t Us er G uide
Page 83

Storing documents to a repository
Creating a Document
Options Sheet
If you want to add opt i on s to a FlowPort job, you can
create a Document Options Sheet. The following
checkboxes can be added to a Document Optio ns Sheet:
• Document Management Field
•Network Accounting
Note: If you include Document Manage m ent Field
checkboxes, you must use the Document Options Sheet
with a Distribute Document Cover Sheet that has a
checkbox for storing to a repository. See “Storin g a
document with docume nt manage ment field s” se c ti on
on page 5-25.
To add Document Mana geme nt Fields:
Log in to the FlowPort Web Centre (refer to the “Login to
1
the FlowPort Web Centre” section on page 2-2).
Click the Forms button.
2
In the Forms and Applications page, under Distribute
3
4
Document, click the New Cover Sheet.
In the Cover Sheet Creator page, click title goes here and
enter a title in the Title box .
To add a Document Management Field checkbox, from
5
the menu, click Document Management Field.
Click on the lower blue arrow.
6
In the window, enter the following:
7
Checkbo x label—the text you want to appear o n the
form next to the checkbox ( usually the val ue of the
property , such as "Case-2401").
Field name—name of the field.
Note: Property names are usually case-sensitive; enter
names exactly as they are defined for a repository.
Field Value—value of the field.
Hidden—click if you wan t all the documents stored to
the repository to have this value automatically associated
with them . No document management field checkbox
appears on the form if you select Hidde n.
Chapter 5: Flow Port cap abil ities ❖ 5-33
Page 84

Storing docu ment s to a rep osit ory
Handprint region—click to include a checkbox and a
rectangular area on the form, which lets you add a
handwritten document management field to the
document when it is stored in a DocuShare collection.
Refer to Table 5.2 for detail information regarding the
document management fields for a specific repository.
Click OK.
8
The checkbo x and label d isplay on the f orm. You can
repeat steps 6 through 8 to add more Document
Management Field checkboxes.
Note: For some types of fields, you can sto re more th an
one property value with a document (such as selecting
multiple checkboxes for that property).
To add a checkbox for Network Accounting, from the
9
menu, select Network Accounting.
Click on the lower blue arrow.
10
In the window, enter the following:
11
• Checkbo x label—the text you want to appear o n the
form next to the checkbox (usually to indicate the
account to be charged).
• Network Accounting User ID—your User ID for
network accounting on the Document Centre.
5-34 ❖ Xero x Flo wPor t Us er G uide
• Network Accounting Account ID—the Account ID to
be charged with the print job.
Note: If you want the account to be charged ever y time
the form is used, click the checkbox to select the option
perma n e ntly. For remote printing, network a ccounti ng
IDs must be registere d for the specified print er.
For Limit Form Access To, cl ic k one of the follo w i ng t o
12
specify who can use t he f orm.
• Public Use—allows anyone to use the form. You only
need to authenticate if an administrator has created
special security requir ements.
• Shared Use—al lows any local FlowPort user to use the
form, provided ‘guest’ access is enabled on the
Document Cen t re. See yo ur administrator if you are
not sure.
Page 85

Storing documents to a repository
Note: If you select Public Use or Shared Use, any
Document Token that is printed as a result of storing a
document to a repository such as DocuShare, will also
be public or shared.
• Private Use—allows only the form's owner (providing
authentication) to use the form.
Note: In general, create a form as ‘Public’ or you may
need to provide authenticat ion s uch as a Login Sh eet, as
described below.
Click the Save & Print button.
13
Click the Continue button.
14
The form appears on your Forms and Applications page
and is printed at your de fault printer.
Place the Docu ment Options Sheet after a Di st ribute
15
Document Cover Sheet and scan in the forms with the
document.
If the Options Sheet contain only Network Accounting
checkboxes, it can simply be placed on top and scanned
with the document.
Chapter 5: Flow Port cap abil ities ❖ 5-35
Page 86

Using the Document
Options Sheet
Use a Document O ptions S he et to provide additional
instructions to process a FlowPort job.
Mark t he checkboxes on the Options Sheet to s elect
1
options (document management fields you wish to
associate with the stored document or a Network
Accounting number for printing).
The Options Sheet is used with or without a Distribute
2
Document Cover Sheet.
• If the Opti o ns Sheet has Docum ent Man agemen t Field
checkboxes it must be placed behind a Distribute
Document Cover Sheet that contains a repository
checkbox, followed by the document.
• If the Options Sheet has Network Accounting
checkboxes, it must be placed behind a Distribute
Document Cover Sheet, followed by the document to
apply the Network Account number to all documents
printed as a result of the Cover Sheet job—such as
Confirmation Sheets or retrieved documents
• The Options Sheet has only Network Accounting
checkboxes, it can be placed on top of the document
without a Distribute Document Cover Sheet. You can
also place it with a Document Token or Document
Catalog. The Network Account number is applied to all
documents printed.
5-36 ❖ Xerox Flo wPort U ser G uid e
If either the Options Sheet or the Cover Sheet is ‘Private,’
3
or your system has special secu rity restriction s, pr ov id e
authentication by placing a Login Sheet in front or login
at the Document Centre. See page 8-6.
Page 87

Retrieving yo ur stored do cument s from a reposit ory
Retrieving your stored documents from a
repository
Retrie v ing and
printing with a
Document Token
A Document Token is used to retrieve and print o ut a
document that you stored with a Distrib ut e Document
Cover Sheet.
FlowPort prints a Document Token when a document is
stored to a repository that supports both storage and
access such as:
• Documentum Repository
• DocuS hare Collection
•Domino Repository
• Domino.Doc Repository
•FTP Directory
•iManage Repository
• Microsoft Exchange 2000 Web Folder
To retrieve and print a document with a Document
Token:
1
Note: If you have stored to a repository that is not
listed, you must retrieve and print the document from
your desktop application.
Take the Doc ument Token t o the Doc ument Centr e, and
place it face up in the f eeder.
Refer to the “Scanning forms in the Xerox Document
2
Centre” section on page 4-2 to process the Document
Token. Your docu m ent is printed.
If you want to retrieve your document by InternetFax,
your Internet Fax machine must be able to print. Refer to
the “Scanning forms by Internet Fax” section on page 4-3
to fax the Document Token to FlowPort.)
Chapter 5: Flow Port cap abil ities ❖ 5-37
Page 88

Retrieving your stored documen ts from a repository
Emailing a stored
document
Y ou can email a stored document from your desktop using
your regular mail program. With FlowPort, if you have a
Document Token that was created when you scanned and
stored a document, or if you have a Document Catalog,
you can email a stored doc ume nt directly from a
multifunction or Internet Fax device.
Note: Document Tokens and Document Catalogs are
only created if a document is stored to a repositor y
supported by FlowPort for both storage and acc ess. If
you have stored a document in an Exchange public
folder or Lotus Notes database, you can email the
document from your desktop applicat io n.
First, create a Distribute Docume nt Cover Sheet for
emailing; then use it with a Documen t Token or with a
Document Cata log, to email th e stored d ocument or
documents.
To create a Distribute Document Cover Sheet for
emailing:
Login to the FlowPort Web Centre (refer to the “Login to
1
2
3
the FlowPort Web Centre” section on page 2-2).
Click the Forms button.
In the Forms and Applications page, under Distribute
Document, click the Create New Cover Sheet link.
5-38 ❖ Xero x Flo wPor t Us er G uide
In the Cover Sheet Creator page, click title goes here and
4
enter a title in the Title box .
From the menu, click Email Recipient.
5
On the form, click on the lower blue arrow icon (below
6
the Send To heading).
In the Email Recipient window, enter the following:
7
Email address—the address for an individual or group.
You can enter more than o ne address, separated by
commas.
Checkbo x label—th e text that appears on the form
(usually the name of the email recipient).
Page 89

Retrieving yo ur stored do cument s from a reposit ory
Send URL if available—click to email the URL of the
repository that contains the document, instead of
emailing the actual document. To use this option, you
must add a checkbox for the URL of a document
repository on the form. See “Emailing a stored docume nt
URL” section on page 5-7.
Note: Although you can select an option under File
Format for Scanned Documents, if you are emailing a
stored document, it will be emailed in its current
format.
Click OK.
8
The checkbo x and label d isplay on the f orm. You can
repeat steps 5 through 8 to add other email checkboxes.
To add an Email Subject, do the following:
9
A From the menu, click Email Subject.
B On t h e form, cl i ck a blue ar row.
C In the Subject box, en ter the text you wa nt and cli ck OK.
Note: By adding one or more Email Subjects, you can
select a message subject when emailing a document.
For Limit Form Access To, click one of the following to
10
specify who can use t he f orm.
• Public Use—allows anyone to use the form. You will
only need to authenticate if an administrator has
created spe c ial sec urity re quirements.
• Shared Use—al lows any local FlowPort user to use the
form, provided ‘guest’ access is enabled on the
Document Cen t re. See yo ur administrator if you are
not sure.
Note: If you select Public Use or Shared Use, any
Document Token that is printed as a result of storing a
document to a repository such as DocuShare, will also
be public or shared.
• Private Use—allows only the form's owner (providing
authentication) to use the form.
Note: In general, create a form as ‘Public’ or you may
need to provide authenticat ion s uch as a Login Sh eet, as
described below.
Click the Save & Print.
11
Chapter 5: Flow Port cap abil ities ❖ 5-39
Page 90

Retrieving your stored documen ts from a repository
Click the Continue.
12
The form appears on your Forms and Applications page
and is printed at your default printer.
To scan the Cover Sheet and document to FlowPort:
Place your Cover Sheet on top of the Document Token or
1
Document Catalog (for a Document Catalog, mark a
checkbox on the Catalog to select a document.
If the Cover Sheet. D ocument Token, or Document
Catalog is ‘Private,’ or your system has special security
restrictions, provide authentication by placing a Login
Sheet on top of the stack or login at the Document
Centre. See page 8-6.
Mark t he checkbox o n t he Cov er Sheet to s elect a n email
2
recipient.
Refer to the “Scanning in FlowPort forms” secti o n o n
3
page 4-2 to process the Cover Sheet and document in a
Xerox D ocument Cent re or a Internet Fax device.
You will receive a confirmation that your document was
emailed.
Distributing a stored
document in other
ways
5-40 ❖ Xero x Flo wPor t Us er G uide
Use a Distribute Docu ment Cover Sheet and a Document
T oken or Document Catalog to distribute a document that
is stored in a repository.
Note: Document Tokens and Document Catalogs are
only created if a document is stored to a repositor y
supported by FlowPort for both storage and acc ess. If
you have stored a document in an Exchange public
folder or Lotus Notes database, you can email the
document from your desktop applicat io n.
Create a Distribute Document Cover Sheet for distributing
in your preferred method (email, Internet Fax, remote
printi n g , or storing to a repos itory). The n u s e it with yo ur
Document Token or Document Catalog to distribute the
stored document.
Page 91

Retrieving yo ur stored do cument s from a reposit ory
To create the Cover Sheet and document to FlowPort:
Login to the FlowPort Web Centre (refer to the “Login to
1
the FlowPort Web Centre” section on page 2-2).
Click the Forms button.
2
In the Forms and Applications page, under Distribute
3
Document, click the Create New Cover Sheet.
In the Cover Sheet Creator page, click title goes here and
4
enter a title in the Title box .
From the menu, click a menu item and then click the blue
5
arrow on the form. The menu items let you add the
following checkboxes for distribution:
• Email Recipient—the address for an individual or
group. You can enter more than o ne addr es s, sepa ra ted
by commas.
• Internet Fax Recipient—an Internet F a x recipient's
address
• Remote Printer—the name of a remote printer.
• Documentum Repository—the name of a
Document u m doc ba se .
• DocuShare Collection—the URL of a DocuShare
collection.
• Domino Repository—the Domino server name and
database path.
• Domino.Doc Repository—th e URL of a Do mino.Doc
library.
• FTP Directory—the fully qualified na me or I P a ddress
of an FTP file server.
• iManage Repository—the fully qualified name of an
iManage server and a database name.
• Lotus Notes/Domino —the SMTP a ddr es s of a Notes or
Domino re p o sitory.
• Microsoft Exchange 2000 Web Folder—the UR L of an
Exchange Web Folder.
• Microsoft Exchange Folder—the SMTP address of a
Microsoft Exchange public folder.
Chapter 5: Flow Port cap abil ities ❖ 5-41
Page 92

Retrieving your stored documen ts from a repository
In the window t hat is opened, enter th e requir ed
6
information. For help, click a link for an option.
Click OK in the window. The checkbox and label display
7
on the form.
You can repeat steps 6 through 8 to add more checkboxes.
8
For Limit Form Access To, click one of the following to
9
specify who can use t he f orm.
• Public Use—allows anyone to use the form. You will
only need to authenticate if an administrator has
created spe c ial sec urity re quirements.
• Shared Use—al lows any local FlowPort user to use the
form, provided ‘guest’ access is enabled on the
Document Cen t re. See yo ur administrator if you are
not sure.
Note: When you create a checkbox to email or store a
document, you can select an option for File Format for
Scanned Documents. However, when you distribute a
stored document it will be distribu ted in it s c urren t
format.
5-42 ❖ Xero x Flo wPor t Us er G uide
• Private Use—allows only the form's owner (providing
authentication) to use the form.
Note: In general, create a form as ‘Public’ or you may
need to provide authenticat ion s uch as a Login Sh eet, as
described below.
Click Save & Print.
10
Click Continue.
11
The form appears on your Forms and Applications page
and is printed at your default printer.
To scan the Cover Sheet, and the Document Token or
Document Catalog, to FlowPort:
Place your Cover Sheet on top of a Document Token or a
1
Documen t Catalog, marking checkbox es to select one or
more do cument s f o r distrib ution.
If the Cover Sheet, D ocument Token, or Document
Catalog is ‘Private,’ or your system has special security
restrictions, provide authentication by placing a Login
Page 93

Retrieving yo ur stored do cument s from a reposit ory
Sheet on top of the stack or login at the Document
Centre. See page 8-6.
Refer to the “Scanning in FlowPort forms” secti o n o n
2
page 4-2 to process the Cover Sheet and other forms in a
Xerox Document Cent re or a Inte rnet Fax device.
Creating a Document
Token
Document Tokens can be created for a repository in the
following docu ment manage ment systems:
• Documentum Repository
• DocuS hare Collection
•Domino Repository
• Domino.Doc Repository
•FTP Directory
•iManage Repository
• Microsoft Exchange 2000 Web Folder
There are two ways to create a Document Token:
• When you use a Distribute Document Cover Sh ee t t o
scan a document to a repository that supports both
storage and access, by defa ult, yo u'll receive a
Document Token of the document.
• In the FlowPort Web Centre, create a Document Token
for any document stored in a repository that supports
both storage and access.
Note: To ensure that you receive the Document Token,
click the Account bu t ton an d check that your Job
Confirmation Method is set to Printer.
Any Document Token can be used for distributing a stored
document. For example, you could place a Document
Token after a Distribute Documen t Cover Sheet in order
to ema il the represented document.
However, only the following document file types are
supported for printing from a Document Token:
•TIFF
•PostScript
• PDF (P ortable Document Format) doc uments
Chapter 5: Flow Port cap abil ities ❖ 5-43
Page 94

Retrieving your stored documen ts from a repository
• Microsoft Office documents.
For all other file types, the Do cument Token indicates
with a printed message, that the document c annot be
printed.
To create a Document Token in the Web Centre:
Log in to the FlowPort Web Centre (refer to the “Login to
1
the FlowPort Web Centre” section on page 2-2).
Click the Forms button.
2
In the Forms and Applications page, under Document
3
Token, click Create New Acc e s s She e t.
In the Create Document Token page, unde r Select
4
Document Repository, choose a repository from the
menu.
The page is refreshed to display options for that
repository.
Speci fy info rmation about the s tored d o c ument a nd
5
repository. F or help about th e rep ository parameters , cli c k
a link for an option.
For Limit Form Access To, click one of the following to
6
specify who can use t he f orm.
5-44 ❖ Xero x Flo wPor t Us er G uide
• Public Use—allows anyone to use the form. You will
only need to authenticate if an administrator has
created spe c ial sec urity re quirements.
• Shared Use—al lows any local FlowPort user to use the
form, provided ‘guest’ access is enabled on the
Document Cen t re. See yo ur administrator if you are
not sure.
Note: If you select Public Use or Shared Use, any
Document Token that is printed as a result of storing a
document to a repository such as DocuShare, will also
be public or shared.
• Private Use—allows only the form's owner (providing
authentication) to use the form.
Note: In general, create a form as ‘Public’ or you may
need to provide authentication such as a Login Sheet.
Page 95

Retrieving yo ur stored do cument s from a reposit ory
Click Save or Save & Print.
7
The Documen t Token is printed at you r de f au l t printer,
and listed on your Forms and Applications page.
Note: When creating a Document Token for a long or
complex document, you may receive a message that the
browser could not open a particular internet site.
FlowPo rt c ontinue s to create th e Document Token. Wait
a few minutes and open the browser again.
Using a Document
Token
You can use a Docume nt Token to retrieve stored
documents for printing or distribution.
The stored document ca n be printed from the Docume nt
Token only if the document is one of the following file
types:
• TIFF
• PDF ( P ort able Document Forma t)
• Microsoft Office (Word
•PostScript.
To print a document represented by the Document
Token:
1
2
Place the Document Token in the device document feeder.
Refer to the “Scanning in FlowPort forms” secti o n o n
page 4-2 to process the Document Token.
If the Docume nt Token is ‘Private,’ or yo u r syst em has
security restrictions, provide authentication by placing a
Login Sheet in front of it or login at the Document
Centre. See page 8-6.
The document is ret rieved a nd print ed.
, PowerPoint, and Excel)
To distribute a stored document using a Document
Token:
Place the Document Token after a Distribute Document
1
Cover Sheet, marking checkboxes on the Cover Sheet to
indicate how to distribute the document (by email,
Internet fax, remote printing, or storing to a repository).
Chapter 5: Flow Port cap abil ities ❖ 5-45
Page 96

Retrieving your stored documen ts from a repository
If either the Cover Sheet or Document Token are ‘P rivate,’
or your system has security restrictions, provide
authentication by placing a Login Sheet on top of the
Cover Sheet or logi n at the D o c umen t Centr e. See
page 8-6.
Place the forms in the device document feeder. Refer to
2
the “Scanning in F lowPort forms” section on page4-2 to
process the D o c ument Token in a Docume nt Centre or a
Internet Fax device.
Creating a Document
Catalog
You can create and print a Document Catalog from the
FlowPort Web Centre.
Document Catalo gs can be created for a repo sito ry in the
following docu ment manage ment systems:
• Documentum Repository
• DocuS hare Collection
•Domino Repository
• Domino.Doc Repository
•FTP Directory
•iManage Repository
• Microsoft Exchange 2000 Web Folder
To create and pr int a Document Catalog:
1
2
3
Login to the FlowPort Web Centre (refer to the “Login to
the FlowPort Web Centre” section on page 2-2).
Click the Forms button. In the Forms and Applications
page, click Create New Access Sheet.
In the Document Catalog page, under Select Document
Repository, choose a repository from the menu. The page
refreshes to di sp lay t he options for that rep ository.
5-46 ❖ Xero x Flo wPor t Us er G uide
Enter the information for the selected repository. Refer to
4
Table 5.1 for repository information.
For Limit Form Access To, click one of the following to
5
specify who can use t he f orm.
Page 97

Retrieving yo ur stored do cument s from a reposit ory
• Public Use—allows anyone to use the form. You will
only need to authenticate if an administrator has
created spe c ial sec urity re quirements.
• Shared Use—al lows any local FlowPort user to use the
form, provided ‘guest’ access is enabled on the
Document Cen t re. See yo ur administrator if you are
not sure.
• Private Use—allows only the form's owner (providing
authentication) to use the form.
Note: In general, create a form as ‘Public’ or you may
need to provide authentication such as a Login Sheet.
Click Save and Print to print out the Document Catalog,
6
or Save to return to the Forms and Applications page.
The D ocume nt Catalo g is pri n t ed at y o ur default prin t er,
and listed on your Forms and Applications page. Note
that the Document Catalog may have multiple pages.
Using a Document
Catalog
You can use a Docume nt Catalog form to retrieve sto red
documents for printing or distribution.
To print one or more documents using a Document
Catalog:
1
Note: Only the following document file types can be
printed from a Document Catalog:
• TIFF
• PDF (Portable Document Format)
• Microsoft Office (Word, PowerPoint, and Excel)
• PostScript
Mark checkboxes on the Document Catalog to select the
documents you want to print.
Note: A Document Catalog may have multiple pages.
You do not need to scan all the pages when you process
the Document Catalog; just use the pages on which you
have selec ted docum e nts (the pag e s wi th marked
checkboxes).
If you select several documents for printing, and one of
them cannot be printed, the FlowPort server will not be
able to print any other of the selected documents. For
example, if an HTML document is selected, it can not be
Chapter 5: Flow Port cap abil ities ❖ 5-47
Page 98

Retrieving your stored documen ts from a repository
printed. Check the file type of a document listed on the
Document Catalog before selecting it for printing.
Plac e t he Document Ca talog in the de vice do c ument
2
feeder. Refer to the “Scanning in FlowPort forms” section
on page 4-2 to proces s the Document Cata log.
If the Document Catalog is ‘Private,’ or your system has
security restrictions, provide authentication by placing a
Login Sheet on top of the Document Catalog or login at
the Document Centre . See pag e 8-6.
To distribute one or more documents using a
Document Catalog:
Mark checkboxes on the Document Catalog to select the
1
documents you want to distribute. You can distribute a
document of any file type.
Note: If a Document Catalog consists of multiple pages,
you do not need to use all the pages. Just use the pages
that ha v e selecte d documents.
Note: If a Document Catalog consists of multiple pages,
you do not need to use all the pages. Just use the pages
that ha v e selecte d documents.
5-48 ❖ Xero x Flo wPor t Us er G uide
Place the Document Catalog after a Distribute Document
2
Cover Sheet, marking checkboxes on the Cover Sheet to
indicate how to distribute the document or documents
(by email, Internet fax, remote printing, or storing to a
repository).
Plac e b oth form s in the device document feeder. Refer to
the “Scanning in FlowPort forms” section on page4-2 to
process the Document Catalog in a Xerox Document
Centre or a Inte rnet Fax device.
If either the Cover Sheet or Document Catalog are
‘Private ,’ o r y our system has secu rity restrict ions, provide
authentication by placing a Login Sheet in front or login
at the Document Centre. See page 8-6.
Page 99

Receivin g In tern et Fax es throug h Flo wPort
Receiving Internet Faxes through FlowPort
Receiving faxes by way of t he In te rnet is cost effective
because it uses Int ern et protocols to deliver a faxed
document instead of a standard fax phone line. FlowPort
provides you the capability to receive Internet Faxes, have
them printed , stored for you, and the option of recei ving
email notification when a fax is sent.
FlowPort provides you with an Internet Fax mailbox with
options for how you receive Faxes. You can easily enable
or disable your Internet Fax mailbox. Contact your
FlowPort administrator for your FlowPort Intern et Fax
address.
To enable or disable receiving your Inter net Faxes:
Login to the FlowPort Web Centre (refer to the “Login to
1
the FlowPort Web Centre” section on page 2-2).
Click the Options button.
2
3
Under Application Options, click Internet Fax Mailbox.
Depending o n whether your Internet Fax Mailbox is
4
already enabled, you see one of the following:
• If Internet Fax receiving is not enabled, the page
provides a status. Click Enable.
• If Intern et Fa x receiving is enabled, the page displ a ys
Current Settings. Under Changing Settings, click
Enable/disable receipt of Internet Faxes for
<username>.
On the next page, click one of the following options:
5
• Accept Internet Fax via FlowPort SMTP Mail
Server—to receive Internet Faxes.
• Accept Internet Faxes via a POP3 mailbox on
another server—to receive Internet faxes.
Note: The option shown depends on how Internet Fax
receiving is setup by your FlowPor t administrator (an
SMTP mail server or POP mailbox).
Chapter 5: Flow Port cap abil ities ❖ 5-49
Page 100

Receivin g In ternet Faxe s th roug h Flow Port
• Do not accept incoming Internet Faxes for this
user—disables your Internet Fax mailbox, so incoming
faxes are not received.
Click Next.
6
If you chose Accept Internet Faxes via a POP3 mailbox
7
on another server, you see a page for s pecify ing the POP
mailbox. For help, click a link for an option or see your
FlowPort administrator. Click Next when you are done.
If you chose Do not accept incoming faxes for this user ,
you see a confirmation page. Click Save to confirm (and
do not follow any steps below).
If you chose the option to accept Internet Faxes, an
8
Internet Fax Receive Options page is displayed. Select
one or more of the following:
• Notify by E mai l—sends an email message to you when
an Internet Fax is received .
• Print Doc ume nt —prints the en tire fax on your de fault
printer.
• Store Document in Repository—selects a repository
for storing Internet faxes. You will be prompted to
specify a repository when you click Next.
• Print Document Token—prints a o ne-pag e document
that represents the stored document on the user's
default printer. To use this option, you must specify a
repository and a repository user name and password.
Click Next.
9
5-50 ❖ Xero x Flo wPor t Us er G uide
 Loading...