

Page 1

Xerox Document Centre Setup
Guide for FlowPort
This document is intended for use by FlowPort System Administrators when
configuring the following Xerox Document Centres to scan to a FlowPort server:
• Document Centre 240/255/265/460/470/480/490
• Document Centre 220/230/332/340/432/420/425/432/440
There are two basic things you must do on the Document Centre:
• Designating a “repository” on the document centre. This is the IP address of
the FlowPort server.
• Setting up a default scan template.
The procedures in this guide are provided as examples only. Because of firmware
differences, the screens you see may be different, however you may use the
concepts presented here.
Chapter1
Chapter2
Xerox Document Centre Setup Guide for FlowPort 1
Page 2

Configuring a Document Centre 240/255/265/460/47 0/480/490 with Centreware Internet Services
Configuring a Document Centre 240/255/265/460/470/480/490
with Centreware Internet Services
Verify that the Scan-to-File feature is installed on the Document Centre. Print a
Configuration sheet and check the installed options list for Scan-to-File. If the
Scan-to-File is not listed, contact your Xerox service representative to obtain and
install the Scan-to-File kit. You can also call 1-800about obtaining and installing this feature.
FlowPort Repository & Template Setup
The Xerox Document Centre uses templates and repositories to control the
disposition of scanned documents. Information about these template s and
repositories is stored inside the Document Centre and is accessible through the
Web server embedded in the device. The Document Centre provides a default
template, a number of named template (optional), a default public repository, and
four other configurable public reposi tor i es.
Templates are shown as choices on the Document Centre Touch Screen. The
default template is named “@default.xst” and it is the first template shown in the
template list on the screen. The Xerox Document Centre uses templates and
repositories to control the disposition of scanned documents. Information about
these templates and repositories is stored inside the Document Centre and is
accessible through the Web server embedded in the device. The Document
Centre provides a default template, a number of named templates (optional), a
default public repository, and four other configurable public repositories.
ASK-XEROX for information
Templates are shown as choices on the Document Centre Touch Screen. The
default template is named “@default.xst” and it is the first template shown in the
template list on the screen.
Repositories are shown as choices for template setup in the Document Centre
Web-based administration tool. Each repository has the following settings :
• Repository List
• Protocols
• File Server IP Address
• Directory Path
•Login Name
•Password
2 Xerox Document Centre Setup Guide for FlowPort
Page 3
Configuring a Document Ce ntre 240/255/265/460/470/ 480/490 wit h Centreware Internet Services
FlowPort Repository Setup
The following settings for the Default Repository and Template Pool Setup are
recommended.
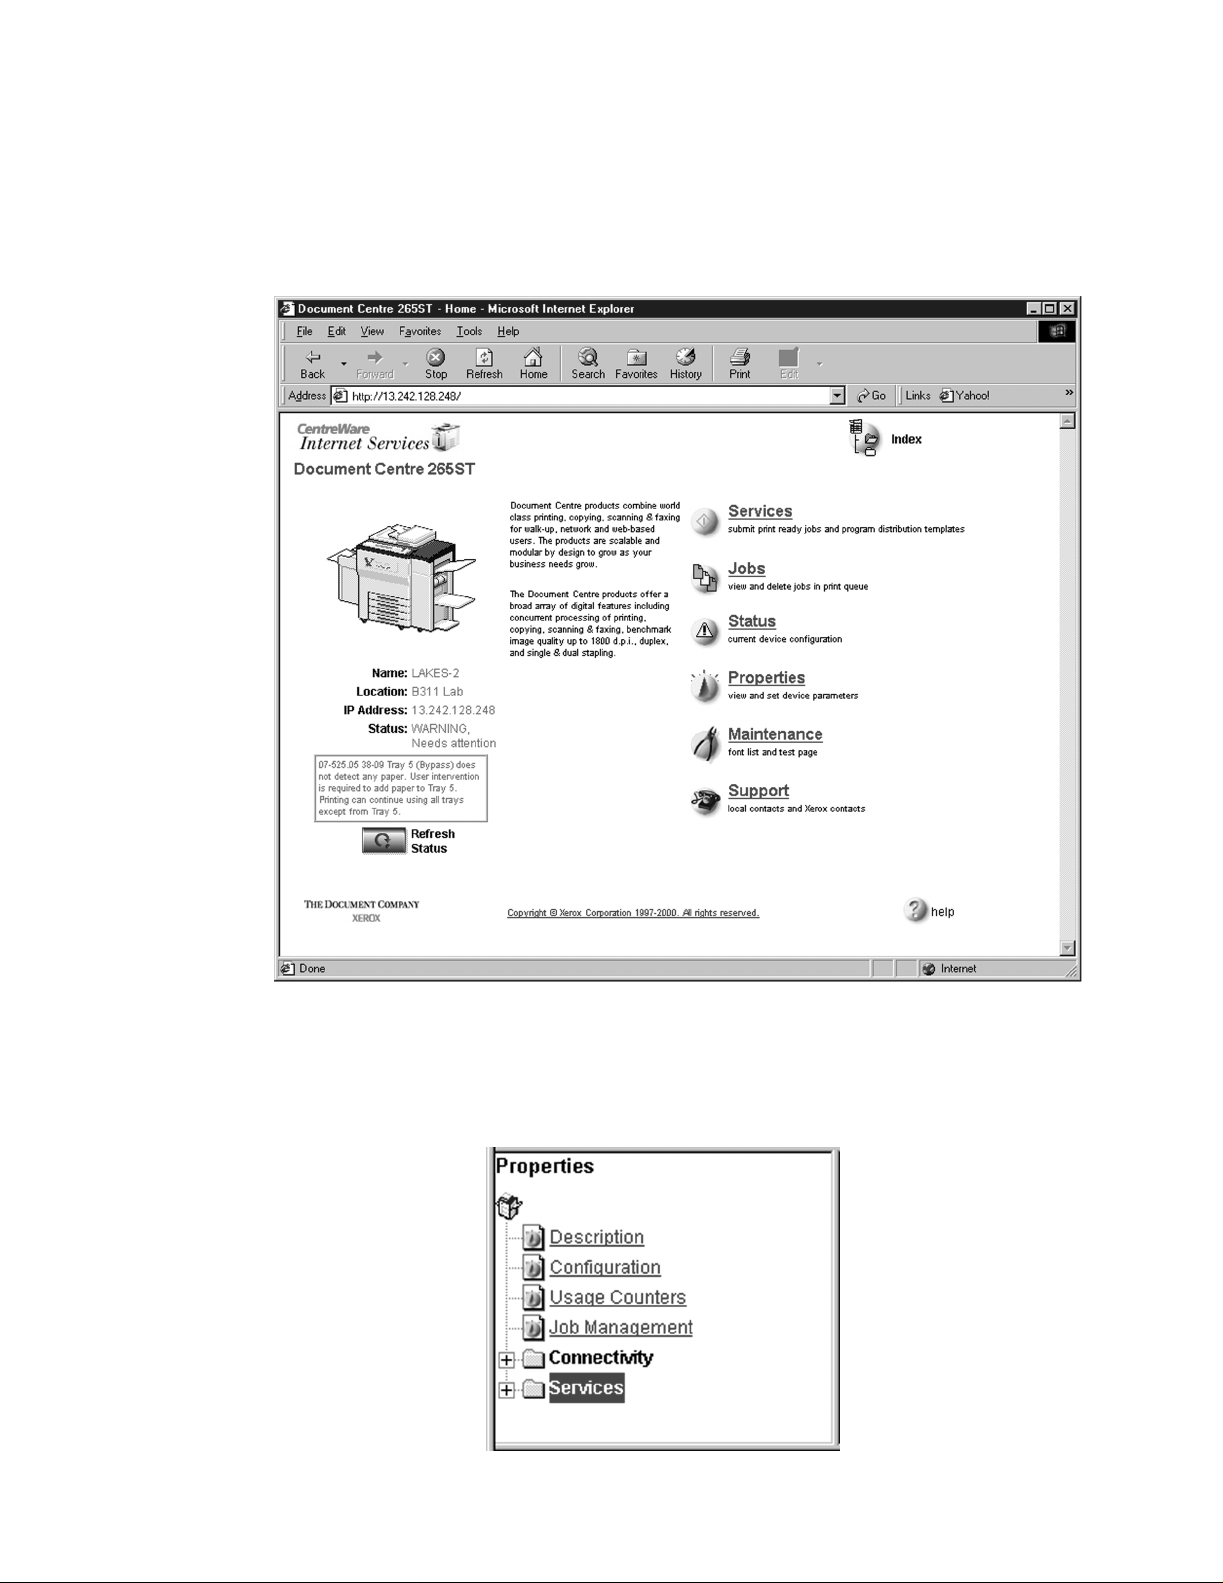
In your Web browser’s Address (or Location) box, enter the TCP/IP
1
address of your Document Centre.
Click on Properties.
2
In the Properties column (left side of screen), click on the plus (+) sign for the
3
Services folder. The properties for th e Document Centre will display as shown
below.
Xerox Document Centre Setup Guide for FlowPort 3
Page 4
Configuring a Document Centre 240/255/265/460/47 0/480/490 with Centreware Internet Services
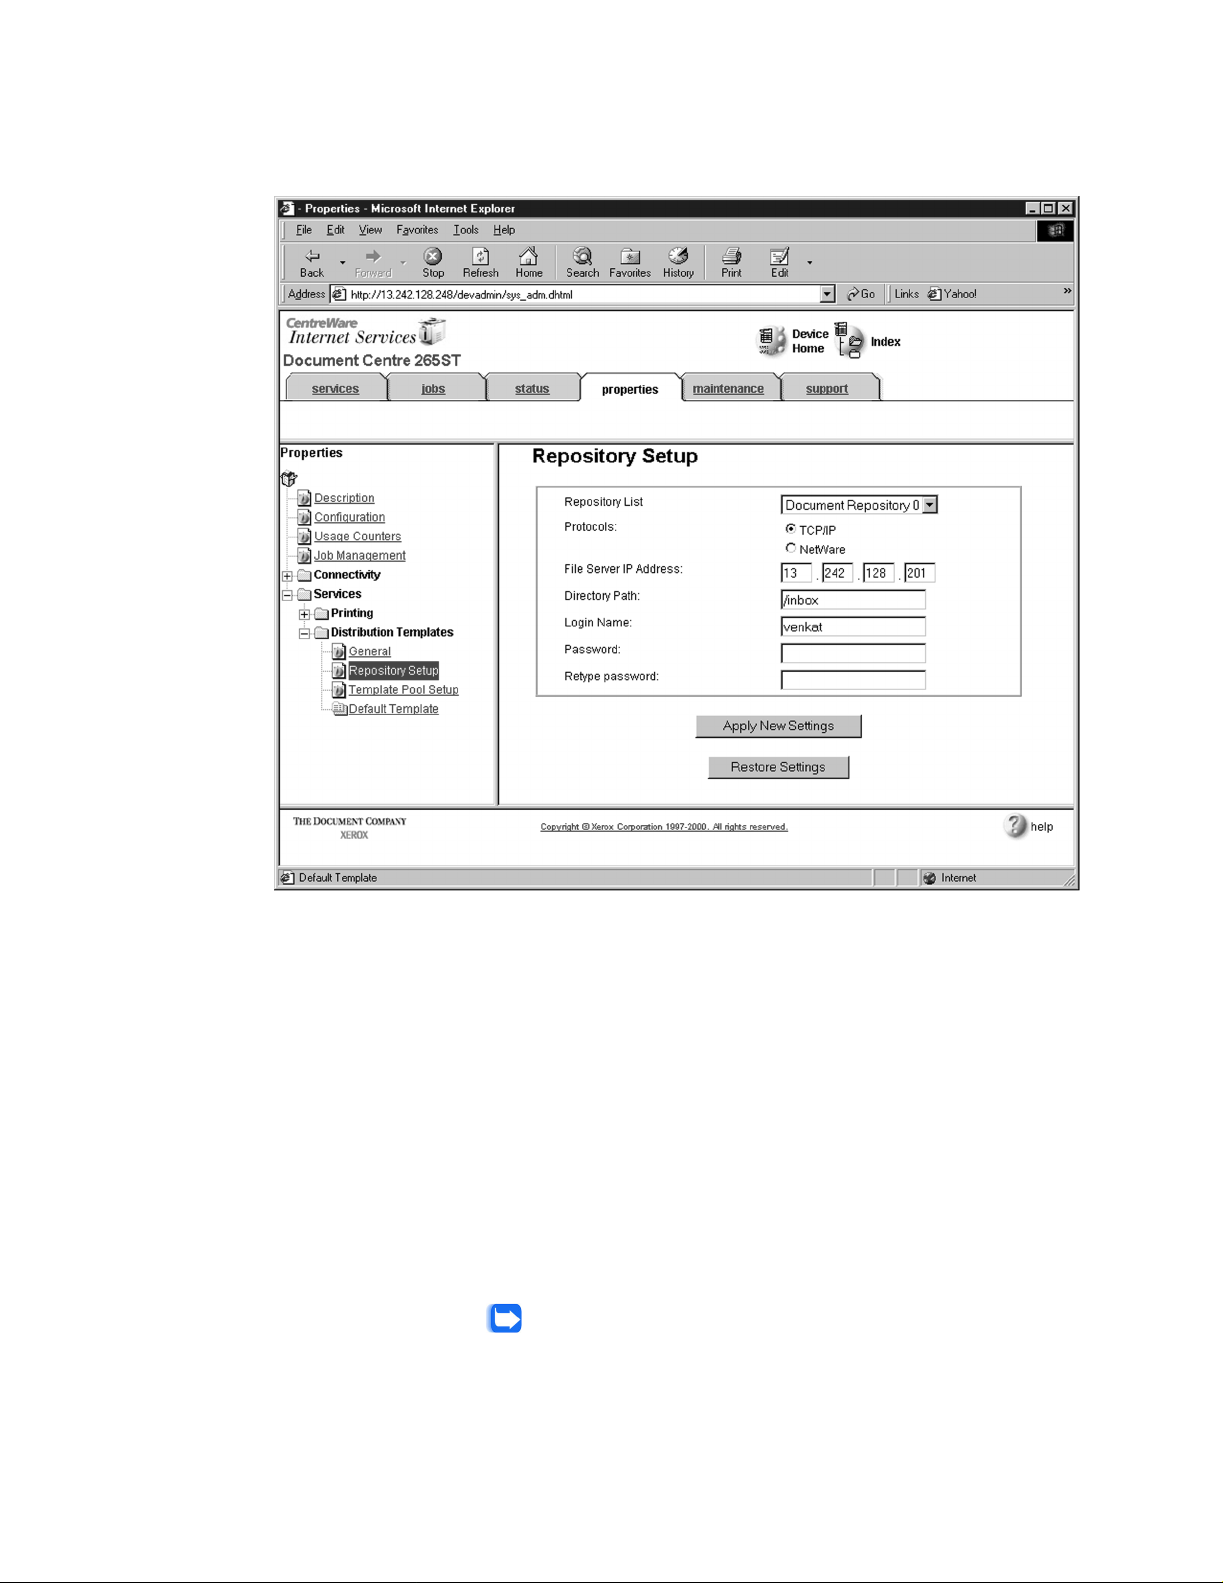
Click on the plus (+) sign for the Distribution Templates.
4
Click the Repository Setup link.
5
Under Repository Setup, perform the following:
6
Repository List: Select Document Repository 0. Check with your Xero x
Document Centre System Administrator to make sure the Repository is not in use.
NOTE: Depending on the pr inter software model, there may only be 1 re pository.
Some models will have Document Repositories of 0-4 or 1-5.
Protocols: Selec t TCP/IP.
File Server IP Address: Enter the TCP/IP address of your FlowPort server.
Contact your Network Administrator if you do not know the address. In some
versions, you ma y need to enter a port number. In this case, enter 21.
Directory Path: Enter /.
Login Name: Enter the guest account user name (NSA is the default guest account
user name).
Password: Enter the FTP password twice (nsa is the default guest password).
Note: If you have changed the NSA FTP user name or password in t he
FlowPort NSA Protocol Service configuration, enter the new user name
and password here to enabl e F TP access.
4 Xerox Document Centre Setup Guide for FlowPort
Page 5
Configuring a Document Ce ntre 240/255/265/460/470/ 480/490 wit h Centreware Internet Services
Click on Apply New Setting s.
7
A Login window may display. Enter admin for the user name followed by your
8
password. If you do not know your password, contact your printer system
administrator.
Note: The user name and pa ssw ord are case sensitive.
FlowPort Template Setup
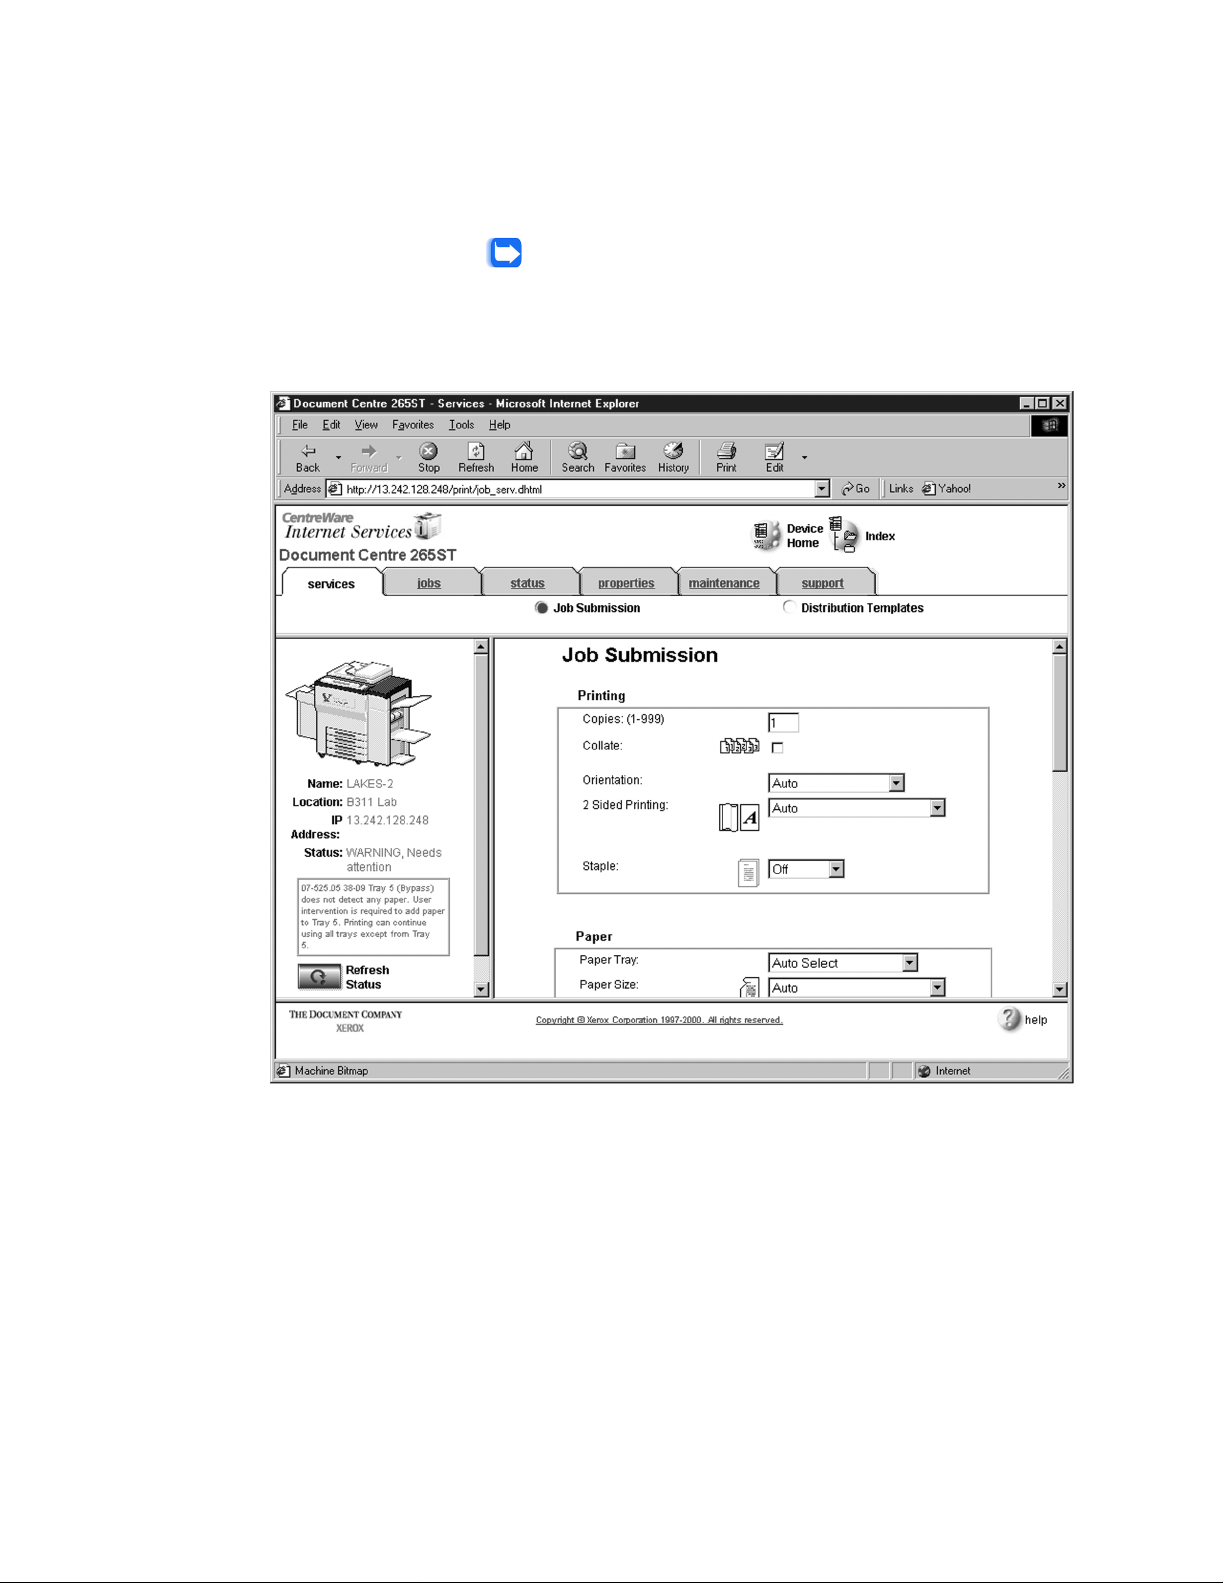
Click on the Services tab. The Job Submission page displays as shown below.
1
Xerox Document Centre Setup Guide for FlowPort 5
Page 6
Configuring a Document Centre 240/255/265/460/47 0/480/490 with Centreware Internet Services
Click on the Distribution Templates button.
2
6 Xerox Document Centre Setup Guide for FlowPort
Page 7
Configuring a Document Ce ntre 240/255/265/460/470/ 480/490 wit h Centreware Internet Services
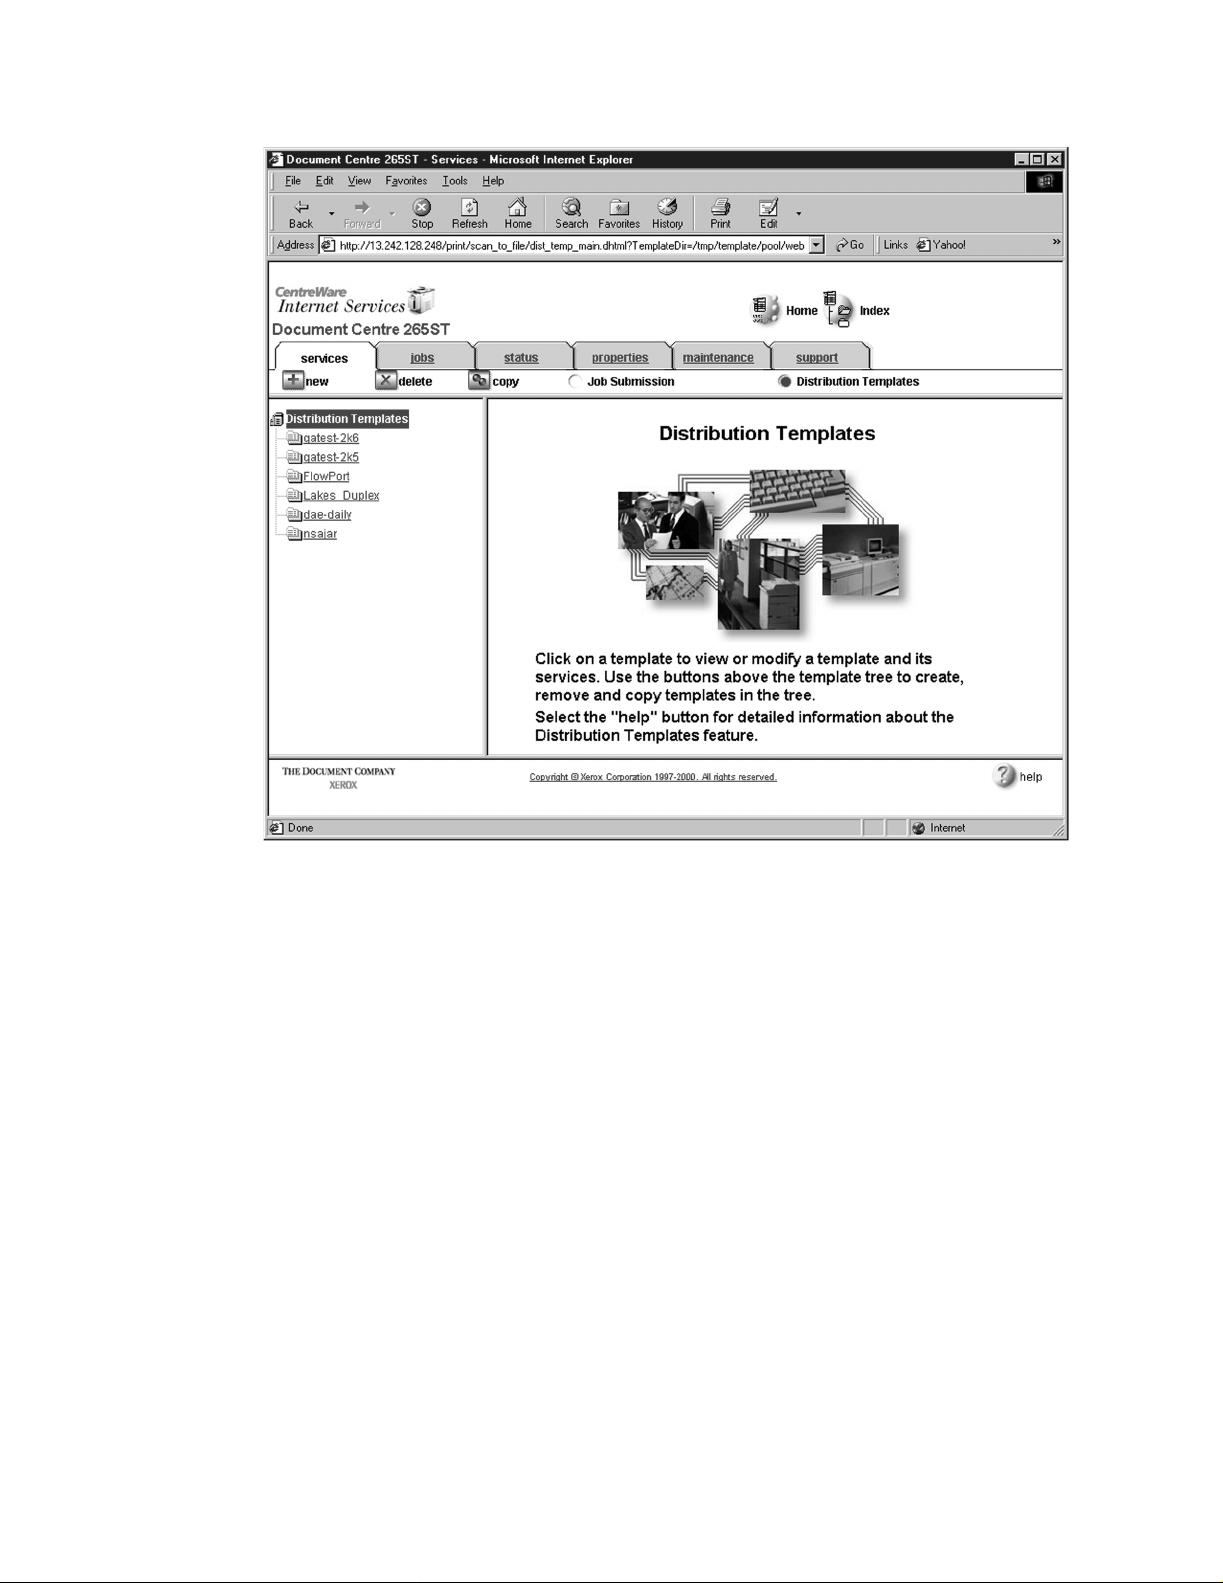
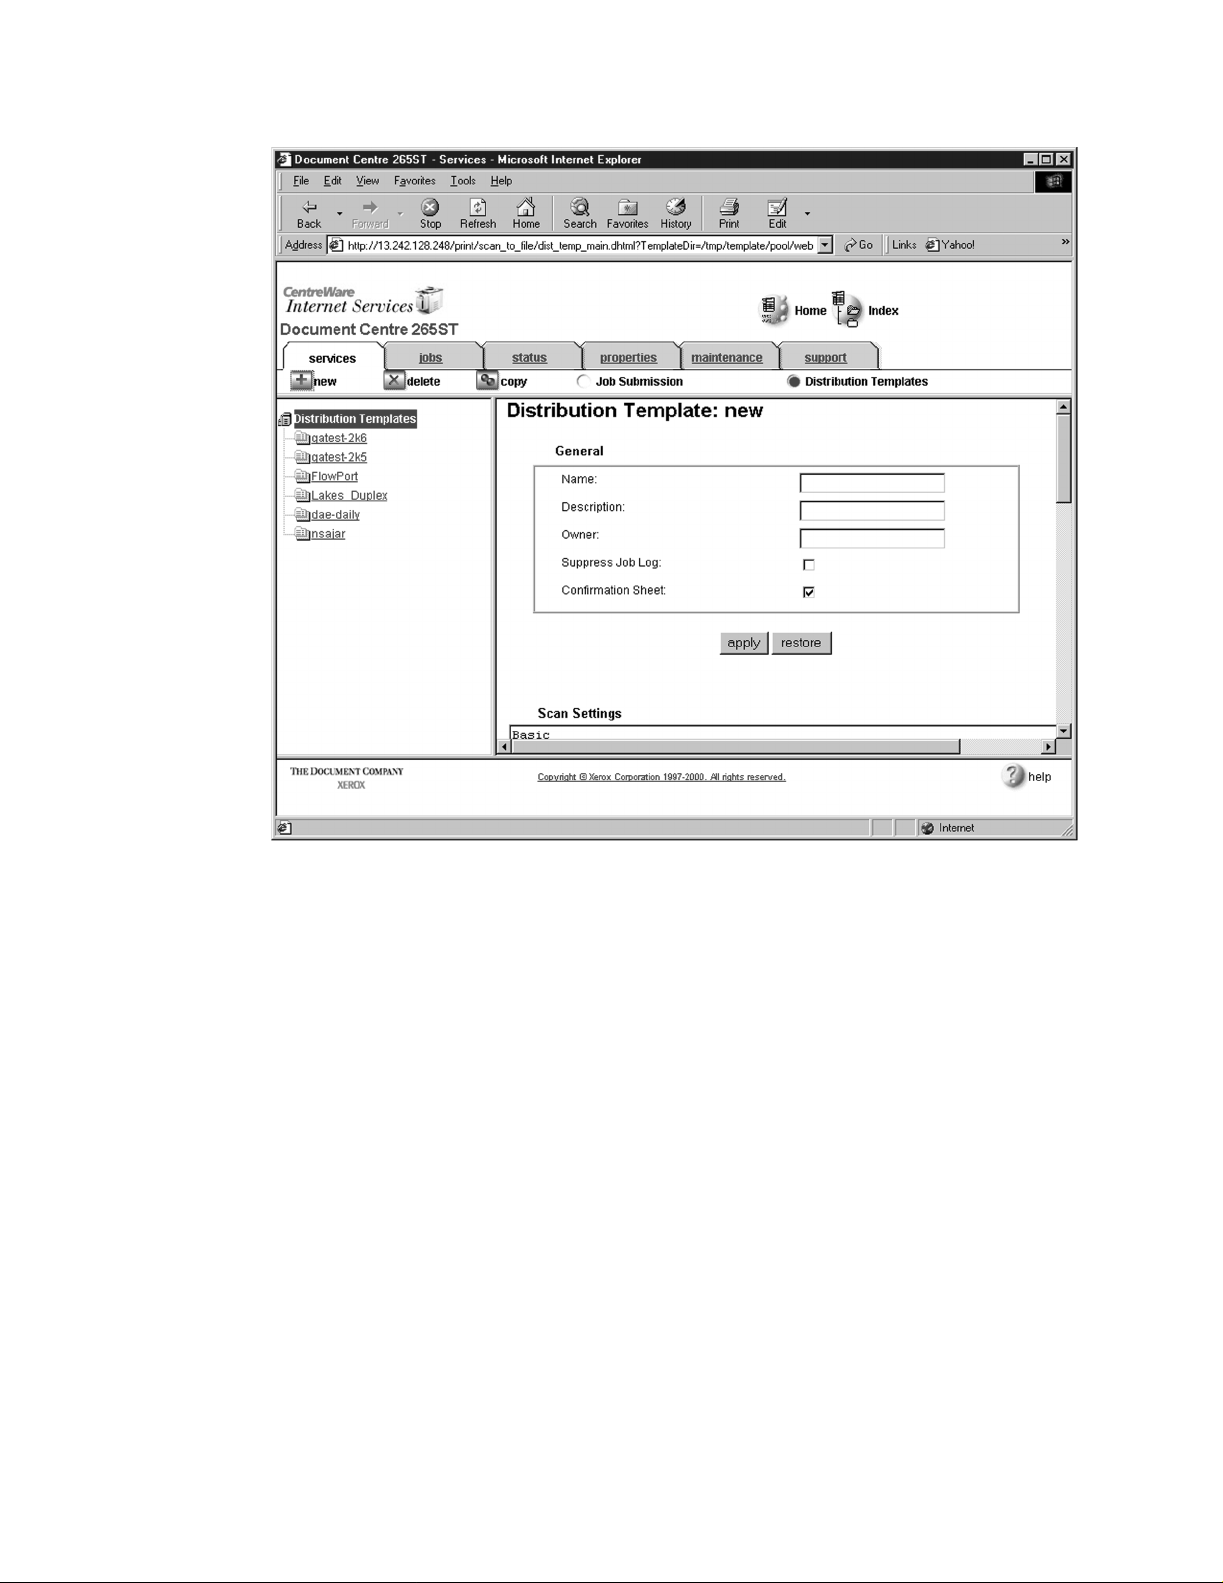
Under the Services tab, click on the [+] new button.
3
In the General settings box, enter the following:
4
Name: Type FlowPort (or any name that would let users know that this is the
FlowPort template. It can be up to eight characters in length).
Description: Type Scan to FlowPort.
Owner: Type your name or the FlowPort administrator’s name.
Xerox Document Centre Setup Guide for FlowPort 7
Page 8

Configuring a Document Centre 240/255/265/460/47 0/480/490 with Centreware Internet Services
Review the Scan Settings. Clic k on Edit if yo u ne ed to cha nge th e defau lt sett ings .
5
Text
8 Xerox Document Centre Setup Guide for FlowPort
Page 9

Configuring a Document Ce ntre 240/255/265/460/470/ 480/490 wit h Centreware Internet Services
In the Distribution area, specify a Destination. Select Public Internet Folder
6
from the New Destination list, and click add.
Xerox Document Centre Setup Guide for FlowPort 9
Page 10

Configuring a Document Centre 240/255/265/460/47 0/480/490 with Centreware Internet Services
In the list of Select from Repository Servers, select repository that points to the
7
FlowPort server.
T yp e the Path to Doc um e nt /
8
Check the Filing Policy New Auto Generate.
9
Document name is DOC.
10
Select the Output Image Format Multi-Page TIFF.
11
Click on Apply New Setting s. The Document Centre is ready to use Fl ow Po rt .
12
Note: This setup provides users Guest access (Trusted/Shared) to
FlowPort. If a higher authentication level is required, users should use
their FlowPort Login sheet.
Testing the FlowPort Template
To check that the Document Centre is ready for FlowPort use, perform the
following test:
At the Document Centre, place a document in the scanner.
1
Select the FlowPort template an d select Scan.
2
Note: If the Document Centre is properly configured, a DC confirmation
sheet will be printed confirming that the scan to FlowPort was
successful, otherwise an error report with some specific failure notice
will be printed. If the scan to FlowPort was successful a FlowPort
confirmation sheet will also print.
10 Xerox Document Centre Setup Guide for FlowPort
Page 11

Configuring a Document Centre 220/230/332/340/432/420/ 425/432/440 with Centreware Internet Services
Configuring a Document Centre 220/230/332/340/432/420/425/
432/440 with Centreware Internet Services
Verify that the Scan-to-File feature is installed on the Document Centre. Print a
Configuration sheet and check the installed options list for Scan-to-File. If the
Scan-to-File is not listed, contact your Xerox service representative to obtain and
install the Scan-to-File kit. You can also call 1-800-ASK-XEROX for
information about obtaining and installing this feature.
FlowPort Repository and Template Setup
The Xerox Document Centre uses templates and repositories to control the
disposition of scanned documents. Information about these template s and
repositories is stored inside the Document Centre and is accessible through the
Web server embedded in the device. The Document Centre provides a default
template, a number of named template (optional), a default public repository, and
four other configurable public reposi tor i es.
Templates are shown as choices on the Document Centre Touch Screen. The
default template is named “@default.xst” and it is the first template shown in the
template list on the screen. The Xerox Document Centre uses templates and
repositories to control the disposition of scanned documents. Information about
these templates and repositories is stored inside the Document Centre and is
accessible through the Web server embedded in the device. The Document
Centre provides a default template, a number of named templates (optional), a
default public repository, and four other configurable public repositories.
Templates are shown as choices on the Document Centre Touch Screen. The
default template is named “@default.xst” and it is the first template shown in the
template list on the screen.
Repositories are shown as choices for template setup in the Document Centre
Web-based administration tool. Each repository has the following settings :
• Repository List
• Protocols
• File Server IP Address
• Directory Path
•Login Name
• Password
Xerox Document Centre Setup Guide for FlowPort 11
Page 12

Configuring a Document Centre 220/230/332/340/43 2/420/425/432/440 with Centrew are Internet Services
FlowPort Repository Setup
The following settings for the FlowPort Repository setup are recommended.
In your Web browser’s Address (or Location) box, enter the TCP/IP
1
address of your Document Centre.
Click on Properties.
2
Click on [+] Services.
3
Click on [+] Stored Templates
4
12 Xerox Document Centre Setup Guide for FlowPort
Page 13

Configuring a Document Centre 220/230/332/340/432/420/ 425/432/440 with Centreware Internet Services
Click on Re pository Setup.
5
/
Select an unused repository from the Repository List (Default is recommneded).
6
Verify that the protocol is TCP/IP.
7
Type the File Server IP address (the IP address of your FlowPort server).
8
Type the Directory Path /
9
Type the login name NSA, and the password nsa.
10
Click on Apply New Setting s.
11
In the dialog box that appears, type the admin User Name and Password of the
12
Document Centre, and click OK.
Xerox Document Centre Setup Guide for FlowPort 13
Page 14

Configuring a Document Centre 220/230/332/340/43 2/420/425/432/440 with Centrew are Internet Services
14 Xerox Document Centre Setup Guide for FlowPort
Page 15

Configuring a Document Centre 220/230/332/340/432/420/ 425/432/440 with Centreware Internet Services
FlowPort Template Se tup
Next, you need to set up the scan template that you will use when scanning to
1
FlowPort server. Select Device Index.
Xerox Document Centre Setup Guide for FlowPort 15
Page 16

Configuring a Document Centre 220/230/332/340/43 2/420/425/432/440 with Centrew are Internet Services
Select St ored Templates.
2
16 Xerox Document Centre Setup Guide for FlowPort
Page 17

Configuring a Document Centre 220/230/332/340/432/420/ 425/432/440 with Centreware Internet Services
Select [+] new.
3
In the Template fields, enter a name for the template in the Name field. Leave the
4
Description and Owner fields blank.
Under Services, select File.
5
Click apply.
6
If you see the following dialog box, click Yes.
7
Xerox Document Centre Setup Guide for FlowPort 17
Page 18

Configuring a Document Centre 220/230/332/340/43 2/420/425/432/440 with Centrew are Internet Services
Click the browser’s Refresh button. You should see the name of the new template
8
in the list of Device Templates.
List of
Device
Templates
Click on [+] next to the name of the new template in the list of Device Templates.
9
18 Xerox Document Centre Setup Guide for FlowPort
Page 19

Configuring a Document Centre 220/230/332/340/432/420/ 425/432/440 with Centreware Internet Services
Click Scan and verify the scan settings. Typically, the default settings are used,
10
however click Edit if you want to change them.
Text
Xerox Document Centre Setup Guide for FlowPort 19
Page 20

Configuring a Document Centre 220/230/332/340/43 2/420/425/432/440 with Centrew are Internet Services
Click File.
11
Under Stored templates, select the following: TCP/IP , Public, Default (or the
12
repository designated for FlowPort), New Auto Generate, and TIFF
(Multi-Page) . Then, click Apply New Settings.
The Document Center is now conf ig ured to scan to the FlowPort server.
13
20 Xerox Document Centre Setup Guide for FlowPort
Page 21

Configuring a Document Centre 220/230/332/340/432/420/ 425/432/440 with Centreware Internet Services
Testing the FlowPort Template
To check that the Document Centre is ready for FlowPort use, perform the
following test:
At the Document Centre, place a document in the scanner.
1
Select the FlowPort template and select Scan.
2
Note: If the Document Centre is properly configured, a DC confirmation
sheet will be printed confirming that the scan to FlowPort was
successful, otherwise an error report with some specific failure notice
will be printed. If the scan to FlowPort was successful a FlowPort
confirmation sheet will also print.
Xerox Document Centre Setup Guide for FlowPort 21
 Loading...