

Page 1

User Addendum
Fiery XJ Color Server
Software version 3.1
This document describes new features and updates information for Fiery XJ software
version 3.1. Before using the Fiery XJ, please read this addendum and distribute it to all
users.
The User Software CD contains PostScript Printer Description (PPD) files for use with
Adobe printer drivers. Please be sure to install these printer files in the appropriate
locations.
What’s new in
version 3.1
The Fiery XJ Color Server version 3.1 has a number of new features, including:
• Windows 95, Windows NT v3.51, and Windows NT v4.0 support
• Fiery WebTools
• DocuColor 5750 color copier support
N
:
OTE
This document uses the term 5750 to refer to the DocuColor 5750 color copier.
• Expanded dual copier/device support
• Adobe PostScript v2015 support
• Media type options
• Sharpness option
• Calibration/Simulation option
• Tray selection
• AutoCal
™
II
• Spanish and Italian language support
OTE
N
:
Fiery XJ user software no longer includes WPD files for use with Windows 3.1x,
PDF files for use with QuarkXPress, or EFICOLOR Works software for Macintosh;
however, printing with Windows 3.1x and from the QuarkXPress application is now
supported through the use of the Adobe PS Printer Driver and appropriate PPD file (both
included with the Fiery XJ user software).
User software
The Fiery XJ supports the following software versions for the Macintosh:
• Utilities v3.1 (Fiery XJ Scan, Fiery XJ Export, Fiery XJ Downloader, Fiery XJ Spooler,
and Fiery XJ Print Calibrator)
• Adobe PS Printer Driver v8.31
• Fiery WebTools v1.0 (Status, WebSpooler , WebLink, Installer)
N
OTE
:
EFICOLOR Works v2.02 software (including EFICOLOR for scanners, Profile
Editor, and EFICOLOR EPS Xtension), is supported for use with Fiery XJ version 3.1.
EFI part number: 10012717
Page 2
Page 2
The Fiery XJ supports the following software versions for Windows:
• Utilities v3.1 (Fiery XJ Scan, Fiery XJ Export, Fiery XJ Downloader, Fiery XJ Spooler,
and Fiery XJ Print Calibrator)
• Adobe PS Printer Driver v4.1
• Fiery WebTools v1.0 (Status, WebSpooler, WebLink, Installer)
Windows 95 and NT support
Fiery WebTools
In addition to Macintosh and Windows 3.1x support, you can now print and use all the
Fiery XJ utilities and plug-ins with Windows 95 and Windows NT v3.51 and v4.0.
Windows 95 utilities communicate over IPX/SPX; in order to use them, both IPX and
TCP/IP protocols are required.
Windows NT utilities communicate over TCP/IP only.
N
:
OTE
The necessary network files are installed with the Utilities Installer, not with the
Export or Scan Installers. Be sure to run the Utilities Installer in or der to use all the F iery XJ
utilities and plug-ins. For instructions, see Getting Started .
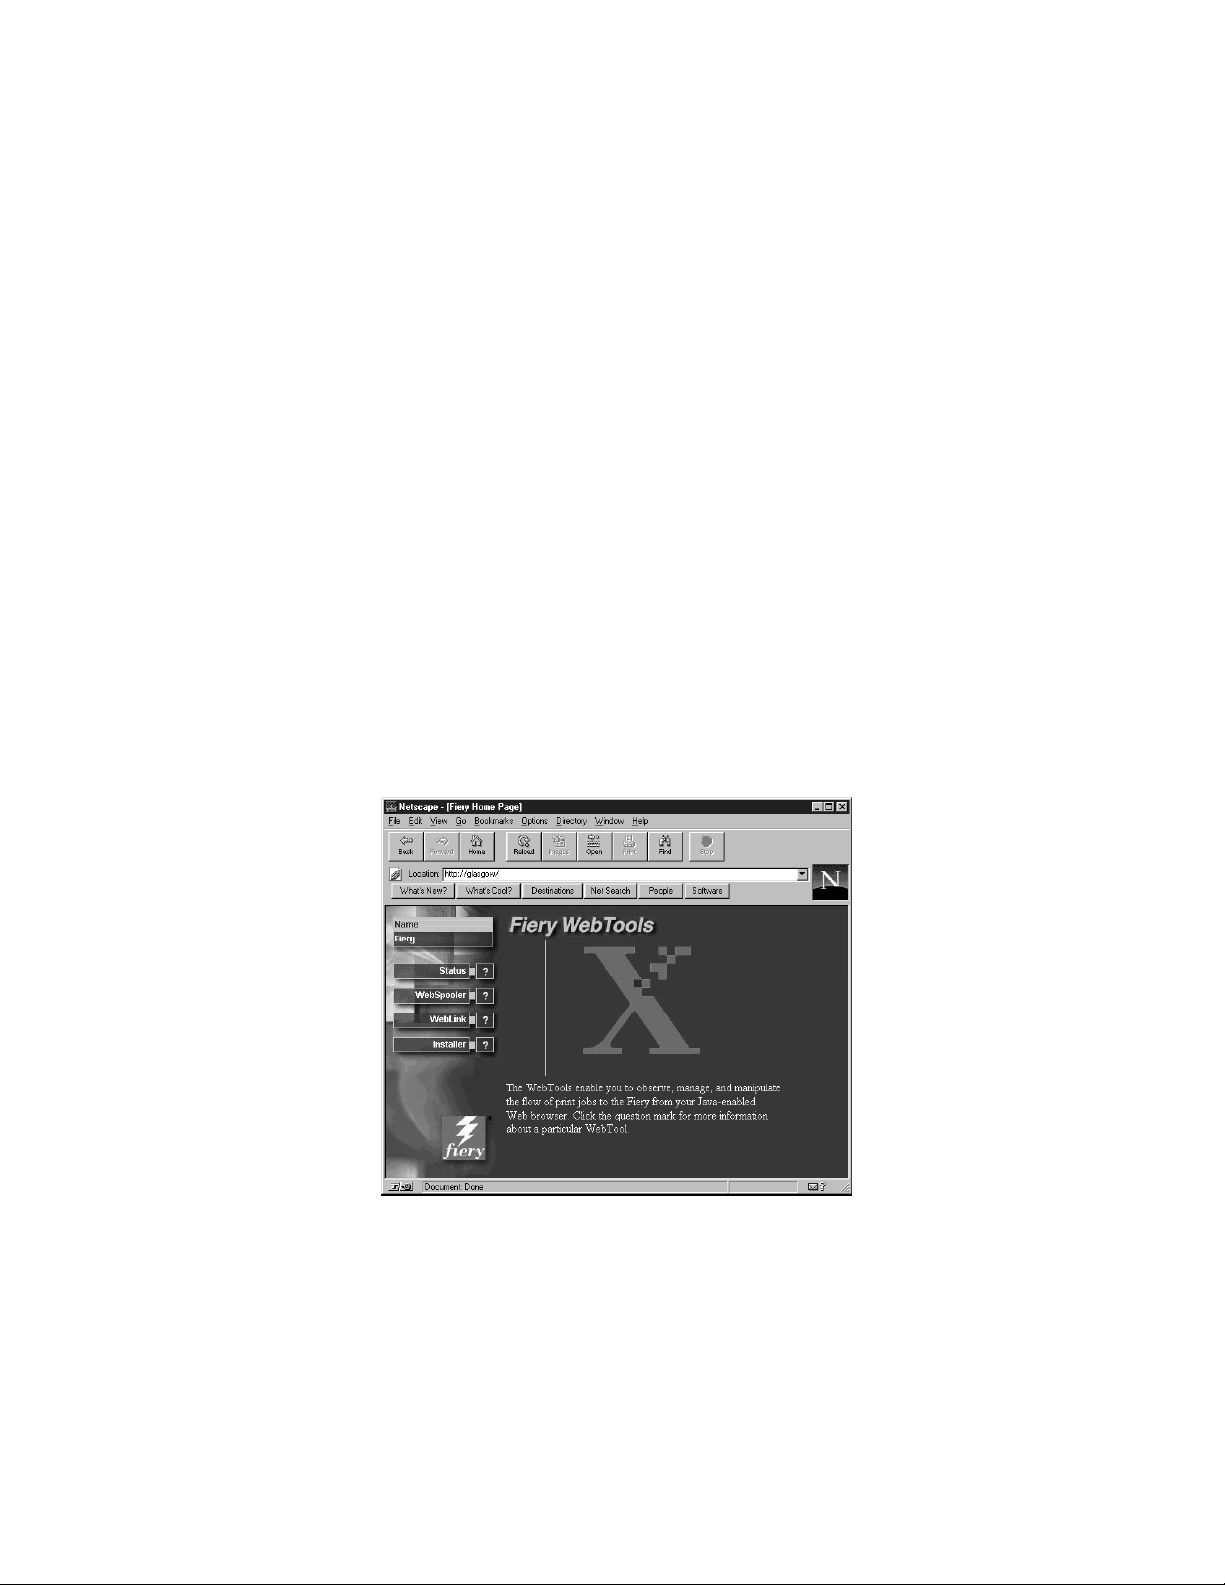
Fiery WebTools allow you to remotely manage your Fiery XJ from the Internet or your
company’s intranet. The Fiery XJ has its own home page, from which you are able to select
from a variety of functions.
For information on Fiery WebTools setup, see Getting Started .
Launch Fiery WebTools from the Fiery XJ home page. Enter
http://
followed by the
IP address or DNS name of the Fiery XJ.
Click a button on the left side of the page to launch a particular WebTool; click the
question mark next to the button to display information about that WebTool on the right
side of the page.
Page 3
Page 3
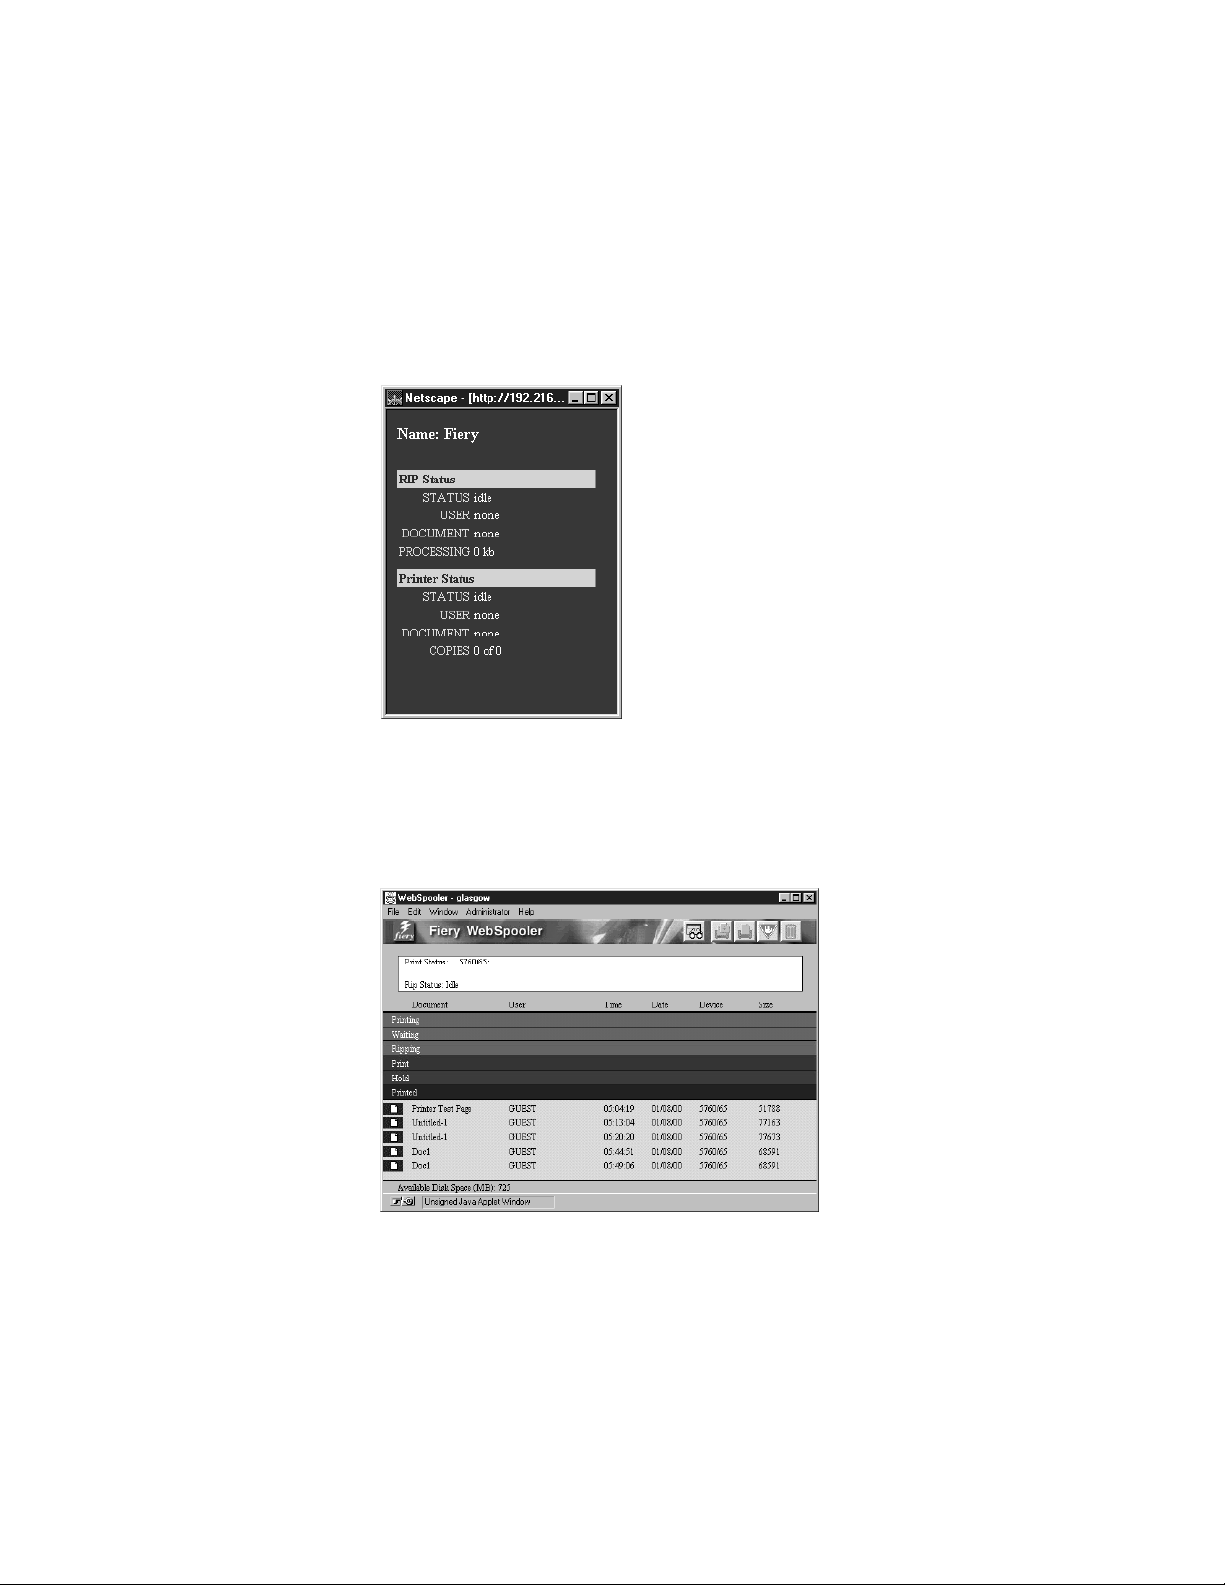
Status
Gives you a quick update of Fiery XJ status by showing the jobs currently processing and
printing. The Status WebTool polls the Fiery XJ every 30 seconds to display the most
current information. You can also close the active web browser window and leave the Status
window open on the desktop to view current Fiery XJ information, which is dynamically
updated.
In a dual copier/device configuration, the Status window shows information for both
copiers/devices connected to the Fiery XJ.
WebSpooler
Allows you to view, manipulate, reorder, reprint, and delete the jobs currently spooling,
processing, and printing on the Fiery XJ. The WebSpooler also allows you to view or print
the Job Log.
Page 4

Page 4
The WebSpooler functions similarly to the Fiery XJ Spooler (see Chapter 5 of the
User Guide ), with the following exceptions:
• Keystroke shortcut commands are not supported.
• If a password is enabled and the correct password is not entered, you cannot manipulate
any jobs, including your own; all jobs in the main WebSpooler window are dimmed.
• In the Job Log, double-clicking a job with an error icon does not retrieve details of the
error.
• In a dual device configuration, if you choose Print Job Log from the File menu the
Job Log is printed for the first device attached to the Fiery XJ.
• Fiery XJ Downloader, Fiery XJ Print Calibrator , and F iery XJ Scan are not available from
the W ebS pooler.
• PageN ow (Macintosh) is not available.
WebLink
Links you to the default Fiery WebLink home page (www.efi.com/weblink/xerox), pr ovided
a valid Internet connection is available. From this page, you can link to either the Xerox
home page (www.xerox.com) or the Electronics for Imaging home page (www.efi.com).
You can change the WebLink destination by holding down the Control key
(Macintosh)/Ctrl key (Windows) and clicking the WebLink button. In the New URL field,
type the new WebLink address and click OK.
Any change to the WebLink destination remains permanent until changed again.
N
:
OTE
Page 5
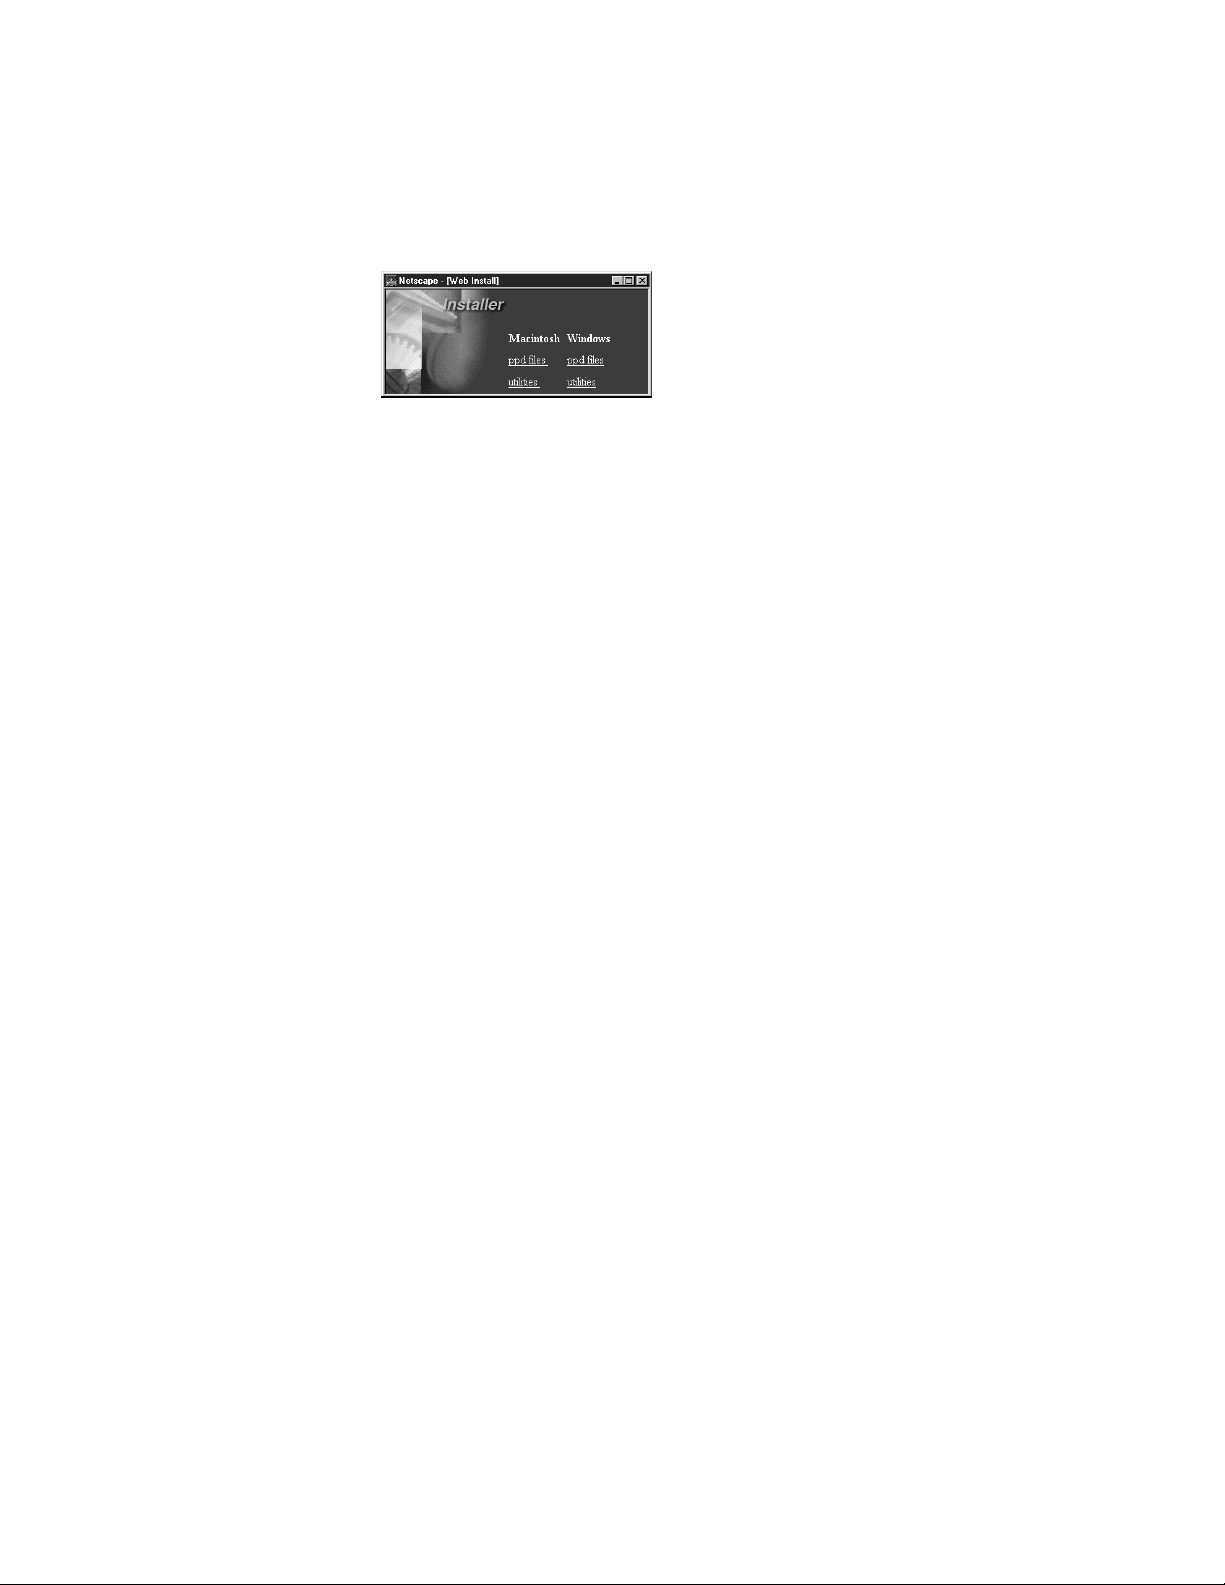
Installer
Duplicates the Utilities and Printer Driver installers from the User Software CD, allowing
you to easily access current user software from your workstation. For information on using
the WebTools Installer, see Getting Started .
Page 5
Dual copier support
Print options
Fiery XJ models support the simultaneous connection of any combination of two
5750/MajestiK/Regal color copiers.
To install a dual copier/device configuration on the Fiery XJ, you must separately configure
each copier/device in Printer Setup on the Control Panel. After selecting Printer Setup,
select
Printer 1
or
Printer 2
; continue configuring the options for each copier/device
according to the printing requirements and network protocols at your site. For more
information about setting up the Fiery XJ, see the Administrator Guide .
The following print options are available with Fiery XJ Color Server version 3.1.
Printer’s Default values are shown in square brackets.
OTE
Although some of these options were available in v3.0, note these feature differences
N
:
in version 3.1.
Media Type
(MajestiK and Regal color copiers only) Plain Paper/Thick Paper/Transparency/
Interleaved [Plain Paper]
(5750 color copiers only) Plain Paper/Thick Paper/Transparency/Interleaved/
Coated Paper/Thick Paper 2/Tacking Film/SST/Labels [Plain Paper]
The Media Type feature allows you to select the type of media for loading into the
manual feed tray:
• Plain Paper—Standard bond paper from 16 lb to 28 lb (60 g/m
2
to 105 g/m
• Thick Paper—Paper heavier than 28 lb, up to 90 lb Index (163 g/m
2
2
).
).
• Transparency—Transparency sheets.
• Interleaved—Multiple transparency sheets inserted with blank, plain paper separators.
• Coated Paper—Special paper with binders, adhesives, and/or pigments applied to the
paper’s surface on one or both sides.
Select this setting for coated paper from 32 lb to 60 lb Cover (120 g/m
2
to 162 g/m
2
).
The paper must be fed through the manual feed tray with the grain perpendicular to the
lead edge of the sheet.
• Thick Paper 2— Any paper heavier than 90 lb Index.
This setting should also be selected for coated paper greater than 60 lb up to 80 lb Cover
(215 g/m
2
).
• Tacking Film—(Also known as Adhesive Drafting Film) Special paper used to make
corrections to vellum-type drawings.
OTE
The Tacking Film setting is not supported in software version 3.1.
N
:
Page 6

Page 6
• Single-Step Transfer (SST)—Special paper used to transfer full-color images directly from
copies or prints onto fabric or other types of materials.
• Labels—Adhesive-backed, pressure-sensitive label stock.
Color Mode
CMYK/Grayscale
OTE
The default setting for printing reflects the Color Mode specified in Control Panel
N
:
Setup.
• CMYK—Enables both Contone and Halftone Printer Mode options.
• Grayscale—Enables Contone Printer Mode option only.
N
OTE
:
The ACA 1 and ACA 2 settings are no longer available.
Sharpness
Softer/Normal/Sharper [Normal]
• Softer—Decreases the clarity of the printed image.
• Normal—No adjustment is made to the clarity of the printed image.
• Sharper—Increases the clarity of the printed image.
OTE
This option is available on MajestiK and Regal color copiers only .
N
:
Calibration/Simulation
Copier/SWOP-Coated/DIC/Euroscale/Linear/Custom-1/Custom-2/None [Copier]
Calibration/Simulation allows you to change the calibration curve currently set on the
Fiery XJ for the current print job only . As the job begins processing, the target selected in
Calibration/Simulation is loaded and applied before printing. Once the print job is
complete, the Fiery XJ returns to its previous calibration curve.
You are able to select targets that reflect those currently existing on the Fiery XJ. If you
select a target that does not exist, a PostScript error results and the job does not print.
• Copier—Uses the current copier calibration target set in Printer Setup on the Fiery XJ
Control Panel.
• SWOP-Coated—Uses the United States press standard.
• DIC—Uses the Japanese press standard.
• Euroscale—Uses the European press standard.
• Linear—Divides the maximum measured density for each color into equal, linearized
density steps, providing an even distribution of tones over the copier’s density range.
• Custom-1—Uses a custom calibration target. Before selecting this setting, you are
required to create a new target in Fiery XJ Print Calibrator and name the target
“Custom-1”.
• Custom-2—Uses a second custom calibration target. Before selecting this setting, y ou are
required to create a new target in Fiery XJ Print Calibrator and name the target
“Custom-2”.
• None—Disables calibration.
For more information about calibration, see chapter 6 of the User Guide .
Page 7

Page 7
Non-imageable area
Printing from
MSOffice 95 with
Windows 95
Tray selection
On MajestiK and Regal color copiers, the Fiery XJ non-imageable area is 8mm on the
leading edge, and 3mm on the trailing, near, and far edges; on the 5750 color copier, the
Fiery XJ non-imageable area is 5mm on the leading and trailing edges, and 3mm on the
near and far edges.
Color Rendering Dictionaries (CRDs) are generally not used when printing from
PostScript Level 1 applications. However, for the Microsoft Office 95 suite of applications,
you are able to use PostScript Level 2 CRDs. In the Color Printer Job Notes dialog box,
choose
Enable PostScript Level 2: For MSOffice Only
Tray selection is supported on 5750/MajestiK/Regal color copiers and allows you to select a
particular tray from which to draw paper. Tray selection is valid for the current job only.
.
Error messages
Depending on the copier model, the following options are available:
• 5750—Auto Select, Tray 1, Tray 2, Tray 3, Tray 4, Manual Feed
• MajestiK—Auto Select, Tray 1, Tray 2, Tray 3, Manual Feed
• Regal—Auto Select, Tray 1, Tray 2, Tray 3, Manual Feed
OTE
N
:
If paper loaded in the selected tray is a different size, orientation, and/or media type
than that of the job you are sending, the Fiery XJ displays an error message and the job does
not print. You should then load the correct paper in the selected tray or cancel the job.
Other error messages (in addition to the error messages listed in Appendix A of the
User Guide ) may appear on the Fiery XJ Control Panel:
Message Corrective action/additional information
Ld ___ in tray 4
(5750 only)
No tray 4
(5750 only)
The copier’s tray 4 is not loaded with the paper size specified.
The Fiery XJ will print when tray 4 is loaded with the required
paper.
Tray 4 has been selected as the paper source, but the copier
does not have a Tray 4. Check and reconfigure the copier’s
Installable Options if necessary.
Page 8

l
Page 8
AutoCa
Utilities
™
II
AutoCal II functions the same as AutoCal, with the added capability of reading a 20-step
strip of Kodak Grayscale printed patches along with the color Measurements page. The
result is a more consistent calibration reading across devices and better matching of print
targets.
To use AutoCal II, position the color Measurements page on the copier glass, place the
grayscale strip below it, as described on the Measurements page, and then continue with the
AutoCal procedure. For more information about AutoCal, see chapter 6 of the User Guide .
Some changes have been made to the utilities in version 3.1.
Fiery XJ Spooler error alert
Fiery XJ Spooler now alerts you to error messages by sounding an audible beep. To enable
this feature, choose Beep on Error from the Administrator menu.
Fiery XJ Spooler Change Device option
In a dual-device configuration, you can switch print devices in Fiery XJ Spooler. In the
main window, select the job you want to print, and choose Change Device from the Edit
menu. You may need to reconfigure print option settings depending on the copier model.
Fiery XJ Export
While the basic functionality of Fiery XJ Export has not changed, there has been a minor
change in the location of files required to use the Fiery XJ Export Photoshop plug-in.
OTE
N
:
This change affects Macintosh users only . The following files are installed by the
Fiery XJ Export Installer:
Filename Location
Fiery XJ Export User selected location
Export Processor
Export Profiles folder
Apple 13" RGB
CIE LAB
efirgb
SWOP-coated
Same folder as Fiery XJ Export
Export Profiles folder
Page 9

Page 9
Fiery XJ Print Calibrator
Some new features and information are now available for Fiery XJ Print Calibrator. These
changes affect Macintosh, Windows 95, and Windows NT users only.
Printing patch pages
In order to print a patch page to measure data with a densitometer, choose Print Patch Page
from the Measurements menu.
Measurement files
Two different types of new measurement files can be used:
• To create a new measurement file using a densitometer, choose Densitometer from the
Measurements menu.
• To use a previously saved measurements file, choose Import from the Measurements
menu, browse to the file, and click Open.
Calibration targets
A new calibration target can be created in two ways:
• To use a measurements file from an outside source, such as “custom.ps” from the User
Software CD, first download and print the file. After measuring the patches, choose
Save Measurements as Target from the Measurements menu, name the file, and click S ave
to save it to your hard disk.
Custom.ps is a PostScript measurements file included with the user software. It is
provided to enable you to download measurement patches that incorporate the copier’s
current calibration set; however, this file should not be used for day-to-day calibration.
• To use a newly edited file, click the Edit Calibration button, modify the target curve (by
editing the custom curve or changing the Maximum Density values), click Save Target,
name the file, and click Save to save it to your hard disk.
When editing calibration, note that measurements are represented by thin lines and
targets are represented by thick lines.
Once a target is created, you must save it to the Fiery XJ in order to use it.
1. Click the Target button and then click Local in the Select Target window.
2. Browse to the target file and click Open.
3. When the new target file appears under the Target button, click the Apply Calibration
button and click OK in the next two windows.
4. In the Save Target window, name the new target and click Save.
5. When you are prompted that the new calibration target has been applied, click OK.
Page 10

Page 10
Graphical Net_wsck.ini file configuration for Windows 95
and Windows NT
It is no longer necessary to modify the Net_wsck.ini file directly in order to set up or edit
the connection to the utilities. You are now presented with a graphical window to enter the
necessary information. For more information, see Getting Started .
Transparent connection
It is no longer necessary to enable the Print queue in order for the utilities to connect to the
Fiery XJ. In this way the system administrator can control all print jobs by enabling only the
Hold queue, thus forcing all users to print to that queue. The administrator can then use
Fiery XJ Spooler or the Command WorkStation to connect to the Fiery XJ and print jobs
from the Hold queue.
To enable the transparent connection in Windows 95 and Windows NT, check the
Attended Printing
WorkStation over Ethernet.
option when configuring the utilities or installing the Command
Power Macintosh
The utilities have been improved to provide increased performance with Power Macintosh
computers.
 Loading...