


EX700i Print Server/Integrated Fiery
Color Server
Printing

© 2011 Electronics For Imaging, Inc. The information in this publication is covered
under Legal Notices for this product.
45099423
22 June 2011

CONTENTS
CONTENTS
CONTENTS 3
INTRODUCTION 7
Terminology and conventions 8
User software for printing 9
MAC OS X 10
Installing the Mac OS X printer driver files 10
Installing from the User Software DVD 11
Downloading printer drivers using WebTools 12
Downloading printer drivers from the EX700i 12
Uninstalling printer driver files 13
Setting up the Mac OS X computer for printing 14
Setting up printing with Mac OS X v10.6.x 14
Setting up printing with Mac OS X v10.5.x 17
Setting up printing with Mac OS X v10.4.x 21
Setting up printing with Mac OS X v10.3.9 25
Adding a non-English printer on Mac OS X v10.5 and v10.6 27
Configuring installable options 27
Using Desktop Printer (optional) 27
Printing from Mac OS X computers 28
Selecting the EX700i in the printer list 29
Setting print options and printing from Mac OS X applications 30
Customizing the Quick Access view 33
Viewing the digital press status 33

CONTENTS 4
WINDOWS FOR EX700I PRINT SERVER 34
Installing Windows printer drivers 34
Installing printer drivers by Point and Print 35
Downloading printer drivers using WebTools 37
Downloading printer drivers from the EX700i 38
Installing printer drivers from the User Software DVD 39
Installing the printer driver on 64-bit Windows computer
from a 32-bit Windows Server 2003 Server 42
Configuring installable options for printer drivers 42
Installing and connecting to a virtual printer 43
Uninstalling printer drivers 45
Setting up the Windows computer for printing 46
Setting up printing connections 46
Completing the SMB printing connection 46
Completing Standard TCP/IP Port (Raw or LPR) printing connections 47
Completing IPP connections 50
Configuring installable options 53
Printing from Windows computers 54
Setting print options and printing from Windows applications 55
Specifying default print options for print jobs 58
Customizing the Quick Access icon 59
Viewing the digital press status 59
Saving files to print at a remote location 59
WINDOWS FOR INTEGRATED FIERY COLOR SERVER 60
Installing Windows printer drivers 60
Installing printer drivers by Point and Print 61
Downloading printer drivers using WebTools 63
Installing printer drivers from the User Software DVD 64
Installing the printer driver on 64-bit Windows computer
from a 32-bit Windows Server 2003 Server 67
Configuring installable options for printer drivers 67
Installing and connecting to a virtual printer 68
Uninstalling printer drivers 70

CONTENTS 5
Setting up the Windows computer for printing 71
Setting up printing connections 71
Completing the SMB printing connection 71
Completing Standard TCP/IP Port (Raw or LPR) printing connections 72
Completing IPP connections 75
Configuring installable options 78
Printing from Windows computers 79
Setting print options and printing from Windows applications 80
Specifying default print options for print jobs 83
Customizing the Quick Access icon 84
Viewing the digital press status 84
Saving files to print at a remote location 84
PRINTING METHODS 85
Configuring and using Job Monitor 86
Configuring the connection 86
Using Job Monitor 86
E-mail Service 87
Printing using an e-mail client 87
Managing print jobs with e-mail commands 89
Printing from a USB device 90
FTP printing 92
Printing and retrieving a secure print job 93
Adobe PDF Print Engine (APPE) 94
Printing with APPE workflow 94
Printing multiple files with APPE 96
Direct Mobile Printing 97

CONTENTS 6
PRINT OPTIONS 98
About printer drivers and printer description files 98
Setting print options 99
Print option override hierarchy 99
Print options and default settings 100
Job Info options 101
Media options 103
Layout options 106
Color options 111
Image options 116
Finishing options 117
Variable Data Printing (VDP) options 119
Stamping/Watermark options 120
Overriding print option settings 121
Additional information 122
Auto Trapping 122
Booklet Maker 122
Booklet Maker in the printer driver 124
Booklet Maker in Job Properties 124
Collate 129
Defining and printing custom page sizes 129
Document size and Paper size 130
Duplex printing 131
Folding options 132
Gang-up printing 133
Image Enhance 134
Output Delivery 134
Punch Edge Position and Hole Punching 135
Scale 136
Scale to Fit 136
Stapler Mode 137
User Authentication 138
INDEX 139

INTRODUCTION
INTRODUCTION 7
This document describes how to install the printer drivers and printer description files for the
EX700i Print Server/Integrated Fiery Color Server. This document covers the following
topics:
• Installing printer files on Apple Mac OS computers
• Setting up the Mac OS X computer for printing
• Printing from Mac OS computers
• Installing printer files on Microsoft Windows computers
• Setting up the printing connections on Windows computers
• Printing from Windows computers
• EX700i Print Server/Integrated Fiery Color Server print options
• Using printing methods other than the printer driver to print to the EX700i Print Server/
Integrated Fiery Color Server
For information about setting up network servers and clients to use the EX700i Print Server/
Integrated Fiery Color Server, see Configuration and Setup. For general information about
using the color digital press, your computer, application software, or network, see the
documentation that accompanies those products.
For information about supported operating systems and system requirements, see Welcom e.
INTRODUCTION 8
Terminology and conventions
This document uses the following terminology and conventions.
Term or convention Refers to
Aero EX700i (in illustrations and examples)
Digital press Xerox 700 Digital Color Press
EX700i EX700i Print Server/Integrated Fiery Color Server
Titles in italics Other documents in this set
Windows Microsoft Windows XP, Windows Vista, Windows Server 2003/
2008/2008 R2, Windows 7
Topics for which additional information is available by starting
Help in the software
Tips and information
A warning concerning operations that may lead to death or injury
to persons if not performed correctly. To use the equipment safely,
always pay attention to these warnings.
A caution concerning operations that may lead to injury to persons
if not performed correctly. To use the equipment safely, always pay
attention to these cautions.
Operational requirements and restrictions. Be sure to read these
items carefully to operate the equipment correctly, and avoid
damage to the equipment or property.

INTRODUCTION 9
User software for printing
The following table lists the user software that is described in this document. This is the user
software you need for setting up basic printing on the EX700i. Other documents may
describe user software that can be used to print documents.
User software Description
PostScript Printer Description
(PPD) file and associated files
(for Windows)
PostScript Printer Description
(PPD/Plugin) files
(for Mac OS X)
PageMaker PPD files Allow you to print to the EX700i from Adobe PageMaker. You must
PostScript screen fonts
(for Mac OS X)
Job Monitor
(for Windows)
Printer Delete Utility
(for Windows)
Provide information about the EX700i and your particular digital
press model to your application and printer driver.
Used with the PostScript printer driver to allow the EX700i to
appear in the Print and Page Setup dialog boxes of popular
applications. The EX700i PPDs provide information about the
digital press to your application and printer driver.
install the appropriate PPD in PageMaker. For instructions, see the
documentation that accompanies PageMaker.
PostScript/TrueType screen fonts that correspond to the printer fonts
installed on the EX700i. For a complete list of PostScript/TrueType
fonts installed on the EX700i, print a Font List.
For more information, see Command WorkStation Help.
Monitor the status of each connected EX700i and the print jobs sent
to it. Job Monitor is automatically installed when the printer driver
is installed on a Windows computer.
For more information, see “Configuring and using Job Monitor” on
page 86.
Uninstall the Windows printer driver.
For more information, see “Uninstalling printer drivers” on page 45
and page “Uninstalling printer drivers” on page 70.
Fiery Software Uninstaller
Utility
(for Mac OS X)
Uninstall the Mac OS X printer and associated printer driver files.
For more information, see “Uninstalling printer driver files” on
page 13.

MAC OS X
MAC OS X 10
To set up the EX700i as a PostScript printer on a Mac OS X computer, install the printer
driver files that correspond to your digital press and set up the EX700i for printing. Printer
drivers provide a way to communicate information about print jobs between your
applications, the EX700i, and the digital press.
For the location of each procedure, see the following table.
Procedure See
Installing the Mac OS X printer driver files page 10
Setting up the Mac OS X computer for printing page 14
Printing from Mac OS X computers page 28
Installing the Mac OS X printer driver files
Installing printer drivers files is the first step in setting up the EX700i as a printer.
NOTE: If the EX700i printer driver is already installed, you must uninstall it before you install
a new driver (see “Uninstalling printer driver files” on page 13).
The following sections describe how to install the printer files for the EX700i.
Procedure See
Installing printer drivers from the User Software DVD page 11
Downloading printer drivers using WebTools page 12
Downloading printer drivers from the EX700i page 12
Uninstalling printer driver files page 13

MAC OS X 11
Installing from the User Software DVD
The User Software DVD provides the following software for Mac OS X (see the
OSX : Printer Driver folder):
•
OSX Installer: Installs the printer driver files required to print from Mac OS X.
•
Language folders: Printer description files that are installed by OSX Installer. You do not
need to open these folders or install them manually on your computer. The appropriate
files are installed by OSX Installer.
TO INSTALL THE PRINTER DRIVER FILES FOR MAC OS X
1 Quit all open applications.
2 Mac OS X v10.3.9 and v10.4.x: Make sure that the Printer Setup Utility is not running on your
computer.
Printer Setup Utility updates the list of available printers when it starts. If a printer
description file is added while Printer Setup Utility is running, you cannot select the
associated printer model until you restart.
Mac OS X v10.5.x and v10.6.x: Proceed to step 3.
3 Insert the User Software DVD into the DVD drive.
4 Open the OSX : Printer Driver folder on the User Software DVD.
If you are installing from a folder you downloaded from WebTools or the EX700i, browse to
the Printer Driver folder on your desktop.
5 Double-click the OSX Installer icon to start installing the printer driver.
6 Follow the on-screen instructions.
The OSX Installer installs the printer driver files that correspond to the EX700i.
7 When copying is complete, click Quit.

MAC OS X 12
Downloading printer drivers using WebTools
If your administrator has enabled access to WebTools, you can download installers for printer
drivers to your computer directly from the EX700i.
For more information about setting up and starting WebTools, see Utilities.
TO DOWNLOAD PRINTER DRIVERS WITH WEBTOOLS
1 Start your Internet or intranet browser and type the DNS name or IP address of the EX700i.
2 Click the Downloads tab.
3 Click the link for the printer drivers that you want to install (Printer Files for Mac OS X).
A file named OSX.dmg is downloaded to your desktop. The file contains a folder named
Printer Driver in a compressed format. If your Internet browser is equipped with an expander
utility, such as StuffIt Expander, the folder decodes and decompresses automatically.
If the Printer Driver folder does not automatically decode and decompress, double-click the
file to start the utility that performs that function.
4 Open the OSX : Printer Driver folder.
5 Double-click the OSX Installer icon to start installing the printer driver.
Follow the on-screen instructions.
6 When copying is complete, click Quit.
Downloading printer drivers from the EX700i
You can download printer driver files to your computer directly from the EX700i over the
network.
TO DOWNLOAD PRINTER DRIVER FILES FROM THE EX700I
1 In the Finder, choose Connect to Server from the Go menu.
2 Type SMB:// followed by the name or IP address of the EX700i and click Connect.
If you cannot locate your EX700i, contact your administrator.
3 Type the user name and password in the SMB/CIFS File System Authentication dialog box.
The “Guest” account can be used as the default. The Guest account does not require a
password. If the Guest account cannot be used, ask your network administrator for an
account.
4 Select the Mac_User_SW folder from the shared volume list and click OK.
5 Open the OSX : Printer Driver folder.
6 Double-click the OSX Installer icon to start installing the printer driver.
Follow the on-screen instructions.

MAC OS X 13
Uninstalling printer driver files
The Fiery Software Uninstaller utility is installed and used locally. You do not need to connect
to the EX700i before you use the software.
TO INSTALL AND USE THE FIERY SOFTWARE UNINSTALLER UTILITY
1 Copy Fiery Software Uninstaller.dmg to the desktop from the User Software DVD or the
Mac_User_SW folder from the shared volume list on the EX700i.
2 On the desktop, double-click Fiery Software Uninstaller.dmg.
The Fiery Software Uninstaller opens in the Finder, showing the Fiery Software Uninstaller
icon and an arrow pointing to a link to the Applications folder.
3 Select the Fiery Software Uninstaller icon on the left and drag it onto the Applications folder.
4 Browse to the Applications folder and double-click the Fiery Software Uninstaller icon.
5 Click the Printers tab if it is not already selected.
6 Select a printer from the Installed Printers list and do one of the following:
• Click Remove Printer and Driver to remove the printer along with its printer driver files.
If you want to remove the printer and the associated printer driver, you can select only one
printer at a time.
• Click Remove Printer to remove the printer from the Installed Printers list only, but leave
the printer driver installed.
The utility can remove only printers that are not currently in use or open on the Dock.
NOTE: If more than one printer uses a printer driver, removing the printer driver also removes
all printers using that driver.
7 To confirm that you want to delete the printer, type the password for your Mac OS X computer
in the dialog box and click OK.
8 Click the Drivers tab to view the installed printer drivers.
9 Close the Fiery Software Uninstaller dialog box.
TO DELETE THE FIERY SOFTWARE UNINSTALLER UTILITY
• Delete the Fiery Software Uninstaller icon from the Mac OS X Applications folder.

MAC OS X 14
Setting up the Mac OS X computer for printing
The following section describes how to set up the EX700i on a Mac OS X computer.
Procedure See
Setting up printing with Mac OS X v10.6.x page 14
Setting up printing with Mac OS X v10.5.x page 17
Setting up printing with Mac OS X v10.4.x page 21
Setting up printing with Mac OS X v10.3.9 page 25
Adding a non-English printer on Mac OS X v10.5.x and v10.6 page 27
Configuring installable options page 27
Using Desktop Printer (optional) page 27
Setting up printing with Mac OS X v10.6.x
Use the following procedures to set up the EX700i on a computer with Mac OS X v10.6.x.
TO SET UP THE EX700I FROM THE PRINT DIALOG BOX
1 Open a file in your application.
2 Choose Print from the File menu.
The Print dialog box appears.
3 Select Add Printer from the Printer list.
In the dialog box that appears, select a printer connection. Use one of the printer connections
in the following table to add a printer.
TO SET UP THE EX700I USING PRINT & FAX
1 Choose System Preferences from the Apple menu, and then choose Print & Fax.
The Print & Fax dialog box appears.
2 Click the “+” button to add a printer.
In the dialog box that appears, select a printer connection. Use one of the following
connections to add a printer.
Printing connection See
Default (Bonjour) page 15
IP Printer page 16
MAC OS X 15
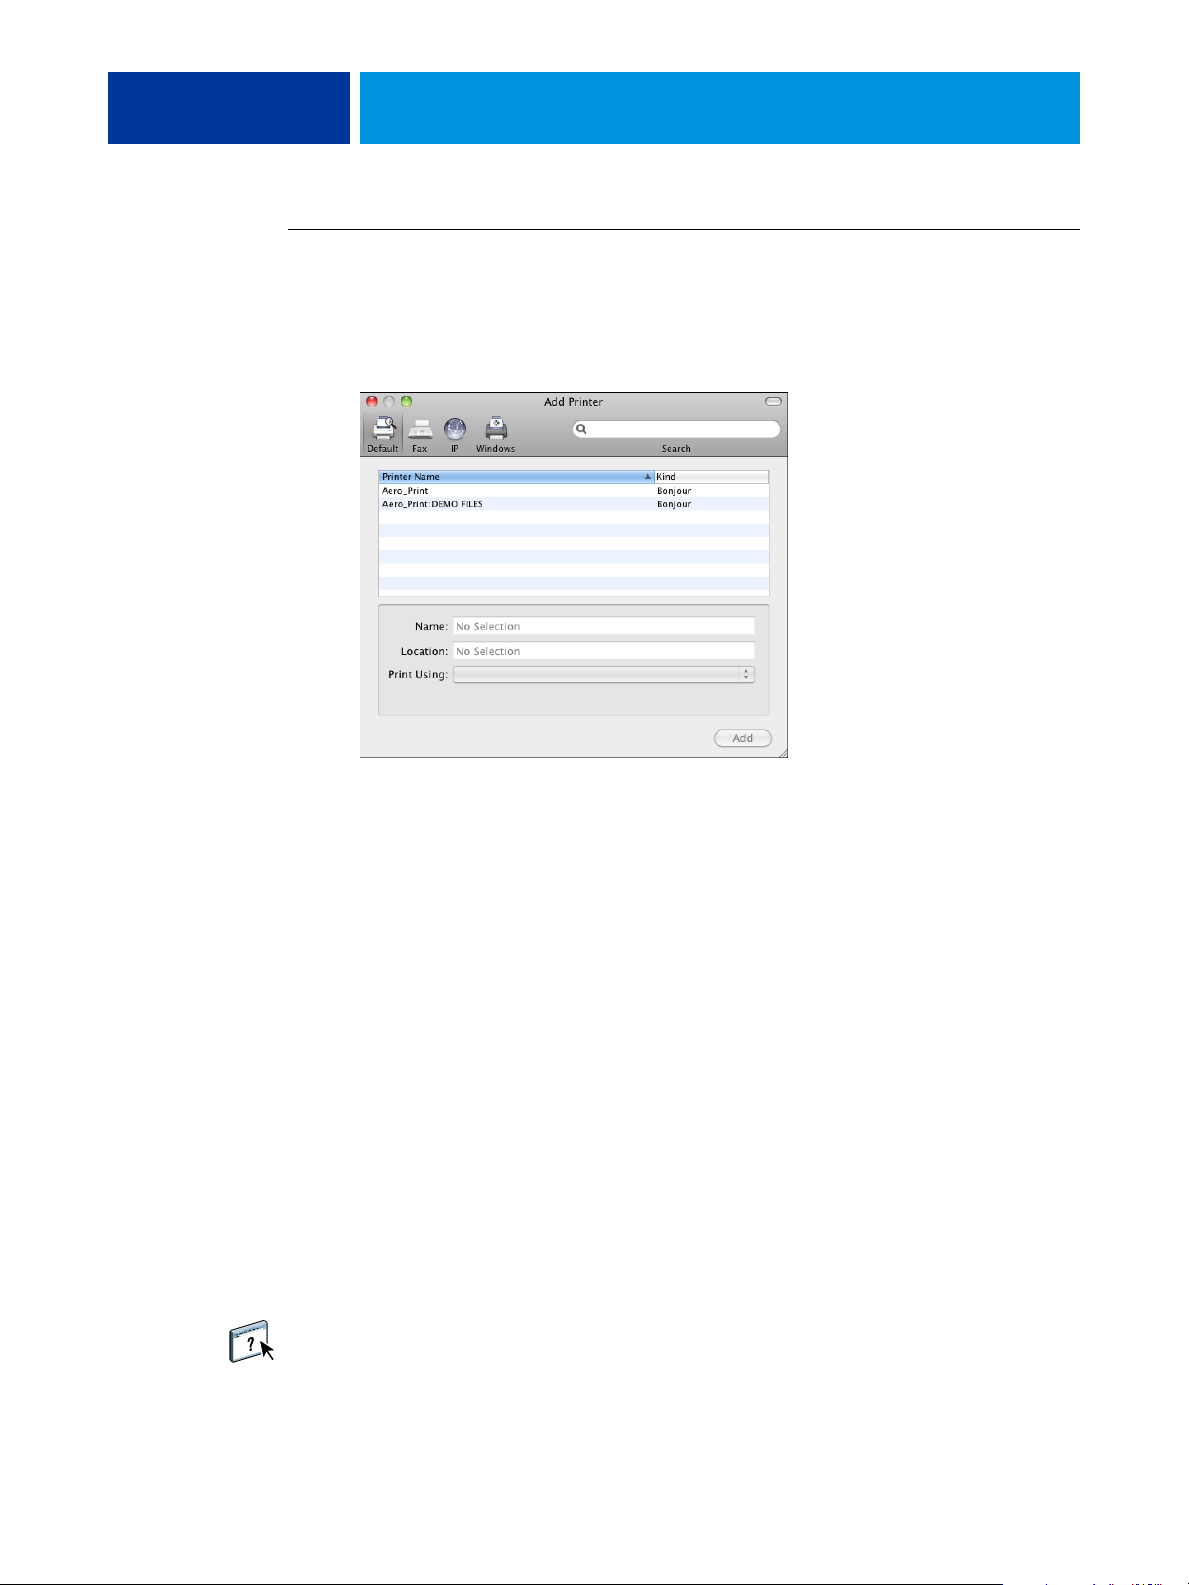
TO ADD A PRINTER WITH THE DEFAULT (BONJOUR) CONNECTION
NOTE: Bonjour printer setup works only if the EX700i is on the same LAN as the client
Mac OS X computer. Bonjour must also be enabled on the EX700i.
1 Click the Default icon in the dialog box.
The names of printers with default connections are listed. The virtual printers that are
configured at the EX700i are also listed.
NOTE: The names of the virtual printers appear as printer name:virtual printer name in the
Printer Name list.
2 Select the EX700i from the list.
The information about the selected printer appears at the bottom of the Default pane.
The appropriate PPD file for the EX700i is automatically selected. If your administrator
configured the Secure Access printing at the EX700i, the PPD file for Secure Access printing
is selected.
3 Click Add.
The Installable Options pane in the Print & Fax dialog box appears.
4 Click Continue.
The EX700i name appears in the Printer List.
5 Choose EX700i from the Printer List.
6 Click Options & Supplies, and then click the Driver tab.
7 Specify the installable option settings, and then click OK.
For information about configuring installable options, see printer driver Help.
MAC OS X 16
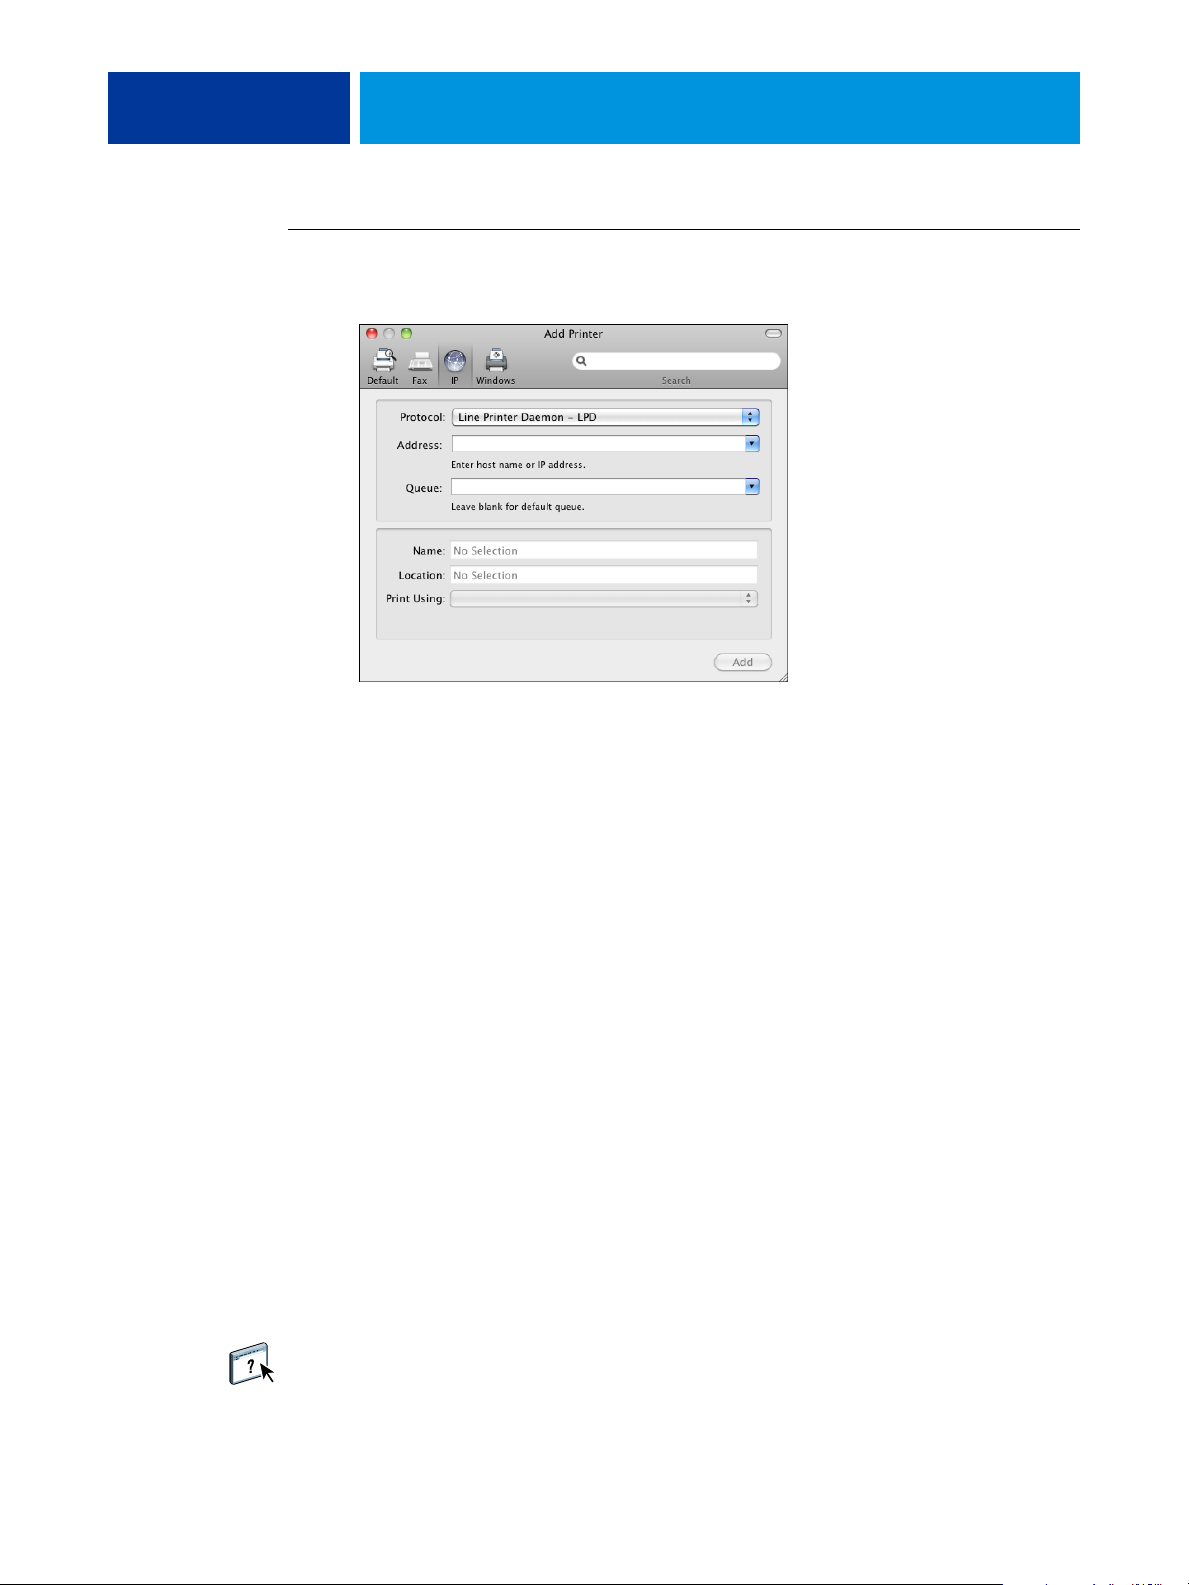
TO ADD A PRINTER WITH THE IP PRINTER CONNECTION
1 Click the IP icon in the dialog box.
2 LPD printing: Select Line Printer Daemon - LPD from the Protocol list, type the EX700i IP
address or DNS name in the Address field, and then type the print connection (print, hold or
direct) in the Queue field. Proceed to step 4.
IP printing: Select Internet Printing Protocol - IPP from the Protocol list and type the EX700i
IP address or DNS name in the Address field. Proceed to step 3.
The IP address or DNS name appears in the Name field.
3 Type “ipp/” followed by the print connection (print, hold, direct, or name of virtual printer)
in lowercase letters in the Queue field.
NOTE: The EX700i requires a queue name. Do not leave the Queue field empty.
4 Choose Select Printer Software from the Print Using menu.
5 Locate the digital press manufacturer or model in the list, select the PPD file, and then click
OK.
6 Click Add.
The Installable Options pane in the Print & Fax dialog box appears.
7 Click Continue.
The EX700i with its IP address appears in the Printer List.
8 Choose EX700i from the Printer List.
9 Click Options & Supplies, and then click the Driver tab.
10 Specify the installable option settings, and then click OK.
For information about configuring installable options, see printer driver Help.

MAC OS X 17
Setting up printing with Mac OS X v10.5.x
Use the following procedures to set up the EX700i on a computer with Mac OS X v10.5.x.
TO SET UP THE EX700I FROM THE PRINT DIALOG BOX
1 Open a file in your application.
2 Choose Print from the File menu.
The Print dialog box appears.
3 Select Add Printer from the Printer list.
In the dialog box that appears, select a printer connection. Use one of the printer connections
in the following table to add a printer.
TO SET UP THE EX700I USING PRINT & FAX
1 Choose System Preferences from the Apple menu, and then choose Print & Fax.
The Print & Fax dialog box appears.
2 Click the “+” button to add a printer.
In the dialog box that appears, select a printer connection. Use one of the following
connections to add a printer.
Printing connection See
Default (Bonjour or AppleTalk) page 18
IP Printer page 19
AppleTalk page 20

MAC OS X 18
TO ADD A PRINTER WITH THE DEFAULT (BONJOUR OR APPLETALK) CONNECTION
NOTE: Bonjour printer setup works only if the EX700i is on the same LAN as the client
Mac OS X computer. Bonjour must also be enabled on the EX700i.
1 Click the Default icon in the dialog box.
The names of printers with default connections are listed. The virtual printers that are
configured at the EX700i are also listed.
NOTE: The names of the virtual printers appear as printer name: virtual printer name in the
Printer Name list.
2 Select the EX700i from the list.
The information about the selected printer appears at the bottom of the Default pane. The
appropriate PPD file for the EX700i is automatically selected.
3 Click Add.
AppleTalk:
Bonjour: The Installable Options pane in the Print & Fax dialog box appears. Click Continue
The EX700i name appears in the Printer List of the Print & Fax dialog box.
to return to the Print & Fax dialog box. The EX700i name appears in the Printer List.
4 Choose the EX700i from the Printer List.
5 Click Options & Supplies, and then click the Driver tab.
6 Specify the installable option settings, and then click OK.
MAC OS X 19
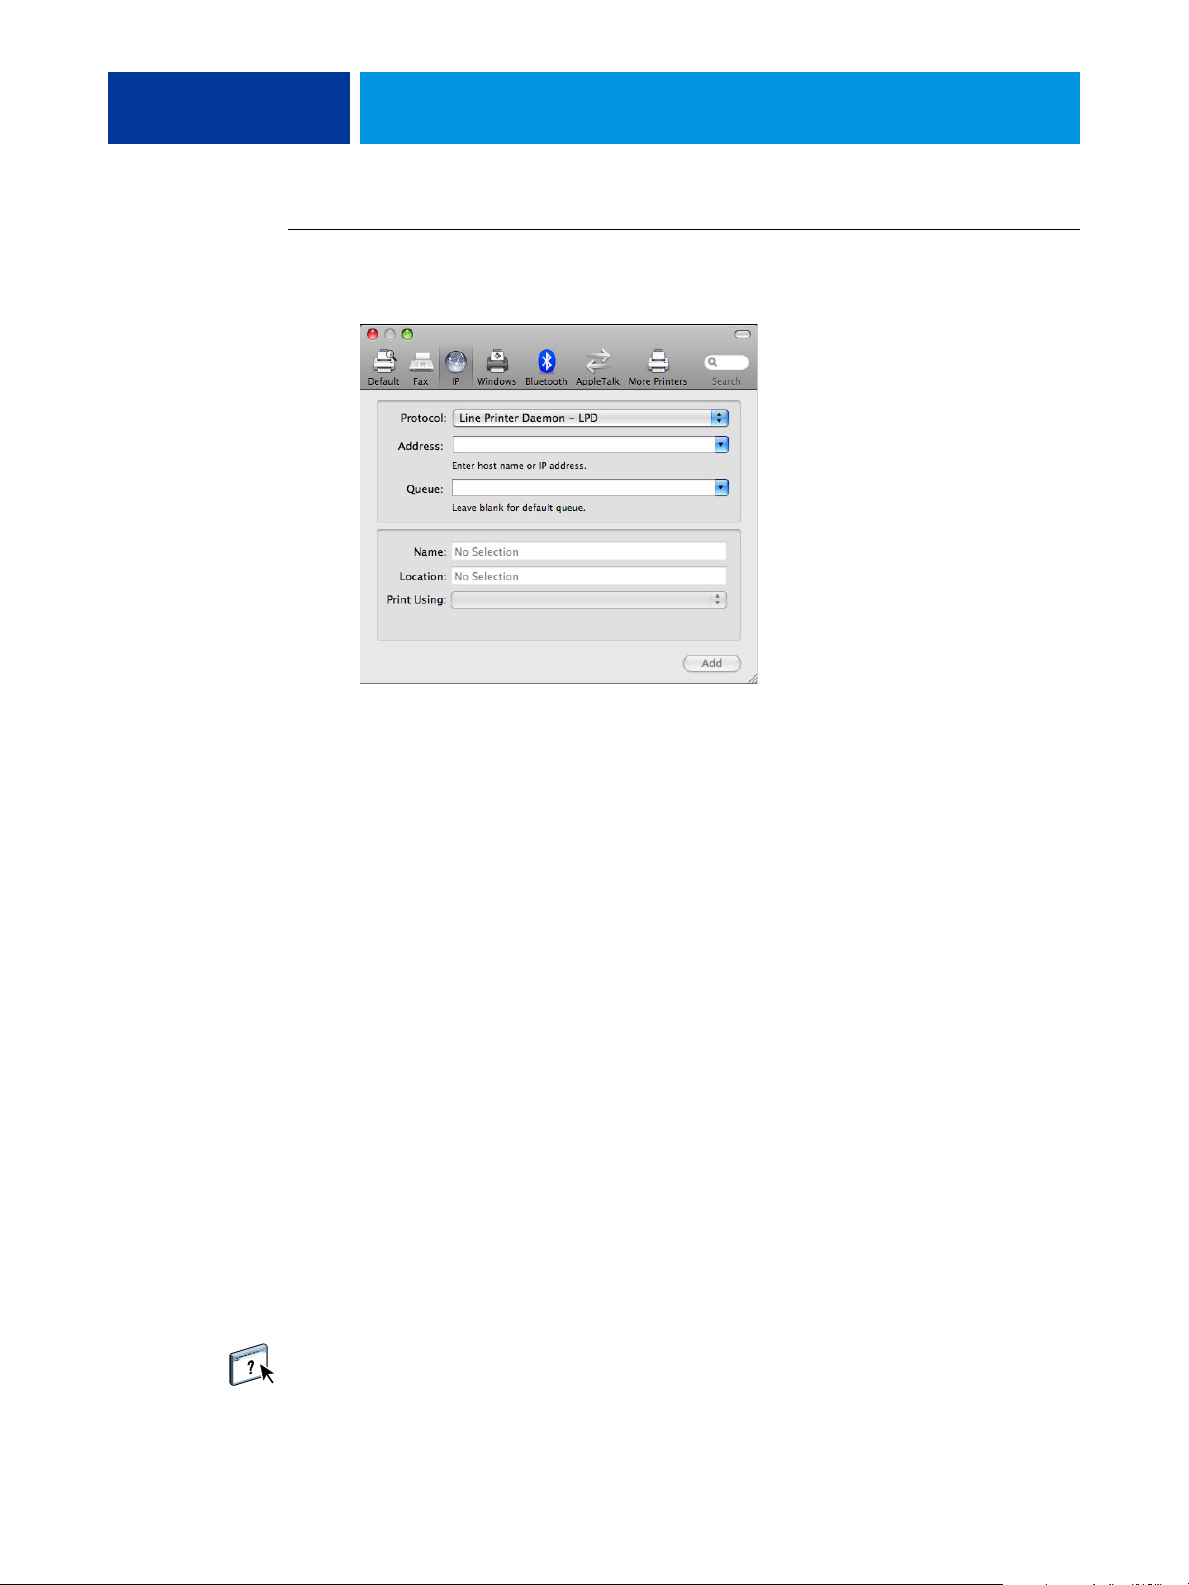
TO ADD A PRINTER WITH THE IP PRINTER CONNECTION
1 Click the IP icon in the dialog box.
2 LPD printing: Select Line Printer Daemon - LPD from the Protocol list, type the EX700i IP
address or DNS name in the Address field, and then type the print connection (print, hold, or
direct) in the Queue field. Proceed to step 4.
IP printing: Select Internet Printing Protocol - IPP from the Protocol list and type the EX700i
IP address or DNS name in the Address field. Proceed to step 3.
The IP address or DNS name appears in the Name field.
3 Type “ipp/” followed by the print connection (print, hold, direct, or name of virtual printer)
in lowercase letters in the Queue field.
NOTE: The EX700i requires a queue name. Do not leave the Queue field empty.
4 Choose Select a driver to use from the Print Using menu.
5 Locate the digital press manufacturer or model in the list, select the PPD file, and then click
OK.
6 Click Add.
The Installable Options pane in the Print & Fax dialog box appears.
7 Click Continue.
The EX700i with its IP address appears in the Printer List.
8 Choose the EX700i from the Printer List.
9 Click Options & Supplies, and then click the Driver tab.
10 Specify the installable option settings, and then click OK.
For information about configuring installable options, see printer driver Help.
MAC OS X 20
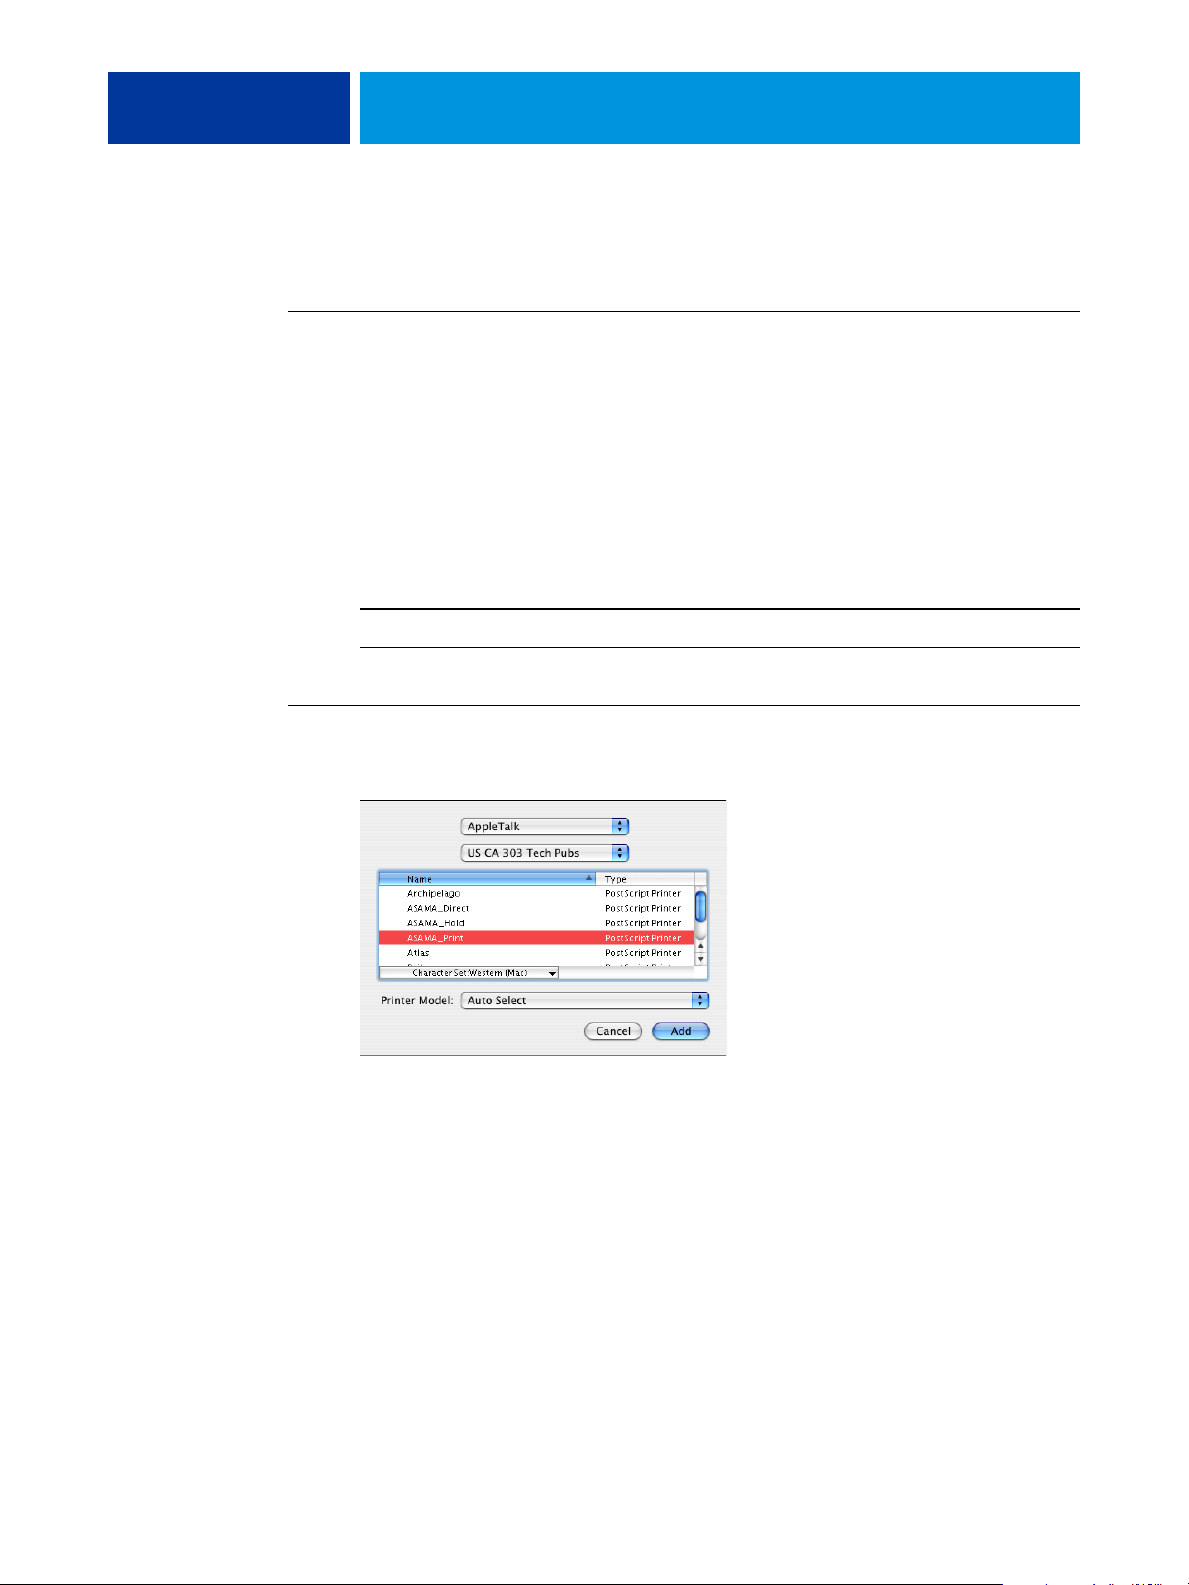
TO ADD A PRINTER WITH THE APPLETALK CONNECTION
NOTE: Use this procedure if the EX700i is in a different AppleTalk zone than your computer.
If the EX700i is in the same zone, it is displayed as a default following the procedure on
page 18.
1 Click the AppleTalk icon in the dialog box.
2 Select the AppleTalk zone for the EX700i from the list.
The AppleTalk printers in the specified zone are listed. The virtual printers that are
configured at the EX700i are also listed.
NOTE: The names of the virtual printers appear as printer name: virtual printer name in the
Name list.
3 Select the EX700i name in the Printer List and click Add.
The EX700i name appears in the Printer List of the Print & Fax dialog box.
4 Choose the EX700i from the Printer List.
5 Click Options & Supplies, and then click the Driver tab.
6 Specify the installable option settings, and then click OK.

MAC OS X 21
Setting up printing with Mac OS X v10.4.x
Use the following procedures to set up the EX700i on a computer with Mac OS X v10.4.x.
TO SET UP THE EX700I FROM THE PRINT DIALOG BOX
1 Open a file in your application.
2 Choose Print from the File menu.
The Print dialog box appears.
3 Select Add Printer from the Printer list.
In the dialog box that appears, select a printer connection. Use one of the printer connections
in the following table to add a printer.
TO SET UP THE EX700I USING PRINTER SETUP UTILITY
1 In the Finder, choose Utilities from the Go menu.
2 Start Printer Setup Utility.
The Printer List dialog box appears.
3 Click Add.
In the dialog box that appears, select a printer connection. Use one of the printer connections
in the following table to add a printer.
TO SET UP THE EX700I USING PRINT & FAX
1 Choose System Preferences from the Apple menu, and then choose Print & Fax.
The Print & Fax dialog box appears.
2 Click the “+” button to add a printer.
In the dialog box that appears, select a printer connection. Use one of the following
connections to add a printer.
Printing connection See
Default Browser (Bonjour or AppleTalk) page 22
IP Printer page 23
AppleTalk page 24
MAC OS X 22
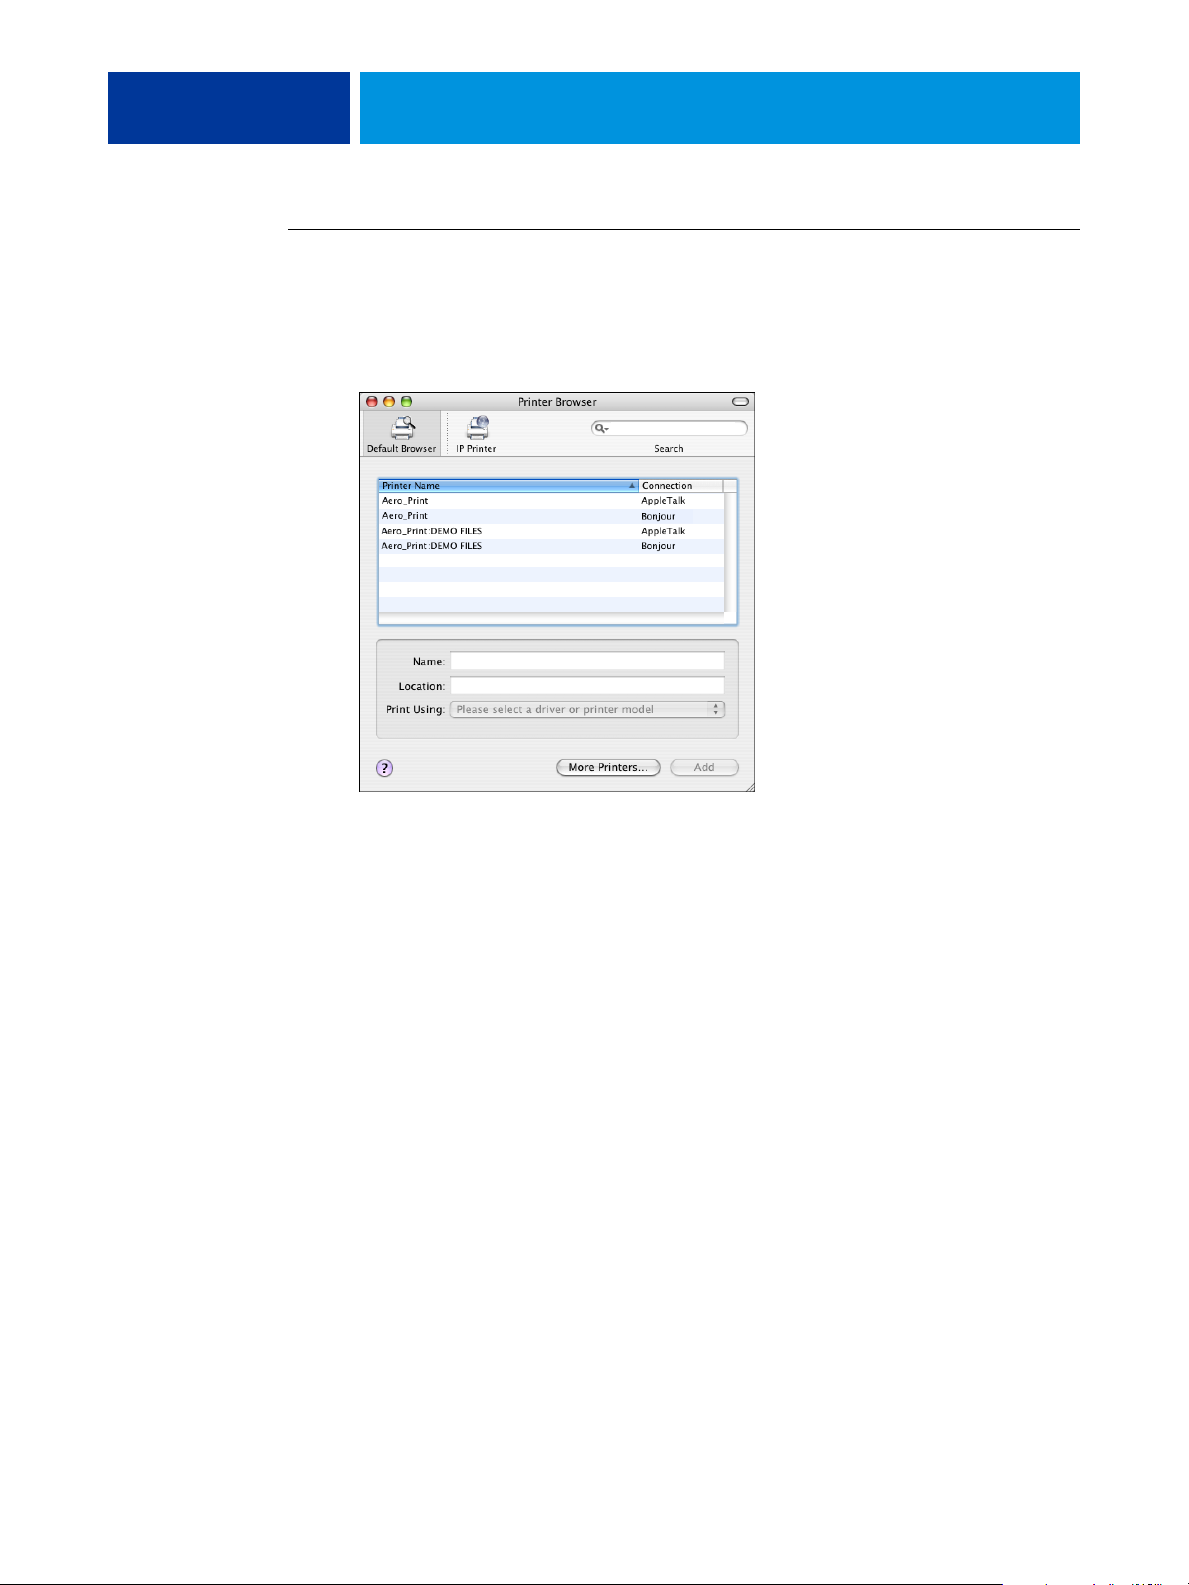
TO ADD A PRINTER WITH THE DEFAULT BROWSER (BONJOUR OR APPLETALK) CONNECTION
NOTE: Bonjour printer setup works only if the EX700i is on the same LAN as the client
Mac OS X computer. Bonjour must also be enabled on the EX700i.
1 Click Default Browser in the Printer Browser dialog box.
The names of printers with default connections are listed. The virtual printers that are
configured at the EX700i are also listed.
If the printer is not listed in the Printer Name list, click More Printers.
NOTE: The names of the virtual printers appear as printer name: virtual printer name in the
Name list.
2 Select the EX700i from the list.
The information about the selected printer appears at the bottom of the Default Browser
pane. The appropriate PPD file for the EX700i is automatically selected.
3 Click Add.
AppleTalk:
Bonjour: The Installable Options pane in the Printer Browser dialog box appears. Click
The EX700i name appears in the Printer List of the Print & Fax dialog box.
Continue to return to the Print & Fax dialog box. The EX700i name appears in the Printer
List.
4 Choose the EX700i from the Printer List and click Show Info.
5 In the Printer Info dialog box, choose Installable Options, specify the installable option
settings, and then click Apply Changes.
6 Close the Printer Info dialog box.
MAC OS X 23
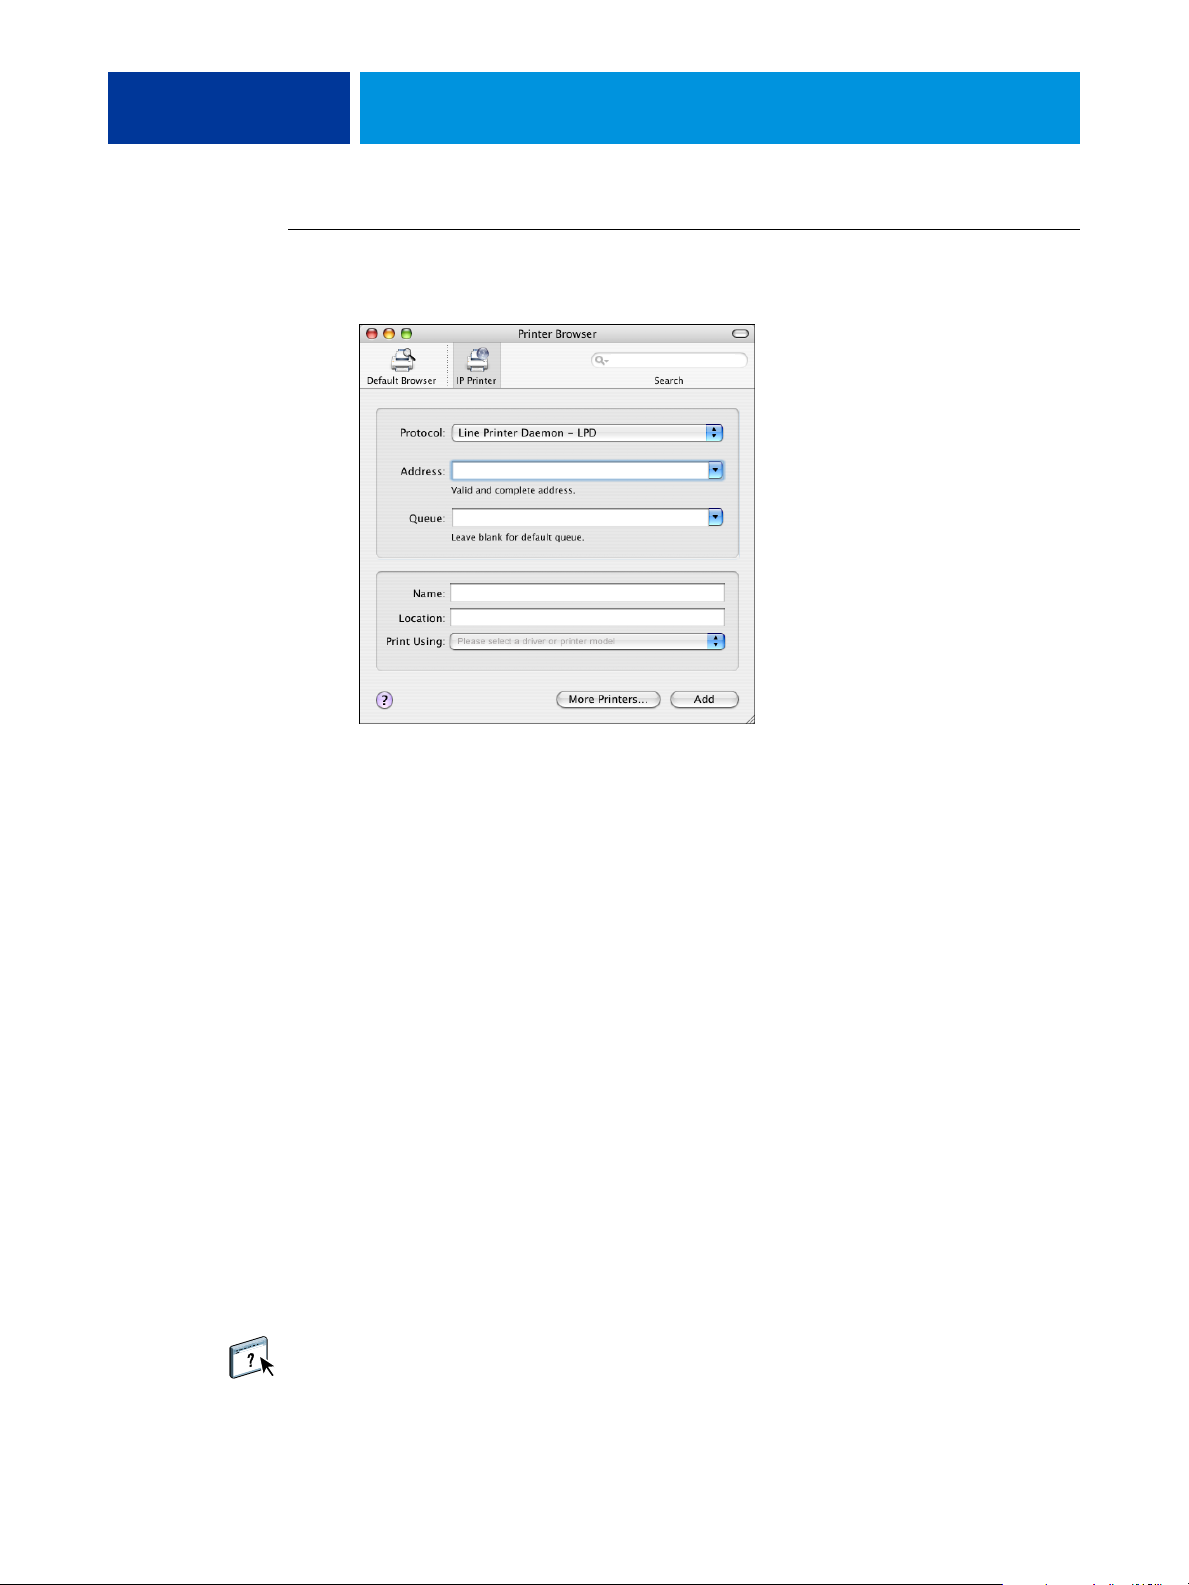
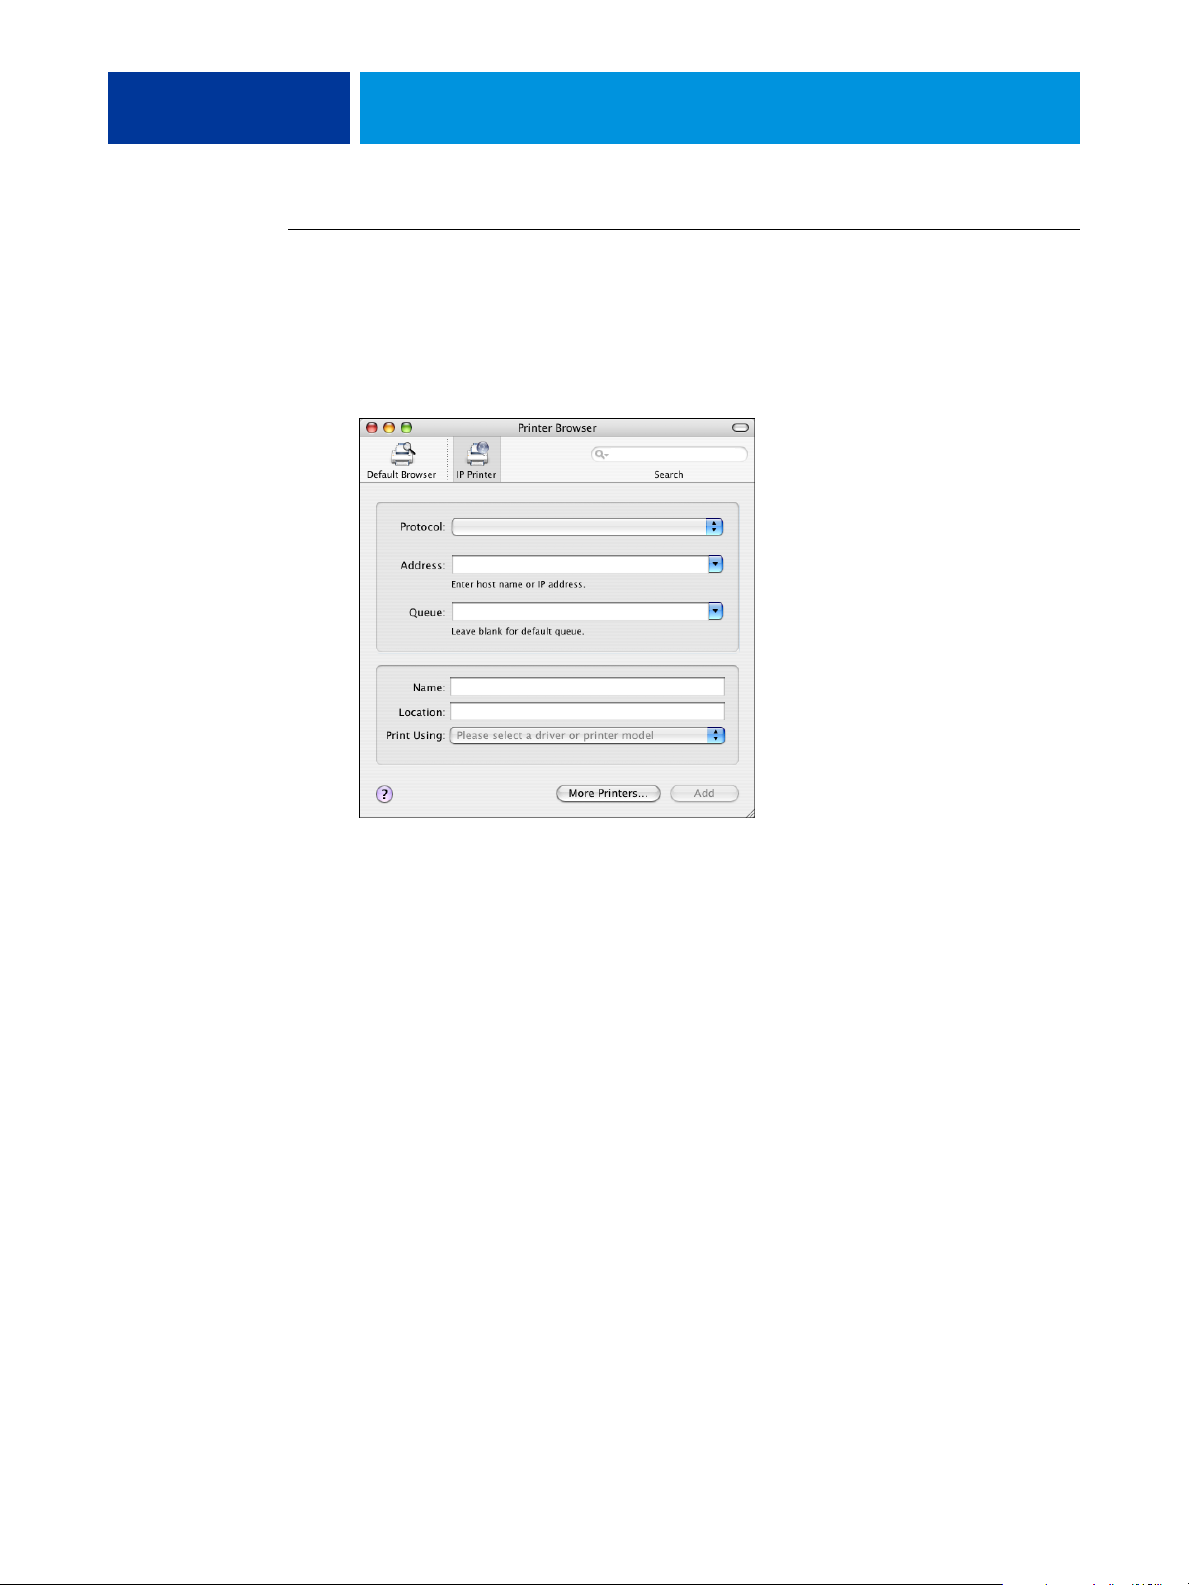
TO ADD A PRINTER WITH THE IP PRINTER CONNECTION
1 Click IP Printer in the Printer Browser dialog box.
2 LPD printing: Select Line Printer Daemon - LPD from the Protocol list, type the EX700i IP
address or DNS name in the Address field, and then type the print connection (print, hold, or
direct) in the Queue field. Proceed to step 6.
IP printing: Select Internet Printing Protocol - IPP from the Protocol list and type the EX700i
IP address or DNS name in the Address field. Proceed to step 3.
The IP address or DNS name appears in the Name field.
3 Type “ipp/” followed by the print connection (print, hold, direct, or name of virtual printer)
in lowercase letters in the Queue field.
NOTE: The EX700i requires a queue name. Do not leave the Queue field empty.
4 Print Using: Locate the digital press manufacturer or model in the list, and then select the
PPD file.
5 Click Add.
The Installable Options pane in the Printer Browser dialog box appears.
6 Click Continue.
The EX700i with its IP address appears in the Printer List.
7 Choose EX700i from the Printer List and click Show Info.
8 In the Printer Info dialog box, choose Installable Options, specify the installable option
settings, and then click Apply Changes.
For information about configuring installable options, see printer driver Help.
9 Close the Printer Info dialog box.
MAC OS X 24
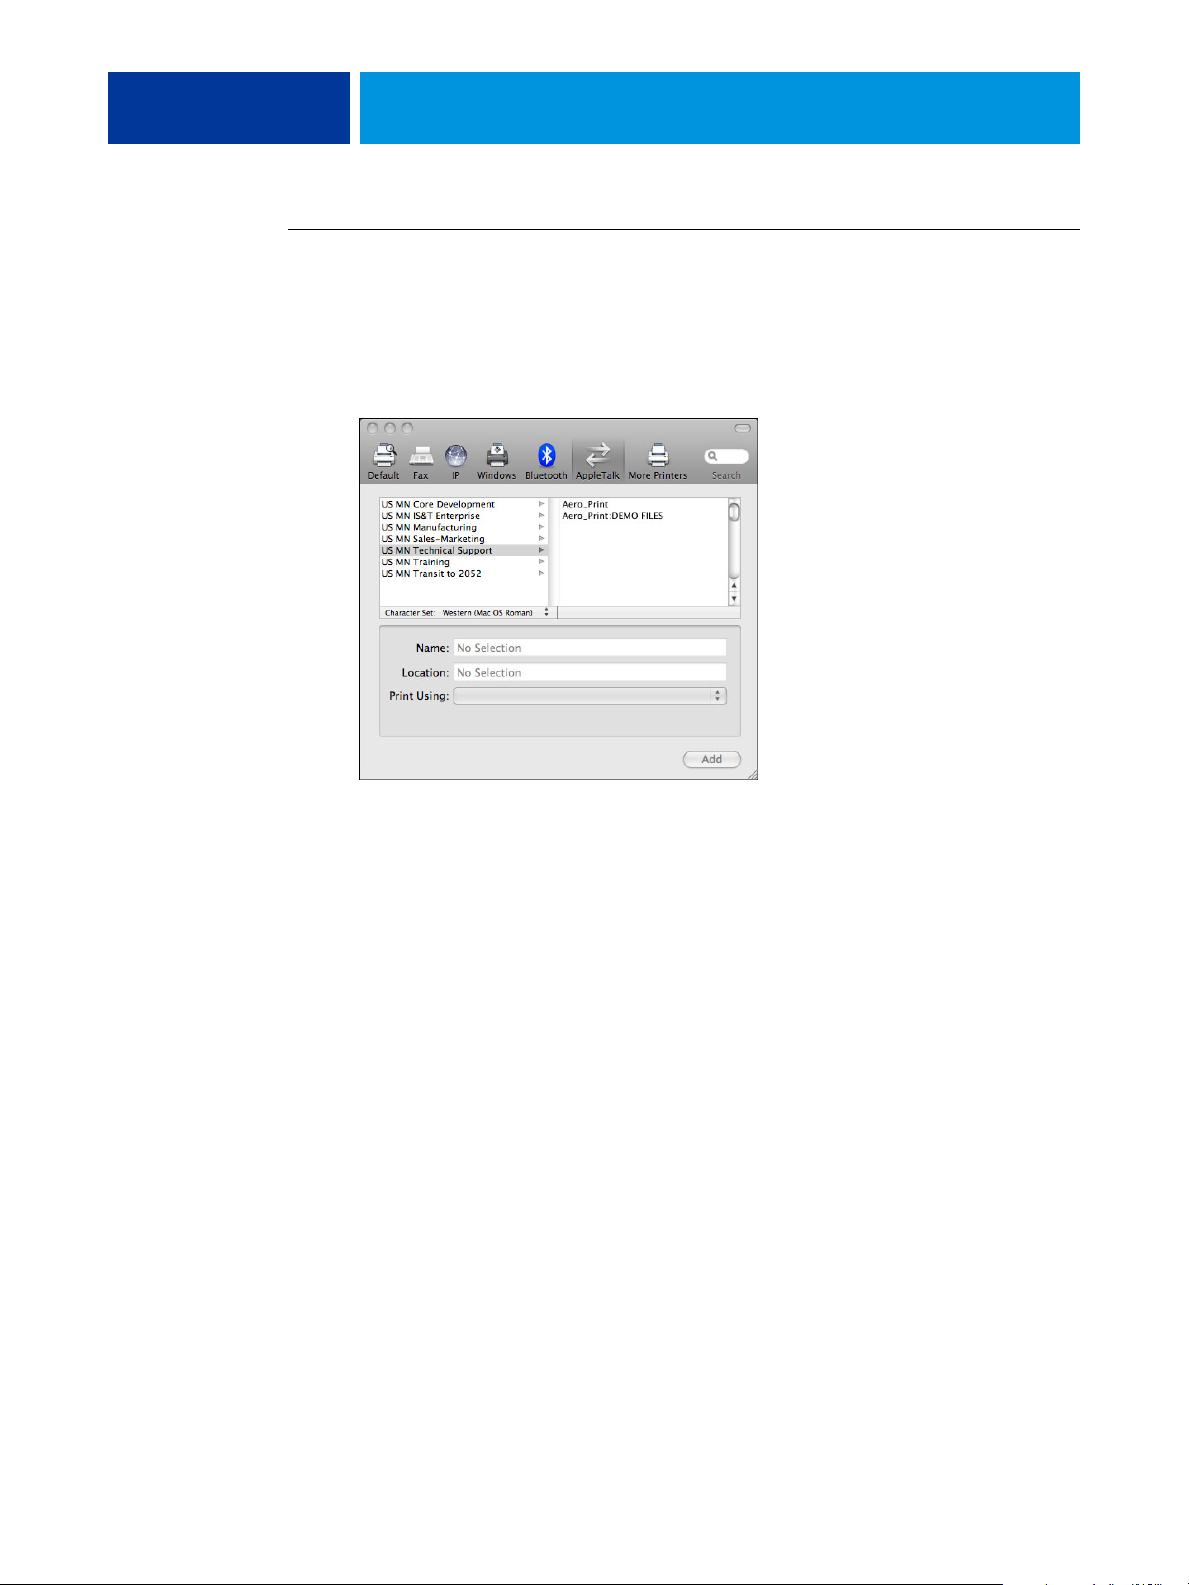
TO ADD A PRINTER USING THE APPLETALK CONNECTION
NOTE: Use this procedure if the EX700i is in a different AppleTalk zone than your computer.
If the EX700i is in the same zone, it is displayed as a default following the procedure on
page 22.
1 Click Default Browser or IP Printer in the Printer Browser dialog box.
2 Click More Printers.
The dialog box with a list of other connections appears.
3 Select AppleTalk from the connection list.
The AppleTalk pane appears.
4 Select the AppleTalk zone for the EX700i from the list.
The AppleTalk printers in the specified zone are listed. The virtual printers that are
configured at the EX700i are also listed.
NOTE: The names of the virtual printers appear as printer name: virtual printer name in the
Name list.
5 Select the EX700i name in the Name list and click Add.
The EX700i name appears in the Printer List dialog box.
6 Choose EX700i from the Printer List and click Show Info.
7 In the Printer Info dialog box, choose Installable Options, specify the installable option
settings, and then click Apply Changes.
8 Close the Printer Info dialog box.
MAC OS X 25
Setting up printing with Mac OS X v10.3.9
Use the following steps for setting up the EX700i on a computer with Mac OS X v10.3.9.
TO SET UP THE EX700I FOR PRINTING
1 In the Finder, choose Utilities from the Go menu.
2 Start Printer Setup Utility or Print Center.
The Printer List dialog box appears.
3 Click Add.
In the dialog box that appears, select a printer connection. Use one of the following
connections to add a printer.
Printing connection See
AppleTalk page 25
LPD/LPR page 26
TO ADD A PRINTER WITH THE APPLETALK CONNECTION
1 Select AppleTalk from the list.
2 Select the AppleTalk zone for the EX700i from the zone pop-up list.
The AppleTalk printers in the specified zone are listed. The virtual printers that are
configured at the EX700i are also listed.
NOTE: The names of the virtual printers appear as printer name: virtual printer name in the
Name list.
3 Select the EX700i name in the Name list.
4 Click Add.
The appropriate PPD file for the EX700i is automatically selected.
The EX700i name appears in the Printer List.
MAC OS X 26
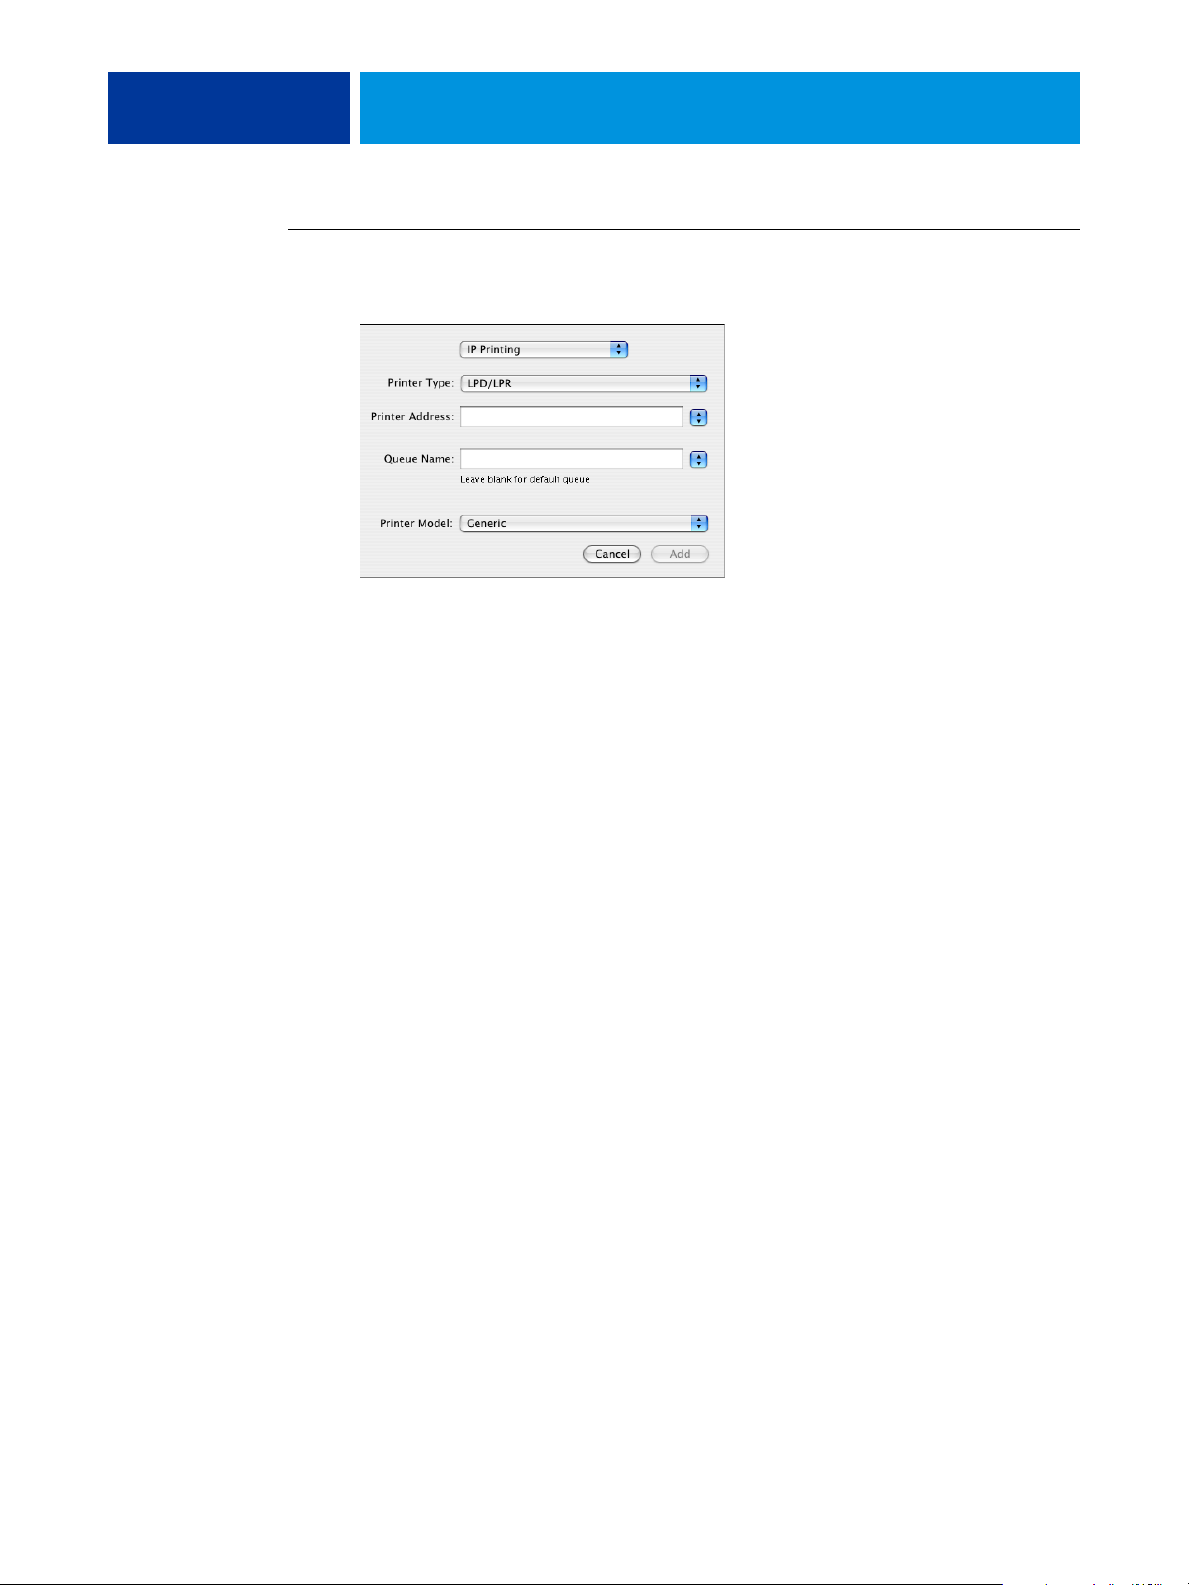
TO ADD A PRINTER WITH THE LPD/LPR CONNECTION
1 Select IP Printing from the list.
2 Select LPD/LPR from the Printer Type list.
3 Type the EX700i IP address in the Printer Address field.
4 Type the virtual printer name in the Queue Name field or leave it blank for the default queue.
5 Select the appropriate model from the Printer Model list.
6 Select the PPD file from the Model Name list.
7 Click Add.
The EX700i with its IP address appears in the Printer List.

MAC OS X 27
Adding a non-English printer on Mac OS X v10.5 and v10.6
When adding a non-English EX700i printer on Mac OS X v10.5 and 10.6, you must
navigate to Other to select the correct printer driver for your language.
TO ADD A NON-ENGLISH PRINTER
1 Open the Add Printer dialog box.
The list of available Bonjour printers is displayed.
2 Select the EX700i from the list.
3 From the Print Using menu, select Other.
4 On your computer, navigate to Library > Printers > PPDs > Contents > Resources, and open the
language folder that corresponds to the language you are using on your system.
5 Select the EX700i from the list.
6 Click Open, then click Add.
Configuring installable options
To use the print options for the digital press and EX700i appropriately, you must configure
the EX700i from your computer for the options that are installed on the digital press.
Configure the options manually.
For information about configuring installable options, see printer driver Help.
Using Desktop Printer (optional)
After adding the EX700i to the Printer List in Print & Fax or the Printer Setup Utility, you
can create and use the Desktop Printer feature.
For information about the Desktop Printer feature, see printer driver Help.

MAC OS X 28
Printing from Mac OS X computers
You can print to the EX700i just as you would print to any other printer from a
Mac OS X application. Select the EX700i as the current printer in the Printer List, specify
print options, and then print the document from the application.
The following table includes other methods to print to the EX700i and describes where to
find information about these features.
For more information See
Downloading files to the EX700i using the Docs WebTool Utilities
Printing documents using Hot Folders Utilities
Printing documents using Command WorkStation Utilities
Achieving optimal printing results from applications Color Printing and Fiery
Selecting the EX700i in the Printer List page 29
Color Reference
Setting print options and printing from Mac OS X applications page 30
Customizing the Quick Access view page 33
Viewing the digital press status page 33
Defining and printing custom page sizes page 129
MAC OS X 29
Selecting the EX700i in the printer list
Before you print a job, you must select the EX700i from the printer list. Use the following
procedure to select the EX700i as your default printer.
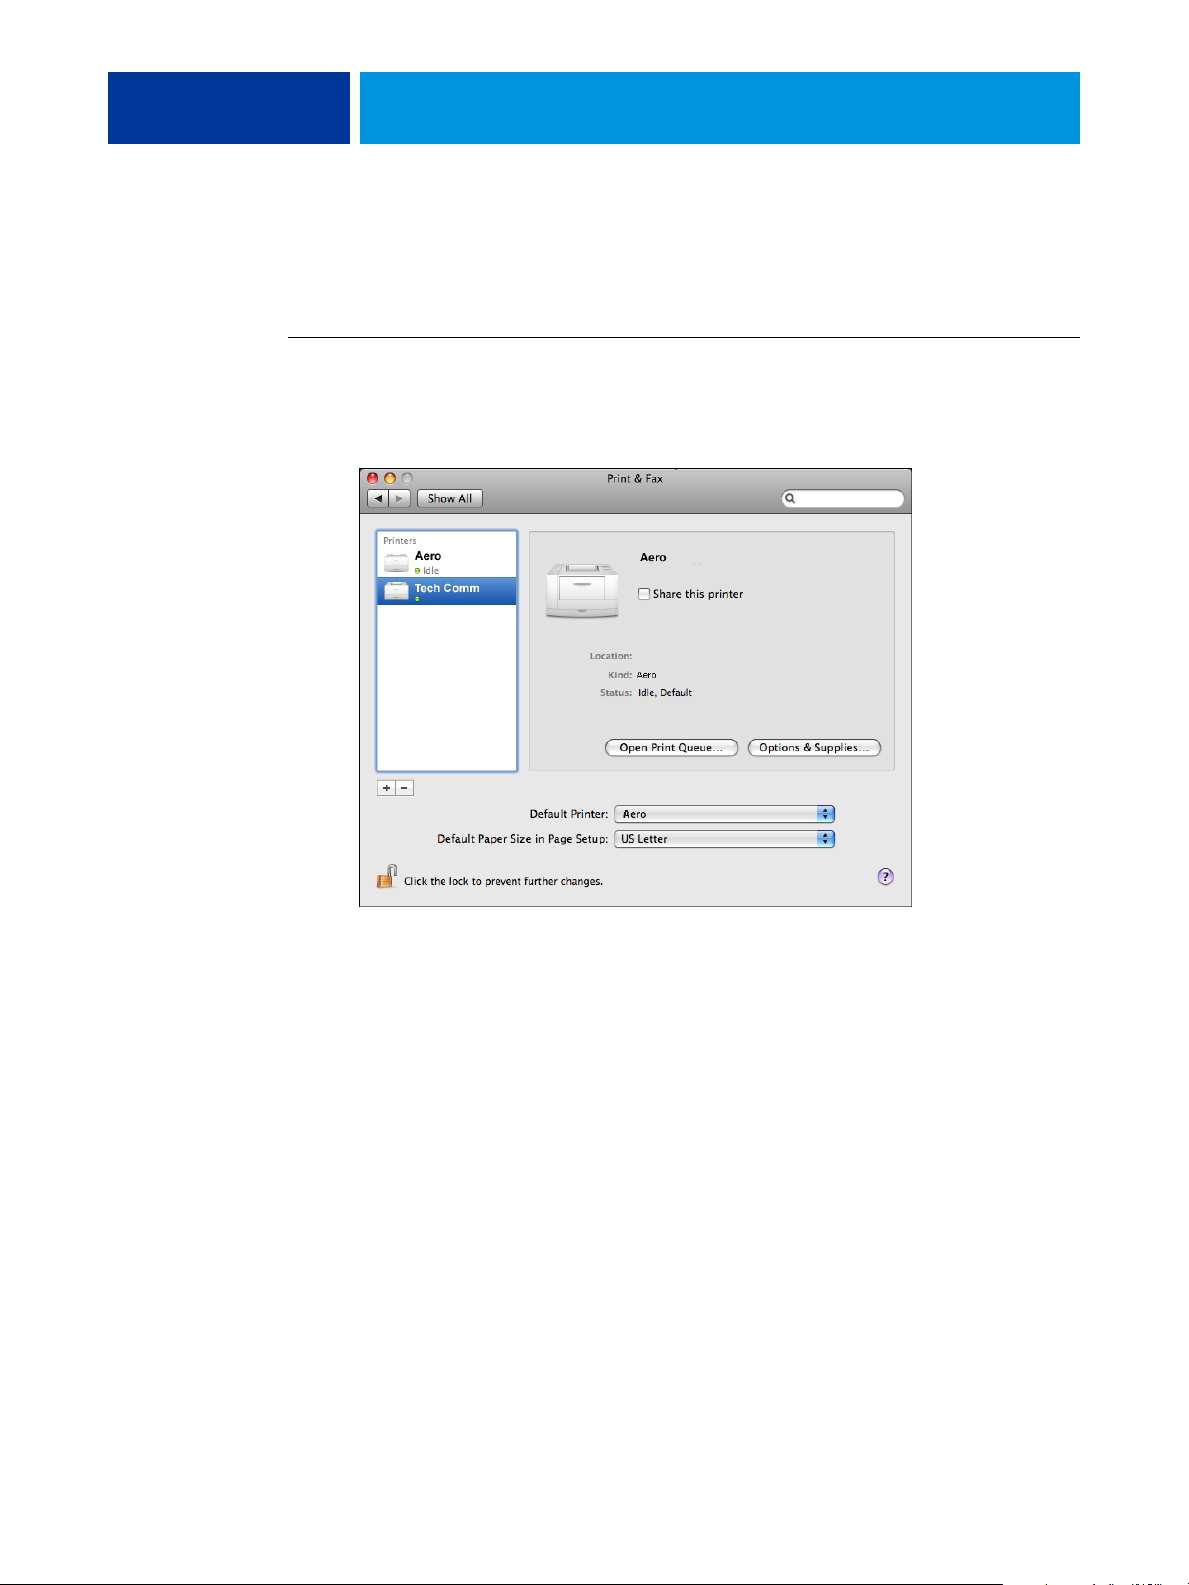
TO SELECT THE EX700I AS THE DEFAULT PRINTER WITH MAC OS X V10.5 OR V10.6
1 Make sure that the EX700i is connected to the network and turned on.
2 Choose System Preferences from the Apple menu, and then choose Print & Fax.
The printers that are set up for printing are listed. The virtual printers that are configured at
the EX700i and set up for printing are also listed.
3 To make the EX700i the default printer, select it from the Default Printer menu.
4 Close the window.
MAC OS X 30
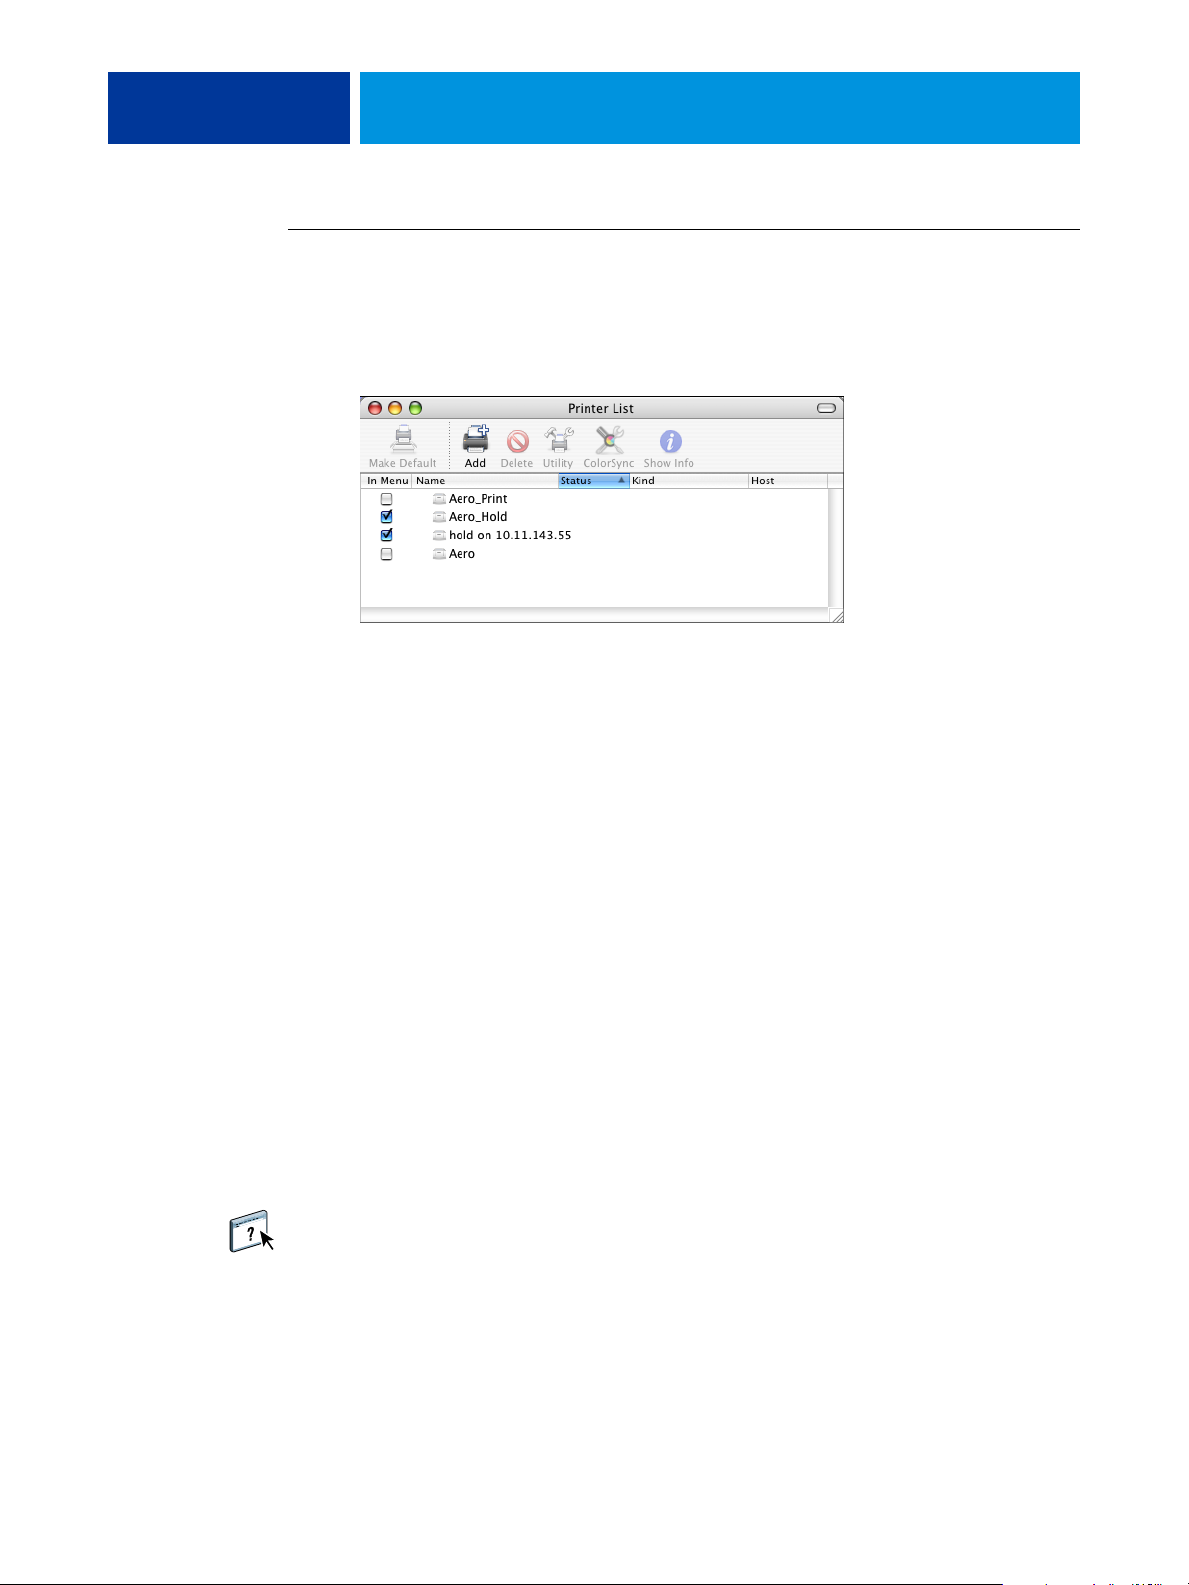
TO SELECT THE EX700I AS THE DEFAULT PRINTER WITH MAC OS X V10.4.X OR V10.3.9
1 Make sure that the EX700i is connected to the network and turned on.
2 In the Finder, choose Utilities from the Go menu.
3 Start Printer Setup Utility.
The printers that are set up for printing are listed. The virtual printers that are configured at
the EX700i and set up for printing are also listed.
4 To specify it as your current printer, select the EX700i in the Printer List.
5 Click the Make Default icon.
The EX700i is now your default printer.
Setting print options and printing from Mac OS X applications
To print from Mac OS X client computers, install the printer driver files. For instructions, see
“Installing the Mac OS X printer driver files” on page 10. In Mac OS X applications, print
options are set from the Print dialog box.
Some print options that are selectable from an application are similar to print options that are
specific to the EX700i and the digital press. In these cases, use the print options specific to the
EX700i and the digital press. These options appear in the Fiery Features pane and/or in the
Printing Preferences window. The application may not set up the file properly for printing on
the EX700i, resulting in unexpected finishing, printing errors, or longer processing time.
If you specify incompatible print settings when printing a document, the Conflict dialog box
provides instructions to resolve the conflict.
Some print options, such as expert color settings, are available only if Two-Way
Communication is enabled or if a particular installable option has been configured. For
information about enabling Two-Way Communication, see printer driver Help. For
information about configuring installable options, see “Configuring installable options” on
page 27.
If you choose Printer’s default, the job prints according to the settings that the administrator
specified in Setup. For more information, see page 99.

1 Fiery Features
2 Customize button
3 Full Properties button
4 Presets menu
5 Two-Way Communication
MAC OS X 31
The following procedure explains how to use the printer driver to specify print options for a
particular job and print it to the EX700i. For information about print options, see page 98.
NOTE: The following procedure uses Mac OS X v10.5 illustrations.
TO SET PRINT OPTIONS AND PRINT FROM MAC OS X
1 In your application, choose File > Print, and select the EX700i as your printer.
2 Choose Fiery Features from the drop-down list.
4
1
2
5
3
For information about using presets, see printer driver Help.
NOTE: For a list of print options, see page 100.

MAC OS X 32
3 Click Full Properties in the Quick Access pane to specify print options and settings for your
job.
The print options are grouped by categories. Each group or tab contains print options that are
similar or complement one another.
The groups or tabs are as follows:
Quick Access contains duplicate print options from the other job properties groups. It is
customizable, so any Job Override print option can be added or removed from the view. The
Quick Access tab lets you find print options quickly without having to browse through all the
Properties tabs. For information about customizing the Quick Access view, see page 33.
Job Info contains all information about the job, including user information that may be
required for user authentication, secure print properties, job handling, and document server.
For information about Job Info options, see page 101.
Media contains attributes and sources of paper to print and insert. For information about
Media options, see page 103.
Layout defines how the file is positioned or imaged on the media/sheet, except for positioning
that compensates for finishing options, for example, Tray Alignment. For information about
Layout options, see page 106.
Color contains color settings and graphic arts features (when enabled). For information about
Color options, see page 111.
Image contains all Image Quality settings supported by the connected EX700iand digital
press. For information about Image options, see page 116.
Finishing contains print options that are specific to the EX700i and to the finishing
equipment on the digital press. These options override settings in EX700i Printer Setup but
can be changed from Command WorkStation. For information about Finishing options, see
page 117.
VDP contains all Variable Data Printing (VDP) settings, such as FreeForm and advanced VDP
settings. For information about VDP options, see page 119.
Stamping contains any image stamping option that adds or hides/removes any image on the
job. This also includes watermark properties that define the placement and style of the
watermark. For information about Stamping/Watermark options, see page 120 or printer
driver Help.
Printer contains digital press status that includes the current paper and dry ink levels. For
more information, see page 33 or printer driver Help.
4 After you specify the print settings, click Print to send your print job.

MAC OS X 33
Customizing the Quick Access view
The Quick Access view can be customized with the print options that you use frequently. This
saves time because you do not have to open all of the other print option icons if you only want
to set the options in Quick Access.
When you place a print option in Quick Access, it still appears under its original print option
icon. You can set the option from either location.
TO CUSTOMIZE QUICK ACCESS
1 In your application, choose File > Print, and select the EX700i as your printer.
2 Choose Fiery Features from the drop-down list.
3 Click Customize to specify the options shown in the Quick Access window.
You can select a shortcut from the Available Shortcuts list and add it to the Current Shortcuts
list, as well as remove a shortcut from the Current Shortcuts list. Click OK to save your
changes.
For information about Quick Access view, see printer driver Help.
Viewing the digital press status
If you enable a TCP/IP network, you can retrieve the digital press status and color settings
from the EX700i and display them in the printer driver with the Two-Way Communication
option. The digital press status includes the current paper and dry ink levels. You can set the
color settings on the EX700i with Command WorkStation. For more information about
color print options, see Color Printing or Command WorkStation Help.
For information about monitoring digital press status, see printer driver Help.

WINDOWS FOR EX700I PRINT SERVER 34
WINDOWS FOR EX700I PRINT SERVER
To set up the EX700i as a digital press on a Windows computer, install the printer driver files
that correspond to your digital press and set up the EX700i for printing. Printer drivers
provide a way to communicate information about print jobs between your applications, the
EX700i, and the digital press.
For the location of each procedure, see the following table.
Procedure See
Installing Windows printer drivers page 34
Setting up the Windows computer for printing page 46
Printing from Windows computers page 54
Installing Windows printer drivers
Installing printer drivers and printer description files is the first step in setting up the EX700i
as a PostScript printer.
NOTE: Windows Vista, Windows 7, and Windows Server 2008 R2 have a User Account
Control (UAC) feature. You must be the administrator or a user with administrator privileges
to install printer drivers.
NOTE: If the EX700i printer driver is already installed, you must uninstall it before you install
a new driver (see “Uninstalling printer drivers” on page 45).
The following sections describe how to install the printer files for the EX700i.
Procedure See
Installing printer drivers by Point and Print page 35
Downloading printer drivers using WebTools page 37
Downloading printer drivers from the EX700i page 38
Installing printer drivers from the User Software DVD page 39
Installing and connecting to a virtual printer page 43
Uninstalling printer drivers page 45

WINDOWS FOR EX700I PRINT SERVER 35
Installing printer drivers by Point and Print
SMB printing (also known as Windows or WINS printing) allows you to install PostScript
printer drivers on your computer from the EX700i using Point and Print, and print to a
particular connection (Print queue, Hold queue, Direct connection, or Virtual Printer).
Each connection (print, hold, direct or virtual printer) requires a separate installation. Repeat
the procedure for each connection.
When you install the printer driver using Point and Print, you cannot configure installable
options manually. The installed options are displayed as the EX700i configuration in the
printer driver. For more information, see “Configuring installable options” on page 53.
BEFORE YOU BEGIN
Ask your administrator to do the following in Setup on the EX700i:
• Assign the EX700i a valid IP address.
Ask your administrator for the IP address or DNS name required in the following procedure.
• Configure the EX700i for SMB printing.
NOTE: SMB printing is referred to as Windows Printing in Setup and on the Configuration
page.
For more information, see Configuration and Setup or Configure Help.
TO SET UP SMB PRINTING ON WINDOWS COMPUTERS
1 Windows 2000/XP/Server 2003: Right-click Network Neighborhood or My Network Places, and
then select Find Computer or Search for Computers.
Windows Vista/Server 2008: Click Start, choose Control Panel, double-click Network and
Sharing Center, and then click the View computers and devices link.
Windows 7/Server 2008 R2: Click Start, choose Control Panel, choose Network and Internet,
choose Network and Sharing Center, and then click the View network computers and devices
link.
2 Windows 2000/XP/Server 2003: Type the name or IP address of the EX700i and click Search
Now or Search.
Windows Vista/Windows 7/Server 2008/Server 2008 R2: Type the name of the EX700i in the
Search field and click Enter.
If you cannot locate the EX700i, contact your EX700i administrator.

WINDOWS FOR EX700I PRINT SERVER 36
3 Double-click the name of the EX700i to display enabled print connections.
NOTE: For a description of each print connection, see Configuration and Setup.
4 Double-click the connection that you want to set up (print, hold, direct, or virtual printer).
The files are installed on your computer.
NOTE: You may receive a message that you are about to connect to a printer on the EX700i,
which will automatically install a printer driver on your machine. Click Yes to continue.
5 Windows 2000: Click Start, choose Settings, and then choose Printers.
Windows XP: Click Start and choose Printers and Faxes.
Windows Server 2003: Click Start, choose Control Panel, and then choose Printers and Faxes.
Windows Vista: Click Start, choose Control Panel, and then double-click Printers.
Windows Server 2008: Click Start, choose Control Panel, and under Classic View, double-click
Printers.
Windows 7/Server 2008 R2: Click Start and choose Devices and Printers.
The printer is displayed in the Printers or Printers and Faxes window.
6 Right-click the EX700i icon and choose Properties.
7 Click Print Test Page on the General tab.
If the Test Page prints successfully, you are ready to print from the computer.
8 Repeat the previous steps for the other connections that you want to set up.

WINDOWS FOR EX700I PRINT SERVER 37
Downloading printer drivers using WebTools
WebTools allows you to download installers for printer drivers to your computer directly
from the EX700i, if your administrator has enabled access to WebTools.
For information about Setup, see Configuration and Setup.
For information about setting up and starting WebTools, see Utilities.
TO DOWNLOAD PRINTER DRIVER FILES WITH WEBTOOLS
1 Start your Internet or intranet browser and type the DNS name or IP address of the EX700i.
2 Click the Downloads tab.
3 Click the link for the item that you want to install.
For Windows printer drivers, click the Printer Files link under the Windows heading.
4 If a dialog box prompts you to open the file or save it to disk, choose to save it
to disk.
5 Browse to the location where you want to save the PRNTDRV.EXE file and click Save.
The file is downloaded from the EX700i. This compressed file is an archive that contains
multiple files.
6 Double-click the PRNTDRVE.EXE file to extract the files.
Depending on your operating system, you might be prompted to select a location to extract
the files to.
Follow the instructions for your operating system to install the printer driver. The procedures
are the same as for installing from the DVD, except that after you click Have Disk, you
browse to the location where you extracted the files, rather than to the DVD.
For instructions on installing the Windows printer driver, see “To install and complete the
print connection for Windows” on page 39.
For more information, see WebTools Downloads Help.

WINDOWS FOR EX700I PRINT SERVER 38
Downloading printer drivers from the EX700i
You can download printer drivers files to your computer directly from the EX700i over the
network, and then install them following the procedures in “Installing printer drivers from
the User Software DVD” on page 39.
TO DOWNLOAD PRINTER DRIVER FILES FROM THE EX700I
1 Windows 2000/XP/Server 2003: Right-click Network Neighborhood or My Network Places,
and then select Find Computer or Search for Computers.
Windows Vista/Server 2008: Click Start, choose Control Panel, double-click Network and
Sharing Center, and then click the View computers and devices link.
Windows 7/Server 2008 R2: Click Start, choose Control Panel, choose Network and Internet,
choose Network and Sharing Center, and then click the View network computers and devices
link.
2 Windows 2000/XP/Server 2003: Type the name or IP address of the EX700i and click Search
Now or Search.
Windows Vista/Windows 7/Server 2008/Server 2008 R2: Type the name of the EX700i in the
Search field and click Enter.
If you cannot locate your EX700i, contact your administrator.
3 Double-click the name of the EX700i.
A folder named PC_User_SW is displayed, along with the enabled print connections.
4 Double-click the PC_User_SW folder and browse to the Print Drivers\Ps_drvr folder.
Follow the instructions for your operating system to install the printer driver. The procedures
are the same as for installing from the DVD, except that after you click Have Disk, you
browse to the Win_2K_XP_VISTA folder on your desktop, rather than to the DVD.

WINDOWS FOR EX700I PRINT SERVER 39
Installing printer drivers from the User Software DVD
The following procedures describe installing the printer driver from the User Software DVD.
To install the printer driver on a Windows Server 2003/Server 2008/Server 2008 R2 or
Windows 7 computer, select the same PPD (oemsetup.inf) file as for Windows 2000/XP/
Vista, described in the following procedure.
NOTE: The following procedures use Windows XP illustrations.
This procedure describes the installation of a local printer (Port 9100). You can modify the
printing protocol later, according to your network type.
TO INSTALL AND COMPLETE THE PRINT CONNECTION FOR WINDOWS
1 Windows 2000: Click Start, choose Settings, and then choose Printers.
Windows XP: Click Start and choose Printers and Faxes.
Windows Server 2003: Click Start, choose Control Panel, and then choose Printers and Faxes.
Windows Vista: Click Start, choose Control Panel, and then double-click Printers.
Windows Server 2008: Click Start, choose Control Panel, and under Classic View, double-click
Printers.
Windows 7/Server 2008 R2: Click Start, choose Control Panel, choose Network and Internet,
choose Network and Sharing Center, and then click the View network computers and devices
link.
2 Windows 2000/XP: Double-click the Add Printer icon and click Next.
Windows Server 2003: Double-click the Add a printer icon and click Next.
Windows Vista/Server 2008/Server 2008 R2/Windows 7: Click Add a printer.
3 Windows 2000/XP/Server 2003: Specify printing using a Local printer, clear the
“Automatically detect and install my Plug and Play printer” option, and then click Next.
Windows Vista/Server 2008/Server 2008 R2/Windows 7: Select Add a local printer.
4 Select Create a New Port, choose Standard TCP/IP Port from the Type of port menu, and then
click Next.
5 Windows 2000/XP/Server 2003: Click Next in the Welcome to the Add Standard TCP/IP
Printer Port Wizard dialog box.
The Add Standard TCP/IP Printer Port Wizard dialog box appears. Proceed to step 6.
Windows Vista/Server 2008/Server 2008 R2/Windows 7: Select the Device Type, type the
Hostname or IP address of the EX700i, and then click Next. Proceed to step 9.
6 Type the printer name or IP address of the EX700i and click Next.
Windows 2000/Server 2003: Proceed to step 7.
Windows XP: Select the Device Type and click Next.
7 Windows 2000/XP/Server 2003: Make sure that Generic Network Card is selected as Standard
for Device Type and click Next.

WINDOWS FOR EX700I PRINT SERVER 40
8 Windows 2000/XP/Server 2003: Click Finish to close the Add Standard TCP/IP Printer Port
Wizard dialog box.
NOTE: If the device is not found on the network, the device is displayed instead of the Finish
button. If a device is not found on the network, that could be for one of the following
reasons:
• EX700i is not powered on.
• Network is not connected.
• EX700i is not configured properly.
• IP address is not correct.
If you encounter one of these situations, you can continue to set up the port by configuring
the port manually. See “To set up Standard TCP/IP Port (Raw or LPR) for Windows” on
page 47 and follow steps 11 to 14 before proceeding to step 9.
9 Click Have Disk in the dialog box displaying lists of manufacturers and printers.
The Install From Disk dialog box prompts you for the disk.
10 Insert the User Software DVD into the DVD drive, type the name of the DVD drive (for
example, D:\), and then click Browse. Browse to the Print Drivers\Ps_drvr folder.
If you are installing from the files you downloaded from the EX700i using the Downloads tab
in WebTools, browse to Print Drivers\Ps_drvr and click Open.
11 Make sure that “oemsetup.inf” or “oemsetup” is selected and click Open.
The path is copied to the Install From Disk dialog box.
12 Verify that the path is correct and click OK.
13 In the Printers box, select your printer and click Next.

WINDOWS FOR EX700I PRINT SERVER 41
14 Type a name for the EX700i in the Printer name field, indicate whether you want to make it
the default printer, and then click Next.
This name is used in the Printers window and the queues window.
15 Follow the on-screen instructions.
Do not share the printer and do not print a Test Page at this time. Continue with the printer
driver installation and at the last screen, click Finish.
The necessary files are installed on your hard disk. When installation is complete, the Printers
window appears with an icon for the newly installed printer.
Now you are ready to configure the installable options (see “Configuring installable options”
on page 53).
To set up a connection other than port 9100, proceed to “Setting up printing connections”
on page 46.
To use the printer driver, you must select the following options on the Advanced tab of the
printer driver after installation is complete:
• Spool print documents
• Start printing immediately
• Print spooled documents first

WINDOWS FOR EX700I PRINT SERVER 42
Installing the printer driver on 64-bit Windows computer from a 32-bit Windows Server 2003 Server
If your network users print to the EX700i using Windows Server 2003 (32-bit) print sharing,
and you have 64-bit Windows XP users on your network, you must add the 64-bit printer
driver to the Windows Server 2003 (32-bit) computer, so that users can install the printer
driver on their computers using Point and Print. We do not recommend installing the printer
driver from a Server (32-bit) to Client (64-bit). When you install the 64-bit printer driver to
the Server (32-bit), the Windows Server 2003 (64-bit) CD is required.
TO ADD THE 64-BIT PRINTER DRIVER TO A 32-BIT WINDOWS SERVER 2003 COMPUTER
1 Install the EX700i printer driver on the Windows Server 2003 computer.
For instructions, see “Installing printer drivers from the User Software DVD” on page 39.
During the installation, when asked if you want to share the printer, select Yes.
2 In the Printer & Faxes window, right-click the printer that you just installed and choose
Properties.
3 Click the Sharing tab and then click Additional Drivers.
4 Select the x64 components and click OK.
5 Browse to the printer driver files and select the oemsetup.inf file.
6 When prompted, insert the Windows Server 2003 x64 Installation CD on the Windows Server
2003 computer.
7 On the CD, browse to the AMD64 folder and click OK.
The printer driver installation is complete.
Configuring installable options for printer drivers
If you install the printer driver from Add Printer Wizard and then use Two-Way
Communication to configure the installable options, the installable options are not
configured properly. After you install the printer driver, you must properly configure these
options.
TO CORRECTLY CONFIGURE INSTALLABLE OPTIONS
1 After you install the printer driver, right-click the printer icon, choose Properties, click the
Accessories tab, and then choose your installed options.
2 Click OK or Apply.

WINDOWS FOR EX700I PRINT SERVER 43
Installing and connecting to a virtual printer
A virtual printer allows you to print to the EX700i using a predefined set of job settings. You
do not have to set print options manually. Before you can print to a virtual printer, the
administrator must create and configure the virtual printer using Command WorkStation.
After the virtual printer is set up, you can install the printer driver and printer description files
on your computer from the EX700i using Point and Print.
For more information about setting up virtual printers, see Command WorkStation Help.
When you install the printer driver using Point and Print, you cannot configure installable
options manually. Installable options are configured automatically. The installed options are
displayed in the printer driver when you select the Two-Way Communication option.
TO SET UP A VIRTUAL PRINTER ON WINDOWS COMPUTERS USING POINT AND PRINT
1 Windows 2000/XP/Server 2003: Right-click Network Neighborhood or My Network Places and
select Find Computer or Search for Computers.
Windows Vista/Server 2008: Right-click Network and choose Open from the menu.
Windows 7/Server 2008 R2: Click Start, choose Control Panel, choose Network and Internet,
choose Network and Sharing Center, and then click the View network computers and devices
link.
2 Windows 2000/XP/Server 2003: Type the name or IP address of the EX700i and click Search
Now or Search.
Windows Vista/Windows 7/Server 2008 R2: Type the name of the EX700i in the Search field
and click Enter.
Windows Server 2008: Type the name or \\IP address of the EX700i in the Search field and
click Enter.
If you cannot locate the EX700i, contact your network administrator.
3 Double-click the EX700i name to display enabled print connections.
Virtual printers are listed along with the Print queue, Hold queue, and Direct connection
(if those connections are enabled). Virtual printers usually have names that indicate the type
of job they are set up for.
4 Right-click the virtual printer that you want and choose Connect.
The files are installed on your computer.
5 Windows 2000: Click Start, choose Settings, and then choose Printers.
Windows XP: Click Start and choose Printers and Faxes.
Windows Server 2003: Click Start, choose Control Panel, and then choose Printers and Faxes.
Windows Vista: Click Start, choose Control Panel, and then double-click Printers.
Windows Server 2008: Click Start, choose Control Panel, and under Classic View, double-click
Printers.
Windows 7/Server 2008 R2: Click Start and choose Devices and Printers.
The virtual printer is displayed in the Printers or Printers and Faxes window.

WINDOWS FOR EX700I PRINT SERVER 44
You can print to a virtual printer as you would print to the EX700i. Depending on how the
virtual printer is configured, you may not be able to set some print options.
When you print to a virtual printer installed using Point and Print, you must open the
Printing Preferences window and click OK before the job is printed. This applies the virtual
printer settings to the job.
Enabling Two-Way Communication
You must enable Two-Way Communication to automatically update your printer driver to
reflect the options currently installed on the digital press.
NOTE: You must log on with Administrator privileges to add or change the installable options
after the Windows Vista, Windows 7, or Windows Server 2008 R2 printer driver is installed.
For more information, see “Configuring installable options for Windows Vista/Windows 7/
Server 2008 R2 printer driver” on page 53.
TO ENABLE TWO-WAY COMMUNICATION
1 Windows 2000: Click Start, choose Settings, and then choose Printers.
Windows XP: Click Start and choose Printers and Faxes.
Windows Server 2003: Click Start, choose Control Panel, and then choose Printers and Faxes.
Windows Vista: Click Start, choose Control Panel, and then double-click Printers.
Windows Server 2008: Click Start, choose Control Panel, and under Classic View, double-click
Printers.
Windows 7/Server 2008 R2: Click Start and choose Devices and Printers.
2 Windows 2000/XP/Server 2003/Server 2008/Vista: Right-click the EX700i icon and choose
Properties.
Windows 7/Server 2008 R2: Right-click the EX700i icon and choose Printer properties.
3 Click the Accessories tab.
4 Select Two-Way Communication.
5 Type the EX700i IP address or DNS name.
6 Select Update Fiery Driver When Opened to display the printer’s current default settings
when the printer driver is opened.
7 Click Update.
NOTE: To confirm that Two-Way Communication is enabled, click the About tab and check
that the EX700i name and other server information are displayed.
8 Click OK.

WINDOWS FOR EX700I PRINT SERVER 45
Uninstalling printer drivers
The Printer Delete Utility is installed and used locally. You do not need to connect to the
EX700i before you use the software.
TO INSTALL AND USE THE FIERY PRINTER DELETE UTILITY
1 Insert the User Software DVD into the DVD drive of the computer.
2 In the window that appears, select Modify, and then click Next.
3 Select the Fiery Printer Delete Utility check box, and follow the on-screen instructions to
install it.
4 Click Start, choose Programs or All Programs, and then choose Fiery.
5 Choose PrinterDeleteUtility.
The Printer Delete Utility dialog box appears. Any EX700i printer drivers found on your
computer are listed.
6 To delete a printer, select the check box next to the printer name and click Delete the
Selected Printers.
To delete all the installed printer drivers, select the Delete All Printer Drivers check box.
7 Click OK to delete the selected printer driver(s).
8 When you finish deleting printer drivers, click Exit and restart your computer.

WINDOWS FOR EX700I PRINT SERVER 46
Setting up the Windows computer for printing
Now that you the printer driver files are installed, you need to configure the proper
connection for your networked EX700i printer.
To print from Windows computers, you or the administrator must perform the
following tasks to set up a connection other than port 9100:
• Set up network servers, if any.
• Set up the EX700i to accept print jobs from your computer.
• Configure a port on each Windows computer for the network type.
Setting up printing connections
The EX700i supports the following printing connections:
•SMB
• Standard TCP/IP (RAW or LPR)
• IPP or IPP over SSL
For the location of each procedure, see the following table.
Procedure See
Completing the SMB printing connection page 46
Completing Standard TCP/IP Port (Raw or LPR) printing connections page 47
Completing IPP connections page 50
Configuring installable options page 53
Completing the SMB printing connection
If your network does not have a Windows server, Windows computers can still print to the
EX700i. This method of printing is SMB printing (also known as Windows or WINS
printing). When users send print jobs, Windows computers operate in a peer-to-peer
environment and communicate directly with the EX700i.
Enabling SMB printing allows the EX700i to be listed on the network, so that Windows
clients can print to a particular print connection (Print queue, Hold queue, Direct connection
or Virtual Printer) on the EX700i without using other networking software. Windows
printing runs via TCP/IP. You must configure TCP/IP on the EX700i and on all computers
that use SMB printing.
After you enable SMB printing on the EX700i, you can set up the Windows or SMB
connection and install the printer driver in one procedure. For more information, see
“Installing printer drivers by Point and Print” on page 35.

WINDOWS FOR EX700I PRINT SERVER 47
Completing Standard TCP/IP Port (Raw or LPR) printing connections
After you install the PostScript and printer driver files, you can add or configure the Setup
for the Standard TCP/IP Port (Raw or LPR) connection as follows:
• Prepare the EX700i to accept print jobs using Standard TCP/IP Port (Raw or LPR)
protocols.
• Enable LPD or Port 9100 on the EX700i.
• Configure the computer for the TCP/IP connection.
For more information about Setup, see Configure Help.
Before you complete the following procedure, contact your system administrator for the
IP address assigned to the EX700i.
The TCP/IP protocol should be installed as a default on the Windows computer. For Port
9100, you can set up the connection and install the printer driver in one procedure.
NOTE: You can also set up the LPR Port connection by installing Print Services for UNIX,
which is supplied as an add-on Windows component. For more information, see the
documentation that accompanies Windows.
TO SET UP STANDARD TCP/IP PORT (RAW OR LPR) FOR WINDOWS
NOTE: The following procedures use Windows XP illustrations.
1 Windows 2000: Click Start, choose Settings, and then choose Printers.
Windows XP: Click Start and choose Printers and Faxes.
Windows Server 2003: Click Start, choose Control Panel, and then choose Printers and Faxes.
Windows Vista/Server 2008: Click Start, choose Control Panel, and then double-click Printers.
Windows 7/Server 2008 R2: Click Start and choose Devices and Printers.
2 Windows 2000/XP/Server 2003/Server 2008/Vista: Right-click the EX700i icon and choose
Properties.
Windows 7/Server 2008 R2: Right-click the EX700i icon and choose Printer properties.

WINDOWS FOR EX700I PRINT SERVER 48
3 Click the Ports tab.
4 To add a new port, click Add Port.
To change the port settings, proceed to step 11.
5 Windows 2000/XP/Server2003: Select Standard TCP/IP Port from the list of Available port
types and click New Port Type.
Windows Vista/Server 2008: Double-click Standard TCP/IP Port from the list.
Windows 7/Server 2008 R2: Select Standard TCP/IP Port from the list of Available port types
and click New Port.
The Add Standard TCP/IP Printer Port Wizard dialog box appears.
6 Click Next.

WINDOWS FOR EX700I PRINT SERVER 49
7 Type the EX700i IP address.
8 Click Next.
9 Make sure that Generic Network Card is selected as Standard for Device Type and click Next.
10 Click Finish to close the Add Standard TCP/IP Printer Port Wizard dialog box, and then click
Close in the Printer Ports dialog box.
To change the default setting, proceed to step 11.
If you do not want to change the default setting, the setting is now completed.
NOTE: Port 9100 was set as the default setting in the preceding procedure.
11 Click Configure Port on the Ports tab of the Properties dialog box.
The Configure Standard TCP/IP Port Monitor dialog box appears.

WINDOWS FOR EX700I PRINT SERVER 50
12 To use LPR printing, select LPR in the Protocol area and LPR Byte Counting Enabled in the LPR
Settings area.
NOTE: You can also proceed without selecting LPR Byte Counting Enabled.
To use Port 9100 printing, select Raw in the Protocol area.
The port number 9100 automatically appears in the Raw Settings area. This is the default
port number. You can print to the printer connection selected for Port 9100 printing on the
EX700i.
To specify a specific port number, see the following step.
13 Type the name of the print connection.
For Port 9100, type the following port numbers for each print connection in the Raw Settings
area:
EX700i default:
9100
direct: 9101
print: 9102
hold: 9103
OTE: Type the number exactly as shown.
N
14 Click OK to close the Configure Standard TCP/IP Port Monitor dialog box.
NOTE: The EX700i supports printing in the IPv6 environment on Windows Server 2008/
Server 2008 R2, Windows 7, and Windows Vista.
NOTE: LPR printing in the IPv6 environment is supported on the Windows XP/Server 2003
computer from a command line, but other methods may work.
15 Click Apply in the EX700i Properties dialog box, and then click OK.
Completing IPP connections
With Internet Printing Protocol (IPP), print jobs are sent to the EX700i over the Internet.
Before you begin, perform the following tasks:
• Make sure that the EX700i is configured for TCP/IP printing and IPP printing.
For more information, see Configure Help.
• Specify the printing destination on your computer.
NOTE: IPP over SSL connections is supported.

WINDOWS FOR EX700I PRINT SERVER 51
TO SET UP IPP PRINTING WITH WINDOWS
1 Windows 2000: Click Start, choose Settings, and then choose Printers.
Windows XP: Click Start and choose Printers and Faxes.
Windows Server 2003: Click Start, choose Control Panel, and then choose Printers and Faxes.
Windows Vista: Click Start, choose Control Panel, and then double-click Printers.
Windows Server 2008: Click Start, choose Control Panel, and then double-click Printers under
Classic View.
Windows 7/Server 2008 R2: Click Start, choose Control Panel, choose Network and Internet,
choose Network and Sharing Center, and then click the View network computers and devices
link.
2 Windows 2000/XP: Double-click the Add Printer icon and click Next.
Windows Server 2003: Double-click the Add a printer icon and click Next.
Windows Vista/Server 2008/Server 2008 R2/Windows 7: Click Add a printer.
3 Windows 2000/XP/Server 2003: Select Network printer and click Next.
Windows Vista: Select Add a network printer.
Windows Server 2008/Server 2008 R2/Windows 7: Select Add a network, wireless, or
Bluetooth printer.
4 Windows 2000/XP/Server 2003/Vista: Select Connect to a printer on the Internet or
your intranet.
Windows Server 2008/Server 2008 R2/Windows 7: If the printer search takes a long time,
click Stop, and then click “The printer that I want isn’t listed.”
5 Windows 2000/XP/Server 2003/Vista: In the URL field, type the IP address or DNS name of
the EX700i, followed by “ipp/”and then the name of the connection (hold, direct, print, or
name of virtual printer).
For example, http://10.10.10.150/ipp/print or http://DNS name of the EX700i/ipp/print
sends the job to the Print queue on the EX700i.
For IPP over SSL, type
https, instead of http.
NOTE: The ipp/print in the example is case sensitive.

WINDOWS FOR EX700I PRINT SERVER 52
Windows Server 2008/Server 2008 R2/Windows 7: Click Select a printer by name, and in the
URL field, type the IP address or DNS name of the EX700i, followed by the name of the
connection (print, hold, or direct).
NOTE: For example, http://10.10.10.150/ipp/print or http://DNS name of EX700i/ipp/print
sends the job to the Print queue on the EX700i.
NOTE: The URL for the printer is not case-sensitive.
6 Windows 2000/XP/Server 2003/Vista: Click Next.
The Connect to Printer dialog box appears.
Windows Server 2008/Server 2008 R2/Windows 7: Click Next.
7 Windows 2000/XP/Server 2003/Vista: Click OK.
The Add Printer Wizard dialog box appears.
Windows Server 2008/Server 2008 R2/Windows 7: Click Install driver.
8 If you are installing the PostScript printer for the first time, follow the procedure “To install
and complete the print connection for Windows” on page 39, step 9.
9 Indicate whether you want to make the EX700i the default printer and click Next.
10 Click Finish.

WINDOWS FOR EX700I PRINT SERVER 53
Configuring installable options
After you complete the printer driver installation, you must configure the EX700i for the
options installed on the digital press to allow the EX700i to take advantage of the digital press
options. Configure the options manually, or for TCP/IP network connections, use the
Two-Way Communication option to configure the options automatically.
For information about specifying installable options, see printer driver Help.
Configuring installable options for Windows Vista/Windows 7/Server 2008 R2
printer driver
Windows Vista, Windows 7, and Windows Server 2008 R2 have a User Account Control
(UAC) feature. You must log on with Administrator privileges to add or change the installable
options after the printer driver is installed.
TO CHANGE INSTALLABLE OPTIONS
1 Windows Vista: Open the Printers Control Panel.
Windows 7/Server 2008 R2: Open the Devices and Printers Control Panel.
2 Windows Vista: Right-click the EX700i printer icon, choose Run as administrator, and then
choose Properties.
Windows 7/Server 2008 R2: Right-click the EX700i printer icon, choose Run as administrator,
and then choose Printer properties.
The User Account Control dialog box opens.
3 Choose the User that has administrator privileges, type the password, and then click OK.
4 Windows Vista: Right-click the EX700i printer icon again and choose Properties.
Windows 7/Server 2008 R2: Right-click the EX700i printer icon again and choose Printer
properties.
5 Click the Accessories tab and make your selections.
6 Click Apply, and then click OK.

WINDOWS FOR EX700I PRINT SERVER 54
Printing from Windows computers
You can print to the EX700i just as you would print to any other printer from a Windows
application. You can print from a networked Windows computer or a computer using
Windows (WINS) printing. Select the EX700i as the current printer in the Printer Name list,
specify print options, and then print the document from the application.
The following table includes other methods to print to the EX700i and describes where to
find information about these features.
For more information See
Downloading files to the EX700i using the Docs WebTool Utilities
Printing documents using E-mail Services “E-mail Service” on
Printing documents using Hot Folders Utilities
Printing documents using Command WorkStation Utilities
page 87
Setting up the Windows environment for printing
with Windows servers connected to the EX700i
Achieving optimal printing results from applications Color Printing and Fiery
Setting print options and printing from Windows applications page 55
Specifying default print options page 58
Customizing the Quick Access icon page 59
Viewing the digital press status page 59
Saving files to print to a remote location page 59
Defining and printing custom page sizes page 129
NOTE: The following procedures use Windows XP illustrations, unless specified.
Configuration and Setup
Color Reference

WINDOWS FOR EX700I PRINT SERVER 55
Setting print options and printing from Windows applications
To print from Windows platforms, install the PostScript printer driver. For instructions, see
“Installing Windows printer drivers” on page 34. Be sure to configure the options on the
Advanced tab of the printer driver after installation is complete, as described on page 39.
If you print to a virtual printer, you may not be able to set some print options, depending on
how the virtual printer is configured.
Some print options that are selectable from an application are similar to print options that are
specific to the EX700i and the digital press. In these cases, use the print options specific to the
EX700i and the digital press. These options appear in the Fiery Printing tab. The application
may not set up the file properly for printing on the EX700i, resulting in unexpected finishing,
printing errors, or longer processing time.
If you specify incompatible print settings when printing a document, the Conflict dialog box
provides instructions to resolve the conflict.
Some print options, such as expert color settings, are available only if Two-Way
Communication is enabled or a particular installable option is configured. For information
about enabling Two-Way Communication, see printer driver Help. For information about
configuring installable options, see “Configuring installable options” on page 53.
If you choose Printer’s default, the job prints according to the settings that the administrator
specified in Setup. For more information, see page 99.
The following procedures explain how to use the printer driver to specify print options for a
particular job and print it to the EX700i. You can also set default print settings using the
driver. For information about print options, see page 98.
NOTE: The following procedures use Windows XP illustrations.

1 Presets (Job Templates),
see Help
2 Print Option icons
3 Customize (Shortcuts),
see Help
4 Active area
5Job View
6 Printer Status
7Help
WINDOWS FOR EX700I PRINT SERVER 56
TO SET PRINT OPTIONS FOR A SPECIFIC WINDOWS PRINT JOB USING THE PRINTER DRIVER
1 In your application, choose File > Print, and select the EX700i as your printer.
2 Click Properties.
3 Click the Fiery Printing tab.
6
2
4
1
3
5
7
The Fiery Printing tab serves as the control center for all frequently used printing functions.
For information about using presets, see printer driver Help.
NOTE: For a list of print options, see page 100.

WINDOWS FOR EX700I PRINT SERVER 57
4 Specify print options and settings for your job.
The print options are grouped by categories. Each group or tab contains print options that are
similar or complement one another.
The groups or tabs are as follows:
Quick Access contains duplicate print options from the other job properties groups. It is
customizable, so any Job Override print option can be added or removed from the view. The
Quick Access tab lets you find print options quickly without having to browse through all the
Properties tabs. For information about customizing the Quick Access view, see page 59.
Job Info contains all information about the job, including user information that may be
required for user authentication, secure print properties, job handling, and document server.
For information about Job Info options, see page 101.
Media contains attributes and sources of paper to print and insert. For information about
Media options, see page 103.
Layout defines how the file is positioned or imaged on the media/sheet, except for positioning
that compensates for finishing options, for example, Tray Alignment. For information about
Layout options, see page 106.
Color contains color settings and graphic arts features (when enabled). For information about
Color options, see page 111.
Image contains all Image Quality settings supported by the connected EX700i and digital
press. For information about Image options, see page 116.
Finishing contains print options that are specific to the EX700i and to the finishing
equipment on the digital press. These options override settings in EX700i Printer Setup but
can be changed from Command WorkStation. For information about Finishing options, see
page 117.
VDP contains all Variable Data Printing (VDP) settings, such as FreeForm and advanced VDP
settings. For information about VDP options, see page 119.
Stamping contains any image stamping option that adds or hides/removes any image on the
job. This also includes watermark properties that define the placement and style of the
watermark. For information about Stamping/Watermark options, see page 120 or printer
driver Help.
Printer contains digital press status that includes the current paper and dry ink levels. For
more information, see page 59 or printer driver Help.
5 After you specify the print settings, click Print to send your print job.

WINDOWS FOR EX700I PRINT SERVER 58
Specifying default print options for print jobs
To set default print options, use the following procedure.
TO SET DEFAULT PRINT OPTIONS FOR WINDOWS PRINT JOBS USING THE POSTSCRIPT PRINTER DRIVER
1 Windows 2000: Click Start, choose Settings, and then choose Printers.
Windows XP: Click Start and choose Printers and Faxes.
Windows Server 2003: Click Start, choose Control Panel, and then choose Printers and Faxes.
Windows Vista/Server 2008: Click Start, choose Control Panel, and then double-click Printers.
Windows 7/Server 2008 R2: Click Start and choose Devices and Printers.
2 Right-click the EX700i icon and choose Printing Preferences.
3 If the Fiery Printing tab is not displayed, click it.
4 Specify the default settings for your print job, as described on page 56.
5 Click OK to close the dialog box.

WINDOWS FOR EX700I PRINT SERVER 59
Customizing the Quick Access icon
The Quick Access view can be customized with the print options that you use frequently.
This saves time because you do not have to open all of the other print option icons if you only
want to set the options in Quick Access.
When you place a print option in Quick Access, it still appears under its original print option
icon. You can set the option from either location.
TO CUSTOMIZE QUICK ACCESS
1 In your application, choose File > Print, and select the EX700i as your printer.
2 Click Properties.
3 Click the Fiery Printing tab.
4 Click Customize to specify the options shown in the Customize Quick Access dialog box.
You can select a shortcut from the Available Shortcuts list and add it to the Current Shortcuts
list, as well as remove a shortcut from the Current Shortcuts list. Click OK to save your
changes.
For more information about customizing the Quick Access icon, see printer driver Help.
Viewing the digital press status
If you enable a TCP/IP network, you can retrieve the digital press status and color settings
from the EX700i and display them in the printer driver with the Two-Way Communication
option. If you enable Two-Way Communication for your digital press, you can monitor the
status of the digital press, including the levels of consumable materials, such as paper and dry
ink.
For more information about enabling Two-Way Communication, see printer driver Help.
Saving files to print at a remote location
If you do not have an EX700i onsite and are preparing files for a service bureau or other
location, print the final files to the File port (as opposed to one of the local ports). You can
also print to the File port to create a file to download using the Docs WebTool. For
instructions on printing to the File port, see the documentation that accompanies Windows.

WINDOWS FOR INTEGRATED FIERY COLOR SERVER 60
WINDOWS FOR INTEGRATED FIERY COLOR SERVER
To set up the EX700i as a digital press on a Windows computer, install the printer driver files
that correspond to your digital press and set up the EX700i for printing. Printer drivers
provide a way to communicate information about print jobs between your applications, the
EX700i, and the digital press.
For the location of each procedure, see the following table.
Procedure See
Installing Windows printer drivers page 60
Setting up the Windows computer for printing page 71
Printing from Windows computers page 79
Installing Windows printer drivers
Installing printer drivers and printer description files is the first step in setting up the EX700i
as a PostScript printer.
NOTE: Windows Vista, Windows 7, and Windows Server 2008 R2 have a User Account
Control (UAC) feature. You must be the administrator or a user with administrator privileges
to install printer drivers.
NOTE: If the EX700i printer driver is already installed, you must uninstall it before you install
a new driver (see “Uninstalling printer drivers” on page 70).
The following sections describe how to install the printer files for the EX700i.
Procedure See
Installing printer drivers by Point and Print page 61
Downloading printer drivers using WebTools page 63
Installing printer drivers from the User Software DVD page 64
Installing the printer driver on 64-bit Windows computer
from a 32-bit Windows Server 2003 Server
Installing and connecting to a virtual printer page 68
Uninstalling printer drivers page 70
page 67

WINDOWS FOR INTEGRATED FIERY COLOR SERVER 61
Installing printer drivers by Point and Print
SMB printing (also known as Windows or WINS printing) allows you to install PostScript
printer drivers on your computer from the EX700i using Point and Print, and print to a
particular connection (Print queue, Hold queue, Direct connection, or Virtual Printer).
Each connection (print, hold, direct or virtual printer) requires a separate installation. Repeat
the procedure for each connection.
When you install the printer driver using Point and Print, you cannot configure installable
options manually. The installed options are displayed as the EX700i configuration in the
printer driver. For more information, see “Configuring installable options” on page 78.
BEFORE YOU BEGIN
Ask your administrator to do the following in Setup on the EX700i:
• Assign the EX700i a valid IP address.
Ask your administrator for the IP address or DNS name required in the following procedure.
• Configure the EX700i for SMB printing.
NOTE: SMB printing is referred to as Windows Printing in Setup and on the Configuration
page.
For more information, see Configuration and Setup or Configure Help.
TO SET UP SMB PRINTING ON WINDOWS COMPUTERS
1 Windows 2000/XP/Server 2003: Right-click Network Neighborhood or My Network Places, and
then select Find Computer or Search for Computers.
Windows Vista/Server 2008: Click Start, choose Control Panel, double-click Network and
Sharing Center, and then click the View computers and devices link.
Windows 7/Server 2008 R2: Click Start, choose Control Panel, choose Network and Internet,
choose Network and Sharing Center, and then click the View network computers and devices
link.
2 Windows 2000/XP/Server 2003: Type the name or IP address of the EX700i and click Search
Now or Search.
Windows Vista/Windows 7/Server 2008/Server 2008 R2: Type the name of the EX700i in the
Search field and click Enter.
If you cannot locate the EX700i, contact your EX700i administrator.

WINDOWS FOR INTEGRATED FIERY COLOR SERVER 62
3 Double-click the name of the EX700i to display enabled print connections.
NOTE: For a description of each print connection, see Configuration and Setup.
You must now create a printer port and install the printer driver from the User Software
DVD.
NOTE: You cannot use Point and Print to install the driver and configure the printing
connection to the EX700i in a single procedure.
4 Windows 2000: Click Start, choose Settings, and then choose Printers.
Windows XP: Click Start and choose Printers and Faxes.
Windows Server 2003: Click Start, choose Control Panel, and then choose Printers and Faxes.
Windows Vista: Click the Start button, choose Control Panel, and then double-click Printers.
Windows Server 2008: Click the Start button, choose Control Panel, and under Classic View,
double-click Printers.
Windows 7/Server 2008 R2: Click Start and choose Devices and Printers.
5 On Windows XP: Double-click the Add Printer icon and click Next.
On Windows Server 2003: Double-click the Add a printer icon and click Next.
Windows Vista/Server 2008/Server2008 R2/Windows 7: Click Add a printer.
6 Click Local Printer and click Next.
7 Click Create a New Port, choose Local Port from the menu, and then click Next.
8 In the Port Name dialog box, type the name of the EX700i, followed by the printing
connection, and click OK.
Enter the port name as follows: \\Aero\print where Aero is the name of the EX700i and print
is the printing connection.
9 In the dialog box displaying lists of manufacturers and printers, click Have Disk.
You will now install the printer driver from the User Software DVD.
10 Type the name of the DVD drive and browse to the Print Drivers\Ps_drvr folder.
11 Make sure “oemsetup.inf” or “oemsetup” is selected and click Open.
12 Verify the path is correct in the Install From Disk dialog box and click OK.
13 Follow the on-screen instructions.

WINDOWS FOR INTEGRATED FIERY COLOR SERVER 63
Downloading printer drivers using WebTools
WebTools allows you to download installers for printer drivers to your computer directly from
the EX700i, if your administrator has enabled access to WebTools.
For information about Setup, see Configuration and Setup.
For information about setting up and starting WebTools, see Utilities.
TO DOWNLOAD PRINTER DRIVER FILES WITH WEBTOOLS
1 Start your Internet or intranet browser and type the DNS name or IP address of the EX700i.
2 Click the Downloads tab.
3 Click the link for the item that you want to install.
For Windows printer drivers, click the Printer Files link under the Windows heading.
4 If a dialog box prompts you to open the file or save it to disk, choose to save it
to disk.
5 Browse to the location where you want to save the PRNTDRVE.EXE file and click Save.
The file is downloaded from the EX700i. This compressed file is an archive that contains
multiple files.
6 Double-click the PRNTDRV.EXE file to extract the files.
Depending on your operating system, you might be prompted to select a location to extract
the files to.
Follow the instructions for your operating system to install the printer driver. The procedures
are the same as for installing from the DVD, except that after you click Have Disk, you
browse to the location where you extracted the files, rather than to the DVD.
For instructions on installing the Windows printer driver, see “To install and complete the
print connection for Windows” on page 64.
For more information, see WebTools Downloads Help.

WINDOWS FOR INTEGRATED FIERY COLOR SERVER 64
Installing printer drivers from the User Software DVD
The following procedures describe installing the printer driver from the User Software DVD.
To install the printer driver on a Windows Server 2003/Server 2008/Server 2008 R2 or
Windows 7 computer, select the same PPD (oemsetup.inf) file as for Windows 2000/XP/
Vista, described in the following procedure.
NOTE: The following procedures use Windows XP illustrations.
This procedure describes the installation of a local printer (Port 9100). You can modify the
printing protocol later, according to your network type.
TO INSTALL AND COMPLETE THE PRINT CONNECTION FOR WINDOWS
1 Windows 2000: Click Start, choose Settings, and then choose Printers.
Windows XP: Click Start and choose Printers and Faxes.
Windows Server 2003: Click Start, choose Control Panel, and then choose Printers and Faxes.
Windows Vista: Click Start, choose Control Panel, and then double-click Printers.
Windows Server 2008: Click Start, choose Control Panel, and under Classic View, double-click
Printers.
Windows 7/Server 2008 R2: Click Start, choose Control Panel, choose Network and Internet,
choose Network and Sharing Center, and then click the View network computers and devices
link.
2 Windows 2000/XP: Double-click the Add Printer icon and click Next.
Windows Server 2003: Double-click the Add a printer icon and click Next.
Windows Vista/Server 2008/Server 2008 R2/Windows 7: Click Add a printer.
3 Windows 2000/XP/Server 2003: Specify printing using a Local printer, clear the
“Automatically detect and install my Plug and Play printer” option, and then click Next.
Windows Vista/Server 2008/Server 2008 R2/Windows 7: Select Add a local printer.
4 Select Create a New Port, choose Standard TCP/IP Port from the Type of port menu, and then
click Next.
5 Windows 2000/XP/Server 2003: Click Next in the Welcome to the Add Standard TCP/IP Printer
Port Wizard dialog box.
The Add Standard TCP/IP Printer Port Wizard dialog box appears. Proceed to step 6.
Windows Vista/Server 2008/Server 2008 R2/Windows 7: Select the Device Type, type the
Hostname or IP address of the EX700i, and then click Next. Proceed to step 9.
6 Type the printer name or IP address of the EX700i and click Next.
Windows 2000/Server 2003: Proceed to step 7.
Windows XP: Select the Device Type and click Next.
7 Windows 2000/XP/Server 2003: Make sure that Generic Network Card is selected as Standard
for Device Type and click Next.

WINDOWS FOR INTEGRATED FIERY COLOR SERVER 65
8 Windows 2000/XP/Server 2003: Click Finish to close the Add Standard TCP/IP Printer Port
Wizard dialog box.
NOTE: If the device is not found on the network, the device is displayed instead of the Finish
button. If a device is not found on the network, that could be for one of the following
reasons:
• EX700i is not powered on.
• Network is not connected.
• EX700i is not configured properly.
• IP address is not correct.
If you encounter one of these situations, you can continue to set up the port by configuring
the port manually. See “To set up Standard TCP/IP Port (Raw or LPR) for Windows” on
page 72 and follow steps 11 to 14 before proceeding to step 9.
9 Click Have Disk in the dialog box displaying lists of manufacturers and printers.
The Install From Disk dialog box prompts you for the disk.
10 Insert the User Software DVD into the DVD drive, type the name of the DVD drive (for
example, D:\), and then click Browse. Browse to the Print Drivers\Ps_drvr folder.
If you are installing from the files you downloaded from the EX700i using the Downloads tab
in WebTools, browse to Print Drivers\Ps_drvr and click Open.
11 Make sure that “oemsetup.inf” or “oemsetup” is selected and click Open.
The path is copied to the Install From Disk dialog box.
12 Verify that the path is correct and click OK.
13 In the Printers box, select your printer and click Next.

WINDOWS FOR INTEGRATED FIERY COLOR SERVER 66
14 Type a name for the EX700i in the Printer name field, indicate whether you want to make it
the default printer, and then click Next.
This name is used in the Printers window and the queues window.
15 Follow the on-screen instructions.
Do not share the printer and do not print a Test Page at this time. Continue with the printer
driver installation and at the last screen, click Finish.
The necessary files are installed on your hard disk. When installation is complete, the Printers
window appears with an icon for the newly installed printer.
Now you are ready to configure the installable options (see “Configuring installable options”
on page 78).
To set up a connection other than port 9100, proceed to “Setting up printing connections”
on page 71.
To use the printer driver, you must select the following options on the Advanced tab of the
printer driver after installation is complete:
• Spool print documents
• Start printing immediately
• Print spooled documents first

WINDOWS FOR INTEGRATED FIERY COLOR SERVER 67
Installing the printer driver on 64-bit Windows computer from a 32-bit Windows Server 2003 Server
If your network users print to the EX700i using Windows Server 2003 (32-bit) print sharing,
and you have 64-bit Windows XP users on your network, you must add the 64-bit printer
driver to the Windows Server 2003 (32-bit) computer, so that users can install the printer
driver on their computers using Point and Print. We do not recommend installing the printer
driver from a Server (32-bit) to Client (64-bit). When you install the 64-bit printer driver to
the Server (32-bit), the Windows Server 2003 (64-bit) CD is required.
TO ADD THE 64-BIT PRINTER DRIVER TO A 32-BIT WINDOWS SERVER 2003 COMPUTER
1 Install the EX700i printer driver on the Windows Server 2003 computer.
For instructions, see “Installing printer drivers from the User Software DVD” on page 64.
During the installation, when asked if you want to share the printer, select Yes.
2 In the Printer & Faxes window, right-click the printer that you just installed and choose
Properties.
3 Click the Sharing tab and click Additional Drivers.
4 Select the x64 components and click OK.
5 Browse to the printer driver files and select the oemsetup.inf file.
6 When prompted, insert the Windows Server 2003 x64 Installation CD into the Windows Server
2003 computer.
7 On the CD, browse to the AMD64 folder and click OK.
The printer driver installation is complete.
Configuring installable options for printer drivers
If you install the printer driver from Add Printer Wizard and then use Two-Way
Communication to configure the installable options, the installable options are not
configured properly. After you install the printer driver, you must properly configure these
options.
TO CORRECTLY CONFIGURE INSTALLABLE OPTIONS
1 After you install the printer driver, right-click the printer icon, choose Properties, click the
Accessories tab, and then choose your installed options.
2 Click OK or Apply.

WINDOWS FOR INTEGRATED FIERY COLOR SERVER 68
Installing and connecting to a virtual printer
A virtual printer allows you to print to the EX700i using a predefined set of job settings. You
do not have to set print options manually. Before you can print to a virtual printer, the
administrator must create and configure the virtual printer using Command WorkStation.
After the virtual printer is set up, you can install the printer driver and printer description files
on your computer from the EX700i using Point and Print.
For more information about setting up virtual printers, see Command WorkStation Help.
When you install the printer driver using Point and Print, you cannot configure installable
options manually. Installable options are configured automatically. The installed options are
displayed in the printer driver when you select the Two-Way Communication option.
TO SET UP A VIRTUAL PRINTER ON WINDOWS COMPUTERS USING POINT AND PRINT
1 Windows 2000/XP/Server 2003: Right-click Network Neighborhood or My Network Places and
select Find Computer or Search for Computers.
Windows Vista/Server 2008: Right-click Network and choose Open from the menu.
Windows 7/Server 2008 R2: Click Start, choose Control Panel, choose Network and Internet,
choose Network and Sharing Center, and then click the View network computers and devices
link.
2 Windows 2000/XP/Server 2003: Type the name or IP address of the EX700i and click Search
Now or Search.
Windows Vista/Windows 7/Server 2008 R2: Type the name of the EX700i in the Search field
and click Enter.
Windows Server 2008: Type the name or \\IP address of the EX700i in the Search field and
click Enter.
If you cannot locate the EX700i, contact your network administrator.
3 Double-click the EX700i name to display enabled print connections.
Virtual printers are listed along with the Print queue, Hold queue, and Direct connection
(if those connections are enabled). Virtual printers usually have names that indicate the type
of job they are set up for.
4 Right-click the virtual printer that you want and choose Connect.
The files are installed on your computer.
5 Windows 2000: Click Start, choose Settings, and then choose Printers.
Windows XP: Click Start and choose Printers and Faxes.
Windows Server 2003: Click Start, choose Control Panel, and then choose Printers and Faxes.
Windows Vista: Click Start, choose Control Panel, and then double-click Printers.
Windows Server 2008: Click Start, choose Control Panel, and under Classic View, double-click
Printers.
Windows 7/Server 2008 R2: Click Start and choose Devices and Printers.
The virtual printer is displayed in the Printers or Printers and Faxes window.

WINDOWS FOR INTEGRATED FIERY COLOR SERVER 69
You can print to a virtual printer as you would print to the EX700i. Depending on how the
virtual printer is configured, you may not be able to set some print options.
When you print to a virtual printer installed using Point and Print, you must open the
Printing Preferences window and click OK before the job is printed. This applies the virtual
printer settings to the job.
Enabling Two-Way Communication
You must enable Two-Way Communication to automatically update your printer driver to
reflect the options currently installed on the digital press.
NOTE: You must log on with Administrator privileges to add or change the installable options
after the Windows Vista, Windows 7, or Windows Server 2008 R2 printer driver is installed.
For more information, see “Configuring installable options for Windows Vista/Windows 7/
Server 2008 R2 printer driver” on page 78.
TO ENABLE TWO-WAY COMMUNICATION
1 Windows 2000: Click Start, choose Settings, and then choose Printers.
Windows XP: Click Start and choose Printers and Faxes.
Windows Server 2003: Click Start, choose Control Panel, and then choose Printers and Faxes.
Windows Vista: Click Start, choose Control Panel, and then double-click Printers.
Windows Server 2008: Click Start, choose Control Panel, and under Classic View, double-click
Printers.
Windows 7/Server 2008 R2: Click Start and choose Devices and Printers.
2 Windows 2000/XP/Server 2003/Server 2008/Vista: Right-click the EX700i icon and choose
Properties.
Windows 7/Server 2008 R2: Right-click the EX700i icon and choose Printer properties.
3 Click the Accessories tab.
4 Select Two-Way Communication.
5 Type the EX700i IP address or DNS name.
6 Select Update Fiery Driver When Opened to display the printer’s current default settings when
the printer driver is opened.
7 Click Update.
NOTE: To confirm that Two-Way Communication is enabled, click the About tab and check
that the EX700i name and other server information are displayed.
8 Click OK.

WINDOWS FOR INTEGRATED FIERY COLOR SERVER 70
Uninstalling printer drivers
The Printer Delete Utility is installed and used locally. You do not need to connect to the
EX700i before you use the software.
TO INSTALL AND USE THE FIERY PRINTER DELETE UTILITY
1 Insert the User Software DVD into the DVD drive of the computer.
2 In the window that appears, select Modify, and then click Next.
3 Select the Fiery Printer Delete Utility check box, and follow the on-screen instructions to
install it.
4 Click Start, choose Programs or All Programs, and then choose Fiery.
5 Choose PrinterDeleteUtility.
The Printer Delete Utility dialog box appears. Any EX700i printer drivers found on your
computer are listed.
6 To delete a printer, select the check box next to the printer name and click Delete the
Selected Printers.
To delete all the installed printer drivers, select the Delete All Printer Drivers check box.
7 Click OK to delete the selected printer driver(s).
8 When you finish deleting printer drivers, click Exit and restart your computer.

WINDOWS FOR INTEGRATED FIERY COLOR SERVER 71
Setting up the Windows computer for printing
Now that the printer driver files are installed, you need to configure the proper connection for
your networked EX700i printer.
To print from Windows computers, you or the administrator must perform the
following tasks to set up a connection other than port 9100:
• Set up network servers, if any.
• Set up the EX700i to accept print jobs from your computer.
• Configure a port on each Windows computer for the network type.
Setting up printing connections
The EX700i supports the following printing connections:
•SMB
• Standard TCP/IP (RAW or LPR)
• IPP or IPP over SSL
For the location of each procedure, see the following table.
Procedure See
Completing the SMB printing connection page 71
Completing Standard TCP/IP Port (Raw or LPR) printing connections page 72
Completing IPP connections page 75
Configuring installable options page 78
Completing the SMB printing connection
If your network does not have a Windows server, Windows computers can still print to the
EX700i. This method of printing is SMB printing (also known as Windows or WINS
printing). When users send print jobs, Windows computers operate in a peer-to-peer
environment and communicate directly with the EX700i.
Enabling SMB printing allows the EX700i to be listed on the network, so that Windows
clients can print to a particular print connection (Print queue, Hold queue, Direct connection
or Virtual Printer) on the EX700i without using other networking software. Windows
printing runs via TCP/IP. You must configure TCP/IP on the EX700i and on all computers
that use SMB printing.
After you enable SMB printing on the EX700i, you can set up the Windows or SMB
connection and install the printer driver in one procedure. For more information, see
“Installing printer drivers by Point and Print” on page 61.

WINDOWS FOR INTEGRATED FIERY COLOR SERVER 72
Completing Standard TCP/IP Port (Raw or LPR) printing connections
After you install the PostScript and printer driver files, you can add or configure the Setup
for the Standard TCP/IP Port (Raw or LPR) connection as follows:
• Prepare the EX700i to accept print jobs using Standard TCP/IP Port (Raw or LPR)
protocols.
• Enable LPD or Port 9100 on the EX700i.
• Configure the computer for the TCP/IP connection.
For more information about Setup, see Configure Help.
Before you complete the following procedure, contact your system administrator for the
IP address assigned to the EX700i.
The TCP/IP protocol should be installed as a default on the Windows computer. For Port
9100, you can set up the connection and install the printer driver in one procedure.
NOTE: You can also set up the LPR Port connection by installing Print Services for UNIX,
which is supplied as an add-on Windows component. For more information, see the
documentation that accompanies Windows.
TO SET UP STANDARD TCP/IP PORT (RAW OR LPR) FOR WINDOWS
NOTE: The following procedures use Windows XP illustrations.
1 Windows 2000: Click Start, choose Settings, and then choose Printers.
Windows XP: Click Start and choose Printers and Faxes.
Windows Server 2003: Click Start, choose Control Panel, and then choose Printers and Faxes.
Windows Vista/Server 2008: Click Start, choose Control Panel, and then double-click Printers.
Windows 7/Server 2008 R2: Click Start and choose Devices and Printers.
2 Windows 2000/XP/Server 2003/Server 2008/Vista: Right-click the EX700i icon and choose
Properties.
Windows 7/Server 2008 R2: Right-click the EX700i icon and choose Printer properties.

WINDOWS FOR INTEGRATED FIERY COLOR SERVER 73
3 Click the Ports tab.
4 To add a new port, click Add Port.
To change the port settings, proceed to step 11.
5 Windows 2000/XP/Server2003: Select Standard TCP/IP Port from the list of Available port
types and click New Port Type.
Windows Vista/Server 2008: Double-click Standard TCP/IP Port from list.
Windows 7/Server 2008 R2: Select Standard TCP/IP Port from the list of Available port types
and click New Port.
The Add Standard TCP/IP Printer Port Wizard dialog box appears.
6 Click Next.

WINDOWS FOR INTEGRATED FIERY COLOR SERVER 74
7 Type the EX700i IP address.
8 Click Next.
9 Make sure that Generic Network Card is selected as Standard for Device Type and click Next.
10 Click Finish to close the Add Standard TCP/IP Printer Port Wizard dialog box, and then click
Close in the Printer Ports dialog box.
To change the default setting, proceed to step 11.
If you do not want to change the default setting, the setting is now completed.
NOTE: Port 9100 was set as the default setting in the preceding procedure.
11 Click Configure Port on the Ports tab of the Properties dialog box.
The Configure Standard TCP/IP Port Monitor dialog box appears.

WINDOWS FOR INTEGRATED FIERY COLOR SERVER 75
12 To use LPR printing, select LPR in the Protocol area and LPR Byte Counting Enabled in the LPR
Settings area.
NOTE: You can also proceed without selecting LPR Byte Counting Enabled.
To use Port 9100 printing, select Raw in the Protocol area.
The port number 9100 automatically appears in the Raw Settings area. This is the default
port number. You can print to the printer connection selected for Port 9100 printing on the
EX700i.
To specify a specific port number, see the following step.
13 Type the name of the print connection.
For LPR, type print, hold, direct or published virtual printer name for Queue Name.
For Port 9100, type the following port numbers for each print connection in the Raw Settings
area:
EX700i default:
9100
direct: 9101
print: 9102
hold: 9103
OTE: Type the number exactly as shown.
N
14 Click OK to close the Configure Standard TCP/IP Port Monitor dialog box.
NOTE: The EX700i supports printing in the IPv6 environment on Windows Server 2008/
Server 2008 R2, Windows 7, and Windows Vista.
NOTE: LPR printing in the IPv6 environment is supported on the Windows XP/Server 2003
computer from a command line, but other methods may work.
15 Click Apply in the EX700i Properties dialog box, and then click OK.
Completing IPP connections
With Internet Printing Protocol (IPP), print jobs are sent to the EX700i over the Internet.
Before you begin, perform the following tasks:
• Make sure that the EX700i is configured for TCP/IP printing and IPP printing.
For more information, see Configure Help.
• Specify the printing destination on your computer.
NOTE: IPP over SSL connections is supported.

WINDOWS FOR INTEGRATED FIERY COLOR SERVER 76
TO SET UP IPP PRINTING WITH WINDOWS
1 Windows 2000: Click Start, choose Settings, and then choose Printers.
Windows XP: Click Start and choose Printers and Faxes.
Windows Server 2003: Click Start, choose Control Panel, and then choose Printers and Faxes.
Windows Vista: Click Start, choose Control Panel, and then double-click Printers.
Windows Server 2008: Click Start, choose Control Panel, and then double-click Printers under
Classic View.
Windows 7/Server 2008 R2: Click Start, choose Control Panel, choose Network and Internet,
choose Network and Sharing Center, and then click the View network computers and devices
link.
2 Windows 2000/XP: Double-click the Add Printer icon and click Next.
Windows Server 2003: Double-click the Add a printer icon and click Next.
Windows Vista/Server 2008/Server 2008 R2/Windows 7: Click Add a printer.
3 Windows 2000/XP/Server 2003: Select Network printer and click Next.
Windows Vista: Select Add a network printer.
Windows Server 2008/Server 2008 R2/Windows 7: Select Add a network, wireless, or
Bluetooth printer.
4 Windows 2000/XP/Server 2003/Vista: Select Connect to a printer on the Internet or
your intranet.
Windows Server 2008/Server 2008 R2/Windows 7: If the printer search takes a long time,
click Stop, and then click “The printer that I want isn’t listed.”
5 Windows 2000/XP/Server 2003/Vista: In the URL field, type the IP address or DNS name of
the EX700i, followed by “ipp/” and then the name of the connection (hold, direct, print, or
name of virtual printer).
For example, http://10.10.10.150/ipp/print or http://DNS name of the EX700i/ipp/print
sends the job to the Print queue on the EX700i.
For IPP over SSL, type
https, instead of http.
NOTE: The ipp/print in the example is case sensitive.

WINDOWS FOR INTEGRATED FIERY COLOR SERVER 77
Windows Server 2008/Server 2008 R2/Windows 7: Click Select a printer by name, and in the
URL field, type the IP address or DNS name of the EX700i, followed by the name of the
connection (print, hold, or direct).
NOTE: For example, http://10.10.10.150/ipp/print or http://DNS name of EX700i/ipp/print
sends the job to the Print queue on the EX700i.
NOTE: The URL for the printer is not case-sensitive.
6 Windows 2000/XP/Server 2003/Vista: Click Next.
The Connect to Printer dialog box appears.
Windows Server 2008/Server 2008 R2/Windows 7: Click Next.
7 Windows 2000/XP/Server 2003/Vista: Click OK.
The Add Printer Wizard dialog box appears.
Windows Server 2008/Server 2008 R2/Windows 7: Click Install driver.
8 If you are installing the PostScript printer for the first time, follow the procedure “To install
and complete the print connection for Windows” on page 64, step 9.
9 Indicate whether you want to make the EX700i the default printer and click Next.
10 Click Finish.

WINDOWS FOR INTEGRATED FIERY COLOR SERVER 78
Configuring installable options
After you complete the printer driver installation, you must configure the EX700i for the
options installed on the digital press to allow the EX700i to take advantage of the digital press
options. Configure the options manually, or for TCP/IP network connections, use the
Two-Way Communication option to configure the options automatically.
For information about specifying installable options, see printer driver Help.
Configuring installable options for Windows Vista/Windows 7/Server 2008 R2
printer driver
Windows Vista, Windows 7, and Windows Server 2008 R2 have a User Account Control
(UAC) feature. You must log on with Administrator privileges to add or change the installable
options after the printer driver is installed.
TO CHANGE INSTALLABLE OPTIONS
1 Windows Vista: Open the Printers Control Panel.
Windows 7/Server 2008 R2: Open the Devices and Printers Control Panel.
2 Windows Vista: Right-click the EX700i printer icon, choose Run as administrator, and then
choose Properties.
Windows 7/Server 2008 R2: Right-click the EX700i printer icon, choose Run as administrator,
and then choose Printer properties.
The User Account Control dialog box opens.
3 Choose the User that has administrator privileges, type the password, and then click OK.
4 Windows Vista: Right-click the EX700i printer icon again and choose Properties.
Windows 7/Server 2008 R2: Right-click the EX700i printer icon again and choose Printer
properties.
5 Click the Accessories tab and make your selections.
6 Click Apply, and then click OK.

WINDOWS FOR INTEGRATED FIERY COLOR SERVER 79
Printing from Windows computers
You can print to the EX700i just as you would print to any other printer from a Windows
application. You can print from a networked Windows computer or a computer using
Windows (WINS) printing. Select the EX700i as the current printer in the Printer Name list,
specify print options, and then print the document from the application.
The following table includes other methods to print to the EX700i and describes where to
find information about these features.
For more information See
Downloading files to the EX700i using the Docs WebTool Utilities
Printing documents using E-mail Services “E-mail Service” on
Printing documents using Hot Folders Utilities
Printing documents using Command WorkStation Utilities
page 87
Setting up the Windows environment for printing
with Windows servers connected to the EX700i
Achieving optimal printing results from applications Color Printing and Fiery
Setting print options and printing from Windows applications page 80
Specifying default print options page 83
Customizing the Quick Access icon page 84
Viewing the digital press status page 84
Saving files to print to a remote location page 84
Defining and printing custom page sizes page 129
NOTE: The following procedures use Windows XP illustrations, unless specified.
Configuration and Setup
Color Reference

WINDOWS FOR INTEGRATED FIERY COLOR SERVER 80
Setting print options and printing from Windows applications
To print from Windows platforms, install the PostScript printer driver. For instructions, see
“Installing Windows printer drivers” on page 60. Be sure to configure the options on the
Advanced tab of the printer driver after installation is complete, as described on page 64.
If you print to a virtual printer, you may not be able to set some print options, depending on
how the virtual printer is configured.
Some print options that are selectable from an application are similar to print options that are
specific to the EX700i and the digital press. In these cases, use the print options specific to the
EX700i and the digital press. These options appear in the Fiery Printing tab. The application
may not set up the file properly for printing on the EX700i, resulting in unexpected finishing,
printing errors, or longer processing time.
If you specify incompatible print settings when printing a document, the Conflict dialog box
provides instructions to resolve the conflict.
Some print options, such as expert color settings, are available only if Two-Way
Communication is enabled or if a particular installable option has been configured. For
information about enabling Two-Way Communication, see printer driver Help. For
information about configuring installable options, see “Configuring installable options” on
page 78.
If you choose Printer’s default, the job prints according to the settings that the administrator
specified in Setup. For more information, see page 99.
The following procedures explain how to use the printer driver to specify print options for a
particular job and print it to the EX700i. You can also set default print settings using the
driver. For information about print options, see page 98.
NOTE: The following procedures use Windows XP illustrations.

1 Presets (Job Templates),
see Help
2 Print Option icons
3 Customize (Shortcuts),
see Help
4 Active area
5Job View
6 Printer Status
7Help
WINDOWS FOR INTEGRATED FIERY COLOR SERVER 81
TO SET PRINT OPTIONS FOR A SPECIFIC WINDOWS PRINT JOB USING THE PRINTER DRIVER
1 In your application, choose File > Print, and select the EX700i as your printer.
2 Click Properties.
3 Click the Fiery Printing tab.
6
2
4
1
3
5
7
The Fiery Printing tab serves as the control center for all frequently used printing functions.
For information about using presets, see printer driver Help.
NOTE: For a list of print options, see page 100.

WINDOWS FOR INTEGRATED FIERY COLOR SERVER 82
4 Specify print options and settings for your job.
The print options are grouped by categories. Each group or tab contains print options that are
similar or complement one another.
The groups or tabs are as follows:
Quick Access contains duplicate print options from the other job properties groups. It is
customizable, so any Job Override print option can be added or removed from the view. The
Quick Access tab lets you find print options quickly without having to browse through all the
Properties tabs. For information about customizing the Quick Access view, see page 84.
Job Info contains all information about the job, including user information that may be
required for user authentication, secure print properties, job handling, and document server.
For information about Job Info options, see page 101.
Media contains attributes and sources of paper to print and insert. For information about
Media options, see page 103.
Layout defines how the file is positioned or imaged on the media/sheet, except for positioning
that compensates for finishing options, for example, Tray Alignment. For information about
Layout options, see page 106.
Color contains color settings and graphic arts features (when enabled). For information about
Color options, see page 111.
Image contains all Image Quality settings supported by the connected EX700i and digital
press. For information about Image options, see page 116.
Finishing contains print options that are specific to the EX700i and to the finishing
equipment on the digital press. These options override settings in EX700i Printer Setup but
can be changed from Command WorkStation. For information about Finishing options, see
page 117.
VDP contains all Variable Data Printing (VDP) settings, such as FreeForm and advanced VDP
settings. For information about VDP options, see page 119.
Stamping contains any image stamping option that adds or hides/removes any image on the
job. This also includes watermark properties that define the placement and style of the
watermark. For information about Stamping/Watermark options, see page 120 or printer
driver Help.
Printer - contains digital press status that includes the current paper and dry ink levels. For
more information, see page 84 or printer driver Help.
5 After you specify the print settings, click Print to send your print job.

WINDOWS FOR INTEGRATED FIERY COLOR SERVER 83
Specifying default print options for print jobs
To set default print options, use the following procedure.
TO SET DEFAULT PRINT OPTIONS FOR WINDOWS PRINT JOBS USING THE POSTSCRIPT PRINTER DRIVER
1 Windows 2000: Click Start, choose Settings, and then choose Printers.
Windows XP: Click Start and choose Printers and Faxes.
Windows Server 2003: Click Start, choose Control Panel, and then choose Printers and Faxes.
Windows Vista/Server 2008: Click Start, choose Control Panel, and then double-click Printers.
Windows 7/Server 2008 R2: Click Start and choose Devices and Printers.
2 Right-click the EX700i icon and choose Printing Preferences.
3 If the Fiery Printing tab is not displayed, click it.
4 Specify the default settings for your print job, as described on page 81.
5 Click OK to close the dialog box.

WINDOWS FOR INTEGRATED FIERY COLOR SERVER 84
Customizing the Quick Access icon
The Quick Access view can be customized with the print options that you use frequently. This
saves time because you do not have to open all of the other print option icons if you only want
to set the options in Quick Access.
When you place a print option in Quick Access, it still appears under its original print option
icon. You can set the option from either location.
TO CUSTOMIZE QUICK ACCESS
1 In your application, choose File > Print, and select the EX700i as your printer.
2 Click Properties.
3 Click the Fiery Printing tab.
4 Click Customize to specify the options shown in the Customize Quick Access window.
You can select a shortcut from the Available Shortcuts list and add it to the Current Shortcuts
list, as well as remove a shortcut from the Current Shortcuts list. Click OK to save your
changes.
For more information about customizing the Quick Access icon, see printer driver Help.
Viewing the digital press status
If you enable a TCP/IP network, you can retrieve the digital press status and color settings
from the EX700i and display them in the printer driver with the Two-Way Communication
option. If you enable Two-Way Communication for your digital press, you can monitor the
status of the digital press, including the levels of consumable materials, such as paper and dry
ink.
For more information about enabling Two-Way Communication, see printer driver Help.
Saving files to print at a remote location
If you do not have an EX700i onsite and are preparing files for a service bureau or other
location, print the final files to the File port (as opposed to one of the local ports). You can
also print to the File port to create a file to download using the Docs WebTool. For
instructions on printing to the File port, see the documentation that accompanies Windows.

PRINTING METHODS
In addition to printing jobs from the EX700i printer driver, you can print jobs using these
methods:
•
•
•
•
PRINTING METHODS 85
Job Monitor displays information about the jobs sent to the EX700i and reprints them.
For more information, see page 86.
E-mail Service submits jobs to the EX700i as e-mail attachments. For more information,
see page 87.
USB device prints files saved on a USB drive. For more information, see page 90.
FTP printing prints to the EX700i using the FTP protocol. For more information, see
page 92.
•
Secure printing requires that a password be entered at the EX700i before a job is printed.
For more information, see page 93.
•
Adobe PDF Print Engine (APPE) is an additional interpreter that allows native PDF
processing and rendering without the need for the EX700i to convert the job from PDF to
PostScript. For more information, see page 94.
•
Direct Mobile Printing enables direct printing to the EX700i from mobile devices. For
more information, see page 97.

PRINTING METHODS 86
Configuring and using Job Monitor
Use Job Monitor to monitor the status of jobs sent to the EX700i and view information about
them.
Job Monitor is supported only on Windows 32-bit version operating systems.
NOTE: Job Monitor is not supported on Windows 64-bit version operating systems, or
Mac OS X.
Configuring the connection
When you send your first print job to the EX700i, Job Monitor opens and establishes a
connection to the EX700i. If you installed and configured printer drivers for more than one
digital press, Job Monitor automatically establishes connections to all the EX700i digital
presses.
The Job Monitor icon ( ) appears on the desktop and in the Windows taskbar of
your computer.
Job Monitor is automatically installed when you choose the printer driver to install on your
computer. To use Job Monitor, you must enable it in the printer driver.
TO ENABLE JOB MONITOR
• Select the Monitor my Print Job check box on the Printer tab of the printer driver.
TO DISABLE JOB MONITOR
• Clear the Monitor my Print Job check box on the Printer tab of the printer driver.
Using Job Monitor
For information about using Job Monitor, see Job Monitor Help and printer driver Help.

PRINTING METHODS 87
E-mail Service
E-mail Service allows you to control the EX700i using your current e-mail infrastructure,
print to remote locations, and bypass firewalls. E-mail Service is not application-specific.
You can use any e-mail infrastructure.
NOTE: E-mail Service is not supported on Mac OS X.
The EX700i supports internal address books. Administrators can retrieve, add, delete, and
clear addresses from the address books by sending requests through e-mail. For more
information about address books, see Configuration and Setup.
To set up E-mail Service, see Configure Help.
Use E-mail Service in the following ways:
• Print a job from an e-mail application.
To print with an e-mail client, you send a file as an e-mail attachment. E-mail Service
extracts the file and sends it to the EX700i. The attachment can be in any format the
EX700i recognizes (PostScript, PDF, EPS, VDP, or TIFF).
NOTE: E-mail Service does not process files with .vbs, .exe, or .bat extensions.
• Manage jobs using an e-mail application.
You can manage your print jobs by submitting e-mail commands to the EX700i using
e-mail.
•Scan to E-mail.
You can scan a document and send it to an e-mail address as an attachment or URL.
For more information about Scan to E-mail, see Utilities.
Printing using an e-mail client
You can submit print jobs to the EX700i in the form of an e-mail attachment using your
e-mail application. When you send an e-mail with an attachment, E-mail Service extracts the
file and sends it to the EX700i Print queue. The file format must be one supported by the
EX700i.
By default, anyone can print with an e-mail client, unless the Print address book has been set
up by the administrator. If the Print address book has been set up and your e-mail address is
not in it, you cannot send files to the EX700i via e-mail. For more information about address
books, see Configuration and Setup.

PRINTING METHODS 88
When User Authentication is enabled on the EX700i, the e-mail attachment must have the
appropriate user name and password when it is printed through e-mail printing. As part of
creating the e-mail attachment with the EX700i printer driver, type the appropriate user name
and password in the Job Info tab of the printer driver. The user name and password must
match those defined by the administrator in the Users and Groups section of Configure. For
information about Users and Groups, see Configure Help.
NOTE: The Direct connection is not supported by the e-mail client feature.
NOTE: The following illustrations depict the Microsoft Outlook e-mail application.
TO PRINT USING AN E-MAIL CLIENT
1 Open your e-mail application.
2 Type the EX700i e-mail address in the To: line.
3 Type text in the Subject line or leave the Subject line blank.
4 Attach the file that you want to print.
The attachment can be in any format the EX700i recognizes (PostScript, PDF, EPS, VDP,
or TIFF).
NOTE: If your attachment exceeds the file size limitation set by your e-mail system
administrator, the e-mail is not sent.
5 Optionally, you can type text in the body of the message. The text is printed with the file.
NOTE: HTML-formatted e-mail messages are not supported, and might not print as they
appear on the remote workstation. Send e-mail messages in plain text format.
6 Send the e-mail.

PRINTING METHODS 89
The file is sent to the EX700i and the job is printed. After the EX700i receives the job, you
are sent an e-mail notification that the print job was accepted. The e-mail provides a job
identification (ID). Use the job IDs to manage jobs with e-mail commands (see “Managing
print jobs with e-mail commands” on page 89). The e-mail notification indicates any current
error at the digital press.
After the job is printed, you are sent a second e-mail notification that indicates the job printed
successfully.
Managing print jobs with e-mail commands
You can manage your print jobs by submitting commands to the EX700i using e-mail. You
can cancel a job, check job status, and get help on a job. When you send a command, the
EX700i returns an e-mail response.
TO MANAGE PRINT JOBS WITH E-MAIL COMMANDS
1 In your e-mail application, type the EX700i e-mail address in the To: line.
2 Type one of the following commands in the Subject line:
To check the status of a job, type #JobStatus<job id> in the Subject line.
You receive a reply to your job status query. You can only get the status of the job if you sent
the job or are an administrator.
To cancel a job, type #CancelJob<job id> in the Subject line.
You receive a notification indicating that the job has been cancelled and did not print to the
EX700i. You can only cancel a job if you sent the job.
To get help, type #Help in the Subject line.
You receive an e-mail response that contains links that allow you to cancel jobs, check job
status, and search and manage address books. Click any of the links to perform a command.
3 Send the e-mail to the EX700i.

PRINTING METHODS 90
Printing from a USB device
You can print files on a USB device to the EX700i. To do so, save PS, PCL, EPS, TIFF, and
PDF files to the USB device and download them directly to the EX700i. You can print files
that originated on Mac OS X or Windows computers.
You can print files automatically from a USB device to one of the standard print queues on
the EX700i (Print, Hold, or Direct) or to published virtual printers (if supported). Verify
with your administrator that these connections are published in Setup. Or you can print any
of the files on your USB device, specify where to send them, and also select some print
options. For more information about virtual printers, see Command WorkStation Help.
Before you print files from a USB device, ask your administrator to configure the appropriate
options. For more information about configuring the appropriate options, see Configuration
and Setup or Configure Help.
The two methods of printing files from a USB device are automatic printing and manual
printing.
Automatic printing
To print automatically to Print, Hold, or Direct queues, or to published virtual printers with
the Print All setting, set up folders on your USB device with the names print, hold, direct,
and the names of any published virtual printers. When you plug the USB device into a USB
port on the EX700i, the files in those folders are sent automatically to the corresponding
queues.
TO PRINT FILES FROM THE USB DEVICE
1 Configure the USB printing options in Setup.
2 Create folders at the top (root) level of the USB device named print, hold, direct, and virtual
printer.
3 Save the files (PS, EPS, PCL, TIFF, and PDF) from the user’s computer to the USB device.
Files copied to the print, hold, direct, or virtual printer folders are downloaded to the
corresponding print connection on the EX700i automatically when you connect the USB
device to the EX700i. Files copied to the root level of the USB device are downloaded to the
Print queue.
4 Remove the USB device from the computer and connect it to the USB connector on the
EX700i.
Make sure that the USB device is properly stopped before you disconnect it from the
computer.
For the location of the USB port, see Configuration and Setup.

PRINTING METHODS 91
Manual printing
When USB Media Autoprint is disabled in Server Setup, you must manually select the files
you want to print from the USB device and specify where you want to send them.
NOTE: Integrated Fiery Color Server does not support manual printing from the USB device.
TO PRINT USING USB MEDIA SERVER
1 Insert the USB device into a USB port on the EX700i.
2 Press All Services icon on the digital press touch panel.
3 Press Web Applications.
4 Press the USB tab to view the USB Media Server browsing window.
The queues (Print, Hold or Direct) are displayed. The queues displayed correspond to the
folders that you created on the USB device.
The files on the USB device are displayed on the digital press touch panel. Both files at the
root level of the USB device and folders are displayed.
5 Press Browse next to a folder to open it.
6 To browse back to the root level, press Upper Directory located in the lower-left corner.
7 To navigate through the list of files and folders, you can press First, Prev, Next, Last.
8 Print one file or all files in the directory.
• To print one file, select it, press Print, and proceed to step 9.
• To print all files in the directory, press Print All located in the lower-left corner.
9 Specify print options for the file.
The print options you can choose are:
• Queue (Print, Direct, Hold or any published virtual printer set up for the EX700i)
• Copies (number of copies)
• Du p lex ( Def a ul t , Of f , Top- To p, To p -Bo t to m )
• Page Size (Default, list of page sizes
10 Press Print to send the file to the EX700i Print Server for printing or Cancel to cancel the
print request.
11 Press All Services on the digital press touch panel.
12 Remove the USB device from the EX700i.

FTP printing
PRINTING METHODS 92
If FTP Services are enabled on the EX700i, the EX700i is set up as an FTP server. You can
send jobs to the EX700i using FTP printing. For more information about configuring FTP
Services, see Configure Help.
You can use any FTP client software. Before you use FTP printing, the FTP client software
requires the following information (see your administrator):
• IP address or DNS name for the EX700i
• Directory or path to send the job to, such as the Print queue, Hold queue, or published
virtual printers (if supported)
NOTE: You cannot print to the Direct connection using FTP printing.
• User name and password (if required)
You can send PostScript (PS), Printer Control Language (PCL), Tagged Image File Format
(TIFF), and Portable Document Format (PDF) files to the EX700i. Encapsulated PostScript
(EPS) files are not supported for FTP printing.
TO PRINT FILES TO THE EX700I USING THE FTP PROTOCOL
1 Connect to the EX700i with your FTP client software.
Folders corresponding to the Print queue and Hold queue are displayed. Folders for any
published virtual printer are also displayed.
2 Navigate to the folder representing the print connection or published virtual printer.
3 Upload your job to the folder that you want.
After the job is printed, it is deleted from the EX700i.

PRINTING METHODS 93
Printing and retrieving a secure print job
The Secure Print feature offers a level of security for confidential or sensitive print jobs, which
print only when you are present at the digital press. To use this feature, you first enter an
arbitrary password into the Secure Print field in the printer driver when you send your job to
the EX700i. To print your job, you re-enter the password at the EX700i digital press touch
panel as described in the following procedures.
TO SEND A SECURE PRINT JOB
1 In your application, choose File > Print.
2 Select the EX700i as the printer.
3 Windows: Click Properties, and then click the Job Info icon.
Mac OS X: Choose Fiery Features from the drop-down list, click Full Properties, and then click
the Job Info icon in the Printing Preferences dialog box.
4 Type an arbitrary password in the Secure Print field.
NOTE: The password is limited to alphanumeric characters (do not use symbols).
For more information about typing the password, see page 102.
5 Make any other required changes to Job Properties and send your job to the EX700i.
6 Click OK to close the EX700i Properties dialog box.
7 Click OK or Print to close the Print dialog box.
The job is sent to the digital press.
TO RETRIEVE A SECURE PRINT JOB
1 At the digital press touch panel, press the Fiery button.
2Press the Jobs tab.
3 Press the Secure Print tab.
4 At the Password screen, click the Password field, and a keyboard appears.
5 Type the same password that you typed in the Secure Print field of the printer driver, and
then press OK.
The print jobs that match the password are displayed in the login window.
6 Select your print job and choose Print or Delete.
After 45 seconds of inactivity, the Secure screen returns to the main Jobs screen.

PRINTING METHODS 94
Adobe PDF Print Engine (APPE)
The EX700i provides features of the Adobe PDF Print Engine (APPE), which is an additional
interpreter that allows native PDF processing and rendering without the need for the EX700i
to convert the job from PDF to PostScript. No special printer driver is required for printing
APPE jobs, but the administrator must enable related settings in Setup. If APPE is not
enabled, PDF files are processed with the PostScript interpreter of the EX700i. All PostScript
files continue to be processed with the PostScript interpreter.
The APPE option is not available from the printer driver, but is included in Job Properties in
Command WorkStation. After the administrator enables APPE as the default in Configure,
you can enable or disable the APPE option in Job Properties on a per-job basis.
To enable Adobe PDF Print Engine (APPE) workflow in the EX700i, see Configuration and
Setup.
NOTE: Integrated Fiery Color Server does not support APPE.
Printing with APPE workflow
You can print with the APPE workflow using one of the following methods:
• Command WorkStation
Import a job, or drag a job from your computer and drop it in the Job Center of
Command WorkStation.
For information about using Command WorkStation, see Command WorkStation Help.
•Hot Folders
Configure a hot folder for APPE.
For information about using Hot Folders, see Hot Folders Help.

1 Adobe PDF Print Engine
Preferred option
PRINTING METHODS 95
USING APPE WORKFLOW IN COMMAND WORKSTATION
1 Double-click a PDF job in the Held or Printed list, or select the job and do one of the
following:
• Right-click to select Properties.
• Choose Job Center > Properties.
• Choose Properties from the Actions menu.
For information about printing multiple files, see “Printing multiple files with APPE” on
page 96.
2 Select the Adobe PDF Print Engine Preferred check box.
1
3 Specify the print option settings, and then click Print.

1 Adobe PDF Print Engine
Preferred (Applies only
to PDF jobs) option
PRINTING METHODS 96
Printing multiple files with APPE
If you open Job Properties for files of different file types, the Adobe PDF Print Engine
Preferred option is displayed only if one of the selected files is a PDF. The print option name
is shown as Adobe PDF Print Engine Preferred (Applies only to PDF jobs) and the check box
indicates at least one of the PDF jobs selected has been processed through the APPE
workflow.
1
For a multiple file selection containing non-PDF files, the Adobe PDF Print Engine Preferred
option is not shown.
If a PDF file contains mixed page sizes when processed using APPE, the Paper Size option
reflects the size of the first page in the PDF. If you override the size in Job Properties, all of
the pages in the PDF become the selected size.
TO ACCESS THE PROPERTIES OF MULTIPLE JOBS
1 Shift-click to select multiple, sequential jobs, or Ctrl-click to select multiple, non-sequential
jobs, and then click Properties.
The Job Properties dialog box appears. Menus for each available print option are displayed.
2 After the multiple jobs have opened, specifying a value in the Job Properties dialog box
applies it to all jobs.
The Summary tab allows a side-by-side comparison of the Job Properties for multiple jobs.

PRINTING METHODS 97
Direct Mobile Printing
Direct Mobile Printing enables direct printing to the EX700i from mobile devices, such as
iPad, iPhone, and iPod touch. The EX700i must have certain networking options enabled in
Setup. After Setup is complete, the EX700i appears in the list of available printers on the
mobile device.
In addition, observe the following configuration requirements:
• Make sure that the EX700i is connected to a wireless access point on the network.
• Make sure that supported mobile devices are connected to the same wireless network as
the EX700i. The Printer Default Paper Size is used for all Direct Mobile Printing jobs.
For information about configuring the settings in Setup on the EX700i, see Configuration and
Setup.
For a list of supported mobile devices, see Welcome .
TO PRINT FROM A MOBILE DEVICE
1 On the mobile device, open the Print window.
For more information, see the documentation that accompanies your device.
2 Select the EX700i printer in the list of available printers.
3 Specify print settings, and then click Print.

PRINT OPTIONS
About printer drivers and printer description files
PRINT OPTIONS 98
This chapter describes printer drivers and PPD (PostScript Printer Description) files, EX700i
print options, and where to set print options.
The EX700i receives files from computers on the network, processes (RIPs) the files, and then
sends them to the digital press. Windows and Mac OS computers communicate with the
EX700i by means of a printer driver and a PostScript Printer Description (PPD) file. A PPD
file contains information about the features and capabilities of a particular device (for
example, what paper sizes and media types are supported). The PPD file for the EX700i
includes information about the features of both the digital press and the EX700i.
A printer driver manages printing communication between your application and the printer.
It interprets the instructions generated by the application, merges those instructions with
printer-specific options you set, and then translates all information into Adobe PostScript,
a language the printer understands. In other words, the printer driver writes a PostScript file
based on your original file and the options you set from the Print dialog box.
For information about the specific print options for the EX700i, see the tables that begin on
page 101.

PRINT OPTIONS 99
Setting print options
Print options give you access to the special features of your digital press and the EX700i. You
can specify print options in these areas:
•Setup
Some settings are specified during Setup by the administrator. For information about the
current default server settings, contact the administrator or the operator.
• Applications
With the printer drivers provided, you can specify job settings when you print a job.
For more information, see “Defining and printing custom page sizes” on page 129.
• Color Setup
Set the default CMYK/Grayscale Source, CMYK/Grayscale Processing Method, RGB
Source, Separate RGB/Lab to CMYK Source, Output Profile, RGB/Lab Rendering Intent,
Spot Color Matching, Gray (CMYK), Gray (RGB), Black Text and Graphics, and Black
Overprint settings.
For information about using Color Setup, see Color Printing.
•Hot Folders
Assign a group of print options to a Hot Folder. When you specify print options for a
Hot Folder, the print options are assigned to all jobs sent through that Hot Folder.
These print options override any default options.
For information, see Hot Folders Help.
• Overrides in Command WorkStation Job Properties
To change job settings from Command WorkStation, double-click a job to display the
Properties dialog box.
For more information, see Command WorkStation Help.
Print option override hierarchy
The override hierarchy is as follows:
• Settings from the user’s printer driver override the EX700i Setup settings.
• Settings assigned to Hot Folders override the user’s printer driver settings.
• Settings made from the job management tools (Command WorkStation Job Properties)
override the user’s printer driver settings.

PRINT OPTIONS 100
Print options and default settings
If you do not use the printer driver interface to configure a particular option, the EX700i
prints the job with the default setting. For options that the administer configures, choosing
Printer’s default results in the EX700i printing the job with the factory default. For options
that cannot be configured in Setup, the EX700i prints the job with a preconfigured Printer’s
default setting. When you select the printer driver for US, the default Document Size is Letter
or for International, the default Document Size is A4. For more information, see the
following tables.
To determine the current Setup defaults, print the Configuration page from Command
WorkStation. For information about how to print a Configuration page, see Configuration
and Setup.
NOTE: A job uses the EX700i default settings (unless otherwise specified) at the time it is
processed for printing, and not at the time it is sent to the EX700i Hold queue.
The print option tables are organized according to the printer driver icons (tabs). Use the
following links for quick access:
Printer driver icon See
Quick Access (shortcuts) page 33, page 59 or
page 84
Job Info page 101
Media page 103
Layout page 106
Color page 111
Image page 116
Finishing page 117
Variable Data Printing (VDP) page 119
Stamping/Watermark page 120
 Loading...