


Version 1.0
June 2009
®
Xerox
4112™/4127™
Copier/Printer
Backup/restore/migrate tools

©
2009 Xerox Corporation. All rights reserved. Xerox, the sphere of connectivity design, and
4112/4127 are trademarks of Xerox Corporation in the United States and/or other countries.
Microsoft, MS-DOS, Windows, Microsoft Network, and Windows Server are either trademarks or
registered trademarks of Microsoft Corporation in the United States and/or other countries.
Novell, NetWare, IntranetWare and NDS are registered trademarks of Novell, Inc. in the United
States and other countries.
Adobe, Acrobat, PostScript, PostScript3, and PostScript Logo are trademarks of Adobe Systems
Incorporated.
WinZip is a registered trademark of WinZip International LLC.
HP, HPGL, HPGL/2, and HP-UX are registered trademarks of Hewlett-Packard Corporation.
Changes are periodically made to this document. Changes, technical inaccuracies, and
typographic errors will be corrected in subsequent editions.

Table of contents
1 Introduction . . . . . . . . . . . . . . . . . . . . . . . . . . . . . . . . . . . . . . . . . . . . 1-1
Overview . . . . . . . . . . . . . . . . . . . . . . . . . . . . . . . . . . . . . . . . . . . . . . . . . . . . . . . . . . . . . . . . . . 1-1
Backup and restore . . . . . . . . . . . . . . . . . . . . . . . . . . . . . . . . . . . . . . . . . . . . . . . . . . . . 1-1
Migration tool . . . . . . . . . . . . . . . . . . . . . . . . . . . . . . . . . . . . . . . . . . . . . . . . . . . . . . . . . 1-1
When to use both applications . . . . . . . . . . . . . . . . . . . . . . . . . . . . . . . . . . . . . . . . . . . . . 1-2
Backup Tool for restored document . . . . . . . . . . . . . . . . . . . . . . . . . . . . . . . . . . . . 1-2
Important criteria regarding the Backup Tool application. . . . . . . . . . . . 1-2
Migration Tool for Restored Document . . . . . . . . . . . . . . . . . . . . . . . . . . . . . . . . . 1-2
2 Machine setup . . . . . . . . . . . . . . . . . . . . . . . . . . . . . . . . . . . . . . . . . . 2-1
Prerequisites. . . . . . . . . . . . . . . . . . . . . . . . . . . . . . . . . . . . . . . . . . . . . . . . . . . . . . . . . . . . . . . 2-1
Obtain the computer IP address. . . . . . . . . . . . . . . . . . . . . . . . . . . . . . . . . . . . . . . . . . . . 2-1
Obtain machine information . . . . . . . . . . . . . . . . . . . . . . . . . . . . . . . . . . . . . . . . . . . . . . . 2-2
Static IP address . . . . . . . . . . . . . . . . . . . . . . . . . . . . . . . . . . . . . . . . . . . . . . . . . . . . . . 2-2
Machines using DHCP . . . . . . . . . . . . . . . . . . . . . . . . . . . . . . . . . . . . . . . . . . . . . . . . . 2-3
Enable machine settings . . . . . . . . . . . . . . . . . . . . . . . . . . . . . . . . . . . . . . . . . . . . . . . . . . . 2-4
Register client’s IP address on the machine . . . . . . . . . . . . . . . . . . . . . . . . . . . . . . . . . 2-5
3 Retrieve documents . . . . . . . . . . . . . . . . . . . . . . . . . . . . . . . . . . . . . 3-1
Prerequisites. . . . . . . . . . . . . . . . . . . . . . . . . . . . . . . . . . . . . . . . . . . . . . . . . . . . . . . . . . . . . . . 3-1
Import documents from the machine to your computer . . . . . . . . . . . . . . . . . . . . . 3-2
4 Software installation. . . . . . . . . . . . . . . . . . . . . . . . . . . . . . . . . . . . . 4-1
Backup Tool for restored document installation . . . . . . . . . . . . . . . . . . . . . . . . . . . . . 4-1
Overview . . . . . . . . . . . . . . . . . . . . . . . . . . . . . . . . . . . . . . . . . . . . . . . . . . . . . . . . . . . . . . 4-1
Operating Environment . . . . . . . . . . . . . . . . . . . . . . . . . . . . . . . . . . . . . . . . . . . . . . . . 4-1
Installation files . . . . . . . . . . . . . . . . . . . . . . . . . . . . . . . . . . . . . . . . . . . . . . . . . . . . . . . 4-1
Software installation . . . . . . . . . . . . . . . . . . . . . . . . . . . . . . . . . . . . . . . . . . . . . . . . . . 4-1
Downloaded WinZip file . . . . . . . . . . . . . . . . . . . . . . . . . . . . . . . . . . . . . . . . . . . 4-2
CD-ROM. . . . . . . . . . . . . . . . . . . . . . . . . . . . . . . . . . . . . . . . . . . . . . . . . . . . . . . . . . . 4-5
Migration Tool installation . . . . . . . . . . . . . . . . . . . . . . . . . . . . . . . . . . . . . . . . . . . . . . . . . 4-8
Operating Environment . . . . . . . . . . . . . . . . . . . . . . . . . . . . . . . . . . . . . . . . . . . . . . . . 4-8
Software installation . . . . . . . . . . . . . . . . . . . . . . . . . . . . . . . . . . . . . . . . . . . . . . . . . . 4-8
5 Backup Tool for restored document. . . . . . . . . . . . . . . . . . . . . . . 5-1
Launch/open the application. . . . . . . . . . . . . . . . . . . . . . . . . . . . . . . . . . . . . . . . . . . . . . . 5-1
Add a machine to the application service . . . . . . . . . . . . . . . . . . . . . . . . . . . . . . . . . . . 5-2
Import mailbox/folder information from the machine. . . . . . . . . . . . . . . . . . . . . . . 5-4
Copy (backup) the mailboxes/folders onto your computer . . . . . . . . . . . . . . . . . . . 5-6
Save the backup onto your computer . . . . . . . . . . . . . . . . . . . . . . . . . . . . . . . . . . . . . . . 5-8
Read (view/edit) the saved mailboxes/folders on your computer . . . . . . . . . . . . . 5-9
Password information. . . . . . . . . . . . . . . . . . . . . . . . . . . . . . . . . . . . . . . . . . . . . . . . . . . . . 5-10
6 Migration Tool . . . . . . . . . . . . . . . . . . . . . . . . . . . . . . . . . . . . . . . . . . 6-1
Launch/open the application. . . . . . . . . . . . . . . . . . . . . . . . . . . . . . . . . . . . . . . . . . . . . . . 6-1
7 Restore backed-up files to machine . . . . . . . . . . . . . . . . . . . . . . . 7-1
Restore backed-up mailboxes/folders to the machine . . . . . . . . . . . . . . . . . . . . . . . 7-2
Xerox 4112/4127 Copier/Printer Backup/restore/migrate tools i

Table of contents Xerox 4112/4127 Copier/Printer
ii Backup/restore/migrate tools

Introduction
1
Overview
Backup and restore
Note
If your machine software level is version 2.0, the documents are stored on the machine in the
Mailbox. If your machine software level is version 3.0, the documents are stored on the
machine in the Folder. The terms “Mailbox” and “Folder” are used synonymously to express the
same thing.
The mailbox/folder Backup Tool for restored document is a software application that allows
you to:
• Copy and save (backup) documents and mailboxes/folders from the machine onto your
personal computer’s hard drive or onto a secondary backup device that is attached to your
computer (such as USB flash drive);
• Create, copy, delete, or change settings from your computer for documents/mailboxes/
folders that reside on the machine; and
• Restore the backed-up (copied) documents/mailboxes/folders from your computer to the
machine.
Note
Always refer to the software application’s online Help for information on the various features
and functions. The online Help can be accessed by starting the application and selecting Help.
Migration tool
The Migration Tool for Restored Document is a software application that works in conjunction
with the Backup Tool for restored document application. The Migration Tool converts the
saved documents and mailboxes/folders residing on your computer into a format supported by
your machine’s upgraded software level. This allows you to restore these saved documents and
mailboxes/folders onto your machine after the completion of its software upgrade.
Backup/restore/migrate tools 1-1

Introduction Xerox 4112/4127 Copier/Printer
When to use both applications
Backup Tool for restored document
Use the Backup Tool for restored document application when:
• You want to periodically backup your machine’s documents and mailboxes/folders,
• You need/want to restore the backed-up documents/mailboxes/folders onto the machine,
and most importantly,
• The machine’s software is upgraded; all the documents and mailboxes/folders stored
locally on the machine will be lost/deleted at the time of the software upgrade.
Important criteria regarding the Backup Tool application
The following important criteria applies when using the Backup Tool for restored document
application:
• The machine cannot be used while making backups.
• When using the backup documents on any 4112/4127 Copier/Printer, ensure that all the
settings on the machine along with the paper tray settings are exactly the same as when
the backup documents were saved to your computer.
Tip
If these settings are not the same, or if optional features were added to the machine after
the mailbox/folder documents were backed up (copied and saved), then the restored
documents may not print in accordance with their original settings.
• Always refer to these Backup Tool for restored document files for additional information:
manual.pdf and readme.txt; refer to “Operating Environment” on page 4-1.
Migration Tool for Restored Document
Use the Migration tool application:
• After
• After the machine’s software is upgraded, and finally,
• To convert and restore the copied/saved documents and mailboxes/folders on your local
the documents and mailboxes/folders have been saved/backed up to your client’s
computer,
computer onto the upgraded machine.
1-2 Backup/restore/migrate tools

Machine setup
2
Prerequisites
Before you can use either the Backup Tool for restore document or the Migration Tool
applications, you must ensure that the following prerequisites are met:
• Obtain and record the client’s computer IP address
• Obtain and record the machine’s IP address/DNS host name
• Ensure that specific machine settings are enabled
• Register the client’s IP address on the machine
Tip
The User Interface (UI) screens shown in this document may or may not reflect the screens
displayed on your system or on your personal computer. The UI screens vary
system, computer to computer, and from marketplace to marketplace. Therefore, the UI
screens in this document show examples of the type of screens that may be seen on your
particular system/computer.
from system to
Obtain the computer IP address
1. Ensure that the client’s computer is started and running.
2. From the client’s computer, select Start > Control Panel > Network Connections.
3. From Network Connections, double-click on the Local Area Connections.
Backup/restore/migrate tools 2-1
Machine setup Xerox 4112/4127 Copier/Printer
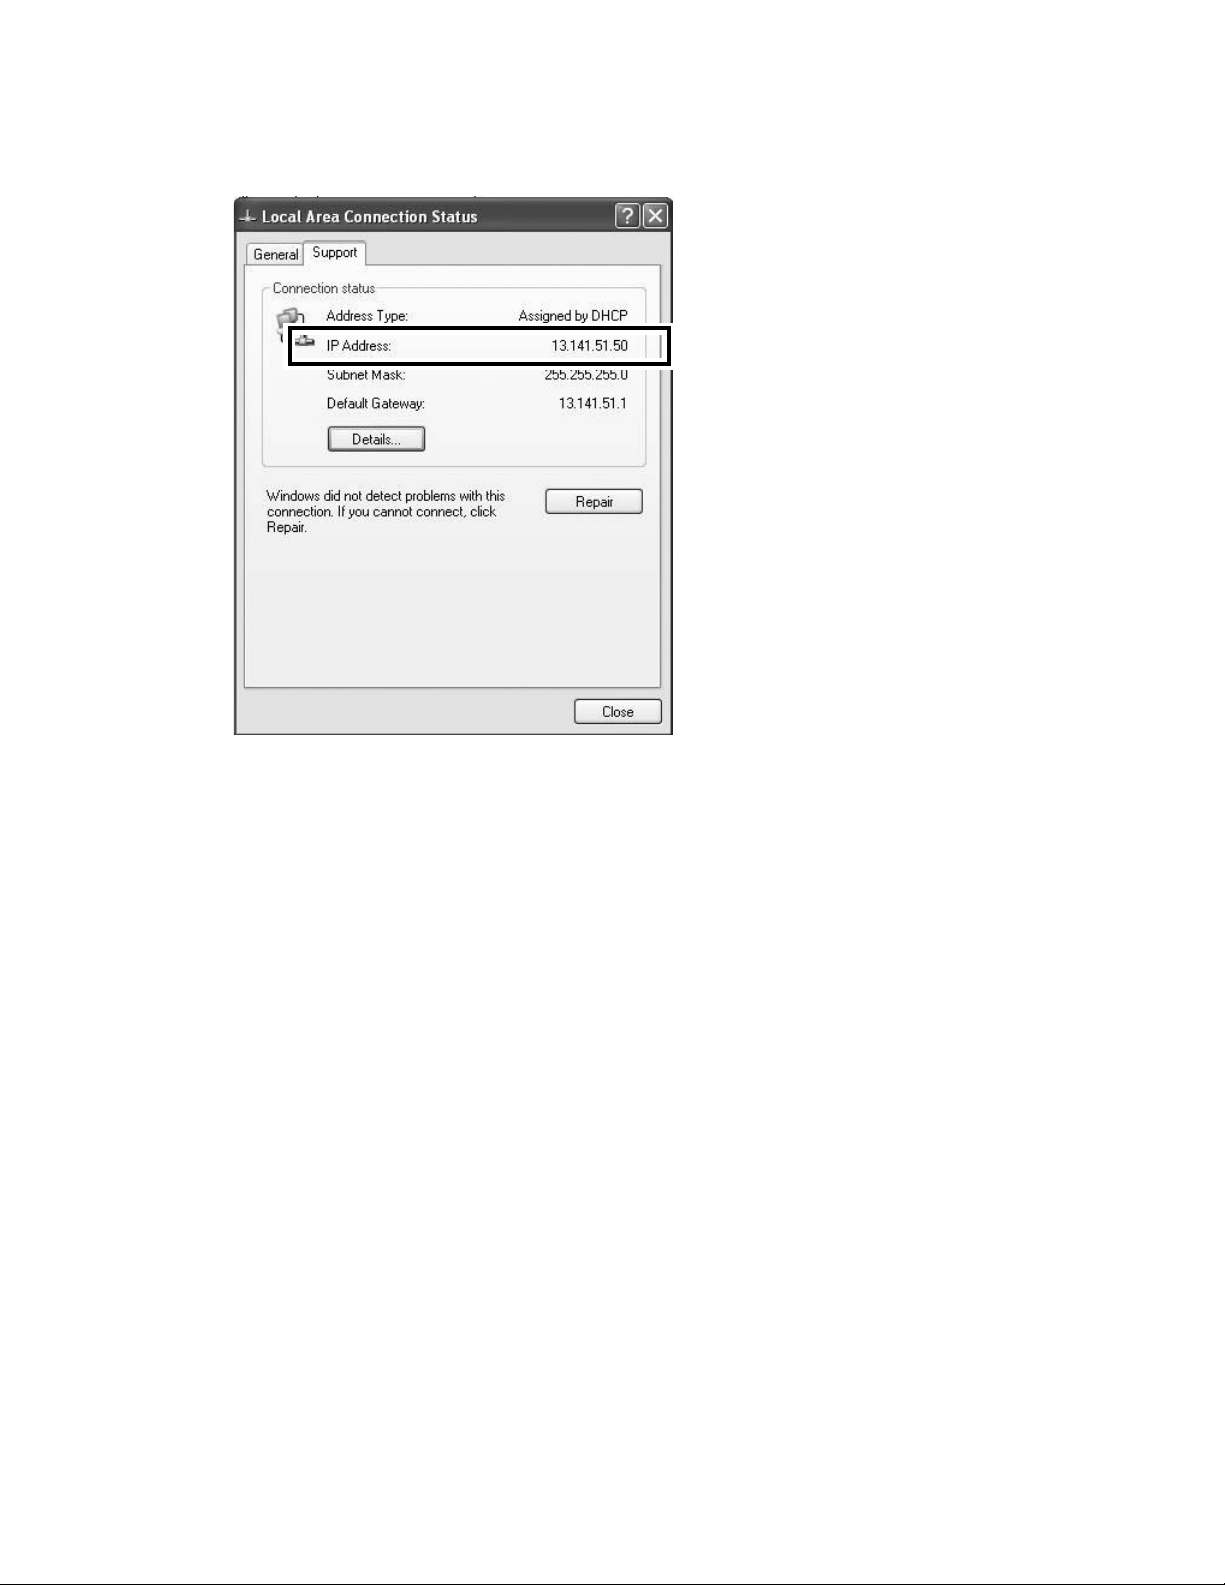
4. From Local Area Connections, select the Support tab; your computer’s IP address is listed
there.
5. Record the computer’s IP address; this will be used later in this chapter.
6. Close the Local Area Connections Status window. Close the Network Connections and
Control Panel windows, if applicable.
Obtain machine information
Static IP address
Obtain your machine’s static IP address by performing the following steps:
Note
It is recommended that you use a static IP address on your machine (versus a DHCP
address). If your machine uses DHCP, you must specify the DNS host name; this is discussed in
the section entitled Machines using DHCP on page 2-3.
1. From the machine’s User Interface (UI), press the Machine Status button on the Control
Panel.
2. From the Machine Information tab, select Print Reports...
3. Select Copy Reports, Configuration Report, and then press the Start button on the
Control Panel.
4. Collect the printed Configuration Report from the machine’s exit area.
5. After the report is printed, select Close until you are returned to the Machine Information
tab (Tools) on the machine’s UI.
6. Press the Services button on the Control Panel to exit Machine Status.
7. On the printed Configuration Report, locate and record the machine’s host/domain name.
2-2 Backup/restore/migrate tools
Xerox 4112/4127 Copier/Printer Machine setup
Machines using DHCP
Obtain your machine’s DNS host name by performing the following steps:
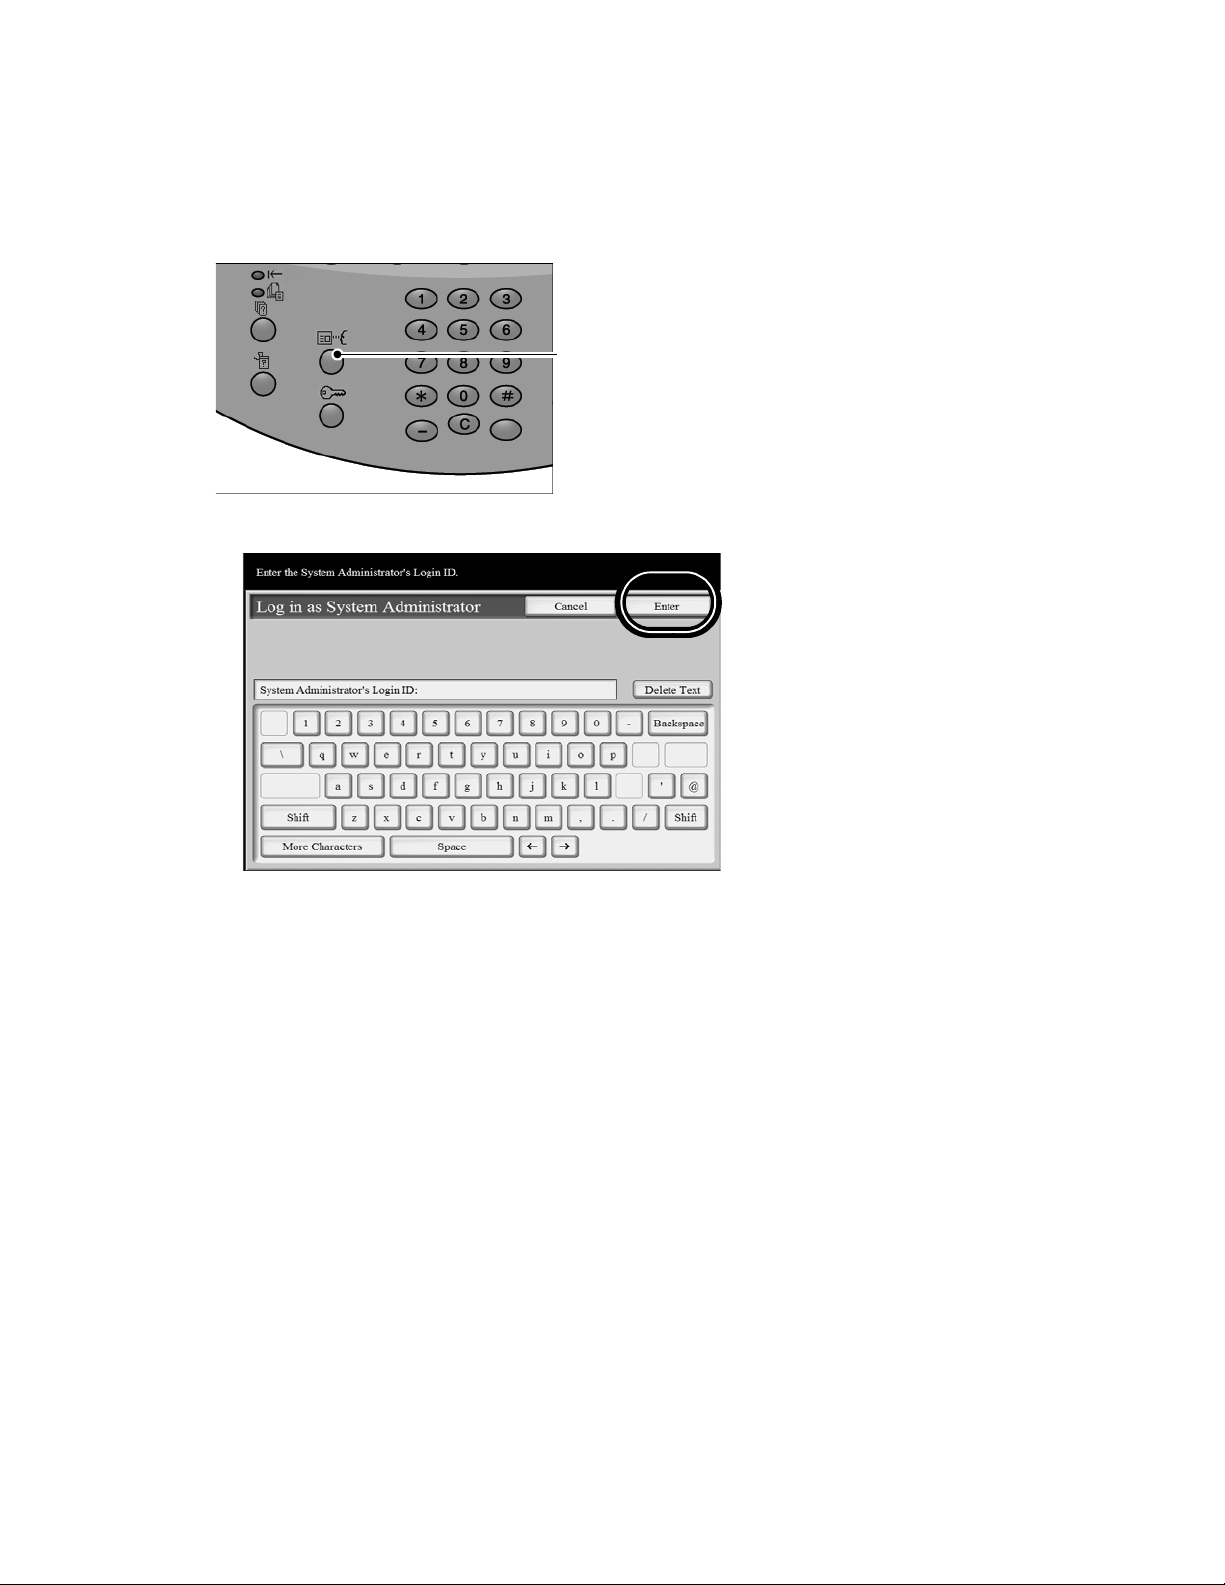
1. Press the Log In/Out button.
Log In/Out
button
2. Enter the System Administrator ID with the numeric keypad, and select Enter.
Note
The default Login ID is 11111. When using the Authentication feature, a password is
required. If applicable, enter the password; the default password is x-admin.
3. Press the Machine Status button on the Control Panel.
4. Select the Tools tab from the UI.
Backup/restore/migrate tools 2-3
Machine setup Xerox 4112/4127 Copier/Printer
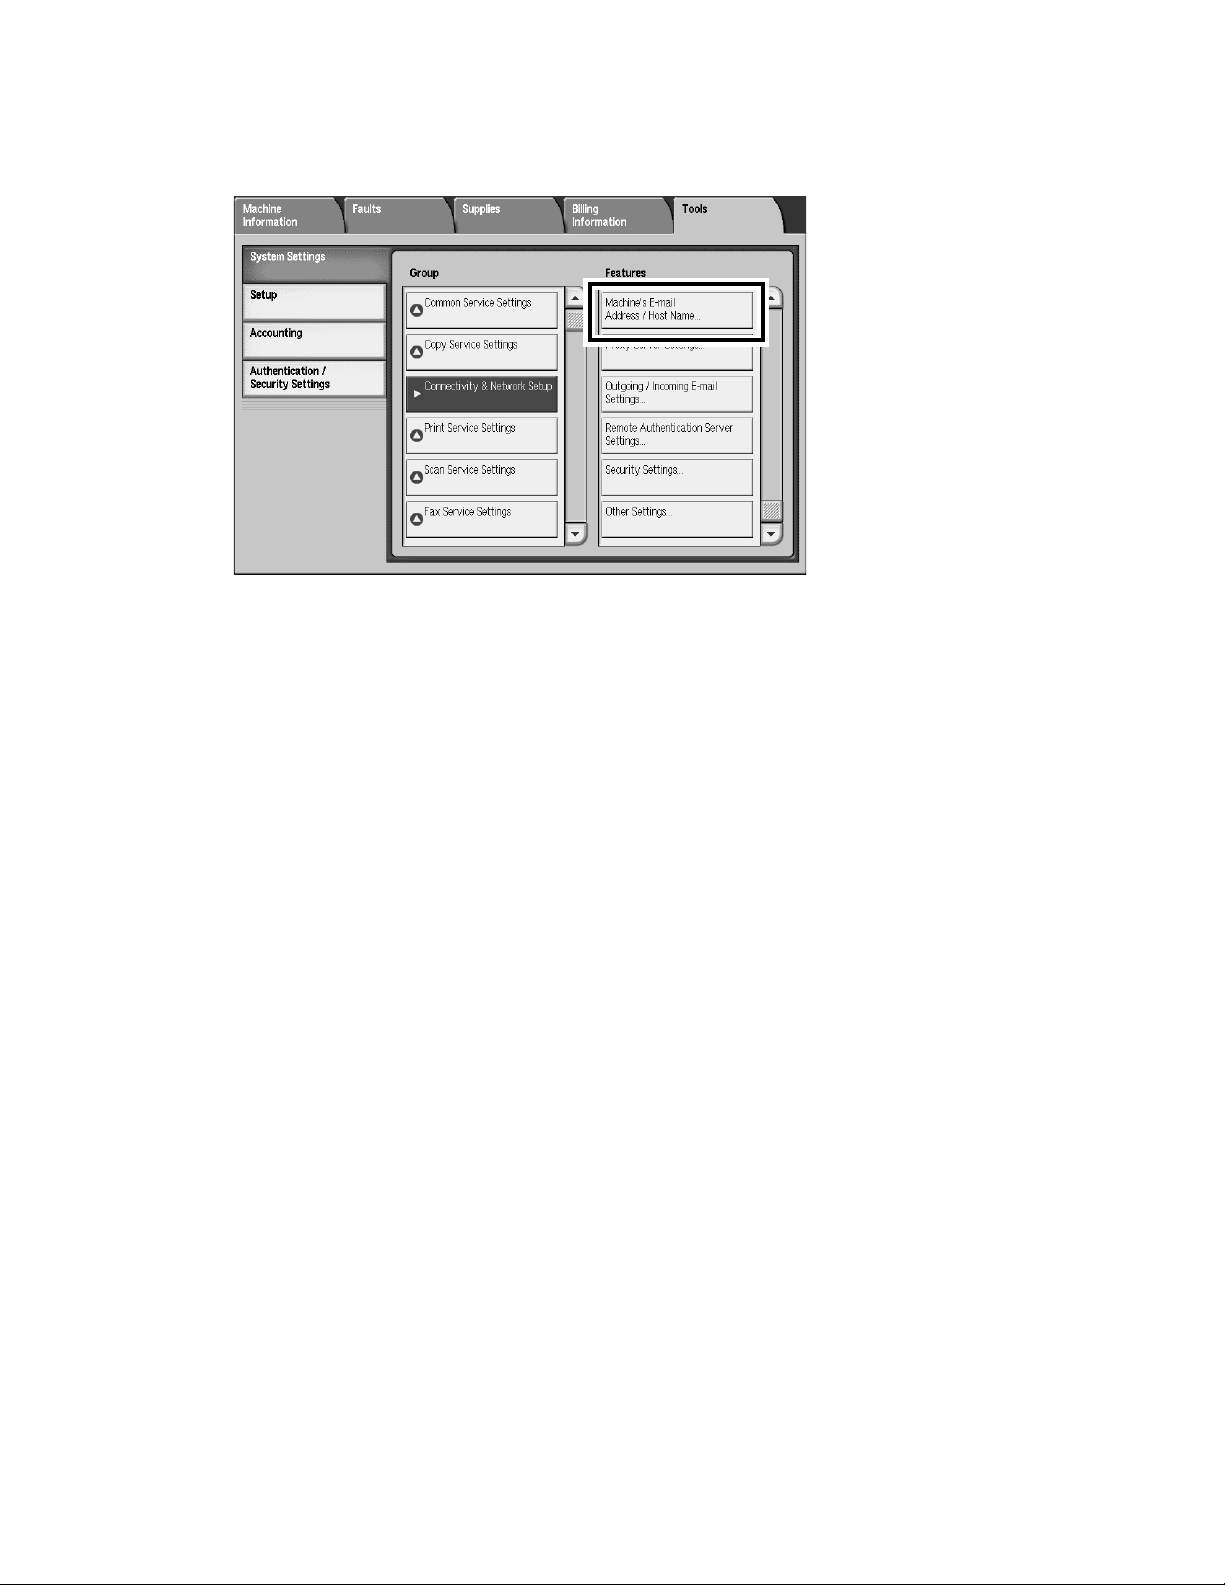
a. Select System Settings > Connectivity and Network Setup > Machine’s E-mail
Address/Host Name.
5. From the Machine’s E-mail Address/Host Name screen, record the machine’s Host Name.
6. Select Close.
7. Press the Log In/Out button on the Control Panel.
8. Select Logout to exit the System Administration mode.
Enable machine settings
1. Press the Log In/Out button.
2. Enter the System Administrator ID with the numeric keypad, and select Enter.
Note
The default Login ID is 11111. When using the Authentication feature, a password is
required. If applicable, enter the password; the default password is x-admin.
3. Press the Machine Status button on the Control Panel.
4. Press the Too ls tab.
5. Select System Settings > Connectivity and Network Setup > Port Settings.
6. Ensure that the following ports are Enabled:
•SNMP
•SOAP
•WebDAV port
• (CentreWare) Internet Services (HTTP)
7. From the Port Settings screen, select Close to return to the main Tools screen.
8. Exit Too ls mode by pressing the Log In/Out button on the Control Panel.
9. Select Logout to exit the System Administration mode.
2-4 Backup/restore/migrate tools
Xerox 4112/4127 Copier/Printer Machine setup
Register client’s IP address on the machine
1. Press the Log In/Out button.
2. Enter the System Administrator ID with the numeric keypad, and select Enter.
Note
The default Login ID is 11111. When using the Authentication feature, a password is
required. If applicable, enter the password; the default password is x-admin.
3. Press the Machine Status button on the Control Panel.
4. Press the Too ls tab.
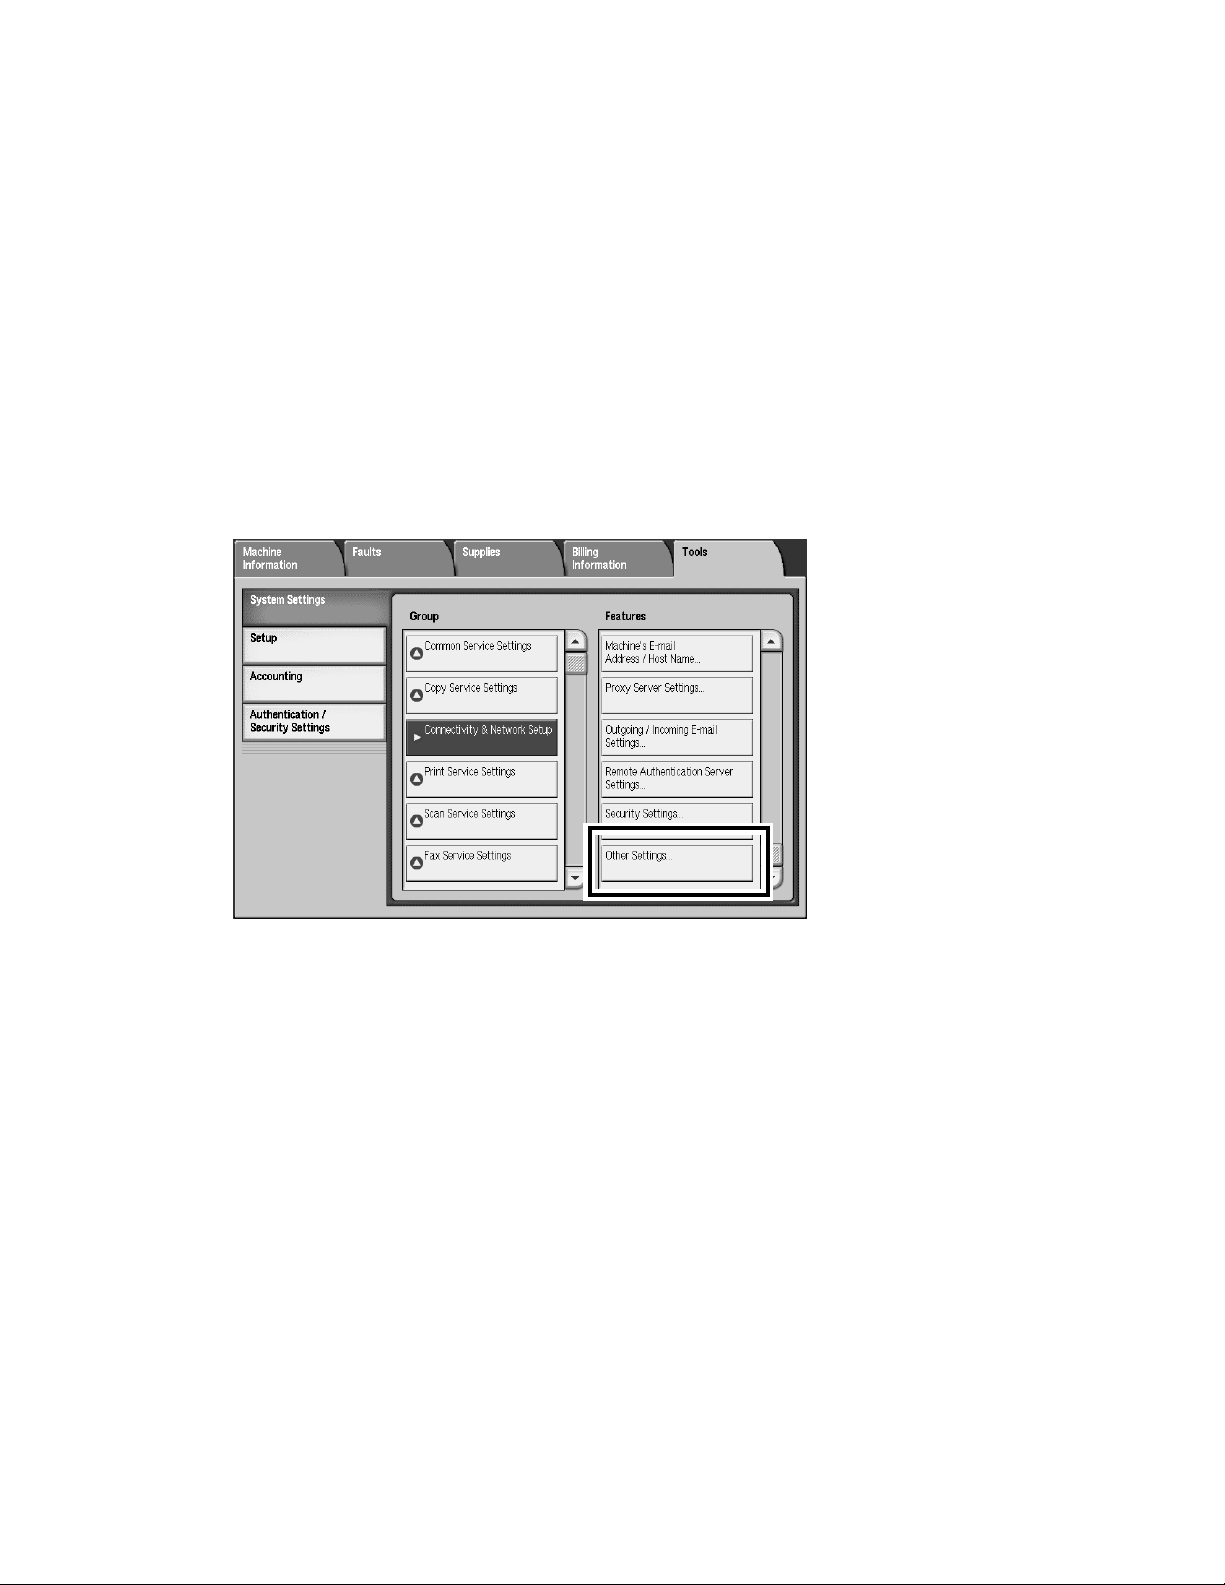
5. Select System Settings, and then select Connectivity & Network Setup.
6. Select Other Settings.
7. From the Other Settings screen, select Mailbox/Folder Backup Tool - IP Address and then
select the Change Settings button.
8. Enter your computer’s IP address and select Save and then Close.
9. Exit Too ls mode by pressing the Log In/Out button on the Control Panel.
10. Select Logout to exit the System Administration mode.
Backup/restore/migrate tools 2-5

Machine setup Xerox 4112/4127 Copier/Printer
2-6 Backup/restore/migrate tools

Retrieve documents
3
Tip
• Documents that are scanned on the machine and saved to a mailbox/folder will be lost
during a software upgrade. To prevent the loss of the (Scan to Mailbox/Folder) documents,
you can save them to a client’s computer before a machine upgrade. After the machine
upgrade is completed, you can then resubmit the saved documents to the machine’s
mailbox/folder.
• The User Interface (UI) screens shown in this document may or may not reflect the screens
displayed on your system or on your personal computer. The UI screens vary
to system, computer to computer, and from marketplace to marketplace. Therefore, the UI
screens in this document show examples of the type of screens that may be seen on your
particular system/computer.
This chapter describes how to import files that are stored in a machine’s mailbox/folder (Scan to
Mailbox/Folder) onto a client’s computer by using the CentreWare Internet Services .
Prerequisites
from system
Before you can retrieve scanned documents from the machine to your computer, read the
following prerequisites and use the ones applicable to your network environment:
• Ask your system administrator for the IP address or internet address of your machine.
• If your network uses DNS (Domain Name System) and the machine’s host name is
registered, you can access the machine using the internet address with a combination of
the host name and domain name. For example, the internet address may be
“myhost.example.com”: “myhost” represents the host name, while “example.com”
represents the domain name.
• When specifying a port number, add a colon “:” and the port number after the IP address or
internet address.
• If the machine uses the authentication feature, enter a user ID and passcode into the User
Name and Passcode fields. Ask your system administrator for the user ID and passcode.
• If communications are encrypted, you must specify an address that starts with “https”
instead of “http” in order to access CentreWare Internet Services.
Backup/restore/migrate tools 3-1
Retrieve documents Xerox 4112/4127 Copier/Printer
Import documents from the machine to your computer
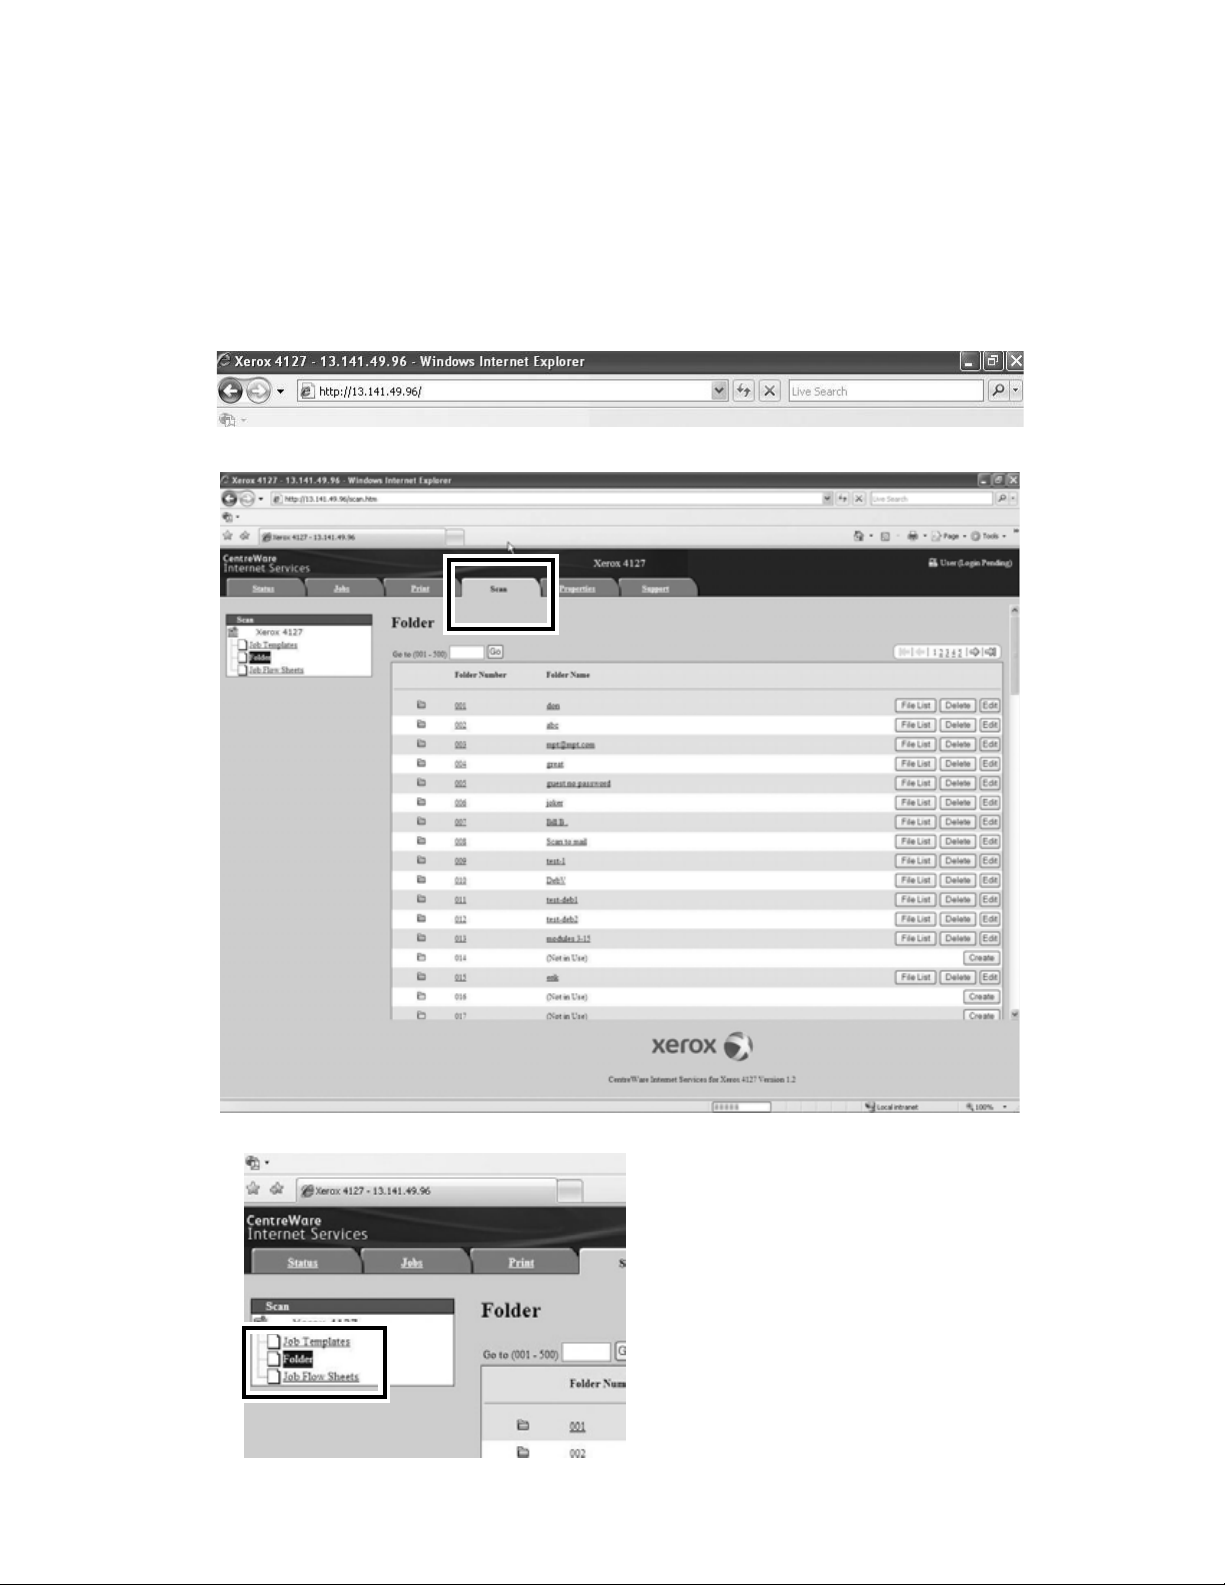
1. Start up the computer and open a web browser.
2. Enter the machine’s IP address or internet address in the browser address field and then
press the Enter key; refer to the following example.
3. Select the Scan tab.
4. Select the Mailbox/Folder option.
3-2 Backup/restore/migrate tools

Xerox 4112/4127 Copier/Printer Retrieve documents
5. Click on a specific mailbox/folder that contains the files you want to import to your
computer.
Note
If a passcode is set for that mailbox/folder, enter the passcode in the Passcode field.
6. Place a checkmark in the box to the left of the desired file (that you want to import).
Note
Files are retrieved/imported one at a time
to your computer. Multiple files cannot be
simultaneously retrieved/imported to your computer.
Backup/restore/migrate tools 3-3

Retrieve documents Xerox 4112/4127 Copier/Printer
7. Click the Retrieve button.
8. Click Save this link.
9. Save the file to the desired location on your computer’s hard drive.
10. Repeat Steps 3 - 9 for any remaining, desired mailboxes/folders that you want to retrieve/
import to your computer.
11. Upon completion of the retrieval/importation process, close the web browser to exit
CentreWare Internet Services.
3-4 Backup/restore/migrate tools

Software installation
4
Backup Tool for restored document installation
The Backup Tool for restored document software resides on a CD-ROM that came with your
machine. If you do not have or cannot find this CD, go to www.xerox.com
contact your local Xerox Representative.
Overview
The CD contains the software for installing the application and two other important files:
• Readme.txt: This text file provides an overview of the features and functions of the
software application.
• Manual.pdf: This file provides instructions for installing the software on a user’s computer.
Tip
Before installing the software, access these files on the CD and print a hard copy for easy access
and reference.
to download it or
Operating Environment
The Backup Tool for restored document is compatible with most Microsoft Windows Operating
Systems (OS). Refer to both the Readme.txt and the Manual.pdf files for specific OS
information and other additional application information.
Installation files
As stated previously, the Backup Tool for restored document resides on a CD-ROM that comes
with your computer. It can also be obtained by going to www.xerox.com
WinZip
®
file.
and downloading the
Software installation
Begin the software installation process either by going to the Downloaded WinZip file (refer to
page 4-2) or by going to CD-ROM (refer to page 4-5), depending on how you obtained the
Backup Tool for restored document software.
Backup/restore/migrate tools 4-1

Software installation Xerox 4112/4127 Copier/Printer
Tip
The User Interface (UI) screens shown in this document may or may not reflect the screens
displayed on your system or on your personal computer. The UI screens vary
system, computer to computer, and from marketplace to marketplace. Therefore, the UI
screens in this document show examples of the type of screens that may be seen on your
particular system/computer.
from system to
Downloaded WinZip file
If the WinZip file is downloaded from the www.xerox.com to your computer, perform the
following steps prior to installing the application:
1. From Start > My Computer, browse to the folder containing the downloaded WinZip file.
2. Open the WinZip file either by double-clicking on the file or by selecting File > Open with
Winzip.
3. From the WinZip window, select Actions >Select All; this select all the files.
4. Click the Extract button.
5. From the Extract window, select the desired location on your C: drive to which the files will
be copied, and click the Extract button.
4-2 Backup/restore/migrate tools

Xerox 4112/4127 Copier/Printer Software installation
6. After the files are extracted to the desired location, close the WinZip file.
7. Browse to the folder containing the extracted WinZip files.
8. Open the 1033 folder.
9. Continue the installation process either double-clicking on the setup.exe file or by selecting
File > Open.
10. From the Setup window, click the Next button.
11. Select Agree and click the Next button to continue.
Backup/restore/migrate tools 4-3

Software installation Xerox 4112/4127 Copier/Printer
12. Select Next again.
13. Select the Install button.
As the software is installing, the following screen is displayed:
4-4 Backup/restore/migrate tools

Xerox 4112/4127 Copier/Printer Software installation
14. On the final screen, select Finish.
15. The Backup Tool for restored document application launches and opens this window:
Enter the password, and click OK. The default password is x-admin
CD-ROM
1. Insert the CD into your CD-ROM drive:
a. The CD automatically launches and opens the Setup window.
b. If the CD does not automatically launch, perform the following:
– Select Start > My Computer
–From the My Computer window, right click on the CD-ROM drive and select either
Open or Explore
–Open the 1033 folder
– Continue the installation process either by double-clicking on the setup.exe file or
by selecting File > Open.
Backup/restore/migrate tools 4-5

Software installation Xerox 4112/4127 Copier/Printer
2. From the Setup window, click the Next button.
3. Select Agree and click the Next button to continue.
4. Select Next again.
4-6 Backup/restore/migrate tools

Xerox 4112/4127 Copier/Printer Software installation
5. Select the Install button.
As the software is installing, the following screen is displayed:
6. On the final screen, select Finish.
Backup/restore/migrate tools 4-7

Software installation Xerox 4112/4127 Copier/Printer
7. The Backup Tool for restored document application launches and opens this window:
Enter the password, and click OK. The default password is x-admin
Migration Tool installation
The Migration Tool for Restored Document software can be downloaded as a WinZip file by
going to www.xerox.com
Operating Environment
The Migration Tool for Restored Document is compatible with most Microsoft Windows
Operating Systems (OS). Refer to the Readme.txt file for specific OS information.
or by contacting your local Xerox Representative.
Software installation
Perform the following steps prior to installing the application:
1. From Start > My Computer, browse to the folder containing the downloaded WinZip file.
2. Open the WinZip file either by double-clicking on the file or by selecting File > Open with
Winzip.
3. From the WinZip window, select Actions >Select All; this selects all the files.
4. Click the Extract button.
5. From the Extract window, select the desired location on your C: drive to which the files will
be copied, and click the Extract button.
6. After the files are extracted to the desired location, close the WinZip file.
7. Browse to the folder containing the extracted WinZip files.
8. Continue the installation process either double-clicking on the bc1010m.exe file or by
selecting File > Open.
4-8 Backup/restore/migrate tools

Xerox 4112/4127 Copier/Printer Software installation
9. Click the Yes button on the Migration Tool for Restored Document installation window.
10. Select a folder location by clicking the Browse button or by typing a folder location for the
software.
11. Click the OK button to continue.
12. After the software is installed, browse to the folder containing the software.
13. Open the readme.txt file by double-clicking on it or by selecting File > Open.
14. Launch the Migration Tool application by double-clicking on the boxconv.exe file or by
selecting File > Open.
Backup/restore/migrate tools 4-9

Software installation Xerox 4112/4127 Copier/Printer
4-10 Backup/restore/migrate tools

Backup Tool for restored document
Tip
The User Interface (UI) screens shown in this document may or may not reflect the screens
displayed on your system or on your personal computer. The UI screens vary
system, computer to computer, and from marketplace to marketplace. Therefore, the UI
screens in this document show examples of the type of screens that may be seen on your
particular system/computer.
from system to
5
Launch/open the application
1. If the application isn’t already opened, launch it now by selecting the Back-up Tool for
restored document application from the Start menu.
2. The Backup Tool for restored document application launches and opens this window:
Enter the password, and click OK. The default password is x-admin
Backup/restore/migrate tools 5-1

Backup Tool for restored document Xerox 4112/4127 Copier/Printer
3. The application opens to the main screen.
Add a machine to the application service
Follow the steps below to register the machine’s IP address or DNS host name on your computer
via the Back-Up Tool for restored document application.
Note
For information about how to register the machine by searching the network, refer to the
application’s online help.
1. Select Backup Mailbox Document, and from the Edit menu, select Add Device....
5-2 Backup/restore/migrate tools

Xerox 4112/4127 Copier/Printer Backup Tool for restored document
2. Select the Device Type from the pull-down menu.
3. Enter an IP v4 Address, IP v6 Address or Host Name, and click OK.
4. Click OK.
Backup/restore/migrate tools 5-3

Backup Tool for restored document Xerox 4112/4127 Copier/Printer
Import mailbox/folder information from the machine
Follow the steps below to import the information from the mailboxes/folders and documents
stored on the machine onto your computer via the Back-Up Tool for restored document
application.
1. Select the machine, and from the Edit menu, select Get Attributes from Device.
2. Click Yes /O K.
3. Click OK.
Note
When the attribute values cannot be imported, ensure that the machine is powered on and
that its IP address or host name are entered correctly in the backup application on your
computer.
5-4 Backup/restore/migrate tools

Xerox 4112/4127 Copier/Printer Backup Tool for restored document
4. Right-click on Mailbox List and select Retrieve Mailbox Document Information.
5. Click OK.
6. After the import is complete, click OK.
Backup/restore/migrate tools 5-5

Backup Tool for restored document Xerox 4112/4127 Copier/Printer
Copy (backup) the mailboxes/folders onto your computer
Tip
The machine cannot be used while making backups.
1. Right-click on a mailbox, and select Backup Mailbox documents.
Note
If you select the Mailbox List and then Backup Mailbox documents, you can back up all
the files in the list.
2. Click Backup.
5-6 Backup/restore/migrate tools

Xerox 4112/4127 Copier/Printer Backup Tool for restored document
3. After the backup is complete, click Close.
4. To confirm that the mailbox was copied and saved, click on the plus sign to the left of the
Backup File List; the saved mailbox is displayed.
Note
•If the Version of Document Attributes value is 10.0.0, the files that were backed up/
saved from the machine (to the clien’ts computer) reflects the machine’s system
software version 2.0. The files can be restored only
to a machine with version 2.0
system software.
• If the machine’s system software was upgraded to version 3.0, then the Migration
Tool f o r Rest ored D oc u men t application must be used to convert the files before they
can be restored to the machine. The Migration Tool application converts the Version of
Document Attributes 10.0.0 value to a value of 11.0.0. Refer to Chapter 6, Migration
To ol for more information and instructions on converting these files.
Backup/restore/migrate tools 5-7

Backup Tool for restored document Xerox 4112/4127 Copier/Printer
Save the backup onto your computer
1. From the Backup File List right-click on a mailbox and select Export Backup Files.
Note
If you select the Backup File List and then Export Backup Files, you can save all the files in
the list.
2. If necessary, select a location on your computer to save the mailbox and click Save.
3. After the processing is complete, click OK.
The files are saved to your computer and be restored when required.
4. Your machine is now ready for its software upgrade. Have the Xerox service representative
install the new software onto your machine.
• While the machine’s software is being upgraded, review the remainder of this chapter
for additional information on the Backup Tool for restored document features.
5. Upon completion of the machine software upgrade, continue to the next chapter.
5-8 Backup/restore/migrate tools

Xerox 4112/4127 Copier/Printer Backup Tool for restored document
Read (view/edit) the saved mailboxes/ folders on your computer
1. From the Backup File List, right-click on a mailbox, and select Import Backup Files.
Note
•If the Version of Document Attributes value is 10.0.0, the files that were backed up/
saved from the machine (to the clien’ts computer) reflects the machine’s system
software version 2.0. The files can be restored only
system software.
• If the machine’s system software was upgraded to version 3.0, then the Migration
Tool f o r Rest ored D oc u men t application must be used to convert the files before they
can be restored to the machine. The Migration Tool application converts the Version of
Document Attributes 10.0.0 value to a value of 11.0.0. Refer to Chapter 6, Migration
To ol for more information and instructions on converting these files.
2. Select a mailbox, and click Open.
Note
Only mailboxes/folders/documents with an extension of “.bf1” can be read (viewed).
When two of the same mailboxes/folders/documents exist, a confirmation window opens
and ask you to choose either Overwrite Existing Backup File or Save As A New Backup
File.
to a machine with version 2.0
Backup/restore/migrate tools 5-9

Backup Tool for restored document Xerox 4112/4127 Copier/Printer
3. After the processing is complete, click OK.
Password information
The Back-Up Tool for restored document requires the system administrator ID and password
when communicating with the machine. Initially, the application is configured with factory
default ID and password.
Note
The default system administrator ID is “11111.” The default password is “x-admin.”
If the machine’s ID and password are changed from their default settings, you must also
change the ID and password on the Back-Up Tool for restored document application.
Note
If you change the system administrator’s ID and password, you must select [Get attributes from
the machine] in order to obtain the latest mailbox information/attributes.
1. Select a machine, and select Device Communication Settings... from the Edit menu.
5-10 Backup/restore/migrate tools

Xerox 4112/4127 Copier/Printer Backup Tool for restored document
2. Enter the system administrator’s ID in System Administrator ID.
3. Enter the password in Password and Confirm Password.
4. Click OK.
Backup/restore/migrate tools 5-11

Backup Tool for restored document Xerox 4112/4127 Copier/Printer
5-12 Backup/restore/migrate tools

Migration Tool
6
Tip
Do not complete the instructions in this chapter until the machine’s software has been
upgraded by the Xerox representative.
Launch/open the application
Tip
The User Interface (UI) screens shown in this document may or may not reflect the screens
displayed on your system or on your personal computer. The UI screens vary
system, computer to computer, and from marketplace to marketplace. Therefore, the UI
screens in this document show examples of the type of screens that may be seen on your
particular system/computer.
1. If the application isn’t already opened, launch it now by selecting Start > My Computer
and opening the folder containing the software.
from system to
Backup/restore/migrate tools 6-1

Migration Tool Xerox 4112/4127 Copier/Printer
2. Launch the Migration Tool application by double-clicking on the boxconv.exe file or by
selecting File > Open.The Migration Tool for Restored Document dialog box opens.
3. In the Migration Tool dialog box, either type or Browse to the folder containing the mailbox
backup file.
4. Type or Browse to the folder where you want to save/store the converted backup file.
5. From the Compatible Model pull-down menu,
select the machine type and software
version which reflects your machine.
Note
This is the software version after
the machine has completed its upgrade.
6. Click the Execute button.
7. Upon completion, select End.
8. Go to the machine, and re-register the client’s computer IP address on the machine; refer to
the instructions provided in Chapter 2, Register client’s IP address on the machine on
page 2-5.
9. Continue to the next chapter.
6-2 Backup/restore/migrate tools

Restore backed-up files to machine
Tip
When the mailboxes/folders were backed up, the following settings were not backed up and
thereby lost:
• Mailbox/Folder Passwords
• Access restrictions (Target Operations):
• Always (All Operations): Requires a password for:
– Scanning and saving documents to the mailbox/folder
– Viewing (reading) the mailbox’s/folder’s Document List
– Printing or deleting documents from the mailbox/folder
• Save (Write): Requires a password only when scanning and saving to a mailbox/
folder.Does not require a password for reading (viewing) the mailbox’s/folder’s
Document List nor for printing or deleting documents from the mailbox/folder.
• Print/Delete (Read): Requires a password only when reading (viewing) the mailbox’s/
folder’s Document List, and when printing or deleting documents from the mailbox/
folder. Does not require a password when scanning and saving documents to the
mailbox/folder.
• Automatic deletion of documents after retrieval
• Deletion of documents after their expiration date
• Links to Job Flow Sheets
7
Backup/restore/migrate tools 7-1

Restore backed-up files to machine Xerox 4112/4127 Copier/Printer
Restore backed-up mailboxes/folders to the machine
Each mailbox/folder owner must reprogram their mailbox/folder and document contents with
the appropriate settings.
1. From the Backup File List right-click on a mailbox, and select Restore Backup Files.
2. Enter a Mailbox Number, and click Restore.
7-2 Backup/restore/migrate tools

Xerox 4112/4127 Copier/Printer Restore backed-up files to machine
Note
If the entire Backup File List is selected, the following dialog box opens:
Setup New Mailbox in the Device: Check this box when there is currently no mailbox/folder
with the same name residing on the machine. If this item remains unchecked, a new mailbox/
folder will not be created on the machine.
Delete Mailbox Documents in the Device: Check this box if you want to delete documents
currently stored in the machine’s selected mailbox/folder before restoring the backup files into
the mailbox/folder.
3. Click OK.
Note
Deleted documents cannot be recovered. If necessary, always copy and save (backup)
before deleting them.
4. After the processing is complete, click Close.
Backup/restore/migrate tools 7-3

Restore backed-up files to machine Xerox 4112/4127 Copier/Printer
7-4 Backup/restore/migrate tools


 Loading...