

Page 1

Fiery EX12/EX2000d
CONFIGURATION GUIDE
Page 2

About the Documentation
This manual is part of a set of Fiery® documentation that includes the following
manuals for users and system administrators:
• The
Quick Start Guide
It also describes how to access the online documentation.
• The
User Software Installation Guide
User Software CD to enable users to print to the Fiery, and also describes setting up
printing connections to the Fiery.
• The
Configuration Guide
Fiery for the supported platforms and network environments. It also includes
guidelines for setting up UNIX, Windows NT 4.0, and Novell NetWare servers
to provide printing services to users.
• The
Printing Guide
jobs from their computers.
• The
Color Guide
It explains how to calibrate your Fiery and take advantage of the ColorWise®
color management system, as well as features in ColorWise Pro Tools™.
• The
Fiery Color Reference
color output of the Fiery and outlines key workflow scenarios. In addition, it offers
information on printing color documents from popular Microsoft Windows and
Apple Mac OS applications.
summarizes the steps for configuring the Fiery and printing.
describes how to install software from the
explains basic configuration and administration of the
describes the printing features of the Fiery for users who send
provides information on managing the color output of the Fiery.
addresses concepts and issues associated with managing
• The
Job Management Guide
including EFI Command WorkStation™ and Fiery DocBuilder™ Pro, and how you
can use them to manage jobs and maintain color quality. This manual is intended
for an operator or administrator, or a user with the necessary access privileges, who
needs to monitor and manage job flow, perform color calibration, and troubleshoot
problems that may arise.
•
Customer Release Notes
for some of the problems you may encounter.
explains the functions of the Fiery client utilities,
provide last-minute product information and workarounds
Page 3

Copyright © 2002 Electronics For Imaging, Inc. All rights reserved.
This publication is protected by copyright, and all rights are reserved. No part of it may be reproduced or transmitted in any form or by any means for any purpose
without express prior written consent from Electronics For Imaging, Inc., except as expressly permitted herein. Information in this document is subject to change
without notice and does not represent a commitment on the part of Electronics For Imaging, Inc.
The software described in this publication is furnished under license and may only be used or copied in accordance with the terms of such license.
This product may be covered by one or more of the following U.S. Patents: 4,500,919, 4,837,722, 5,212,546, 5,343,311, 5,424,754, 5,467,446, 5,506,946,
5,517,334, 5,537,516, 5,543,940, 5,553,200, 5,615,314, 5,619,624, 5,625,712, 5,666,436, 5,760,913, 5,818,645, 5,835,788, 5,867,179, 5,959,867,
5,970,174, 5,982,937, 5,995,724, 6,002,795, 6,025,922, 6,041,200, 6,065,041, 6,112,665, 6,122,407, 6,134,018, 6,141,120, 6,166,821, 6,185,335,
6,201,614, 6,215,562, 6,219,659, 6,222,641, 6,224,048, 6,225,974, 6,226,419, 6,238,105, 6,239,895, 6,256,108, 6,269,190, 6,289,122, 6,292,270,
6,310,697, 6,327,047, 6,327,050, 6,327,052, RE36,947, D406,117, D416,550, D417,864, D419,185. D426,206, D439,851, D444,793
Trademarks
ColorWise, EDOX, EFI, Fiery, the Fiery logo, Fiery Driven and RIP-While-Print are registered trademarks of Electronics For Imaging, Inc. in the U.S. Patent
and Trademark Office and/or certain other foreign jurisdictions.
The eBeam logo, the Electronics For Imaging logo, the Fiery Driven logo, the Splash logo, AutoCal, ColorCal, Command WorkStation, DocBuilder, DocBuilder
Pro, DocStream, eBeam, EFI Color Profiler, EFI Production System, EFI ScanBuilder, Fiery X2, Fiery X2e, Fiery X2-W, Fiery X3e, Fiery X4, Fiery ZX, Fiery Z4,
Fiery Z5, Fiery Z9, Fiery Z16, Fiery Z18, Fiery Document WorkStation, Fiery Downloader, Fiery Driver, Fiery FreeForm, Fiery Link, Fiery Prints, Fiery Print
Calibrator, Fiery Production System, Fiery Scan, Fiery ScanBuilder, Fiery Spark, Fiery Spooler, Fiery WebInstaller, Fiery WebScan, Fiery WebSpooler, Fiery
WebStatus, Fiery WebTools, NetWise, RIPChips, Splash, Velocity, Velocity Balance, Velocity Build, Velocity Design, Velocity Estimate, Velocity Scan, and
VisualCal are trademarks of Electronics For Imaging, Inc.
All other terms and product names may be trademarks or registered trademarks of their respective owners, and are hereby acknowledged.
Legal Notices
APPLE COMPUTER, INC. (“APPLE”) MAKES NO WARRANTIES, EXPRESS OR IMPLIED, INCLUDING WITHOUT LIMITATION THE
IMPLIED WARRANTIES OF MERCHANTABILITY AND FITNESS FOR A PARTICULAR PURPOSE, REGARDING THE APPLE SOFTWARE.
APPLE DOES NOT WARRANT, GUARANTEE, OR MAKE ANY REPRESENTATIONS REGARDING THE USE OR THE RESULTS OF THE USE
OF THE APPLE SOFTWARE IN TERMS OF ITS CORRECTNESS, ACCURACY, RELIABILITY, CURRENTNESS, OR OTHERWISE. THE ENTIRE
RISK AS TO THE RESULTS AND PERFORMANCE OF THE APPLE SOFTWARE IS ASSUMED BY YOU. THE EXCLUSION OF IMPLIED
WARRANTIES IS NOT PERMITTED BY SOME STATES. THE ABOVE EXCLUSION MAY NOT APPLY TO YOU.
IN NO EVENT WILL APPLE, ITS DIRECTORS, OFFICERS, EMPLOYEES OR AGENTS BE LIABLE TO YOU FOR ANY CONSEQUENTIAL,
INCIDENTAL OR INDIRECT DAMAGES (INCLUDING DAMAGES FOR LOSS OF BUSINESS PROFITS, BUSINESS INTERRUPTION, LOSS OF
BUSINESS INFORMATION, AND THE LIKE) ARISING OUT OF THE USE OR INABILITY TO USE THE APPLE SOFTWARE EVEN IF APPLE
HAS BEEN ADVISED OF THE POSSIBILITY OF SUCH DAMAGES. BECAUSE SOME STATES DO NOT ALLOW THE EXCLUSION OR
LIMITATION OF LIABILITY FOR CONSEQUENTIAL OR INCIDENTAL DAMAGES, THE ABOVE LIMITATIONS MAY NOT APPLY TO YOU.
Apple’s liability to you for actual damages from any cause whatsoever, and regardless of the form of the action (whether in contract, tort [including negligence],
product liability or otherwise), will be limited to $50.
Restricted Rights Legends
For defense agencies: Restricted Rights Legend. Use, reproduction, or disclosure is subject to restrictions set forth in subparagraph (c)(1)(ii) of the Rights in
Technical Data and Computer Software clause at 252.227.7013.
For civilian agencies: Restricted Rights Legend. Use, reproduction, or disclosure is subject to restrictions set forth in subparagraph (a) through (d) of the
commercial Computer Software Restricted Rights clause at 52.227-19 and the limitations set forth in Electronics For Imaging’s standard commercial agreement
for this software. Unpublished rights reserved under the copyright laws of the United States.
Part Number:
45026395
Page 4

FCC Information
WARNING: FCC Regulations state that any unauthorized changes or modifications to this equipment not expressly approved by the manufacturer could void
the user’s authority to operate this equipment.
Class B Declaration of Conformity
This equipment has been tested and found to comply with the limits for a class B digital device, pursuant to Part 15 of the FCC rules. These limits are designed
to provide reasonable protection against harmful interference in a residential installation. This equipment generates, uses and can radiate radio frequency energy
and if not installed and used in accordance with the instructions, may cause harmful interference to radio communications. However, there is no guarantee that
interference will not occur in a particular installation.
If this equipment does cause harmful interference to radio or television reception, which can be determined by turning the equipment off and on, the user is
encouraged to try to correct the interference by one or more of the following measures:
Reorient or relocate the receiving antenna.
Increase the separation between the equipment and receiver.
Connect the equipment into an outlet on a circuit different from that to which the receiver is connected.
Consult the dealer or an experienced radio/TV technician for help.
In order to maintain compliance with FCC regulations, shielded cables must be used with this equipment. Operation with non-approved equipment or unshielded
cables is likely to result in interference to radio and TV reception. The user is cautioned that changes and modifications made to the equipment without the
approval of manufacturer could void the user’s authority to operate this equipment.
Industry Canada Class B Notice
This Class B digital apparatus complies with Canadian ICES-003.
Avis de Conformation Classe B de l’Industrie Canada
Cet appareil numérique de la Classe B est conforme à la norme NMB-003 du Canada.
RFI Compliance Notice
This equipment has been tested concerning compliance with the relevant RFI protection requirements both individually and on system level (to simulate normal
operation conditions). However, it is possible that these RFI Requirements are not met under certain unfavorable conditions in other installations. It is the user
who is responsible for compliance of his particular installation.
Dieses Gerät wurde sowohl einzeln als auch in einer Anlage, die einen normalen Anwendungsfall nachbildet, auf die Einhaltung der Funkentstörbestimmungen
geprüft. Es ist jedoch möglich, dass die Funkentstörbestimmungen unter ungünstigen Umständen bei anderen Gerätekombinationen nicht eingehalten werden.
Für die Einhaltung der Funkentstörbestimmungen einer gesamten Anlage, in der dieses Gerät betrieben wird, ist der Betreiber verantwortlich.
Compliance with applicable regulations depends on the use of shielded cables. It is the user who is responsible for procuring the appropriate cables.
Die Einhaltung zutreffender Bestimmungen hängt davon ab, dass geschirmte Ausführungen benützt werden. Für die Beschaffung richtiger Ausführungen ist der
Betreiber verantwortlich.
Software License Agreement
YOU SHOULD CAREFULLY READ THE FOLLOWING TERMS AND CONDITIONS BEFORE USING THIS SOFTWARE. IF YOU DO NOT
AGREE TO THE TERMS AND CONDITIONS OF THIS AGREEMENT, DO NOT USE THE SOFTWARE. INSTALLING OR USING THE
SOFTWARE INDICATES THAT YOU AGREE TO AND ACCEPT THE TERMS OF THIS AGREEMENT. IF YOU DO NOT AGREE TO ACCEPT
THE TERMS OF THIS AGREEMENT YOU MAY RETURN THE UNUSED SOFTWARE FOR A FULL REFUND TO THE PLACE OF PURCHASE.
License
EFI grants you a non-exclusive license to use the software (“Software”) and accompanying documentation (“Documentation”) included with the Product. The
Software is licensed, not sold. You may use the Software solely for your own customary business or personal purposes. You may not rent, lease, sublicense or lend
the Software. You may, however, permanently transfer all of your rights under this Agreement to another person or legal entity provided that: (1) you transfer to
the person or entity all of the Software and Documentation (including all copies, updates, upgrades, prior versions, component parts, the media and printed
materials, and this Agreement); (2) you retain no copies of the Software and Documentation, including copies stored on a computer; and (3) the recipient agrees
to the terms and conditions of this Agreement.
You may not make or have made, or permit to be made, any copies of the Software or portions thereof, except as necessary for backup or archive purposes in
support of your use of the Software as permitted hereunder. You may not copy the Documentation. You may not attempt to alter, disassemble, decompiler, decr ypt
or reverse engineer the Software.
Page 5

Proprietary Rights
You acknowledge that the Software is proprietary to EFI and its suppliers and that title and other intellectual property rights therein remain with EFI and its
suppliers. Except as stated above, this Agreement does not grant you any right to patents, copyrights, trade secrets, trademarks (whether registered or unregistered),
or any other rights, franchises or licenses in respect of the Software. You may not adopt or use any trademark or trade name which is likely to be similar to or
confusing with that of EFI or any of its suppliers or take any other action which impairs or reduces the trademark rights of EFI or its suppliers.
Confidentiality
You agree to hold the Software in confidence, disclosing the Software only to authorized users having a need to use the Software as permitted by this Agreement
and to take all reasonable precautions to prevent disclosure to other parties.
Remedies and Termination
Unauthorized use, copying or disclosure of the Software, or any breach of this Agreement will result in automatic termination of this license and will make available
to EFI other legal remedies. In the event of termination, you must destroy all copies of the Software and all of its component parts. All provisions of this Agreement
relating to disclaimers of warranties, limitation of liability, remedies, damages, and EFI’s proprietary rights shall survive termination.
Limited Warranty and Disclaimer
EFI warrants to the original purchaser (“Customer”) for thirty (30) days from the date of original purchase from EFI or its authorized retailer that the Software
will perform in substantial conformance to the Documentation when the Product is used as authorized by EFI’s specifications. EFI warrants the media containing
the Software against failure during the above warranty period. EFI makes no warranty or representation that the Software will meet your specific requirements,
that the operation of the Software will be uninterrupted or error free, or that all defects in the Software will be corrected. EFI makes no warranty, implied or
otherwise, regarding the performance or reliability of any third party products (software or hardware) not provided by EFI. THE INSTALLATION OF ANY
THIRD PARTY PRODUCTS OTHER THAN AS AUTHORIZED BY EFI WILL VOID THIS WARRANTY. IN ADDITION, USE, MODIFICATION,
AND/OR REPAIR OF THE PRODUCT OTHER THAN AS AUTHORIZED BY EFI WILL VOID THIS WARRANTY.
EXCEPT FOR THE ABOVE EXPRESS LIMITED WARRANTY, EFI MAKES AND YOU RECEIVE NO WARRANTIES OR CONDITIONS ON THE
SOFTWARE, EXPRESS, IMPLIED, STATUTORY, OR IN ANY OTHER PROVISION OF THIS AGREEMENT OR COMMUNICATION WITH YOU,
AND EFI SPECIFICALLY DISCLAIMS ANY IMPLIED WARRANTY OR CONDITION OF MERCHANTABILITY OR FITNESS FOR A PARTICULAR
PURPOSE OR NONINFRINGEMENT OF THIRD PARTY RIGHTS.
Limitation of Liability
TO THE MAXIMUM EXTENT PERMITTED BY LAW, EFI AND ITS SUPPLIERS SHALL NOT BE LIABLE FOR ANY DAMAGES, INCLUDING
LOSS OF DATA, LOST PROFITS, COST OF COVER OR OTHER SPECIAL, INCIDENTAL, CONSEQUENTIAL OR INDIRECT DAMAGES
ARISING FROM THE SALE, INSTALLATION, MAINTENANCE, USE, PERFORMANCE OR FAILURE OF THE SOFTWARE, HOWEVER CAUSED
AND ON ANY THEORY OF LIABILITY. THIS LIMITATION WILL APPLY EVEN IF EFI HAS BEEN ADVISED OF THE POSSIBILITY OF SUCH
DAMAGE. YOU ACKNOWLEDGE THAT THE PRICE OF THE PRODUCT REFLECTS THIS ALLOCATION OF RISK. BECAUSE SOME
JURISDICTIONS DO NOT ALLOW THE EXCLUSION OR LIMITATION OF LIABILITY FOR CONSEQUENTIAL OR INCIDENTAL DAMAGES,
THE ABOVE LIMITATION MAY NOT APPLY TO YOU.
Export Controls
You agree that you will not export or re-export the Software in any form in violation of any applicable laws or regulations of the United States or the country in
which you obtained them.
U.S. Government Restricted Rights:
The Software and Documentation are provided with RESTRICTED RIGHTS. Use, duplication, or disclosure by the United States Government is subject to
restrictions as set forth in subparagraph (c)(1)(ii) of the Rights in Technical Data and Computer Software clause at DFARS 252.227-7013 or subparagraphs (c)(1)
and (2) of the Commercial Computer Software Restricted Rights at 48 CFR 52.227-19, as applicable.
General
The laws of the State of California govern this Agreement. You agree that this Agreement shall not be subject to the United Nations Convention on Contracts for
the International Sale of Goods (1980). This Agreement is the entire agreement held between us and supersedes any other communications or advertising with
respect to the Software. If any provision of this Agreement is held invalid, the remainder of this Agreement shall continue in full force and effect.
If you have any questions, please see EFI’s web site at www.efi.com.
Electronics For Imaging
303 Velocity Way
Foster City, CA 94404
Page 6

Page 7

Contents
About the Documentation
Introduction
About this manual
Chapter 1: Connecting to the Network
Fiery on the network
Stages of installation on the network
Quick path to installation
Connecting network cable to the Fiery
Back view of the Fiery 1-10
Ethernet connection 1-11
Token Ring connection 1-11
Chapter 2: Setting up Network Servers
Fiery on a TCP/IP network with Windows NT 4.0
Tips for experts—Windows NT 4.0 with TCP/IP 2-2
Configuring a Windows NT 4.0 server to communicate with the Fiery 2-3
Fiery on a NetWare 4.x or 5.x network
Tips for experts—IPX networks 2-9
Overview of IPX printing to the Fiery 2-9
Configuring a NetWare 4.x server for printing 2-10
xii
1-1
1-2
1-4
1-10
2-1
2-8
Fiery on a NetWare 5.x network with NDPS
Tips for experts—NetWare 5.x networks 2-14
Configuring a NetWare 5.x server for printing 2-15
Fiery on a network with UNIX workstations
Tips for experts—UNIX workstations 2-17
Important note about the remote printer name 2-18
Setting up the Fiery on TCP/IP networks 2-18
Managing print jobs 2-20
2-14
2-17
Page 8

viii Contents
Chapter 3: Preparing for Fiery Setup
Levels of access and control
Fiery print connections 3-1
Passwords 3-3
Fiery WebTools 3-4
Control level scenarios 3-6
Fiery system software
About Setup
Local Setup from the Fiery 3-9
Network server setup requirements 3-9
Ensuring the copier/printer connection 3-10
Chapter 4: Performing Setup from the Control Panel
Fiery Setup from the Control Panel
Fiery Control Panel
Safety warnings 4-2
Activity light 4-3
Buttons 4-3
Display window 4-4
Functions menu 4-6
Accessing Setup options 4-8
About the Control Panel Setup interface 4-9
Types of Setup screens 4-10
3-1
3-7
3-8
4-1
4-2
Server Setup options
Network Setup options
Port Setup options 4-17
Protocol Setup options 4-18
Service Setup options 4-26
Printer Setup options
PostScript Setup options
4-12
4-14
4-42
4-43
Page 9

ix Contents
Color Setup options
Administrative functions in the Setup menu
Job Log Setup 4-50
Font Archiving 4-52
Exit Setup 4-52
Chapter 5: Setting up the Fiery from a Windows Computer
Accessing Setup
Local Fiery Setup 5-2
Remote Fiery Setup 5-3
General Setup options
Job Log Setup 5-6
Network Setup
Adapters/Ports 5-7
Protocols 5-9
Services 5-15
Windows Print Sharing (SMB) 5-34
Printer Setup options
Printer Connections 5-40
Job Batching Delay 5-41
PS (PostScript) Setup 5-42
Color Setup 5-46
4-47
4-50
5-1
5-4
5-7
5-40
Setting up printing groups
Exiting Setup
Printing the Configuration page
Chapter 6: Configuring Fiery WebTools
Configuring the Fiery and clients for Fiery WebTools
Setting up Fiery WebTools
Setting the WebLink destination
5-48
5-50
5-50
6-1
6-2
6-3
Page 10

x Contents
Chapter 7: Administering the Fiery
Administrator functions
Setting passwords
Passwords from the Control Panel 7-3
Passwords 7-4
Clearing the Fiery
Restoring the Fiery to factory defaults
Managing Address Books
Printing a Configuration page from the Control Panel
Maintaining optimal Fiery performance
Starting and shutting down the Fiery
Starting the Fiery 7-11
Restarting the Fiery 7-12
Shutting down the Fiery 7-13
Appendix A: Token Ring Network Option
Fiery Token Ring option
Connecting Token Ring hardware A-1
IPX/SPX installations
TCP/IP installations
Setting up Token Ring on the Fiery
Setting up NetWare Windows clients
7-1
7-2
7-5
7-6
7-7
7-9
7-10
7-11
A-1
A-3
A-3
A-3
A-3
Appendix B: Troubleshooting
Troubleshooting the Fiery
Tr oubleshooting during Setup from the Control Panel B-1
Runtime error messages B-7
Index
B-1
Page 11

xi About this manual
Introduction
EX12
EX2000d
This manual is intended for anyone who is responsible for integrating the
Fiery EX12/EX2000d Color Server™ into a business environment that
includes networked personal computers. After setting up the Fiery EX12/
EX2000d Color Server and client workstations, individual users can print to the
Fiery EX12/EX2000d Color Server as a high-performance color printer.
This manual describes how to set up network servers and clients to use the
Fiery EX12/EX2000d Color Server and how to install user software and set up
printing from Windows and Mac OS computers. For general information on using the
color copier, your computer, your application software, or your network, see the
manuals that accompany those products.
OTE
The term “Fiery” is used in this manual to refer to the Fiery EX12/
N
:
EX2000d Color Server. The name “Aero” is used in illustrations to represent the Fiery.
The term “Windows 9x” is used in this manual to represent both Windows 95 and
Windows 98.
This icon specifies information that applies only to the Fiery EX12.
This icon specifies information that applies only to the Fiery EX2000d.
The Fiery includes support for the Fiery WebTools™ and software for Command
WorkStation, which allow an operator to manage all jobs sent to the Fiery. Although it
may not be the case at all sites, the documentation for this product assumes the
presence of an operator who controls and manages jobs sent by users from remote
workstations.
Any additional connectivity or administrative features specific to the copier/printer are
described in the
Printing Guide
or the
Release Notes.
Page 12

xii Introduction
About this manual
This manual covers the following topics:
•Basic configuration of the Fiery to support printing over AppleTalk, TCP/IP, and
IPX (Novell) networks
•Administering network printing
• Configuring Novell and Microsoft Windows NT 4.0 servers and UNIX systems
to provide Fiery printing services
•Using the Fiery in mixed network environments
•Setting up a Token Ring connection
OTE
The network guidelines in this book are not intended to replace the services of
N
:
an experienced network engineer.
This manual is organized as follows:
• Chapter 1 illustrates the supported network configurations and shows the network
connectors on the Fiery.
• Chapter 2 provides guidelines for setting up Windows network servers and UNIX
systems for printing to the Fiery and for using Fiery WebTools.
• Chapter 3 describes how to prepare for Fiery Setup™, including planning system
security through access levels.
• Chapter 4 describes Fiery configuration (Setup) from the Control Panel.
• Chapter 5 describes Fiery Setup from a Windows computer.
• Chapter 6 describes setting up the Fiery for Fiery WebTools
• Chapter 7 summarizes some administrative features of Fiery software that
are available for IPX/SPX, TCP/IP, and AppleTalk networks, and offers
troubleshooting hints.
• Appendix A describes the Token Ring option.
• Appendix B describes issues that may occur in setting up the Fiery and
offers solutions.
N
OTE
:
Administrator features described in other manuals are summarized on page 7-1.
Page 13

1-1 Fiery on the network
1
Chapter 1: Connecting to the Network
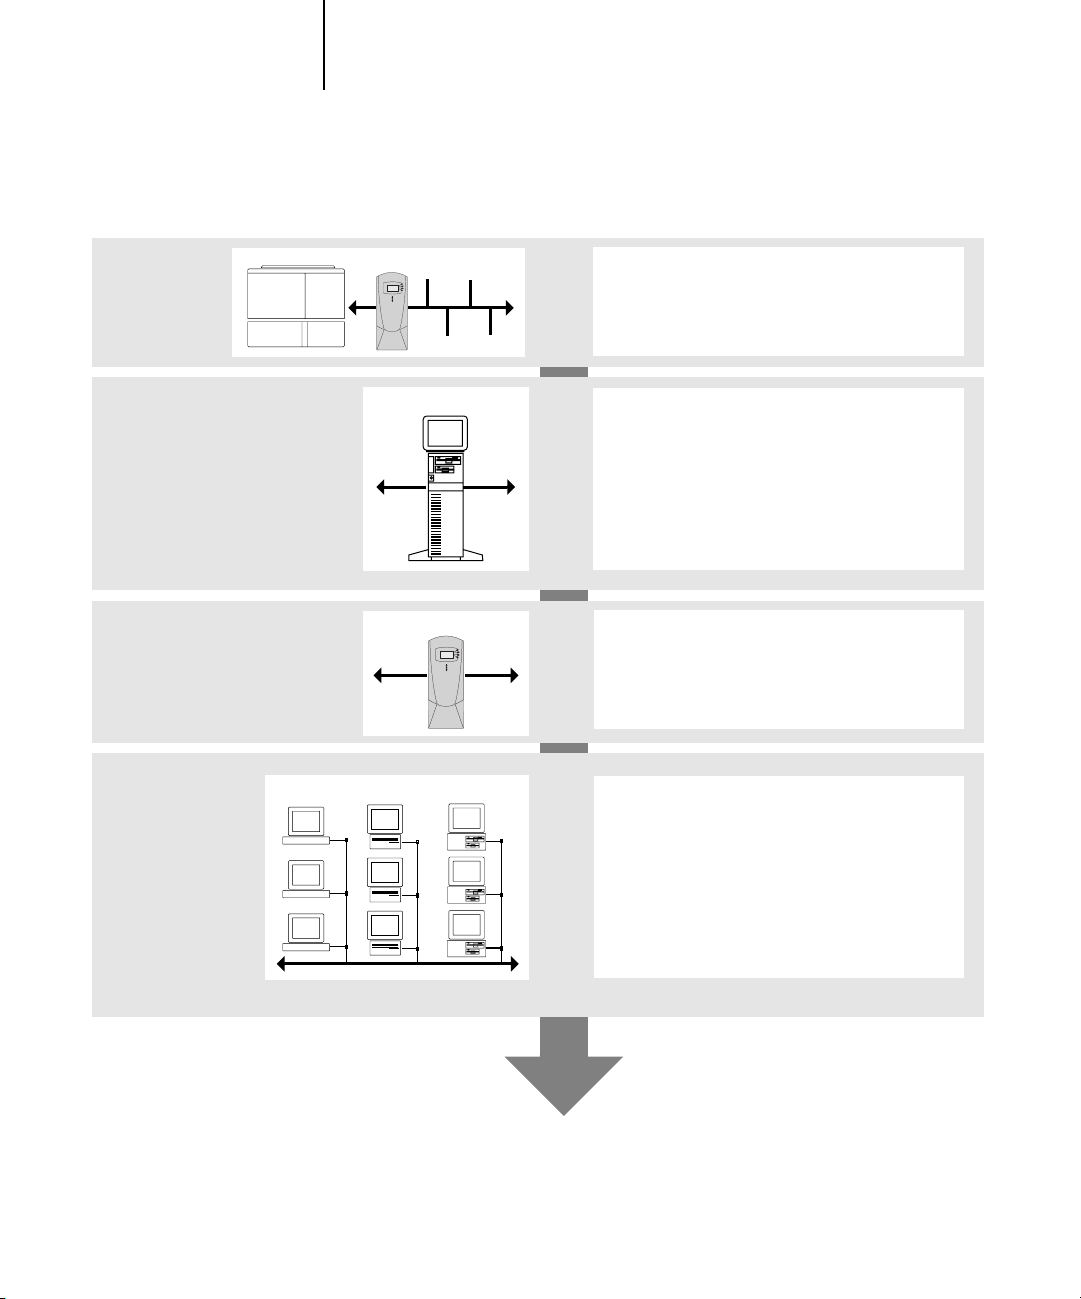
This chapter summarizes the stages in setting up the Fiery, and includes diagrams
that refer you to other chapters or other manuals for completing your installation.
Check those references to find the information you need quickly.
Fiery on the network
When the Fiery is connected to a network, it behaves as a networked PostScript
printer. The built-in Ethernet interface on the Fiery supports the following
network protocols:
•AppleTalk
• TCP/IP (the lpd, nbt, and http protocols)
TCP/IP stands for Transmission Control Protocol/Internet Protocol. The lpd
protocol is the standard TCP/IP printing protocol. The nbt protocol supports
Windows (SMB) printing. The http protocol is commonly used for Web pages on
the Internet and on intranets.
• IPX/SPX (Novell)
IPX/SPX stands for Internetwork Packet Exchange/Sequenced Packet Exchange.
These protocols (rules that enable computers on a network to communicate with each
other) are supported on Mac OS, Windows, and UNIX platforms and can run
concurrently on the same cable. Workstations that use other protocols can print
through a server that uses one of the protocols mentioned. A Token Ring option is also
available. This option supports the TCP/IP and IPX/SPX protocols. The Fiery is
auto-sensing, and can handle all of these connections simultaneously.
When you add the Fiery to a network, it is assumed that a network administrator has
already installed a network cabling system and connected workstations and servers.
Page 14

1-2 Connecting to the Network
1
•Physically connecting the Fiery to a functioning network
• Configuring the network server
Stages of installation on the network
Installation can be performed by a network or printing administrator. The stages of a
successful installation are:
Prepare a network node for the Fiery—obtain cable, route it to the location where the
Fiery will be installed (near the copier/printer), and attach the cable to the network
interface of the Fiery (see page 3-10 for details).
OTE
If you plan to run Command WorkStation software, you will need to install the
N
:
software and connect the Command WorkStation computer to the network along with
the Fiery. For more information, see the
When network servers are required, you need to configure those servers to provide
client access to the Fiery as a color PostScript printer. For information on configuring
network servers in Windows and UNIX network environments, see Chapter 2.
User Software Installation Guide
.
• Setting up the Fiery
Configure the Fiery for your particular printing and network environment. First read
Chapter 2, and then see subsequent chapters for details.
•Preparing client workstations for printing
Install the files needed for printing, install additional user software, and connect the
client to the Fiery over the network. These steps are described in the User Software
Installation Guide, and some information is also provided in Chapter 2.
•Administering the Fiery
Monitor and maintain system performance and troubleshoot problems that arise.
For details, see Chapter 7 of this manual and the Job Management Guide.
Page 15
1-3 Stages of installation on the network
1
Summary of Fiery network installation
CONNECTION
SERVER CONFIGURATION
FIERY SETUP
CLIENT SETUP
Fiery
Network server
Fiery
UNIX Mac OS Windows
Prepare a network node. Connect the Fiery to the
copier/printer and the network. If you use a
computer running Command WorkStation software,
connect it to the network.
Configure UNIX, Windows NT 4.0, and IPX (Novell)
servers to specify Fiery print queues and Fiery
users.
No special configuration of AppleShare servers is
required.
On the Fiery Control Panel, configure, at a
minimum, the Server Setup, Network Setup, and
Printer Setup. After the initial Setup, you can
configure the remaining Setups from the Control
Panel or Command WorkStation.
At each computer from which users print to
the Fiery:
•Install the appropriate printer files and connect
to one or more queues.
•Install Fiery utilities and an Internet browser for
those computers that will use them.
•Verify the Fiery in the list of printers and run a
test print.
Fiery available on the network
Page 16

1-4 Connecting to the Network
1
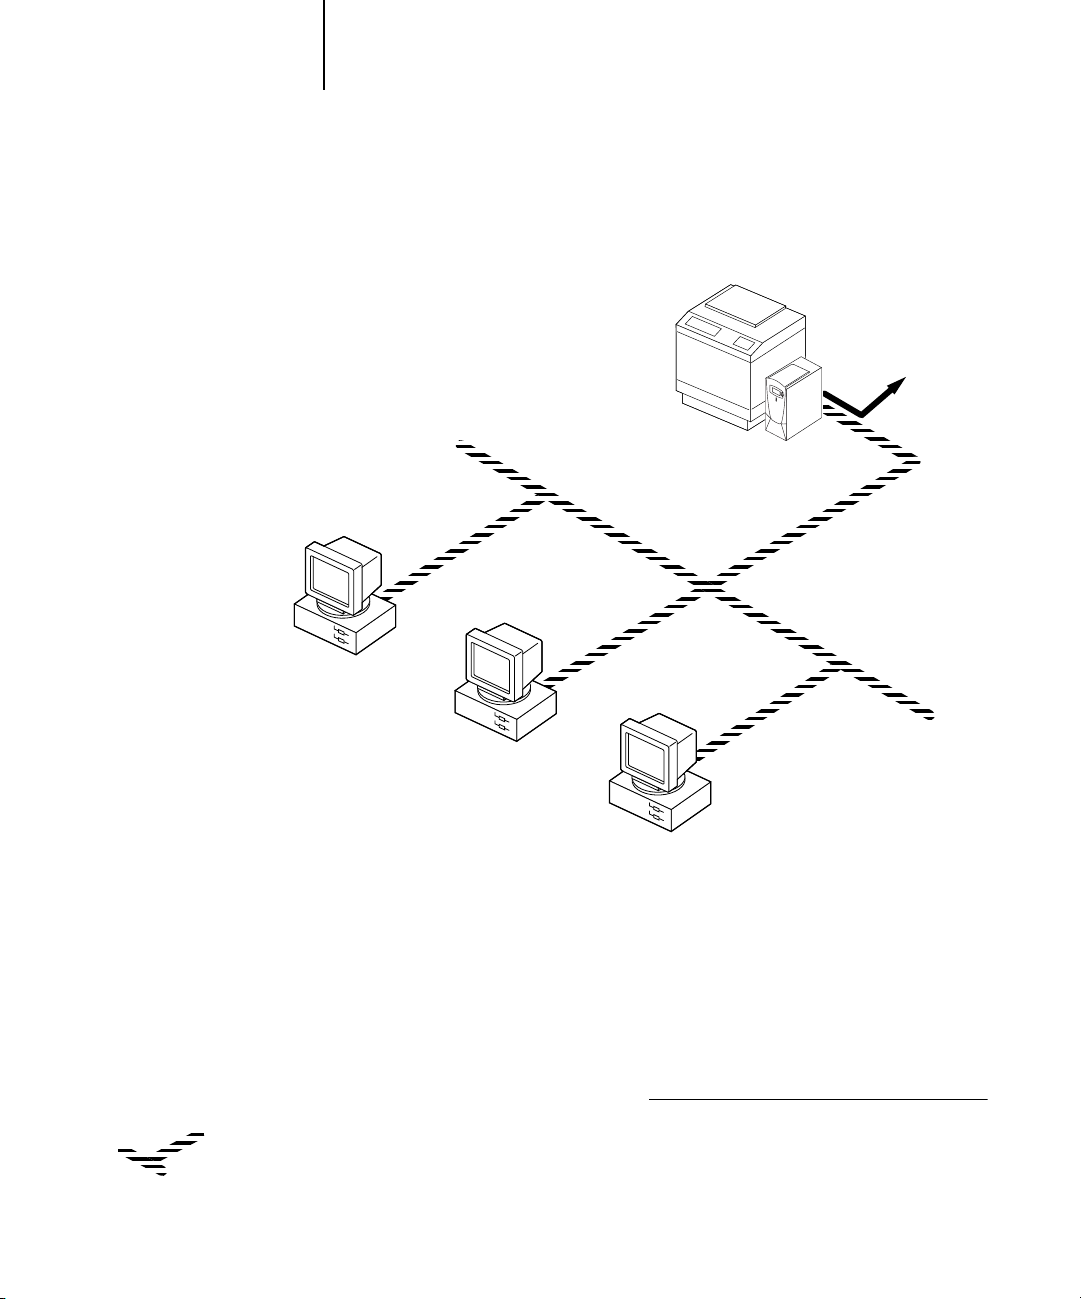
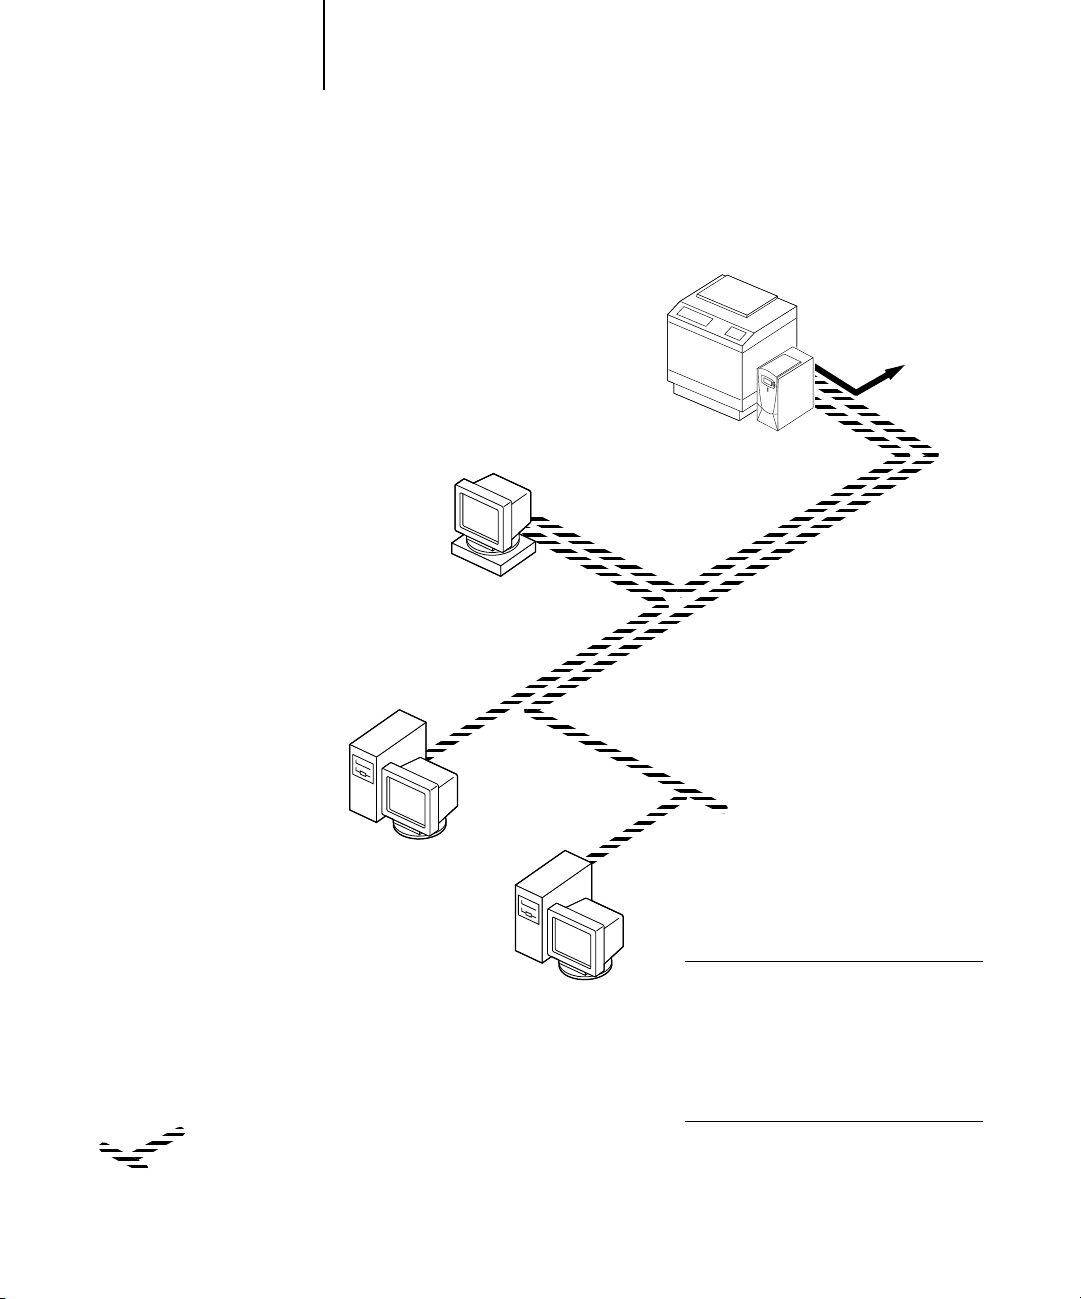
Quick path to installation
The diagrams on the following pages show typical systems you can use to print and run
Fiery software from remote workstations. Find the page with your preferred platform
and network type, and then look up the setup procedures referenced in the “Key to
setup” in the upper-left corner of each diagram.
The diagrams describe devices that use the supported networking protocols. They are
logical diagrams and are not intended to describe the physical arrangement (topology)
of devices on the network. A variety of physical arrangements is possible with each
logical arrangement. For example, twisted pair Ethernet networks commonly use a star
configuration around a hub, rather than a bus arrangement. The design of physical
networks is beyond the scope of this manual.
If your network uses more than one protocol or more than one type of workstation,
combine the setups listed for each component of your system. Multiple protocols
(shown in the diagrams as parallel lines) can run on the same cable. A solid connection
from the Fiery with an arrow indicates that other supported network types can be
operational at the same time.
A Token Ring card is required for connection to a Token Ring network. For more
information, see Appendix A.
NOTE: The IPX/SPX and TCP/IP functionality outlined in this section is available on
both Ethernet and Token Ring networks. AppleTalk is supported on Ethernet only.
The protocols used in these diagrams are indicated as follows:
IPX (Novell)
AppleTalk
TCP/IP (lpd,
nbt, or http)
Other
Page 17
1-5 Quick path to installation
1
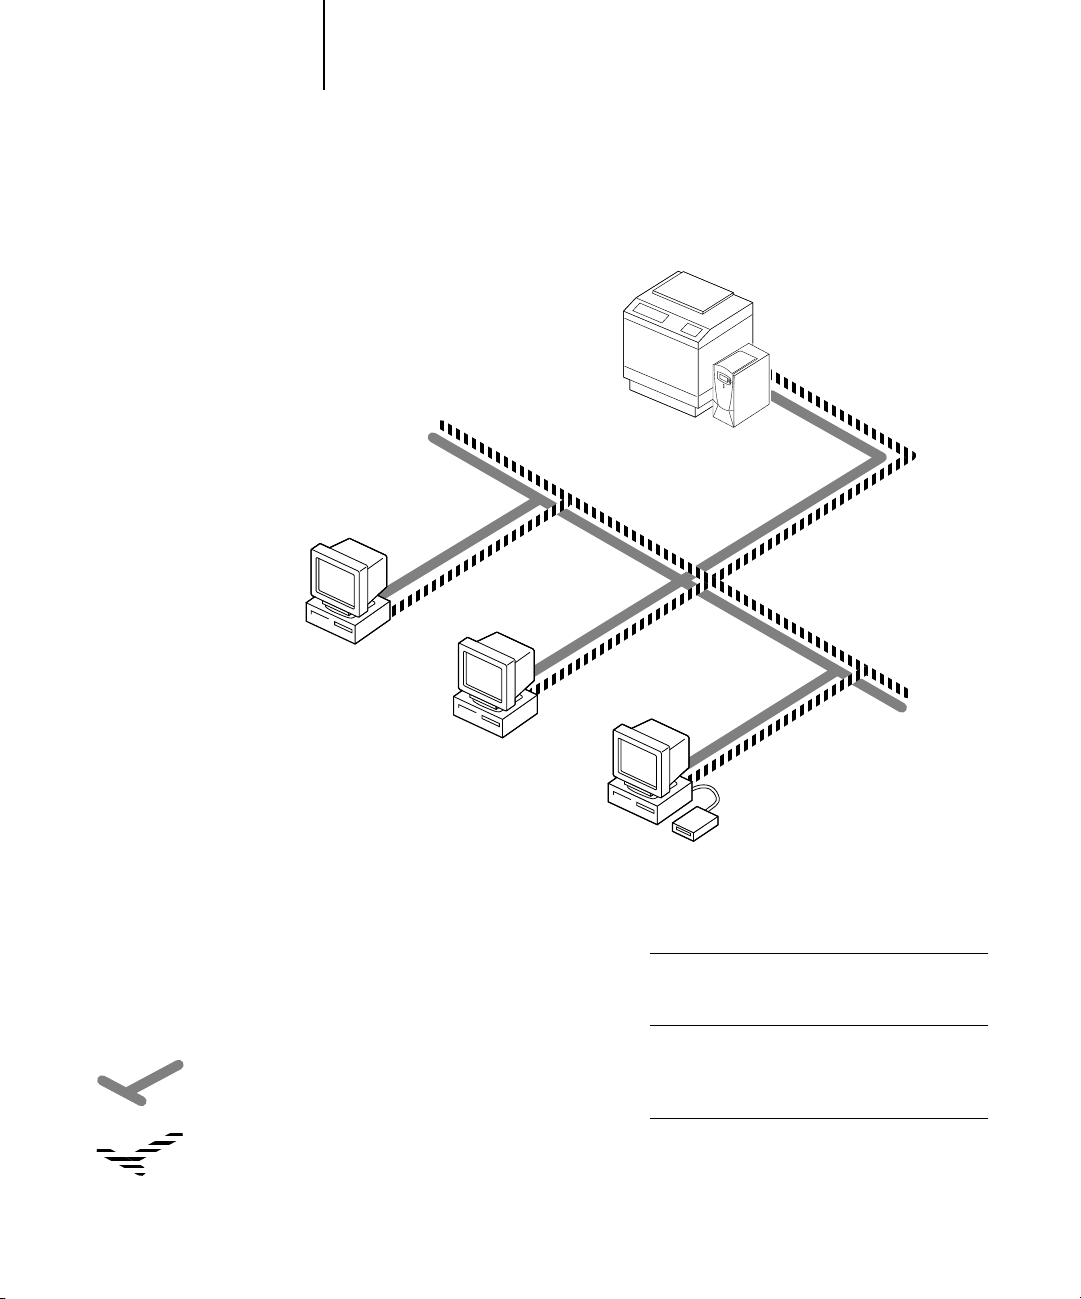
Mac OS environment with AppleTalk
Key to setup:
1Mac OS computer User Software Installation Guide
2Fiery Setup Chapter 4
Fiery connected to copier/printer
2
TCP/IP (http) for
Fiery WebTools
AppleTalk
Mac OS computer
AppleTalk protocol
TCP/IP
1
Mac OS computer
1
Mac OS computers can print directly.
Mac OS computer
1
Printing on this network
Mac OS computers can print directly using the
AppleTalk protocol.
For using Fiery Utilities
Fiery utilities can be used with the AppleTalk
protocol. To use ColorWise Pro Tools and Fiery
™
, TCP/IP is required.
Link
For using Fiery WebTools
A Mac OS computer with TCP/IP (http) loaded
Fiery WebSetup is not supported on Mac.
Page 18
1-6 Connecting to the Network
4
1
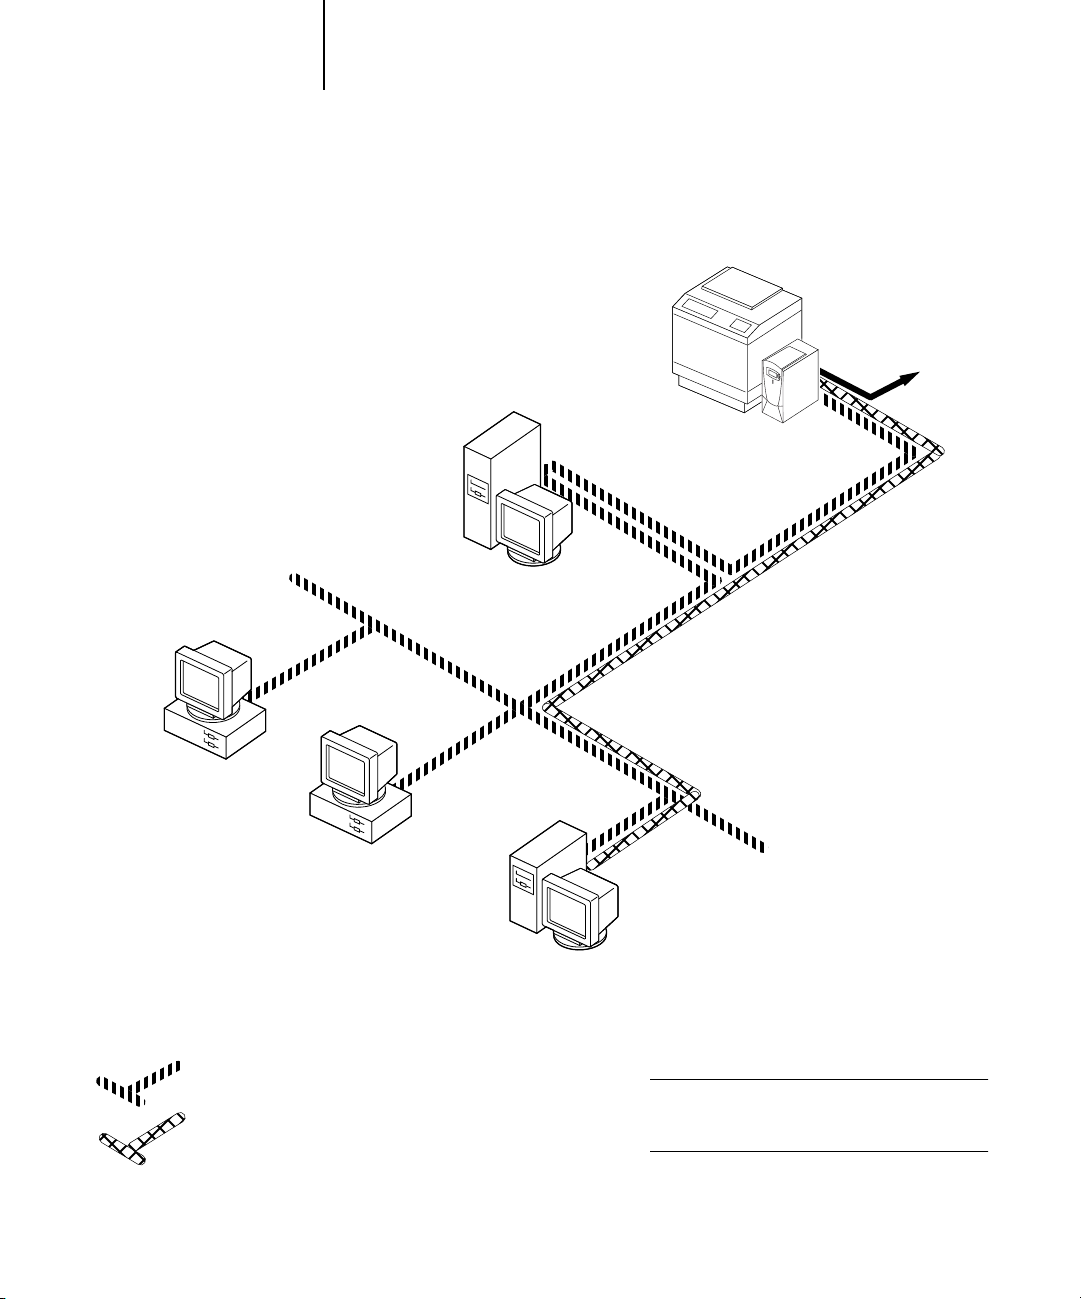
Windows computers in a Novell environment
Key to setup:
1NetWare server page 2-14
2Fiery Setup Chapter 4
3NetWare client User Software Installation Guide
Windows computer with SPX page 2-9
Fiery connected to copier/printer
2
Another supported
protocol
Windows computer:
NetWare client
3
IPX protocol
SPX protocol (TCP/IP
or AppleTalk
possible)
IPX
Windows computer:
NetWare client
3
NetWare server
1
Windows computer:
NetWare client
running SPX
3, 4
IPX
TCP/IP (http) for Fiery WebTools
Printing on this network
All Windows computers can print through the
NetWare server.
For using Fiery WebTools
A Windows computer with TCP/IP (http) loaded
Page 19
1-7 Quick path to installation
1
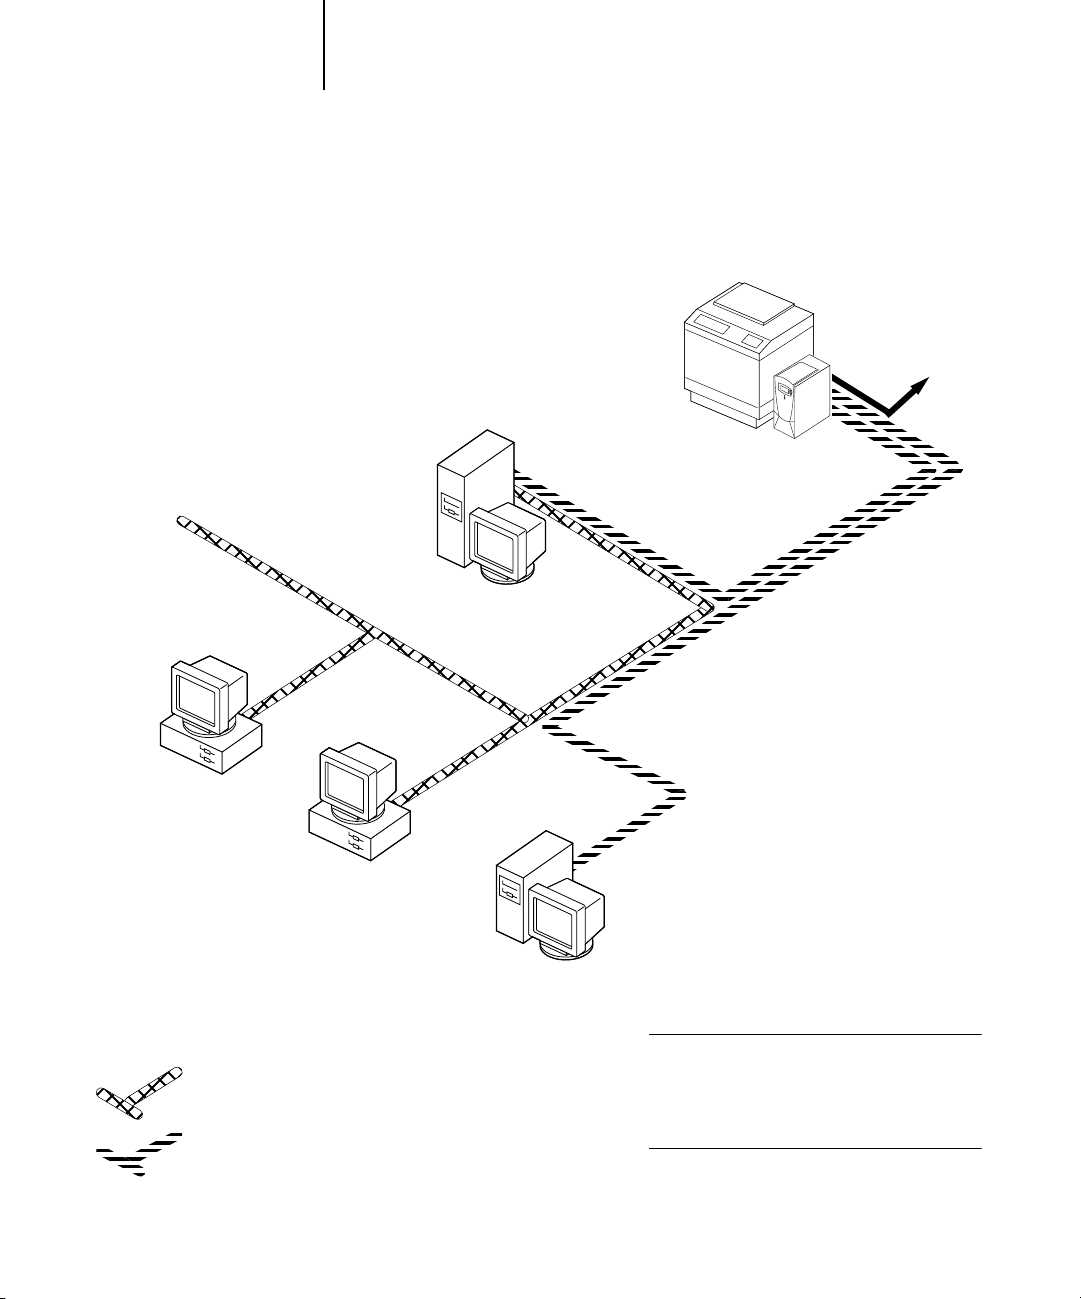
Windows NT 4.0 Server environment
Key to setup:
1 Windows NT 4.0 Server page 2-3
2Fiery Setup Chapter 4
3 Windows NT 4.0 client page 2-6
Windows NT Workstation
or Windows NT Server
acting as print server
1
LAN with
NETBEUI, etc.
Another supported
protocol
Fiery connected to copier/printer
2
TCP/IP (lpd) for printing
TCP/IP (http) for Fiery WebTools
TCP/IP for Fiery utilities
Windows computer
3
Windows computer
NETBEUI or other protocol available on
the clients and the server
TCP/IP
3
Windows NT 4.0 computer
with TCP/IP loaded
1
Printing on this network
Windows clients can print using a protocol
available on the Windows NT 4.0 print server.
Windows NT 4.0 computers can print using
TCP/IP with the lpd protocol.
For running Fiery utilities and Fiery WebTools
A Windows NT 4.0 computer with TCP/IP loaded
Page 20
1-8 Connecting to the Network
1
Windows computers using Windows printing
Key to setup:
1 Windows computer User Software Installation Guide
2Fiery Setup Chapter 4
Another supported
protocol
Fiery connected to copier/printer
2
TCP/IP (nbt)
Windows computer
TCP/IP (nbt) protocol
1
Windows computer
1
Windows computer
1
For Windows printing
Windows (SMB) printing enabled on the Fiery
Windows NetBios and TCP/IP enabled on the
computer
Page 21
1-9 Quick path to installation
1
UNIX workstations and Windows NT 4.0 computers on a TCP/IP network
Key to setup:
1 UNIX server/host page 2-17
2Fiery Setup Chapter 4
3 UNIX workstation page 2-17
4TCP/IP client User Software Installation Guide,
Chapter 4
5 Windows NT 4.0 client page 2-6
UNIX server or
workstation
1, 3
Another supported
protocol
Fiery connected to copier/printer
2
TCP/IP (lpd) protocol
TCP/IP client PC
4
TCP/IP (lpd, http, and ipp)
Windows NT 4.0 computer
with TCP/IP loaded
5
Printing on this network
UNIX workstations with the TCP/IP (lpd)
protocol can print directly and act as host
for shared printing.
TCP/IP clients can print through UNIX
server or directly; requires TCP/IP and the
lpr print service loaded.
For running Fiery utilities and Fiery WebTools
Windows computers with TCP/IP loaded can
use these applications.
Page 22
1-10 Connecting to the Network
1
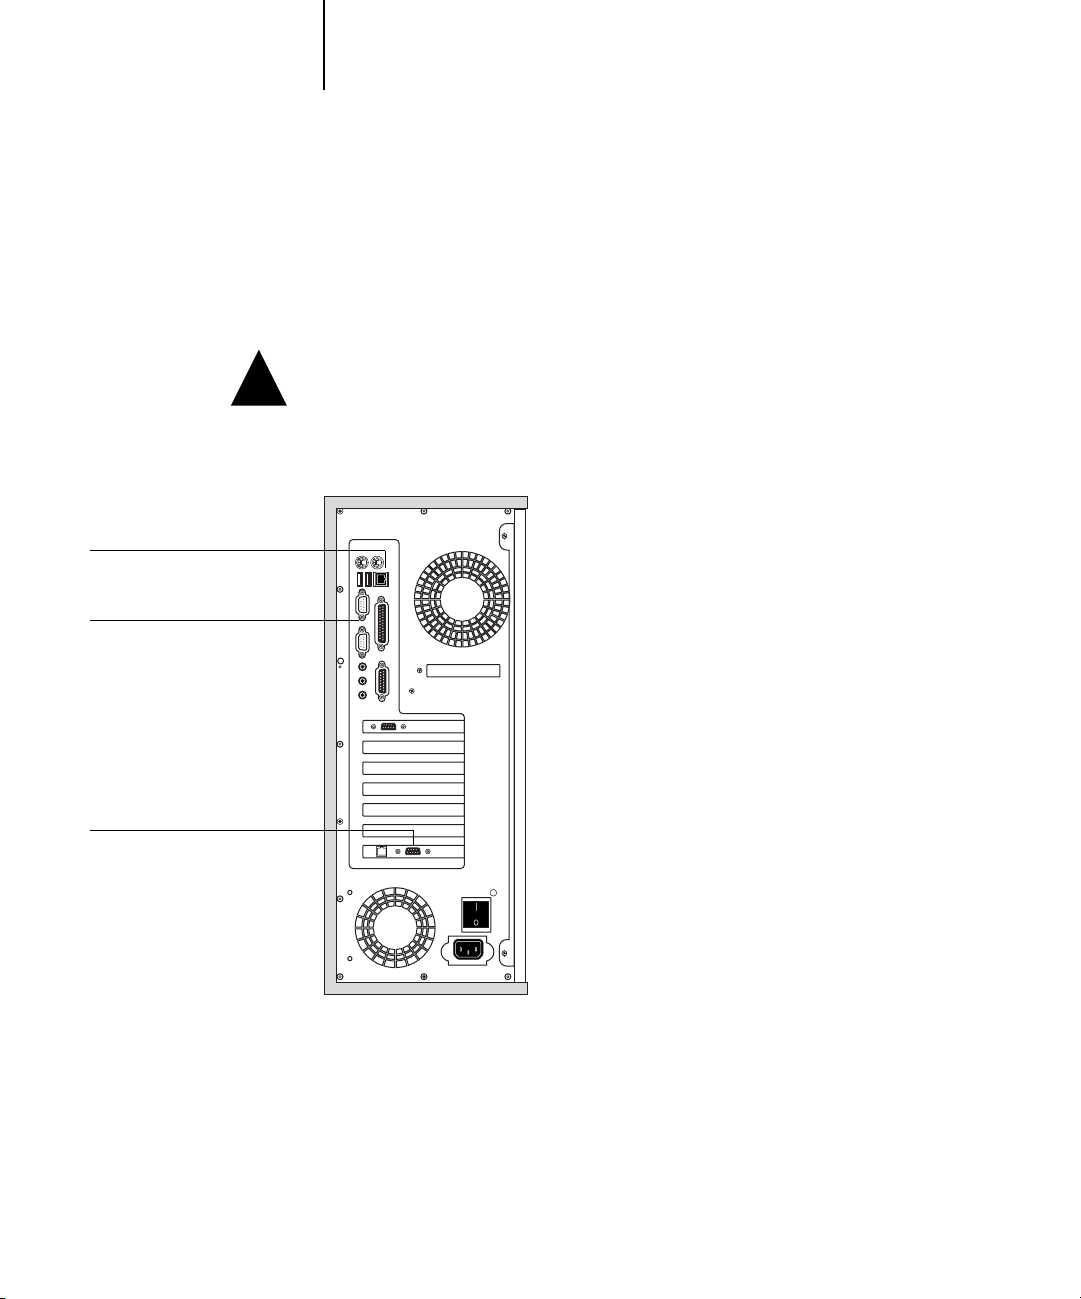
Connecting network cable to the Fiery
In this section, the back panel of the Fiery is illustrated, followed by information for
connecting to the Ethernet board. For information about connecting to a Token Ring
network, see Appendix A.
!
10/100BaseT Ethernet (RJ-45)
Dongle
Token Ring
Shut down the Fiery
finished processing, wait five seconds after the system reaches the Idle state before using
the power switch to turn it off. For the proper shutdown procedure, see page 7-11.
Back view of the Fiery
before attaching it to any network device. If the Fiery has just
Page 23

1-11 Connecting network cable to the Fiery
1
Ethernet connection
For Ethernet connections, the Fiery supports Unshielded Twisted Pair (UTP) cabling,
defined as Category 5 for use with 100BaseT; or as Category 3, Category 4, or
Category 5 for use with 10BaseT. The cable uses an 8-pin RJ-45 connector that plugs
into the RJ-45 socket on the Fiery.
NOTE: The 100BaseT type supported by the Fiery is 100BaseTX, also known as Fast
Ethernet. If an Ethernet hub is used, it must be a 100BaseTX hub. The term
“100BaseT” is used to refer to 100BaseTX.
TO CONNECT TO THE ETHERNET BOARD
• Connect the network cable to the RJ-45 connector on the back of the Fiery.
You must use a Category 5 unshielded twisted pair cable network cable for 100BaseT.
Token Ring connection
For Token Ring connections, the Fiery supports Unshielded Twisted Pair (UTP)
cabling with an RJ-45 connector and Shielded Twisted Pair (STP) with a DB-9
connector.
If the Token Ring option is installed, you cannot enable both Ethernet and Token Ring
simultaneously. For more information, see Appendix A.
TO CONNECT TO THE TOKEN RING BOARD
• Connect the network cable to the proper connector on the back of the Fiery.
Page 24

Page 25

2-1 Fiery on a TCP/IP network with Windows NT 4.0
2
Chapter 2: Setting up Network Servers
This chapter describes environments that typically include one or more network
servers—Novell NetWare, Windows NT 4.0, and Windows 2000 servers—that share
printing to the Fiery. It describes setting up servers that use IPX/SPX or TCP/IP
protocols for communicating with the Fiery. In addition, it includes guidelines for
setting up direct communication from Windows NT 4.0 workstations or UNIX
workstations, where a network server is optional. This chapter also outlines the
requirements for users to print to the Fiery and run Fiery utilities and Fiery WebTools.
The Fiery can accept jobs concurrently from NetWare, Windows NT 4.0, and
AppleShare servers, as well as jobs sent directly from Windows NT 4.0 or UNIX
workstations. Because AppleShare servers require no special configuration, they are
not discussed in this chapter, except for use in a Windows NT 4.0 environment
(see the following section).
If your network is based on Windows NT 4.0, proceed to the following section.
For information on UNIX workstations, proceed to page 2-17.
Fiery on a TCP/IP network with Windows NT 4.0
When a Windows NT 4.0 computer is configured to connect to the Fiery using
TCP/IP, it can print directly to the Fiery. If the computer shares the printer over the
network, it is acting as a print server to Windows NT 4.0/2000 clients. Client
computers print to the Fiery by printing to the Windows NT 4.0 print server. You
can then monitor and control printing at the Windows NT 4.0 server computer.
With TCP/IP protocols loaded, you can run Fiery utilities and Fiery WebTools from a
Windows NT 4.0/2000 or Windows 9x/Me/XP computer.
The Windows NT 4.0 server can also use AppleTalk protocols to print to the Fiery as
an alternative to TCP/IP.
NOTE: When you create a printer to share with AppleTalk users, do not “capture” the
printer. Capturing the printer forces all users to print to the server, rather than directly
to the printer. If you capture the printer, Fiery print connections will not appear in the
Mac OS Chooser.
Page 26

2-2 Setting up Network Servers
2
• Make sure you have a valid IP address for the Fiery and any workstations that will
• In Fiery Setup, enable TCP/IP and enter the IP address, subnet mask, and gateway
• Make sure the Fiery name and address are listed in a domain name server (DNS) or
• Make sure the system host table includes the correct internal name for the Fiery as a
Tips for experts—Windows NT 4.0 with TCP/IP
Setting up printing from Windows NT 4.0 using TCP/IP protocols is similar to
setting up UNIX workstations with TCP/IP. When TCP/IP network connections are
made from Windows NT 4.0 workstations, note the following:
print to it or run the Fiery utilities.
address for the Fiery.
You can enter these addresses manually or use DHCP, RARP, or BOOTP protocols to
assign them dynamically.
hosts name database used by your system.
remote printer.
For more information, see page 2-18.
•For Windows NT 4.0, install the appropriate printer driver files on the Windows NT 4.0
server.
For more information, see the User Software Installation Guide.
• Repeat the installation for all users who print to the Fiery.
Each server and workstation running the Fiery utilities with TCP/IP also needs the
TCP/IP protocol and the Fiery utility software.
Page 27

2-3 Fiery on a TCP/IP network with Windows NT 4.0
2
Configuring a Windows NT 4.0 server to communicate with
the Fiery
To configure a Windows NT 4.0 server to communicate with the Fiery, follow these
general steps. More detail is provided in subsequent sections in this chapter and in
your Microsoft documentation.
• Load the TCP/IP network protocol on the server and configure it with an
IP address, subnet mask, and gateway.
•Enter the host name of the Fiery in the host database used by your system (see
page 2-4).
•Perform Fiery Setup.
•On the Windows NT 4.0 server, create a printer for each Fiery print connection,
install the appropriate printer drivers, and (optionally) share the printer on the
network (see page 2-5).
•Enter the host name and remote printer name of the Fiery in the printer connection.
For more information, see page 2-18.
•If the Windows NT 4.0 server is also a workstation, install Fiery utilities (see the
User Software Installation Guide).
Page 28

2-4 Setting up Network Servers
2
Adding the Fiery to the TCP/IP network
If your TCP/IP network consists of Windows NT 4.0, Windows NT 4.0 clients, and
Windows 2000 clients, follow the procedures in this section. If the network also
includes UNIX workstations, also see the procedures on page 2-18.
TO ADD THE FIERY TO A TCP/IP NETWORK WITH A WINDOWS NT 4.0 SERVER
1. Register the IP address of the Fiery in the host name database used by your system.
For installations that do not have a network administrator or central host name
database, add the Fiery to the hosts file on the Windows NT 4.0 server. Also add
it to the hosts file on any workstations that have TCP/IP loaded and will use the
Fiery utilities.
The Windows NT 4.0 hosts file provides compatibility with the UNIX hosts file.
The hosts file is used as a local Domain Name Services (DNS) equivalent. It has the
same format as the /etc/hosts file on UNIX servers. The format of the hosts entry is:
IP Address<TAB>host name<TAB>#comments
where <TAB> indicates that you press the Tab key.
To determine the IP address and server name of your system, print a Configuration
page (see page page 7-9).
NOTE: If the Fiery has already been defined in an /etc/hosts file or equivalent host
name database on a UNIX workstation on your network, we recommend you use the
same host name here as you used for the name of the remote printer in the
/etc/printcap file.
2. Perform Fiery Setup to support TCP/IP printing.
Enter the options in Protocol Setup (IP address of the Fiery, subnet mask, and gateway
address).
Page 29

2-5 Fiery on a TCP/IP network with Windows NT 4.0
2
Installing the Fiery as a shared printer
The first step in creating a printer is installing the printer driver files, which give your
applications access to printer features. You can use the installation instructions in the
User Software Installation Guide for every workstation that will print directly and
independently to the Fiery. However, if you are an administrator running a
Windows NT 4.0 Server, Windows NT 4.0 Workstation, or Windows 2000
Professional computer, you can also create a printer and share it with clients on the
network. This allows clients who do not have permission to establish an independent
network connection to the Fiery to print through the server.
You can specify sharing of the printer during installation of the Fiery printer files. If
you have not yet installed the Fiery printer files on the Windows NT 4.0 print server
computer, do so now, following the instructions in the User Software Installation Guide.
During installation, enter the information necessary to share the Fiery.
If you have already installed the Fiery printer files on the computer you are using as an
NT 4.0 print server, see your Windows documentation for information about sharing
the Fiery.
If more than one Fiery print connection is published (for example, if both the Print
queue and the Hold queue are published), you may want to create a printer for each
print connection, so you and other users can print to each connection directly. When
prompted to specify the printer name, enter a name that indicates the Fiery print
connection.
Page 30

2-6 Setting up Network Servers
2
Configuring clients of a Windows NT 4.0 server
Each client of a Windows NT 4.0 server is already using a network protocol to
communicate with the server. Each client can print to the Fiery if it has been shared by
a Windows NT 4.0 Server, Windows NT 4.0 Workstation, or Windows 2000
Professional computer. In that case, the client does not have to use the same network
protocol to connect to the Windows NT 4.0 server as the server uses to communicate
with the Fiery.
TO CONNECT AND PRINT TO THE FIERY SHARED BY A
WINDOWS NT 4.0 SERVER
•For Windows 9x/Me/2000 clients: Before printing, double-click the Windows NT 4.0
server icon in the Network Neighborhood window, and then double-click the printer
name.
You are prompted to set up the printer. When you choose to set it up, the Add Printer
Wizard dialog box appears. Follow the procedures in the User Software Installation
Guide.
•For Windows NT 4.0 Workstation clients: Before printing, connect to the print server
computer and select the Fiery. Right-click and choose the Open command.
When prompted, click Yes to have Windows set up the printer.
After clients have selected the printer, they can choose it from the Print Setup, Page
Setup, or Print dialog box of their application. Clients can change printing options for
their own job, but printer properties appear dimmed, and unavailable for changing.
When a client chooses Print, the job is transmitted to the Windows NT 4.0 print
server, and from there to the selected print connection on the Fiery. The job is listed in
the Print Manager on the client workstation, and the administrator can track it in the
Fiery window in the Print Manager on the Windows NT 4.0 print server.
Page 31

2-7 Fiery on a TCP/IP network with Windows NT 4.0
2
• Print a Configuration page (see page 7-9).
• Load the TCP/IP network protocol on the computer (for Windows 9x/Me/XP only, also
Configuring Windows computers without a Windows NT 4.0 server
If your network does not have a Windows NT 4.0 server, Windows 9x/Me/XP and
Windows NT 4.0/2000 workstations can still print to the Fiery. This method of
printing is called Windows, or SMB, printing. In this type of network environment,
computers running Windows 9x/Me/XP and Windows NT 4.0 Workstation operate
in a peer-to-peer environment and communicate directly with the Fiery when users
send print jobs.
Many of the same prerequisites for setting up printing through a Windows NT 4.0
server also apply to setting up Windows printing where a server is not present. The
prerequisites are summarized in the following list, and you can find more detail in your
Microsoft documentation.
Use the information on this page to determine the current Fiery settings.
load Client for Microsoft Networks).
•Verify the Workgroup name of the computer in the Windows Network control panel.
Make sure the Workgroup name is the same as the one listed in Fiery Setup.
•For Windows 9x/Me/XP only, in the Windows Network control panel, configure the
computer to allow file sharing, and then restart the computer.
• Ping the Fiery to verify TCP/IP communication is successful (see page 2-19).
Page 32

2-8 Setting up Network Servers
2
Fiery on a NetWare 4.x or 5.x network
The NetWise™ features built into the Fiery support the following network operating
environments:
•NetWare 4.x or 5.x—NDS (Novell Directory Services)
•Servers running NetWare 4.x or 5.x in bindery emulation mode
For Ethernet-based networks, the IPX/SPX protocol is supported. For Token Ringbased NetWare networks, both IPX/SPX and TCP/IP are supported.
NOTE: Setting up a NetWare environment correctly requires the presence and active
cooperation of the Novell network administrator. You must have administrator
privileges on the network to create new NDS or bindery objects.
The term “bindery server” is used to refer to a Novell file server running NetWare 4.x
or 5.x in emulation mode. The term “NDS” is used to describe components of a
NetWare operating system running NetWare 4.x or 5.x in native mode.
NetWare clients print to the Fiery through the Novell network server. Server setup and
client network setup are outlined in this chapter, client printing setup is described in
the User Software Installation Guide, and printing is described in the Printing Guide.
The Fiery can receive print jobs from NetWare clients over Ethernet or Token Ring
network topologies. (For information about the Token Ring option, see Appendix A.)
During Fiery Setup, you select the frame type or types that will be used for
communication between the Fiery and network servers. Frame type refers to the
format of a communications packet; frame types are specified in a startup file when the
NetWare server (or any other workstation) loads its network drivers.
Page 33

2-9 Fiery on a NetWare 4.x or 5.x network
2
•A minimum connection to the Fiery consists of a NetWare file server, a NetWare
•A single directory tree and up to eight bindery servers can be configured
• The Fiery looks for print jobs on one NetWare print server per bindery server.
• Each print server can store jobs for any print connection on the Fiery.
Tips for experts—IPX networks
Setting up the Fiery is similar to setting up any other PostScript printer on the
network.
The Fiery with IPX connections has the following characteristics:
print server, and a NetWare queue.
simultaneously.
This limit is the same regardless of whether the Fiery is connected to the network via
Ethernet, via Token Ring, or both.
Overview of IPX printing to the Fiery
NetWare file servers support the creation of print queues, which are storage areas for
print jobs. When a client on a remote computer decides to print, the job is directed to
a print queue on the NetWare file server and spooled to the NetWare server disk,
freeing up the client workstation.
You must give the NetWare queue names a specific extension corresponding to the
Fiery print connection, as follows:
_print
_hold
_direct
NOTE: These extension names must be in English and in all lowercase letters.
Page 34

2-10 Setting up Network Servers
2
You do not need to rerun Setup when you add or remove a NetWare queue; however,
you should restart the Fiery after you create or remove a queue.
When the Fiery is configured to connect to a NetWare server, it polls the NetWare
server for jobs in each of its queues. If jobs are found, they are automatically transferred
over the network to the matching connection on the Fiery. For example, jobs from the
NetWare queue with the _print extension are sent to the Fiery Print queue. While a job
is processed and printed, a record of the job is being created. You can access the Job
Log containing these records at any time.
Configuring a NetWare 4.x server for printing
The following sections explain how to set up a NetWare file server so networked users
can print to the Fiery from their workstations, and the Fiery can obtain print jobs from
the NetWare server.
For each NetWare file server that you configure, follow these general steps. More detail
is provided in subsequent sections and in your NetWare documentation.
•Make sure the server is connected to a functioning IPX network.
• Log in as the Supervisor on a PC connected to the NetWare file server.
•For NetWare 4.x installations, set up an NDS connection (see page 2-12).
•For NetWare 4.x in emulation mode, set the bindery context (see page 2-12).
•For NetWare 4.x in bindery emulation, set up a file server, print server, and print
queue for the Fiery (see page 2-13).
With bindery services, you can route all Fiery print jobs through the same NetWare file
server, or you can configure more than one file server to handle Fiery jobs.
The functions you perform on the Novell server, the Fiery, and the client workstation
are summarized in the following tables. The first table applies to NDS connections,
and the second to bindery connections. Complete the operations in the left column,
then the center column, then the right column.
Page 35

2-11 Fiery on a NetWare 4.x or 5.x network
2
Configuring an NDS connection
Abbreviations:
FS = file server
PS = print server
PQ = print queue (on the NetWare server)
On NDS FS
In NETADMIN:
Create NDS PQs
Create NDS printer
and assign PQs
Create PS and assign
the printer
Configure users of
the PQs
Configuring a bindery connection
On Bindery FS
In PCONSOLE:
Select NetWare FS
(up to 8)
For each FS:
Configure PS
Configure PQ
Configure users of
the PQ
Port Setup
Protocol Setup
Service Setup
Port Setup
Protocol Setup
Service Setup
In Setup from
Command WorkStation
Ethernet Setup
IPX/SPX Setup—select frame
types
PServer Setup and NDS Setup
Select Root
Browse to select PS
Specify PQ search root
(optional)
Set Polling Interval
In Setup from
Command WorkStation
Ethernet Setup
IPX/SPX Setup—select frame
types
PServer Setup and Bindery Setup
Add FS (up to 8)
Set Polling Interval
On client workstation
Install user software.
For printing:
Connect client to PQs that
you set up on the NetWare FS
(associated with the PS
selected in NDS Setup).
For running Fiery utilities:
Configure the connection to
the Fiery.
On client workstation
Install user software.
For printing:
Connect client to PQs that
you set up on the NetWare FS
(associated with the PS
selected in Bindery Setup).
For running Fiery utilities:
Configure the connection to
the Fiery.
Page 36

2-12 Setting up Network Servers
2
Setting up an NDS connection
In NDS, all NetWare entities (objects) are organized in a hierarchical tree structure.
Objects have a name, properties, and a context that defines the location of the object
in the directory tree. For the Fiery, you are mainly concerned with defining a printer,
a print server object, and one or more print queue objects. Objects are created in
NetWare administrator programs such as PCONSOLE, NETADMIN, or NetWare
Administrator.
The top-level tree object is known as the [Root] object. The name of the [Root] object
is also the name of the tree. Below the [Root] are other objects: either containers
(which consist of other objects) or leaf objects (which do not contain other objects).
Access to objects is controlled by rights that are defined as properties of each object.
Rights are established by network administrators.
Setting the NetWare 4.x bindery context
You can connect only one directory tree to the Fiery. If you need to connect additional
NetWare 4.x servers, you can do so by using bindery emulation. You can connect up to
eight bindery servers to the Fiery.
NOTE: The file server you select must not be in the same tree as the one you selected in
NDS Setup.
In order to set up the NetWare 4.x server in bindery emulation mode for printing to
the Fiery, the network administrator must do the following:
•Determine the Directory Services path to the container in which the print server and
the print queue for the Fiery will be created.
The container defines the “bindery context” for your network structure.
•Edit the network startup file to set the bindery context.
•Activate the new bindery context.
Page 37

2-13 Fiery on a NetWare 4.x or 5.x network
2
Setting up a NetWare print queue for bindery
For NetWare 4.x in emulation mode, the NetWare print server and print queue for
the Fiery are created and configured from NetWare Print Console (PCONSOLE), a
NetWare utility that is stored in the NetWare PUBLIC directory.
As with NDS, you can create several NetWare entities on a Novell server, and then you
can select them in Network Setup (see page 4-26).
Setting up NetWare Windows clients for printing
Before setting up client workstations for printing, perform Network Setup (see
page 4-14), and verify that the settings reflect the entities you created in the NetWare
administrator utilities (see page 2-10).
NOTE: For printing to the Fiery, connect all Windows clients to a NetWare server and
permit them to connect to the Netware print server or servers on which you defined a
NetWare print queue for the Fiery.
After the Novell server and the Fiery have been set up, client setup consists of:
•Installing the networking protocol, binding it to the network adapter card, and
permitting the client to log in to the NetWare file server.
On Windows 9x/Me workstations, load both the IPX/SPX-compatible protocol and
the Client for NetWare Networks from the Network Control Panel.
On Windows NT 4.0/2000 workstations, install Client Services for NetWare.
Use the CSNW option in the Control Panel to set printing options and specify a
preferred NetWare server.
•Setting up the Fiery as a PostScript printer by installing a PostScript printer driver
and the Fiery PPD (PostScript printer description).
•Adding a network port and connecting the workstation to one or more NetWare
queues that have been defined for the Fiery.
•Installing Fiery software, such as color reference files.
For details, see the User Software Installation Guide.
Page 38

2-14 Setting up Network Servers
2
Fiery on a NetWare 5.x network with NDPS
The Fiery supports printing over a NetWare 5.x network running either the TCP/IP
protocols or the IPX protocol. For pure IP printing, the Fiery takes advantage of
features in NDPS (Novell Distributed Print Services). For IPX printing, the Fiery
supports the PServer service in Bindery emulation or through NDS (Novell Directory
Services). For more information on IPX-based printing, see “Fiery on a NetWare 4.x or
5.x network” on page 2-8.
NOTE: Setting up a NetWare environment correctly requires the presence and active
cooperation of the Novell network administrator. You must have administrator
privileges on the network to create new NDS or bindery objects.
NDPS is not like earlier queue-based versions of NetWare printing. Instead, you use an
NDPS Manager and a Printer Agent, which control the tasks previously handled by a
print queue, print server, and spooler. You can also make the printer driver available for
clients to download from Windows 9x/Me/XP and Windows NT 4.0/2000
computers.
The Fiery can receive print jobs from NetWare clients over Ethernet or Token Ring
network topologies. (For information about the Token Ring option, see Appendix A.)
During Fiery Setup, you select the frame type or types that will be used for
communication between the Fiery and network servers. Frame type refers to the
format of a communications packet; frame types are specified in a startup file when the
NetWare server (or any other workstation) loads its network drivers.
Tips for experts—NetWare 5.x networks
Setting up the Fiery in an NDPS environment is similar to setting up any other
PostScript printer on the network. Refer to the following information when setting up
the Fiery in such an environment:
• Make sure you have a valid IP address for the Fiery and for any workstations that will
print to it or run Fiery utilities.
• In Fiery Setup, enable TCP/IP and enter the IP address, subnet mask, and gateway
address for Fiery. You can enter these manually or use DHCP, RARP, or BOOTP protocols
to assign the addresses dynamically.
• Bidirectional communication features in NDPS are not supported on the Fiery.
Page 39

2-15 Fiery on a NetWare 5.x network with NDPS
2
Configuring a NetWare 5.x server for printing
Before you begin
The following procedure assumes NDPS has been installed during NetWare 5.x
installation and that a Broker is running on the server. Unless you have manually
unloaded the Broker, it loads and runs when you install NDPS. Make sure you are
using the latest NetWare 5.x service pack and Novell gateway. Finally, create an NDPS
Manager. For more information, see your NetWare documentation.
In Fiery Setup, make sure you have enabled TCP/IP (page 4-19) and LPD printing
(page 4-26) on the Fiery. You can ping the Fiery (page 2-19) to verify that TCP/IP
communication is successful.
Setting up the Fiery printer driver
You first need to create a directory for Windows NT 4.0/2000 or a folder for Windows
9x/Me in the NetWare server for NDPS to install the corresponding printer driver files
from the User Software CD.
TO SET UP THE PRINTER DRIVER FOR WINDOWS NT 4.0/2000
1. Log on to the Novell file server as a superuser or Administrator.
2. In the SYS:ndps\resdir\Prndrv\NT4/2000 directory, create a directory called Fiery.
3. From the User Software CD, copy the contents of the
ENGLISH\INSTALRS\PS_DRVR\WIN_NT/2000 folder to the Fiery directory.
TO SET UP THE PRINTER DRIVER FOR WINDOWS 9X/ME
1. Log on to the Novell file server as a superuser or Administrator.
2. In the SYS:ndps\resdir\Prndrv\Win9x/Me directory, create a folder called Fiery.
3. From the User Software CD, copy the contents of the
ENGLISH\INSTALRS\PS_DRVR\WIN_9x/Me folder to the Fiery directory.
Page 40

2-16 Setting up Network Servers
2
Setting up the Fiery on a NetWare 5.x network
Depending on the security needs at your organization, you can set up the Fiery as a
Public Access printer or a Controlled Access printer. The following procedure describes
setting up a Public Access printer. You can then convert the printer to Controlled
Access if necessary. For more information, see your NetWare documentation.
TO SET UP THE FIERY AS A PUBLIC ACCESS PRINTER
1. In NetWare Administrator, double-click the NDPS Manager object you created.
2. In the Details window for the NDPS Manager object, click Printer Agent List.
The list of Printer Agents appears.
3. Click New.
4. In the Printer Agent (PA) Name field, enter a name.
5. Under Gateway Types, select Novell Printer Gateway, and click OK.
6. In the Configure Novell PDS for Printer Agent dialog box, select “((NONE))”, and
click OK.
7. In the Configure Port Handler dialog box, choose “Remote LPR on IP” as the
connection type, and click Next.
8. For Host Address, enter the IP address of the Fiery.
Page 41

2-17 Fiery on a network with UNIX workstations
2
9. For Printer Name, enter the name of the Fiery print connection you want users to print
10. In the Select Printer Drivers dialog box, select the printer driver for Windows 9x/Me
11. Click Continue, and then click OK.
to, and click Finish.
This name must be either print or hold.
and the driver for Windows NT 4.0/2000.
Fiery on a network with UNIX workstations
When a UNIX workstation is configured with the lpd protocol and connected to the
Fiery over a TCP/IP network, it can print directly to the Fiery.
Setting up UNIX workstations requires an administrator with root privileges. After the
initial configuration, UNIX users simply submit print jobs to a named printer.
The job management tools, along with the other Fiery utilities and Fiery WebTools,
are unavailable on the UNIX platform. A Windows or Mac OS computer on the same
network as the UNIX computer that is set up to use TCP/IP for printing to the Fiery
can use the job management tools to manage print jobs that originate from all
workstations on the network.
Tips for experts—UNIX workstations
Setting up the Fiery in a UNIX environment has the same requirements as setting up
any printer or new device:
•A distinct IP address is required for the Fiery as well as for each workstation on the
network.
•A name must be selected for the Fiery that goes with the IP address.
• The IP address of the Fiery must be registered for the network in a host database, and
also on the Fiery itself.
• The Print queue, Hold queue, or Direct queue (or all) must be published.
Page 42

2-18 Setting up Network Servers
2
• The Fiery is a printer controller that understands lpd protocols.
• The Fiery has a remote printer name you must use in order to communicate with it
The following information applies especially to the Fiery:
successfully.
For details, see the next section.
Important note about the remote printer name
Whichever UNIX system you use, the name used for the remote printer (or rp in the
/etc/printcap file) in configuring the Fiery must be one of the following:
print
hold
direct
The remote printer name is also used when setting up your Windows NT 4.0
Workstation, Windows NT 4.0 Server, or Windows 2000 Professional computer to
connect to the Fiery over TCP/IP. Enter the remote printer name when you set up your
Windows NT 4.0 printer, as the “Name of printer or print queue on that (lpd host)
server” in the Add LPR Compatible Printer dialog box.
Setting up the Fiery on TCP/IP networks
Every machine (host) on a TCP/IP network, including the Fiery, must have a unique
32-bit internet address (IP address). Contact your network administrator to obtain an
address for the Fiery. Workstations on a TCP/IP network can print directly to the Fiery
as a remote printer, or can print to a Windows NT 4.0 server or UNIX workstation
acting as a print server. Since the Fiery spools jobs and acts as a print server, there is no
advantage in placing another print server between a workstation and the Fiery. If you
choose to do so, however, there is no difference in setup except that a client machine
does not have its own spooling area.
Page 43

2-19 Fiery on a network with UNIX workstations
2
TO SET UP FIERY PRINTING ON UNIX SYSTEMS
1. Specify the appropriate settings in Fiery Server Setup.
To access Fiery Setup, see page 4-8.
2. Specify the appropriate settings in Fiery Network Setup.
Enter a valid IP address, subnet mask, and gateway address for the Fiery.
3. Specify the appropriate settings in Fiery Printer Setup.
Publish the Print queue, Hold queue, and/or Direct queue.
TO SET UP TCP/IP FOR COMMUNICATION WITH THE FIERY
1. A superuser (with root login) must add the Fiery to the network’s IP host table or
other system database of network printers.
2. In the file or utility used by your network, specify the remote printer name, the print
server protocol, the queue, and the spool file for the Fiery name you assigned.
3. Make the Fiery available as a printer to other network users.
4. To verify the TCP/IP connection, ping the IP address or the host name. From any
computer on the network, at the command prompt, type:
ping <IP address>
Type the Fiery IP address assigned in Fiery Network Setup.
After the Fiery is set up as a network printer, you can also ping the name you gave to
the Fiery:
ping <hostname>
The server should respond with a message such as
Reply from <IP address> ...
Some systems will respond with a continuous display of output from the IP address.
To stop the output, type Control-C. You can use the ping command at any time.
Page 44

2-20 Setting up Network Servers
2
TO PRINT TO THE FIERY
• On a UNIX system running SunOS 4.x or other BSD-based variant, use the lpr command
to send a job to the Fiery.
• On a UNIX system running Solaris 2.x or any System V implementation of UNIX, use
the lp command to send a job to the Fiery.
• Windows NT 4.0 users with the TCP/IP protocol loaded can send print jobs to the Fiery
from their applications or from a command prompt.
When Windows NT 4.0 users print from applications, they can set print options with
the driver but not from the UNIX command line.
Managing print jobs
UNIX network administrators can use UNIX utilities for viewing the list of jobs, and
for printing and removing jobs that are spooled on UNIX servers. If the network
includes a Windows NT 4.0/2000 workstation that has TCP/IP protocols loaded, you
can use Command WorkStation or Fiery Downloader to download fonts and files.
You can also use the job management tools to manage jobs from remote workstations.
For more information, see the Job Management Guide.
Even without the Fiery utilities, you can:
•Set up the Fiery to print a log of printed jobs automatically after every 55 jobs
(see Job Log Setup on page 4-50).
•Print a Job Log manually at any time from the Command WorkStation Functions
menu (see the Job Management Guide).
Page 45

3-1 Levels of access and control
3
Chapter 3: Preparing for Fiery Setup
To prepare for printing at your site, you must do some initial Fiery configuration, or
Setup, to specify the network environment and the kind of printing you will do. Before
you perform Setup, you must decide the levels of access you will implement for your
site. Administrators and operators must also understand how Fiery system software is
structured in order to configure and use the Fiery system correctly.
Levels of access and control
When you configure the Fiery during Setup, you (as system administrator) implement
a particular level of control by enabling or not enabling print connections, passwords,
and access to Fiery WebTools. The level of control you implement can range from
minimum to moderate to maximum—or none at all.
•Minimum control might be appropriate for a small site where anyone on the local
network can control all printing and Fiery functions. Although there may be an
administrator or operator charged with certain duties, all users have equal access to
the system and job management tools.
•Maximum control might be appropriate for a high-volume printing environment
where an administrator or operator controls the job flow and all printing; jobs sent
by users are spooled (stored) to the Fiery disk until the operator decides it is time to
print them. In addition, only the administrator and operator have access to job
management tools. This is the recommended level of control.
NOTE: The term “job management tools” is used in this manual to refer to
Command WorkStation, Fiery Spooler, and Fiery WebSpooler.
Fiery print connections
The Fiery supports three print connections: Hold queue, Print queue, and Direct
connection. These print connections can be enabled, or “published,” to users on the
network when you configure Printer Setup. All published connections are constantly
checked for the presence of jobs. The Print queue and Direct connection give remote
users more direct access to the Fiery than the Hold queue. Therefore, do not publish
the Print queue and the Direct connection in environments where maximum control is
desired.
Page 46

3-2 Preparing for Fiery Setup
3
In addition, you can enable the Printed queue, which is a storage area for the most
recent jobs from the Print queue. The Printed queue makes it convenient to reprint
those jobs. In Setup, you can enable the Printed queue and specify the maximum
number of jobs retained in the queue (see page 4-13). Reprinting jobs in the Printed
queue requires the job management tools.
To use the Fiery utilities and Fiery WebTools, you must enable at least one of the print
connections.
Hold queue
Jobs sent to the Hold queue are spooled to the Fiery hard disk for printing at a later
time or for repeated printing. Because the Hold queue is a storage place, jobs sent to it
cannot proceed through the printing process until the operator intervenes using the
job management tools (see the Job Management Guide).
Print queue
This is the standard Fiery queue. Jobs sent to the Print queue are processed and printed
in the order they are received. Jobs prioritized by an operator with the job management
tools and jobs sent via the Direct connection can take priority over jobs sent to the
Print queue.
Direct connection
The Direct connection transmits jobs directly to the Fiery, but only when the Fiery is
Idle. If the Fiery is busy, the job remains at the user workstation until the Fiery is ready.
The job is then processed as soon as the previous job is finished and before the next
queued job is processed.
Jobs sent to the Direct connection are not stored on the Fiery hard disk, and cannot be
selected for reprinting, moving, or deletion. Therefore, the Direct connection provides
a measure of security for sensitive files. Jobs sent to the Direct connection do appear in
the Job Log, for accounting purposes.
You cannot use the Direct connection for lpd printing over TCP/IP.
NOTE: To download fonts to the Fiery, you must publish the Direct connection.
Page 47

3-3 Levels of access and control
3
Passwords
You can implement passwords as a means of controlling access to Fiery functions. The
Fiery allows you to set the following passwords in Setup:
•Administrator—from the Control Panel or Command WorkStation (or local Setup,
if you have installed the Fiery Advanced Controller Interface)
•Operator—from Command WorkStation or Fiery WebSetup
NOTE: By default, no passwords are set on the Fiery. If you do not specifically
set passwords, all users will have administrator privileges, which include access to
important functions such as Setup (including setting passwords), and job control.
We strongly recommend that you set at least an Administrator password to protect
the Fiery from random or accidental changes to Setup.
Administrator privileges
Administrator control, which confers control of Setup, is the highest level of control,
since the person who has access to Setup can control the printing and job management
environment. Administrator privileges include publishing print connections, setting
passwords, deleting fonts, controlling print jobs from the job management tools,
overriding job settings, clearing the Fiery of all job data, performing calibration,
defining default color profiles, and setting default values for print options.
When performing a function from the Fiery Control Panel that prompts you for the
Administrator password, you must enter it promptly. Otherwise, the Fiery Control
Panel returns to Idle, and you must start over again.
The administrator password also controls printer driver defaults for printer drivers
EX12
installed with Point and Print on Windows NT 4.0 clients. For information on
installing printer drivers with Point and Print, see the User Software Installation Guide.
Operator privileges
Operator control includes control of print jobs from the job management tools,
including the ability to override job settings.
Guest privileges (no password)
No password is needed for a user to log in as a Guest from the job management tools.
A Guest can view the status of active jobs but cannot make changes to jobs or to the
Fiery state.
Page 48

3-4 Preparing for Fiery Setup
3
Fiery WebTools
The Fiery can support Internet or intranet access with Fiery WebTools from Windows
computers. To enable use of Fiery WebTools, you must do the following in Setup:
•Enable TCP/IP.
•Set an IP address, subnet mask, and gateway address for the Fiery.
•Enable Web Services.
For more information, see Chapter 6.
You can set passwords to control access to Fiery WebTools features. If you do not
specifically set these passwords, all users have access to all Fiery WebTools functions
(see page 3-3). Fiery WebTools include Status™, WebSpooler™, WebLink™,
WebScan™, WebDownloader™, WebSetup™, and Installer™.
Status
The Status WebTool provides you with current information on the jobs processing and
printing on the Fiery. It is not affected by passwords. For more information, see the
Printing Guide.
WebSpooler
The WebSpooler interface is very similar to that of Command WorkStation. It allows
remote users to preview, manipulate, reorder, reprint, and delete jobs currently
spooling, processing, or printing on the Fiery. It also allows the administrator and
operator to edit and merge jobs (Thumbnails A and B) and view, print, or delete the
Job Log.
Fiery WebSpooler access can be controlled by setting an Operator password in Setup.
If you set a password, only users with that password can manipulate jobs from
Fiery WebSpooler. A user who does not have the password can still log in to
Fiery WebSpooler as a Guest with view-only access (see page 3-3). For more
information, see the Job Management Guide.
Page 49

3-5 Levels of access and control
3
EX12
WebLink
WebLink provides all users with a link to an address on the Internet. To change the
WebLink Internet address, see page 6-3. This function requires the Administrator
password, if one has been set (see “Passwords” on page 3-3).
NOTE: If you do not set the Administrator password, any user can change the WebLink
address, which affects all users. For this reason, we strongly recommend that you set an
Administrator password.
WebScan
With WebScan, you can retrieve scanned documents from a computer on the Internet
or your organization’s intranet. For more information, see the Printing Guide.
WebDownloader
WebDownloader allows you to print PostScript, EPS, PDF, and TIFF files directly to
the Fiery without first opening the file in an application.
WebSetup
WebSetup allows you to view and modify Fiery Setup options from a remote
workstation. For more information, see Chapter 5.
NOTE: Fiery WebSetup is supported on Windows computers only.
Installer
The Installer WebTool allows users to download installers for printer drivers,
Command WorkStation, ColorWise Pro Tools, and Documentation directly from the
Fiery. It is not affected by passwords. For more information, see the User Software
Installation Guide.
Page 50

3-6 Preparing for Fiery Setup
3
1. No designated administrator or operator (Minimum control—not recommended)
2. An administrator but no operator
Control level scenarios
Typical scenarios of access and control, ranging from minimum control to maximum
control, are described in this section. Choose the scenario that best matches your site
requirements, and then refer to the corresponding number in the table for guidance on
how to configure your system for those requirements.
NOTE: We strongly recommend that you set at least an Administrator password to
prevent unauthorized changes to system settings.
All users have equal access to all system functions including Setup, clearing the Fiery,
deleting printer fonts, setting the WebLink address, performing calibration, printing to
all Fiery print connections, and managing all jobs from the job management tools.
Only an administrator can perform Setup, calibration, and other administrator
functions, but all other system functions are accessible to all users, including printing
to all Fiery print connections, and managing all jobs from the job management tools.
3. An administrator and an operator
Only an administrator can perform Setup, calibration, and other administrator
functions, and only an operator or administrator can control jobs from the job
management tools. Users can print to all Fiery print connections.
4. An administrator and an operator; no Fiery WebTool access
Only an administrator can perform Setup, calibration, and other administrator
functions, and only an operator or administrator can control jobs from the job
management tools; users can print to the Hold queue and Print queue, but not to the
Direct connection; the operator controls all job flow, but jobs sent to the Print queue
may not require operator intervention; no access to Fiery WebTools.
Page 51

3-7 Fiery system software
3
5. An administrator and an operator; operator controls all jobs; no Fiery WebTool access
(Maximum control)
Only an administrator can perform Setup, calibration, and other administrator
functions, and only an operator or administrator can control jobs from the job
management tools; users can print only to the Hold queue; the administrator and the
operator have complete control of job flow; no access to Fiery WebTools.
Use these settings
in Setup
Enable Direct connection √ √ √
Enable Print queue √ √ √ √
Enable Web Services √ √ √
Set an Administrator Password
(strongly recommended )
Set an Operator password √ √ √
1
(Minimum)
234 5
(Maximum)
√ √ √ √
Fiery system software
The Fiery uses Windows NT Workstation system architecture to receive and process
jobs and send job data to the copier/printer. To log on to the Fiery, enter Administrator
as the user name, and enter the password.
NOTE: Configuring and monitoring the Windows NT functions from the Fiery require
the Fiery Advanced Controller Interface option. For more information, contact your
authorized service/support technician.
Page 52

3-8 Preparing for Fiery Setup
3
Resident on the Windows NT Workstation is the following software unique to
the Fiery:
•Server—The Server is an independent software process started automatically
whenever Windows NT is booted. As the central element of Fiery system software,
the Server process controls the spooling, rasterizing, and printing of jobs, as well as
job accounting (the Job Log), storage, and retrieval.
When the Server is not running, jobs cannot be received by the Fiery, job processing
cannot occur, job data cannot be transferred to the copier/printer for printing, and
Command WorkStation cannot connect to the Fiery. In the event that you need to
restart the Server process, right-click the FieryBar™ and choose Restart Fiery.
• Command WorkStation—Command WorkStation is the interface tool for the
Server. It provides a graphical means of viewing and controlling Server functions.
About Setup
Setup configures the Fiery to communicate with other devices and manage print jobs.
You must perform Setup the first time you turn on the Fiery after new system software
is loaded, or any time Server software is reinstalled. An initial Setup using default
settings is adequate for allowing users to print to the Fiery and to use the Fiery
WebTools. When your network or user printing environment changes, you can change
Setup options accordingly.
The first time you perform Setup, you must use the Fiery Control Panel. Configure, at
a minimum, Server Setup, Network Setup, and Printer Setup, in that sequence. After
the initial Setup, you can change Setup options from the Control Panel (page 4-2) or
Command WorkStation. Most Setup options can be set using any of these methods.
NOTE: Configuring and monitoring the Windows NT functions on the Fiery require
the Fiery Advanced Controller Interface option. For more information, contact your
authorized service/support technician.
If you do not configure the remaining Setups, the Fiery uses default settings. You need
to make settings appropriate for the printing environment at your site.
Page 53

3-9 About Setup
3
Local Setup from the Fiery
You can also perform Setup locally at the Fiery, using Server Setup, a Windows NT
Control Panel. Some of the settings you specify in Server Setup configure the Server
process (such as print job defaults), while some configure the Windows NT
Workstation environment (such as system date and time). Depending on the settings
you change in Server Setup, you must restart Windows NT 4.0 before your changes
take effect.
Setup options for local Setup are divided into three groups:
General Setup System settings, passwords, and Job Log options
Network Setup All the active network systems that will transmit print jobs to
the Fiery
Printer Setup Fiery print connections to be made available to users, and
color defaults for jobs
Network server setup requirements
For Token Ring, Novell, and Windows NT (using TCP/IP) networks, you must
configure the network servers for printing to the Fiery before you configure Fiery
network settings in Setup. For chapter references to information about network server
setup, see the diagrams in Chapter 1.
To configure network settings in Setup, you must have a live network connection, so
the Fiery can query the network for zones, servers, and server-based queues.
Whenever the configuration of the Fiery, the copier/printer, or the network itself
changes at your site, you can alter individual settings to correspond to the changed
environment. Changing network or port settings may require that you make changes
to other Setup options, as well.
Page 54

3-10 Preparing for Fiery Setup
3
You must configure the Fiery with the correct Windows NT domain name. This is
especially important for Windows printing, also known as SMB printing. For Fiery
systems that include the Fiery Advanced Controller Interface, open the Start
Menu>Settings>Control Panel> Network >Identification tab, and enter the correct
domain name. You must also select “Create a Computer Account in the Domain,” and
enter the user name and password of a user who can add workstations to the specified
domain. For configurations that do not include the Fiery Advanced Controller
Interface, you must add the Fiery to the domain from a networked Windows NT 4.0
server, using the Server Manager utility.
Ensuring the copier/printer connection
Complete the following steps before you configure the Fiery and the workstations that
will print to the Fiery. A service technician will have performed some initial
installation.
TO PREPARE FOR FIERY CONFIGURATION
1. Print a copier/printer test page to verify the copier/printer is functioning normally.
2. Turn off the copier/printer and connect the interface cable from the copier/printer to
the Fiery.
3. To confirm this connection, turn on the copier/printer and the Fiery, and print a Test
Page from the Fiery Control Panel.
To print a Test Page, press the Menu button on the Control Panel to display the
Functions menu. Choose Print Pages, and then choose Test Page.
4. With both the copier/printer and the Fiery turned off, connect the network cable to
the Fiery, as described in Chapter 1.
The network should already be installed and operational.
5. Turn on the copier/printer and then the Fiery.
Proceed to Fiery Setup, described in Chapter 4.
Page 55

4-1 Fiery Setup from the Control Panel
4
Chapter 4:
Performing
Setup from
the Control
Panel
Setup is required the first time the Fiery is turned on after new system software is
loaded. In this initial Setup, you (or the service technician who loads the software)
choose the language to use for Fiery Control Panel menus and messages. If you do not
configure a particular Setup option, the Fiery uses default settings. You should make
the settings appropriate for the printing environment at your site.
Fiery Setup from the Control Panel
Setup performed from the Control Panel configures the Fiery to communicate with
other devices and manage print jobs sent to it.
Setup provides these groups of options:
•Server Setup to specify system options
•Network Setup to specify all the active network systems that transmit print jobs to
the Fiery
•Printer Setup to specify how print jobs and queues are managed
• PS Setup to specify PostScript settings
• Color Setup to specify color settings
•Job Log Setup to specify how the Fiery handles its log of printed jobs
•Font Archiving to back up and restore fonts
The Change Password option in the Setup menu allows you to create and change the
Administrator password on the Fiery.
The Control Panel on the front of the Fiery allows you to set options and view
information about jobs printed to the Fiery. It comprises the following parts:
•Activity light—indicates normal or problem activity
• Line selection buttons—select a setting and proceed to the next option
•Display window—shows status information and options for setting up the Fiery
Page 56
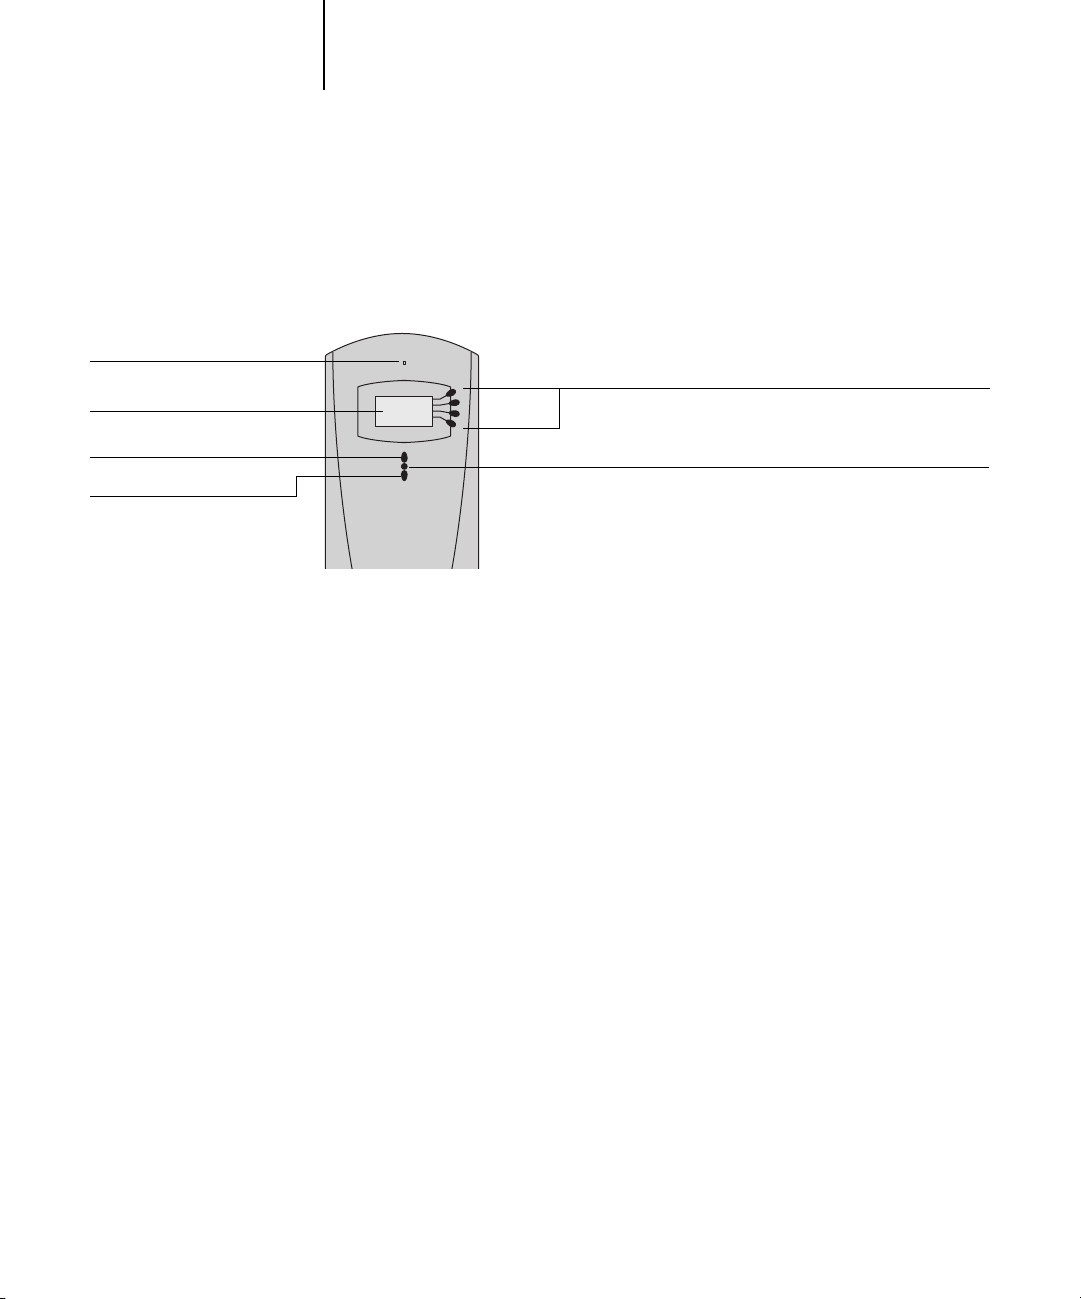
Activity light
Display window
4-2 Performing Setup from the Control Panel
4
•Up and Down arrow buttons—scroll menus, options, and settings
•Menu button—cancels without saving changes; also toggles to the Functions menu
Fiery Control Panel
Line selection buttons
Up button
Down button
Menu button
Fiery Control Panel
Use the Fiery Control Panel to view status information, print special pages, and set up
printing. While most elements in the Control Panel display have counterparts in
Command WorkStation, you can view current functions on the Control Panel even
when Command WorkStation is not connected to the server or is not running.
The Control Panel is located on the front of the Fiery.
Safety warnings
The Fiery display window is a liquid crystal display (LCD) made of glass, and it can
break. Do not subject it to strong shocks.
If the display window breaks and the liquid crystal material leaks out, do not inhale,
ingest, or touch it. If the material gets on your skin or clothing, wash it off with soap
and water immediately.
Do not touch or put pressure on the panel. This will change the color of the panel.
Page 57

4-3 Fiery Control Panel
4
Activity light
The activity light indicates the current Fiery activity. If the light is:
Solid red An error has occurred, causing the Fiery to be disabled.
Flashing red An error has occurred, causing printing to be disabled, but
the Fiery is capable of processing.
Solid green The Fiery is idle.
Flashing green The Fiery is processing or printing a job, or communicating
with a remote computer.
No light The Fiery is off or starting up.
Buttons
Line selection
buttons
Up and Down
arrow buttons
Menu button Press this button to view other screens. Under normal
Power button Press this button to turn the Fiery on and off.
Reset button Press this button to restart the Fiery after you have selected
Use these buttons to select the command displayed on the
corresponding line of the display window. When a button is
active, a special character (>) appears in the display window
next to the button.
Use these buttons to scroll to different screens in
multi-screen lists, select Setup options from a list of available
options, and scroll through alphanumeric characters.
operation, the Control Panel displays the Info, RIP, or Print
Status screen with information about the status of the Fiery.
If you press the Menu button, the Functions menu is
displayed and you can perform additional operations (see
page 4-6). If a job is processing or printing, press the Menu
button to cycle among the active screens.
Shut Down System from the Shut Down menu.
Page 58

4-4 Performing Setup from the Control Panel
4
Display window
The display window provides information about the status of the Fiery, displays menu
information, and allows you to view and edit information in the Setup menus.
The status area at the bottom of the display window displays the screen name and
highlights one of the icons to indicate what the Fiery is doing. Only the icons for the
screens currently available appear. The Menu button cycles through the active screens.
The screens are:
Alert Status If there is a problem with processing a job or printing functions, an error message
appears on the Control Panel. For information on error messages, see Appendix B.
Print Status When the Fiery is printing a job, the Print Status screen appears. This screen
displays the following:
Cancel Job—Press the top line selection button to cancel the job currently
printing.
User name—The name of the user who sent the job currently processing.
Pages/Total—The number of copies of the current job printed and the total
number of copies of the job requested.
RIP Status When the Fiery is processing a job, the RIP Status screen appears. This screen
displays the following:
Cancel Job—Press the top line selection button to cancel the job currently
processing. The Fiery cancels the job before printing begins.
Document name—The name of the document currently processing.
User name—The name of the user who sent the job currently processing.
Kilobytes—The size (in kilobytes) of the job processed so far.
NOTE: This number is always displayed in kilobytes; for example, 10MB is
displayed as 10000KB.
Page 59

4-5 Fiery Control Panel
4
Info Status When the Fiery is not processing or printing a job, it displays information about
the current server and software:
Server Name—The Fiery name, as it is configured in Setup.
Status—The current status of the Fiery. The Fiery status can be: Idle, Initializing,
Busy, Processing, or Printing.
Megabytes—The space (in megabytes) available on the Fiery hard disk, for
example, 756MB.
Version—The system software version running on the Fiery.
Functions You can press the Menu button to display the Functions menu. Use the Up and
Down arrow buttons to scroll through the list. Press the line selection button to
the right of a command to select that command. For more information, see
page 4-6.
Network The Network icon appears at the lower left of any of the other screens when a job
is being sent to the Fiery over the network. The Network icon also appears,
together with a flashing green activity light, when a remote utility is running.
Page 60

Print Pages
4-6 Performing Setup from the Control Panel
4
Functions menu
The Functions menu provides many of the options available from
Command WorkStation. Choose the following commands from this menu:
Print special pages from the Fiery. You can print the following pages from the
submenu that appears:
Test Page—A Test Page allows you to confirm that the Fiery is properly connected
to the copier, and provides color and grayscale samples to troubleshoot problems
with the copier or the Fiery. The following settings are among those listed on the
Test Page: Server Name, Printer Model, color settings, calibration information,
date and time the Test Page was printed.
Configuration—Prints the Configuration page, which gives the current server and
device configuration. This page lists general information about the hardware and
software configuration of the Fiery, the current options for all Setup settings,
information about the current calibration, and the Ethernet and Token Ring
addresses of the Fiery.
Job Log—Prints a log of the last 55 jobs. For information on the fields in the Job
Log and on printing it in other forms, see the Job Management Guide.
Control Panel Map—Prints the Control Panel Map, which is an overview of the
screens you can access from the Control Panel.
Color Charts—Prints samples of the RGB, CMY, and PANTONE colors available
from the Fiery.
Font List—Prints a list of all fonts currently on the Fiery hard disk.
Scan Job
Scan a document placed on the copier’s glass or the document feeder. For more
EX12
information on using this function, see the Printing Guide.
Page 61

4-7 Fiery Control Panel
4
Suspend Printing
Resume Printing
Shut Down
Clear Server
Run Setup
Run Diagnostics
Tray Alignment
Suspend communication between the Fiery and the copier. You must suspend
printing if you want to interrupt the current Fiery job and use the copier to make
copies or print another job first. Jobs continue to process on the Fiery. After you
make the copies, select Resume Printing to continue printing jobs from the Fiery.
Resume communication between the copier and the Fiery after you have finished
making copies or printing other jobs.
Shut down all Fiery activity in the correct manner and then restart. Use this
option instead of the power switch on the back of the Fiery. The following
options are available from the submenu that appears:
Restart Server—Restarts the server without shutting down the Fiery hard disk.
Shut Down System—Shuts down the Fiery hard disk.
Reboot System—Restarts the system after shutting down the Fiery hard disk.
Clear all jobs in all server queues, as well as all jobs archived on the Fiery hard disk,
the index of archived jobs (in the Archive window), all FreeForm masters, and the
index of FreeForm masters (in the FreeForm window). Check with your
administrator or operator before choosing Clear Server. If an Administrator password
has been set, you must enter it to access Clear Server.
Enter the Setup menu and change Setup option settings.
This function is provided for service representatives only. For information about
EX12
running diagnostics, contact your authorized service/support technician.
EX2000d
Use this option to adjust the placement of text and images on the page so that
they are correctly aligned on the sheet of paper and both sides of a duplex sheet
have the exact same alignment. For more information on this function, see the Job
Management Guide.
Page 62
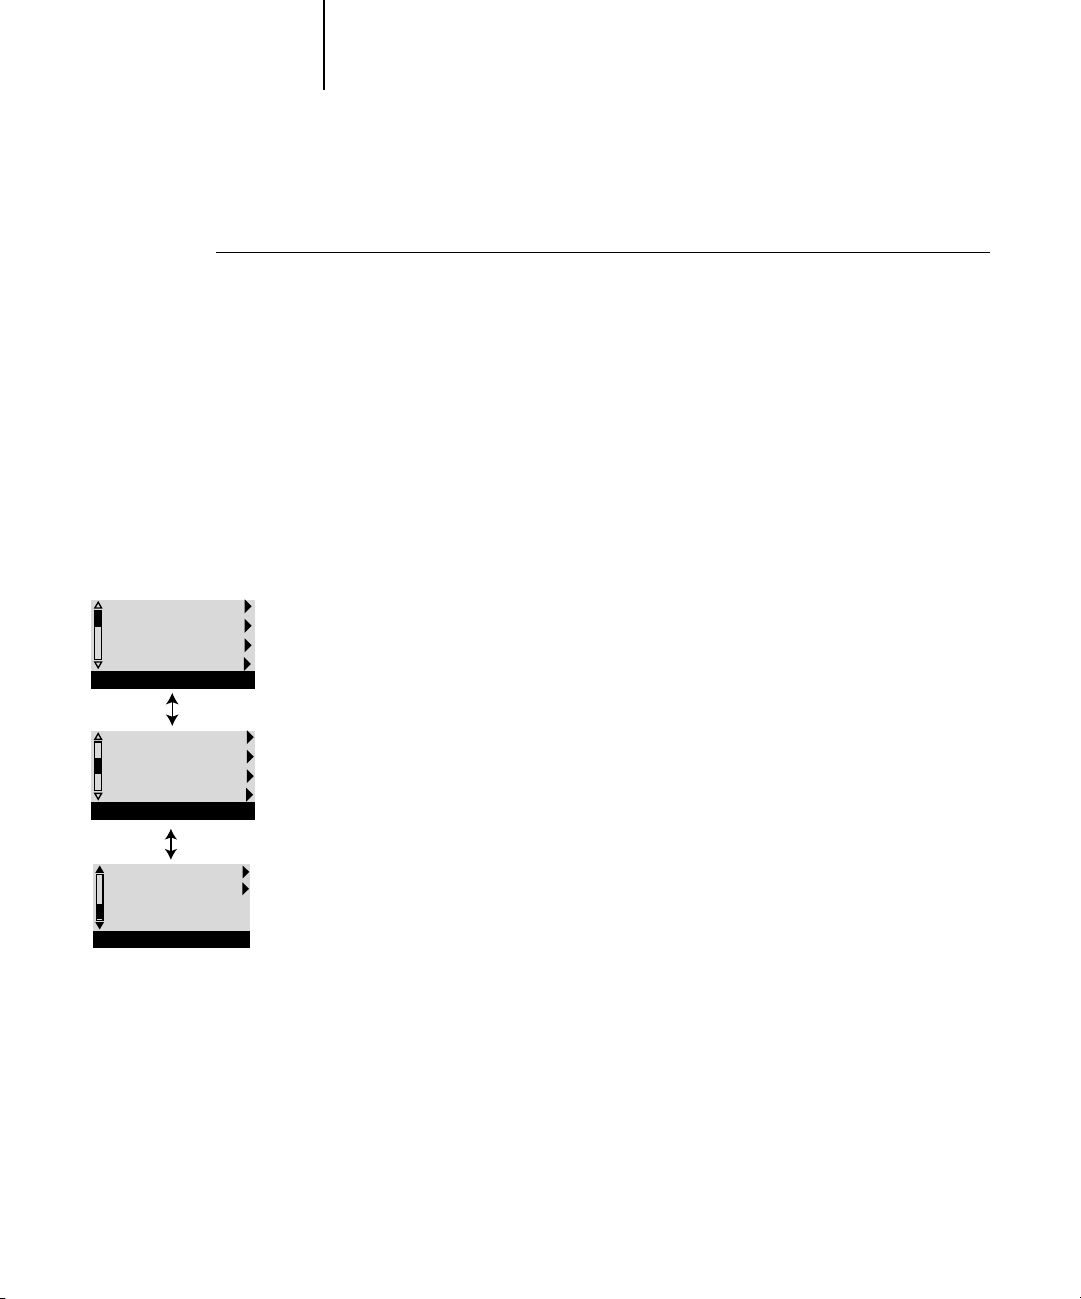
4-8 Performing Setup from the Control Panel
4
Accessing Setup options
TO ACCESS SETUP WHEN THE FIERY IS AT IDLE
1. Make sure the information screen on the Control Panel reads Idle.
If Printing or RIPping appears, the Fiery is processing, and you must wait until
the system finishes and reaches the Idle state.
2. Press the Menu button on the Control Panel to go to the Functions menu.
3. Scroll with the Down arrow button and press the line selection button next to Run
Setup.
If an Administrator password has been set on the Fiery, you are prompted to enter
it before you can perform Setup (see page 7-2).
4. When prompted, confirm your choice to proceed to Setup.
Exit Setup
Server Setup
Network Setup
Printer Setup
Setup
PS Setup
Color Setup
Job Log Setup
Change Password
Setup
Font Archiving
Setup
5. Press the line selection button to choose a Setup menu or command.
Use the Down arrow button to view the remaining screens of the main Setup
menu.
6. Perform Server Setup, Network Setup, and Printer Setup, in that order.
This is the minimum required for initial Setup. Later, you can complete the
remaining Setups, either from the Control Panel or a Windows computer.
7. Set an Administrator password to protect your Setup from unauthorized changes.
Review the settings described in this chapter.
Page 63

4-9 Fiery Control Panel
4
About the Control Panel Setup interface
When you perform Setup from the Control Panel, you can select one menu after
another and enter information about your Fiery and your network and printing
environment.
In each Setup screen, the last line of the display window shows the name of the current
Setup menu. Most of the menus you see are shown on the Control Panel Map, a
flowchart you can print from the Control Panel.
TO PRINT THE CONTROL PANEL MAP
1. At the Control Panel, press the Menu button to access the Functions menu.
2. Press the button next to Print Pages.
The Control Panel displays the first four types of pages you can print. To see the
remaining types of pages, press the Down arrow button.
3. Press the button for Control Panel Map.
Page 64

4-10 Performing Setup from the Control Panel
4
Types of Setup screens
There are two types of Setup options:
Multiple choice
questions
Information
entry options
You are given choices (for example, Yes or No, or a list
of options from which to choose). Only one choice is
displayed at a time, in highlighted text. The currently
selected (or default) value appears first.
Use the Up and Down arrow buttons to scroll through the
choices, and choose OK when the correct information is
displayed.
You must specify the information for your site (the printer
name or IP address). Use the Up and Down arrow buttons
to scroll through the alphanumeric symbols to make your
selection.
The cursor position is highlighted, and two of the line
selection buttons become Left and Right arrow buttons.
Arrows appear on the display window next to the
corresponding buttons. Use these buttons to move
between positions for entering information.
NOTE: When you enter text, enter it from left to right,
as the Left arrow button acts as a Delete key as well as a
cursor-moving key. This is indicated in the display by the
Delete symbol ( ).
The following section provides three specific examples of these types of options.
Page 65

4-11 Fiery Control Panel
4
Example: Multiple choice
Publish Print Queue
Yes
OK
Printer Setup
Press the Up or Down arrow
buttons to display the other
option or options.
Example: Information entry with fields
Subnet Mask
255.0.0.0 >
<
OK
TCP/IP (Ethernet)
From the starting position,
press the Right arrow button
to move the cursor to the
right.
Example: Information entry with individual characters
Enter Your File
Server Password >
OK
Bindery Setup
Publish Print Queue
No
OK
Printer Setup
When the setting you want
is displayed, press the button
beside OK to continue.
Subnet Mask
255.0.0.0 >
<
OK
TCP/IP (Ethernet)
The next field is selected.
Press the Up or Down arrow
buttons to change the
number.
Enter Your File
Server Password >
9
x
OK
Bindery Setup
x
Subnet Mask
255.255.0.0 >
<
OK
TCP/IP (Ethernet)
When the correct number is
displayed, press the Right arrow
button to move to the third field.
Press the Left arrow button to go
back and edit, or press OK to select
the choice and continue.
Enter Your File
Server Password >
9
OK
Bindery Setup
x
From the starting position,
press the Up or Down arrow
buttons to enter the first
character.
When the correct character
is displayed, press the Right
arrow button to move the
cursor to the next position.
Press the Up or Down arrow
buttons to enter a character in
the second position.
The Delete button erases the
current character and moves the
cursor to the left.
Pressing OK enters what is
currently displayed.
Page 66

4-12 Performing Setup from the Control Panel
4
NOTE: If you make a mistake during Setup, you can always use the Menu button to
cancel without saving changes. Pressing the Menu button cancels what you are doing
in the current screen to bring you to the next higher-level menu. You may need to press
Menu more than once to return to the top level for the particular Setup in which you
are working. Once at the top level, you can enter a Setup menu again, or exit without
making changes.
When you have entered the settings, you need to save the changes. You are usually
prompted to do so. If you choose Yes, your settings overwrite previous settings. If you
choose No, your previous settings are retained. If necessary, the Fiery reboots after you
exit from the Setup menu.
Server Setup options
The Server Setup menu lets you specify system information that pertains to the Fiery
and all users. Accessing the menu is described on page 4-8.
Exit Setup
Server Setup
Network Setup
Printer Setup
Setup
Press button for Server Setup
When you choose Server Setup, the options appear in sequence, as follows. Default
values, where applicable, appear in square brackets. Words shown in italics indicate
that a product- or site-specific value is displayed.
Server Name
Default server name
Enter a name for the Fiery (up to 15 characters long). This name appears in the
Chooser on an AppleTalk network.
NOTE: Do not use the device name (DC12 or DC2000) as the server name. Also, if you
have more than one Fiery, do not give them the same name. Windows NT 4.0 is not
designed to handle two computers with the same name in the same workgroup or
domain.
System Date
Enter the correct system date in the standard form for your use. The date appears on
the Job Log.
Page 67

4-13 Server Setup options
4
System Time
Enter the correct system time. Enter the time based on the 24-hour clock in the form
HH:MM (Hours:Minutes). The time appears on the Job Log.
Print Start Page
Yes/No [Yes]
Specify whether the Fiery should print a start page every time it restarts. The start page
displays information about the Fiery, including the server name, current date and
time, amount of memory installed in the Fiery, network protocols enabled, and
connections published.
Use Character Set
Macintosh/DOS/Windows [Macintosh]
Specify whether the Control Panel and Command WorkStation should use the
Macintosh, DOS, or Windows character set for displaying file names. This is
important if file names include accented or composite characters (such as é or æ).
For mixed-platform networks, choose the option that gives the best overall
representation of the special characters you use.
Enable Printing Groups
Yes/No [Yes]
Specify whether to enable printer groups for Member Printing. If you enable this
option, you must use Command WorkStation to define user groups and passwords.
Users must then enter their group name and password when they print.
Enable Printed Queue
Yes/No [Yes]
Specify whether to enable the Printed queue, which creates a storage location on
the Fiery disk for recent jobs that were printed from the Print queue. Users with
Administrator or Operator access to the job management tools can reprint jobs from
the Printed queue without resending them to the Fiery. If you select No, jobs are
deleted from the Fiery disk immediately after they are printed.
Jobs Saved in Printed Queue
1-99 [10]
This option appears only if Enable Printed Queue is set to Yes. Specify the number of
jobs to be stored in the Printed queue. Jobs in the Printed queue take up space on the
Fiery hard disk. If disk space is low, use a smaller value for saved jobs.
Page 68

4-14 Performing Setup from the Control Panel
4
EX12
Clear Each Scan Job
After 1 day/Now/Manually/After 1 week [After 1 day]
Specify how you want to remove scanned data from the HDD. If you select Manually,
the scanned data remains on the HDD until specifically deleted, or until all scanned
jobs are cleared by the Administrator.
Save Changes
Yes/No [Yes]
Select Yes to activate any changes made in the Server Setup; select No to return to the
main Setup menu without making any changes.
Network Setup options
Network Setup configures the Fiery to receive print jobs over the network systems that
are used at your site.
Exit Setup
Server Setup
Network Setup
Printer Setup
Setup
Exit Network Setup
Port Setup
Protocol Setup
Service Setup
Network Setup
In the Setup menu, choose Network Setup, where you specify network addresses and
names to be used by workstations, servers, and the Fiery when they communicate with
each other.
The Network Setup menu includes three submenus that allow you to choose port
types, protocols, and network services. You must perform Port Setup and enable at
least one port.
For each item you enable, you are prompted to enter settings for that item. Default
values, where applicable, appear in this manual with square brackets.
You should display and select options only for the network systems that are currently
used at your site. If your network requirements change, you can change Network
Setup at any time.
If the Fiery is configured to enable more than one protocol, it automatically switches
to the correct protocol when it receives a print job.
Page 69

4-15 Network Setup options
4
The available network types, and the Setup areas that pertain to them, are summarized
in the following table.
For this Network or
Connection Type
AppleTalk over Ethernet Ethernet Setup AppleTalk Setup AppleTalk printing (PAP) is
TCP/IP over Ethernet Ethernet Setup TCP/IP Setup: Ethernet Setup LPD Setup
IPX/SPX over Ethernet Ethernet Setup IPX/SPX Setup PServer Setup (NDS, Bindery,
For this Network or
Connection Type
TCP/IP over Token Ring Token Ring Setup TCP/IP Setup: Token Ring Setup LPD Setup
Use this Port
Setup
If the Token Ring option is installed, you have these additional options:
Use this Port Setup Use this Protocol Setup Use this Service Setup
Use this Protocol Setup Use this Service Setup
enabled automatically.
Web Services Setup
Windows Setup
Port 9100 Setup
IPP Setup
or both)
Web Services Setup
Windows Setup
Port 9100 Setup
(Windows 2000)
IPP Setup (Windows 9x/Me
and Windows 2000)
IPX/SPX over Token Ring Token Ring Setup IPX/SPX Setup PServer Setup (NDS,
Bindery, or both)
Page 70

4-16 Performing Setup from the Control Panel
4
TO ACCESS NETWORK SETUP OPTIONS
1. Confirm that the network cable is connected to the Fiery.
During Network Setup, the Fiery queries the network for zones, servers, and
server-based queues. If you perform Network Setup without a connected and
functioning network, default settings are used that may not meet your needs.
2. Choose Network Setup from the main Setup menu.
3. Choose Port Setup from the Network Setup menu.
4. To use Ethernet, choose Ethernet Setup from the Port Setup menu, and enter the
appropriate settings.
5. If the Token Ring option is installed, choose Token Ring Setup and enter the
appropriate settings.
6. When you have finished entering port settings, choose Exit Port Setup, and then
choose Protocol Setup.
7. Enter the appropriate settings for the protocol or protocols you will use.
8. When you have finished entering protocol settings, choose Exit Protocol Setup, and
then choose Service Setup.
9. Enter the appropriate settings for the services you will use.
The options are described in detail in the following pages.
TO EXIT NETWORK SETUP
1. When you have finished entering service settings, choose Exit Network Setup.
2. Choose Yes when prompted to save changes.
3. From the main Setup menu, choose another Setup or choose Exit Setup.
Page 71

4-17 Network Setup options
4
Port Setup options
Exit Port Setup
Ethernet Setup
Token Ring Setup
Port Setup
Network Setup
Port Setup
Network Setup
Port Setup
You cannot enable Ethernet and Token Ring simultaneously. To configure the Fiery,
choose the port type you use and enter the settings for that port. Since network
setups are nested, the names of higher-level menus are shown in this chapter to the
left of each menu heading.
Ethernet Setup
Enable Ethernet
Yes/No [Yes]
Select Yes if you have Ethernet cabling connected to the Fiery.
Ethernet Speed
Auto Detect/100 Mbps/10 Mbps [Auto Detect]
Select Auto Detect if your network environment is mixed or if you do not know the
network speed. If you know the speed of the network to which the Fiery is attached
(10 Mbps or 100 Mbps), select it.
Token Ring Setup
Enable Token Ring
Yes/No [No]
Select Yes if the Fiery is to be connected to a Token Ring network.
Token Ring Speed
Auto Detect/16 Mbps/4 Mbps [Auto Detect]
Select Auto Detect if your network environment is mixed, or select the speed
(4 Mbps or 16 Mbps) of the network to which the Fiery is attached.
Maximum Frame Size
(bytes)
4202/2154/1130/632 [4202]
Select the maximum frame size recommended by the network administrator at your
site. If you are uncertain of the setting to use, select the default value (4202).
Page 72

4-18 Performing Setup from the Control Panel
4
Enable Source Routing
Yes/No [No]
Select Yes if your network supports source routing.
Source Routing
Request All Routes
Yes/No [No]
This option appears only if you enabled Source Routing. Select Yes if you want the
Request packet to travel to its destination by all routes.
Source Routing
Respond All Routes
Yes/No [Yes]
This option appears only if you answered No to the previous option. Select Yes if you
want the Response packet to return by all routes to the originating computer.
Protocol Setup options
Exit Protocol Setup
AppleTalk Setup
TCP/IP Setup
IPX/SPX Setup
Protocol Setup
Network Setup
Protocol Setup
To configure the Fiery, choose each protocol and enter the settings for that
protocol. You can enable AppleTalk, TCP/IP, and IPX/SPX communication
simultaneously.
AppleTalk Setup
Enable AppleTalk
Yes/No [Yes]
Select Yes if you have an AppleTalk network connected to the Fiery. This setting
enables the Fiery to communicate over AppleTalk networks.
Page 73

4-19 Network Setup options
4
AppleTalk Zone
List of zones
The Fiery searches the network for AppleTalk zones in your network segment. Scroll
through the list to select the AppleTalk zone in which you want the Fiery to appear.
If your segment has only one zone, the Fiery is assigned to that zone automatically.
The message “No AppleTalk zone found” may mean your network has no zones, or the
network cable is not connected (see Appendix B). Choose OK to dismiss the message.
TCP/IP Setup options
Exit Protocol Setup
AppleTalk Setup
TCP/IP Setup
IPX/SPX Setup
Protocol Setup
Exit TCP/IP Setup
Ethernet Setup
Token Ring Setup
TCP/IP Setup
To configure the Fiery for TCP/IP, choose TCP/IP Setup.
Choose Ethernet Setup and enter the appropriate settings. Choose each network
type you use (Ethernet and/or Token Ring) and enter the appropriate settings.
Token Ring Setup appears as an option only if you have enabled Token Ring in Port
Setup.
NOTE: If TCP/IP is running on both an Ethernet and a Token Ring network, it is
assumed that the two networks are already routed to each other. The Fiery does not
function as a router.
NOTE: Concurrent use of Ethernet and Token Ring is not supported on the Fiery.
When you set an IP address, subnet mask, or gateway address for the Fiery during
Setup, you can allow the Fiery to get these addresses automatically from a DHCP,
BOOTP, or RARP server. First, turn on or restart the Fiery and allow it to reach Idle.
Next, make sure the DHCP, BOOTP, or RARP server is running. Finally, perform
Fiery Setup.
Page 74

Network Setup
Protocol Setup
TCP/IP Setup
4-20 Performing Setup from the Control Panel
4
TCP/IP Setup with Ethernet
Ethernet Setup
Enable TCP/IP for Ethernet
Yes/No [Yes]
Select Yes if you have a TCP/IP network connected to the Fiery over Ethernet
cabling.
If you use Token Ring, enabling TCP/IP for Token Ring is required for enabling the
Fiery WebTools.
NOTE: If you are using TCP/IP for printing from Windows computers, enabling
TCP/IP here also enables you to use Fiery utilities from Windows computers using
TCP/IP protocols.
Enable Auto IP Configuration
Yes/No [Yes]
Select Yes to allow the Fiery to obtain its Ethernet IP address by searching the network.
Depending on your network and the protocol you select in the following option
(DHCP, BOOTP, or RARP), the IP address can change. Select No to assign the Fiery a
static IP address that will not change. If you select No, you proceed to the IP Address
option, where you manually set the IP address.
Select protocol
DHCP/BOOTP/RARP [DHCP]
This option appears only if you answered Yes to Enable Auto IP Configuration. Select
the protocol over which the Fiery should search for its IP address. Both DHCP and
BOOTP allow the Fiery to obtain the Ethernet IP address and Subnet Mask
automatically. RARP obtains only the Ethernet IP address.
Depending on your network, the Fiery might be assigned a different address after you
restart the Fiery. With the DHCP setting, the Fiery can be assigned a different address
even if it is not restarted. Make sure the network is already configured properly for the
protocol you select.
Page 75

4-21 Network Setup options
4
Get Gateway Address Automatically
Yes/No [Yes]
Use this option to assign the gateway address automatically for printing with TCP/IP.
This option appears only if you selected DHCP or BOOTP as the protocol in the
previous option.
If you select a DHCP or BOOTP protocol and later change it to RARP, you must
return to Setup and set this option to No. You can then set the address manually.
RARP does not support automatic assignment of the gateway address.
IP Address
[127.0.0.1]
Enter the Fiery IP address for Ethernet. This IP address, unlike an IP address set
automatically, remains the same if you restart the Fiery. You must change the default to
a valid address for your network. For information about setting up printing with
TCP/IP, see Chapter 2.
Subnet Mask
This option lets you modify the subnet mask for printing with TCP/IP over Ethernet.
To set the subnet mask, enter one of the following values:
• 255.0.0.0 if the IP address starts with a number less than 128
• 255.255.0.0 if the IP address starts with a number from 128 through 191
• 255.255.255.0 if the IP address starts with a number greater than 191
NOTE: Confirm the subnet mask setting with your network administrator before
proceeding. In some cases, the required setting may be different from those listed.
Gateway Address
[127.0.0.1]
This option appears only if you answered No to Get Gateway Address Automatically,
or if you selected RARP as the protocol.
Use this option to set the gateway address for printing with TCP/IP. If your network
uses a gateway, you must change the default to a correct gateway address for your
network.
Page 76

Network Setup
Protocol Setup
TCP/IP Setup
4-22 Performing Setup from the Control Panel
4
TCP/IP Setup with Token Ring
Enable TCP/IP for Token Ring, and enter the IP address and subnet mask. If your
TCP/IP network has a gateway and users outside the gateway plan to print to the Fiery
using TCP/IP, enter the gateway address.
Token Ring Setup
Enable TCP/IP for Token Ring
Yes/No [Yes]
Select Yes if you have a TCP/IP network connected to the Fiery over Token Ring.
If you use Token Ring, you must enable TCP/IP for Token Ring in order to enable
Fiery WebTools.
NOTE: If you are using TCP/IP for printing from Windows computers, enabling
TCP/IP here also lets you use the Fiery utilities from Windows computers using
TCP/IP protocols.
Enable Auto IP Configuration
Yes/No [Yes]
Select Yes to allow the Fiery to obtain its Token Ring IP address. Depending on your
network and the protocol you select in the following option (DHCP, BOOTP, or
RARP), the IP address can change. Select No to assign the Fiery a static IP address that
will not change. If you select No, proceed to the IP Address option, where you
manually set the IP address.
Select protocol
DHCP/BOOTP [DHCP]
This option appears only if you answered Yes to Enable Auto IP Configuration.
Select the protocol over which the Fiery should search for its IP address. Both DHCP
and BOOTP allow the Fiery to obtain the Token Ring IP address and Subnet Mask
automatically.
Depending on your network, the Fiery might be assigned a different address after you
reboot the Fiery. With the DHCP setting, the Fiery can be assigned a different address
even if it is not rebooted.
Make sure the network is already configured properly for the protocol you select.
Page 77

4-23 Network Setup options
4
Get Gateway Address Automatically
Yes/No [Yes]
Use this option to get the gateway address automatically for printing with TCP/IP.
This option appears only if you selected DHCP or BOOTP as the protocol in the
previous option.
If you select a DHCP or BOOTP protocol and later change it to RARP, you must
return to Setup and set this option to No. You can then set the address manually.
RARP does not support automatic assignment of the gateway address.
IP Address
[127.0.0.1]
Enter the Fiery IP address for Token Ring. This IP address, unlike an IP address set
automatically, remains the same if you restart the Fiery. You must change the default to
a valid address for your network. For information about setting up printing with
TCP/IP, see Chapter 2.
Subnet Mask
[255.255.255.0]
This option lets you modify the subnet mask for printing with TCP/IP over Token
Ring. To set the subnet mask, enter one of the following values:
• 255.0.0.0 if the IP address starts with a number less than 128
• 255.255.0.0 if the IP address starts with a number from 128 through 191
• 255.255.255.0 if the IP address starts with a number greater than 191
NOTE: Confirm the subnet mask setting with your network administrator before
proceeding. In some cases, the required setting may be different from those listed.
Gateway Address
[127.0.0.1]
This option appears only if you answered No to Get Gateway Address Automatically,
or if you selected RARP as the protocol.
Use this option to set the gateway address for printing with TCP/IP. If your network
uses a gateway, you must change the default to a correct gateway address for your
network.
Page 78

4-24 Performing Setup from the Control Panel
4
IPX/SPX Setup options
Exit Protocol Setup
AppleTalk Setup
TCP/IP Setup
IPX/SPX Setup
Protocol Setup
To specify the frame types the Fiery uses for IPX/SPX protocols, choose IPX/SPX
Setup from the Protocol Setup menu. You must choose at least one frame type to
enable IPX/SPX protocols. The Fiery supports the following frame types for
IPX/SPX:
•For Ethernet—Ethernet 802.2, Ethernet 802.3, Ethernet II, and Ethernet SNAP
•For Token Ring—Token Ring and Token Ring SNAP
For protocols other than IPX/SPX, the frame type is automatically enabled and does
not require setup, as follows:
With this protocol And these printing services
AppleTalk PAP (Printer Access Protocol) Ethernet SNAP
TCP/IP with Ethernet LPD (Line Printer Daemon) Ethernet II
TCP/IP with
Token Ring
LPD (Line Printer Daemon) Token Ring SNAP
This frame type is
automatically enabled
Page 79

4-25 Network Setup options
4
Exit IPX/SPX Setup
Select Frame Types
Clear Frame Types
IPX/SPX Setup
Exit IPX/SPX Setup
Ethernet 802.2 *
Ethernet 802.3
Ethernet II
IPX/SPX Setup
Select Frame Types
Enable IPX Auto Frame Type
Yes/No [Yes]
Specify whether the Fiery should try to bind to all available frame types automatically.
The Fiery does so whether or not all frame types are appropriate. To determine the
frame types that were successfully bound, save your changes, exit Setup, restart the
Fiery, and print a Configuration page. The Configuration page lists only one of the
frame types that were successfully bound.
If you answer No to this option, you can select frame types manually. You must choose
at least one frame type to enable IPX/SPX protocols.
The frame selection screen allows you to make multiple selections. Depending on your
Port Setup selection, only Ethernet frame types, only Token Ring frame types, or all
frame types are displayed.
Press the line selection button beside each frame type used on your IPX/SPX network.
An asterisk (*) appears beside each selected frame type. Press the line selection button
again to deselect a frame type. Use the Up and Down arrow buttons to scroll to
additional frame types. The Fiery binds to each frame type as you select it.
When you have selected all the frame types used, choose Exit IPX/SPX Setup.
Clear Frame Types
You can clear all frame types at once by choosing Exit IPX/SPX Setup, then choosing
IPX/SPX Setup and selecting Clear Frame Types.
Page 80

Network Setup
Service Setup
LPD Setup
4-26 Performing Setup from the Control Panel
4
Service Setup options
PServer is a Fiery program that can service the Novell print queues assigned to the
Novell print servers you have set up for printing to the Fiery. When you choose
PServer Setup and enable PServer, you can set up NDS (Novell Directory Services),
Bindery Services, or both. NDS is used with NetWare 4.x/5.x; Bindery Services are
used with NetWare 4.x/5.x in bindery emulation mode.
LPD Setup options
Enable LPD
Yes/No [Yes]
Select Yes to allow lpd printing. For more information, see “Setting up the Fiery on
TCP/IP networks” on page 2-18.
PServer Setup options
Network Setup
Service Setup
PServer Setup
Exit PServer Setup
NDS Setup
Bindery Setup
Polling Interval
PServer Setup
Enable PServer
Yes/No [No]
Select Yes if you have a Novell network connected to the Fiery.
Choose NDS Setup if your network uses NetWare 4.x/5.x in native mode.
Choose Bindery Setup if your network uses NetWare 4.x/5.x in bindery emulation
mode.
If your network uses both NDS and Bindery, set up NDS first. If you set up NDS
after Bindery, you will overwrite Bindery Setup.
If your network uses both NDS and Bindery, and uses NetWare 4.x/5.x servers in
bindery emulation, note that the Fiery cannot service NDS and bindery emulation
servers on the same NDS tree.
Page 81

Network Setup
Service Setup
PServer Setup
4-27 Network Setup options
4
NDS Setup
Before entering NDS settings, make sure the Fiery is connected to the network and
that you have configured an NDS directory tree with a Printer, Print Server, and
one or more Print Queue objects for Fiery jobs (see page 2-13). To perform NDS
Setup, you may need permission to browse the NDS tree. If access to the Print
Server is restricted, you need a login password.
The main objective of NDS Setup is to specify the Print Server object. In addition,
you can indicate the location of the Fiery print queues.
NOTE: The terms NetWare server, Novell server, and IPX server are in common use
and are used here interchangeably to mean the server on an IPX network running
Novell NetWare networking software.
Enable NDS
Yes/No [No]
Select Yes if the NetWare servers you will use to print to the Fiery are running
NetWare 4.x/5.x in native mode.
Select NDS Tree
List of trees
Use the Up and Down arrow buttons to browse the list of NDS trees available to the
Fiery. Choose OK when you have displayed the tree that contains the Printer, Print
Server, and Print Queue objects you previously defined for the Fiery.
Your new NDS tree selection automatically overwrites any previous tree selection.
If you change the NDS tree selection and there are also current Bindery settings, you
are alerted that they will be deleted. If you continue with NDS Setup, you can replace
Bindery settings later. If you do not want to continue, press the Menu button to exit
NDS Setup.
Page 82

4-28 Performing Setup from the Control Panel
4
Is user login needed
to browse NDS tree?
Yes/No [No]
Select No if no password is required to browse the tree. You can proceed to navigate to
the Print Server object.
Select Yes if network permissions require that you log in to browse the NDS tree and
see the Print Server object you want to select. If you select Yes, you are prompted to
navigate to the User Login object.
Navigate the NDS
tree to the User
Login object.
This message is displayed if you selected Yes for the previous option. Choose OK and
browse the NDS tree, as described in the following paragraphs.
NDS Tree name
Object list, “..”
Browsing to find the User Login object begins with the NDS tree that you selected
previously (with Select NDS Tree). Use the Up and Down arrow buttons to scroll a list
of objects in the tree beneath the [Root] in the hierarchy, or use the navigation symbol
“..” to go up one level at a time.
In each subsequent browse screen, the top line represents your current location. The
second line contains:
•A list of objects in the current container directly below your current location
• The symbol “..” to go up one level
With an object selected, choose OK to travel down the tree, or choose “..” to go up the
tree. When you select an object and choose OK, that object is displayed on the top
line, and the second line lists objects directly below it.
Continue to browse the NDS tree until the User Login object is displayed in the
second line. Choose OK.
Page 83

4-29 Network Setup options
4
Enter Password
Enter the login password for the NDS tree, using the Up and Down arrow buttons to
select characters, and the Left and Right arrow buttons to move the cursor. Choose
OK.
Navigate the NDS
tree to the Print
Server.
Choose OK to browse the NDS tree to the Print Server object.
Browsing to find the Print Server object begins with the NDS tree that you selected
previously (with Select NDS Tree). In each subsequent browse screen, the top line
represents your current location. The second line contains:
•A list of objects in the current container directly below your current location
• The symbol “..” to go up one level
With a container object selected, choose OK to travel down the tree, or choose “..” to
go up the tree. When you select an object and choose OK, that object is displayed on
the top line, and the second line lists objects directly below it.
When the Print Server is displayed in the second line, choose OK.
Enter Print Server
Password
Enter the Print Server password, using the Up and Down arrow buttons to enter
characters, and the Left and Right arrow buttons to move the cursor. Choose OK. (If
no password is required, choose OK.)
Server should look
for print queues in:
Entire NDS Tree/Specified Subtree [Entire NDS Tree]
By default, the Fiery searches the entire NDS tree for Fiery print connections. This
option lets you restrict the search for Fiery print jobs to a subtree (the Print Queue
root) in which the Fiery print connections have been defined. This makes the search
more efficient. Select Entire NDS Tree if the tree is small. Select Specified Subtree to
restrict the search and specify the subtree.
Page 84

4-30 Performing Setup from the Control Panel
4
If you select Entire NDS Tree, choosing OK returns to PServer Setup. Proceed with
Bindery Setup (see page 4-31), set the Polling Interval (see page 4-36), or choose Exit
PServer Setup to return to the Service Setup menu.
Browse to the root
of the Print Queue
Subtree.
This message is displayed if you selected Specified Subtree in the previous option.
Choose OK to browse the NDS tree to the Print Queue subtree.
Browsing to find the container object begins with the NDS tree that you selected
previously (with Select NDS Tree). In each subsequent browse screen, the top line
represents your current container. The second line contains:
•A list of objects directly below your current location
• The symbol “..” to go up one level
• The symbol “.” to select the current container object (displayed in the top line)
without traveling down the tree
With an object selected, choose OK to travel down the tree, or choose “..” to go up the
tree. When you select an object and choose OK, that object is then displayed on the
top line, and the second line lists objects contained within.
When the container that contains print queues is displayed in the second line, choose
OK. In the next screen, choose “.” and choose OK to select the object in the top line.
When the Fiery displays the container name, choose OK to return to PServer Setup.
Proceed with Bindery Setup (see page 4-31), set the Polling Interval (see page 4-36), or
choose Exit PServer Setup to return to the Service Setup menu when prompted.
Page 85

Network Setup
Service Setup
PServer Setup
4-31 Network Setup options
4
Bindery Setup options
Bindery Setup
Use Bindery Setup if you have already configured one or more bindery servers (file
servers running NetWare 4.x/5.x in bindery emulation) with a Print Server and a Print
Queue for Fiery jobs. Before entering bindery settings, be sure the Fiery is connected
to the network and the NetWare file server is running. If Guest Login is not
supported, you need a valid user name and password.
NOTE: The terms NetWare server, Novell server, and IPX file server are in common use
and are used here interchangeably to mean the server on an IPX network running
Novell NetWare networking software.
Bindery Setup menu
Exit Bindery Setup
Add File Server
View Server List
Edit Connection
Bindery Setup
Remove File Server
Bindery Setup
Because you can set up more than one Novell server to handle Fiery print jobs, an
additional menu is displayed for this purpose. The options are:
•Add File Server—creates a new file server connection to the Fiery. You can set up a
maximum of eight file server connections. After you have finished adding a new
server, you return to the Bindery Setup menu, where you can set up another server.
•View Server List—displays the list of file servers that have already been selected to
communicate with the Fiery.
•Edit Connection—lets you change the NetWare Print Server that will print to the
Fiery.
•Remove File Server—lets you disconnect the Fiery from a file server to which it is
currently connected. Remove a file server when you want to reduce the number of
connections to the Fiery or reassign the connection to a different NetWare file
server.
•Exit Bindery Setup—lets you exit this menu after you have added all servers, viewed
a list of file servers, or removed a file server from the list.
NOTE: If you change your mind about any of the menus you have selected, use the
Menu button to escape and return to the main Bindery Setup menu. To cancel all
changes, exit Network Setup and select No to Save Changes.
Page 86

Network Setup
Service Setup
PServer Setup
Bindery Setup
4-32 Performing Setup from the Control Panel
4
Add File Server
This option gives you two ways to add a Novell NetWare file server.
Select File Server
From List/Search by Name [From List]
You may select the file server from a scrollable list, or by a name search.
Choose From List if your network does not have a large number of file servers.
Choose Search by Name if the number of file servers is so large that scrolling through
the list would take a long time.
If you selected From List:If you selected Search by Name:
Add Server
List of all servers
The Fiery obtains a list of NetWare file
servers by querying the IPX network. Use
the Up and Down arrow buttons to select
a NetWare file server from the list.
Choose the server on which you have
configured a print server and print queue
to handle Fiery print jobs.
Once you have chosen a file server, the Fiery immediately tries to log in as a guest
without a password. If it succeeds, it skips to the NetWare Print Server option.
If you try to add a file server but all Fiery connections are already in use, you are
prompted to remove a file server (see “Remove File Server” on page 4-35).
Enter First Letters of Server Name
Use the Up and Down arrow buttons to
enter the first letters of the name of the
file server you want to use, and choose
OK.
Add Server
List of servers matching the search
This option is displayed if you entered
letters to search. Scroll to select the server
you want from the list.
Page 87

4-33 Network Setup options
4
File Server Login
administrator/supervisor/Enter Login Name [supervisor]
This option appears only if a password is required for login, or if there is no guest
account, or the guest account is restricted. Choose Enter Login Name to enter your
own login name and password or log in as a guest. Choose administrator or supervisor
if you have those privileges.
Enter Your Login Name
[guest]
This option and the next appear only if you selected Enter Login Name for the File
Server Login. Enter your login name or select guest.
Enter Your File Server Password
Enter the password for logging in to your NetWare file server.
NetWare Print Server
Print Server Name
Select the name of the print server that you have configured in the NetWare utility
PCONSOLE. This is the print server that will route print jobs to the Fiery from
computers on IPX networks.
Enter Your Print Server Password
This option appears only if your NetWare print server is set up to require you to log in
with a password. Enter your print server password.
Choose Add Server again until you have connected each NetWare file server you have
configured for printing to the Fiery. When you have added all the IPX file servers for
your site, choose Exit Bindery Setup.
Page 88

Network Setup
Service Setup
PServer Setup
Bindery Setup
Network Setup
Service Setup
PServer Setup
Bindery Setup
4-34 Performing Setup from the Control Panel
4
View Server List
Supported servers
This option allows you to view the list of file servers currently connected to the Fiery,
that is, servers you have added in Bindery Setup. You are notified if there are none.
When you choose OK, you return to the Bindery Setup menu.
Edit Connection
On each connected NetWare file server, you have defined a print server to handle Fiery
print jobs. Use this option to change the print server assigned to the Fiery.
Choose File Server
File server name
From the list of connected NetWare file servers, choose the file server whose print
server you want to change.
NetWare Print Server
List of print servers on selected file server
Choose the name of the print server you want to use. This is the print server that will
route print jobs to the Fiery from computers on IPX networks.
If you change your mind, press the Menu button to return to the Bindery Setup menu
without making a change.
Page 89

Network Setup
Service Setup
PServer Setup
Bindery Setup
4-35 Network Setup options
4
Enter Your Print Server Password
This option appears only if your NetWare print server is password-protected. Enter
your print server password.
The Bindery Setup menu is displayed again. You can edit other connections, choose
another Bindery Setup option, or choose Exit Bindery Setup.
Remove File Server
Remove support for
File server name
This option allows you to select a NetWare file server from a list of connected file
servers and remove the connection to it. You are notified that you have removed the
connection, and the Bindery Setup menu is displayed again. If you change your mind
and do not want to remove any of the file servers, press the Menu button.
Network Setup
Service Setup
PServer Setup
Bindery Setup
You can choose another Bindery Setup option (such as adding another file server) or
choose Exit Bindery Setup and proceed to set the polling interval.
Exit Bindery Setup
Choose Exit Bindery Setup after you have viewed a list of IPX file servers, removed a
file server from the list, or connected all the configured NetWare file servers. After you
select Exit Bindery Setup, you return to the PServer Setup menu.
Page 90

Network Setup
Service Setup
PServer Setup
4-36 Performing Setup from the Control Panel
4
Polling Interval options
Polling Interval
Whether you use NDS or Bindery services, choose Polling Interval from the main
PServer Setup menu. If you do not reset the interval, the default value of 15 seconds
is used.
NetWare Server Poll Interval in Seconds
1–3600 [15]
Specify the interval, in seconds, at which the Fiery communicates with the Novell print
server to see if there are print jobs waiting.
NOTE: If you select a short interval, the amount of network traffic increases. This may
slow down other network jobs.
Windows Setup options
Network Setup
Service Setup
Windows Setup
Enable Windows Printing
Yes/No [Yes]
Enabling Windows Printing enables Server Message Block (SMB), the file and
printer sharing protocol built into Windows. Enabling SMB allows the Fiery to
be listed on the network so that Windows clients can print to a particular print
connection (Hold, Print, or Direct) on the Fiery without any other networking
software. For information on setting up a Windows computer for Windows
printing, see the User Software Installation Guide. Windows printing runs via
TCP/IP, so you must configure TCP/IP on the Fiery and on all computers that
use Windows printing.
Page 91

4-37 Network Setup options
4
Use Automatic Configuration
Yes/No [Yes]
This option appears if you chose DHCP or BOOTP as the protocol for automatically
obtaining the IP address of the Fiery (see page 4-22).
Choose Yes to have the Fiery use a WINS name server and automatically obtain its
IP address. After making your choice, proceed to the Server Name option.
Choose No to proceed to the Use WINS Name Server option, where you specify
whether to use a WINS name server, and then to the WINS IP Address option, where
you specify its IP address.
Use WINS Name Server
Yes/No [No]
Broadcasts from SMB devices cannot pass across a router without a WINS name
server. Setting up the WINS name server is outside the scope of this manual. To find
out if a name server is available, contact your network administrator.
WINS IP Address
[127.0.0.1]
This option appears only if you choose Yes for WINS Name Server. Change the default
address to the correct IP address for the WINS Name Server. Obtain the correct
address from your network administrator.
Server Name
Default Name
The server name is the name that will appear on the network for accessing the Fiery via
SMB. The default name is the same as the server name assigned in Server Setup (see
page 4-12).
Server Comments
Server comments (optional) can contain information about the printer. These
comments are listed in the Properties of the Fiery in Network Neighborhood and
can be up to 15 characters.
Page 92

Network Setup
Service Setup
Web Services Setup
4-38 Performing Setup from the Control Panel
4
Set Domain Name
Select from list/Enter manually [Select from list]
This option provides two ways to specify the workgroup or domain where you want
the Fiery to appear.
If you selected Select from list:If you selected Enter manually:
Choose Domain
List of domains
Select the workgroup or domain from
the list.
Web Services Setup
Enable Web Services
Yes/No [Yes]
Select Yes to make the Fiery WebTools available to users (see page 6-1).
TCP/IP must be enabled on the Fiery and on user workstations. The
Fiery WebTools include WebSpooler, Status, WebLink, WebScan (Fiery EX12
only), WebDownloader, WebSetup, and Installer.
Workgroup or Domain
Enter the name of the workgroup or
domain. For more information about
entering text and characters, see “Types of
Setup screens” on page 4-10.
Network Setup
Service Setup
IPP Setup
A Java-enabled Web browser and a valid IP address are required for each user. For
details on browser choice and workstation requirements, see the User Software
Installation Guide.
IPP Setup
Enable IPP
Yes/No [Yes]
Select Yes to enable printing with the Internet Printing Protocol (IPP). You must
enable Web Services. For information on setting up user computers to use IPP
printing, see the User Software Installation Guide.
Page 93

Network Setup
Service Setup
Port 9100 Setup
Network Setup
Service Setup
E-mail Setup
4-39 Network Setup options
4
Port 9100 Setup
Enable Port 9100
Yes/No [Yes]
This option enables applications to open a TCP/IP socket to the Fiery at Port 9100
to download a print job.
Port 9100 Queue
Direct/Print Queue/Hold Queue [Print Queue]
Specify the Fiery print connection for downloading jobs to Port 9100. Only the
print connections you have enabled in Printer Setup are available.
E-mail Setup
Enable E-mail Services
Yes/No/Restore Settings [No]
This option enables the Fiery to use e-mail as a means of communication for a
variety of purposes. The Fiery serves as a messenger between the copier/printer and
the e-mail recipient.
Enable Print via E-mail
Yes/No [No]
Choose Yes to enable printing through e-mail.
Outgoing Server
[127.0.0.1]
Enter the IP address of the server on your network that handles outgoing e-mail.
Incoming Server
[127.0.0.1]
Enter the IP address of the server on your network that handles incoming e-mail.
Page 94

4-40 Performing Setup from the Control Panel
4
Server Type
POP3/IMAP [POP3]
Choose the type of mail server.
Fiery E-mail User Name
Enter the user name of the e-mail account. This is typically the part of the e-mail
address that precedes the @ symbol. For example, in the address pat@test.com, the
user name is pat.
Fiery E-mail Domain Name
Enter the name of the domain where the user has an account. This is typically the part
of the e-mail address that follows the @ symbol. For example, in the address
pat@test.com, the domain name is test.com.
Account Name
Enter the account name. This is the internal name your network recognizes, which is
not necessarily the same as User Name.
Password
Enter the password for the e-mail account.
Administrator E-mail User Name
Enter the administrator name of the administrator e-mail account. This is typically the
part of the e-mail address that precedes the @ symbol. For example, in the address
pat@test.com, the administrator e-mail user name is pat.
Administrator E-mail Domain Name
Enter the name of the domain where the administrator has an account. This is typically
the part of the e-mail address that follows the @ symbol. For example, in the address
pat@test.com, the domain name is test.com.
Page 95

4-41 Network Setup options
4
The administrator authorizes a unique e-mail address to remotely administrate the
Fiery e-mail services via e-mail. If an error occurs while you are executing a scan to
e-mail, the e-mail service sends an error message to the administrator e-mail address
specified. The administrator can authorize additional e-mail addresses as
administrators from this e-mail address.
Timeout (sec)
30–300 [60]
Enter the length of time, in seconds, that the Fiery should try to connect to each e-mail
server before determining that the connection is unsuccessful.
Polling Interval (sec)
1–3600 [15]
If you have enabled auto-checking for new messages in the previous option, enter
the interval in seconds at which the Fiery should automatically check for new e-mail.
Max Scan File Size
0–15000 [1000]
Specify the maximum file size of a scan for the Fiery to send it as an attachment. If the
scan file exceeds this maximum, the file will automatically be sent as a URL.
Exit Service Setup
This returns you to the main Network Setup menu. Choose Exit Network Setup.
Save Changes
Yes/No [Yes]
Select Yes to activate any changes made in Network Setup; select No to return to the
main Setup menu without making any changes.
Page 96

4-42 Performing Setup from the Control Panel
4
Printer Setup options
Printer Setup configures the connections and printing behavior associated with a
particular printing device. For more information on Fiery print connections,
see page 3-1.
TO ACCESS PRINTER SETUP OPTIONS
Exit Setup
Server Setup
Network Setup
Printer Setup
Setup
1. In the main Setup menu, choose Printer Setup.
2. Enter the options appropriate to the printing requirements at the site.
3. When you have finished, save changes.
In the list of options that follows, default values, where applicable, appear in brackets.
NOTE: For users to use the Fiery utilities and Fiery WebTools or print to the Fiery over
a TCP/IP network, you must publish at least the Hold queue or the Print queue.
Publish Direct Connection
Yes/No [Yes]
This option allows users to print (or download) jobs to the Fiery without spooling.
Jobs printed to the Direct connection are not saved in the Printed queue.
If you plan to download fonts to the Fiery, you must publish the Direct connection.
Publish Print Queue
Yes/No [Yes]
This option allows users to print (or download) jobs to the Print queue. Jobs that are
printed to the Print queue are spooled to the Fiery disk and printed on a first-in,
first-out basis. Only queues published in the Printer Setup are available to users.
Publish Hold Queue
Yes/No [Yes]
Use this option to allow users to print (or download) jobs to the Hold queue. Jobs in
the Hold queue can only be printed by copying or moving the jobs to the Print queue
with the job management tools.
Page 97

4-43 PostScript Setup options
4
EX2000d
TO ACCESS POSTSCRIPT SETUP OPTIONS
PS Setup
Color Setup
Job Log Setup
Change Password
Setup
Job Batching Delay
0...99 [0]
Use this option to specify the amount of time (in seconds) for the server to wait before
batching jobs.
Save Changes
Yes/No [Yes]
Select Yes to activate any changes made in the Printer Setup; select No to return to the
main Setup menu without making any changes.
PostScript Setup options
PS (PostScript) Setup allows you to set defaults for the Fiery. Users can override most
of these defaults on a job-by-job basis. However, users printing from UNIX or DOS
command lines cannot override defaults from their applications. Therefore, you must
set defaults in PostScript Setup. For information about these defaults, see the Printing
Guide.
1. In the main Setup menu, choose PS Setup.
2. Enter the options appropriate to the printing requirements at the site.
3. When you have finished, save changes.
In the list of options that follows, default values, where applicable, appear in square
brackets.
Default Paper Sizes
US/Metric [US]
Specify whether to print on US paper sizes (for example, Letter, Legal, 11x17), or
Metric paper sizes (for example, A4 or A3) by default. When no page size is defined
within a PostScript file, jobs are printed on Letter paper if you selected US, or A4
paper if you selected Metric.
Page 98

4-44 Performing Setup from the Control Panel
4
EX12
Convert Paper Sizes
No Letter/11x17->A4/A3 A4/A3->Letter/11x17 [No]
Specify whether to convert paper sizes in documents automatically to the default paper
sizes specified. For example, if you select Letter/11x17->A4/A3, a letter size document
is automatically printed on A4 paper.
NOTE: This option works in conjunction with the Default Paper Sizes option. For
example, if Convert Paper Sizes is set to Letter/11
is set to US, then jobs are printed A4/A3 size. This also includes Fiery system pages
such as the Start Page, Test Page, and Job Log.
Page Order
Forward/Reverse [Forward]
Select Forward if you want to print the pages of your job from first to last. Select
Reverse if you want to print the pages of your job from last to first.
x17->A4/A3, and Default Paper Sizes
EX2000d
EX12
Page Order
From N to 1/From 1 to N [From N to 1]
Specify the page order for printed output. Forward (From 1 to N) prints pages in the
order received, so the last page is on the top of the stack and the first page is on the
bottom. Reverse (From N to 1) prints jobs in reverse order, so that the first page is on
the top of the stack and the last page is on the bottom.
Color Mode
CMYK/Grayscale [CMYK]
Specify whether to print color (CMYK) or Grayscale images to the Fiery by default.
CMYK gives you full color prints. Select CMYK as the Color Mode before performing
calibration on the Fiery. Grayscale converts all colors into shades of gray.
Print to PS Error
Yes/No [No]
Specify whether the Fiery should print the available portion of a print job when it
encounters a PostScript error. Select Yes to print the portion of the job that was
processed before the error occurred; select No to cancel the print job entirely when a
PostScript error is encountered. Leave this option at No unless you encounter printing
problems.
Page 99

4-45 PostScript Setup options
4
EX12
Allow Courier Substitution
Yes/No [Yes]
Specify whether to substitute Courier for fonts that are unavailable when you
download files to the Fiery, or when you print a document for which you do not have
the corresponding printer font. If this option is set to No, jobs with fonts that are
unavailable on the Fiery hard disk generate a PostScript error and do not print. This
setting does not apply to PDF files; font substitution occurs automatically in PDF files.
Print Cover Page
Yes/No [No]
Specify whether the Fiery prints a cover page (job summary) at the end of each print
job. If you select Yes, each print job is followed by a page containing the name of the
user who sent the job, the document name, the server name, the time the job was
printed, the number of pages printed, and the status of the job. If a PostScript error
occurs and the Print to PS Error option is set to Yes, the cover page lists the PostScript
error message instead of the job status.
Face-Down Printing
On/Off [On]
Specify whether the copier/printer should print the pages face-down.
Halftone Screen
User Screen 1/User Screen 2/User Screen 3 [User Screen 1]
Choose a user screen to specify the frequency value, shape, and angle of your halftone
screen. Halftone screens control how much ink is deposited at a specific location on
the media. The following options define the halftone screen you select for this option.
NOTE: It is not necessary to restart the server for the halftone screen to take affect.
Halftone Frequency
60–300 [85]
Specify the frequency for the user halftone screen you chose in the previous option.
Var ying the frequency creates the illusion of variations of gray or color.
Halftone Angle Cyan
0–360 [15]
Specify the Cyan halftone screen angle. Choose the angle to correctly register the
halftone shape.
Page 100

4-46 Performing Setup from the Control Panel
4
Halftone Angle Magenta
0–360 [15]
Specify the Magenta halftone screen angle. Choose the angle to correctly register the
halftone shape.
Halftone Angle Yellow
0–360 [15]
Specify the Yellow halftone screen angle. Choose the angle to correctly register the
halftone shape.
Halftone Angle Black
0–360 [15]
Specify the Black halftone screen angle. Choose the angle to correctly register the
halftone shape.
Halftone Dot Shape
Round/Square/Default/Line/Ellipse [Round]
Choose the shape that will create the pattern for your Halftone Screen.
Enable Bypass Tray as default
EX12
Yes/No [No]
Select Yes to specify that jobs should be printed from the bypass tray. Use this option to
enable printing from the bypass tray when tray selection is not otherwise available in
the interface, such as when printing from the command line (lpd or DOS). In general,
select No when the interface permits tray selection on a job-by-job basis.
Save Changes
Yes/No [Yes]
Select Yes to activate any changes made in PS Setup; select No to return to the main
Setup menu without making any changes.
 Loading...