

Page 1

Fax Sharing User’s Guide
February 2000
Page 2

WinFax PRO Fax Sharing User’s Guide
Copyright Notice
© Symantec Corporation 2000
All rights reserved.
The use and copying of this product is subject to a license agreement. Any other use is prohibited. No part of
this publication may be reproduced, transmitted, transcribed, stored in a retrieval system or translated into any
language in any form by any means without the prior written consent of Symantec Corporation. Information in
this manual is subject to change without notice and does not represent a commitment on the part of the vendor.
Federal copyright law permits you to make a backup of this software for archival purposes only. Any other
duplication of this software, including copies offered through sale, loan, rental or gift is a violation of law, and
subject to both criminal and civil penalties.
Notice to WinFax PRO Users
It shall be unlawful for any person within the United States to use any computer or other electronic device to
send any message via a facsimile machine unless such message clearly contains, in a margin at the top or bottom
of each transmitted page or on the first page of the transmission, the date and time it is sent and an identification
of the business, other entity or individual sending the message and the telephone number of the sending machine
or such business, other entity, or individual.
Trademarks
Symantec, the Symantec logo, TalkWorks PRO, Cover Your Voice, WinFax PRO, Cover Your Fax, and
pcANYWHERE are trademarks of Symantec Corporation and its subsidiaries.
AOL is a registered trademark of America Online, Inc.
cc:Mail is a trademark of cc:Mail, a division of Lotus Development Corporation.
CompuServe is a registered trademark of CompuServe, Inc.
Corel Wo rdPerfect is a registered trademark of Corel Corporation.
Intel is a trademark of Intel Corporation.
Microsoft, MS, MS-DOS, Word, Excel, and PowerPoint are registered trademarks, and Windows is a
trademark of Microsoft Corporation.
SatisFAXtion is a trademark of WildCard Technologies Inc.
TextBridge® OCR ©1994-96 Xerox Corporation. All rights reserved.
All other product names are trademarks of their respective owners.
01/00
Page 3

CONTENTS
About this Guide ....................................................................................6
Using the Online Help ....................................... .................................................. .............6
Getting Help in a Dialog ................................................. ................................................. 7
Documentation Feedback ............ ................................................. ....................................7
Introducing WinFax PRO Fax Sharing .................................................... 8
System Requirements ......................................................................................................10
The WinFax PRO Program Group ............................................... ..................................10
Starting and Exiting WinFax Programs ...................................................... ....................11
Installing WinFax for Fax Sharing
(Administrators Only) ...............................................................11
Setting Up a Fax Sharing Host Station ............................ ............................................... 11
Installing WinFax on a Host Computer .................................................................. 12
Enabling the Fax Sharing Host Feature .................................................................. 12
Installing the Fax Sharing Client Automatically ............................................................. 14
Copying the Installation Files to a Network Drive ................................................ 16
Creating an InstallShield Silent Response File .......................... .............................17
Creating an Installation Script ......................... ................................................. .......18
Starting the Scripted Installation ................ .............................................................19
Troubleshooting the Scripted Installation ..............................................................20
Installing the Fax Sharing Client Manually ....................................................................21
Modifying Fax Sharing Client Settings ......................................... ..................................22
Working With Faxes ............................................................................. 23
Sending Faxes ................................................................................................................. 23
How Faxes Are Sent ................................................................................ ................24
Monitoring Fax Status ........................ .................................................. ....................24
Receiving Faxes in Message Manager ............................................... .............................26
Troubleshooting ....................................................................................28
iii
Page 4

Contents
iv
Page 5

WinFax PRO Fax Sharing
If you do not have a modem installed on your computer, you can still use
WinFax™ PRO to send and receive faxes. To do so, you must be attached
to a network, and there must be at least one computer with a fax capable
modem or similar communications device and WinFax installed. This
modem sharing feature in WinFax is called Fax Sharing.
If you are sending and receiving messages using a modem on another
computer, your computer is a Fax Sharing Client station. If you and others
in your office are sending and receiving faxes using the modem or device
on your computer, your computer is a Fax Sharing Host station.
This document describes how to use WinFax with the Fax Sharing feature.
Topics in this document include:
Q
information about using this document and the WinFax online
help
Q
understanding the Fax Sharing feature
Q
installing WinFax PRO for Fax Sharing (administrators only)
Q
sending and receiving faxes using the Fax Sharing feature
Q
troubleshooting
5
Page 6
WinFax PRO Fax Sharing
g
About this Guide
While this guide contains instructions for the most basic Fax Sharing tasks,
the online help covers all features. Additional information on using the Fax
Sharing Host (that is, WinFax with a local modem or device) is provided in
the WinFax PRO User’s Guide, available in Adobe Acrobat format on your
WinFax installation CD.
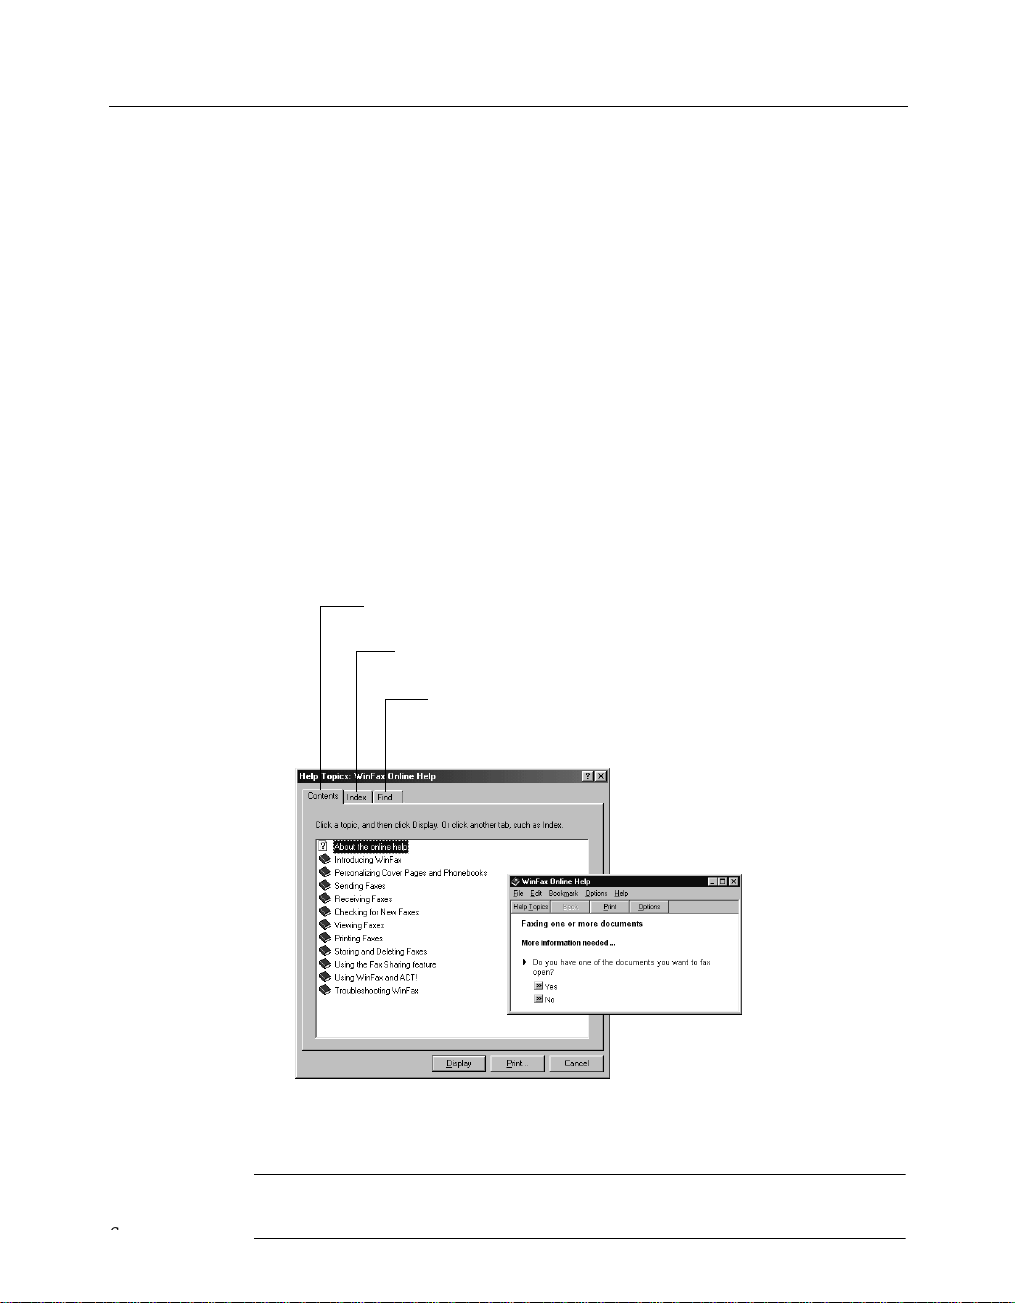
Using the Online Help
The Help Topics dialog is the main entry into the WinFax online help and
contains links to both feature overviews and instructions for the most
commonly used features.
To open the Help Topics dialog:
1
In Message Manager, click WinFax PRO Help Topics on the Help
menu. The Help Topics dialog appears.
Click a book and display
the topics available
Use to quickly locate information
a standard index
usin
Use to search for words
in the online help
2
Select the help options you want to use.
Note: For more information about the Fax Sharing feature, look up “Fax
Sharing” in the online help index.
6
Page 7
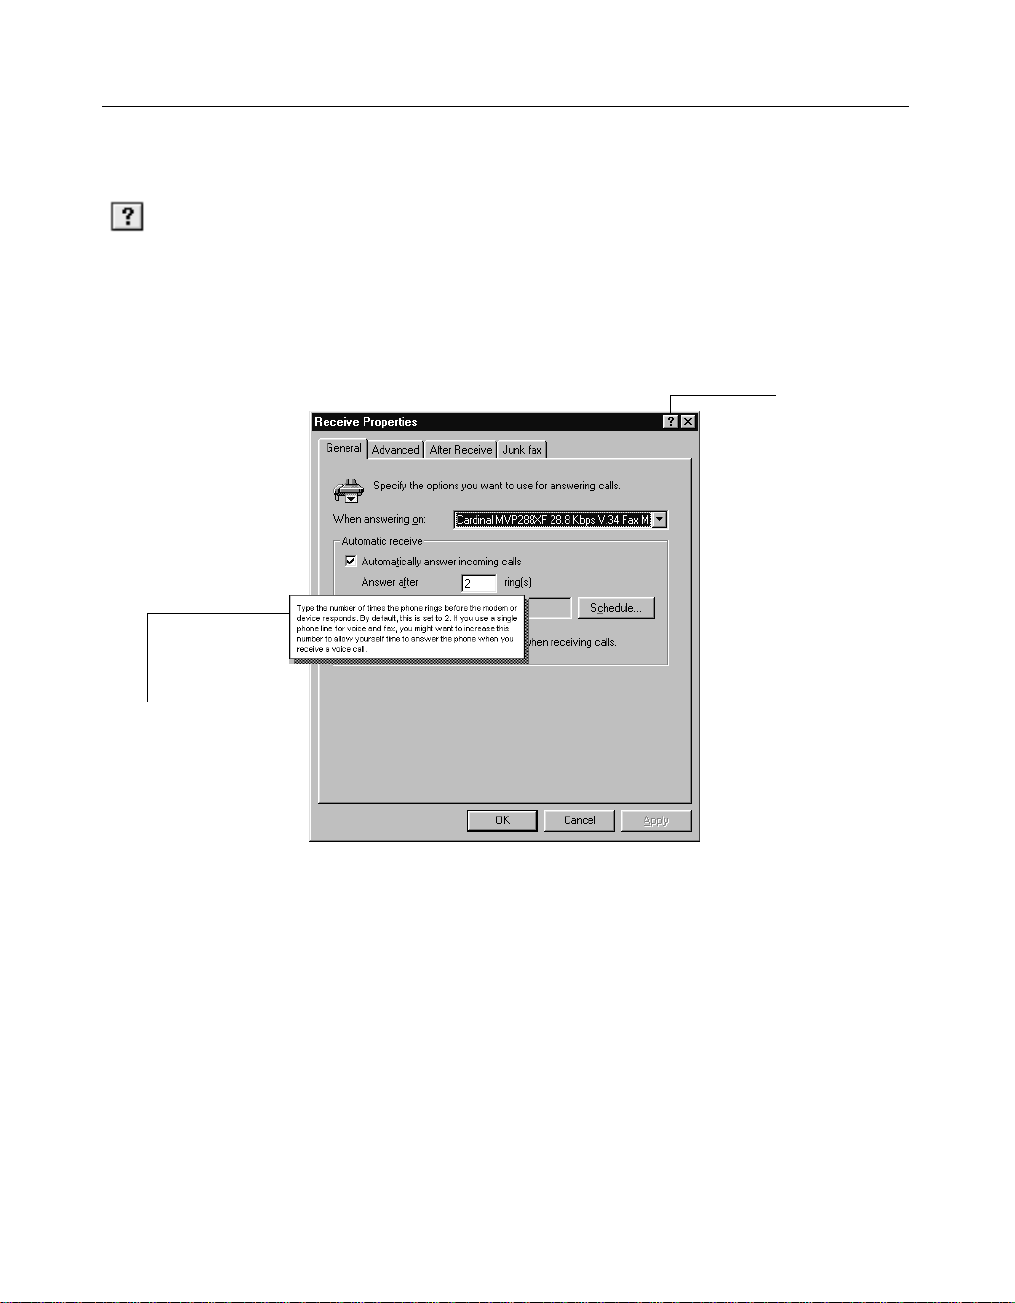
Getting Help in a Dialog
g
g
Many WinFax dialogs and windows contain a help button (in the upper
right corner) that you can use to display information about on-screen
Help button
in upper ri
corner of most
WinFax dialo
and windows
ht
components, such as commands and individual fields in dialogs.
To view the pop-up help for an on-screen component:
s
In a dialog, click the What’s This? button in the upper right corner,
then click any screen element. A pop-up appears over the element.
About this Guide
Help button
Help pop-up contains
information about
onscreen components
Documentation Feedback
Symantec is interested in your suggestions for improving both the print and
the online documentation for WinFax. We are interested in knowing what
works and what needs improvement. Did you find errors, omissions, or
confusing information? Tell us if you found information too difficult to find.
Tell us where you looked for information, and where you looked first.
Your feedback will help shape future versions of the documentation for
WinFax.
7
Page 8

WinFax PRO Fax Sharing
To forward your feedback, use any of the following methods:
Q
Fax – Fax your comments to 1-416-441-0333 to the attention of the
Technical Publications Department.
Q
Postal letter – Send a letter to:
Symantec Corporation
Technical Publications Department
895 Don Mills Road, 500-2 Park Centre
Toronto, Ontario M3C 1W3 (Canada)
Introducing WinFax PRO Fax Sharing
WinFax turns your computer into a full-featured fax messaging
communications center. Using WinFax, you can send and receive fax
documents from your computer at any time.
WinFax sends and receives messages using a modem or related
communications device. For most WinFax users, the modem or device is
installed locally on their computer. However, if you do not have a modem
or device installed on your computer, you can still send and receive
messages by setting up your computer as a Fax Sharing Client station and
using the modem or device attached to the Fax Sharing Host station on
your network.
The Fax Sharing Host station is the messaging center for all Fax Sharing
Clients on your network. Using Fax Sharing Client, you can select the
documents you want to fax on your computer, assemble your fax in the
Send dialog, and then transfer the documents over the network to a Fax
Sharing Host to be faxed—all with a single click. Similarly, the Fax Sharing
Host receives messages for all users on your Fax Sharing network.
To retrieve faxes, you simply connect to the Fax Sharing Host Receive Log
and select the faxes that belong to you.
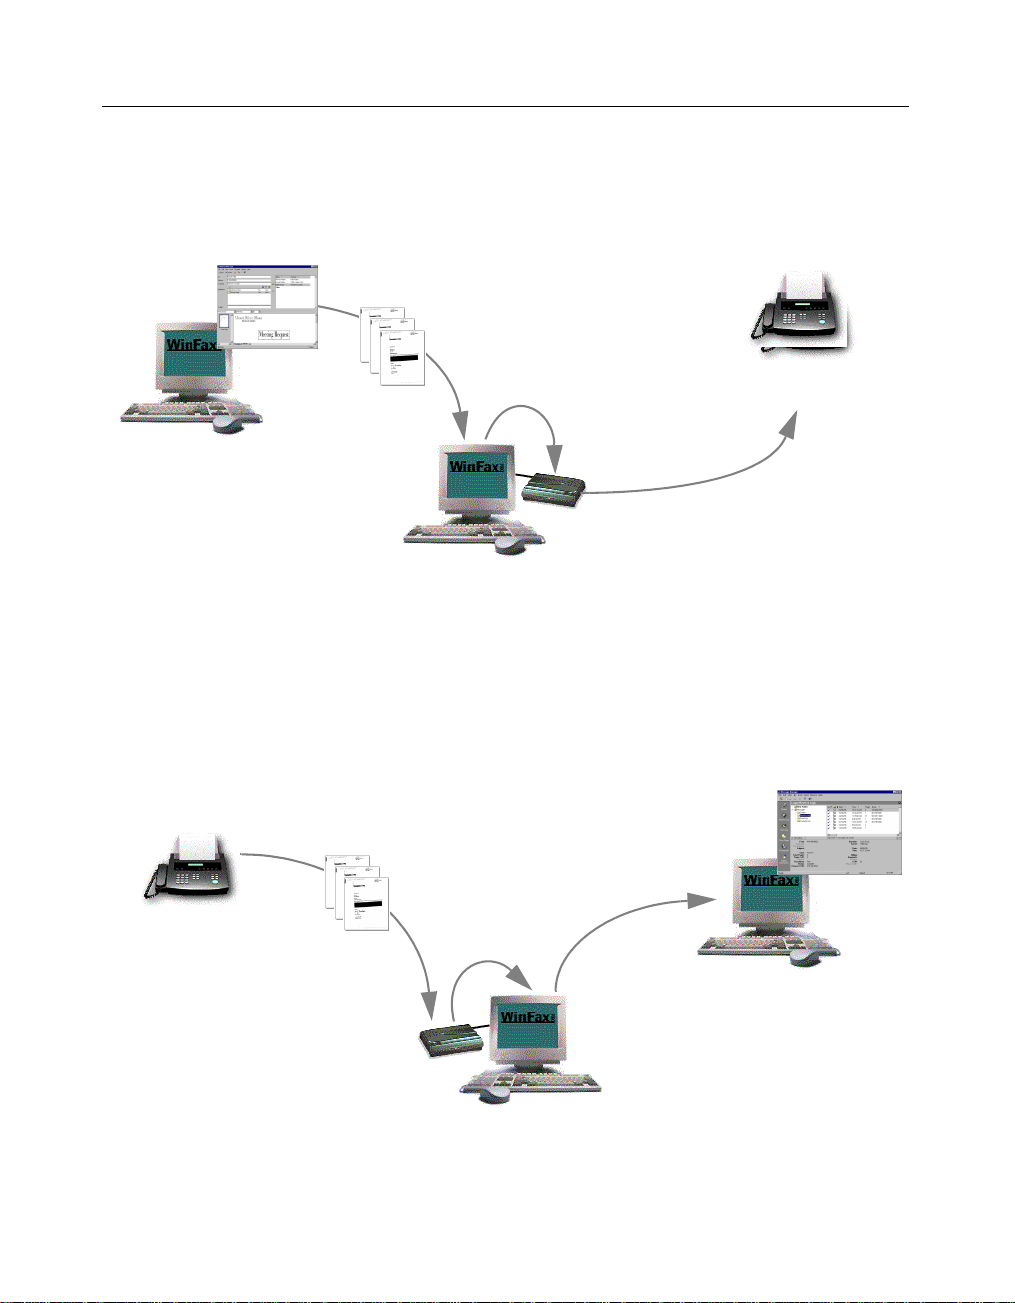
The following diagrams illustrate how the Fax Sharing Host handles all
sending and receiving activities for your Fax Sharing network.
8
Page 9
g
g
g
g
g
Step 1:
g
g
g
g
g
g
g
Prepare your fax using
Fax Sharin
the Send button to send it to
the Fax Sharin
Client, then click
Host’s Outbox.
Client
Sending Faxes
Step 2:
Fax Sharing Client
sends your fax files to the
Fax Sharin
Host with modem or
device
Host’s Outbox.
Introducing WinFax PRO Fax Sharing
Step 4:
Your fax is
received on the
destination fax device.
Destination
Step 3:
The Fax Sharing Host
sends your fax when the host
modem or device is available.
If you scheduled your fax, the
Fax Sharin
that time.
Host waits until
Step 1:
Someone sends
you a fax.
Originating
fax machine
Step 2:
The modem
or device receives
your fax and
transfers it to the Fax
Host’s
Sharin
Receive Lo
.
Receiving Faxes
(Receive Log)
Step 3:
When the Fax
Host receives
Sharin
a fax, the pro
displays a dialo
Fax Sharin
showin
received. You can
retrieve your fax at that
time.
Host with modem or
ram
to the
Client
all the faxes
device
Client
Step 4:
View and print your
fax usin
Client.
your Fax Sharing
9
Page 10

WinFax PRO Fax Sharing
System Requirements
The Fax Sharing feature enables Fax Sharing Client stations to transfer faxes
across the network to and from the Fax Sharing Host station. To use the
Fax Sharing feature, you need at least one Fax Sharing Host station and
one Fax Sharing Client station on your network. Multiple Client stations ca n
connect to a single Host station at any one time (maximum 15 under
Windows 95/98, maximum 25 under Windows NT/2000).
The Fax Sharing Host station is any computer running WinFax with an
attached fax-capable modem or similar communications device that has
enabled the Fax Sharing Host feature.
The Fax Sharing Client station is any computer running WinFax that does
not have an attached modem or device and is set up for Fax Sharing with
the Fax Sharing Host.
The WinFax PRO Program Group
The table below describes the items included in the WinFax PRO program
group.
More information on using these items is provided in the online help and
the WinFax PRO User’s Guide.
Icon Program
Controller – Use the Controller to receive faxes at all times (even when Message
Manager is not running), to monitor current WinFax activity, and to quickly view
new faxes.
The Controller icon indicates that you are running in Fax Sharing mode by
displaying a “network node” graphic directly below the usual Controller graphic.
Install Directory – This is a shortcut to the WinFax installation folder.
Program Setup – Use Program Setup to configure and personalize your WinFax
installation, and to set up many of the main WinFax features.
Send New Fax – Use this command to open the WinFax PRO Send dialog so you
can send faxes without starting Message Manager.
10
Page 11

Installing WinFax for Fax Sharing (Administrators Only)
Icon Program
WinFax PRO Message Manager – Use WinFax PRO Message Manager to maintain
a list of all WinFax messages, and to create detailed reports about fax events.
Starting and Exiting WinFax Programs
The Message Manager is the main interface for sending faxes, for
organizing and storing messages, and for config uring your W inFax system.
Program Setup is the program you use to set up Fax Sharing and modify
your WinFax preferences. You can start these programs in a variety of
ways. For more information on alternate methods, look up “starting” in the
online help index.
To start Message Manager:
Click the Windows Start button, point to Programs, point to Sy mantec
WinFax, and then click WinFax Message Manager. Message Manager
starts.
To exit Message Manager:
On the File menu, click Exit.
To start Program Setup:
Click the Windows Start button, point to Programs, point to Sy mantec
WinFax, and then click Program Setup. Program Setup starts.
To exit Program Setup:
On the Program Setup dialog, click Close.
Installing WinFax for Fax Sharing
(Administrators Only)
Y ou can install W inFax on one or more computers, depending on the type
of license you purchased. If you are installing WinFax on a single
computer, you can do so from the W inFa x CD. If more than one person in
your organization is installing WinFax, your administrator may automate
the installation process using a scripted installation.
11
Page 12

WinFax PRO Fax Sharing
Setting Up a Fax Sharing Host Station
Y our Fax Sha ring network must have at least one Fax Sharing Host station.
If you have a modem or communications device attached to your WinFax
station, you can share your modem or device with other WinFax users on
your network when you enable the Fax Sharing Host feature. To set up
your WinFax station as a Fax Sharing Host, install WinFax to work with
your modem or device and then enable the Fax Sharing Host feature.
Installing WinFax on a Host Computer
The Setup program guides you through the installation process by prompting
you for information and automatically determining your system configuration,
modem or device setup, COM port location, and available disk space.
Note: To install WinFax under W indows NT/2000, your W indows NT/2000
account must have administrative privileges.
To install WinFax on a host computer:
1 Insert the WinFax installation CD into the CD-ROM drive.
2 Click the Windows Start button, and then click Run. The Run
dialog appears.
3 In the Open field, type ...
<drive and path>\SETUP.EXE
… where “drive and path” is the CD ROM drive containing the
WinFax installation CD or the location of the WinFax installation files
on the network.
4 Click OK. The Setup program starts.
5 Follow the instructions on the screen. Click Next to proceed.
6 When the Modems And Communications Devices panel appears,
click your modem or device in the list and click Next.
7 Follow the instructions on the screen. Click Next to proceed.
8 On the final wizard panel, click Finish.
9 After the installation is complete, enable the Fax Sharing Host
feature (see “Enabling the Fax Sharing Host Feature”, next).
10 Assist WinFax users in installing WinFax on client computers (see
“Installing the Fax Sharing Client Automatically” on page 14 and
“Installing the Fax Sharing Client Manually” on page 21).
12
Page 13

Installing WinFax for Fax Sharing (Administrators Only)
Enabling the Fax Sharing Host Feature
To allow Fax Sharing Clients to receive voice messages and send and
receive faxes using the host computer, you must first enable the Fax
Sharing Host feature and then enable automatic reception.
To enable the Fax Sharing Host feature:
1
If your Host computer is running under Windows 95/98, proceed
to Step 2. If your Host computer is running under Windows NT/
2000, create an account on the Fax Sharing Host for each Fax
Sharing Client workstation (see your Windows NT/2000
documentation).
Note: Use the same user name and password that the client uses
on their own workstation.
2
Start Program Setup (see page 11).
3
In the list, double click Fax Sharing Host. The Fax Sharing Host
Properties dialog appears.
13
Page 14

WinFax PRO Fax Sharing
4 Click the General tab.
5 Enable Use This WinFax PRO Station As A Fax Sharing Host.
6 If you want to protect the Fax Sharing Host station with a
password, enable Use Password then type a password in the
Password field.
7 In the Host Computer Information section, type the appropriate
information.
8 In the After Sending Client Events section, click the option that
best describes what you want WinFax to do with messages that
Fax Sharing Client users send and receive through your computer.
9 Enable automatic reception by doing one of the following:
Q
Using the Controller – Right click the Controller icon in the
Windows taskbar and enable Automatic Receive on the menu
that appears.
Q
Using Message Manager – On the Receive menu, enable
Automatic Receive.
Installing the Fax Sharing Client Automatically
14
To automate the installation process, you can use a scripted installation. A
scripted installation installs WinFax using the settings contained in two
files: an InstallShield silent response file (SETUP.ISS) and a script file
(WFSCRIPT.SPT). The InstallShield silent response file contains all options
you would normally specify during the WinFax installation. The script file
contains options that you would configure after installing WinFax (for
example, the modem or communications device you want to use).
The following flow chart illustrates the scripted installation process including
the preparatory steps and how to run the scripted installation. For step-by-step
instructions on how to use the scripted installation feature, see the procedure
following the flow chart.
Page 15

WinFax CD
Installing WinFax for Fax Sharing (Administrators Only)
Start Here
Copy files to network (see page 16)
Copy the installation files to a shared
network directory.
Silent response file (see page 17)
Copy the silent response file (SETUP .ISS)
to the shared network directory.
On the Fax Sharing Client computer, run the Setup program
from the shared network directory using the “-s” command
line parameter. In the Run dialog, type:
<network path> SETUP.EXE -s
Note: More information on using a scripted install is provided in the
Multiple Installation Guide, available in Adobe Acrobat format
(WFSCRIPT.PDF) in the “Docs” folder on your WinFax installation CD.
To install Fax Sharing Client using a scripted install:
1 Set up a Fax Sharing Host station. See “Setting Up a Fax Sharing
Host Station” on page 12.
2 Copy the WinFax installation files to a network drive that is
accessible to all users who will install WinFax on their computers.
See “Copying the Installation Files to a Network Drive” on
page 16.
3 Create an InstallShield silent response file (SETUP.ISS) that you can
use as an installation template. See “Creating an InstallShield Silent
Response File” on page 17.
Shared
network
directory
Fax Sharing Client
Installation
Script files (see page 18)
Copy the script file (WFSCRIPT .SPT)
to the shared network directory.
15
Page 16

WinFax PRO Fax Sharing
4 Create an installation script file (WFSCRIPT.SPT) containing the
appropriate installation options. See “Creating an Installation
Script” on page 18.
5 Copy both the InstallShield silent response file (SETUP .ISS) and the
installation script (WFSCRIPT.SPT) to the Disk1 subdirectory of the
network directory containing the WinFax installation files.
6 Instruct users to install WinFax using the silent response file and
installation script. See “Starting the Scripted Installation” on
page 19.
7 Have each user modify their settings, as required (select their
shared mailbox, change greetings, and so on). See “Modifying Fax
Sharing Client Settings” on page 22 and “Installing the Fax Sharing
Client Manually” on page 21 for more information.
Copying the Installation Files to a Network Drive
With a scripted installation, all users install WinFax from a network drive.
To prepare for the scripted installation, you must copy the WinFax
installation files from the WinFax installation CD to a network drive.
Note: All users who will install WinFax must have network access to the
network drive containing the WinFax installation files.
16
To copy the installation files to a network drive:
1 Start Windows.
Note: To install WinFax under Windows NT/2000, your Windows
NT/2000 account must have administrative privileges.
2 Insert the WinFax installation CD into the CD-ROM drive. The
WinFax AutoRun program starts.
3 Click the Exit button to return to your Windows desktop.
4 Start Windows Explorer.
5 Locate the WinFax directory on the WinFax installation CD.
6 Copy the contents of the WinFax directory and all subdirectories to
a network drive that is accessible to all users who will install
WinFax.
Page 17

Installing WinFax for Fax Sharing (Administrators Only)
Creating an InstallShield Silent Response File
WinFax uses the InstallShield program. To perform a scripted install,
InstallShield requires you to create a silent response file (SETUP.ISS). You
can create a silent response file by running the Setup program with the “-r”
command line parameter. This parameter instructs the Setup program to
record all of your selections in a silent response file (SETUP.ISS) that you
can later use as an installation template for other WinFax installations.
Note: These installation options will apply to all users who install WinFax
using the scripted installation. When users perform a scripted installation,
the Setup program uses the recorded responses from the SETUP.ISS file. It
will also move through the installation screens at the same pace as you did
when you created the original SETUP.ISS file.
To create an InstallShield silent response file:
1
Set up your computer exactly as user computers are set up.
Remove any previous installation of WinFax.
2
Click the Windows Start button, and then click Run. The Run
dialog appears.
3
In the Open field, type ...
<path>\SETUP.EXE -r
… where “path” is the network drive and directory containing the
WinFax installation files.
4
Click OK. The Setup program starts.
5
Follow the instructions on the screen. Click Next to proceed.
6
On the final panel, click Finish. Setup installs WinFax on your
computer and creates an InstallShield silent response file (*.ISS) in
your Windows directory.
7
Open the silent response file (SETUP.ISS) located in your Windows
directory in a text editor such as Notepad.
8
Locate the [SetupType-0] section.
9
Check for the “szDir=” line. Do one of the following:
Q
Line exists and a drive and directory specification appear after
the equals (=) sign – Proceed to step 10.
Q
Line does not exist – Proceed to step 10.
Q
Line exists and nothing appears after the equals (=) sign –
Locate the “szExeDir” entry earlier in the file and copy its value
17
Page 18

WinFax PRO Fax Sharing
(that is the drive and directory specification) after the equals
sign in the “szDir=” line and proceed to step 10.
Note: You must edit the silent response file (SETUP.ISS) before
you can run a scripted installation.
10 Save the file and exit Notepad.
11 Copy the file to the Disk1 subdirectory of the network directory
containing the WinFax installation files.
Creating an Installation Script
If an installation script is included in the Disk1 subdirectory of the network
directory containing the WinFax installation files, users can use a scripted
installation to bypass many of the configuration tasks they would normally
perform after installing WinFax (for example, setting up the modem or
device they want to use). This scripted installation installs WinFax on a
local computer as a Fax Sharing Client station.
To create a Fax Sharing Client installation script:
1 In a text editor (such as Notepad), open the sample script file,
WFSCRIPT.SPT, included in the WinFax\DISK1 directory on the
WinFax installation CD.
The sample script file contains all possible installation options and
“commented” text that explains the available options.
2 Save the file on your hard drive.
3 Using the sample file as a template, specify the options for your
Fax Sharing Client station. Do the following:
a In the [GENERAL] section, specify the appropriate installation
b In the [LOCATION] section, specify the appropriate dialing
c In the [STANDALONE] section, set STDALONE=0.
d In the [WFXIFSETUP] section, set WFXIFID=WPP.
e In the [MODEMS] section, set USEHAL=1 and HAL=2.
f In the [WPP SETTINGS] section, identify the Fax Sharing Host
directory and type.
instructions.
station you will be using, the operating system on which the
Fax Sharing Host station is running, the Fax Sharing Host
password (if it exists), and whether you want to check for new
messages when you start WinFax.
18
Page 19

Installing WinFax for Fax Sharing (Administrators Only)
Note: The sample script file also contains information for other
modems and communications devices. Do not delete those entries.
4 Save the updated file.
5 Copy the file to the Disk1 subdirectory of the network directory
containing the WinFax installation files.
Starting the Scripted Installation
The Setup program guides you through the installation process by prompting
you for information and automatically determining your system configuration
and available disk space. Depending on the options predefined in the
InstallShield silent response file and the installation script file, users may or
may not be prompted for additional information after they start the WinFax
Setup program.
Note: To install WinFax under Windows NT/2000, your W indows NT/2000
account must have administrative privileges.
To prepare for the scripted installation (administrators only):
1 Set up a Fax Sharing Host station (see page 12).
2 Copy the WinFax installation files to a network drive (see
page 16).
3 Create an InstallShield silent response file (see page 17).
4 Create an installation script for the Fax Sharing Client stations (see
page 18).
5 Copy both the InstallShield silent response file (SETUP .ISS) and the
installation script (WFSCRIPT.SPT) to the network dr ive containing
the WinFax installation files.
6 Instruct users to install WinFax using the response file and
installation script (see the next section).
To install WinFax on a client computer (scripted install):
1 Ensure that all preparations have made for the scripted install (see
the preceding procedure).
2 Start Windows.
3 If you are installing on a Windows NT/2000 computer, log on to
Windows NT/2000 using an account with administrative privileges.
19
Page 20

WinFax PRO Fax Sharing
4 Click the Windows Start button, and then click Run. The Run
dialog appears.
5 In the Open field, type ...
<network path>\SETUP.EXE -s
… where “network path” is the location of the WinFax installation
files on the network.
6 Click OK. The Setup program installs WinFax.
7 After the install is complete, restart the computer.
8 Start Message Manager (see page 11).
9 On the Receive menu, click Automatic Receive.
Troubleshooting the Scripted Installation
The scripted installation creates a log file called “SETUP.LOG” in the
directory containing the WinFax installation files. If you do not have write
access to that directory, SETUP.LOG is saved in your Windows directory. If
the scripted installation does not work properly, open SETUP.LOG in a text
editor such as Notepad and check for the response code in the
[ResponseResult] section. The table below lists the possible error codes.
20
Result Code Meaning
0 Scripted install was successful.
-1 General error.
-2 Invalid mode.
-3 Required data not found in the SETUP.ISS file. This result code
appears when you did not edit the silent response file after it was
created (see “Creating an InstallShield Silent Response File” on
page 17).
-4 Not enough memory available.
-5 File does not exist.
-6 Cannot write to the silent response file.
-7 Unable to write to the log file.
-8 Invalid path to the InstallShield silent response file.
-9 Not a valid list type (string or number).
Page 21

Installing WinFax for Fax Sharing (Administrators Only)
Result Code Meaning
-10 Data type is invalid.
-11 Unknown error during setup.
-12 Dialogs are out of order.
-51 Cannot create the specified folder.
-52 Cannot access the specified folder.
-53 Invalid option selected.
Installing the Fax Sharing Client Manually
If you do not have a modem or communications device attached to your
WinFax station, but another WinFax station on your Fax Sharing network
has an attached modem or device and is configured as a Fax S haring Host,
you can use that modem or device as if it were attached to your WinFax
station. To do so, you must install WinFax on your computer as a Fax
Sharing Client and connect to the appropriate Fax Sharing Host.
The Setup program guides you through the installation process by prompting
you for information and automatically determining your system configuration,
modem or device setup, COM port location, and available disk space.
Note: To install WinFax under Windows NT/2000, your W indows NT/2000
account must have administrative privileges.
To install WinFax on a client computer:
1 Obtain the following information from your system administrator:
Q
the name of the Fax Sharing Host station on your network
Q
if your Fax Sharing Host station is running under Windows NT/
2000, verify that you have an account set up on the Fax Sharing
Host station (you cannot install or use Fax Sharing Client un less
you have an account)
Q
the password for the Fax Sharing Host station, if one exists
2 Click the Windows Start button, and then click Run. The Run
dialog appears.
3 In the Open field, type ...
<drive and path>\SETUP.EXE
21
Page 22

WinFax PRO Fax Sharing
… where “drive and path” is the CD ROM drive containing the
WinFax installation CD or the location of the WinFax installation files
on the network.
4 Click OK. The Setup program starts.
5 Follow the instructions on the screen. Click Next to proceed.
6 When the Modems And Communications Devices panel appears,
click the WinFax PRO Fax Sharing device and click Next.
Note: Y ou can also set up Fax Sharing after you install WinF ax. T o
do this, start Program Setup (see page 11), double click Modems
And Communications Devices, and then enable the Active check
box beside the WinFax PRO Fax Sharing fax device.
7 Follow the instructions on the screen. Click Next to proceed.
8 When prompted to configure the WinFax PRO Fax Sharing device,
click Yes. The WinFax Fax Sharing Client Properties dialog
appears.
9 In the Host Name section, click Browse, select the Fax Sharing
Host station you want to use to send and receive faxes, and then
click Open.
10 In the Password field, type the password required to access the
specified Fax Sharing Host station (if a password exists—see your
WinFax administrator for details).
11 If you want WinFax to automatically check for new faxes each
time you start WinFax, enable Check For New Events On Startup.
12 Click Next. WinFax pings the selected Host station to confirm
connectivity, and connects your Client station to that Host. This
may take a few minutes.
13 Click Finish to save your settings and exit the Fax Sharing Client
Properties wizard.
Modifying Fax Sharing Client Settings
You can modify your Fax Sharing Client settings at any time. For example,
if your network has multiple Fax Sharing Host stations, you can switch to
another Fax Sharing Host.
To modify Fax Sharing Client settings:
1 Start Program Setup (see page 11).
22
Page 23

2 In the list, double click Modems And Communications Devices.
The Modems And Communications Devices Properties dialog
appears.
3 In the devices list, click the WinFax PRO Fax Sharing device.
4 Click Properties. The WinFax Fax Sharing Client Properties dialog
appears.
5 Make any changes as desired, clicking Next to proceed.
Working With Faxes
This section describes how to send and receive faxes with WinFax. The
instructions in this section apply to both Fax Sharing Client and Fax
Sharing Host stations, unless otherwise noted.
Note: This section contains instructions for the most basic WinFax tasks—
the online help covers all features. Additional information on using Fax
Sharing Host mode or regular mode (that is, WinFax with a local modem or
communications device) is provided in the WinFax PRO User’s Guide and
in the WinFax PRO User’s Guide, both available in Adobe Acrobat format
on your WinFax installation CD.
Working With Faxes
Sending Faxes
WinFax sends faxes using a modem or communications device. Which
modem WinFax uses depends on the active modem set up in the Modems
And Communications Devices Properties dialog (start Program Setup, see
page 11, and double click Modems And Communications Devices). Fax
Sharing Host stations use their local modem or device, while Fax Sharing
Client stations use the WinFax PRO Fax Sharing device to connect to the
Fax Sharing Host station and access its modem or device. Once you have
set up WinFax for Fax Sharing (either as a Fax Sharing Host or a Fax
Sharing Client), you can send faxes using the procedures described in the
WinFax PRO User’s Guide and the WinFax PRO User’s Guide.
Note: For more information, look up “sending faxes” in the online help
index.
23
Page 24

WinFax PRO Fax Sharing
How Faxes Are Sent
After you prepare your fax and click Send, WinFax begins processing your
fax. The steps involved in processing a fax may vary, depending on where
the fax was created and assembled.
Faxes created on the Fax Sharing Host – WinFax delivers the fax to the
modem or device, displays the Status dialog, dials the recipient’s fax
number, and instructs the modem or device to send your fax. When the
transmission is complete, the Status dialog closes and WinFax updates the
fax status in the display area of the Message Manager Logs window.
Faxes created on the Fax Sharing Client – After you prepare your fax
and click Send, WinFax does the following:
Q
Creates a log record in the Fax Sharing Client Outbox (in Message
Manager).
Q
Connects to the Fax Sharing Host using the WinFax PRO Fax
Sharing device.
Q
Transfers the fax image files to the Fax Sharing Host’s Outbox (in
Message Manager) for delivery.
Q
Updates the Fax Sharing Client fax status that appears in the
display area of the Message Manager Logs window to read
“waiting at server”.
Q
Monitors the Fax Sharing Host until the fax is sent using the
modem attached to the Fax Sharing Host.
Q
Updates the Fax Sharing Client fax status.
Q
Moves the log record from the Outbox to the Send Log.
24
Notes: After the fax is delivered to the Fax Sharing Host, you can exit
WinFax. If WinFax is not running when your fax is finally delivered, the
status is updated the next time you start WinFax.
Monitoring Fax Status
You can verify the status of sent faxes in the following ways:
Q
From the Status dialog (Fax Sharing Host only) – During fax
transmission, status information appears in the Status dialog on the
Fax Sharing Host. The Status dialog is not visible to the Fax
Sharing Client station.
Page 25

Current fax
g
transmission
activity
Rate of
transmission
Working With Faxes
Current pa
Collapse details
display area
e
Cancel the
transmission
If the faxing traffic on your computer is heavy, you can disable the
Status dialog so it does not appear each time a fax is sent or received.
Start Program Setup (see page 11), double click Call Status And
Controller, click the General tab, and then disable Display Status
Dialog.
Q
From the Controller – The Controller icon changes to reflect the
status of the current faxing activity. If a fax fails, a failed
transmission marker (a red X) appears on the Controller icon in
the Windows system tray.
Q
From the Send Log – The details about sent faxes, including
those canceled, appear in the record list of the Send Log folder (on
the Go menu in Message Manager, click Send Log). WinFax uses
icons to identify the status of faxes in the Logs record list.
Successful – Entire message
was sent or received and can
be viewed.
Unsuccessful – Message
was not sent or received, or
was only partially
transmitted.
Recurring – Message is
scheduled to be sent at
regular intervals.
Held – Message is “on hold”
until you instruct WinFax to
send it.
In progress – Message is
currently being sent.
Collapsed group –
Message is being sent to a
recipient group.
25
Page 26

WinFax PRO Fax Sharing
Scheduled or pending –
Message is scheduled, or
WinFax is waiting to retry the
send.
Sometimes faxes are not sent successfully due to communication problems
such as busy or no-answer signals. In those situations, WinFax stores the
faxes in the Outbox until either they are successfully delivered or the
available number of retries is exceeded.
Note: If the number of retries is exceeded, WinFax places the fax in the
Send Log and marks it as an “unsuccessful” event. For more information,
look up “retrying” in the online help index.
Receiving Faxes in Message Manager
In Fax Sharing mode, all incoming fa xes not di rected to a WinFax mailbox
are received on the Fax Sharing Host station and appear in the Receive Log
on that computer. Before the Fax Sharing Host can receive faxes, it must
have:
Q
an active modem or communications device capable of sending
and receiving faxes (if you use a “send only” modem, receive
features are disabled)
Q
Windows running
Q
one of the following WinFax programs running: Message Manager
or the Controller
Q
automatic reception enabled
26
After faxes are received by the Fax Sharing Host, each Fax Sharing Client
can connect and download their faxes.
To receive faxes (Fax Sharing Host):
Do one of the following:
Q
Using the Controller – Right click the Controller icon in the
Windows system tray and enable Automatic Receive on the
menu that appears.
Q
Using Message Manager – On the Receive menu in Message
Manager, enable Automatic Receive.
Page 27

Working With Faxes
To download received faxes from the Fax Sharing Host (Fax Sharing
Client):
1 Do one of the following, depending on when you want to receive
faxes:
Q
Receive faxes automatically – On the Receive menu in Message
Manager, enable Automatic Receive. Whenever there are new
faxes at the Fax Sharing Host, the WinFax Receive dialog
appears on your screen and displays a list of all unread faxes in
the Fax Sharing Host’s Receive Log.
Q
Receive faxes manually – On the Receive menu in Message
Manager, click Manual Receive Now. In the dialog that appears,
click Yes. The WinFax Receive dialog appears and lists all the
unread faxes in the Fax Sharing Host’s Receive Log.
2 To identify the faxes that belong to you, click a fax in the list and
then read the first page information in the display area.
3 In the list, select the faxes you want to download.
4 If you want the faxes you download to be available for other Fax
Sharing Client stations to download, enable Leave As Unread At
The Host For Others To Read.
27
Page 28

WinFax PRO Fax Sharing
5 Click Receive Now. The Fax Sharing Host marks those faxes as
read and transfers them across the network into your Message
Manager Receive Log.
Note to Fax Sharing Clients: To display the WinFax Receive dialog each
time you start WinFax, enable Check For New Events On Startup in the Fax
Sharing Properties dialog. Start Program Setup (see page 11), double click
Modems And Communications Devices, click WinFax PRO Fax Sharing in
the list, and then click Properties).
Troubleshooting
If you encounter problems while using WinFax, there are a number of
things you can do before calling technical support. Taking the time to
troubleshoot your situation may help you identify the problem and fix it. In
many cases, this can save you time and money.
Make note of any changes you have made to your computer and to your
Windows setup. Determine when you started experiencing the problem. If
you can reproduce the problem, make note of the steps required to do so.
Also, record any messages that appear on the screen when the problem
occurs. When you have done this, check the following sources for
troubleshooting information:
Q
WinFax PRO User’s Guide – Contains detailed troubleshooting
information for the most common problems encountered by
WinFax users. The WinFax PRO User’s Guide is included on the
WinFax installation CD in Adobe Acrobat format.
Q
WinFax PRO Online help – Contains detailed troubleshooting
information for WinFax. To view the troubleshootin g section in the
online help, click WinFax Help Topics on the Help menu, and
then double click the “Troubleshooting” book in the Help Topics
dialog.
Q
WinFax PRO ReadMe file – Contains hardware-specific
information and information not available when this user’s guide
was printed. To view the ReadMe file, click the Windows Start
button, point to Programs, then to WinFax PRO, and then click
Install Directory. Double click README.TXT in the WinFax install
directory.
Q
Symantec Service And Support W eb site – For 24-hour access to
technical product information (Knowledge Base), discussion
28
Page 29

groups, FAQs, the automated Symantec Support Genie, and the
Symantec FTP site, connect to http://service.symantec.com. For
more information, look up “support” in the online help index.
Q
Online forums – Provide question-and-answer support on
CompuServe and America Online (AOL). Symantec Technical
Support representatives monitor these forums. For more
information, look up “support” in the online help index.
Q
Other documentation – In addition to the above sources of
information, the documentation provided with your hardware,
your operating system, and any other programs you use with
WinFax may be a good source of information.
Q
Telephone support – Contact your WinFax administrator to
obtain the technical support telephone number.
Troubleshooting
29
Page 30

WinFax PRO Fax Sharing
30
 Loading...