

Page 1
Xerox FaxCentre F12
Quick Start Guide
602E97930
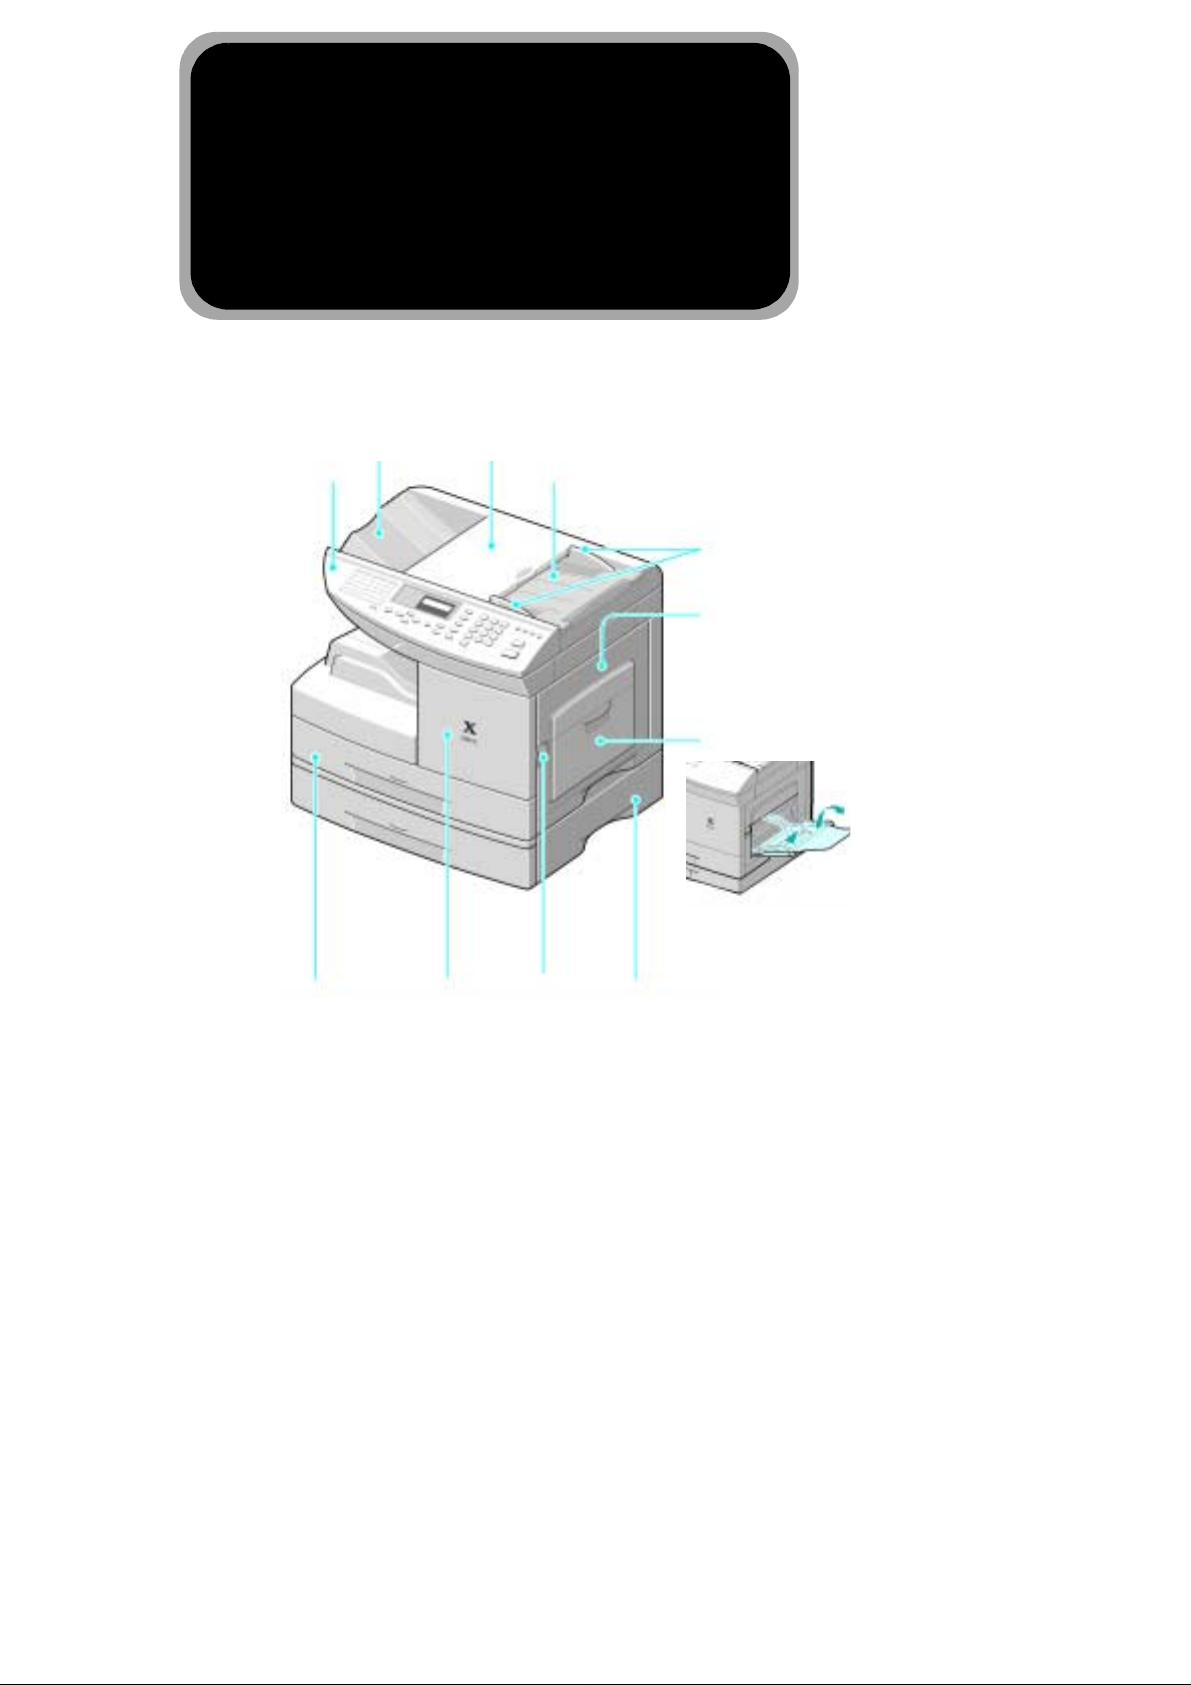
Document
Output Tray
Control Panel
Automatic
Document
Feeder
Document Input
Tray
Document
Guides
Side Cover
Bypass tray
Tray 1
Cover
Release
Lever
Tray 2Front
Page 2

Welcome to your FaxCentre F12....
Thank you for choosing the Xerox FaxCentre F12.
To support the delivery of your new machine please refer to the following:
½
Quick Start Guide
½
Installation Sheet
½
User Guide
The following pages contain an overview of the main features to help you get
started. If you require more detailed information about any of the features
available on your FaxCentre F12, please refer to the User Guide which explains
and identifies all the features and functions available on your machine.
The Document Company Xerox
GKLS European Operations
Bessemer Road
Welwyn Garden City
Hertfordshire
AL7 1HE
ENGLAND
©2002 by Xerox Corporation. All rights reserved.
Copyright protection claimed includes all forms and matters of copyrighted material and information now allowed
by statutory or judicial law or hereinafter granted, including without limitations, material generated from the
software programs which are displayed on the screen, such as icons, screen displays, looks etc.
®
Xerox
, The Document Company®, the digital X® and all Xerox products mentioned in this publication are
trademarks of Xerox Corporation. Product names and trademarks of other companies are hereby acknowledged.
Page 2
Page 3
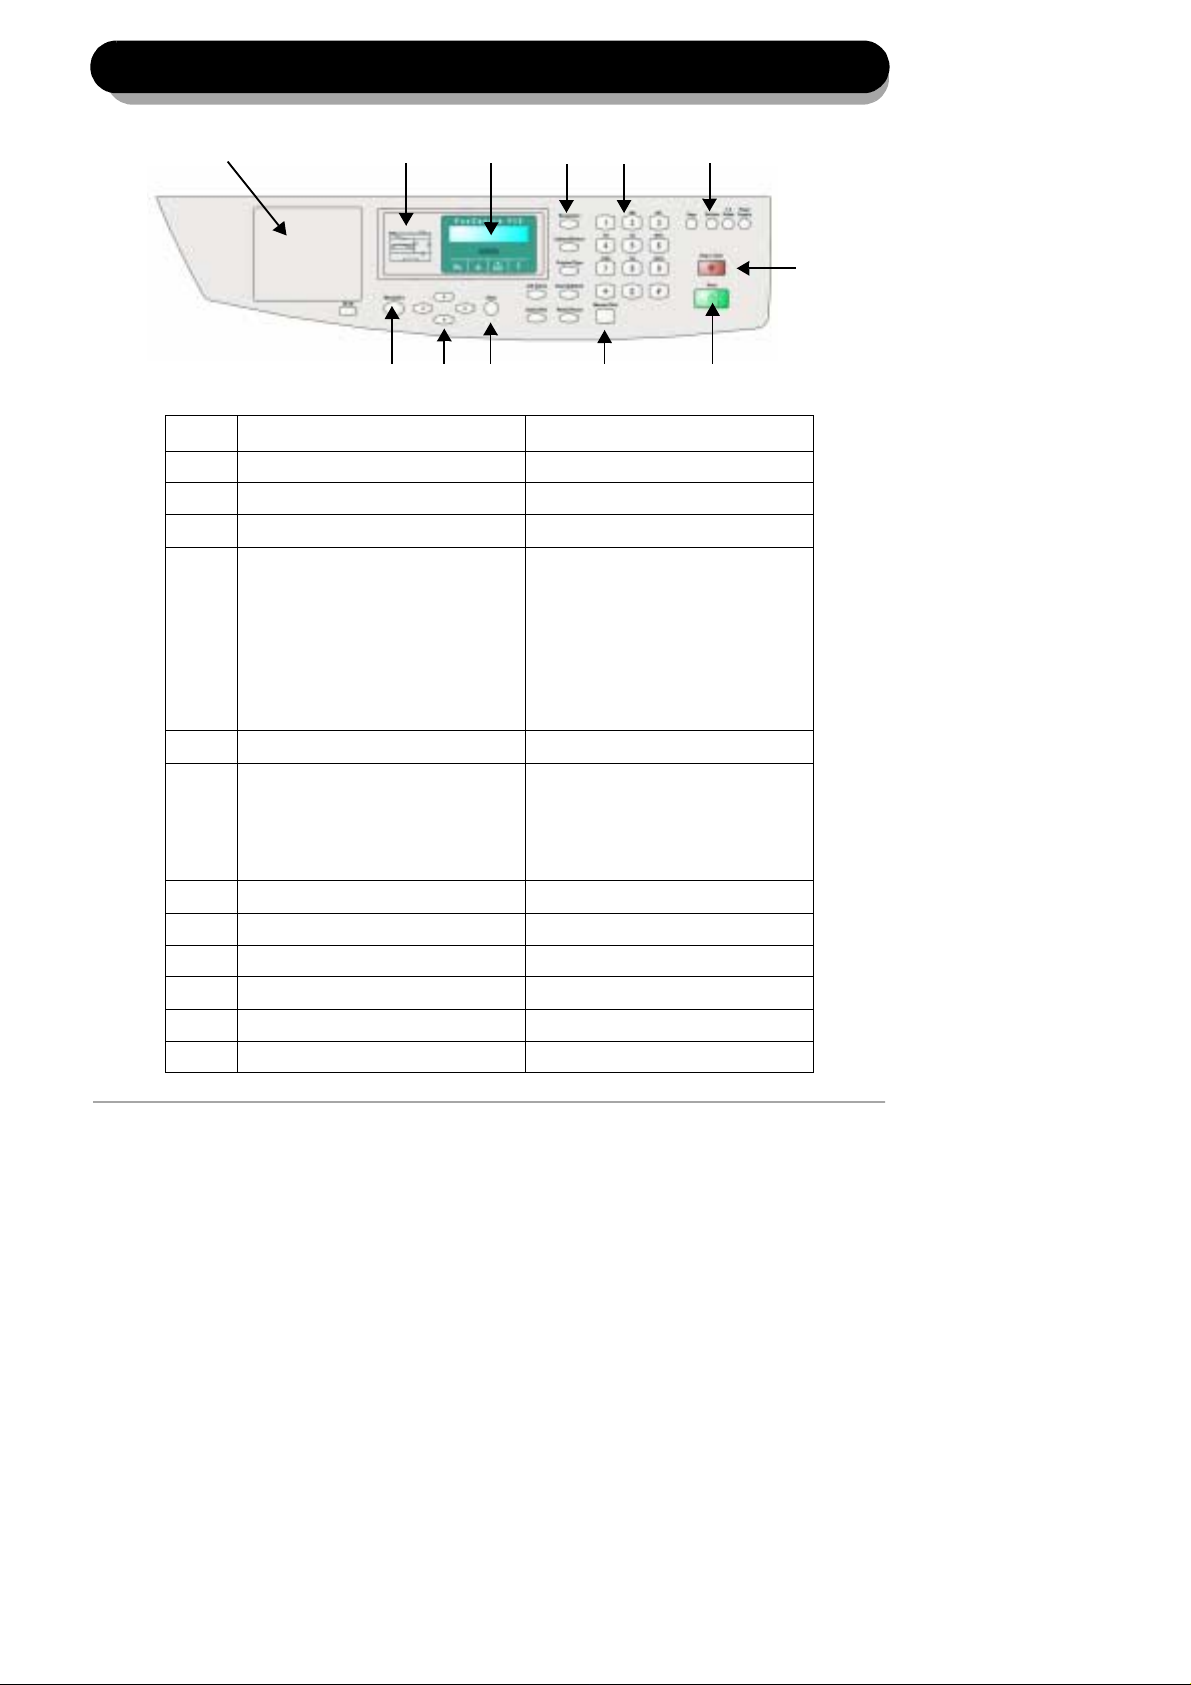
Working around the control panel....
213456
789 10 11
Key User Guide Page
One Touch Keys Page 5-19
1
Status Map Page 2-6
2
LCD Display Page 2-7, 8-12
3
Function Keys:
4
- Resolution
- Lighten/Darken
- Original Type
-Search/Delete
- Speed Dial
- Redial/Pause
- Job Status
Alpha/Numerical Keys Page 2-10
5
Copy Functions:
6
-Copy
-Collate
- 1-2 Sided
- Paper Supply
Menu/Exit Page 2-8, 9-1
7
Cursor Keys Page 2-8
8
Enter Page 2-8
9
Manual Dial Page 5-10
10
Start Page 2-8
11
Stop/Clear Page 2-8
12
Page 5-5 (Fax Only)
Page 3-8 (Copy), 5-6 (Fax)
Page 3-9 (Copy), 5-7 (Fax)
Page 5-25 (Fax Only)
Page 5-21 (Fax Only)
Page 2-7 (Fax Only)
Page 2-7
Page 3-2 (Copy Only)
Page 3-11 (Copy Only)
Page 3-10 (Copy Only)
Page 3-3 (Copy Only)
12
Page 3
Page 4

Making copies....
1
Ensure th e LCD displ ays ‘REA DY
TO COPY’.
If not, press the [Copy] Key on
the control panel.
Insert the originals into the
document feeder, face down. Up
to 50 sheets can be inserted at a
2
3
time.
The first page should be at the
bottom with the headings
towards the left or back.
Align the stack to the left and
against the rear edge of the
document feeder tray and adjust
the guides if necessary.
Enter Copy features and the copy
quantity required, up to 999
copies can be selected.
Press [Start]. The LCD displays
copy processing.
Copying can be stopped at any
time by pressing [Stop/Clear].
Press [Stop/Clear] to return to
the default fax mode.
Copy Key
Stop/Clear Key
Start Key
For a more detailed explanation of the standard Copy features, please refer to the
following pages of the User Guide....
½
Lighten/Darken - page 3-8
½
Original Type - page 3-9
½
1-2 Sided Copy - page 3-10
½
Collated - page 3-11
½
Reduce/Enlarge - page 3-11
Page 4
Page 5

Sending a fax manually....
2
Insert the originals into the
document feeder, face down.
1
Up to 50 sheets can be inserted
at a time.
The first page should be at the
bottom with the headings
towards the left or back.
Align the stack to the left and
against the rear edge of the
document feeder tray and adjust
the guides if necessary.
Use the numeric keypad to dial
the number of the remote fax
machine.
Press [Start] to send the fax.
To enter the number, you can
also press a one-touch button or
press [Speed Dial] and enter a
speed dial number including a
group dial number.
For details, see “Automatic Dialing”
on page 5-18 of the User Guide.
Press [Stop/Clear] to return to
the default fax mode.
Numeric Keypad
Start Key
For a more detailed explanation of the Fax features, please refer to the following
pages of the User Guide....
½
Resolution - page 5-5
½
Lighten/Darken - page 5-6
½
Original Type - page 5-7
½
Toll Save - page 5-12
½
One Touch Dialing - page 5-19
½
Speed Dialing - page 5-21
½
Group Dialing - page 5-22
Page 5
Page 6

Advanced fax features overview....
Setting the Date &
Time
Setting the Fax ID
1. Press [Menu/Exit] then press until
‘6:MACHINE SETUP’ is displayed, then press
[Enter].
2. Press until ‘DATE & TIME’ is displayed
then press [Enter].
3. Enter the date in the following format MM-DDYYYY e.g. 08-12-2002.
4. Enter the time in the following format HH-MM.
If AM or PM is shown then the clock is set for
12 Hour and you will need to choose one or the
other using the cursor key.
5. Press [Stop/Clear] to return to Standby Mode.
For further information about Setting the Date &
Time, refer to page 2-23 of the User Guide.
1. Press [Menu/Exit] then press until
‘6:MACHINE SETUP’ is displayed, then press
[Enter].
2. Press until ‘MACHINE ID’ is displayed then
press [Enter].
3. Press [Enter] to select 'FAX NO.', then enter
your fax number and press [Enter] when
completed to write the number to the
machine’s memory.
4. Press [Enter], then press until ‘ID’ is
displayed and then press [Enter] to select the
entry.
5. Enter the name of the Company using the
numeric keypad.
Refer to the User Guide page 2-10 for further
information about the numeric keypad.
6. When complete press [Enter] to write the name
to the machine’s memory.
7. Press [Stop/Clear] to return to Standby mode.
For further information about Setting the Fax ID,
refer to page 2-21 of the User Guide.
Page 6
Page 7

Advanced fax features overview continued....
Setting Up the Fax
Message
Confirmation Sheet
Setting Up a Mailbox
1. Press [Menu/Exit] then press until ‘7:FAX
SETUP’ is displayed, then press [Enter].
2. Press until ‘MESSAGE CONF .’ is displayed
then press [Enter].
3. Press until ‘ON’ is displayed then press
[Enter].
4. Press [Stop/Clear] to return to Standby Mode.
For further information about Setting up the Fax
Message Confirmation Sheet, refer to page 9-6 of
the User Guide.
1. Press [Menu/Exit] then press until
‘4:MAILBOX’ is displayed, then press [Enter].
2. Press until ‘SETUP’ is displayed then
press [Enter].
3. Press [Enter] to create a mailbox.
4. Press until the required mailbox is
selected, then press [Enter].
5. Enter a number ID for the mailbox and press
[Enter].
6. Press 1 to select ‘YES’ or press 2 to select ‘NO’
for password security. If you choose NO, go to
step 8.
7. Enter a numeric security password and press
[Enter].
8. Enter a name ID for the mailbox and press
[Enter].
9. Press 1 to create another mailbox or 2 to
return to Standby Mode.
For further information about Setting Up a
Mailbox, refer to page 5-28 of the User Guide.
Page 7
Page 8

Reference information....
To find out more about the following functions, please refer to the User Guide pages listed
below:
Basic Fax Functions
Fax Forwarding
Polling
Mailbox
Department Control
Mode
• Redial Page 5-33
• Delayed Transmission Page 5-33
• Memory Transmission Page 5-35
• Toll Save Page 5-12
• One Touch Dialing Page 5-19
• Speed Dialing Page 5-21
• Group Dialing Page 5-22
• Setup RX Forwarding Page 5-36
• Setup TX Forwarding Page 5-37
• Priority Transmission Page 5-38
• TX Poll Page 5-39
• Delay RX Poll Page 5-40
• Transmitting Page 5-27
• Receiving Page 5-28
• Setting Up Page 5-28
• Delete Page 5-29
• Storing Documents Page 5-30
• Printing Documents Page 5-31
• Delete Documents Page 5-31
• Setting Department Control Page 5-43
• Printing a Department Journal Page 5-44
• Managing Departments Page 5-45
Other Functions
• Printing System Reports Page 5-48
• Setting Prefix Dial Numbers Page 5-49
• Setting Fax Duplex Page 5-49
• Clearing Memory Page 5-49
• Errors & Solutions Page 8-12 to 8-22
Page 8
Page 9

For further assistance....
If after product installation further assistance is required, please call our experts at the
Xerox Welcome Centre or your local representative.
When telephoning the Welcome Centre, please quote the machine serial number.The
serial number is located on the machine, behind the front door.
Prior to telephoning the Welcome Centre, it is recommended that you print a System Data
report. This list shows the status of the user-selectable options and may help to identify a
problem. For instructions on printing the System Data report and for further information
about all the reports available, refer to page 9-9 of the User Guide.
You will be provided with the Xerox Welcome Centre or local representative telephone
number when the FaxCentre F12 is installed.
For convenience and future reference, please record the telephone number in the space
below:
Xerox Welcome Centre / Local Representative:
#
Xerox US Welcome Center:
1-800-821-2797
Xerox Canada Welcome Center:
1-800-93-XEROX (1-800-939-3769)
Page 9
Page 10

Page 10
 Loading...