

Page 1

Version 3.2
January 2008
Xerox 4590 Enterprise Printing Systems
Xerox 41 10 Enterprise Printing Systems
User
Guide
Page 2

‘
Xerox Corporation
Global Knowledge & Language Services
800 Phillips Road
Building 218
Webster, New York 14580
©Copyright 2008 by Xerox Corporation. All Rights Reserved.
Copyright protection claimed includes all forms and matters of copyrighted material and information now allowed by statutory or judicial law or
hereinafter granted, including without limitation, material generated from the software programs that are displayed on the screen such as styles,
templates, icons, screen displays, looks, etc.
Xerox® and all Xerox product names and product numbers mentioned in this publication are trademarks of XEROX CORPORATION. Other
company brands and product names may be trademarks or registered trademarks of the respective companies and are also acknowledged.
Microsoft, MS-DOS, Windows, Windows NT, Microsoft Network, and Windows Server are either trademarks or registered trademarks of Microsoft
Corporation in the United States and/or other countries. Novell, NetWare, IntranetWare and NDS are registered trademarks of Novell, Inc. in the
United States and other countries. Adobe, Acrobat, PostScript, PostScript3, and PostScript Logo are trademarks of Adobe Systems
Incorporated. Apple, AppleTalk, EtherTalk, LocalTalk, Macintosh, MacOS and TrueType are trademarks of Apple Computer, Inc., registered in the
U.S. and other countries. HP, HPGL, HPGL/2, and HP-UX are registered trademarks of Hewlett-Packard Corporation.
All product/brand names are trademarks or registered trademarks of the respective holders.
The following software configuration was used to create this guide: Controller + PS ROM 1.2026 / IOT ROM: 17.14.0
Page 3

Table of contents
Product overview 1-1
Related information sources. . . . . . . . . . . . . . . . . . . . . . . . . . . . . . . . .1-1
Customer documentation updates . . . . . . . . . . . . . . . . . . . . . . . . . . . .1-1
Introducing the 4110 EPS/4590 EPS . . . . . . . . . . . . . . . . . . . . . . . . . . . . .1-2
Base configuration . . . . . . . . . . . . . . . . . . . . . . . . . . . . . . . . . . . . . . . . 1-2
Options . . . . . . . . . . . . . . . . . . . . . . . . . . . . . . . . . . . . . . . . . . . . . . . . .1-2
Job submission and workflow. . . . . . . . . . . . . . . . . . . . . . . . . . . . . . . .1-3
Machine components . . . . . . . . . . . . . . . . . . . . . . . . . . . . . . . . . . . . . . . . .1-4
User Interface (UI) . . . . . . . . . . . . . . . . . . . . . . . . . . . . . . . . . . . . . . . . . .1-10
Power on/off . . . . . . . . . . . . . . . . . . . . . . . . . . . . . . . . . . . . . . . . . . . . . . .1-12
Power on . . . . . . . . . . . . . . . . . . . . . . . . . . . . . . . . . . . . . . . . . . . . . .1-12
Power off . . . . . . . . . . . . . . . . . . . . . . . . . . . . . . . . . . . . . . . . . . . . . .1-13
About the circuit breaker . . . . . . . . . . . . . . . . . . . . . . . . . . . . . . . . . . . . .1-13
Power Saver Mode . . . . . . . . . . . . . . . . . . . . . . . . . . . . . . . . . . . . . . . . . .1-14
Enter the Power Saver Mode . . . . . . . . . . . . . . . . . . . . . . . . . . . . . . .1-14
Exit the Power Saver Mode . . . . . . . . . . . . . . . . . . . . . . . . . . . . . . . .1-14
Paper and other media 2-1
Paper types supported . . . . . . . . . . . . . . . . . . . . . . . . . . . . . . . . . . . . . . . .2-1
Normal paper (printable paper). . . . . . . . . . . . . . . . . . . . . . . . . . . . . . .2-1
Custom (nonstandard) size paper . . . . . . . . . . . . . . . . . . . . . . . . . . . .2-1
Storing and handling paper . . . . . . . . . . . . . . . . . . . . . . . . . . . . . . . . . . . .2-3
Paper tray features. . . . . . . . . . . . . . . . . . . . . . . . . . . . . . . . . . . . . . . . . . .2-4
Automatic paper size detection feature . . . . . . . . . . . . . . . . . . . . . . . .2-4
Automatic paper tray selection feature . . . . . . . . . . . . . . . . . . . . . . . . .2-4
Automatic tray switching feature. . . . . . . . . . . . . . . . . . . . . . . . . . . . . .2-5
Load While Run . . . . . . . . . . . . . . . . . . . . . . . . . . . . . . . . . . . . . . . . . .2-5
Paper tray programming. . . . . . . . . . . . . . . . . . . . . . . . . . . . . . . . . . . . . . .2-5
Load paper . . . . . . . . . . . . . . . . . . . . . . . . . . . . . . . . . . . . . . . . . . . . . . . . .2-6
Load paper in trays 1 and 2 . . . . . . . . . . . . . . . . . . . . . . . . . . . . . . . . .2-6
Load paper in trays 3 and 4 . . . . . . . . . . . . . . . . . . . . . . . . . . . . . . . . .2-7
Load paper in Tray 5 (Bypass) . . . . . . . . . . . . . . . . . . . . . . . . . . . . . . .2-8
Load paper in the optional High Capacity Feeder (Trays 6 and 7). . . .2-9
Load paper in the optional Oversized High Capacity Feeder (Tray 6)2-10
Load paper in the optional Tray 8 (post-process inserter) . . . . . . . . .2-12
Xerox 4590 EPS/4110 EPS User Guide i
Page 4

Table of contents
Load tab paper . . . . . . . . . . . . . . . . . . . . . . . . . . . . . . . . . . . . . . . . . .2-13
Change the size of paper trays. . . . . . . . . . . . . . . . . . . . . . . . . . . . . . . . .2-16
Change the size in Trays 3 and 4 . . . . . . . . . . . . . . . . . . . . . . . . . . . .2-16
Change the size in the optional Trays 6 and 7 (HCF). . . . . . . . . . . . .2-18
Change the paper size in the optional OHCF (Tray 6) . . . . . . . . . . . .2-19
Change/verify the Paper Tray Attribute settings. . . . . . . . . . . . . . . . . . . .2-21
Map the paper type and weight . . . . . . . . . . . . . . . . . . . . . . . . . . . . .2-21
Program/verify the tray settings from the All Services screen . . . . . .2-23
Program/change the DEFAULT tray settings (System Administration)2-27
Manually confirm/change the tray settings on the DocuSP . . . . . . . . . . .2-32
Job Status 3-1
Job status overview . . . . . . . . . . . . . . . . . . . . . . . . . . . . . . . . . . . . . . . . . .3-1
Checking current/pending jobs. . . . . . . . . . . . . . . . . . . . . . . . . . . . . . . . . .3-2
Checking completed jobs . . . . . . . . . . . . . . . . . . . . . . . . . . . . . . . . . . . . . . 3-3
When jobs are not completed correctly . . . . . . . . . . . . . . . . . . . . . . . .3-3
Printing waiting jobs . . . . . . . . . . . . . . . . . . . . . . . . . . . . . . . . . . . . . . . 3-4
Machine status 4-1
Machine status overview . . . . . . . . . . . . . . . . . . . . . . . . . . . . . . . . . . . . . .4-1
Machine status . . . . . . . . . . . . . . . . . . . . . . . . . . . . . . . . . . . . . . . . . . . . . .4-2
Machine information . . . . . . . . . . . . . . . . . . . . . . . . . . . . . . . . . . . . . . .4-2
Paper tray. . . . . . . . . . . . . . . . . . . . . . . . . . . . . . . . . . . . . . . . . . . . . . .4-4
Overwriting the hard disk (optional) . . . . . . . . . . . . . . . . . . . . . . . . . . .4-5
Print mode . . . . . . . . . . . . . . . . . . . . . . . . . . . . . . . . . . . . . . . . . . . . . .4-6
Billing meter/print report . . . . . . . . . . . . . . . . . . . . . . . . . . . . . . . . . . . . . .4-10
Billing meter . . . . . . . . . . . . . . . . . . . . . . . . . . . . . . . . . . . . . . . . . . . . 4-10
Job status . . . . . . . . . . . . . . . . . . . . . . . . . . . . . . . . . . . . . . . . . . . . . . 4-11
Print mode settings . . . . . . . . . . . . . . . . . . . . . . . . . . . . . . . . . . . . . . .4-12
Consumables . . . . . . . . . . . . . . . . . . . . . . . . . . . . . . . . . . . . . . . . . . . . . . 4-13
Faults . . . . . . . . . . . . . . . . . . . . . . . . . . . . . . . . . . . . . . . . . . . . . . . . . . . . 4-14
Maintenance 5-1
Replacing consumables . . . . . . . . . . . . . . . . . . . . . . . . . . . . . . . . . . . . . . . 5-1
Handling consumables . . . . . . . . . . . . . . . . . . . . . . . . . . . . . . . . . . . . .5-1
Confirming status of consumables . . . . . . . . . . . . . . . . . . . . . . . . . . . .5-2
Replacing toner cartridges . . . . . . . . . . . . . . . . . . . . . . . . . . . . . . . . . .5-2
Replacing the waste toner container . . . . . . . . . . . . . . . . . . . . . . . . . .5-5
Replacing the staple cartridge . . . . . . . . . . . . . . . . . . . . . . . . . . . . . . .5-7
Replacing the staple cartridge for booklets . . . . . . . . . . . . . . . . . . . . .5-9
ii
Xerox 4590 EPS/4110 EPS User Guide
Page 5

Table of contents
Replacing the staple waste container. . . . . . . . . . . . . . . . . . . . . . . . . 5-11
Emptying the punch scrap container . . . . . . . . . . . . . . . . . . . . . . . . . 5-12
Cleaning the machine. . . . . . . . . . . . . . . . . . . . . . . . . . . . . . . . . . . . . . . .5-14
Problem Solv in g 6-1
Troubleshooting . . . . . . . . . . . . . . . . . . . . . . . . . . . . . . . . . . . . . . . . . . . . .6-1
Machine trouble . . . . . . . . . . . . . . . . . . . . . . . . . . . . . . . . . . . . . . . . . . . . .6-3
Image quality problems . . . . . . . . . . . . . . . . . . . . . . . . . . . . . . . . . . . . . . .6-6
Trouble during printing . . . . . . . . . . . . . . . . . . . . . . . . . . . . . . . . . . . . . . . 6-11
Unable to print . . . . . . . . . . . . . . . . . . . . . . . . . . . . . . . . . . . . . . . . . . 6-11
The printed result is not what was expected . . . . . . . . . . . . . . . . . . .6-13
Error code. . . . . . . . . . . . . . . . . . . . . . . . . . . . . . . . . . . . . . . . . . . . . . . . .6-15
Other Errors . . . . . . . . . . . . . . . . . . . . . . . . . . . . . . . . . . . . . . . . . . . . 6-16
Paper jams . . . . . . . . . . . . . . . . . . . . . . . . . . . . . . . . . . . . . . . . . . . . . . . .6-25
Paper jams in trays 1 to 4. . . . . . . . . . . . . . . . . . . . . . . . . . . . . . . . . .6-26
Paper jams in transport unit 4. . . . . . . . . . . . . . . . . . . . . . . . . . . . . . .6-27
Paper jams in duplex module 3 . . . . . . . . . . . . . . . . . . . . . . . . . . . . .6-28
Paper jams in tray 5 (Bypass) . . . . . . . . . . . . . . . . . . . . . . . . . . . . . .6-30
Paper jams in Trays 6 and 7 (HCF) . . . . . . . . . . . . . . . . . . . . . . . . . .6-31
Paper jams in Tray 6 (Oversized High Capacity Feeder) . . . . . . . . . .6-32
Paper jams in Tray 8 (Post-process inserter) . . . . . . . . . . . . . . . . . . .6-33
Paper jams in lower left cover . . . . . . . . . . . . . . . . . . . . . . . . . . . . . .6-34
Paper jams inside the body . . . . . . . . . . . . . . . . . . . . . . . . . . . . . . . .6-35
Paper jams inside finisher left cover. . . . . . . . . . . . . . . . . . . . . . . . . .6-38
Paper jams inside finisher right cover. . . . . . . . . . . . . . . . . . . . . . . . .6-41
Paper jams at Z folding unit . . . . . . . . . . . . . . . . . . . . . . . . . . . . . . . .6-45
Paper jams at output area of finisher . . . . . . . . . . . . . . . . . . . . . . . . .6-53
Paper Jams at the optional High Capacity Feeder Unit . . . . . . . . . . .6-55
Stapler faults. . . . . . . . . . . . . . . . . . . . . . . . . . . . . . . . . . . . . . . . . . . . . . .6-59
Staple jams in the staple cartridge . . . . . . . . . . . . . . . . . . . . . . . . . . .6-60
Staple jams at staple cartridge for booklets . . . . . . . . . . . . . . . . . . . .6-62
Solving curled output . . . . . . . . . . . . . . . . . . . . . . . . . . . . . . . . . . . . . . . .6-64
Mode and function of De-curl button . . . . . . . . . . . . . . . . . . . . . . . . .6-65
Specifications 7-1
Print engine specifications . . . . . . . . . . . . . . . . . . . . . . . . . . . . . . . . . . . . .7-1
Trays 6 and 7 (2-drawer High Capacity Feeder) - optional. . . . . . . . . .7-4
Tray 6 (1-drawer Oversized High Capacity Feeder) - optional . . . . . . .7-4
D2 Finisher/Booklet D2 Finisher . . . . . . . . . . . . . . . . . . . . . . . . . . . . . .7-5
Folder module (Z and C fold) - optional . . . . . . . . . . . . . . . . . . . . . . . .7-9
Printable area . . . . . . . . . . . . . . . . . . . . . . . . . . . . . . . . . . . . . . . . . . . . . .7-10
Xerox 4590 EPS/4110 EPS User Guide
iii
Page 6

Table of contents
Standard printing area . . . . . . . . . . . . . . . . . . . . . . . . . . . . . . . . . . . .7-10
Extended printing area . . . . . . . . . . . . . . . . . . . . . . . . . . . . . . . . . . . .7-10
List of options . . . . . . . . . . . . . . . . . . . . . . . . . . . . . . . . . . . . . . . . . . . . . . 7-11
Cautions and limitations . . . . . . . . . . . . . . . . . . . . . . . . . . . . . . . . . . . . . . 7-12
When the print results differ from the settings . . . . . . . . . . . . . . . . . .7-12
Installing and moving the machine . . . . . . . . . . . . . . . . . . . . . . . . . . .7-12
Meter counts for duplex printing . . . . . . . . . . . . . . . . . . . . . . . . . . . . .7-12
Network confidentiality . . . . . . . . . . . . . . . . . . . . . . . . . . . . . . . . . . . .7-12
Character code . . . . . . . . . . . . . . . . . . . . . . . . . . . . . . . . . . . . . . . . . .7-12
Simple procedures . . . . . . . . . . . . . . . . . . . . . . . . . . . . . . . . . . . . . . . . . .7-13
Common function settings . . . . . . . . . . . . . . . . . . . . . . . . . . . . . . . . .7-13
Safety and Notices 8-1
Safety notices. . . . . . . . . . . . . . . . . . . . . . . . . . . . . . . . . . . . . . . . . . . . . . .8-1
Electrical safety . . . . . . . . . . . . . . . . . . . . . . . . . . . . . . . . . . . . . . . . . .8-1
Disconnect device . . . . . . . . . . . . . . . . . . . . . . . . . . . . . . . . . . . . . . . .8-2
Laser safety . . . . . . . . . . . . . . . . . . . . . . . . . . . . . . . . . . . . . . . . . . . . . . . . 8-3
North America. . . . . . . . . . . . . . . . . . . . . . . . . . . . . . . . . . . . . . . . . . . .8-3
Europe and other markets . . . . . . . . . . . . . . . . . . . . . . . . . . . . . . . . . .8-4
Safety standards. . . . . . . . . . . . . . . . . . . . . . . . . . . . . . . . . . . . . . . . . . . . . 8-5
North America. . . . . . . . . . . . . . . . . . . . . . . . . . . . . . . . . . . . . . . . . . . .8-5
Europe and other markets . . . . . . . . . . . . . . . . . . . . . . . . . . . . . . . . . .8-5
Maintenance safety . . . . . . . . . . . . . . . . . . . . . . . . . . . . . . . . . . . . . . . . . .8-5
Operational safety . . . . . . . . . . . . . . . . . . . . . . . . . . . . . . . . . . . . . . . . . . .8-6
Ozone safety . . . . . . . . . . . . . . . . . . . . . . . . . . . . . . . . . . . . . . . . . . . . . . .8-7
Notices . . . . . . . . . . . . . . . . . . . . . . . . . . . . . . . . . . . . . . . . . . . . . . . . . . . .8-7
Radio frequency emissions . . . . . . . . . . . . . . . . . . . . . . . . . . . . . . . . .8-7
Safety extra low voltage approval. . . . . . . . . . . . . . . . . . . . . . . . . . . . . . . .8-8
Certifications in Europe . . . . . . . . . . . . . . . . . . . . . . . . . . . . . . . . . . . . . . . 8-9
It’s illegal... . . . . . . . . . . . . . . . . . . . . . . . . . . . . . . . . . . . . . . . . . . . . . . . .8-10
In the USA . . . . . . . . . . . . . . . . . . . . . . . . . . . . . . . . . . . . . . . . . . . . .8-10
In Canada . . . . . . . . . . . . . . . . . . . . . . . . . . . . . . . . . . . . . . . . . . . . . .8-12
In other countries . . . . . . . . . . . . . . . . . . . . . . . . . . . . . . . . . . . . . . . .8-13
Environmental notices for the USA. . . . . . . . . . . . . . . . . . . . . . . . . . . . . .8-14
Product recycling and disposal. . . . . . . . . . . . . . . . . . . . . . . . . . . . . . . . .8-15
iv
Xerox 4590 EPS/4110 EPS User Guide
Page 7

1. Product overview
Related information sources
This section describes the guides provided with this machine.
• Getting Star ted Guide: This guide gives basic information for
print jobs, clearing paper jams, daily care, and safety
information.
• System Administration Guide: System Administrators use
this guide to set up the machine defaults/settings and the
network environment.
• DocuSP Customer Documentation Set: The DocuSP
customer documentation in the DocuSP Media Kit provides
information related to the use and installation of the DocuSP
Controller.
Customer documentation updates
You can get the latest customer documentation and information for
your product by going to www.xerox.com
following:
• Enter your product number (e.g., 4110, 4595) in the Search
field and select Search.
• Select the Support & Drivers
options to locate your specific printer.
Be sure to periodically check www.xerox.com
information for your product.
and doing one of the
link and then use the search
for the latest
Xerox 4590 EPS/4110 EPS User Guide
1-1
Page 8

1. Product overview
Introducing the 4110 EPS/4590 EPS
The Xerox 4110 Enterprise Printing System and the 4590
Enterprise Printing System are black and white, digital network
printing systems driven by the DocuSP Controller. They are
intended for large offices and small-to-medium size reproduction
departments or print shops. The 4110 EPS configuration prints
jobs up to 110 pages per minute (8.5 x 11 inches/A4) while the
4590 EPS configuration prints up to 90 pages per minute.
The Xerox 4110 EPS/4590 EPS can feed a variety of paper types
and weights. Both heavy weight and light weight paper media can
run reliably. It also includes efficient production features such as
Load While Run and Auto Tray Switching for continuous print
operation.
Base configuration
The standard or base configuration of the Xerox 4110 EPS/4590
EPS system consists of a:
Options
• Standalone FreeFlow DocuSP Controller for accepting and
processing documents for print
• Print engine with a User Interface (UI)
• 4 input trays, an inserter tray and a Bypass tray for a total
capacity of 4,225 sheets at 20 lb. (75 gsm)
• D2 Staple Finisher module with stapling and hole punching
capability, a post-process inserter and decurling unit
The Xerox 4110 EPS/4590 EPS printing system is available with
the following optional equipment:
• Booklet Maker finisher
• Folder module for creating Z and C folds
• Either one of the following High Capacity Feeders:
• Standard 2-drawer High Capacity Feeder with a paper
capacity of 2,000 sheets per tray
• Oversized 1-drawer High Capacity Feeder with a paper
capacity of 2,000 sheets that feeds up to 13 x 19 in. (330
mm x 483 mm) stock
1-2
Xerox 4590 EPS/4110 EPS User Guide
Page 9

Job submission and workflow
Jobs are sent to the Xerox 4110 EPS/4590 EPS network printer by
way of the DocuSP Controller, which is the interface between the
printer and the client workstation. The DocuSP Controller accepts,
processes and manages the print-ready jobs for printing.
Jobs can be submitted over the network and received by the
DocuSP Controller in any of the following ways:
• Jobs submitted from an application on a PC client workstation
using print drivers within the application that convert the job to
a print-ready file and submit it for printing
• Web submission of print-ready files (PDF or PS) using a web
browser or the Xerox FreeFlow Print Manager
• Importing jobs on a CD or USB drive at the DocuSP Controller
The jobs submitted are either printed immediately or sent to a
queue on the DocuSP Controller where they are held for job setup
and printed at a later time.
NOTE: For more information on setting up a job for printing,
defining job properties, and managing jobs on the DocuSP
Controller, refer to the DocuSP Online Help or customer
documentation.
1. Product overview
Xerox 4590 EPS/4110 EPS User Guide
1-3
Page 10
1. Product overview
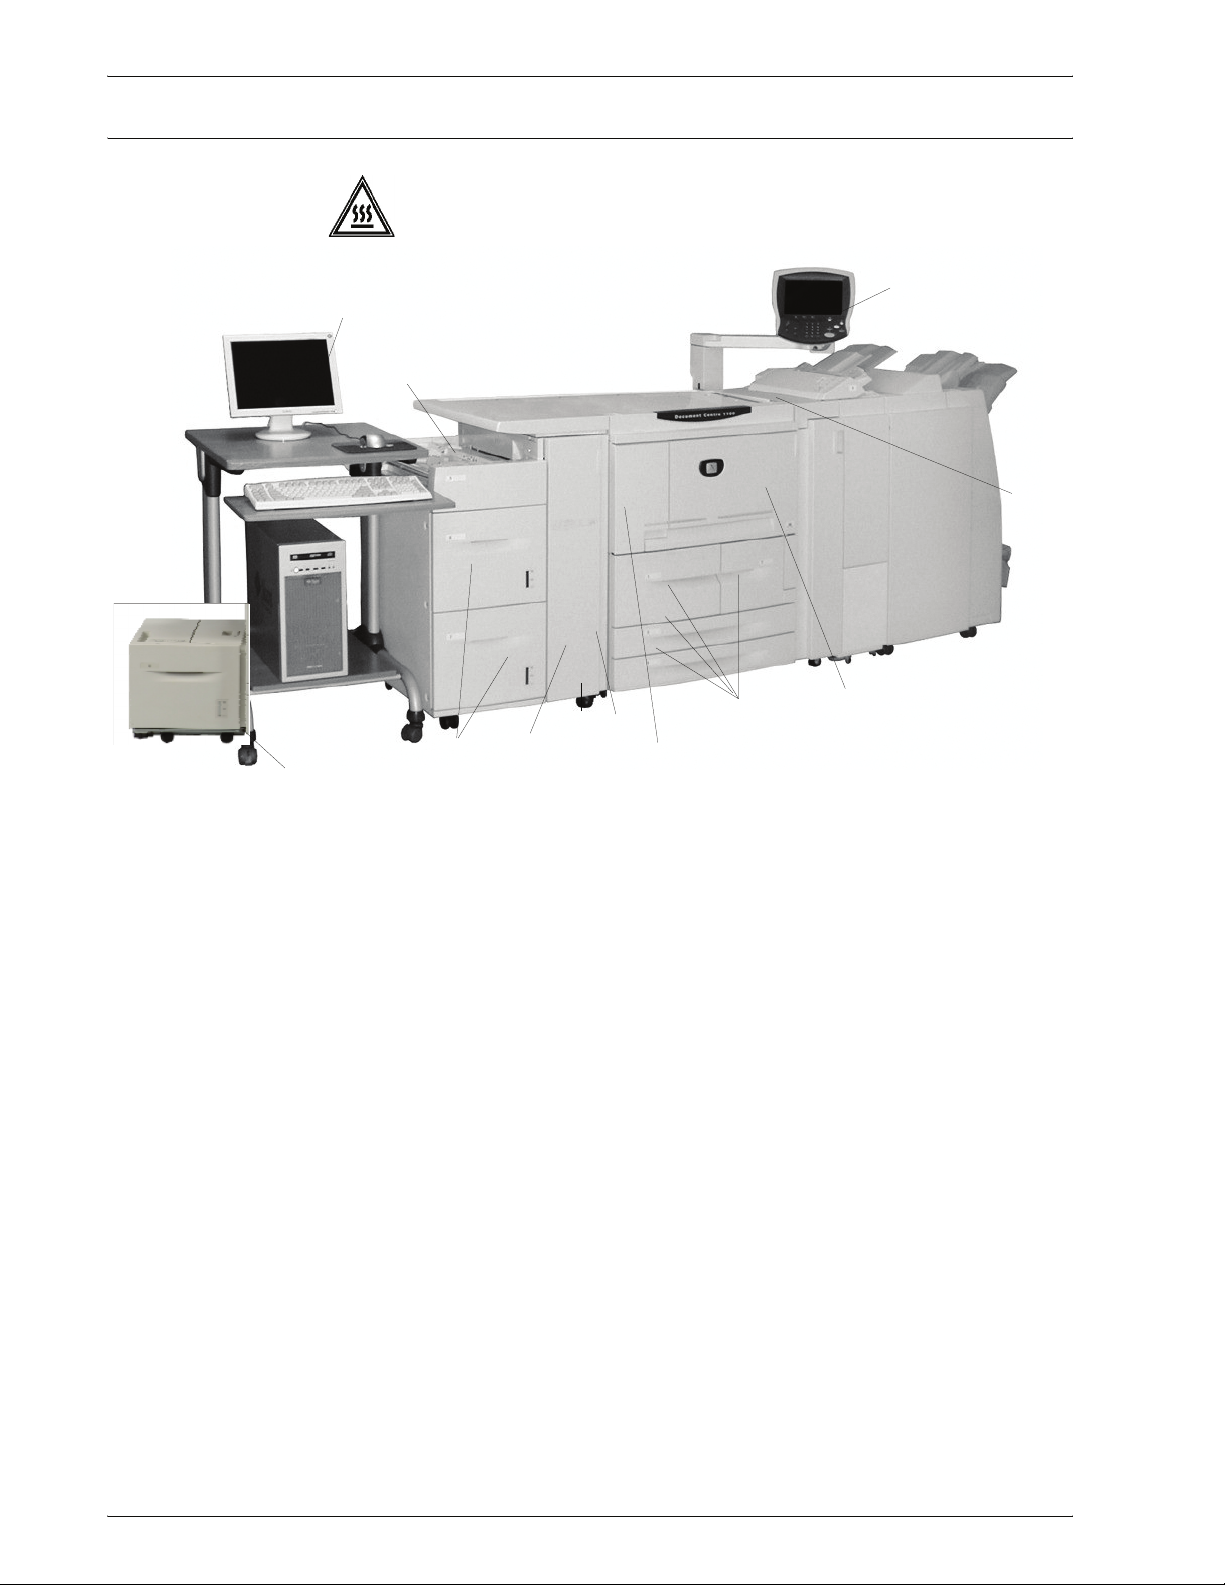
Machine components
1
WARNING: To prevent personal injury, do not touch any labeled
area that indicates High Temperature.
2
12
3
11
10
6
7
9
8
5
4
1-4
Xerox 4590 EPS/4110 EPS User Guide
Page 11

1. Product overview
No. Component Function
1 DocuSP Controller The DocuSP Print Services software that provides a graphical user interface
(GUI) to the printer for
controlling system-level preferences, and managing fonts, security,
accounting, and many other activities.
2 User Interface The User Interface (UI) is attached to the machine and consists of the Control
Panel and the Touch Screen. Refer to “User Interface (UI)” in this chapter.
3 Power switch Switches on/off the machine power.
4 Front cover Open this cover to clear paper jams and to replace the waste toner bottles.
5 Left cover Open this cover to replace the toner cartridge.
6 Tray 1, 2, 3, 4 Contains the media used for print output.
7 Locking casters Locks the wheels of the machine. Lock these casters after moving the machine
to its installation site.
8 Bottom left cover Open this cover to remove paper jams.
setting up and printing jobs, setting up the printer,
9 Front cover for the
optional Trays 6, 7
10 HCF (Trays 6, 7) Optional High Capacity Feeder contains 2,000 sheets per tray for print output.
11 OHCF (Tray 6) Alternative to the 2-drawer HCF, the optional Oversized High Capacity Feeder
12 Tray 5 (Bypass) Load nonstandard paper (heavy stock or other special media) that cannot be
Open this cover to access the bottom left cover. This cover and Trays 6 and 7
are part of the optional High Capacity Feeder (HCF).
feeds oversized stock up to 13 x 19 in/SRA3 paper.
loaded in trays 1-4. It can be folded away when not in use and extended to
support longer length stock.
Xerox 4590 EPS/4110 EPS User Guide
1-5
Page 12
1. Product overview
18
17
16
15
14
13
1-6
Xerox 4590 EPS/4110 EPS User Guide
Page 13
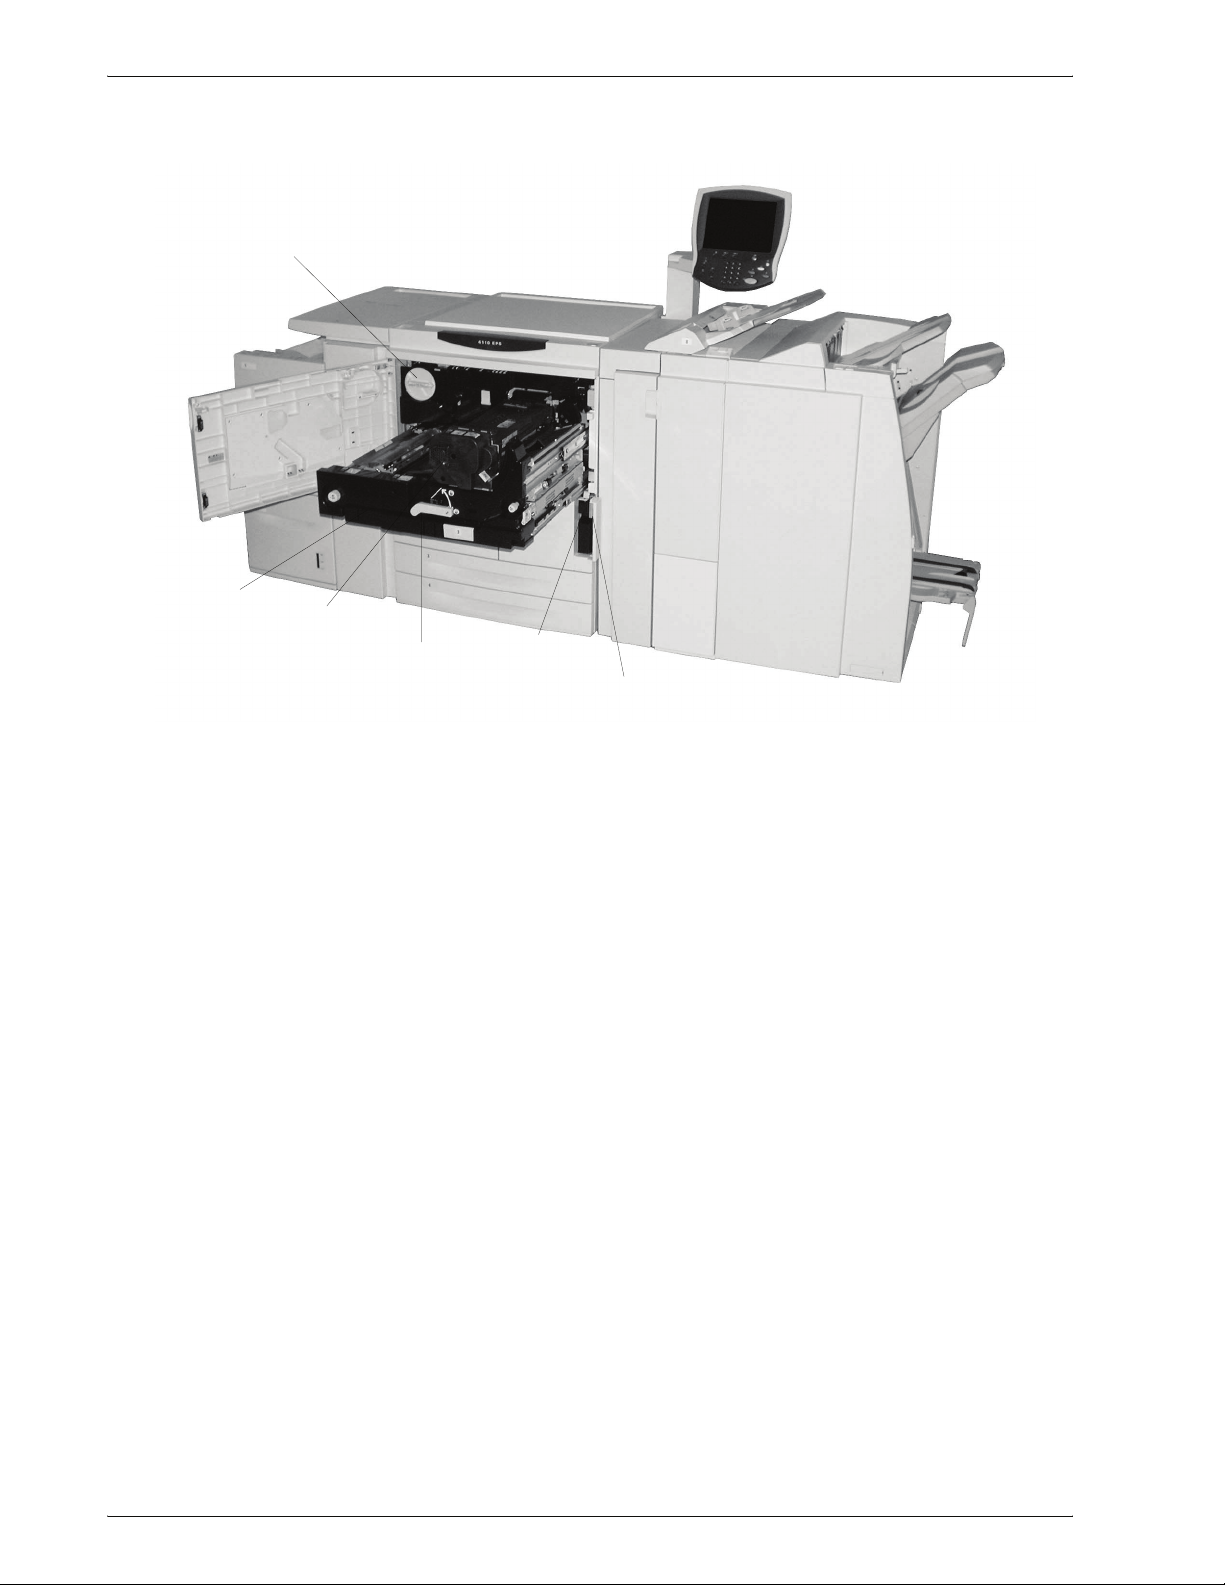
No. Component Function
1. Product overview
13 Waste toner
container cover
14 Waste toner
container
15 Lever Use in order to pull out the transfer module.
16 Fuser Fuses the printed image on the paper.
Open this cover when removing the waste toner bottle.
Collects used toner.
WARNING: The fuser is extremely hot and will cause injury if jam
clearing instructions are not followed.
17 Transfer module Copies the image from the drum to the paper. Open this to remove paper jams.
18 Toner cartridge Provides toner for laying down the image on the paper.
Xerox 4590 EPS/4110 EPS User Guide
1-7
Page 14
1. Product overview
31
32
30
29
28
27
19
21
20
22
23
24
26
25
1-8
Xerox 4590 EPS/4110 EPS User Guide
Page 15
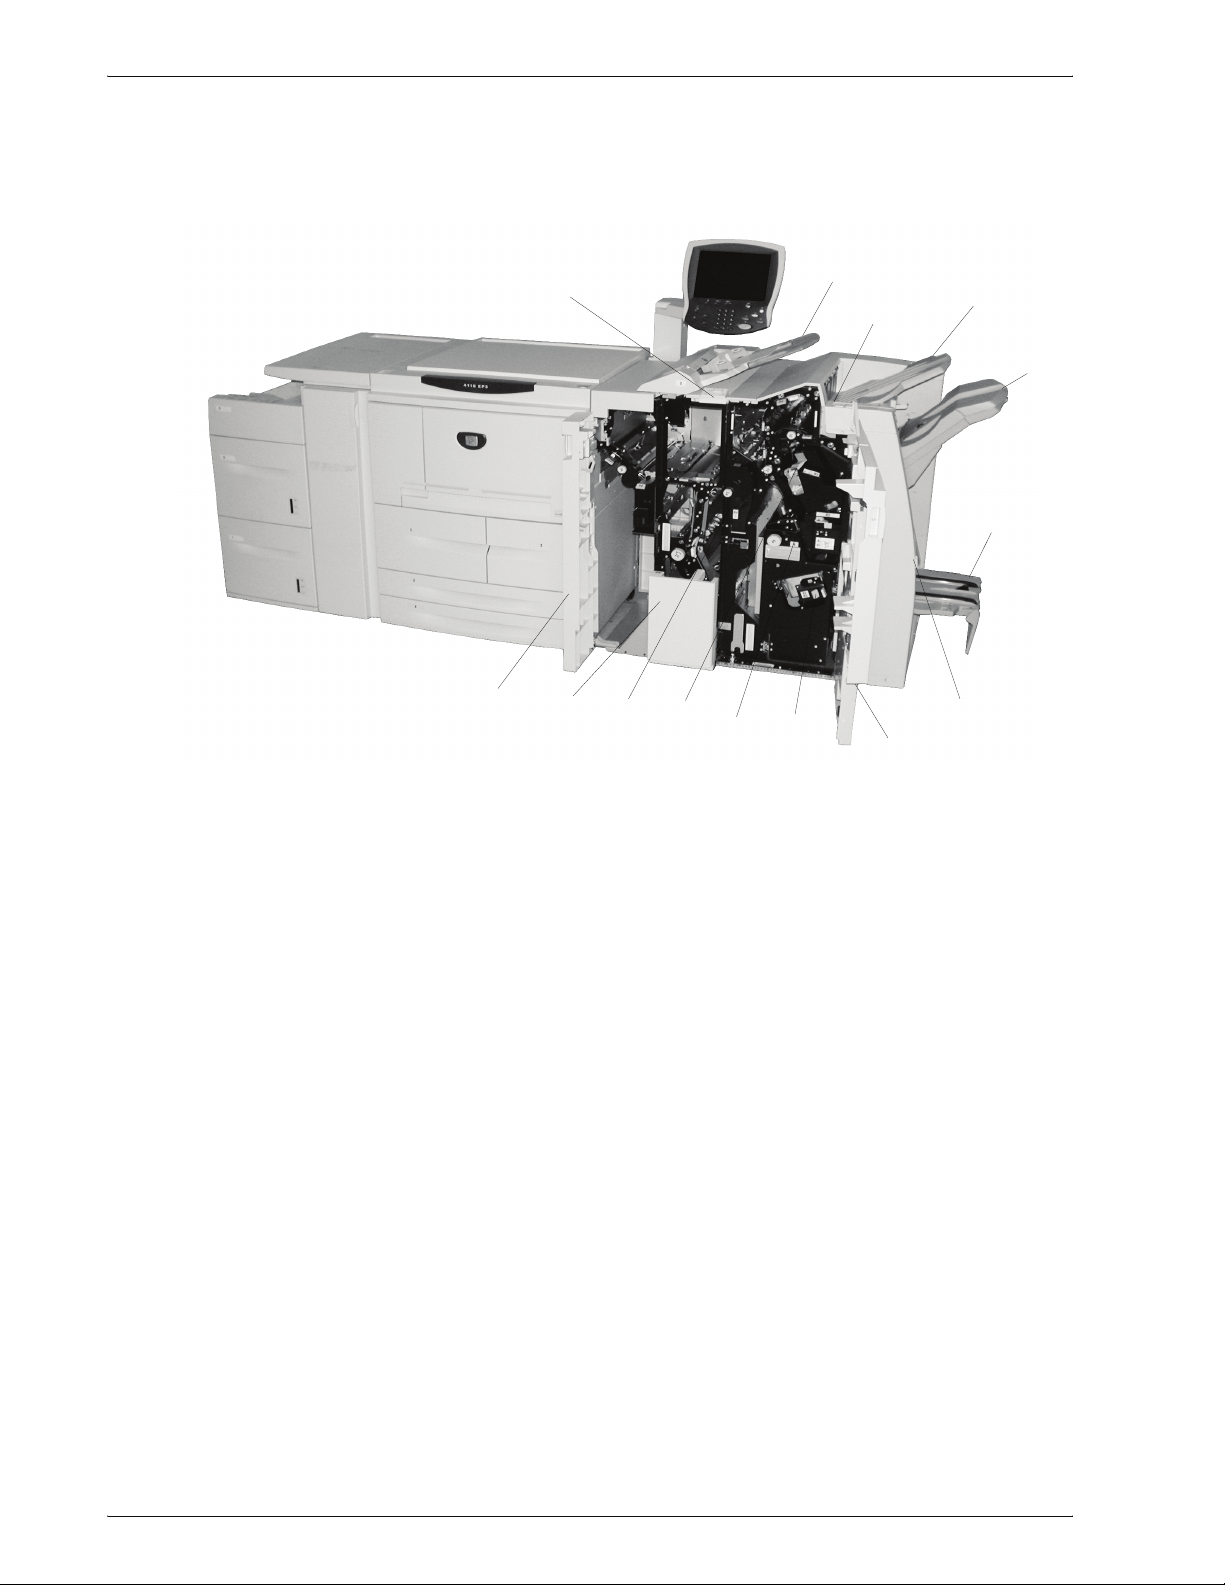
No. Component Function
1. Product overview
19 Post-process inserter
(Tray 8)
20 Decurl button For lighter weight paper especially, press this button to decurl the output.
21 Output tray Prints are delivered here when specific output features are selected, such as
22 Finisher tray Receives prints when you select Stapled, Punched and Z-folded.
23 Booklet output tray Receives prints when you select Bi-Fold or Bi-Fold + Stapling.
24 Booklet output tray
button
25 Right cover Open to clear paper jams, replace staples, clear jammed staples or remove
26 Staple cartridges for
booklet
27 Staple cartridge Contains staples. Remove this cartridge to replace staples and clear staple
28 Staple waste
container
29 Punch scrap
container
Loads and inserts offset and color documents, preprinted tabs, covers, or
transparency separators.
Automatic sorting, Collated, Uncollated or Normal.
Press this button to deliver and retrieve booklets from the output area.
the scraps from the puncher.
There are two staple cartridges for booklets. Remove this cartridge to replace
staples and clear staple jams.
jams.
Collects the staple wire cuttings from the 4 staple cartridges. Open to remove
and replace the waste container.
Collects the scraps from the puncher. Open to remove the scraps.
30 Tri-Fold output tray
(optional)
31 Left cover Open this cover to access the machine and to clear paper jams.
32 Tri-Fold output tray
button
Receives prints when you select Tri-Fold In or Tri-Fold Out.
Press this button to open the Tri-Fold output tray.
NOTE: Throughout this guide, Finisher D2 and Booklet Finisher
may be referred to simply as the finisher.
Xerox 4590 EPS/4110 EPS User Guide
1-9
Page 16
1. Product overview
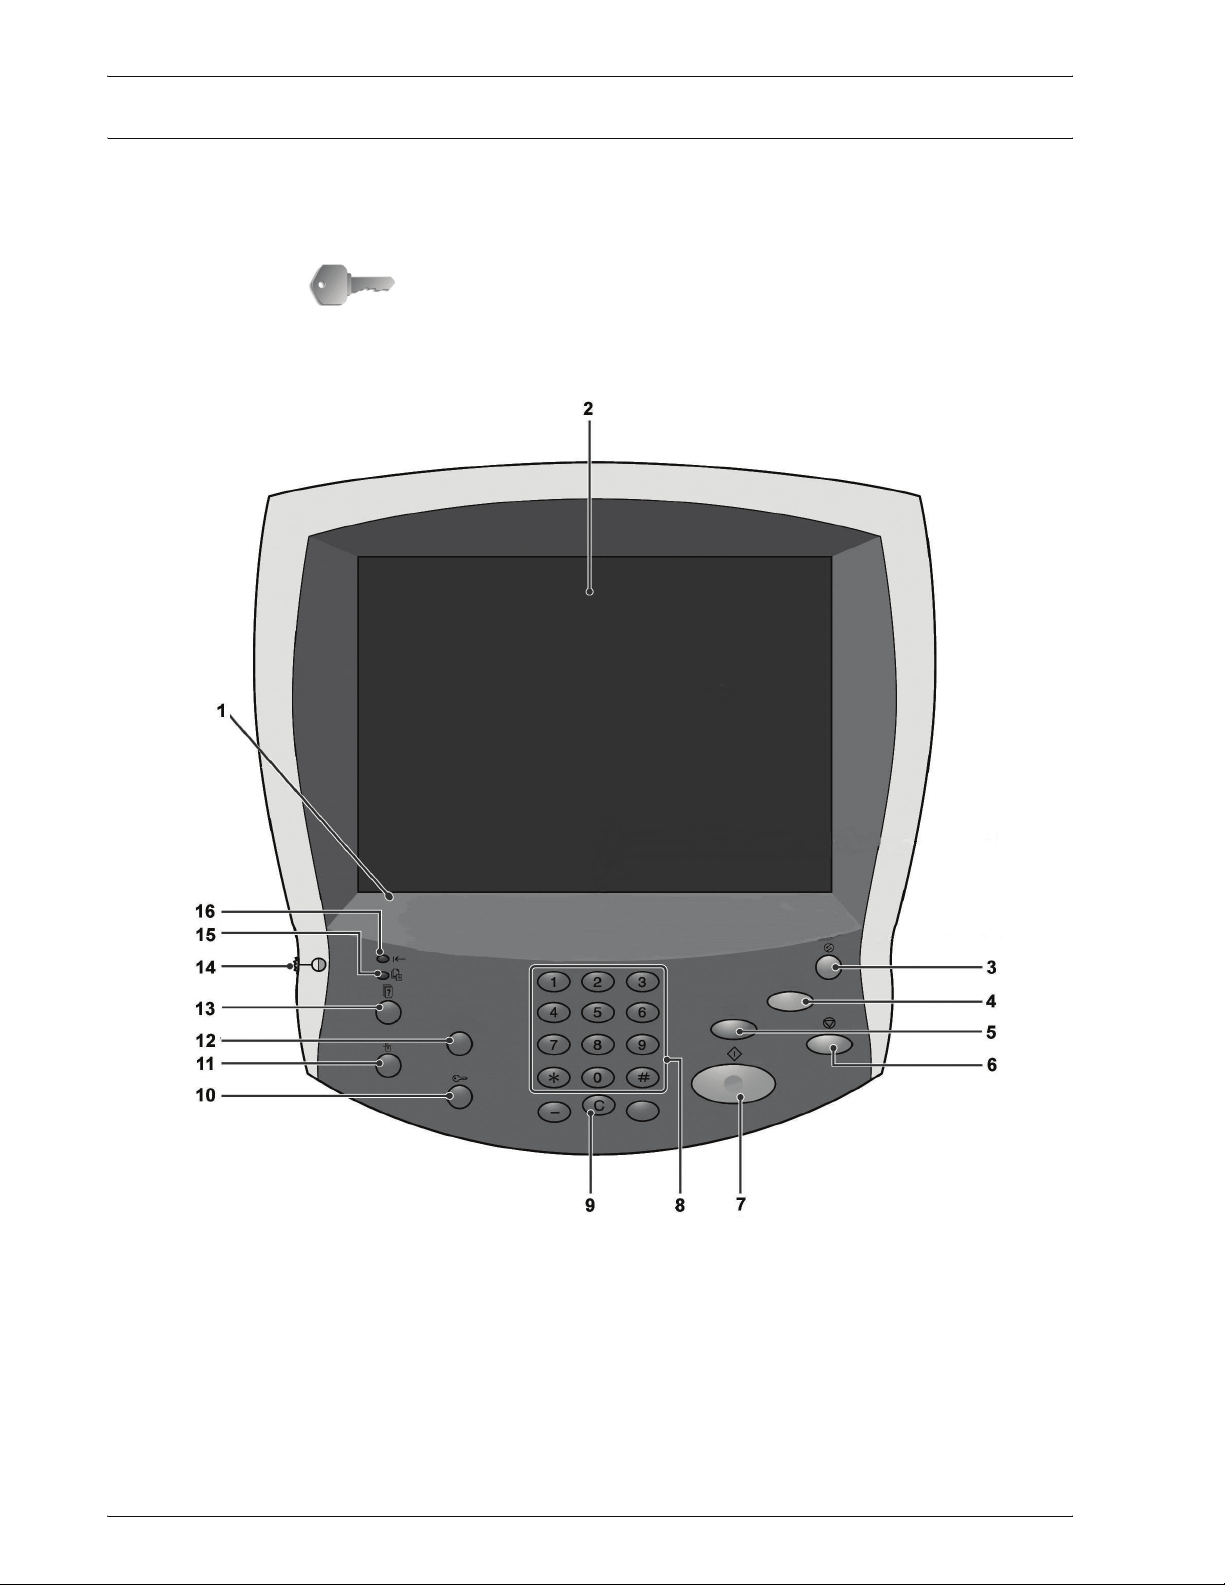
User Interface (UI)
The User Interface (UI) consists of the Control Panel and Touch
Screen. The following describes the names and functions of
components and indicators on the Control Panel.
KEY POINT: The screens shown on the User Interface are a
representation only of the type of screens that may be seen on the
system. They may or may not reflect the screens displayed on
your particular system. Also the functions and features shown on
the UI screens may not be functional for this product.
1-10
Xerox 4590 EPS/4110 EPS User Guide
Page 17
1. Product overview
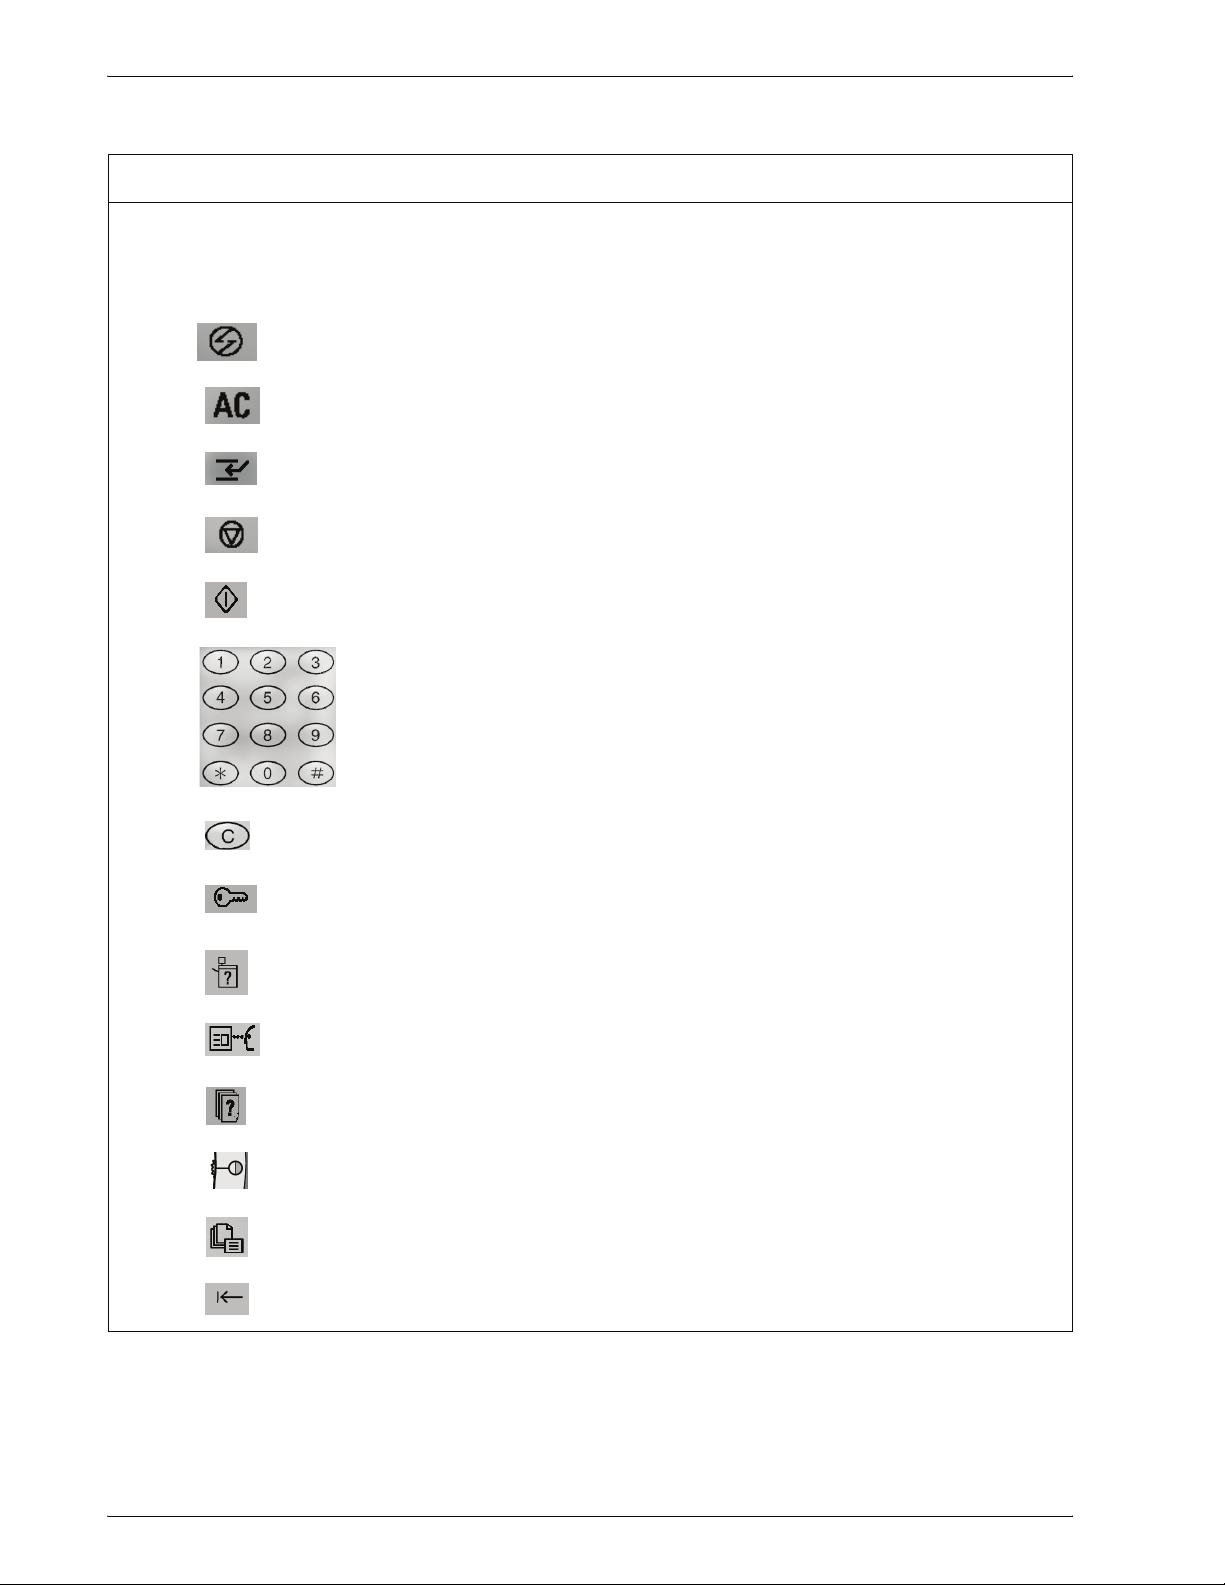
No. Component Function
1 Control panel Allows keypad selection of features.
2 Touch Screen Allows selections to be made simply by touching a button on
the screen.
3
4
5
6
7
8
9
10
Power Saver
Clear All
Interrupt
Stop
Start
Clear
Log In/Out
Numeric keypad
Lights when the machine is in the Power Saver mode. To
cancel the Power Saver mode, press this button.
Not applicable to this product.
Not applicable to this product.
Press this button to stop the current print job or
communications.
Press this button to start the printing process.
Press these buttons to enter the passwords and other
numerical values.
Press this button if you have entered the wrong numerical
value or if instructed by the UI.
This button is used by the System Administrator to log into
the System Administration mode.
11
12
13
14
15
16
Machine Status
Review
Job Status
Brightness dial
Job in Memory indicator
Online indicator
Press this button to check the machine status, meters, and
the state of consumables and print reports.
Not applicable to this product.
Press this button to confirm or cancel currently running or
completed jobs.
Adjusts the brightness of the touch screen.
Not applicable to this product.
This indicator lights when data is transmitting from this
machine or is receiving data from a client.
Xerox 4590 EPS/4110 EPS User Guide
1-11
Page 18
1. Product overview
Power on/off
WARNING: Never touch a labeled area indicating High
Temperature. Contact can lead to burns.
Switch on the power before operating the machine. After the
power is on, the machine will take about 5 minutes to warm up
before you can start printing. Turn the machine off at the end of
the day or when it is not in use for a long period of time. Also, the
Power Saver feature on the machine will automatically activate
when print data has not been received for a specified time thereby
reducing power consumption.
NOTE: For information about the power saving feature, refer to
“Power Saver Mode” in this chapter.
NOTE: For information about when and how to power down and
restart the entire printing system (both the DocuSP Controller and
the machine), refer to the System Administration Guide.
Power on
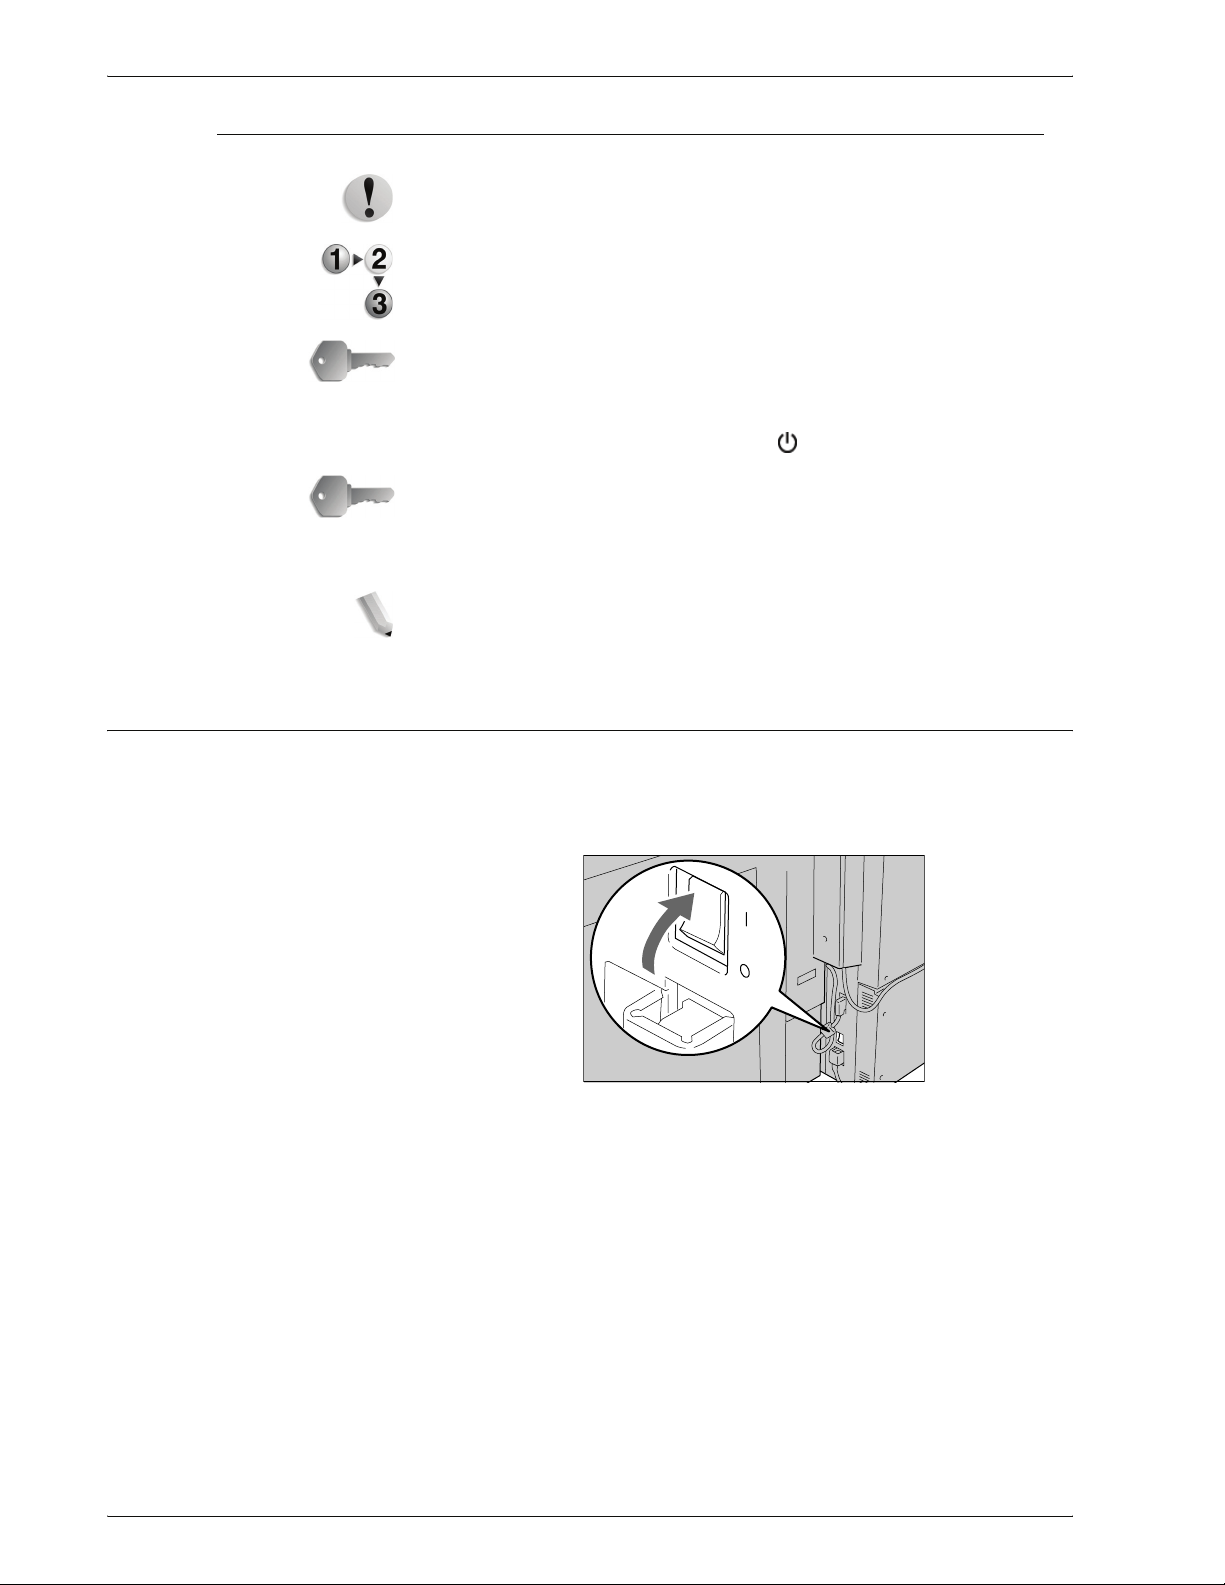
1. Open the power switch cover and press the power switch to
the (|) position to turn the power on.
NOTE: The “Please wait...” message indicates that the machine
is warming up. The machine cannot be used while it is warming
up.
1-12
Xerox 4590 EPS/4110 EPS User Guide
Page 19
Power off
1. Product overview
CAUTION: Switching off the power of the machine may cause
loss of data being processed.
1. Before turning the power off, make sure that all print jobs have
completely finished. Also, make sure that the Online indicator
is not lit.
KEY POINT: Never turn the power off while data is being received
or when jobs are being printed.
2. Open the power switch cover at the front of the machine and
press the power switch to the Off position.
KEY POINT: Power off processing is performed internally on the
machine for a while after the power switch is turned off. Therefore,
do not unplug the power cord from the power outlet immediately
after turning the power switch off.
NOTE: If you turn the power back on after turning it off, first make
sure that the display on the UI has gone out.
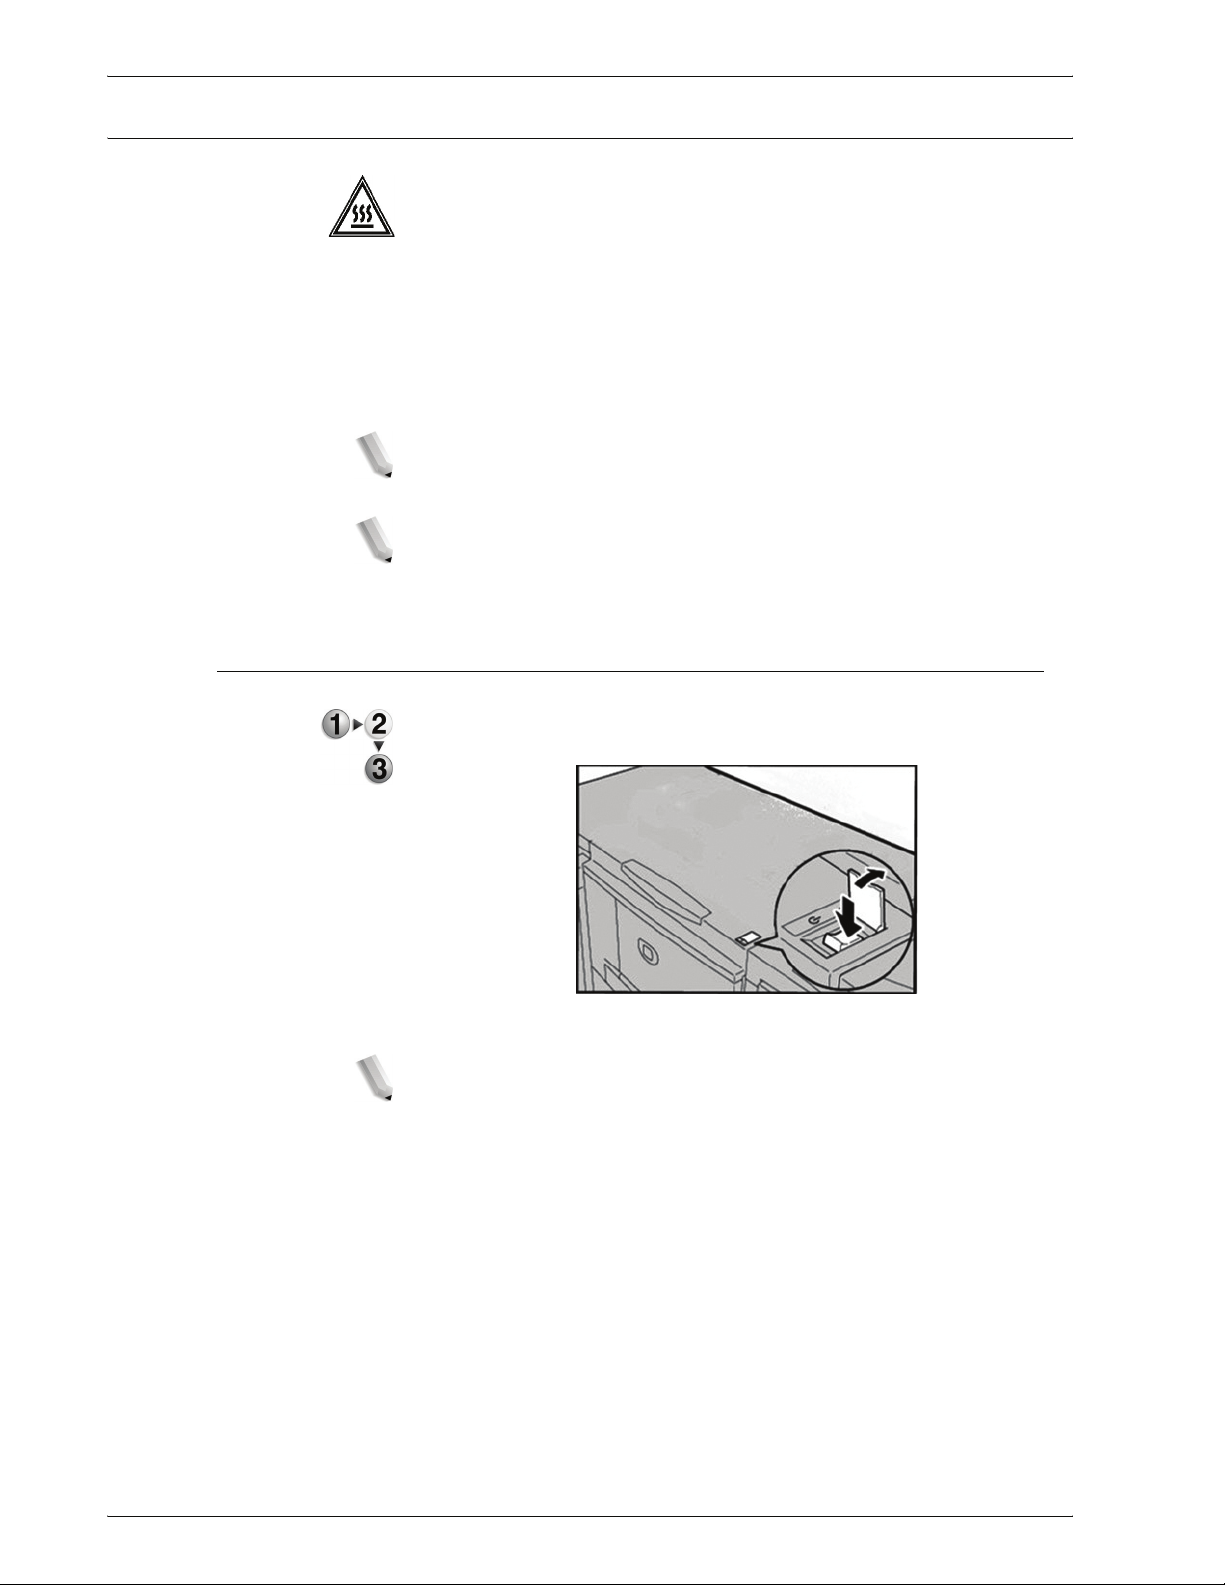
About the circuit breaker
The machine is provided with a circuit breaker. The circuit breaker
is normally set to the On (|) position as shown in the figure below.
In the event of a current leakage, the breaker will automatically cut
off the power circuit to prevent any leakage or fire from occurring.
If the breaker is set to the Off (O) position, contact your Customer
Support Center as there might be some unusual conditions.
Xerox 4590 EPS/4110 EPS User Guide
1-13
Page 20
1. Product overview
Power Saver Mode
Enter the Power Saver Mode
The machine is installed with a Power Saver feature that will
automatically shut off the electricity to the machine if no print data
is received for a certain duration. Even though the Control Panel
display will be off, the Power Saver button will be lit indicating that
the machine is in Power Saver Mode.
The Power Saver feature has two modes: a Low Power mode and
Sleep mode. The machine enters the Low Power mode after the
preset time has elapsed if the machine is left unused for a fixed
period of time. The machine then enters the Sleep mode if a
further preset time elapses.
For example, if the system administrator sets the Low Power
Mode for 30 minutes and the Sleep Mode for 60 minutes, the
machine enters Low Power Mode after 30 minutes of inactivity. If
the machine continues to remain inactive for an additional 30
minutes, it then enters Sleep Mode.
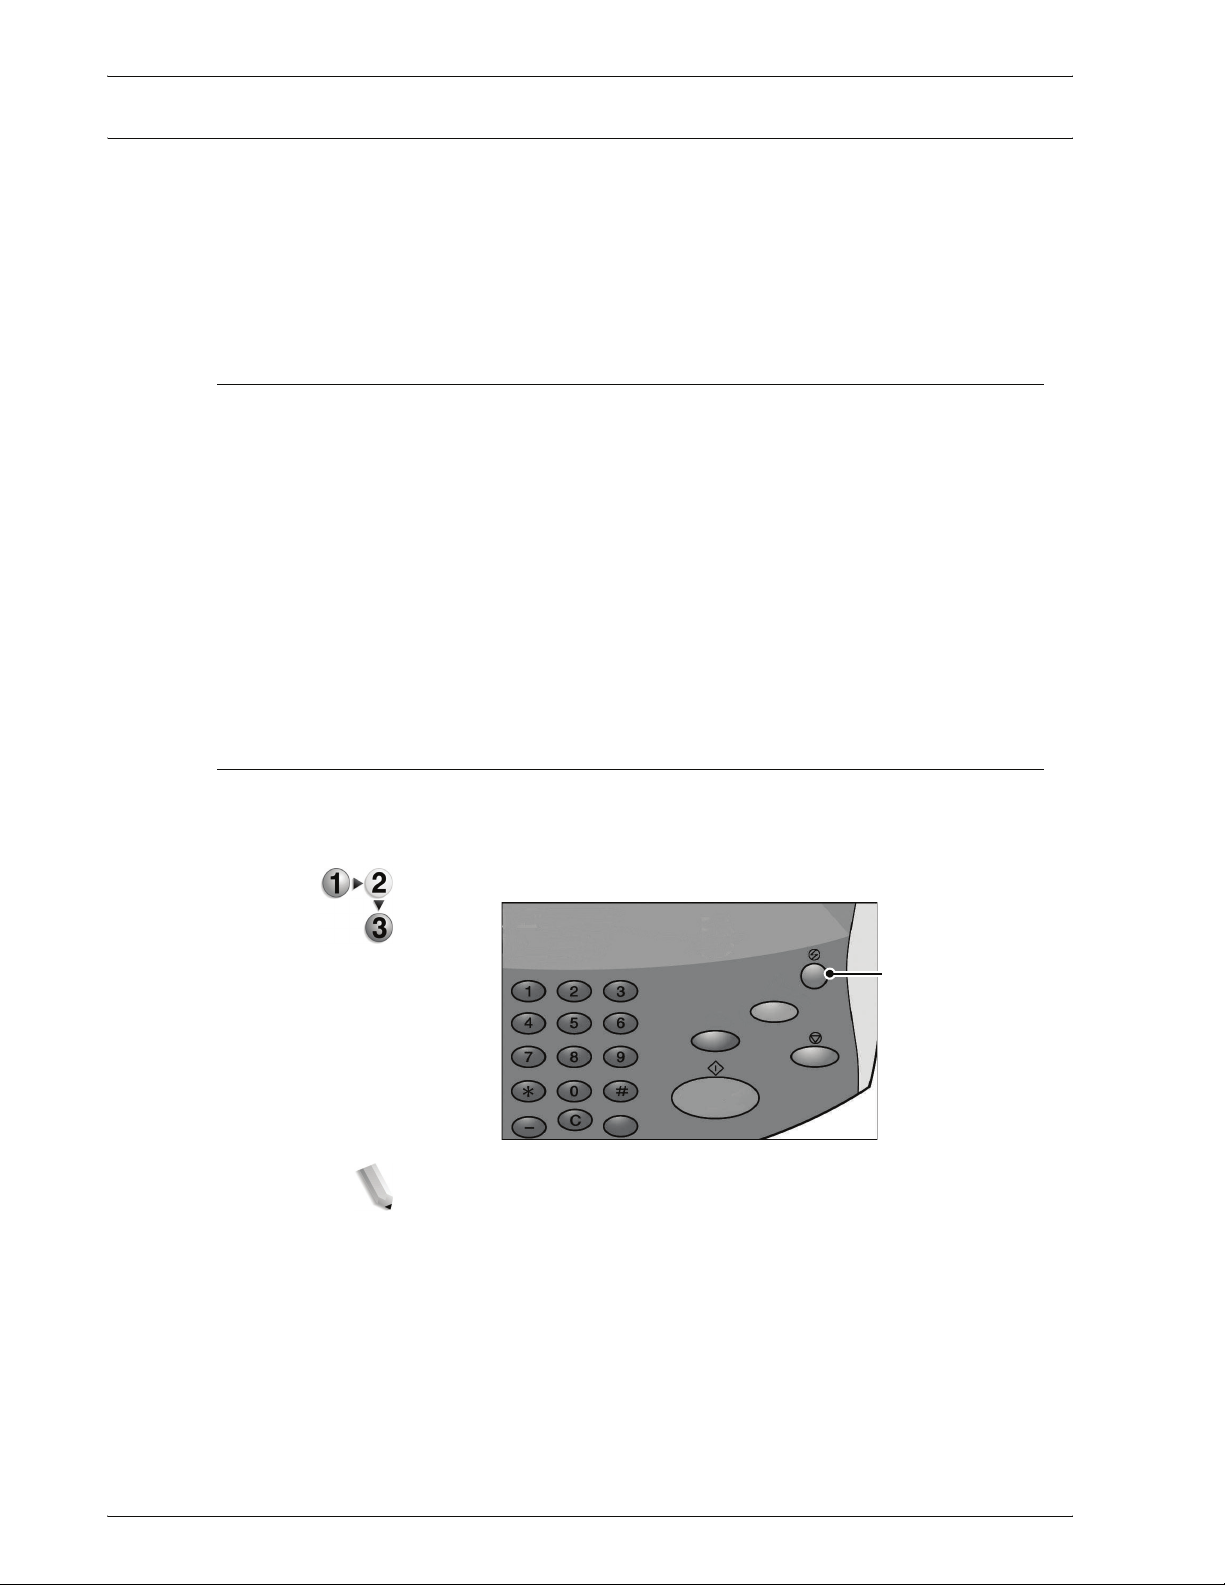
Exit the Power Saver Mode
The Power Saver Mode exits automatically whenever print data is
received by the printer.
1. Press the Power Saver button on the Control Panel.
NOTE: The period of time indicated for the Power Saver Mode to
begin is set by the System Administrator. See the System
Administrator Guide for adju sting the setti ngs for Low Power mode
and Sleep mode.
Power Saver
button
1-14
Xerox 4590 EPS/4110 EPS User Guide
Page 21
Paper types supported
2. Paper and other media
This section describes the kinds of paper available for this device.
To ensure correct printing and make full and effective use of the
performance of the machine, it is recommended that you use only
the paper types approved by Xerox. Printing with paper that is a
different type or size from the paper selected by the printer driver,
or printing from an unsupported paper tray, can result in paper
jams, reduced print quality, malfunctions, and other problems.
If you want to use paper not recommended by Xerox, contact the
Customer Support Center.
KEY POINT: The printed image may fade due to moisture such as
water, rain or vapor. For more information, contact the Customer
Support Center.
Normal paper (printable paper)
When using supplier paper (known as printable paper) for printing,
make sure that it complies with the following specifications. It is
recommended, however, that you use the standard paper types
listed in the following table to achieve clear print results.
Custom (nonstandard) size paper
Custom or nonstandard-sized paper is any paper for which there
is no paper guide setting within the minimum and maximum sizes
for the trays. Custom size paper can be loaded into all trays
except Tray1 and Tray 2.
Paper Tray
Tray1 1,100 8.5" x 11/ A4 16 lb. Bond (60 gsm) to
Tray 2 1,600
Capacity
(sheet)
Paper Size Weight Paper Type
80 lb. Cover (216 gsm)
•Plain
• Recycled
• Lightweight (52-63 gsm)
• Heavyweight 1 (106-216 gsm)
• Side 2 Paper (preprinted)
• Hole Punched
Xerox 4590 EPS/4110 EPS User Guide
2-1
Page 22
2. Paper and other media
Tray 3
Tray 4
Tray 5
(Bypass Tray)
Optional Tray
6 and Tray 7
(High
Capacity
Feeder)
OR
Variable from:
5.5” x 7.2”
550 each
250 Variable from:
2,000
each
(140 x 182 mm)
to
13.0” x 19.2”
(330 x 488 mm)
4” x 6”/Postcard
to
12.5” x 18”/SRA3
Max: 13” x19.2”
(330 x 488 mm)
•8.5" x 11”/ A4
• 6.9” x 9.9”/B5
• 7.25” x 10.5”
(executive)
16 lb. Bond (60 gsm) to
80 lb. Cover (216 gsm)
16 lb. Bond (60 gsm) to
140 lb. Index (253 gsm)
16 lb. Bond (60 gsm) to
80 lb. Cover (216 gsm)
•Plain
• Recycled
• Lightweight (52-63 gsm)
• Heavyweight 1 (106-216 gsm)
• Side 2 Paper (preprinted)
• Hole Punched
• Tab Stock 1 (106-216 gsm)
•Plain
• Recycled
• Transparency
• Lightweight (52-63 gsm)
• Heavyweight 1 (106-216 gsm)
• Heavyweight 2 (217-253 gsm)
• Labels
• Side 2 Paper (preprinted)
• Hole Punched
• Tab Stock 1 (106-216 gsm)
• Tab Stock 2 (217-253 gsm)
•Plain
• Recycled
• Lightweight (52-63 gsm)
• Heavyweight 1 (106-216 gsm)
• Side 2 Paper (preprinted)
• Hole Punched
Optional Tray
6 (Oversized
High Capacity
Feeder)
Tray 8 (Postprocess
inserter)
8.5” x 11”/A4
2000
175 8.5" x 11”/ A4
to
13” x 19”/SRA3 +
to
11” x17”/A3
NOTE: GSM is a measure of the substance of pap er expressed in
grams per square meter.
NOTE: Ream weight is the weight of a 788 × 1,091 mm ream
consisting of 1,000 sheet s.
18 lb. Bond (64 gsm) to
110 lb. Cover (300 gsm)
16 lb. Bond (60 gsm) to
90 lb. Cover (220 gsm)
•Plain
• Recycled
• Heavyweight
• Coated
• Transparency
• Labels
• Hole Punched
• Lightweight
•Tab Stock
•Custom
• Coated
Preprinted Stock on:
•Plain
• Recycled
• Lightweight (52-63 gsm)
• Heavyweight 1 (106-216 gsm)
• Hole Punched
2-2
Xerox 4590 EPS/4110 EPS User Guide
Page 23

Storing and handling paper
Consider the following when storing paper:
• Store paper inside a cabinet or other dry place. Paper that has
• After opening a package of paper, wrap up the remaining
• Paper should be stored flat, to prevent bends or warping.
Consider the following when handling paper and setting paper into
the tray:
• Align the stack of paper neatly before setting it in the tray.
• Do not use paper that is folded, creased, or heavily warped.
• Do not use waved or curled paper.
• Do not load paper of mixed size together into the tray.
2. Paper and other media
absorbed moisture can cause paper jams and image quality
defects.
paper to store it. It is recommended that you include moisture
prevention packets.
• Transparency paper and label paper can cause paper jams,
and multiple sheets can be fed to the printer at once. Be sure
to carefully fan these types of paper.
• When continuously outputting onto transparencies,
transparency sheets sometimes will stick to each other.
Remove transparencies from the output tray every 20 or so
sheets, and fan them to cool them down.
Xerox 4590 EPS/4110 EPS User Guide
2-3
Page 24
2. Paper and other media
Paper tray features
Automatic paper size detection feature
This section provides an overview of the paper tray features and
functionality on the 4590 EPS/4110 EPS printer.
When you load standard-sized paper in trays 3, 4, 6 and 7, the
size is automatically detected by the machine.
NOTE: Tr ays 1 and 2 are preset for paper size 8.5 x 11 inches.
The machine detects only that size in trays 1 and 2.
The paper type attribute is not automatically detected and must be
set. Normally, plain paper is set as the default for each of the
trays. Change the paper type settings if you load other paper
types. Up to five paper types can be named and set as userdefined paper.
For details about changing the paper type, refer to “Paper Tray
Attributes” in the System Administrat ion Guide.
Automatic paper tray selection feature
The machine automatically selects the paper tray containing the
correct size paper without the user needing to select a specific
paper tray.
The Automatic Tray Selection feature is active if Auto Size Detect
is selected for Paper Size. Set the Paper Type Priority order for
automatic tray selection from the Paper Tray Settings screen. If
the machine senses that there are two or more corresponding
trays (the Paper Type Priority setting is exactly the same), paper
selection is determined by the Paper T ray Priorit y order set at the
Paper Tray Settings screen. During automatic tray selection, trays
whose Paper Type Priority setting is set to Off are not targeted in
automatic tray selection.
NOTE: Tr ay 5 (Bypass) cannot be selected when the automatic
tray selection feature is active.
For information about setting Paper Type , Paper Type Priority,
Paper Tray Priority, and setting the paper substi tute feature, ref er
to “Paper Tray Settings” in the System Administration Guide. The
same settings can also be made from CentreWare Internet
Services. See your System Administrator for help.
2-4
Xerox 4590 EPS/4110 EPS User Guide
Page 25

Automatic tray switching feature
When the paper tray currently being used is empty, the machine
automatically switches to another tray containing paper of the
same size, weight, type and feeding orientation (SEF or LEF) as
the tray currently being used.
This feature is enabled from the Administration Mode in the Paper
Tray Settings screen.
See your System Administrator. Details about the paper tray
settings are found in the System Administration Guide.
Load While Run
For continuous and uninterrupted printing, this feature allows
toner to be replaced and paper stock to be loaded in the trays
while the printer is still printing.
2. Paper and other media
Paper tray programming
NOTE: For information on programming paper tr ay attributes on
the DocuSP Controller, refer to the DocuSP online Help.
Once you load the paper in the printer paper trays, you may need
to update the paper tray attribute settings to match the tray
contents. The Paper Color attribute for all trays must be set at the
Printer Manager on the DocuSP Controller. Settings for the Paper
Type, Paper Weight and Paper Size are programmed at either the
machine user interface or the DocuSP Controller depending on
the tray.
The paper tray attribute settings for trays 1-4 and 6-7 are
programmed on the machine user interface and the settings are
automatically uploaded to the Printer Manager on the DocuSP
Controller.
The paper tray attribute settings for Tray 5 (Bypass), however, are
programmed at the DocuSP Controller. Since Tray 5 does not
have stock size guides, do not program Tray 5 settings at the
machine user interface. The DocuSP Controller will download the
settings from the Printer Manager to the printer and set the tray
attributes for Tray 5.
Set or change all Tray 8 paper tray attributes at the DocuSP
Controller.
Xerox 4590 EPS/4110 EPS User Guide
2-5
Page 26
2. Paper and other media
Load paper
Load paper in trays 1 and 2
NOTE:When the machine runs out of paper during printing, a
message is displayed on the Printer UI. Add paper according
to the displayed instructions. Printing automatically resumes
when paper is added.
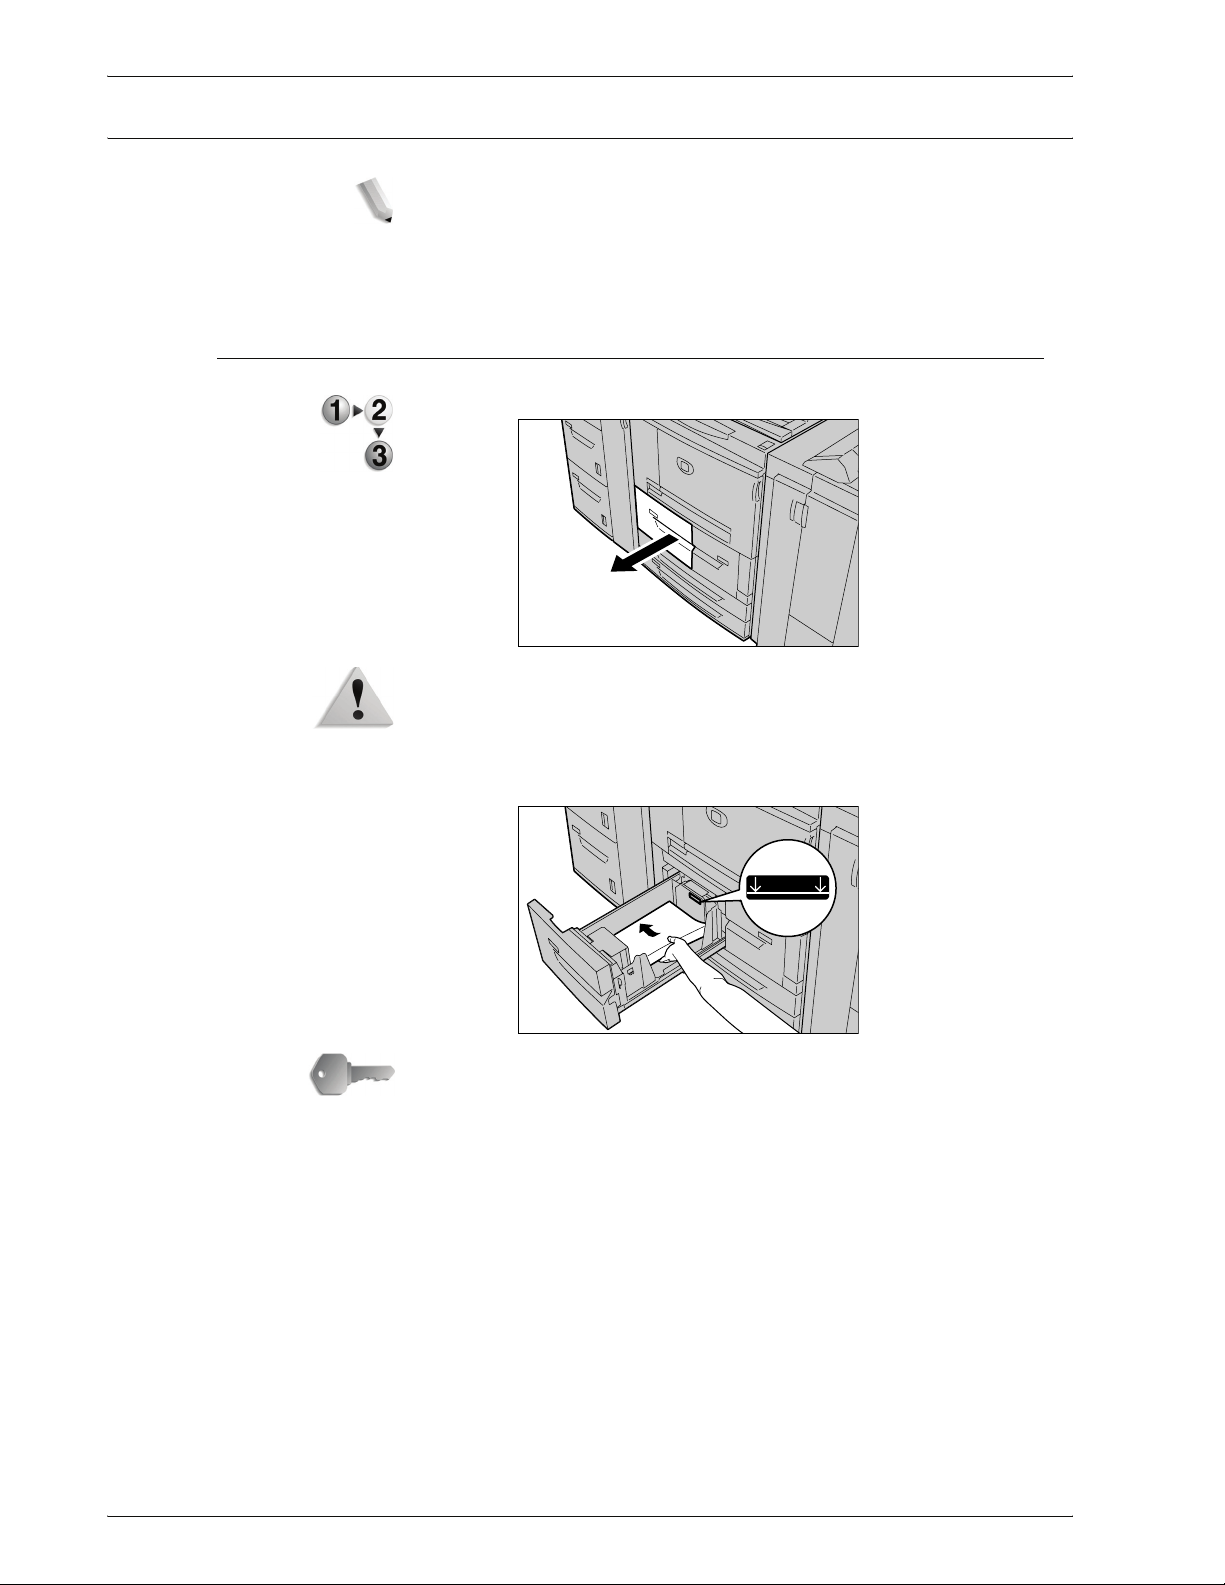
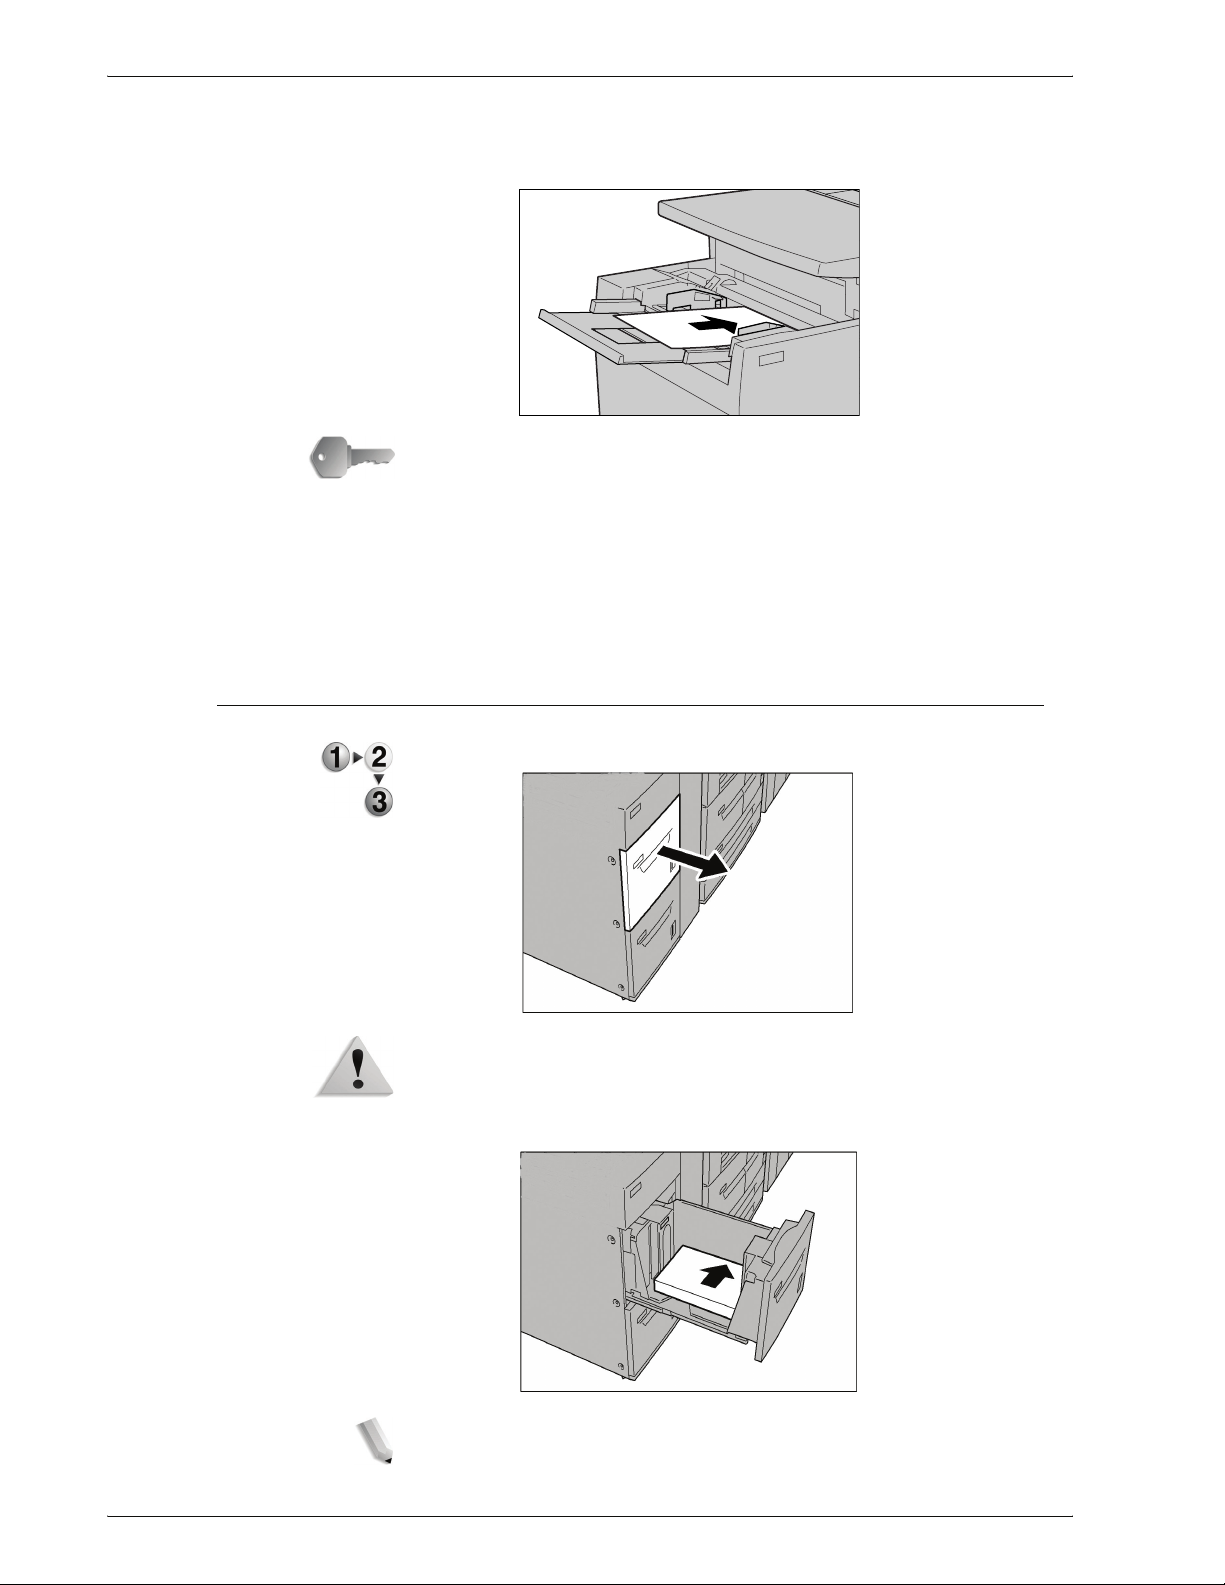
1. Pull out the tray towards you until it stops.
WARNING: When pulling out the paper tray, do it slowly. If
pulled out with too much force, the tray can hit and injure your
knees.
2. Load and align the edge of the paper against the left edge of
the tray with the side to be copied or printed on facing up.
MAX
KEY POINT: Do not load paper exceeding the maximum fill line.
Doing so might cause paper jams or machine trouble.
3. If you changed the paper type and/or weight, enter this in the
Paper Tray Attributes window on the machine user interface.
Select [OK] to save the information and close the window.
4. Push the tray in gently until it comes to a stop.
2-6
Xerox 4590 EPS/4110 EPS User Guide
Page 27
Load paper in trays 3 and 4
For information about changing the paper attributes (size, weight,
etc.) and orientation, refer to “Change the size of paper trays” in
this chapter.
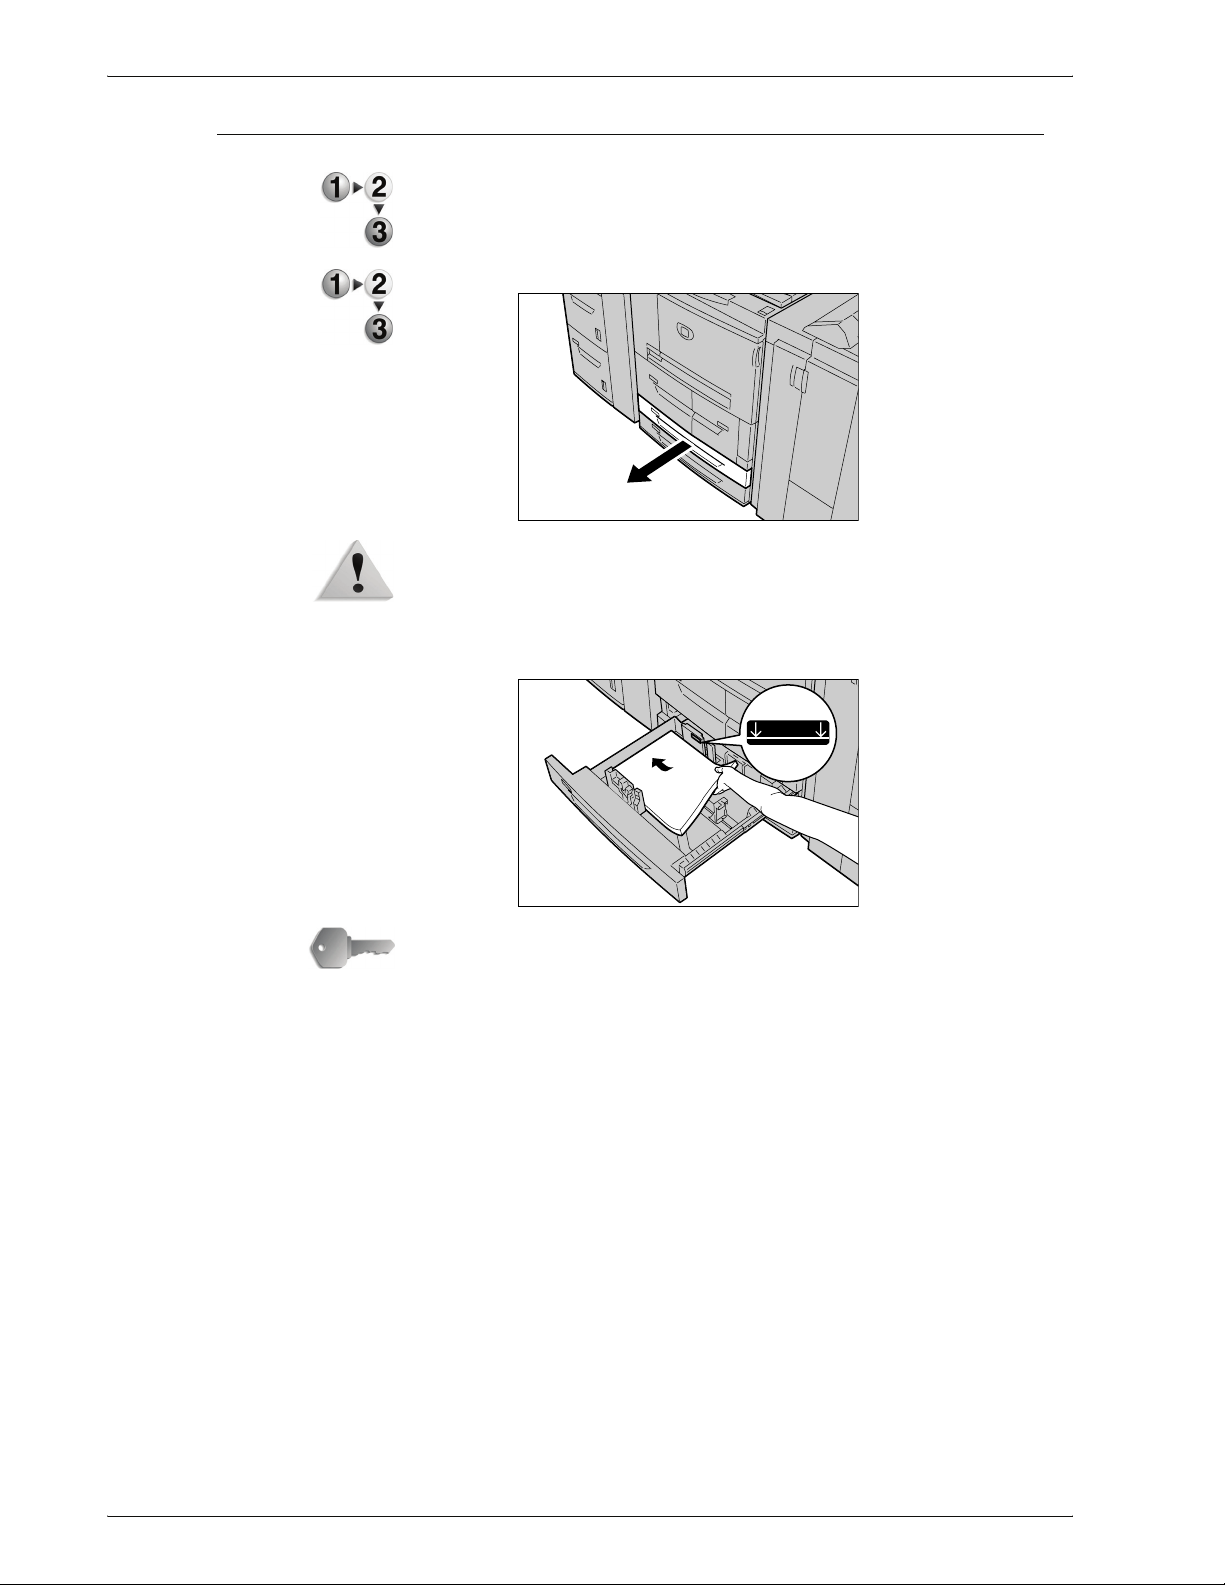
1. Pull out the tray towards you until it stops.
WARNING: When pulling out the paper tray, do it slowly. If
pulled out with too much force, the tray can hit and injure your
knees.
2. Load and align the edge of the paper against the left edge of
the tray with the side to be printed on facing up.
2. Paper and other media
MAX
KEY POINT: Do not load paper exceeding the maximum fill line.
Doing so might cause paper jams or machine trouble.
Do not put paper or anything in the empty space on the right side
of trays 3 or 4. Doing so might cause paper jams or machine
trouble.
3. If you changed the paper type, weight or size, enter this in
the Paper Tray Attributes window on the machine user
interface. Select [OK] to save the information and close the
window.
4. Push the tray in gently until it comes to a stop.
Xerox 4590 EPS/4110 EPS User Guide
2-7
Page 28
2. Paper and other media
Load paper in Tray 5 (Bypass)
When printing with paper that does not match the sizes or types in
trays 1 to 4 and the optional trays 6 or 7, use Tray 5 (Bypass).
Specify the type of paper to load in the Printer Manager at the
DocuSP Controller. To make detailed instructions during printing,
specify the instructions using either the Print dialog in the
application or from the Printer Manager.
NOTE: When adding paper to Tray 5 (Bypass), remove any p aper
remaining in the tray, add it to the stack of paper to be added, then
load all of the paper into the tray at once.
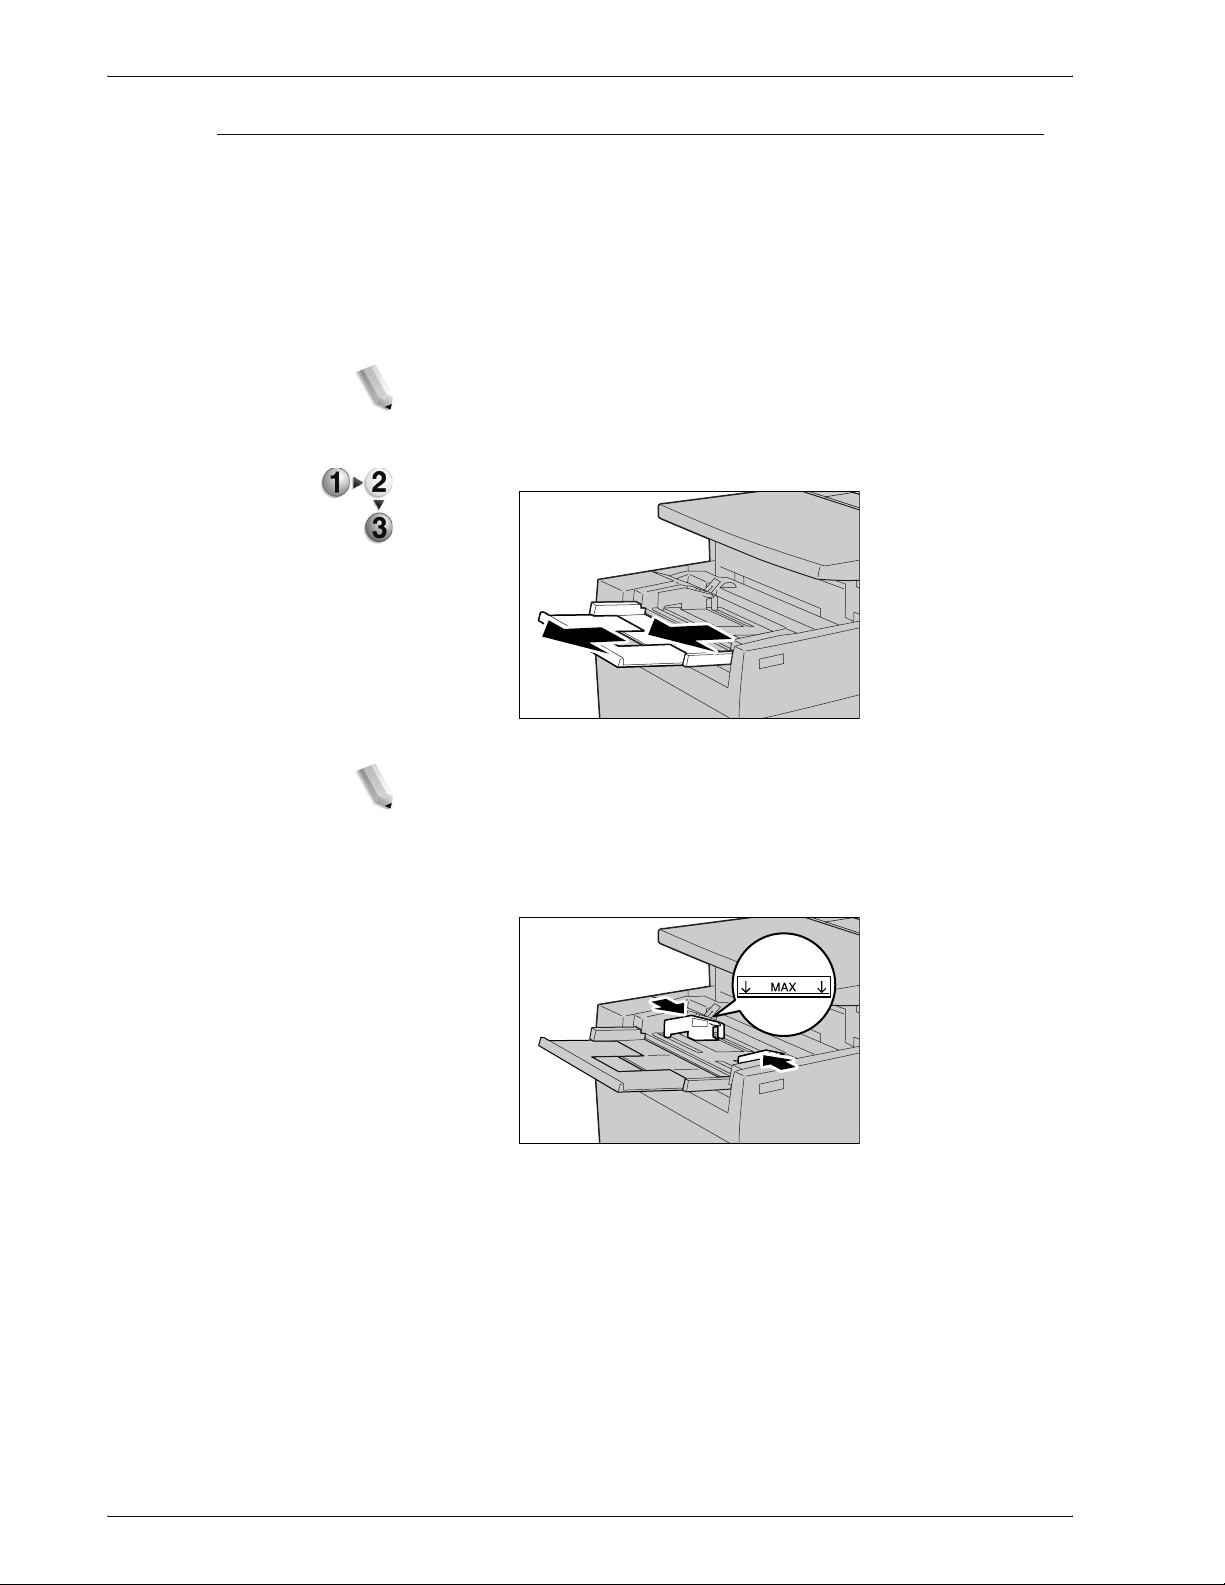
1. Open Tray 5 (Bypass) as necessary.
NOTE: If necessary, extend the extension flap. The extension flap
can be extended in two stages. When pulling out the
extension flap, do it gently.
2. Hold the center of the paper guides and slide them to the
desired paper size.
2-8
Xerox 4590 EPS/4110 EPS User Guide
Page 29
2. Paper and other media
3. Load paper with the side to be printed on facing up, and insert
the paper lightly along the paper guide on the front side of the
machine until it comes to a stop.
KEY POINT: Do not load mixed size paper into the tray.
Do not load paper exceeding the maximum fill line. Doing
so might cause paper jams or machine trouble.
4. When loading a non-standard paper size from Tray 5
(Bypass), move the paper guides to accommodate the paper.
5. Select printing.
Load paper in the optional High Capacity Feeder (Trays 6 and 7)
1. Pull out the tray towards you until it stops.
WARNING: When pulling out the paper tray, do it slowly. If pulled
out with too much force, the tray can hit and injure your knees.
2. Load and align the edge of the paper against the right edge
of the tray with the side to be printed on facing up.
NOTE: Do not load paper exceeding the maximum fill line. Doing
so might cause paper jams or machine trouble.
Xerox 4590 EPS/4110 EPS User Guide
2-9
Page 30
2. Paper and other media
Load paper in the optional Oversized High Capacity Feeder (Tray 6)
3. Push the tray in gently until it comes to a stop.
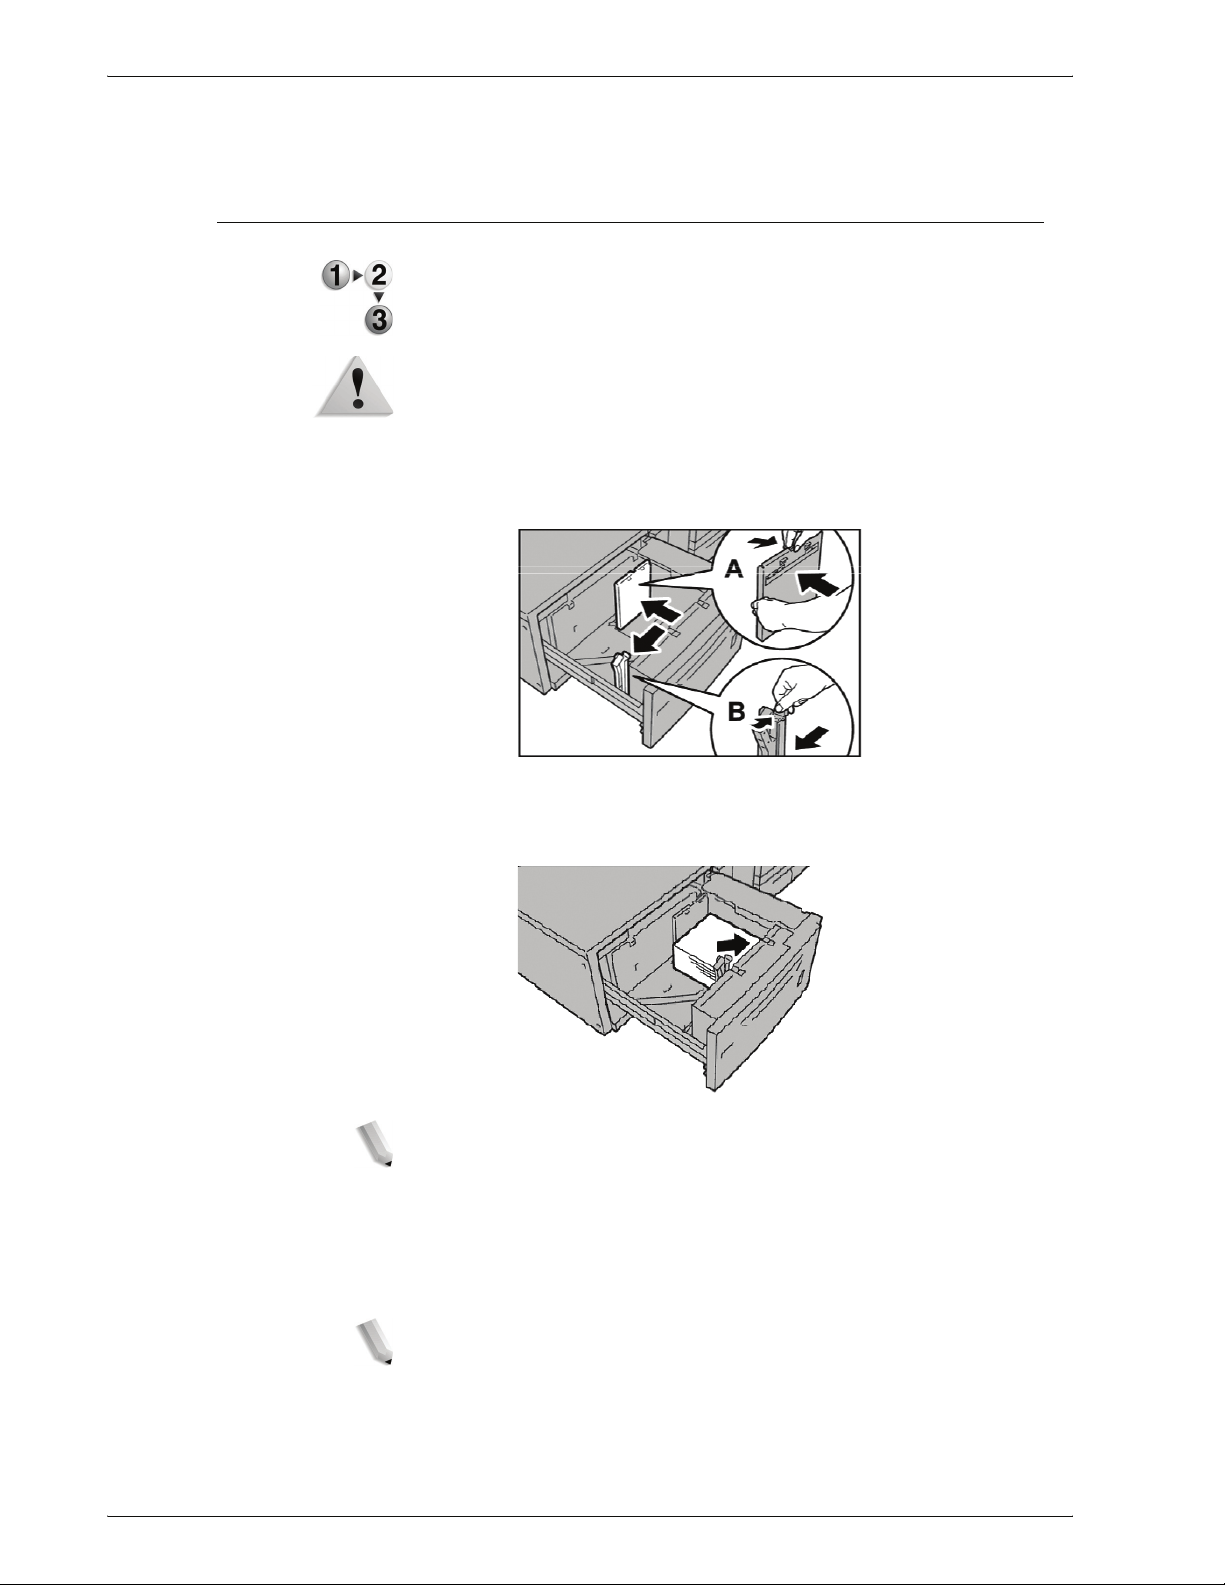
1. Pull out the tray towards you until it stops.
WARNING: When pulling out the paper tray, do it slowly. If pulled
out with too much force, the tray can hit and injure your knees.
2. Squeeze the handle on the paper guide (A) and slide the
guide to the desired paper size. Squeeze the handle on the
paper guide (B) and slide the guide to the desired paper
size.
3. Fan the sheets before loading them into the tray. With the
side to be printed on facing up, load and align the paper
stack in the lower right corner of the tray as shown below.
NOTE: Do not load paper exceeding the maximum fill line. Doing
so might cause paper jams or machine malfunctions. When
loading drilled stock, place the paper with its drilled side to the
right. When loading tab stock, pl ace the tabs to the left.
4. Slide both paper guides to just touch the edges of the paper
stack.
NOTE: Position the paper guides correctly to match the paper
size. If the position of the paper guide is not correct, the paper
may not be fed properly and paper jams may occur.
2-10
Xerox 4590 EPS/4110 EPS User Guide
Page 31

2. Paper and other media
CAUTION: For paper heavier than 256 gsm, slide both Paper
Weight Switches to the heavier weight position (257 - 300 gsm).
Failure to do so may result in paper jams.
5. Move both Paper Weight Switches to their appropriate
positions.
6. Push the tray in gently until it comes to a stop.
NOTE: When the loaded tray is closed, the tray position is
automatically adjusted in the front/back direction based on the
paper size.
Xerox 4590 EPS/4110 EPS User Guide
2-11
Page 32

2. Paper and other media
Load paper in the optional Tray 8 (post-process inserter)
The Post-Process Inserter is meant for loading paper (blank,
copied paper, and so forth) to be used as separators and covers.
Media loaded here will not be used to make copies.
NOTE: When adding paper to the Post-Process Inserter, remove
any paper remaining in the t ray, add it to the stack of paper
to be added, then load all of the paper int o the
Post-Process Inserter at once.
1. Hold the center of the paper guides and slide them to the
desired paper size.
2. Load the paper, aligning to the front side of the tray.
2-12
Xerox 4590 EPS/4110 EPS User Guide
Page 33

Load tab paper
Load tab paper in trays 3 and 4
2. Paper and other media
1. Pull out the tray towards you until it stops.
WARNING: When pulling out the paper tray, do it slowly. If
pulled out with too much force, the tray can hit and injure your
knees.
2. Load and align the edge of the tab paper against the right
edge of the tray with the side to be printed on facing down.
MAX
3. Move the two paper guide levers while holding their grips so
that they lightly contact the edges of the paper.
Ensure that the levers are positioned correctly.
NOTE: Do not load paper exceeding the maximum fill line. Doing
so might cause paper jams or machine trouble.
Xerox 4590 EPS/4110 EPS User Guide
2-13
Page 34

2. Paper and other media
Load tab p a per in Tray 5 (Bypass)
1. Open Tray 5 (Bypass).
NOTE: If necessary, extend the extension flap. The extension flap
can be extended in two stages. When pulling out the
extension flap, do it gently.
2. Hold the center of the paper guides and slide them to the
desired paper size.
3. Place the paper with the side to be printed facing up and the
bottom side to be fed first. Insert the paper slowly to the end
along the paper guide.
2-14
Xerox 4590 EPS/4110 EPS User Guide
Page 35

2. Paper and other media
Load tab paper in Tray 8 (Post-process inserter)
1. Hold the center of the paper guides and slide them to the
desired paper size.
2. If the paper in already printed on, load the paper with the
printed side facing up and with the tab side to be fed first.
A
A
Xerox 4590 EPS/4110 EPS User Guide
2-15
Page 36

2. Paper and other media
Change the size of paper trays
NOTE: If you need to change the paper size for trays 1 and 2,
contact the Customer Support Center.
Paper tray attributes are configurable and should match
the attributes of the paper to be loaded to maintain high
print quality.
Normally, plain paper is set. When changing the setting to
a different paper quality, change the paper quality settings
to match the type of paper to be loaded to maintain high
print quality.
For more information about paper quality, refer to “Paper
Tray Attributes” in the System Administration Guide.
When setting a non-standard paper size, you must register
the paper size. For information about registering paper
sizes, refer to “Paper Size Settings” in t he System
Administration Guide.
For a description of how to print to non-standard size paper, refer
to the online help for the print driver.
Change the size in Trays 3 and 4
1. Pull out the tray towards you until it stops.
WARNING: When pulling out the paper tray, do it slowly. If
pulled out with too much force, the tray can hit and injure your
knees.
2. Remove any paper in the tray.
2-16
Xerox 4590 EPS/4110 EPS User Guide
Page 37

2. Paper and other media
3. While pressing the paper guide lever (2 paper guides), adjust
the paper guide to match the size of your paper.
4. Check that the paper guides fit correctly in the slots and
release the paper guide lever.
5. Load and align the edge of the paper against the left side of
the tray.
NOTE: Make sure that the p aper gui des are adj usted t o the p aper
being used.
6. Gently push the tray in until it comes to a stop.
NOTE: Affix the paper size label to the front of the tray to indicate
the paper size currently in the tray.
Xerox 4590 EPS/4110 EPS User Guide
2-17
Page 38

2. Paper and other media
Change the size in the optional Trays 6 and 7 (HCF)
NOTE: When changing the paper size to non-standard size
loaded in trays 6 and 7, contact your Customer Support
Center. If doing so, it never returns to the original sett ing.
1. Pull out the tray towards you until it stops.
WARNING: When pulling out the paper tray, do it slowly. If
pulled out with too much force, the tray can hit and injure your
knees.
2. Remove any paper loaded on the tray.
3. Loose the screw on the right to remove your side and the other
side guide.
4. Attach the guides according to the hole of the paper size to
change, and tighten the screws.
2-18
Xerox 4590 EPS/4110 EPS User Guide
Page 39

2. Paper and other media
5. Load and align the edge of the paper against the right edge of
the tray with the side to be printed on facing up.
KEY POINT: Do not load paper exceeding the maximum fill line.
Doing so might cause paper jams or machine trouble.
6. Push the tray in gently until it comes to a stop.
NOTE: Affix the paper size label to the front of the paper tray.
Change the paper size in the optional OHCF (Tray 6)
1. Pull out the tray towards you until it stops.
WARNING: When pulling out the paper tray, do it slowly. If pulled
out with too much force, the tray can hit and injure your knees.
2. Remove any paper loaded on the tray.
3. Squeeze the handle on the paper guide (A) and slide the
guide to the desired paper size. Squeeze the handle on the
paper guide (B) and slide the guide to the desired paper
size.
Xerox 4590 EPS/4110 EPS User Guide
2-19
Page 40

2. Paper and other media
4. Load and align the paper stack in the lower right corner of
the tray as shown below.
NOTE: Do not load paper exceeding the maximum fill line. Doing
so might cause paper jams or machine malfunctions.
5. Slide both paper guides to just touch the edges of the paper
stack.
NOTE: Position the paper guides correctly to match the paper
size. If the position of the paper guide is not correct, the paper
may not be fed properly and paper jams may occur.
CAUTION: For paper heavier than 256 gsm, slide both Paper
Weight Switches to the heavier weight position (257 - 300 gsm).
Failure to do so may result in paper jams.
6. Move both Paper Weight Switches to their appropriate
positions.
7. Push the tray in gently until it comes to a stop.
NOTE: When the loaded tray is closed, the tray position is
automatically adjusted in the front/back direction based on the
paper size.
2-20
Xerox 4590 EPS/4110 EPS User Guide
Page 41
Change/verify the Paper Tray Attribute settings
NOTE: For information on programming paper tr ay attributes on
the DocuSP Controller, refer to the DocuSP online Help.
If paper in a tray has changed, the paper tray attribute settings
associated with that tray may need to be modified. The following
describes how to change the paper type settings to match the
paper type currently loaded in the paper trays.
KEY POINT: It is very important to identify the actual Paper Type
settings for any media loaded into the paper trays.
NOTE: This procedure requires a System Administrat or
password. Contact your System Administrator for assistance with
this procedure.
NOTE: For information about how to set names to custom paper
(up to five), refer to “Custom Paper Name” in the System
Administration Guide or contac t your System Administrator .
2. Paper and other media
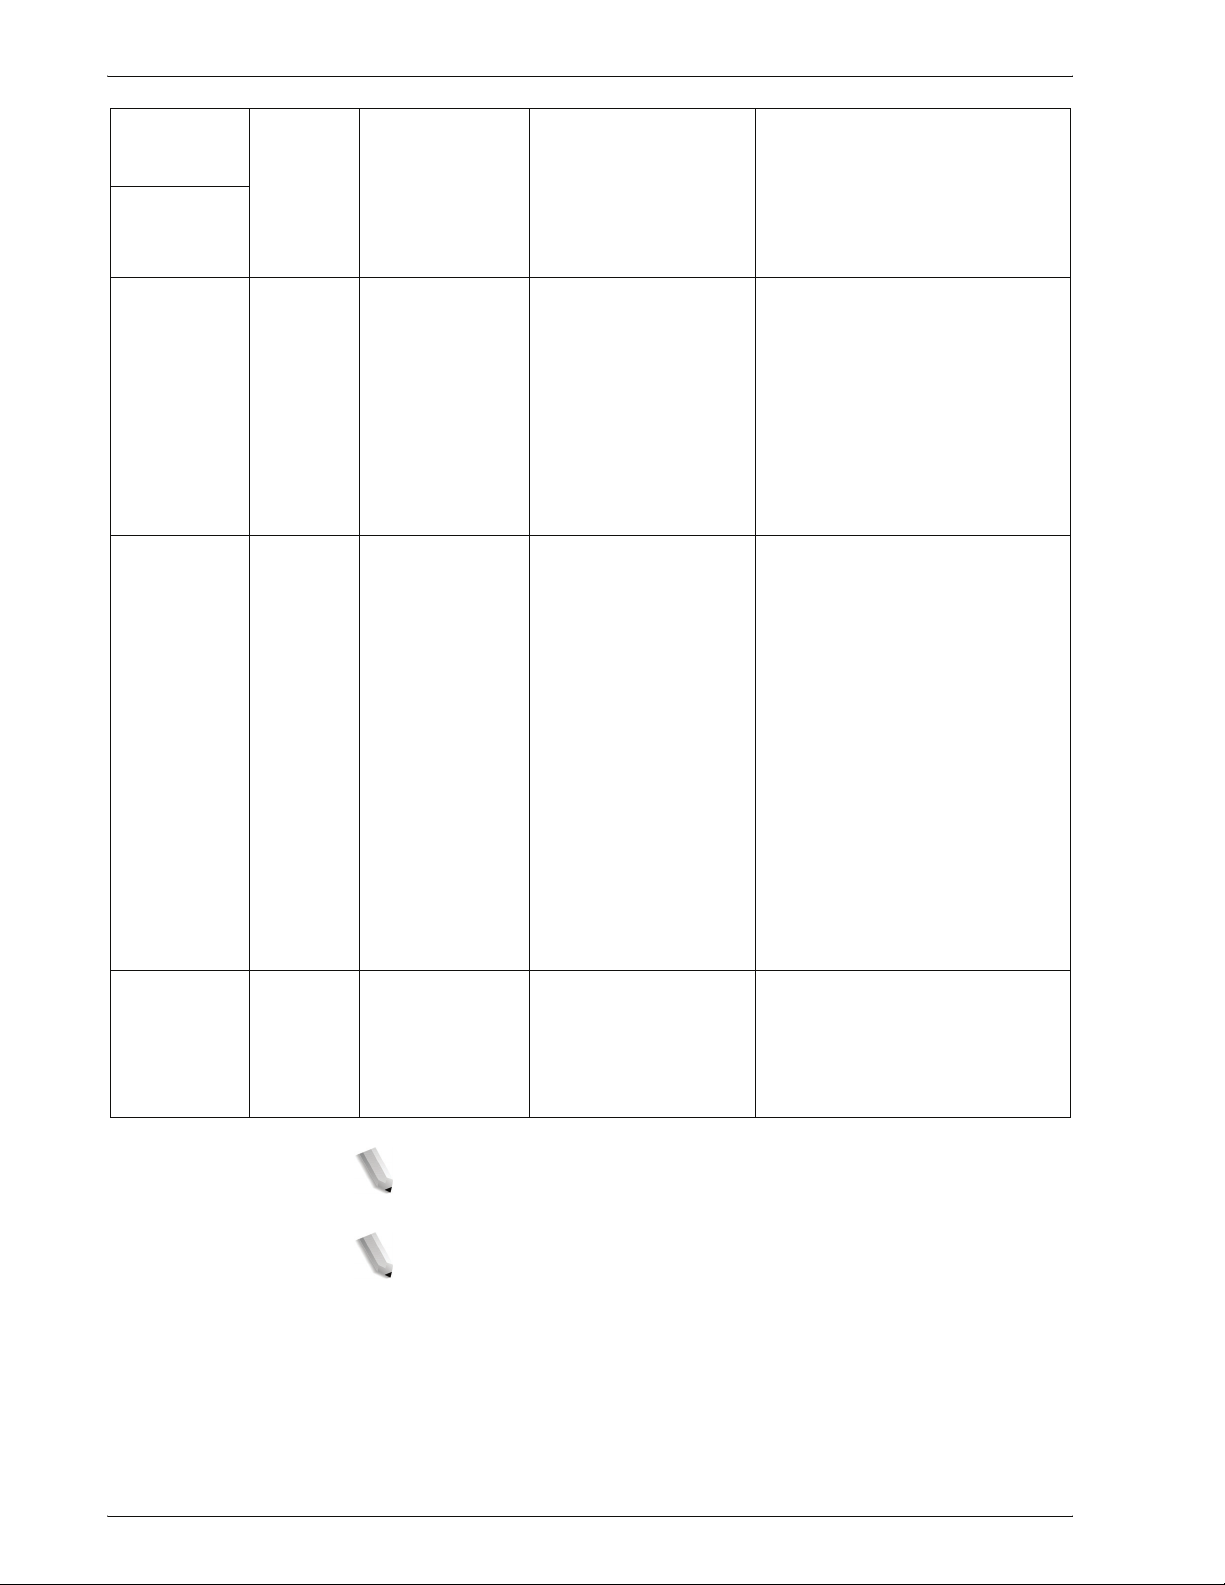
Map the paper type and weight
Printer Paper Types &
Weights
2
Plain (64-105 g/m
Recycled (64-105 g/m
Lightweight (52-63 g/m2)
Heavyweight 1 (106-216 g/m
Heavyweight 2 (217-253 g/m
)
2
)
KEY POINT: The tray programming options available on the
Printer do not consistently correspond with the tray programming
options on the DocuSP. When selecting the paper type or weight
on both the printer UI and the DocuSP UI, refer to the name
mapping table below. This table shows which Paper Types &
Weights on the Printer UI correspond to which Paper Types and
Weights on the DocuSP UI.
Paper Type names and weight
DocuSP Paper
Types
Plain 75 All (Trays 1, 2, 3, 4,
Recycled 75 All
Plain 60 All
2
Plain 150 All
)
2
Plain 250 (or 150 if 250 is
)
DocuSP Paper
weight (g/m
2
)
not available)
Paper can be used
in which trays:
5, 6, 7, and 8)
Trays 5 and 8
Plain (Side 2) Plain 75 All
Hole Punched Plain
75 All
Drilled
Transparency Transparency 75 Tray 5
Tab Stock 1 (106-216 g/m
Xerox 4590 EPS/4110 EPS User Guide
2
Full-Cut Tab 150 Trays 3, 4, 5, and 8
)
2-21
Page 42

2. Paper and other media
Paper Type names and weight
Printer Paper Types &
Weights
Tab Stock 2 (217-253 g/m
2
DocuSP Paper
Types
Full-Cut Tab 250 (or 150 if 250 is
)
DocuSP Paper
weight (g/m
Paper can be used
2
)
in which trays:
Tray 5
not available
Labels 1 (106-216 g/m
2
Labels 2 (217-253 g/m2)
)
Labels 150 Tray 5
Labels 250 (or 150 if 250 is
Tray 5
not available
Custom 1 (64-105 g/m
Custom 2 (64-105 g/m
Custom 3 (64-105 g/m
2
2
2
Custom 4 (64-105 g/m2)
Custom 5 (64-105 g/m
2
)
)
)
)
Plain or Custom 75 All
Plain or Custom 75 All
Plain or Custom 75 All
Plain or Custom 75 All
Plain or Custom 75 All
Not applicable (N/A) Pre-Cut Tab 150 N/A
Any (program on the printer
according to type, weight, size)
Pre-Printed Any (varies
depending on
All (suggested use
in Tray 5 or 8)
specific Pre-Printed
stock used)
N/A Ordered Stock N/A N/A
Any (program on the printer
according to type, weight, size)
Custom Any Depends on size,
weight, and type
NOTE: This table does not represent a complete and
comprehensive list of all
paper types/weights.
2-22
Xerox 4590 EPS/4110 EPS User Guide
Page 43

2. Paper and other media
Program/verify the tray settings from the All Services screen
NOTE: The UI screens shown may or may not reflect your system
configuration. The UI screens vary from system to system and
from marketplace to marketplace. Therefore, the UI screens
shown here are a representation of the type
be seen on your particular system
You can manually confirm and/or change the paper settings (such
as weight, size, type, etc.) from the All Services/Setup Menu on
the printer UI.
of screens that may
1. From the Printer UI All Servi ces screen, select Setup Menu.
2. Select Paper Tray Attributes.
Xerox 4590 EPS/4110 EPS User Guide
2-23
Page 44
2. Paper and other media
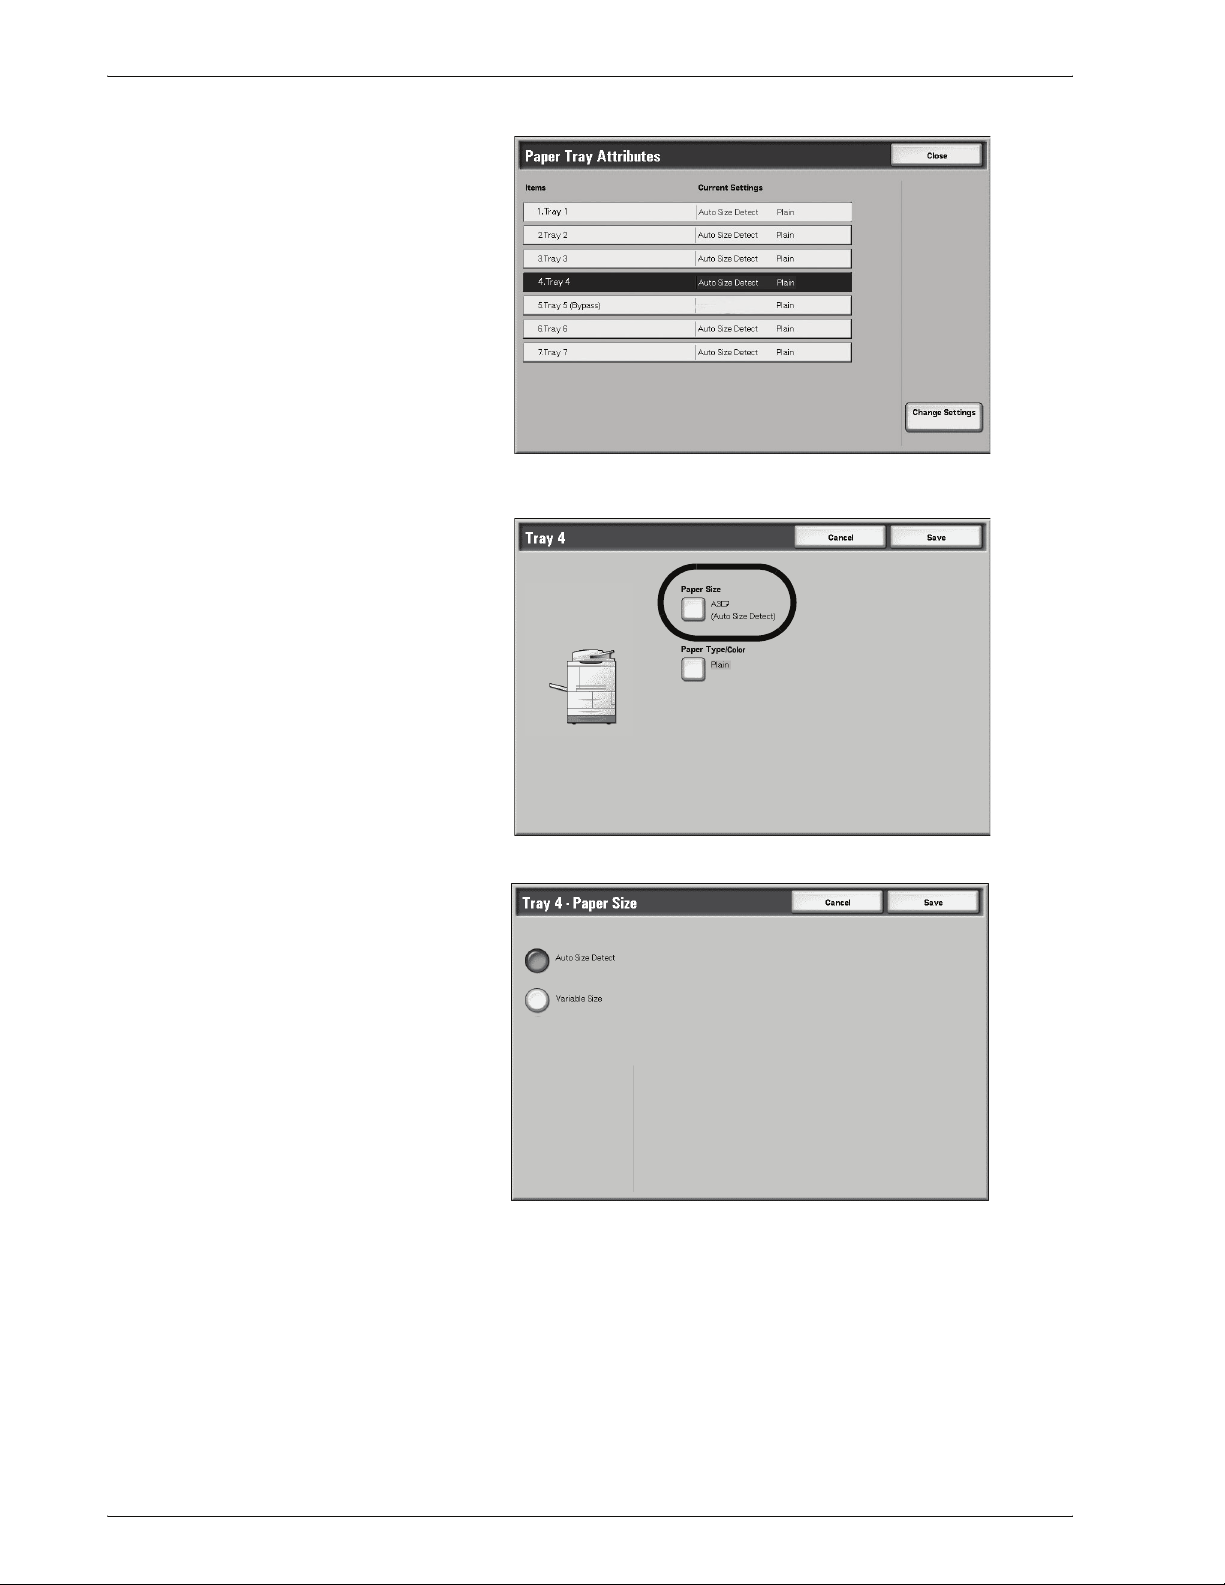
3. Select the desired paper tray and select Change Settings.
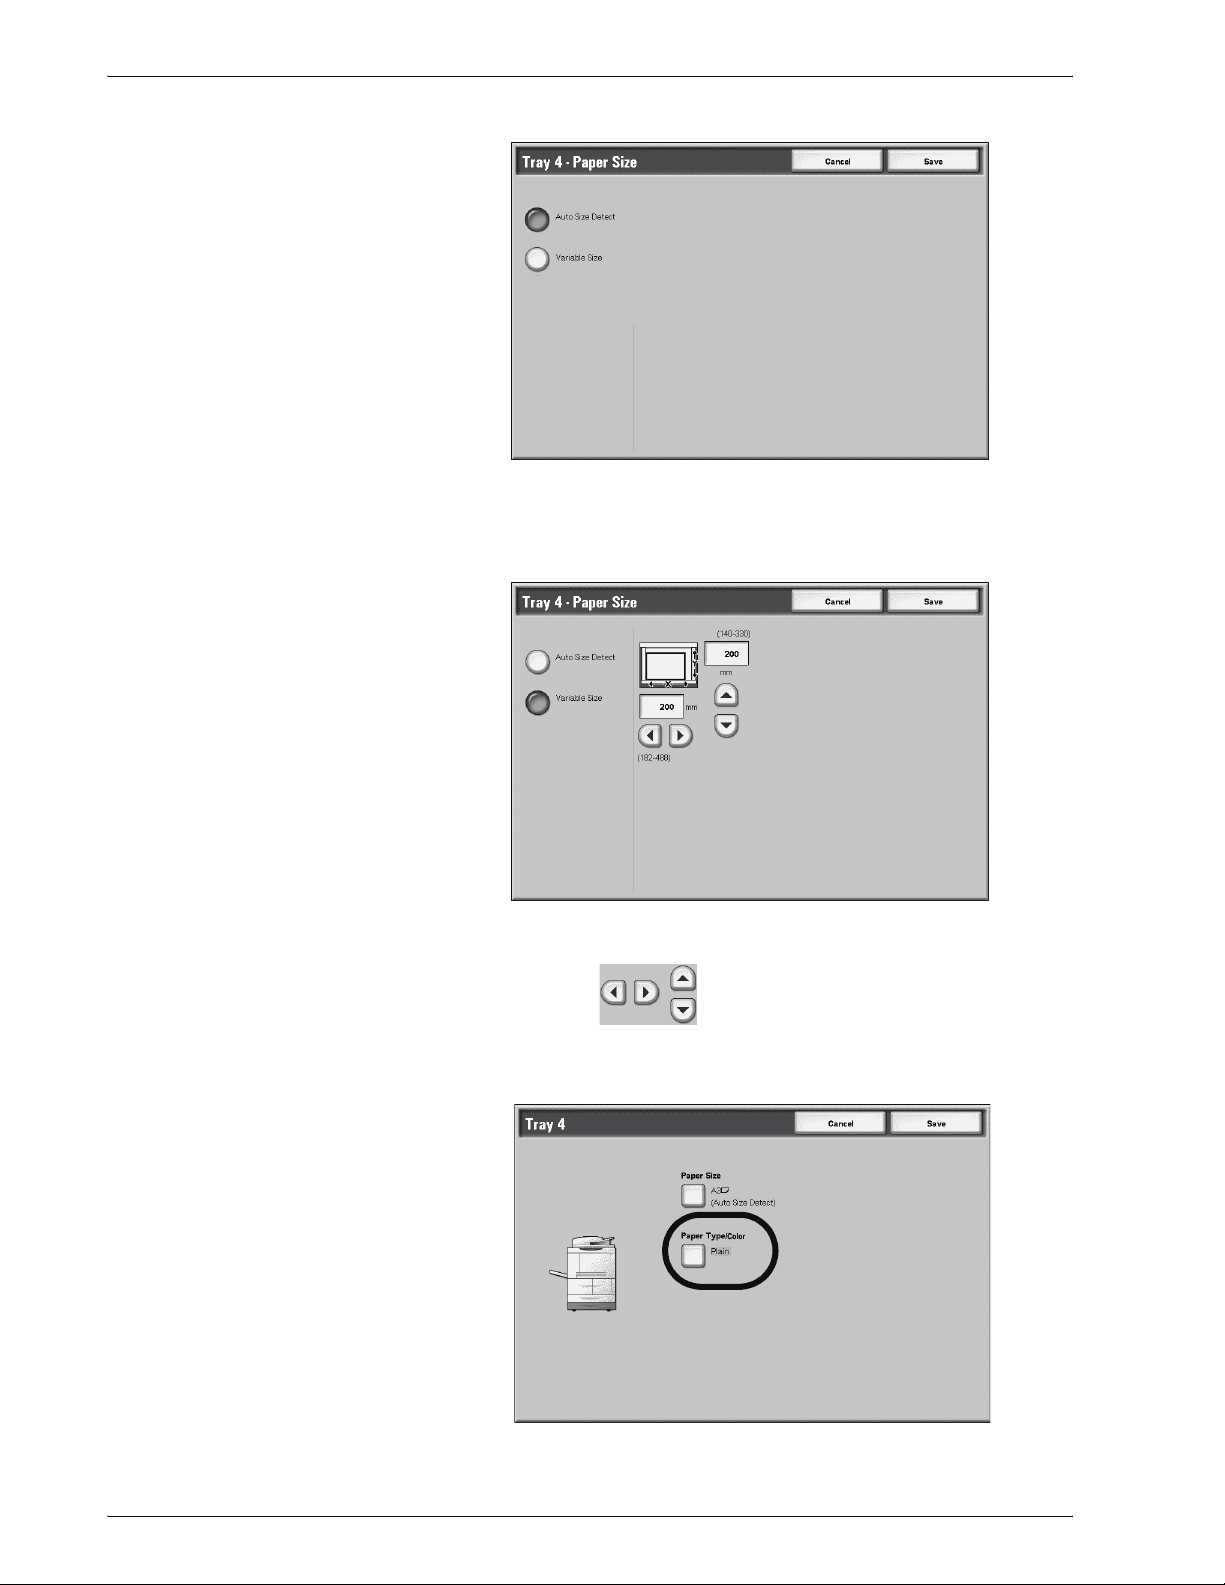
4. Select Paper Size.
5. Select either Auto Size Detect or Variable.
• If you select Auto Size Detect, select save to save and
close the window.
2-24
Xerox 4590 EPS/4110 EPS User Guide
Page 45

2. Paper and other media
• If you select Variable, the screen displays:
a. Select the width and height of the paper by selecting
the buttons.
b. Select Save.
6. Select Paper Type/Color.
7. Select the desired Paper Type and if applicable, the Paper
Color, and then select Save.
NOTE: If the optional OHCF (Tray 6) is installed, an additional
Paper Type option, Coated Stock, is available for selection.
Xerox 4590 EPS/4110 EPS User Guide
2-25
Page 46

2. Paper and other media
8. Select Save to return to the Tray screen.
9. Select Save to return to the Paper Tray Attributes screen.
10. Choose one of the following:
a. If you want to change the attributes for another tray, repeat
Step 2. - Step 8.
2-26
b. If you finished, repeatedly select Close until you return to
the All Services screen.
Xerox 4590 EPS/4110 EPS User Guide
Page 47

2. Paper and other media
Program/change the DEFAULT tray settings (System Administration)
1. Press the Log In/Out button.
Log In/Out
button
2. Enter the System Administrator Login ID (password) with the
numeric keypad, and select Confirm.
3. Select System Settings.
Xerox 4590 EPS/4110 EPS User Guide
2-27
Page 48

2. Paper and other media
4. Select System Settings.
5. Select Common Settings.
6. Select Paper Tray Settings.
2-28
Xerox 4590 EPS/4110 EPS User Guide
Page 49

2. Paper and other media
7. Select Paper Tray Attributes.
8. Select the desired paper tray and select Change Settings.
9. Select Paper Size.
NOTE: The Paper Size option is not available for Trays 1 and
2. The default paper size for Trays 1 and 2 is 8.5 x 11/A4.
NOTE: If you are programming Trays 1 and 2, proceed to Step 11.
Xerox 4590 EPS/4110 EPS User Guide
2-29
Page 50
2. Paper and other media
10. Select either Auto Size Detect or Variable.
• If you select Auto Size Detect, select save to save and
close the window.
• If you select Variable, the screen displays:
a. Select the width and height of the paper by selecting
the buttons.
b. Select Save.
11. Select Paper Type and/or Color (if applicable).
2-30
Xerox 4590 EPS/4110 EPS User Guide
Page 51

2. Paper and other media
NOTE: The Paper Color option is available only if it is Enabled
from System Settings. Refer to the System Administration Guide,
Chapter 5, the section entitled “Customize the paper color
screen.”
12. Select the desired for the paper type and/or paper color (if
applicable), and then select Save.
NOTE: If the optional OHCF (Tray 6) is installed, an additional
Paper Type option, Coated Stock, is available for selection.
13. Review the Paper Type screen and ensure that the Current
Settings for the Items you changed reflect the newly
entered values, and select Close.
14. Select Close/Exit repeatedly to exit the System
Administration mode.
Xerox 4590 EPS/4110 EPS User Guide
2-31
Page 52

2. Paper and other media
Manually confirm/change the tray settings on the DocuSP
KEY POINT: You can quickly and easily check the status of the
printer trays from the DocuSP by selecting Printer Status from
the Printer pull-down menu. The settings for the individual trays
cannot be changed from here. In order to change the settings,
perform the procedure provided in this section.
NOTE: The UI screens shown may or may not reflect your system
configuration. The UI screens vary from system to system and
from marketplace to marketplace. Therefore, the UI screens
shown here are a representation of the type
be seen on your particular system
You can manually confirm and/or change the paper tray settings
on the DocuSP UI by performing the following steps.
KEY POINT: You must be logged on as the System Administrator
in order to make changes to the paper tray settings.
of screens that may
1. From the DocuSP UI, select the Logon pull-down menu and
select Logon...
2. From the Logon screen, select System Administrator from
the User Name pull-down menu.
3. Enter the correct Password and select OK.
4. From Services, select Printer.
2-32
Xerox 4590 EPS/4110 EPS User Guide
Page 53

2. Paper and other media
5. Check the paper tray settings for the desired tray(s).
• Ensure that the settings reflect any changes made to the
tray (such as size, type, weight, etc.).
• If the settings shown on the DocuSP are correct, you
finished.
• If the settings shown on the DocuSP are different from
the actual tray contents, continue to the next step.
6. Double click on the desired tray to open the Properties
window.
7. Make the desired changes to the settings (size, type, weight,
etc.).
Ensure that the changes made here reflect the Printer UI
settings and the contents of the paper tray.
8. Select Apply to save the changes.
9. Select OK to close the Properties window.
Xerox 4590 EPS/4110 EPS User Guide
2-33
Page 54

2. Paper and other media
2-34
Xerox 4590 EPS/4110 EPS User Guide
Page 55
Job status overview
3. Job Status
KEY POINT: Since jobs are managed, printed and deleted
through the DocuSP Controller, it is recommended that you check
the status of the print jobs at the controller.
The Job Status feature lets you check executing, pending, and
completed jobs. You can also cancel printing or print pending jobs.
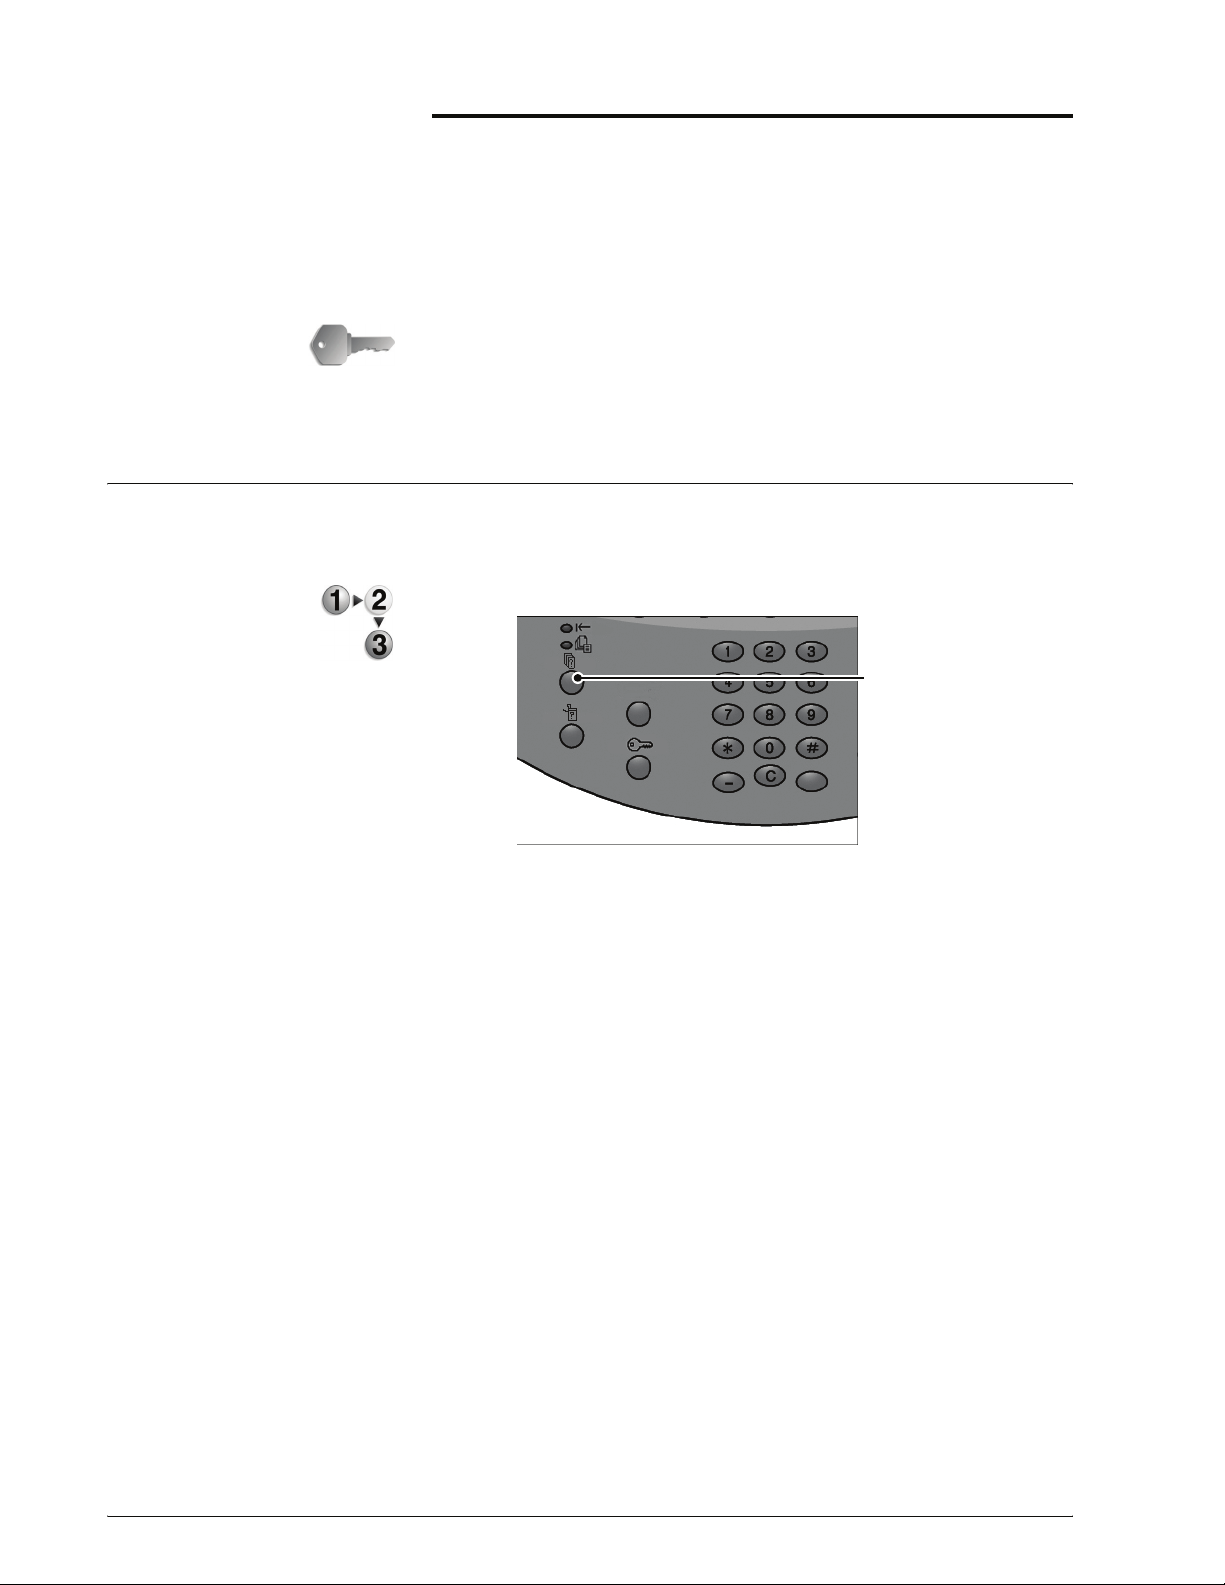
1. Press the Job Status button.
Job Status
button
In the Job Status screen, the following tabs are present:
Current and pending jobs
You can check lists of executing and pending jobs, and display
more details about the jobs. You can also cancel an executing or
pending job.
For more information, refer to “Checking current/pending jobs” in
this chapter.
Completed jobs
You can display the status of completed jobs. You can also display
more details about the completed jobs.
For more information, refer to “Checking completed jobs” in this
chapter.
Print waitin g jo b s
You can print pending print jobs and select the order that they will
print.
For more information, refer to “Printing waiting print jobs” in this
chapter.
Xerox 4590 EPS/4110 EPS User Guide
3-1
Page 56

3. Job Status
Checking current/pending jobs
This section describes how to check current or pending jobs. In
the Job Status screen, you can cancel jobs, or execute jobs in the
order you set.
1. Press the Job Status button.
2. Select the Current and Pending Jobs tab.
3. Check the executing/pending job.
NOTE: Select to display the previous screen and select to
display the next screen.
Display Time
The estimated job completion time is displayed. The time is
displayed either in the form of Cumulative Time Required or Time
Required.
NOTE: The estimated job completion time is not displayed during
data processing.
NOTE: The information displayed can be changed under
Common Settings...Other Settings in Admin mode. For more
information about the Displ ay Time values, refer to “Es timated Job
Time” in the System Administr ation Guide or contact your System
Administra t o r fo r h e l p .
4. To cancel or preferentially execute a job, first select the job.
5. Select Cancel to cancel the current pending job.
6. Select Promote Job to promote a job to run after the
currently executing job.
3-2
An icon appears on the Status of a job set to Promote Job.
Xerox 4590 EPS/4110 EPS User Guide
Page 57

Checking completed jobs
3. Job Status
This section describes how to check completed jobs.
You can check whether a job has completed successfully as well
as display more details about a selected job.
1. Press the Job Status button.
2. Select the Completed Jobs tab.
NOTE: Select to display the previous screen and select to
display the next screen.
3. To check the details of a job, select the job.
4. After checking the job, select Close.
When jobs are not completed correctly
If a job is not completed correctly, print the Job History Report to
view the error.
For information about the error code, refer to “Error Code” in the
Problem Solving chapter of this guide.
Xerox 4590 EPS/4110 EPS User Guide
3-3
Page 58

3. Job Status
Printing waiting jobs
You can print pending print jobs.
NOTE: If there are no pending print jobs, then you cannot select
Print Waiting Jobs.
1. Press the Job Status button.
2. Select the Print Waiting Jobs tab.
3. Locate and select the job to print.
NOTE: Select to display the previous screen and select to
display the next screen.
3-4
Xerox 4590 EPS/4110 EPS User Guide
Page 59
Machine status overview
4. Machine status
You can check the machine status and number of printed pages
on the screen. You can also print a report/list, as well as check the
job history and settings/recorded values.
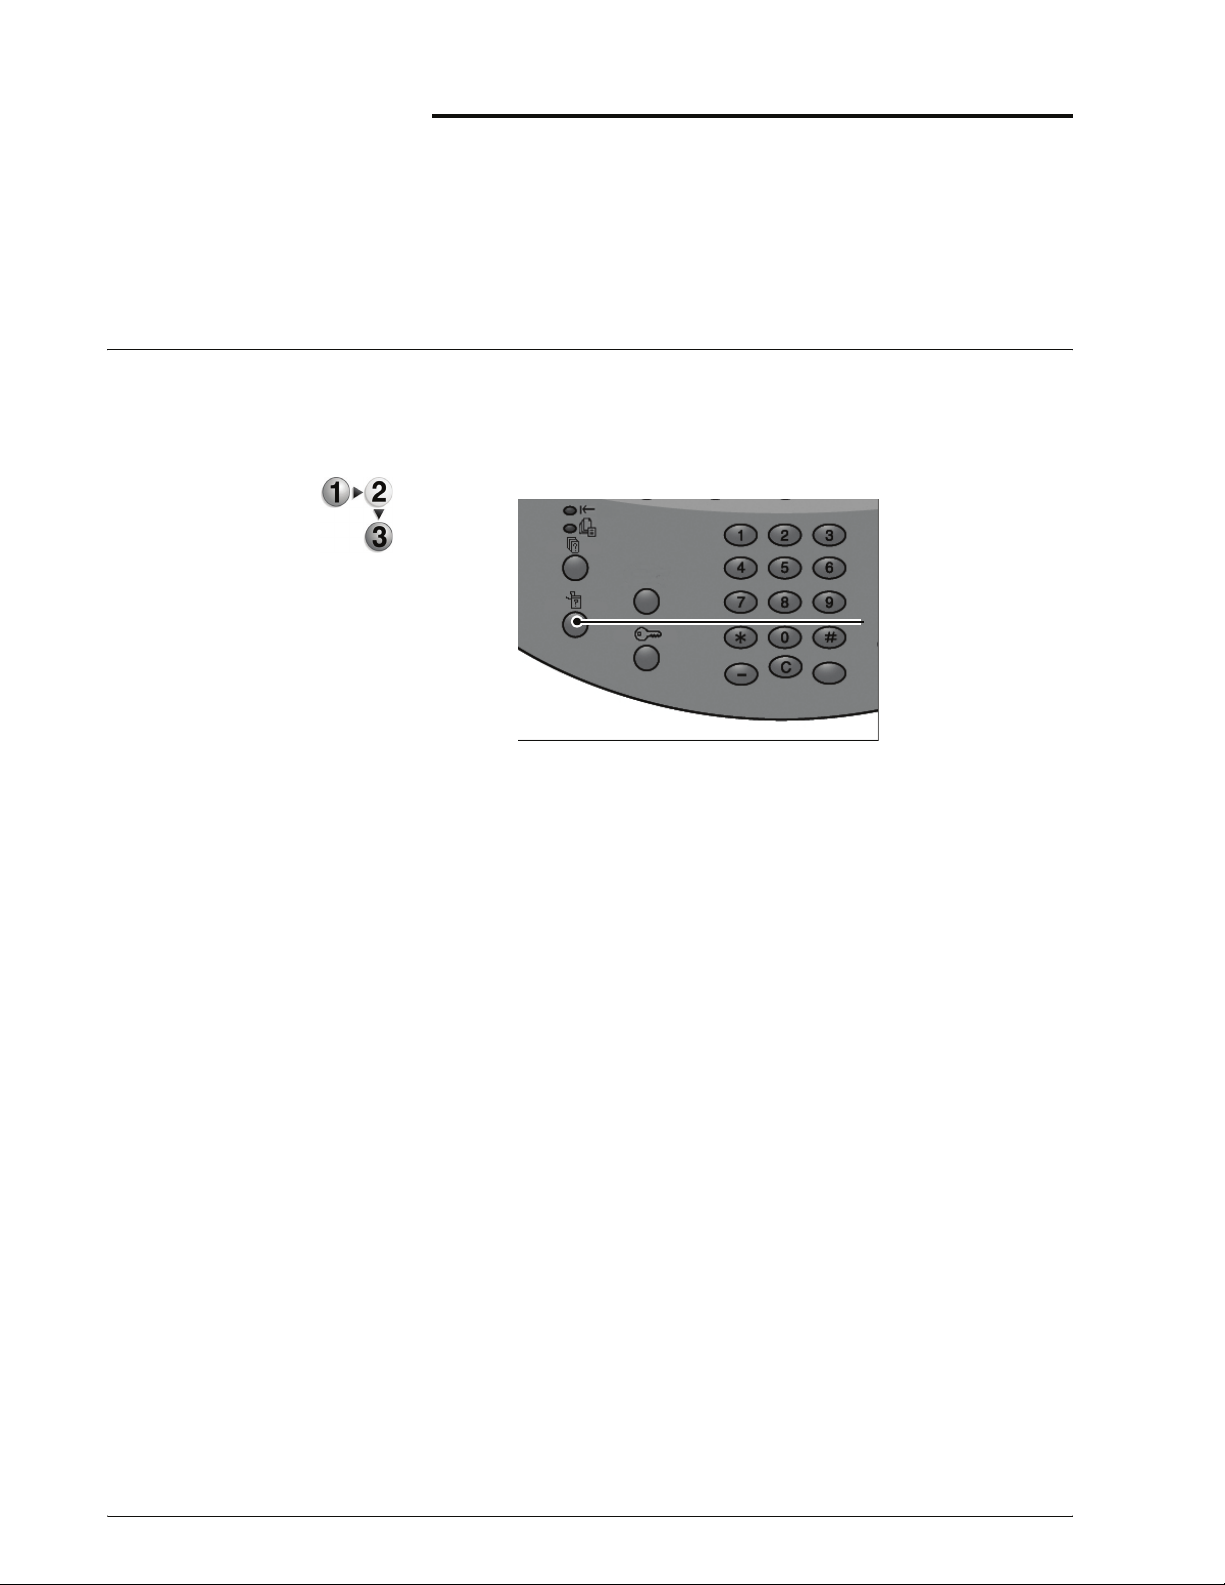
1. Press the Machine Status button.
Machine
Status button
2. Review the Machine Status screen; the following tabs
appear:
Machine Status
You can check the machine configuration, paper tray status, and
the optional overwrite hard disk status. You can also set the printer
mode.
For more information, refer to the “Machine status” section of this
chapter.
Billing Meter/Print Report
You can check the number of pages printed for each meter. You
can also print a report/list, the job history and settings/recorded
values.
Consumables
You can check the status of consumables.
For more information, refer to the “Consumables” section of this
chapter.
Faults
You can print the faults that have occurred on the machine.
For more information, refer to the “Faults” section of this chapter.
Xerox 4590 EPS/4110 EPS User Guide
4-1
Page 60

4. Machine status
Machine status
From the Machine Status screen, you can check the
configuration of the machine, the paper tray status, and set the
print mode.
1. Press the Machine Status tab.
2. Make a selection from the Machine Status screen.
Machine information
If you select Machine Information, you can check the serial
number, machine configuration, and software version.
1. From the Machine Status screen, select Machine
2. Review the screen for the following information:
For enquiry on maintenance and operation
Information.
4-2
This indicates how to make maintenance and operating inquiries.
Serial Number
This displays the machine serial number.
Xerox 4590 EPS/4110 EPS User Guide
Page 61

Machine Configuration
This displays the Machine Configuration screen, which identifies
the devices associated with the machine such as feeders, print
drivers and finishing equipment.
Software Version
This displays the Software Version screen that identifies the
version of all software applications loaded on the machine.
Machine configuration screen
You can check the configuration of the machine.
1. From the Machine Status screen, select Machine
Information and then Machine Configuration.
4. Machine status
NOTE: Select to display the previous screen and select to
display the next screen.
2. From the Machine Configuration screen, you can check
the following items:
z
Configuration Code
z
Paper Tray
z
High capacity feeder
z
Separators/Covers Tray
z
Output Device
z
Folder
z
Booklet Maker
z
Waste Toner Container
z
Hard Disk
z
Page Memory Size
z
System Memory Size
z
PostScript
z
PCL
z
HP-GL/2
Xerox 4590 EPS/4110 EPS User Guide
4-3
Page 62

4. Machine status
Software version screen
You can check the software version of the IOT and finisher, for
example.
1. From the Machine Status screen, select Machine
Information and then Software Version.
Paper tray
NOTE: Select to display the previous screen and select to
display the next screen.
2. From the Software Version screen, you can check the
following items:
z
Controller + PS ROM
z
IOT ROM
z
HCF ROM
z
Finisher ROM
If you select Paper Tray from the Machine Status screen, you
can check the following paper tray configuration information:
• Tray status
• Amount of paper remaining
• Paper size
4-4
• Paper type
Xerox 4590 EPS/4110 EPS User Guide
Page 63

1. From the Machine Status screen, select Paper Tray.
2. When finished examining the tray configurations, select
Close.
Overwriting the hard disk (optional)
4. Machine status
You can check whether the hard disk is being overwritten. When
“Standby” appears, the overwriting operation has finished.
NOTE: An optional package is necessary for this selection. For
more information, contact the Customer Support Center.
KEY POINT: Overwrite Hard Disk only appears when Overwrite
Hard Disk is set in the System Settings. For more information,
refer to “Overwrite Hard Disk” in the System Administration Guide.
1. From the Machine Status screen, select Overwrite Hard
Disk.
2. When finished examining the status, select Close.
Xerox 4590 EPS/4110 EPS User Guide
4-5
Page 64

4. Machine status
Print mode
You can set the printer mode.
NOTE: The items that appear depend on the options that are
installed.
1. From the Machine Status screen, select Print Mode.
2. Make a selection:
Off-line
The printer cannot accept data. Any data being sent is terminated,
and not printed.
On-line
The printer can accept data and is ready for printing jobs.
3. Select the printer language for the printer mode such as HP-
GL/2 Emulation.
4-6
4. Select the item to be set.
NOTE: These item selections are discussed further on the
following pages.
5. Otherwise, select Close repeatedly to return to the main
default screen.
Xerox 4590 EPS/4110 EPS User Guide
Page 65

Retrieve programming
You can recall and use a printer mode saved in memory.
1. From the specified printer language screen, select Retrieve
Programming.
4. Machine status
2. Select Factory Defaults to use the software default settings
or select Custom Settings to select the custom settings
memory number to use.
3. Select Close to apply the stored programming. Select Close
repeatedly to return to the System Settings screen.
Programming
You can check or set the value for a printer mode item number.
1. From the specified printer language screen, select
Programming.
2. Enter the Item Number for the feature to be set, using the
numeric keypad.
Xerox 4590 EPS/4110 EPS User Guide
4-7
Page 66

4. Machine status
Item Number
Enter the item number for the feature you want to set.
Current Value
When you enter an Item Number, this shows the currently set
value.
3. Select Confirm.
4. Select Change Value.
5. Using the numeric keypad, enter the value to which you want
to change the setting in New Value.
6. Select Save.
7. Select Close to leave this screen.
Store/delete programming
You can save up to 5 printer modes in memory for HP-GL/2
emulation.
1. From the specified printer language screen, select Store/
Delete Programming.
4-8
Xerox 4590 EPS/4110 EPS User Guide
Page 67

4. Machine status
2. Select either S tore Current Selec tions or Delete to identify
the task you want to perform.
Store Current Selections
This stores the current selections. If you select a number in which
information is already stored, this data is overwritten. Overwritten
data cannot be restored.
Delete
When you select Delete and the number to be deleted, the
information stored in this number is erased.
KEY POINT: Deleted data cannot be restored.
3. Select the memory number you want to store or delete.
4. Select Close to apply the selection and return to the Print
Mode screen.
Default programming
You can start the printer with a printer mode stored in memory.
1. From the specified printer language screen, select Default
Programming.
2. Select either Factory Defaults to use the software default
settings or Custom Settings to display and select the
memory number to be used.
3. Select Save to apply the setting.
Xerox 4590 EPS/4110 EPS User Guide
4-9
Page 68

4. Machine status
Billing meter/print report
From the Billing Meter/Print Report tab on the Machine Status
screen, you can check the number of pages printed for each meter
or for each user. You can also print a report/list and check the job
history and settings/recorded values.
1. Press the Machine Status button.
2. From the Machine Status screen, select the Billing Mete r /
Print Report tab.
Billing meter
You can confirm the total number of printed pages by individual
billing meters on the display of the Control Panel.
NOTE: For duplex printing, any blank pages inser ted
automatically by the application are counted for metering
purposes. However, paper run through the post process inserter
will not increment the billing meter.
1. From the Billing Meter/Print Report tab, select Billing Meter.
4-10
Xerox 4590 EPS/4110 EPS User Guide
Page 69

Job status
4. Machine status
2. Note the current meter count.
Serial Number
Displays the Serial Number of the machine.
Total Impressions
This shows the number of pages printed.
3. Select Close to leave this screen.
1. From the Print Report/List screen, select Job Status.
2. Select the report or list to be output.
Job History Report
You can print the job results. The data for the last 50 jobs is
printed.
You can also automatically print a Job History Report when 50
jobs are exceeded. If automatic print is set, all job results are
printed.
For the settings, refer to “Reports” in the System Administration
Guide.
Error History Report
Information about the most recent 50 errors occurring on the
machine is printed.
3. Press the Start button.
Xerox 4590 EPS/4110 EPS User Guide
4-11
Page 70
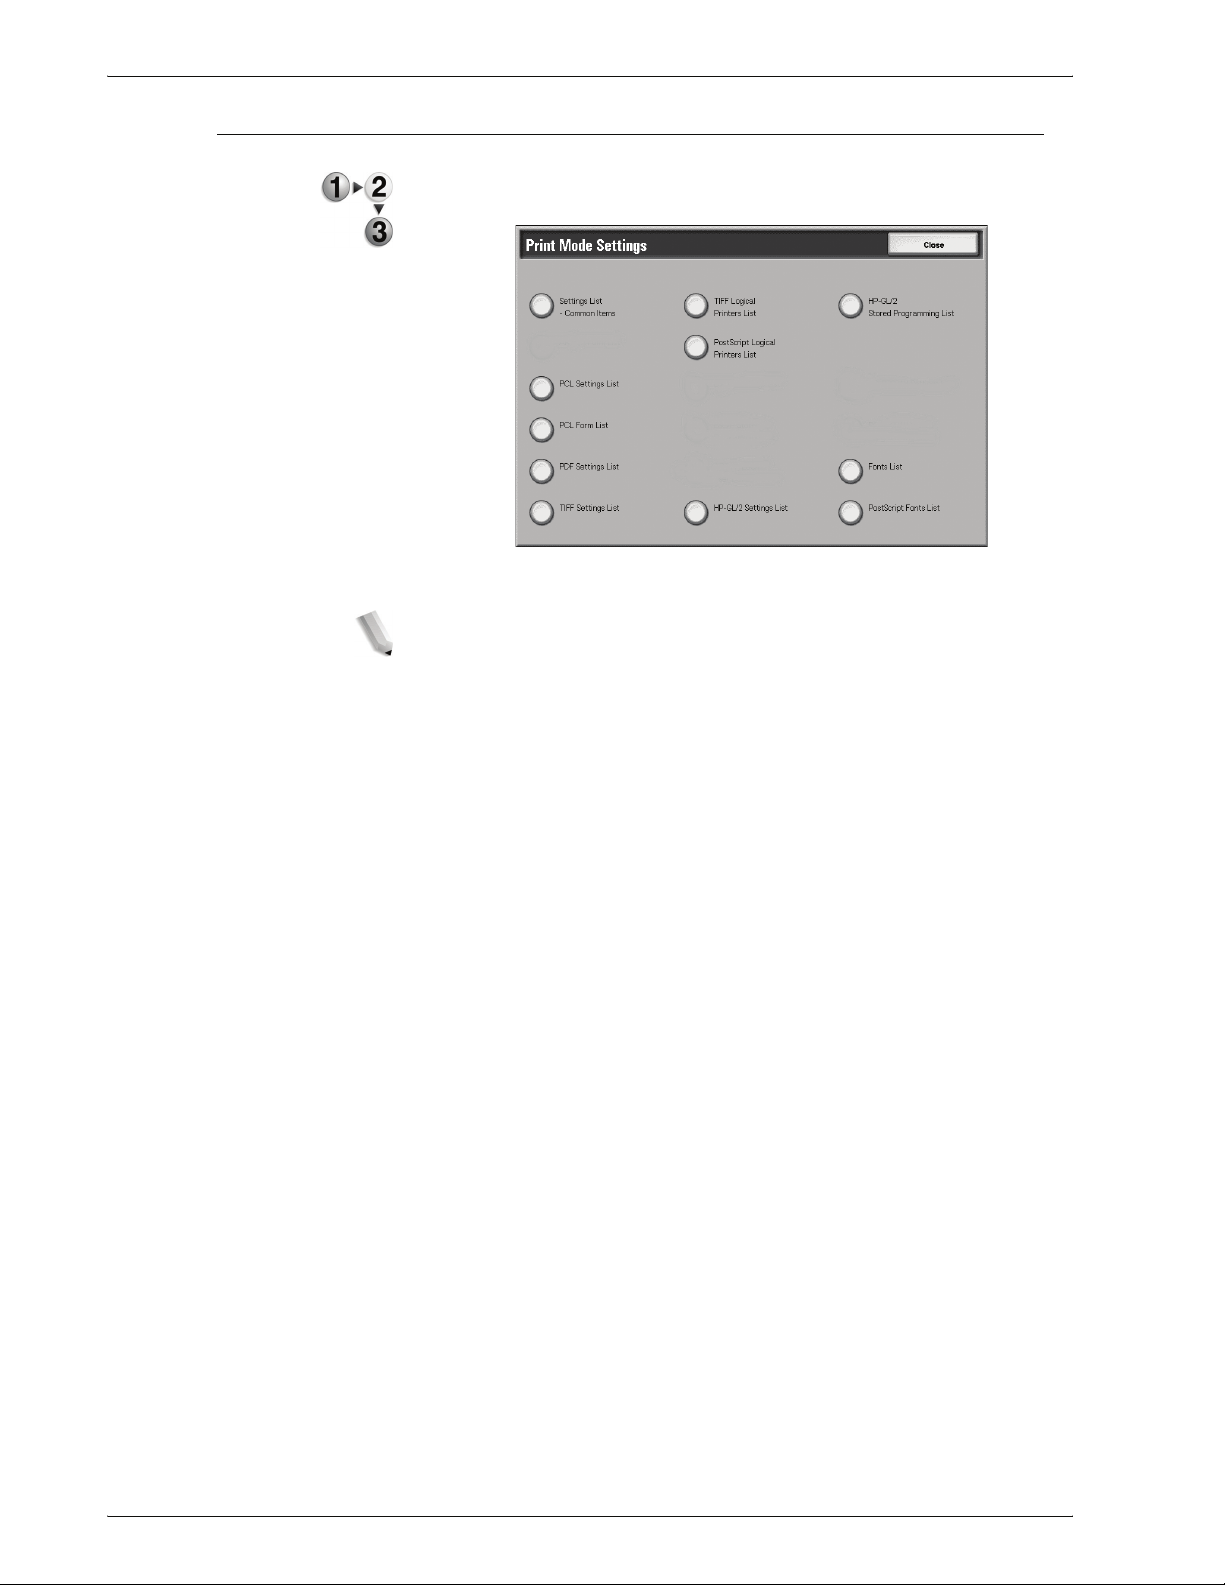
4. Machine status
Print mode settings
1. From the Print Report/List screen, select Print Mode
Settings.
2. Select the report or list to be printed.
NOTE: The items displayed depend on the options that are
installed.
Settings List - Common Items
You can check the hardware configuration of the machine,
network information, and the print feature setting status.
Fonts List
This prints a list of the fonts that can be used in the machine.
PostScript Fonts List
This prints a list of PostScript fonts that can be used in the
machine.
3. Press the Start button.
4-12
Xerox 4590 EPS/4110 EPS User Guide
Page 71

Consumables
4. Machine status
You can check the status of printer consumables used on the
machine from the Consumables screen. The status of
consumables is identified as “Ready,” “Replace Soon,” or
“Replace Now.” For toner, the amount is measured from 0 to
100%.
The following describes the procedure for checking the status of
consumables.
NOTE: For information about how to replace consumables, refer
to “Replacing Consumables” in the Maintenance chapter of this
guide.
1. Press the Machine Status button on the Control Panel.
2. From the Machine Status screen, select the Consumables
tab.
NOTE: Select to display the previous screen and select to
display the next screen.
KEY POINT: If using a partly consumed toner cartridge (for
example, a toner cartridge removed from another Xerox machine),
the indicated status may not match the actual amount of
consumable remaining. When replacing toner cartridges, it is
recommended that you use new supplies.
Xerox 4590 EPS/4110 EPS User Guide
4-13
Page 72

4. Machine status
Faults
This section describes how to check the information given with
respect to a fault in the machine.
The Error History Report shows the last 50 errors that occurred on
the machine. The items displayed include the date and time, error
code, and error category.
This section describes how to print the error history.
1. Press the Machine Status button from the Control Panel.
2. From the Machine Status screen, select the Faults tab.
3. Select Error History Report.
4. Press the Start button.
4-14
Xerox 4590 EPS/4110 EPS User Guide
Page 73

Replacing consumables
5. Maintenance
The machine includes the following consumables and periodical
replacement parts. It is recommended that you use the following
consumables since they have been made according to standards
that match the specifications of the machine.
CAUTION: Use only consumables recommended by Xerox for
the machine. The use of consumables not recommended by
Xerox may impair quality and performance.
Type of consumable/
Periodical replacement part
Toner Cartridge 6R01237 1 item/1 box
Waste Toner Container 8R13036 1 unit/1 box
Staple Cartridge (R1) for D2 Finisher
Staple cartridge includes Staple Waste
Container (R5)
Booklet Staples
Booklet Staple Refill*
4
Product code Quantity/Box
8R13041 1 unit/1 box
8R12925 5,000 x 4 sets
NOTE: It is recommended that you have a spare toner cartridge
available at all times.
NOTE: The D2 Finisher is easily identified by its staple waste
container.
Handling consumables
Consider the following when handling and storing consumables:
• Do not store boxes for consumables upright.
• Do not unpack consumables until they are to be used.
• Avoid storing consumables in the following locations:
- Hot and humid location
- Location close to a fire
- Location exposed to direct sunlight
- Dusty location
• Before using consumables, carefully read the instructions and
Xerox 4590 EPS/4110 EPS User Guide
5-1
Page 74

5. Maintenance
Confirming status of consumables
precautions on the packaging.
• Have spare consumables ready.
• Check the product code of the consumables and contact the
Customer Support Center to place your orders.
• The use of toner cartridges, waste toner containers, or staple
cartridges not recommended by Xerox may impair quality and
performance. Use only those consumables recommended by
Xerox for the machine.
The status of consumables can be confirmed from the
Consumables tab on the Machine Status screen.
The status of consumables is indicated by “Ready” “Order New”
and “Replace Now”. The remaining amount of toner is indicated
and measured from 0 to 100%.
NOTE: For more information about confirming consumables, refer
to “Consumables” in the Machine Status chapter of this guide.
Replacing toner cartridges
Always replace toner cartridges while the machine is powered on.
A message appears on the Control Panel screen indicating when
it is time to replace a toner cartridge. If only a small amount of
toner remains in a toner cartridge, the machine may stop during
printing and display a message.
If you continue printing without replacing the toner cartridge,
another message displays and the machine stops after printing
approximately 5,000 pages.
Replacing the toner is possible even when the machine is
operating. Messages appear on the screen in accordance with the
remaining amount of toner. Solve the problem in accordance with
the message on the Control Panel screen.
NOTE: The number of pages stated in these messages is based
on using 8.5 x 11 in./A4 ( ) paper. The number of pages that you
can print is only an estimate and varies depending on conditions
such as the content, paper size, paper type, and the computer
environment.
CAUTION: Using toner cartridges not recommended by Xerox
may impair quality and performance. Use only toner cartridges
recommended by Xerox for the machine. If a partially used toner
cartridge is used, the number of pages that you can print after the
“Please order a new xxx” message appears may differ
considerably.
5-2
Xerox 4590 EPS/4110 EPS User Guide
Page 75
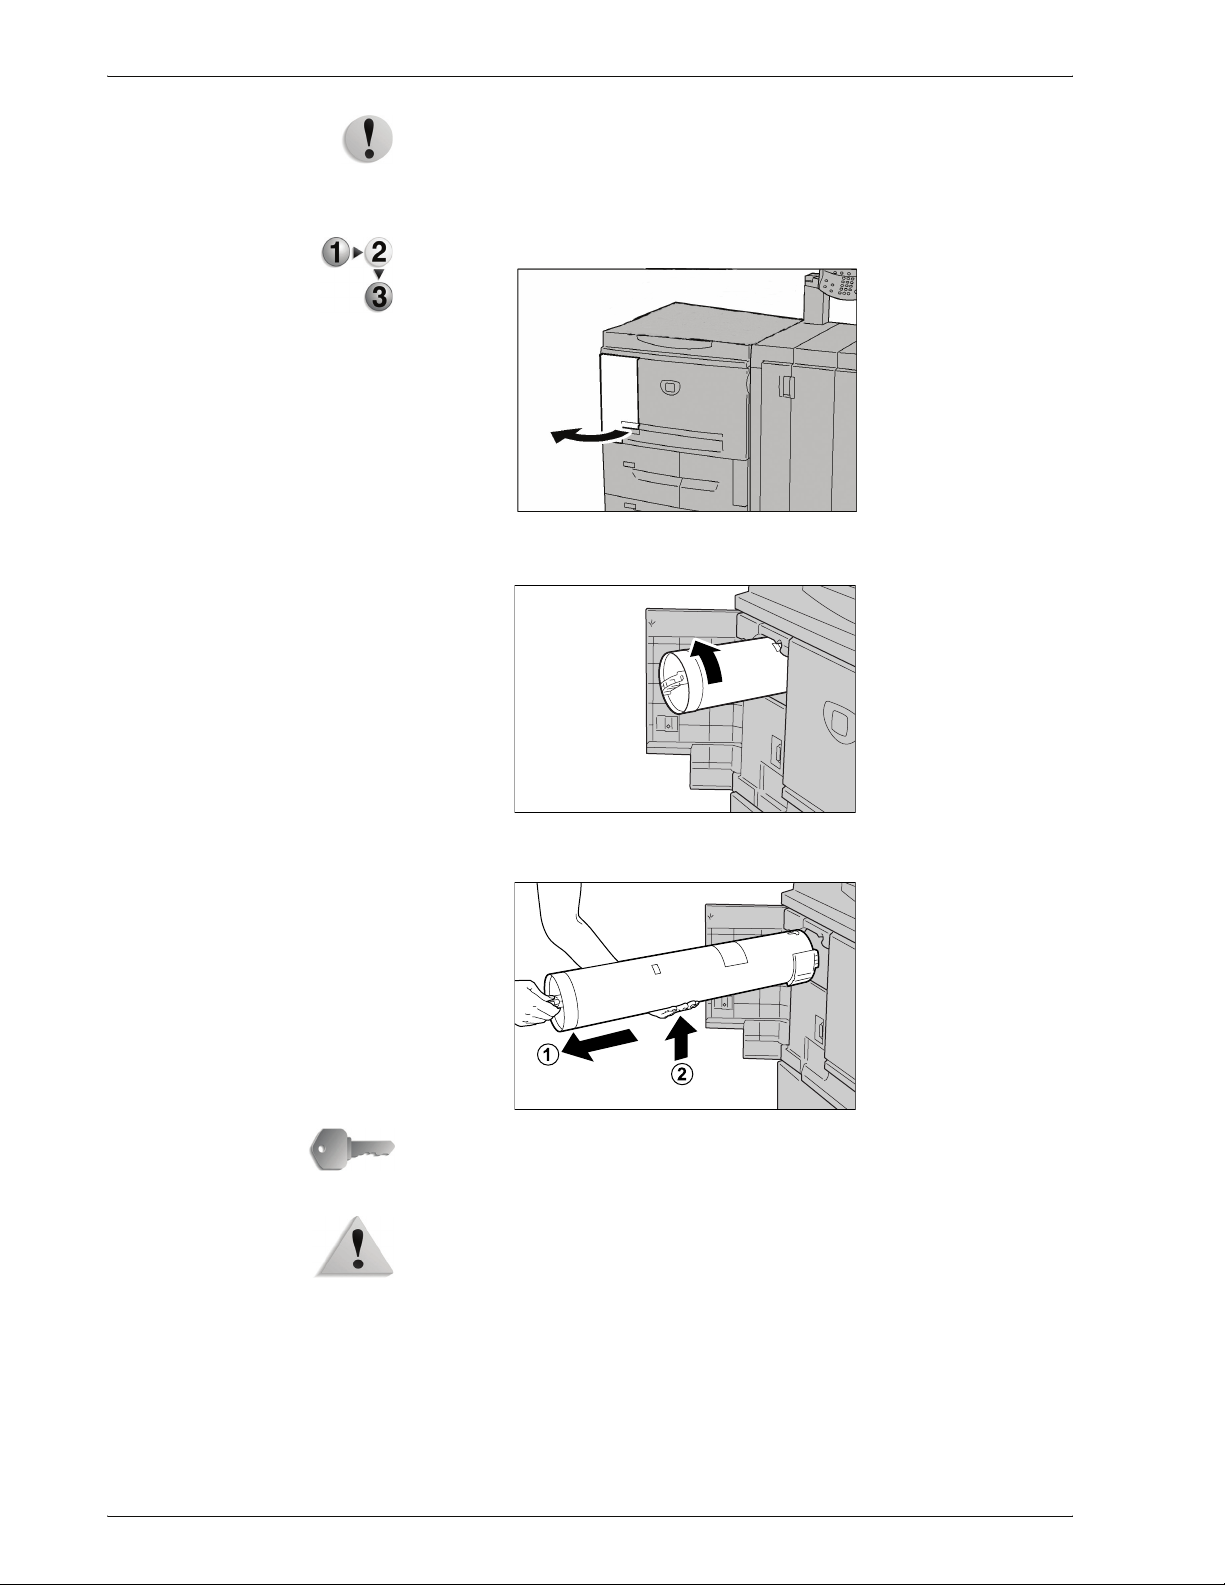
5. Maintenance
CAUTION: When replacing toner cartridges, toner may spill and
dirty the floor. It is recommended that you first lay paper on the
floor before accessing the cartridge.
1. Open the left cover of the machine.
2. Turn the toner cartridge to the left until it aligns with the unlock
sign.
3. Pull out the toner cartridge slowly and then lift to remove it.
KEY POINT: Used toner cartridges require special processing
during disposal. Return used toner cartridges to our Customer
Support Center for disposal.
WARNING: Never throw a toner cartridge into an open flame
since the toner remaining in the cartridge can cause an explosion.
Xerox 4590 EPS/4110 EPS User Guide
5-3
Page 76
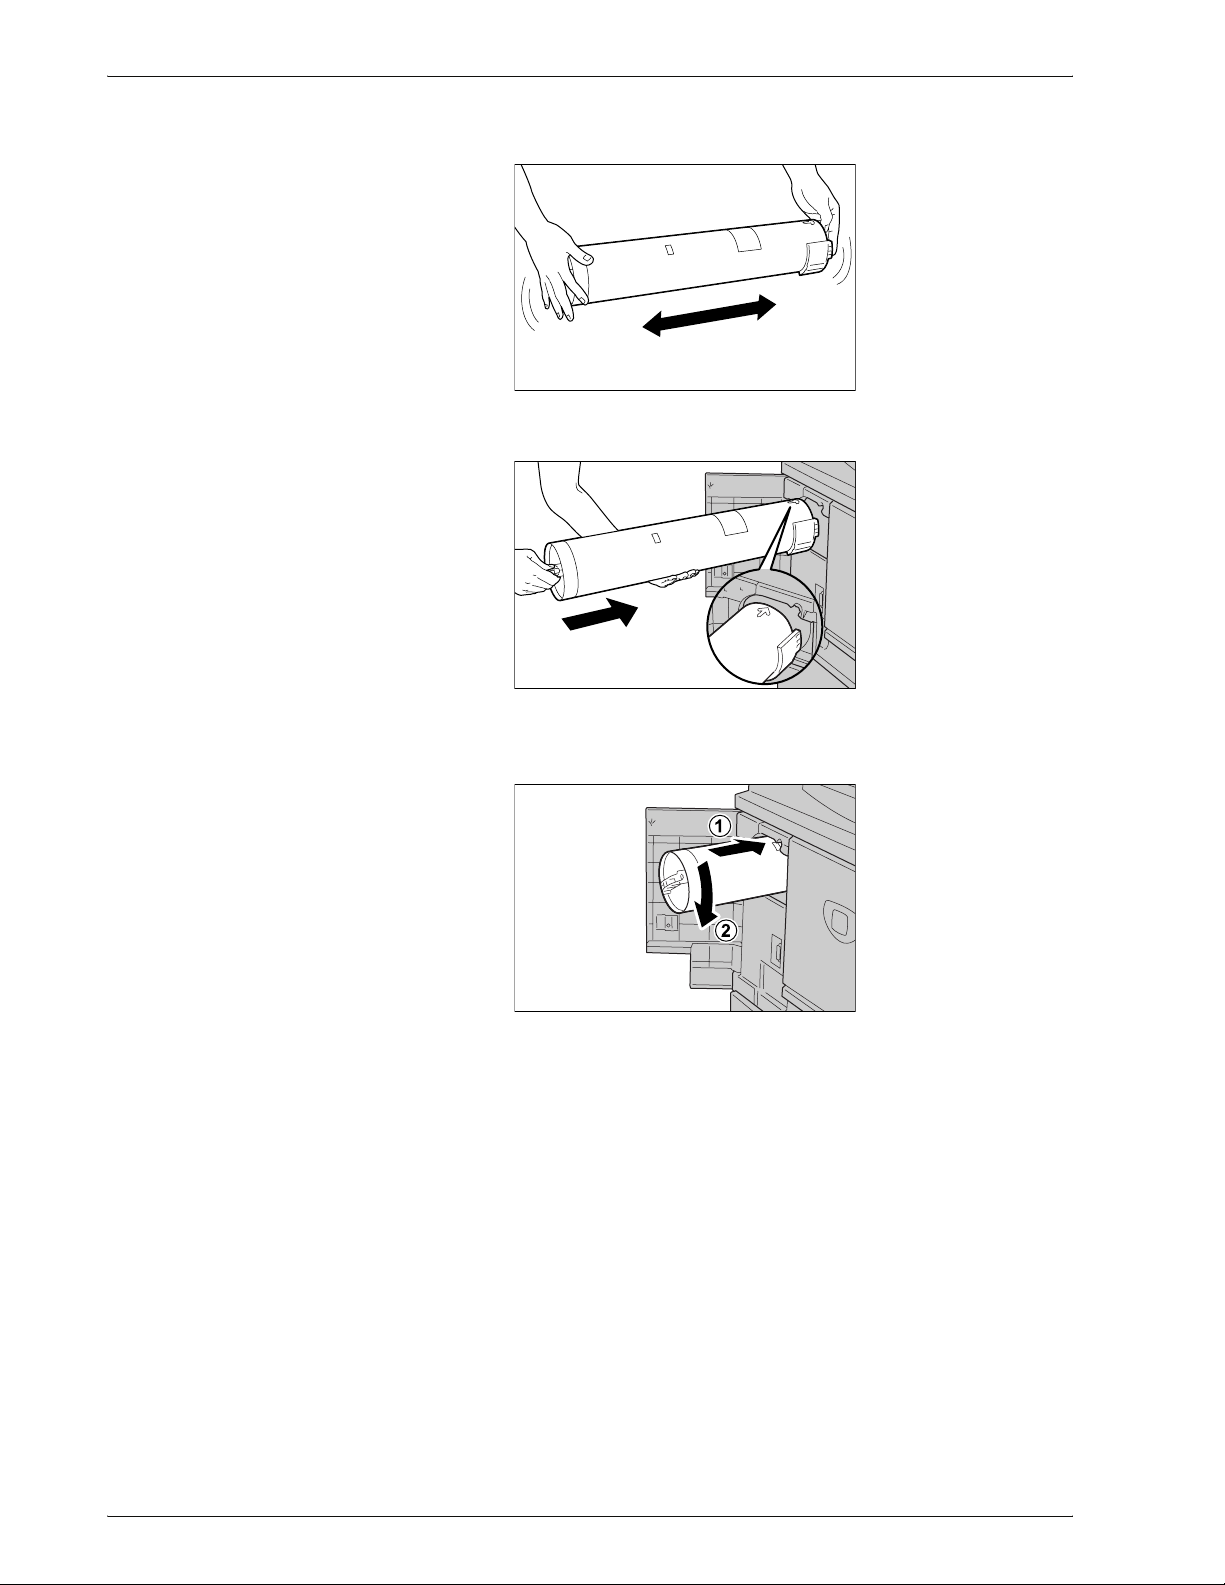
5. Maintenance
4. Remove the new cartridge from the box and shake the toner
cartridge to the left and right before removing it from the bag.
5. Hold the toner cartridge with the arrow (Ç) mark facing up.
6. Push the toner cartridge slowly to the end and turn it to the
right until it aligns with the lock sign.
7. Close the left cover of the machine.
5-4
Xerox 4590 EPS/4110 EPS User Guide
Page 77

Replacing the waste toner container
Always replace the waste toner container while the machine is
powered on.
A message appears on the Control Panel screen indicating when
the waste toner container is full. If you continue printing without
replacing the waste toner container, another message appears
and the machine stops after printing approximately 18,000 pages.
NOTE: The number of pages stated in these messages is based
on using 8.5 x 11 in./A4 ( ) paper. The number of pages that you
can print is only an estimate and varies depending on conditions
such as the content, paper size, paper type, and the computer
environment.
CAUTION: Using waste toner containers not recommended by
Xerox may impair quality and performance. Use only waste toner
containers recommended by Xerox for the machine.
CAUTION: When replacing the waste toner container, toner may
spill and dirty the floor. It is recommended that you first lay paper
on the floor before accessing the container.
5. Maintenance
1. Make sure that the machine has stopped before opening the
front cover.
2. Open the waste toner container cover and push the lever.
Xerox 4590 EPS/4110 EPS User Guide
5-5
Page 78

5. Maintenance
3. Grip the handle of the waste toner bottle and pull it out about
half way.
4. Hold the center part on the top of the bottle (as shown in the
illustration), and then use both hands to remove the bottle.
5. Hold the used waste toner container firmly with both hands
and put it into the provided plastic bag.
Close the bag with the provided ring. If the bag is left
open, toner may leak out during disposal.
6. Place the used container into the special bag and close it
with the provided ring. If the bag is left open, toner may leak
out during disposal.
KEY POINT: Used waste toner containers require special
processing during disposal. Return used waste toner containers to
our Customer Support Center for disposal.
WARNING: Never throw a waste toner container into an open
flame since the toner remaining in the container can cause an
explosion.
5-6
Xerox 4590 EPS/4110 EPS User Guide
Page 79

5. Maintenance
7. Hold the center part on the top of the bottle and insert it as far
as possible.
NOTE: When inserting the waste toner container, do not grip the
container handle.
8. Close the waste toner container cover.
9. Close the front cover.
NOTE: A message will be displayed and the machine will not
operate if the front cover is even slightly open.
Replacing the staple cartridge
A message appears on the Control Panel screen when it is time to
replace the staple cartridge.
CAUTION: Using staple cartridges not recommended by Xerox
may impair quality and performance. Use only staple cartridges
recommended by Xerox for the machine.
NOTE: To order a staple cartridge, contact the Customer Support
Center.
1. Make sure that the machine has stopped, and then open the
right cover on the finisher.
NOTE: The removal and replacement procedures of the st aple
cartridge are also illustrate d on the inside of the finisher cover
door.
Xerox 4590 EPS/4110 EPS User Guide
5-7
Page 80

5. Maintenance
2. Locate the R1 area within the machine and grasp the R1
handle.
3. Pull the staple cartridge straight out from the machine.
4. Remove the staple cartridge from the staple case by rotating
the staple cartridge up and out of the staple case.
5. Insert a new staple cartridge into the staple case and snap
into place.
5-8
Xerox 4590 EPS/4110 EPS User Guide
Page 81

6. Push the removed cartridge back into the original position
until a click sound is heard.
7. Close the right cover on the finisher.
NOTE: A message will be displayed and the machine will not
operate if the right cover is even slightly open.
Replacing the staple cartridge for booklets
5. Maintenance
When a booklet finisher (optional) is installed and it is time to
replace the staple cartridge for booklets, a message appears on
the Control Panel screen.
CAUTION: Using staple cartridges not recommended by Xerox
may impair quality and performance. Use only staple cartridges
recommended by Xerox for the machine.
NOTE: To order a staple cartridge, contact the Customer Support
Center.
1. Make sure that the machine has stopped and then open the
right cover on the finisher.
Xerox 4590 EPS/4110 EPS User Guide
5-9
Page 82
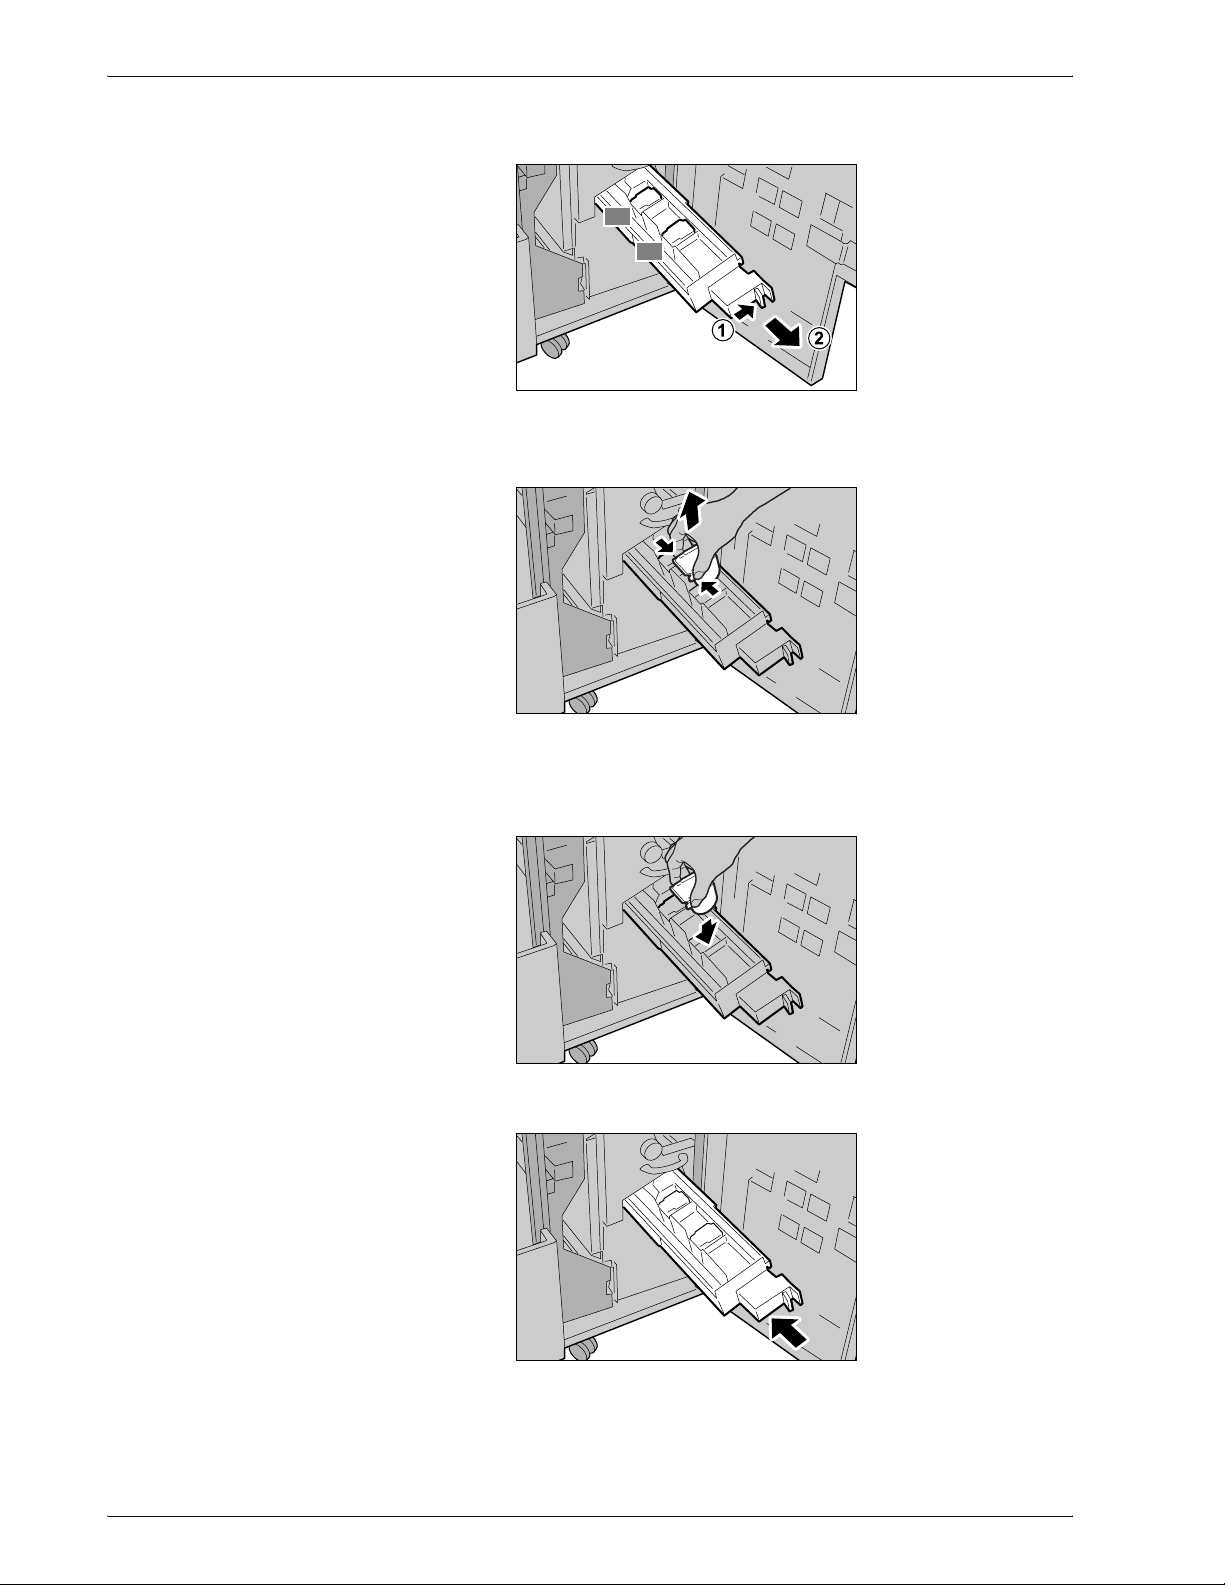
5. Maintenance
2. Pressing the lever to the right, pull out the booklet staple
cartridge.
R3
R2
3. Hold the tabs of the booklet staple cartridge and then lift to
remove it.
4. Holding the tabs of a new booklet staple cartridge, return the
cartridge to the original position and gently push it until it
clicks.
5. Return the unit to its original position.
5-10
6. Close the right cover of the finisher.
Xerox 4590 EPS/4110 EPS User Guide
Page 83

NOTE: A message will be displayed and the machine will not
operate if the right cover is even slightly open.
Replacing the staple waste container
The staple waste container collects the unused staple cuttings
from the staple cartridge. A message will display on the Control
Panel screen indicating that the container is full and it is time to
replace it.
NOTE: The following replacement procedures are also illustrated
on the inside of the finisher cover door.
1. Make sure that the machine has stopped, and then open the
right cover on the finisher.
5. Maintenance
2. Pinch the R5 lever to unlock it and pull out the staple waste
container.
3. Safely discard the used staple waste container.
Xerox 4590 EPS/4110 EPS User Guide
5-11
Page 84

5. Maintenance
4. Align the bottom of the new staple waste container onto the
support shelf..
5. Push the container into the machine until you hear a click
noise. After a short delay, the new staple waste container will
lock automatically.
6. Close the right cover of the finisher.
NOTE: A message will be displayed and the machine will not
operate if the right cover is even slightly open.
Emptying the punch scrap container
The Control Panel screen will display a message indicating when
it is time to empty the punch scrap container. Once you discard
the scraps according to the message, the machine resets the
punch counter to 0.
NOTE: If you pull the container out to check the level and place
the container back into t he machine without emptyin g it, the punch
counter is still reset to 0 and the actual punch count no longer
reflects the correct amount of scraps in the container.
To ensure that the container does not overflow and result in jams
in the Finisher, it is recommended that you regularly check and
empty the punch scrap container, such as every time you open the
Finisher door.
5-12
Xerox 4590 EPS/4110 EPS User Guide
Page 85

5. Maintenance
NOTE: Remove the container while the machin e is powered on. If
you switch the power off when emptying the scrap container, the
machine will not be able to detect that the scraps have been
disposed. Ensure that all scraps are discarded.
1. Make sure that the machine has stopped, and then open the
right cover on the finisher.
2. Pull out the punch scrap container.
3. Discard all the punch scraps in an appropriate container.
4. Insert the empty punch scrap container as far as possible.
Xerox 4590 EPS/4110 EPS User Guide
5-13
Page 86

5. Maintenance
CAUTION: Pulling out the container and pushing it back into
place resets the punch counter setting to 0. Make sure to
completely empty the container so the counter number accurately
matches the state of the container.
5. Close the right cover of the light finisher.
NOTE: A message will be displayed and the machine will not
operate if the right cover is even slightly open.
Cleaning the machine
The following procedure describes how to clean the components
of the machine.
WARNING: Before you start to clean the machine, be sure to
switch off and unplug the machine. Cleaning the machine without
switching off the power may cause an electric shock.
CAUTION: Do not use benzene, paint thinner, other volatile
liquids, or spray insect repellent on the machine as doing so may
discolor, deform, or crack covers.
CAUTION: Cleaning the machine with an excessive amount of
water may cause the machine to malfunction or damage
documents.
1. Wipe the exterior with a soft cloth moistened with water.
5-14
NOTE: If it is difficult to remove dirt, try gently wiping with a soft
cloth moistened with a small amount of neutral detergent.
2. Wipe off any excess water from the exterior with a soft cloth.
Xerox 4590 EPS/4110 EPS User Guide
Page 87

6. Problem Solving
Troubleshooting
Use the following information for troubleshooting procedures to
solve the problems.
Power is not switched On. Cause Is the power switch on the machine turned off?
No Yes Action Turn the power switch on.
Refer to “Power on/off” in Chapter 2.
No
Cause Is the power cord plugged into the power outlet?
Action Turn the power switch off and then firmly plug in the power
cord. Then turn the power switch on.
Refer to “Power on/off” in Chapter 2.
No
Cause Is the power cord disconnected from the machine or the
rear of the rack?
Action Turn the power switch off and then firmly plug in the power
cord. Then turn the power switch on.
Refer to “Power on/off” in Chapter 2.
No
Cause Is power of the correct voltage being supplied?
Action Make sure that the power supply is 200 -240 V (volts),
15 A (amperes).
Make sure that power of capacity compatible with the
specified maximum power consumption of the machine
(2.8 - 3.1 KVA) is being supplied.
Display is dark. Cause Is the Power Saver button on?
No Yes Action The machine is in the Power Saver mode. Press the
Power Saver button on the Control Panel to cancel the
Power Saver mode.
Refer to “Power Saver Mode” in Chapter 2.
No
Cause Is the Brightness Dial set too low?
Action Use the Brightness Dial to adjust display brightness.
Xerox 4590 EPS/4110 EPS User Guide
Refer to “User Interface (UI)” in Chapter 2.
6-1
Page 88

6. Problem Solving
A message is displayed. Cause Has a paper jam occurred?
No Yes Action For information on paper jams, refer to “Paper Jams” in this
chapter.
No
Cause An error code displayed?
Action Refer to “Error Code” in this chapter.
The machine is not working
properly.
No Yes
Image quality is not good. Action Refer to “Image Quality Problems” in this chapter.
No Yes
Trouble during printing. Action Refer to “Trouble during Printing” in this chapter.
Yes
Action Refer to “Machine Trouble” in this chapter.
6-2
Xerox 4590 EPS/4110 EPS User Guide
Page 89

Machine trouble
If you think some trouble is occurring on the machine, check the
machine status again.
WARNING: Precision components and high-voltage power
supplies are used on the machine. Never open or remove
machine covers that are screwed shut unless specifically
instructed in the User Guide. A high-voltage component can cause
electric shocks. When opening the panels and covers that are
screwed shut to install or detach optional accessories, be sure to
follow instructions in the respective User Guide. Do not try to alter
the machine configuration or modify any parts. Doing so might
cause machine malfunction or fire.
Symptoms Check Remedy
6. Problem Solving
Power is not
switched On.
Display is dark. Is the Power Saver button on? The machine is in the Power Saver mode. Press
Unable to print. Is a message displayed on the
Is the power switch on the
machine turned off?
Is the power cord plugged into the
power outlet?
Is the power cord disconnected
from the machine or the rear of the
rack?
Is power of the correct voltage
being supplied?
Is the brightness dial set too low? Use the brightness dial to adjust display brightness.
Control Panel's display?
Turn the power switch on.
Refer to “Power on/off” in Chapter 2.
Turn the power switch off and then firmly plug in the
power cord. Then turn the power switch on.
Refer to “Power on/off” in Chapter 2.
Make sure that the power supply is
200 -240 V (volts), 15 A (amperes).
Make sure that power of capacity compatible with
the specified maximum power consumption of the
machine
(2.8 - 3.1 KVA) is being supplied.
the Power Saver button on the Control Panel to
cancel the Power Saver mode.
Refer to “Power Saver Mode” in Chapter 2.
Refer to “User Interface (UI)” in Chapter 2.
Follow the instructions displayed to solve the
problem.
Is the printer mode Off-line? Press the Machine Status button and confirm the
Is the power cord disconnected
from the machine or the rear of the
rack?
Xerox 4590 EPS/4110 EPS User Guide
Print Mode on the Machine Status screen. If Print
Mode is Off-Line, select On-Line in the Print
Mode screen.
Turn the power switch off and then firmly plug in the
power cord. Then turn the power switch on.
Refer to “Power on/off” in Chapter 2.
6-3
Page 90

6. Problem Solving
Symptoms Check Remedy
Online indicator
does not light
even though you
instructed it to
print.
Printing is not
performed even
though printing
was instructed
on Tray 5
(Bypass).
Unsatisfactory
print quality.
Text is not
printed correctly
(text is
corrupted).
Online indicator
lights and copies
are not delivered
with Online still
lit.
Is the interface cable
disconnected?
Is the environment correctly set on
the personal computer?
Is paper of the size specified for
printing loaded on the tray?
A probable cause is an image
defect.
Non-standard fonts are used for
printing.
Data remaining in machine
memory.
Turn the power switch off, unplug the power cord
from the power outlet, and check the interface cable
connection.
For information about network connectivity, refer to
the System Administration Guide.
Check the DocuSP print driver and other
environment settings on the personal computer.
Follow the instructions displayed to load paper of
correct size and instruct it to print again.
Refer to “Loading paper in Tray 5” in Chapter 3.
Remedy the trouble referring to Image Quality
Trouble described later.
Refer to “Image Quality Problems” in this chapter.
Check the application or print driver settings.
Cancel printing or purge remaining data.
Refer to “Checking current/pending jobs” in Chapter
4.
Cannot insert or
remove trays.
Did you open a cover or turn
power off during printing?
Turn the power off without unnecessarily inserting
or removing a paper tray. Wait several seconds and
then turn the power switch on. Make sure that the
machine is online (ready to receive data) and then
insert or remove the paper tray.
6-4
Xerox 4590 EPS/4110 EPS User Guide
Page 91

Symptoms Check Remedy
6. Problem Solving
Paper is often
jammed or
wrinkled.
Is paper loaded properly in the
paper tray?
Is the paper tray set properly? Firmly push in the paper tray as far as possible to
Is the paper damp? Replace with paper from a new ream.
Is the paper curled? Either turn the paper so that the curl is facing down
Are the paper and paper tray
settings correct?
Are there any torn pieces of paper
still remaining inside the machine
or is there a foreign object in the
machine?
Load paper correctly.
Refer to “Loading paper in trays 1 and 2” in chapter
3.
set it properly.
Refer to “Loading paper in trays 1 and 2” in chapter
3.
Refer to “Loading paper” in Chapter 3.
in the paper tray, or replace with paper from a new
ream.
Refer to “Loading paper” in Chapter 3.
Make sure the paper and paper tray match the
configured paper size.
Refer to "Paper Tray Settings" in the System
Administration Guide.
Open the door of the machine or slide out the paper
tray to remove the torn paper or the foreign object.
Refer to “Paper Jams” in this chapter or “Loading
paper” in Chapter 3.
Is out-of-spec paper loaded in the
tray?
Is paper loaded in the paper tray
past its maximum fill line?
Is the paper guide set correctly? Load the paper correctly, and apply the paper
An error
message is
displayed after
paper is loaded
in paper Tray 5
(Bypass) and the
Start button is
pressed.
Stapler faults – Refer to “Stapler faults” in this chapter.
Check the position of the paper
guides at the front side of paper
Tray 5 (Bypass).
Replace with paper that meets machine
specifications.
Refer to “Loading paper” in Chapter 3.
Load paper in the paper tray so that it does not
exceed the maximum fill line.
Refer to “Loading paper in trays 1 and 2” in chapter
3.
guides lightly.
Refer to “Loading paper” in Chapter 3 or “Changing
the size of paper trays” in Chapter 3.
Set the paper guides to the correct positions.
Refer to “Loading paper in Tray 5” in Chapter 3.
Xerox 4590 EPS/4110 EPS User Guide
6-5
Page 92
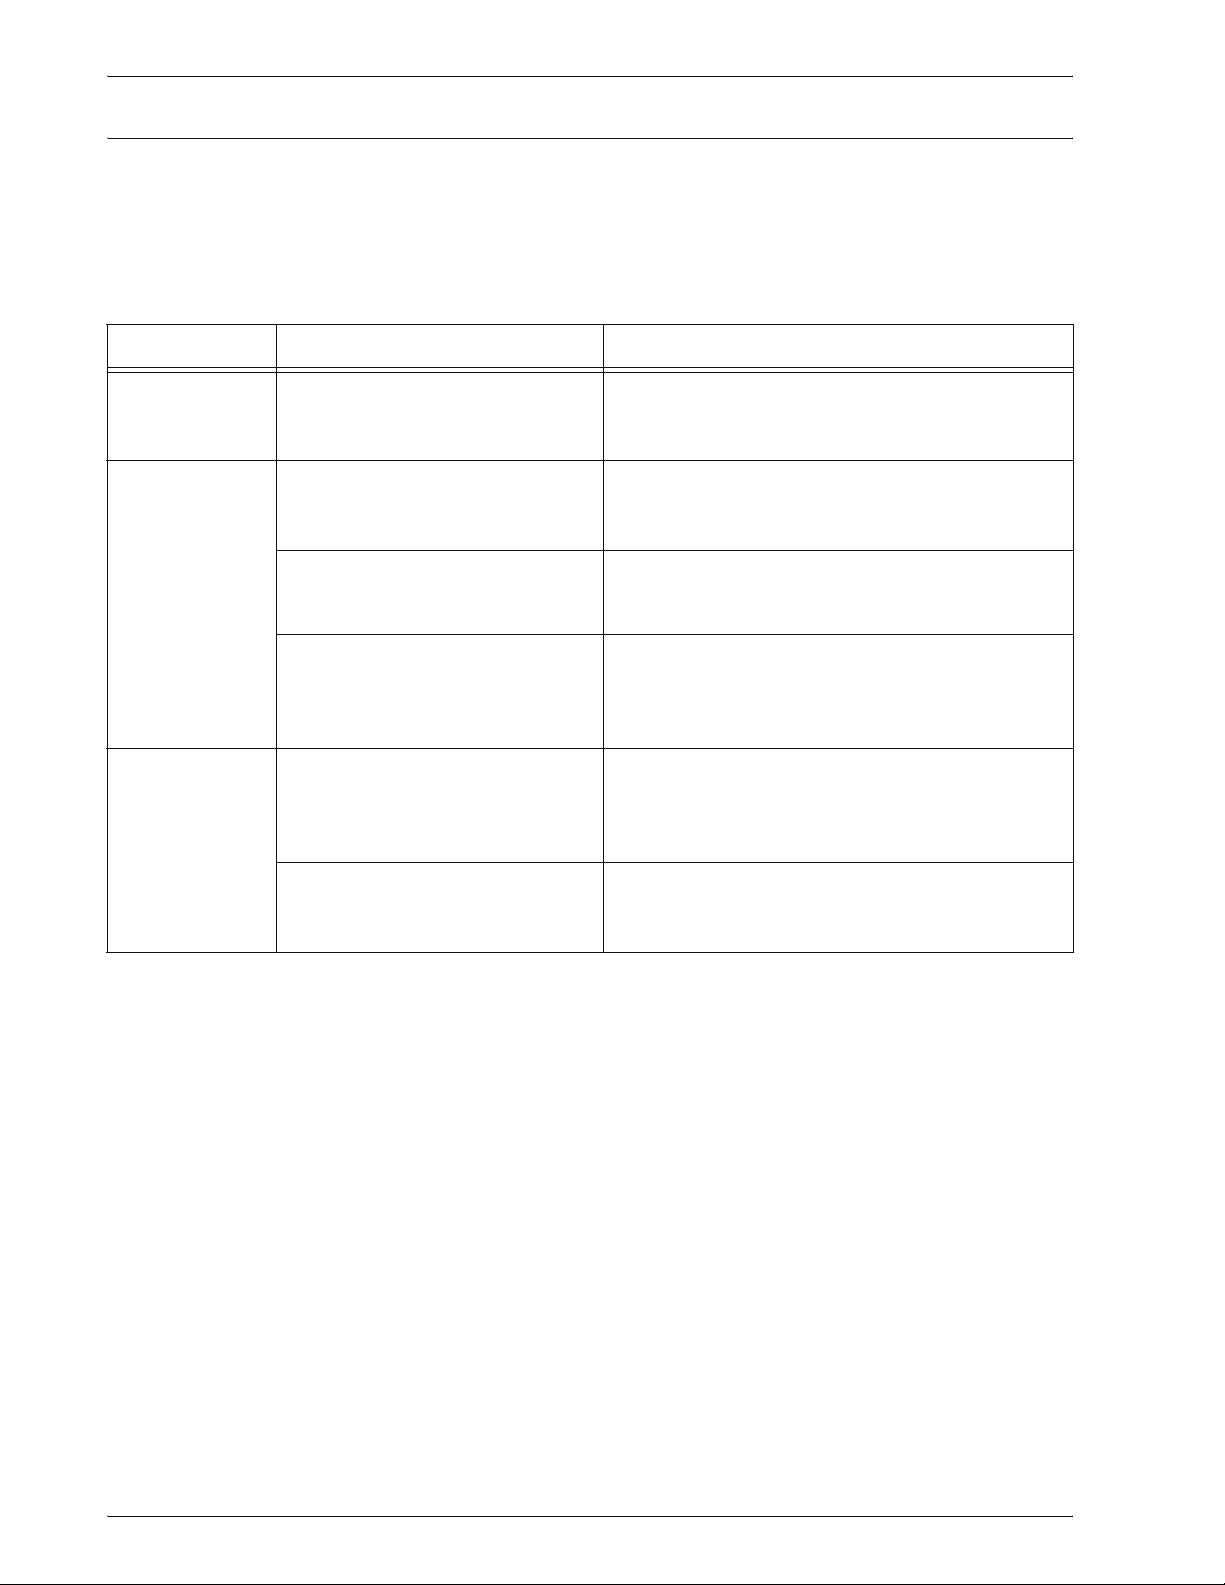
6. Problem Solving
Image quality problems
When image quality of the printed result is poor, choose the
closest symptom in the following table and perform the required
remedy.
If image quality is not improved by performing the relevant
remedy, contact the Customer Support Center.
Symptoms Check Remedy
The print shifts
slightly.
Images on the
print are skewed.
Part of the image
is missing on the
print.
Is the paper shifting or is the
leading edge of the paper not
loaded flush with the tray corners?
Is paper loaded properly in the
tray?
Is the paper guide for paper tray 5
(manual feed) set so that the tray
touches the paper?
Is the paper tray set properly? Firmly push in the tray as far as possible to set it
Is the paper damp? If the paper is damp, either some parts of the copy
Is the loaded paper folded or
wrinkled?
Align the edges of the paper and load the paper
again so that is flush against the paper tray corners.
Refer to “Loading paper” in Chapter 3.
Load paper correctly.
Refer to “Loading paper in trays 1 and 2” in chapter
3.
Load paper correctly.
Refer to “Loading paper in Tray 5” in Chapter 3.
properly.
Refer to “Loading paper in trays 1 and 2” in chapter
3.
are not shown or the copy is smudged and unclear.
Replace with paper from a new ream.
Refer to “Loading paper” in Chapter 3.
Remove the defective paper and replace with paper
from a new ream.
Refer to “Loading paper” in Chapter 3.
6-6
Xerox 4590 EPS/4110 EPS User Guide
Page 93

Symptoms Check Remedy
6. Problem Solving
Printing is faint
(smudged,
unclear).
Black dots are
printed.
Black lines are
printed.
Is the paper damp? Replace with paper from a new ream.
Refer to “Loading paper” in Chapter 3.
The drum cartridge is depleted or
damaged.
The drum cartridge is depleted or
damaged.
The drum cartridge is depleted or
damaged.
Contact the Customer Support Center.
Contact the Customer Support Center.
Contact the Customer Support Center.
Dirt appears at
equal intervals.
Xerox 4590 EPS/4110 EPS User Guide
Dirt on the paper feed path. Print a few pages.
The drum cartridge is depleted or
damaged.
Contact the Customer Support Center.
6-7
Page 94

6. Problem Solving
Symptoms Check Remedy
White dots appear
in black filled areas.
Printed toner
smudges when
rubbed with your
finger.
Toner is not fused
to the paper.
The paper is dirtied
with toner.
The paper in use is unsuitable. Load suitable paper.
Refer to “Loading paper” in Chapter 3.
The drum cartridge is depleted or
damaged.
Is the paper damp? Replace with paper from a new ream.
The paper in use is unsuitable. Load suitable paper.
Contact the Customer Support Center.
Refer to “Loading paper” in Chapter 3.
Refer to “Loading paper” in Chapter 3.
The entire paper
area is printed
black.
Nothing is printed. Two or more sheets of paper are
The drum cartridge is depleted or
damaged.
A probable cause is a highvoltage power supply
malfunction.
being fed simultaneously
(double-feed).
A probable cause is a
high-voltage power supply
malfunction.
Contact the Customer Support Center.
Contact the Customer Support Center.
Fan the paper well and reset.
Refer to “Loading paper” in Chapter 3.
Contact the Customer Support Center.
6-8
Xerox 4590 EPS/4110 EPS User Guide
Page 95

Symptoms Check Remedy
6. Problem Solving
White areas or
stripes appear.
The entire page is
printed faint.
Paper becomes
wrinkled.
Text is blurred.
Is the paper damp? Replace with paper from a new ream.
Refer to “Loading paper” in Chapter 3.
The paper in use is unsuitable. Load suitable paper.
Refer to “Loading paper” in Chapter 3.
When the print was made using
Tray 5 (Bypass), the size and
type of the actually loaded paper
differed from the setting on the
print driver.
Two or more sheets may be
feeding at once.
The paper in use is unsuitable. Replace with paper from a new ream.
Paper is being added while it is
being fed.
Either load paper of the correct size and type into
Tray 5 (Bypass), or fan the paper thoroughly
before loading it again.
Refer to “Loading paper in Tray 5” in Chapter 3.
Fan the paper well and reset.
Refer to “Loading paper” in Chapter 3.
Refer to “Loading paper” in Chapter 3.
Is the paper damp?
Xerox 4590 EPS/4110 EPS User Guide
6-9
Page 96

6. Problem Solving
Symptoms Check Remedy
Outline characters
on a colored
background
longwise.
Text or images are
printed at an angle.
The drum cartridge is depleted or
damaged.
The paper guide in the paper tray
is not set at the correct position.
Contact the Customer Support Center.
Set the horizontal and vertical paper guides to the
correct positions.
Refer to “Loading paper in trays 1 and 2” in
chapter 3.
6-10
Xerox 4590 EPS/4110 EPS User Guide
Page 97

Trouble during printing
Unable to print
6. Problem Solving
This section describes solutions when unable to print.
Data remains in the
printer icon
No Action Turn the power on.
Cause The printer is not powered on.
Cause The network cable is disconnected from the
computer.
Action Connect the network cable to the computer.
Cause The network cable is disconnected from the DocuSP
Controller.
Action Connect the network cable to the DocuSP Controller.
For information about network connectivity, refer to
the System Administration Guide.
Cause Print mode is set to Off-line.
Action Press the Machine Status button and confirm the
Print Mode in the Machine Status screen. If Print
Mode is Off-line, select On-line in the Print Mode
screen.
Cause An error occurred with the printer.
Action Check the error details.
Cause The network connection between the computer and
Action Check with your system administrator.
Cause Insufficient space available on the hard disk.
Action Delete unnecessary data to increase free space.
Xerox 4590 EPS/4110 EPS User Guide
the DocuSP Controller is abnormal.
6-11
Page 98
6. Problem Solving
Sent to printer Cause Out of paper.
Action Supply paper to the printer.
Cause No paper for the specified paper size.
Action Set paper for the specified paper size.
Refer to “Loading paper in trays 1 and 2” or “Loading
paper in Tray 5” in Chapter 3.
Cause An error occurred with the printer.
Action Check the error details.
6-12
Xerox 4590 EPS/4110 EPS User Guide
Page 99

6. Problem Solving
The printed result is not what was expected
This section describes solutions for situations in which the print
result is different from that expected.
No stapling done Cause The number of pages to staple exceeds 100 sheets.
No Action Staple-enabled number of pages is 100 or lower with
the staple cartridge for 100 sheets. For Z-folding,
staple-enabled number of pages is 10 or 5 sheets
depending on the size of the paper used. For
booklet, up to 15 sheets can be stapled at one
time. Reduce the number of printed pages,
depending on the staple cartridge used.
No folding Cause The folder is not attached.
No Action Check the options attached with this printer, and
reset the printer configuration.
Printing performed with
a different paper size
No Action Change the paper size set in the tray, or change print
The image is cut off on
the edge of the paper
No Action Increase the printable area of the machine, or
The printed font differs
from the font specified
on the computer
No Action Check the font replacement table.
Cause Paper size provided is different from the specified
tray size.
options to specify a tray that contains the appropriate
size.
Cause Image exceeds the printable area of the machine.
decrease the document print area.
Cause Font replacement is configured on the DocuSP print
driver.
Cause Non-standard fonts are used for printing.
Action Check the application or print driver settings.
If PostScript is being used, download the required
fonts.
Printing is slow Cause The print mode specifies Print Quality.
No Action When printing image data that has image quality as a
Xerox 4590 EPS/4110 EPS User Guide
priority, such as pictures, the print speed decreases.
Turn off the quality priority in the print mode.
6-13
Page 100

6. Problem Solving
The settings specified
for print options do not
take effect
No Action Install the print driver for this model.
There is no edge Cause Image exceeds the printable area of the machine.
Cause A print driver for another model is in use.
Cause The optional apparatus cannot be attached to the
printer.
Action Check the options attached with this printer and reset
the printer configuration.
Action Increase the printable area of the machine, or
decrease the document print area.
6-14
Xerox 4590 EPS/4110 EPS User Guide
 Loading...