

Page 1
Page 2

©
1999, 2000 Xerox Corporation. All rights reserved.
Copyright protection cl aimed includes all forms and matters of
copyrightable material and information now allowed by statutory or
judicial law or hereinafte r granted, including without limitation,
material generated from the software programs that are displayed
on the screen such as styles, templat es, icons, screen displays,
looks, etc.
®
Xerox
, The Document Company®, the stylized X, and all Xerox
product names and product numbers mentioned in this publi cation
are registered trad ema rks of Xerox Corporation. Xerox Canada is a
licensee of all the trademarks. Other company brands and product
names may be trademarks or registered trademarks of their
respective companies and are also acknowledged.
®
PANTONE
* Colors generated by the Document Centre
ColorSeries 50 are four- color process simulations and may not
match PANTONE identified soli d color standards. Use current
PANTONE Color Reference Manuals for accurate color.
PANTONE Color simulations are only obtainable on this product
when driven by qualified Pantone-licensed software packages.
Contact Pantone, Inc. for a current list of qualified licensees.
*Pantone, Inc.’s chec k-standard trademark for col or.
©Pantone, Inc., 1988.
Changes are periodical ly made to this doc ument. Technical updates
will be included in subsequent edit ions.
Printed in the United S tates of America.
Page 3

Safety Notes
The Xerox Document Centre ColorSeries 50
copier/printer a nd the recommended mai ntenance
supplies have been designed and tested to meet
strict safety requirements. Attention to the
following notes will ensure the continued safe
operation of your copier/printer.
Electrical safety
• Use only the power cord supplied with this
equipment.
1
2
3
• Plug the power cord directly into a correctly
grounded electrical outlet. Do not use an
extension cord. If you do not know whether or
not an outlet is grounded, consult a qualified
electrician.
• Do not use a ground adapter plug to connect
this equipment to an el ectrical out let that l acks
a ground connection terminal.
WARNING: You may get a severe electrical
shock if the outlet is not correctly grounded.
• Do not place the copier/print er where people
may step on or trip on the power cord. Do not
place objects on the power cord.
• Do not override or disable electrical or
mechanical interlocks.
• Do not obstruct the ventilation openings.
These openings are provided to prevent
overheating of the machine.
4
5
6
DOCUMENT CENTRE CS 50 SYSTEM ADMINISTRATION GUIDE III SAFETY NOTES
7
Page 4

WARNING: Never push objects of any kind into
slots or openings on this equipment. Making a
1
contact with a voltage point or shorting out a part
could result in fire or electrical shock.
• If any of the following conditions occur, switch
off the power t o the machine immediately and
disconnect the power cord from the electrical
outlet. Call an authorized Xerox service
representati ve to cor rect the problem.
2
3
– The machine emits unusual noises or
odors.
– The power cord is damaged or frayed.
– A wall panel circuit breaker, fuse, or other
safety device has been tripped.
– Liquid is spilled into the copier/printer.
– The machine is exposed to water.
– Any part of the machine is damaged.
Disconnect Device
The power cable is the disconnect device for this
equipment. It is attached to the back of the
machine as a plug-in device. To remove all
electrical power from the machine, disconnect the
4
power cable from the electrical outlet.
5
6
7
SAFETY NOTES IV DOCUMENT CENTRE CS 50 SYSTEM ADMINISTRATION GUIDE
Page 5

Laser safety
CAUTION: Use of controls, adjustments, or
procedures other than thos e specified in this
documentation may result in a hazardous
exposure to laser radiat ion.
This equipment complies with internati onal safety
standards. Wit h specif ic regar d t o laser s afe ty, the
equipment complies with performance standards
for laser product s set by government, national,
and international agencies as a Class 1 laser
product. It does not emit hazardous light, as the
beam is totally enclosed during all phases of
customer operation and maintenance.
1
2
3
4
5
6
DOCUMENT CENTRE CS 50 SYSTEM ADMINISTRATION GUIDE V SAFETY NOTES
7
Page 6

Maintenance safety
1
• Do not attempt any maintenance procedure
that is not specifically described in the
documentation that is supplied with your
copier/printer.
• Do not use aerosol cleaners. The use of
supplies that are not approved may cause
2
3
poor performance of the copier/printer, and
could create a dangerous condition.
• Use the supplies and cleaning materials only
as directed in this manual. Keep all of t hese
materials out of the reach of children.
• Do not remove the covers or guards that are
fastened with screws. There are no parts
behind these covers that you can maintain or
service.
Do not perform any maintenance procedures
unless you have been trained to do them by a
Xerox representative or unless a procedure is
specifically described in one of the copier/printer
manuals.
4
5
6
7
SAFETY NOTES VI DOCUMENT CENTRE CS 50 SYSTEM ADMINISTRATION GUIDE
Page 7

Operational safety
Your Xerox equipment and supplies were
designed and tested to meet strict safety
requirements. These include safety agency
examination, approval, and compliance with
established environmental standards.
Your attention to the following safety guidelines
will help ensure the continued safe operation of
your copier/prin ter:
• Use the materials and supplies specifically
designed for your copier/printer . The use of
unsuitable materials may result in poor
performance of the machine and possibly a
hazardous situatio n.
• Follow all warnings and instruct ions that are
marked on or supplied with the machine.
• Place the machine in a room that provides
adequate space for ventilation and servicing.
• Place the machine on a level, solid surface
(not on a thick pile carpet) t hat has adequate
strength to support the weight of the machine.
• Do not attempt to move the machine. A
leveling device that was lowered when your
machine was installed may damage the
carpet or floor.
1
2
3
4
• Do not locate the machine near a heat source.
• Do not locate the machine in direct sunli ght.
5
6
7
DOCUMENT CENTRE CS 50 SYSTEM ADMINISTRATION GUIDE VII SAFETY NOTES
Page 8

•
Do not locate the machine i n line wit h the col d
air flow from an air conditioning system.
1
• Do not place containers of cof fee or other
liquid on the machine.
• Do not block or cover the slots and openings
on the machine. Without adequate ventilat ion,
the machine may overheat.
2
mechanical interlock devices.
WARNING:Be careful when working in areas
identified with this warni ng symbol. These areas
may be very hot and could cause personal injury.
If you need any additional safety information
concerning the machi ne or mater ials, cont ac t your
Xerox representative.
3
Ozone safety
This product produces ozone during normal
operation. The ozone is heavier than air, and t he
quantity is dependent on copy volume. Provi ding
the correct environmental parameters, as
• Do not attempt to override any elect ri cal or
4
specified in the Xerox inst allation procedures,
ensures that concentration levels meet safe limits.
If you need additional informati on about ozone,
request the Xerox publication, OZONE,
600P83222, by calling 1-800-828-6571 in the
USA. For a French language version, call 1-800828-6571 in the USA, then press 2.
5
6
7
SAFETY NOTES VIII DOCUMENT CENTRE CS 50 SYSTEM ADMINISTRATION GUIDE
Page 9

Notices
Radio Frequency Emissions
FCC
This equipment has been tested and found to compl y wit h
the limits for a Class B digit al devi ce, pursuant t o Part 15 of
the FCC Rules. These limits are designed to provi de
reasonable protection against harmful interference in a
residential inst allation. This equipment generates, uses,
and can radiate radi o frequency energy and, i f not inst alled
and used in accordance with the instructions, may cause
harmful interference to radio communications. However,
there is no guarantee that interference will not occur in a
particular inst allation. If this equi pment does cause harmful
interference to radio or television reception, whi ch can be
determined by turning the equipment off and on, the user
is encouraged to try to correct the interference by one or
more of the following measures:
1
2
3
4
5
• Reorient or relocate the receivi ng antenna.
• Increase the separation between the
equipment and receiver.
• Connect the equipment into an outlet on a
circuit dif ferent from that to which the r eceiver
is connected.
• Consult the dealer or an experienced radio/TV
technician for help.
Changes or modifications to this equi pment not
specifically approved by the Xerox Corporation may void
the authority granted by the FCC to operate this
equipment.
DOCUMENT CENTRE CS 50 SYSTEM ADMINISTRATION GUIDE IX NOTICES
6
7
Page 10

Shielded cables must be used with this equipment to
maintain com p li a nc e wi th F C C re gulations.
1
In Canada
This digital appar atus does not exceed the Class
B limits for radio noise emissions from digital
apparatus as defined in the Radio interference
regulations of Industry Canada.
2
FCC
The following applies to the product when
equipped with the Token Ring or Banyan Vines
connectivity options :
3
4
5
This equipment has been tested and found to
comply with the limits for a Class A digital device,
pursuant to Part 15 of t he FCC Rules. These li mits
are designed to provide reasonable protection
against harmful interf erence when the equipment
is operated in a commercial environment. This
equipment generates, uses, and can rad iate radi o
frequency energy and, if not installed and used in
accordance with the instruction manual, may
cause harmful interference to radio
communications. Operat ion of this equipment in a
residential area is likely to cause harmful
interference in which case the user will be
required to correct the interference at his/her own
expense.
Changes or modifications to this equi pment not
specifically approved by the Xerox Corporation
may void the user’s authority to operate this
equipment.
Shielded cables must be use d wit h thi s equi pment
to maintain compliance with FCC regulations.
In Canada
6
This digital appar atus does not exceed the Class
A limits for radio noise emissions from digital
apparatus as defined in the Radio interference
regulations of Industry Canada.
7
NOTICES X DOCUMENT CENTRE CS 50 SYSTEM ADMINISTRATION GUIDE
Page 11

Safety Extra Low Voltage Approval
The Xerox Document Centre ColorSeries 50
copier/printer is in compliance with various
governmental agencies and national safety
regulations. All system ports meet the Safety
Extra Low Voltage (SELV) circuits for connection
to customer-owned devices and networks.
Additions of customer-owned or third-party
accessories that are attached to the copier/printer
must meet or exceed the requirements l isted
above. All modules that require external
connection must be installed per the Document
Centre ColorSeries 50 ins tallation procedure.
1
2
3
4
5
6
DOCUMENT CENTRE CS 50 SYSTEM ADMINISTRATION GUIDE XI NOTICES
7
Page 12

Certifications . . . in Europe
1
The CE marking that is applied to this product
symbolizes Xerox Europe’s Declaration of
Conformity with the following appli cable Direc tives
of the European Union as of the dates indicated:
January 1, 1995: - Council Directive 73/23/EEC
amended by Council Directive 93/68/EEC,
2
3
approximation of the laws of the member states
related to low voltage equipment .
January 1, 1996: - Council Directive 89/336/EEC,
approximation of the laws of the member states
related to electromagnetic compatibility.
Changes or modifications to this equi pment not
specifically approved by Xerox Europe may void
the user’s authority to operate the equipment.
Shielded cables must be use d wit h thi s equi pment
to maintain compliance with the EMC Directive 89/
336/EEC.
This equipment is not primari ly intended for us e in
a domestic environment.
4
A full declaration, defining the relevant Directives
and referenced standards, can be obtained from
your Xerox Europe represe ntative.
WARNING: In order to allow this equipment to
operate in proximity to Industrial, Scientific and
Medical (ISM) equipment, the external radiation
from ISM equipment may have to be limited or
5
special mitigation measures t aken.
6
7
NOTICES XII DOCUMENT CENTRE CS 50 SYSTEM ADMINISTRATION GUIDE
Page 13

The following applies to the product when
equipped with Token Ring or Banyan Vines
connectivity options :
WARNING:This is a Class A product. In a
domestic environment, this product may cause
radio interference, in which case the user may be
required to take adequate measures.
Changes or modifications to this equi pment not
specifically approved by Xerox Europe may void
the user’s authority to operate the equipment.
Shielded cables must be use d wit h thi s equi pment
to maintain compliance with the EMC Directive 89/
336/EEC.
WARNING: In order to allow this equipment to
operate in proximity to Industrial, Scientific and
Medical (ISM) equipment, the external radiation
from ISM equipment may have to be limited or
special mitigation measures t aken.
1
2
3
4
5
6
DOCUMENT CENTRE CS 50 SYSTEM ADMINISTRATION GUIDE XIII NOTICES
7
Page 14

It’s Illegal . . . in the USA
1
Congress, by st atute, has forbidden the copy ing of
the following subject s under certain
circumstances. Penalt ies of fine or imprisonment
may be imposed on those guilty of making such
copies.
1. Obligations or Securities of the United St ates Govern-
2
ment, such as:
Certificates of Indebtedness National Bank Currency
Coupons from Bonds Federal Reserve Bank Notes
Silver Certificates Gold Certificates
United States Bonds Treasury Notes
3
Federal Reserve Notes Fractional Notes
Certificates of Deposit Paper Money
Bonds and Obligations of certain agencies of the
government, such as FHA, etc.
Bonds. (U.S. Savings Bonds may be photo-
4
5
graphed only for publicity purposes in connection with the campaign for the sale of such
bonds.)
Internal Revenue Stamps. (If necessary to
copy a legal document on which there is a
canceled revenue stamp, this may be done,
provided the reproduction of the document is
performed for legal purposes.)
Postage S tamps, canceled or uncanceled.
(For philatelic purposes, Post age S t amps may
be photographed, provi ded the reproducti on is
in black and white and is less than 75% or
more than 150% of the linear dimensions of
the original.)
Postal Money Orders.
6
Bills, Checks, or Drafts of money drawn by or
upon authorized officers of the United States.
St amps and other represent atives of value, of
whatever denomination, which have been or
may be issued under any Act of Congress.
7
NOTICES XIV DOCUMENT CENTRE CS 50 SYSTEM ADMINISTRATION GUIDE
Page 15

2. Adjusted Compensation Certificates for Veterans of the World W ars.
3. Obligations or Securities of any Foreign Government, Bank, or Corporation.
4. Copyrighted material, unless permission of
the copyright owner has been obtained or the
copying falls within the “fair use” or library
reproduction right s provi sions of the copyri ght
law . Further information of these provisions
may be obtained from the Copyright Off ice,
Library of Congress, W ashi ngton, D. C. 20559.
Ask for Circular R21.
5. Certificates of Citizenship or Naturalization.
(Foreign Naturalization Certificates may be
photographed.)
6. Passports. (Foreign Passports may be photographed.)
7. Immigration Papers.
8. Draft Registration Cards.
9. Selective Servi ce Induction Papers that bear
any of the following Registrant’s information:
1
2
3
Earnings or Income Dependency Status
Court Record Previous milit ary service
Physical or mental conditio n
Exception: U.S. Army and Navy discharge
certificates may be photographed.
10. Badges, Identification Cards, Passes, or
Insignia carried by Mili tary or Naval personn el,
or by members of the various Federal Departments, such as FBI, Treasury, etc. (unless
photograph is ordered by the head of such
department or bureau.)
Copying the following is also prohibited in
certain states:
Automobile Licenses - Drivers’ Licens es Automobile Certificates of Title.
The above list is not all inclusive, and no
liability is assumed for its completeness or
accuracy. In case of doubt, consult your
attorney.
4
5
6
DOCUMENT CENTRE CS 50 SYSTEM ADMINISTRATION GUIDE XV NOTICES
7
Page 16

It’s Illegal . . . in Canada
1
Parliament, by statute, has forbidden the copying
of the following subjects under certain
circumstances. Penalties of fines or imprisonment
may be imposed on those guilty of making such
copies.
1. Current bank notes or current paper money.
2
3
4
2. Obligations or securities of a government or bank.
3. Exchequer bill paper or revenue paper.
4. The public sea l of Can ada or of a p rovince , or t he s eal
of a public body or authority in Canada, or of a court of
law.
5. Proclamations, or ders, regula tions or appoi ntments, or
notices thereof (with i ntent to falsely cause same to
purport to have been printed by the Queen’s Printer
for Canada, or the equivalent printer for a province ).
6. Marks, brands, seals, wrappers or designs used by or
on behalf of the Government of Canada or of a province, the government of a state other than Canada or
a department, board, Commission or agency established by the Government of Canada or of a province
or of a government of a state other than Canada.
7. Impressed or adhesive stamps used for the purpose
of revenue by the Government of Canada or of a province or by the government of a state oth er than Canada.
8. Documents, registers or records kept by public offi-
5
6
cials charged with the duty of making or issuing certified copies thereof, wher e the copy falsely purport s to
be a certified copy thereof.
9. Copyrighted mater ial or trademarks of any manner or
kind without the consent of the copyright or trademark
owner.
10. The above list is provided for your convenience and
assistance, but it is not al l i nclusive, and no liability is
assumed for its completeness or accuracy. In case of
doubt, consult your solicitor.
7
NOTICES XVI DOCUMENT CENTRE CS 50 SYSTEM ADMINISTRATION GUIDE
Page 17

Environmental Notices . . . in the USA
As an ENERGY STAR® partner, Xerox
Corporation has de termined that thi s copier/print er
model meets the ENERGY STAR
energy effici ency.
®
ENERGY STAR
is a US registered trademark.
®
guidelines for
1
The ENERGY STAR program is a team effort
between the Environmental Prot ection Agency
and the office equipment in dustry to promote
energy-effi cient personal computers, monitors,
printers, fax machines and copi ers. Reducing the
energy consumption of this equipment wil l hel p
combat smog, acid rai n and long-term changes to
the climate by decreasing the emissions that
result from generating electricity.
2
3
4
DOCUMENT CENTRE CS 50 SYSTEM ADMINISTRATION GUIDE XVII NOTICES
5
6
7
Page 18

Environmental Notices . . . in Canada
1
As a participan t in the Envir onmental Choice
program, Xerox Corporation has determined that
this copier/pri nter model meets t he Environmental
Choice guidelines for energy efficiency.
Environment Canada established the
Environmental Choice program in 1988 to help
2
3
consumers identify environmentally responsible
products and services. Copier, printer and fax
products must meet energy efficiency and
emissions criteria, and exhi bit compatibility with
recycled supplies. Cu rrently, Environmental
Choice has more than 1600 approved product s
and 140 licensees. Xerox has been a leader in
offering EcoLogo appr oved products. In 1996,
Xerox became the first company licensed to use
the Environmental Choice EcoLogo for its copiers
printers, and fax machines.
4
5
6
7
NOTICES XVIII DOCUMENT CENTRE CS 50 SYSTEM ADMINISTRATION GUIDE
Page 19

Contents
Safety Notes . . . . . . . . . . . . . . . . . . . . . . . . . . . . . . . . . . . . . . . . . . . . III
Electrical safety . . . . . . . . . . . . . . . . . . . . . . . . . . . . . . . . . . . . . . . . . . . . . . . . . . . . .III
Laser safety . . . . . . . . . . . . . . . . . . . . . . . . . . . . . . . . . . . . . . . . . . . . . . . . . . . . . . . .V
Maintenance safety . . . . . . . . . . . . . . . . . . . . . . . . . . . . . . . . . . . . . . . . . . . . . . . . . VI
Operational safety . . . . . . . . . . . . . . . . . . . . . . . . . . . . . . . . . . . . . . . . . . . . . . . . . . VII
Ozone safety . . . . . . . . . . . . . . . . . . . . . . . . . . . . . . . . . . . . . . . . . . . . . . . . . . . . . VIII
Notices. . . . . . . . . . . . . . . . . . . . . . . . . . . . . . . . . . . . . . . . . . . . . . . . . IX
Radio Freq u e n cy Emissions . . . . . . . . . . . . . . . . . . . . . . . . . . . . . . . . . . . . . . . . . . IX
FCC . . . . . . . . . . . . . . . . . . . . . . . . . . . . . . . . . . . . . . . . . . . . . . . . . . . . . . . IX
In Canada . . . . . . . . . . . . . . . . . . . . . . . . . . . . . . . . . . . . . . . . . . . . . . . . . . .X
FCC . . . . . . . . . . . . . . . . . . . . . . . . . . . . . . . . . . . . . . . . . . . . . . . . . . . . . . . .X
In Canada . . . . . . . . . . . . . . . . . . . . . . . . . . . . . . . . . . . . . . . . . . . . . . . . . . .X
Safety Extra Low Voltage Approval . . . . . . . . . . . . . . . . . . . . . . . . . . . . . . . . . . . . . XI
Certifications . . . in Europe . . . . . . . . . . . . . . . . . . . . . . . . . . . . . . . . . . . . . . . . . . . XII
It’s Illegal . . . in the USA . . . . . . . . . . . . . . . . . . . . . . . . . . . . . . . . . . . . . . . . . . . . XIV
It’s Illegal . . . in Canada. . . . . . . . . . . . . . . . . . . . . . . . . . . . . . . . . . . . . . . . . . . . . XVI
Environmental Notices . . . in the USA. . . . . . . . . . . . . . . . . . . . . . . . . . . . . . . . . .XVII
Environmental Notices . . . in Canada . . . . . . . . . . . . . . . . . . . . . . . . . . . . . . . . . XVIII
1
2
3
4
1 About this manual . . . . . . . . . . . . . . . . . . . . . . . . . . . . . . . . . . . . 1-1
Conventions used in this manual. . . . . . . . . . . . . . . . . . . . . . . . . . . . . . . . . . . . . . 1-2
2 Meters, consumables, and Auditron . . . . . . . . . . . . . . . . . . . . . 2-1
Overview . . . . . . . . . . . . . . . . . . . . . . . . . . . . . . . . . . . . . . . . . . . . . . . . . . . . . . . . 2-1
Entering the Administration mode . . . . . . . . . . . . . . . . . . . . . . . . . . . . . . . 2-2
Meters . . . . . . . . . . . . . . . . . . . . . . . . . . . . . . . . . . . . . . . . . . . . . . . . . . . . . . . . . . 2-2
Consumables status. . . . . . . . . . . . . . . . . . . . . . . . . . . . . . . . . . . . . . . . . . . . . . . . 2-4
Auditron Administration mode . . . . . . . . . . . . . . . . . . . . . . . . . . . . . . . . . . . . . . . . 2-6
Overview . . . . . . . . . . . . . . . . . . . . . . . . . . . . . . . . . . . . . . . . . . . . . . . . . . 2-6
Auditron administrator duties . . . . . . . . . . . . . . . . . . . . . . . . . . . . . . . . . . . 2-6
Auditron access levels . . . . . . . . . . . . . . . . . . . . . . . . . . . . . . . . . . . . . . . . 2-7
Auditron account structure. . . . . . . . . . . . . . . . . . . . . . . . . . . . . . . . . . . . . 2-8
Auditron forms . . . . . . . . . . . . . . . . . . . . . . . . . . . . . . . . . . . . . . . . . . . . . . 2-8
DOCUMENT CENTRE CS 50 SYSTEM ADMINISTRATION GUIDE XIX CONTENTS
5
6
7
Page 20

Entering the Auditron Administration mode . . . . . . . . . . . . . . . . . . . . . . . . 2-9
Exiting the Auditron Administration mode . . . . . . . . . . . . . . . . . . . . . . . . 2-11
1
Review Accounts . . . . . . . . . . . . . . . . . . . . . . . . . . . . . . . . . . . . . . . . . . . 2-12
Create/Modify User Accounts . . . . . . . . . . . . . . . . . . . . . . . . . . . . . . . . . 2-14
Reset Accounts . . . . . . . . . . . . . . . . . . . . . . . . . . . . . . . . . . . . . . . . . . . . 2-20
Auditron Access . . . . . . . . . . . . . . . . . . . . . . . . . . . . . . . . . . . . . . . . . . . . 2-25
Changing the Auditron Administrator Password . . . . . . . . . . . . . . . . . . . 2-29
3 Tools Mode. . . . . . . . . . . . . . . . . . . . . . . . . . . . . . . . . . . . . . . . . . 3-1
2
3
4
5
Overview . . . . . . . . . . . . . . . . . . . . . . . . . . . . . . . . . . . . . . . . . . . . . . . . . . . . . . . . 3-1
Entering and Exiting Tools Mode. . . . . . . . . . . . . . . . . . . . . . . . . . . . . . . . . . . . . . 3-3
Entering Tools Mode . . . . . . . . . . . . . . . . . . . . . . . . . . . . . . . . . . . . . . . . . 3-3
Exiting Tools Mode . . . . . . . . . . . . . . . . . . . . . . . . . . . . . . . . . . . . . . . . . . 3-4
Tray Management . . . . . . . . . . . . . . . . . . . . . . . . . . . . . . . . . . . . . . . . . . . . . . . . . 3-5
Paper Type . . . . . . . . . . . . . . . . . . . . . . . . . . . . . . . . . . . . . . . . . . . . . . . . 3-5
Auto Tray Setup . . . . . . . . . . . . . . . . . . . . . . . . . . . . . . . . . . . . . . . . . . . . . 3-7
Feature Defaults. . . . . . . . . . . . . . . . . . . . . . . . . . . . . . . . . . . . . . . . . . . . . . . . . . . 3-9
Basic procedure for setting Featur e De faul ts. . . . . . . . . . . . . . . . . . . . . . 3-11
Paper Supply . . . . . . . . . . . . . . . . . . . . . . . . . . . . . . . . . . . . . . . . . . . . . . 3-12
Cover Tray . . . . . . . . . . . . . . . . . . . . . . . . . . . . . . . . . . . . . . . . . . . . . . . . 3-12
Reduce/Enlarge. . . . . . . . . . . . . . . . . . . . . . . . . . . . . . . . . . . . . . . . . . . . 3-13
Original Type . . . . . . . . . . . . . . . . . . . . . . . . . . . . . . . . . . . . . . . . . . . . . . 3-14
Photo Type – Photo & Text . . . . . . . . . . . . . . . . . . . . . . . . . . . . . . . . . . . 3-15
Photo Type – Photo . . . . . . . . . . . . . . . . . . . . . . . . . . . . . . . . . . . . . . . . . 3-16
Text Type. . . . . . . . . . . . . . . . . . . . . . . . . . . . . . . . . . . . . . . . . . . . . . . . . 3-17
Lighten / Darken. . . . . . . . . . . . . . . . . . . . . . . . . . . . . . . . . . . . . . . . . . . . 3-18
Output Color. . . . . . . . . . . . . . . . . . . . . . . . . . . . . . . . . . . . . . . . . . . . . . . 3-18
Color Shift . . . . . . . . . . . . . . . . . . . . . . . . . . . . . . . . . . . . . . . . . . . . . . . . 3-19
Saturation. . . . . . . . . . . . . . . . . . . . . . . . . . . . . . . . . . . . . . . . . . . . . . . . . 3-19
Variable Color Balance (Yellow, Magent a, Cyan, Black). . . . . . . . . . . . . 3-20
Sharpness . . . . . . . . . . . . . . . . . . . . . . . . . . . . . . . . . . . . . . . . . . . . . . . . 3-20
Margin Shifts for Side 1 and Side 2 . . . . . . . . . . . . . . . . . . . . . . . . . . . . . 3-21
Corner Shift . . . . . . . . . . . . . . . . . . . . . . . . . . . . . . . . . . . . . . . . . . . . . . . 3-22
Variable Shift . . . . . . . . . . . . . . . . . . . . . . . . . . . . . . . . . . . . . . . . . . . . . . 3-22
Edge Erase . . . . . . . . . . . . . . . . . . . . . . . . . . . . . . . . . . . . . . . . . . . . . . . 3-23
Original Orientation . . . . . . . . . . . . . . . . . . . . . . . . . . . . . . . . . . . . . . . . . 3-24
2 Sided Copy . . . . . . . . . . . . . . . . . . . . . . . . . . . . . . . . . . . . . . . . . . . . . . 3-24
Side 2 Rotate . . . . . . . . . . . . . . . . . . . . . . . . . . . . . . . . . . . . . . . . . . . . . . 3-24
Multiple-Up. . . . . . . . . . . . . . . . . . . . . . . . . . . . . . . . . . . . . . . . . . . . . . . . 3-25
2 Pages Up . . . . . . . . . . . . . . . . . . . . . . . . . . . . . . . . . . . . . . . . . . . . . . . 3-25
4 & 8 Pages Up . . . . . . . . . . . . . . . . . . . . . . . . . . . . . . . . . . . . . . . . . . . . 3-25
6
7
CONTENTS XX DOCUMENT CENTRE CS 50 SYSTEM ADMINISTRATION GUIDE
Page 21

Machine Set-up . . . . . . . . . . . . . . . . . . . . . . . . . . . . . . . . . . . . . . . . . . . . . . . . . . 3-26
Audio Tones. . . . . . . . . . . . . . . . . . . . . . . . . . . . . . . . . . . . . . . . . . . . . . . . . . . . . 3-28
Customize Screens . . . . . . . . . . . . . . . . . . . . . . . . . . . . . . . . . . . . . . . . . . . . . . . 3-30
System Image Quality . . . . . . . . . . . . . . . . . . . . . . . . . . . . . . . . . . . . . . . . . . . . . 3-32
Adjusting Image Recognition settings . . . . . . . . . . . . . . . . . . . . . . . . . . . 3-33
Auto Screening Adjust (Calibration). . . . . . . . . . . . . . . . . . . . . . . . . . . . . 3-35
Machine Timeouts . . . . . . . . . . . . . . . . . . . . . . . . . . . . . . . . . . . . . . . . . . . . . . . . 3-38
Reduce/Enlarge Defaults. . . . . . . . . . . . . . . . . . . . . . . . . . . . . . . . . . . . . . . . . . . 3-41
Reduce / Enlarge Fine Adjust . . . . . . . . . . . . . . . . . . . . . . . . . . . . . . . . . . . . . . . 3-43
Change Tools Access Number . . . . . . . . . . . . . . . . . . . . . . . . . . . . . . . . . . . . . . 3-44
Original Size Presets . . . . . . . . . . . . . . . . . . . . . . . . . . . . . . . . . . . . . . . . . . . . . . 3-45
4 Maintenance. . . . . . . . . . . . . . . . . . . . . . . . . . . . . . . . . . . . . . . . . 4-1
Overview . . . . . . . . . . . . . . . . . . . . . . . . . . . . . . . . . . . . . . . . . . . . . . . . . . . . . . . . 4-1
Cleaning the Touch Screen . . . . . . . . . . . . . . . . . . . . . . . . . . . . . . . . . . . . . . . . . . 4-2
Cleaning the Document Glass . . . . . . . . . . . . . . . . . . . . . . . . . . . . . . . . . . . . . . . . 4-3
Cleaning the Document Glass Cover. . . . . . . . . . . . . . . . . . . . . . . . . . . . . . . . . . . 4-4
Supply replacement . . . . . . . . . . . . . . . . . . . . . . . . . . . . . . . . . . . . . . . . . . . . . . . . 4-5
Replacing the Dry Ink Cartridge. . . . . . . . . . . . . . . . . . . . . . . . . . . . . . . . . 4-5
Replacing the Dry Ink Waste Container. . . . . . . . . . . . . . . . . . . . . . . . . . . 4-9
Replacing the Developer Waste Container . . . . . . . . . . . . . . . . . . . . . . . 4-12
Replacing the Fuser Oil Cartridge . . . . . . . . . . . . . . . . . . . . . . . . . . . . . . 4-15
Replacing the Cleaning Web . . . . . . . . . . . . . . . . . . . . . . . . . . . . . . . . . . 4-20
Replacing the Copy/Print Cartridge . . . . . . . . . . . . . . . . . . . . . . . . . . . . . 4-23
Calling for Service . . . . . . . . . . . . . . . . . . . . . . . . . . . . . . . . . . . . . . . . . . . . . . . . 4-27
Ordering Replacement Units and supplies. . . . . . . . . . . . . . . . . . . . . . . . . . . . . . 4-29
Customer Replaceable Units . . . . . . . . . . . . . . . . . . . . . . . . . . . . . . . . . . 4-29
Consumable supplies. . . . . . . . . . . . . . . . . . . . . . . . . . . . . . . . . . . . . . . . 4-30
Supplies to keep on hand . . . . . . . . . . . . . . . . . . . . . . . . . . . . . . . . . . . . 4-31
Recommended papers and transpare ncies. . . . . . . . . . . . . . . . . . . . . . . 4-32
Replacement Manuals (USA market only). . . . . . . . . . . . . . . . . . . . . . . . 4-32
1
2
3
4
Appendix A . . . . . . . . . . . . . . . . . . . . . . . . . . . . . . . . . . . . . . . . . . . . A-1
Auditron forms . . . . . . . . . . . . . . . . . . . . . . . . . . . . . . . . . . . . . . . . . . . . . . . . . . . . A-1
5
6
7
DOCUMENT CENTRE CS 50 SYSTEM ADMINISTRATION GUIDE XXI CONTENTS
Page 22

1
2
3
4
5
6
7
CONTENTS XXII DOCUMENT CENTRE CS 50 SYSTEM ADMINISTRATION GUIDE
Page 23

1. About this manual
The System Administration screens enable the
System Administr a to r to ch e ck meters ,
consumables, and output counts. The screens
also enable the System Administrator to access
the Tools Mode.
In the Tools Mode, the System Administrator can
set the default values for a variety of copy output
and copier/print er features and register custom
colors.
In the Auditron Administrati on mode, the System
Administrator can set up Audit ron accounts for
various customer copy accounts. This mode also
allows the System Administrator to maint ain a
record of the copy output for each customer
account.
1
1
2
4
Finally, the System Administrator is generally the
one person trained to perf orm mainte nance tasks,
order supplies, and perform removal/replacement
procedures.
The System Administration guide focuses on the
following subject s:
• Checking meters, consumable s, and Auditron
Administration mode
• Tools mode
• Maintenance
This guide should be used in conjunction with the
Document Centre ColorSeries 50 User Guide,
Color Materials Usage Guide and the
Recommended Materials List.
For planning information, refer to the Document
Centre ColorSeries 50 Customer Site Planning
Guide.
5
6
7
DOCUMENT CENTRE CS 50 SYSTEM ADMINISTRATION GUIDE 1–1 ABOUT THIS MANUAL
Page 24
Conventions used in this manual
1
1
2
Descriptions of feat ures an d opt ions gener ally
precede procedure steps. You may need to
combine several proc edures to achieve
desired result s.
This manual uses a number of symbols to
help you identify various kinds of information.
These symbols are described below.
The 1, 2, 3 symbol indicates the beginning of
a procedure. Be sure to follow steps carefully
in the order given.
NOTE: Notes provide extra information that
may be helpful to your understanding or
performance of procedures.
KEY POINT: The key symbol draws your
attention to important additional information,
hints, or tips.
4
WARNING:This symbol alerts you to an operating or maintenance procedure, practice, or
condition that, if not str ictly observed, could
result in inju r y o r lo ss o f lif e.
WARNING:This Hot Surface symbol warns
5
6
you of an area that may be v ery hot and woul d
cause personal injury if touched.
CAUTION:This symbol alerts you to an
operating or maintenan ce procedure, practice,
or condition that, if not stri ctly ob served, c ould
result in damage to or destructi on of
equipment or loss of data.
7
ABOUT THIS MANUAL 1–2 DOCUMENT CENTRE CS 50 SYSTEM ADMINISTRATION GUIDE
Page 25

2. Meters, consumables, and Auditron
Overview
The System Administrator is responsible for
periodically checking the current meter counts for
copy output and the status of consumabl es, such
as dry ink or fuser oil.
NOTE: You do not have to be the System
Administrator in order t o check the meter counts
or the consumables stat us. Any user can check
both of these features.
1
2
2
4
The System Administrator also sets up and
maintains the Auditron accounts. Finally, the
System Administrator can delet e accounts or
change the Auditron Administra tor password.
This chapter provides inform ati on on how to
access and perform the procedures needed for
checking the meter count s and the status of the
consumables. Furthermore, this chapter provides
information on how to set up and maintain the
Auditron, including info rmati on on how to change
the Auditron Administrator password.
5
6
7
DOCUMENT CENTRE CS 50 SYSTEM ADMINISTRATION GUIDE 2–1 METERS, CON S U MABLES, AND AUDITRON
Page 26
Entering the Administration mode
1
2
2
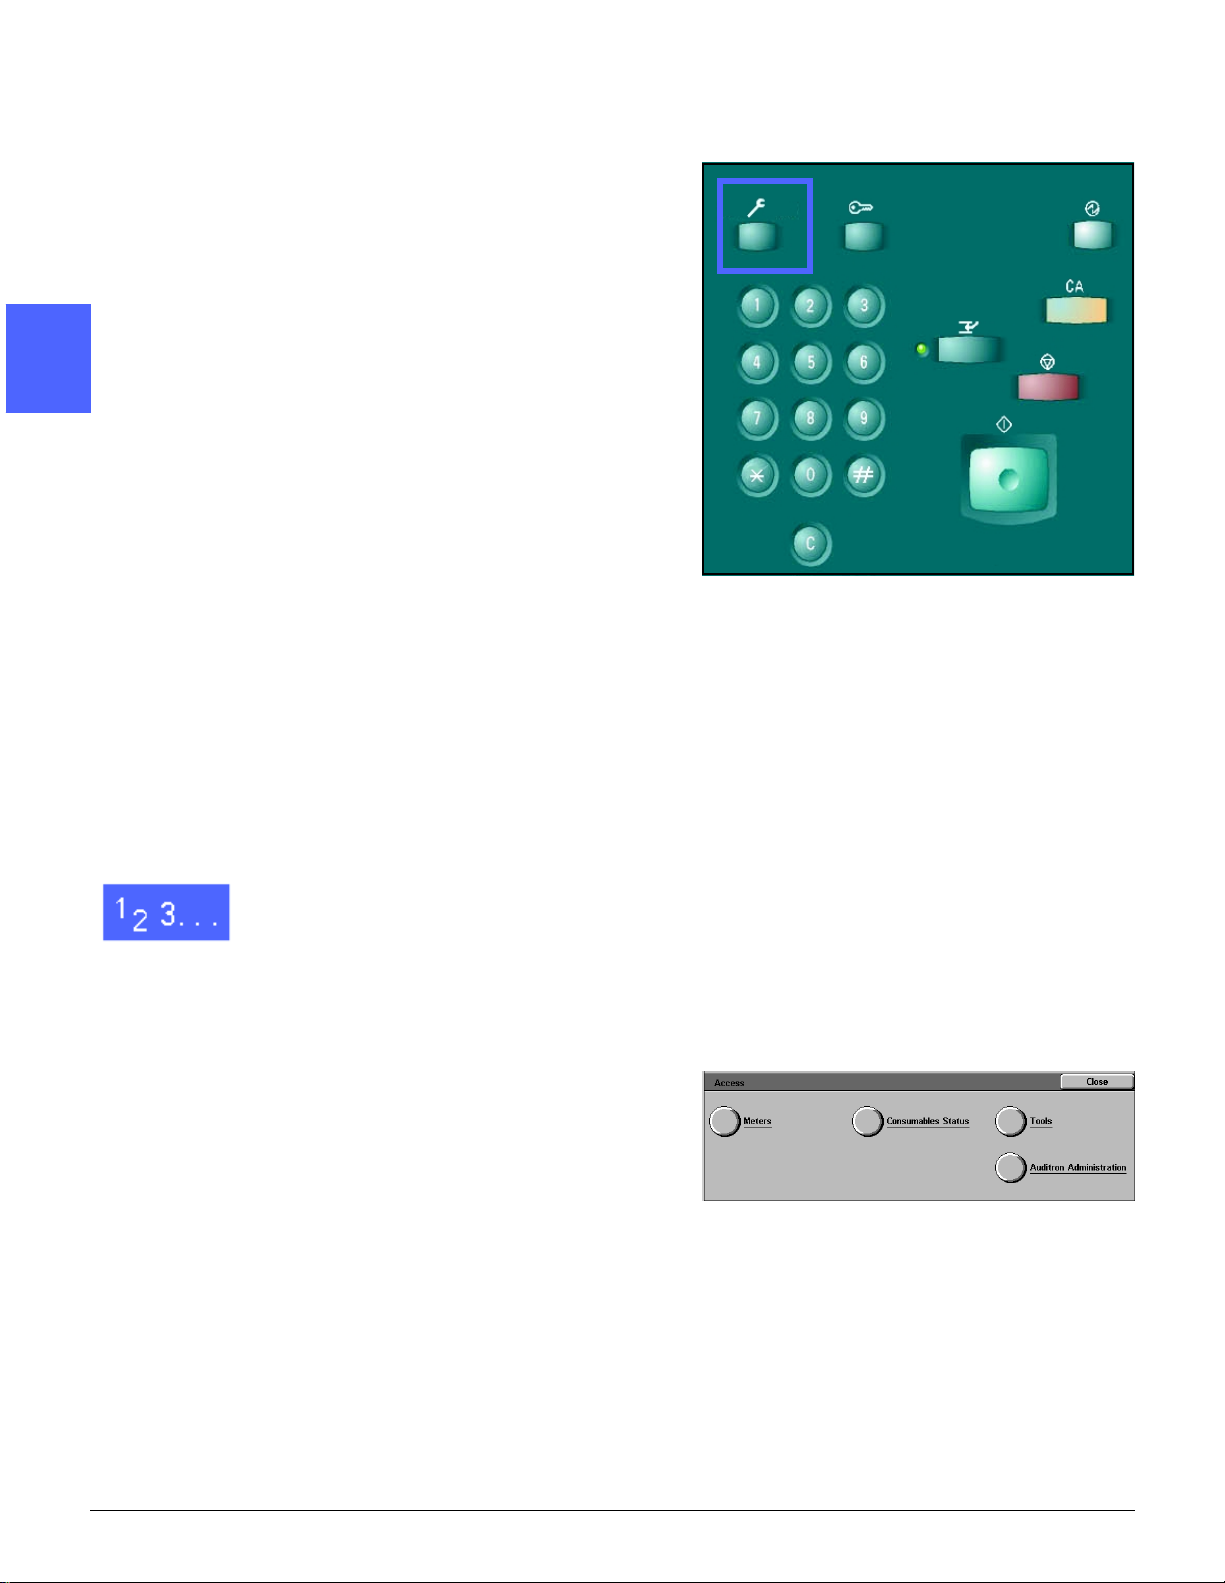
In order to enter the Administration mode, press
the Administration button, Figure 1. This button
is located above the numeric keypad.
Figure 1: Administration button
Meters
The Meters feature allows you to check the
current copy volume for bl ack and white, full- color,
11 x 17 inch or A3 color, and a total for all black
4
and white and full color copies. You do not have to
be the System Administrator in order to check the
meter counts. Any user can check the meter
counts.
5
1
If you are not already in the Administration mode,
enter it now by pressing the Administration
button, Figure 1. This button is located above the
numeric keypad.
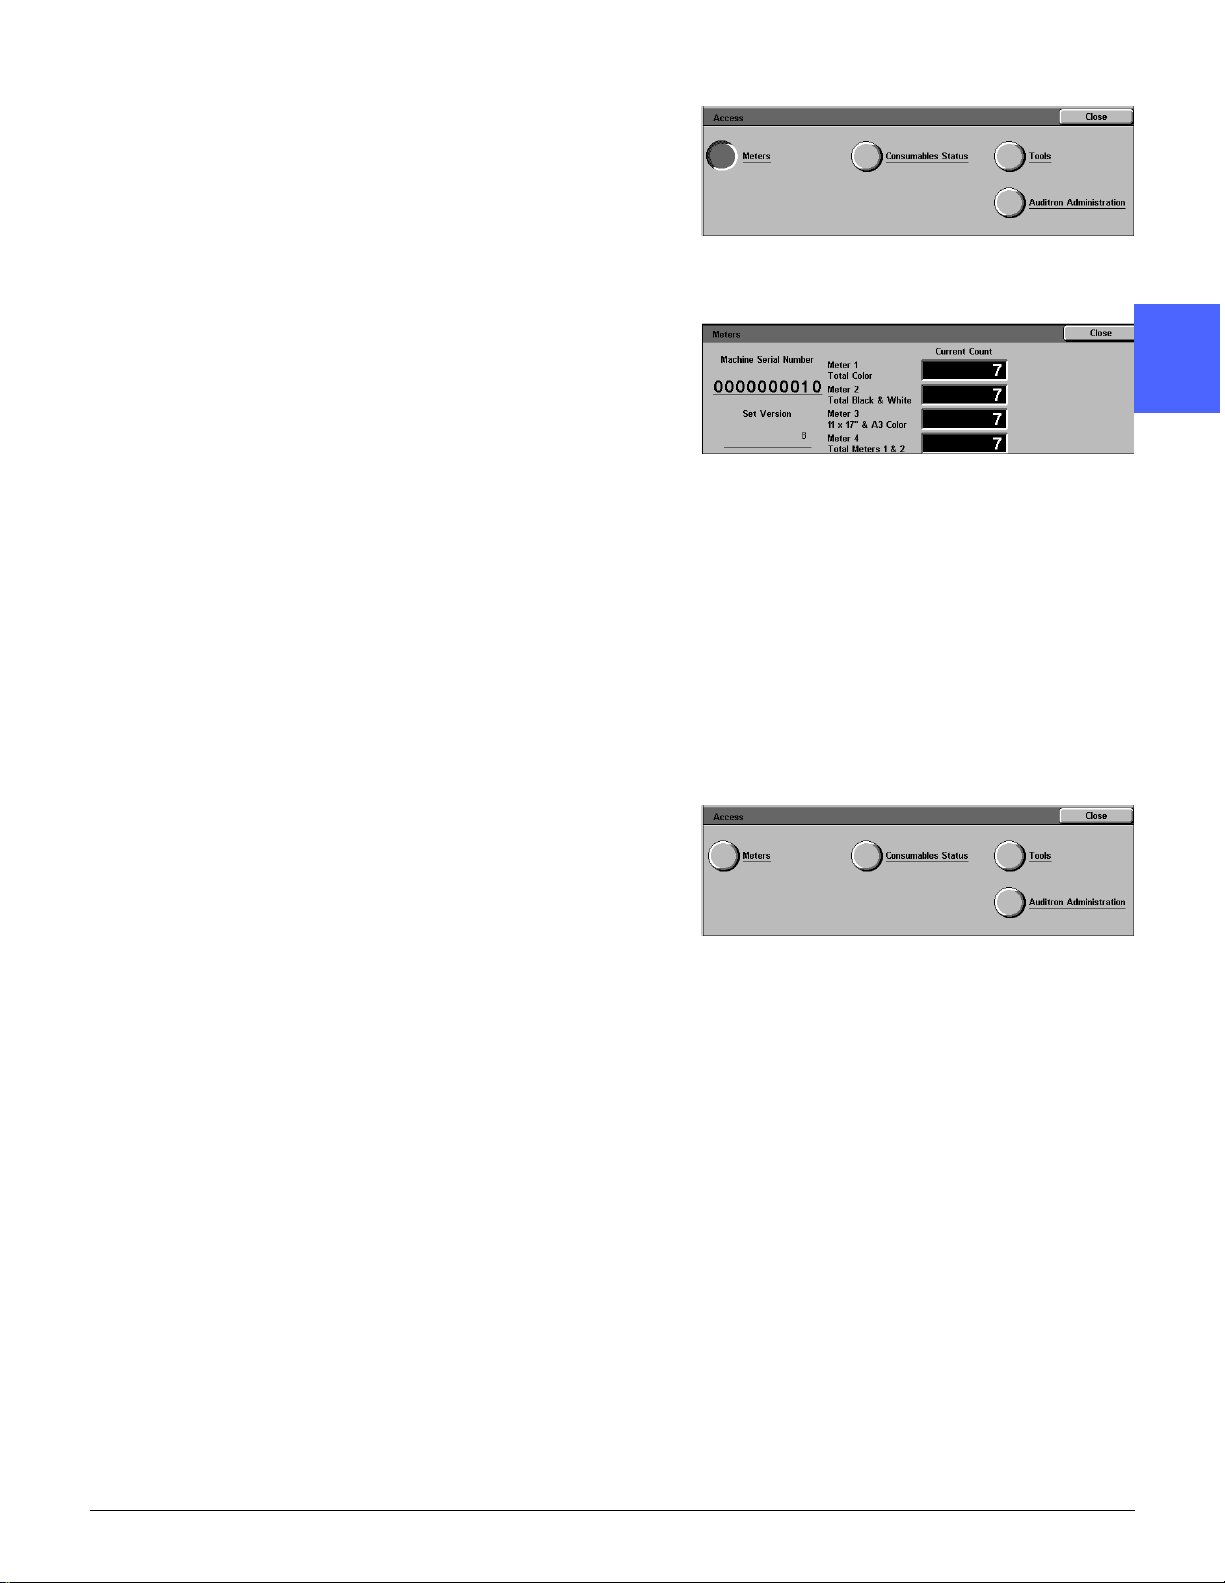
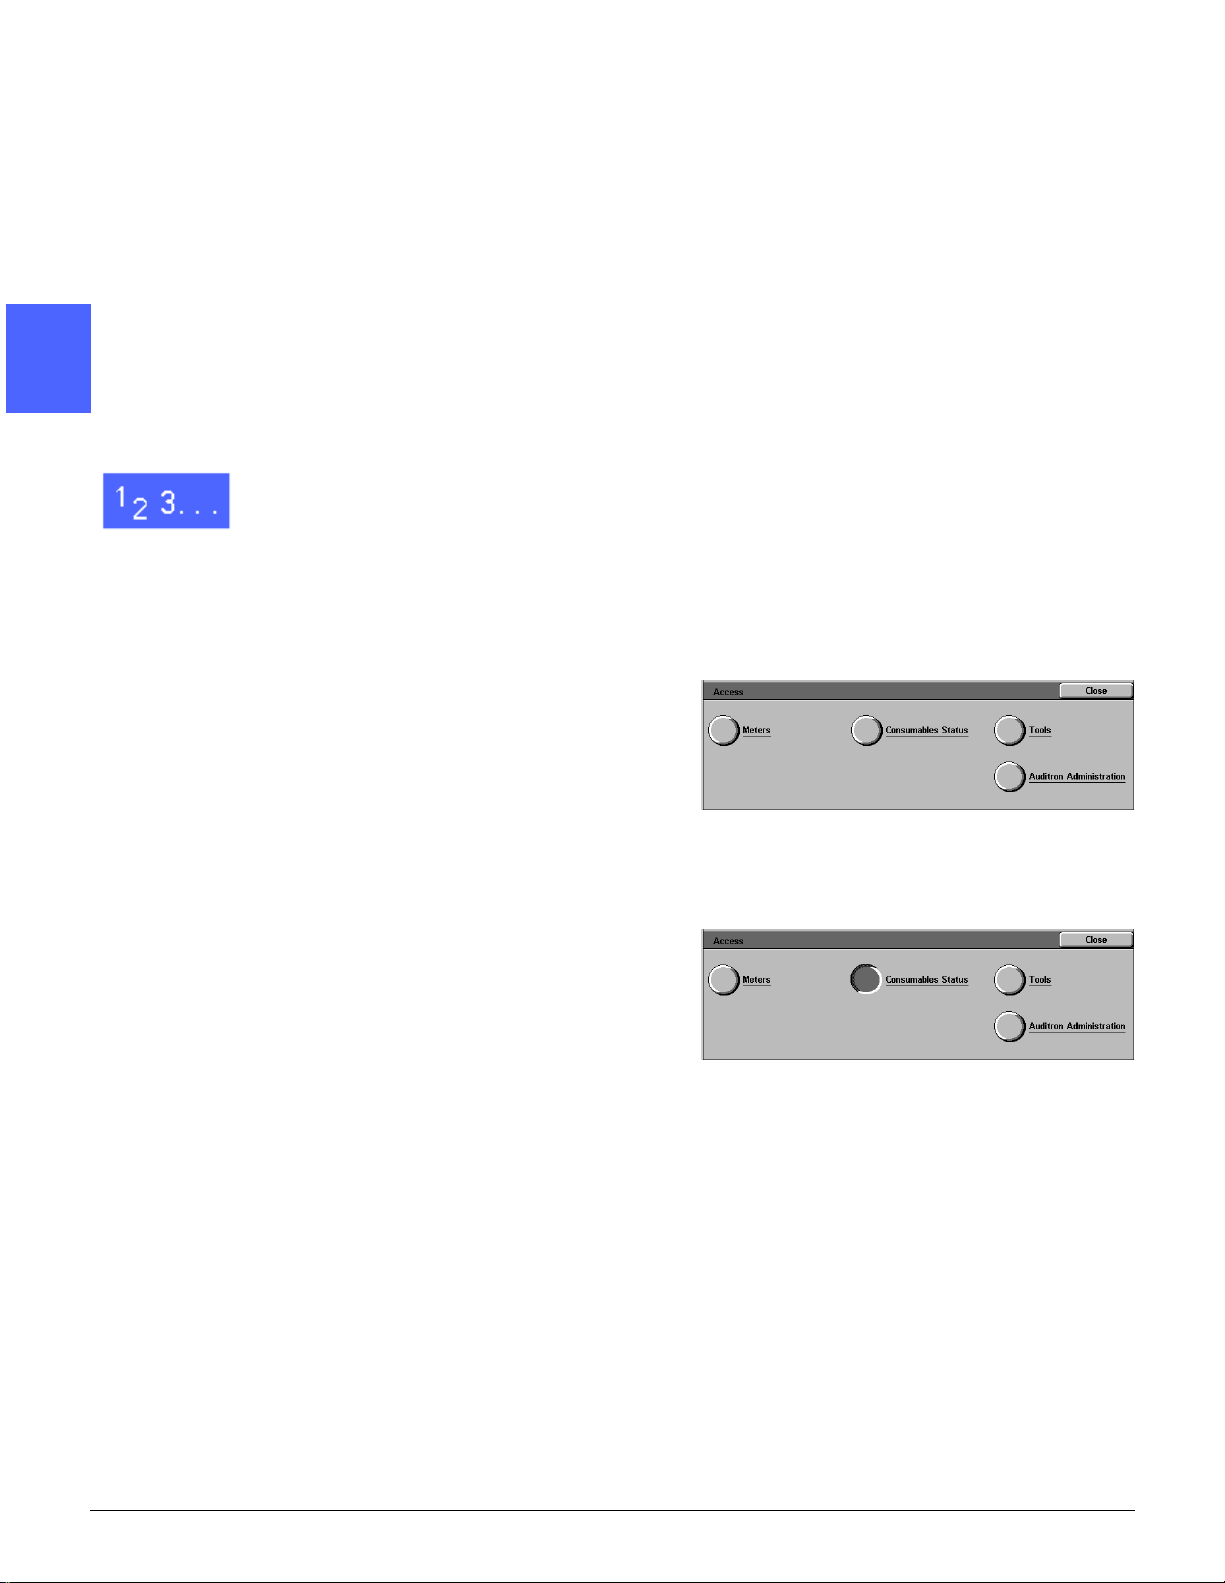
The Access screen is displayed , Fig ure 2.
6
Figure 2: Access screen
7
METERS, CONSUMABLES, AND AUDITRON 2–2 DOCUMENT CENTRE CS 50 SYSTEM ADMINISTRATION GUIDE
Page 27
2
Touch the Meters button, Figure 3.
1
Figure 3: Meters button
The Meters screen is displayed, Fi gure 4.
3
4
Set Version - This information reflects the
software level on the machine.
Meter 1: Total Color - This meter provides the
total copy output for al l color copies/prints,
regardless of paper size.
Meter 2: Total Black & White - This meter
provides the total copy output for all black and
white copies/prints, regardless of paper size.
Meter 3: 1 1 x17” & A3 Color - This meter
provides the total copy output for all 11 x 17 inch
or A3 color copies/prints.
Meter 4: Total Meters 1 & 2 - This met er provides
the combined total copy/pr int output for Meters 1
and 2.
To exit, touch Close; the Access scr een is
displayed, Figure 5.
Touch Close to exit Administration mode and to
return to the basic copying/printing mode.
Figure 4: Meters screen
2
2
4
Figure 5: Access screen
DOCUMENT CENTRE CS 50 SYSTEM ADMINISTRATION GUIDE 2–3 METERS, CON S U MABLES, AND AUDITRON
5
6
7
Page 28
Consumables status
1
The Consumables Status feature allows you to
check the current st atus for the various
consumables, such as dry ink and fuser oil. As
stated previously, you do not have to be the
System Administrator in order to check the status
of the consumables. Any user can check the
status.
2
2
1
By periodically checkin g the Consumables
Status, you can determine what, if any,
consumables need to be replaced.
If you are not already in the Administration mode,
enter it now by pressing the Administration
button. This button is located above the numeric
keypad.
The Access screen is displayed , Fig ure 6.
4
Figure 6: Access screen
2
Touch the Consumables Status button, Figure 7.
5
Figure 7: Consumables Status button
6
7
METERS, CONSUMABLES, AND AUDITRON 2–4 DOCUMENT CENTRE CS 50 SYSTEM ADMINISTRATION GUIDE
Page 29
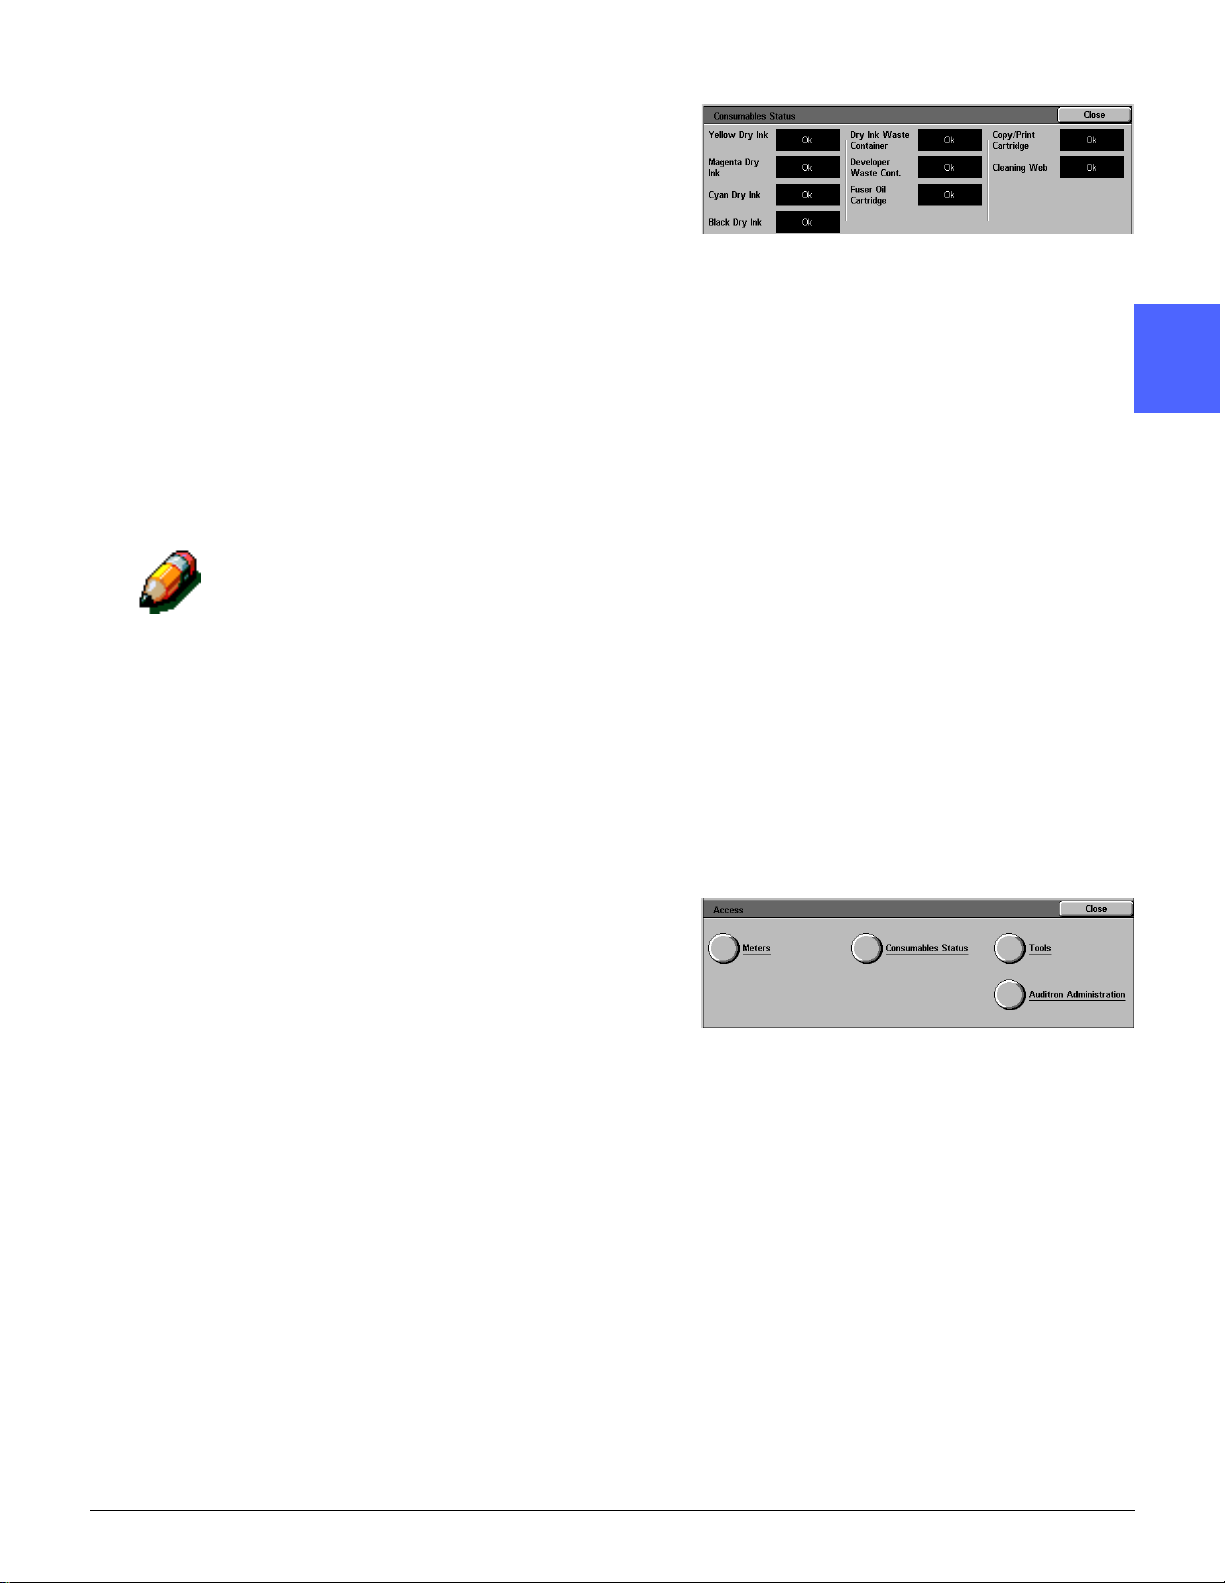
The Consumables Status screen is displayed,
Figure 8.
Note the current status for the various
consumables:
1
• Dry ink color (colors: yellow, magenta, cyan,
and black)
• Dry Ink Waste Container
• Developer Waste Container
• Fuser Oil Cartridge
• Copy/Print Cartri dge
• Cleaning Web
NOTE: “Ok” indicates that no replacement is
necessary. Other messages include:
• “Low” indicates that the dry ink is getting
low and a new dry ink will be required
soon
• “Empty” indicates that the fuser oil or dry
ink must be replaced immediately
• “Change soon” indicates that the
appropriate consumable be replaced soon
• “Change” indicates that the dry ink waste
container, developer waste container,
cleaning web or copy/print car tridge must
be replaced immediately
Figure 8: Consumables Status screen
2
2
4
3
4
To exit, touch Close; the Access scr een is
displayed, Figure 9.
Touch Close to exit Administration mode and to
return to the basic copying/printing mode.
5
Figure 9: Access screen
6
7
DOCUMENT CENTRE CS 50 SYSTEM ADMINISTRATION GUIDE 2–5 METERS, CON S U MABLES, AND AUDITRON
Page 30

Auditron Administration mode
1
Overview
The Auditron is a copy audit feature of the
Document Centre ColorSeries 50 copier/printer.
This feature electronical ly records the number of
copies made for each user account and controls
2
2
the access and use of the copier/printer.
Auditron administrator duties
The Auditron Administrator assig ns use r account s
and maintains the Auditron system. The d uties of
the Auditron Administrator i nclude the following:
• Enabling the Auditron feature
• Assigning account numbers to users
• Assigning passwo rds for each user account
• Assigning copy limits a nd restric tions (such as
black and white copying only)
4
• Modifying user account infor m ati on
• Reviewing user account information
• Providing a record of the copy output to
account users
• Changing the Auditron Administration
password
5
6
• Maintaining the Auditron
KEY POINT: If you cannot remember your
Auditron Administra tion p as sword, y ou must c all a
Xerox Service Representative who will set the
password back to the defaul t set ting.
KEY POINT: With Auditron enabled, you may still
print from your client workstation.
7
METERS, CONSUMABLES, AND AUDITRON 2–6 DOCUMENT CENTRE CS 50 SYSTEM ADMINISTRATION GUIDE
Page 31

Auditron access levels
There are two levels of access to the Audit ron:
Administrator access level and user access level.
Administrator access level
The Auditron Administrator creates and modi fi es
user accounts and monitor s copying status for
billing purposes.
As the Auditron Administrator, you will change the
default Auditron Administration password to your
own personal password. This allows you, and
only you, to have access to this level; however, it
is wise to have another person as a backup.
In the administrator access level, you will enable
the Auditron for usage, assign user account
numbers and passwords, set specific parameters
for each user account (such as copy output limit),
modify user account informati on when necessary,
and collect and record account data.
You access the Auditron Administrator level by
pressing the Administration button on the control
panel and touching the Auditron Administration
button on the Access screen, as shown in
Figure 10.
1
2
2
4
User access level
This level is used for making copies. When the
Auditron is enabled and user accounts are set up,
users must enter their specific user account
numbers prior to making copies.
Figure 10: Auditron Administration butt on
5
6
7
DOCUMENT CENTRE CS 50 SYSTEM ADMINISTRATION GUIDE 2–7 METERS, CON S U MABLES, AND AUDITRON
Page 32

Auditron account structure
1
2
2
The Auditron stores the copy quantities for each
specific user account. The Document Centre
ColorSeries 50 copier/ printer can record
information for a maximum of 2,000 user
accounts. The user accounts are numbered
starting at 100 and ending at 2099.
The accounts are accessed by the users through
their user account numbers. Each individual or
group of individuals who wishes to make copies
using the Auditron is assigned a user account.
Each account has a unique user number, and
each account has a unique user passwor d. The
user password must contain four to twelve
numbers.
The remainder of this sect ion provides information
on setting up and maintaining the Auditron.
Auditron forms
Appendix A contains sample forms tha t can be
used to record the data when configuring the
Auditron or when recording the copy volumes for
4
billing purposes. To use the Auditron User Chart
and Auditron Periodic Billing Form, make copi es
prior to configuring the Auditron.
NOTE: There are no Auditron reports to be
printed. You must visually review copy counts for
each account. After recording the numbers, you
5
touch Reset Copy Counts to start a new billing
period. Refer to the “Reset Accounts” section for
more details on setting copy counts.
6
7
METERS, CONSUMABLES, AND AUDITRON 2–8 DOCUMENT CENTRE CS 50 SYSTEM ADMINISTRATION GUIDE
Page 33

Entering the Auditron Administration mode
1
1
2
If you are not already in the Administration mode,
enter it now by pressing the Administration
button. This button is located above the numeric
keypad.
The Access screen is displayed .
Touch the Auditron Administration button,
Figure 11.
The Enter Password screen is displ ayed.
Figure 11: Auditron Administration button
2
2
4
DOCUMENT CENTRE CS 50 SYSTEM ADMINISTRATION GUIDE 2–9 METERS, CON S U MABLES, AND AUDITRON
5
6
7
Page 34

3
Using the numeric keypad, enter the Auditron
Administration password, Fi gure 12.
1
The Document Centre ColorSeries 50 copier/
printer is shipped with a default Auditron
Administration password of 11111 (five ones).
Enter the default password if you are using the
Auditron feature f or the f irst ti me or i f you have not
already changed the passwor d to a new one.
Figure 12: Entering the Auditron
Administration pas swo rd
2
2
4
NOTE: Change the password in order to prevent
any unauthorized individuals from having access
to the Auditron Administration mode. For
information on how to change the password, re fer
to the section entitled “Changing the Auditron
Administration password.”
Touch the Enter button. The Auditron
Administration screen is disp layed, Figure 13.
KEY POINT:
• When you press the Clear All button on the
control panel while in the Auditron
Administration mode, all previous
programming selections are cance led.
Figure 13: Auditron Administration screen
• You cannot program copy jobs while in the
4
Auditron Administration mode.
5
6
7
METERS, CONSUMABLES, AND AUDITRON 2–10 DOCUMENT CENTRE CS 50 SYSTEM ADMINISTRATION GUIDE
Page 35

Exiting the A uditron Admi ni st rat i on mode
To exit the Auditron Administration mode and
return to the b asic pr ogra mming screen , t ouch the
Close button on the Auditron Administration
screen, Figure 14.
NOTE: While in the Auditron Administration
mode, you may touch the Close button at any
time in order to exit without making changes to
that particular feature. Touching the Close button
causes the previous screen to be displ ayed.
Figure 14: Auditron Administration screen
1
2
2
4
5
6
DOCUMENT CENTRE CS 50 SYSTEM ADMINISTRATION GUIDE 2–11 METERS, CONSUMABLES, AND AUDITRON
7
Page 36

Review Accounts
1
The Revie w Accounts mode allows you to revi ew
the Auditron information for any specified user
account. This mode provides the followi ng user
account information:
• password
• account limit
2
2
• color restriction
• total black and white copi es
• total color copi es
In order to review one or more user accounts,
perform the following steps:
1
From the Auditron Administration screen, touch
the Review Accounts button, Figure 15.
The Review Accounts screen is displayed.
4
Figure 15: Review Accounts button
5
6
7
METERS, CONSUMABLES, AND AUDITRON 2–12 DOCUMENT CENTRE CS 50 SYSTEM ADMINISTRATION GUIDE
Page 37

2
Enter an Account Number by performing one of
the following (Figure 16):
• Use the up and down arrows, or
• Touch the Input Number With Keypad
button, and enter the account number using
the keypad.
1
Figure 16: Review Accounts
3
4
5
Touch the Enter button. The Touch screen
displays the user account information for the
entered account number. User account
information includes:
• The password which is assigned to that
specific account number
• The account limit, which is the total number of
copies that the user is allowed to make
• Color restriction i nformation (for example, the
user account is allowed to make black and
white copies only and no color copies )
• The Total Copies information displayed here
provides a tot al copy count of black and white
copies and another total copy count of color
copies
Y ou may review the account data inform ation for a
different user account by repeating steps 2 and 3.
Touch the Close button in order to exit the Review
Accounts screen.
2
2
4
You are returned to the Auditron Administration
screen.
5
6
7
DOCUMENT CENTRE CS 50 SYSTEM ADMINISTRATION GUIDE 2–13 METERS, CONSUMABLES, AND AUDITRON
Page 38

Create/Modify User Accounts
1
2
2
1
The Create/Modify User Accounts mode allows
you to create new user accounts and modify
existing user accounts. The maximum number of
user accounts that can be created is 2,000.
KEY POINT: You must
account number before you can enter a new or
change the existing password, account limit, or
restrictions information.
NOTE: Before you create user accounts, make a
list of all users who will have an Auditron user
account. Be sure to include user account number
information and the corresponding password for
each user account.
In order to create or modify an account, perform
the following steps:
From the Auditron Administration screen, touch
the Create/Modify User Accounts button,
Figure 17.
create an account with an
4
Figure 17: Create/Modify User Accounts
button
The Create/Modify User Accounts screen is
displayed, Figure 18.
5
NOTE: Ensure that you have a copy of the
sample form from Appendix A before continu ing
with the next steps in this procedure. The forms
contained in Appendix A include Auditron User
Chart and Auditron Periodic Billing Form.
Figure 18: Create/Modify User Accounts
screen
6
7
METERS, CONSUMABLES, AND AUDITRON 2–14 DOCUMENT CENTRE CS 50 SYSTEM ADMINISTRATION GUIDE
Page 39

2
Create a new account number by performing one
of the following steps (Figure 19):
1
• Use the up and down arrows to enter an
account number, or
3
4
• Touch the Input Number With Keypad
button, and enter the account number using
the keypad.
KEY POINT: The account numbers may be
between 100 to 2099.
After you have entered the account number, touch
the Enter button.
NOTE: You are now ready to enter the remaining
account information for this specific account.
Continue to the next step.
Touch the Change Settings: Account ####
button.
The Change Settings screen is displayed, Figure
20. The account number is displayed next t o
Change Settings in the title bar.
Figure 19: Entering the account number
2
2
4
Figure 20: The Change Settings screen
5
6
7
DOCUMENT CENTRE CS 50 SYSTEM ADMINISTRATION GUIDE 2–15 METERS, CONSUMABLES, AND AUDITRON
Page 40

5
1
2
2
6
Enter the user account password (Figure 21) by
touching the Input Number with Keypad button
to enter the user passwo rd for this specific
account number.
NOTE: The password must have a minimum of
four digits and can have a maximum of twelve
digits.
The password appears in the Account Password
window.
Once the password is entered, touch the Enter
button.
Figure 21: Entering the account password
7
4
8
Touch the Input Number with Keypad button to
enter the Account Limit number. Use the
numeric keypad to enter the copy outp ut limit for
this specific account number. The number
entered is multiplied by 100 when you touch the
Enter button.
KEY POINT: If the Account Limit is entered as
12. This means that the copy output limit for this
specific user account is 1,200. Whatever number
or numbers are entered here are automatically
multiplied by 100. In another example, when you
enter a number of 7, the copy output limit for that
account is 700.
Once the Account Limit is entered, touch the
Enter button.
5
6
7
METERS, CONSUMABLES, AND AUDITRON 2–16 DOCUMENT CENTRE CS 50 SYSTEM ADMINISTRATION GUIDE
Page 41

9
Select the user restrictions for this user account,
Figure 22:
• Touch the No Restriction button in order to
allow this user account to make bot h color and
black and white copies.
• Touch the Co lo r O n ly button in order to allow
this user account to make color copies only.
• Touch the Black & White Only button in or der
to allow this user account to make black and
white copies only.
Figure 22: Selecting the Restri ctions
1
2
2
10
11
Touch the Close button in order to save the
settings and return to the previous screen.
The Create/Modify User Accounts screen is
displayed. Notice that the screen now re flect s the
information you entered for the account,
Figure 23.
To modify the new account settings, touch the
Change Settings: Account #### button and
repeat steps 5-10. Continue to repeat these st eps
until all the user account s and their respective
account data is entered.
Figure 23: Create/Modify User Accounts
screen
4
5
DOCUMENT CENTRE CS 50 SYSTEM ADMINISTRATION GUIDE 2–17 METERS, CONSUMABLES, AND AUDITRON
6
7
Page 42

Reset Counter
1
2
2
1
2
The Reset Counter button allows you to reset to
zero the total number of copies for any specified
user account.
In order to reset the total number of copies for a
user account, complete the following steps:
Perform steps 1-4 of the Create/Modify User
Accounts procedure.
Touch the Reset Counter button, Figure 24.
The Total Copies number resets to zero, as seen
in the example in Figure 25.
You can make copies up to the copy Account
Limit.
Figure 24: Reset Counter button
Figure 25: Total Copies
4
5
6
7
METERS, CONSUMABLES, AND AUDITRON 2–18 DOCUMENT CENTRE CS 50 SYSTEM ADMINISTRATION GUIDE
Page 43

Exiting the Create/Modify User Accounts mode
Touch the Close button in order to exit the Create/
Modify User Accounts screen, Fi gure 26.
You are returned to the Auditron Admi nistration
screen, Figure 27.
Figure 26: Close button
Figure 27: Auditron Administration screen
1
2
2
4
5
6
DOCUMENT CENTRE CS 50 SYSTEM ADMINISTRATION GUIDE 2–19 METERS, CONSUMABLES, AND AUDITRON
7
Page 44

Reset Accounts
1
The Reset Account s mode all ows you to per form
the following Auditron functions:
• Delete all A u di tr o n user accounts .
• Reset the copy counters to zero for all the
Auditron user accounts.
2
2
• Remove any copy limits that were assigned to
any of the Auditron user account s.
• Remove any color restrictions that were
assigned to any of the Auditron user
accounts, thereby allowing all accounts to
perform both color and black and white
copying.
In order to use the Reset Accounts feature,
perform the following steps:
1
From the Auditron Administration screen, touch
the Reset Accounts button, Figure 28.
4
Figure 28: Reset Accounts button
The Reset Accounts screen is displayed,
Figure 29.
5
Figure 29: Reset Accounts scre en
6
7
METERS, CONSUMABLES, AND AUDITRON 2–20 DOCUMENT CENTRE CS 50 SYSTEM ADMINISTRATION GUIDE
Page 45

2
Touch the Delete All Accounts button if you want
to delete all the Auditron user account s, Figure 30.
A delete accounts confirmation screen is
displayed, Figure 31.
• Touch Yes if you want to delete all the
Auditron data.
• Touch No if you do not want to delete all the
Auditron data.
Figure 30: Delete All Accounts button
1
2
2
NOTE: To exit the Delete All Accounts function
at any time without making any changes, touch
the Close button.
Figure 31: Delete Auditron data message
4
5
DOCUMENT CENTRE CS 50 SYSTEM ADMINISTRATION GUIDE 2–21 METERS, CONSUMABLES, AND AUDITRON
6
7
Page 46

3
1
2
2
Touch the Reset Copy Counters button if you
want to reset all the copy counters for all the user
accounts to zero, Figure 32.
Figure 32: Reset Copy Counters button
A reset copy counters confirmation screen is
displayed, Figure 33.
• Touch Yes if you want to reset all the copy
counters to zero.
• Touch No if you do not want to reset the copy
counters.
NOTE: T o exit t he Reset Copy Counters functi on
at any time without making any changes, touch
the Close button.
Figure 33: Reset Copy Counters message
4
5
6
7
METERS, CONSUMABLES, AND AUDITRON 2–22 DOCUMENT CENTRE CS 50 SYSTEM ADMINISTRATION GUIDE
Page 47

4
Touch the Disable All Copy Limits button if you
want to remove all copy count limits that were
assigned to any user account s, Figure 34.
A remove copy limits confirmation screen is
displayed, Figure 35.
• Touch Yes if you want to remove all copy
limits that were assigned to any of the user
accounts.
Figure 34: Disable All Copy Limits button
1
2
2
• Touch No if you do not want to remove the
copy limits from all the user accounts.
NOTE: To exit the Disable All Copy Limits
function at any time without making any changes,
touch the Close button.
Figure 35: Disable All Copy Limits messag e
4
5
DOCUMENT CENTRE CS 50 SYSTEM ADMINISTRATION GUIDE 2–23 METERS, CONSUMABLES, AND AUDITRON
6
7
Page 48

5
1
Touch the Remove Color Restrictions button if
you want to remove any color restri ctions that
were assigned to any of the Auditron user
accounts. By removing the color restrictions, all
Auditron users will be able to make both col or and
black and white copies, Figure 36.
Figure 36: Remove Color Restrictions button
2
2
A remove color restrictions screen is displayed,
Figure 37.
• Touch Yes if you want to allow all users the
ability to make both color and black and white
copies.
• Touch No if you do not want to remove the
color restrictions from all the user accounts.
NOTE: To exit the Remove Color Restrictions
function at any time without making any changes,
touch the Close button.
6
4
Touch the Close button in order to exit the Reset
Accounts screen, Figure 38.
You are returned to the Auditron Administration
screen.
Figure 37: Remove Color Restrictions
message
Figure 38: Reset Accounts scre en
5
6
7
METERS, CONSUMABLES, AND AUDITRON 2–24 DOCUMENT CENTRE CS 50 SYSTEM ADMINISTRATION GUIDE
Page 49

Auditron Access
1
Use the Auditron Access mode in order to enable
the Auditron feature. The Auditron fea ture will not
function until it has been enabled by th e Audit ron
Administrator.
KEY POINT: When the Auditron is enabled,
users must enter passwords in order to use the
copier. In order for the Auditron to function
properly, the Auditron Administrator must ensure
that at least one account is created and assigned
a password.
From the Auditron Administration screen, touch
the Auditron Access button, Figure 39.
Figure 39: Auditron Access button
1
2
2
The Auditron Access screen is displayed,
Figure 40.
4
Figure 40: Auditron Access screen
5
6
DOCUMENT CENTRE CS 50 SYSTEM ADMINISTRATION GUIDE 2–25 METERS, CONSUMABLES, AND AUDITRON
7
Page 50

2
To enable or disable the Auditron, perform one of
the following:
1
• To enable and use the Auditron feature, t ouch
the Enabled button, Figure 41.
Figure 41: Enabled button
2
2
• To disable the Auditron feature, touch the
Disabled button, Figure 42. Disabled is the
default setting.
KEY POINT: The Auditron feature cannot
function when it is disabled. The copier will be
available for general usage by all users.
KEY POINT: If you disable the Auditron you will
not lose any existing account information.
Figure 42: Disabled button
4
5
6
7
METERS, CONSUMABLES, AND AUDITRON 2–26 DOCUMENT CENTRE CS 50 SYSTEM ADMINISTRATION GUIDE
Page 51

User Account Timeout
When the Auditron is enabled and user accounts
have been created, you can set a timeout period
for all user account s. This timeout feature causes
the copier to revert to its default programming
screen after a preset period of time. The timeout
feature acts as an added security measure for
Auditron users. It ensures that unaut horized use
of an account does not occur.
When you enter your account number and
password, you proceed to make copi es with the
copies being charged against your Auditron
account. If the t imeout f eature is not pro grammed,
then your account remains act ive and anyon e can
make copies. Those copies in turn are charged to
your Auditron user’s account.
With the timeout feature pro grammed for a preset
period of time, the copier rev erts to its default
programming screen and the Auditron user’s
account information is cleared from the copier.
This ensures that unauthoriz ed use of the
Auditron user’s account does not occur.
1
2
2
1
Touch the User Account Timeout button,
Figure 43.
Figure 43: User Account Timeout button
4
5
6
DOCUMENT CENTRE CS 50 SYSTEM ADMINISTRATION GUIDE 2–27 METERS, CONSUMABLES, AND AUDITRON
7
Page 52

The User Account s Ti meout screen is displayed,
Figure 44.
1
2
To set a timeout for all user a ccounts, perform o ne
of the following:
• Use the up and down arrows to set the
timeout (from 1 second to 10 minute s)
Figure 44: User Accounts Ti me out screen
• Touch the Disable button to remove any
2
2
NOTE: When the timeout feature is disabl ed, you
must manually clear your account infor m ati on
from the copier after completing copy jobs. Even
with the timeout feature enabled, it is good
practice to clear your account information after
copying by touching the Access button.
3
4
4
Touch the Save button in order to save the
timeout selections.
The Auditron Access screen is displayed,
Figure 45.
Touch the Save butt on to exi t .
The Auditron Administration scr een is displ ayed.
timeout restrictions.
Figure 45: Auditron Access screen
5
6
7
METERS, CONSUMABLES, AND AUDITRON 2–28 DOCUMENT CENTRE CS 50 SYSTEM ADMINISTRATION GUIDE
Page 53

Changing the Auditron Admini strator Password
1
This feature allows you to change the Auditron
Administrator password. As the Auditron
Administrator, you should change the default
Auditron Administrator pa ssword to your own
personal password. This allows you, and only
you, to have access to this level; however, it is
wise to have another person as a backup.
NOTE: The default for the Administrator
password and Tools mode password are the
same number (11111). However, if you change
the Auditron Administrator password, the Tools
mode password does not change. You must
change the Tools mode password in Tools mode if
you want the numbers to be the same.
From the Auditron Administration screen, touch
Auditron Administrator Password button,
Figure 46.
1
2
2
4
The Auditron Administrator Password screen is
displayed, Figure 47.
Figure 46: Auditron Administrator Password
button
5
Figure 47: Auditron Administrator Password
screen
6
7
DOCUMENT CENTRE CS 50 SYSTEM ADMINISTRATION GUIDE 2–29 METERS, CONSUMABLES, AND AUDITRON
Page 54

2
1
Enter a new password in the New password box,
Figure 48, by usin g the numeri c keyp ad. Asteri sks
display instead of the numbers shown in the
example.
3
4
2
2
5
6
Press the Enter button.
Enter the same number in the Confirm password
box, Figure 48. Again, asteri sks display.
Press the Enter button.
NOTE: If you make a mistake while entering a
value, touch the Reset button, type the number
again, and touch the Enter button.
Touch Close to save the new Auditron
Administrator password, Figure 49.
NOTE: Be sure to write down the new Auditron
Administrator password and leave it in a secured
area.
Figure 48: Confirm password window
4
Figure 49: Close button
KEY POINT: You cannot enter the Auditron
Administration mode without your p assword. If
you lose or forget your Auditron Administrator
password, contact your Xerox representat ive.
The Xerox representative will clear the existing
password by returning it to its factory default of
5
7
6
8
11111.
The Auditron Administration scr een is displ ayed,
Figure 50.
Touch the Close button to display the Access
screen.
Touch Close in order to exit and return to the
basic programming screens.
Figure 50: Auditron Administration screen
7
METERS, CONSUMABLES, AND AUDITRON 2–30 DOCUMENT CENTRE CS 50 SYSTEM ADMINISTRATION GUIDE
Page 55

3. Tools Mode
Overview
In the Tools Mode, the System Administrator can
set the default values for a variety of copy output
and copier/printer features, or register custom
colors.
1
2
3
Figure 1: Tools screen
The Tools screen, illustrated in Figure 1, is
displayed when you enter the Tools Mode. From
this screen, you can access and change options
for the following featur es:
• Tray Management
• Feature Defaults
• Machine Set-up
4
5
6
7
DOCUMENT CENTRE CS 50 SYSTEM ADMINISTRATION GUIDE 3–1TOOLS MODE
Page 56

•
Audio Tones
1
• Customize Screens
• System Image Quality
• Machine Timeouts
• Reduce/Enlarge Defaults
• Edit Pad Setup ( if you have one)
2
• Change Tools Access Number
• Original Size Presets
This chapter helps you enter and exit Tools Mode,
and provides infor mation and proc edures f or eac h
of the features li sted above to help you customize
the Document Centre ColorSeries 50.
3
KEY POINT: Touch Close on the Tools screen t o
return to the operator tabs.
4
5
6
7
TOOLS MODE 3–2 DOCUMENT CENTRE CS 50 SYSTEM ADMINISTRATION GUIDE
Page 57

Entering and Exiting Tools Mode
Entering Tools Mode
KEY POINT:
• All previous programming selections are
canceled when you press the Clea r All button
in the Tools Mode.
• You cannot program jobs while in the Tools
Mode.
1
2
3
1
2
Press the Administration butto n (Fig ure 2) above
the numeric keypad t o display the Access screen,
illustrated in Figure 3.
Figure 2: Administration symbol
4
Figure 3: Access screen
5
Touch the Tools button to display the Tools
Access Number screen, as illustr ated in Figure 4.
Figure 4: Tools Access Number screen
6
7
DOCUMENT CENTRE CS 50 SYSTEM ADMINISTRATION GUIDE 3–3TOOLS MODE
Page 58

3
Use the numeric keypad to enter the correct
password and touch Enter on the Touch screen.
1
NOTE: The default password is 11111. Be sure to
change the password so tha t unauthorized
individuals do not have access to Tools Mode.
To close the window without entering a password,
touch Close.
After you have entered the correct password, the
2
Tools screen displays, as illustrat ed in Figure 5.
Figure 5: Tools screen
3
Exiting Tools Mode
4
To exit the Tools Mode, touch the Close button on
the System Administration Items screen.
KEY POINT: Touch Close to exit any screen
within Tools Mode without making changes and to
display the previous screen.
5
6
7
TOOLS MODE 3–4 DOCUMENT CENTRE CS 50 SYSTEM ADMINISTRATION GUIDE
Page 59

Tray Management
The Tray Management screen displays the Paper
Type and Auto Tray Setup features.
Paper Type
The Paper Type screen displays Paper Trays 1, 2,
3 and 4 and the current type of stock (normal,
heavyweight, or transp arency separator s) that is
in each tray.
NOTE: Do not run heavyweight p aper from Paper
Tray 1. Use Trays 2, 3 and 4 for paper stock up to
32 lb. Use Tray 5 for st ock up to 140 lb.
1
2
3
1
2
On the T ools scr een, touch the Tray Management
button to display the T ray Manageme nt screen, as
illustrated in Figure 6.
4
Figure 6: Tray Management screen
Touch the Paper T ype but ton to displ ay t he Paper
Type screen, as illustrated in Figure 7.
5
Figure 7: Paper Type screen
6
7
DOCUMENT CENTRE CS 50 SYSTEM ADMINISTRATION GUIDE 3–5TOOLS MODE
Page 60

3
1
Review the current settings for each tray. Use the
up and down arrows to hi ghlight t he d esired p aper
tray and touch the Change Settings button to
display the detail scr een for the tray. A sample
detail screen for Trays 2, 3, and 4 is illustrated i n
Figure 8.
NOTE:
Figure 8: Sample Tray detail screen
• You cannot run heavyweight paper from
2
Paper Tray 1. The only option on the Tray 1
detail screen is Normal.
• The Auto Tray Setup - Switching option, set
through Auto Paper Select in Tools Mode,
must be disabled before you can select the
Heavyweight option for Trays 2, 3, or 4.
• The Heavyweight option for Trays 2, 3 or 4
3
must be selected when running paper above
105 gsm (28 lb bond). The heaviest paper
that can be run from Tr ays 2, 3 or 4 is 128
gsm (32 lb bond).
• For additional information on Normal and
Heavyweight papers, see the Color Materi a ls
Usage Guide.
4
4
5
Touch the button for the setting that best
describes the paper ty pe for the tray.
Touch Save to display the Paper Ty pe screen.
6
7
5
8
If necessary, repeat steps 3 through 5 for another
paper tray.
Touch Close to display the Tray Management
screen.
Touch Close to display the Tools screen.
6
7
TOOLS MODE 3–6 DOCUMENT CENTRE CS 50 SYSTEM ADMINISTRATION GUIDE
Page 61

Auto Tray Setup
Touching Auto Tray Setup on the Tray
Management screen displays the Auto T ray Setup
screen.
On this screen, you can enable Auto Tray
Switching for Paper Trays 1, 2, 3, and 4.
Enabling Auto Tray Swit ching allows the copier/
printer to switch automatic all y to another tray with
the same size and type of pap er when the first tray
runs out of paper.
NOTE: To enable Auto Tray Switching, ensure
that more than one tray is co nfigur ed for th e same
size paper and f eeding ori entation ( long edge feed
or short edge feed).
NOTE: To exclude a tray from Auto Tray
Switch in g, select Disable Auto Paper in the Auto
Tray Setup after selecting the appropri ate tray.
1
2
3
1
2
On the T ools scr een, touch the Tray Management
button to display the T ray Manageme nt screen, as
illustrated in Figure 9.
Touch the Auto Tray Setup button to display the
Auto Tray Setup screen, as illustrated in
Figure 10.
The options include Tray 1, Tray 2, Tray 3, Tray 4
and Auto Tray Switching.
4
Figure 9: Tray Management screen
5
Figure 10: Auto Tray Setup screen
6
7
DOCUMENT CENTRE CS 50 SYSTEM ADMINISTRATION GUIDE 3–7TOOLS MODE
Page 62

3
Review the current settings for each tray and the
Auto Tray Switching option.
1
4
To enable or disable Auto Tray Switching, use the
up and down arrows to hi ghlight t he d esired p aper
tray, and touch the Change Settings button to
display the tray detail screen, as illustrated in
Figure 11.
Touch Enable Auto Paper or Disable Auto
2
5
3
4
6
Paper.
Touch Save to display the Auto Tray Setup
screen.
If necessary, repeat steps 3 through 5 for another
paper tray.
To enable or disable Auto Tray switching, use the
up and down arrows to highlight the Auto Tray
Switching option. Touch the Change Settings
button to display the Auto T ray Switching screen,
as illustrated in Figure 12.
Touch Switching Enabled, Switch-Auto Paper
Only, or Switching Disabled.
• Switching Enabled enables switching for all
paper trays even if you manually select an
output tray.
Figure 11: Sample Tray detail screen
Figure 12: Auto Tr ay Switching screen
• Switch-Auto Paper Only enables switching
when Auto Paper is selected on the Basic
Copyi ng Tab.
• Switching Disabled disables tray switching
5
7
8
9
altogether.
Touch Save to return to the Auto Tray Setup
screen.
Touch Close to display the Tray Management
screen.
Touch Close to display the Tools screen.
6
7
TOOLS MODE 3–8 DOCUMENT CENTRE CS 50 SYSTEM ADMINISTRATION GUIDE
Page 63

Feature Defaults
The Feature Defaults options enable you to
change factory default settings for a number of
features, including Paper Supply, Reduce/
Enlarge, Original Type, Image Quality Settings,
Margin Shift, Edge Erase, Original Orientation, 2
Sided Copy, and Multiple-Up. The first Feat ure
Defaults screen is illustrated in Figure 13.
1
Because these procedures are very similar, use
the basic procedure that follows to set new
defaults. Any differences are noted in the
descriptions provided for each default and its
settings.
NOTE: Additional information on Featur e Defaults
is found in the Document Centre ColorSeries 50
User Guide.
Figure 13: Feature Default s screen
(page 1 of 4)
2
3
4
5
6
7
DOCUMENT CENTRE CS 50 SYSTEM ADMINISTRATION GUIDE 3–9TOOLS MODE
Page 64

The Feature Defaults options include:
1
• Paper Supply
• Cover Tray
• Reduce / Enlarge
• Original Type
• Photo T ype - Photo & Text
2
• Photo T ype - Photo
• Text Type
• Lighten / Darken
• Output Color
3
• Color Shif t
• Saturation
• Variable Color Balance
• Sharpness
• Margin Shifts
4
• Corner Shift
• Variable Shift
• Edge Erase
• Original Orientation
• 2 Sided Copy
5
• Side 2 Rotate
• Multiple-Up
• 2 Pages Up
• 4 & 8 Pages Up
6
7
TOOLS MODE 3–10 DOCUMENT CENTRE CS 50 SYSTEM ADMINISTRATION GUIDE
Page 65

Basic procedure for setting Featu re Defau lts
1
1
2
3
On the Tools screen, touch the Feature Defaults
button to display the Feature Defaults screen, as
illustrated in Figure 14.
Review feature default items and their current
settings.
KEY POINT: There are multiple screens or
pages for Feature Defaults. The numbers in the
box at the top right of the screen indicate which
Feature Defaults screen you are viewing and the
total number of screen s. For example, 1/4
indicates you are viewing the first of four Feature
Defaults screens.
To display items on other screens, t ouch the Next
Page button or Previous Page button or use the
arrow keys to scroll to the locati on.
To change the current setting of a feature, use the
up and down arrows to highlight the desired
feature.
Touch the Change Settings button to display th e
feature detail screen.
2
Figure 14: Feature Default s screen
3
4
4
5
6
7
Touch the button for the desired default.
Touch Save to display the Feature Defaults
screen.
If necessary , selec t another feature and change it s
settings using step s 2- 5. Refe r to t he section s that
follow for more informati on about individual
features.
Touch Close to display the Tools screen.
5
6
7
DOCUMENT CENTRE CS 50 SYSTEM ADMINISTRATION GUIDE 3–11 TOOLS MODE
Page 66

Paper Supply
1
This option (Figure 15) allows you to desi gnate
the default paper tray. Selecting Auto enables the
copier/printer to determine the paper tray to use
based on the size of the original document.
Figure 15: Paper T ray Default screen
2
Cover Tray
This option (Figure 16) allows you to set the
default cover tray. Ensure the tray can
accommodate the desired stock.
3
Figure 16: Cover Tray screen
4
5
6
7
TOOLS MODE 3–12 DOCUMENT CENTRE CS 50 SYSTEM ADMINISTRATION GUIDE
Page 67

Reduce/Enlarge
This option allows you to designate the default
reduction or enlargement. Selecting Auto enabl es
the copier/printer to determine the reduction or
enlargement percent age to use based on the size
of the original document and the selected paper
tray.
The selected value is displayed in the percentage
box of the Reduce/Enlarge sc reen, as illustr ated in
Figure 17 and listed in Table 1.
NOTE: Auto% cannot be used with Auto Paper
Supply.
Reduce / Enlarge Option Buttons
100% 400% 78%
14” to 11”
Auto% 220%
8.5” to 17”
25% 129%
11” to 1 7”
Table 1: Reduce Enlarge Buttons Table
64%
17” to 11”
50%
A3 to A5
1
2
Figure 17: Reduce/Enlarge screen
3
4
DOCUMENT CENTRE CS 50 SYSTEM ADMINISTRATION GUIDE 3–13 TOOLS MODE
5
6
7
Page 68

Original Type
1
2
This option allows you to set the original type for
the majority of the original documents you will be
copying or printing. Based on your se lection, the
copier/printer automatically makes fine
adjustments to optimize the copy sharpness
based on the type of original selected. As
illustrated in Figure 18, original types include:
Figure 18: Original Type screen
• Photo & Text — Most original documents
consist of both text and graphic s.
• Text — Most original documents consist of
words with few detailed graphics.
• Photo — Most original documents contain
halftones or photographs.
3
4
• Graphics & Maps — Most original
documents contain intricate drawings that
require a number of details to be copied with
utmost precision.
Use the Graphics & Maps option to optimize
the reproduction of detailed graphics, maps,
or map-like originals. Examples i nclude hi ghly
technical drawings, his tograms, pie charts, or
roadmaps.
With this option, text on a light-colored
background is enhanced more than if the
Photo option or the Text option were used.
Fine detail and light colors are copied very
well in this mode. Black and white documents
with fine details and a wide r ange of densities
5
also copy well in this mode, although the
fidelity of the reproduction would be better if
the Photo option were used.
If you select one of the first three options, you
should also select the detail for that original type
using the appropriate Original Type screens that
follow this option.
6
7
TOOLS MODE 3–14 DOCUMENT CENTRE CS 50 SYSTEM ADMINISTRATION GUIDE
Page 69

Photo Type – Photo & Text
Photo T ype–Ph oto & Text is the best selection for
original documents that contain pictures and
printed text, such as magazines or profe ssional
journals with pictures and text.
Output copies are made using the sharpness and
density levels that combine the best levels for
picture, chart, and text areas to provide optimum
image quality.
As illustrated in Figure 19, this option allows you
to specify the default for the kind of photograph or
picture originals you wi ll be copying.
• Halftone — Use this option when most
original documents will be images that are
created using a fine screen that varies the
darkness and density of dot s that make up the
image. Examples of halftone images can be
found in magazines and newspapers.
• Photograph — Use this option when most
original documents will be photographs or
extremely fine halftones.
Figure 19: Photo Type–Photo & Text screen
1
2
3
• Xerographic Copy — Use this option when
most jobs will use a repr oduction ( copy) as t he
original document.
The Photo & Text option applies the best
sharpness and density levels automatically for
optimum color quality on all color copies
4
5
6
DOCUMENT CENTRE CS 50 SYSTEM ADMINISTRATION GUIDE 3–15 TOOLS MODE
7
Page 70

Photo Type – Photo
1
The Photo T ype–Photo opti on is the best selection
for photographs, lithographs, or graphics that
contain a variety of pastel colors.
This option provides the following advantages:
• The most accurate color and density copy for
2
continuous tone documents that contain a
wide range of densities from very dark to very
light images
• The best selection when true reproduction of
light skin colors, li ght colors, or gray areas is
important
• The best option for very high quality halftone
3
4
documents.
As illustrated in Figure 20, this option allows you
to specify t he default f or the kind of Photo orig inals
you will be copying.
• Halftone — Use this option when most
original documents will be images that are
created using a fine screen that varies the
darkness and density of dot s that make up the
image. Examples of halftone images can be
found in magazines and newspapers.
Figure 20: Photo Type–Photo screen
• Photograph — Use this option when most
original documents will be photographs or
extremely fine halftones.
• Xerographic Copy — Use this option when
5
most jobs will use a repr oduction ( copy) as t he
original document.
6
7
TOOLS MODE 3–16 DOCUMENT CENTRE CS 50 SYSTEM ADMINISTRATION GUIDE
Page 71

Text Type
The Text Type option is the best selection for
documents composed of fine line char acters or
other high contrast documen ts with bright, dense
colors. For documents in which priority is given to
the text, this selection produces the clearest
output text. Selecting this option suppresses
background color.
As illustrated in Figure 21, this option allows you
to specify the default for the kind of text originals
you will be copying.
• Standa rd Text — Most original documents
will be of standard darkness.
• Light Text — Most original documents will be
lighter than normal or consist of lines that vary
in thickness and darkness, such as those that
are written in pencil.
1
2
Figure 21: Text Type screen
3
4
5
6
DOCUMENT CENTRE CS 50 SYSTEM ADMINISTRATION GUIDE 3–17 TOOLS MODE
7
Page 72

Lighten / Darken
1
2
The Lighten / Darken feature enables you to
adjust the overall lightness or darkness (density)
of the output copy.
Select darker settings for light originals and light
settings for dark originals, as illustrated in
Figure 22.
Selecting Auto Contra st enables t he copier/ print er
to determine the lightness or darkness to use
based on its scan of the original document.
Figure 22: Lighten/Darken screen
Output Color
3
The Output Color option allows you to set the
default to Auto Color, Full Color (using Black,
Yellow, Cyan and Magenta), 3 Pass Color (u sing
Yellow, Cyan and Magenta), or Black, as
illustrated in Figure 23.
Selecting Auto Color enables the copier/printer to
determine the output color to use based on its
4
scan of the original document.
Figure 23: Output Color screen
5
6
7
TOOLS MODE 3–18 DOCUMENT CENTRE CS 50 SYSTEM ADMINISTRATION GUIDE
Page 73

Color Shift
This option allows you to shift the output color
from blue (cool est) to red (warmest), as illustrated
in Figure 24.
If you select a shift toward red (a warm color), the
red colors shift towards th e yellow hue, the green
colors towards the cyan hue, and the blue colors
towards the magenta hue. The lower bar shifts
toward the right. All col ors in between these
original colors also shift in the same direction.
If you select a shift toward bl ue (a cool color), the
red colors shift towards th e magent a hue, t he b lue
colors toward the cyan hue, and the green col ors
toward the yellow hue. The lower bar shi fts to ward
the left. Again, al l colors in between thes e original
document colors also shift in the same direction.
NOTE: Refer to the Color Shift option in the User
Guide for examples of the Color Shift, Warm and
Cool options.
1
Figure 24: Color Shift screen
2
3
Saturation
This option allows you to adjust the overall
richness of color on the output copy. Colors with
high saturation are sometimes cal led vivid colors,
while those with low saturation are someti me s
called pastel colors.
Use the flower illustrations on the Saturation
screen (Figure 25) to anticipate the results of the
shift. The left flower illu str ates the most pastel
setting of satura tion. The right fl ower illustra tes the
richest or most vivid saturation. The center flower
represents the factory default Normal saturation.
Selections do not cause an y changes t o the flower
illustrations.
4
5
Figure 25: Saturation screen
6
DOCUMENT CENTRE CS 50 SYSTEM ADMINISTRATION GUIDE 3–19 TOOLS MODE
7
Page 74

Variable Color Balance (Yellow, Magenta, Cyan, Black)
1
2
3
These options allow you to adjust the default
levels of all four process colors (Yellow, Magenta,
Cyan, and Black) for areas of high, medi um, and
low density on the copies.
Three higher settings, thr ee lower settings, and
the normal (medium) settings are available for
each density level of each color, as illustrated in
Figure 26.
You can adjust each density level and each color
independently in any combination.
KEY POINT: Remember that adjusting the
amount of any of the process colors affects the
complementary colors that use that color. For
example, when yellow is adjusted, both red and
green are affected.
Figure 26: Sample Color Balance screen
Sharpness
The Sharpness option allows you to adjust the
amount of image edge definition on the copies.
4
5
NOTE: For optimum sharpness, select the correc t
Original Type in the Image Quality tab.
Use the Sharp levels (Figure 27) to increase the
amount of edge definition for original documents
such as maps, line art, or graphics t hat have crisp
lines.
Use the Soft levels (Figure 27) to decrease the
amount of edge definition to copy photogr aphs or
any other documents for which softer, less
focused, output copies are desi red. This option is
especially useful when copying very coarse dot
screens.
Figure 27: Sharpness screen
6
7
TOOLS MODE 3–20 DOCUMENT CENTRE CS 50 SYSTEM ADMINISTRATION GUIDE
Page 75

Margin Shifts for Side 1 and Side 2
This option controls the default Margin Shift. You
can set separate defaults for Side 1 and Side 2
images on the output copy.
You can set the following options, as shown in
Figure 28:
• No Shift
If you select this option, the copier/printer
assumes that the original document is
registered in the upper left cor ner of the
document glass.
• Auto Center
If you select this option, the origi nal image is
centered on the output page.
• Corner Shift
If you select this option, you shoul d also select
the Corner Shift opti on in Feature Defaults f or
the appropriate side.
1
2
Figure 28: Margin Shift screen
3
• Variable Shift
If you select this option, you shoul d also select
the Variable Shift option in Feature Defaults
for the appropriate side.
4
5
6
DOCUMENT CENTRE CS 50 SYSTEM ADMINISTRATION GUIDE 3–21 TOOLS MODE
7
Page 76

Corner Shift
1
2
3
Use this option i f you s elected t he Corner Shi ft
option for Margin Shifts for either Side 1 or
Side 2.
Touch the desired corner shif t posi tion ( Figure
29) and then touch Save to retur n to th e
Feature Defaults screen.
Variable Shift
Use this option, illustrated in Figure 30, if you
selected the Variable Shift option for Margin
Shifts for either Side 1 or Side 2.
To set a horizontal s hift, touch t he r ight arro w
to shift the image to the right edge, or touch
the left arrow to shift the image to the left
edge from 0 to 17 inches (0 to 432 mm).
To set a vertical shift, touch the up arr o w to
shift the image to the top edge, or touch the
bottom arrow to shift the image to the lower
edge from 0 to 17 inches (0 to 432 mm).
Figure 29: Sample Corner Shift Default
screen
Figure 30: Sample Variable Shift Default
screen
4
Touch Save to return to the Feature Defaults
screen.
5
6
7
TOOLS MODE 3–22 DOCUMENT CENTRE CS 50 SYSTEM ADMINISTRATION GUIDE
Page 77

Edge Erase
This option allows you to set the Edge Erase
default to eliminate the shadows that are caused
by the document edges during the copying
process.
This featu re offers two option s , as illu s t ra te d in
Figure 31:
• No Erase — Uses 2 mm edge erase. This
factory setting cannot be eliminated.
• Var iable Erase to display an additional
screen with vari able shift set tings. This s creen
will display values in either inc hes or mm,
depending on Localization settings specified
on the Machine Set-up screen.
Under the Top & Bottom button, touch t he up
arrow to increase the amount of eras ure at
the top and bottom edges. Touch the down
arrow to decrease the amount of erasure at
the top and bottom edges.
Under the Left & Right button, touch the up
arrow to increase the amount of eras ure at
the left and right edges. Touch the down
arrow to decrease the amount of erasure at
the left and right edges.
1
2
Figure 31: Edge Erase screen with
Input Erase V alue selected
3
4
When you are making 2-sided c opies, Edge Eras e
is applied to both sides of the output.
NOTE: A factory setting for a 2 mm edge erase
cannot be eliminated. See the User Guide for
more information on this setting.
5
6
7
DOCUMENT CENTRE CS 50 SYSTEM ADMINISTRATION GUIDE 3–23 TOOLS MODE
Page 78

Original Orientation
1
This option allows you to indicate the position of
most original documents on the Document Glass,
as illustrated in Figure 32. An original document
may be placed with its image upright or wit h the
top of its image positioned towards the left side.
The diagrams on this screen illustrate the correct
positioning of documents on the Document Glass.
Figure 32: Original Orientation Default screen
2
2 Sided Copy
This option allows you to set default copying for 1
to 1 Sided, 1 to 2 Sided, 2 to 2 Sided, or 2 to 1
Sided, as illustrated in Figure 33.
3
You must select the appropriate Side 2 Rotate
option from the Feature Defaults options.
Figure 33: 2 Sided Copying Default screen
Side 2 Rotate
This option should be used if you set the defaul t
copying for 2-Sided output. With this option, you
can specify whether the 2-sided copy should be
4
made with Flip on Long Edge (head- to-head, boo k
style) or Flip on Shor t Edge (hea d-to-toe, calendar
style), as illust rated in Figure 34.
NOTE: For more information on Side 2 Rotate,
see the User Guide, 2 Sided Copy option.
Figure 34: Side 2 Rotate Default screen
5
6
7
TOOLS MODE 3–24 DOCUMENT CENTRE CS 50 SYSTEM ADMINISTRATION GUIDE
Page 79

Multiple-Up
The Multiple-Up feature (Figure 35) enables you
to specify whether 1, 2, 4, or 8 images from
multiple originals are copied onto a single page.
Each image is centered in its sp ace.
If you select 2 Pages Up, use the 2 Pages Up
Copy Layout feature described bel ow.
If you select 4 Pages Up or 8 Pages Up, use the 4
& 8 Pages Up Copy Layout feature described
below.
NOTE: Refer to the User Guide for additional
information on the Multiple Up feature.
2 Pages Up
This option (Figure 36) allows you to specify how
two images will be placed on a single sheet of
paper:
• Left-to-right / top-to-bottom
1
Figure 35: Multiple-Up Default screen
2
3
• Right-to-lef t / top-to-bottom
4 & 8 Pages Up
This option allows you to specify how four or eig ht
images will be placed on a single sheet of paper,
as illustrated in Figure 37:
• Horizontally, beginning from upper left corner
• Horizontally, beginning from upper right corner
• Vertically, beginning from upper left corner
• Vertically, beginning from upper right corner
Figure 36: 2 Pages Up Default screen
Figure 37: 4 Pages Up Default screen
4
5
6
DOCUMENT CENTRE CS 50 SYSTEM ADMINISTRATION GUIDE 3–25 TOOLS MODE
7
Page 80

Machine Set-up
1
Use these settings to limit the number of copy
sets, disable/enable the Power Saver mode
option, select desired displ ay units, and enter
network information.
2
1
2
3
3
On the Tools screen, touch the Machine Set-up
button to display the Machine Set-up scr een, as
illustrated in Figure 38.
Review the current settings for each item. To
change a setting, use the up and down arrows to
highlight the desired item and touc h the Change
Settings button to display the detail screen.
Perform one of the following:
Figure 38: Machine Setup screen
• On the Copy Quantity Limit screen (Figure
39), use the numeric keypad to enter the
maximum number (1—999) of copies/sets
allowed.
4
Figure 39: Copy Quantity Limit screen
• On the Power Saver Default screen (Figure
40), touch either the Enabled or Disabl ed
5
button.
NOTE: If the Power Saver Default option is
disabled, the Power Save Timeout in Machine
Timouts will not be selectable.
Figure 40: Power Saver Default screen
6
7
TOOLS MODE 3–26 DOCUMENT CENTRE CS 50 SYSTEM ADMINISTRATION GUIDE
Page 81

•
On the Localization screen (Figure 41), touch
the setting for Inches or Millim eters to indicate
the desired units for di splay on the Touch
screen.
• On the IP Address screen, Subnet Mask, and
Gateway Address screens, enter the
appropriate address using the numeric
keypad. Enter spaces as zero.
As shown in the IP Address screen example
in Figure 42, an address of 1.150.75.120
would be entered as 001.150.075.120.
• On the Frame Type screen (Figure 43), touch
the appropriate Frame Type.
1
Figure 41: Localization screen
2
Figure 42: IP Address screen
3
Figure 43: Frame Type screen
4
5
6
• On the Source Routing screen (Figure 44),
touch Yes or No to indicate if sourc e rout ing i s
taking place.
Touch Save to display the Machine Set-up screen.
Repeat steps 2 through 4 until al l necessary
information is entered.
Touch Close to display the Tools screen.
4
Figure 44: Source Routing screen
5
6
DOCUMENT CENTRE CS 50 SYSTEM ADMINISTRATION GUIDE 3–27 TOOLS MODE
7
Page 82

Audio Tones
1
You can change the Audio Tones settings for the
following options:
• Selection Tone
• Conflict Tone
• Control Panel Input Tone
2
• Machine Ready Tone
• End of Job Tone
• Fault Tone
You can turn the Control Panel Input Tone on or
3
1
4
off. For all other options, you can turn the tone off
or set its volume to soft, normal or loud.
On the Tools screen, touch the Audio Tones
button to display the Audio Tones screen, as
illustrated in Figure 45.
Figure 45: Audio Tones screen
2
5
Review the current settings for each tone. To
change a setting, use the up and down arrows to
highlight the desired tone and touch the Change
Settings button to display the detail screen.
6
7
TOOLS MODE 3–28 DOCUMENT CENTRE CS 50 SYSTEM ADMINISTRATION GUIDE
Page 83

3
4
Perform one of the following:
• For the Control Panel Input Tone (Figure 46),
touch No Tone or Tone.
• For other tones (Figure 47), touch No Tone,
Softer, Normal, or Louder.
Touch Save to display the Audio Tones screen.
1
Figure 46: Control Panel Input Tone screen
2
Figure 47: Sample audio tone setting screen
3
5
6
If necessary, repeat steps 2 through 4 for other
tones.
Touch Close to display the Tools screen.
4
5
6
DOCUMENT CENTRE CS 50 SYSTEM ADMINISTRATION GUIDE 3–29 TOOLS MODE
7
Page 84

Customize Screens
1
The Customize Screens feature enables you to
set two paper trays and two reduction/
enlargement values to display on the Basic
Copying tab.
2
1
On the Tools screen, touch the Customize
Screens button to displa y the Cust omize Sc reens
screen, as illustrated in Figure 48.
Figure 48: Customize Screens screen
3
2
4
3
Touch the Basic Copying Presets button to
display the Basic Copying Presets screen, as
illustrated in Figure 49.
Figure 49: Basic Copying Presets screen
Review the current settings. Use the up and down
arrows to highlight the desired item and touch the
Change Settings button to display the detail
screen for the item.
5
6
7
TOOLS MODE 3–30 DOCUMENT CENTRE CS 50 SYSTEM ADMINISTRATION GUIDE
Page 85

4
Perform one of the following:
• If you selected a Preset Paper Select ion
option, touch the desired tray but ton on the
Preset Paper Selection screen (Figure 50).
The copier/printer illustration highlights your
selection.
• If you selected a Reduce/Enlarge Preset
option, touch the desired reduction/
enlargement percent age button on the Preset
Reduce/Enlarge Preset scr een (Figure 51).
The presets are listed in Table 2.
Reduce / Enlarge Preset Values
Figure 50: Preset Tray screen
Figure 51: Preset Reduce/Enlarge Selection
screen
1
2
3
5
6
7
25% 70%
A3 to A4
35%
A3 to A6
50%
A3 to A5
64%
17” to 11”
Touch Save to display the Basic Copying Presets
screen.
If necessary, repeat steps 3 through 5 for another
item.
Touch Close to display the Customize Screens
screen.
78%
14” to 11”
81% 122%
86% 127% 180% 400%
Table 2: Reduce / Enlarge Presets
97%
11” to A4
115% 141%
8.5” x 11”
129%
11” x 17”
A4 to A3
154%
8.5” x 11”
200%
A5 to A3
220%
3.5” x 5” to
11”
282%
A6 to A3
4
5
6
8
DOCUMENT CENTRE CS 50 SYSTEM ADMINISTRATION GUIDE 3–31 TOOLS MODE
Touch Close to display the Tools screen.
7
Page 86

System Image Quality
1
This feature enables you to control a number of
system image quality options.
With the Image Recognition screen, you can
adjust the following options :
• T ext & Photo Recognition for text and photo
2
separation levels
• Auto Color Recognition for black/white and
color separation levels
• T ext & Photo Balance to lower or raise levels
of density, optimizing text or photo settings
• Screening Adjustment to apply settings to
3
both copy and print modes, copy mode only,
or to disable this option
With the Auto Screening Adjust screen, you can
select the following Calibrati on options:
• Halftone Screen to indicate the level of det ai l/
resolution to use, ranging from halftones (200
line screen) to photographs (200 dpi) to prints
4
(150 dpi).
• Print Test Original to produce a Print Test
Original and enter the adjustment mode.
• Adjustment Completed to print a final test
after the adjustment process is completed.
NOTE: Prior to using the Auto Screening Adjust
feature to calibrate your copier/printer, you must
5
set the Image Recognition setting to Appl y to
Copies only.
6
7
TOOLS MODE 3–32 DOCUMENT CENTRE CS 50 SYSTEM ADMINISTRATION GUIDE
Page 87

Adjust ing Image Recognit ion settings
1
1
2
3
On the Tools screen, touch the System Image
Quality button to display the System Image
Quality screen, as illustrated in Figure 52.
Touch the Image Recognition button to display
the Image Recognition screen , as illustrated in
Figure 53.
Review the current settings for each item. To
change a setting, use the up and down arrows to
highlight the desired item and touc h the Change
Settings button to display the image quality det ail
screen.
• Text & Photo Recognition enhances image
quality by favoring either a stronger text bias
or a stronger photo bias.
• Auto Color Recognition favors detecting
either color or black and white.
2
Figure 52: System Image Quality screen
3
Figure 53: Image Recognition screen
4
• Text & Photo Balance lowers or increases
the level of density t o optimiz e print ing for text
or photo.
• Screening Adjustment e nables the settings
to be applied t o copies and print s, copies only
or to be disabled. Set this option to Apply to
Copies only before calibrating the copier.
5
6
7
DOCUMENT CENTRE CS 50 SYSTEM ADMINISTRATION GUIDE 3–33 TOOLS MODE
Page 88

4
Perform one of the following:
1
• Touch the box that indicates the appropriate
image quality level set ting for Text & Photo, as
illustrated in Figure 54.
Figure 54: Text & Photo settings
2
• Touch the box that indicates the appropriate
image quality level sett ing f or Auto Color
Recognition, as illustrated in Figure 55.
Figure 55: Color Recognition settings
3
• Touch the box that indicates the appropriate
image quality level setting for Text & Photo
Balance, as illustrat ed in Fi gure 56.
Figure 56: Text & Photo settings
4
• For Screening Adjustment, touch the box that
indicates the appropriate application for the
adjustment, as illustrated in Figure 57.
5
5
6
7
6
8
Touch Save to display the Image Recognition
screen.
If necessary, repeat steps 2 through 5 for other
image recognition items.
Touch Close to display the System Image Quality
screen.
Touch Close to display the Tools screen.
Figure 57: Screening Adjustment screen
7
TOOLS MODE 3–34 DOCUMENT CENTRE CS 50 SYSTEM ADMINISTRATION GUIDE
Page 89

Auto Screening Adjust (Calibration)
1
1
2
3
On the Tools screen, touch the System Image
Quality button to display the System Image
Quality screen.
Touch the Auto Screening Adjust button to
display the Auto Screening Adjust screen, as
illustrated in Figure 58.
NOTE: If Image Recognition Screening
Adjustment setting is set to Do Not Apply, you will
be unable to calibrate using Auto Screeni ng
Adjust.
Touch Print Test Original and examine the output.
NOTE: Test originals are printed from Paper
Tray 5. The original prints on 8.5”x 1 1 ” or A4
paper. For best results, use Xerox Color
Xpressions or ColoTech + paper.
2
Figure 58: Auto Screening Adjust screen
3
4
DOCUMENT CENTRE CS 50 SYSTEM ADMINISTRATION GUIDE 3–35 TOOLS MODE
5
6
7
Page 90

4
Examine the output and perform one of the
following:
1
• Touch the Halftone Screen button to access
the Halftone Screen, as illustr ated in
Figure 59.
Touch the appropriate setting and touch Save
to return to the Auto Screening Adj ust screen .
The Halftone screen options affect specific
2
Original Types and Photo Ty pes:
Figure 59: Halftone screen
• Halftone - 200 line screen (a rotated line
screen) calibrat ion affects the followi ng
modes:
Original Type Photo Type
3
4
5
Photo & Text Halftone
Photo & Text Xerographic Copy
Photo Halftone
Photo Xerographic Copy
Table 3: Halftone - 200 line screen
• Photograph - 200 dpi (a clustered dot
screen) calibrat ion affects the followi ng
modes:
Original Type Photo Type
Photo & Text Photograph
Photo Photograph
Table 4: Photograph - 200 dpi
• Printer use - 150 dpi is used when Auto
Screening Adjust is appl ied to Copies only .
The Document Center ColorSer ies 50 ha s
its own calibrati on procedure. Refer to the
Document Center ColorSeries 50 Printer
6
User Guide for more informati on about
calibrating the printer.
7
TOOLS MODE 3–36 DOCUMENT CENTRE CS 50 SYSTEM ADMINISTRATION GUIDE
Page 91

•
Touch Print Test Original to print a sample of
the settings.
Follow the directions on the Touch Screen to
print the test original and enable the
adjustment.
1
5
6
7
8
Place the test original on the document glass with
the magenta or “red” boxes against t he left side of
the Document Glass face down. Place five blank
white sheets on top of the test original and touch
Start Adjustment.
These instructions are displayed on the Touch
Screen.
Once the second original has been printed and
you are satisfied with the quality, touch
Adjustment Completed to indicate the calibr ation
process has successfully completed.
You may repeat the process if you are dissatisfied
with the image quality of the second original .
Touch Close to display the System Image Quality
screen.
Touch Close to display the Tools screen.
2
3
4
DOCUMENT CENTRE CS 50 SYSTEM ADMINISTRATION GUIDE 3–37 TOOLS MODE
5
6
7
Page 92

Machine Timeouts
1
The Machine Timeouts feature allows you to
change the length of time the copier/pr inter waits
before returning to the default settings after a job
is complete or only part ially pr ogrammed, entering
Power Saver mode, powering off, or exiting
System Administration mode. You may also
disable or enable a timeout option through the
2
Timeouts feature screens.
These screens do not have a Save button. When
you Close the screen, settings ar e automat ically
saved. To change settings, access the ap propriate
screen and change the settings.
The machine timeouts and settings are described
in Table 5.
3
Machine Timeout Description Setting
Job Completion This sets the time for job completion
until the machine returns all sel ections to the default.
1- 59 seconds
1 - 10 minutes
4
5
6
Job Program
Incomplete
Low Power This sets the time for job completion
Power Saver This sets the time from the last selec-
Auditron Administration / Tools Mode
Timeout
Network Controller This sets the time for job timeout until
Network Controller
Job Complete
This sets the time for job program
incomplete until the machine retur ns
all selections to the default .
or last selection until the machi ne
enters low power mode.
tion until the machine enters power
saver mode.
This sets the time from last selection
until the Auditron Administrator or
Tools Mode is exited.
the machine discontinues access
through the Network Controller.
This sets the time from job completion
until the machine di scontinues access
through the Network Controller.
1- 59 seconds
1 - 10 minutes
1 - 240 minutes
1 - 240 minutes
10 - 60 minutes
Timeout Disabled
1 - 59 seconds
10 - 60 minutes
Timeout Disabled
(Recommended:
15 second)
1 - 59 seconds
10 - 60 minutes
Timeout Disabled
(Recommended:
15 second)
7
Table 5: Machine Timeout s
TOOLS MODE 3–38 DOCUMENT CENTRE CS 50 SYSTEM ADMINISTRATION GUIDE
Page 93

1
1
2
On the Tools screen, touch the Machine
Timeouts button to display the Timeouts screen,
as illustrated in Figure 60.
Review the current settings for each tone. To
change a setting, use the up and down arrows to
highlight the desired item and touc h the Change
Settings button to display the detail screen.
Figure 60: Timeouts screen
2
3
4
DOCUMENT CENTRE CS 50 SYSTEM ADMINISTRATION GUIDE 3–39 TOOLS MODE
5
6
7
Page 94

3
Perform one of the following:
1
2
• Use the up and down arrows (Figure 61) to
increase or decrease the desired time before
returning to the default settings after a job is
complete or only partial ly programmed,
entering Low Power mode, powering off, or
exiting System Administration mod e. Be sure
to stay within the stated minimum and
maximum times.
• Touch the Timeout Disabled button to
prevent the machine from timing out.
NOTE: The disable option is not available on
the Low Power Timeout or Auto Power Off
screen. If the copier/printer is not used for
over four hours (default set ting), it must enter
Low Power mode.
Figure 61: Sample timeout setting screen
3
To re-enable an option that was previously
disabled, use the up arrow to set a new time.
4
5
Touch Close to save the settings and display the
Timeouts screen.
If necessary, repeat steps 2 through 4 for other
timeout settings.
4
6
Touch Close to display the Tools screen.
5
6
7
TOOLS MODE 3–40 DOCUMENT CENTRE CS 50 SYSTEM ADMINISTRATION GUIDE
Page 95

Reduce/Enlarge Defaults
Selecting value s on the Reduce / Enlarge Presets
screen enables you to specify six standard
reduction/enlargement percentages to display as
defaults on the Reduce/Enlarge screen. Reduce /
Enlarge Fine Adjust enables adjustments to the
length and width.
1
1
2
On the Tools screen, touch the Reduce/Enlarge
Defaults button to display the Reduce/Enlarge
Presets screen, as illustrated in Figure 63.
Review the current settings for each item. To
change a setting, use the up and down arrows to
highlight the desired item and touc h the Change
Settings button to display the preset reduction/
enlargement detail screen.
Figure 62: Feature Defaults - Reduce /
Enlarge buttons
Figure 63: Reduce/Enlarge Presets screen
2
3
4
DOCUMENT CENTRE CS 50 SYSTEM ADMINISTRATION GUIDE 3–41 TOOLS MODE
5
6
7
Page 96

3
1
Touch the button with the desired reduction/
enlargement percentage, as illustrated in
Figure 64.
4
5
2
6
3
Touch Save to display the Reduce/Enlarge
Presets screen.
If necessary, repeat steps 2 through 4 for other
reduction/enlargement items.
Touch Close to display the Tools screen.
The presets are listed in Table 6.
Reduce / Enlarge Preset Values
25% 70%
35%
A3 to A6
50%
A3 to A5
64%
17” to 11”
A3 to A4
78%
14” to 11”
81% 122% 154%
86% 127% 180% 400%
97%
11 t o A4 ”
115% 141%
129%
11” x 17
A4 to A3
8.5 x 11”
Figure 64: Sample Preset screen
200%
A5 to A3
220%
3.5” to 1 1 ”
282%
A6 to A3
4
Table 6: Reduce / Enlarge Presets
5
6
7
TOOLS MODE 3–42 DOCUMENT CENTRE CS 50 SYSTEM ADMINISTRATION GUIDE
Page 97

Reduce / Enlarge Fine Adjust
The Redu ce / Enlarge Fine Adjust button, shown
in Figure 65, enables small adjustments to the
length and width of an or iginal. It affec ts the 100%
Reduce/Enlarge option by making the copy
slightly smaller or l arger than the original.
Adjustments made using this tool al low you t o
more closely define output when used with the
Repeat Image and Multiple Up features.
KEY POINT: Setting this as your default affects
all copies printed.
Figure 65: Fine Adjust options
1
2
3
1
2
3
Touch the Reduce / Enlarge Fine Adjust button
and the Reduce / Enlarge Fine Adjust scr een
will be displayed.
Make your selections.
4
Touch Save and exit Tools mode.
5
6
DOCUMENT CENTRE CS 50 SYSTEM ADMINISTRATION GUIDE 3–43 TOOLS MODE
7
Page 98

Change Tools Access Number
1
Access numbers (sometimes called passwords)
are used to ensure that unauthorize d indi viduals
do not have access to System Administration
Tools. For maximum security, set your Access
Number to a number other than the default
(11111), and c hange it periodically (for example,
quarterly).
2
KEY POINT: In choosing a new access number,
avoid known values such as birthdates or phone
numbers, simple combinations, or fi ve repeated
numbers.
KEY POINT: If you forget your access number, a
Service Technician will be required to reset it to
the default setting.
3
1
4
On the Tools screen, touch the Change Tool s
Access Number button to display the Change
Tools Access Number screen, as illustrated in
Figure 66.
2
3
5
4
Enter a value from the nu meric key p ad in th e New
Number box. Touch the Enter button.
Enter the same number in the Confirm New
Number box. Touch the Enter button.
NOTE: If you make a mistake in ent ering a value,
touch the Clear button, retype the numb er and
touch the Enter button again.
Touch Close to display the Tools screen.
Figure 66: Change Tools Access Number
screen
6
7
TOOLS MODE 3–44 DOCUMENT CENTRE CS 50 SYSTEM ADMINISTRATION GUIDE
Page 99

Original Size Presets
Selecting values on the Original Size Presets
screen enables you to specify eleven sizes to
display to users as preset defaults on the Original
Size screen.
1
2
1
2
On the Tools screen, touch the Original Size
Presets button to displ ay the Original Size
Presets screen, as illustrated in Figure 67.
Review the current settings for each preset item.
NOTE: There are two Original Size Presets
screens. Check both to set or change all options.
To display additional original size items, touch the
Next Page or Previous Page bu tt on or use the
arrows to move to the next screen.
To change a setting, use the up and down arrows
to highlight the desired item and touch the
Change Settings button to display the original
size detail screen.
Figure 67: Original Size Presets screen
(page 1)
3
4
5
DOCUMENT CENTRE CS 50 SYSTEM ADMINISTRATION GUIDE 3–45 TOOLS MODE
6
7
Page 100

3
Perform one of the following:
1
• Touch the International Sizes button and
touch one of the displayed internati onal sizes
(Figure 68)
• Touch the Inch Sizes button and touch one of
the standard US sizes (Figure 69)
Figure 68: Original Size Presets screen (with
International Sizes option selected)
• Touch the Variable Size button. Use the right
2
4
3
5
6
and left arrows to set the X dimensions and
the up and down arrows to set the Y
dimensions for a customized preset original
document size. (Figure 70)
Touch Save to display the Original Size Presets
screen.
If necessary, repeat steps 2 through 4 for other
original size items.
Touch Close to display the Tools screen.
Figure 69: Original Size Presets screen (with
Inch Sizes option selected)
Figure 70: Original Size Presets screen (with
4
Vari able Size option selected)
5
6
7
TOOLS MODE 3–46 DOCUMENT CENTRE CS 50 SYSTEM ADMINISTRATION GUIDE
 Loading...