

Page 1

27 October 2008
Xerox
®
490/980
TM
Color
Continuous Feed Printing System
Color Management Guide
Page 2

Page 3

Xerox 490/980 Color Continuous Feed Printing System Table of Contents
Table of Contents
1 Color Management Overview . . . . . . . . . . . . . . . . . . . . . . . . . . . 1-1
CMS Option Tool Overview . . . . . . . . . . . . . . . . . . . . . . . . . . . . . . . . . . . . . . . . . . . . . . . . . 1-2
Major Functions of the CMS Option Tool . . . . . . . . . . . . . . . . . . . . . . . . . . . . . . . 1-2
CMS Option Tool Setup . . . . . . . . . . . . . . . . . . . . . . . . . . . . . . . . . . . . . . . . . . . . . . . . . . . . 1-3
Prerequisites to setting up CMS Option Tool . . . . . . . . . . . . . . . . . . . . . . . . . . . . 1-3
Color Options. . . . . . . . . . . . . . . . . . . . . . . . . . . . . . . . . . . . . . . . . . . . . . . . . . . . . . . . . . . . . . 1-3
Color Resource Set . . . . . . . . . . . . . . . . . . . . . . . . . . . . . . . . . . . . . . . . . . . . . . . . . . . . 1-3
Convert CMYK/RGB Black to K . . . . . . . . . . . . . . . . . . . . . . . . . . . . . . . . . . . . . . . . . 1-3
Black Overprint . . . . . . . . . . . . . . . . . . . . . . . . . . . . . . . . . . . . . . . . . . . . . . . . . . . . . . . . 1-4
Color Characteristics . . . . . . . . . . . . . . . . . . . . . . . . . . . . . . . . . . . . . . . . . . . . . . . . . . 1-4
Pre-Printed Paper . . . . . . . . . . . . . . . . . . . . . . . . . . . . . . . . . . . . . . . . . . . . . . . . . . . . . . 1-7
2 CMS Option Tool. . . . . . . . . . . . . . . . . . . . . . . . . . . . . . . . . . . . . . . 2-1
Introduction to the CMS Option Tool . . . . . . . . . . . . . . . . . . . . . . . . . . . . . . . . . . . . . . . 2-1
Measuring devices . . . . . . . . . . . . . . . . . . . . . . . . . . . . . . . . . . . . . . . . . . . . . . . . . . . . 2-1
Install the CMS Option Tool . . . . . . . . . . . . . . . . . . . . . . . . . . . . . . . . . . . . . . . . . . . 2-2
CMS Option tool tab menus . . . . . . . . . . . . . . . . . . . . . . . . . . . . . . . . . . . . . . . . . . . 2-3
After the installation . . . . . . . . . . . . . . . . . . . . . . . . . . . . . . . . . . . . . . . . . . . . . . . . . . 2-3
Cancelling the installation . . . . . . . . . . . . . . . . . . . . . . . . . . . . . . . . . . . . . . . . . . . . . 2-4
Uninstall the CMS Option Tool . . . . . . . . . . . . . . . . . . . . . . . . . . . . . . . . . . . . . . . . . 2-4
Using the CMS Option Tool . . . . . . . . . . . . . . . . . . . . . . . . . . . . . . . . . . . . . . . . . . . . 2-5
Create Calibration Data . . . . . . . . . . . . . . . . . . . . . . . . . . . . . . . . . . . . . . . . . . . . . . . 2-8
Custom Paper . . . . . . . . . . . . . . . . . . . . . . . . . . . . . . . . . . . . . . . . . . . . . . . . . . . . . . . . 2-10
Registering Custom Paper . . . . . . . . . . . . . . . . . . . . . . . . . . . . . . . . . . . . . . . . . . . . 2-12
Custom Ink Characteristic . . . . . . . . . . . . . . . . . . . . . . . . . . . . . . . . . . . . . . . . . . . . 2-13
Paper Information . . . . . . . . . . . . . . . . . . . . . . . . . . . . . . . . . . . . . . . . . . . . . . . . . . . 2-13
Color Resource Management . . . . . . . . . . . . . . . . . . . . . . . . . . . . . . . . . . . . . . . . . 2-16
3 Prepare for Color Calibration. . . . . . . . . . . . . . . . . . . . . . . . . . . . 3-1
Recommended Calibration Conditions. . . . . . . . . . . . . . . . . . . . . . . . . . . . . . . . . . . . . . 3-2
Verify Color Calibration Resources . . . . . . . . . . . . . . . . . . . . . . . . . . . . . . . . . . . . . . . . . . 3-3
Copy Color Calibration Resources. . . . . . . . . . . . . . . . . . . . . . . . . . . . . . . . . . . . . . . . . . . 3-8
Download ColorPort Utility Software . . . . . . . . . . . . . . . . . . . . . . . . . . . . . . . . . . . . . . 3-10
Check for Queue and Imposition Files . . . . . . . . . . . . . . . . . . . . . . . . . . . . . . . . . . . . . 3-11
Check for Existing Imposition Files . . . . . . . . . . . . . . . . . . . . . . . . . . . . . . . . . . . . 3-11
Check for Existing Queues . . . . . . . . . . . . . . . . . . . . . . . . . . . . . . . . . . . . . . . . . . . . 3-11
4 Pre-Calibration Engine Density Adjustment . . . . . . . . . . . . . . 4-1
Create an Empty Color Resource . . . . . . . . . . . . . . . . . . . . . . . . . . . . . . . . . . . . . . . . . . . 4-2
For Simplex Systems . . . . . . . . . . . . . . . . . . . . . . . . . . . . . . . . . . . . . . . . . . . . . . . . . . 4-2
For Duplex Systems . . . . . . . . . . . . . . . . . . . . . . . . . . . . . . . . . . . . . . . . . . . . . . . . . . . 4-4
Set Up Imposition Files . . . . . . . . . . . . . . . . . . . . . . . . . . . . . . . . . . . . . . . . . . . . . . . . . . . . 4-6
Import Simplex/Duplex Imposition Files . . . . . . . . . . . . . . . . . . . . . . . . . . . . . . . . 4-6
Manipulate the Imported Simplex Imposition File . . . . . . . . . . . . . . . . . . . . . . 4-7
Manipulate the Imported Duplex Imposition File . . . . . . . . . . . . . . . . . . . . . . . 4-8
Create a New Queue. . . . . . . . . . . . . . . . . . . . . . . . . . . . . . . . . . . . . . . . . . . . . . . . . . . . . . . 4-9
Color Management Guide i
Page 4

Table of Contents Xerox 490/980 Color Continuous Feed Printing System
Create a new Simplex Queue . . . . . . . . . . . . . . . . . . . . . . . . . . . . . . . . . . . . . . . . . . 4-9
Create a new Duplex Queue . . . . . . . . . . . . . . . . . . . . . . . . . . . . . . . . . . . . . . . . . . 4-13
Color Density Adjustment. . . . . . . . . . . . . . . . . . . . . . . . . . . . . . . . . . . . . . . . . . . . . . . . . 4-18
5 Color Calibration Process for v1.1.6 Software . . . . . . . . . . . . .5-1
Create a TRC File . . . . . . . . . . . . . . . . . . . . . . . . . . . . . . . . . . . . . . . . . . . . . . . . . . . . . . . . . . 5-2
For Simplex Systems . . . . . . . . . . . . . . . . . . . . . . . . . . . . . . . . . . . . . . . . . . . . . . . . . . 5-2
For Duplex Systems . . . . . . . . . . . . . . . . . . . . . . . . . . . . . . . . . . . . . . . . . . . . . . . . . . . 5-6
Regional Settings. . . . . . . . . . . . . . . . . . . . . . . . . . . . . . . . . . . . . . . . . . . . . . . . . . . . . . . . . 5-11
Use ColorPort to Measure Targets . . . . . . . . . . . . . . . . . . . . . . . . . . . . . . . . . . . . . . . . .5-12
Create TRC File with TRC Viewer . . . . . . . . . . . . . . . . . . . . . . . . . . . . . . . . . . . . . . . . . . 5-14
For Simplex Systems . . . . . . . . . . . . . . . . . . . . . . . . . . . . . . . . . . . . . . . . . . . . . . . . . 5-14
For Duplex Systems . . . . . . . . . . . . . . . . . . . . . . . . . . . . . . . . . . . . . . . . . . . . . . . . . . 5-16
Import TRC File into PC-UI . . . . . . . . . . . . . . . . . . . . . . . . . . . . . . . . . . . . . . . . . . . . . . . . 5-18
For Simplex Systems . . . . . . . . . . . . . . . . . . . . . . . . . . . . . . . . . . . . . . . . . . . . . . . . . 5-18
For Duplex Systems . . . . . . . . . . . . . . . . . . . . . . . . . . . . . . . . . . . . . . . . . . . . . . . . . . 5-20
Create a New Queue for Calibration Confirmation . . . . . . . . . . . . . . . . . . . . . . . . . 5-21
For Simplex Systems . . . . . . . . . . . . . . . . . . . . . . . . . . . . . . . . . . . . . . . . . . . . . . . . . 5-22
For Duplex Systems . . . . . . . . . . . . . . . . . . . . . . . . . . . . . . . . . . . . . . . . . . . . . . . . . . 5-25
Post-Calibration Density Check. . . . . . . . . . . . . . . . . . . . . . . . . . . . . . . . . . . . . . . . . . . . 5-28
Apply a Calibration TRC to existing Queues using the User TRC option . . . . . .5-30
For Simplex Systems . . . . . . . . . . . . . . . . . . . . . . . . . . . . . . . . . . . . . . . . . . . . . . . . . 5-30
For Duplex Systems . . . . . . . . . . . . . . . . . . . . . . . . . . . . . . . . . . . . . . . . . . . . . . . . . . 5-30
6 Color Calibration Using ColorPort Utility Software. . . . . . . . .6-1
Color Calibration . . . . . . . . . . . . . . . . . . . . . . . . . . . . . . . . . . . . . . . . . . . . . . . . . . . . . . . . . . 6-2
Using ColorPort for Color Calibration . . . . . . . . . . . . . . . . . . . . . . . . . . . . . . . . . . . . . . . 6-3
A Appendix. . . . . . . . . . . . . . . . . . . . . . . . . . . . . . . . . . . . . . . . . . . . . . A-1
Logical Page Setting . . . . . . . . . . . . . . . . . . . . . . . . . . . . . . . . . . . . . . . . . . . . . . . . . . . . . . .A-1
Offset Specification . . . . . . . . . . . . . . . . . . . . . . . . . . . . . . . . . . . . . . . . . . . . . . . . . . . A-1
Logical Page Size . . . . . . . . . . . . . . . . . . . . . . . . . . . . . . . . . . . . . . . . . . . . . . . . . . . . . . A-1
Offset Specification and Logical Page Size Explained . . . . . . . . . . . . . . . . . . . A-2
Calculate Offset Specification and Logical Page Size Values . . . . . . . . . . . . A-3
Table of Offset Specification and Logical Page Size Values . . . . . . . . . . . . . A-4
B Appendix . . . . . . . . . . . . . . . . . . . . . . . . . . . . . . . . . . . . . . . . . . . . . . B-1
Print Using LPR . . . . . . . . . . . . . . . . . . . . . . . . . . . . . . . . . . . . . . . . . . . . . . . . . . . . . . . . . . . . B-1
ii Color Management Guide
Page 5

Color Management
1
Overview
The CMS (Color Management System) Option Tool is an add-on software for the Xerox 490/980
Color Continuous Feed Printing System, and it can be installed on a remote PC. The CMS Option
Tool is the primary tool used when adjusting color on the Xerox 490/980 Color Continuous Feed
Printing System. Color selections and calibrations are performed using the CMS Tool. This
section explains what the CMS Option tool is and how to make color selections for a specified
job on the PC-GUI.
The Xerox 490/980 Color Continuous Feed Printing System produces what is commonly known
in the industry as "Business" or "Transactional Color". This is one way to describe this caliber of
color and where it fits in the market; between that of ink jet products and offset quality. The
machine is also the fastest toner-based production color system available today. Utilizing four
color housings, the machine outputs CMYK at 600dpi, and line screens from 85 to 300 lpi. Color
output of this machine is richer in tone and hue than comparable ink jet systems. The color
gamut is targeted at newsprint-type image quality.
Because the machine uses dry toner, it can print on a wide variety of substrates ranging from 64
gsm to 160 gsm. Paper weights lighter than 64 gsm may also be used subject to satisfactory
testing for suitability. Light weight stocks are typically a problem for ink jet printers because the
ink often causes water saturation, curling, and other issues. Through the use of dry toner and
flash fusing technology, the machine provides a competitive advantage to the customer.
Because of its unique use of strobing xenon lamps, only the toner is heated and no pressure,
heat or contact is made with the substrate itself. Therefore, the customer gains the ability to
use light weight stocks and other special media, such as cards and adhesive labels, without any
of the problems associated with the use of ink jet systems.
Color Management Guide 1-1
Page 6

Color Management Overview Xerox 490/980 Color Continuous Feed Printing System
CMS Option Tool Overview
The CMS (Color Management System) optional tool is installed using GUI software added to
the remote PC.
The CMS Option tool has the following features:
• Creating a color conversion table
• Creating a calibration table
You can use the CMS Option Tool to add paper color characteristics and CMYK ink
characteristics. When adding characteristics, the printer will generate a color conversion table.
This table will be used and allow you to specify paper color characteristics or CMYK ink
characteristics. You can add these selections when making job queue settings.
Over the course of time, the printer’s color characteristics are often altered during printing. The
process to correct those color inconsistencies is called calibration. You can create a color
correction table using the CMS Option Tool for calibration. If you have a duplex configuration,
you can perform calibration on both printers.
Major Functions of the CMS Option Tool
The two major functions of the CMS Option tool is to generate calibration and color conversion
tables.
Generating the calibration adjustment tables
• Printing Colorimetry patterns
• Creating calibration data
Generating the color conversion table
• Creating user definition paper data
• Creating user-specified ink characteristics data
• Viewing paper information
1-2 Color Management Guide
Page 7

Xerox 490/980 Color Continuous Feed Printing System Color Management Overview
CMS Option Tool Setup
This section describes the setup of the CMS Option Tool. The CMS Option Tool should be
installed on a remote PC where the GUI is also present.
Prerequisites to setting up CMS Option Tool
The following are required before setting up the CMS Option Tool:
• You must be logged in as an Administrator or a user with Administrator privileges.
• Ensure the remote PC being used is connected to the network.
• Resolution of the screen must be set to 1280 x 1024 or greater.
• The remote PC must have at least 300 MB or more of free disk space.
• The GUI software must be able to connect to the Controller.
Color Options
Color options can be selected for an individual job. To view color options for a job, perform the
following:
1. Open Job Management.
2. Select the desired job.
3. Select [Properties].
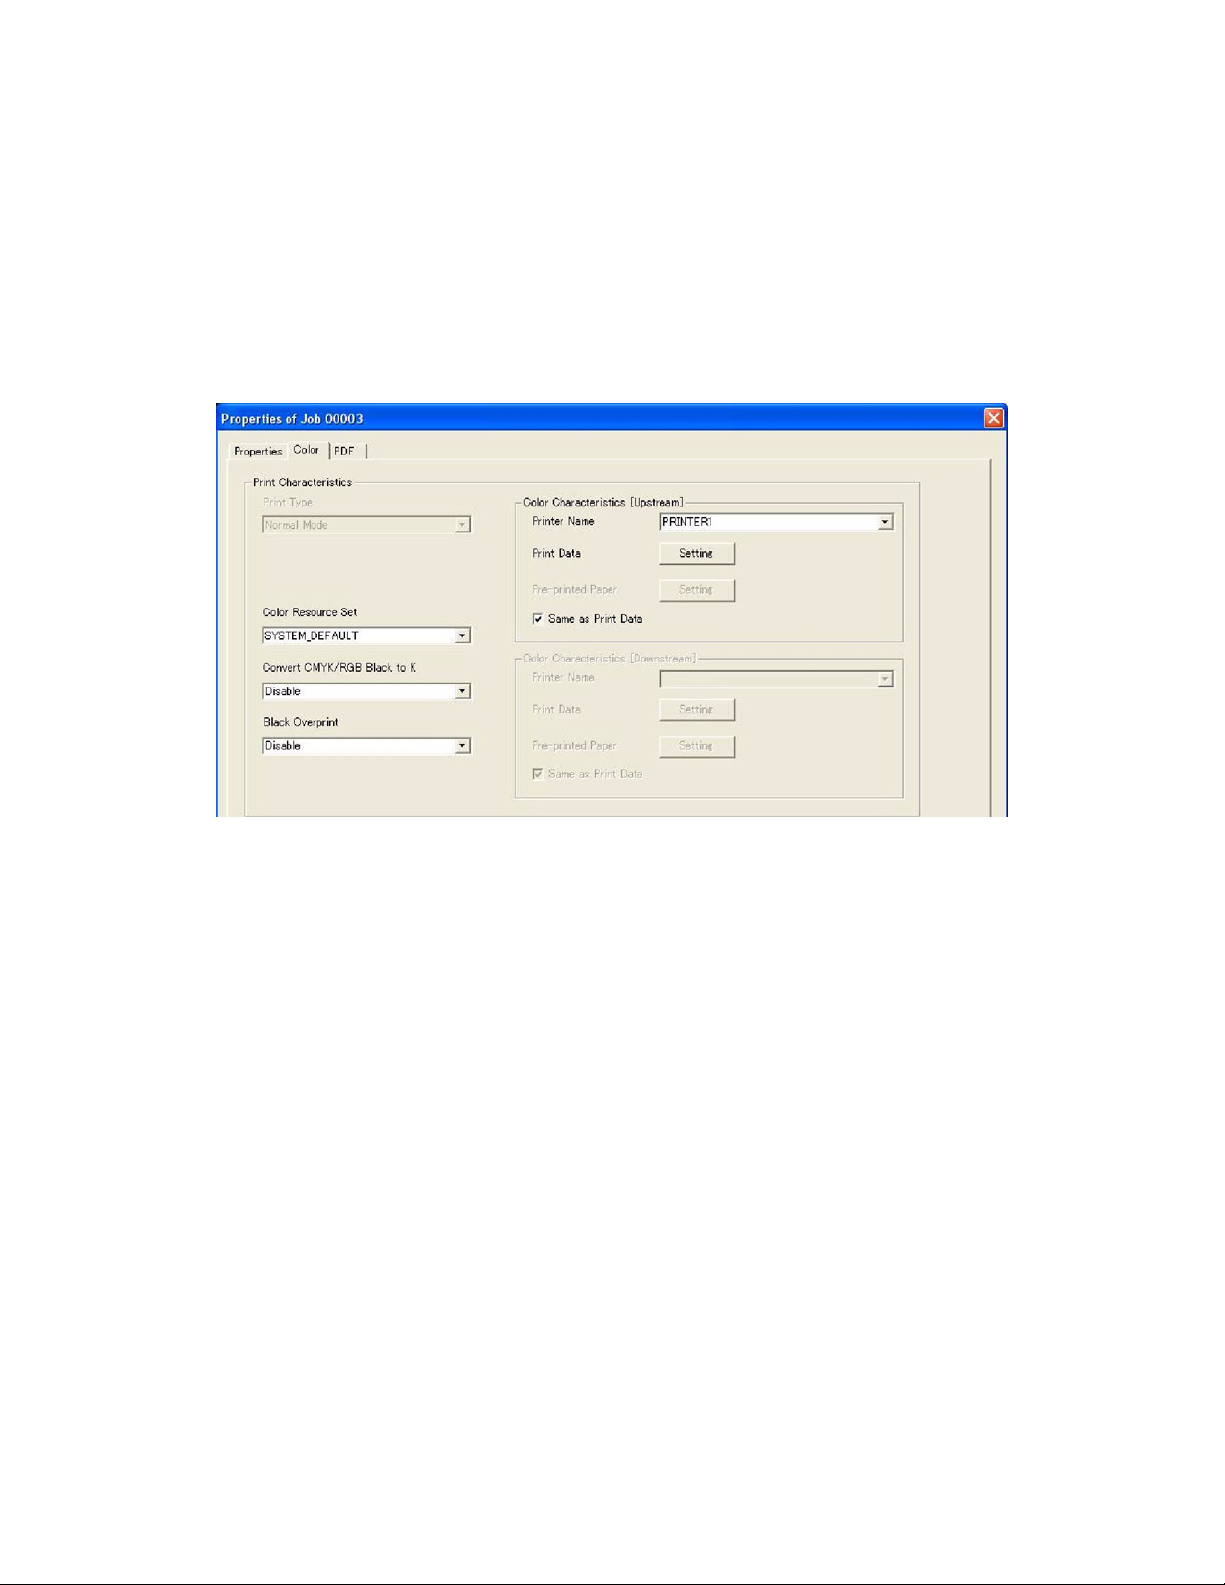
4. Select the [Color] tab.
Any selections made on this color tab are characteristics of the printed output for the desired
job. If an option is greyed out, it is not selectable.
Color Resource Set
A color resource set is created at the PC-GUI and is used to transmit color characteristics to the
printer for the given job. Options are available in the pull-down menu. Select the System Default
if there is no desired set.
Convert CMYK/RGB Black to K
This option is available for PS/PDF. You can choose whether or not to map the black in an input
color space directly to the black in an output color space.To convert CMYK/RGB Black to K, select
the Color tab of the Properties window. Select the pull-down menu on the Convert CMYK/RGB
Black to K option. The black of the input color space is mapped directly to the black of the
output color space. It is only effective for K 100% or RGB data.
Color Management Guide 1-3
Page 8
Color Management Overview Xerox 490/980 Color Continuous Feed Printing System
Black Overprint
This option is available for PS/PDF. You can choose whether or not to overprint on the black
portion of an input color space, without printing the under-color. The Black Overprint option is
available on the Color tab of the Properties window. When this option is selected, the black of
the input color space is overprinted.
This is only effective for PS/PDF data and applies only to characters and graphics, not images.
Color Characteristics
Color characteristics are displayed on the Color tab of the Job Properties window. The window is
divided for Upstream and Downstream printers. The Upstream refers to the first printer,
Downstream is the second printer. If you are using a simplex printer, you will make selections for
only the Upstream printer. If selections are made for a duplex configuration printer, selections
will need to be made for both the Upstream and the Downstream printer. The following
information is pertinent for both Upstream and Downstream printers.
Black & White printing is available in the Color Mode option.
In a Duplex printing mode, both printers must be in the “Not Ready” status before changing to
the Color Mode.
Printer Name
Select the desired printer from the Printer Name pull-down menu.
Print Data
Select the output screen characteristics of the print data. Select the [Setting] button to open
the Color Characteristics Upstream Print Data dialog box.
1-4 Color Management Guide
Page 9

Xerox 490/980 Color Continuous Feed Printing System Color Management Overview
Print Mode
Select Color or B/W. (Color is the Default.)
Resource Group Name
The file name of the color resource group can be specified (None is Default.)
User TRC
Setting of the User Toner Reduction Curve (TRC). This is only effective in the Color mode. Select
[Browse] to adjust the TRC.
Simulation
Specify RGB/CMYK color simulation to be performed on the input data. The following options
are available:
•Device
•Ink Simulation
Intent
In the Intent option, specify the way to map the ink simulation from the pull-down menu and
select one of the following:
•Perceptual
•Relative
• Saturation
•Absolute
Color Space
In the Color Space option, specify the color space for ink simulation.
Image Quality
In the Image Quality option, specify the image quality to be used for ink simulation from the
pull-down menu. The following options are available.
•Business Document
•Photo
You cannot specify this for RGB data in PS/PDF.
Perceptual (Default of RGB)
The rendering technique is specified so that compression or expansion will be performed
according to color spaces of the device. This will reproduce all color spaces of the images.
In general, the saturation and lightness will be lowered.
Color Management Guide 1-5
Page 10

Color Management Overview Xerox 490/980 Color Continuous Feed Printing System
Relative (Default of CMYK)
After dynamic range compression is done, colors that can not be reproduced will be converted,
lightness will be sustained as much as possible, and saturation will be decreased. This is not
intended for conversion of wide dynamic-ranged images, or high key and low key images.
Saturation
The saturation option is specific for pixels in images. When saturation is changed, it changes
the hue and lightness of an image.
It is not recommended to change this option for photos, but is useful for conversion of graphics
and charts for presentations.
Absolute
The Absolute option allows colors of reproducible areas to be converted correctly. When colors
are converted, lightness is similar to original and saturation will be decreased. For colors in areas
that are not reproduced, halftones will decrease significantly. It is not recommended to choose
this option for conversion of wide dynamic-ranged images, or high key and low key images.
Output Screen Characteristics
The following options can be selected on the Output screen:
• Screen Job: Selects Halftone Dot [Not Selectable]
• Halftone Dot Shape: Circle [Not Selectable]
• Select Frequency: Choose from 80/100/120/150/200/300
Note
PS/PDF must be the same setting in upstream/downstream. It is only selectable on the
upstream system.
Screen Angle: Select C:15
o
M:75o Y:0o K:45o [Not Selectable]
User TRC
When the Browse button of User TRC is selected, the Edit TRC window is displayed. Make any
desired changes on the Edit TRC window.
1-6 Color Management Guide
Page 11

Xerox 490/980 Color Continuous Feed Printing System Color Management Overview
Pre-Printed Paper
Select the output screen characteristics of the pre-printed paper. Select the [Setting] button to
open the [Color Characteristics [Upstream] (Print Data)] dialog box.
Custom ink settings
If an ink is to be used that is different than either of the two standard types, it must be
registered as a custom ink.
Calibration data
Calibration data is used to adjust the colors of the printer. After extended use, colors may shift
from desired calibration. When this happens, use calibration data to make adjustments.
Chapter 2 details the CMS Option Tool.
Color Management Guide 1-7
Page 12

Color Management Overview Xerox 490/980 Color Continuous Feed Printing System
1-8 Color Management Guide
Page 13

CMS Option Tool
This chapter details the CMS Option Tool. Operations performed with the CMS Option Tool are
discussed here. For detailed information on Calibration, please see the remaining chapters of
the Color Management Guide.
2
Introduction to the CMS Option Tool
Listed below are the common uses of the CMS Option Tool:
• Print a Colorithmic pattern: Use this option to print a colorithmic pattern to be used for
color conversion.
• Create calibration data: Use this option to create data to be used for calibration.
• Create custom paper settings: Use this option when using a paper type other than the
standard types listed.
• Create custom ink settings: Use this option to create CMYK ink settings to be used other
than the two standard types listed.
• Download Paper Information: Use this option to download paper settings that are
registered in the CMS Option Tool.
• Backup and restore paper information: Use this option to backup and restore paper
settings that are saved in the CMS Option tool.
Measuring devices
The following measuring devices are supported by the Xerox 490/980 Color Continuous Feed
Printing System:
• iCColor
• DTP70
• Eye-One iSis
Although the above measuring devices are supported, it is recommended that you use the XRite Eye-One iSis measuring device with the Xerox 490/980 Color Continuous Feed Printing
System. For instructions in this guide, the X-Rite Eye-One iSis is the measuring device preferred.
Color Management Guide 2-1
Page 14
CMS Option Tool Xerox 490/980 Color Continuous Feed Printing System
Install the CMS Option Tool
1. Insert the CMS Option Tool CD into the CD-ROM of the remote PC.
2. Double click [setup.exe]. The setup wizard will open.
3. Select [Next].
4. Allow the CMS Option Tool to install in the default location [C:\Program Files\Xerox\CMS
Option Tool], select [Next].
5. Specify a folder name or select the Program Folder where the program icon will be added
and select [Next].
6. Select [Next] again. The installation will begin. When installation is complete, a dialog box
will appear.
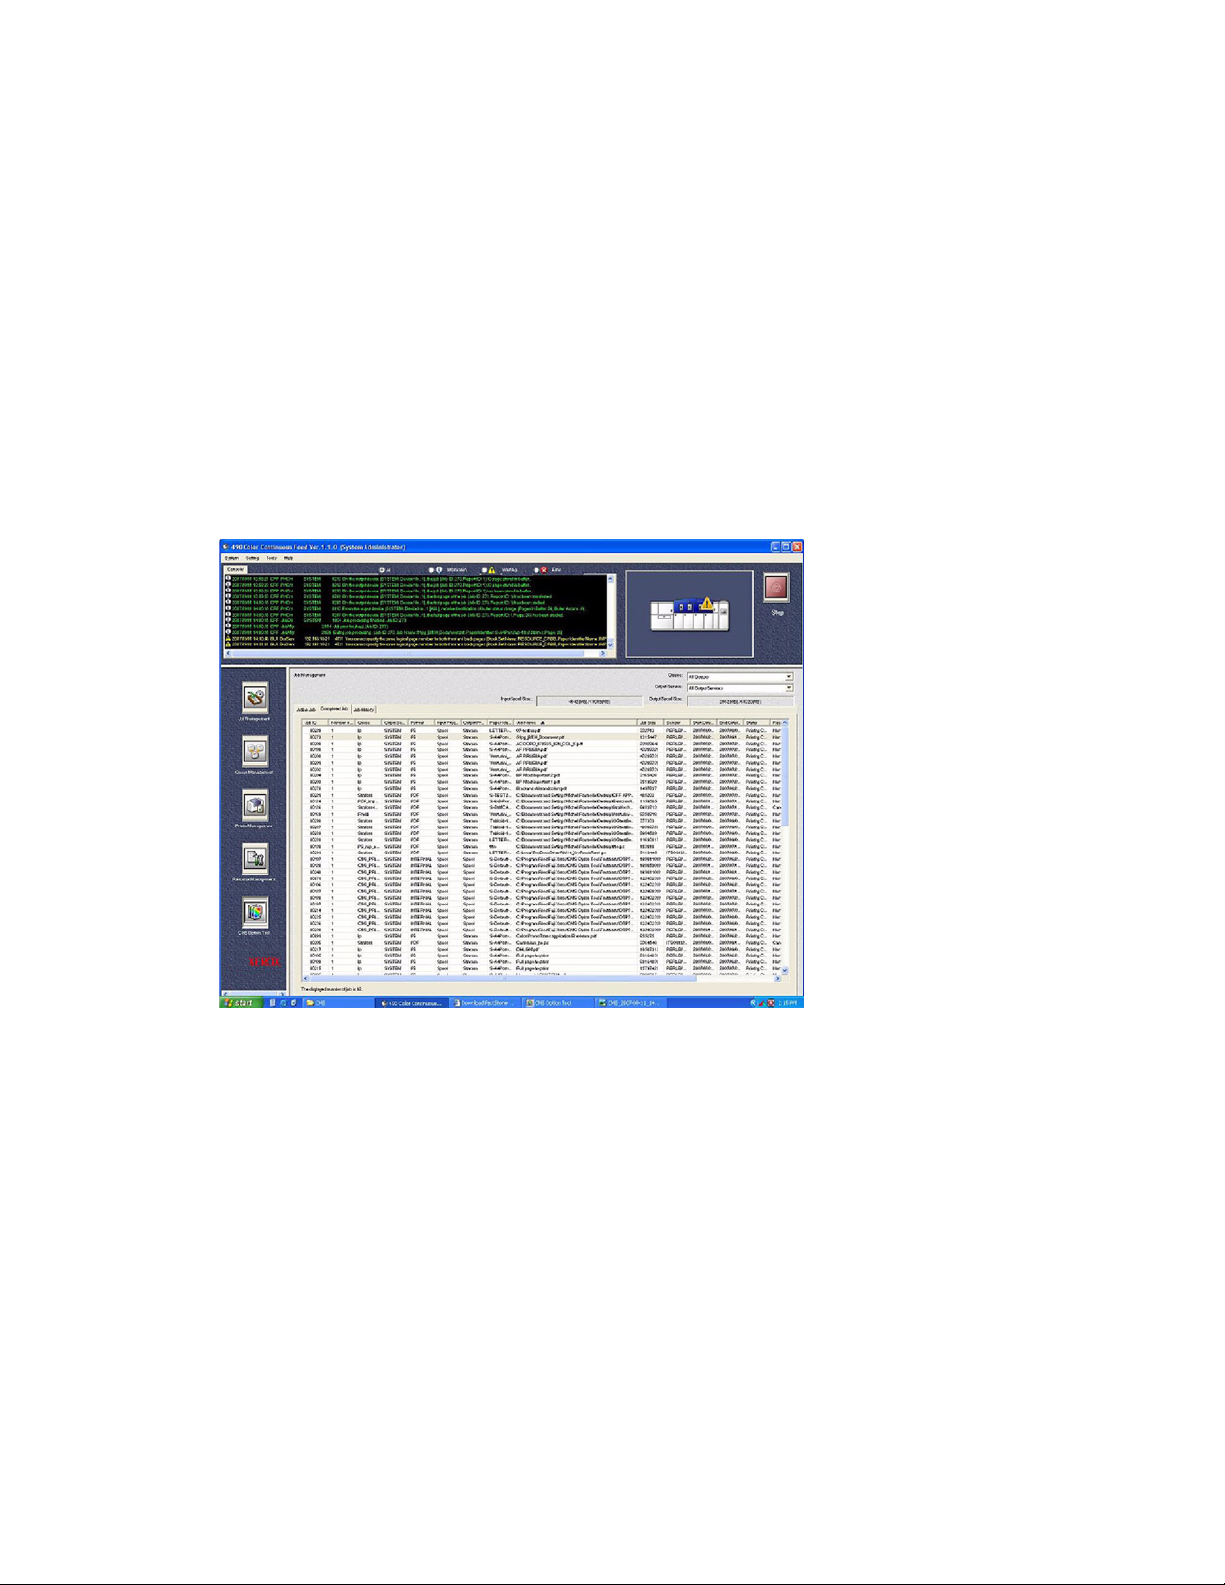
7. Select [Finish].To begin using the CMS Option Tool, select the icon on the GUI to open the
CMS Option tool dialog box.The tool will display similar to the following:
2-2 Color Management Guide
Page 15
Xerox 490/980 Color Continuous Feed Printing System CMS Option Tool
CMS Option tool tab menus
The following tabs are located on the CMS Option Tool window.
•Print Colorimetric Pattern
• Create Calibration Data
•Custom Paper
• Custom Ink Characteristic
• Paper Information
After the installation
When the installation is complete, start the PC-GUI to ensure that the CMS Option Tool
installed properly. The CMS Option Tool button will be displayed on the GUI.
Color Management Guide 2-3
Page 16
CMS Option Tool Xerox 490/980 Color Continuous Feed Printing System
Cancelling the installation
If you wish to cancel the installation process, select [Cancel]. Select [Ye s] to cancel installation.
Then select [Finish]. The following dialog box will appear.
Uninstall the CMS Option Tool
To uninstall the CMS Option tool, select [Start: Settings: Control Panel] Then select [Add/
Remove Programs] and select the CMS Option Tool. If this is unsuccessful, use the following
instructions to uninstall the CMS Option Tool.
1. Insert the CMS Option Tool CD into the CD-ROM of the remote PC being used.
2. Double-click [setup.exe]. The setup wizard will display.
3. Select [Remove] and select [Next].
4. Select [OK]. The uninstallation will begin.
5. Select [Finish].
2-4 Color Management Guide
Page 17
Xerox 490/980 Color Continuous Feed Printing System CMS Option Tool
Using the CMS Option Tool
The CMS tool can be used for a variety of tasks. The most common task is printing a
colorimetric pattern to be used for calibration. The following sections explain how to use the
options on the CMS Option tool. Detailed instructions on how to perform calibration can be
found in the later chapters of this guide.
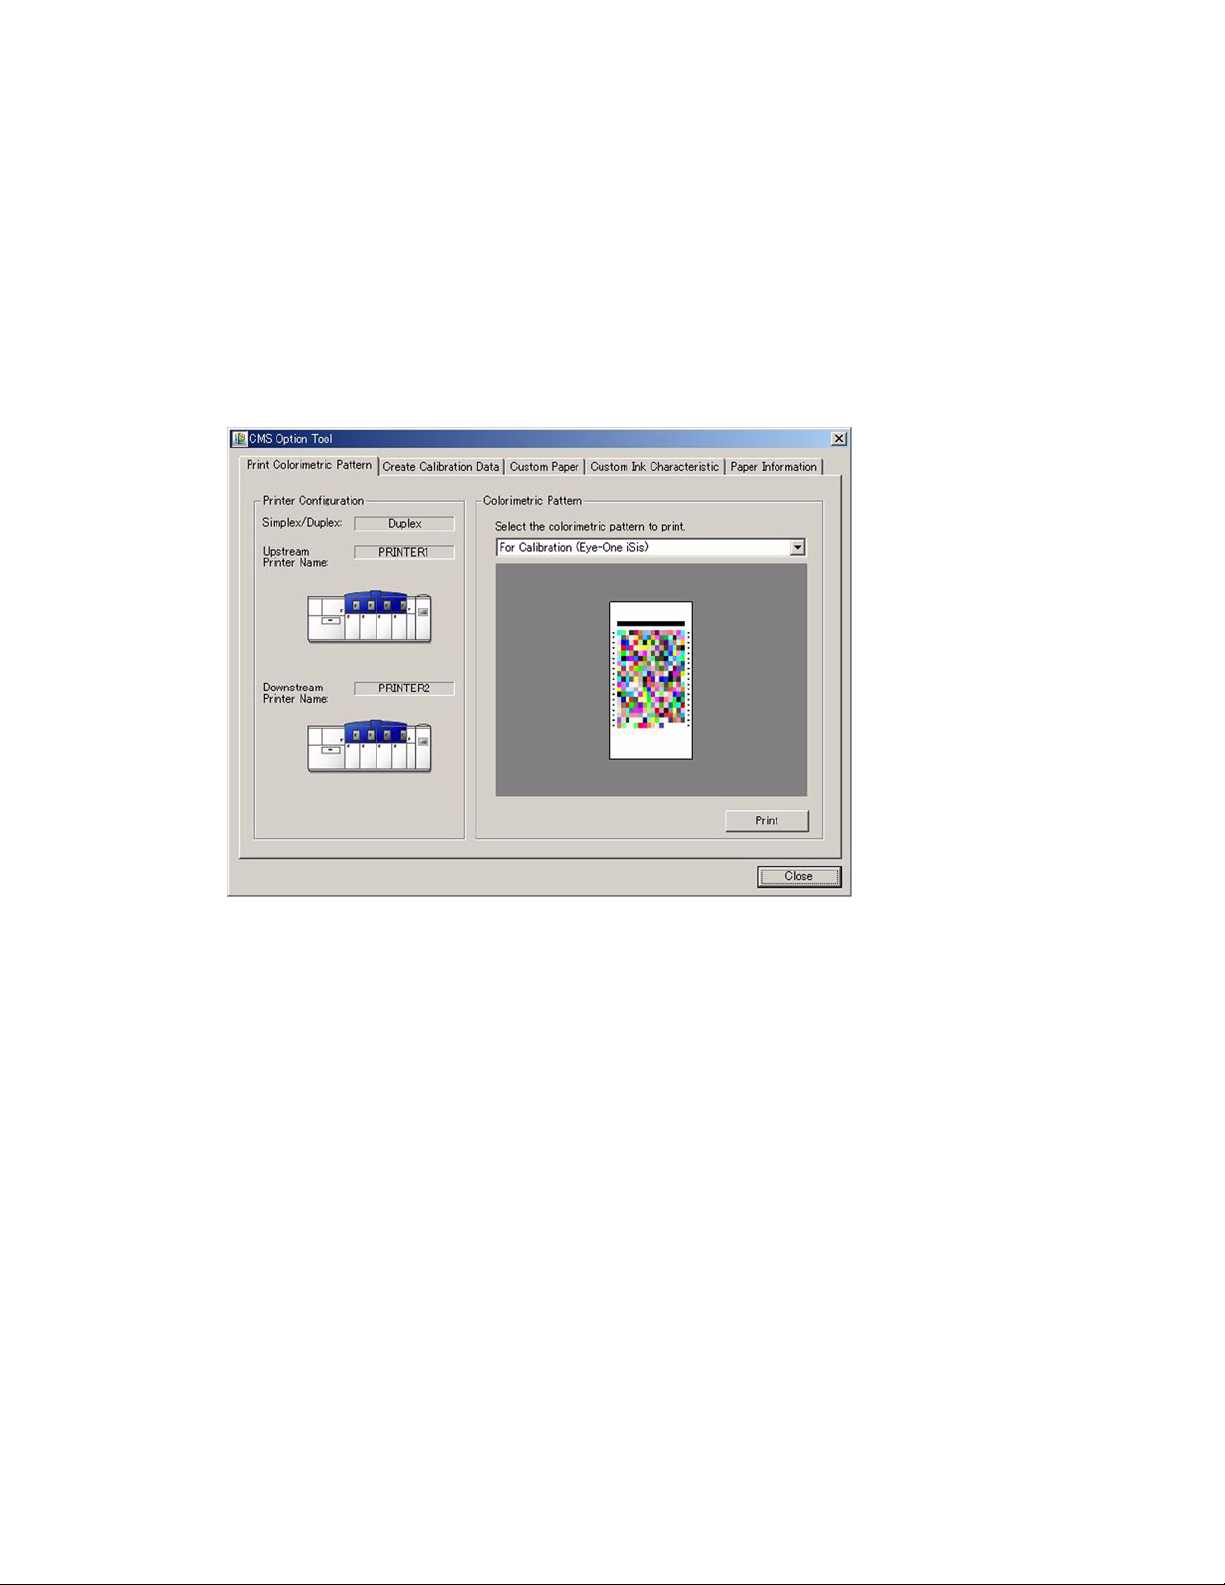
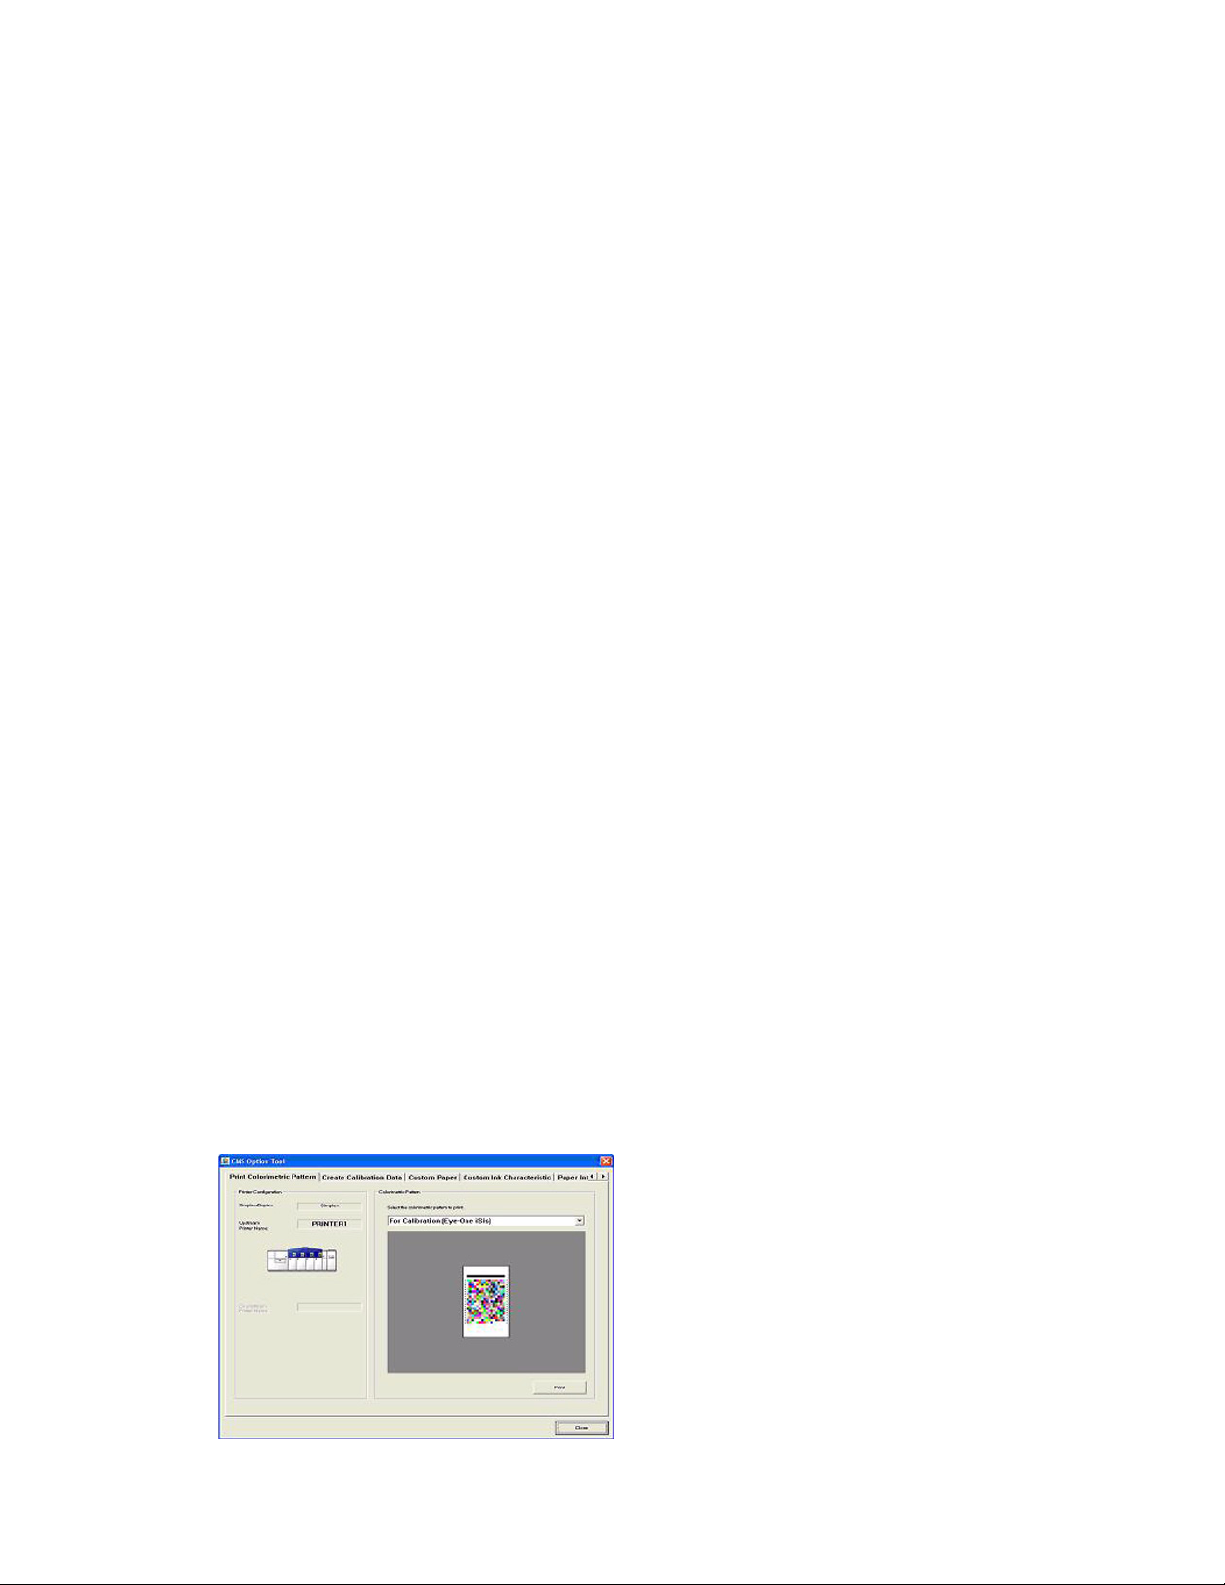
Print Colorimetric Pattern
Use the Print Colorimetric Pattern tab to print a desired colorimetric pattern for use when
performing calibration. Before you print a colorimetric pattern, you may have to login. Doubleclick the [Xerox 980 Color Continuous] and enter your username and password.
The colorimetric pattern print is used to calibrate the printing system. If you have a simplex
configuration, a total of six copies will print of the colorimetric pattern will be printed. Three
copies each of the Error Diffusion and three copies of the Halftone Dot will be printed. The
name of each print will be printed along with the pattern print. If it is a simplex machine, the
word “Upstream” will also be printed.
If you have a duplex configuration, a total of 12 prints will be printed. There will be three prints
for each of the Error Diffusion and the Halftone dot for the Upstream printer and three each of
the downstream printer. The name of the print (Error Diffusion or Halftone Dot) will be printed
at the bottom of each pattern along with the words “Upstream” or “Downstream” to identify
the printer.
Once the patterns are printed, select the best copy of each of the prints. You will need to cut out
one print of each to be used for calibration. It is important when you cut the print that the lead
edge is neatly and evenly trimmed.
How to print a colorimetric pattern
1. Select the CMS Option Tool icon from the PC-GUI.
2. Select the [Print Colorimetric Pattern] tab.
3. Using the options on the window, make the desired selections. It is recommended that you
use the X-Rite Eye-One iSis as your measuring device. For more information on these
selections, refer to the following information in this section for a detailed description of
options.
4. Select [Print].
5. The colorimetric pattern will be printed. A window will appear asking if you wish to
continue. Select [Ye s]. In the following window, select [OK].
Color Management Guide 2-5
Page 18
CMS Option Tool Xerox 490/980 Color Continuous Feed Printing System
The following explains options available under the [Print Colorimetric Pattern] tab:
Printer Configuration
Simplex/Duplex Make a selection depending on what printer configuration you have.
Select [Simplex] for simplex machines, [Duplex] for duplex configured
machines.
Upstream Printer Name The name of the first printing system is displayed here.
Downstream Printer
Name
Colorimetric Pattern
Note
The following three options are for conversion use with a new paper setting:
[DTP 70] Use this option for color conversion on the DTP70. Select this option when
[iCColor] Use this option for color conversion when using ICCOLOR. Select this
[Eye-One iSis] Use this option for color conversion on the Eye-One iSis. Select this option
Note
The following four options are for calibration use for daily ads:
[DTP 70] Select this when using the DTP70 color measuring device and need a
[ICCOLOR] Select this when using the iCColor color measuring device and need a
The name of the second printer, if you have a duplex configuration.
you are using the DTP70 color measuring device and wish to create a
colorimetric pattern for the color conversion table.
option when you are using the iCColor color measuring device and wish to
create a colorimetric pattern for the color conversion table.
when you are using the Eye-One iSis color measuring device and wish to
create a colorimetric pattern for the color conversion table. This is the
recommended measuring device.
colorimetric pattern for calibration.
colorimetric pattern for calibration.
[Eye-One iSis] Select this when using the Eye-One iSis color measuring device and need a
colorimetric pattern for calibration. This is the recommended measuring
device.
[Print] Select this to print the chosen colorimetric pattern.
Layout files for the colorimetric patterns
The layout files for the colorimetric patterns are stored in the same folder where the CMS
Option Tool is located. The default location is:
C:\Program Files\Xerox\CMS Option Tool\ReferenceFiles
2-6 Color Management Guide
Page 19
Xerox 490/980 Color Continuous Feed Printing System CMS Option Tool
Selecting a layout file
Each layout file is dependent upon the desired measuring purpose. The layout file chosen will
appear on the printed colorimetric pattern. The following table displays the measuring purpose
and the name of the layout file that should be chosen:
Color Conversion Layout Files
ICCOLOR: iCColor.rnd.xml
Calibration iCColor_up_Calib.rnd_1.xml
iCColor_up_Calib.rnd_2.xml
iCColor_up_Calib.rnd_3.xml
iCColor_dn_Calib.rnd_1.xml
iCColor_dn_Calib.rnd_2.xml
iCColor_dn_Calib.rnd_3.xml
DTP70: DTP70.rnd.xml (all three prints are in one file)
Calibration DTP70_up_Calib.rnd_1.xml
DTP70_up_Calib.rnd_2.xml
DTP70_up_Calib.rnd_3.xml
DTP70_dn_Calib.rnd_1.xml
DTP70_dn_Calib.rnd_2.xml
DTP70_dn_Calib.rnd_3.xml
Eye-One iSis: EyeOneiSis.rnd.xml
Calibration EyeOneiSis_up_Calib.rnd_1.xml
EyeOneiSis_up_Calib.rnd_2.xml
EyeOneiSis_up_Calib.rnd_3.xml
EyeOneiSis_dn_Calib.rnd_1.xml
EyeOneiSis_dn_Calib.rnd_2.xml
EyeOneiSis_dn_Calib.rnd_3.xml
Color Management Guide 2-7
Page 20
CMS Option Tool Xerox 490/980 Color Continuous Feed Printing System
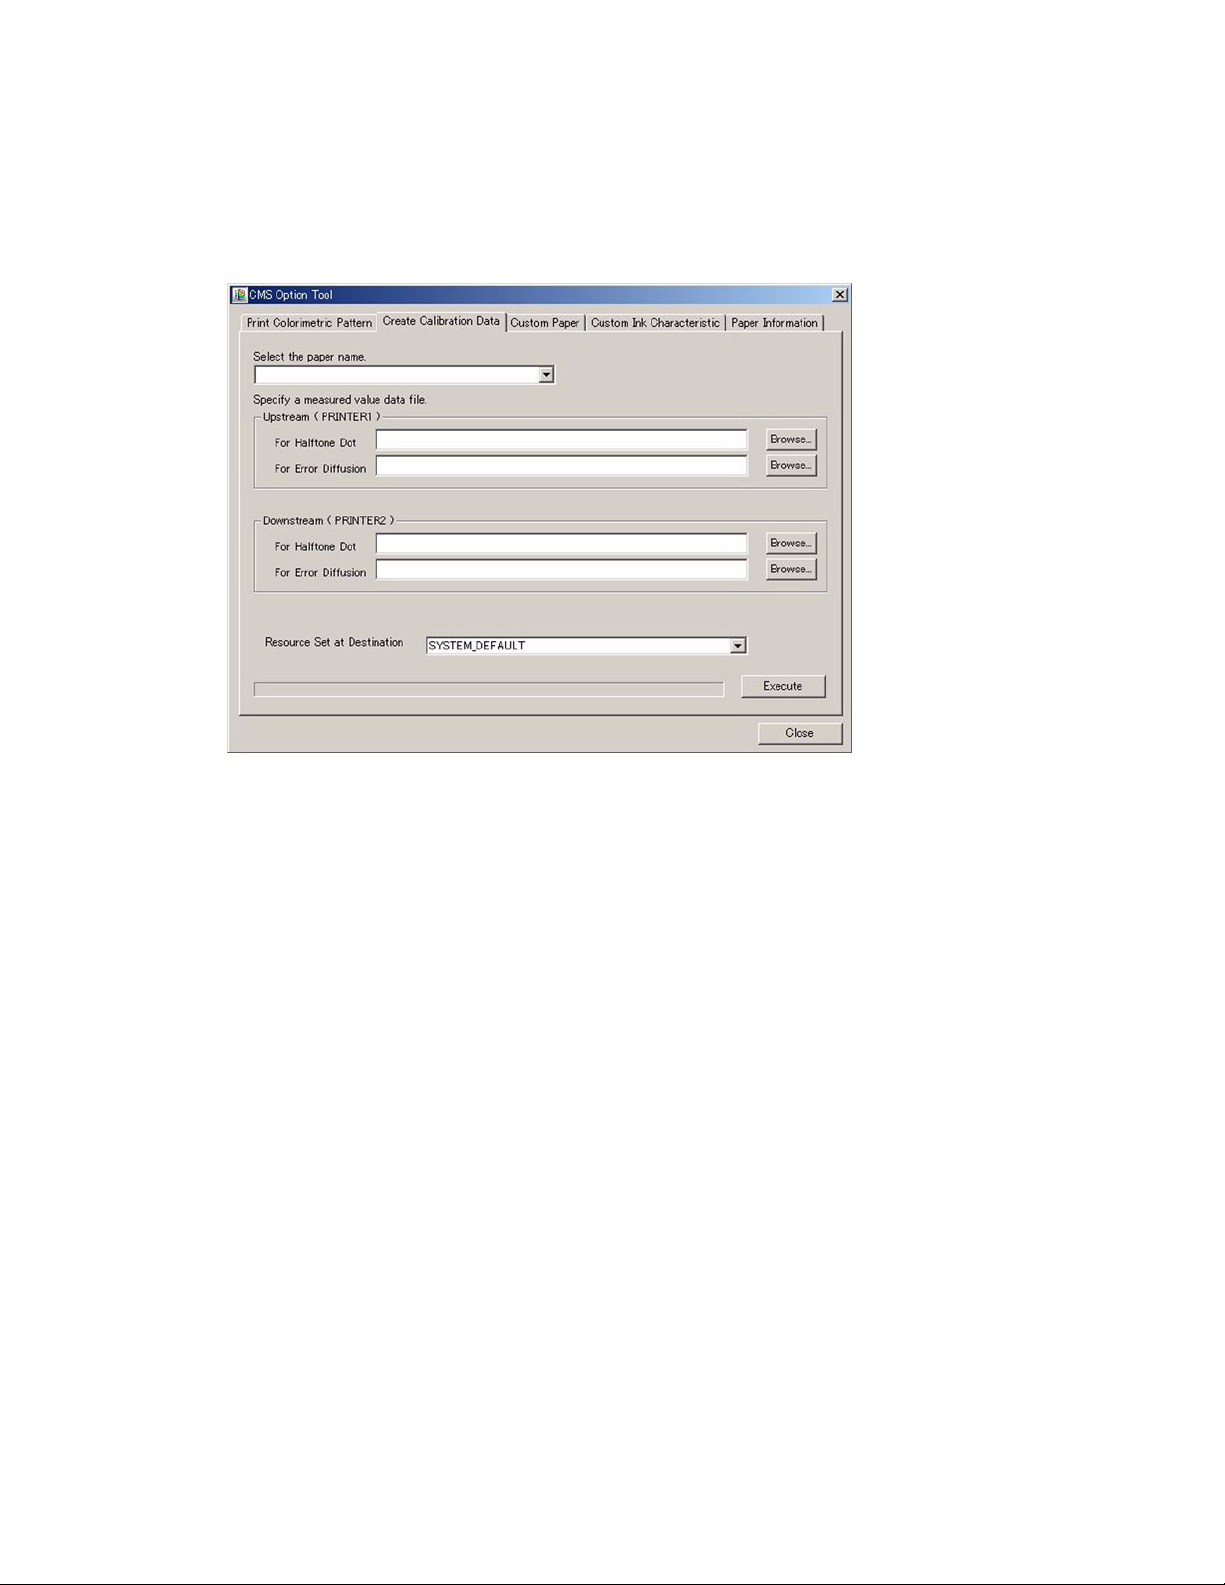
Create Calibration Data
Use the Create Calibration Data tab to create a table to be used for calibration. This table is
generated based on measured colorimetric data. Select [Resource Set at Destination] to send
color resources to the printer.
How to Create Calibration Data
1. Select the CMS Option Tool icon from the PC-GUI.
2. Select the [Create Calibration Data] tab.
3. Select the Paper Name from the pull-down menu.
4. Select the desired data file for the printer(s). When selecting the data file for Halftone Dot,
the file will be *.ht. When selecting the data file for Error Diffusion, the file will be *.ed.
Select the first file for each.
5. Select the Resource and set at destination or leave as System Default.
6. Select [Execute].
For a detailed description of options on these selections, refer to the information in the
following section.
Select the paper type
All standard and registered types of paper will be listed. Select a paper type from this option.
Plain paper and Special paper are considered standard. All other paper types must be registered
through the Custom Paper option.
2-8 Color Management Guide
Page 21

Xerox 490/980 Color Continuous Feed Printing System CMS Option Tool
Specify data file
Use this option to select a data file to be applied to the desired printer. If you are using a duplex
configuration, the first printer is referred to as [Upstream], the second printer is referred to as
[Downstream].
Use the following information to select the correct data file.
Upstream printer
• For Halftone Dot: Select [Browse] to specify the halftone dot data for the printer. The file
will be named *.ht
•For Error Diffusion: Select [Browse] to specify the error diffusion data for the printer. The
file will be named *.ed
Downstream Printer
• For Halftone Dot: Select [Browse] to specify the halftone dot data for the printer. The file
will be named *.ht
•For Error Diffusion: Select [Browse] to specify the error diffusion data for the printer. The
file will be named *.ed
Resource set at destination
Select the desired resource to be used as a color resource when downloaded for printing.
Execute
Select this option to generate calibration data.
Color Management Guide 2-9
Page 22

CMS Option Tool Xerox 490/980 Color Continuous Feed Printing System
Custom Paper
Use the Custom Paper tab to create a color conversion table to be used for custom paper. This
table is based on measured colorimetric values from the data file. A color conversion table can
also be created for halftone dot and error diffusion. When [Resource Set at Destination] is
selected, color resources for a custom paper are sent to the printer. When you create a custom
paper, you must make the following selections:
Paper Name
Select a paper name from the pull-down list or enter a new name for the custom paper to be
used.
2-10 Color Management Guide
Page 23
Xerox 490/980 Color Continuous Feed Printing System CMS Option Tool
Specify data file
Use this option to select a data file to be applied to the desired printer. If you are using a duplex
configuration, the first printer is referred to as [Upstream], the second printer is referred to as
[Downstream].
Use the following information to select the correct data file.
Upstream printer
• For Halftone Dot: Select [Browse] to specify the halftone dot data for the printer.
•For Error Diffusion: Select [Browse] to specify the error diffusion data for the printer.
Downstream Printer
• For Halftone Dot: Select [Browse] to specify the halftone dot data for the printer.
•For Error Diffusion: Select [Browse] to specify the error diffusion data for the printer.
Colorimetric value data for sides
Use this option to choose if the same data file will be used for Upstream and Downstream. If
different data files should be applied, select the check box.
Select CMYK
The selected CMYK ink attributes are registered and used to create a color conversion table for
the selected custom paper.
Download paper information
Use this option to download the paper information to the printer.
Resource Set at Destination of Downloading
Select this option if you choose to allow the resources to be set at the download destination.
Execute
Select this option to generate a color conversion table for the custom paper.
Color Management Guide 2-11
Page 24

CMS Option Tool Xerox 490/980 Color Continuous Feed Printing System
Registering Custom Paper
To register custom paper:
1. Enter the Paper Setting. Set Paper Length to 18 inches.
2. Select a colorimetric pattern for color conversion. For color conversion, use Eye-One iSis.
3. The colorimetric pattern will be printed for color conversion. Select [Print] and then select
[OK].
4. Select [OK] in the CMS Option Tool window.
5. Cut out the pattern along the dotted line. Halftone Dot, Error Diffusion, and Upstream/
Downstream. Lead edge black bar and left edge are critical.
6. Measure the patterns using the Eye-One iSis.
a. Connect to the Eye-One iSis and switch on the power.
b. Select [Start/Programs/X-Rite/ColorPort/ColorPort1.5.3/ColorPort 1.5.3].
c. Select [Measure Target] tab.
d. Select [EyeOneiSis.rnd] under Target.
e. Select [X-Rite Eye-One iSis] under Measurement Device.
f. Select [Connect].
g. Select [No Filter].
h. Insert the Halftone Dot pattern, and select [Close].
i. Select [OK] when measurement is successful.
j. Select [Save Data...].
k. Select [CGATS] then select [Save].
l. Save the file as eyeoneisis_up_ht.txt in the My Documents directory.
m. Select [Clear Data...].
n. Repeat the previous steps for Error Diffusion pattern.
o. Save file as eyeoneisis_up_ed.txt.
7. In the CMS Option Tool window, select the [Custom Paper] tab.
8. Enter the Media name in the “Enter or select the paper name” field.
9. Browse to the data files that you have created, under “Specify a measured value data file.”
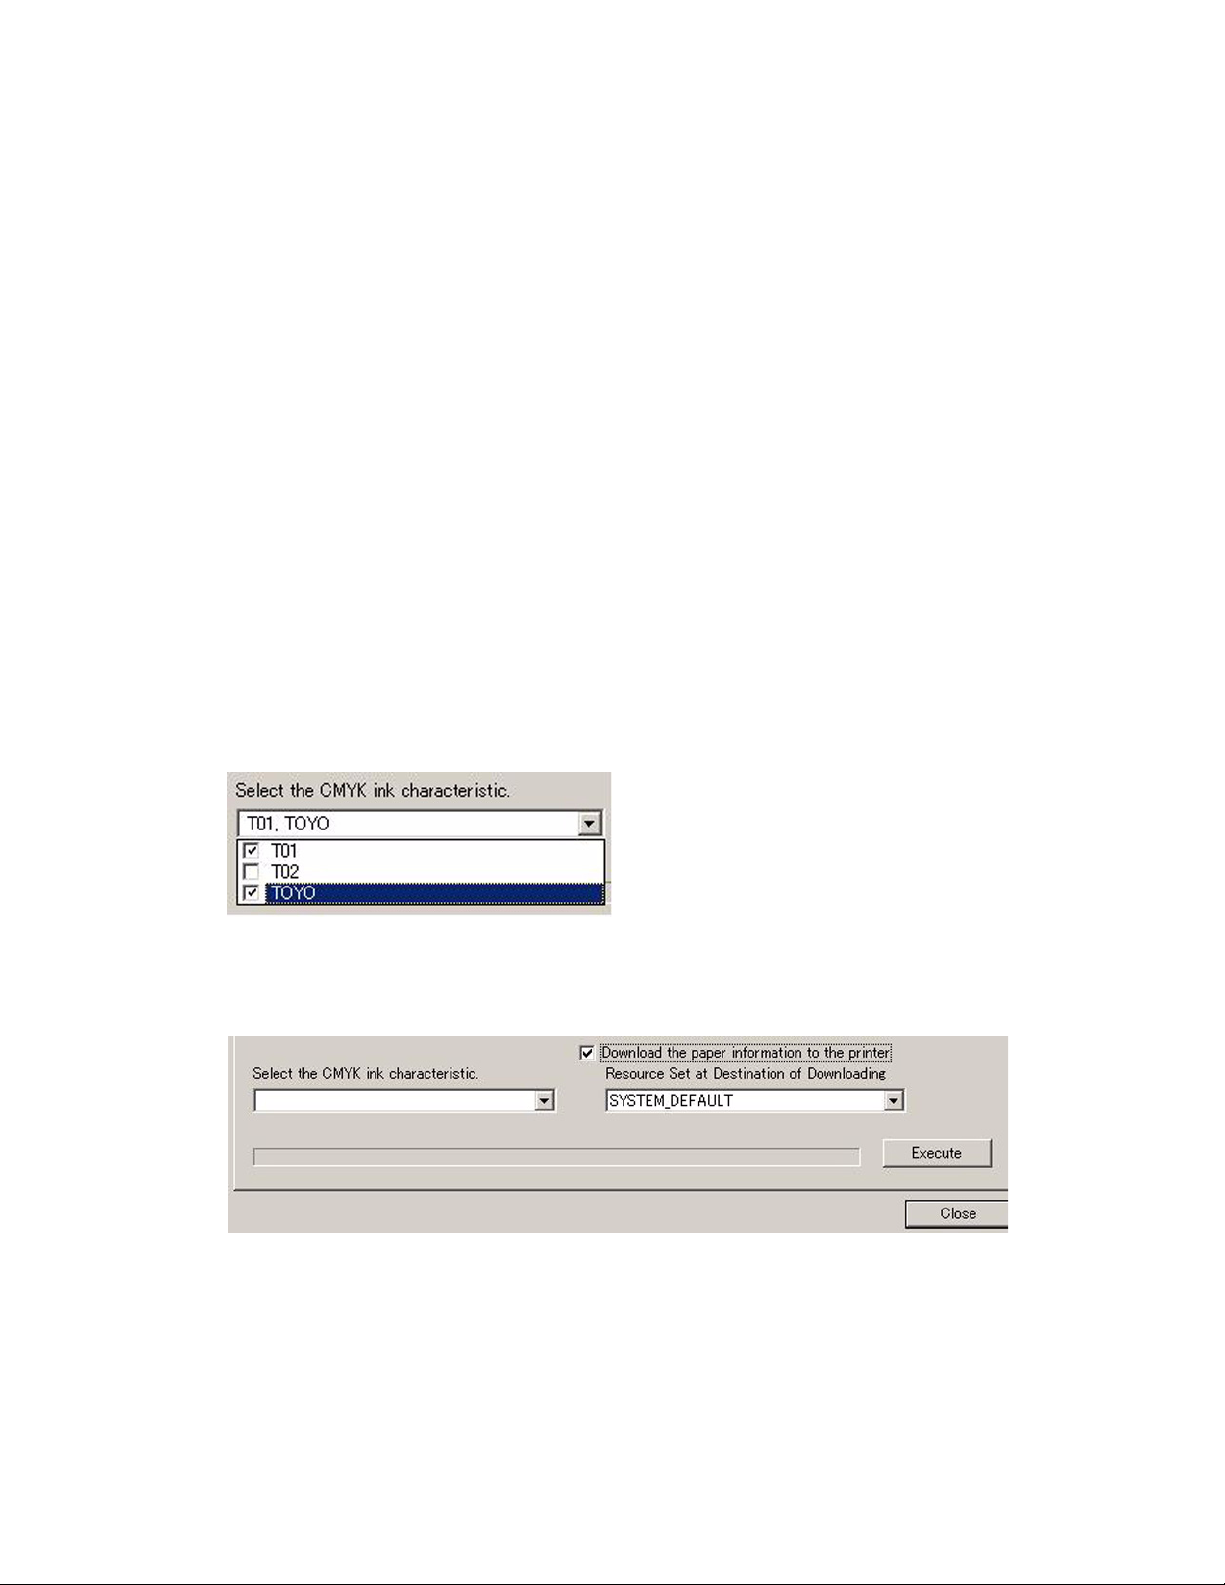
There is a data file for Upstream and a data file for Downstream.
10. Select [T01] in the “Select the CMYK ink characteristic” drop down menu. T01 is General
printing and T02 is for Newspapers.
11. Select [Download the paper information to the printer].
12. Select [OK] in the CMS Option Tool window.
2-12 Color Management Guide
Page 25

Xerox 490/980 Color Continuous Feed Printing System CMS Option Tool
Custom Ink Characteristic
Use the Custom Ink Characteristic tab to specify information for a new custom ink.
If you specify the International Color Consortium (ICC) profile and paper to be used, you can
create a color conversion table for converting CMYK specifics in the profile to the printer.
How to Create Custom Ink Characteristic
1. Select the CMS Option Tool icon from the PC-GUI.
2. Select the [Custom Ink Characteristic] tab.
3. Enter the name of the CMYK ink characteristic.
4. Select [Browse] to specify the ICC profile name that indicated the CMYK ink characteristic.
5. Select one or more paper types to add to the CMYK ink characteristic registration in the
Specify Paper section.
6. Select the check box to allow you to select the resources when downloaded in the
Download paper information section.
7. Select [Execute]. Selecting the execute button will generate a color conversion table. If
resources are to be set at destination, then color resources are downloaded to the printer.
Paper Information
Use the Paper Information window to view and make changes to saved paper settings.
How to view Paper Information
1. Select the CMS Option Tool icon from the PC-GUI.
2. Select the [Paper Information] tab.
3. A majority of this window is read-only. The following information explains in detail the
options available on this window.
Paper name
The paper names specified in Custom Paper are displayed. There are two generally supported
papers also listed, plain and special. All paper types are listed here.
Printer name
The printer names that are registered in the GUI are displayed here. You can change the name
in the Properties dialog box.
CMYK ink characteristics
The registered ink characteristics are listed here.
Measurement time
All data from each color measurement is generated and these dates are listed here.
Color Management Guide 2-13
Page 26

CMS Option Tool Xerox 490/980 Color Continuous Feed Printing System
Comment
Any registered comments are listed in the properties of paper information.
Download Paper Information
Paper information can be downloaded to the printer. Select the paper information from the list
and select [Download]. A confirmation window will appear, select [Yes ] to proceed. The color
resource of the selected paper information will download and be sent to the printer.
You can download paper information with calibration data to the printer. This data is generated
using previously generated calibration files and color measurement data. This data is specific to
the paper that is selected in the paper information list.
Select the check box and select a resource to be used when downloaded. Select any paper
information and then select [Download].
Change Paper Properties
To display the properties of a paper registered in the CMS Option tool, select [Properties]. The
window that displays is available to edit. The following options are available to change.
Paper name
The paper name displays.
Printer name
The printer name that has been registered on the GUI is displayed. The printer name can be
changed.
Standard/Custom paper
The paper name of either the standard or custom paper is displayed here.
Measurement time
All data from each color measurement is generated and these dates are listed here.
Resource creation time
The date and time when a color resource file has been created will be displayed.
Calibration On/Off
If calibration data is enabled or disabled, it will be displayed here.
Calibration mode
The calibration mode will be displayed here depending on if the configuration is for simplex or
duplex.
2-14 Color Management Guide
Page 27

Xerox 490/980 Color Continuous Feed Printing System CMS Option Tool
CMYK ink characteristics
The registered ink characteristics are listed here. If you wish to rename or delete a
characteristic, right-click on the specific characteristic. Printer defaults cannot be renamed or
deleted.
Ink name
The ink names are listed here.
ICC Profile
The ICC profile names that are specified in the Custom Ink Characteristics are listed here.
Comment
Any additional paper information, or other information that is necessary can be added in the
Comment field. Any information in the comment field will be displayed in the Custom Ink
Characteristics list.
Save
All paper information that has been changed will be saved when this option is selected. All
previously saved information will be lost.
Save As
Paper information will be saved as a name that you specify.
Close
This option will close the Paper Properties window.
Delete Paper information
Paper information can be deleted from the paper information list. To delete paper information,
select the desired item and select [Delete]. A confirmation window will appear. Select [Yes] to
delete the color resource of the paper information. Select [No] to cancel this operation.
Backup paper information
Paper information can be backed up to a disk. Information such as the user-defined paper
information and CMYK ink characteristics and ICC Profile can be saved.
When you select to backup this information, a directory is automatically generated with the
following name:
CMSProfilesYYYYMMDDhhmm
Select [Backup] and a confirmation window will appear. Select [Save to] and enter a directory
where the information will be saved. Select [OK] and a confirmation window will appear.
Select [Ye s] to backup the paper information into the desired directory. Select [No] to cancel
this option.
Color Management Guide 2-15
Page 28
CMS Option Tool Xerox 490/980 Color Continuous Feed Printing System
Restore of paper information
Paper information can be restored if it was backed up. If this option is selected, it will overwrite
the current information.
Select [Restore] and a confirmation window will appear. Select [Save to] and enter a directory
where the information will be saved. Select [OK] and a confirmation window will appear.
Color Resource Management
The Color Resource Management provides functions to create, edit, take out and delete color
resource files, as well as functions to copy between resources. It is also possible to create, copy,
rename, and delete resource sets.
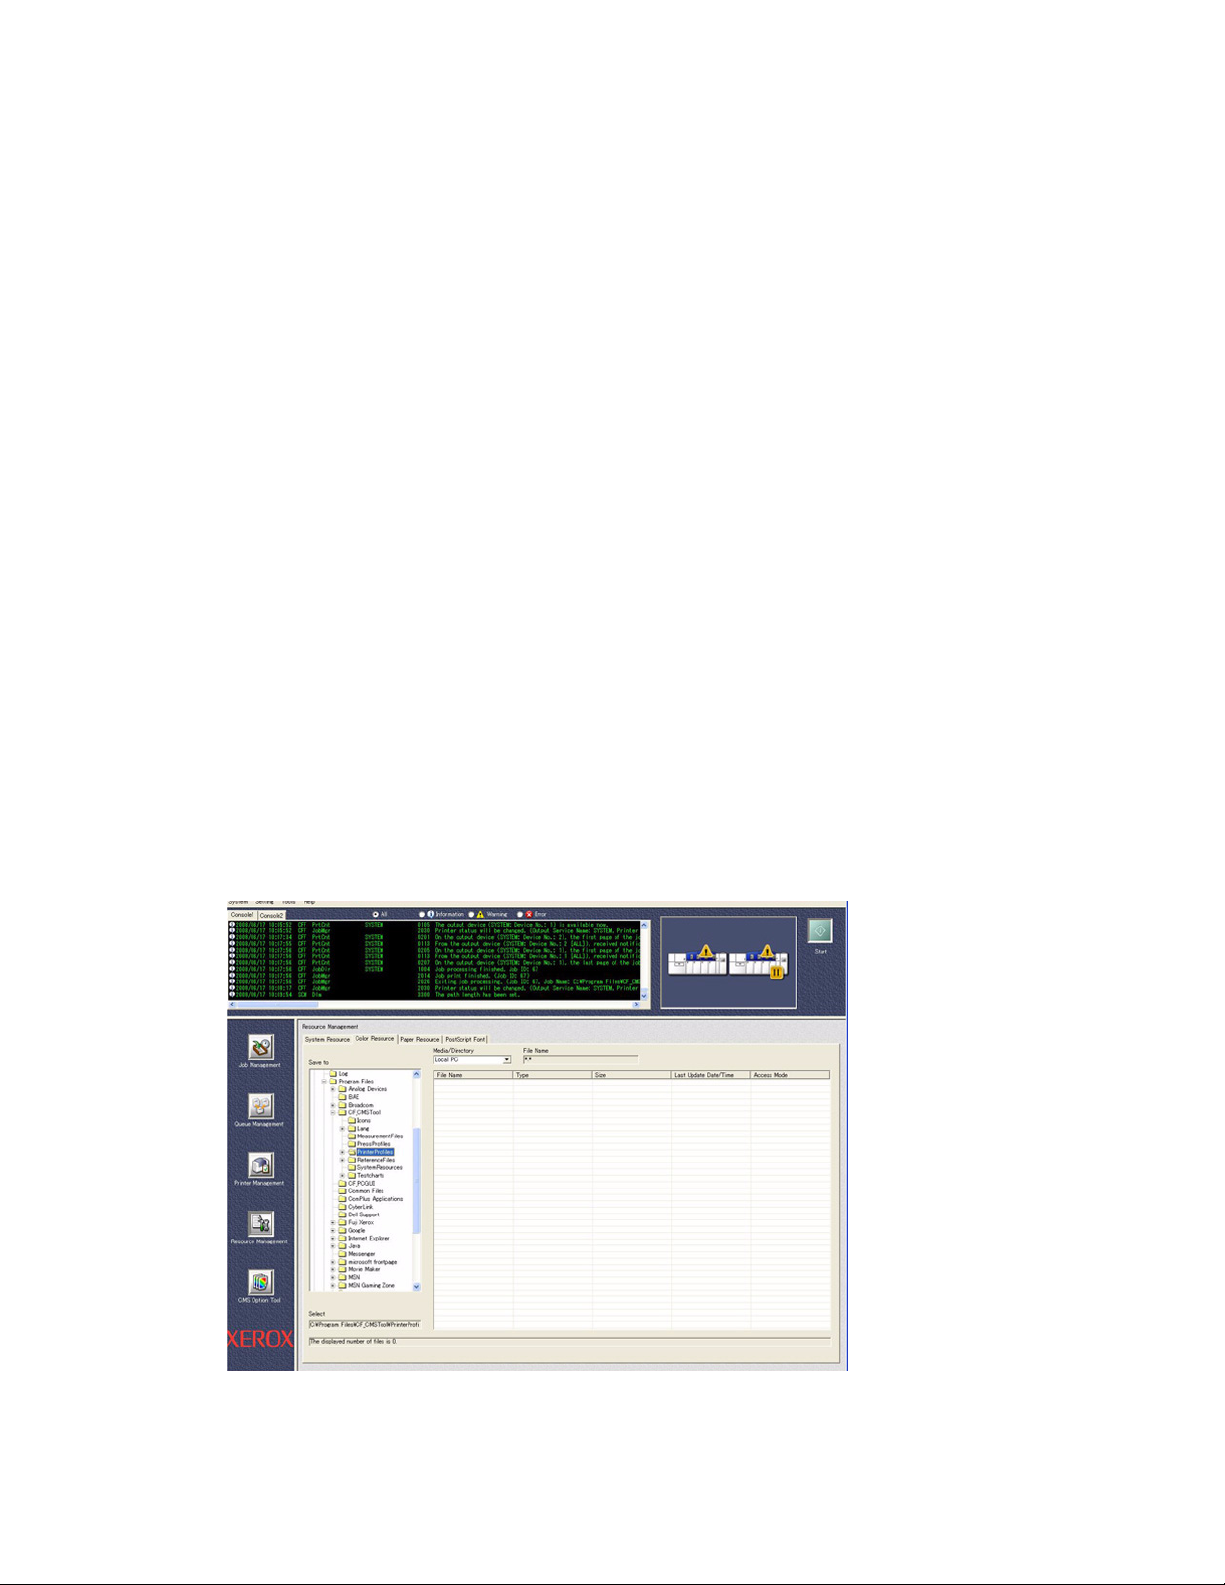
1. Open Resource Management.
2. Select [Color Resource].
3. Select the Media Directory, select [Local PC].
4. On the left side, open the following path: [C:\Program Files\CF_CMS Tool\Printer Profiles]
5. On the right side:
a. Highlight [HPA_PRINTER1.cntl].
b. Right click and select [Import].
c. Select [HPA_980] and select [OK].
d. A popup window will appear asking if you wish to overwrite the file, select [Ye s].
6. On the left side:
a. Highlight [HPA_Printer2.cntl].
b. Right click and select [Import].
c. Select [HPA_980] and select [OK].
d. A pop-up window will appear asking if you wish to overwrite the file, select [Yes ].
2-16 Color Management Guide
Page 29

Prepare for Color
3
Calibration
This chapter discusses what needs to be done before the procedures in the remaining chapters
of the Color Management Guide are performed. A method of determining if you are able to skip
the
Set Up Imposition Files and Create a New Queue sections of Chapter 4 is also provided.
It is important to follow the sections of this chapter in order.
Color Management Guide 3-1
Page 30

Prepare for Color Calibration Xerox 490/980 Color Continuous Feed Printing System
Recommended Calibration Conditions
This section describes the recommended conditions for performing the pre-calibration and color
calibration procedures in the following chapters.
1. The printer should be properly maintained in accordance with supplied Xerox
documentation.
2. The paper stock used to perform the pre-calibration and color calibration should be the
same paper stock used for jobs that will be submitted after the pre-calibration and color
calibration have been successfully performed.
Note
The lamp specification given in the following condition is only a recommendation, not a
requirement.
D50 Ra=99, Color rendering AAA, 5000K Extra neutral white fluorescent bulb.
3. The printer is located in an environment comparable to the B-Zone of the table below:
Environmental Zone Temp. Range Rel. Humidity Range Comments
B-Zone 59° F to 86° F
15° C to 30° C
C-Zone 50° F to 82° F
15° C to 27° C
A-Zone 59° F to 90° F
15° C to 32°
30% to 65% RH The 490/980 CCF
Printing System will
deliver optimal
performance in this
zone.
65% - 85% RH The 490/980 CCF
Printing System will
deliver degraded
performance in this
zone.
15% to 30% The 490/980 CCF
Printing System will
deliver degraded
performance in this
zone.
3-2 Color Management Guide
Page 31

Xerox 490/980 Color Continuous Feed Printing System Prepare for Color Calibration
Verify Color Calibration Resources
The purpose of this procedure is to verify that you have all of the files necessary to perform the
pre-calibration and color calibration procedures in the later chapters of the Color Management
Guide.
1. Insert the Xerox 490/980 Color Continuous Feed Printing System Customer Documentation
CD into the CD-ROM drive of the computer that contains the PC-UI.
2. Select the indented link under the link to this Color Management Guide called [Color
Calibration Resources]. This will open Windows Explorer and show you the root folder of
the Xerox 490/980 Color Continuous Feed Printing System Customer Documentation CD.
Select this link
Color Management Guide 3-3
Page 32

Prepare for Color Calibration Xerox 490/980 Color Continuous Feed Printing System
Note
The directory tree referenced in the following step is on pages 3-4 to 3-7.
3. Open the [Color Calibration Resources] directory and verify that the folders and files
shown in the following directory tree exist:
\
• \ColorPort Targets
•\Imposition Files
•\Resource Group Names
•\TOF Mark
•\TRC Viewer
•\ColorPort_DTP70.pdf
• \ColorPort_iCColor.pdf
•\ColorPort_iSis.pdf
• \Duplex Xerox 490980 Color Test Pattern.pdf
• \Simplex Xerox 490980 Color Test Pattern.pdf
\ColorPort Targets
• \ATCN_DTP70.xml
• \ATCN_iCColor.xml
•\ATCN_iSis.xml
\Imposition Files
• \Confirm_105.forms
• \Confirm_105.imp
• \Confirm_195.forms
• \Confirm_195.imp
• \Duplex_PreCal.forms
•\Duplex_PreCal.imp
• \Duplex_iSis2_195.forms
• \Duplex_iSis2_195.imp
• \iSis2_105.forms
• \iSis2_105.imp
• \iSis2_180.forms
• \iSis2_180.imp
• \Simplex_PreCal.forms
• \Simplex_PreCal.imp
• \Simplex_iSis2_195.forms
• \Simplex_iSis2_195.imp
• \TRC_18.forms
• \TRC_18.imp
3-4 Color Management Guide
Page 33

Xerox 490/980 Color Continuous Feed Printing System Prepare for Color Calibration
\TOF Mark
•\TOFMark3.tif
\TRC Viewer
• \mfc71.dll
• \msvcr71.dll
•\TRCViewer.exe
Color Management Guide 3-5
Page 34

Prepare for Color Calibration Xerox 490/980 Color Continuous Feed Printing System
Note
The contents of the following directory [Resource Group Names] continues onto the next
page.
\Resource Group Names
• \TRC_PRINTER1.cntl
• \TRC_PRINTER1_absolute.crd
• \TRC_PRINTER1_perceptual.crd
• \TRC_PRINTER1_relative.crd
• \TRC_PRINTER1_saturation.crd
• \TRC_PRINTER1_sRGB.csa
• \TRC_PRINTER1_sRGB_absolute.br3c
• \TRC_PRINTER1_sRGB_absolute.by3c
• \TRC_PRINTER1_sRGB_absolute.pr3c
• \TRC_PRINTER1_sRGB_absolute.py3c
• \TRC_PRINTER1_sRGB_perceptual.br3c
• \TRC_PRINTER1_sRGB_perceptual.by3c
• \TRC_PRINTER1_sRGB_perceptual.pr3c
• \TRC_PRINTER1_sRGB_perceptual.py3c
• \TRC_PRINTER1_sRGB_relative.br3c
• \TRC_PRINTER1_sRGB_relative.by3c
• \TRC_PRINTER1_sRGB_relative.pr3c
• \TRC_PRINTER1_sRGB_relative.py3c
• \TRC_PRINTER1_sRGB_saturation.br3c
• \TRC_PRINTER1_sRGB_saturation.by3c
• \TRC_PRINTER1_sRGB_saturation.pr3c
• \TRC_PRINTER1_sRGB_saturation.py3c
• \TRC_PRINTER1_T01_absolute.py3c
• \TRC_PRINTER1_T01_absolute.c3ch
• \TRC_PRINTER1_T01_absolute.c4c
• \TRC_PRINTER1_T01_perceptual.c3ce
• \TRC_PRINTER1_T01_perceptual.c3ch
• \TRC_PRINTER1_T01_perceptual.c4c
• \TRC_PRINTER1_T01_relative.c3ce
• \TRC_PRINTER1_T01_relative.c3ch
• \TRC_PRINTER1_T01_relative.c4c
• \TRC_PRINTER1_T01_saturation.c3ce
• \TRC_PRINTER1_T01_saturation.c3ch
• \TRC_PRINTER1_T01_saturation.c4c
• \TRC_PRINTER1_T02_absolute.c3ce
• \TRC_PRINTER1_T02_absolute.c3ch
• \TRC_PRINTER1_T02_absolute.c4c
• \TRC_PRINTER1_T02_perceptual.c3ce
• \TRC_PRINTER1_T02_perceptual.c3ch
• \TRC_PRINTER1_T02_perceptual.c4c
• \TRC_PRINTER1_T02_relative.c3ce
• \TRC_PRINTER1_T02_relative.c3ch
• \TRC_PRINTER1_T02_relative.c4c
• \TRC_PRINTER1_T02_saturation.c3ce
• \TRC_PRINTER1_T02_saturation.c3ch
• \TRC_PRINTER1_T02_saturation.c4c
3-6 Color Management Guide
Page 35

Xerox 490/980 Color Continuous Feed Printing System Prepare for Color Calibration
Note
The contents of the following directory [Resource Group Names] is continued from the
previous page.
\Resource Group Names
• \TRC_PRINTER2.cntl
• \TRC_PRINTER2_absolute.crd
• \TRC_PRINTER2_perceptual.crd
• \TRC_PRINTER2_relative.crd
• \TRC_PRINTER2_saturation.crd
• \TRC_PRINTER2_sRGB.csa
• \TRC_PRINTER2_sRGB_absolute.br3c
• \TRC_PRINTER2_sRGB_absolute.by3c
• \TRC_PRINTER2_sRGB_absolute.pr3c
• \TRC_PRINTER2_sRGB_absolute.py3c
• \TRC_PRINTER2_sRGB_perceptual.br3c
• \TRC_PRINTER2_sRGB_perceptual.by3c
• \TRC_PRINTER2_sRGB_perceptual.pr3c
• \TRC_PRINTER2_sRGB_perceptual.py3c
• \TRC_PRINTER2_sRGB_relative.br3c
• \TRC_PRINTER2_sRGB_relative.by3c
• \TRC_PRINTER2_sRGB_relative.pr3c
• \TRC_PRINTER2_sRGB_relative.py3c
• \TRC_PRINTER2_sRGB_saturation.br3c
• \TRC_PRINTER2_sRGB_saturation.by3c
• \TRC_PRINTER2_sRGB_saturation.pr3c
• \TRC_PRINTER2_sRGB_saturation.py3c
• \TRC_PRINTER2_T01_absolute.py3c
• \TRC_PRINTER2_T01_absolute.c3ch
• \TRC_PRINTER2_T01_absolute.c4c
• \TRC_PRINTER2_T01_perceptual.c3ce
• \TRC_PRINTER2_T01_perceptual.c3ch
• \TRC_PRINTER2_T01_perceptual.c4c
• \TRC_PRINTER2_T01_relative.c3ce
• \TRC_PRINTER2_T01_relative.c3ch
• \TRC_PRINTER2_T01_relative.c4c
• \TRC_PRINTER2_T01_saturation.c3ce
• \TRC_PRINTER2_T01_saturation.c3ch
• \TRC_PRINTER2_T01_saturation.c4c
• \TRC_PRINTER2_T02_absolute.c3ce
• \TRC_PRINTER2_T02_absolute.c3ch
• \TRC_PRINTER2_T02_absolute.c4c
• \TRC_PRINTER2_T02_perceptual.c3ce
• \TRC_PRINTER2_T02_perceptual.c3ch
• \TRC_PRINTER2_T02_perceptual.c4c
• \TRC_PRINTER2_T02_relative.c3ce
• \TRC_PRINTER2_T02_relative.c3ch
• \TRC_PRINTER2_T02_relative.c4c
• \TRC_PRINTER2_T02_saturation.c3ce
• \TRC_PRINTER2_T02_saturation.c3ch
• \TRC_PRINTER2_T02_saturation.c4c
Color Management Guide 3-7
Page 36

Prepare for Color Calibration Xerox 490/980 Color Continuous Feed Printing System
Copy Color Calibration Resources
This procedure describes how to copy the contents of the [Color Calibration Resources]
directory on the Xerox 490/980 Color Continuous Feed Printing System Customer
Documentation CD to the computer containing the PC-UI.
1. Insert the Xerox 490/980 Color Continuous Feed Printing System Customer Documentation
CD into the CD-ROM drive of the computer that contains the PC-UI.
2. Select the indented link called [Color Calibration Resources]. This will open Windows
Explorer and show you the root folder of the Xerox 490/980 Color Continuous Feed Printing
System Customer Documentation CD.
Select this link
3-8 Color Management Guide
Page 37

Xerox 490/980 Color Continuous Feed Printing System Prepare for Color Calibration
3. Right-click the folder [Color Calibration Resources]. A pop-up menu will appear.
4. Select [Copy].
5. Right-click on the clock shown on the Windows taskbar. A pop-up menu will appear.
6. Select [Show the Desktop].
7. Place the mouse cursor over a vacant area of the Windows Desktop and right-click. A popup menu will appear.
8. Select [Paste]. The [Color Calibration Resources] directory will be copied to the Windows
Desktop.
9. Close the Adobe Flash Player window.
10. Close the Windows Explorer Window.
11. Remove the Xerox 490/980 Color Continuous Feed Printing System Customer
Documentation CD from the CD-ROM drive of the PC-UI computer.
Color Management Guide 3-9
Page 38

Prepare for Color Calibration Xerox 490/980 Color Continuous Feed Printing System
Download ColorPort Utility Software
The purpose of this section is to download the latest documentation-supported version of the
ColorPort Utility Software (version 1.5.4). This software is required for performing color
calibration in Chapter 5
Calibration Using ColorPort Utility Software
Note
If you are viewing this document using a .pdf reader, the following URL is a hyperlink.
1. Go to the following URL:
[http://www.xrite.com/product_overview.aspx?ID=719&Action=Support&SoftwareID=681].
2. Select the [PC Version] hyperlink from the web page.
3. Choose to save the .zip file (56.4 MB) to the hard drive.
4. When the download is complete, extract the contents of the .zip file.
5. Select [install.exe] to begin the installation.
6. Follow the on-screen instructions to install the ColorPort Utility Software.
Color Calibration Process for v1.1.6 Software and in Chapter 6 Color
.
Select PC Version
3-10 Color Management Guide
Page 39

Xerox 490/980 Color Continuous Feed Printing System Prepare for Color Calibration
Check for Queue and Imposition Files
The purpose of this section is to determine if any of the imposition files or queues used in
chapter 4 have already been created.
The following procedures explain how to check for pre-existing imposition files and queues.
Check for Existing Imposition Files
A new imposition file is required only if the paper stock is being changed. An imposition file may
have already been created to accommodate the new paper stock width. The following
procedure explains how to check for existing imposition files.
1. Ensure that the Xerox 490/980 Color Continuous Feed Printing System is powered on and is
connected to the PC-UI.
2. Select [Resource Management] on the left-side navigation pane of the PC-UI.
3. Look for any imposition files that are named with the following convention:
• Simplex_PreCal_[Paper Stock Width]
Note
As an example, if you were changing to 18 in (457 mm) width paper stock, you would look
for an imposition file called [Simplex_PreCal_18in].
4. If you find an imposition file that has the width of paper stock you are using, you can skip
the
Set Up Imposition Files section of Chapter 4.
5. If you do not find an imposition file that has the width of paper stock that you are using,
you must perform the
Set Up Imposition Files section of Chapter 4.
Check for Existing Queues
A new queue is required only if the paper stock width is being changed. A queue may have
already been created to accommodate the new paper stock width. The following procedure
explains how to check for existing queues.
1. Ensure that the Xerox 490/980 Color Continuous Feed Printing System is powered on and is
connected to the PC-UI.
2. Select [Queue Management] on the left-side navigation pane of the PC-UI.
3. Look for any imposition files that are named with the following convention:
• TRC_[Paper Stock Width]
Note
As an example, if you were changing to 19.5 in (495 mm) width paper stock, you would look
for a queue called [TRC_19-5in].
4. If you find a queue that has the width of paper stock you are using, you can skip the
a New Queue
5. If you do not find a queue that has the width of paper stock that you are using, you must
perform the
section of Chapter 4.
Create a New Queue section of Chapter 4.
Create
Color Management Guide 3-11
Page 40

Prepare for Color Calibration Xerox 490/980 Color Continuous Feed Printing System
3-12 Color Management Guide
Page 41

Pre-Calibration
4
Engine Density
Adjustment
This chapter discusses how to set the color densities of Yellow, Magenta, Cyan and Black (Y/M/
C/K) to within optimal parameters for color calibration.
This procedure should be performed as desired, but especially:
• After changing the Developer of a color
• After using approximately one roll of paper since the Developer of a color was changed
• When the highest level of image quality is required
Color Management Guide 4-1
Page 42

Pre-Calibration Engine Density Adjustment Xerox 490/980 Color Continuous Feed Printing System
Create an Empty Color Resource
In order to perform the pre-calibration engine density adjustment, a Color Resource must be
created with no calibration data associated with it. This is because we want to simulate native
engine performance. Follow these steps to create an Empty Color Resource. There is a separate
procedure for Simplex Systems and for Duplex Systems.
For Simplex Systems
1. Ensure that the Xerox 490/980 Color Continuous Feed Printing System is powered on and is
connected to the PC-UI.
2. On the left-side navigation pane of the Xerox 490/980 Color Continuous Feed Printing
System PC-UI, select [CMS Option Tool].
3. Select the [Paper Information] tab.
Note
Ensure that [Downloading with Calibration] is not selected.
4. Under the Paper Name field, select [Plain Paper] for PRINTER1.
5. Select [Properties].
4-2 Color Management Guide
Page 43

Xerox 490/980 Color Continuous Feed Printing System Pre-Calibration Engine Density Adjustment
6. For the Paper Name field, type [TRC].
7. Select [Save As].
8. After the pop-up window appears, select [Ye s].
9. Select the Paper Name [TRC] for PRINTER1.
10. Select [Download].
11. After the pop-up window appears, select [Ye s].
12. The message “Resource file Download process (Ended).” will appear at the lower part of the
window above the status bar.
13. Exit the CMS Option Tool by selecting [Close] located at the bottom right of the window.
Color Management Guide 4-3
Page 44

Pre-Calibration Engine Density Adjustment Xerox 490/980 Color Continuous Feed Printing System
For Duplex Systems
1. Ensure that the Xerox 490/980 Color Continuous Feed Printing System is powered on and is
connected to the PC-UI.
2. On the left-side navigation pane of the Xerox 490/980 Color Continuous Feed Printing
System PC-UI, select [CMS Option Tool].
3. Select the [Paper Information] tab.
Note
Ensure that [Downloading with Calibration] is not selected.
4. Under the Paper Name field, select [Plain Paper] for PRINTER1.
5. Select [Properties].
4-4 Color Management Guide
Page 45

Xerox 490/980 Color Continuous Feed Printing System Pre-Calibration Engine Density Adjustment
6. For the Paper Name field, type [TRC].
7. Select [Save As].
8. After the pop-up window appears, select [Ye s].
9. Under the Paper Name field, select [Plain Paper] for PRINTER2 and repeat steps 4-8 of this
procedure.
10. Holding <CRTL> on the keyboard, select the Paper Name [TRC] for both PRINTER1 and
PRINTER2.
11. Select [Download].
12. After the pop-up window appears, select [Ye s].
13. The message “Resource file Download process (Ended).” will appear at the lower part of the
window above the status bar.
14. Exit the CMS Option Tool by selecting [Close] located at the bottom right of the window.
Color Management Guide 4-5
Page 46

Pre-Calibration Engine Density Adjustment Xerox 490/980 Color Continuous Feed Printing System
Set Up Imposition Files
This section explains how to import either a simplex or duplex imposition file from the [Color
Calibration Resources] directory copied to the Windows Desktop in Chapter 3, and how to
manipulate the imported simplex or duplex imposition file to accommodate whatever paper
size you are using. There are different procedures for manipulating the imposition file
depending on if it is for a simplex or duplex system.
Import Simplex/Duplex Imposition Files
The purpose of this procedure is to ensure proper placement of the density test pattern on the
paper. This imposition file has already been created for you. The following procedure will
describe how to import it onto the PC-UI.
1. On the left-side navigation pane of the Xerox 490/980 Color Continuous Feed Printing
System PC-UI, select [Resource Management].
2. Select the [System Resource] tab.
3. In the Media/Directory drop-down menu, select [Local PC].
Note
In the following step, if the [Color Calibration Resources] does not appear, the directory
structure must be refreshed. Refresh the directory structure by selecting [System Directory]
and then [Local PC] in the Media/Directory drop-down menu.
4. Browse to [Local Disk (C:)\Documents and Settings\[Current Logged in Windows XP
Profile]\Desktop\Color Calibration Resources\Imposition Files].
5. Right-click on the appropriate file:
a. For a simplex configuration: [Simplex_PreCal.forms].
b. For a duplex configuration: [Duplex_PreCal.forms].
6. Select [Import].
7. Select the stock set (folder) [SYSTEM_DEFAULT] and select [OK].
8. If you are using a cutter/stacker as a post-processor, follow steps 9-11. If you are not using
a cutter/stacker as a post-processor, go to step 12.
9. Browse to [Local Disk (C:)\Documents and Settings\[Current Logged in Windows XP
Profile]\Desktop\Color Calibration Resources\TOF Mark].
10. Right click on [TOFMark3.tif] and select [Import].
11. Select the stock set (folder) [SYSTEM_DEFAULT] and select [OK].
12. Do not navigate away from the [System Resource] tab. The following section describe how
to manipulate the imposition file just imported using this tab.
4-6 Color Management Guide
Page 47

Xerox 490/980 Color Continuous Feed Printing System Pre-Calibration Engine Density Adjustment
Manipulate the Imported Simplex Imposition File
Now that you have imported the simplex imposition file into the PC-UI, you must ensure that
the Logical Paper Settings of the imposition file match whatever paper stock width you are
currently using.
1. On the left-side navigation pane of the Xerox 490/980 Color Continuous Feed Printing
System PC-UI, select [Resource Management].
2. Select the [System Resource] tab.
3. In the Media/Directory drop-down menu, select [System Directory].
4. Double-click [Simplex_PreCal.forms]
Note
For the next step, the Paper Identifier Name should follow the convention of
[Simplex_PreCal_ ] and the number in inches or millimeters of the paper stock width (i.e.,
[Simplex_PreCal_19-5in], [Simplex_PreCal_495mm]). Decimal points are not allowed in a
Paper Identifier Name, so substitute in a dash [ - ] if the paper stock width is not a whole
number.
5. Rename the imposition file. Add an [ _ ] to the end of the Paper Identifier Name and type
the paper stock width in inches or millimeters (i.e. [Simplex_PreCal_ [Paper Stock Width]].
6. Select [Properties] located on the bottom of the window.
7. Ensure that the numerical values entered for the Offset Specification and Logical Page Size
are correct for your current paper stock width. To do this, reference
explains how to find these values. When you are finished, return to this procedure.
8. Select [OK] to save the Logical Page Setting changes (if any were made).
9. Select [OK] again to save the imposition file.
to open the imposition file.
Appendix A which
Color Management Guide 4-7
Page 48

Pre-Calibration Engine Density Adjustment Xerox 490/980 Color Continuous Feed Printing System
Manipulate the Imported Duplex Imposition File
Now that you have imported the duplex imposition file into the PC-UI, you must ensure that the
Logical Paper Settings of the imposition file match whatever paper stock width you are
currently using.
1. On the left-side navigation pane of the Xerox 490/980 Color Continuous Feed Printing
System PC-UI, select [Resource Management].
2. Select the [System Resource] tab.
3. In the Media/Directory drop-down menu, select [System Directory].
4. Double-click [Duplex_PreCal.forms] t
Note
For the next step, the Paper Identifier Name should follow the convention of
[Duplex_PreCal_ ] and the number in inches or millimeters of the paper stock width (i.e.,
[Duplex_PreCal_19-5in], [Duplex_PreCal_495mm]). Decimal points are not allowed in a
Paper Identifier Name, so substitute in a dash [ - ] if the paper stock width is not a whole
number.
5. Rename the imposition file. Add an [ _ ] to the end of the Paper Identifier Name and type
the paper stock width in inches or millimeters (i.e. [Duplex_PreCal_ [Paper Stock Width]].
6. Select [Properties] located on the bottom of the window.
7. Ensure that the numerical values entered for the Offset Specification and Logical Page Size
are correct for your current paper stock width. To do this, reference
explains how to find these values. When you are finished, return to this procedure.
8. Select [OK] to save the Logical Page Setting changes (if any were made).
9. Select the [2] tab at the upper left part of the preview pane.
10. Repeat steps 5-8.
11. Select [OK] again to save the imposition file.
o open the imposition file.
Appendix A which
4-8 Color Management Guide
Page 49

Xerox 490/980 Color Continuous Feed Printing System Pre-Calibration Engine Density Adjustment
Create a New Queue
The purpose of this section is to submit the density test pattern using the proper imposition,
queue and color settings. We do this by creating a new queue. Please follow the appropriate
procedure based on whether you have a simplex or duplex system.
Create a new Simplex Queue
Use this procedure to create a new queue for a simplex system.
1. On the left-side navigation pane of the Xerox 490/980 Color Continuous Feed Printing
System PC-UI, select [Queue Management].
2. Select [New] located at the lower right of the window.
Color Management Guide 4-9
Page 50

Pre-Calibration Engine Density Adjustment Xerox 490/980 Color Continuous Feed Printing System
Note
For the next step, the Queue Name should follow the convention of [TRC_ ] and the number
in inches or millimeters of the paper stock width (i.e., [TRC_19-5in], [TRC_495mm]).
Decimal points are not allowed in a Queue Name, so substitute in a dash [ - ] if the paper
stock width is not a whole number.
3. In the Queue Name field, type [TRC_ [Paper Stock Width]].
4. Under the Data Format drop-down menu, select [PDF].
5. In the Delete Job After Printing box, select the [Manual] radio button.
6. For Input Process Mode, select the [Spool] and [Do Not Hold Job] radio buttons.
7. For Output Process Mode, select the [Spool] and [Do Not Hold Job] radio buttons.
8. For Extended Spool, select the [Enable] radio button.
9. Select the [Paper Setting] tab.
10. Ensure that [SYSTEM_DEFAULT] is the selected stock set name.
11. In the Paper Identifier drop-down menu, select the imposition file [Simplex_PreCal_[Paper
Stock Width]].
4-10 Color Management Guide
Page 51

Xerox 490/980 Color Continuous Feed Printing System Pre-Calibration Engine Density Adjustment
12. Select the [Color] tab.
13. In the Color Characteristics [Upstream] box, in the Printer Name drop-down menu, select
[PRINTER1].
14. In the Color Characteristics [Upstream] box, select [Setting].
15. In the Resource Group Name drop-down menu, select [TRC_PRINTER1.cntl].
16. Select [OK].
17. Select the [PDF] tab.
18. In the Page Size drop-down menu, select [Non-standard].
Color Management Guide 4-11
Page 52

Pre-Calibration Engine Density Adjustment Xerox 490/980 Color Continuous Feed Printing System
Note
In the following step, while using Inches is recommended, it is not required. Millimeters are
also supported by this documentation.
19. For Unit, select [Inch].
20. In the Width field type [5.6] (142 mm). In the Length field type [12.00] (305 mm).
21. In the Copies field, type [10].
22. Select [OK].
4-12 Color Management Guide
Page 53

Xerox 490/980 Color Continuous Feed Printing System Pre-Calibration Engine Density Adjustment
Create a new Duplex Queue
On the left-side navigation pane of the Xerox 490/980 Color Continuous Feed Printing System
PC-UI, select [Queue Management].
1. Select [Queue Management] on the left-side navigation pane of the PC-UI.
2. Select [New] located at the lower right of the window.
Color Management Guide 4-13
Page 54

Pre-Calibration Engine Density Adjustment Xerox 490/980 Color Continuous Feed Printing System
Note
For the next step, the Queue Name should follow the convention of [TRC_ ] and the number
in inches or millimeters of the paper stock width (i.e., [TRC_19-5in], [TRC_495mm]).
4-14 Color Management Guide
Page 55

Xerox 490/980 Color Continuous Feed Printing System Pre-Calibration Engine Density Adjustment
Decimal points are not allowed in a Queue Name, so substitute in a dash [ - ] if the paper
stock width is in a half-inch increment.
3. In the Queue Name field, type [TRC_ [Paper Stock Width]].
4. Under the Data Format drop-down menu, select [PDF].
5. In the Delete Job After Printing box, select the [Manual] radio button.
6. For Input Process Mode, select the [Spool] and [Do Not Hold Job] radio buttons.
7. For Output Process Mode, select the [Spool] and [Do Not Hold Job] radio buttons.
8. For Extended Spool, select the [Enable] radio button.
9. Select the [Paper Setting] tab.
10. Ensure that [SYSTEM_DEFAULT] is the selected stock set name.
11. In the Paper Identifier drop-down menu, select the imposition file [Duplex_PreCal_[Paper
Stock Width]].
Color Management Guide 4-15
Page 56

Pre-Calibration Engine Density Adjustment Xerox 490/980 Color Continuous Feed Printing System
12. Select the [Color] tab.
13. In the Color Characteristics [Upstream] box, in the Printer Name drop-down menu, select
[PRINTER1].
14. In the Color Characteristics [Upstream] box, select [Setting].
15. In the Resource Group Name drop-down menu, select [TRC_PRINTER1.cntl].
16. Select [OK].
17. In the Color Characteristics [Downstream] box, in the Printer Name drop-down menu, select
[PRINTER2].
18. In the Color Characteristics [Downstream] box, select [Setting].
19. In the Resource Group Name drop-down menu, select [TRC_PRINTER2.cntl].
20. Select [OK].
4-16 Color Management Guide
Page 57

Xerox 490/980 Color Continuous Feed Printing System Pre-Calibration Engine Density Adjustment
21. Select the [PDF] tab.
22. In the Page Size drop-down menu, select [Non-standard].
Note
In the following step, while using Inches is recommended, it is not required. Millimeters are
also supported by this documentation.
23. For Unit, select [Inch].
24. In the Width field type [5.6] (142 mm). In the Length field type [12.00] (305 mm).
25. In the Copies field, type [10].
26. Select [OK].
Color Management Guide 4-17
Page 58

Pre-Calibration Engine Density Adjustment Xerox 490/980 Color Continuous Feed Printing System
Color Density Adjustment
The purpose of the following procedure is to achieve the proper color density levels for optimum
color calibration.
Note
The following procedure must be performed:
• For a Simplex System: One time.
• For a Duplex System: One time for each printer.
1. Open the [Color Calibration Resources] folder that was copied to the Windows Desktop.
2. Select either the duplex or simplex test patterns. The test patterns are named as follows:
a. For Simplex: [Simplex Xerox 490980 Color Test Pattern.pdf].
b. For Duplex: [Duplex Xerox 490980 Color Test Pattern.pdf].
Tes t P a tte r n
4-18 Color Management Guide
Page 59

Xerox 490/980 Color Continuous Feed Printing System Pre-Calibration Engine Density Adjustment
Note
As a reminder, the queue name used to submit the job in the next step is [TRC_ [Paper
Stock Width]].
3. Reference
Appendix B and submit the appropriate test pattern to the printer using Line
Printer Remote (LPR). Return to this procedure when you are finished.
4. The command prompt window should look similar to the following when you are finished
typing:
5. After you have confirmed that you have the appropriate text in the command prompt
window, press <Enter> to submit the job to the printer.
6. Close the command prompt and Windows Explorer windows.
7. Save the last three print-outs of the test pattern.
Note
In the following step, the white paper is used as a backdrop under the test pattern print to
prevent the viewing surface from interfering with the color squares.
8. Place a piece of white paper on a table, then place the test pattern on top of the white
piece of paper.
9. Place the SIR on top of the test pattern. Ensure that the square cut outs are in line with the
100% color squares of the test pattern.
10. Using the provided Xerox 490/980 Color Continuous Feed Printing System SIR, evaluate by
eye if the 100% square of colors on the test pattern are lighter or darker in density than the
Light shade or the Dark shade of the SIR. Repeat this procedure for each of the four colors
(Y/M/C/K). Write down the results of each observation for recording purposes.
100% SIR
11. Repeat steps 9 and 10 for each of the three test pattern print-outs.
12. Average the results from step 10 together.
Color Management Guide 4-19
Page 60

Pre-Calibration Engine Density Adjustment Xerox 490/980 Color Continuous Feed Printing System
Note
In order to change color density values, the system must be paused (in NOT READY mode)
and the user must be logged in as a System Administrator. Once both of these
requirements have been met, the color density values can be changed from the PC-UI by
selecting [Printer Management] on the left-side navigation pane.
13. If the 100% color square on the test pattern (on average) is darker in density than the Dark
color square on the SIR, lighten (decrease) the print density of that color by 1 using the PCUI.
14. If the 100% color square on the test pattern (on average) is lighter in density than the
Light color square on the SIR, darken (increase) the print density of that color by 1 using
the PC-UI.
15. Select [Setting] after making the appropriate color density changes.
16. If another print-out of the test pattern is required, it may be released from the hold queue
of the IOT-UI without resubmitting the job from the client station.
Note
In the following step, if any color density settings are at their maximum or minimum
values, and the color settings are still not within the specified parameters of the SIR, notify
your local Xerox service representive.
17. Repeat steps 8-16 as many times as is required until all four colors are within the specified
parameters of the SIR.
18. When you are finished with this procedure, delete the job from the hold queue of the IOTUI.
4-20 Color Management Guide
Page 61

s
Color Calibration Process for v1.1.6 Software
This chapter discusses how to properly calibrate the color output of the printer.
5
Color Management Guide 5-1
Page 62

Color Calibration Process for v1.1.6 Software Xerox 490/980 Color Continuous Feed Printing System
Create a TRC File
The purpose of this procedure is to set up a queue for printing the color calibration grids. There
is a separate procedure for simplex and duplex systems.
For Simplex Systems
1. On the left-side navigation pane of the Xerox 490/980 Color Continuous Feed Printing
System PC-UI, select [Resource Management].
2. In the Media/Directory drop-down menu, select [System Directory].
3. In the [Save to] list of directories on the left side of the screen, right click the mouse. A pop
up menu will appear.
4. Select [New].
5. Type [ColorCal] and select [OK].
6. In the Media/Directory drop-down menu, select [Local PC].
7. Browse for the folder [C:\Documents and Settings\[Current Active Windows XP
Profile]\Desktop\Color Calibration Resources\Imposition Files\].
8. Select the imposition file [Simplex_iSis2_195.forms].
9. Right-click and select [Import].
10. Ensure that the [ColorCal] folder is selected and select [OK] to import the imposition file.
5-2 Color Management Guide
Page 63

Xerox 490/980 Color Continuous Feed Printing System Color Calibration Process for v1.1.6 Software
11. On the left-side navigation pane of the Xerox 490/980 Color Continuous Feed Printing
System PC-UI, select [Queue Management].
12. Select [New] at the bottom right of the window.
13. In the Queue Name field, type [Calibration].
14. In the Data Format drop-down menu, select [PDF].
15. In the Delete Job After Printing box, select the [Manual] radio button.
16. For Input Process Mode, select the [Spool] and [Do Not Hold Job] radio buttons.
17. For Output Process Mode, select the [Spool] and [Do Not Hold Job] radio buttons.
18. In the Extended Spool box, select the [Enable] radio button.
19. Select the [Paper Setting] tab.
20. For Stock Set Name, select [ColorCal].
21. A popup window will appear asking for you to specify the paper identifier. Select [OK].
22. In the Paper Identifier drop-down menu, select [Simplex_iSis2_195].
Color Management Guide 5-3
Page 64

Color Calibration Process for v1.1.6 Software Xerox 490/980 Color Continuous Feed Printing System
23. Select the [Color] tab.
24. In the Color Characteristics (Upstream) box, in the Printer Name drop-down menu select
[PRINTER1], then select [Setting].
25. In the Resource Group Name drop-down menu, select [TRC_PRINTER1.cntl].
26. For both RGB and CMYK under the Simulation drop-down menus, ensure [Device] is
selected.
27. Select [OK].
28. Select the [PDF] tab.
29. In the Page Size drop-down menu, select [Non-standard].
Note
In the following step, while using Inches is recommended, it is not required. Millimeters are
also supported by this documentation.
30. For Unit, select [Inch].
31. In the Width field type [5.6] (142 mm). In the Length field type [12.00] (305 mm).
32. In the Copies field, type [5] and select [OK].
5-4 Color Management Guide
Page 65

Xerox 490/980 Color Continuous Feed Printing System Color Calibration Process for v1.1.6 Software
Note
As a reminder, the queue name used to submit the job in the next step is [Calibration].
33. Reference
Appendix B and submit the ColorPort test pattern [ColorPort_iSis] located in the
folder [C:\Documents and Settings\[Current Active Windows XP Profile]\Desktop\Color
Calibration Resources] to the printer using Line Printer Remote (LPR). Return to this
procedure when you are finished.
34. The command prompt window should look similar to the following when you are finished
typing:
35. After you have confirmed that you have the appropriate text in the command prompt
window, press <Enter> to submit the job to the printer.
36. Close the command prompt and Windows Explorer windows.
37. Depending on whether you have a simplex system or a duplex system, do one of the
following:
a. Select the third set of targets from the printer.
b. Select the third set of targets from the prints done by each printer.
38. Identify and mark the test patterns based on their positions as inboard, middle or
outboard.
39. Cut around the dotted line edge of the test patterns.
Color Management Guide 5-5
Page 66

Color Calibration Process for v1.1.6 Software Xerox 490/980 Color Continuous Feed Printing System
For Duplex Systems
1. On the left-side navigation pane of the Xerox 490/980 Color Continuous Feed Printing
System PC-UI, select [Resource Management].
2. In the Media/Directory drop-down menu, select [System Directory].
3. In the [Save to] list of directories on the left side of the screen, right click the mouse. A pop
up menu will appear.
4. Select [New].
5. Type [ColorCal] and select [OK].
6. In the Media/Directory drop-down menu, select [Local PC].
7. Browse for the folder [C:\Documents and Settings\[Current Active Windows XP
Profile]\Desktop\Color Calibration Resources\Imposition Files\].
8. Select the imposition file [Duplex_iSis2_195.forms].
9. Right-click and select [Import].
10. Ensure that the [ColorCal] folder is selected and select [OK] to import the imposition file.
5-6 Color Management Guide
Page 67

Xerox 490/980 Color Continuous Feed Printing System Color Calibration Process for v1.1.6 Software
11. On the left-side navigation pane of the Xerox 490/980 Color Continuous Feed Printing
System PC-UI, select [Queue Management].
12. Select [New] at the bottom right of the window.
13. In the Queue Name field, type [Calibration].
14. In the Data Format drop-down menu, select [PDF].
15. In the Delete Job After Printing box, select the [Manual] radio button.
16. For Input Process Mode, select the [Spool] and [Do Not Hold Job] radio buttons.
17. For Output Process Mode, select the [Spool] and [Do Not Hold Job] radio buttons.
18. In the Extended Spool box, select the [Enable] radio button.
19. Select the [Paper Setting] tab.
20. For Stock Set Name, select [ColorCal].
21. A popup window will appear asking for you to specify the paper identifier. Select [OK].
22. In the Paper Identifier drop-down menu, select [Duplex_iSis2_195].
Color Management Guide 5-7
Page 68

Color Calibration Process for v1.1.6 Software Xerox 490/980 Color Continuous Feed Printing System
23. Select the [Color] tab.
24. In the Color Characteristics (Upstream) box, in the Printer Name drop-down menu select
[PRINTER1], then select [Setting].
25. In the Resource Group Name drop-down menu, select [TRC_PRINTER1.cntl].
26. For both RGB and CMYK under the Simulation drop-down menus, ensure [Device] is
selected.
27. Select [OK].
28. In the Color Characteristics (Upstream) box, in the Printer Name drop-down menu select
[PRINTER2], then select [Setting].
29. In the Resource Group Name drop-down menu, select [TRC_PRINTER2.cntl].
30. For both RGB and CMYK under the Simulation drop-down menus, ensure [Device] is
selected.
31. Select [OK]
5-8 Color Management Guide
Page 69

Xerox 490/980 Color Continuous Feed Printing System Color Calibration Process for v1.1.6 Software
32. Select the [PDF] tab.
33. In the Page Size drop-down menu, select [Non-standard].
Note
In the following step, while using Inches is recommended, it is not required. Millimeters are
also supported by this documentation.
34. For Unit, select [Inch].
35. In the Width field type [5.6] (142 mm). In the Length field type [12.00] (305 mm).
36. In the Copies field, type [5] and select [OK].
Color Management Guide 5-9
Page 70

Color Calibration Process for v1.1.6 Software Xerox 490/980 Color Continuous Feed Printing System
Note
As a reminder, the queue name used to submit the job in the next step is [Calibration].
37. Reference
Appendix B and submit the ColorPort test pattern [ColorPort_iSis] located in the
folder [C:\Documents and Settings\[Current Active Windows XP Profile]\Desktop\Color
Calibration Resources] to the printer using Line Printer Remote (LPR). Return to this
procedure when you are finished.
38. The command prompt window should look similar to the following when you are finished
typing:
39. After you have confirmed that you have the appropriate text in the command prompt
window, press <Enter> to submit the job to the printer.
40. Close the command prompt and Windows Explorer windows.
41. Depending on whether you have a simplex system or a duplex system, do one of the
following:
a. Select the third set of targets from the printer.
b. Select the third set of targets from the prints done by each printer.
42. Identify and mark the test patterns based on their positions as inboard, middle or
outboard.
43. Cut around the dotted line edge of the test patterns.
5-10 Color Management Guide
Page 71

Xerox 490/980 Color Continuous Feed Printing System Color Calibration Process for v1.1.6 Software
Regional Settings
This is to ensure that the ColorPort Utility Software can function properly when measuring
targets in the next section.
1. Select [Start] and [Control Panel].
2. Select [Regional and Language Options].
3. Select [Customize].
4. For the decimal symbol field, ensure that the decimal point [.] is selected, and not the
comma [,].
5. Select [OK], select [OK] again, and close the Control Panel window.
Color Management Guide 5-11
Page 72

Color Calibration Process for v1.1.6 Software Xerox 490/980 Color Continuous Feed Printing System
Use ColorPort to Measure Targets
This is to measure the printed test grids using the ColorPort Utility Software.
1. Open the ColorPort Utility Software (v1.5.4).
2. Select the [Measure Target tab].
3. Under the Target drop-down menu, select [ATCN_i Si s].
4. Under the Measurement Device drop-down menu, select [X-Rite Eye-One iSis].
5. Select [Connect] and wait for the Eye-One iSis to be ready.
5-12 Color Management Guide
Page 73

Xerox 490/980 Color Continuous Feed Printing System Color Calibration Process for v1.1.6 Software
Note
Each test pattern takes about two minutes for the Eye-One iSis to process.
6. Insert a test pattern into the Eye-One iSis with the solid black bar facing upwards.
7. After the color data has been successfully processed, remove the test pattern from the EyeOne iSis and press [OK] at the pop-up window.
8. Select [Save Data].
9. Under the Format drop-down menu, select [CGATS].
10. Select [Save].
Note
If a duplex system exists, the first file scanned from each engine should be denoted with an
_1.txt at the end of the filename. The second file with a _2.txt, etc.
11. For the filename, type in an appropriate name (i.e. Upstream_1.txt).
12. Select [Save] and choose the [My Documents] folder.
13. Select [Clear Data] and select [OK] at the pop-up window.
14. Do one of the following based on whether a simplex or duplex configuration exists:
a. For a simplex configuration: Repeat steps 6-13 for the remaining two test patterns and
proceed to step 15.
b. Repeat steps 6-13 for the remaining two test patterns of the upstream printer, and
three test patterns of the downstream printer, then proceed to step 15.
15. At the pop-up window, select [Close].
16. Exit the ColorPort Utility Software.
Color Management Guide 5-13
Page 74

Color Calibration Process for v1.1.6 Software Xerox 490/980 Color Continuous Feed Printing System
Create TRC File with TRC Viewer
Depending on whether you have a simplex system or a duplex system, use the appropriate
procedure.
For Simplex Systems
1. Ensure that the 490/980 Color Continuous Feed Printing System Customer Documentation
CD is inserted into the CD-ROM Drive of the PC-UI computer.
2. Open the TRC Viewer software from the main menu of the Xerox 490/980 Color Continuous
Feed Printing System Customer Documentation CD.
3. When prompted by the Security Warnings, select [Run] twice to open the TRC Viewer
Software.
4. Select the third option down on the right hand side of the window called [??..].
Browse for input file
5. Browse for the Upstream_1.txt (or similar named) file created by ColorPort located in [My
Documents].
6. Select [Open].
5-14 Color Management Guide
Page 75

Xerox 490/980 Color Continuous Feed Printing System Color Calibration Process for v1.1.6 Software
7. Click into the fourth field down from the top of the window. Delete the _1 from the end of
the filename (ends with .trc).
Note
The TRC Viewer will automatically process the Upstream_1.txt, Upstream_2.txt and
Upstream_3.txt files and average the results.
8. Select [TRC??].
Browse for input file
Edit name of TRC
Create TRC
Refresh
9. Select [OK] after the pop-up window appears.
10. Select the bottom right [???] to close the TRC Viewer Software.
Exit
Color Management Guide 5-15
Page 76
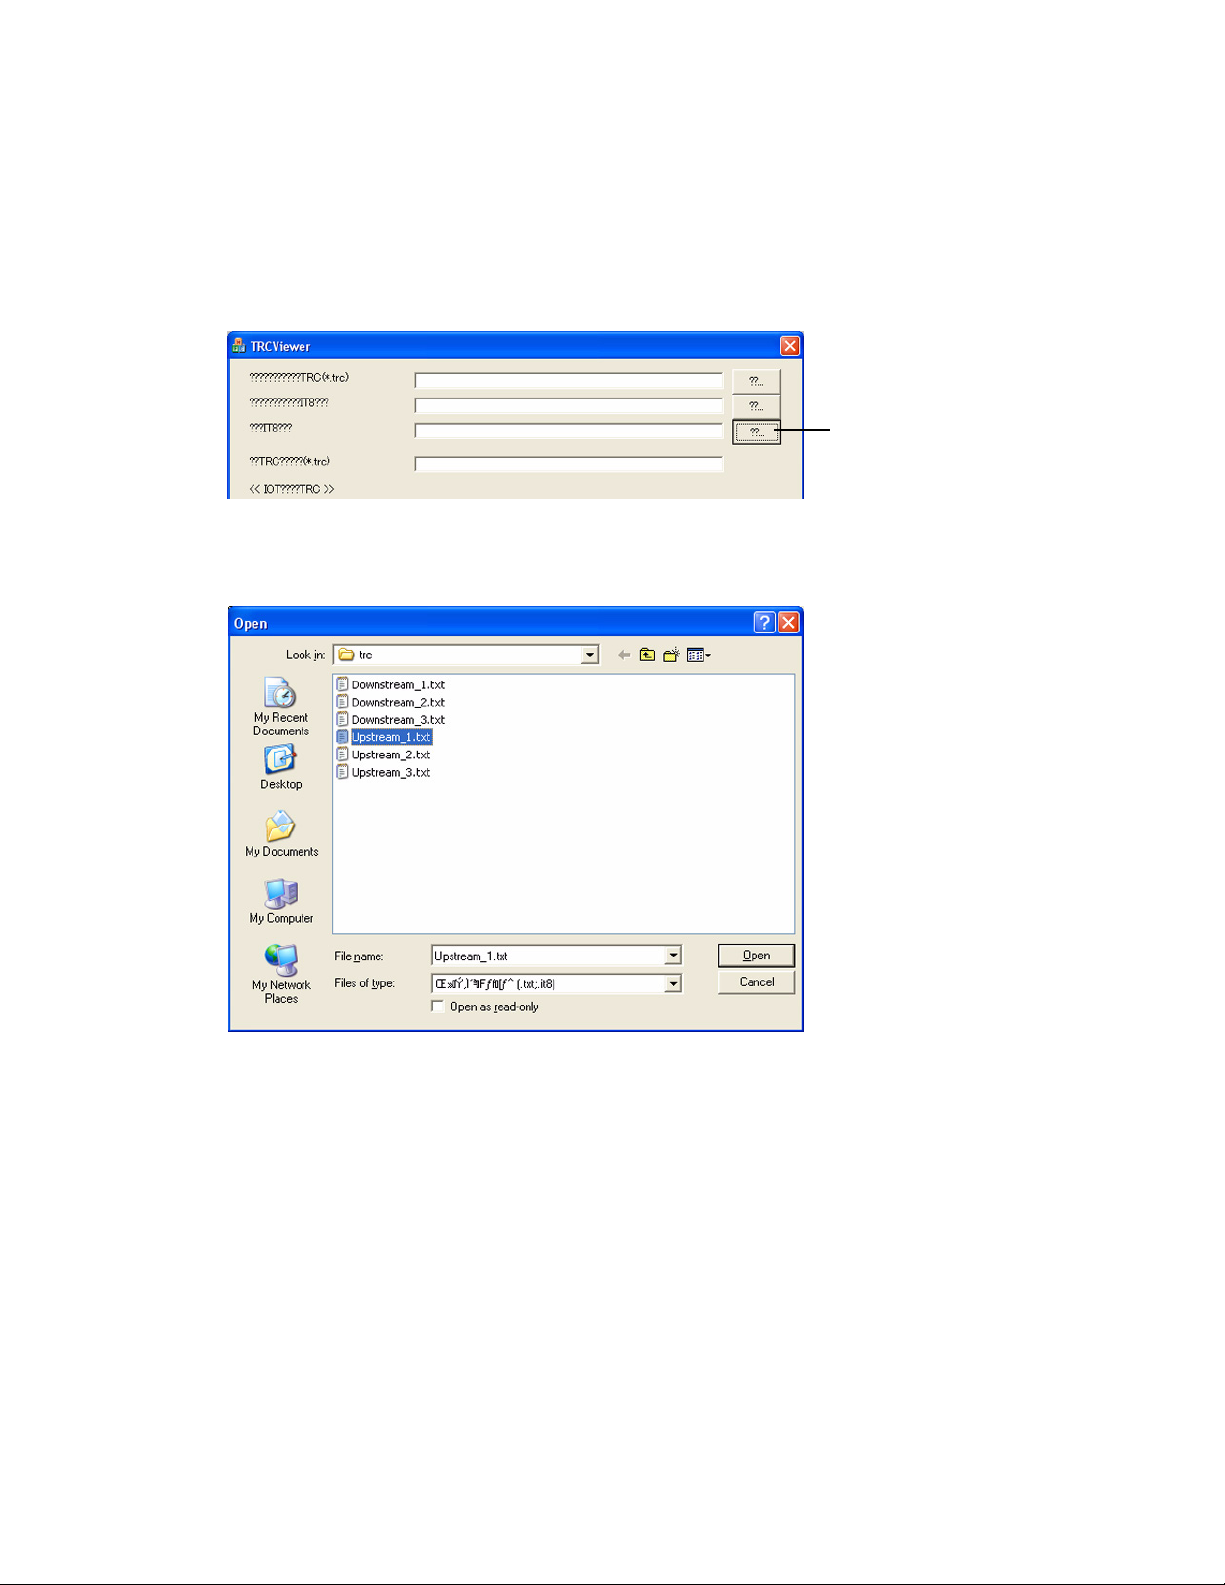
Color Calibration Process for v1.1.6 Software Xerox 490/980 Color Continuous Feed Printing System
For Duplex Systems
1. Ensure that the 490/980 Color Continuous Feed Printing System Customer Documentation
CD is inserted into the CD-ROM Drive of the PC-UI computer.
2. Open the TRC Viewer software from the main menu of the Xerox 490/980 Color Continuous
Feed Printing System Customer Documentation CD.
3. Select the third option down on the right hand side of the window called [??..].
Browse for input file
4. Browse for the Upstream_1.txt (or similar named) file created by ColorPort located in [My
Documents].
5. Select [Open].
5-16 Color Management Guide
Page 77

Xerox 490/980 Color Continuous Feed Printing System Color Calibration Process for v1.1.6 Software
6. Click into the fourth field down from the top of the window. Delete the _1 from the end of
the filename (ends with .trc).
Note
The TRC Viewer will automatically process the Upstream_1.txt, Upstream_2.txt,
Upstream_3.txt files and average the results. The same process applies to the
Downstream_1.txt, Downstream_2.txt and Downstream_3.txt files.
7. Select [TRC??].
Browse for input file
Edit name of TRC
Exit
Create TRC
Refresh
8. Select [OK] after the pop-up window appears.
9. Repeat steps 3-8 for the downstream engine using file Downstream_1.txt.
10. Select the bottom right [???] to close the TRC Viewer Software.
Color Management Guide 5-17
Page 78

Color Calibration Process for v1.1.6 Software Xerox 490/980 Color Continuous Feed Printing System
Import TRC File into PC-UI
For Simplex Systems
1. On the left-side navigation pane of the Xerox 490/980 Color Continuous Feed Printing
System PC-UI, select [Resource Management].
2. Select the [Color Resource] tab.
3. Select [Local PC] under the Media/Directory drop-down menu and browse for the [Local
Disk (C:)\Documents and Settings\[Current Windows XP Profile]\My Documents] folder
where the TRC file is stored.
4. Locate and select the [Upstream.trc] file created with the TRC viewer.
5. Right-click and select [Import].
5-18 Color Management Guide
Page 79

Xerox 490/980 Color Continuous Feed Printing System Color Calibration Process for v1.1.6 Software
6. Select the appropriate directory (i.e. SYSTEM_DEFAULT) and select [OK].
Color Management Guide 5-19
Page 80

Color Calibration Process for v1.1.6 Software Xerox 490/980 Color Continuous Feed Printing System
For Duplex Systems
1. On the left-side navigation pane of the Xerox 490/980 Color Continuous Feed Printing
System PC-UI, select [Resource Management].
2. Select the [Color Resource] tab.
3. Select [Local PC] under the Media/Directory drop-down menu and browse for the [Local
Disk (C:)\Documents and Settings\[Current Windows XP Profile]\My Documents] folder
where the TRC files are stored.
4. Locate and select the [Upstream.trc] file created with the TRC viewer.
5. Right-click and select [Import].
6. Select the appropriate directory (i.e. SYSTEM_DEFAULT) and select [OK].
7. Repeat steps 4-6 for the [Downstream.trc] file.
5-20 Color Management Guide
Page 81

Xerox 490/980 Color Continuous Feed Printing System Color Calibration Process for v1.1.6 Software
Create a New Queue for Calibration Confirmation
Depending on whether a simplex or duplex system exists, use the appropriate procedure on the
following pages.
Color Management Guide 5-21
Page 82

Color Calibration Process for v1.1.6 Software Xerox 490/980 Color Continuous Feed Printing System
For Simplex Systems
Create a queue that uses the TRC created for the upstream User TRC.
1. On the left-side navigation pane of the Xerox 490/980 Color Continuous Feed Printing
System PC-UI, select [Queue Management].
2. Select [New].
3. In the Queue Name field, type [CalibrationConfirmation].
4. Under the Data Format drop-down menu, select [PDF].
5. In the Delete Job After Printing box, select the [Manual] radio button.
6. For Input Process Mode, select the [Spool] and [Do Not Hold Job] radio buttons.
7. For Output Process Mode, select the [Spool] and [Do Not Hold Job] radio buttons.
8. In the Extended Spool box, select the [Enable] radio button.
9. Select the [Paper Setting] tab.
10. Ensure that the Stock Set Name is [SYSTEM_DEFAULT].
11. In the Paper Identifier drop-down menu, select the imposition file [Simplex_PreCal].
5-22 Color Management Guide
Page 83

Xerox 490/980 Color Continuous Feed Printing System Color Calibration Process for v1.1.6 Software
12. Select the [Color] tab.
13. In the Color Characteristics [Upstream] box, in the Printer Name drop-down menu, select
[PRINTER1].
14. In the Color Characteristics [Upstream] box, select [Setting].
15. In the User TRC drop-down menu, select [Upstream.trc].
16. In the Resource Group Name drop-down menu, select [TRC_PRINTER1.cntl].
17. Select [OK].
18. Select the [PDF] tab.
19. In the Page Size drop-down menu, select [Non-standard].
Color Management Guide 5-23
Page 84

Color Calibration Process for v1.1.6 Software Xerox 490/980 Color Continuous Feed Printing System
Note
In the following step, while using Inches is recommended, it is not required. Millimeters are
also supported by this documentation.
20. For Unit, select [Inch].
21. In the Width field type [8.50] (216 mm). In the Length field type [12.00] (305 mm).
22. In the Copies drop-down menu, type [10].
23. Select [OK].
5-24 Color Management Guide
Page 85

Xerox 490/980 Color Continuous Feed Printing System Color Calibration Process for v1.1.6 Software
For Duplex Systems
Create a queue that uses the TRC’s created for the upstream and downstream as User TRC’s.
1. On the left-side navigation pane of the Xerox 490/980 Color Continuous Feed Printing
System PC-UI, select [Queue Management].
2. Select [New].
3. In the Queue Name field, type [CalibrationConfirmation].
4. Under the Data Format drop-down menu, select [PDF].
5. In the Delete Job After Printing box, select the [Manual] radio button.
6. For Input Process Mode, select the [Spool] and [Do Not Hold Job] radio buttons.
7. For Output Process Mode, select the [Spool] and [Do Not Hold Job] radio buttons.
8. In the Extended Spool box, select the [Enable] radio button.
9. Select the [Paper Setting] tab.
10. In the Paper Identifier drop-down menu, select the imposition file [Duplex_PreCal].
Color Management Guide 5-25
Page 86

Color Calibration Process for v1.1.6 Software Xerox 490/980 Color Continuous Feed Printing System
11. Select the [Color] tab.
12. In the Color Characteristics [Upstream] box, in the Printer Name drop-down menu, select
[PRINTER1].
13. In the Color Characteristics [Upstream] box, select [Setting].
14. In the User TRC drop-down menu, select [Upstream.trc].
15. In the Resource Group Name drop-down menu, select [TRC_PRINTER1.cntl].
16. Select [OK].
17. In the Color Characteristics [Downstream] box, in the Printer Name drop-down menu, select
[PRINTER2].
18. In the Color Characteristics [Downstream] box, select [Setting].
19. In the User TRC drop-down menu, select [Downstream.trc].
20. In the Resource Group Name drop-down menu, select [TRC_PRINTER2.cntl].
21. Select [OK].
5-26 Color Management Guide
Page 87

Xerox 490/980 Color Continuous Feed Printing System Color Calibration Process for v1.1.6 Software
22. Select the [PDF] tab.
23. In the Page Size drop-down menu, select [Non-standard].
Note
In the following step, while using Inches is recommended, it is not required. Millimeters are
also supported by this documentation.
24. For Unit, select [Inch].
25. In the Width field type [5.6] (142 mm). In the Length field type [12.00] (305 mm).
26. In the Copies drop-down menu, type [10].
27. Select [OK].
Color Management Guide 5-27
Page 88

Color Calibration Process for v1.1.6 Software Xerox 490/980 Color Continuous Feed Printing System
Post-Calibration Density Check
The purpose of the following procedure is to confirm that the proper color density levels have
been achieved for optimum color calibration.
Note
This procedure must be performed:
• For a Simplex System: One time.
• For a Duplex System: One time for each printer.
1. Open the [Color Calibration Resources] folder that was copied to the Windows Desktop.
2. Select either the duplex or simplex test patterns. The test patterns are named as follows:
a. For Simplex: [Simplex Xerox 490980 Color Test Pattern.pdf].
b. For Duplex: [Duplex Xerox 490980 Color Test Pattern.pdf].
Tes t P a tte r n
5-28 Color Management Guide
Page 89

Xerox 490/980 Color Continuous Feed Printing System Color Calibration Process for v1.1.6 Software
Note
As a reminder, the queue name used to submit the job in the next step is
[CalibrationConfirmation].
3. Reference
Appendix B and submit the appropriate test pattern to the printer using Line
Printer Remote (LPR). Return to this procedure when you are finished.
4. The command prompt window should look similar to the following when you are finished
typing:
5. After you have confirmed that you have the appropriate text in the command prompt
window, press <Enter> to submit the job to the printer.
6. Close the command prompt and Windows Explorer windows.
7. Save the last three print-outs of the test pattern.
Note
In the following step, the white paper is used as a backdrop under the test pattern print to
prevent the viewing surface from interfering with the color squares.
8. Place a piece of white paper on a table, then place the test pattern on top of the white
piece of paper.
9. Place the SIR on top of the test pattern. Ensure that the square cut outs are in line with the
100% color squares of the test pattern.
10. Using the provided Xerox 490/980 Color Continuous Feed Printing System SIR, evaluate by
eye if the 100% square of colors on the test pattern are lighter or darker in density than the
Light shade or the Dark shade of the SIR. Repeat this procedure for each of the four colors
(Y/M/C/K). Write down the results of each observation for recording purposes.
100% SIR
11. If the color densities of each color square are within the specified parameters of the Xerox
490/980 Color Continuous Feed Printing System SIR, color calibration has been successfully
completed. If the color densities of each square are not within the specified parameters of
the Xerox 490/980 Color Continuous Feed Printing System SIR, color calibration must be
repeated. Please go back to the
Color Density Adjustment on page 18 of Chapter 4 and
repeat all procedures up to this point again.
Color Management Guide 5-29
Page 90

Color Calibration Process for v1.1.6 Software Xerox 490/980 Color Continuous Feed Printing System
Apply a Calibration TRC to existing Queues using the User TRC option
For the queues that you would like calibrated, follow this procedure.
For Simplex Systems
1. On the left-side navigation pane of the Xerox 490/980 Color Continuous Feed Printing
System PC-UI, select [Queue Management].
2. Double-click on an existing print queue from the list.
3. Select the [Color] tab.
4. In the Color Characteristics (Upstream) box, select [Setting].
5. Under the User TRC drop-down menu, select the [Upstream.trc] file that was created
previously.
6. Select [OK].
7. Select [OK] again.
For Duplex Systems
1. On the left-side navigation pane of the Xerox 490/980 Color Continuous Feed Printing
System PC-UI, select [Queue Management].
2. Double-click on an existing print queue from the list.
3. Select the [Color] tab.
4. In the Color Characteristics (Upstream) box, select [Setting].
5. Under the User TRC drop-down menu, select the [Upstream.trc] file that was created
previously.
6. Select [OK].
7. In the Color Characteristics (Downstream) box, select [Setting].
8. Under the User TRC drop-down menu, select the [Downstream.trc] that was created
previously.
9. Select [OK] again.
5-30 Color Management Guide
Page 91

Color Calibration
6
Using ColorPort
Utility Software
This chapter discusses how to perform Calibration. All processes that need to be performed
before calibration are discussed in earlier chapters.
Calibration is when you check and adjust (by comparison with a standard print) the accuracy of
the printed output. The Xerox 490/980 Color Continuous Feed Printing System uses the
calibration process to ensure the best possible printed output.
To perform calibrations, you must have the CMS Option Tool loaded. Information on how to
install the CMS Option tool is located in Chapter 2.
For calibration on the Xerox 490/980 Color Continuous Feed Printing System, it is recommended
that you use the X-Rite Eye-One iSis spectrophotometer measuring device and the ColorPort
Utility Software. See Chapter 3
to obtain the latest version of the ColorPort Utility Software.
Download ColorPort Utility Software for information on how
Color Management Guide 6-1
Page 92
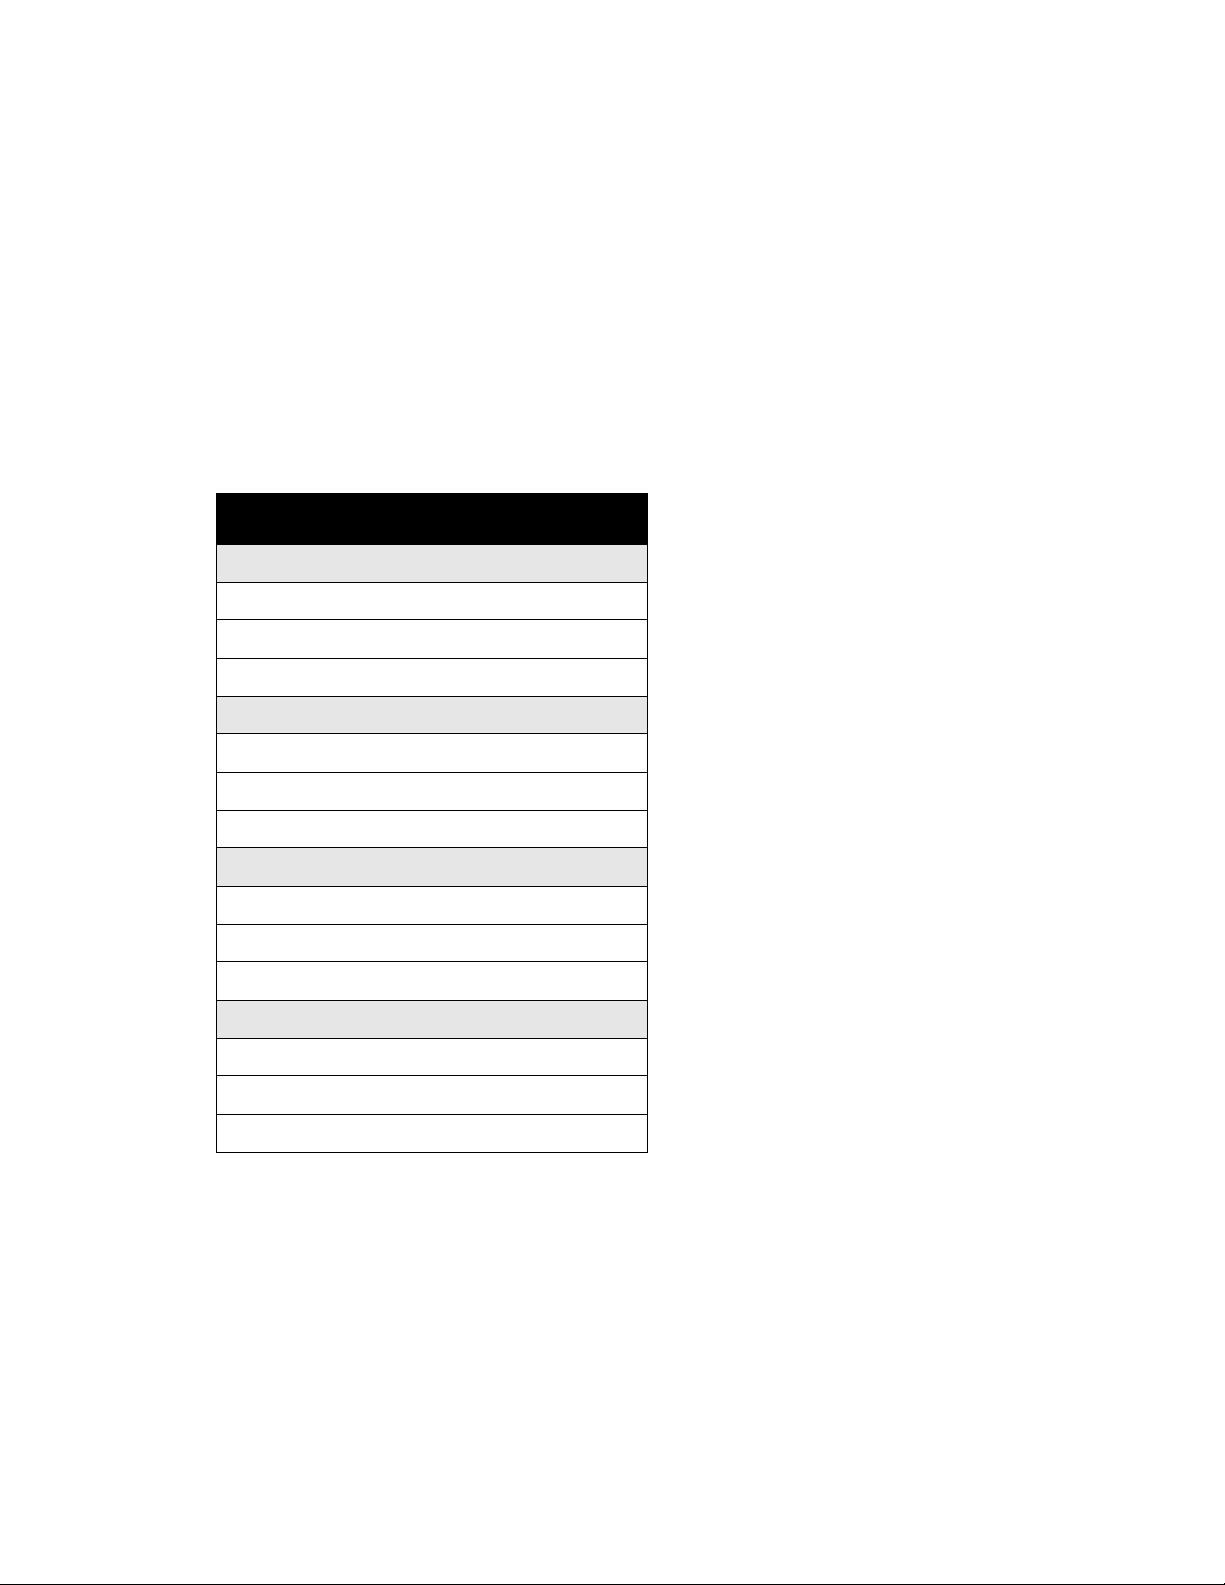
Color Calibration Using ColorPort Utility Software Xerox 490/980 CCF Printing System
Color Calibration
Before performing color calibration, set the cutter to A3 and ensure that all color settings for
both printers are set at 4 (C,M,Y,K).
1. Select the CMS Option Tool icon from the PC-GUI.
2. Select the [Print Colorimetric Pattern] tab.
3. Select the colorimetric pattern to print from the pull-down menu. For Calibration, select
(Eye-One iSis).
4. Select [Print].
5. Select [Yes] to continue. After printing is complete, select one sample of the following test
patterns and cut around the dotted lines neatly:
Tes t Pat t er n Na m es
For Upstream Halftone Dot
EyeOneiSis_up_Calib.rnd_1 (299)
EyeOneiSis_up_Calib.rnd_2 (299)
EyeOneiSis_up_Calib.rnd_3 (299)
For Downstream Halftone Dot
EyeOneiSis_dn_Calib.rnd_1 (299)
EyeOneiSis_dn_Calib.rnd_2 (299)
EyeOneiSis_dn_Calib.rnd_3 (299)
For Upstream Error Diffusion
EyeOneiSis_up_Calib.rnd_1 (299)
EyeOneiSis_up_Calib.rnd_2 (299)
EyeOneiSis_up_Calib.rnd_3 (299)
For Downstream Error Diffusion
EyeOneiSis_dn_Calib.rnd_1 (299)
EyeOneiSis_dn_Calib.rnd_2 (299)
EyeOneiSis_dn_Calib.rnd_3 (299)
6-2 Color Management Guide
Page 93

Xerox 490/980 CCF Printing System Color Calibration Using ColorPort Utility Software
Using ColorPort for Color Calibration
Open the Colorport software. Select [Start: Programs: Colorport] on your PC or select
[Colorport.exe] on the desktop.
1. Select the [Measure Target] tab.
2. Select the Target pull down menu. Select the name of the first test pattern, (ex:
EyeOneiSis_up_Calib.rnd_1). The “EyeOneiSis” refers to the measuring device.
3. Select the measuring device [X-Rite Eye-One iSis].
4. Select [Connect].
5. After the pop-up window appears, place the test pattern into the reader, image facing up.
You may need to hold the test pattern as the reader begins.
6. When the EyeOneiSis has completed the reading of the printed pattern, select [Save Data].
7. Select the Format pull down menu and select [CGATS]. Spectral Range is 400nm - 700nm
and Value Scale is 0-100.
8. Select [Save].
9. A save screen will open. Select the name that matches the name of the test pattern
(upstream, downstream, error diffusion, halftone dot). Older files can be used as naming
templates to create a name. An example of how a file should be named is:
Date_Printer_Filetype_Scan #.txt.
10. Select [Save]. A pop-up window will appear asking if you wish to replace it, select [Yes].
11. Repeat the above steps (except steps 2 and 3) for each test pattern. When completed, close
Colorport.exe.
12. On the CMS Option tool, select the [Create Calibration Data] tab.
13. Select paper name.
14. Specify a measured data file for Upstream (Printer1):
a. Halftone Dot: select [Browse] and select file [EyeOneiSis_Cal_299_up_(HD)] with
today’s date.
b. Error Diffusion: select [Browse] and select file [EyeOneiSis_Cal_299_up_(ERRD)] with
today’s date.
15. Specify a measured data file for Downstream (Printer2):
a. Halftone Dot: select [Browse] and select file [EyeOneiSis_Cal_299_dn_(HD)] with
today’s date.
b. Error Diffusion: select [Browse] and select file [EyeOneiSis_Cal_299_dn_(ERRD)] with
today’s date.
16. Select [Execute] and then [Ye s]. When completed, select [OK] and close the previous
window.
Color Management Guide 6-3
Page 94

Color Calibration Using ColorPort Utility Software Xerox 490/980 CCF Printing System
6-4 Color Management Guide
Page 95

Appendix
A
Logical Page Setting
The purpose of this appendix is to help you create imposition files in the pre-calibration and
color calibration chapters of the Color Management Guide. The Logical Page Setting is one of
the necessary properties that needs to be configured when creating an imposition file.
Note
This section is referenced as appropriate throughout the pre-calibration and color
calibration chapters of this manual.
The Logical Page Setting is comprised of two sets of numerical values:
Offset Specification
The Offset Specification determines the positioning of the printed page on the paper.
Accordingly, the PC-UI requires the following two numerical values:
1. X-direction, which determines how far away the printed page is from the outboard paper
edge (on the imposition preview screen).
2. Y-direction.
Logical Page Size
The Logical Page Size (or image area) tells the software what the printable area of the paper is.
Accordingly, the PC-UI requires the following two numerical values:
1. Width.
2. Height.
Printer Operator Guide A-1
Page 96

Appendix Xerox 490/980 Color Continuous Feed Printing System
Offset Specification and Logical Page Size Explained
The two sets of numerical values that make up the Offset Specification and the Logical Page
Size are dependent on two variables:
1. The DPI (dots per inch) selected in the imposition file, which can be either:
• 300x300 DPI or;
• 600x600 DPI
2. The width of the logical page (image area) being printed.
Note
In the following paragraph, it mentions that a logical page size of 5.6 in (142 mm) by 12 in
(305 mm) is used. This is because 5.6 in (142 mm) by 12 in (305 mm) is the size of the test
pattern printed to perform color calibration using the Xerox 490/980 Color Continuous Feed
Printing System SIR.
Later in this chapter, there is a
Table of Offset Specification and Logical Page Size Values. This table
shows the numerical values for the Offset Specification and Logical Page Size for widths of
paper stock from 8.3 (211 mm) in to 19.5 in (495 mm) and a logical page size of 5.6 in (142
mm) by 12 in (305 mm).
If the width of the paper stock you are using is not covered in the
Logical Page Size Values
Logical Page Size Values
, use the sample procedure in the section Calculate Offset Specification and
to determine the appropriate numerical values.
Table of Offset Specification and
A-2 Printer Operator Guide
Page 97

Xerox 490/980 Color Continuous Feed Printing System Appendix
Calculate Offset Specification and Logical Page Size Values
The following sample procedure uses the following hypothetical paper stock width, logical page
size (image area) and DPI settings:
• Paper Stock Width: 8.3 in (457 mm)
• Logical Page Size (image area): 5.6 in (142 mm) x 12 in (305 mm)
• DPI: 300x300
To Calculate Logical Page Size Width
Multiply the width of the logical page size in inches by the DPI:
5.6 x 300 + 500 = 1680 = Logical Page Size Width
To Calculate Logical Page Size Height
Multiply the height of the logical page size in inches by the DPI:
12 x 300 = 3600 = Logical Page Size Height
To Calculate Offset Specification X-direction
1. Multiply the width of the paper stock in inches by the DPI:
8.3 x 300 = 2490
2. Divide the number calculated in the previous step by 2:
2490 / 2 = 1245
3. Divide the Logical Page Size Width already calculated by 2:
1680 / 2 = 840
4. Subtract the number calculated in step 2 by the number calculated in step 3:
1245 - 840 = 405 = Offset Specification X-direction
To Calculate Offset Specification Y-direction
This value is always equal to 0.
When finished with all calculations...
Add 500 dpi to the Logical Page Width:
1680 + 500 = 2180 = New Logical Page Width
Subtract 200 dpi from the Offset Specification X-direction:
405 - 200 = New Offset Specification X - direction
The Logical Page Settings should match the graphic below:
Printer Operator Guide A-3
Page 98

Appendix Xerox 490/980 Color Continuous Feed Printing System
Table of Offset Specification and Logical Page Size Values
The following table shows the numerical values for the Offset Specification and Logical Page
Size for:
• Widths of paper stock from 8.3 in (267 mm) to 19.5 in (495 mm) at 0.5 in or 12-13 mm
intervals
• A logical page size of 5.6 in (142 mm) by 12 in (305 mm)
• A DPI setting of 300x300
Offset Specification (DPI) Logical Page Size (DPI)
Paper Stock Width X-direction Y-direction Width Height
8.3 in (211 mm) 205 0 2180 3600
8.5 in (216 mm) 235 0 2180 3600
9 in (229 mm) 310 0 2180 3600
9.5 in (241 mm) 385 0 2180 3600
10 in (254 mm) 460 0 2180 3600
10.5 in (267 mm) 535 0 2180 3600
11 in (279 mm) 610 0 2180 3600
11.5 in (292 mm) 685 0 2180 3600
12 in (305 mm) 760 0 2180 3600
12.5 in (317 mm) 835 0 2180 3600
13 in (330 mm) 910 0 2180 3600
13.5 in (343 mm) 985 0 2180 3600
14 in (356 mm) 1060 0 2180 3600
14.5 in (368 mm) 1135 0 2180 3600
15 in (381 mm) 1210 0 2180 3600
15.5 in (394 mm) 1285 0 2180 3600
16 in (406 mm) 1360 0 2180 3600
16.5 in (419 mm) 1435 0 2180 3600
17 in (432 mm) 1510 0 2180 3600
17.5 in (444 mm) 1585 0 2180 3600
18 in (457 mm) 1660 0 2180 3600
18.5 in (470 mm) 1735 0 2180 3600
19 in (483 mm) 1810 0 2180 3600
19.5 in (495 mm) 1885 0 2180 3600
A-4 Printer Operator Guide
Page 99

Appendix
B
Print Using LPR
The purpose of this appendix is to help you submit the various test patterns necessary to
perform the pre-calibration and color calibration procedures found in this guide to the printer.
The following procedure uses LPR (Line Printer Remote) to submit a job to the printer.
1. Select [Start] and [Run].
2. Type [cmd] and select [OK].
3. A command-prompt window will appear. Type the following exactly as shown, substituting
the IP Address of the printer for [printer IP address], the and any underscores for spaces; do
not type the underscores unless it is actually part of the queue name: [lpr_-S_[printer IP
address]_-P_[queue name]_ ].
4. Ensure that the command-prompt window is small enough so that you can see the
Windows Explorer window behind it that has the [Color Calibration Resources] directory
open.
5. Select the appropriate test pattern to be printed and hold down the left mouse button.
Printer Operator Guide B-1
Page 100

Appendix Xerox 490/980 Color Continuous Feed Printing System
6. Drag and drop the .pdf into the command-prompt window. The location of the .pdf will
automatically be entered into the command-prompt window in double-quotes.
Drag and drop the
test pattern
7. Ensure that the command prompt window is selected. Enter one space after the last
double-quotes of the filename.
8. Go back to the original procedure that referenced this appendix. Compare what you have
typed into the command prompt window to the text in the graphic before submitting the
job to the printer.
B-2 Printer Operator Guide
 Loading...