

Page 1
Print the 480cx User Guide
Display the Online User Guide
XERO X
WorkCentre 480cx
Color All in One
Page 2

Xerox Corporation
Print the 480cx User Guide
©19 99 by Xerox corporation. All rights reserved.
Copyright protection claimed includes all forms and matters of copyrightable material and
information now allowed by statutory or judicial law or hereinaft er granted.
Xerox and all Xerox products mentioned in this publication are trademarks of Xerox
Corporation.
Xerox and all Xerox products mentioned in this publication are regi stered trademarks of the
Xerox Corporation and used by Xerox Canada Ltd. as a registered user.
ii
Windows
companies are also acknowledged.
Publication number: 701P99757
TM
is a trademark of Microsoft Corporatio n. Pro ducts and trademarks of other
Page 3

ABLE OF CONTENTS
Print the 480cx User Guide
T
Preface . . . . . . . . . . . . . . . . . . . . . . . . . . . . . . . . . . . . . . . . . . . . . . . . . . .ix
Safety Notes . . . . . . . . . . . . . . . . . . . . . . . . . . . . . . . . . . . . . . . . . . . . . . . . ix
1. Getting Started . . . . . . . . . . . . . . . . . . . . . . . . . . . . . . . . . . . . . . . .1-1
Set Up Your Machine . . . . . . . . . . . . . . . . . . . . . . . . . . . . . . . . . . . . . . . . .1-1
Unpacking . . . . . . . . . . . . . . . . . . . . . . . . . . . . . . . . . . . . . . . . . . . . . . . 1-1
Control Locations and Functions . . . . . . . . . . . . . . . . . . . . . . . . . . . . . .1-2
Choosing a Location . . . . . . . . . . . . . . . . . . . . . . . . . . . . . . . . . . . . . . . 1-4
Setting Up Your M achine . . . . . . . . . . . . . . . . . . . . . . . . . . . . . . . . . . . 1-4
Document Input Tray . . . . . . . . . . . . . . . . . . . . . . . . . . . . . . . . . . . 1-4
Paper Exit Tray . . . . . . . . . . . . . . . . . . . . . . . . . . . . . . . . . . . . . . . . 1-5
Document Exit Tray . . . . . . . . . . . . . . . . . . . . . . . . . . . . . . . . . . . . 1-5
Telephone Line. . . . . . . . . . . . . . . . . . . . . . . . . . . . . . . . . . . . . . . . 1-6
Extension Phone . . . . . . . . . . . . . . . . . . . . . . . . . . . . . . . . . . . . . . 1-7
PC Cable . . . . . . . . . . . . . . . . . . . . . . . . . . . . . . . . . . . . . . . . . . . . 1-7
AC Power Cord . . . . . . . . . . . . . . . . . . . . . . . . . . . . . . . . . . . . . . . . 1-9
Installing Ink Cartridges . . . . . . . . . . . . . . . . . . . . . . . . . . . . . . . . . . . . 1-11
Installing Ink Cartridges . . . . . . . . . . . . . . . . . . . . . . . . . . . . . . . . 1-12
Storing Ink Cartridges . . . . . . . . . . . . . . . . . . . . . . . . . . . . . . . . . . . . .1-18
Loading Paper . . . . . . . . . . . . . . . . . . . . . . . . . . . . . . . . . . . . . . . . . . .1-20
Using the Automatic Paper F eeder . . . . . . . . . . . . . . . . . . . . . . . 1-20
Loading Envelopes . . . . . . . . . . . . . . . . . . . . . . . . . . . . . . . . . . . . 1-23
Using the Manual Paper Feeder. . . . . . . . . . . . . . . . . . . . . . . . . . 1-25
Paper Guidelines . . . . . . . . . . . . . . . . . . . . . . . . . . . . . . . . . . . . . . . . . . . 1-27
Paper Selection . . . . . . . . . . . . . . . . . . . . . . . . . . . . . . . . . . . . . . . . . . 1-28
Paper Types . . . . . . . . . . . . . . . . . . . . . . . . . . . . . . . . . . . . . . . . . 1-28
Guidelines for Special Paper and ot her Media . . . . . . . . . . . . . . . . . . . .1-30
Installing Software . . . . . . . . . . . . . . . . . . . . . . . . . . . . . . . . . . . . . . . . . . 1-31
System Requirements . . . . . . . . . . . . . . . . . . . . . . . . . . . . . . . . . . . . .1-31
Overview of WorkCentre 480cx Drivers . . . . . . . . . . . . . . . . . . . . . . . 1-32
Software Included With the WorkCentre 480cx . . . . . . . . . . . . . . . . . . 1-32
Software Installation Procedure . . . . . . . . . . . . . . . . . . . . . . . . . . . . . 1-33
In Windows 3.x, Windows 95/98, or Windows NT 4.0 . . . . . . . . . 1-33
Uninstalling Software . . . . . . . . . . . . . . . . . . . . . . . . . . . . . . . . . . . . . . 1-34
Using the Control Panel . . . . . . . . . . . . . . . . . . . . . . . . . . . . . . . . . . . . . .1-36
System Setup . . . . . . . . . . . . . . . . . . . . . . . . . . . . . . . . . . . . . . . . . . . . . 1-38
Ringer Volume . . . . . . . . . . . . . . . . . . . . . . . . . . . . . . . . . . . . . . . . . . .1-38
Default Settings . . . . . . . . . . . . . . . . . . . . . . . . . . . . . . . . . . . . . . . . . . 1-39
Arrange Alignment . . . . . . . . . . . . . . . . . . . . . . . . . . . . . . . . . . . . . . . . 1-41
iii
Page 4

Clean Head . . . . . . . . . . . . . . . . . . . . . . . . . . . . . . . . . . . . . . . . . . . . . 1-43
Print the 480cx User Guide
Select Language . . . . . . . . . . . . . . . . . . . . . . . . . . . . . . . . . . . . . . . . . 1-43
Adjusting Speaker Volume . . . . . . . . . . . . . . . . . . . . . . . . . . . . . . . . .1-44
Setting the Clock Mode . . . . . . . . . . . . . . . . . . . . . . . . . . . . . . . . . . . .1-44
Setting the Date and Time . . . . . . . . . . . . . . . . . . . . . . . . . . . . . . . . . .1-45
Setting the System ID (Your N umber and N ame) . . . . . . . . . . . . . . . .1-46
Reports . . . . . . . . . . . . . . . . . . . . . . . . . . . . . . . . . . . . . . . . . . . . . . . .1-48
To Print Reports . . . . . . . . . . . . . . . . . . . . . . . . . . . . . . . . . . . . . . 1-50
User Options (System Data) . . . . . . . . . . . . . . . . . . . . . . . . . . . . . . . .1-51
Setting an Option . . . . . . . . . . . . . . . . . . . . . . . . . . . . . . . . . . . . . 1-51
Selectable Options . . . . . . . . . . . . . . . . . . . . . . . . . . . . . . . . . . . . 1-52
2. Making a Copy . . . . . . . . . . . . . . . . . . . . . . . . . . . . . . . . . . . . . . . .2-1
Making a Copy . . . . . . . . . . . . . . . . . . . . . . . . . . . . . . . . . . . . . . . . . . . . . . 2-1
3. Sending a Fax. . . . . . . . . . . . . . . . . . . . . . . . . . . . . . . . . . . . . . . . .3-1
Options for Sending a Fax Using the WorkCentre 480cx . . . . . . . . . . . . . 3-1
Manual Faxing . . . . . . . . . . . . . . . . . . . . . . . . . . . . . . . . . . . . . . . . . . . . . . 3-2
Preparing Documents for Faxing . . . . . . . . . . . . . . . . . . . . . . . . . . . . . . 3-2
Sending a Fax Manually . . . . . . . . . . . . . . . . . . . . . . . . . . . . . . . . . . . . 3-3
Sending a Fax Using a One-Touch Number . . . . . . . . . . . . . . . . . . . . . 3-4
Sending a Fax Using a Speed D ial N umber . . . . . . . . . . . . . . . . . . . . .3-5
Sending a Fax Using Group Dialing
(Multi-Address Transmission) . . . . . . . . . . . . . . . . . . . . . . . . . . . . . . . .3-5
Sending a Fax After Talking . . . . . . . . . . . . . . . . . . . . . . . . . . . . . . . . .3-7
Canceling a Transmission . . . . . . . . . . . . . . . . . . . . . . . . . . . . . . . . . . . 3-8
Confirming a Transmis sion . . . . . . . . . . . . . . . . . . . . . . . . . . . . . . . . . .3-8
Memory Transmission (Broadcasting) . . . . . . . . . . . . . . . . . . . . . . . . . 3-10
Delayed Transmission . . . . . . . . . . . . . . . . . . . . . . . . . . . . . . . . . . . . . 3-12
Adding Documents To a Standby Operation . . . . . . . . . . . . . . . . . . . .3-14
Canceling a Standby Operation . . . . . . . . . . . . . . . . . . . . . . . . . . . . . 3-15
Configuring Automatic Dialing Features . . . . . . . . . . . . . . . . . . . . . . . . . 3-16
One-Touch Dialing . . . . . . . . . . . . . . . . . . . . . . . . . . . . . . . . . . . . . . . 3-16
Storing a N umber for One-Touch Dialing . . . . . . . . . . . . . . . . . . . 3-16
Dialing a One-T ouch Number . . . . . . . . . . . . . . . . . . . . . . . . . . . . 3-17
Speed Dialing . . . . . . . . . . . . . . . . . . . . . . . . . . . . . . . . . . . . . . . . . . . 3-19
Storing a N umber for Speed Dialing . . . . . . . . . . . . . . . . . . . . . . . 3-19
Dialing a Speed-D ial Number. . . . . . . . . . . . . . . . . . . . . . . . . . . . 3-20
Group Dialing (for Multi-Address Transmission) . . . . . . . . . . . . . . . . . 3-20
Storing One-Touch or Speed D ial Numbers f or Group Dialing. . . 3-20
Setting Document Resolution and Contrast . . . . . . . . . . . . . . . . . . . . . . . 3-23
iv
Page 5

Resolution . . . . . . . . . . . . . . . . . . . . . . . . . . . . . . . . . . . . . . . . . . . . . .3-23
Print the 480cx User Guide
Contrast . . . . . . . . . . . . . . . . . . . . . . . . . . . . . . . . . . . . . . . . . . . . . . . . 3-25
Using the Number Keypad . . . . . . . . . . . . . . . . . . . . . . . . . . . . . . . . .3-25
Entering Alphanumeric Characters. . . . . . . . . . . . . . . . . . . . . . . . 3-26
Keypad Character Assignments. . . . . . . . . . . . . . . . . . . . . . . . . . 3-28
Entering Numbers . . . . . . . . . . . . . . . . . . . . . . . . . . . . . . . . . . . . . 3-28
Editing Numbers or Names . . . . . . . . . . . . . . . . . . . . . . . . . . . . . 3-29
Inserting a Paus e . . . . . . . . . . . . . . . . . . . . . . . . . . . . . . . . . . . . . 3-29
Other Functions . . . . . . . . . . . . . . . . . . . . . . . . . . . . . . . . . . . . . . . . . . . .3-30
Redial . . . . . . . . . . . . . . . . . . . . . . . . . . . . . . . . . . . . . . . . . . . . . . . . . 3-30
Redial Memory . . . . . . . . . . . . . . . . . . . . . . . . . . . . . . . . . . . . . . . . . . 3-30
Searching for a Number in Memory . . . . . . . . . . . . . . . . . . . . . . . . . .3-31
Searching Sequentially through Memory . . . . . . . . . . . . . . . . . . . 3-31
Searching by the First Letter . . . . . . . . . . . . . . . . . . . . . . . . . . . . 3-31
Tone . . . . . . . . . . . . . . . . . . . . . . . . . . . . . . . . . . . . . . . . . . . . . . . . . .3-32
Flash . . . . . . . . . . . . . . . . . . . . . . . . . . . . . . . . . . . . . . . . . . . . . . . . . . 3-33
Automatic Redial . . . . . . . . . . . . . . . . . . . . . . . . . . . . . . . . . . . . . . . . . 3-33
Priority Transmission . . . . . . . . . . . . . . . . . . . . . . . . . . . . . . . . . . . . . .3-34
Polling . . . . . . . . . . . . . . . . . . . . . . . . . . . . . . . . . . . . . . . . . . . . . . . . . . .3-36
What is Polling? . . . . . . . . . . . . . . . . . . . . . . . . . . . . . . . . . . . . . . . . . .3-36
Being Polled By a Remote Machine (TX POLL) . . . . . . . . . . . . . . . . . 3-36
Adding Documents To the Job to be Polled . . . . . . . . . . . . . . . . . . . .3-38
Canc elling a Job Already in Memory Which is Waiting to be Polled . .3-38
PC Faxing . . . . . . . . . . . . . . . . . . . . . . . . . . . . . . . . . . . . . . . . . . . . . . . .3-40
What is LaserFAX Lite? . . . . . . . . . . . . . . . . . . . . . . . . . . . . . . . . . . . . 3-40
LaserFAX Installation . . . . . . . . . . . . . . . . . . . . . . . . . . . . . . . . . . . . .3-40
Sending Faxes with LaserFAX Lite . . . . . . . . . . . . . . . . . . . . . . . . . . . 3-41
Fax Conversion Dialog Advanced Features . . . . . . . . . . . . . . . . . . . .3-45
Cover Sheet Options . . . . . . . . . . . . . . . . . . . . . . . . . . . . . . . . . . 3-46
The Send Opt ions Button . . . . . . . . . . . . . . . . . . . . . . . . . . . . . . . 3-47
The Attach Button . . . . . . . . . . . . . . . . . . . . . . . . . . . . . . . . . . . . . 3-48
The Keep But ton . . . . . . . . . . . . . . . . . . . . . . . . . . . . . . . . . . . . . . 3-50
LaserFAX Application Features . . . . . . . . . . . . . . . . . . . . . . . . . . . . . .3-51
LaserFAX Application Toolbar Features . . . . . . . . . . . . . . . . . . . . 3-52
The LaserFAX Phonebook . . . . . . . . . . . . . . . . . . . . . . . . . . . . . . . . .3-55
Adding Entries to the Phonebook. . . . . . . . . . . . . . . . . . . . . . . . . 3-55
Troubleshooting LaserFAX . . . . . . . . . . . . . . . . . . . . . . . . . . . . . . . . . 3-55
v
Page 6

4. Receiving a Fax. . . . . . . . . . . . . . . . . . . . . . . . . . . . . . . . . . . . . . . .4-1
Print the 480cx User Guide
Options for Receiving a Fax Using the W orkCentre 480cx . . . . . . . . . . . .4-1
Reception Modes . . . . . . . . . . . . . . . . . . . . . . . . . . . . . . . . . . . . . . . . . . . . 4-2
Determining the Reception Mode . . . . . . . . . . . . . . . . . . . . . . . . . . . . . 4-3
Receiving Automatically in FAX Mode . . . . . . . . . . . . . . . . . . . . . . . . . 4-4
Receiving Automatically in TEL/FAX Mode . . . . . . . . . . . . . . . . . . . . . . 4-4
Receiving Manually in TEL M ode . . . . . . . . . . . . . . . . . . . . . . . . . . . . .4-5
Receiving Automatically in ANS/FAX Mode . . . . . . . . . . . . . . . . . . . . .4-6
Receiving a Fax When the Machine is Out of Paper . . . . . . . . . . . . . . . 4-7
Distinctive Ring Pattern Detection (DRPD) . . . . . . . . . . . . . . . . . . . . . . 4-8
Polling . . . . . . . . . . . . . . . . . . . . . . . . . . . . . . . . . . . . . . . . . . . . . . . . . . . . 4-9
What is Polling? . . . . . . . . . . . . . . . . . . . . . . . . . . . . . . . . . . . . . . . . . . . 4-9
Polling Rem ote Machines (CONT. POLL) . . . . . . . . . . . . . . . . . . . . . . . 4-9
PC Fax Reception . . . . . . . . . . . . . . . . . . . . . . . . . . . . . . . . . . . . . . . . . . 4-13
What is LaserFAX Lite? . . . . . . . . . . . . . . . . . . . . . . . . . . . . . . . . . . . . 4-13
LaserFAX Lite Installation . . . . . . . . . . . . . . . . . . . . . . . . . . . . . . . . . .4-13
Receiving Faxes With the WorkCentre 480c x . . . . . . . . . . . . . . . . . . . 4-14
Troubleshooting LaserFAX Lite . . . . . . . . . . . . . . . . . . . . . . . . . . . . . . 4-16
5. Printing . . . . . . . . . . . . . . . . . . . . . . . . . . . . . . . . . . . . . . . . . . . . . .5-1
Printing a D ocument . . . . . . . . . . . . . . . . . . . . . . . . . . . . . . . . . . . . . . . . . 5-1
Printer Settings . . . . . . . . . . . . . . . . . . . . . . . . . . . . . . . . . . . . . . . . . . . . . 5-2
Windows 95/98 and 3.x Printer Settings . . . . . . . . . . . . . . . . . . . . . . . . 5-3
Windows NT 4.0 Printer Settings . . . . . . . . . . . . . . . . . . . . . . . . . . . .5-15
The Xerox WorkCentre Control
Program . . . . . . . . . . . . . . . . . . . . . . . . . . . . . . . . . . . . . . . . . . . . . . . . . .5-21
Starting the Xerox WorkCentre 480cx Control Program. . . . . . . . 5-21
Xerox WorkCentre 480cx Control Program Window . . . . . . . . . . 5-22
Using the DOS Printing tab . . . . . . . . . . . . . . . . . . . . . . . . . . . . . 5-27
Using the About Tab. . . . . . . . . . . . . . . . . . . . . . . . . . . . . . . . . . . 5-29
vi
6. Scanning . . . . . . . . . . . . . . . . . . . . . . . . . . . . . . . . . . . . . . . . . . . . .6-1
Overview . . . . . . . . . . . . . . . . . . . . . . . . . . . . . . . . . . . . . . . . . . . . . . . . . . 6-1
Windows 95/98 and NT Installations . . . . . . . . . . . . . . . . . . . . . . . . . . .6-2
Windows 3.x Installations . . . . . . . . . . . . . . . . . . . . . . . . . . . . . . . . . . .6-2
User Guide Information for Scanning . . . . . . . . . . . . . . . . . . . . . . . . . . 6-3
Overview of Scanning Applications . . . . . . . . . . . . . . . . . . . . . . . . . . . .6-3
Pagis Pro . . . . . . . . . . . . . . . . . . . . . . . . . . . . . . . . . . . . . . . . . . . . 6-3
The WorkCentre 480cx TWAIN Scanner Application . . . . . . . . . . . 6-4
TextBridge Pro . . . . . . . . . . . . . . . . . . . . . . . . . . . . . . . . . . . . . . . . 6-5
Page 7

Scanning With the WorkCentre 480cx . . . . . . . . . . . . . . . . . . . . . . . . . . . . 6-6
Print the 480cx User Guide
Scanning With Pagis Pro Version 2.0 . . . . . . . . . . . . . . . . . . . . . . . 6-6
Starting the WorkCentre 480cx TWAIN Scanner Application . . . . . 6-8
WorkCentre 480cx TWAIN Scanner Application Features . . . . . . . . . . . 6-12
The WorkCentre 480cx TWAIN Scanner Window . . . . . . . . . . . . 6-14
WorkCentre 480cx TWAIN Scanner Help . . . . . . . . . . . . . . . . . . 6-15
Scanner Control Tabs . . . . . . . . . . . . . . . . . . . . . . . . . . . . . . . . . . . . . 6-16
The Basic Tab . . . . . . . . . . . . . . . . . . . . . . . . . . . . . . . . . . . . . . . 6-17
The Image Quality Tab . . . . . . . . . . . . . . . . . . . . . . . . . . . . . . . . . 6-28
The Filters Tab . . . . . . . . . . . . . . . . . . . . . . . . . . . . . . . . . . . . . . . 6-42
Preview Window . . . . . . . . . . . . . . . . . . . . . . . . . . . . . . . . . . . . . . . . .6-47
Image Control Tools . . . . . . . . . . . . . . . . . . . . . . . . . . . . . . . . . . . 6-48
7. Trou bleshooting . . . . . . . . . . . . . . . . . . . . . . . . . . . . . . . . . . . . . . . 7-1
Clearing Jams . . . . . . . . . . . . . . . . . . . . . . . . . . . . . . . . . . . . . . . . . . . . . . 7-2
Document Jams While Sending a Fax . . . . . . . . . . . . . . . . . . . . . . . . .7-2
Paper Jams While the Machine is Printing . . . . . . . . . . . . . . . . . . . . . . 7-3
If Jammed in the Paper Feed Area at the Rear of the Machine . . . 7-3
If Paper is Jammed in the Printer Output Area . . . . . . . . . . . . . . . . 7-5
If Paper is Jammed Inside the Machine . . . . . . . . . . . . . . . . . . . . . 7-6
Tips for Avoiding Paper Jams . . . . . . . . . . . . . . . . . . . . . . . . . . . . . . . . 7-7
LCD Display Error Messages . . . . . . . . . . . . . . . . . . . . . . . . . . . . . . . . . . 7-8
Fax Problems . . . . . . . . . . . . . . . . . . . . . . . . . . . . . . . . . . . . . . . . . . . . . . 7-12
Printer Problem s . . . . . . . . . . . . . . . . . . . . . . . . . . . . . . . . . . . . . . . . . . . 7-15
Print Quality Problems . . . . . . . . . . . . . . . . . . . . . . . . . . . . . . . . . . . . . . . 7-18
Paper Feeding Problems . . . . . . . . . . . . . . . . . . . . . . . . . . . . . . . . . . . . . 7-22
Scanning Problem s . . . . . . . . . . . . . . . . . . . . . . . . . . . . . . . . . . . . . . . . .7-24
8. Maintenance . . . . . . . . . . . . . . . . . . . . . . . . . . . . . . . . . . . . . . . . . .8-1
Clearing Memory . . . . . . . . . . . . . . . . . . . . . . . . . . . . . . . . . . . . . . . . . . . . 8-1
Cleaning the Document Scanner . . . . . . . . . . . . . . . . . . . . . . . . . . . . . . . . 8-2
Managing the Print Cartridges . . . . . . . . . . . . . . . . . . . . . . . . . . . . . . . . . . 8-7
Tips for your print cartridges . . . . . . . . . . . . . . . . . . . . . . . . . . . . . . 8-7
Print Cartridge Nozzle Test . . . . . . . . . . . . . . . . . . . . . . . . . . . . . . 8-7
Cleaning the Print Heads . . . . . . . . . . . . . . . . . . . . . . . . . . . . . . . . 8-8
Replacing the Print Cartridge . . . . . . . . . . . . . . . . . . . . . . . . . . . . 8-17
Cartridge Alignment . . . . . . . . . . . . . . . . . . . . . . . . . . . . . . . . . . . 8-19
ADF Rubber Retard Pad Replacement . . . . . . . . . . . . . . . . . . . . 8-22
vii
Page 8

9. Appendix. . . . . . . . . . . . . . . . . . . . . . . . . . . . . . . . . . . . . . . . . . . . . 9-1
Print the 480cx User Guide
Specifications . . . . . . . . . . . . . . . . . . . . . . . . . . . . . . . . . . . . . . . . . . . . . . . 9-1
FCC Regulations . . . . . . . . . . . . . . . . . . . . . . . . . . . . . . . . . . . . . . . . . . . . 9-3
Send Header R equirem ents . . . . . . . . . . . . . . . . . . . . . . . . . . . . . . . . . 9-3
Data Coupler Information . . . . . . . . . . . . . . . . . . . . . . . . . . . . . . . . . . . 9-3
Radio Frequency Emissions . . . . . . . . . . . . . . . . . . . . . . . . . . . . . . . . . 9-6
Canadian Certification . . . . . . . . . . . . . . . . . . . . . . . . . . . . . . . . . . . . . . 9-7
Safety and Legal Requirements for the UK . . . . . . . . . . . . . . . . . . . . . . . .9-9
The Electricity at Work Regulation
(in England and Wales) UK ONLY . . . . . . . . . . . . . . . . . . . . . . . . . . .9-13
Electricity at Work Regulations: . . . . . . . . . . . . . . . . . . . . . . . . . . 9-13
European Product Marking Requirements . . . . . . . . . . . . . . . . . . . . . . . . 9-17
CTR 21 Annex II . . . . . . . . . . . . . . . . . . . . . . . . . . . . . . . . . . . . . . . . .9-17
CTR 21 Annex III . . . . . . . . . . . . . . . . . . . . . . . . . . . . . . . . . . . . . . . . . 9-17
Telephone Connectivity Guidelines . . . . . . . . . . . . . . . . . . . . . . . . . . . .9-19
The WorkCentre Telephone Connectors . . . . . . . . . . . . . . . . . . . . . . .9-20
10. Glossary . . . . . . . . . . . . . . . . . . . . . . . . . . . . . . . . . . . . . . . . . . . . 10-1
viii
Page 9

Preface
Print the 480cx User Guide
Safety Notes
Your WorkCentre 480cx and supplies are designed and tested to meet stri ct
safety requirements. Included are safety agency examination and approval
and compliance to established environmental standards. Pleas e read the
following instructio ns care fully befo re operating the WorkCentre 480cx,
and refer to them as needed to ensure the continued safe operation of your
W orkCentre.
Follow a ll wa rnings and instructions marked on or su pp lied with the
product.
Symbols Used: Caution = Warning
Unplug the WorkC entre 480cx from the wal l outl et befor e c le aning.
Always use ma t erials spe cifi ca lly designat ed fo r t his produc t. Use of other
materials may result in poor performance and could create a hazardous
situation.
Do no t use ae r osol clean ers. Fo llow the instr uctio ns in this User Guide for
pr oper cle aning methods. Never spray anyt hi ng onto or inside of t he
WorkC entre 480cx.
! !!
ix
Page 10

Use supplies or cleaning materials only as directed. Keep all supplies and
Print the 480cx User Guide
materials out of reach of childr en.
Do no t u se the Wo rkCen tre 480cx near water, in we t locations, or outdoors.
Do no t place the WorkCentre 480cx on an unstable cart, stand, or table.
T he W o r kC en t re 48 0c x ma y fa ll , c ausi n g pe r s on a l inju ry or se r i ou s damag e
to the m a chin e.
This product is equipped with a grounding type plug. The plug will fit only
into a g roun ded power outlet. This is a saf e ty featur e. To avoid risk of
electric sh ock, contact your electrician to replace the receptacle if you are
unable to insert the plug into the o utlet. Neve r us e an adapter to connect th e
WorkCentre to a power source receptacle that lacks a ground connection
terminal.
The WorkCentre 480cx should be operat ed from the type of power source
indicated on the label. If you are not sure of t he type of power available,
consult your local power company.
Do no t allow anything to rest on the power cord. Do not locate the
WorkCentre 480cx w here people will step on the cord.
The power supply cord is the disconnect device for this equipment.
Ensure that the WorkCentre 480cx is installed near an outlet and is easily
accessible.
Yo u r m achine is equipped with an energy saving device to conserve power
wh en the machi ne is n o t in us e. The mach ine may b e left on con tinuou sly .
Slots and opening s in the cabinet and in the back and sides of the
WorkCentre ar e provided fo r ventilation. To ensu re reliable op e ration of the
WorkCentre and to protect it from overheating, these openin gs must not be
blocked or covered. The WorkCentre 480cx should never be located near or
over a radiato r or h eat reg ister. The Wo rk Centre 480c x should n ot be placed
in a bu ilt-in ins ta lla tion unles s proper ventilation is provided.
x
Page 11

Never pus h object s of a ny kind into the slots of the WorkCe ntre 480cx as
Print the 480cx User Guide
they m a y touch dang erous voltag e points or short out parts which could
result in a fire or e le ctric shock.
Never spill liquid of any kind on the WorkCentre 480cx.
Never remove covers or guards that require a tool for removal. There are
no casual operator serviceable areas wit hin the covers of the Wo rkCentre
480cx.
Never def eat interloc k switch es. This Mac hine is designed to restrict
operator access to unsafe areas. Covers, guards, and interlock swi tches are
provided to ensure that the machine will n ot o pera te with covers opened.
Use of an extension cord with this WorkCentre is not recommended or
authorized.
Avoid direct viewing of the document lights. The lamps are bright and,
while not harmful, they may cause an an noyin g afte rimage. Always keep
the document cov er closed dur ing operation and storage.
I f you need addi tional safe t y info rmati on conc erning th e WorkCentre or
Xerox supplied materials, you may call the followin g toll-free num ber.
In the United States or Canad a: 1 - 800 - 828 - 6571
xi
Page 12

xii
Print the 480cx User Guide
Page 13
Gett ing Started
y
y
Print the 480cx User Guide
Set Up Your Machine
Unpacking
Chapter 1
1
WorkCentre
Document exit tra
Telephone line cord
*2
Ink Cartridges
Document Input tra
Power cord
*2
WC480cx Quick
Installation G uide
CD-ROMs
PC c abl e
*1
WC480cx Quick
Reference Guide
01 02 03 04 05
06 07 08 09 10
11 12 13 14 15
16 17 18 19 20
One-touch label
Replacement ADF
Rubber Pads
*1 Two CD ROMs c ontaining Installer, Softwa re and Online U ser Guide.
*2 Appearance may vary according to country.
1-1
Page 14
Control Locations and Functions
y
y
y
y
g
Print the 480cx User Guide
Take a moment to familiarize yourself with the main components and their
locations.
Front View
Automatic
Document
Feeder
Paper
Guide
Document
Guide
Control
Panel
Document
Exit Tr a
Paper Exit Tra
Document
Input Tra
Paper Feeder
Extension Tra
Automatic
Paper
Feeder
Envelope
Guide
Ca rt ridge
e
Stor a
Area
1-2 Getting Started
Note:
Your machine may look slightly different than the illustration.
Page 15
Re ar V iew
g
g
Print the 480cx User Guide
Powe r Cord
Connector
1
PC Cable
Connec tor
Inside
Color Ink
Cartrid
Control
Panel
Cover
EXT
Jac k
LINE
Jac k
e
Black Ink
e
Cartri d
Set Up Your Machine 1-3
Page 16
Choosing a Location
Print the 480cx User Guide
To help guarantee trouble-free operation of your machine, place it o n a flat,
stab le surface nea r you r workstati on. Lea ve enough sp ace to allow for e asy
paper loading, paper unloading, and opening of the front cover.
Do not place your machine:
In direct sunligh t.
Near heat sources or air con ditioner s.
In dusty or dirty environments.
Setting Up Your Machine
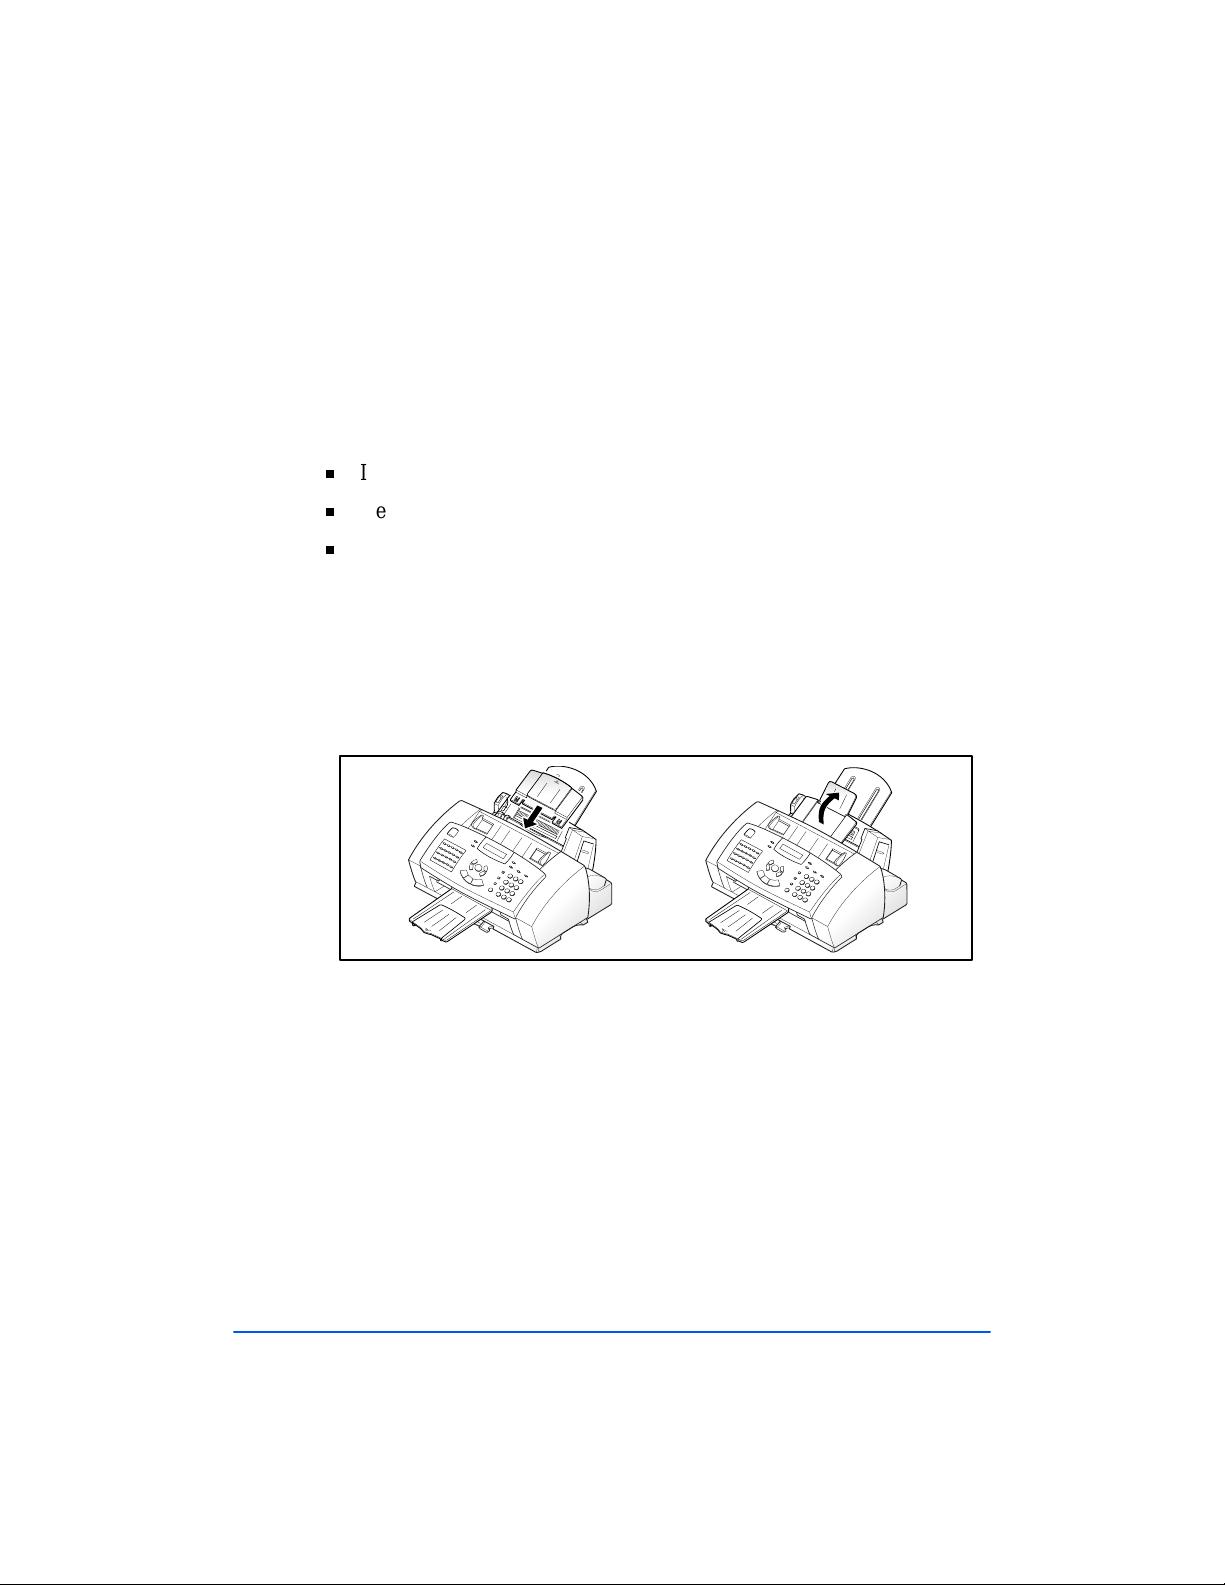
Do cument In put Tray
Insert the two tabs o n th e tray into the slots as shown. Fold out the
ex te ns ion tray, if necessar y.
1-4 Getting Started
Page 17
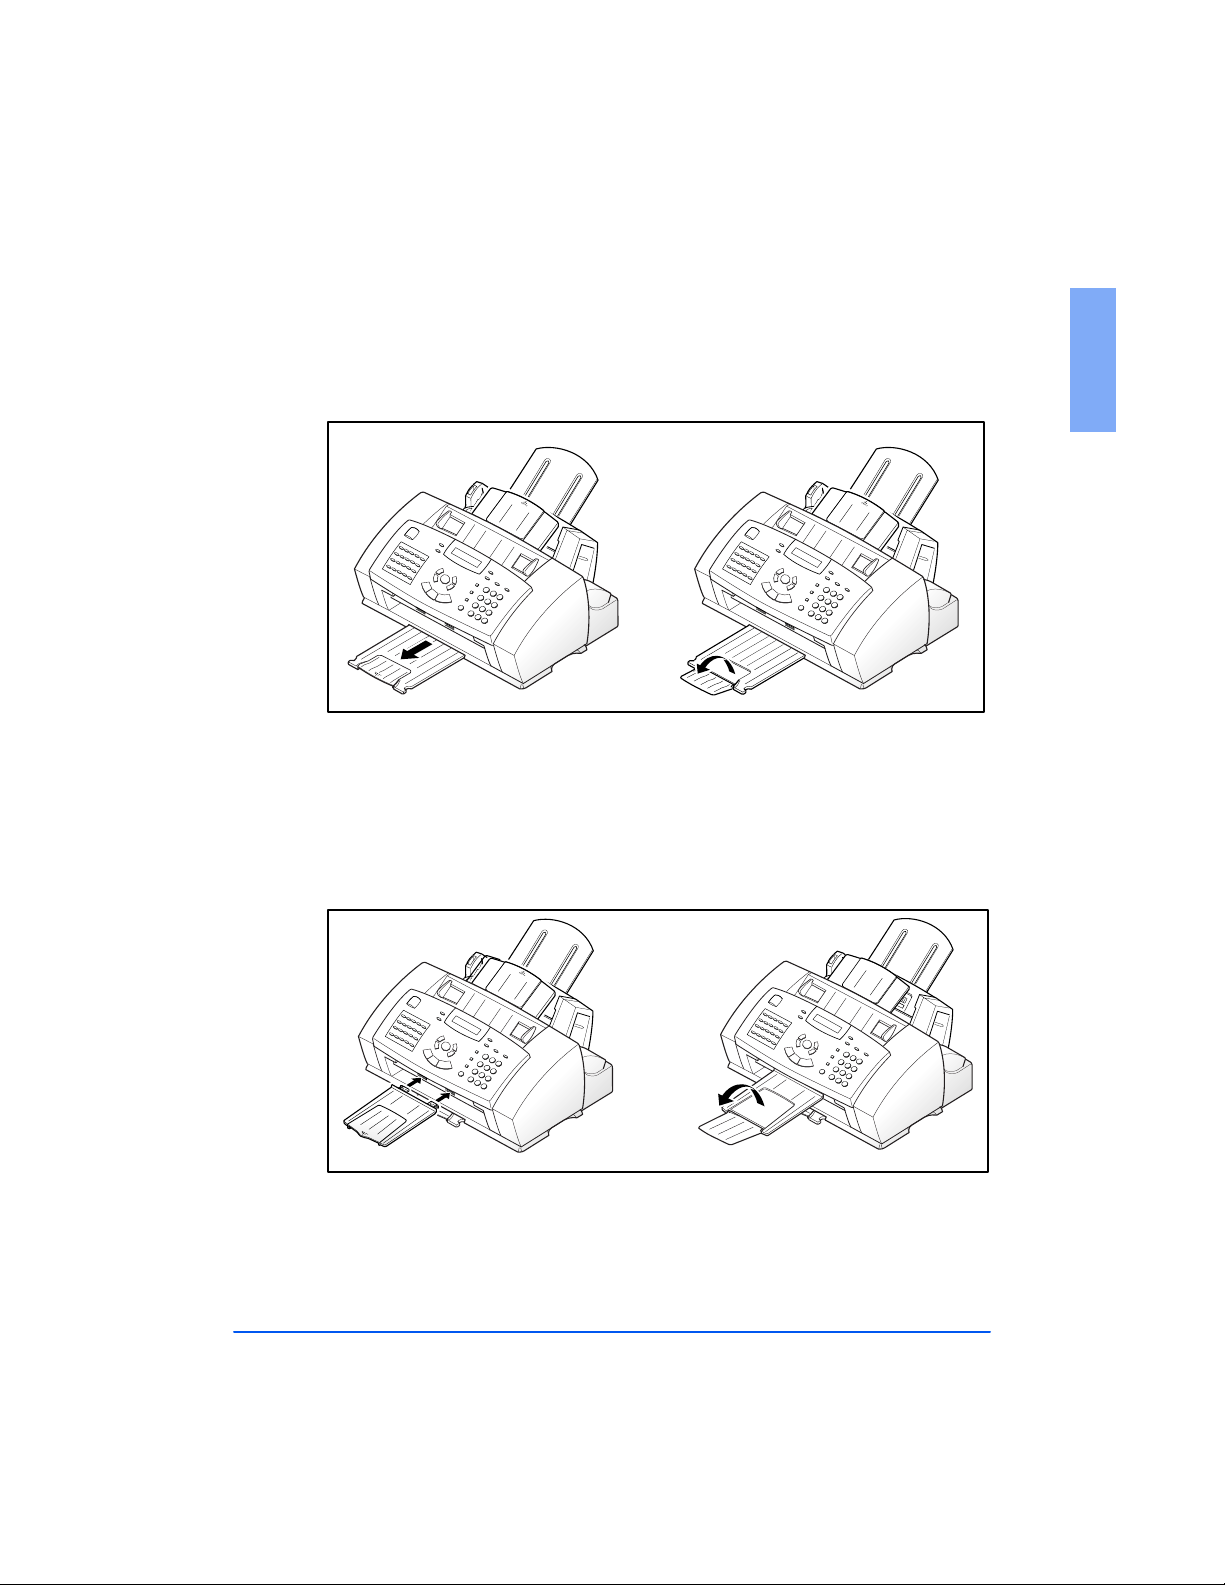
Paper E xi t Tr ay
Print the 480cx User Guide
Slide the Paper Exit Tray out fr om the base of the machine. If desir ed, fold
out the exte ns ion tray.
Do cument Exi t Tray
Insert the two tabs o n th e document exit tray into the slo ts o n the front of
your machine. Fold out the extension tray, if necessary.
1
Set Up Your Machine 1-5
Page 18
Telephone Li ne
j
Print the 480cx User Guide
Note: There are many possible ways to connect telephone accessories to
the WorkCentre 480cx. Refer to
page 9-19 for more detailed connection scenarios.
Plug one end of the telephone line cord into the TEL LINE ja c k and the
other end into a standard phone wall jack.
Te lep hone Connectiv ity G uidelines
To a
standar d
teleph one
wall
on
ack
1-6 Getting Started
Page 19
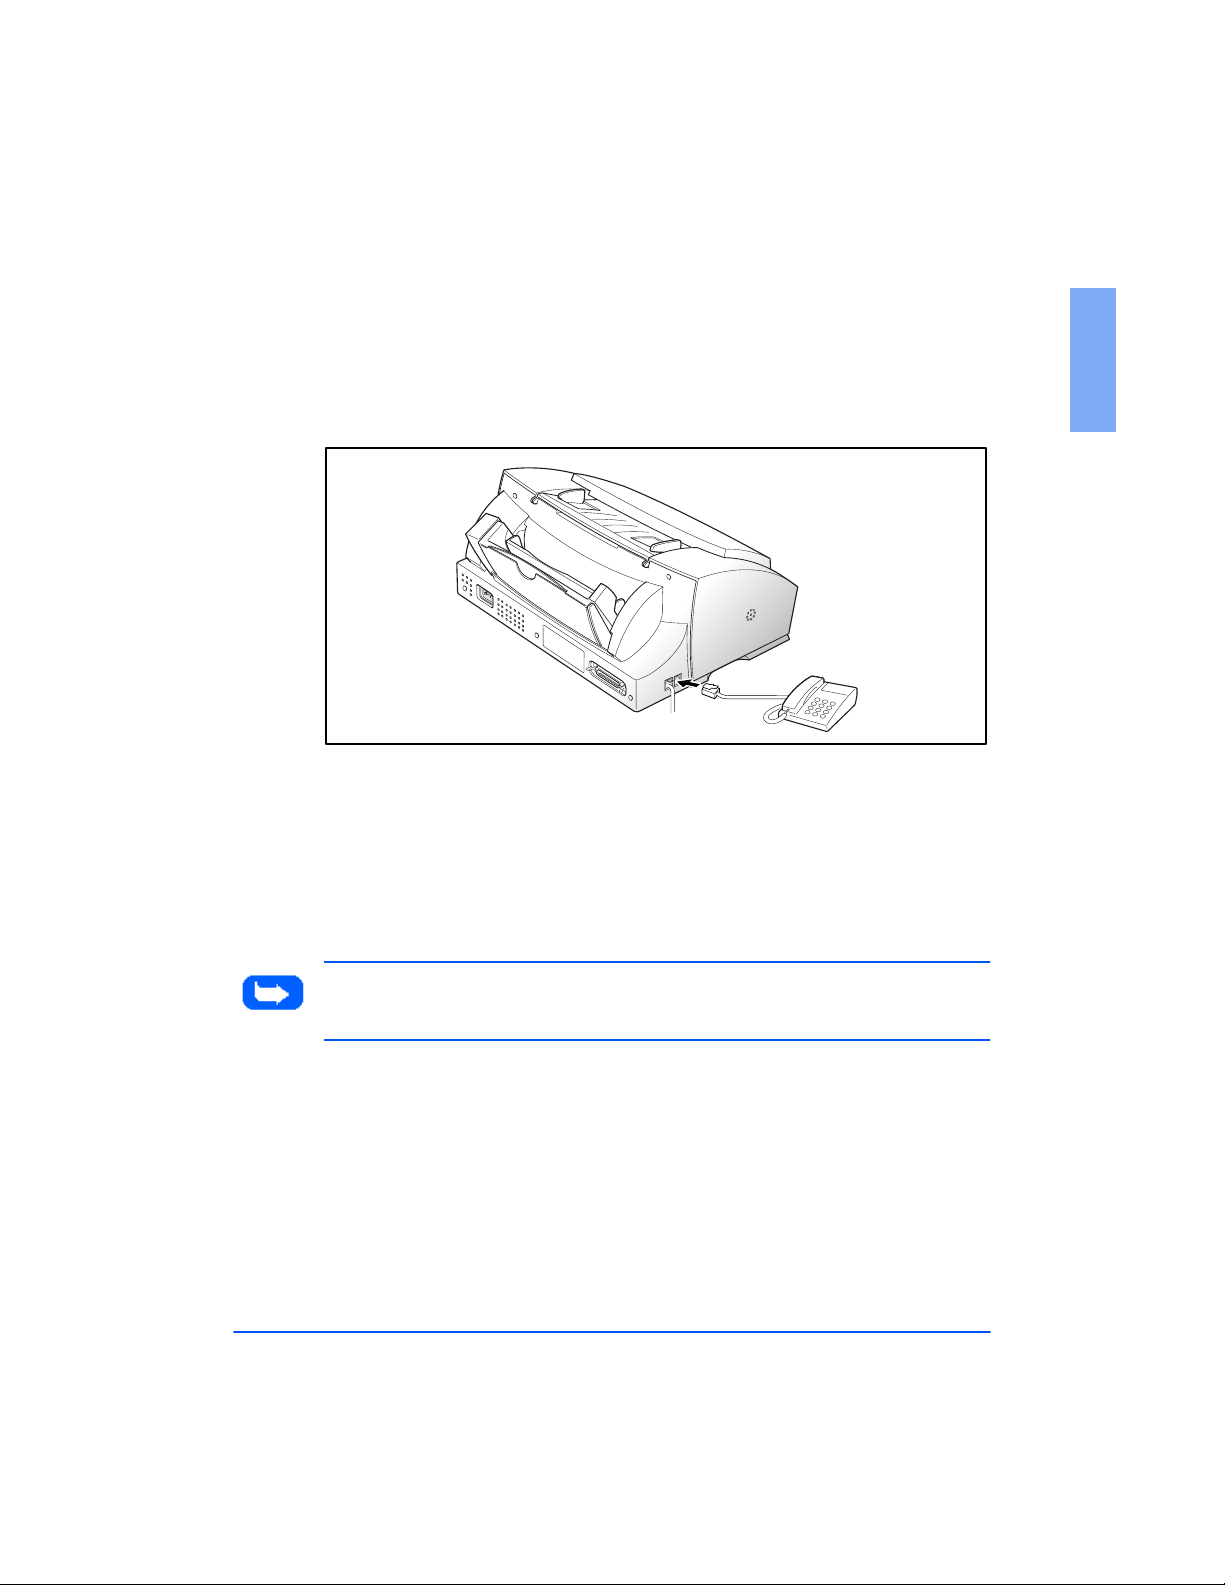
Ext ension Phone
g
Print the 480cx User Guide
If you want to use a regular phone or answ ering ma chi ne with your
WorkCentre 480cx, co nne ct it to th e jack labeled EXT on the side o f the
mach ine.
To a
telephone or
answerin
machine
PC Cable
Your Xerox WorkCentre 480cx is equipped with a parallel in terface port for
use with IBM PCs an d compatible computers. Using the suppl ied
Cen troni cs pa rallel cable, connect your Wo rkCen tre 480cx to a co mputer
that supports bi-directio nal communications ( I EEE stand ard 1284).
1
Note:
If using another parallel cable, ensure that it meets
1284 specifications and is not longer than twelve feet.
Set Up Your Machine 1-7
I EEE stan da rd
Page 20
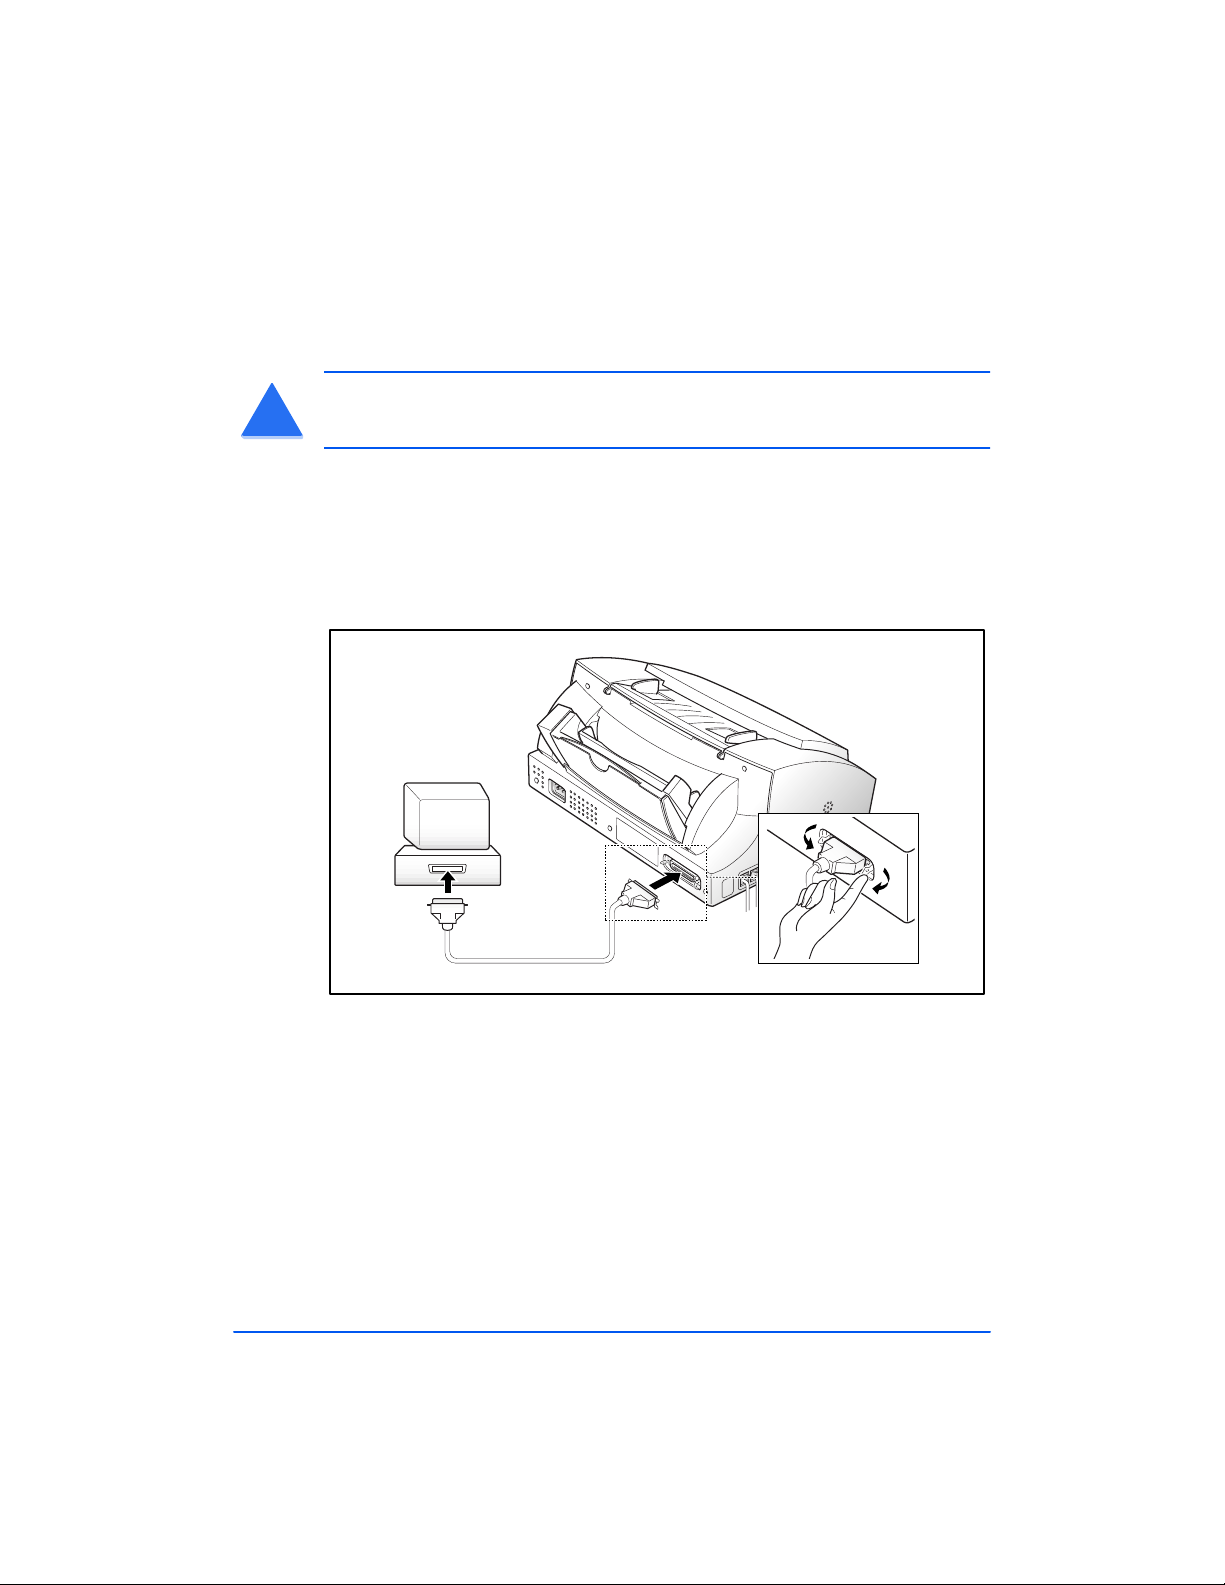
To connect the WorkCentre 480cx to a computer, follow the
Print the 480cx User Guide
steps below :
CAUT ION: Make sure the computer is turned off, and the WorkCentre
!
480cx is unpl ugged fr om t he power outlet.
1
Plug the parallel cable into the conn ector on the back of the
WorkCentre 480cx. Swing the metal clips o f the connector inward un til
they lo c k firmly inside the notches on the parallel cable connecto r.
1-8 Getting Started
2
Connect the other end of the cable to the parallel port on your com pute r.
Refer to your computer documentation fo r assistance with this
procedure.
Page 21

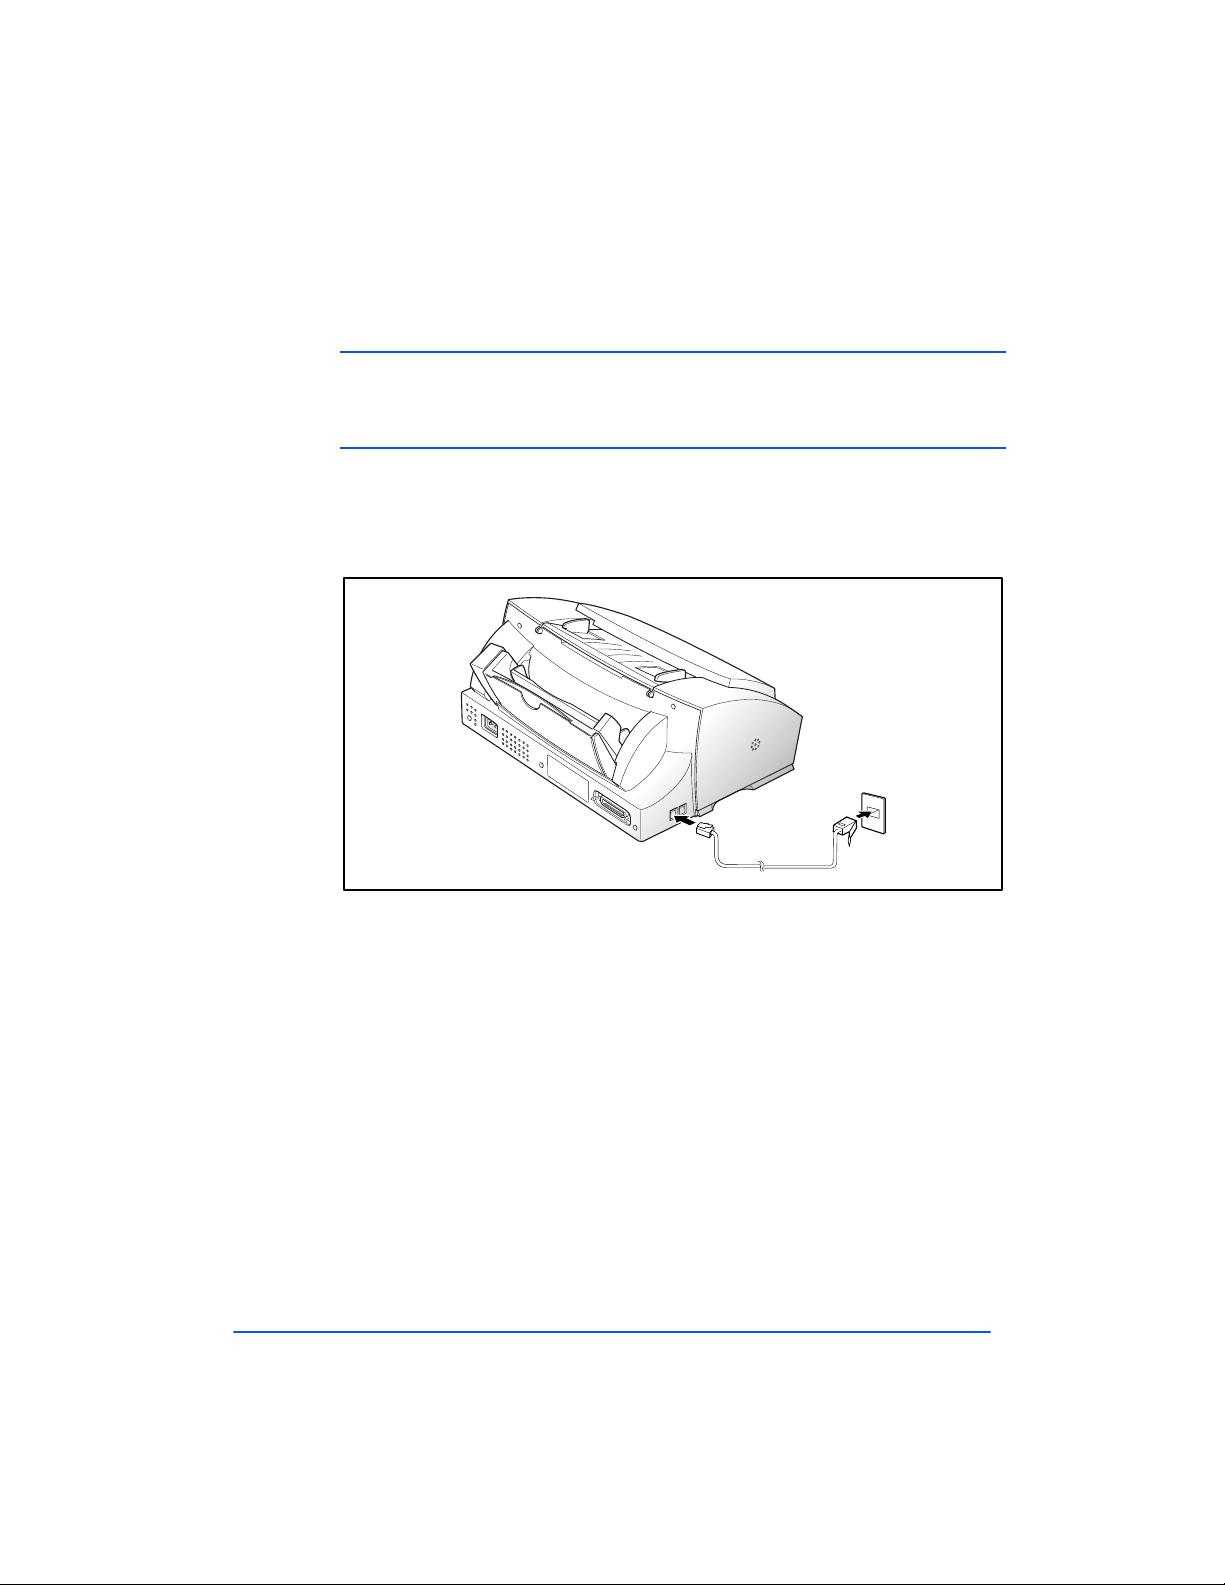
AC Power Cord
Print the 480cx User Guide
!!
WARNING:
the AC power cord is plugged in, the machine is fully energized.
1
Plu g one e nd of th e AC po wer cord into the back of the machin e an d the
other end into a grounded AC power outlet.
To AC outlet
2
T he machine turns on and p erforms a self diagnost ic test. POWE RING
UP PLEASE WAIT appears on the LCD display.
There is NO On/Off switch for the WorkCentre 480cx. When
1
If you are setting u p the machin e for the first time, o r if th e machine has
not been operated for an exten ded per iod of time, it will emit an alar m
sound and the Al arm LE D will light. SET DATE AND TIME, and
PRESS START w ill appear on the L CD d isplay.
.
SET DATE AND TIME
P RESS START
Set Up Your Machine 1-9
Page 22

3
Print the 480cx User Guide
Pre ss th e Start bu tton. A flas h in g cur sor will app ear on the fir st
character of the date in the LCD d isplay.
4
Enter the d a te and time using the Number Keypad. If y ou need
assistance entering characters using the Number keypad, refer to
En ter ing A lph anume r ic C har acters
on page 3-26.
5
Press the
Th e WorkCe ntr e 480c x returns to standby mode . If the re are no ink
cartridges insta lled, ALL CART. EMPTY appears in the top line of the
display.
Note: If you do not set the date and time, after a short period of time the
mac hine wil l automati call y accept whatever d ate and tim e are dis pl ayed on
power up. It will then go into standby mode.
Note: To power off the machi ne, unplug the power cord. Power must be
applied at all times if the machine is used as an unattended fax machi ne.
Start/Enter
butto n to confirm your settings.
1-10 Getting Started
Page 23

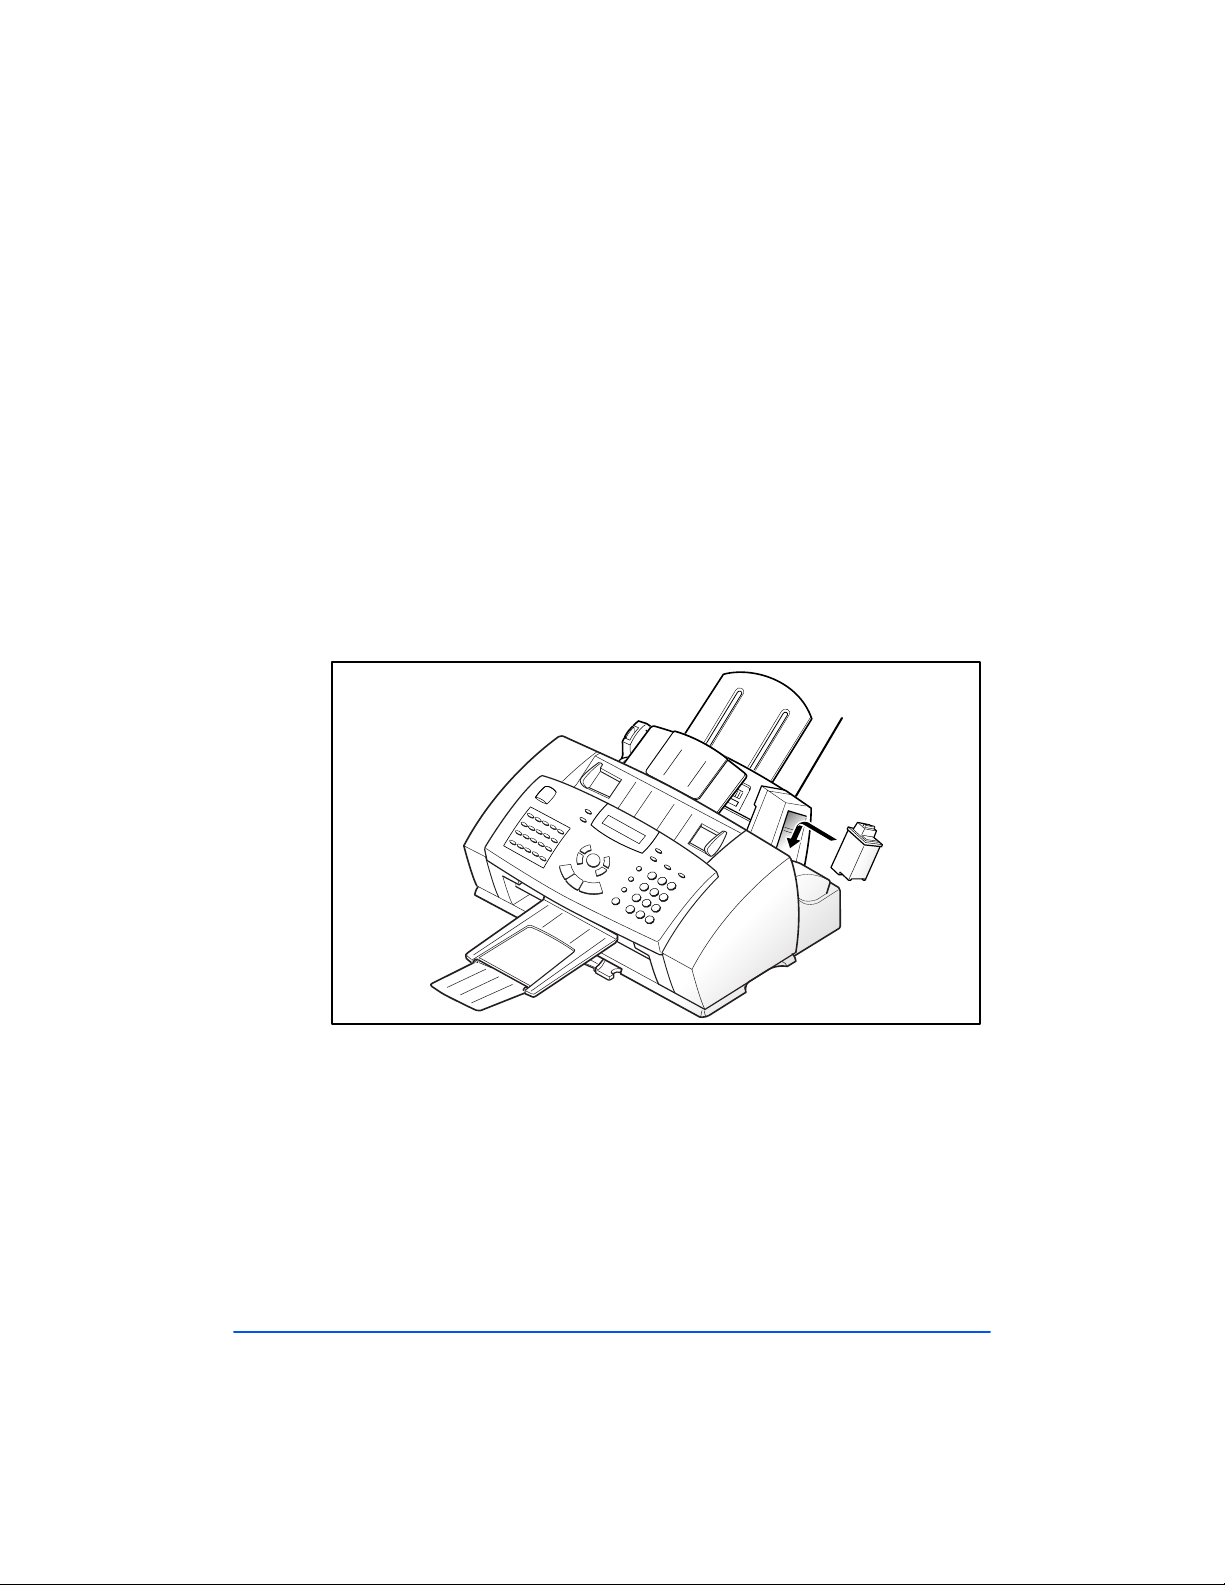
Installing Ink Cartridges
Print the 480cx User Guide
Your machine is a dual cartridge Inkjet printer. You must use a black and a
color ink cartridge. When viewed fr om the front of the machine, the Black
Ink Car tridge in stalls in the right Cartridge Holder while the Color Ink
Cartridge installs in the left Cartridge Holder. An optional Photo Ink
Cartridge, which can be installed in place of the Black Ink Cartridge, is also
available.
When installing ink cartridges , yo u must provid e specific information to the
Workcentre 480cx about the cartridg es you install. This allows th e printer
to keep track of which cartridges are installed and to gauge ink cartridge
utilization. There are two methods of enter ing this information. You m a y
enter the required information dire ctly via the WorkCe ntre 480cx contr ol
p anel or you c an update Ink Ca rt r i dg e infor mat i o n us in g t he W orkCe n t re
480cx Control Software and a PC.
The procedures in this section co ver Ink Cartridge Installatio n with out using
the WorkCentre 480cx Control Program . To install Ink Cartridges using the
WorkCentre 480cx Control Program, refer to The Xerox WorkCentre
Contr ol P r ogr am on page 5-21.
1
Set Up Your Machine 1-11
Page 24
Inst al l i ng Ink Cart ri dges
Print the 480cx User Guide
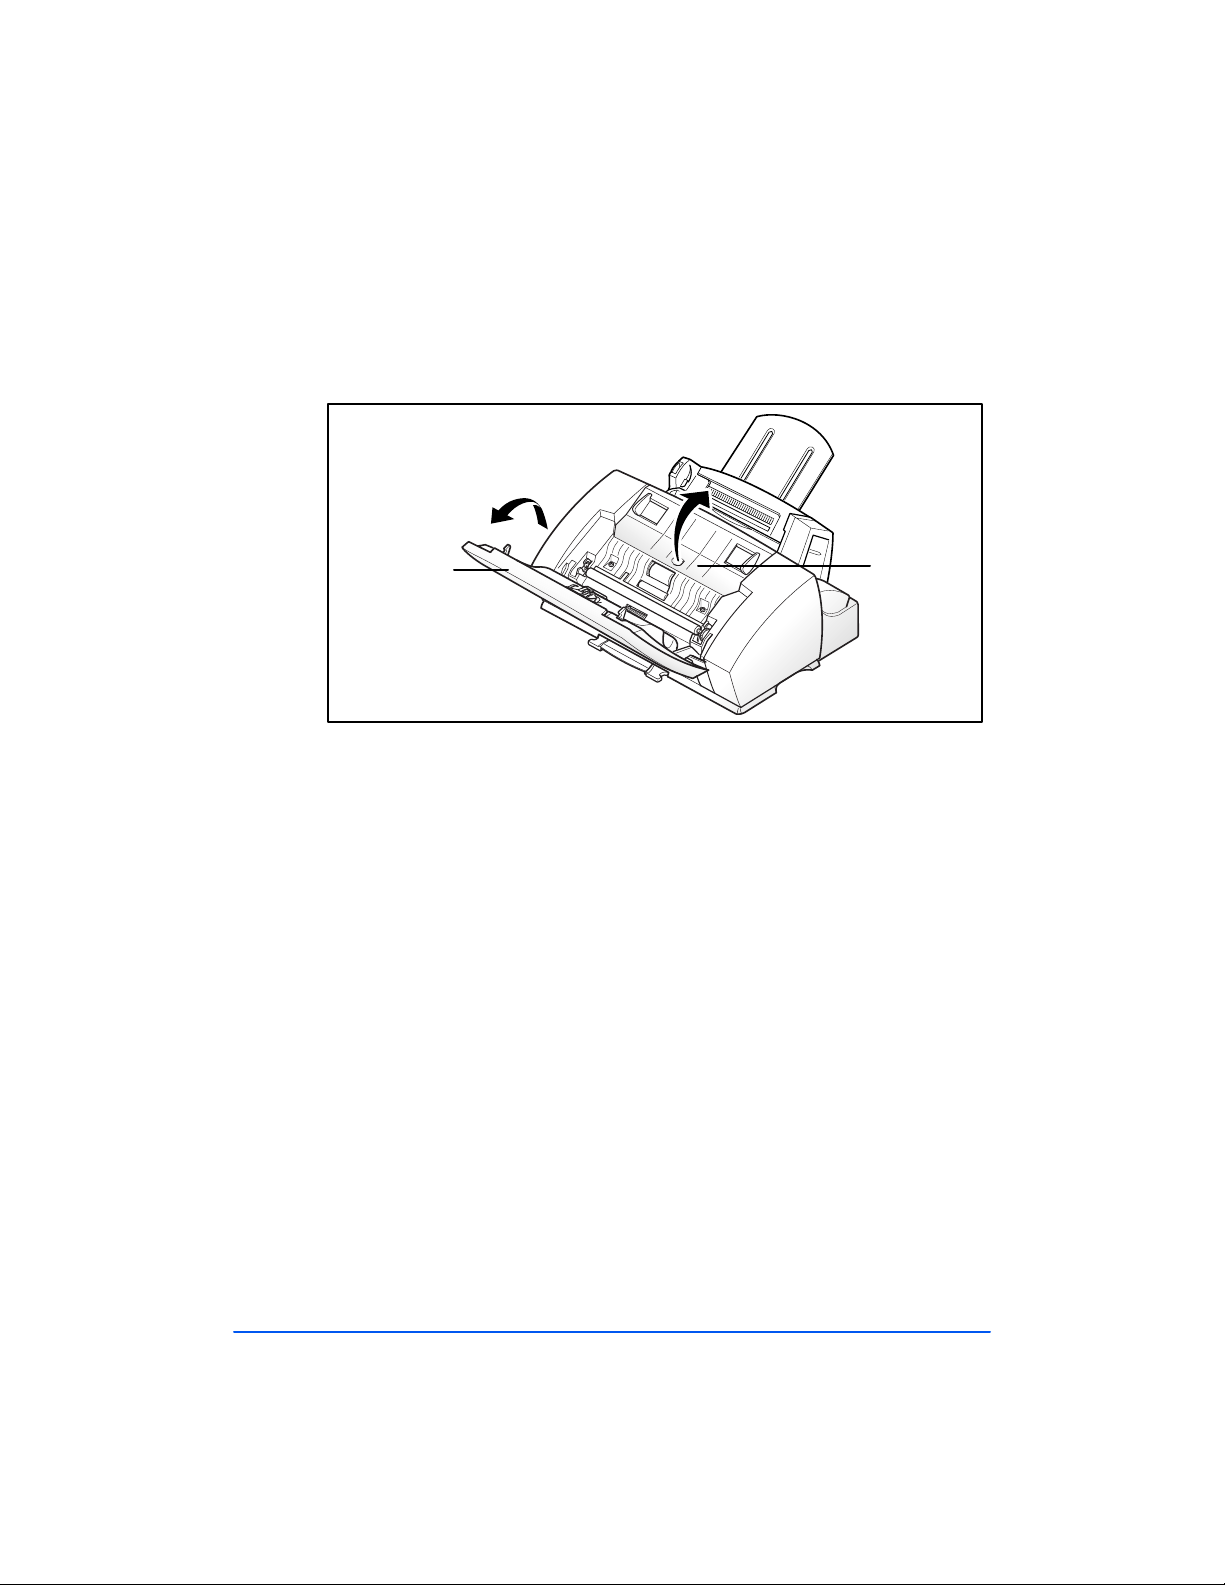
1
Lift open the Control Panel cover b y
Control Panel
pullin g up on th e Control Panel
Cartridge
Compartment
Cover
The Cartridge Compartment Cover is now accessible.
2
Open th e Cartridge Compartment Cover by lifting up on the recessed
handle.
The Cartridge Carrier Assembly moves to the center of the machine.
.
1-12 Getting Started
Page 25

3
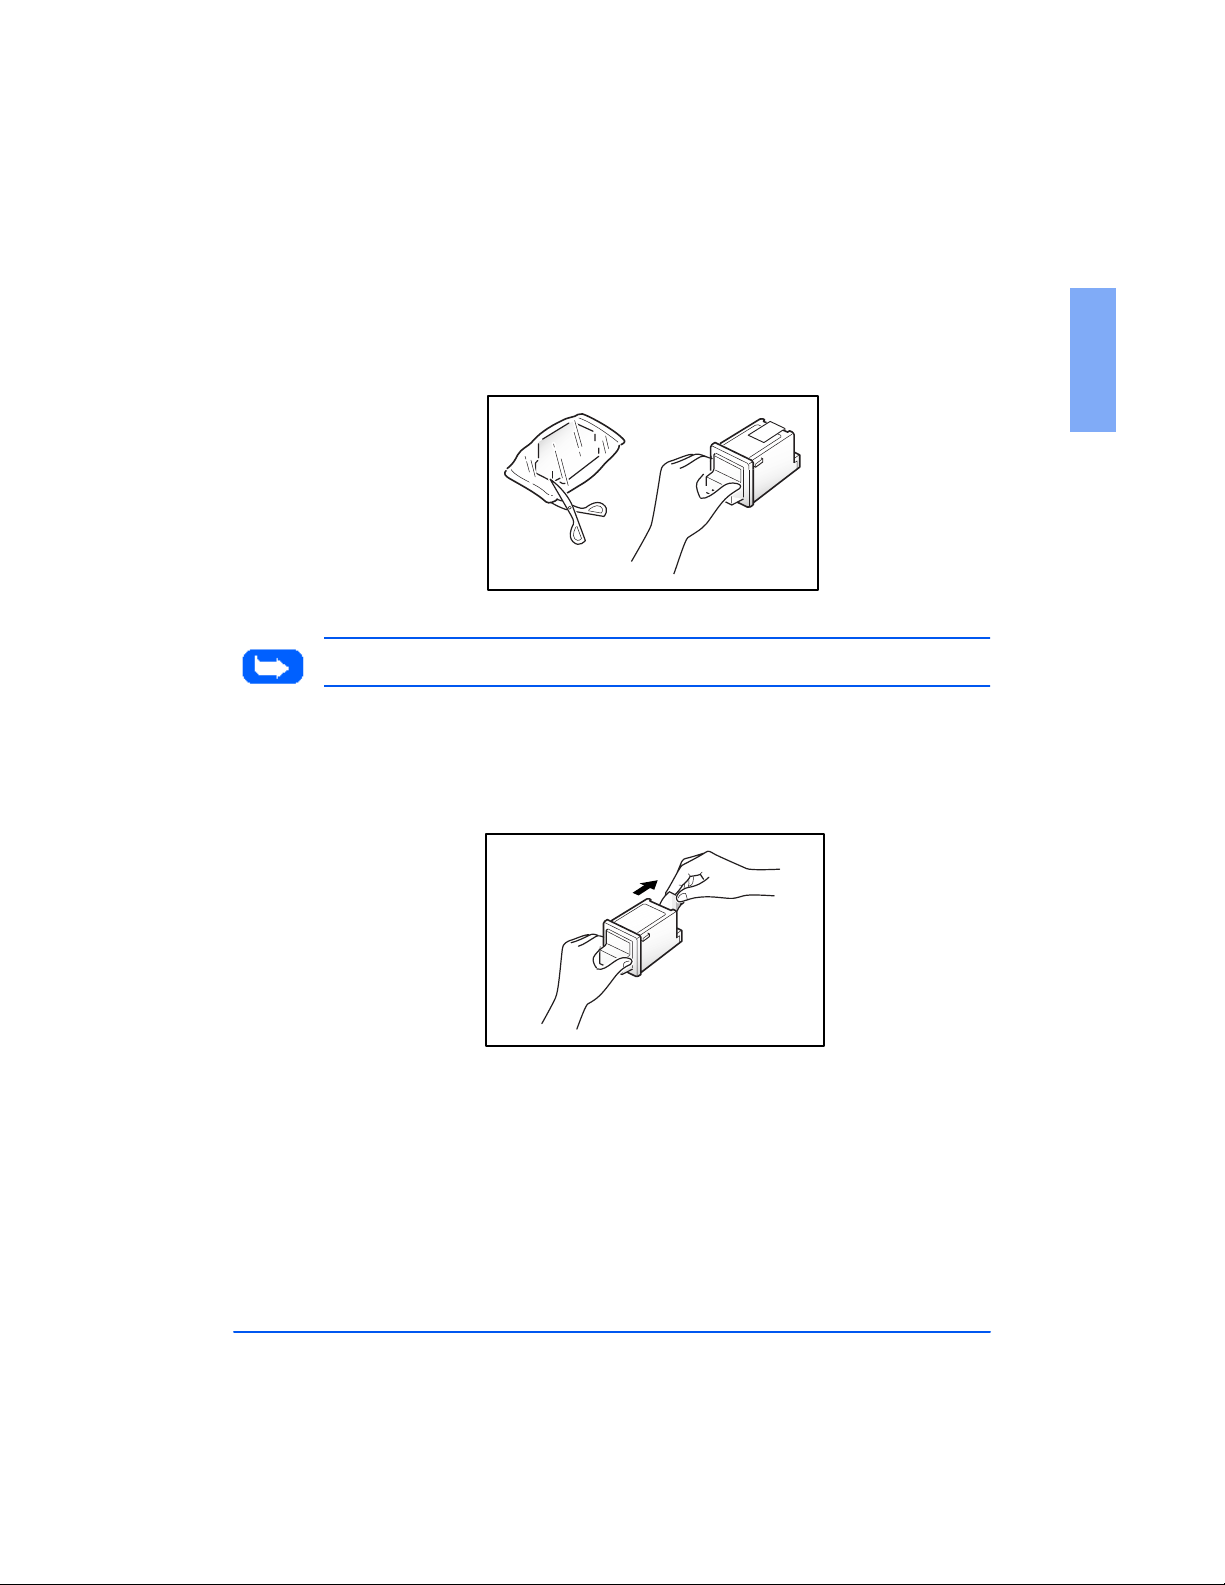
Print the 480cx User Guide
Unwrap and remove the Black Ink Cartridge from its packaging. Hold
the cartridge by th e top only.
1
Note:
4
Note:
Avoid touching the electrical contacts on the cartridge.
Carefully remove the sealing tape b y p ulling straight ou t on the tab
located at the end of the In k Cartridge.
Ensure that there are no pieces of tape remai ning on the cartridge.
Set Up Your Machine 1-13
Page 26

5
g
g
Print the 480cx User Guide
L ocate the Bla ck Ink Cartridg e h older inside the printer . T he Black I nk
Cartridge holder is located on the right side of the Cartridge Carrier
As s embly and c an be ide nt if ie d by a blac k key tab.
Color Cartrid
Hol der
Black
Ca rtrid
Holder
6
Slide the Black Ink Car tridge down in to the holder and push it in th e
e
e
direction of the arrow un til it clicks into place.
Note: If you want to install the optional Photo Ink Cartridge, you must first
remove the Black Ink cartridge. Next, i nstall th e Photo Ink cartridge into the
cartr idge holder i n place of the Blac k Ink C ar tridge.
1-14 Getting Started
Page 27
7
Print the 480cx User Guide
Unwrap and remove the Color Ink Cartridge from its packaging. Hold
the cartrid ge by the black areas or colored top only.
1
Note:
8
Avoi d touc hing t he el ectrical cont acts on the bac k of the cartridge.
Carefully remove the sealing tape b y p ulling straight ou t on the tab
located on the end of the Ink Cartridge.
Set Up Your Machine 1-15
Page 28
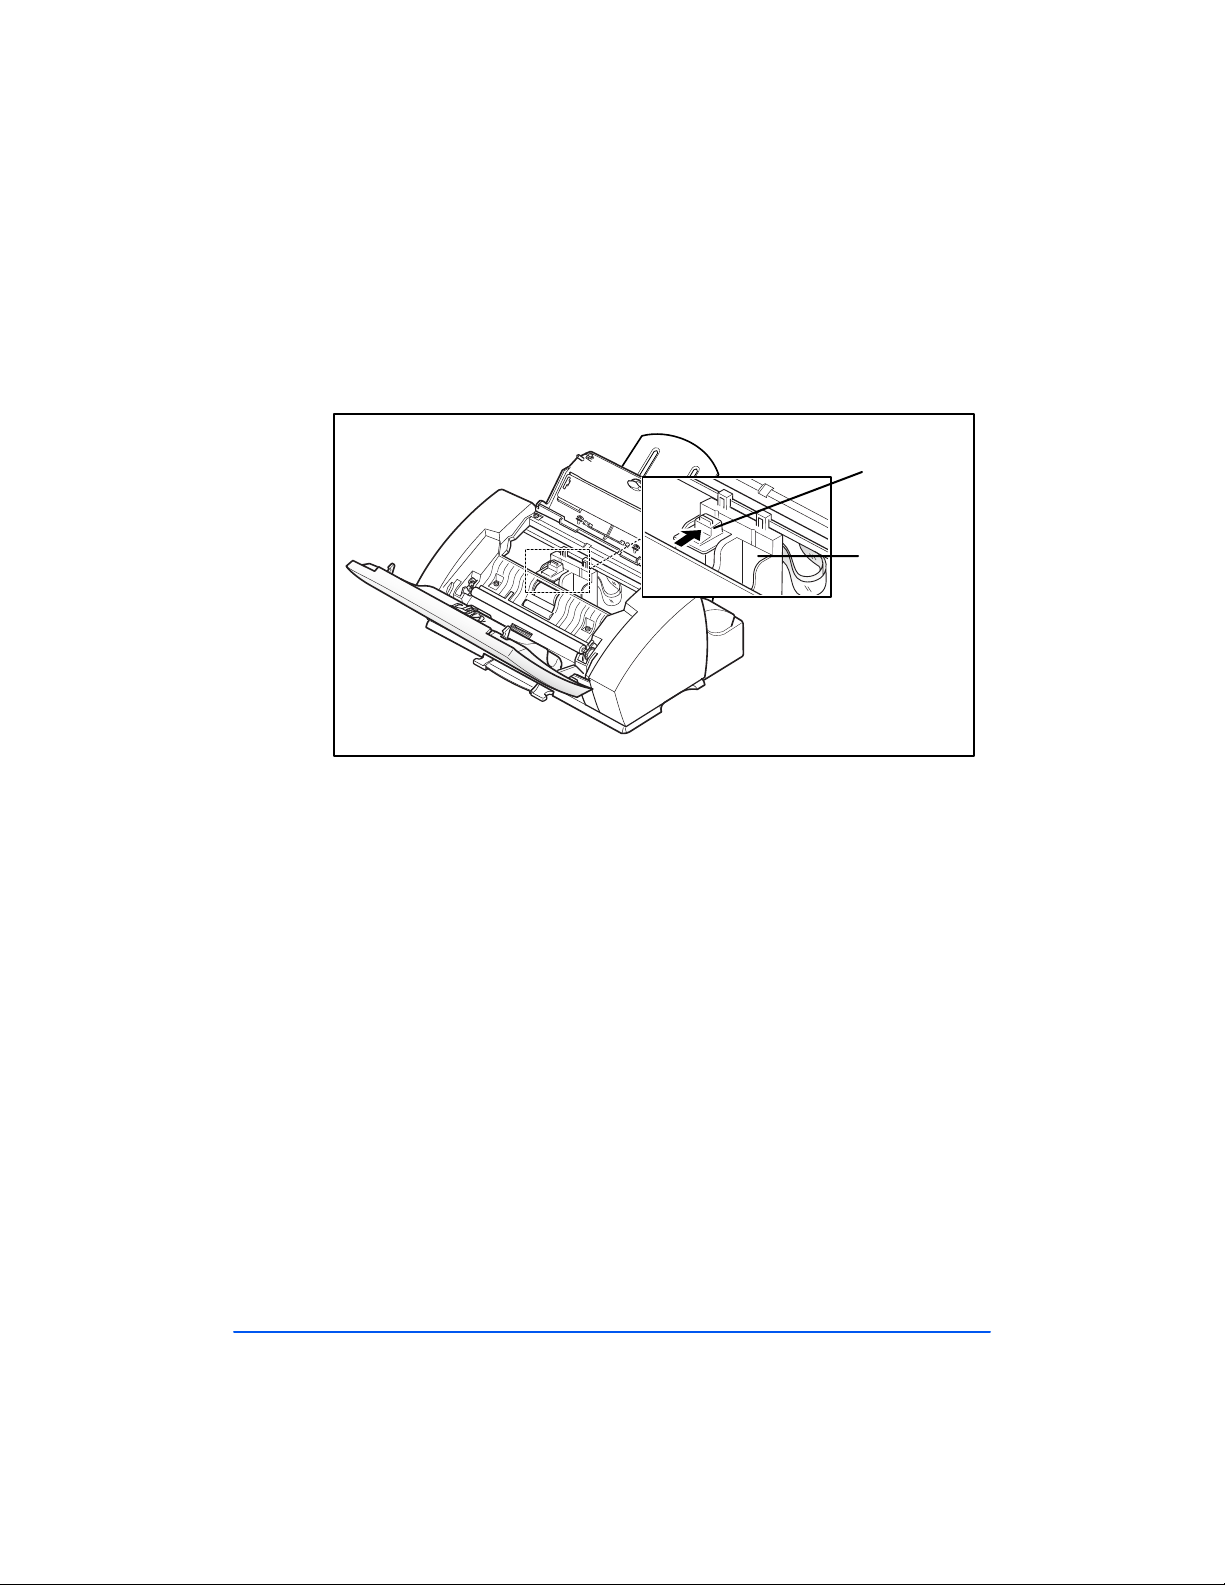
9
g
g
Print the 480cx User Guide
Locate the Color In k Cartridge hold er inside the printer. The Color Ink
Cartridge holder is located on the left side of the Cartridge Carrier
As s embly and c an be ide nt if ie d by a lig ht blue ke y tab.
Color Cartrid
Black/Photo
Cartrid
Holder
10
Slide the Color Ink Cartridge do wn in to the holder and push it in the
direction of the arrow un til it clicks into place.
11
Close the Cartridge Compartment Cover.
CARTRIDGE CHANGED? appears in the display
12
13
Press the
Press the
Down
or Up button u ntil BOTH appears in the display.
Start/Enter
Bu tton.
LEFT CARTR IDGE? appear s in the top line of the LCD display.
e
e
1-16 Getting Started
Page 29

14
Print the 480cx User Guide
Press the Up or
appears in the lower line o f the display.
15
Press the
RIGHT CARTRIDGE? appears in the top line of the LCD display.
Down
Start/Enter
buttons until NEW COLOR CARTRIDGE
butt on to c onfi rm your choic e.
1
16
Press the Up or
appears in the lower line o f the display.
17
Press the
The Cartridge Carrier Assembly moves ba c k to the docking position.
18
Run a Car tridge Alignment Test. This will en sure that y our WorkCentre
480cx generates the best possible prints. Ref er to
on page 1-41.
CAUTION:
!
A ssembly has moved ba ck into the dockin g po sit ion. If n o menu choices are
made , the Carrie r Assembly will autom at ic ally return to the doc k ing posit ion
after about one minute.
Do not power off the machine until the Cartridge Carrier
Down
Start/Enter
buttons until NEW BLACK CARTR IDGE
butt on to c onfi rm your choic e.
Arr a nge Alignment
Set Up Your Machine 1-17
Page 30
Storing Ink Cartridges
Print the 480cx User Guide
The ink cartridge storage unit provides a convenient place to store an extra
black or color print cartridge, and prevents an opened cartrid ge from drying
out.
To stor e a ink cart ridge in the stora ge unit:
Insert the ink cartridge into the storage unit and push down ligh tly until it
clicks into place.
When s wit chi ng between phot o and blac k ink cartri dges, ke ep the unused
one in the ink ca rtrid ge sto rag e unit. The stora ge unit p reven ts the cartri dge
from drying out while providing easy access to it.
Stor age Unit
Cartridge
1-18 Getting Started
Page 31

To remo ve a print car tridge from the st orage unit :
Print the 480cx User Guide
Push the cartridge down slightly and pull it toward yo u.
1
Set Up Your Machine 1-19
Page 32

Loa ding Paper
y
Print the 480cx User Guide
For best results, use high quality xerogra phic copy paper or inkjet paper.
Using the Automatic Paper Feeder
You can st ack paper, envelopes, card stocks, labels, or transparencies in the
Automatic Paper Feeder to feed automatically. If ther e is no paper load ed in
the Automatic Paper Feeder, NO PAPE R will a ppe a r in the LCD Disp la y.
The WorkCentre 480cx will beep and the Alar m LE D will light. The
Automatic Paper Feeder can hold a maximum of 100 sheets of 20 lb pl ain
paper, o r 10 envelopes or ot her print media. De pending upon media
thickness, maximum capacity may be reduced.
Note:
Manual Paper Feeder one sheet at a time.
1
2
If you experience problems feeding paper, place the media into the
Pull the E xtension Tray o n the Automat ic Paper Feeder all the way up.
Extension
Tra
Automatic Paper
Feeder
Prepare the print materia l for loading.
For paper and envel opes, flex paper or fan envelopes back and forth.
Do no t fold or creas e the paper.
1-20 Getting Started
Page 33

Straighten the edges on a level surface.
Print the 480cx User Guide
1
Note:
envelopes i n the Automatic Pa per Feeder.
If envelopes jam while printing, try reducing the number of
For transparencies, be sure to use transparency s tock approved for use
with inkjet printers. Refer to the p a ckaging for the transp aren cy stock
to deter mine the print s ide. Hold the transparencies by the edges and
avoid touching the print s ide. B e careful not to scratch or leave
fingerprints on the print side.
Fan the stack of trans parencies to prevent feeding fai lures.
Set Up Your Machine 1-21
Page 34

3
Print the 480cx User Guide
Load the print material in the Automatic Paper Fee der. Ensure that the
right ed ge of th e media is in contact with the right side of the Au tomatic
Paper Feeder. Do not exceed the rated capacity. Do not mix different
types of print media. Refe r to the fo llowin g in structions f or loadi ng
each type of print material.
a)
Load paper or transparencies with the print side facing you.
b)
Load letterhead paper with the design side face-up. The top edge of
the sheet with the logo sh ou ld enter the printe r fir st.
4
While s queezin g the tab on the paper guide , move th e g uide t o the right .
Slide th e paper guide until it lightly touches the side of the sta ck of print
media. Do not press th e paper g uid e too tightly to the edge of the print
med ia, the guide may b end the media or provide too much res istance
wh en feed ing.
1-22 Getting Started
Note: When you print a file from your PC using the Automatic Paper
Fee der, make sure that you select the source and the correct p aper size
from your software application before starting your print job.
Page 35

Loa di ng Enve l opes
Print the 480cx User Guide
When printing envelopes, remember to use th e envelo pe g uide in the
Automatic Paper Feeder.
T o load envelopes:
1
T urn t he enve lope gu i de up r ight.
2
Load envelopes with the address side facing you. The end of the
envelope with the stamp area must enter the Aut omatic Paper Feeder
first. The right edge of the en velope must align with the raised edge of
the envel ope guide.
1
Set Up Your Machine 1-23
Page 36

3
Print the 480cx User Guide
Squeeze the Left Paper Guide and move it to th e right until it lightly
touches the enve lope .
Note: Do not feed
CAUTION: Never use envelopes with clasps, snaps, windows, coated
linings, or self-stick adhesives. These enve lopes may severely damage the
!
printer.
stamped
envelopes.
1-24 Getting Started
Page 37
Usi ng the Manual Paper F eeder
Print the 480cx User Guide
Use the Manual Paper Feeder to feed paper one sheet at a time into yo ur
mach ine.
Note:
ensure that you select the source and the correct p aper size from your
software applic ati on before st arting your print job.
When you print a f ile from your PC using the Manual Paper Feeder,
1
Set Up Your Machine 1-25
Page 38

1
Print the 480cx User Guide
Place the paper in the Manual Paper Feeder and adjust th e paper guide
to the width of the pr int material. Slide the pape r guide to the right until
it lightly to uches the stack of print med ia. Do not tightly press the paper
guide to the ed ge of the print media, the guide may bend the media or
prevent the media fro m feeding.
Paper Guide
Note: Refe r to
loading var ious types of media.
2
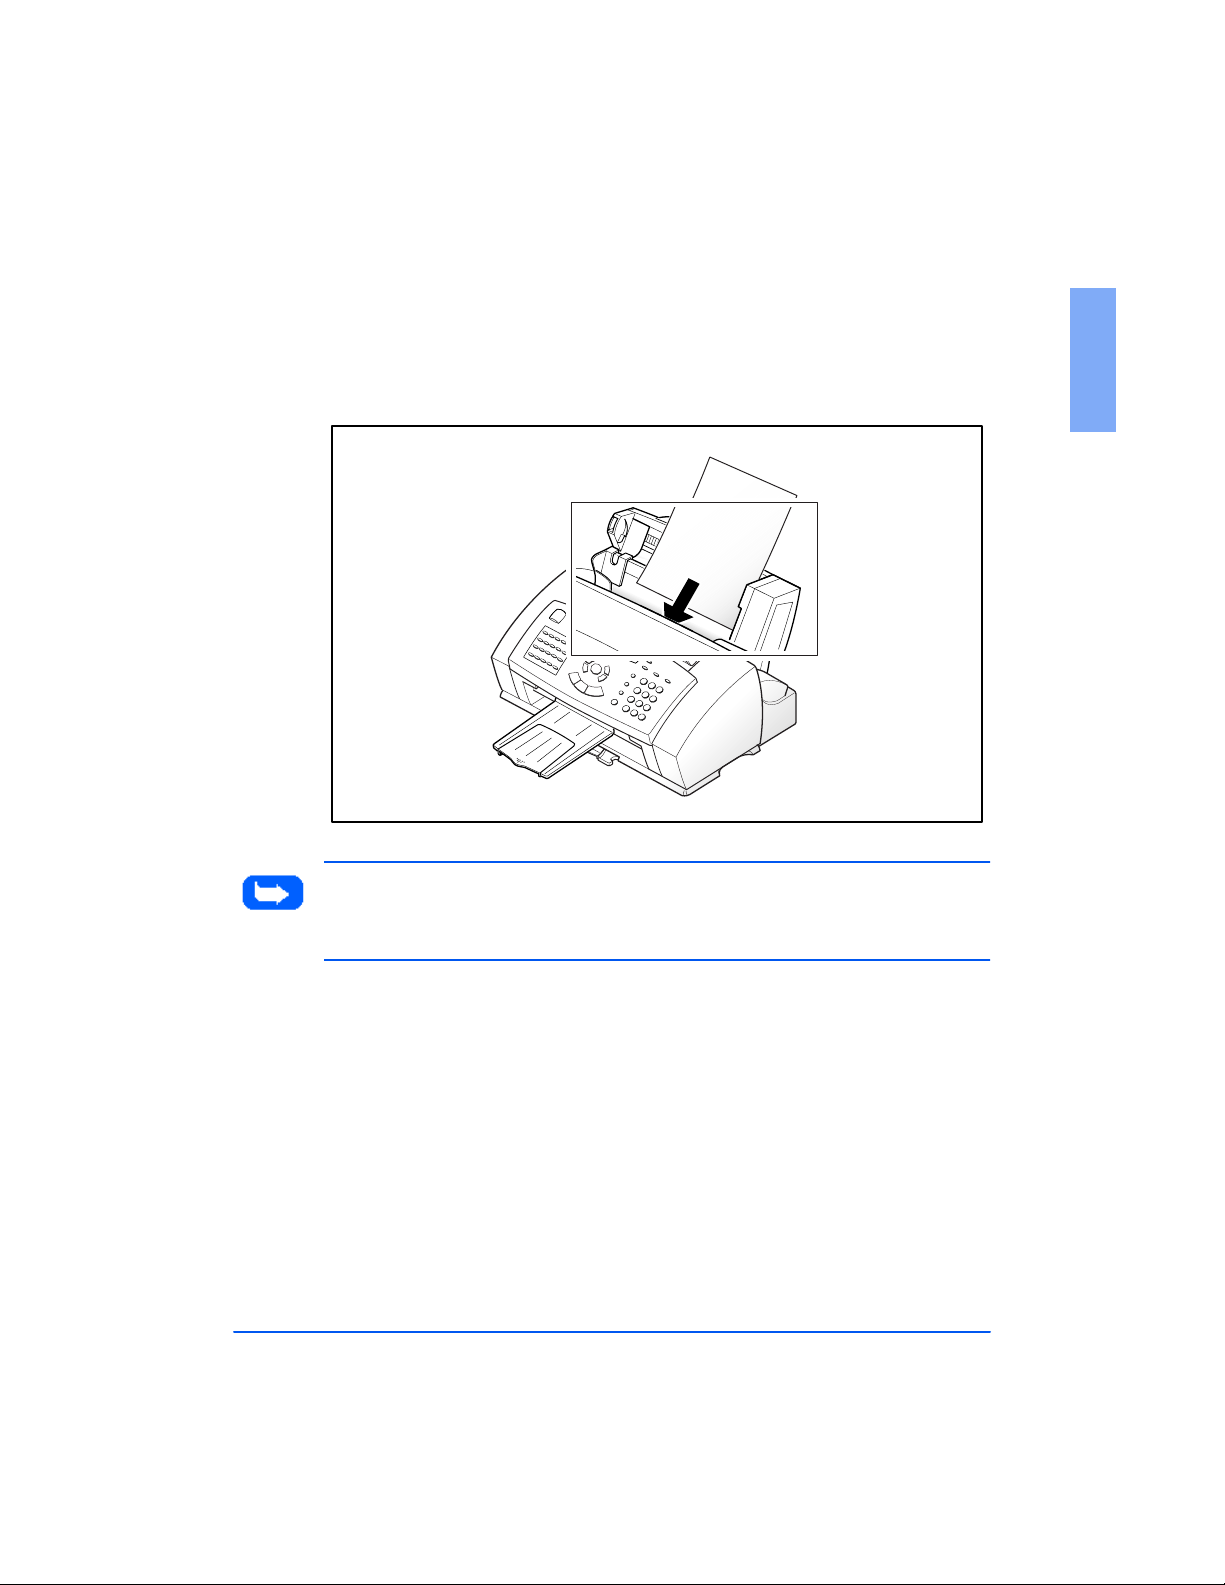
Ensure that the m e dia is fed into the machine as far as it will go.
3
Press the
you have more than one pa ge to pri nt, press t he
each page .
1-26 Getting Started
Loading Paper
Start/Enter
on page 1-20 for specific instructions on
butto n to start manual feeding of the media. If
Start/Enter
button for
Page 39

Paper Guidelines
Print the 480cx User Guide
When selecting or loading paper, envelopes, or other special media, keep
these guidelines in mind:
Attempting to print on damp, curled, wrinkled, or torn paper can cause
paper jams and poor print quality.
Use only hig h q uality, co pier grade pape r. Avoid paper with embossed
lettering, perf oration s, or texture that is too smo oth or too rough.
Store paper in its ream wrapper until read y to use. Place carto ns o n
pal lets o r sh elv es, n ot on th e floor . Do not place hea vy objects on to p of
the paper, wh ether it is packaged or unpackaged. Keep it away from
moisture, or other conditions that can cause it to wrinkle o r cu rl.
During storage, moisture-proof wrap (any plastic container or bag)
should be used to prevent dust and mois tur e fr om contaminating your
paper.
Always us e paper and other media that conform with those listed under
Specificati ons in the Appendix.
Use only well-constructe d envelopes with sh arp, well cre ased folds.
DO NOT use envelopes with clasp s and snaps .
DO NOT use envelopes with wind ows, coated linings, self -s tick
adhesi ves, or other s ynthetic ma t erials .
1
DO NOT use damag ed or po orl y made enve lopes .
Paper Guidelines 1-27
Page 40

Paper Selection
Print the 480cx User Guide
One of the most im po rtant thin gs you can do to ass ure the best possible
prin ting perfo rmance o f your mach ine is to sel ect the c orrect paper. Yo ur
machine produces letter quality print on most plai n bond papers, including
cotton bond and photocopying pape rs; it does not require spe cial ink jet
papers. However, the print qu ality varies with different paper type s. Be
sure to test a typ e of paper before you purchase a larg e quantity.
Paper Types
Plain Paper
The machine supports paper sizes of letter, legal, and A4 in portrait
or ienta t ion. You c an use regular copier paper, c otton bond papers, and
typical letterhead . Always use pa per w ithout curls, folds , staples, or
damage d edge s .
Inkjet Paper
This paper has been dev eloped specifically for printing with inkjet printer s.
It will produce high q uality doc ume nts which will compare favorably to
those produced with a laser printer.
Coated Paper
T he coated pap er has be en developed for hi gh quali t y p ri nt i ng w it h m ini m a l
or no smearing or running when in contact with water or damp surfaces,
making it a good c hoice for damp or rai ny envi ronmen ts.
Gl oss y Photo Paper
Glossy phot o pape r i s a high gl oss, t hicker paper that produces the look a nd
feel of a photo gra ph. Use this paper to produce photo -realistic prints fr om
your pri nter.
1-28 Getting Started
Page 41

Trans par en cies
Print the 480cx User Guide
Your transparencies will possess excellent contrast, sharpness, and color.
Iron-on Transfers
Use inkjet T-shirt transfers to create and personalize T-shirts, sweatshirts,
aprons, t ablec loths , na pkins, tot e ba gs, and a nything els e your imaginati on
allows! Use on any cotton or cotton/poly blend fabric. You r image is
printed in mirror image so when y ou iron it onto the T-shirt, the image is
viewed correctly.
Greeting Card Stock
Get the m ost out of ca rd makin g so ftwar e with Greetin g Car ds. T hese card s
give your unique, personalize d ca rds the look and fee l of professional ca rds.
You ca n create c ards, invitations, announcem ents, and more.
1
Paper Guidelines 1-29
Page 42

Guidelines for Special Paper and other
Print the 480cx User Guide
Media
Be sure to read any instructions that come with your sp ecial paper. Th ese
instructions provide im portan t information regarding how to ac hiev e the
highest print quality with these papers.
It is recommended that you feed sp ecial paper t ypes one sheet at a time.
For transparencies and glossy photo paper, follow thes e guidelines:
Let the p rinted she e ts dry comple tely before storin g them.
When a printed sheet has dried completely , c over the printe d side w ith a
sheet of plain (not coated) paper before storing it; this is recommended
e ven if yo u place the sh eets in a clear file or plastic h older .
Do no t le ave the film in the paper tray for long periods of time. Dust
and dirt may accumulate on the film resulting in sp otty printin g.
T o avoid sm ud ging cau sed by fin gerprint s, handle tran spar ency film and
coated paper carefully.
To avoi d fading, do not expose the printed fi lm to pr olonge d sunlight.
St ore unuse d media flat. D o not r emove papers from their protec tive
packaging until you are ready to u se them .
Store unused medi a at temperatures between 59 and 86 degrees
Fahrenhei t (15 to 30 degree s Centigr ade). The relative humidity should
be betwe en 10% and 70%.
I f th e p ri n t de ns it y of your pa ge i s v e ry hi g h, light p aper s tock m ay cu rl
slightly due to th e large amount of ink. If you ne ed to print dense
gr aphics, try pri nt ing on he avier stock.
Do n ot use thicker paper th an meets the specif ic ations for this machine.
Printing with a paper that is th ic k enough to come in contact with the
pr int head nozzles may dam age t he c artri dge.
1-30 Getting Started
Page 43

Installing Software
Print the 480cx User Guide
Syst em Requ iremen ts
Proper operation of the WorkCentre 480cx requires that your personal
computer meets o r exceeds the following system requirements:
IB M comp atible personal computer, with a 486SX 33MHz or faster
processor
Windows ope rating enviro nment (3.1x, Windows 95, Windows 98,
Windows NT 4.0)
At least 10MB of free hard disk space*
8 MB or mo re R A M* * ( W indow s 3.1x), 16 MB RA M (Wi nd ow s 95 , 98 ),
and 24MB R AM (NT 4.0)
* 10MB minimum hard disk space required for driver installation only.
If ins talling the additional sof tware packages included on th e CD ROM,
an additional 100MB free hard disk space is req uire d (70MB Pagis Pro,
20MB MGI PhotoSuite, 10MB LaserFax Lit e).
** 8 M B RAM required for driver installation only. If installing the
additional software packages included on the CD ROM, 16MB RAM is
required.
1
Installing Software 1-31
Page 44

Overview of WorkCentre 480cx Drivers
Print the 480cx User Guide
Before the WorkCentre 480cx can interface with your computer, you must
install driver files. These drivers will enable your computer to properly
comm unicat e with th e Wor kCen tre 480cx fo r printing , sc ann ing and PC fax
operations. PC fax is the process of faxing a computer file, such as a word
pro cessin g do cument o r im ag e f ile , dir ectly from your computer v ia th e
built-in fax mo dem in the WorkCentre 480cx.
All of the necessary drivers are contained on the CD includ ed with your
WorkCentre 480cx. In addition to the driver files, several software
applications are also included on the CD ROM. The scanning program
Pagis Pro, a suite of four scanning applicat ions, is provided for your
conv enience. LaserFAX Lite, a PC Fax softwar e applicatio n which all ows
you to f ax directly to and from your PC, is also included.
Software Included With the WorkCentre 480cx
In add ition to th e dr iver files, several so ftware applications ar e also in cluded
on t he CD ROM .
Pagis Pr o 2.0 - a s uite of four sca nni ng applic atio ns.
LaserFAX Lite 3.5 - a PC Fax softwar e applicatio n which allows
you to fa x dir ec tly to and from your P C.
MGI PhotoSuite - a suite of graphics processing tools.
1-32 Getting Started
Page 45

Software Installation Procedure
Print the 480cx User Guide
In Wi ndows 3. x, Windows 95/98, or Windows NT 4.0
1
Make su re t he Xe ro x W orkCe n t re 48 0cx is conne ct e d t o yo ur co mpu t e r .
2
Power o ff the WorkCen tre 480cx by unplugging it from the wall outlet.
3
Turn on your PC and start Windows.
4
Power on the Workcentre 480cx by plugging it into a grounded wall
outlet.
5
Insert the supplied CD into you r co mputer ’s CD ROM drive.
The Xerox WorkCentre 480cx installatio n progra m will begin.
If the program does not start:
a)
From the
Or
From the
Run
(Windows 3.x).
b)
Type D:\XINSTALL.EXE (whe re "D" represen ts the letter
designation of the computer’s CD ROM drive), and click OK to
start the installation program.
Start
menu, select
File
menu of the Windows Program Manager, select
Run
(Windows 95/98 and N T 4.0) .
1
The Xerox WorkCentre 480cx installatio n progra m will begin.
Installing Software 1-33
Page 46

6
Print the 480cx User Guide
Follow th e on-scree n instructions to comp lete the software insta llation .
Note: When installing LaserFAX Lite, you must complete th e registration
form. Follow the on-screen instructions when filing out the form. The
info rmation you pr ovide will also b e u s ed by Lase rFAX Lite t o create your
fax cover page.
Note: You mus t s hut dow n and restart your computer to complete the
installation proces s. If y our computer does not shut dow n and r estart
automatically, you must shut it down manually and restart it before the
chang es you have made ta ke effect.
Note: Th e Work Cen tre 480c x will be se lect ed as th e De fault printer in
Windows after installing the printer driver.
Uninstalling Software
Uninstallation of software is required on ly if you ar e up gradin g the
software, or if y ou r installation fails.
In Wi ndows 3. x
In W i ndows 3.x, al l WorkCe ntre 480cx softwa re compone nts a re installed
into a single program group.
1
Start Windows.
1-34 Getting Started
Page 47

2
Print the 480cx User Guide
In the Pr ogram M anager, doubl e cl ick the WorkC entre 480cx Pr ogram
Group.
The WorkCentre 48 0cx Progra m Grou p will open.
3
Double Click on the Program Group contai ning the component you
wish to uninstall.
The Program Group will open.
4
Double Click on the Uninstall icon.
The selected compo nent is uninstalled.
In Wi ndows 95/9 8, or Windows NT
1
Start Windows.
1
2
From the
3
Locate the Start Menu P rogram Item for the component you wish to
uninstall.
4
Click on the Submenu uninstall icon for the component you wish to
remove.
A wind ow will ope n prompting you to confirm that you wish to remove
the selected application .
5
C li c k on
6
Uninstall Shield laun ches and the component is uninstalled.
Note:
Start
menu, select
Yes
.
Each sof twar e component must be uni nstalled one at a time.
Programs
.
Installing Software 1-35
Page 48

Using the Control Panel
q
y
j
y
g
g
j
p
q
,
p
y
j
g
y
p
y
py
y
j
y
y
y
y
y
y
Print the 480cx User Guide
Express
uickly scan
Use to
documents into
when faxing.
memor
Form Feed
ect paper
Use to e
from the printer if the
pa per is not
automa ticall
from the printer after
printin
machine runs out of
paper durin
One-touch Dial and
S
numbers with one
use in conjunction
Also
with the Menu button to
set up special functions
fed out
. Al so, use to
load paper if the
a PC
ob.
print
ecial Function
Button s
Use to call most
uently used
fre
button.
or print reports.
The display shows the current
status of
Menu
Use to choose special functions.
and Dow n Butt ons
U
Use to displa
Also used to make ad
Right and Left
Use to move cursor left or ri
.
displa
Sto
Use to stop an operation at an
Co
Use to cop
Start/Enter
Use to start a
selection shown in the displa
a document.
our machine, and guides
ou through various tasks using a
stem for each operation.
menu s
the next or previous menu item.
ustments.
ht across the
ob. Also use to activate the
.
LCD Displa
time.
LED
Bus
Indicates machine is in
use.
ALARM LED
Indic ates a malfunction.
1-36 Getting Started
Page 49

y
y
j
g
g
p
j
y
g
Search/Delete
y
(
)
y
y
Print the 480cx User Guide
Use to search for numbers in
. Also use to delete digits
memor
in the edit mode.
Rec eive
Use to choose the receive mode
mode is displa
Res olution
Use to choose the resolution of
copied or transmitted documents.
Contrast
Use to choose the contrast of
copied or transmitted documents.
Number Keypad
Use to dial numbers manuall
to enter letters and numbers for
various pro
Receive Mode
ou want to use. T he selected
ed.
or
ramming functions.
1
Speed/Dual
Use to dial calls and send fax documents
b
entering a 2-digit number. Also use to
switch the LCD displa
obs.
dual
Redial/Pause
Use to redial the last phone number
called. You can also use it to add a pause
when storin
Flash
Use to perform a switch-hook operation
such as call waitin
Use to ad
speaker.
a number in memory.
S
eaker
ust the volume of the internal
while performing
.
Using the Control Panel 1-37
Page 50

System Setup
Print the 480cx User Guide
Ringer Volum e
Yo u can ad just the volume of the ringer to th e desired loudness.
1
Press the Menu button, then press the System Setup button o n the one-
touch keypad. The display indicates RINGER VOLUME ?.
2
Press Enter, then press the Up or Do wn butt on to choos e the de sire d
loudness of the ringer. You can choose between OFF, LOW,
MED (medium), or HIGH settings.
The selected ringer sounds and the dis play indicates the loudness level.
Note:
3
4
Th e ma c hine will work normally eve n if the ringer is set to off.
RINGER VOLUME
LEVEL [MED]
Press Enter wh en the desired volume level is selected. Th e displ ay
indicate s the next setu p m enu , DEFAULT SETTING ?. For details on
the Default Settings m enu, see Default Settin gs on page 1-39.
To ret urn t o S tandby mode, press the St op button.
1-38 Getting Started
Page 51

Default Settings
Print the 480cx User Guide
The default print resolution and contrast can be set to th eir mos t frequ ently
use d modes. Wh ene ver a docu ment is sent o r copied , th e home contrast and
resolution mode will be activated unless otherwise changed by using the
Resolution or Cont rast button on the control panel.
1
Press the Menu button, then press the System Setup button o n the one-
touch keypad. The display indicates RINGER VOLUME ?.
2
Press the Up or Down button u ntil DEFAULT SETTING ? a ppears.
3
Press the Start/Enter button. The display prompts you to choose
Resolution or Contrast.
1.RESOLUTION
2.CONTRAST
4
Press 1. or pre ss the Start/Enter butto n to enter the Default R esolution
se t up menu. You may a lso use the Up and D own butt ons to sele ct
1. RESOLUTION.
DEF. RESOLUTION
[ FINE ]
The c urrent Default Resolution is displayed.
1
System Setup 1-39
Page 52

5
Print the 480cx User Guide
Press the
Left
or
Right
button repeatedly until y ou locate the desired
mode:
STANDARD - use with most docume nts.
FINE - u se for docu men ts with fine detail, such as sm all print.
SUPER FINE–use for documents that have extremely fine detail.
6
Press the
Start/Enter
butto n to sele ct the desired Def ault R esolu tion.
The display again prompts you to choose Resolution or Contrast .
1.RESOLUTION
2.CONTRAST
7
Press the Up and
Down
buttons or
2
on the Number keypad to enter the
De f a u lt Co nt rast se t up me nu .
DEF. CONTRAST
[ NORMAL ]
The c urrent Default Resolution is displayed.
8
Press the
Left
or
Right
button repeatedly until y ou find the desired
mode:
NORMAL–use with documents of average or normal contrast.
DARKEN–use with d ocu men ts with low contrast or lig ht ima ges.
LIGH TEN–use wit h docume nts w i th high contrast or dark ima ges.
9
Press the
Sta r t/E n ter
butto n to select the desire d mode. The Resolution
o r Co nt ra s t set u p me n u sel ectio n i s dis pl ayed .
10
Press the
Stop
button to return to Standby mode.
1-40 Getting Started
Page 53

Arrange Alignmen t
Print the 480cx User Guide
The Arrang e Alignment menu settings provides an easy way to check and
adjust Ink Car tridge p rint head alig nme nt.
To run the Arrange Align ment:
1
Press the Menu button, then press the Maintenance but ton on the one-
touch keypad. The display indicates SELF TEST ?.
2
Press the Down button. ARRANGE AL IGNMENT ? appears in the
display.
3
Press the Start/Enter button. PRINTING... appears on the LCD di splay.
The WorkCentre 480cx will then print out a Cartridge Alignment
pattern sh eet consisting of a series of four test patterns. The patterns are
designated A,B,C, and D. Each pattern is made up of a series of lines
which are individually numbered. By selecting the straightest line from
each pattern, you can optimize the print head alignment.
After printing out the Cartridge Alignment shee t, the Cartrid ge
Maintenance set up menu appears on the LCD display.
CARTRIDGE MAINT.
<15> [0-30] A
The letter A, lo c ate d on the right end of the lower line in the display,
corresponds to alignment test pattern A. The range of numbers
bracketed in the center of the display line indicates the range of valid
pattern selectio n choices. The flashing nu mber o n the left side of the
display indicates the line from print pattern A that is cu rrently selec te d
as optimal.
1
4
Using the Number Keypad, enter the number of the line which appears
the straightest from pattern A.
System Setup 1-41
Page 54

5
Print the 480cx User Guide
Press the
updates and the set up screen for the Alignment B test patter n is
displayed.
6
Using the Number Keypad, enter the number of the line which appears
the straightest from pattern B.
Start/ En ter
button to c onfirm yo ur selection. The LCD pan el
7
Press the
updates and the set up screen for the Alignment C test patter n is
displayed.
8
Using the Number Keypad, enter the number of the line which appears
the straightest from pattern C.
9
Press the
updates and the set up screen for the Alignment D t est patter n is
displayed.
10
Using the Number Keypad, enter the number of the line which appears
the straightest from Alignm ent pattern D.
11
Press the
updates and the set up screen for the Alignment A t est patter n is
displayed.
12
Pr es s the
Start/ En ter
Start/ En ter
Sta r t/E n ter
Stop
button to c onfirm yo ur selection. The LCD pan el
button to confirm yo ur selection. The LCD pan el
button to confirm yo ur selection. The LCD pan el
button to retu rn to normal operation.
1-42 Getting Started
Page 55

Clean He ad
Print the 480cx User Guide
The Clean Head procedure cleans the print n ozzles and removes any
deposits that may impair printing functions.
To run the Clean Head Procedure:
1
Press the Menu button, then press the Maintenance but ton on the one-
touch keypad. The display indicates SELF TEST ?.
2
Press the UP b utton. CLEAN HEAD ? ap pears in the LCD d isplay.
3
Press the Start/Enter button. PRINTI NG... appears on the LCD
display.
The WorkCentre 480cx prints a head cleaning test pattern. Note the ser ies
of dia gonal lines across the top and bottom of the test patter n. Breaks with in
a line of the same color indicate a clogged nozzle. Try running th e Clean
Head proced ure again if you see breaks in the diagonal lines.
Select Language
Select L angua ge a llows you to configure the default la nguage for t he L C D
panel displ ay. You ma y choose b etween fi ve diffe rent l angua ges: Engl ish,
German, French, Italian, and Spanish.
To select a default lang uag e :
1
1
Press the Menu button, then press the System Setup button o n the one-
touch keypad. The display indicates RINGER VOLUME ?.
2
Press the Up or Down buttons until SELEC T LA NGUAGE ? and I TEM
1-5 appear in the LCD display.
3
Press the UP or Do wn buttons to scroll through the language options. A
flashing cursor will indicate the currently selecte d lan guage.
4
Press the Start/Enter button to confirm your lan gua ge selection .
System Setup 1-43
Page 56

Adjusting Speaker Volume
Print the 480cx User Guide
1
Press the button on the front pan e l to adjust the speaker vo lume. If
you cannot hear a dial tone, check the pho ne line connection.
2
The display indicates the current volume level. Press the Up or
button re peatedly un til the des ired loudnes s setting is displayed.
Loudness is set in the r a nge from 1 throu gh 7, with 7 representing the
loudest setting .
3
After ch oo sin g the desired volume level, press th e butto n to return to
the Standby mode.
Down
Setting the Clock Mode
You can c onfigure your machine to display time using either a 12 hour or 24
hour forma t.
1
Press the
one-touch keypad. PAPER SIZE appears on the display .
2
Press the Up button two times.
CLOCK MODE appears on the LCD display.
The display prompts you to select either a 12 hour or 24 hour Clock
Mode.
3
Press 1 to sel ec t a 12 hour Clock Mode or, Press 2 to s elect a 24 hour
Clock M ode.
Menu
button, then press the
System Data (01)
butto n on the
1-44 Getting Started
Page 57

Setting the Date and Time
Print the 480cx User Guide
The current date and time are shown in the display when the machine is on
and ready for use (Standby mode). The dat e and time are printed on all faxes
you se nd.
1
Press the Menu button, then press the Date & Ti me bu tton on t he one -
touch keypad. The current date and time are displayed. A flashing
cursor in the d isp la y prompts you to enter the date.
2
Using the number keypad, enter th e c urrent date usin g a MMDDY YYY
date fo rmat. If you make a mistak e , use the right and left buttons to
move the cur so r to the d igit you wish to change.
12-03-1998
04:06 (PM)
After entering the date the flashing cursor will move into the first digit
of the time.
3
Using the nu mb er keypad, enter the current tim e. Remember to enter
the time according to the current Clock Mode setting (12 or 24 hour
format). Refer to th e previous section, CLOCK MODE for details.
4
Press Enter wh e n the date and time settings displayed are correct.
1
The display indicates the date and time yo u h ave set, then returns to
St a n db y mode.
Note:
proceed to the next step. If this happens, enter the correct number.
If an invalid number is entered, the machine beeps and does not
System Setup 1-45
Page 58

Setting the System ID (Yo ur Number and Name)
Print the 480cx User Guide
In som e countr ies you are required by law to indic ate your fax number on
any fax you se nd.
name, will be printed at the top of each page sent from your machine.
The System ID, including your telephone number an d name, will be pr inted
at the top of each page sent from your machine.
1
Press the Menu button, then press the Syst em ID button on the one-
touch keypad. SYSTE M N UMBER appea rs in the L C D displa y. A
flashing cursor in the display prompts you to enter the telephone
number.
T he Sys t em ID, i ncluding your telephone numbe r and
Note:
2
3
If ther e is a number previously registered, it appears in the display.
Enter the telephone number (up to 20 digits) to which y our ma chin e is
connected.
You can enter a space by pressing the RIGHT button two times.
If an incorrect number is entered, press the Right or Left button to
m ove the cursor u nder the incorr ect d igit, then enter the corr ect numbe r
or press t he Delete bu tton to delete th e number.
Press Enter when the correct number is displayed. Th e display prompts
you to enter yo ur ID n ame .
1-46 Getting Started
Page 59

4
Print the 480cx User Guide
Enter your ID name. This can be any name up to 20 characters in
length. You can enter alphanumeric characters usin g the number
keypad. Special symbo ls such as + and - can be included by pressing 0
repeatedly.
1
Note:
5
If there is an ID name previously registered, it appears in the display.
If you want to enter the sa me letter or numbe r i n s ucc ession ( for
e xample, SS, AA, 77 7), en ter o ne dig it, the n m ove the cu rso r by
pressing the Right button, and enter the n e xt digit.
Use the Right button to insert a space in the name, Pressing the R ight
button two times moves the cursor two positions to th e right, creatin g a
space.
For ad ditional details on h ow to use the number keypad to enter
alp hanumeric char acters, se e
page 3-26.
Enter
Press
when the name in the display is correct.
En t e rin g A lphanumeric Ch ar a c t er s
on
System Setup 1-47
Page 60

Reports
Print the 480cx User Guide
Your fax machine can print reports containing useful info rmation like
Scheduled J obs and Sys tem Data . The fol lowing r eports ar e av ail ab le:
Journal (One-Touch button 14)
The journal consists of two reports, a Tr ansmission R eport and a
Reception Report. Each report contains infor mation concern ing
transmission or reception activities. They can be printed on comma nd,
or auto matica lly if certain conditions a re met (see Selectable Options on
page 1-52). These reports will be automatically printed after every 40
tr ansmiss ions or recep tions .
Help List (One-Touch button 15)
This quick reference guide consists of a list detailing the machine’s
basic functions and commands.
TX Confirm (One-Touch button 16)
The Message Confirmation Report lists important in formation a bout
faxes s e nt from your machine including: th e remote site fax number, a
sample of the transmitted text, the number of pag e s faxed, the
communicatio n mode, and the communication results.
Yo u can set up your machine to print a TX Con firm report :
Automatically after each transmission (ON).
Automatically only if an error o c c urs during trans mission (ERR).
The machine can be set to print n o repo rt at all (OFF). You c an print
this report manually at any time y ou want.
1-48 Getting Started
Page 61

Print the 480cx User Guide
Schedule Job (One-Touch button 17)
The Schedule Infor matio n List provides information abo ut docume nts
cur rentl y stor ed for Dela yed Tr ansmissi on, Prior i t y T ransmission,
Memory Transmission, Contin uo us Polling, and TX Polling. The list
shows the star ting time, type of operation, etc.
Phone Book (One-Tou ch button 18)
This Telephone Numbers List indicates all of the numbers currently
stored in machine memory as One-Touch Dial numbers, Speed Dial
numbers , and Group Dial numbers.
Sys tem List (One-Touch button 19)
T his Syst em Data L ist indicates the status o f the user -s electab le op tio ns.
See User Options (System Data) on page 1-51. After changing any
setting, print this list to confir m your ch ang es.
1
System Setup 1-49
Page 62

To Pr int Rep or ts
Print the 480cx User Guide
1
2
Press the
Press the
Menu
button.
One-T ouch
button corresponding to the desired report on the
one-t ouch ke ypad. Re fe r to the t abl e below:
One-Touch
Button #
14
15
16
17
18
19
Button Label Report/List Name
Journal Transmission or Reception Journal
Help List Help List
TX Confi rm Mes s age C onfi rma tion Report
Schedule Job Schedule Information List
Phone Book Tel ephone Numbers Lis t
System List System Data List
The selected list will be pr inted out.
Other Reports
Multi-Communication Report
This report is printed automatically after sending to or receiving from
more than one lo c ation and provides detailed information a bout the
operation.
Note: Any report which is configured to print automatic ally will no t print if
your machine runs out of ink or paper, has a paper jam, or is printing a file
sent from a PC.
1-50 Getting Started
Page 63

User Options (System Data)
Print the 480cx User Guide
Your mach ine has va rious use r-selectable featu res. T hese option s are pr eset
at the factory, but you may need to change them. To find out how the
options are currently set, print the Syste m List. For more informati on on
printing the list, see To Pri n t Repor ts on pa ge 1-50.
Setting an Opt i on
1
Press the Menu button.
2
Press the System Da ta b utto n on the One-Tou ch ke ypad.
Th e dis play s hows t he first option menu.
3
Scroll through the options by pressin g the Down or Up buttons
repeatedly.
4
When the op tion you want appears in the display, ente r the number f or
the desired setting.
Or
Yo u can use Right or Left buttons to select the desired setting.
5
Press the Enter butt on to store your cho ice in me mory .
You can exit fr om s etup mode at any time by pres sing the Stop button.
When you press the Stop button, the machine stores the options you
changed and returns to the Standby mode.
1
System Setup 1-51
Page 64

Sel ect abl e Options
Print the 480cx User Guide
These instructions assu me you’v e followed the steps listed in the pre vious
procedure, Setting an Option, and the machine is prompting you to change
one of the options listed be low .
All of thes e options are menu settin gs accessed by the On e-T ouch b ut ton 01,
System Data .
PAPER SIZE - Select the pape r size you will be pr inting o n.
Press 1 for l etter (LTR), 2 for A4 si ze, or 3 to use leg a l (LGL ) size
paper.
MESSA G E CON F. - A mes s a ge c on fi r m at i o n re po rt s h owing
transmission informa tion; whether the tra nsmission was suc cessf ul,
how many pa ges w ere s ent, etc.
Press 1 to print a confirmation report auto matically each time you send
a fax (ON) .
Press 2 to turn this feature off (OFF).
Press 3 to print only when an error occurs and the tra nsmission was n ot
succe ssful (ERR).
AUTO JOURNA L - The journal is a report providing detailed
information about the previous 40 com munica tion operations including
times and d ates.
Press 1 to print the journal a utomatically af ter ev ery 40 trans missions or
receptions (ON).
Press 2 to disable automatic printing o f the Journa l (OFF). Yo u can still
print Journal reports manually at any time. See T o Print R eports on
page 1-50.
1-52 Getting Started
Page 65

Print the 480cx User Guide
REMOTE RCV CODE - The remote receive start code allows you to
initiate fax reception from an extension pho ne plugged into the EXT
jack on th e back of the m achine. If you pick up the ext ension ph one a nd
hear f ax to nes, enter the Remote Code and the machine will star t
receiving. Th e Remo te C ode is pres et to *9* at factory. You may
change the Remote Code by selecting any number fro m 0 to 9 on the
numeric keypad.
DIAL MODE - Select the type of dial system your fax machine is
connected to:
Press 1 if the fax machine is connected to a tone (Touch Tone) dial line.
Press 2 if the fax machine is connected to a pulse (Rotary) dial line.
ECM MO DE (Error C orrect ion Mod e) - This mode comp ensa tes for
poor line quality and ensures accu rate, error-free communication with
any other ECM-equipped facsimile machine. If the line quality is poor,
transmission time may be increased when ECM is enabled.
Press 1 to turn the Error Correction mode on.
Press 2 to turn the Error Correction mode off.
RX REDUCTION - When receiving a document as long as or longer
than the paper installed in your machine, the machine can reduce the
data in the d ocu men t to fit the p aper size in th e machine . Use this
feature if you want to automatically reduce an incoming page (that
woul d ot h e rw ise b e divide d i nt o two pa g e s ) to fi t on a si ng l e page . If the
fax ma c hine cannot reduce the data to fit into one page with this featu re
enabled, the da t a is divided a nd pri nted in act ual s i ze on two or more
sh eets.
1
There are two R X Redu ction modes avai lable, On and Vertical Only.
Press 1 to turn the RX reduction feature on. Note that this feature doe s
not apply t o the copy mode .
System Setup 1-53
Page 66

This will reduce incoming pages equally along both axes in order to
Print the 480cx User Guide
maintain the proporti onalit y of the original image, as shown b e low.
Original
Received Data
Press 2 to turn off RX Red uctio n.
Press 3 to enable vertica l only RX Reductio n. The machine will red uce
an inco ming page con tainin g ov erf lo w d ata along the verti cal axis onl y.
The net effect will b e a vertical compression of the image as sh own
below:
Original
Received Data
1-54 Getting Started
Page 67

Print the 480cx User Guide
DI SCARD SIZE - Wh en recei ving o r copying a doc um ent as long as or
longer than the p a per installed in your fax machine, you can set the fa x
mach ine to discard an y excess image at the bottom of the page, to fit
into the recording paper size.
If the received page is outside the margin y ou set, it will be prin te d o n
two shee ts of paper at the actual size .
If the data is with in the margin, and the Auto Reduction featur e is
turned ON, it will be red uced to fit into the appropriate size paper
(Discard does not take place). If the Auto Reduction feature is turned
OFF or fails, the data within the margin will be discar ded .
Using the number keypad, enter the desired discard size (0-30 mm), and
pre ss t he Enter button to store your selection.
REDI AL INTE RVAL - Your machine can au tomati cally redial a r emote
fax ma c hine if it was busy or does not answer the first call.
En ter th e numbe r of minutes (from 1 to 15) usi ng the number keypad.
REDIALS - Enter the nu mb er of redial attempts (from 0 to 9) you wish
your machine to make.
1
Note:
If you enter 0, the machine will not redial.
ANSWER ON RINGS - Yo u can select the num ber of times your
m achine rings b efore answer ing an i ncomin g call. If you are usin g yo ur
mach ine as b oth a telephone and a fax machine, it is recommended that
you set the r ing count to at least 4 to allow you time to answer a call.
Enter the ring count by selecting a number from 1 through 7 on the
number keypad.
System Setup 1-55
Page 68

Print the 480cx User Guide
SEND FROM MEMORY - With this fe a ture e nabled, all tra nsmission
documents are automatic al ly scanned into memory, an d it will n ot b e
necessary to wait until do c ume nts in the Automatic Documen t Feeder
(ADF) are sent out before you can send or store other fax jobs.
Press 1 to tu rn this feature on.
Press 2 to turn this feature off.
LOCAL ID - Enablin g this feature causes the machine to automatically
print the page number, date, and time of the reception at the bottom of
each page of a received document.
Press 1 to turn this feature on.
Press 2 to turn this feature off.
CONT. POLL REPORT (Continuous Polling Report) - You can
configure your WorkCentre 480cx to automatically poll and retrie ve
faxes fr om unattended fax machines. This can be set u p to occur daily
at re gu lar inte rvals. By en a bling th e Continuous Polling Report, every
time continuous pollin g ends a m ulti-communication report will be
printed. The rep ort will c onta in the results for each registered station.
Press 1 to turn this feature on.
Press 2 to turn this feature off.
1-56 Getting Started
Page 69

F AXPR INT QUALITY - This feature deter mines the print q uality for
Print the 480cx User Guide
incoming faxes. The two ch oice available are Letter Quality (LQ) and
Draft. Letter Quality Faxprint will print o ut faxes at a highe r resolution
than Dra ft Faxprint Quality. However, Letter Quality Faxprint will prin t
slower and consume mor e ink.
Press 1 to choose Letter Quality printing of inco ming faxes.
Press 2 to choose Draft Quality printing of incomin g faxes.
CLOCK MODE - Use this featu re to determine how tim e is displayed
on your machine.
Press 1 to s elec t a 12 hour Clock Mode.
Press 2 to se lect a 24 hour Clock M ode.
1
System Setup 1-57
Page 70

Print the 480cx User Guide
DRPD (Distinctive Ring Pattern Detectio n) M ODE - Distinctiv e Ring is
a telephone company service which enables a user to use a single
telephone line to answer sev e ral differen t telephone numbers . The
particular number someone uses to call you is identified by different
ringing patterns, which consis t of var ious combinations of lon g an d
short ri nging sounds. Th is fe ature is often us ed by a nswering ser vic es
who answer telephones for many different clients . They need to know
which number someone is calling on to properly answer the phone.
Using the Distinctive Ring Pattern Detection featu re, your fax machin e
can "learn" the ring patt ern you designate to be answered as a fax.
Unless you change it, this ringing pattern will continue to be recognized
and answered as a fax call. All other ringing patterns will be forwarded
to the exten sio n telephon e or answering machine plugged into the EXT
jack.
Note: Before using the Distincti ve Ring Pattern Detection option,
Distinctive Ring service must be installed on your telephone line by the
tele ph one company. To se t up Disti nctive Ring Pattern De te c tion, y ou will
need anot her telephone line at your locat ion, or someone avail abl e to di al
your FAX number from outside.
1-58 Getting Started
Page 71

You can suspend or change Distinctive Ring Pattern Detection at an y
Print the 480cx User Guide
time:
Press the Menu button.
Press the System Da ta but ton on the One-Tou ch ke ypad.
Press the Up butt on once. The DRPD learn mode menu is displayed.
Press 1 to tu rn DRPD on.
Press 2 to turn DRPD off.
If you press 1 to setu p the Distinctive Ring Pattern Detectio n, the LCD
displays W A ITING RING. Call your fax number from another
telephone. It is not necessary to place the call from a fax machine.
When your machine begins to ring, d o not answer the call. The
machine requires several rings to lea r n th e pattern.
Whe n the machin e completes "learnin g, " the LC D disp lays END DR PD
SETUP .
With the DRPD feature active, DRPD app ears in th e display and the
previously set reception mode is ignored. If you turn DRP D off, the
mach ine return s to any previously set reception mode.
Note:
connect the machine to another telephone li ne.
DRPD mus t be s et up agai n i f you re-assi gn your fax num ber , or
1
After DRPD has been set up, call your fax number again to verify that the
mac hine answers w i th a fax tone, t hen have a c al l plac ed to a different
number assigned to that same line to be sure the call is forwarded to the
extension telephone or answering machi ne plugged into the EXT. jack.
System Setup 1-59
Page 72

1-60 Getting Started
Print the 480cx User Guide
Page 73

Chapter 2
y
Print the 480cx User Guide
Making a Co p
Making a Copy
Your machine is a hig h quality co pier which offers the followin g features:
Adjustable Contras t - Th e contrast settin g can be changed to obtain
the best copy q uality for documents con tainin g faint markings , dark
images , photo graphs or ot h e r ha lf tone ima g e s.
2
Multiple copies - 1 to 99 cop ies of the document can be made.
Enlarge\Reduce - Using the COPY RATE menu, you can reduce or
enlarge the size of a copied image from 25% to 200% in incremen ts of
1%.
Collation - When the COPY COL LA TE men u o ption is set to ON, the
mach ine sorts the copy job. For example, if you print two copies of a
three-page document, the machine prints one complete document (page
1, page 2, page 3) before printing a second copy (page 1, page 2, and
page 3).
2-1
Page 74

To make one quick copy:
Print the 480cx User Guide
Adjust the do c ume nt guid es to match the width of the document.
1
Slide the document
2
until it is grasped an d p ulled into the machine.
If necessary, press the
3
You may cho ose STANDARD, FINE, or S UPER FINE resolution.
Note: Pressing the Express butto n automatically selects Standard
res olu tio n. T his will allow th e Work Centre 480 c x to scan each pa ge into
memory in only three seconds, reducing total copy time.
Press the
4
To make copies using the Copy menu features:
Adjust the do c ume nt guid es to match the width of the document.
1
Slide the document
2
until it is grasped an d p ulled into the machine.
If necessary, press the
3
You may cho ose STANDARD, FINE, or S UPER FINE resolution.
Copy
face down
Contras t
button twice. The machine will make a copy.
face down
Contras t
into the Automatic Do cument Fe eder
butto n or the
into the Automatic Do cument Fe eder
butto n or the
Resolution
Resolution
button.
button.
2-2 Making a Copy
Note: Pressing the Express butto n automatically selects Standard
res olu tio n. T his will allow th e Work Centre 480 c x to scan each pa ge into
memory in only three seconds, reducing total copy time.
Page 75

Press the
Print the 480cx User Guide
4
copies (2 to 99), enter the desired number using the Number keypad,
then press the
Th e dis play s hows t he ne xt option: the CO PY RATE menu where you
5
can manually adjust the copy image scale size settings.
The number in the right corner of the bottom line shows the current
im age percen tage. To red uce or enlarge th e im age size, en ter the percen t
value (25 to 20 0) using t he number keypad.
button to display the COPY menu. For two o r more
Copy
Down
butt on or pre s s
COPY
[01-99] <01>
COPY RATE
[25-200]% <100>
Start/Enter
.
2
Press the
Th e dis play s hows t he ne xt option: the CO PY COL LATE menu.
6
butto n to confirm your settings.
Down
C OPY C OLLATE
1:ON 2:OFF
Making a Copy 2-3
Page 76
When making m ultiple copies, there are two co lla te options: ON and
Print the 480cx User Guide
OFF.
Selecting 1:ON will make 1 co py of page 1, 2, a nd 3 in order , then
makes a se cond copy o f 1, 2, and 3 until a total of n copies has been
made.
SORT
3
2
1
Selecting 2:OFF will make n copies of pa ge one , n c opies of pa g e
3
2
1
two, an d so on. Thes e copy sets will all be stacked on top of each
other.
G ROUP
1
1
1
2
2
2
Press 1 or 2 to choose the desired collation method. Y o u can also press
the Down button to choose the default collation setting: 2.OFF. The
LC D display scrolls back and shows the firs t option: number of copies.
Press the Start/Enter button or the Copy butto n to beg in th e copy
7
operation.
Note: When setting the c opy options , press i ng the Copy bu tton will begin
th e c opy operati o n im me di at el y wi t ho ut di s playing any re ma i ni ng op ti ons.
2-4 Making a Copy
Page 77

Chapter 3
Print the 480cx User Guide
Sending a Fax
Options for Sending a Fax Using the
WorkCentre 480cx
You can send faxes with the WorkCentre 480cx in one of two ways:
By placing the do cument in the Automatic Document Feeder and
entering t he information required for faxing at the WorkCentre 480cx
Control Panel. This is called Manual Faxing.
3
For information and instructions for Manual Faxing, refer to Manual
Faxing on pa ge 3- 2.
By faxing the document directly from your computer workstation using
LaserFAX Lite, a software application included with your WorkCentre.
This is called PC Faxing.
For information and instructions for PC Faxing, refer to PC Faxing on
page 3-40.
3-1
Page 78

M an ua l Fa xing
Print the 480cx User Guide
This section provides informatio n and instruc tions for faxing a document
from the WorkCentre 480cx using the features of the Control Panel.
Preparing Documents for Faxing
You can fa x documents that are printed on standard letter, legal or A4 si ze
paper. Follow these guideli nes to prepare your documents.
Do no t a ttemp t to feed th e followin g types of documents into the
mach ine:
car bon-pap er or carb on-backed p aper
coated paper
onion skin or thin paper
wrinkled or creased paper
curl ed or r olled pa per
torn paper
Note:
If your document falls into any of the above categories, make a copy
of the document first. Use the copy for insertion into the Automatic
Document Feeder.
Remove all staples and p aper clips before feeding the d ocument.
Make sure any glue, ink or correction fluid on the paper is completel y
dr y before l oadi ng t he doc ument.
Do not load documents containing different sizes or weights of paper.
3-2 Sending a Fax
Page 79

Sending a Fax Manually
Print the 480cx User Guide
Adjust the do c ume nt guid es to match the width of the document.
1
Slide the document
2
until it is grasped an d p ulled into the machine.
document guides
Th e display alternately reads DOCUMENT READY and shows the
remaining memory capa city. Up to 30 sheets m a y be insert ed at a time.
To insert more than one sheet, ensure that the bottom sheet enters first.
Stagger the leading edge of the sh eets slightly and insert them with light
pre ssure to e nsure sm ooth feeding.
To add pag es while th e fax is sending, insert them
Automatic Document Feeder on top of t he already loaded sheets.
face down
into the Automatic Do cument Fe eder
face down
into the
3
If you are loading pages that are unusually thick or thin, feed one sheet
at a time.
If necessary, adjust the document reso lutio n and contrast. See
3
Resolution
on page 3-23 and
Contrast
on page 3-25
.
Manual Faxing 3-3
Page 80

Note: Pressing the Express butto n automatically selects Standard
Print the 480cx User Guide
res olu tio n. T his will allow th e Work Centre 480 c x to scan each pa ge into
memory in three seconds, reducing total fax tim e.
Using the Number keypad, enter the nu mber of the fax mac hine to
4
which you wish to send the document. If you make a mistake while
entering a number, move the cursor under the incorrect di git by using
the
incorrect numbers by pressing the
Right
or
buttons, and correct the number. You may also delete
Left
Delete
button.
Press the
5
display. The machine dials the number and begins to transmit the fax.
If you wish to cancel the fax, pres s the
Start /Ent e r
butto n when the number appears correctly in the
butto n two times.
Stop
Sending a Fax Using a One-Touch Number
Adjust the do c ume nt guid es to match the width of the document.
1
Slide the document
2
until it is grasped an d p ulled into the machine.
Note: Pressing the Express butto n automatically selects Standard
res olu tio n. T his will allow th e Work Centre 480 c x to scan each pa ge into
memory in three seconds, reducing total fax tim e.
Press the
3
telephone number yo u wish to call. For informatio n o n storing numbers
in memory, see
T he machin e will scan t he documen t a nd di al the num ber auto matically .
When the rem ote fa x machine ans wers, the document will be
transmitted automatically.
One-T ouch
face down
bu t ton (01 t hrough 20) to w hich you assigned the
C onfigu ring Automatic D ialing Fe atures
into the Automatic Do cument Fe eder
on page 3-16.
3-4 Sending a Fax
Page 81

Sending a Fax Using a Speed Dial Number
Print the 480cx User Guide
Adjust the do c ume nt guid es to match the width of the document.
1
Slide the document
2
until it is grasped an d p ulled into the machine.
Note:
res olu tio n. T his will allow th e Work Centre 480 c x to scan each pa ge into
memory in three seconds, reducing total fax tim e.
3
4
Note:
your most frequently used numbers with one touch of a button or a two digit
speed dial number. For information on stori ng num ber s in m em or y, see
Co nfigur ing Au tomat ic Dialin g Featu res
Pressing the Express butto n automatically selects Standard
Press the Speed button , then enter a two digit sp e e d dial locati on
number. For information on storing numbers in memory,
on page 3-19.
Press the
T he machin e will scan t he documen t a nd di al the num ber auto matically .
When the rem ote fa x machine ans wers, the document will be
transmitted automatically.
Start /Ent e r
You can store One-Touch or Speed Dial numbers so you can dial
face do wn
button to dial the number.
into the Automatic Do cument Fe eder
Speed Dialing
on pa ge 3- 16 .
3
Sending a Fax Usi ng Group Dialing
(Multi-Address Transmission)
Group D ia l in g ca n be us e d in c on j un c t ion wit h Me mo r y Tra n sm i ss i o n o r
Delaye d Tra nsmission faxing operati ons . H owe ver, bef ore you c an a ccess
the Group D i al i ng featur e , Group N um be rs mu s t be co nfi g ur e d. See
Dialing (for Multi-Address Transmission)
information .
on page 3-20 f or more
Manual Faxing 3-5
Group
Page 82

To send a fa x using the Group Dialing f ea tur e:
Print the 480cx User Guide
Adjust the do c ume nt guid es to match the width of the document.
1
Slide the document face d own into the Automatic Do cument Fe eder
2
until it is grasped an d p ulled into the machine.
Note: Pressing the Express butto n automatically selects Standard
res olu tio n. T his will allow th e Work Centre 480 c x to scan each pa ge into
memory in three seconds, reducing total fax tim e.
F ollow the procedure for the desired operation (s ee Memory
3
Tran sm i ssi on (Broadcasting) on page 3-10 or Delayed Tran smission on
page 3-12).
When you come to the step wh ere the displ ay prompts you to enter the
4
remot e fax number, enter the Group Numb er.
Note: You can use only one Group Number in a single operation.
Continue the procedure to complete the (Memory Transmission or
5
Delayed T ransm issio n) operation. Y our machine will automatically
scan the document loaded in the Automatic Document Feeder into
memory and subsequently dial each of the numbers included in the
group.
3-6 Sending a Fax
Page 83

Sending a Fax After Talking
Print the 480cx User Guide
If you have a regular phone connected to the EXT j ack on th e back of the
machine, you can send a f ax af ter speaking with a person at the re mote site.
Adjust the do c ume nt guid es to match the width of the document.
1
Slide the document face down into the Auto matic Docu men t Fe eder
2
until it is grasped an d p ulled into the machine.
Pick up the hands et o f the telepho ne connected to the EXT jack.
3
Call the remote location.
4
DIAL FAX NUMBER THEN PRESS START appears in the LCD
display.
3
Note:
occur in the proper order.
5
6
7
8
For a successful fax transmission, it is im perat ive that ste ps 5 t o 7
When finished talking, instruct the perso n at the remote location to
pre ss t he Sta rt bu tton on their fax machine. They can then hang up.
The remote fax machine will send the initial fax tones.
Wa it until you he ar the fax tone f r om the remote fax machine.
Pres s t he Star t/E nter but ton on the WorkCe ntre 480cx. The machi ne
begins to transmit.
Repl ace the handset.
Manual Faxing 3-7
Page 84

Canceling a Transmission
Print the 480cx User Guide
To cancel a fax:
Press the
1
The machine conti nues to send the fax, and the display shows a
message warning you that the machine is in u se.
Press the
2
butto n at any time du ring th e tran smiss ion.
Stop
butto n agai n to cancel the tr ansmiss ion.
Stop
Confirming a Transmission
A Messag e Conf irmation report shows wheth er the transmiss ion was
successful and how many pages were sent.
When the last page of your document has been sent successfully, the
mach ine beeps and returns to Standby mode.
To print a Message Confirma tion report:
Press the
1
Press the
2
The machine prints out a Mes sage Confirmation report.
3
butto n.
Menu
TX C onfirm
( 16) but ton on the One-Tou ch ke ypad.
3-8 Sending a Fax
Page 85

You can also configure your machine to print out a confirmation report
Print the 480cx User Guide
automatically each time a fax is sent.
To automatically print a confirmation re port:
Press the Menu butto n.
1
Press the System Da ta butt o n (0 1) on t he O ne-T ou c h key pa d .
2
Press the Down or Up buttons repeatedly until MESSAGE CON F.
3
appe ars in the d is play.
Press 1 to print a confirmation report automatically each time you
a)
se nd a fax (ON).
Or
Press 2 to tu rn this feature off ( OFF).
b)
Or
Press 3 to print only when an error occurs and the tr ansmission was
c)
not suc c essful (E RR).
If an error occurred during your fax transmissio n, an error mess age appears
in the d isplay. If you receive an error mess a ge, press Stop to clear the
message and try to send the docum ent again.
3
For a listing of error messages and t heir meanings, see LCD Display Error
Messages on page 7-8.
Manual Faxing 3-9
Page 86

Memory Transmission (Broadcasting)
Print the 480cx User Guide
With Memory Transmission (Memory TX), documents are stored in
memory and automatically sent to one or more remote statio ns. Use th is
feature to send your documents to multiple locations.
Y o u can store a max imum of ten fax num bers for a memor y transmis sion. If
you need to s end your fax to mo re than ten loca tions, you can increa se t he
number of fax locations dialed by including a Group Dial number as one of
the ten numbers.
After sending, the docu ments are automatically erased from memory.
Adjust the do c ume nt guid es to match the width of the document.
1
Slide the document face down into the Auto matic Docu men t Fe eder
2
until it is grasped an d p ulled into the machine.
If necessary, ad just the resolution an d contrast . For details , see
Resolution on page 3-23 and Contrast on pa ge 3-25.
Press the Menu butto n, then press the Memory TX button on the One-
3
Tou ch ke ypad.
Enter the telephone number of the remote mach in e. There ar e seve ral
4
methods availabl e to d o th is:
Direct entry of the telephone number using the numeric keypad.
One-Touch keypad dialing of stored telephone n umbers (see OneTouch Dialing on pa ge 3-16).
Speed Number dialing using the numeric keypad (see Speed
Dialing on page 3-19).
3-10 Sending a Fax
Page 87

Press the
Print the 480cx User Guide
5
Th e dis play prompt s you t o ent er another fa x number.
Start/Enter
button .
ANO THER
FAX NUMBER?
If you have entered the last fax number, press the
6
Or
If you want to send the d ocu men t to more than one location, press the
Start/Enter
keypad, One-Touch keypad, or two digit Speed Dial number.
The number appears in t he display.
Repeat Step 6 until y ou hav e entered the last fax number. Press the
button after enterin g the last fax number .
Stop
Th e docu ment i s s ca nned into memory. T he display show s the
7
remaining memory capacity and the number of pages. The machine
dials the first telephone number and begins sending the document.
Note:
Tr ansmiss ion op erat i on.
Only a single Group Dial number may be used per Memory
butt on and e nter another f ax numbe r usi ng the numer ic
Stop
button.
3
Manual Faxing 3-11
Page 88

Delayed Transmission
Print the 480cx User Guide
Y o u can config ure your ma chine to send a f ax a t a spec ified time. Up to 10
delayed transmission operations can be reserved in your machine.
Place the docum ent face down in the Automatic Document Feeder. If
1
desired, adjust the r esolution and contra st. For details, see Resolution on
page 3-23 and Contrast on page 3-25.
Press the Menu butto n, then press the Dela y TX button on the One-
2
Tou ch ke ypad.
Enter the telephone number of the remote machine (up to 46 digits) .
3
There are several methods available to do this:
Direct entry of the telephone number using the numeric keypad.
One-Touch keypad dialing of stored telephone n umbers (see OneTouch Dialing on pa ge 3-16).
Group an d Speed number dialing usin g the numeric keypad (see
Configuring Automatic Dia ling Features on page 3-16).
Press the Start/Enter button.
4
Th e dis play prompt s you t o ent er another fa x number.
3-12 Sending a Fax
AN OTHER
FAX NUMBER?
Page 89

If you hav e entered the last fax number setting, press th e
Print the 480cx User Guide
5
Or
If you want to send the d ocu men t to more than one location, press the
Start/Enter
keypad, One-Touch keypad, or two digit Speed Dial number.
The number appears in t he display.
Repeat Step 5 until you have entered the last fax number. Press the
button after enterin g the last fax number .
Stop
butt on and e nter another f ax numbe r usi ng the numer ic
Stop
butto n.
Note:
Tr ansmiss ion Operat i on.
6
7
O nly a singl e Group di al number may be us ed i n a Delay ed
The display prompts you to enter an ID fo r the transmiss ion. If you
want to assign a nam e to the transmiss ion , enter it using the Number
keypad. If not, proceed to Step 7.
For details on how to enter letters using the Number keypad, see
En ter ing A lph anume r ic C haract ers
Press the
upper line and p rompts you to e nter the time the fax will be sent.
Start/E nter
button. T he dis p lay sh ow s the cu rrent time on th e
CURRENT 12:30PM
START 12:30PM
on page 3-26.
3
Manual Faxing 3-13
Page 90

Using the Number keypad, enter the time the fax will be sen t. Use the
Print the 480cx User Guide
8
or
Up
earlier than the current time, the document wi ll be sent at that time on
the following day.
Note: Remember to enter the time in either twelve or twenty-four hour
clock mode format, depending upon which mode you enabled. For more
info rmation, see
button to switch between AM and PM. If yo u set a time
Down
Selectable Options
on page 1-52.
After entering the time, press the
9
T he machin e scan s th e document in to memor y , return s to St andb y mode
10
and displays a reminder that a Delayed Transmissio n is set.
Note: If you want to cancel the Delayed Transmission, see
Standby Operation
on page 3-15
Start/Enter
.
button.
Canceling a
Adding Documents To a Standby Operation
You can ad d docume nts to a Dela yed Transmission prev iously ente red into
memory.
Place the docum ent
1
necessary, adjust the resolution and contrast. For details, see
on page 3-23 and
2
Press the
Menu
face down
C on t ra st
butto n.
in the Automatic Documen t Feede r. If
Reso lutio n
on page 3-25.
3-14 Sending a Fax
Page 91

Press the
Print the 480cx User Guide
3
display prompts you to select ADD or CANCEL. Note that
already selected in the LCD display.
Add/Can cel
butt on on the One -Touc h keypa d. The LCD
OPE RATION
1.ADD 2.CANCEL
1. ADD
is
Press the
4
currently reserved in memory.
Press the
5
you want to add docume nts to, th en pres s the
The machine automatically adds th e new documents to the pages
6
already in memory , displays the number of total pages and added pages,
then r e turns to Stand by mode.
Start/Enter
Down
button to confirm. Th e dis play s hows ope rations
09:00AM DELAY TX
FAX 1
or Up buttons repeatedly until you find the operation
Start/Enter
button
Canceling a Standby Operation
Press
1
keypad. The display prompts you to select 1.ADD or 2.CANCEL.
Press 2. The display shows the o per ation s curr ently reserved in
2
memory.
Press the
3
you want to canc el.
, then press the
Menu
Down
Add/Cancel
or Up button repeatedly until you find the operation
butt on on the One -Touc h
3
.
4
Press the
Start/Enter
bu tton to cancel the job.
Manual Faxing 3-15
Page 92

Configuring Automatic Dialing Features
Print the 480cx User Guide
One-Touch Di aling
One-Touch dialing lets you use any one of the 20 One-Touch buttons
located on the left of the machine ’s con trol pan e l to au tomatically dial a
number.
Storing a Num ber f or One-Touch Dial i ng
When assi gnin g a One-T ouch numb er , pres s and hold the One-Touch
1
button (01 t hrough 20) for 2 seco nd s. The display shows TXX:, w here
"T" signifies you are assigning a On e-Touch number and "XX"
des ign ates the selec ted One-Touch butto n.
If a number is already stored in the location, the display shows the
number in th e up per line and 1:RENEW 2 :O T HER in the bo ttom line.
Press 1 to d e le te the existing number or 2 to select another One-Touch
button.
Enter the nu mber you wa nt to stor e (up to 46 digit s ) using the Number
2
keypad, then pr ess Start/Enter.
To insert a pause between numbers when dialing, press the R edial/
Pause b utton.
If you make a mistake while entering a number, use the Right o r Left
buttons to move the cu rsor under the wrong dig it, then enter the co r rect
digit, or pr ess the Delete button.
The display asks you to enter a name. Us ing the Number keypad, enter
3
the desired name (up to 20 alphanumeric character s). For information
on how to enter names, see Entering Alphanumeric Characters on page
3- 26.
Or
If you don’t want to ass ign a name, skip this step.
3-16 Sending a Fax
Page 93

Note:
Print the 480cx User Guide
display whenever you press the One-Touch button.
If you assign a name to the number, the name will appear in the
Press the
4
without entering a name.
The display prompts you to press another One-Touch button.
To assign another One-Touch number, press the desired One-Touch
5
button and repeat steps 2 throu gh this s tep.
Or
To return to St andby mode, pre s s the
Start/Enter
button whe n the name appears co rrect ly or
but ton.
Sto p
Diali ng a One-To uch Number
Press t he One-Tou ch button (0 -20) t o which you as s igned the number
1
you wish to dia l .
The number is automatically dialed. If a d ocument is loaded into the
Automatic Documen t Feeder, th e WorkCentre 48 0cx will begin
transmission of the document after the remote machine answers.
Using t he One-Touch Address Label S heet
A One-Touch label sheet is included with your machine. As you store
numbers in One-Touch dial buttons, make a note of the numbers on the
label to remind you which number is s tored in each position.
3
Configuring Automatic Dialing Features 3-17
Page 94
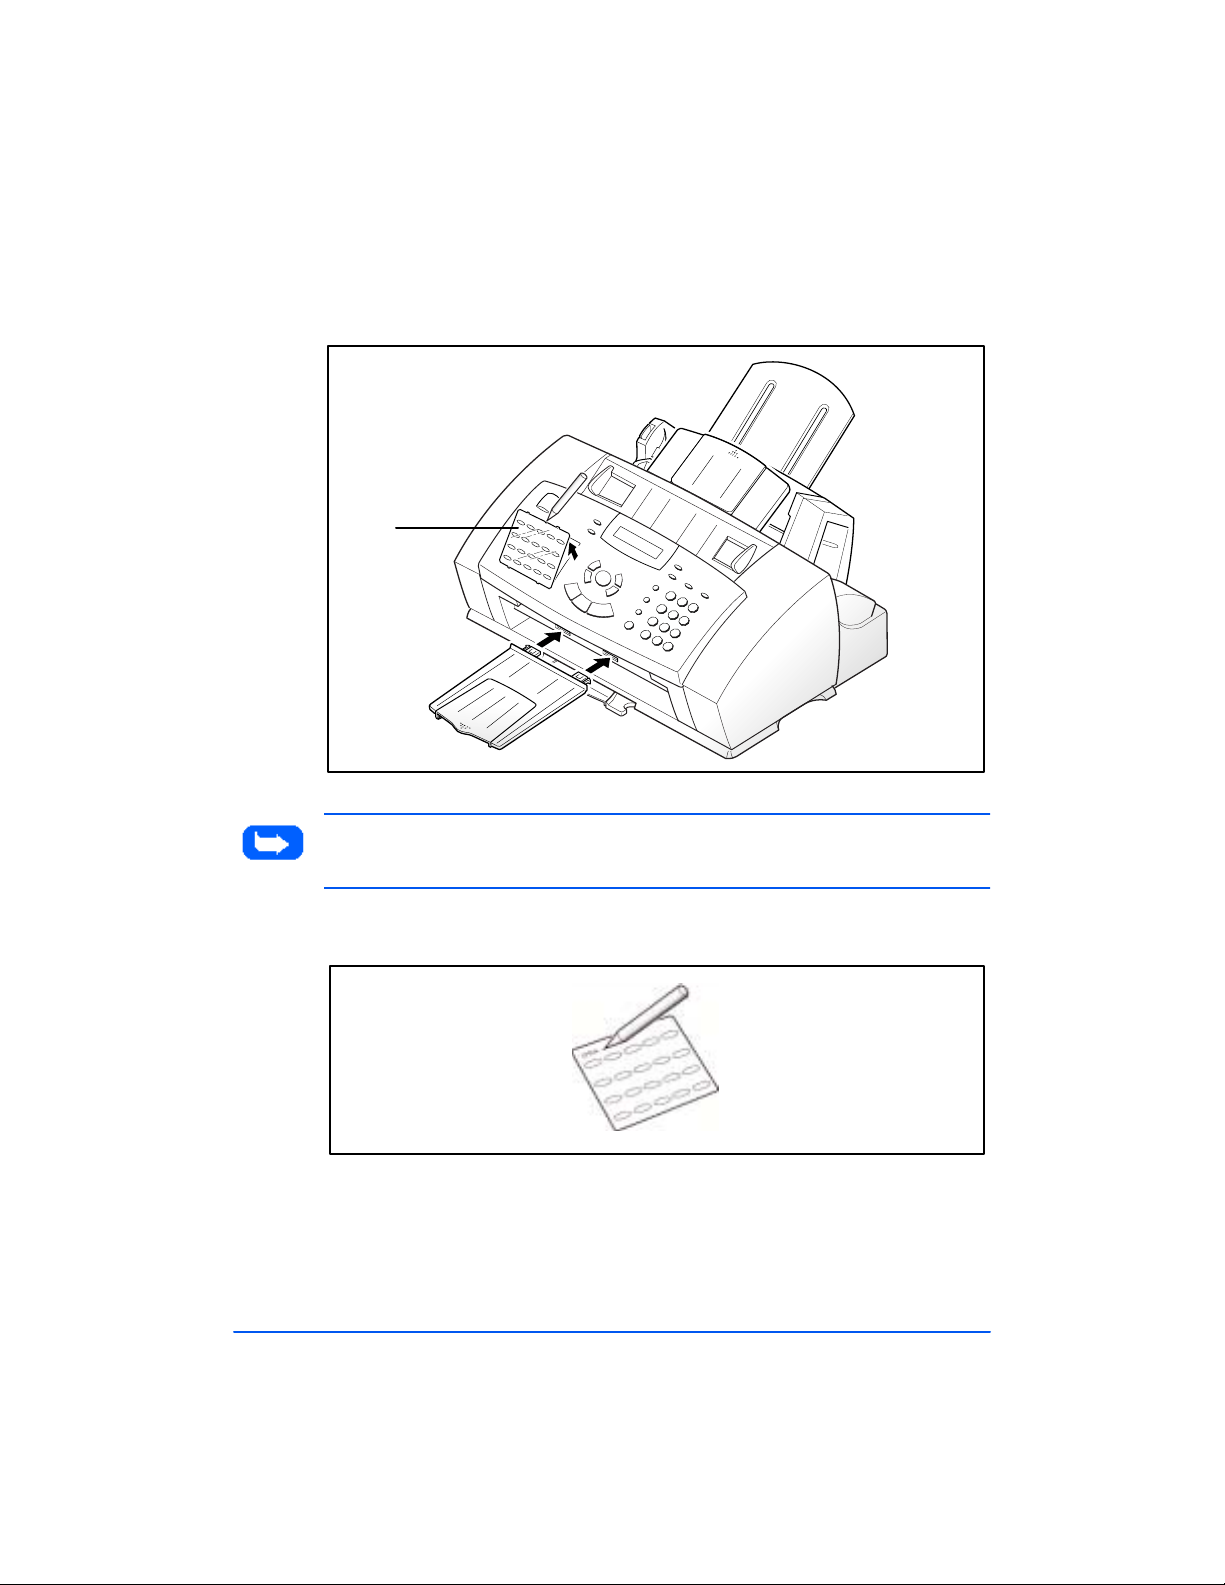
Remove the clear cover and label using a p ointed instrument, as shown
Print the 480cx User Guide
1
below.
Label
Note: You may want to write on th e label u s ing a pencil in case you wis h t o
change these numbers later.
Write in formation on the label and re-install the label and cover.
2
3-18 Sending a Fax
Page 95

Spee d Dialing
Print the 480cx User Guide
You can store up to 50 numbers in two digit Speed Dial locations (01-50).
Storing a Num ber f or Sp eed Di ali ng
You can assign up to 50 fax or telephone speed dial numbers using the two
digi t numbers 01-50 on th e Nu mber keypad .
Press and hold the Speed/Dual button for 2 seconds.
1
Enter a two digit loca tion nu mber (01 through 50) to which you want to
2
store a number, then press the Sta rt/En ter button.
If a number is already stored in the location, the display shows the
number in th e up per line and 1:RENEW 2:OTHER in the bottom line.
Press 1 to delete the existing n u mber or 2 to select another speed dial
number.
Enter the telephone number you want to store, then press the Start/
3
En ter button.
To assign a name to the number, enter the desired name. For
4
information on how to enter name s, see E n t eri n g Al phanumeric
Characters on page 3-26.
3
Or
If you don’t want to ass ign a name, skip this step.
Press the Start/Enter bu tton whe n th e n ame app ears correct ly or
5
without entering a name.
To store more telephone numbers, repeat steps 2 through 5.
6
Or
To return to St andby mode, pre s s the St o p button.
Configuring Automatic Dialing Features 3-19
Page 96

Diali ng a Spe ed-Di al Number
Print the 480cx User Guide
Press the
1
number you wish to call.
Press the
2
The number is automatically dialed. If a d ocument is loaded into the
Automatic Documen t Feeder, th e WorkCentre 48 0cx will begin
transmission of the document after the remote machine answers.
button, then enter th e tw o digit number assigned to the
Speed
Start/Enter
button to dial the number.
Group Dialing (for Multi-Address Transmission)
Multiple One-To uch and speed dial numbers can be registered as a Gr ou p.
By u sing the Group number, you can s e nd a docu ment to multiple parties in
a s ingle ope ra tion. U p to ten numbers may be s t ored a s a G roup. You r
mach ine will dial the remote numbers in a stored sequence. If the number is
busy, your machin e will dial the n e xt stor ed numbe r and af ter dia ling a ll of
the stored numbers, will automatically redial any nu mbe r previously busy.
Before you can use this feature, you must coordinate and store Group
numbers.
Storing One-Touch or Sp eed Di al Numbers f or Group
Dialing
Press the
1
Tou ch ke ypad.
Menu
butto n, then press the
Group Dial
button on the O ne-
3-20 Sending a Fax
Th e LCD displ ay pr ompt s you t o s elec t a O ne-To uch N umber.
Page 97

Press the
Print the 480cx User Guide
2
Dial, then press the
Th e LCD displ ay pr ompt s you t o confirm your choice.
Press 1 to confirm your select ion or 2 to ca ncel it and choose a diff erent
3
One-Tou ch button.
The display promp ts you to press a One-Touch butto n or enter a Speed
Dial number which you wish to include in the group.
One-T ouch button
Start/Enter
GROUP NO.:T02
1.YES 2.NO
( 01 th ro ugh 20) you w ant to use f o r G ro up
button.
ENTER ONE-TOUCH
/ SPEED DIAL> ##
Press the
4
include in the group.
Or
Enter the
wish to include in the g roup is stored.
Press the
5
more destination number s in the group.
Press the
6
you want to include in the group. The display a sks you to enter a name .
One-Touc h button
two digit Speed Dial location
Start/Enter
button when you have en tered a ll the telephone numbers
Stop
assigned to the fax number you wish to
to which the fax number you
butto n. Rep eat steps 4 and this step to include
3
Configuring Automatic Dialing Features 3-21
Page 98

To assign a name to the Group, enter the desired name.
Print the 480cx User Guide
7
Or
If you don’t want to ass ign a name, skip this step.
Press the
8
another group dial number. If you want to store another group dial
number, repea t steps 2 t hrough 8.
Or
To return to St andby mode, pre s s the
Start/Enter
butt on. The display prompts you to assign
button.
Sto p
Using Group Dialing
Group Dial numbers can be used for Memory Transmission, Delayed
Transmission, or Continuous Polling operations. See
(Broadcasting)
Polling Remote Mach ines (CONT. POLL)
on page 3-10,
De l ayed Transm i ssi on
on page 4-9.
Memory T ransmission
on page 3-12, and
3-22 Sending a Fax
Page 99

Setting Document Resolution and Contrast
Print the 480cx User Guide
It is re c ommen ded that y ou fax documen ts that wer e printed with a
typewriter, felt tip pen, b lac k ink o r laser printer. Th e paper should be white
or very li ght. The document s hould be of norma l we ight; do not use
cardboard. Blue lines on a ruled pad will n ot fa x well.
When sending typical text based documents, you should not need to adjust
the resolution and the contrast. However, if y ou send do cuments with
unusua l contras t char ac t eris t ic s, i ncluding photogra phs , you can adjus t the
resolution and contra st to ensure a hig h q uality transmission.
Resolution
Press the Resolu tion button to increase sharpness and clarity. By pressing
the Resolu tion button r epeatedly after loading a document, you can choose
between ST ANDAR D, FI NE, or SUPER FINE modes .
The document types recommended for these setting s are describe d in the
table on the ne xt page.
3
Setting Document Resolution and Contrast 3-23
Page 100

Mode Recommended for...
Print the 480cx User Guide
Standard Documents wit h normal size d characters.
Fine Documents containing small characters or thin lines, or for sending
documents printed with a dot-ma trix printe r.
Super
Fine
Note: Super Fine Resolu ti on m ode i s not available if the Send F r om
Memory feature is set to ON. If Send From Mem ory is set to ON, all
document s will be stored to memory in Fine Resolution mod e.
If the WorkCentre 480cx i s set to Super Fine Resol ution mode and the
remote fax machine does not support Super Fine Resolution, the
WorkCentre 480cx will transmit using the highest resoluti on mode
supported by the remote fax machi ne.
Documents containing extre m ely fin e detail. SU PE R FI N E mo d e
works only if the remote machine also supports SU PER F INE
resolution.
3-24 Sending a Fax
 Loading...