

Page 1

The Document Company
Print this User Guide
View the Online User Guide
XEROX
WorkCentre 490cx
Color All-in-One
User Guide
Page 2

Prepared by:
Xerox Industrial Design Human Interface
Graphic Design
Jefferson Road
Henrietta
New York
©1999 by Xerox Limited. All rights reserved.
Copyright protection c laimed includes all forms and matters of
copyrightable material and inf ormati on now allo wed by sta tut ory or judi cial
law or hereinafter granted, including without limitation, material generated
from the software programs which are displa yed on the screen, such as
icons, screen displays, looks, etc.
Xerox ® and all Xerox products mentioned in this publication are registered
trademarks of the Xerox Corporation.
Windows TM is a trademark of Microsoft Corporation. Product names and
trademarks of other companies are also acknowledged.
Changes are periodical ly made to this document. Changes, technical
inaccuracies and typo graphical errors will be corrected in subse quent
editions.
This document was created on a PC using Adobe Framemaker software.
ii
Page 3

Safety Notes . . . . . . . . . . . . . . . . . . . . . . . . . . . . . . . . . . . . . . . . . . . . . . . . ix
1. Getting Started . . . . . . . . . . . . . . . . . . . . . . . . . . . . . . . . . . . . . . . .1-1
Set Up Your Machine . . . . . . . . . . . . . . . . . . . . . . . . . . . . . . . . . . . . . . . . .1-1
Unpacking . . . . . . . . . . . . . . . . . . . . . . . . . . . . . . . . . . . . . . . . . . . . . . .1-1
Control Locations and Functions . . . . . . . . . . . . . . . . . . . . . . . . . . . . . .1-2
Choosing a Location . . . . . . . . . . . . . . . . . . . . . . . . . . . . . . . . . . . . . . .1-4
Setting Up Your Machine . . . . . . . . . . . . . . . . . . . . . . . . . . . . . . . . . . .1-4
Document Input Tray . . . . . . . . . . . . . . . . . . . . . . . . . . . . . . . . . . . 1-4
Paper Exit Tray. . . . . . . . . . . . . . . . . . . . . . . . . . . . . . . . . . . . . . . . 1-5
Document Exit Tray . . . . . . . . . . . . . . . . . . . . . . . . . . . . . . . . . . . . 1-5
Telephone Line. . . . . . . . . . . . . . . . . . . . . . . . . . . . . . . . . . . . . . . . 1-6
Extension Phone . . . . . . . . . . . . . . . . . . . . . . . . . . . . . . . . . . . . . . 1-7
PC Cable . . . . . . . . . . . . . . . . . . . . . . . . . . . . . . . . . . . . . . . . . . . . 1-7
USB Cable . . . . . . . . . . . . . . . . . . . . . . . . . . . . . . . . . . . . . . . . . . . 1-9
AC Power Cord. . . . . . . . . . . . . . . . . . . . . . . . . . . . . . . . . . . . . . . 1-11
Installing Ink Cartridges . . . . . . . . . . . . . . . . . . . . . . . . . . . . . . . . . . . .1-14
Installing Ink Cartridges . . . . . . . . . . . . . . . . . . . . . . . . . . . . . . . . 1-15
Loading Paper . . . . . . . . . . . . . . . . . . . . . . . . . . . . . . . . . . . . . . . . . . .1-21
Using the Automatic Paper Feeder . . . . . . . . . . . . . . . . . . . . . . . 1-21
Loading Envelopes. . . . . . . . . . . . . . . . . . . . . . . . . . . . . . . . . . . . 1-25
Using the Manual Paper Feeder. . . . . . . . . . . . . . . . . . . . . . . . . . 1-27
Paper Guidelines . . . . . . . . . . . . . . . . . . . . . . . . . . . . . . . . . . . . . . . . . . .1-30
Paper Selection . . . . . . . . . . . . . . . . . . . . . . . . . . . . . . . . . . . . . . . . . .1-31
Paper Types . . . . . . . . . . . . . . . . . . . . . . . . . . . . . . . . . . . . . . . . . 1-31
Guidelines fo r Speci al Paper and other Media . . . . . . . . . . . . . . . . . . . .1-33
Installing Software . . . . . . . . . . . . . . . . . . . . . . . . . . . . . . . . . . . . . . . . . .1-35
System Requirements . . . . . . . . . . . . . . . . . . . . . . . . . . . . . . . . . . . . .1-35
Overview of WorkCent re 490cx Drivers . . . . . . . . . . . . . . . . . . . . . . .1-36
Software Included With the WorkCentre 490cx . . . . . . . . . . . . . . . . . .1-36
Software Installation Procedure . . . . . . . . . . . . . . . . . . . . . . . . . . . . .1-37
In Windows 95/98, Windo ws 2000, or Windows NT 4.0. . . . . . . . 1-37
Uninstalling Software . . . . . . . . . . . . . . . . . . . . . . . . . . . . . . . . . . . . . .1-39
Using the Control Panel . . . . . . . . . . . . . . . . . . . . . . . . . . . . . . . . . . . . . .1-40
System Setup . . . . . . . . . . . . . . . . . . . . . . . . . . . . . . . . . . . . . . . . . . . . .1-44
Ringer Volume . . . . . . . . . . . . . . . . . . . . . . . . . . . . . . . . . . . . . . . . . . .1-44
Default Settings . . . . . . . . . . . . . . . . . . . . . . . . . . . . . . . . . . . . . . . . . .1-45
Arrange Alignment . . . . . . . . . . . . . . . . . . . . . . . . . . . . . . . . . . . . . . . .1-48
Clean Head . . . . . . . . . . . . . . . . . . . . . . . . . . . . . . . . . . . . . . . . . . . . .1-50
Select Language . . . . . . . . . . . . . . . . . . . . . . . . . . . . . . . . . . . . . . . . .1-51
Adjusting Speaker Volume . . . . . . . . . . . . . . . . . . . . . . . . . . . . . . . . .1-52
Setting the Clock Mode . . . . . . . . . . . . . . . . . . . . . . . . . . . . . . . . . . . .1-53
iii
Page 4

Setting the Date and Time . . . . . . . . . . . . . . . . . . . . . . . . . . . . . . . . . .1-53
Settin g the Syst e m ID (Your Nu mber and Name) . . . . . . . . . . . . . . . .1-55
Reports/Lists . . . . . . . . . . . . . . . . . . . . . . . . . . . . . . . . . . . . . . . . . . . .1-58
To Print Reports/Lists. . . . . . . . . . . . . . . . . . . . . . . . . . . . . . . . . . 1-60
User Options (System Data) . . . . . . . . . . . . . . . . . . . . . . . . . . . . . . . .1-62
Setting an Option . . . . . . . . . . . . . . . . . . . . . . . . . . . . . . . . . . . . . 1-62
Selectable Options . . . . . . . . . . . . . . . . . . . . . . . . . . . . . . . . . . . . 1-63
2. Making a Copy . . . . . . . . . . . . . . . . . . . . . . . . . . . . . . . . . . . . . . . .2-1
Making a Copy . . . . . . . . . . . . . . . . . . . . . . . . . . . . . . . . . . . . . . . . . . . . . .2-1
Changing Copy Setup . . . . . . . . . . . . . . . . . . . . . . . . . . . . . . . . . . . . . . . .2-5
Collating and Sorting . . . . . . . . . . . . . . . . . . . . . . . . . . . . . . . . . . . . . . . . .2-7
Changing the Paper Type. . . . . . . . . . . . . . . . . . . . . . . . . . . . . . . . . . . . . .2-9
3. Sending a Fax . . . . . . . . . . . . . . . . . . . . . . . . . . . . . . . . . . . . . . . . .3-1
Options for Sending a Fax Using the WorkCentre 490cx . . . . . . . . . . . . .3-1
Manual Faxing . . . . . . . . . . . . . . . . . . . . . . . . . . . . . . . . . . . . . . . . . . . . . .3-3
Preparing Documents for Faxing or Scanning . . . . . . . . . . . . . . . . . . .3-3
Sending a Fax Manually . . . . . . . . . . . . . . . . . . . . . . . . . . . . . . . . . . . .3-4
Sending a Fax Using a Speed Dial Number . . . . . . . . . . . . . . . . . . . . .3-6
Sending a Fax Using Group Dialing
(Multi-Address Transmission) . . . . . . . . . . . . . . . . . . . . . . . . . . . . . . . .3-7
Sending a Fax After Talking . . . . . . . . . . . . . . . . . . . . . . . . . . . . . . . . .3-8
Canceling a Transmission . . . . . . . . . . . . . . . . . . . . . . . . . . . . . . . . . .3-10
Confirming a Transmission . . . . . . . . . . . . . . . . . . . . . . . . . . . . . . . . .3-10
Memory Transmis sion (Broadcasting ) . . . . . . . . . . . . . . . . . . . . . . . . .3-12
Delayed Transmission . . . . . . . . . . . . . . . . . . . . . . . . . . . . . . . . . . . . .3-14
Adding Documents To a Standby Ope ration . . . . . . . . . . . . . . . . . . . .3-17
Canceling a Standby Operation . . . . . . . . . . . . . . . . . . . . . . . . . . . . .3-19
Speed Dialing . . . . . . . . . . . . . . . . . . . . . . . . . . . . . . . . . . . . . . . . . . .3-19
Storing a Number for Speed Dialing. . . . . . . . . . . . . . . . . . . . . . . 3-19
Dialing a Speed-Dial Number. . . . . . . . . . . . . . . . . . . . . . . . . . . . 3-20
Group Dialing (for Multi-Address Transmission) . . . . . . . . . . . . . . . . .3-21
Storing Speed Dial Numbers for Group Dialing . . . . . . . . . . . . . . 3-21
Setting Document Resolution and Contrast . . . . . . . . . . . . . . . . . . . . . . .3-24
Resolution . . . . . . . . . . . . . . . . . . . . . . . . . . . . . . . . . . . . . . . . . . . . . .3-25
Contrast . . . . . . . . . . . . . . . . . . . . . . . . . . . . . . . . . . . . . . . . . . . . . . . .3-27
Using the Number Keypad . . . . . . . . . . . . . . . . . . . . . . . . . . . . . . . . .3-28
Entering Alphanumeric Characters. . . . . . . . . . . . . . . . . . . . . . . . 3-29
Keypad Character Ass ignments. . . . . . . . . . . . . . . . . . . . . . . . . . 3-31
Editing Numbers or Names . . . . . . . . . . . . . . . . . . . . . . . . . . . . . 3-32
Inserting a Pause . . . . . . . . . . . . . . . . . . . . . . . . . . . . . . . . . . . . . 3-32
iv
Page 5

Redial/Pause . . . . . . . . . . . . . . . . . . . . . . . . . . . . . . . . . . . . . . . . . . . .3-33
Redial Memory . . . . . . . . . . . . . . . . . . . . . . . . . . . . . . . . . . . . . . . . . .3-33
Automatic Redial . . . . . . . . . . . . . . . . . . . . . . . . . . . . . . . . . . . . . . . . .3-34
Job Status . . . . . . . . . . . . . . . . . . . . . . . . . . . . . . . . . . . . . . . . . . . . . .3-34
On-Hook Dial . . . . . . . . . . . . . . . . . . . . . . . . . . . . . . . . . . . . . . . . . . . .3-35
Searching for a Number in Memory . . . . . . . . . . . . . . . . . . . . . . . . . .3-35
Searching Sequentially through Memory . . . . . . . . . . . . . . . . . . . 3-35
Searching by the First Letter . . . . . . . . . . . . . . . . . . . . . . . . . . . . 3-36
Tone Switching . . . . . . . . . . . . . . . . . . . . . . . . . . . . . . . . . . . . . . . . . .3-37
Priority Transmission . . . . . . . . . . . . . . . . . . . . . . . . . . . . . . . . . . . . . .3-37
Polling . . . . . . . . . . . . . . . . . . . . . . . . . . . . . . . . . . . . . . . . . . . . . . . . . . .3-39
What is Polling? . . . . . . . . . . . . . . . . . . . . . . . . . . . . . . . . . . . . . . . . . .3-39
Being Polled By a Remote Machine (POLL TX) . . . . . . . . . . . . . . . . .3-39
Adding Documents To the Job to be Polled . . . . . . . . . . . . . . . . . . . .3-42
Cancelling a Job Already in Memory Which is Waiting to be Polled . .3-43
PC Faxing . . . . . . . . . . . . . . . . . . . . . . . . . . . . . . . . . . . . . . . . . . . . . . . .3-44
What is LaserFAX Lite? . . . . . . . . . . . . . . . . . . . . . . . . . . . . . . . . . . . .3-44
LaserFAX Installation . . . . . . . . . . . . . . . . . . . . . . . . . . . . . . . . . . . . .3-45
Sending Faxes with LaserFAX Lite . . . . . . . . . . . . . . . . . . . . . . . . . . .3-46
Fax Conversion Dialog Advanced Features . . . . . . . . . . . . . . . . . . . .3-51
Cover Sheet Options . . . . . . . . . . . . . . . . . . . . . . . . . . . . . . . . . . 3-52
The Send Options Button . . . . . . . . . . . . . . . . . . . . . . . . . . . . . . . 3-53
The Attach Button. . . . . . . . . . . . . . . . . . . . . . . . . . . . . . . . . . . . . 3-54
The Keep Button. . . . . . . . . . . . . . . . . . . . . . . . . . . . . . . . . . . . . . 3-56
LaserFAX Application Features . . . . . . . . . . . . . . . . . . . . . . . . . . . . . .3-58
LaserFAX Applic ation Too lbar Fea tures. . . . . . . . . . . . . . . . . . . . 3-59
The LaserFAX Phonebook . . . . . . . . . . . . . . . . . . . . . . . . . . . . . . . . .3-62
Adding Entries to the Phonebook. . . . . . . . . . . . . . . . . . . . . . . . . 3-62
Troubleshoot ing LaserFAX . . . . . . . . . . . . . . . . . . . . . . . . . . . . . . . . .3-63
4. Receiving a Fax. . . . . . . . . . . . . . . . . . . . . . . . . . . . . . . . . . . . . . . . 4-1
Options for Receiving a Fax Using the WorkCentre 490 cx . . . . . . . . . . . .4-1
Reception Modes . . . . . . . . . . . . . . . . . . . . . . . . . . . . . . . . . . . . . . . . . . . .4-3
Determining the Reception Mode . . . . . . . . . . . . . . . . . . . . . . . . . . . . .4-4
Adjusting Ringer Volume . . . . . . . . . . . . . . . . . . . . . . . . . . . . . . . . . . . .4-5
Receiving Automatically in FAX Mode . . . . . . . . . . . . . . . . . . . . . . . . .4-5
Receiving Manually in TEL Mode . . . . . . . . . . . . . . . . . . . . . . . . . . . . .4-6
Receiving Automati cally in ANS/FAX Mode . . . . . . . . . . . . . . . . . . . . .4-7
Receiving a Fax When the Machine is Out of Paper . . . . . . . . . . . . . . .4-8
Distinctive Ring Pattern Detection (DRPD) . . . . . . . . . . . . . . . . . . . . . .4-9
Polling . . . . . . . . . . . . . . . . . . . . . . . . . . . . . . . . . . . . . . . . . . . . . . . . . . .4-10
v
Page 6

What is Polling? . . . . . . . . . . . . . . . . . . . . . . . . . . . . . . . . . . . . . . . . . .4-10
Polling Remote M a c h ines (CO NT. POLL) . . . . . . . . . . . . . . . . . . . . . .4-10
Canceling Continuous Polling . . . . . . . . . . . . . . . . . . . . . . . . . . . . . . .4-16
PC Fax Reception . . . . . . . . . . . . . . . . . . . . . . . . . . . . . . . . . . . . . . . . . .4-16
What is LaserFAX Lite? . . . . . . . . . . . . . . . . . . . . . . . . . . . . . . . . . . . .4-16
LaserFAX Lite Installation . . . . . . . . . . . . . . . . . . . . . . . . . . . . . . . . . .4-17
Receiving Faxes With the WorkCentre 490cx . . . . . . . . . . . . . . . . . . .4-18
Troubleshoot ing LaserFAX Lite . . . . . . . . . . . . . . . . . . . . . . . . . . . . . .4-20
5. Printing . . . . . . . . . . . . . . . . . . . . . . . . . . . . . . . . . . . . . . . . . . . . . . 5-1
Printing a Document . . . . . . . . . . . . . . . . . . . . . . . . . . . . . . . . . . . . . . . . .5-1
Printer Settings . . . . . . . . . . . . . . . . . . . . . . . . . . . . . . . . . . . . . . . . . . . . .5-2
Windows 95/98 Printer Settings . . . . . . . . . . . . . . . . . . . . . . . . . . . . . .5-4
Windows NT 4.0 Printer Settings . . . . . . . . . . . . . . . . . . . . . . . . . . . . .5-9
The Xerox WorkCentre Control
Program . . . . . . . . . . . . . . . . . . . . . . . . . . . . . . . . . . . . . . . . . . . . . . . . . .5-11
Starting the WorkCentre 490cx Control Program. . . . . . . . . . . . . 5-12
Xerox WorkCentre 490cx Control Program Window . . . . . . . . . . 5-12
6. Scanning . . . . . . . . . . . . . . . . . . . . . . . . . . . . . . . . . . . . . . . . . . . . .6-1
Overview . . . . . . . . . . . . . . . . . . . . . . . . . . . . . . . . . . . . . . . . . . . . . . . . . .6-1
The WorkCentre 490cx TWAIN Scanner Program . . . . . . . . . . . . . . . .6-2
Starting the WorkCent re 490cx TWAIN Scanner Application. . . . . 6-3
The WorkCentre 490cx TWAIN Scanner Window . . . . . . . . . . . . . 6-7
WorkCentre 490cx TWA IN Scanner Help . . . . . . . . . . . . . . . . . . . 6-7
Scanner Control Tabs . . . . . . . . . . . . . . . . . . . . . . . . . . . . . . . . . . . . . .6-8
The Basic Tab . . . . . . . . . . . . . . . . . . . . . . . . . . . . . . . . . . . . . . . . 6-8
The Image Quality Tab. . . . . . . . . . . . . . . . . . . . . . . . . . . . . . . . . 6-15
The Filters Tab . . . . . . . . . . . . . . . . . . . . . . . . . . . . . . . . . . . . . . . 6-16
Preview Window . . . . . . . . . . . . . . . . . . . . . . . . . . . . . . . . . . . . . . . . .6-17
7. Troubleshooting . . . . . . . . . . . . . . . . . . . . . . . . . . . . . . . . . . . . . . . 7-1
Clearing Jams . . . . . . . . . . . . . . . . . . . . . . . . . . . . . . . . . . . . . . . . . . . . . .7-2
Docume n t J am s W h il e S e nding a Fax . . . . . . . . . . . . . . . . . . . . . . . . .7-2
Paper Jams While the Machine is Printing . . . . . . . . . . . . . . . . . . . . . .7-3
If Jammed in the Paper Feed Area at th e Rear of t he Ma chine . . . 7-3
If Paper is Jammed in the Printer Outp ut Area. . . . . . . . . . . . . . . . 7-6
If Paper is Jammed Inside the Machine . . . . . . . . . . . . . . . . . . . . . 7-7
Tips for Avoiding Paper Jams . . . . . . . . . . . . . . . . . . . . . . . . . . . . . . . .7-9
LCD Display Error Messages . . . . . . . . . . . . . . . . . . . . . . . . . . . . . . . . .7-10
Fax Problems . . . . . . . . . . . . . . . . . . . . . . . . . . . . . . . . . . . . . . . . . . . . . .7-15
Printer Problems . . . . . . . . . . . . . . . . . . . . . . . . . . . . . . . . . . . . . . . . . . .7-18
Print Quality Problems . . . . . . . . . . . . . . . . . . . . . . . . . . . . . . . . . . . . . . .7-21
vi
Page 7

Paper Feeding Problems . . . . . . . . . . . . . . . . . . . . . . . . . . . . . . . . . . . . .7-25
Scanning Problems . . . . . . . . . . . . . . . . . . . . . . . . . . . . . . . . . . . . . . . . .7-27
8. Maintenance . . . . . . . . . . . . . . . . . . . . . . . . . . . . . . . . . . . . . . . . . .8-1
Clearing Memory . . . . . . . . . . . . . . . . . . . . . . . . . . . . . . . . . . . . . . . . . . . .8-1
Cleaning the Document Scanner . . . . . . . . . . . . . . . . . . . . . . . . . . . . . . . .8-3
Managing the Ink Cartridges . . . . . . . . . . . . . . . . . . . . . . . . . . . . . . . . . . .8-8
Tips for your ink cartridges . . . . . . . . . . . . . . . . . . . . . . . . . . . . . . . 8-8
Print Cartridge Nozzle Test . . . . . . . . . . . . . . . . . . . . . . . . . . . . . . 8-9
Cleaning the Print Heads . . . . . . . . . . . . . . . . . . . . . . . . . . . . . . . . 8-9
Replacing the Ink Cartridge . . . . . . . . . . . . . . . . . . . . . . . . . . . . . 8-19
Cartridge Align me nt . . . . . . . . . . . . . . . . . . . . . . . . . . . . . . . . . . . 8-22
ADF Rubber Retard Pad Replacemen t . . . . . . . . . . . . . . . . . . . . 8-27
9. Appendix . . . . . . . . . . . . . . . . . . . . . . . . . . . . . . . . . . . . . . . . . . . . .9-1
Specifications . . . . . . . . . . . . . . . . . . . . . . . . . . . . . . . . . . . . . . . . . . . . . . .9-1
FCC Regulations . . . . . . . . . . . . . . . . . . . . . . . . . . . . . . . . . . . . . . . . . . . .9-4
Send Header Requirement s . . . . . . . . . . . . . . . . . . . . . . . . . . . . . . . . .9-4
Data Coupler Informat ion . . . . . . . . . . . . . . . . . . . . . . . . . . . . . . . . . . .9-4
Radio Frequency Emissions . . . . . . . . . . . . . . . . . . . . . . . . . . . . . . . . .9-8
Canadian Certification . . . . . . . . . . . . . . . . . . . . . . . . . . . . . . . . . . . . . .9-9
Safety and Legal Requirements
for Xerox Europe . . . . . . . . . . . . . . . . . . . . . . . . . . . . . . . . . . . . . . . . . . .9-11
The Electricit y at Work Regulation
(in England and Wales) UK ONLY . . . . . . . . . . . . . . . . . . . . . . . . . . .9-16
Electricity at Work Regulations: . . . . . . . . . . . . . . . . . . . . . . . . . . 9-16
European Product Mark ing Requirements . . . . . . . . . . . . . . . . . . . . . . . .9-21
Certification to 1999/5/EC Radio Equipment &
Telecommunic a tions Te rminal Eq u ipment Directive . . . . . . . . . . . . . .9-21
Telephone Connecti vity Guidelines . . . . . . . . . . . . . . . . . . . . . . . . . . . .9-23
The WorkCentre Teleph one Connectors . . . . . . . . . . . . . . . . . . . . . . .9-25
10. Glossary . . . . . . . . . . . . . . . . . . . . . . . . . . . . . . . . . . . . . . . . . . . .10-1
vii
Page 8

viii
Page 9

Preface
Safety Notes
Your WorkCentr e 490cx and supplies a re designed and tested to meet strict
safety requirements. Included are safety agency examination and approval
and compliance to established environmental standards. Please read the
following instructions carefully before operat ing the W orkCentre 490cx,
and refer to them as needed to ensure the continued safe operation of your
WorkCentre.
Follow
product.
Symbols U se d
Unplug
Always use materials specifically designated for this product. Use of other
materials may result in poor performance and could create a hazardous
situation.
all warnings and instructions marked on or supplied with the
: = Caution = Warning
the WorkCentre 490cx from the wall outlet before cleaning.
ix
Page 10

Do not
use aerosol cleaners. Follow the inst ructions in this User Guide for
proper cleaning methods . Never spra y anything onto or inside of the
WorkCentre 490cx.
supplies or cleaning materia ls only as directed. Keep all supplies and
Use
materials out of reach of children.
Do not
Do not
use the W orkCentre 490cx near water, in wet locations, or outdoors.
place the WorkCentre 490cx on an unstable cart, stand, or table.
The WorkCentre 490cx may fall, c ausing personal injury or seri ous damage
to the machine.
This product
is equipped with a gr ounding type plug. The plug wil l fit onl y
into a grounded power outlet. This is a safety fea ture. To avoid risk of
electric shock, contact your electrician to replace the receptacle if you are
unable to insert t he plug into the outl et . Never use an adapte r to connec t the
WorkCentre to a power source receptacle that lacks a ground connection
terminal.
The WorkCentre 490cx
should be operated from the type of power sour ce
indicated on the label. If you are not sure of the typ e of power availa ble,
consult your local power company.
Do not
allow anything to rest on the power cord. Do not locate the
WorkCentre 490cx where people will step on the cord.
x
Page 11

The power supply cord
is the disconnect device for this equipment.
Ensure that the WorkCentre 490cx is installed near an outlet and is easily
accessible.
Your machine
is equipped with an energy saving device to conserve power
when the machine is not in use. The machine may be left on continuously.
Slots and openings
in the cabinet and in the back and sides of the
WorkCentre are provided fo r ventilation. To ensure reliable operation of
the WorkCentre and to protect it from overheating, these op enings must not
be blocked or covered. The WorkCentre 490cx should never be located
near or over a radiator or heat register. The WorkCe ntr e 490cx should not
be placed in a built-in installation unless proper ventil ation is provided.
push objects of any kind into the slots of the WorkCentr e 490cx as
Never
they may touch dangerous voltage points or short out parts which could
result in a fire or electric shock.
spill liquid of any kind on the WorkCentre 490cx.
Never
remove covers or guards that require a tool for removal. There are
Never
no casual operator servic eable areas within the covers of the WorkCentre
490cx.
defeat interlock switc hes. This Machine is designed to restrict
Never
operator access to unsaf e area s. Cover s, gua rds, and interlock switches are
provided to ensure that the machine will not operate with covers opened.
xi
Page 12

Use of an extens ion co rd wi th thi s WorkCentre is no t reco mm en ded or
authorized.
direct viewing of the document lights. The lamps are bright a nd,
Avoid
while not harmful, they may cause an annoying afterimage. Always keep
the document cover closed duri ng operation and storage.
If you need additional safety information concerning the WorkCentre or
Xerox supplied materia ls, you may call Xerox at 1-800 TEAM XRX
(1-832-6979) from within the United Sates. From outside the United Sates
please contact your local Xerox Helpline.
xii
Page 13
Getting Started
Set Up Your Machine
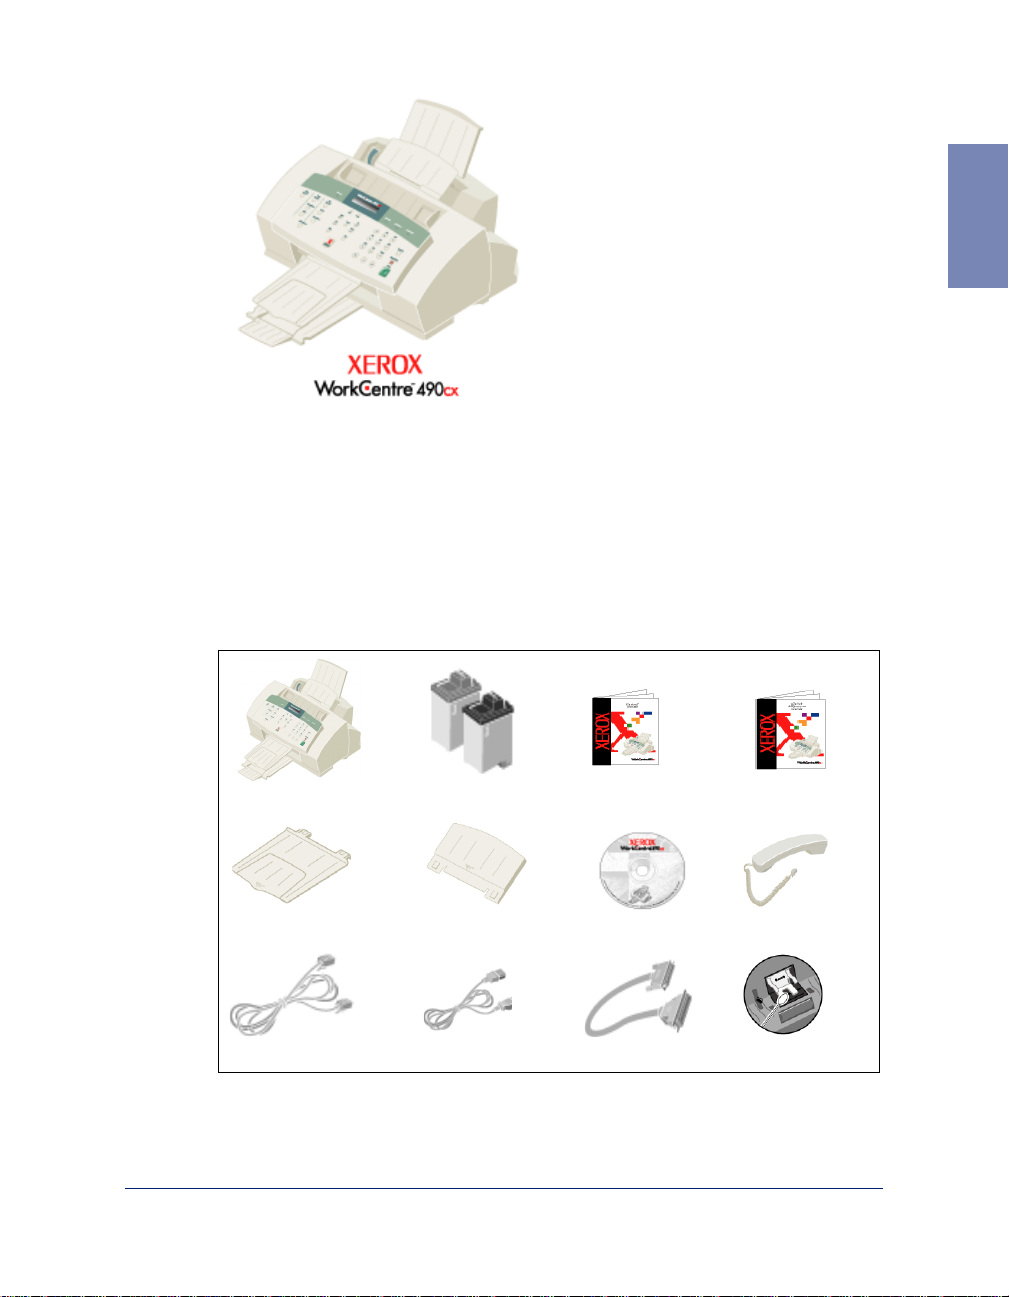
Unpacking
Chapter 1
1
WorkCentre
Document exit tray
Telephone line cord
*2
Ink Cartridges
Document Input tray
Power cord
*2
WC490cx Install
Guide
CD-ROMs
PC cable
*1
WC490cx Quick
Reference Guide
Handset
Replacement ADF
Rubber Pads
*1 Two CD ROMs containing Installer, Software and Online User Guide.
*2 May vary according to count ry.
*2
1-1
Page 14
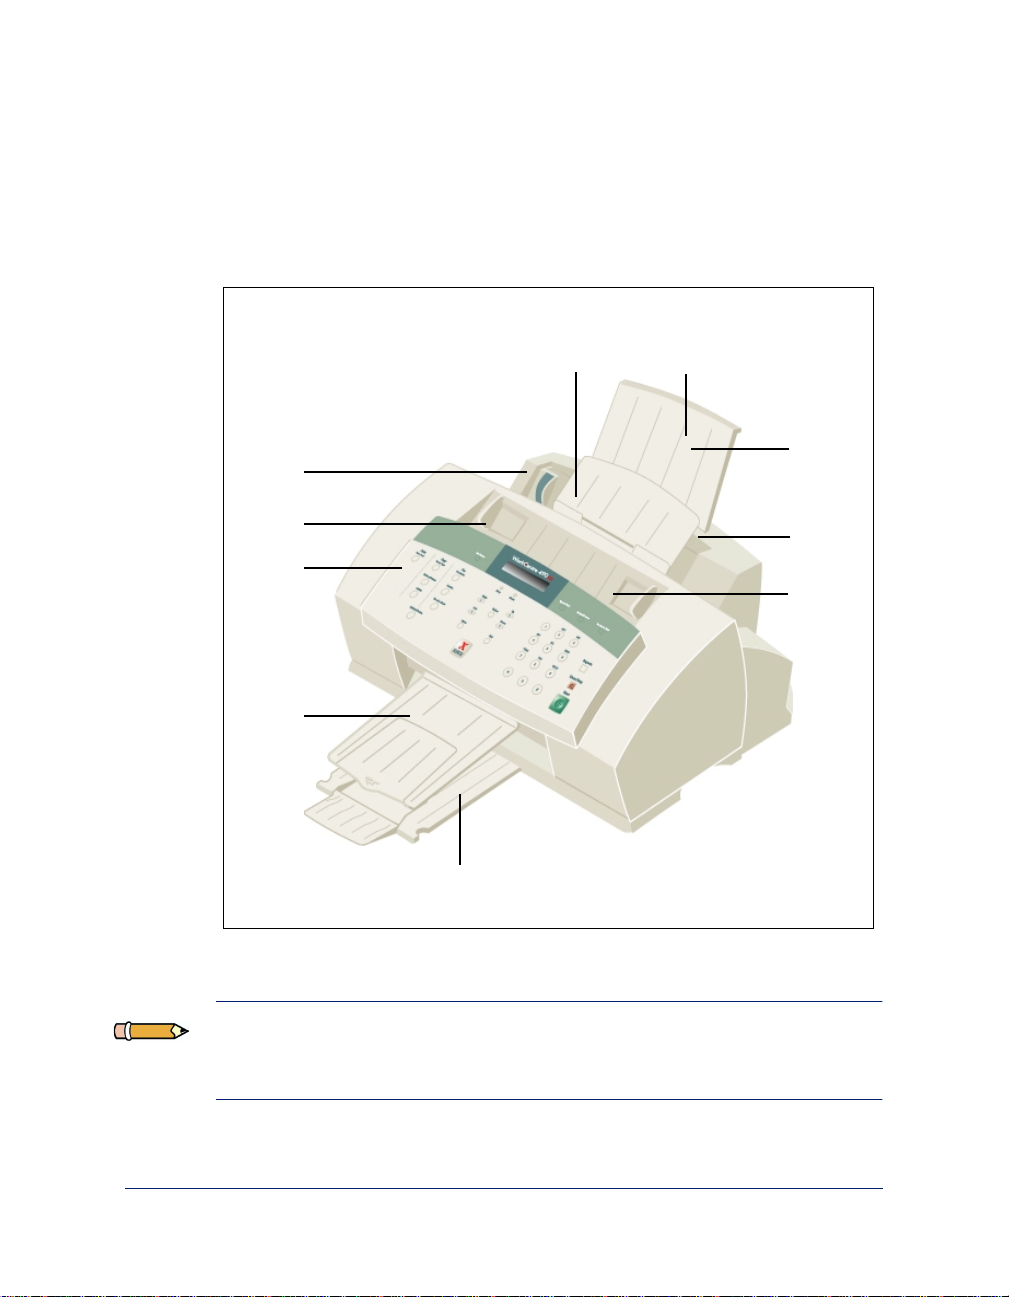
Contr ol Locations and F unctions
Take a moment to familiarize yourself with the main components and their
locations.
Front View
Paper
Guide
Document
Guide
Control
Panel
Document
Exit Tray
Paper Exit Tray
Document
Input Tray
Paper Feeder
Extension Tray
Automatic
Paper
Feeder
Envelope
Guide
Automatic
Document
Feeder
Note:
In some countries, a handset is provided. Your machine may look
slightly different than the illustration with the handset mounted on the left
side of the machine.
1-2 Getting Started
Page 15
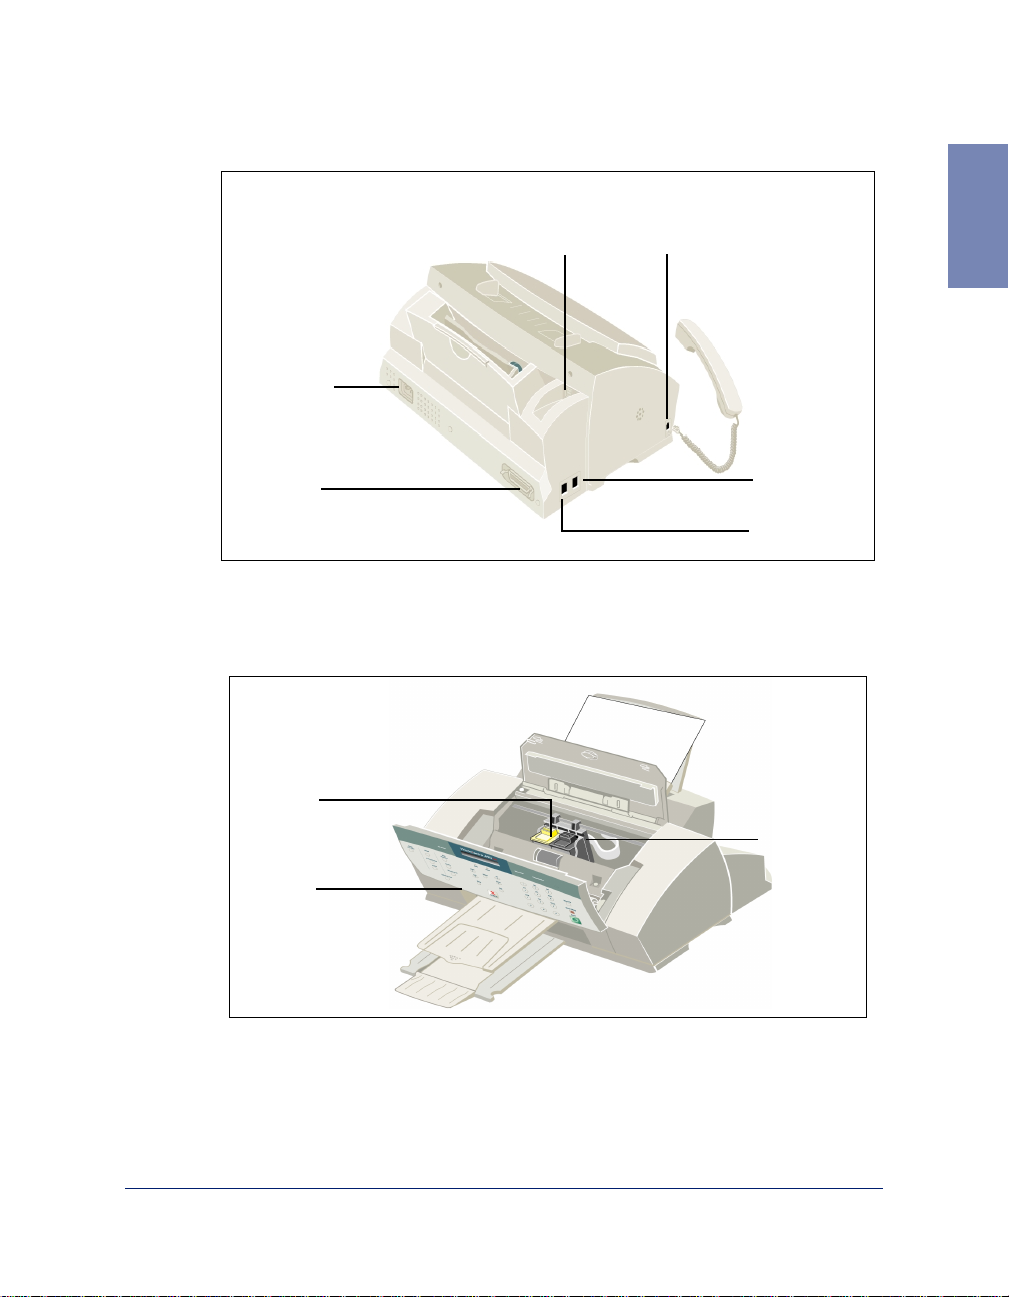
Rear View
Power Cord
Connector
USB Cable
Connector
Handset Connector (not
available in all countries)
1
PC Parallel
Cable
Connector
Inside
Color Ink
Cartridge
Control
Panel
Cover
EXT Connection
LINE
Connection
Black Ink
Cartridge
Set Up Your Machine 1-3
Page 16

Choosing a Location
T o help guarantee trou ble-free operation of your machine, place it on a flat,
stable surf ace near your workstation. Leave enough space to allow for easy
paper loading, paper unloading, and opening of the front cover.
Do not place your machine:
• In direct sunlight.
• Near heat sources or air conditioners.
• In dusty or dirty environments.
Setting Up Your Machine
Document Input Tray
Insert the two tabs on the tray into the slots as shown. Fold out the
extension tray, if necessary.
1-4 Getting Started
Page 17

Paper Exit Tray
Slide the Paper Exit Tray out from the base of the machine. If desired, fold
out the extension tray.
Document Exit Tray
Insert the two tabs on the document exit tray into the slots on the front of
your machine. Fold out the extension tray, if necessary.
1
Set Up Your Machine 1-5
Page 18
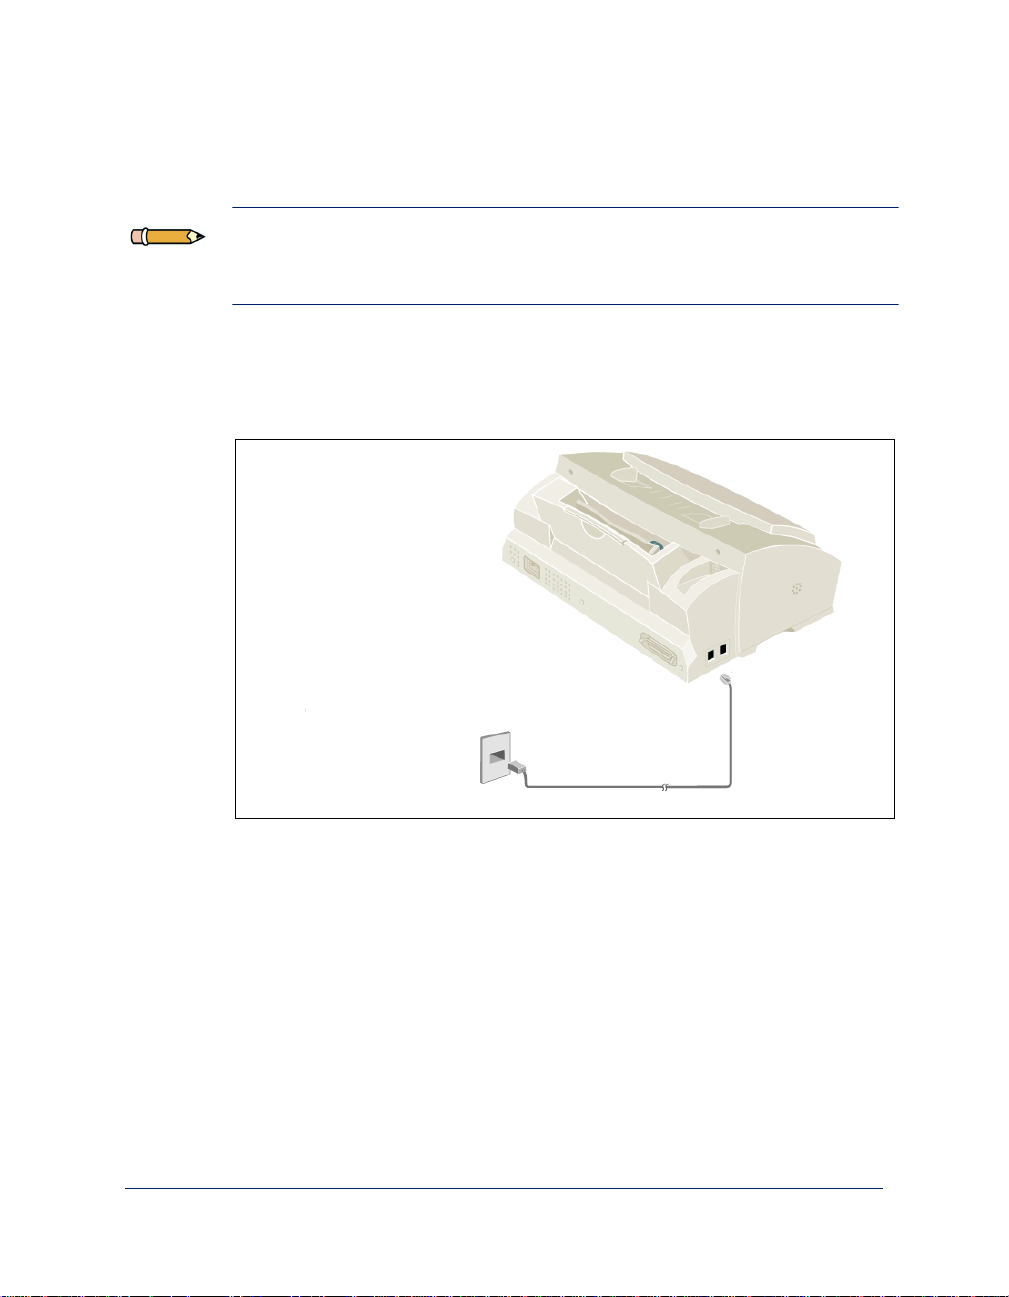
Telephone Line
Note:
the WorkCentre 490cx. Refer to
There are many possible ways to connect telephone accessories to
Telephone Connectivity Guidelines
on
page 9-23 for more details.
Plug one end of the telephone line cord into the TEL LINE jack and the
other end into a standard phone wall jack.
To a standard
telephone wall
jack ( will var y
according to
country).
1-6 Getting Started
Page 19
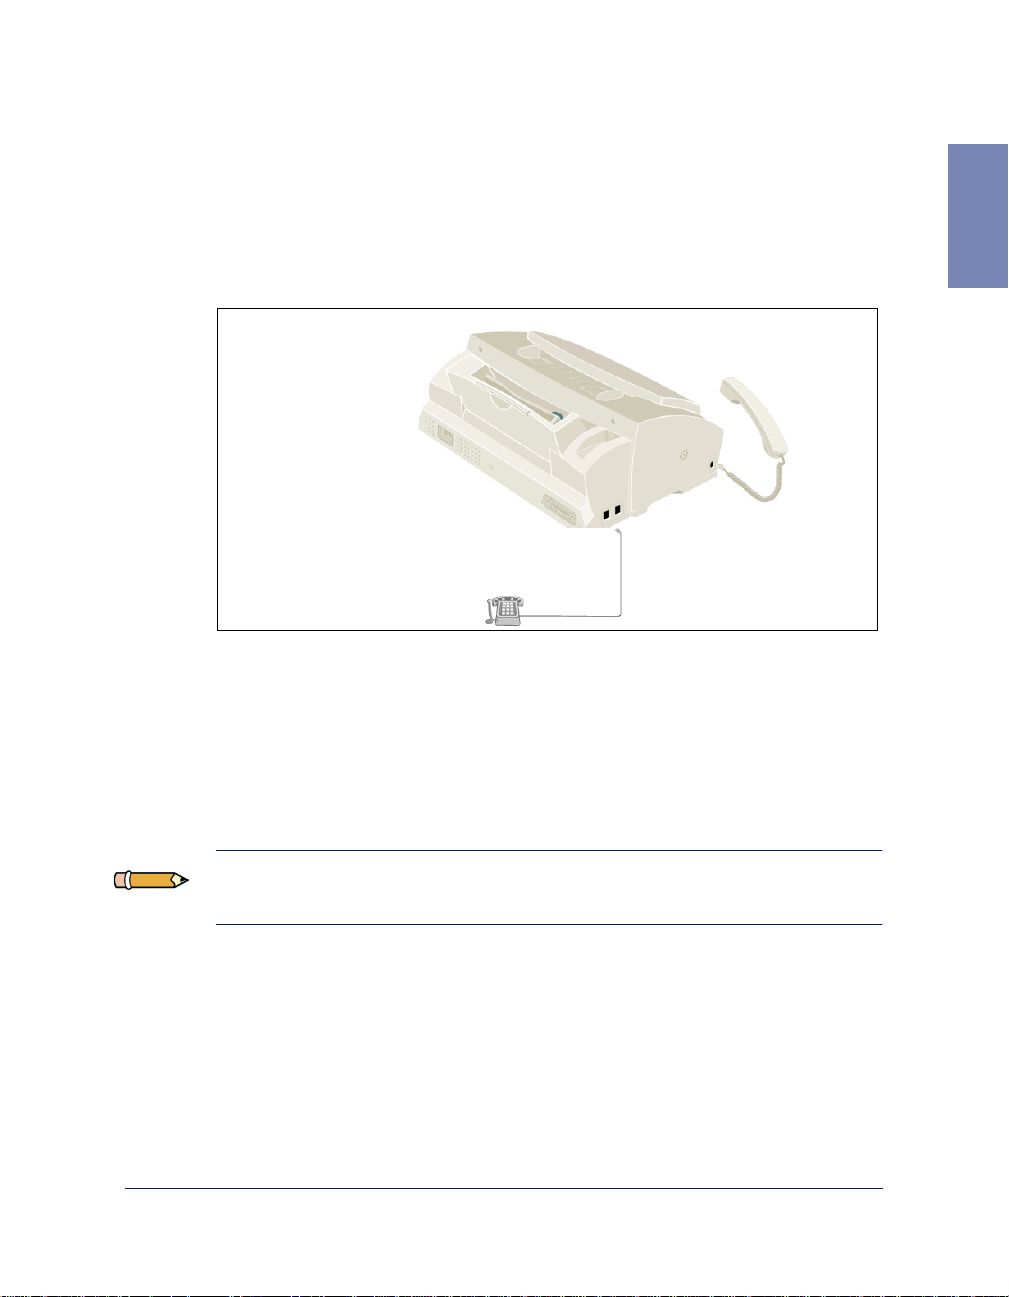
Extension Phone
If you want to use a standard phone or answering machine with your
WorkCentre 490cx, connect it to the jack labeled EXT on the side of the
machine.
To a
telephone or
answering
machine
PC Cabl e
Your Xerox WorkCentre 490cx is equipped with a parallel interface port for
use with IBM PCs and compatible computers. Using the supplie d
Centronics paralle l cable , connect your WorkCentre 490cx to a computer
that supports bi-directional communications (IEEE standard 1284).
1
Note:
meets IEEE standard 1284 specifications and is not longer than twelve feet.
If using another parallel cable, ensure that it is bi-directional and
Set Up Your Machine 1-7
Page 20
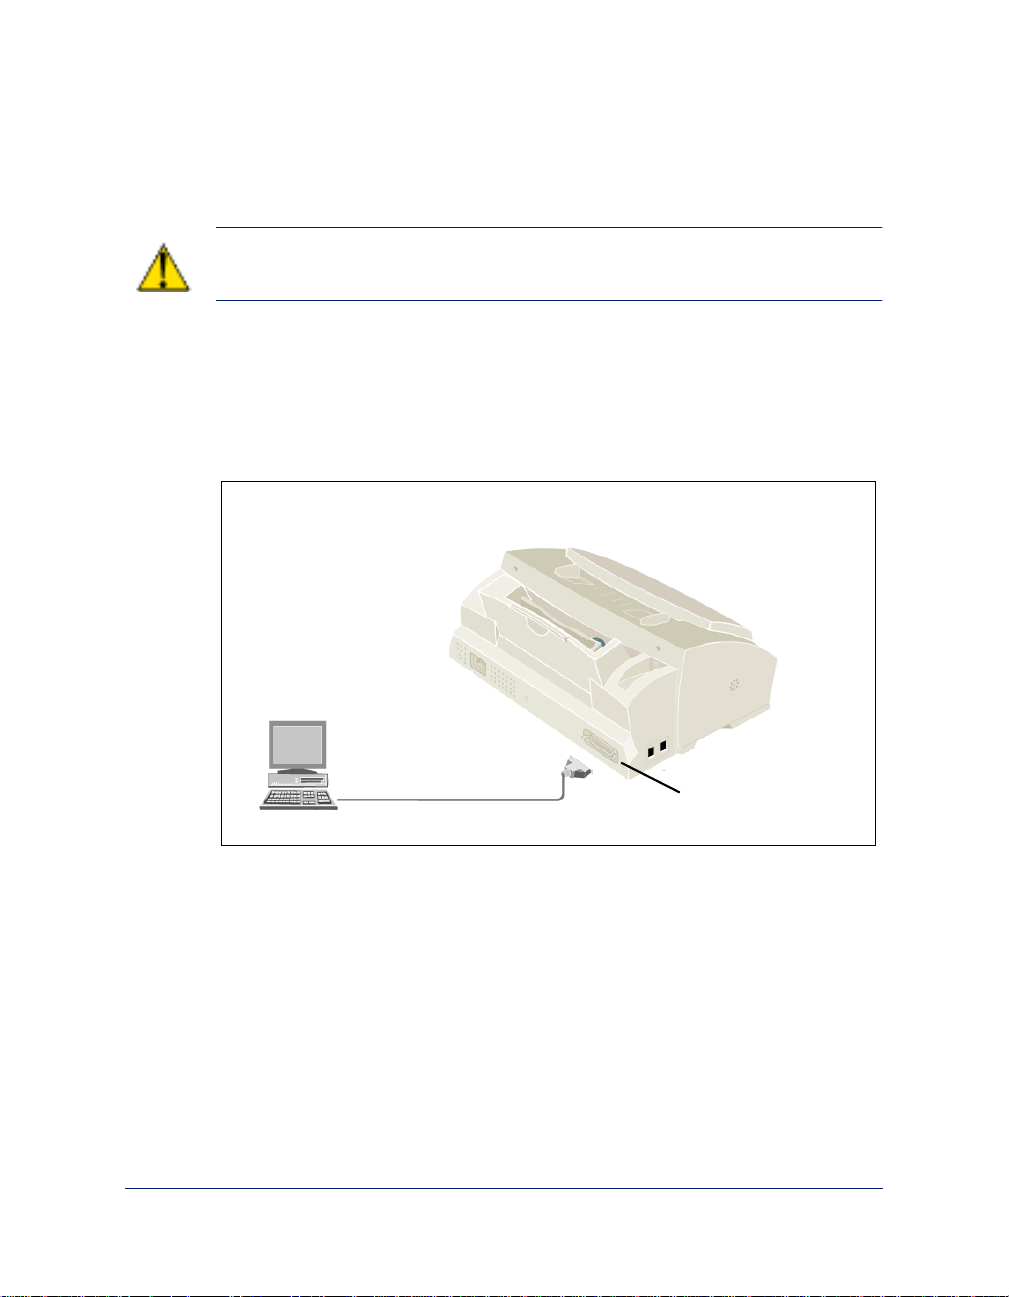
T o connect the WorkCentre 490cx to a computer using a parallel cabl e, follow t h e steps bel ow:
CAUTION:
490cx is unplugged from the power outlet.
1
Plug the parallel cable into the con nector on the back of the
Make sure the computer is turned off, and the WorkCentre
WorkCentre 490cx. Swing the metal clips of the connector inward until
they lock firmly inside the notc hes on the parallel cable connector.
Close Cable
Connector
Locking Clips
2
Connect the other end of the cabl e to the pa rallel port on yo ur compute r.
Refer to your computer documentation for assistance with this
procedure.
1-8 Getting Started
Page 21
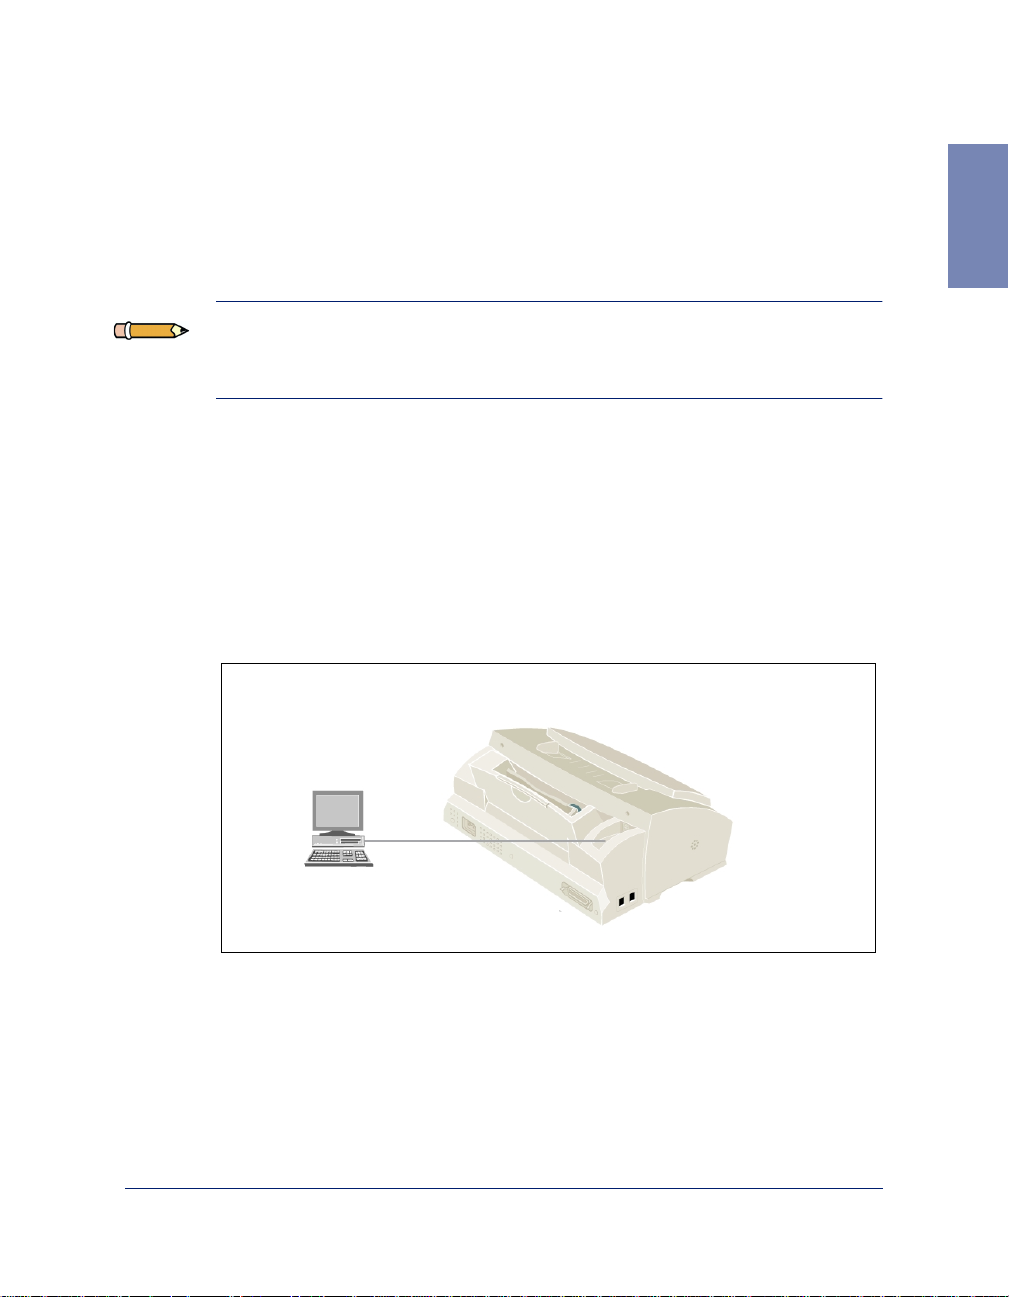
USB Cable
Your Xerox WorkCentre is equipped with a USB interface port, that can be
used if you are running W indows 98/2000 or Windows NT4.0. However,
the USB cable is not provided with the machine.
Note:
computer and the 490cx must be powered on before connecting the USB
cable to the computer.
To connect the WorkCentre 490cx to a computer using the USB cabl e, follow t h e steps bel ow:
1
2
If using a USB cable, the parallel cable is not used. In addition, the
Turn on the computer and the 490cx and allow them to power up.
Plug the rectangle end of the USB cable into the connector on the back
of the WorkCentre 490cx.
1
3
Connect the other end of the USB ca ble to on e of t he USB ports on y our
computer. Refer to your computer documentation for assistance with
this procedure.
Set Up Your Machine 1-9
Page 22
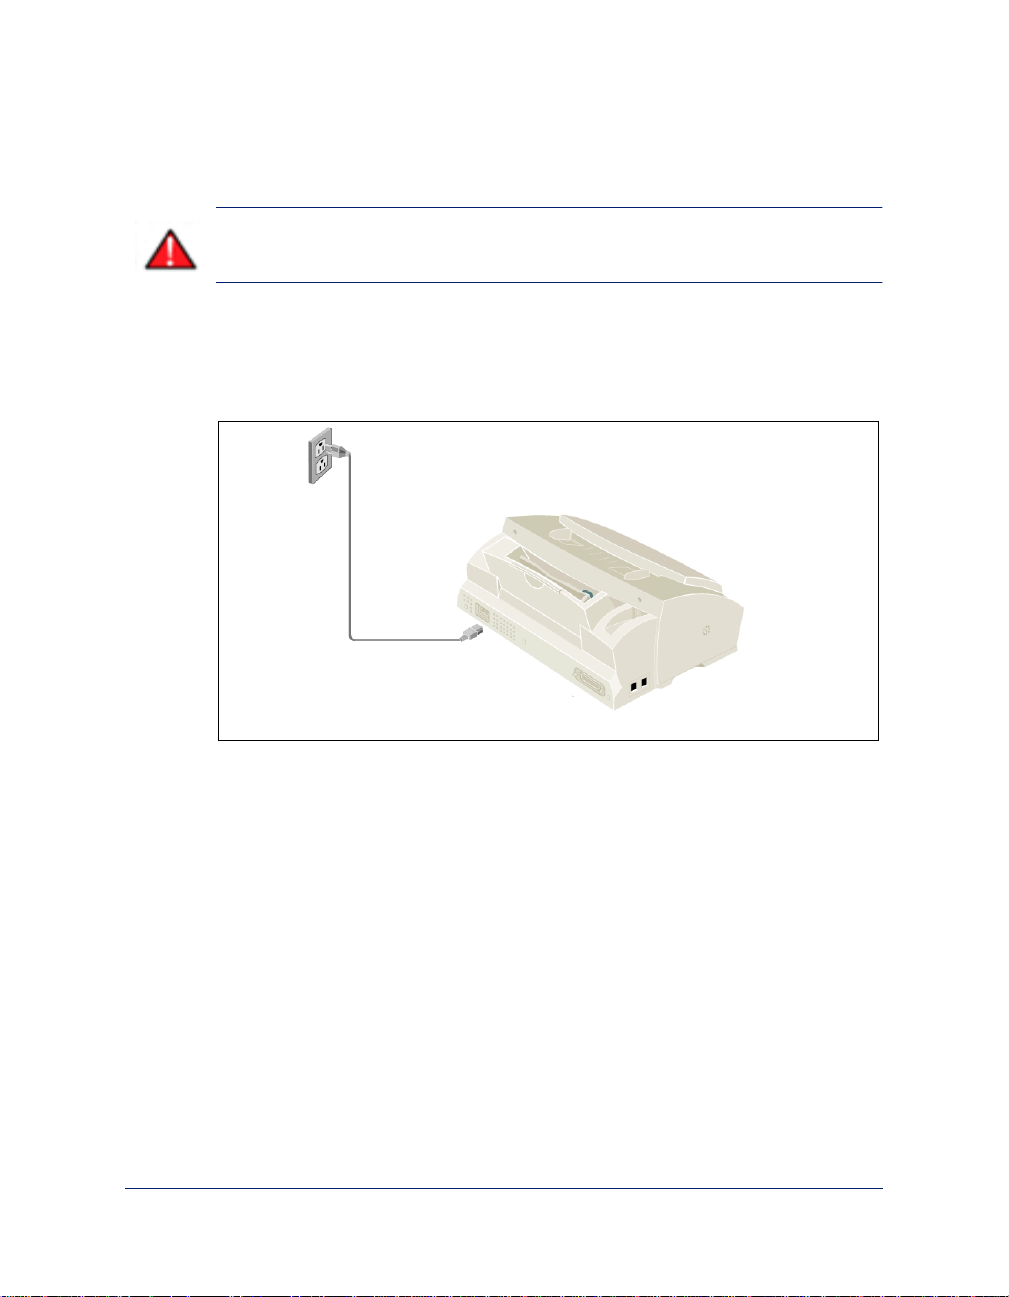
AC Powe r Cor d
WARNING:
the AC power cord is plugged in, the machine is fully energized.
1
Plug one end of t he AC power co rd into t he back of t he machine and the
There is NO On/Off switch for the WorkCentre 490cx. When
other end into a grounded AC power outlet.
To AC outlet
1-10 Getting Started
Page 23
2
The machine turns on and performs a self diagnosti c test. POWERING
UP PLEASE WAIT appears on the LCD display.
If you are setting up the mach ine for the first time, or if the machine has
not been operated for an extended period of time, SET DATE AND
TIME, and PRESS START will appear on the LCD display.
.
SET DA TE AND TIME
PRESS START
1
Set Up Your Machine 1-11
Page 24

3
Press the
character of the date in the LC D display.
4
Enter the date and time using the Number Keypad. If you need
assistance entering characters using the Number keypad, refer to
Entering Alphanumeri c Characters
5
Press the
The WorkCentre 490cx returns to standby mode. If there are no ink
cartridges installed, ALL CART. EMPTY appears in the top line of the
display.
Start
Start
button. A flashing cursor will appear on the first
on page 3-29.
button to confirm your settings.
Note:
machine w ill au t omatically a ccep t w h atever date a nd tim e a r e di sp la y ed on
power up. It will then go into standby mode.
Note:
applied at all times if the machine is used as an unattended fax machine.
If you do not set the date and time, after a short period of time the
To power off the machine, unplug the power cord. Power must be
1-12 Getting Started
Page 25

Installing Ink Cartridges
Your machine is a dual cartridge Inkjet printer. You must use a black and a
color ink cartri dg e. Whe n view ed from the front of the mach in e, th e Black
Ink Cartridge installs in the right Cartridge Holder while the Color In k
Cartridge installs in the left Cartridge Holder.
When installing ink cartrid ges , you must p rovide spe cific i nformat ion to the
WorkCentre 490cx about the cartridges you install. This allows the printer
to keep track of which cartridges are installed and to gauge ink cartridge
utilization . There are two methods of entering this information. You may
enter the required information directly via the WorkCentre 490cx control
panel or you can update Ink Cartridge inf ormation using the WorkCentre
490cx Printer Driver Soft ware and a PC.
The procedures in this sect ion cover Ink Cartridge Insta llation without using
the WorkCentre 490cx Printer Driver Program. To install Ink Cartridges
using the WorkCentre 490cx Printer Driver Program, refer to
WorkCentre Contr ol Program
Note:
Xerox dealer:
For the following Xerox print cartridges, please contact your nearest
- High Capacity Black Print Cartridge (8R7881)
on page 5-11.
The Xe rox
1
- Color Print Cartridge (8R12591)
Set Up Your Machine 1-13
Page 26
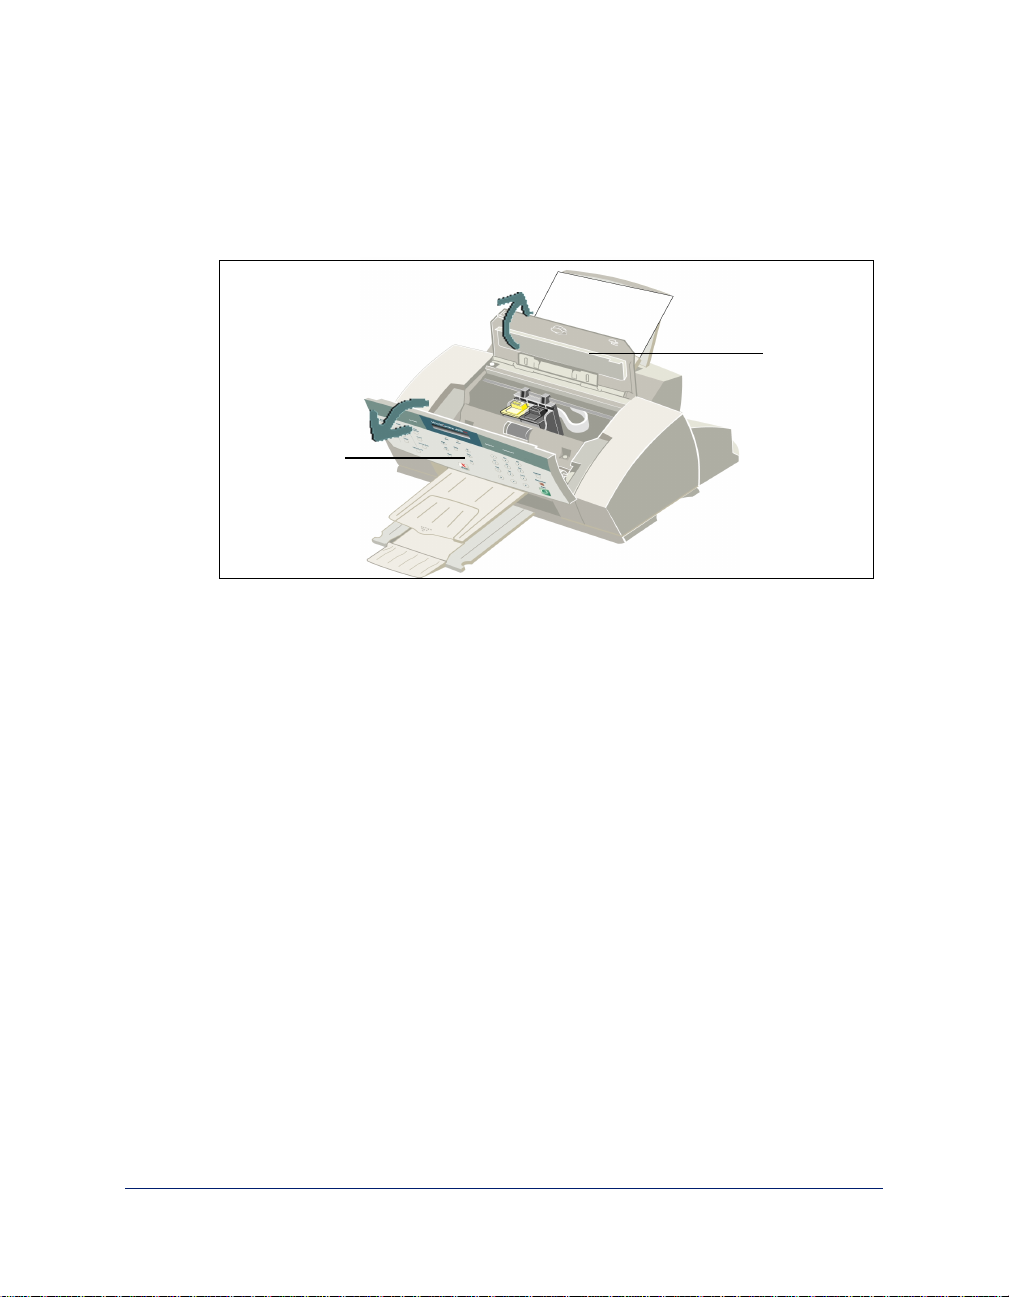
Installing Ink Cartridges
1
Lift open the Control Panel cover by pulling up on the Control Panel.
Cartridge
Compartment
Cover
Control Panel
The Cartridge Compartment Cover is now accessible.
2
Open the Cartridge Compartment Cover by lifting up on the recessed
handle. The Cartri dge Carrier Assembly move s to the ce nter o f the
machine.
1-14 Getting Started
Page 27
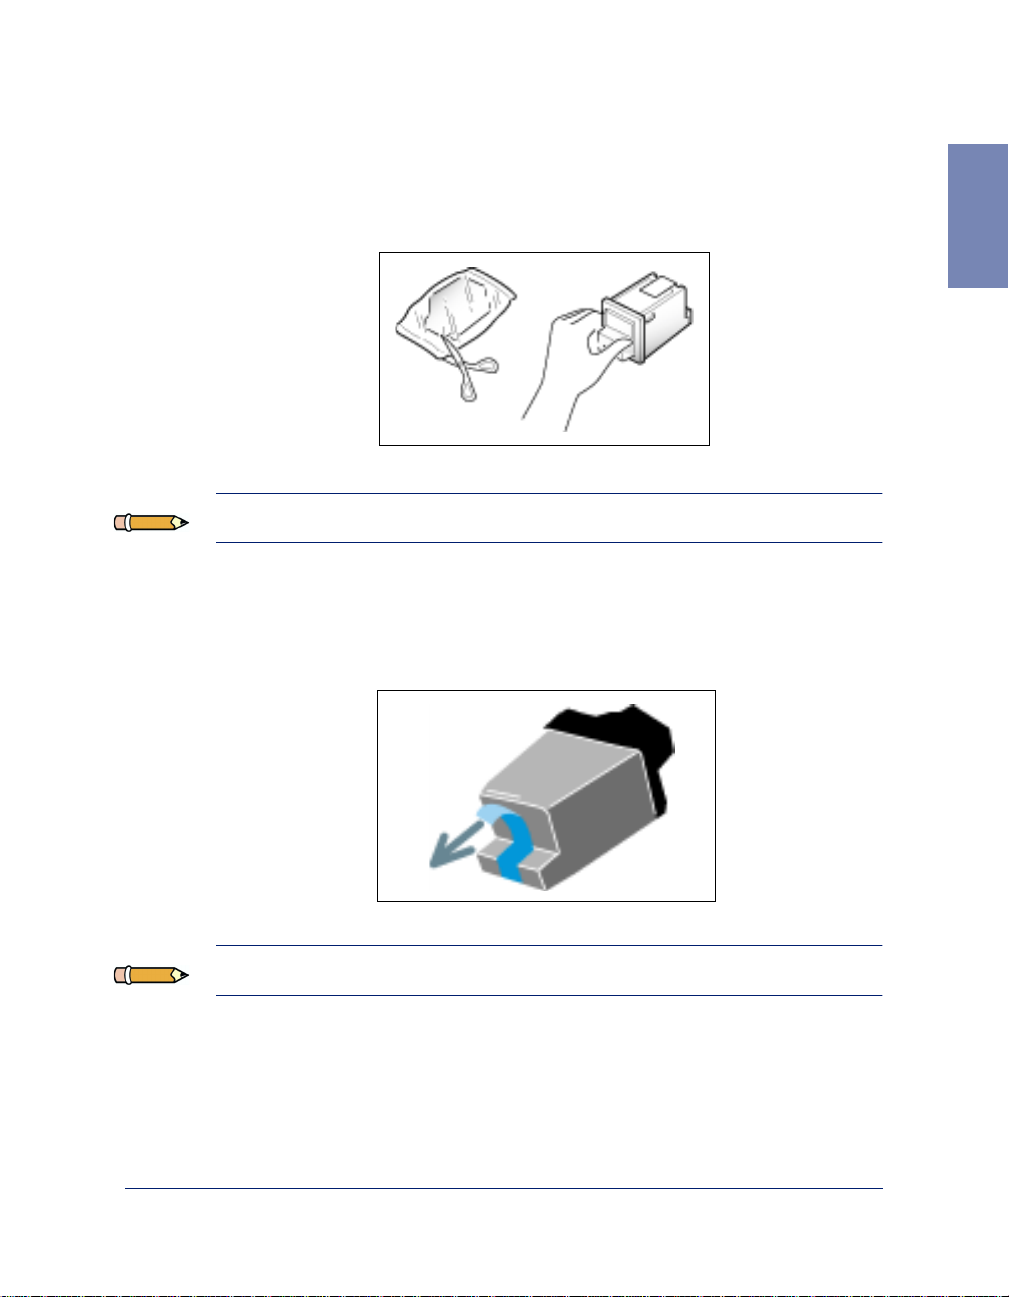
3
Unwrap and remove the Black Ink Cartridge from its packa ging. Hold the cartridge by the top only.
1
Note:
4
Note:
Avoid touching the electrical contacts on the cartridge.
Carefully remove the sealing tape by pulling straight out on the tab
located at the end of the Ink Cartridge .
Ensure that there are no pieces of tape remaining on the cartridge.
Set Up Your Machine 1-15
Page 28

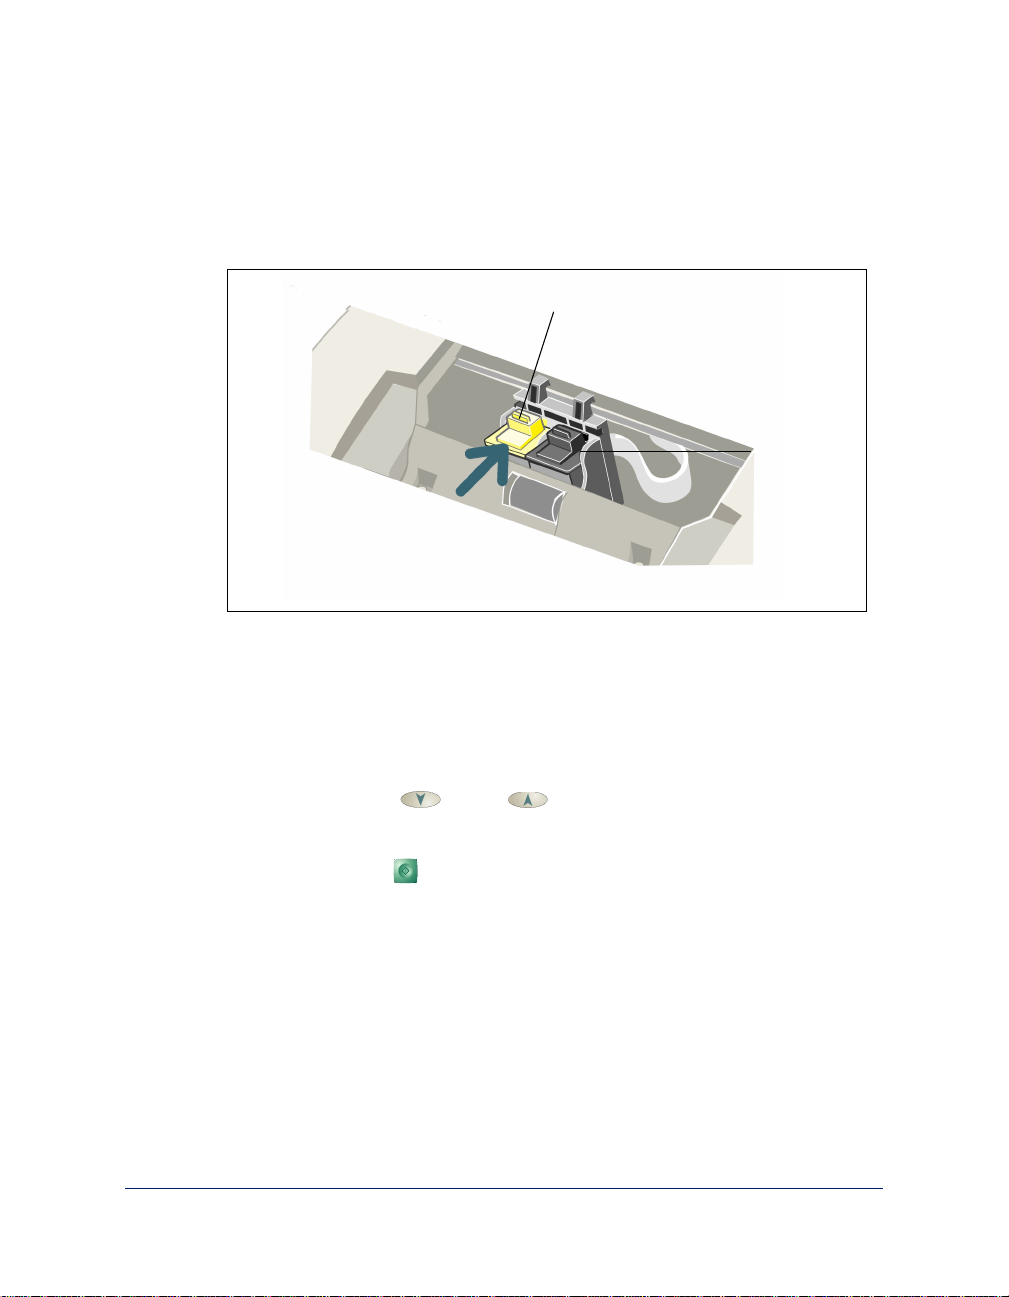
5
Locate the Bla ck Ink Cartridge holder inside the printer. The Black Ink
Cartridge holder is located on the right side of the Cartridge Carrier
Assembly and can be identified by a black key tab.
Color
Cartridge
Holder
6
Slide the Black Ink Cartridge down into the holder and push it in the
Black
Cartridge
Holder
direction of the arrow until it clicks into place.
1-16 Getting Started
Page 29
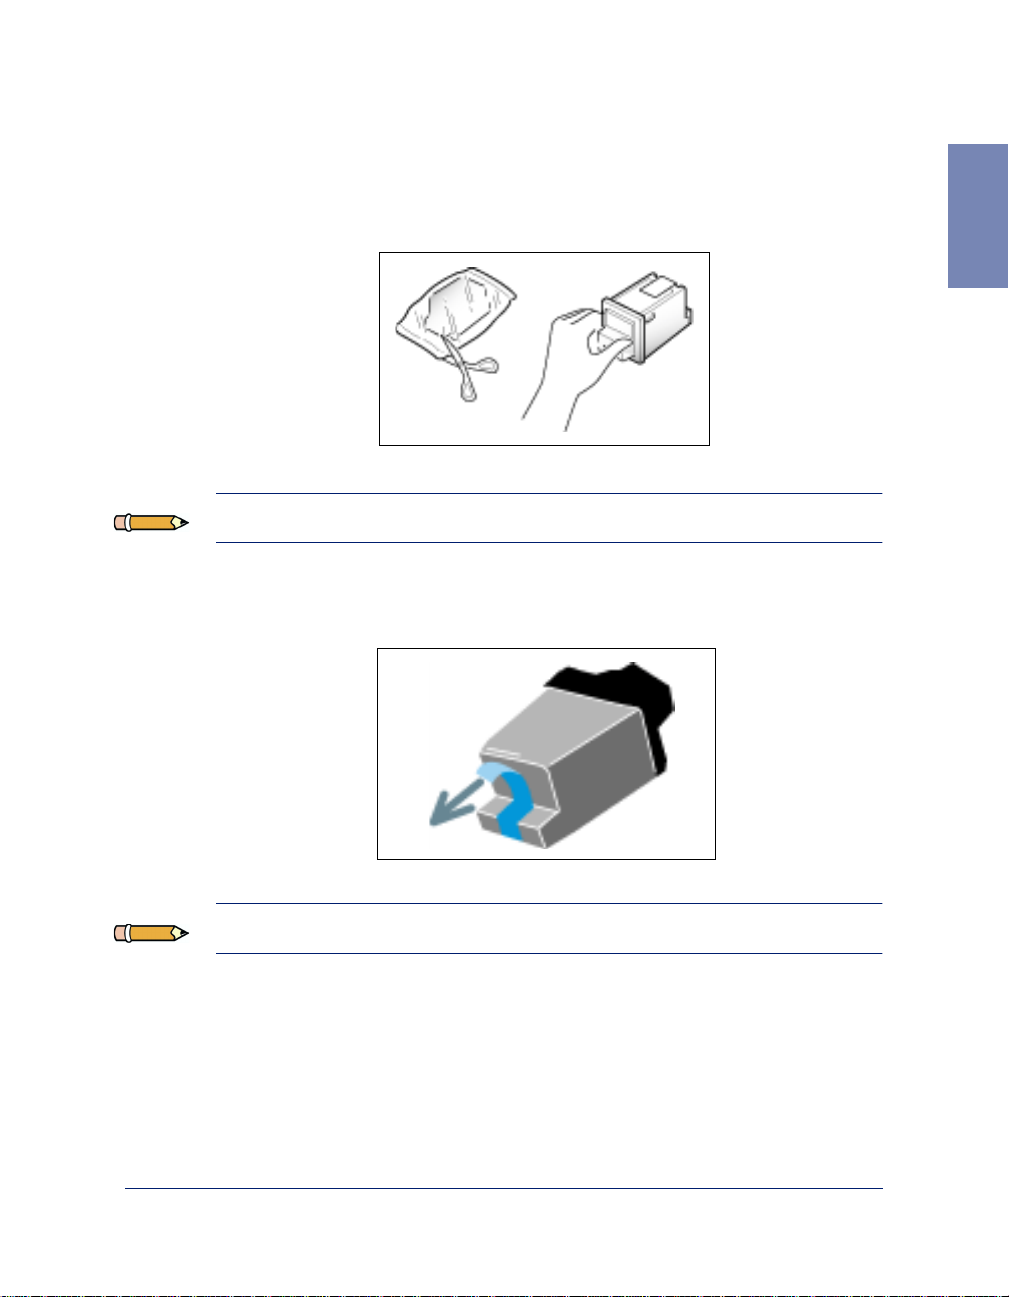
7
Unwrap and remove the Color Ink Cartridge from its pack aging. Hold
the cartridge by the black are as or col ored top only.
1
Note:
8
Note:
Avoid touching the electrical contacts on the back of the cartridge.
Carefully remove the sealing tape by pulling straight out on the tab
located on the end of the Ink Cartridge.
Avoid touching the electrical contacts on the cartridge.
Set Up Your Machine 1-17
Page 30
9
Locate the Color Ink C artridge holder inside the printer. The Color Ink
Cartridge holder is loc ated on the left side of the Cartridge Carrier
Assembly and can be identified by a light blue key tab.
Color Cartridge
Holder
Black/Photo
Cartridge
Holder
10
Slide the Color Ink Cartridg e down into the holder and push it in the
direction of the arrow until it clicks into place.
11
Close the Cartridge Compartment Cover.
CAR TRIDGE CHANGED? appears in the display.
12
Press the
display.
13
Press the
LEFT CARTRIDGE? appears in the top line of the LCD display.
1-18 Getting Started
Down
Start
or
Up
Button.
button until BOTH appears in the
Page 31

14
Press the
CARTRIDGE appears in the lower line of the display.
15
Press the
RIGHT CAR TRIDGE? appears in the top line of the LCD display.
16
Press the Up or
CARTRIDGE appears in the lower line of the display.
17
Press the
The Cartridge Carrier Assembly moves back to the docking position.
18
A Cartridge Alignment Test print is printed out. This will ensure that
your WorkCentre 490cx generates the best possible prints. Refer to
Arrange Alignment
Up
Start
Start
or
Down
button to confirm your choice.
Down
button to confirm your choice.
on page 1-48.
buttons until NEW COLOR
buttons until NEW BLACK
1
CAUTION:
Assembly has moved back into the docking position. If no menu choices are
made, the Carrier Assembly will automatically return to the docking position
after about one minute.
Do not power off the machine until the Cartridge Carrier
Set Up Your Machine 1-19
Page 32
Loading Paper
For best results, use high quality Xerographic copy paper or inkjet paper.
Using the Automatic Paper Feeder
You can stack paper, envelope s, c ard stocks, labels, or transparencies in the
Automatic Paper Feeder to feed automatically. The Automatic Paper
Feeder can hold a maximum of 100 sheets of 20 lb plain paper, or 10
envelopes or other print media . Depending upon media thickness,
maximum capacity may be reduced.
Note:
Manual Paper Feeder one sheet at a time.
1
2
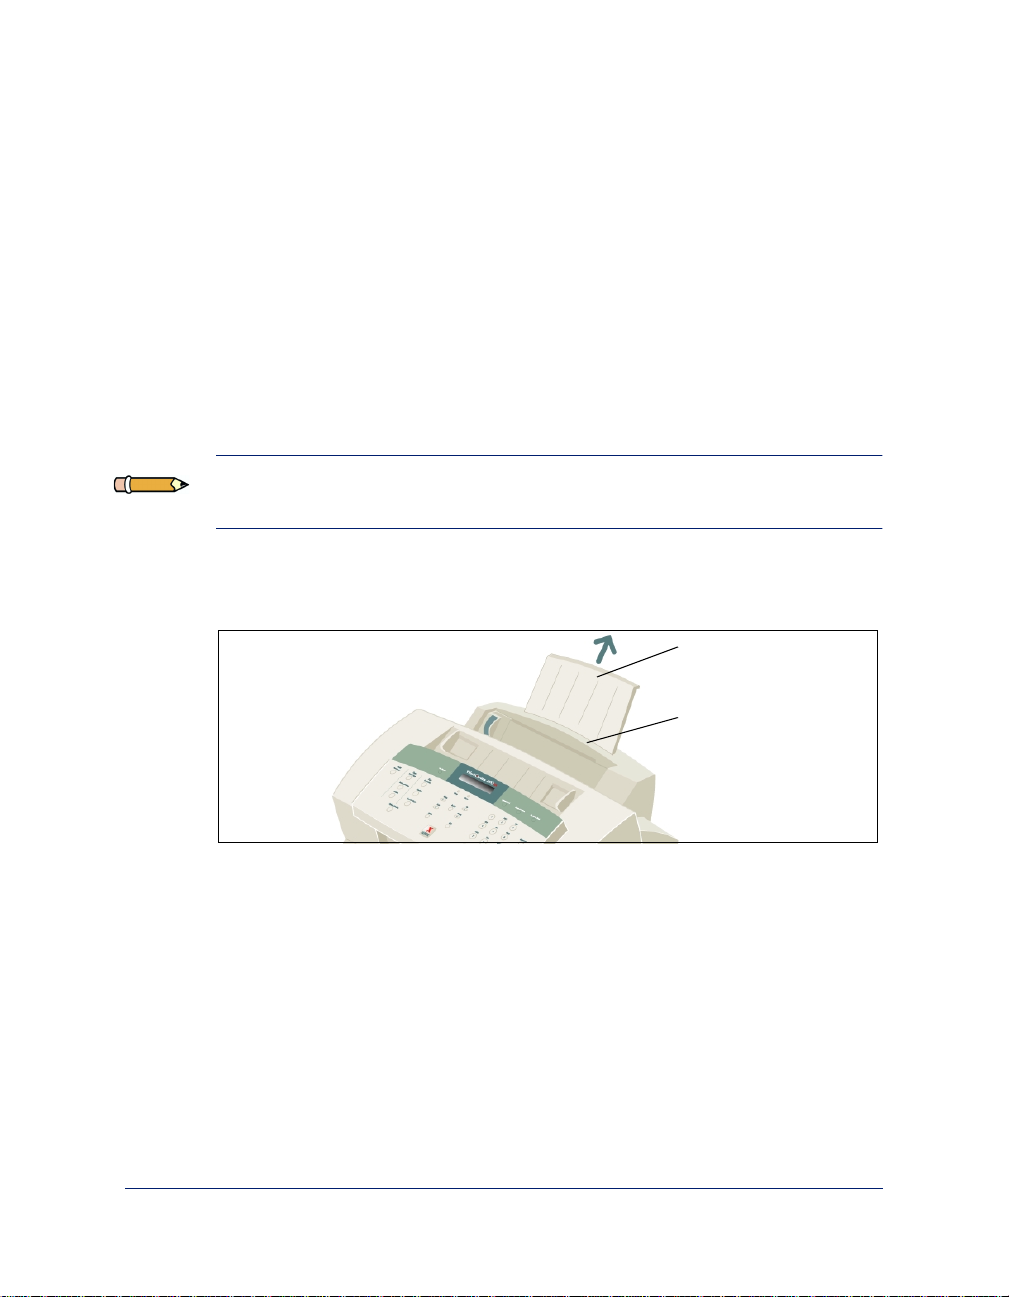
If you experience problems feeding paper, place the media into the
Pull the Extension Tray on the Automatic Paper Feeder all the way up.
Extension
Tray
Automatic Paper
Feeder
Prepare the print material for load ing.
For paper and envelopes, flex paper or fan envelopes back and forth.
Do not fold or crease the paper.
1-20 Getting Started
Page 33

Straighten the edges on a level surfa ce.
1
Note:
envelopes in the Automatic Paper Feeder.
If envelopes jam while printing, try reducing the number of
For transpare nc i es, be sure to use tran spa ren cy stock approved fo r use
with inkjet printers. Refer to the packaging for the transparency stock
to determin e the pri nt side. Hold the trans p ar en cies by the edges and
avoid touching the print side. Be careful not to scratch or leave
fingerprints on the print side.
Fan the stack of tra nsparencies to prev ent feed in g failure s.
Set Up Your Machine 1-21
Page 34

3
Load the print material in the Automatic Paper Feeder. Ensure that the
right edge of the m edia is in c ontact with t he rig ht side of the Autom atic
Paper Feeder. Do not exceed the rated capacity. Do not mix different
types of print media. Refer to the following instructions for loading
each type of print material.
a)
Load paper or transparencies with the print side facing you.
b)
Load letterhea d paper wi th t he design si de face-up. The to p edge of
the sheet with the logo should enter the printer first.
1-22 Getting Started
Page 35

4
While squeezing the tab on the paper guide, move the guide to the right.
Slide the paper guide un til it lightl y touc hes the s ide of the sta ck of pr int
media. Do not press the paper guide too tightly to the edge of the print
media; the guide may bend the media or provide too much resistance
when feeding.
1
Note:
Feeder, make sure that you select the source and the correct paper size
from your software application before starting your print job.
When you print a file from your PC using the Automatic Paper
Set Up Your Machine 1-23
Page 36

Loading Envelopes
When printing envelopes, remember to use the envelope guide in the
Automatic Paper Feeder.
To load envelopes:
1
Load envelopes with the address side facing up. The end of the
envelope with the stamp area must enter the Automatic Paper Feeder
first. The right edge of the envelope must align with the raised edge of
the envelope guide.
1-24 Getting Started
Page 37

2
Squeeze the Left Paper Guide and move it to the right until it lightly touches the envelope.
1
Note:
CAUTION:
linings, or self-adhesive seals. These envelopes may severely damage the
printer.
Do not feed
Never use envelopes with clasps, snaps, windows, coated
stamped
envelopes.
Set Up Your Machine 1-25
Page 38

Using the Manual Paper Feeder
Use the Manual Paper Feeder to feed paper
one sheet at a time
into your
machine.
Note:
ensure that you select the source and the correct paper size from your
software application before starting your print job.
When you print a file from your PC using the Manual Paper Feeder,
1-26 Getting Started
Page 39

1
Place the paper in the Manual Paper Feeder and adjust the paper guide
to the width of t he print m ateria l. Sl ide the pa per guide t o the r ight until
it lightly touche s the stack of pri nt media. Do not ti ghtly press the paper
guide to the edge of the print media; the guide may bend the media or
prevent the media from feeding.
Paper Guide
1
Note:
1-30 for specific instructions on loading various types of media.
Refer to
Loading Paper
on page 1-21 and
Paper Guidelines
Set Up Your Machine 1-27
on page
Page 40

2
Ensure that the media is fed into the machine as far as it will go.
3
Press the
have more than one page to print, press the
page.
Start
button to start manual feeding of the media. If you
Start
button for each
1-28 Getting Started
Page 41

Paper Guidelines
When selecting or loading paper, envelopes, or other special media, keep
these guidelines in mind:
• Attempting to print on damp, curled, wrinkled, or torn paper can cause
paper jams and poor print quality.
• Use only high quality, copier grade paper. Avoid paper with embossed
lettering, perforations, or texture that is too smooth or too rough.
• Store paper in its ream wrapper until ready to use. Place cartons on
pallets or she lves, not on the floor. Do not place heavy objects on top of
the paper, whether it is packag e d or unpa ck aged . Keep it away fro m
moisture, or other conditions that can cause it to wrinkle or curl.
• During storage, moisture-proof wrap (any plastic container or bag)
should be used to prevent dust and moistur e fro m contaminating your
paper.
• Always use paper and ot her media that conform with those listed under
Specifications in the Appendix.
• Use only well-construc ted envelopes with sharp, well creased folds.
• DO NOT use envelopes with clasps and snaps.
• DO NOT use envelopes with windows, coated linings, selfadhesive seals, or other synthetic materials.
1
• DO NOT use damaged or poorly made envelopes.
Paper Guidelines 1-29
Page 42

Paper Selec tion
One of the most important things you can do to assure the best possible
printing performanc e of your machine is to select the correct paper. Your
machine produces letter qual ity print on most plain bond papers, including
cotton bond and photocopying paper s; it does not require special ink jet
papers. However, the print quality varies with different paper types. Be
sure to test a type of paper before you purchase a large quantity.
Paper Types
Plain Paper
The machine supports paper sizes of letter, legal, and A4 in portrait
orientation. You can use regular copier paper, cotton bond papers, and
typical letterhead. Always use paper without curls, folds, staples, or
damaged edges.
Inkjet Paper
This paper has been devel oped specific ally for printin g with inkj et pri nters.
It will produce high quality doc uments which will compare favorably to
those produced with a laser printe r.
Coated Paper
The coated paper ha s been de veloped f or high q uality pr in ting with m inimal
or no smearing or running when in contact with water or damp surfaces,
making it a good choice for damp or rainy environments.
1-30 Getting Started
Page 43

Glossy Photo Paper
Glossy photo pape r is a high gloss, thicker paper that produces the look and
feel of a photograph. Use this paper to produce photo- realistic prints from
your printer.
Transparencies
Your transparencies should be products de signed for use in Ink Jet produc ts,
with excellent contrast, sharpness, and color quality. The transparency is
placed in the mach in e with the i ma ge side up.
Iron-on Transfers
Use inkjet T-shirt tra nsfers to create and personalize T-shir ts, sweatshirts,
aprons, tablecloths, napkins, tote bags, and anything el se your imagination
allows! Use on any cotton or cotton/poly ble nd fabric. Your image is
printed in mirror image so when you iron it onto the T-shirt, the image is
viewed correctly.
Greeting Card Stock
Get the most out of ca rd making so ftware with Greeti ng Cards. These card s
give your unique, p ersonali zed MESSAGE the look and f eel of p rofessio nal
cards. You can create cards, invitations, ann ouncements, and more.
1
Labels
Use Label produ cts designed for us e with Ink Jet products. Label stock can
be 8-1/2 x 11 or A4 size materia l.
Paper Guidelines 1-31
Page 44

Guidelines for Special Paper and other Media
Be sure to read any instructions that come with your special paper. These
instructions provide important information regar ding how to achie ve the
highest print quality with these papers.
• It is recommended that you fee d spe cial paper types one sheet at a time.
• For transparencies and glossy photo paper, follow these guidelines:
Let the printed sheets dry completely before storing them.
When a printed shee t has drie d compl etely, cover the printed side wi th a
sheet of plain (not coated) paper before storing it; this is recommended
even if you place the sheets in a clear file or plastic holder.
Do not leave the film in the paper tray for long periods of time. Dust
and dirt may accumulate on the film resulting in spotty printing.
T o avoid smudging caused by fingerpri nts, handle transparency film
and coated paper careful ly.
T o avoid fading, do not expose the printed film to prolonged sunlight.
Store unused media flat. Do not remove papers from their protective
packaging until you are ready to use them.
Store unused media at temperatures between 59 and 86 degrees
Fahrenheit (15 to 30 degrees Centi grade) . The relati ve hu midity shoul d
be between 10% and 70%.
1-32 Getting Started
Page 45

• If the print density of your page is very high, lig ht paper stock may curl
slightly due to the large amount of ink. If you need to print dense
graphics, try printing on heavier stock.
• Do not use thic ker paper than meets the specifications for this machine .
Printing with a paper that is thick enough to come in contact with the
print head nozzles may damage the cartridge.
1
Guidelines fo r Speci al Paper and other Media 1-33
Page 46

Installing Software
System Requirements
Proper operation of the WorkCentre 490cx requires that your personal
computer meets or exceeds the following system requirements:
• IBM compatible personal comput er, with a Pentium, 100MHz or faster
processor
• Windows operating envir onment (W in dows 95, Wi ndows 98, W i ndows
2000, and Windows NT 4.0)
• At least 10MB of free hard disk space*
• 24MB or more RAM
* 10MB minimum hard disk space required for driver installation only.
If installing the ad ditio nal softwa re packa ges inc luded on the CD ROM,
an additional 70MB fre e hard disk space is required (70MB Pagis Pro).
1-34 Getting Started
Page 47

Overview of WorkCentre 490cx Drivers
Before the WorkCentre 490cx can interface with your computer, you must
install driver files. These drivers will enable your computer to properly
communicate with the WorkCentre 490cx for printing and scanning
operations.
All of the necessary driver s are conta ined on the CD included with your
WorkCentre 490cx.
Software Included With the WorkCentre 490cx
For your convenience, in addition to the driver files, the scanning program
Pagis Pro 2.0 (a suite of scanning applications) is also included on the CD
ROM.
1
Installing Software 1-35
Page 48

Software Installation Procedure
In Windows 95/98, Windows 2000, or Windows NT 4.0
1
Make sure the Xerox WorkCentre 490cx is connected to your computer.
2
Power off the WorkCentre 490cx by unplugging it from the wall outlet.
3
Turn on your PC and start Windows.
4
Power on the Workcentre 490cx by plugging it into a grounded wall outlet.
5
Insert the supplied CD into your compute r’s CD ROM drive.
The Xerox WorkCentre 490cx installation program will begin.
If the program does not start:
a)
From the
and NT 4.0).
menu, select
Start
(Windows 95/ 98, Wind ows 2000,
Run
1-36 Getting Started
Page 49

b)
T ype D:\XINSTALL.EXE (where "D" represents the letter
designation of the computer’s CD ROM drive), and click OK to
start the install ation program.
The Xerox WorkCentre 490cx installation program will begin.
1
Note:
installation process. If your computer does not shut down and restart
automatically, you must shut it down manually and restart it before the
changes you have made take effect.
Note:
Windows after installing the printer driver.
You must shut down and restart your computer to complete the
The WorkCentre 490cx will be selected as the Default printer in
Installing Software 1-37
Page 50

Uninstalling Softwa re
Uninstallati on of software is required only if you are upgrading the
software, or if your installation fails.
In Windows 95/98, Windows 2000, or Windows NT
1
Start Windows.
2
From the
3
Locate the Start Menu Program Item for the compon ent you wish to uninstall.
4
Click on the Submenu uninstall icon for the component you wish to remove.
A window will open prompting you to confirm that you wish to remove
the selected applica tion.
5
Click on
6
Uninstall Shield lau nches and the component is uninstalled.
menu, select
Start
.
Yes
Programs
.
Note:
1-38 Getting Started
Each software component must be uninstalled one at a time.
Page 51

Using the Control Panel
Print Functions
1
FAX Functions
Form Feed
Use to eject paper from the
printer if the paper is not
automaticall y f ed ou t fr om
the printer after printing.
Also, use to load paper if
the machine runs out of
paper during a PC print
job.
Resolution
Use to choose the resolution of
copied or tran smitted documents.
Confirm
Use to print out confirmation message
of successful FAX transmission.
Receive Mode
Use to determine the mode for FAX
reception.
Busy LED
Indicates the
machine is in use.
ALARM LED
Indicates a
malfunction.
Using the Control Panel 1-39
Page 52

Copy Functions
Copy/BW
Use to select the copy
mode.
Reduce/Enlarge
Use to change the size.
Collate
Use to select copy collation
if desired.
1-40 Getting Started
Menu
Use to choose special
functions.
Exit
Use to exit any function or
move up in the menu level.
Up and Down Buttons
Use to display the next or
previous menu item. Also used
to make adjustments.
Select
Use to choose a menu selection
or move down in the menu level.
Right and Left Buttons
Use to move cursor left or right
across the display.
Page 53

LCD Display
The display shows the current status of your
machine, and guides you through various
tasks using a menu system for each
operation.
Job Status
Use to verify background printing
job sent from the PC.
Speed Dial
Use to dial calls and send fax
documents by entering a 2-digit
number.
Redial/Pause
Use to redia l th e l ast phone n umber
called. You can also use it to add a
pause when storing a number in
memory.
On Hook Dial
Use to adjust the volume of the
internal speaker and for
on-hook dialing.
1
Using the Control Panel 1-41
Page 54

Reports
Use to print out reports and lists
of significant machine
information.
Clear/Stop
Use to stop an operation of any
kind.
Start
Use to start a job. Also use to
activate the selection shown on
the LCD display.
Lighten/Darken
Use to change the contrast of
the copied or transmitted
documents.
1-42 Getting Started
Number Keypad
Use to dial number s manually
or to enter letters and numbers
for various programming
functions.
Page 55

System Setup
Ringer Vo lu me
You can adjust the volume of the ringer to the desired loudness.
1
Press the
Press the
2
Press the
button to choose the desired loudness of the ringer. You can choose
between OFF, LOW, MED (medium), or HIGH settings.
The selected ringer sound s and the displa y indicates the loudness level.
Note:
Menu
Start
Start
The machine will work normally even if the ringer is set to off.
button, then press the
button. The display indic ates RINGER VOLUME?.
button, then press the
RINGER VOLUME
LEVEL [MED]
buttons on the k eypad.
0 + 4
Up
or
Down
1
System Setup 1-43
Page 56

3
Press the
The display indicate s t he next s et up menu, DEFAUL T SETTING ?. For
details on the
4
To return to Standby mode, press the
Start
button when the desired volume level is selected.
Default Setti ngs
menu, see
Clear/Stop
Default Settings
on page 1-45.
button.
Default Se tt in gs
The default print resolution and contrast can be set to their most frequently
used modes. Whenever a document is sent or copied, the home contr ast and
resolution mode will be activa ted unless otherwise changed by using the
Resolution
1
Press the
or
Contrast
Menu
button on the control panel.
button, then press the
0 + 4
buttons on the keypad.
Then press the
VOLUME ?.
2
Press the
appears.
3
Press the
Resolution or Contrast.
Up
Start
Start
button. The display indicates RINGER
or
Down
button. The display prompts you to choose
1.RESOLUTION
2.CONTRAST
button until DEFAULT SETTING ?
1-44 Getting Started
Page 57

4
Press
up menu. You may also use the Up and Down buttons to
select RESOLUTION.
The current Default Resolu tion is displayed.
5
Press the
the desired mode:
• STANDARD – use with most documents.
• FINE – use for documents with fine detail, suc h as small print.
• SUPER FINE – use for documents that have extremely fine det ail.
6
Press the
display again prompts you to choose Resolution or Contrast.
or press the
1.
Left
Start
Start
DEF. RESOLUTION
or
button to select the desired Def ault Resol ution . The
button to enter the Default Reso lutio n set
[ FINE ]
Right
button repeatedly until you locate
1
1.RESOLUTION
2.CONTRAST
System Setup 1-45
Page 58

7
Press the
to enter the Default Contrast setup menu.
The current Default Resolu tion is displayed.
8
Press the
the desired mode:
• NORMAL–use with documents of average or normal contrast.
• DARKEN–use with documents with low contrast or light images.
• PHOTO–use with documents containing photos or for faxing
• LIGHTEN–use with documents with high contra st or dark images.
9
Press the
Contrast setup menu selection is displayed.
Up
Left
Start
and
Down
DEF. CONTRAST
[ NORMAL ]
or
Right
button to sele ct the de sire d mode. The Resolution or
buttons or
button repeatedly until you find
on the Number keypad
2
10
Press the
1-46 Getting Started
Clear/Stop
button to return to Standby mode.
Page 59

Arrang e A li g nm e nt
The Arrange Alignment menu settin gs provide an easy way to check and
adjust Ink Cartridge pri nt head alignment.
To run the Arrange Alignment:
1
Press the
Then press the
2
Press the
the display.
3
Press the
The WorkCentre 490cx prints out a Cartridge Alignment pattern sheet
consisting of a se ries of six test patte rns. The pa tterns a re designa ted A,
B, C, D, E and F. Each pattern is made up of a series of lines which are
individually number ed. By selecting the straightest line from each
pattern, you can optimize the print head alignment.
Menu
Down
Start
button, then press the
Start
button. The display indicates SELF TEST ?.
button. ARRANGE ALIGNMENT ? appears in
button. PRINTING... appears on the LCD display.
buttons on the keypad.
1 + 2
1
System Setup 1-47
Page 60

After printing out the Cart ridge Alignment sheet, the Cartridge
Maintenance setup menu appears on the LCD display.
CARTRIDGE MAINT.
<15> [0-30] A
The letter A, located on the right end of the lower line in the display,
corresponds to alignment te st pattern A. The range of numbers
bracketed in the center of the display line indicates the range of valid
pattern selecti on choices. The flashing number on the left side of the
display indicates the line from print pattern A that is currently selected
as optimal.
4
Using the Number Keypad, enter the number of the line whic h appears
the straightest from pattern A.
5
Press the
The LCD panel updates and the setup screen for the Alignment B test
pattern is displayed.
Up
and
Down
button to confirm your selecti on.
6
Repeat steps 4 and 5 for Alignment test patterns B through F .
Note:
returned to normal operation.
1-48 Getting Started
After entering the value for Alignment test pattern F, the user is
Page 61

Clean Head
The Clean Head procedure cleans the print nozzles and removes any
deposits that may impair pri nting functions.
To run the Clean Head Procedure:
1
Press the
Then press the
2
Press the
display.
3
Press the
The WorkCentre 490cx prints a head cleaning test pattern. Note the series
of diagonal line s across the top a nd bottom of the test p attern. Break s within
a line of the same color indicate a clogged nozzle. Try running the Clean
Head procedure again if you see breaks in the diagonal lines.
Menu
Up
Start
button, then press the
Start
button. The display indicates SELF TEST ?.
button twice. CLEAN HEAD ? appears in the LCD
button. PRINTING... appears on the LCD display.
buttons on the keypad.
1 + 2
1
System Setup 1-49
Page 62

Select Language
Select Language allows you to confi gure the default language for the LCD
panel display. You may choose between two different languages: English
and French.
To select a default language
1
Press the
Then press the
VOLUME ?.
2
Press the
LANGUAGE? and ITEM 1-2 appear in the LCD display. Then press
the
3
Press the
language options. A flashing cursor will indicate the currently selected
language.
4
Press the
Start
Menu
Start
Up
button.
Up
Start
:
button, then press the
button. The display indicates RINGER
or
Down
or
Down
button to confirm your language selection.
buttons until SELECT
buttons to scroll through the
buttons on the keypad.
0 + 4
1-50 Getting Started
Page 63

Adjusting Speaker Volume
1
Press the
speaker volume. If you cannot hear a dial tone, check the phone line
connection.
2
Press the
the current volume level. Press the
repeatedly until the desired loudness setting is displayed.
3
After choosing the desired volume level, press the
button to return to the Standby mode.
On-Hook Dial
Up
or
Down
button on the front panel to adjust the
button once. The display indicates
Up
or
Down
On-Hook Dial
1
button
System Setup 1-51
Page 64

Setting the Clock Mode
You can configure your machine t o displa y time using e it her a 12 hou r or 24
hour forma t.
1
Press the
Menu
button, then press the
buttons on the keypad.
0 + 1
Then press the
2
Press the
CLOCK MODE appears on the LCD display .
The display prompts you to select eit her a 12 hour or 24 hour Clock
Mode.
3
Press 1 to select a 12 hour Clock Mode, or Press 2 to select a 24 hour Clock Mode.
Start
Up
button. PAPER SIZE appears on the display.
button two times.
Setting the Date and Time
The current date and time are shown in the display when the machine is on
and ready for use (Standby mode). The date and time are pri nte d on all
faxes you send.
1
Press the
Then press the
displayed. A flashing cursor prompts you to enter the date.
Menu
button, then press the
Start
button. The current date and time are
buttons on the keypad.
0 + 3
1-52 Getting Started
Page 65

2
Using the number keypad , enter t he current date using a MMDDYYYY
or DDMMYYYY date format. If you make a mistake, use the right a nd
left buttons to move the cursor to the digit you wish to change.After
entering the date the flashing cursor will move into the first digit of the
time.
(
Date and Tim e format
determined by country
10-27-1998
04:06 (PM)
location.
)
MMDDYYYY
1
27-10-1998
04:06 (PM)
3
Using the number keypad, enter the current time. Remember to enter
DDMMYYYY
the time according to the current Clock Mode setting (12 or 24 hour
format). Refer to the previous section, CLOCK MODE for details.
System Setup 1-53
Page 66

4
Press the
correct.
The display indicates the date and time you have set, then returns to
Standby mode.
Start
button when the d ate and t ime sett ings displ ayed are
Note:
proceed to the next step. If this happens, enter the correct number.
If an invalid number is entered, the machine beeps and does not
Setting the System ID (Your Number and Name)
In some countries you are required by law to indicate your fax number on
any fax you send. The System ID, containing your telephone number and
name, will be printed at the top of each page sent fro m your machine.
1
Press the
Then press the
LCD display. A flashing cursor in the display prompts you to enter the
telephone number.
Note:
Menu
If there is a number previously registered, it appears in the display.
button, then press the
Start
button. SYSTEM NUMBER appears in the
buttons on the keypad.
0 + 2
1-54 Getting Started
Page 67

2
Enter the telephone number (up to 20 digi ts) to which your machine is connected.
You can enter a space by pressing the
Right
button two times.
1
If an incorrect num b er is ent ere d , pres s th e
button to move the cursor under the incorrect digit, then enter the
correct number.
3
Press the
display prompts you to enter your ID name.
Start
button when the correct number is dis played. The
Left
or
Right
System Setup 1-55
Page 68

4
Enter your ID name. This can be any name up to 40 characters in
length. You can enter alphanumeric characters using the number
keypad. Special symbols such as + a nd - can be included by pre ssing 0
repeatedly.
Note:
5
If there is an ID name previously registered, it appears in the display.
If you want to enter the same letter or number in succession (for
example, SS, AA, 777), enter one digit, then move the cursor by
pressing the
Use the
Right
right, creating a space.
For additional details on how to use the number keypad to enter
alphanumeric characters, see
page 3-29.
Press the
Right
Right
button two times moves the cursor two positions to the
Start
button, and enter the next digit.
button to insert a space in the name. Pressing the
Entering Alphanumeri c Characters
button when the name in the display is correct.
on
1-56 Getting Started
Page 69

Reports/Lists
Your fax machine can print reports or lists containing useful infor mation
like Scheduled Jobs and System Data. The following reports are available
for selection by the user:
• TX and RX/Journal
These journals consist of a Transmission Report and a Reception
Report. Each report contains inf ormation concerning transmission or
reception act ivities . They can be printe d on command, or automati call y
if certain conditi ons are met (see
These reports will be automatica lly print ed afte r every 40 transm issions
or receptions.
• Schedule Information List (Schedule Job)
The Schedule Informatio n List provides information about documents
currently stored for Delayed Transmission, Priority Transmission,
Memory Transmission, Continuous Polling, and TX Polling. The list
shows the starting time, type of operation, etc.
• T elephone Number List (Phone Book)
This Telephone Numbers List indicate s all of the numbers currently
stored in machine memory as One-Touch Dial numbers, Speed Dial
numbers, and Group Dial numbers.
• System Data List
Selectable Options
on page 1-63).
1
This System Data List indicates the status of the user-selectable options.
See
User Options (System Data)
setting, print this list to confirm your changes.
on page 1-62. After changing any
System Setup 1-57
Page 70

•Help List
This quick reference guide consists of a list detailing the machine’s
basic functions and commands.
• Message Confirmation Repor t
The Message Confirmation Report lists important information about
faxes sent from your machine including: the remote site fax number, a
sample of the transmitted text, the number of pages faxed, the
communication mode, and the communication results.
You can set up your machine to print a TX Confirm report:
• Automatically after each transmission (ON).
• Automatically only if an error occur s during transmission (ERR).
The machine can be set to print no report at all (OFF). You can print
this report manually whene ver you want by pressing the
Confirm
button on the control panel.
1-58 Getting Started
Page 71

To Print Reports/Lists
1
Press the
2
Press the
list is displayed. Press the
will be printed out.
Reports
Up
or
button.
Down
Start
1
button to until the desired report or
button. The selected rep ort or list
Note:
button.
To obtain a Message Confirmation Report, press the
Confirm
System Setup 1-59
Page 72

Automatic Reports
Some reports will print out auto matically depending on machine status.
The user is not required to select these reports.
Note:
print if your machine runs out of ink or paper, has a paper jam, or is printing
a file sent from a PC.
Any report or list which is configured to print automatically will not
• Multi-Communication Repor t
This report is printed aut omatically after sending to or receivin g from
more than one location, and provides de tailed information about the
operation.
• Power Failure Report
This report is printed out aut omatically if the memory has not been
backed up when power is restored following a power failure. This
report shows any data (if any) that was erased due to the power failure.
1-60 Getting Started
Page 73

User Options (System Data)
Your machine has various user-sel ectable featu res. The se option s are pr eset
at the factory, but you may need to change them. To find out how the
options are currently se t, print the System List. For more information on
printing the list, see
To Print Reports/Lists
on page 1-60.
Setting an Option
1
Press the
2
Press the
The display shows the first option menu.
3
Scroll through the options by pr essing the
buttons repeatedly.
4
When the option you want appears in the display, enter the number for the desired setting.
Or
You can use the
setting.
Menu
0 + 1
button.
buttons on the keypad. Then pr ess the
Down
Left
or
Right
buttons to select the desir ed
Start
or
Up
button.
1
System Setup 1-61
Page 74

5
Press the
You can exit from the System Data setup mode at any time by pressing
the
button, the machine stores the options you changed and returns to the
Standby mode.
Start
Clear/Stop
button to store your choice in memory.
button. When you press the
Clear/Stop
Selectable Options
These instructions assume you’ve followed the steps listed in the previous
procedure,
one of the options listed below.
All of thes e options are menu settings accesse d by the System Da ta (Press
Setting an Option,
and the machine is prompting you to change
the
Menu
Start
• PAPER SIZE - Select the paper size you will be printing on.
Press 1 for letter (LTR), 2 for A4 size, or 3 to use legal (LGL) size
paper.
button, press the 0 + 1 buttons on t he keypad. Then press the
button).
1-62 Getting Started
Page 75

• MESSAGE CONF. - A message confirmation report showing
transmission info rmation; whether the transmission was successful,
how many pages were sent, etc.
Press 1 to print a confirmation repor t auto matically each time you send
a fax (ON).
Press 2 to turn this feature off (OFF).
Press 3 to print only when an error oc cu rs and the transmission was no t
successful (ERR).
• AUTO JOURNAL - The journal is a report providing detailed
information about the previous 40 communication operations including
times and dates.
Press 1 to print the journal a utoma tically a fter every 40 trans missions or
receptions (ON).
Press 2 to disable automatic printing of the Jo urnal (OFF). You can still
print Journal reports manually at any time. See
on page 1-60.
To Print Reports/Lists
1
System Setup 1-63
Page 76

• REMOT E RCV CODE - The rem ote receive start cod e allow s y ou to
initiate fax recep tion from an extension phone plugged into the EXT
jack on the side of the machine. If you pick up the extension phone and
hear fax tones, enter the Remote Code and the machine will start
receiving. The Remote Code is preset to *9* at the fact ory. You may
change the Remote Code by selecting any number from 0 to 9 on the
numeric keypad.
• DIAL MODE - Select the type of dial system your fax machine is
connected t o:
Press 1 if the fax machine is connected to a tone (Touch Tone) dial line.
Press 2 if the fax machine is connected to a pulse (Rotary) dial line.
Note:
Pulse (Rotary) dialing is not available in all countries.
• ECM MODE (Error Correction Mode) - This mode compensates for
poor line quality and ensures a ccur ate, error-free communicati on with
any other ECM-equippe d facsimile machine. If the line quality is poor,
transmiss ion tim e may b e incr eas ed w hen EC M is ena bled.
Press 1 to turn the Error Correction mode on.
Press 2 to turn the Error Correction mode off.
1-64 Getting Started
Page 77

• RX REDUCTION - When receiving a document as long as or longer
than the paper install ed in your machine, the machine can reduce the
data in the document to fit the paper size in the machine. Use this
feature if you want to automatica lly reduce an incoming page (that
would otherwise be divided into two pag es) to fit on a single page. If
the fax machine cannot reduce the data to fit into one page with this
feature enabled, the data is divided and printed in actual size on two or
more sheets.
There are two RX Reduction modes available , On and Vertical Only.
Press 1 to turn the RX reduction feature on. Note that this feature does
not apply to the copy mode.
This will reduce incoming pages equally along each axis in order to
maintain the proportionality of the original image, as shown below.
1
Original
Press 2 to turn off RX Reduction.
Received Data
System Setup 1-65
Page 78

Press 3 to enable vertical only RX Reduction. The machine will reduc e
an incoming pag e contai ning o verflow data along the v erti cal axis only.
The net effect will be a vert ical comp re s sio n of the im age as show n
below:
Original
Received Data
• DISCARD SIZE - When receiving or copying a document as long as or
longer than the paper insta lled in your fax machine, you can set the fax
machine to discard any excess image at the bottom of the page, to fit
into the recording paper size.
If the received page is outside the margin you set, it will be printed on
two sheets of pap er at the act ual size .
If the data is within the margin, and the Auto Reduction feature is
turned ON, it will be reduced to fit into the appropriate size paper
(Discard does not take place). If the Auto Reduction feature is turned
OFF or fails, the data within the margin will be discarded.
Using the number keypad, e nter the desir ed di scard si ze (0- 30 mm), and
press the
Start
button to store your selection.
1-66 Getting Started
Page 79

• REDIAL INTERVAL - Your machine can automatically redial a remote
fax machine if it was busy or does not answer the first call.
Enter the number of minutes (from 1 to 15) using the number keypad.
• REDIALS - Enter the number of redial attempts (from 0 to 2) you wish
your machin e to ma k e.
Note:
• ANSWER ON RINGS - Y ou can select the number of times your
• SEND FROM MEMORY - With this feature enabled, all transmission
If you en ter 0 , th e ma c hine will not redial.
machine rings be fore answeri ng a n incoming c all. If you are using your
machine as both a tele phone and a fax machine, it is r ecomme nded that
you set the ring count to at least 4 to allow you time to answer a call.
Enter the ring count by selecti ng a number from 1 through 7 on the
number keypad.
documents are automatically scanned into memory, and it will not be
necessary to wait until documents in the Automatic Document Feeder
(ADF) are sent out before you can send or store other fax jobs.
Press 1 to turn this feature on.
Press 2 to turn this feature off .
1
System Setup 1-67
Page 80

• LOCAL ID - Enabling this feature causes the machine to automatically
print the page number, date, and time of the reception at the bott om of
each page of a received document.
Press 1 to turn this feature on.
Press 2 to turn this feature off .
• CONT. POLL REPORT (Continuous Polling Report) - You can
configure your WorkCentre 490cx to automatically poll and retrieve
faxes from unattended fax machines. This can be set up to occur daily
at regular interva ls. By enabling the Continuous Polling Report, every
time continuous polling e nds a multi-communication report will be
printed. The report will contain the results for each registered sta tion.
Press 1 to turn this feature on.
Press 2 to turn this feature off .
FAXPRINT QUALITY - This feature determines the print qua lity for
incoming faxes. The two choices available are Letter Quality (LQ) and
Draft. Letter Quality Faxprint will print out faxes at a higher resolution
than Draft Faxprint Quali ty. However, Letter Qualit y Faxprint will
print more slowly and consume more ink.
Press 1 to choose Letter Quality printing of incoming faxes.
Press 2 to choose Draft Quality printing of incoming faxes.
1-68 Getting Started
Page 81

• CLOCK MODE - Use this feature to determine how time is displayed
on your machine.
Press 1 to select a 12 hour Clock Mode.
Press 2 to select a 24 hour Clock Mode.
• DRPD (Distinctive Ring Patter n Detection) MODE - Distinctive Ring
is a telephone company service which enables a user to use a single
telephone line to answer several different telephone numbers. The
particular number someone uses to call you is ide ntified by different
ringing patterns , whic h consist of various combinations of long and
short ringing sounds. This feature is often used by answering services
who answer telephones for many different clients. They need to know
which number someone is calling on to properly answer the phone.
Using the Distinctiv e Ring Pattern Detection feature, your fax machine
can "learn" the ring patt ern you designate to be answered as a fax.
Unless you change it, thi s ringing pat tern will cont inue to b e recogniz ed
and answered as a fax call. All other ringing patter ns will be forwarded
to the extension te lephone or answering machine plugged into the EXT
jack.
Note:
Distinctive Ring service must be installed on your telephone line by the
telephone company. To set up Distinctive Ring Pattern Detection, you will
need another telephone line at your location, or someone available to dial
your Distinctive Ring phone number from outside.
Before using the Distinctive Ring Pattern Detection option,
1
System Setup 1-69
Page 82

You can suspend or change Distinctive Ring Pattern Detection at any
time:
Press the
Press the
Press the
Menu
0 + 1
Up
button.
buttons on the keypad. Then pr ess the
Start
button once. The DRPD learn mode menu is
button.
displayed.
Press 1 to turn DRPD on.
Press 2 to turn DRPD off.
If you press 1 to set up the Distinc tive Ring Pattern Detection, the LCD
displays WAITING RING. Call your (DR) fax number from another
telephone. It is not necessary to place the call from a fax machine.
When your machine begins to ring, do not answer the call. The
machine requires several rings to learn the pattern.
When the machine completes "learning," the LCD displays END DRPD
SETUP.
1-70 Getting Started
Page 83

With the DRPD feature active, DRPD appears in the display and the
previously set reception mode is ignored. If you turn DRPD off, the
machine returns to any previously set reception mode.
1
Note:
connect the machine to another telephone line.
After DRPD has been set up, call your fax number again to verify that the
machine answers with a fax tone, then have a call placed to a different
number assigned to that same line to be sure the call is not answered by
the 490cx.
DRPD must be set up again if you re-assign your fax number, or
System Setup 1-71
Page 84

1-72 Getting Started
Page 85

Chapter 2
Making a Copy
Making a Copy
Your machine is a high quality copier which offers the following features:
2
•
Color Copies
local copi es.
•
Adjustable Contrast
setting can be changed to obtain the best copy quality for documents
containing faint markings, dark images, photographs or other halftone
images.
•
Multiple copies
•
Enlarge\Reduce
enlarge the siz e of a copied image from 25% to 200% in increments of
1%.
- The WorkC entre 490cx can act as a color copier for
- Using the Lighten/Darken button , the contrast
- 1 to 99 copies of the document can be made.
- Using the
Enlarge\Reduce
menu, you can reduce or
2-1
Page 86

•
Collation -
machine sorts the copy job. For example, if you print two copies of a
three-page do cument, the machine prints one complete doc ument (page
1, page 2, page 3) before printing a second copy (page 1, pa ge 2, and
page 3). If the PHOTO MODE is selected, COPY COLLATE is set to
OFF.
To make a si n g l e co p y:
1
Adjust the document guides to match the width of the document.
2
Slide the document
until it is grasped and pulled into the machine. The DOCUMENT
READY prompt is displayed on the LCD display.
When the COPY COLLATE menu option is set to ON, the
face down
into the Automatic Document Feeder
Note:
at one time.
3
Up to 30 pages may be inserted in the Automatic Document Feeder
Press the
displayed. You may choose COLOR-DRAFT, COLOR-NORMAL,
COLOR-PHOTO, MONO-DRAFT, MONO-NORMAL and MONOPHOTO.
Copy/BW
button until the desired Copy Mode is
2-2 Making a Copy
Page 87

Note:
Copy Setup
4
5
To m ake 2 or more copies:
1
2
If you want to change the contrast or copy size, refer to
on page 2-5.
Using the keypad, enter the desired number of copies , which is 1 in this case.
Press the
Adjust the document guides to match the width of the document.
Slide the document
until it is grasped and pulled into the machine. The DOCUMENT
READY prompt is displayed on the LCD display.
Start
button. The machine will make a copy.
face down
into the Automatic Document Feeder
Changing
2
Note:
at one time.
3
Up to 30 pages may be inserted in the Automatic Document Feeder
Press the
displayed. You may choose
COLOR-PHOTO, MONO-DRAFT, MONO-NORMAL and MONO-PHOTO
Copy/BW
button until the desired Copy Mode is
COLOR-DRAFT, COLOR-NORMAL,
.
Making a Copy 2-3
Page 88

Note:
Copy Setup
4
If you want to change the contrast or copy size, refer to
Press the
copy collation.
on page 2-5.
Collate
Changing
button, then press 1 on the keypad. This turns on
Note:
again, you must turn collation on again.
5
After making a copy , collation is turned off. If you want to collate
For Normal col lation, press 1. To reverse the copy from the orde r of the
original document, press 2. For more information on collation, refer to
Collating and Sorting
6
Using the keypad, enter the desired number of copies.
Note:
accept the last two digits, or it will attempt to place a phone call to the digits
entered.
7
Do not enter more than two digits (1 - 99) or the machine will onl y
Press the
Start
on page 2-7.
button. The machine will make the selected number
of copies.
2-4 Making a Copy
Page 89

Changing Cop y Setup
When making copies, you may change the C ontrast or Copy Size. This must
be done after the document is inserted into the Automatic Document Feeder.
After making a copy , the machi ne will return to the origina l default settings.
Therefore, you must repeat the Copy Setup changes for the next copy job.
To c hange copy Contrast:
1
With the document insert ed in the Aut omatic Docum ent Feed er, press
the
Lighten/Darken
displayed on the LCD display.
2
T o change the Contrast, continue to press the
button. The s etting will chan ge each t ime yo u pre ss t he butt on. You may
choose NORMAL, DARKEN, LIGHTEN, or FAX PHOTO.
Note:
currently displayed. It is not necessary to press any other buttons for this
action.
3
After releasing the button, the ma ch ine will s wit c h to the mode
When the desired Contrast setting has been selected, return to the
procedure that was being perfor med.
button. The current Contrast setting is
CONTRAST
[ NORMAL ]
Lighten/Darken
2
Changing Copy Setup 2-5
Page 90

To c hange Copy Size:
1
With the document insert ed in the Aut omatic Docum ent Feed er,
observe the LCD display. The current copy size setting is displayed on
the LCD display.
DOCUMENT READY
AUG--20--2000 100%
2
To change the Copy Size, continue to press the
Reduce/Enlarge
button. The number in the right corner of the bottom line shows the
current image percentage. To reduce or enlarge the image size, enter the
percent value (25 to 200) using the keyp ad.
REDUCE/ENLARGE
[25-200%] <100>
Note:
currently displayed. It is not necessary to press any other buttons to
complete thi s act ion.
3
After releasing the button, the ma ch ine will s wit c h to the mode
Press the
procedure that was being perfor med.
2-6 Making a Copy
Down
button to confirm your setting. Return to the
Page 91

Collating and Sorting
The 490cx is n ormally s et with the Col lation off . The refore , coll ating c opies
always requires that the collation be turned on before copying. Otherwi se,
the copies will be uncollat ed.
To Collate and Sort copies:
1
With the document insert ed in the Aut omatic Docum ent Feed er, press
the
Collate
options.
2
Selecting 1. ON will collate your copi es. There are two collation modes,
NOR (Norm al) an d REV (Reverse).
button. The LCD display sh ows the COPY COLLATE
COPY COLLATE
1.ON 2.OFF
COPY PRINT ORDER
1. NOR 2. REV
2
Collating and Sorting 2-7
Page 92

a)
Selecting REV will produce copie s collated in the same order that
the original document is in. The machine will make one copy of
page 1, page 2, and page 3, in order, then make a second copy of
page 1, page 2, and page 3 until all copies have been made.
SORT - RE V
3
2
1
b)
Selecting NOR will make copies in rever se order of the original
3
2
1
document. The machine will make one copy of page 3, page 2 and
page 1 (reverse order), then make a second copy of page 3, page 2,
and page 1, until all copies have been made.
SORT - NOR
3
Selecting 2: OFF will make the requested number of copies of page 1
completely, then page 2, then page 3, etc. These copy sets will all be
stacked atop of one another in the Paper Output Tray.
GROUP - NON-SORT
1
1
1
2
2
2
2-8 Making a Copy
Page 93

4
Press the
Start
button to begin the copy operation.
Note:
The Collate function is not available in the Photo or Color Modes.
Changin g the Paper Type
The print quality can vary depending on the type of paper you are using.
Generally, if you use better quality paper, and tell the WorkCentre you’re
using better paper, you’ll get a higher quality print. You can configure the
WorkCentre fo r the foll o wing pap er typ es:
• Plain
•Premium
• Glossy
• Transparency
T o change the media type:
1
2
3
Press the
Press the
Press the
Menu
Up
Start
button.
button until "Menu 13" displays in the LCD display.
button to display the Paper Type menu.
2
4
Press
Up
corresponding to the desi red paper type blinks.
5
Press the
Start
button or
Down
button. The WorkCentre 490cx returns to idle sta te.
button until the number
Changing the Paper Typ e 2-9
Page 94

2-10 Making a Copy
Page 95

Chapter 3
Sending a Fax
Options for S endin g a Fax Usi ng the WorkCentre 490cx
You can send faxes with the WorkC en t r e 490cx in one of two ways:
• By placing the document in the Automatic Document Feeder and
entering the informat ion required for faxing at the WorkCentre 490cx
Control Panel. This is called Manual Faxing.
3
For information and instr uctions for Manual Faxing, refer to
Faxing
on page 3-3.
Manual
3-1
Page 96

• By faxing the documen t di rectly fro m your c omputer worksta tion usin g
LaserF AX L ite , a softwa re app licat ion incl uded with yo ur WorkCentre.
This is called PC Faxing.
For information and instructions for PC Faxing, refer to
page 3-44.
PC Faxing
on
3-2 Sending a Fax
Page 97

Manual Faxing
This section provides information and instructions for faxing a document
from the WorkCentre 490cx using the features of the Control Panel.
Preparing Documents for Fax ing or Scanning
You can fax documents that are printed on standard letter, legal or A4 size
paper. Follow these guidelines to prepa re your documents.
• Do not attempt to feed the following types of document s into the
machine:
• carbon-paper or carbon- ba cked paper
• coated paper
• onion skin or thin paper
• wrinkled or creased paper
• curled or rolled paper
• torn paper
Note:
of the document on a platen glass copier. Us e the c opy for i nsertion into the
Automatic Document Feeder.
If your document falls into any of the above categories, make a copy
3
Manual Faxing 3-3
Page 98

• Remove all staples and paper clips before feeding the document.
• Make sure any glue, ink or correction fluid on the paper is completely
dry before loading the document .
• Do not load documents containing different sizes or weights of paper.
Sending a Fax Manually
1
Adjust the document guides to match the width of the document.
2
Slide the document
until it is grasped and pulled into the machine.
face down
into the Auto ma tic D ocu m en t Feeder
Document Guides
The display alternately reads DOCUMENT READY and shows the
remaining memory capacity. Up to 30 sheets may be inserted at a time.
3-4 Sending a Fax
Page 99

To insert more than one sheet, ensure that the bottom sheet enters first.
Stagger the le ading edge of the sheets sligh tly and inser t them with light
pressure to ensure smooth feeding.
To add pages while the fax is sending, insert them
Automati c Doc u me nt Fee d er o n top of the al rea d y load ed shee ts.
If you are loading pages that are unusually thick or thin, feed one sheet
at a time.
3
If necessary, adjust the document resolution and contrast. See
Resolution
4
Using the Number keypad, enter the number of the fax machine to
which you wish to send the document. If you make a mistake while
entering a number, move the cursor under the incorrect digit by using
the
Left
may also delete incorrect numb ers by pressing the
button.
Note:
digits, a co py o pe ra ti o n w ill s tart.
5
A phone number must be four digits or more. If it is less than four
Press the
display. The machine dials the number and begins to transmit the fax.
on page 3-25 and
or
Right
Start
button when the numb e r ap pears correctly in the
Contrast
buttons, and correct the number. You
on page 3-27
face down
.
Clear/Stop
into the
3
If you wish to cancel the fax, press the
times.
Clear/Stop
button two
Manual Faxing 3-5
Page 100

Sending a Fax Using a Speed Dial Number
1
Adjust the document guides to match the width of the document.
2
Slide the document
until it is grasped and pulled into the machine.
3
Press the
location number. For information on storing numbers in memory, see
Speed Diali ng
4
Press the
The machine will scan the document and dial the number automatically.
When the remo te fax mac h ine ans w er s, the d oc ument will be
transmitted automatically.
Speed /Dial
Start
face down
on page 3-19.
button to dial the number.
into the Automatic Document Feeder
button, then enter a two digit speed dial
Note:
frequently used numbers with a two digit speed dial number. For information
on storing numbers in memory, see
You can store Speed Dial numbers so you can dial your most
Speed Dialing
on page 3-19.
3-6 Sending a Fax
 Loading...